

Page 1

Rainin QuickFlow
Ergonomic Aspiration System
Operating Instructions
Page 2

Rainin QuickFlow
Convenient, Trouble-free Operation
• Continuous and Non-continuous Flow
• Optical Liquid Level Sensor
• Multiple Adapters
• Easy Cleaning
Table of Contents
1 Box Contents .........................................................................................................3
2 Safety ...................................................................................................................5
2.1 Electrical safety ................................................................................................5
2.2 General safety . ................................................................................................6
3 Introduction ..........................................................................................................6
3.1 Device and liquid compatibility ..........................................................................7
4 Setup ....................................................................................................................8
4.1 Prepare workspace ...........................................................................................8
4.2 Check shipping box ..........................................................................................8
4.3 Unpack QuickFlow ...........................................................................................8
4.4 Assemble QuickFlow ........................................................................................9
4.5 Assemble the handle ......................................................................................11
5 Operation ............................................................................................................13
5.1 Select Continuous or Non-continuous aspiration ................................................13
5.2 Power up QuickFlow .......................................................................................14
5.3 Adjust speed ..................................................................................................14
5.4 Full bottle: Level sensor and liquid level alert .....................................................15
5.5 Eject tips or remove Pasteur pipette ..................................................................15
6 Cleaning and Maintenance ...................................................................................16
6.1 Emptying the bottle .........................................................................................16
6.2 Cleaning bottle and cap ............................................................................. ....17
6.3 Cleaning vacuum tube ...................................................................................17
6.4 Autoclaving ...................................................................................................18
7 Spare Parts and Accessories ................................................................................18
7.1 Filter (blue vacuum inlet tube) .........................................................................18
7.2 Handle hang-up ............................................................................................18
8 Specications ......................................................................................................19
9 Troubleshooting ...................................................................................................20
10 Incompatible Liquids and Agents ..........................................................................20
11 Ordering Information ............................................................................................21
12 Warranty .............................................................................................................22
Rainin, Pipetting 360 and TerraRack are trademarks of Mettler-Toledo Rainin, LLC.
©2018 Mettler-Toledo Rainin, LLC. No part of this manual may be copied without the express written permission of
Mettler-Toledo Rainin, LLC.
2
Page 3
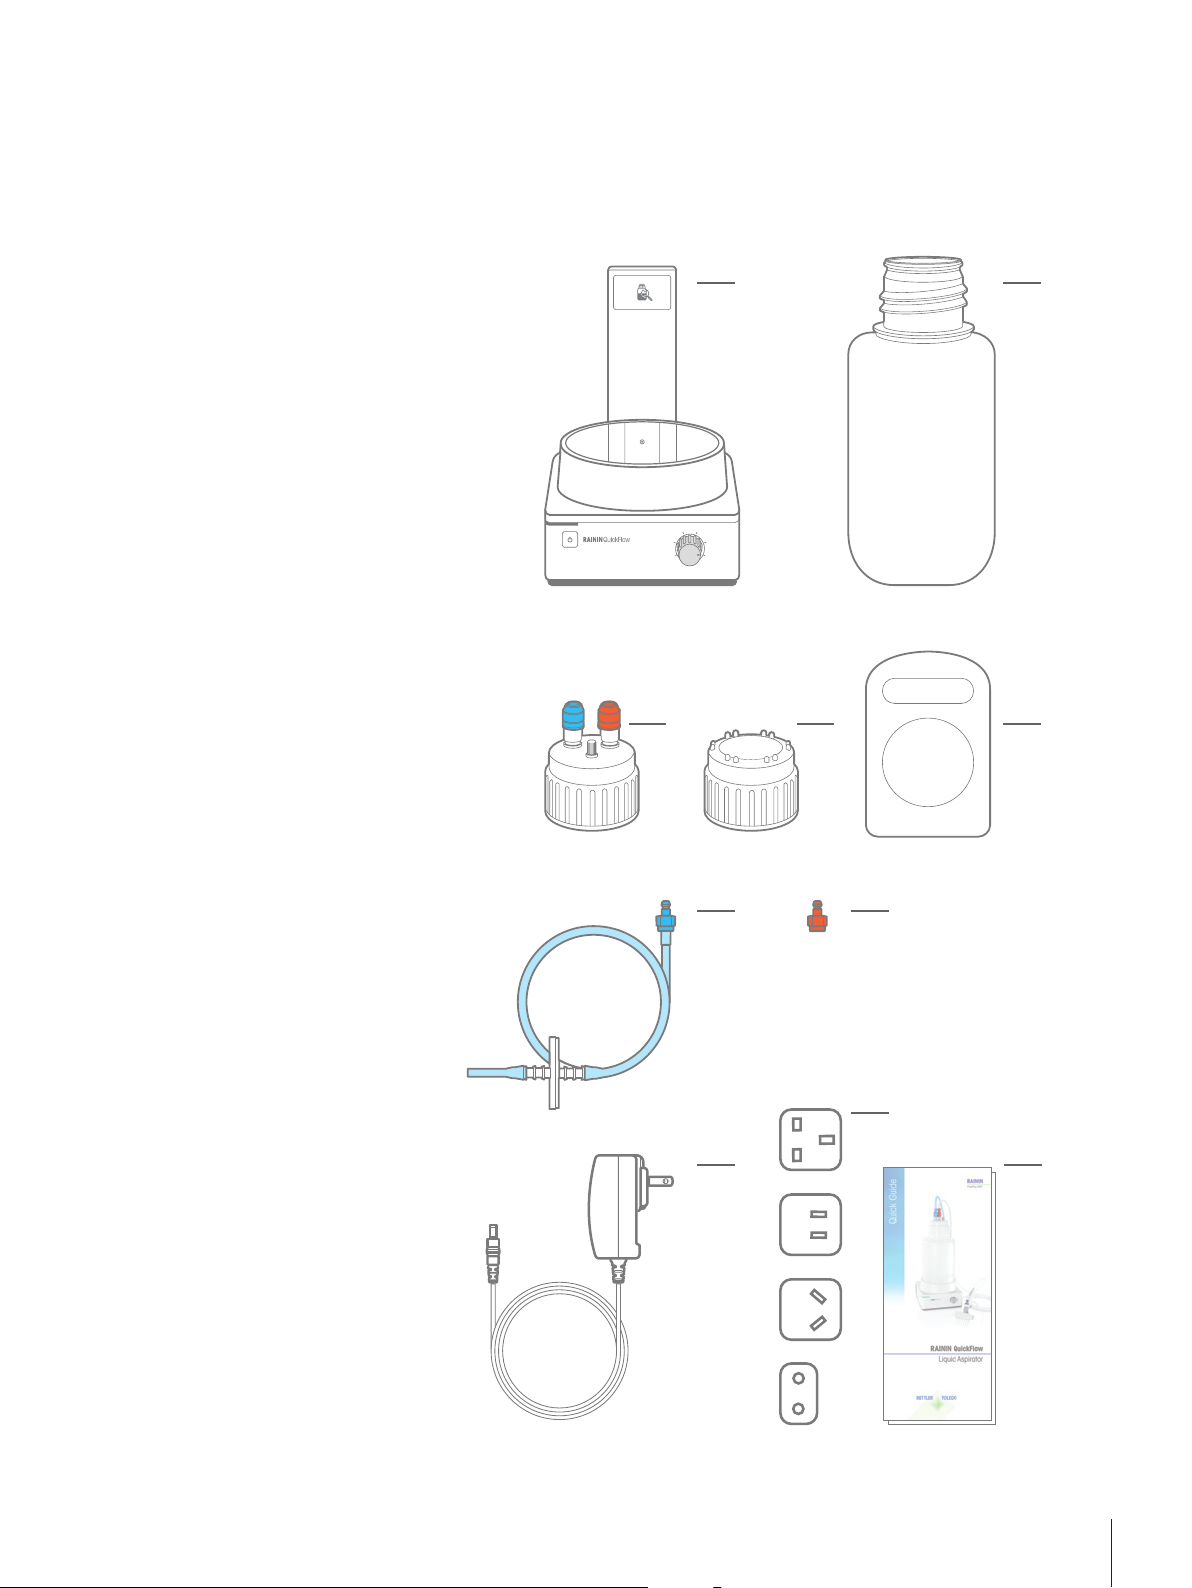
1 Box Contents
Shipping box
a. Base unit
a b
b. 4-liter collecting bottle
1
c. Bottle cap with quick connector
heads
d. Bottle cap with closed top
e. Bottle carrying plate
f. Airflow inlet tube (blue)
g. Quick connector plug (orange)
for vacuum tube
4
Note: The vacuum tube (clear)
is part of the handle kit,
3
5
2
6
1
see next page
h. Power supply
i. Power adapters (4)
j. Quick Reference Guide
k. Handle kit / inner box
(see next page for details)
c d e
f g
h
i
j
Figure 1: QuickFlow shipping box components
3
Page 4
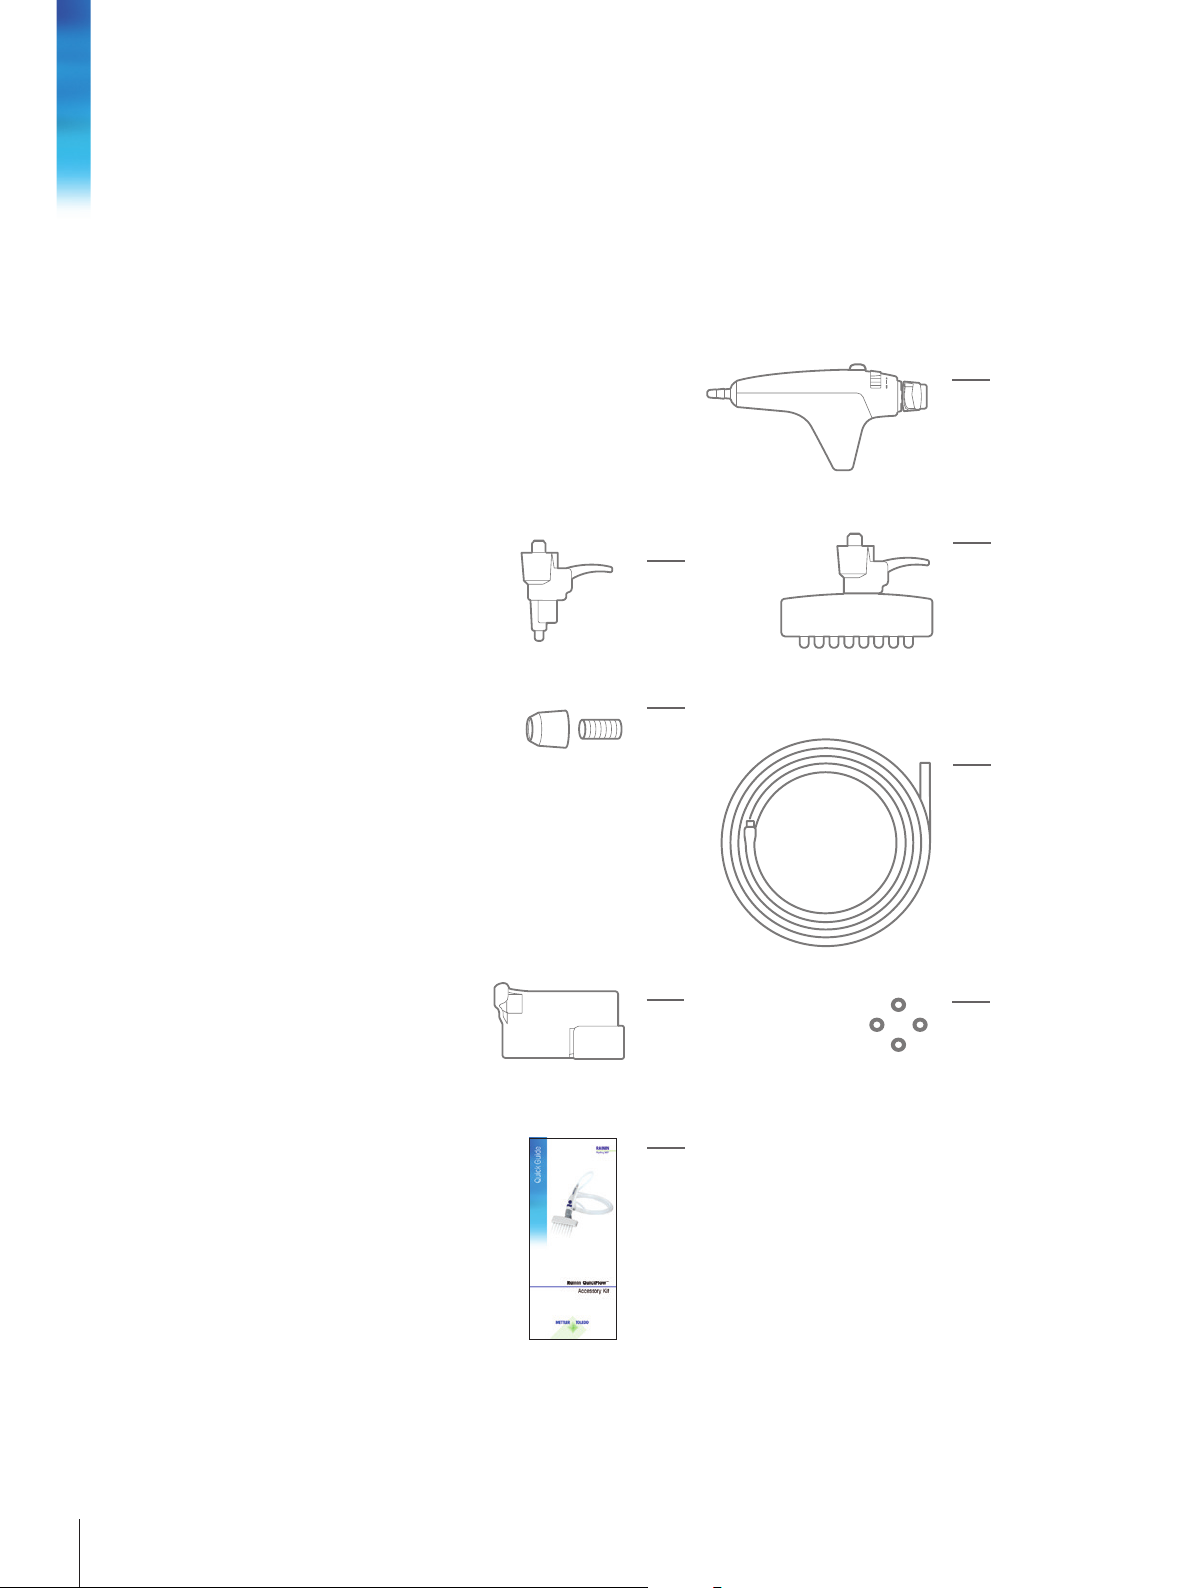
Inner box (handle kit)
a. Handle
b. Single-tip adapter
c. Multi-tip adapter
d. Pasteur pipette adapter (glass/plastic)
e. Vacuum tube (clear)
f. Handle hang up (for safe handle storage)
g. Extra o-rings
h. Quick Reference Guide
a
Box Contents
b
d
f
c
e
g
h
Figure 2: Handle kit contents (inner box)
4
Page 5
2 Safety
Read all Safety warnings before setting up or servicing your Rainin QuickFlow. Always
operate QuickFlow in accordance with this User Manual. For your convenience and future
reference, this manual is available online to download at www.mt.com/quickflow-manual.
Safety notes are marked with signal words and warning symbols. These show safety
issues and warnings. Ignoring the safety notes may lead to personal injury, damage to the
instrument including malfunction, as well as unreliable results.
Safety terms used in this manual
WARNING – a hazardous situation with medium to high risk, possibly resulting in severe
personal injuries (or death) if not avoided, as well as damage to the instrument or laboratory.
CAUTION – a hazardous situation with lower risk, possibly resulting in damage to the
instrument and laboratory, data loss, and/or minor or medium personal injuries if not
avoided.
ATTENTION or NOTE (no symbol) – useful or important information about the product
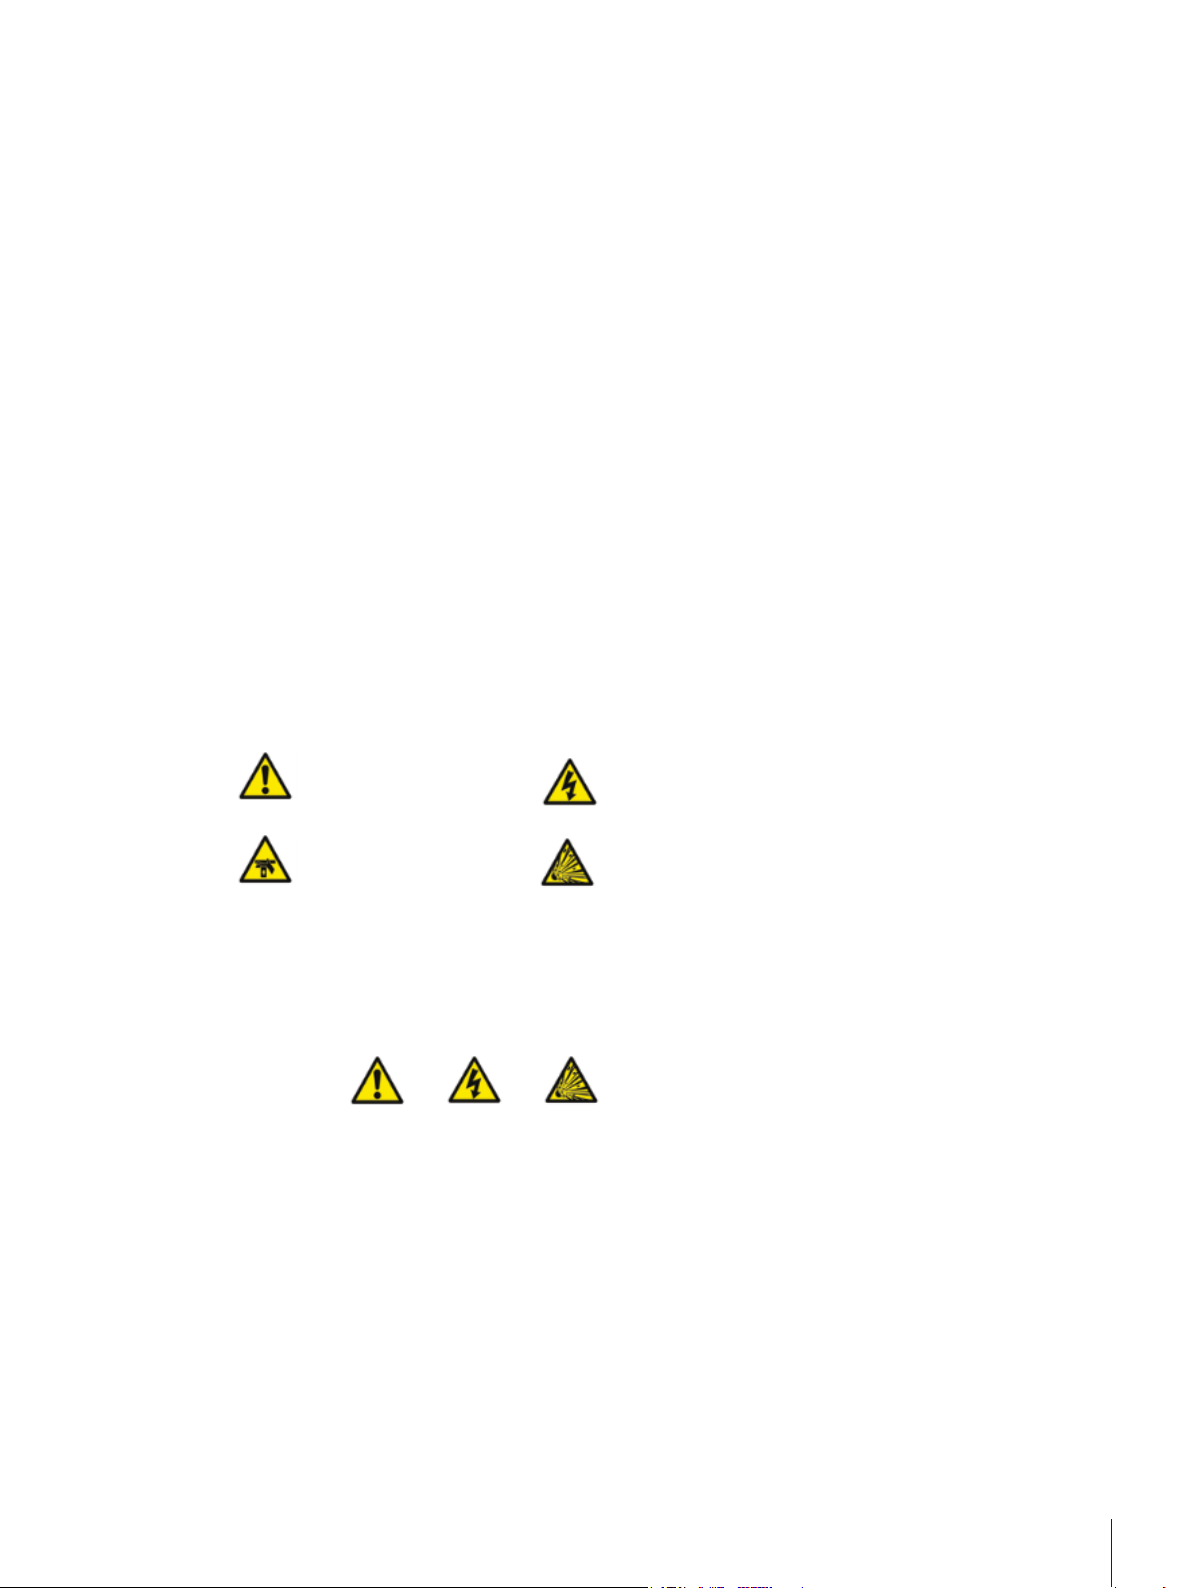
Safety symbols used in this manual
General Hazard Electrical Hazard
Hand Injury Explosion Hazard
2.1 Electrical safety
WARNINGS
To reduce the risk of electric shock:
- Only use the supplied power cord at the rated line voltage when connecting QuickFlow to
electrical power. Do not modify the power cord in any way or plug it in to an ungrounded
poweroutlet.Fordetailedinformationonthepowersupply,seepage19(Specications).
-Donotopentheinstrument.Nouser-serviceablepartsareinside.Refertoqualiedservice
personnel if help is required. NOTE: Place QuickFlow in an area where it can be easily dis-
connected from power outlet in a case of emergency.
Use this product only as described in this manual. If the equipment is used in a manner not
speciedbythemanufacturer,theprotectionprovidedbytheequipmentmaybeimpaired.
NOTE: Keep the power adapter away from instrument to avoid electric shock caused by
overowing.
5
Page 6

2.2 General safety
WARNINGS
When lifting a full collecting bottle off the QuickFlow base unit, grasp the carrying plate from
both sides and use proper lifting procedures. A filled collecting bottle weighs approximately
Safety
5 kg (11 lbs.)
At all times, keep face and body away from the aspiration tips and pipettes when using
QuickFlow.
CAUTIONS
Always use safe laboratory practices. Wear personal protective equipment (PPE) when using
QuickFlow.
Never move QuickFlow when the collecting bottle is full. Always empty the collecting bottle
before moving the instrument.
Using QuickFlow with strong acids, bases or other aggressive liquids may damage seals,
nozzles, or other parts. Clean up any contamination or accidental splashes immediately.
6
Page 7

3 Introduction
The Rainin QuickFlow is a benchtop liquid aspirator system made by METTLER TOLEDO.
It is designed for the safe and efficient removal of cell culture media and other commonly
used buffers in life sciences research labs.
Adapters snap to an ergonomic handle for precision aspiration control.
Aspiration may be continuous (always on) or touch-actuated via a button on the handle.
A liquid-level sensor integrated into the base unit alerts users when the collecting bottle is
full. This stops the pump to prevent overflow.
QuickFlow is intended for laboratory research purposes only. If used for other purposes,
METTLER TOLEDO is not liable for any resulting damage.
Please read this User Manual carefully, especially regarding safety, setup and basic
operation, before using QuickFlow in real lab conditions. It is the responsibility of the User to
read the instructions and to work in accordance with the standard operating procedures and
general safety guidelines defined by your workplace.
3.1 Device and liquid compatibility
Liquid-touching components of QuickFlow are made from materials including PVDF
(polyvinylidene difluoride), polypropylene and silicone rubber.
Lower concentration (up to 30%) chemicals including
- Bleach
- Acetone
- DMSO
- Trichlorethylene
- Chloroform
- Phenol
and other liquids may be aspirated safely.
7
Page 8

4 Setup
4.1 Prepare a workspace
An ideal workspace is a clean, dry area of bench that is protected from vibration and drafts
and is near an electrical power source. It should be out of direct sunlight.
Setup
QuickFlow requires a working horizontal bench space about 40 cm (18 inch) wide and
40 cm (18 inch) deep. It weighs about 6 kg (13.2 lbs) and is about 51 cm (20 inch) high.
Electrical power: QuickFlow comes with a set of four power adapters to enable operation
in any region.
NOTE: Avoid connecting QuickFlow to a power source used by any device with large current
fluctuations, such as a refrigerator that cycles on and off.
4.2 Check shipping box
QuickFlow is shipped from the manufacturer in one large shipping box. Check the box for
signs of damage. If there is damage to the shipping box or contents, please contact your
METTLER TOLEDO Customer Service or Sales representative.
4.3 Unpack QuickFlow
Open the shipping box. This reveals the first layer of QuickFlow components.
Take out the Quick Reference Guide, handle kit box and the cap with connectors.
Remove the top layer of foam.
Take out the QuickFlow base unit, tubing, power adapters and power supply.
Take out the empty collecting bottle with the bland (flat) cap on.
Keep the shipping box. It will be useful if you ever need to transport QuickFlow
or return it for authorized service.
If any items are missing, please contact your METTLER TOLEDO Customer Service
or Sales representative.
8
Page 9

4.4 Assemble QuickFlow
1. Place the open bottle on the base unit. Take the flat
metal carrying plate, align the large center hole over
the open top of the collecting bottle, and rotate the
plate clockwise until it rests on the shoulder of
the bottle.
2. Place the cap with quick connector heads (orange
and blue) on top of the collecting bottle and rotate the
cap clockwise until the bottle is tightly closed.
3
2
1
4
3
5
2
6
1
3. Close the gray pressure-release valve on top of the
cap between the blue and orange connector heads by
turning it clockwise until it stops. Loosening it counterclockwise opens the pressure-release valve.
4. Unpack the handle and adapter kit to take the clear
vacuum tubing out.
4
3
5
2
6
1
9
Page 10

Setup
5. Attach the orange connector plug to one end of the
clear vacuum tubing.
6. Attach the blue connector-plug end of the blue tube
to the blue connector head by pushing it in firmly.
Attach the orange connector-plug end of the clear tube
to the orange connector head by pushing it in firmly.
7. Firmly push the filter-end of the blue airflow tube
onto the port labelled "Inlet" on the rear of the base
unit. The filter picture points to the correct port.
4
3
5
2
6
1
Inlet
10
Page 11

4.5 Assemble the handle
1. Decide what length of the clear tubing you desire
between QuickFlow and the handle (working end).
Suggested length is not less than 1 meter.
At a desired length(s), cut perpendicularly across the
tube with scissors.
2. Press the open end of the clear tube firmly and fully
over the ridged extrusion on the tube-connecting end
of the handle.
3. (Optional) Splitter – A splitter with additional QuickFlow handle, tube and adapters is sold separately.
QuickFlow supports a maximum of 2 operating
channels at the same time. The splitter can be used to
connect an extra tube.
4. QuickFlow includes three different handle adapters
(see Figure 2 on page 4) :
Inlet
- Single-tip
- Multi-tip (8-channel)
- Glass/plastic Pasteur pipette
The Pasteur adapter fits most extended glass or plastic
pipette tubes. This adapter and pipette combination
allows more liquid to be aspirated with higher flow capacity, and deep vessels can be reached.
Snap an adapter to the handle by gently pressing and
rotating it into position.
5. Insert power cord into the back of the base unit at
the port marked "Power." Connect the other end to a
power outlet.
11
Page 12

Setup
6.LoadRaininUNV250μLtipsoraglass(Pasteur)pipetteonto
appropriate adapter
NOTE: QuickFlow is designed for use with Rainin universal (UNV) tips.
See page 20 for tip ordering information.
- Multi-tip (8-channel) adapter
As with a multichannel pipette, press the QuickFlow adapter nozzles
into a row of 8 tips with sufficient force to make a good seal.
- Single-tip adapter
Press the adapter into pipette tip with sufficient force to make a good
seal
- Pasteur pipette adapter
Insert the glass or plastic pipette tube into the open end of the adapter.
12
Page 13

5 Operation
5.1 Continuous or Non-continuous
Operating Conditions
Keep the machine in the laboratory on the work bench or on another flat
surface such as a table or the floor.
QuickFlow's operating temperature range is 0 °C to 40 °C.
Optimal operation is below 2000 m elevation.
aspiration
Continuous aspiration
Continuous (always-on) aspiration offers more relaxed operation by
bypassing the on/off button on the handle.
To select Continuous aspiration mode, move the sliding switch at the front
of the handle to the left. A solid line indicates Continuous operation.
Turn aspiration on or off at the base by pushing the Power button.
Non-continuous aspiration
If your aspiration task requires pinpoint on/off control, you can activate
and deactivate the vacuum action by pressing the button on the handle.
This is Non-continuous aspiration.
To select Non-Continuous aspiration, move the sliding switch at the front
of the handle to the right, where a dotted line indicates Non-Continuous
operation.
Turn on QuickFlow by pushing the Power button on the front of the base
unit.
Then, press the button on top of the handle to aspirate.
Release the button to halt aspiration.
13
Page 14

5.2 Power up and turn off QuickFlow
WARNING
To reduce the risk of electric shock, use only the supplied power cord at
the rated line voltage when connecting the QuickFlow to your electrical
power supply. Do not modify the power cord in any way or plug it into
an ungrounded power outlet.
1. Make sure the QuickFlow power indicator light is off/dark.
Operation
2. Press the power button for one second to power up the machine.
The indicator light turns green. A slightly audible working pump sound is
normal.
In operation
Green
5.3 Adjust Vacuum Speed
On the QuickFlow base unit, the speed knob rotates from 1 (slow) to
6 (more rapid). Maximum speed is 17 mL/s.
Clockwise rotation speeds up aspiration, and counter-clockwise slows it
down.
NOTE: QuickFlow may stop temporarily to
reset system air pressure.
Status indicator
Power button
• Push 1x to turn on
• Push and hold 5 sec
to turn off
3
2
1
3
2
1
4
5
6
Fast Slow
3
2
1
4
5
6
4
5
6
14
Page 15

A high vacuum pressure within the collecting bottle may interfere with
speed control. If this happens, either:
- Rotate the gray pressure-release valve on top of the cap counter-clock
wise to equalize pressure within the bottle, or
- Use the handle to momentarily aspirate air.
5.4 Full bottle: Level sensor and liquid level alert
When the collecting bottle is full, the level sensor turns off the pump and
alerts the user to empty the bottle.
The pump is disabled until the bottle is emptied.
WARNING:
When working with liquids at
higher than ambient temperature
or with liquids that tend to foam,
the maximum liquid level may be
reduced.
Red(ashing)
Bottle is full
5.5 Eject tips or remove Pasteur pipette
NOTE: Tips or Pasteur pipettes (glass/plastic) cannot be removed when
vacuum flow is on.
If using Continuous aspiration mode, either turn off QuickFlow or switch to
Non-Continuous mode.
The ergonomic trigger design make it easy to discard tips. Pull trigger
using whichever finger is most comfortable.
Full bottle
15
Page 16

Pull off
Cleaning and Maintenance
Figure 3: Ejecting Tips or removing the Pasteur pipette
6 Cleaning and Maintenance
To keep QuickFlow performing optimally, aspirate water or a lowconcentration ethanol or bleach solution as the last step of any aspiration
cycle. Empty and clean the bottle daily, or as needed.
6.1 Emptying the bottle
1. Turn off QuickFlow by pressing the Power button on the front of the
base unit for five (5) full seconds.
2. Turn the gray pressure-release valve on top of the bottle cap counterclockwise to equalize pressure in the bottle.
3. At the top of the collecting bottle, the blue and orange quick connectors join the tubes to the bottle. When a connecting collar is pulled down,
spring forces will lightly "pop" a tube from a connector. To prevent liquid
splashing or spilling from the tube, hold the connector-end of the tube in
one hand while pulling down the connecting collar with the other hand.
Repeat to disconnect both tubes.
16
4. Using the metal handle beneath the cap of the bottle, lift the bottle to
transport to the liquid disposal location.
5. Unscrew cap to empty the bottle. Always follow your lab's policy for a
safe liquid media disposal.
Page 17

4
3
5
2
6
1
4
3
5
2
6
1
4
3
5
2
6
1
4
3
5
2
6
1
Release
pressure
Disconnect
blue connector
Disconnet
orange connector
Figure 4: Emptying the bottle
6.2 Cleaning the handle, adapter, bottle and cap
The QuickFlow handle, adapters, cap and collecting bottle are easily cleaned
in mild soapy water. These parts may be more thoroughly decontaminated
using cleaning agents best matched to the aspirated liquid, such as alcohol
(70%) or bleach (10%) solutions.
NOTE: Extra o-rings for adapters are provided with QuickFlow for
replacement as needed.
6.3 Cleaning the clear vacuum tube
1. Place the empty bottle onto the QuickFlow base unit and screw on the
cap with connectors.
Grab the handles
to lift the bottle
2. Connect both tubes to the cap.
3. Select a cleaning agent based on the substance to be removed from the
tube: for example, 10% bleach solution (proteinaceous liquids) or 70%
alcohol (aqueous liquids), and pour the cleaning agent into a reservoir.
4. Aspirate the cleaning agent for 20 seconds to clean the tube. Ensure
proper ventilation and wear personal protective equipment whenever
solvents are in use.
5. Disconnect tubes and empty the collecting bottle and rinse with water.
17
Page 18

6. Place the empty bottle back on the QuickFlow base unit, screw on the
cap, connect the tubes, and aspirate distilled water for 20 seconds to
rinse the handle and tube.
7. Disconnect tubes and empty the collecting bottle.
6.4 Autoclaving
The QuickFlow handle, tubes, adapters, cap and collecting bottle may be
autoclaved at 121 ºC, 1 Bar, for 15-20 minutes.
NOTE: Cap and collecting bottle must be separated before autoclaving.
IMPORTANT: To autoclave the handle, move the switch to Non-Continuous
mode (dotted line) to keep it at optimum performance.
Do not autoclave the entire machine or any other parts of the machine.
7 Spare parts and accessories
Cleaning and Maintenance
Check with your local sales rep for a full list of QuickFlow spare parts
and accessories.
7.1 Filter (blue vacuum inlet tube)
If liquid splashes into the vacuum inlet tube, the filter will protect the
machine.
If the filter is blocked, disassemble and spin-dry it for reuse. If a filter is
destroyed, disassemble it and replace with a new one.
Pay attention to filter direction when reassembling. The side with indicator
"IN" connects toward the bottle.
7.2 Handle hang-up
When QuickFlow is not being used, you can secure the handle on
a nearby flat vertical surface using the handle hang-up.
Remove the adhesive backing and attach the hang-up
to a nearby surface. Then, insert the QuickFlow handle
as shown.
Hang-up
QuickFlow handle
18
Figure 5: Mounted hang-up with handle resting inside it
Page 19

8Specications
Description
Max. aspiration speed 17 mL/s (with aspiration pipette)
Vacuum range -20KPa – -70KPa
Power adapter input 100 – 240 VAC, 50/60Hz
Device power input 24V DC / 0.625A
Dimensions (H*W*D) 460 x 200 x 400 mm
Weight 4.016 kg (base unit, bottle and accessories)
Shipping weight 5.6 kg (includes packaging)
Max. liquid volume 4L
Tube diamater 4 mm (inner), 8 mm (outer)
Tube length 2 m
Operating range (°C) 0 to 40 °C, Max. 85% RH (non-condensing)
Storage range (°C) -30 to 60 °C, Max. 95% RH (non-condensing)
Power supply
(Manufacturer information)
Model: PSA 15R-240P
Manufacturer: PHIHONG
Manufacturer address:
Keji Road Yinhu Industrial Park, Qingxi Town
Dongguan City, Guangdong Province, China
19
Page 20

Troubleshooting
9
7 Troubleshooting
9
Before performing any troubleshooting, remember to turn off the QuickFlow completely and
remove the power adapter from the instrument.
Problem Probable cause Remedy
Device doesn't run Power switch is off Press the switch and turn on the device.
Power not connected Plug the power adapter and turn on.
Defective main PC Board* See disclaimer below.
Pump keeps running Air leakage Ensure the cap is tightly closed.
Ensure the handle is on non-continuous mode
(with switch moved toward dotted line).
Ensure the pressure-release valve is closed.
Ensure the connecting tubes are airtight at all
connection points.
Defective pump* See disclaimer below.
Defective main PC Board* See disclaimer below.
Slow aspiration
False full bottle
alerts
Aspiration speed is set to minimum Rotate the speed control knob clockwise to set
faster speed.
Blocked tubes Check the tubes and clean. Replace if needed.
Blocked filter Emptythebottleandreplacethelter.
Air leakage Ensure the cap is tightly closed.
Ensure the pressure-release valve is closed.
Check the tube connectors and ensure they are
tight.
Defective pump* See disclaimer below.
Inside wall of the bottle is dirty Clean the bottle with a cleaning agent such as
soapy water, 70% alcohol or a 10% bleach
solution.
Electromagnetic interference
disturbs the level sensor
Viscous or bubbly liquid Move bottle as far forward as possible on the base
Liquid splashes on the inside bottle
wall
Defective sensor* See disclaimer below.
Identify and remove source of electromagnetic
interference.
unit.
Check whether the tube inside the cap is bending;
keep the tube straight.
20
N/A Immediately turn off the instrument, unplug the
power adapter from the instrument and contact
Technical Support or your local METTLER TOLEDO
Power mulfunction
* If any of these occour, please immediately turn off the instrument, unplug the power adapter and contact Technical
Suppport or your local METTLER TOLEDO Service Organization. See page 22 for contact information.
Service Organization.
NEVER open the instrument cover and attempt to
troubleshoot this power problem. For more information, see Section 2.1 on page 5.
10 Incompatible chemicals and agents
QuickFlow should not be used to aspirate full strength corrosive chemicals.
Page 21

11 Ordering information
Part Number Description
30519826 Aspirator, QuickFlow 4L
30519824 QuickFlow Handle Kit – Standard
30519825 QuickFlow Handle Kit – w/ Splitter
QuickFlow Accessories
30524505 Bottle kit, QuickFlow 4L
30524507 Accessory: Handle Hang-up
30520489 2μmFilter–w/Tubing
Rainin Universal Tips for QuickFlow
30 389191 250μLUniversal(UNV)TipsinRT-racks
30 389193 250μLUniversal(UNV)TipsinRT-racks–Sterilized
17014 976 250μLUniversal(UNV)TipsinTerraRack™ – Sterilized
21
Page 22

12 Warranty
Limited Warranty and Limitation of Liability
Seller warrants the merchandise to conform to specifications. Under no circumstances shall
Seller be responsible for alleged nonconformities with respect to any merchandise which
has been used for purposes or in any manner for which it was not intended, or any
merchandise which has been customized or modified without Seller’s prior written consent,
or damaged or misused. As Buyer’s exclusive remedy in the event of breach of warranty,
Seller shall repair or replace, as its option, any nonconforming merchandise or parts thereof
Warranty
for a period of one (1) year after delivery. All claims must be made in writing to the Seller. Any
claims not made within the period specified above shall be deemed waived and released.
The provisions of the foregoing warranties are in lieu of any other warranty, whether express
Troubleshooting
or implied, written or oral (including any warranty of merchantability, fitness for a particular
purpose, title or non-infringement). Seller’s liability arising out of the manufacture, sale or
supplying of a product or its use or its disposition, whether based upon warranty, contract,
tort or otherwise, shall not for any reasons exceed the aggregate purchase price paid by
buyer for such product. In no event shall seller be liable to buyer or any other person or entity
for special, incidental, consequential or exemplary damages (including but not limited to
damages for loss of profits, loss of data or loss of use) arising out of the manufacture, sale,
supply, use, marketing, resale or operation of the merchandise, even if seller has been ad
vised of the possibility of such damages or losses.
Contact information
China: Phone: 4008 878 989
Email: mtservice@mt.com
North America/ Technical Support: Phone: 800 662 7027
E-mail: tech.support@rainin.com
RoW: www.mt.com/contacts
FCC Statement
This device complies with part 15 of FCC Rules. Operation is subject to the following two
conditions. (1) This device may not cause harmful interference, and (2) this device must
accept any interference received, including interference that may cause undesired operation.
CAN ICES-3(B)/NMB-3(B)
See Section 5 - Specifications for information on electrical power rating and power cord
selection.
22
Page 23

23
Page 24

Mettler-Toledo Rainin, LLC
7500 Edgewater Drive
Oakland, California 94621 USA
Subject to technical changes
© 2018 Mettler-Toledo Rainin, LLC
30532602_EN Rev A
www.mt.com/rainin
For more information
 Loading...