

Page 1
User Manual
Refractometer Excellence
R4/R5
Page 2

Page 3

Table of Contents
1 Introduction 3
2 Safety information 3
2.1 Definitions of signal words and warning symbols................................................ 3
2.2 Product specific safety notes ............................................................................. 4
3 Design and function 5
3.1 Overview refractometer ..................................................................................... 5
3.2 Rear panel ...................................................................................................... 6
3.3 Terminal ......................................................................................................... 7
4 Installation and commissioning 7
4.1 Scope of delivery ............................................................................................. 7
4.2 Download the Reference Manual ....................................................................... 8
4.3 Unpack the refractometer .................................................................................. 8
4.4 Position the refractometer ................................................................................. 8
4.5 Connect the refractometer to the power supply..................................................... 9
4.6 Disconnect the refractometer from the power supply............................................. 9
4.7 Connect, adjust and disconnect the terminal ....................................................... 10
4.7.1 Connect the terminal.......................................................................... 10
4.7.2 Adjust the angle of the terminal........................................................... 10
4.7.3 Disconnect the terminal ..................................................................... 10
4.8 Install accessories ........................................................................................... 10
5 Operation 11
5.1 Start up the refractometer .................................................................................. 11
5.2 Shut down the refractometer.............................................................................. 11
5.3 Typical phases of refractive-index determinations ................................................ 11
5.3.1 Fill the measuring cell........................................................................ 11
5.3.2 Rinse the measuring cell.................................................................... 11
5.3.3 Dry the measuring cell....................................................................... 12
5.4 Example: refractive-index determination without automation ................................. 12
5.4.1 Create the measurement method......................................................... 12
5.4.2 Configure the measurement method .................................................... 13
5.4.3 Create a shortcut on the home screen.................................................. 14
5.4.4 Determine the refractive index ............................................................. 14
6 Maintenance 16
6.1 Maintenance schedule...................................................................................... 17
6.2 Clean the refractometer..................................................................................... 17
6.2.1 Clean the housing and the lid............................................................. 17
6.3 Clean the measuring cell .................................................................................. 17
6.3.1 Typical phases of cleaning the measuring cell...................................... 17
6.3.2 Example: clean with deionized water................................................... 18
6.3.2.1 Create the cleaning method ........................................................... 18
6.3.2.2 Configure the cleaning method ...................................................... 19
6.3.2.3 Clean using deionized water.......................................................... 19
6.4 Check the measurement accuracy ..................................................................... 21
6.4.1 Typical phases of checking the measurement accuracy ......................... 21
6.4.2 Example: test with a water standard.................................................... 21
6.4.2.1 Create the test method .................................................................. 21
6.4.2.2 Configure the test method.............................................................. 22
6.4.2.3 Perform the test............................................................................ 23
6.5 Replace the protection plate .............................................................................. 25
1Refractometer Excellence
Page 4

6.5.1 Remove the protection plate ............................................................... 25
6.5.2 Install the protection plate .................................................................. 26
6.6 Replace the lid ................................................................................................ 26
6.6.1 Remove the lid.................................................................................. 26
6.6.2 Install the lid..................................................................................... 27
6.7 Replace the measuring-cell cover ...................................................................... 27
6.7.1 Remove the measuring-cell cover ....................................................... 27
6.7.2 Install the measuring-cell cover .......................................................... 28
6.8 Replace the measuring-cell O-ring ..................................................................... 28
6.8.1 Remove the measuring-cell O-ring ...................................................... 28
6.8.2 Install the measuring-cell O-ring ......................................................... 29
6.9 Replace the O-ring of the measuring-cell cover.................................................... 29
6.9.1 Remove the O-ring of the measuring-cell cover..................................... 29
6.9.2 Install the O-ring of the measuring-cell cover........................................ 30
6.10 View the firmware version................................................................................. 30
6.11 Prepare the refractometer for storage.................................................................. 30
6.12 Transport the refractometer................................................................................ 30
6.13 Dispose of the refractometer.............................................................................. 31
7 Technical data 31
7.1 Refractometer .................................................................................................. 31
7.2 Terminal ......................................................................................................... 32
7.3 Measurement .................................................................................................. 32
2 Refractometer Excellence
Page 5
1 Introduction
Thank you for choosing a METTLER TOLEDO refractometer. The refractometers R4 and R5 are easy-to-operate,
high-performance instruments for measuring the refractive index of liquid samples.
About this document
This document provides you with the information you need to get started with your METTLER TOLEDO refractometer.
The instructions in this document refer to refractometers R4 and R5 running firmware version 1.0 or higher.
For a full description of the refractometer and its functions, refer to the Reference Manual supplied
online.
u www.mt.com/library
If you have any additional questions, contact your authorized METTLER TOLEDO dealer or service representative.
u www.mt.com/contact
Conventions and symbols
Refers to an external document.
Elements of instructions
Prerequisites
§
1 Steps
2 ...
ð Intermediate results
ð Results
2 Safety information
Two documents named "User Manual" and "Reference Manual" are available for this instrument.
• The User Manual is printed and delivered with the instrument.
• The electronic Reference Manual contains a full description of the instrument and its use.
• Keep both documents for future reference.
• Include both documents if you transfer the instrument to other parties.
Only use the instrument according to the User Manual and the Reference Manual. If you do not use the
instrument according to these documents or if the instrument is modified, the safety of the instrument may be
impaired and Mettler-Toledo GmbH assumes no liability.
User Manual and Reference Manual are available online.
u www.mt.com/library
2.1 Definitions of signal words and warning symbols
Safety notes contain important information on safety issues. Ignoring the safety notes may lead to personal
injury, damage to the instrument, malfunctions and false results. Safety notes are marked with the following
signal words and warning symbols:
Signal words
WARNING
A hazardous situation with medium risk, possibly resulting in death or severe injury if not
avoided.
3Refractometer Excellence
Page 6
CAUTION
NOTICE
A hazardous situation with low risk, resulting in minor or moderate injury if not avoided.
A hazardous situation with low risk, resulting in damage to the instrument, other material
damage, malfunctions and erroneous results, or loss of data.
Warning symbols
Electrical shock
Hot surface
2.2 Product specific safety notes
Intended use
The refractometers R4 and R5 are designed to be used by trained staff. The refractometers are intended for
measuring the refractive index of liquid samples that are compatible with the materials with which they come into
contact.
Any other type of use and operation beyond the limits of use stated by Mettler-Toledo GmbH without consent from
Mettler-Toledo GmbH is considered as not intended.
Responsibilities of the instrument owner
The instrument owner is the person holding the legal title to the instrument and who uses the instrument or
authorizes any person to use it, or the person who is deemed by law to be the operator of the instrument. The
instrument owner is responsible for the safety of all users of the instrument and third parties.
METTLER TOLEDO assumes that the instrument owner trains users to safely use the instrument in their workplace
and deal with potential hazards. METTLER TOLEDO assumes that the instrument owner provides the necessary
protective gear.
Protective clothing
Gloves that protect your hands from contact with hot or cold surfaces.
Safety notes
WARNING
Danger of death or serious injury due to electric shock!
Contact with parts that carry a live current can lead to death or injury.
1 Only use the METTLER TOLEDO power supply cable and AC adapter designed for your
instrument.
2 Connect the power cable to a grounded power outlet.
3 Keep all electrical cables and connections away from liquids and moisture.
4 Check the cables and the power plug for damage and replace damaged cables and power
plugs.
CAUTION
Slight burns due to hot surface
The measuring cell can become hot enough to cause slight burns.
1 Do not touch the measuring cell without gloves before the measuring cell has cooled down.
2 Wear gloves that protect from contact heat if you need to touch the hot measuring cell.
4 Refractometer Excellence
Page 7
NOTICE
1
6
7
8
9
3
4
2
5
Risk of damage to the instrument due to the use of unsuitable parts!
Using unsuitable parts with the instrument can damage the instrument or cause it to malfunction.
− Only use parts from METTLER TOLEDO that are intended to be used with your instrument.
FCC Rules
This equipment has been tested and found to comply with the limits for a Class A digital device, pursuant to Part
15 of the FCC rules. These limits are designed to provide reasonable protection against harmful interference when
the equipment is operated in a commercial environment. This equipment generates, uses, and can radiate radio
frequency energy and, if not installed and used in accordance with the instruction manual, may cause harmful
interference to radio communications. Operation of this equipment in a residential area is likely to cause harmful
interference in which case the user will be required to correct the interference at his own expense.
3 Design and function
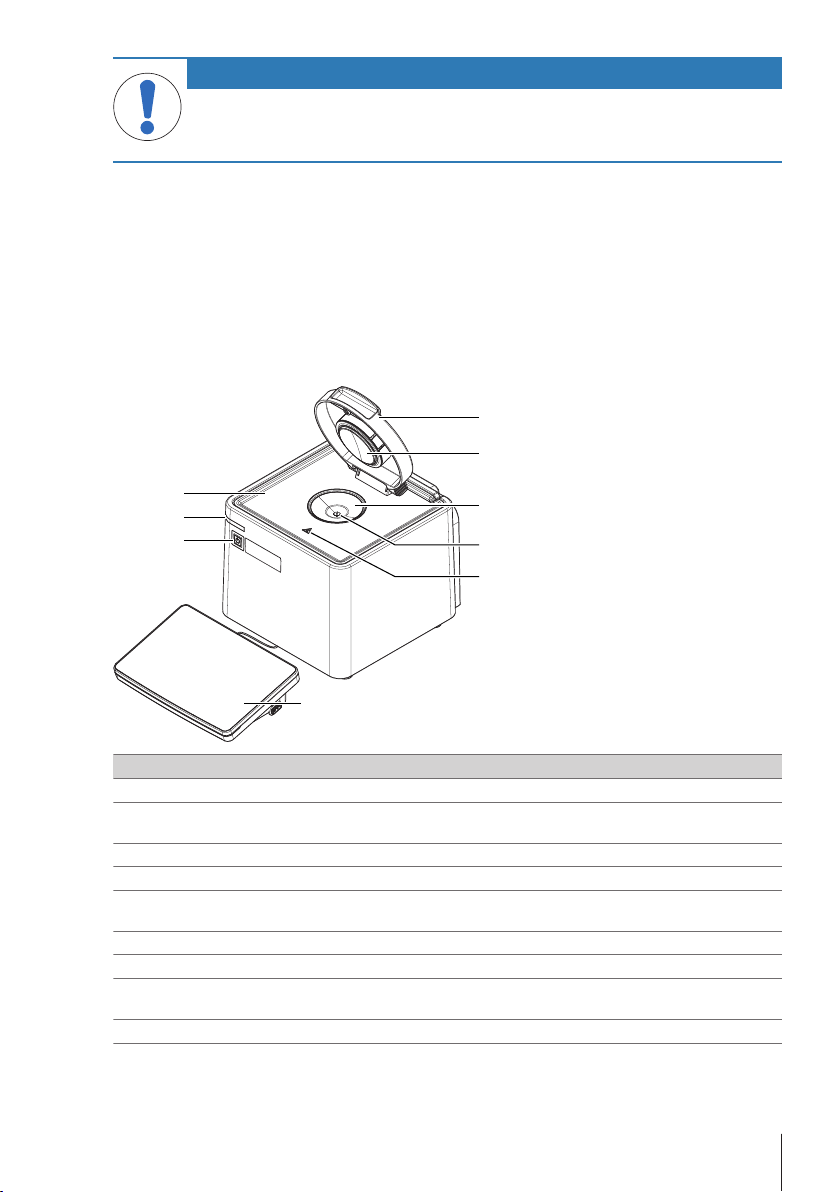
3.1 Overview refractometer
No. Name Function
Lid Protects the measuring cell
1
Measuring-cell cover Closes off the measuring cell and permits the formation of a stable vapour-
2
Measuring cell Holds the sample
3
Prism Refracts the light at its surface
4
Safety label Warns that the measuring cell can be hot and cause slight burns if you touch
5
Terminal Displays information and is used to enter information
6
Power button Starts up and shuts down the refractometer
7
Instrument status light
8
(StatusLight™)
Protection plate Collects spilled sample or cleaning solution
9
liquid equilibrium
it without protective gloves
Provides information about the status of the refractometer.
5Refractometer Excellence
Page 8
Status light
1
13 11 234567891012
StatusLight Refractometer status
Steady, green light The refractometer is ready for operation.
Blinking, green light The refractometer is performing a task.
Steady, orange light The refractometer waits for the user to perform an action.
Blinking, orange light The task has been interrupted, for example because a value lies outside of its
Steady,red light An error has occurred during task execution.
limits.
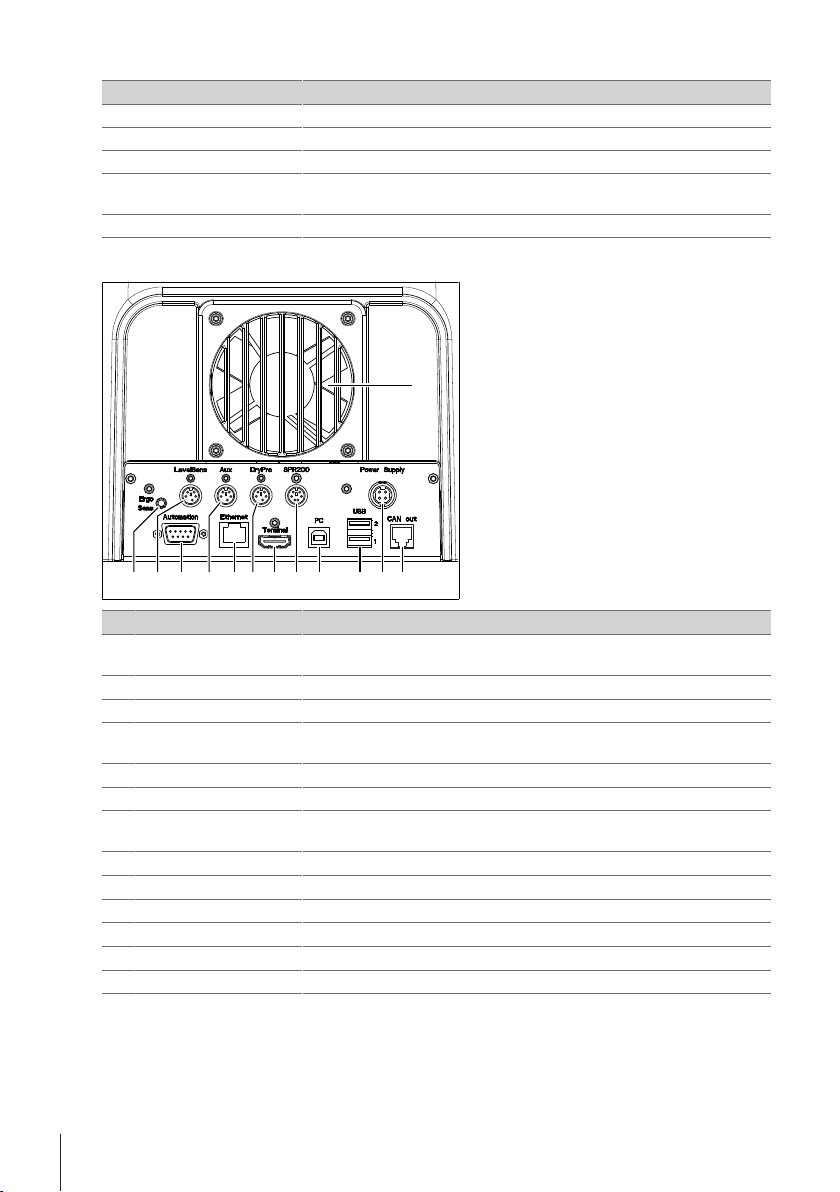
3.2 Rear panel
No. Name Function
Fan and ventilation
1
openings
2 CAN out
3 Power Supply
4 USB 1 / USB 2
5 PC
6 SPR200
7 Terminal
8 DryPro
9 Ethernet
10 Aux
11 Automation
12 LevelSens
13 ErgoSens
Move air over the heat sink of the Peltier element
RJ12 socket to connect a LevelSens box
DC Socket to connect the AC adapter
USB-A socket to connect USB devices, for example printers, barcode readers
or an InMotion™ Autosampler
USB-B socket to connect a computer
6-pin Mini-DIN socket to connect the filling pump SPR200
19-pin Mettler-HDMI socket with non-standard pin assignment, reserved to
connect the terminal and no other display device
5-pin Mini-DIN socket to connect the drying pump DryPro
RJ45 socket to connect a network
5-pin Mini-DIN socket to connect an auxiliary instrument
9-pin male D-sub socket to connect a sample delivery and cleaning unit
5-pin Mini-DIN socket to connect the fluid-level sensor LevelSens
3.5mm jack socket to connect the infrared motion-sensor ErgoSens
6 Refractometer Excellence
Page 9
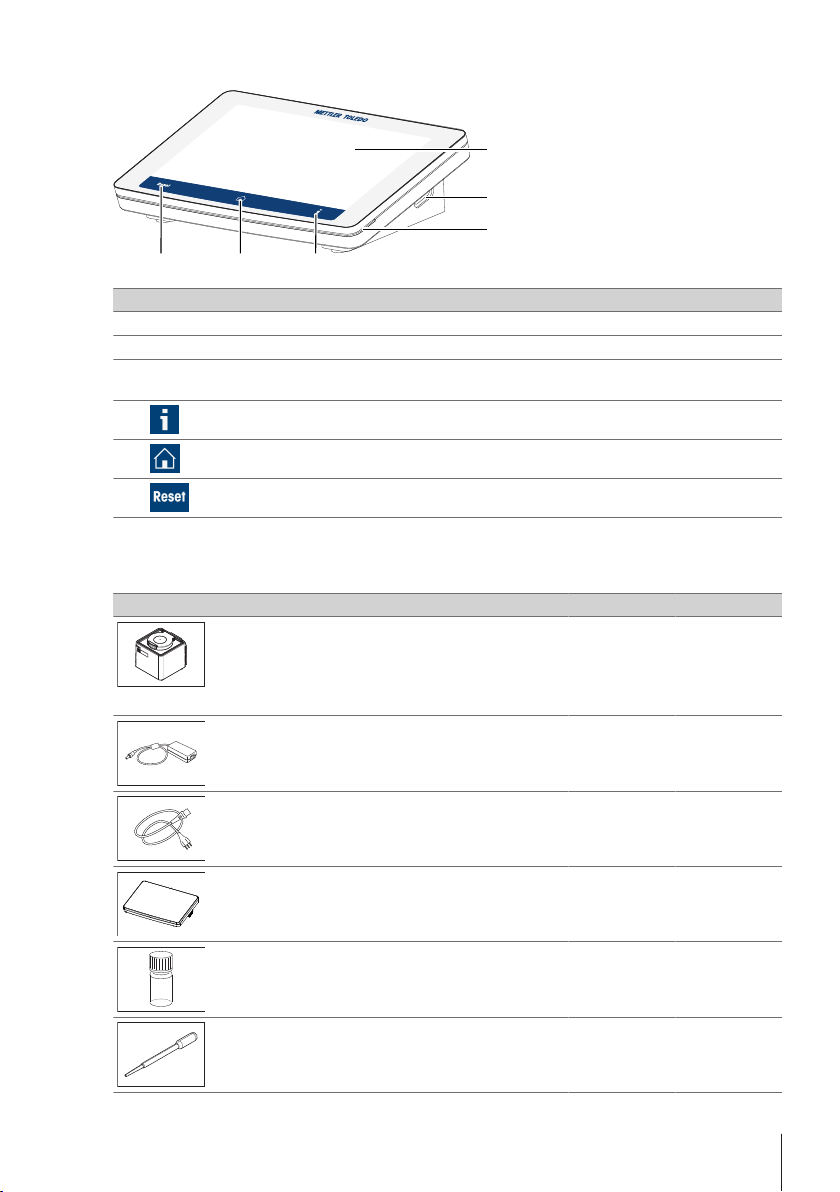
3.3 Terminal
1
2
3
456
No. Name Function
Touch screen Displays information and can be used to enter information
1
USB-A socket Is used to transfer data to and from a USB flash drive
2
Terminal status light
3
(StatusLight™)
4
Provides information about the status of the refractometer
Opens a window with general information about the refractometer
5
6
Opens the home screen
Ends all running tasks
4 Installation and commissioning
4.1 Scope of delivery
Part Order number R4 R5
Refractometer – • •
Extern. Power Supply 120W 30298362 • •
Power cable (country-specific) – • •
Terminal WVGA 7inch AnaChem
• Terminal
• HDMI cable
Combined water standard
9mL, density/refractive index
Plastic pipettes (3 pcs)
PP (polypropene)
– • •
51338010 • •
– • •
7Refractometer Excellence
Page 10
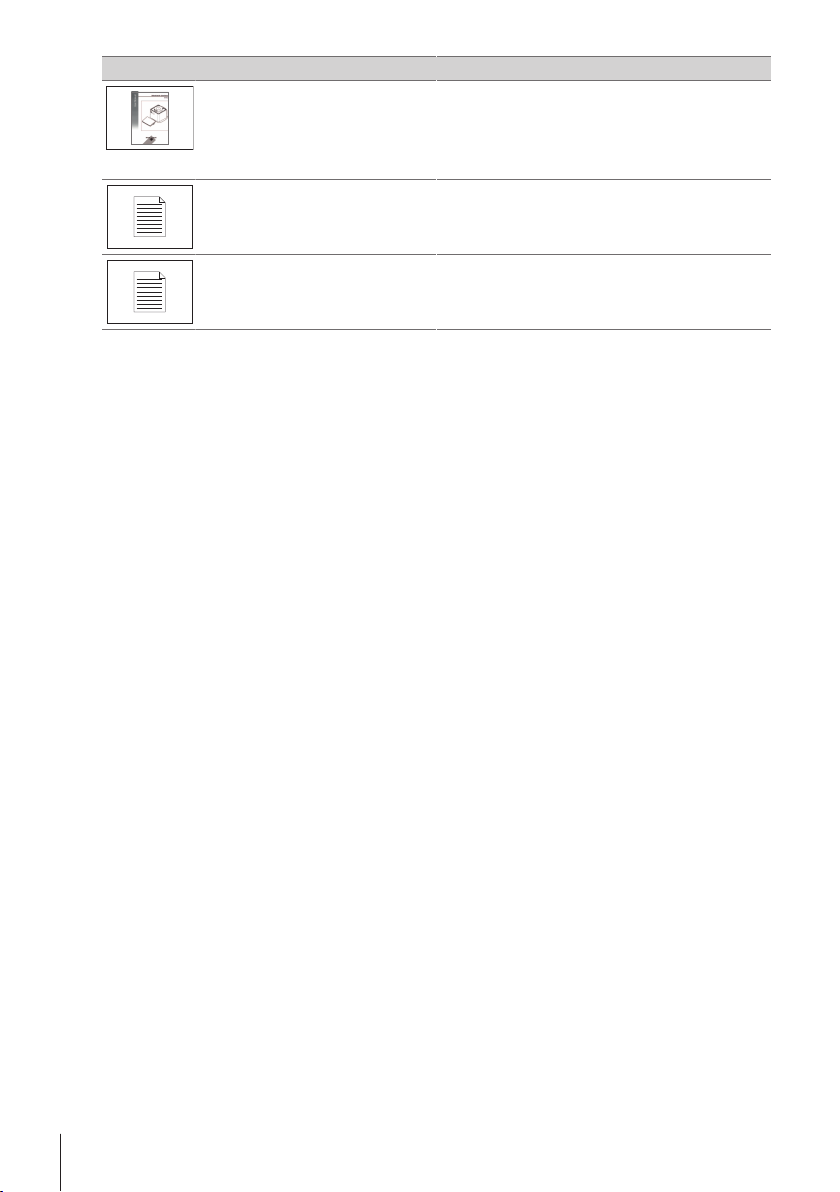
Part Order number R4 R5
User Manual – • •
Declaration of conformity – • •
Test report – • •
4.2 Download the Reference Manual
1 Go to the website www.mt.com/library.
2 Select the Technical Documentation tab.
3 Enter the product type in the search field and start the search.
4 Select the Reference Manual from the result list.
5 Select the link.
ð The Reference Manual is either opened or downloaded depending on the browser settings.
6 Check which firmware version is installed on your refractometer.
7 If the Reference Manual is not written for the installed firmware version, contact your authorized METTLER
TOLEDO dealer or service representative.
u www.mt.com/contact
See also
2 Introduction}Page3
2 View the firmware version}Page30
4.3 Unpack the refractometer
1 Remove the refractometer from the protective packaging.
2 Store the packing material for later transport over long distances.
3 Check if you received all parts listed in the scope of delivery.
4 Inspect the parts visually for flaws or damage.
5 If parts are missing or damaged, report it to your authorized METTLER TOLEDO dealer or service represen-
tative.
u www.mt.com/contact
See also
2 Scope of delivery}Page7
4.4 Position the refractometer
The refractometer has been developed for indoor operation in a room with stable temperature and ventilation as
needed by the chemicals that are used.
The following site requirements apply:
• Dew point below the measurement temperature
• Ambient conditions within the limits specified in the technical data
• No powerful vibrations
• No direct sunlight
8 Refractometer Excellence
Page 11
• No corrosive gas atmosphere
1
• No explosive atmosphere
• No powerful electric or magnetic fields
Procedure
1 Place the refractometer on a level surface.
2 Make sure that there are at least 15 cm clearance behind the refractometer.
3 Make sure that nothing blocks the ventilation openings at back of the refractometer.
See also
2 Technical data}Page31
4.5 Connect the refractometer to the power supply
The AC adapter is suitable for all supply line voltages ranging from 100...240 V AC and 50/60 Hz.
WARNING
Danger of death or serious injury due to electric shock!
Contact with parts that carry a live current can lead to death or injury.
1 Only use the METTLER TOLEDO power supply cable and AC adapter designed for your
instrument.
2 Connect the power cable to a grounded power outlet.
3 Keep all electrical cables and connections away from liquids and moisture.
4 Check the cables and the power plug for damage and replace damaged cables and power
plugs.
NOTICE
Danger of damage to the AC adapter due to overheating!
If the AC adapter is covered or in a container, it is not sufficiently cooled and overheats.
1 Do not cover the AC adapter.
2 Do not put the AC adapter in a container.
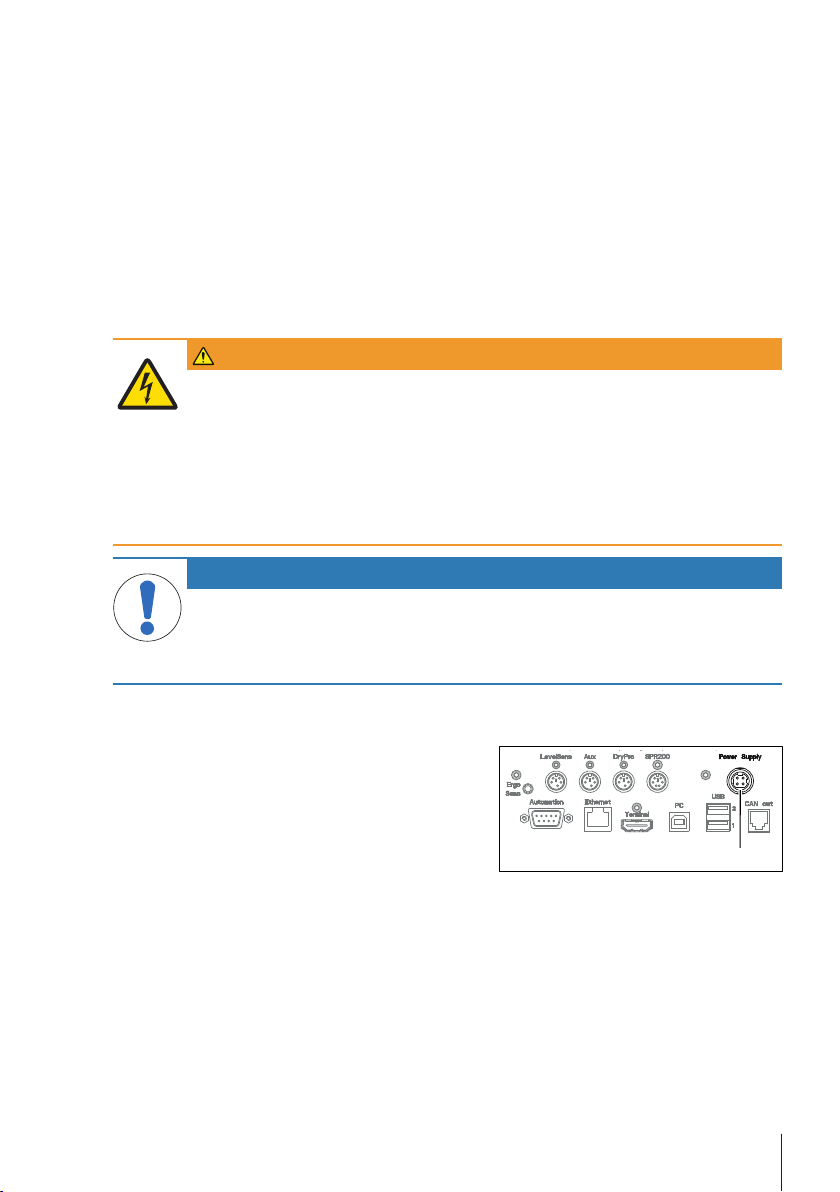
1 Install the cables in such a way that they cannot be damaged or interfere with operation.
2 Insert the plug of the power cable in the socket of the AC adapter.
3 Insert the plug of the AC adapter in the Power Supply(1)
socket on the rear panel.
4 Insert the plug of the power cable in a grounded power
outlet that is easily accessible.
4.6 Disconnect the refractometer from the power supply
The refractometer is shut down.
§
1 Pull the plug of the power cable out of the power outlet.
2 Pull the plug of the AC adapter out of the Power Supply socket on the rear panel.
9Refractometer Excellence
Page 12

4.7 Connect, adjust and disconnect the terminal
1 2
1
1
4.7.1 Connect the terminal
The refractometer is shut down.
§
1 Insert one of the plugs of the supplied terminal cable in the socket(1) on the back of the terminal.
2 Insert the other plug of the terminal cable into the Terminal socket(2) on the rear panel.
3 Start up the refractometer.
ð The refractometer automatically detects the terminal and activates it.
See also
2 Start up the refractometer}Page11
4.7.2 Adjust the angle of the terminal
The angle of the terminal has twopositions.
Procedure
No task is running.
§
− To increase the angle of the terminal, fold out the two
feet(1) at the underside of the terminal.
4.7.3 Disconnect the terminal
The refractometer is shut down.
§
1 Pull the plug of the terminal cable out of the socket on the back of the terminal.
2 Pull the plug of the terminal cable out of the Terminal socket on the rear panel.
See also
2 Shut down the refractometer}Page11
4.8 Install accessories
The installation of accessories is described in the Reference Manuals.
u www.mt.com/library
10 Refractometer Excellence
Page 13

5 Operation
1
2
1
2
5.1 Start up the refractometer
− Press the power button(2).
ð The StatusLight(1) turns green.
ð The refractometer starts up and detects connected
devices.
ð The welcome screen on the terminal opens.
ð The refractometer is ready for use when the StatusLight
of the terminal turns green.
5.2 Shut down the refractometer
Shut down the refractometer using the power button
No task is running.
§
The measuring cell is clean and dry.
§
− Press the power button(2).
ð METTLER TOLEDO is displayed and the StatusLight(1)
starts blinking.
ð When the StatusLight and the screen are dark, the
refractometer is shutdown.
ð The control circuit for the power button is energized. The
rest of the refractometer is no longer energized.
Shut down the refractometer in emergency situations
− Pull the plug of the power cable out of the power outlet.
5.3 Typical phases of refractive-index determinations
Refractive-index determinations usually include three phases.
• Fill the measuring cell and measure the refractive index.
• Rinse the measuring cell to remove residue of the sample.
• Dry the measuring cell.
5.3.1 Fill the measuring cell
This chapter describes how to fill the measuring cell using a plastic pipette. How to work with
automation is described in the Reference Manual.
If you work without automation, METTLER TOLEDO recommends to use small sample volumes. For small
volumes, the temperatures of the sample and the measuring cell equalize faster and the analysis therefore takes
less time.
• Samples with high surface tension: 0.5mL
• Samples with low surface tension: 1mL
If you have samples that contain particles, it is important, that you always use the same sample volume.
5.3.2 Rinse the measuring cell
At the end of this phase, the residue in the measuring cell must have the following properties.
• Evaporate without leaving incrustations.
• Evaporate easily.
To clean the measuring cell, it has to be rinsed with one or two different cleaning solutions.
u www.mt.com/library
11Refractometer Excellence
Page 14

• Purpose of the cleaning solution1: Dissolve and remove the sample, so that the residue in the measuring
Home
Tasks
Log out User data Barcode start Start
Methods /
Products
Series
Results
Setup
Manual
08/15/2018Administrator
20.00
1
R5
cell is pure cleaning solution1. If the cleaning solution1 does not easily evaporate, a second cleaning
solution must be used.
• Purpose of the cleaning solution2: Dissolves the cleaning solution1 and evaporates easily without leaving
any residue.
METTLER TOLEDO recommends the following cleaning solutions if you work without a flow cell.
Sample Cleaning solution1 Cleaning solution2
Water, water based Deionized water Measuring temperature <20°C:
acetone, ethanol (100%)
Measuring temperature >20°C:
none
Acids (concentrated) Water (flush the measuring cell with
plenty of water to remove the heat
from the reaction of water and acid)
Measuring temperature <20°C:
acetone, ethanol (100%)
Measuring temperature >20°C:
none
Alkaline solutions (concentrated) 0.3…0.5% deconex solution Measuring temperature <20°C:
acetone, ethanol (100%)
Measuring temperature >20°C:
water
Samples with fats or oily
components
0.3…0.5% deconex solution Measuring temperature <20°C:
acetone, ethanol (100%)
Measuring temperature >20°C:
water
Petrochemical samples, edible oils
and fats
Toluene, xylene or petrol ether
mixtures
Room temperature: low-boiling
petrol ether mixture or acetone
Temperature > 30°C: hexane or
similar organic solvents
5.3.3 Dry the measuring cell
At the end of this phase, the measuring cell contains no residue and is ready for a new analysis or storage.
5.4 Example: refractive-index determination without automation
The following chapters show you how to configure a measurement method and determine the refractive index of
tap water at 20°C.
You can find more information about the configuration of methods and working with other types of
samples in the Reference Manual.
u www.mt.com/library
5.4.1 Create the measurement method
The home screen is open.
§
1 Go to Methods / Products(1) > Methods.
ð The Methods window opens.
12 Refractometer Excellence
Page 15

Back
Type ID
New
Tasks
Title
°C
Methods
1
MS
MS
MS
nD manualM8501 20.00
M8502
M8503
M8504
M8505
Brix manual
Brix w. SPR200
Brix & pH (S220) w. InMotion
Clean&Park electrode InMotion
20.00
20.00
20.00
20.00
MS
MS
2 Select the method M8501 nD manual(1).
Cancel
Title
Configuration
Line Method function
Sample
Fill
Measure
Print Insert Save
Tasks
nD manual
M8101:
Cancel
Title
Configuration
Line Method function
Sample
Fill
Measure
Print Insert Save
Tasks
nD manual
M8101:
1
Cancel
Title
Method ID
Tasks
OK
Method type
Title
Author
Created on
Modified on
Administrator
08/15/2018
08/15/2018
1
2
3
Measurement
A0001
Water 20°C
Cancel
Sample
Sample ID
Tasks
OK
Correction factor
Comment
1
2
Sample
1
2
Cancel
Report
Export to network
None
Tasks
Delete OK
Export to USB stick
Print / USB-RS232 data export
Condition
None
ð The method window with the list of the method
functions opens.
5.4.2 Configure the measurement method
1 Select the Title(1) method function.
2 Change Method ID(1) as needed. The following format is
reserved for METTLER TOLEDO predefined methods: "M"
followed by a number.
3 Change Title(2) as needed and tap OK(3).
ð The method window with the list of the method
functions opens.
4 Select the Sample method function.
5 Enter for Sample ID(1) the default value for the sample
identification and tap OK(2).
ð The default value is used in the Start analysis window.
ð The method window with the list of the method
functions opens.
6 Move your finger upward on the touch screen to scroll
down.
7 Select the Report method function.
8 Deactivate Print / USB-RS232 data export(1) and tap
OK(2).
13Refractometer Excellence
Page 16

Cancel
Measure
Line Method function
Clean
Online display
Report
Print Insert Save
Tasks
Calculation
1
M8101:
nD manual
9 Tap Save(1).
Back
Measure
Line Method function
Clean
Online display
Report
Print Insert Start
Tasks
Calculation
Delete method
1
A0001: Water20°C
Start analysis
Method ID
Method
Tasks
AddToHome Start
Sample
A0001
Type
Method type
Number of samples
Sample ID
Continuous run
Measurement
1
Cancel
Shortcut parameters
Description
Tasks
Delete Save
Type
Method ID
Immediate start
Homescreen position
Created by
Method
Water20°C
A0001
Administrator
1
2
Home
Tasks
Log out User data Barcode start Start
Methods /
Products
Series
Results
Setup
Manual
08/15/2018Administrator
20.00
1
R5
ð The method is listed with Method ID and Title in the
Methods window.
5.4.3 Create a shortcut on the home screen
1 Tap Start(1).
2 Tap AddToHome(1).
3 For Description(1), enter a name to identify the shortcut
on the home screen and tap Save(2).
ð The home screen with the shortcut(1) opens.
5.4.4 Determine the refractive index
Material
• Tap water
• Deionized water
• Plastic pipettes
• Waste container
14 Refractometer Excellence
• Lint free tissues
Page 17

Start the method
Home
Tasks
Log out User data Barcode start Start
Methods /
Products
Series
Results
Setup
Manual
08/15/2018Administrator
20.00
1
R5
Start analysis
Method ID
Method
Tasks
AddToHome Start
Sample
A0001
Type
Method type
Number of samples
Sample ID
Continuous run
Measurement
1
2
1
OK
Add sample.
Info
1
A0001: Water 20°C
Calculated results
Tasks
Stop
Measuring
10 s
1.33299
20.00
1.33299
A0001: Water 20°C
1
2
3
The lid is closed.
§
1 Tap the shortcut(1) of the method you configured.
2 If needed, change the entry in Sample ID(1).
3 Tap Start(2).
ð The temperature of the measuring cell is brought to the
temperature defined in the method.
ð A message prompts you to add the sample.
Fill the measuring cell
1 Fill a clean plastic pipette with 0.5mL of tap water.
2 Open the lid.
3 Place the pipette tip on the prism(1) and move it in circles
over the prism while you empty it into the measuring cell.
4 Close the lid.
5 Tap OK(1).
ð The temperature of the measuring cell(2) is brought to
the temperature defined in the method(1).
ð The currently measured value is displayed(3).
ð The measured value is saved as result when the criteria
for measurement reliability are met.
ð A message prompts you to drain the measuring cell.
Drain the measuring cell
1 Open the lid.
15Refractometer Excellence
Page 18

1
2 Place the pipette tip on the prism(1) and aspirate the
1
1
content of the measuring cell.
3 Empty the pipette into a suitable waste container.
4 Tap OK.
ð A message prompts you to rinse the measuring cell with
deionized water.
Rinse the measuring cell with deionized water
1 Fill a clean plastic pipette with deionized water.
2 Place the pipette tip on the prism(1) and move it in circles
over the prism while you empty it into the measuring cell.
3 Place the pipette tip on the prism(1) and aspirate the
content of the measuring cell.
4 Empty the pipette into a suitable waste container.
5 Repeat the steps above two or three times.
6 Tap OK.
ð A message prompts you to dry the measuring cell.
Dry the measuring cell
1 Wipe the measuring cell with a dry, clean and lint-free tissue.
2 Tap OK.
ð The home screen opens.
3 Wait a few seconds until any remaining residue of the deionized water has evaporated.
4 Close the lid.
ð The measuring cell is clean and dry.
6 Maintenance
In this chapter you find descriptions of the maintenance tasks you should perform on your refractometer. Any
other maintenance tasks need to be performed by a service technician that has been qualified by METTLER
TOLEDO.
If you experience problems with your refractometer, contact your authorized METTLER TOLEDO dealer or service
representative.
METTLER TOLEDO recommends that a preventive maintenance and calibration certification is done at least once
a year through your authorized METTLER TOLEDO dealer or service representative.
16 Refractometer Excellence
Page 19

u www.mt.com/contact
6.1 Maintenance schedule
If the standard operating procedures of your company require other maintenance intervals, use the intervals listed
in the standard operating procedures.
Frequency Task Link
Daily Clean the measuring cell at the end of the work
day.
Perform a test with deionized water. [Check the measurement
[Clean the measuring
cell}Page17]
accuracy}Page21]
6.2 Clean the refractometer
NOTICE
Danger of damage to the refractometer due to inappropriate cleaning methods!
Inappropriate cleaning agents can damage the housing or other parts of the refractometer. If
liquids enter the housing they can damage the refractometer.
1 Make sure the cleaning agent is compatible with the material of the part you want to clean.
2 Make sure that no liquid enters the interior of the refractometer.
If you have questions about the compatibility of cleaning agents, contact your authorized METTLER TOLEDO
dealer or service representative.
u www.mt.com/contact
See also
2 Technical data}Page31
6.2.1 Clean the housing and the lid
METTLER TOLEDO recommends the following cleaning agents:
• Water
• Water with a mild detergent
Procedure
The refractometer is shut down.
§
The measuring cell has cooled down to room temperature.
§
1 Wipe the housing with a cloth moistened with the cleaning agent.
2 Wipe the inside and the outside of the lid with a cloth moistened with the cleaning agent.
3 Wait until the lid and the space between the lid and the measuring-cell cover are dry.
4 Close the lid.
6.3 Clean the measuring cell
6.3.1 Typical phases of cleaning the measuring cell
Cleaning the measuring cell usually includes two phases:
• Rinse the measuring cell to remove residue of the sample.
• Dry the measuring cell.
See also
2 Rinse the measuring cell}Page11
2 Dry the measuring cell}Page12
17Refractometer Excellence
Page 20

6.3.2 Example: clean with deionized water
Home
Tasks
Log out User data Barcode start Start
Methods /
Products
Series
Results
Setup
Manual
08/15/2018Administrator
20.00
R5
1
Back
Type ID
New
Tasks
Title
°C
Methods
1
New
Methods
MS
MS
MS
nD manualM8501 20.00
M8502
M8503
M8504
M8505
Brix manual
Brix w. SPR200
Brix & pH (S220) w. InMotion
Clean&Park electrode InMotion
20.00
20.00
20.00
20.00
MS
MS
Cancel
Type ID
Tasks
Title
Method templates
MS
ADJ
MEASURET001
T002
T003
T004
ADJUSTMENT
TEST
CLEANCL
TE
1
Cancel
Configuration
Automation
Tasks
OK
Cell mode
1
2
None
R
Cancel
Title
Configuration
Line Method function
Clean
Print Insert Save
Tasks
U8001:
CLEAN
The following chapters show you how to configure a cleaning method and clean the measuring cell with
deionized water.
You can find more information about the configuration of methods and working with other types of
samples in the Reference Manual.
6.3.2.1 Create the cleaning method
The home screen is open.
§
1 Go to Methods / Products(1) > Methods.
ð The Methods window opens.
2 Tap New(1).
3 Select the template CLEAN(1).
u www.mt.com/library
4 For Automation select None(1) and tap OK(2).
ð The method window with the list of the method
functions opens.
18 Refractometer Excellence
Page 21

6.3.2.2 Configure the cleaning method
Cancel
Title
Configuration
Line Method function
Clean
Print Insert Save
Tasks
U8001:
CLEAN
1
Cancel
Title
Method ID
Tasks
OK
Method type
Title
Author
Created on
Modified on
Administrator
08/15/2018
08/15/2018
1
2
3
Clean
A0002
Clean water based
1
2
4
3
Cancel
Clean
Automation
None
Tasks
OK
Deionized water
Drain
Rinse cycle 1
Solvent 1
Dry
Rinse cycle 2
Cancel
Title
Configuration
Line Method function
Clean
Print Insert Save
Tasks
U8001:
CLEAN
1
Home
Tasks
Log out User data Barcode start Start
Methods /
Products
Series
Results
Setup
Manual
08/15/2018Administrator
20.00
R5
1
1 Select the Title(1) method function.
2 Change Method ID(1) as needed. The following format is
reserved for METTLER TOLEDO predefined methods: "M"
followed by a number.
3 Change Title(2) as needed and tap OK(3).
ð The method window with the list of the method
functions opens.
4 Select the Clean method function.
5 Deactivate Drain(1).
6 Enter for Solvent 1(2) "Deionized water".
7 Deactivate Rinse cycle 2(3) and tap OK(4)
8 Tap Save(1).
ð The method is listed with Method ID and Title in the
Methods window.
6.3.2.3 Clean using deionized water
Material
• Deionized water
• Plastic pipettes
• Waste container
• Lint-free tissues
Start the method
The home screen is open.
§
The measuring cell is drained.
§
1 Go to Methods / Products(1) > Methods.
ð The Methods window opens.
19Refractometer Excellence
Page 22

Back
Type ID
New
Tasks
Title
°C
Methods
1
MS
nD manualM8501
20.00
M8502
M8503
Brix manual
Brix w. SPR200
20.00
20.00
20.00
20.00
MS
MS
MS A0001 Water 20°C
Clean water basedA0002CL
2 Select the cleaning method that you configured(1).
Back
Title
Configuration
Line Method function
Clean
Print Insert Start
Tasks
Delete method
1
A0002: Clean water based
Start analysis
Method ID
Method
Tasks
AddToHome Start
A0002
Type
Method type
Clean
1
1
1
3 Tap Start(1).
4 Tap Start(1).
ð The method window with the list of the method
functions opens.
ð A message prompts you to rinse the measuring cell with
deionized water.
Rinse the measuring cell with deionized water
1 Fill a clean plastic pipette with deionized water.
2 Open the lid.
3 Place the pipette tip on the prism(1) and move it in circles
over the prism while you empty it into the measuring cell.
4 Place the pipette tip on the prism(1) and aspirate the
content of the measuring cell.
5 Repeat the steps above two or three times.
6 Tap OK.
ð A message prompts you to dry the measuring cell.
20 Refractometer Excellence
Page 23

Dry the measuring cell
Home
Tasks
Log out User data Barcode start Start
Methods /
Products
Series
Results
Setup
Manual
08/15/2018Administrator
20.00
R5
1
CAUTION
Slight burns due to hot surface
The measuring cell can become hot enough to cause slight burns.
1 Do not touch the measuring cell without gloves before the measuring cell has cooled down.
2 Wear gloves that protect from contact heat if you need to touch the hot measuring cell.
1 Wipe the measuring cell with a dry, clean and lint-free tissue.
2 Tap OK.
ð The home screen opens.
3 Wait a few seconds until any remaining residue of the deionized water has evaporated.
4 Close the lid.
ð The measuring cell is clean and dry.
6.4 Check the measurement accuracy
6.4.1 Typical phases of checking the measurement accuracy
Checking the measurement accuracy usually includes three phases:
• Fill the measuring cell and measure the refractive index.
• Rinse the measuring cell to remove residue of the sample.
• Dry the measuring cell.
See also
2 Fill the measuring cell}Page11
2 Rinse the measuring cell}Page11
2 Dry the measuring cell}Page12
6.4.2 Example: test with a water standard
The following chapters show you how to configure and perform a refractive-index determination for a water
standard at 20°C.
You can find more information about the configuration of methods and working with other types of
samples in the Reference Manual.
6.4.2.1 Create the test method
The home screen is open.
§
1 Go to Methods / Products(1) > Methods.
ð The Methods window opens.
u www.mt.com/library
21Refractometer Excellence
Page 24

Back
Type ID
New
Tasks
Title
°C
Methods
1
New
Methods
MS
MS
MS
nD manualM8501 20.00
M8502
M8503
M8504
M8505
Brix manual
Brix w. SPR200
Brix & pH (S220) w. InMotion
Clean&Park electrode InMotion
20.00
20.00
20.00
20.00
MS
MS
2 Tap New(1).
Cancel
Type ID
Tasks
Title
Method templates
MS
ADJ
MEASURET001
T002
T003
T004
ADJUSTMENT
TEST
CLEANCL
TE
1
Cancel
Configuration
Automation
Tasks
OK
Cell mode
1
2
None
R
Cancel
Title
Configuration
Line Method function
Sample
Fill
Measure
Print Insert Save
Tasks
TEST
U8001:
Cancel
Title
Configuration
Line Method function
Sample
Fill
Measure
Print Insert Save
Tasks
TEST
U8001:
1
Cancel
Title
Method ID
Tasks
OK
Method type
Title
Author
Created on
Modified on
Administrator
08/15/2018
08/15/2018
1
2
3
Test water 20°
A0003
Test
3 Select the template TEST(1).
4 For Automation select None(1) and tap OK(2).
ð The method window with the list of the method
functions opens.
6.4.2.2 Configure the test method
A test set for water at 20°C is configured.
§
1 Select the Title(1) method function.
2 Change Method ID(1) as needed. The following format is
reserved for METTLER TOLEDO predefined methods: "M"
followed by a number.
3 Change Title(2) as needed and tap OK(3).
ð The method window with the list of the method
functions opens.
22 Refractometer Excellence
4 Move your finger upward on the touch screen to scroll
down.
Page 25

Test
Back
Tasks
1
Tolerance nD
0.00002
5 Select the Test method function.
1
2
Cancel
Clean
Automation
None
Tasks
OK
Drain
Rinse cycle 1
Condition
Dry
1
2
Cancel
Report
Export to network
None
Tasks
Delete OK
Export to USB stick
Print / USB-RS232 data export
Condition
None
Cancel
Measure
Line Method function
Clean
Online display
Report
Print Insert Save
Tasks
Calculation
1
U8001:
TEST
Home
Tasks
Log out User data Barcode start Start
Methods /
Products
Series
Results
Setup
Manual
08/15/2018Administrator
20.00
R5
1
6 Set Tolerance nD to a value in the range listed for your
instrument type.
- R4: 0.0002
- R5: 0.00002…0.00008
7 Select the Clean method function.
8 Deactivate Rinse cycle 1(1) and tap OK(2).
9 Select the Report method function.
10 Deactivate Print / USB-RS232 data export(1) and tap
OK(2).
11 Tap Save(1).
6.4.2.3 Perform the test
Material
• METTLER TOLEDO water standard
• Plastic pipettes
• Waste container
• Lint-free tissues
Start the method and configure the standard
The home screen is open.
§
The lid is closed.
§
The measuring cell is clean and dry.
§
1 Go to Methods / Products(1) > Methods.
ð The Methods window opens.
23Refractometer Excellence
Page 26

Back
Type ID
New
Tasks
Title
°C
Methods
1
MSCLA0001 20.00
A0002
A0003
20.00
20.00TE
Water 20°C
Clean water based
Test water 20°C
MS
MS
20.00
20.00
M8501
M8502
nD manual
Brix manual
2 Select the test method that you configured(1).
Back
Title
Configuration
Line Method function
Sample
Fill
Measure
Print Insert Start
Tasks
Delete method
1
A0003: Test water 20°C
Start analysis
Method ID
Method
Tasks
AddToHome Start
A0003
Type
Method type
Standard
Comment
Test
1
Cancel
Standard data
Lot number
08/15/2018
Tasks
Water
OK
Standard name
Date of certification
Expiry date Std
08/15/2020
171118
1
3
2
4
5
Uncertainty nD
nD nominal
1.33299
0.00002
1
3 Tap Start(1).
4 Tap Standard(1).
5 Enter the information Lot number(1), Date of certifi-
cation(2), Expiry date Std(3) and Uncertainty nD(4)
as printed on the certificate and tap OK(5).
6 Tap Start(2).
ð The temperature of the measuring cell is brought to the
temperature defined in the method.
ð A message prompts you to add the sample.
Fill the measuring cell
1 Open the standard bottle.
2 Fill a clean plastic pipette with 0.5mL of the water standard.
3 Open the lid.
4 Place the pipette tip on the prism(1) and move it in circles
over the prism while you empty it into the measuring cell.
5 Close the lid.
24 Refractometer Excellence
Page 27

OK
Add sample.
Info
1
A0003: Test water20°C
6 Tap OK(1).
Tasks
Stop
Measuring
10 s
1.33298
20.00
1.33298
A0003: Test water 20°C
1
2
3
1
2
1
ð The temperature of the measuring cell(2) is brought to
the temperature defined in the method(1).
ð The currently measured value is displayed(3).
ð The measured value is saved as result when the criteria
for measurement reliability are met.
ð A message prompts you to drain the measuring cell.
Drain the measuring cell
1 Open the lid.
2 Place the pipette tip on the prism(1) and aspirate the
content of the measuring cell.
3 Empty the pipette into a suitable waste container.
4 Tap OK.
ð A message prompts you to dry the measuring cell.
Dry the measuring cell
1 Wipe the measuring cell with a dry, clean and lint-free tissue.
2 Tap OK.
ð The home screen opens.
3 Wait a few seconds until any remaining residue of the deionized water has evaporated.
4 Close the lid.
ð The measuring cell is clean and dry.
6.5 Replace the protection plate
6.5.1 Remove the protection plate
The measuring cell is clean and dry.
§
1 Hold the protection plate(1) by the back of the lid(2) with
one hand.
2 Pull the back of the lid up to overcome the force of the
magnets that hold the protection plate in place.
25Refractometer Excellence
Page 28

1
1
3 Hold one of the edges(1) of the protection plate with your
2
1
3
1
1
2
1
2
2
1
free hand, let go of the lid and hold the protection plate
with both hands.
4 Remove the protection plate with both hands.
6.5.2 Install the protection plate
1 Open the lid(2).
2 Hold the protection plate by its edges(1) with both hands.
3 Align the front edge of protection plate with the front
edge(3) of the refractometer.
4 Let go with one hand and use it to hold the protection cover
by the open lid.
5 CAUTION Bruising of fingers due to strong magnet.
Hold the protection plate by the open lid and not by its
edge when you lower it.
6 Lower the protection plate and make sure that the
opening(2) in the protection plate is aligned with the
rim(1) of the measuring cell.
ð When the protection plate is close to the top of the
refractometer, strong magnets pull it down and hold it
in place.
6.6 Replace the lid
6.6.1 Remove the lid
1 Open the lid(1) completely.
2 Pull one side of the lid(2) up until it slides off its axle.
3 Pull the other side of the lid(1) off the axle(2).
26 Refractometer Excellence
Page 29

4 Remove the lid.
3
4
1 2
1
1
2
3
1
6.6.2 Install the lid
1 Align the back of the upright lid(3) with the axle(4).
2 Make sure that the spring(1) is in front of the lid.
3 Push one side of the lid(2) down until it clicks into place.
4 Push the other side of the lid down until it clicks into place.
6.7 Replace the measuring-cell cover
6.7.1 Remove the measuring-cell cover
1 Remove the lid.
2 Insert the tip of a flat screwdriver(3) in the slit between the
measuring-cell cover(1) and the lid(2).
3 Use the screwdriver to lift the measuring-cell cover partially
out of the lid.
4 Remove the measuring-cell cover(1).
See also
2 Remove the lid}Page26
27Refractometer Excellence
Page 30

6.7.2 Install the measuring-cell cover
1
2
1
2
3
1
1
2
1 Lower the measuring-cell cover(1) into its support on the
lid(2).
2 Push the measuring-cell cover into its support until it clicks
into place.
3 Install the lid.
See also
2 Install the lid}Page27
6.8 Replace the measuring-cell O-ring
6.8.1 Remove the measuring-cell O-ring
1 Remove the protection plate.
2 Insert the tip of a flat screwdriver(3) in the slit between the
O-ring(2) and the measuring cell(1).
3 Use the screwdriver to lift the O-ring(1) over the rim of the
groove.
4 Lift the O-ring(1) completely out of the groove(2).
See also
2 Remove the protection plate}Page25
28 Refractometer Excellence
Page 31

6.8.2 Install the measuring-cell O-ring
1
2
1
1
2
3
1
1
2
1 Place the one side of the O-ring(1) in the groove(2) on
the measuring cell.
2 Push the other side of the O-ring(1) over the rim into the
groove.
3 Install the protection plate.
See also
2 Install the protection plate}Page26
6.9 Replace the O-ring of the measuring-cell cover
6.9.1 Remove the O-ring of the measuring-cell cover
1 Remove the lid.
2 Insert the tip of a flat screwdriver(3) in the slit between the
O-ring(2) and the measuring-cell cover(1).
3 Use the screwdriver to lift the O-ring(1) over the rim of the
groove.
4 Lift the O-ring(1) completely out of the groove(2).
See also
2 Remove the lid}Page26
29Refractometer Excellence
Page 32

6.9.2 Install the O-ring of the measuring-cell cover
1
2
1
1 Place the one side of the O-ring(1) in the groove(2) on
the measuring-cell cover.
2 Push the other side of the O-ring(1) over the rim into the
groove.
3 Install the lid.
See also
2 Install the lid}Page27
6.10 View the firmware version
1 Press the Info key.
2 The firmware version and other system information is displayed.
6.11 Prepare the refractometer for storage
1 Shut down the refractometer.
2 Disconnect the refractometer from the power supply.
3 Disconnect and remove any accessories from the refractometer.
4 Disconnect the terminal.
5 Clean the refractometer.
6 Protect the refractometer from dust.
7 Store the refractometer and the terminal in a dry and clean place.
6.12 Transport the refractometer
If you have questions about transporting your refractometer, contact your authorized METTLER TOLEDO dealer or
service representative.
u www.mt.com/contact
1 Shut down the refractometer.
2 Disconnect the refractometer from the power supply.
3 Disconnect any accessories from the refractometer.
4 Disconnect the terminal.
5 Clean the refractometer.
6 If you transport the refractometer and the terminal over long distances, use the original packaging.
7 Move the refractometer and the terminal to the new location.
30 Refractometer Excellence
Page 33

6.13 Dispose of the refractometer
In conformance with the European Directive 2012/19/EU on Waste Electrical and Electronic
Equipment (WEEE) this device may not be disposed of in domestic waste. This also applies to
countries outside the EU, per their specific requirements.
Please dispose of this product in accordance with local regulations at the collecting point
specified for electrical and electronic equipment. If you have any questions, please contact the
responsible authority or the distributor from which you purchased this device. Should this
device be passed on to other parties, the content of this regulation must also be related.
7 Technical data
Additional technical data are listed in the Reference Manuals.
7.1 Refractometer
Characteristic Value
Power rating instrument
Power rating AC adapter
Dimensions
Materials
Ambient conditions
Storage
Directives and standards
The instrument complies with the directives and standards that are listed on the declaration of conformity.
Input values 24VDC, 5A
Socket 4-pin, power Mini-DIN female
Input values 100...240VAC ±10%, 1.8A
Input frequency 50-60Hz
Output values 24VDC, 5A
Width 208mm
Depth 226mm
Height 193mm
Weight 4.8kg
Housing PP HCT540
Lid PBT-CRASTIN SO653
Measuring-cell cover PTFE C25
O-ring of measuring-cell cover EPDM
Measuring cell Sapphire prism, stainless steel SUS316, perfluo-
roelastomer
Ambient temperature +5°C…+40°C
Relative humidity 20…80% (not condensing)
Altitude ≤5000 m above sea level
Pressure range Atmospheric pressure
Use In interior spaces
Overvoltage category II
Pollution degree 2
Temperature range -20…70°C
Relative humitidy 10…90%
u www.mt.com/library
31Refractometer Excellence
Page 34

7.2 Terminal
Characteristic Value
Dimensions
Width 194mm
Depth 129.5mm
Height 56.7mm
Weight 638.4g
Materials
Top housing EN ZL-ZnAl4Cu1 (EN Zl-0410)
Lower housing Crastin SO653
Cover glas Gorilla glas
7.3 Measurement
Characteristic R4 R5
Refractive index
Measuring temperature
1)
R4: for temperature range 15…70°C, R5: for temperature range 15…50°C
2)
R5: 0.00002 (around the adjustment point), 0.00004 (entire range)
3)
Minimal temperature not more than 12 °C below ambient temperature
International standards and norms
International standards and norms complied with are listed on the internet.
Measuring range 1.32…1.70 1.32…1.58
1)
Accuracy
Repeatability
Resolution
1)
1)
±0.0001 ±0.00002
±0.00005 ±0.00001
0.0001 0.00001
Wavelength 589nm 589nm
3)
Range
5…100°C 5…75°C
Accuracy (5…15°C) ±0.1°C ±0.05°C
Accuracy (15…50°C) ±0.1°C ±0.03°C
Accuracy (50…75°C) ±0.1°C ±0.05°C
Accuracy (75…100°C) ±0.1°C –
Resolution
1)
0.01°C 0.01°C
2)
u www.mt.com/dere-norms
32 Refractometer Excellence
Page 35

Page 36

Mettler-Toledo GmbH
30471970
Im Langacher 44
8606 Greifensee, Switzerland
www.mt.com/contact
Subject to technical changes.
© Mettler-Toledo GmbH 06/2018
30471970A
www.mt.com/Refractometry-Excellence
For more information
 Loading...