

Mettler Toledo AL-IC, PL-IC Operating Instructions Manual

Operating Instructions
METTLER TOLEDO
L-IC Line of balances
• AL-IC
• PL-IC
www.mt.com/classic
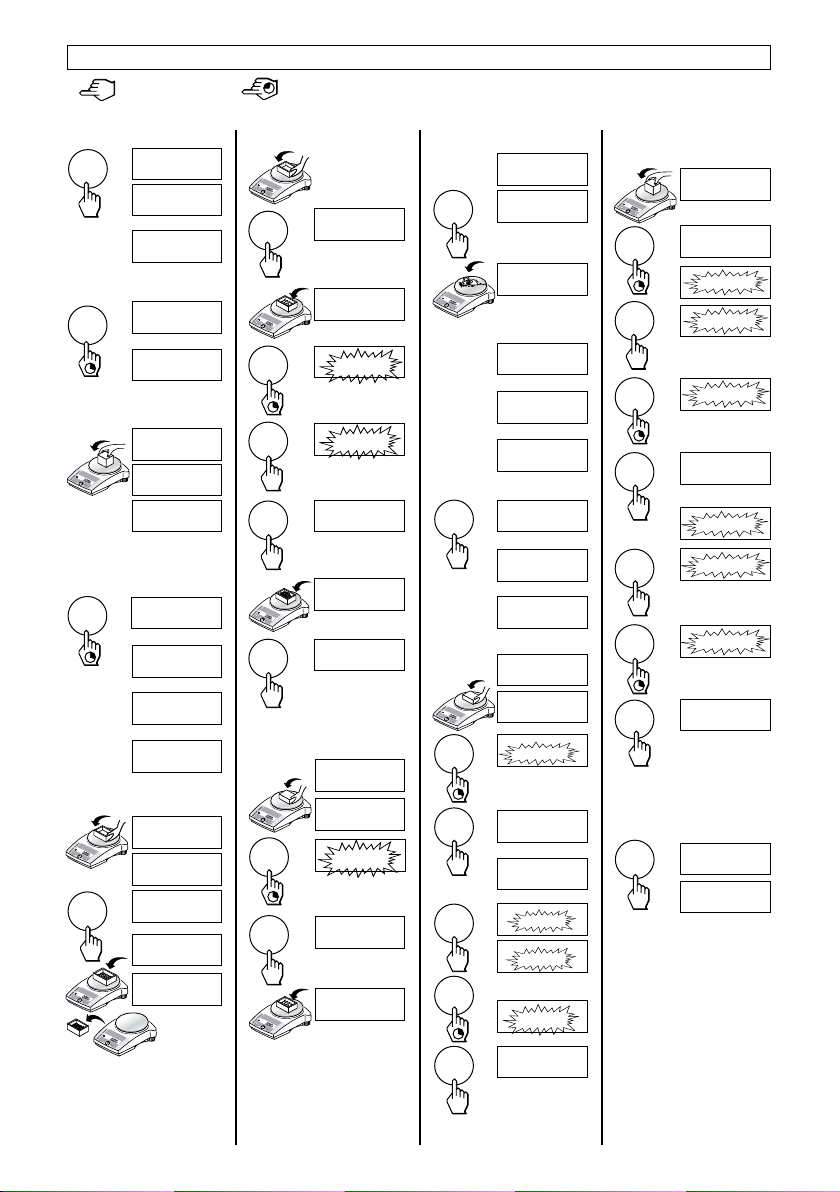
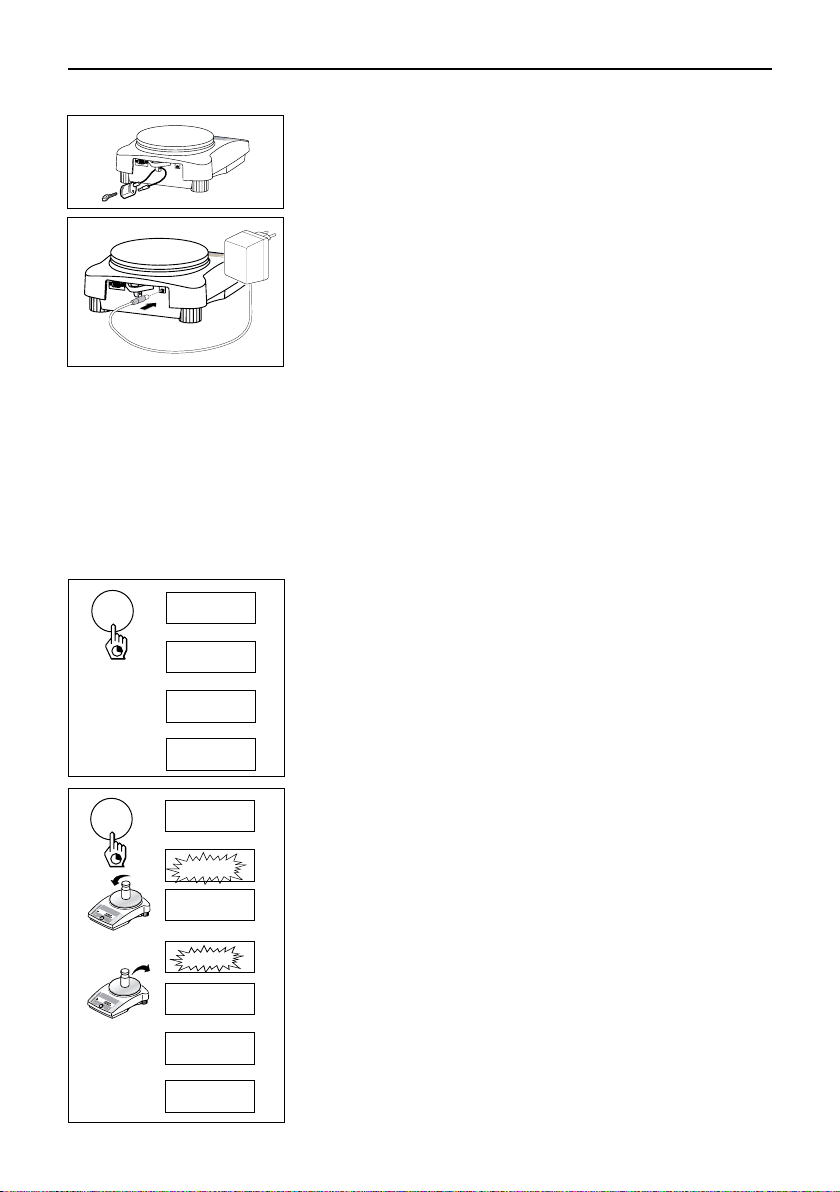
Operating instructions in a nutshell
Press key briefly
* These functions must be activated in the menu (section 4.3.2)
Switching on
On
88888888
▼
0.00 g
Switching off
OFF
Off
▼
Simple weighing
0.00 g
• 1182.03 g
1250.00 g
Adjusting (calibration)
internal
1/10d
Cal
CAL int
▼
Cal
------
▼
CAL donE
▼
0.00 g
Taring
0.00 g
121.01 g
#
0.00
g
95.97 g
-121.01 g
Press and hold key down until the desired display appears automatic sequence
Piece counting*
#
0.00 g
12.07 g
F
“
±
“
SEt 10
SEt 20
20
244
147.25 g
PCS
PCS
PCS
PCS
Percent weighing*
0.00 g
12.07 g
%
%
%
±
F
SEt100
100.00
101.60
Dynamic weighing*
0.00 g
á
0.00 g
“
á
• 257.35 g
▼
with automatic start (Dyn A)
á
-- 3 --
…
á
-- 1 --
▼
á
260.33 g
*
with manual start (Dyn M)
á
±
-- 3 --
á
-- 1 --
á
260.33 g
*
…
▼
Plus-minus weighing*
0.00 g
15.13 g
- ok +
F
±
“
“
±
tArGEt
ok
*
15.13 g
▼
- +
toLá
▼
- +
1.00
- +
1.01
…
- +
5.00
ok
15.13 g
▼
Free factor / selectable
display increment*
F
1/10d
1/10d
±
“
“
±
Unit switching*
“
%
%
%
%
17.89 g
#
F FAC ŸÖ
#
1.0000
#
0.9999
…
#
0.9500
#
StEPá
▼
#
0.01
#
0.02
…
#
0.05
#
17.00
22.00 g
oz
0.78

Contents
Contents
3
1 Getting to know L-IC balances line ..............4
1.1 General .............................................................. 4
1.2 Layout of balances ............................................... 4
1.3 Overview of key functions ...................................... 5
2 Startup ......................................................6
2.1 Unpacking / standard equipment ............................ 6
2.2 Cautionary notes ................................................. 6
2.3 Setting up, leveling, preparations for weighing below
the balance ......................................................... 6
2.4 Adjusting (calibration) ..........................................
3 Weighing ...................................................8
3.1 On/Off switching ................................................... 8
3.2 Simple weighing ..................................................
3.3 Faster weighing with reduced readability ................. 8
3.4 Taring .................................................................
4 Menu .........................................................9
4.1 Overview ............................................................. 9
4.2 Menu operation ..................................................
4.3 Description of menu options ................................
5 Functions .................................................15
5.1 Piece counting ................................................... 15
5.2 Percent weighing ................................................ 15
5.3 Dynamic weighing ............................................. 16
5.4 Plus-minus weighing .......................................... 18
5.5 Weighing with free factor and/or selectable display
increments ........................................................ 18
5.6 Switching weight units ........................................ 19
6 Technical data, options,
7
8
8
optional equipment ..................................20
6.1 Technical data ................................................... 20
6.2 RS232C interface ............................................... 22
6.3 MT-SICS Interface commands and functions .......... 22
6.4 Optional equipment ............................................ 24
6.5 Dimensional drawings (in mm) ........................... 25
7 Appendix .................................................26
7.1 Typical printouts from METTLER TOLEDO
RS-P26 and LC-P45 printers ............................... 26
7.2 What if ...? ........................................................ 27
10
7.3 Maintenance and cleaning .................................. 28
10
7.4 Declaration of conformity .................................... 29
Getting to know L-IC balances line
4
1 Getting to know L-IC balances line
1.1 General
Balance features
• The L-IC balance line ranges from high-resolution analytical balances (AL-IC) with a readability of 0.1 mg through to precision
balances (PL-IC) with a readability of 0.001 g to 1 g. The weighing ranges extend from 51 g to 4.1 kg.
• The operation of all theses balances is identical.
• In addition to basic operations such as
counting”, “Percent weighing”, “Dynamic weighing”, “+/- Weighing” or “Free factor” can be activated.
• Several balances are fitted with a glass draft shield in the factory; with other models a draft shield is available as an optional
extra.
Note
All Models are available as certified versions. Please ask your METTLER TOLEDO dealer for details.
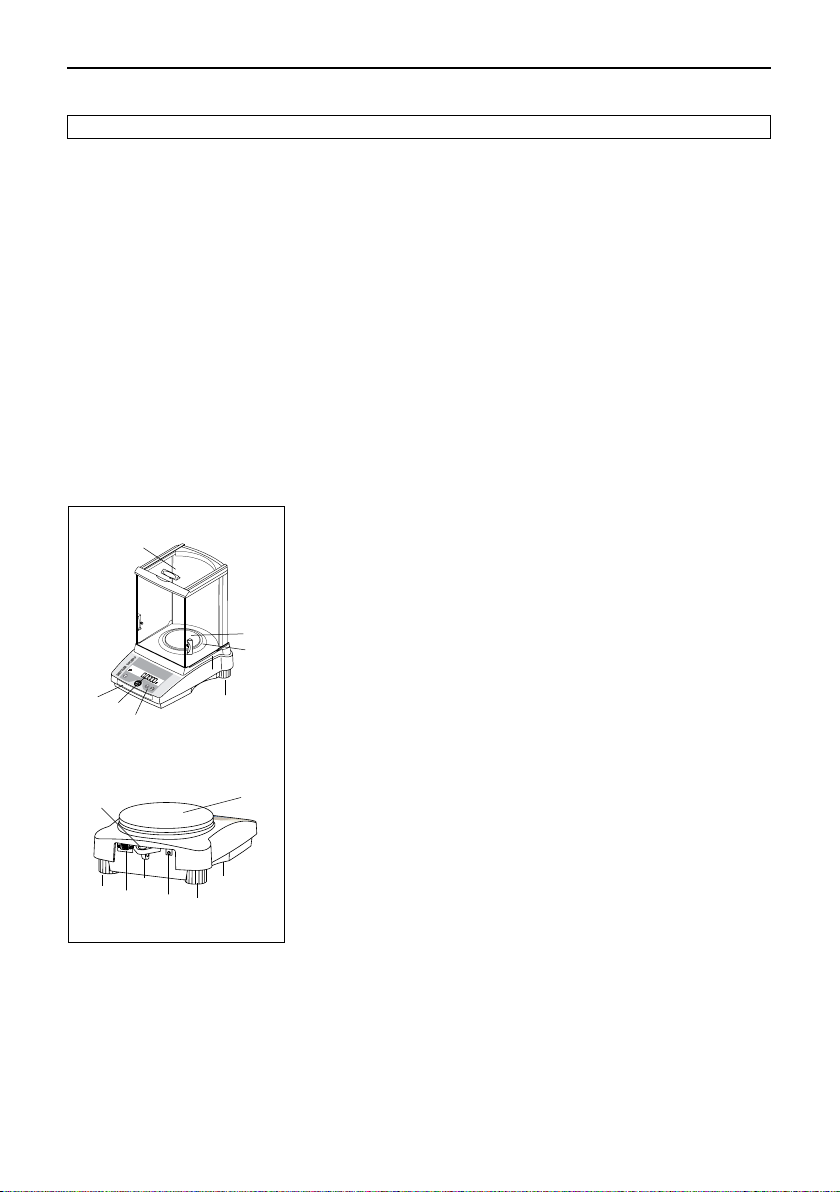
1.2 Layout of balances
6
12
3
2
1
7
4
weighing, taring and adjusting (calibration) miscellaneous functions such as “Piece
1 Keys
2 Display
3 Model plate with the following data:
“Max”: maximum capacity
“d”: readability
“Min”: minimum capacity (recommended minimum load; only relevant for
certified balances)
4
5
“e”: verification scale interval (smallest display increment tested during
certification; only relevant for certified balances)
4 Weighing pan
5 Draft shield element (not on all models)
6 Draft shield (supplied as standard with models with a readability of 0.1 mg and
1 mg)
7 Leveling feet
8 Hanger opening for weighing below the balance (underside of balance)
9 AC adapter socket
10 RS232C interface
11 Lug for optional antitheft device
12 Leveling control
Keys and display are identical for all L-IC balances.
11
7
10
8
9
7
Getting to know L-IC balancees line
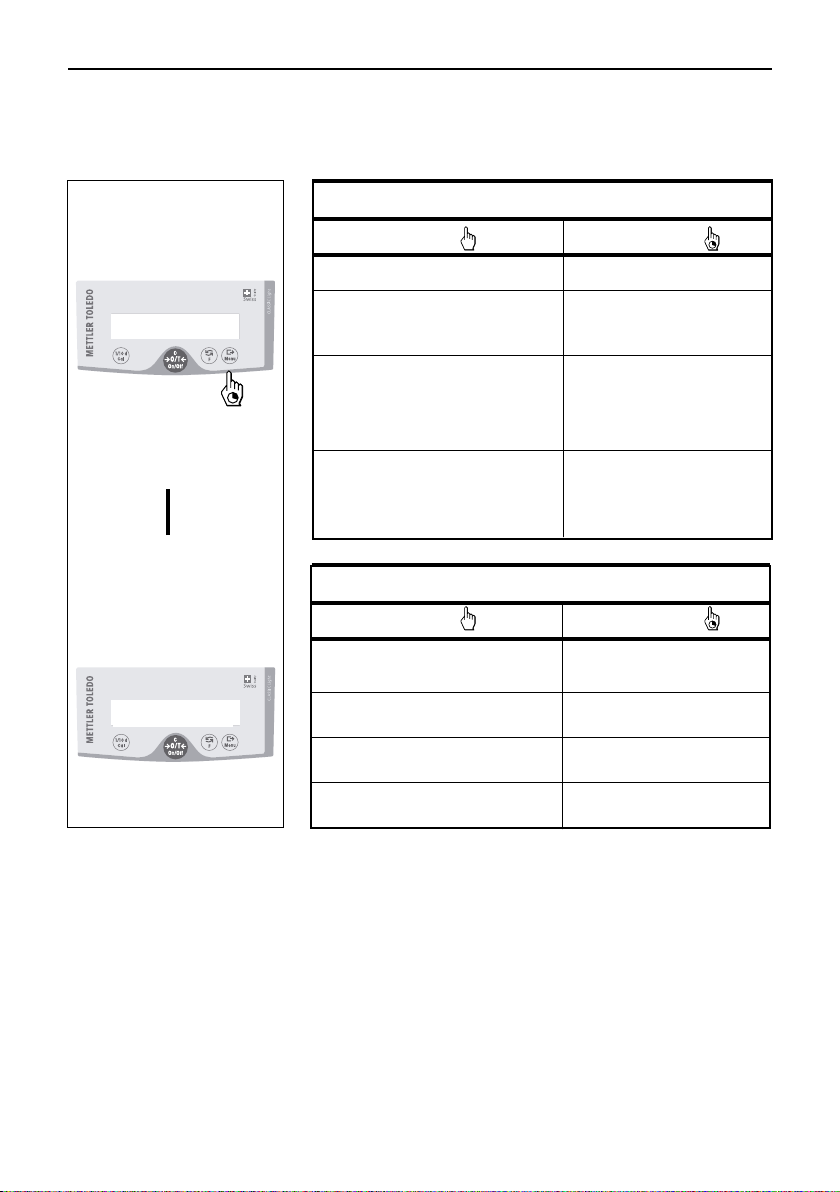
1.3 Overview of key functions
The balances have two operator control levels: the weighing mode and the menu. The function of each individual key depends
on the operator control level and how long the key is pressed.
Key functions in weighing mode
5
Weighing mode
Menu
0.000
▼
ŸÖENV
Press briefly
1/10d • Reduce readability Cal • Adjust (calibrate)
On • Switch on Off • Switch off
g
# • Zero/tare
C • Cancel function
“ • Switch F • Call function;
• Change settings A function must be
activated in the menu,
otherwise “F nonE”
appears in the display
± • Transfer weighing data via Menu • Show menu (hold key
interface with activated down until MENU
printer appears)
• Confirm settings
Key functions in menu mode
Press briefly Press and hold down
1/10d • Change settings 1/10d • Reduce value
• Reduce value by 1 step rapidly
C • Close menu (without –
saving changes)
“ • Change settings “ • Increase value rapidly
• Increase value by 1 step
± • Select next menu item Menu • Save changes and close
menu
Press and hold down
Startup
6
2 Startup
2.1 Unpacking / standard equipment
The standard equipment for every balance comprises:
AC adapter, to national standard
•
Weighing pan, Weighing pan support, draft shield element (depending on
•
model)
Draft shield
•
models available as an optional extra
• Operating Instructions
standard supply with models of 0.1 /1 mg readability (
)
for other
1)
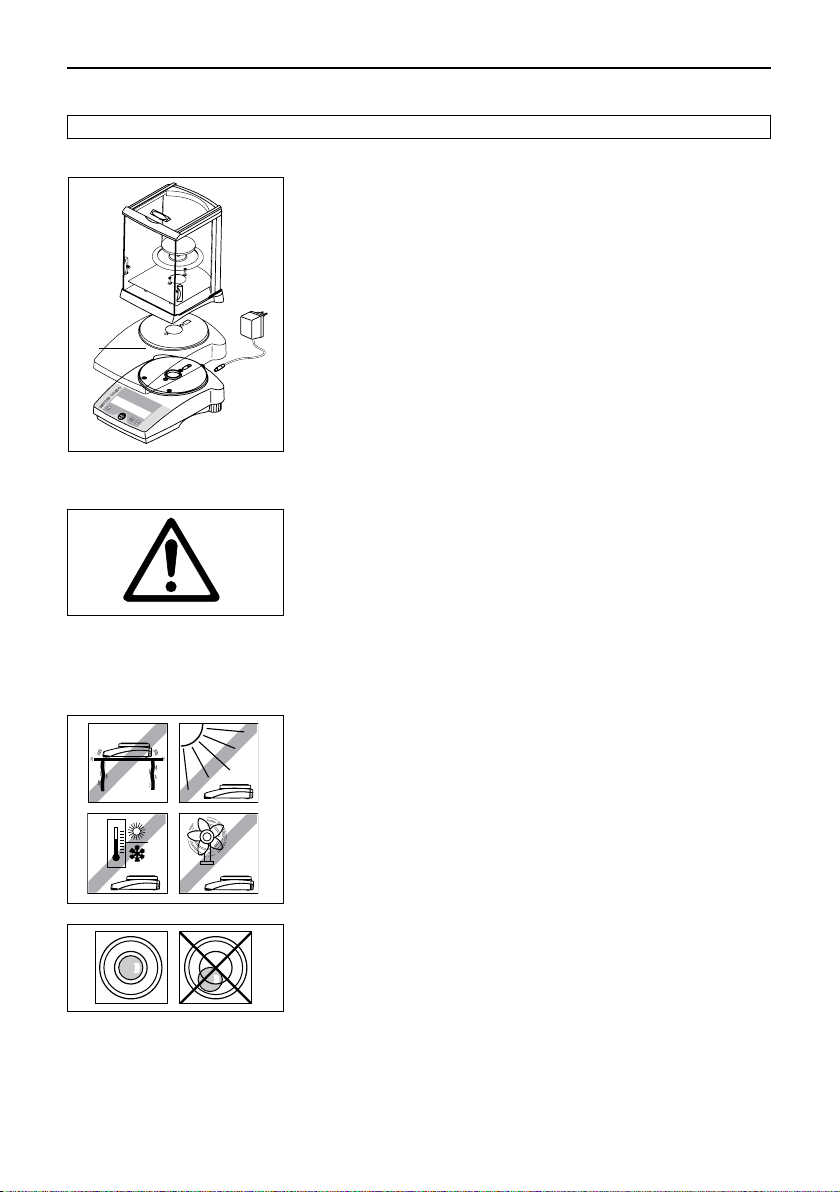
2.2
Cautionary notes
2.3 Setting up, leveling, preparations for weighing below the balance
1) In-use covers are available as optional extras (Section 6.4).
• L-IC balances must
ply AC adapter.
connecting the AC adapter, verify that the voltage printed on it corresponds
• Before
to the local AC power supply voltage. If this is not the case, please contact your
local METTLER TOLEDO dealer.
• L-IC balances may only be used indoors in a dry environment.
• For use with CSA Certified (or equivalent approved) power source, which must
have a limited and SELV circuit output.
The optimum location
The correct location makes an important contribution to the accuracy of the weighing
results of high-resolution analytical and precision balances.
• Stable, vibration-free position as horizontal as possible
• No direct sunlight
• No excessive temperature fluctuations
• No drafts
The best location is on a stable bench in a corner protected against drafts, as far
away as possible from doors, windows, radiators or the louvers of air conditioners.
not be operated in hazardous areas with the standard-sup-
Leveling
All models are equipped with a level glass and two leveling feet to compensate
for minor irregularities in the surface on which the balance stands. The balance is
exactly horizontal when the air bubble is in the middle of the level glass.
Note: The balance should be leveled each time it is moved to a new location.
Preparations for weighing below the balance
To carry out weighing operations below the balance, get rid of the special cover on
the underside of the balance. (Note: never put the balance without the protective
cover over its cone down on its head, only on its side!). This exposes the opening
for the hanger, making weighing below the balance possible.
2.4 Adjusting (calibration)
Cal
CAL int
▼
Cal
------
▼
Cal
CAL donE
▼
0.00 g
Startup
7
Antitheft device
All models are provided with a lug for attaching an antitheft device (see optional
equipment in Section 6.4).
Power supply
➞ Plug the AC adapter into the AC adapter socket on the balance, and connect to
the power supply.
➞ The balance performs a self-test. This test is finished when “OFF” appears.
➞ Press the «On» key briefly: the balance is in operational readiness. Before any
work is performed with the balance, it must be adjusted (Section 2.4).
Notes
To achieve accurate results with analytical balances (AL-IC), they must be left
switched on for at least 60 minutes to reach operating temperature before carrying
out the first weighing operation.
To obtain accurate weighing results, the balance must be adjusted to match the
gravitational acceleration at its location.
Adjusting is necessary
• before the balance is used for the first time
• at regular intervals during weighing service
• after a change of location
To obtain accurate results, the balance must be left switched on for 60 minutes to
reach operating temperature before starting the adjustment procedure.
Adjusting with internal weight
➞ To carry out tis operation, in the second menu option (Adjustment) select
“CAL int” (= factory setting) (section 4.1).
➞ Unload weighing pan.
➞ Press and hold the «Cal» key down until “CAL” appears in the display, then
release key.
➞ The balance adjusts itself automatically.
The adjusting is finished when the message «Cal done» appears briefly in the
display, followed by “0.00 g”. The balance is again in weighing mode and
ready for operation.
Cal
CAL
▼
Cal
2000.00
Cal
------
▼
Cal
0.00
Cal
------
▼
Cal
CAL donE
▼
0.00 g
Adjusting with external weight
➞ Have required adjusting weight ready.
➞ Unload weighing pan.
➞ Press and hold the «Cal» key down until “CAL” appears in the display. Release
key.
The required adjustment weight value flashes in the display.
➞ Place adjustment weight in centre of pan. The balance adjusts itself auto-mati-
cally.
➞ When “0.00 g” flashes, remove adjustment weight.
The adjusting is finished when the message “CAL done” appears briefly in the
display, followed by “0.00 g”. The balance is again in weighing mode and ready
for operation.
Notes
• This adjustment procedure can be terminated at any time with the «C» (“Cancel”)
key. The balance reverts to weighing mode.

Weighing
8
3 Weighing
3.1 On/Off switching
On
0.00 g
88888888
▼
Switching on
➞ Remove any load from weighing pan and press «On» key briefly.
The balance performs a display test (all segments in the display light up
briefly).
When zero is displayed, the balance is ready for operation.
Off
3.2 Simple weighing
3.3 Faster weighing with reduced readability
The balance has the facility for speeding up the weighing operation by reducing its readablity (number of decimal places):
1/10d
3.4 Taring
#
OFF
▼
0.00 g
• 1182.03 g
1250.00 g
1.24 g
1.2 g
0.00 g
121.01 g
0.00 g
Switching off
➞ Press and hold the «Off» key down until “OFF” appears in the display. Release
the key.
➞ Place weighing sample on the weighing pan.
➞ Wait until the stability detector “•” disappears.
➞ Read the result.
➞ The balance is operating with its normal readability and speed.
➞ Press the «1/10d» key and …
➞ … the balance operates with reduced readability (one decimal place less), but
displays the weighing result quicker. Pressing the «1/10d» key briefly again
toggles the balance back to its full readability.
➞ Place empty container on the balance.
➞ The weight is displayed.
➞ Press the «#» key briefly.
95.97 g
-121.01 g
➞ Add weighing sample to container. The net weight is now displayed.
If the container is removed from the balance, the
negative value.
The tare weight remains stored until the «
balance is switched off.
tare weight will be shown as a
#» key is pressed again or the
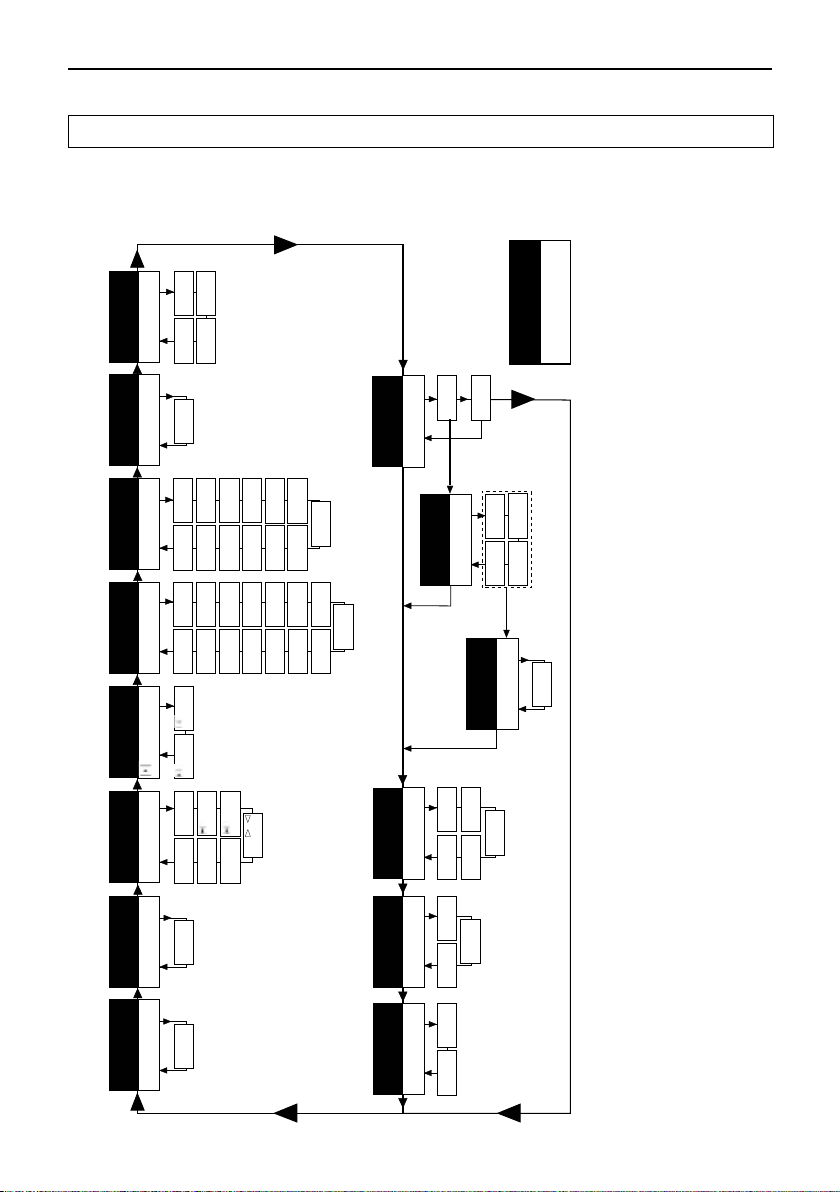
4 Menu
kg
Unit 1
Unit 1
mg
Unit 1
ct
oz
Unit 1
Unit 1
ozt
Unit 1
GN
Unit 1
Unit 1
Unit 1
Unit 1
Unit 1
Unit 1
Unit 1
Unit 1
lb
dwt
t o
t tl
S tl
H tl
m
mo
Unit 1
b t
kg
Unit 2
Unit 2
mg
Unit 2
ct
oz
Unit 2
Unit 2
ozt
Unit 2
GN
Unit 2
Unit 2
Unit 2
Unit 2
Unit 2
Unit 2
lb
t o
ti
m
mo
dwt
Unit 2
b t
HoSt
ZDISPLAY
S. StbS. ALL
S. PÑÖ
bd
4800
bd
9600
bd
1200
bd 600
bd
19200
7b-no7b-odd
8b-no
HS
SoFtHS
HArd
rESEt
LiST
HS OFF 7b-E bd 2400
S. SICS
S. oFF
PrintEr
S. ContS. Auto
F count
F100
F nonE
PCS
Std
dosrobust
Unit 1
g
F
FAC d
F
FAC
ÑÖ
F PÑÖ
#
#
- ok +
no A.ZEro
A.Off -
A.Off
5
'
A.Off
30"
A.Off
2'
Unit 2
g
A.ZEro
A.Off 10'
%
CAL int
CAL E
Cal
Fdyn A
FdynÑÖ
Cal
4.1 Overview
In the menu you can change the weighing unit (for certified balances, only if national weights and measures legislation allows),
select additional functions and carry out various settings. A description of the individual menu options is given in Section 4.3.
8 Auto shut off
1)
7 Autozero
2)
6 Weighing
unit 2
2)
unit 1
5 Weighing
4 Weighing
mode
6)
9 Peripheral
unit
5) 6)
10 Send
3) 6)
mode
11 Send
4) 6)
format
Menu option
Factory setting
Menu
9
Overview of menu
1)
2 Calibration
1 Reset 3 Function
12 Baud rate
5) 6)
13 Bit/Parity
5) 6)
14 Handshake
legislation may be selected.
With certified balances, this menu option has a fixed setting and cannot be changed.
With certified balances, only those weighing units allowed by the appropriate national weights and measures
Notes
1)
This menu option is only shown if “Host” has been selected in menu option 8 (Peripheral unit).4) This menu option is only shown if “S.oFF” has not been selected in menu option 9 (Send mode).5) These menu options are only shown if “Host” or “Printer” has been selected in menu option 8 (Peripheral unit).
2)
3)
Only displayed if the optional interface has been installed.
6)
Menu
10
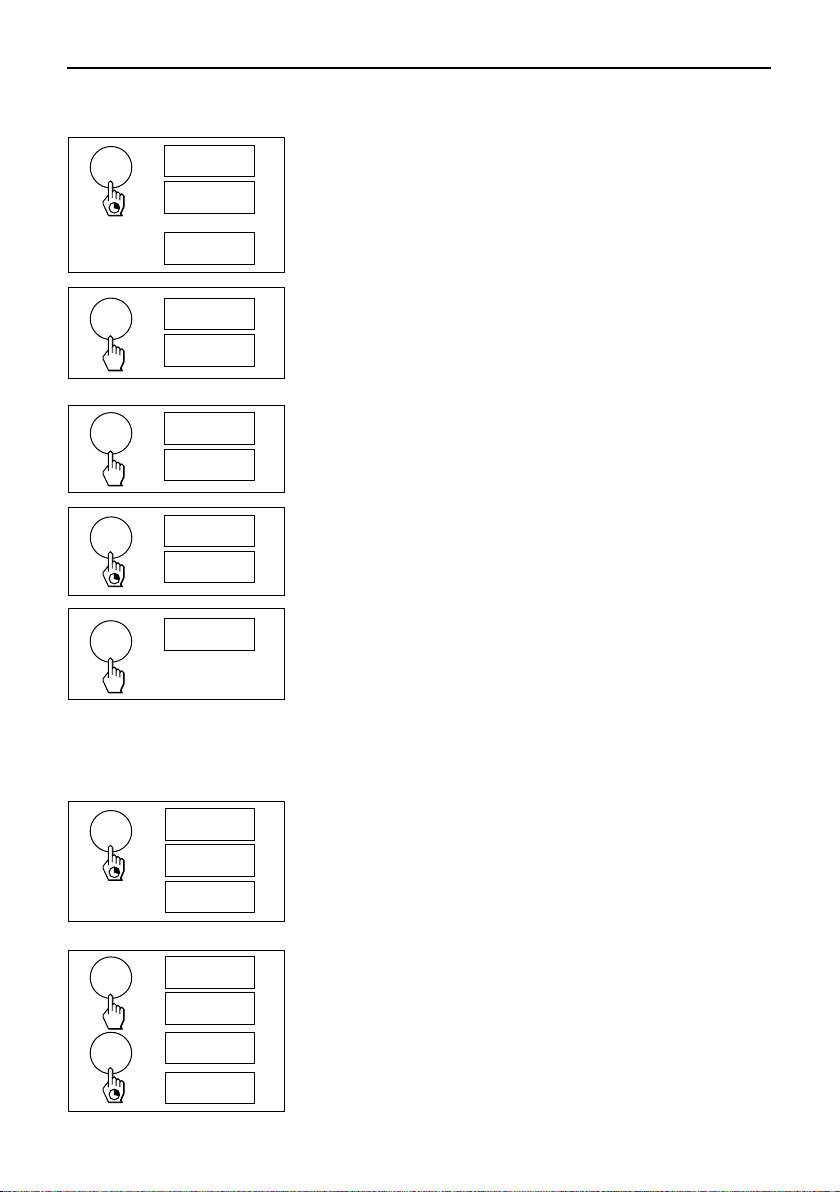
4.2 Menu operation
Menu
±
0.01 g
ŸÖENU
▼
rESEt
rESEt
F count
Opening the menu
In weighing mode, press and hold down the «Menu» key until “MENU” appears in
the display. Release the key: the 1st menu option is displayed.
Select menu options
The «±» key is used to select individual menu options with their current settings
one after the other.
PCS
Change settings
Pressing the «“» key displays the next setting; pressing the «1/10d» key displays
the previous one. Once the desired setting appears in the display, the next menu
option can be selected («±») or you can close the menu (see following Section).
“
F count
F 100
PCS
%
Saving settings and closing the menu
Menu
StorEd
Hold the «Menu» key down until “StorEd” appears in the display. Release the key and
the balance reverts to weighing mode. All changes are saved.
0.01 g
Abort
0.01 g
C
Press the «C» key briefly. The balance reverts to weighing mode. Changes are not
saved.
Note
If no entry is made within 45 seconds, the balance reverts to weighing mode.
Changes are not saved.
4.3 Description of menu options
4.3.1 Reset or recording of balance settings (1st menu option “RESET”)
Reset balance settings
Menu
rESEt
r donE
➞ Select “Reset”, press and hold down the «Menu» key until the message “r donE”
confirms that all menu settings have been reset. The balance then reverts to
weighing mode and works with the factory settings (Section 4.1).
0.00 g
Recording balance settings
“
rESEt
LISt
➞ Select “List” and hold down the «Menu» key until the message “StorEd” is dis-
played.
The current balance settings are transmitted to the peripheral device connected
to the optional RS232C interface. To do this the setting “Printer” must always be
Menu
StorEd
selected at the 8th menu option (Peripheral unit). The current balance settings
are saved at the same time.
0.00 g
 Loading...