

Mettler Toledo PHL Operating Instructions Manual
C
C
C
C
Pharmacy Balances
PHL Models
Operating Instructions


Table of contents
Introduction1
Conventions and Symbols Used in These Operating Instructions1.1
Safety Precautions2
Overview3
Components3.1
Operation Keys3.2
Display Panel 3.3
Setting up the Balance4
Unpacking and Delivery Inspection4.1
Installing the Components4.2
Selecting the Location and Leveling the Balance4.3
Selecting the Location4.3.1
Leveling the Balance4.3.2
Power Supply4.4
AC Operation4.4.1
Battery Operation4.4.2
Transporting the Balance4.5
Weighing Below the Balance4.6
Adjustment (Calibration)4.7
Adjustment with Internal Weight4.7.1
Adjustment with External Weight4.7.2
7
7
8
9
9
10
11
13
13
14
15
15
16
16
16
17
18
18
19
19
19
Weighing Made Simple5
Switching the Balance On and Off5.1
Performing a Simple Weighing5.2
Zero Setting / Taring5.3
Switching Weight Units5.4
Recall / Recall Weight Value5.5
Weighing with the Weighing-in Aid5.6
Print / Transmit Data5.7
The Menu6
What is in the Menu ?6.1
Menu Operation6.2
Description of Menu Topics6.3
Main Menu6.3.1
Basic Menu6.3.2
Advanced Menu6.3.3
Interface Menu6.3.4
Application "Formulation" (Net Total Formulation)7
Application "Piece Counting"8
Application "Check Weighing"9
Application "Statistics"10
21
21
22
22
22
23
23
23
24
24
25
26
26
26
27
31
36
38
40
43
Table of contents
3

Application "Routine Test"11
45
Application "Diagnostics"12
Repeatability Test12.1
Display Test12.2
Key Test12.3
Motor Test12.4
Balance History12.5
Calibration History12.6
Balance Information12.7
Service Provider Information12.8
Communication with Peripheral Devices13
Function PC-Direct13.1
Firmware (Software) Updates14
Operating Principle14.1
Update Procedure14.2
Error and Status Messages15
Error Messages15.1
Status Messages15.2
Cleaning and Service16
Interface Specification17
RS232C Interface17.1
MT-SICS Interface Commands and Functions17.2
48
48
49
50
51
51
52
53
54
55
55
57
57
57
58
58
59
60
61
61
61
Technical Data18
General Data18.1
Model-Specific Data18.2
Balances with Readability of 0.1 mg with Draft Shield18.2.1
Balances with Readability of 1 mg with "Flex" Draft Shield18.2.2
Balances with Readability of 0.01 g18.2.3
Balances with Readability of 0.1 g / 1 g18.2.4
Dimensions18.3
Balances with Readability of 0.1 mg with Draft Shield18.3.1
Balances with Readability of 1 mg with "Flex" Draft Shield18.3.2
18.3.3
Accessories and Spare Parts19
Appendix20
Balances with Readability of 0.01 g with Square Weighing Pan and
Draft Shield Element
Balances with Readability of 0.1 g / 1 g18.3.4
Accessories19.1
Spare Parts19.2
Conversion Table for Weight Units20.1
64
64
64
64
65
65
66
67
67
68
69
70
71
71
73
75
75
4
Table of contents

Index21
76
Table of contents
5

1 Introduction
Thank you for choosing a METTLER TOLEDO balance.
The precision balances of the Pharmacy line combine a large number of weighing possibilities with easy opera
tion. These balances are designed specially for use in pharmacies.
These operating instructions apply to all balance models PHL in the Pharmacy line. However, the different mod
els have different charcteristics regarding equipment and performance. Special notes in the text indicate where
this makes a difference to operation.
1.1 Conventions and Symbols Used in These Operating Instructions
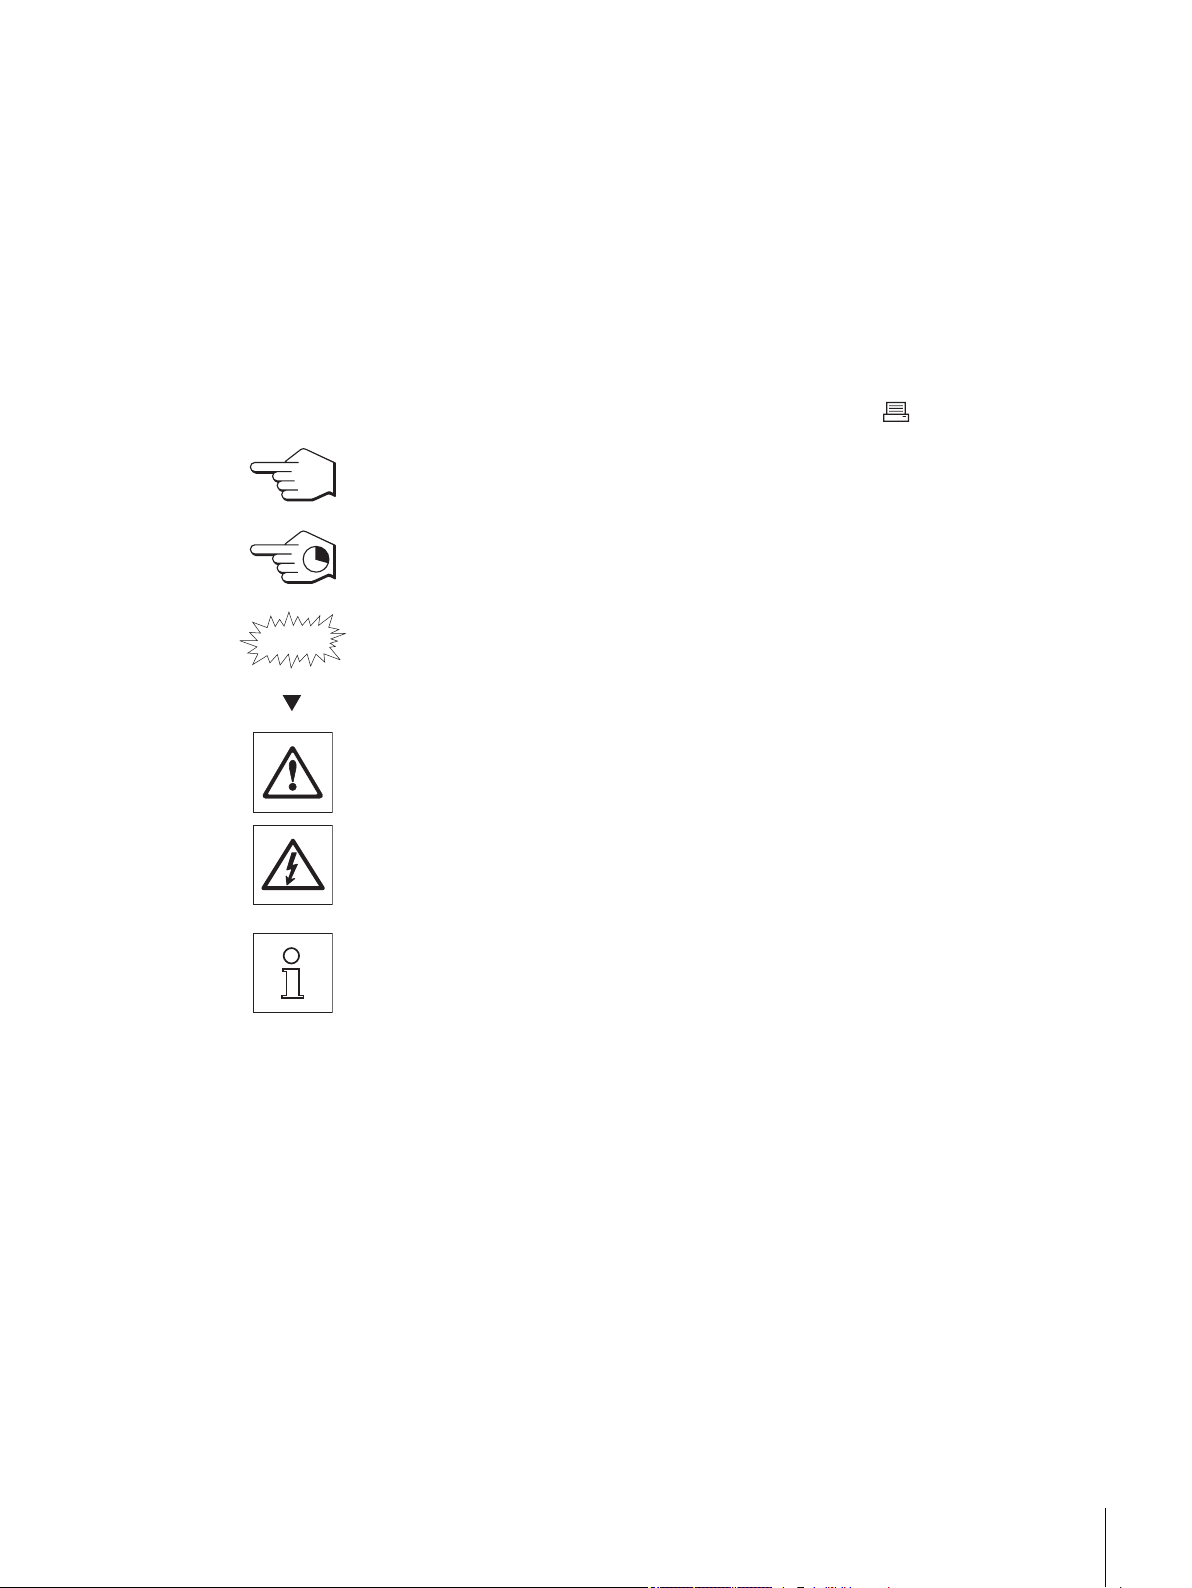
Key designations are indicated by double angular brackets (e.g. « »).
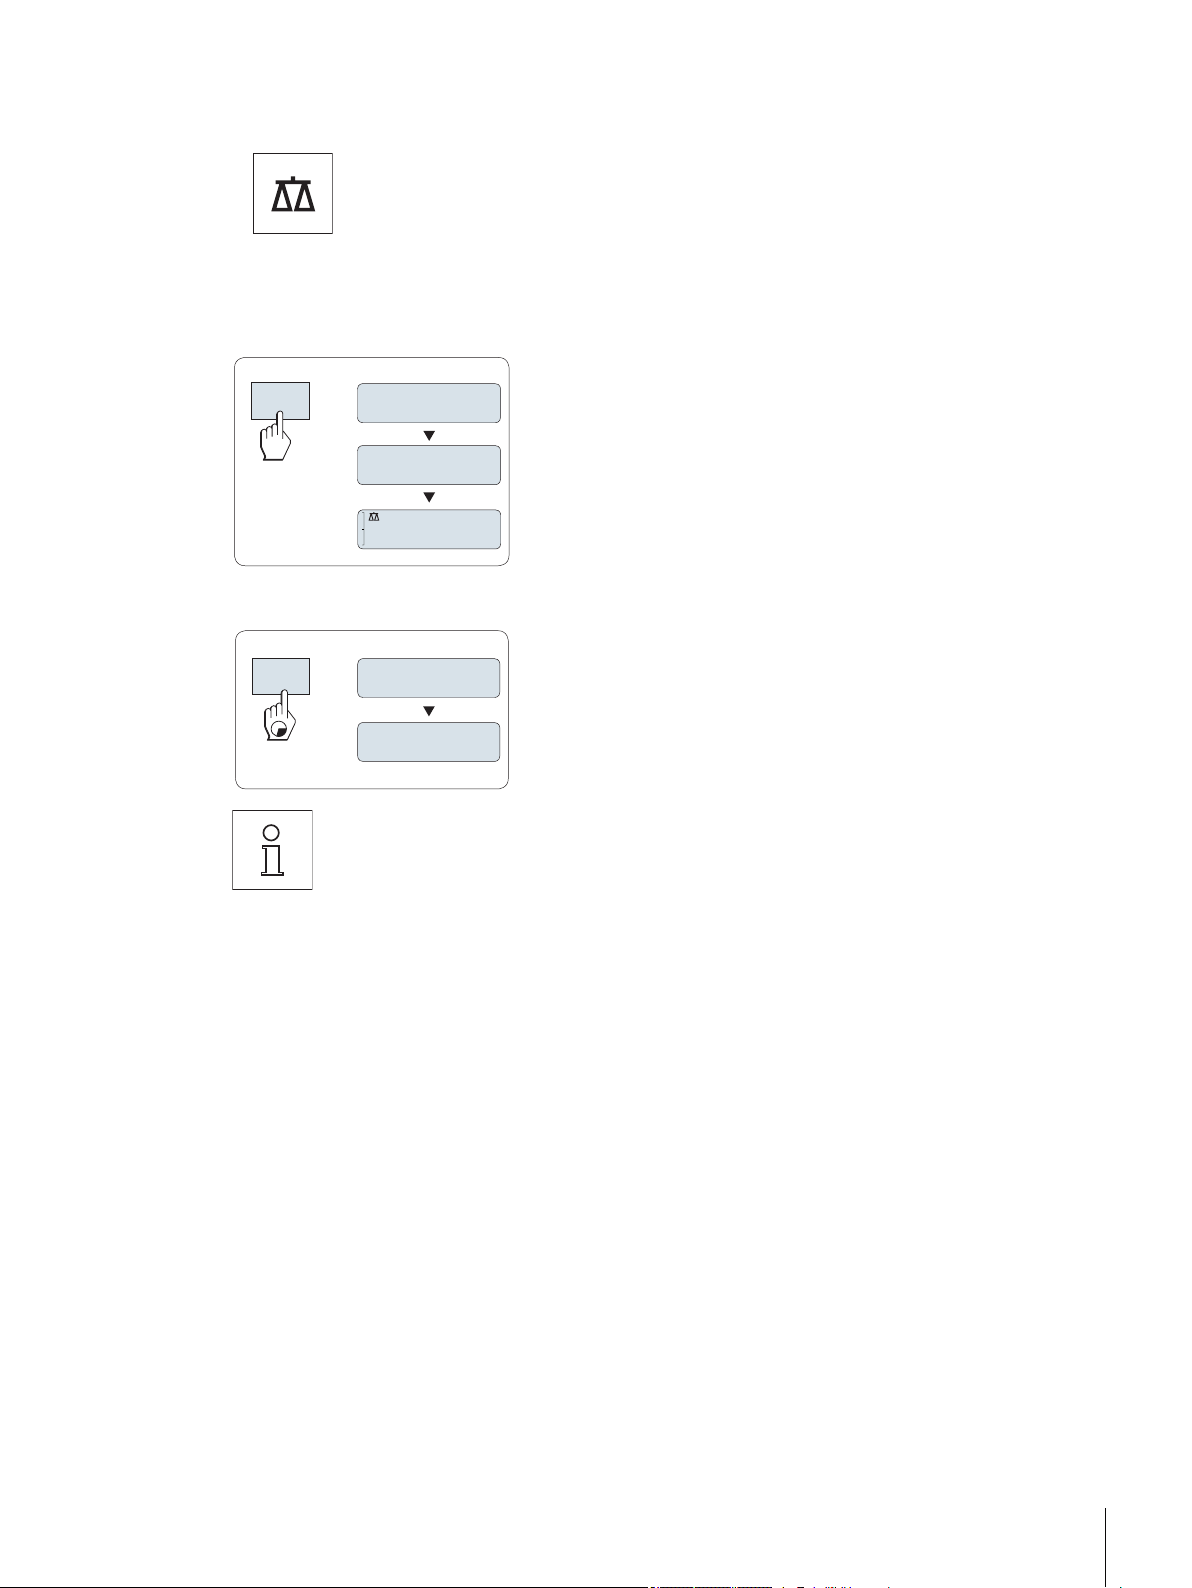
This symbol indicates press key briefly (less than 1.5 s).
This symbol indicates press and hold key down (longer than 1.5 s).
This symbol indicates a flashing display.
This symbol indicates an automatic sequence.
These symbols indicate safety notes and hazard warnings which, if ignored, can cause per
sonal danger to the user, damage to the balance or other equipment, or malfunctioning of the
balance.
This symbol indicates additional information and notes. These make working with your bal
ance easier, as well as ensuring that you use it correctly and economically.
7Introduction
2 Safety Precautions
Always operate and use your balance only in accordance with the instructions contained in this manual. The
instructions for setting up your new balance must be strictly observed.
If the balance is not used according to these Operating Instructions, protection of the balance may be
impaired and METTLER TOLEDO assumes no liability.
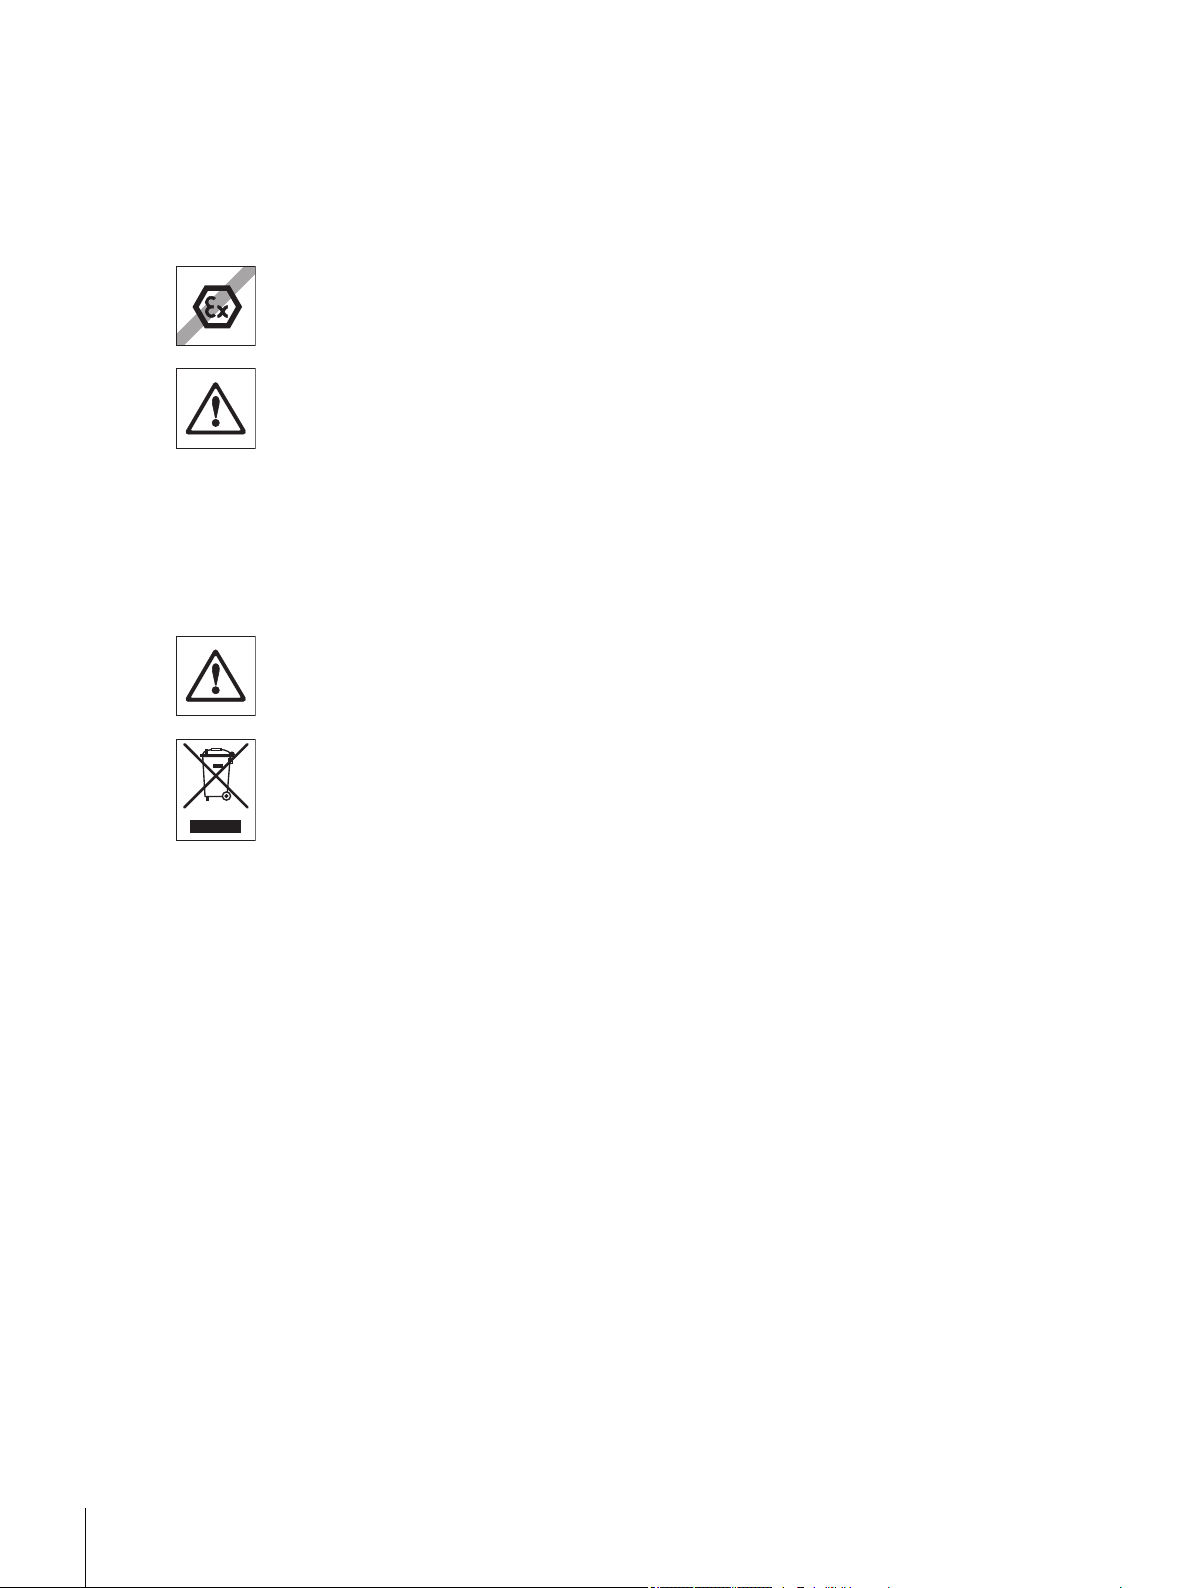
It is not permitted to use the balance in explosive atmosphere of gases, steam, fog, dust and
flammable dust (hazardous environments).
For use only in dry interior rooms.
Do not use sharply pointed objects to operate the keyboard of your balance! Although your
balance is very ruggedly constructed, it is nevertheless a precision instrument. Treat it with
corresponding care.
Do not open the balance: It does not contain any parts which can be maintained, repaired, or
replaced by the user. If you ever have problems with your balance, contact your METTLER
TOLEDO dealer.
Use only balance accessories and peripheral devices from METTLER TOLEDO; they are opti
mally adapted to your balance.
Use only the original universal AC adapter delivered with your balance.
Disposal
In conformance with the European Directive 2002/96/EC on Waste Electrical and Electronic
Equipment (WEEE) this device may not be disposed of in domestic waste. This also applies
to countries outside the EU, per their specific requirements.
Please dispose of this product in accordance with local regulations at the collecting point
specified for electrical and electronic equipment. If you have any questions, please contact
the responsible authority or the distributor from which you purchased this device. Should this
device be passed on to other parties (for private or professional use), the content of this regu
lation must also be related.
Thank you for your contribution to environmental protection.
8 Safety Precautions
3 Overview
C
0.1 mg
C
1 mg
C
0.01 g
C
0.1 g
11
12
13
10
14
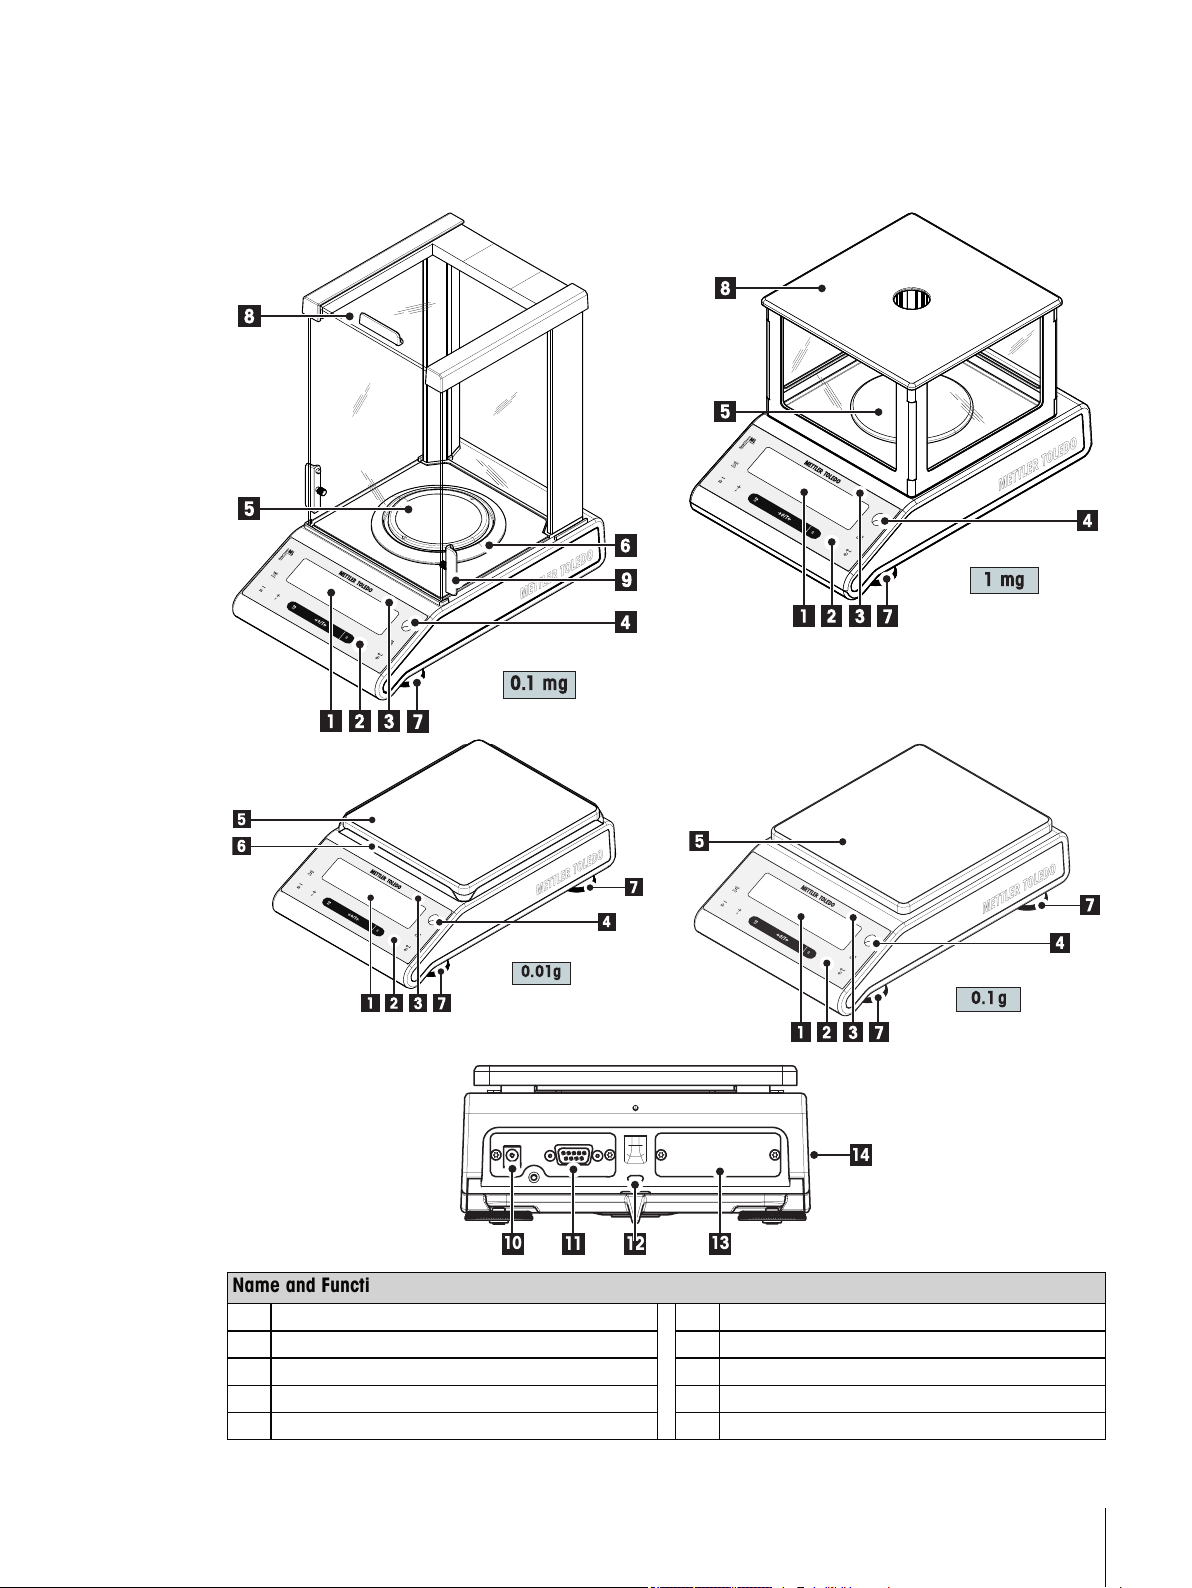
3.1 Components
Name and Function of Components
1 Display 8 Glass draftshield
2 Operation keys 9 Handle for operation of the draft-shield door
3 Model sticker (with approved models only) 10 Socket for AC Adapter
4 Level indicator 11 RS232C serial interface
5 Weighing pan 12 Kensington slot for anti-theft purposes
9Overview
Name and Function of Components
C
51 42
9
3 6
7
8
6 Draft shield element 13 Slot for second interface (optional)
7 Leveling foot 14 Product label
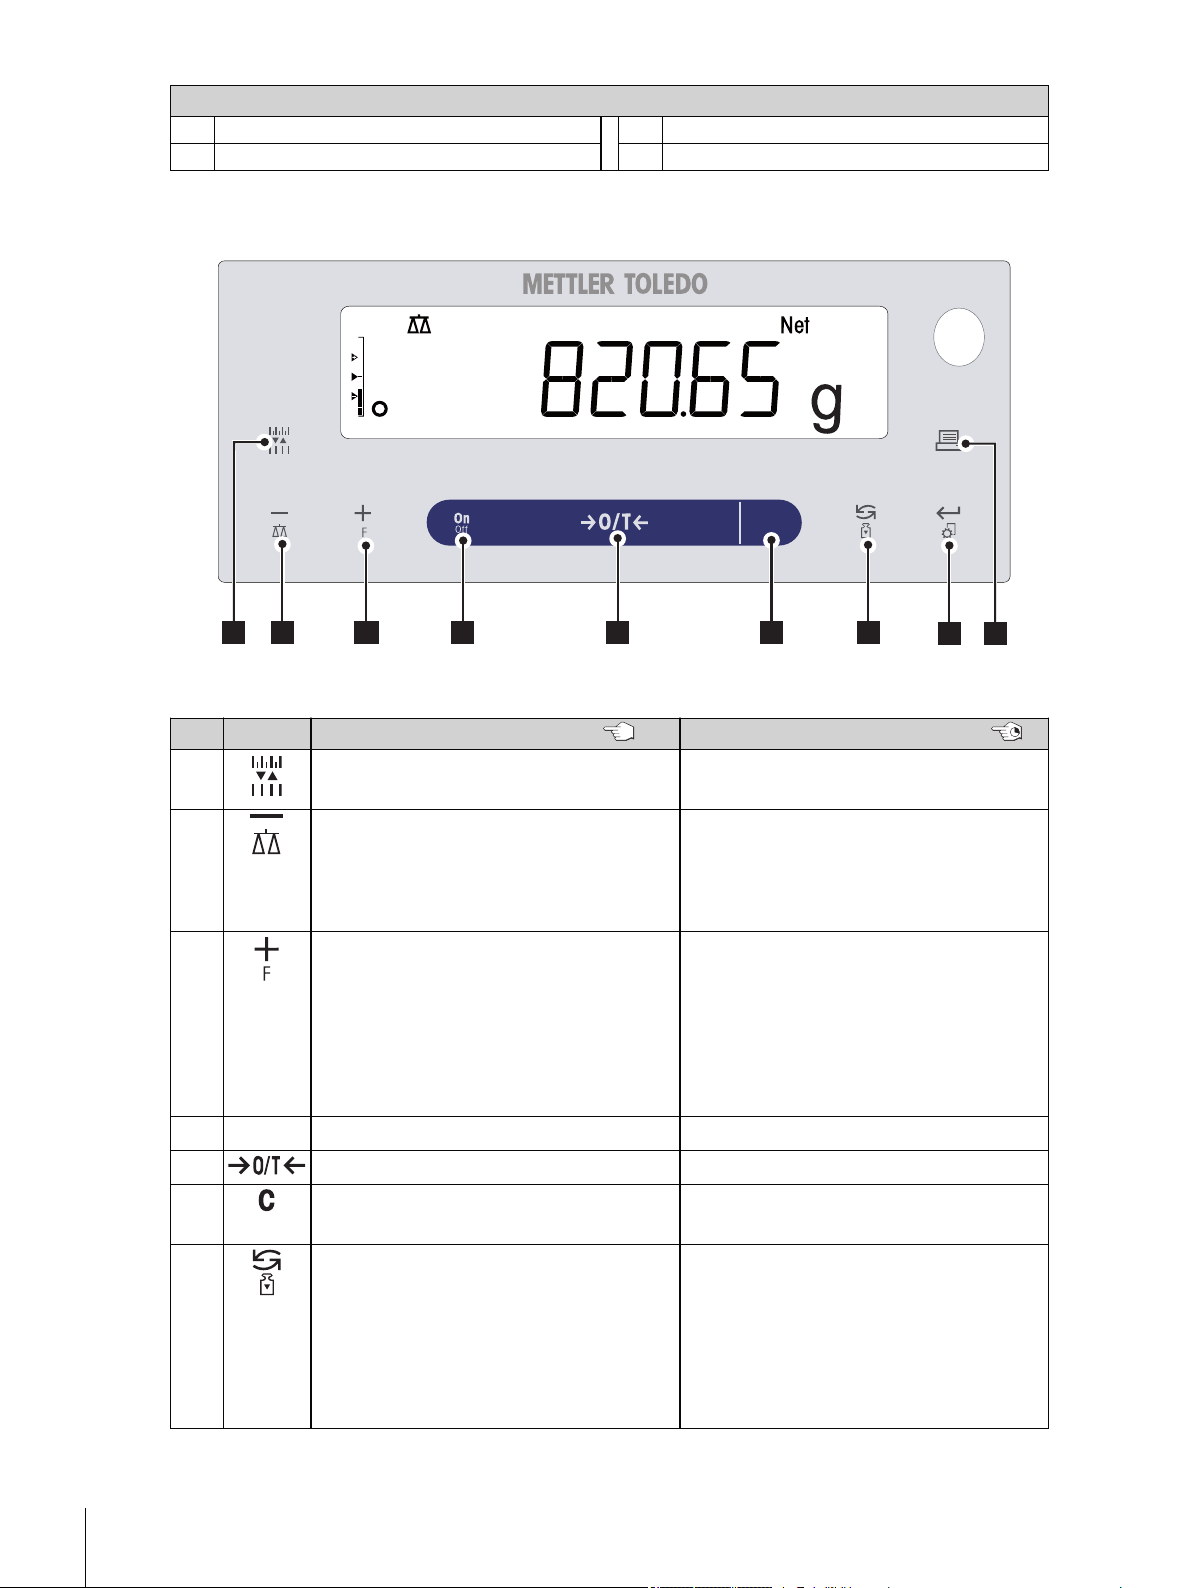
3.2 Operation Keys
Key Functions
No. Key Press briefly (less than 1.5 s) Press and hold (longer than 1.5 s)
1
●
To change display resolution (1/10d
no function
function) while application is running
2
●
To navigate back (scroll up) within menu
topics or menu selections
●
Decrease (numerical) parameters within
●
To select the weighing application
●
Decrease (numerical) parameters quickly
within menu and in applications
menu and in applications
3
●
To navigate forward (scroll down) within
menu topics or menu selections
●
Increase (numerical) parameters within
menu and in applications
●
To select assigned application and enter
ing the parameter settings of application.
●
Default application assignment: Formula
tion
●
Increase (numerical) parameters quickly
within menu and in applications
4 ON//OFF
5
6
●
Switch on
●
Zero/Tare
●
Cancel and to leave menu without saving
●
Switch off
●
Switch off
no function
(one step back in the menu).
7
●
With entries: scroll down
●
To navigate through menu topics or
●
Execute predefined adjusting (calibra
tion) procedure
menu selections
10 Overview
●
To toggle between unit 1, recall value (if
selected), unit 2 (if different from unit 1)
and the application unit (if any)

No. Key Press briefly (less than 1.5 s) Press and hold (longer than 1.5 s)
Application Icons
Status Icons
Weighing-in aid
Weight Value Field
Unit Field
8
●
To enter or leave menu selection (from /
●
Enter or leave menu (Parameter settings)
to menu topic)
●
To enter application parameter or switch
to next parameter
●
To store parameter
9
●
Printout display value
●
Printout active user menu settings
●
Transfer data
3.3 Display Panel
Application Icons
Menu locked Application "Check weighing"
Menu setting activated Application "Statistics"
Application "Weighing" Application “Formulation / Net-Total”
Application "Piece counting"
Status Icons
Indicates stored value (Memory) Acoustic feedback for pressed keys activated
Indicates Net weight values Weighing range 1 (Dual Range models only)
Adjustments (calibration) started Weighing range 2 (Dual Range models only)
Applications "Diagnostics" and “Routine Test” Charge of battery: full, 2/3, 1/3, discharged
Service reminder
Weight Value Field and Weighing-in aid
Indicates negative values Brackets to indicate uncertified digits
Indicates unstable values Marking of nominal or target weight
(Battery operated models only)
(approved models only)
Indicates calculated values Marking of tolerance limit T+
Marking of tolerance limit T-
11Overview

Unit Field
g gram
kg kilogram
mg milligram
12 Overview
4 Setting up the Balance
The balance must be disconnected from the power supply when carrying out all setup and
mounting work.
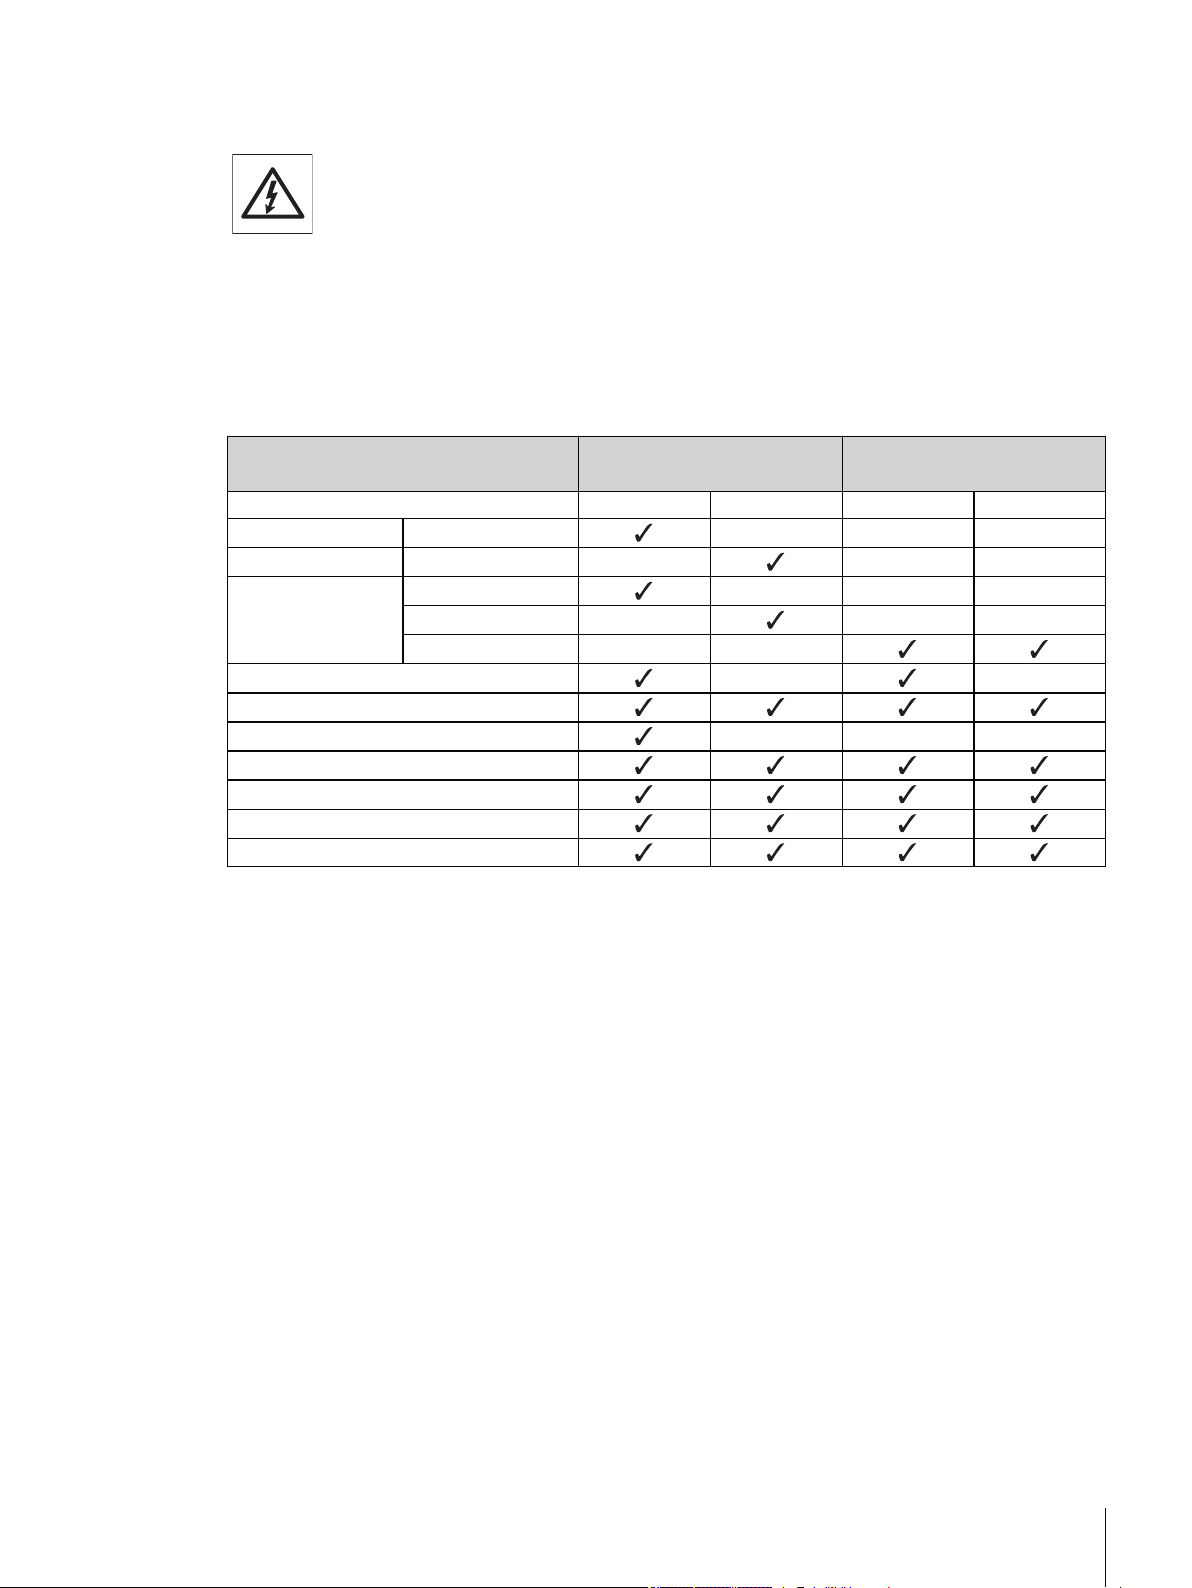
4.1 Unpacking and Delivery Inspection
a) Open the packaging and carefully remove all components.
b) Check the delivered items.
The standard scope of delivery contains the following items:
Components Balances with round weighing
pan
0.1 mg 1 mg 0.01 g 0.1 g / 1 g
Draft shield 235 mm – – –
Flex draft shield 105 mm – – –
Weighing pan Ø 90 mm – – –
Ø 120 mm – – –
170 x 190 mm – –
Draft shield element – –
Pan support
Bottom plate – – –
Protective cover
Universal AC adapter (country specific)
Quick Guide
EC declaration of conformity
Balances with square weigh
ing pan
13Setting up the Balance
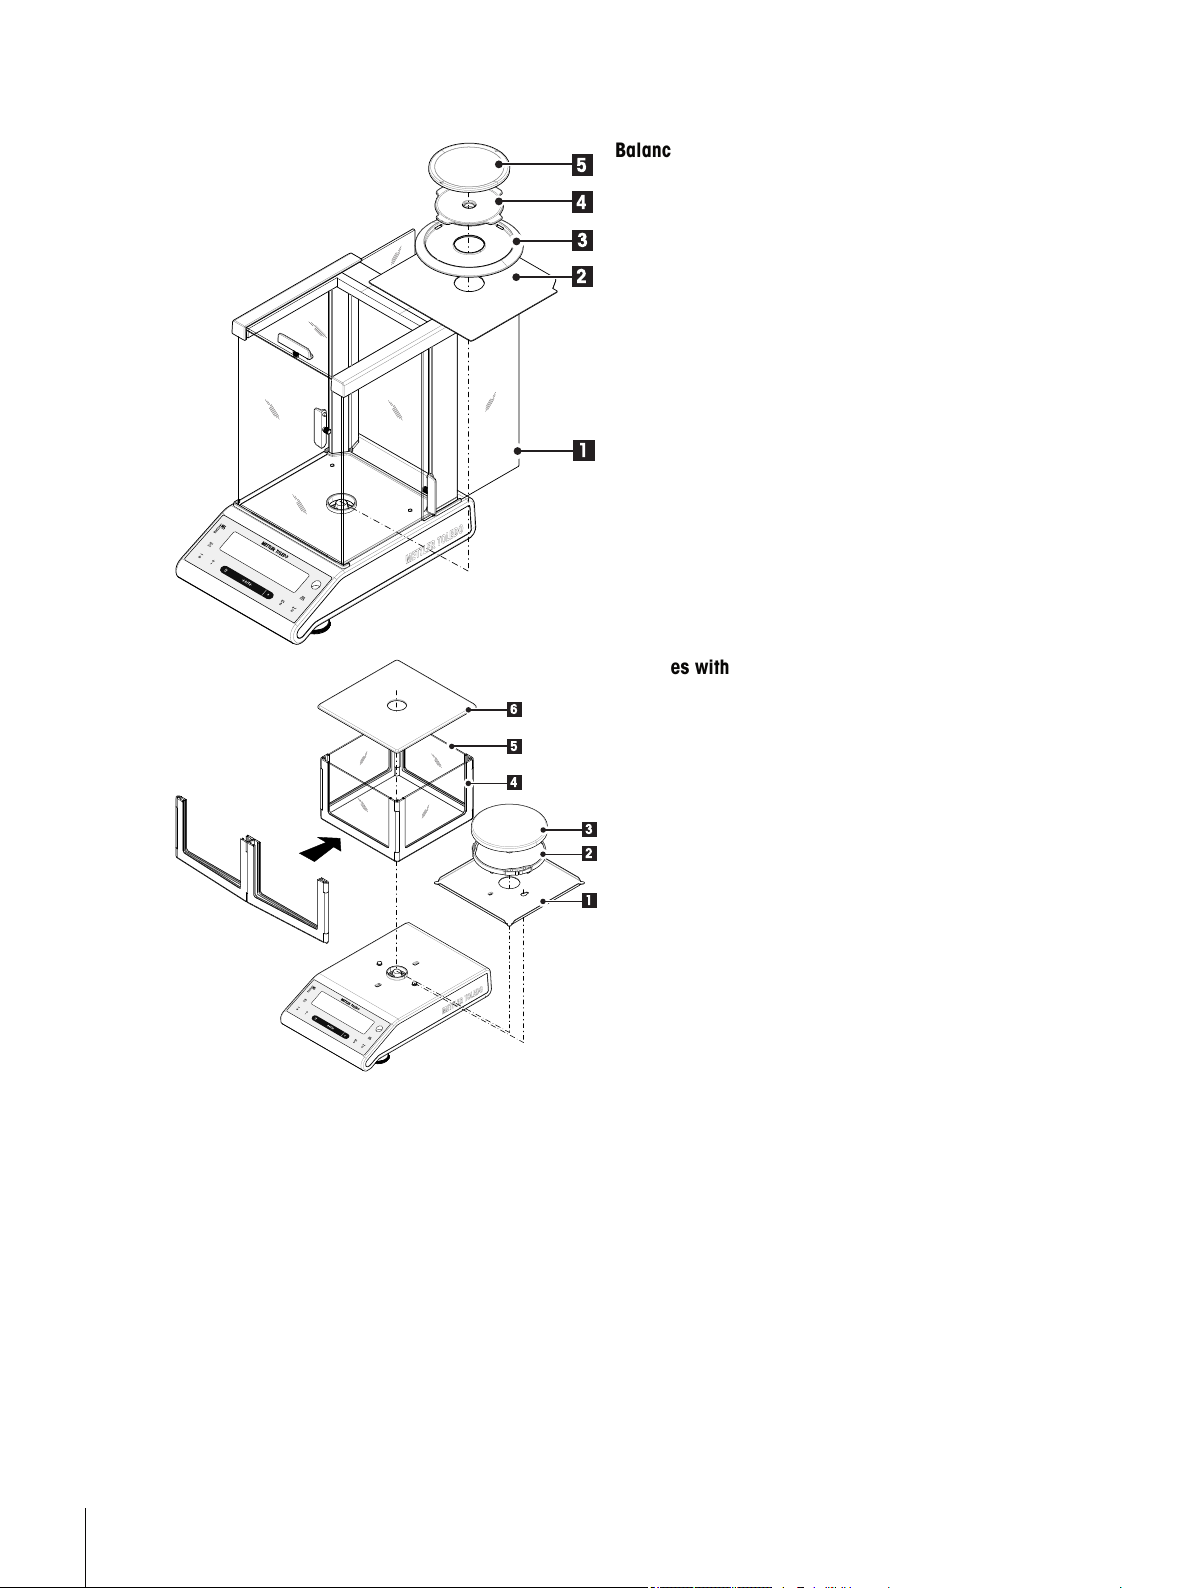
4.2 Installing the Components
C
2
3
4
1
5
C
2
3
4
1
6
5
Balances with readability of 0.1 mg, with draft
shield (235 mm)
Place the following components on the balance in the
specified order:
Note: Push the side glass door (1) back as far as will
go.
●
Bottom plate (2)
●
Draft shield element (3)
●
Pan support (4)
●
Weighing pan (5)
Balances with readability of 1 mg, with flex draft
shield (105 mm)
Place the following components on the balance in the
specified order:
a) Place bottom plate (1) (push and turn)
b) Place pan support (2) with weighing pan (3).
c) Unfold the draft shield frame (4) and place it cor
rectly.
d) Insert the glass panels (5) into the draft shield
frame.
e) Place draft shield top (6)
14 Setting up the Balance
C
5
4
3
2
1
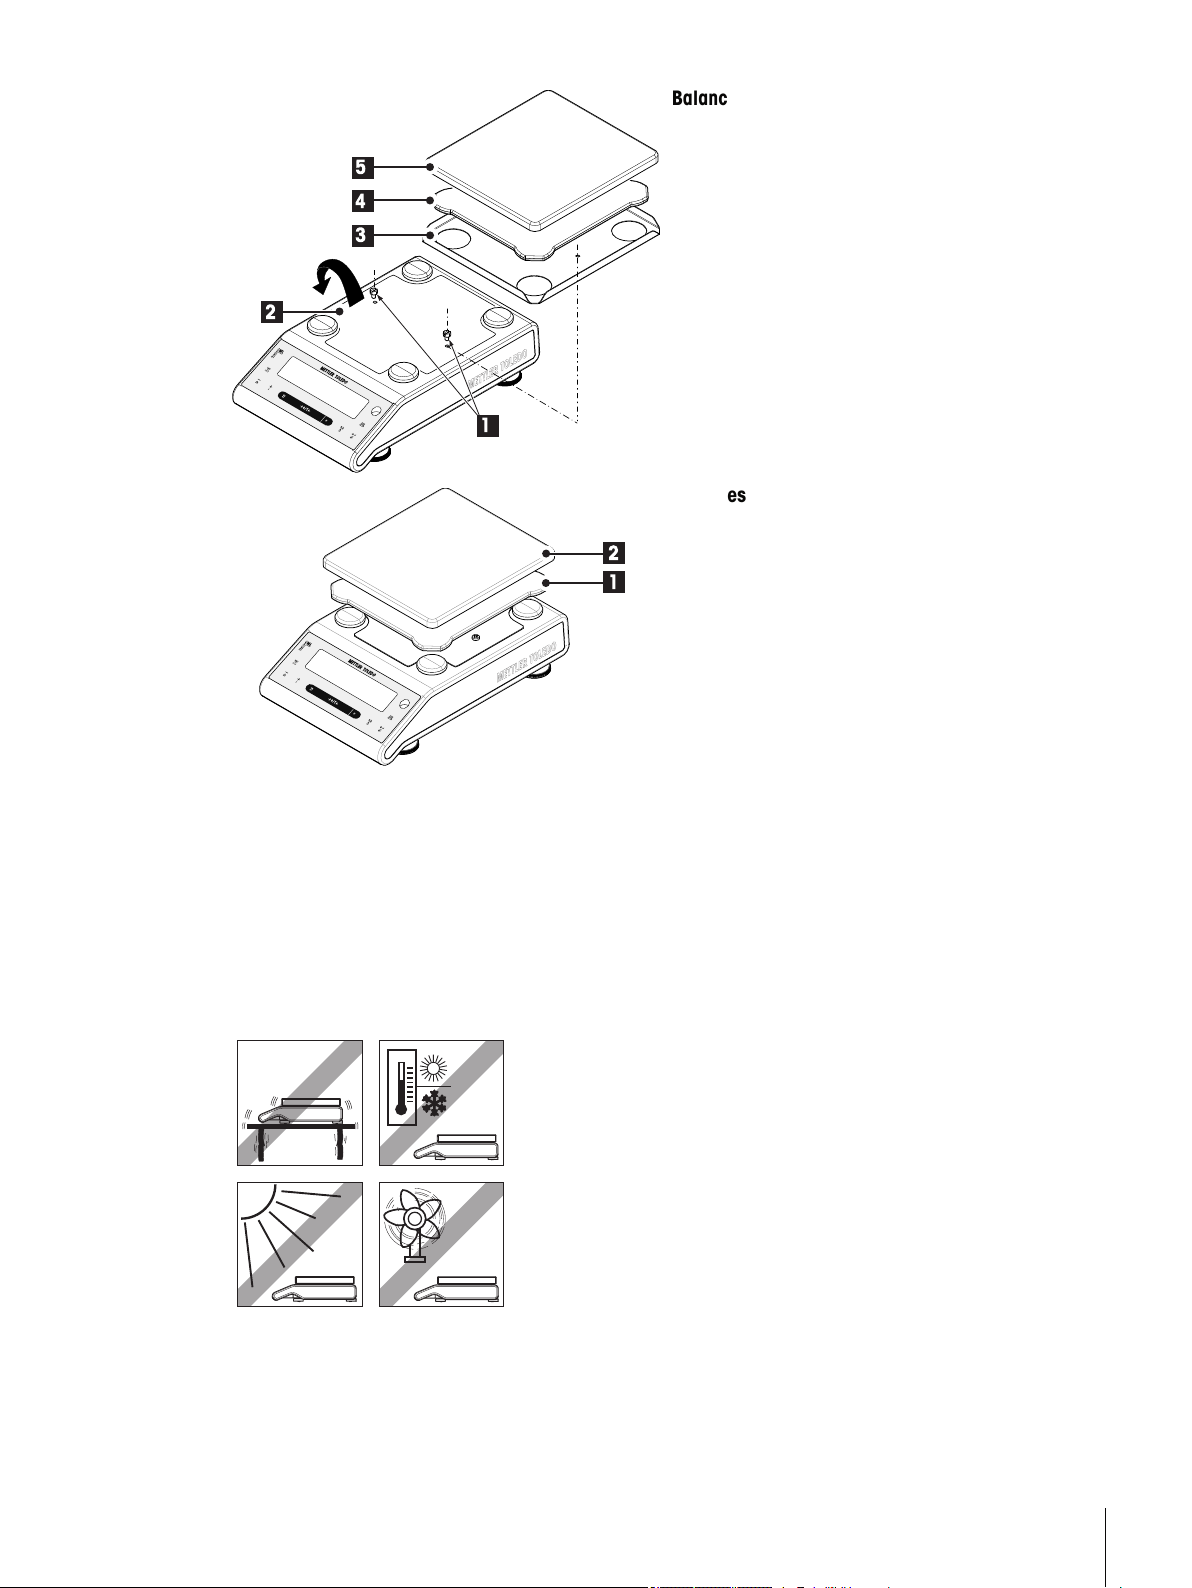
Balances with readability of 10 mg with square
C
2
1
weighing pan and draft shield element
a) Remove the two screws (1)
b) Remove the plate (2) and retain it.
c) Place draft shield element (3) and fix it with the
two screws.
d) Place pan support (4) with weighing pan (5).
Balances with readability of 0.1 g with square
weighing pan
Place the following components on the balance in the
specified order:
●
Pan support (1)
●
Weighing pan (2)
4.3 Selecting the Location and Leveling the Balance
Your balance is a precision instrument and will thank you for an optimum location with high accuracy and
dependability.
4.3.1 Selecting the Location
Select a stable, vibration-free position that is as horizontal as possible. The surface must be able to safely carry
the weight of a fully loaded balance.
Observe ambient conditions (see Technical Data).
Avoid the following:
●
Direct sunlight
●
Powerful drafts (e.g. from fans or air conditioners)
●
Excessive temperature fluctuations
15Setting up the Balance

4.3.2 Leveling the Balance
C
The balances have a level indicator and two or four adjustable leveling
feet to compensate for slight irregularities in the surface of the weighing
bench. The balance is exactly horizontal when the air bubble is in the
middle of the level glass.
Note: The balance should be leveled and adjusted each time it is
moved to a new location.
Balances with 2 leveling feet
Adjust the two front leveling feet appropriately until the air bubble
comes to rest exactly in the middle of the glass:
Air bubble at "12 o'clock" turn both feet clockwise
Air bubble at "3 o'clock" turn left foot clockwise, right
foot counterclockwise
Air bubble at "6 o'clock" turn both feet counterclockwise
Air bubble at "9 o'clock" turn left foot counterclockwise,
right foot clockwise
Balances with 4 leveling feet
a) First turn the two rear leveling feet all the way in.
b) Adjust the two front leveling feet as previously described.
c) Turn the rear leveling feet down onto the surface for extra stabiliz
ing safety, so the balance cannot tilt over under eccentric loads.
4.4 Power Supply
Allow your balance to warm up for 30 minutes (0.1 mg models 60 minutes) to enable it
to adapt itself to the ambient conditions.
4.4.1 AC Operation
Your balance is supplied with an country-specific AC adapter or with a country-specific power cable. The power
supply is suitable for all line voltages in the range: 100 - 240 VAC, 50/60 Hz (for exact specifications, see
section "technical data").
First, check the local line voltage is in the range 100 - 240 VAC, 50/60 Hz and whether the
power plug fits your local power supply connection. If this is not the case, on no account
connect the balance or the AC adapter to the power supply, but contact the responsible
METTLER TOLEDO dealer.
Important:
●
Before operating, check all cables for damage.
16 Setting up the Balance
●
Guide the cables so that they cannot become damaged or interfere with the weighing
process!
●
Take care that the AC adapter cannot come into contact with liquids!
●
The power plug must be always accessible.
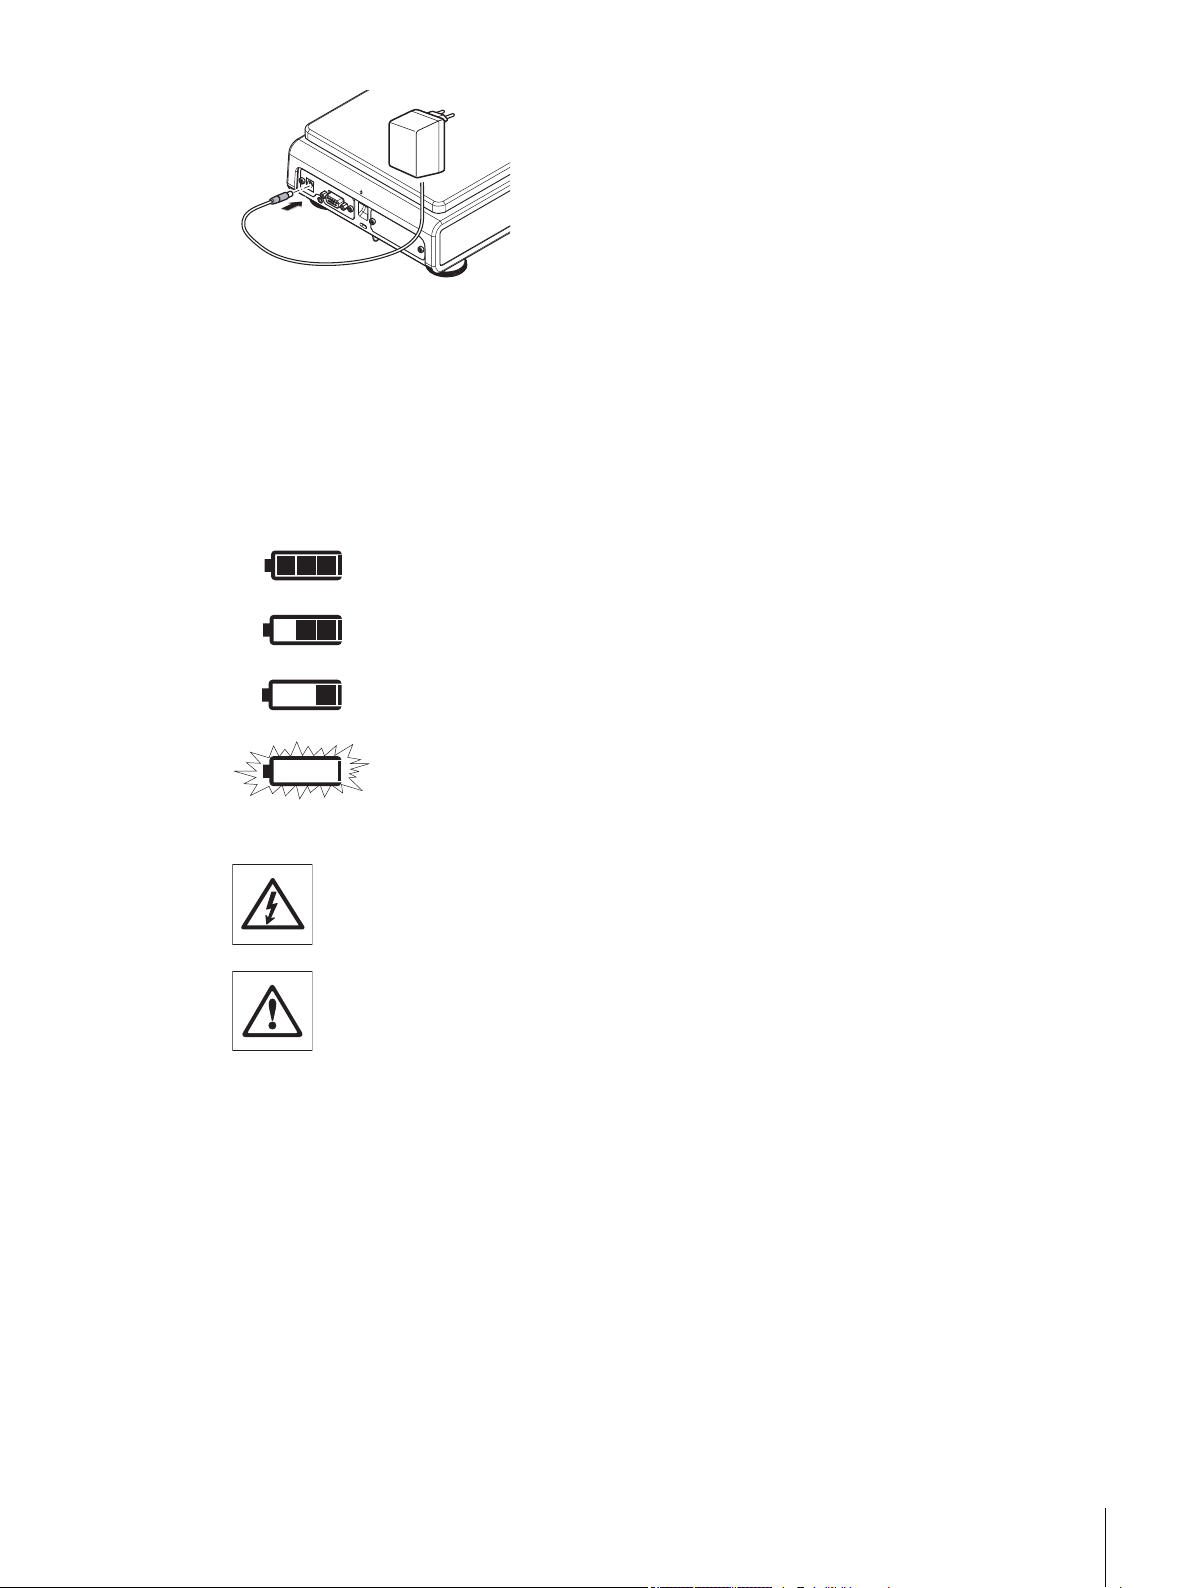
Connect the AC adapter to the connection socket on the back of your
balance (see figure) and to the power line.
4.4.2 Battery Operation
The Balance can also operates with batteries. Under normal operation conditions, the balance works indepen
dently of the AC power line for about 8 to 15 hours (using alkaline batteries). Immediately after the AC power
supply is interrupted e.g. by withdrawing the power plug or if there is a power failure, the balance switches
automatically to battery operation. Once the AC power supply is restored, the balance reverts automatically to
AC operation.
Note: It is also possible to use rechargeable batteries. Charging batteries inside the balance is not possible.
battery fully When the balance is operating on its batteries, the battery symbol in
the display lights up. The number of segments that are lit is an indica
2/3 full
tor of battery condition (3 = fully charged, 0 = discharged). When the
batteries are almost completely discharged, the battery symbol flashes.
1/3 full
battery empty
Inserting / Replacing Batteries
The balance must be disconnected from the power supply when carrying out all setup and
mounting work.
●
Make sure that the balance is off before removing or inserting batteries.
●
Do not place the balance on the pan support location bolt.
●
Battery Warnings: Read and follow all warnings and instructions supplied by the battery
manufacturer.
●
Do not mix different types or brands of batteries. Performance of batteries can vary very
greatly depending on the manufacturer.
●
If you don't operate the balance with batteries for an extended period, it is recommended
to remove the batteries from the balance.
●
Batteries must be disposed of in an environmentally responsible manner. No attempt
must be made to incinerate or disassemble item.
Your balance uses 8 standard AA (LR6) batteries (alkaline batteries preferred)
17Setting up the Balance
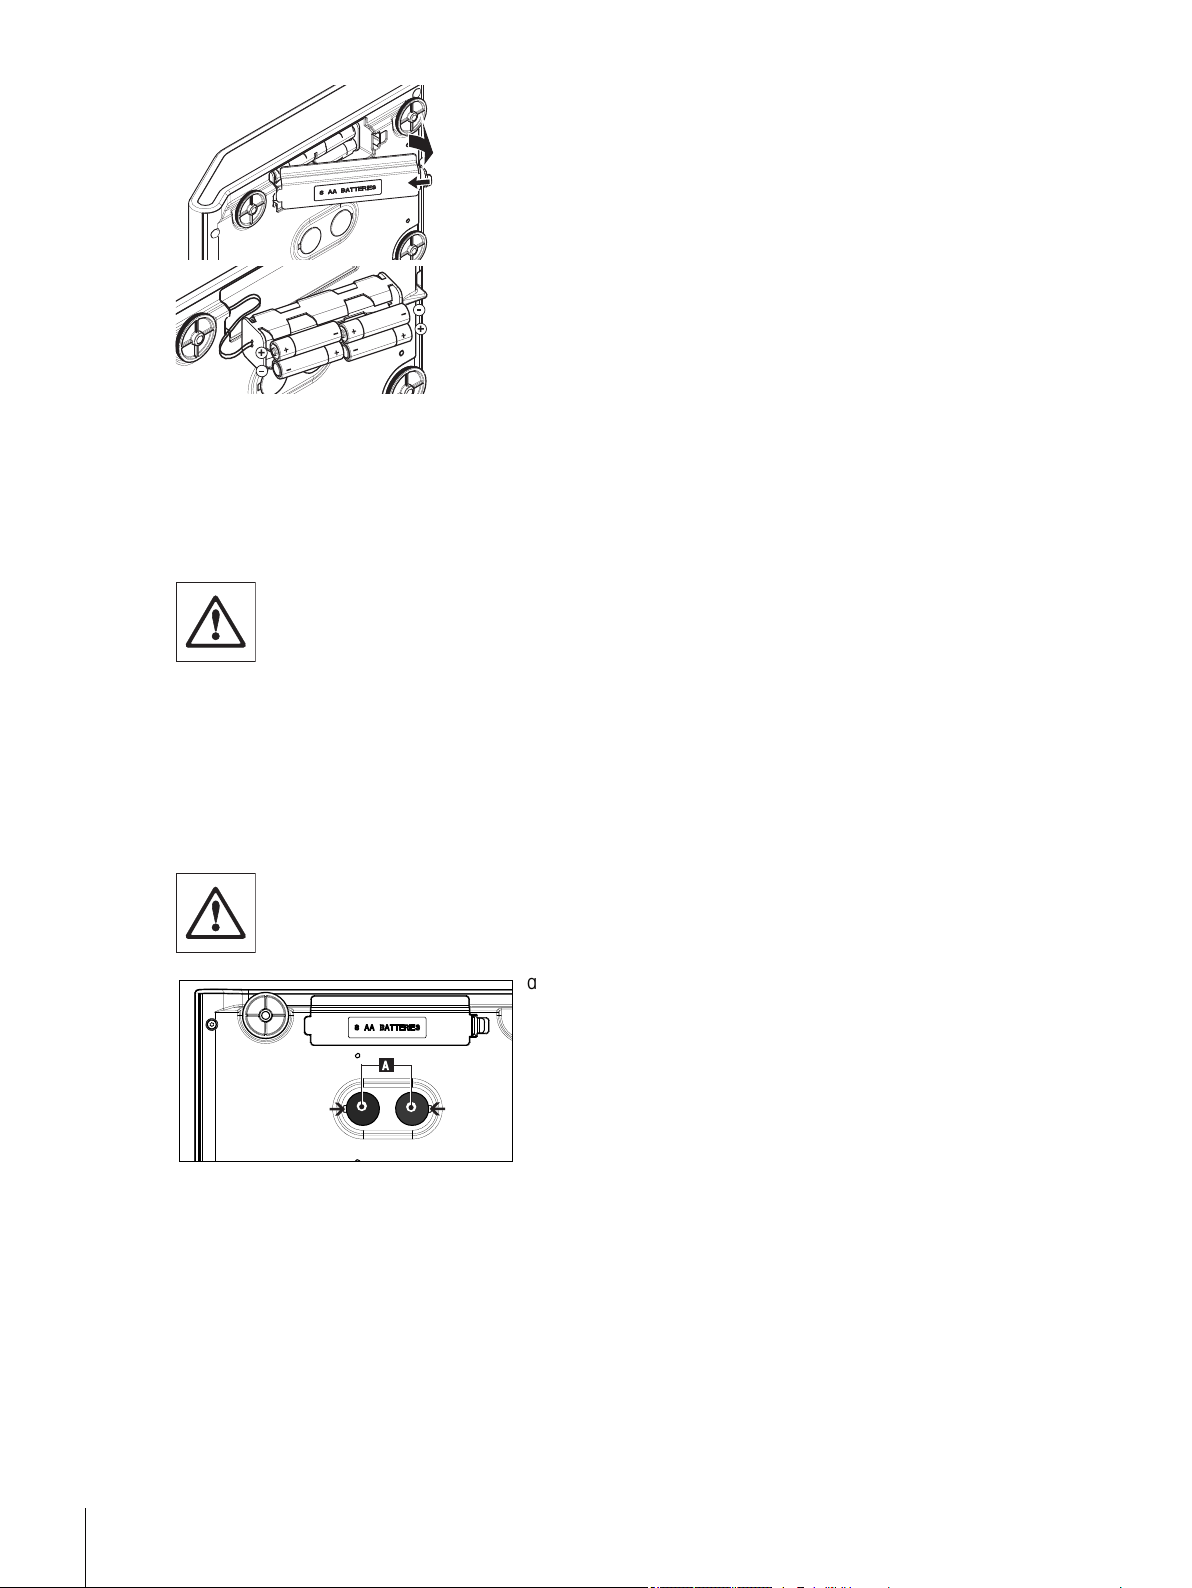
a) Remove weighing pan, pan support and draft shield element or
A
draft shield "100 mm" if present.
b) Turn the balance carefully on its side.
c) Open and remove the battery-chamber cover.
d) Insert / replace the batteries with the correct polarity as shown in
the battery holder.
e) Insert and close the battery-chamber cover.
f) Turn the balance carefully to its normal position.
g) Reinstall all components in the reverse order.
4.5 Transporting the Balance
Switch off the balance and remove the power cable and any interface cable from the balance. Refer to the notes
in Section "Selecting the location" regarding the choice of an optimal location.
Transporting Over Short Distances
For balances with a draft shield: Observe the following instructions to transport your bal
ance over a short distance to a new location: Never lift the balance using the glass draft
shield. The draft shield is not sufficiently fastened to the balance.
Transporting Over Long Distances
If you would like to transport or send your balance over long distances, use the complete original packaging.
4.6 Weighing Below the Balance
The balances are equipped with a hanger for carrying out weighings below the work surface (weighing below
the balance).
Attention:
●
Do not place the balance on the pan support location bolt.
a) Switch off the balance and remove the power cable and any
interface cable from the balance.
b) Remove weighing pan, pan support and draft shield element
or "Easy draft shield" if present.
c) Turn the balance carefully on its side.
d) Remove one of the caps (A) depending on the models.
e) Then turn the balance to its normal position and simply rein
stall all components in the reverse order.
18 Setting up the Balance
4.7 Adjustment (Calibration)
------
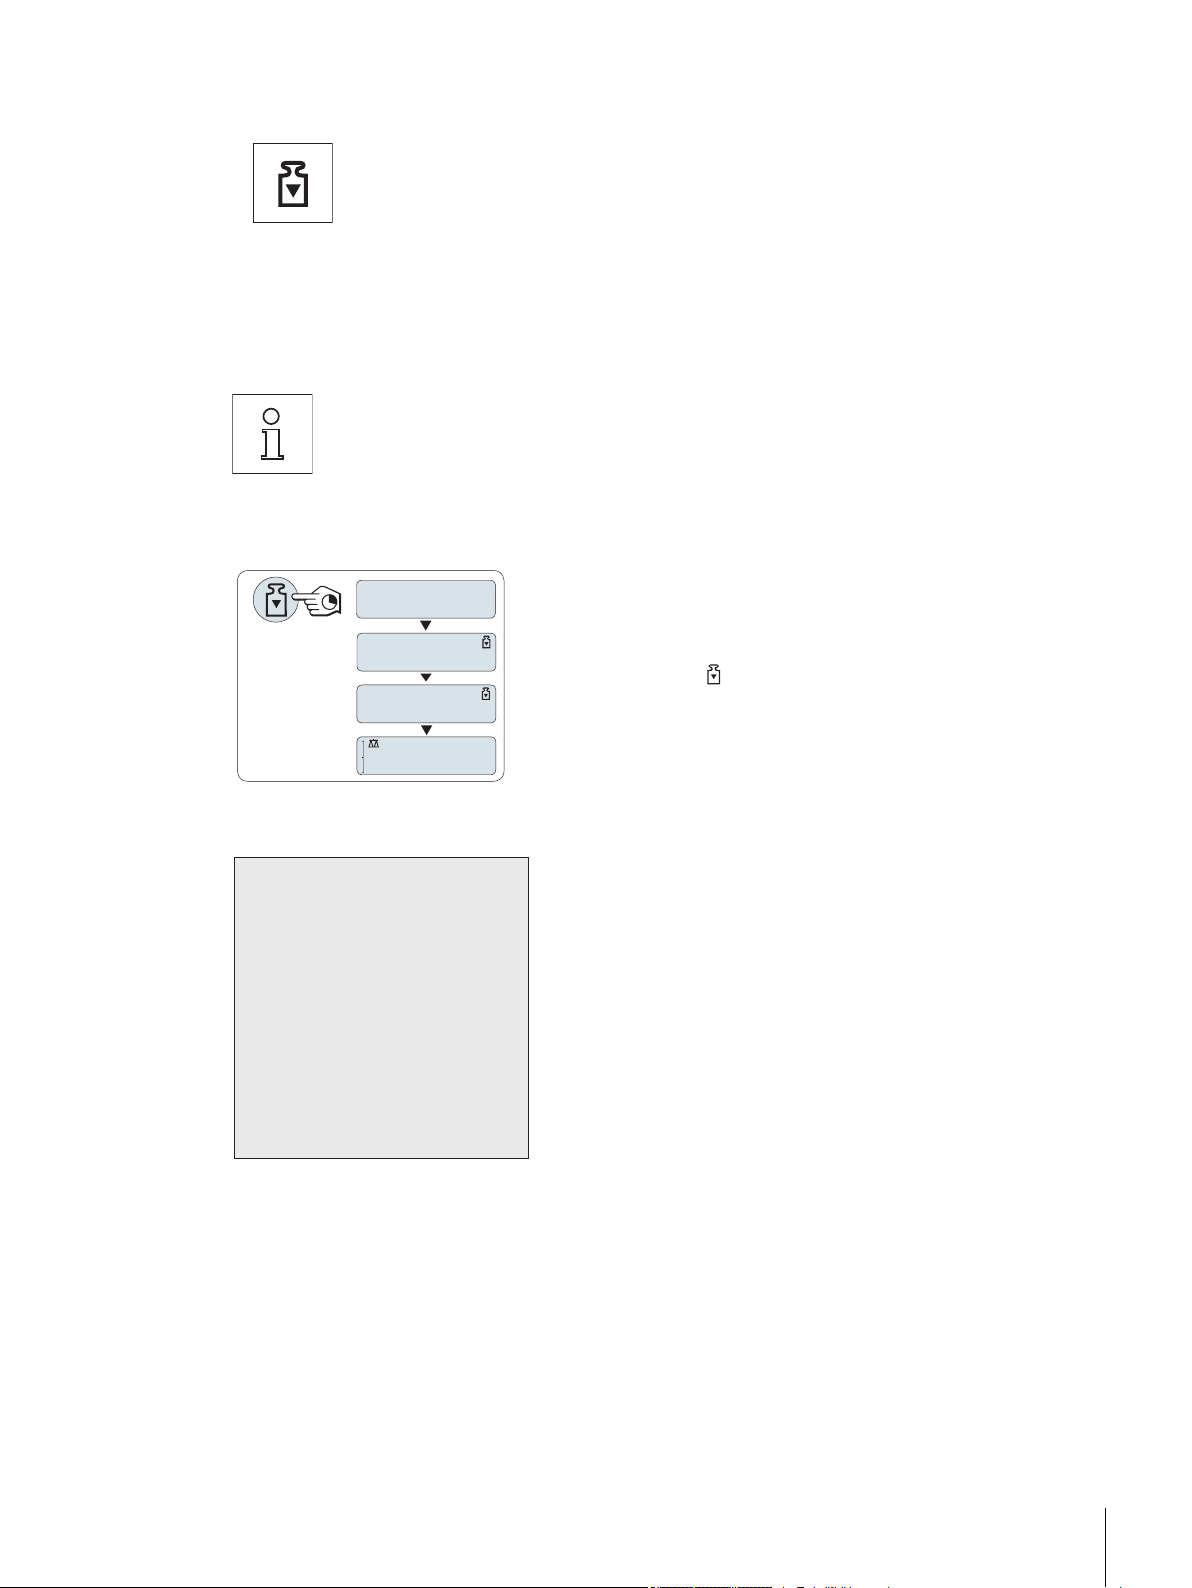
ADJ.DONE
0.00
g
ADJ.INT
- Internal Adjustment --
21.Jan 2010 12:56
METTLER TOLEDO
Balance Type PH4002L
SNR 1234567890
Temperature 22.5 °C
Diff 3 ppm
Adjustment done
-----------------------
To obtain accurate weighing results, the balance must be adjusted to match the gravitational
acceleration at its location. Adjusting is necessary:
●
before the balance is used for the first time.
●
at regular intervals during weighing service.
●
after a change of location.
4.7.1 Adjustment with Internal Weight
To obtain accurate results, the balance must be connected to the power supply for
approximately,
●
30 minutes for balances with redability of 1 mg to 5 g
●
60 minutes for balances with redability of 0.01 mg to 0.1 mg
in order to reach operating temperature before adjusting.
Requirement: To carry out this operation, in the menu topic "CAL"
(Adjustment) of advanced menu "ADJ.INT" must be selected.
a) Unload weighing pan
b) Press and hold « » to execute "Internal Adjustment".
Sample adjustment printout using internal weight:
4.7.2 Adjustment with External Weight
Note: Because of certification legislation, the approved models cannot be adjusted with an external weight *
(depend on selected countries' certification legislation).
* except OIML accuracy class I approved models.
The balance adjusts itself automatically. The adjusting is finished when
the message "ADJ.DONE" appears briefly on the display. The balance
returns to the last active application and is ready for operation.
19Setting up the Balance
To obtain accurate results, the balance must be connected to the power supply for
------
2000.00
g
ADJ.DONE
0.00
g
C
0.00
g
------
C
ADJ.EXT
- External Adjustment --
21.Jan 2010 12:56
METTLER TOLEDO
Balance Type PH4002L
SNR 1234567890
Temperature 22.5 °C
Nominal 2000.00 g
Actual 1999.99 g
Diff 5 ppm
Adjustment done
Signature
.......................
-----------------------
approximately,
●
30 minutes for balances with redability of 1 mg to 5 g
●
60 minutes for balances with redability of 0.01 mg to 0.1 mg
in order to reach operating temperature before adjusting.
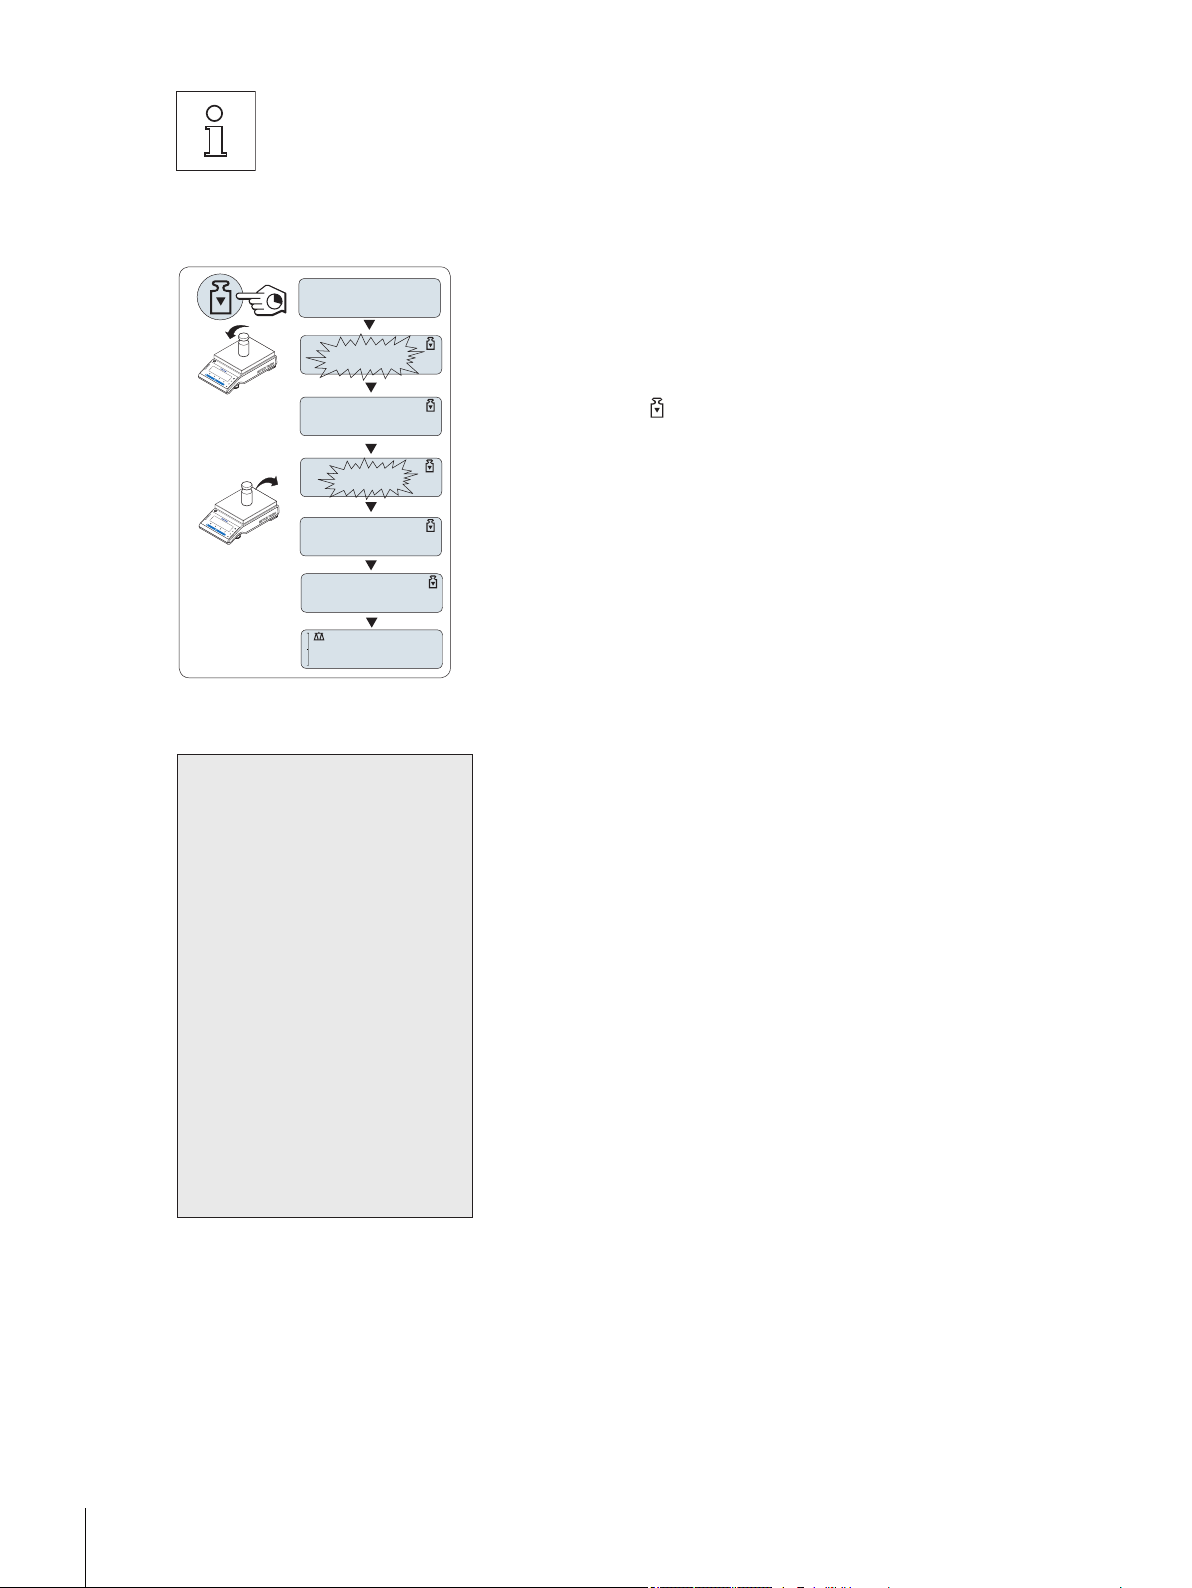
Requirement: To carry out this operation, in the menu topic "CAL"
(Adjustment) " of advanced menu ADJ.EXT" must be selected.
a) Have required adjustment weight ready.
b) Unload weighing pan.
c) Press and hold « » to execute "External Adjustment". The required
(predefined) adjustment weight value flashes in the display.
d) Place adjustment weight in center of pan. The balance adjusts
itself automatically.
e) When "0.00 g" flashes, remove adjustment weight.
The adjusting is finished when the message "ADJ.DONE" appears
briefly on the display. The balance returns to the last active application
and is ready for operation.
Sample adjustment printout using external weight:
20 Setting up the Balance
5 Weighing Made Simple
On
Off
8888888
XXXXXXX
0.00
g
SHUTOFF
On
Off
This section shows you how to perform simple weighings and how you can accelerate the
weighing process.
5.1 Switching the Balance On and Off
This section shows you how to perform simple weighings and how you can accelerate the weighing process.
Switching On
a) Remove any load from weighing pan.
b) Press «On».
The balance performs a display test (all segments in the display light
up briefly), "WELCOME", Software version, Maximum load and Read
ability appears briefly. (Startup "FULL" mode only)
The balance is ready for weighing or for operation with the last active
application.
Switching Off
Press and hold the «Off» key until "SHUTOFF" appears on the display.
Release the key.
When Quickstart is selected (Advanced menu, topic "STARTUP" > "QUICK"): Once your bal
ance has been switched off, it is in standby mode. In this case your balance needs no warmup time in the standby mode and is immediately ready for weighing. If you wish to perform a
weighing, you now only need to place the sample on the weighing pan and the balance
immediately displays the result. There is no need to switch it on with the «On/Off» key.
●
If your balance has been switched off after a preselected time, the display is dimly lit and
shows date, time, maximum load and readability.
●
If your balance has been switched off manually, the display is off.
Note:
●
Quickstart is not possible with approved balances (only available in selected countries).
●
Standby mode is available on line powered balances only.
21Weighing Made Simple
5.2 Performing a Simple Weighing
1250.38
g
0.00
g
1182.03
g
C
#
0.00
g
121.01
g
#
0.01
g
0.00
g
C
C
121.01
g
0.00
g
0.00
g
95.97
g
121
.
01
g
-
Net
Net
Net
#
C
C
22000
mg
22.00
g
*
22.00
g
M
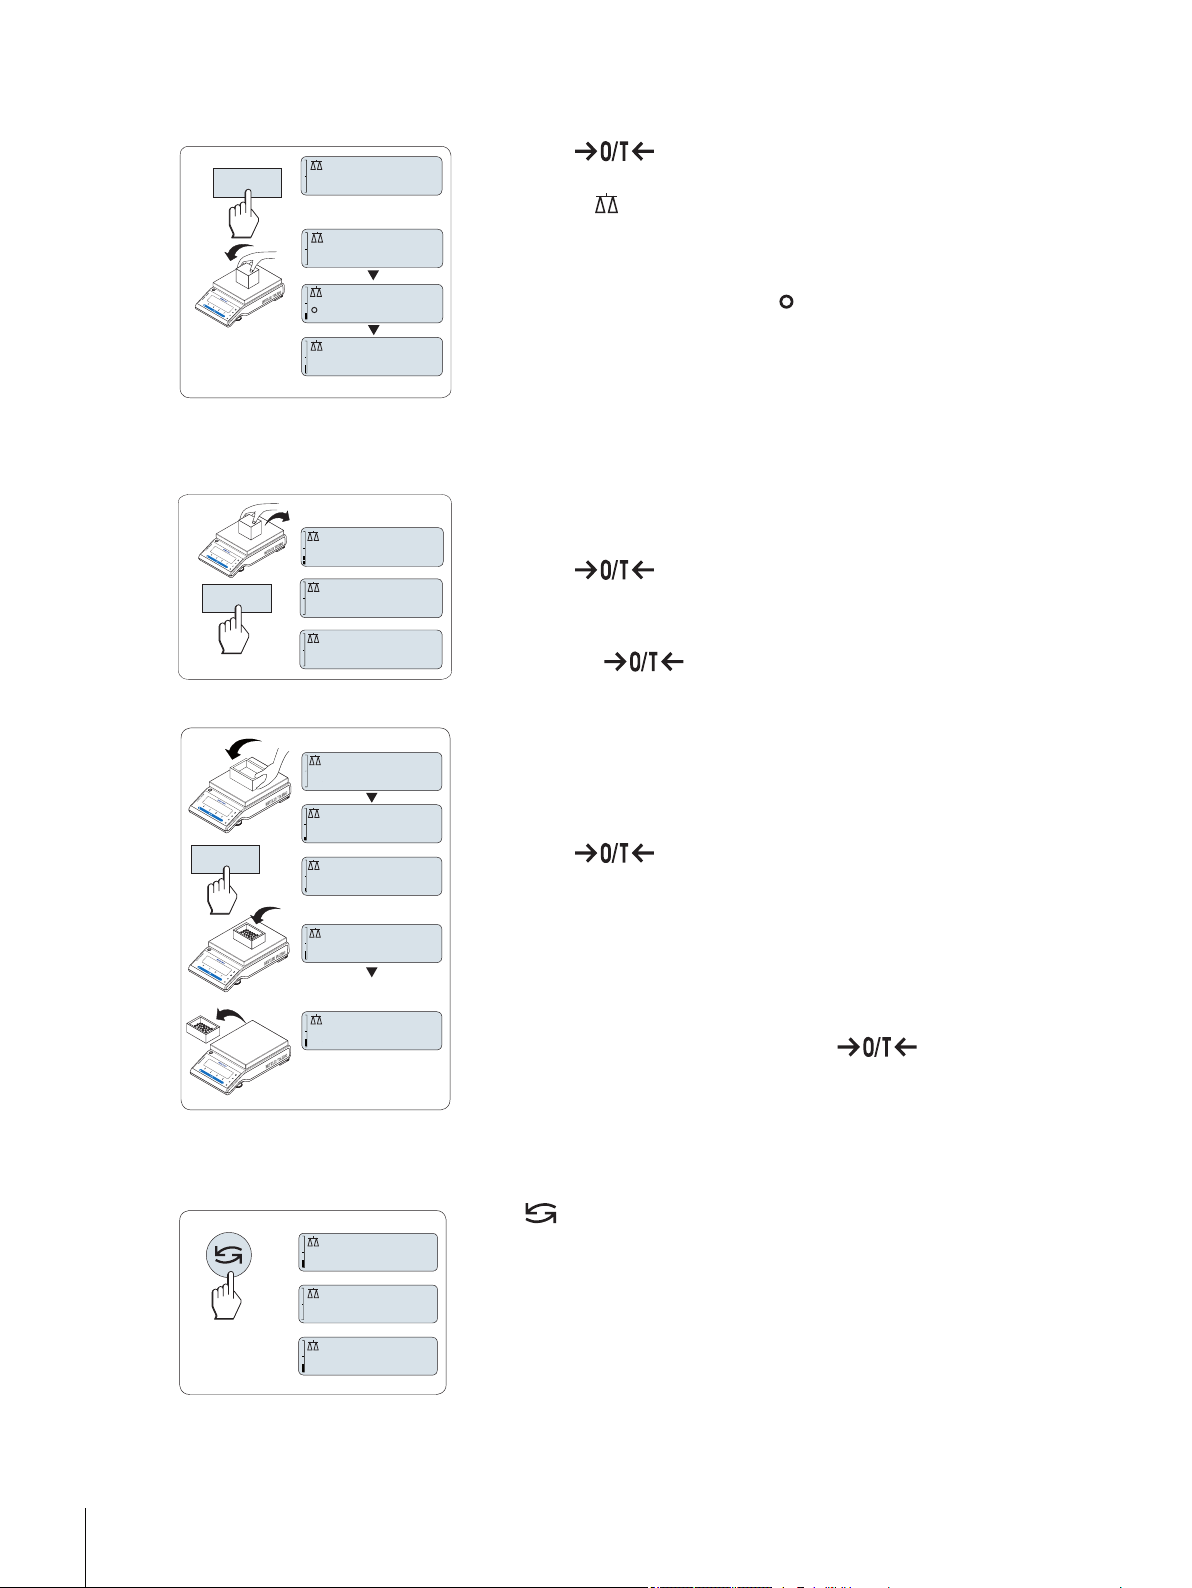
a) Press « » to zero the balance.
Note: If your balance is not in the weighing mode, first press and
hold the « » key until “WEIGH“ appears in the display. Release
the key. Your balance is in the weighing mode.
b) Place weighing sample on the weighing pan.
c) Wait until the instability detector " " disappears and the stability
beep sounds.
d) Read the result.
5.3 Zero Setting / Taring
Zero setting
a) Unload the balance.
b) Press « » to set the balance to zero. All weight values are
measured in relation to this zero point (see menu topic
"ZERO.RNG").
Note: Use the « » zeroing key before you start with a weigh
ing.
5.4 Switching Weight Units
22 Weighing Made Simple
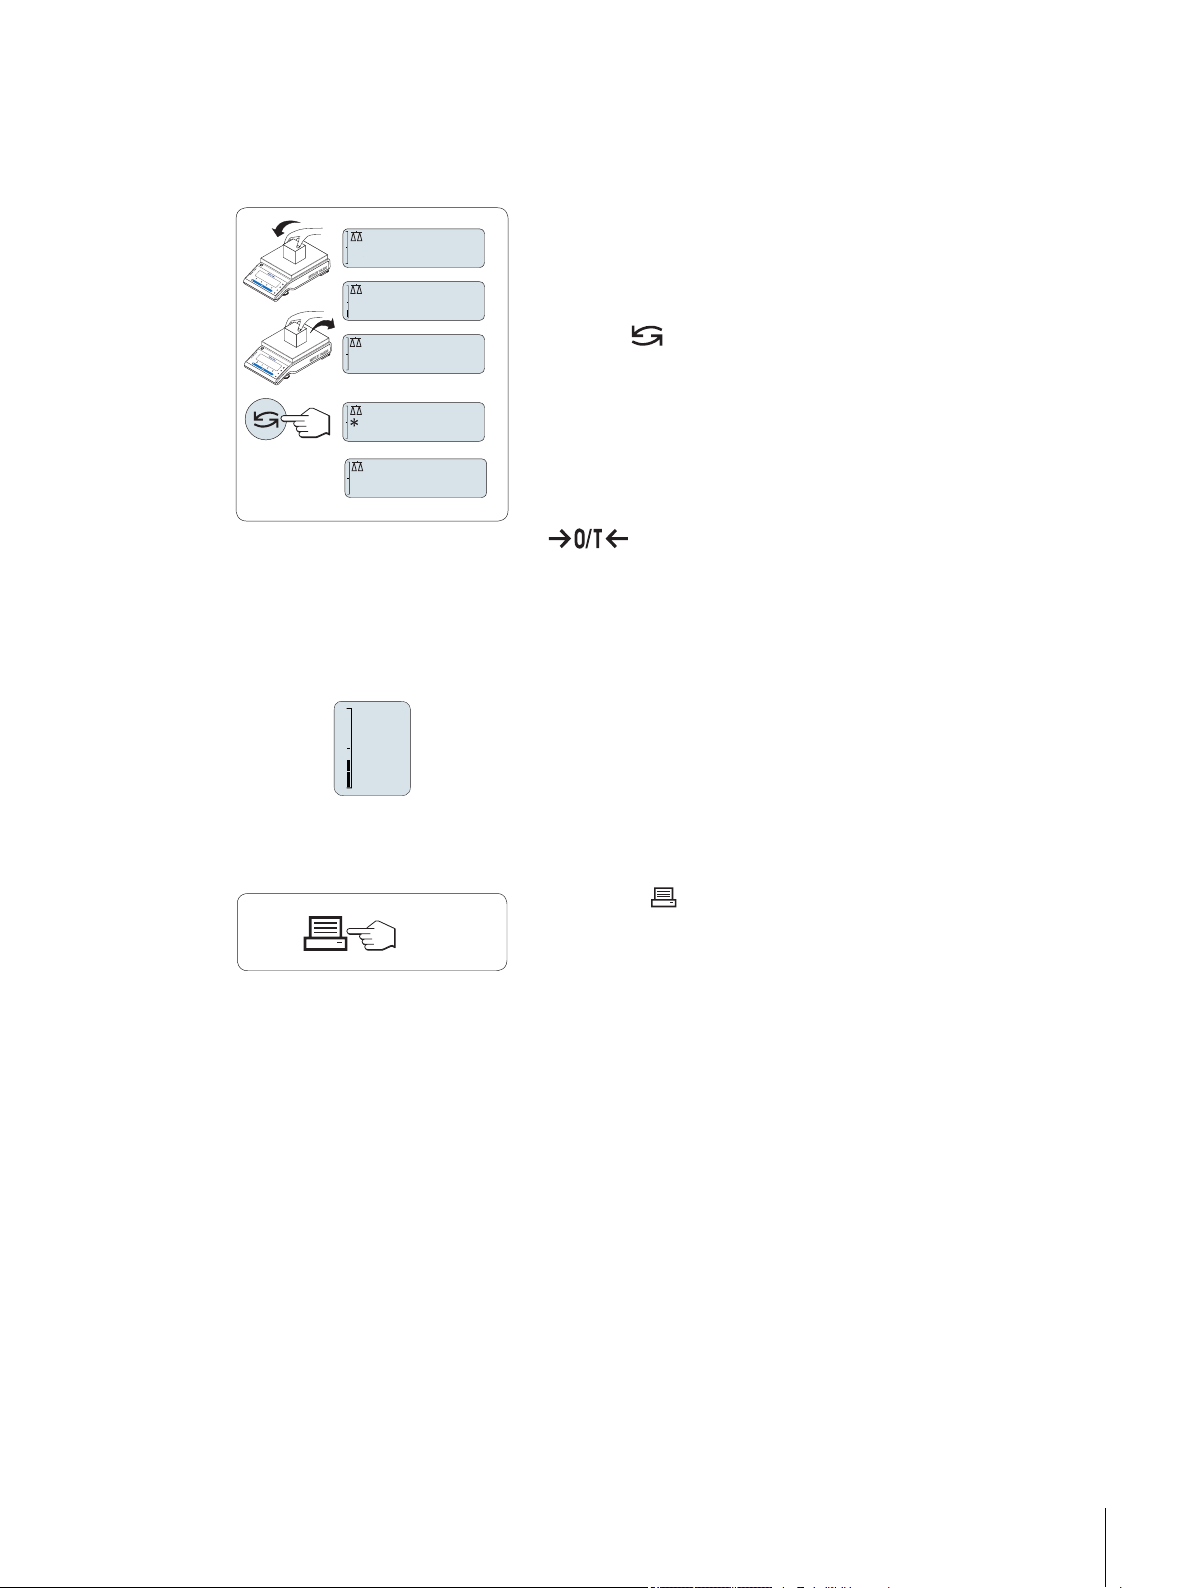
Taring
If you are working with a weighing container, first set the balance to
zero.
a) Place empty container on the balance. The weight is displayed.
b) Press « » to tare the balance.
"0.00 g" and "Net" appears in the display. "Net" indicates that all
weight values displayed are net values.
Note:
●
If the container is removed from the balance, the tare weight will be
shown as a negative value.
●
The tare weight remains stored until the « » key is
pressed again or the balance is switched off.
The « » key can be used at any time to toggle between weight unit
"UNIT 1","RECALL" value (if selected), weight unit "UNIT 2" (if different
from weight unit 2) and the application unit (if any).
5.5 Recall / Recall Weight Value
121.01
g
0.00
g
0.00
g
M
121.01
g
0.00
g
C
C
0%
100%
Recall stores stable weights with an absolute display value bigger than 10d.
Requirement: The function "RECALL" must be activated in the menu.
a) Load weighing sample. The display shows weight value and
stores stable value.
b) Remove weighing sample. When the weight is removed the Dis
play shows zero.
c) Press « ». The display shows last stored stable weight value for
5 seconds together with asterisk (*) and Memory (M) symbols.
After 5 seconds the display goes back to zero. This can be repeat
ed unlimited times.
Delete last weight value
As soon a new stable weight value is displayed, the old recall value
becomes replaced by the new weight value. When pressing
« », the recall value is set to 0.
Note: If the power is switched off, the recall value is lost. The recall
value can not be printed.
5.6 Weighing with the Weighing-in Aid
5.7 Print / Transmit Data
The weighing-in aid is a dynamic graphic indicator which shows the
used amount of the total weighing range. You can thus recognize at a
glance whether the load on the balance approaches the maximum
load.
Pressing the « » key transmits the weighing results over the interface
e.g. to a printer or a PC.
23Weighing Made Simple
6 The Menu
6.1 What is in the Menu ?
The Menu allows you to match your balance to your specific weighing needs. In the menu
you can change the settings of your balance and activate functions. The main menu has 4
different menus and these contains 35 different topics, each of which allows you various
selection possibilities. For Menu "PROTECT" see chapter "Description of menu topics" section
"Main menu".
Note: See Quick Guide for the graphical overview of the menu (Menu Map) with all setting possibilities.
Menu "BASIC"
Topic Description
DATE Setting the current date.
TIME Setting the current time.
UNIT 1 Specification of the 1st weight unit in which the balance should show the result.
UNIT 2 Specification of the 2nd weight unit in which the balance should show the result.
KEY.BEEP Setting the key beep level.
STB.BEEP Setting the stability beep level.
RESET Call up of the factory settings.
Menu "ADVANCE."
Topic Description
ENVIRON. Matching the balance to the ambient conditions.
CAL Settings for the type of adjustment (calibration).
DATE.FRM Setting the date format.
TIME.FRM Preselection of the time format.
RECALL Switching the application "Recall" for storing stable weights on or off.
STARTUP Setting the mode which the balance powers up ("FULL" or "QUICK").
SHUTOFF Setting the time after which the balance should be switched off automatically.
B.LIGHT Setting the time after which the display backlight should be switched off automatically.
A.ZERO Switching the automatic zero correction (Autozero) on or off.
ZERO.RNG Setting the zero limit of the zero/tare key.
ASSIGN:F Selection of assigned F key application and entering their parameter settings.
DIAGNOS. Starting a diagnostic application.
SRV.ICON Switching the service reminder (service icon) on or off.
SRV.D.RST Reset service date and hours (service reminder)
24 The Menu
Menu "INT.FACE"
Topic Description
RS232 Matching the serial interface RS232C to a peripheral unit.
HEADER Setting the header for printout of individual values.
SINGLE Setting the information for printout of individual values.
SIGN.L Setting the footer for printout of individual values.
LN.FEED Setting line feed for printout of individual values.
ZERO.PRT Setting the auto print function for printing zero.
COM.SET Setting the data communication format of the serial interface RS232C.
BAUD Setting the transfer speed of the serial interface RS232C.
BIT.PAR. Setting the character format (Bit/Parity) of the serial interface RS232C.
STOPBIT Setting the character format (stop bit) of the serial interface RS232C.
HD.SHK Setting the transfer protocol (Handshake) of the serial interface RS232C.
Topic Description
406.2
g
ADVANCE
BASIC
TIME
DATE
ENVIRON.
STABLE
ENVIRON.
01.
2
500
01.
6
500
01.6500
RS E.O.L. Setting the end of line format of the serial interface RS232C.
RS.CHAR Setting the char set of the serial interface RS232C.
INTERVL. Selection of the time interval for the simulated print key press.
6.2 Menu Operation
In this Section you will learn how to work with the menu.
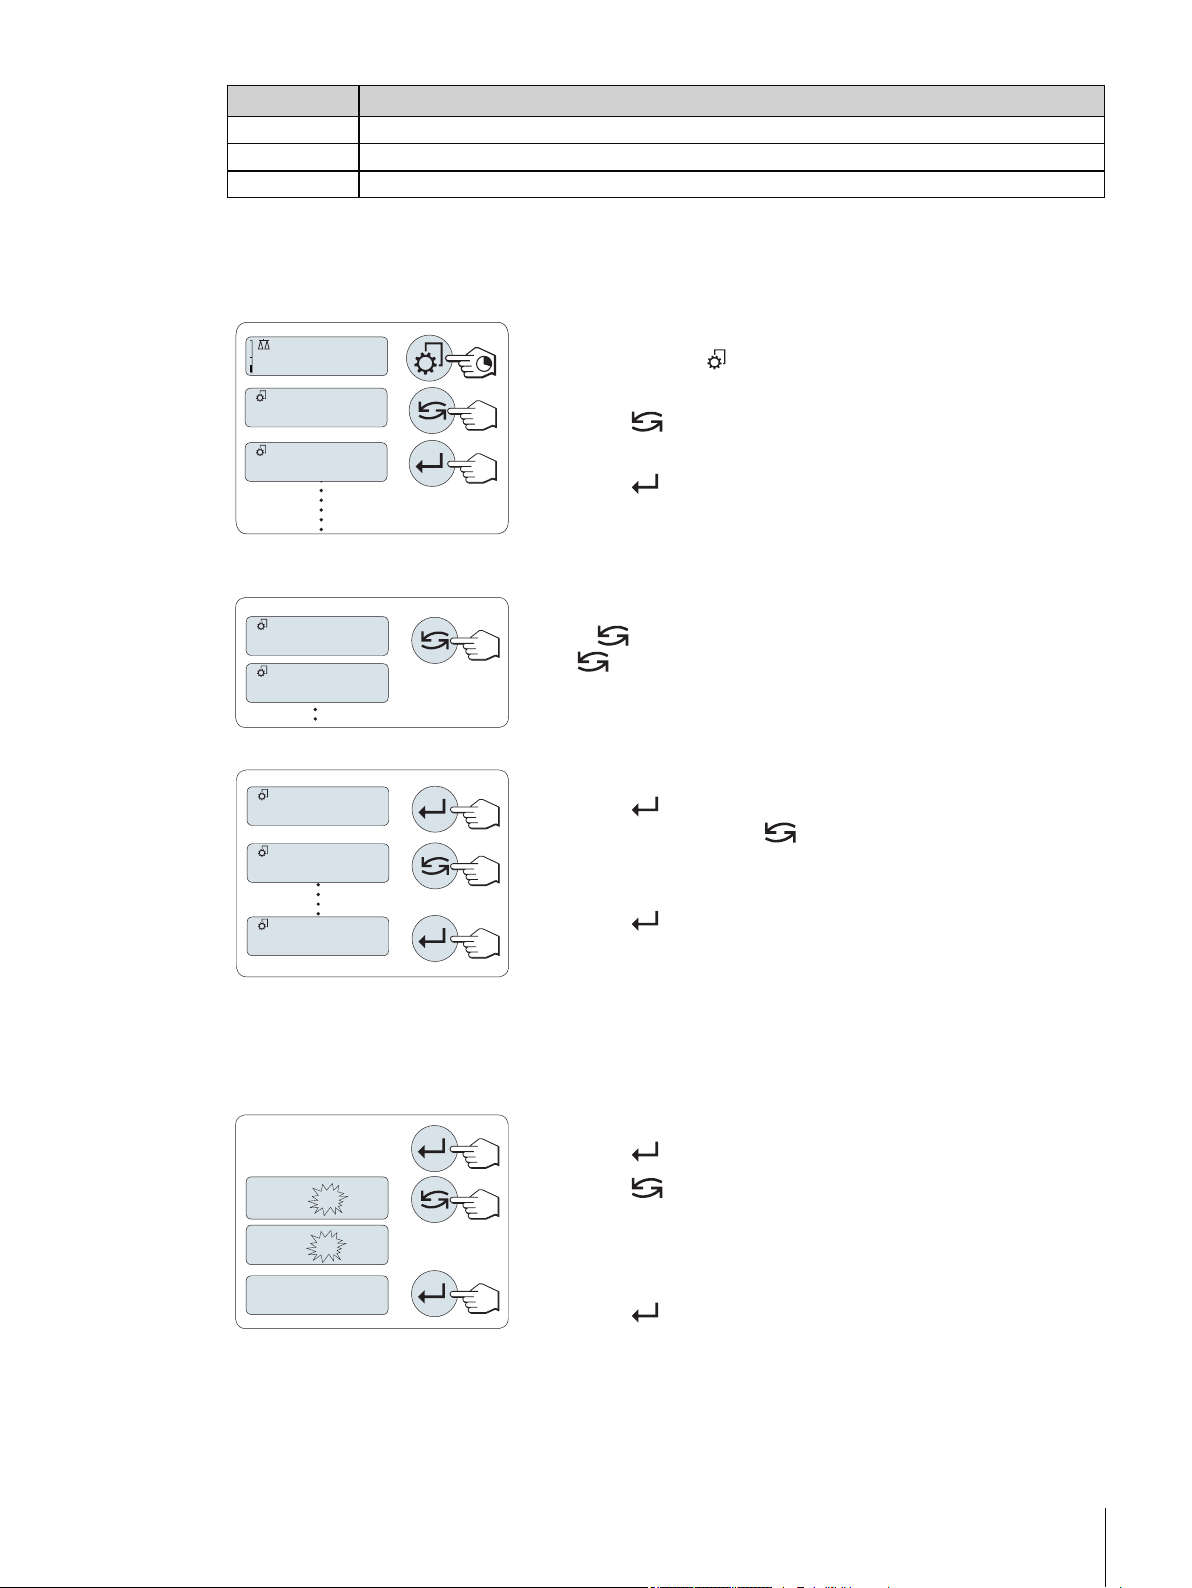
Select Menu
a) Press and hold « » to activate main menu. The first menu
"BASIC" is displayed (except menu protection is active).
b) Press « » repeatedly to change menu (Scrolling down/up «+» /
«–» keys).
c) Press « » to confirm the selection.
Note: The menu selection "BASIC", "ADVANCE." or "INT.FACE" can not
be saved. The selection "PROTECT" must be saved.
Select Menu Topic
Press « ». The next menu topic appears in the display. Each time
the « » or the «+» key is pressed, the balance switches to the next
menu topic; the «–» key to the previous menu topic.
Change Settings in a Selected Menu Topic
a) Press « ».The display shows the current setting in the selected
menu topic. Each time « » or «+» is pressed, the balance
switches to the next selection; press «–» to the previous selection.
After the last selection, the first is shown again.
b) Press « », the selected setting is accepted but not yet executed.
The settings are executed only after "SAVE:YES" has been con
firmed.
Change Settings in a Submenu Selection
The same procedure as for menu topics.
Input Principle of Numerical Values
a) Press « » for input of numerical values.
b) Press « » to select a digit or a value (depending on the appli
cation). The selected digit or the selected value is blinking.
c) For changing digits or values, press «+» to scroll up or «–» to
scroll down.
d) Press « » to confirm the input.
25The Menu
SAVE:YES
SAVE:NO
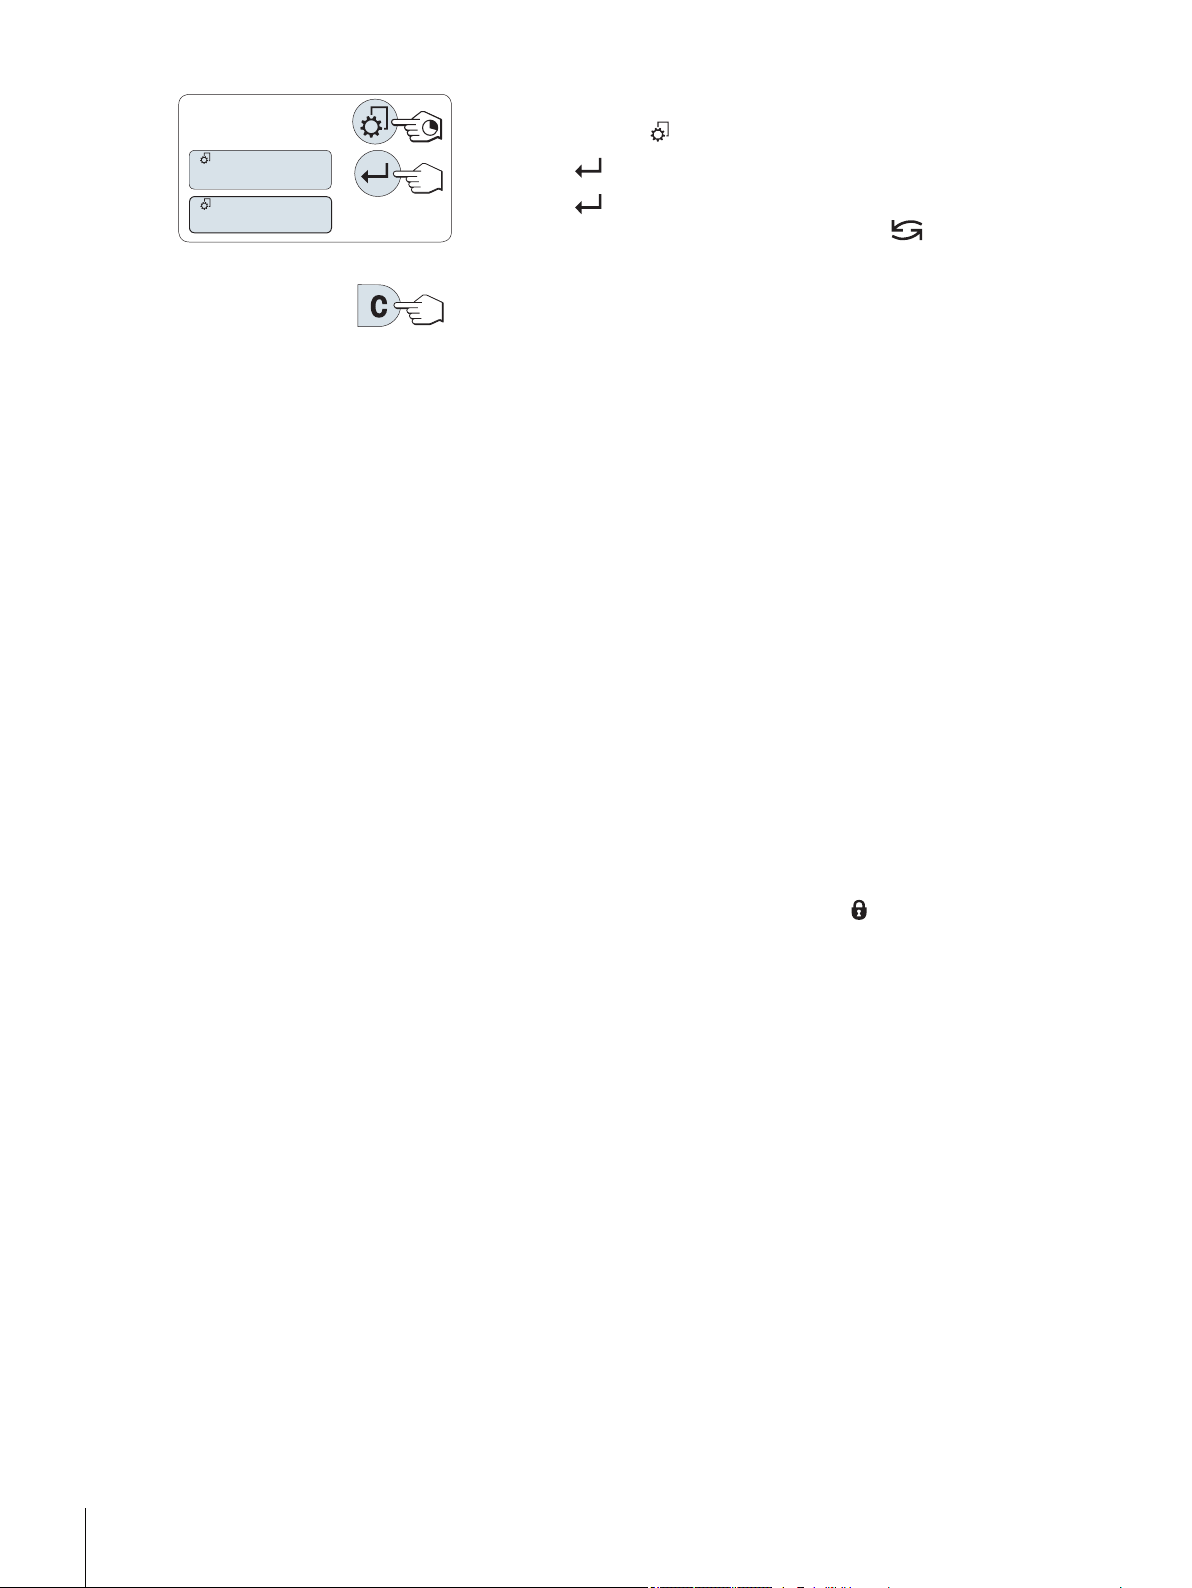
Saving Settings and Closing the Menu
a) Press and hold « » to leave menu topic.
b) Press « » to execute "SAVE:YES". Changes are saved.
c) Press « » to execute "SAVE:NO". Changes are not saved. To tog
gle between "SAVE:YES" and "SAVE:NO" press « ».
Cancel
For leaving menu topic or menu selection without saving press «C»
(one step back in the menu).
Note: If no entry is made within 30 seconds, the balance reverts to last active application mode. Changes are
not saved. If changes are made, the balance asks "SAVE:NO".
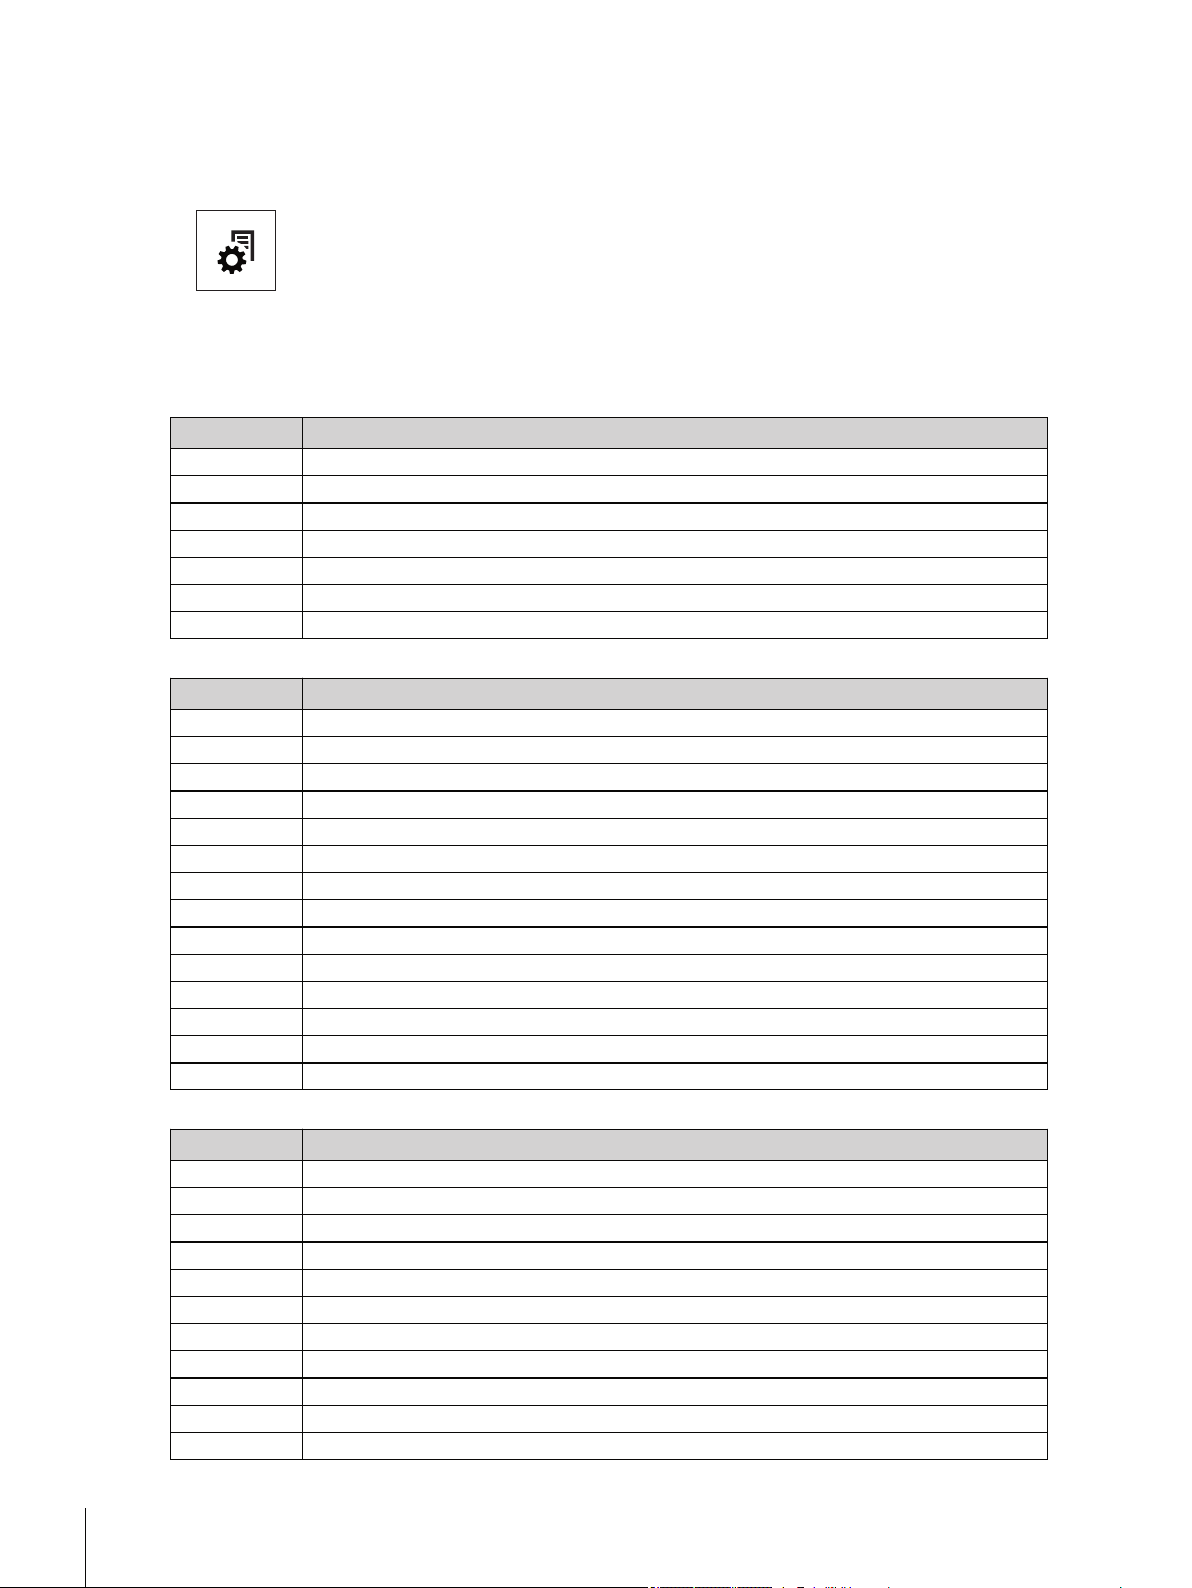
6.3 Description of Menu Topics
In this Section you will find information regarding the individual menu topics and the available selections.
6.3.1 Main Menu
Selecting the menu.
"BASIC" The small "BASIC" menu for simple weighing is displayed.
"ADVANCE." The extended "ADVANCE." menu for further weighing settings is
displayed.
"INT.FACE" The menu "INT.FACE" for all interface parameter settings for
peripheral devices e.g. printer is displayed.
"PROTECT" Menu protection. Protection of balance configurations against
unmeant manipulation.
"OFF" Menu protection is off. (Factory setting)
"ON" Menu protection is on. The menu BASIC, ADVANCE. and INT.FACE
are not displayed. This is indicated with " " in the display.
Note:
●
The menu selection "BASIC", "ADVANCE." or "INT.FACE" can not be saved.
26 The Menu
●
To activate "PROTECT" "ON" or "OFF", this selection must be saved.
6.3.2 Basic Menu
"DATE" – Date
Setting the current date according to date format.
Note: A reset of the balance will not change this setting.
"TIME" – Time
Setting the current time according to time format
"+1H" Set the current time forwards by 1 hour (to adjust summer or
winter time). (Factory setting)
"-1H" Set the current time backwards by 1 hour (to adjust summer or
winter time).
"SET.TIME" Enter the current time.
 Loading...