

Mettler Toledo PE200, PE400, PE4000, PE2000 Operating Instructions Manual

Operating Instructions
Bedienungsanleitung
Mode d‘emploi
Instrucciones de manejo
PE200
PE400
PE2000
PE4000

Leerseite

OPERATING INSTRUCTIONS
Page 2
BEDIENUNGSANLEITUNG
Seite 20
MODE D‘EMPLOI
Page 38
English
Deutsch
Français
INSTRUCCIONES DE MANEJO
Página 56
Español
1

AVAILABLE MODELS
These Operating Instructions apply to all models of the METTLER TOLEDO PE Series introduced on these pages.
The operation of the balances is virtually identical. The differences are only apparent in their weighing range, readability and
size of the weighing pan.
PE balances are equipped with METTLER TOLEDO DeltaDisplay, a special display mode for weighing in.
PE200 PE2000
Weighing range 210 g Weighing range 2100 g
Readability 0.01 g Readability 0.1 g
PE400 PE4000
Weighing range 410 g Weighing range 4100 g
Readability 0.01 g Readability 0.1 g
2
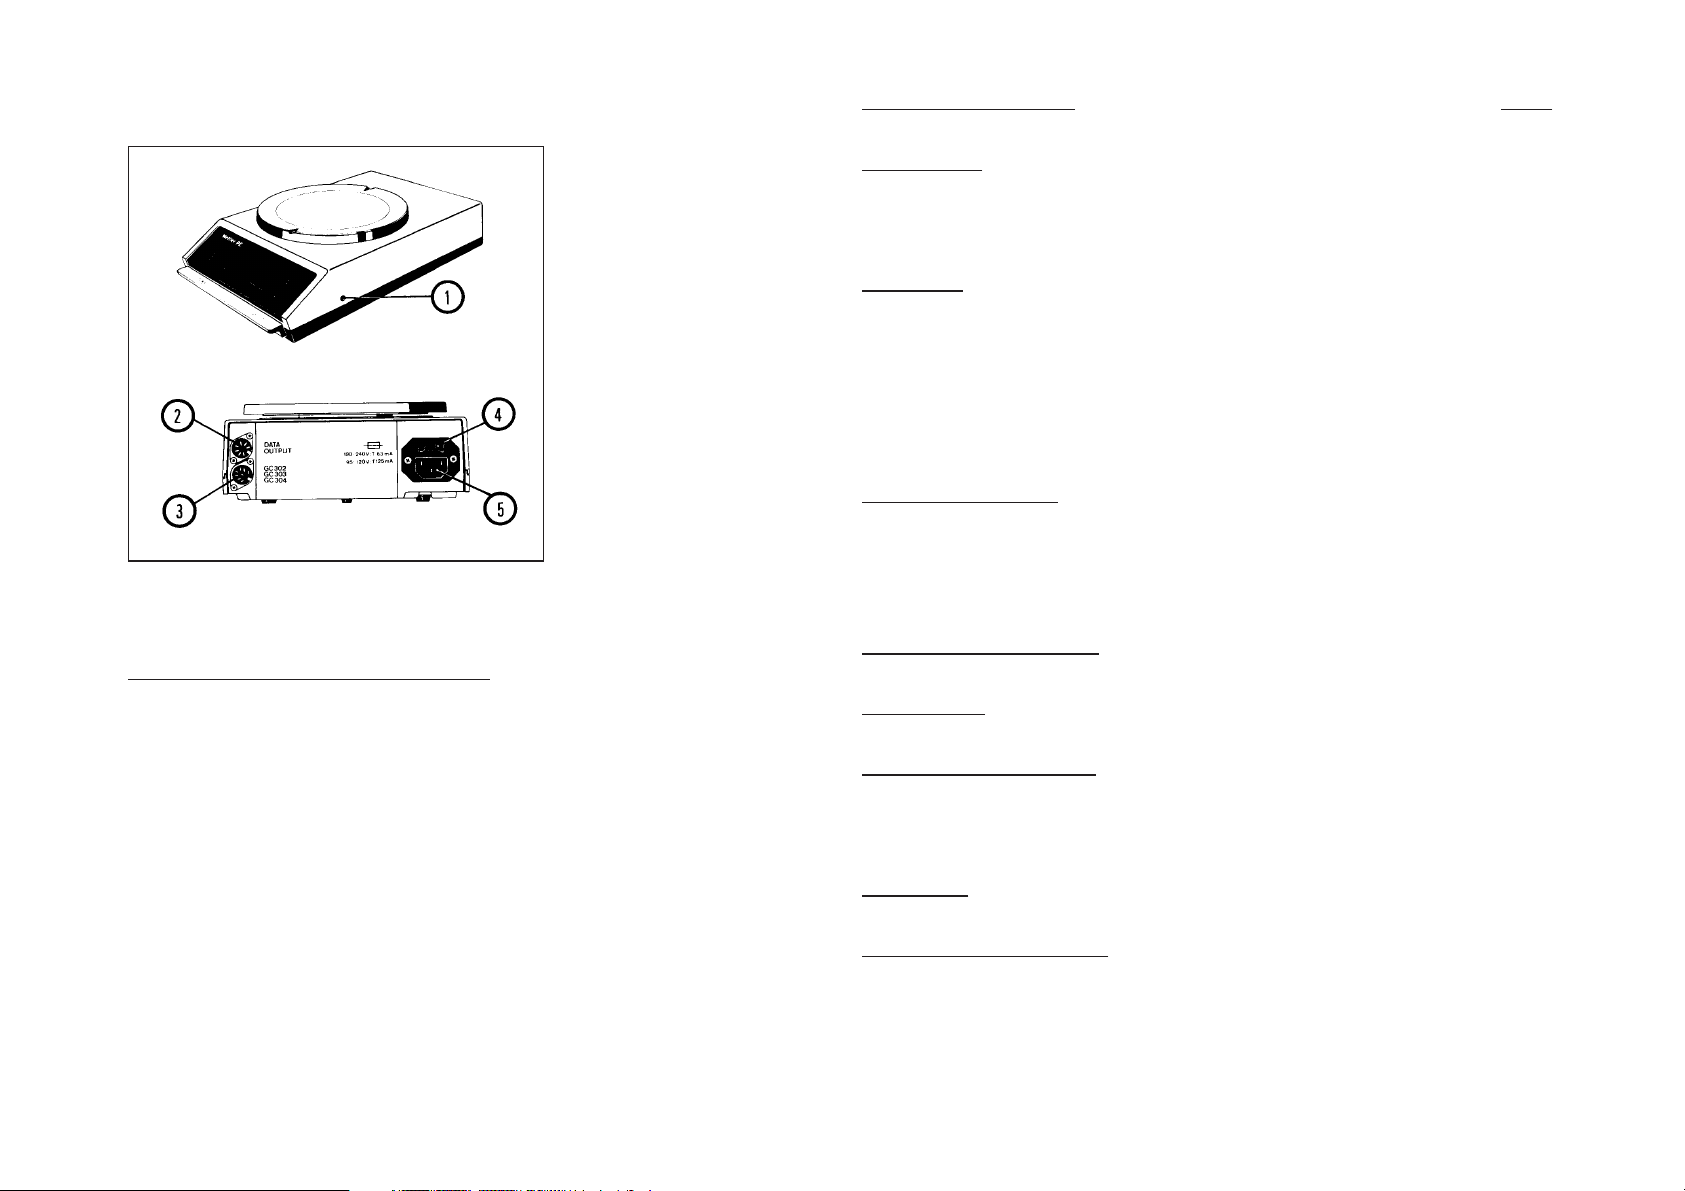
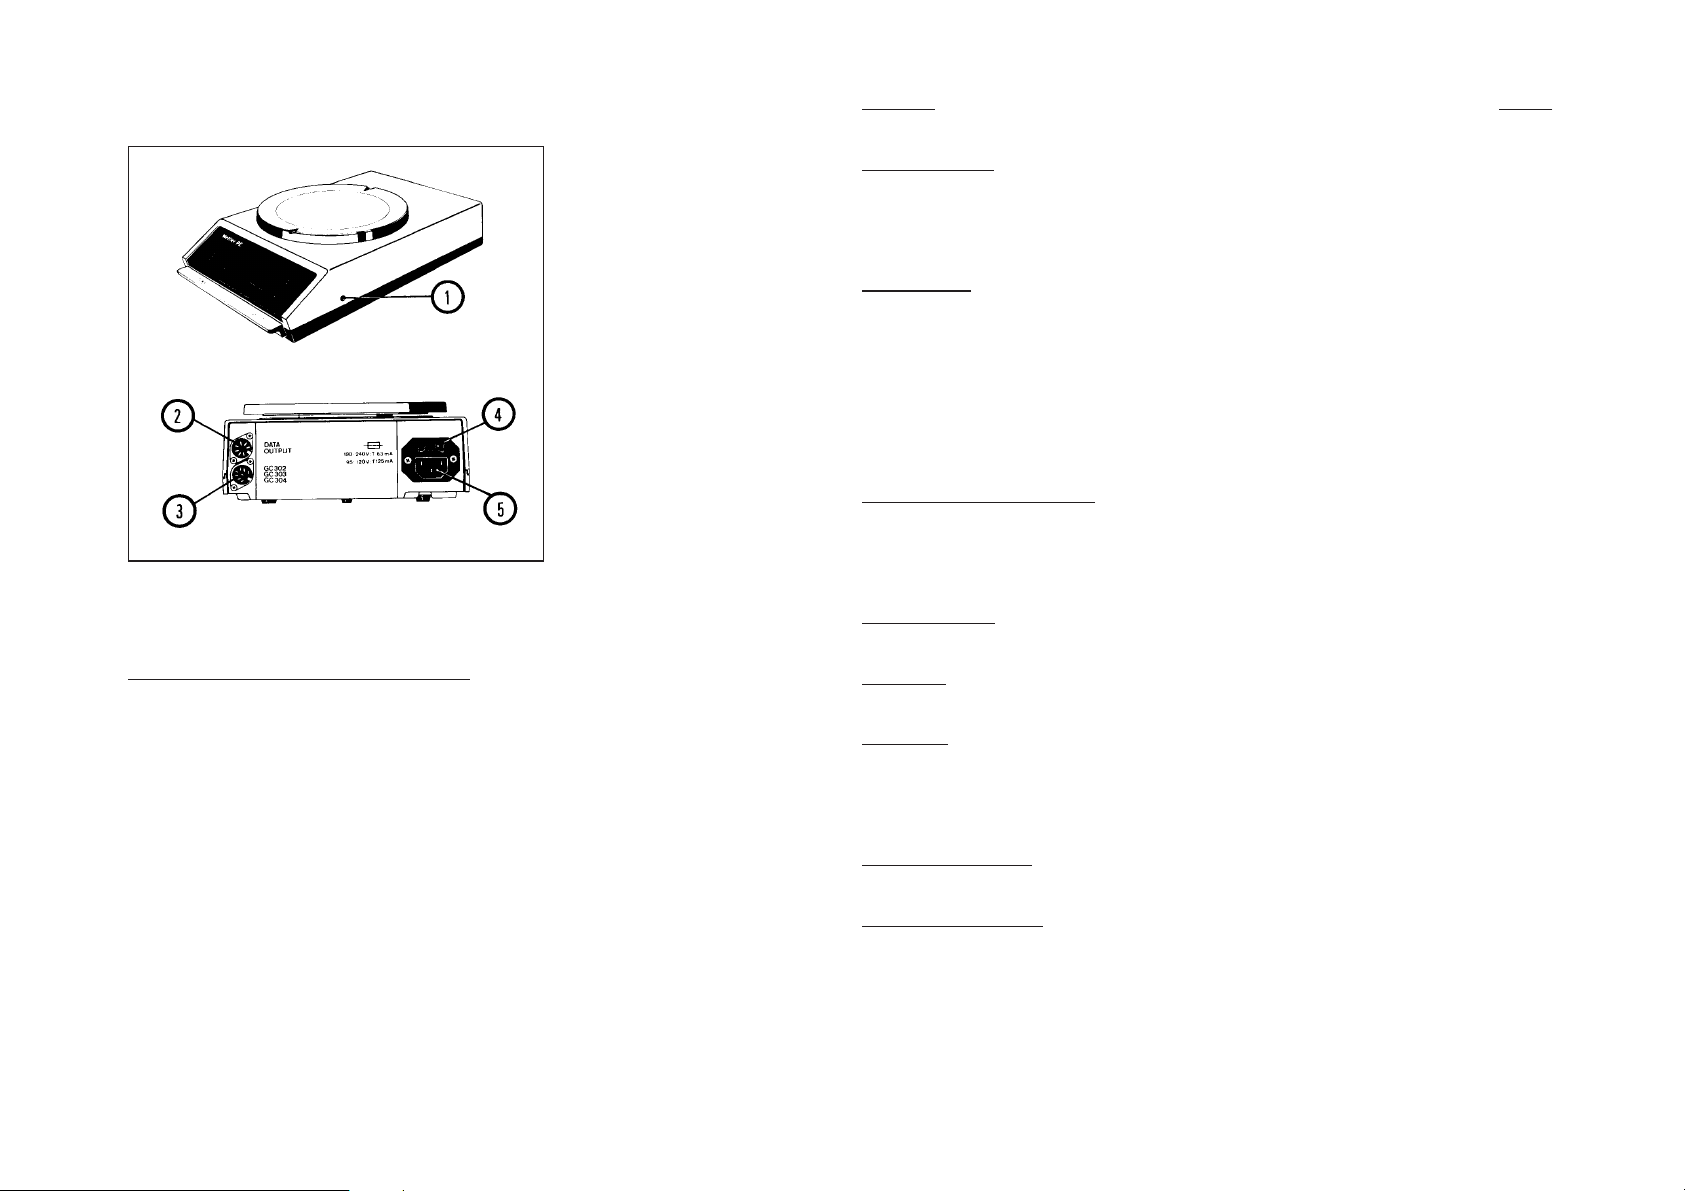
Operating components and connections
TABLE OF CONTENTS Page
Preparation
How to check the voltage setting 4
How to position the weighing pan and set up the balance 5
Operation
How to switch the balance on or off 6
How to calibrate the balance 7
How to make a weight determination or tare the balance 8
How to weigh in with DeltaDisplay 9
How to weigh out and make weight comparisons 10
Additional features
Unstable or restless weighing objects;
weighing below the balance 11
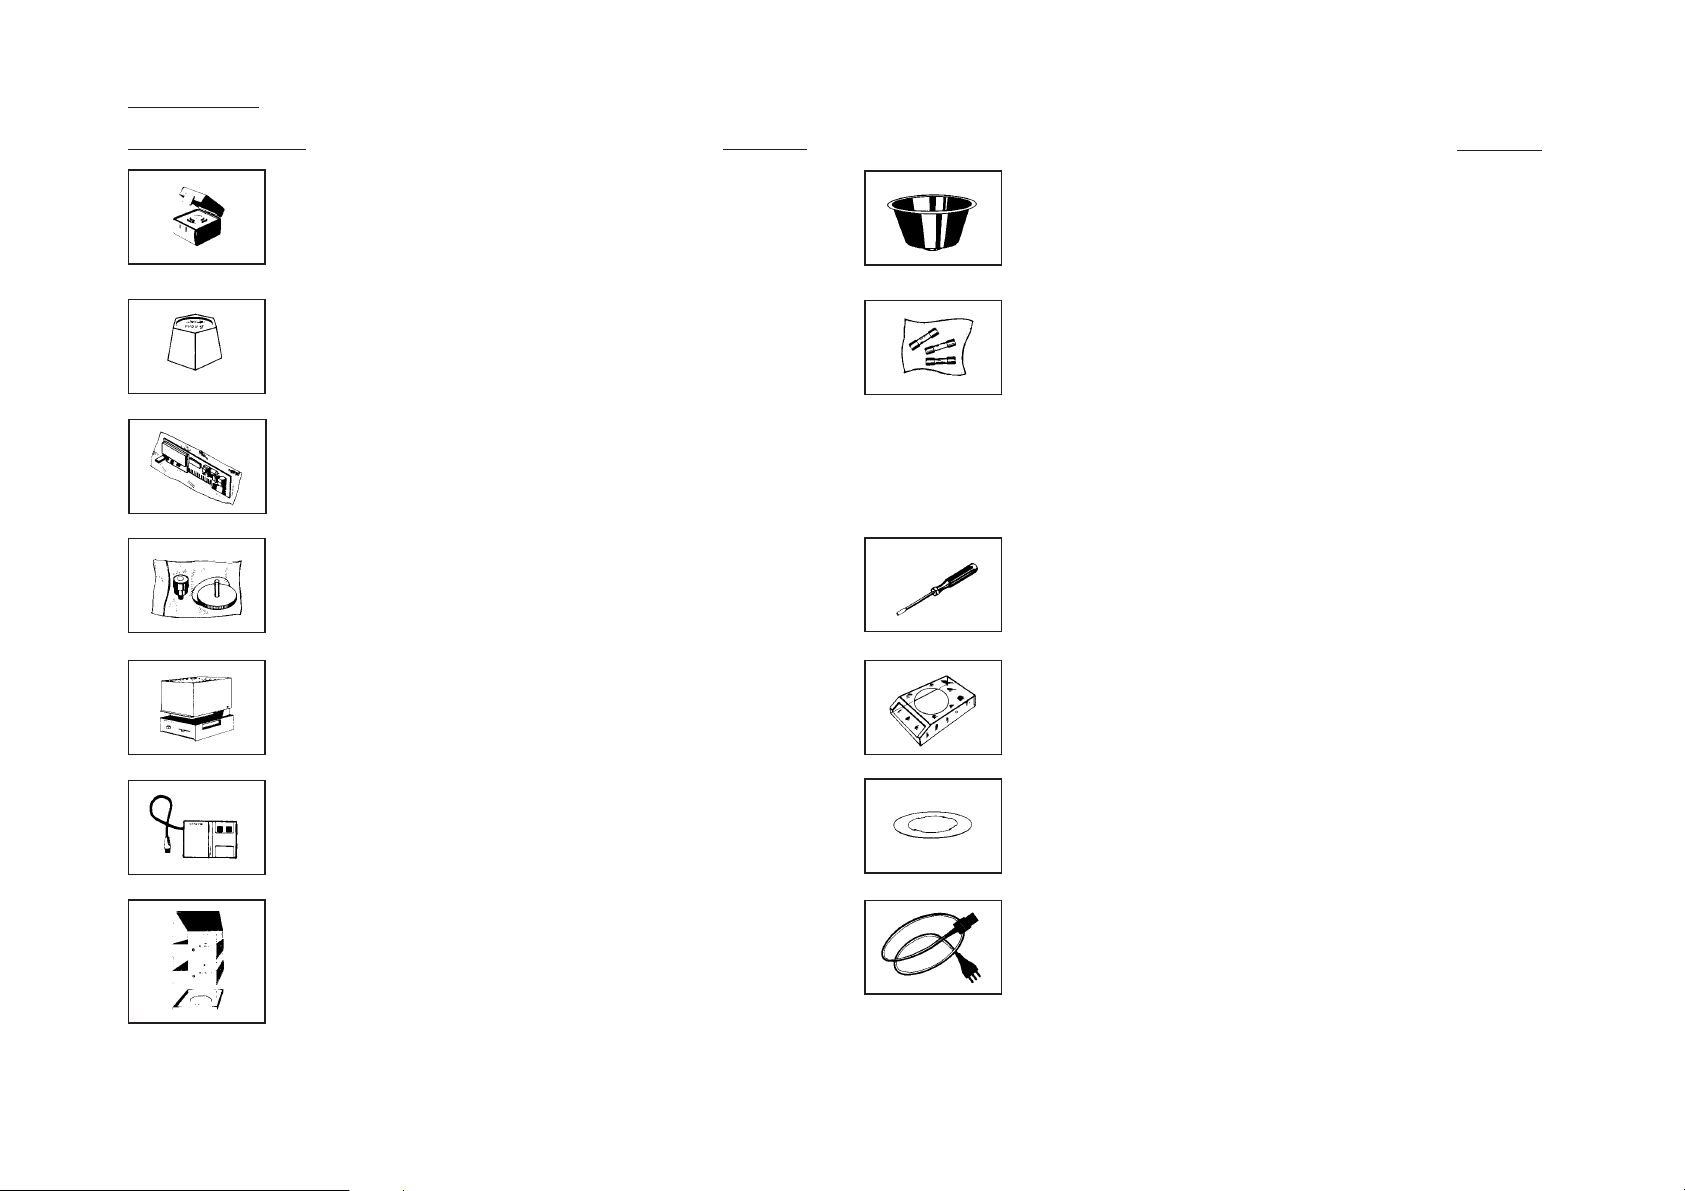
Application Input Units; 05 Data Output 12
Peripheral instruments (for 05 Data Output) 13
1 Calibration screw
2 Connection socket for Data Output (Option 05)
3 Connection socket for GC302, GC303 and GC304
Application Input Units
4 Fuse holder with back-up fuse
5 Power cable receptacle
Accessories 14
Care and Maintenance
How to replace the in-use cover and the fuse 15
Maintenance and calibration 16
What if … 17
Technical specifications 18
3
PREPARATION: How to check and correct the preselected voltage
The voltage selected for the balance must agree with the power line voltage. Before placing the balance in operating for the first time, check and if necessary, correct
the voltage setting.
The factory setting is indicated on a lable at power cable receptacle (5). If the indicated voltage agrees with that of the local power supply line, this page can be
disregarded. If the voltage does
selector and change it, if necessary. To do this, proceed as follows:
not agree with the local power supply voltage, or if the label is missing, open the balance housing, check the position of the voltage
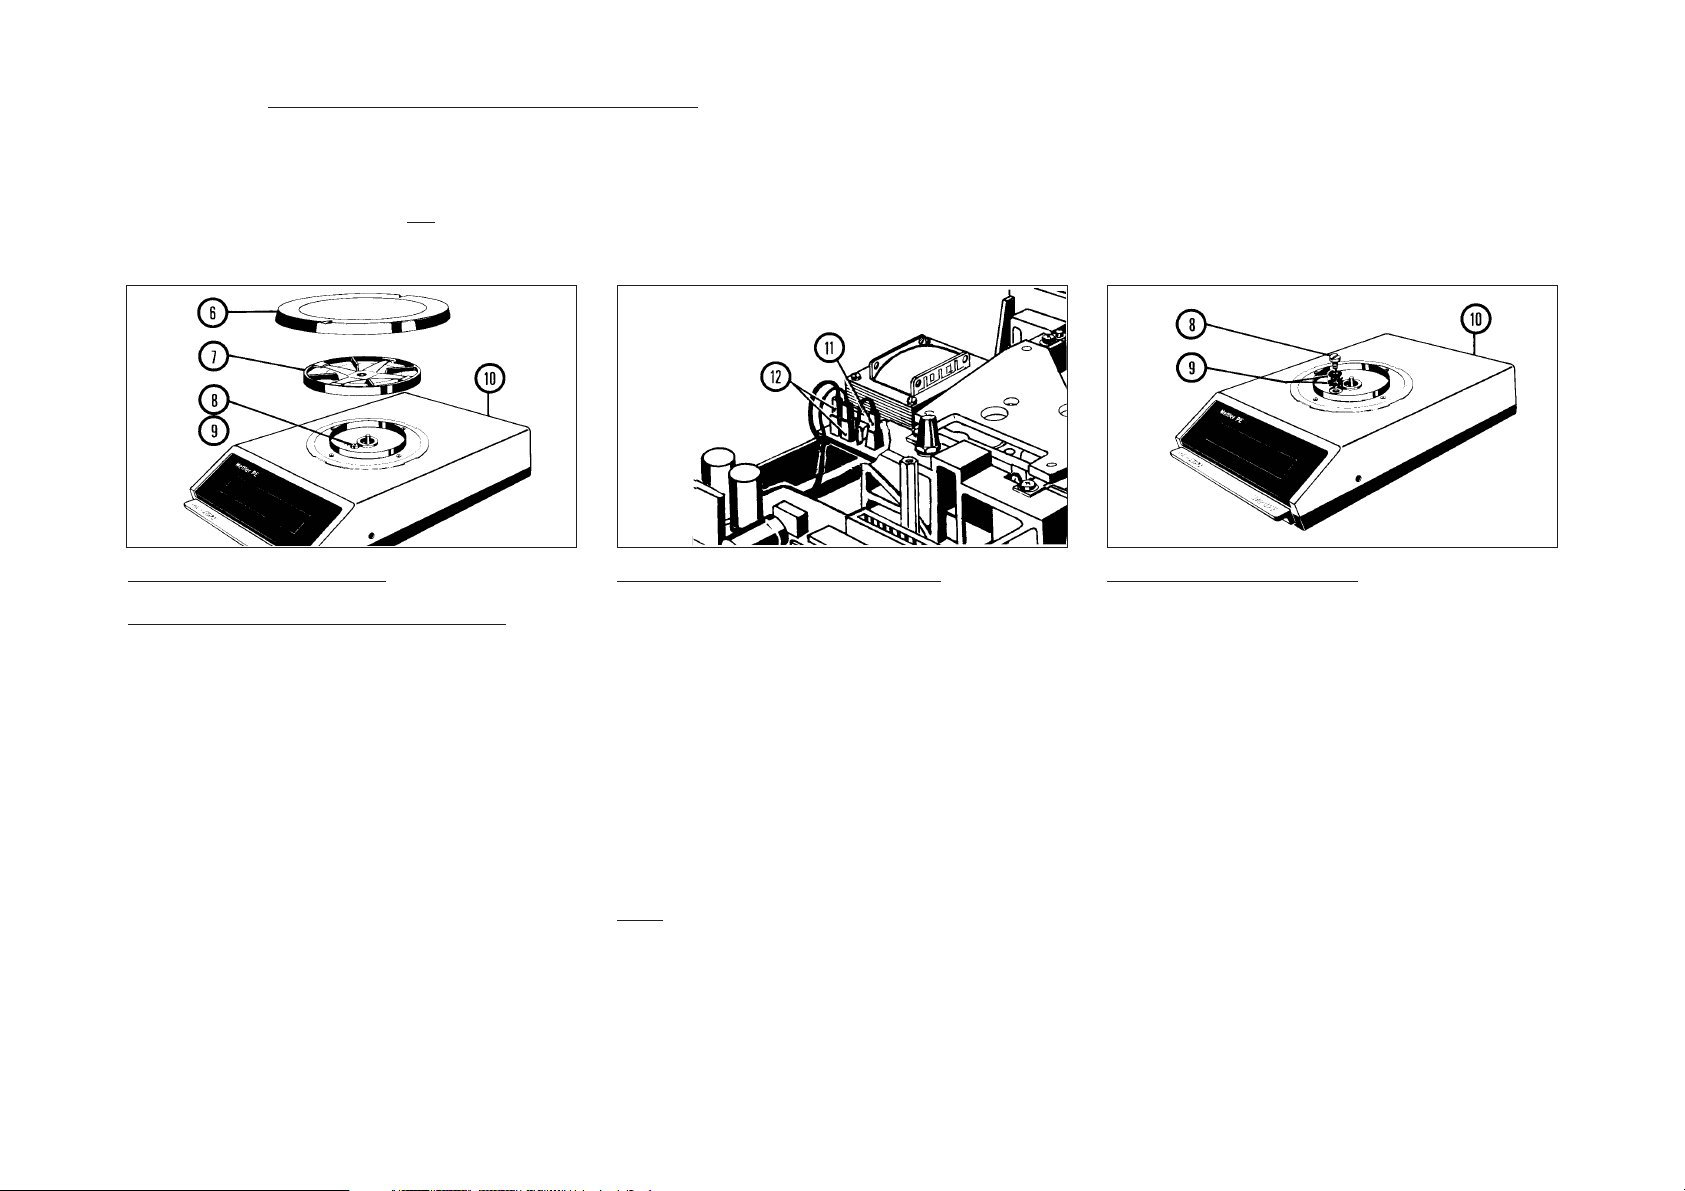
Opening the balance housing
Make sure the power cord is not connected
– Remove weighing pan (6) and pan support
(7), if they are already installed.
– Remove screw (8) and put aside toothed ring
and washer (9).
– Carefully lift off upper part f housing (10)
together with in-use cover, if the latter is
installed.
4
Voltage selector next to weighing cell
– Check to make sure that voltage selector plug
(11) is attached to the pin which designated
your local power supply voltage.
– If necessary, disconnect voltage selector plug
(11) and attach it to the pin designated with
your local power supply voltage.
– Admissible operating voltages:
95 V, 105 V { insert
110 V, 120 V {125 mAT microfuse
190 V, 210 V { insert
220 V, 240 V { 63 mAT microfuse
Note: when changing the power supply voltage setting from 95…120 V to 190…240 V (or vice versa),
make sure that the microfuse is also changed.
– The two connectors (12) must not be interchanged.
Closing the balance housing
– Carefully place upper part of housing (10)
from top onto balance.
– First position toothed ring, then regular washer
(9).
– Screw in and tighten screw (8).
PREPARATION: How to install the weighing pan and set up the balance
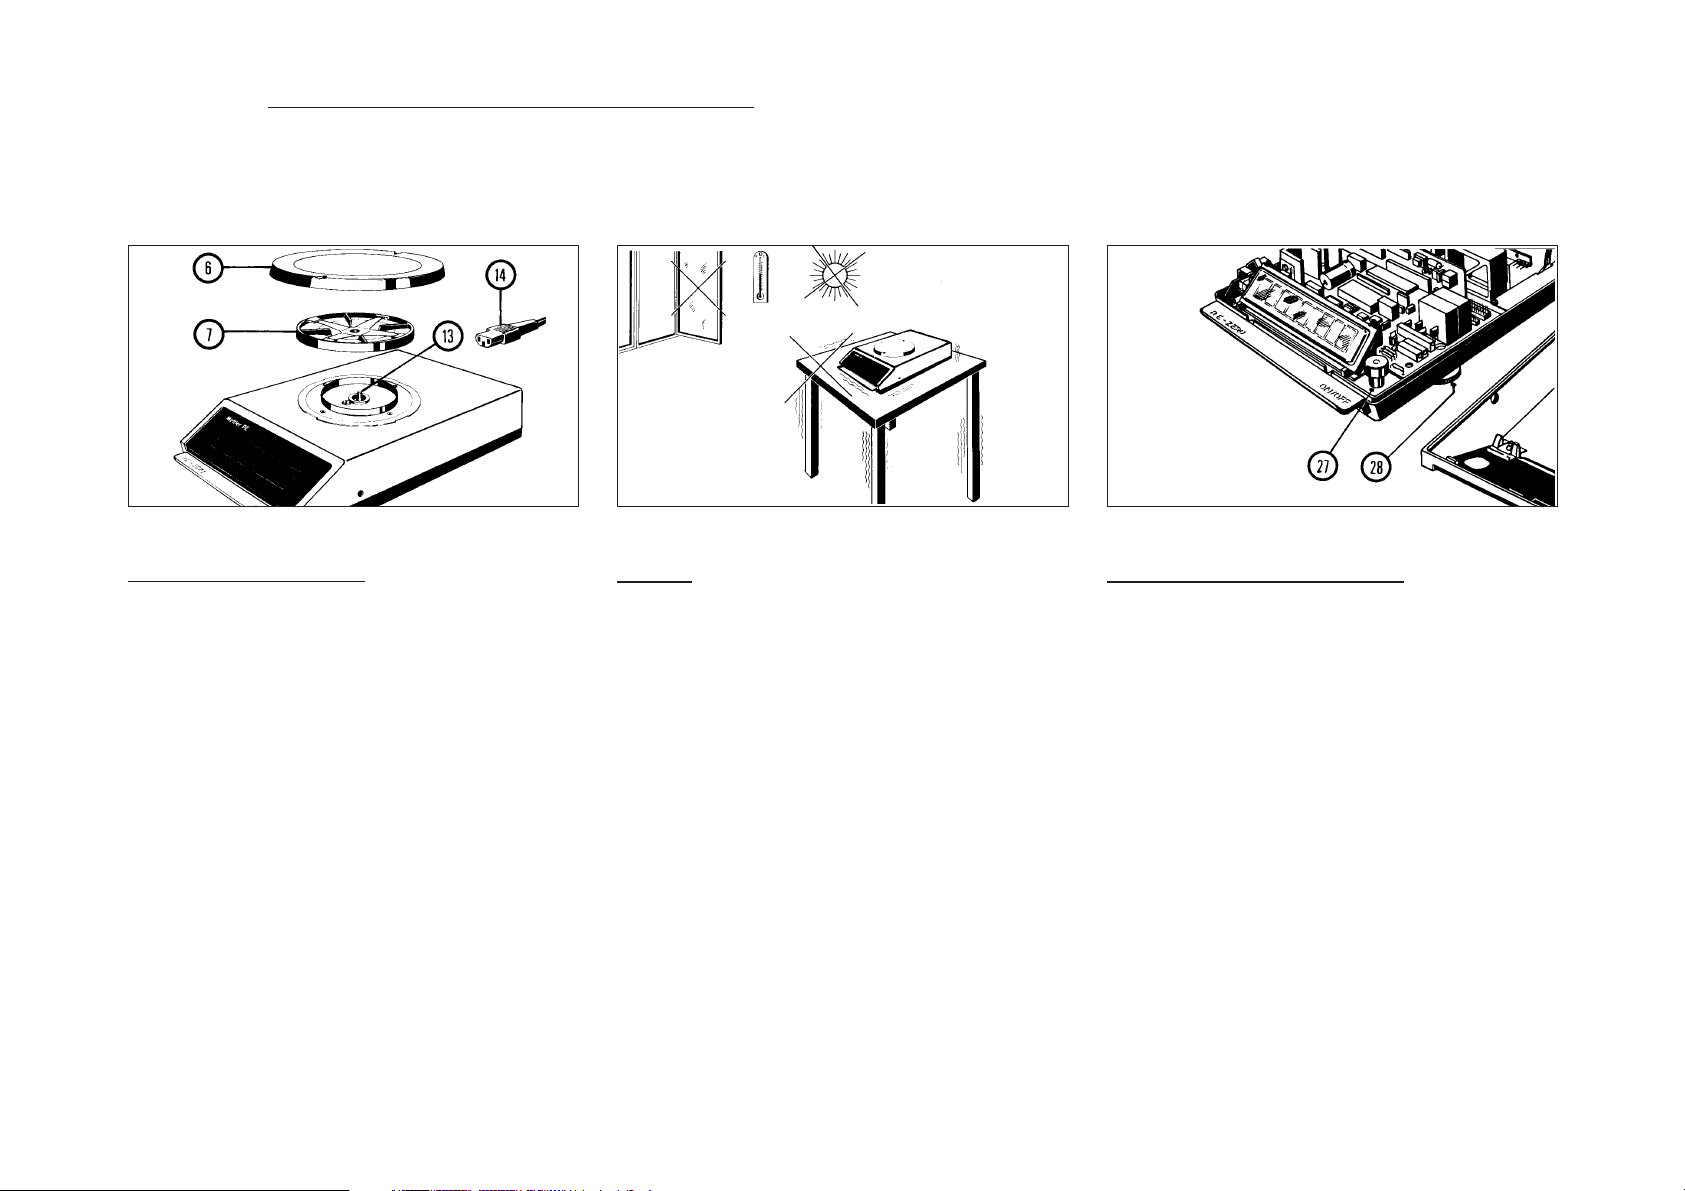
Installing the pan support and weighing pan is always done in the same manner, regardless of whether the in-use cover is installed or not.
Every PE balance provides reliable results, even under less than favorable environmental conditions.
However, it is best to select a location that is stable, and not exposed to sunshine or to drafts (fast, stable display).
Installing the weighing pan
– Place pan support (7) on conical peg (13).
– Place weighing pan (6) on pan support.
– Connect power cable (14).
Location
– Solid, vibration-free support.
– No excessive temperature fluctuations.
–Avoid exposure to direct sunlight.
–Avoid drafts.
If it is absolutely necessary to work under less favorable conditions, consult section “ADDITIONAL
FEATURES: Switching the integration time”.
Level indicator field installation kit
This level indicator field installation kit was developed
for PE balances which are moved frequently to new
locations. With the level indicator, the PE balance
can be leveled at every new location. Its efficiency is
therefore increased. The field installation kit contains
2 foot screws (28) and 1 level indicator (27).
METTLER TOLEDO Service can also be called on for
this installation. Order No. see page 14.
5
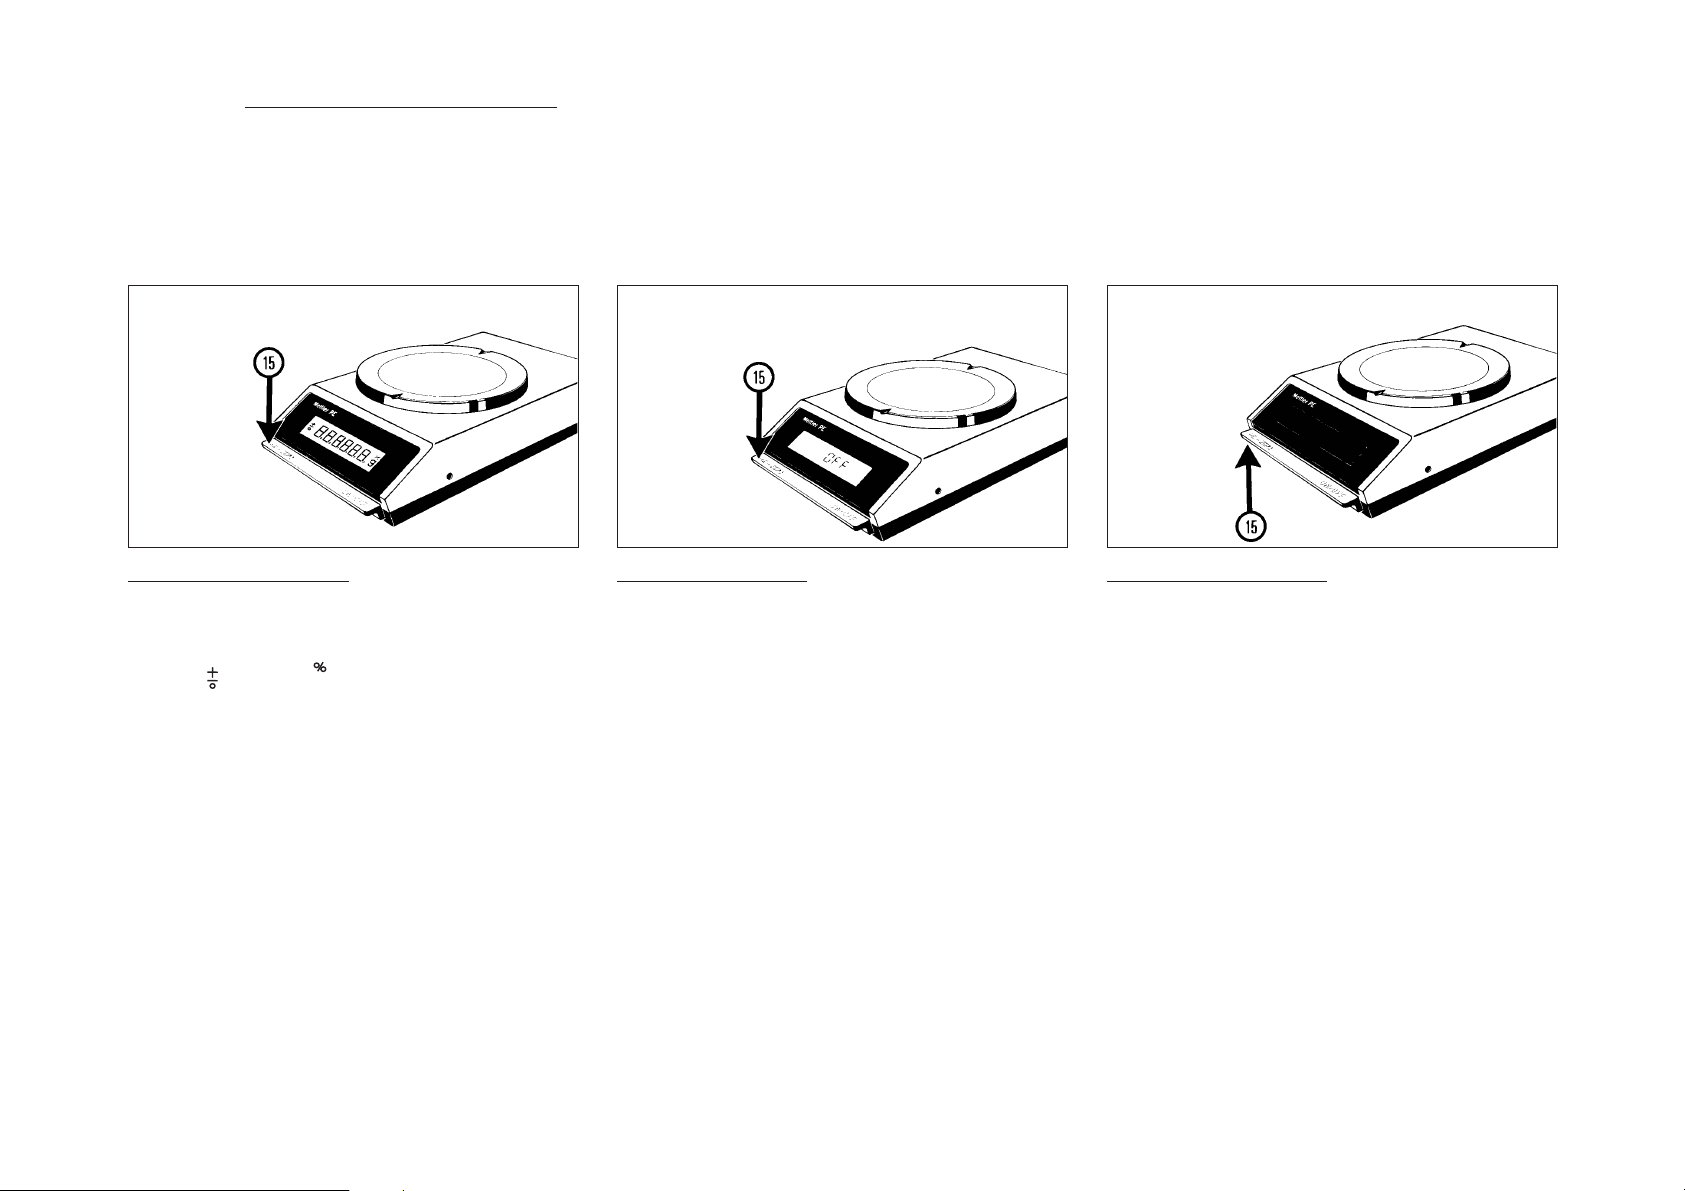
OPERATION: How to switch the balance on or off
If you use your PE balance several times a day, it is best to leave it switched on all day long.
This way, a constant operating temperature can be reached and weighing accuracy is increased.
It is also recommended that the balance be switched on some time before you begin to work with it (warm-up time).
Switching the balance on
– Briefly press single control bar (15): all display
elements light up for a few seconds.
((((((
g
This will allow you to make a function check of the
display. Then the zero display lights up with as many
decimal places as are provided by te accuracy of
your balance model,
i.e. 0.00 g for the PE200, PE400
0.0 g for the PE2000, PE4000
6
Display indicates OFF
If the power supply is interrupted during operation,
the display will indicate “OFF” as soon as power is
restored.
At that time, you must briefly press single control bar
(15).
Switching the balance off
– Lift single control bar (15).
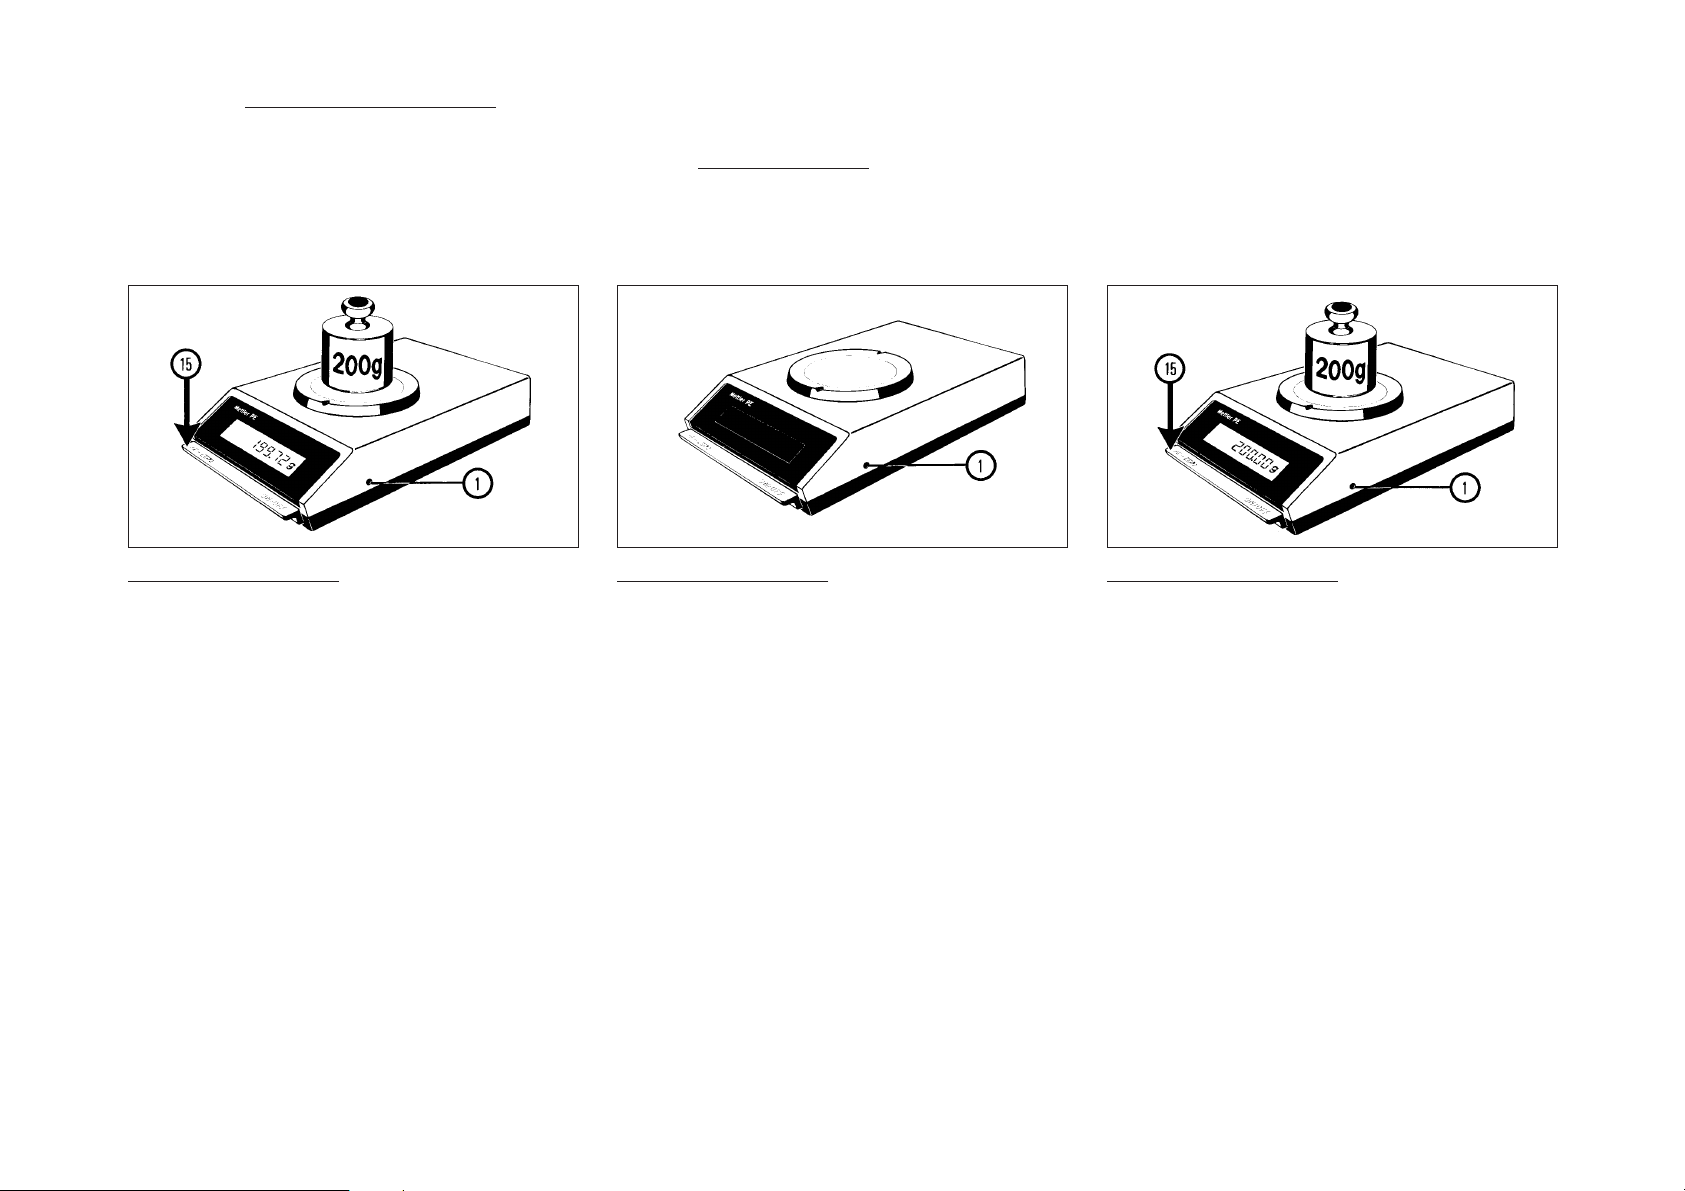
OPERATION: How to calibrate the balance
Your balance must be calibrated (i.e., set to the correct weight indication) every time its location is changed; this is the only way to ensure accurate weighings.
Before being calibrated, the balance must be left switched on for
Depending on your balance model, you will need certain test weights for calibration. These are listet under “ACCESSORIES, Optional equipment” for each balance
model. The test weights must always be handled carefully; they should not be picked up with your bare hands.
at least 30 minutes (warm-up time).
Checking the calibration
– Press single control bar (15): display will
indicate zero.
– Place test weight on pan, read indication on
display.
If the result displayed by the balance corresponds to
the weight indicated on the test weight down to the
last decimal, your balance is O.K. If not, it must be
calibrated.
Using calibration screw (1), adjust calibration as
described in the adjacent dolumn.
Recheck calibration after every correction (see
column at right).
Adjusting the calibration
– Place test weight on pan, press single control
bar.
– Remove test weight from pan.
–Turn calibration screw (1):
Clockwise, if the indicated weight value is
larger than the test weight;
Counterclockwise, if the indicated weight value
is smaller than the test weight.
With each turn of the screw, the calibration is changed
by about:
0.16 g for the PE200, PE400 (test weight 200 g),
1.6 g for the PE2000, PE4000 (test weight 2000 g).
Rechecking the calibration
After every correction made with calibration screw
(1), the calibration must be rechecked:
– Press single control bar (15), display will
indicate zero.
– Place test weight on pan and read result.
If the result now displayed by the balance
corresponds to the weight indicated on the test weight
down to the last decimal, your balance is ready for
use.
If not, continue adjusting calibration screw (1) until
the balance is correctly calibrated.
7
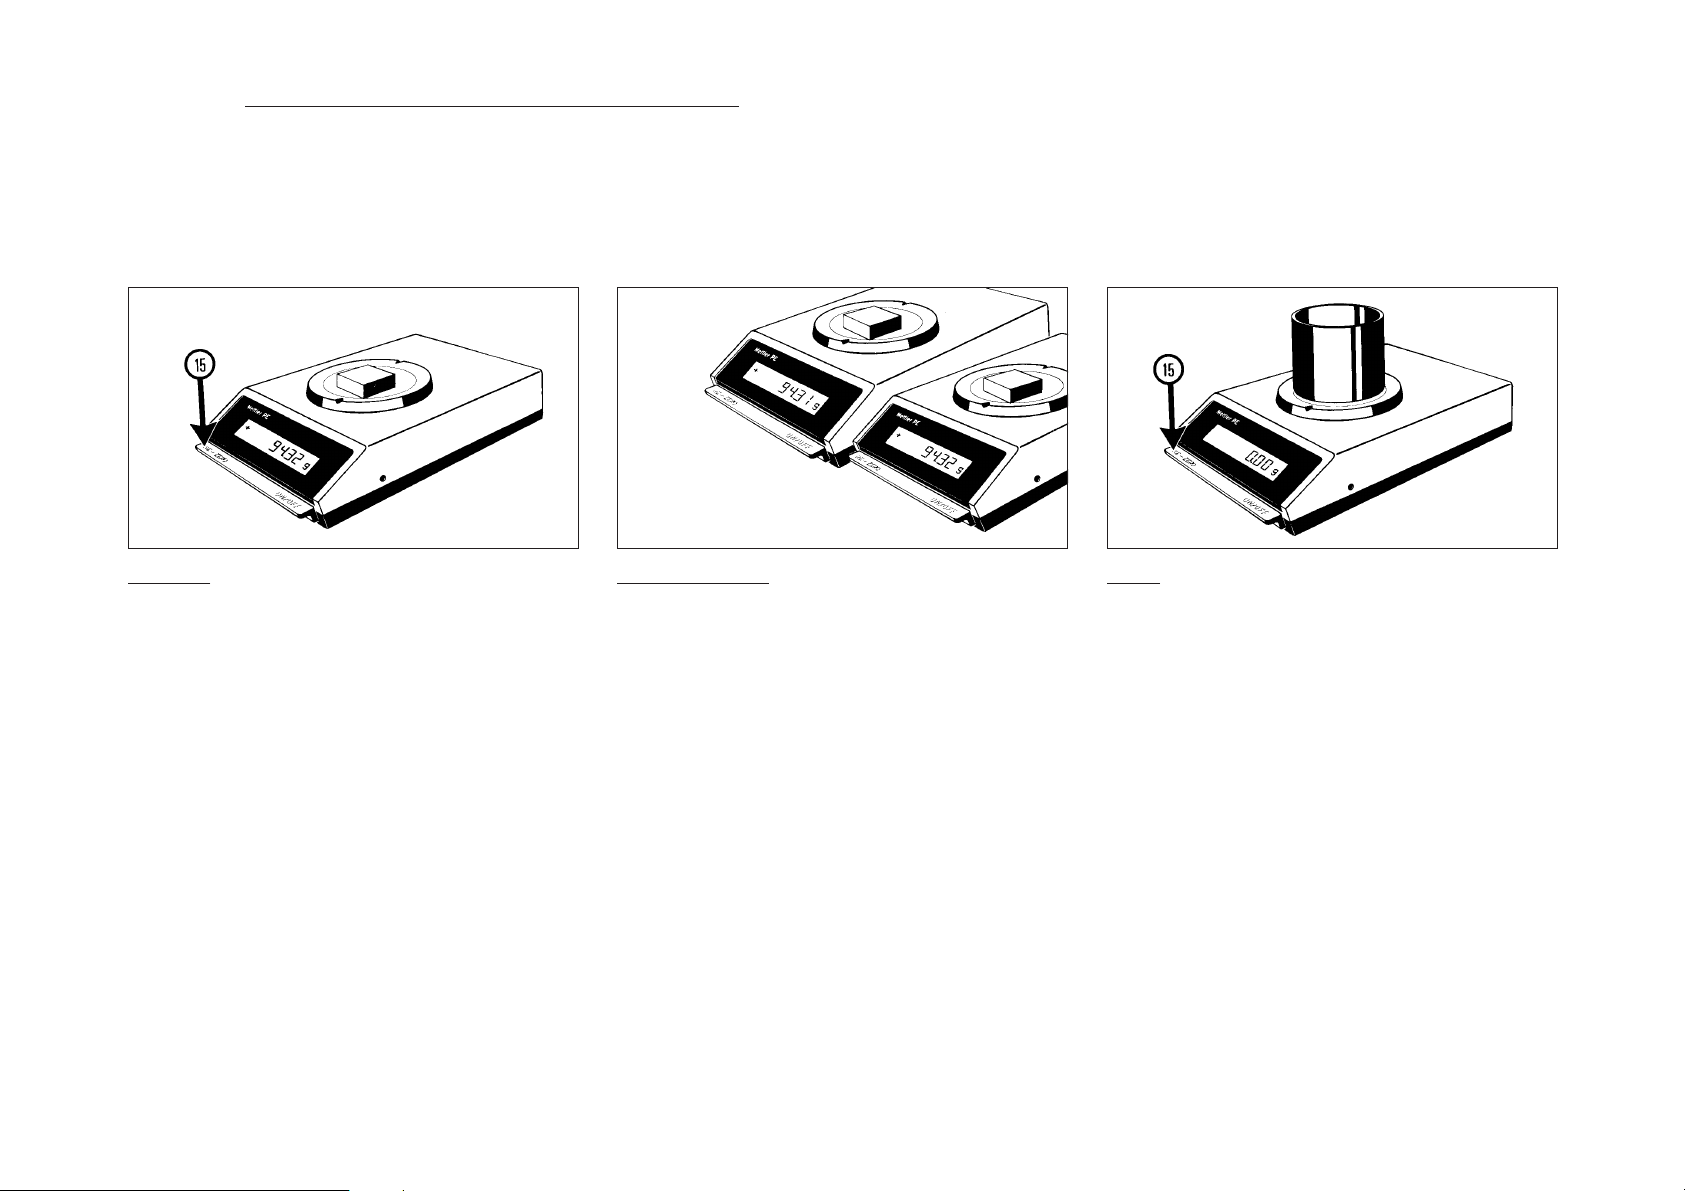
OPERATION: How to make a weight determination or tare the balance
In PE balances, the readability is the same throughout the entire weighing range.
Automatic rounding of the last digit increases the accuracy of your PE balance even more.
Taring means that the display is reset to zero while a weight (such as a container) is on the weighing pan.
This way, the balance will automatically subtract the weight of the container from the total weight when an object or substance is weighed in. In that case, the
balance only displays the weight of the weighed-in object.
However, the combined weight of container and the object may not exceed the overall weighing range.
Weighing
– Briefly press down single control bar (15) to
set the display to zero.
– Place weighing object on pan.
– Read weight display.
If the weighing range is exceeded, the display is
blanked out except for the upper horizontal segments
of the numbers. The balance thus indicates that it is
overloaded.
8
Display accuracy (result rounding)
Your balance always measures one more decimal
place than it actually displays. This last, invisible
digit is then rounded off according to the 4/5 principle.
Example:
The balance measures 94.314 g,
but displays 94.31 g
or
the balance measures 94.315 g,
but displays 94.32 g.
Taring
– Place container on weighing pan: balance will
indicate its weight.
– Briefly press down single control bar (15),
thus taring the balance: display now indicates
zero.
The entire weighing range (minus the weight of the
container) is now available for weighing in.
If DeltaDisplay is switched on (see next page), and
if the balance is tared before achieving stability, the
entire display is blanked out until stability is reached;
only then will zero appear.

OPERATION: How to weigh in
Weighing-in means to fill loose or liquid objects into a container on the pan until a desired weight (target weight) is reached.
All PE balances are equipped with DeltaDisplay which considerably simplifies weighing in. To help you follow the weight changes, the display sequence speeds up
automatically and the last decimal place of the display is blanked out. A stability detector is switched on along with the DeltaDisplay and it blocks the data output until
the weighing result is stable enough. DeltaDisplay and stability detector can be switched off from within the balance (see also “ADDITIONAL FEATURES OF PE
BALANCES”).
Weighing-in
– Place container on pan.
–Tare (15): Balance will now indicate zero.
– Fill in weighing objects until desired target
weight is reached.
Reading the result
While filling in at a steady and fairly rapid pace until
you reach the vicinity of the target weight, watch only
the first two digits (16).
During fine weighing-in to the actual target weight,
watch primarily the digits at right (17).
When the weight increases rapidly, there is also an
automatic increase in the display speed and the last
digit (18) is temporarily blanked out. It reappears
again when fine weighing-in is resumed.
Weighing-in several components
If different objects are to be weighed in one after the
other, the operator can tare after each component.
This way, every new weighing can
This procedure can be continued until the combined
weight of the container and of the weighing objects
reaches the end of the total weighing range of the
balance:
– PE200 210 g
– PE400 410 g
– PE2000 2100 g
– PE4000 4100 g
start from zero.
9
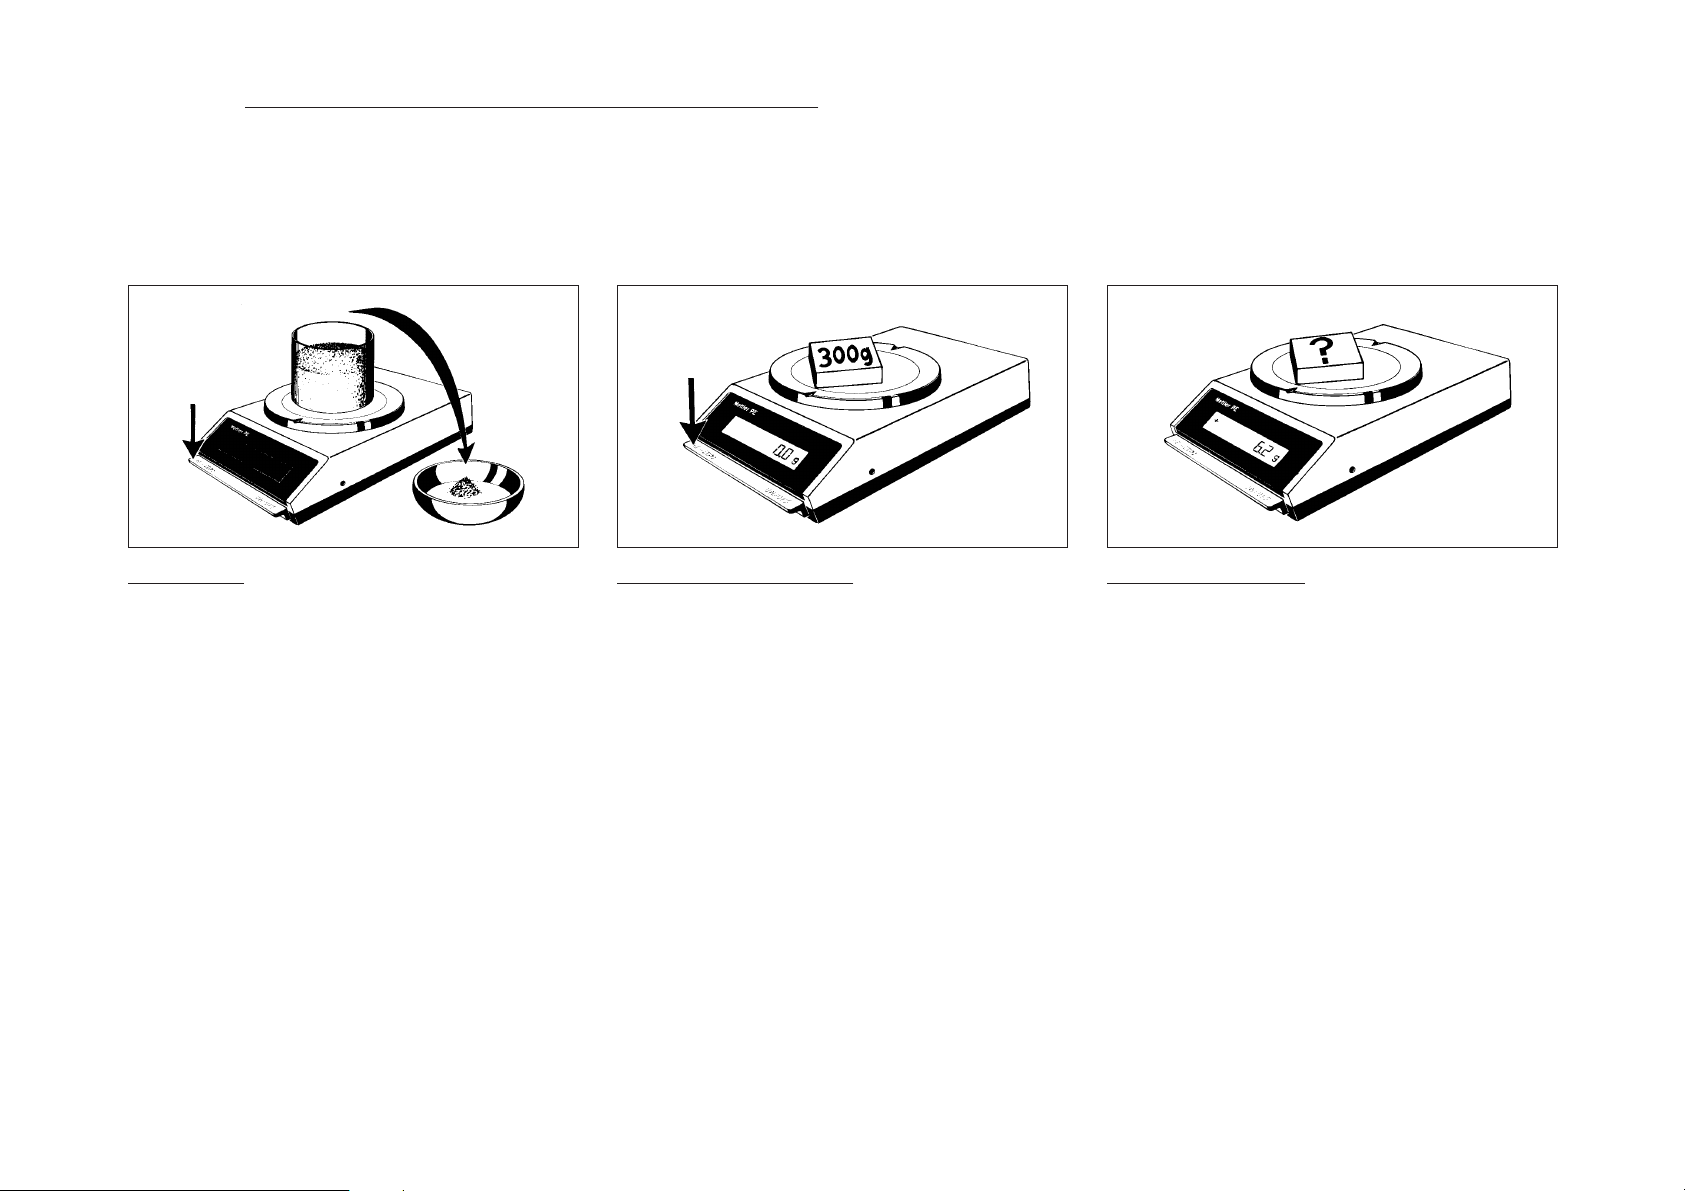
OPERATION: How to weigh out; how to read devations from a reference weight
It is also possible to tare out a container filled with weighing objects. Thus the weighing-in process can be reversed and it is just as feasible to weigh out objects from
a previously weighed full container.
Likewise, it is possible to tare a target weight (reference weight). This way, deviations from the reference weight can be read directly.
Weighing out
– Place container with weighing object on pan.
–Tare: Balance will now indicate zero.
– Remove material from container:
The weight of the removed material will now be
displayed with the minus sign in front.
10
Entering a reference weight
– Place reference weight on pan (weight piece or
sample).
–Tare: Balance will now indicate zero.
– Remove reference weight.
The reference weight will now appear in the
display with the minus sign in front.
Example: -300.0 g
Deviations from this reference weight can now be
read directly:
Determinig a deviation
– Place object that is to be compared with
reference weight on pan.
If the object is heavier, the actual deviation is indicated
on the display with the positive sign in front, because:
-300.0 g + 306.2 g = +6.2 g
If the object is lighter, the actual deviation is indicated
with the negative sign in front, because:
-300.0 g + 294.2 g = -5.8 g
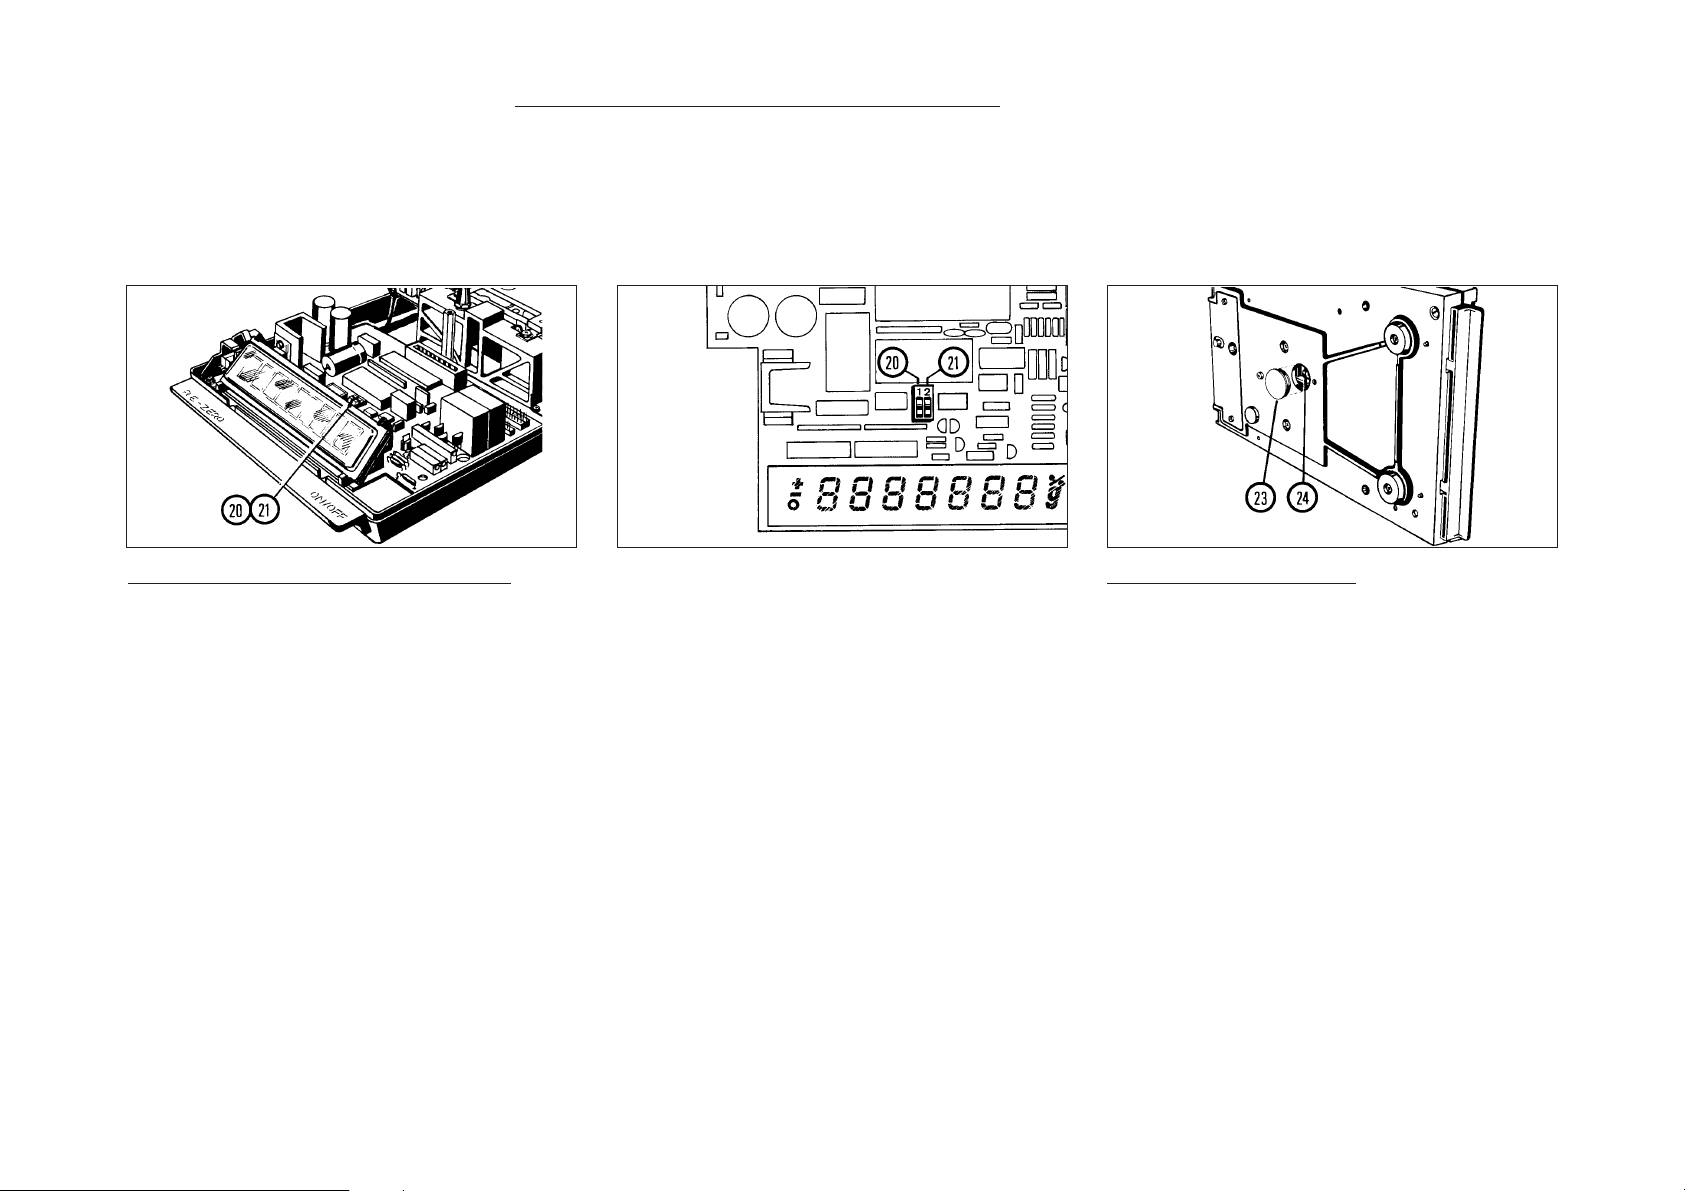
ADDITIONAL FEATURES OF PE BALANCES: Restless weighing objects; weighing below the balance All PE balances are shipped with the DeltaDisplay switched on. In case of rapid weight changes, the display changes are automatically increased and the last digit
is temporarily blanked out. The DeltaDisplay can be switched off by an internal switch. In addition, the integration time can be doubled. In this case, display changes
are only half as fast. This makes it possible to adapt PE balances to difficult conditions and to stabilize restless displays to the correct value.
All PE balances are equipped for weighing below the balance.
Switching DeltaDisplay and integration time
If restless objects have to be weighed (e.g., live
animals) or if weighing must be made under
conditions of external instability (i.e., drafts), the
result can be stabilized by switching of DeltaDisplay
and doubling the integration time.
This procedure can also be handled by METTLER
TOLEDO Service.
– Disconnect power cable.
– Open balance housing (see page 4,
“PREPARATION; How to check the voltage
setting”).
Switches (20) (21) for DeltaDisplay and integration
time are located directly behind the display.
Slide switch (20) at left controls DeltaDisplay and
stability detector.
– DeltaDisplay and SD on: Switch is at the stop
nearer to the display.
– DeltaDisplay and SD off:
Switch is at rear stop.
Slide switch (21) at right is used to adjust the
integration time:
– Short integration time: Switch is at the stop
nearer to the display.
– Long integration time:
Switch is at rear stop.
– Close balance housing (see under
“PREPARATION: How to check the voltage
setting”).
Weighing below the balance
Your PE balance is specially equipped to handle
weight determinations that can not be made on the
weighing pan. This is done by suspending the object
from the weighing cell. To do this, the balance table
must have an appropriate opening.
– Remove weighing pan and pan support, and
tilt balance to its side.
– Remove cover (23).
– Using a holder, suspend weighing object from
hook (24).
– Set balance right side up and install weighing
pan and pan support.
– With holder attached, tare balance.
11
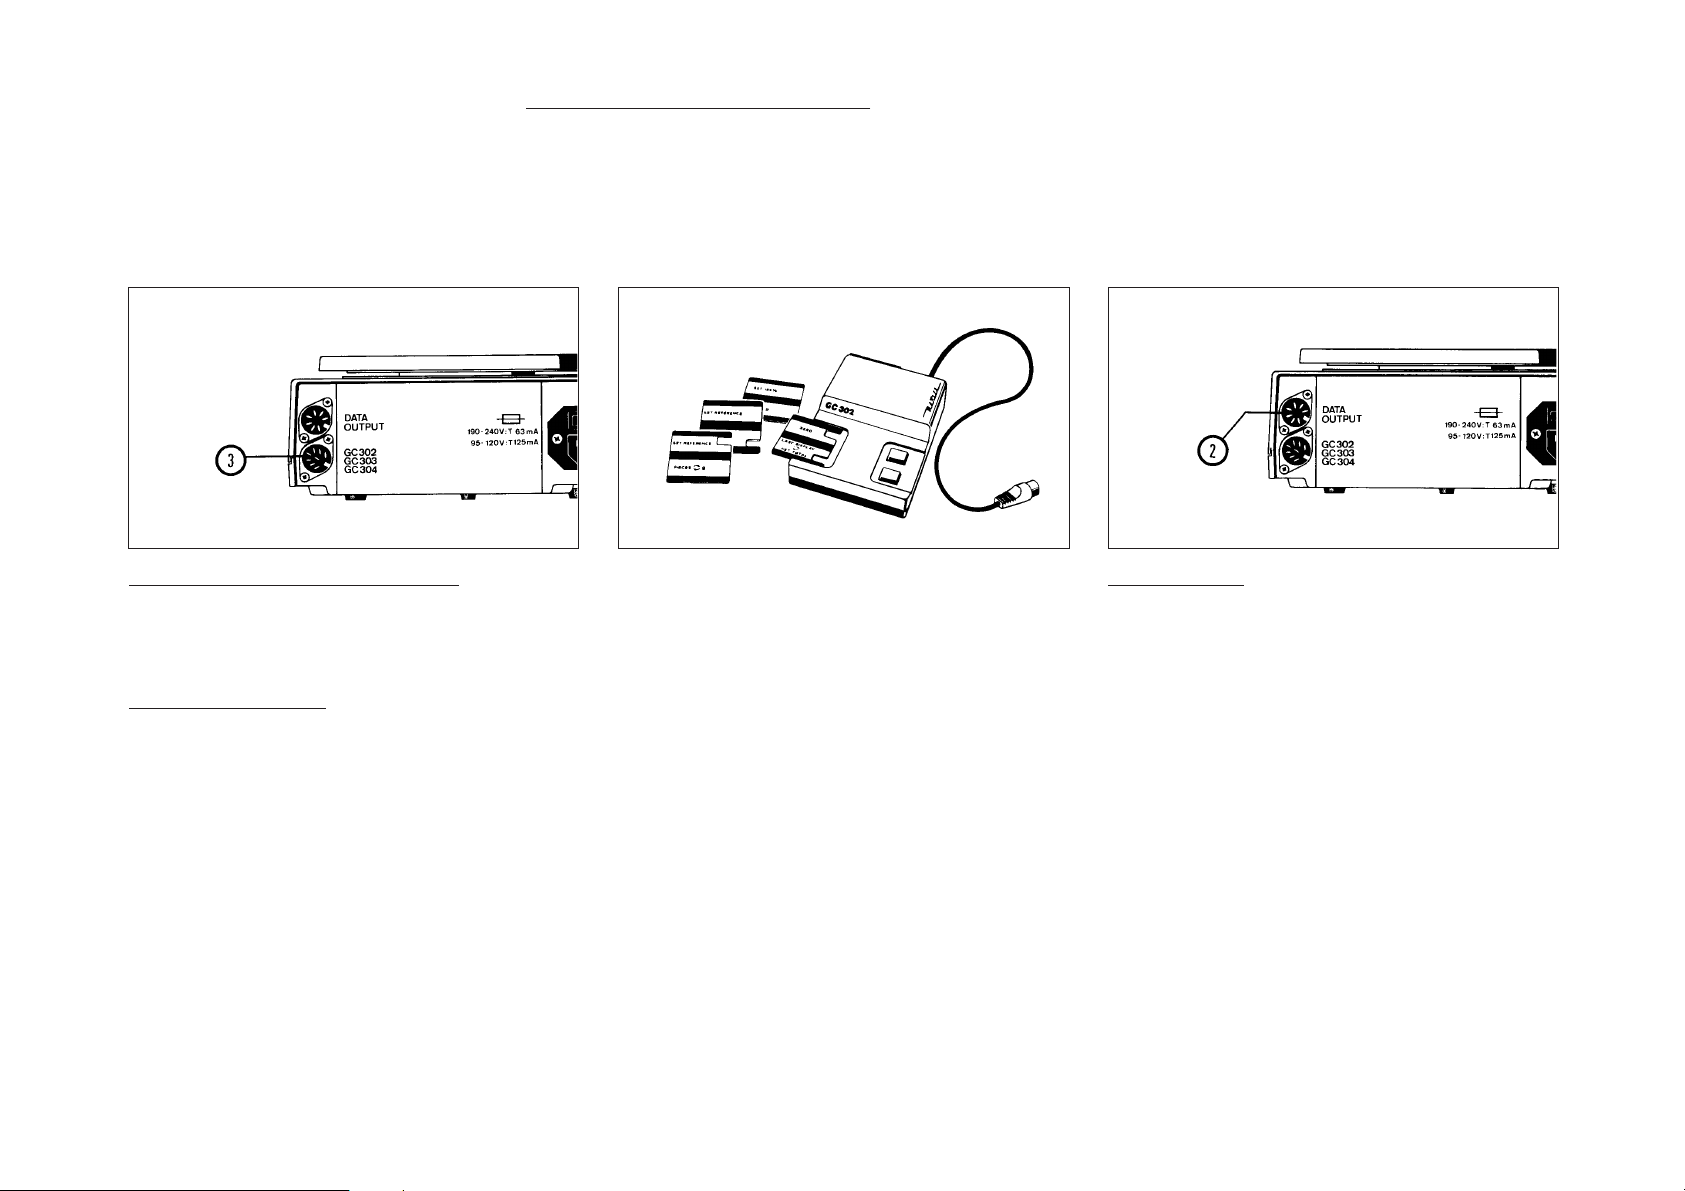
ADDITIONAL FEATURES OF PE BALANCES: Application Input Units; 05 Data Output
Some very useful accessories for the PE200/400/2000/4000 are the GC302, GC303 and GC304 Application Input Units.
They make it possible to quickly and conveniently perform a variety of special weighing procedures and functions.
A data output (option 05) can be delivered along with every PE200/400/2000/4000 and easily installed by the user.
The necessary wires and connectors are already installed at the factory. In the next two pages we show you some of the METTLER TOLEDO peripheral instruments and
accessories which make it possible to use PE balances for special applications.
Connection for Application Input Units
Every PE200/400/2000/4000 is equipped with a
connection socket (3) for GC Application Input Units.
Application Input Units
These units are suitable for the following applications:
GC302 Application Input Unit
– Piece counting
– Percent weighing
– Net total weighing
– Animal weighing
12
GC303 Application Input Unit
– Piece counting with weight display in:
pounds/grams (lb/g)
ounces/grams (oz/g)
GC304 Application Input Unit
–Weighing in grams and in the following non-
metric units:
• Pounds (lb)
• Ounces (oz)
•Troy-ounces (ozt)
• Pennyweights (dwt)
• Grains (GN)
•Tael (tl)
• Carats (C.M.)
05 Data Output
The following peripheral instruments can be connected to the 05 Data Output (2):
– GA40 Thermal Printer
– GC45 Remote Display
– GC47 Digital/Analog Converter
(These instruments are discussed in greater detail
on the following page).
You can also retrofit your balance by using an
“Option 05 Field Installation Kit” (Order No. 47660).
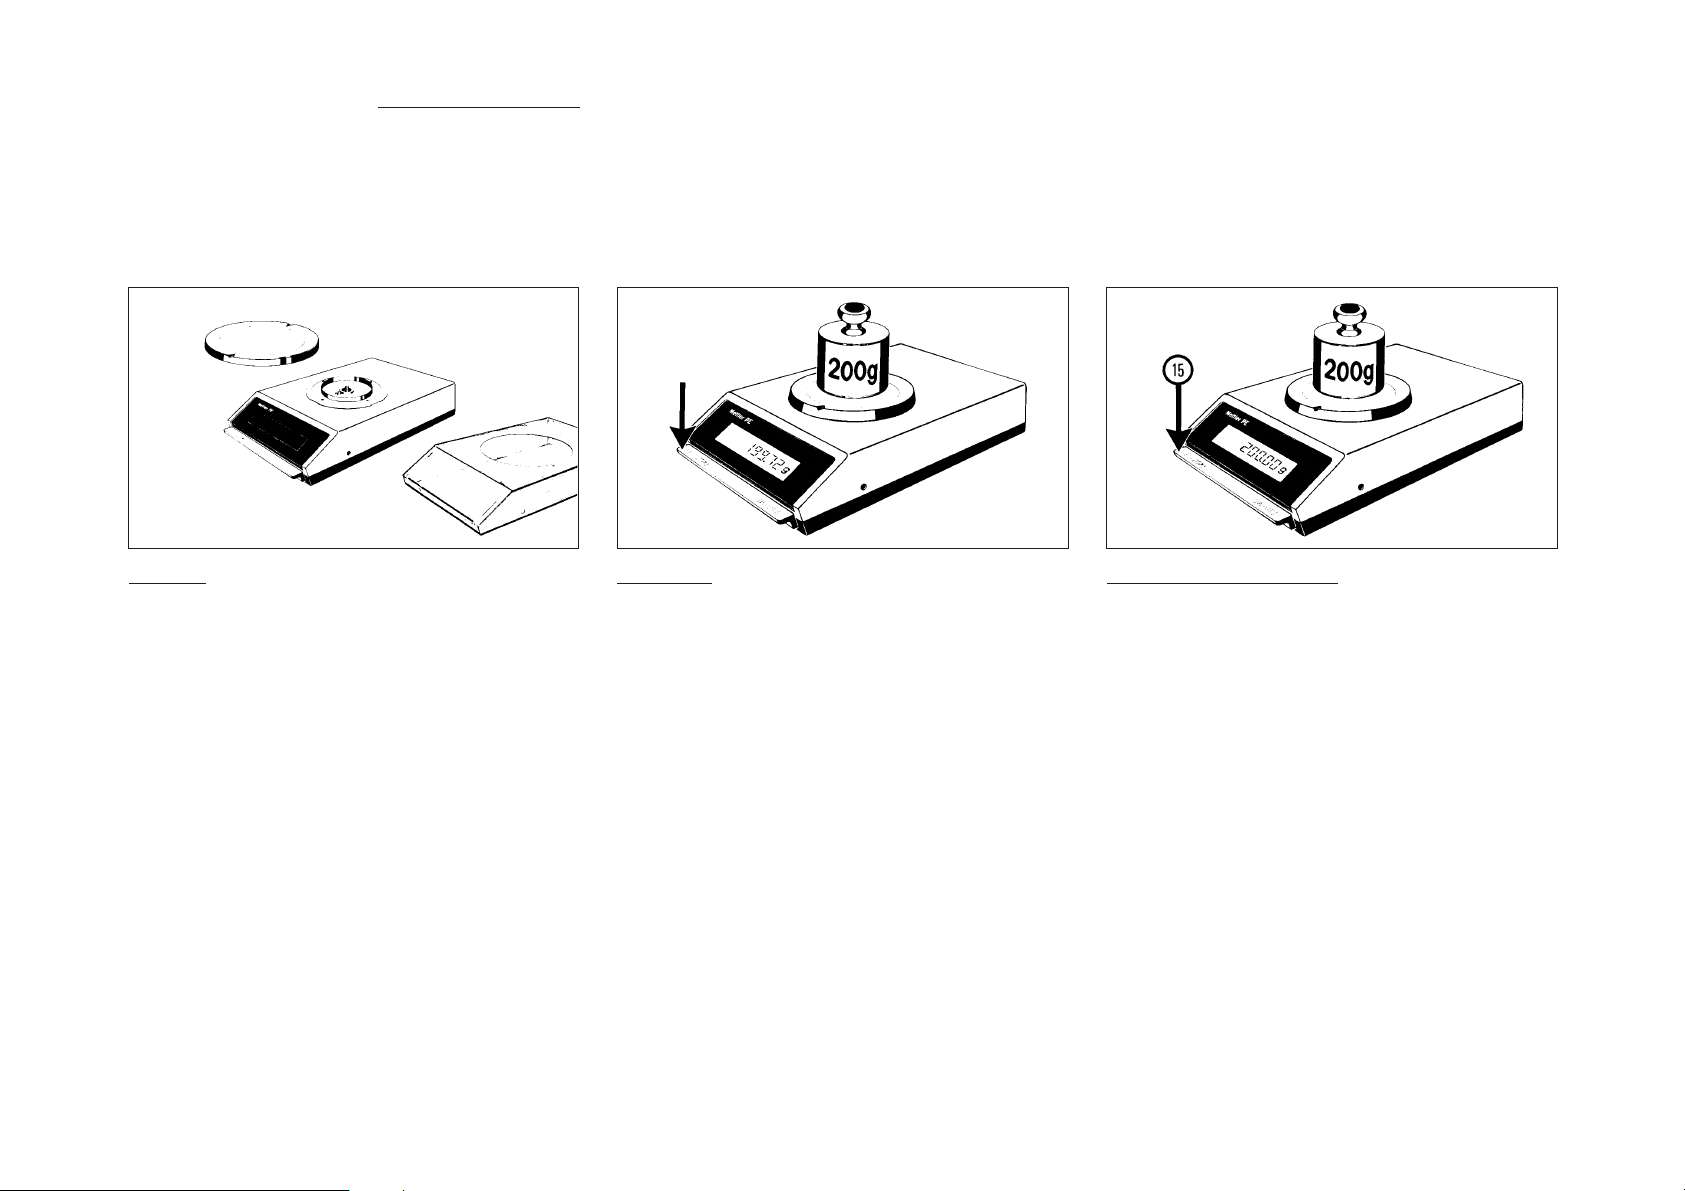
PERIPHERAL INSTRUMENTS: Data output and data preparation The three peripheral instruments introduced on this page can be connected to any PE200/400/2000/4000 balance equipped with a 05 Data Output (see preceeding
page).
Several peripheral instruments can be connected at the same time.
GA40 Thermal Printer
For the printed recording of weighing data.
Maintenance-free thermal printer (dot printer, no
printing ribbon), compact, fast and low noise.
Nonfading paper tape, not sensitive to mechanical
imprinting, rolls are 30 meter in lenght each and
will accommodate about 5000 lines of print. Width
of paper tape 57 mm (2
1
/4 inch).
Separate power supply:
110/130/220/240 V
Dimension (W x D x H):
185 x 200 x 60 mm
GC45 Remote Display
For the visual monitoring of weighing results away
from the weighing station.
Display is completely identical with that of the balance
itself.
Separate power supply:
110/130/220/240 V
Dimension (W x D x H):
185 x 200 x 60 mm
GC47 Digital/Analog Converter
For the conditioning of (digital) weighing data
generated by the balance for entry into analog
instruments such as line printers.
Two outputs:
+ 10 V; + 1 V
Multiswitch for decade selection (in group of three).
Separate power supply:
110/130/220/240 V
Dimension (W x D x H):
185 x 200 x 60 mm
13
ACCESSORIES
Optional equipment: Order No.
Calibration weights
certified according to OIML
200 g for PE200/400 42053
2000 g for PE2000/4000 42065
Calibration weights, non-certified
200 g for PE200, PE400 47698
2000 g for PE2000, PE4000 47699
Field Installation Kit 47660
for 05 Data Output
Field Installation Kit 47659
for level indicator
Infrared Dryer LP15B
110/220 V, 140 VA
Order No.
Animal weighing pan 47644
(for PE2000/4000 only)
Microfuses (set of 3)
125 mA, slow-acting, for 95/120 V 26172
63 mA, slow-acting, for 190/240 V 46328
Standard equipment:
Screwdriver 50279
In-use cover 47465
14
Application Input Unit GC302
GC303
GC304
Lid 46433 Plastic draft
Element 46432 shield with two 43260
Base 43256 elements
(can only be used with PE200/400)
}
Retaining ring for in-use cover 41156
Power cable Neutral 87576
Switzerland 87920
Germany 87925
USA 88668

CARE AND MAINTENANCE: How to replace the in-use cover and the fuse To protect the balance housing against soiling, damage and corrosive chemicals, the balance is delivered with the in-use cover already in place. This cover is made
of stiff plastic so that it cannot be folded.
The in-use cover does in no way hinder your working with the balance.
A back-up fuse is built into the fuse holder, in case your microfuse becomes defective.
If the microfuse has to be replaced repeatedly without apparent reason, call METTLER TOLEDO Service.
Removing the in-use cover
– Remove weighing pan and pan support.
–Turn retaining ring (25) counterclockwise until
it is released and can be lifted off.
– Remove in-use cover (26).
– Install pan support and weighing pan.
(The retaining ring should only be installed when
the in-use cover is in place).
Installing the in-use cover
– Remove weighing pan and pan support.
– Place in-use cover (26) on balance.
– Position and engage retaining ring (25), then
turn clockwise to stop position.
– Install pan support and weighing pan.
Replacing the microfuse
– Disconnect power cable.
– Using a screwdriver, remove fuse holder (4).
– Remove defective fuse and insert new fuse
(back-up fuse from fuse holder).
Fuse rating:
125 mA, slow-acting, for 95/120 V
63 mA, slow-acting, for 190/240 V
– Insert fuse holder.
– Plug in power cable.
15
CARE AND MAINTENANCE: Upkeep and calibration
Your METTLER TOLEDO PE balance requires very little maintenance, but it should be cleaned and calibrated at regular intervals.
Before checking the calibration, the balance must have been switched on for at least 30 minutes (warm-up time).
Cleaning
Weighing pan, in-use cover and, if necessary, the
balance housing should be cleaned whenever the
need arises.
As much as possible, avoid using strong solvents.
16
Calibration
If your balance is to deliver accurate weighing results,
it must be properly calibrated.
Check the calibration of your balance at regular
intervals; in case of constant operation, at least once
a month.
The test weight to be used with your balance model
is listed under “ACCESSORIES, Optional equipment”.
Rechecking the calibration
– Press single control bar (15):
The display indicates zero.
– Place test weight on pan and read the result.
If the result now displayed by the balance corresponds to the weight indicated on the test weight
down to the last decimal, your balance is ready for
use. If not, it has to be calibrated.
For instructions on how to do it, see “OPERATION:
How to calibrate the balance” (page 7).

WHAT IF … Then …
… the entire display is blanked out? – Balance is not switched on.
– Power cable is not plugged in.
– No power.
–Microfuse is defective (see “CARE AND MAINTENANCE: Replacing the microfuse”).
If this occurs again: Check voltage selector setting and fuse rating.
If both are correct, call METTLER TOLEDO Service.
… only the upper segments of the display light up? – Weight on pan is too heavy (weighing range is exceeded).
– Balance is defective (call METTLER TOLEDO Service).
… only the lower segments of the display light up? – Pan support is not installed.
–Weighing pan is not installed.
– In-use cover is touching pan support (retaining ring of in-use cover is not installed).
–Weighing range was exceeded before balance was unloaded (overload was not obvious
because it is composed of tare and weighing object).
Correct defect by taring after the balance is unloaded.
… OFF is displayed? – Power was out: Check the two power cable connectors for tight fit.
Again switch on balance by pressing control bar.
– Control bar was not pressed down all the way when power was switched on.
… the weighing result is unstable? – Draft at the weighing station.
(PE200, PE400: Use draft shield. See “ACCESSORIES: Optional equipment”).
– Balance table is not stable.
–Weighing object is restless, e.g., live animals (see “ADDITIONAL FEATURES”).
–Voltage selector is set to an incorrect voltage (see “PREPARATION: How to correct the
selected voltage setting”).
… the weighing result is obviously wrong? – Balance is not leveled.
– Balance is not properly calibrated (see “OPERATION: How to calibrate the balance”).
– In-use cover touches the pan support (install retaining ring).
– Balance was not tared before weighing was made (single control bar had not been
pressed).
–Weighing object might be touching the draft shield.
17
TECHNICAL SPECIFICATIONS
PE200 PE400 PE2000 PE4000
Weighing range 210 g 410 g 2100 g 4100 g
Readability 0.01 g 0.01 g 0.1 g 0.1 g
Tare range (by subtraction) 210 g 410 g 2100 g 4100 g
Admissible ambient temperature (during operation) 10…+ 40 °C 10…+ 40 °C 10…+ 40 °C 10…+ 40 °C
Sensitivity drift (10…30 °C)
Result deviation (with balance inclined 1 : 1000) + 0.02 g + 0.02 g + 0.2 g + 0.2 g
Reproducibility 0.005 g 0.005 g 0.05 g 0.05 g
Linearity + 0.015 g + 0.015 g + 0.15 g + 0.15 g
Stabilization time (typical) 2 s
Integration time 1.25 s / 2.5 s*
Display sequence: DeltaDisplay off 0.6 s / 1.2 s* * When integration time is doubled
DeltaDisplay on 0.15 s / 0.3 s*
Stability control (sensitivity invariable) ON / OFF
Power supply:
– Adjustable voltage settings 95V, 105V / 110V, 120V / 190V, 210V / 220V, 240V
– Admissible voltage fluctuations + 10 %
– Frequency 50…60 Hz
– Power consumption about 10 VA
+ 2·10-5 /°C + 1.2·10-5 /°C + 2·10-5 /°C + 1.2·10-5 /°C
Dimensions of housing (W x D x H) 194 x 310 x 65 mm
Weight 3.7 kg 3.8 kg
Weighing pan (chrom-nickel steel) dia. 130 mm dia. 170 mm
METTLER TOLEDO 05 Data Output Combined current loop and voltage interface.
Galvanically separated, unidirectional 2-wire interface. Characters: alphanumeric. Character code: ASCII/ISO, 7-bit, even parity.
Transfer speed: 2400 baud. Connector socket: 7-pole, type Hirschmann Mab 7S.
03 Mode (for METTLER TOLEDO peripheral instruments) Loop current: 20 mA (passive)
CL Mode (for METTLER TOLEDO CL instruments as well as for non-METTLER TOLEDO instrument with active loop current input)
RS232 Mode (for non-METTLER TOLEDO instruments) Voltage interface according to RS232C/V24
18

19

TYPENÜBERSICHT
Diese Bedienungsanleitung gilt für alle hier vorgestellten Waagen der PE-Typenreihe.
Die Bedienung dieser Waagen ist nahezu identisch.
Verschieden sind nur Wägebereich, Anzeigegenauigkeit und Grösse der Waagschale.
Die PE-Waagen haben den METTLER TOLEDO DeltaDisplay, einen speziellen Anzeigemodus für das Einwägen.
PE200 PE2000
Wägebereich: 210 g Wägebereich: 2100 g
Anzeigegenauigkeit: 0,01 g Anzeigegenauigkeit: 0,1 g
PE400 PE4000
Wägebereich: 410 g Wägebereich: 4100 g
Anzeigegenauigkeit: 0,01 g Anzeigegenauigkeit: 0,1 g
20
INHALT Seite
Vorbereitung
Spannung überprüfen 22
Waagschale aufsetzen, Waage aufstellen 23
Bedienung
Waage ein- oder ausschalten 24
Kalibrieren 25
Gewicht bestimmen oder tarieren 26
Einwägen mit DeltaDisplay 27
Herauswägen, Gewichtsvergleiche 28
Weitere Möglichkeiten
Unruhiges Wägegut, Gehängedurchführung 29
Funktionseinheiten, Datenausgang 05 30
Zusatzgeräte (für Datenausgang 05) 31
Bedienungselemente und Anschlüsse
1) Kalibrierschraube
2) Anschlussbuchse für Datenausgang (Option 05)
3) Anschlussbuchse
für Funktionseinheiten GC302, GC303, GC304
4) Sicherungshalter
(mit Reservesicherung)
5) Netzanschluss
Zubehör 32
Wartung
Schutzhülle und Sicherung wechseln 33
Pflege und Kalibrierung 34
Was ist wenn … 35
Technische Daten 36
21
 Loading...