

Page 1
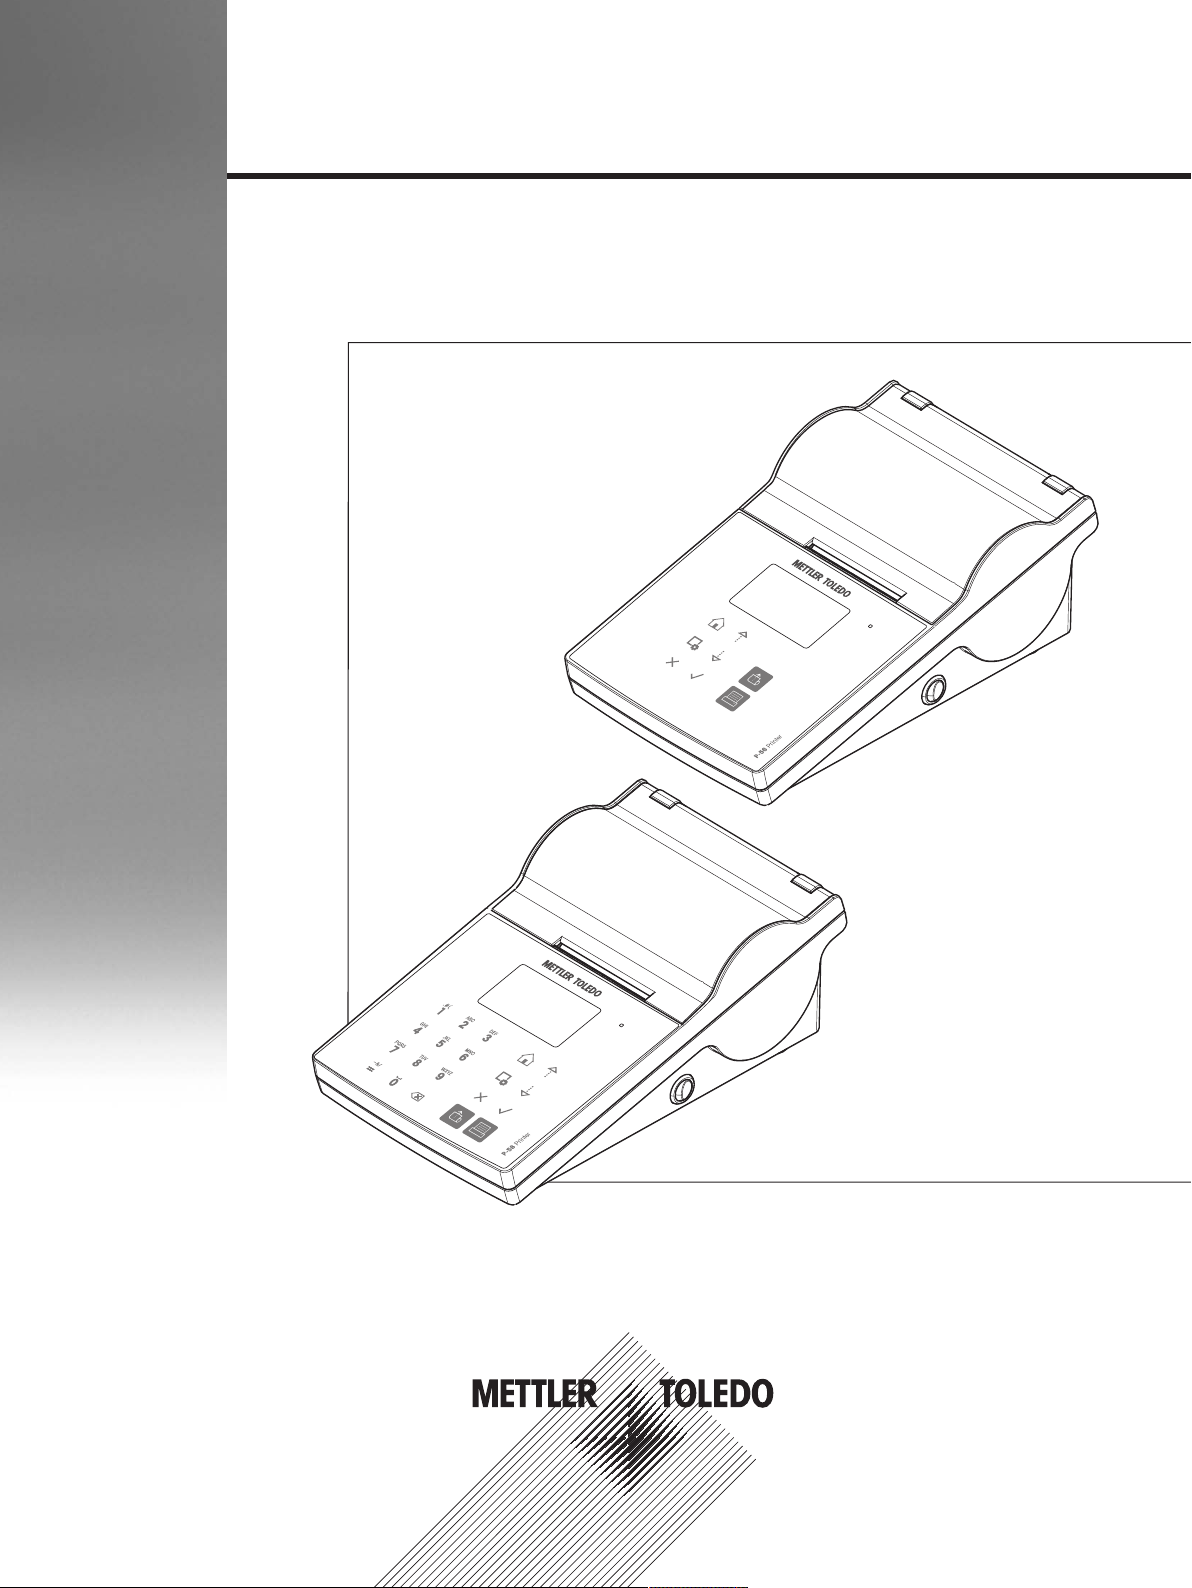
Printer
P-56RUE, P-58RUE
Operating Instructions
Page 2

Page 3

Table of Contents
1 Introduction 3
1.1 Conventions and symbols used in these operating instructions ......................................... 3
2 Safety Information 4
2.1 Definition of signal warnings and symbols...................................................................... 4
2.2 Product specific safety notes ......................................................................................... 4
3 Design and Function 6
3.1 Overview..................................................................................................................... 6
3.2 General keys ............................................................................................................... 7
3.3 Display elements and dialogs ....................................................................................... 8
4 Installation and Putting into Operation 9
4.1 Scope of delivery ......................................................................................................... 9
4.2 Connecting the printer to the power supply...................................................................... 9
4.3 Inserting the paper roll.................................................................................................. 10
4.4 Connecting the printer to a METTLER TOLEDO instrument.................................................. 11
4.5 Connecting the printer to a host computer ....................................................................... 12
4.6 Defining language, date and time .................................................................................. 14
4.7 Printer test................................................................................................................... 14
3.3.1 Basic elements on display ............................................................................. 8
3.3.2 Entry Dialogs................................................................................................ 8
4.4.1 Connecting the printer via the RS232 connection .............................................. 11
4.4.2 Connecting the printer via the USB connection .................................................. 11
4.4.3 Connecting the printer via the Ethernet connection............................................. 12
4.5.1 Installing DirectLabel ..................................................................................... 12
5 Settings 16
5.1 System settings ........................................................................................................... 16
5.1.1 Date / Time .................................................................................................. 16
5.1.2 Language..................................................................................................... 16
5.1.3 Printing........................................................................................................ 16
5.1.4 Display / Audio ............................................................................................. 17
5.1.5 Auto features ................................................................................................ 17
5.1.6 System reset................................................................................................. 17
5.2 Data connection settings............................................................................................... 18
5.2.1 Char set ....................................................................................................... 18
5.2.2 RS232......................................................................................................... 18
5.2.3 Ethernet ....................................................................................................... 18
5.3 Access protection......................................................................................................... 19
5.3.1 Defining the password ................................................................................... 19
5.4 Application settings (only for P-58RUE).......................................................................... 19
5.4.1 Statistics ...................................................................................................... 19
5.4.2 Formulation.................................................................................................. 19
5.4.3 Totaling ....................................................................................................... 20
5.4.4 Labels ......................................................................................................... 20
5.4.4.1 Defining templates................................................................................... 20
6 Applications (only for P-58RUE models) 22
6.1 Statistics..................................................................................................................... 22
6.1.1 Evaluation values.......................................................................................... 22
6.1.2 Functions ..................................................................................................... 22
6.1.3 Performing Statistics...................................................................................... 22
6.2 Formulation................................................................................................................. 23
6.2.1 Evaluation values.......................................................................................... 23
6.2.2 Functions ..................................................................................................... 23
Table of Contents 1Printer
Page 4

6.2.3 Performing Formulation ................................................................................. 23
6.3 Totaling ...................................................................................................................... 23
6.3.1 Evaluation values.......................................................................................... 24
6.3.2 Functions ..................................................................................................... 24
6.3.3 Performing Totaling ....................................................................................... 24
6.4 Labels ........................................................................................................................ 24
6.4.1 Label printing with pre-defined printer templates ............................................... 25
6.4.1.1 Information on templates ......................................................................... 25
6.4.1.2 Label Specifications................................................................................. 25
6.4.1.3 Barcode types......................................................................................... 26
6.4.2 Label printing of user-defined labels designed by PC......................................... 26
7 Maintenance 27
7.1 Replacing the platen roller............................................................................................. 27
7.2 Cleaning the housing ................................................................................................... 28
7.3 Cleaning the printhead and the platen roller .................................................................... 28
7.4 Disposal..................................................................................................................... 29
8 Troubleshooting 30
8.1 Information messages.................................................................................................. 30
8.2 Warning messages...................................................................................................... 31
8.3 Error messages ........................................................................................................... 32
8.4 What to do if…............................................................................................................ 34
9 Technical Data 35
9.1 General technical Data ................................................................................................. 35
9.2 Dimensions................................................................................................................. 37
10 Interface Specifications 38
10.1 RS232C serial port....................................................................................................... 38
10.2 USB device port........................................................................................................... 38
10.3 Ethernet 10/100base-TX RJ45 port................................................................................ 38
11 Accessories and spare parts 39
11.1 Accessories................................................................................................................. 39
11.2 Spare parts ................................................................................................................. 39
11.3 Consumables.............................................................................................................. 40
Index 41
Table of Contents2 Printer
Page 5
1 Introduction
The P-56RUE and P-58RUE are easy-to-handle direct thermal printers for METTLER TOLEDO instruments.
These high-value printers guarantee long-term traceability.
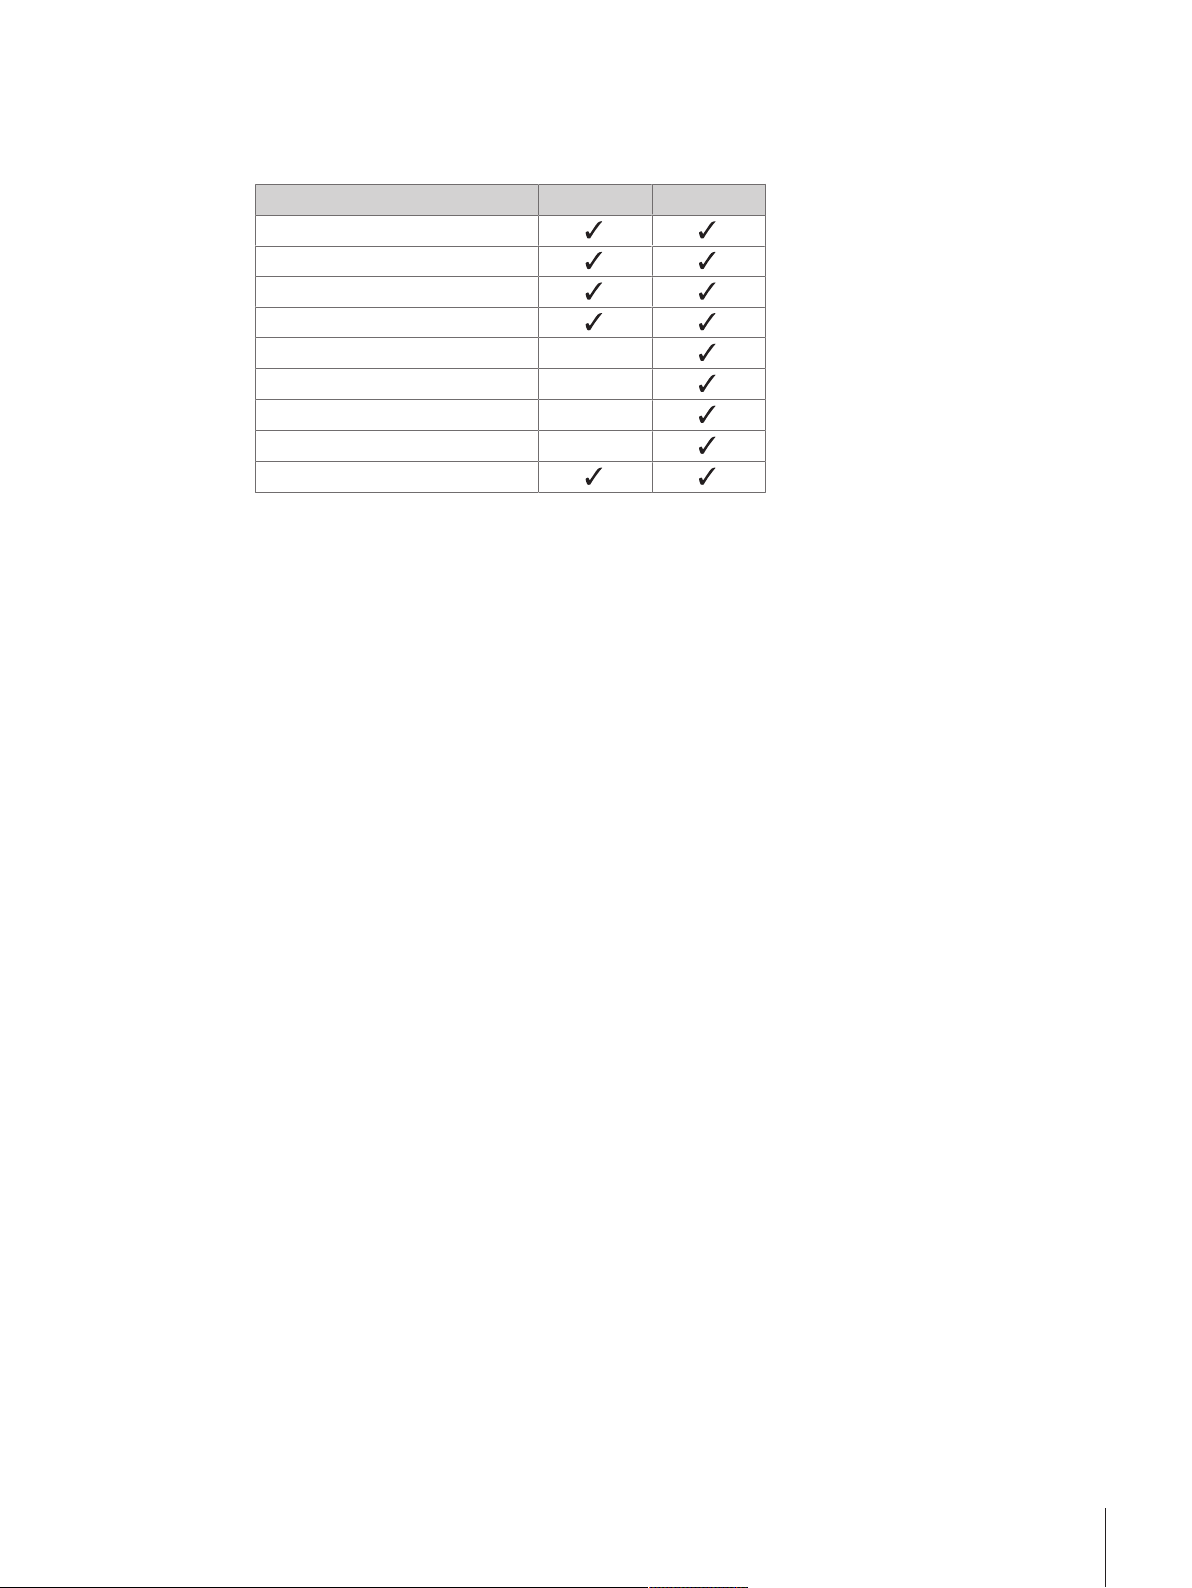
Feature P-56RUE P-58RUE
Auto connection
USB interface
RS232 interface
Ethernet interface
Application Statistics
Application Formulation
Application Totaling
Application Labels
Access Protection
1)
Label printing is possible only from host device e.g. PC.
Software version
These operating instructions are based on the initially installed firmware (software) version V1.04.
Finding more information
—
—
—
—
1)
u www.mt.com/lab-printers
1.1 Conventions and symbols used in these operating instructions
These symbols indicate an instruction:
prerequisites
§
1 steps
2 ...
ð results
Introduction 3Printer
Page 6
2 Safety Information
• Read and understand the information in these Operating Instructions before you use the instrument.
• Keep these Operating Instructions for future reference.
• Include these Operating Instructions if you pass on the instrument to other parties.
If the instrument is not used according to the information in these Operating Instructions or if it is modified,
the safety of the instrument may be impaired and Mettler-Toledo GmbH assumes no liability.
2.1 Definition of signal warnings and symbols
Safety notes are marked with signal words and warning symbols. Ignoring the safety notes may lead to
personal injury, damage to the instrument and malfunctions.
WARNING
for a hazardous situation with medium risk, possibly resulting in death or severe
injury if not avoided.
CAUTION
NOTICE
Note
General hazard Electrical shock Hot surface
for a hazardous situation with low risk, resulting in minor or moderate injury if not
avoided.
for a hazardous situation with low risk, resulting in damage to the instrument, other
material damage, malfunctions and erroneous results, or loss of data.
(no symbol)
for useful information about the product.
2.2 Product specific safety notes
General Safety Information
Your instrument corresponds to the state of the art technology and complies with all recognized safety rules,
however, certain hazards may arise in extraneous circumstances. Do not open the housing of the
instrument: It does not contain any parts which can be maintained, repaired or replaced by the user. If you
ever have problems with your instrument, contact your authorized METTLER TOLEDO dealer or service representative.
This printed document must be read and understood before using the instrument. This printed document
must be retained for future reference.
Always operate and use your instrument only in accordance with the instructions contained in this
document. The instructions for setting up your new instrument must be strictly observed.
If the instrument is not used according to the Operating Instructions, protection of the instrument may
be impaired and METTLER TOLEDO assumes no liability.
The instrument must not be altered or modified in any way. Only use METTLER TOLEDO original spare parts
and accessories.
Safety Notes
WARNING
Risk of electric shock
1 Do not open the AC adapter housing. Make sure that the AC adapter does not come in
contact with liquids.
2 Use only the 3-pin power cable with equipment grounding conductor which was
supplied with your instrument and only a 3-pin grounded outlet must be used.
Safety Information4 Printer
Page 7

NOTICE
Data Loss
Continuous printing can lead to a overheating of the print head. The printing process
stops until the print head has cooled down. During this cooling down phase the printer
must not be switched off, otherwise the buffer data will be lost.
Operating conditions
• The printer must be used in dry interior rooms only.
For the ambient conditions see [General technical Data}Page35].
• The printer should be acclimated to room temperature.
• The printer should not be used in the presence of humidity and liquids.
Safety Information 5Printer
Page 8
3 Design and Function
P-56RUE P-58RUE
2
3 4 5 6
1
3 4 5 6
2
2 3 4 5 6 7 8
1
3.1 Overview
Alphanumerical keys
1
General control keys
2
Display
3
Platen roller
1
Socket for AC adapter
2
RS232 serial interface (9-pin)
3
Anti-theft slot
4
Triple status indicator
4
Power switch
5
Printer cover
6
USB device connection
5
Ethernet RJ45 connection
6
Thermal printhead
7
Handler to open the printer cover
8
Design and Function6 Printer
Page 9
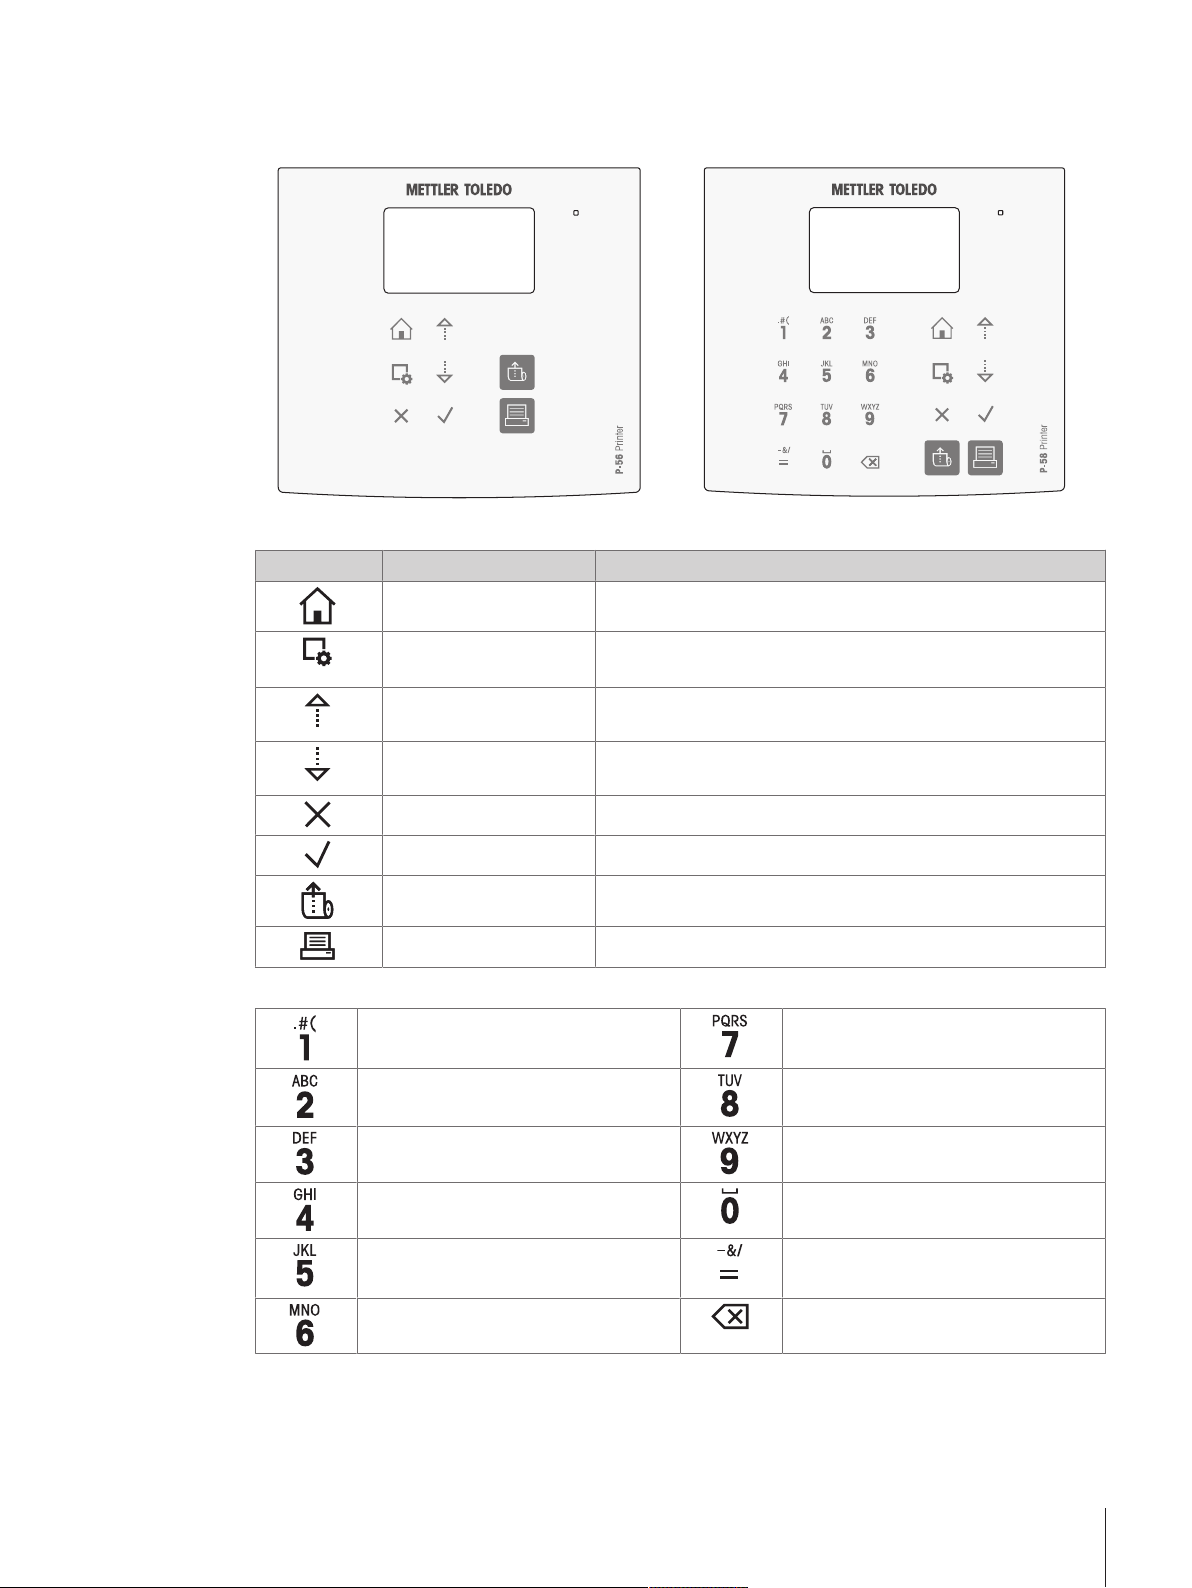
3.2 General keys
General Control keys
P-56RUE P-58RUE
Name Explanation
Home key To return to the printer home screen.
Menu key
Scroll up key To scroll up through a list or to move the curser to the left in a
Scroll down key To scroll down through a list or to move the curser to the right
Cancel key To cancel a running process/application or the last step.
Confirmation key To confirm the current selection.
Paper feed key To feed the paper.
Print key To print parameters or weighing results.
Alphanumerical keys (P-58RUE)
1 . # ( ) , : 7 P Q R S p q r s
2 A B C a b c 8 T U V t u v
3 D E F d e f 9 W X Y Z w x y z
4 G H I g h i 0 ˽
To open the section Settings (P-56RUE).
To open the section Main menu (P-58RUE).
string or number entry screen.
in a string or number entry screen.
5 J K L j k l = - & / + * @ %
Last entry recall of ID
6 M N O m n o Delete key
To delete the last character.
Design and Function 7Printer
Page 10
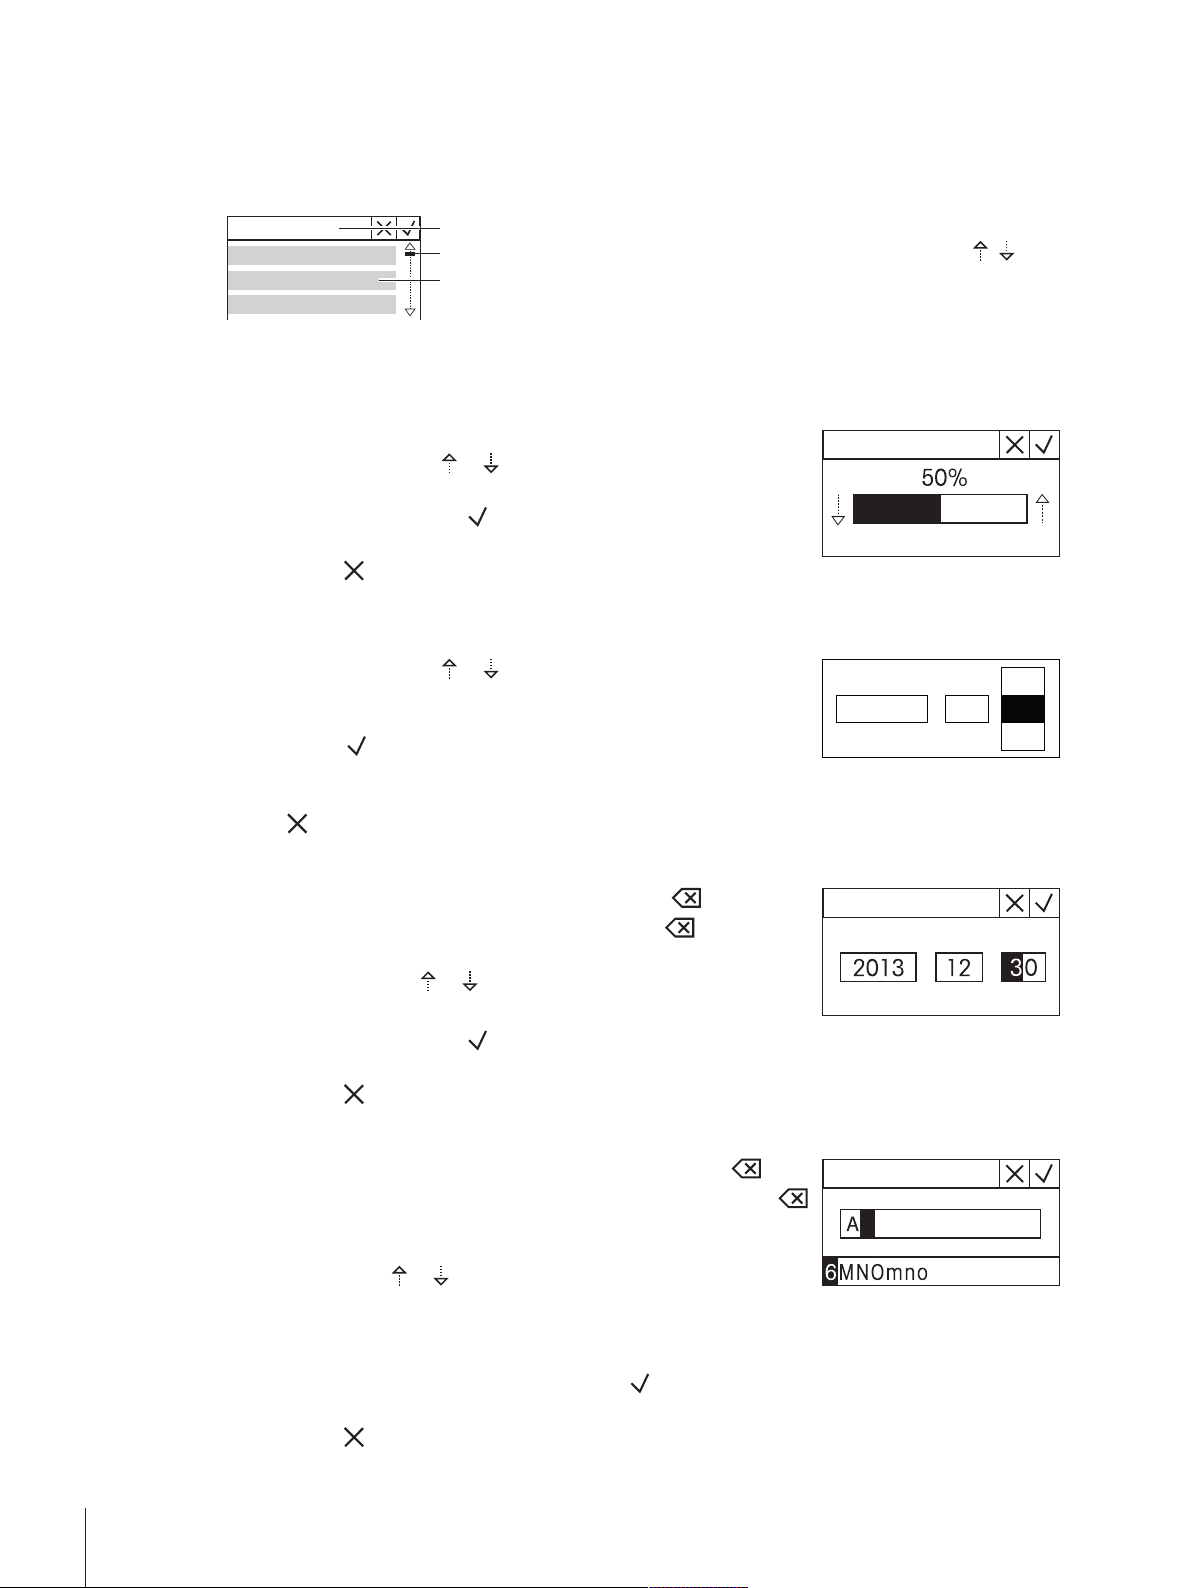
3.3 Display elements and dialogs
1
3
2
31
30
01
MM
122012
YYYY
3.3.1 Basic elements on display
1 Title of menu or selection
2 Scroll display, use the scrolling up and scrolling down keys
3 Settings area
3.3.2 Entry Dialogs
Slider bar
• To increase or decrease the current field value, press the scroll up key
or the scroll down key (
the key.
• Press the confirmation key
• To cancel and for switching back to the last active screen, press the
cancel key
.
Numbers (P-56RUE)
• To increase or decrease the current field value, press the scroll up key
or the scroll down key (
the key.
• To move to the next field when it is not the last field, press the confir-
mation key
. If the current selected field is the last field then the
current valid entry is accepted.
• To cancel and to switch back to the last active screen press the cancel
.
key
or ). Speed up by pressing and holding
to confirm.
or ). Speed up by pressing and holding
, .
Numbers (P-58RUE)
• To remove last character, press briefly the delete key
• To remove all entries, press and hold the delete key
• To move position of blinking cursor by pressing the scroll up key or
the scroll down key (
• Press the numerical keys for entering a value.
• Press the confirmation key
• To cancel and for switching back to the last active screen, press the
cancel key
.
or ).
.
.
.
Alphanumerical strings (P-58RUE)
• To remove a single character, press briefly on the delete key
• To remove a whole character string, press and hold the delete key
.
.
• To move position of blinking cursor, press the scroll up key or the
scroll down key (
• Repeatedly press a numerical key to select the needed character.
or ).
Note
The maximum entry length is 20 characters.
• To confirm an entry, press the confirmation key
• To cancel and to switch back to the last active screen, press the
cancel key
.
.
Design and Function8 Printer
Page 11
4 Installation and Putting into Operation
4.1 Scope of delivery
The following accessories are part of the equipment:
• P-56RUE or P-58RUE thermal printer
• Set of paper rolls
• Universal AC adapter
• Country-specific power cable
• USB cable
• RS232 cable
• User Manual
• Declaration of conformity
• CD-ROM (containing documents in different languages, software and drivers)
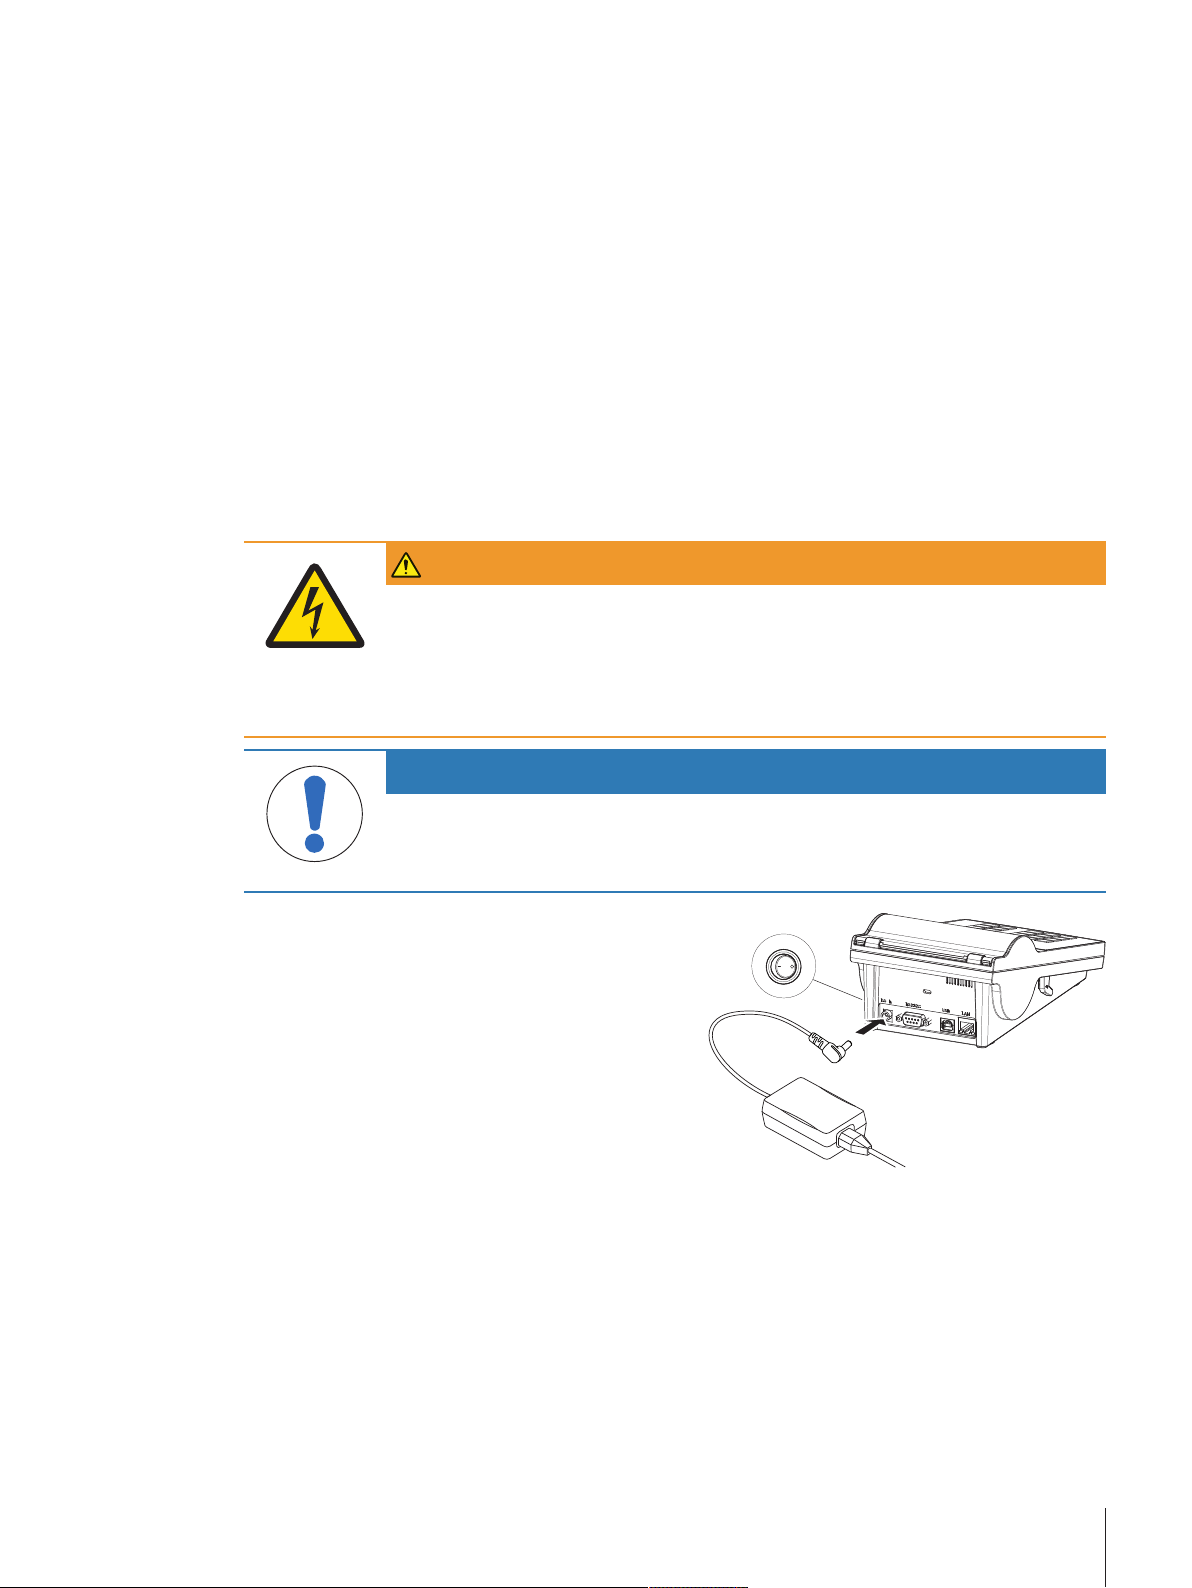
4.2 Connecting the printer to the power supply
WARNING
Risk of electric shock
1 Do not open the AC adapter housing. Make sure that the AC adapter does not come in
contact with liquids.
2 Use only the 3-pin power cable with equipment grounding conductor which was
supplied with your instrument and only a 3-pin grounded outlet must be used.
NOTICE
Use only the original AC adapter delivered with your printer.
− Do not try to use this AC adapter for other METTLER TOLEDO instruments, otherwise
they could be damaged.
1 Connect the AC adapter to the connection socket on
the back of the printer.
2 Lock the connector with the screw nut.
3 Connect the 3-pin grounded power cable to the
socket for the AC adapter.
4 Connect the power cable to the mains.
5 Switch the printer on.
Installation and Putting into Operation 9Printer
Page 12
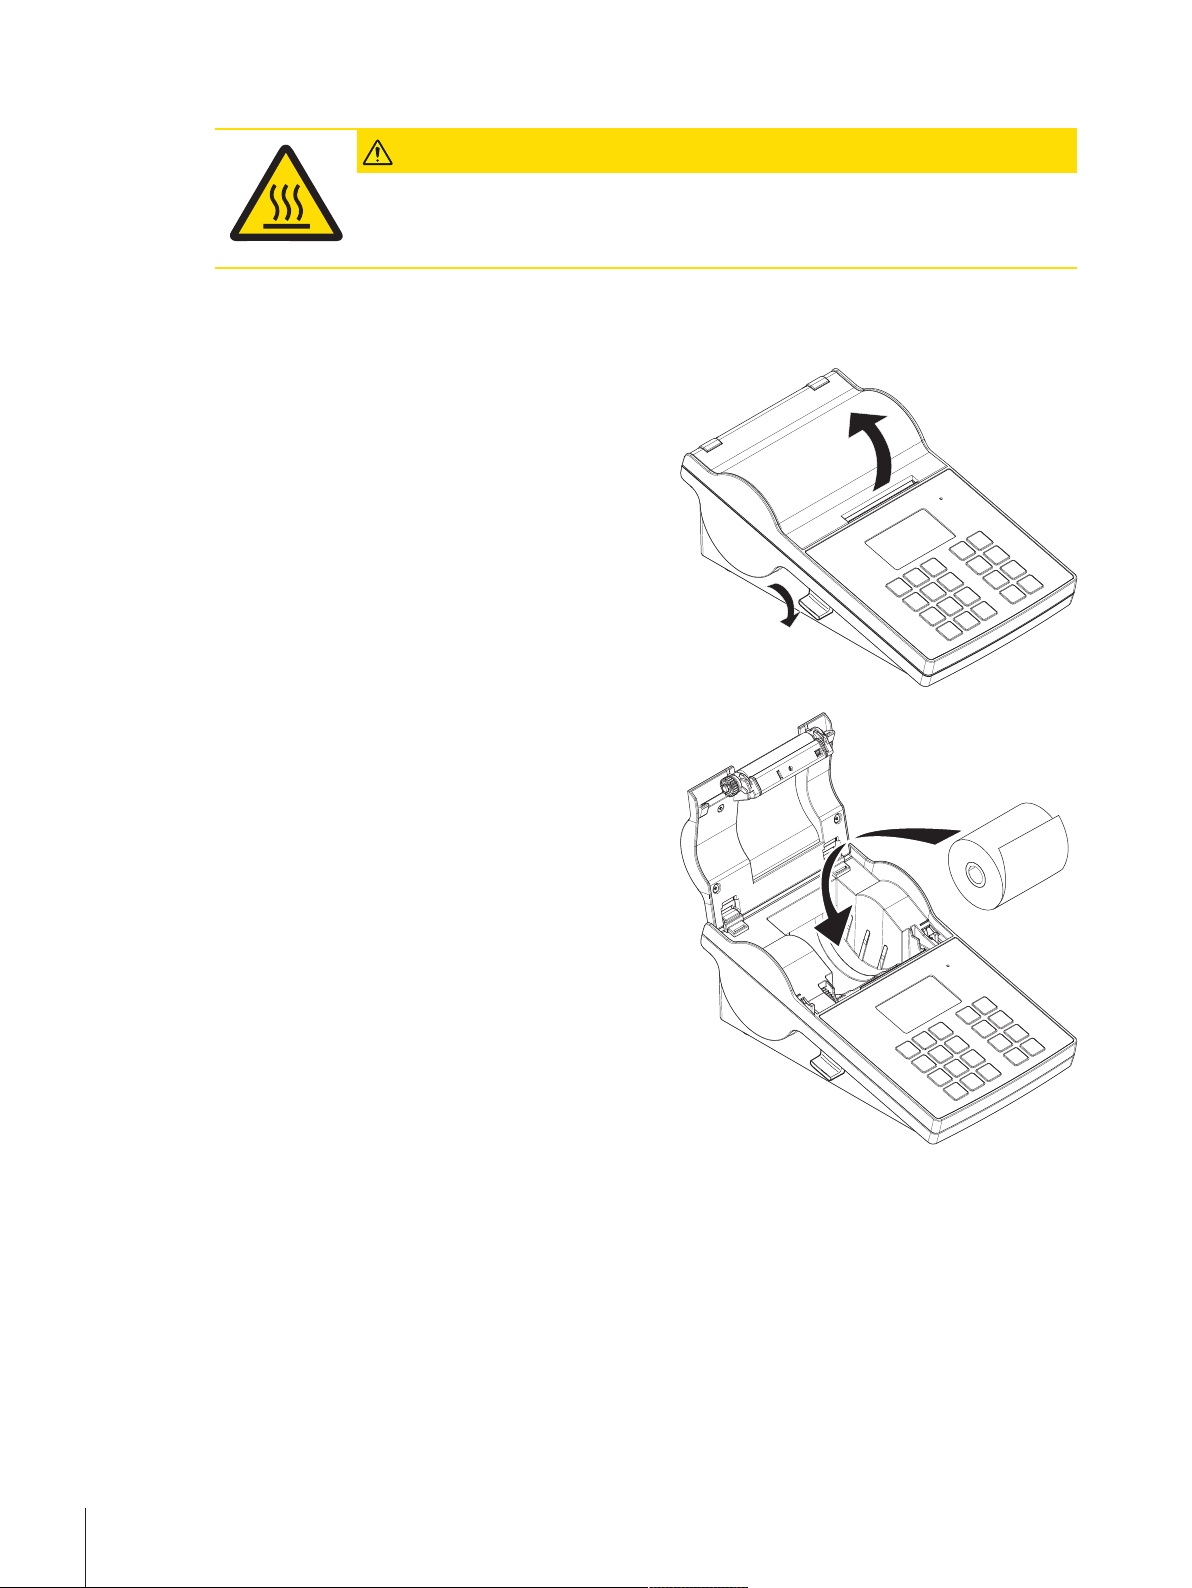
4.3 Inserting the paper roll
CAUTION
Danger of burns
The thermal printhead is getting hot during the printing process. Wait until the printhead
has cooled down before opening the printer cover.
Note
We recommend to use only specified paper from METTLER TOLEDO, see Accessories and spare parts in the
Operating Instructions.
1 Switch on the printer.
2 Press down the release key.
ð The printer cover opens.
3 Insert the paper roll into the printer frame.
Note
The paper roll must unroll in the correct direction
(see picture).
Installation and Putting into Operation10 Printer
Page 13
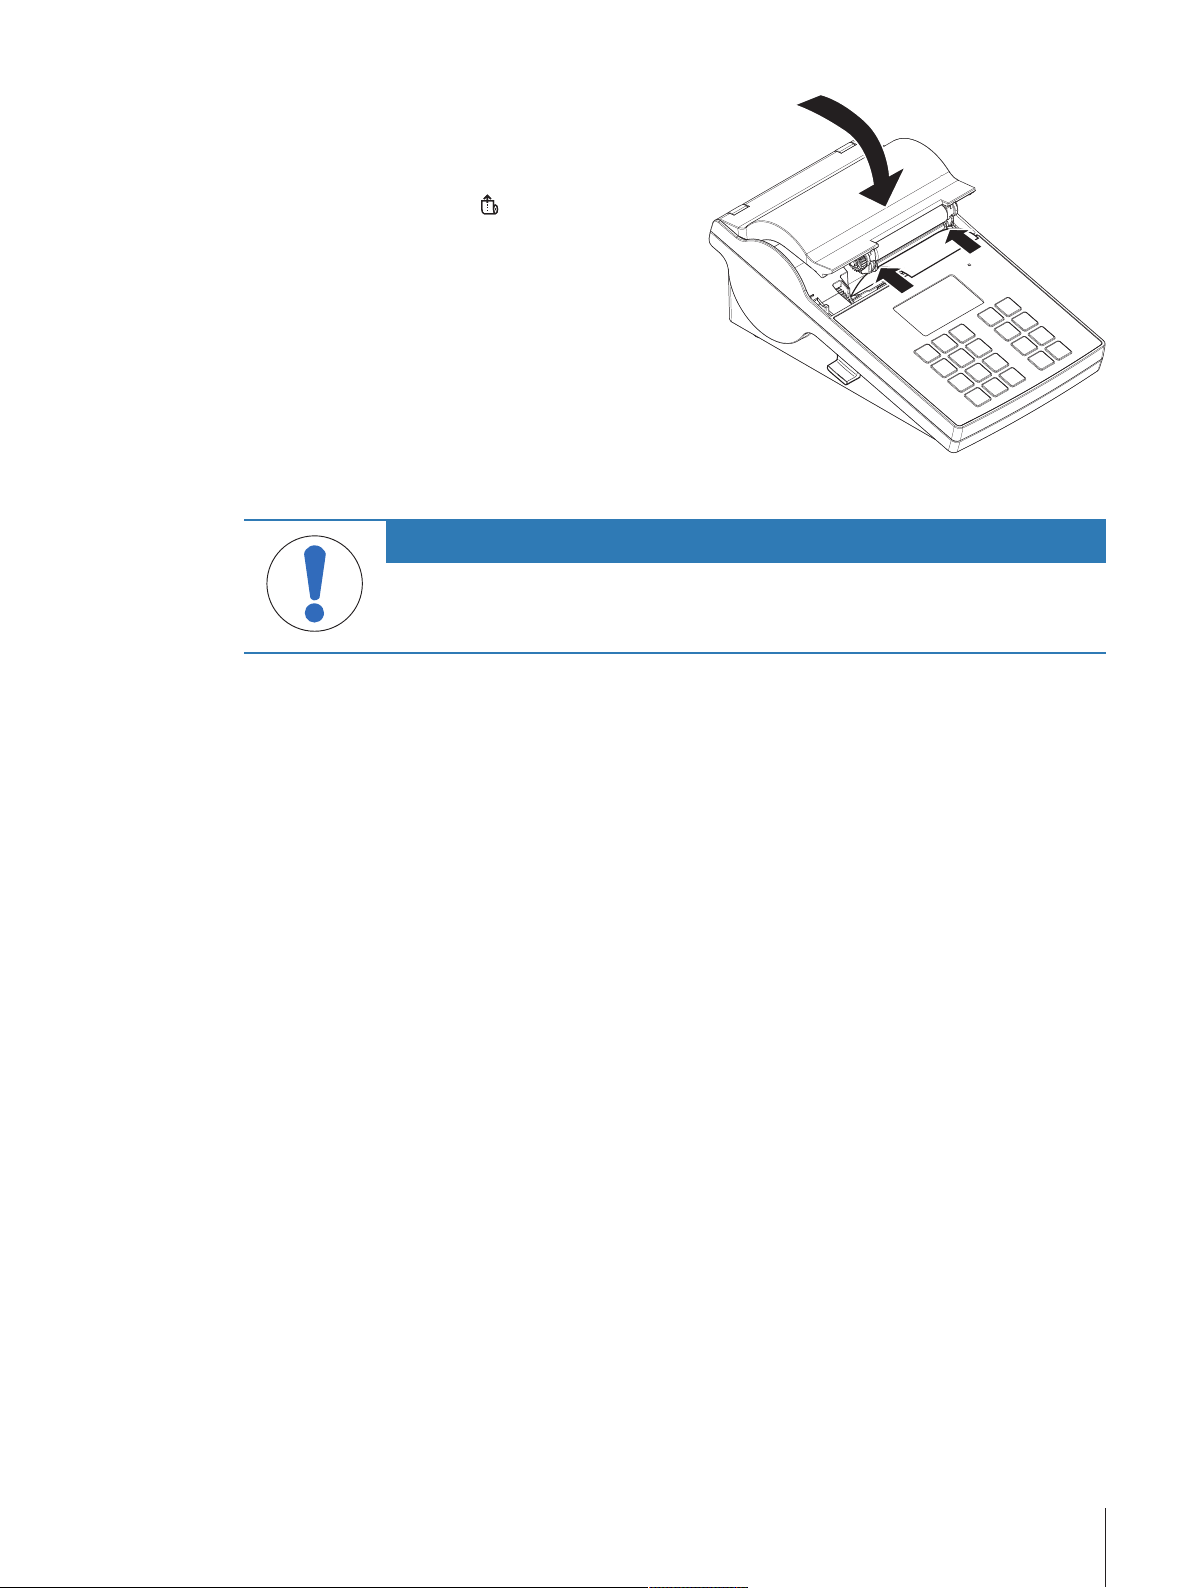
4 Make sure that the paper is in the middle of the
paper guides.
5 Close the printer cover. Firmly press down until it
snaps.
6 Press the paper feed key
to check the paper feed.
4.4 Connecting the printer to a METTLER TOLEDO instrument
NOTICE
We recommend connecting the printer to only one instrument at a time. If several
instruments are connected to the printer at the same time METTLER TOLEDO cannot
assume the correct functionality of the printer.
Note
The printer automatically detects the settings of the connected instrument if the instrument supports this
function.
4.4.1 Connecting the printer via the RS232 connection
1 Connect the printer to the power supply.
2 Use the RS232 cable to connect the printer to the METTLER TOLEDO instrument.
Note
The RS232 connection settings of the printer and of the instrument must be identical.
3 Switch on the printer.
Note
The function Auto connection is switched off by default. It can be switched on if the printer is connected
with the RS232 connection and if the connection settings (Baudrate, Bits / Parity, Handshake) of the
printer differ from the settings of the balance. For more information about activating the function Auto
connection see [RS232}Page18].
Printer default settings
Baudrate: 9600 Stop bits: 1 Bit
Bits / Parity: 8 / None Handshake: XOn/XOff
4.4.2 Connecting the printer via the USB connection
1 Connect the printer to the power supply.
2 Use the USB cable to connect the printer to a METTLER TOLEDO instrument.
3 Switch on the printer.
Note
The system identifies the USB printer automatically. The connected devices can be managed in the
connections settings of the connected METTLER TOLEDO instrument.
Installation and Putting into Operation 11Printer
Page 14
4.4.3 Connecting the printer via the Ethernet connection
1 Connect the printer to the power supply.
2 Use an Ethernet cable to connect the printer directly to a METTLER TOLEDO instrument or indirectly over
the company's Ethernet.
Note
For installation and configuration of the Ethernet interface you need to have basic knowledge of TCP/IPbased networks, and of network technology in general. If necessary, contact the network administrator of
your IT department or your IT support.
4.5 Connecting the printer to a host computer
Note
Before connecting the printer to a PC, the printer driver must be installed first.
Installing the USB driver
1 Go to the site http://www.ftdichip.com/Drivers/VCP.htm
2 Click the windows printer driver (.zip version) or as "setup executable (.exe version).
3 Click save to save it on your specified storage location.
4 Unzip the file if required.
5 Right-click on the *.exe and select Run as Administrator from the menu.
6 Follow the instructions.
ð The installation process was successful, the driver has been installed.
7 Switch off the printer.
8 Connect the printer to the PC with the USB connection.
9 Switch on the printer.
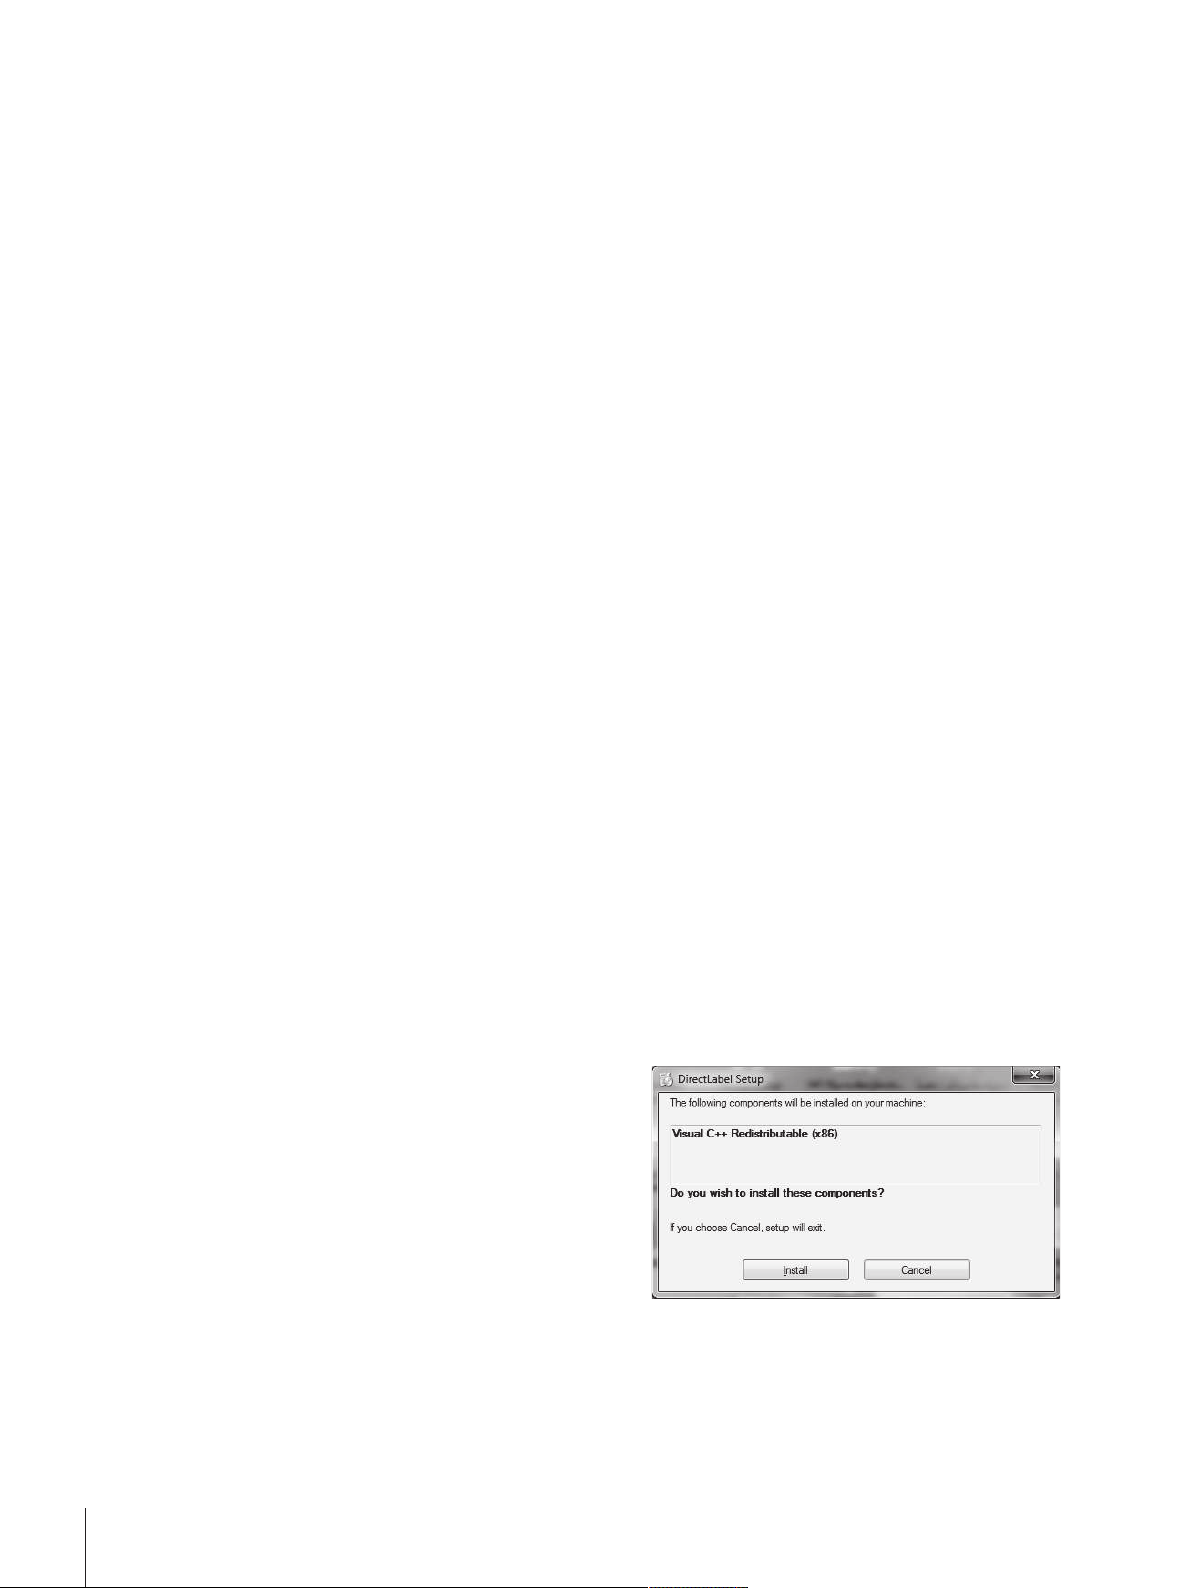
4.5.1 Installing DirectLabel
With the software DirectLabel labels can be individually designed on a PC. The software can be found on
the CD-ROM.
1 Select the DirectLabel software from the CD-
ROM.
2 Save the *.exe file on the local drive.
3 Right-click on the *.exe file, select Run as
Administrator.
4 Follow the installation instructions.
5 Click on Install to install the Visual C++
components.
Installation and Putting into Operation12 Printer
Page 15

6 Follow the instructions in the installation wizard.
7 Click on Next to continue.
8 Select the folder for the program installation.
9 Click on Next to continue.
10 Click on Next to start the installation.
Installation and Putting into Operation 13Printer
Page 16

The software DirectLabel has been successfully
installed.
11 Click on Close to exit.
The software DirectLabel is installed on the host
computer and ready to use.
12 Double click DirectLable icon.
Note
If a Windows security message appears when starting the software, the Windows firewall has blocked the
software. Re-define the firewall rules to unblock the software.
4.6 Defining language, date and time
When using the printer for the first time, we recommend to define the printer language, the current time and
date.
1 Switch on the printer.
ð The message Set language & date / time first! is indicated.
2 Use the scroll keys (
ð Press the confirmation key
3 Chose a date format.
4 Define the date.
5 Chose a time format.
6 Define the time.
ð The language, time and date have been defined.
Note
• These settings are retained even if you disconnect your printer from the power supply.
• Date and time will be changed from a connected instrument if the connected instrument supports date
and time.
• If the connected instrument supports date and time, the menu items are not available.
, ) to chose a language from the list.
.
4.7 Printer test
The printer is equipped with a self-test function. We recommend to use the self-test function regularly to
make sure that the printer is fully operational.
Printing the settings
To print the current settings, the application settings (only for P-58RUE) and the printer firmware settings:
− Switch on the printer while holding the print key
Installation and Putting into Operation14 Printer
.
Page 17

Printing the character table
To print the character table with all fonts and character sets:
− Switch on the printer while holding the paper feed key
.
Printing the character table endlessly
To print the character table with all fonts and character sets:
− Switch on the printer while holding the paper feed key
and the print key .
Note
The character table will be automatically printed until the printer is switched off.
Installation and Putting into Operation 15Printer
Page 18

5 Settings
By pressing the menu key
opens the section Main menu that contains the sub-sections Settings and Applications. For more information about the section Applications see [Applications (only for P-58RUE models)}Page22].
Navigation P-56RUE:
Navigation P-58RUE:
The section Settings does have the following sub-sections:
• System
• Data connection
• Access Protection
• Application (for P-58RUE only)
5.1 System settings
Navigation P-56RUE:
Navigation P-58RUE:
5.1.1 Date / Time
Parameters Explanation Values
Date To set the date. Numerical
Time To set the time. Numerical
Date format To define the date format. D. MMM YY*| MMM
Time format To define the date format. 24:MM*| 12:MM|
* Factory setting
the P-56RUE printer opens directly the section Settings. The P-58RUE printer
Settings
Main menu > Settings
Settings > System
Main menu > Settings > System
DD YY| DD.MM.YY|
MM / DD / YY| YYMM-DD
24.MM| 12.MM
5.1.2 Language
In this section the printer display language can be defined. The following languages can be chosen:
English Pусский
Deutsch 中文
Français 日本語
Italiano 한국어
Español
5.1.3 Printing
Parameters Explanation Values
Darkness To set the darkness of the print. 1 - 100% (80%*)
Speed To set the speed of the printing process.
* Factory setting
High | Medium* | Low
Low (4 inch/second)
Medium (3 inch/second)
Low (2 inch/second)
Settings16 Printer
Page 19

Contents
Parameters Explanation Values
Header To print and to define the header in the print. No header* | Date /
Sample weight To print the sample weight. Off | On*
Signature To print a signature line. Off* | On
* Factory setting
5.1.4 Display / Audio
Parameters Explanation Values
Brightness A control bar to set the display brightness. 1 - 100% (50*)
Contrast A control bar to set the display contrast. 1 - 100% (60*)
Key beep To set the volume of the key beep.
Message beep To set the volume of the message beep.
Off (0 % volume)
Low (33 % volume)
Medium (66% volume)
High (100 % volume)
Off (0 % volume)
Low (33 % volume)
Medium (66% volume)
High (100 % volume)
Time | D / T / Balance
Off | Low | Medium* |
High |
Off | Low | Medium* |
High
* Factory setting
5.1.5 Auto features
Parameters Explanation Values
Standby To switch to standby mode after the preset time. The standby
Backlight To define the time after which the backlight turns automatically
* Factory setting
5.1.6 System reset
Parameters Explanation Values
System reset To reset the printer to factory settings. Yes | No*
* Factory setting
mode can be finished by pressing any key.
off.
Off* | 2 minutes | 5
minutes | 10 minutes |
30 minutes
On* | 30 seconds | 2
minutes | 5 minutes |
10 minutes | 30
minutes
Settings 17Printer
Page 20

5.2 Data connection settings
Navigation P-58RUE:
Navigation P-58RUE:
5.2.1 Char set
Parameters Explanation Values
Char set To chose the character set for printing. The selected character
* Factory setting
5.2.2 RS232
Parameters Explanation Values
Auto connection To automatically detect the settings of the connected device.
Baudrate To select the baudrate. This menu item is only visible when the
Bits / Parity To select the Bits / Parities. This menu item is only visible
Stop bits To select the stop bits. This menu item is only visible when the
Handshake To define the synchronization for the data transfer. This menu
Monitoring To detect the connection status. On* | Off
* Factory setting
Settings > Data connection
Main menu > Settings > Data connection
set must match with the defined printer language.
The connected device must support this function.
option Auto connection is not activated.
when the option Auto connection is not activated.
option Auto connection is not activated.
item is only visible when the option Auto connection is not
activated.
IBM/DOS | IBM/DOS
Cyrillic | IBM/DOS
Japanese | Ansi/Win
Latin 1* | Ansi/Win
Cyrillic | Ansi/Win
Japanese | UTF-8
On | Off*
600 | 1200 | 2400 |
4800 | 9600* |
19200 | 38400 |
57600 | 115200
8 / None* | 7 / None |
7 / Even | 7 / Odd | 7 /
Mark | 7 / Space
1 Bit* | 2 Bits
XOn / XOff* | RTS /
CTS | None
5.2.3 Ethernet
Parameters Explanation Values
DHCP
IP address
Subnet mask To define the subnet within which the ethernet device is
Gateway
Port To define the port number. The connected instruments must
Alias name To define the port number. The connected instruments must
Settings18 Printer
To activate or deactivate the Dynamic Host Configuration
Protocol (DHCP). If this option is activated, all network
parameters assign to this interface automatically.
To define the IP adress of the printer. If the option DHCP is not
activated the system sets the default value 192.168.000.001.
adressable. If the option DHCP is not activated the system sets
the default value 255.255.255.000.
To define the gateway. If the option Auto connection is not
activated the system sets the default value 192.168.000.254.
have the identical port numbers.
have the identical port numbers.
On* | Off
Numerical
(192.168.000.001*)
Numerical
(255.255.255.000*)
Numerical
(192.168.001.000*)
Numerical (9100*)
Numerical (9100*)
Page 21

* Factory setting
5.3 Access protection
With the function Access Protection the settings can be protected with a password to prevent the settings
from unauthorized changes. The password can be defined and changed by the user.
Parameters Explanation Values
Lock To protect the system settings by a password. If the option
Lock is activated, the password must be entered before the
system settings can be accessed.
Password To define a password. The password length is restricted to 12
digits.
* Factory setting
5.3.1 Defining the password
1 Open the section Settings > Access Protection > Password.
2 Enter the old password.
Note
If you define the password for the first time, the default password is 12345678.
3 Enter the new password and press the confirmation key
4 Confirm the new password and press the confirmation key
Note
The new password and the confirmed password must be identical.
On | Off*
Alphanumerical
(12345678*)
.
.
5.4 Application settings (only for P-58RUE)
Navigation:
5.4.1 Statistics
Parameter Explanation
Off*
Input once
Input for each
From balance
* Factory setting
5.4.2 Formulation
Parameter Explanation
Off*
Input once
Input for each
From balance
* Factory setting
Main menu > Settings > Application
No sample ID is prompted.
To prompt the sample ID once when activating the application (max. 20 characters).
To prompt the sample ID every time when requesting the sample weight (max. 20
characters).
To transfer the sample ID from the connected balance, if the balance supports that
feature (max. 20 characters).
Settings 19Printer
Page 22

5.4.3 Totaling
Parameter Explanation
Off*
Input once
Input for each
From balance
* Factory setting
No sample ID is prompted.
To prompt the sample ID once when activating the application (max. 20 characters).
To prompt the sample ID every time when requesting the sample weight (max. 20
characters).
To transfer the sample ID from the connected balance, if the balance supports that
feature (max. 20 characters).
5.4.4 Labels
In this section labels for printing can be defined.
5.4.4.1 Defining templates
5 different templates can be defined. Every template consists of 4 lines and a barcode. The information for
each line can be defined separately. The barcode can be selected from a list. If the information for each line
are not defined, the printer selects default values for each line. Also the number of copies can be defined.
Lines 1 - 4
Parameters Explanation Values
Empty To set an empty line ON| OFF*
Weight To set the weight value with the chosen unit. ON| OFF*
Sample ID
Lot ID
Date / Time To print the current date and time (as defined in the system
Expiry date
Counter To set a counter (10 digits). ON| OFF*
Input once
To prompt the sample ID only once when activating the application Labels.
Input for each
To prompt the sample ID every time when printing the
template.
From balance
To transfer the sample ID from the balance every time when
printing the template.
Input once
To prompt the Lot ID only once when activating the application
Labels.
Input for each
To prompt the Lot ID every time when printing the template.
settings see [Date / Time}Page16]).
Offset
To set a specific number of days.
Fixed Date
To set a specific date.
Input once*| Input for
each| From balance
(max. 20 characters)
Input once*| Input for
each
(max. 20 characters)
ON*| OFF
Offset(30 days*) |
Fixed Date
Note
If no line is defined, the printer sets the following default values: Line 1: Date / Time, Line 2: Sample ID,
Line 3: Weight, Line 4: Empty.
Settings20 Printer
Page 23

Barcode
Parameters Explanation Values
Font To chose a barcode type. For details about the barcode types
see [Labels}Page24].
Code 39 ext. | Code
128 | PDF417 | Aztec
| QR code | Data
matrix
Data To define which data from Line 1-4 are being included in the
barcode.
No | Line 1 | Line 2 |
Line 3 | Line 4 |
Include all
Copies
A specific number of copies can be set by the user (default value: 1 copy).
Design by PC
For the option Design by PC, the DirectLabel software has to be installed and the option has to be activated.
Print templates
With the option Print templates all templates are being printed without real data.
Settings 21Printer
Page 24

6 Applications (only for P-58RUE models)
In this section it is described how to use the applications for the P-58RUE printer.
Navigation:
The P-58RUE printer contains the following applications:
• Statistics
• Formulation
• Totaling
• Labels
6.1 Statistics
With the application Statistics, statistics of weighing values can be generated. 1 to 999 values are
possible.
Navigation:
6.1.1 Evaluation values
• number of samples, n
• average, x
• standard deviation, s
• relative standard deviation, s rel
• sum of all values, Sum
• lowest value (minimum), Min.
• highest value (maximum), Max.
• difference between the minimum and the maximum, Diff
Main menu > Applications
Main menu > Applications > Statistics
6.1.2 Functions
Selection Action
Add sample
Tare
Zero
Sample ID
Display result
Delete last
6.1.3 Performing Statistics
1 Open the application Statistics.
2 Select Continue last to continue the last evaluation.
OR
Select Start new to start a new evaluation.
3 Press the confirmation key
ð Add sample / Tare appears.
4 If you use a container, select Tare.
5 Place the container on the weighing pan and press the confirmation key
6 Select Add sample.
7 Place the first sample and press the confirmation key
ð The stable weight value is displayed, added to the statistics and printed.
Request for adding a sample and printing out of ID and value.
Request for adding a tare.
Request for zeroing the balance.
Entering a sample ID and printing out.
Display of the current result.
Delete of last added sample in memory and printing out.
to confirm.
.
.
Applications (only for P-58RUE models)22 Printer
Page 25

8 Unload sample.
9 To continue, follow the same procedure as for the first sample weight.
10 Press the print key
11 Press the home key
6.2 Formulation
With the application Formulation, 999 individual component weights and container weights can be defined
and printed individually and as a total.
Navigation:
6.2.1 Evaluation values
• number of samples, n
• total sample value, Sum
• total gross value, SumGross
• total tare value, SumTare
6.2.2 Functions
Selection Action
Add sample
Tare
Zero
Sample ID
Display result
Delete last
Main menu > Application > Formulation
for printing results.
or the menu key to exit the application.
Request for adding a sample and printing out of ID and value.
Request for adding a tare and printing out of ID and value.
Request for zeroing the balance.
Entering a sample ID and printing out.
Display of the current result.
Delete of last added sample or tare value in memory and printing out.
6.2.3 Performing Formulation
1 Open the application Formulation.
2 Select Continue last to continue the last evaluation.
OR
Select Start new to start a new evaluation.
3 Press the confirmation key
ð Add sample / Tare / Zero … appears.
4 Select Zero and press the confirmation key
5 If you use a container, select the option Tare.
6 Place the container on the weighing pan and press the confirmation key
7 Select Add sample.
8 Place the first sample and press the confirmation
ð The stable weight value is displayed and printed.
9 Unload sample.
10 To continue, follow the same procedure as for the first sample weight.
11 Press the print key
12 Press the home key
for printing results.
or the menu key to exit the application.
6.3 Totaling
With the application Totaling weighing results can be totaled. 1 to 999 results can be totaled.
Navigation:
Main menu > Application > Totaling
to confirm.
to zero the balance if needed.
.
.
Applications (only for P-58RUE models) 23Printer
Page 26

6.3.1 Evaluation values
• number of samples, n
• sum of all values, Sum
6.3.2 Functions
Selection Action
Add sample
Tare
Zero
Sample ID
Display result
Delete last
6.3.3 Performing Totaling
1 Open the application Totaling.
2 Select the option Continue last to continue the last evaluation.
OR
Select the option Start new to start a new evaluation.
3 Press the confirmation key
ð Add sample / Tare appears.
4 If you use a container, select the option Tare.
5 Place the container on the weighing pan and press the confirmation key
6 Select Add sample.
7 Place the first sample and press the confirmation key
ð The stable weight value is displayed and printed.
8 Unload sample.
9 To continue, follow the same procedure as for the first sample weight.
10 Press the print key
11 Press the home key
Request for adding a sample and printing out of ID and value.
Request for adding a tare and printing out of ID and value.
Request for zeroing the balance.
Entering a sample ID and printing out.
Display of the current result.
Delete of last added sample or tare value in memory and printing out.
to confirm.
.
.
for printing results.
or the menu key to exit the application.
6.4 Labels
With the application Labels predefined label templates can be selected and printed.
Navigation: Main menu
Note
Before using a label it must be defined via Main menu > Settings > Application > Labels. With the application Labels the labels can only be selected but they cannot be edited.
Application Selections Actions
Continue last
Start auto sensing
Applications (only for P-58RUE models)24 Printer
> Application > Labels
Continue with label printing.
Starts gap sensing between the labels
and adjusts them into the correct
position e.g. after changing a roll.
Page 27

Application Selections Actions
xxxxxxxxxxxxxxxxxxxxxxxx
xxxxxxxxxxxxxxxxxxxxxxxx
xxxxxxxxxxxxxxxxxxxxxxxx
xxxxxxxxxxxxxxxxxxxxxxxx
1
2
3
4
xxxxxxxxxxxxxxxxxxxxxxxx
xxxxxxxxxxxxxxxxxxxxxxxx
xxxxxxxxxxxxxxxxxxxxxxxx
1
2
3
4
xxxxxxxxxxxxxxxxxxxxxxxx
xxxxxxxxxxxxxxxxxxxxxxxx
xxxxxxxxxxxxxxxxxxxxxxxx
xxxxxxxxxxxxxxxxxxxxxxxx
1
2
3
4
2-D
Template 1 Request values and print out Template 1
2…4 2…4
Template 5 Request values and print out Template 5
Design by PC1 Request values and print out Design by
2…9 2…9
Design by PC10 Request values and print out Design by
6.4.1 Label printing with pre-defined printer templates
6.4.1.1 Information on templates
See details below for each template:
Without barcode layout
Print Information Line 1
1
Print Information Line 2
2
Print Information Line 3
3
Print Information Line 4
4
label
label
PC 1 label (only visible if present)
PC 10 label (only visible if present)
With 1-D barcode layout
With 2-D barcode layout
6.4.1.2 Label Specifications
the label templates have fixed sizes according to the labels on the paper roll.
Print Information Line 1
1
Print Information Line 2
2
Print Information Line 3
3
1-D Barcode Line Reserve
4
Print Information Line 1
1
Print Information Line 2
2
Print Information Line 3
3
Print Information Line 4
4
Applications (only for P-58RUE models) 25Printer
Page 28

A
B
C
D
E
6.4.1.3 Barcode types
Code Example Width x height in dots
Code 39 ext. (1-D)
Label width 56mm
A
Label height 18mm
B
Gap between labels
C
Perforation
D
Non adhesive area 10mm
E
432 x 32
Code 128 (1-D)
PDF417 (2-D)
Note
Same layout as 1-D barcode.
Aztec (2-D)
QR code (2-D)
Data matrix (2-D)
6.4.2 Label printing of user-defined labels designed by PC
DirectLabel software
With the DirectLabel software customer-specific labels can be designed and stored with an external host
computer. The software can be found on the CD-ROM. After installing and starting the software, go to the
section Others, chose a language and open the online help. The online help contains information about
how to define costumer-specific labels.
Note
User-defined labels cannot be stored to P-56RUE printers. A host computer is needed to print these labels.
432 x 32
432 x 32
120 x 120
120 x 120
120 x 120
Applications (only for P-58RUE models)26 Printer
Page 29

7 Maintenance
WARNING
Risk of electric shock
1 Before cleaning or performing maintenance work, disconnect the printer and the AC
adapter from the power supply.
2 Take care that no liquid penetrates into the printer or the AC adapter.
NOTICE
Never open the housing of the printer or the AC adapter – they contain no components,
which can be cleaned, repaired or replaced by the user.
Use only the power cable from METTLER TOLEDO.
7.1 Replacing the platen roller
Replace the platen roller if the paper feed does not work correctly and cleaning has no effect.
Removing
Printer is switched-off.
Printer cover is open.
§
1 Pull the two black lock holders (left and
right) outwards for releasing and push
them upwards.
ð Both lock holders are facing up.
2 Remove platen roller.
Inserting
1 Hold the new platen roller as shown on figure 1 and insert it into the holder.
2 Pull the two black lock holders (left and right) outwards and push them downwards until they are
attached (figure 2).
3 Make sure that both black lock holders are in correct position before closing the printer cover.
Maintenance 27Printer
Page 30

Figure 1:
A
B
Figure 2:
7.2 Cleaning the housing
The printer housing is made of top grade, resistant materials. Therefore, all commercially available mild
cleaning agents can be used.
7.3 Cleaning the printhead and the platen roller
CAUTION
Danger of burns
The thermal printhead is getting hot during the printing process. Wait until the printhead
has cooled down before opening the printer cover.
Note
Dirt on the printhead or glue residue from the label may result in inadequate print quality. The printer cover
must therefore always be closed. Keeping dirt and dust away from the paper or labels ensures a good print
quality and a longer lifespan of the print head.
1 Switch-off the printer.
2 Open the printer cover.
3 Remove any label residue or other dirt from the
printhead (A) using a soft lint-free cloth dipped
in alcohol.
4 If necessary, clean the platen roller (B) using a
soft lint-free cloth dipped in alcohol.
Note
• It is suggested to clean the printhead frequently.
• Make sure that there are no metal fragments or
other hard particles on the soft cloth.
Maintenance28 Printer
Page 31

7.4 Disposal
In conformance with the European Directive 2012/19/EU on Waste Electrical and
Electronic Equipment (WEEE) this device may not be disposed of in domestic waste. This
also applies to countries outside the EU, per their specific requirements.
Please dispose of this product in accordance with local regulations at the collecting point
specified for electrical and electronic equipment. If you have any questions, please
contact the responsible authority or the distributor from which you purchased this device.
Should this device be passed on to other parties (for private or professional use), the
content of this regulation must also be related.
Thank you for your contribution to environmental protection.
Maintenance 29Printer
Page 32

8 Troubleshooting
Legend
LED
8.1 Information messages
Note
The message appears on the display for 3 seconds or until error is solved. Press
Message Alert Issue Solution
Detecting connection!
Please wait…
Zero is done!
Tare is done!
Data receiving… Green LED
Auto connection
detection canceled!
No connection found!
Printout:
-- No Connection found
– *Please connect
device and switch the
printer off/on. *Alternatively you can change
the settings of the
printer or device.
Printer settings:
Baudrate 9600 Bit/
Parity 8 Bit/None Stop
bit 1 bit Handshake
Xon/Xoff
Set language & date /
time first!
Waiting for stability! Orange LED
Triple status indicator (green, orange, red)
LED on
LED flashing
Beeper voice 5 seconds
Beeper voice twice for 3 seconds
Green LED
— Zero is done! —
— Tare is done! —
— After 90 seconds timeout
Orange LED
Orange LED
Detecting connection! Please wait…
Data receiving… Please wait…
of the message No
connection found or
auto connection was
canceled by pressing
Auto connection failed.
Language, date and time
are not set.
The balance displays
unstable values.
to close the message.
• Set Auto connection to
off.
• Connect the
instrument and switch
.
the printer off/on.
• Set correct printer/
instrument settings.
Set language, date and
time.
Please wait…
Troubleshooting30 Printer
Page 33

8.2 Warning messages
Note
The message appears on the display for 3 seconds or until error is solved. Press
Message Alert Issue Solution
Underload! Orange LED
Overload! Orange LED
Load / Unload! Orange LED
Out of range! Orange LED
No last sample to
Orange LED
delete!
Over heating protection! Red LED
Near end of paper! Orange LED
Firmware updating…
Green LED
Do not switch off!
Date / time not set! Orange LED
When try to
print:
Red LED
Memory error! Orange LED
Balance application error:
underload.
Balance application error: The
weight on the pan exceeds the
weighing capacity of the
balance.
Balance application error: no
variation on the sample
Balance application error:
Sample weight is outside the
allowed range.
Balance application error:
sample value cannot be
deleted from the memory by
pressing
.
Printhead too hot. Continuing
to print may damage the
printhead.
The sensor has detected that
the paper is close to the end.
Firmware update is running. • Do not switch off the printer
• Date and time not set.
• Date and time lost; backup
battery which stores date
and time is empty.
Non-volatile memory and its
data format.
to close the message.
• Check that the weighing
pan is positioned correctly.
• Reduce the weight on the
weighing pan.
• Change sample.
• Unload the pan and load a
new sample weight.
• Only the last stored value
can be deleted.
• Wait a few seconds until
printhead is cooled.
• The paper roll should be
replaced.
while updating.
• Set date and time.
• For charging the built-in
backup battery, we
recommend to connect the
printer to the power supply
and switch on for approximately 24 hours e.g.
– when the printer is
taken into operation for
the first time.
– when the printer was
out of use for a longer
periode.
• Contact your METTLER
TOLEDO representative.
Troubleshooting 31Printer
Page 34

8.3 Error messages
Note
The message appears on the display for 5 seconds or until error is solved. Press
Message Alert Issue Solution
No connection! Red LED
Transmission error! Red LED
Not executable! Orange LED
Action is not allowed! Orange LED
Connection monitor detects no
connection.
Transmission failed. • Check connection.
Balance application error:
Command understood but
currently not executable.
Action not allowed. —
to close the message.
• Check connection.
• Try again later.
• Check the balance.
Barcode print failed! Orange LED
Time out! Orange LED
Memory full! Red LED
Unit change! Orange LED
Buffer overflow! Red LED
Access denied! Orange LED
Wrong password! Orange LED
No match! Orange LED
Wrong setting for barcode in
DirectLabel, e.g. too much
information included for low
resolution.
Action canceled. Waiting time
was longer than 60 seconds.
Tare count is higher than
1000 (Formulation, Totaling,
Statistics).
Balance application error: The
weighing unit on the balance
has been changed during the
application by the user.
During data transmission, the
cache data exceed the
capacity of the buffer.
The buffer has been flushed
and the transmitted data was
lost!
The access to the settings
have been denied by the
system.
The entered password was
wrong.
The new password and the
new confirmed password are
not identical.
• Increase the resolution of
barcode font setting in
DirectLabel.
• Repeat this action.
• Start a new evaluation and
clear the memory.
• Change it back.
• Repeat this action.
• Activate handshake
(Interface setting).
• Reduce baudrate (interface
setting).
• Enter the correct password.
• Enter the correct password.
• Make sure that the new
password and the
confirmed password are
identical.
System errors
Message Alert Problem Solution
Paper run out! Red LED
Out of paper. The printing job
is blocked to protect the print
• Insert a new paper roll.
head but the data are stored.
Paper error! Red LED
• Wrong paper type in use.
• Roll type has been
exchanged.
• Replace the paper/endless
label roll with label roll.
• Start auto sensing (Label
applications).
Troubleshooting32 Printer
Page 35

Message Alert Problem Solution
Cover open! Red LED
Printer cover is open. • Close printer cover.
----- Display Error ----
(Print out)
Keypad error! Please
call service
Red LED
Red LED
Display error. Printer is
blocked.
No keypad detected. Printer is
blocked.
• Please contact METTLER
TOLEDO representative.
• Please contact METTLER
TOLEDO representative.
Troubleshooting 33Printer
Page 36

8.4 What to do if…
Note
If any issue occurs that is not described in this section, please contact your METTLER TOLEDO representative.
Problem Solution
The printer is switched on but
the LEDs do not light up.
The LED lights up red
(ERROR) and printing is interrupted.
The paper roll passes through
the printer but no image is
printed.
The paper roll jams during
printing.
The paper roll does not move
correctly and there is no
printed image on some parts
of the label.
There is no printed image on
part of the paper.
The printed image is
positioned incorrectly.
A label is missed out during
printing.
The printed image is blurred. • Check the darkness setting.
Printer can't connect balance
anymore untill restart balance.
• Check the power supply
• Check whether this is an error in the software settings or the print
commands.
• Check if the used paper roll is suitable.
• Check whether there is a paper jam.
• Check whether the paper roll is finished.
• Check whether the printer cover is closed (the print head is not
positioned correctly).
• Check whether the paper is covering the sensor.
• Make sure that the label roll is loaded the right way up and that it is
suitable material.
• Use the correct power supply (24V).
• Clear the paper jam.
• Clean the print head.
• Clean or replace the platen roller.
• Check whether any label material is stuck to the thermal print head.
• Check whether the starting position has been set incorrectly.
• Check the power supply.
• Check if the platen roller needs cleaning.
• Check if the platen roller needs replacing
• Check the thermal print head for dust or other dirt.
• Check the quality of the paper.
• Check whether there is paper or dust covering the sensor.
• Check whether the paper roll is suitable.
• Make sure that the paper roll is loaded correctly.
• Check the label height.
• Check whether there is dust covering the sensor.
• Check the thermal print head for glue residue or other dirt.
• Switch the printer off and on (restart printer).
Troubleshooting34 Printer
Page 37

9 Technical Data
9.1 General technical Data
Power Supply
AC/DC Adapter: Primary: 100 V - 240 V, ±10%, 50/60 Hz
Secondary: 24 V DC, 2.5 A (with electronic overload protection)
Power supply to the
printer:
Protection and Standards
Overvoltage category II
Degree of pollution 2
Standards for safety and
EMC
Range of application Indoor use only
Environmental Conditions
Height above mean sea
level
Ambient temperature
range
Relative air humidity 20% ~ 80% up to 31°C decreasing linearly to 50% at 40°C, non-condensing
24 V DC, 2.5 A
Declaration of Conformity (part of standard equipment)
up to 4000 m
Operation: 5°C ~ 40°C
Storage: -25°C ~ 60°C
Printer Features
Print technology Direct Thermal
Resolution 8 dots/mm (203 dpi)
Print speed Max. 101.6 mm/s (4 IPS)
Printable width 54 mm (2.12")
Real time clock Date and time
Resident fonts 7 Windows bit map fonts: 6 pt, 7 pt, 10 pt, 12 pt, 24 pt, 16x26, OCR A & B
Barcodes • 1-D Bar codes: Code 39, Code 138
• 2-D Bar codes: PDF417 (layout as 1-D), Datamatrix code, QR code, Aztec
code
Graphics • Support BMP and PCX
• Support ICO, WMF, JPG, EMF file through software
• Support image resize, rotating, mapping and inverse through DirectLabel
software
Interfaces • RS232 port (Male DB 9)
• USB 2.0 device port (B-type)
• Ethernet 10/100base-TX port (Rj-45)
Control Panel • Triple color LED: green, orange or red for status indicating
• 8 tactile keys (P-56RUE), 20 tactile keys (P-58RUE)
Display LCD, backlight, 128 x 64 dots
Display languages English, German, French, Italian, Spanish, Russian, Chinese (simplified),
Japanese, Korean
Technical Data 35Printer
Page 38

Materials
Top housing Die-cast zinc, chromed and plastics (PBT)
Bottom housing Plastics (PBT)
Platen-roller
Media
Width Max. 58 mm (2.28")
Thickness Min. 0.06 mm (0.003") ~ Max. 0.2 mm (0.008")
Roll diameter Max. 60 mm (2.36")
Core diameter 12.7 mm (0.5")
Paper roll wound
Outwards
direction
USB driver
Link http://www.ftdichip.com/Drivers/VCP.htm
Dimension / Weight
Length 220 mm
Height 88 mm
Width 130 mm
Net Weight 1.4 kg, without AC/DC adapter
Technical Data36 Printer
Page 39

9.2 Dimensions
220 mm
130 mm
88 mm
Technical Data 37Printer
Page 40

10 Interface Specifications
15
6
IN
GND
OUT
HAND
SHAKE
IN
DATA
OUT
RxD
TxD
CTS
RTS
10.1 RS232C serial port
Pin No. Function
+12V output control
1
RxD
2
TxD
3
Connect to Pin 6
4
GND
5
Connect to Pin 4
6
RTS
7
CTS
8
Note
The total current to the serial port may not exceed 250 mA.
10.2 USB device port
USB connector type B
Pin No. Function
1
2
3
4
VBUS
D-
D+
GND
10.3 Ethernet 10/100base-TX RJ45 port
RJ45 connector
Pin No. Signal
TX+
TX-
RX+
RX-
1
2
3
4
5
6
7
8
Interface Specifications38 Printer
Page 41

11 Accessories and spare parts
11.1 Accessories
11.2 Spare parts
Bluetooth RS232 serial adapter set ADP-BT-P for wireless
connection between printer and balance. Compatible with
the following balance models (SW V2.20 or higher
required): JP, JS, MS, MS-S, MS-L, ML, MS-TS, ML-T, ME-T,
PHS, PL-E.
• 2 Bluetooth RS232 serial adapter paired (slave/master)
• 1 MT-DB9 male to female connector
• 1 MT-DB9 male to male connector
Bluetooth RS232 serial adapter set for wireless connection
between XPE/XSE/XS balances and P5x printers.
• Paired set of Bluetooth adapters
• RS232 option with 12V power
Anti-theft steel cable 11600361
30086495
30237797
AC/DC adapter (without power cable) 100–240VAC,
50/60Hz, auto switching, 24VDC, 2.5A
Country-specific 3-Pin power cable with grounding
conductor.
Power cable AU 00088751
Power cable BR 30015268
Power cable CH 00087920
Power cable CN 30047293
Power cable DK 00087452
Power cable EU 00087925
Power cable GB 00089405
Power cable IL 00225297
Power cable IN 11600569
Power cable IT 00087457
Power cable JP 11107881
Power cable TH, PE 11107880
Power cable US 00088668
Power cable ZA 00089728
30094772
Accessories and spare parts 39Printer
Page 42

11.3 Consumables
RS9 – RS9 (m/f): connection cable for PC, length = 1 m 11101051
USB (A –B) connection cable, length=1m 30241476
Platen roller 30094770
Thermal labels
Label size: 56mm x 18mm, 6rolls with 550labels per
roll, durability:up to 10 years
Thermal continuous label
58mm, length:13m, 10 rolls, durability: up to 10years
Thermal paper
58mm, length: 27 m, 10rolls, durability: up to 25 years
30094725
30094724
30094723
Accessories and spare parts40 Printer
Page 43

Index
A
Access protection 16, 19
Alphanumerical keys 7
Alphanumerical strings 8
Anti-theft slot 6
Application 16
Formulation 23
Labels 24
Statistics 22
Totaling 23
Application settings 19
Applications 22
Auto connection 11
C
Cancel 7
Cancel key 7
Char set 18
Cleaning printhead 28
Cleaning the housing 28
Confirmation key 7
Connecting to host computer 12
Connecting to the mains 9
Connection
Ethernet 12
RS232 11
Connections
USB 11
Connetion
Host computer 12
D
Darkness 16
Data connection 16
Date 14, 16
Defining the password 19
DirectLabel 12
Disposal 29
Driver installation 12
E
Entering date 8
Entering letters 8
Entering numbers 8
Error Messages 32
Ethernet 12, 18
Ethernet connection 6
F
Features 3
Formulation 23
Performing 23
G
General control keys 6
General safety information 4
H
Home 7
Housing 28
I
Information messages 30
Inserting paper roll 10
Installing direct label 12
K
Key
Alphanumerical 7
Cancel 7
Confirmation 7
Menu 7
Numerical 6
Paper feed 7
Print 7
Scroll down 7
Scroll up 7
L
Labels 20, 24
Language 14
Languages 16
M
Mains 9
Menu 7
Messages 30, 31, 32
N
Numbers 8
Numerical keys 6
P
Paper feed key 7
Paper roll 10
Index 41Printer
Page 44

Password 19
Perfoming Statistics 22
Performing Formulation 23
Performing Totaling 24
Platen roller 27
Platten roller 6
Power supply 9
Print key 7
Printer features 3
Printer menu 7
Printer test 14
Printhead 28
Printing 16
R
Replacing platen roller 27
RS232 18
S
Safety Information 4
Signal words 4
Warning Symbols 4
Scroll down 7
Scroll down key 7
Scroll up 7
Scroll up key 7
Set
Date 14
Language 14
Time 14
Settings 16
Applications 19
Signal words 4
Software version 3
Statistics 22
Performing 22
System 16
System settings 16
V
Version 3
W
Warning messages 31
Warning Symbols 4
T
Time 14, 16
Totaling 23
U
USB 11
USB connection 6
USB driver 12
Index42 Printer
Page 45

Page 46

Mettler-Toledo GmbH
30096749
Im Langacher 44
8606 Greifensee, Switzerland
www.mt.com/contact
Subject to technical changes.
© Mettler-Toledo GmbH 03/2017
30096749C en
www.mt.com/lab-printers
For more information
 Loading...