

Page 1
User's Guide
IND131/IND131xx/IND331/IND331xx
Weighing Terminal
Page 2

IND131/IND131xx/IND331/IND331xx
Essential Services for Dependable Performance of Your IND131/IND131xx/IND331/IND331xx
Weighing Terminal
Register your product
Contact METTLER TOLEDO for service
Installation, Configuration, Integration and Training
Initial Calibration Documentation
Periodic Calibration Maintenance
Weighing Terminal
Congratulations on choosing the quality and precision of METTLER TOLEDO. Proper use of your
new equipment according to this Manual and regular calibration and maintenance by our factorytrained service team ensures dependable and accurate operation, protecting your investment.
Contact us about a service agreement tailored to your needs and budget. Further information is
available at www.mt.com/service
There are several important ways to ensure you maximize the performance of your investment:
1.
www.mt.com/productregistration so we can contact you about enhancements, updates and
important notifications concerning your product.
.
: We invite you to register your product at
2.
accuracy – an out of specification scale can diminish quality, reduce profits and increase
liability. Timely service from METTLER TOLEDO will ensure accuracy and optimize uptime and
equipment life.
a.
trained, weighing equipment experts. We make certain that your weighing equipment is
ready for production in a cost effective and timely fashion and that personnel are trained for
success.
b.
requirements are unique for every industrial scale so performance must be tested and
certified. Our calibration services and certificates document accuracy to ensure production
quality and provide a quality system record of performance.
c.
confidence in your weighing process and documentation of compliance with requirements.
We offer a variety of service plans that are scheduled to meet your needs and designed to
fit your budget.
: The value of a measurement is proportional to its
: Our service representatives are factory-
: The installation environment and application
: A Calibration Service Agreement provides on-going
Page 3
© METTLER TOLEDO 2014
No part of this manual may be reproduced or transmitted in any form or by any means, electronic or
mechanical, including photocopying and recording, for any purpose without the express written
permission of METTLER TOLEDO.
U.S. Government Restricted Rights: This documentation is furnished with Restricted Rights.
Copyright 2014 METTLER TOLEDO. This documentation contains proprietary information of METTLER
TOLEDO. It may not be copied in whole or in part without the express written consent of METTLER
TOLEDO.
METTLER TOLEDO reserves the right to make refinements or changes to the product or manual
without notice.
COPYRIGHT
METTLER TOLEDO® is a registered trademark of Mettler-Toledo, LLC. All other brand or product
names are trademarks or registered trademarks of their respective companies.
METTLER TOLEDO RESERVES THE RIGHT TO MAKE REFINEMENTS OR CHANGES
WITHOUT NOTICE.
FCC Notice
This device complies with Part 15 of the FCC Rules and the Radio Interference Requirements of the
Canadian Department of Communications. Operation is subject to the following conditions: (1) this
device may not cause harmful interference, and (2) this device must accept any interference
received, including interference that may cause undesired operation.
This equipment has been tested and found to comply with the limits for a Class A digital device,
pursuant to Part 15 of FCC Rules. These limits are designed to provide reasonable protection against
harmful interference when the equipment is operated in a commercial environment. This equipment
generates, uses, and can radiate radio frequency energy and, if not installed and used in
accordance with the instruction manual, may cause harmful interference to radio communications.
Operation of this equipment in a residential area is likely to cause harmful interference in which case
the user will be required to correct the interference at his or her expense.
Declaration of Conformity is located on the documentation CD.
RoHS Compliance Statement.
The majority of our products fall within categories 8 and 9. Those categories currently do not fall
within the scope of the Directive 2002/95/EG (RoHS) of January 27, 2003. If our products are
intended for use in other products which themselves fall within the scope of the RoHS Directive,
compliance requirements have to be separately negotiated contractually.
Those products which fall within categories 1-7 and 10 will be in compliance with the EU RoHS
Directive from no later than July 1, 2006.
If it is not possible for technical reasons to replace any non-RoHS-compliant substances in any of
the above products as required, we plan to inform our customers in a timely manner
Statement regarding harmful substances
We do not make direct use of harmful materials such as asbestos, radioactive substances or
arsenic compounds. However, we purchase components from third party suppliers, which may
contain some of these substances in very small quantities.
Page 4
Warnings and Cautions
• READ this manual BEFORE operating or servicing this equipment and FOLLOW these
instructions carefully.
• SAVE this manual for future reference.
WARNING
FOR CONTINUED PROTECTION AGAINST SHOCK HAZARD CONNECT THE AC VERSION OF THE
HARSH AND JUNCTION BOX ENCLOSURES TO PROPERLY GROUNDED OUTLET ONLY. DO NOT
REMOVE THE GROUND PRONG.
WARNING
WHEN THIS EQUIPMENT IS INCLUDED AS A COMPONENT PART OF A SYSTEM, THE
RESULTING DESIGN MUST BE REVIEWED BY QUALIFIED PERSONNEL WHO ARE FAMILIAR
WITH THE CONSTRUCTION AND OPERATION OF ALL COMPONENTS IN THE SYSTEM AND THE
POTENTIAL HAZARDS INVOLVED. FAILURE TO OBSERVE THIS PRECAUTION COULD RESULT IN
BODILY HARM AND/OR PROPERTY DAMAGE.
WARNING
ENSURE THAT THE POWER CONNECTION TO THE IND131 OR IND331 TERMINAL MATCHES
THE SPECIFIED OPERATING VOLTAGE OF THAT TERMINAL. REFER TO THE DATA LABEL OF THE
TERMINAL FOR THE OPERATING VOLTAGE. CONNECTING THE INCORRECT POWER SOURCE
TO THE TERMINAL COULD RESULT IN DAMAGE TO OR DESTRUCTION OF THE EQUIPMENT
AND/OR BODILY HARM.
WARNING
THE IND131, IND131xx, IND331 AND IND331xx TERMINALS ARE NOT INTRINSICALLY
SAFE. DO NOT USE WITHIN AREAS CLASSIFIED AS HAZARDOUS DIVISION 1 OR ZONES
0/1/20/21 BECAUSE OF COMBUSTIBLE OR EXPLOSIVE ATMOSPHERES. FAILURE TO
COMPLY WITH THIS WARNING COULD RESULT IN BODILY HARM AND/OR PROPERTY
DAMAGE.
WARNING
IF THE KEYBOARD, DISPLAY LENS OR ENCLOSURE IS DAMAGED ON AN IND131xx OR
IND331xx TERMINAL THAT IS USED IN A DIVISION 2 OR ZONE 2/22 AREA, THE DEFECTIVE
COMPONENT MUST BE REPAIRED IMMEDIATELY. REMOVE POWER IMMEDIATELY AND DO
NOT REAPPLY POWER UNTIL THE DISPLAY LENS, KEYBOARD OR ENCLOSURE HAS BEEN
REPAIRED OR REPLACED BY QUALIFIED SERVICE PERSONNEL. FAILURE TO DO SO COULD
RESULT IN BODILY HARM AND/OR PROPERTY DAMAGE.
WARNING
IND131xx AND IND331xx TERMINALS USED IN A DIVISION 2 OR ZONE 2/22 ENVIRONMENT
MUST BE INSTALLED AND MAINTAINED PER THE SPECIAL CONDITIONS LISTED IN CHAPTER
2 OF THE IND131xx AND IND 331xx DIVISION 2 INSTALLATION MANUAL (64068795)
WITHOUT EXCEPTION. FAILURE TO DO SO COULD RESULT IN BODILY HARM AND/OR
PROPERTY DAMAGE.
Page 5
Warnings and Cautions
WARNING
METTLER TOLEDO ASSUMES NO RESPONSIBILITY FOR CORRECT INSTALLATION OF THIS
EQUIPMENT WITHIN A DIVISION 2 OR ZONE 2/22 AREA. THE INSTALLER MUST BE
FAMILIAR WITH ALL DIVISION 2 OR ZONE 2/22 WIRING AND INSTALLATION
REQUIREMENTS.
WARNING
THE IND131XX AND IND331XX TERMINALS HAVE BEEN APPROVED BY FM (US AND
CANADA) WITH A TEMPERATURE RATING OF T5 (100˚ C) FOR USE IN HAZARDOUS
ENVIRONMENTS. THEY HAVE BEEN CERTIFIED BY KEMA (ATEX AND IECEx) WITH A
TEMPERATURE RATING OF T5 (100˚ C) FOR GAS ENVIRONMENTS AND A T RATING OF
100°C FOR DUST ENVIRONMENTS. THEY MUST NOT BE USED IN AREAS WHERE THE AUTO
IGNITION TEMPERATURE OF THE HAZARDOUS MATERIAL IS BELOW THIS RATING.
WARNING
NON-APPROVED MODELS OF THE IND131 AND IND331 TERMINAL THAT ARE NOT
FACTORY-LABELED AS DIVISION 2 OR ZONE 2/22 APPROVED MUST NOT BE INSTALLED
INTO A DIVISION 2 OR ZONE 2/22 ENVIRONMENT.
WARNING
IN ORDER TO INSTALL THE IND131xx OR IND331xx TERMINAL UTILIZING THE U.S. OR
CANADIAN FM APPROVAL, METTLER TOLEDO CONTROL DRAWING 72238303R MUST BE
FOLLOWED WITHOUT EXCEPTION. IN ORDER TO INSTALL THE CATEGORY 3 MARKED
IND131xx OR IND331xx TERMINAL UTILIZING THE EUROPEAN ATEX APPROVAL, THE TYPE
EXAMINATION CERTIFICATE KEMA 10ATEX0097 X, DRAWING 72246295R AND ALL LOCAL
REGULATIONS MUST BE FOLLOWED WITHOUT EXCEPTION. IN ORDER TO INSTALL THE
IND131xx OR IND331xx TERMINAL UTILIZING THE iECEx APPROVAL, THE CERTIFICATE OF
CONFORMITY IECEx KEM 10.0060X AND ALL LOCAL REGULATIONS MUST BE FOLLOWED
WITHOUT EXCEPTION. FAILURE TO DO SO COULD RESULT IN BODILY HARM AND/OR
PROPERTY DAMAGE.
WARNING
THE INTERNAL DISCRETE I/O RELAY OPTION (#72225753 OR #72225757) MUST NOT BE
USED IN A TERMINAL INSTALLED IN AN AREA CLASSIFIED AS DIVISION 2 OR ZONE 2/22.
FAILURE TO COMPLY WITH THIS WARNING COULD RESULT IN BODILY HARM AND/OR
PROPERTY DAMAGE.
WARNING
THE CC-LINK PLC OPTION (#30059622) MUST NOT BE USED IN A TERMINAL INSTALLED
IN AN AREA CLASSIFIED AS DIVISION 2 OR ZONE 2/22 (IND131xx/IND331xx). FAILURE TO
COMPLY WITH THIS WARNING COULD RESULT IN BODILY HARM AND/OR PROPERTY
DAMAGE.
THE CONTROLNET™ PLC OPTION (64057423) MUST NOT BE USED IN AC VERSIONS OF
IND131 AND IND331 TERMINALS. FAILURE TO COMPLY WITH THIS WARNING COULD
RESULT IN EQUIPMENT DAMAGE AND/OR BODILY HARM.
WARNING
Page 6
WARNING
In conformance with the European Directive 2002/96/EC on Waste Electrical and Electronic
ONLY THE DC POWERED VERSIONS OF THE DIN, PANEL-MOUNT AND J-BOX ENCLOSURES
OF THE IND131xx AND IND331xx TERMINALS HAVE BEEN APPROVED FOR USE IN
DIVISION 2 AND ZONE 2/22 ENVIRONMENTS. THE HARSH ENCLOSURE IND331 DC
POWERED TERMINAL AND ALL AC POWERED VERSIONS OF THE IND131 AND IND331
TERMINALS DO NOT HAVE A DIVISION 2 OR ZONE 2/22 APPROVAL AND MUST NOT BE
INSTALLED IN DIVISION 2 ENVIRONMENTS OR IN ZONE 2/22 ENVIRONMENTS.
WARNING
DISCONNECT ALL POWER TO THIS UNIT BEFORE INSTALLING, SERVICING, OR CLEANING.
FAILURE TO DO SO COULD RESULT IN BODILY HARM AND/OR PROPERTY DAMAGE.
CAUTION
BEFORE CONNECTING/DISCONNECTING ANY INTERNAL ELECTRONIC COMPONENTS OR INTERCONNECTING
WIRING BETWEEN ELECTRONIC EQUIPMENT ALWAYS REMOVE POWER AND WAIT AT LEAST THIRTY (30)
SECONDS BEFORE ANY CONNECTIONS OR DISCONNECTIONS ARE MADE. FAILURE TO OBSERVE THESE
PRECAUTIONS COULD RESULT IN DAMAGE TO OR DESTRUCTION OF THE EQUIPMENT AND/OR BODILY HARM.
NOTICE
OBSERVE PRECAUTIONS FOR HANDLING ELECTROSTATIC SENSITIVE DEVICES.
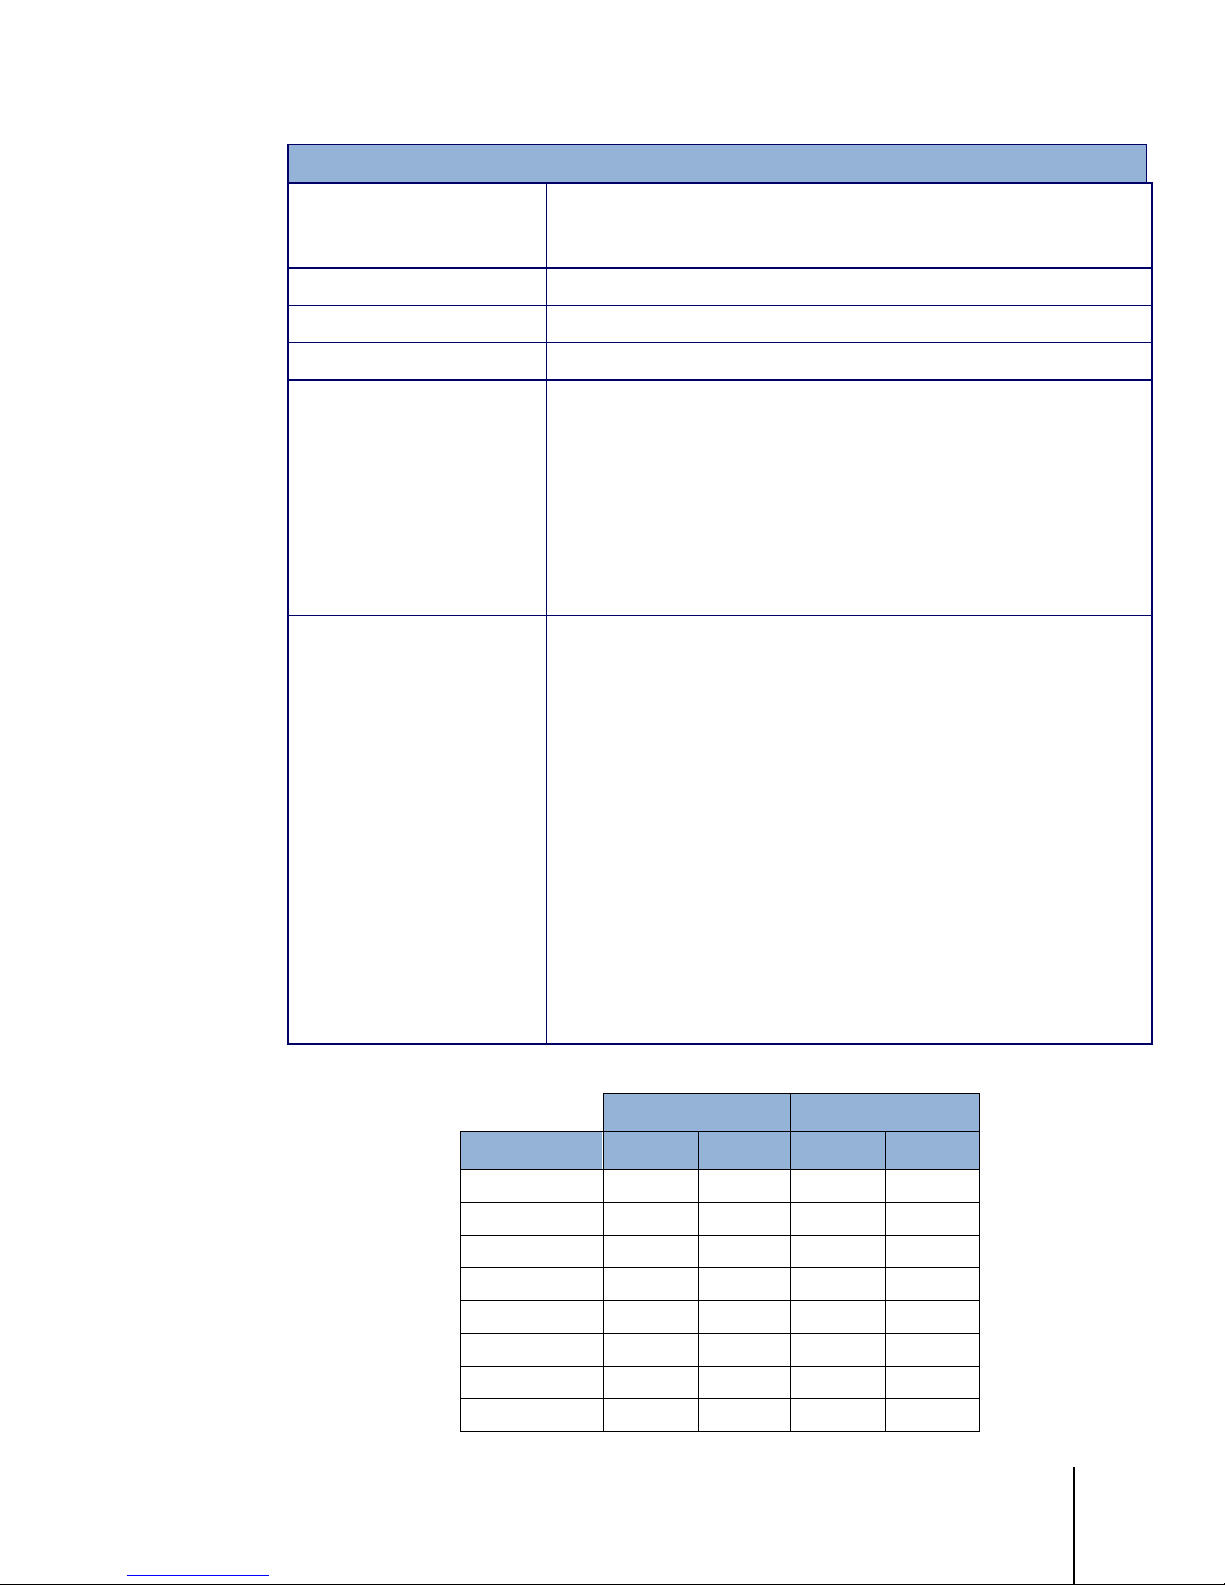
Disposal of Electrical and Electronic Equipment
Equipment (WEEE) this device may not be disposed of in domestic waste. This also applies
to countries outside the EU, per their specific requirements.
Please dispose of this product in accordance with local regulations at the collecting point
specified for electrical and electronic equipment.
If you have any questions, please contact the responsible authority or the distributor from
which you purchased this device.
Should this device be passed on to other parties (for private or professional use), the
content of this regulation must also be related.
Thank you for your contribution to environmental protection.
Page 7

64067481 | 08 | 11/2014
METTLER TOLEDO IND131/IND131xx/IND331/IND331xx User's Guide
1
Contents
1 Introduction ................................................................................. 1-1
1.1. Overview ...................................................................................... 1-1
1.1.1. Standard Features ............................................................................................... 1-1
1.2. Terminal Versions ......................................................................... 1-2
1.3. Specifications ............................................................................... 1-3
1.4. Use in Hazardous Areas ................................................................. 1-6
1.5. Inspection and Contents Checklist ................................................... 1-6
1.6. Model Identification ....................................................................... 1-7
1.7. Physical Dimensions ..................................................................... 1-8
1.8. Main PCB .................................................................................. 1-11
1.9. Scale Base ................................................................................. 1-11
1.10. Options ...................................................................................... 1-11
1.10.1. COM2 Serial Port ............................................................................................... 1-11
1.10.1.1. Modbus RTU .................................................................................................................. 1-12
1.10.2. Discrete I/O ....................................................................................................... 1-12
1.10.3. PLC Interfaces ................................................................................................... 1-12
1.10.3.1. Analog Output ................................................................................................................ 1-12
1.10.3.2. A-B RIO ......................................................................................................................... 1-12
1.10.3.3. CC-Link ......................................................................................................................... 1-13
1.10.3.4. ControlNet ..................................................................................................................... 1-13
1.10.3.5. EtherNet/IP and Modbus TCP ........................................................................................... 1-13
1.10.3.6. DeviceNet ...................................................................................................................... 1-13
1.10.3.7. PROFIBUS DP ................................................................................................................ 1-14
1.10.4. SD Memory Option ............................................................................................ 1-14
1.11. Display and Keyboard ................................................................. 1-14
1.11.1. Display Layout .................................................................................................. 1-15
1.11.2. Front Panel Keys ............................................................................................... 1-15
2 Operation .................................................................................... 2-1
2.1. Overview ...................................................................................... 2-1
2.2. Basic Functionality ........................................................................ 2-1
2.2.1. Zero ................................................................................................................... 2-1
2.2.1.1. Automatic Zero Maintenance .............................................................................................. 2-1
2.2.1.2. Pushbutton Zero ............................................................................................................... 2-1
2.2.2. Tare ................................................................................................................... 2-1
2.2.2.1. Pushbutton Tare ............................................................................................................... 2-1
2.2.2.2. Net Sign Correction ........................................................................................................... 2-1
2.2.3. Clearing Tare ...................................................................................................... 2-1
2.2.3.1. Manual Clear ................................................................................................................... 2-1
2.2.3.2. Auto Clear ....................................................................................................................... 2-1
2.2.4. Print ................................................................................................................... 2-1
Page 8

2
METTLER TOLEDO IND131/IND131xx/IND331/IND331xx User's Guide
64067481 | 08 | 11/2014
Contents
2.2.5. Information Recall ............................................................................................... 2-1
2.2.6. Target ................................................................................................................ 2-1
2.2.6.1. Target Control .................................................................................................................. 2-1
2.2.6.2. Target Terms ................................................................................................................... 2-1
2.2.7. Comparators ....................................................................................................... 2-1
2.2.7.1. Target Value Comparators ................................................................................................. 2-1
2.2.7.2. Range Comparators.......................................................................................................... 2-1
2.2.8. Calibration .......................................................................................................... 2-1
2.2.9. CalFree™ ........................................................................................................... 2-1
2.3. Security ....................................................................................... 2-1
2.4. Display Operation ......................................................................... 2-1
2.5. Keypad Operation ......................................................................... 2-1
2.6. Operator Menu .............................................................................. 2-1
2.6.1. Language Selection – F Codes .............................................................................. 2-1
2.6.2. Accessing the Operator Menu ................................................................................ 2-1
2.6.3. Navigating the Operator Menu ............................................................................... 2-1
2.6.4. Numerical Data Entry ........................................................................................... 2-1
2.6.5. Target Menu........................................................................................................ 2-1
2.6.6. Comparator Menu ............................................................................................... 2-1
2.6.7. Information Recall Menu ...................................................................................... 2-1
2.6.8. Calibration Menu ................................................................................................. 2-1
2.6.8.1. Zero Calibration................................................................................................................ 2-1
2.6.8.2. Span .............................................................................................................................. 2-1
2.6.8.3. Step Calibration................................................................................................................ 2-1
2.6.8.4. CalFree™ ........................................................................................................................ 2-1
2.6.9. Setup Access ...................................................................................................... 2-1
3 Configuration .............................................................................. 3-1
3.1. Setup Menu Tree ........................................................................... 3-1
3.1.1. Use of Keys within Menus .................................................................................... 3-1
3.1.1.1. Overview of Navigation ..................................................................................................... 3-1
3.1.1.2. Entering Numerical Parameters .......................................................................................... 3-2
3.1.1.3. Making Selections from a List ............................................................................................ 3-2
3.2. Entering Setup Mode...................................................................... 3-3
3.3. Security ....................................................................................... 3-3
3.3.1. Metrology Switch ................................................................................................. 3-4
3.4. Exiting Setup ................................................................................ 3-4
3.5. Overview of Setup ......................................................................... 3-4
3.5.1. Configuration Options .......................................................................................... 3-5
3.6. Scale – F1 ................................................................................... 3-6
3.6.1. Type – F1.1 ........................................................................................................ 3-8
3.6.1.1. Name – F1.1.1 ................................................................................................................ 3-8
3.6.1.2. Approval – F1.1.2 ............................................................................................................ 3-8
3.6.2. Capacity and Increment – F1.2 ............................................................................. 3-8
3.6.2.1. Units – F1.2.1 ................................................................................................................. 3-8
Page 9

64067481 | 08 | 11/2014
METTLER TOLEDO IND131/IND131xx/IND331/IND331xx User's Guide
3
3.6.2.2. Capacity – F1.2.2 ............................................................................................................ 3-8
3.6.5.1.
3.7.1.3.
3.6.2.3. Increment – F1.2.3........................................................................................................... 3-9
3.6.2.4. x10 Always – F1.2.4 ........................................................................................................ 3-9
3.6.3. Calibration – F1.3 ............................................................................................... 3-9
3.6.3.1. Linearity – F1.3.1............................................................................................................. 3-9
3.6.3.2. Set Zero – F1.3.2 ............................................................................................................. 3-9
3.6.3.3. Set Span – F1.3.3 ............................................................................................................ 3-9
3.6.3.4. Step Calibration – F1.3.4 ................................................................................................ 3-10
3.6.3.5. CalFREE – F1.3.5........................................................................................................... 3-10
3.6.4. Zero – F1.4....................................................................................................... 3-11
3.6.5. Tare – F1.5....................................................................................................... 3-12
3.6.5.2. Auto Clear – 1.5.2.......................................................................................................... 3-12
3.6.5.3. Rate– F1.6 .................................................................................................................... 3-12
3.6.5.4. Weight Units – F1.6.1 ..................................................................................................... 3-12
3.6.5.5. Time Units – F1.6.2........................................................................................................ 3-13
3.6.5.6. Measurement Period – F1.6.3 ......................................................................................... 3-13
3.6.5.7. Output Average – F1.6.4 ................................................................................................. 3-13
Tare Types 1.5.1............................................................................................................ 3-12
3.6.6. Filter – F1.7 ...................................................................................................... 3-13
3.6.6.1. Low Pass Filter – F1.7.1 ................................................................................................. 3-13
3.6.6.2. Stability Filter – F1.7.2 .................................................................................................... 3-13
3.6.7. Stability – F1.8.................................................................................................. 3-13
3.6.7.1. Motion Range – F1.8.1 ................................................................................................... 3-13
3.6.8. Log or Print – F1.9 ............................................................................................ 3-14
3.6.8.1. Auto Print – F1.9.1 ......................................................................................................... 3-14
3.6.9. Reset – F1.10 ................................................................................................... 3-14
3.7. Application – F2 ......................................................................... 3-15
3.7.1. Target Operation – F2.1 ..................................................................................... 3-15
3.7.1.1. Tolerance Type – F2.1.1 ................................................................................................. 3-16
3.7.1.2. Output Type – F2.1.2 ...................................................................................................... 3-16
3.7.1.4. Target Latching – F2.1.4 ................................................................................................. 3-16
Target Source – F2.1.3 ................................................................................................... 3-16
3.7.2. Target Values – F2.2 ......................................................................................... 3-16
3.7.2.1. Target – F2.2.1 .............................................................................................................. 3-16
3.7.2.2. Negative and Positive Tolerance (-Tol and +Tol) – F2.2.2, F2.2.3 ....................................... 3-16
3.7.2.3. Spill – F2.2.4 ................................................................................................................ 3-16
3.7.2.4. Fine Feed – F2.2.5 ......................................................................................................... 3-16
3.7.3. Comparators – F2.3 .......................................................................................... 3-17
3.7.3.1. Comparator n Source – F2.3.1, F2.3.5, F2.3.9 ................................................................. 3-17
3.7.3.2. Active – F2.3.2, F2.3.6, F2.3.10 ..................................................................................... 3-17
3.7.3.3. Limit – F2.3.3, F2.3.7, F2.3.11 ...................................................................................... 3-18
3.7.3.4. High Limit – F2.3.4, F2.3.8, F2.3.12 ............................................................................... 3-18
3.7.4. Discrete I/O – F2.4 ............................................................................................ 3-18
3.7.4.1. Discrete Inputs – F2.4.1 .................................................................................................. 3-18
3.7.4.2. Discrete Outputs – F2.4.2.1, F2.4.2.2, F2.4.2.3, F2.4.2.4, ................................................ 3-18
3.7.5. Reset – F2.5 ..................................................................................................... 3-19
3.8. Terminal – F3 ............................................................................. 3-19
3.8.1.1. Serial Number – F3.1.1 .................................................................................................. 3-19
3.8.1.2. Screen Saver – F3.2.1 .................................................................................................... 3-19
Page 10

4
METTLER TOLEDO IND131/IND131xx/IND331/IND331xx User's Guide
64067481 | 08 | 11/2014
Contents
3.8.2. Region – F3.3 ................................................................................................... 3-20
3.8.2.1. Menu Language – F3.3.1 ................................................................................................ 3-20
3.8.2.2. Setup Language – F3.3.2 ................................................................................................ 3-20
3.8.3. User – F3.4 ...................................................................................................... 3-20
3.8.3.1. Password Protection – F3.4.1 ......................................................................................... 3-20
3.8.3.2. Password – F3.4.2 ........................................................................................................ 3-20
3.8.4. Menu Keys – F3.5 ............................................................................................. 3-20
3.8.4.1. Calibration Access – F3.5.1 ............................................................................................ 3-20
3.8.4.2. Target Access – F3.5.2 ................................................................................................... 3-20
3.8.4.3. Comparator Access – F3.5.3 ........................................................................................... 3-21
3.8.5. Reset – F3.6 ..................................................................................................... 3-21
3.9. Communication – F4 ................................................................... 3-21
3.9.1. Output Template – F4.1 ..................................................................................... 3-21
3.9.2. Format – F4.1.1 ................................................................................................ 3-21
3.9.3. Print Scale Name – F4.1.2 ................................................................................. 3-22
3.9.4. Connections – F4.2 ........................................................................................... 3-22
3.9.5. COMn Assignment – F4.2.1, F4.2.2 .................................................................... 3-22
3.9.6. Checksum – F4.2.1.1, F4.2.2.1 ......................................................................... 3-22
3.9.7. Serial – F4.3 ..................................................................................................... 3-22
3.9.8. COM1 and COM2 – F4.3.1, F4.3.2 ..................................................................... 3-22
3.9.9. PLC – F4.4 ....................................................................................................... 3-23
3.9.9.1. Analog Output – F4.4.1 .................................................................................................. 3-23
3.9.9.2. A-B RIO – F4.4.1 ........................................................................................................... 3-24
3.9.9.3. Data Format – F4.4.2 ..................................................................................................... 3-25
3.9.9.4. CC-Link – F4.4.1 ........................................................................................................... 3-26
3.9.9.5. Data Format – F4.4.2 ..................................................................................................... 3-26
3.9.9.6. ControlNet – F4.4.1 ........................................................................................................ 3-27
3.9.9.7. Data Format – F4.4.2 ..................................................................................................... 3-27
3.9.9.8. DeviceNet – F4.4.1 ........................................................................................................ 3-28
3.9.9.9. Data Format – F4.4.2 ..................................................................................................... 3-28
3.9.9.10. EtherNet / IP and Modbus TCP – F4.4.1 ............................................................................ 3-29
3.9.9.11. Data Format – F4.4.2 ..................................................................................................... 3-30
3.9.9.12. PROFIBUS – F4.4.1 ........................................................................................................ 3-30
3.9.9.13. Data Format – F4.4.2 ..................................................................................................... 3-31
3.9.10. Reset – F4.5 ..................................................................................................... 3-31
3.10. Maintenance – F5 ....................................................................... 3-32
3.10.1. Scale Diagnostics – F5.1 ................................................................................... 3-32
3.10.1.1. Load Cell Output – F5.1.1 ............................................................................................... 3-32
3.10.1.2. Calibration Values – F5.1.2 ............................................................................................. 3-32
3.10.1.3. Statistics – F5.1.3 .......................................................................................................... 3-33
3.10.2. Serial Test – F5.2 .............................................................................................. 3-34
3.10.2.1. COM1 – F5.2.1 ............................................................................................................. 3-34
3.10.2.2. COM2 – F5.2.2 ............................................................................................................. 3-34
3.10.3. Discrete I/O Test – F5.3 ...................................................................................... 3-34
3.10.4. Display Test – F5.4 ........................................................................................... 3-35
3.10.5. Install Software Update – F5.5 ............................................................................ 3-35
3.10.6. Reset All – F5.6 ................................................................................................ 3-35
Page 11

64067481 | 08 | 11/2014
METTLER TOLEDO IND131/IND131xx/IND331/IND331xx User's Guide
5
3.11. Restoring Factory Default Settings ................................................. 3-35
4 Service and Maintenance ............................................................. 4-1
4.1. Cleaning and Maintenance ............................................................. 4-1
4.2. Service ........................................................................................ 4-2
4.3. Troubleshooting ............................................................................ 4-2
4.3.1. Diagnostic LEDs .................................................................................................. 4-2
4.3.2. Problems ............................................................................................................ 4-3
4.3.3. Error Codes and Error Messages ........................................................................... 4-3
4.3.4. Internal Diagnostics ............................................................................................. 4-4
4.3.4.1. Scale Diagnostics............................................................................................................. 4-4
4.3.4.2. Serial Test ....................................................................................................................... 4-5
4.3.4.3. Discrete I/O Test ............................................................................................................... 4-5
4.4. System Backup and Restore ........................................................... 4-7
4.4.1. Backup .............................................................................................................. 4-7
4.4.2. Restore ............................................................................................................... 4-8
4.5. SD Memory Files and InSite ............................................................ 4-9
4.5.1. Importing the File ................................................................................................ 4-9
4.5.2. Saving as a *.txt File ......................................................................................... 4-10
4.5.3. Saving as a *.BCF File ....................................................................................... 4-10
4.6. Master Reset .............................................................................. 4-10
4.7. Updating Firmware ...................................................................... 4-11
4.7.1. Using InSite ...................................................................................................... 4-12
4.7.2. Using the SD Memory Card ................................................................................. 4-12
A Default Settings ........................................................................... A-1
A.1. Setup Defaults .............................................................................. A-1
B Parameter Values ........................................................................ B-1
C Communications .......................................................................... C-1
C.1. Serial Interface Parameters ............................................................. C-1
C.2. Demand Output Mode.................................................................... C-1
C.2.1. Output Templates ................................................................................................ C-1
C.3. Continuous Output Mode ................................................................ C-1
C.3.1. Standard Continuous Output ................................................................................. C-1
C.3.2. Continuous – Extended Output .............................................................................. C-1
C.4. CTPZ ........................................................................................... C-1
C.5. Standard Interface Command Set (SICS) Protocol .............................. C-1
C.5.1. Version Number of the MT-SICS ............................................................................. C-1
C.5.2. Command Formats .............................................................................................. C-1
C.5.3. Response Formats ............................................................................................... C-1
C.5.3.1. Format of the Response with Weight Value .......................................................................... C-1
C.5.3.2. Format of the Response without Weight Value ...................................................................... C-1
Page 12

6
METTLER TOLEDO IND131/IND131xx/IND331/IND331xx User's Guide
64067481 | 08 | 11/2014
Contents
Format of Error Message ..................................................................................................................... C-1
C.5.4. Tips for the Programmer ....................................................................................... C-1
C.5.4.1. Command and Response .................................................................................................. C-1
C.5.4.2. Reset .............................................................................................................................. C-1
C.5.4.3. Quotation Marks (“ ”) ....................................................................................................... C-1
C.5.5. Commands and Responses MT-SICS Level 0 ......................................................... C-1
C.5.5.1. I0 – INQUIRY OF ALL IMPLEMENTED MT-SICS COMMANDS .................................................... C-1
C.5.5.2. I1 – INQUIRY OF MT-SICS LEVEL AND MT-SICS VERSIONS ..................................................... C-1
C.5.5.3. I2 – INQUIRY OF DATA ...................................................................................................... C-1
C.5.5.4. I3 – INQUIRY OF SW VERSION ........................................................................................... C-1
C.5.5.5. I4 – INQUIRY OF SERIAL NUMBER ...................................................................................... C-1
C.5.5.6. S – SEND STABLE WEIGHT VALUE ...................................................................................... C-1
C.5.5.7. SI – SEND WEIGHT VALUE IMMEDIATELY ............................................................................. C-1
C.5.5.8. SIR – SEND WEIGHT VALUE IMMEDIATELY AND REPEAT........................................................ C-1
C.5.5.9. Z – ZERO ......................................................................................................................... C-1
C.5.5.10. @ – RESET ...................................................................................................................... C-1
C.5.6. Commands and Responses MT-SICS Level 1 ......................................................... C-1
C.5.6.1. SR – SEND WEIGHT VALUE ON WEIGHT CHANGE (SEND AND REPEAT) .................................. C-1
C.5.6.2. T – TARE ......................................................................................................................... C-1
C.5.6.3. TA – INQUIRE/ENTER TARE VALUE ...................................................................................... C-1
C.5.6.4. TAC – CLEAR TARE VALUE ................................................................................................. C-1
C.5.6.5. TI – TARE IMMEDIATELY .................................................................................................... C-1
C.6. Variable Access ............................................................................ C-1
C.6.1. Connection ......................................................................................................... C-1
C.6.2. Commands......................................................................................................... C-1
C.6.2.1. Individual Variables .......................................................................................................... C-1
C.6.2.2. Blocks of Variables ........................................................................................................... C-1
C.6.3. Variable List ........................................................................................................ C-1
C.6.3.1. Scale Status (read only) .................................................................................................... C-1
C.6.3.2. DIO and Target Status (read only) ...................................................................................... C-1
C.6.3.3. Terminal Commands (write only) ....................................................................................... C-1
C.6.3.4. Setup – Scale (read and write) ........................................................................................... C-1
C.6.3.5. Setup – Application (read and write) ................................................................................... C-1
C.6.3.6. Setup – Terminal (read and write) ...................................................................................... C-1
C.6.3.7. Setup – Communication (read and write) ............................................................................ C-1
C.6.3.8. Setup – Communication – PLC (read and write) ................................................................... C-1
C.6.3.9. Setup – Maintenance (read only) ....................................................................................... C-1
C.6.3.10. Calibration Values (read and write) .................................................................................... C-1
C.6.3.11. Target Values (read and write) ........................................................................................... C-1
C.6.3.12. Comparator Values (read and write) ................................................................................... C-1
D GEO Codes .................................................................................. D-1
D.1. Original Site Calibration ................................................................. D-1
D.2. New Site GEO Code Adjustment ...................................................... D-1
Page 13

64067481 | 08 | 11/2014
METTLER TOLEDO IND131/IND131xx/IND331/IND331xx User's Guide
1-1
This chapter covers
1 Introduction
DIV 2 AND ZONE 2/22 INSTALLATION
IF YOU WISH TO INSTALL THE IND131xx OR IND331xx TERMINAL IN A DIVISION 2 OR ZONE 2/22 AREA, REFER
TO THE DIVISION 2 AND ZONE 2/22 INSTALLATION INSTRUCTIONS INCLUDED ON THE RESOURCE CD
PROVIDED WITH THE TERMINAL. FAILURE TO COMPLY WITH THE INSTRUCTIONS PROVIDED THERE COULD
RESULT IN BODILY HARM AND/OR PROPERTY DAMAGE.
The IND131, IND131xx, IND331 and IND331xx industrial scale terminals provide a
• Overview
• Terminal Versions
• Specifications
• Use in Hazardous Areas
• Inspection and Contents
Checklist
• Model Identification
• Physical Dimensions
• Main PCB
• Scale Bases
• Options
•
Display and Keyboard
compact but flexible solution to a variety of weighing needs. Configured in a variety
of enclosure types, these terminals are at home in virtually any industrial
environment. They are optimized for ease of integration into existing weighing
systems, and their modular construction makes for simplicity of maintenance.
Innovative use of Secure Data (SD) Memory technology permits quick, simple
replacement of a terminal, complete with all its calibration and configuration settings.
Both 2mv/V and 3mv/V load cells are supported without the need for any
configuration change. Measurement and control applications are enhanced with an
ultra-fast A/D conversion rate, patented TraxDSP™ digital filtering technology, and
discrete I/O update rate of 50 Hz. The IND131, IND131xx, IND331 and IND331xx
deliver precision measurement data from grams to tons in a single cost effective
package.
Whether communicating weight data to a process PLC or providing a serial output of
data to a printer, the terminals offer solutions for a wide range of applications.
1.1. Overview
1.1.1. Standard Features
• Modular design, multiple mounting methods
• Supports one analog load cell platform (The DC version supports up to four 350 ohm load
cells in legal for trade applications globally. The AC version supports up to eight 350 ohm
load cells in legal for trade applications in the US. The AC version in Europe and the rest of
the world supports up to four for legal for trade applications and maximum eight 350 ohm
load cells in non-legal for trade applications.)
• Ability to position the IND331 panel-mount display remotely from the DIN terminal module
• Organic LED (OLED) displays for crisp readability in all light conditions
• One serial port for asynchronous, bidirectional communication and print output
• Powered by either 85–264 V AC or 24 V DC (selected by model)
Page 14

1-2
METTLER TOLEDO IND131/IND131xx/IND331/IND331xx User's Guide
64067481 | 08 | 11/2014
Introduction
• Support for the following option boards:
COM2 and Discrete I/O interface (includes Modbus RTU protocol)
Choice of one PLC interface:
o 4-20mA Analog Output
®
o Allen Bradley RIO
o CC-Link
o ControlNet™ (for DC version only)
o DeviceNet™
o Ethernet/IP
o Modbus TCP
®
o PROFIBUS
• Front panel key access to basic weighing functions – zero, tare, clear and print
• Latching target control to provide one- or two-speed feeding control with the press of a start
DP
button
• Rate calculation used for comparator source or communicated to a PLC
• Comparators - simple coincidence setpoints for comparison of weight or rate with absolute
target values or ranges
• Selectable unit of measure including grams, kilograms, pounds, tons
• Backup and restore of configuration and calibration settings, using SD memory device or
InSite™ PC tool
• TraxEMT™ performance monitoring and recording
• CalFREE™ calibration without test weights
• Scale calibration via A-B RIO, CC-Link, ControlNet, DeviceNet, Ethernet/IP, Modbus RTU and
Modbus TCP, and PROFIBUS interfaces.
• Models IND131xx and IND331xx are certified for use within hazardous (explosive) areas
classified as Division 2 or Zone 2 or 22.
1.2. Terminal Versions
The terminals are available in the following versions:
• IND131 DIN rail mount, AC power
• IND131 DIN rail mount, 24 VDC power
• IND131xx DIN rail mount, 24 VDC power, Division 2 and Zone 2/22 certified
• IND331 Panel-mount, AC power
• IND331 Panel-mount, 24 VDC power
• IND331xx Panel-mount, 24 VDC power, Division 2 and Zone 2/22 certified
• IND331 Harsh, AC power
Page 15
64067481 | 08 | 11/2014
METTLER TOLEDO IND131/IND131xx/IND331/IND331xx User's Guide
1-3
• IND331 Harsh, 24 VDC power
Enclosure Type
Dimensions (w × h × d)
Shipping Weight
• IND131 Junction Box, AC power
• IND131 Junction Box, 24 VDC power
• IND131xx Junction Box, 24 VDC power, Division 2 and Zone 2/22 certified
1.3. Specifications
The terminals conform to the specifications listed in Table 1-1.
Table 1-1: Terminal Specifications
IND131 and IND331 Specifications
IND131 DIN rail-mount: plastic housing with operator interface
IND331 Panel-mount: Stainless steel front panel with operator interface.
Plastic rear chassis that can be mounted to the display or remotely DIN rail
mounted.
IND331 Harsh: Stainless steel desk top or wall mount enclosure including
operator interface.
IND131 J-Box: Stainless steel enclosure including internal board for
summing four load cells.
IND131 DIN module: 68 mm × 138 mm × 111 mm
(2.7 in. × 5.4 in. × 4.4 in.)
IND331 Panel-mount:
Front panel: 168 mm × 68 mm × 12 mm
(6.6 in. × 2.7 in. × 0.5 in.)
Rear chassis: 156 mm x 68 mm x 111 mm
(6.1 in. x 2.7 in. x 4.4 in.)
IND331 Harsh: 220 mm x 131 mm x 177 mm
(8.7 in. x 5.2 in. x 7.0 in.)
IND131 J-Box: 251 mm x 261 mm x 123 mm
(9.9 in. x 10.3 in. x 4.8 in.) Original design.
IND131 J-Box: 251 mm x 261 mm x 169 mm
(9.9 in. x 10.3 in. x 6.6 in.) Updated design.
IND131 DIN: 1 kg (2.2 lb)
IND331 Panel: 1.5 kg (3.3 lb)
IND331 Harsh: 3 kg (6.5 lb)
IND131 J-Box: 5.5 kg (12.1 lb)
Page 16

1-4
METTLER TOLEDO IND131/IND131xx/IND331/IND331xx User's Guide
64067481 | 08 | 11/2014
Introduction
Environmental Protection
Operating Environment
Hazardous Areas
Power
Power Consumption
Display
Weight Display
Scale Types
Number of Cells
Number of Scales
IND131 and IND331 Specifications
IND131 DIN: IP20, Type 1
IND131 J-Box: IP69K
IND131xx J-Box: IP65
IND331 Panel: IP65, Type 4x and12
IND331 Harsh: IP66
The terminal (all enclosure types) can be operated at temperatures ranging
from −10° to 40° C (14° to 104° F) at 10% to 95% relative humidity,
non-condensing.
The standard IND131/IND331 terminal cannot be operated in areas
classified as Hazardous because of combustible or explosive atmospheres
in those areas. Special models IND131xx and IND331xx are designed for
use within Division 2 or Zone 2/22 areas. None of the IND131/331 family
of terminals is designed for use within Division 1 or Zone 0/1/20/21 areas.
Contact an authorized METTLER TOLEDO representative for information
about hazardous area applications.
AC version: Operates at 100 -- 240 VAC, 49–61 Hz
DC version: Operates from 18 to 36 VDC
All DC versions and AC versions of the DIN and panel-mount models
provide a terminal strip for power connections.
AC versions of the harsh environment and junction box models include a
power cord configured for the country of use.
Note: When an IND131xx or IND331xx terminal is installed into an area
classified as Division 2 or zone 2/22, special AC wiring requirements must
be met. Refer to document 64068795 Division 2 and Zone 2/22
Installation Guide. Provisions must be made to prevent transient
disturbances of more than 40% from the DC voltage supplied to the
IND131xx and IND331xx terminals.
Refer to Table 1-2 and Table 1-3
Green OLED including weight display, weight units, gross/net indication
and graphic symbols for motion and center of zero. Also used for
programming. Update rate of 10 updates per second.
IND131: 5.6 mm (0.22 in) high weight display
IND331: 12 mm (0.47 in) high weight display
Maximum displayed resolution of 100,000 divisions.
Analog load cells
DC Version: Up to four 350-ohm load cells (2 or 3 mv/V)
AC Version:
Up to eight 350-ohm load cells (2 or 3 mv/V), approved in the US.
Up to four for legal for trade applications in Europe and the rest of
the world, eight maximum in non-legal for trade applications.
One
Page 17
64067481 | 08 | 11/2014
METTLER TOLEDO IND131/IND131xx/IND331/IND331xx User's Guide
1-5
IND131 and IND331 Specifications
Analog/Digital Update Rates
Load Cell Excitation Voltage
Minimum Sensitivity
Keypad
Communications
Approvals
Internal analog: 366 Hz
Target Comparison: 50 Hz;
PLC Interface: 20 Hz
5 V DC
0.1 microvolts
4 keys; polyester overlay (PET) with polycarbonate display lens
Serial Interfaces
Standard: One serial port (COM1) RS-232, 300 to 115,200 baud
Optional Serial Port: (COM2) RS-232/485, 300 to 115,200 baud
Protocol
Serial Inputs:, ASCII commands for CTPZ (Clear, Tare, Print, Zero), SICS
(most level 0 and level 1 commands)
Serial Outputs: Continuous, Extended continuous, Demand (limited
formats) or SICS. Optional COM2 provides Modbus RTU.
Weights and Measures
USA: NTEP Class III/IIIL,10,000d - CoC 09-051
Canada: Class III - 10,000d; Class IIIHD - 20,000d;
AM-5744
Europe: Class III, 6000 e - TC7600
Gravimetric Filling (MID) – T10261
Catchweighing (MID) – T10262
OIML: Class III, 6000 e - R76/2006-NL1-09.26
Product Safety
UL, cUL, CE Note: When an IND131xx or IND331xx terminal is installed
into an area classified as Division 2 or zone 2/22, special AC wiring
requirements must be met. Refer to document 64068795 Division 2 and
Zone 2/22 Installation Guide. Provisions must be made to prevent
transient disturbances of more than 40% from the DC voltage supplied to
the IND131xx and IND331xx terminals.
Table 1-2: IND131, IND331 Power Consumption (AC Source)
IND131 IND331
Input Voltage I (mA) P (W) I (mA) P (W)
85V/50 Hz 73 3.3 79 3.5
110 V/50 Hz 58 3.3 63 3.5
240 V/50 Hz 28 3.3 30 3.6
264 V/50 Hz 27 3.4 28 3.6
85 V/60 Hz 70 3.3 75 3.5
110 V/60 Hz 56 3.3 60 3.5
240 V/60 Hz 27 3.4 30 3.6
264 V/60 Hz 27 3.5 28 3.8
Page 18
1-6
METTLER TOLEDO IND131/IND131xx/IND331/IND331xx User's Guide
64067481 | 08 | 11/2014
Introduction
Table 1-3: IND131, IND331 Power Consumption (DC Source)
Input Voltage I (mA) P (W) I (mA) P (W)
18VDC (min) 158 2.84 170 3.06
24 VDC 120 2.88 130 3.12
36 VDC (max) 84 3.02 90 3.24
IND131 IND331
Values shown are with internal COM2/DIO option and Analog Output option installed and
load cell input loaded with 4 x 350Ω load cells.
1.4. Use in Hazardous Areas
Standard versions of the IND131 and IND331 terminals are not certified for use within hazardous
(explosive) areas. Specially marked terminals (models IND131xx and IND331xx) are FM and
KEMA certified for use in hazardous areas classified as Division 2 or Zone 2/22.
DO NOT USE THE STANDARD IND131 OR IND331 TERMINALS IN AREAS CLASSIFIED AS
HAZARDOUS BECAUSE OF COMBUSTIBLE OR EXPLOSIVE ATMOSPHERES. SPECIAL MODELS
(IND131xx AND IND331xx) ARE AVAILABLE FOR THESE APPLICATIONS. CONTACT AN
AUTHORIZED METTLER TOLEDO REPRESENTATIVE FOR INFORMATION ABOUT HAZARDOUS
AREA APPLICATIONS.
WARNING
DIV 2 AND ZONE 2/22 INSTALLATION
IF YOU WISH TO INSTALL THE IND131xx OR IND331xx TERMINAL IN A DIVISION 2 OR ZONE
2/22 AREA, REFER TO THE DIVISION 2 AND ZONE 2/22 INSTALLATION INSTRUCTIONS
INCLUDED ON THE RESOURCE CD PROVIDED WITH THE TERMINAL. FAILURE TO COMPLY
WITH THE INSTRUCTIONS PROVIDED THERE COULD RESULT IN BODILY HARM AND/OR
PROPERTY DAMAGE.
Note: When an IND131xx or IND331xx terminal is installed into an area classified as Division 2 or zone
2/22, special AC wiring requirements must be met. Refer to document 64068795 Division 2 and Zone
2/22 Installation Guide.
1.5. Inspection and Contents Checklist
Verify the contents and inspect the package immediately upon delivery. If the shipping container is
damaged, check for internal damage and file a freight claim with the carrier if necessary. If the
container is not damaged, remove the terminal from its protective package, noting how it was
packed, and inspect each component for damage.
If shipping the terminal is required, it is best to use the original shipping container. The terminal
must be packed correctly to ensure its safe transportation.
The package should include:
Page 19

64067481 | 08 | 11/2014
METTLER TOLEDO IND131/IND131xx/IND331/IND331xx User's Guide
1-7
• IND131, IND131xx, IND331 or IND331xx
• Installation manual
Terminal
• Note: Panel-mount model includes DIN
housing, panel display, mounting brackets
and barrel nuts.
1.6. Model Identification
The IND131/IND331 model number, factory number and serial number are located on the data
plate of the terminal. Refer to Figure 1-1 to verify the configuration of the IND131/IND331 terminal.
• Resource CD (includes all required
documents and manuals)
• Bag of miscellaneous parts, depending on
terminal configuration
Figure 1-1: IND131/IND331 Model Identification Numbers
Page 20
1-8
METTLER TOLEDO IND131/IND131xx/IND331/IND331xx User's Guide
64067481 | 08 | 11/2014
Introduction
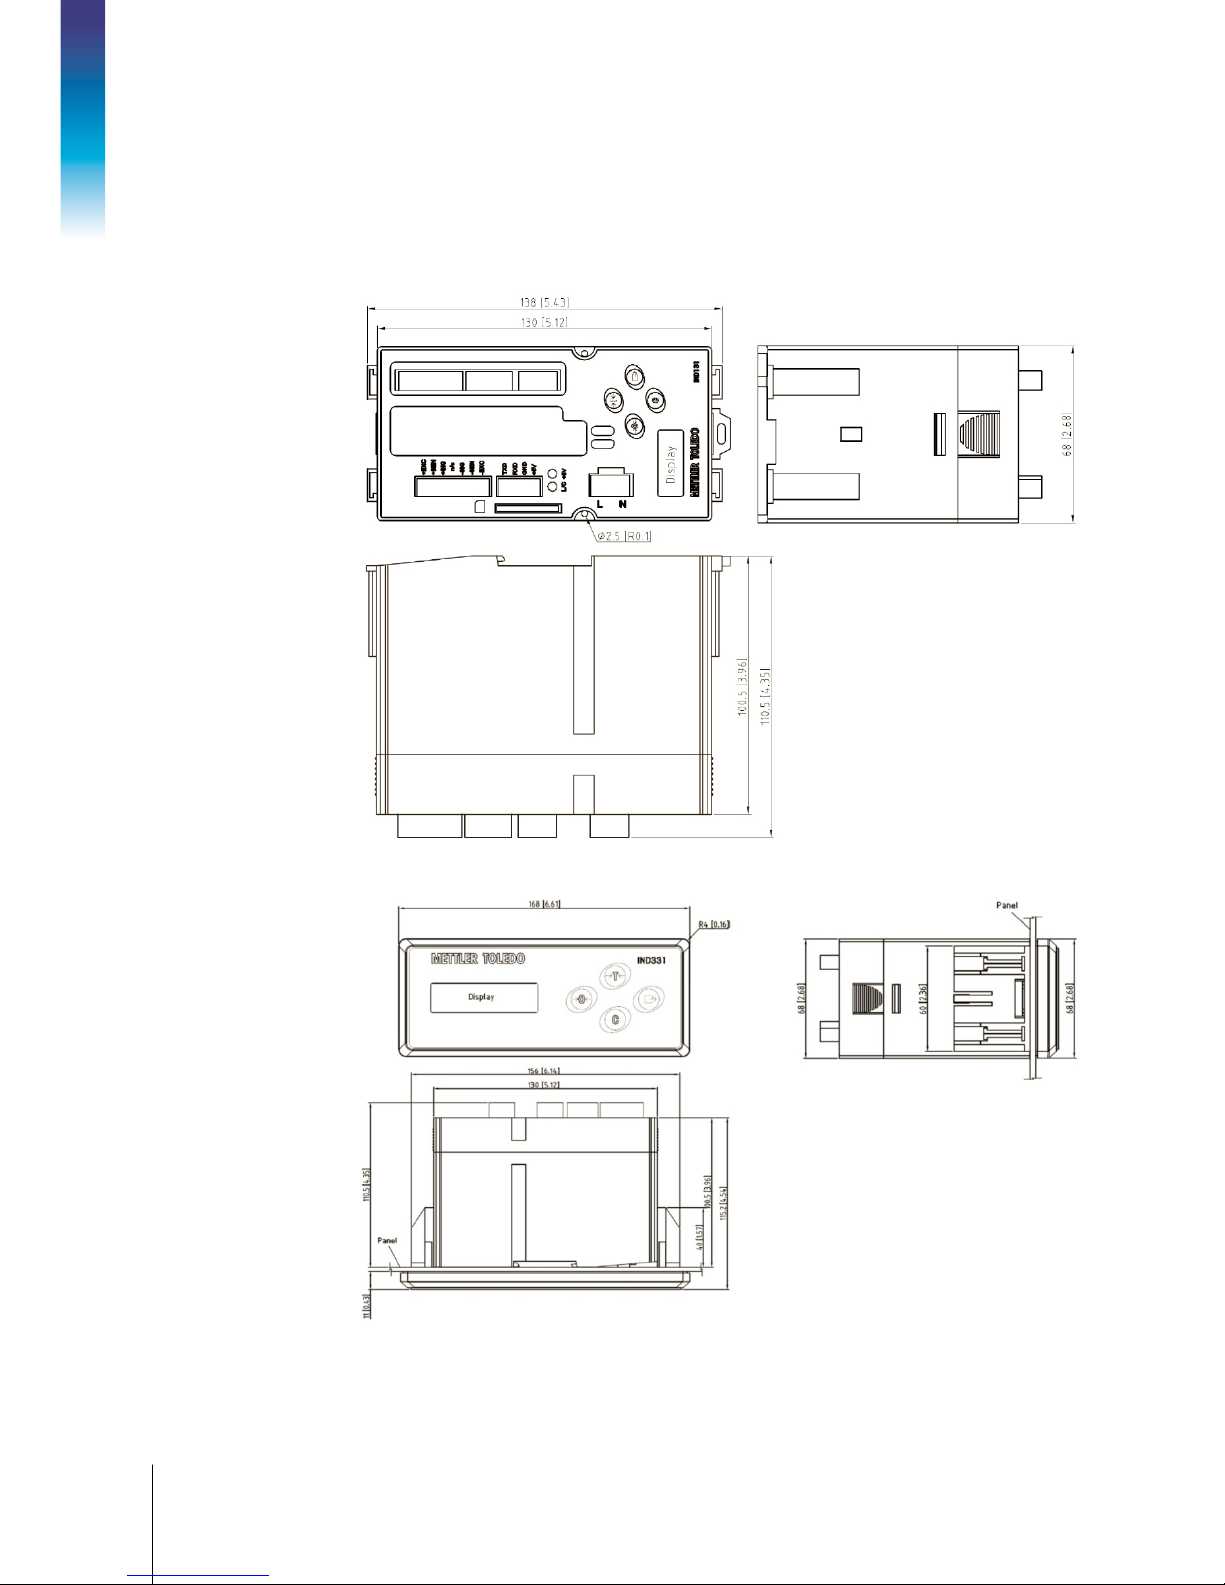
1.7. Physical Dimensions
The physical dimensions of each of the IND131 and IND331 enclosures are shown in the following
five Figures in mm and [inches].
Figure 1-2: IND131 DIN Rail Mount Enclosure Dimensions
Figure 1-3: IND331 Panel Mount Enclosure Dimensions
Page 21
64067481 | 08 | 11/2014
METTLER TOLEDO IND131/IND131xx/IND331/IND331xx User's Guide
1-9
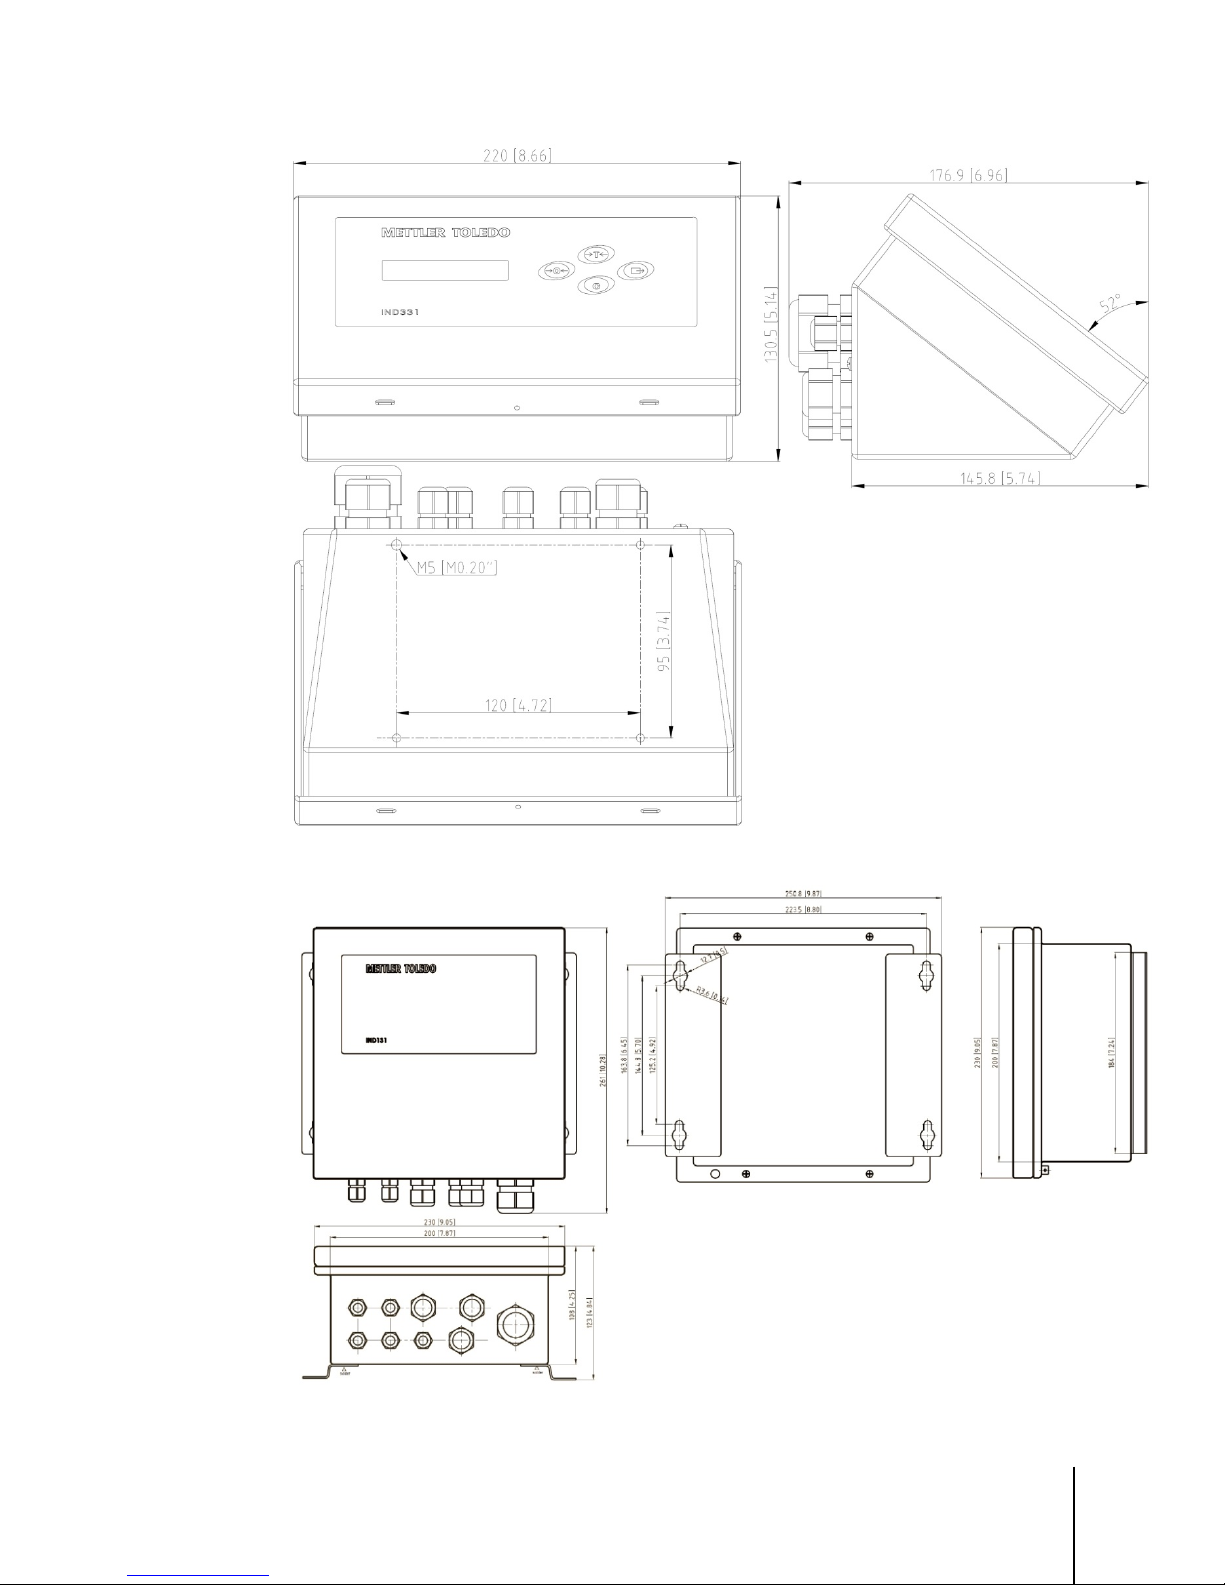
Figure 1-4: IND331 Harsh Enclosure Dimensions
Figure 1-5: Original IND131 Junction Box Enclosure Dimensions
Page 22
1-10
METTLER TOLEDO IND131/IND131xx/IND331/IND331xx User's Guide
64067481 | 08 | 11/2014
Introduction
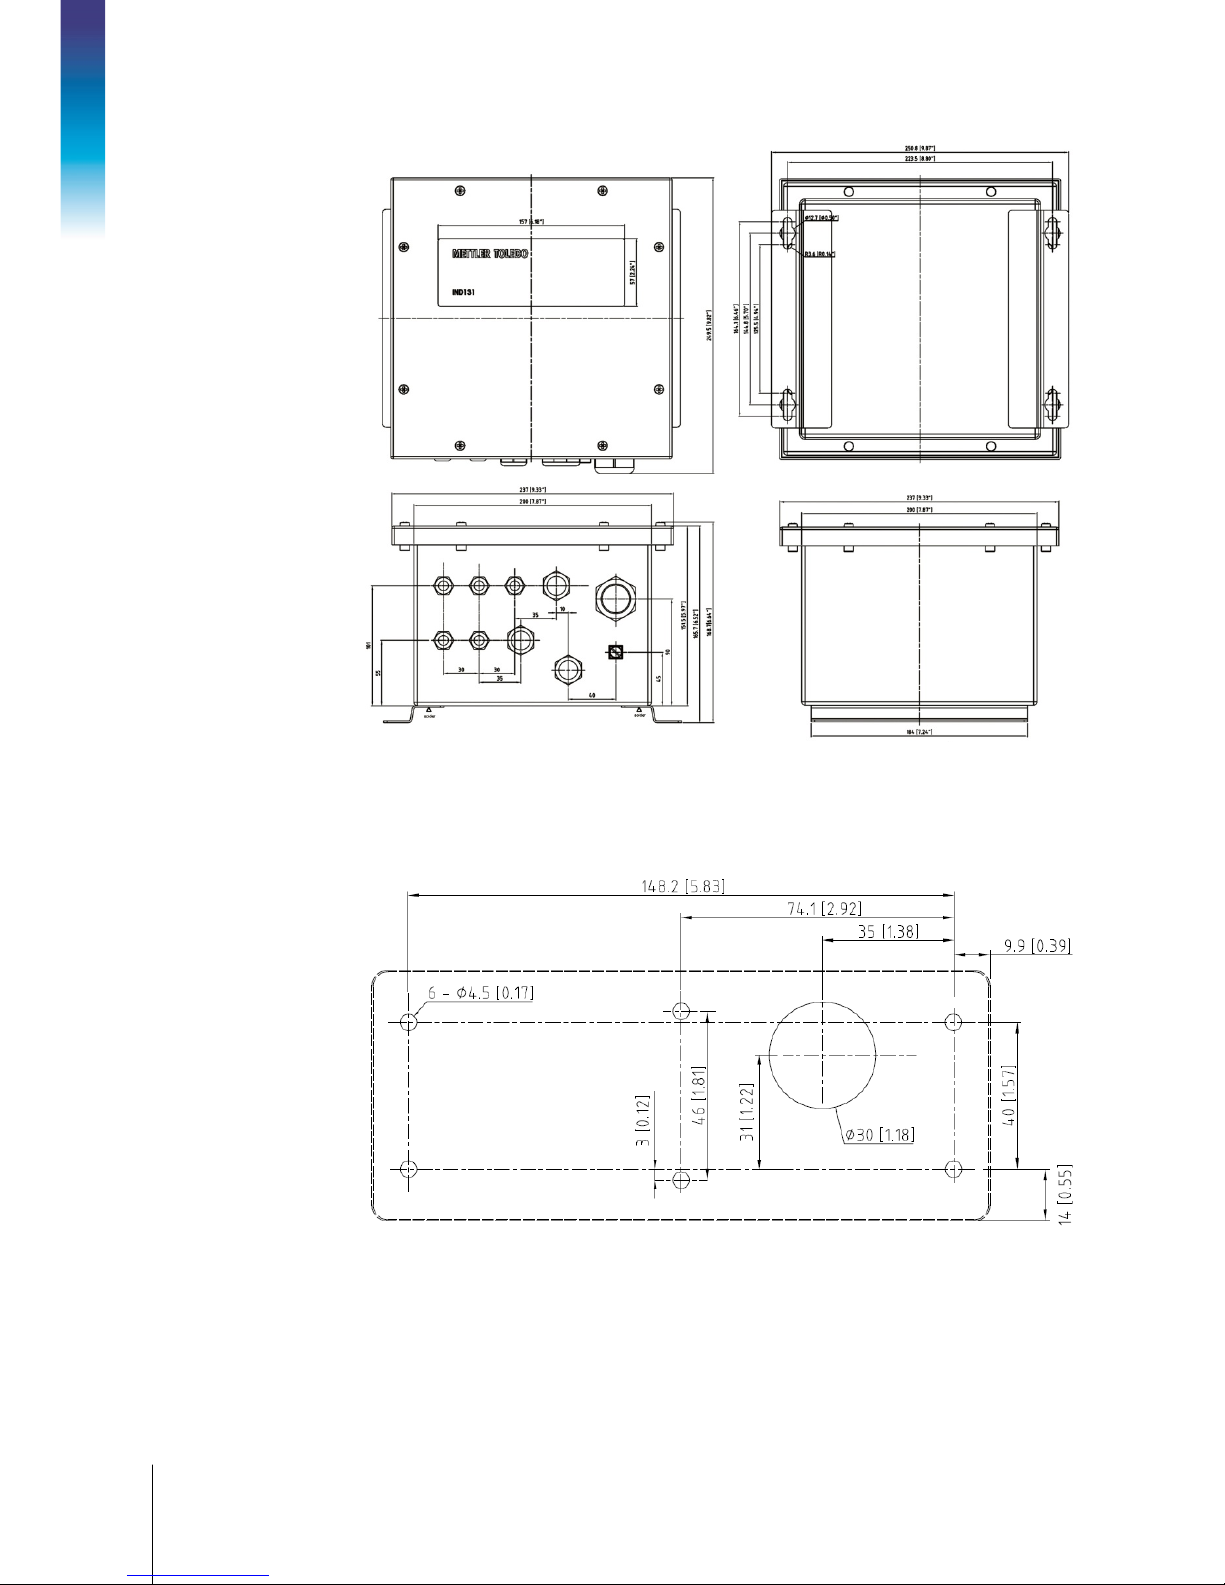
Figure 1-6: Updated IND131 Junction Box Enclosure Dimensions
Figure 1-7 shows the measurements for the drilled holes required to mount the Panel Mount
enclosure.
Figure 1-7: IND331 Panel Mount Drill Template
Page 23

64067481 | 08 | 11/2014
METTLER TOLEDO IND131/IND131xx/IND331/IND331xx User's Guide
1-11
1.8. Main PCB
4-20mA Analog Output
A-B RIO
CC-Link
ControlNet
DeviceNet
Ethernet/IP
ModbusTCP
PROFIBUS DP
The IND131/IND331 terminal’s main printed circuit board (PCB) provides the analog load cell
scale interface, as well as the COM1 RS-232 serial port.
The main board also contains the power input connection (for either AC or DC supply, depending
on the model), display interfaces (one each for the larger IND331 and smaller IND131 displays), 6
position DIP switch and bus connectors for the PLC and COM2/DIO option boards.
Two LEDs are provided to indicate the operational status of the terminal and a memory card socket
is mounted to the under-side of the PCB to support the optional SD memory.
1.9. Scale Base
The IND131/IND331 terminals support analog scale bases and provide 5 volts of excitation to drive
analog load cells.
A six wire load cell connection is provided with sense lines to help maintain accuracy as the load
cell cable resistance changes with temperature variations.
1.10. Options
The following options are available for the IND131/IND331:
• COM2/DIO (relay output)
One RS-232/485 serial COM port
Internal, discrete I/O (2 inputs and 4 outputs)
─ Inputs are optically isolated solid state and switch selectable as either active or passive
─ Output relays provide one normally open contact per relay
This option not for use with the IND131xx or IND331xx terminal
COM2/DIO (solid state output)
•
One RS-232/485 serial COM port
Internal, discrete I/O (2 inputs and 4 outputs)
─ Inputs are optically isolated solid state and switch selectable as either active or passive
─ Outputs are solid state open collector
•
Programmable Logic Control (PLC) interfaces, including:
1.10.1. COM2 Serial Port
This optional port provides RS-232 and RS-485 communication at rates from 300 to 115.2k baud.
The port is bidirectional and can be configured for various functions such as demand output,
Page 24

1-12
METTLER TOLEDO IND131/IND131xx/IND331/IND331xx User's Guide
64067481 | 08 | 11/2014
Introduction
continuous output, SICS host communications, Modbus RTU and ASCII command input (C, T, P,
Z).
1.10.1.1. Modbus RTU
Modbus RTU is a serial communications protocol published by Modicon in 1979 for use with its
programmable logic controllers (PLCs). It is a standard serial communications protocol in industry.
The RTU format follows the commands/data with a cyclic redundancy check checksum as an error
check mechanism to ensure the reliability of data. Modbus RTU is the most common
implementation available for Modbus. Most Modbus devices communicate over a serial EIA-485
physical layer but RS-232 is also supported.
1.10.2. Discrete I/O
The discrete I/O interface option is available with dry-contact or solid state relay outputs. The relay
contacts will switch up to 30 volts DC or 250 volts AC at 1A. The solid state outputs will switch up
to 30 volts DC at 350mA maximum.
The inputs are switch selectable as either active (for simple pushbutton control) or passive (for
connection to PLCs or other devices that supply their own power for the inputs).
WARNING
THE INTERNAL DISCRETE I/O RELAY OPTION (#72225753 OR #72225757) MUST NOT BE USED
IN A TERMINAL INSTALLED IN AN AREA CLASSIFIED AS DIVISION 2 OR ZONE 2/22. FAILURE TO
COMPLY WITH THIS WARNING COULD RESULT IN BODILY HARM AND/OR PROPERTY DAMAGE.
1.10.3. PLC Interfaces
IND131 and IND331 interface options include 4-20mA Analog Output, A-B RIO, CC-Link,
ControlNet, DeviceNet, Ethernet/IP, Modbus TCP and PROFIBUS DP. Additional details about each of
these interfaces can be found in the IND131/IND331 PLC Interface Manual, provided on the
documentation CD.
1.10.3.1. Analog Output
The Analog Output option provides a 4-20mA analog signal corresponding to the gross or net
weight or the rate The analog signal is isolated and requires that the connected device have a
maximum internal resistance of 500 ohms.
Two solid state error outputs are provided to indicate out of range and error conditions.
1.10.3.2. A-B RIO
The A-B RIO option enables data exchange by bi-directional communications using the Discrete
Data Transfer mode. The IND131/IND331 terminals provide new information for the PLC
approximately 20 times per second. This communication is a high-speed, real-time message
interface between the terminal and the PLC for process control. Division, integer, and floating point
values are supported. The A-B RIO interface does not support Block Transfer mode.
Page 25
64067481 | 08 | 11/2014
METTLER TOLEDO IND131/IND131xx/IND331/IND331xx User's Guide
1-13
1.10.3.3. CC-Link
EtherNet / IP
Modbus TCP
CC-Link is a network that uses dedicated cables to connect distributed modules such as I/O
modules, intelligent function modules, and a special function module, enabling them to be
controlled by the PLC CPU. The CC-Link option board runs as a remote device station. It is designed
to connect to a field network using the CC-Link protocol.
1.10.3.4. ControlNet
ControlNet is an open industrial network designed for cyclic data exchange. The protocol operates
in cycles, known as NUTs, where NUT stands for Network Update Time. Each NUT has two phases,
the first phase is dedicated to scheduled traffic, where all nodes with scheduled data are guaranteed
a transmission opportunity. The second phase is dedicated to unscheduled traffic.
WARNING
THE CC-LINK PLC OPTION (#30059622) MUST NOT BE USED IN A TERMINAL INSTALLED IN AN
AREA CLASSIFIED AS DIVISION 2 OR ZONE 2/22. FAILURE TO COMPLY WITH THIS WARNING
COULD RESULT IN BODILY HARM AND/OR PROPERTY DAMAGE.
WARNING
THE CONTROLNET™ PLC OPTION (64057423) MUST NOT BE USED IN AC VERSIONS OF IND131
AND IND331 TERMINALS. FAILURE TO COMPLY WITH THIS WARNING COULD RESULT IN
EQUIPMENT DAMAGE AND/OR BODILY HARM.
One feature of ControlNet is support for fully redundant network cables.
1.10.3.5. EtherNet/IP and Modbus TCP
The IND131/IND331 terminals support communications of the EtherNet/IP or Modbus TCP interface
options, using a common interface.
routers). It uses the proven Control and Information Protocol (CIP) to provide control, configuration
and data collection capability.
communication between intelligent devices. The protocol can be used in multiple master-slave
applications to monitor and program devices; to communicate between intelligent devices and
sensors and instruments; and to monitor field devices using PCs and HMIs.
1.10.3.6. DeviceNet
DeviceNet is an RS-485 based network utilizing CAN chip technology. This network was created for
bit and byte-level devices. The network can be configured to run up to 500Kbits per second
depending on cabling and distances. Messages are limited to 8 unfragmented bytes. The network
can include up to 64 nodes including the master, commonly called the scanner.
utilizes commercial, off-the-shelf EtherNet hardware (for example, switches and
protocol is a messaging structure that is used to establish master-slave/client-server
Page 26
1-14
METTLER TOLEDO IND131/IND131xx/IND331/IND331xx User's Guide
64067481 | 08 | 11/2014
Introduction
OLED display
Scale function
1.10.3.7. PROFIBUS DP
The terminal communicates to a PROFIBUS-DP master according to DIN 19 245. PROFIBUS is an
open, RS-485 digital communication system with a wide range of applications, particularly in the
fields of factory and process automation. PROFIBUS is designed for use in fast, time-critical
applications. Additional specifications can be found in PROFIBUS International documents. A
maximum of 126 devices (masters or slaves) can be connected to a bus.
1.10.4. SD Memory Option
An optional SD Memory card provides a medium on which to extract and save the configuration
and calibration settings of the terminal. These can then be restored to the terminal or loaded to a
different terminal. This feature can be used to clone the setup of one terminal then transfer it to other
units, which minimizes the chance of error in setting up a new configuration.
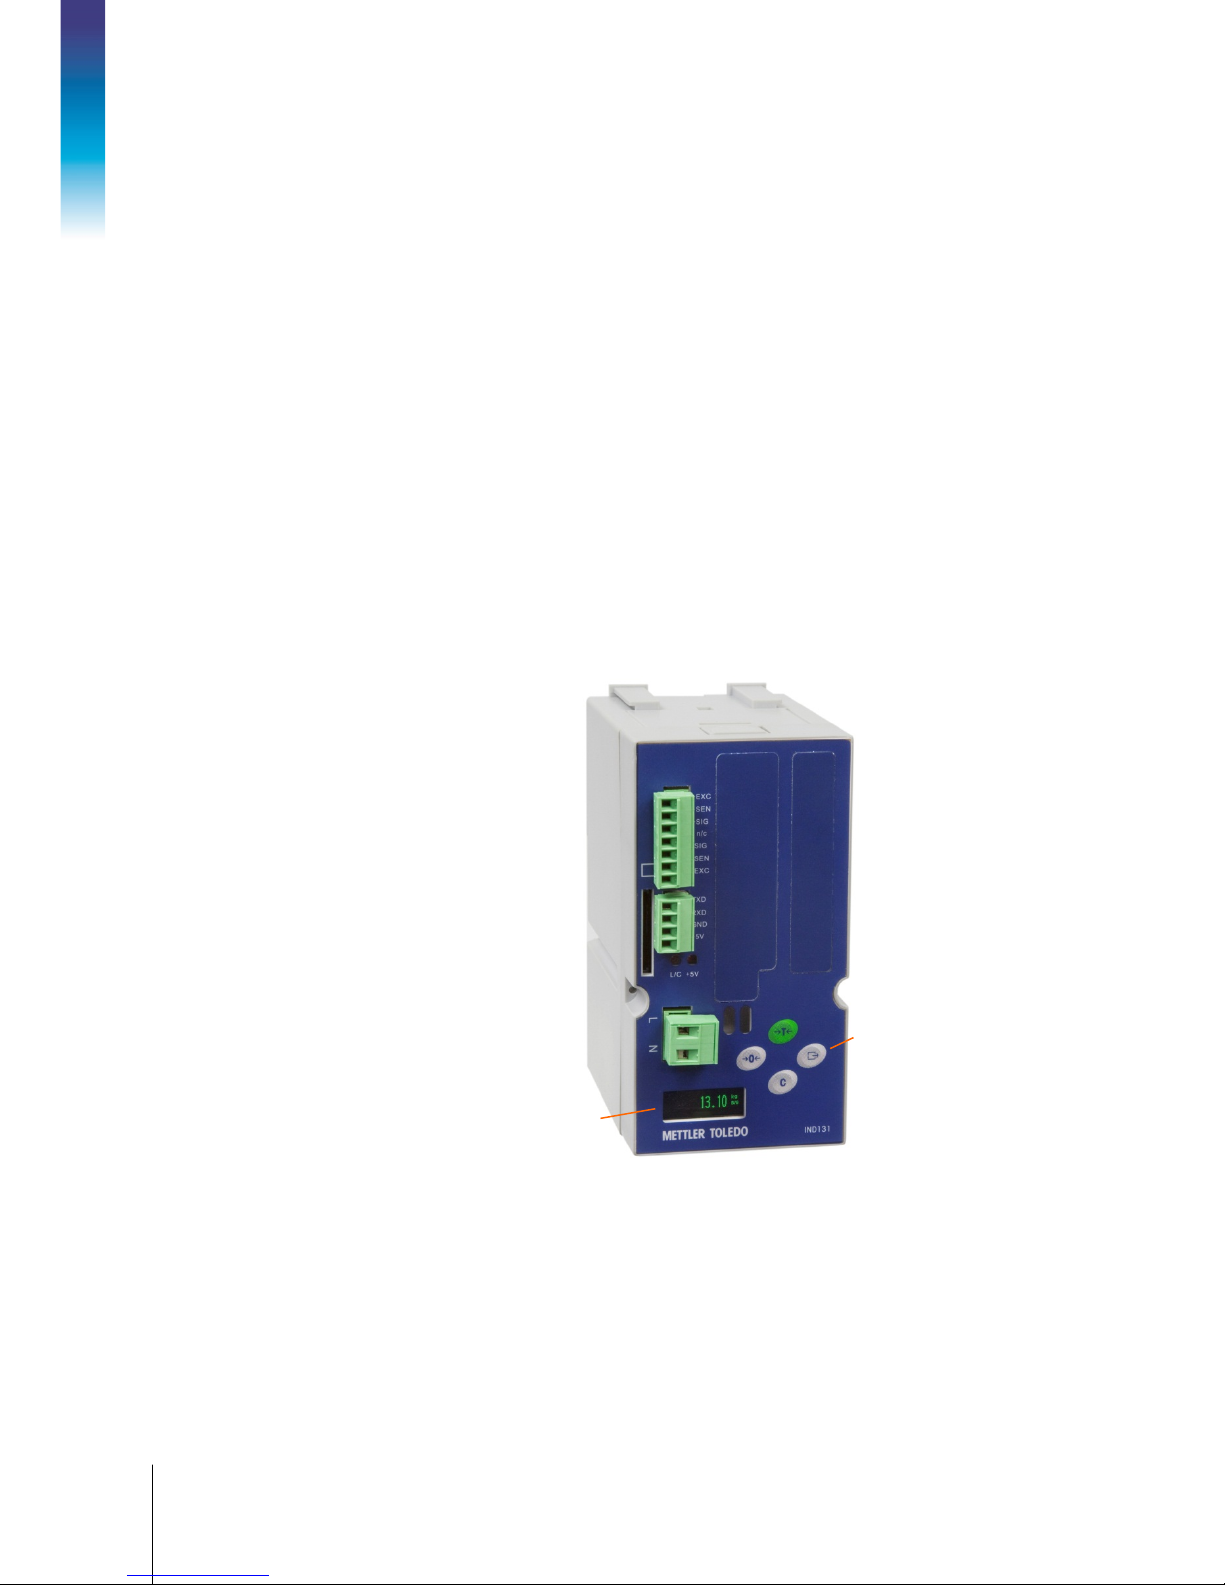
1.11. Display and Keyboard
The IND131 terminal has an Organic LED (OLED) graphic type display. The IND131 DIN model is
shown in Figure 1-8. The same module is used internally in the IND131 Junction Box model.
and setup menu
navigation
buttons
Figure 1-8: IND131 Front Panel Layout
Page 27
64067481 | 08 | 11/2014
METTLER TOLEDO IND131/IND131xx/IND331/IND331xx User's Guide
1-15
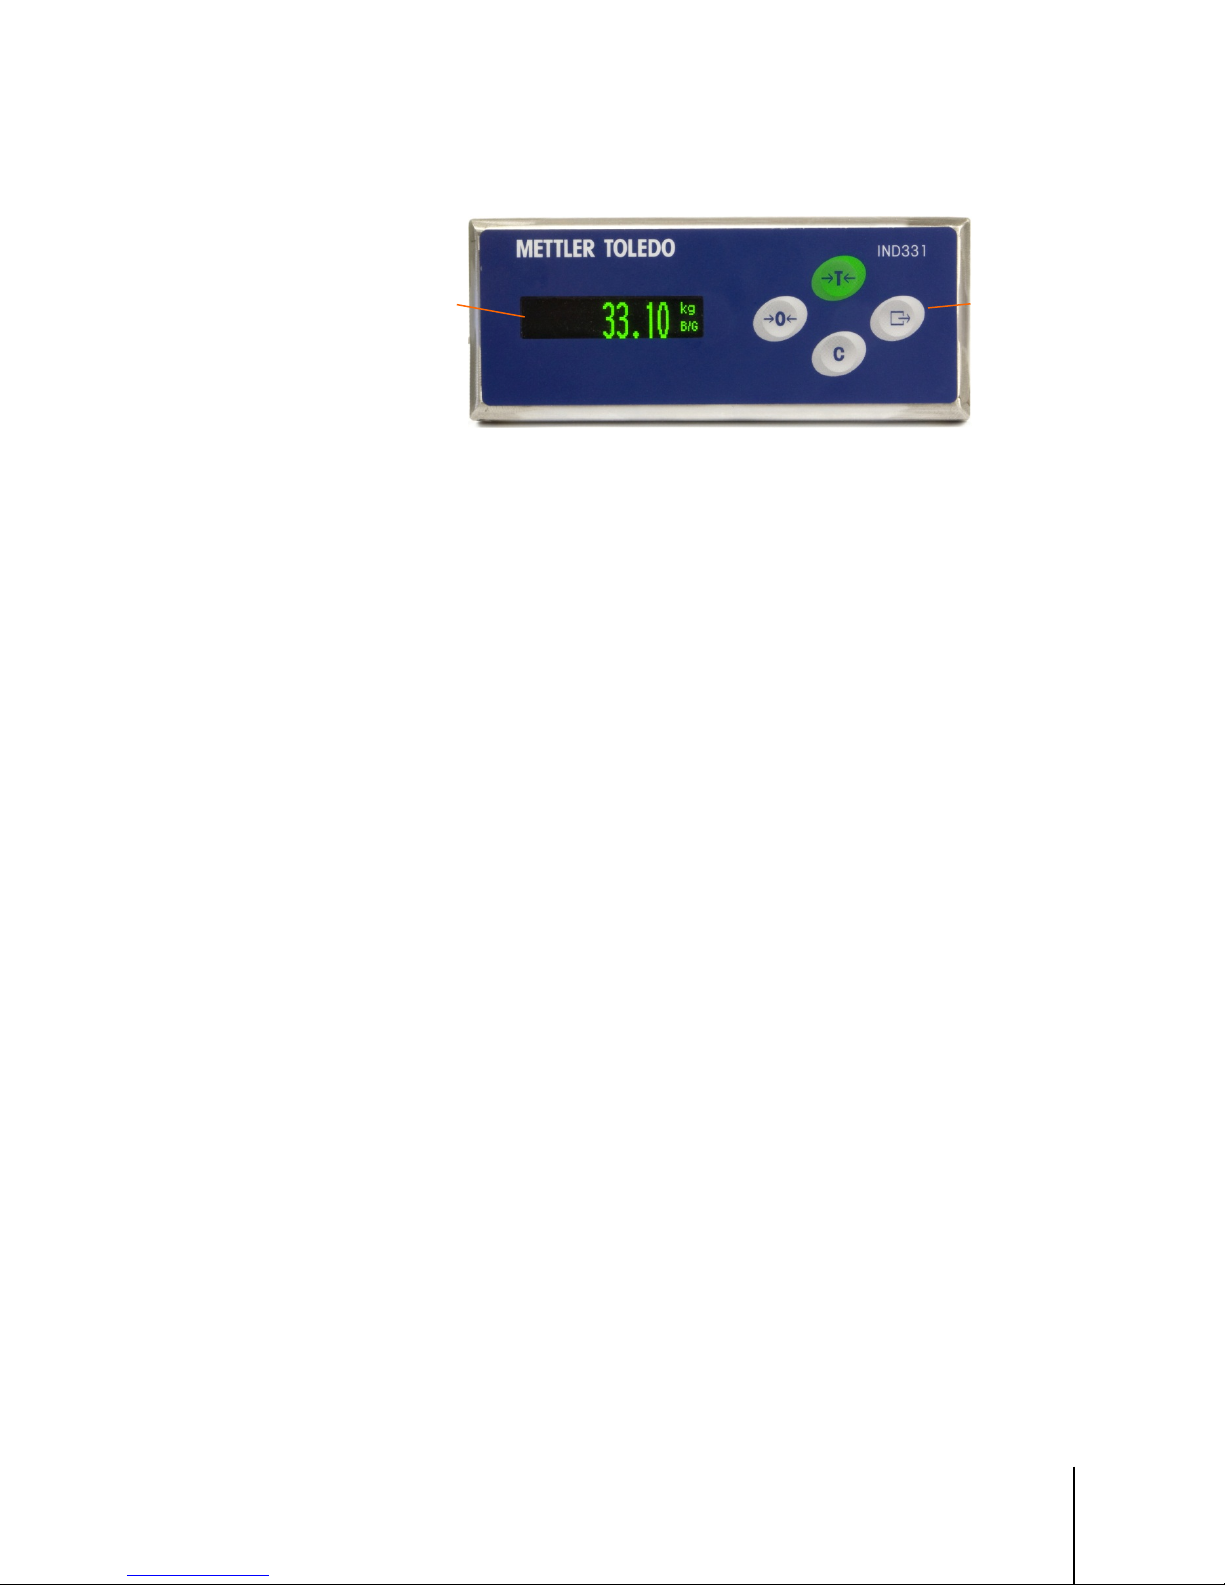
The panel-mount and harsh models of the IND331 (Figure 1-9) include a larger graphic OLED
Configuration
Configuration
OLED display
Scale function
and setup menu
display.
1.11.1. Display Layout
During normal operation, the IND131 and IND331 displays show the Gross or Net weight, together
with the weight units and the weight legend. Graphic symbols are used to indicate center of zero
and motion. For display operation during setup, refer to Chapter 3,
1.11.2. Front Panel Keys
Four dedicated scale function keys are located to the right of the display. These provide the interface
to zero or tare the scale, to clear a tare, and to initiate a print. The same keys are used to enter the
setup menu, to navigate and select setup elements, and to enter values in setup as described in
Chapter 3,
.
Figure 1-9: IND331 Front Panel Layout
navigation
buttons
.
Page 28

64067481 | 08 | 11/2014
METTLER TOLEDO IND131/IND131xx/IND331/IND331xx User's Guide
2-1
This chapter covers
2 Operation
Configuration
Zero
Print • Comparators
Tare
Information Recall
Calibration
Clearing Tare
Target
CalFree
Configuration
2.1. Overview
This chapter provides information about the basic functionality of the IND131, IND131xx,
• Overview
• Basic Functionality
• Security
• Display Operation
• Keypad Operation
• Operator Menu
2.2. Basic Functionality
IND331 and IND331xx terminals including display operation, keypad functions and menu
navigation.
Operation of the terminal depends on enabled functions and parameters that are configured in
setup as described in Chapter 3,
in the following sections.
This section provides information about the IND131/IND331’s basic functionality. Functions
addressed in this section include:
. Navigation and basic functionality are covered
•
•
•
Refer to Chapter 3,
described in this section.
2.2.1. Zero
The Zero function is used to set or reset the initial zero reference point of the terminal. There are two
types of zero setting modes:
• Automatic Zero Maintenance
• Pushbutton Zero
2.2.1.1. Automatic Zero Maintenance
Automatic Zero Maintenance (AZM) enables the IND131/IND331 to compensate for the build up of
small amounts of weight and track itself back to the center of zero. Within the AZM operating range
(selectable from 0.5, 1, 3 or 10 divisions), when the terminal is in a no motion condition, it makes
small adjustments to the current zero reading to drive the weight reading toward the true center-ofzero. When the weight is outside of the programmed AZM range, this feature is not functional.
•
•
•
, for further information about programming all the functionality
•
•
Page 29

2-2
METTLER TOLEDO IND131/IND131xx/IND331/IND331xx User's Guide
64067481 | 08 | 11/2014
Operation
Pushbutton Tare
Net Sign Correction
Auto Clear Tare
2.2.1.2. Pushbutton Zero
The pushbutton (semi-automatic) zero function can be accomplished by pressing the ZERO
scale function key, by programming a discrete input, by using a PLC command, or by issuing a
serial command.
The range for all types of semi-automatic zero is selectable (Disabled, 2% or 20%) plus or minus
from the calibrated zero point.
Remote initiation of the semi-automatic Zero command is possible via a discrete input, an ASCII ‘Z’
command sent serially (CPTZ and SICS interface modes), or a command initiated by the PLC
interface.
2.2.2. Tare
Tare is the weight of an empty container. A tare value subtracts from the gross weight
measurement, providing the computation of the net weight (material without the container). The tare
function can also be used to track the net amount of material being added to or removed from a
vessel or container. In this second case, the weight of the material in the container is included with
the tare weight of the container and the display then reflects the net amount being added to or
removed from the vessel.
Tare types and associated operations available in the IND131 / IND131xx / IND331 / IND331xx
include:
•
2.2.2.1. Pushbutton Tare
•
•
Pushbutton tare can be configured in setup as enabled or disabled. When disabled, the TARE scale
function key
cannot be used to obtain a tare.
If enabled, pressing the pushbutton TARE scale function key initiates a semi-automatic tare.
The IND131/IND331 will attempt to perform a tare process. If the process is successful, the display
changes to a zero net weight indication and the previous weight on the scale is stored as the tare
value. The net mode will be indicated on the display.
Several conditions could inhibit the pushbutton tare function:
Motion – Pushbutton tare cannot be taken when the scale is in motion. If motion is detected
when a pushbutton tare command is received, the IND131/IND331 will wait up to three
seconds for a no-motion condition. If a stable (no motion) weight condition occurs before
the three seconds expire, the pushbutton tare command is executed.
If there is still motion at the end of three seconds, the command is aborted.
Pushbutton Tare Disabled – If pushbutton tare is configured as disabled, the TARE scale
function key will not initiate a semi-automatic tare.
Negative Gross Weight – Any pushbutton tare attempted when the gross weight is at or below
zero is ignored. Ensure that the gross weight is above zero.
Page 30

64067481 | 08 | 11/2014
METTLER TOLEDO IND131/IND131xx/IND331/IND331xx User's Guide
2-3
2.2.2.2. Net Sign Correction
Clear Threshold
Weight
After the weight value has stabilized at a value above the threshold, tare will be
Net sign correction enables the terminal to be used for both shipping (inbound empty) and
receiving (inbound loaded) operations. Net sign correction can be either disabled or enabled on the
IND131/IND331.
If net sign correction is disabled in setup, the stored weight value in the tare register is assumed to
be a tare regardless of the gross weight present on the scale at the time of the final transaction. Net
values can therefore be negative if the weight on the scale is less than the tare value.
If net sign correction is enabled, the terminal will switch the gross weight and tare weight fields
when necessary, so that the larger weight is the gross weight, the smaller weight is the tare weight,
with the difference always a positive net weight. Net sign correction affects the display and printed
data.
An example of weight values with and without net sign correction is shown in Table 2-1. In this
example, the tare register value is 53 kg and the live weight on the scale is 16 kg.
Table 2-1: Weight Values With and Without Net Sign Correction
2.2.3. Clearing Tare
Tare values can be cleared manually or automatically.
2.2.3.1. Manual Clear
Manually clear tare values by pressing the CLEAR key on the keypad when the IND131/IND331
is in the net mode and has completed the weighing operation. Motion on the scale will not impact a
manual clear. The weight display will return to the gross weight value.
2.2.3.2. Auto Clear
The IND131/131xx/331/331xx can be configured to clear tare automatically when the weight
returns to a value below a programmable threshold, or when a print command is issued. Once the
tare is cleared, the display returns to the gross weighing mode.
Auto clear can be disabled or enabled in setup. If it is enabled, the following parameters, also
configured in setup, affect the auto clear operation:
Printed and Displayed Disabled Enabled
Gross 16 kg 53 kg
Tare 53 kg 16 kg
Net
Net Sign Correction
−37 kg
37 kg
cleared automatically when the weight falls below this threshold.
Page 31

2-4
METTLER TOLEDO IND131/IND131xx/IND331/IND331xx User's Guide
64067481 | 08 | 11/2014
Operation
Motion Check
A motion check is provided to control the automatic clearing of tare. If this
disabled
enabled
Clear After Print
If this is enabled, pressing the PRINT key transmits the weight data and then
Configuration
check is
the threshold weight (auto clear threshold), regardless of the motion status.
If the motion check is
requirements are met, the terminal waits for a no-motion condition and then
clears the tare automatically.
clears the tare automatically. The scale then returns to gross mode.
For further information about configuring auto clear, refer to the Scale – Auto Clear section in
Chapter 3,
2.2.4. Print
The print function (demand print) can be initiated by pressing the PRINT function key on the
main keyboard or by automatic print settings. Demand printing of data may also be initiated as part
of a particular sequence of operation or special application software.
2.2.5. Information Recall
A limited number of data fields are made available for easy recall on the terminal display. These
fields include data such as model, serial number, identification fields, hardware and software
configuration, a service contact phone number and whether the terminal has been set up as
approved for legal for trade operation.
, the tare value is cleared as soon as the weight drops below
, once the auto clear threshold weight
.
All this data is accessible under the Information Recall icon in the operator menu.
2.2.6. Target
Target comparison is used to compare either the gross or net weight on the scale to a
predetermined target value. This feature is typically used in automatic processes. As an example,
an automatic filling system using target comparison could provide a Start signal to the terminal and
2.2.6.1. Target Control
the IND131 or IND331 terminal could control the feeder system to fill a container to a desired target
then turn the outputs off. The target comparison rate is 50 comparisons per second.
If the target comparison will be used to control the flow of material, the application can be classified
as a Material Transfer application. These types of applications are usually automated but can also
be manual. A single or two-speed feeding system is used to either add weight to or remove weight
from the scale. The terminal monitors the change in weight and compares it to a previously entered
target and other control parameters.
Latching outputs must be enabled for the terminal to provide the automated control. For a latched
output, only a Start discrete input signal is needed to begin the target comparison process. No other
control is required. The comparison runs to completion then the latch sets the outputs FALSE until a
Start signal is received the next time.
For simple applications, the target output can be programmed as a coincidence signal and the
target control can be handled by external logic or a PLC.
Page 32

64067481 | 08 | 11/2014
METTLER TOLEDO IND131/IND131xx/IND331/IND331xx User's Guide
2-5
2.2.6.2. Target Terms
Abort
While a latched target comparison process is in process, it can be totally stopped
Coincidence Outputs
A coincidence output is always active and does not require a start or stop signal. If
Concurrent Outputs
This describes the operation of the Feed output in a 2-speed feeding system. If the
ut are active concurrently at the beginning of a feed cycle. It
Fast Feed Output
This refers to the physical output connection that is used for the faster feed in a 2-
Feed Output
This refers to the physical output connection that is used for the slower feed in a 2-
Fine Feed
The value entered for the amount of material that will be fed in the slower rate of
Independent Outputs
This describes the operation of the feed output in a 2-speed feeding system. If the
Latched Outputs
When the target is selected as Latched, the outputs turn off at the target weight
Spill
The amount of material that will be added (on a weigh-in) or removed (on a weigh-
in process, this is the
Start
When using latched targets, the default condition is with the latch set or in the “off”
Target
The target is the weight value that is the end goal of the material transfer process. If
Tolerance
The weight range above and below the target value that will be acceptable as an “in
The following definitions explain some terms used in Material Transfer applications:
by an Abort signal. This signal is not used in a coincidence type of target.
the weight on the scale is below the target minus the spill value, the outputs are
“on”. If the weight is above the target minus the spill value, the outputs are “off”.
This type of output typically requires external logic to provide the required control for
feeding systems.
feeder type is programmed as concurrent, both the Feed output and the Fast Feed
output turn on when the Start is triggered. The Fast Feed continues to operate until
the weight reaches the Target minus the Fine Feed value and the Feed continues to
operate until the weight reaches the Target minus the Spill value. Both the Fast Feed
output and the Feed outp
is the opposite of independent outputs.
speed feeding system. This output is not used in a single speed feeding system.
speed feeding system or the only feed output in a single speed feeding system.
feed in a 2-speed feeding system. This value and the spill value are subtracted from
the target to determine the point that the fast feed output turns off.
feeder type is programmed as independent, the Feed output does not turn on until
the Fast Feed output turns off. Only one feeder speed is active at a time. It is the
opposite of concurrent outputs.
minus the spill value and remain off (regardless of additional weight changes) until
a “start” signal is received. These types of outputs do not usually require external
logic to perform standard weigh-in or weigh-out sequences.
out) from the scale after the final feed is turned off. In a weighmaterial in suspension that will still fall onto the scale when the feed is turned off.
This value is subtracted from the target value to determine when the feed output
turns off.
condition. To turn any outputs “on”, a start signal is required. This is done by a
discrete input programmed as Target Start/Resume.
a container should be filled with 10 kg of material, the target value is 10 kg.
tolerance” target comparison. The tolerance can either be entered as a weight
deviation from the target or a percentage deviation from the target depending upon
setup.
Page 33

2-6
METTLER TOLEDO IND131/IND131xx/IND331/IND331xx User's Guide
64067481 | 08 | 11/2014
Operation
Gross
_< >_
Limit
High Limit
2.2.7. Comparators
Comparators are simple targets which can be configured in setup. They are controlled either by
coincidence or by comparison with a range. Each of the three Comparator’s limit/s may be modified
by accessing the operator menu if enabled in setup. To use a Comparator, it must be assigned to a
discrete output.
Comparator values can be positive (the default) or negative.
When the Active value is <, <=, =, >= or >, the selected source is compared to a target weight.
When the Active value is within (>_ _<) or outside (_<
compared to a range defined by the Limit and High Limit values.
2.2.7.1. Target Value Comparators
In this case, the output will be triggered depending on the Active setting. For example, if the Active
operator is <= (less than or equal to) and the Limit is 1000 kg, the output be ON when the weight
is below 1000 kg and will turn OFF when the measured value reaches 1000 kg.
2.2.7.2. Range Comparators
In the case of a Range mode Comparator, the Limit value sets the lower of the two rates that define
the range, within or outside (depending on the operator) which the output is active. For example, if
the Active operator for a rate sourced comparator is Within (>_ _<), the Limit is 3.0 kg/sec and the
High Limit is 8 kg/sec, the output will be active provided the rate remains between 3 and 8 kg/sec.
If the rate falls below 3 or exceeds 8 kg/sec, the output will turn OFF.
>_) a range, the selected source is
Note that the Rate value configured in setup at Scale > Rate permits weight and time units to be
defined, together with the period between measurements and the number of measurements
averaged to generate the output value.
If the weight information in the terminal becomes invalid, the Rate display will show 0.000.
A Range Comparator can also use displayed or gross weight as its source. As an example, set
weight is the source, the Active operator as
values at 200 kg and 1500 kg respectively. The output will turn “ON” when the gross weight is
below 200 kg or above 1500kg. The output will be “OFF” when the weight is between 200 kg and
1500 kg. A typical application might be to indicate if the weight in a large vessel falls below a
minimum value (200 kg) or exceeds a maximum value (1500 kg).
(outside), and the
and
2.2.8. Calibration
Calibration is the process of adjusting the display of the terminal so that when the scale is empty,
the display shows zero gross weight and, with a specific amount of weight on the scale, shows an
accurate weight value. The IND131 and IND331 terminals provide the traditional zero calibration
and three different types of span calibration.
• Traditional span calibration - using test weights
• Step calibration - using a build-up or substitution method of calibration (for large vessels where
only a portion of the required test weights can be placed on the scale)
Page 34

64067481 | 08 | 11/2014
METTLER TOLEDO IND131/IND131xx/IND331/IND331xx User's Guide
2-7
• CalFree calibration – once certain load cell criteria have been entered manually, the terminal
will automatically calculate the span; no test weights are required
When calibration access is enabled for the operator menu, zero and span procedures for the
weighing system can easily be performed without entering setup. This is useful to provide quick
access to the calibration process without having to step through the complete setup mode.
To provide additional protection from unintentional modifications to the calibration values, the
calibration icon can be removed from the operator menu. In this case, calibration can only be
accessed by entering setup mode.
2.2.9. CalFree™
The IND131 and IND331 terminals provide a method to calibrate a scale without using test
weights. This is based on manual entry of capacity and performance data from the load cell or load
cell platform. This method of calibration can be used for initial check-out and testing of systems or
when a large structure is used as the weighing vessel and it is not possible to apply test weights to
the structure. METTLER TOLEDO highly recommends that test weights be used whenever possible as
this provides the most accurate method of calibration.
Scale calibration using CalFree wil not be accurate when using Zener Diode barriers (such as
METTLER TOLEDO ISB05 and ISB05x) between the terminal and the scale. DO NOT use CalFree
when barriers are installed.
2.3. Security
Access to the configuration/setup mode of the terminal can be password protected if enabled in
setup. A single password of up to 6 digits can be programmed. If enabled, the password will be
prompted when the setup mode is accessed. The correct password must be entered in order to
access the setup mode.
The operator level menu which provides access to target and comparator data entry is not protected
by this password so operators can easily change operational parameters but configuration data can
be protected.
2.4. Display Operation
When in the weighing mode, the display is used for indicating the weight value and other types of
information related to the weight. The other information provided includes:
• Weight unit (lb, kg, g, ton, t)
• Motion / no-motion condition
• Center of zero
• Gross or net mode
Page 35

2-8
METTLER TOLEDO IND131/IND131xx/IND331/IND331xx User's Guide
64067481 | 08 | 11/2014
Operation
Center of Zero
indication
Unit of measure
indication
Gross mode
Weight display
Arrows indicate
and below
Icon for
Target setup
Tare
Clear
Print
Zero
An example of the display format for the weighing mode data is shown in Figure 2-1.
indication
Figure 2-1: Display in Weighing Mode
When accessing the operator menu or setup mode, the display is also used to display icons,
parameters and settings. This operation is explained in the following sections and a display of the
target value entry is shown in Figure 2-2
more menu
selections above
Figure 2-2: Display in Operator Entry Mode, Target Icon Displayed
2.5. Keypad Operation
The front panel scale function keys are used to operate the IND131/IND331 and also configure the
terminal as described later in this chapter.
Figure 2-3 shows the four scale function keys on the front panel of the IND331. The IND131 is
equipped with smaller versions of the same keys. Table 2-2 explains the function of each of the
four keys during normal operation.
Figure 2-3: IND131/IND331 Scale Function Keys
Page 36

64067481 | 08 | 11/2014
METTLER TOLEDO IND131/IND131xx/IND331/IND331xx User's Guide
2-9
Table 2-2: Keypad Functions – Normal Operation
or
both
ZERO
TARE
CLEAR
PRINT
The Zero, Tare and Print functions will not operate when there is motion on the scale. If one of these
keys is pressed while the scale is in motion, the command will be retained for 3 seconds while the
terminal waits for no-motion. If a no-motion condition is not detected within the 3 seconds, the
request is cancelled and discarded.
When the scale platform or weighbridge is empty, the terminal should indicate
zero. The gross zero reference is recorded during calibration. Press the ZERO
scale function key to capture a new gross zero reference point if pushbutton zero
is enabled in configuration and the weight is within the zero range.
Tare is the weight of an empty container. The tare weight is can be subtracted
from the gross weight of a package to determine the net weight of the contents of
a container. Press the TARE key when an empty container is on the scale. The
terminal then displays a zero net weight. As the container is loaded, the terminal
then displays the net weight of the contents. Pushbutton tare must be enabled to
use the Tare key.
When in the net weight mode, if the Clear key is pressed, the current tare value
will be cleared which will cause the weight display to revert to the gross weight
value. The Clear key operates regardless of motion on the scale. Note that once
the tare value has been cleared, it cannot be recalled. The complete tare process
as described above must be performed.
Press the PRINT scale function key to initiate a demand output of the
programmed print data. A demand output connection must be configured for the
selected serial port. This key also provides access to the operator menu and
setup mode when pressed for 3 seconds or more.
2.6. Operator Menu
There are a few functions that operators typically perform which are available in a top-level menu
system in the IND131 and IND331 terminals. These include target value entry, comparator value
entry, data recall and calibration. An explanation of how to access these functions follows.
2.6.1. Language Selection – F Codes
Depending on the terminal’s language setup (at Terminal | Region | Menu Language), parameter
labels in the operator menu will appear as words (“Target”)
are shown in all of the flow charts in this chapter.
2.6.2. Accessing the Operator Menu
To access the operator menu, the PRINT key must be pressed and held for approximately 3
seconds. At the end of the 3 seconds, the display will change from showing the normal weigh
display to showing an icon. Depending upon programming in the terminal, the icon shown will be
one of the ones shown in Table 2-3 below. The Target, Comparator and Calibration icons can be
added or removed from the operator menu by programming in the setup mode.
as an F-code (“F2.2.1”). For clarity,
Page 37

2-10
METTLER TOLEDO IND131/IND131xx/IND331/IND331xx User's Guide
64067481 | 08 | 11/2014
Operation
Target
Comparators
Information
Recall
Calibration
Setup
Table 2-3: Operator Menu Icons
Access to all target values including the target, tolerances, fine feed and
spill values.
Access to the limit value (and high limit value if the comparator is
programmed as a range) for all comparators.
Recall mode for all terminal information fields.
Quick access to zero and span adjustment (in non-approved mode only).
Access to all setup parameters for the terminal.
2.6.3. Navigating the Operator Menu
When navigating through the operator menu, the function of the keys on the keypad change. The
keys now work as navigation keys to navigate to the correct entry group. Figure 2-4 shows the
function of the keys when viewing the operator menu.
Figure 2-4: Key Functions When Viewing the Operator Menu
Page 38

64067481 | 08 | 11/2014
METTLER TOLEDO IND131/IND131xx/IND331/IND331xx User's Guide
2-11
The operator menu is accessed by pressing and holding the PRINT key for 3 seconds. Then, using
the four keys on the keypad, an operator can easily navigate to and view and/or change an item in
the Operator Menu. An overview of the operator menu is shown in Figure 2-5.
2.6.4. Numerical Data Entry
An operator may be required to change a value in the operator menu such as a target value for
instance. The four keys on the keypad are also used to make selections and for data entry.
When one of the operator menu icons is selected (by pressing PRINT), a list of parameters
associated with that function will be shown. Two items will be shown on the display at a time. One
Figure 2-5: Operator Menu Overview
Page 39

2-12
METTLER TOLEDO IND131/IND131xx/IND331/IND331xx User's Guide
64067481 | 08 | 11/2014
Operation
Parameter
Target
weight unit
First editable
Reverse video
of the items will be in “focus” indicated by reverse video. Refer to Figure 2-6 where the Target line is
shown in focus.
showing focus
Figure 2-6: Menu Item in Focus
The item in focus is the active item. The focus is moved by pressing the TARE (up) key and CLEAR
(down) key. When the parameter to be changed is in focus, press the PRINT (enter) key and the
value for that parameter will be shown. Refer to Figure 2-7 which shows the data entry for the target
value.
digit, flashing
Figure 2-7: Target Entry Screen, Value in Focus
Once a parameter is accessed, as in Figure 2-7, data entry is possible. To indicate this, the far right
digit of the value on the bottom line of the display will be flashing. The flashing digit indicates the
position of the currently editable value. This digit can be increased by pressing TARE (up) or
decreased by pressing CLEAR (down) until the desired digit is displayed. To move to the next
position to the left, press the ZERO key. The ZERO, TARE and CLEAR keys are used until the desired
value is displayed then the PRINT key is used to accept and save the new data.
Figure 2-8 details the method for entering numerical values in a flow chart form. Note that, whether
or not the setting is altered, the PRINT key will confirm the currently displayed value and return the
view to the next higher menu. In the flow charts that follow, values that can be modified are
indicated by a blue star – .
Figure 2-8: Setting Numerical Values
When the value has been entered and the display shows a list of items again, the ZERO key can be
pressed to exit to the next higher level of the menu. Pressing the ZERO multiple times will exit the
operator menu.
Page 40

64067481 | 08 | 11/2014
METTLER TOLEDO IND131/IND131xx/IND331/IND331xx User's Guide
2-13
2.6.5. Target Menu
Configuration
If the Target menu is enabled for the operator, Target values can be modified without entering setup.
Once the Target icon appears (as in Figure 2-2), press the PRINT key to access the displays to
set parameters associated with the target. Refer to the Numerical Data Entry section on page 2-11
for the method used to modify numerical values. Depending on the parameters configured in Setup
at Application | Target Setup, the tolerance values will either be in absolute weight values or
percentages of the target.
Details of the target menu are shown in Figure 2-9
described in Chapter 3,
. Note that both the text and F-code labels for each field are
shown.
. The function of each of these parameters is
Figure 2-9: Target Setup Screens
Page 41

2-14
METTLER TOLEDO IND131/IND131xx/IND331/IND331xx User's Guide
64067481 | 08 | 11/2014
Operation
2.6.6. Comparator Menu
If the Comparator feature is enabled in the operator menu, Comparator parameters can be modified
without entering setup. Once the Comparator icon appears, press the PRINT key to access the
limit settings screens for the first comparator.
If the operator is a single value, only one limit value can be set for the comparator, and pressing
the PRINT key again returns to the list of comparators. If the operator is a range, then the Limit
screen is followed by the High Limit screen, from which the PRINT key exits back to the list of
comparators. To edit parameters other than limits, Comparator configuration must be accessed in
setup. Refer to the Numerical Data Entry section on page 2-11 for the method used to modify
numerical values.
The comparator operator menu is organized as indicated in Figure 2-10.
Figure 2-10: Comparator Setup
Page 42

64067481 | 08 | 11/2014
METTLER TOLEDO IND131/IND131xx/IND331/IND331xx User's Guide
2-15
2.6.7. Information Recall Menu
Model
S/N
Base S/N
ID1
ID2
ID3
H/W Info
H/W Info
H/W Info
S/W Info
Service
A telephone number used to contact METTLER TOLEDO authorized service as
MCN
Approved
The information recall function is always available in the operator menu. Once the Information
Recall icon appears, press the PRINT key to recall specific information about the terminal. In
this menu, items are viewed in sequence by pressing the down (CLEAR) key or the up (TARE) key.
Table 2-4 lists the elements of the Information Recall menu in the sequence in which they occur.
Some items may not appear, depending on the configuration of the terminal.
Item Value/Explanation
F6.1 The model number of the terminal (IND131 or IND331) is shown.
F6.2 Serial number of the terminal as entered in the setup mode.
Serial number of the attached scale base as entered using the InSite™
F6.3
F6.4 Series of up to three identification strings entered using the InSite™
F6.5
F6.6
configuration tool or serially via the variable access. (It is not possible to
enter this data from the IND131/IND331 keypad.)
configuration tool or serially via the variable access. (It is not possible to
enter this data from the IND131/IND331 keypad.) The default values for
these fields are:
Table 2-4: Information Recall Menu Tree Items
METTLER TOLEDO / Industrial / Terminal
F6.7 Indicates if the AC or DC version of the Main Board is used
F6.8 Indicates optional PLC interface type
F6.9 Indicates optional discrete I/O
F6.10 Information about the standard firmware version
F6.11
F6.12
F6.13
2.6.8. Calibration Menu
If the Calibration function is enabled for the operator menu, Calibration can be performed without
entering setup. The scale must also be programmed as NOT approved for the Calibration menu to
operate.
With the Calibration icon in view, press the PRINT key to access the calibration procedures. The
following four sections and flow charts describe calibration options and procedures. Refer to the
Numerical Data Entry section on page 2-11 for the method used to modify numerical values.
entered via InSite or via variable access
Metrology Control Number used to indicate revisions to the metrology
performance of the terminal
or
Yes (1)
No (0)
Indicates whether the terminal has been programmed as Approved for use in
legal for trade applications.
Page 43

2-16
METTLER TOLEDO IND131/IND131xx/IND331/IND331xx User's Guide
64067481 | 08 | 11/2014
Operation
2.6.8.1. Zero Calibration
Scale zero is set simply by emptying the scale and running the “Set Zero” calibration routine, as
indicated in Figure 2-11. The scale must be in the gross weight mode when zero is calibrated. If the
net mode is displayed when the zero calibration is initiated, the tare value will be cleared
automatically.
Figure 2-11: Zero Calibration
Page 44

64067481 | 08 | 11/2014
METTLER TOLEDO IND131/IND131xx/IND331/IND331xx User's Guide
2-17
2.6.8.2. Span
The scale’s span calibration can be determined either with or without a linearity adjustment. With
linearity disabled, a single reference point is used to calibrate the scale. This is the normal method
of span calibration. If linearity is enabled, an additional mid-range weight reference point is added
to the adjustment procedure. Linearity can be enabled or disabled in the setup mode. Refer to the
Numerical Data Entry section on page 2-11 for the method used to modify numerical values.
Figure 2-12: Span Calibration
Page 45

2-18
METTLER TOLEDO IND131/IND131xx/IND331/IND331xx User's Guide
64067481 | 08 | 11/2014
Operation
2.6.8.3. Step Calibration
Step calibration is an iterative process in which a build-up or material substitution method of
calibration is used to calibrate the span. This is typically used with large vessels where only a
portion of the required calibration test weights can be placed on the scale at one time. Figure 2-13
shows the logic of the procedure.
Figure 2-13: Step Calibration
Page 46

64067481 | 08 | 11/2014
METTLER TOLEDO IND131/IND131xx/IND331/IND331xx User's Guide
2-19
2.6.8.4. CalFree™
Configuration
CalFree allows the scale to be calibrated without the use of test weights. It requires the load cell
capacity and output in mV/V to be entered. The system then calculates correct calibration for the
scale. Figure 2-14 provides a visual representation of the CalFree calibration procedure.
Scale calibration using CalFree wil not be accurate when using Zener Diode barriers (such as
METTLER TOLEDO ISB05 and ISB05x) between the terminal and the scale. DO NOT use CalFree
when barriers are installed.
2.6.9. Setup Access
The last icon displayed in the operator menu accesses Setup , where all the terminal’s
programming parameters can be viewed and modified. Details of the setup mode are described in
Chapter 3,
It is not intended that operators enter the setup mode. After a weighing system is installed and is
operational, it should not be necessary for an operator to access setup.
Note that a security password can be enabled in setup. When a password is set, it must be entered
in order to access setup. This protects the setup parameters from inadvertent changes.
Figure 2-14: CalFree
.
Page 47

64067481 | 08 | 11/2014
METTLER TOLEDO IND131/IND131xx/IND331/IND331xx User's Guide
3-1
This chapter covers
3 Configuration
This chapter provides information about how to modify the IND1331/331 terminals’
• Setup Menu Tree
• Entering Setup Mode
• Exiting Setup Mode
• Overview of Setup
• Scale
• Application
• Terminal
• Communication
•
Maintenance
3.1. Setup Menu Tree
Parameters in the setup menu tree are accessed in the same manner as items in the Operator menu
- either sequentially (at the same level), or by stepping down through the tree structure to a lower
level. This section explains the use of the scale function keys to navigate the menus, to enter
numerical parameters, and to select options from lists. A key to conventions used in the setup
menu flow charts is also provided.
settings. It describes access to the setup mode, where functions can be enabled, disabled,
or defined by entering parameter values or selecting from lists.
WHEN PROGRAMMING AN IND131XX OR IND331XX TERMINAL INSIDE A
HAZARDOUS AREA, ELECTROSTATIC DISCHARGES TO THE EXPOSED NONMETALLIC PARTS OF THE ENCLOSURE MUST BE AVOIDED.
WARNING
In this chapter, references are made to the “next higher menu level”, which is accessed either using
the ZERO key (to exit a menu) or, in some cases, by the PRINT key (where a setting is confirmed
and a process concluded).
3.1.1. Use of Keys within Menus
3.1.1.1. Overview of Navigation
The scale function keys double as navigation and data entry keys when the setup menu is
accessed.
Page 48

3-2
METTLER TOLEDO IND131/IND131xx/IND331/IND331xx User's Guide
64067481 | 08 | 11/2014
Chapter Subject
For menus where settings may be made or options selected, the scale function keys work as
indicated in Figure 3-1.
Figure 3-1: Navigating and Setting Parameters Using Scale Function Keys
3.1.1.2. Entering Numerical Parameters
Figure 3-2 shows how to set numerical values. Note that, whether or not the setting is altered, the
PRINT key will confirm the currently displayed value and return the view to the next higher menu.
Figure 3-2: Setting Numerical Values
3.1.1.3. Making Selections from a List
Figure 3-3 details the method used to make a selection from a list. In this case, the ZERO key
returns the view to the next higher level without making a change, while the TARE and CLEAR keys
Page 49

64067481 | 08 | 11/2014
METTLER TOLEDO IND131/IND131xx/IND331/IND331xx User's Guide
3-3
are used to move up and down through the list, with the selection being confirmed by pressing the
Operation
PRINT key.
Figure 3-3: Selecting from a List
3.2. Entering Setup Mode
The setup menu of the IND131 and IND331 terminals is accessed by pressing and holding the
PRINT scale function key. The screen will show the first icon in the Operator Menu. The number of
icons in the Operator Menu depends on how the terminal is configured. The complete operator
menu is described in Table 2-3 and shown in Figure 2-5 in the previous Chapter 2 -
After accessing the Operator Menu, continue to the Setup icon then press PRINT to open the
setup menu tree.
3.3. Security
Access to the configuration/setup mode of the terminal can be password protected if enabled in
setup. A single password of up to 6 digits can be programmed. If enabled, the password will be
prompted when the setup mode is accessed. The correct password must be entered in order to
access the setup mode. If an incorrect password is entered, the display returns to the Setup icon.
Refer to Figure 3-4 for an example of the password entry display.
Figure 3-4: Prompt for Password Entry
.
Page 50

3-4
METTLER TOLEDO IND131/IND131xx/IND331/IND331xx User's Guide
64067481 | 08 | 11/2014
Chapter Subject
Installation
The operator level menu which provides access to target and comparator data entry is not protected
by this password so operators can easily change operational parameters but configuration data can
be protected.
3.3.1. Metrology Switch
Access to the metrology switch may be sealed in conformity with local regulations in “legal-fortrade” applications. Refer to Appendix A,
, for details about the metrology switch.
3.4. Exiting Setup
To return to the normal (run) mode, navigate back to the operator menu tree by pressing ZERO and
then exit the operator menu by pressing the ZERO scale function key again. This is shown in Figure
3-5.
If the terminal has been programmed as approved, the metrology switch (SW1-1) must be
switched “ON” before setup can be exited. If an exit of setup is attempted when the scale is
approved and SW1-1 is “OFF”, an error message of [ Err 0015 ] is shown indicating the switch is
unsecured and exit is prohibited.
3.5. Overview of Setup
There are five major branches in the setup menu tree:
• Scale
• Application
• Terminal
• Communication
• Maintenance
Page 51

64067481 | 08 | 11/2014
METTLER TOLEDO IND131/IND131xx/IND331/IND331xx User's Guide
3-5
Details for each branch are provided in the following Configuration Options section. Figure 3-5
either
[0]
shows an overview of the setup menu tree, and indicates how to navigate between the branches.
Note the use of the gray highlighted blocks to indicate focus. The line with the highlight is the
branch that will be accessed when PRINT is pressed.
Depending on the terminal’s language setup,
appear. For clarity, both are shown in
Figure 3-5 and throughout the configuration section of this
the label (“Scale”) or the F code (F1) will
manual. F-code parameter options are given in square brackets – e.g.
.
3.5.1. Configuration Options
This section describes how to configure terminal options in the setup menu that are available under
the five major branches of the setup tree.
If the terminal has been programmed to use F codes for setup instead of English, the selections for
the parameters will also be shown in code. Appendix C of this manual provides a listing of the
choices for each parameter. An explanation of what each choice corresponds to is also provided.
If the metrology switch is in the approved position (SW1-1 = ON), access to certain parameters
in the Scale branch is restricted to view only. If an attempt is made to change one of these
parameters, the display will show an error message of [ Err 0007 ] which indicates that
access is denied since the scale is approved.
Figure 3-5: Overview of IND131/331 Setup Menu
Page 52

3-6
METTLER TOLEDO IND131/IND131xx/IND331/IND331xx User's Guide
64067481 | 08 | 11/2014
Chapter Subject
Scale
•
•
• Calibration
• Zero parameters
• Tare parameters
• Rate parameters
• Filter parameters
• Log or print threshold parameters
• Stability parameters
3.6. Scale – F1
The
branch provides access to the configuration of the connected scale and includes the
following sub-branches:
Type
A Reset option is also provided, to enable a limited reset to the factory default settings for the Scale
parameters.
Capacity and increment values
Page 53

64067481 | 08 | 11/2014
METTLER TOLEDO IND131/IND131xx/IND331/IND331xx User's Guide
3-7
Figure 3-6: Scale Branch of Setup
Page 54

3-8
METTLER TOLEDO IND131/IND131xx/IND331/IND331xx User's Guide
64067481 | 08 | 11/2014
Chapter Subject
Scale Type
None [0]
USA [1], OIML [2]
Canada [3]
Argentina
Argentina
Capacity and Increment
x10 always
None [0]
g [1]
[2]
lb [3]
t [4]
ton [5]
9,000,000
3.6.1. Type – F1.1
The
selection list for the Approval mode.
3.6.1.1. Name – F1.1.1
The Name field shows what identification has been assigned to this scale. This field can be added
to the print template for demand outputs. Because alphanumeric data entry is not possible in the
IND131/331, the scale name must be entered using the InSite™ configuration tool.
3.6.1.2. Approval – F1.1.2
Approval refers to the metrological (weights and measures) approval configuration for the specific
scale. The selection list can be set to:
If an approval (USA, OIML, Canada) is configured and the metrology security switch, SW1-1, is set
to ON, access to certain parameters in the Scale setup branch in the menu tree will be restricted to
view only for metrological parameters.
sub-branch displays the name that was assigned to the scale and provides a
and
[4].
(default - no approval),
,
If the approval is configured as
the entire setup menu is prohibited. If an attempt is made to access the setup menu, an error
message “Err 0007” will display.
If an approval is selected but SW1-1 is not ON, it will not be possible to exit setup, and an error
message “Err 0015” will appear. Setting SW1-1 to ON without selecting an approval will not secure
the scale.
and the metrology switch, SW1-1, is set to ON, access to
3.6.2. Capacity and Increment – F1.2
Use the
the scale. The option to display a finer weight resolution (
disabled from this set of menus.
3.6.2.1. Units – F1.2.1
Set the primary units by scrolling through the options and selecting from the choices of
(no weight display shown on display),
3.6.2.2. Capacity – F1.2.2
(pounds),
switching is not a supported feature.
Enter the capacity value for the scale. Values from 1 to
blank in an over capacity condition at 5 display divisions above this value. If the capacity entered
(in conjunction with the increment size stored) results in more than 100,000 display divisions, the
increment size will automatically be reduced so that the number of display divisions is below
100,000. Always check the increment size after making a change to the capacity.
(ton) or
setup menus to select the weight units, capacity and increment for
(grams), kg
. Only one weight unit is possible in the IND131/331 – unit
(default – kilograms),
) can also be enabled or
are possible. The display will
Scale calibration should also be checked after a change of the capacity.
Page 55

64067481 | 08 | 11/2014
METTLER TOLEDO IND131/IND131xx/IND331/IND331xx User's Guide
3-9
3.6.2.3. Increment – F1.2.3
0.001
100
Enabled [1]
Disabled [0]
Calibration
Enabled [1]
Disabled [0]
Select the desired display increment size by scrolling through the available choices. The full range
of increments is from
(previous parameter) and are limited by the terminal. The minimum number of resulting display
divisions is 1000 and the maximum number is 100,000.
0 = 0.001 4 = 0.02 8 = 0.5 12 = 10
1 = 0.002 5 = 0.05 9 = 1 13 = 20
2 = 0.005 6 = 0.1 10 = 2 14 = 50
3 = 0.01 7 = 0.2 11 = 5 15 = 100
3.6.2.4. x10 Always – F1.2.4
to
. The displayed choices are based on the capacity of the scale
The choices are
it is sometimes useful to expand the weight display resolution by 10 so a finer weight increment
can be seen. This is intended for diagnostic purposes only. The terminal should not be used in the
x10 expanded mode for normal operation. Some functionality (such as PLC data) may be disabled
in this mode.
3.6.3. Calibration – F1.3
The
calibration, CalFREE calibration and entry of a GEO code value. Note that the zero, span, step
calibration and CalFREE are also accessible from the Operator menu if enabled in the Terminal
block of setup.
3.6.3.1. Linearity – F1.3.1
A linearity adjustment feature can be
enabled, a 3-point linearity adjusted span calibration process (zero, mid-weight and high-weight)
will be used. If disabled, a standard 2-point span adjustment (zero and single span weight) will be
used
3.6.3.2. Set Zero – F1.3.2
Scale zero is set simply by emptying the scale and running the calibration routine. At the end of the
zero capture routine, the display will indicate if the routine was successful or not. If there is motion
on the scale during calibration, the display will indicate a dynamic weight adjustment and ask if the
dynamic value should be used or not. Pressing the PRINT key accepts the dynamic calibration and
pressing the ZERO key reverts the zero reference back to the previously calibrated value.
menu provides access to linearity adjustment, zero and span calibration, step
and
(default). During diagnostics of a weighing system,
or
(default) in this parameter. If
3.6.3.3. Set Span – F1.3.3
The scale’s span can be defined either with or without linearity. If 3-point linearity is enabled, an
intermediate test weight is used in addition to the full-capacity test weight. Including zero, this
provides 3 points of reference for the span adjustment. As much test weight as possible should be
used for calibration in order to help assure accuracy.
Page 56

3-10
METTLER TOLEDO IND131/IND131xx/IND331/IND331xx User's Guide
64067481 | 08 | 11/2014
Chapter Subject
To perform a step calibration:
Step Cal
Capture temporary zero”.
Place Test Load”
Calibrating”
Calibration OK”
Calibration Failed”
Place Test Load”
Remove test load”
Fill to:”
Fill to:
Place Test Load”
To perform calibration of span using CalFREE:
Total cell capacity”
3.6.3.4. Step Calibration – F1.3.4
Step calibration initiates a procedure that enables a “build-up” or “substitution” method of
calibration intended for use on large tanks and hoppers. During the step calibration, the same
amount of test weight is added for each step of the calibration procedure.
1. Select the
menu item and press the PRINT key.
2. In the Test Weight display, enter the target weight for the test load (the same amount of test
load weight is used in each step).
3. Press the PRINT key. A message appears – “
This step allows zeroing
of any extra equipment required to secure the test weights during the calibration procedure such
as chains or shelves. If used, add this equipment to the scale then press PRINT to continue. If
no extra equipment will be used, press PRINT with nothing added to the scale.
4. When prompted in the “
menu, which reflects the test weight value previously
entered place the test load on the scale and press the PRINT key.
5. The display will show “
process is complete, the display will show either “
, together with a live indication of progress. Once the
or “
. If the
calibration was successful, pressing PRINT moves the view to the next step. If the calibration
failed, pressing PRINT will return the view to the “
6. The display now prompts to “
from the scale. Remove the test weights and
prompt.
press PRINT when complete. If you have completed multiple calibration steps and wish to exit
the Step Calibration procedure, press ZERO to exit the routine at this time.
7. If additional calibration steps are required, press PRINT and the screen now prompts “
and indicates the target amount of material to be added to the tank or hopper as a substitute
weight. On the bottom of this display, the active weight is shown. Fill the tank or hopper as
close as possible to the
weight value then press PRINT to continue.
,
8. The procedure returns to step 4 (“
) above. Refer back to steps 4 – 7 as many
times as the sequence is run. This procedure can be repeated until the scale capacity is
reached. Pressing ZERO at any step in the process will exit the Step Calibration procedure.
3.6.3.5. CalFREE – F1.3.5
CalFREE allows the scale to be calibrated without the use of test weights. It requires the total load cell
capacity and output rating in mV/V to be manually entered then the system calculates correct calibration
for the scale.
1. Access the CalFREE menu and press the PRINT key to initiate the procedure.
2. The display prompts “
. Enter the total load cell capacity of all the load cells
used on the scale then press PRINT.
The total load cell capacity should be entered here. For example, for a tank with three 5000
kg cells, cell capacity would be 3 x 5000 kg or 15000 kg. The weight unit displayed will
be the same unit selected for the scale capacity. It cannot be changed.
Page 57

64067481 | 08 | 11/2014
METTLER TOLEDO IND131/IND131xx/IND331/IND331xx User's Guide
3-11
3. Next, the terminal will prompt “
Rated cell output”
Perform CalFREE?”
Calibration OK
Calibration Failed
Appendix E
Disabled [0]
Gross
[1]
Gross and Net [2]
0.5d [0], 1d
[1], 3d [2]
10d [3]
Disabled [0]
5 divisions [1]
Disabled [0], +/-2%
[1]
+/-20% [2]
. It is important that the most accurate value
possible for the millivolt output rating be used. This is typically a value which includes data to
5 positions right of the decimal point. After entering the millivolt rating of the load cell system,
press PRINT.
If multiple load cells are used, the average output of all cells should be entered here. To
calculate the average, add the millivolt ratings of all load cells together and then divide by
the number of cells. Enter the result in the step above.
4. When prompted with “
key to exit the calibration procedure without executing CalFREE.
5. If the calibration operation was successful, a verification message that reads “
displays. If the calibration operation was not successful, an error message that reads
“
to accept the message and return to the menu tree.
3.6.3.5.1. GEO code – F1.3.6
Enter the GEO value appropriate for the current geographic location. GEO codes are numbered 0 to
31 – refer to
3.6.4. Zero – F1.4
This section provides access to parameters for Auto Zero, under zero blanking and power-up and
pushbutton zero ranges.
3.6.4.1.1. Auto Zero – F1.4.1
Auto Zero Maintenance is a feature that tracks zero when the scale is empty. It compensates for
conditions such as debris falling onto a scale platform. Select from the list whether Auto Zero is
whether it is active in both
3.6.4.1.2. Auto Zero Range – F1.4.2
, whether is it active only in the
, press the PRINT key to perform CalFREE or the ZERO
”
” displays. If the calibration fails, repeat the CalFREE procedure. Press PRINT
for a complete list.
weight mode
weight modes.
(the default setting), or
The Auto Zero Range programs the range from the center of zero in which the automatic zero
maintenance will operate. If the weight on the scale exceeds the number of display divisions
programmed for the range, AZM will not operate. If the weight is within this range and the scale is at
no motion, the AZM will slowly adjust zero back to the center of zero. The choices are
3.6.4.1.3. Under Zero Blanking – F1.4.3
and
.
The Under Zero Blanking function programs the point at which an under-zero condition blanks the
display with just dashes showing. This feature may be
when the weight is below zero), or set to
3.6.4.1.4. Pushbutton Zero – F1.4.4
(the default value).
(the display will not blank
This step selects the range (plus and minus) from the calibrated zero reference weight in which the
front panel ZERO key will operate to rezero the scale. The selections include
, and
.
Page 58

3-12
METTLER TOLEDO IND131/IND131xx/IND331/IND331xx User's Guide
64067481 | 08 | 11/2014
Chapter Subject
Enabled [1]
Disabled [0]
Enabled
[1]
Disabled [0]
enabled
None [0]
Primary [1]
3.6.5. Tare – F1.5
Tare is used to subtract the weight of an empty container from the gross weight on the scale to
determine the net weight of the contents. Tare is inhibited if the scale is in motion.
3.6.5.1. Tare Types 1.5.1
3.6.5.1.1. Pushbutton Tare – F1.5.1.1
When pushbutton tare is
be pressed when an empty container is on the scale and that weight will be stored as the tare
weight. If Pushbutton Tare is
3.6.5.1.2. Net Sign Correction – F1.5.1.2
Net sign correction will operate to switch the gross and tare weight values so that the resulting net
weight is always positive and affects the printed data output and the displayed weight. Continuous
data output will continue to show a negative net weight value. Net Sign Correction can be
or
3.6.5.2. Auto Clear – 1.5.2
. By default, it is disabled.
Use the Auto Clear screen to enable or disable auto clear tare, clear after print, to set the clear
threshold weight, and to enable or disable motion checking for auto clearing of tare.
3.6.5.2.1.
Auto Clear Tare – 1.5.2.1
To clear tare automatically when the scale returns to below the threshold weight, enable the auto
clear tare setting.
3.6.5.2.2. Clear Threshold Wt. – 1.5.2.2
When the gross scale weight exceeds then falls below the clear threshold weight value, the terminal
automatically clears tare and returns to gross mode.
(the default setting), the TARE scale function key can
, the front panel TARE key will not function.
3.6.5.2.3. Motion Check – 1.5.2.3
The Motion Check field displays only when Auto Clear Tare is enabled. Enable the motion check
setting to prevent auto clear from occurring when the scale is in motion.
3.6.5.2.4. Clear After Print – 1.5.2.4
The Clear After Print field displays only when Auto Clear Tare is
. To clear tare automatically
after printing, enable this setting.
3.6.5.3. Rate– F1.6
A rate of weight change, expressed as change in weight units per time unit, may be programmed
for use with the comparators and is available via the various PLC interfaces.
The following parameters can be configured for the rate:
3.6.5.4. Weight Units – F1.6.1
The weight unit can be set to
weight units which enables the rate calculation.
(default) which disables the rate calculation or can be set to
Page 59

64067481 | 08 | 11/2014
METTLER TOLEDO IND131/IND131xx/IND331/IND331xx User's Guide
3-13
3.6.5.5. Time Units – F1.6.2
Seconds [0], Minutes [1]
Hours [2]
1 second [1]
0.5 [0]
5 [2]
1 [0], 5 [1], 10 [2], 30 [3]
60 [4]
Light [0], Medium [1]
Heavy [2]
Enabled [1]
Disabled [0]
Disabled [0], 1
division [1]
3 [2] divisions
Disabled
Time Units may be set to
3.6.5.6. Measurement Period – F1.6.3
The Measurement Period value sets the frequency of weight measurements.
default value. Other options are
3.6.5.7. Output Average – F1.6.4
Output from the rate function is set by a computed rolling average of measurements. Available
values are
Output Average value should be sufficiently larger than the Measurement Period to allow the
terminal to take multiple measurements for each average.
3.6.6. Filter – F1.7
The IND131/331 terminals have a low-pass, multi-pole vibration filter that can be set for several
conditions when using analog load cells. The heavier the filtering, the slower the display settling time
will be.
3.6.6.1. Low Pass Filter – F1.7.1
Low Pass filter selections include
sets the amount of filtering that is applied to the weigh The heavier the filter applied, the more stable
the weight will be, but the longer the settling time required for the scale.
and
and
or
. The default value is Seconds.
is the
seconds.
seconds, with a default value of 1 second. The
(default) and
. This parameter
3.6.6.2. Stability Filter – F1.7.2
The stability filter works in conjunction with the low pass filter to provide a more stable final weight
reading. The display will appear to respond sluggishly due to the additional filtering applied to stable
weights. The stability filter should only be used in transaction weighing applications, since the
nonlinear action of the filter switching may cause inaccurate cutoffs in batching or filling applications.
The stability filter can be
3.6.7. Stability – F1.8
The IND131/331 terminals include a stability detector (weight in motion). The Stability setup menu
enables setting a motion range.
3.6.7.1. Motion Range – F1.8.1
Sets the amount of motion (in divisions) that the weight is permitted to fluctuate and still have a nomotion condition. This affects the zero, tare and print functions. Available values are
Setting the motion range to
the weight change, the terminal will not be able to detect motion.
(the default) and
or
– by default, it is disabled.
.
will disable motion detection in the terminal so that regardless of
Page 60

3-14
METTLER TOLEDO IND131/IND131xx/IND331/IND331xx User's Guide
64067481 | 08 | 11/2014
Chapter Subject
Log or Print
Disabled [0]
After target [1]
After target
Reset
WARNING Reset
Scale?
Reset Successful
Reset Failed
3.6.8. Log or Print – F1.9
The
demand mode printing occurs whenever a print request is made, providing there is no motion on the
scale and zero has been captured (a negative gross weight will not be printed).
3.6.8.1. Auto Print – F1.9.1
setup menu defines whether or not data is output to a printer automatically. Normal
Auto Print may be
demand print command is issued when a target is met and a stable condition established.
3.6.9. Reset – F1.10
The
menu enables the scale setup block of values to be reset to factory default settings. To
initiate a reset, press the PRINT key. A confirmation message appears, reading “
” Either press PRINT again to confirm the action, or ZERO to return to the Scale menu without
resetting the values.
After a reset attempt, a status message of “
indicating the status of the reset. Press PRINT to clear the message and return to the Reset menu
branch.
Scale reset does NOT include the reset of metrologically significant parameters –approval,
weight units, capacity, increment, or calibration data. This data is reset only by performing a
Master Reset with DIP switch 1-2 in its ON position and reset calibration switch 1-4 in the ON
position.
(the default) or set to
” or “
. If
is selected, a
” will be shown
Page 61

64067481 | 08 | 11/2014
METTLER TOLEDO IND131/IND131xx/IND331/IND331xx User's Guide
3-15
3.7. Application – F2
• Target Operation
• Comparators
• Target Values
• Discrete I/O
Tolerance Type
Target Source
Output Type
Target Latching
Use application setup menus to configure the following items:
Figure 3-7 shows the layout of the complete Application branch.
3.7.1. Target Operation – F2.1
This setup menu is used to configure the way Targets function in the terminal. The parameters that
must be set are:
Figure 3-7: Application Branch of Setup
Page 62

3-16
METTLER TOLEDO IND131/IND131xx/IND331/IND331xx User's Guide
64067481 | 08 | 11/2014
Chapter Subject
Weight Deviation [0]
% of Target [1]
Concurrent [0]
Independent [1]
Displayed Weight [0]
Gross Weight [1]
Enabled [1]
Disabled [0]
Menu Keys
Terminal
Application | Target Setup | Tolerance Type
3.7.1.1. Tolerance Type – F2.1.1
The default value is
target tolerance. Alternatively, Tolerance Type can be set to
percentage of the target value to set the tolerance.
3.7.1.2. Output Type – F2.1.2
Either
(the default) or
method of the target outputs.
3.7.1.3. Target Source – F2.1.3
The Target Source may be either
3.7.1.4. Target Latching – F2.1.4
Target Latching can be
like a comparator without any latching logic
3.7.2. Target Values – F2.2
Target values may also be entered from the operator menu, if Target Access is enabled (refer to the
they can be entered in setup and the Target Access for the operator can be disabled.
Target control is available via the Discrete I/O and the feeding status is reported in the standard PLC
interfaces.
section of
, below). For applications where the target values do not change,
, which uses an absolute difference in weights for the
(the default) or
output types can be selected as the operation
(the default) or
. If disabled, the target will work
, which uses a
.
3.7.2.1. Target – F2.2.1
Enter the target value. The Target is an absolute weight value, expressed in the default weight units.
3.7.2.2. Negative and Positive Tolerance (-Tol and +Tol) – F2.2.2, F2.2.3
The Target Tolerance values set the band around the absolute target value within which the target is
considered to have been met. This figure is expressed as an absolute value or as a percentage of
the target, depending on the setting selected at
3.7.2.3. Spill – F2.2.4
.
The Spill value is a weight value used to compensate for material in the process of transfer when
the Target is met and the output enabling the feed is turned off. It is expressed in the default weight
units.
3.7.2.4. Fine Feed – F2.2.5
The Fine Feed value programs the amount of material that will be fed at the slower feed rate in a 2speed filling system. If the Fine Feed value is programmed as “0”, then the target is reduced to a
single speed control system.
Page 63

64067481 | 08 | 11/2014
METTLER TOLEDO IND131/IND131xx/IND331/IND331xx User's Guide
3-17
3.7.3. Comparators – F2.3
Comparators
Disabled [0]
Displayed Weight [1]
Gross Weight [2], Rate [3], ABS – Displayed weight [4]
ABS – Rate [5]
<
< =
=
>
= >
<>
_< >_
> __ <
The
comparators controlled either by a limit value or by comparison with a range. The comparator
values can be assigned positive (default) or negative signs. They are used as an assignment for
Discrete I/O outputs and the status is also available via the PLC interface.
Each of the three comparators is configured in the same way, one after the other. In the sections
immediately below, “Comparator
Comparators 1, 2 and 3.
Note that the limit and high limit values for the Comparators can also be set from the operator menu
if enabled. The Source and Active parameters of Comparators is configured here in Setup.
menus permit the configuration of a maximum of three simple coincidence
n
” is used to signify that the same settings are available for
3.7.3.1. Comparator
n
Source – F2.3.1, F2.3.5, F2.3.9
The Source setting determines the basis for the comparison made by the Comparator. The default
value is
. To use a Comparator, this setting must be changed to
3.7.3.2. Active – F2.3.2, F2.3.6, F2.3.10
(absolute value of rate).
The active operator for the Comparator must be selected as one of the following:
Active Symbol F-code parameter Description
Table 3-1: Active Operators
0
1
2
3
Output is active when source value is less than the
programmed limit (default value)
Output is active when source value is less than or equal
to the programmed limit
Output is active when source value is equal to the
programmed limit
Output is active when source value is greater than the
programmed limit
(absolute value of displayed weight), or
,
4
5
6
7
Output is active when source value is equal to or greater
than the programmed limit
Output is active when source value is NOT equal to the
programmed limit
Output is active when source value is outside the range
of the programmed limit and high limit
Output is active when source value is within the range of
the programmed limit and high limit
Page 64

3-18
METTLER TOLEDO IND131/IND131xx/IND331/IND331xx User's Guide
64067481 | 08 | 11/2014
Chapter Subject
Err 0010
Discrete I/O
+ True [0]
– True [1]
+ True
None
[0]
[5]
[9]
[1]
[6]
[10]
[2]
[7]
[11]
[3]
[8]
[12]
[4]
Keypad Disable
Discrete Output
[0]
[5]
[10]
[1]
[6]
[11]
[2]
[7]
[12]
[3]
[8]
[13]
[4]
[9]
3.7.3.3. Limit – F2.3.3, F2.3.7, F2.3.11
The Limit either sets the target weight value to which the actual source value is compared, or the
lower target value for the range to which the currently measured source value is compared.
3.7.3.4. High Limit – F2.3.4, F2.3.8, F2.3.12
The High Limit is available only when the Active value is set to a range. It defines the upper target
value for the range to which the currently measured source value is compared. Its value must be
higher than the Limit – if a lower value is entered, the terminal will show an “
” message
and the PRINT key must be pressed to clear the error message and make a valid entry.
3.7.4. Discrete I/O – F2.4
setup menus allow the configuration of 2 inputs and 4 outputs. The Discrete I/O option
does not have to be installed to program this functionality.
3.7.4.1. Discrete Inputs – F2.4.1
The Discrete Input menus display discrete input polarity and assignments for Input 1 and Input 2.
The two Inputs are configured in the same way.
3.7.4.1.1. Polarity – F2.4.1.1, F2.4.1.3
The inputs can be programmed to accept either a
The default is
3.7.4.1.2. Assignment – F2.4.1.2, F2.4.1.4
.
Options for input assignment are:
•
• Clear Tare
• Keypad Disable
• Print
• Tare
*
(default)
• Display/Keypad Disable
simple press-and-hold or key and lock mechanism
• Target Abort
• Target Start
• Zero
and Display/Keypad Disable are designed to be continuously activated by a
• SICS – S
• SICS – SI
• SICS – SIR
or
• Silence Alarm
polarity level as “ON”.
3.7.4.2. Discrete Outputs – F2.4.2.1, F2.4.2.2, F2.4.2.3, F2.4.2.4,
For each
• None (default)
• Center of Zero
• Comparator 1
• Comparator 2
• Comparator 3
, menus permit an assignment to be selected from the following options:
• Fast Feed
• Feed
• In Tolerance
• Motion
• Net
• Under Zero
• Over Capacity
• Alarm
• Ready
Page 65

64067481 | 08 | 11/2014
METTLER TOLEDO IND131/IND131xx/IND331/IND331xx User's Guide
3-19
3.7.5. Reset – F2.5
Reset
WARNING Reset
Application?
Application
Reset Successful
Reset Failed
The
menu enables the Application setup block of values to be reset to factory default settings.
To initiate a reset, press the PRINT key. A confirmation message appears, reading “
menu without resetting the values.
” Either press PRINT again to confirm the action, or ZERO to return to the
After a reset attempt, a status message of “
indicating the status of the reset. Press PRINT to clear the message and return to the Reset menu
branch.
3.8. Terminal – F3
Setup parameters available through the Terminal menu include:
Set Serial Number User Access
Set Screen Saver Menu Keys
Region Language
” or “
” will be shown
3.8.1.1. Serial Number – F3.1.1
The Serial Number setup menu enables the entry of an eight-digit terminal serial number.
3.8.1.2. Screen Saver – F3.2.1
The Screen Saver menu sets the number of minutes that must elapse with no scale motion and no
keypad activity before the display blanks and the screensaver is shown. The screen saver can either
be graphical or weight display.
The screen saver trigger in a metrologically approved application is restricted to zero gross. The
screen saver will be triggered to come on only when the scale is in gross mode and the weight is
zero. The screen saver trigger does not have any restrictions in non-metrologically approved
applications.
Figure 3-8: Terminal Branch of Setup
Page 66

3-20
METTLER TOLEDO IND131/IND131xx/IND331/IND331xx User's Guide
64067481 | 08 | 11/2014
Chapter Subject
Disabled [0], 1 [1], 5 [2], 10 [3]
Weight – 1 min [4], Weight – 5 mins [5]
Weight – 10 min [6]
Target
Comparators
English [0]
F codes [1], French [2], German [3], Italian [4]
Spanish [5]
English
[0]
F codes [1]
Disabled [0]
Enabled [1]
Menu Keys
Enabled [1]
Disabled [0].
Disabled [0]
Enabled [1].
The parameter is selected from a list. Options are
default),
3.8.2. Region – F3.3
The Region menus are used to configure the Menu Language and Setup Language for the terminal.
3.8.2.1. Menu Language – F3.3.1
Menu Language sets the language used in the operator menus (such as
Options are
. If F codes is selected, the text in the operator menu will be replaced with numeric
codes.
3.8.2.2. Setup Language – F3.3.2
The Setup Language menu can be configured to appear either with
or with
. Select the value from the list. If F codes is selected, the text in the operator
menu will be replaced with numeric codes.
3.8.3. User – F3.4
This group of menus enables/disables the use of a protective password when entering the setup
mode. This helps protect the setup mode from unintentional or inadvertent changes.
(the default),
and
.
minutes (the
and
labels
).
and
(the default),
3.8.3.1. Password Protection – F3.4.1
The User branch allows selection of password protection for the setup mode. If
(default), the setup mode can be entered normally. If
, a password code must be
entered before access is granted to the setup mode to change parameters.
3.8.3.2. Password – F3.4.2
If password protection is enabled in the previous step, this parameter allows entry of the actual
password. A numeric value up to six characters in length can be entered to protect setup mode
access.
3.8.4. Menu Keys – F3.5
The
operator when the PRINT key is pressed and held while the run (normal) screen is displayed. The
Information Recall and Setup icons are always available in the Operator menu.
3.8.4.1. Calibration Access – F3.5.1
The default value is
icon, select
3.8.4.2. Target Access – F3.5.2
parameters determine which of the selectable operator menus are accessible to the
. To prevent operator level access to the Calibration menu via the
The default value is
icon, select
. To provide operator level access to the Target value menu via the
Page 67

64067481 | 08 | 11/2014
METTLER TOLEDO IND131/IND131xx/IND331/IND331xx User's Guide
3-21
3.8.4.3. Comparator Access – F3.5.3
Disabled [0]
Enabled [1].
Reset
WARNING Reset
Terminal?
Terminal
Reset Successful
Reset Failed
Communication
Output Template definition
Serial port parameters
Connections configuration
PLC Interface setup
Displayed Weight [0]
GTN
single line [1]
GTN multiple lines
[2]
GTN multiple lines
The default value is
via the icon, select
. To provide operator level access to the Comparator value menu
3.8.5. Reset – F3.6
The
menu enables the Terminal setup block of values to be reset to factory default settings. To
initiate a reset, press the PRINT key. A confirmation message appears, reading “
” Either press PRINT again to confirm the action, or ZERO to return to the
without resetting the values.
After a reset attempt, a status message of “
indicating the status of the reset. Press PRINT to clear the message and return to the Reset menu
branch.
3.9. Communication – F4
Setup parameters available through the
Note that if a COM2 or a PLC option is not installed, those specific setup parameters will not be
displayed
” or “
menu include:
” will be shown
menu
3.9.1. Output Template – F4.1
The format for the demand print output of the terminal can be configured using the following menus.
3.9.2. Format – F4.1.1
The format of the output can be selected from
only - depending if tare was taken),
. The default is
Figure 3-9: Communication Branch of Setup
(Gross Tare Net)
.
(gross weight or net weight
and
Page 68

3-22
METTLER TOLEDO IND131/IND131xx/IND331/IND331xx User's Guide
64067481 | 08 | 11/2014
Chapter Subject
Scale | Type | Name
Enabled [0]
Disabled [1]
None [0]
Continuous Output [1], Continuous-Extended Output [2], Demand Output [3]
SICS
[4] , Variable Access [5]
Front Panel [6]
Modbus RTU [7]
Continuous
Continuous-Extended
Enabled [1]
Disabled [0]
Baud Rate – F4.3.1.1, F4.3.2.1
[0]
[2]
[4]
[6]
[8]
[1]
[3]
[5]
[7]
[9]
7 [0]
8 [1]
3.9.3. Print Scale Name – F4.1.2
Transmitting of the scale name (set using InSite) at
(the default), depending on whether the name should appear in the output.
3.9.4. Connections – F4.2
Connections for COM1 and, if installed, COM2 can be set from these menus. Options are the same
for both COM1 and COM2 except for the following exceptions:
• COM1 has additional assignment selections of Variable Access and Front Panel.
• COM2 has an additional assignment selection of Modbus RTU.
• COM2 includes an additional parameter for the interface type.
3.9.5. COM
n
Assignment – F4.2.1, F4.2.2
The COM Assignment is selected from a list, which includes the following options:
(COM1 only),
(COM2 only).
If the Assignment is
or
3.9.6. Checksum – F4.2.1.1, F4.2.2.1
can be
or
,
(the default),
(COM1 only) and
, the Checksum menu is shown next.
A Checksum character can be
or
(the default) for the continuous output
string.
3.9.7. Serial – F4.3
Serial communication setup menus provide access to the communication parameters for the serial
ports COM1 and, if installed, COM2. The COM2 port is only shown if the option board has been
installed.
3.9.8. COM1 and COM2 – F4.3.1, F4.3.2
Use the COM1 and COM2 menus to configure the parameters for serial ports. Configuration options
3.9.8.1.1. Data Bits – F4.3.1.2, F4.3.2.2
are the same for both ports.
Use the Baud selection menu to set the baud rate for the serial port. Options are:
300
600
1200
2400
4800
9600
19200
38400
57600
115200
The default is 9600 baud.
Use the Data Bits menu to select the number of data bits to be used on the serial port – options are
or
(the default).
Page 69

64067481 | 08 | 11/2014
METTLER TOLEDO IND131/IND131xx/IND331/IND331xx User's Guide
3-23
3.9.8.1.2. Parity – F4.3.1.3, F4.3.2.3
None [0]
Odd [1]
Even [2]
RS-232 [0]
RS-485 [1]
000
Integer [0]
Division [1]
• None [0]
• Analog Output [6]
• A-B RIO [5]
• CC-Link [7]
• ControlNet [1]
• DeviceNet [4]
•
[3]
•
[2]
None [0]
Use the Parity menu to set the parity to
port.
3.9.8.1.3. Interface (COM2 only) – F4.3.2.4
The COM2 port must be set to
set to
when connecting to an RS-485 device. For uni-directional connection of an RS422 device, select the RS-232 interface type. Note that bi-directional communication is not possible
when connected to an RS-422 device.
3.9.8.1.4. Modbus RTU Node (COM2 only) – F4.3.2.5
If Modbus RTU is selected as the assignment for COM2, a node address must be entered here.
Values from 000 to 255 are accepted with
3.9.8.1.5. Modbus Data Format (COM2 only) – F4.3.2.6
If Modbus RTU is selected as the assignment for COM2, the data format must be selected. The
choices are
(the default) and
3.9.9. PLC – F4.4
The PLC parameter menu is only available when a PLC option is installed. The menu choices will
vary depending upon which type of PLC interface option has been installed. The supported types
include:
(the default),
, or
for the serial
(the default) when connecting to an RS-232 device or
being the default.
.
EtherNet/IP - Modbus TCP
3.9.9.1. Analog Output – F4.4.1
This block is used to configure the 4-20mA Analog Output interface option and data format. The
branches in this group are Source, Zero Value, Full Scale Value and Calibrate Output.
Additional interface information can be found in the IND131/IND331 Terminal PLC Interface
Manual, which is included on the documentation CD.
3.9.9.1.1. Source – F4.4.1.1
The IND131/331 analog output option provides a 4 - 20 mA output signal which can represent
either the weight or the rate. In the Source selection menu, select the output source as
PROFIBUS
Figure 3-10: Setup Menu for Analog Output
Page 70

3-24
METTLER TOLEDO IND131/IND131xx/IND331/IND331xx User's Guide
64067481 | 08 | 11/2014
Chapter Subject
Displayed Weight [1], Gross Weight [2], Rate [3], ABS – Displayed weight [4]
,
ABS – Rate [5]
00000
Calibrate Output
(the default),
(absolute value of displayed weight)
3.9.9.1.2. Zero Value – F4.4.1.2
The Zero Value menu allows a numeric entry to be made, setting the displayed value equivalent for
the analog output’s 4mA (zero) level. For a standard weighing application, this would be
reflecting zero weight on the scale.
Note: It is not possible to enter a negative value here as the zero reference value. However, a
negative value can be entered via the Variable Access index number 465.
3.9.9.1.3. Full Scale Value – F4.4.1.3
The Full Scale Value menu allows a numeric entry to be made, setting the displayed value
equivalent for the analog output’s 20mA (full scale) level. For a standard weighing application, this
would be the capacity of the scale.
3.9.9.1.4. Calibrate Output – F4.4.1.4
Pressing the PRINT key at the
correlation of the zero and full scale analog output points of the terminal to what the connected
device is expecting. The procedure follows these steps:
1. First, a message is shown WARNING! Analog Output will change indicating that the analog
output will be controlled by the terminal for calibration purposes and will not represent the
weight or rate as normal.
or
(absolute value of rate).
menu initiates a calibration routine that allows
2. After accepting this message by pressing PRINT, a second message appears – Signal now
4mA. Adjust then ENTER. Use the TARE key to increase the analog signal or the CLEAR key to
decrease the analog output signal to fine tune the output for the 4mA (zero) reference. Press
ENTER when done.
3. The message WARNING! Analog Output will change is shown again indicating the analog
output will change and is not related to the source value. Press PRINT to accept the message.
4. The next message is Signal now 20mA. Adjust then ENTER. Press the PRINT key to continue.
5. Use the TARE key to increase the analog signal or the CLEAR key to decrease the analog output
signal to fine tune the output for the 20mA (full scale) reference. Press PRINT when done.
3.9.9.2. A-B RIO – F4.4.1
This block is used to configure the A-B RIO interface option and data format. The two branches in
this group are A-B RIO and Data Forma.
Page 71

64067481 | 08 | 11/2014
METTLER TOLEDO IND131/IND131xx/IND331/IND331xx User's Guide
3-25
Additional interface information and programming examples can be found in the IND131/IND331
0
[1]
[2]
[3]
[4]
1
Disabled [0]
Enabled [1]
57,600 [0]
115,200 [1]
230,400 [2]
Division [0], Floating
Point [1]
Integer [2]
Byte Swap [0], Historic [1]
Word Swap [2]
Terminal PLC Interface Manual, which is included on the documentation CD.
Provides access to address, rack position and data rate.
3.9.9.2.1. Node Address – F4.4.1.5
Each IND131 or IND331 Terminal connected to the network represents one physical node;
however, the addressing of the node is defined as a logical rack address. This address is
determined by the system designer, then configured in the terminal by accessing the Node Address
menu and entering the appropriate node address, from
IND131/331 terminal is decimal, while the address entered in the PLC is octal.
3.9.9.2.2. Start Quarter – F4.4.1.6
The block of data communicated from the terminal occupies a quarter rack (single group) in the
RIO address space and the quarter (group) may be defined as the first (group 0)
(group 2)
, third (group 4)
location to be used in a logical rack by selecting the appropriate start quarter address, from
(group 0–6), from the list.
3.9.9.2.3. Last Rack – F4.4.1.7
Figure 3-11: Setup Menu for A-B RIO
to 62. The address entered in the
, or fourth (group 6)
quarter (group) of a rack. Designate the
, second
to 4
From the list, select
3.9.9.2.4. Data Rate – F4.4.1.8
(the default) or
for last rack designation.
In the Data Rate menu, select the desired data rate from these options:
•
3.9.9.3. Data Format – F4.4.2
(default) •
•
Provides access to the Format and Byte Order parameters.
3.9.9.3.1. Format – F4.4.2.1
The Format menu allows a data format to be selected from a list. Options are
3.9.9.3.2. Byte Order – F4.4.2.2
and
(the default).
This parameter selects the order in which the data bytes and words will be presented in the PLC
data format. The choices are
(the default) and
.
Page 72

3-26
METTLER TOLEDO IND131/IND131xx/IND331/IND331xx User's Guide
64067481 | 08 | 11/2014
Chapter Subject
Byte Swap
Historic
Word Swap
0
63
•
•
•
makes the floating point format compatible with S7 PROFIBUS.
makes the floating point format compatible with PLC 5.
takes the IEE 754 single-precision floating point format and swaps the two
words in the 32-bit double word. This format is compatible with RSLogix 5000 processors.
3.9.9.4. CC-Link – F4.4.1
This block is used to configure the CC-Link interface option and data format. The two branches in
this group are CC-Link and Data Format.
Figure 3-12: Setup Menu for CC-Link
Additional interface information and programming examples can be found in the IND131/IND331
Terminal PLC Interface Manual, which is included on the documentation CD.
Provides access to the node address and data rate menus used to set up the CC-Link option.
3.9.9.4.1. Node Address – F4.4.1.5
Each IND131/331 Terminal connected to the network represents one physical node. This address is
determined by the system designer, then configured in the terminal by entering the Node Address (
). The default address is 63. The actual address value is shown whether the terminal
to
language is set to English or F-codes.
3.9.9.4.2. Data Rate – F4.4.1.9
In the Data Rate menu, select the desired data rate from these options:
Baud Rate F-Code
125 Kb [0] (default)
625 Kb [1]
2.5 Mb [2]
5 Mb [3]
10 Mb [4]
3.9.9.5. Data Format – F4.4.2
Provides access to the Format parameter.
Page 73

64067481 | 08 | 11/2014
METTLER TOLEDO IND131/IND131xx/IND331/IND331xx User's Guide
3-27
3.9.9.5.1. Format – F4.4.2.1
Division [0]
Integer
[2]
IND131/IND331
Terminal PLC Interface Manual
0
99 (default)
Division [0], Floating
Point [1]
Integer [2]
Byte Swap [0], Standard [1], Word Swap [2]
Double Word Swap [3]
Byte Swap
Standard
Word Swap
From this menu, select a data format for the CC-Link network. Options are
(the default).
3.9.9.6. ControlNet – F4.4.1
This block is used to configure the ControlNet interface option and data format. The two branches in
this group are ControlNet and Data Format.
This option is not for use in the IND131xx and IND331xx.
Additional interface information and programming examples can be found in the
Provides access to the node address for the terminal. Note that the network baud rate is
automatically determined by the terminal.
Figure 3-13: Setup Menu for ControlNet
, which is included on the documentation CD.
and
3.9.9.6.1. Node Address – F4.4.1.5
Each IND131 or IND331 Terminal connected to the network represents one physical node. This
address is determined by the system designer, then configured in the terminal by entering the
appropriate number (
3.9.9.7. Data Format – F4.4.2
Provides access to the Format and Byte Order parameters.
3.9.9.7.1. Format – F4.4.2.1
The Format menu allows a data format to be selected from a list. Options are
3.9.9.7.2. Byte Order – F4.4.2.2
and
This parameter selects the order in which the data bytes and words will be presented in the PLC
data format. The choices are
•
•
•
makes the floating point format compatible with S7 PROFIBUS.
makes the floating point format compatible with PLC 5.
takes the IEE 754 single-precision floating point format and swaps the two
words in the 32-bit double word. This format is compatible with RSLogix 5000 processors.
to
) in the Node Address menu.
(the default).
.
(the default) and
Page 74

3-28
METTLER TOLEDO IND131/IND131xx/IND331/IND331xx User's Guide
64067481 | 08 | 11/2014
Chapter Subject
Double Word Swap
0
63
125
[0]
250
[1]
500
[1]
Division [0], Floating
Point [1]
Integer [2]
Byte Swap [0], Standard [1], Word Swap [2]
Double Word Swap [3]
Byte Swap
Standard
•
takes the IEE 754 single-precision floating point format and swaps the
two words plus byte swaps in the 32-bit double word. This format makes floating point data
compatible with Modicon Quantum processors.
3.9.9.8. DeviceNet – F4.4.1
This block is used to configure the DeviceNet interface option and data format. The two branches in
this group are DeviceNet and Data Format.
Figure 3-14: Setup Menu for DeviceNet
Additional interface information and programming examples can be found in the IND131/IND331
Terminal PLC Interface Manual, which is included on the documentation CD.
Provides access to the node address and data rate menus used to set up the DeviceNet option.
3.9.9.8.1. Node Address – F4.4.1.5
Each IND131/331 Terminal connected to the network represents one physical node. This address is
determined by the system designer, then configured in the terminal by entering the Node Address (
). The default address is 63.
to
3.9.9.8.2. Data Rate – F4.4.1.9
In the Data Rate menu, select the desired data rate from these options:
•
Kb (the default)
3.9.9.9. Data Format – F4.4.2
•
Kb
•
Kb
Provides access to the Format and Byte Order parameters.
3.9.9.9.1. Format – F4.4.2.1
From this menu, select a data format for the DeviceNet network. Options are
3.9.9.9.2. Byte Order – F4.4.2.2
and
This parameter selects the order in which the data bytes and words will be presented in the PLC
data format. The choices are
(the default).
.
(the default) and
•
•
makes the floating point format compatible with S7 PROFIBUS.
makes the floating point format compatible with PLC 5.
Page 75

64067481 | 08 | 11/2014
METTLER TOLEDO IND131/IND131xx/IND331/IND331xx User's Guide
3-29
•
Word Swap
Double Word Swap
Enabled
[1]
Disabled [0]
takes the IEE 754 single-precision floating point format and swaps the two
words in the 32-bit double word. This format is compatible with RSLogix 5000 processors.
•
takes the IEE 754 single-precision floating point format and swaps the
two words plus byte swaps in the 32-bit double word. This format makes floating point data
compatible with Modicon Quantum processors.
3.9.9.10. EtherNet / IP and Modbus TCP – F4.4.1
This block is used to configure the Ethernet/IP and Modbus TCP interface option and data format.
Both of these interfaces are supported from the same interface board. The format of the data can be
configured to be compatible with either interface type. The two branches in this group are
Ethernet/IP - Modbus TCP and Data Format.
Additional interface information and programming examples can be found in the IND131/IND331
Terminal PLC Interface Manual, which is included on the documentation CD.
Provides access to the DHCP and network address menus used to set up the Ethernet/IP and
Modbus TCP option.
3.9.9.10.1. Mac ID – F4.4.1.14
Display the Mac ID of the interface PCB.
3.9.9.10.2. DHCP Client – F4.4.1.10
This setting determines if the address information for the terminal will be automatically assigned by
the network when connected or if a static address will be used. The DHCP can either be
or
3.9.9.10.3. IP Address – F4.4.1.11
(the default) for the interface.
The IP address for the terminal can be viewed (if DHCP is Enabled) or entered (if DHCP is
Disabled). The default value is 192-168-000-001.
3.9.9.10.4. Subnet Mask – F4.4.1.12
Figure 3-15: Setup Menu for Ethernet/IP and Modbus TCP
The Subnet Mask address for the terminal can be viewed (if DHCP is Enabled) or entered (if DHCP
is Disabled). The default value is 255-255-255-000.
Page 76

3-30
METTLER TOLEDO IND131/IND131xx/IND331/IND331xx User's Guide
64067481 | 08 | 11/2014
Chapter Subject
Division [0], Floating
Point [1]
Integer [2]
Byte Swap [0], Standard [1], Word Swap [2]
Double Word Swap [3]
Byte Swap
Standard
Word Swap
Double Word Swap
IND131/IND331
Terminal PLC Interface Manual
1
125
3.9.9.10.5. Gateway Address – F4.4.1.13
The Gateway address for the terminal can be viewed (if DHCP is Enabled) or entered (if DHCP is
Disabled). The default value is 000-000-000-000.
3.9.9.11. Data Format – F4.4.2
Provides access to the Format and Byte Order parameters.
3.9.9.11.1. Format – F4.4.2.1
From this menu, select a data format for the Ethernet network. Options are
3.9.9.11.2. Byte Order – F4.4.2.2
and
This parameter selects the order in which the data bytes and words will be presented in the PLC
data format. The choices are
•
•
•
makes the floating point format compatible with S7 PROFIBUS.
makes the floating point format compatible with PLC 5.
takes the IEE 754 single-precision floating point format and swaps the two
words in the 32-bit double word. This format is compatible with RSLogix 5000 processors.
•
two words plus byte swaps in the 32-bit double word. This format makes floating point data
compatible with Modicon Quantum processors.
3.9.9.12. PROFIBUS – F4.4.1
This block is used to configure the PROFIBUS interface option and data format. The two branches in
this group are PROFIBUS and Data Format.
(the default).
(the default) and
.
takes the IEE 754 single-precision floating point format and swaps the
Additional interface information and programming examples can be found in the
Provides access to the node address for the terminal. Note that the network baud rate is
automatically determined by the terminal.
3.9.9.12.1. Node Address – F4.4.1.5
Each IND131 or IND331 Terminal connected to the network represents one physical node. This
address is determined by the system designer, then configured in the terminal by entering the
to
appropriate number (
Figure 3-16: Setup Menu for PROFIBUS
, which is included on the documentation CD.
) in the Node Address menu.
Page 77

64067481 | 08 | 11/2014
METTLER TOLEDO IND131/IND131xx/IND331/IND331xx User's Guide
3-31
3.9.9.13. Data Format – F4.4.2
Division [0], Floating
Point [1]
Integer [2]
Byte Swap [0]
Standard [1], Word Swap [2]
Double Word Swap [3]
Byte Swap
Standard
Word Swap
Double Word Swap
Reset
WARNING Reset Communication?
Communication
Reset Successful
Reset Failed
Provides access to the Format and Byte Order parameters.
3.9.9.13.1. Format – F4.4.2.1
The Format menu allows a data format to be selected from a list. Options are
3.9.9.13.2. Byte Order – F4.4.2.2
and
This parameter selects the order in which the data bytes and words will be presented in the PLC
data format. The choices are
•
•
•
makes the floating point format compatible with S7 PROFIBUS.
makes the floating point format compatible with PLC 5.
takes the IEE 754 single-precision floating point format and swaps the two
words in the 32-bit double word. This format is compatible with RSLogix 5000 processors.
•
two words plus byte swaps in the 32-bit double word. This format makes floating point data
compatible with Modicon Quantum processors.
3.9.10. Reset – F4.5
The
menu enables the Communication setup block of values to be reset to factory default
settings. To initiate a reset, press the PRINT key. A confirmation message appears, reading
“
return to the
(the default).
(the default),
and
.
takes the IEE 754 single-precision floating point format and swaps the
” Either press PRINT again to confirm the action, or ZERO to
menu without resetting the values.
After a reset attempt, a status message of “
” or “
” will be shown
indicating the status of the reset. Press PRINT to clear the message and return to the Reset menu
branch.
Page 78

3-32
METTLER TOLEDO IND131/IND131xx/IND331/IND331xx User's Guide
64067481 | 08 | 11/2014
Chapter Subject
• Scale Diagnostics
• Display Test
• Serial Test
• Install Software Update
• Discrete I/O Test
• Reset All
Load Cell Output, Calibration Values
Statistics
Load Cell Output
Zero Counts
3.10. Maintenance – F5
The maintenance menus include:
Figure 3-17: Maintenance Branch of Setup
3.10.1. Scale Diagnostics – F5.1
Provides access to its three sub-menus,
3.10.1.1. Load Cell Output – F5.1.1
The
engineering units.
3.10.1.2. Calibration Values – F5.1.2
This menu item accesses a sequence of three sub-menus (five sub-menus if Linearity is enabled)
where parameters associated with calibration can be viewed or entered (if transferring calibration
from another IND131 or IND331 terminal).
menu is a live display that shows the current output of the load cell circuit, in
and
.
3.10.1.2.1. Zero Counts – F5.1.2.1
The
on the display. The zero count value is automatically determined when the scale is calibrated. This
value can be edited allowing the calibration values of one terminal to be transferred to another
terminal.
menu shows the number of engineering units or “counts” that equate to gross zero
If this value is changed, the zero reference point will be shifted thus affecting the accuracy of
the weighing system. DO NOT CHANGE THIS VALUE UNLESS YOU ARE TRANSFERRING ALL
CALIBRATION VALUES FROM ANOTHER TERMINAL.
Page 79

64067481 | 08 | 11/2014
METTLER TOLEDO IND131/IND131xx/IND331/IND331xx User's Guide
3-33
3.10.1.2.2. Test Load 1 – F5.1.2.2
Test Load 1
Test Load 2
Zero Counts
Test Load 2 [if Linearity enabled] – F5.1.2.4
Test Load 2 Counts [if Linearity enabled] – F5.1.2.5
Test Load 2
Weighments
F5.1.3.1
The number of weighments that have been performed using the
terminal. A weighment is determined when the PRINT key is pressed.
Overloads
F5.1.3.2
The number of scale over capacities encountered. (An overload
determined when the display blanks in an overcapacity situation.)
Peak Weight
F5.1.3.3
The heaviest weight that has been applied to the scale.
Zero
Commands
F5.1.3.4
The number of pushbutton Zero commands issued.
This menu displays the value set during span calibration for calibration Test Load 1. With linearity
disabled, this will be the full span test load. With linearity enabled, this will be the mid-point test
load.
If this value is changed, the test load used by the terminal to determine span will be shifted
thus affecting the accuracy of the weighing system. DO NOT CHANGE THIS VALUE UNLESS YOU
ARE TRANSFERRING ALL CALIBRATION VALUES FROM ANOTHER TERMINAL.
3.10.1.2.3. Test Load 1 counts – F5.1.2.3
This menu displays the “counts” that are associated with the
value. The counts are
automatically determined when the scale is calibrated. This value can be edited allowing the
calibration values of one terminal to be transferred to another terminal.
If this value is changed, the span counts will be changed thus affecting the accuracy of the
weighing system. DO NOT CHANGE THIS VALUE UNLESS YOU ARE TRANSFERRING ALL
CALIBRATION VALUES FROM ANOTHER TERMINAL.
If Linearity is enabled, pressing the PRINT key here moves to the
view returns to the
menu.
menu; otherwise, the
This menu displays the value set during span calibration for calibration Test Load 2. This will be the
full span test load when linearity has been enabled.
This menu displays the “counts” that are associated with the
value. The counts are
automatically determined when the scale is calibrated. This value can be edited allowing the
calibration values of one terminal to be transferred to another terminal.
If this value is changed, the span counts will be changed thus affecting the accuracy of the
weighing system. DO NOT CHANGE THIS VALUE UNLESS YOU ARE TRANSFERRING ALL
CALIBRATION VALUES FROM ANOTHER TERMINAL.
3.10.1.3. Statistics – F5.1.3
Accesses a sequence of five menus that display statistics accumulated for the scale since the last
Master Reset was performed. The following menus appear in sequence. Press the PRINT key to step
through them.
is
Page 80

3-34
METTLER TOLEDO IND131/IND131xx/IND331/IND331xx User's Guide
64067481 | 08 | 11/2014
Chapter Subject
Zero Failures
F5.1.3.5
The number of
command was issued.
WARNING! REMOVE CONTROL POWER
Discrete I/O Test
Discrete I/O Test
Service and Maintenance.
times the scale failed to achieve Zero when a zero
3.10.2. Serial Test – F5.2
Provides access to COM1 and COM2 serial port test routines.
3.10.2.1. COM1 – F5.2.1
Accesses the display screen for testing of COM1. The display will appear similar to the one shown
in Figure 3-18:
Figure 3-18: Serial Test Display
During this test, the serial port will transmit the string shown in the upper line approximately every
two seconds. The two digits at the end of the transmit string “Testing COM1 xx” will increment from
01 to 99 at each transmission then start over again.
If a simple loop-back jumper is inserted onto the COM1 port during this test, the data that is
transmitted (as shown on the upper line) will also be displayed on the lower line as data received.
3.10.2.2. COM2 – F5.2.2
The COM2 serial port test is performed as described previously for COM1.
3.10.3. Discrete I/O Test – F5.3
This menu provides access to a test routine where the outputs can be turned “ON” or “OFF” by key
strokes and the status of the two inputs are indicated as “OFF” or “ON”.
WARNING
BEFORE PERFORMING THE DISCRETE I/O TEST, ALWAYS REMOVE CONTROL POWER FROM ALL ATTACHED
CONTROLS. FAILURE TO DO SO CAN RESULT IN INJURY AND/OR EQUIPMENT DAMAGE.
When first accessed, a message will appear –
remove control power and press the PRINT key to proceed to the next step, or press the ZERO key to
return to the
A two-line display will appear as shown in Figure 3-19. To terminate the Discrete I/O test, press the
PRINT key. The view will return to the
DIO diagnostic screen in Chapter 4,
menu.
menu. Refer to the details of operating the
. Either
Page 81

64067481 | 08 | 11/2014
METTLER TOLEDO IND131/IND131xx/IND331/IND331xx User's Guide
3-35
Figure 3-19: Discrete I/O Test Display, Output Active (bottom)
Warning! Display Test Mode
Working…..
Service and Maintenance
Reset All
WARNING Reset
all?
Maintenance
Reset Successful
Reset Failed
3.10.4. Display Test – F5.4
This branch begins a sequence that turns all display dots on and off, in order to perform a display
test. Before the test begins, a message will be shown on the display –
The test is then started by pressing the PRINT key.
The test is executed by turning all dots on (illuminated) for approximately 4 seconds then turning
them off for approximately 1 second with a display message of
all graphic dots on the display, when it is operated for an extended length of time (such as 1 hour)
the test sequence can help to reduce the visual impact of display burn-in.
To end the display test, press the PRINT key.
3.10.5. Install Software Update – F5.5
This will permit installation of new firmware from the SD memory card. For a full description of this
procedure, refer to Chapter 4,
3.10.6. Reset All – F5.6
The
associated parameters to their factory default settings.
menu triggers the Reset function in each branch of the menu tree and restores the
.
. In addition to testing
.
To initiate a reset, press the PRINT key. A confirmation message appears, reading
Either press PRINT again to confirm the action, or ZERO to return to the
without resetting the values.
After a reset attempt, a status message of
the status of the reset. Press PRINT to clear the message and return to the Reset menu branch.
The Reset All step resets all parameters in the terminal, excluding calibration and the other
associated metrological parameters.
or
3.11. Restoring Factory Default Settings
Factory default settings can be restored individually for branches such as Scale, Application,
Terminal, and Communication or a reset of all of these branches can be done with the Reset All
screen under the Maintenance branch. The Reset screen is the last branch in each major branch of
the menu tree. Note that calibration and other metrological parameters related to the calibration are
not reset. To reset the calibration parameters, a Master Reset must be performed.
To restore factory default settings for Terminal, for example:
1. In setup, navigate to the Terminal branch.
will be shown indicating
menu
Page 82

3-36
METTLER TOLEDO IND131/IND131xx/IND331/IND331xx User's Guide
64067481 | 08 | 11/2014
Chapter Subject
2. Press PRINT to open the Terminal branch and view the sub-menus.
3. Press CLEAR to navigate down to the Reset menu.
4. Press PRINT to open the Terminal Reset screen.
5. A warning message of “WARNING! Reset Terminal?” is shown.
6. Press PRINT to perform the reset or ZERO to escape without a reset.
7. A status message appears that verifies a successful reset.
8. Press the ZERO key to return to the setup menu tree display.
Steps 1–8 can be repeated to reset factory default settings for any major branch in setup.
Select Reset All under Maintenance to restore all setup settings to factory defaults. Note that
neither this, nor Scale Reset, includes the reset of capacity, increment, or calibration data. This
data is reset only with a Master Reset.
Page 83

64067481 | 08 | 11/2014
METTLER TOLEDO IND131/IND131xx/IND331/IND331xx User's Guide
4-1
This chapter covers
4 Service and Maintenance
The IND131 and IND331 terminals are designed to provide years of dependable
• Cleaning and Maintenance
• Service
• Troubleshooting
• System Backup and Restore
• SD Memory Files and InSite
• Master Reset
• Updating Firmware
operation. However, METTLER TOLEDO recommends that – as with any industrial
measurement equipment – the terminal and the connected scale system be serviced
periodically. Timely, factory-specified maintenance and calibration by a METTLER
TOLEDO service technician will ensure and document accurate and dependable
performance to specifications.
WARNING
IF THE KEYBOARD, DISPLAY LENS OR ENCLOSURE IS DAMAGED ON AN IND131xx OR
IND331xx TERMINAL THAT IS USED IN A DIVISION 2 OR ZONE 2/22 AREA, THE DEFECTIVE
COMPONENT MUST BE REPAIRED IMMEDIATELY. REMOVE POWER IMMEDIATELY AND DO
NOT REAPPLY POWER UNTIL THE DISPLAY LENS, KEYBOARD OR ENCLOSURE HAS BEEN
REPAIRED OR REPLACED BY QUALIFIED SERVICE PERSONNEL. FAILURE TO DO SO COULD
RESULT IN BODILY HARM AND/OR PROPERTY DAMAGE.
4.1. Cleaning and Maintenance
Clean the terminal’s keypad and cover with a clean, soft cloth that has been dampened with a mild
glass cleaner. Do not use any type of industrial solvent such as toluene or isopropanol (IPA) that
could damage the terminal’s finish. Do not spray cleaner directly on the terminal.
WHEN CLEANING AN IND131XX OR IND331XX TERMINAL INSIDE A HAZARDOUS AREA,
ELECTROSTATIC DISCHARGES TO THE EXPOSED NON-METALLIC PARTS OF THE
ENCLOSURE MUST BE AVOIDED.
Regular maintenance inspections and calibration by a qualified service technician are
recommended. The IND131 and IND331 terminals are rugged instruments; however, the front
panel is a relatively thin covering over sensitive electronic switches and a lighted display. Care
should be taken to avoid any punctures to this surface or any vibrations or shocks to the
instrument. Should the front panel become punctured, ensure that steps are taken to prevent dust
and moisture from entering the unit until the terminal can be repaired.
WARNING
Page 84

4-2
METTLER TOLEDO IND131/IND131xx/IND331/IND331xx User's Guide
64067481 | 08 | 11/2014
Service and Maintenance
4.2. Service
WARNING
DO NOT INSTALL OR PERFORM ANY SERVICE ON THIS EQUIPMENT BEFORE THE AREA IN
WHICH THE TERMINAL IS LOCATED HAS BEEN SECURED AS NON-HAZARDOUS BY
PERSONNEL AUTHORIZED TO DO SO BY THE RESPONSIBLE PERSON AT THE CUSTOMER’S
SITE.
Only qualified personnel should perform installation, programming, and service. Please contact a
local METTLER TOLEDO representative for assistance.
METTLER TOLEDO recommends periodic preventative maintenance to the terminal and scale system
to ensure reliability and to maximize service life. All measurement systems should be periodically
calibrated and certified as required to meet production, industry and regulatory requirements. We
can help you maintain uptime, compliance and quality system documentation with periodic
maintenance and calibration services. Contact your local METTLER TOLEDO authorized service
organization to discuss your requirements.
WARNING
ONLY PERMIT QUALIFIED PERSONNEL TO SERVICE THE TERMINAL. EXERCISE CARE WHEN
MAKING CHECKS, TESTS AND ADJUSTMENTS THAT MUST BE MADE WITH POWER ON.
FAILING TO OBSERVE THESE PRECAUTIONS CAN RESULT IN BODILY HARM AND/OR
PROPERTY DAMAGE.
4.3. Troubleshooting
Troubleshooting activities described here are limited to simple diagnostics to assist in identifying
whether the problem is in the IND131/331 terminal or has an external cause.
• Diagnostic LEDs
• Problems
• Error Codes and Error Messages
• Internal Diagnostic Testing
4.3.1. Diagnostic LEDs
Two red LEDs are positioned next to the COM1 serial port connector (Figure 4-1) that indicate the
operational status of the load cell excitation circuit and the +5 volt logic voltage of the terminal. If
an LED is ON, it indicates normal operation of that circuitry. If either LED is OFF during operation, it
indicates a problem with that circuitry in the terminal. In this case, contact an authorized METTLER
TOLEDO service representative for assistance.
Page 85

64067481 | 08 | 11/2014
METTLER TOLEDO IND131/IND131xx/IND331/IND331xx User's Guide
4-3
4.3.2. Problems
Diagnostic
The following chart lists a few potential symptoms and some suggestions for resolving the issue.
Use qualified electricians to test for problems with the AC power source. If a problem occurs but that
specific problem is not listed in Table 4-1, or the suggested fix does not resolve the problem,
contact an authorized METTLER TOLEDO service representative for assistance.
Symptom Suggestion
Blank display – no LEDs Confirm source of AC or DC power is OK.
Blank display – LEDs on
Display on but no
weight change
No serial port
communications
Discrete inputs or
outputs don’t operate.
LEDs
Figure 4-1: Diagnostic LEDs
Table 4-1: Symptoms and Suggested Fixes
Possible problem with communication to the display PCB. Contact service
representative.
Check wiring to load cell. Look for broken wires, open connections or mis-wiring.
Use serial diagnostics section of Maintenance block of setup to determine if the
problem is internal or external to the terminal.
Use the discrete input and output diagnostics section of the Maintenance block of
setup to determine if the problem is internal or external to the terminal.
4.3.3. Error Codes and Error Messages
The IND131 and IND331 terminals use error codes and error messages to indicate error conditions
that occur in the terminal. An example of an error code display is given in Figure 4-2.
Error messages that occur as a result of an operator action will remain on the display until cleared
by pressing PRINT. Error messages that result from a remote operation and not an operator action
Figure 4-2: Error Code Display
Page 86

4-4
METTLER TOLEDO IND131/IND131xx/IND331/IND331xx User's Guide
64067481 | 08 | 11/2014
Service and Maintenance
Load Cell Output
Calibration Values
Statistics
will clear automatically after approximately 3 seconds. In either case, after the message is cleared,
the display reverts to the previous data shown before the error was detected. The possible error
codes and messages are listed in Table 4-2 with a brief description of the error.
Table 4-2: Error Codes
Error Code Description
0003 FLASH checksum error. Press PRINT to clear and reset the FLASH.
0004 No factory calibration for A/D circuit. Replace Main PCB.
0005 The function currently being accessed has been disabled.
0007 Access denied. Scale is approved.
0008 Data is out of range of valid entries.
0009 Zero failed – weight is beyond capture range.
0010 Comparator data entry error: High Limit value must be larger than Limit value.
0011 Command failed.
0012 Command failed – motion.
0013 Weight exceeds scale capacity. Exit the Step Calibration procedure.
0014 Invalid Password.
0015
0016
0017 PLC node address is outside allowed range.
0018 Existing calibration weight exceeds new capacity; recalibrate scale with valid test weight.
Switch SW1-1 is unsecured. If the terminal is W&M approved, this switch must be ON before
setup can be exited.
New capacity results in resolution of less than 1,000 divisions or more than 100,000
divisions: Increment size has been changed automatically.
4.3.4. Internal Diagnostics
The IND131 and IND331 terminals provide several internal diagnostic tools that are accessible in
setup mode. These tests are intended to assist in diagnosing whether a problem is internal or
external to the terminal.
To access these tools, enter SETUP mode and navigate to the Maintenance menu. Open the
Maintenance branch. Each of the diagnostic items is shown in the menu. The following diagnostic
tests are included:
4.3.4.1. Scale Diagnostics
•
When weight is placed on the scale platform, the number of counts should increase.
•
recorded after a scale calibration, and the Main PCB is replaced in the future, the calibration
values can be manually entered here to “transfer” the previous calibration to the new Main PCB.
•
— Displays statistical information for the scale such as the total number of
weighments (as determined by a demand print), the number of scale overloads, the peak
weight weighed on the scale, total number of zero commands and failed zero commands. This
data can be very helpful when diagnosing scale problems.
— Displays the current load cell output (active weight) in internal counts.
— Displays the current calibration values for the scale. If these values are
Page 87

64067481 | 08 | 11/2014
METTLER TOLEDO IND131/IND131xx/IND331/IND331xx User's Guide
4-5
4.3.4.2. Serial Test
This tool tests the transmit and receive functions on the serial (COM) ports. The COM port to be
tested must be selected first and then the test can be started.
1. With the desired COM port in focus, press PRINT to begin the test.
2. During the test, a data string is output repeatedly approximately once every three seconds. The
data is: [Testing COMx: nn] where “x” is the COM port and “nn” is an incrementing value
beginning at 1 and continuing through 99 then starting over again. Each transmission
increments this number by one.
3. Any data received during the serial test is displayed in the bottom part of the display to the right
of the “Rx:” label. Control characters are not displayed in this mode.
4. If a jumper wire is placed between the transmit and the receive terminals (Figure 4-4) on the
port being tested, the same data string that is transmitted displays as the receiving field. This
jumper can confirm correction operation of both the transmit and receive circuitry of that COM
port.
Figure 4-3: Serial Test Display
5. To stop the serial port test, press the PRINT key.
4.3.4.3. Discrete I/O Test
This test provides a view of the status of the discrete inputs and allows enabling or disabling of the
discrete outputs for diagnostic purposes. Expand the Discrete I/O branch by pressing the PRINT key.
1. A warning message is shown first to remind the tester that the outputs can be turned on
manually during this test so any control power to the discrete outputs should be removed.
Figure 4-4: Jumper Wire Between COM Transmit and Receive Terminals
Page 88

4-6
METTLER TOLEDO IND131/IND131xx/IND331/IND331xx User's Guide
64067481 | 08 | 11/2014
Service and Maintenance
WARNING
THE DISCRETE OUTPUTS OF THE TERMINAL WILL BE MANUALLY ENABLED DURING THIS TEST.
REMOVE OUTPUT CONTROL POWER SO EXTERNAL EQUIPMENT WILL NOT BE ENERGIZED BY
MISTAKE. EXERCISE CARE WHEN MAKING CHECKS, TESTS AND ADJUSTMENTS THAT MUST BE
MADE WITH POWER ON. FAILURE TO OBSERVE THESE PRECAUTIONS CAN RESULT IN BODILY
HARM AND/OR PROPERTY DAMAGE.
2. Press PRINT to continue to the diagnostic screen. When viewing the test screen, the input status
will be shown at the top of the display and the output status will be shown at the bottom of the
display (Figure 4-5). Focus is shown on Output #4 (far right) first.
Figure 4-5: Discrete I/O Test Screen
3. Focus for control of a specific output is indicated by a large circle around the outside of the
smaller circle. When an output is in focus, pressing the TARE key turns the output ON. The
smaller circle becomes solid to indicate that output is ON . This is shown in Figure 4-6.
Figure 4-6: Discrete I/O Test Screen, One Output Active
4. Pressing the CLEAR key returns the output in focus to the OFF condition and the circle is shown
as empty .
5. Focus can be moved to any of the other outputs by using the ZERO key to move one position to
the left. Each of the outputs can then be turned ON with the TARE key or OFF with the CLEAR
key.
6. To end the test and exit, press the PRINT key.
Note that when the Discrete I/O Test screen is exited, all outputs will be turned off again.
Page 89

64067481 | 08 | 11/2014
METTLER TOLEDO IND131/IND131xx/IND331/IND331xx User's Guide
4-7
4.4. System Backup and Restore
An optional SD memory card is available for the IND131 and IND331 terminal. The card provides a
medium to store a setup file containing the terminal’s configuration. All setup parameters are saved
in a file that can be restored to the terminal in case the data is lost or after the setup is totally
cleared with a master reset.
The SD memory card supports saving of as many as 99 setup files. The backup and restore
process provides the ability to name the backup file with a value from 01 to 99, and permits the
selection of a particular file to restore.
The terminal will initiate the backup and restore sequence of prompts when the terminal detects at
power up that an SD memory card is present when it was not present the previous time the
terminal was powered on.
The SD memory card is not hot-swappable.
The SD memory media provided by METTLER TOLEDO as an option has been fully tested for
correct operation. While other SD memory media may work, some may not work correctly.
METTLER TOLEDO will only support correct operation of the SD memory card model offered as
the IND131 and IND331 terminal accessory.
4.4.1. Backup
With the terminal unplugged from power, insert the SD memory into the slot as shown in Figure 4-7
or Figure 4-8. Note that it is inserted upside down from the normal orientation. Do not force the
card into the slot. If the card does not slide smoothly into the slot, confirm the correct orientation.
Figure 4-7: SD Memory Card Insertion, DIN Terminal
Page 90

4-8
METTLER TOLEDO IND131/IND131xx/IND331/IND331xx User's Guide
64067481 | 08 | 11/2014
Service and Maintenance
When power is applied to the terminal
When power is applied to the terminal
Figure 4-8: SD Memory Card Insertion, IND331 in Harsh Enclosure
, the SD memory card will be recognized and a series of
prompts will be shown on the display. Follow the prompts to perform the backup function.
The sequence of prompts for backing up or saving the setup is shown in Table 4-3.
Table 4-3: Backup Sequence
Step Display Notes
1
2
3
4
TARE or CLEAR key to change “No” to “Yes” then press PRINT.
Increment the number for the file name using the TARE and CLEAR
keys then press PRINT.
File was successfully written to the SD memory. Acknowledge by
pressing PRINT.
After the sequence is complete the display returns to the normal
weight display.
4.4.2. Restore
With the terminal unplugged from power, insert the SD memory into the slot as shown in Figure 4-7
or Figure 4-8. Note that it is inserted upside down from the normal orientation. Do not force the
card into the slot. If the card does not slide smoothly into the slot, confirm the correct orientation.
prompts will be shown on the display. Follow the prompts to perform the restore function.
, the SD memory card will be recognized and a series of
Page 91

64067481 | 08 | 11/2014
METTLER TOLEDO IND131/IND131xx/IND331/IND331xx User's Guide
4-9
The sequence of prompts is shown in Table 4-4.
Table 4-4: Restore Sequence
Step Display Notes
1
2
3
4
5
6
Press PRINT with “No” as the selection for Save Setup File.
TARE or CLEAR key to change “No” to “Yes” then press PRINT.
Scroll through the list of available stored files using the TARE and
CLEAR keys until the desired file is shown then press PRINT.
If calibration values from the stored file are not to be used in the
new terminal, press PRINT with “No” displayed. If calibration is to
be transferred, press TARE to change “No” to “Yes” then press
PRINT.
The selected file was successfully uploaded from the SD memory to
the terminal. Acknowledge by pressing PRINT.
After the sequence is complete the display returns to the normal
weight display.
4.5. SD Memory Files and InSite
Version 5.01.03 of InSite adds the ability to import a saved configuration file from the SD memory
card into InSite. Once it is imported into InSite, configuration changes may be done and InSite can
then export the modified file back onto the SD memory card as a “File_nn.txt” file (IND131 and
IND331 terminal format) or save it as a “*.BCF” file (native InSite format).
A PC with an SD memory card reader is required for this operation. These instructions do not
include details on the SD memory card reader.
4.5.1. Importing the File
To import a saved file from the SD memory card, perform the following steps:
1. Open InSite and confirm the firmware version is 5.01.03 or newer. This feature is not present
on earlier versions of InSite.
2. Select terminal model IND131/IND331 in InSite.
3. Select OPEN on the left of the top menu bar of InSite.
4. At the bottom of the Open pop-up screen, change the “Files of type:” selection from BCF files
(*.bcf) to Text Files (*.txt).
5. In the “Look in:” field at the top of the display, navigate to the location of the SD memory card
and select the file to be imported.
6. Press the Open button at the lower right of the display.
Page 92

4-10
METTLER TOLEDO IND131/IND131xx/IND331/IND331xx User's Guide
64067481 | 08 | 11/2014
Service and Maintenance
Default Settings
7. The saved *.txt file will be imported from the SD memory card into InSite and configuration
changes can be made.
4.5.2. Saving as a *.txt File
If the file was imported from the SD memory card, when you perform a standard Save function, the
file will be saved in the original *.txt file format back to the original file path. If needed, the file path
or file name can be modified by using the “Save as:” feature of InSite. Make sure the “Files of type:”
selection is selected as *.txt file.
If the file was originally opened as a *.bcf file, the normal “Save” function of InSite will save the file
in the *.bcf format. To save the file to an SD memory card, select the “Save as:” feature of InSite
and change the “Files of type:” selection to *.txt. Enter the file path in the “Save in:” field and when
the Save button is pressed, the file will be saved in the *.txt file format for use by the IND131 and
IND331 terminals.
Note: In order for the IND131 or IND331 terminal to load the file from the SD memory card, the file
name must be File_nn.txt where “nn” is a number from 1 to 99. Other file names will be ignored by
the terminal.
4.5.3. Saving as a *.BCF File
If the file was originally opened from a *.bcf file, when you perform a standard Save function, the
file will be saved in the original *.bcf file format back to the original file path. If needed, the file path
or file name can be modified by using the “Save as:” feature of InSite. Make sure the “Files of type:”
selection is selected as *.bcf file.
If the file was originally imported from the SD memory card, the normal “Save” function of InSite will
save the file in the original *.txt file format. To save the file in the native BCF InSite format, select the
“Save as:” feature of InSite and change the “Files of type:” selection to *.bcf file. Enter the file path in
the “Save in:” field and when the Save button is pressed, the file will be saved in the *.bcf file format
for use by InSite.
4.6. Master Reset
A hardware master reset restores all terminal setup parameters to the factory default settings (refer
to Appendix B,
The master reset typically is performed under these circumstances:
• When a software configuration problem arises that cannot be resolved without starting from the
factory default settings.
• When password security is enabled to protect setup, and the password is lost.
).
• After a firmware upgrade is performed.
To initiate a master reset, perform the following steps:
1. Remove AC power.
2. Place switch SW1-2 in the ON position, as shown in Figure 4-9.
Page 93

64067481 | 08 | 11/2014
METTLER TOLEDO IND131/IND131xx/IND331/IND331xx User's Guide
4-11
not
Figure 4-9: Switches SW1-2 and SW1-4
The position of SW1-4 (also shown in Figure 4-9) determines whether metrologically
significant EEPROM data for scale calibration is reset when a master reset is performed. SW1-4
must be set to ON to reset EEPROM data. If SW1-4
is set to OFF, EEPROM data will
be
affected by the master reset.
3. Apply AC power. A warning message displays asking if a master reset should be performed.
Figure 4-10: Master Reset Warning Message
4. Press PRINT to perform a master reset. When the reset is complete, the screen will return to the
normal weight display.
OR
To exit without a master reset, do not press PRINT.
5. Remove AC power.
6. Return SW1-2 (and, if it was changed, SW1-4) to their original OFF positions.
7. Reapply AC power.
4.7. Updating Firmware
There are two different methods of updating the firmware in the terminal, each of which uses a
different file type. The first method is via InSite which uses an “72225989A00n.hex” file to load.
The second method is via the SD Memory card which uses a “3311A00n.hex” file. The letter “n”
represents a revision number that will appear in each file name.
Page 94

4-12
METTLER TOLEDO IND131/IND131xx/IND331/IND331xx User's Guide
64067481 | 08 | 11/2014
Service and Maintenance
before
3
4.7.1. Using InSite
The InSite configuration tool program is used to flash new terminal firmware files such as
“72225989A00n.hex” through the COM1 serial port of the IND131 and IND331 terminals. The
firmware update and the InSite configuration tool program must be saved on a PC that will be
connected to the terminal for firmware flashing.
Implement the following steps to prepare the terminal for firmware flashing using the InSite
configuration tool:
Access the InSite tool by double-clicking on its icon – .
After updating, the new firmware may generate a checksum error on restart, which can be
cleared by pressing PRINT on the terminal’s keypad. This confirms it is acceptable to perform a
Master Reset. Therefore,
configuration data.
1. Remove power from the terminal.
2. Open the terminal enclosure.
3. Set switch SW1-3 to the ON position and all other switches to OFF.
performing the upgrade, it is important to back up the current
4. Connect a serial cable configured as shown in Figure 4-11 from the PC to the terminal.
IND131/IND331
COM1 Terminal
TxD 2
RxD 3
Gnd 5
Figure 4-11: Serial Cable Wiring
5. Apply power to the terminal. The IND
31 display should begin to slowly alternate between a
PC 9-Pin
Connector
blank display and all dots lit while the IND131 display will remain blank. The terminal is now
ready for firmware flashing.
6. Refer to the instructions/help provided with the InSite configuration tool program for procedures
required to complete firmware flashing.
7. When the firmware download process is complete, disconnect the serial cable, return switch
SW1-3 to the OFF position and return all other switches to the positions they were in.
8. Close the terminal enclosure.
To eliminate potential memory errors, it is recommended that a Master Reset be performed after
flashing new firmware.
4.7.2. Using the SD Memory Card
If a new “3311A00n.hex” file is copied to the SD Memory card from a PC, the firmware can then be
updated by the following procedure in the Maintenance section of setup.
Page 95

64067481 | 08 | 11/2014
METTLER TOLEDO IND131/IND131xx/IND331/IND331xx User's Guide
4-13
Remove power from the terminal and insert the SD memory card with the “3311A00n.hex” file
Setup > Maintenance > Install SW Update
0
Setup > Maintenance > Install SW Update
1
2
3
5
6
copied to it into the SD memory card slot on the Mainboard. Refer to Figure 4-7 and Figure 4-8 for
location of the SD memory slot.
It will be necessary to open the harsh and J-box enclosures to access the SD memory slot.
Power up the terminal and access
sequence of prompts is shown in
Step Display Notes
Table 4-5.
Table 4-5: Update Sequence
Press PRINT with “No” as the selection to exit the update
sequence or press TARE to change the “No” to a “Yes” then press
PRINT to begin the update.
If the SD memory card is not detected, an error will be displayed.
Press PRINT to clear the display and exit the update sequence.
If the correct file name is not found on the SD memory card, an
error will be displayed. Press PRINT to clear the display and exit
the update sequence.
If a file is found, its name will be shown on the display. If more
than one update file is stored on the card, the TARE and CLEAR
keys can be used to scroll through the list to select the desired
file. When displayed, press PRINT.
(F5.5). The Update
The terminal will display “Erasing” on the display as the process
begins.
After erasing the old code, the new firmware will be loaded while
a “Loading” message is displayed.
During the process, the terminal both reads the update file and
writes a file to the SD memory card. If either the read or write
fails, an error message is displayed. Pressing PRINT clears the
error and exits the update sequence.
After the update is complete, the terminal will restart.
To eliminate potential memory errors, it is recommended that a Master Reset be performed after
updating the firmware.
Page 96

64067481 | 08 | 11/2014
METTLER TOLEDO IND131/IND131xx/IND331/IND331xx User's Guide
A-1
A Default Settings
A.1. Setup Defaults
The following table lists the factory default settings for the setup parameters of the IND131 and
IND331 terminals. Both the Name and the F-Code for each parameter are listed. The default value
when viewing the setup programmed for F-Codes is shown in parenthesis immediately after the FCode number. A column is provided to note how each parameter has been programmed for this
specific terminal.
Setup Feature F-Code Default Value As Programmed
Scale – Type 1.1
Name 1.1.1 Scale 1
Approval 1.1.2 None (0)
Scale – Capacity and Increment 1.2
Units 1.2.1 kg (2)
Capacity 1.2.2 50
Increment 1.2.3 0.01 (3)
x10 Always 1.2.4 Disabled (0)
Scale – Calibration 1.3
Linearity 1.3.1 Disabled (0)
GEO Code 1.3.6 16
Scale – Zero 1.4
Auto Zero 1.4.1 Gross (1)
Auto Zero Range 1.4.2 0.5 d (0)
Under Zero Blanking 1.4.3 5d (1)
Pushbutton Zero 1.4.4 +/- 2% (1)
Scale – Tare – Types 1.5.1
Pushbutton Tare 1.5.1.1 Enabled (1)
Net Sign Correction 1.5.1.2 Disabled (0)
Scale – Tare – Auto Clear 1.5.2
Auto Clear Tare 1.5.2.1 Disabled (0)
Clear Threshold Weight 1.5.2.2 0.00
Page 97

A-2
METTLER TOLEDO IND131/IND131xx/IND331/IND331xx User's Guide
64067481 | 08 | 11/2014
Default Settings
Setup Feature F-Code Default Value As Programmed
Motion Check 1.5.2.3 Disabled (0)
Clear After Print 1.5.2.4 Disabled (0)
Scale – Rate 1.6
Weight Units 1.6.1 None (0)
Time Units 1.6.2 Seconds (0)
Measurement Period 1.6.3 1 sec (1)
Output Average 1.6.4 1 sec (0)
Scale – Filter 1.7
Low Pass Filter 1.7.1 Medium (1)
Stability Filter 1.7.2 Disabled (0)
Scale – Stability 1.8
Motion Range 1.8.1 1d (1)
Scale – Log or Print 1.9
Auto Print 1.9.1 Disabled (0)
Application – Target Operation 2.1
Tolerance Type 2.1.1 Weight Deviation (0)
Output Type 2.1.2 Concurrent (0)
Target Source 2.1.3 Displayed Weight (0)
Target Latching 2.1.4 Enabled (1)
Application – Target Values 2.2
Target 2.2.1 0.00 kg
- Tol 2.2.2 0.00 kg
+ Tol 2.2.3 0.00 kg
Spill 2.2.4 0.00 kg
Fine Feed 2.2.5 0.00 kg
Application – Comparator 1 2.3
Comparator 1 Source 2.3.1 Disabled (0)
Comparator 1 Active 2.3.2 < (0)
Limit 1 2.3.3 +0.00 kg
High Limit 1 2.3.4 0.00 kg
Application – Comparator 2 2.3
Comparator 2 Source 2.3.5 Disabled (0)
Comparator 2 Active 2.3.6 < (0)
Page 98

64067481 | 08 | 11/2014
METTLER TOLEDO IND131/IND131xx/IND331/IND331xx User's Guide
A-3
Setup Feature F-Code Default Value As Programmed
Limit 2 2.3.7 +0.00 kg
High Limit 2 2.3.8 0.00 kg
Application – Comparator 3 2.3
Comparator 3 Source 2.3.9 Disabled (0)
Comparator 3 Active 2.3.10 < (0)
Limit 3 2.3.11 +0.00 kg
High Limit 3 2.3.12 0.00 kg
Application – Discrete I/O – Discrete Inputs 2.4.1
Input 1 Polarity 2.4.1.1 + True (0)
Input 1 Assignment 2.4.1.2 None (0)
Input 2 Polarity 2.4.1.3 + True (0)
Input 2 Assignment 2.4.1.4 None (0)
Application – Discrete I/O – Discrete Outputs 2.4.2
Output 1 Assignment 2.4.2.1 None (0)
Output 2 Assignment 2.4.2.2 None (0)
Output 3 Assignment 2.4.2.3 None (0)
Output 4 Assignment 2.4.2.4 None (0)
Terminal – Serial Number 3.1
Serial Number 3.1.1 00000000
Terminal – Screen Saver 3.2
Screen Saver 3.2.1 10 min (3)
Terminal – Region 3.3
Menu Language 3.3.1 English (0)
Setup Language 3.3.2 English (0)
Terminal – User 3.4
Password Protection 3.4.1 Disabled (0)
Password 3.4.2 000000
Terminal – Menu Keys 3.5
Calibration Access 3.5.1 Enabled (1)
Target Access 3.5.2 Disabled (0)
Comparators Access 3.5.3 Disabled (0)
Communication – Output Template 4.1
Format 4.1.1 GTN, multiple lines (2)
Page 99

A-4
METTLER TOLEDO IND131/IND131xx/IND331/IND331xx User's Guide
64067481 | 08 | 11/2014
Default Settings
A-B RIO
Setup Feature F-Code Default Value As Programmed
Print Scale Name 4.1.2 Disabled (0)
Communication – Connections – COM1 4.2
COM1 Assignment 4.2.1 Demand Output (3)
Checksum 4.2.1.1 Disabled (0)
Communication – Connections – COM2 4.2
COM2 Assignment 4.2.2 Demand Output (3)
Checksum 4.2.2.1 Disabled (0)
Communication – Serial – COM1 4.3.1
Baud Rate 4.3.1.1 9600 (5)
Data Bits 4.3.1.2 8 (1)
Parity 4.3.1.3 None (0)
Communication – Serial – COM2 4.3.2
Baud Rate 4.3.2.1 9600 (5)
Data Bits 4.3.2.2 8 (1)
Parity 4.3.2.3 None (0)
Interface 4.3.2.4 RS-232 (0)
Modbus Node Address 4.3.2.5 000
Modbus Data Format 4.3.2.6 Integer (0)
Communication – PLC – Analog Output [Shown when option is detected] 4.4
Analog Output 4.4.0 Analog Out (6)
Source 4.4.1.1 None (0)
Zero Value 4.4.1.2 0
Full Scale Value 4.4.1.3 50
Communication – PLC – A-B RIO [Shown when option is detected.] 4.4
A-B RIO 4.4.0 A-B RIO (5)
Node Address 4.4.1.5 001
Start Quarter 4.4.1.6 1 (1)
Last Rack 4.4.1.7 Disabled (0)
Data Rate 4.4.1.8 57600 (0)
Communication – PLC – Data Format [Shown when option is detected.] 4.4.2
Format 4.4.2.1 Integer (2)
Byte Order 4.4.2.2 Historic (1)
Page 100

64067481 | 08 | 11/2014
METTLER TOLEDO IND131/IND131xx/IND331/IND331xx User's Guide
A-5
Setup Feature F-Code Default Value As Programmed
DeviceNet
PROFIBUS
EtherNet/IP
ControlNet
CC-Link
Communication – PLC – DeviceNet [Shown when option is detected.] 4.4
DeviceNet 4.4.0 DeviceNet (4)
Node Address 4.4.1.5 063
Data Rate 4.4.1.9 125k (0)
Communication – PLC – Data Format [Shown when option is detected.] 4.4.2
Format 4.4.2.1 Integer (2)
Byte Order 4.4.2.2 Word Swap (2)
Communication – PLC – PROFIBUS [Shown when option is detected.] 4.4
PROFIBUS 4.4.0 PROFIBUS (2)
Node Address 4.4.1.5 001
Communication – PLC – Data Format [Shown when option is detected.] 4.4.2
Format 4.4.2.1 Integer (2)
Byte Order 4.4.2.2 Byte Swap (0)
Communication – PLC – EtherNet/IP & Modbus TCP [Shown when option is detected.] 4.4
EtherNet/IP Modbus TCP 4.4.0 EtherNet/IP (3)
Modbus TCP
DHCP Client 4.4.1.10 Disabled (0)
IP Address 4.4.1.11 192.168.000.001
Subnet Mask 4.4.1.12 255.255.255.000
Gateway Address 4.4.1.13 000.000.000.000
Communication – PLC – Data Format [Shown when option is detected.] 4.4.2
Format 4.4.2.1 Integer (2)
Byte Order 4.4.2.2 Word Swap (2)
Communication – PLC – ControlNet [Shown when option is detected.] 4.4
ControlNet 4.4.0 ControlNet (1)
Node Address 4.4.1.5 99
Communication – PLC – Data Format [Shown when option is detected.] 4.4.2
Format 4.4.2.1 Integer (2)
Byte Order 4.4.2.2 Word Swap (2)
Communication – PLC – CC-Link [Shown when option is detected.] 4.4.2
Node Address 4.4.1.5 63
Data Rate 4.4.1.9 125 Kb (0)
Communication – PLC – Data Format [Shown when option is detected.] 4.4.2
Format 4.4.2.1 Integer (2)
 Loading...