

Mettler Toledo NCR RealScan 7876 Service Manual
METTLER TOLEDO
DIVA Service Manual
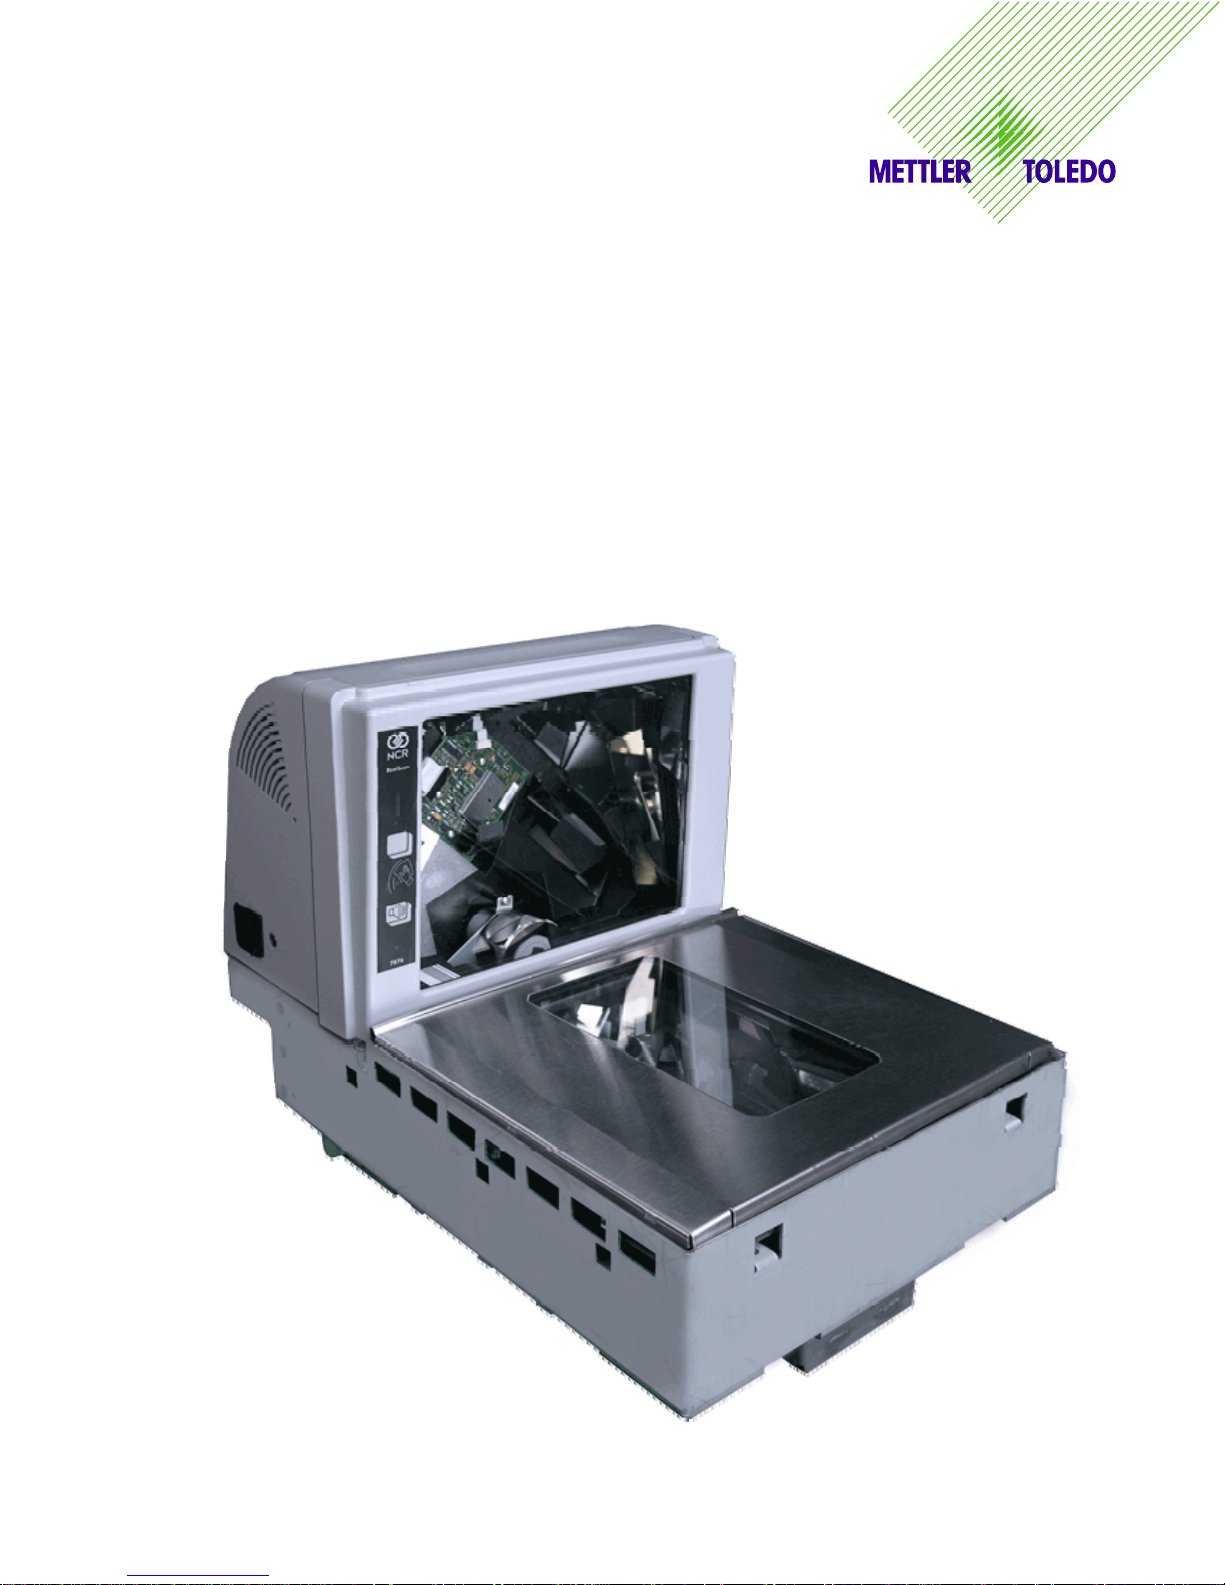
NCR RealScan 7876 Scanner
72191202 (05/2012) 0.0

INTRODUCTION
This publication is provided solely as a guide for individuals who have purchased the
METTLER TOLEDO Diva scale product.
Information regarding METTLER TOLEDO Technical Training may be obtained by writing to:
METTLER TOLEDO
1900 Polaris Parkway
Columbus, Ohio 43240-2020
(614) 438-4511
©
Mettler-Toledo, LLC 2012
No part of this manual may be reproduced or transmitted in any form or by any means,
electronic or mechanical, including photocopying and recording, for any purpose without
the express written permission of Mettler-Toledo, LLC.
U.S. Government Restricted Rights: This documentation is furnished with Restricted Rights.
METTLER TOLEDO RESERVES THE RIGHT TO MAKE REFINEMENTS
OR CHANGES WITHOUT NOTICE.
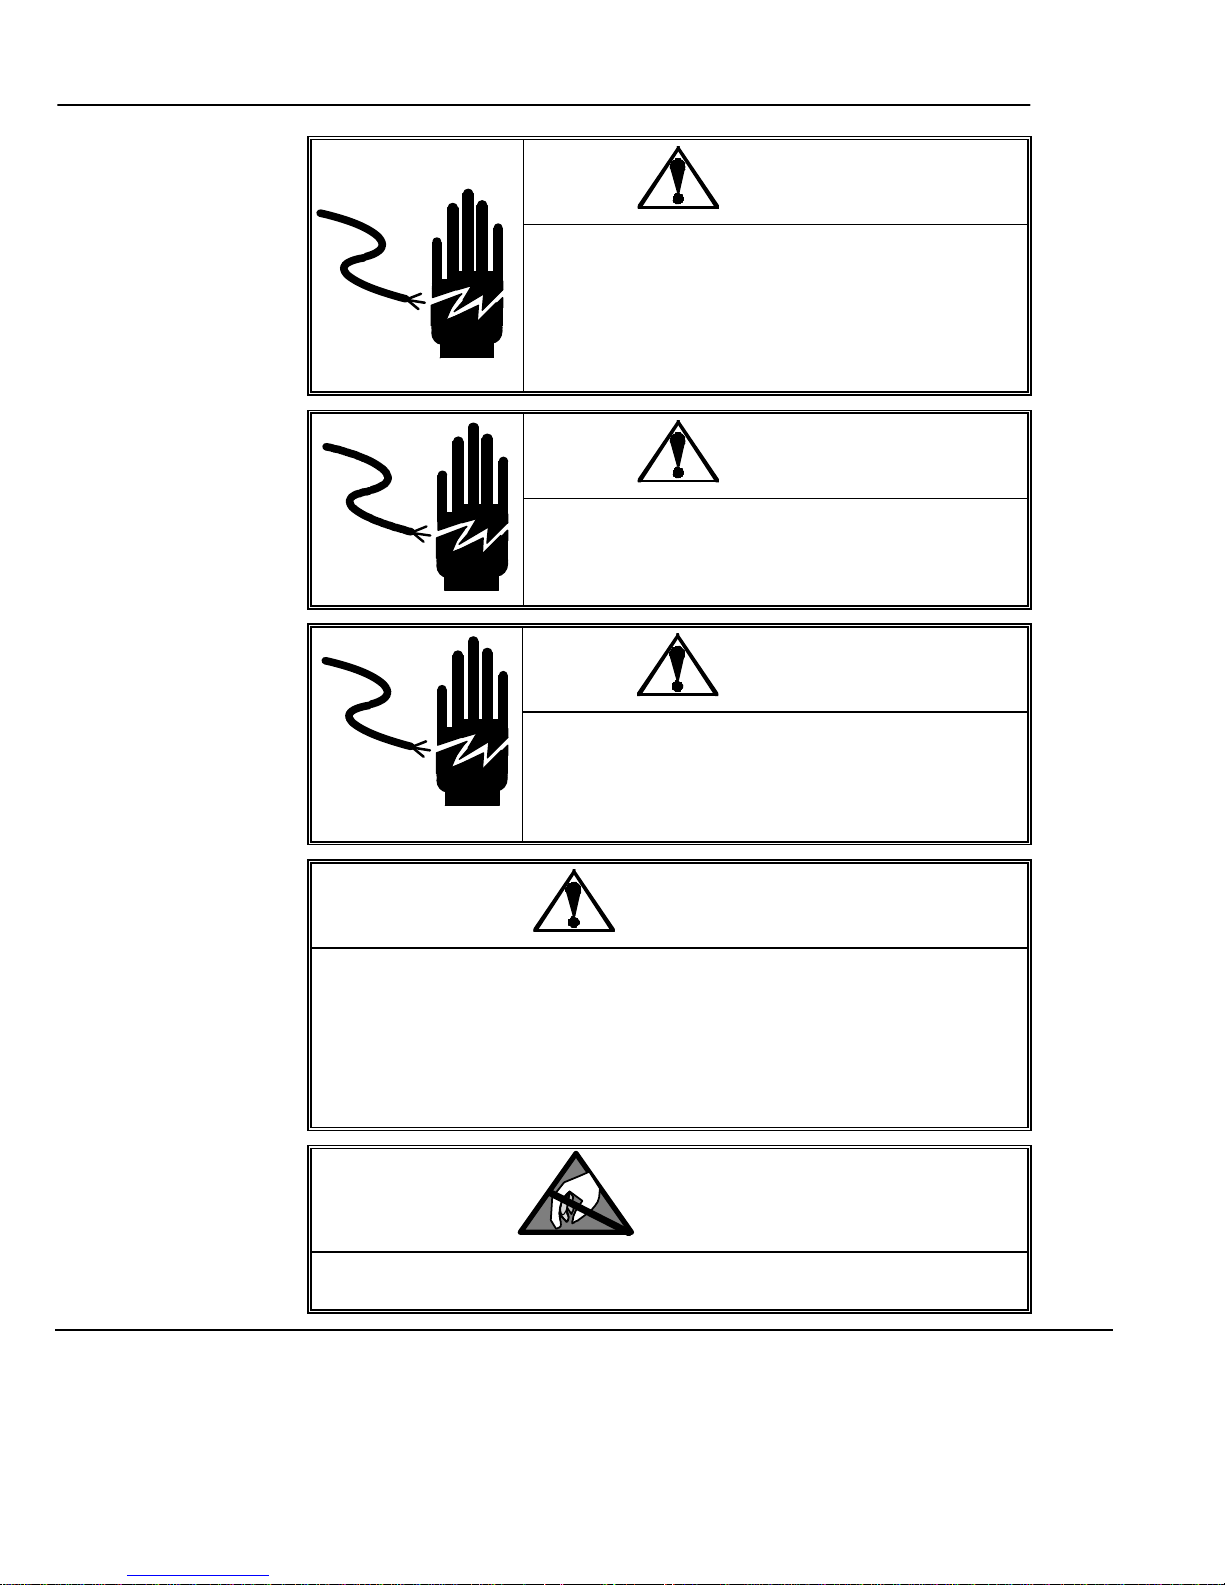
Precautions
ONLY PERMIT QUALIFIED PERSONNEL TO
SERVICE THIS EQUIPMENT. EXERCISE
CARE WHEN MAKING CHECKS, TESTS AND
ADJUSTMENTS THAT MUST BE MADE WITH
POWER ON. FAILING TO OBSERVE THESE
PRECAUTIONS CAN RESULT IN BODILY
HARM.
WARNING
WARNING
FOR CONTINUED PROTECTION AGAINST
SHOCK HAZARD CONNECT TO PROPERLY
GROUNDED OUTLET ONLY. DO NOT
REMOVE THE GROUND PRONG.
WARNING
DISCONNECT ALL POWER TO THIS UNIT
BEFORE REMOVING THE FUSE OR
SERVICING. FAILURE TO DO SO MAY
RESULT IN BODILY INJURY OR PROPERTY
DAMAGE.
CAUTION
BEFORE CONNECTING/DISCONNECTING ANY INTERNAL
ELECTRONIC COMPONENTS OR INTERCONNECTING WIRING
BETWEEN ELECTRONIC EQUIPMENT ALWAYS REMOVE POWER
AND WAIT AT LEAST THIRTY (30) SECONDS BEFORE ANY
CONNECTIONS OR DIS-CONNECTIONS ARE MADE. FAILURE TO
OBSERVE THESE PRECAUTIONS COULD RESULT IN DAMAGE TO
OR DESTRUCTION OF THE EQUIPMENT OR BODILY HARM.
CAUTION
OBSERVE PRECAUTIONS FOR HANDLING ELECTROSTATIC
SENSITIVE DEVICES.

Contents
1 INTRODUCTION ..................................................................................................................................................................... 1
1.1 RELIABILITY ........................................................................................................................................................................ 1
1.2 STANDARD FEATURES .......................................................................................................................................................... 1
1.3 PHYSICAL DIMENSIONS ........................................................................................................................................................ 2
1.4 POWER REQUIREMENTS ....................................................................................................................................................... 3
1.5 TEMPERA TURE AND HUMIDITY ............................................................................................................................................. 3
1.6 WEIGHTS AND MEASURES APPROVAL .................................................................................................................................. 3
1.7 OPTION ................................................................................................................................................................................ 3
2 INST ALLA TION ....................................................................................................................................................................... 6
2.1 PRECAUTIONS ...................................................................................................................................................................... 6
2.2 CONTENTS OF PACKAGING ................................................................................................................................................... 6
2.3 SETUP ................................................................................................................................................................................... 6
2.4 POWER UP SEQUENCE ........................................................................................................................................................... 7
2.5 SEALING ............................................................................................................................................................................... 8
3 SET -UP AND CALIBRA TION ............................................................................................................................................... 10
3.1 SERVICE SETUP MODE: ........................................................................................................................................................ 10
3.2 MASTER SETUP MODE:........................................................................................................................................................ 11
3.3 SET UP SOFT SWITCH AND DEFAULT TABLE ........................................................................................................................ 12
3.4 COUNTRY DEFAULTS .......................................................................................................................................................... 14
3.5 GEOCAL
3.6 GEOCAL USA STATE LOCATION CODES ........................................................................................................................... 16
3.7 CALIBRATION ..................................................................................................................................................................... 18
COUNTRY CODES ............................................................................................................................................... 15
4 OPERATING INSTRUCTIONS ............................................................................................................................................ 20
4.1 DISPLAYS ........................................................................................................................................................................... 20
4.2 KEYBOARD ........................................................................................................................................................................ 21
4.3 CURSORS ............................................................................................................................................................................ 21
4.4 OPERATIONS ....................................................................................................................................................................... 22
4.4.1 Weighing and Communication .................................................................................................................................. 22
4.4.2 Backlight function ..................................................................................................................................................... 22
4.4.3 Re-zero Functions ..................................................................................................................................................... 22
4.4.4 Tare Function ............................................................................................................................................................ 22
5 SERVICE AND MAINTENANCE ......................................................................................................................................... 23
5.1 CLEANING AND REGULAR MAINTENANCE ......................................................................................................................... 23
5.2 TROUBLESHOOTING ........................................................................................................................................................... 24
5.3 CONNECTIONS TO A POS .................................................................................................................................................... 24
5.3.1 Communications Pinout ............................................................................................................................................ 24
5.3.2 Handshaking ............................................................................................................................................................. 25
5.4 PARTS AND DESCRIPTIONS .................................................................................................................................................. 26
5.5 REPLACEMENT PARTS ORDER NUMBERS ............................................................................................................................ 28
6 APPENDIX ............................................................................................................................................................................... 30
6.1 PROTOCOLS ........................................................................................................................................................................ 30
6.1.1 NCI – ECR ................................................................................................................................................................ 31
6.1.3 8217 Mettler Toledo .................................................................................................................................................. 36
6.1.4 8213 Mettler Toledo .................................................................................................................................................. 41
6.1.5 EPOS 1 ...................................................................................................................................................................... 45
6.1.6 EPOS 2 ...................................................................................................................................................................... 47
6.1.8 Dialog 06 .................................................................................................................................................................. 50
6.1.9 Dialog 04 / 02 ........................................................................................................................................................... 55
6.1.11 ICL ............................................................................................................................................................................ 59
DIVA Service Manual
3


METTLER TOLEDO
1 Introduction
The DIVA is designed to mount on the NCR RealScan 7876 Bioptic Scanners and communicate with
ECR and POS systems for weighing needs.
1.1 Reliability
The DIVA is developed, produced, and tested in a Mettler Toledo facility that has been audited and
registered according to international ISO 9001 quality standards and ISO 14000 environment control
program.
1.2 Standard Features
Capacity: 6x0.002kg;15 x 0.005kg – both single and dual ranges
15x0.005lb; 30x0.01lb – both single and dual ranges
Platter: Stainless Steel: 260 x 280mm
Tower Display: LCD with backlight, Single Line for Weight Only applications and a Four Line
for Price Computing applications
LCD: 13.5mm high character weight (5 digits); unit price (6 digits); total price (6 digits).
Keyboard: two keys, with tactile and tone feedback when pressing the key.
Power supply: Power provided via connection with the scanner.
A sealable Setup and Calibration Software switch
Basic functions: Zero; Tare
RS-232 interface
DIVA Service Manual
1

METTLER TOLEDO
1.3 Physical Dimensions
The dimensions of the scale with tower is as follows:
DIVA Service Manual
2

METTLER TOLEDO
1.4 Power Requirements
Power is supplied via a Y-cable connected to the Scanner power supply.
1.5 Temperature and Humidity
Working temperature range: -10 to +40 oC (+14 to +114F) at 10 to 85% humidity, non-condensing.
o
Storage temperature range: from -25 to +50
C at 10 to 85% humidity, non-condensing.
1.6 Weights and Measures Approval
EC Type-approval Certificate: T6941
EC Test Certicate: TC6942 (when the scale is used without the Mettler-Toledo displays)
NTEP: Certificate of Conformance Number 06-024
Canadian Approval: AM# 5591
1.7 Option
Remote display bracket
Dual Display
DIVA Service Manual
3
METTLER TOLEDO
year
Mettler-Toledo (ChangZhou) Scale & System Ltd.
Legal Metrology
Declaration of Conformity
Konformitätserklärung
Déclaration de conformité
Declaración de Conformidad
Conformiteitsverklaring
Dichiarazione di conformità
We/Wir/Nous/Nosotros/Noi
Mettler-Toledo (ChangZhou) Scale & System Ltd.
111 ChangXi Road, ChangZhou, JiangSu, 213001, P.R.China
declare under our sole responsibility that the product,
erklären, in alleiniger Verantwortung, dass dieses Produkt,
déclarons sous notre seule responsabilité que le produit,
declaramos, bajo nuestra sola responsabilidad, que el producto,
verklaren onder onze verantwoordelijkheid, dat het product,
dichiariamo sotto nostra unica responsabilitá, che il prodotto,
Model/Type: DIVA
To which this declaration relates , is in conformity with the following standard(s) or other normative document(s),
auf das sich diese Erklärung bezieht, mit der/den folgenden Norm(en) oder Richtlinie(n) übereinstimmt.
Auquel se réfère cette déclaration est conforme à la (aux) norme(s) ou au(x) document(s) normatif(s).
Al que se refiere esta declaración es conforme a la(s) norma(s) u otro(s) documento(s) normativo(s).
Waarnaar deze verklaring verwijst, aan de volende norm(en) of richtlijn(en) beantwoordt.
A cui si riferisce questa dichiarazione è conforme alla/e sequente/i norma/e o documento/i normativo/i.
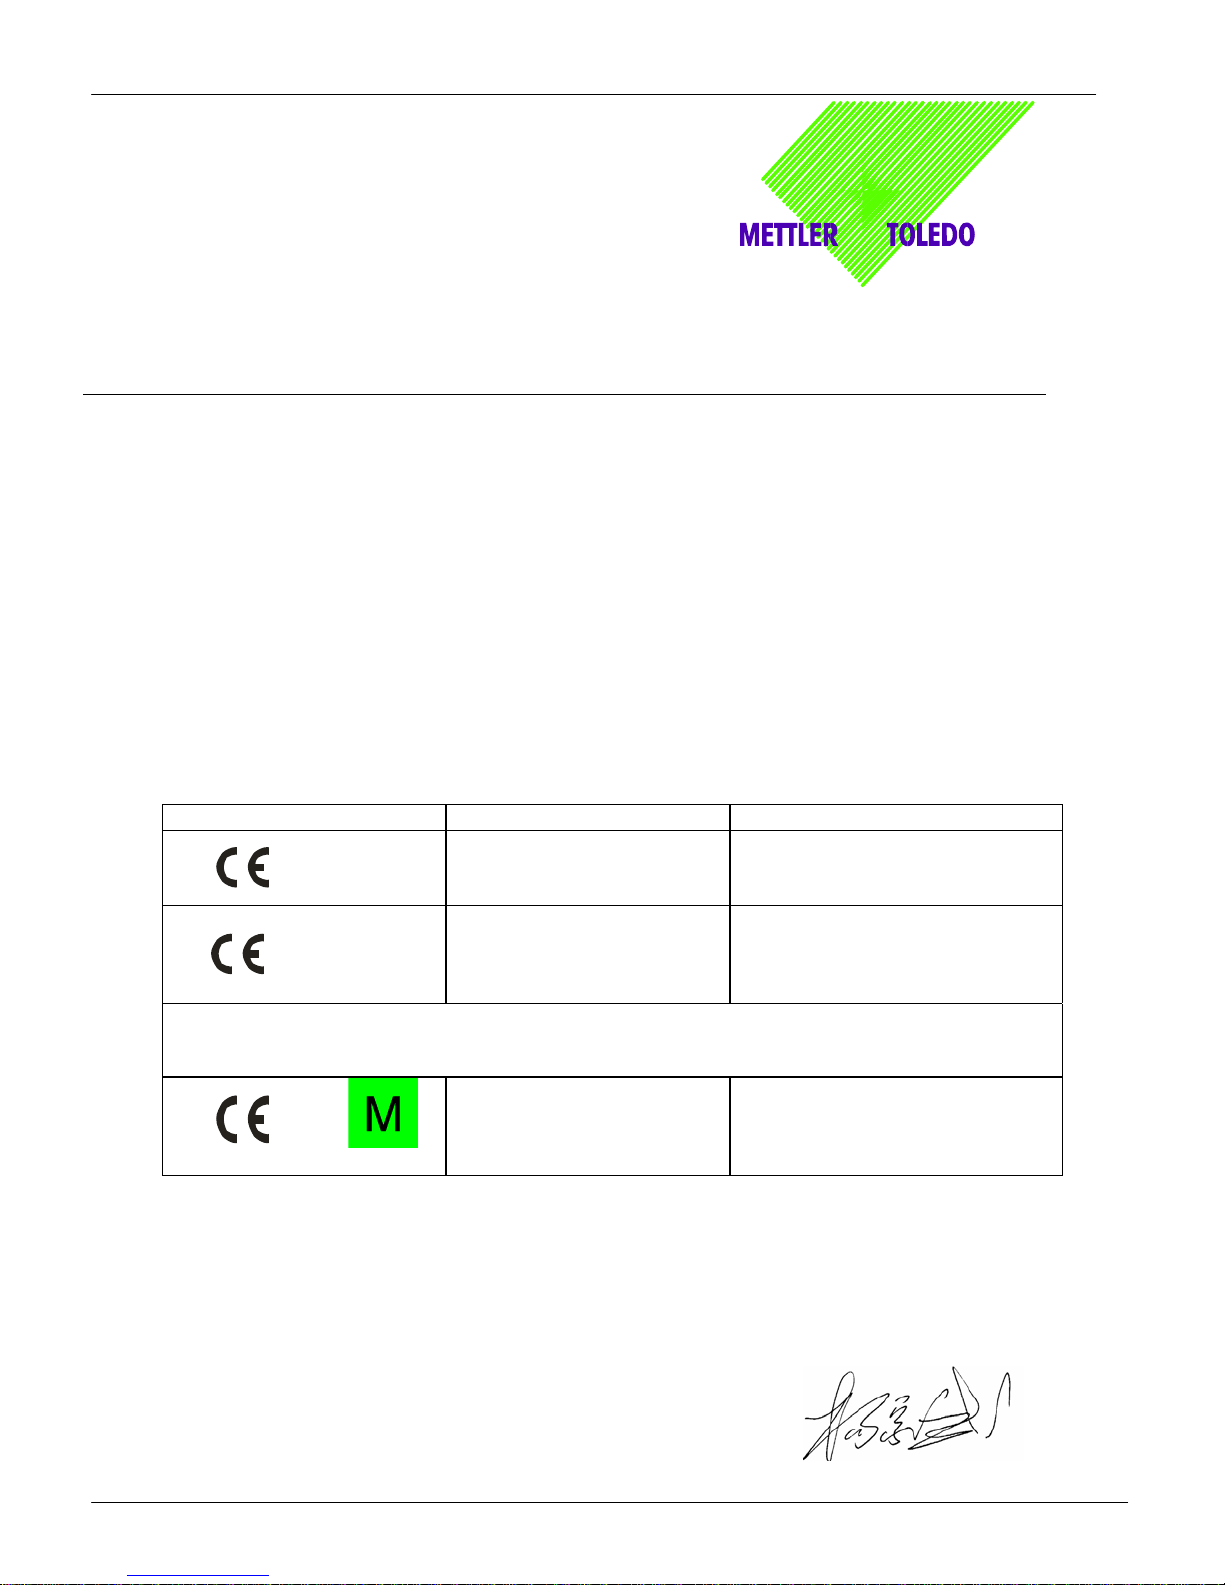
EC Marking EC Directive: Applicable Standards:
73/23/EEC
Low Voltage Directive
EN60950
EN61326:1997+A1+A2 (Class
89/336/EEC
EMC Directive
B)
EN61000-3-2
EN61000-3-3
For non-automatic weighing instrument used in an Article 1,2.(a) application ,additional
metrological marking according to Annex IV of Council Directive 90/384/EEC must be attached
to the instrument
0103
90/384/EEC
Non-automatic
Weighing Instruments
EN45501 1)
Directive
1) valid only for “DIVA” base in connection with approved terminal.
zulässig nur für“DIVA” Waage zusammen mit zugelassenem Terminal
valid only for la base “DIVA” dans connection with approved le terminal
válido solamente para la base “DIVA” en la conexión con el terminal aprobado.
valido soltanto per la base “DIVA” in relazione al terminale approvato.
ChangZhou, April 2006
Mettler-Toledo (ChangZhou) Scale & System Ltd.
Yang JiaWu, Quality Assurance Manager
DIVA Service Manual
4
METTLER TOLEDO
Important notice for verified weighing instruments
Weighing Instruments verified at the place of manufacture bear the preceding mark on the packing label
M M
M M
The first step of the verification has been carried out at the manufacturing plant. It comprises all tests according to EN 45501-8.2.2.
If national regulations in individual countries limit the period of validity of the certification, the operator of such a scale is himself
responsible for its timely re-certification.
and a green “M” sticker on the descriptive plate. They may be set to work immediately.
Weighing Instruments which are verified in two steps have no green “M” on the descriptive plate and bear
the preceding identification mark on the packing label. The second step of the verification must be carried
out by the approved Mettler-Toledo service or by the W&M authorities. Please contact your Mettler-Toledo
organization.
Wichtiger Vermerk für geeichte Wägeinstrumente in EU-Ländern
Werksgeeichte Waagen tragen vorstehendes Kennzeichen auf dem Packetikett und einen grünen
M M
M M
Der erste Schritt der Eichung wurde im Herstellerwerk durchgeführt. Er umfasst alle Prüfungen gemäß EN45501-8.2.2.
Sofern gemäß den nationalen Vorschriften in den einzelnen Staaten die Gültigkeitsdauer der Eichung beschränkt ist, ist der Betreiber
einer solchen Waage für die rechtzeitige Nacheichung selbst verantwortlich.
“M”-Kleber auf dem Eichschild. Sie dürfen sofort in Betrieb genommen werden.
Waagen, die in zwei Schritten geeicht werden und kein grünes “M” auf dem Eichschild haben, tragen
vorstehendes Kennzeichen auf dem Packetikett. Der zweite Schritt der Eichung ist durch den behördlich
anerkannten Mettler-Toledo Kundendienst oder durch den Eichbeamten durchzuführen. Bitte nehmen Sie
mit dem Mettler-Toledo Kundendienst Kontakt auf.
Remarque Importante pour les Instruments de pesages vérifiés dans les pays membre de l’Union Européenne
Les instruments de pesage vérifiés en usine portent l‘identification ci-contre sur leur emballage et un
M M
M M
La première étape de la vérification a été effectuée en usine. Cela comprend tous les essais suivant la norme EN45501-8.2.2.
Dans la mesure où la durée de la vérification est limitée en fonction des prescriptions nationales dans les différents pays, l’utilisateur
d’une telle balance est lui-même responsable de la vérification ultérieure dans les délais.
Nota importante para básculas verificadas en paises de la UE
M M
M M
La primera fase de la verificación ha sido realizada en origen. Incluye todos los ensayos según lo norma EN45501-8.2.2.
Si el plazo de validez de la verificación está limitado por las normas nacionales de cada estado, el usuario será responsable de las
verificaciones posteriores reglamentarias de su balanza.
autocollant “M“ vert sur la plaque d’identification. Ils peuvent être utilisés après leur installation.
Les instruments de pesage vérifiés en deux étapes portent l’identification ci-contre sur leur emballage et
n’ont pas d’autocollant “M“ vert sur la plaque d’identification. La seconde étape de la vérification doit être
effectuée par le service technique Mettler-Toledo autorisé responsable. Veuillez s.v.p. contacter le service
technique Mettler-Toledo.
Las balanzas verificadas en origen llevan esta indicación en la etiqueta del embalaje y con la etiqueta
“M“ sobre londo verde en la placa de caracteristicas pueden ser utilizadas inmediatamente.
Balanzas cuya verificación se realiza en dos fases llevan esta indicación en la etiqueta del embalaje
(ninguna etiqueta “M“ verde en la placa de caracteristicas). La segunda fase de la verificación debe ser
realizada por personal Mettler-Toledo acreditado, o por la autoridad competente. Rogamos contacten con
el Servicio Técnico de Mettler-Toledo.
Nota Importante per la balance approvate nei paesi UE
Le balance verificate in fabbrica portano questo contrassegno sull’etichetta dell’imballo e con il sigillo “M”
M M
M M
La prima fase della verifica è stata eseguila dal produttore e comprende lutte le prove previste dalla norma EN 45501-8.2.2.
Se la durota di validità della verifica è limitata in accordo con le prescrizioni nazionali vigenti nei singoli paesi, I’utilizzatore stesso di
una bilancia di tale tipa sorà responsabile dell’esecuzione, entro le date di scadenza previsle, delle verifiche periodiche.
su stando verde sulla targhetta metrological possono essere messe in uso immediatamente.
Le balance che vengono verificate in due fasi, portano questo contrassegno sull’etichetta dell’imballo e non
portano il sigillo “M” sulla targhetta metrological. La seconda fase delia verifica dev’essere eseguita dal
servizio assistenza Mettler-Toledo autorizzato, oppure dalla autorità competente. Prego contaltare il vostro
servizio assistenza Mettler-Toledo.
DIVA Service Manual
5
METTLER TOLEDO
A
2 Installation
2.1 Precautions
Before you install your DIVA scale, keep in mind the following factors, which might have a negative
influence on the scale's operation:
Vibration diminishes the scale’s ability to measure accurately. Excessive vibration from
equipment such as conveyors can cause inaccurate and non-repeatable readings.
Be sure the scale is leveled properly.
Air currents can also diminish a scales performance. Avoid placing the scale in front of or
directly under air vents.
Other than items being weighed, keep the scale free from objects rubbing or pressing against
the platter.
2.2 Contents of Packaging
Package contents for all DIVA units include:
DIVA scale base
Operation manual
Display Cable
Tower included and attachment hardware (The optional display may be packed separately)
Sealing Kit
2.3 Setup
1. Open the box, carefully remove the packing material, take all items out of the carton.
2. Attach the display as described below, depending on which version of scale you ordered:
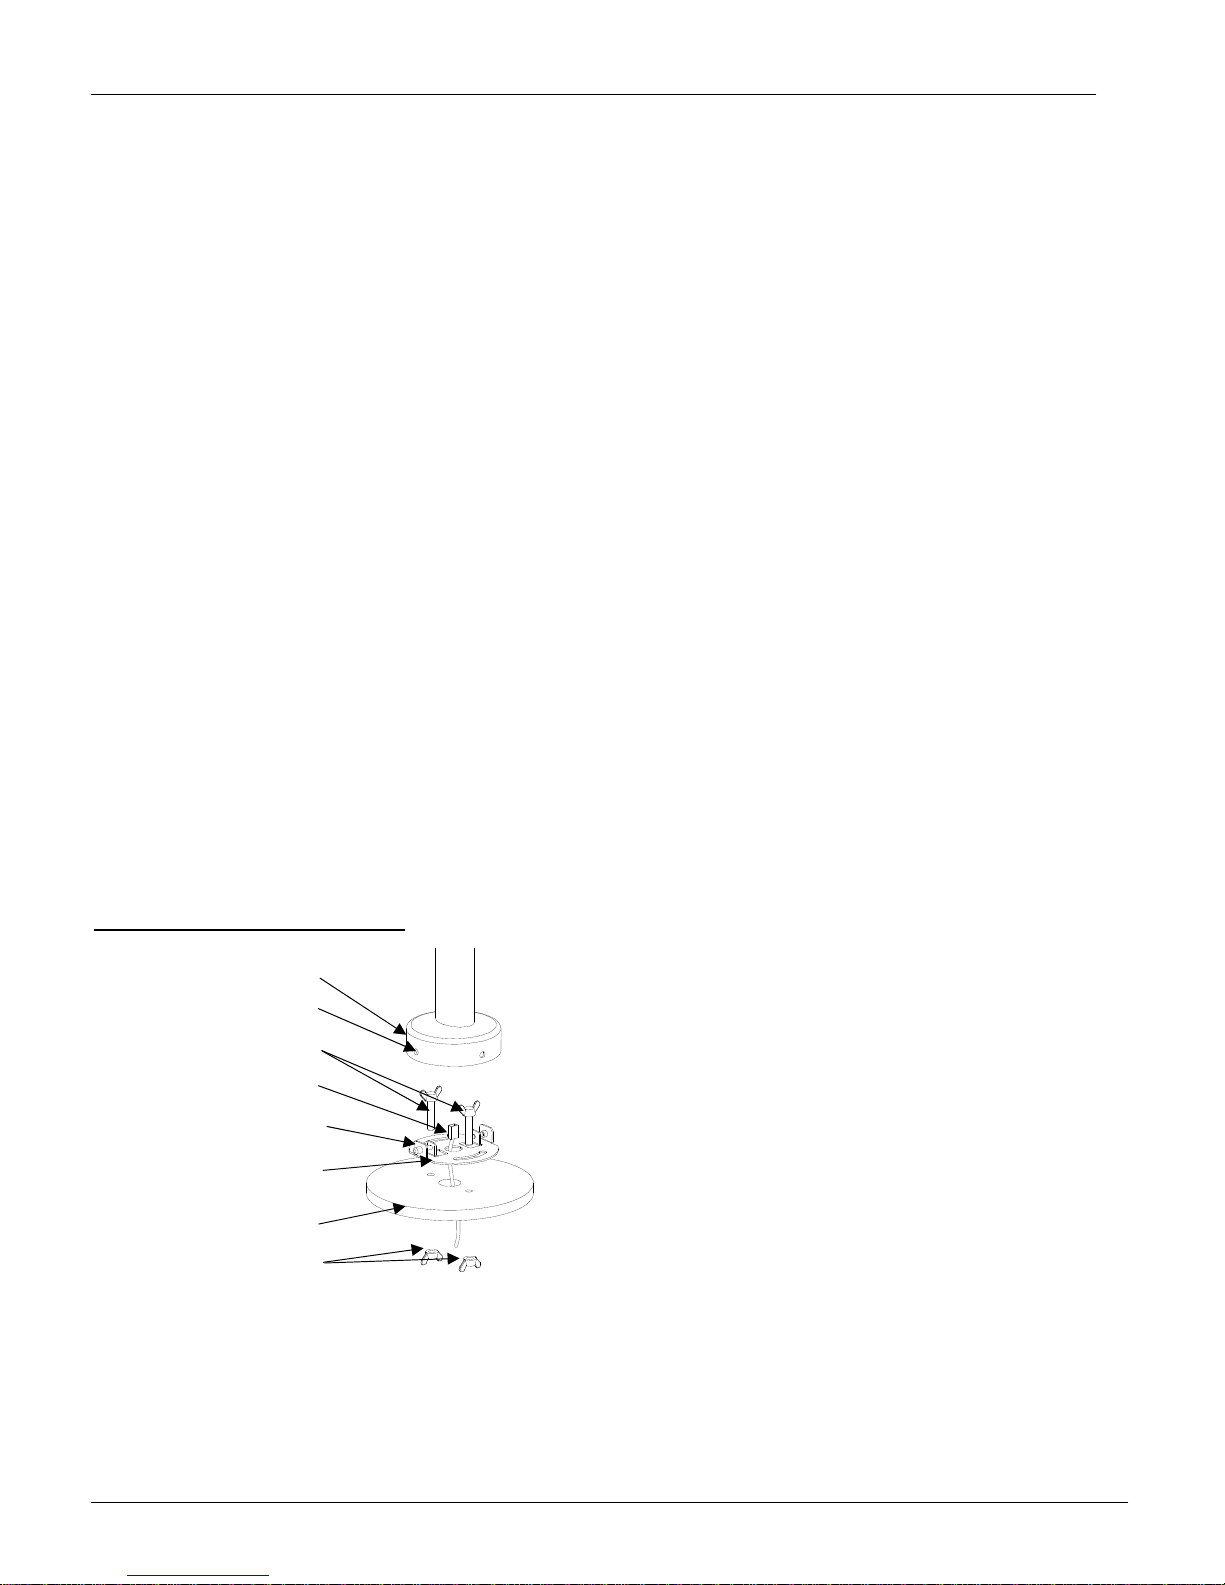
For Price Computing Version:
Tower base
Pin attachment holes
Attachment Screws (2)
Connector of cable
Attachment pins (2)
Tower Mounting Bracket
Table surface
ttachment wing nuts (2)
for Attachment Screws
A: Pull the connector of the cable through the holes of the
table surface and tower mounting bracket;
B: Put (2) screws though the (2) arch holes on the bracket
and (2) holes on the table surface;
C: Attach cover to the surface of table with (2) nuts.
D: Connect the cable to the connector at the bottom of the
tower display
E: Attach the base of the display to the mounting bracket
by insuring that the (2) pins on the bracket are inserted
in the holes of the base to attach the tower and snap
the tower into place.
DIVA Service Manual
6
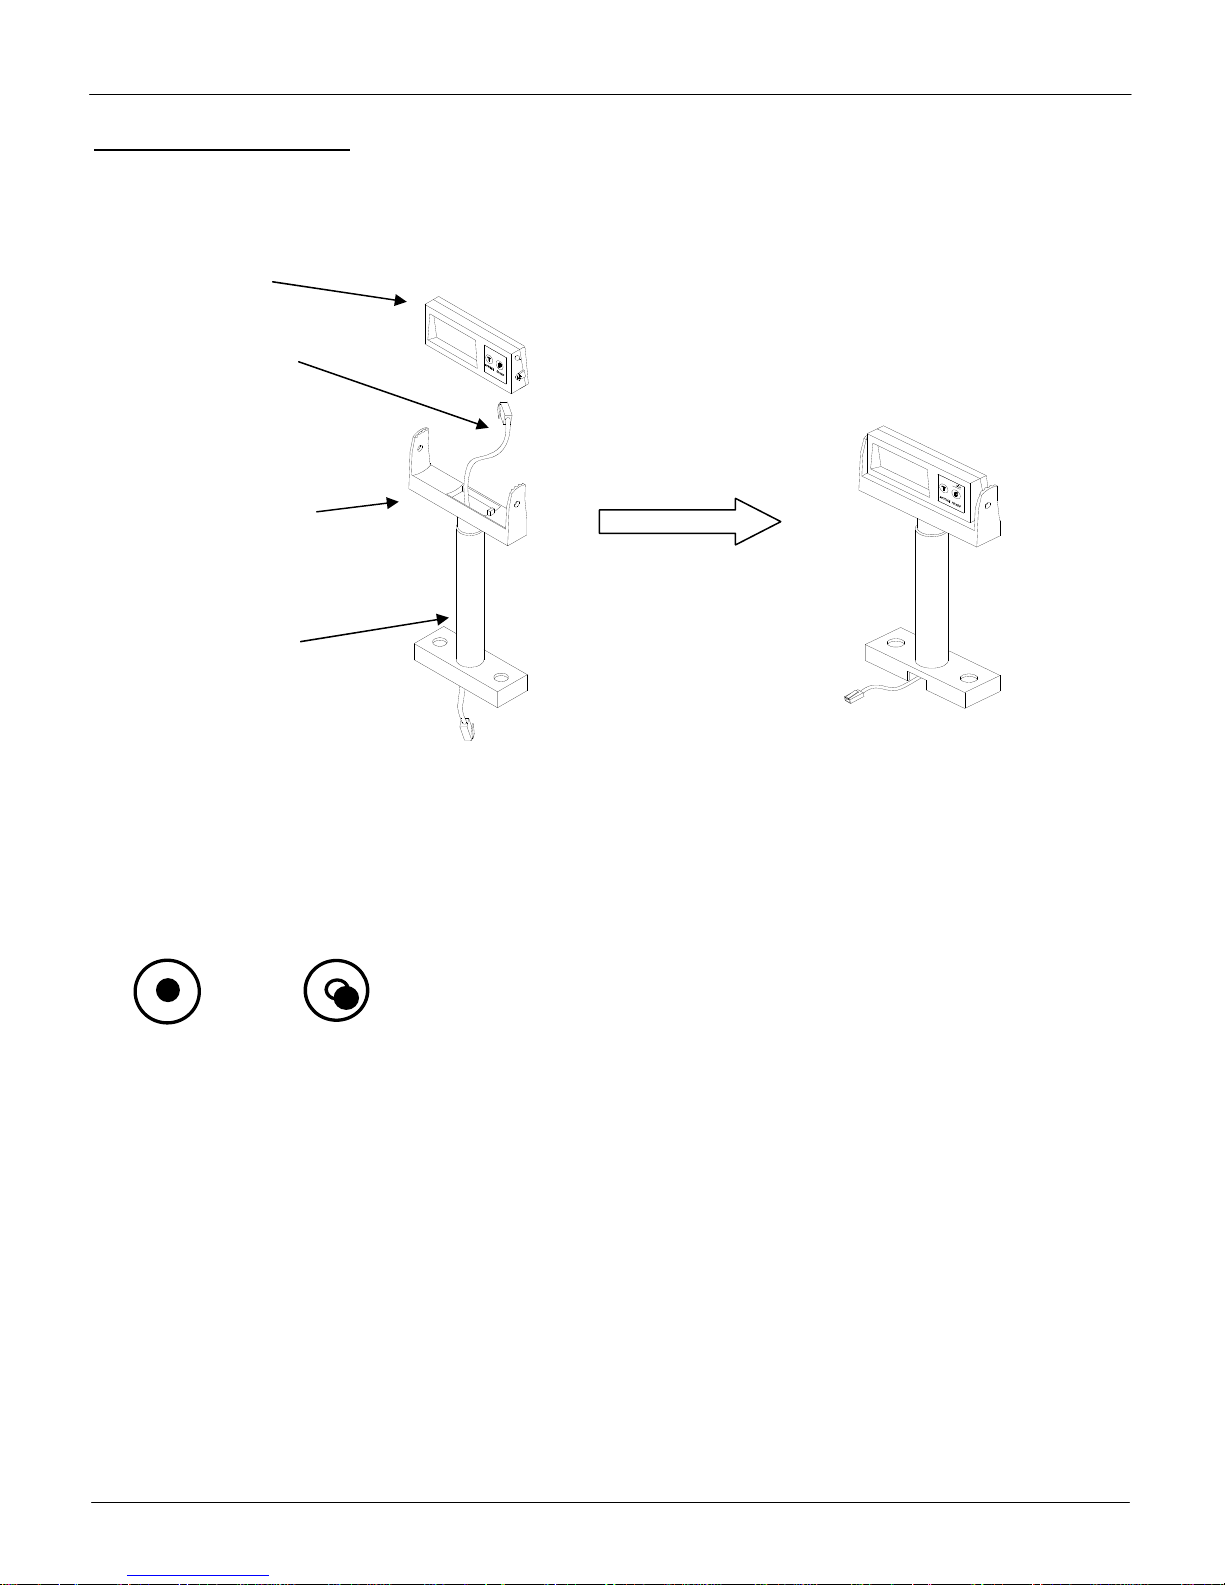
For Weigh Only Version:
The Weigh Only version comes with a tower mount.
Assemble the Weight Only tower as is illustrated here:
Display
Display Cable
Display Bracket
Display Tower
METTLER TOLEDO
3. Attach the Diva scale to the NCR 7876 Scanner as described in the Installation Manual
4. Level the scale by turning the adjustable feet on the bottom of the unit. Adjust the feet until the level
bubble is in the center of the circle.
Bubble indicator:
Correct Wrong
5. Put the platter on top of the DIVA scale.
6. Connect the tower display cable to the appropriate port on the scanner.
7. Connect the power cord from the wall transformer to the scanner.
2.4 Power up sequence
Note: Before powering on the DIVA scale, always make sure there is nothing on the platter.
Apply power to the scanner. The scale will go through a series of self-tests and then will proceed to
normal operating mode. The power-up sequence is as follows:
1. All segments of the display characters are lit. This verifies operation of all segments;
2. The scale displays the country code and GEO code, software part number and revision.
3. The scale then captures zero and is ready for normal operation.
DIVA Service Manual
7
METTLER TOLEDO
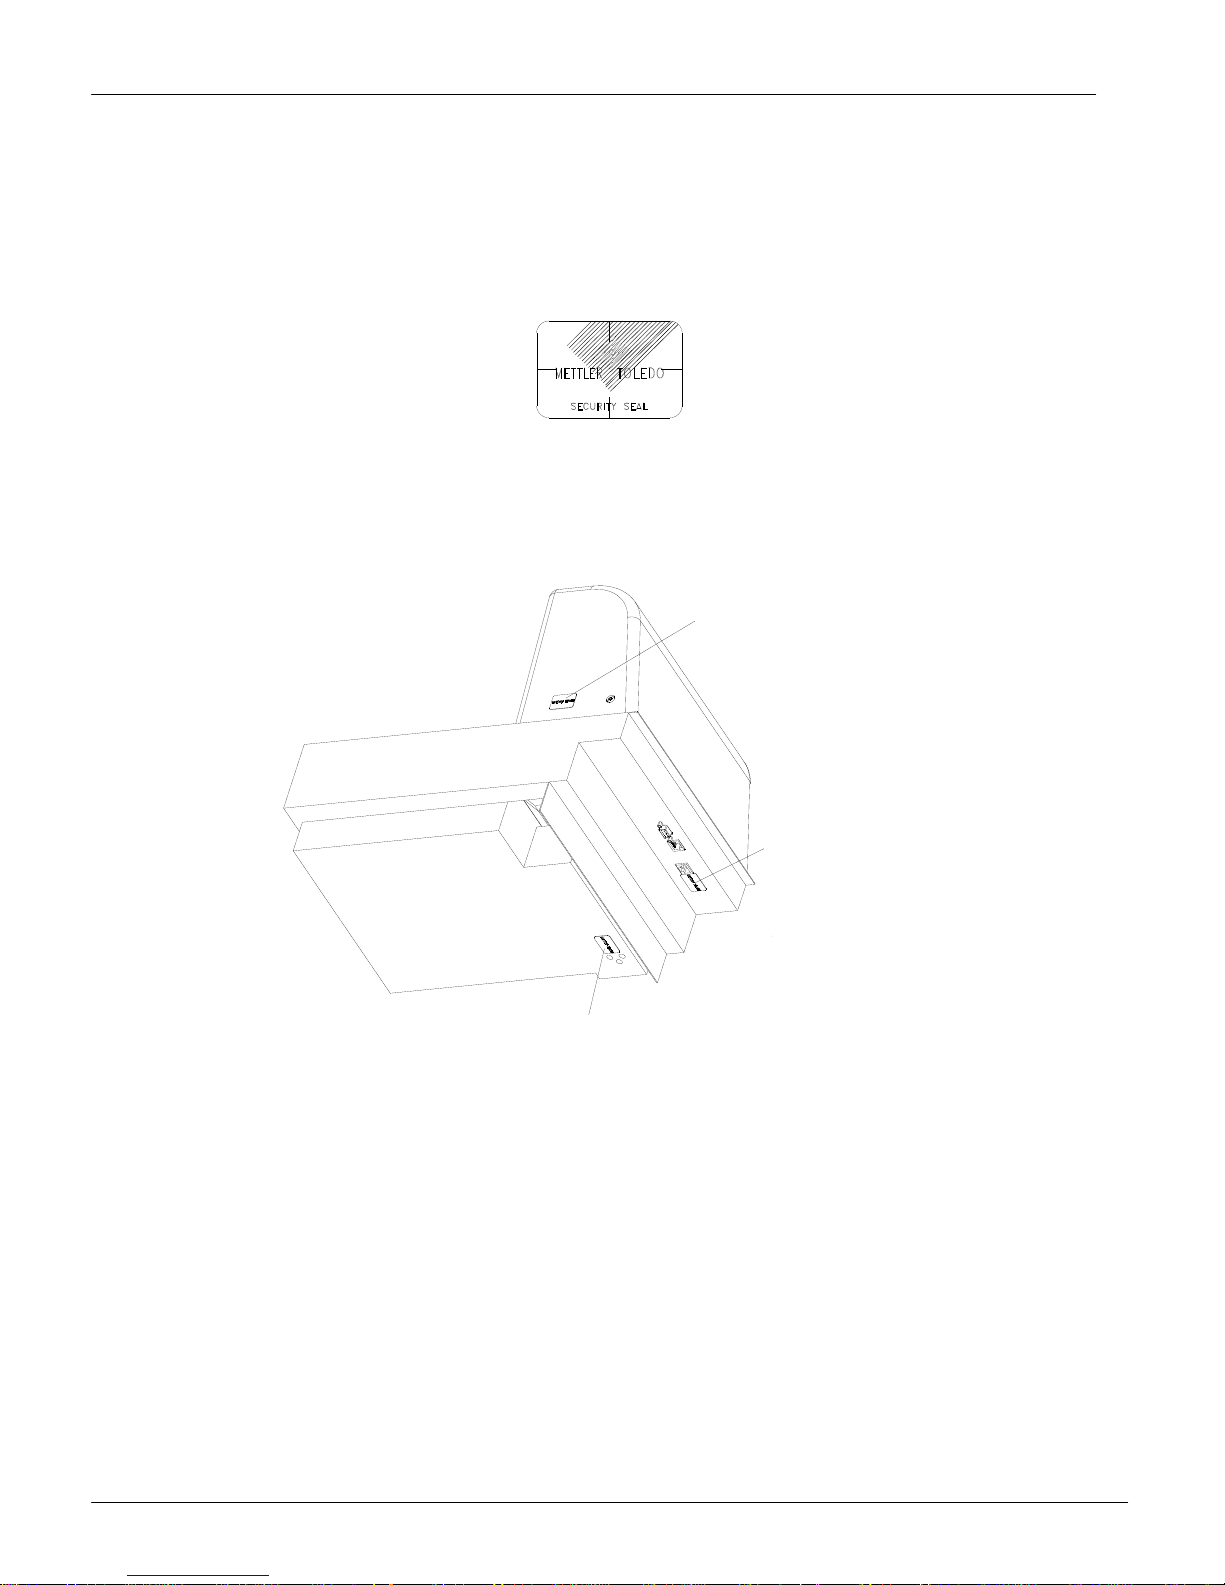
2.5 Sealing
After installation is complete, legal-for-trade applications require sealing the enclosure so the settings
cannot be changed.
The label sealing sequence
Security Sticker 28x19mm, material Vinyl white 3690 E UL, text color black. Need
There are 3 labels that used for sealing. The position for the sealing labels is shown below.
SCANNER HOUSING
(SECURITY LABEL 2)
CALIBRATION BUTTON POSITION
(SECURITY LABEL 1)
LC SCREWS
(SECURITY LABEL 3)
DIVA Service Manual
8

METTLER TOLEDO
For your notes:
DIVA Service Manual
9
METTLER TOLEDO
3 Set-up and Calibration
There are two types of setup modes. The first is called “Service Mode” and it allows full access to all
soft switches and to calibrate the scale. The second is called “Master Mode” and it only allows
access to soft switches that do not affect the metrology of the scale.
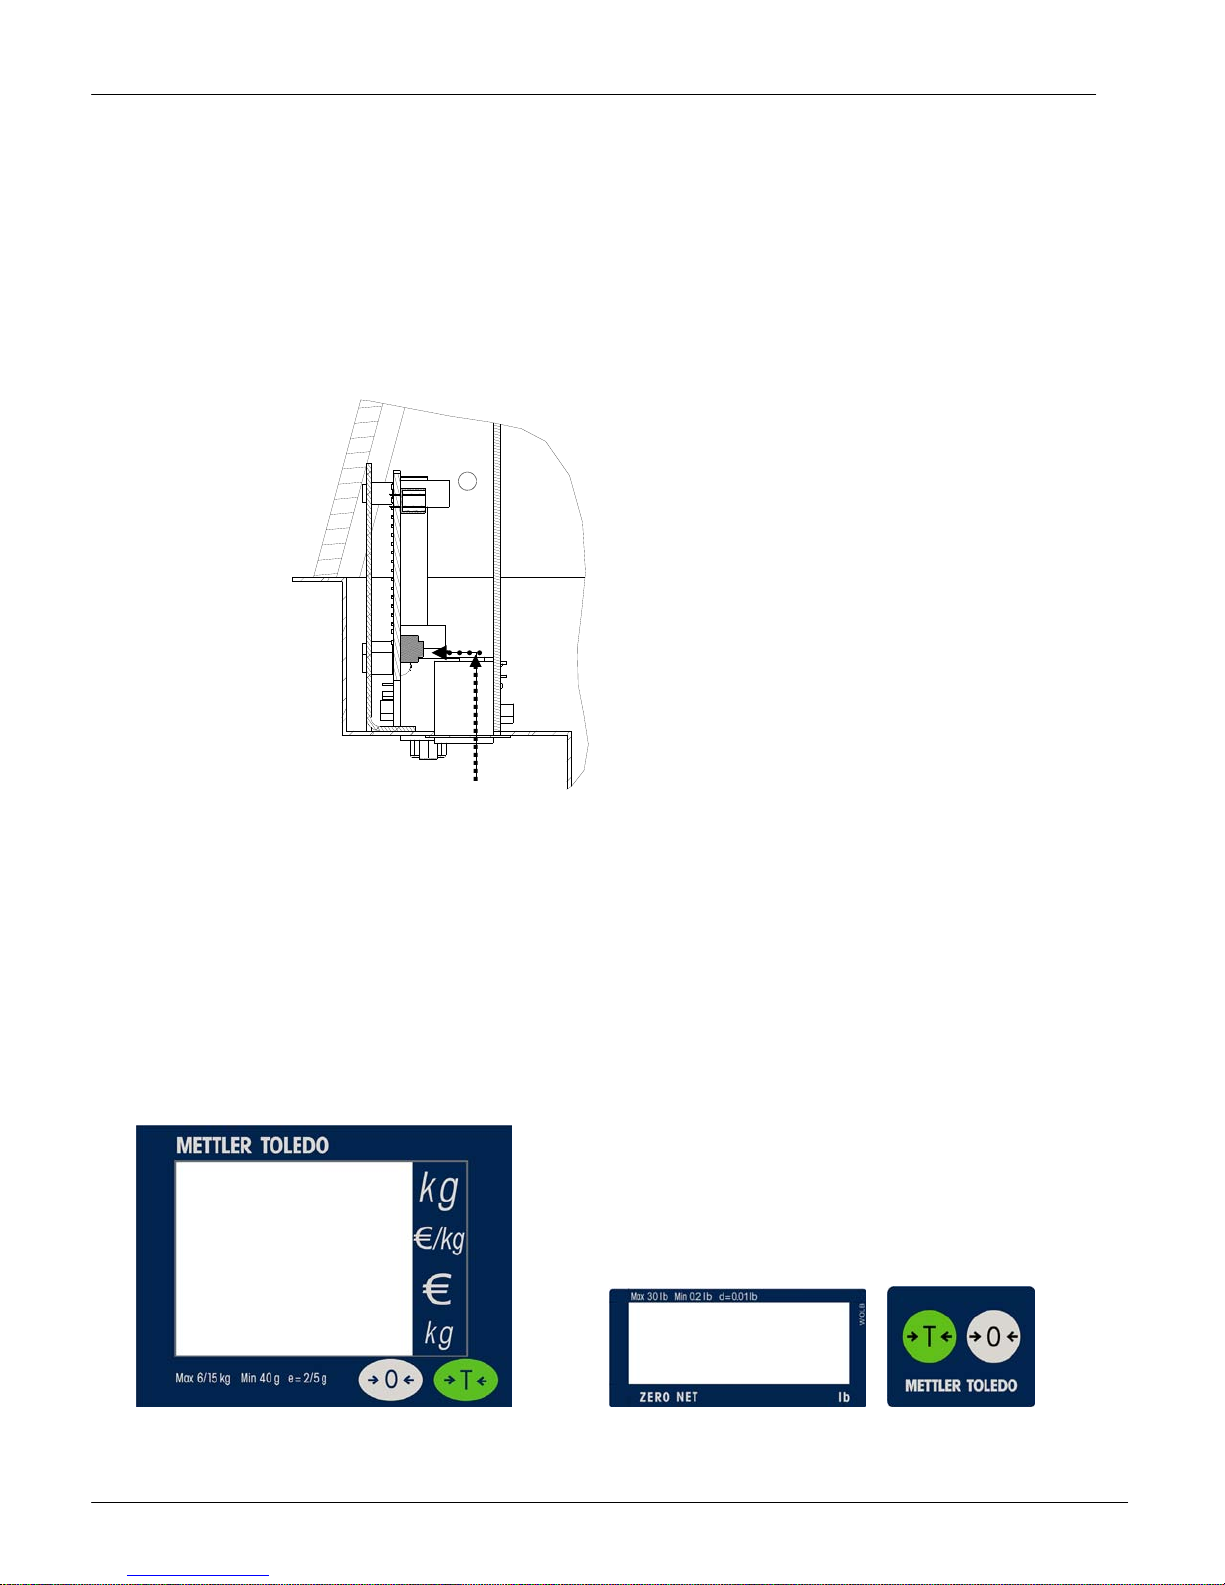
3.1 Service setup mode:
In order to access the Service Mode, break the seal and insert a thin rod like small screwdriver
through the calibration hole and press the button as illustrated:
2
1
To change settings using the Diva display follow the directions below.
During the set up procedure, the display will start off by showing the following.
Price Computing Version Weigh Only Version
1. Insert a thin rod into the calibration hole
2. Move the rod toward the calibration button until
you feel it depress
Conf
DIVA Service Manual
10
Conf
METTLER TOLEDO
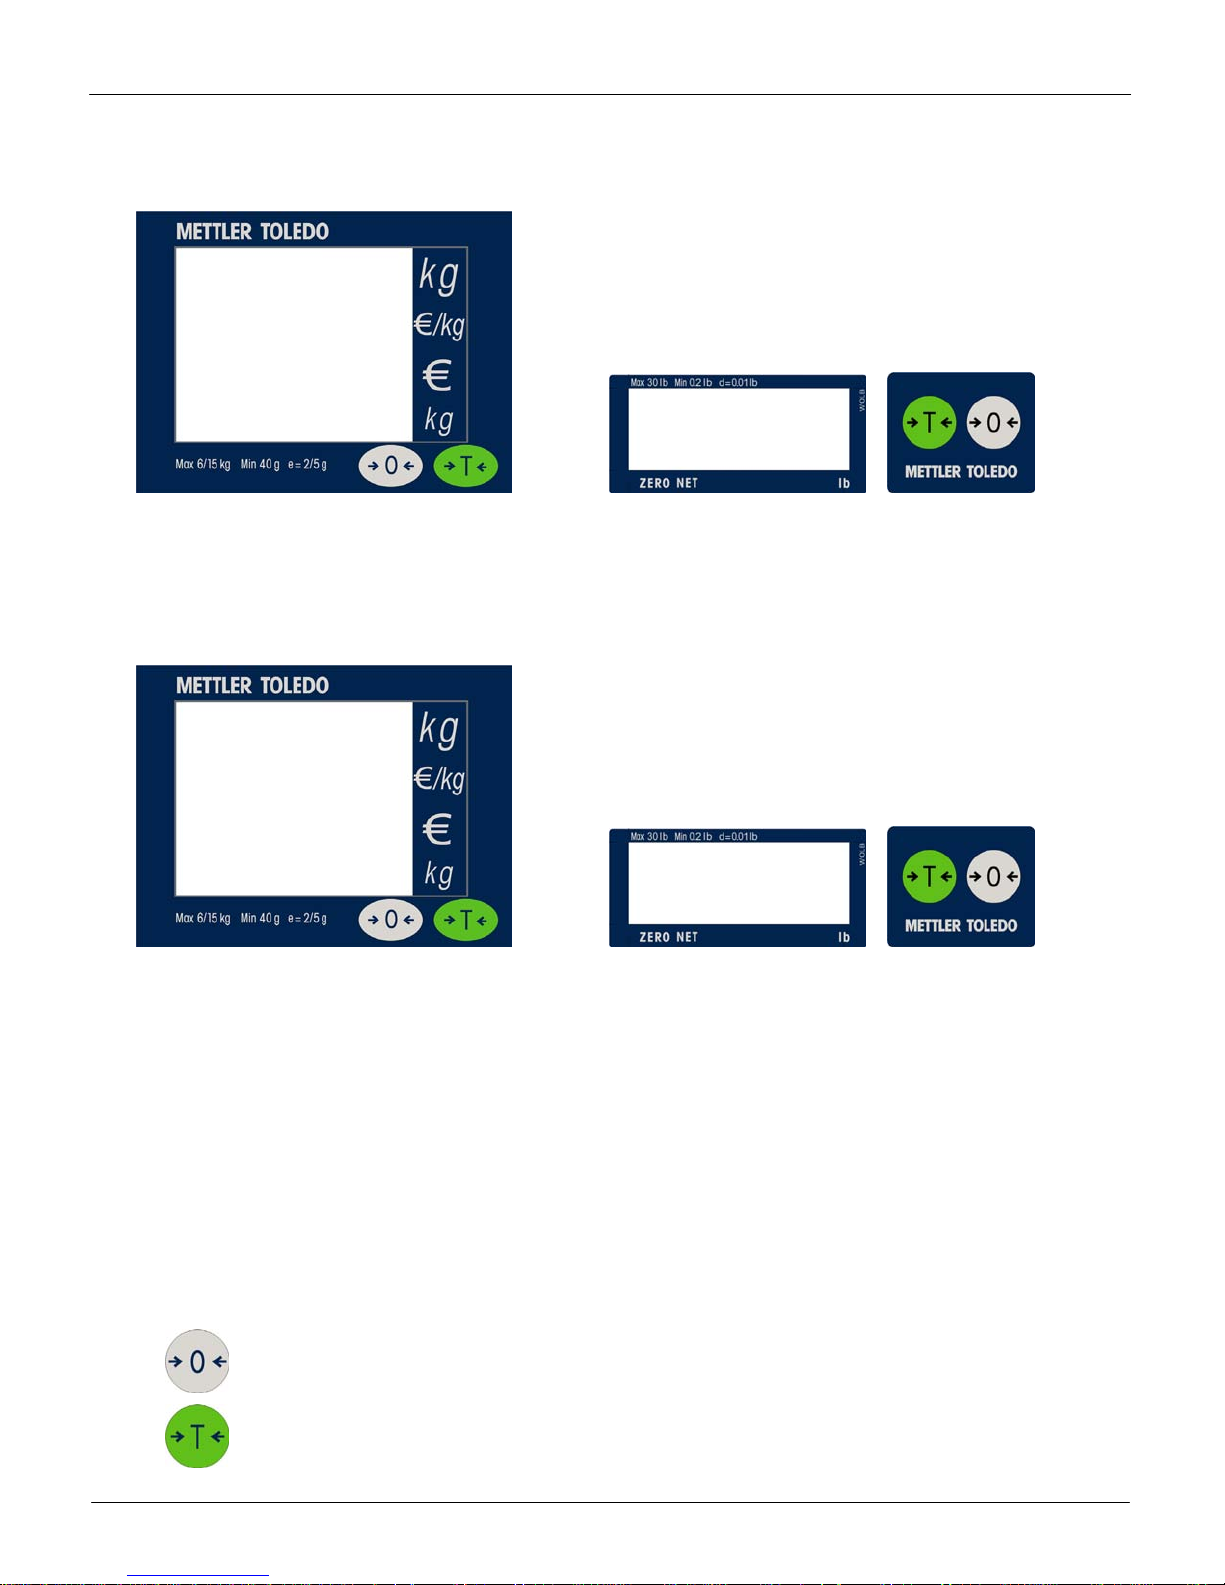
Press the Zero Key:
Price Computing Version Weigh Only Version
Grp 1
Grp 1
You can press the Tare key to move to Grp 2, 3, or 4. To go into a particular Group, press the Zero
Key. Below is what you will see when going into the first Step of Group 1.
Price Computing Version Weigh Only Version
Grp 1
Step 1
DE
1.1 DE
Refer to Section 3.3 Setup and Soft Switch Default Table for all available settings.
3.2 Master setup mode:
This mode allows an operator to change certain softswitches not protected behind the seal directly
from the keyboard or through the scanner. To get into Master mode, press and hold >T< key for eight
seconds until “Grp 1” is displayed. Refer to the Section 3.3 Set Up Softswitch and Default Table for
the accessibility of softswitches via keyboard.
The scale can be configured for your specific needs through a special interactive set up procedure. In
order to access the various prompts, you must utilize the following keys during the scale setup mode.
This key is used to accept a choice and then advance one softswitch at a time.
This key is used to step through the options.
DIVA Service Manual
11
METTLER TOLEDO
3.3 Set up Soft Switch and Default Table
Group.Step Function Possible Selections Master Mode Access
Group 1
1.1 Country Select
1.2 Initialize to Defaults
1.3 Beeper
1.4 Zero cursor
1.5 Decimal point
1.6* Decimal Position 0 - 3 – Digits right of the decimal for Unit and Total Price fields. No
1.7 Auto-clear of Tare
1.8 Weight unit
1.9 Expanded Weight Display
1.10
1.11 Main Calibration Button
Group 2
2.1 Tare Enable
2.2 Chain Tare Enable
2.3*
2.4 Digital Filter Selection 0 - 3 – Minimal to High No
2.5 GEO 0 through 31 – See GeoCal chart below No
2.6 Calibration
Enable Main PCB Service
Mode Button
Total Price Round
(To Nearest 0 or 5)
Press Zero to Enter
Press Tare to go to Group 2
DE (Germany)
FR (France)
US (USA)
CA (Canada)
AT (Austria and Croatia and Slovenia)
ES (Portugal and Spain)
BE (Belgium, Netherland, Poland and England)
IT (Italy)
CH (Kazachstan and Switzerland)
UA (Ukraine)
RU (Russia)
HU (Hungary)
SK (Slovakia)
CZ (Czechia)
EXPORT (General export)
CN (China)
YES – Soft switches will be reset to factory defaults
NO – Soft switches will remain in current configuration
0 – Beeper will not sound at any time
1 – Scale will not “beep” when a key is pressed
2 – Scale will not sound when a key is pressed, but it will “beep” when
sending command of NCI-ECR
3 – Scale will sound when a key is pressed, and it will “beep” when
sending command of NCI-ECR
ON – Display zero cursor.
OFF – Disable zero cursor.
ON - .
OFF - ,
ON – Tare is automatically cleared when weight is removed.
OFF – Tare is not cleared when weight is removed.
1 – lbs range (0 to 30 lbs)
2 – kg range (0 to 15kg)
3 – kg multi-interval (0 to 6kg, 6 to 15kg)
4 – lbs multi-interval (0 to 15lb, 15 to 30 lb)
ON – Division quantity is displayed, Maximum is 30000.
OFF – Weight is displayed in normal display increments.
ON – Button on Main PCB Enabled
OFF – Button on Main PCB Disabled
ON – Calibration button on the Main PCB is Enabled
OFF – Calibration button on the Main PCB is Disabled
Press Zero to Enter
Press Tare to go to Group 3
ON – Enables tare function.
OFF – Disables tare function.
ON – Enables multiple tares.
OFF – Only one tare per transaction is allowed.
ON – The total price will round up or down to 0 or 5.
OFF – Total price will not be rounded.
No – Do not enter calibration mode
Yes – Calibrate scale
No
No
Yes
Yes
Yes
No
No
No
No
No
Yes
Yes
No
No
DIVA Service Manual
12
r
r
r
Group.Step Function Possible Selections
2.7 Display (1 or 4 Line)
2.8 Display Update Rate 0-100 – Adjust display rate Yes
2.9 Enter Flash Mode
Group 3
3.1 Baud rate
3.2 Parity
3.3 Data
3.4 Bit stop
3.5 Chose Protocol
Group 4
4.1 Weight Change
4.2 Return to Zero
EXIT
SAVE Save or abort setting
0 – None
1 – 1 Line
2 – 4 Line
ON – Enter Flash Mode
OFF – Do not enter Flash Mode
Press Zero to Ente
Press Tare to go to Group 4
0 – 1200
1 – 2400
2 – 4800
3 – 9600
0 – None
1 – Even
2 – Odd
0 – 7 data bit
1 – 8 data bit
0 – None
1 – 1 stop bit
2 – 2 stop bit
0 = Disabled
1 = NCI-ECR (WO)
2 = (reserved)
3 = 8217 Mettler-Toledo (WO)
4 = 8213 Mettler-Toledo (WO)
5 = EPOS 1(WO)
6 = EPOS 2(WO)
7 = (reserved)
8 = Dialog 06 (PC)
9 = Dialog 04/02 (PC)
10 = (reserved)
11 = ICL (WO)
Press Zero to Ente
Press Tare to go to EXIT
00 - No Weight Change Required
yy - 01 to 99 weight change divisions required
0 - No Return to Zero Required
1 - Return to Zero Active
Press Zero to Ente
Press Tare to go to Group 1
SAVE – save all settings and return to weighing mode
ABORT – abort all settings and return to weighing mode
* Used only on the 4 Line display
PC – Price Computing
WO – Weight Only
METTLER TOLEDO
Master Mode Access
Yes
No
Yes
Yes
Yes
Yes
Yes
No
No
Yes
DIVA Service Manual
13
METTLER TOLEDO
M
i
C
lib
ti
Button
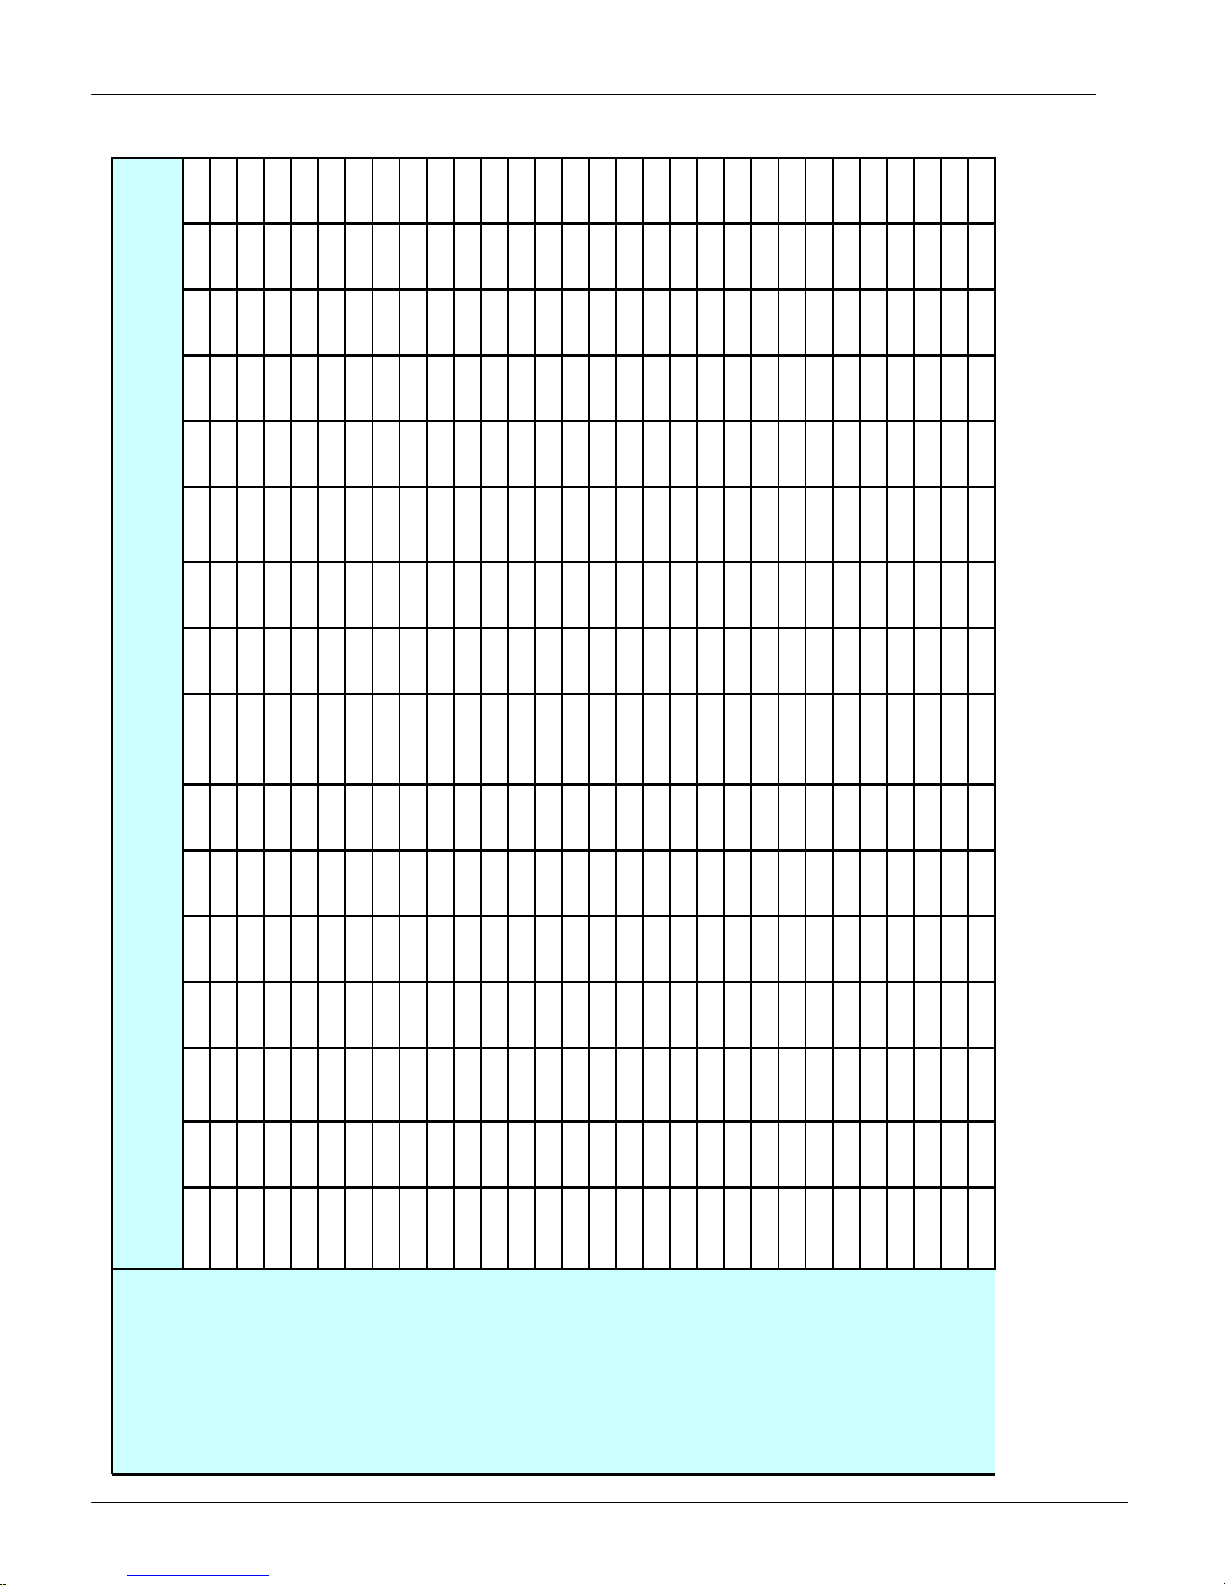
3.4 Country Defaults
PC WO WO WO WO WO WO WO WO WO WO WO WO WO WO WO
(Europe) Portugal Poland/ Swiss Export
Germany/ France USA Austria Spain/ Belguim/ Italy Kazachstan/ Ukraine Russia Hungary Slovakia Czechia General China Canada
Function
1.1 Country Code dE fr US AT ES BE iT CH UA rU HU SK C2 OrT CN CA
1.2 Initialize to Defaults No No No No No No No No No No No No No No No No
1.3Beeper 1 1 1 1111 1 11 1 11111
1.4 Zero Cursor Off Off On Off Off Off Off Off Off Off On Off Off On On On
1.5 Decimal Point Off (,) Off (,) On (.) Off (,) Off (,) Off (,) Off (,) Off (,) Off (,) Off (,) On (.) Off (,) Off (,) On (.) On (.) On (.)
1.6Decimal Position($)2 2 2 2222 2 22 0 22222
1.7 Auto Clear Tare On On On On On On On On On On On On On On On On
Group 1 England
DIVA Service Manual
14
1.8 Weight Unit kg (3) kg (3) lb (1) kg (3) kg (3) kg (3) kg (3) kg (3) kg (3) kg (3) kg (3) kg (3) kg (3) kg (3) kg (3) kg (3)
1.9 Expanded Displa y Off Off Off Off Off Off Off Off Off Off Off Off Off Off Off Off
1.10 Blank Weight Display Off Off Off Off Off Off Off Off Off Off Off Off Off Off Off Off
– Weigh Only
WO
Off Off Off Off Off Off Off Off Off Off Off Off Off Off Off Off
– Price Computing,
PC
on
ra
a
n
a
2.1 Tare Enable On On On On On On On On On On On On On On On On
2.2 Chain Tare Enable Off Off Off Off Off Off Off Off Off Off Off Off Off Off Off Off
2.3 Total Price Round Off Off Off Off Off Off Off Off Off Off Off Off Off Off Off Off
2.4 Digital Filter 1 (Low) 1 (Low) 1 (Low) 1 (Low) 1 (Low) 1 (Low) 1 (Low) 1 (Low) 1 (Low) 1 (Low) 1 (Low) 1 (Low) 1 (Low) 1 (Low) 1 (Low) 1 (Low)
2.5 GEO 20 19 15 18 15 15 17 18 21 23 19 19 20 12 12 15
2.6 Calibration No No No No No No No No No No No No No No No No
2.7 Display Type 2 (4Line) 1 (1Line) 1 (1Line) 1 (1Line) 1 (1Line) 1 (1Line) 1 (1Line) 1 (1Line) 1 (1Line) 1 (1Line) 1 (1Line) 1 (1Line) 1 (1Line) 1 (1Line) 1 (1Line) 1 (1Line)
2.8Display Update Rate2 2 2 2222 2 22 2 22222
2.9 Flash Mode Enable Off Off Off Off Off Off Off Off Off Off Off Off Off Off Off Off
3.1 Baud Rate 3 (9.6kb) 3 (9.6kb) 3 (9.6kb) 3 (9.6kb) 3 (9.6kb) 3 (9.6kb) 3 (9.6kb) 3 (9.6kb) 3 (9.6kb) 3 (9.6kb) 3 (9.6kb) 3 (9.6kb) 3 (9.6kb) 3 (9.6kb) 3 (9.6kb) 3 (9.6kb)
3.2 Parity 2(odd) 1(even) 1(even) 1(even) 1(even) 1(even) 1(even) 1(even) 1(even) 1(even) 1(even) 1(even) 1(even) 1(even) 1(even) 1(even)
3.3 Data Bits 0 (7bits) 0 (7bits) 0 (7bits) 0 (7bits) 0 (7bits) 0 (7bits) 0 (7bits) 0 (7bits) 0 (7bits) 0 (7bits) 0 (7bits) 0 (7bits) 0 (7bits) 0 (7bits) 0 (7bits) 0 (7bits)
3.4Stop Bit 1 1 1 1111 1 11 1 11111
3.5 Protocol 8(Dialog06) 3(8217) 3(8217) 3(8217) 3(8217) 3(8217) 3(8217) 3(8217) 3(8217) 3(8217) 3(8217) 3(8217) 3(8217) 3(8217) 3(8217) 3(8217)
4.1Weight Change 10 10 0 10101010 10 1010 10 10101010 0
1.11
Group 2
Group 3
4.2Return to Zero 0 0 1 0000 0 00 0 00001
Group 4
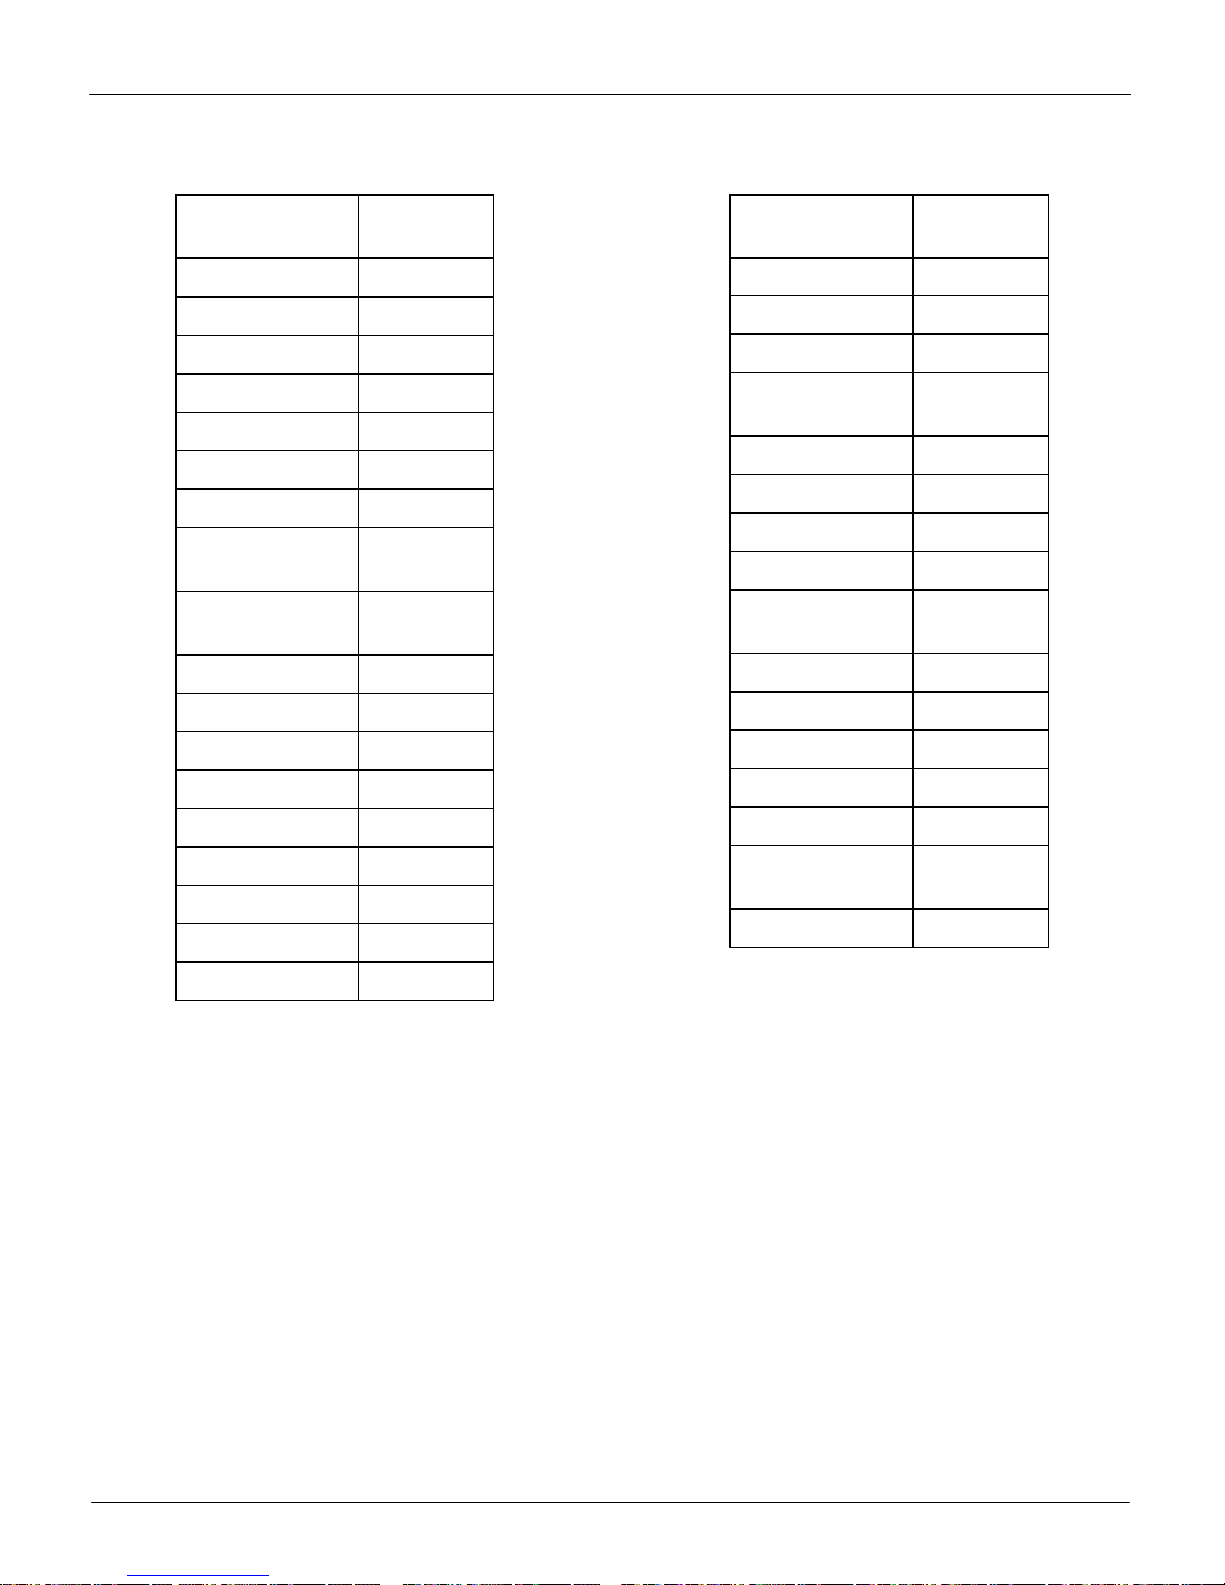
3.5 GeoCal Country Codes
METTLER TOLEDO
Country Geo-Value
Austria 18
Belgium 21
Bulgaria 16
Croatia 18
Czechia 20
Denmark 23
Estonia 24
Finland
France
25*
26
17
19*
Germany 20
Greece 15
Hungary 19
Ireland 22
Country Geo-Value
Liechtenstein 18
Lithuania 22
Netherlands 21
Norway
24*
26
Poland 21
Portugal 15
Romania 18
Russia 23
Sweden
24*
26
Switzerland 18
Slovakia 19
Slovenia 18
Spain 15
Iceland 26
Italy 17
Kazakhstan 18
Latvia 23
Turkey 16
United Kingdom
21*
23
Ukraine 21
* Factory Default
Luxemburg 20
DIVA Service Manual
15
 Loading...