

Page 1

MS
MS
MS
MS
Precision and Analytical Balances
User Manual
MS-TS
Page 2

Page 3

This User Manual is a brief instruction that provides information to handle with the first steps of the
instrument in a safe and efficient manner. Personnel must have carefully read and understood this
manual before performing any tasks.
For full information, always consult the Reference Manual (RM).
u www.mt.com/ms-ts-RM
3Precision and Analytical Balances
Page 4
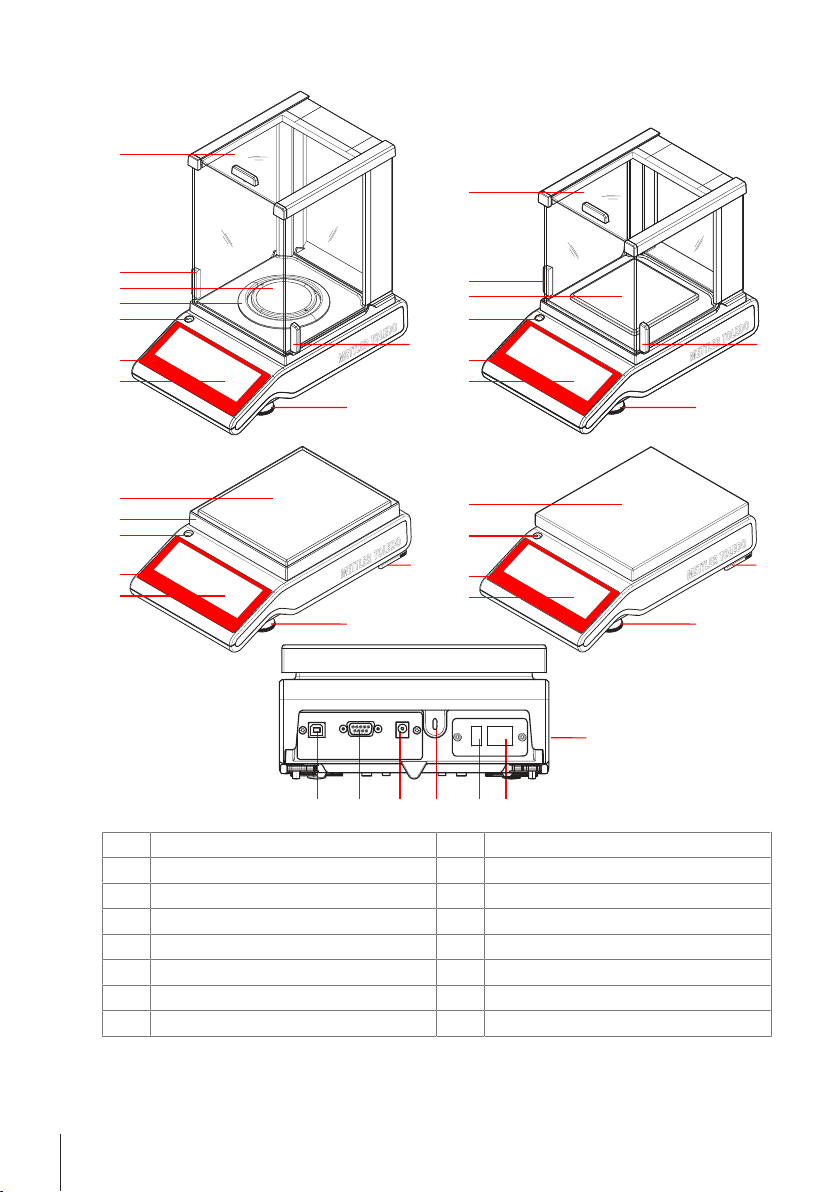
Overview balance
MS
C
MS
MS
M
S
0.1 mg
1
2
3
4
5
7
1
2
3
5
6
1
2
3
5
7
1
2
3
5
4
6
8
6 6
8
8
99
8
10
12 1113141516
Capacitive color TFT touch screen
1
Level indicator
3
Weighing pan
5
Glass draft shield
7
Safety feet (10mg and 100mg models)
9
Ethernet port
11
Kensington slot for anti-theft purposes
13
RS232 serial interface
15
Operating keys
2
Draft shield element
4
Handle for operation of the draft shield door
6
Leveling foot
8
Product label
10
USB host port
12
Socket for AC/DC adapter
14
USB device port
16
4 Precision and Analytical Balances
Page 5
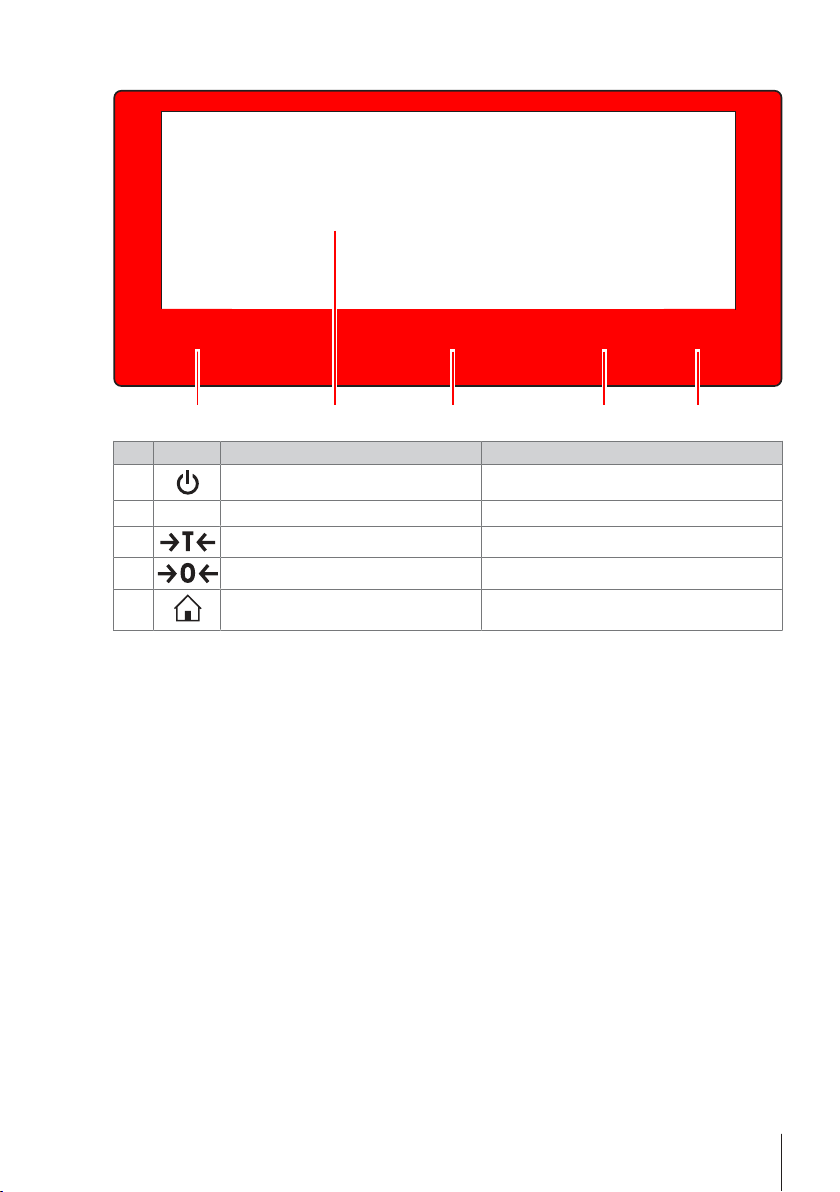
Overview operation keys
53 4
1
2
Key Name Description
1
ON/OFF Switches the balance on or off.
2
3
4
5
Capacitive color TFT touch screen General navigation
Tare Tares the balance.
Zero Zeros the balance.
Home Returns from any menu level, or other window to
the application home screen.
5Precision and Analytical Balances
Page 6

6 Precision and Analytical Balances
Page 7

Table of Contents
1 Introduction 3
1.1 Further documents and information.................................................................... 3
1.2 Compliance information ................................................................................... 3
2 Safety Information 3
2.1 Definitions of signal warnings and warning symbols ........................................... 4
2.2 Product specific safety notes ............................................................................. 4
3 Design and Function 5
3.1 Overview ........................................................................................................ 5
3.2 User interface .................................................................................................. 5
3.2.1 Main settings and activities at a glance ............................................... 6
3.2.2 Application home screen.................................................................... 7
3.2.3 Entering characters and numbers........................................................ 8
3.2.4 Lists and tables ................................................................................ 9
3.2.5 Touch screen navigation.................................................................... 9
4 Installation and Putting into Operation 10
4.1 Selecting the location ....................................................................................... 10
4.2 Unpacking ...................................................................................................... 11
4.3 Scope of delivery ............................................................................................. 11
4.4 Assembling the balance ................................................................................... 12
4.5 Putting into operation ....................................................................................... 13
4.5.1 Connecting the balance ..................................................................... 13
4.5.2 Switching on the balance................................................................... 14
4.5.3 Changing the date and time ............................................................... 14
4.5.4 Leveling the balance.......................................................................... 15
4.5.4.1 Leveling the balance using the level indicator .................................. 15
4.5.4.2 Leveling the balance using the leveling assistant ............................. 16
4.5.5 Adjusting the balance ........................................................................ 16
4.6 Performing a simple weighing........................................................................... 17
4.7 Transporting, packaging and storage ................................................................. 18
4.7.1 Transporting over short distances........................................................ 18
4.7.2 Transporting over long distances ........................................................ 18
4.7.3 Packaging and storage...................................................................... 18
5 Maintenance 18
5.1 Maintenance tasks........................................................................................... 19
5.2 Cleaning......................................................................................................... 19
5.2.1 Cleaning the glass draft shield (0.1 mg and 1 mg models) ................... 19
5.2.2 Cleaning the balance......................................................................... 21
5.2.3 Putting into operation after cleaning .................................................... 22
6 Troubleshooting 23
6.1 Error messages ............................................................................................... 23
6.2 Error symptoms............................................................................................... 24
6.3 Status messages/Status icons ........................................................................... 25
6.4 Putting into operation after fixing an error ........................................................... 26
7 Technical Data 27
7.1 General data ................................................................................................... 27
8 Disposal 28
1Precision and Analytical Balances
Page 8

2 Precision and Analytical Balances
Page 9

1 Introduction
EULA
The software in this product is licensed under the METTLER TOLEDO End User
License Agreement (EULA) for Software.
When using this product you agree to the terms of the EULA.
1.1 Further documents and information
This document is available in other languages online.
u www.mt.com/MS-TS-analytical-balance
Search for software downloads u www.mt.com/labweighing-software-download
Search for documents u www.mt.com/library
For further questions, please contact your authorized METTLER TOLEDO dealer or service representative.
1.2 Compliance information
European Union
The instrument complies with the directives and standards listed on the EU Declaration of Conformity.
United States of America
This equipment has been tested and found to comply with the limits for a Class A digital device, pursuant to part
15 of the FCC Rules. These limits are designed to provide reasonable protection against harmful interference
when the equipment is operated in a commercial environment. This equipment generates, uses, and can radiate
radio frequency energy and, if not installed and used in accordance with the instruction manual, may cause
harmful interference to radio communications. Operation of this equipment in a residential area is likely to cause
harmful interference in which case the user will be required to correct the interference at his own expense.
This device complies with Part 15 of the FCC Rules. Operation is subject to the following two conditions:
1. This device may not cause harmful interference.
2. This device must accept any interference received, including interference that may cause undesired
operation.
Changes or modifications not expressly approved by the party responsible for compliance could void the user's
authority to operate the equipment.
The FCC Supplier Declaration of Conformity is available online.
u http://www.mt.com/ComplianceSearch
u www.mt.com/EULA
u www.mt.com/MS-precision
u www.mt.com/contact
2 Safety Information
Two documents named "User Manual" and "Reference Manual" are available for this instrument.
• The User Manual is printed and delivered with the instrument.
• The electronic Reference Manual contains a full description of the instrument and its use.
• Keep both documents for future reference.
• Include both documents if you transfer the instrument to other parties.
Only use the instrument according to the User Manual and the Reference Manual. If you do not use the
instrument according to these documents or if the instrument is modified, the safety of the instrument may be
impaired and Mettler-Toledo GmbH assumes no liability.
3Precision and Analytical Balances
Page 10
2.1 Definitions of signal warnings and warning symbols
Safety notes contain important information on safety issues. Ignoring the safety notes may lead to personal
injury, damage to the instrument, malfunctions and false results. Safety notes are marked with the following
signal words and warning symbols:
Signal words
DANGER
WARNING
CAUTION
NOTICE
A hazardous situation with high risk, resulting in death or severe injury if not avoided.
A hazardous situation with medium risk, possibly resulting in death or severe injury if not
avoided.
A hazardous situation with low risk, resulting in minor or moderate injury if not avoided.
A hazardous situation with low risk, resulting in damage to the instrument, other material
damage, malfunctions and erroneous results, or loss of data.
Warning symbols
General hazard: read the User Manual or the Reference Manual for information about the hazards
and the resulting measures.
Electrical shock Notice
2.2 Product specific safety notes
Intended use
This instrument is designed to be used in laboratories by trained staff. The instrument is intended for weighing
purposes.
Any other type of use and operation beyond the limits of technical specifications without written consent from
Mettler-Toledo GmbH is considered as not intended.
Responsibilities of the instrument owner
The instrument owner is the person holding the legal title to the instrument and who uses the instrument or
authorizes any person to use it, or the person who is deemed by law to be the operator of the instrument. The
instrument owner is responsible for the safety of all users of the instrument and third parties.
METTLER TOLEDO assumes that the instrument owner trains users to safely use the instrument in their workplace
and deal with potential hazards. METTLER TOLEDO assumes that the instrument owner provides the necessary
protective gear.
Safety notes
WARNING
Death or serious injury due to electric shock
Contact with parts that carry a live current can lead to death or injury.
1 Only use the METTLER TOLEDO power supply cable and AC/DC adapter designed for your
instrument.
2 Connect the power cable to a grounded power outlet.
3 Keep all electrical cables and connections away from liquids and moisture.
4 Check the cables and power plug for damage and replace damaged cables and power plugs.
4 Precision and Analytical Balances
Page 11

NOTICE
Damage to the instrument due to the use of unsuitable parts
Using unsuitable parts with the instrument can damage the instrument or cause it to malfunction.
− Only use parts from METTLER TOLEDO that are intended to be used with your instrument.
A listing of all parts can be found in the Reference Manual (RM).
3 Design and Function
3.1 Overview
See also
2 Overview balance
3.2 User interface
The screen displays information and allows the user to enter commands by tapping certain areas on its surface.
You can choose the information displayed on the screen, change the balance settings and perform certain
operations on the balance.
}Page4
5Precision and Analytical Balances
Page 12

3.2.1 Main settings and activities at a glance
Application main configuration
General settings Activities
Balance information
Depending on the application, the options available to be selected and their content may differ.
6 Precision and Analytical Balances
Page 13

3.2.2 Application home screen
Prepare adjustment weight and start
The application home screen appears after switching the balance on. It always displays the last application that
was in use before the balance was switched off. The application home screen is the main screen of the balance.
Every function can be accessed from here. You can return to the application home screen at any time by pressing
the home button
in the lower right corner of the screen.
Information and work bars
Name Description
Weighing information bar Displays the weighing-in aid and general balance information.
1
Work title bar Displays information about the current activity.
2
Value bar Displays information about the current weighing process.
3
Main navigation Work-related functions.
4
Information fields
Name Description
Weighing-in aid A dynamic graphic indicator displays how much of the total weighing
5
Short balance information Readability and capacity of the balance.*
6
Weighing value field Displays the value of the current weighing process (model-specific).
7
Coach text field Displays instructions for the current weighing process.
8
range is in use.
* For legal-for-trade approved balances: Min (minimum capacity) and e (verification of scale interval) are
shown in the upper left corner.
Action buttons
Name Description
Main activity configuration
9
Detailed balance information Displays detailed technical data about the balance.
10
Weighing unit Displays the unit of the current weighing process (model- and country-
11
Activities Opens the activities selection.
12
Print Prints out results and/or settings (printer required).
13
Settings/preferences Configures balance and user settings/preferences (application
14
Status information field Displays information about the system status.
15
To configure the current application, e.g., Weighing.
specific).
independent).
7Precision and Analytical Balances
Page 14

3.2.3 Entering characters and numbers
0…16 characters
ID - Label
The keyboard allows the user to enter characters, including letters, numbers and a range of special characters.
If a barcode reader is connected to your balance and your sample provides a barcode, scan the product barcode
instead of entering the designation manually (e.g. the ID can be scanned via barcode reader to ensure that the
sample is clearly assigned to the corresponding product). Additionally, it is possible to connect a USB keyboard
to enter the information.
Name Description
Input field Displays all characters that have been entered.
1
Delete all Deletes all entered characters.
2
Discard Discards the entered data and exits the dialog.
3
Delete Deletes the last character.
4
Confirm Confirms the data entered.
5
Shift Switches between lower and upper case letters.
6
Specialized tabs Switches keyboard mode for entering letters, numbers or special characters.
7
Explanation field Extra information about the value to be entered.
8
8 Precision and Analytical Balances
Page 15

3.2.4 Lists and tables
6
1
3
2
4
5
General configuration and data
Weighing options
Weighing mode, autozero, MinWeigh and more
Publishing
Print and output options
Devices and services
Printers, PC, barcode readers, FTP servers and more
Network and Bluetooth
General LAN, WLAN and Bluetooth configuration
Navigation:
> General configuration and data
The basic elements in a simple list include a content title and a list of sub-elements. Tapping an element opens a
list of sub-elements or an input dialog.
Name Description
List title Title of the current list.
1
Back button Moves one step back.
2
List element title Title of the list element.
3
List element description Displays the sub-elements.
4
Scroll position Scrolls through the list.
5
Selection tabs Tabs of the selectable sub-categories.
6
3.2.5 Touch screen navigation
To interact with the balance, use the screen and the operating keys at the bottom of the screen.
Using shortcuts
To simplify navigation on the touch screen, there are a few shortcuts that provide quick access to key areas of
the balance. For example, the weighing value field on the application home screen works as a shortcut (see
screen below), as does the weighing unit next to the weighing value field. Other shortcuts may be available to
use depending on the application.
9Precision and Analytical Balances
Page 16

Every setting that can be changed directly via shortcut, can also be changed in the main configuration settings
for that application.
4 Installation and Putting into Operation
4.1 Selecting the location
A balance is a sensitive precision instrument. The location where it is placed will have a profound effect on the
accuracy of the weighing results.
Requirements of the location
Place indoors on stable
table
Ensure sufficient spacing Level the instrument Provide adequate lighting
Avoid direct sunlight Avoid vibrations Avoid strong drafts Avoid temperature fluctu-
Sufficient spacing for balances: > 15 cm all around the instrument
Take into account the environmental conditions. See "Technical Data."
10 Precision and Analytical Balances
ations
Page 17

4.2 Unpacking
Open the balance packaging. Check the balance for transport damage. Immediately inform a METTLER TOLEDO
representative in the event of complaints or missing accessories.
Retain all parts of the packaging. This packaging offers the best possible protection for transporting the balance.
4.3 Scope of delivery
Components 0.1 mg 1 mg 10 mg 100mg
Balance with draft shield 236 mm – – –
168 mm – – –
Balance – –
Weighing pan ø 90 mm – – –
127 × 127 mm – – –
170 × 200 mm – – –
190 × 226 mm – – –
Draft shield element – –
Pan support
Bottom plate – –
ESD plate – –
Protective cover
Universal AC/DC adapter -
AC/DC adapter with country-specific power cable - - -
User Manual
Declaration of Conformity
11Precision and Analytical Balances
Page 18

4.4 Assembling the balance
3
4
5
6
1
2
MS
3
4
5
1
2
MS
CAUTION
Injury due to sharp objects or broken glass
Instrument components, e.g., glass, can break and lead to injuries.
− Always proceed with focus and care.
Balances with a readability of 0.1 mg with draft shield (236mm)
Place the following components on the balance in the specified order:
Push the side glass doors back as far as they will go.
§
1 Hold the draft shield (1) with both hands using the bars at
the top.
2 Turn the draft shield lock (2) to position
3 Place the draft shield on the balance.
4 Turn the draft shield lock to
(lock) and insert the bottom
plate (3).
5 Insert the draft shield element (4) and weighing pan (6)
with pan support (5).
(unlock).
Balances with a readability of 1 mg with draft shield (168mm)
Place the following components on the balance in the specified order:
Push the side glass doors back as far as they will go.
§
1 Hold the draft shield (1) with both hands using the bars at
the top.
2 Turn the draft shield lock (2) to position
(unlock).
3 Place the draft shield on the balance.
4 Turn the draft shield lock to
(lock) and insert the bottom
plate (3).
5 Insert the weighing pan (5) with pan support (4).
12 Precision and Analytical Balances
Page 19

Balances with a readability of 10 mg
MS
2
3
4
1
MS
3
2
1
Place the following components on the balance in the specified order:
• ESD plate (1)
• Pan support (2)
• Weighing pan (3)
• Draft shield element (4)
Balances with a readability of 100 mg
Place the following components on the balance in the specified order:
• ESD plate (1)
• Pan support (2)
• Weighing pan (3)
4.5 Putting into operation
4.5.1 Connecting the balance
WARNING
Death or serious injury due to electric shock
Contact with parts that carry a live current can lead to death or injury.
1 Only use the METTLER TOLEDO power supply cable and AC/DC adapter designed for your
instrument.
2 Connect the power cable to a grounded power outlet.
3 Keep all electrical cables and connections away from liquids and moisture.
4 Check the cables and power plug for damage and replace damaged cables and power plugs.
NOTICE
Damage to the AC/DC adapter due to overheating
If the AC/DC adapter is covered or in a container, it is not sufficiently cooled and will overheat.
1 Do not cover the AC/DC adapter.
2 Do not put the AC/DC adapter in a container.
13Precision and Analytical Balances
Page 20

1
1 Install the cables in such a way that they cannot be
Time
damaged or interfere with operation.
2 Insert the plug of the AC/DC adapter (1) in the power inlet
of the instrument.
3 Secure the plug by firmly tightening the knurled nut.
4 Insert the plug of the power cable into a grounded power
outlet that is easily accessible.
ð The balance is ready for use.
Note
Always connect the AC/DC adapter to the balance before connecting to the power.
Do not connect the instrument to a power outlet controlled by a switch. After switching on the instrument, it must
warm up before giving accurate results.
4.5.2 Switching on the balance
Before using the balance, it must be warmed up in order to obtain accurate weighing results. To reach operating
temperature, the balance must be connected to the power supply for at least 30 minutes (60 minutes for 0.1mg
models).
The balance is connected to the power supply.
§
The balance is warmed up.
§
− Press
When the balance is switched on for the first time, the Weighing application home screen will open. If the
balance is switched on again, it will always start with the screen of the application last used before switching it
off.
.
ð After the start screen has disappeared, the application home screen will open.
4.5.3 Changing the date and time
Navigation:
The dialog (Picker view) allows the user to set the date and time.
Tap
> General configuration and data > System settings > Date and Time
for Time and 25 for Date. The format can be selected by tapping .
14 Precision and Analytical Balances
Page 21

Name Description
È
2
2
1
1
Change date/time format Various date/time formats can be selected.
1
Pick button Increment.
2
Picker field Displays the defined time/date.
3
Pick button Decrement.
4
Selection tabs Tabs of the selectable sub-categories.
5
4.5.4 Leveling the balance
Exact horizontal and stable positioning are essential for repeatable and accurate weighing results.
The balance can be levelled using the leveling assistant and/or the level indicator in front of the balance. There
are two adjustable leveling feet to compensate for slight irregularities in the surface of the weighing bench.
The balance must be leveled and adjusted each time it is moved to a new location.
4.5.4.1 Leveling the balance using the level indicator
All balances have a level indicator with an air bubble that can be used level the balance manually.
Leveling balances with a readability of 0.1 mg and 1 mg
1 Position the balance at the selected location.
2 Align the balance horizontally.
3 Turning the two front leveling feet of the housing until the
air bubble is in the middle of the glass.
Leveling balances with a readability of 10mg and 100mg
1 Remove the clamps (1) for the safety feet by turning them
outwards.
2 Turn the clamps (1) outwards as far as they will go (~
90°), so that the safety feet can move freely.
3 Now level the balance by turning both leveling screws (2)
until the bubble is in the inner circle of the level indicator
(see procedure above).
4 Secure the safety feet by turning the clamps (1) inwards.
15Precision and Analytical Balances
Page 22

Example
The instrument is out of level
Turn leveling feet as indicated
until the air bubble is in the
center of the level indicator.
Air bubble at 12
o'clock:
turn both feet clockwise.
Air bubble at 3
o'clock:
Air bubble at 6
turn left foot clockwise, right foot counterclockwise.
turn both feet counterclockwise.
o'clock:
Air bubble at 9
o'clock:
turn left foot counterclockwise, right foot
clockwise.
4.5.4.2 Leveling the balance using the leveling assistant
When the balance is switched on at its new location, the symbol
the status information field on the left of the screen.
1 Tap
.
ð The screen Notifications appears.
2 Select The instrument is out of level.
ð The function Leveling assistant appears.
The function Leveling assistant is a step-by-step guide that helps to level the balance.
Navigation:
Quick settings/Preferences > Leveling assistant
The instrument is out of level appears in
After following the instructions, the leveling assistant will display the next steps. Follow the steps until the balance
is level.
Note
Always use the physical air bubble on the level indicator as a reference. If the physical air bubble is centered, but
the symbol
The instrument is out of level still appears on the screen, please consider performing a central
adjustment of the level indicator, see System settings.
4.5.5 Adjusting the balance
To obtain accurate weighing results, the balance must be adjusted to match the gravitational acceleration at its
location. This is also dependent on the ambient conditions. After reaching the operating temperature, it is
important to adjust the balance in the following cases:
• Before the balance is used for the first time.
• If the balance has been disconnected from the power supply or in the event of power failure.
• After significant environmental changes, e.g., temperature, humidity, air draft or vibrations.
16 Precision and Analytical Balances
Page 23

• At regular intervals during weighing service.
For further information, consult the Reference Manual (RM).
u www.mt.com/ms-ts-RM
4.6 Performing a simple weighing
Navigation:
This section describes how to perform a simple weighing operation. The basic navigation concept and the basic
functions of the balance are also explained.
When you switch on the balance for the first time, the Weighing application home screen opens automatically. If
the balance has already been used, the application that was last used before the balance was switched off will
open. If another application is running, switch to Weighing.
1 Press
ð The application home screen appears.
2 Place the sample on the weighing pan.
ð The instability symbol
3 Wait until the instability symbol
again.
ð The weighing process is complete.
ð The results are now displayed.
Zeroing
Use the
1 Unload the balance.
2 Press
ð All weight values are measured in relation to this zero point.
Taring
If you are working with a weighing container, tare the balance.
1 Place a container on the weighing pan.
ð The weight is displayed.
2 Press
ð 0.000 g and Net appears in the display. Net indicates that all weight values displayed are net values.
Weighing
− Place the sample in the container.
ð The results are now displayed.
• If the container is removed from the balance, the tare weight will be shown as a negative value.
• The tare weight remains stored until the
Switching off
1 Press and hold
2 Tap
ð The balance switches off and enters standby mode.
• After switching on from standby mode, the balance does not need to warm up. It is immediately ready to start
weighing.
• If the balance has been switched off manually, the display will also be off.
To switch off the balance fully, it must be disconnected from the power supply.
> Activities - Weighing and other applications > Weighing
to zero the balance.
appears and the value in the weighing value field becomes light blue.
disappears and the value in the weighing value field becomes dark blue
zeroing key before starting to weigh anything.
to zero the balance.
to tare the balance.
key is pressed again or the balance is switched off.
until the dialog Switch-off appears.
to confirm.
17Precision and Analytical Balances
Page 24

For further information, consult the Reference Manual (RM).
MS
4.7 Transporting, packaging and storage
CAUTION
Injury due to sharp objects or broken glass
Instrument components, e.g., glass, can break and lead to injuries.
− Always proceed with focus and care.
1 Press and hold the key.
2 Disconnect the balance from the power supply.
3 Disconnect all interface cables.
4.7.1 Transporting over short distances
To move the balance over a short distance to a new location, follow the instructions below.
1 Hold the balance with both hands as shown.
2 Carefully lift the balance and carry the balance in horizontal
position to the new location.
If you want the balance put into operation, proceed as follows:
1 Connect in reverse order.
2 Level the balance.
3 Perform an internal adjustment.
u www.mt.com/ms-ts-RM
4.7.2 Transporting over long distances
To transport the balance over long distances, always use the original packaging.
4.7.3 Packaging and storage
Packaging
Store all parts of packaging in a save place. The elements of the original packaging are developed specifically for
the balance and its components to ensure maximum protection during transportation or storing.
Storage
Store the balance under following conditions:
• Indoor and in the original packaging.
• According to the environmental condition, see "Technical data".
• When storing for longer than six months, the rechargeable battery maybe down (date and time get lost).
5 Maintenance
To guarantee the functionality of the balance and the accuracy of the weighing results, a number of maintenance
actions must be performed by the user.
18 Precision and Analytical Balances
Page 25

For further information, consult the Reference Manual (RM).
1
2
5.1 Maintenance tasks
Maintenance action Recommended interval Remarks
Performing an internal
adjustment
Performing routine tests
(eccentricity test, repeatability test, sensitivity test).
• Daily
• After cleaning
• After leveling
• After changing the location
• After cleaning
• After assembling the balance
• Depending on your internal regulations (SOP)
METTLER TOLEDO
recommends to at least
perform a sensitivity test.
Cleaning • After every use
• After changing the substance
• Depending on the degree of pollution
• Depending on your internal regulations (SOP)
See also
2 Cleaning
}Page19
5.2 Cleaning
5.2.1 Cleaning the glass draft shield (0.1 mg and 1 mg models)
u www.mt.com/ms-ts-RM
see "Activities - Adjustments and
tests"
see "Activities - Adjustments and
tests" in the Reference Manual
see "Cleaning"
CAUTION
Injury due to sharp objects or broken glass
Instrument components, e.g., glass, can break and lead to injuries.
− Always proceed with focus and care.
1 Remove weighing pan, draft shield element and pan support.
2 Remove the bottom plate.
3 Unlock the draft shield, lift it off the balance and place it on a clean surface.
4 Push the glass doors (1) back.
5 Turn the two lock covers (2) on the front as far as they will
go.
19Precision and Analytical Balances
Page 26

3
6 Tilt the front glass (3) forward.
4
5
6
7 Remove the front glass.
8 Pull the top glass door (4) out from the front.
9 Lift the side glass doors (5) and (6) and pull them out
from the front.
20 Precision and Analytical Balances
Page 27

7
10 Push the lock button (7) to release the rear glass.
8
11 Remove the rear glass (8).
12 Turn the draft shield lock to the (Service) position.
13 Remove the draft shield lock.
After cleaning, reinstall all components in the reverse order. For
balance mounting, refer to "Assembling the balance".
5.2.2 Cleaning the balance
WARNING
Death or serious injury due to electric shock
Contact with parts carrying a live current can lead to injury and death.
1 Disconnect the instrument from the power supply prior to cleaning and maintenance.
2 Prevent liquid from entering the instrument, terminal or AC/DC adapter.
21Precision and Analytical Balances
Page 28

NOTICE
Damage due to improper cleaning
Improper cleaning can damage the load cell or other essential parts.
1 Do not use any cleaning agents other than the ones specified in the "Reference Manual" or
"Cleaning Guide".
2 Do not spray or pour liquids on the instrument. Always use a moistened lint-free cloth or a
tissue.
3 Always wipe out from inside to outside of the instrument.
Cleaning around the balance
− Remove any dirt or dust around the balance and avoid further contaminations.
Cleaning the removable parts
− Clean the removed part with a damp cloth or a tissue and a mild cleaning agent.
Cleaning the balance
1 Disconnect the balance from the power supply.
2 Use a lint-free cloth moistened with a mild cleaning agent to clean the surface of the balance.
3 Remove powder or dust at first with a disposable tissue.
4 Remove sticky substances with a damp lint-free cloth and a mild solvent.
Note
Useful details to avoid soiling the instrument are described in the Mettler-Toledo GmbH "SOP for Cleaning a
Balance".
5.2.3 Putting into operation after cleaning
1 Reassemble the balance.
2 Check the functionality of the draft shield.
3 Press
4 Warm up the balance. Wait 1h for the acclimatization, before starting the tests.
5 Check the level status, level the balance if necessary.
6 Perform an internal adjustment.
7 Perform a routine test due to the internal regulations of your company. METTLER TOLEDO recommends to
8 Press
ð The balance has been putting into operation and is ready to use.
to switch on the balance.
perform an repeatability test after cleaning the balance.
to zero the balance.
See also
2 Leveling the balance}Page15
22 Precision and Analytical Balances
Page 29

6 Troubleshooting
For a detailed description of the causes of errors and how to remedy them, refer to the Reference
Manual (RM). The most common ones during installation of the balance are listed below.
Possible errors with their cause and remedy are described in the following chapter. If there are errors that cannot
be corrected through these instructions, contact METTLER TOLEDO.
6.1 Error messages
Error message Possible cause Diagnostic Remedy
NO STABILTY
Adjustment aborted
Weight out of range.
A problem occured while
starting the balance.
Some data could not be
read correctly from
memory. Please proceed
and check date and time
settings. Please contact
your MT-Support representative if the problem
persists.
Weight out of initial zero
range
Vibrations at the
workplace.
Draft due to untight draft
shield and /or open
window.
The location is not suitable
for weighing.
Something is touching the
weighing pan.
Wrong adjustment weight. Check weight. Place correct weight on the
Some data could not be
read correctly from
memory.
Wrong weighing pan.
Pan is missing.
Pan is not empty.
Place beaker with tap
water on the weighing
table. Vibrations cause
ripples on the water
surface.
• Protect weighing
location against
vibrations (vibration
absorber, etc.).
• Set weighing
parameters coarser
(change Environment
from Stable to
Standard or even
Unstable.
• Find a different
weighing location (by
agreement with
customer).
Make sure draft shield or
window is closed.
• Close draft shield or
window.
• Set weighing
parameters coarser
(change Environment
from Stable to
Standard or even
Unstable.
– Check and observe the
requirements for the
location, refer to "Selecting
the location".
Check for touching parts or
dirts.
Remove touching parts or
clean the balance.
weighing pan.
Check date and time
settings.
Please contact your
METTLER TOLEDO-Support
representative if the
problem persists.
Check weighing pan. Mount correct weighing
pan or unload weighing
pan.
23Precision and Analytical Balances
Page 30

Error message Possible cause Diagnostic Remedy
Battery backup lost
Backup battery is empty.
This battery ensures that
the date and time are not
lost when the balance is
Connect the balance to the
power supply for charging
the battery (full capacity
after 2 days of charging).
If battery cannot be
recharged, contact your
METTLER TOLEDO-Support
representative.
disconnected from power.
6.2 Error symptoms
Error symptom Possible cause Diagnostic Remedy
Display is dark Instrument is switched off. – Switch on the instrument.
The value drifts into plus or
minus
Power plug not connected. Check Connect power cable to
Power supply not
Check Connect power supply.
connected to balance.
Power supply is faulty. Check/test Replace power supply.
Wrong power supply. Check that input data on
type plate match the power
supply values.
Balance must be restarted. – Restart balance.
Connector socket on
Check Please contact your
balance is corroded or
faulty.
Display is faulty. Replace display. Please contact your
Room, environment not
–
suitable.
Direct sunlight or other
heat source.
Is any sun shade (blinds,
curtains, etc.) available?
power supply.
Use proper power supply.
METTLER TOLEDO-Support
representative.
METTLER TOLEDO-Support
representative.
Environmental recommendations
• Windowless, non air-
conditioned room,
e.g., basement.
• Only one person in the
weighing room.
• Sliding doors.
Standard doors cause
pressure changes.
• No draft in weighing
room (check with
suspended threads).
• No air conditioning
(temperature
oscillates, draft).
• Acclimatize balance,
take dummy
measurements.
• Instrument uninter-
ruptedly connected to
the power supply (24h
per day).
Select location according
to "Selecting the
location" (customer
responsibility).
24 Precision and Analytical Balances
Page 31

Error symptom Possible cause Diagnostic Remedy
The value drifts into plus or
minus
Weighing sample absorbs
moisture or evaporates
moisture.
• Is the weighing result
with a test weight
stable?
• Sensitive weighing
• Use aids.
• Cover weighing
sample.
samples, e.g., paper,
cardboard, wood,
plastic, rubber, liquids.
Weighing sample is
electrostatically charged.
• Is the weighing result
with a test weight
stable?
• Sensitive weighing
• Increase air humidity
in weighing chamber
(45% - 50%).
• Use ionizer.
samples, e.g., plastic,
powder, insulating
materials.
Weighing sample is hotter
or colder than the air in the
weighing chamber.
Instrument has not yet
reached thermal
equilibrium.
Weighing operation with
test weight does not show
this effect.
• Was there a power
outage?
• Was power supply
disconnected?
Bring weighing sample to
room temperature before
weighing.
• Acclimatize instrument
for at least 1 hour.
Depending on climatic
conditions, extend this
period accordingly.
• Instrument switched on
for at least 1 hour,
refer to "General data"
Display shows overload or
underload
The weight on the
weighing pan exceeds the
Check weight. Reduce the weight on the
weighing pan.
weighing capacity of the
instrument.
Wrong weighing pan. Slightly lift or press
Use proper weighing pan.
weighing pan. The weight
display appears.
No weighing pan. – Install weighing pan.
Incorrect zero point at
switch-on.
– • Switch off balance.
• Disconnect and
reconnect power cable.
6.3 Status messages/Status icons
Status messages are displayed by means of small icons. The status icons indicate the following:
Icon Status description Diagnostic Remedy
Automatic FACT adjustment is
currently not possible.
Service due. – Please contact your METTLER
The built-in level sensor has
detected that the instrument is
not correctly leveled.
Instrument is busy. • Unload the balance.
• Do not press any key for 2
TOLEDO-Support representative.
Instrument is out of level. Immediately level the
instrument.
minutes. The display
stabilizes.
25Precision and Analytical Balances
Page 32

Icon Status description Diagnostic Remedy
External input device connected. A keyboard or a barcode reader
has been connected to the
balance, and the balance could
not recognize the device type.
6.4 Putting into operation after fixing an error
After fixing an error, perform the following steps to put the balance into operation:
• Ensure that the balance is completely reassembled and cleaned.
• Reconnect the balance to the AC/DC adapter.
Tap icon in the status field.
• View corresponding
workflow.
• Connect external device and
select the device type in
Devices and services.
26 Precision and Analytical Balances
Page 33

7 Technical Data
7.1 General data
Standard power supply
AC/DC adapter: Primary: 100 – 240 V~ 0.5 A, 50 – 60 Hz
Secondary: 12 V 1.0 A MAX 24 – 34 VA LPS (Limited Power
Source), SELV (Safety Extra Low Voltage)
Balance power consumption: 12 V DC, 0.84 A
Polarity:
Mean see level: Can be used up to 2000 m above mean sea level
If the balance is used above 2000 m mean sea level, the power
supply for 0.1 mg models must be used
Power supply for 0.1 mg models
AC/DC adapter: Primary: 100 – 240 V~ 0.8 A, 50 – 60 Hz, 60 – 80 VA
Secondary: 12 V DC, 2.5 A LPS (Limited Power Source), SELV
(Safety Extra Low Voltage)
Cable for AC/DC adapter: 3-core, with country-specific plug
Balance power consumption: 12 V DC, 2.25 A
Polarity:
Mean see level: Can be used up to 4000 m above mean sea level
Protection and standards
Overvoltage category: II
Degree of pollution: 2
Protection: Protected against dust and water
Standards for safety and EMC: See Declaration of Conformity
Range of application: Use only indoors in dry locations
Environmental conditions
Height above mean sea level: Depending on the power adapter (up to 2000 or 4000 m)
Ambient temperature: Operating conditions for ordinary lab application: +10 to 30°C
Relative air humidity: Max. 80% up to 31°C, linearly decreasing to 50% at 40°C,
Warm-up time: At least 30 minutes (60 minutes for 0.1 mg models) after
Materials
Housing: Die-cast aluminum
Weighing pan: Stainless steel X2CrNiMo 17-12-2 (1.4404)
Draft shield element: 0.1mg models: Stainless steel X2CrNiMo 17-12-2 (1.4404)
Draft shield: Plastic (PBT), glass
Protective cover: Plastic (PET)
TFT touch screen surface: Glass
(operability guaranteed between +5 and 40°C)
noncondensing
connecting the balance to the power supply. When switched on
from standby, the instrument is ready for operation immediately.
Roughness Ra < 0.8μm
10mg models: Plastic (PBT)
27Precision and Analytical Balances
Page 34

8 Disposal
In conformance with the European Directive 2012/19/EU on Waste Electrical and Electronic
Equipment (WEEE) this device may not be disposed of in domestic waste. This also applies to
countries outside the EU, per their specific requirements.
Please dispose of this product in accordance with local regulations at the collecting point specified for electrical
and electronic equipment. If you have any questions, please contact the responsible authority or the distributor
from which you purchased this device. Should this device be passed on to other parties, the content of this
regulation must also be related.
28 Precision and Analytical Balances
Page 35

Page 36

Mettler-Toledo GmbH
30240546
Im Langacher 44
8606 Greifensee, Switzerland
www.mt.com/contact
Subject to technical changes.
© Mettler-Toledo GmbH 07/2019
30240546Jen
www.mt.com/balances
For more information
 Loading...