Page 1
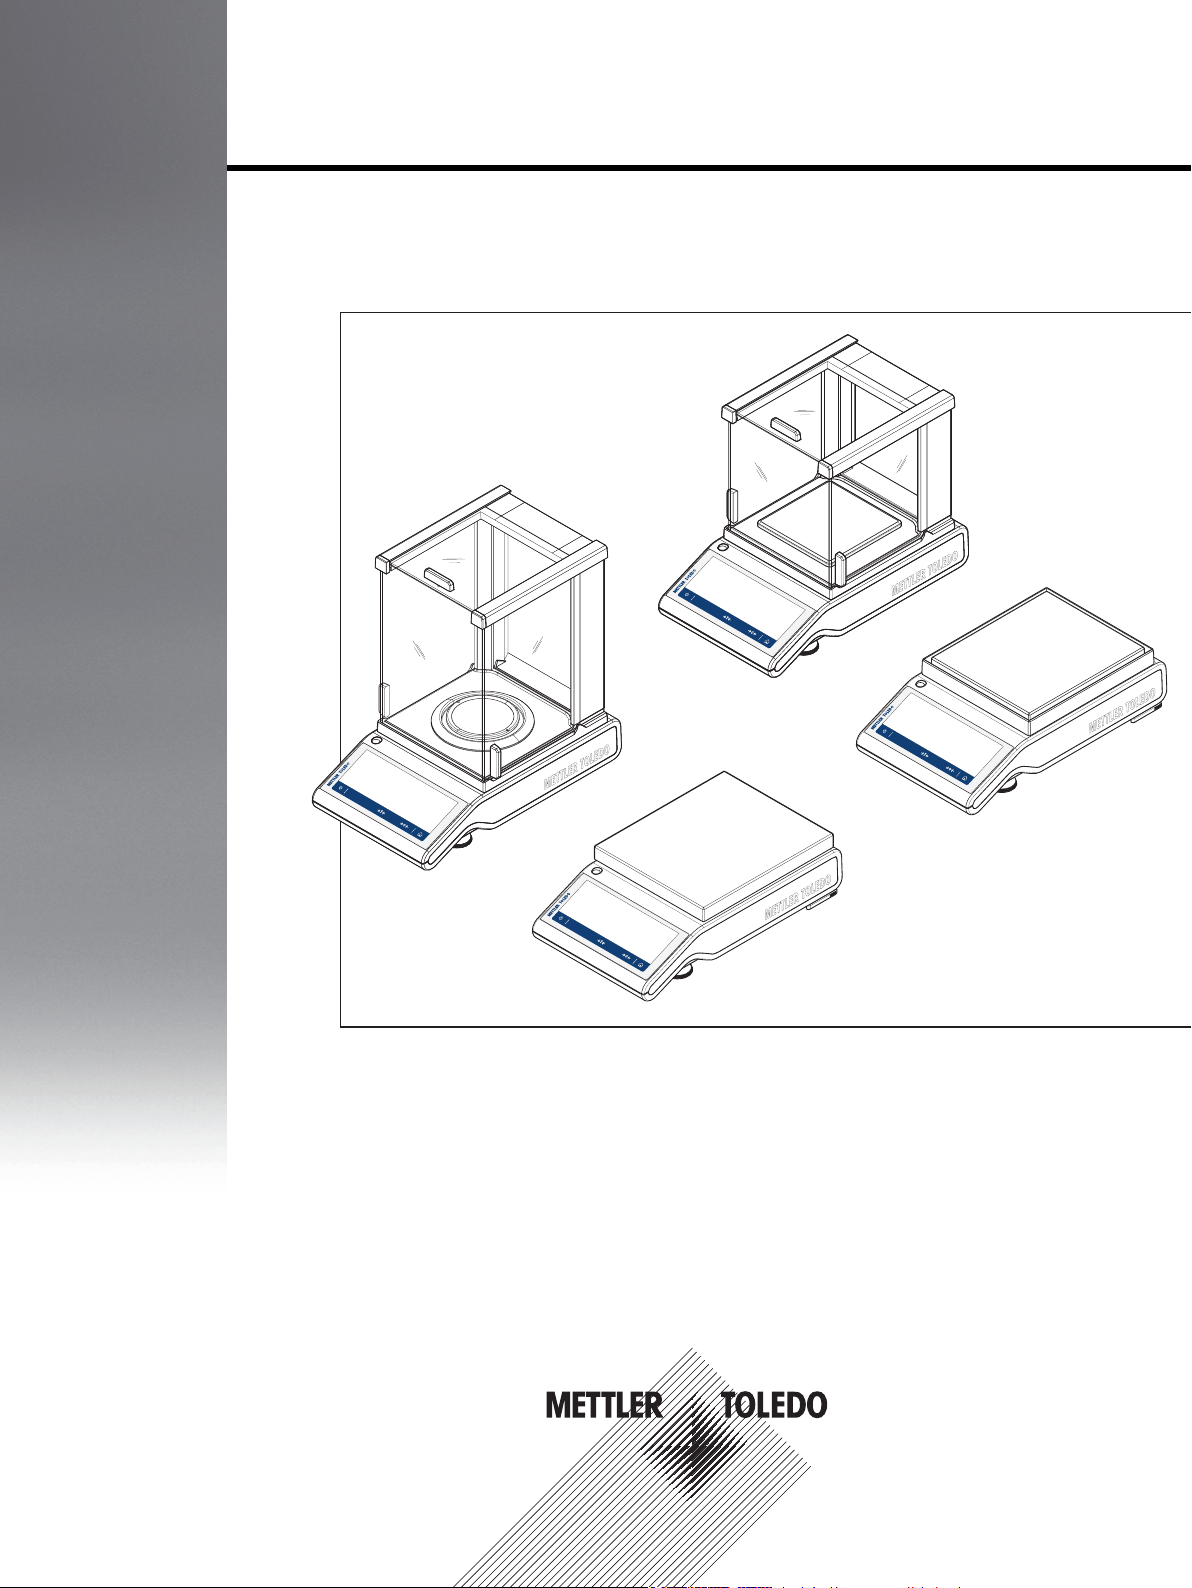
MS
MS
MS
MS
Precision and Analytical Balances
MS-TS
Operating Instructions
Page 2

Page 3

Table of Contents
Introduction1 7
Safety Information2 8
Design and Function3 10
Installation and Putting into Operation4 16
Weighing Made Simple5 24
Conventions and symbols used in these operating instructions1.1 7
Definition of signal warnings and symbols2.1 8
Product safety information2.2 8
Components3.1 10
Terminal keys3.2 11
User Interface3.3 11
Application home screen3.3.1 12
Input Dialogs3.3.2 13
Entering Characters and Numbers3.3.2.1 13
Changing the time and date3.3.2.2 14
Lists and tables3.3.3 15
Scope of delivery4.1 16
Installing the components4.2 17
Selecting the location4.3 18
Connecting the instrument4.4 19
Leveling the balance4.5 20
Leveling the balance with the level indicator4.5.1 20
Leveling the balance using the leveling assistant4.5.2 21
Transporting the balance4.6 22
Weighing below the balance4.7 22
General requirements4.8 23
Warming up the balance4.8.1 23
Adjusting the balance4.8.2 23
Switching on the balance5.1 24
Switching off the balance5.2 24
Main settings and activities at a glance5.3 25
Navigation on the touch screen5.4 26
Opening an application5.4.1 26
Scrolling5.4.2 26
Using shortcuts5.4.3 27
Performing a simple weighing5.5 27
Switching the weighing unit5.6 28
Changing the resolution5.7 31
Zeroing5.8 32
Taring5.9 32
Working with IDs5.10 33
Defining an ID5.10.1 33
Workflow handling options5.10.2 34
Table of Contents 3
Page 4

Statistics5.11 35
Activities6 36
Activities - Weighing and other applications6.1 36
Weighing6.1.1 37
Counting6.1.2 38
Percent Weighing6.1.3 40
Formulation6.1.4 42
Dynamic Weighing6.1.5 44
Check Weighing6.1.6 46
Factor Weighing6.1.7 50
Totaling6.1.8 51
Activities - Adjustments and tests6.2 53
FACT Fully automatic internal adjustment6.2.1 54
Internal Adjustment6.2.2 55
External Adjustment6.2.3 56
General Settings7 57
Quick settings/Preferences7.1 57
Date and time7.1.1 57
Brightness7.1.2 57
Sound7.1.3 58
Language7.1.4 58
Glove mode7.1.5 58
Quick Adjustment7.1.6 58
Leveling assistant7.1.7 58
General configuration and data7.2 59
Weighing options7.2.1 59
Publishing7.2.2 60
Devices and connectivity7.2.3 62
System settings7.2.4 63
ISO-log7.2.5 63
Access protection7.2.6 64
Communication with Peripheral Devices8 65
PC-Direct Function8.1 65
USB Device Interface8.2 66
Firmware (Software) Updates9 68
Operating principle9.1 68
Update procedure9.2 69
Error and Status Messages10 70
Maintenance11 71
Cleaning the glass draft shield (0.1 mg and 1 mg models)11.1 71
Disposal11.2 73
Interface Specification12 74
RS232C interface12.1 74
USB host12.2 75
USB device12.3 75
Table of Contents4
Page 5

MT-SICS interface commands and functions12.4 76
Technical Data13 77
General data13.1 77
Model-specific data13.2 78
Balances with readability of 0.1 mg, S platform with draft shield13.2.1 78
Balances with readability of 1 mg, S platform with draft shield13.2.2 80
Balances with readability of 0.01 g, S platform13.2.3 82
Balances with readability of 0.1 g to 1 g, S platform13.2.4 85
Dimensions13.3 86
Balances with readability of 0.1 mg and draft shield13.3.1 86
Balances with readability of 1 mg and draft shield13.3.2 87
Balances with readability of 0.01 g13.3.3 88
Balances with readability of 0.1 g13.3.4 89
Accessories and Spare Parts14 90
Accessories14.1 90
Spare parts14.2 95
Index 96
Table of Contents 5
Page 6

Page 7

1Introduction
1
2
…
Thank you for choosing a METTLER TOLEDO balance. The precision and analytical balances of the MS-TS line
combine a large number of weighing possibilities with easy operation.
These operating instructions apply to all balance models of the MS-TS line and are based on the initially
installed firmware (software) version V 3.30.
1.1Conventions and symbols used in these operating instructions
Key and button designations are indicated by a picture or text in square brackets (e.g. [ ]).
These symbols indicate an instruction:
Requirements
Steps
Results
u www.mt.com/balances
7Introduction
Page 8
2Safety Information
2.1Definition of signal warnings and symbols
Safety notes are marked with signal words and warning symbols. These show safety issues and warnings.
Ignoring the safety notes may lead to personal injury, damage to the instrument, malfunctions and false results.
WARNING for a hazardous situation with medium risk, possibly resulting in severe
injuries or death if not avoided.
CAUTION for a hazardous situation with low risk, resulting in damage to the device or
the property or in loss of data, or minor or medium injuries if not avoided.
Attention (no symbol)
for important information about the product.
Note (no symbol)
for useful information about the product.
General hazard Electrical shock
2.2Product safety information
Intended use
Your balance is used for weighing. Use the balance exclusively for this purpose. Any other type of use and
operation beyond the limits of technical specifications without written consent from Mettler-Toledo AG, is con
sidered as not intended.
It is not permitted to use the instrument in explosive atmosphere of gases, steam, fog, dust
and flammable dust (hazardous environments).
General safety information
This balance complies with current industry standards and the recognized safety regulations; however, it can
constitute a hazard in use. Do not open the balance housing: The balance contains no user-serviceable parts.
In the event of problems, please contact a METTLER TOLEDO representative.
Always operate and use your instrument only in accordance with the instructions contained in this manual. The
instructions for setting up your new instrument must be strictly observed.
If the instrument is not used according to these Operating Instructions, protection of the instrument may
be impaired and METTLER TOLEDO assumes no liability.
Staff safety
These operating instructions must be read and understood before using the balance. These operating instruc
tions must be retained for future reference.
The balance must not be altered or modified in any way. Only use METTLER TOLEDO original spare parts and
accessories.
8 Introduction
Page 9
Safety notes
CAUTION
Damage to the balance
a) Only use indoors in dry locations.
b) Do not use pointed objects to operate the touch screen!
The balance is of a very sturdy design, but is still a precision instrument. It must be han
dled with care.
c) Do not open the balance:
The balance contains no user-serviceable parts. In the event of problems, please contact
a METTLER TOLEDO representative.
d) Only use METTLER TOLEDO original accessories and peripheral devices for the balance.
These are specifically designed for the balance.
WARNING
Risk of electric shock
Use only the original universal AC/DC adapter delivered with your balance, and check that
the voltage printed on it is the same as your local power supply voltage. Only plug the
adapter into a socket which is grounded.
9Safety Information
Page 10
3Design and Function
C
0.1 g
10
9
7
1
2514
0.01 g
9
5
10
1
2
7
14
6
MS
MS
3
101 2
5
7
4
3
14
MS
MS
0.1 mg
10
1
2
5
7
4
14
6
11
12
8
1
3
15
14
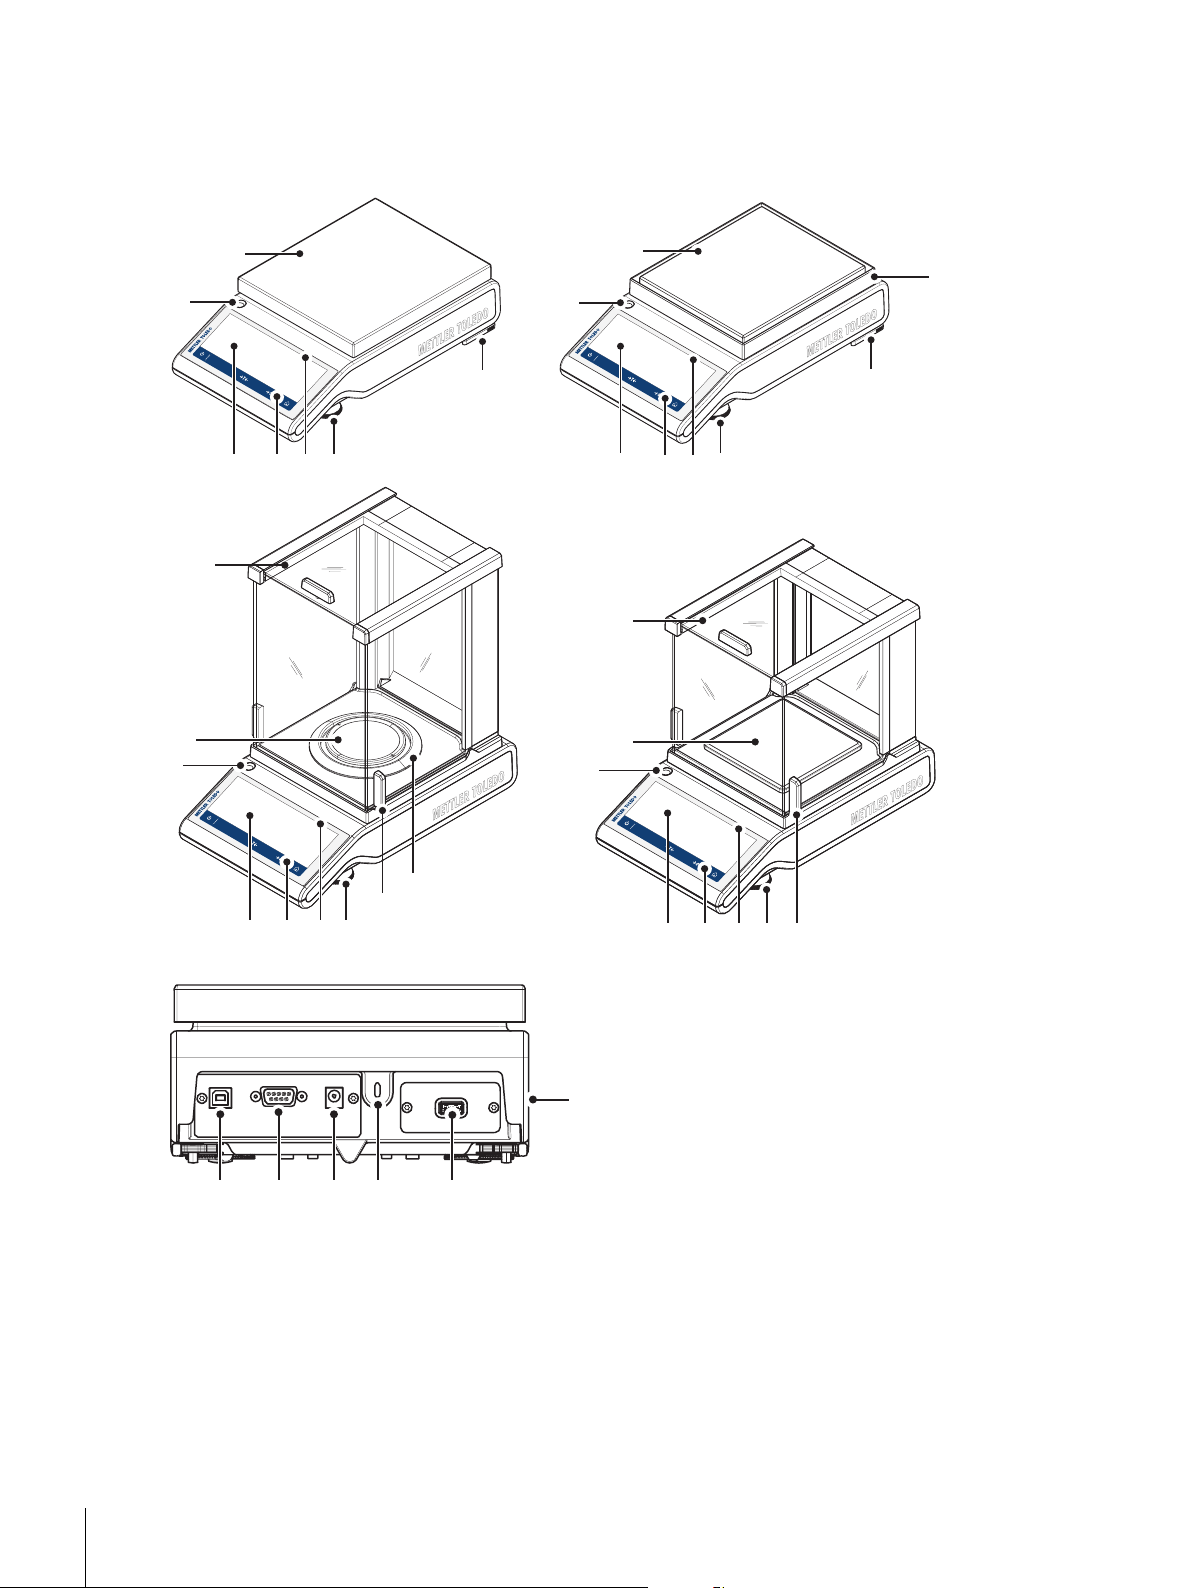
3.1Components
10 Safety Information
1 Capacitive color TFT touch screen
2 Operation keys
3 Glass draft shield
4 Handle for operation of the draft shield door
5 Weighing pan
6 Draft ring element
7 Level indicator
8 Kensington slot for anti-theft purposes
9 Safety feet (0.01 g and 0.1 g models)
10 Leveling foot
11 USB Device connection
12 RS232C serial interface
13 Socket for AC/DC adapter
14 USB Host connection
15 Product label
Page 11
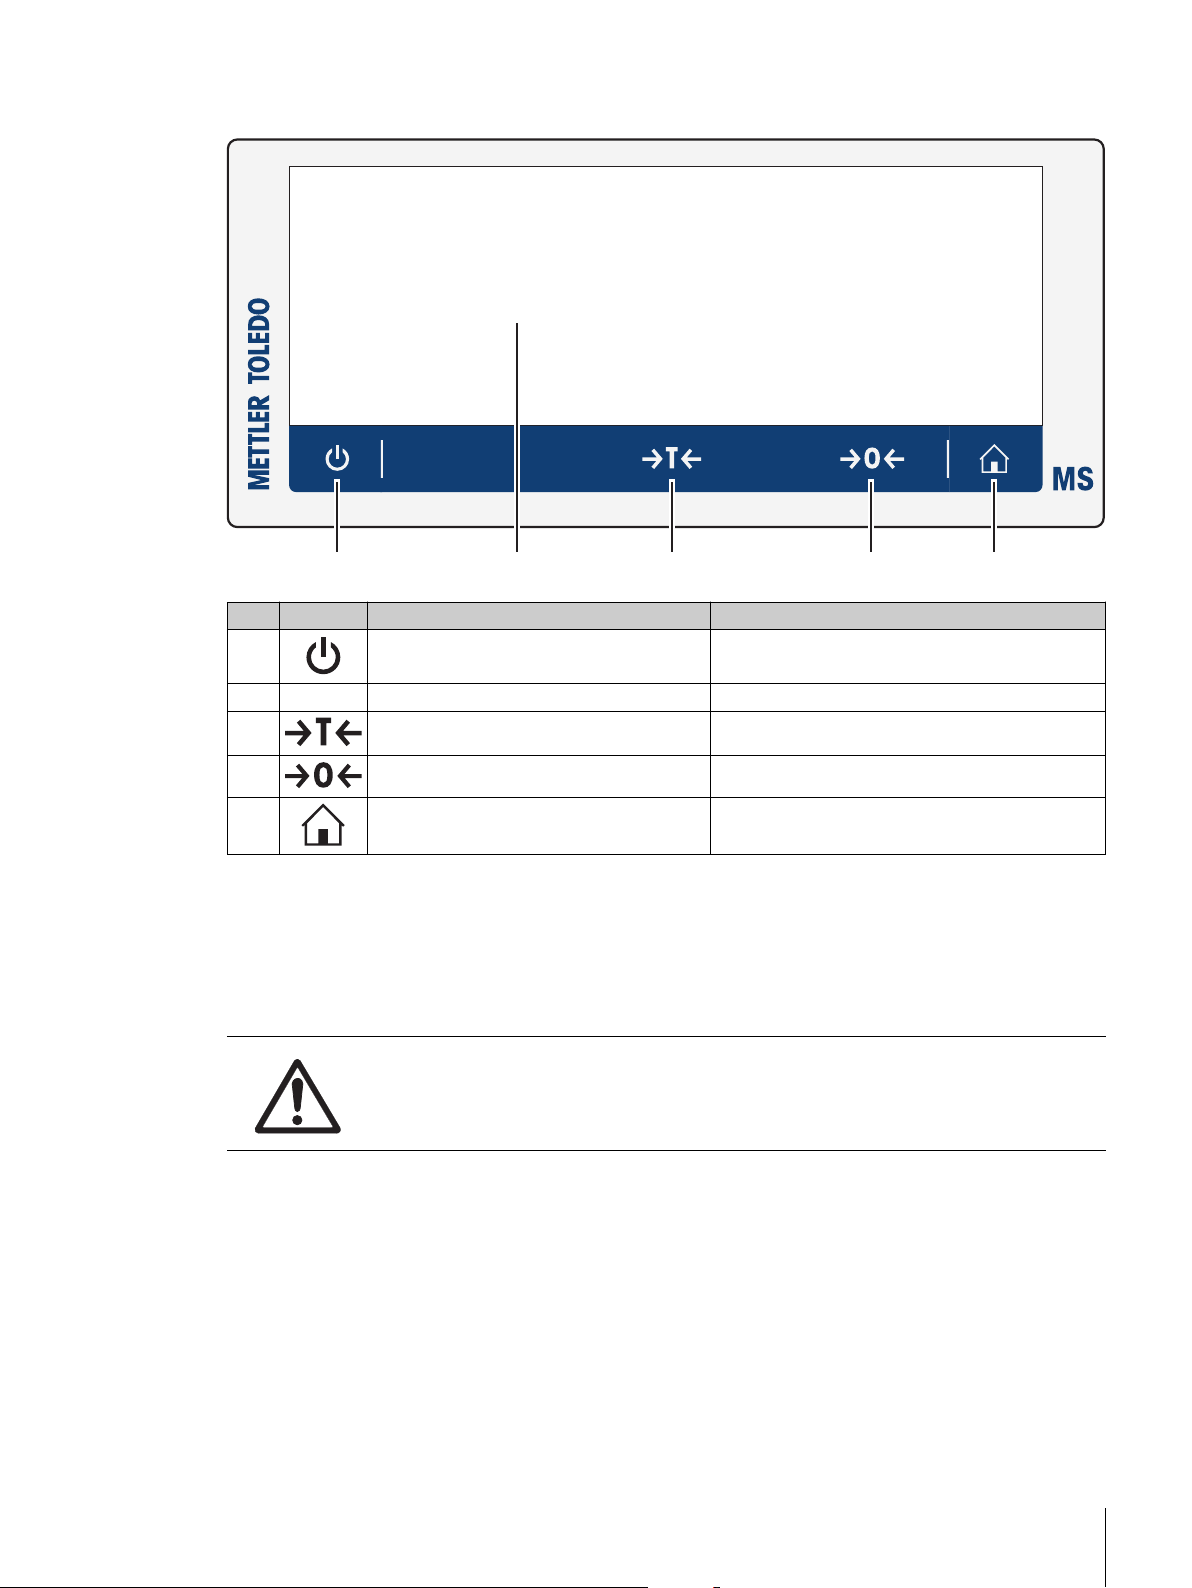
3.2Terminal keys
53 4
1
2
No. Key Name Explanation
1 ON/OFF To switch the instrument on or off.
2 Capacitive color TFT touch screen General navigation
3 Tare To tare the balance.
4 Zero To zero the balance.
5 Home To return from any menu level, or other window
3.3User Interface
The screen is a capacitive color TFT touch screen. The screen not only displays information, it also allows the
user to enter commands by tapping on certain areas on its surface. You can choose the information displayed
on the screen, change balance settings or perform certain operations on the instrument.
Only those elements which are available for the current dialog appear on the display.
to the application home screen.
CAUTION
Do not touch the touch screen with pointed or sharp objects!
This may damage the touch screen.
11Design and Function
Page 12
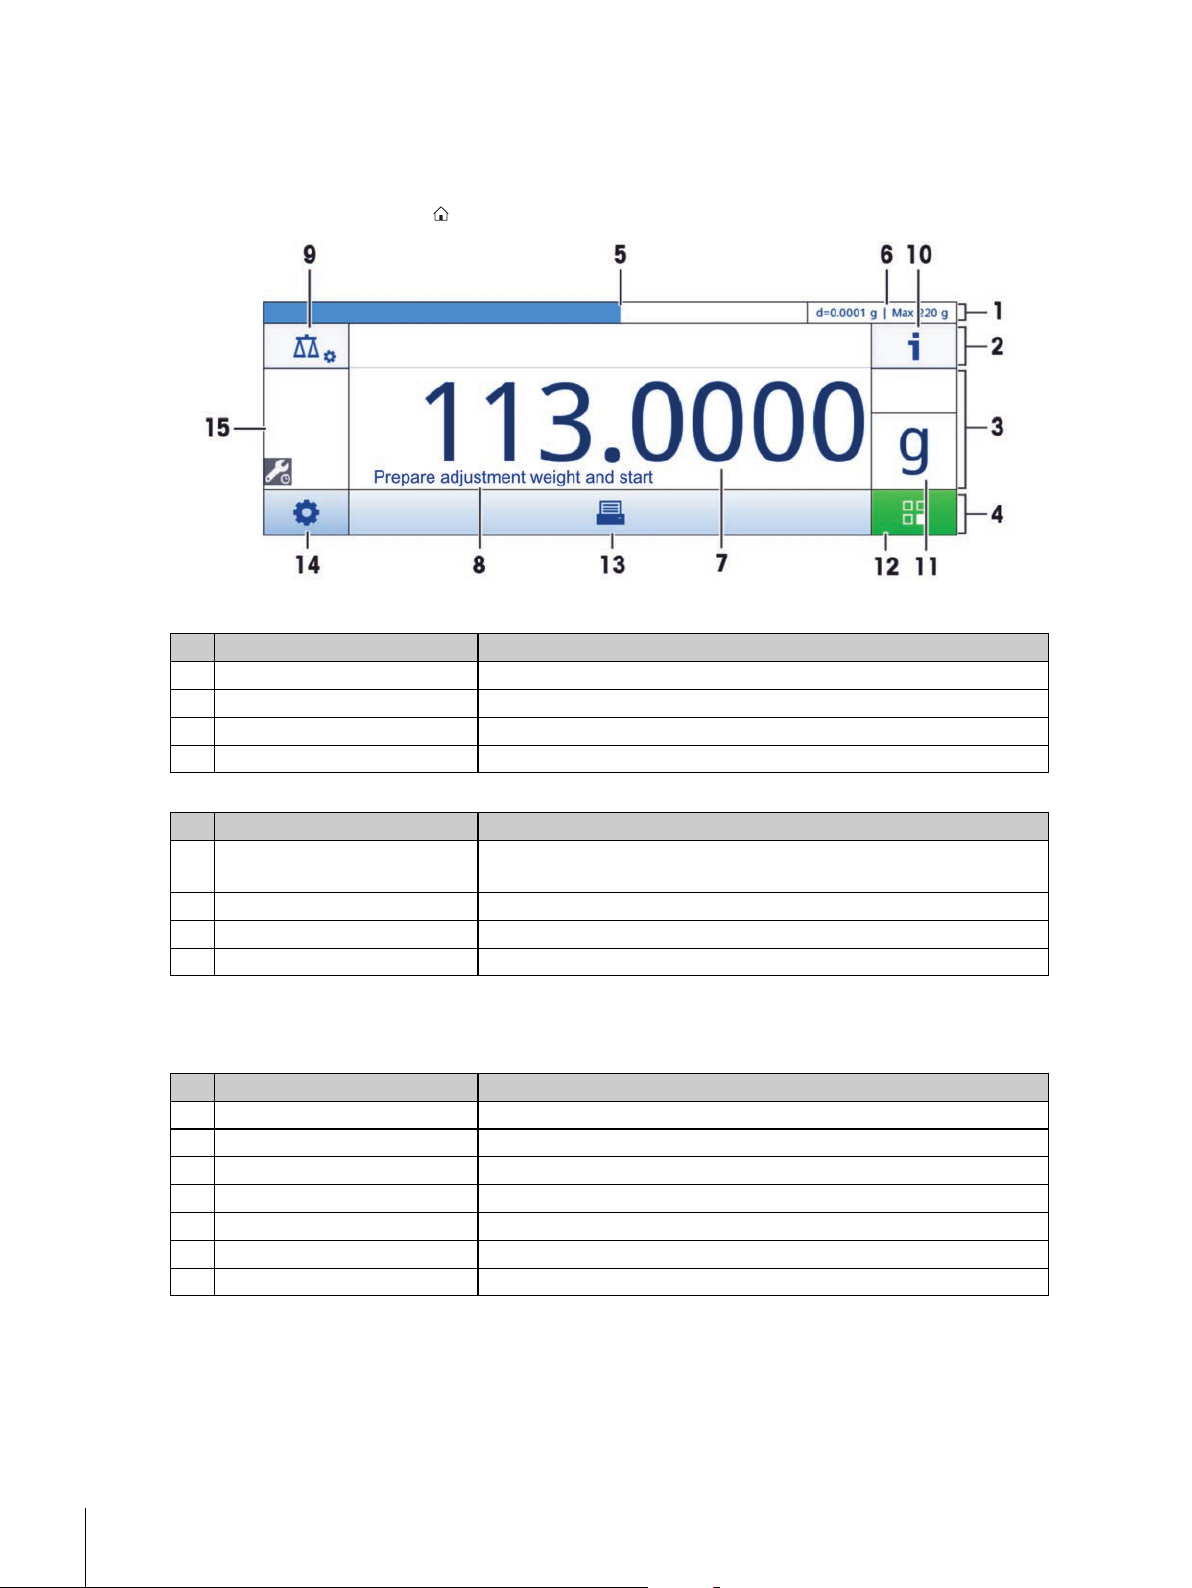
3.3.1Application home screen
The application home screen appears after the startup of the instrument. It always shows the last application
that was being used before the balance was switched off. The application home screen is the main screen of
the balance, from where every function can be accessed. You can always return to the application home screen
by pressing on the home button [ ] in the lower right corner of the screen.
Information and work bars
Name Explanation
1 Weighing information bar Shows the weighing-in aid and general balance information.
2 Work title bar Shows information about the current activity.
3 Value bar Shows information about the current weighing process.
4 Main navigation Work-related functions.
Information fields
Name Explanation
5 Weighing-in aid A dynamic graphic indicator shows the used amount of the total
weighing range.
6 Short balance information Readability and capacity of the balance.*
7 Weighing value field Shows the value of the current weighing process.
8 Coach text field Shows instructions for the current weighing process.
* For approved balances: Min (minimum capacity) and e (Verification scale interval) are shown in the left
upper corner.
Action buttons
Name Explanation
9 Main activity configuration To configure the current application (e.g. Weighing).
10 Detailed balance Information Shows detailed technical data about the balance.
11 Weighing unit Shows the unit of the current weighing process.
12 Activities To open the activities selection.
13 Print To produce a print.
14 Settings/Preferences To configure settings/preferences.
15 Status information field Shows information about the system status.
12 Design and Function
Page 13
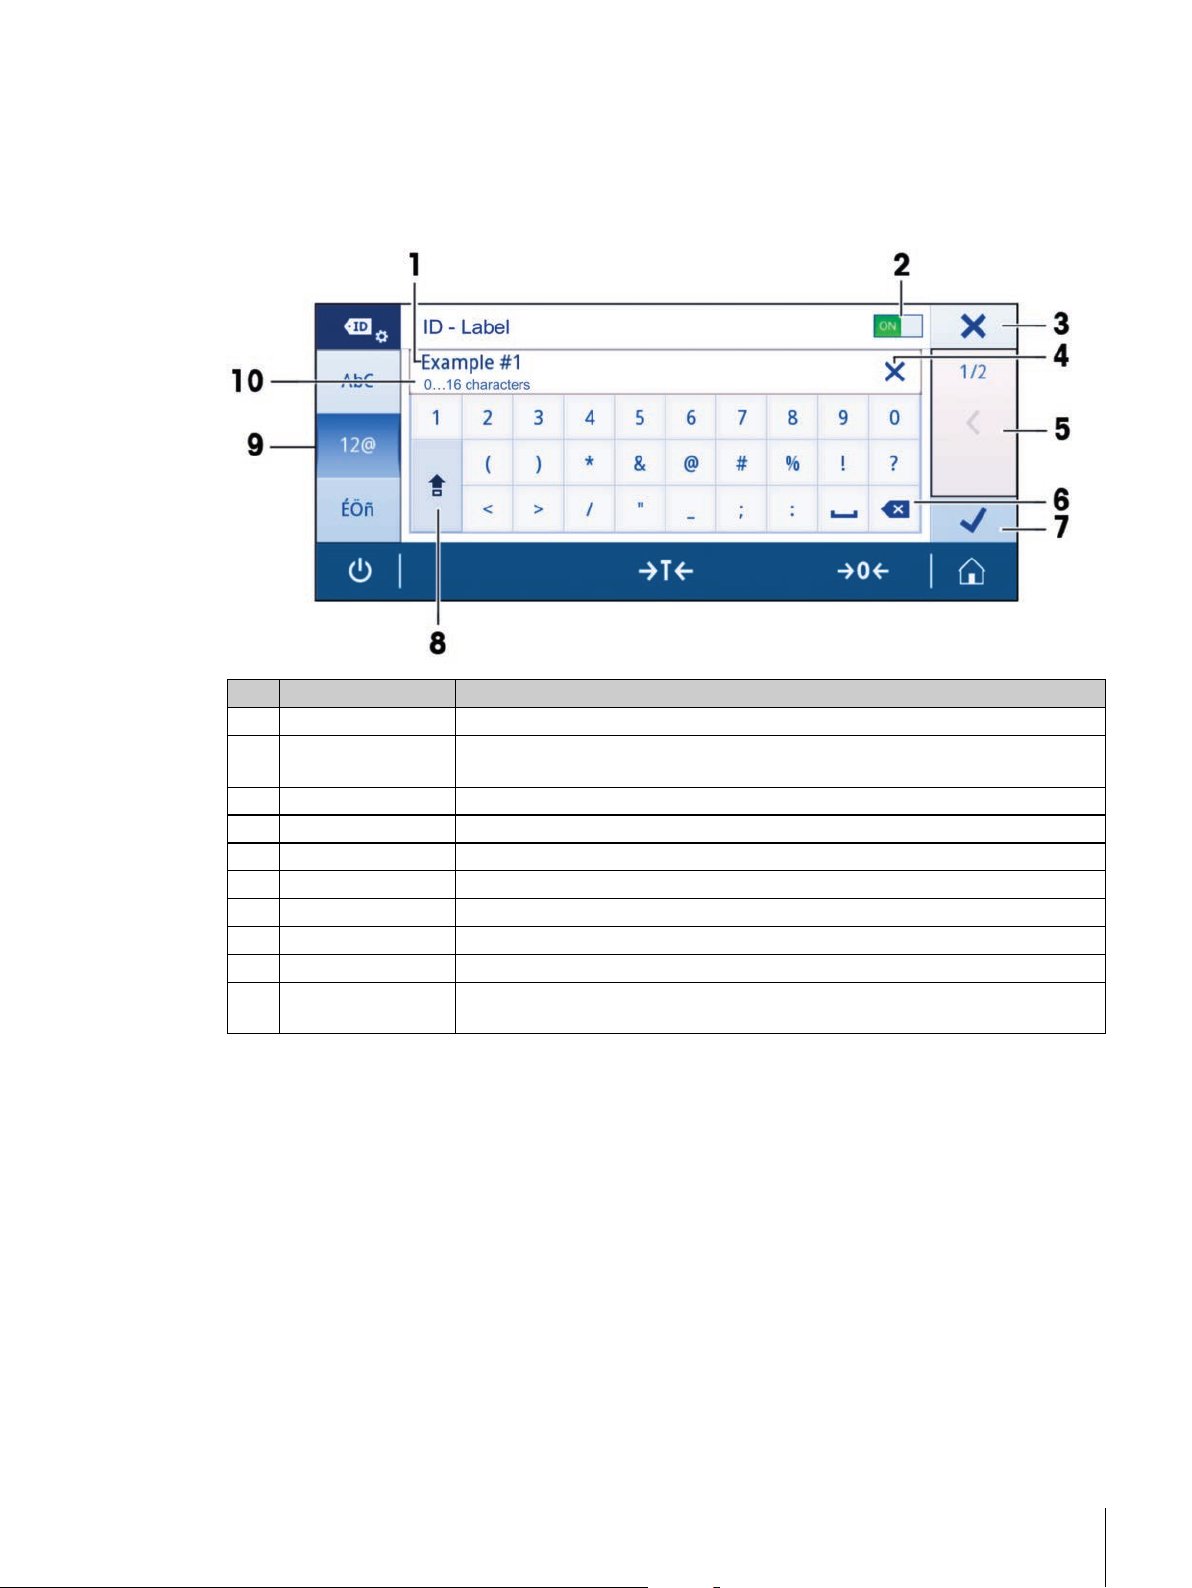
3.3.2Input Dialogs
3.3.2.1Entering Characters and Numbers
The keyboard dialog allows the user to enter characters including letters, numbers and a variety of special char
acters.
Name Explanation
1 Input field Shows the characters that have been entered.
2 Switch If a switch appears on the right side in the content title bar, it must be switched
on in order to enter a value.
3 Discard To discard the entered data and to exit the dialog.
4 Delete all To delete all entered characters.
5 Page indicator To navigate when the dialog consists of several steps.
6 Delete To delete the last entered character.
7 Confirm To confirm the data entered.
8 Shift To switch between lower or upper case letters.
9 Specialized tabs To switch the keyboard mode for entering letters, numbers or special characters.
10 Explanation field Extra information about the value to enter (e.g. the maximum number of charac
ters available).
13Design and Function
Page 14
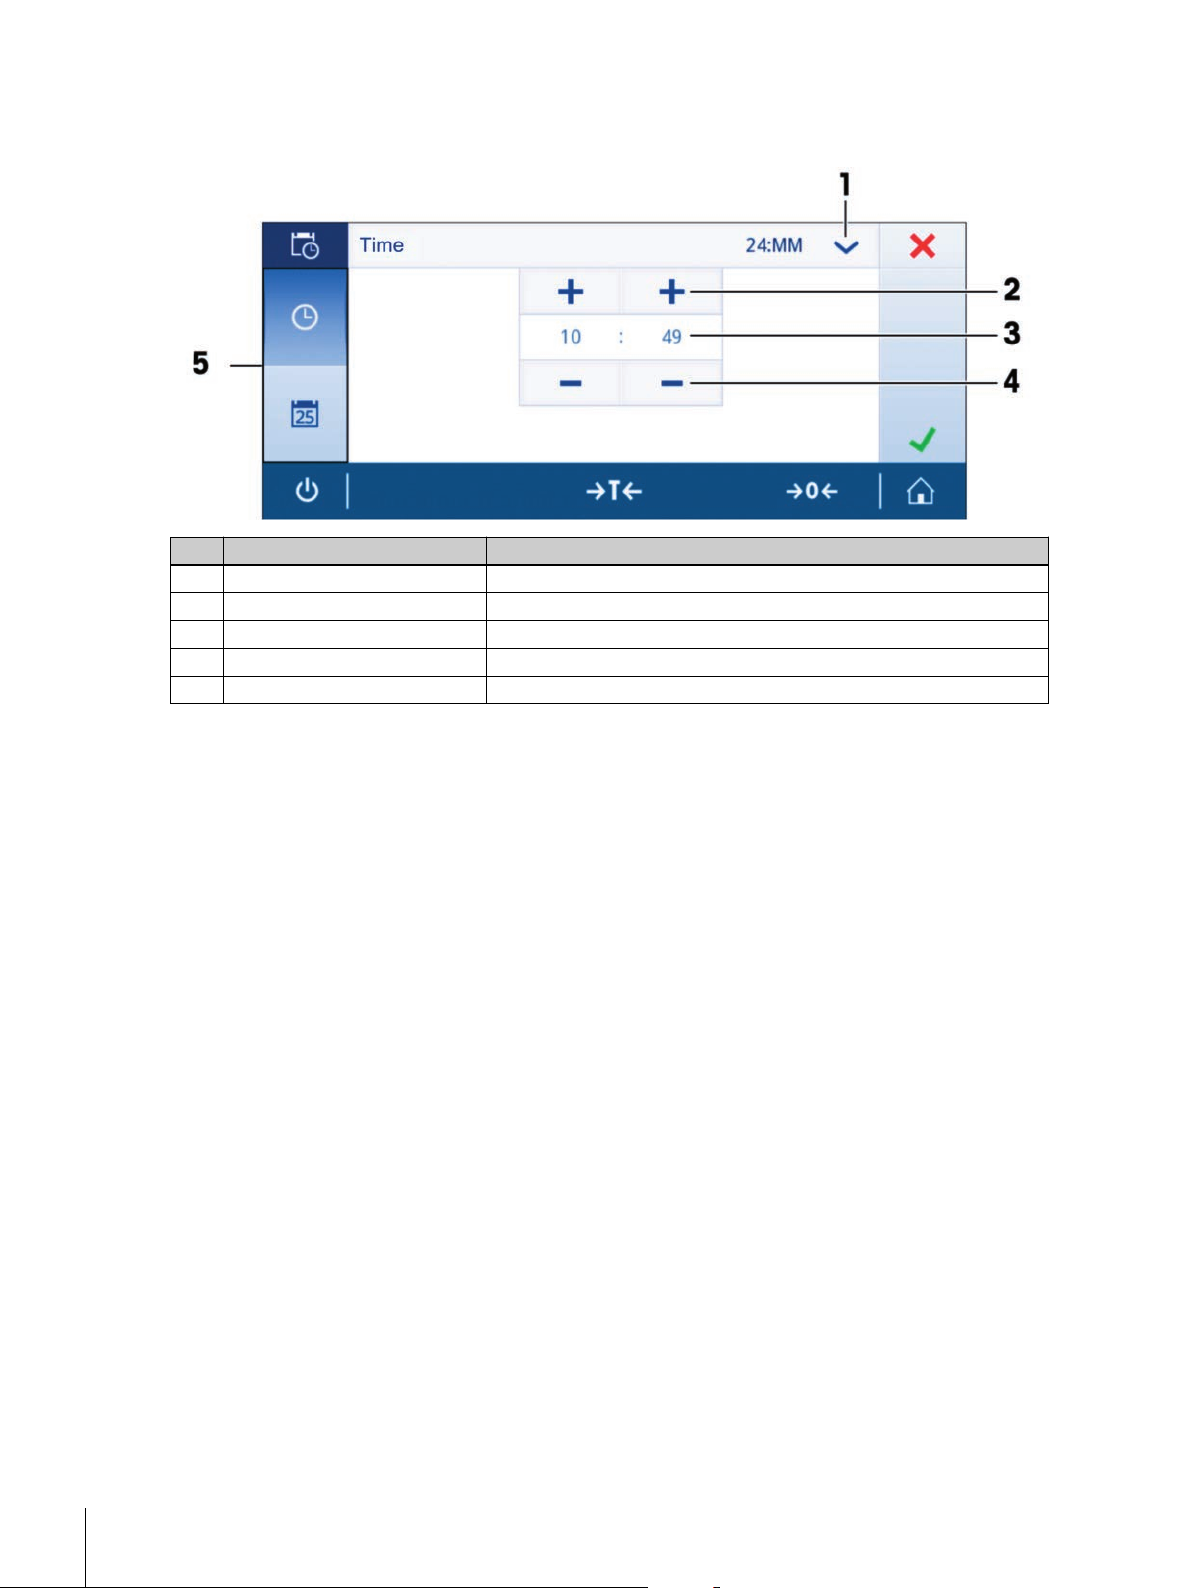
3.3.2.2Changing the time and date
The dialog (Picker view) allows the user to set the time and date.
Name Explanation
1 Change time/date format Various time/date formats can be chosen.
2 Pick button Increment
3 Picker field Shows the defined time/date.
4 Pick button Decrement
5 Selection tabs Tabs of the selectable sub-categories
14 Design and Function
Page 15
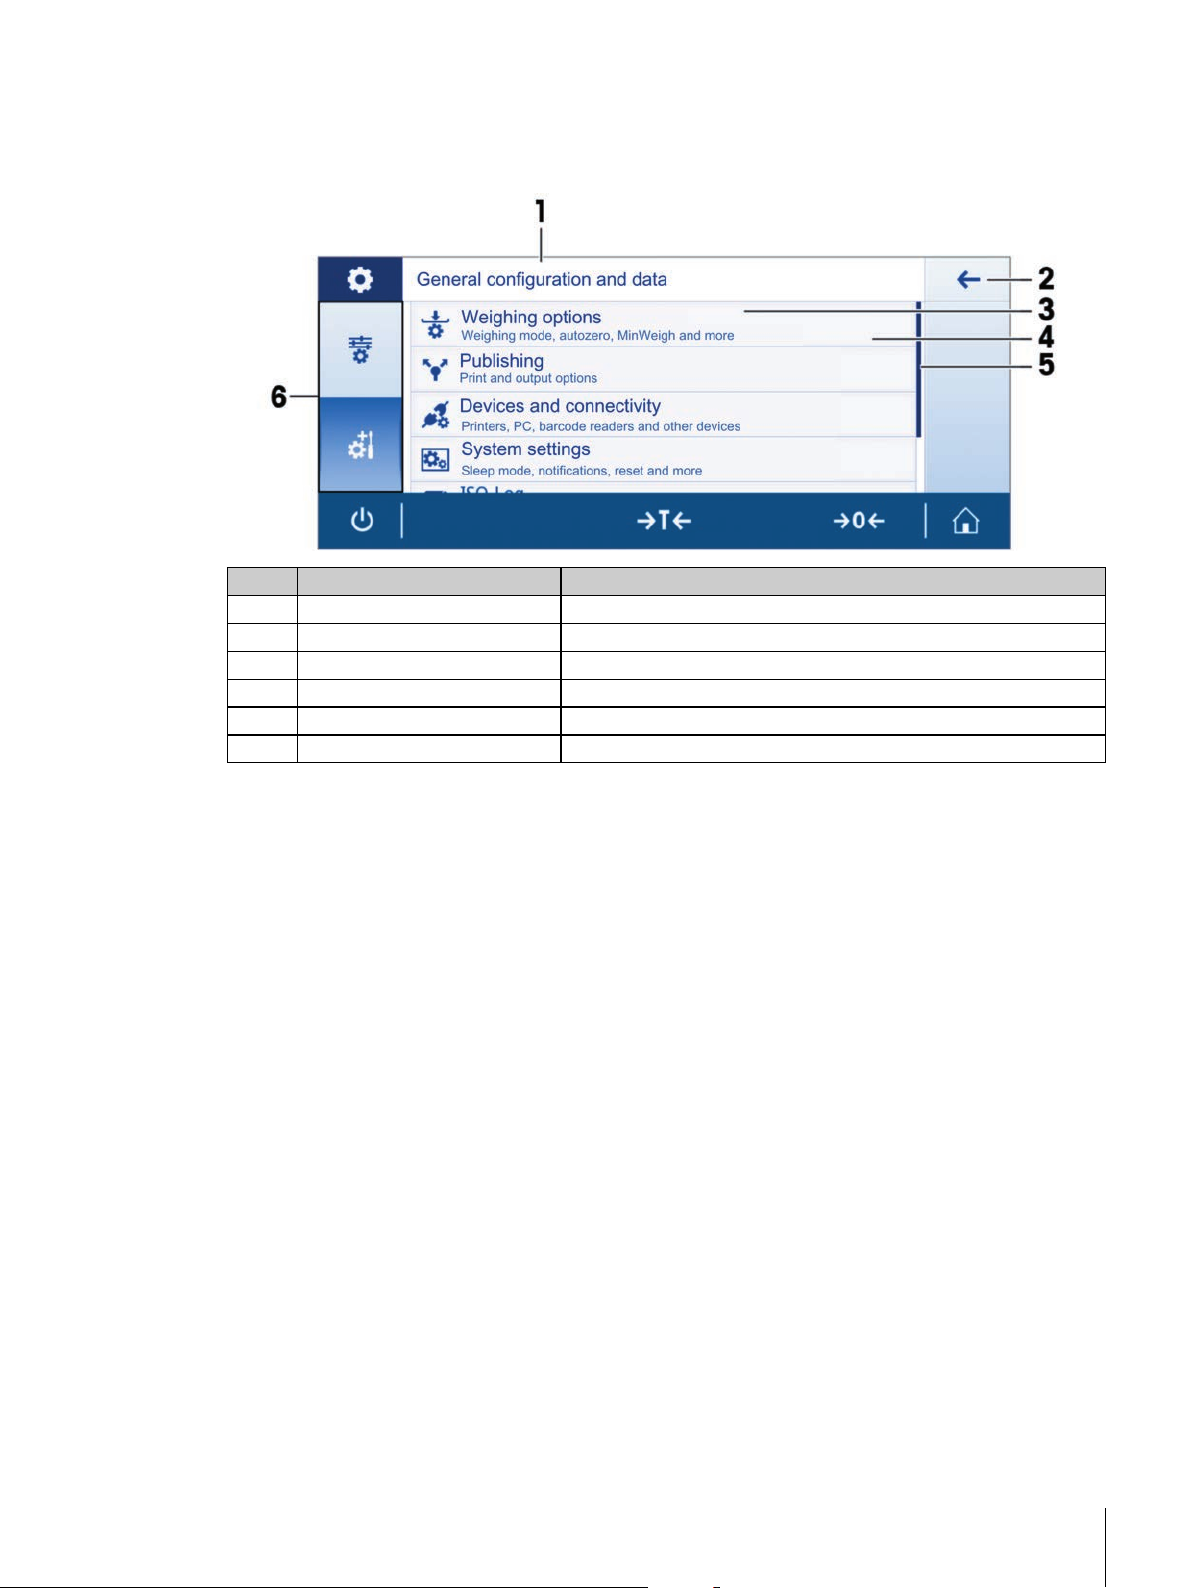
3.3.3Lists and tables
Basic elements of a simple list include a content title and a list of sub-elements. Tapping on an element opens
a list of sub-elements or an input dialog.
Name Explanation
1 List title Title of the current list
2 Back button To go one step back.
3 List element title Title of the list element
4 List element description Shows the sub-elements.
5 Scroll position The list can be scrolled.
6 Selection tabs Tabs of the selectable sub-categories.
15Design and Function
Page 16
4Installation and Putting into Operation
This section describes how to put the new instrument into operation.
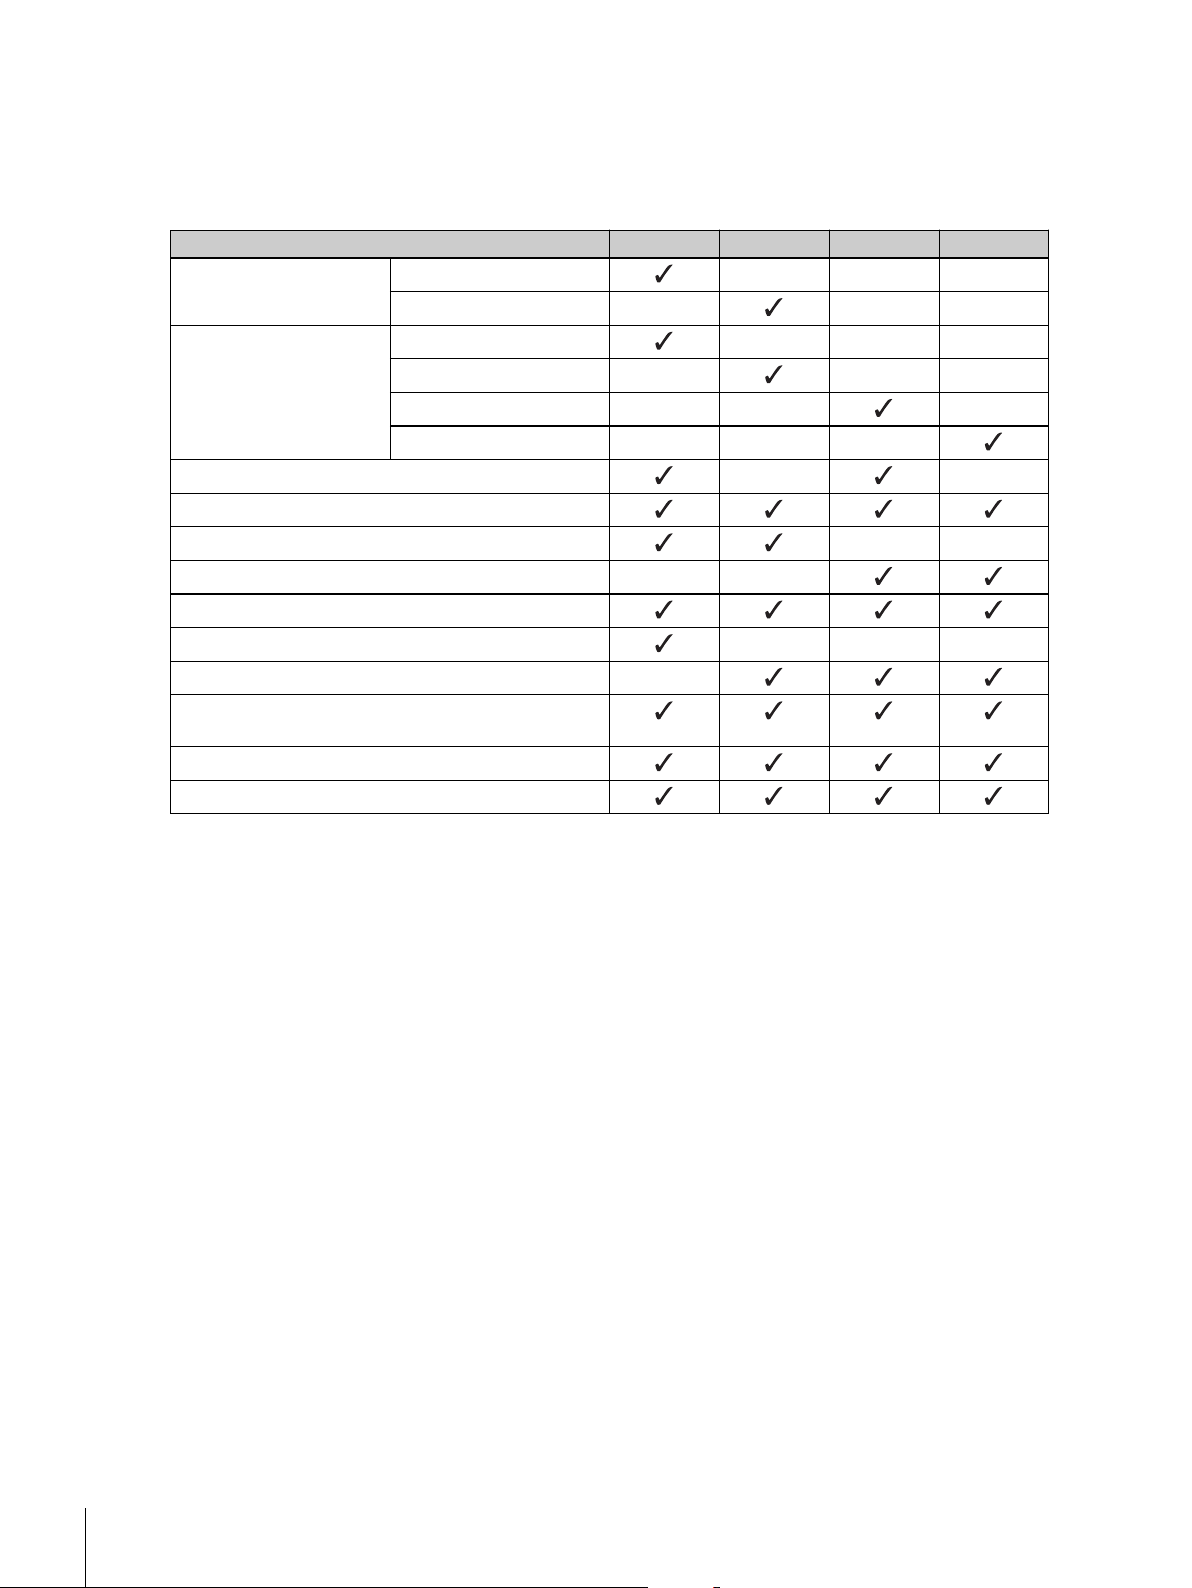
4.1Scope of delivery
Components 0.1 mg 1 mg 0.01 g 0.1 g
236 mm – – –Draft shield
168 mm – – –
Weighing pan
Draft shield element – –
Pan support
Bottom plate – –
ESD plate – –
Protective cover
Universal AC/DC adapter (country-specific) - - -
AC/DC adapter (without power cable) -
Operating instructions printed or on CD-ROM (countryspecific)
Quick guide
EC declaration of conformity
Ø 90 mm – – –
127 x 127 mm – – –
170 x 200 mm – – –
190 x 226 mm – – –
16 Design and Function
Page 17
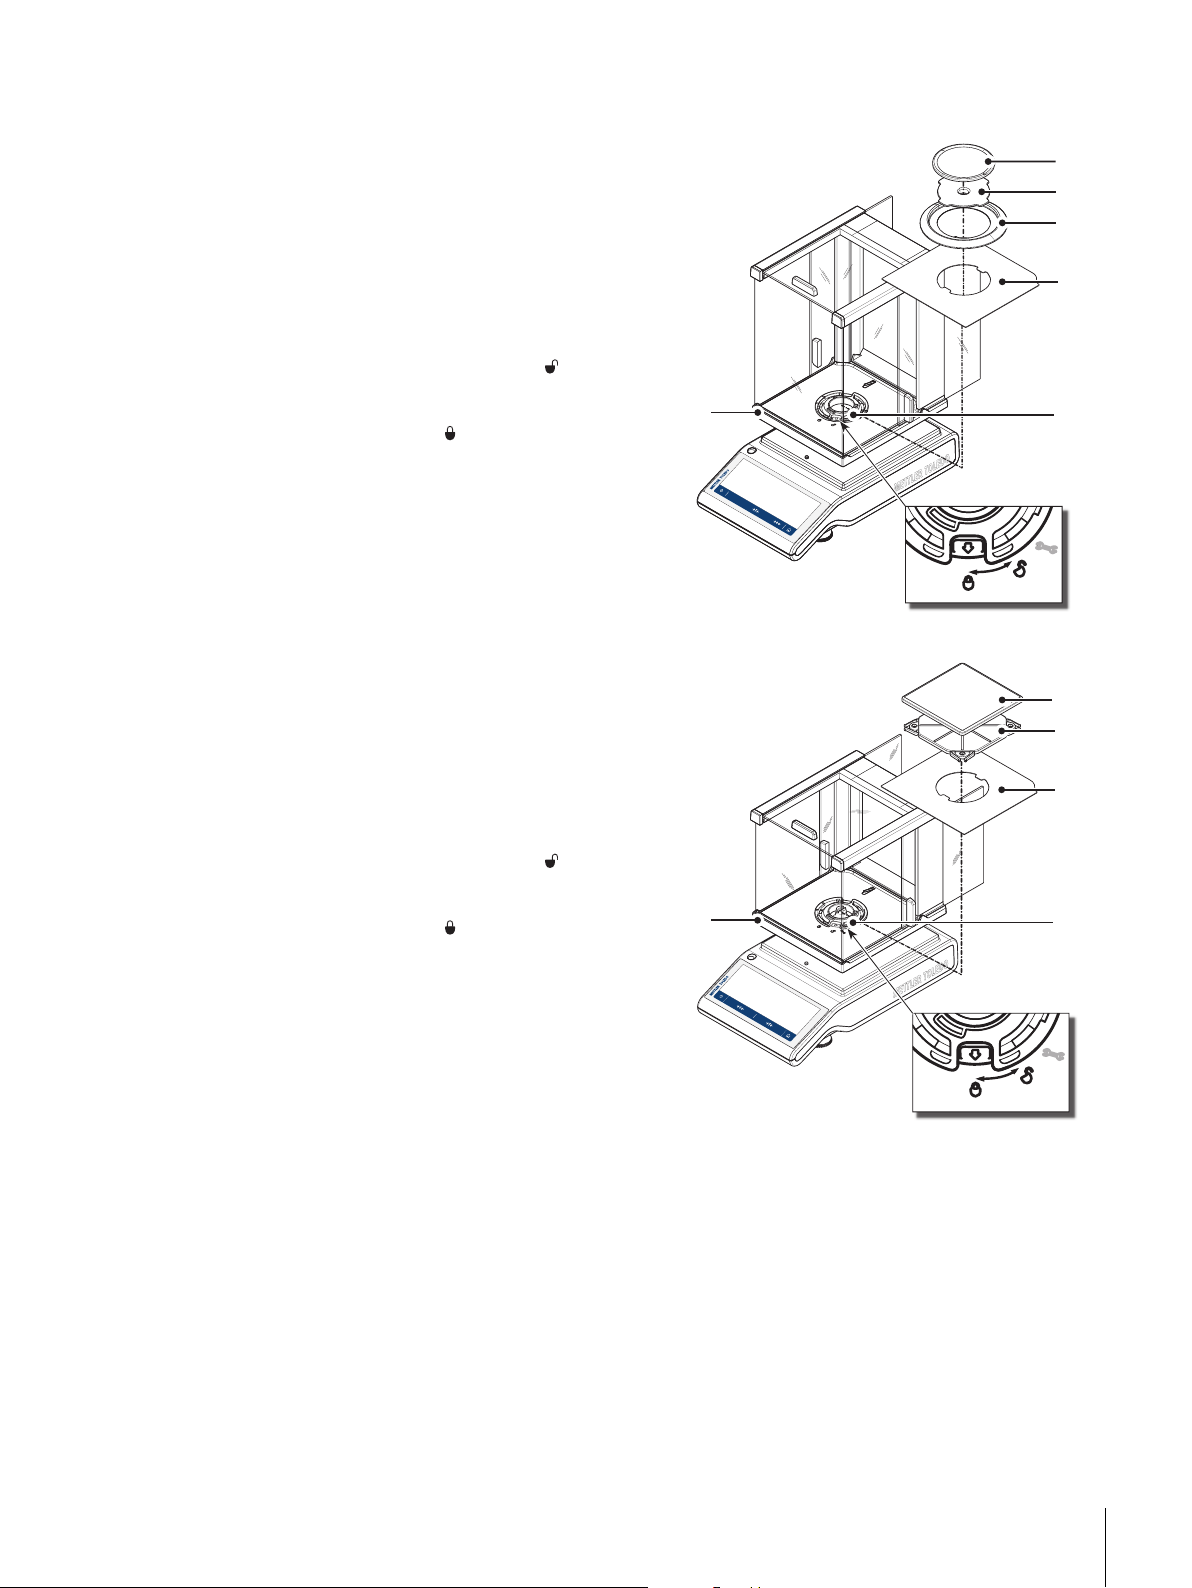
4.2Installing the components
3
4
5
6
1
2
2
M
S
3
4
5
1
2
MS
Balances with readability of 0.1 mg and draft shield
(236mm)
Place the following components on the balance in the
specified order:
Note
Push the side glass back as far as it will go and hold
the draft shield (1) with both hands on the bars at the
top.
1 Turn draft shield lock (2) to position (unlock).
2 Place draft shield on the balance.
3 Turn draft shield lock to (lock) and place bottom
plate (3).
4 Place draft ring element (4) and weighing pan (6)
with pan support (5).
Note
For cleaning the draft shield see section Cleaning the
glass draft shield (0.1 mg and 1 mg models)
(page71).
Balances with readability of 1 mg and draft shield
(168mm)
Place the following components on the balance in the
specified order:
Note: Push the side glass back as far as it will go
and hold the draft shield (1) with both hands on the
bars at the top.
1 Turn draft shield lock (2) to position (unlock).
2 Place draft shield on the balance.
3 Turn draft shield lock to (lock) and place bottom
plate (3).
4 Place weighing pan (5) with pan support (4).
Note
For cleaning the draft shield see section Cleaning the
glass draft shield (0.1 mg and 1 mg models)
(page71).
17Installation and Putting into Operation
Page 18
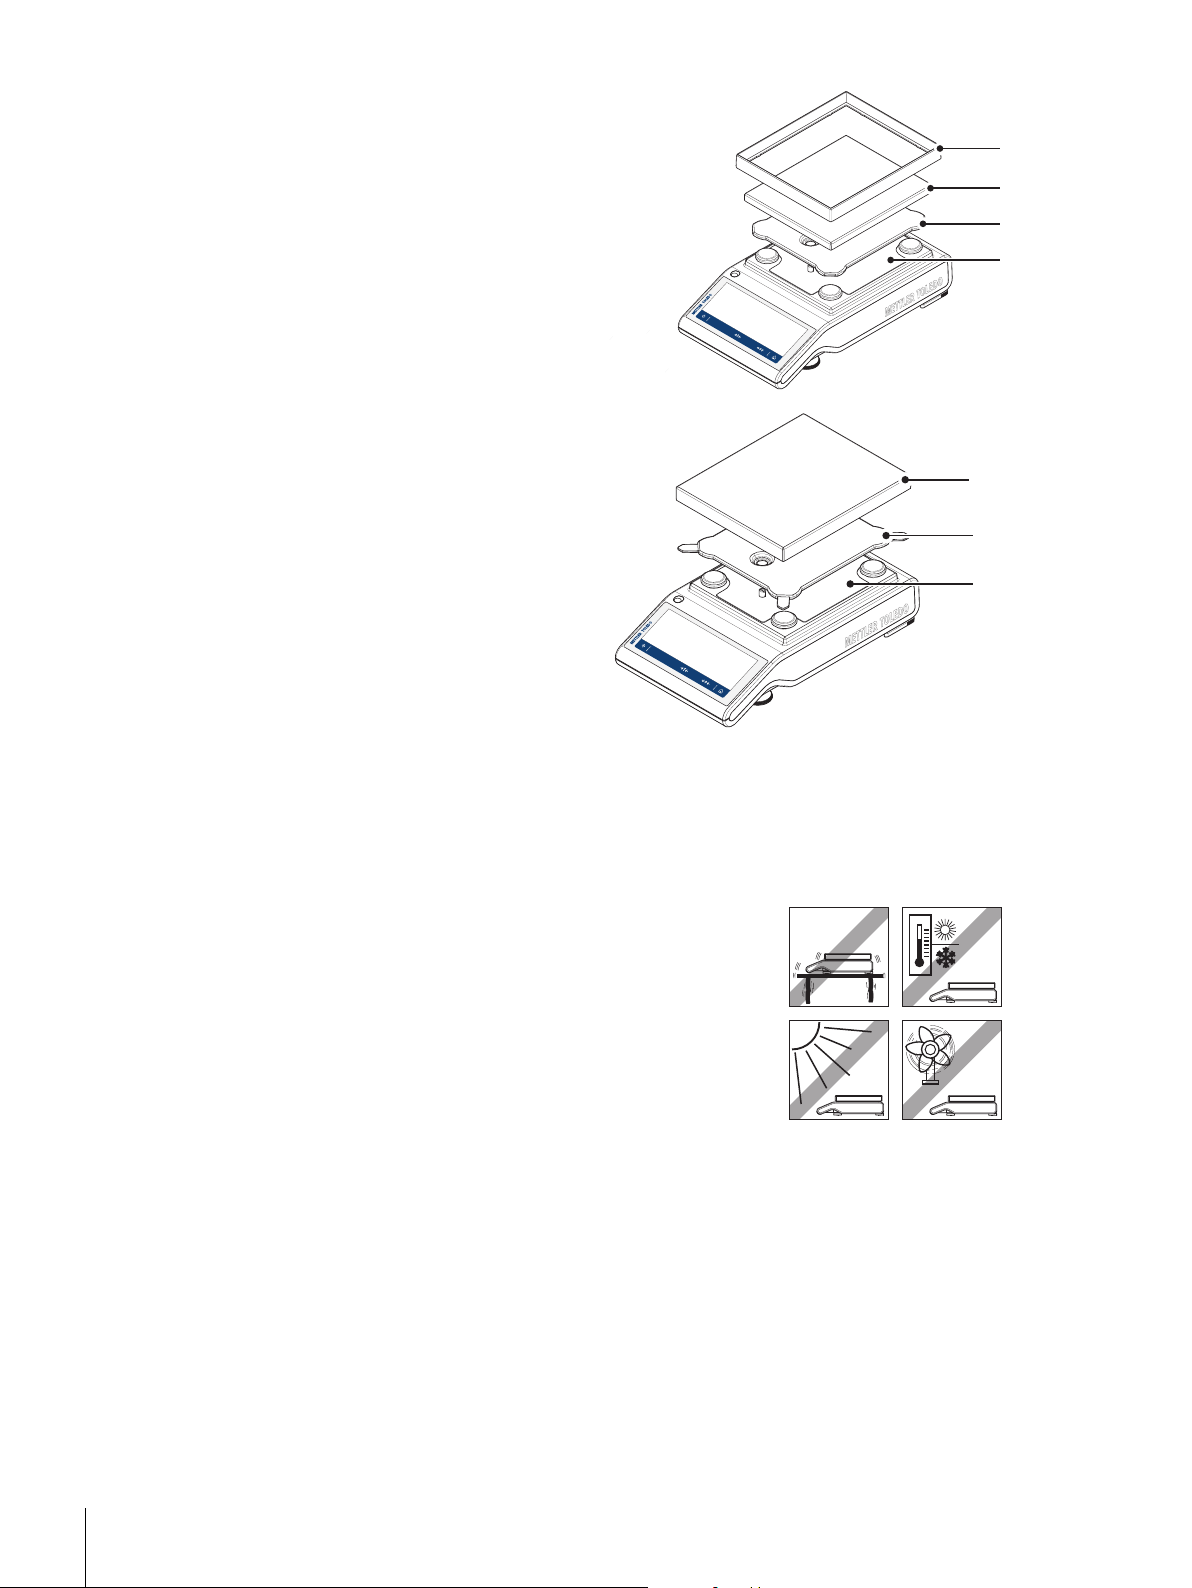
Balances with readability of 0.01 g
MS
2
3
4
1
MS
3
2
1
– Place the following components on the balance in
the specified order:
●
ESD plate (1)
●
Pan support (2)
●
Weighing pan (3)
●
Draft ring element (4)
Balances with readability of 0.1 g
– Place the following components on the balance in
the specified order:
●
ESD plate (1)
●
Pan support (2)
●
Weighing pan (3)
4.3Selecting the location
Your balance is a precision instrument and will reward you for finding its optimum location with higher accura
cy and dependability. Select a stable surface that is as horizontal as possible. The surface must be able to
safety carry the weight of a fully loaded balance.
Observe ambient conditions (see Technical Data).
Avoid the following:
●
Direct sunlight
●
Powerful drafts (e.g. from fans or air conditioners)
●
Excessive temperature fluctuations
●
Vibrations
18 Installation and Putting into Operation
Page 19

4.4Connecting the instrument
The balance is supplied with a country-specific AC/DC adapter or with a country-specific power cable. The pow
er supply is suitable for all line voltages in the range: 100 - 240 VAC, 50/60 Hz. For detailed specifications,
see the section Technical Data.
CAUTION
Allow the balance to warm up for 30 minutes (0.1 mg models need 60 minutes) to adapt itself to the ambient
conditions.
Connect the AC/DC adapter to the connection socket on the back of your balance
and to the power line.
Attention
●
Check if the local power supply falls within this range. If this is not the case, under no circumstances con
nect the AC/DC adapter to the power supply, but contact a METTLER TOLEDO representative.
●
The power plug must be accessible at all times.
●
Prior to use, check the power cable for damage.
●
Route the cable in such a way that it cannot be damaged or cause a hindrance when working.
●
Ensure that no liquid ever comes into contact with the AC/DC adapter.
19Installation and Putting into Operation
Page 20
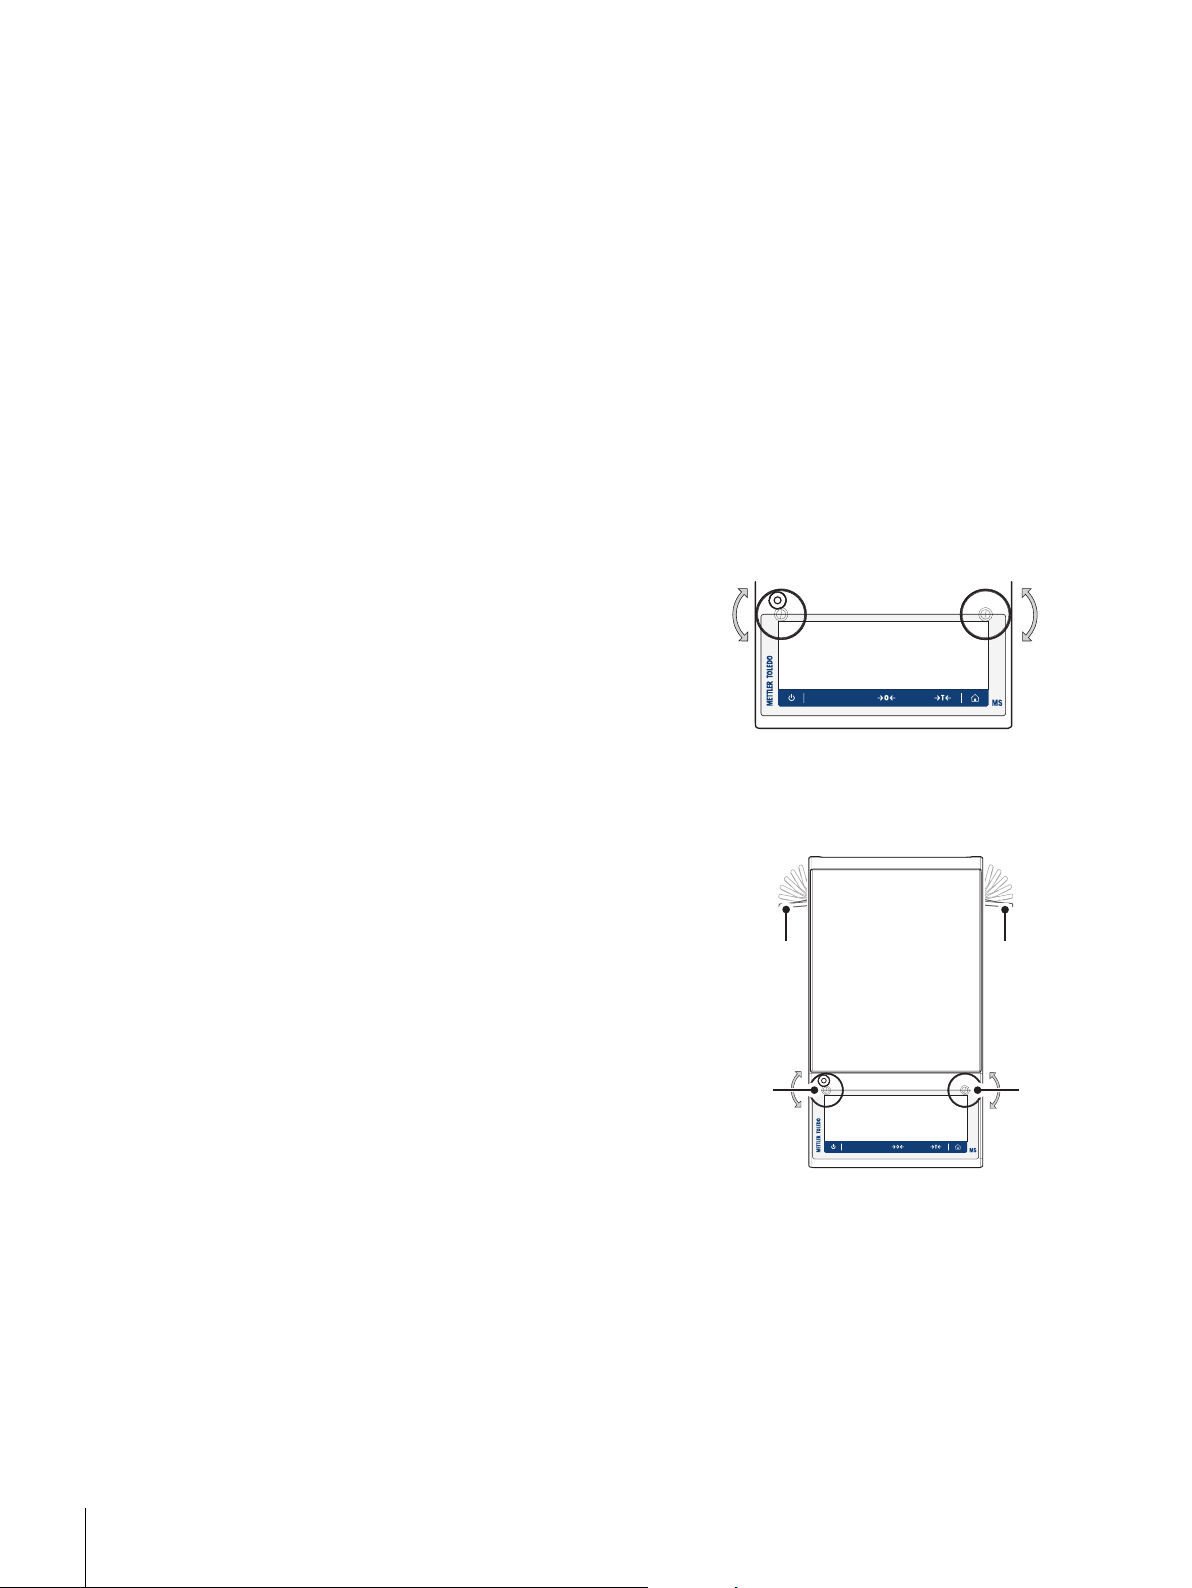
4.5Leveling the balance
B
B
A
A
Exact horizontal positioning and stable installation are prerequisites for repeatable and accurate weighing
results.
Note
To compensate for small irregularities or inclinations (±2 %) at the location, the instrument must be leveled
and adjusted each time it is moved to a new location.
The balance can be levelled with the leveling assistant and/or with the level indicator on top of the terminal.
There are two adjustable leveling feet to compensate for slight irregularities in the surface of the weighing
bench.
4.5.1Leveling the balance with the level indicator
All balances have a level indicator with an air bubble to level the balance manually.
Leveling balances with readability of 0.1 mg and 1 mg
– Adjust the two leveling feet until the bubble comes to rest
exactly in the middle of the glass:
Air bubble at "12 o'clock" turn both feet clockwise.
Air bubble at "3 o'clock" turn left foot clockwise, right
foot counterclockwise.
Air bubble at "6 o'clock" turn both feet counterclockwise.
Air bubble at "9 o'clock" turn left foot counterclockwise,
right foot clockwise.
Leveling balances with readability of 0.01 g and 0.1 g
1 Remove the clamps (A) for the safety feet by turning them out
wards.
2 Turn the clamps (A) outwards as far as they will go (~ 90°), so
that the safety feet can move freely.
3 Now level the balance by turning both leveling screws (B) until the
bubble is in the inner circle of the level indicator (see procedure
above).
4 Secure the safety feet by turning the clamps (A) inwards as far as
they will go.
20 Installation and Putting into Operation
Page 21
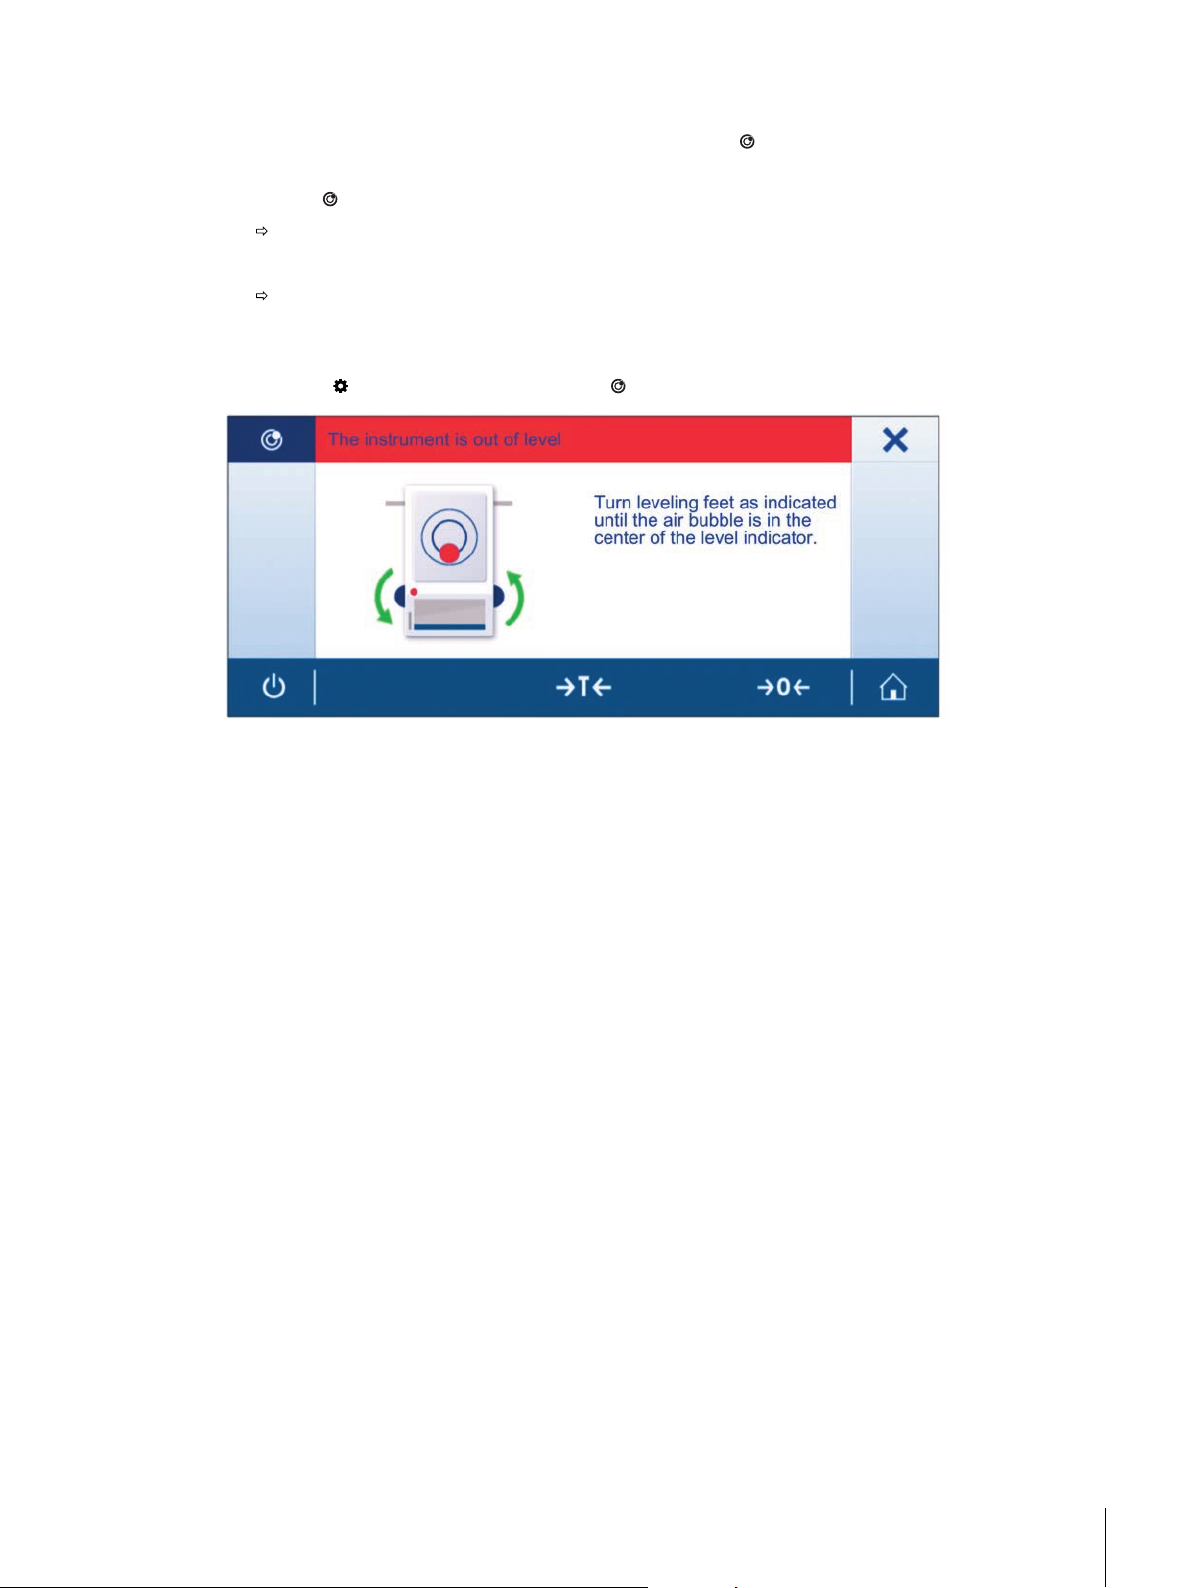
4.5.2Leveling the balance using the leveling assistant
When the balance is switched on at its new location, the symbol The instrument is out of level appears in
the status information field at the left side of the screen.
1 Tap on [ ].
The screen Notifications opens.
2 Select The instrument is out of level.
The function Leveling assistant opens.
The function Leveling assistant is a step-by-step guidance that helps in leveling the balance.
Navigation: [ ] Quick settings/Preferences > [ ] Leveling assistant
After following the instructions, the leveling assistant will show the next steps. Follow the steps until the balance
is levelled.
Note
Always use the physical air bubble of the level indicator as a reference.
21Installation and Putting into Operation
Page 22
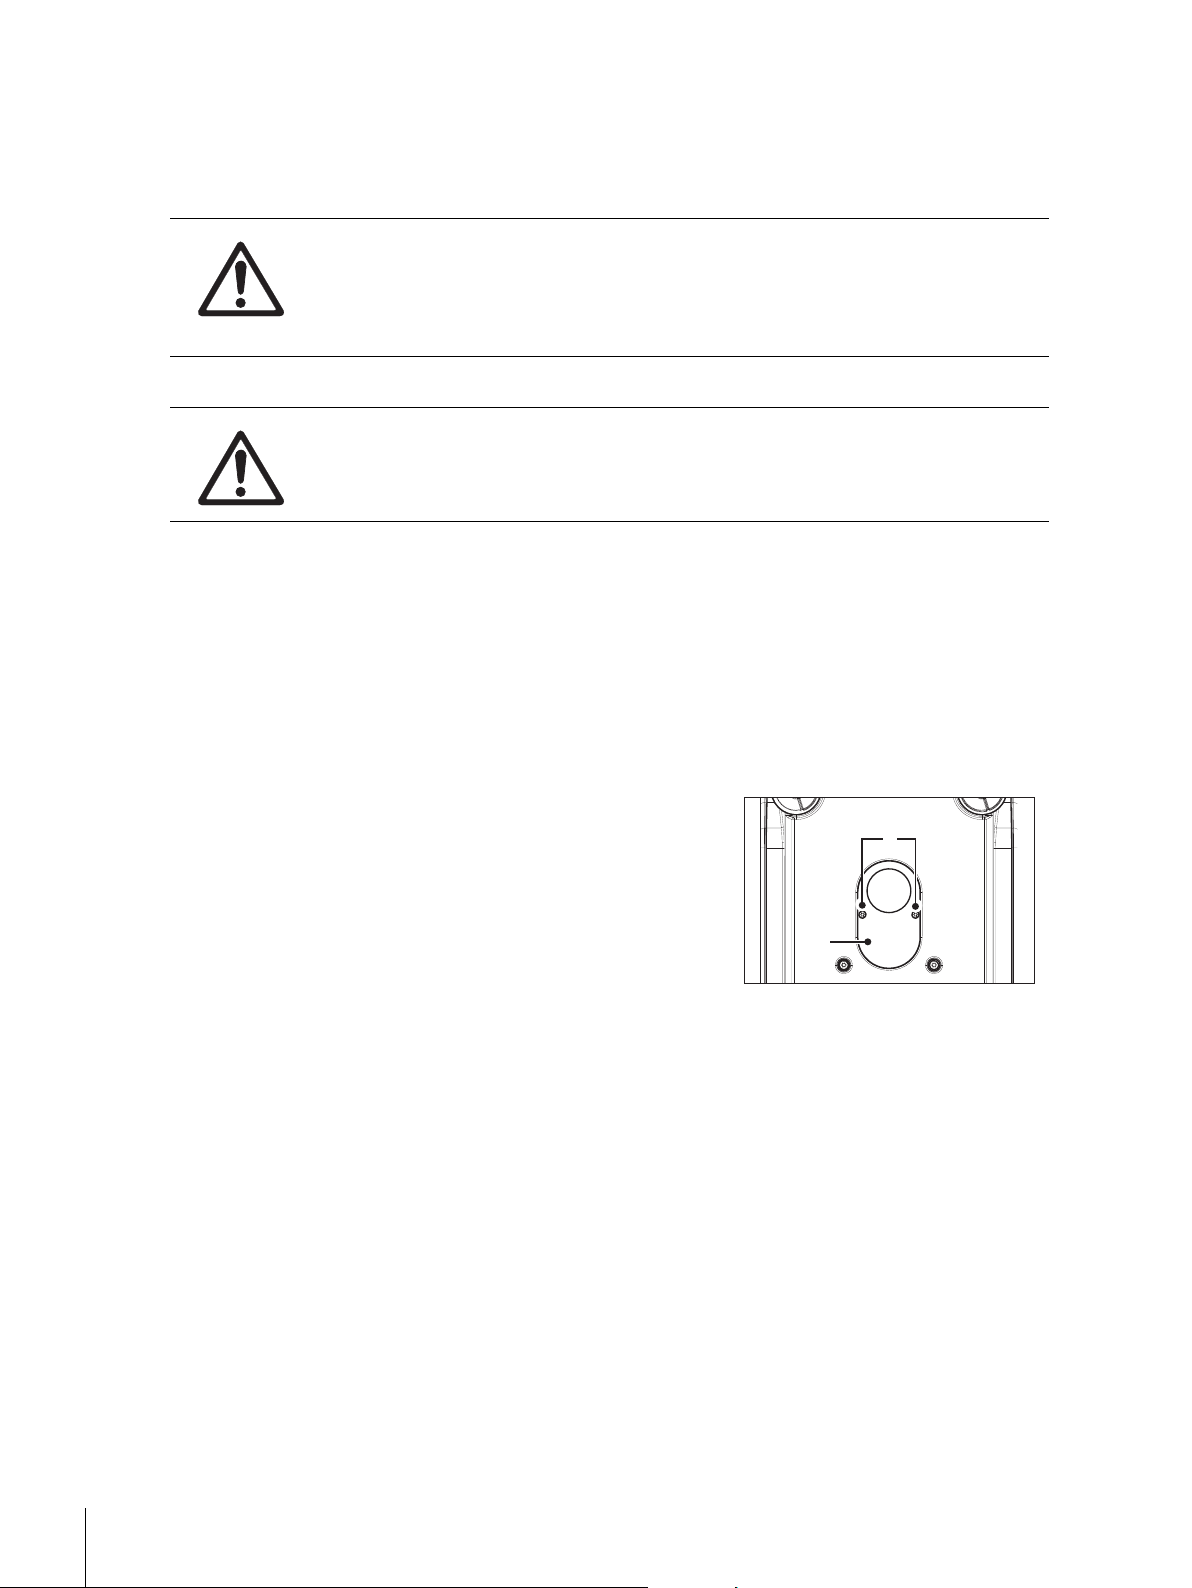
4.6Transporting the balance
B
A
Switch off the balance and remove the power cable and any interface cable from the balance. Refer to the notes
in section Selecting the location (page18) regarding the choice of an optimal location.
Transporting over short distances
CAUTION
For balances with a draft shield:
Never lift the balance by its glass draft shield. The draft shield is not sufficiently fastened to
the balance.
Transporting over long distances
CAUTION
If you would like to transport or send your balance over long distances, use the complete
original packaging.
4.7Weighing below the balance
The balances are equipped with a hanger for carrying out weighings below the work surface.
CAUTION
●
Do not place the balance on the pan support location bolt (0.1 mg and 1 mg models).
●
Models with a glass draft shield: Carefully lift the draft shield from the weighing platform and put it aside.
1 Switch off the balance and remove the power cable and any inter
face cable from the balance.
2 Remove the draft ring element (10 mg models).
3 Remove the weighing pan and pan support.
4 Remove the bottom plate and unlock the draft shield (models with
draft shield). Carefully lift the draft shield from the weighing plat
form and put it aside.
5 Turn the balance carefully on its side.
6 Remove and retain the 2 screws (A) and the cover plate (B). The
hanger is now accessible.
7 Then return the balance to its normal position and simply reinstall
all components in the reverse order.
22 Installation and Putting into Operation
Page 23

4.8General requirements
4.8.1Warming up the balance
Before working with the balance, it must be warmed up in order to obtain accurate weighing results. To reach
operating temperature, the balance must be connected to the power supply for at least:
●
30 minutes for balances with a readability of 1mg (0.01ct) to 5g.
●
60 minutes for balances with a readability of 0.1mg (0.001ct) and higher.
4.8.2Adjusting the balance
To obtain accurate weighing results, the balance must be adjusted to match the gravitational acceleration at its
location and depending on the ambient conditions. After reaching the operation temperature, an adjusting is
necessary in the following cases:
●
Before the balance is used for the first time.
●
When the balance (readability of 0.1 mg) was disconnected from the power or in case of power failure.
●
After a change of location and after the warming-up phase.
●
At regular intervals during weighing service.
23Installation and Putting into Operation
Page 24

5Weighing Made Simple
This section describes how to perform a simple weighing. In addition, the basic concept of the navigation and
the basic functions of the balance are explained.
5.1Switching on the balance
Switching on the balance for the first time
1 Remove any load from the weighing pan.
2 Connect the balance using the AC/DC adapter to the mains.
After the start screen has disappeared, the balance starts with the application home screen.
After the balance has switched on for the first time, it can be switched on by pressing long on [ ].
Note
When the balance is switched on for the first time, the home screen of the application Weighing opens. If the
balance is switched on again, it always starts with the home screen of the application that was used before
switching off.
5.2Switching off the balance
1 Press on [ ] and hold until the dialog Switch-off appears.
2 Tap on [ ].
the balance switches off and goes into standby mode.
Note
●
After switching on from standby mode, the balance needs no warm-up time and is immediately ready for
weighing.
●
If the balance has been switched off after a preselected time, the display is dimly lit and shows the time and
the date.
●
If the balance has been switched off manually, the display is off.
To completely switch off the balance, it must be disconnected from the power supply.
24 Installation and Putting into Operation
Page 25
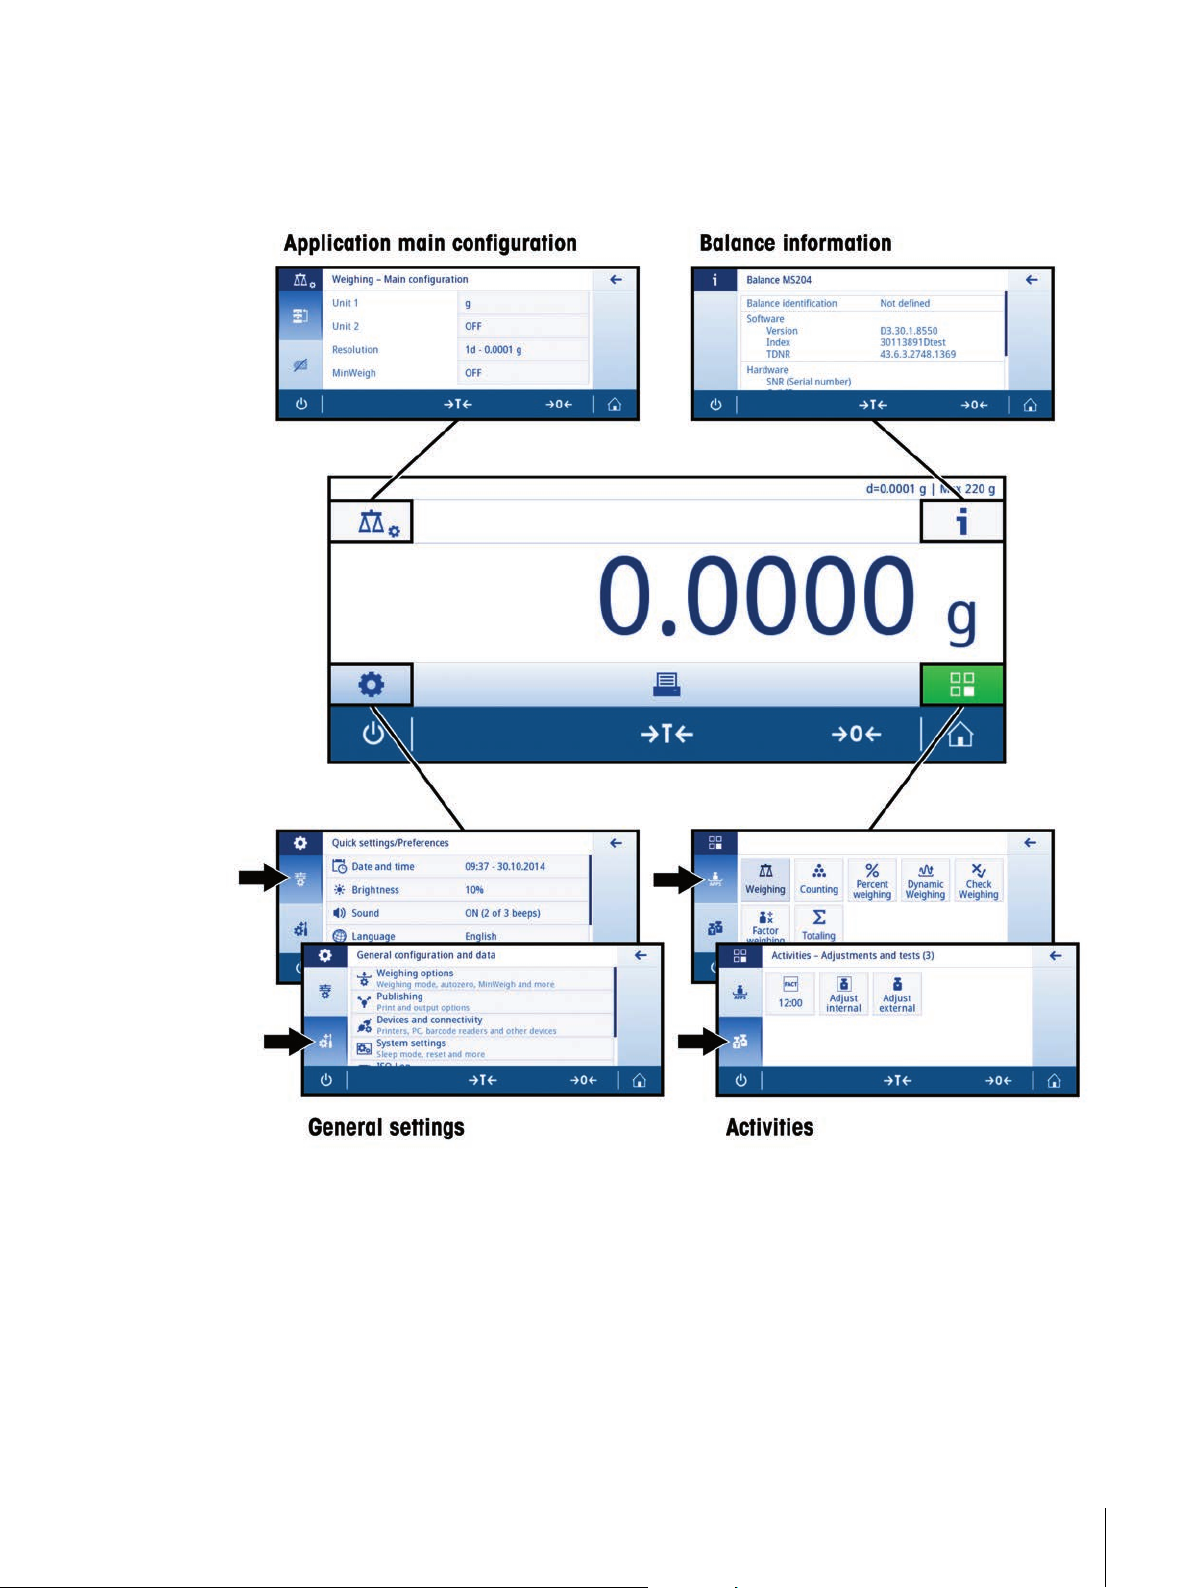
5.3Main settings and activities at a glance
The diagram below provides an overview of the main settings of an application (e.g. Weighing). Depending on
the application, the selectable options and their content can differ. Every application is based on this concept.
25Weighing Made Simple
Page 26
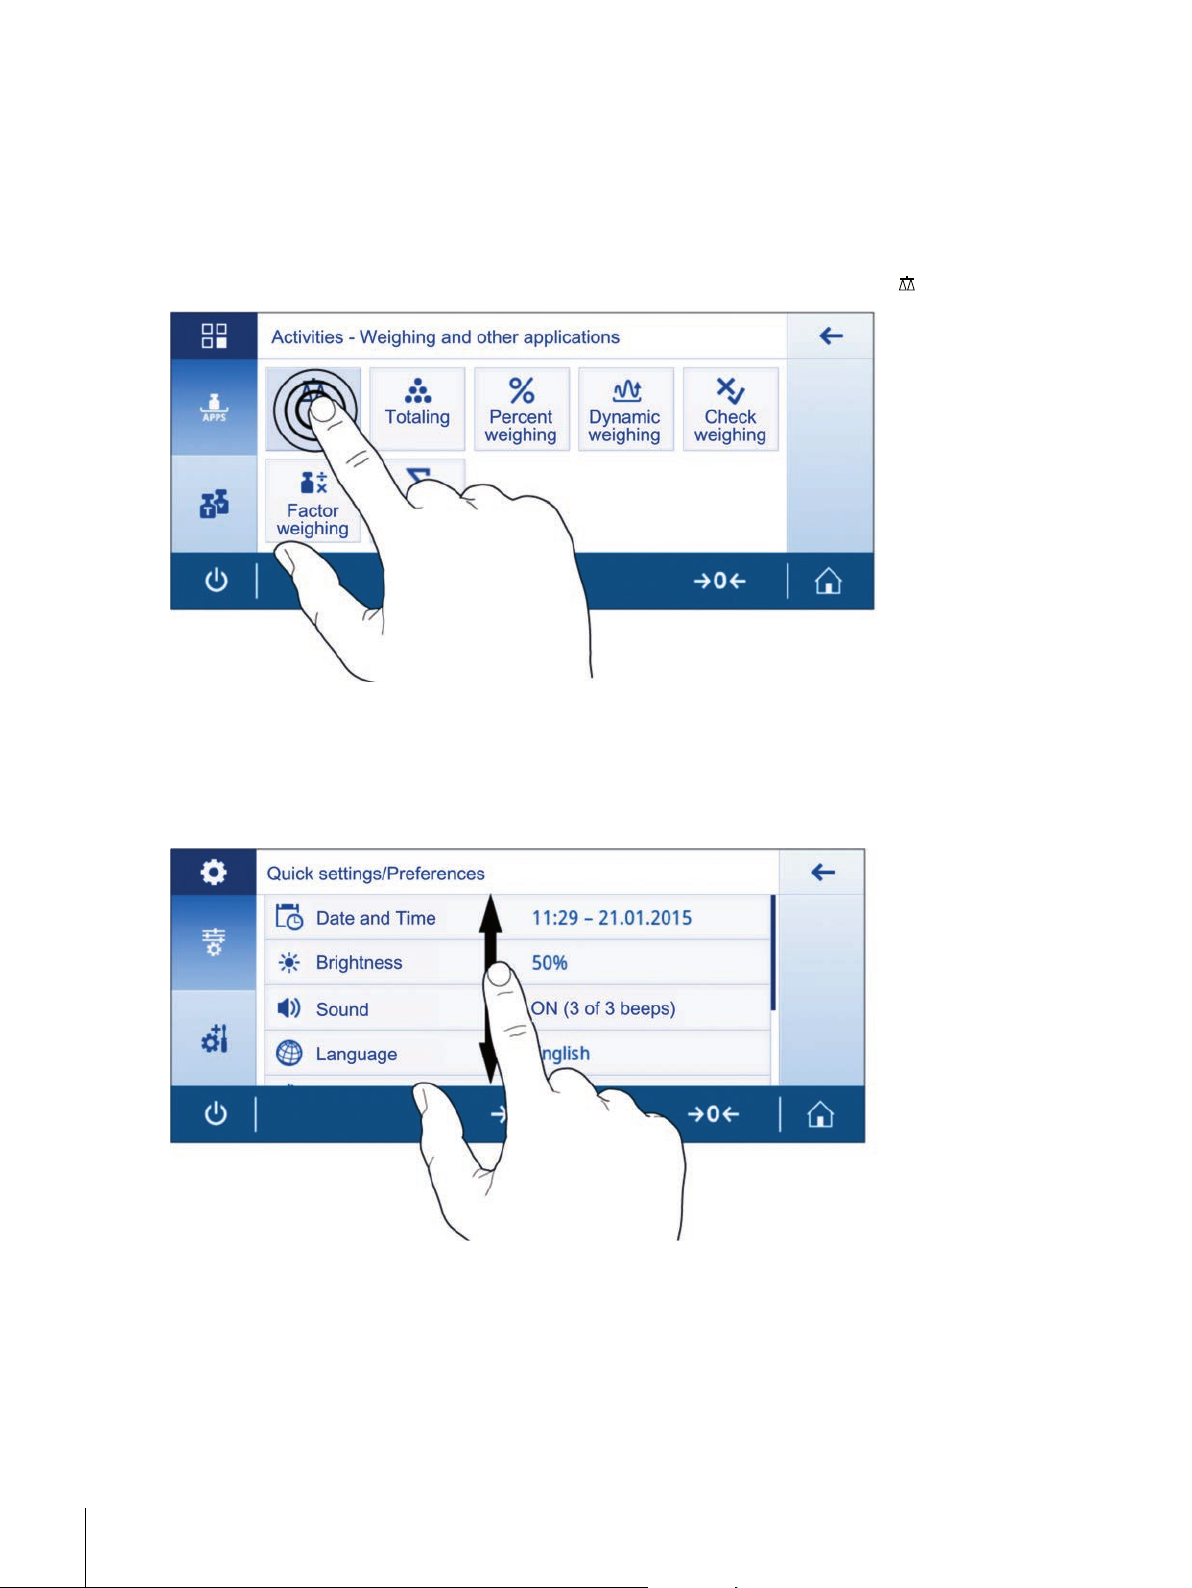
5.4Navigation on the touch screen
To interact with the balance, use the screen and the operating keys at the bottom of the screen. The navigation
on the screen is similar to the navigation of a smart phone or tablet PC.
5.4.1Opening an application
To open settings or applications, tap with your finger on the symbol of the application (e.g. [ ] Weighing).
5.4.2Scrolling
When the options are too numerous to be shown on one screen, a blue bar on the right side appears. This
means that the user can scroll up and down. For scrolling, simply place your finger somewhere in the list and
drag it up or down.
26 Weighing Made Simple
Page 27
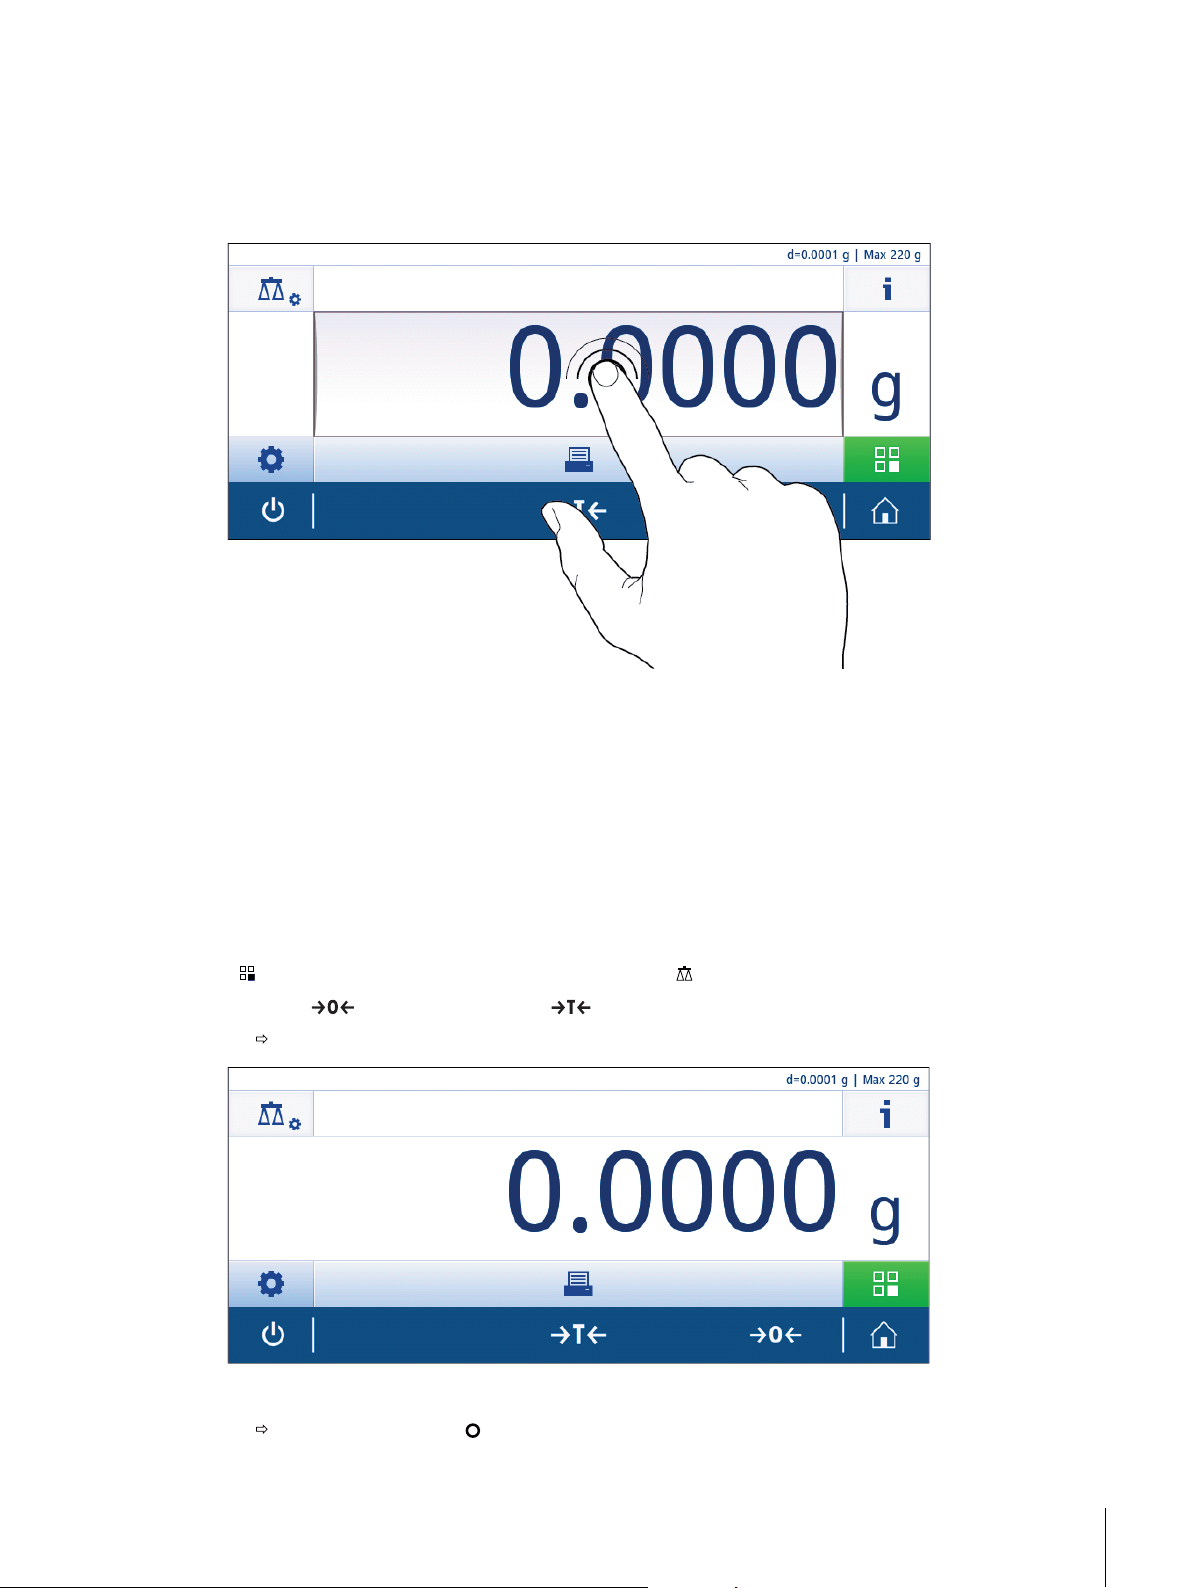
5.4.3Using shortcuts
To simplify navigation on the capacitive color TFT touch screen, there are a few shortcuts that allow quick
access to the most important areas of the balance. The weighing value field on the application home screen for
example works as a shortcut (see diagram below), so does the weighing unit next to the weighing value field.
Depending on the application, there may be other shortcuts that can be used.
Note
Every setting that can be changed directly via shortcut, can also be changed in the main configuration settings
of the application.
5.5Performing a simple weighing
When you switch on the balance for the first time, the home screen of the application Weighing opens auto
matically. If the balance was used already, the last used application before the balance was switched off
opens. If another application is running, switch to the application Weighing.
Navigation:
[ ] > Activities - Weighing and other applications > [ ] Weighing
1 Press [ ] to zero the balance or [ ] to tare the balance.
The initial screen looks like this:
2 Place a sample on the weighing pan.
The unstability symbol appears and the value in the weighing value field becomes light blue.
27Weighing Made Simple
Page 28
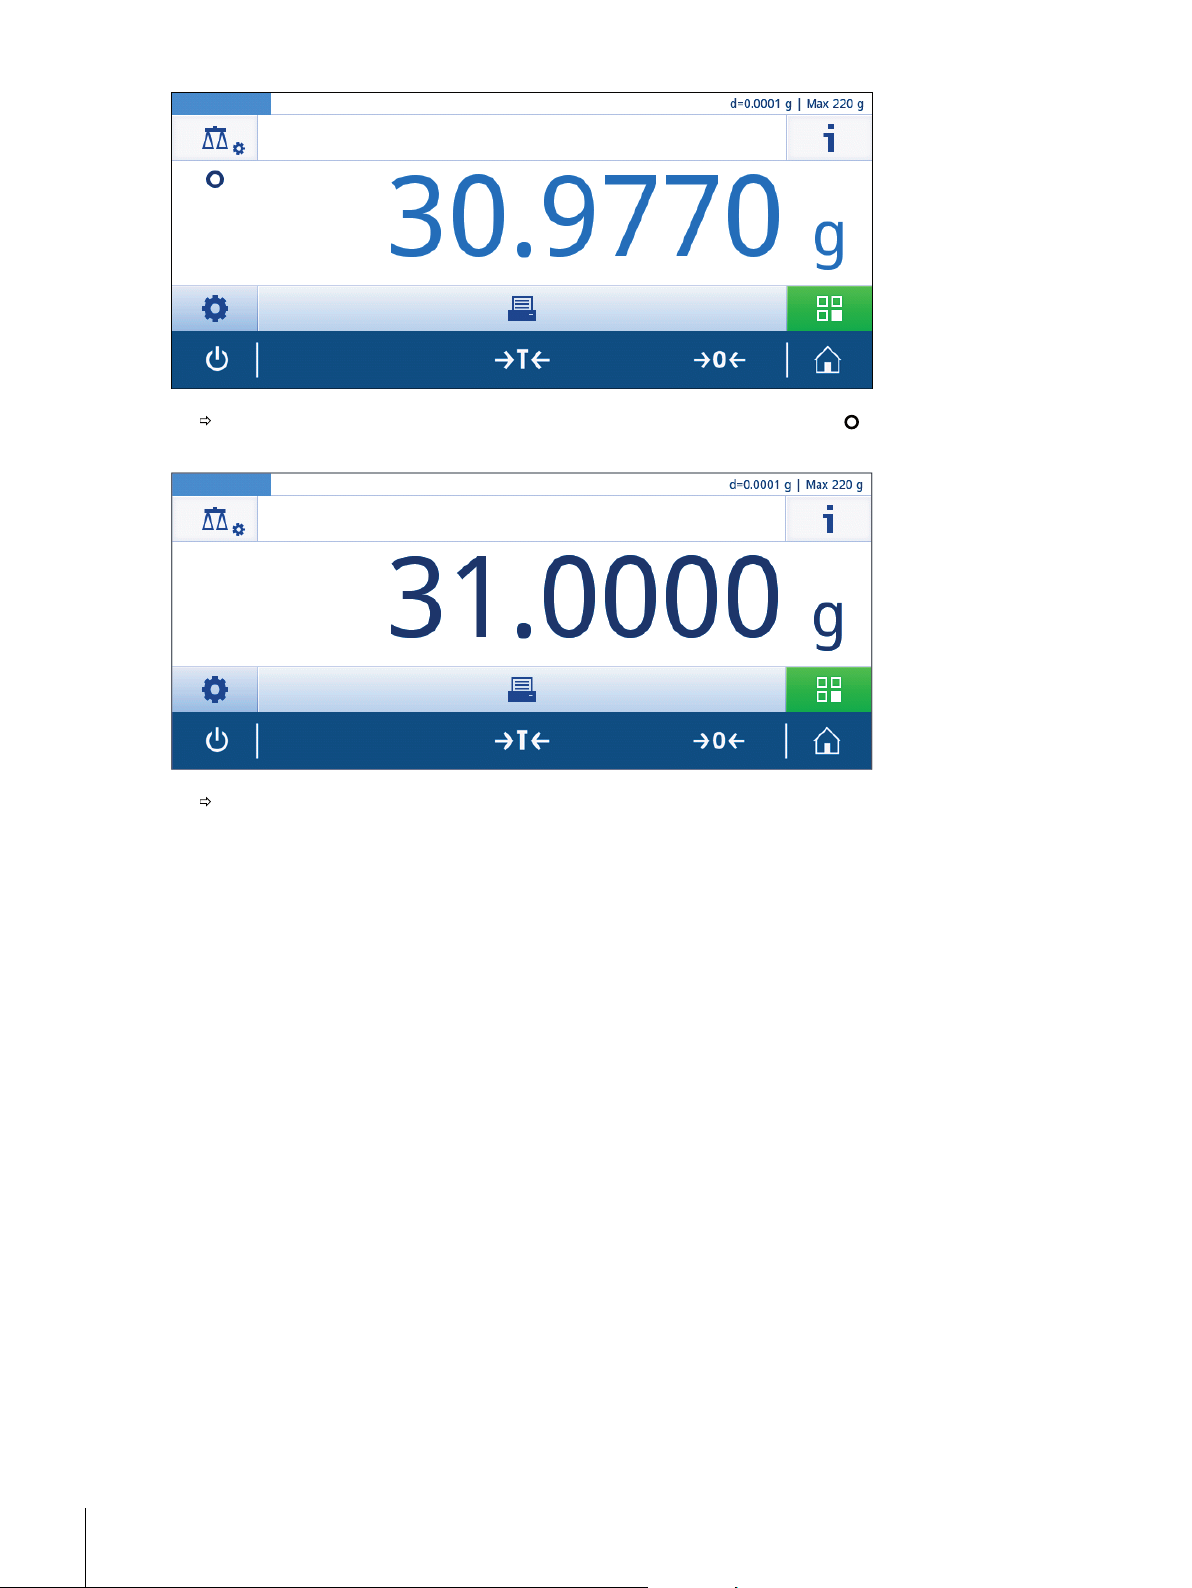
After a short period of time, the weighing pan is stable. The unstability symbol disappears and the
value in the weighing value field becomes dark blue again.
The weighing process is finished. The result appears on the screen.
5.6Switching the weighing unit
There are several weighing units available. The default value is country-specific.
The weighing unit can be chosen via the main configuration of the current application or via shortcut. This
example describes how to change the weighing unit via shortcut.
1 Tap on the weighing process unit (shortcut) gram (g).
28 Weighing Made Simple
Page 29
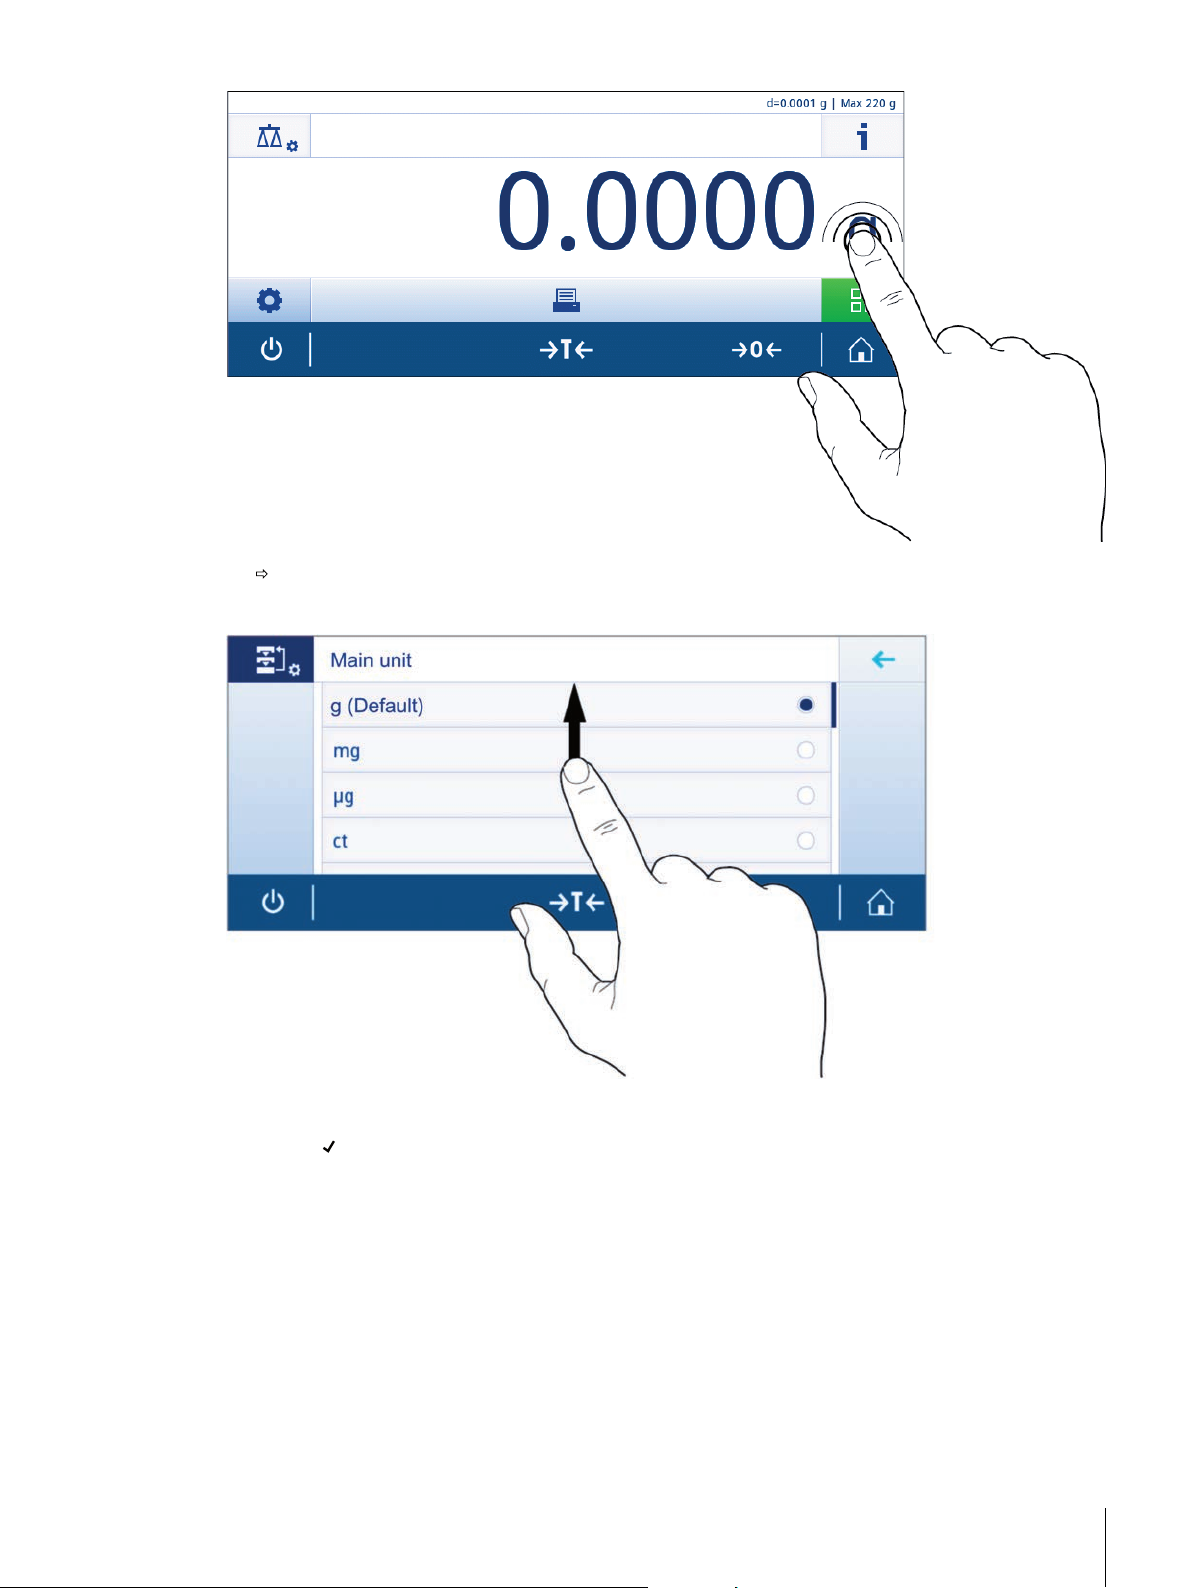
the screen Main unit opens.
2 Put your finger somewhere in the list and drag up to scroll down.
3 Choose another weighing unit (e.g. ounce (oz)) by tapping on it.
4 Tap on [ ] to confirm the chosen weighing unit.
29Weighing Made Simple
Page 30
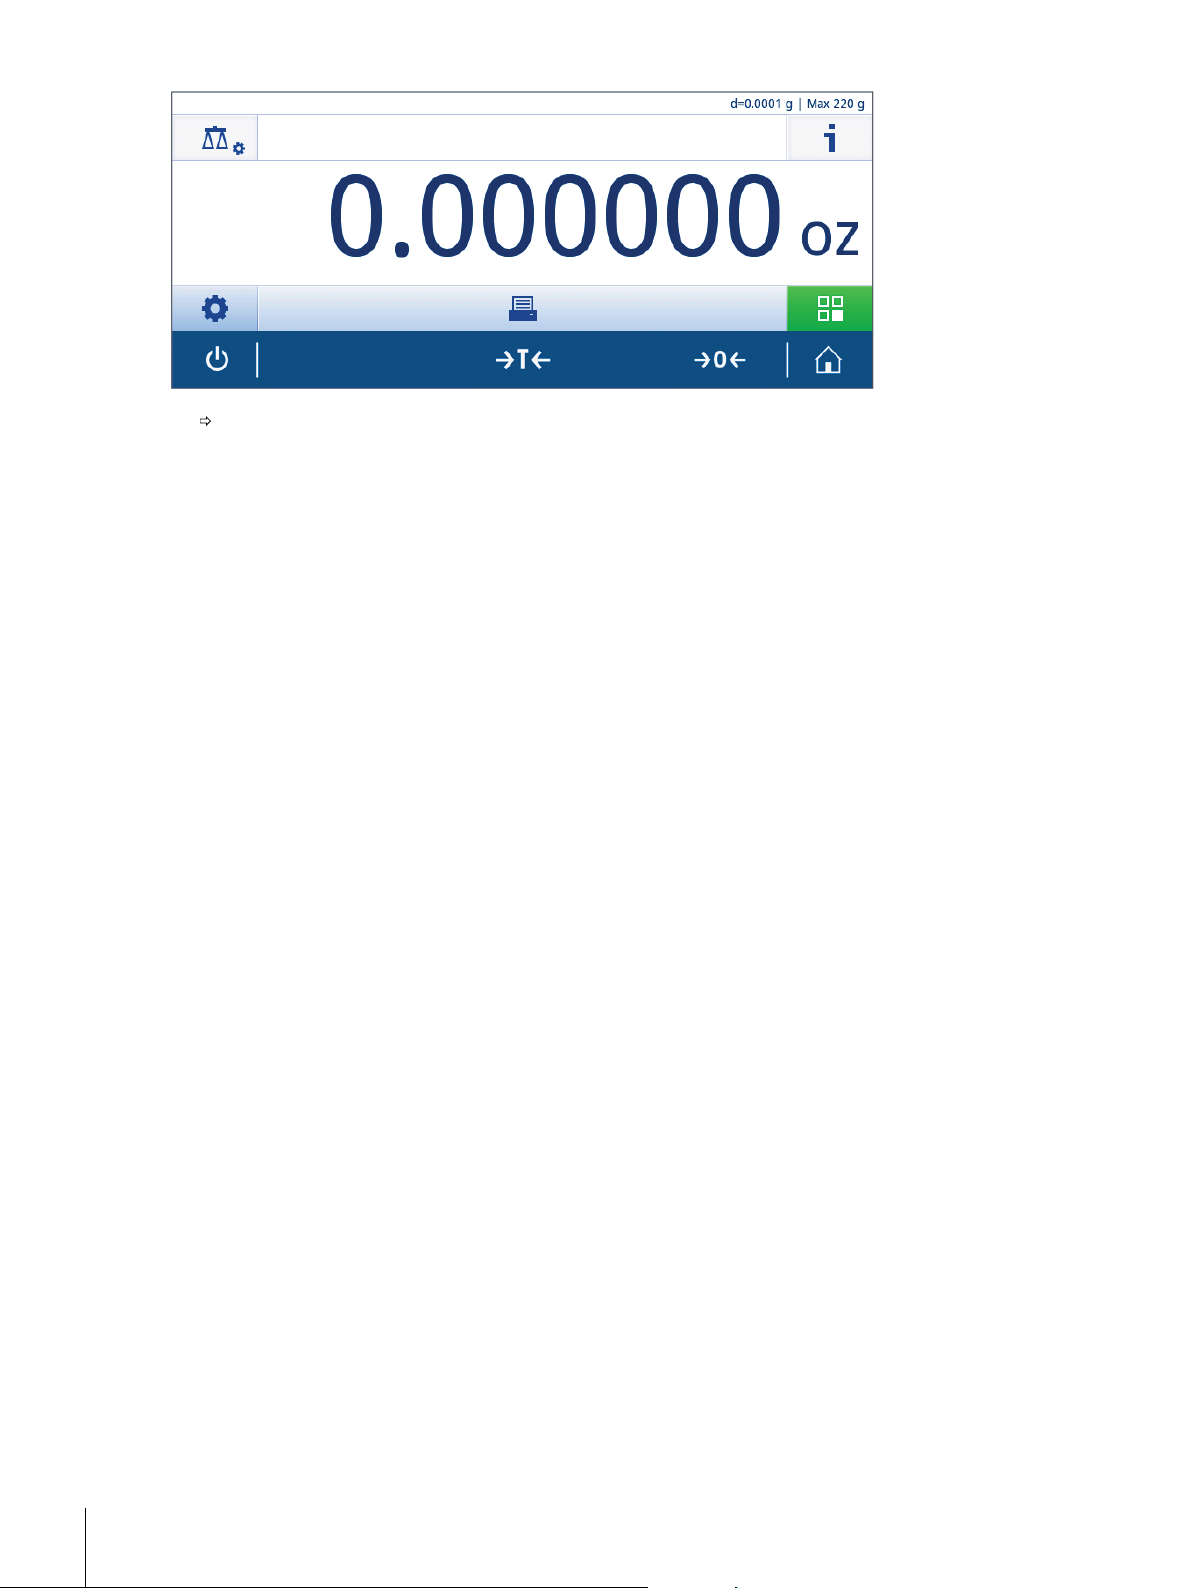
The weighing unit gram (g) has been changed to ounce (oz).
Note
With approved balances, this menu topic has a fixed setting and cannot be changed.
30 Weighing Made Simple
Page 31

5.7Changing the resolution
There are several resolutions available. The default resolution is instrument-specific.
The resolution can be changed as follows:
1 Tap on the weighing value field.
2 Tap on 1d - 0.0001 g (Default).
3 Confirm the chosen resolution by tapping on [ ].
31Weighing Made Simple
Page 32

5.8Zeroing
1 Unload the balance.
2 Press [ ] to set the balance to zero.
All weight values are measured in relation to the zero point.
Note
Press [ ] before starting the weighing process.
5.9Taring
1 Tap on [ ] to set the balance to zero.
2 Place the empty container on the balance.
3 Press [ ] to tare the balance.
The resolution has been changed.
The weight is displayed.
The status information field shows Net and the weighing value field shows 0.000 g.
32 Weighing Made Simple
Page 33

5.10Working with IDs
Identifications (IDs) contain descriptive text for individual measurements, which enables samples to be easily
allocated to specific tasks or customers. This feature defines identifications in order to comment measurements,
such as company ID, badge ID or sample ID.
Identifications must be defined in the contextual settings of an application. Usage and definition of the ID differ
depending on the application the ID is used for.
Identification dialog screen
The Identification dialog screen can slightly differ depending on the application in which the ID is used. The dia
log screen always consists of two parts:
●
The table with the ID definitions on the upper part of the screen.
●
The Workflow handling options on the lower part of the dialog screen.
5.10.1Defining an ID
A new ID is defined as follows:
1 Open an application (e. g. Weighing).
2 Tap on the Main configuration symbol on the upper left corner.
3 Tap on [ID] Identifications
4 Tap on ID 1.
The input dialog ID 1 opens. The input dialog is inactive.
5 Activate ID 1 with the switch in the title bar.
The input dialog ID 1 is activated.
The title bar shows ID 1 - Label.
6 Define ID 1 - Label.
7 Tap on [ ] to confirm the definition.
The input dialog ID 1 - Value opens.
8 Define ID 1 - Value.
9 Tap on [ ] to confirm the definition.
The screen Identifications opens showing the defined ID.
10 Tap on [ ] to accept the defined ID.
Repeat the steps for the other IDs.
33Weighing Made Simple
Page 34

Note
The maximum length of an ID is 16 characters.
The picture below shows an example of defined IDs. IDs 1-3 are defined, ID 4 is still inactive.
5.10.2Workflow handling options
The workflow handling options differ depending on the application in which they are used. The following func
tions are available:
●
Input prompt
●
Autoincrement
●
Assign to sample
Input prompt
The function Input prompt can be used for every ID. If the function Input prompt is activated, the ID will be
prompted on the display before it is used. The user can decide whether to use the default value that has been
defined with the ID or to define an individual value.
Autoincrement
The function Autoincrement specifies that the last part of the ID is incremented with each use of that ID. There
are two basic functions depending on how the ID is defined:
●
If there is no counter in the ID, the system automatically adds a counter to the ID starting with 1 (e.g. the ID
Process will be Process1 in the next use).
●
If a counter is part of the ID, the system automatically increments the ID starting at that counter (e.g. the ID
Process 1 will be Process 2 in the next use).
Note
●
The counter must be set at the end of the ID, otherwise the system doesn't recognize the number as a
counter (e.g. in 567Apple the system doesn't recognize 567 as a counter).
●
If the ID has no counter and a maximum length of 16 characters, the last few characters will be overwritten
by the counter.
Assign to sample
If the option Assign to sample is activated, the ID will be used for each sample.
34 Weighing Made Simple
Page 35

5.11Statistics
The function Statistics generates statistics for a series of values. The option is available for every application.
Defining Statistics
1 Open an application (e.g. Weighing).
2 Tap on the main configuration symbol of the application.
The main configuration screen opens.
3 Tap on [ ].
The screen Statistics opens.
4 Activate the function Statistics.
5 Define the available options.
6 Tap on [ ] to confirm the adjustments.
Statistics configuration
The following options can be defined:
Parameter Explanation Values
Acceptance
range
Accepting mode To define if a weight sample is added automatically to the result.
* Factory setting
Note
The function Statistics is not available for the applications Totaling and Formulation.
To define the acceptable deviation in relation to the average val
ue.
The sample is automatically accepted if: the sample is at least
10d and a deflection according to the SNR command described
in the MT-SICS manual MT-SICS interface commands and func
tions (page76) was detected.
1%...100% (10%*)
Manual* | Automatic
35Weighing Made Simple
Page 36

6Activities
The section Activities can be opened by tapping on [ ]. The section Activities includes the following two sub-sections:
●
Activities - Weighing and other applications
●
Activities - Adjustments and tests
6.1Activities - Weighing and other applications
Activities - Weighing and other applications includes the following applications:
●
Weighing see at section Weighing (page37) and Weighing Made Simple (page24)
●
Counting see section Counting (page38)
●
Percent Weighing see section Percent Weighing (page40)
●
Formulation see section Formulation (page42)
●
Dynamic Weighing see section Dynamic Weighing (page44)
●
Check Weighing see section Check Weighing (page46)
●
Factor Weighing see section Factor Weighing (page50)
●
Totaling see section Totaling (page51)
36 Weighing Made Simple
Page 37

6.1.1Weighing
The application Weighing allows the user to perform simple weighings. For more information about the basic weighing functions see the section Weighing Made Simple (page24).
Navigation
[ ] Activities > Activities - Weighing and other applications > [ ] Weighing
Weighing – Main configuration
The following options can be defined:
Parameter Explanation Values
Main unit To define the main unit of the weighing process. Available values are
Additional unit To define an additional weighing unit. Available values are
Resolution To define the resolution of the weighing process. Available values are
model-specific.
model-specific.
model-specific
37Activities
Page 38

6.1.2Counting
The application Counting determines a specific number of pieces, based on pre-determined reference piece weight.
Navigation
[ ] Activities > Activities - Weighing and other applications > [ ] Counting
Defining Reference piece weight
To define the Reference piece weight, Reference piece number and Reference weight must successively be
defined. The system will automatically navigate from one option to the other.
Defining Reference piece number
1 Tap on [ ].
the screen Counting – Main configuration opens.
2 Tap on [Reference piece weight].
The dialog screen Reference piece number opens.
3 Delete the value by tapping on [ ].
4 Enter the number of reference pieces.
5 Tap on [ ] to confirm the defined reference piece number.
Note
The reference piece number must be a natural number between 1 to 999.
Defining Reference weight
Reference weight can be defined manually by entering the weight of the reference pieces or by weighing the
reference pieces.
Defining Reference weight manually
1 Delete the reference weight by tapping on [ ].
2 Enter the new reference weight.
3 The reference unit can be changed by tapping in the sensitive area at the right side of the input field.
4 Confirm the new value by tapping on [ ].
The reference piece weight has been defined.
5 Confirm the new reference piece weight by tapping on [ ].
Defining Reference weight by weighing
1 Tap on [ ].
2 Place reference weight on the weighing pan.
3 Tap on [ ] to confirm the weight.
The screen Counting – Main configuration opens.
4 Tap on [ ] to confirm the configurations.
38 Activities
Page 39

The following picture shows the home screen of the application. The work title bar displays the defined Refer
ence piece number and Reference piece weight that can be used as shortcuts.
Note
A fixed minimum reference piece number of 10 and inactive reference weight options for approved balances
(except for some selected countries).
Counting – Main configuration
The following options can be defined:
Parameter Explanation Values
Reference piece
weight
Additional unit To activate/deactivate and define the additional unit of the weigh
* Factory setting
To define the number and the weight of the reference piece/s. 1...999
(10*)
Available values are
ing process.
model-specific.
39Activities
Page 40

6.1.3Percent Weighing
With the application Percent Weighing a sample weight can be checked as percentage to a reference target weight.
Navigation
[ ] Activities > Activities - Weighing and other applications > [ ] Percent Weighing
Defining Reference weight
There are two possible ways to define the reference weight: The reference weight can be defined manually by
entering the value or by weighing the reference weight.
Defining the reference weight by weighing
1 Tap on [ ].
The screen Percent weighing – Main configuration opens.
2 Tap on Reference weight.
3 Tap on [ ].
4 Press [ ] to zero the balance.
5 Place the reference weight on the weighing pan.
6 Tap on [ ] to accept the value of the reference weight.
The screen Reference weight reappears.
7 Tap on [ ] to accept the reference weight.
8 Tap on [ ] to accept the reference weight and to return to the application home screen.
Defining the Reference Weight manually
1 Tap on [ ].
2 Tap on Reference weight.
3 Delete the default value by tapping on [ ].
4 Enter the value of the reference weight.
5 Confirm the reference weight by tapping on [ ].
The reference weight has now been defined and will be shown in the work title bar.
40 Activities
Page 41

The picture shows the home screen of the application Percent Weighing. The work title bar displays a defined
reference weight of 200g that can be used as shortcut.
Percent weighing – Main configuration
The following options can be defined:
Parameter Explanation Values
Reference
weight
Main unit To define the main unit of the weighing process. Available values are
To define the reference weight manually or by weighing. -220.0000 ... -
0.0010 | 0.0010 ...
220.0000
model-specific.
41Activities
Page 42

6.1.4Formulation
The application Formulation allows the user to:
●
Weigh-in (add and store) up to 999 individual component weights and display the total.
●
Tare/pre-tare and store up to 999 container weights and display the total.
●
fill up the sum of all component net weight values by adding a further component to a higher value.
Note
Total number of containers + component weights ≤ 999.
Navigation
[ ] Activities > Activities - Weighing and other applications > [ ] Formulation
Performing Formulation
1 Press [ ] to zero the balance
2 If a container is used: Place container on the weighing pan and press [ ] to tare the balance.
If the balance is tared, the status information field shows Net.
3 Place the first component weight.
The weighing value field shows the value of the first component weight.
4 Tap on [ ] to add the first component weight.
5 Place the second component weight.
The weighing value field shows the value of the second component weight.
6 Tap on [ ] to add the second component weight.
7 Continue adding components untill all the components are weighed.
Defining Fill up sample
With the function Fill up sample an additional component weight can be added to the total weight of all com
ponents to reach a desired target weight.
The weighing value field shows the total net weight.
1 Tap on [ ].
2 Place the fill up sample.
3 Tap on [ ] to confirm.
Discard value
The last weighing result can be discarded as follows:
1 Tap on [ ].
The dialog screen Confirm discard opens. It is an overview of all the weighing results within the current
weighing process.
2 Tap on [ ] to discard the last weighing result.
CAUTION
Discard is only possible until the last time the balance has been tared.
42 Activities
Page 43

Display results
When the weighing process is finished, the results can be shown as follows:
1 Tap on [ ].
2 Tap on [ ] View result.
Note
The results can also be displayed by using the shortcut in the work title bar.
Note
Depending on the procedure, several containers can be used (number of used containers ≤ 999).
Pause the application
1 Tap on [ ].
2 Tap on [ ] Pause.
The application Formulation is paused and another application can be used in the meantime.
3 Open the application Formulation again.
4 Tap on [ ].
The process can be continued.
Formulation – Main configuration
The following options can be defined:
Parameter Explanation Values
Main unit To define the main unit. Available values are
model-specific.
Resolution To define the resolution of the weighing process. Available values are
model-specific.
Terminate the application
1 Tap on [ ].
2 Tap on [ ] Finish and discard data.
The home screen of the application Formulation opens.
43Activities
Page 44

6.1.5Dynamic Weighing
The application Dynamic Weighing determines the weights of unstable samples or when the weighing process is being executed under unstable ambient conditions. The balance calculates the weight as an average of a number of weighing operations over a defined time.
Navigation
Activities > Activities - Weighing and other applications > [ ] Dynamic Weighing
Defining Measuring time
1 Tap on [ ].
The screen Dynamic weighing – Main configuration opens.
2 Tap on [Measuring time].
The dialog screen Measuring time in seconds opens.
3 Tap on [ ] to delete the value in the input field.
4 Enter a value between 3 and 120 seconds.
5 Tap on [ ] to confirm the entered value.
The screen Dynamic weighing – Main configuration opens.
6 Tap on [ ] to confirm the defined measuring time.
Note
The displayed measuring time on the application home screen can be used as shortcut to define the measuring
time.
Defining Start mode
1 Tap on [ ].
2 Tap on Start mode.
3 Chose Automatic or Manual.
4 Tap on [ ] to confirm the chosen option.
5 Tap on [ ] again.
The home screen of the application Dynamic Weighing opens again.
Performing Dynamic Weighing
When the measuring time and the start mode have been defined, the dynamic weighing process can be started.
1 Press [ ] to zero the balance.
2 If using a container: place container on the weighing pan and press [ ] to tare the balance.
3 Place sample weight.
If the option Start mode is set to Automatic, the weighing process start automatically with relative sta
bility.
It the option Start mode is set to Manual, Tap on [ ] to start the weighing process.
The weighing process starts. The defined measuring time in the work title bar is counting down.
44 Activities
Page 45

When the weighing process has finished, the screen looks as follows:
Note
The weighing process will automatically be aborted when an overload or underload is detected.
Dynamic weighing – Main configuration
The following options can be defined:
Parameter Explanation Values
Measuring time To define the measuring time in seconds. 3...120
(3 seconds*)
Start mode To define the start mode. Automatic*
Manual
Main unit To define the main weighing unit. Available values are
model-specific.
Additional unit To define the additional weighing unit. Available values are
model-specific.
Resolution To define the resolution of the weighing process. Available values are
model-specific.
* Factory setting
45Activities
Page 46

6.1.6Check Weighing
The application Check Weighing allows the user to check the deviation of a sample weight within a tolerance limit to a reference target weight. The target weight can be determined manually or by weighing; the tolerance limit must be defined manually.
Navigation
[ ] Activities > Activities - Weighing and other applications > [ ] Check Weighing
Before performing Check Weighing
Before performing a check weighing, the following options can be defined:
●
Target weight
●
± Tolerance limits
●
Tolerance threshold
Defining the target weight manually by entering the nominal weight
1 Tap on [ ] .
The screen Check weighing - Main configuration opens.
2 Tap on [Target, tolerance].
3 Tap on [ ] Target weight.
4 Delete the default value by tapping on [ ].
5 Enter the nominal weight.
Tap on [ ] to confirm the defined nominal weight.
46 Activities
Page 47

Defining the target weight by weighing
1 Tap on [ ].
The screen Check weighing - Main configuration opens.
2 Tap on [Target, tolerance].
3 Tap on [ ] Target weight.
4 Tap on [ ] to open the weighing dialog.
5 Place the reference weight on the weighing pan.
6 Tap on [ ] to confirm the defined target weight.
Defining the lower and upper limits manually by entering a percentage value or weight
1 Tap on [ ].
The screen Check weighing - Main configuration opens.
2 Tap on [Target, tolerance].
3 Tap on [ ] ± Tolerance limits.
4 Delete the default value by tapping on [ ].
5 Enter the tolerance limit.
6 Tap on [ ] to accept the new tolerance limit.
Defining Tolerance threshold
With the option Tolerance threshold a value limit can be set. Is the value of the check weight below the defined
threshold, it won't be checked.
1 Tap on [ ]. .
The screen Check weighing - Main configuration opens.
2 Tap on Tolerance threshold.
3 Define Tolerance threshold.
4 Tap on [ ].
5 Tap on [ ] to confirm.
Note
The option Tolerance threshold always refers to the lower tolerance limit.
47Activities
Page 48

Performing Check Weighing
After defining the target weight and the tolerance limits, the application Check Weighing can be performed. The
weighing-in aid at the top bar provides a visual confirmation whether the sample falls within the defined toler
ances.
In the example below, the defined target weight is 100.000g and the tolerance limit is ±2.5%. The sample
weight is 97.0000g.
– Place the sample weight on the weighing pan.
The weight is stable and the unstability symbol disappears.
The value is out of tolerance, the weighing-in aid bar and the weighing value field are red.
In the example below, the defined target weight is still 100.000g and the tolerance limit is ±2.5%. The sam
ple weight is 99.0000g.
– Place the sample weight on the weighing pan.
The weight is stable and the unstability symbol disappears.
The value is within tolerances, the weighing-in aid bar and the weighing value field are green.
Note
If the weight is below a defined tolerance threshold, the background color of the screen doesn't change.
48 Activities
Page 49

Check weighing - Main configuration
The following options can be defined:
Parameter Explanation Values
Target, toler
ance
To define the target weight in the defined unit and its tolerance
limits in %.
Target weight: 100g*
± Tolerance limits:
0.10...100 (2.5%*)
Tolerance
threshold
Within tolerance
To define the threshold. Values below the defined threshold are
1%...100% (1%*)
not being checked.
To create an acoustic signal when the result is within tolerance. OFF* | ON
beeps
Main unit To define the main unit of the weighing process. Available values are
model-specific.
Resolution To define the resolution of the weighing process. Available values are
model-specific.
* Factory setting
Note
The selectable weighing units and the resolution can differ depending on the balance model.
●
Only those weight units allowed by the appropriate national legislation are selectable.
●
With approved balances, this menu topic has fixed settings and cannot be changed.
49Activities
Page 50

6.1.7Factor Weighing
The application Factor Weighing multiplies or divides a pre-defined factor by the measured weight value (in grams) and calculates it to a predefined number of decimal places.
Navigation
[ ] Activities > Activities - Weighing and other applications > [ ] Factor Weighing
Defining Factor, step
1 Tap on [ ].
The screen Factor weighing – Main configuration opens.
2 Tap on [Factor, step].
The dialog screen Factor – Multiplication opens.
3 Tap on [ ] to delete the defined value.
4 Define Factor.
5 Tap on [ ] to change the operation from Multiplication to Division or vice versa.
6 Tap on [ ] to confirm.
7 Tap on [ ].
The dialog screen Step opens.
8 Define Step.
9 Tap on [ ] to confirm.
10 Tap on [ ] again to confirm the defined adjustments.
Note
The allowed range for the steps depends on the defined factor and the resolution of the balance.
Factor weighing – Main configuration
The following options can be defined:
Parameter Explanation Values
Factor, step To define the factor and the step. Factor | Step
Additional unit To define an additional weighing unit. Available values are
model-specific.
50 Activities
Page 51

6.1.8Totaling
The application Totaling allows the user to weigh different samples, adding their weight values and to totalize them.
Navigation
[ ] Activities > Activities - Weighing and other applications > [ ] Totaling
Performing Totaling
1 Press [ ] to zero the balance.
2 If using a container: Place empty container on the weighing pan and press [ ] to tare the balance.
3 Place the first weight.
4 Wait until the unstability symbol disappears.
5 Tap on [ ] to accept the weight and to start the procedure.
6 Place next sample weight.
7 Tap on [ ] to accept the second sample weight.
When the balance is stable, the weighing value becomes dark blue.
The work title bar shows the number of samples (2 samples) and the total weight of the samples ( =
30.0000g).
Discard value
If a weighing value was incorrect, it can be discarded from the result as follows:
1 Tap on [ ].
The screen Confirm discard opens.
2 Tap on [ ].
The incorrect value has been deleted. The weighing process can be continued.
Display results
1 Tap on [ ].
2 Tap on [ ] View result.
Note
The results can also be displayed by using the shortcut in the work title bar.
51Activities
Page 52

Pause the application
1 Tap on [ ].
2 Tap on [ ] Pause.
The application Totaling is paused and another application can be used in the meantime.
3 Open the application Totaling again.
4 Tap on [ ].
The process can be continued.
Totaling – Main configuration
The following options can be defined:
Parameter Explanation Values
Accepting mode To define if a weight sample is added automatically to the result.
The sample is automatically accepted if: the sample is at least
10d and a deflection according to the SNR command described
in the MT-SICS manual MT-SICS interface commands and func
tions (page76) was detected.
Main unit To define the main unit of the weighing process. Available values are
Resolution To define the resolution of the weighing process. Available values are
Terminate the application
1 Tap on [ ].
2 Tap on [ ] Finish and discard data.
The home screen of the application Totaling opens.
Note
If the option Workflow reports is set to Automatic, a printer symbol appears in the list element. By tapping on
[ ] Discard data the process can be aborted without printing the reuslts.
Manual* | Automatic
model-specific.
model-specific.
52 Activities
Page 53

6.2Activities - Adjustments and tests
Activities - Adjustments and tests contains the following elements:
●
FACT, see section FACT Fully automatic internal adjustment (page54)
●
Internal Adjustment, see section Internal Adjustment (page55)
●
External Adjustment, see section External Adjustment (page56)
53Activities
Page 54

6.2.1FACT Fully automatic internal adjustment
FACT stands for Fully Automatic Calibration Technology. It is activated as default value.
FACT means that the balance adjusts itself based on the following criteria:
●
in case the conditions change (temperature difference > 2°C), which could lead to a noticeable deviation in
the measurement.
●
on a predefined day time programmed by the user.
Setting FACT
You can define the day time of FACT as follows:
1 Tap on [ ].
2 Tap on [ ]. .
The screen Activities - Adjustments and tests opens.
3 Tap on [FACT].
4 Activate Fully automatic adjustment.
The Fully automatic adjustment dialog opens.
5 Select the time (hours : minutes) with the pick buttons.
6 Tap on [ ] to confirm the defined time.
The time underneath FACT has been updated and shows the time of the daily adjustment.
CAUTION
If the function FACT is not activated, all the FACT functionalities, such as temperature FACT and time FACT are
inactive.
Note
When defining the time, hold the pick button to scroll faster.
54 Activities
Page 55

6.2.2Internal Adjustment
Note
The function Internal Adjustment is available for models with internal weight only (see technical data).
Perform an internal adjustment manually
1 Tap on [Internal Adjustment].
The internal adjustment procedure starts. The screen shows Adjustment ongoing, please wait....
When the internal adjustment procedure is successfully completed, the results of the internal adjustment
appear.
2 Tap on [ ] to confirm the results.
Note
If the balance is configured and connected to a printer, the results of the adjustment process are printed.
55Activities
Page 56

6.2.3External Adjustment
Note
Because of certification legislation, approved balances cannot be adjusted with an external weight (depending
on the certification legislation of the selected country).
Performing an external adjustment
1 Open Activities - Adjustments and tests. 2 Tap on External Adjustment.
The External Adjustment screen opens.
3 Tap on [ ] to define the adjustment weight according to the weight certificate.
4 Confirm the adjustment weight by tapping on [ ].
5 Prepare the adjustment weight and tap on [ ] to start the adjustment process.
6 Load the adjustment weight in the center of the weighing pan.
7 Unload the adjustment weight from the weighing pan.
When the external adjustment procedure is successfully completed, the result of the external adjustment
appear.
56 Activities
Page 57

7General Settings
The section General settings is divided into two sub-sections:
●
Quick settings/Preferences
●
General configuration and data
7.1Quick settings/Preferences
The following options are available:
●
Date and Time
●
Brightness
●
Sound
●
Language
●
Glove mode
●
Quick Adjustment
●
Leveling assistant
7.1.1Date and time
In this menu topic, the date and time can be defined. Tap on [ ] for Time and tap on [25] for Date.
The following parameters can be defined:
Parameter Explanation Values
Time To define the time format. 24:MM* | 12:MM |
The date can be defined with the pick buttons. Hours | Minutes
Date To define the date format. DD.MM.YYYY* |
The date can be defined with the pick buttons. Day | Month | Year
* Factory setting
24.MM | 12.MM
D.MMM YYYY |
MM/DD/YYYY | MMM
DD YYYY | YYYY-MMDD
7.1.2Brightness
In this menu topic the brightness of the display can be defined.
Parameter Explanation Values
Brightness To define the level of brightness. 10...100 % (50 %*)
* Factory setting
57General Settings
Page 58

7.1.3Sound
In this menu topic, the sound can be defined.
Parameter Explanation Values
Stability beep Notifies when an unstable weight becomes stable. OFF | Low* | Medium |
Workflow feed
back beep
Touch beep Notifies every touch of interactive elements on touch display and
* Factory setting
7.1.4Language
The following languages can be chosen:
English Русский Português BRA.
Deutsch Polski Türkçe
Français Česky 中文
Español Magyar 日本語
Italiano Nederlands 한국어/조선말
Notifies when zero/tare bar actions are not available, provides
additional feedback in case of input errors, messages and status
notifications.
zero/tare bar.
High
OFF | Low* | Medium |
High
OFF* | Low | Medium |
High
7.1.5Glove mode
With the function Glove mode activated, the touch-screen becomes more sensitive and easier to navigate when wearing gloves.
Parameter Explanation Values
Glove mode To activate or deactivate the function Glove mode. ON | OFF*
* Factory setting
7.1.6Quick Adjustment
Parameter Explanation Values
Quick Adjust
ment
* Factory setting
Note If the option Quick Adjustment is activated, the symbol appears in the main navigation of an application.
7.1.7Leveling assistant
The function Leveling assistant helps to adjust the balance (e.g. when the balance has changed location).
For more information, see section Leveling the balance (page20).
To activate/deactivate and define the function Quick Adjustment. Internal Adjustment |
External Adjustment
58 General Settings
Page 59

7.2General configuration and data
The following options are available:
●
Weighing options
●
Publishing
●
Devices and connectivity
●
System settings
●
ISO-Log
●
Access protection
7.2.1Weighing options
The following options can be defined:
Parameter Explanation Values
Weighing mode To define Weighing mode. Universal* = for stan
Environment To adapt the balance to the environmental circumstances. Standard* = for stan
Autozero To activate or deactivate Autozero ON* | OFF
AutoTare To activate or deactivate AutoTare ON | OFF*
MinWeigh To define MinWeigh Not defined* | Cus
Recall To retain and recall the last stable weight. ON | OFF*
* Factory setting
Note
The function Autozero can not be deactivated for approved balances (except for some selected countries).
dard weighing applica
tions
Dosing = for dosing liq
uid or powdery samples
dard environments
Unstable = for unstable
environments
Stable = for stable
environments
tomized | Certificate
59General Settings
Page 60

MinWeigh method
The option MinWeigh method notifies when a measurement value is not fulfilling the required weighing accura
cy. The usage of MinWeigh is application-specific (contextual settings).
Defining MinWeigh method
1 Tap on MinWeigh.
The dialog MinWeigh configuration opens.
2 Tap on MinWeigh method.
The dialog MinWeigh method opens.
3 Select method and confirm by tapping on [ ].
Depending on the chosen method, the selectable options in the dialog MinWeigh configuration vary.
The following methods are available:
●
Customized
●
Certificate
●
OIML
Note
The method OIML is only available for approved balances.
7.2.2Publishing
In this section, the print and output options can be defined.
Note
Depending on the connected peripheral device (see section Devices and connectivity (page62)) the available
options in this section can differ. It is possible that not every options described in this section is available for
the used peripheral device.
Print
This option can be activated or deactivated.
The following options can be defined:
Parameter Values
Single values Manual, stable* | Manual, all values | Automatic, stable
Workflow
reports
Automatic* |
Manual
FACT report ON* | OFF
* Factory setting
60 General Settings
Page 61

Printouts data (Weighing applications only)
The following options can be defined:
Parameter Explanation Values
Date, time To add date and time. ON | OFF*
Balance infor
mation
MinWeigh Infor
mation
Leveling infor
mation
Gross/Tare To add gross/tare to single values. ON | OFF*
Signature line To add the signature line. ON | OFF*
Empty lines To add empty lines. ON | OFF*
* Factory setting
Send weight value
This option can be activated or deactivated.
The following options can be chosen:
Parameter Explanation
Manual, stable* Send next stable weight at will
Manual, all val
ues
Automatic, sta
ble
Automatic, con
tinuous
* Factory setting
To add information about the balance. ON | OFF*
To activate/deactivate MinWeigh Information ON | OFF*
To activate/deactivate Leveling information ON | OFF*
Send any stable or unstable weight at will
Send next stable weight automatically
Send any stable or unstable weight automatically
Autopublish
The option Autopublish can be activated or deactivated with the switch in the work title bar.
A numerical value for the function Autopublish can be defined.
61General Settings
Page 62

7.2.3Devices and connectivity
This section describes how the peripheral devices can be configured.
RS232
The following options can be defined:
Parameter Values
Allocated device RS-P2X | P5X | Printer | Host* | PC-Direct | Second display | Barcode Reader
Baudrate 600 | 1200 | 2400 | 4800 | 9600* | 19200 | 38400 | 57600 | 115200
Bit/Parity 8/No* | 7/No | 7/Mark | 7/Space | 7/Even | 7/Odd
Stop bits 1 bit* | 2 bits
Handshake Xon/Xoff* | RTS/CTS | None
Character set IBM/DOS* | ANSI/WIN | UTF-8
End of line <CR><LF>* | <CR> | <LF> | <TAB>
* Factory setting
USB Device
The following options can be defined:
Parameter Values
Allocated device Host* | PC-Direct
Command set MT-SICS* | MT-PM | Sartorius 16 | Sartorius 22
End of line <CR><LF>* | <CR> | <LF> | <TAB>
* Factory setting
62 General Settings
Page 63

7.2.4System settings
The following options can be defined:
Parameter Explanation Values
Balance identifi
cation
Sleep mode To activate/deactivate and define the function Sleep mode. After 30 seconds
Backlight OFF To define the functionBacklight OFF. After 30 seconds
Out of level noti
fication
Service due
notification
* Factory setting
System and data management
The following options can be defined:
Parameter Explanation
Touch screen
adjustment…
Level indicator
center
adjustment…
Reset balance… To reset the balance to default.
Note
Run the Level indicator center adjustment only when the electronic in/out level notification (status icon) and the
visual bubble position don't match.
CAUTION
By resetting the balance, any changes to general settings and contextual settings that have been made as well
as any temporary collected data (e.g. paused applications or statistics) will be lost.
A balance identification that can be defined by the user. Values can be defined
individually.
After 1 minute
After 2 minutes
After 5 minutes
After 10 minutes*
After 1 minute
After 2 minutes
After 5 minutes
After 10 minutes
To activate/deactivate the function Out of level notification. ON* | OFF
To activate/deactivate the function Service due notification. ON* | OFF
The balance is executing a screen adjustment.
The adjustment sets the exact center position of the level indicator and corrects any possi
ble shifts.
7.2.5ISO-log
In this section, detailed history information about performed adjustments, intensity of use and settings can be
displayed.
The following options can be selected:
Parameter Explanation
ISO-Log –
Adjustments
ISO-Log – Bal
ance
ISO-Log – Set
tings and status
Shows detailed information about the performed adjustments.
Shows detailed information about the balance history.
Shows detailed information about changes of the settings.
63General Settings
Page 64

7.2.6Access protection
With the function Access protection, certain functionalities of the balance can be protected by a numerical passcode.
The following options can be defined:
Parameter Explanation Values
Applications To protect the application. ON | OFF*
Adjustments and
tests
Settings To protect all settings. ON | OFF*
Passcode To define the passcode by the user. 1....9 (1-16 digits)
* Factory setting
User passcode
The user passcode can be defined by the user. The default value is 12345678. The length of the freely change
able user passcode is restricted to 16 digits.
Note
Passcode and access options are not affected by a balance reset.
What if you forgot the passcode?
When you forgot or lost the passcode, please contact a Mettler Toledo representative or visit the Mettler Toledo
balance support site.
To protect adjustments and tests. ON | OFF*
64 General Settings
Page 65

8Communication with Peripheral Devices
8.1PC-Direct Function
The numerical value displayed at the balance can be transferred to the cursor position in Windows Applications
(e.g. Excel, Word), by typing with the keyboard.
Note: The units will not be transferred.
Requirements
●
PC with one of the following Microsoft Windows® operating systems 32bit/64bit: XP (SP3), Vista (SP2),
Win 7 (SP1) or Win 8
●
Serial interface RS232, USB or BT option
●
Administrator rights for installing software (for USB not required)
●
Windows Application (e.g. Excel)
●
Balance to PC connection with cable RS232 or USB
Settings on the balance:
CAUTION
Disconnect the USB connection from the balance prior to changing settings.
Balance Interface Settings (see Interface Menu):
●
Topic RS232 or USB Device: set PC-Direct and select the most appropriate option for the desired weighing
result.
●
Topic End of line (transmitted end of line character):
– set <TAB> to write into the same row (e.g. in Excel).
– set <CR><LF> to write into the same column (e.g. in Excel).
●
Save changes.
Settings on the PC:
Installing SerialPortToKeyboard
Operation of PC-Direct via serial port RS232 requires the installation of SerialPortToKeyboard on your host
computer.
Using CD-ROM
1 Insert the product CD in the CD/DVD drive of the host computer.
2 Double click the folder SerialPortToKeyboard.
Using internet
1 Go to the site http://www.mettler-toledo-support.com.
2 Log in to the METTLER TOLEDO Balance Support Site (registration with the serial number of a METTLER
TOLEDO instrument is required).
3 Click Customer Support
4 Click appropriate product folder and save the program file SerialPortToKeyboard.exe on your specified
storage location.
Installation procedure
1 Right-click on SerialPortToKeyboard.exe and select Run as Administrator from the menu.
2 Follow the installer's instructions.
65Communication with Peripheral Devices
Page 66

Settings for SerialPortToKeyboard
➀
➁
➂
1 Select the serial port (COM) to be used for connec
tion with the balance.
2 Set the baud rate to 9600.
3 Activate "Connect"
Note
Note
●
The window can be minimized.
●
Closing the window terminates the session.
Checking operation
1 Start SerialPortToKeyboard (RS232)
2 Start Excel (or another application) on the PC.
3 Activate a cell in Excel.
According to your selected PC-Direct option, the displayed values will appear e.g. in the column one after the
other one in the different rows.
8.2USB Device Interface
To perform the functionality USB DEVICE with a PC equipped only with a USB Interface, you have to install an
appropriate USB Driver on the PC first.
Requirements
●
Balance with USB Device Interface.
●
PC with one of the Microsoft Windows® operating system 32bit/64bit: XP (SP3), Vista (SP2), Win 7 (SP1)
or Win 8.
●
Administrator rights for installing software.
●
PC to balance USB connection cable.
Installing USB driver on the PC:
Using CD-ROM
1 Insert the product CD in the CD/DVD drive of the host computer.
2 Double click the folder USB Driver.
3 Click USBDriverInstaller.exe.
Using internet
1 Connect to the Internet
2 Go to the site http://www.mettler-toledo-support.com.
3 Log in to the METTLER TOLEDO Balance Support Site (registration with the serial number of a METTLER
TOLEDO instrument required).
4 Click Customer Support.
5 Click appropriate product folder.
6 Click USB Driver.
66 Communication with Peripheral Devices
Page 67

7 Click USBDriverInstaller.exe.
Installing procedure
1 Click Save to download to your specified location.
2 Right-click on the downloaded install program: USBDriverIn
staller.exe
3 If a safety warning appears, allow Windows to install.
4 Click Next and follow the installer's instructions.
Installing instrument
1 Switch the balance off.
2 Connect the balance to the preferred USB Port on the PC.
3 Switch the balance on.
4 Follow the instructions of the Wizard and install the software auto
matically (recommended)
Note: The wizard appears again for each USB port, either on your PC
or if another balance is connected.
Warning: Do not click Cancel as for the connected USB port, it might
not be possible anymore to perform the installation process.
67Communication with Peripheral Devices
Page 68

9Firmware (Software) Updates
METTLER TOLEDO is continuously improving its balance firmware (software) for the benefit of customers. In
order that the customer can benefit quickly and easily from further developments, METTLER TOLEDO makes the
latest firmware versions available on the Internet. The firmware made available on the Internet has been devel
oped and tested by Mettler-Toledo AG using processes that meet the guidelines of ISO 9001. Mettler-Toledo AG
does not, however, accept liability for consequences that might arise from updating the firmware.
9.1Operating principle
You will find all the relevant information and updates for your balance on the METTLER TOLEDO website at the
following address:
www.mettler-toledo-support.com
A program known as "e-Loader II" is loaded onto your computer together with the firmware update. You can
use this program to download the firmware to the balance. The "e-Loader II" can also save the settings in your
balance before the new firmware is downloaded to it. You can reload the saved settings into the balance manu
ally or automatically after the software is downloaded.
If the selected update includes an application that is not described in these instructions (or that has been updat
ed in the meantime) you can download the corresponding instructions in Adobe Acrobat® PDF format.
Note
New applications might not be visible unless the type data are updated by a service technician.
Requirements
The minimum requirements for obtaining applications from the Internet and downloading them into your bal
ance are as follows:
●
PC with one of the following Microsoft Windows® operating systems:
•
Microsoft® Windows® XP Home or Professional with Service Pack 3 (32 bit)
•
Microsoft® Windows Vista® Home Premium, Business, Ultimate, or Enterprise with Service Pack 2 (32 bit
and 64 bit)
•
Microsoft® Windows 7 with Service Pack 1 Home Premium, Professional, Ultimate, or Enterprise (32 bit
and 64 bit)
•
Microsoft ® Windows ® 8 , Professional or Enterprise
●
Administrator rights for installing software.
●
PC to balance connection cable (e.g. No. 11101051 see chapter accessories)
68 Communication with Peripheral Devices
Page 69

9.2Update procedure
Installing "e-Loader II" software from the Internet onto the PC.
1 Connect to the Internet.
2 Go to the site http://www.mettler-toledo-support.com.
3 Log in to the METTLER TOLEDO Balance Support Site (registration with the serial number of a METTLER
TOLEDO instrument required).
4 Click on Customer Support.
5 Click the appropriate product folder.
6 Click the firmware version (e-Loader II) you need and save it on your specified storage location.
7 Right-click on the firmware SNxxx.exe.
8 Follow the installer's instructions.
Loading the new firmware into the balance.
1 Right-click on METTLER TOLEDO e-Loader II and select Run as Administrator from the menu.
2 Follow the instructions, which will take you step-by-step through the installation.
69Firmware (Software) Updates
Page 70

10Error and Status Messages
Error messages in the display draw your attention to incorrect operation or that the balance could not execute a
procedure properly.
Error message Cause Rectification
NO STABILTY No stability Ensure more stable ambient condi
Adjustment aborted - Weight out
of range
EEPROM error - Please contact
your MT-Support representative.
Wrong adjustment weight on the
weighing pan or none at all.
●
EEPROM (memory) error.
●
Excessive mains voltage fluctu
ation or strong glitches
occurred.
tions. If not possible, check settings
for environment.
Place required adjustment weight in
center of pan.
Please contact your MT-Support
representative.
Wrong cell data - Please contact
your MT-Support representative.
No standard adjustment - Please
contact your MT-Support repre
sentative.
Program memory defect - Please
contact your MT-Support repre
sentative.
Temperature sensor defect Please contact your MT-Support
representative.
Wrong load cell brand - Please
contact your MT-Support repre
sentative.
Wrong type data set - Please con
tact your MT-Support representa
tive.
Battery backup lost - Please
check date and time settings.
Weight is above initial zero
range.
Weight is below initial zero
range.
Memory full Memory full. Clear the memory and start a new
Weight out of range Sample weight is outside the
Wrong cell data. Please contact your MT-Support
representative.
No standard calibration. Please contact your MT-Support
representative.
Program memory defect. Please contact your MT-Support
representative.
Temperature sensor defect. Please contact your MT-Support
representative.
Wrong load cell brand. Please contact your MT-Support
representative.
Wrong type data set. Please contact your MT-Support
representative.
Backup battery is empty. This bat
tery ensures that the date and time
are not lost when the balance is
disconnected from power.
Overload - The weight on the pan
exceeds the weighing capacity of
the balance.
Underload Check that the weighing pan is
Wrong weighing pan or pan is not
empty.
Wrong weighing pan or pan is
missing.
allowed range.
Connect the balance to the power
supply for charging the battery
(e.g. during the night) or contact
METTLER TOLEDO customer ser
vice.
Reduce the weight on the weighing
pan.
positioned correctly.
Mount correct weighing pan or
unload weighing pan.
Mount correct weighing pan.
evaluation.
Unload the pan and load a new
sample weight.
70 Firmware (Software) Updates
Page 71

11Maintenance
A
B
C
WARNING
Risk of electric shock
– The instrument must be disconnected from the power supply, before cleaning or other
maintenance work to be performed.
– Use only the power cord from METTLER TOLEDO, if it needs replacing.
Please observe the following notes:
Note
On no account use cleaning agents which contain solvents or abrasive ingredients, as this can result in dam
age to the touch screen.
11.1Cleaning the glass draft shield (0.1 mg and 1 mg models)
Remove the following parts:
1 Remove weighing pan, draft shield element and pan support.
2 Remove the bottom plate.
3 Unlock the draft shield, lift it off the balance and place it on a clean surface.
1 Push the glass doors (A) back.
2 Turn the two lock covers (B) on the front as
far as they will go.
1 Tilt the front glass (C) forward.
2 Remove the front glass.
71Maintenance
Page 72

– Pull the top glass door (D) out from the
E
F
G
H
front.
– Push the lock button (G) to release the rear
glass.
– Lift the side glass doors (E) at (F) and pull
them out from the front.
– Remove the rear glass (H).
72 Maintenance
1 Turn the draft shield lock to the (Service)
position.
2 Remove the draft shield lock.
After cleaning reinstall all components in the reverse order. For balance mounting see section Installing the
components (page17-18).
Page 73

11.2Disposal
In conformance with the European Directive 2002/96/EC on Waste Electrical and Electronic
Equipment (WEEE) this device may not be disposed of in domestic waste. This also applies
to countries outside the EU, per their specific requirements.
Please dispose of this product in accordance with local regulations at the collecting point
specified for electrical and electronic equipment. If you have any questions, please contact
the responsible authority or the distributor from which you purchased this device. Should this
device be passed on to other parties (for private or professional use), the content of this regu
lation must also be related.
Thank you for your contribution to environmental protection.
73Maintenance
Page 74

12Interface Specification
15
9 6
IN
GND
OUT
HAND
SHAKE
IN
DATA
OUT
RxD
TxD
CTS
RTS
OUT
POWER
SUPPLY
+12V
2nd di
splay mode only
12.1RS232C interface
Each balance is equipped with an RS232C Interface as standard for the attachment of a peripheral device (e.g.
printer or computer).
Schematic Item Specification
Interface type Voltage interface according to EIA
RS-232C/DIN66020 CCITT V24/V.28)
Max. cable length 15 m
Signal level Outputs:
+5 V … +15 V (RL = 3–7 kΩ)
–5 V … –15 V (RL = 3–7 kΩ)
Inputs:
+3 V … +25 V
–3 V … -25 V
Connector Sub-D, 9-pole, female
Operating mode Full duplex
Transmission mode Bit-serial, asynchronous
Transmission code ASCII
Baud rates 600, 1200, 2400, 4800, 9600, 19200,
38400, 57600, 115200 (software selectable)
Bits/parity 7-bit/none, 7-bit/even, 7-bit/odd, 8-bit/none
(software selectable)
Stop bits 1 stop bit
Handshake None, XON/XOFF, RTS/CTS (software selectable)
End-of-line <CR><LF>, <CR>, <LF> (software selectable)
Power supply for
2nd display
+ 12 V, max 40 mA (software selectable, 2nd
display mode only)
74 Maintenance
Page 75

12.2USB host
1 VBUS (+5 VDC)
2 D– (Data –)
3 D+ (Data +)
4 GND (Ground)
Shield Shield
Schematic Item Specification
12.3USB device
Each balance is equipped with an USB device interface as standard for the attachment of a peripheral device
(e.g. computer).
Note
This interface is not suitable to communicate with a printer.
Schematic Item Specification
Standard In conformity with USB Specification Revision
1.0/1.1
Speed Full speed 12 Mbps (requires shielded cable)
Power usage Max. 500 mA
Connector Type A
Pin assignment
Standard In conformity with USB Specification Revision
Speed Full speed 12 Mbps (requires shielded cable)
Function CDC (Communication Device Class) serial port
Power usage Suspended device: Max 10 mA
Connector Type B
1 VBUS (+5 V DC)
2 D- (Data -)
3 D+ (Data +)
4 GND (Ground)
Shell Shield
1.1
emulation
75Interface Specification
Page 76

12.4MT-SICS interface commands and functions
Many of the instruments and balances used have to be capable of integration in a complex computer or data
acquisition system.
To enable you to integrate balances in your system in a simple manner and utilize their capabilities to the full,
most balance functions are also available as appropriate commands via the data interface.
All new METTLER TOLEDO balances launched on the market support the standardized command set "METTLER
TOLEDO Standard Interface Command Set" (MT-SICS). The commands available depend on the functionality of
the balance.
For further information please refer to the Reference Manual MT-SICS downloadable from the Internet under
u www.mt.com/sics-newclassic
76 Interface Specification
Page 77

13Technical Data
13.1General data
Power supply for 0.1 mg balances
●
AC adapter Primary: 100–240VAC, -15%/+10%, 50/60Hz
●
Cable for AC adapter 3-core, with country-specific plug
●
Balance power supply 12VDC ±3%, 2.25A, maximum ripple: 80mVpp
Power supply for all other balances
●
AC/DC Adapter Primary: 100V–240V, ±10%, 50/60Hz, 0.3A
●
Power supply to the balance 11–20VDC, 10W
Protection and standards
●
Overvoltage category II
●
Degree of pollution 2
●
Degree of protection Protected against dust and water
Secondary: 12 V DC ±3%, 2.5 A (with electronic overload protection)
Secondary: 12VDC, 0.84A (with electronic overload protection)
Use only with a tested AC Adapter with SELV output current.
Ensure correct polarity
●
Standards for safety and EMC See Declaration of Conformity
●
Range of application For use only in enclosed interior rooms
Environmental conditions
●
Height above mean sea level up to 4000m
●
Ambient temperature range 10 to 30°C
●
Relative air humidity 10% up to 80% at 31°C, linearly decreasing to 50% at 40°C, non
condensing
●
Warm-up time After connecting the balance to the power supply at least
●
30 minutes on balances with a readability of 0.001 g (0.01ct) to
5 g.
●
60 minutes on balances with a readability of 0.1 mg (0.001ct)
and better.
Materials
●
Housing Die-cast aluminum, lacquered
●
Weighing pan Stainless steel X2CrNiMo 17-12-2 (1.4404)
245 x 351 mm: Stainless steel X5CrNiMo 18-10 (1.4301)
●
Draft shield element with 0.1mg models: Stainless steel X2CrNiMo 17-12-2 (1.4404)
with 10mg models: Plastic (PBT)
●
Draft shield Plastic (PBT), glass
●
In-use-cover Plastic (PET)
77Technical Data
Page 78

13.2Model-specific data
13.2.1Balances with readability of 0.1 mg, S platform with draft shield
MS104TS MS204TS
Limit values
Maximum capacity 120 g 220 g
Readability 0.1 mg 0.1 mg
Repeatability (at nominal load) 0.1 mg 0.1 mg
Linearity deviation 0.2 mg 0.2 mg
Sensitivity temperature drift 1.5 ppm/°C 1.5 ppm/°C
Typical values
Repeatability (at nominal load) 0.08 mg 0.08 mg
Linearity deviation 0.06 mg 0.06 mg
Minimum sample weight (acc. to USP) 0.16 g 0.16 g
Minimum sample weight (U=1 %, k=2) 0.016 g 0.016 g
Minimum capacity OIML 0.01 g 0.01 g
Settling time 2 s 2 s
Adjustment Int.Cal / FACT Int.Cal / FACT
Balance dimensions (W x D x H) 204x347x348 mm 204x347x348 mm
Weighing pan dimensions ø 90 mm ø 90 mm
Usable height of draft shield 236 mm 236 mm
Weight of balance 5.9 kg 5.9 kg
Weights for routine testing
OIML CarePac
Weights
ASTM CarePac
Weights
#11123002
100g F2, 5g E2
#11123102
100g 1, 5g 1
#11123001
200g F2, 10g E2
#11123101
200g 1, 10g 1
78 Technical Data
Page 79

MS304TS
Limit values
Maximum capacity 320 g
Readability 0.1 mg
Repeatability (at nominal load) 0.1 mg
Linearity deviation 0.2 mg
Sensitivity temperature drift 1.5 ppm/°C
Typical values
Repeatability (at nominal load) 0.08 mg
Linearity deviation 0.06 mg
Minimum sample weight (acc. to USP) 0.16 g
Minimum sample weight (U=1 %, k=2) 0.016 g
Minimum capacity OIML 0.01 g
Settling time 2 s
Adjustment Int.Cal / FACT
Balance dimensions (W x D x H) 204x347x348 mm
Weighing pan dimensions ø 90 mm
Usable height of draft shield 236 mm
Weight of balance 5.9 kg
Weights for routine testing
OIML CarePac
Weights
ASTM CarePac
Weights
#11123001
200g F2, 10g E2
#11123101
200g 1, 10g 1
79Technical Data
Page 80

13.2.2Balances with readability of 1 mg, S platform with draft shield
MS303TS MS403TS
Limit values
Maximum capacity 320 g 420 g
Readability 1 mg 1 mg
Repeatability (at nominal load) 1 mg 1 mg
Linearity deviation 2 mg 2 mg
Sensitivity temperature drift 3 ppm/°C 3 ppm/°C
Typical values
Repeatability (at nominal load) 0.7 mg 0.7 mg
Linearity deviation 0.6 mg 0.6 mg
Minimum sample weight (acc. to USP) 1.4 g 1.4 g
Minimum sample weight (U=1 %, k=2) 0.14 g 0.14 g
Minimum capacity OIML 0.02 g 0.02 g
Settling time 1.5 s 1.5 s
Adjustment Int. Cal / FACT Int. Cal / FACT
Balance dimensions (W x D x H) 204x347x283 mm 204x347x283 mm
Weighing pan dimensions 127x127 mm 127x127 mm
Usable height of draft shield 168 mm 168 mm
Weight of balance 5.6 kg 5.6 kg
Weights for routine testing
OIML CarePac
Weights
ASTM CarePac
Weights
#11123001
200g F2, 10g F1
#11123103
200g 1, 10g 1
#11123000
200g F2, 20g F1
#11123100
200g 1, 20g 1
80 Technical Data
Page 81

MS603TS MS1003TS
Limit values
Maximum capacity 620 g 1020 g
Readability 1 mg 1 mg
Repeatability (at nominal load) 1 mg 1 mg
Linearity deviation 2 mg 2 mg
Sensitivity temperature drift 3 ppm/°C 3 ppm/°C
Typical values
Repeatability (at nominal load) 0.7 mg 0.7 mg
Linearity deviation 0.6 mg 0.6 mg
Minimum sample weight (acc. to USP) 1.4 g 1.4 g
Minimum sample weight (U=1 %, k=2) 0.14 g 0.14 g
Minimum capacity OIML 0.02 g 0.02 g
Settling time 1.5 s 1.5 s
Adjustment Int. Cal / FACT Int. Cal / FACT
Balance dimensions (W x D x H) 204x347x283 mm 204x347x283 mm
Weighing pan dimensions 127x127 mm 127x127 mm
Usable height of draft shield 168 mm 168 mm
Weight of balance 5.6 kg 5.6 kg
Weights for routine testing
OIML CarePac
Weights
ASTM CarePac
Weights
#11123007
500g F2, 20g F1
#11123107
500g 1, 20g 1
#11123008
1000g F2, 50g F1
#11123108
1000g 1, 50g 1
81Technical Data
Page 82

13.2.3Balances with readability of 0.01 g, S platform
MS1602TS MS3002TS MS4002TS
Limit values
Maximum capacity 1620 g 3200 g 4200 g
Readability 0.01 g 0.01 g 0.01 g
Repeatability (at nominal load) 0.01 g 0.01 g 0.01 g
Linearity deviation 0.02 g 0.02 g 0.02 g
Sensitivity temperature drift 3 ppm/°C 3 ppm/°C 3 ppm/°C
Typical values
Repeatability (at nominal load) 0.007 g 0.007 g 0.007 g
Linearity deviation 0.006 g 0.006 g 0.006 g
Minimum sample weight (acc. to USP) 14 g 14 g 14 g
Minimum sample weight (U=1 %, k=2) 1.4 g 1.4 g 1.4 g
Minimum capacity OIML 0.5 g 0.5 g 0.5 g
Settling time 1.5 s 1.5 s 1.5 s
Adjustment Int. Cal / FACT Int. Cal / FACT Int. Cal / FACT
Balance dimensions (W x D x H) 194x347x99 mm 194x347x99 mm 194x347x99 mm
Weighing pan dimensions 170x200 mm 170x200 mm 170x200 mm
Weight of balance 4.6 kg 4.6 kg 4.6 kg
Weights for routine testing
OIML CarePac
Weights
ASTM CarePac
Weights
#11123008
1000g F2, 50g F2
#11123106
1000g 1, 50g 1
#11123009
2000g F2, 100g
F2
#11123109
2000g 1, 100g 1
#11123010
2000g F2, 200g
F2
#11123110
2000g 4, 200g 4
82 Technical Data
Page 83

MS4002TSDR MS6002TS MS6002TSDR
Limit values
Maximum capacity 4200 g 6200 g 6200 g
Maximum capacity, fine range 820 g – 1220 g
Readability 0.1 g 0.01 g 0.1 g
Readability, fine range 0.01 g – 0.01 g
Repeatability (at nominal load) 0.1 g 0.01 g 0.01 g
Repeatability, at fine range (at nominal
load)
Linearity deviation 0.2 g 0.02 g 0.2 g
Linearity deviation, fine range 0.02 g – 0.02 g
Sensitivity temperature drift 3 ppm/°C 3 ppm/°C 3 ppm/°C
Typical values
Repeatability (at nominal load) 0.05 g 0.007 g 0.05 g
Repeatability, at fine range (at nominal
load)
Linearity deviation 0.02 g 0.006 g 0.02 g
Linearity deviation, at fine range 0.006 g – 0.006 g
Minimum sample weight (acc. to USP) 14 g 14 g 14 g
Minimum sample weight (U=1 %, k=2) 1.4 g 1.4 g 1.4 g
Minimum capacity OIML 0.5 g 0.5 g 0.5 g
Settling time 1.5 s 1.5 s 1.5 s
Adjustment Int. Cal / FACT Int. Cal / FACT Int. Cal / FACT
Balance dimensions (W x D x H) 194x347x99 mm 194x347x99 mm 194x347x99 mm
Weighing pan dimensions 170x200 mm 170x200 mm 170x200 mm
Weight of balance 4.6 kg 5.1 kg 5.1 kg
Weights for routine testing
OIML CarePac
Weights
ASTM CarePac
Weights
0.01 g – 0.01 g
0.007 g – 0.007 g
#11123010
2000g F2, 200g
F2
#11123110
2000g 4, 200g 4
#11123011
5000g F2, 200g
F2
#11123111
5000g 4, 200g 4
#11123011
5000g F2, 200g
F2
#11123111
5000g 4, 200g 4
83Technical Data
Page 84

MS12002S MS12002TS
Limit values
Maximum capacity 12200 g 12200 g
Readability 0.01 g 0.01 g
Repeatability (at nominal load) 0.01 g 0.01 g
Linearity deviation 0.02 g 0.02 g
Sensitivity temperature drift 3 ppm/°C 3 ppm/°C
Typical values
Repeatability (at nominal load) 0.007 g 0.007 g
Linearity deviation 0.006 g 0.006 g
Minimum sample weight (acc. to
USP)
Minimum sample weight (U=1 %,
k=2)
Minimum capacity OIML 0.5 g 0.5 g
Settling time 1.5 s 1.5 s
Adjustment Int. Cal / FACT Int. Cal / FACT
Balance dimensions (W x D x H) 194x347x99 mm 194x347x99 mm
Weighing pan dimensions 170x200 mm 170x200 mm
Weight of balance 5.2 kg 5.2 kg
Weights for routine testing
OIML Weights 10000g F2, 500g F2 10000g F2, 500g F2
ASTM Weights #11123110
14 g 14 g
1.4 g 1.4 g
#11123110
10000g 4, 500g 4
10000g 4, 500g 4
84 Technical Data
Page 85

13.2.4Balances with readability of 0.1 g to 1 g, S platform
MS8001TS
Limit values
Maximum capacity 8200 g
Readability 0.1 g
Repeatability (at nominal load) 0.1 g
Linearity deviation 0.2 g
Sensitivity temperature drift 3 ppm/°C
Typical values
Repeatability (at nominal load) 0.07 g
Linearity deviation 0.06 g
Minimum sample weight (acc. to USP) 140 g
Minimum sample weight (U=1 %, k=2) 14 g
Minimum capacity OIML 5 g
Settling time 1 s
Adjustment Int. Cal / FACT
Balance dimensions (W x D x H) 194x347x99 mm
Weighing pan dimensions 170x200 mm
Weight of balance 4.6 kg
Weights for routine testing
OIML CarePac
Weights
ASTM CarePac
Weights
#11123011
5000g F2, 200g F2
#11123111
5000g 4, 200g 4
85Technical Data
Page 86

13.3Dimensions
236
77
86
245
21
173
174
140
347
194
204
348
74
98
218
85
ø 90
115
140
99
13.3.1Balances with readability of 0.1 mg and draft shield
Models:
MS104TS
MS204TS
MS304TS
86 Technical Data
Page 87

13.3.2Balances with readability of 1 mg and draft shield
127
127
168
85
104.5 (MS1003x)
86
245
21
173
174
140
347
194
204
283
74
100
218
77
140
99
115
Models:
MS303TS
MS403TS
MS603TS
MS1003TS
87Technical Data
Page 88

13.3.3Balances with readability of 0.01 g
113
28
245
86
18.5
74
94
99
140
170
194
268
200
170
235.5
347
104.5 (MS6002x)
Models:
MS12002S
MS12002TS
MS1602TS
MS3002TS
MS4002TS
MS4002TSDR
MS6002TS
MS6002TSDR
88 Technical Data
Page 89

13.3.4Balances with readability of 0.1 g
226
190
113
28
245
86
14
74
99
140
170
194
268
240
347
Models:
MS8001TS
89Technical Data
Page 90

14Accessories and Spare Parts
C
C
14.1Accessories
Description Part No.
Density determination
Glass beaker, height 100 mm, Ø 60 mm 00238167
Sinker for density of liquids in conjunction with density kit 00210260
Calibrated (sinker + certificate) 00210672
Recalibrated (new certificate) 00210674
Calibrated thermometer with certificate 11132685
Weighing pans
Draft shields
Dynamic weighing pan MS-DWP-21 with 4 liter bowl (for bal
30006471
ances with readability of 0.01g and 0.1g )
Draft shield with sliding doors "mg" (usable height 168mm) 12122405
Draft shield with sliding doors "0.1 mg" (usable height
12122404
236mm)
Draft shield MS-DS-21 for models with readability of 0.1g up
12121014
to 0.01g.
90 Technical Data
Page 91

Printers
RS-P25 printer with RS232C connection to instrument 11124300
Paper roll, set of 5pcs 00072456
Paper roll, self-adhesive, set of 3pcs 11600388
Ribbon cartridge, black, set of 2pcs 00065975
RS-P26 printer with RS232C connection to instrument (with
date and time)
Paper roll, set of 5pcs 00072456
Paper roll, self-adhesive, set of 3pcs 11600388
Ribbon cartridge, black, set of 2pcs 00065975
RS-P28 printer with RS232C connection to instrument (with
date, time and applications
Paper roll, set of 5pcs 00072456
Paper roll, self-adhesive, set of 3pcs 11600388
Ribbon cartridge, black, set of 2pcs 00065975
P-56RUE thermal printer with RS232C, USB and ethernet con
nections, simple printouts, date and time, label printing (limit
ed).
Paper roll, white, set of 10pcs 30094723
Paper roll, white, self-adhesive, set of 10pcs 30094724
Paper roll, white, self-adhesive labels, set of 6pcs 30094725
P-58RUE Thermal printer with RS232C, USB and ethernet con
nections, simple printouts, date and time, label printing, bal
ance applications: statistics, formulation, totaling,
Paper roll, white, set of 10pcs 30094723
Paper roll, white, self-adhesive, set of 10pcs 30094724
Paper roll, white, self-adhesive labels, set of 6pcs 30094725
11124303
11124304
30094673
30094674
Cables for RS232C interface
RS9 – RS9 (m/f): connection cable for PC, length = 1 m 11101051
RS9 – RS25 (m/f): connection cable for PC, length = 2m 11101052
RS232 - USB converter cable – Cable with converter to connect
a balance (RS232) to a USB port
64088427
91Accessories and Spare Parts
Page 92

Cables for USB interface
METTLER TOLEDO
000000
USB (A –B) connection cable for connection to PC,
length=1m
Cable replacement (wireless)
Auxiliary displays
RS232 auxiliary display AD-RS-M7 12122381
Power supplies
AC/DC universal adapter (EU, USA, AU, UK) 100–240VAC,
50/60 Hz, 0.3 A, 12 VDC 0.84 A
30241476
11120270
AC/DC adapter (without power cable) 100–240VAC, 0.8A,
50/60Hz, 12VDC2.5A
11107909
92 Accessories and Spare Parts
Page 93

Protective covers
Protective cover 30216667
Anti-theft devices
Steel cable 11600361
Software
LabX direct balance (simple data transfer) 11120340
Weighing below the balance
Transport cases
Transport case 11124245
93Accessories and Spare Parts
Page 94

Adjustment weights
OIML / ASTM Weights (with calibration certificate) see www.mt.com/weights
Density kit MS-DNY-43 for MS-TS balances
(d=0.1mg/1mg)
Bluetooth RS232 serial adapter ADP-BT-S for wireless connec
tion between printer and balance* or between balance and
PC*.
Fits printers P-56 / P-58.
The balance and PC* connection is supported by the following
balance models (SW V2.20 or higher required): MS, MS-S,
MS-L, ML, PHS, JP, JS.
* Bluetooth interface required
●
1 Bluetooth RS232 serial adapter (slave)
●
1 MT-DB9 male to female connector
●
1 MT-DB9 male to male connector
Bluetooth RS232 serial adapter ADP-BT-S for wireless connec
tion between printer and balance* or between balance and
PC*.
Fits printers P-56 / P-58.
The balance and PC* connection is supported by the following
balance models (SW V2.20 or higher required): MS, MS-S,
MS-L, ML, PHS, JP, JS.
* Bluetooth interface required
●
2 Bluetooth RS232 serial adapters paired (slave/master)
●
1 MT-DB9 male to female connector
●
1 MT-DB9 male to male connector
11142143
30086494
30086495
94 Accessories and Spare Parts
Page 95

14.2Spare parts
7
4
2
1
3
5
6
4
1
2
3
5
6
7
9
10
8
M
S
MS
Draft shield
Drawing Pos Description Part No.
Weighing pans / draft shield elements / support
Drawing Pos Description Part no.
5 Draft shield lock 12122013
6 Bottom plate 12122019
Draft shield "168 mm"
1 Top glass with handle 12121884
2 Rear glass low 12122015
3 Side glass door left low with handle 12121881
4 Side glass door right low with handle 12121883
7 Front glass low 12122014
Draft shield "236 mm"
1 Top glass with handle 12121884
2 Rear glass high 12122012
3 Side glass door left high with handle 12121880
4 Side glass door right high with handle 12121882
7 Front glass high 12122011
1 0.1 mg Weighing pan Ø 90 mm 12122010
2 0.1 mg Pan support Ø90mm 11124249
3 0.1 mg Draft ring element 12122008
4 1 mg Weighing pan 127x127mm 12122009
5 1 mg Pan support 127x127mm for
12122017
models up to 999g
5 1 mg Pan support 127x127mm for
12122016
models from 1000g
6 0.01 g Draft ring element
12122018
170x200mm
7 0.01 g Weighing pan 170x200mm 11124247
8 0.01 g Pan support 170x200mm 12121064
7 0.1 g Weighing pan 190x226mm 11124248
8 0.1 g Pan support 190x226mm 12121066
9 from
Pan support caps 11131029
0.01g
10 Leveling foot 11106323
95Accessories and Spare Parts
Page 96

Index
A
AC adapter 77
Access protection 64
Accessories 90
Action buttons 12
Activities 12
Check Weighing 46
Counting 38
Dynamic Weighing 44
Factor Weighing 50
Formula 42
Percent Weighing 40
Totaling 51
Weighing 37
Applications 36
Adjusting 23
Adjustments 53
Adjustments and Tests 53
air bubble 20
Ambient conditions 18
Application home screen 12
Assign to sample 34
Autoincrement 34
Autopublish 61
B
Backlight 63
Balance History 63
Balance Information 12, 61
Baud rates 74
Baudrate 62
Beep 58
Bit/Parity 62
C
Changing the resolution 31
Changing the time 14
Check Weighing 46
Cleaning 71
Coach text field 12
Conventions and Symbols 7
Counting 38
D
Date format 57
Defining an ID 33
Defining reference piece number 38
Defining statistics 35
Defining the measuring time 44
Defining the reference piece
weight
Defining tolerance threshold 47
Density kit 94
Devices and connectivity 62
Dimensions 86
Discard value 51
38
Display results 43
Disposal 73
Dosing 59
Draft Shield 17, 95
Dynamic Weighing 44
E
Entering Characters and Num
bers
Environment 59
Error messages 70
External Adjustment 56
F
FACT 54
Factor Weighing 50
Fill up 42
Fill up sample 42
Firmware update 68
Formula 42
Fully Automatic Calibration Tech
nology
G
General configuration and data 59
Devices and connetivity 62
Publishing 60
RS232 62
System settings 63
USB Device 62
Weighing options 59
General safety information 8
General settings 57
H
Handshake 62, 74
History 63
Host 75
I
Identification dialog screen 33
Information and work bars 12
Information fields 12
Input prompt 34
Installing the components 17
Intended use 8
Interface
MT-SICS 76
RS232C 74
USB Device 75
Internal Adjustment 55
Internal Weight 55
Introduction 7
ISO-Log 63
L
Language 58
Quick settings/Preferences 58
Leveling assistant 21, 58
13
54
Index96
Page 97

Leveling foot 10
Leveling the balance 20
Location 18
M
Main activity configuration 12
Main navigation 12
Measuring time 44
MinWeigh 60
MT-SICS 76
N
Navigation 26
O
Operating temperature 23
Operation keys 10
Overview 25
P
PC-Direct 65
PC-Direct Function 65
Percent Weighing 40
Performing a dynamic weighing 44
Performing a simple weighing 27
Performing Formula 42
Power supply 19, 77
Print 12, 60
Publishing 60
R
Reference piece number 38
Reference piece weight 38
Reset Balance 63
RS232 62
RS232C interface 74
S
Safety Information
General 8
Intended use 8
Signal words 8
Staff safety 8
Warning Symbols 8
Scope of delivery 16
Selecting the location 18
Send weight value 61
Setting FACT 54
Setting/Preferences 12
Short balance information 12
Signal words 8
Simple weighing 27
Sleep Mode 63
Software update 68
Sound 58
Spare parts 95
Staff safety 8
Statistics 35
Statistics configuration 35
Status information field 12
Switching
On 23
Switching off 24
Switching on 24
Switching on the balance for the
first time
Switching the weighing unit 28
Symbols 7
System and Data Management 63
System settings 63
T
Taring 32
Technical Data 77
Technical data dimensions 86
Technical data general 77
Threshold 49
Time 57
Time format 57
Totaling 51
Touch beep 58
Touch Screen Adjustment 63
Transporting the balance 22
U
USB Device 62
USB device interface 66, 75
USB driver installation 66
USB Host 75
User Interface 11
V
Value bar 12
W
Warm-up time 23, 77
Warning Symbols 8
Weighing 37
Weighing below the balance 22
Weighing information bar 12
Weighing options 59
Weighing unit 12
Weighing value field 12
Weighing-in aid 12
Work title bar 12
Workflow Feedback Beep 58
Z
Zero setting 32
Zeroing 32
24
Index 97
Page 98

Page 99

Page 100

GWP®
is the global weighing standard, ensuring consistent accuracy
of weighing processes, applicable to all equipment from any manufacturer. It helps to:
• Choose the appropriate balance or scale
•
Calibrate and operate your weighing equipment with security
• Comply with quality and compliance standards in laboratory and
manufacturing
www.mt.com/GWP
GWP
®
Good Weighing Practice
™
Mettler-Toledo AG, Laboratory Weighing
CH-8606 Greifensee, Switzerland
Tel. +41 (0)44 944 22 11
Fax +41 (0)44 944 30 60
www.mt.com
Subject to technical changes.
© Mettler-Toledo AG 02/2015
30235435B en
www.mt.com/balances
For more information
*30235435*
 Loading...