

Page 1

Melting Point Excellence System
User Manual
MP50/MP55
Page 2

Page 3

Table of Contents
1 Introduction 3
2 Safety information 4
2.1 Definitions of signal words and warning symbols ............................................................ 4
2.2 Product-specific safety notes ......................................................................................... 4
3 Design and function 6
3.1 Instrument overview ..................................................................................................... 6
3.2 Connections at the back of the instrument....................................................................... 7
3.3 Control panel layout..................................................................................................... 7
3.4 User interface .............................................................................................................. 8
4 Installation and commissioning 12
4.1 Scope of delivery ......................................................................................................... 12
4.2 Unpack the instrument.................................................................................................. 12
4.3 Position the instrument................................................................................................. 13
4.4 Connect the instrument to the power supply .................................................................... 13
4.5 Disconnect the instrument from the power supply ............................................................ 14
3.4.1 Home screen ................................................................................................ 8
3.4.2 Basic elements of windows ............................................................................ 9
3.4.3 Information displayed during an analysis......................................................... 9
3.4.4 Menu structure.............................................................................................. 10
5 Operation 15
5.1 Start up the instrument.................................................................................................. 15
5.2 Log in ........................................................................................................................ 15
5.3 Shut down the instrument ............................................................................................. 15
5.4 Determine melting points or melting ranges .................................................................... 16
5.4.1 Prepare samples........................................................................................... 16
5.4.1.1 Prepare samples of solid substances......................................................... 16
5.4.1.2 Prepare samples that decompose, sublime or vaporize ............................... 18
5.4.2 Run an analysis using a manual method......................................................... 18
5.5 Determine slip melting points (MP55 only)..................................................................... 20
5.5.1 Prepare samples........................................................................................... 20
5.5.2 Run an analysis using a manual method......................................................... 21
5.6 Stop an analysis.......................................................................................................... 23
6 Maintenance 24
6.1 Maintenance schedule.................................................................................................. 24
6.2 Clean the instrument .................................................................................................... 24
6.2.1 Clean the housing and control panel ............................................................... 25
6.2.2 Clean the insulation glass, the capillary guide and the transmitted light holes ...... 25
6.2.2.1 Remove insulation glass and capillary guide.............................................. 25
6.2.2.2 Clean the insulation glass ........................................................................ 26
6.2.2.3 Clean the capillary guide and transmitted light holes ................................... 26
6.2.2.4 Reinstall insulation glass and capillary guide ............................................. 27
6.3 Switch the furnace power off.......................................................................................... 27
6.4 Check the temperature accuracy of the instrument............................................................ 27
6.5 View the inside of the furnace ........................................................................................ 28
6.6 Prepare the instrument for storage.................................................................................. 28
6.7 Transport the instrument ............................................................................................... 28
6.8 Dispose of the instrument ............................................................................................. 29
7 Technical data 30
7.1 Instrument................................................................................................................... 30
Table of Contents 1Melting Point Excellence System
Page 4

Table of Contents2 Melting Point Excellence System
Page 5

1 Introduction
Thank you for choosing a METTLER TOLEDO Excellence Melting Point System. The Excellence Melting Point
System is an easy-to-operate instrument for automated and accurate measurements of the following
physical values:
• Melting point and melting range
• Slip melting point (only MP55)
About this document
This document provides you with the information you need to get started with your METTLER TOLEDO
Excellence Melting Point System.
For a comprehensive description of the instrument and its functions, refer to the Operating
Instructions, supplied as PDF file on the CD.
The instructions in this document refer to MP50 and MP55 instruments running firmware version 2.10 or
higher.
If you have any additional questions, contact your authorized METTLER TOLEDO dealer or service representative.
u www.mt.com/contact
Conventions and symbols
Refers to an external document.
Note
Elements of instructions
Prerequisites
§
1 Steps
2 ...
ð Intermediate results
ð Results
for useful information about the product.
Introduction 3Melting Point Excellence System
Page 6
2 Safety information
• Read and understand the information in this User Manual before you use the instrument.
• Keep this User Manual for future reference.
• Include this User Manual if you pass on the instrument to other parties.
If the instrument is not used according to the information in the Operating Instructions or if it is modified, the
safety of the instrument may be impaired and Mettler-Toledo GmbH assumes no liability.
For a comprehensive description of the instrument and its functions, refer to the Operating
Instructions, supplied as PDF file on the CD.
2.1 Definitions of signal words and warning symbols
Safety notes are marked with signal words and warning symbols. These show safety issues and warnings.
Ignoring the safety notes may lead to personal injury, damage to the instrument, malfunctions and false
results.
Signal words
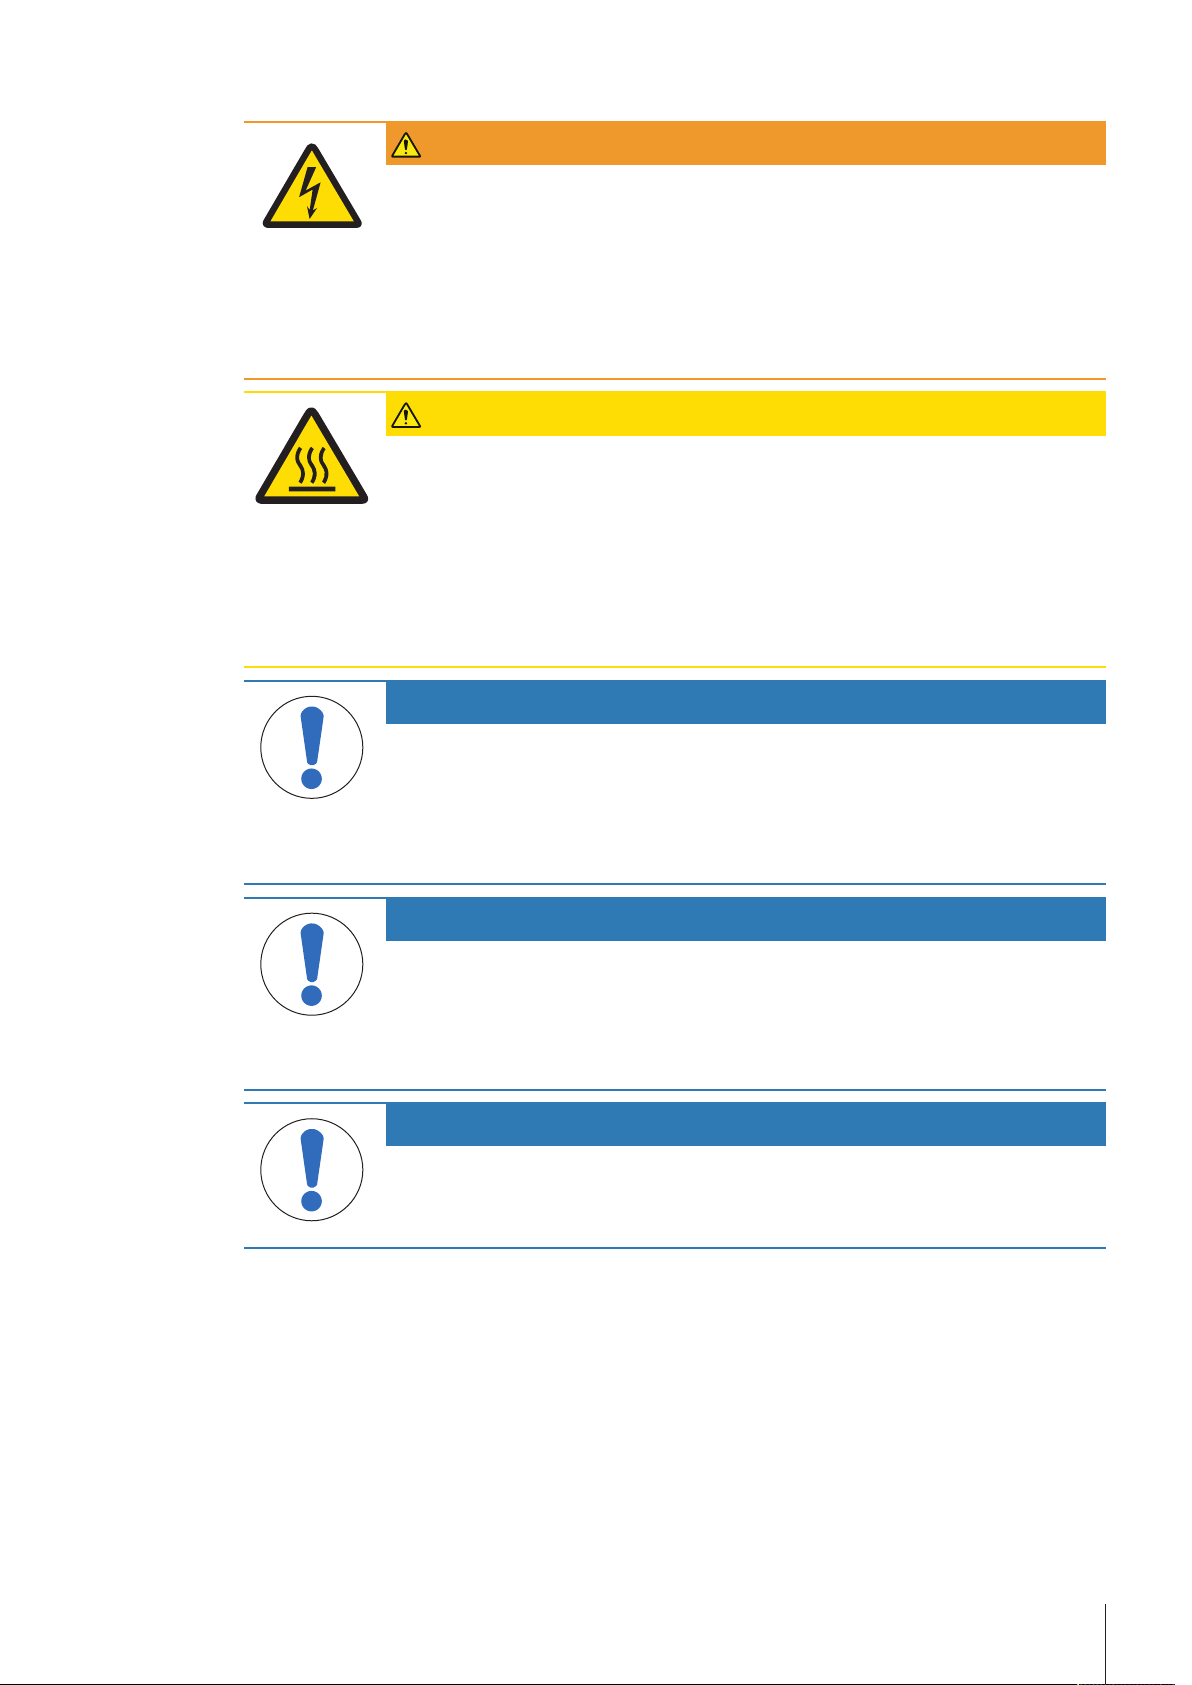
WARNING
for a hazardous situation with medium risk, possibly resulting in death or severe
injury if not avoided.
CAUTION
NOTICE
Warning symbols
Electrical shock Hot surface
for a hazardous situation with low risk, resulting in minor or moderate injury if not
avoided.
for a hazardous situation with low risk, resulting in damage to the instrument, other
material damage, malfunctions and erroneous results, or loss of data.
2.2 Product-specific safety notes
Intended use
This instrument is designed to be used in laboratories by trained staff. The instrument is intended for
performing measurements for determining the following physical values:
• Melting point and melting range
• Slip melting point (only MP55)
Any other type of use and operation beyond the limits of technical specifications without written consent
from Mettler-Toledo GmbH is considered as not intended.
Responsibilities of the instrument owner
The instrument owner is the person that uses the instrument for commercial use or places the instrument at
the disposal of the staff. The instrument owner is responsible for product safety and the safety of staff, users
and third parties.
METTLER TOLEDO assume that the instrument owner provides the necessary protective gear, appropriate
training for the daily work and for dealing with potential hazards in their laboratory.
This equipment has been tested and found to comply with the limits for a Class A digital device, pursuant to
Part 15 of the FCC Rules. These limits are designed to provide reasonable protection against harmful interference when the equipment is operated in a commercial environment. This equipment generates, uses, and
can radiate radio frequency energy and, if not installed and used in accordance with the instruction manual,
may cause harmful interference to radio communications. Operation of this equipment in a residential area
is likely to cause harmful interference in which case the user will be required to correct the interference at his
own expense.
Safety information4 Melting Point Excellence System
Page 7
Safety notes
WARNING
Danger of death or serious injury due to electric shock!
Contact with parts that contain a live current can lead to injury and death.
1 Only use a METTLER TOLEDO power cable and AC adapter designed for your
instrument.
2 Connect the power cable to a grounded power outlet.
3 Keep all electrical cables and connections away from liquids.
4 Replace damaged power cables and AC adapters immediately.
CAUTION
Danger of burns due to hot surfaces!
The oven can reach temperatures that are high enough to cause burns and heats up parts
contained in the oven, the lid and the back of the instrument.
1 Never touch a sample you have just removed from the furnace (capillary tubes, glass
tubes, slides, sample cups or crucibles).
2 Do not operate the instrument without the lid.
3 Never touch the furnace, furnace lid or the back of the device before the instrument
has cooled down.
NOTICE
Danger of malfunction due to overheating of the instrument!
If the cooling is impeded, the instrument can overheat and malfunction.
1 Do not stack paper on top of the instrument.
2 Do not block the ventilation openings in the back and at the bottom of the instrument.
3 Respect the clearance around the instrument specified in the installation instructions.
NOTICE
Danger of damage to the instrument due to incorrect parts!
Using incorrect parts with the instrument can damage the Instrument or cause the
instrument to malfunction.
− Only use parts supplied with the instrument, listed accessories and spare parts from
METTLER TOLEDO.
NOTICE
Danger of damaging the touch screen with pointed or sharp objects!
Pressing on the touch screen with pointed or sharp objects may damage it.
− Operate the touch screen by applying gentle pressure with the pad of your finger.
Safety information 5Melting Point Excellence System
Page 8
3 Design and function
2
3
1
4
6
7
8
9
5
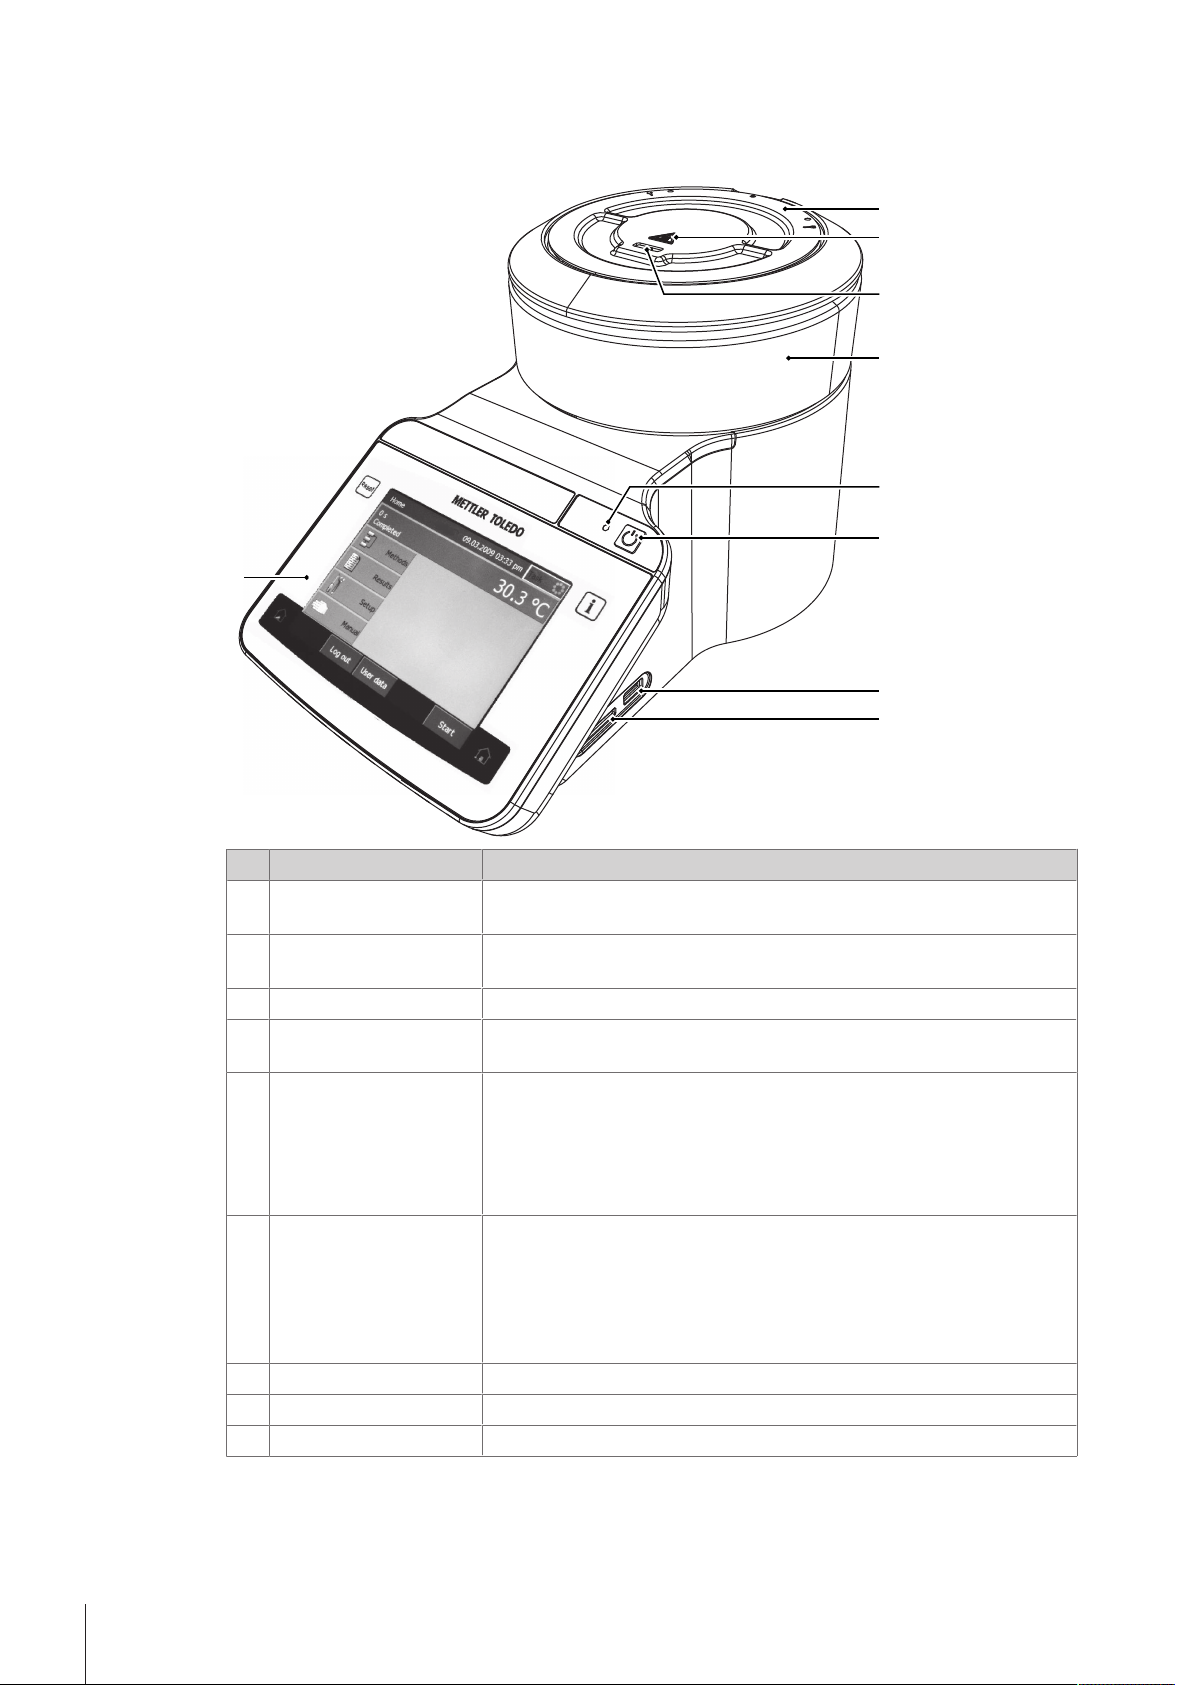
3.1 Instrument overview
Nr. Name Function
Lid Protects the user from hot parts and protects the furnace from dust. The
1
lid allows access to the measuring cell for maintenance tasks.
Safety sign for hot
2
surfaces
Slot for capillaries Is used to insert capillaries with the sample into the measuring cell.
3
Housing The cylindrical part of the housing contains the measuring cell and the
4
Power indicator light Shows the status of the instrument:
5
Power button The power button has the following functions:
6
USBA socket Used by service technicians to update the firmware.
7
Slot for SD cards Not functional.
8
Control panel Consists of an integrated touchscreen and the four hard keys.
9
The safety signs warns that the lid can be hot enough to cause burns.
furnace.
• Power indication light on: The instrument is on.
• Power indication light off: The instrument has shut down.
• Power indication light fades on and off: The instrument is on and the
screen saver is active.
• Start up the instrument.
• Shut down the instrument.
• Activate the screen saver if the instrument is on.
• Deactivate the screen saver.
See also
2 Control panel layout}Page7
Design and function6 Melting Point Excellence System
Page 9
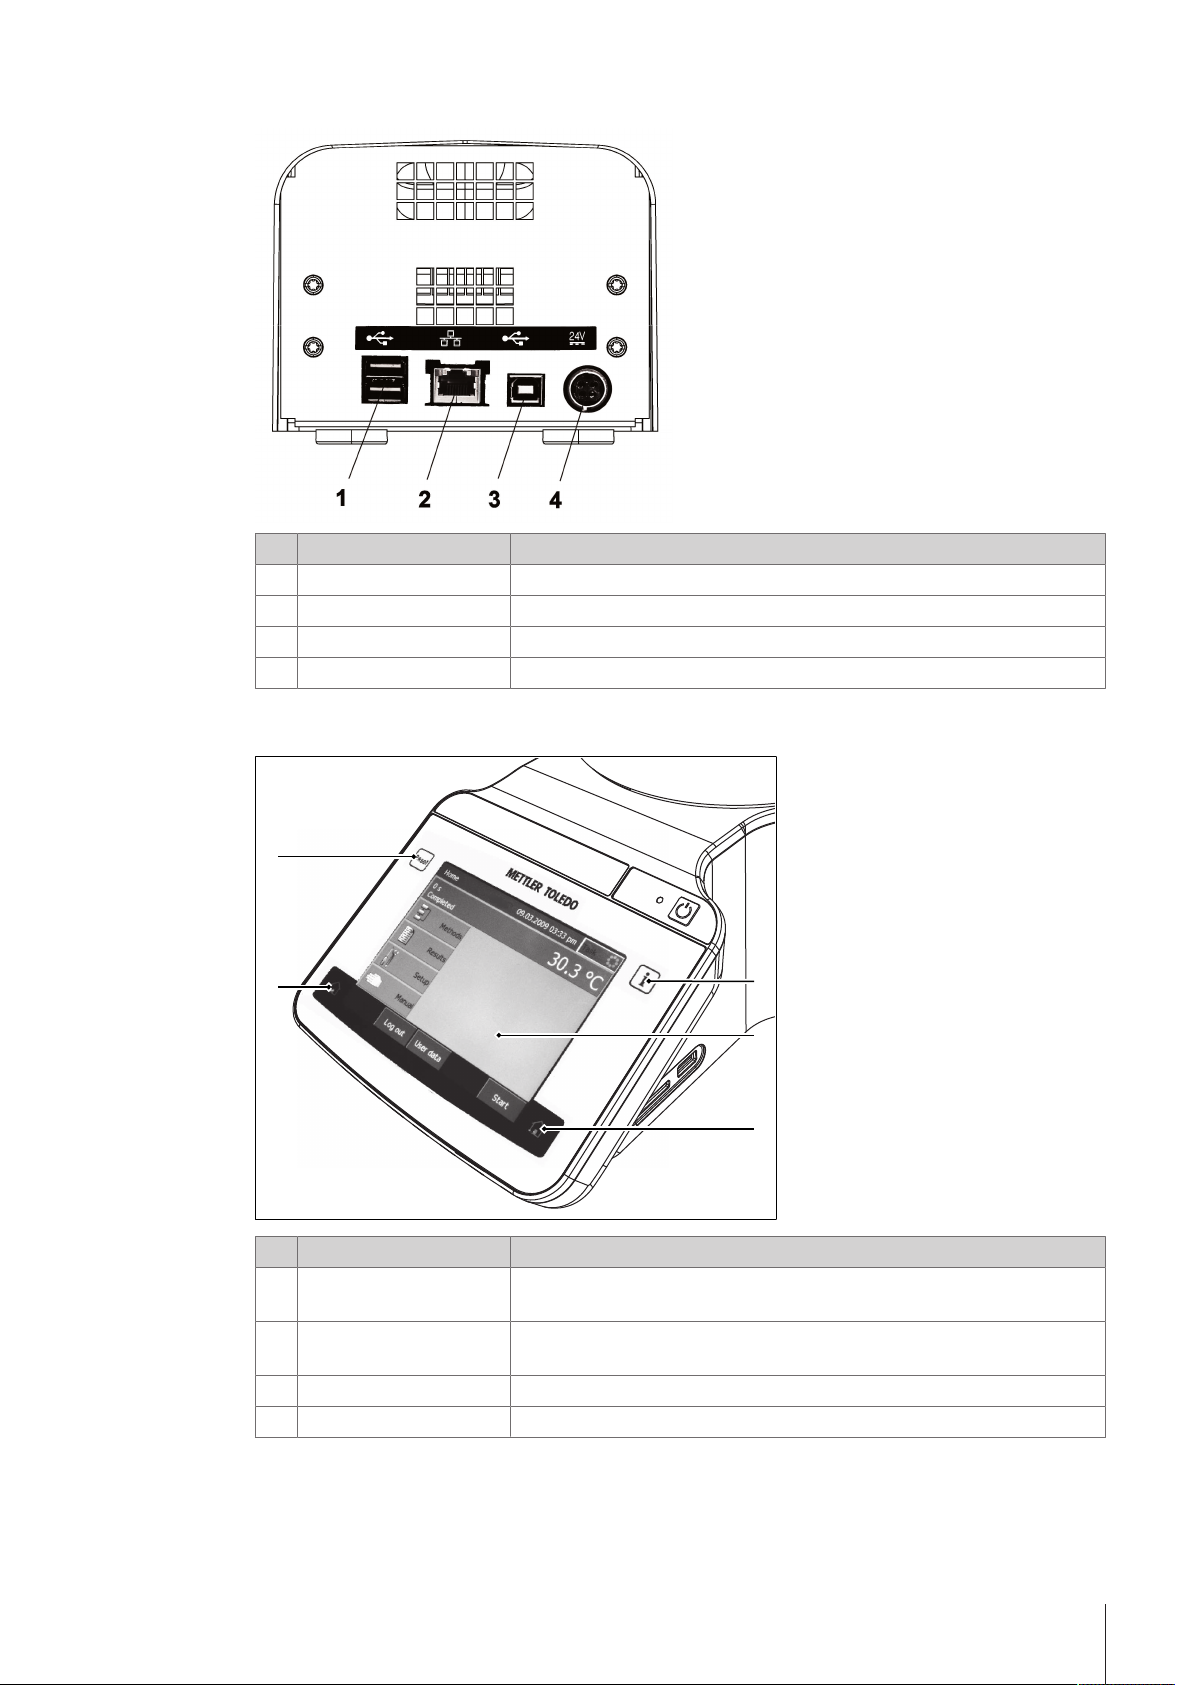
3.2 Connections at the back of the instrument
3
1
2
3
3
4
Nr. Name Function
USB type A ports Connection for printers, mouse, keyboards, or USB sticks
1
Ethernet connection Used for service purposes
2
USB type B port Used for service purposes
3
Power supply connection Socket for AC adapter
4
3.3 Control panel layout
Nr. Name Function
Info The Info key opens a window with general information about the
1
Touch screen The touch screen displays information and can be used to enter infor-
2
Home The home key opens the home screen.
3
4 Reset The Reset key stops the task that is currently running.
instrument.
mation.
Design and function 7Melting Point Excellence System
Page 10

3.4 User interface
Home
Log out
Manual
Setup
Results
Manual
method
User data Start
Task
Temperature control
1
2
3
4
56
7
8
9
10
11
3.4.1 Home screen
Nr. Name Function
Furnace monitor area The furnace monitor area shows the current temperature of the furnace. If
1
Shortcut area The shortcut area holds up to twelve shortcuts for frequently used manual
2
Indirect shortcut
3
Direct shortcut A direct shortcut starts the manual method and opens the analysis
4
5 Start Opens the window Manual method of the last analysis that was run.
6 User data Opens the window User data with information about the user that is
7 Log out Logs the current user out and opens the window Login window.
8 Manual Opens the window Manual operations, where you can start a manual
9 Setup Opens the window Setup where you can configure the hardware and the
10 Results
11 Manual method Opens the window Manual method where you can configure the method.
you tap the furnace monitor area, you can switch to a full display of the
furnace temperature.
methods.
An indirect shortcut opens the window Manual method.
window of the manual method.
logged in.
operation.
resources.
Opens a window with the results of the last analysis.
Design and function8 Melting Point Excellence System
Page 11
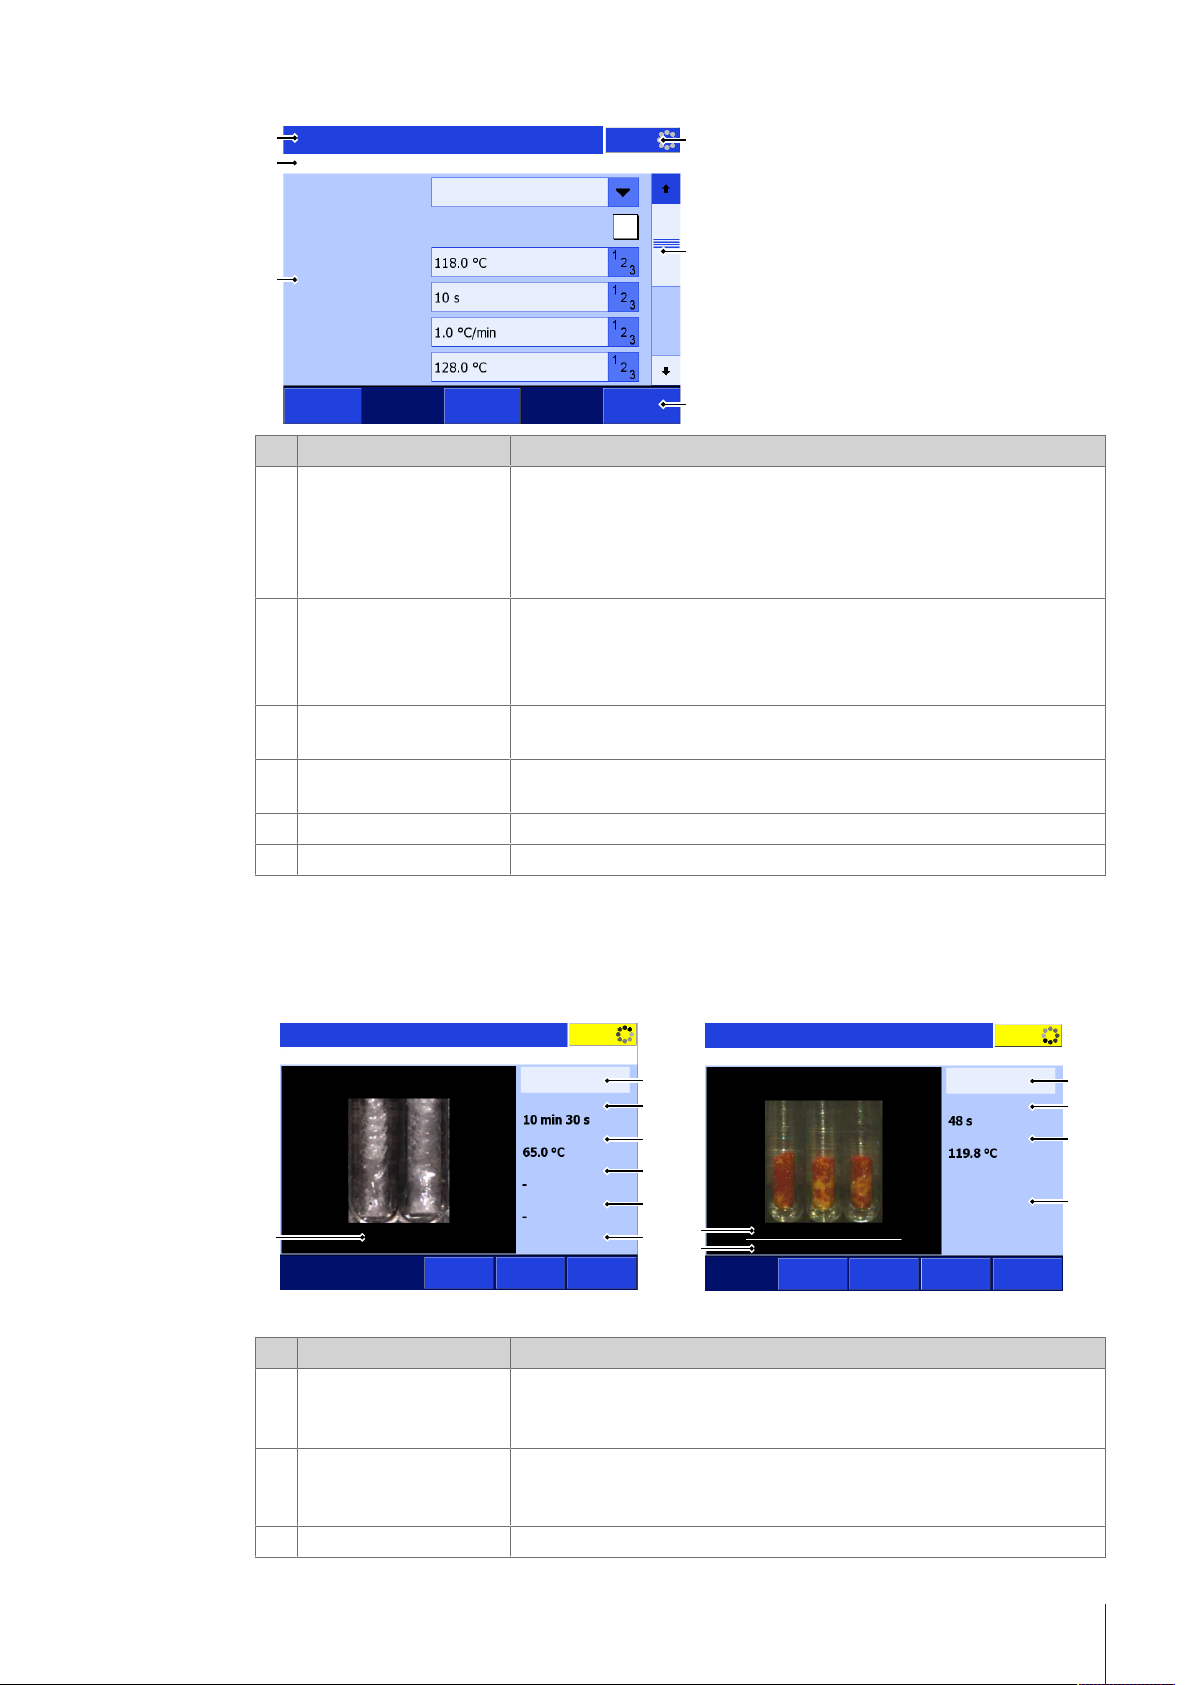
3.4.2 Basic elements of windows
Manual method
Task
Method type
Start temperature
Waiting time
Heating rate
End temperature
Ramp to start temperature
Back AddToHome Start
Melting point
1
3
2
5
4
6
Task
Remaining time
Temperature
Mean value
Temp. difference
SMP
Ramp
Analysis
comment
Capillary
comments
Stop
Manual method
1
2
3
4
5
67
Task
Ramp
Remaining time
Temperature
[°C] Start of melting
MR
[°C] End of melting
Manual method
Diagram
Analysis
comment
Capillary
comments
Stop
1
2
3
6
8
9
Nr. Name Function
1 Task
Scroll bar The scroll bar is visible if the content of the window extends beyond the
2
Footer Up to five buttons are located in the footer. Which buttons are visible
3
Body The body of the window shows information like the video of an ongoing
4
Navigation The navigation shows the path to the open window.
5
Title bar The title bar shows the name of the open window.
6
The task panel shows if a task is running or not.
Blue: No task is running.
Yellow: A task is running.
If you tap Task while a task is running, the analysis window of the
running task opens.
viewable area. You can use either the arrows or the slider to move the
viewable area of the screen up or down.
To page up and down, tap the area below or above the slider.
depends on the context of the open window.
analyses or items like shortcuts or parameters.
3.4.3 Information displayed during an analysis
Information on the current analysis is displayed in the analysis window. The information is constantly
updated and includes the following data.
Nr. Name Description
Analysis status bar The analysis status bar displays the various positions reached during the
1
2 Remaining time
3 Temperature
analysis: Go to T(start), T(start) reached, Waiting time, Ramp,
Isothermal, Create report
Remaining time until the end of the analysis. The time indicated includes
the waiting time, the duration of temperature ramp and that of the
isothermal segment.
Current temperature reading inside the measuring cell.
Design and function 9Melting Point Excellence System
Page 12

Nr. Name Description
4 Mean value, s
Mean value
5 Temp. difference
6 MP
MR
SMP
Temperature values
7
[ºC, °F or K]
8 [°C] Start of melting
9 [°C] End of melting
3.4.4 Menu structure
Manual method
The menu Manual method has no submenus.
Mean value, s: current mean value of all the temperature readings of the
individual capillaries and the standard deviation for the method type
melting point
Mean value: current mean value of all the temperature readings of the
individual capillaries for the method types boiling point, cloud point and
slip melting point
Difference of the temperatures measured for the 2capillaries for the
method type slip melting point
Method type of the running analysis
MP: Melting point
MR: Melting range
SMP: Slip melting point
The temperature values for the melting point or slip melting point of each
capillary
The temperature values for the start of melting for each capillary for the
method type Melting range
The temperature values for the end of melting for each capillary for the
method type Melting range
Results
The menu Results has no submenus.
Setup
The menu Setup has the following submenus.
Hardware Peripherals Printer
Network
SOAP Settings
Temperature sensor
User settings Language
Screen
Beep
Shortcuts
Keyboards
Global settings System Identification
User management User
Behavior of analyses and
resources
Adjustment
Mainten. & Service Import / Export
– –
Reset to factory settings
Update
Service
–
–
–
–
–
–
Date / Time
Header and footer
Data storage
Analysis settings
–
–
–
–
Design and function10 Melting Point Excellence System
Page 13

Manual
The menu Manual has the following submenus.
• Furnace power off
• Set furnace temperature
• Furnace inside view
Design and function 11Melting Point Excellence System
Page 14

4 Installation and commissioning
4.1 Scope of delivery
Part Order number MP50 SF MP55
MP50 Melting Point System – • –
MP55 Melting Point System – – •
Extern. Power Supply 120W 30298362 • •
Power cable Country-specific • •
Melting Point capillaries (150pcs) 18552 • •
BP/CP/SMP outer capillaries
(40pcs)
Slip Melting Point inner capillaries
(10pcs)
Syringe 1mL (3pcs) – – •
Syringe 1mL (3pcs) – – •
Injection Needle 80x0.8 (3pcs) – • •
Quick Guide – • •
Declaration of conformity – • •
18572 – •
30312868 – •
Test report – • •
4.2 Unpack the instrument
1 Remove the instrument (and accessories) from the protective packing material.
2 Store the packing material for later transport over long distances.
3 Check whether you received all parts listed in the scope of delivery.
Installation and commissioning12 Melting Point Excellence System
Page 15

4 Remove the adhesive seal from the slot for capillaries.
5 Inspect the parts visually for flaws or damage.
6 If parts are missing or damaged, report it immediately and file a freight claim if needed.
4.3 Position the instrument
The instrument has been developed for indoor operation in a well-ventilated area. The following site
requirements apply:
• The ambient conditions are within the limits specified in the technical data.
• No powerful vibrations
• No direct sunlight
• No corrosive gas atmosphere
• No explosive atmosphere
• No powerful electric or magnetic fields
1 Place the instrument on a level surface.
2 Make sure that there are at least 15 cm clearance in front, above and behind the instrument.
3 Make sure that nothing blocks the ventilation openings at the bottom and the back of the instrument.
4.4 Connect the instrument to the power supply
The AC adapter is suitable for all supply line voltages ranging from 100...240VAC and 50/60Hz.
WARNING
Danger of death or serious injury due to electric shock!
Contact with parts that contain a live current can lead to injury and death.
1 Only use a METTLER TOLEDO power cable and AC adapter designed for your
instrument.
2 Connect the power cable to a grounded power outlet.
3 Keep all electrical cables and connections away from liquids.
4 Replace damaged power cables and AC adapters immediately.
NOTICE
Danger of damage to the AC adapter due to overheating!
If the AC adapter is covered or in a container, it is not sufficiently cooled and overheats.
1 Do not cover the AC adapter.
2 Do not put the AC adapter in a container.
1 Install the cables in such a way that they cannot be damaged or interfere with operation.
2 Insert the plug of the power cable in the socket of the AC adapter.
3 Insert the plug of the AC adapter in the socket 24V at the back of the instrument.
4 Insert the plug of the power cable in a grounded power outlet that is easily accessible.
Installation and commissioning 13Melting Point Excellence System
Page 16

See also
2 Start up the instrument}Page15
2 Log in}Page15
4.5 Disconnect the instrument from the power supply
The instrument has shut down.
§
1 Pull the plug of the power cable out of the power outlet.
2 Pull the plug of the AC adapter out of the socket 24V at the back of the instrument.
Installation and commissioning14 Melting Point Excellence System
Page 17

5 Operation
5.1 Start up the instrument
The instrument is connected to the power supply
§
No samples are inserted.
§
1 Press .
ð METTLER TOLEDO logo appears and the fan starts.
ð The screen darkens and the fan stops.
ð The screen Starting up the system appears; the red light and white light flash alternately.
ð The home screen or the window Login appears.
2 Login if the window Login appears.
See also
2 Log in}Page15
5.2 Log in
The window Login is open.
§
1 Tap .
ð The window User opens.
2 Select your name from the list.
3 Tap Login.
ð The Home screen appears.
5.3 Shut down the instrument
NOTICE
Danger of losing data due to wrong shut down procedure.
If you press longer than 5seconds, the instrument performs a forced shut down. If an
analysis is running, it will be terminated prematurely and any data produced during this
time will be lost.
− Do not press for more than 5seconds unless you need to force the instrument to
shut down.
Shut down the instrument using the touch screen
You are on the home screen.
§
No task is running.
§
No samples are inserted.
§
1 Press Log out.
ð The Login window opens.
2 Press Shut down.
ð The screen Shutting down the system appears and then the screen turns dark.
ð An acoustical signal informs you that you are logged out and the instrument has shut down.
ð The AC adapter and the control circuit for the power button are energized. The rest of the instrument is no
longer energized.
Operation 15Melting Point Excellence System
Page 18

Shut down the instrument using the power button
No task is running.
§
No samples are inserted.
§
− Press for 1…4seconds.
ð The screen Shutting down the system appears and then the screen turns dark.
ð An acoustical signal informs you that you are logged out and the instrument has shut down.
ð The AC adapter and the control circuit for the power button are energized. The rest of the instrument is no
longer energized.
Forced shut down
The instrument should only be shut down in this way if it is absolutely necessary.
1 Press for more than 5seconds.
ð The instrument performs a forced shut down.
ð If an analysis is running, it is terminated prematurely and any data produced during this time is lost.
ð The AC adapter and the control circuit for the power button are energized. The rest of the instrument
is no longer energized.
2 Remove all samples.
Shut down of the instrument in emergency situations
− Pull the plug of the power cable out of the power outlet.
5.4 Determine melting points or melting ranges
5.4.1 Prepare samples
When you prepare the samples, pay attention to the rules listed below.
• The amount of substance is the same across all capillaries. Slight differences in the amounts could
cause deviations in the measured melting point temperatures.
• The melted substance still covers the hole for transmission light.
We recommend using capillaries from METTLER TOLEDO for compliance with standards.
5.4.1.1 Prepare samples of solid substances
In the following procedures, a sample height of 3mm is used. If you need to use a different height, you
need to adjust the procedure.
Prepare the substance
1 If your sample is moist, dry it in a desiccator.
2 If you have a coarse crystalline substances, grind it in an agate mortar to a fine powder.
Fill the melting point capillaries without the sample preparation tool
The substance and melting point capillaries are dry.
§
The substance is a fine powder.
§
1 Press the open end of the capillary into the substance.
Operation16 Melting Point Excellence System
Page 19

2 To move the substance to the bottom of the melting point capillary, turn
1
over the melting point capillary and tap the bottom of the melting point
capillary on a hard surface.
ð The substance slides to the bottom of the capillary.
3 If the sample does not move to the capillary bottom, you can run the
bottom of the capillary along the ribbed part of tweezers or tamp it down
using a minimum amount of force with the tamping wire supplied.
4 To compact the substance tap the bottom of the melting point capillary
several times on a hard surface.
ð The substance is compacted.
5 Check the sample height with a ruler.
6 If the sample height is less than 3mm, repeat the steps above.
ð 3mm of compacted substance fill the bottom of the melting point capillary.
Fill the melting point capillaries with the sample preparation tool
The substance and melting point capillaries are dry.
§
The substance is a fine powder.
§
1 Press the blue(1) and the gray part together and insert the closed end
of the melting point capillaries you need to fill with the same
substance into the sample preparation tool.
2 Make sure that the open ends of the melting point capillaries are on
the same height.
3 Turn over the sample preparation tool and press the open ends of the
capillaries into the substance.
Operation 17Melting Point Excellence System
Page 20

4 To move the substance to the bottom of the melting point capillary,
1
turn over sample preparation tool and hold it about 10mm above a
hard surface and press the blue(1) and the gray part together.
ð The capillaries fall towards the hard surface and bounces up and
down a few times.
ð The substance slides to the bottom of the capillary.
5 Press the blue(1) and the gray part together and lower the sample
preparation tool to the surface.
ð The melting point capillaries are pushed up into the sample prepa-
ration tool.
6 To compact the substance, hold it about 10mm above a hard surface
and press the blue(1) and the gray part together .
ð The capillaries fall towards the hard surface and bounces up and
down a few times.
ð The substance is compacted.
7 Press the blue(1) and the gray part together and lower the sample
preparation tool to the surface.
ð The melting point capillaries are pushed up into the sample prepa-
ration tool.
8 Check if the fill height of all capillaries is 3mm.
9 If the sample height is less than 3mm, repeat the steps above.
ð 3mm of compacted substance fill the bottom of the melting point
capillary.
5.4.1.2 Prepare samples that decompose, sublime or vaporize
When a sealed capillary is heated, the volatile components evolved by the sample produce an over
pressure that might inhibit further decomposition or sublimation.
The melting point capillary is filled with the substance.
§
1 Make sure that the upper part of the melting point capillary is free from sample.
2 Seal the melting point capillary in a gas flame properly and rapidly.
5.4.2 Run an analysis using a manual method
The following procedure shows you how to run an analysis using an indirect shortcut. The procedure is
based on an example. Some steps may differ if the manual method you use is configured differently.
Aside of an indirect shortcut you can also start a manual method using a direct shortcut or the button
Manual method. Some differences are described after the example below.
Operation18 Melting Point Excellence System
Page 21

Start an analysis using an indirect shortcut
Home
Log out
Manual
Setup
Results
Manual
method
User data Start
Task
Temperature control
1
Manual method
Task
Method type
Start temperature
Waiting time
Heating rate
End temperature
Ramp to start temperature
Back AddToHome Start
Melting point
Task
Remaining time
Temperature
Mean value, s
MP
[°C] Melting point
Diagram
Analysis
comment
Capillary
comments
Manual method
T(start) reached
Start
1
At least one indirect shortcut of a manual method is defined.
§
The samples are prepared.
§
1 Select the indirect shortcut(1) of the manual
method you want to run.
ð The window Manual method opens.
2 If needed, enter comments to the method.
3 Tap Start.
ð The analysis window opens.
ð The instrument heats up to the start
temperature.
4 If needed, enter comments to the analysis or the
samples.
5 Wait until T(start) reached(1) is displayed.
6 Insert the samples.
7 Tap Start.
ð The waiting time starts.
ð The instrument performs the measurement.
Operation 19Melting Point Excellence System
Page 22

Results
Melting pointCap. Status
Back Print
Select
analysis
Data Statistics
included
included
included
Task
8 Wait until the results are displayed.
1
2
9 CAUTION Danger of burns due to hot capillaries
Do not remove the capillaries until the instruments
has cooled down or take care not to touch the tips
of the capillaries you removed.
10 Let the samples cool down and dispose of them
according to the safety data sheet of the substance
that you measured.
11 Tap Back.
ð The home screen opens.
Start the analysis using the button Manual method
1 Go to Home > Manual method.
ð The window Manual method opens with the setting of the last manual method you started with the
button Manual method.
2 Continue with step 2 of the procedure for an indirect shortcut.
Start the analysis using a direct shortcut
1 Go to Home and select the direct shortcut of the manual method you want to run.
ð The analysis window opens.
ð The instrument heats up to the start temperature.
2 Continue with step 4 of the procedure for an indirect shortcut.
See also
2 Prepare samples}Page16
5.5 Determine slip melting points (MP55 only)
5.5.1 Prepare samples
The height of the sample influences the slip melting point. For this reason the sample height needs to be
defined and constant. Most norms and standards require a height of 10mm.
To fill the boiling point outer capillary, you can either use the supplied syringe or a pipette. Both procedures
are described in this chapter.
Fill the slip melting point inner capillary
The substance used in the analysis can be melted.
§
The height of the sample needed for the analysis is defined.
§
1 Fill at least 10mm of the substance that you want to analyse into an appropriate
container.
2 Heat the substance until it is melted.
3 Insert the slip melting point inner capillary(1) into the substance until it reaches
the mark indicating 10mm(2) on the slip melting point inner capillary.
4 Pull the slip melting point inner capillary out and let it cool down.
5 When the substance has cooled down, check that the substance height is close to
the mark indicating 10mm(2) on the slip melting point inner capillary.
Operation20 Melting Point Excellence System
Page 23

Fill the boiling point outer capillary using a syringe
1 2
1 2
1
2
3
The solution used in the analysis is prepared.
§
The volume needed for the analysis is defined.
§
1 Fill the syringe with the defined volume of the solution.
2 Insert the needle of the syringe(2) into the boiling
point outer capillaryso that it reaches all the way to
the tip of the outer boiling point capillary(1).
3 Inject the solution into the boiling point outer capillary.
Fill the boiling point outer capillary using a pipette
The solution used in the analysis is prepared.
§
The volume needed for the analysis is defined.
§
A Pipet-Lite Pipette and a Tips GelWell pipette tip are
§
available.
1 Fill the pipette tip with the defined volume of the
solution.
2 Insert the tip of the pipette(2) into the boiling point
outer capillary(1) so that it touches the inner surface
of the capillary.
3 Slowly push one drop of the solution into the outer
boiling point capillary and let it slide down to the
bottom of the capillary.
ð The inner surface of the capillary is coated with the
solution, thus allowing for easier filling of the
capillary and also minimizing the chance of air
being trapped at the bottom of the capillary.
4 Pipette the remaining solution into the boiling point
outer capillary and let it slide down to the bottom of
the capillary.
5.5.2 Run an analysis using a manual method
Insert the slip melting point inner capillary into the boiling point outer capillary
The slip melting point inner capillary is prepared.
§
The boiling point outer capillary is filled.
§
1 Insert the slip melting point inner capillary(1) with the sample(3) into the boiling point
outer capillary(2).
2 Carefully push the slip melting point inner capillary(1) down until it touches the bottom of
the boiling point outer capillary.
ð The level of the solution in the boiling point outer capillary is higher than the height of
the sample(3).
The following procedure shows you how to run an analysis using an indirect shortcut. The procedure is
based on an example. Some steps may differ if the manual method you use is configured differently.
Operation 21Melting Point Excellence System
Page 24

Aside of an indirect shortcut you can also start a manual method using a direct shortcut or the button
Home
Log out
Manual
Setup
Results
Manual
method
User data Start
Task
Temperature control
1
Manual method
Task
Method type
Start temperature
Waiting time
Heating rate
End temperature
Ramp to start temperature
Back AddToHome Start
Slip melting point
Task
Remaining time
Temperature
Mean value
Temp. difference
SMP
Analysis
comment
Capillary
comments
Manual method
Start
T(start) reached
1
Manual method. Some differences are described after the example below.
Start the analysis using an indirect shortcut
At least one indirect shortcut of a manual method is defined.
§
The samples are prepared.
§
1 Select the indirect shortcut(1) of the manual
method you want to run.
ð The window Manual method opens.
2 If needed, enter comments to the method.
3 Tap Start.
ð The analysis window opens.
ð The instrument heats up to the start
temperature.
4 If needed, enter comments to the analysis or the
samples.
5 Wait until T(start) reached(1) is displayed.
6 Insert the samples.
7 Tap Start.
ð The waiting time starts.
ð The instrument performs the measurement.
Operation22 Melting Point Excellence System
Page 25

Status
Back Print
Select
analysis
Data
Define
outliers
Task
included
included
Mean value
Difference
Results
Slip melting point
Cap.
70.1 °C
70.3 °C
70.2 °C
0.2 °C
8 Wait until the results are displayed.
9 CAUTION Danger of burns due to hot capillaries
Do not remove the capillaries until the instruments
has cooled down or take care not to touch the tips
of the capillaries you removed.
10 Let the samples cool down and dispose of them
according to the safety data sheet of the substance
that you measured.
11 Tap Back.
ð The home screen opens.
Start the analysis using the button Manual method
1 Go to Home > Manual method.
ð The window Manual method opens with the setting of the last manual method you started with the
button Manual method.
2 Continue with step 2 of the procedure for an indirect shortcut.
Start the analysis using a direct shortcut
1 Go to Home and select the direct shortcut of the manual method you want to run.
ð The analysis window opens.
ð The instrument heats up to the start temperature.
2 Continue with step 4 of the procedure for an indirect shortcut.
See also
2 Prepare samples}Page20
5.6 Stop an analysis
If you stop a running analysis, you still have the opportunity to save the results up to the point of interruption.
An analysis is running in the analysis window.
§
1 Tap Stop or press the key Reset.
ð The analysis is interrupted.
ð The message Do you want to stop the analysis? is displayed.
2 To stop the analysis, tap Yes.
ð The analysis is stopped.
ð The message Do you want to save the results? is displayed.
3 To save and print the results, tap Yes.
ð The results are save and printed according to you setting.
4 If you do not want to save the results, tap No.
ð The homescreen opens.
Operation 23Melting Point Excellence System
Page 26

6 Maintenance
In this chapter you find descriptions of the maintenance tasks you should perform on your instrument. Any
other maintenance tasks need to be performed by a service technician that has been qualified by METTLER
TOLEDO.
Do not open the housing of the instrument; it does not contain any parts that can be maintained, repaired or
replaced by the user. If you experience problems with your instrument, contact your authorized METTLER
TOLEDO dealer or service representative.
METTLER TOLEDO recommends that a preventive maintenance and calibration certification is done at least
once a year through your authorized METTLER TOLEDO dealer or service representative.
u www.mt.com/contact
6.1 Maintenance schedule
Note
If the standard operating procedures of you company require other maintenance intervals, use the intervals
of the standard operating procedures.
Frequency Task Link
Daily Switch the furnace off at the end of the work
day
Weekly Clean housing and control panel [Clean the housing and control
Check transmitted light holes [View the inside of the
Monthly Check the temperature accuracy of the
instrument
[Switch the furnace power
off}Page27]
panel}Page25]
furnace}Page28]
Check the temperature accuracy of
the instrument
6.2 Clean the instrument
CAUTION
Danger of injuries due to hot surfaces
If the instrument is accidently turned on during the cleaning, hot surfaces can cause
burns.
1 Before you clean the instrument, shut down the instrument and disconnect the power
cable.
2 Before you clean the instrument, make sure the instrument has cooled off to room
temperature.
NOTICE
Danger of damage to the instrument due to inappropriate cleaning methods!
Attempts to remove debris from the camera lens can damage the camera lens.
− If debris is on the camera lens, contact your authorized METTLER TOLEDO dealer or
service representative.
Markings on the lid
The metal lid has 3 different markings on it. Each marking indicates the possibility of specific operations.
• Filled circle: You can insert capillaries into the capillary guide.
• Open circle: The furnace is protected and you cannot insert capillaries into the capillary guide.
• Wrench: The metal lid can be removed for cleaning and servicing.
Maintenance24 Melting Point Excellence System
Page 27

Lid markings and positions
1
2
3
Filled circle position Open circle position Wrench position
6.2.1 Clean the housing and control panel
To keep the instrument looking good and functioning properly, clean the housing and control panel as
needed.
The instrument is switched off and disconnected from the power supply.
§
The instrument has cooled off to room temperature.
§
All samples have been removed.
§
1 Remove any loose particles from the housing and control panel with a fine brush.
2 Turn the metal lid to the position.
ð No cleaning agent can enter the instrument.
3 Moisten a soft cloth with water and a mild detergent.
4 Clean the housing with the soft, slightly moist cloth.
5 Dry off any residual moisture.
6 Turn the metal lid to the position.
7 Reconnect the instrument to the power supply and switch on the instrument.
ð The instrument housing is clean and the instrument ready for your next analyses.
6.2.2 Clean the insulation glass, the capillary guide and the transmitted light holes
To prevent false readings, the insulation glass should be checked regularly and cleaned as needed.
Particles and smudges on the insulation glass can block the light, cause bothersome spots in the pictures
or cause false readings.
Clean the insulation glass, if the light does not appear homogeneous and bright for all holes.
Occasionally, tiny particles can fall into the capillary guide or glass splitters of broken capillaries can
remain in the capillary guide. This debris can either result in black spots in the videos or prevent adequate
light exposure for the substances under investigation. In most cases, you can remove this debris.
The following chapters describe how to remove and reinstall the insulation glass and the capillary guide
and how to clean the parts.
See also
2 View the inside of the furnace}Page28
6.2.2.1 Remove insulation glass and capillary guide
The instrument has shut down and is discon-
§
nected from the power supply.
The instrument has cooled off to room
§
temperature.
All whole capillaries are removed.
§
1 Gently press the release latch inside the
opening(2) with a long object(1) such as a
screw driver and turn the lid(3) to .
ð The lid pops up slightly.
Maintenance 25Melting Point Excellence System
Page 28

2 Lift out the screw driver and insert your finger in
1
2
1
22
1
4
2
3
the recess(1) at the top of the measuring cell
and lift off the lid(2) with two hands.
3 Gently press the clamping plate(1) between
your thumb and fingers.
ð This loosens the 4 small hooks(2) on either
side of the clamping plate.
4 Lift off the clamping plate.
5 Lift the insulation glass(2) carefully out of the
recess(4).
6 Lift the capillary guide(3) carefully out of its
recess.
6.2.2.2 Clean the insulation glass
The insulation glass has been removed.
§
1 Moisten a soft cloth with water and a mild detergent.
2 Clean the insulation glass with the soft, slightly moist cloth.
3 Dry the insulation glass so that no humidity enters the instrument.
6.2.2.3 Clean the capillary guide and transmitted light holes
The insulation glass and the capillary guide have been removed.
§
− You can dislodge and remove debris or broken capillaries from the transmitted light holes in several
ways:
- Turn the instrument upside down and gently shake out the particles.
- Use a very thin cleaning wire to lift out the particles.
- Use a syringe with a needle to crush the particles and aspirate them into the syringe.
Maintenance26 Melting Point Excellence System
Page 29

6.2.2.4 Reinstall insulation glass and capillary guide
1
4
2
3
1
2
3
The instrument is switched off and the power
§
cable is disconnected.
The instrument has cooled off to room
§
temperature.
1 Carefully place the capillary guide(3) into its
recess.
2 Orient the insulation glass so that the white
bar(1) faces toward the capillary guide(3).
3 Carefully place the insulation glass(2) into the
recess(4) behind the capillary guide(3).
4 Orient the clamping plate so that the two
tongues(2) look towards the control panel.
5 Lower the clamping plate and make sure that the
slot fits(1) over the capillary guide.
6 NOTICE Danger of damage to the instrument
due to improperly inserted clamping plate
Push the clamping plate down, making sure the
4 small metal hooksfit back into the respective
openings (3).
7 Replace the metal lid and turn it to or to .
8 Reconnect the power cable and switch on the
instrument.
ð The instrument is ready for your next analyses.
6.3 Switch the furnace power off
No analysis is running.
§
The furnace temperature control is switched on.
§
1 Go to Home > Manual.
2 Tap Furnace power off.
ð The furnace power is switched off.
ð The button Furnace power off becomes inactive.
ð The measuring cell cools down to room temperature without an active fan.
6.4 Check the temperature accuracy of the instrument
To check if the temperature accuracy of your instrument is still within the specified tolerance limits, you need
to perform a calibration. To perform a calibration, you run a melting point method for a reference substance
and compare the results with the values on the Certificate of Analysis of the reference substance.
Perform the calibration
A shortcut for a calibration method for the relevant reference substance is available.
§
The tolerance limits for the reference substance are defined.
§
1 Run an analysis using the appropriate calibration method.
2 Check if the mean value of the analysis lies within the tolerance limits for the reference substance.
3 If the calibration results are not within the tolerance limits, inform the person responsible for the
adjustment of the instrument.
See also
2 Prepare samples}Page16
2 Run an analysis using a manual method}Page18
Maintenance 27Melting Point Excellence System
Page 30

6.5 View the inside of the furnace
Furnace inside view
Task
Actual temperature
Back
2
1
3
You can view a live video of the inside of the furnace to check the currently reflected light(2) and transmitted light(1). If any of the holes for the transmitted light are clogged, this is noticeable in the lower
image(1). In this case you must clean the holes.
No analysis is running.
§
1 Go to Home > Manual.
2 Tap Furnace inside view.
ð The window shows the transmitted light(1), the
reflected light(2) and the furnace
temperature(3).
See also
2 Clean the insulation glass, the capillary guide and the transmitted light holes}Page25
6.6 Prepare the instrument for storage
If you do not use the instrument for a longer period of time, you should do the following:
1 Remove all samples.
2 Shut down the instrument.
3 Disconnect the instrument from the power supply.
4 Turn the lid to the position to protect the instrument.
5 Clean the instrument.
6.7 Transport the instrument
If you have questions about transporting your instrument, contact your authorized METTLER TOLEDO dealer
or service representative.
u www.mt.com/contact
Note
When you send or transport the instrument over long distances, please use all of the original packing
material and shipping carton.
1 Remove all samples.
2 Shut down the instrument.
3 Disconnect the instrument from the power supply.
4 Disconnect any accessories like keyboard and mouse.
5 To prevent the capillary guide from falling out of the instrument, turn the metal lid to .
6 Clean the instrument.
7 Move the instrument to the new location.
See also
2 Clean the instrument}Page24
Maintenance28 Melting Point Excellence System
Page 31

6.8 Dispose of the instrument
In conformance with the European Directive 2012/19/EU on Waste Electrical and
Electronic Equipment (WEEE) this device may not be disposed of in domestic waste. This
also applies to countries outside the EU, per their specific requirements.
Please dispose of this product in accordance with local regulations at the collecting point
specified for electrical and electronic equipment. If you have any questions, please
contact the responsible authority or the distributor from which you purchased this device.
Should this device be passed on to other parties (for private or professional use), the
content of this regulation must also be related.
Thank you for your contribution to environmental protection.
Maintenance 29Melting Point Excellence System
Page 32

7 Technical data
7.1 Instrument
Characteristic Value
Power rating instrument
Power rating AC
adapter
Dimensions
Display
Materials
Ambient conditions
Input values 24VDC ±5%, 5A
Connector type 4-pin, power Mini-DIN female
Input values 100...240VAC, 1.8A±10%
Input frequency 50-60Hz
Output values 24VDC, 5A
Width 180mm
Depth 350mm
Height 190mm
Weight 4000g
Technology VGA color with touch screen
Size 5.7” VGA
Housing Crastin® PBT
Measuring cell Stainless steel
Chassis Stainless steel
Protective film
(touch screen)
Ambient temperature 10…35°C
Relative humidity Noncondensing, max. 80% for temperatures
Altitude Up to 2000m above sea level
Use Interior spaces
Polution degree 2
Overvoltage category II
PET
up to 31°C, decreasing linearly to 50% at
40°C
Directives and standards
Directives and standards complied with are listed on the declaration of conformity and on the internet http://
www.mt.com/mpdp-norms.
Technical data30 Melting Point Excellence System
Page 33

Page 34

Page 35

Page 36

Mettler-Toledo GmbH
30352603
Im Langacher 44
8606 Greifensee, Switzerland
www.mt.com/contact
Subject to technical changes.
© Mettler-Toledo GmbH 07/2017
30352603B
www.mt.com/mpdp
For more information
 Loading...