

Page 1
1
Installation
1. Unpack the meter, power supply, electrode,
electrode arm, buffer sachets, Guide Book and
calibration certificate. Keep the calibration
certificate in a safe place.
2. Check the power supply unit is the correct
voltage for your local supply. If it is not, contact
your distributor.
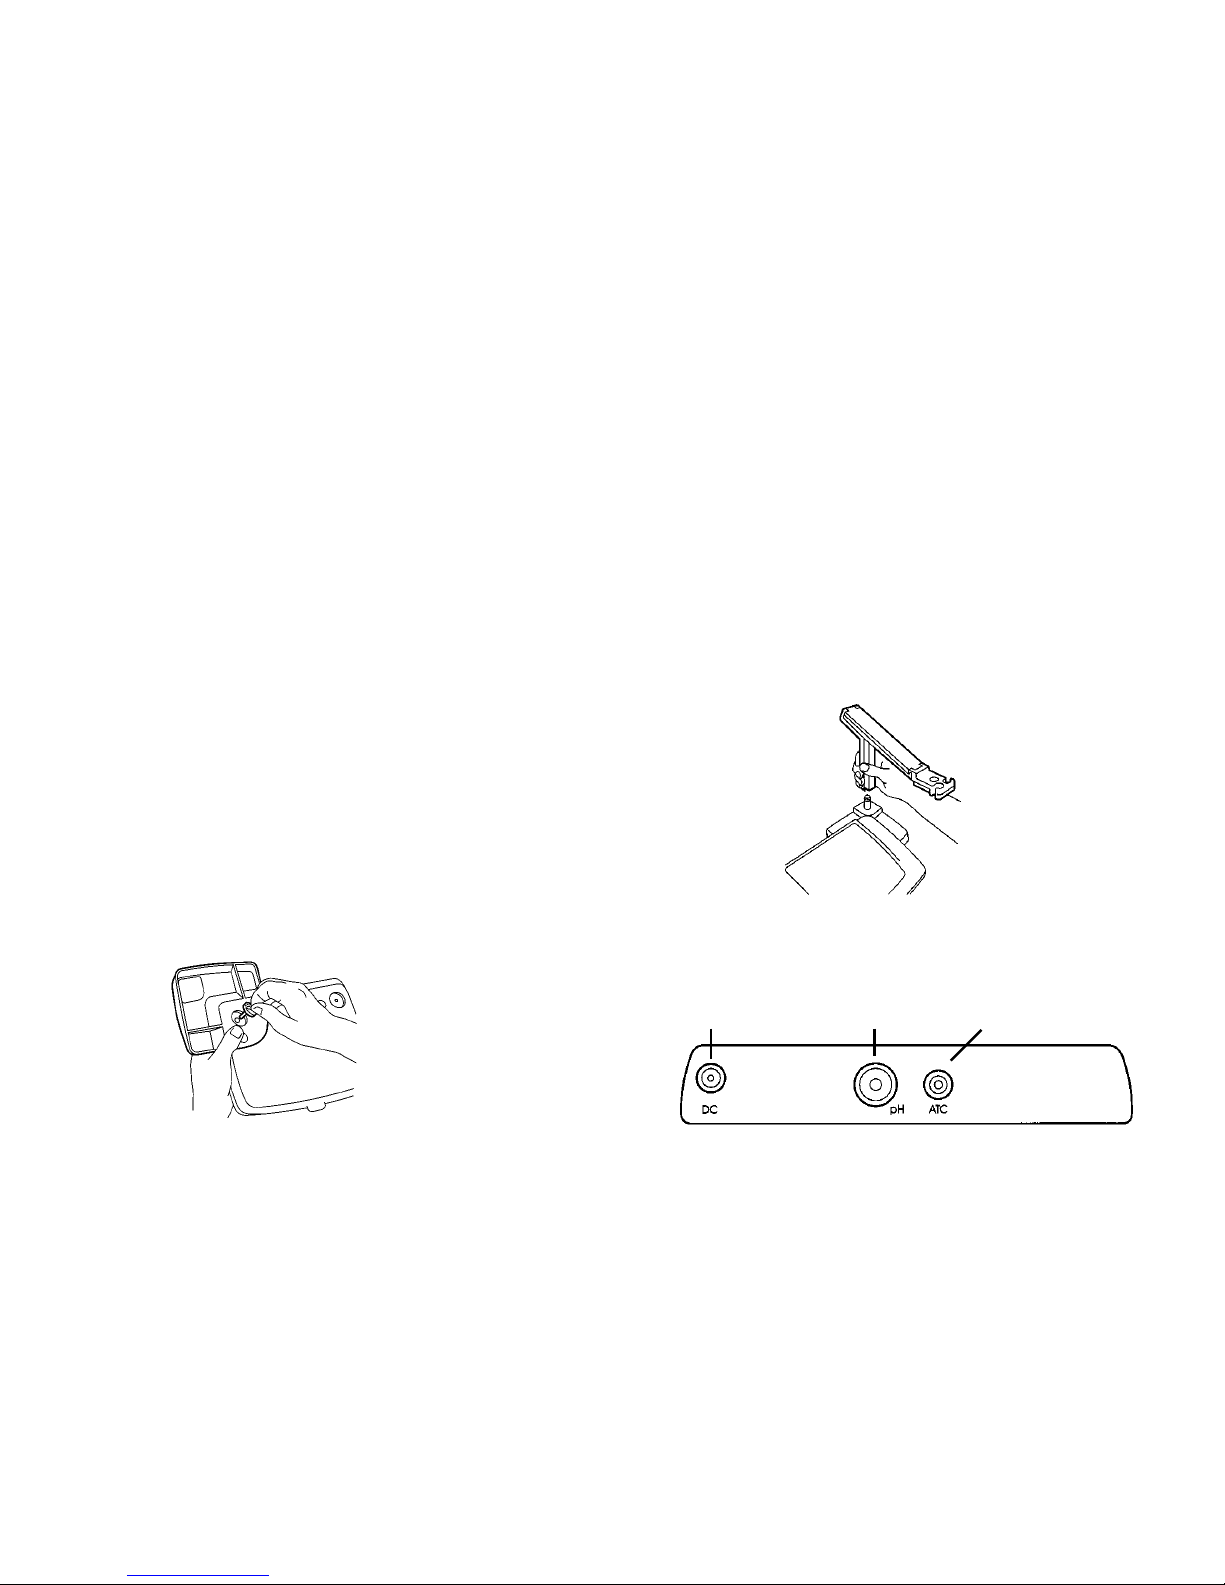
3. Attach the electrode arm to the left or righthand
side of the meter:
a. Turn the meter upside down and seat the
dome of the electrode arm base into the left
or righthand meter recess.
b. Insert and tighten the fixing screw.
c. Turn the meter and base the right way up
and locate the electrode arm onto the base
fixing post. Press down to snap into place.
Input and Output Connections
MP220 Rear Panel
power supply
unit socket
combination
electrode socket
automatic temperature
compensation probe socket
Page 2
2
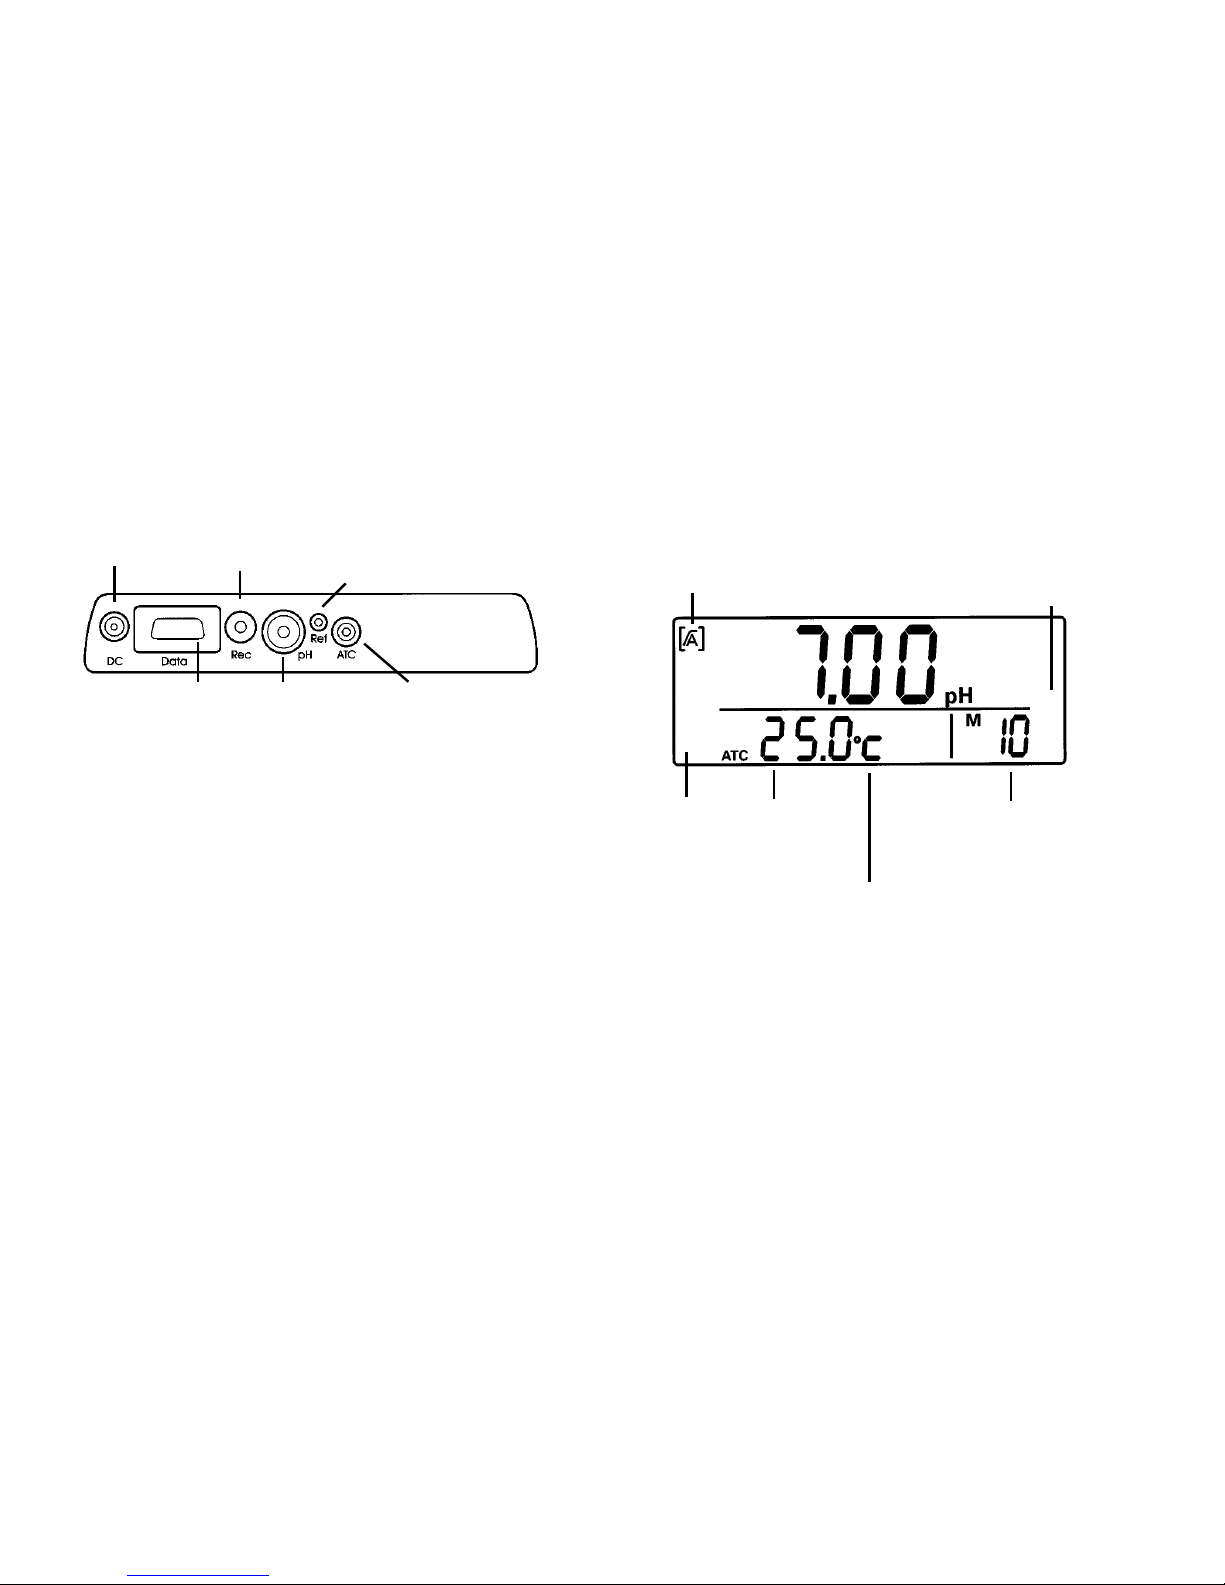
Display
stability/auto endpoint
indicator
electrode
condition
shown
here
prog. menu icons shown
here (and data transfer
icon - MP225 only)
temperature,
electrode
offset/slope
shown here
memory,
cal and
error
number
shown here
automatic or
manual
temperature
compensation
indicator
power supply
unit socket
pH or
combination
electrode socket
data output
socket
recorder output
socket
reference
electrode
socket
Input and Output Connections (continued)
MP225 Rear Panel
1. Disconnect the shorting clip from the pH socket
and retain it by clipping it over the socket.
2. Connect the electrode to the pH socket. If you
are using an electrode incorporating ATC
connect the other lead to the ATC socket.
3. If you are using a separate ATC probe connect it
to the ATC socket.
4. Connect the power supply unit to the DC socket.
automatic temperature
compensation probe
socket
Page 3
3
3. Repeat steps 1 and 2 using other buffers for a
2 point (or 3 point - MP225 only) calibration.
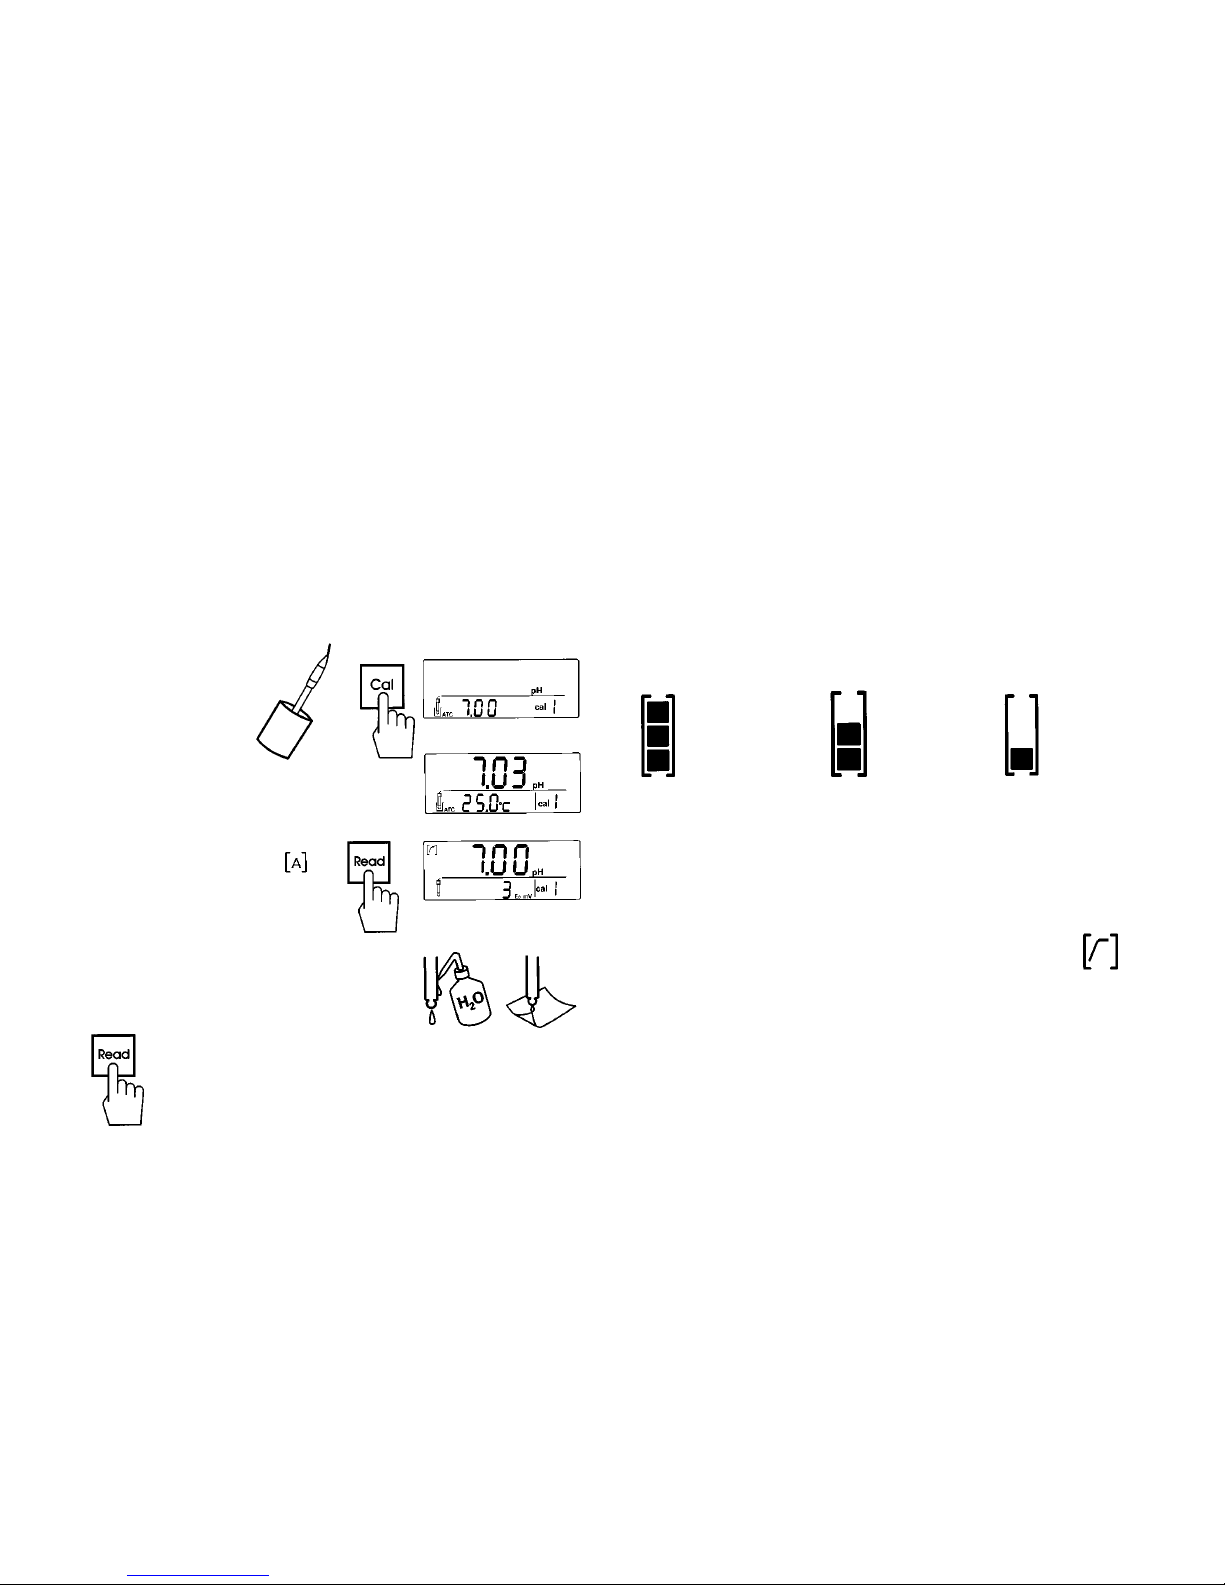
Electrode Condition Indicator
95.0 - 105.0% 90.0 - 94.9% 85.0 - 89.9%
electrode in electrode electrode
good needs needs
condition cleaning conditioning
n When you press Cal the pH buffer you selected for
cal 1 (Program Menu) is displayed for 2 seconds, and
then the meter starts measuring. If you want to use
another pH buffer (choice of 3) press Cal again. Press
Cal repeatedly to exit the calibration routine.
n The decimal point flashes during calibration
measurement. When the electrode output
has stabilized the stability indicator appears.
Manual endpoint - press Read to endpoint.
Auto endpoint - the meter automatically endpoints.
n When a calibration has endpointed you can press
Mode to display the absolute mV value and temperature of the buffer. The display reverts to the buffer and
E0 values, or buffer and slope values for a 2 point (or 3
point - MP225 only) calibration after 2 seconds.
buffer
Calibrating
1. 1-point calibration
Example
Use auto endpoint or
to freeze the reading.
2. Rinse the electrode and blot dry
to return to sample measurement, or
continue with step 3 for further cal points
↓ 2 seconds
Page 4
4
n If you press Mode to select pH or mV mode the meter
begins measuring immediately. You will not need to
press Read to start the reading.
n The decimal point flashes during sample
measurement. When the electrode output
has stabilized the stability indicator appears.
Manual endpoint - press Read to endpoint.
Auto endpoint - the meter automatically endpoints.
n If you have the RS232 cable connected to the Data
socket (MP225 only), sample data is transmitted at
endpoint.
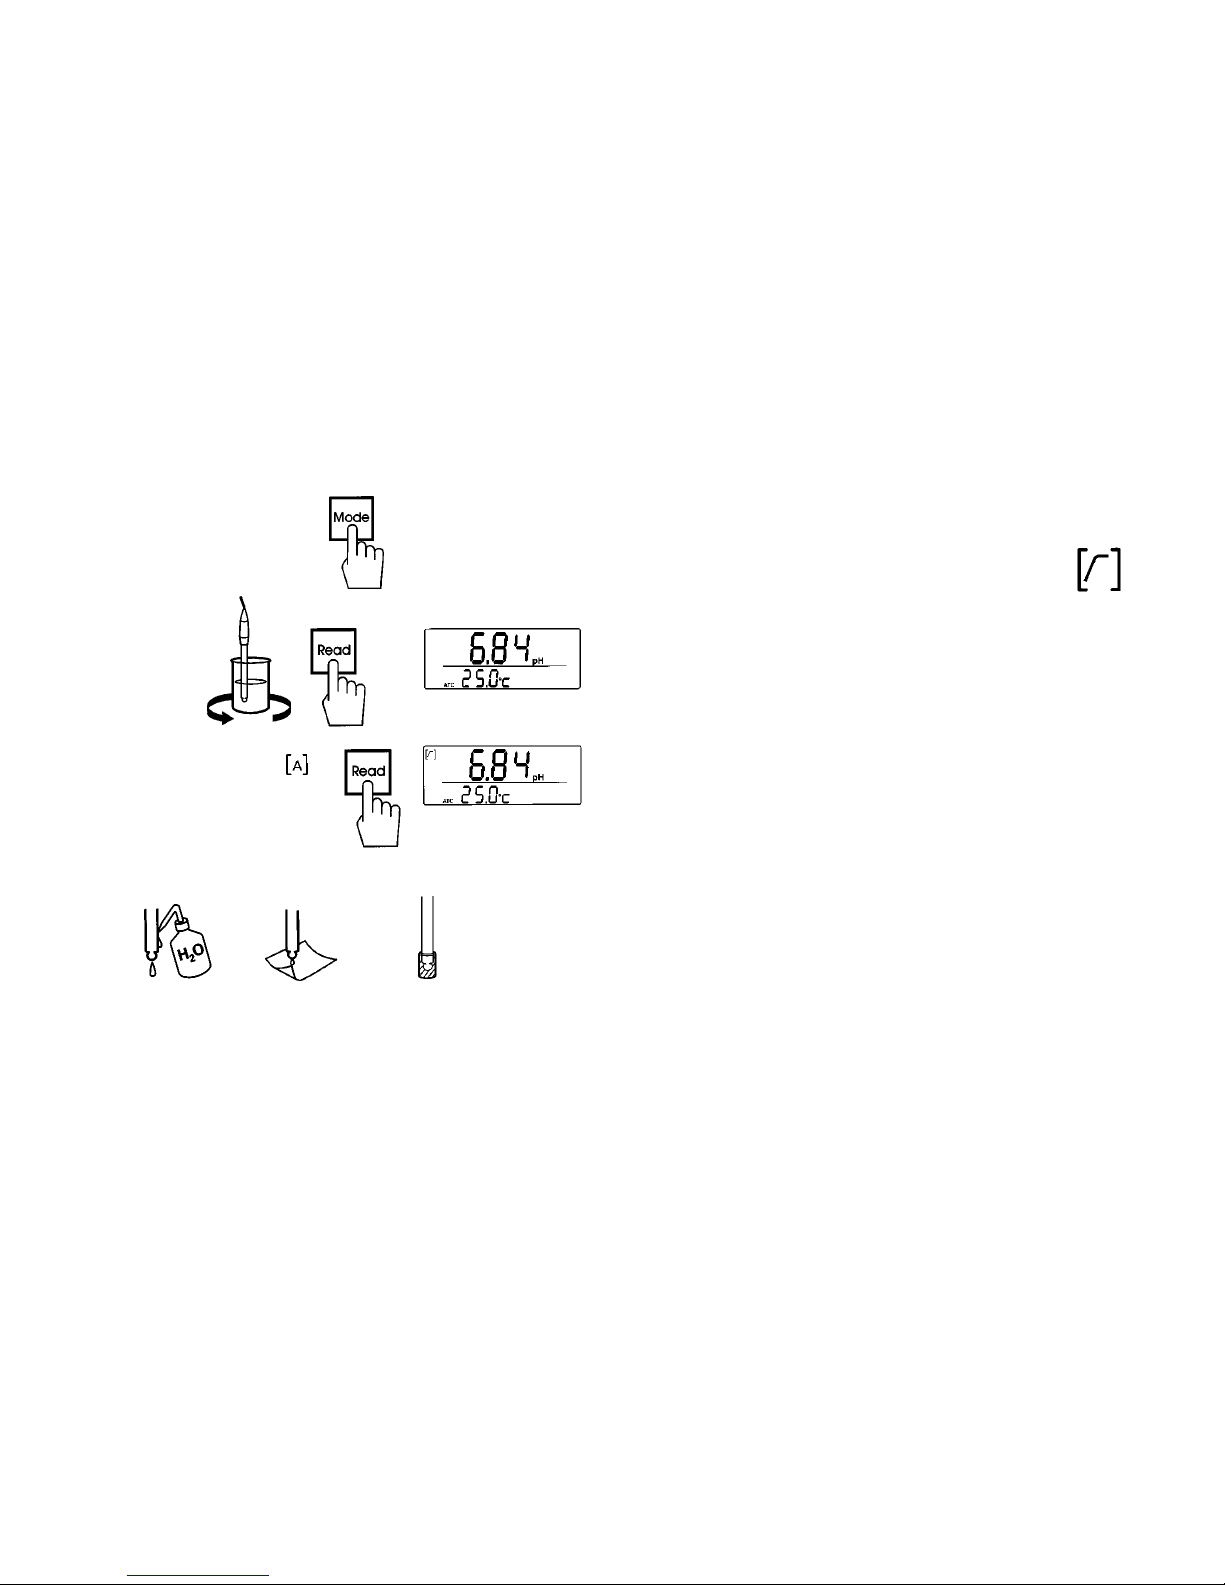
Measuring Samples
1. Select pH or mV mode
2. Measure sample
Use auto endpoint or
to freeze the reading.
3. Rinse, blot and store the electrode.
Page 5

5
Operating Hints
n Remove the wetting cap from the end of the
electrode and the rubber cap from the fill hole (if
fitted) before using the electrode.
n Calibrate using buffers with values that bracket
that of the sample. With a new pH electrode, or
after maintenance, we recommend you use a
buffer close to pH 7 for the first calibration point.
n For greatest accuracy, buffers and samples
should be at the same temperature.
n Do not use solutions after the expiry date.
n When transferring the electrode from one
solution to another, rinse it with distilled water
and blot dry with tissue paper - do not wipe the
electrode as this may cause polarization and
slow response.
n When you select the calibration buffers
(Program Menu), set the buffer you will use
most frequently for 1-point calibrations as cal 1
and the one you will use most frequently for the
second calibration point as cal 2, and for the
MP225, the one you will use most frequently for
the third calibration point as cal 3.
Page 6

6
A
A
R
R
R
Using Auto Endpoint
The auto read feature can be used in pH and mV
mode to automatically determine a stable endpoint
during calibrations and sample measurements.
Press . The display shows the auto endpoint
indicator . The display will freeze automatically
when a stable endpoint is reached. To manually
freeze the display press Read. To turn auto endpoint
off press again.
Using the Memory
Entering a Reading into Memory
The MP220 can store 10 endpointed results and the
MP225 can store 20.
Press when the measurement has endpointed.
M 1 is displayed (or M 2 to M 20 if readings have
already been stored).
M 10 (MP220) or M 20 (MP225) indicates the
memory is full.
Recalling Memory
You can only recall stored memories if the current
measurement has endpointed.
Press - the last stored memory is displayed.
Press or to scroll through memories. RM 1 to
RM 20 indicates which memory is being displayed.
M 0 indicates no memories stored.
Clearing the Memories
Press then press or until M C is displayed.
Press Mode to clear the memories, M 0 indicates
the memories have been cleared. (Press Read to exit
without clearing the memories).
b697
M
M
M
M
Page 7

7
Using Continuous Data
Transfer Mode
(MP225 only)
In continuous data transfer mode readings are sent
to the data output approximately every second. If
the measurement endpoints (manually, or using
auto endpoint) data transfer stops. If you recall
memories all stored readings are output, (from the
first to the last stored).
To select continuous data transfer mode press and
hold for 2 seconds.
n To maintain continuity of sample readings
calibration data is only output at endpoint.
R
Resetting Sample ID (MP225 only)
The sample identity number is sent to the
serial output and increments 1 every time a sample
measurement endpoints.
To reset the sample ID number to 1, press and hold
Read for 2 seconds. The sample ID icon flashes
three times to show the number has been reset.
Recalling Calibration Data (MP225 only)
You can only recall calibration data if the current
measurement has endpointed - press Read if
necessary.
Press and hold Cal for 2 seconds. The display
shows the date and time of the last calibration,
the buffer value, the mV offset (E
0
) for 1-point
calibrations, and the slope value (%) for 2 (3) point
calibrations.
Page 8

8
MTC
The MP225 has a preset reminder interval
of 1 hour. Change the interval using and
. Press Mode to enter the value and move
on.
Time and Date (MP225 only)
Time and date are displayed during
calibration recall, and will be sent to the
serial output. Time is shown on the main
display, the date is shown on the lower part
of the display. Set the time and date using
and . Press Mode to enter the value
and move on.
Manual Temperature Compensation
(MP220 and MP225)
You can enter temperature manually
between –5.0 and 105.0°C. (An ATC probe
will override manual compensation.) The
meters have a preset temperature of 25°C.
Use and to change temperature. Press
Mode to enter the value and move on.
Program Menu
The Program Menu allows you to set manual
temperature compensation, pH calibration buffers
and, for the MP225 only, calibration reminder and
date and time.
You can only enter the Program Menu if the current
measurement has endpointed - press Read if
necessary.
Press and hold the Mode key for 2 seconds to
access the Program Menu - appears.
Press Mode to scroll through the options and press
and to change the value. Press Read to exit the
Program Menu at any time. If you press Read when a
value is flashing that value will not be entered.
Calibration Reminder (MP225 only)
The calibration reminder interval can be
set, in hours, between 0 and 4 (where
0 = no reminder). When the selected time
has elapsed the calibration reminder
symbol will appear.
M
R
M
R
M
R
M
R
Page 9

9
cal 1
cal 2
cal 3
Program Menu (continued)
pH Buffer Selection (MP220 and MP225)
The buffers are grouped in sets
(b = 1, b = 2, b = 3); select your required
set first using and :
set 1 = 7.00, 4.00, 10.01, 1.68
set 2 = 7.00, 4.01, 9.21, 2.00, 11.00
set 3 = 6.87, 4.01, 9.18, 1.68
Press Mode to enter the set and move on.
NOTE: Check buffer set 2 is selected to use
the buffers supplied
Choose three buffers (cal 1, cal 2, cal 3)
from the set for calibration. For ease of
use, set the buffers in the order that you
will use them.
For example: Set 2 (factory settings)
cal 1 = 7.00, cal 2 = 4.01, cal 3 = 9.21
(2.00 and 11.00 not selected).
These can be rearranged in any order using
and . Press Mode to enter the value
and move on.
Press Read to exit the Program Menu.
M
R
M
R
b697
Page 10

10
Interfacing (MP225 only)
Serial Output
The MP225 can interface with computers, printers
(GA42), Acquire Data Acquisition software and other
RS232 compatible devices via the RS232 cable. The
maximum source or sink current available is ± 10mA.
Pin Signal Pin Signal
1 device enable (link to pin 5) 6 not used
2 RS232 Tx (signal transmit) 7 not used
3 not used 8 not used
4 not used 9 not used
5 protective ground (0V)
Data Socket
Type of communication - uni directional, baud rate 2400,
data format - 7 data bits : 1 stop bit : even parity
n Data is sent to the Data socket at measurement
endpoint (manual or automatic), calibration recall and
memory recall.
n To use the output to monitor continually, you need to
select continuous data transfer mode.
Recorder Output
An output is available for both modes. The polarity
of the output is the same as the polarity of the input
signal.
Approximate Recorder Outputs
pH - Output follows display and provides approximately 60 mV output/pH unit. This value varies with
changes in electrode slope and temperature.
mV - Output follows display, i.e. output varies from
–1999 to 1999 mV.
Recorder output is not available for temperature.
Rec Socket Polarity
protective
ground (0V)
signal transmit
0V
data output
51
96
Page 11

11
Problem Solving
Err 1 - offset value (E0) out of range
Check correct buffer is used.
Check mV reading for pH 7 buffer is 0 ± 30 mV. If it
is not, clean or replace the electrode.
Err 2 - slope out of range
Slope less than 85%, or not calculable.
Electrode needs cleaning, conditioning or
replacing. Check correct buffers are used.
Slope more than 105.0%.
Check calibration buffers.
NOTE: Where 0 mV/pH unit = 0%, and
59.16 mV/pH unit = 100% (at 25°C)
Err 3 - pH buffer outside temperature limits
pH buffers must be between 5°C and 50°C for
accurate calibration.
. Displayed (out of range)
Check electrode is connected and immersed in
sample. Check wetting cap is removed.
Data Entry Errors
Date flashes and reverts to previous setting - invalid
date entered.
Entered temperature value changes to –5.0 or 105.0
- the meter will not accept values outside this
range.
Dashes displayed instead of buffer value during
calibration buffer set up - that buffer has already
been selected for a cal point. Cal points must have
different values.
Page 12

12
Maintenance
There are no user replaceable parts in the meters or
power supply unit. Do not remove the covers.
The meters require very little maintenance.
Occasionally wipe the meter with a damp cloth. The
casework is made of ABS/PC which is known to be
affected by some organic solvents, including
toluene, xylene and methyl-ethyl-ketone. It is good
practice to wipe away any spillages as soon as they
occur.
Electrode Maintenance
Refer to the electrode product insert for full details
on maintaining your electrode.
Spares and Accessories
52000100 InLab 413 ‘3 in 1’ pH Electrode
52000118 InLab 410 pH Electrode
51300164 30KΩ NTC Probe
51302118 Electrode Arm and Base
51302152 Recorder Cable (MP225 only)
51302125 RS232 Cable (MP225 only)
00229170 GA42 Printer (MP225 only)
00229119 LC - P45 GLP Printer (MP225 only)
51300047 Guide to pH Measurement
51302069 pH 4.01 Buffer Sachets, 30/pack
51302047 pH 7.00 Buffer Sachets, 30/pack
51302070 pH 9.21 Buffer Sachets, 30/pack
51302068 Rainbow Pack Buffer Sachets
(10 each of pH 4.01, 7.00 and 9.21)
51340058 pH 4.01 Buffer Solution, 250 mL x 6
51340060 pH 7.00 Buffer Solution, 250 mL x 6
51300194 pH 9.21 Buffer Solution, 250 mL x 6
c897
Page 13

13
1.68 2.00 4.00 4.01 6.87 7.00 9.18 9.21 10.01 11.00
5°C 1.67 2.02 4.00 4.01 6.95 7.09 9.39 9.45 10.25 11.72
10°C 1.67 2.01 4.00 4.00 6.92 7.06 9.33 9.38 10.18 11.54
15°C 1.67 2.00 4.00 4.00 6.90 7.04 9.28 9.32 10.12 11.36
20°C 1.68 2.00 4.00 4.00 6.88 7.02 9.22 9.26 10.06 11.18
25°C 1.68 2.00 4.00 4.01 6.87 7.00 9.18 9.21 10.01 11.00
30°C 1.68 1.99 4.01 4.01 6.85 6.99 9.14 9.16 9.97 10.82
35°C 1.69 1.99 4.02 4.02 6.84 6.98 9.10 9.11 9.93 10.64
40°C 1.69 1.98 4.03 4.03 6.84 6.98 9.07 9.06 9.89 10.46
45°C 1.70 1.98 4.04 4.04 6.83 6.97 9.04 9.03 9.86 10.28
50°C 1.71 1.98 4.06 4.06 6.83 6.97 9.01 8.99 9.83 10.10
Buffer Tables
The MP220 and MP225 automatically correct pH
buffers for temperature using the values shown in
the table.
b697
Page 14

14
Specifications
MP220 MP225
Measurement pH 0.00 to 14.00 –2.00 to 16.00
Ranges mV ± 1999 mV ± 1999 mV
Temp. -5.0 to 105.0°C –5.0 to 105.0°C
Calibration 2 of 3 3 of 3
Points selectable selectable
Resolution pH 0.01 0.01
mV 1 1
Temp. 0.1 0.1
Relative pH ± 0.01 ± 0.01
Accuracy* mV ± 1 mV ± 1 mV
Temp. ± 0.5°C ± 0.2°C
Isopotential pH 7.00 7.00
Point
Outputs – Recorder
– Serial
* ± 1 least significant digit
MP220 MP225
Memory 10 memories 20 memories
Temp. –5.0 to 105.0°C –5.0 to 105.0° C
Compensation auto/manual auto/manual
Display LCD LCD
Input Conditions Impedance Impedance
>10
12
ohms >1012 ohms
Operating Conditions
Temperature 5 to 40°C 5 to 40°C
Humidity at 35°C max. 85% max. 85%
(non condensing)
Installation Category 2 2
Pollution Category Degree 2 Degree 2
Size inches
101/2 x 71/2 x 21/2 101/2 x 71/2 x 21/2
mm 265 x 190 x 65 265 x 190 x 65
Weight lb 1
3/4 1 3/4
kg 0.8 0.8
b697
Page 15

15
Specifications (continued)
Power Requirements
The MP220 and MP225 are supplied with an
appropriate power supply unit.
USA/Japan 100 - 120V, 50/60Hz, 0.85VA
Europe 230V, 50Hz, 1.1VA
Output from PSU: 9V DC
Meter Power Rating: 0.3VA
NOTE: The meters should only be used with the
power supply unit supplied.
 Loading...