

Mettler Toledo JP1203C, JS1203C, JP1603C, JS1603C, JP303G Operating Instructions Manual
...Page 1
C
C
C
C
Jewelry Balances
JP/JS Models
Operating Instructions
Page 2

Page 3

Table of contents
Introduction1 7
Safety Precautions2 8
Overview3 9
Setting up the Balance4 13
Weighing Made Simple5 21
The Menu6 24
Applications7 36
Conventions and Symbols Used in These Operating Instructions1.1 7
Components3.1 9
Operation Keys3.2 10
Display Panel3.3 11
Unpacking and Delivery Inspection4.1 13
Installing the Components4.2 13
Selecting the Location and Leveling the Balance4.3 14
Selecting the Location4.3.1 15
Leveling the Balance4.3.2 15
Power Supply4.4 15
AC Operation4.4.1 16
Battery Operation4.4.2 16
Transporting the Balance4.5 17
Weighing Below the Balance4.6 17
Adjustment (Calibration)4.7 18
Fully Automatic Adjustment FACT4.7.1 18
Adjustment with Internal Weight4.7.2 18
Adjustment with External Weight 4.7.3 19
Switching the Balance On and Off5.1 21
Performing a Simple Weighing5.2 22
Zero Setting / Taring5.3 22
Switching Weight Units5.4 22
Recall / Recall Weight Value5.5 23
Weighing with the Weighing-in Aid5.6 23
Print / Transmit Data5.7 23
What is in the Menu ?6.1 24
Menu Operation6.2 25
Description of Menu Topics6.3 26
Main Menu6.3.1 26
Basic Menu6.3.2 26
Advanced Menu6.3.3 28
Interface Menu6.3.4 31
Application "Piece Counting"7.1 36
Application "Percent Weighing"7.2 38
Application "Check Weighing"7.3 40
Table of contents 3
Page 4

Application "Statistics"7.4 43
Application "Totaling"7.5 45
Application "Multiplication Factor Weighing"7.6 47
Application "Division Factor Weighing"7.7 49
Application "Density"7.8 51
Density Determination of Solids7.8.1 51
Density Determination of Liquids7.8.2 53
Formulae Used to Calculate Density7.8.3 54
Application "Routine Test"7.9 57
Application "Diagnostics"7.10 60
Repeatability Test7.10.1 60
Display Test7.10.2 61
Key Test7.10.3 62
Motor Test7.10.4 63
Balance History7.10.5 63
Calibration History7.10.6 64
Balance Information7.10.7 65
Service Provider Information7.10.8 66
Communication with Peripheral Devices8 67
Function PC-Direct8.1 67
Firmware (Software) Updates9 69
Operating Principle9.1 69
Update Procedure9.2 69
Error and Status Messages10 70
Error Messages10.1 70
Status Messages10.2 70
Cleaning and Service11 72
Interface Specification12 73
RS232C Interface12.1 73
MT-SICS Interface Commands and Functions12.2 73
Technical Data13 76
General Data13.1 76
Model-Specific Data13.2 76
Carat Balances with Readability of 0.001 ct13.2.1 76
Gold Balances with Readability of 0.001 g13.2.2 77
Gold Balances with Readability of 0.01 g13.2.3 78
Gold Balances with Readability of 0.1 g13.2.4 80
Dimensions13.3 82
Carat Balances with Readability of 0.001ct13.3.1 82
Gold Balances with Readability of 0.001 g13.3.2 83
Gold Balances with Readability of 0.01 g13.3.3 84
Gold Balances with Readability of 0.1 g13.3.4 85
Accessories and Spare Parts14 86
Accessories14.1 86
Table of contents4
Page 5

Spare Parts14.2 89
Appendix15 91
Conversion Table for Weight Units15.1 91
Recommended Printer Settings15.2 91
Index16 92
5
Page 6

Page 7
1Introduction
Thank you for choosing a METTLER TOLEDO balance.
The precision balances of the Jewelry line combine a large number of weighing possibilities with easy opera
tion.
These operating instructions
●
apply to all balance models JP/JS in the Jewelry line.
●
are based on the initially installed firmware (software) version V1.50.
However, the different models have different charcteristics regarding equipment and performance. Special notes
in the text indicate where this makes a difference to operation.
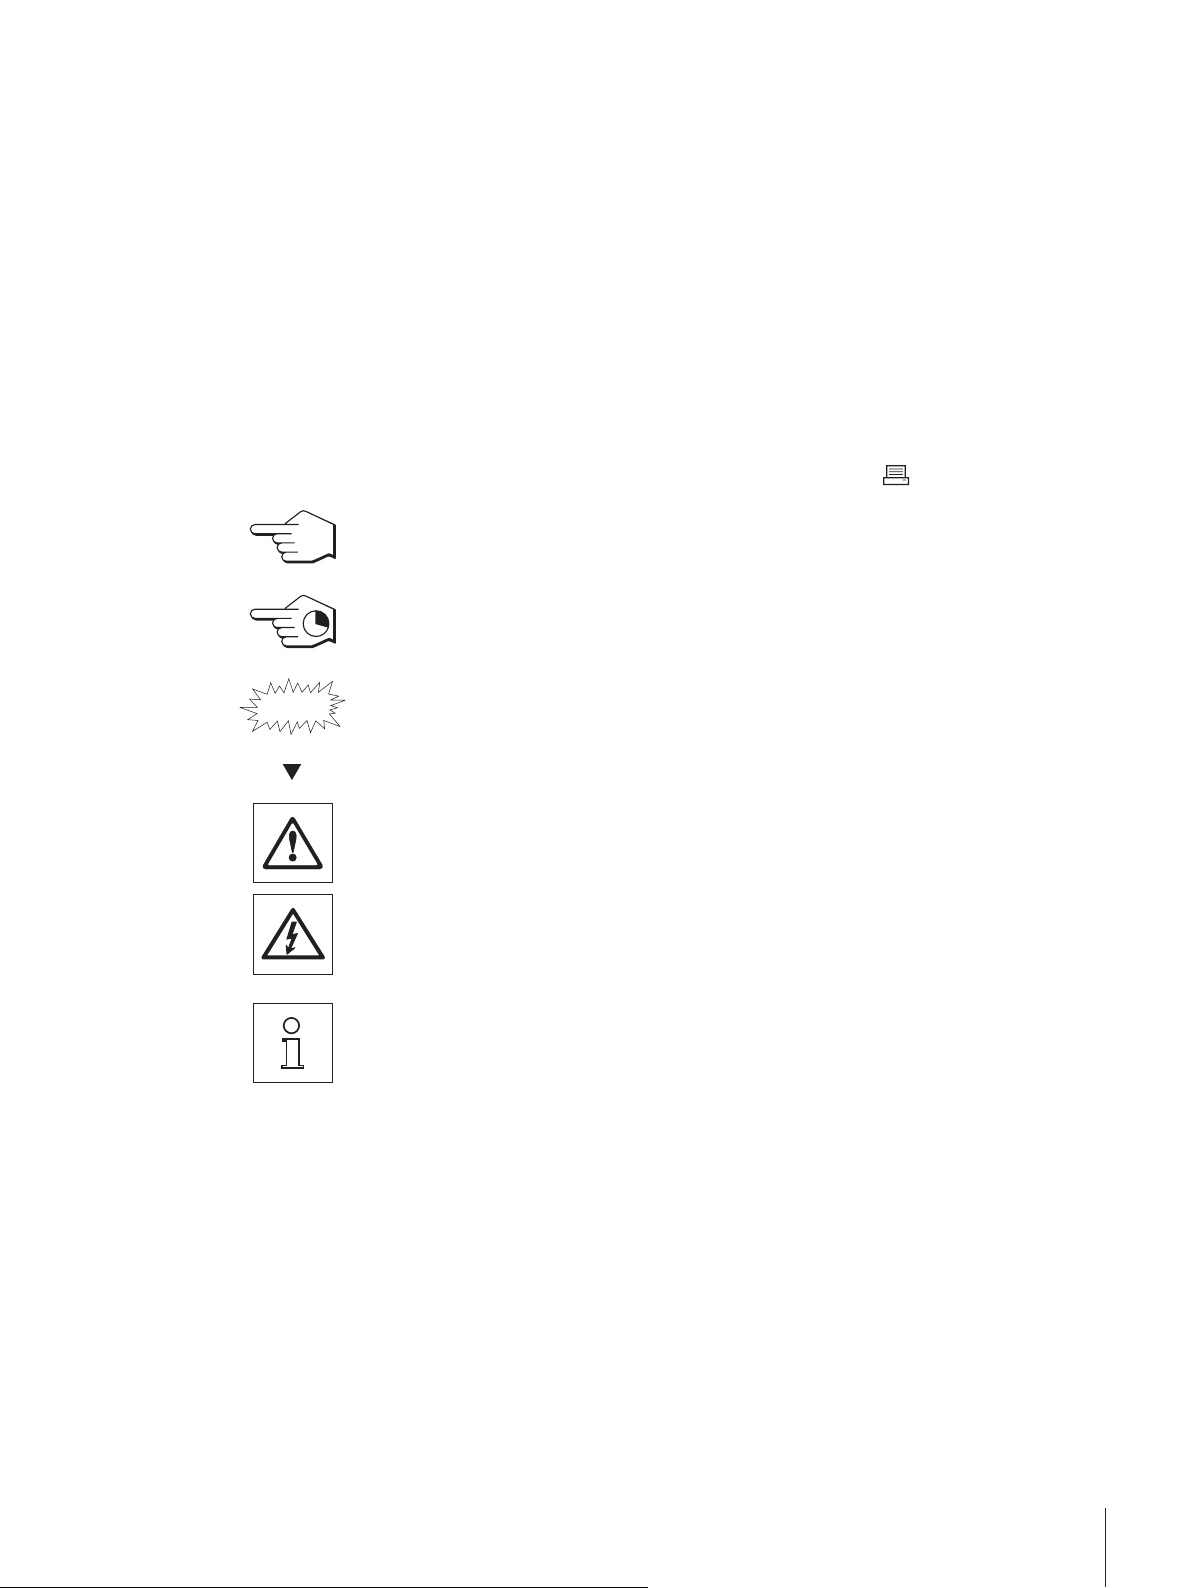
1.1Conventions and Symbols Used in These Operating Instructions
Key designations are indicated by double angular brackets (e.g. « »).
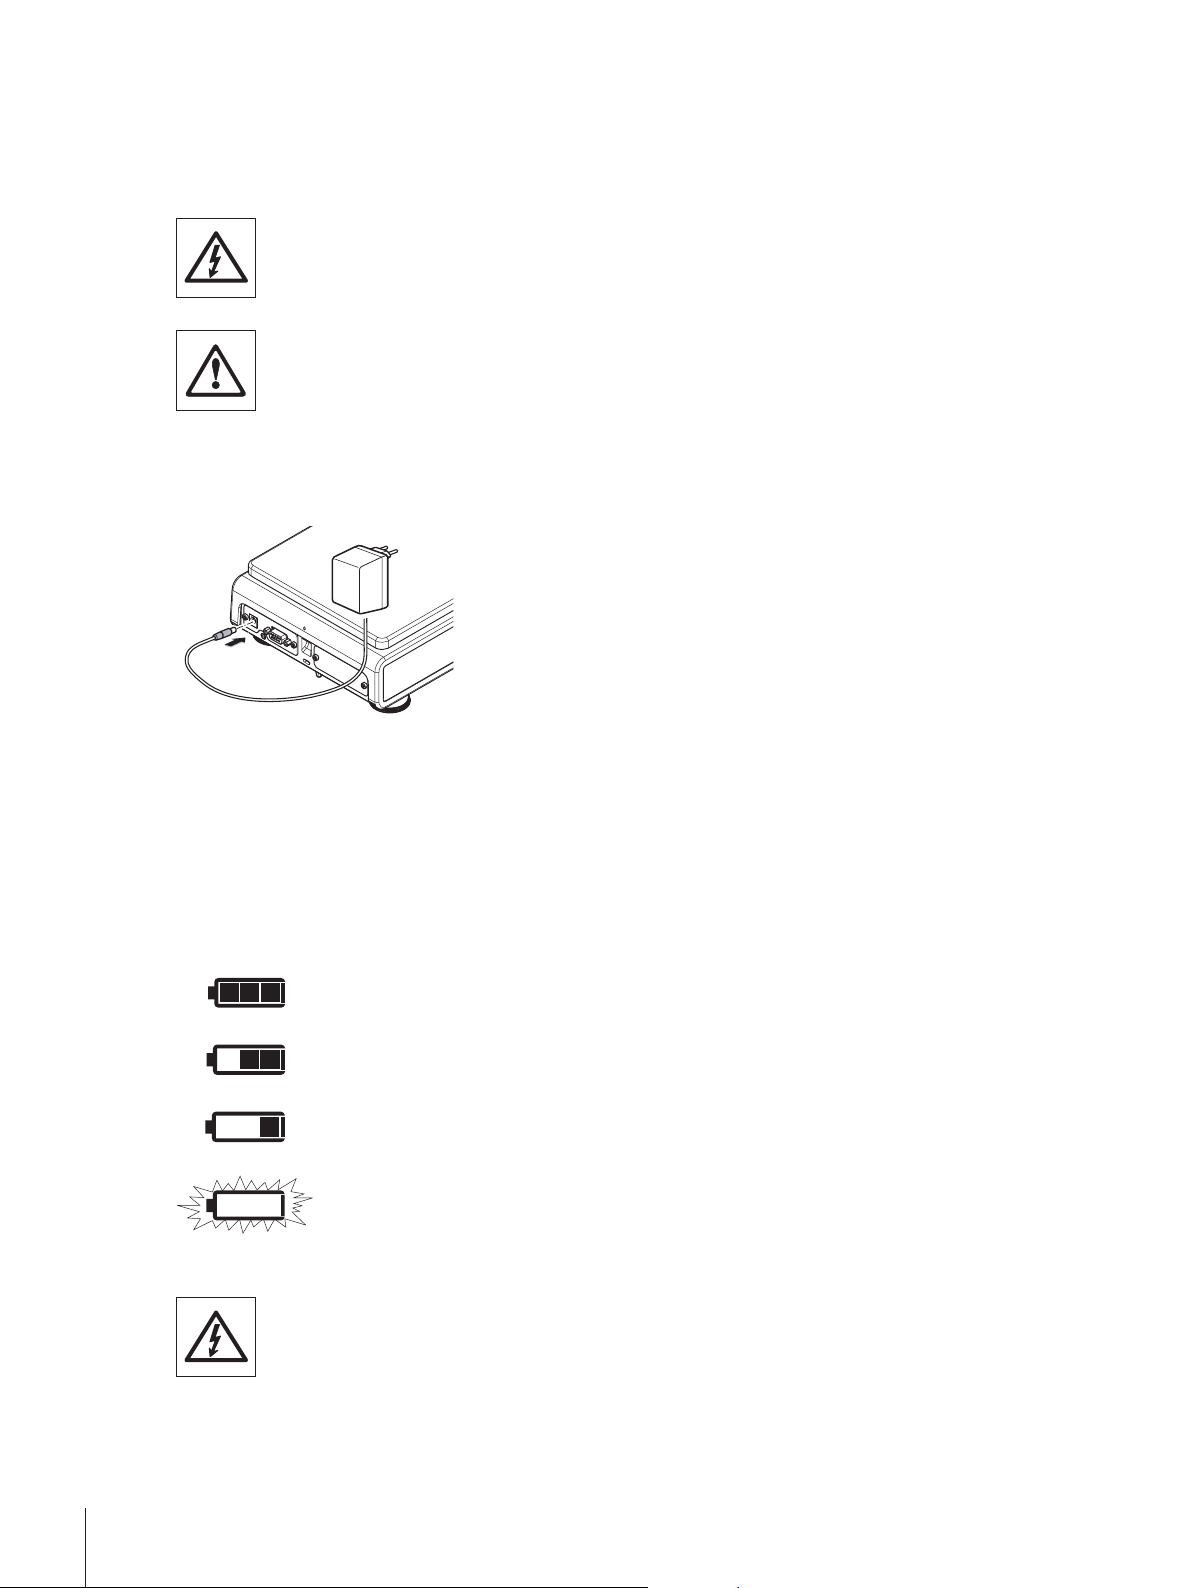
This symbol indicates press key briefly (less than 1.5 s).
This symbol indicates press and hold key down (longer than 1.5 s).
This symbol indicates a flashing display.
This symbol indicates an automatic sequence.
These symbols indicate safety notes and hazard warnings which, if ignored, can cause per
sonal danger to the user, damage to the balance or other equipment, or malfunctioning of the
balance.
This symbol indicates additional information and notes. These make working with your bal
ance easier, as well as ensuring that you use it correctly and economically.
7Introduction
Page 8
2Safety Precautions
Always operate and use your balance only in accordance with the instructions contained in this manual. The
instructions for setting up your new balance must be strictly observed.
If the balance is not used according to these Operating Instructions, protection of the balance may be
impaired and METTLER TOLEDO assumes no liability.
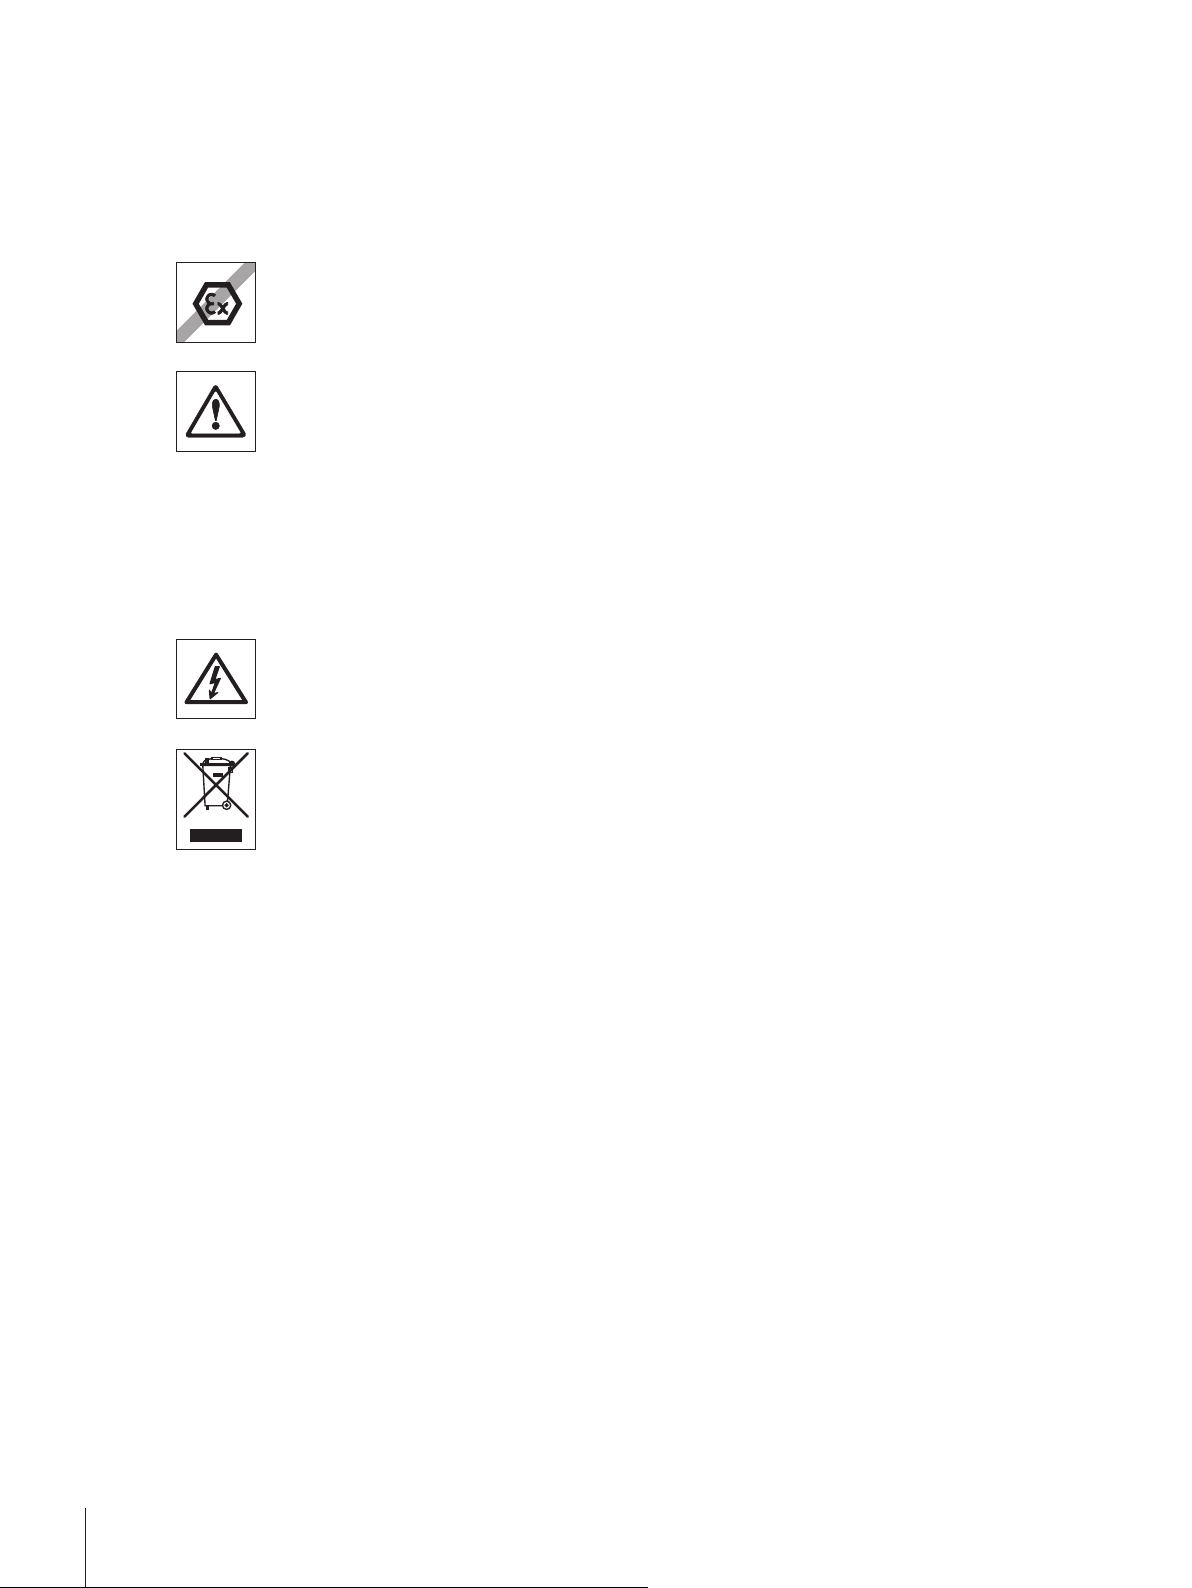
It is not permitted to use the balance in explosive atmosphere of gases, steam, fog, dust and
flammable dust (hazardous environments).
For use only in dry interior rooms.
Do not use sharply pointed objects to operate the keyboard of your balance! Although your
balance is very ruggedly constructed, it is nevertheless a precision instrument. Treat it with
corresponding care.
Do not open the balance: It does not contain any parts which can be maintained, repaired, or
replaced by the user. If you ever have problems with your balance, contact your METTLER
TOLEDO dealer.
Use only balance accessories and peripheral devices from METTLER TOLEDO; they are opti
mally adapted to your balance.
Use only the original universal AC adapter delivered with your balance.
Disposal
In conformance with the European Directive 2002/96/EC on Waste Electrical and Electronic
Equipment (WEEE) this device may not be disposed of in domestic waste. This also applies
to countries outside the EU, per their specific requirements.
Please dispose of this product in accordance with local regulations at the collecting point
specified for electrical and electronic equipment. If you have any questions, please contact
the responsible authority or the distributor from which you purchased this device. Should this
device be passed on to other parties (for private or professional use), the content of this regu
lation must also be related.
Thank you for your contribution to environmental protection.
8 Safety Precautions
Page 9
3Overview
C
0.001 ct
C
0.001 g
C
0.01 g
C
0.1 g
11
12
13
10
14
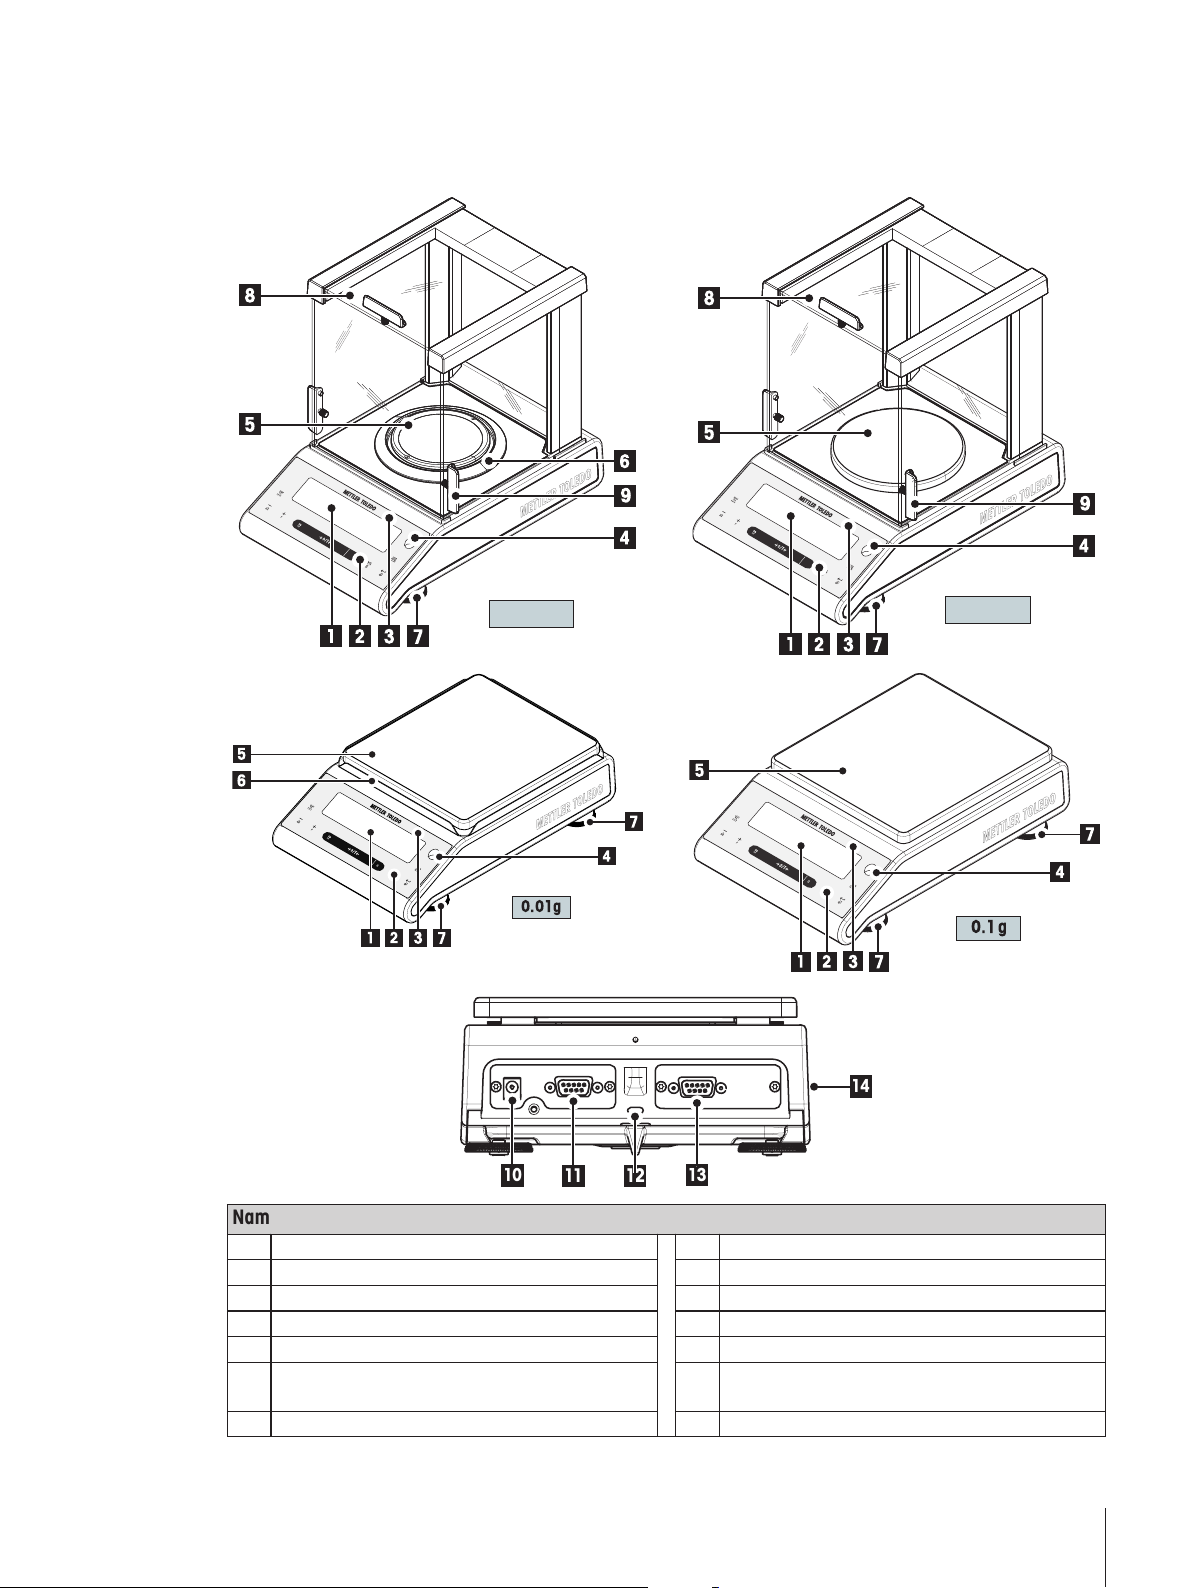
3.1Components
Name and Function of Components
1 Display 8 Glass draft shield
2 Operation keys 9 Handle for operation of the draft shield door
3 Model sticker (with approved models only) 10 Socket for AC Adapter
4 Level indicator 11 RS232C serial interface COM1
5 Weighing pan 12 Kensington slot for anti-theft purposes
6 Draft shield ring / element 13 Second RS232C serial interface COM2 (JP
models)
7 Leveling foot 14 Product label
9Overview
Page 10

3.2Operation Keys
C
51 42
9
3 6
7
8
Key Functions
No. Key Press briefly (less than 1.5 s) Press and hold (longer than 1.5 s)
1
2
3
4 ON//OFF
5
6
7
●
To change display resolution (1/10d
function) while application is running
Note: not available with approved mod
els in selected countries.
●
To navigate back (scroll up) within menu
topics or menu selections
●
Decrease (numerical) parameters within
menu and in applications
●
To navigate forward (scroll down) within
menu topics or menu selections
●
Increase (numerical) parameters within
menu and in applications
●
Switch on
●
Zero/Tare
●
Cancel and to leave menu without saving
(one step back in the menu).
●
With entries: scroll down
●
To navigate through menu topics or
menu selections
●
To toggle between unit 1, recall value (if
selected), unit 2 (if different from unit 1)
and the application unit (if any)
no function
●
To select the weighing application
●
Decrease (numerical) parameters quickly
within menu and in applications
●
To select assigned application and enter
ing the parameter settings of application.
●
Default application assignment: Piece
counting
●
Increase (numerical) parameters quickly
within menu and in applications
●
Switch off
●
Switch off
no function
●
Execute predefined adjusting (calibration)
procedure
10 Overview
Page 11
No. Key Press briefly (less than 1.5 s) Press and hold (longer than 1.5 s)
Application Icons
Status Icons
Weighing-in aid
Weight Value Field
Unit Field
8
●
To enter or leave menu selection (from /
●
Enter or leave menu (Parameter settings)
to menu topic)
●
To enter application parameter or switch
to next parameter
●
To store parameter
9
●
Printout display value
●
Printout active user menu settings
●
Transfer data
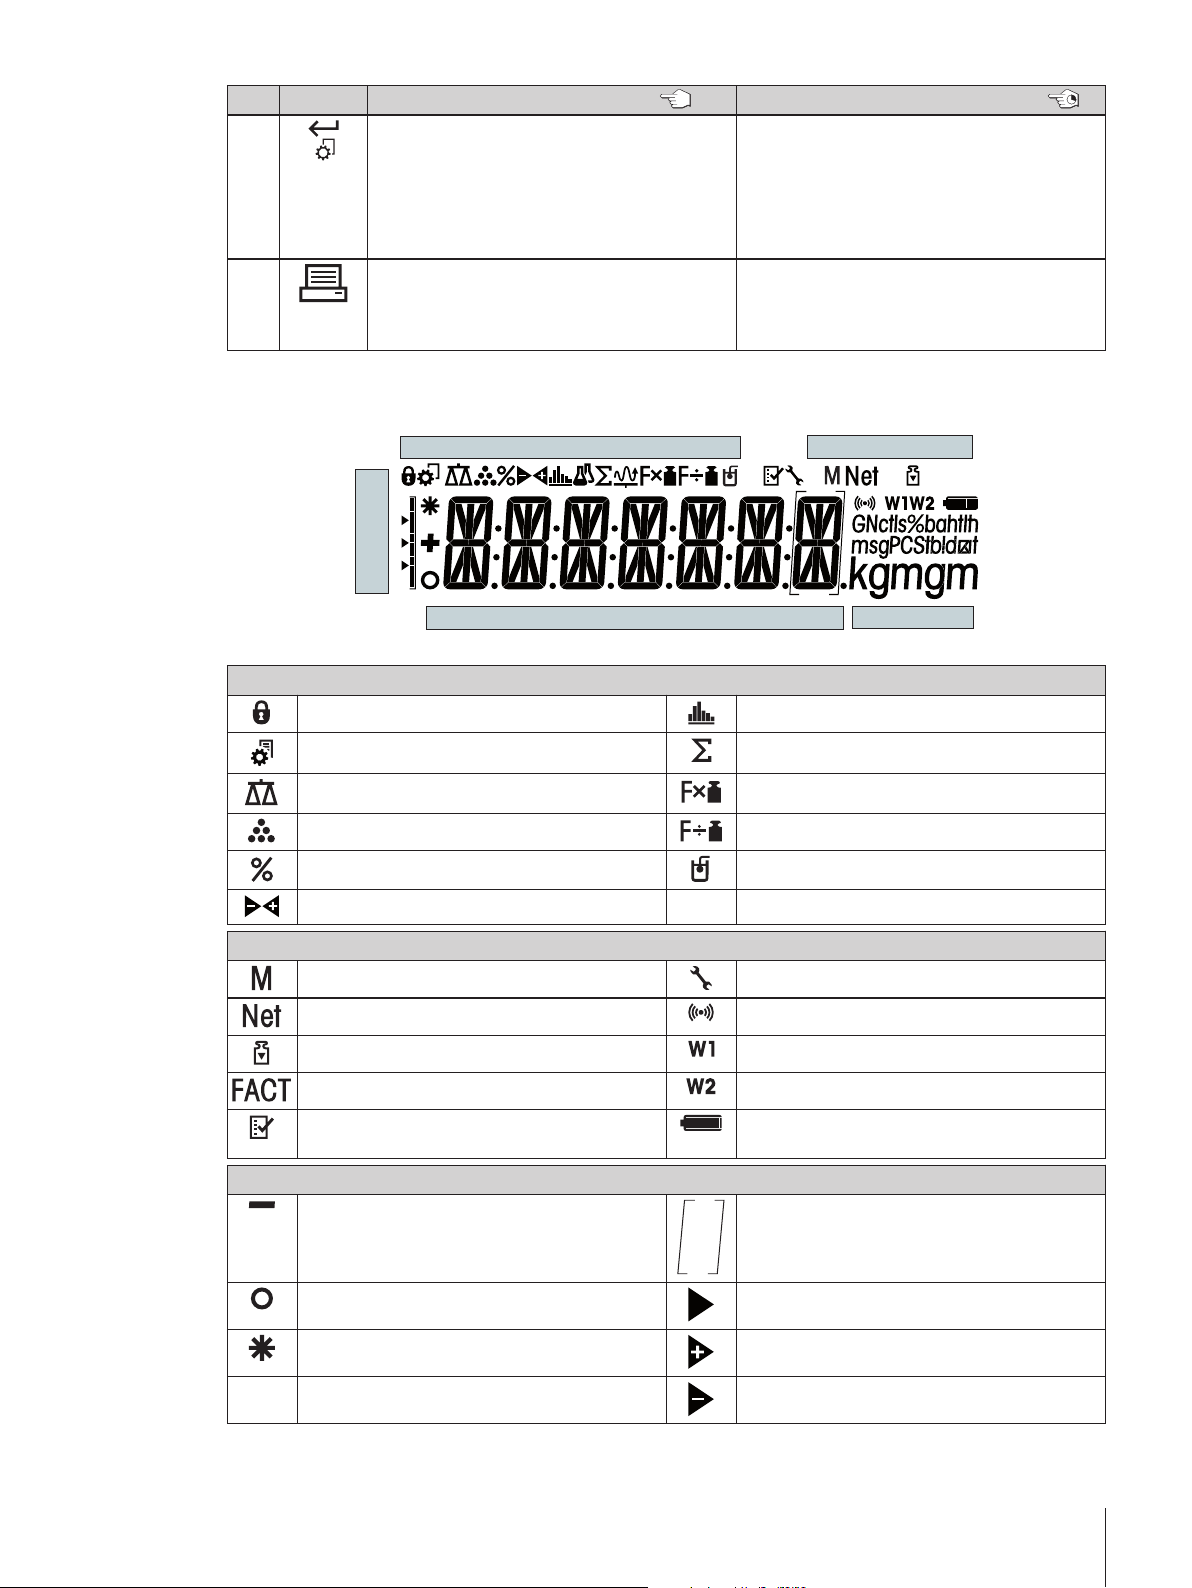
3.3Display Panel
Application Icons
Menu locked Application "Statistics"
Menu setting activated Application “Totaling”
Application "Weighing" Application “Multiplication factor”
Application "Piece counting" Application “Division factor”
Application "Percent weighing" Application “Density”
Application "Check weighing"
Status Icons
Indicates stored value (Memory) Service reminder
Indicates Net weight values Acoustic feedback for pressed keys activated
Adjustments (calibration) started Weighing range 1 (Dual Range models only)
FACT activated Weighing range 2 (Dual Range models only)
Applications "Diagnostics" and “Routine Test” Charge of battery: full, 2/3, 1/3, discharged
Weight Value Field and Weighing-in aid
Indicates negative values Brackets to indicate uncertified digits
(Battery operated models only)
(approved models only)
Indicates unstable values Marking of nominal or target weight
Indicates calculated values Marking of tolerance limit T+
Marking of tolerance limit T-
11Overview
Page 12

Unit Field
g gram ozt troy ounce tls Singapore taels
kg kilogram GN grain tlt Taiwan taels
mg milligram dwt pennyweight tola tola
ct carat mom momme baht baht
lb pound msg mesghal
oz ounce tlh Hong Kong taels
12 Overview
Page 13
4Setting up the Balance
C
2
3
4
1
5
The balance must be disconnected from the power supply when carrying out all setup and
mounting work.
4.1Unpacking and Delivery Inspection
1 Open the packaging and carefully remove all components.
2 Check the delivered items.
The standard scope of delivery contains the following items:
Components Carat balances Gold balances
0.001 ct 0.001 g 0.01 g 0.1 g
Draft shield 165 mm – –
Weighing pan
Draft shield ring – – –
Draft shield element – – –
Pan support
Bottom plate – –
Protective cover
Universal AC adapter (with plug set)
Carat pan S 80 Ø x 20 mm – – –
Operating Instructions
Quick Guide
EC declaration of conformity
Ø 90 mm – – –
Ø 120 mm – – –
170 x 190 mm – –
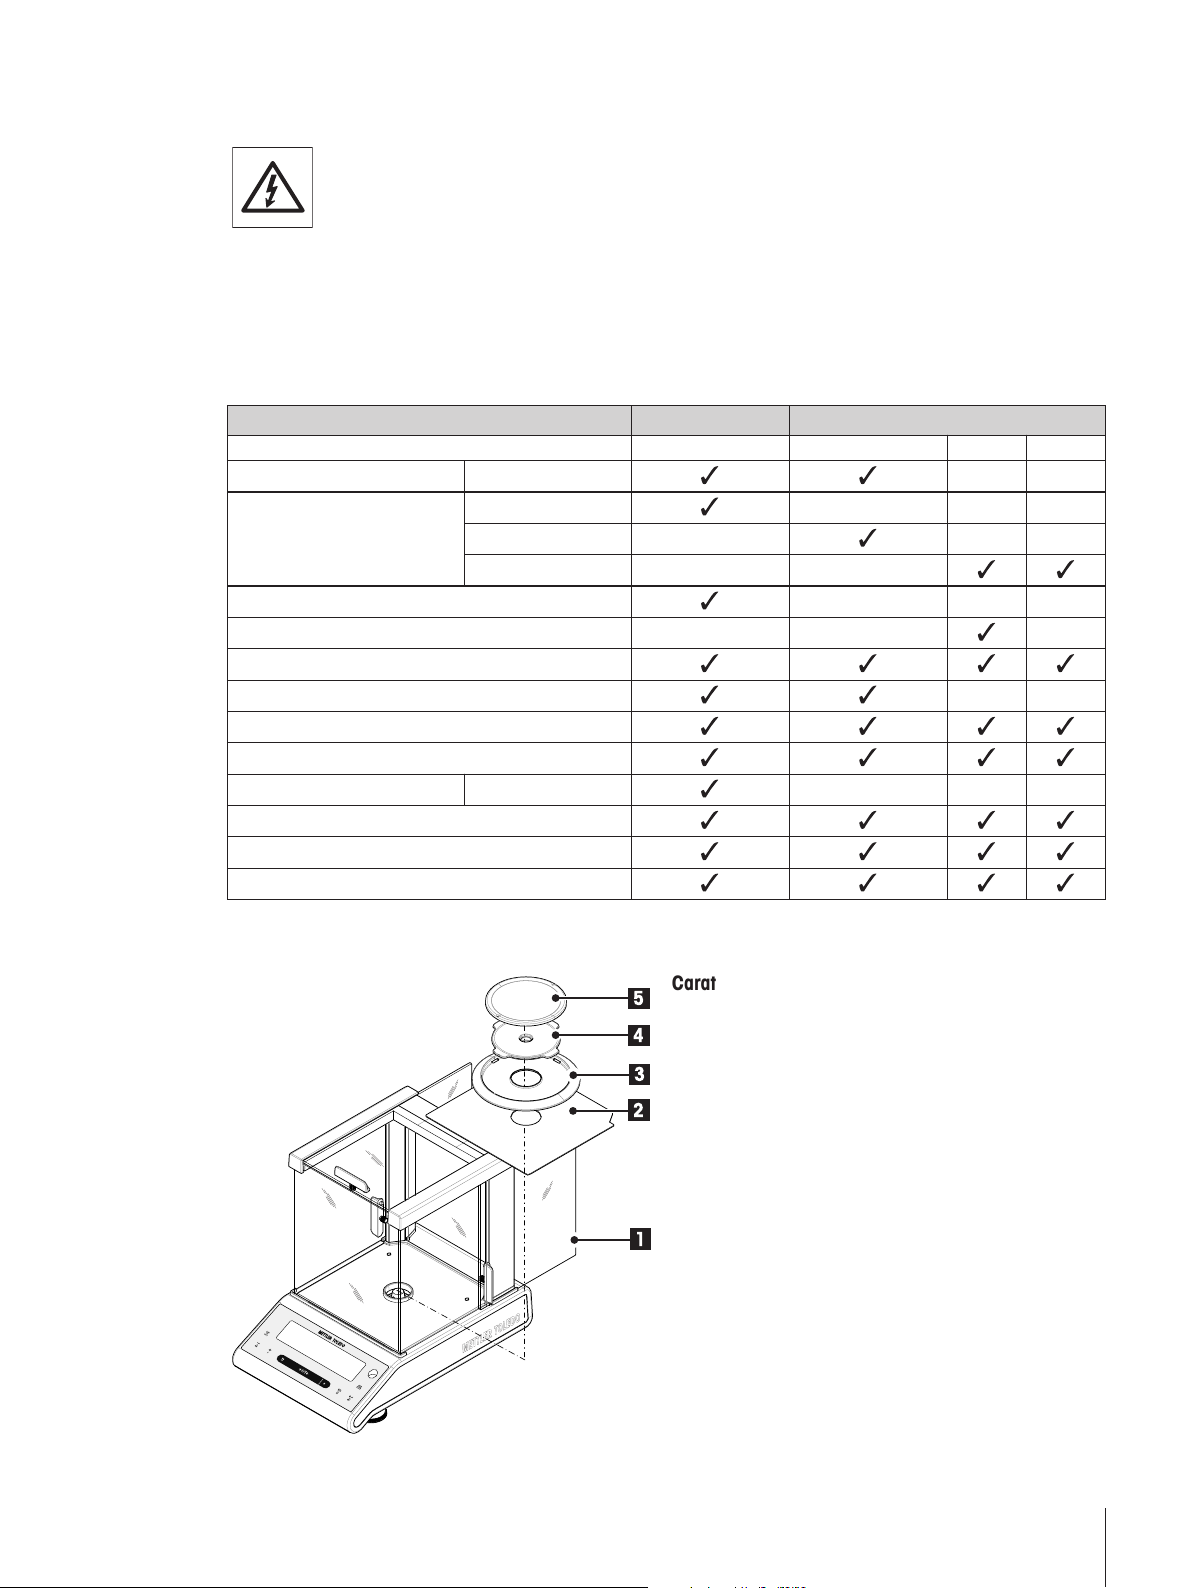
4.2Installing the Components
Carat balances with readability of 0.001 ct
– Place the following components on the balance in
the specified order:
Note: Push the side glass door (1) back as far as will
go.
●
Bottom plate (2)
●
Draft shield element (3)
●
Pan support (4)
●
Weighing pan (5)
13Setting up the Balance
Page 14
C
2
3
4
1
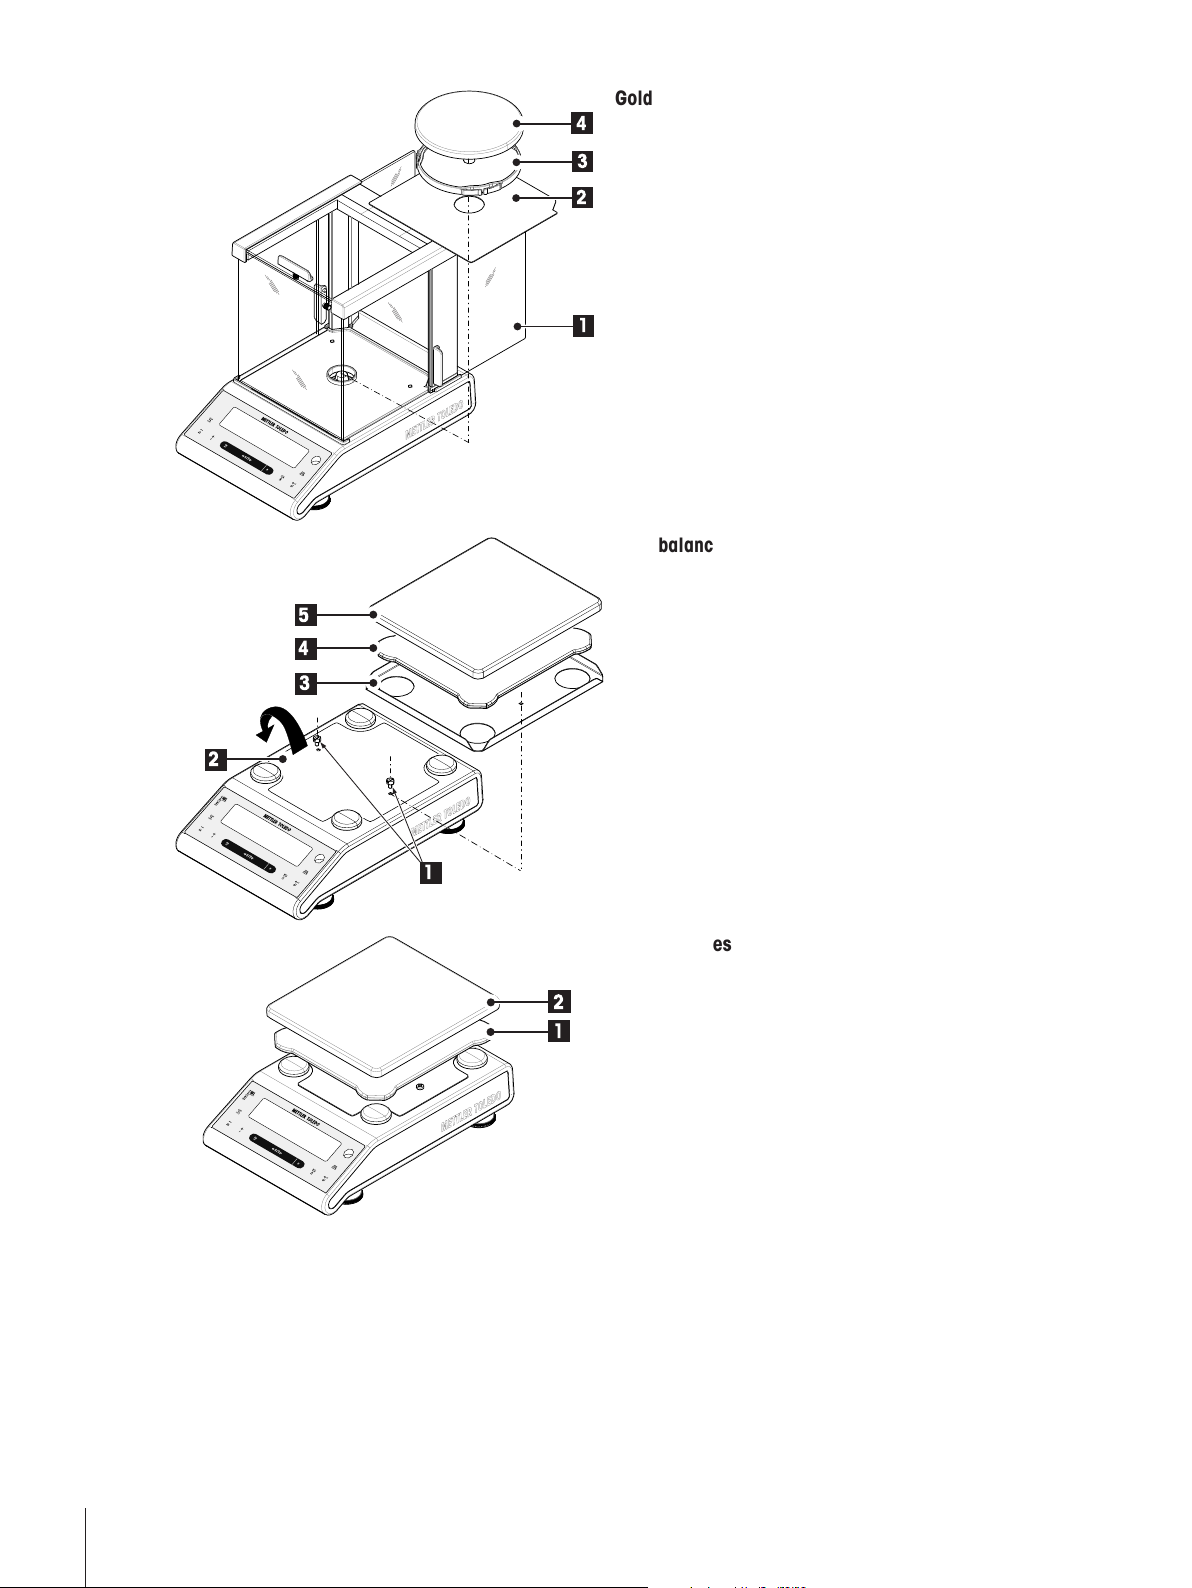
Gold balances with readability of 0.001 g
C
5
4
3
2
1
C
2
1
– Place the following components on the balance in
the specified order:
Note: Push the side glass door (1) back as far as will
go.
●
Bottom plate (2)
●
Pan support (3) if present
●
Weighing pan (4)
Gold balances with readability of 0.01g
1 Remove the two screws (1)
2 Remove the plate (2) and retain it.
3 Place draft shield element (3) and fix it with the
two screws.
4 Place pan support (4) with weighing pan (5).
Gold balances with readability of 0.1 g
– Place the following components on the balance in
the specified order:
●
Pan support (1)
●
Weighing pan (2)
4.3Selecting the Location and Leveling the Balance
Your balance is a precision instrument and will thank you for an optimum location with high accuracy and
dependability.
14 Setting up the Balance
Page 15
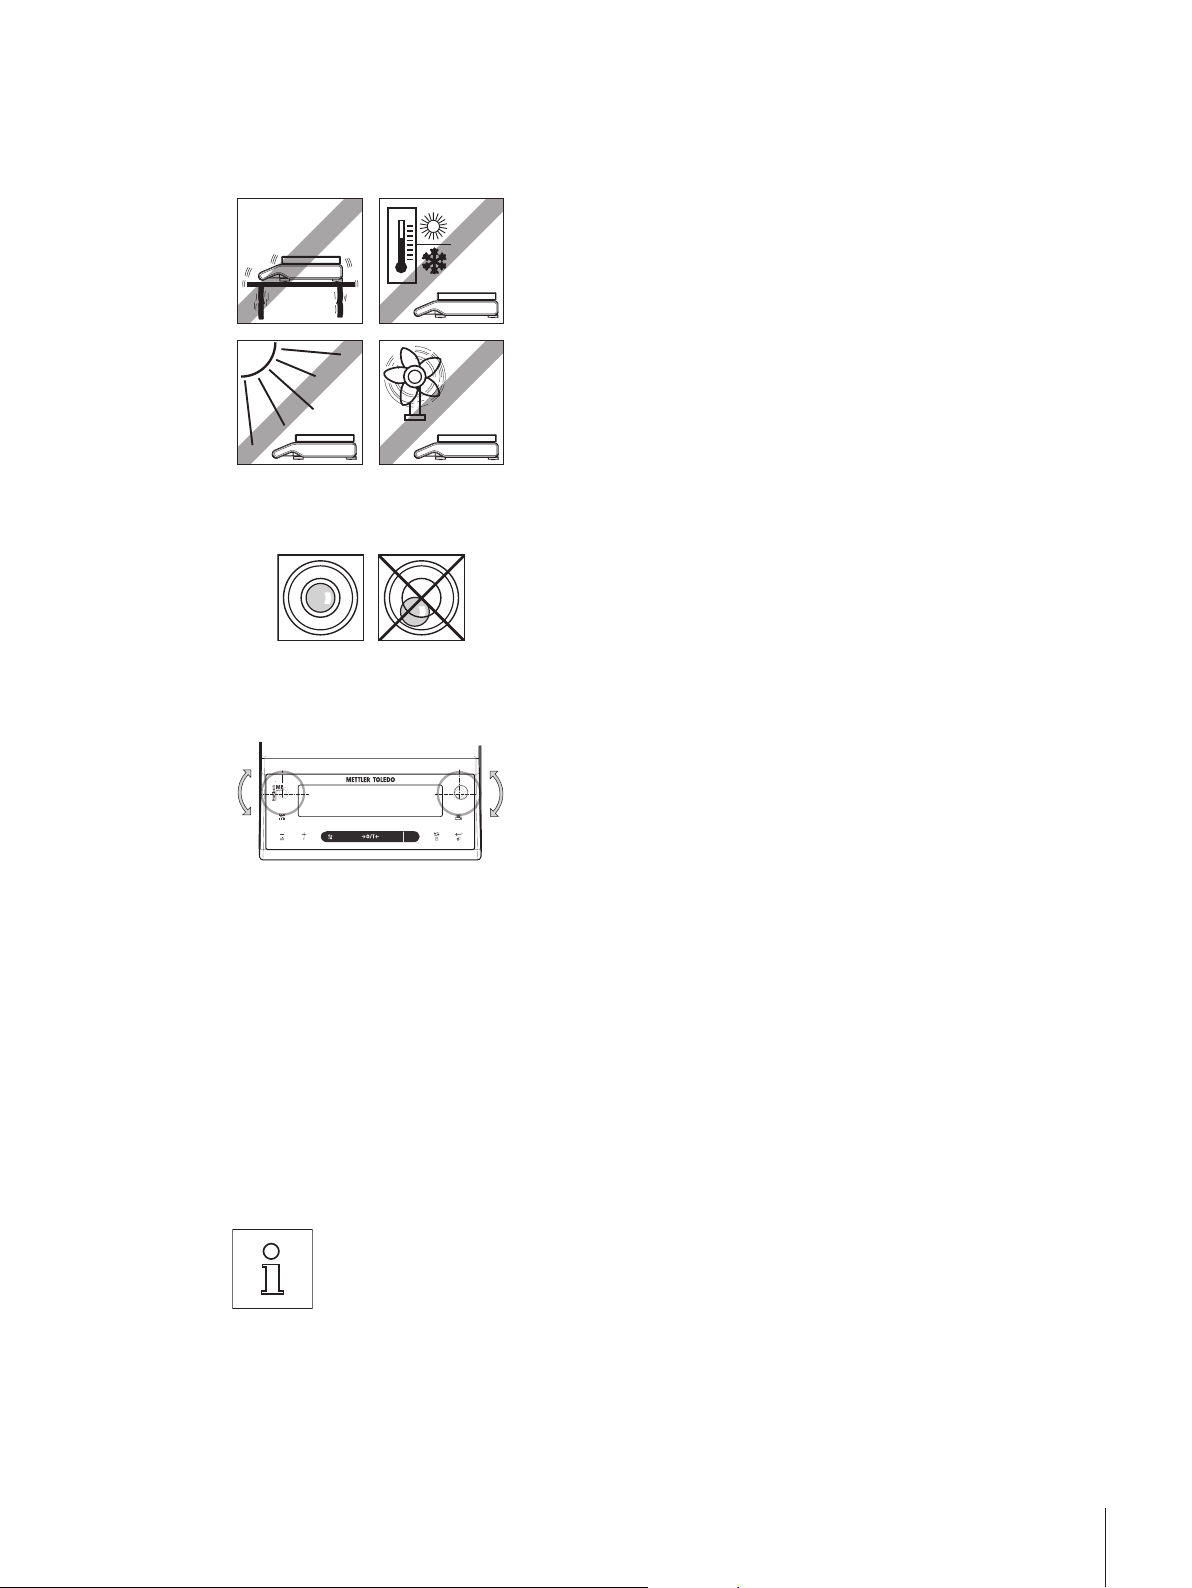
4.3.1Selecting the Location
C
Select a stable, vibration-free position that is as horizontal as possible. The surface must be able to safely carry
the weight of a fully loaded balance.
Observe ambient conditions (see Technical Data).
Avoid the following:
●
Vibrations
●
Excessive temperature fluctuations
●
Direct sunlight
●
Powerful drafts (e.g. from fans or air conditioners)
4.3.2Leveling the Balance
The balances have a level indicator and two or four adjustable leveling
feet to compensate for slight irregularities in the surface of the weighing
bench. The balance is exactly horizontal when the air bubble is in the
middle of the level glass.
Note: The balance should be leveled and adjusted each time it is
moved to a new location.
4.4Power Supply
Allow your balance to warm up for 30 minutes (0.1 mg models 60 minutes) to enable it
to adapt itself to the ambient conditions.
Balances with 2 leveling feet
– Adjust the two front leveling feet appropriately until the air bubble
comes to rest exactly in the middle of the glass:
Air bubble at "12 o'clock" turn both feet clockwise
Air bubble at "3 o'clock" turn left foot clockwise, right
foot counterclockwise
Air bubble at "6 o'clock" turn both feet counterclockwise
Air bubble at "9 o'clock" turn left foot counterclockwise,
right foot clockwise
Balances with 4 leveling feet
1 First turn the two rear leveling feet all the way in.
2 Adjust the two front leveling feet as previously described.
3 Turn the rear leveling feet down onto the surface for extra stabiliz
ing safety, so the balance cannot tilt over under eccentric loads.
15Setting up the Balance
Page 16
4.4.1AC Operation
Your balance is supplied with an country-specific AC adapter or with a country-specific power cable. The power
supply is suitable for all line voltages in the range: 100 - 240 VAC, 50/60 Hz (for exact specifications, see
section "technical data").
First, check the local line voltage is in the range 100 - 240 VAC, 50/60 Hz and whether the
power plug fits your local power supply connection. If this is not the case, on no account
connect the balance or the AC adapter to the power supply, but contact the responsible
METTLER TOLEDO dealer.
Important:
●
Before operating, check all cables for damage.
●
Guide the cables so that they cannot become damaged or interfere with the weighing
process!
●
Take care that the AC adapter cannot come into contact with liquids!
●
The power plug must be always accessible.
Connect the AC adapter to the connection socket on the back of your
balance (see figure) and to the power line.
4.4.2Battery Operation
The Balance can also operates with batteries. Under normal operation conditions, the balance works indepen
dently of the AC power line for about 8 to 15 hours (using alkaline batteries). Immediately after the AC power
supply is interrupted e.g. by withdrawing the power plug or if there is a power failure, the balance switches
automatically to battery operation. Once the AC power supply is restored, the balance reverts automatically to
AC operation.
Note: It is also possible to use rechargeable batteries. Charging batteries inside the balance is not possible.
battery fully
2/3 full
1/3 full
battery empty
Inserting / Replacing Batteries
The balance must be disconnected from the power supply when carrying out all setup and
mounting work.
When the balance is operating on its batteries, the battery symbol in
the display lights up. The number of segments that are lit is an indica
tor of battery condition (3 = fully charged, 0 = discharged). When the
batteries are almost completely discharged, the battery symbol flashes.
16 Setting up the Balance
Page 17
●
Make sure that the balance is off before removing or inserting batteries.
●
Do not place the balance on the pan support location bolt.
●
Battery Warnings: Read and follow all warnings and instructions supplied by the battery
manufacturer.
●
Do not mix different types or brands of batteries. Performance of batteries can vary very
greatly depending on the manufacturer.
●
If you don't operate the balance with batteries for an extended period, it is recommended
to remove the batteries from the balance.
●
Batteries must be disposed of in an environmentally responsible manner. No attempt
must be made to incinerate or disassemble item.
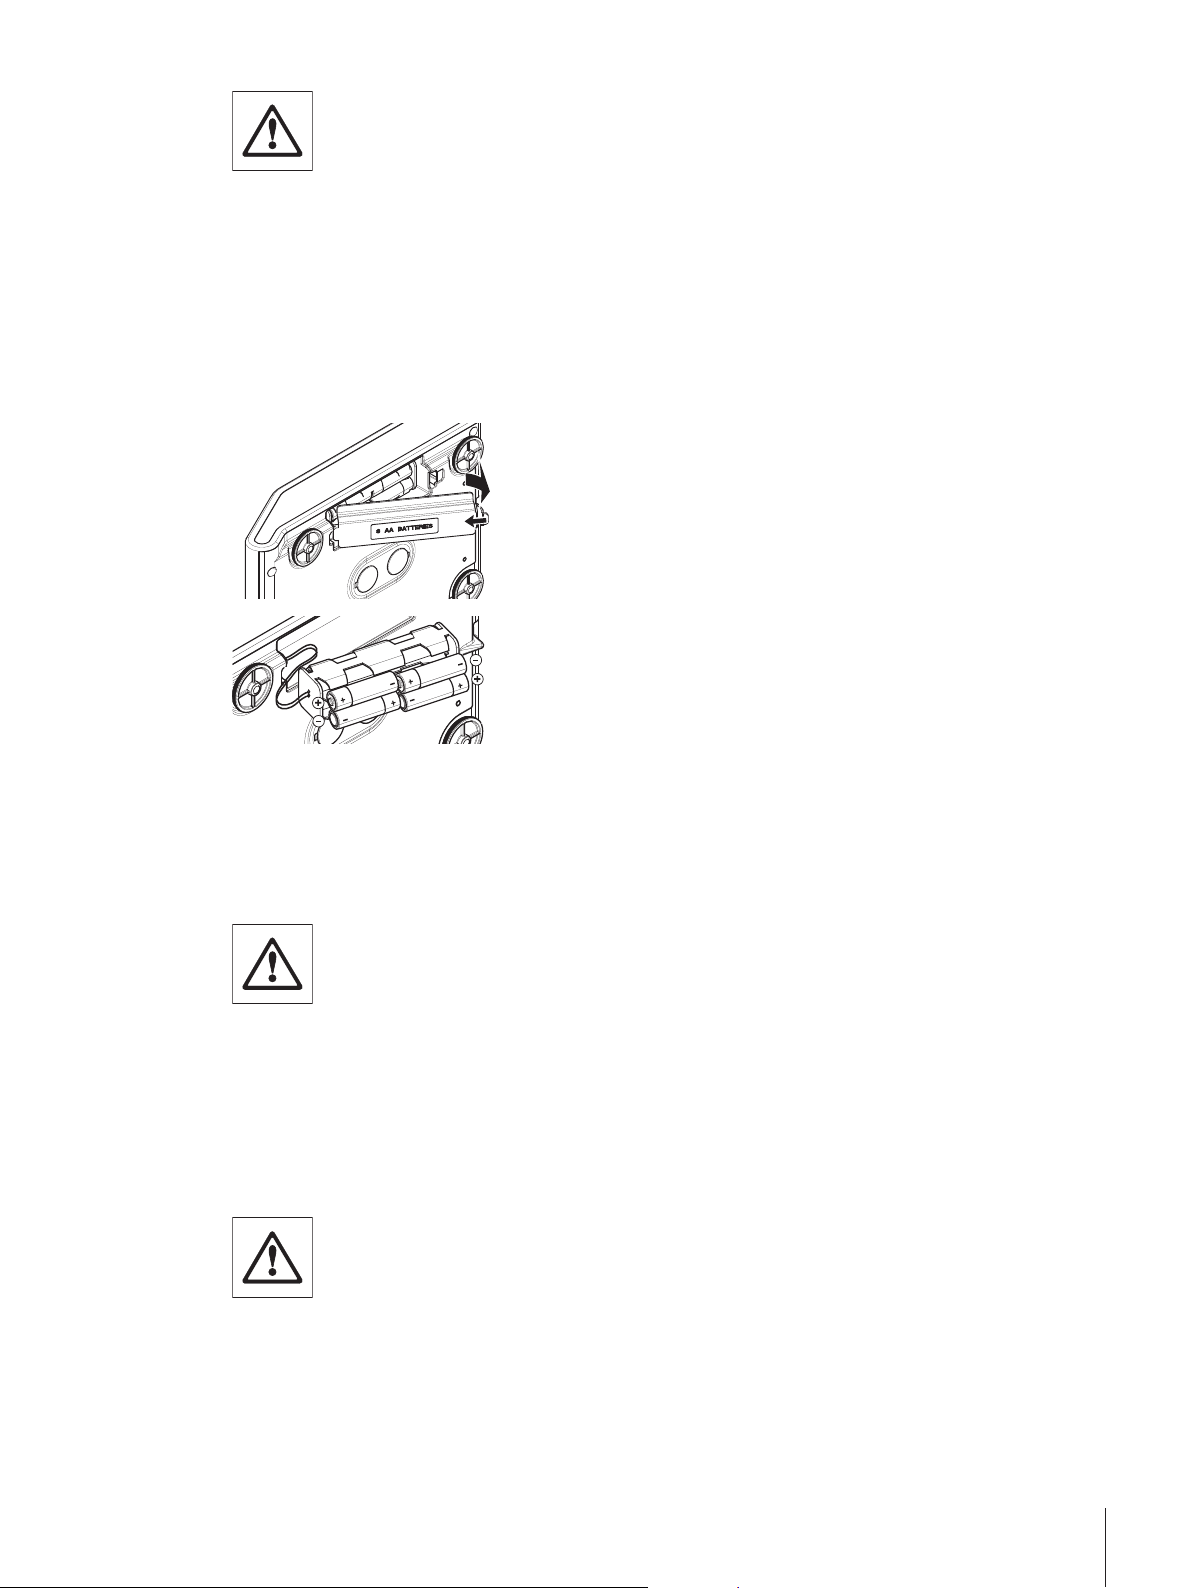
Your balance uses 8 standard AA (LR6) batteries (alkaline batteries preferred)
1 Remove weighing pan, pan support and draft shield element or
draft shield "100 mm" if present.
2 Turn the balance carefully on its side.
3 Open and remove the battery-chamber cover.
4 Insert / replace the batteries with the correct polarity as shown in
the battery holder.
5 Insert and close the battery-chamber cover.
6 Turn the balance carefully to its normal position.
7 Reinstall all components in the reverse order.
4.5Transporting the Balance
Switch off the balance and remove the power cable and any interface cable from the balance. Refer to the notes
in Section "Selecting the location" regarding the choice of an optimal location.
Transporting Over Short Distances
For balances with a draft shield: Observe the following instructions to transport your bal
ance over a short distance to a new location: Never lift the balance using the glass draft
shield. The draft shield is not sufficiently fastened to the balance.
Transporting Over Long Distances
If you would like to transport or send your balance over long distances, use the complete original packaging.
4.6Weighing Below the Balance
The balances are equipped with a hanger for carrying out weighings below the work surface (weighing below
the balance).
Attention:
●
Do not place the balance on the pan support location bolt.
17Setting up the Balance
Page 18
A
4.7Adjustment (Calibration)
------
ADJ.DONE
0.00
g
ADJ.INT
To obtain accurate weighing results,
●
the balance must be adjusted to match the gravitational acceleration at its location.
Adjusting is necessary:
•
before the balance is used for the first time.
•
at regular intervals during weighing service.
•
after a change of location.
●
the balance must be connected to the power supply for approximately,
•
30 minutes for balances with redability of 0.01 ct / 0.001 g to 0.1 g
•
60 minutes for balances with redability of 0.0001 ct / 0.01 mg to 0.001 ct / 0.1 mg
1 Switch off the balance and remove the power cable and any
interface cable from the balance.
2 Remove weighing pan, pan support and draft shield element
or "Easy draft shield" if present.
3 Turn the balance carefully on its side.
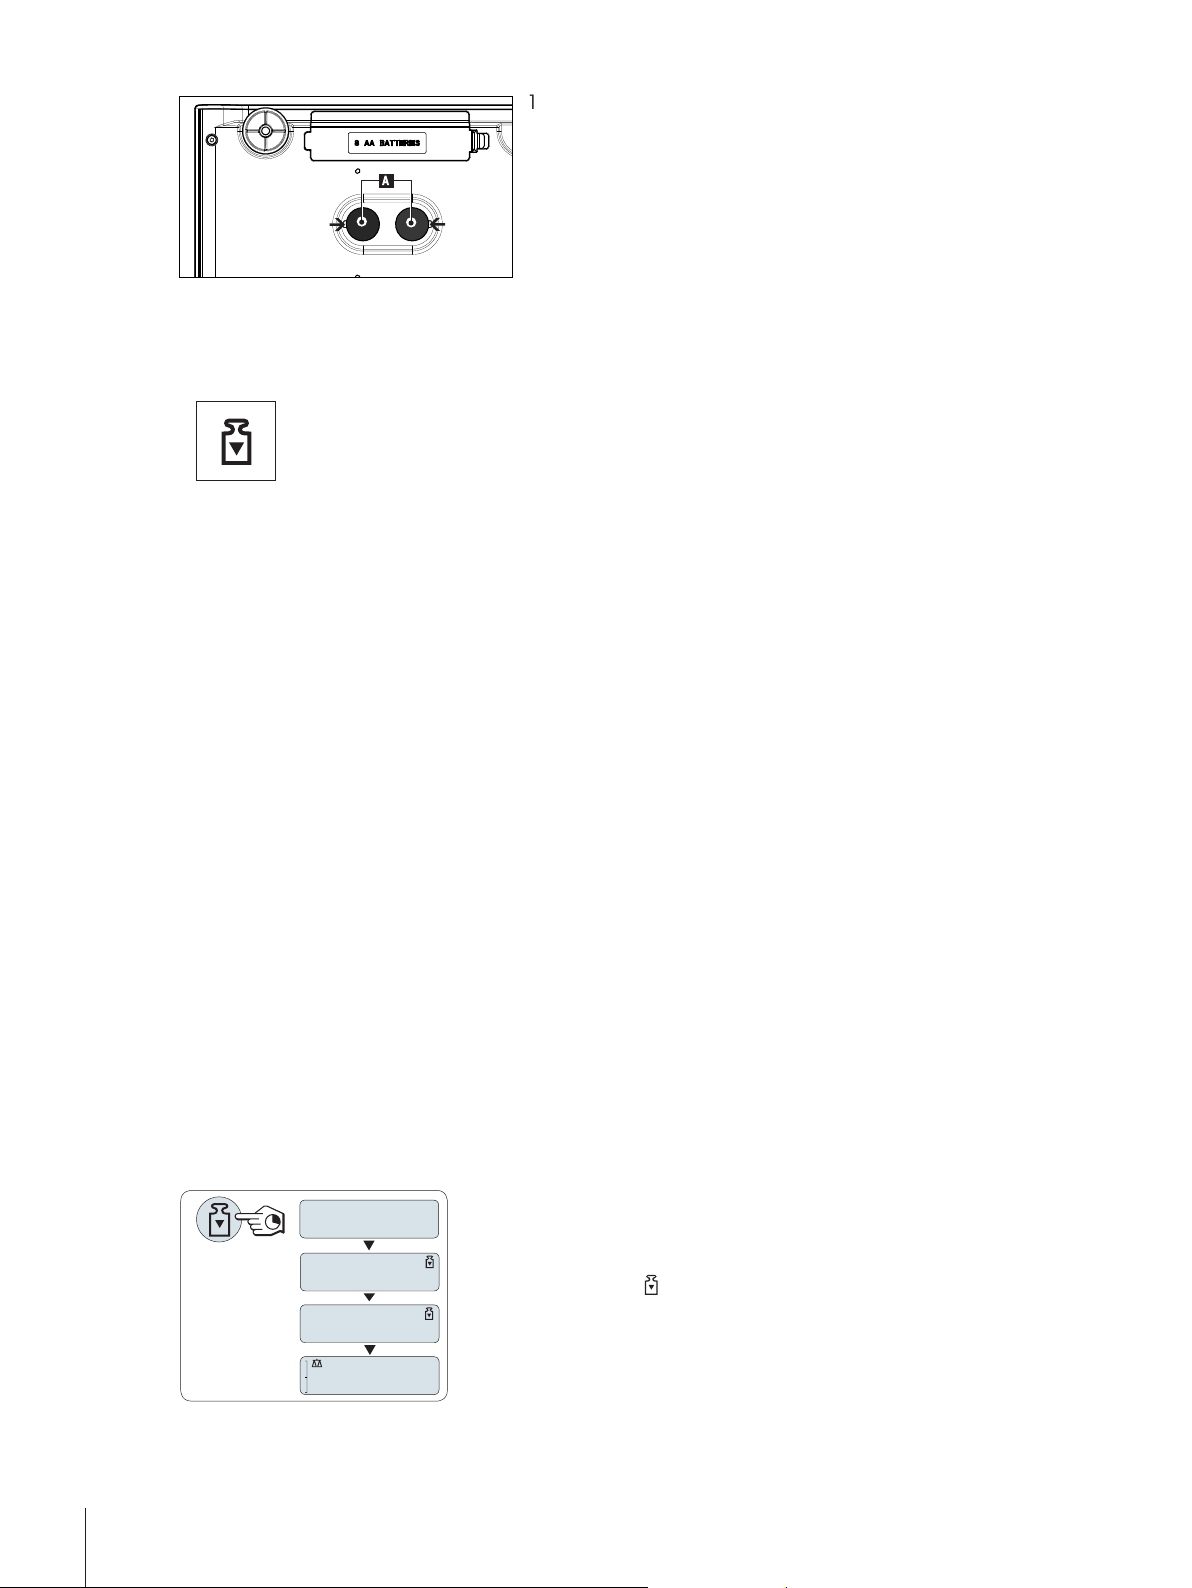
4 Remove one of the caps (A) depending on the models.
5 Then turn the balance to its normal position and simply rein
stall all components in the reverse order.
in order to reach operating temperature before adjusting.
4.7.1Fully Automatic Adjustment FACT
Note: On models with FACT only.
The factory setting is fully automatic adjustment FACT (Fully Automatic Calibration Technology) with the inter
nal weight (see also section "The Menu"). In this setting, you have no need worry about adjusting your bal
ance.
The balance adjusts itself automatically:
●
after the warm-up phase on connection to the power supply.
●
when a change in the ambient conditions, e.g. the temperature, could lead to a noticeable deviation in the
measurement.
●
on a predefined time. (see menu topic "FACT")
●
time interval. (with OIML accuracy class II approved models)
4.7.2Adjustment with Internal Weight
Note: On models with internal weight only (see technical data).
Requirement: To carry out this operation, in the menu topic "CAL"
(Adjustment) of advanced menu "ADJ.INT" must be selected.
1 Unload weighing pan
2 Press and hold « » to execute "Internal Adjustment".
The balance adjusts itself automatically. The adjusting is finished when
the message "ADJ.DONE" appears briefly on the display. The balance
returns to the last active application and is ready for operation.
18 Setting up the Balance
Page 19

Sample adjustment printout using internal weight:
- Internal Adjustment --
21.Jan 2010 12:56
METTLER TOLEDO
Balance Type JP4002G
SNR 1234567890
Temperature 22.5 °C
Diff 3 ppm
Adjustment done
-----------------------
------
2000.00
g
ADJ.DONE
0.00
g
C
0.00
g
------
C
ADJ.EXT
4.7.3Adjustment with External Weight
Note: Because of certification legislation, the approved models cannot be adjusted with an external weight *
(depend on selected countries' certification legislation).
* except OIML accuracy class I approved models.
Requirement: To carry out this operation, in the menu topic "CAL"
(Adjustment) " of advanced menu ADJ.EXT" must be selected.
1 Have required adjustment weight ready.
2 Unload weighing pan.
3 Press and hold « » to execute "External Adjustment". The required
(predefined) adjustment weight value flashes in the display.
4 Place adjustment weight in center of pan. The balance adjusts itself
automatically.
5 When "0.00 g" flashes, remove adjustment weight.
The adjusting is finished when the message "ADJ.DONE" appears
briefly on the display. The balance returns to the last active application
and is ready for operation.
19Setting up the Balance
Page 20

Sample adjustment printout using external weight:
- External Adjustment --
21.Jan 2010 12:56
METTLER TOLEDO
Balance Type JP4002G
SNR 1234567890
Temperature 22.5 °C
Nominal 2000.00 g
Actual 1999.99 g
Diff 5 ppm
Adjustment done
Signature
.......................
-----------------------
20 Setting up the Balance
Page 21
5Weighing Made Simple
On
Off
8888888
XXXXXXX
0.00
g
SHUTOFF
On
Off
This section shows you how to perform simple weighings and how you can accelerate the
weighing process.
5.1Switching the Balance On and Off
This section shows you how to perform simple weighings and how you can accelerate the weighing process.
Switching On
1 Remove any load from weighing pan.
2 Press «On».
The balance performs a display test (all segments in the display light
up briefly), "WELCOME", Software version, Maximum load and Read
ability appears briefly. (Startup "FULL" mode only)
The balance is ready for weighing or for operation with the last active
application.
Switching Off
– Press and hold the «Off» key until "SHUTOFF" appears on the dis
play. Release the key.
When Quickstart is selected (Advanced menu, topic "STARTUP" > "QUICK"): Once your bal
ance has been switched off, it is in standby mode. In this case your balance needs no warmup time in the standby mode and is immediately ready for weighing. If you wish to perform a
weighing, you now only need to place the sample on the weighing pan and the balance
immediately displays the result. There is no need to switch it on with the «On/Off» key.
●
If your balance has been switched off after a preselected time, the display is dimly lit and
shows date, time, maximum load and readability.
●
If your balance has been switched off manually, the display is off.
Note:
●
Quickstart is not possible with approved balances (only available in selected countries).
●
Standby mode is available on line powered balances only.
21Weighing Made Simple
Page 22

5.2Performing a Simple Weighing
1250.38
g
0.00
g
1182.03
g
C
#
0.00
g
121.01
g
#
0.01
g
0.00
g
C
C
121.01
g
0.00
g
0.00
g
95.97
g
121
.
01
g
-
Net
Net
Net
#
C
C
0.78
oz
22.00
g
*
22.00
g
M
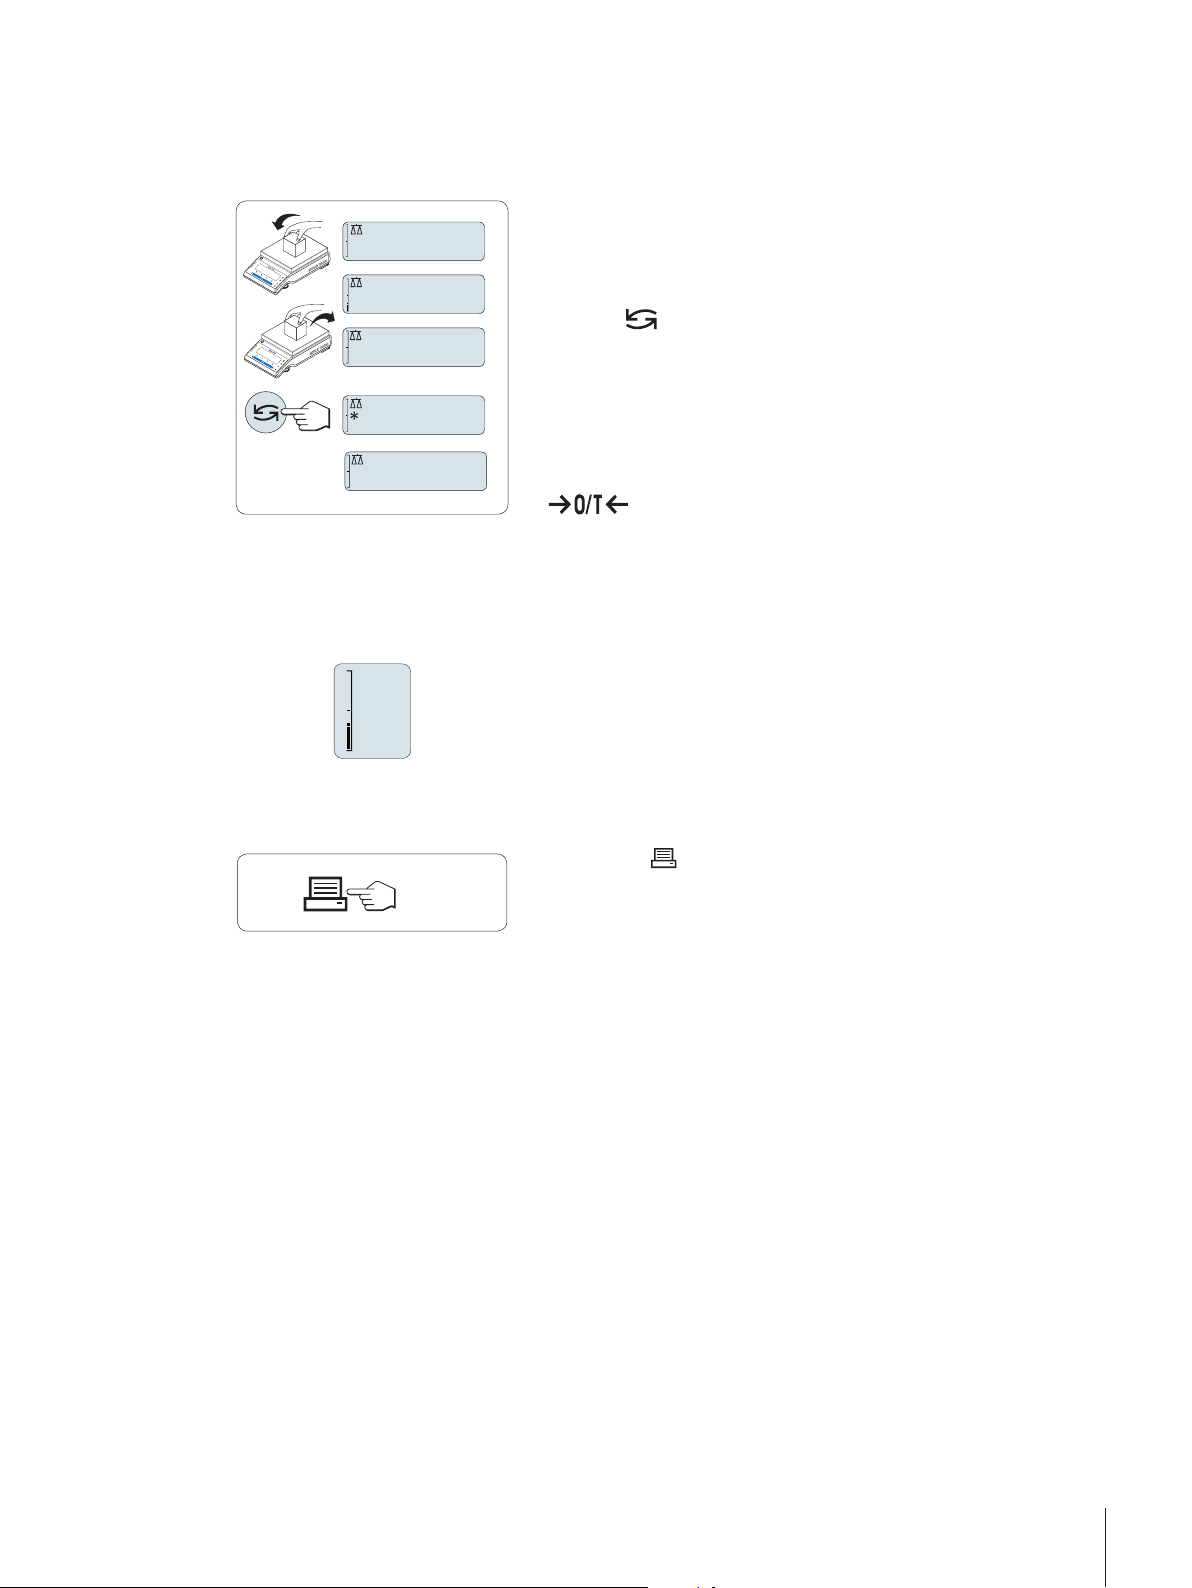
1 Press « » to zero the balance.
Note: If your balance is not in the weighing mode, first press and
hold the « » key until “WEIGH“ appears in the display. Release
the key. Your balance is in the weighing mode.
2 Place weighing sample on the weighing pan.
3 Wait until the instability detector " " disappears and the stability
beep sounds.
4 Read the result.
5.3Zero Setting / Taring
Zero setting
1 Unload the balance.
2 Press « » to set the balance to zero. All weight values are
measured in relation to this zero point (see menu topic
"ZERO.RNG").
Note: Use the « » zeroing key before you start with a weigh
ing.
5.4Switching Weight Units
Taring
If you are working with a weighing container, first set the balance to
zero.
1 Place empty container on the balance. The weight is displayed.
2 Press « » to tare the balance.
"0.00 g" and "Net" appears in the display. "Net" indicates that all
weight values displayed are net values.
Note:
●
If the container is removed from the balance, the tare weight will be
shown as a negative value.
●
The tare weight remains stored until the « » key is pressed
again or the balance is switched off.
The « » key can be used at any time to toggle between weight unit
"UNIT 1","RECALL" value (if selected), weight unit "UNIT 2" (if different
from weight unit 2) and the application unit (if any).
22 Weighing Made Simple
Page 23
5.5Recall / Recall Weight Value
121.01
g
0.00
g
0.00
g
M
121.01
g
0.00
g
C
C
0%
100%
Recall stores stable weights with an absolute display value bigger than 10d.
Requirement: The function "RECALL" must be activated in the menu.
1 Load weighing sample. The display shows weight value and stores
stable value.
2 Remove weighing sample. When the weight is removed the Display
shows zero.
3 Press « ». The display shows last stored stable weight value for
5 seconds together with asterisk (*) and Memory (M) symbols.
After 5 seconds the display goes back to zero. This can be repeat
ed unlimited times.
Delete last weight value
As soon a new stable weight value is displayed, the old recall value
becomes replaced by the new weight value. When pressing
« », the recall value is set to 0.
Note: If the power is switched off, the recall value is lost. The recall
value can not be printed.
5.6Weighing with the Weighing-in Aid
The weighing-in aid is a dynamic graphic indicator which shows the
used amount of the total weighing range. You can thus recognize at a
glance whether the load on the balance approaches the maximum
load.
5.7Print / Transmit Data
Pressing the « » key transmits the weighing results over the interface
e.g. to a printer or a PC.
23Weighing Made Simple
Page 24
6The Menu
6.1What is in the Menu ?
The Menu allows you to match your balance to your specific weighing needs. In the menu
you can change the settings of your balance and activate functions. The main menu has 4
different menus and these contains 34 different topics, each of which allows you various
selection possibilities. For Menu "PROTECT" see chapter "Description of menu topics" section
"Main menu".
Note: See Quick Guide for the graphical overview of the menu (Menu Map) with all setting possibilities.
Menu "BASIC"
Topic Description
DATE Setting the current date.
TIME Setting the current time.
UNIT 1 Specification of the 1st weight unit in which the balance should show the result.
UNIT 2 Specification of the 2nd weight unit in which the balance should show the result.
KEY.BEEP Setting the key beep level.
STB.BEEP Setting the stability beep level.
RESET Call up of the factory settings.
Menu "ADVANCE."
Topic Description
ENVIRON. Matching the balance to the ambient conditions.
CAL Settings for the type of adjustment (calibration).
FACT Settings for fully automatic balance adjustment based on a selected time.
FACT PRT Switching the automatic FACT printout on or off.
DATE.FRM Setting the date format.
TIME.FRM Preselection of the time format.
RECALL Switching the application "Recall" for storing stable weights on or off.
STARTUP Setting the mode which the balance powers up ("FULL" or "QUICK").
SHUTOFF Setting the time after which the balance should be switched off automatically.
B.LIGHT Setting the time after which the display backlight should be switched off automatically.
A.ZERO Switching the automatic zero correction (Autozero) on or off.
ZERO.RNG Setting the zero limit of the zero/tare key.
ASSIGN:F Selection of assigned F key application and entering their parameter settings.
DIAGNOS. Starting a diagnostic application.
SRV.ICON Switching the service reminder (service icon) on or off.
SRV.D.RST Reset service date and hours (service reminder)
24 The Menu
Menu "INT.FACE"
Topic Description
RS232 Matching the serial interface RS232C to a peripheral unit.
HEADER Setting the header for printout of individual values.
SINGLE Setting the information for printout of individual values.
SIGN.L Setting the footer for printout of individual values.
LN.FEED Setting line feed for printout of individual values.
ZERO.PRT Setting the auto print function for printing zero.
COM.SET Setting the data communication format of the serial interface RS232C.
BAUD Setting the transfer speed of the serial interface RS232C.
BIT.PAR. Setting the character format (Bit/Parity) of the serial interface RS232C.
STOPBIT Setting the character format (stop bit) of the serial interface RS232C.
HD.SHK Setting the transfer protocol (Handshake) of the serial interface RS232C.
RS E.O.L. Setting the end of line format of the serial interface RS232C.
Page 25
Topic Description
406.2
g
ADVANCE
BASIC
TIME
DATE
ENVIRON.
STABLE
ENVIRON.
01.
2
500
01.
6
500
01.6500
RS.CHAR Setting the char set of the serial interface RS232C.
INTERVL. Selection of the time interval for the simulated print key press.
6.2Menu Operation
In this Section you will learn how to work with the menu.
Select Menu
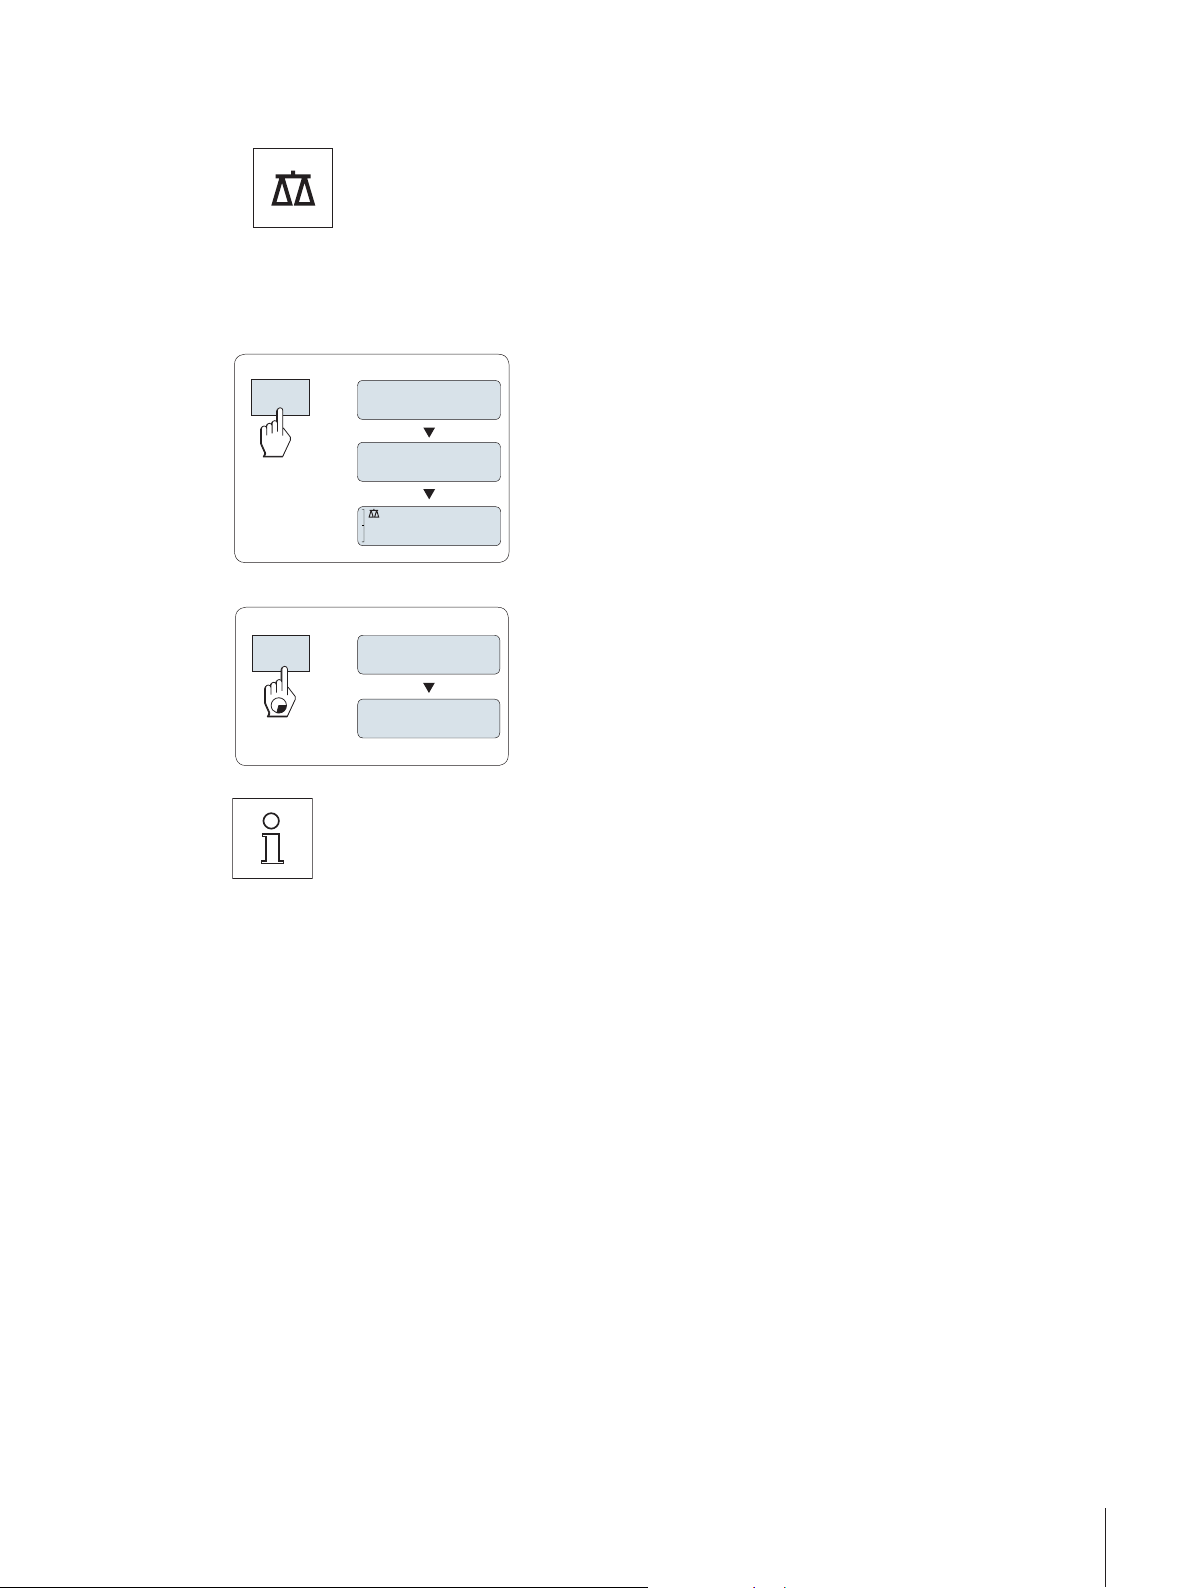
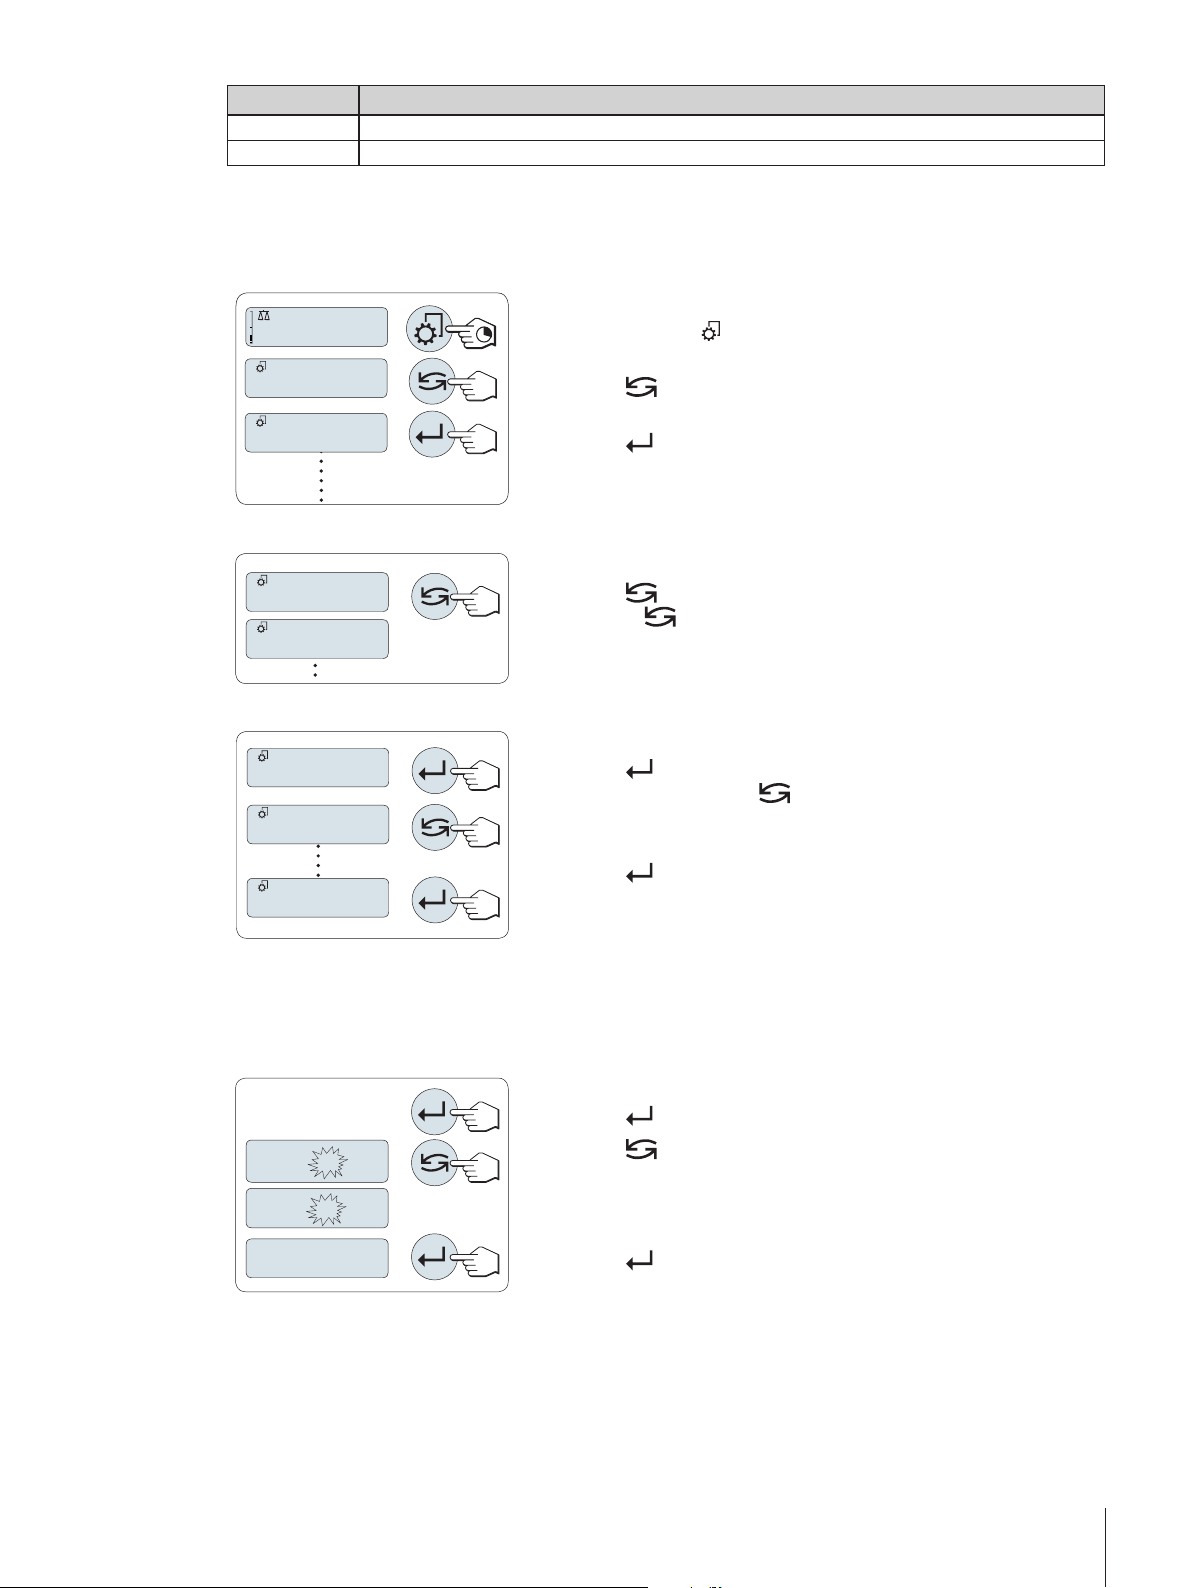
1 Press and hold « » to activate main menu. The first menu "BASIC"
is displayed (except menu protection is active).
2 Press « » repeatedly to change menu (Scrolling down/up «+» /
«–» keys).
3 Press « » to confirm the selection.
Note: The menu selection "BASIC", "ADVANCE." or "INT.FACE" can not
be saved. The selection "PROTECT" must be saved.
Select Menu Topic
– Press « ». The next menu topic appears in the display. Each
time the « » or the «+» key is pressed, the balance switches to
the next menu topic; the «–» key to the previous menu topic.
Change Settings in a Selected Menu Topic
1 Press « ».The display shows the current setting in the selected
menu topic. Each time « » or «+» is pressed, the balance
switches to the next selection; press «–» to the previous selection.
After the last selection, the first is shown again.
2 Press « », the selected setting is accepted but not yet executed.
The settings are executed only after "SAVE:YES" has been con
firmed.
Change Settings in a Submenu Selection
The same procedure as for menu topics.
Input Principle of Numerical Values
1 Press « » for input of numerical values.
2 Press « » to select a digit or a value (depending on the applica
tion). The selected digit or the selected value is blinking.
3 For changing digits or values, press «+» to scroll up or «–» to
scroll down.
4 Press « » to confirm the input.
25The Menu
Page 26
SAVE:YES
SAVE:NO
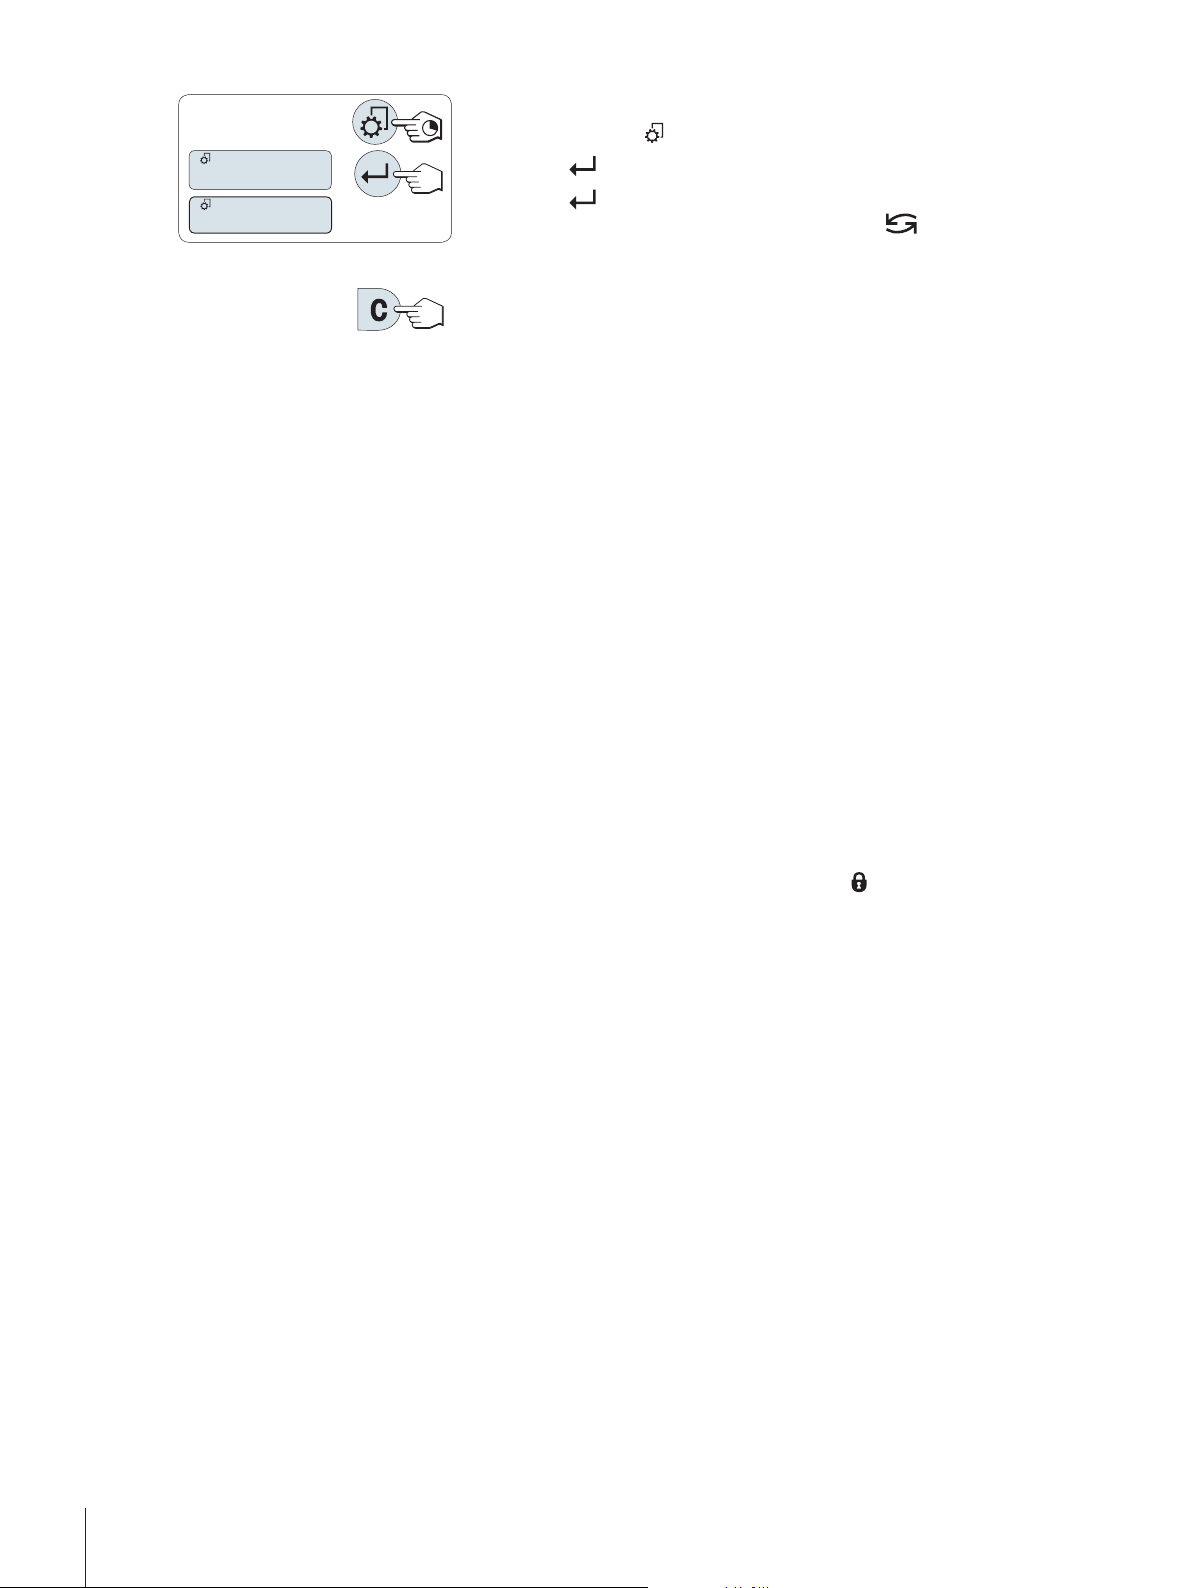
Saving Settings and Closing the Menu
1 Press and hold « » to leave menu topic.
2 Press « » to execute "SAVE:YES". Changes are saved.
3 Press « » to execute "SAVE:NO". Changes are not saved. To tog
gle between "SAVE:YES" and "SAVE:NO" press « ».
Cancel
– For leaving menu topic or menu selection without saving press «C»
(one step back in the menu).
Note: If no entry is made within 30 seconds, the balance reverts to last active application mode. Changes are
not saved. If changes are made, the balance asks "SAVE:NO".
6.3Description of Menu Topics
In this Section you will find information regarding the individual menu topics and the available selections.
6.3.1Main Menu
Selecting the menu.
"BASIC" The small "BASIC" menu for simple weighing is displayed.
"ADVANCE." The extended "ADVANCE." menu for further weighing settings is
displayed.
"INT.FACE" The menu "INT.FACE" for all interface parameter settings for
peripheral devices e.g. printer is displayed.
"PROTECT" Menu protection. Protection of balance configurations against
unmeant manipulation.
"OFF" Menu protection is off. (Factory setting)
"ON" Menu protection is on. The menu BASIC, ADVANCE. and INT.FACE
are not displayed. This is indicated with " " in the display.
Note:
●
The menu selection "BASIC", "ADVANCE." or "INT.FACE" can not be saved.
●
To activate "PROTECT" "ON" or "OFF", this selection must be saved.
26 The Menu
6.3.2Basic Menu
"DATE" – Date
Setting the current date according to date format.
Note: A reset of the balance will not change this setting.
"TIME" – Time
Setting the current time according to time format
"+1H" Set the current time forwards by 1 hour (to adjust summer or
winter time). (Factory setting)
"-1H" Set the current time backwards by 1 hour (to adjust summer or
winter time).
"SET.TIME" Enter the current time.
Note: A reset of the balance will not change this setting.
Page 27

"UNIT 1" – Weight Unit 1
Depending on requirements, the balance can operate with the following units (depending on the model)
●
Only those weight units allowed by the appropriate national legislation are selectable.
●
With approved balances, this menu topic has a fixed setting and cannot be changed.
●
Conversion table for weight units see chapter Appendix.
Units:
1)
g
3)
kg
4)
mg
2)
ct
lb Pound tls
Gram dwt Pennyweight
Kilogram mom Momme
Milligram msg Mesghal
Carat tlh Tael Hong Kong
5)
Tael Singapore
oz Ounce (avdp) tlt Tael Taiwan
ozt Ounce (troy) tola Tola
GN Grain baht Baht
1)
factory setting for gold balances
2)
factory setting for carat balances
3)
not with 0.1 mg and 1 mg balances
4)
with 0.1 mg and 1 mg balances
5)
the Malaysian tael has the same value
"UNIT 2" – Weight Unit 2
If it is required to show the weighing results in weighing mode in an additional unit, the desired second weight
unit can be selected in this menu topic (depending on the model). Units see "UNIT 1".
Note: Only those weight units allowed by the appropriate national legislation are selectable.
"KEY.BEEP" – Key Beep
This menu topic allows you to select the volume of the key beep. The according key beep is emitted during the
setting.
"MED" Medium level (Factory setting)
"HIGH" High level
"OFF" Beep switched off
"LOW" Low level
"STB.BEEP" – Stability Beep
If the unstable symbol disappears, the stability beep becomes active. This menu topic allows you to preselect
the volume of the stability beep.
"LOW" Low level (Factory setting)
"MED" Medium level
"HIGH" High level
"OFF" Beep switched off
"RESET" – Reset Balance Settings
This menu topic allows you to cal-up the factory settings.
To toggle between "YES?" and "NO?" press « » (or «+» or «–»).
Note: A reset of the balance will not change the "DATE" and "TIME" settings.
27The Menu
Page 28

6.3.3Advanced Menu
"ENVIRON." – Environment Settings
This setting can be used to match your balance to the ambient conditions.
"STD." Setting for an average working environment subject to moderate
variations in the ambient conditions. (Factory setting)
"UNSTAB." Setting for a working environment where the conditions are con
tinuously changing.
"STABLE" Setting for a working environment which is practically free from
drafts and vibrations.
"CAL" – Adjustment (calibration)
In this menu topic you can preselect the function of the « » key. Your balance can be adjusted with internal or
external weights by pressing the « » key. If you have attached a printer to your balance, the data of the adjust
ment (calibration) are printed out.
"ADJ.OFF" The adjustment is switched off. The « » key has no function.
"ADJ.INT" Internal adjustment: adjustment is performed at a keystroke with
the built-in weight (depending on the model, see technical data).
"ADJ.EXT" External adjustment: adjustment is performed at a keystroke with
a selectable external weight.
Note:This function is not available for approved balances *
(depend on selected countries' certification legislation). * except
OIML accuracy class I approved models.
"200.00 g" Defining the external adjustment weight: define the weight of
the external adjustment weight (in grams).
Factory setting: depends on the model.
"FACT" – Fully Automatic Adjustment
Fully automatic internal adjustment (calibration) FACT (Fully Automatic Calibration Technology) provides fully
automatic balance adjustment based on temperature criteria and on preselected time. (depending on the mod
el, see technical data)
"TIME" Execute FACT (with selected time).
"12:00" Specify the time for a fully automatic adjustment to take place
every day.
Factory setting: 12:00 (according to time format)
"OFF" FACT is switched off.
"FACT.PRT" – Protocol Trigger for Fact
This setting specifies whether an adjustment report should be printed automatically.
Note: This menu topic does not affect the printing of adjustments with an internal or external adjustment weight.
"OFF" Protocol switched off: if the balance adjusts automatically
(FACT), a protocol is not printed out.
"ON" Protocol switched on: a record is printed out after every automat
ic adjustment of the balance (FACT).
Note: The protocol is printed out without a line for signatures.
"DATE.FRM" – Date Format
This menu topic allows you to preselect the date format.
The following date formats are available:
28 The Menu
Display examples Printing examples
"DD.MM.Y" 01.02.09 01.02.2009
Page 29

"MM/DD/Y" 02/01/ 02/01/2009
"Y-MM-DD" -02-01 2009-02-01
"D.MMM Y" 1.FEB.09 1.FEB 2009
"MMM D Y" FEB.1.09 FEB 1 2009
Factory setting: "DD.MM.Y"
"TIME.FRM" – Time Format
This menu topic allows you to preselect the time format.
The following date formats are available:
Display examples
"24:MM" 15:04
"12:MM" 3:04 PM
"24.MM" 15.04
"12.MM" 3.04 PM
Factory setting: "24:MM"
"RECALL" – Recall
This menu topic allows you to switch the "RECALL" function on or off. When it is switched on recall stores the
last stable weight if the absolute display value was bigger than 10d.
"OFF"
"ON"
Note: The recall value is displayed with an asterisk and cannot be printed.
"STARTUP" – Startup Mode
You can set your balance such that it either immediately starts from the standby mode when you load a weight
or it must be switched on with the «ON/OFF» key after which it then performs a display test.
Note: This topic is not visible with approved balances (only available in selected countries).
"QUICK" "Quickstart": The balance can be started directly from the stand
"FULL" Start with display test: You must switch on the balance with the
"SHUTOFF" – Automatic Shutoff
If the automatic shutoff function is activated, the balance automatically switches itself off after a preselected
time of inactivity (i.e. with no key being pressed or changes of weight occurring etc.) and is switched to the
standby mode.
"RECALL" switched off (Factory setting)
"RECALL" switched on
by mode and is immediately ready for weighing. You can load
the weight in the standby mode and the balance immediately
shows the current weighing result. This is the Factory setting
Note: Standby mode is available on line powered balances only.
«ON/OFF» key. After it has been switched on, it performs a dis
play test for approx. 2 sec. in which all display elements lights
up, it shows "WELCOME", software version, maximum load and
readability. The balance is ready for weighing.
"A.OFF:10' " Automatic shutoff after 10 minutes of inactivity. (Factory setting)
"A.OFF – " Automatic shutoff not activated.
"A.OFF:2' " Automatic shutoff after 2 minutes of inactivity.
"A.OFF:5' " Automatic shutoff after 5 minutes of inactivity.
29The Menu
Page 30

"B.LIGHT" – Backlight
Under this menu topic, the display backlight can be switched off automatically. If the automatic switch-off is
activated, the backlight will turn off automatically after the selected period of inactivity has elapsed. The back
light is reactivated when a key is pressed or the weight is changed.
"B.L. ON" Backlight is always on. (Factory setting)
"B.L. OFF" Backlight is always off.
"B.L. 30" " Automatic switch-off after 30 seconds inactivity.
"B.L. 1' " Automatic switch-off after 1 minute inactivity.
"B.L. 2' " Automatic switch-off after 2 minutes inactivity.
"B.L. 5' " Automatic switch-off after 5 minutes inactivity.
"A.ZERO" – Automatic Zero Setting
This menu topic allows you to switch the automatic zero setting on or off.
“ON“ "A.ZERO" switched on (factory setting). The automatic zero set
ting continuously corrects possible variations in the zero point
that might be caused through small amounts of contamination
on the weighing pan.
"OFF" "A.ZERO" switched off. The zero point is not automatically cor
rected. This setting is advantageous for special applications (e.g.
evaporation measurements).
Note: With approved balances, this setting is not available (only available in selected countries).
"ZERO.RNG" – Zero Range
This menu topic allows you to set a zero limit for the « » key. Up to and including this limit the
« » key will execute a zero. Above this limit the « » key will execute a tare.
"21g" To set the upper limit of the zeroing range as weight in the defini
tion unit of the balance.
(Factory setting: 0.5% of weighing range)
Note: With approved balances, this setting is not available and
fixed to 3e (only available in selected countries).
Note: A reset of the balance will not change this setting.
"ASSIGN:F" – Assign Application Key F
At this menu topic you can assign an application to the «F» key. The following applications are available
(depending on the model):
"COUNT" Piece counting (Factory setting)
"PERCENT" Percent weighing
"CHECK" Checkweighing
"STAT" Statistics
"TOTAL" Totaling
"FACTOR.M" Multiplication factor
"FACTOR.D" Division factor
"DENSITY" Density (not available with JS models)
"R.TEST" Routine test
30 The Menu
"DIAGNOS." – Diagnostics Application
At this menu topic you can start a diagnostic application. For more information see chapter application "Diag
nostics".
The following diagnostics are available:
Page 31

"REPEAT.T" Repeatability test (models with internal weights only)
"DISPLAY" Display test
"KEYPAD.T" Key test
"CAL.MOT.T" Motor test (models with internal weights only)
"BAL.HIST" Balance history
"CAL.HIST" Calibration history
"BAL.INFO" Balance information
"SRV.PROV" Service provider information
"SRV.ICON" – Service Reminder
This menu topic allows you to switch the service reminder " " on or off.
"ON" Service reminder " " switched on.You will be informed after one
Year or 8000 operating hours to call service for recalibration.
This will be indicated by the flashing service icon: " ". (Factory
setting)
"OFF" Service reminder " " switched off.
"SRV.D.RST" – Service Date Reset
This menu topic allows you to reset service date and hours.
Note: This menu topic is only available if “SRV.ICON” setting “ON” was selected.
To toggle between “YES?” and “NO?” press « » (or «+» or «-»)
6.3.4Interface Menu
"RS232" – RS232C Interface
At this menu topic you can select the peripheral device connected to the RS232C interface and specify how the
data is transmitted.
"PRINTER" Connection to a printer. (Factory setting)
"PC-DIR." Connection to a PC: the balance can send data (as a Keyboard)
1)
Note:
●
Only one printer possible.
●
See recommended printer settings found in section "Appen
dix", as well as the printer-specific user's manual.
"PRT.STAB" If the « » key is pressed, the next stable weight value will be
printed. (Factory setting)
"PRT.AUTO" Every stable weight value will be printed, without pressing the
« » key.
"PRT.ALL" If the « » key is pressed, the weight value will be printed
regardless of stability.
to the PC used for PC applications e.g. Excel.
Note: The balance sends the weight value without the unit to the
PC.
"PRT.STAB" If the « » key is pressed, the next stable weight value will be
sent followed by an enter. (Factory setting)
"PRT.AUTO" Every stable weight value will be sent followed by an enter, with
out pressing the « » key.
"PRT.ALL" If the « » key is pressed, the weight value will be sent followed
by an enter regardless of stability.
31The Menu
Page 32

"HOST" Connection to a PC, Barcode Reader etc.: the balance can send
data to the PC and receive commands or data from the PC.
Note: The balance sends the complete MT-SICS answer to the PC
(see chapter "MT-SICS Interface Commands and Functions".
"SND.OFF" Send mode switched off.(Factory setting)
"SND.STB" If the « » key is pressed, the next stable weight value will be
sent.
"SND.CONT" All weight value updates will be sent regardless of stability, with
out pressing the « » key.
"SND.AUTO" Every stable weight value will be sent, without pressing the « »
key.
"SND.ALL" If the « » key is pressed, the weight value will be sent regard
less of stability.
"2.DISP" Connection of an optional auxiliary display unit.
Note: The transmission parameters cannot be selected. Settings
are automatically set.
Attention: If you select 2nd Display "2.DISP", first make sure that
no other device is connected at COM1 as an auxiliary display.
Other devices could be damaged because of the voltage on con
nector Pin 9. Necessary for powering the display (see Chapter
"Interface Specification").
●
The second interface COM2 if present, has no power supply
for a 2nd display. Connect it preferably on COM1.
"HEADER" – Options for the Printout Header of individual values
This menu topic allows you to specify the information that is to be printed at the top of the printout for every
individual weighing results (after pressing « »).
Note: This menu topic is only available if “PRINTER” setting was selected.
"NO" The header is not be printed (Factory setting)
"DAT/TIM" Date and time are printed
"D/T/BAL" Date, time and balance information (Balance type, SNR, Balance
ID) are printed.
Note: Balance ID only if set.
"SINGLE" – Options for Printing out the Result of individual values
This menu topic allows you to specify the information that is to be printed for every individual weighing result
(after pressing « »).
Note: This menu topic is only available if “PRINTER” setting was selected.
"NET" The value of the Net weight from the current weighing is printed
(Factory setting)
"G/T/N" The values of the Gross weight, the Tare weight and the Net
weight are printed
"SIGN.L" – Options for the Printout Footer for Signature Line of individual values
This menu topic allows you to set a footer for signature at the bottom of the printout for every individual weigh
ing result (after pressing « »).
Note: This menu topic is only available if “PRINTER” setting was selected.
32 The Menu
"OFF" The signature footer is not be printed. (Factory setting)
"ON" The signature footer is printed
Page 33

"LN.FEED" – Options for Complete the Printout of individual values
This menu topic allows you to specify the number of blank lines to complete the printout (line feed) for every
individual weighing result (after pressing « ») .
Note: This menu topic is only available if “PRINTER” setting was selected.
"0" Possible numbers of blank lines: 0 to 99 (Factory setting = 0)
"ZERO.PRT" – Options for “PRT.AUTO”
1)
This menu topic allows you to specify the auto print function “PRT.AUTO” for printing zero "YES" or "NO".
"OFF" Zero is not be printed (Zero +/- 3d) (Factory setting)
"ON" Zero is always printed
Note: This menu topic is only available if "PRT.AUTO" fuction of the "PRINTER" or "PC-DIR." was selected.
"COM.SET" – Options for the Data Communication Format (RS232C)(“HOST”)
This menu topic allows you to set the data format depending on which peripheral device is connected.
Note: This menu topic is only available if “HOST” setting was selected.
"MT-SICS" The MT-SICS data transfer formats is used. (Factory setting)
For more information see section “MT-SICS Interface Commands
and Functions”.
The following PM balance commands are supported:"MT-PM"
S Send value
SI Send immediate value
SIR Send immediate value and repeat
SR Send value and repeat
SNR Send next value and repeat
T Tare
TI Tare immediately
B Base (Negative values are limited up to the current tare
values)
MI Modify ambient vibration
MZ Modify Auto Zero
M Modified settings reset
ID Identify
CA Calibrate
D Display (only symbol N and G available)
The following Sartorius commands are supported:"SART"
K Ambient conditions: very stable
L Ambient conditions: stable
M Ambient conditions: unstable
N Ambient conditions: very unstable
O Block keys
P Print key (print, auto print; activate or block)
Q Acoustic signal
R Unblock keys
S Restart/self-test
T Tare key
W Calibration/adjustment (depending on the menu setting)
*)
33The Menu
Page 34

Z Internal calibration/adjustment
**)
f0_ Function key (F)
f1_ Function key (CAL)
s3_ C key
x0_ Perform internal calibration
**)
x1_ Print balance/scale model
x2_ Print weighing cell serial number
x3_ Print software version
*)
may be inaccessible on verified balances/scales
**)
only on models with built-in motorized calibration weight
Functionality mapping
"HOST" settings: Sartorius printer settings:
"SND.OFF" not applicable
"SND.STB" manually print with stability
"SND.ALL" manually print without stability
"SND.CONT" automatically print without stability
"SND.AUTO" similar applicable to automatically print
when load is changed
"BAUD" – Baud rate RS232C
1)
This menu topic allows you to match the data transmission to different serial RS232C receivers. The baud rate
(data transfer rate) determines the speed of transmission via the serial interface. For problem-free data trans
mission the sending and receiving devices must be set at the same value.
The following settings are available:
600 bd, 1200 bd, 2400 bd, 4800 bd, 9600 bd, 19200 and 38400 bd. (default: 9600 bd)
Note:
●
Not visible for 2nd display.
●
Each device has separate settings.
"BIT.PAR." – Bit/Parity RS232C
1)
At this menu topic you can set the character format for the attached RS232C serial peripheral device.
"8/NO" 8 data bits/no parity (Factory setting)
"7/NO" 7 data bits/no parity
"7/MARK" 7 data bits/mark parity
"7/SPACE" 7 data bits/space parity
"7/EVEN" 7 data bits/even parity
"7/ODD" 7 data bits/odd parity
Note:
●
Not visible for 2nd display.
●
Each device has separate settings.
"STOPBIT" – Stop Bits RS232C
1)
At this menu topic you can set the stop bits of the transmitted data to different RS232C serial receivers.
34 The Menu
"1 BIT" 1 Stop bit (Factory setting)
"2 BITS" 2 Stop bits
Note:
Page 35

●
Not visible for 2nd display.
●
Each device has separate settings.
"HD.SHK" – Handshake RS232C
1)
This menu topic allows you to match the data transmission to different RS232C serial receivers.
"XON.XOFF" Software handshake (XON/XOFF) (Factory setting)
"RTS.CTS" Hardware handshake (RTS/CTS)
"OFF" No handshake
Note:
●
Not visible for 2nd display.
●
Each device has separate settings.
"RS E.O.L." – End of Line RS232C
1)
At this menu topic you can set the "End of Line" character of the transmitted data to different RS232C serial
receivers.
"CR LF" <CR><LF> Carriage Return followed by Line feed (ASCII-Codes
013+010) (Factory setting)
"CR" <CR> Carriage Return (ASCII-Code 013)
"LF" <LF> Line feed (ASCII-Code 010)
Note:
●
Not visible for 2nd display.
●
Each device has separate settings.
"RS.CHAR" – Char Set RS232C
1)
At this menu topic you can set the "Character Set" of the transmitted data to different RS232C serial receivers.
"IBM.DOS" Char Set IBM/DOS (Factory setting)
"ANSI.WIN" Char Set ANSI/WINDOWS
Note:
●
Not visible for 2nd display.
●
Each device has separate settings.
"INTERVL." – Print Key Simulation
At this menu topic you can activate a simulation of the « » key. "INTERVL." simulates a print key press every
x seconds.
Range: 0 to 65535 seconds
0 sec: disables the print key simulation
Factory setting: 0 sec
Note: The executed action is according to the configuration of the print key. (see interface setting)
———————————————————————————
1) Note for 2nd RS232C Interface (COM2)
●
If a second interface is installed, the menu topic is displayed for
each interface, e.g
"BAUD.1" for standard interface (COM1)
"BAUD.2" for 2nd interface (COM2)
●
Only one printer can be set if two RS232 interfaces are existing.
———————————————————————————
35The Menu
Page 36

7Applications
COUNT
D
A
B C
A
B
C
D
A
FIX 10
PCS
C
10
PCS
------
FIX 10
PCS
A
B
C
------
VAR.REF
25
PCS
B
15
PCS
REF.
25
PCS
REF.
7.1Application "Piece Counting"
The "Piece Counting" application allows you to determine the number of pieces put on the
weighing pan.
Requirement: The function "COUNT" must be assigned to the «F» key (see advanced menu
topic "ASSIGN:F", factory setting).
– Activate function "COUNT" by pressing and holding the «F» key.
Piece Counting first requires the setting of a reference weight,
there are 4 possibilities:
Setting the reference by multiple pieces with fix reference values.
Setting the reference by multiple pieces with variable reference
values.
Setting the reference for 1 piece in weighing mode.
Setting the reference for 1 piece in manual mode.
Setting possibility
Setting the reference by multiple pieces
1 Select a number of reference pieces by scrolling with « ». Possi
ble numbers* are 5, 10, 20 and 50.
* with approved balances in selected countries: min 10
2 Press « » to tare. If needed: place empty container on the
weighing pan and tare again.
3 Add the selected number of reference pieces to container.
4 Press « » to confirm.
Setting possibility
Setting the reference by multiple pieces with variable refer
ence values
1 Select "VAR.REF" by scrolling with « ». Press « » to confirm.
2 Select a number of reference pieces by scrolling up («+» key) or
down («-» key). Speed up by press and hold. Possible numbers*
are 1 to 999.
* with approved balances in selected countries: min 10
3 Press « » to tare. If using: place empty container on the
weighing pan first or tare again.
4 Add the selected number of reference pieces to container.
5 Press « » to confirm.
36 Applications
Page 37

Setting possibility
C
0.00
g
1
PCS
2.74
g
1
C
------
PCS.WGT
C
D
2.68
g
*
0
PCS
2.74
g
*
PCS.WGT
D
2
.
74
g
2
.
74
g
,
812.7
g
75
PCS
Setting the reference for one piece in weighing mode
1 Select "PCS.WGT" by scrolling with « ».
2 Press « » to tare. If needed: place empty container on the
weighing pan and tare again.
3 Add one reference piece to container. The weight of one piece is
displayed.
4 Press « » to confirm.
Note: With approved balances, this setting is not available in selected
countries.
Setting possibility
Setting the reference for one piece in manual mode
1 Select "PCS.WGT" by scrolling with « ».
2 Press « » to confirm.
3 Enter the final reference one piece weight by scrolling up («+» key)
or down («-» key). Speed up by press and hold.
4 Press « » to confirm.
Note: With approved balances, this setting is not available in selected
countries.
Switching between manual mode and weighing mode
– Press « » to switch between manual and weighing mode.
Note: By switching from weighing mode to manual mode the weight
value will be transferred and can be changed manually.
Note: If without any key press within 60 seconds, the balance returns to the previous active application. Press
«C» to cancel and returns to the previous active application.
On completion of the setting procedure, your balance is ready for piece counting.
Switching between piece count and weight display.
You can use the « » key at any time to switch the display between
piece display, weighing unit "UNIT 1", "RECALL" value (if activated)
and weighing unit "UNIT 2" (if different from "UNIT 1").
Note:
●
The "RECALL" value is displayed with an asterisk (*) and icon "M" and can not be printed.
●
Take into account minimum values: min. reference weight = 10d (10 digits), min. piece weight* = 1d (1
digit)!
* with approved balances in selected countries: min 3e
●
The current reference weight remains stored until the reference setting is changed.
37Applications
Page 38

7.2Application "Percent Weighing"
PERCENT
A
B
A
B
A
0.0
%
175.28
g
*
A
SET 100
%
B
I00.0
%
175.28
g
SET 100
%
C
0.00
g
B
175.28
g
175.28
g
,
The "Percent Weighing" application allows you to check a sample weight as percentage to a
reference target weight.
Requirement: The function "PERCENT" must be assigned to the «F» key (see advanced menu
topic "ASSIGN:F".
– Activate function percent weighing "PERCENT" by pressing and
holding the «F» key.
Percent Weighing first requires the setting of a reference weight
that should corresponds to 100%, there are 2 possibilities:
Setting the reference in manual mode (enter 100%).
Setting the reference in weighing mode (weigh 100%).
Setting possibility
1 Press « » to activate manual mode.
2 Select the reference target weight (100%) by scrolling up («+»
key) or down («–» key). Speed up by press and hold.
3 Press « » to confirm.
Setting the reference by manual mode (enter 100%)
Setting possibility
Setting the reference by weighing mode (weigh 100%)
1 Press « » to tare the balance and to activate the weighing
mode. If needed: place empty container on the weighing pan and
tare again.
2 Load the reference weight (100%).
Note: Reference weight must be at least +/- 10d.
3 Press « » to confirm.
Switching between manual mode and weighing mode
– Press « » to switch between manual and weighing mode.
Note: By switching from weighing mode to manual mode the weight
value will be transferred and can be changed manually.
Note: If without any key press within 60 seconds, the balance returns to the previous active application.
On completion of the weighing-in procedure, your balance is ready for percent weighing.
38 Applications
Page 39

,
128.25
g
73.17
%
128250
mg
128.25
g
M
Switching between percent and weight display
You can use the « » key at any time to switch the display between
percent display, weighing unit "UNIT 1", "RECALL" value (if activated)
and weighing unit "UNIT 2" (if different from UNIT 1).
Note:
●
The recall value is displayed with an asterisk (*) as well as icon
"M" and can not be printed.
●
The current set weight remains stored until it is redetermined.
39Applications
Page 40

7.3Application "Check Weighing"
CHECK
1A
3
1B
2A
2B
1A
1B
2A
2B
3
1A
SET NOM .
10.00
g
20.28
g
1A
1B
1B
SET NOM .
0.00
g
20.28
g
C
10.00
g
10.00
g
The "Check weighing" application allows you to check the deviation of a sample weight
within a tolerance limit to a reference target weight.
Requirement: The function "CHECK" must be assigned to the «F» key (see advanced menu
topic "ASSIGN:F".
– Activate function "CHECK" by pressing and holding the «F» key.
Step 1: Check Weighing first requires the setting of a reference
weight that should corresponds to the nominal weight, there are 2
possibilities:
Setting the reference in manual mode (enter nominal weight).
Setting the reference in weighing mode (weigh nominal weight).
Step 2: Check weighing needs the upper and lower limits, there are
2 possibilities::
Setting the upper and lower limits in percentage.
Setting the upper and lower limits by weight.
Step 3: Setting tolerance beep
Activate or deactivate tolerance beep.
Setting possibility:
Setting the reference in manual mode (enter nominal weight)
1 Press « » to activate manual mode.
2 Select the reference target weight by scrolling up («+» key) or down
(«–» key). Speed up by press and hold.
3 Press « » to confirm the nominal weight.
Setting possibility:
Setting the reference in weighing mode (weigh nominal
weight)
1 Press « » to tare the balance and to activate the weighing
mode. If needed: place empty container on the weighing pan and
tare again.
2 Load the nominal weight.
3 Press « » to confirm the nominal weight.
Switching between manual mode and weighing mode
– Press « » to switch between manual mode and weighing mode.
Note: By switching from weighing mode to manual mode the weight
value will be transferred and can be changed manually.
40 Applications
Page 41

Step 2, setting possibility:
2A
SET.T+
/-
%
2.50
%
20.28
g
2A
2B
SET T+/-
%
2B
2.50
%
20.28
g
0.25
g
0.36
g
0.25
g
2.50
%
3
20.28
g
3
T.BEEP: Y
Setting the upper and lower limits (in percentage):
1 Press « » to start setting.
2 Press « » to confirm the default limit of +/- 2.5 % or enter the
limit value by scrolling up («+» key) or down («–» key). Press
« » to confirm the limits.
Note: Press « » to switch between "UNIT 1" and Unit "%".
Step 2, setting possibility:
Setting the upper and lower limits by weight:
1 Press « » to start setting.
2 Press « » to switch to UNIT 1.
3 Press « » to confirm the default limit or enter the limit value by
scrolling up («+» key) or down («–» key). Press « » to confirm
the limits.
Switching between percentage and weight unit 1
– Press « » to switch between setting in percentage and setting by
weight .
Step 3:
Setting tolerance beep:
The tolerance beep indicates whether the weighing sample lies within
the tolerance by beeping three times.
Note: The beep level corresponds to the setting in menu topic
"STB.BEEP" (Basic menu). If "STB.BEEP" is set to "OFF", the tolerance
beep level is medium.
– To activate tolerance beep press « ». To deactivate tolerance
beep press « » to select "N" and press « ».
Note:
●
If without any key press within 60 seconds, the balance returns to the previous active application. Press
«C» to cancel and returns to the previous active application.
●
The nominal weight must be at least 10 digit.
On completion of the setting procedure, your balance is ready for checkweighing.
41Applications
Page 42

20.15
g
Weighing-in-Aid
The Weighing-in-Aid helps you quickly determine the position of the
sample weight regarding the tolerance.
1 Lower limit
2 Target weight
3 Upper limit
42 Applications
Page 43

7.4Application "Statistics"
CLR. M:NO
STAT
CLEARED
46.36
g
0.00
g
- 1 -
C
999
C
0.00
g
5
N
X
50.530
g
S.DEV
3.961
g
S.REL
7.84
%
MIN
46.36
g
MAX
55.81
g
DIFF
9.45
g
The "Statistics" application allows you to generate statistics of weighing values. 1 to 999
values are possible. Requirement: The function "STAT." must be assigned to the «F» key (see
advanced menu topic "ASSIGN:F"). Connect a printer or a PC if present.
1 Activate function "STAT." by pressing and holding the «F» key.
2 To continue the last statistics press « ». For a new statistical
evaluation press « » (or «+», «–») to select "CLR.M:YES" and
press « » to clear the memory.
Note: If the memory is already cleared (sample counter is 0) the
memory clear question will be not displayed.
Weighing the first sample weight:
1 Press « » to zero/tare the balance if needed.
2 Load the first sample weight.
3 Press « ». The display shows the sample count "- 1 -" and the
current weight is stored as sample and the weight is printed out.
Note: When the sample counter is displayed you may press «C» to
undo (drop) this sample.
4 Unload the first sample weight.
Displayed results:
1 Press « » to show the next
statistical value.
2 Press «C» to cancel displaying
results and to continue weigh
ing next sample.
Weighing further sample weights:
The same procedure as for the first sample weight.
●
1...999 samples are possible.
●
The next value will be accepted if the sample weight is in the range
70% –130% of the current average value. "OUT OF RANGE" will be
displayed if the sample is not accepted.
Results:
– If the numbers of sample are greater than or equal to 2, press
« », the results are displayed and printed.
0.5 seconds
number of samples
average
standard deviation
relative standard deviation
lowest value (minimum)
highest value (maximum)
different between the minimum
and the maximum
43Applications
Page 44

Displayed results:
SUM
252.65
g
------ Statistics ------
21.Jan 2010 12:56
METTLER TOLEDO
Balance Type JP4002G
SNR 1234567890
-----------------------1 46.36 g
2 55.81 g
3 47.49 g
4 53.28 g
5 49.71 g
n 5
x 50.530 g
s dev 3.961 g
s rel 7.84 g
Min. 46.36 g
Max. 55.81 g
Diff 9.45 g
Sum 252.65 g
-----------------------
1 Press « » to show the next
statistical value.
2 Press «C» to cancel displaying
results and to continue weigh
ing next sample.
Printout:
sum of all values
44 Applications
Page 45

7.5Application "Totaling"
CLR.M:NO
TOTAL
CLEARED
0.00
g
46.36
g
- 1 -
999
0.00
g
0.00
g
C
C
879
N
TOTAL
8789
.
79
g
The "TOTALING" application allows you to weigh in different samples to add their weight val
ues and to totalize them. 1 to 999 samples are possible.
Requirement: The function "TOTAL" must be assigned to the «F» key (see advanced menu
topic "ASSIGN:F").
1 Activate function "TOTAL" by pressing and holding the «F» key.
2 For a new totaling evaluation press « » (or «+» or «–») to enter
"CLR.M:YES" and press « » to clear the memory.
Note: If the memory is already cleared (sample counter is 0) the
memory clear question will be not displayed.
3 Press « » to zero or tare the balance.
Weighing in the sample weight:
1 If using a container: place empty container on the weighing pan
and press « » to zero or tare the balance.
2 Load the first sample weight.
3 Press « ». The display shows the sample count "- 1 -" and the
current weight is stored.
Note: When the sample counter is displayed you may press «C» to
undo (drop) this sample.
4 Unload the first sample weight. The display shows zero.
Weighing in further sample weights:
The same procedure as for the first sample weight.
●
1...999 samples are possible.
Results:
– If the numbers of sample are greater than or equal to 2, press
« », the results are displayed and printed.
Displayed results:
1 Press « » briefly to show the
number of samples
0.5 seconds
totalized value.
2 Press «C» briefly to cancel.
totalized value
45Applications
Page 46

Printout:
------- Totaling -------
21.Jan 2010 12:56
METTLER TOLEDO
Balance Type JP2002G
SNR 1234567890
-----------------------1 46.36 g
2 55.81 g
3 47.49 g
4 53.28 g
5 49.71 g
6 53.93 g
.
.
.
n 879
Total 8789.79 g
-----------------------
46 Applications
Page 47

7.6Application "Multiplication Factor Weighing"
FACTOR.M
1
SET.F.MUL
001.0000
009.8
100
2
SET.STEP
001.0
005.0
The "Multiplication Factor Weighing" application allows you to multiply the weight value (in
grams) by a predefined factor (result = factor * weight) and have it calculated to a predefined
number of decimal places.
Requirement: The function "FACTOR.M" must be assigned to the «F» key (see advanced
menu topic "ASSIGN:F").
– Activate function "FACTOR.M" by pressing and holding the «F» key.
Setting the factor value:
1 Press « » to execute "SET.F.MUL". Either the factor 1 appears as
default value or the factor that was saved most recently.
2 Press « » to select a digit. The selected digit is blinking.
3 For changing digits, press «+» to scroll up or «–» to scroll down.
4 Press « » to confirm the selected factor (no automatic accep
tance).
Note: Zero for multiplication factor value is outside the allowed range,
the error message "FACTOR OUT OF RANGE" will be displayed.
Setting the step value:
"SET.STEP" appears in the display, and the program changes automat
ically to allow the display increments to be entered. The smallest pos
sible display increment appears as default value, or the last value that
was saved.
1 Press « » to execute "SET.STEP".
2 Press « » to select a digit. The selected digit is blinking.
3 For changing digits, press «+» to scroll up or «–» to scroll down.
4 Press « » to confirm the selected step (no automatic accep
tance).
Note: The allowed range for the step depends on the factor and the
resolution of the balance. If it is outside the allowed range the error
message "STEP OUT OF RANGE" will be displayed.
Note: If without any key press within 60 seconds, the balance returns to the previous active application. Press
«C» to cancel and returns to the previous active application.
On completion of the setting procedure, your balance is ready for multiplication factor weighing.
47Applications
Page 48

C
9810
1000.02
g
0
C
Weighing procedure
1 Press « » to zero/tare.
2 Load sample weight on weighing pan.
3 Read the result. The appropriate calculation is then made using the
weight of sample and the selected factor, the result being displayed
with the selected display step.
Note: No units are displayed.
4 Unload sample weight.
Toggling between displaying the calculated value and the measured
weight:
You can use the « » key to toggle between the calculated Value,
weight value "UNIT 1", "RECALL" value (if selected) and weight value
"UNIT 2" (if different from "UNIT 1").
48 Applications
Page 49

7.7Application "Division Factor Weighing"
FACTOR.D
1
SET.F.DIV
001.0000
009.8
100
2
SET.STEP
0.0001
0.0050
The "Division Factor Weighing" divide a predefined factor by the weight value (in grams)
(result = factor / weight) and have it rounded to a predefined number of decimal places.
Requirement: The function "FACTOR.D" must be assigned to the «F» key (see advanced
menu topic "ASSIGN:F").
– Activate function "FACTOR.D" by pressing and holding the «F» key.
Setting the Factor Value:
1 Press « » to execute "SET.F.DIV". Either the factor 1 appears as
default value or the factor that was saved most recently.
2 Press « » to select a digit. The selected digit is blinking.
3 For changing digits, press «+» key to scroll up or «–» to scroll
down.
4 Press « » briefly to confirm the selected factor (no automatic
acceptance).
Note: Zero for division factor value is outside the allowed range, the
error message "FACTOR OUT OF RANGE" will be displayed.
Setting the step value:
"SET.STEP" appears in the display, and the program changes automat
ically to allow the display increments to be entered. The smallest pos
sible display increment appears as default value, or the last value that
was saved.
1 Press « » to execute "SET.STEP".
2 Press « » to select a digit. The selected digit is blinking.
3 For changing digits, press «+» to scroll up or «–» to scroll down.
4 Press « » to confirm the selected step (no automatic accep
tance).
Note: The allowed range for the step depends on the factor and the
resolution of the balance. If it is outside the allowed range the error
message "STEP OUT OF RANGE" will be displayed.
Note: If without any key press within 60 seconds, the balance returns to the previous active application. Press
«C» to cancel and returns to the previous active application.
On completion of the setting procedure, your balance is ready for division factor weighing.
49Applications
Page 50

C
0.010
1000.02
g
0.000
C
Weighing procedure
1 Press « » to zero/tare.
2 Load sample weight on weighing pan.
3 Read the result. The appropriate calculation is then made using the
weight of sample and the selected factor, the result being displayed
with the selected display step.
Note:No units are displayed. To avoid a division by zero, the factor
division is not calculated at zero.
4 Unload sample weight.
Toggling between displaying the calculated value and the measured
weight:
You can use the « » key to toggle between the calculated Value,
weight value "UNIT 1", "RECALL" value (if selected) and weight value
"UNIT 2" (if different from "UNIT 1").
50 Applications
Page 51

7.8Application "Density"
DENSITY
SOLID
LIQUID
WEIGH IN
60.0020
g
¢¢¢¢
H-2-0
ETHANOL
FREE
Note: This Application is only available with JP models.
The "Density" application allows you to determine the density of solid bodies and liquids.
Determination of the density uses Archimedes' principle according to which a body
immersed in a fluid undergoes an apparent loss in weight which is equal to the weight of the
fluid it displaces.
To determine the density of solid bodies, we recommended you to work with the optional
density kit which contains all the attachements and aids needed for convenient and precise
density determination. To determine the density of liquids, you additionally need a sinker
which you can also obtain from your METTLER TOLEDO dealer.
Note for performing of density determinations:
●
You can also use the hanger for weighing below the balance which belongs to your bal
ance.
●
We recommended you to consult the operating instructions enclosed with the density kit.
●
If a METTLER TOLEDO printer is attached to your balance, the settings will be automatical
ly recorded.
Requirement: The function "DENSITY" must be assigned to the «F» key (see advanced menu
topic "ASSIGN:F"). Density kit is installed.
– Activate function "DENSITY" by pressing and holding the appropri
ate assigned «F» key.
Setting the method for density determination
1 Select:
"SOLID", the function for the density determination of solids, or
"LIQUID", the function for the density determination of liquids with a
sinker.
2 Press « » to confirm the selection
Switching the display between user guidance and weighing
– Press « » to toggle the display between user guidance and
weighing.
7.8.1Density Determination of Solids
Requirement: The method "SOLID" is set.
Setting the parameter of the auxiliary liquid
1 Select the auxiliary liquid by scrolling with « » (or «-» up / «+»
down):
"H-2-O" for distilled water , "ETHANOL" or "FREE" for a freely defin
able auxiliary liquid.
2 Press « » to confirm the selection.
51Applications
Page 52

20.0
21.8
If you have selected water or ethanol as the auxiliary liquid:
01.00200
01.00000
PRESS EN
WEIGH IN AIR
WEIGH IN LIQUID
5.988
*
1 Enter the current temperature of the auxiliary liquid (read off on
thermometer). Change the value by scrolling up «+» or down «-».
The temperature ranges from 10 °C to 30.9 °C.
2 Press « » to confirm the value.
Note: The densities of distilled water and ethanol in the range 10 °C to
30.9 °C are stored in the balance.
If you have selected a freely definable auxiliary liquid:
Enter the density of the auxiliary liquid at the current temperature (read
off on thermometer).
1 Press « » to select a digit. The selected digit is blinking.
2 For changing digits, press «+» to scroll up or «-» to scroll down.
3 Press « » to confirm the selected value.
Note: If without any key press within 60 seconds or by pressing «C», the balance returns to the previous active
application.
On completion of the settings, your balance is ready for performing the density determination of liquids.
Note: Taring the balance is possible at any time.
The balance prompts you: "PRESS ENTER TO START".
– Press « » to start. Tare/Zero is executed.
The balance prompts you to weigh the solid in air "WEIGH IN AIR".
1 Load the solid.
2 Press « » to initiate the measurement.
The balance prompts you to weigh the solid in the auxilliary liquid
"WEIGH IN LIQUID".
1 Load the solid.
2 Press « » to initiate the measurement.
The balance now shows the determined density of the solid.
Note:
●
This result has already been corrected for the air buoyancy. The
buoyancy caused by the two immersed wires (Ø 0.6 mm) can be
neglected.
●
By pressing «C», the balance returns to "PRESS ENTER TO START".
Result:
Press « », the result will be printed.
52 Applications
Page 53

Sample printout:
---- Density Solid -----
18.Mar 2010 20:14
Balance Type JP703C
SNR 1234567890
------------------------
ID: ................
Liquid:
H-2-O 0.99822 g/cm3
Temp. 20.0 °C
Weight in air:
60.0020 g
Weight in liquid:
49.9997 g
Volume of solid:
1.625 cm3
Density: 5.988 g/cm3
===========
Signature
........................
------------------------
010.0000
012.0000
PRESS EN
WEIGH IN AIR
7.8.2Density Determination of Liquids
Requirement: The method "LIQUID" is set.
Note: If without any key press within 60 seconds or by pressing «C», the balance returns to the previous active
application.
On completion of the settings, your balance is ready for performing the density determination of liquids.
Note: Taring the balance is possible at any time.
Setting the displacement volume of your sinker
Press « » to confirm the default value of 10.0 cm3 or change it if
needed:
1 Press « » to select a digit. The selected digit is blinking.
2 For changing digits, press «+» to scroll up or «-» to scroll down
3 Press « » to confirm the selected value.
The balance prompts you: "PRESS ENTER TO START".
– Press « » to start.
The balance prompts you to weigh the sinker in air "WEIGH IN AIR".
1 Position the sinker.
2 Press « » to initiate the measurement.
53Applications
Page 54

WEIGH IN LIQUID
1.000
*
Sample printout:
---- Density Liquid -----
18.Mar 2010 20:14
Balance Type JP703C
SNR 1234567890
------------------------
ID: ................
Temp. of liquid:
............
Displaced liquid:
10.0023 g
Density: 1.000 g/cm3
===========
Signature
........................
------------------------
The balance prompts you to weigh the sinker in the liquid "WEIGH IN
LIQUID".
1 Pour the liquid into the beaker. Make sure that the sinker is
immersed by al least 1 cm in the liquid, and that there are no air
bubbles in the container.
2 Press « » to initiate the measurement.
The balance now shows the determined density of the liquid at the cur
rent temperature (read off on the thermometer).
Note:
●
This result has already been corrected for the air buoyancy. The
buoyancy caused by the immersed wire (Ø 0.2 mm) of the sinker
can be neglected.
●
By pressing «C», the balance returns to "PRESS ENTER TO START".
Result:
Press « », the result will be printed.
7.8.3Formulae Used to Calculate Density
The "DENSITY" Application is based on the formulae listed below.
Formulae for determining the density of solids with compensation for air density
= Density of the sample
A = Weight of the sample in air
54 Applications
Page 55

B = Weight of the sample in the auxiliary liquid
V = Volume of the sample
= Density of the auxiliary liquid
= Density of Air (0.0012 g/cm3)
= Weight correction factor (0.99985), to take the atmospheric buoyancy of the adjustment weight
into account
Formula for determining the density of liquids with compensation for air density
= Density of the liquid
P = Weight of the displaced liquid
V = Volume of the sinker
= Density of air (0.0012 g/cm3)
= Weight correction factor (0.99985), to take the atmospheric buoyancy of the adjustment weight
into account
Density Table for Distilled Water
55Applications
Page 56

Density Table for Ethanol
Density of C2H5OH according to the "American Institute of Physics Handbook".
56 Applications
Page 57

7.9Application "Routine Test"
R. TEST
TARE:NO
WGT
TEST.
5000.00
g
LMT
CTRL.
2.50
g
The "Routine Test" application allows you to determine the sensitivity of the balance. More
about periodic sensitivity tests (routine tests) see: GWP® (Good Weighing Practice) on
www.mt.com/gwp.
GWP gives clear recommendation for routine testing:
●
how should I test my balance?
●
how often?
●
where can I reduce efforts?
More about test weights see www.mt.com/weights.
Requirement:
●
The function "R.TEST" must be assigned to «F» key (see advanced menu topic
"ASSIGN:F").
●
It is recommended to connect a printer or a PC to the balance for showing the results.
1 Activate function "R.TEST" by pressing and holding the assigned
«F» key.
2 Select "TARE:NO" (no tare weight used).
If a tare weight is used during the test select "TARE:YES" (use a tare
weight). To toggle between "TARE:YES" and "TARE:NO" use « »
(or «+» or «–»).
3 Press « » to confirm the selection.
Note:
●
It is recommended to test the sensitivity without tare load. (factory
setting "TARE:NO").
●
If using tare: Make sure that tare weight plus test weight is not
exceeding max. load.
Setting the reference test weight value
The default value of the test weight: Next smaller OIML weight than the
maximum load of your balance according to the GWP® recommenda
tion.
1 For changing the value, press «+» to scroll up or «–» to scroll
down. Progressing speed by press and hold.
2 Press « » to confirm the value.
Setting the Control Limit
The default value of the control limit:
Test weight x weighing process tolerance / 2
Example: 5000 g x 0.1% / 2 = 2.50 g.
1 For changing the value, press «+» to scroll up or «–» to scroll
down. Progressing speed by press and hold.
2 Press « » to confirm the value.
57Applications
Page 58

LMT
WARN.
1.25
g
Setting the Warning Limit
PRESS EN
PRESS EN
5000.00
g
----- Routine Test -----
21.Jan 2010 12:56
METTLER TOLEDO
Balance Type JP6002G
SNR 1234567890
Sensitivity:
Test weight 5000.00 g
Value 5000.11 g
Warning L. 1.25 g
Control L. 2.50 g
Warning L. OK
Control L. OK
Signature
........................
------------------------
The default value of the warning limit:
Warning limit = control limit / safety factor
Example: 2.5 g / 2 = 1.25 g.
1 For changing the value, press «+» to scroll up or «–» to scroll
down. Progressing speed by press and hold.
2 Press « » to confirm the value.
Note: The default values of control limit and the warning limit are evaluated according the GWP recommenda
tion. These are based under the assumption that the weighing process tolerance is 0.1% and the safety factor
is 2.
On completion of the setting procedure, your balance is ready for
the routine test procedure.
Note: The test weight must be acclimatized to the ambient tempera
ture of the balance.
1 Press « » to start the test.
2 Follow the instructions on the display. If the test weight value is
flashing: Load the test weight (displayed value).
The printout starts after the weighing pan is unloaded.
Exit the current test procedure:
– Press and hold « » for executing a new application.
Printout:
What if Warning Limit or Control Limit are "FAILED"?
The "SOP for Periodic Sensitivity Tests (Routine Tests)" provides information about measures when routine tests
fail. Find a download version of these SOPs on www.mt.com/gwp, link "GWP® The Program / Routine Opera
tion".
Content of SOP:
●
Preparation
●
Test procedure
58 Applications
Page 59

●
Evaluation
●
Deviation
•
If Warning Limit "FAILED"
•
If Control Limit "FAILED"
59Applications
Page 60

7.10Application "Diagnostics"
The "Diagnostics" application allows you to carry out predefined diagnostics tests and to
view or print predefined sets of balance information. This diagnostics tool helps you find
errors faster and more efficiently.
Requirement: A printer or a PC is connected to the balance for showing the results.
1 Activate "ADVANCE." menu. (See section menu operation)
2 Activate function "DIAGNOS." by pressing « ».
3 Use « » to select appropriate tests.
7.10.1Repeatability Test
The repeatability test allows you to repeat tests with internal weight for a given number of times.
Note: On models with internal weights only.
1 Press « » to activate repeatability test "REPEAT.T". "R.TST. 10" appears on the Display.
2 Enter the number of times (blinking) by pressing «+» or «–». Possible values are 5, 10 (default), 20, 50,
100 times.
3 Press « » to start the test. The message "RUNNING REPEAT TEST" is displayed till the tests are completed.
4 Press « » to print the test information..
5 Press « » to scroll forward through the displayed list.
6 Press «C» to cancel the test procedure. The balance will return to the topic "DIAGNOS.".
Sample Information Displayed:
Displayed for 0.5 s Display
"S DEV" * 0.004 g
"MAX.TEMP" 21.2 °C
"MIN.TEMP" 21.0 °C
"AVG.TEMP" 21.1 °C
"TOT.TIME" 00:01:26
60 Applications
Page 61

Sample Printout:
-- Repeatability Test --
21.Jan 2010 11:34
METTLER TOLEDO
Balance Type JP4002G
SNR 1234567890
SW V1.00
Temperature 21.3 °C
No. of tests 10
------------------------
1. Time 00:00:00
1. Temp 21.3 °C
2. Time 00:00:04
2. Temp 21.3 °C
.
.
.
-----------------------s Dev 0.004 g
Max Temp 21.3 °C
Min Temp 21.3 °C
Mean Temp 21.3 °C
Total Time 00:00:44
------------------------
Examples:
Repeatability test is a tool to do functional check with the balance. It may be performed:
●
To check function of balance
•
•
•
●
To develop the optimal environment settings (see menu topic "ENVIRON.").
Measure the time you need to perform repeatability test with each "STABLE", "STD." and "UNSTAB." setting.
The setting with the fastest total time suits best for the existing environmental conditions.
7.10.2Display Test
The display test allows you to test the display of the balance.
1 Press « » to start "DISPLAY".
All possible segments and icons on the display will illuminate.
2 Press « » to print the test information.
3 Press «C» to cancel the test procedure. The balance will return to the topic "DIAGNOS.".
during installation to store print out with installation documents.
after preventative maintenance to store print out with installation maintenance report.
when remarkable decrease of weighing performance occurs, so that you can email/fax print out to service
support provider for diagnose purposes.
61Applications
Page 62

Sample Printout:
----- Display Test -----
21.Jan 2010 11:34
METTLER TOLEDO
Balance Type JP703C
SNR 1234567890
SW V1.00
Display Test DONE
------------------------
------- Key Test -------
21.Jan 2010 11:34
METTLER TOLEDO
Balance Type JP703C
SNR 1234567890
SW V1.00
1/10 d Key OK
Print Key OK
Minus Key OK
Plus Key OK
Toggle Key OK
Enter Key OK
Zero/Tare Key OK
Cancel Key OK
------------------------
7.10.3Key Test
The key test allows you to test the keys of the balance.
1 Press « » to start "KEYPAD.T".
2 The message "KEY TEST - PRESS KEY TO BE TESTED" is displayed scrolling during the duration of the key
test. Press every Key briefly. Each press of a key beeps and echoes with "OK” on the display.
3 Second press «C» key to print the test information. The test procedure will be cancelled and the balance will
return to the topic "DIAGNOS.". If a key has not been tested before printing, then the test results will be indi
cated with a "----" line.
Sample Information Displayed:
Key Display
« » 1/10.D.OK
« » PRINT.OK
«–» MINUS.OK
«+» PLUS OK
« » TOGGL.OK
« » ENTER.OK
«C» C OK
« » 0/T OK
Sample Printout:
62 Applications
Page 63

7.10.4Motor Test
------ Motor Test ------
21.Jan 2010 11:34
METTLER TOLEDO
Balance Type JP703C
SNR 1234567890
SW V1.00
Motor Test OK
------------------------
The motor test allows you to test the calibration motor of the balance.
Note: On models with internal weight only.
1 Press « » to start "CAL.MOT.T".
"RUNNING" is displayed during the Motor Test. A motor test is deemed successful when all the motor posi
tions have been successfully tested. At the end of the test, the test information will be printed.
2 Press « » for printout.
3 Press «C» to cancel the test procedure. The balance will return to the topic "DIAGNOS.".
Sample Printout:
7.10.5Balance History
The balance history function allows you to view and print the history of the balance.
1 Press « » to start "BAL.HIST" .
2 Press « » to scroll forward through the displayed list of balance history information.
3 Press « » for printout.
4 Press «C» to cancel the test procedure. The balance will return to the topic "DIAGNOS.".
Sample Information Displayed:
Information Display
Operation Time (year:day:hour) 00:018:04
Total load kg (t) 115.7191 kg
Number of weighings 1255
Number of key pressed 4931
Number of motor movements 1012
Backlight time (year:day:hour) 00:018:04
Next service due date 01:01:10
63Applications
Page 64

Sample Printout:
--- Statistical Info ---
21.Jan 2010 11:34
METTLER TOLEDO
Balance Type JP4002G
SNR 1234567890
SW V1.00
-----------------------Operating time 18d 23h
Total weight loaded
115.7191 kg
Number of weighings
1255
Number of key presses
4931
Motor movements
1012
Backlight operating time
18d 4h
Next service due date
01.01.2010
------------------------
7.10.6Calibration History
The "Calibration History" function allows you to view and print information of the last 30 (thirty) balance adjust
ment. Adjustments made by a service technician and normal user are counted together.
1 Press « » to start "CAL.HIST".
2 Press « » for printout.
3 Press « » key to scroll forward through the displayed list of Adjustments history information.
4 Press «C» to cancel the test procedure. The balance will return to the topic "DIAGNOS.".
Sample Information Displayed:
64 Applications
Note Display
05:03:S S = External adjusted service
-3 PPM
04:03:II = Internal adjusted
2 PPM
·
·
·
03:03:II = Internal adjusted
-1 PPM
02:03:EE = External adjusted user
4 PPM
02:03:II = Internal adjusted
1 PPM
01
02
·
·
·
28
29
30
Page 65

Sample Printout:
----- Calibration ------
05.Mar 2010 11:34
METTLER TOLEDO
Balance Type JP204C
SNR 1234567890
-----------------------01 05.Mar 2010 11:34
External ADJ SERVICE
23.5°C
Diff -3ppm
-----------------------02 04.Mar 2010 09:00
Internal ADJ
22.4°C
Diff 2ppm
-----------------------.
.
.
28 03.Mar 2010 10:59
Internal ADJ
22.6°C
Diff -1ppm
-----------------------29 02.Mar 2010 16:34
External ADJ USER
24.6°C
Diff 4ppm
-----------------------30 02.Mar 2010 18:36
Internal ADJ
22.4°C
Diff 1ppm
------------------------
7.10.7Balance Information
The balance information function allows you to view and print information about your balance.
1 Press « » to start "BAL.INFO".
2 Press « » for printout.
3 Press « » to scroll forward through the displayed list of Balance information.
4 Press «C» to cancel the test procedure. The balance will return to the topic "DIAGNOS.".
Sample information displayed:
Balance type TYPE ML4002
Max. load MAX 4200 g
Software platform PLATFORM RAINBOW
Serial number SNR 1234567890
Type definition number TDNR 9.6.3.411
Software version SOFTWARE V1.00
Cell ID CELL ID 1172400044
Cell type CELL TYPE MMAI4000G2
Tolerance revision number TOLERANCE NO2
Information Display
65Applications
Page 66

Information Display
-- Balance Information -
05.Mar 2010 11:34
METTLER TOLEDO
Balance Type JP4002G
SNR 1234567890
SW V1.00
Max. Load 4200 g
Platform Rainbow
TDNR 9.6.3.411
Cell ID 1172400044
Cell Type MMAI4000G2
Tolerance Rev.no. 2
Language English
------------------------
--- Service Provider ---
21.Jan 2009 11:34
METTLER TOLEDO
Im Langacher
CH-8606 Greifensee
Switzerland
(+41) 044 944 22 11
------------------------
Language ENGLISH
Sample Printout:
7.10.8Service Provider Information
The service provider Information function allows you to print information about your service provider.
1 Press « » to start "SRV.PROV". The service provider information will be displayed.
2 Press « ». The service provider information will be printed and the balance will return to the topic "DIAG
NOS.".
Sample Printout:
66 Applications
Page 67

8Communication with Peripheral Devices
8.1Function PC-Direct
The numerical value displayed at the balance can be transferred to the cursor position in Windows Applications
(e.g. Excel, Word) as by typing with the keyboard.
Note: The units will not be transferred.
Requirements
●
PC with Microsoft Windows® operating system (Version 98, 98SE, ME, NT4.0, 2000, XP) and serial inter
face RS232.
●
Windows Application (e.g. Excel).
●
Balance to PC connection with cabel RS232 (e.g. No. 11101051 see chapter accessories).
●
Balance Interface Setting (see Interface Menu):
•
Topic "RS232": set "PC-DIR." and select the most appropriate option for the desired weighing result.
•
Save changes.
Settings at the PC
Note:
●
With all country-specific keyboards, in which the "Shift" key must be pressed for entering numbers, "Caps
Lock" must be activated for transferring of correct data (e.g. with french keyboards).
●
The following examples are based on Windows XP.
1 Click "start".
2 Click "ControlPanel".
3 Click "Accessibility Options" in the Control Panel.
Accessibility Option
1 Click "General" Tab.
2 Enter a check mark at "Use Serial Keys".
3 Click "Settings".
Settings for SerialKeys
1 Select the serial port to be used for connection with the balance.
2 Set the baud rate to 9600
3 Click "OK".
67Communication with Peripheral Devices
Page 68

Complete the settings
1 Click "Apply" when active (wait until active).
2 Click "OK" .
Note: If the "serial key" is enabled, applications that use the same port may not function correctly. Remove the
check mark from the check box "Use Serial Keys" to disable serial key function.
Checking Operation
1 Start Excel (or another application) at the PC.
2 Activate a cell in Excel.
According to your selected "PC-DIR." option, the displayed values will appear in the column one after the other
one in the different rows.
68 Communication with Peripheral Devices
Page 69

9Firmware (Software) Updates
METTLER TOLEDO is continuously improving its balance firmware (software) for the benefit of customers. So
that the customer can benefit quickly and easily from further developments, METTLER TOLEDO makes the latest
firmware versions available on the Internet. The firmware made available on the Internet has been developed
and tested by Mettler-Toledo AG using processes that meet the guidelines of ISO 9001. Mettler-Toledo AG does
not, however, accept liability for consequences that might arise from using the firmware.
9.1Operating Principle
You will find all the relevant information and updates for your balance on the METTLER TOLEDO website at the
following address:
www.mettler-toledo-support.com
A program known as the "e-Loader II" is loaded onto your computer together with the firmware update. You
can use this program to download the firmware to the balance. The "e-Loader II" can also save the settings in
your balance before the new firmware is downloaded to it. You can reload the saved settings into the balance
manually or automatically after the software is downloaded.
If the selected update includes an application that is not described in these instructions (or that has been updat
ed in the meantime) you can download the corresponding instructions in Adobe Acrobat® PDF format.
Requirements
The minimum requirements for obtaining applications from the Internet and downloading them into your bal
ance are as follows:
●
PC with Microsoft Windows® operating system (Version 98, 98SE, ME, NT4.0, 2000, XP or Vista).
●
Internet connection and web browser (e.g. MS Internet Explorer).
●
PC to balance connection cable (e.g. No. 11101051 see chapter accessories)
9.2Update Procedure
Installing the "e-Loader II" software from the Internet onto the PC.
1 Connect to the Internet.
2 Go to the site "www.mettler-toledo-support.com".
3 Enter the information required for registration on the METTLER TOLEDO Balance Support Site.
4 Click the "Customer Support" link and log in.
5 Click your Balance.
6 Click the firmware version you need and install it.
Loading the new firmware into the balance.
– Start the "e-Loader II" and follow the instructions, which will take you step-by-step through the installation.
69Firmware (Software) Updates
Page 70

10Error and Status Messages
10.1Error Messages
Error messages in the display draw your attention to incorrect operation or that the balance could not execute a
procedure properly.
Error Message Cause Rectification
NO STABILITY No stability. Ensure more stable ambient condi
tions. If not possible, check settings
for environment.
WRONG ADJUSTMENT WEIGHT Wrong adjustment weight on pan
or none at all.
REFERENCE TOO SMALL Reference for piece counting too
small.
EEPROM ERROR - PLEASE CON
TACT CUSTOMER SERVICE
WRONG CELL DATA - PLEASE CON
TACT CUSTOMER SERVICE
NO STANDARD ADJUSTMENT PLEASE CONTACT CUSTOMER SER
VICE
PROGRAM MEMORY DEFECT PLEASE CONTACT CUSTOMER SER
VICE
TEMP SENSOR DEFECT - PLEASE
CONTACT CUSTOMER SERVICE
WRONG LOAD CELL BRAND PLEASE CONTACT CUSTOMER SER
VICE
WRONG TYPE DATA SET - PLEASE
CONTACT CUSTOMER SERVICE
BATTERY BACKUP LOST - CHECK
DATE TIME SETTINGS
INITIAL ZERO RANGE EXCEEDED Wrong weighing pan or pan is not
BELOW INITIAL ZERO RANGE Wrong weighing pan or pan is
MEM.FULL Memory full. Clear the memory and start a new
FACTOR OUT OF RANGE Factor is outside the allow range. Select a new factor.
STEP OUT OF RANGE Step is outside the allow range. Select a new step.
OUT OF RANGE Sample weight is outside the allow
EEPROM (memory) error. Please contact METTLER TOLEDO
Wrong cell data. Please contact METTLER TOLEDO
No standard calibration. Please contact METTLER TOLEDO
Program memory defect. Please contact METTLER TOLEDO
Temperature sensor defect. Please contact METTLER TOLEDO
Wrong load cell brand. Please contact METTLER TOLEDO
Wrong type data set. Please contact METTLER TOLEDO
Backup battery is empty. This bat
tery ensures that the date and time
are not lost when the balance is
disconnected from power.
Overload - The weight on the pan
exceeds the weighing capacity of
the balance.
Underload Check that the weighing pan is
empty.
missing.
range.
Place required adjustment weight in
center of pan.
Increase reference weight.
customer service.
customer service.
customer service.
customer service.
customer service.
customer service.
customer service.
Connect the balance to the power
supply for charging the battery
(e.g. during the night) or contact
METTLER TOLEDO customer ser
vice.
Reduce the weight on the weighing
pan.
positioned correctly.
Mount correct weighing pan or
unload weighing pan.
Mount correct weighing pan.
evaluation.
Unload the pan and load a new
sample weight.
10.2Status Messages
Status messages are displayed by means of small icons. The status icons indicate the following:
70 Error and Status Messages
Page 71

Status Icon Signification
Service Reminder Your balance is due for servicing. Contact your dealer's customer
service department as soon as possible to have a technician service your balance. (See
menu topic "SRV.ICON")
71Error and Status Messages
Page 72

11Cleaning and Service
Every now and then, clean the weighing pan, draft shield element, bottom plate, draft shield (depending on the
model) and housing of your balance. Your balance is made from high-quality, durable materials and can
therefore be cleaned using a damp cloth or with a standard, mild cleaning agent.
Please observe the following notes:
●
The balance must be disconnected from the power supply
●
Ensure that no liquid comes into contact with the balance or the AC adapter.
●
Never open the balance or AC adapter – they contain no components, which can be
cleaned, repaired or replaced by the user.
●
On no account use cleaning agents which contain solvents or abrasive ingredients, as
this can result in damage to the operation panel overlay.
●
Do not use wet, but only damp cloth for cleaning.
Please contact your METTLER TOLEDO dealer for details of the available service options. Reg
ular servicing by an authorized service engineer ensures constant accuracy for years to come
and prolongs the service life of your balance.
72 Cleaning and Service
Page 73

12Interface Specification
15
9 6
IN
GND
OUT
HAND
SHAKE
IN
DATA
OUT
RxD
TxD
CTS
RTS
OUT
POWER
SUPPLY
+12V
2nd display mode only
12.1RS232C Interface
Each balance is equipped with an RS232C Interface COM1 as standard for the attachment of a peripheral
device (e.g. printer or computer).
Schematic Item Specification
Interface type Voltage interface according to EIA
RS-232C/DIN66020 CCITT V24/V.28)
Max. cable length 15 m
Signal level Outputs:
+5 V … +15 V (RL = 3–7 kΩ)
–5 V … –15 V (RL = 3–7 kΩ)
Inputs:
+3 V … +25 V
–3 V … -25 V
Connector Sub-D, 9-pole, female
Operating mode Full duplex
Transmission mode Bit-serial, asynchronous
Transmission code ASCII
Baud rates 600, 1200, 2400, 4800, 9600, 19200,
38400 (software selectable)
Bits/parity 7-bit/none, 7-bit/even, 7-bit/odd, 8-bit/none
(software selectable)
Stop bits 1 stop bit
Handshake None, XON/XOFF, RTS/CTS (software selectable)
End-of-line <CR><LF>, <CR>, <LF> (software selectable)
Power supply for
2nd display
+ 12 V, max 40 mA (software selectable, 2nd
display mode only)
Note: The second interface COM2 if present, has no power supply on Pin 9 for a 2nd display.
12.2MT-SICS Interface Commands and Functions
Many of the balances and scales used have to be capable of integration in a complex computer or data acqui
sition system.
To enable you to integrate balances in your system in a simple manner and utilize their capabilities to the full,
most balance functions are also available as appropriate commands via the data interface.
All new METTLER TOLEDO balances launched on the market support the standardized command set "METTLER
TOLEDO Standard Interface Command Set" (MT-SICS). The commands available depending on the functionality
of the balance.
Basic information on data interchange with the balance
The balance receives commands from the system and acknowledges the command with an appropriate
response.
Command formats
Commands sent to the balance comprise one or more characters of the ASCII character set. Here, the following
must be noted:
●
Enter commands only in uppercase.
●
The possible parameters of the command must be separated from one another and from the command
name by a space (ASCII 32 dec., in this description represented as ).
73Interface Specification
Page 74

●
The possible input for "text" is a sequence of characters of the 8-bit ASCII character set from 32 dec to 255
dec.
●
Each command must be closed by CRLF (ASCII 13 dec., 10 dec.). The characters CRLF, which can be
inputted using the Enter or Return key of most entry keypads, are not listed in this description, but it is
essential they be included for communication with the balance.
Example
S – Send stable weight value
Command S Get the current stable net weight value.
Response S S WeightValue Unit Current stable weight value in unit actually set
under unit 1.
S I Command not executable (balance is currently
executing another command, e.g. taring, or
timeout as stability was not reached).
S + Balance in overload range.
S - Balance in underload range.
Example
Command S Query a stable weight value.
Response S S 100.00 g The current stable weight value is 100.00 g.
The available MT-SICS commands are listed in the table (depending on the model). For further information
please refer to the Reference Manual "MT-SICS 11780711" downloadable from the Internet under
www.mt.com/sics-newclassic.
Description Description
@ Cancel (Reset) M46 Print interval
C0 Query/Set adjustment settings PW Piece counting: Query/Set piece weight
C1 Start adjustment according to current set
tings
PWR Power on/off (PWR 0 means switch off
completely, if balance is powered by bat
tery)
C2 Start adjustment with external weight S Send stable weight value
C3 Start adjustment with internal weight SI Send weight value immediately
D Display text sent to balance SIR Send weight value immediately and repeat
DAT Date query/set SIRU Send weight value with currently displayed
unit immediately and repeat
DW Display weight SIU Send weight value with currently displayed
unit immediately
I0 Commands implemented SM0 Dynamic weighing: cancel all SMx com
mands
I1 MT-SICS level and MT-SICS versions SM1 Dynamic weighing: Start immediately and
send the result
I2 Balance data SM2 Dynamic weighing: start after a minimum
load is exceeded and send result
I3 Software version, type definition number SM3 Dynamic weighing: start after a minimum
load is exceeded, send result and repeat
I4 Query serial number (SNR) SM4 Dynamic weighing: query/set time interval
I5 Query SW-identification number SNR Send stable weight value and repeat on
weight change
I10 Query/set balance ID SNRU Send stable weight valuewith currently dis
played unit and repeat on weight change
I11 Query balance type SR Send weight value on weight change
I14 Query balance information SRU Send stable weight value with currently dis
played unit on weight change
74 Interface Specification
Page 75

Description Description
K Keys: set configuration ST Send stable weight value on pressing (print)
key
M02 Query/set environment SU Send stable weight value with currently dis
played unit
M03 Query/set AutoZero T Tare
M08 Display brightness TA Get/Set tare weight value
M09 Display contrast TAC Clear tare value
M11 Beeper: Query/set volume TI Tare immediately
M14 List available language TIM Query/set time
M15 Query/set language TST0 Query/set test function settings
M17 FACT: query/set single time criteria (no pos
sibility to set "weekday"
M22 Custom unit definition
Remarks: no possibility to set "name" of
unit
M25 Get application list TST3 Start test function with internal weight
M26 Get/set current application UPD Query/set update rate of the host interface
M27 Adjustment history Z Zero
M30 +/- settings with nominal and tolerance ZI Zero immediately
TST1 Start test function according to current set
tings
TST2 Start test function with external weight
75Interface Specification
Page 76

13Technical Data
13.1General Data
Power Supply
• AC operation:
• Battery operation: 8 standard AA (LR6) batteries (alkaline) for 8–15 hours of use.
Protection and Standards
• Overvoltage category: Class III
• Degree of pollution: 2
• Degree of Protection: Protected against dust and water: IP54 in use with weighing pan.
• Standards for safety and EMC: See Declaration of Conformity
• Range of application: For use only in dry interior rooms
Environmental conditions
• Height above mean sea level: up to 4000 m
• Ambient temperature range: 10 to 30 °C
• Relative air humidity: 10% to 80 % at 31 °C, linearly decreasing to 50 % at 40 °C, non
Materials
• Housing: Top Housing: Plastic (ABS)
• Weighing pan: Stainless steel X2CrNiMo 17-12-2 (1.4404)
• Draft shield element: with 0.1 mg models: Stainless steel X2CrNiMo 17-12-2 (1.4404)
• Draft shield: Plastic (ABS), glass
• In-use-cover: Plastic (ABS)
AC/DC Adapter
Primary: 100V–240V, 50/60Hz, 0.3 A
Secondary: 12VDC, 0.84A (with electronic overload protection)
Power supply to the balance: 8–20VDC, 10W
Use only with a tested AC Adapter with SELV output current.
Ensure correct polarity
condensing
Bottom housing: Die-cast aluminum, lacquered
13.2Model-Specific Data
13.2.1Carat Balances with Readability of 0.001 ct
Technical Data
Model JP703C JS703C JP1203C
Maximum load 700 ct / 140 g 700 ct / 140 g 1200 ct / 240 g
Readability 0.001 ct / 0.0001 g 0.001 ct / 0.0001 g 0.001 ct / 0.0001 g
Taring range 0...700 ct 0...700 ct 0...1200 ct
Repeatability (sd) 0.001 ct / 0.0001 g 0.001 ct / 0.0001 g 0.001 ct / 0.0001 g
Linearity 0.001 ct / 0.0002 g 0.001 ct / 0.0002 g 0.001 ct / 0.0003 g
Sensitivity temperature drift (10...30°C) 1.5 ppm/°C 1.5 ppm/°C 1.5 ppm/°C
Internal adjustment yes, FACT yes yes, FACT
Adjustment range with external weights 50...140 g 50...140 g 100...240 g
Weights for routine testing
Large Weight/Class OIML/ASTM
Small Weight/Class OIML/ASTM
Minimum weight (acc. to USP) 0.3 g 0.3 g 0.3 g
Minimum weight (U=1%, k=2) 0.02 g 0.02 g 0.02 g
76 Technical Data
100 g / F2/4
5 g / E2/2
100 g / F2/4
5 g / F1/3
200 g / F2/4
10 g / F1/3
Page 77

Model JP703C JS703C JP1203C
Minimum weight (OIML) 0.01 g 0.01 g 0.01 g
Settling time, typ. 2 s 2 s 3 s
Weighing technology MonoBloc MonoBloc MonoBloc
Interface RS232C 2 (COM1, COM2) 1 (COM1) 2 (COM1, COM2)
Usable height of draft shield [mm] 165 165 235
Weighing pan dimensions (WxD) [mm] Ø 90 Ø 90 Ø 90
Balance dimensions (WxDxH) [mm] 193x290x266 193x290x266 193x290x331
Net Weight [kg] 3.6 3.4 4.1
Technical Data
Model JS1203C JP1603C JS1603C
Maximum load 1200 ct / 240 g 1600 ct / 320 g 1600 ct / 320 g
Readability 0.001 ct / 0.0001 g 0.001 ct / 0.0001 g 0.001 ct / 0.0001 g
Taring range 0...1200 ct 0...1600 ct 1600 ct
Repeatability (sd) 0.001 ct / 0.0001 g 0.001 ct / 0.0001 g 0.001 ct / 0.0001 g
Linearity 0.001 ct / 0.0003 g 0.002 ct / 0.0003 g 0.002 ct / 0.0003 g
Sensitivity temperature drift (10...30°C) 1.5 ppm/°C 1.5 ppm/°C 1.5 ppm/°C
Internal adjustment yes yes, FACT yes
Adjustment range with external weights 100...240 g 100...320 g 100...320 g
Weights for routine testing
Large Weight/Class OIML/ASTM
Small Weight/Class OIML/ASTM
Minimum weight (acc. to USP) 0.3 g 0.3 g 0.3 g
Minimum weight (U=1%, k=2) 0.02 g 0.02 g 0.02 g
Minimum weight (OIML) 0.01 g 0.01 g 0.01 g
Settling time, typ. 2 s 2 s 2 s
Weighing technology MonoBloc MonoBloc MonoBloc
Interface RS232C 1 (COM1) 2 (COM1, COM2) 1 (COM1)
Usable height of draft shield [mm] 235 235 235
Weighing pan dimensions (WxD) [mm] Ø 90 Ø 90 Ø 90
Balance dimensions (WxDxH) [mm] 193x290x331 193x290x331 193x290x331
Net Weight [kg] 3.9 4.1 3.9
200 g / F2/4
10 g / E2/2
200 g / F2/4
10 g / F1/3
200 g / F2/4
10 g / F1/3
13.2.2Gold Balances with Readability of 0.001 g
Technical Data
Model JP303G JS303G
Maximum load 320 g 320 g
Readability 0.001 g 0.001 g
Taring range 0...320 g 0...320 g
Repeatability (sd) 0.001 g 0.001 g
Linearity 0.002 g 0.002 g
Sensitivity temperature drift (10...30°C) 3 ppm/°C 3 ppm/°C
Internal adjustment (external weight) yes, FACT yes
Adjustment range with external weights 100...320 g 100...320 g
Weights for routine testing
Large Weight/Class OIML/ASTM
Small Weight/Class OIML/ASTM
Minimum weight (acc. to USP) 3 g 3 g
Minimum weight (U=1%, k=2) 0.2 g 0.2 g
Minimum weight (OIML) 0.02 g 0.02 g
Settling time, typ. 1.5 s 1.5 s
200 g / F2/4
20 g / F1/3
200 g / F2/4
20 g / F1/3
77Technical Data
Page 78

Model JP303G JS303G
Weighing technology MonoBloc MonoBloc
Interface RS232C 2 (COM1, COM2) 1 (COM1)
Usable height of draft shield [mm] 165 165
Weighing pan dimensions (WxD) [mm] Ø 120 Ø 120
Balance dimensions (WxDxH) [mm] 193x290x266 193x290x331
Net Weight [kg] 4.2 4.2
Technical Data
Model JP503G JS503G
Maximum load 520 g 520 g
Readability 0.001 g 0.001 g
Taring range 0...520 g 0...520 g
Repeatability (sd) 0.001 g 0.001 g
Linearity 0.002 g 0.002 g
Sensitivity temperature drift (10...30°C) 3 ppm/°C 3 ppm/°C
Internal adjustment (external weight) yes, FACT yes
Adjustment range with external weights 200...520 g 200...520 g
Weights for routine testing
Large Weight/Class OIML/ASTM
Small Weight/Class OIML/ASTM
Minimum weight (acc. to USP) 3 g 3 g
Minimum weight (U=1%, k=2) 0.2 g 0.2 g
Minimum weight (OIML) 0.02 g 0.02 g
Settling time, typ. 1.5 s 1.5 s
Weighing technology MonoBloc MonoBloc
Usable height of draft shield [mm] 165 165
Weighing pan dimensions (WxD) [mm] Ø 120 Ø 120
Balance dimensions (WxDxH) [mm] 193x290x266 193x290x331
Net Weight [kg] 4.2 4.2
500 g / F2/4
20 g / F1/3
500 g / F2/4
20 g / F1/3
13.2.3Gold Balances with Readability of 0.01 g
Technical Data
Model JP802G JS802G
Maximum load 820 g 820 g
Readability 0.01 g 0.01 g
Taring range 0...820 g 0...820 g
Repeatability (sd) 0.01 g 0.01 g
Linearity 0.02 g 0.02 g
Sensitivity temperature drift (10...30°C) 3 ppm/°C 3 ppm/°C
Internal adjustment yes, FACT yes
Adjustment range with external weights 100...820 g 100...820 g
Weights for routine testing
Large Weight/Class OIML/ASTM
Small Weight/Class OIML/ASTM
Minimum weight (acc. to USP) 30 g 30 g
Minimum weight (U=1%, k=2) 2 g 2 g
Minimum weight (OIML) 0.5 g 0.5 g
Settling time, typ. 1.5 s 1.5 s
Weighing technology MonoBloc MonoBloc
Interface RS232C 2 (COM1, COM2) 1 (COM1)
Weighing pan dimensions (WxD) [mm] 170x190 170x190
500 g / F2/4
20 g / F2/4
500 g / F2/4
20 g / F2/4
78 Technical Data
Page 79

Model JP802G JS802G
Balance dimensions (WxDxH) [mm] 184x290x84 184x290x84
Net Weight [kg] 3.6 3.4
Technical Data
Model JP2002G JS2002G
Maximum load 2200 g 2200 g
Readability 0.01 g 0.01 g
Taring range 0...2200 g 0...2200 g
Repeatability (sd) 0.01 g 0.01 g
Linearity 0.02 g 0.02 g
Sensitivity temperature drift (10...30°C) 3 ppm/°C 3 ppm/°C
Internal adjustment yes, FACT yes
Adjustment range with external weights 1000...2200 g 1000...2200 g
Weights for routine testing
Large Weight/Class OIML/ASTM
Small Weight/Class OIML/ASTM
Minimum weight (acc. to USP) 30 g 30 g
Minimum weight (U=1%, k=2) 2 g 2 g
Minimum weight (OIML) 0.5 g 0.5 g
Settling time, typ. 1.5 s 1.5 s
Weighing technology MonoBloc MonoBloc
Weighing pan dimensions (WxD) [mm] 170x190 170x190
Balance dimensions (WxDxH) [mm] 184x290x84 184x290x84
Net Weight [kg] 3.6 3.4
2000 g / F2/4
100 g / F2/4
2000 g / F2/4
100 g / F2/4
Technical Data
Model JP3002G JS3002G
Maximum load 3200 g 3200 g
Readability 0.01 g 0.01 g
Taring range 0...3200 g 0...3200 g
Repeatability (sd) 0.01 g 0.01 g
Linearity 0.02 g 0.02 g
Sensitivity temperature drift (10...30°C) 3 ppm/°C 3 ppm/°C
Internal adjustment yes, FACT yes
Adjustment range with external weights 1000...3200 g 1000...3200 g
Weights for routine testing
Large Weight/Class OIML/ASTM
Small Weight/Class OIML/ASTM
Minimum weight (acc. to USP) 30 g 30 g
Minimum weight (U=1%, k=2) 2 g 2 g
Minimum weight (OIML) 0.5 g 0.5 g
Settling time, typ. 1.5 s 1.5 s
Weighing technology MonoBloc MonoBloc
Weighing pan dimensions (WxD) [mm] 170x190 170x190
Balance dimensions (WxDxH) [mm] 184x290x84 184x290x84
Net Weight [kg] 3.6 3.4
Technical Data
Model JP4002G JS4002G
Maximum load 4200 g 4200 g
Readability 0.01 g 0.01 g
Taring range 0...4200 g 0...4200 g
2000 g / F2/4
100 g / F2/4
2000 g / F2/4
100 g / F2/4
79Technical Data
Page 80

Model JP4002G JS4002G
Repeatability (sd) 0.01 g 0.01 g
Linearity 0.02 g 0.02 g
Sensitivity temperature drift (10...30°C) 3 ppm/°C 3 ppm/°C
Internal adjustment yes, FACT yes
Adjustment range with external weights 2000...4200 g 2000...4200 g
Weights for routine testing
Large Weight/Class OIML/ASTM
Small Weight/Class OIML/ASTM
Minimum weight (acc. to USP) 30 g 30 g
Minimum weight (U=1%, k=2) 2 g 2 g
Minimum weight (OIML) 0.5 g 0.5 g
Settling time, typ. 1.2 s 1.2 s
Weighing technology MonoBloc MonoBloc
Weighing pan dimensions (WxD) [mm] 170x190 170x190
Balance dimensions (WxDxH) [mm] 184x290x84 184x290x84
Net Weight [kg] 3.6 3.4
Technical Data
Model JP6002G JP6002G
Maximum load 6200 g 6200 g
Readability 0.01 g 0.01 g
Taring range 0...6200 g 0...6200 g
Repeatability (sd) 0.01 g 0.01 g
Linearity 0.02 g 0.02 g
Sensitivity temperature drift (10...30°C) 3 ppm/°C 3 ppm/°C
Internal adjustment yes, FACT yes
Adjustment range with external weights 2000...6200 g 2000...6200 g
Weights for routine testing
Large Weight/Class OIML/ASTM
Small Weight/Class OIML/ASTM
Minimum weight (acc. to USP) 30 g 30 g
Minimum weight (U=1%, k=2) 2 g 2 g
Minimum weight (OIML) 0.5 g 0.5 g
Settling time, typ. 1.2 s 1.2 s
Weighing technology MonoBloc MonoBloc
Weighing pan dimensions (WxD) [mm] 170x190 170x190
Balance dimensions (WxDxH) [mm] 184x290x84 184x290x84
Net Weight [kg] 3.3 3.1
2000 g / F2/4
200 g / F2/4
5000 g / F2/4
200 g / F2/4
2000 g / F2/4
200 g / F2/4
5000 g / F2/4
200 g / F2/4
13.2.4Gold Balances with Readability of 0.1 g
Technical Data
Model JP8001G JS8001G
Maximum load 8200 g 8200 g
Readability 0.1 g 0.1 g
Taring range 0...8200 g 0...8200 g
Repeatability (sd) 0.1 g 0.1 g
Linearity 0.2 g 0.2 g
Sensitivity temperature drift (10...30°C) 5 ppm/°C 5 ppm/°C
Internal adjustment yes, FACT yes
Adjustment range with external weights 2000...8200 g 2000...6200 g
80 Technical Data
Page 81

Model JP8001G JS8001G
Weights for routine testing
Large Weight/Class OIML/ASTM
Small Weight/Class OIML/ASTM
Minimum weight (acc. to USP) 300 g 300 g
Minimum weight (U=1%, k=2) 20 g 20 g
Minimum weight (OIML) 5 g 5 g
Settling time, typ. 1 s 1 s
Weighing technology MonoBloc MonoBloc
Interface RS232C 2 (COM1, COM2) 1 (COM1)
Weighing pan dimensions (WxD) [mm] 170x190 170x190
Balance dimensions (WxDxH) [mm] 184x290x84 184x290x84
Net Weight [kg] 3.3 3.1
5000 g / F2/4
200 g / F2/4
5000 g / F2/4
200 g / F2/4
81Technical Data
Page 82

13.3Dimensions
134
54
216
19
156
163
144
290
184
193
70
83
185
78
ø 90
169
(165)
266
C
126
97
13.3.1Carat Balances with Readability of 0.001ct
Models:
JP703C
JS703C
JP1203C
JS1203C
JP1603C
JS1603C
82 Technical Data
Page 83

13.3.2Gold Balances with Readability of 0.001 g
134
54
216
19
156
163
144
290
184
193
70
85
185
78
ø 120
169
(165)
266
C
126
97
Models:
JP303G
JS303G
JP503G
JS503G
83Technical Data
Page 84

13.3.3Gold Balances with Readability of 0.01 g
167
200
54
70
84
184
203
170
144
190
290
200
87
180
C
Models:
JP802G
JS802G
JP2002G
JS2002G
JP3002G
JS3002G
JP4002G
JS4002G
JP6002G
JS6002G
84 Technical Data
Page 85

13.3.4Gold Balances with Readability of 0.1 g
167
200
54
70
84
184
170
144
190
203
290
87
C
Models:
JP8001G
JS8001G
85Technical Data
Page 86

14Accessories and Spare Parts
14.1Accessories
Description Part No.
Carat Pans
Carat pan XS, Ø 50 mm / heigh 20 mm (set of 10 units) 12102565
Carat pan S, Ø 80 mm / heigh 20 mm (set of 10 units) 12102645
Carat pan M, Ø 90 mm / heigh 30 mm (set of 10 units) 12102646
Density Determination
Carat pan L, Ø 90 mm / heigh 45 mm (set of 10 units) 12102647
Density kit ML-DNY-43 for NewClassic ML Balances
(d=0.1mg/1mg)
Glass beaker, height 100 mm, Ø 60 mm 00238167
Sinker for density of liquids in conjunction with Density Kit 00210260
Calibrated (sinker + certificate) 00210672
Recalibrated (new certificate) 00210674
11142144
86 Accessories and Spare Parts
Page 87

Calibrated thermometer with certificate 11132685
METTLER TOLEDO
000000
Draft Shields
Draft shield ML-DS-21 for models with readability of 0.1g up
to 0.01g.
Printers
RS-P28/11 printer with RS232C connection to balance (with
date, time and applications
Cables for RS232C Interface
RS9 – RS9 (m/f): connection cable for PC, length = 1 m 11101051
12121015
11124309
Auxiliary Displays
RS9 – RS25 (m/f): connection cable for PC, length = 1 m 11101052
RS9 – RS9 (m/m): connection cable for devices with DB9 (f)
21250066
socket, length = 1 m
RS232 - USB converter – intelligent expansion module for con
11103691
nection to PC
RS232 auxiliary display AD-RS-J7 12122380
87Accessories and Spare Parts
Page 88

Power Supplies
AC/DC universal adapter (EU, USA, AU, UK) 100–240 VAC,
50/60HZ, 0.3 A, 12 VDC 0.84 A
11120270
Protective Covers
Anti-theft Devices
PowerPac-M-12V, for mains independent operation of bal
ances, 12 VDC/1 A
Protective cover for models with draft shield "165/235 mm" 12122030
Protective cover for models with square weighing pan 12122031
Steel cable 11600361
12122363
Software
Adjustment Weights
88 Accessories and Spare Parts
LabX direct balance (simple data transfer) 11120340
OIML / ASTM Weights (with calibration certificate) see www.mt.com/weights
Page 89

14.2Spare Parts
C
4
3
2
1
9
8
10
5
7
6
C
8
7
9
6
5
3
2
1
4
Carat Balances with Readability of 0.001ct
Drawing Pos Description Part No.
1 Weighing pan Ø 90 mm 12122010
2 Pan support 12122042
3 Draft shield element 12122043
4 Bottom plate 12122044
5 Side glass door low 12122089
6 Top glass door 12122033
7 Pair of handles 12122035
8 Leveling foot 12122040
9 Battery-chamber cover 12122041
10 Weighing below balance cap 12122029
Gold Balances with Readability of 0.001g
Drawing Pos Description Part No.
Weighing pan Ø 90 mm 12122010 1
Weighing pan Ø 120 mm 12122037
2 Pan support Ø 120 mm 12122045
3 Bottom plate 12122044
4 Side glass door low 12122089
5 Top glass door 12122033
6 Pair of handles 12122035
7 Leveling foot 12122040
8 Battery-chamber cover 12122041
9 Weighing below balance cap 12122029
89Accessories and Spare Parts
Page 90

Balances with readability of 10 mg with square weighing pan and draft shield element
C
1
2
3
4
6
5
7
C
1
2
5
4
6
3
Drawing Pos Description Part No.
1 Weighing pan 170 mm x 190 mm 12122048
2 Pan support 12122049
3 Draft shield element 12122050
4 Pan support cap 11131029
5 Leveling foot 12122040
6 Battery-chamber cover 12122041
7 Weighing below balance cap 12122029
Balances with readability of 0.1 g with square weighing pan
Drawing Pos Description Part No.
1 Weighing pan 170 mm x 190 mm 12122048
2 Pan support 12122049
3 Pan support cap 11131029
4 Leveling foot 12122040
5 Battery-chamber cover 12122041
6 Weighing below balance cap 12122029
90 Accessories and Spare Parts
Page 91

15Appendix
15.1Conversion Table for Weight Units
Kilogram 1 kg = 1000.0 g 1 g = 0.001 kg
Milligram 1 mg = 0.001 g 1 g = 1000.0 mg
Microgram 1 µg = 0.000001 g 1 g = 1000000.0 µg
Carat 1 ct = 0.2 g 1 g = 5.0 ct
Pound 1 lb = 453.59237 g 1 g 0.00220462262184878 lb
Ounce (avdp) 1 oz = 28.349523125 g 1 g 0.0352739619495804 oz
Ounce (troy) 1 ozt = 31.1034768 g 1 g 0.0321507465686280 ozt
Grain 1 GN = 0.06479891 g 1 g 15.4323583529414 GN
Pennyweight 1 dwt = 1.55517384 g 1 g 0.643014931372560 dwt
Momme 1 mom = 3.75 g 1 g 0.266666666666667 mom
Mesghal 1 msg 4.6083 g 1 g 0.217 msg
Tael Hong Kong 1 tlh = 37.429 g 1 g 0.0267172513291833 tlh
Tael Singapore
(Malaysia)
Tael Taiwan 1 tlt = 37.5 g 1 g 0.0266666666666667 tlt
Tola 1 tola = 11.6638038 g 1 g 0.0857353241830079 tola
Baht 1 baht = 15.16 g 1 g 0.0659630606860158 baht
15.2Recommended Printer Settings
1 tls 37.7993641666667 g 1 g 0.0264554714621853 tls
Printer Balance Balance / Printer
Model Char Set Char Set Baudrate Bit / Parity Stop Bits Handshake End of Line
RS-
IBM/DOS IBM/DOS 9600 8/NO 1 Xon/Xoff <CR><LF>
P25/26/28
RS-
IBM/DOS
1)
IBM/DOS 1200 8/NO 1 Xon/Xoff <CR><LF>
P42/43/45
1)
Printer settings not available.
1)
1)
91Appendix
Page 92

16Index
A
AC operation 16
Adjustment 18, 28, 28
Advanced menu 24
Advanced Menu 28
Ambient conditions 15
Appendix 91
Application “Check Weighing” 40
Application “Density” 51
Application “Diagnostics” 30, 60
Application “Division Factor
Weighing”
Application “Multiplication Factor
Weighing”
Application “Percent Weighing” 38
Application “Piece Counting” 36
Application “Routine Test” 57
Application “Statistics” 43
Application “Totaling” 45
Application “Weighing” 21
Application icons 11
Assign Application 30
Auto print 33
Automatic adjustment 18
Automatic shutoff 29
Automatic zero setting 30
Autozero 30
B
Backlight 30
Balance history 63
Balance information 65
Basic menu 24, 26
Battery operation 16
Baudrate 34
Beep 27, 27
Bit/Parity 34
C
Calibration 18, 28
Calibration history 64
Cancel 26
Change settings 25, 25
Char Set 35
Check Weighing 40
Cleaning 72
Closing the menu 25
Control Limit 58
Conventions and symbols 7
Conversion table for weight units 91
D
Data communication format 33
Date 26
Date format 28
Delivery inspection 13
49
47
Density 51
Density kit 51
Density table for distilled water 55
Density table for ethanol 56
Diagnose 30
Diagnostics 60
Diagnostics application 30
Display 32
Display panel 11
Display test 61
Disposal 8
Distilled Water 55
Division Factor Weighing 49
Draft Shield 13, 72
E
End of Line 35
Environment 28
Error messages 70
ethanol 56
External weight 19
F
FACT 18, 28, 28
Factor Weighing 47, 49
Firmware update 69
Fully automatic adjustment 18, 28
Function PC-Direct 67
G
Good Weighing Practice 57
GWP 57, 58
H
Handshake 35
Header 32
Host 32
I
Icons 11
Input principle 25
Installing the components 13
Interface menu 24, 31, 31
Interface MT-SICS commands
and functions
Interface RS232C 31, 73
Internal weight 18
Interval 35
Introduction 7
K
Key assign 30
Key beep 27
Key functions 10
Key test 62
L
Leveling the balance 15
Line feed 33
73
Index92
Page 93

Liquid 51
Liquids 53
Location 15
M
Main Menu 26
Manual adjustment with external
weight
Manual adjustment with internal
weight
Menu 24, 26
Menu Advanced 24, 28
Menu Basic 24, 26
Menu Interface 24, 31, 31
Menu operation 25
Menu protection 26
Menu topic 25, 25, 26
Motor test 63
MT-SICS interface commands
and functions
Multiplication Factor Weighing 47
N
Net 22
Numerical values 25
O
Operation keys 10
P
PC-DIR 31
PC-Direct 67
Percent Weighing 38
Performing a simple weighing 22
Piece Counting 36
Power supply 16
Print 23
Printer 31
Printer Settings 91
Protect 26
Protocol trigger 28
Q
Quickstart 21, 29
R
Recall 23, 29
Repeatability test 60
Reset 27
Routine Test 57
RS232C interface 31, 73
S
Safety precautions 8
Saving settings 25
Select menu 25
Select menu topic 25
Selecting the location 15
Service 31, 31, 72
19
18
73
Service date reset 31
Service icon 31
Service provider information 66
Service reminder 31
Setting up the balance 13
Shutoff 21, 29
Signature line 32
Single 32
Sinker 51, 53
Software update 69
Solids 51
SOP 58
Spare parts 89
Stability beep 27
Startup 21, 29
Statistics 43
Status icons 11
Status messages 70
Stop bit 34
Submenu 25
Switching the balance on and off 21
Switching weight units 22
Symbols and conventions 7
T
Taring 22
Technical data general 76
Technical data model-specific 76
Time 26
Time format 29
Topic 25, 25, 26
Totaling 45
Transmit data 23
Transporting the balance 17
U
Unit 27, 27
Unpacking 13
W
Warning Limit 58
Weighing below the balance 17
Weighing made simple 21
Weighing-in aid 23
Weight unit 22, 27, 27, 91
Z
Zero print 33
Zero range 30
Zero setting 22
Zeroing 30
Index 93
Page 94

Page 95

Page 96

Mettler-Toledo AG, Laboratory & Weighing Technologies
CH-8606 Greifensee, Switzerland
Tel. +41 (0)44 944 22 11
Fax +41 (0)44 944 30 60
www.mt.com
www.mt.com/jewelry
For more information
Subject to technical changes.
© Mettler-Toledo AG 02/2011
11781452 2.12
*11781452*
 Loading...