

Page 1
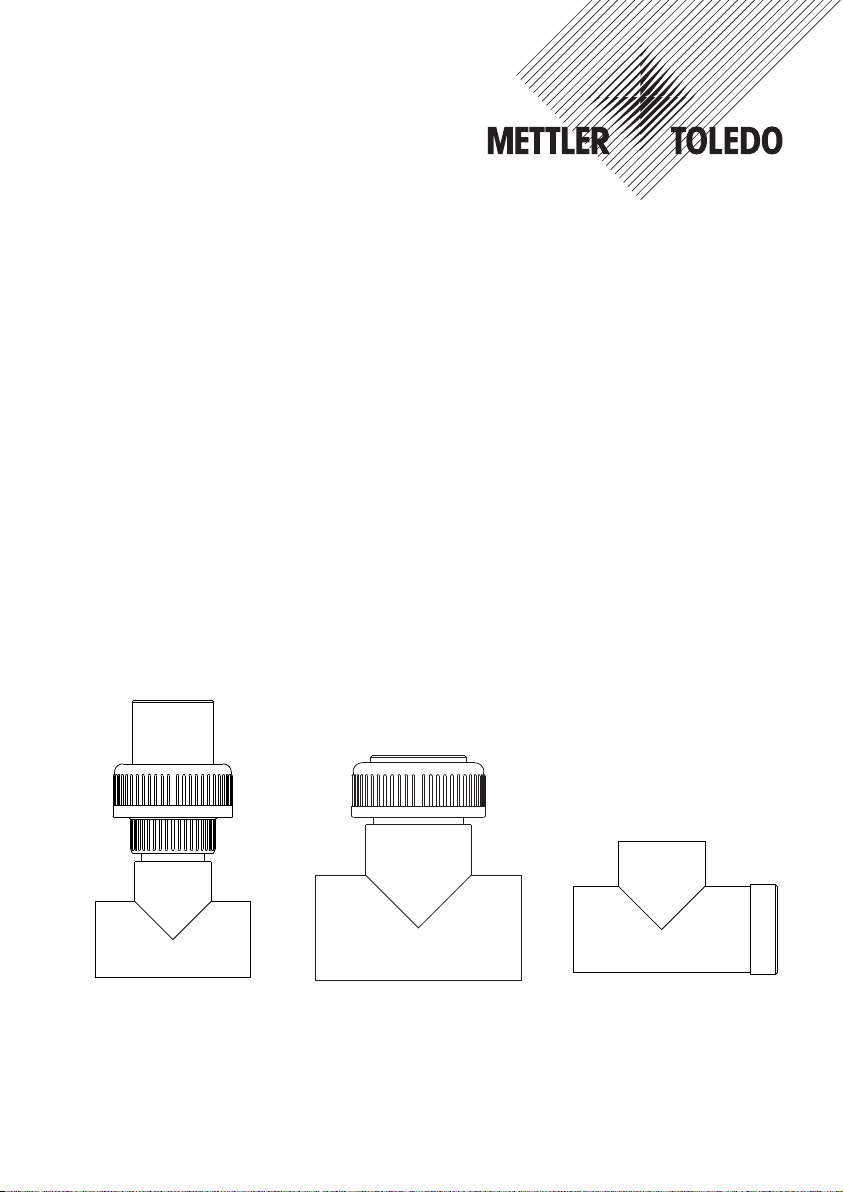
InFlow 751
Instruction manual
Bedienungsanleitung
Instructions d’utilisation
InFlow 751
52 400 740
Page 2

2 InFlow 751
English Page 3
Deutsch Seite 9
Français Page 15
© 04/17 Mettler-Toledo GmbH, CH-8902 Urdorf InFlow 751
Printed in Switzerland 52 400 740
Page 3

InFlow 751 3
InFlow 751
Instruction manual
Contents
Page
1. Introduction 3
1.1 Conventions 3
2. Important notes 3
2.1 General 3
2.2 Safety precautions 3
3. Description of product and materials 4
4. Installation and start up procedures 4
4.1 Fitting the sensor into the housing 4
4.2 Installation of the housing 4
4.3 Checking for correct installation 6
5. Maintenance 6
6. Product specification 6
6.1 Supply 6
6.2 Technical specification 6
7. Accessories 6
8. Warranty 6
9. Housing dimensions 7
InFlow is a registered trademark
of the METTLER TOLEDO Group in Switzerland.
Viton is a registered trademarks
of DuPont Performance Elastomers LLC.
All other trademarks
are the property of their respective holders.
1. Introduction
These operating instructions describe how to
use the housings
These housings are state of the art, highgrade engineered products, tested by
METTLER TOLEDO.
Nevertheless, improper handling could be
dangerous.
InFlow®751.
1.1 Conventions
This pictogram represents safety and
a
hazard warnings which, if ignored could
result in injuries to personnel and/or
in material damage.
2. Important notes
2.1 General
Immediately on receipt, check that the housing is complete and in good condition.
Notify your supplier of any damage or deficiency. Please also refer to your supplier for
further information on the ordering of spare
parts and accessories.
2.2 Safety precautions
Safety and hazard warnings could, if
ignored, result in injuries to personnel
and/or material damage.
Important!
a
Work on the housing should be assigned
only to trained personnel.
– Observe local regulations concerning
the safety of people and property.
– Be sure to read and follow the instruc-
tions in this operating leaflet carefully.
– The InFlow 751 housings are designed
to contain only METTLER TOLEDO
sensors. Any other kind of use could
be dangerous and is not permitted.
© 04/17 Mettler-Toledo GmbH, CH-8902 Urdorf InFlow 751
Printed in Switzerland 52 400 740
Page 4

4 InFlow 751
– The materials used for the housing are
described in Section 3, «Description of
product and materials».
Make sure the materials are suitable
for the required application.
– To ensure that the housing is correctly
installed and maintained, follow the instructions given in this leaflet.
– Incorrect handling of the housing can
result in a broken sensor and leakage
from the vessel.
– Before doing anything to the installed
housing, ensure that the process
facility is in a safe condition (release
pressure, empty, rinse, vent, purge,
etc.).
– Use only clean sensors, housings and
sockets. Replace any damaged seals
and housing components immediately.
– Before starting up, always check the
measuring system. Inspect the housing/sensor assembly and check for
leaks from housing and apparatus.
– If ever in doubt, consult your supplier.
3. Description of product and
materials
The insertion housings InFlow 751 serve as
enclosures for METTLER TOLEDO sensors
used for pH, redox and dissolved oxygen,
conductivity and turbidity measurements,
particularly in industrial waste water.
All parts of the housing in contact with the
process (wetted parts) are made of PVC, or
PVDF according to order specification.
O-rings in contact with the process medium
are made of
Viton®.
4. Installation and start up
procedures
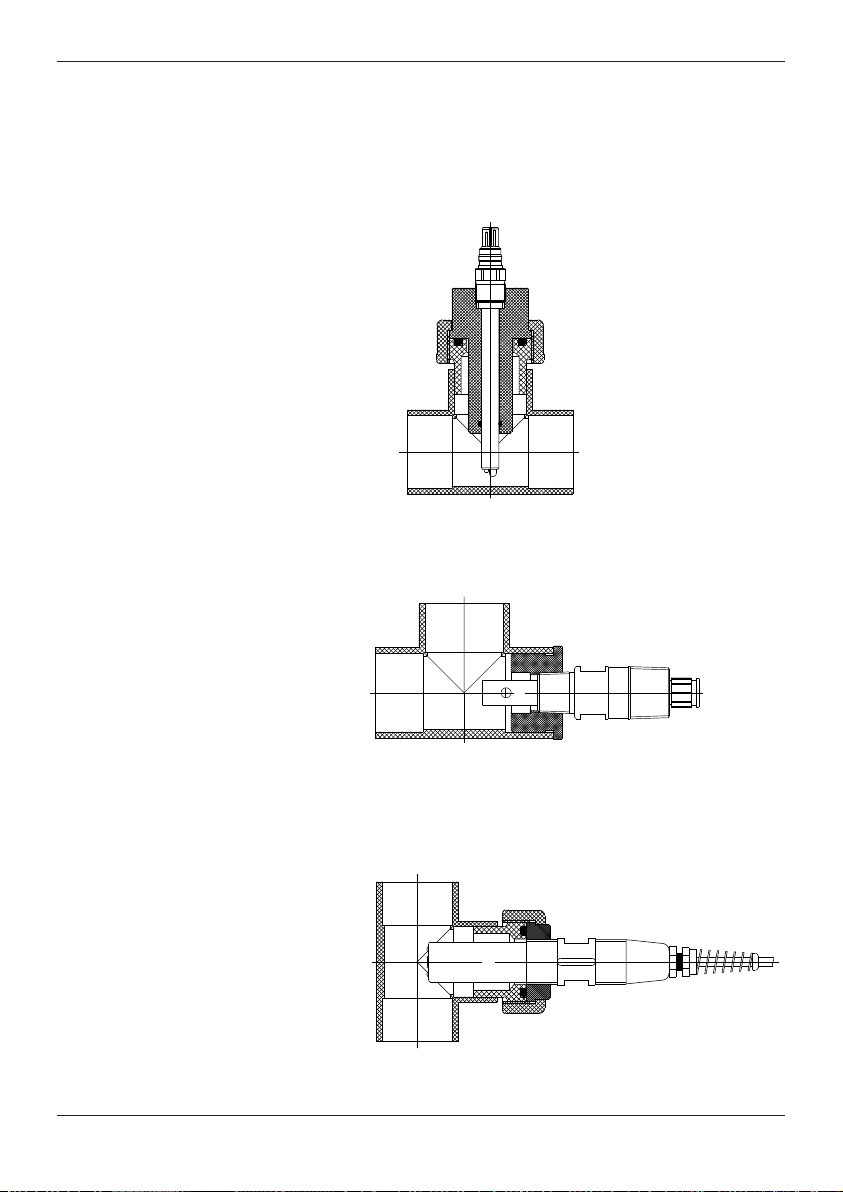
The housing is delivered completely assembled. To fit the sensor, and to install the
housing proceed as follows:
4.1. Fitting the sensor into the housing
(see figure 1)
When installing 12 mm sensors with
PG13.5 ensure that the white (PTFE-)
washer is positioned directly beneath the
12 mm sensor head, with the tapered
(chamfered) face pointing downwards.
Then follows the O-ring.
Screw the sensor with Pg13.5 or NPT1"
thread hand-tight into the housing.
Put the housing into the T-piece and tighten
the cap nut.
Screw the sensor with NPT ¾" thread laterally directly into the T-piece.
Connect the cable socket to the sensor.
For the removal of the sensor, carry out the
above procedure in the reverse order
4.2 Installation of the housing
The housing can be directly fixed to the pipe
by means of a bonding agent (PVC) or by
welding (PVDF)
For installation of the InFlow 751 in a pipe,
please follow th instructions of the pipe supplier.
© 04/17 Mettler-Toledo GmbH, CH-8902 Urdorf InFlow 751
Printed in Switzerland 52 400 740
Page 5
InFlow 751 5
Figure 1
Sensor/electrode with Pg13.5 thread
mounted in an InFlow 751.
Sensor with a NPT ¾" thread
mounted in an InFlow 751.
Electrode with a NPT 1" thread
mounted in an InFlow 751
© 04/17 Mettler-Toledo GmbH, CH-8902 Urdorf InFlow 751
Printed in Switzerland 52 400 740
Page 6

6 InFlow 751
4.3 Checking for correct installation
Important ! Each time before starting up,
a
check the measuring system, inspect the
sensor assembly and examine for leaks
from housing and apparatus.
Do not begin operation until the measuring system has been checked and any
necessary corrective action taken.
5. Maintenance
The sensor, housing and socket must be
kept clean. Replace any damaged seals or
components immediately.
Details on maintenance of the sensor are
contained in the sensor operating instructions.
Attention: Before mounting the housing,
a
it is imperative to clean and grease the
O-rings with anti-seize.
Important: It is advisable that all O-rings
a
are replaced periodically.
6. Product Specification
6.1 Supply
A standard delivery comprises the following
items:
– Housing Type InFlow 751
– Operating instructions
6.2 Technical specification
Temperature PVC 0...60 °C
range: PVDF 0...100 °C
Pressure PVC
range: PVC 1 bar/60°C (14.5 psig /140°F)
Material: All wetted parts made of PVC or PVDF
Dimensions: see chapter 9
4 bar/45°C (58 psig/113°F)
PVDF 4 bar /75°C (58 psig/167°F)
PVDF 1 bar /100°C (14.5 psig/212°F)
according to order specification.
Seals made of Viton.
For further details on sensors, see sensor
data sheets or ask the supplier of your
housing.
7. Spare parts
Articles Order-No.
Electrode holder PVC d=32 52 400 653
Electrode holder PVC d=50 52 400 654
Electrode holder PVDF d=63 52 400 658
8. Warranty
The housings are of high technical quality
and undergo a policy of continuous design
review to incorporate the latest advances.
Their reliability is ensured by a thorough final inspection prior to leaving our factory.
The warranty is valid for one year from the
date of delivery and covers any defects due
to faulty materials or manufacture.
Not covered by the warranty are normal
wear and tear and any damage caused by
improper use (e.g. chemical incompatibility
of the materials, etc.).
The warranty extends only to replacement or
repair of deficient products, at our discretion.
The warranty is void if the customer or others modify in any way the products
supplied by us. Defects must be reported to
the supplier immediately upon discovery,
and, under all circumstances, within the
warranty period.
© 04/17 Mettler-Toledo GmbH, CH-8902 Urdorf InFlow 751
Printed in Switzerland 52 400 740
Page 7
InFlow 751 7
Pg 13.5
a
b
b
d
1" NPT
a
d
b
b
d
b
3/4" NPT
a
b
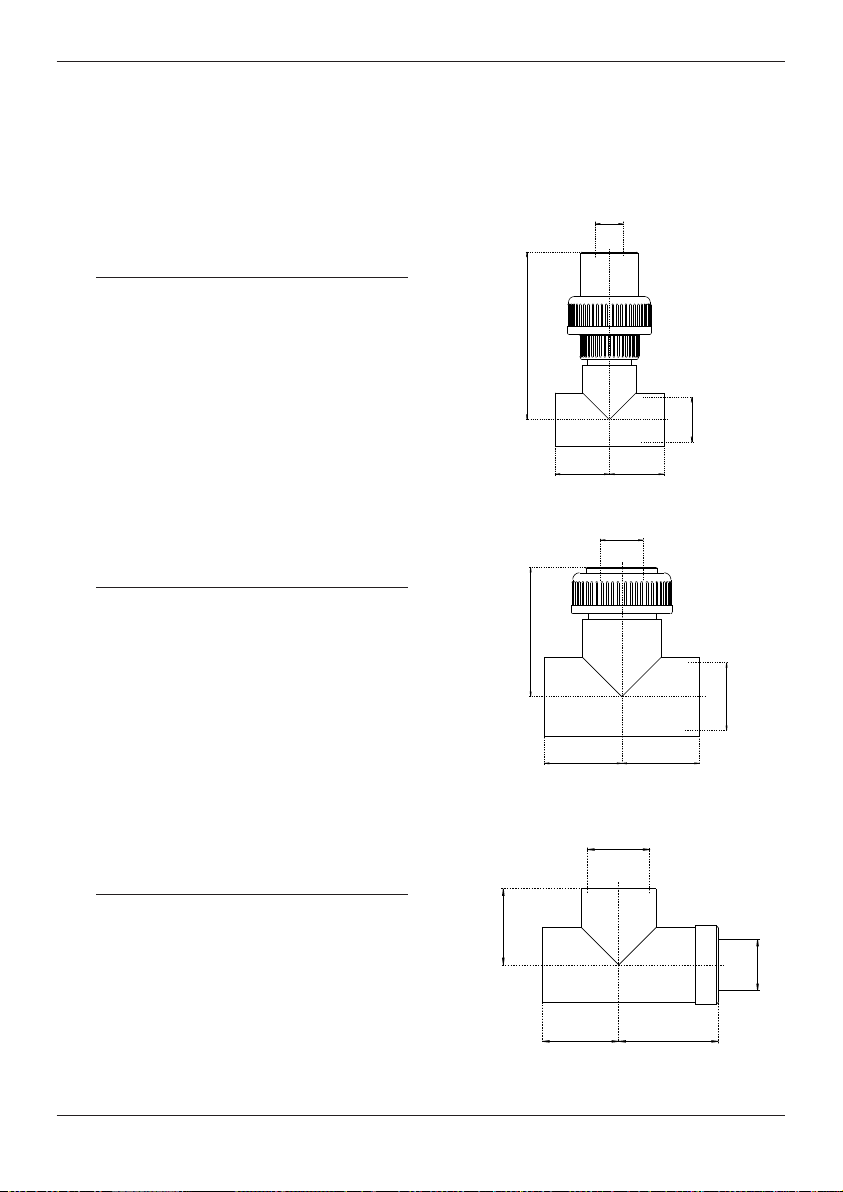
9. Housing Dimensions
Pg13.5
dabab
DN25 32 120 39 120 38
DN40 50 113 57 113 51
DN50 63 107.5 71 106.5 62
1" NPT
dabab
DN40 50 93 57 88 51
DN50 63 108 71 102 62
¾" NPT
dabab
DN25 32 51 39 51 38
DN40 50 63 57 63 51
DN50 63 77 71 77 62
© 04/17 Mettler-Toledo GmbH, CH-8902 Urdorf InFlow 751
Printed in Switzerland 52 400 740
Page 8

8 InFlow 751
© 04/17 Mettler-Toledo GmbH, CH-8902 Urdorf InFlow 751
Printed in Switzerland 52 400 740
Page 9

InFlow 751 9
InFlow 751
Bedienungsanleitung
Inhalt
Seite
1. Einleitung . . . . . . . . . . . . . . . . . . . . . . . .9
1.1 Vereinbarung . . . . . . . . . . . . . . . . . .9
2. Wichtige Hinweise . . . . . . . . . . . . . . . . . . 9
2.1 Allgemeines . . . . . . . . . . . . . . . . . . .9
2.2 Sicherheitshinweise . . . . . . . . . . . . . . 9
3. Produkte- und Materialbeschreibung . . . . 10
4. Installation und Inbetriebnahme . . . . . . . 10
4.1 Einbau der Elektrode . . . . . . . . . . . . 10
4.2 Einbau der Armatur . . . . . . . . . . . . .12
4.3 Prüfen der korrekten Installation . . . . 12
5. Wartung . . . . . . . . . . . . . . . . . . . . . . .12
6. Produktspezifikation . . . . . . . . . . . . . . . . 12
6.1 Lieferumfang . . . . . . . . . . . . . . . . . 12
6.2 Technische Spezifikationen . . . . . . . . 12
7. Zubehör . . . . . . . . . . . . . . . . . . . . . . . . 12
8. Garantiebestimmungen . . . . . . . . . . . . . . 12
9. Dimensionszeichnungen der Armatur . . . . 13
InFlow ist eine eingetragene Handelsmarke
der Mettler-Toledo Gruppe.
Viton ist eine eingetragene Handelsmarke von
DuPont Performance Elastomers LLC.
Alle anderen Markenzeichen sind Eigentum
der jeweiligen Halter.
1. Einleitung
Diese Betriebsanleitung beschreibt die Handhabung der Einbauarmatur
Die Armaturen sind geprüfte, technisch
hochwertige Produkte und entsprechen dem
Stand der Technik.
Ein fehlerhafter Umgang kann dennoch gefährlich sein.
InFlow®751.
1.1 Vereinbarung
Dieses Piktogramm kennzeichnet Sicher-
a
heits- und Gefahrenhinweise, deren Missachtung zu Personen- und/oder Sachschäden führen kann.
2. Wichtige Hinweise
2.1 Allgemeines
Überprüfen Sie die Armatur nach Erhalt sofort auf Vollständigkeit und einwandfreien
Zustand.
Melden Sie allfällige Schäden oder Unvollständigkeit Ihrem Lieferanten. Für weitere
Auskünfte betreffend Bestellungen von Ersatzteilen und Zubehör, wenden Sie sich
bitte ebenfalls an Ihren Lieferanten.
2.2 Sicherheitshinweise
Die Missachtung von Sicherheits- und
Gefahrenhinweisen kann zu Personen- und/
oder Sachschäden führen.
Wichtig!
a
Übertragen Sie Arbeiten an den Armaturen nur dafür qualifiziertem Personal.
– Beachten Sie alle lokalen Vorschriften
betreffend der Sicherheit von Personen
und Sachen.
– Sorgen Sie dafür, daß die Instruktionen
dieser Bedienungsanleigung gelesen
und eingehalten werden.
© 04/17 Mettler-Toledo GmbH, CH-8902 Urdorf InFlow 751
Printed in Switzerland 52 400 740
Page 10

10 InFlow 751
– Die Armaturen dienen ausschließ-
lich zum Einbau von durch METTLER
TOLEDO spezifizierten Elektroden und
Sensoren. Ein anderwertigen Einsatz
kann gefährlich sein und ist nicht zulässig.
– Achten Sie beim Einsatz der Armatur,
daß diese betreffend der Materialbeständigkeit den Anforderungen des
Prozeßes genügt (siehe Kapitel 3
«Produkte- und Materialbeschreibung».)
– Folgen Sie für den korrekten Einbau der
Armatur und die korrektre Handhabung
und Unterhaltsarbeit den Anweisungen
– Fehlmanipulationen an der Armatur
können zum Bruch der Elektrode/des
Sensors und zu einer Leckage des
Reaktors führen.
– Bringen Sie die Prozeßanlage in einen
gefahrlosen Zustand bevor Sie an
der Armatur manipulieren (drucklos
machen, entleeren, spülen, entlüften,
ventilieren usw.).
– Verwenden Sie nur gereinigte Elektro-
den/Sensoren, Armaturen und Stutzen.
Ersetzen Sie beschädigte Dichtungen
und Einzelteile der Armatur sofort.
– Überprüfen Sie vor jeder Inbetriebnah-
me das Meßsystem. Überprüfen Sie
dabei die Meßkette und die Dichtheit
von Armatur und Anlage.
– Wenden Sie sich bei Unklarheiten an
Ihren Lieferanten.
3. Produkte- und Materialbeschreibung
Die Armaturen dienen als Halterung für
METTLER TOLEDO Elektroden und Sensoren
zur Messung von pH, Redox, gelöste Sauerstoff, Leitfähigkeit und Trübung vor allem in
den industriellen Abwasser. Die Armaturen
schützen Elektroden/Sensoren vor mechanischer Beschädigung. Die Steckverbindung
ermöglicht einen einfachen Elektroden-/Sensorenwechsel.
Alle mit dem Prozeß in Berührung kommenden Teile der Armatur sind aus PVC oder
PVDF je nach Ihrer Bestellung. Die mit dem
Prozess in Berührung kommende O-Ringe
sind aus
Viton®.
4. Installation und Inbetriebnahme
Eine Armatur wird als komplette, zusammengebaute Einheit geliefert. Um Elektrode
oder Sensor in die Armatur einzubauen, gehen Sie wie folgt vor:
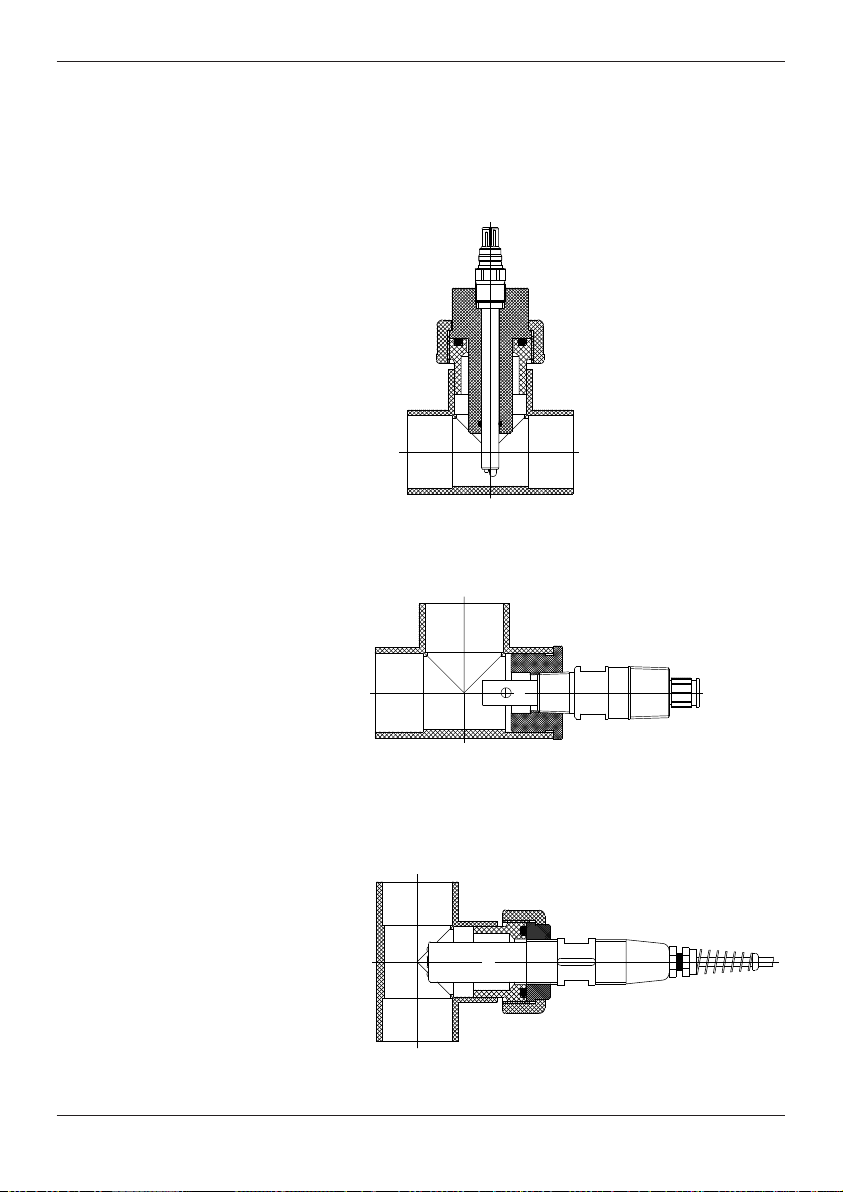
4.1. Einbau der Elektrode oder Sensors in
die Armatur (siehe Abbildung 1)
Für 12 mm Sensoren mit Pg 13.5:
Achten Sie darauf, daß die weiße (PTFE-)
Gleitscheibe direkt unterhalb der 12 mm
Elektroden-/Sensorkopfes positioniert wird,
mit der Abschrägung nach unten geichtet.
Erst dann folgt der O-Ring.
Elektrode oder Sensor mit dem Pg13.5 oder
NPT 1" Gewinde handfest in den Elektrodenhalter einschrauben. Elektrodenhalter in
dem T-Stück mit dem Ueberwurfmutter einschrauben.
Elektrode oder Sensor mit dem NPT ¾" seitlich handfest direkt in dem T-Stück einschrauben.
Kabelbuchse mit der Elektrode/Sensor verbinden.
Der Ausbau der Elektrode erfolgt in umgekehrter Reihe.
4.2 Installation der Armatur
Die Armatur kann direkt in der Rohrleitung
geklebt (PVC) oder angeschweisst (PVDF)
werden. Für den Einbau des METTLER
TOLEDO InFlow in Ihrer Rohrleitung, folgen
Sie bitte der Anleitung Ihres RorhleitungsLieferanten.
© 04/17 Mettler-Toledo GmbH, CH-8902 Urdorf InFlow 751
Printed in Switzerland 52 400 740
Page 11
InFlow 751 11
Abbildung 1
12 mm Sensor/Elektrode mit
Pg 13.5 in einer InFlow 751 eingebaut.
Sensor mit NPT ¾" in einer
InFlow 751 eingebaut.
Elektrode mit NPT 1" in einer
InFlow 751 eingebaut.
© 04/17 Mettler-Toledo GmbH, CH-8902 Urdorf InFlow 751
Printed in Switzerland 52 400 740
Page 12

12 InFlow 751
4.3 Prüfen der korrekten Installation
Wichtig! Überprüfen sie vor jeder Inbe-
a
triebnahme das Meßsystem. Überprüfen
Sie dabei die Meßkette und die Dichtheit
von Armatur und Anlage.
Beginnen Sie mit der Inbetriebnahme erst,
nachdem die Kontrolle des Meßsystems erfolgt ist und die Mängel behoben wurden.
5. Wartung
Elektrode/Sensor, Armatur und Stutzen müssen im sauberen Zustand gehalten werden.
Ersetzen Sie allfällig beschädigte Dichtungen oder Bestandteile sofort.
Angaben über den Unterhalt von Elektroden
und Sensoren sind in den dazugehörigen
Bedienungsanleitungen enthalten.
Wichtig: vor dem Einbau der Armatur
a
müssen unbedingt alle O-Ringe gereinigt
und gefettet werden.
Wichtig! Das periodische Ersetzen aller
a
O-Ringe wird empfohlen.
6. Produktespezifikation
6.1 Lieferumfang
Die Standardlieferung einer Armatur besteht
aus folgenden Teilen:
– Armatur InFlow 751
– Bedienungsanleitung
6.2 Technische Spezifikationen
Temperatur- PVC 0...60 °C
bereich: PVDF 0...100 °C
Druckbereich: PVC
PVC 1 bar/60°C
PVDF 4 bar/75°C
PVDF 1 bar/100°C
Material: Mediumberührte Teile aus PVC oder
PVDF. Dichtungen aus Viton.
Abmessungen: siehe Kapitel 9
4 bar/45°C
Für nähere Angaben über Elektroden und
Sensoren, beachten Sie bitte die entsprechenden Datenblätter, oder wenden Sie
sich an Ihren Armatur-Lieferanten.
7. Erstatzteile
Bezeichnung Bestell-Nr.
Ersatzteilsset
InFlow751 PVC d=32 52 400 653
Ersatzteilsset
InFlow751 PVC d=50 52 400 654
Ersatzteilsset
InFlow751 PVDF d=63 52 400 658
8. Garantiebestimmungen
Die Armaturen sind technisch hochwertig
und verlässlich. Sie werden laufend dem
neuesten Stand der Technik angepasst und
verlassen unsere Produktionsstätten erst
nach eingehender Endkontrolle.
Die Garantie umfasst vom Datum der Auslieferung an gerechnet alle innerhalb eines
Jahres auftretenden Mängel, die ihre Ursache in Material und Produktionsfehler
haben.
Normale Abnutzungserscheinungen oder
Schäden aufgrund unsachgemässem Einsatz (wie chemische Unverträglichkeit, etc.)
fallen nicht unter Garantieleistungen.).
Unsere Garantieleistung beschränkt sich
nach unserer Wahl auf Ersatz oder Reparatur der mangelhaften Produkte.
Die Garantie erlischt, wenn der Kunde oder
Dritte an den von uns gelieferten Produkten
Änderungen vornehmen.
Festgestellte Mängel sind unmittelbar nach
der Feststellung, in jedem Fall innerhalb der
Garantiefrist, dem Lieferanten mitzuteilen.
© 04/17 Mettler-Toledo GmbH, CH-8902 Urdorf InFlow 751
Printed in Switzerland 52 400 740
Page 13
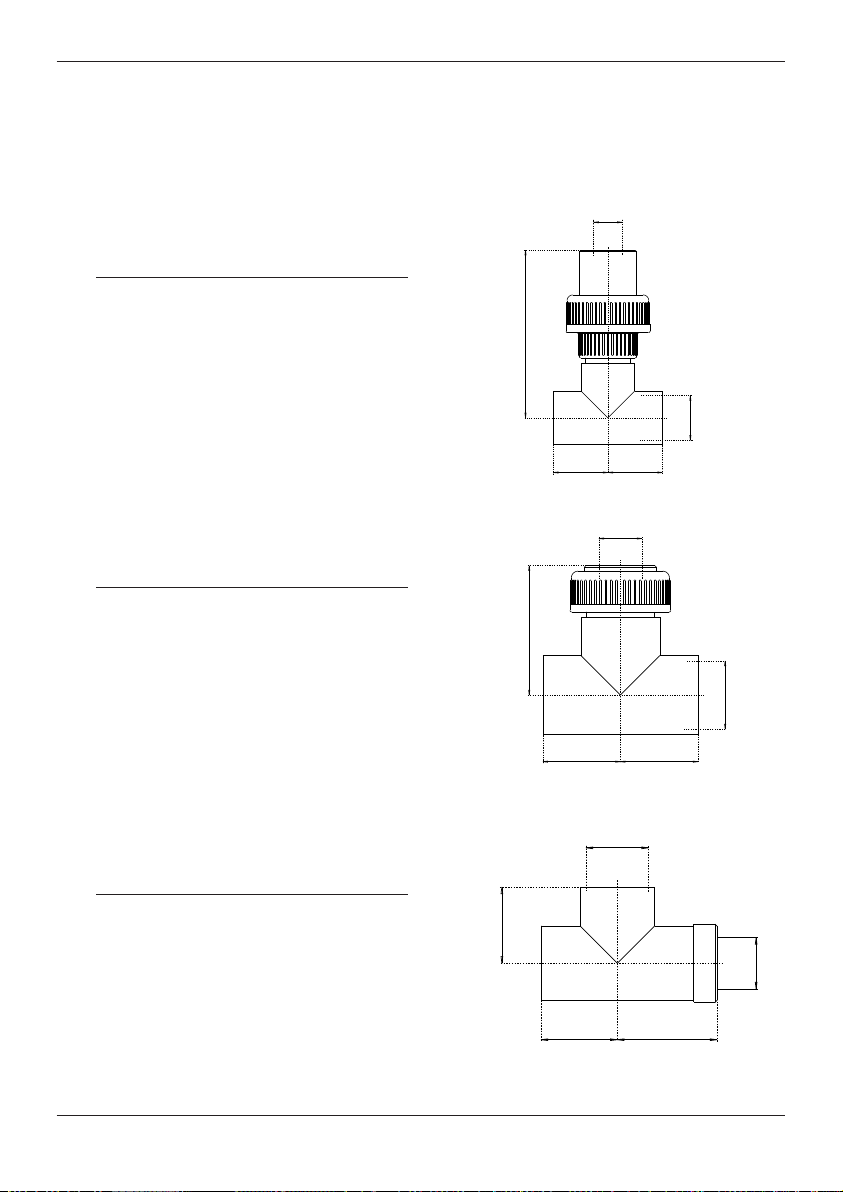
InFlow 751 13
Pg 13.5
a
b
b
d
1" NPT
a
d
b
b
d
b
3/4" NPT
a
b
9. Dimensionszeichnung InFlow
Pg13.5
dabab
DN25 32 120 39 120 38
DN40 50 113 57 113 51
DN50 63 107.5 71 106.5 62
1" NPT
dabab
DN40 50 93 57 88 51
DN50 63 108 71 102 62
¾" NPT
dabab
DN25 32 51 39 51 38
DN40 50 63 57 63 51
DN50 63 77 71 77 62
© 04/17 Mettler-Toledo GmbH, CH-8902 Urdorf InFlow 751
Printed in Switzerland 52 400 740
Page 14

14 InFlow 751
© 04/17 Mettler-Toledo GmbH, CH-8902 Urdorf InFlow 751
Printed in Switzerland 52 400 740
Page 15

InFlow 751 15
InFlow 751
Manuel d’instruction
Table des matières
Page
1. Introduction . . . . . . . . . . . . . . . . . . . . .15
1.1 Conventions . . . . . . . . . . . . . . . . . .15
2. Notes importantes . . . . . . . . . . . . . . . . . 15
2.1 Généralités . . . . . . . . . . . . . . . . . . .15
2.2 Mesures de sécurité . . . . . . . . . . . . . 15
3. Description du produit et matériaux . . . . . 16
4. Procédures d’installation et mise
en marche . . . . . . . . . . . . . . . . . . . . . . 16
4.1 Installation du capteur dans le
support . . . . . . . . . . . . . . . . . . . . . 16
4.2 Installation du support . . . . . . . . . . .16
4.3 Vérification de l’installation . . . . . . . . 18
5. Entretien . . . . . . . . . . . . . . . . . . . . . . . .18
6. Spécifications . . . . . . . . . . . . . . . . . . . . 18
6.1 Fourniture . . . . . . . . . . . . . . . . . . . . 18
6.2 Spécifications techniques . . . . . . . . . 18
7. Accessoires . . . . . . . . . . . . . . . . . . . . . . 18
8. Garantie . . . . . . . . . . . . . . . . . . . . . . . . 18
9. Dimensions du support . . . . . . . . . . . . . 19
InFlow est une marque déposée du
groupe METTLER TOLEDO.
Viton est une marque déposée
de DuPont Performance Elastomers LLC.
Les autres marques déposées sont la propriété
de leurs détenteurs respectifs.
1. Introduction
Ce manuel d’instruction décrit comment
utiliser les supports
Ces supports sont des produits de pointe
d’une grande qualité de conception, testés
par METTLER TOLEDO.
Une mauvaise manipulation pourrait néanmoins être dangereuse.
InFlow®751.
1.1 Conventions
Ce pictogramme représente les avertis-se-
a
ments de sécurité et de danger qui sont
susceptibles d’occasionner des dommages
corporels au personnel et/ou des dommages matériels s’ils sont ignorés.
2. Notes importantes
2.1 Généralités
Dès sa réception, vérifier que le support est
complet et en bon état.
Avertir votre fournisseur de tout dommage
ou défaut. Veuillez aussi vous référer à votre
fournisseur pour de plus amples informations sur la commande de pièces de rechange et d’accessoires.
2.2 Mesures de sécurité
Les avertissements de sécurité et de danger
sont susceptibles d’occasionner des dommages corporels au personnel et/ou des
dommages matériels s’ils sont ignorés.
Important ! Les tâches à effectuer sur le
a
support doivent être uniquement confiées
à du personnel qualifié.
– Respecter les réglementations locales
en matière de sécurité des personnes et
des biens.
– Bien lire et suivre scrupuleusement les
instructions contenues dans cette brochure d’instructions.
© 04/17 Mettler-Toledo GmbH, CH-8902 Urdorf InFlow 751
Printed in Switzerland 52 400 740
Page 16

16 InFlow 751
– Les supports sont destinés à contenir
uniquement des sondes METTLER
TOLEDO ; tout autre type d’utilisation
pourrait être dangereux et n’est pas autorisé.
– Les matériaux utilisés dans le support
sont décrits au chapitre 3, «Description
du produit et des matériaux».
S’assurer que les matériaux sont adaptés à l’application requise.
– S’assurer que le support est convena-
blement installé et entretenu, suivre les
instructions données dans cette brochure.
– Une mauvaise manipulation du support
peut provoquer la rupture d’une électrode et des fuites du milieu.
– S’assurer que l’installation est sûre
avant d’intervenir sur le support, (libérer la pression, vider, rincer, ventiler,
purger, etc.)
– Utiliser uniquement des électrodes ou
des sondes, des supports et des manchons propres. Remplacer immédiatement les pièces et composants du support qui sont endommagés.
– Toujours vérifier le système de mesure
avant la mise en marche. Examiner
l’ensemble support/électrode et rechercher d’éventuelles fuites.
– Consulter votre fournisseur en cas de
doute.
Toutes les parties du support en contact
avec le milieu sont soit en PVC ou PVDF selon le matériel commandé. Tous les joints
toriques sont en
Viton®.
4. Procédures d’installation et de
mise en marche
Le support est livré entièrement monté.
Procéder de la manière suivante pour ins-
taller l’électrode ou la sonde dans le
support.
4.1 Montage de l’électrode ou de la
sonde dans le support
Pour les sondes de diamètre 12 mm avec
Pg13,5: s'assurer que la rondelle PTFE
blanche se trouve directement en dessous
de la tête de l’électrode ou de la sonde, la
partie conique (biseautée) tournée vers le
bas. Le joint torique est placé après la rondelle.
Visser l’électrode ou la sonde avec une
bague Pg13.5 ou un pas NPT 1" à la main
dans l’adapteur. Monter l’adapteur dans la
pièce en T et visser l’écrou-chapeau.
Les électrodes à pas NPT ¾" peuvent être
montées directement dans la pièce en T
(montage sur le côté).
Suivre la procédure en sens inverse pour
démonter l’électrode ou la sonde.
3. Description du produit et des
matériaux
Ces types de supports protègent les électrodes ou les sondes des dommages
mécaniques pour les mesures de pH/ redox, d'oxygène, de conductivité ou de
turbidité, en particulier dans les applications
des eaux industrielles. La connexion
mâle/femelle pour le raccordement du câble
sur la tête de l’électrode simplifie le remplacement de celle-ci.
© 04/17 Mettler-Toledo GmbH, CH-8902 Urdorf InFlow 751
Printed in Switzerland 52 400 740
4.2 Installation du support
Le support peut être directement collé (PVC)
ou soudé (PVDF) sur vos conduites.
Pour le collage ou le soudage des InFlow
751 dans vos conduites, nous vous prions
de consulter la notice du fabriquant des
conduites.
Page 17
InFlow 751 17
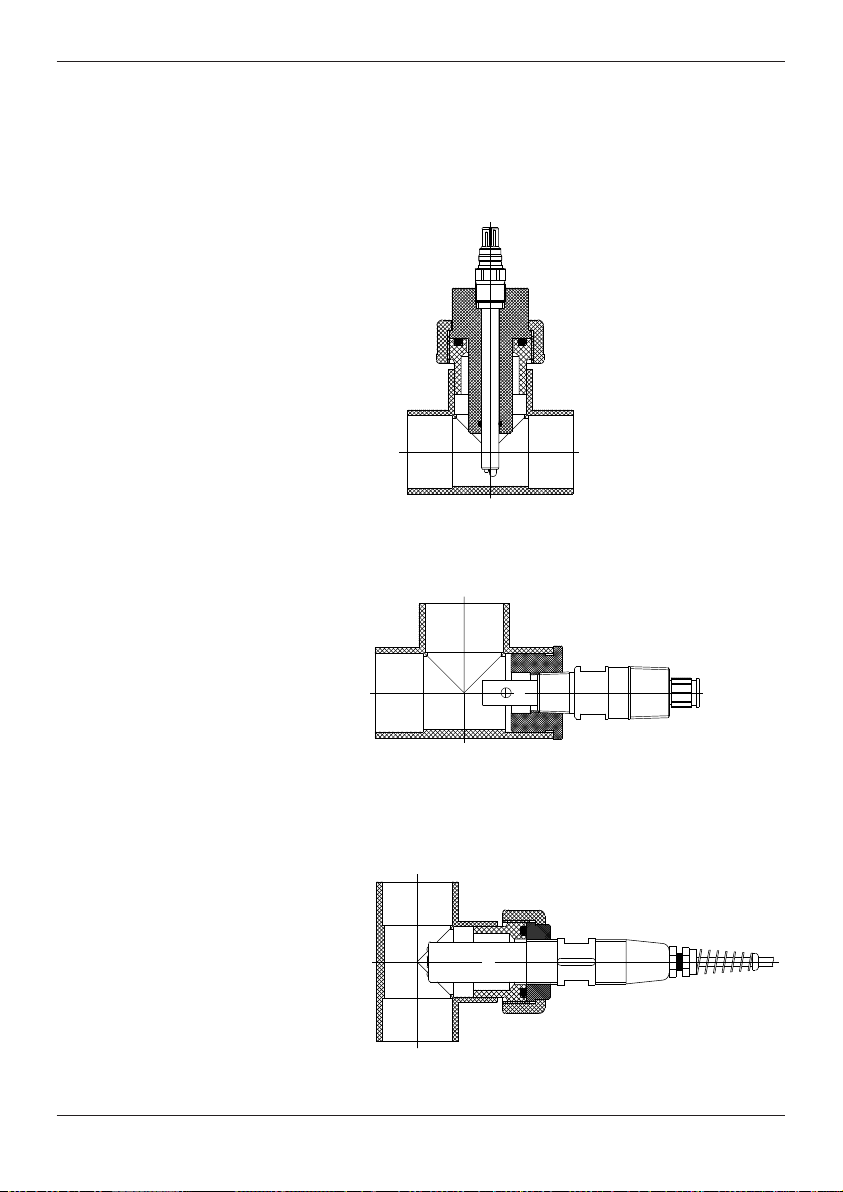
Figure 1
Electrode de Ø 12 mm avec
Pg 13.5 montée dans un support
InFlow 751 eingebaut.
Sonde avec NPT ¾" montée dans
un support InFlow 751.
Electrode avec NPT 1" montée
dans un support InFlow 751.
© 04/17 Mettler-Toledo GmbH, CH-8902 Urdorf InFlow 751
Printed in Switzerland 52 400 740
Page 18

18 InFlow 751
4.3 Vérification de l’installation
Important ! Vérifier le système de mesu-
a
re, examiner l’électrode ou la sonde et
rechercher d’éventuelles fuites avant chaque mise en marche.
Ne pas commencer l’utilisation avant que
le système de mesure n’ait été vérifié et
que toute mesure corrective n’ait été prise.
5. Entretien
L’électrode ou la sonde, le support et le
manchon doivent être gardés propres. Remplacer immédiatement tout joint ou
composant endommagé.
Les détails relatifs à l’entretien de l’électrode
ou de la sonde figurent dans les manuels
d’instructions de celles-ci.
Il est recommandé de changer régulière-
a
ment les joints toriques.
Important: avant le montage du support,
a
vérifier que les joints toriques soient nettoyés et graissés.
6. Spécifications du produit
6.1 Fourniture
Une livraison standard se compose des éléments suivants:
– Support de Type InFlow 751
– Manuel d’instructions
6.2 Spécifications techniques
Domaine de PVC 0...60 °C
température: PVDF 0...100 °C
Domaine de PVC
pression: PVC 1 bar/60°C
PVDF 4 bar/75°C
PVDF 1 bar/100°C
Matériaux: Toutes les parties en contact avec le
milieu sont en PVC ou PVDF selon le
produit livré. Les joints sont en Viton.
Dimensions: se reporter au chapitre 9
4 bar/45°C
Vous pourrez trouver plus de détails sur
les sondes en consultant leurs fiches
tech niques ou en contactant votre fournisseur.
7. Pièces de rechange et
accessoires
Désignation No de commande
Adapteur InFlow751 PVC d=32 52 400 653
Adapteur InFlow751 PVC d=50 52 400 654
Adapteur InFlow751 PVDF d=63 52 400 658
8. Garantie
Les supports sont d’une grande qualité
technique et font l’objet d’une politique de
révision continuelle afin de prendre en
compte les plus récents progrès. Leur fiabilité est assurée par une minutieuse
inspection finale avant de quitter l’usine.
La garantie est valable pendant un an à
partir de la date de livraison et couvre tous
les défauts dus à une défaillance de
matériaux ou de fabrication.
La garantie ne couvre pas l’usure normale
ainsi que tout dommage provoqué par une
utilisation non appropriée (par exemple incompatibilité chimique des matériaux etc.)
Cette garantie s’étend uniquement au remplacement ou à la réparation des produits
déficients, à notre liberté d’appréciation.
Cette garantie est nulle si le client ou des
tiers modifient d’une quelconque manière
les produits fournis par nous.
Les défauts doivent être immédiatement
déclarés au fournisseur dès leur constatation et, dans tous les cas, au cours de la
période de garantie.
© 04/17 Mettler-Toledo GmbH, CH-8902 Urdorf InFlow 751
Printed in Switzerland 52 400 740
Page 19
InFlow 751 19
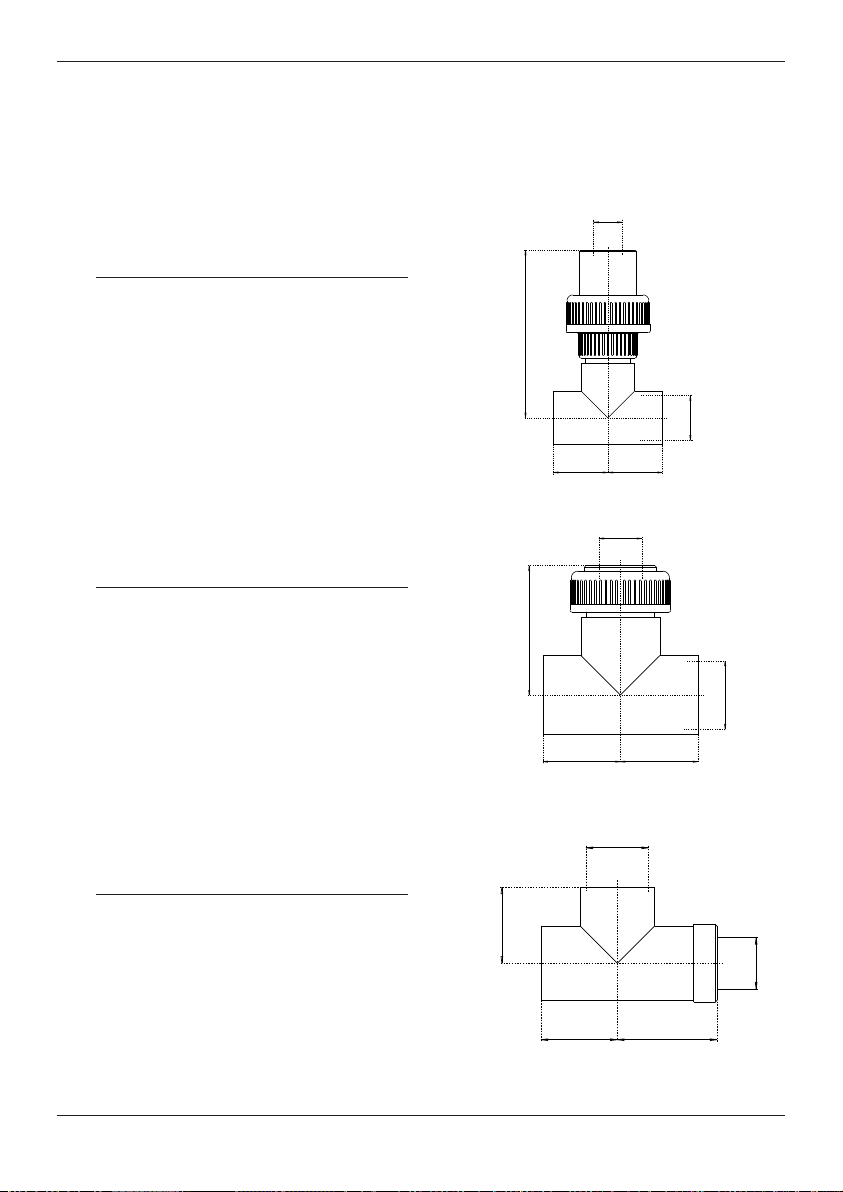
Pg 13.5
a
b
b
d
1" NPT
a
d
b
b
d
b
3/4" NPT
a
b
9. Dimensions
Pg13.5
dabab
DN25 32 120 39 120 38
DN40 50 113 57 113 51
DN50 63 107.5 71 106.5 62
1" NPT
dabab
DN40 50 93 57 88 51
DN50 63 108 71 102 62
¾" NPT
dabab
DN25 32 51 39 51 38
DN40 50 63 57 63 51
DN50 63 77 71 77 62
© 04/17 Mettler-Toledo GmbH, CH-8902 Urdorf InFlow 751
Printed in Switzerland 52 400 740
Page 20

Brazil Mettler-Toledo Ind. e Com. Ltda.
France Mettler-Toledo Analyse Industrielle S.A.S.
Germany Mettler-Toledo GmbH
Switzerland Mettler-Toledo (Schweiz) GmbH
United States METTLER TOLEDO
Mettler-Toledo GmbH, Process Analytics, Im Hackacker 15, CH - 8902 Urdorf
Phone +41 44 729 62 11, Fax +41 44 729 66 36
Subject to technical changes
04 / 2017 © Mettler-Toledo GmbH
Printed in Switzerland. 52 400 740 www.mt.com/pro
Avenida Tamboré, 418 – Tamboré,
BR - 06460-000 Barueri / SP, Brazil
Phone +55 11 4166 7400
e-mail [email protected]; [email protected]
30, Bld. de Douaumont, FR - 75017 Paris, France
Phone +33 1 47 37 06 00
e-mail [email protected]
Prozeßanalytik, Ockerweg 3, DE - 35396 Gießen
Phone +49 641 507-444
e-mail [email protected]
Im Langacher, CH - 8606 Greifensee
Phone +41 44 944 47 60
e-mail [email protected]
Process Analytics
900 Middlesex Turnpike, Bld. 8, Billerica, MA 01821, USA
Phone +1 781 301 8800
Freephone +1 800 352 8763 (only USA)
e-mail [email protected]
For more addresses of METTLER TOLEDO Market Organizations please go to:
www.mt.com/pro-MOs
 Loading...