

Mettler Toledo Impact M User Manual

Network Scales
Impact M
User's Guide

©2012 Mettler-Toledo, LLC
No part of this manual may be reproduced or transmitted in any form or by any means, electronic or
mechanical, including photocopying and recording, for any purpose without the express written
permission of Mettler-Toledo, LLC.
U.S. Government Restricted Rights: This documentation is furnished with Restricted Rights.
Part Number
Date
Revisions
Publication Revision
History
64070241 R00
64070241 R01
64070241 R02
64070241 R03
64070241 R04
64070241 R05
64070241 R06
64070241 R07
64070241 R08
12/2010 Official release
3/2011 Minor formatting updates.
4/2011 Changes pg 2-11 Overrides, & 3-19 DST
value.
4/2012 Change to LLC. Updated Memory and
added Batch Queue to Chapter 2. Major
updates to Chapter 3 to add features up
through 1.1.9, Self Service Mode
instructions, Label Editor, and COOL, etc.
Updated Label Installation Chapter 4 and
Cleaning in Chapter 5.
7/2012 Updates to Chapter 3 GS1Barcode setup
and WEP configuration 3-55.
8/2012 Updated Nutrifacts setup per version
1.1.13, updated NF Labels Vertical
Simplified examples, added missing
section on PLU Access Parameters, and
Wireless Configuration in Chapter 3.
6/2013 Add FCC Notice Section.
8/2013 Updates to Wifi section for MTWA5
8/2014 Updates for Impact M 1.4.4
Trademarks
FCC Notice
64070241 R09
METTLER TOLEDO® and Impact M® are registered trademarks of Mettler-Toledo, LLC,
Columbus, OH, USA.
This device complies with Part 15 of the FCC Rules and the Radio Interference
Requirements of the Canadian Department of Communications. Operation is subject to
the following conditions: (1) this device may not cause harmful interference, and (2)
this device must accept any interference received, including interference that may
cause undesired operation.
This equipment has been tested and found to comply with the limits for a Class A
digital device, pursuant to Part 15 of FCC Rules. These limits are designed to provide
reasonable protection against harmful interference when the equipment is operated in a
commercial environment. This equipment generates, uses, and can radiate radio
frequency energy and, if not installed and used in accordance with the instruction
2/2015 Updates for Impact M 1.5.10
READ this manual BEFORE operating
or servicing this equipment.
FOLLOW these instructions carefully.
SAVE this manual for future reference.
DO NOT allow untrained personnel to
operate, clean, inspect, maintain,
service, or tamper wi
equipment.
ALWAYS DISCONNECT this equipment
from the power source before cleaning
or performing maintenance.
CALL METTLER TOLEDO
information, and service.
METTLER TOLEDO
to make refinements or changes
without n
Precautions
th this
manual, may cause harmful interference to radio communications. Operation of this
equipment in a residential area is likely to cause harmful interference in which case the
user will be required to correct the interference at their own expense.
®
for parts,
otice.
®
reserves the right

CONTENTS
1 Introduction .................................................................................................. 1-1
General .............................................................................................................................. 1-1
Specifications ..................................................................................................................... 1-2
Power ................................................................................................................................. 1-3
Network Connection............................................................................................................. 1-3
Leveling the Scale ............................................................................................................... 1-4
2 Operating Instructions ................................................................................... 2-1
Main Screen ....................................................................................................................... 2-1
Operator Screen .................................................................................................................. 2-2
Operator Setup ..................................................................................................................... 2-2
Beeper ..................................................................................................................................... 2-2
Language................................................................................................................................. 2-2
Set Time .................................................................................................................................. 2-2
Set Date ................................................................................................................................... 2-3
System Status ........................................................................................................................... 2-3
Set Home Screen ...................................................................................................................... 2-3
Restart ..................................................................................................................................... 2-3
Calibration Audit Trail ............................................................................................................ 2-3
Label Printer ........................................................................................................................ 2-4
Voids .................................................................................................................................. 2-5
Presets ............................................................................................................................... 2-5
Create Preset ............................................................................................................................ 2-5
Create Page ............................................................................................................................. 2-7
Swap Presets ........................................................................................................................... 2-8
Delete Preset ............................................................................................................................ 2-9
Quick Edit............................................................................................................................ 2-9
Recent PLUs ...................................................................................................................... 2-10
Select Department .............................................................................................................. 2-10
Display Settings ................................................................................................................. 2-11
Remote Assistance ............................................................................................................. 2-11
Operator Logon ......................................
Transaction Mode Logon ..................................................................................................... 2-12
Customer Display .............................................................................................................. 2-13
PLU Pricing Modes ............................................................................................................ 2-13
By-Weight PLU ................................................................................................................... 2-13
By-Count PLU .................................................................................................................... 2-14
Standard Pack PLU ............................................................................................................. 2-14
PLU Screen Details ............................................................................................................. 2-15
Calling PLUs ..................................................................................................................... 2-16
Printing Labels .................................................................................................................. 2-17
By Weight PLU ................................................................................................................... 2-17
By Count PLU .................................................................................................................... 2-18
Standard Pack PLU ............................................................................................................. 2-18
Temporary Overrides ......................................................................................................... 2-19
Memory Mode ................................................................................................................... 2-20
Batch Queue ..................................................................................................................... 2-21
Self Service Mode ............................................................................................................. 2-22
............................................................................ 2-11

COOL ................................................................................................................................ 2-23
3 Admin Functions ........................................................................................... 3-1
Admin Button ...................................................................................................................... 3-1
Item Database ..................................................................................................................... 3-2
Item Database Editor ............................................................................................................. 3-2
REM Master Editor ................................................................................................................ 3-3
PLUs .................................................................................................................................. 3-3
Extra Text ............................................................................................................................ 3-7
Nutrifacts............................................................................................................................. 3-7
COOL .................................................................................................................................. 3-9
Create/Edit COOL Text .............................................................................................................. 3-10
Tracking or Lot Numbers .......................................................................................................... 3-12
COOL Records and Lists .......................................................................................................... 3-13
COOL Setup ............................................................................................................................ 3-19
Label Formats ........................................................................................................................ 3-20
Using COOL ........................................................................................................................... 3-21
Accumulators ..................................................................................................................... 3-22
Reports ............................................................................................................................. 3-23
Clear ................................................................................................................................ 3-23
Action Code ....................................................................................................................... 3-24
Grade ............................................................................................................................... 3-25
Group ............................................................................................................................... 3-26
Department Settings ............................................................................................................ 3-27
Edit ....................................................................................................................................... 3-27
Clear ..................................................................................................................................... 3-28
Presets ............................................................................................................................. 3-29
Delete ............................................................................................................................... 3-29
Swap Pages ...................................................................................................................... 3-29
Edit Name ......................................................................................................................... 3-30
Change Grid ...................................................................................................................... 3-30
Programming Presets ......................................................................................................... 3-30
Labels .............................................................................................................................. 3-33
Label Styles ....................................................................................................................... 3-33
Print Test Label .................................................................................................................. 3-34
Verify Labels ...................................................................................................................... 3-34
Unit Setup ......................................................................................................................... 3-35
Time & Date ...................................................................................................................... 3-36
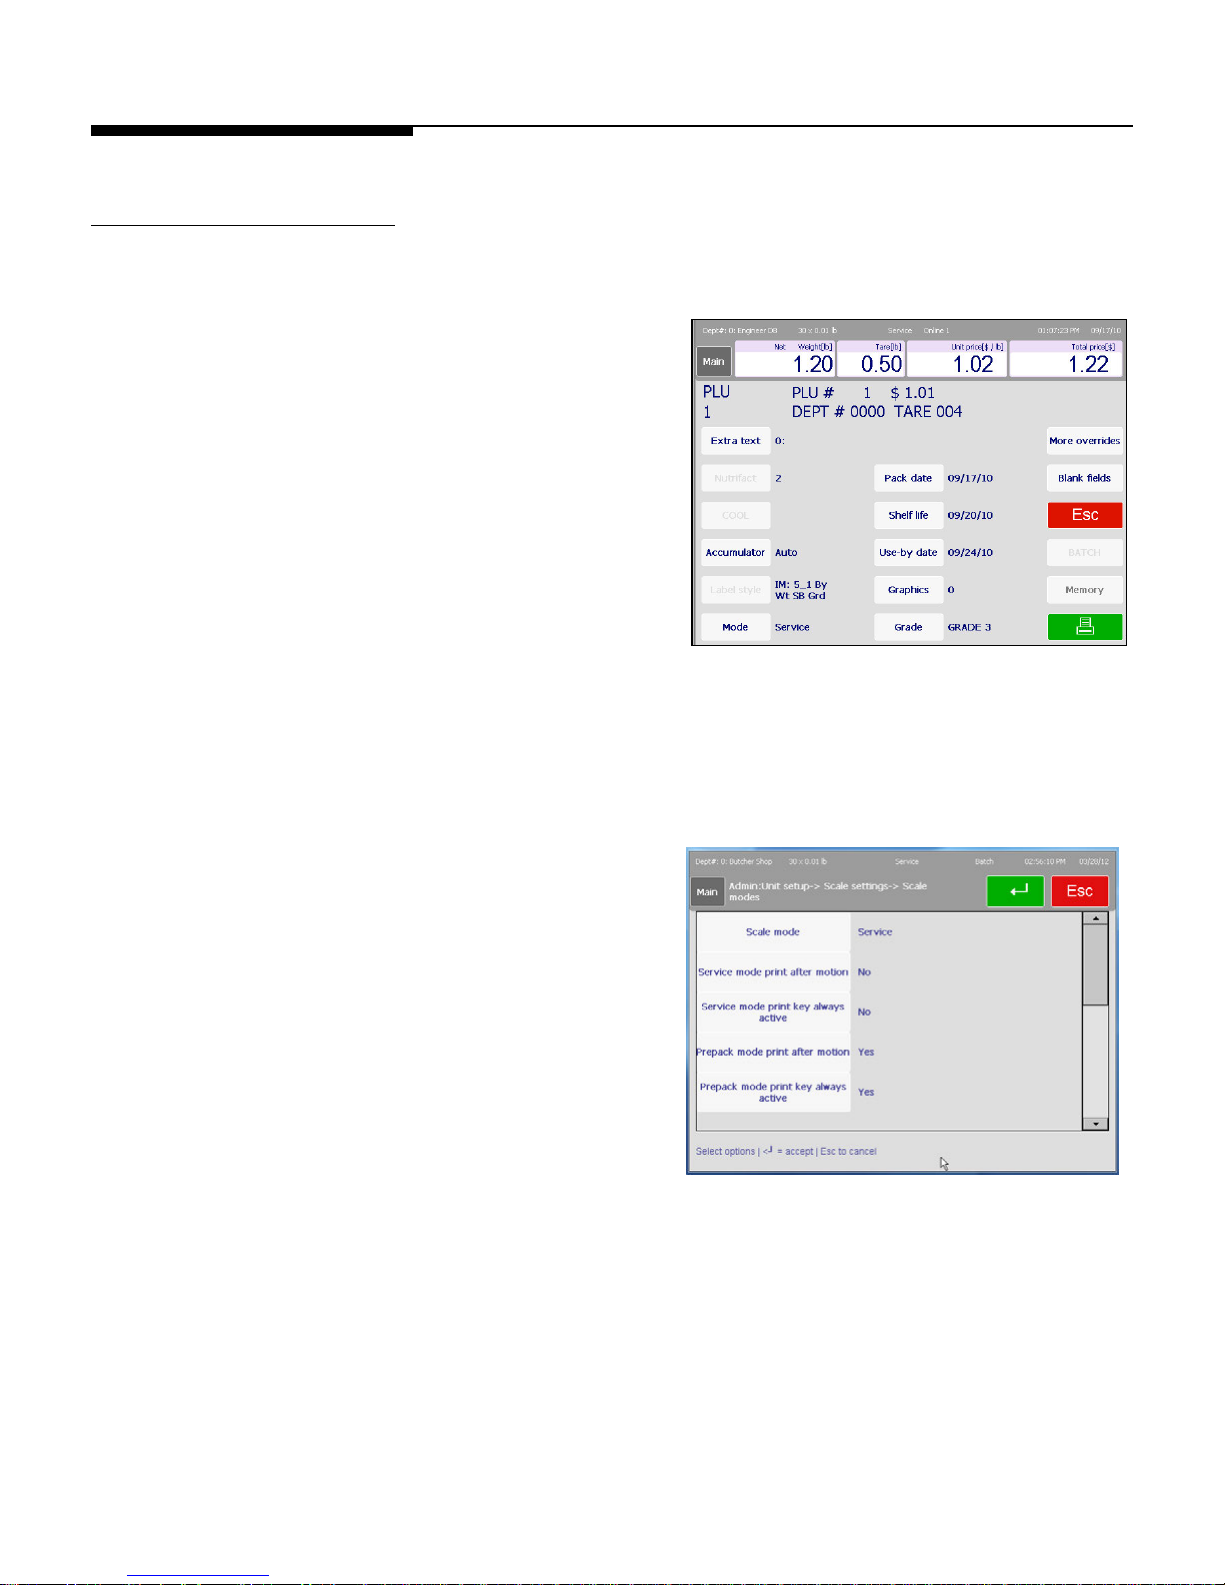
Scale Settings .................................................................................................................... 3-37
Scale Mode ............................................................................................................................ 3-38
Operator Permissions .............................................................................................................. 3-38
Supervisor Permissions ........................................................................................................... 3-39
Transaction Settings ................................................................................................................ 3-39
PLU Access Parameters ........................................................................................................... 3-43
Barcode Settings ..................................................................................................................... 3-45
GS1 Bar Code Setup ................................................................................................................ 3-47
COOL .................................................................................................................................... 3-51
Store Logo.............................................................................................................................. 3-51
Database ............................................................................................................................... 3-52
Screen Saver .......................................................................................................................... 3-54
Preset Settings ........................................................................................................................ 3-55
Nutrition Settings ..................................................................................................................... 3-56
2011 Nutrition Facts Formats ................................................................................................... 3-57
Safe Handling Graphics ........................................................................................................... 3-58
Set Home Screen ................................................................................................................ 3-58

Language .......................................................................................................................... 3-59
Technician......................................................................................................................... 3-59
Communication ................................................................................................................. 3-59
Network Comm. ...................................................................................................................... 3-60
STEM Comm. ......................................................................................................................... 3-63
WiFi Com ............................................................................................................................... 3-64
Touch Screen Calibration ..................................................................................................... 3-67
Backup/Restore .................................................................................................................. 3-68
Printer Setup ..................................................................................................................... 3-70
Label parameters ............................................................................................................... 3-71
Security ............................................................................................................................ 3-72
Users and passwords ......................................................................................................... 3-73
System Status ................................................................................................................... 3-74
System Information ............................................................................................................. 3-74
Log View ........................................................................................................................... 3-75
Log Level .......................................................................................................................... 3-75
Quick Edits ........................................................................................................................ 3-76
Select Department ............................................................................................................. 3-77
Marquee ........................................................................................................................... 3-78
Setup ................................................................................................................................ 3-78
Import Image ..................................................................................................................... 3-80
Self Service Mode Setup .................................................................................................... 3-81
Label Editor ...................................................................................................................... 3-86
Label Format Graphics ........................................................................................................ 3-89
Extended Label .................................................................................................................. 3-90
Tare Preset Configuration .................................................................................................. 3-92
4 Labels .......................................................................................................... 4-1
Loading Labels .................................................................................................................... 4-1
Label Requirements ............................................................................................................. 4-2
Label Paper ......................................................................................................................... 4-2
Activation Temperature ............................................................................................................... 4-2
Adhesive .................................................................................................................................. 4-2
Release Liner ............................................................................................................................ 4-3
Total Thickness (LABEL + ADHESIVE + LINER) ............................................................................. 4-3
Light transmission for Gap Sensor Operation ................................................................................ 4-3
Label Stripping ..................................................................................................................... 4-3
Finished Label Roll Requirements ........................................................................................... 4-3
Core and Method of Label Attachment .......................................................................................... 4-3
Die Cutting ............................................................................................................................... 4-4
Slitting ..................................................................................................................................... 4-4
Winding ................................................................................................................................... 4-4
Label; Curl ............................................................................................................................... 4-4
Splicing ................................................................................................................................... 4-4
Finished Label and Roll Dimensional Requirements .................................................................. 4-5
Preprinted Labels ................................................................................................................ 4-7
Special Shaped Labels......................................................................................................... 4-8
Optical Densities ................................................................................................................. 4-9
Definition of Transmission of Optical Density ................................................................................ 4-9
Label and Liner Optical Density ................................................................................................... 4-9
Black Stripe Optical Density ................................................................................................... 4-9
5 Maintenance ................................................................................................. 5-1

External Cleaning ................................................................................................................ 5-1
Printer Cleaning .................................................................................................................. 5-2
6 Appendix ...................................................................................................... 6-1
Geo Index ........................................................................................................................... 6-1
Country Currency Defaults ................................................................................................... 6-3
Country Time Defaults ......................................................................................................... 6-4
Misc. Country Defaults ......................................................................................................... 6-5
1-1
1 Introduction
General
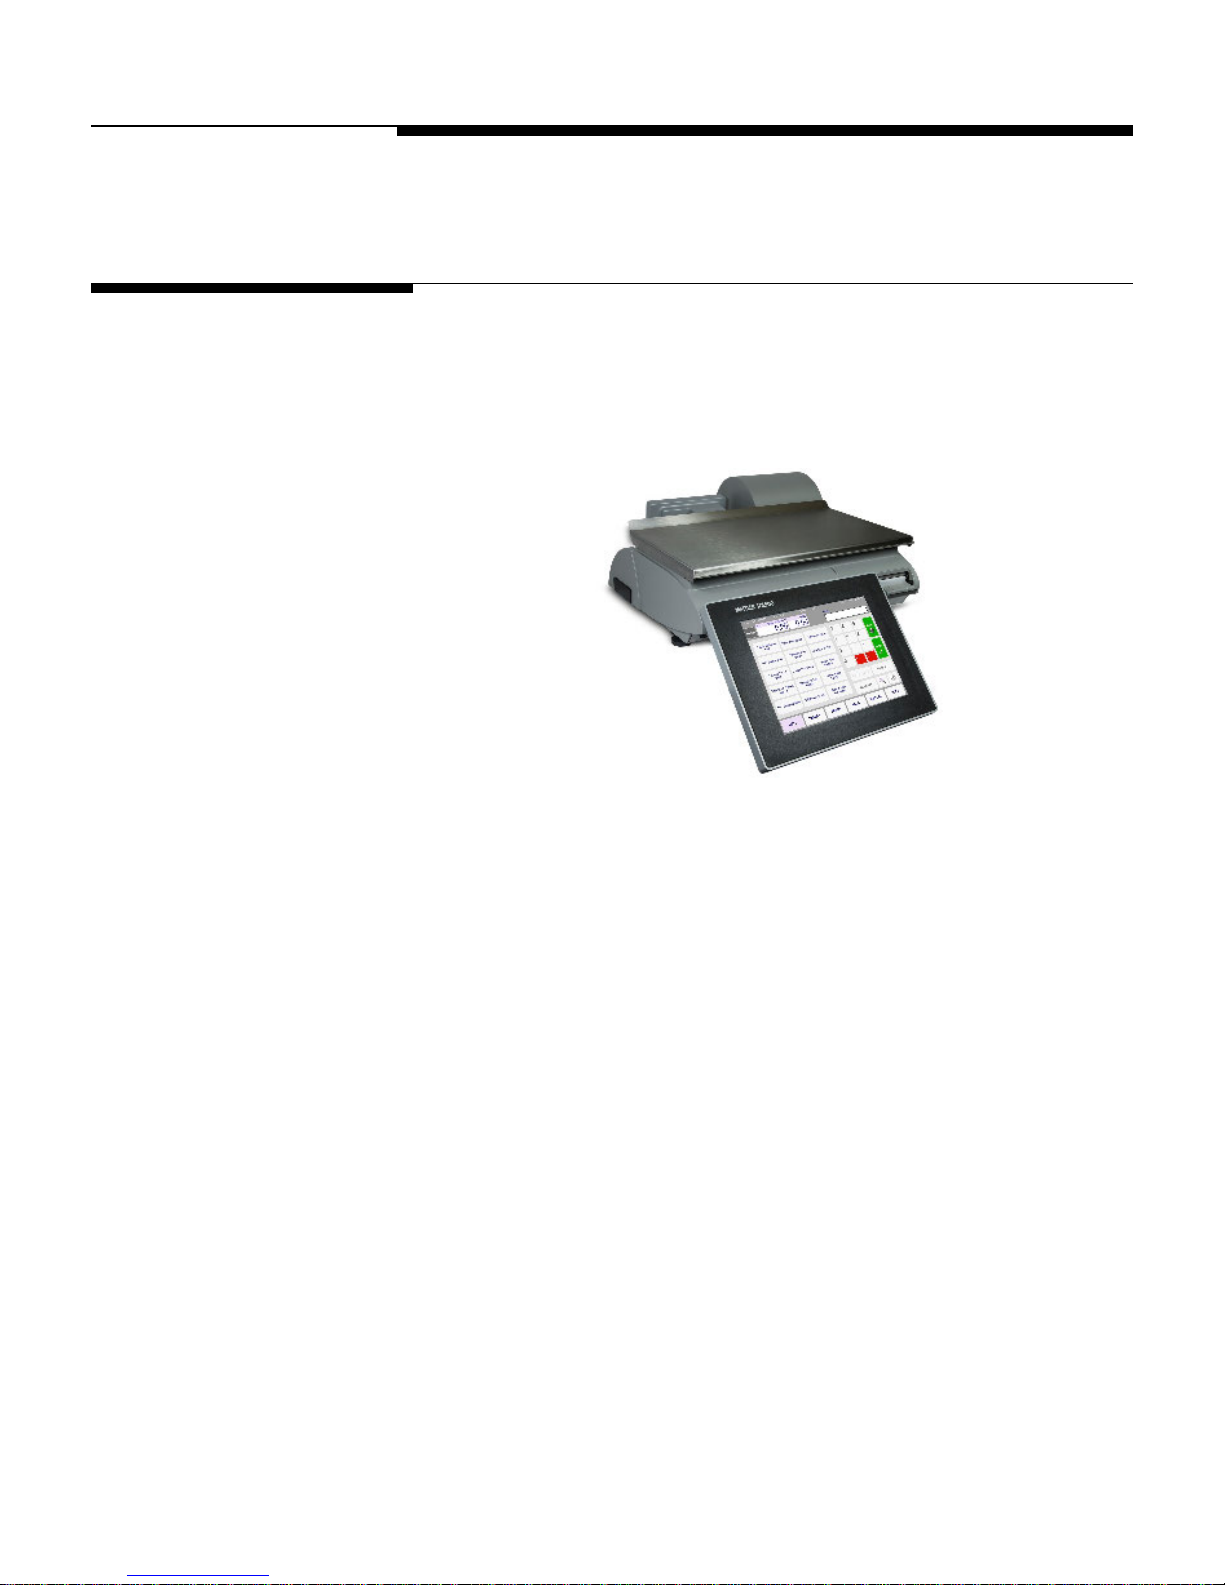
Thank you for purchasing an Impact M® scale. The METTLER TOLEDO® Impact series
was designed for your current and future requirements and it can handle a variety of
operations and adapt to changing process and data requirements. This flexibility protects
your investment and helps you keep pace with rapidly changing production and
customer demands.
Chapter 1: Introduction
General
The Impact M scale offers very easy programming with a user friendly interface. All
scales contain a built-in thermal label printer which is designed for quick and easy roll
changes. Also, the Impact M provides a large, full-color LCD display for easy PLU lookup and straightforward operator control.
The Impact M is a low-profile counter scale with an easy-to-navigate user interface. The
Impact M can be operated in a standalone mode with a local database or connected to a
REM or STEM through an Ethernet network using TCP/IP protocol. In client mode, the
Impact M can be on the same network as the Model UC-ST, 8361, 8450, or 8461
scales.
METTLER TOLEDO Impact M User's Guide
1-2
Description
Specifications – Impact M
Capacity x Division
30 x 0.01 lb
15/30 x 0.005/0.01 lb
Weighing Modes
lb , kg, (single and dual interval)
Dimensions
H: 5.875”, W: 15.35”, D: 17.5”
Platter Dimension
W: 15.25” x D: 9.25” (10.0” counting lip)
Weight of Unit
23.5 lb (10.7 kg)
Shipping Weight
30.0 lb (13.7 kg)
Base Construction
Cast metal upper shell with sheet metal bottom
Operator Display
10.4” color VGA touchscreen
Operator Keyboard /
Touchscreen
4 wire resistive Touchscreen
Customer Display
Monochrome 320 x 240 LCD
Printer
3" nominal (72 mm paper, 80mm path),
up to 5”/sec, thermal - 6” roll capacity
Label Sizes
Default label sizes include 1.9”, 2.1”, 2.4”, 3.3”, 4.2”,
can be used.
Power
100-240 VAC, 50/60 Hz, 1.1A
Operating Temperature
0º C to 40º C/32 º F to 104 º F
humidity 5% to 95% non condensing
Storage Temperature
-20º C to 70º C with humidity from
5% to 95% non -condensing
Network Interface
Ethernet 802.3 10/100 MB
RF optional 802.11abg
Processor
Xscale PXA-270
Memory
Minimum 64 Megabyte SDRAM
Mass Storage
Minimum 1 GB Compact Flash
Available COMM port
External load cell
RJ12
External load cell power
USB Port
For mouse, keyboard, Licensed USB flash drive
Specifications
15 x 0.005 kg
6/15 x 0.002/0.005 kg
4.7”, 5.1”, and Continuous. Custom sizes from 1” to 12”

1-3
Power
Power
Ethernet port
Power
Chapter 1: Introduction
Power
The power switch and power cord jack are located under the touchscreen on the left front
of the scale.
Press on the switch to turn the scale power to ON and again to turn the scale off (it is
a momentary switch, so it will return to its original position after being touched). Always
exit any editing screens before pressing the switch to turn power OFF. Always turn the
scale off before cleaning.
Network Connection
Switch
Cord Jack
The Impact M requires 100-240 VAC, 50/60 Hz, 2.2A power. Wiring must include a
proper ground. The integrity of the power ground for equipment is important for both
safety and dependable operation of the electronic device. A poor ground can result in an
unsafe condition should an electrical short develop in the equipment.
A good ground connection minimizes extraneous electrical noise pulses. The electronic
device should not share power lines with noise-generating equipment. Examples include
electrical motors, compressors, heating elements, lights, and relays that may generate
noise spikes and power surges. To confirm ground integrity, use a commercial branch
circuit analyzer or grounded outlet tester. If adverse power conditions exist, a dedicated
power circuit or power line conditioner might be required.
The Impact M can connect to your Ethernet network using a cable or using a wireless
radio. If you use a wired network connection and experience connection problems, make
sure your Ethernet cable is connected and seated securely in the jack, located under the
touchscreen at the front of the scale.
If you are using a wireless radio, it is built into the scale under an access panel situated
below the platter and spider on the left-hand side.
If the scale has a wireless card installed, do not connect an external Ethernet cable to the
Ethernet port.
METTLER TOLEDO Impact M User's Guide
1-4
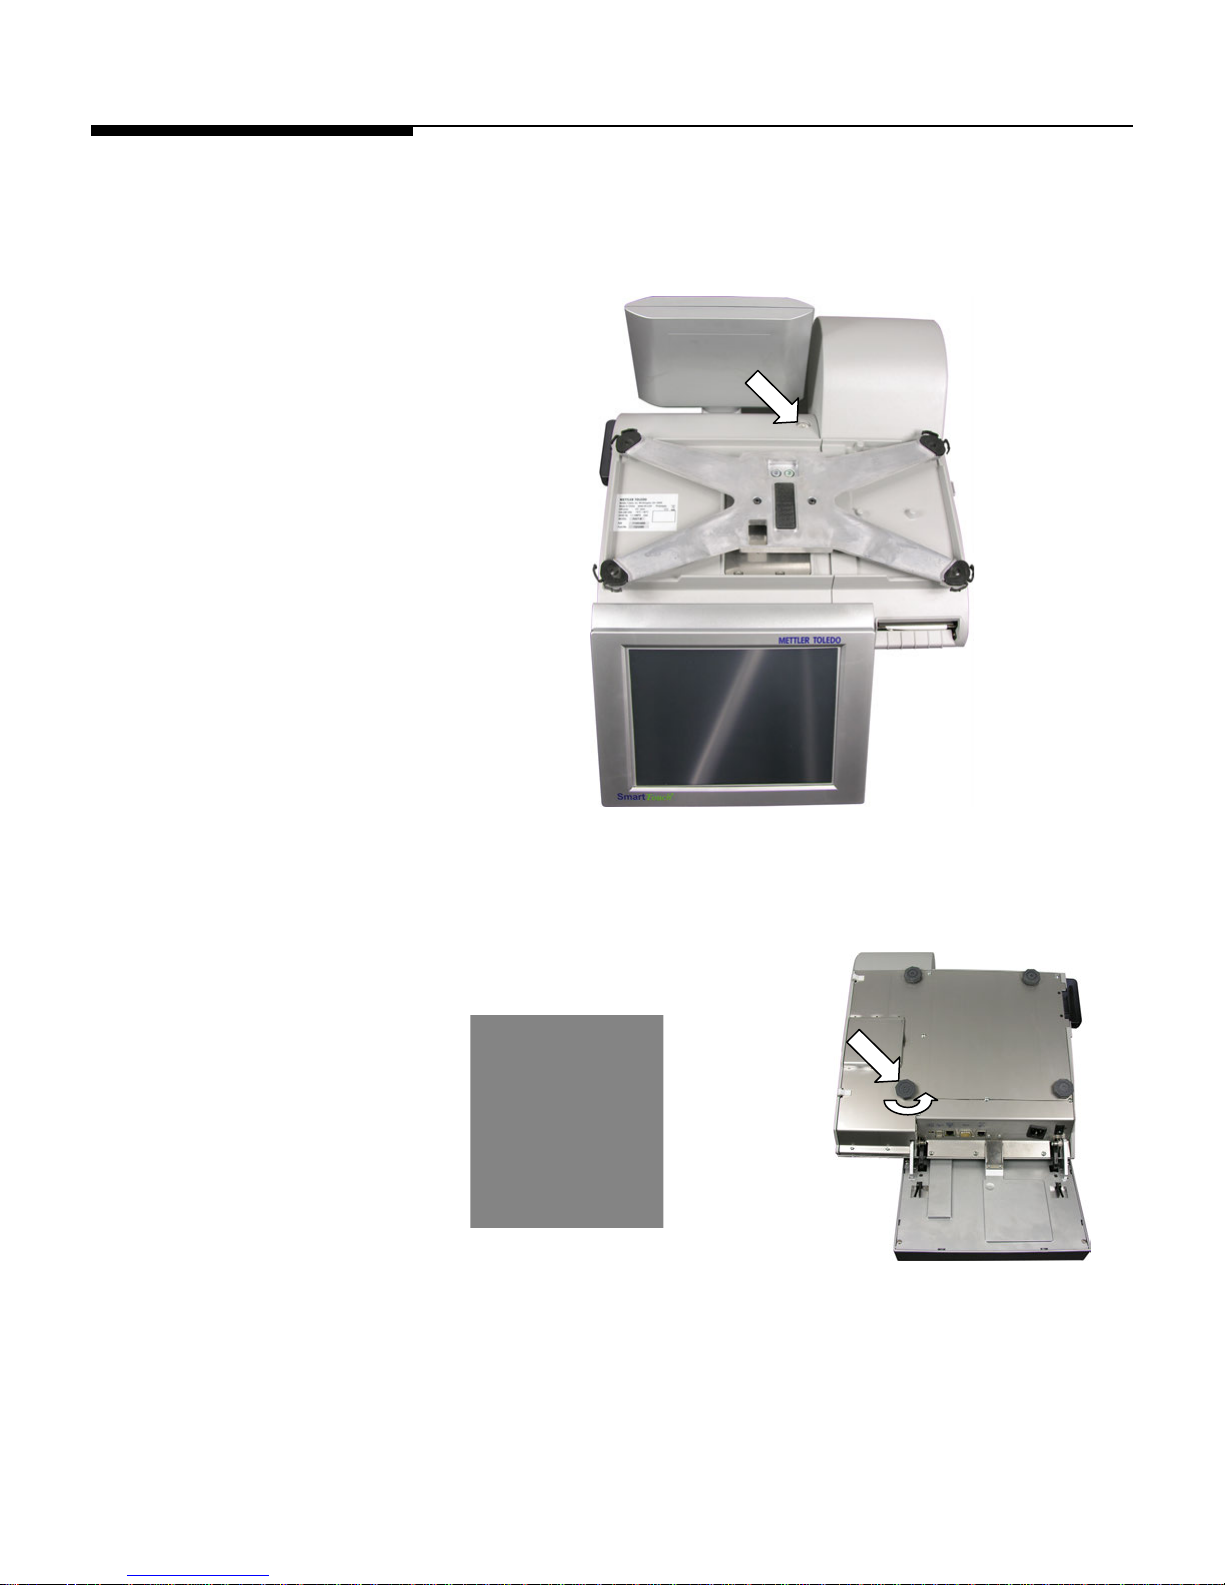
The level indicator consists of
Rotate leveling feet clockwise
Leveling Feet
Leveling the Scale
The Impact M must be level and installed on a stable counter. The level indicator is
located behind the customer display, as shown below.
The bubble in the indicator must be centered inside the circle. If the bubble is outside of
the circle on the indicator, use the four leveling feet to level the scale.
a bubble and two circles.
Center the bubble and the
or counterclockwise to
determine a level platter.
scale will be level.
2-1
1
Admin – Opens the administration screen.
2
Department – shows the current department for the PLU database.
3
~ When this symbol displays, the weight on the scale is fluctuating.
4
Net/Gross when NET displays, it indicates a tare weight has been taken.
5
Weight Display shows the current weight and unit of measure (kg/lb). Touch the weight
to zero the scale if it does not display 0.00 or 0.000.
6
Tare – Displays the current tare in use.
7
Keypad
8
PLU – Displays the keypad entries as they are entered.
9
Print – Prints a label.
10
Enter - Accepts changes and returns to the previous screen.
11
Backspace – deletes characters to the left of the cursor.
12
Clear – clears all data in the entry field.
13
Memory - stores transactions for use in printing a receipt-type label. When transactions
are in memory, the word MEM will appear.
14
I
15
Search - Used to search the PLU records for specific PLUs.
16
Batch Queue - Used to print multiple labels in one batch. When transactions are in
queue, the word ‘Batch’ will appear at the top of the display.
17
Operator –
18
Preset Page Buttons. Selects the preset Page to use.
19
Preset Keys. Used for one-touch calling of PLU records or another page.
NOTE: the operator display is a
1 2 4 6 8 7 9
10
11
12
13
14
15
16
17
18
19
3 ~ 5
14
2 Operating Instructions
Main Screen
Chapter 2: Operating Instructions
Main Screen
touchscreen. Press the keys displayed
on the screen only with your fingertips.
DO NOT use any sharp objects on the
touchscreen. This could cause
permanent damage to the touchscreen.
for entry of numerical data.
– Information and Help.
Additional operator functions such as Quick Edits, Voids, display settings.
METTLER TOLEDO Impact M User's Guide
2-2
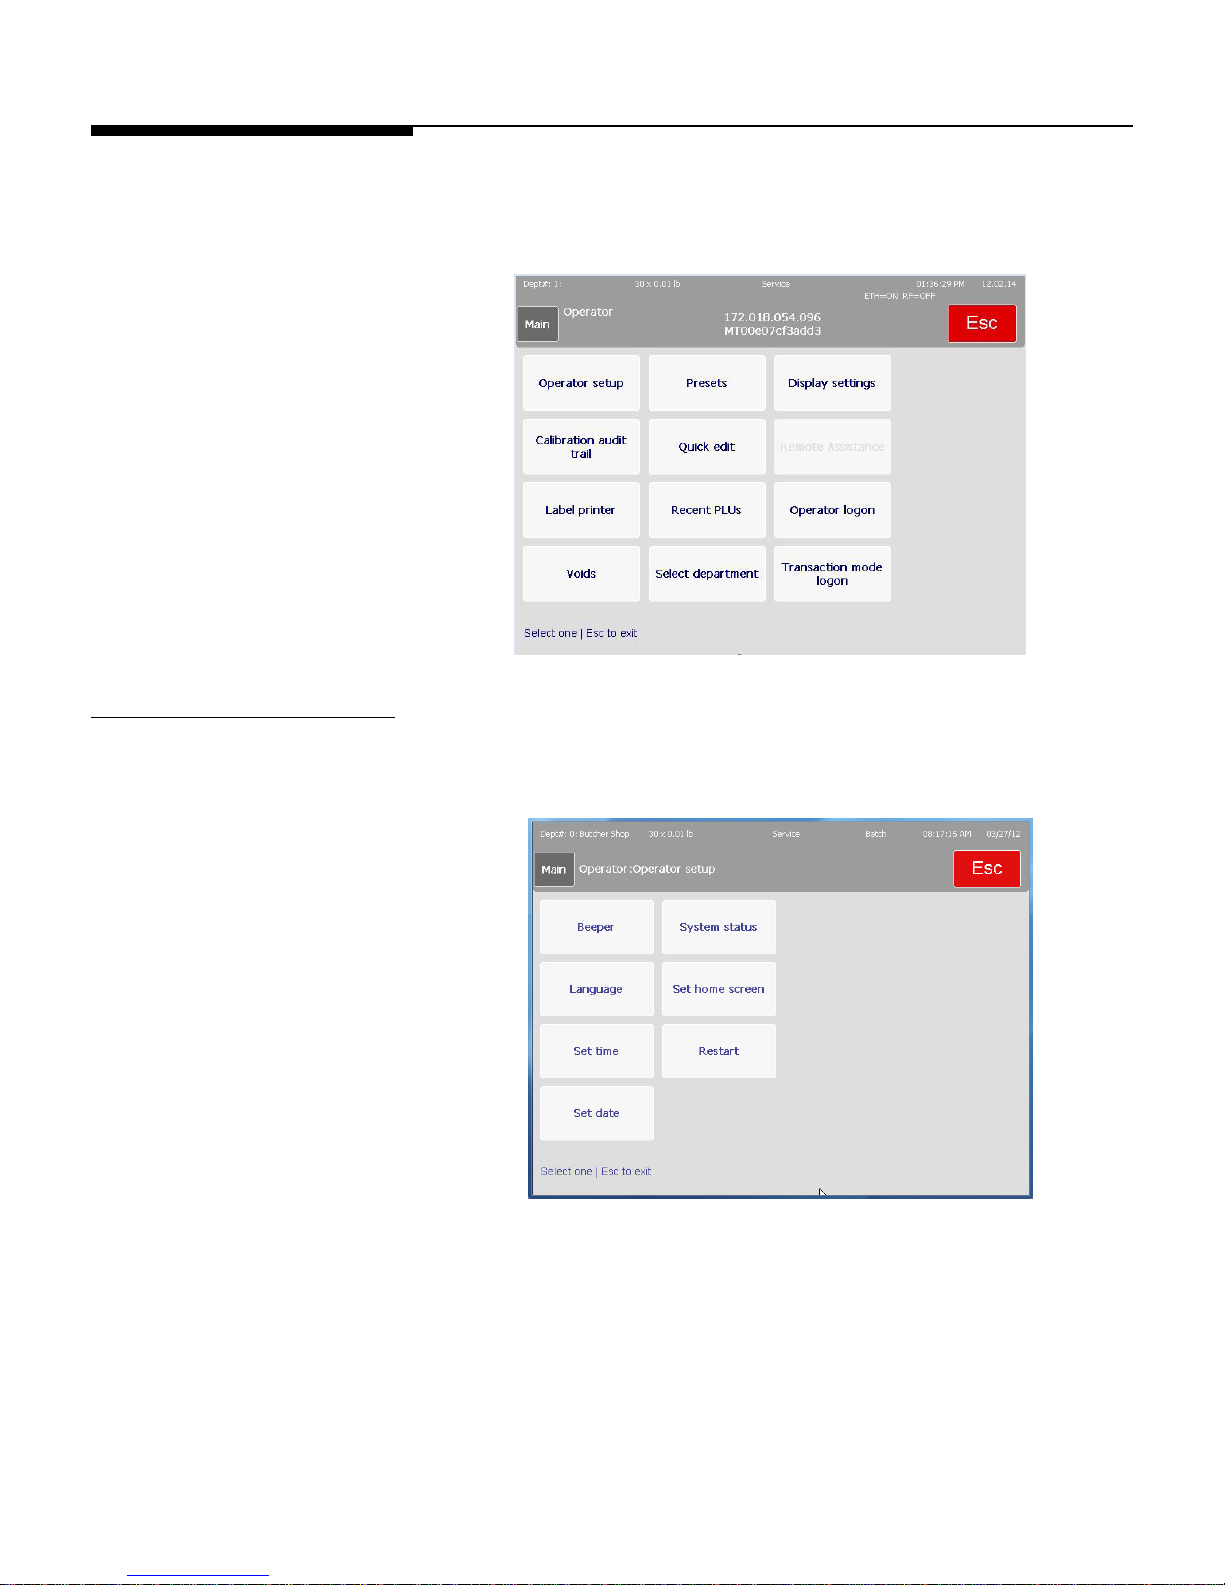
Operator Screen
When the Operator button is pressed, the Operator screen displays with additional
functions the operator can utilize.
Operator Setup
The following functions are available on the Operator Setup screen.
Beeper
Select from Disable, or 1-5, to set the duration of the beeper when a button is pressed.
Language
Select the Scale Language, Operator Language, and External Keyboard Language.
Selections include English, Español, or Français.
Set Time
Set the scale internal clock, hours, minutes, AM/PM.
Chapter 2: Operating Instructions
2-3
Operator Screen
Set Date
Set the scale internal date.
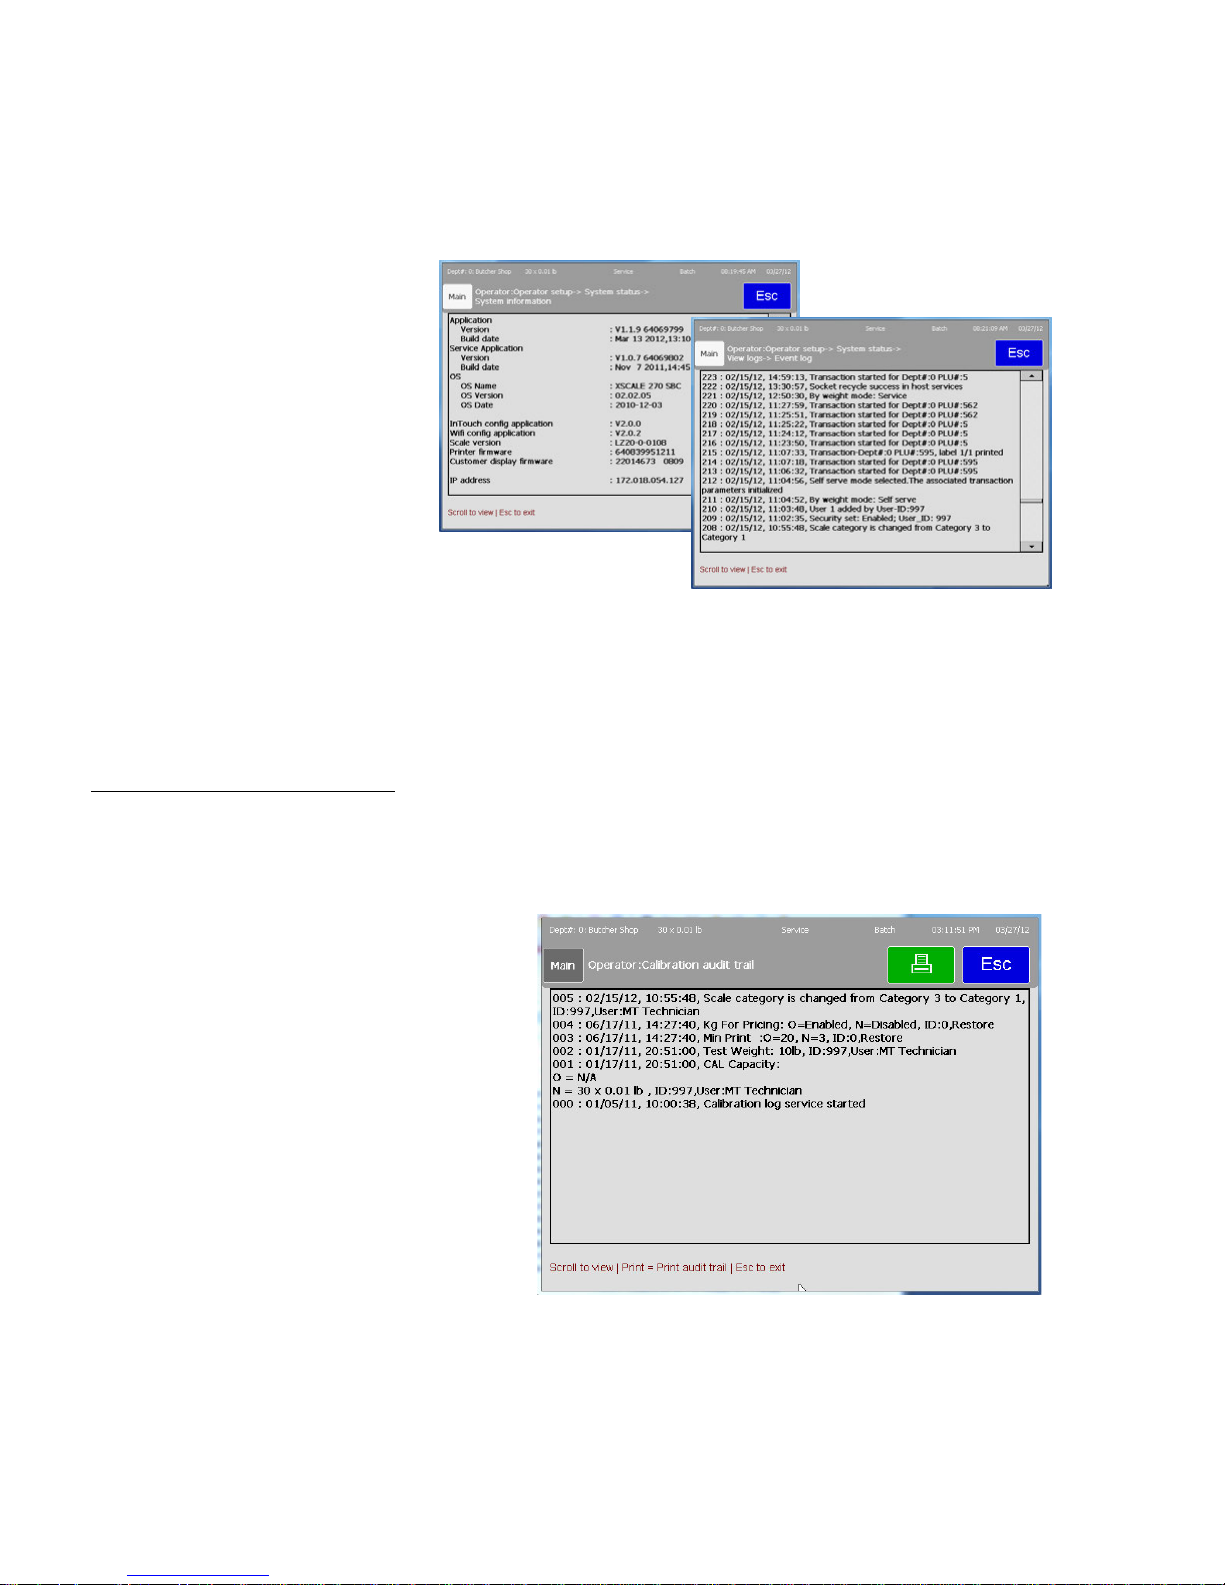
System Status
Show the system details, logs, and log levels.
Set Home Screen
Select the screen that displays as a default on power up and when returning from other
screens.
Calibration Audit Trail
Restart
Performs a restart of the system, similar to pressing the power switch off and on.
This function will display a calibration log for technicians or Weights and Measures
officials to use.
METTLER TOLEDO Impact M User's Guide
2-4
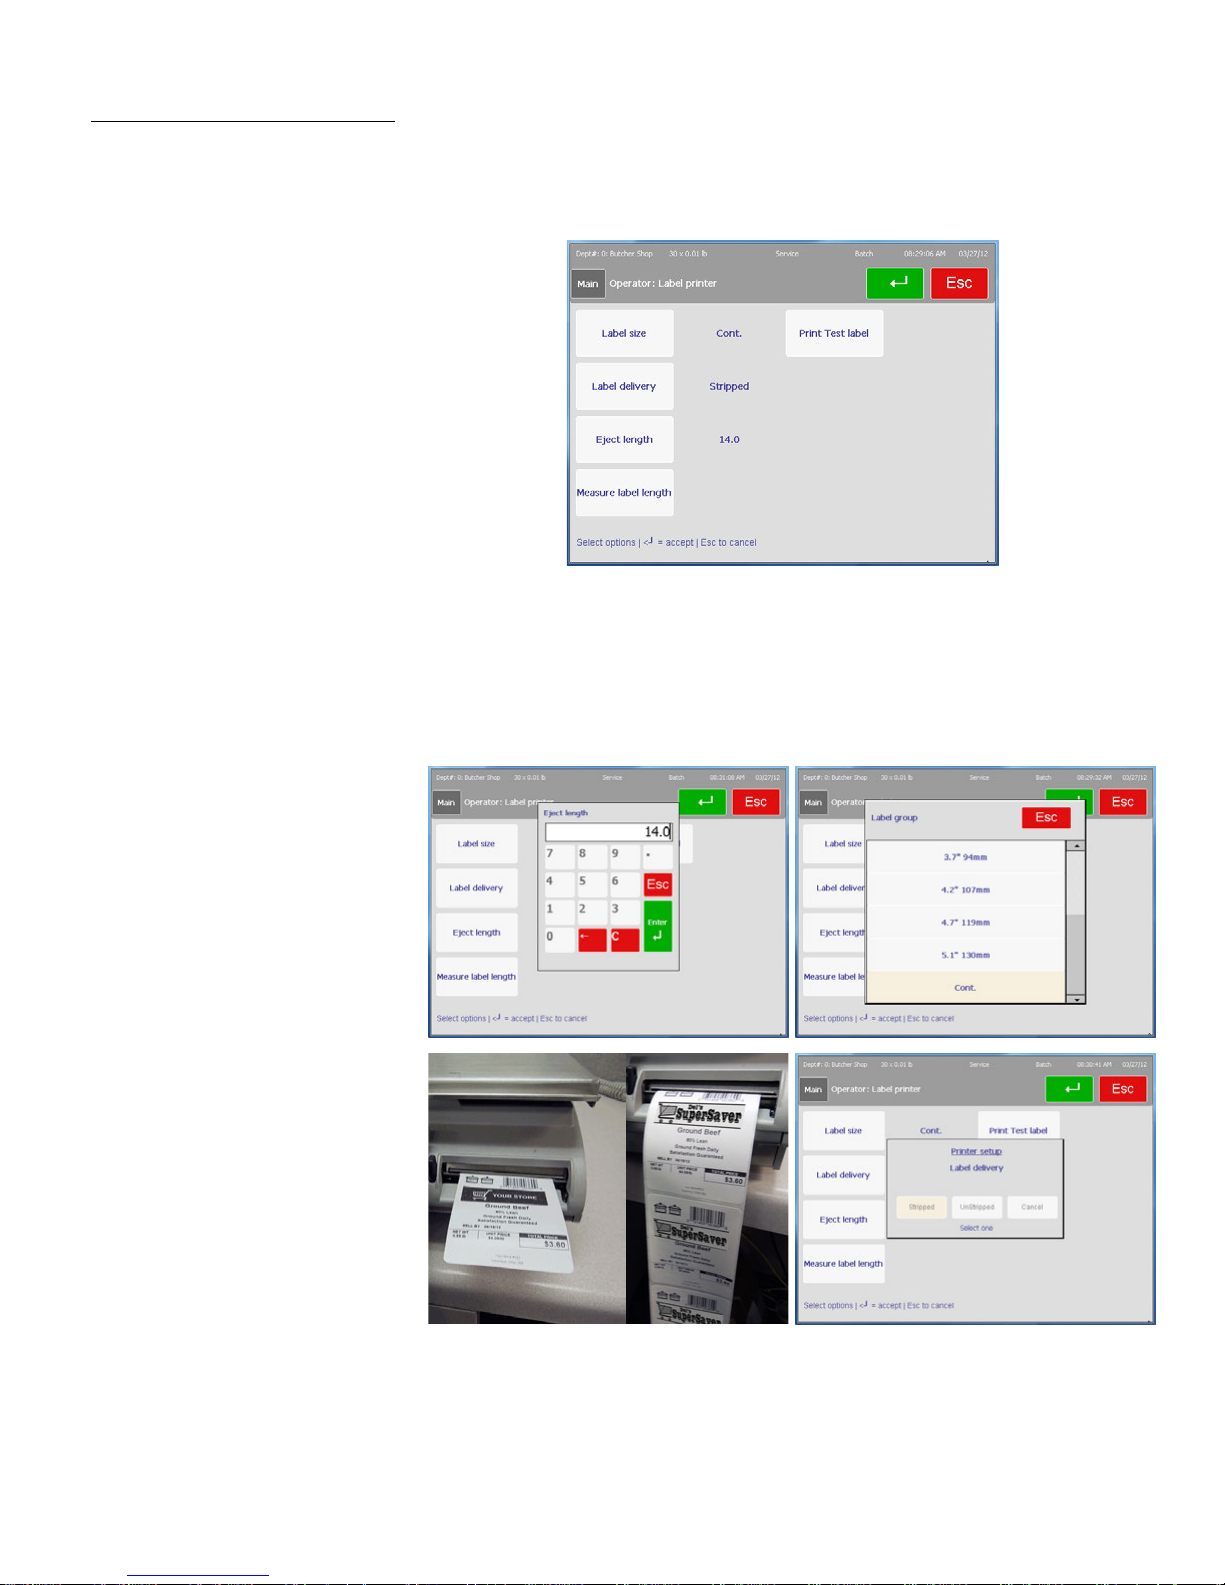
Label Delivery Modes
Stripped
Un-Stripped
Label Printer
The Label Printer screen allows setting label size, delivery mode, length and the functions
Measure and Print Test Label.
Select the label size from the list using the Label Size button. Select stripped or unstripped
label delivery. In stripped mode, the liner is wound on the takeup roller and the label is
ejected peeled from the liner and ready to put on a package. In unstripped mode, the liner
and label are ejected out the front and can be peeled from the liner later. Eject length
adjusts the label stop position after it is printed. This may need to be increased or
decreased in order to stop in the center gap.
2-5
Voids
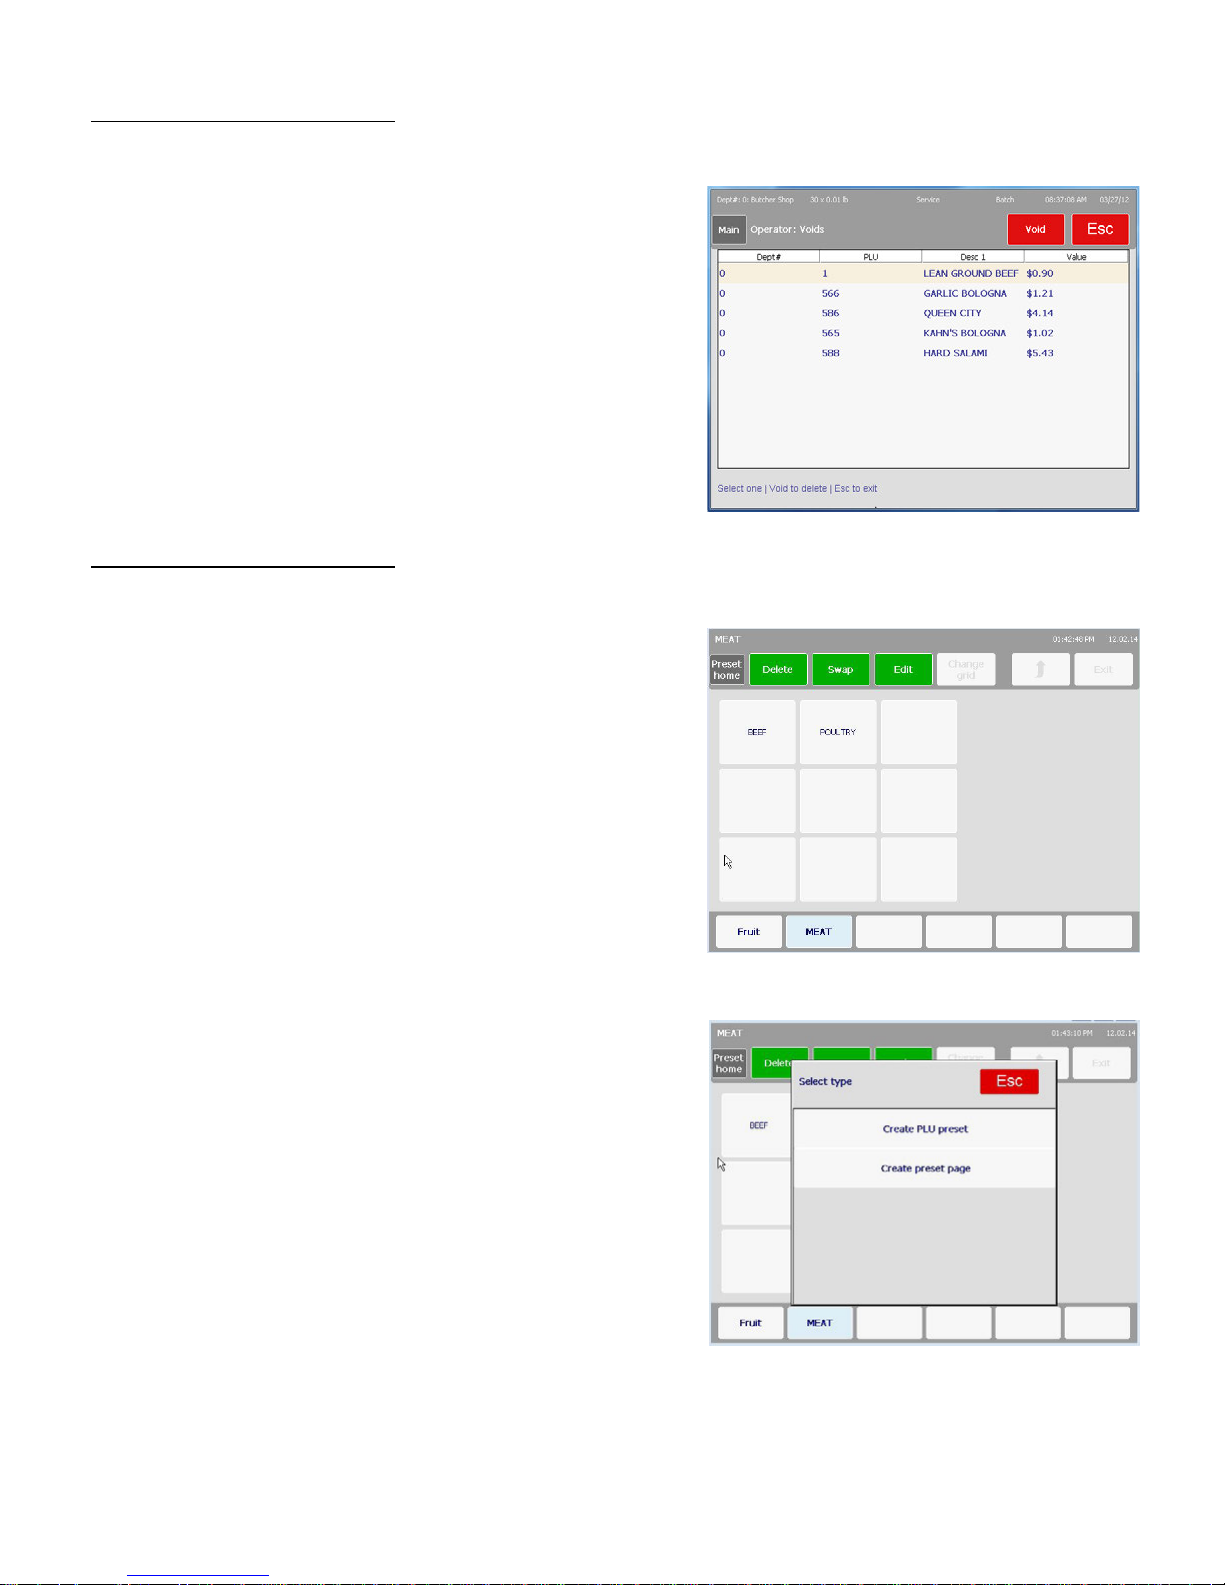
Presets
To void a transaction, press the
Voids button. Touch the
transaction to void, then press
the Void button.
Chapter 2: Operating Instructions
Operator Screen
The Presets button opens a
Preset Editor. In the editor, new
presets can be created and
existing presets edited, moved,
or deleted.
Create Preset
To create a new preset, touch
one of the empty buttons. A
prompt will ask "Create PLU
Preset" or Create Preset Page.
Create PLU preset creates a new
button to call a PLU record.
Create preset page will create a
link to a new page of presets.
METTLER TOLEDO Impact M User's Guide
2-6
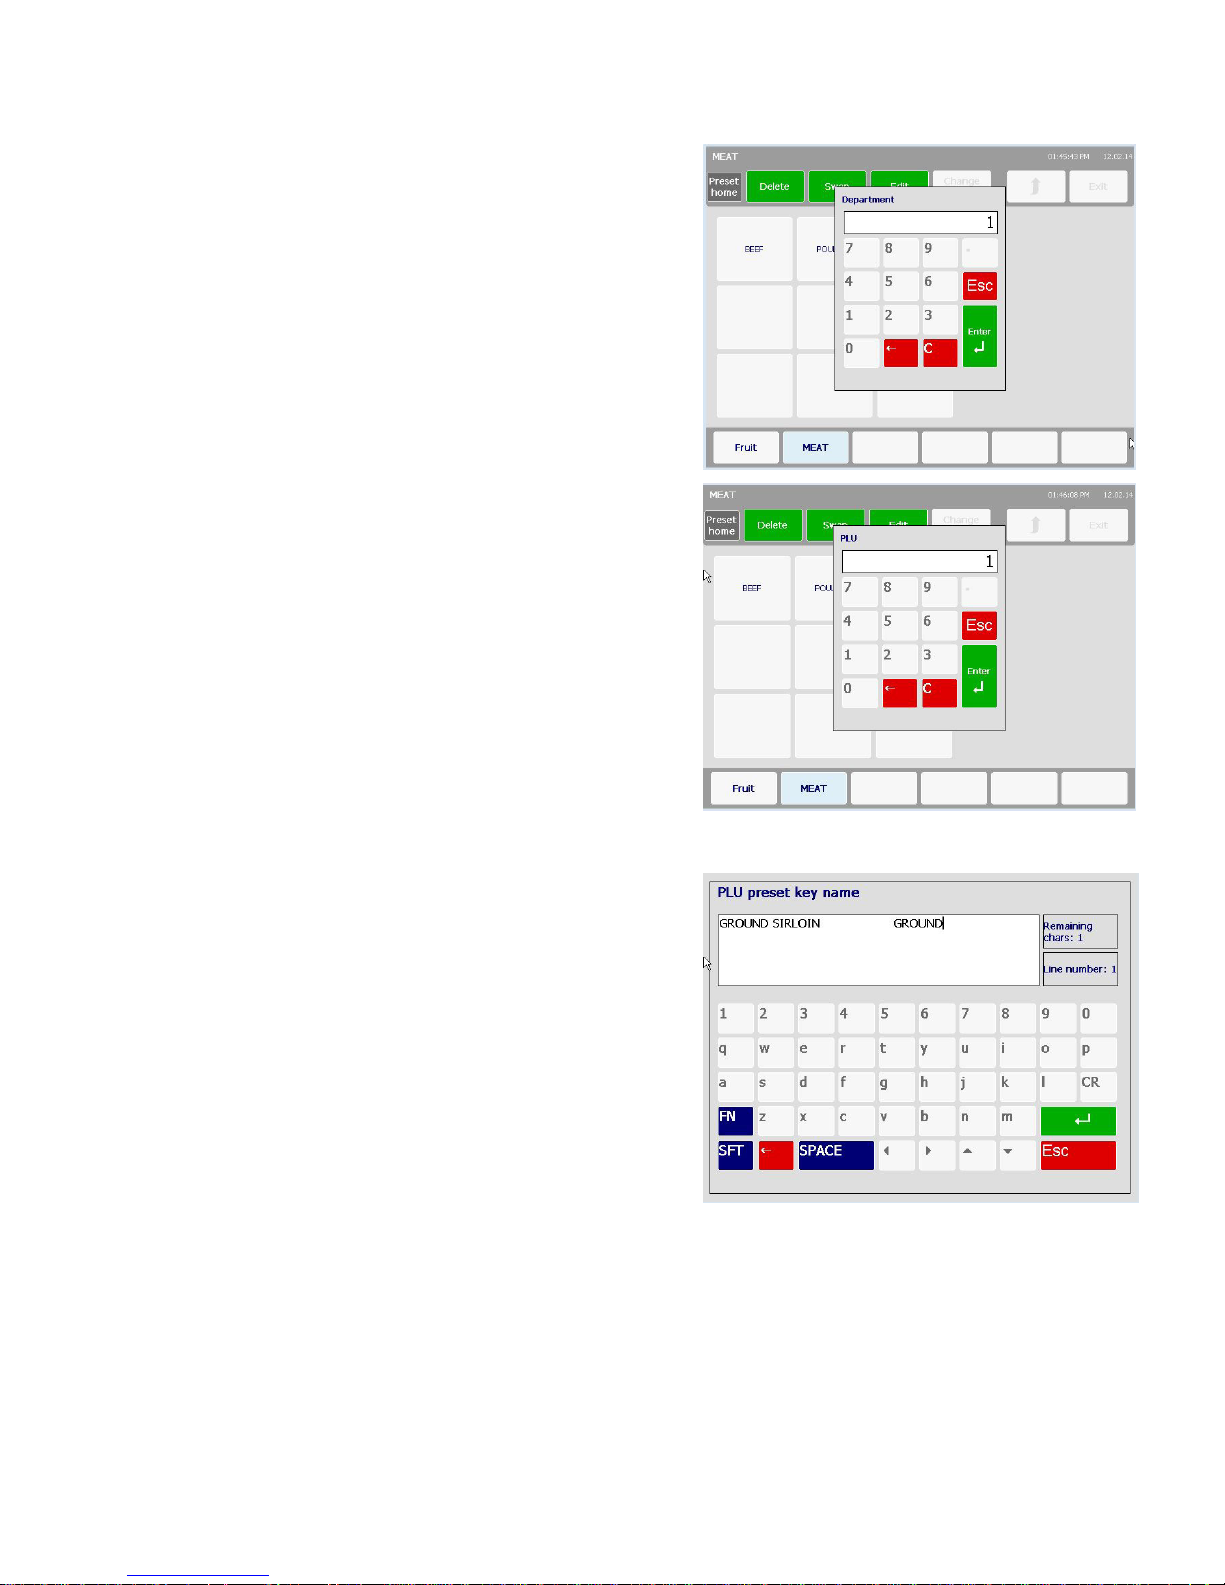
When creating a new PLU preset
button, key in the department
number and press Enter.
Next, key in the PLU number
and press the Enter button.
Edit the name that will be
used on the button and
press the green enter button
to save and exit.
2-7
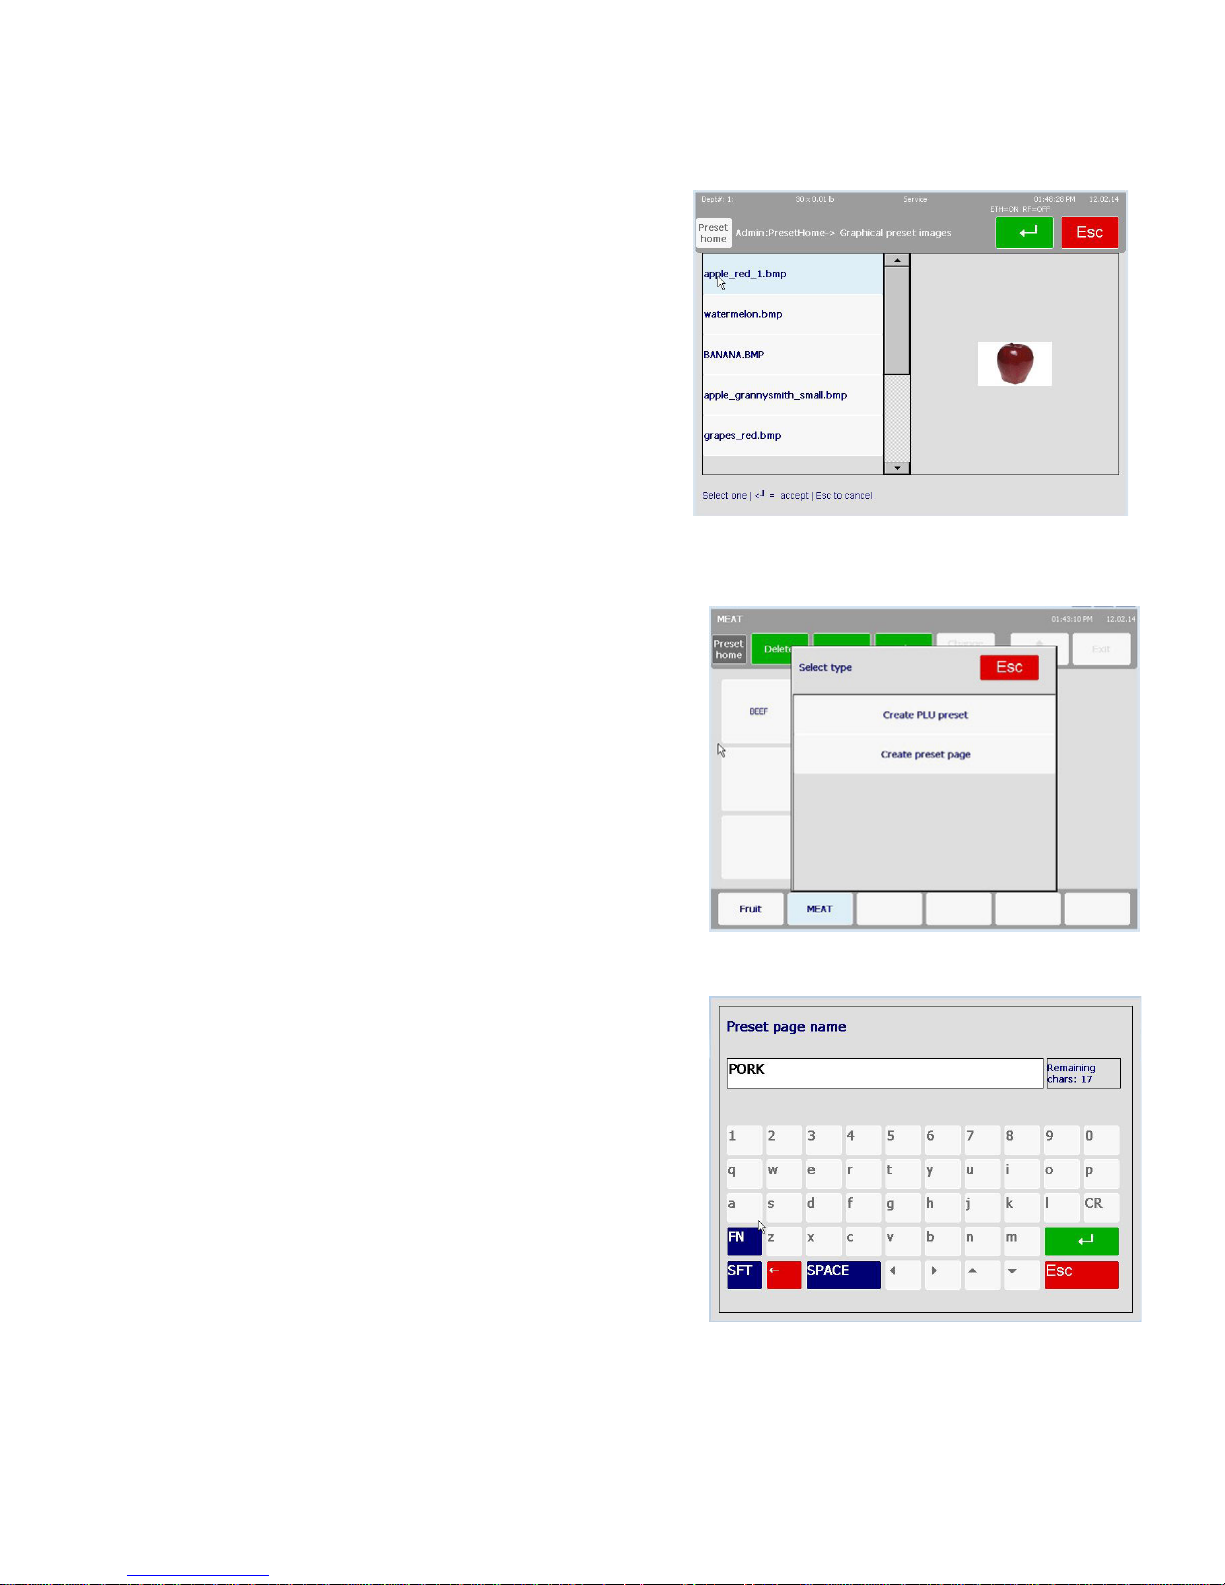
Last, you will be prompted to
select a graphic (if Preset Type
is set to Graphical Preset in
Unit Setup->Scale Setup>Preset Settings) from a list of
those available. If applicable,
choose a graphic, than press
enter. If there is not an
applicable graphic, press enter
without selecting a graphic
and only text will display on
the PLU Preset button.
Create Page
To create a new page, touch a
blank button and select Create
Preset Page.
Chapter 2: Operating Instructions
Operator Screen
Type in the page name and
press the green enter button to
save and exit.
METTLER TOLEDO Impact M User's Guide
2-8
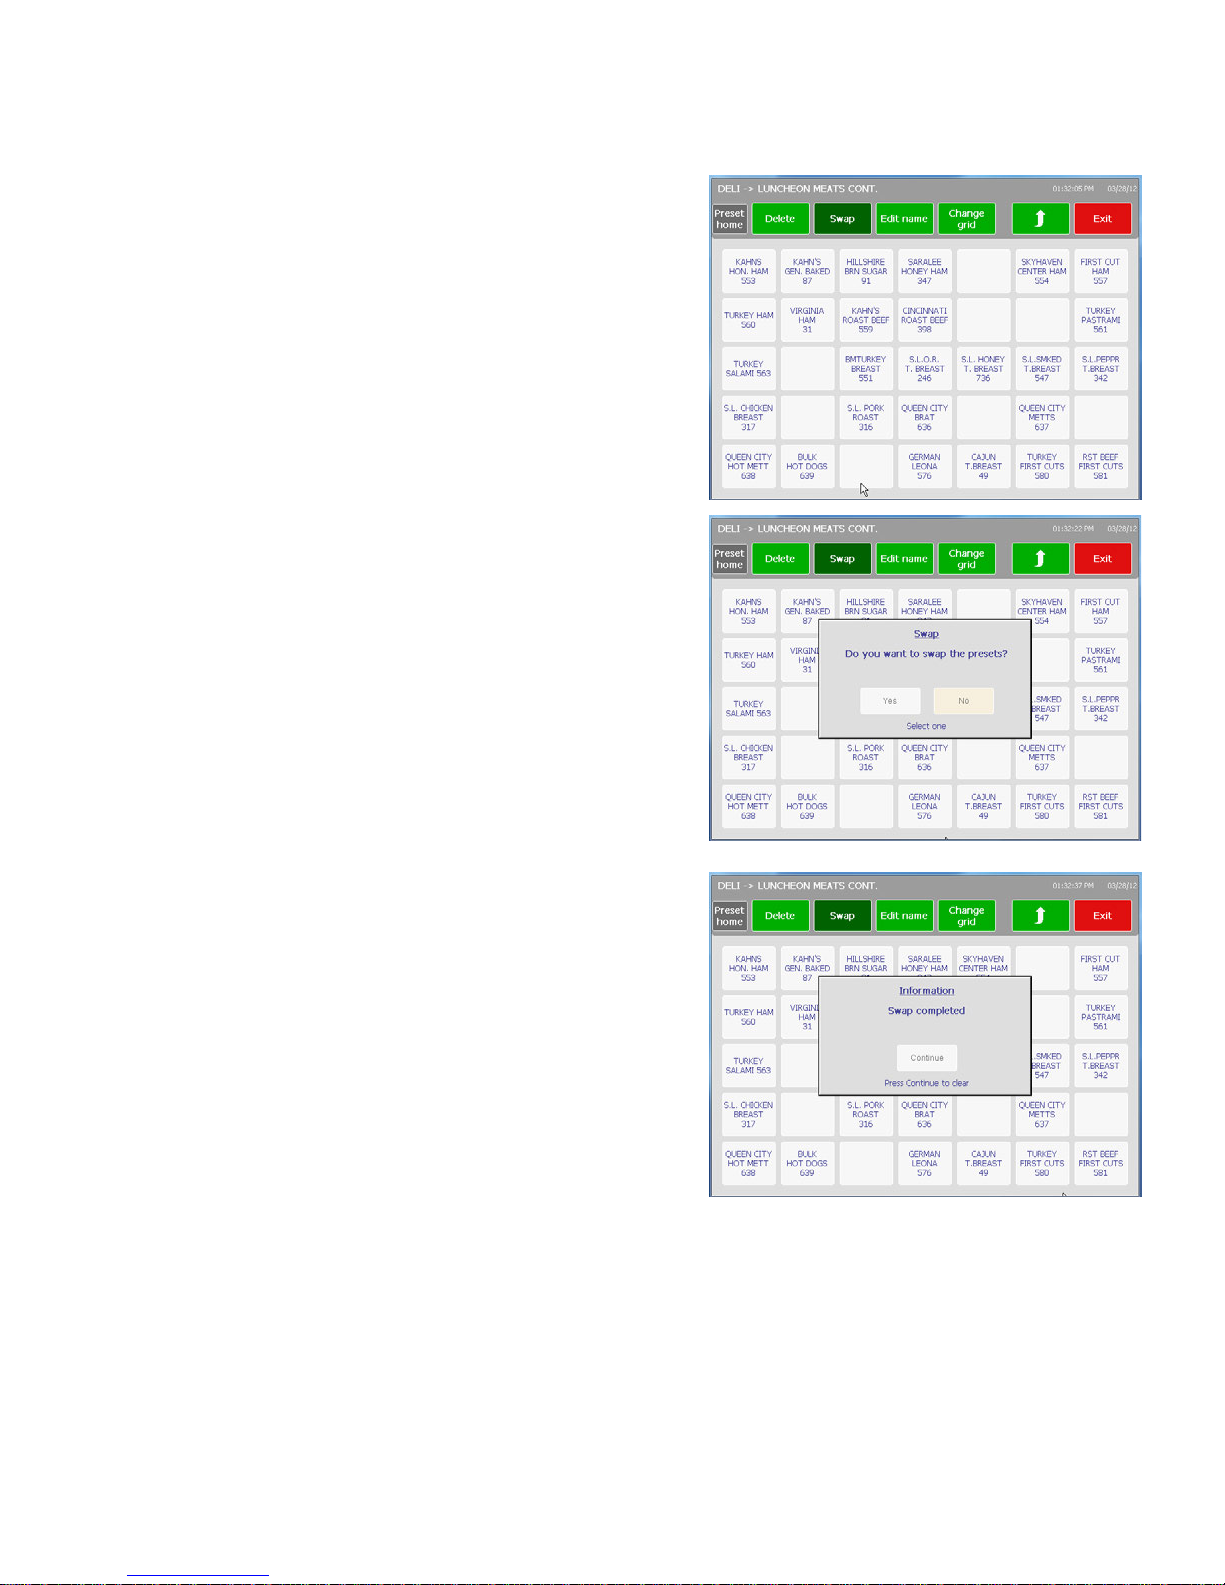
Swap Presets
To swap preset positions, first
press the Swap button and then
press the first Preset to be
swapped.
Next, press the Swap button
again and then the second
Preset to swap.
Press yes to continue with the
swap or No to cancel.
A confirmation window will open
confirming the swap completed
successfully.
Press Continue and press the
green Save button at the top of
the screen to save any changes
made in the editor.
2-9
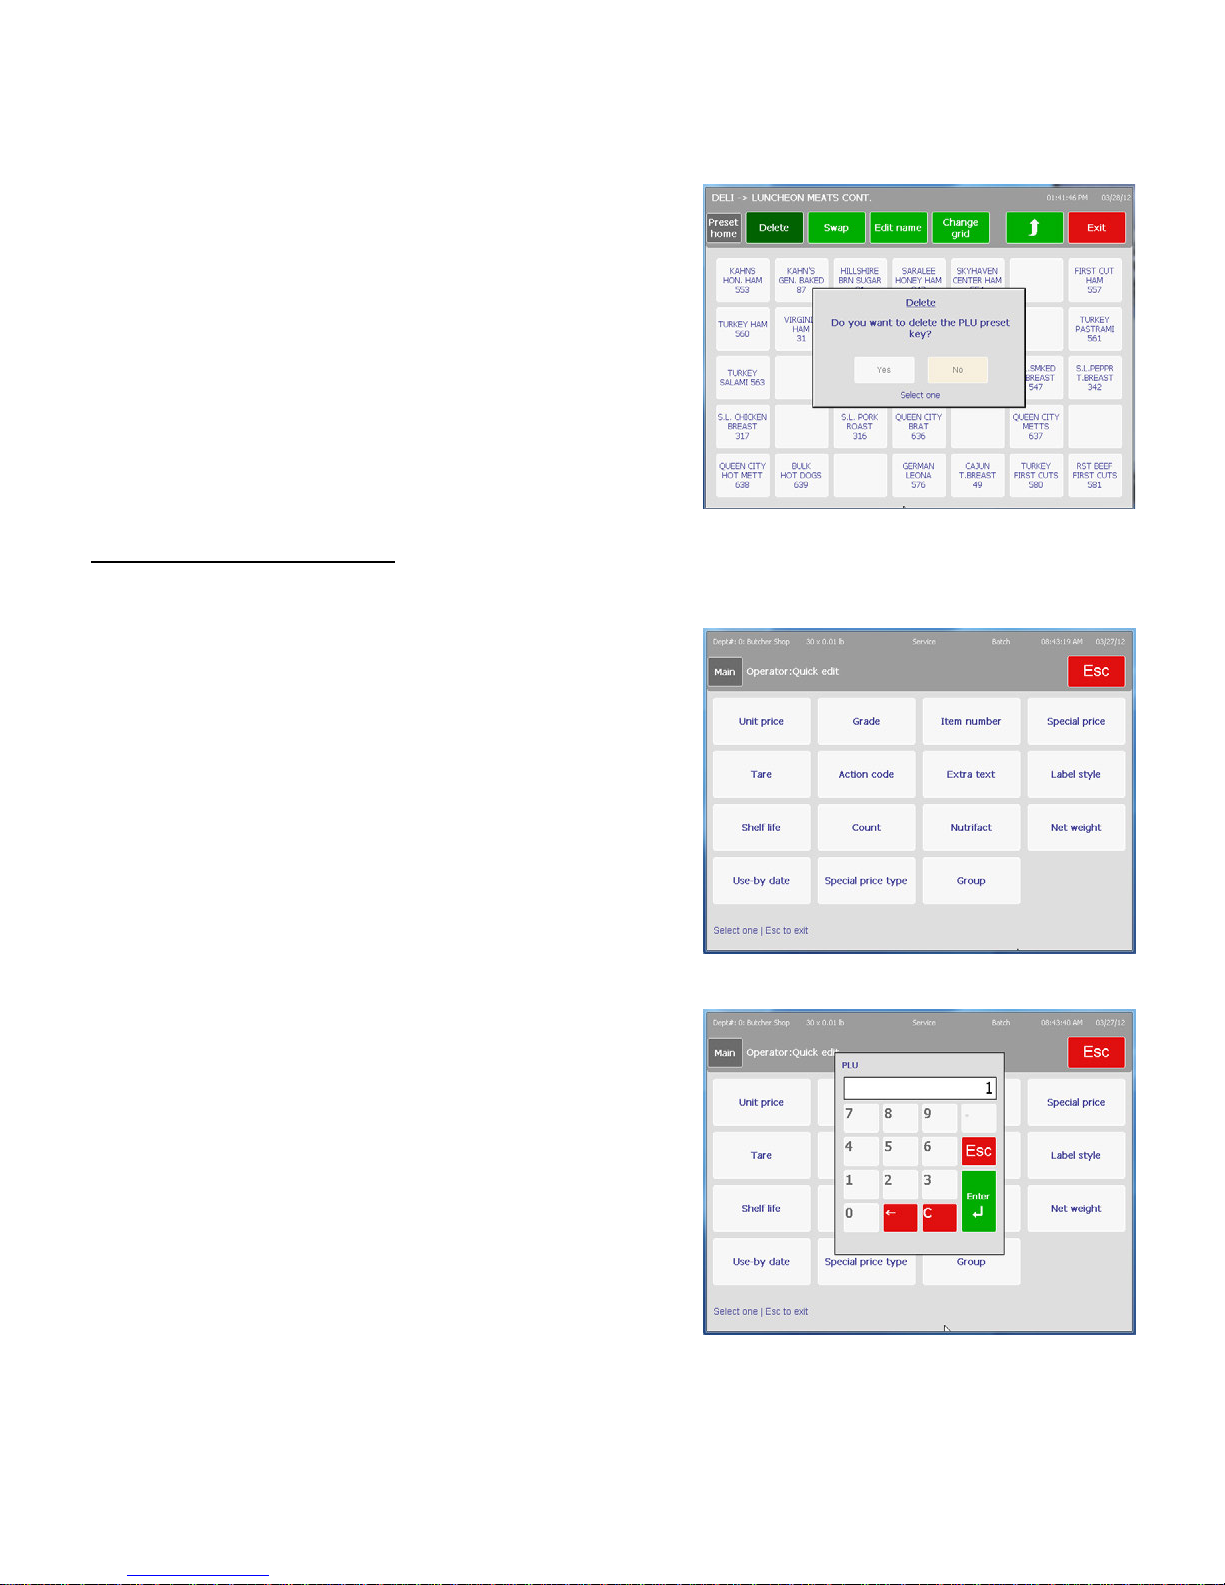
Quick Edit
Delete Preset
To delete a preset, press the
Delete button and then the
Preset to delete.
Press Yes to confirm and delete
or No to abort.
Quick Edit allows editing of
certain fields in the PLU record
database. This function may be
disabled and depends on the
configuration of the scale.
Chapter 2: Operating Instructions
Operator Screen
Press any of the field buttons
and then enter the PLU number.
METTLER TOLEDO Impact M User's Guide
2-10
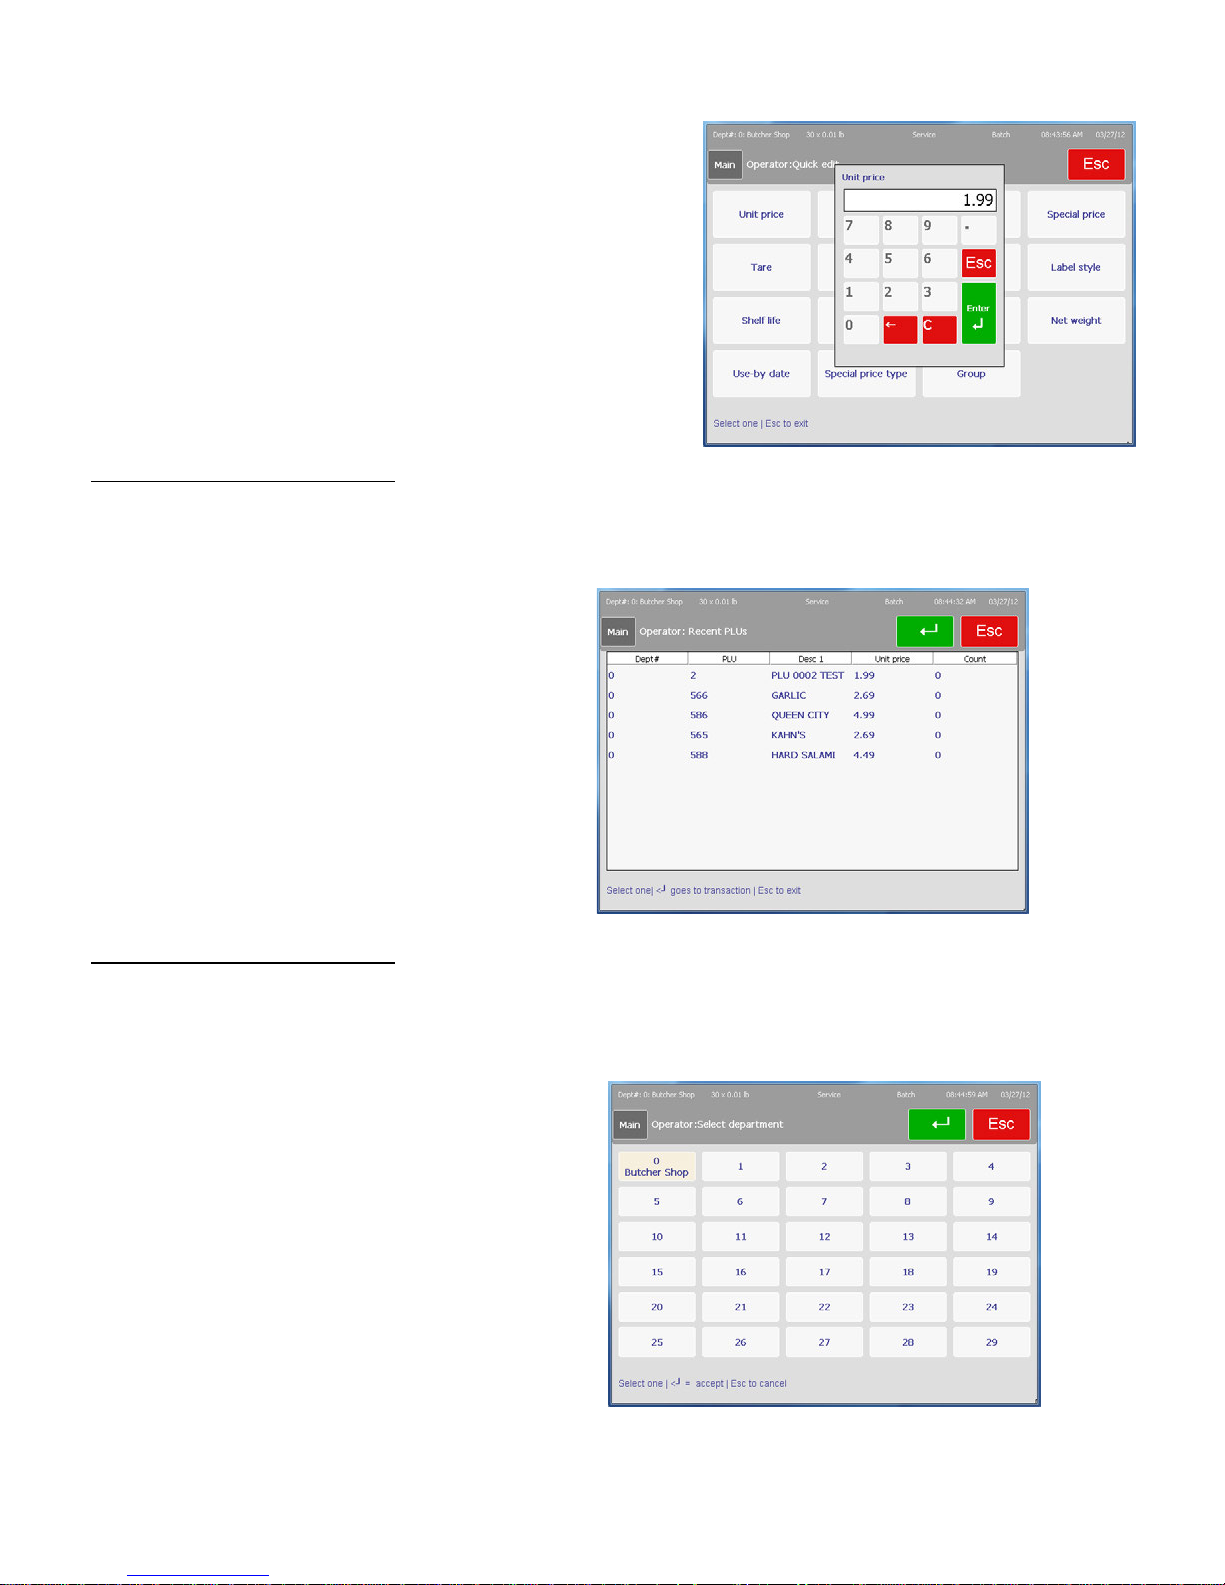
Recent PLUs
Enter the new value for the field
and press the Enter button to
save or ESC to cancel.
To view a list of recent PLUs, press the Recent PLUs button.
Select Department
To select the default department, press the Select Department button. PLUs entered
through the keypad will automatically search this department.
2-11
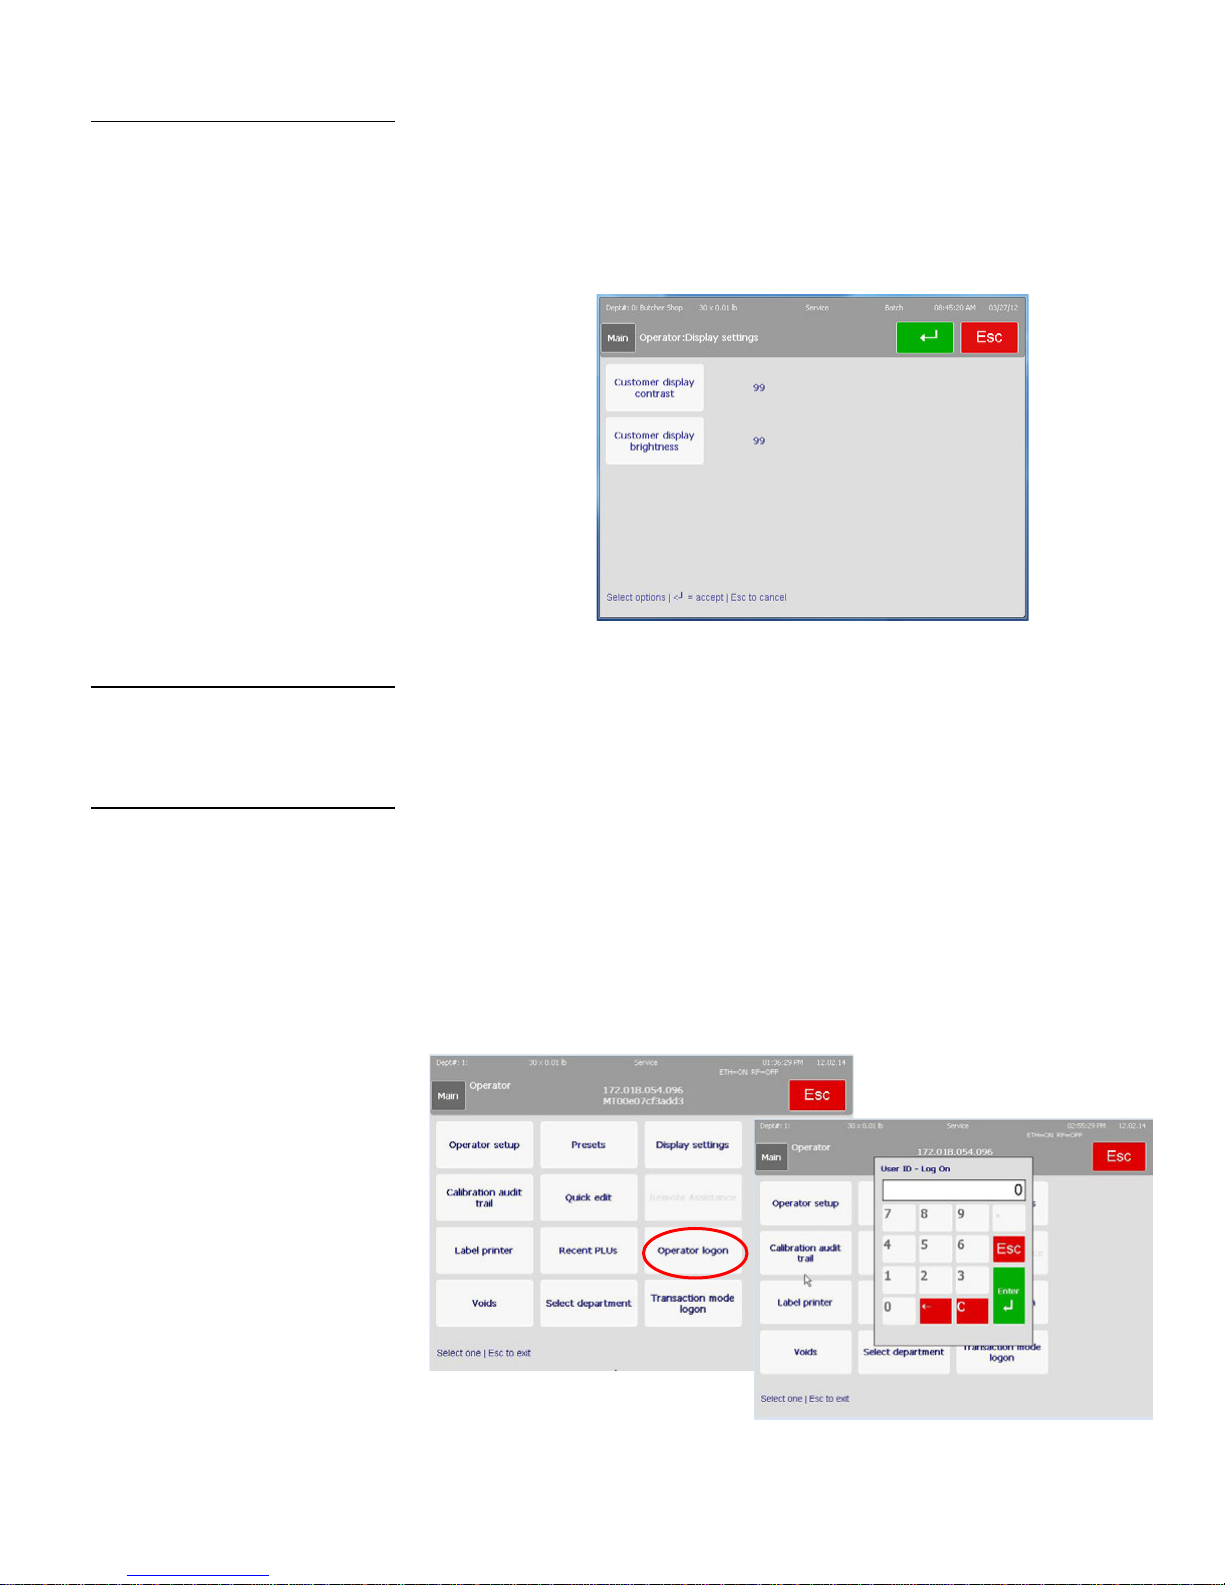
Display Settings
Chapter 2: Operating Instructions
Operator Screen
The contrast on the customer display can be adjusted for the best viewing angle. Valid
entries are 1-1023. Contrast 1 is darkest, Contrast 1023 is lightest. Brightness can be
entered from 1-99. Brightness 1 is darkest, Brightness, 99 is lightest.
Remote Assistance
Operator Logon
Available in future version.
If Operator Mode Logon is enabled in Admin->Unit Setup->Scale Settings->PLU Access
Parameters->Transaction Options, an Operator must log on to the scale to print a label.
In addition, the Operator ID will be recorded in the transaction log with each transaction.
This allows for better security and transaction traceability by operator. When the Operator
Logon button is selected, operators will be prompted to enter their logon information.
Once logged on, the operator will remain logged in until they log off or until the time
between transactions exceeds the transaction mode timeout defined in Scale Settings.
METTLER TOLEDO Impact M User's Guide
2-12
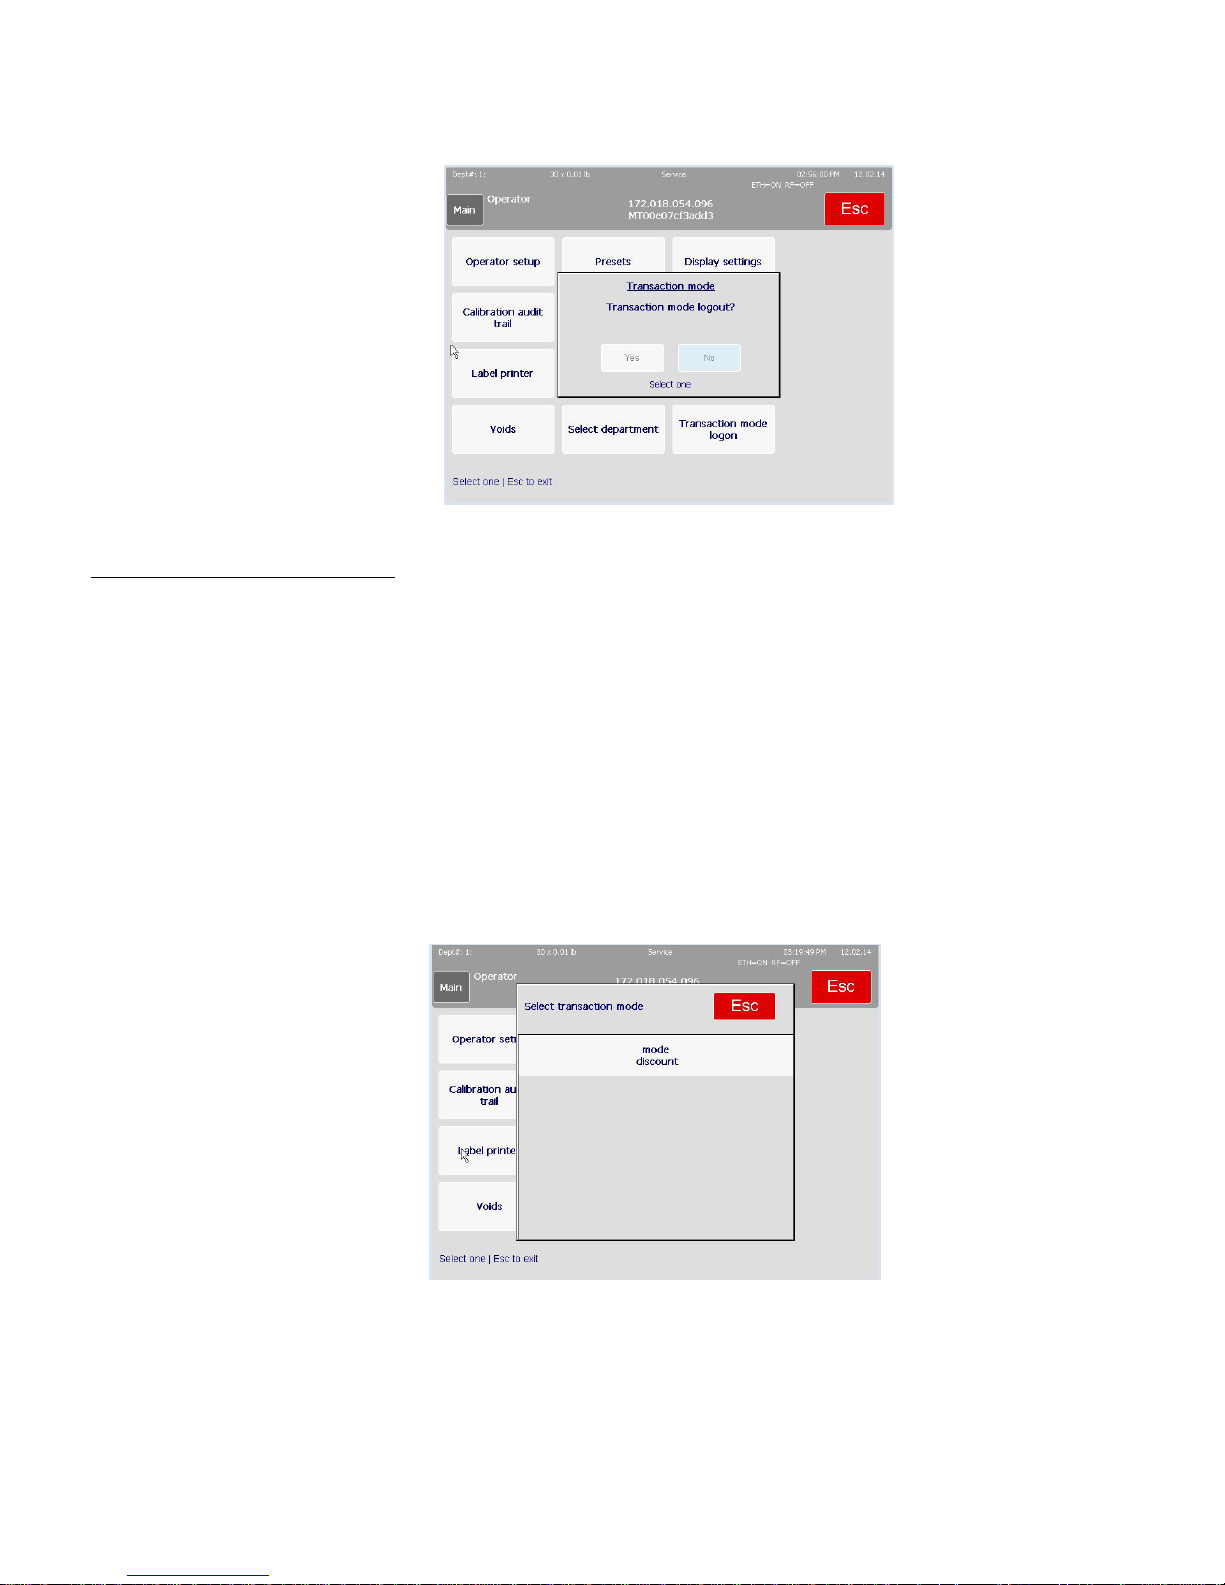
Transaction Mode
Logon
When selected again, operators will be prompted to log out.
Transaction Mode Logon allows users to logon to preconfigured modes that are designed
to run certain functions (ex. A Markdown mode that discounts the transaction by a certain
% or a Rewrap mode that applies a % off discount, changes the label format, and
changes the sell by date). When logged into this mode, all transactions will run these
functions until the operator logs out of this mode.
The available modes are defined in Admin->Unit Setup->Scale Settings->Transaction
Settings->Transaction Mode Configuration. For more information, review the section in
this User's Guide on Transaction Settings.
2-13
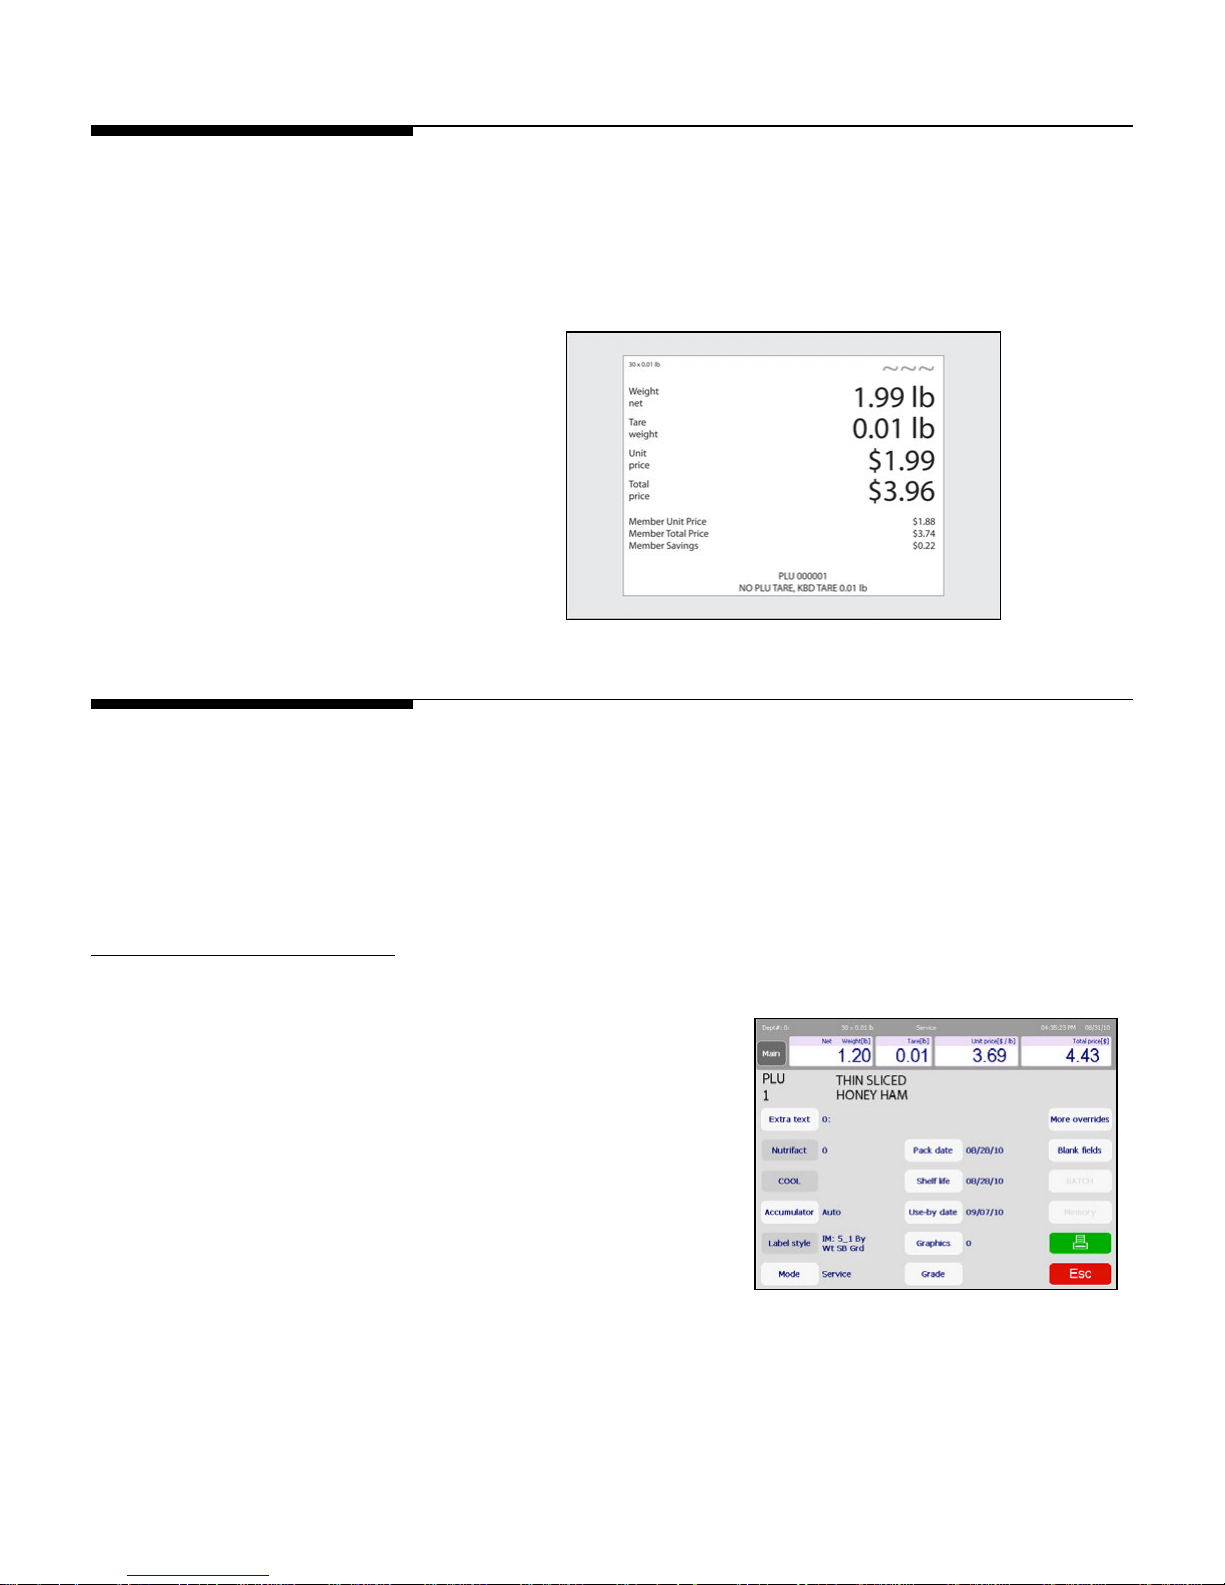
Customer Display
Chapter 2: Operating Instructions
Customer Display
The Customer Display can show different display screens based on the operation mode
the scale is in. The different options are By Weight PLU, By Count PLU, Standard Pack
PLU, Weight Displayed/Weight at Zero/No PLU and Weight at Zero/No PLU with a
marquee message. A slide show can be configured to display when the scale is idle.
Refer to the Marquee section in Chapter 3 for details.
Customer Display – By Count PLU
PLU Pricing Modes
By-Weight PLU
PLU is an abbreviation for Price Look Up. The PLU is a reference number assigned to a
product's record including fields such as the description, price, tare, etc. Different PLU's
will have different pricing modes. Meat is normally sold "By Weight" by the pound or
kilogram. Many bakery products are sold "By Count". Other products may be sold in a
standard package that uses a fixed weight. The different pricing modes are as described
in the following sections.
Examples of products sold By Weight
are meats, cheese, poultry, and
produce. By-Weight items can be
priced in three ways:
Priced "Per Pound/kg" - Typically
weighed items are priced per pound.
The weight multiplied by the unit price
equals the total price of the product.
Priced "Per Fraction of a
Pound/100g" (fractional) - The item
may also be priced by the fraction of
the pound (where legal and desired). Pricing per 1/4 pound and per 1/2 pound are
available in “pounds” mode and 100 gram is available in “kg” mode.
"Pounds/kg for price" - The PLU may be sold with a pounds-for-price (rather than price
per pound). For example, “2 pounds for $1.00” rather than “$0.50/pound.”
METTLER TOLEDO Impact M User's Guide
2-14
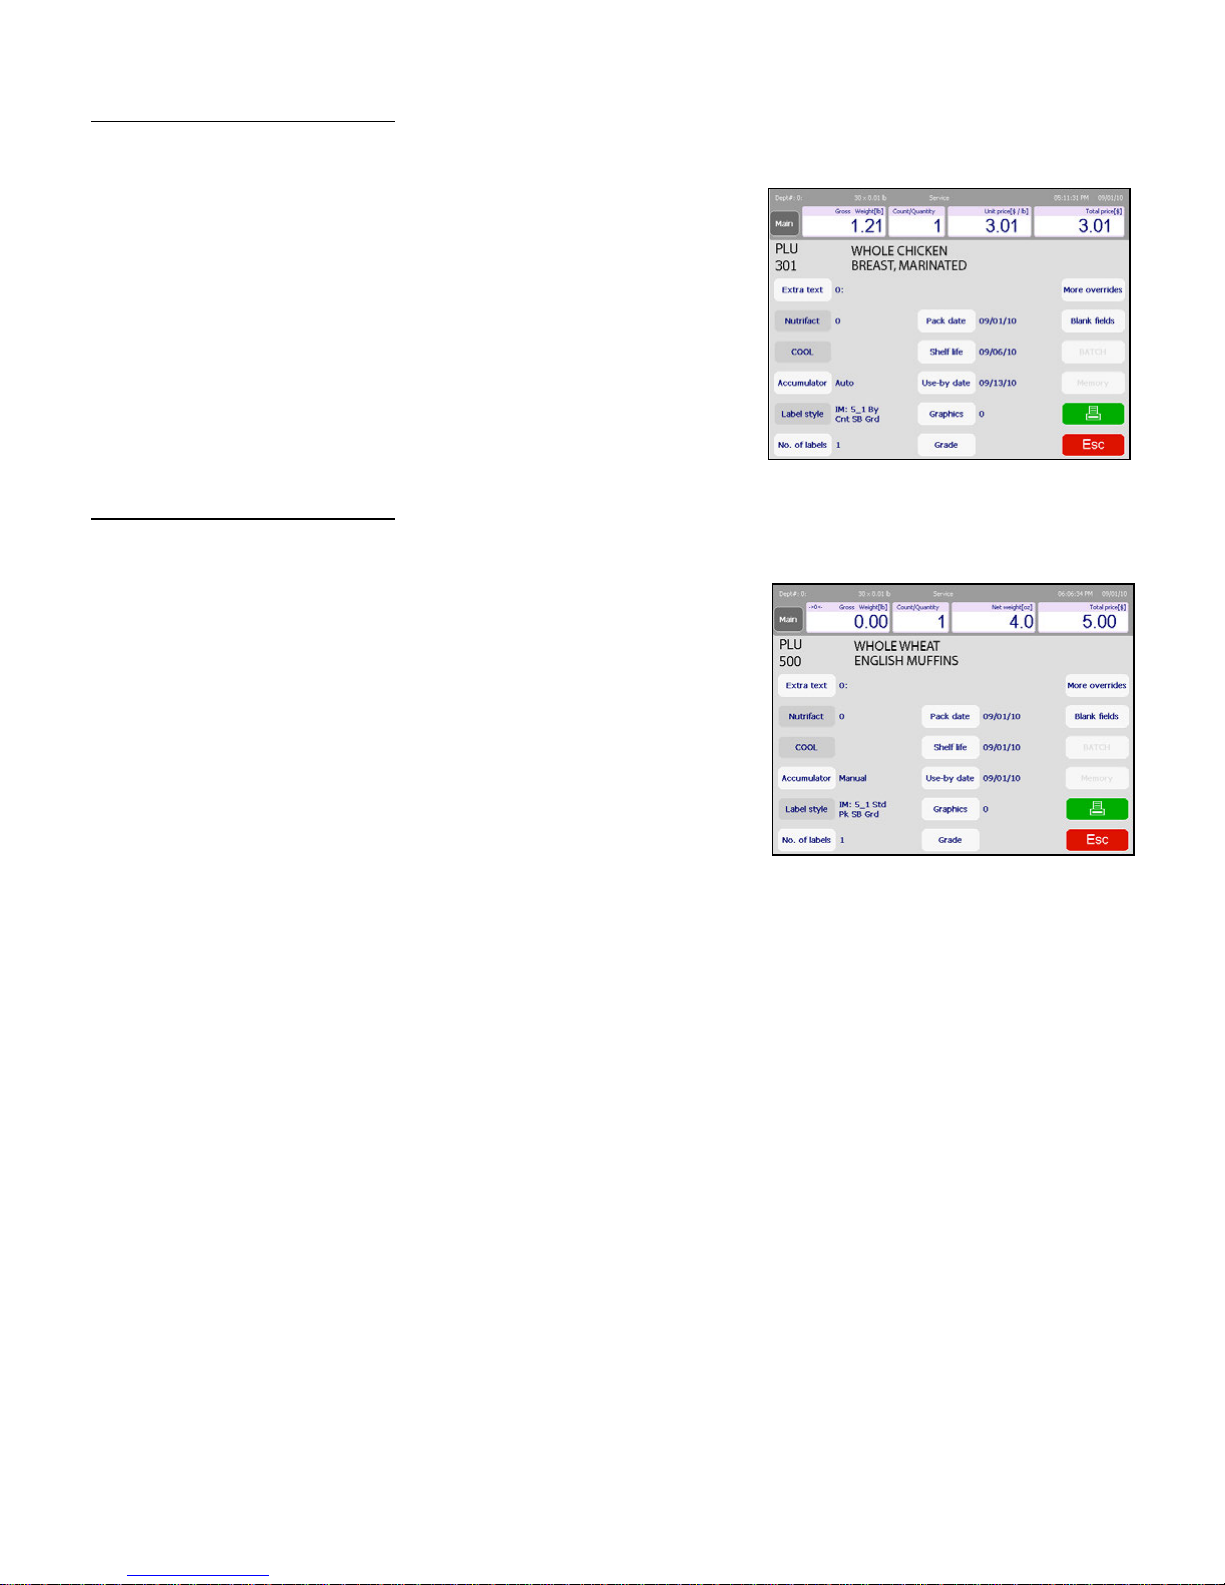
By-Count PLU
Standard Pack PLU
Examples of items sold by the count are
cookies, donuts, rolls, bread, etc.
Example: 4 Apples for $0.69. The ByCount PLU allows the operator to use the
scale to print labels. Pricing is entered
as a certain quantity of items for a set
price. If the total weight for the items is
needed, a weight field can be configured
on the label to print the weight of the
items in addition to the By-Count
information.
Examples of items sold by Standard
Pack include whole chickens, sheet
cakes, bread, etc. The Standard Pack
PLU is similar to By-Count and also
allows the operator to print labels. These
labels indicate the fixed net weight and
total price of the item. These types of
items all use a fixed weight.
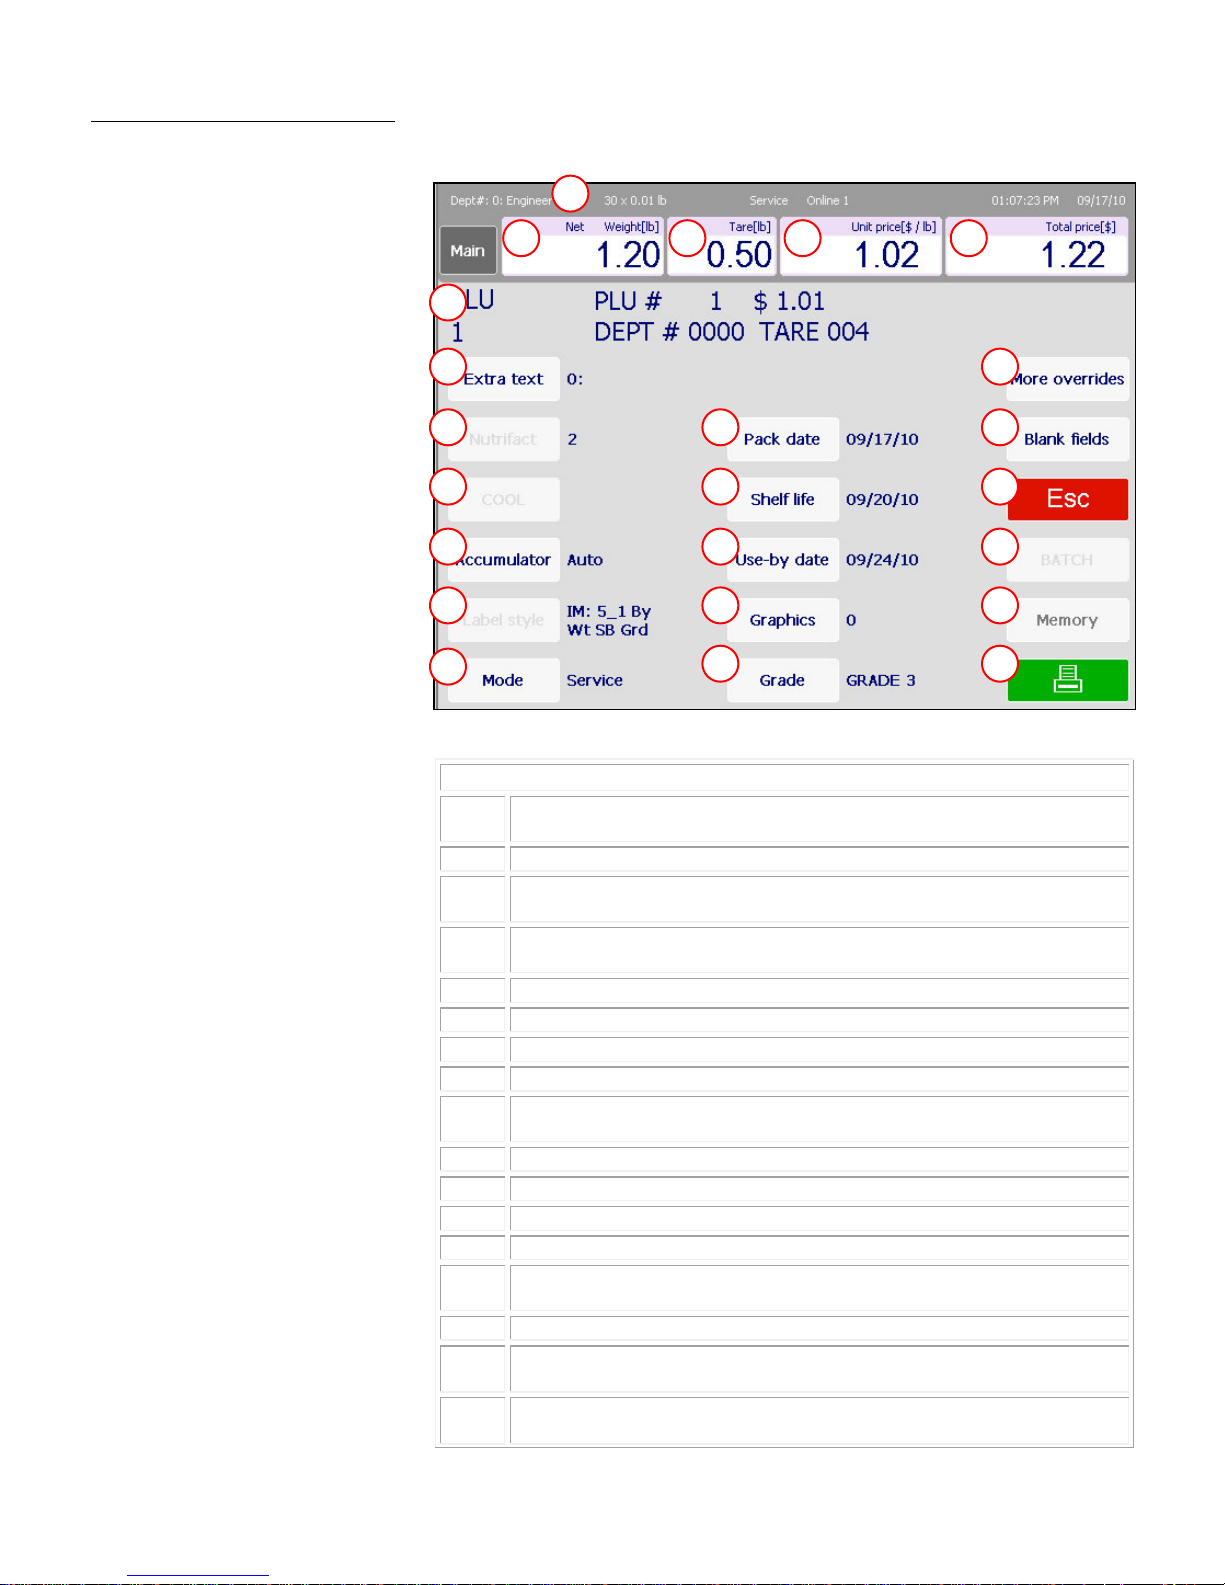
2-15
PLU Screen Components
1
Net weight the weight of actual goods, excluding packing materials. The scale will
automatically determine Kg or Lb or Count depending on the PLU item type.
2
Tare
3
Unit price is programmed into the PLU record. If allowed, touch to override. This is
used to calculate the Total Price.
4
Total price of the item. If the item is sold by weight, this is the unit price multiplied
by the weight of the item. The Total Price is never operator accessible.
5
Net/Gross when NET displays, it indicates a tare weight has been taken.
6
Mode states the mode of Operation: Service, or PrePack.
7
PLU number and description.
8
Pack date
9
Shelf life displays the date programmed into the PLU. The item should NOT be sold
beyond this date.
10
Use-by date shows the date after which the product should no longer be consumed.
11
Graphics
12
Grade designates a “grade” for the product described by the PLU
13
More overrides accesses a menu that holds overrides not described by the buttons
14
Blank fields accesses a list of flags that determine whether a certain parameter will
appear on the printed label
15
ESC returns to the previous screen without printing a label
16
Batch is used to print multiple labels in one batch When in Batch mode with
transactions in queue, the word Batch will appear.
17
Memory is used to store transactions for use in printing a receipt-type label. When
transactions are in memory, the word MEM will appear.
08
07
05
06
04
03
02
01
09
12
18
10
17
15
11
19
14
13
16
20
21
22
23
PLU Screen Details
Chapter 2: Operating Instructions
PLU Pricing Modes
displays the tare value assigned to the PLU transaction.
displays the current date.
allows the user to select a printed graphic from the unit’s archive.
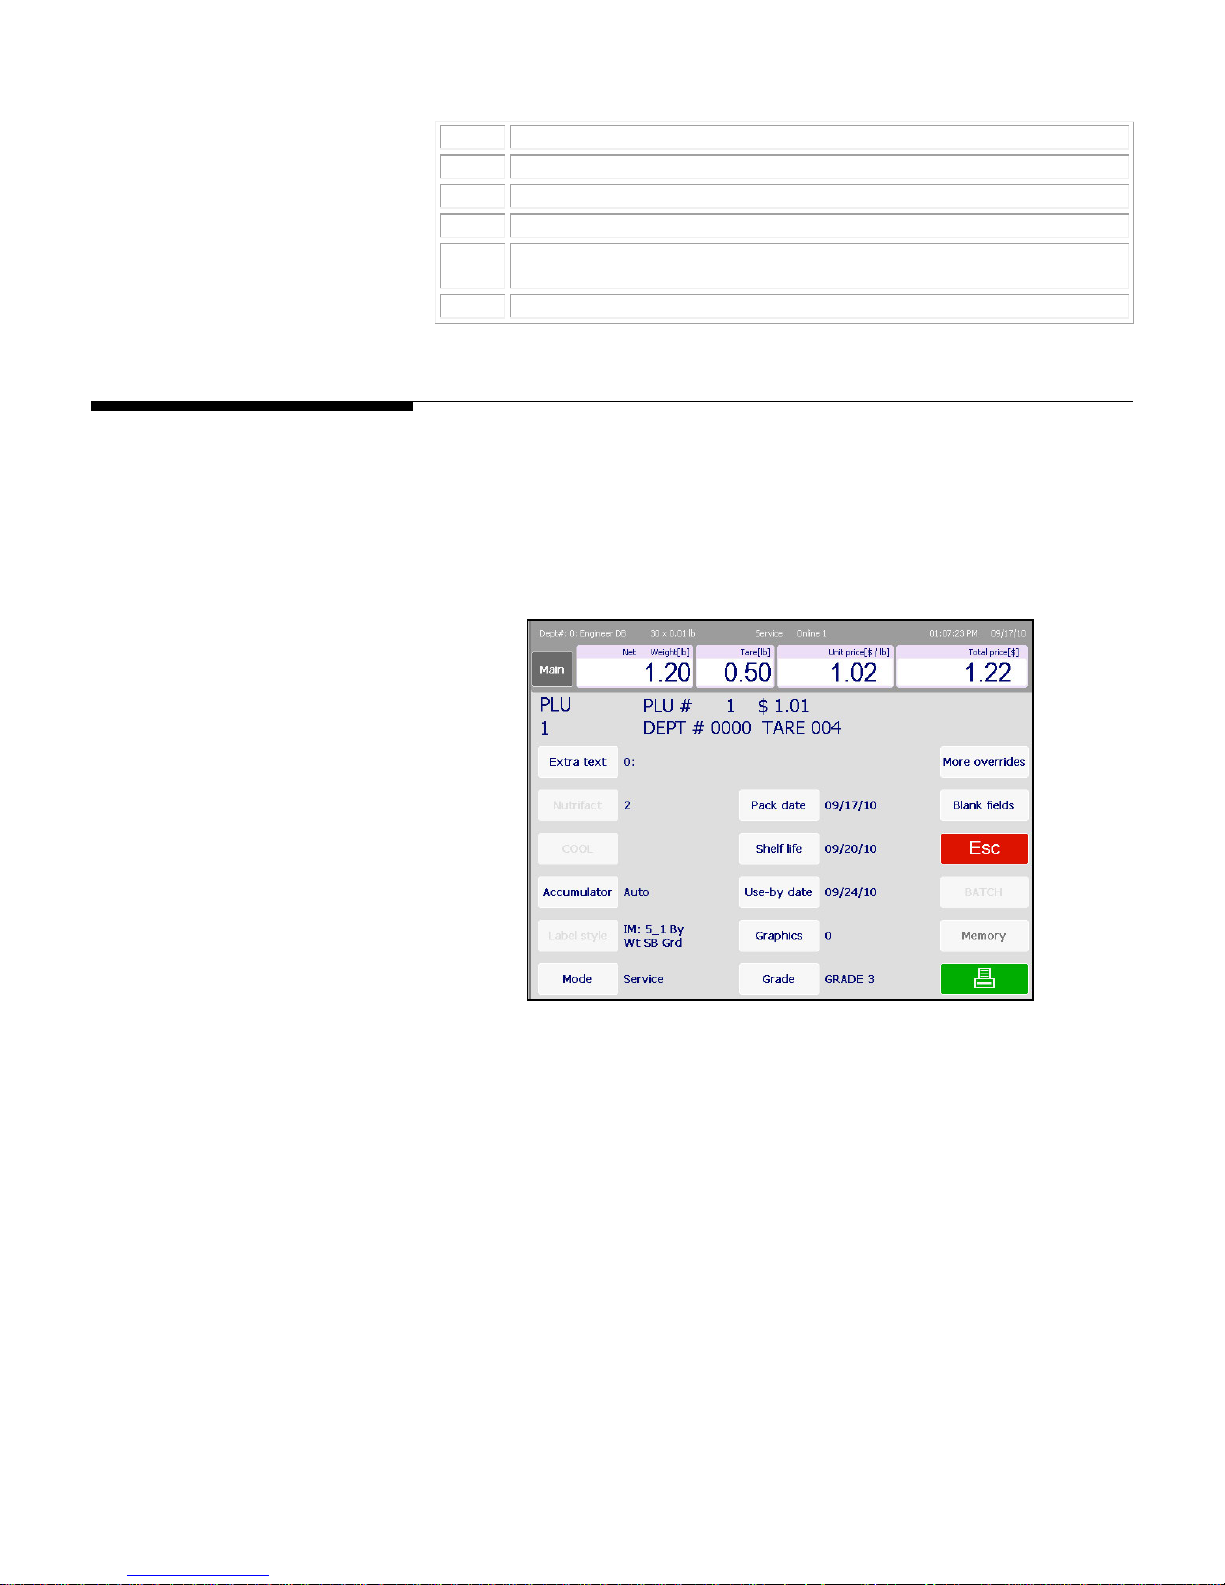
METTLER TOLEDO Impact M User's Guide
2-16
18
Print – prints a label that references the given information
19
Extra Text allows the user to select from the unit’s extra text records
20
Nutrifact allows the user to select from a list of existing nutritional fact entries
21
COOL displays the PLU’s COOL data
22
The accumulator button allows the user to set specific accumulation settings for the
PLU
23
Label style displays the currently selected label style
Calling PLUs
When the Impact M is in Service mode, the operator screen will display the active
department’s Preset Pages and Preset PLUs.
Note: Service mode is the default on the PLU Edit screen. After the product has been
weighed, a label has been printed, and the item has been removed from the scale, the
PLU will clear and the scale will return to the home screen.
To begin a transaction, place an item on the weighing tray (can be done either before or
after a PLU is called up).
Call a PLU (Price Look Up) by pressing the Preset key related to the product directly enter
the PLU number on the keyboard.
The screen will vary slightly in appearance depending on whether it is By Weight, By
Count or Standard Pack. Depending on how the PLU has been set up, some of the fields
may be over-ridden such as Shelf Life, Tare, etc.
2-17
Printing Labels
By Weight PLU
Chapter 2: Operating Instructions
Printing Labels
Once the By Weight PLU has been called up, make any needed changes by pressing the
buttons for allowed fields, and
then press the Print button to
print a label.
Take the label and remove the
item from the scale to
complete the transaction. The
screen will return to the home
screen, unless the Prepack
Mode is selected using the
Mode button. Press the Mode
button to toggle between
Service and Prepack. In
Prepack Mode, the PLU will be retained. Prepack Mode is designed to weigh multiples of
the same item.
Service Mode – Best for weighing different single items. Enter the PLU number, place the
item on the platter, and then press the Print button for a label. When the product is
removed from the platter, the screen will clear and return to home ready for the next PLU.
Prepack Mode – Best for weighing multiples of the same item. To use, enter the PLU
number or press a preset, place the item on the platter and a label will issue
automatically. Remove the
item from the platter and
place the next item (of the
same type) on the platter for
the next label. When done,
press the Clear button to
return to the home screen.
The Service and Prepack
mode print button can be
configured in the Unit Setup,
Scale Settings, Scale Modes
screen. See Chapter 3 for
additional information.
METTLER TOLEDO Impact M User's Guide
2-18
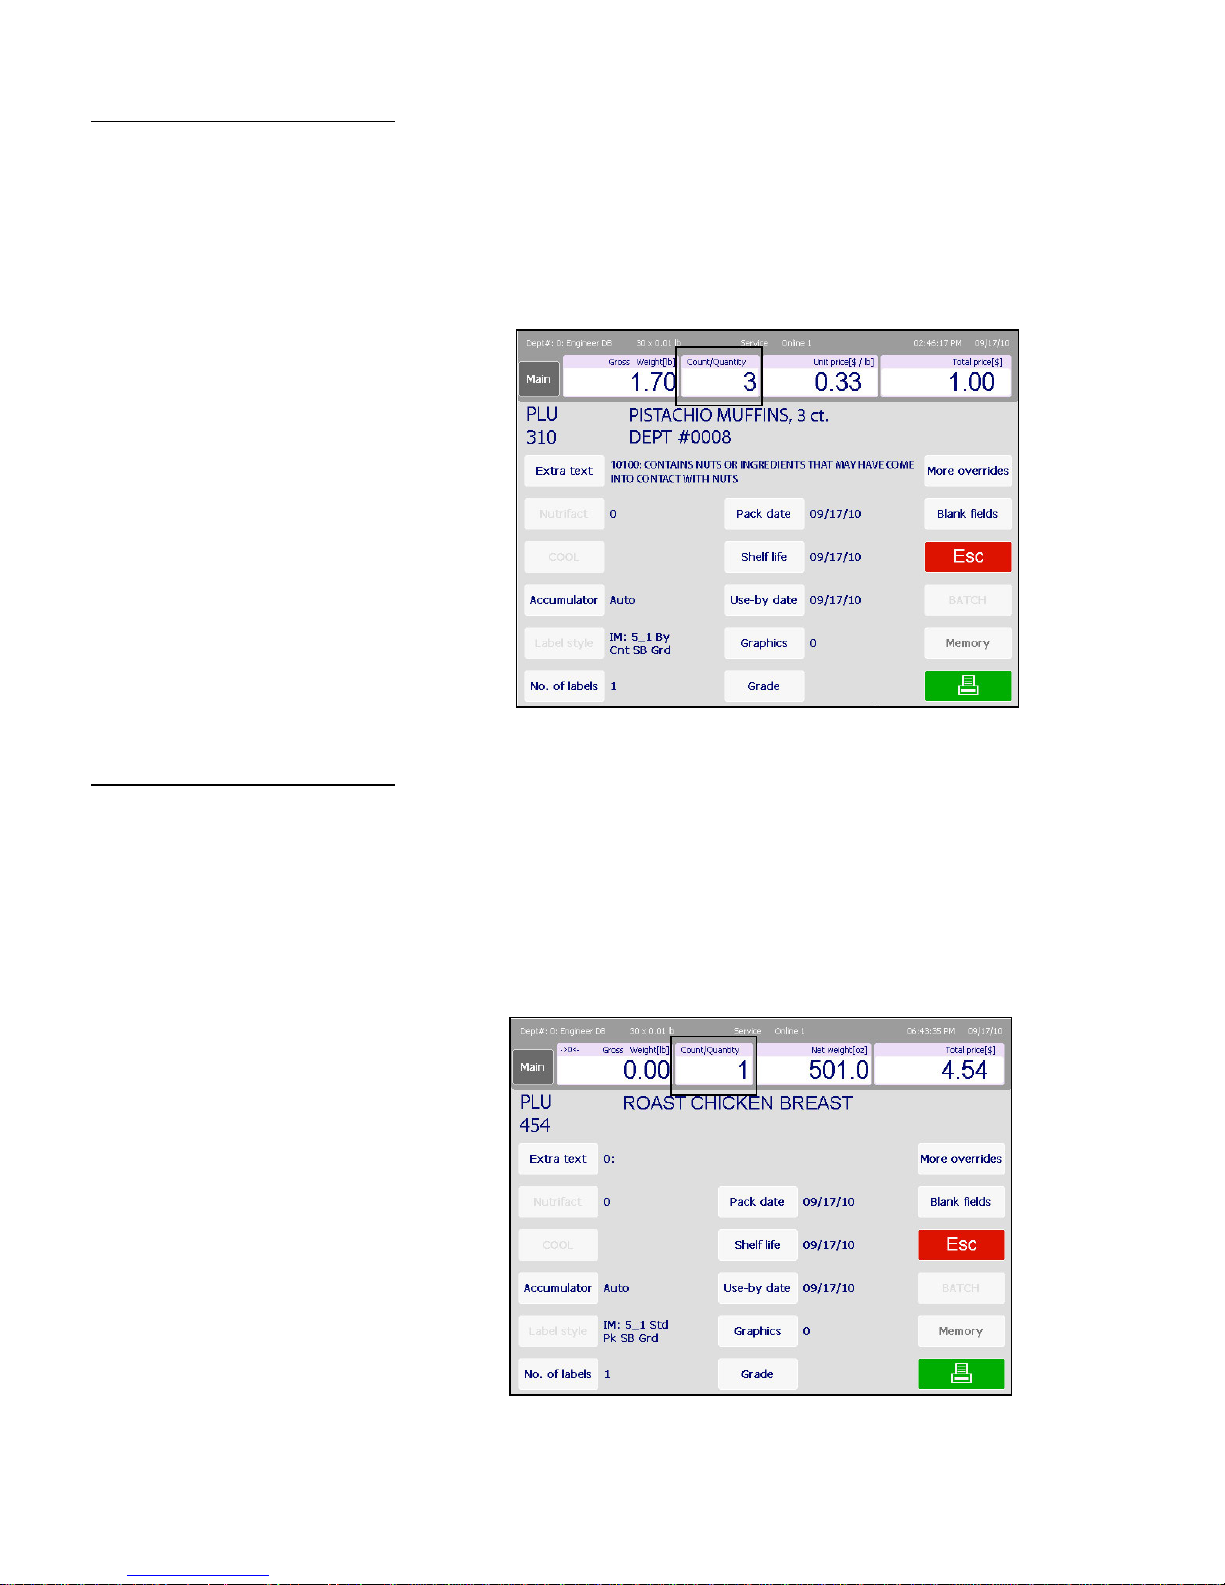
By Count PLU
Once the By Count PLU has been called up, make any needed changes, and then press
the Print button to print a label.
Note: if the count is different than what is programmed into the PLU record, press the
Count/Quantity box, enter the new quantity, press Enter and then press the Print key to
print the label.
Standard Pack PLU
Take the label and remove the item from the scale to complete the transaction.
When a Standard Pack PLU has been called up, make any needed changes, enter the
number of labels needed (with the lower-left button of the same name) and then press
the Print button.
Note: if the count is different than what is programmed into the PLU record, press the
Count/Quantity box, change the amount, press Enter and then press the Print key to print
the label.
Take the label and remove the item from the scale to complete the transaction.
 Loading...