

Mettler Toledo ICS649a-check, ICS649d-check, ICS649-check User Manual
ICS649a-check
ICS649d-check
ICS649a-check-.../c
ICS649a-check-.../f
ICS649a-check-.../t
User manual
ICS649-check
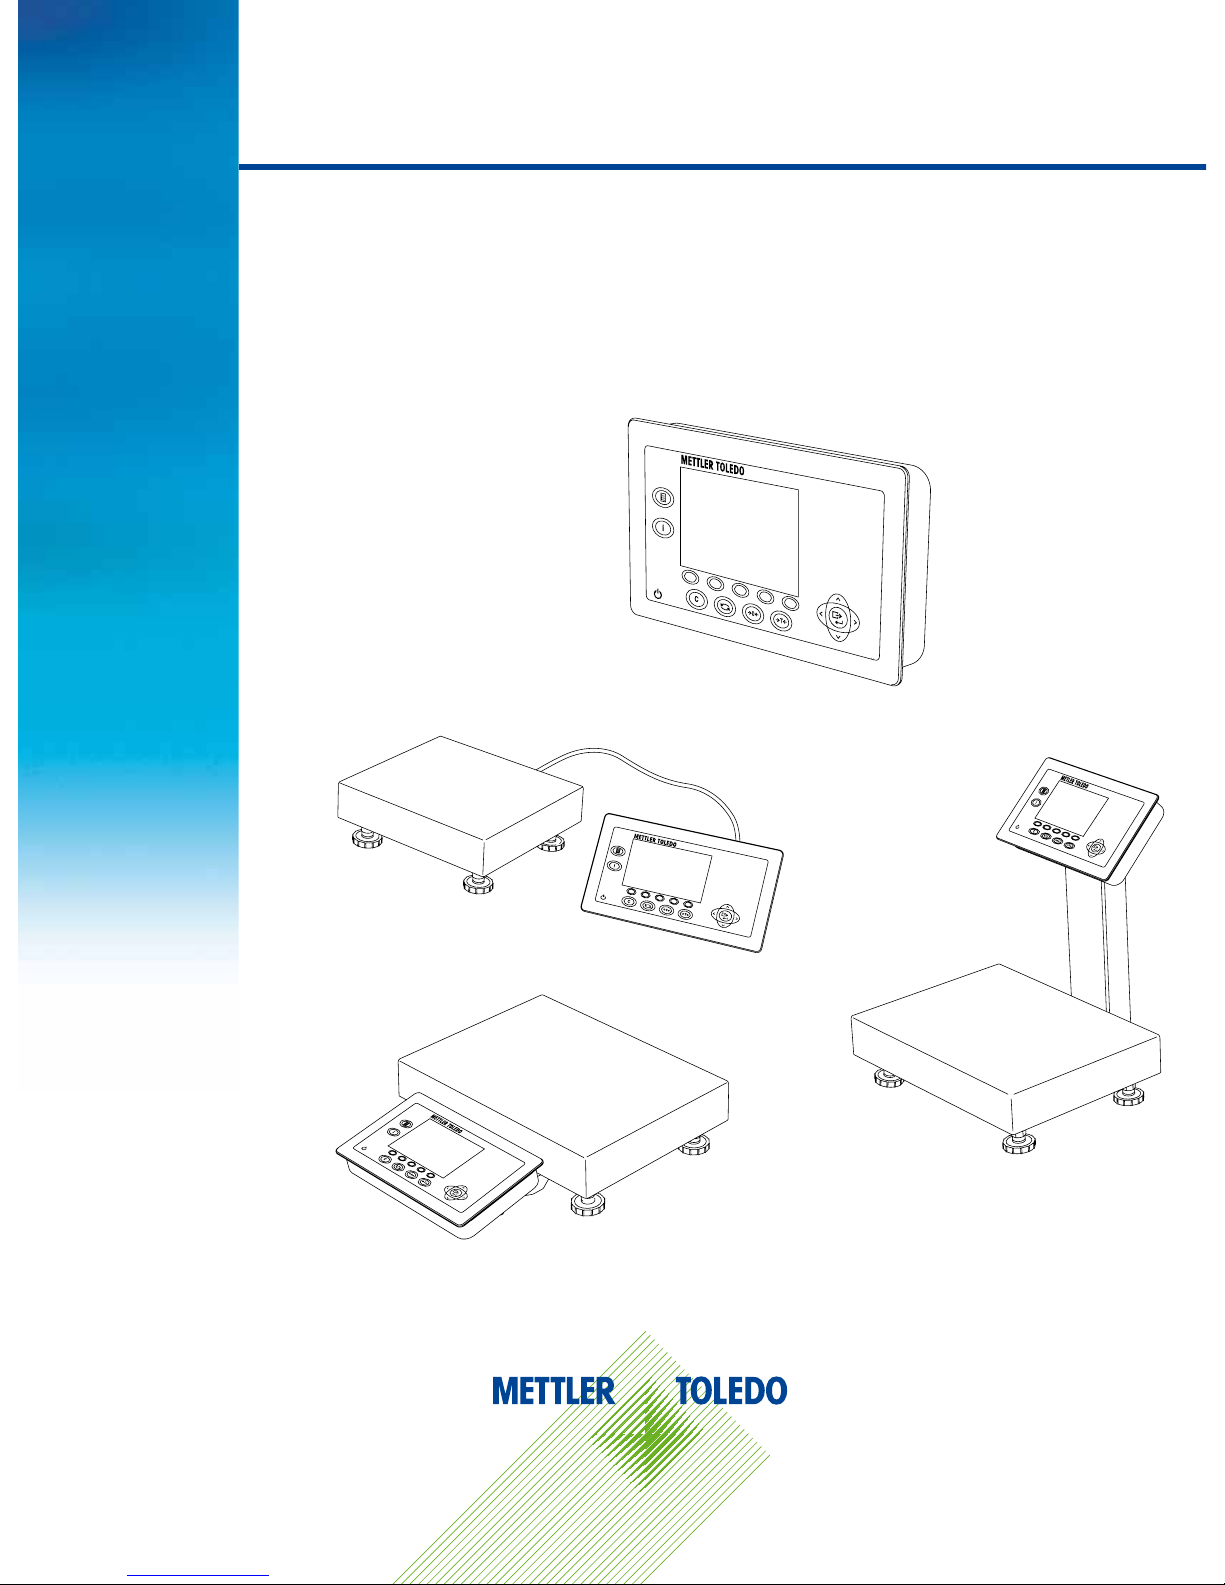
Weighing terminals
Terminal and platform combinations

Service XXL
Congratulations on choosing the quality and precision of METTLER TOLEDO. Proper use
according to these instructions and regular calibration and maintenance by our factorytrained service team ensure dependable and accurate operation to protect your investment.
Contact us about a ServiceXXL agreement tailored to your needs and budget.
We invite you to register your product at
www.mt.com/productregistration
so we can contact you about enhancements, updates and important notications concern
ing your METTLER TOLEDO product.
2
METTLER TOL EDO User manual ICS649-check
12/10Order number 22021156A

3
METTLER TOL EDO User manual ICS649-check12/10 Order number 22021156A
Contents
1 Introduction .........................................................................................................5
1.1 Safety instructions ................................................................................................5
1.2 Presentation ......................................................................................................... 6
1.3 Tracing and tracking features ............................................................................... 16
1.4 Commissioning .................................................................................................. 18
1.5 Use in hygienically sensitive areas ........................................................................20
2 Operation .......................................................................................................... 21
2.1 Switching on and off .......................................................................................... 21
2.2 Zeroing / Zero point correction ..............................................................................22
2.3 Simple weighing ................................................................................................. 22
2.4 Weighing with tare .............................................................................................. 22
2.5 Switching scales ................................................................................................. 24
2.6 Printing results ...................................................................................................24
2.7 Totalising ........................................................................................................... 25
2.8 Average (dynamic) weighing ................................................................................27
2.9 Piece counting ................................................................................................... 27
2.10 Working with identications ................................................................................. 29
2.11 Displaying information ........................................................................................ 29
2.12 Environment and cleaning ...................................................................................30
2.13 Verication test ................................................................................................... 32
3 Over/Under Checkweighing ................................................................................33
3.1 Specifying target values ....................................................................................... 33
3.2 Over/Under Checkweighing procedure ...................................................................36
3.3 Over/Under Checkweighing during subtractive weighing ..........................................38
3.4 Over/Under Checkweighing with "Quick start" ........................................................39
3.5 Over/Under Checkweighing in Take-away mode .....................................................40
3.6 Over/Under Checkweighing to zero ....................................................................... 41
3.7 Terminating Over/Under Checkweighing ................................................................42
4 Settings in the menu ..........................................................................................43
4.1 Operating the menu ............................................................................................43
4.2 Scale menu block – analog scales .......................................................................46
4.3 Scale menu block – IDNet scales .........................................................................49
4.4 Application menu block .......................................................................................52
4.5 Terminal menu block ...........................................................................................56
4.6 Communication menu block ................................................................................ 62
4.7 Maintenance menu block.....................................................................................71

4
METTLER TOL EDO User manual ICS649-check
12/10Order number 22021156A
Contents
5 Quick Select menu .............................................................................................73
5.1 Quick Select menu overview ................................................................................ 73
5.2 Entering main menu ............................................................................................ 73
5.3 Logout ............................................................................................................... 73
5.4 Performing routine test ........................................................................................74
5.5 Calling up routine test log le ............................................................................... 75
5.6 Calling up alibi log le .........................................................................................76
5.7 Calling up calibration log le ................................................................................77
6 Event and error messages .................................................................................. 78
6.1 Error conditions .................................................................................................. 78
6.2 Errors and warnings ............................................................................................ 79
6.3 Smart weighing counter / spanner icon ................................................................. 81
7 Technical data and accessories ..........................................................................82
7.1 Technical data weighing terminal ......................................................................... 82
7.2 Technical data weighing platforms .......................................................................85
7.3 Accessories........................................................................................................89
8 Appendix ..........................................................................................................92
8.1 Tests for utilisation in hygienically sensitive areas ..................................................92
8.2 Notice for veried instruments in EC countries ........................................................92
8.3 Tables of Geo Code values...................................................................................93
8.4 Disposal ............................................................................................................94
8.5 Protocol printouts ...............................................................................................95
8.6 Index ................................................................................................................. 96
5
METTLER TOL EDO User manual ICS649-check12/10 Order number 22021156A
1 Introduction
1.1 Safety instructions
General
▲ Do not use the device in a hazardous environment. Special devices are available in
our range of products for hazardous environments.
▲ The safety of the device cannot be ensured if it is not operated in accordance with
these operating instructions.
▲ Only authorised personnel may open the device.
Devices with built-in power supply unit
▲ Ensure that the power socket outlet for the device is earthed and easily accessible, so
that it can be de-energised rapidly in emergencies.
▲ Ensure that the supply voltage at the installation site lies within the range of 100V
to 240V.
▲ Check the power cable regularly for damage. If it is damaged, immediately disconnect
the device from the power supply.
▲ Ensure that there is a space of at least 3 cm (1.25") at the rear in order to prevent the
power cable from being bent too strongly.
Devices with built-in storage battery
▲ Do not use the battery charger in humid or dusty rooms or below 0 °C (32 °F)
ambient temperature.
▲ After the built-in storage battery has been charged, the cover cap of the charging
socket at the device must be closed.
Terminal and platform combinations
▲ The maximum static safe load must never be exceeded. Observe the operation limits,
see Technical data.
▲ Avoid falling loads, shock loads as well as impacts from the side.
6
METTLER TOL EDO User manual ICS649-check
12/10Order number 22021156A
Introduction
1.2 Presentation
1.2.1 Weighing terminals
There are two versions of the ICS649-check weighing terminal:
ICS649a-check with analog scale interface:
to connect analog METTLER TOLEDO weighing platforms
ICS649d-check with digital scale interface:
to connect METTLER TOLEDO weighing platforms with IDNet interface
On the rear the weighing terminal is equipped with a swivel bracket for mounting the
terminal on the wall or to a METTLER TOLEDO column. As an accessory a table stand for
setting up the terminal on the table is available.
1.2.2 Terminal and platform combinations
The complete name of a terminal and platform combination also indicates the type, size
and capacity of the connected analog weighing platform. E.g., ICS649a-check-A6/c
stands for
ICS649a-check type of weighing terminal and type of weighing interface
A design and size of the weighing platform
6 weighing platform capacity in kg
c mechanical design
As default the weighing platforms are equipped with a hermetically sealed stainless steel
load cell and a readability setting of 2 x 3000 or 5000 divisions, non-approved.
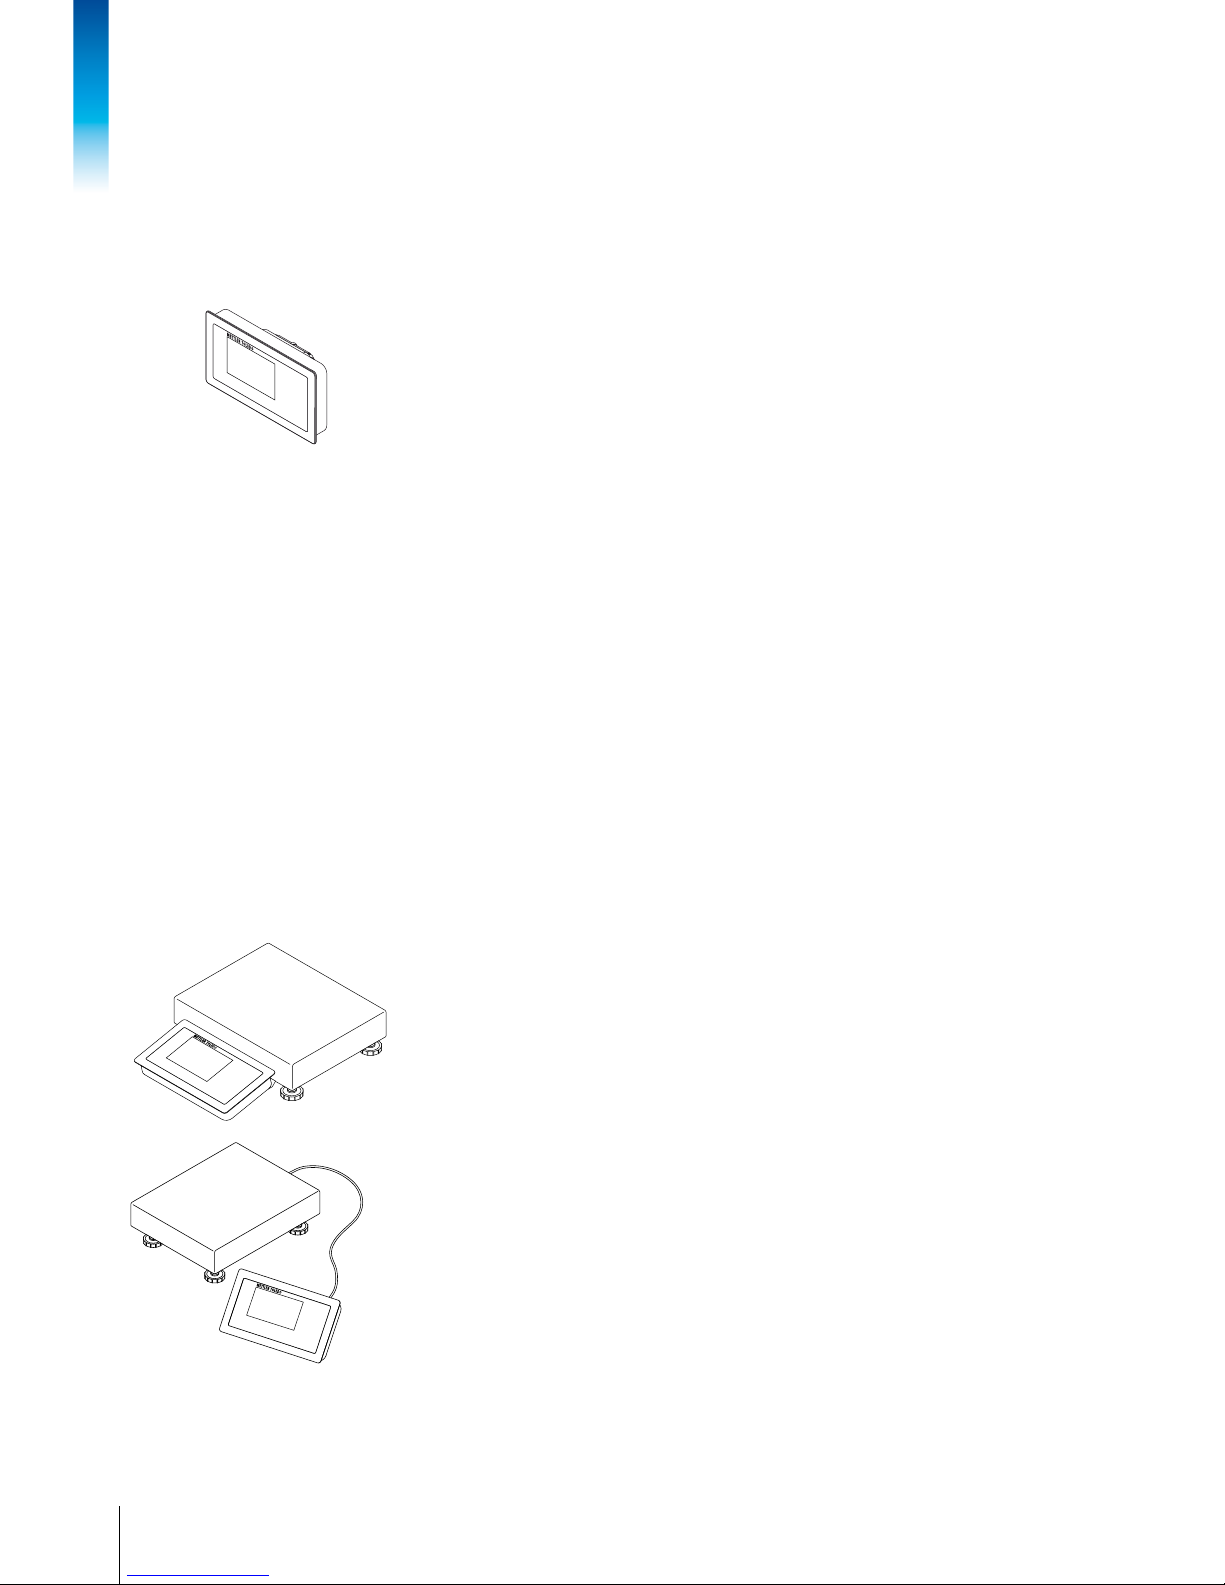
ICS649a-check-.../f
The weighing terminal is xed mounted in front of the weighing platform.
Terminal and platform can be handled as one unit, easy to install and to change location.
The perfect solution if a stand or a bracket would hinder an effective working process.
ICS649a-check-.../t
Weighing terminal and weighing platform are connected by cable.
Suitable for wall mount operation and desk operation with an additional desk mounting
plate, see Options. The combination can be upgraded with a stand, see Accessories.
7
METTLER TOL EDO User manual ICS649-check12/10 Order number 22021156A
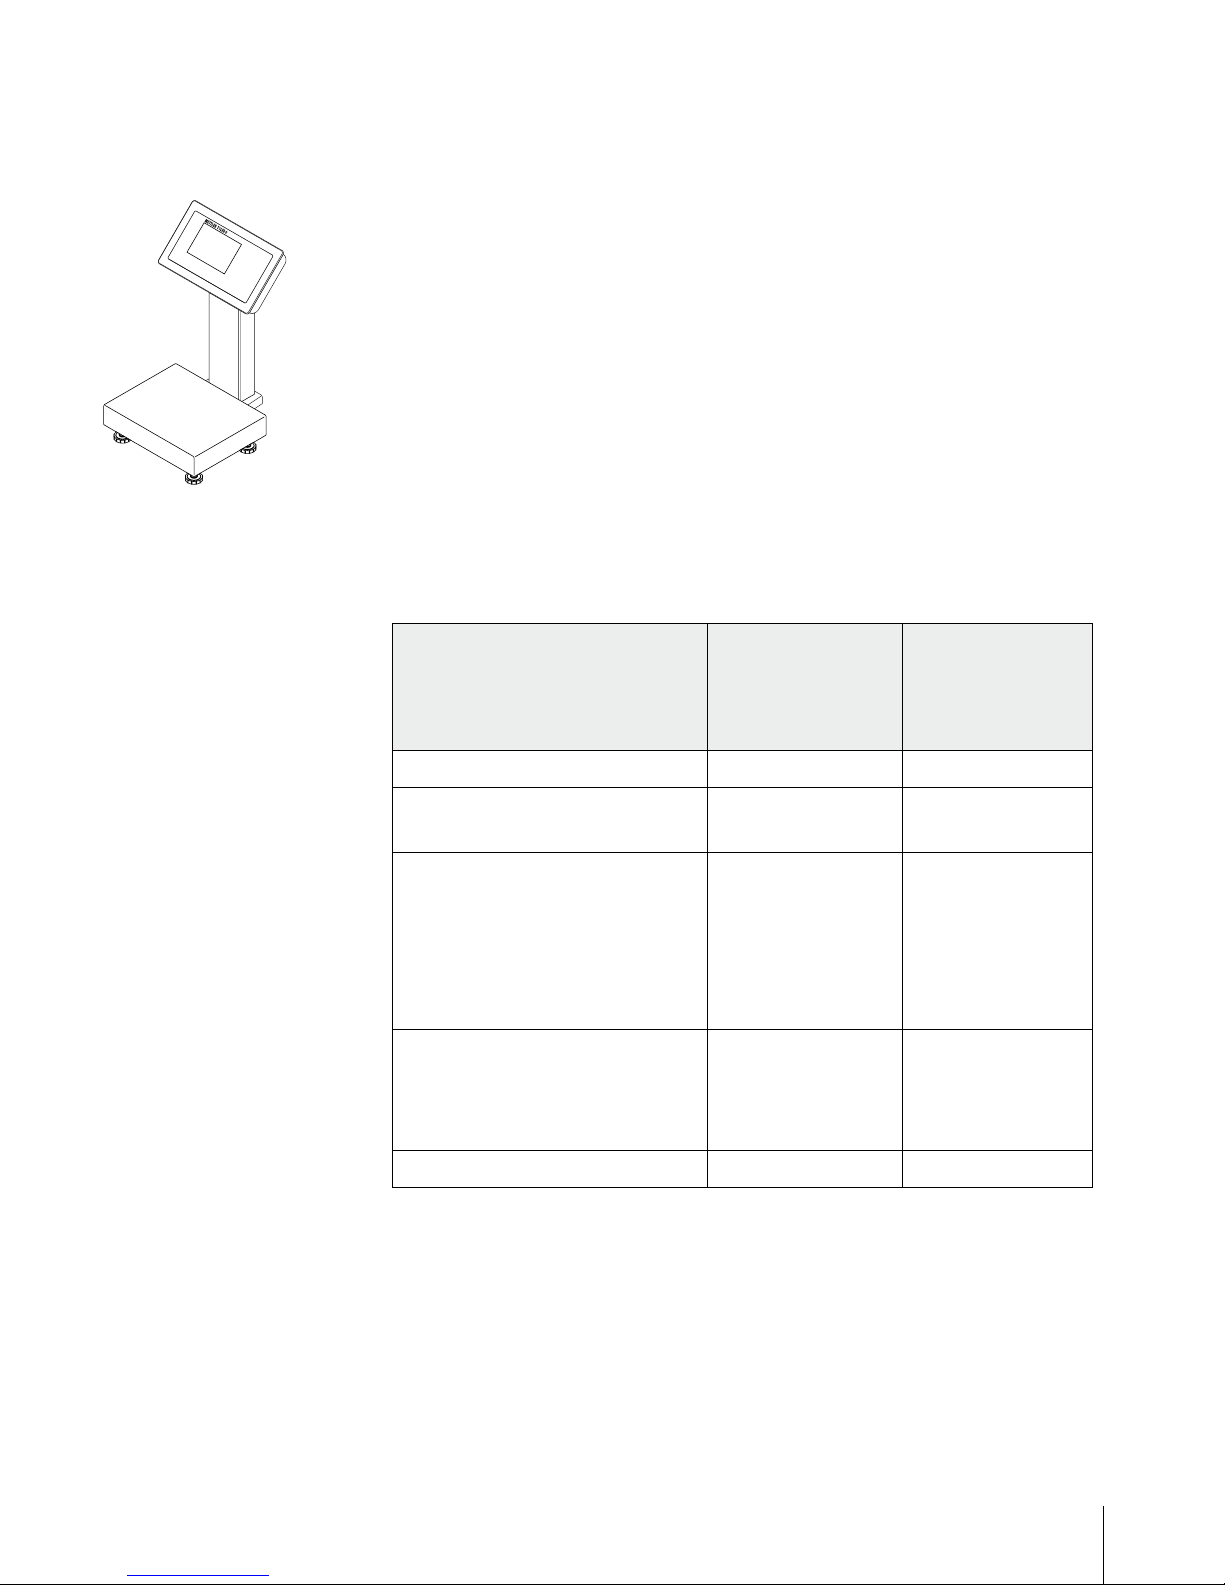
ICS649a-check-.../c
Hygienic optimal version. Weighing terminal and column are seamlessly welded together.
Easy to clean, cables run inside the column.
1.2.3 Options
The following options are available for the ICS649-check:
ICS649a-check,
ICS649d-check,
ICS649a-check-.../f,
ICS649a-check-.../t
ICS649a-check-.../c
Built-in storage battery
✔ ✔
Optional scale interface (SCALE 2) • analog
• digital
–
Optional communication interface
(COM 2)
• RS232
• RS422/RS485
• Ethernet
• WLAN
• RS232
• RS422/RS485
• Ethernet
• WLAN
• USB
• Digital I/O
Optional communication interface
(COM 3)
• RS232
• RS422/RS485
• USB
• Digital I/O
–
Desk mounting plate
✔
–

8
METTLER TOL EDO User manual ICS649-check
12/10Order number 22021156A
Introduction
Terminal and platform combinations
• Load cells for more challenging environments
– Standard: hermetically sealed stainless steel load cell (identical to PBA430)
– Option: loadcell with KS+ coating (identical to PBA430 with option loadcell with
KS+ coating)
• Other resolutions (availability depending on region, weighing unit and Weights and
Measures approval)
– Verication OIML Class III, 1 x 3,000 e
– Verication OIML Class III, 2 x 3,000 e MR
– 6,000 d (non-approvable)
– 10,000 d (non-approvable)
– 15,000 d (non-approvable)
– 30,000 d (non-approvable)
9
METTLER TOL EDO User manual ICS649-check12/10 Order number 22021156A
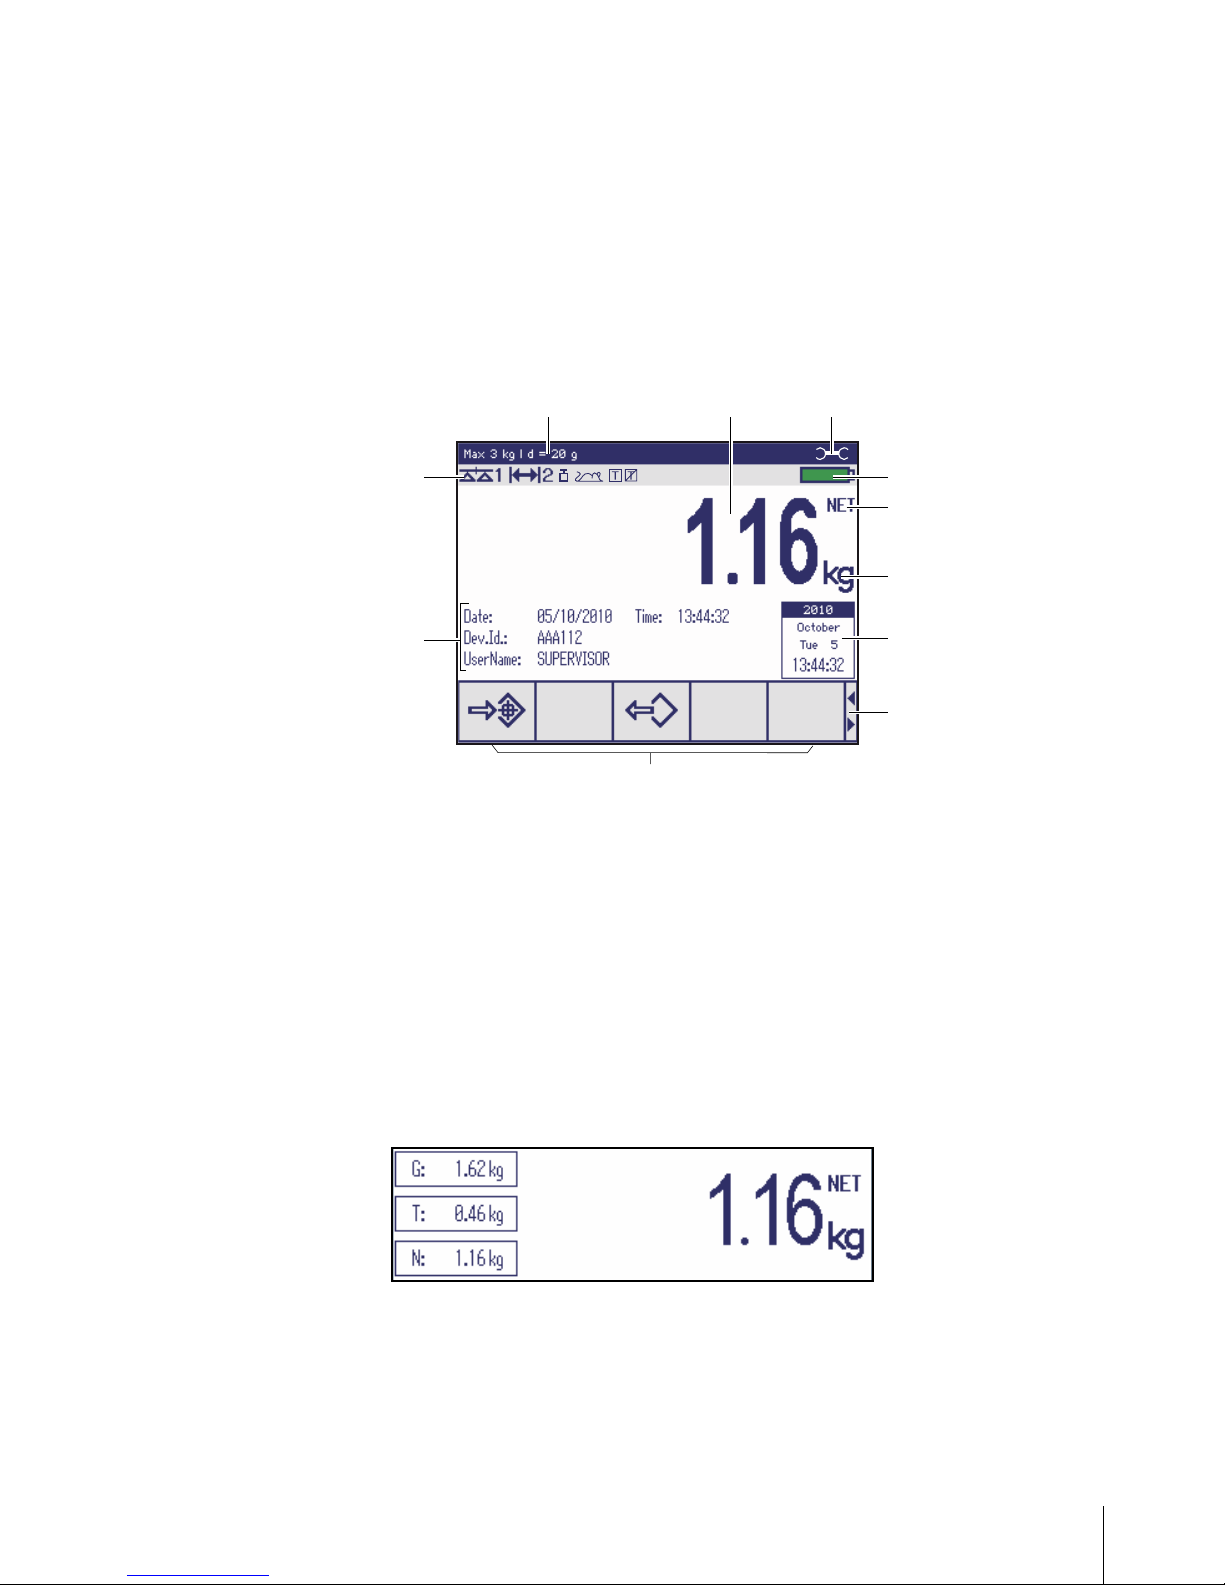
1.2.4 Display
If you specify a target weight for Over/Under Checkweighing, the display automatically
switches from the straight weighing display to the Over/Under Checkweighing display.
To meet your special requirements three different display layouts are selectable in the
terminal menu.
Straight weighing display
9
4
5
6
7
8
11
10
21 3
1 Metrological data – for details see below
2 Weight value with star, sign and stability monitor – for details see below
3 Spanner icon: service needed – for details see Event and error messages
4 Battery symbol
5 Net/Gross
6 Unit
7 Calender – can be activated in the menu
8 Navigation hint: use cursor keys <, > for scrolling soft key pages
9 Soft keys (factory setting, page 1)
10 Auxiliary data – 3 lines can be dened in the menu
11 Symbol and info line – for details see below
Default layout
Weight values in 3-line mode

10
METTLER TOL EDO User manual ICS649-check
12/10Order number 22021156A
Introduction
Over/Under Checkweighing display
In Over/Under Checkweighing the display uses colours to indicate the Over/Under
Checkweighing status.
Instead of the weight display a bargraph is displayed indicating target values.
The example shows the default colour for a sample below the lower tolerance.
Tolerances and target weight are displayed in 3 lines.
The example shows the default colour for a sample above the upper tolerance.
The example shows the default colour for a good sample.
Default layout
3-line mode
Colour mode

11
METTLER TOL EDO User manual ICS649-check12/10 Order number 22021156A
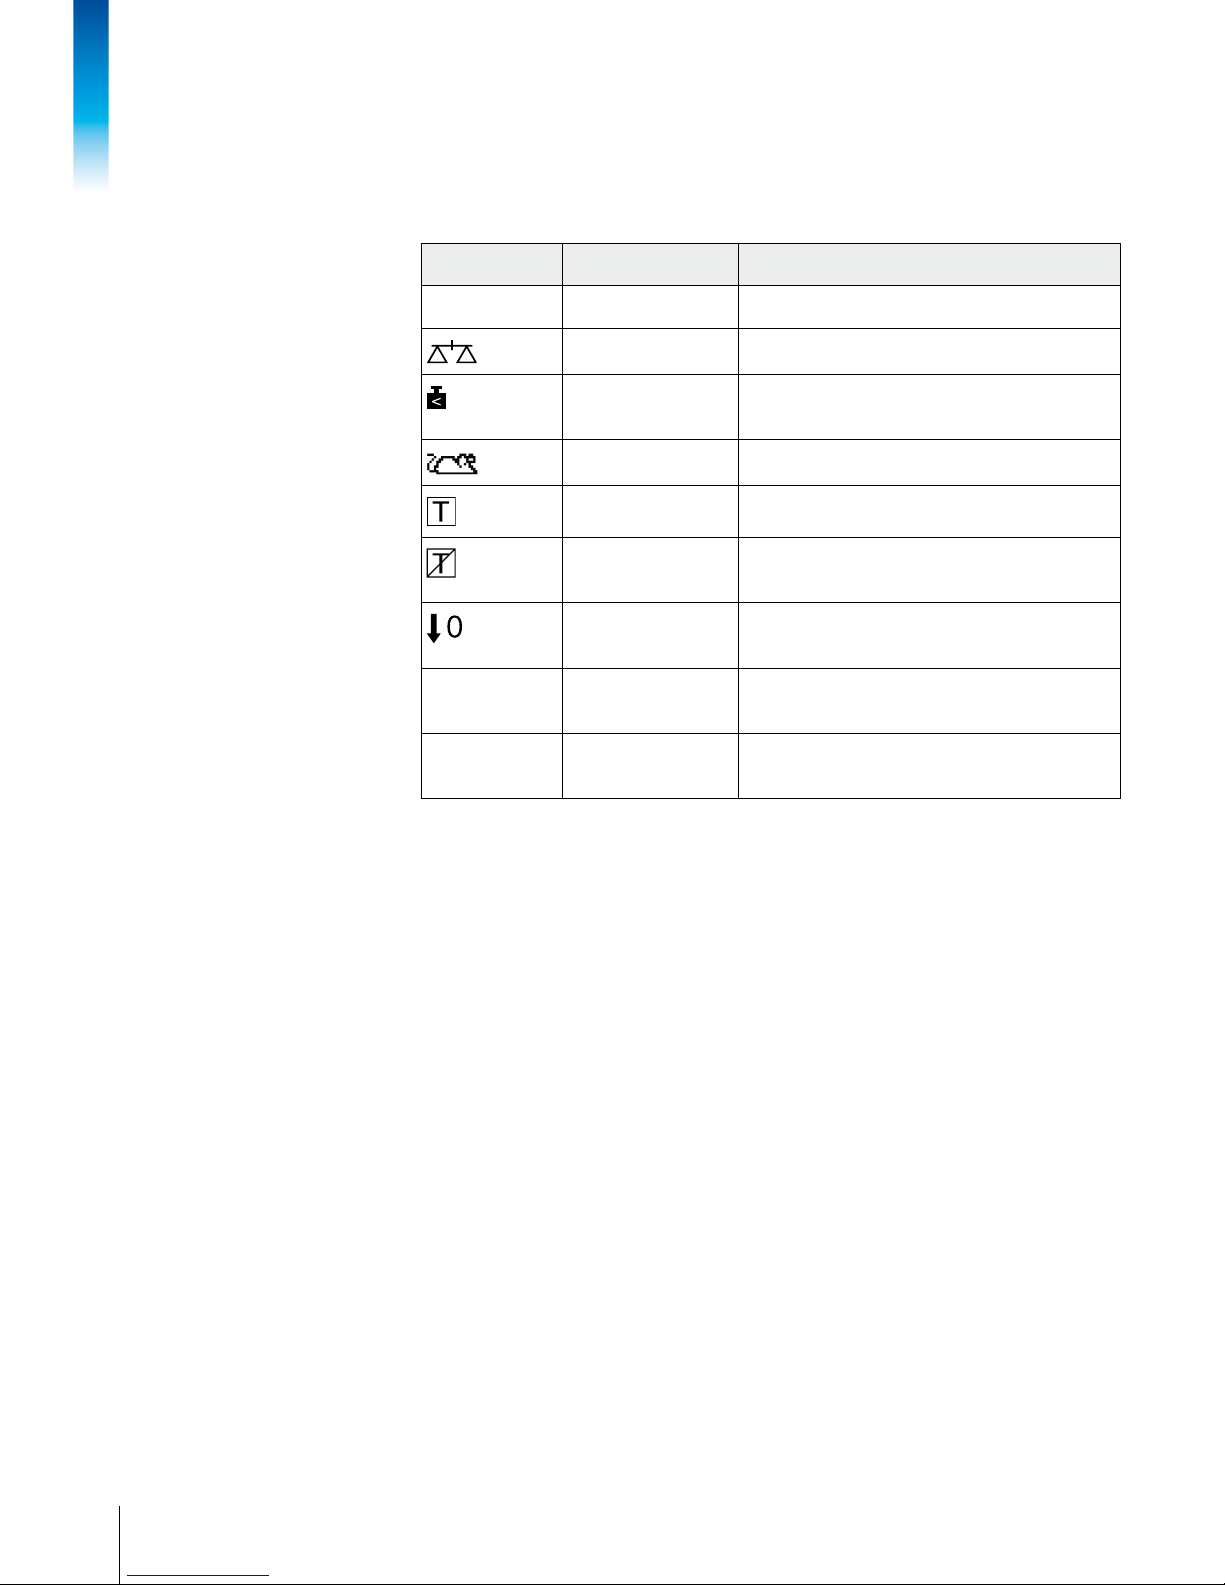
Metrological data line
In the metrological data line the following information is displayed:
Symbol Information Remark
,
,
Accuracy classes Displayed only if the scale is approved
according to the Weights and Measures
guidelines
, ,
Weighing range
information
For multi range devices only,
dsplayed only if the scale is approved
according to the Weights and Measures
guidelines
,
Maximum capacity
Minimum capacity Displayed only if the scale is approved
according to the OIML Weights and
Measures guidelines
Approved resolution OIML: Displayed only if the scale is
approved
NTEP: Displayed only if the scale is
approved and d is different from e
Display resolution OIML: Displayed only if the scale is not
approved or if d is different from e
NTEP: Displayed always
Approved weighing
device
Metrology display disabled,
Weights and Measures data must be
indicated on a label near the weight
display
Weight value
The weight value can be marked with the following symbols:
Symbol Information Remark
✱
Calculated weight value E.g., for average weighing results
–
Sign For negative weight values
Stability monitor For unstable weight values
1.2343 kg
Non-approved last digit
with e > d
For approved scales only
The example shows the weight value for a
scale with e = 1 g and d = 0.1 g
The last, smaller digit is not approved
12
METTLER TOL EDO User manual ICS649-check
12/10Order number 22021156A
Introduction
Symbols and info line
In the symbols and info line the following information can be displayed:
Symbol Information Remark
l<–>l
1
Weighing range For multi range or multi interval scales only
Scale number
Weight below
minimum weight
MinWeigh must be activated in the menu
Average weighing
Average must be activated in the menu
Automatic taring
Auto Tare must be activated in the menu
Automatic clearing
of the tare weight
A-Clear Tare must be activated in the
menu
Over/Under Checkweighing to zero
To zero must be assigned to a soft key in
the menu
TA
Take-away mode
Take away must be assigned to a soft key
in the menu
>0<
Center of zero
indication
Availability depending on local Weights and
Measures regulations
13
METTLER TOL EDO User manual ICS649-check12/10 Order number 22021156A
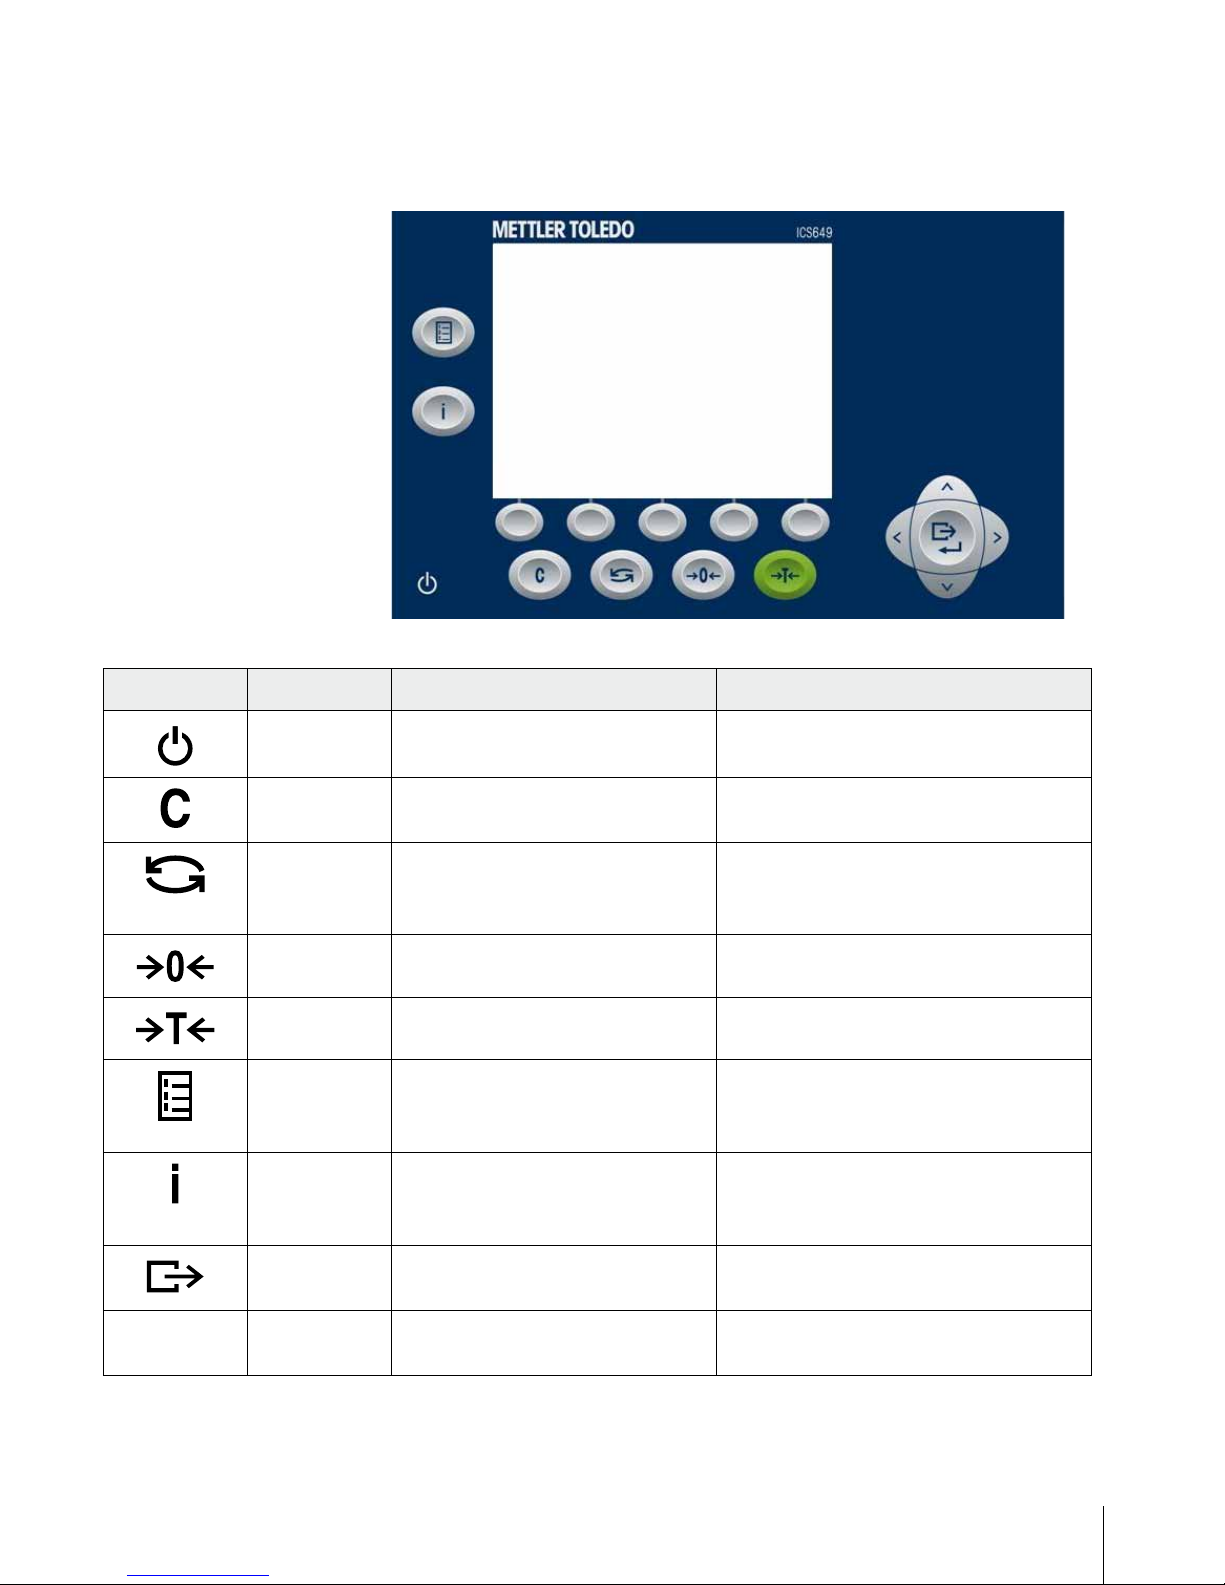
1.2.5 Keyboard
Key Name Function in the operating mode Function in the menu
Power • Switching on and off
• Cancel editing
• Cancel editing
• Exit menu
Clear • Clear tare
• Leave info page
• Clear value, clear digit
Switch • Switch over weight unit • Re-edit
• Switch over from numerics to upper/lower
case letters
Zero • Set scale to zero, clear tare
Tare • Tare scale, clear tare
Quick select • Opening Quick Select menu, e.g.,
for menu access, viewing log les or
logout
Info • Activate info screen
• Proceed to next info line / info page
• Freeze and release startup screen
Transfer • Transfer data to a printer or computer • Enter menu item
• Conrm entry/selection
<, >, ∧, ∨
Cursor keys • Navigating
• Alphanumeric entry
• Navigating
• Alphanumeric entry
14
METTLER TOL EDO User manual ICS649-check
12/10Order number 22021156A
Introduction
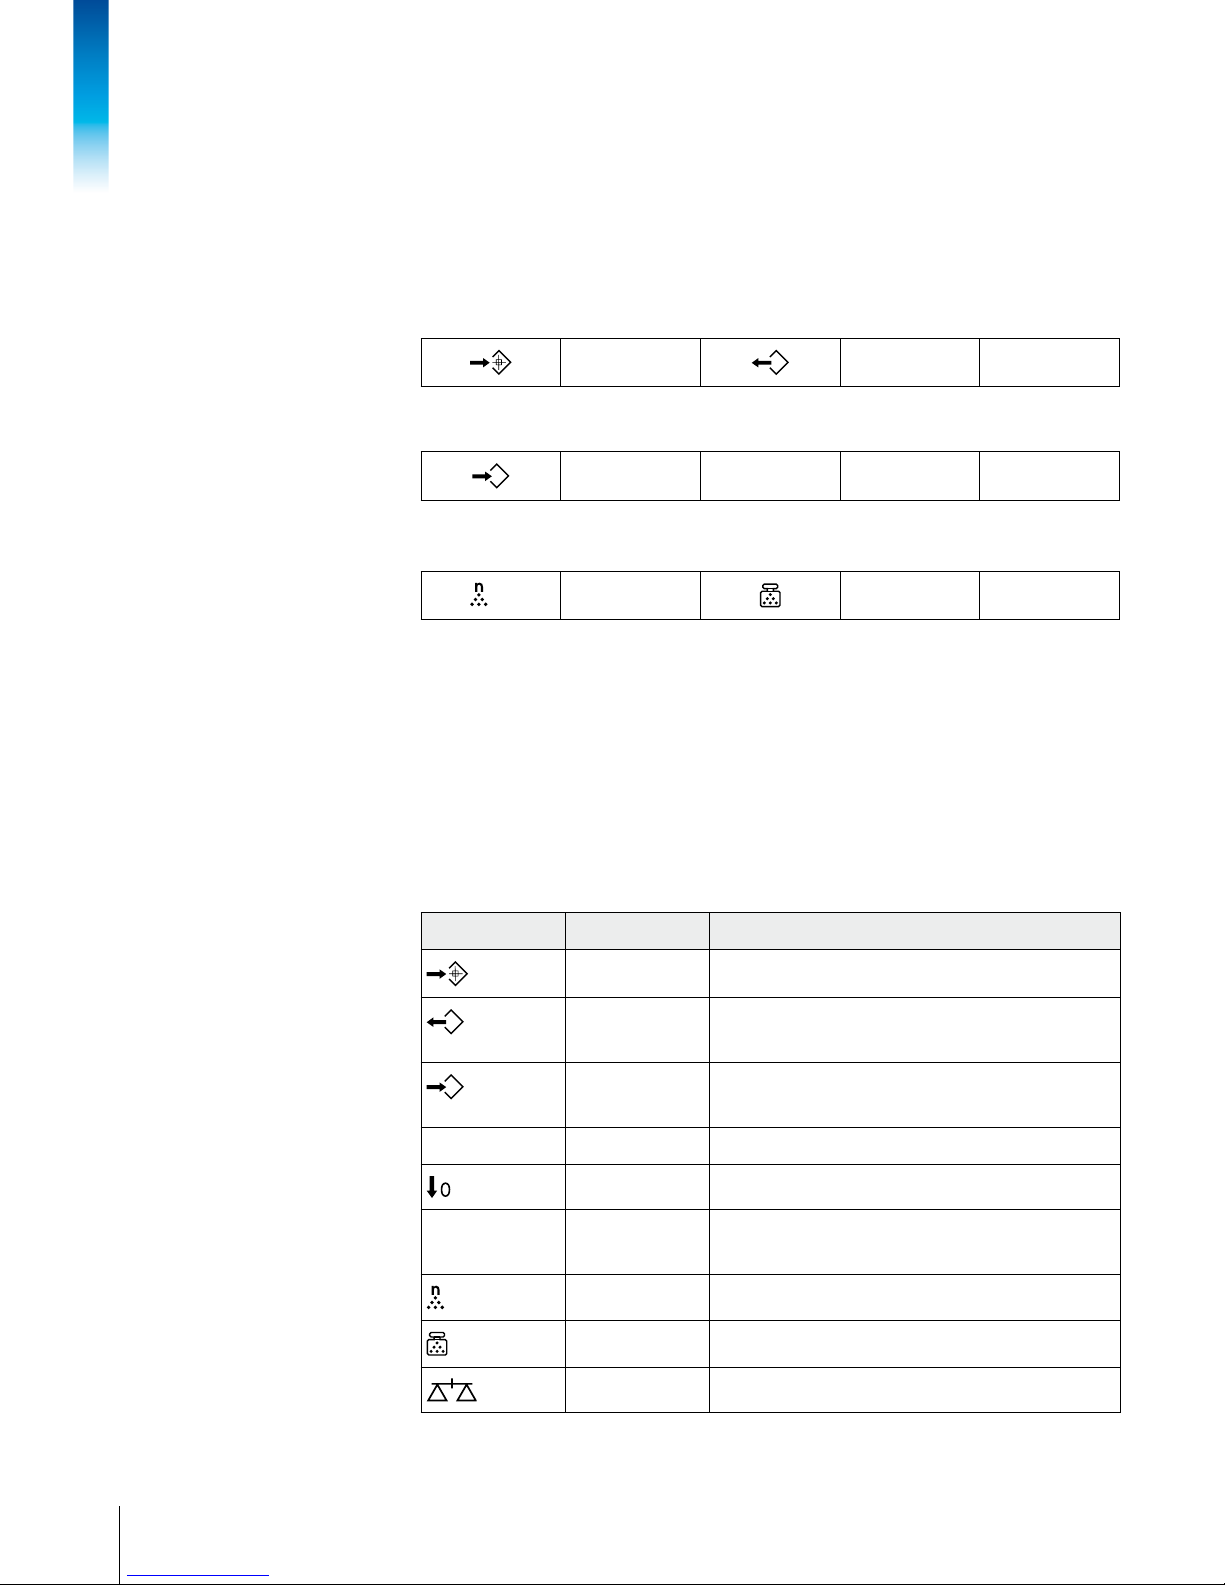
1.2.6 Soft keys
To meet your specic application requirements, ICS649-check offers 15 soft keys which
can be congured in the terminal menu. The soft keys are divided into three lines (pages).
Default setting
Set target Load target
ID1
Store target Identication 1
Reference n
Average piece
weight
Operating soft keys
➜ Press the key below the desired function.
Changing soft key line
➜ Press the cursor keys < or > to switch from line to line.
Page 1
Page 2
Page 3
Possible soft key settings
Symbol Menu setting Function
Target Enter Over/Under Checkweighing parameters
Recall Recall Over/Under Checkweighing parameters out
of the database
Store Store Over/Under Checkweighing parameters in the
database
TA Take away Activate/Deactivate Take-away mode
To zero Over/Under Checkweighing to zero
ID1, ID2, ID3 ID1, ID2, ID3 Enter identication 1, identication 2,
identication3
Reference n Determine the average piece weight
Average PW Enter the average piece weight
Switch scale Switch over weighing platform
15
METTLER TOL EDO User manual ICS649-check12/10 Order number 22021156A
1.2.7 Alphanumeric input
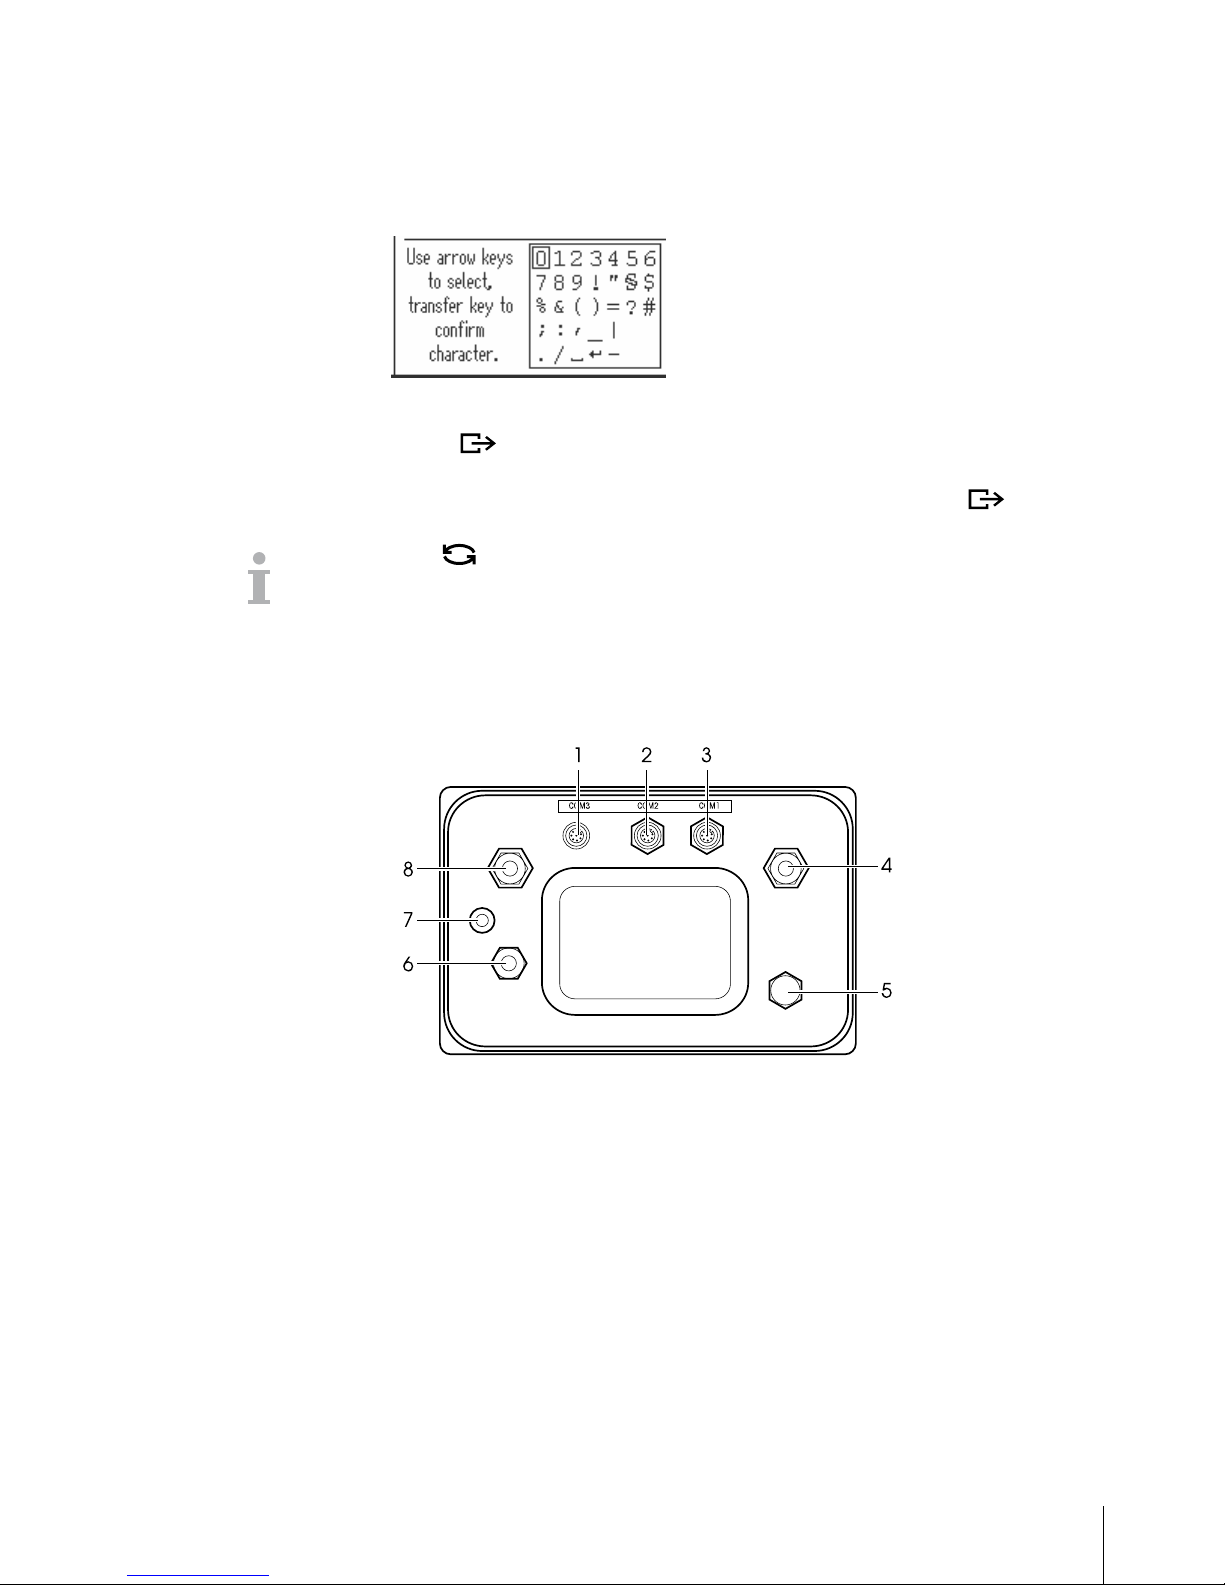
When an alphanumeric input is requested, the following is displayed:
1. Use the arrow keys <, >, ∧, ∨ to select the desired number.
2. Use to conrm the character and move to the next place.
3. Repeat steps 1 and 2 for further characters.
4. To nish input select of the displayed keyboard and confirm with .
Using you can switch the displayed keyboard from upper case to lower case letters
and numerics, if applicable.
1.2.8 Connections
Weighing terminal only, ICS649a-check-.../f, ICS649a-check-.../t
1 Optional interface COM3
2 Optional interface COM2
3 Standard interface COM1 (RS232)
4 Weighing platform connection SCALE 1
5 Pressure compensation
6 AC power supply or battery charging
7 Verication securing seal
8 Optional weighing platform connection SCALE 2

16
METTLER TOL EDO User manual ICS649-check
12/10Order number 22021156A
Introduction
ICS649a-check-.../c
1 Optional interface COM2
2 Weighing platform connection
3 Pressure compensation
4 AC power supply or battery charging
5 Standard interface COM1 (RS232)
Note
The verication securing seal is applied on the weighing terminal as described in the
section above.
4
5
3
2
1
1.3 Tracing and tracking features
ICS649-check offers some advanced features for tracking and tracing operation on your
weighing terminal:
• User management
• Alibi log le
• Routine test and routine test log le
• Calibration weight management
1.3.1 User management
The user management of the ICS649-check allows you to manage up to 20 users by
• user name
• user prole (operator or supvervisor)
• user password
• user language
• user ID
When user management is activated, any access to the terminal is protected by password.
To enter the menu a password is no longer necessary.
• User management can be congured in the menu under Terminal –> User
Management.
• Login/logout with user management is described in chapter 2.

17
METTLER TOL EDO User manual ICS649-check12/10 Order number 22021156A
1.3.2 Alibilogle
If requested by national regulations, you can activate an alibi log le to trace all weighing
activities on the scale.
The alibi log le stores all weighings with the mandatory data. In addition you can store
up to 4 more items such as identications, serial numbers and user name.
• The alibi log le can be congured in the menu under Application –>
Log files.
• Viewing/printing/transferring of the alibi log le is described in the Quick Select menu.
1.3.3 Routinetestandroutinetestlogle
For optimum weighing results the device supports routine calibration tests.
You can congure routine tests by
• Interval (days)
• External test (for analog scales)
• Internal test (for scales with internal calibration weight)
For the external test for analog scales you can specify the following:
• Test weight (value)
• Weight name (to make sure you always use the same weight)
• Tolerance
• The routine test can be congured in the menu under Application –> Log files.
• Performing the routine test and viewing/printing/transferring of the routine test log le
is described in the Quick Select menu.
1.3.4 Calibration weight management
For veried scales the calibration results are stored in the calibration log.
Viewing/printing/transferring of the calibration log le is described in the Quick Select
menu.
18
METTLER TOL EDO User manual ICS649-check
12/10Order number 22021156A
Introduction
1.4 Commissioning
1.4.1 Selecting the weighing platform location
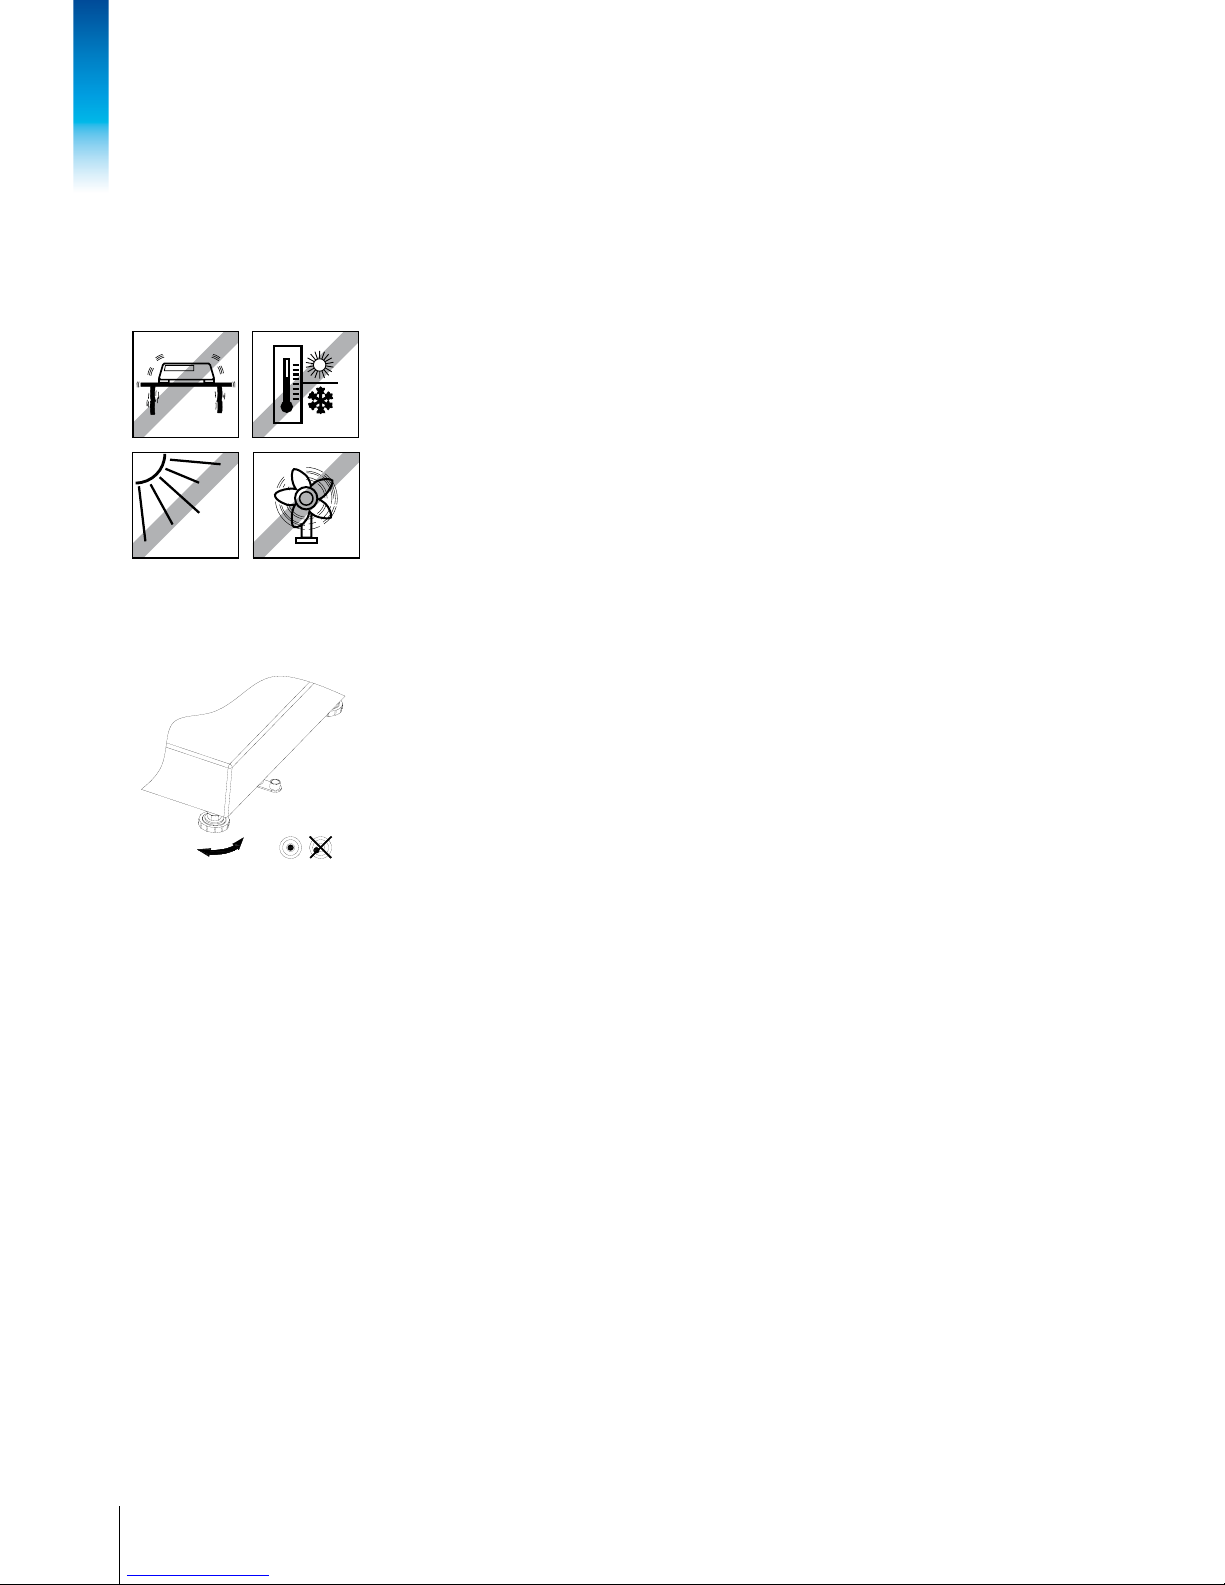
The correct location is crucial to the accuracy of the weighing results.
➜ Select a stable, vibration-free and, if possible, a horizontal location for the weighing
platform.
The ground must be able to safely bear the weight of the fully loaded weighing platform.
➜ Observe the following environmental conditions:
– No direct sunlight
– No strong drafts
– No excessive temperature uctuations
1.4.2 Levelling the weighing platform
Only weighing platforms that have been levelled precisely horizontally provide accurate
weighing results. Weights and Measures approved weighing platforms have a spirit level
to simplify levelling.
1. Turn the adjustable feet of the weighing platform until the spirit level’s air bubble is
inside the inner circle.
2. Tighten the lock nuts of the adjustable feet.
1.4.3 Weighing platform connection and interface commissioning
The weighing platform connection to the weighing terminal as well as the comminssioning
of the interfaces are described in the ICS4x9 installation instructions.
➜ Call the METTLER TOLEDO service technician or carry out commissioning in
accordance with the installation instructions.
19
METTLER TOL EDO User manual ICS649-check12/10 Order number 22021156A
1.4.4 Power supply connection
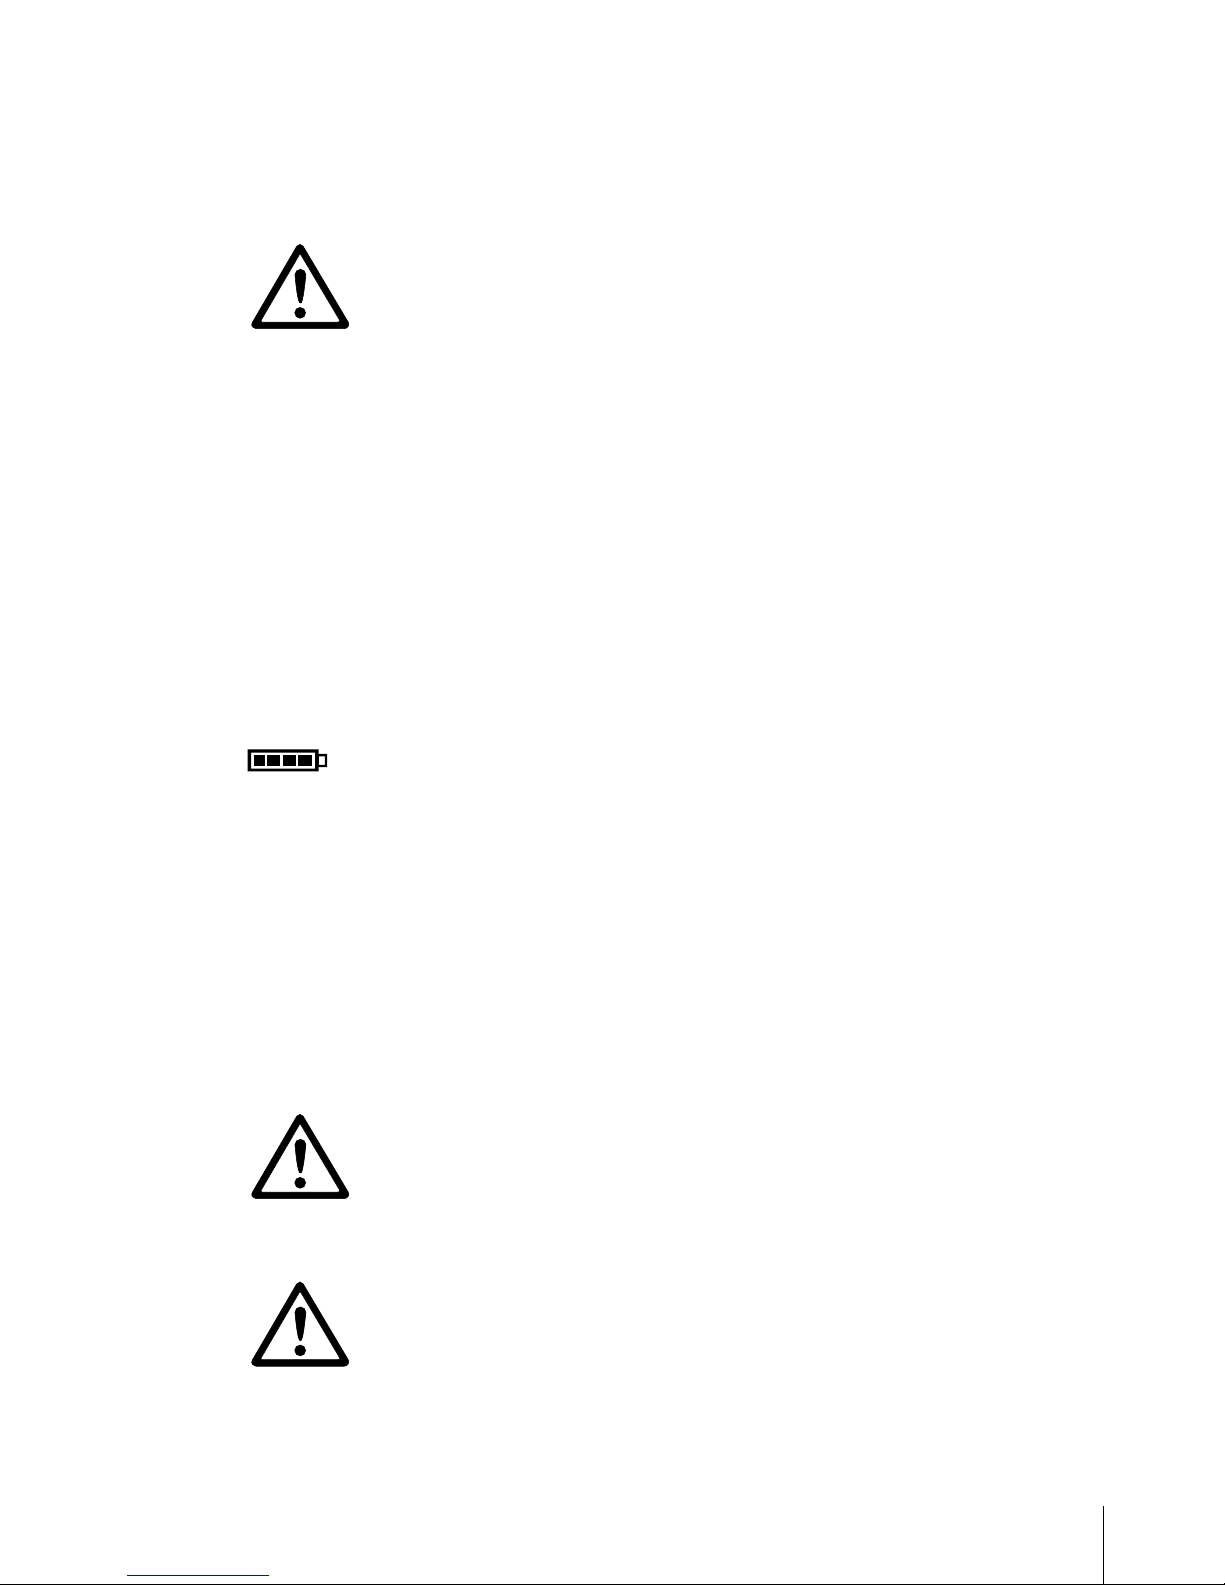
CAUTION
Risk of electric shock!
▲ Before connecting the power supply, check whether the voltage value printed on the
rating plate corresponds to your local system voltage.
▲ Do not under any circumstances connect the device if the voltage value on the rating
plate deviates from the local system voltage.
▲ Make sure the weighing platform has reached room temperature before switching on
the power supply.
➜ Plug the power plug into the power socket.
After it has been connected, the device runs a self-test. The device is ready to operate
when zero appears on the display.
1.4.5 Handling of the built-in storage battery
Note the following when operating a device with a built-in storage battery:
• The operating life depends on the intensity of use, the conguration and the connected
scale. For details see the technical data.
• The battery symbol shows the current state of charge of the storage battery.
– One segment corresponds with approx. 25 % capacity.
– If the symbol ashes, the storage battery has to be charged. A message is
displayed, too.
– During charging the segments are "running" until the battery is fully charged and
all segments light up continuously.
• The charging time of the storage battery amounts to approx. 6 hours.
If work is continued during the charging process, the charging time is extended.
• The storage battery is protected against overcharging.
• The storage battery has a service life of approx. 2 years or 500 to 1,000 charging/
discharging cycles.
• The storage battery is also suitable for permanent mains operation.
CAUTION
Danger of soiling because the charger for the storage battery is not protected to IP69K!
▲ Do not charge the device in humid or dusty rooms.
▲ After the storage battery has been charged, close the cover cap of the charging socket
at the device.
CAUTION
No success in charging the storage battery due to low temperatures!
▲ Do not charge the battery if the battery temperature is below 0 °C (32 °F). Charging
is not possible in this temperature range.
▲ Do not operate the battery charger outside its temperature range of 0 °C to 40 °C
(32°F to 104°F).

20
METTLER TOL EDO User manual ICS649-check
12/10Order number 22021156A
Introduction
Recommended use of the built-in storage battery
The characteristics mentioned above are only valid if the following recommendations are
observed:
• Connect the device to the battery charger as soon as the warning message "Lowbattery"
appears and the battery symbol starts ashing. When the message appeares you still
have enough time (at least 10minutes) to complete your current task.
• Keep the battery charger connected until the charging process is completed, i.e., all
segments of the battery symbol light up continuously.
• For optimum battery performance operate the device with built-in storage battery at an
ambient temperature in the range of 10 °C to 30 °C (50 °F to 86 °F). This applies to
discharging as well as charging the battery.
• If you plan to put the scale out of operation for a longer period, charge the battery
completely.
• Even if you do not use the instrument, charge the battery at least every 3months to
avoid deep discharge.
1.5 Use in hygienically sensitive areas
The device is easy to clean and is designed to be used in the food industry.
Features
• Suitability of the materials for contact with foodstuffs
• Construction made of stainless steel
• No open threads
• No screws with recesses
• Smooth, nonporous and at surfaces that are easy to clean
• Reduced horizontal surfaces
• Continuous welding seams
For further information please refer to the appendix.
21
METTLER TOL EDO User manual ICS649-check12/10 Order number 22021156A
2 Operation
2.1 Switching on and off
2.1.1 Switching on/off
➜ Press .
For a few seconds the device shows a start-up screen with device name, software
version, serial number of the weighing terminal and the Geo value (only if an analog
weighing device is connected).
• You can freeze the start-up screen by pressing
.
• When you start a weighing system with an analog scale the rst time, a message
is displayed: "Scale not calibrated". Call the METTLER TOLEDO service technician to
calibrate the scale.
• When user management is active, you are asked to select your name and enter the
corresponding password.
➜ Press .
Before the display goes out, -OFF- appears briey.
Switching on
Switching off
2.1.2 Login/logout
When user management is active, a login/logout procedure is required. The login screen
is displayed after switching on or logging out.
1. Select your name using the cursor keys ∧ / ∨ and confirm with .
2. Enter your password using the displayed keyboard.
A welcome screen and then the weight display appear.
1. Press to open the Quick Select menu.
2. Select Logout using the cursor keys ∧ / ∨ and confirm with .
A safety prompt is displayed.
3. Press .
The login screen is displayed, the current user is logged out.
Always log out when leaving the terminal in order to prevent unauthorised persons from
working on it.
Login
Logout
22
METTLER TOL EDO User manual ICS649-check
12/10Order number 22021156A
Operation
2.2 Zeroing / Zero point correction
Zeroing corrects the inuence of slight changes on the load plate or minor deviations from
the zero point.
1. Unload scale.
2. Press .
Zero appears in the display.
In case of nonveried scales, the automatic zero point correction can be deactivated in
the menu or the zero range can be changed. Approved scales are set xed to 0.5 d.
As standard, the zero point of the scale is automatically corrected when the scale is
unloaded.
• The zero function is only available within a limited weighing range.
• After zeroing the scale, the whole weighing range is still available.
• A successful zeroing will always delete a tare weight.
Manual
Automatic
2.3 Simple weighing
1. Place weighing sample on the scale.
2. Wait until the stability monitor goes out.
3. Read the weighing result.
2.4 Weighing with tare
2.4.1 Taring
➜ Place the empty container on the scale and press .
The zero display and the symbol NET appear.
The tare weight remains stored until it is cleared.
2.4.2 Clearing the tare
➜ Press .
The symbol NET goes out, the gross weight appears in the display.
If the symbol is displayed, i.e., the A-Clear Tare function is activated in the
menu under Scale -> Tare, the tare weight is automatically cleared as soon as the
scale is unloaded.

23
METTLER TOL EDO User manual ICS649-check12/10 Order number 22021156A
2.4.3 Automatic clearing of the tare
A tare weight is automatically cleared when the scale is unloaded.
Prerequisite
9 The symbol
is displayed, i.e., the tare function A-Clear Tare is activated in
the menu under Scale -> Tare.
2.4.4 Automatic taring
If you place a weight on an empty scale, the scale tares automatically and the symbol
NET is displayed.
Prerequisite
9 The symbol
is displayed, i.e., the tare function Auto Tare is activated in the
menu under Scale -> Tare.
The weight to be tared automatically, e.g., packaging material, must be heavier than
9display steps of the scale.
2.4.5 Chain tare
With this function it is possible to tare several times if, e.g., cardboard is placed between
individual layers in a container.
Prerequisite
9 The tare function Chain tare is activated in the menu under Scale –> Tare.
1. Place the rst container or packaging material on the scale and press
.
The packaging weight is automatically saved as the tare weight, the zero display and
the symbol NET appear.
2. Weigh the weighing sample and read/print out the result.
3. Place the second container or packaging material on the scale and press
again.
The total weight on the scale is saved as the new tare weight. The zero display
appears.
4. Weigh the weighing sample in the second container and read/print the result.
5. Repeat steps 3 and 4 for other containers.
24
METTLER TOL EDO User manual ICS649-check
12/10Order number 22021156A
Operation
2.4.6 Tare preset
If you know the weight of your containers, you can enter the tare weight via barcode or
SICS command. Thus you do not have to tare the empty container.
Prerequisite
9 For barcode use Tare preset is selected as destination for external input.
1. Enter the known tare weight via barcode or SICS command.
The weight display shows the negative tare weight and the symbol NET appears.
2. Place the full container on the weighing platform.
The net weight is displayed.
The entered tare weight is valid until a new tare weight is entered or the tare weight is
cleared.
2.5 Switching scales
Prerequisites
9 For manual totalisation the soft key (Switch scale) is activated in the menu
under Terminal –> Device –> Keyboard –> Softkeys.
➜ Press the soft key to switch from scale 1 to scale 2 or vice versa.
The current active scale is displayed in the symbol and info line on the top of the
display.
2.6 Printing results
If a printer or computer is connected, weighing results and other information can be printed
out or transferred to a computer.
➜ Press .
The dened data is printed out or transferred to the computer.
The printout content can be dened in the Templates menu.

25
METTLER TOL EDO User manual ICS649-check12/10 Order number 22021156A
2.7 Totalising
2.7.1 Totalising manually
Prerequisites
9 Application -> Totalise is activated in the menu.
9 For manual totalisation the soft keys + (Plus) and S (Total) must be activated in the
menu under Terminal –> Device –> Keyboard –> Softkeys.
9 If you want to follow the totalisation on the display, activate Total net and/or n
for the auxiliary lines and/or the info key (Terminal –> Device –> Display
–> Auxiliary lines or Terminal –> Device –> Keyboard –>
Info key).
Totalising
1. Weigh the rst sample and press the soft key
+.
If activated, the total net and the number of items are displayed.
2. Unload the scale.
3. Load the next sample and press the soft key + again.
If activated, the total net and the number of items are increased.
4. Unload the scale.
5. Repeat steps 3 and 4 for further items.
6. To nish totalising, press the soft key S.
A safety prompt is displayed.
7. Press softkey YES to clear the total.
– or –
Press softkey NO to continue totalising.
Piece counting results and Over/Under Checkweighing results can be totalised the same
way.

26
METTLER TOL EDO User manual ICS649-check
12/10Order number 22021156A
Operation
2.7.2 Automatic totalising
Prerequisites
9 Application -> Totalise is activated in the menu.
9 Good print is activated in OverUnder Checkweighing.
– or –
Auto print is activated for other weighing applications.
9 For clearing the total, the soft key S (Total) must be activated in the menu under
Terminal –> Device –> Keyboard –> Softkeys.
9 If you want to follow the totalisation on the display, Total net and/or n must
be activated for the auxiliary lines and/or the info key (Terminal –> Device
–> Display –> Auxiliary lines or Terminal –> Device –>
Keyboard –> Info key).
Totalising
1. Weigh the rst sample.
The result is printed out automatically and total net and n are updated.
If activated, the total net and the number of items are displayed.
2. Unload the scale.
3. Load the next sample.
If activated, the total net and the number of items are increased.
The result is printed out automatically and total net and n are updated.
4. Unload the scale.
5. Repeat steps 3 and 4 for further items.
6. To nish totalising, press the soft key
S.
A safety prompt is displayed.
7. Press softkey YES to clear the total.
– or –
Press softkey NO to continue totalising.
Piece counting results and OverUnder Checkweighing results can be totalised the same
way.

27
METTLER TOL EDO User manual ICS649-check12/10 Order number 22021156A
2.8 Average (dynamic) weighing
With the average weighing function, it is possible to weigh restless weighing samples
such as living animals. If this function is activated, is displayed in the info line.
With average weighing, the scale calculates the mean value from 56 weighing operations
within 4 seconds.
9 Average -> Manual is selected in the menu.
9 Weighing sample heavier than 9 scale divisions.
1. Place the weighing sample on the scale.
2. Press to start average weighing.
3. During average weighing, stars appear in the display, and the average result will be
displayed with the symbol ✱.
4. Unload the scale to be able to start a new average weighing operation.
9 Average -> Auto is selected in the menu.
9 Weighing sample heavier than 9 scale divisions.
1. Place the weighing sample on the scale.
Average weighing starts automatically.
During average weighing, stars appear in the display, and the average result will be
displayed with the symbol ✱.
2. Unload the scale to be able to perform a new average weighing operation.
With manual start
With automatic start
2.9 Piece counting
2.9.1 Piececountingwithaxednumberofreferencepieces
Prerequisite
9 The corresponding soft key is activated in the terminal menu.
1. Apply the reference parts (factory setting: 10 pieces) and press .
The number of reference pieces is displayed.
2. Load the parts to be counted.
The number of pieces is displayed.
• The average weight remains stored until a new reference is determined.
• The number of reference parts can be set in the application menu.
• The auxiliary line and the info page can be congured to show the average piece
weight.

28
METTLER TOL EDO User manual ICS649-check
12/10Order number 22021156A
Operation
2.9.2 Piece counting with a known piece weight
Prerequisite
9 The corresponding soft key is activated in the terminal menu.
1. Press .
Input of the average piece weight (APW) is requested.
2. Enter the average piece weight.
The weight unit changes to PCS.
3. Load the parts to be counted.
The number of pieces is displayed.
• The average piece weight remains stored until a new average piece weight is de-
termined.
• You can enter the average piece weight via barcode if the external input destination is
congured to "Average PW".
2.9.3 Terminating piece counting
➜ Press .
"Cleared" appears in the display.
The average piece weight is cleared and the weight value is displayed.
The device operates in straight weighing mode.

29
METTLER TOL EDO User manual ICS649-check12/10 Order number 22021156A
2.10 Workingwithidentications
Weighing series can be assigned 3 identication numbers ID1, ID2 and ID3 with up to
40characters that are also printed out in the protocols. If for example a customer number
and an article number are assigned, it can be clearly seen in the protocol which article
was weighed for which customer.
Direct entry
9 At least one of the soft keys ID1, ID2 or ID3 is activated.
1. Press the desired soft key ID1, ID2 or ID3.
The last entered ID is displayed.
2. To edit the ID press the soft key
.
3. Enter the ID using the displayed alphanumeric keyboard.
4. Conrm entry with of the displayed keyboard.
The entered ID is assigned to the following weighings until the ID is changed.
Barcodeuse(foroneidenticationonly)
9 ID1, ID2 or ID3 is selected as destination for external input.
9 To display the identication ID1, ID2 or ID3 is activated in the auxiliary line.
UsingSICScommandset(uptothreeidentications)
9 To display the identication(s) the corresponding IDs are activated in the auxiliary line.
2.11 Displaying information
Up to 27 different values for display can be congured in the menu for the info key.
Depending on the conguration in the menu Terminal –> Device –> Keyboard
–> Info key, the following data can be assigned in a free order, e.g.,
• Date & Time
• Weight values
• Identications
• Device information
• Serial numbers and software versions
• User name
1. Press .
The (rst) info screen is displayed.
2. Press again.
With one info screen only, the weight display appears.
With several info screens, the next info screen is displayed.
3. With several info screens press to leave the info screens.
An info screen is displayed until is pressed again or is pressed.
30
METTLER TOL EDO User manual ICS649-check
12/10Order number 22021156A
Operation
2.12 Environment and cleaning
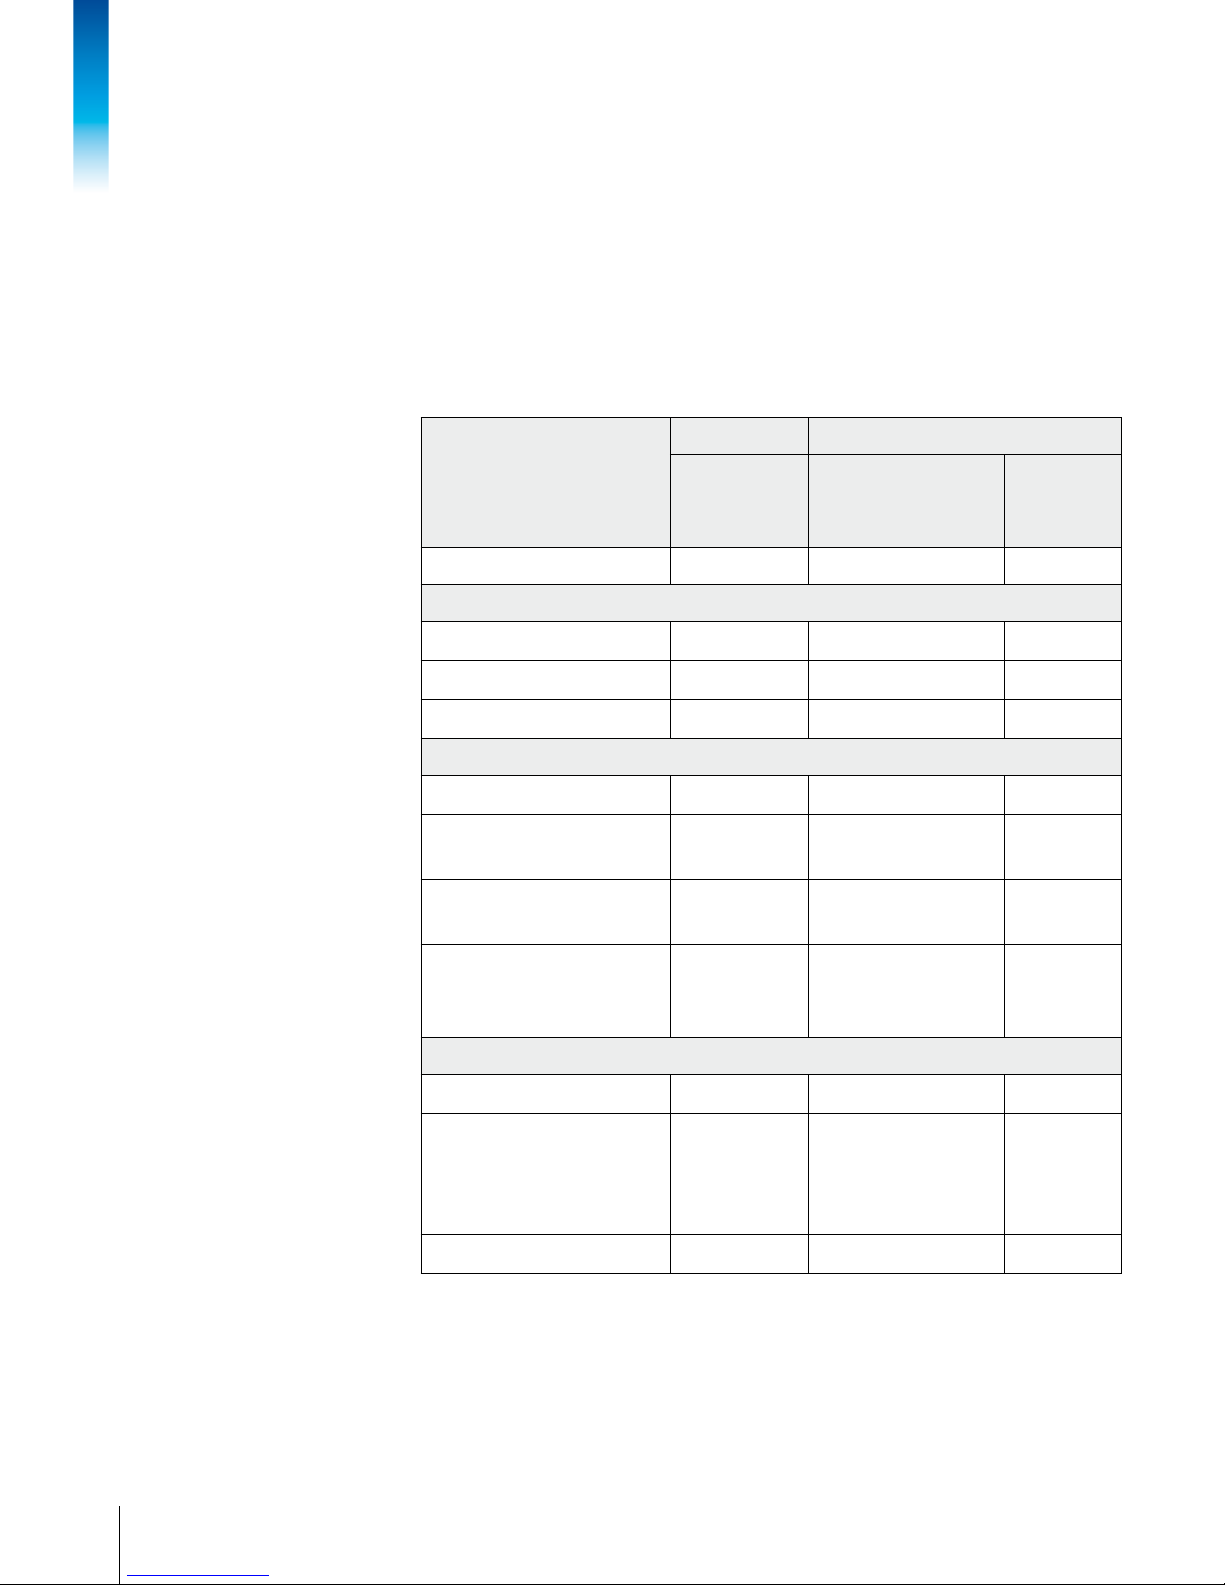
2.12.1 Overview
The devices are designed to be used in a wet environment. Depending on the environment
and the cleaning procedures we suggest weighing platforms with different types of
load cells. The following table gives you a detailed overview about the recommended
environment and suitable cleaning procedures.
Terminal Weighing platform
ICS649a-check
ICS649d-check
Standard version
hermetically sealed
stainless steel load cell
Option
load cell with
KS+ coating
IP rating IP68/IP69k IP68/IP69k IP68/IP69k
Environment
Short time wet (30 min / day)
✔ ✔ ✔
Part time wet (120 min / day)
✔ ✔ ✔
Permanent wet
✔ ✔ ✔
Cleaning procedure
Wet wipe down
✔ ✔ ✔
Light hose down
< 5 l / min, 20 kPa
✔ ✔ ✔
Light wash down
< 12.5 l / min, 30 kPa
✔ ✔ ✔
Heavy wash down
high pressure water and
steam jet up to 10000 kPa
✔ ✔ ✔
Cleaning detergents
Mild detergents
✔ ✔ ✔
Other detergents in
accordance with the
manufacturer's specications
and instructions
✔ ✔ ✔
Acids, lyes, solvents – –
✔
 Loading...