

Mettler Toledo ICS445, ICS449, ICS465, ICS469 User Manual
ICS469
ICS449
ICS465
ICS445
ICS445 / ICS449 / ICS465 / ICS469
User Manual
Weighing systems


Congratulations on choosing the quality and precision of METTLER TOLEDO. Proper use of your new
equipment according to this Manual and regular calibration and maintenance by our factory-trained service
team ensures dependable and accurate operation, protecting your investment. Contact us about a service
agreement tailored to your needs and budget. Further information is available at
www.mt.com/service
There are several important ways to ensure you maximize the performance of your investment:
1 Register your product: We invite you to register your product at
www.mt.com/productregistration
so we can contact you about enhancements, updates and important notifications concerning your
product.
2 Contact METTLER TOLEDO for service: The value of a measurement is proportional to its accuracy – an
out of specification scale can diminish quality, reduce profits and increase liability. Timely service from
METTLER TOLEDO will ensure accuracy and optimize uptime and equipment life.
ð Installation, Configuration, Integration and Training: Our service representatives are factory-
trained, weighing equipment experts. We make certain that your weighing equipment is ready for
production in a cost effective and timely fashion and that personnel are trained for success.
ð Initial Calibration Documentation: The installation environment and application requirements are
unique for every industrial scale so performance must be tested and certified. Our calibration
services and certificates document accuracy to ensure production quality and provide a quality
system record of performance.
ð Periodic Calibration Maintenance: A Calibration Service Agreement provides on-going confidence
in your weighing process and documentation of compliance with requirements. We offer a variety of
service plans that are scheduled to meet your needs and designed to fit your budget.
3


Table of Contents
1 Introduction 7
2 Operation 20
3 Counting 37
1.1 Safety instructions 7
1.2 Presentation 8
1.3 Commissioning 16
2.1 Switching on/off 20
2.2 Straight weighing 20
2.3 Switching units 20
2.4 Zeroing / Zero point correction 21
2.5 Weighing with tare 21
2.6 Displaying information 23
2.7 Printing results 24
2.8 Average (dynamic) weighing 25
2.9 Working with identifications 26
2.10 Working in a higher resolution 27
2.11 Switching scales 27
2.12 Working with a prompt 27
2.13 Calling up alibi log file 34
2.14 Cleaning 35
2.15 Verification test 36
3.1 Counting parts into a container 37
3.2 Counting parts out of a container 37
3.3 Determining the parts in a full container 38
3.4 Counting with a known average piece weight 38
3.5 Changing reference quantity 38
3.6 Counting with reference weight check 39
3.7 Reference optimization 40
3.8 Counting with automatic reference determination 40
3.9 Counting with reference and bulk scale 41
3.10 Counting by calling up an article from the database 42
4 Over/Under Checkweighing 44
4.1 Overview 44
4.2 Specifying target values for Over/Under Checkweighing 45
4.3 Specifying target number of pieces for Over/Under Checkcounting 45
4.4 Over/Under Checkweighing or Checkcounting procedure 46
4.5 Over/Under Checkweighing during subtractive weighing 46
4.6 Over/Under Checkweighing with "Quick start" 47
4.7 Over/Under Checkweighing to zero 47
4.8 Over/Under Checkweighing by calling up an article from the database 48
4.9 Leaving Over/Under Checkweighing 49
5 Totalization 50
5.1 Totalizing manually 50
5.2 Automatic totalizing 51
5.3 Deleting items from the sum 51
5.4 Terminating totalizing 51
6 Settings in the menu 52
6.1 Menu overview 52
6.2 Operating the menu 52
6.3 Scale menu block 55
6.4 Application menu block 64
Table of Contents 5

6.5 Terminal menu block 72
6.6 Communication menu block 76
6.7 Maintenance menu block 86
7 Event and error messages 88
7.1 Error conditions 88
7.2 Errors and warnings 89
7.3 Smart weighing counter / spanner icon 90
7.4 Service information 90
8 Technical data and accessories 91
8.1 Devices for dry environment 91
8.2 Devices for wet environment 98
8.3 General technical data 104
9 Appendix 105
9.1 Metrological information 105
9.2 Table of Geo Code values 105
9.3 Disposal 106
9.4 Protocol printouts 107
Index 108
Table of Contents6

1 Introduction
1.1 Safety instructions
General
• Do not use the device in a hazardous environment. Special devices are available in our range of
products for hazardous environments.
• The safety of the device cannot be ensured if it is not operated in accordance with these operating
instructions.
• Only authorized personnel may open the device.
Devices with protection level IP5x or IP65
Devices with protection level IP54 or IP65 are protected against dust and splashing of water respectively
dust-tight and protected from water jets according to EN 60529. They are suitable for use in dusty
environments and brief contact with liquids.
• Ensure that the device is dried off after coming into contact with liquid.
• Do not use the device in environments with a risk of corrosion.
• Do not flood the device or submerge it in liquid.
Devices with built-in power supply unit
• Ensure that the power socket outlet for the device is earthed and easily accessible, so that it can be deenergized rapidly in emergencies.
• Ensure that the supply voltage at the installation site lies within the range of 100 V to 240 V.
• Ensure that there is a space of at least 3 cm (1.25") at the rear in order to prevent the power cable from
being bent too strongly.
• Check the power cable regularly for damage. If it is damaged, immediately disconnect the device from
the power supply unit.
Devices with built-in storage battery
• Only use storage batteries from the manufacturer.
• Do not use the battery charger in humid or dusty rooms or below 0 °C (32 °F) ambient temperature.
• After the storage battery has been charged, the cover cap of the charging socket on the device must be
closed.
Compact scales / Terminal and platform combinations
• Avoid falling and shock loads as well as any impact from the side.
• The maximum static safe load must never be exceeded. Observe the operation limits, see technical data
of the connected weighing platform.
Introduction 7

1.2 Presentation
1.2.1 Type overview
ICS445 / ICS449 / ICS465 / ICS469 weighing terminals vary in the following:
Numeric keypad
Color display
Environment dry wet dry wet
Available as compact scale
Available as terminal and platform combination
Default equipment
Each weighing terminal offers the following interfaces:
• 1 serial RS232 interface
• 1 scale interface
Optional equipment
The weighing terminals can be equipped or retrofitted with an additional interface:
• RS232 (usable as data interface or SICS scale)
• RS422/485 (usable as data interface or scale interface SICSpro)
• USB Device
• USB Host
• Ethernet
• WLAN
• Digital I/O
• Analog scale
• IDNet
ICS445 ICS449 ICS465 ICS469
– – x x
– x x x
x – x –
x x x x
Introduction8
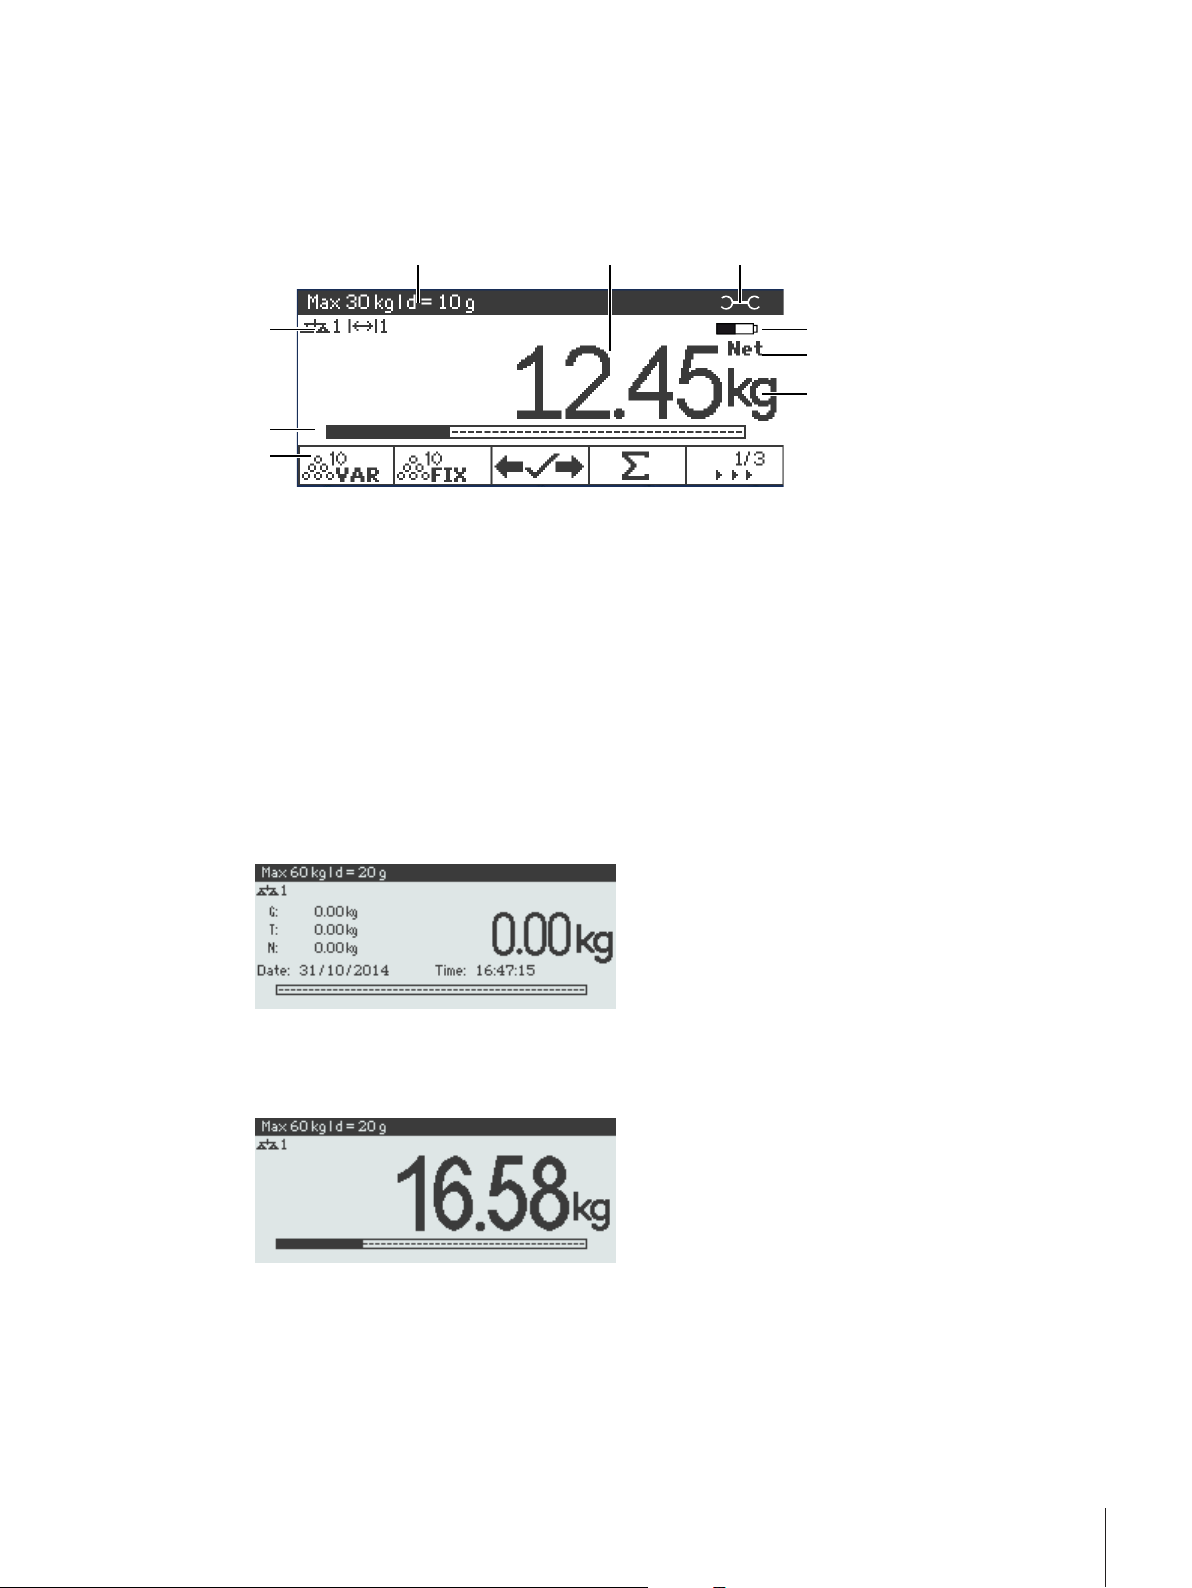
1.2.2 Display
1
2
3
4
5
6
7
8
9
To meet your special requirements, different display layouts are available in the menu underTerminal
–>Device–>Display–>Displaylayout.
Straight weighing display – Default layout
Metrological data For details see following table
1
Weight value with star, sign and stability monitor For details see following table
2
Spanner icon: service needed For details see Event and error messages
3
Battery symbol
4
Net/Gross
5
Unit
6
Soft keys (factory setting, page 1)
7
Auxiliary data line The contents is defined in the menu; here:
8
Symbol and info line For details see following table
9
bargraph
Straight weighing display – 3-line mode
Straight weighing display – Big font mode
Introduction 9
Straight weighing display – Bargraph
The device offers a bargraph indicating the scale capacity.
The bargraph indicates roughly which part of the scale capacity is already occupied and what capacity is
still available.
In the example above, approximately 3/4 of the scale capacity is occupied, although the applied net weight
isn’t really high. The reason therefore could be a high tare weight.
Metrological data line
The metrological data is stored in the weighing platform. The weighing terminal only serves as
indicator.
In the metrological data line the following information is displayed:
Symbol Information Remark
, ,
,
, ,
,
Accuracy classes Displayed only if the scale is approved according to
the Weights and Measures guidelines
Weighing range information For multi range devices only and if the scale is
approved according to the Weights and Measures
guidelines
Maximum capacity
Minimum capacity Displayed only if the scale is approved according to
Approved resolution Displayed only if the scale is approved (OIML)
cap for NTEP only
the OIML Weights and Measures guidelines
Display resolution Please note for approved scales:
OIML: Displayed only if d is different from e
NTEP: Always displayed
Approved weighing device Metrology display disabled for SICS scales, e.g.,
BBK422. Weights and Measures data must be
indicated on a label near the weight display.
Introduction10
Weight value
I<–>I1
The weight value can be marked with the following symbols:
Symbol Information Remark
Calculated weight value For example for average weighing results
Sign For negative weight values
Stability monitor For unstable weight values
Non-approved last digit with
e>d
For approved scales only
The example shows the weight value for a scale
with e=1g and d=0.1g.
The last, smaller digit is not approved.
Symbols and info line
In the symbols and info line the following information can be displayed:
Symbol Information Remark
Scale number Displayed only if 2 scales are connected
Weighing range For multi range or multi interval scales only
Weight below minimum
weight
Average weighing Averagemust be activated in the menu
Automatic taring AutoTaremust be activated in the menu
Automatic clearing of the tare
weight
Over/Under checkweighing to
zero
Center of zero indication Availability depending on local Weights and
Automatic APW optimization APWoptimizationmust be set toAuto
MinWeighmust be activated in the menu
AClearTaremust be activated in the menu
Tozeromust be assigned to a soft key in the
menu
Measures regulations
Totalization Totalization active
Fact needs to be performed Fact = Fully automatic calibration test.
When Fact is displayed: Ensure that the weighing
platform is empty and wait until the calibration test
is done automatically.
For ICS4_5k-.../f compact scales only.
Introduction 11
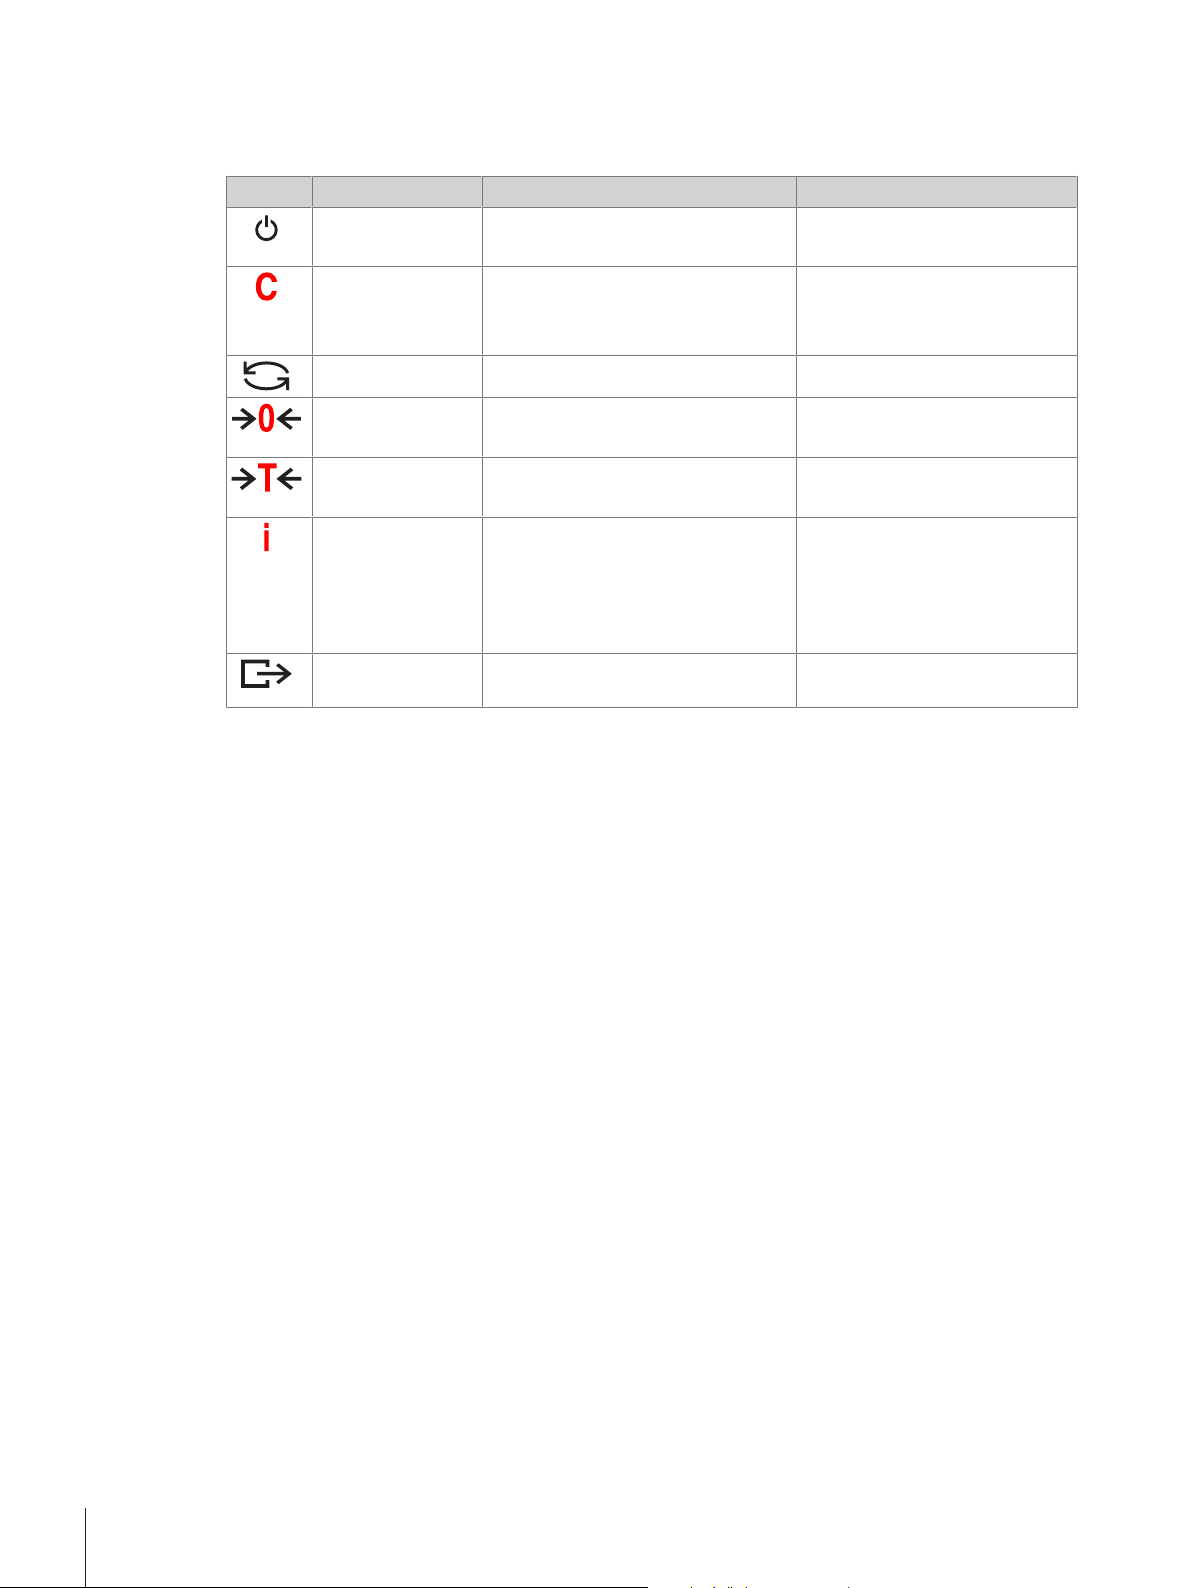
1.2.3 Keyboard
Function keys
Key Name Function in the operating mode Function in the menu
Power • Switching on and off
• Cancelling editing
Clear • Clearing tare
• Leaving info page
• Leaving application
Switch • Switching over weight unit • Re-editing
Zero • Setting scale to zero
• Clearing tare
Tare • Taring scale
• Clearing previous tare
Info • Activating info screen
• Proceeding to the next info line /
info page
• Freezing and releasing startup
screen
Transfer • Transferring data to a printer or
computer
• Cancelling editing
• Exiting menu
• Clearing value
• Clearing digit
• Confirming entry/selection
Introduction12
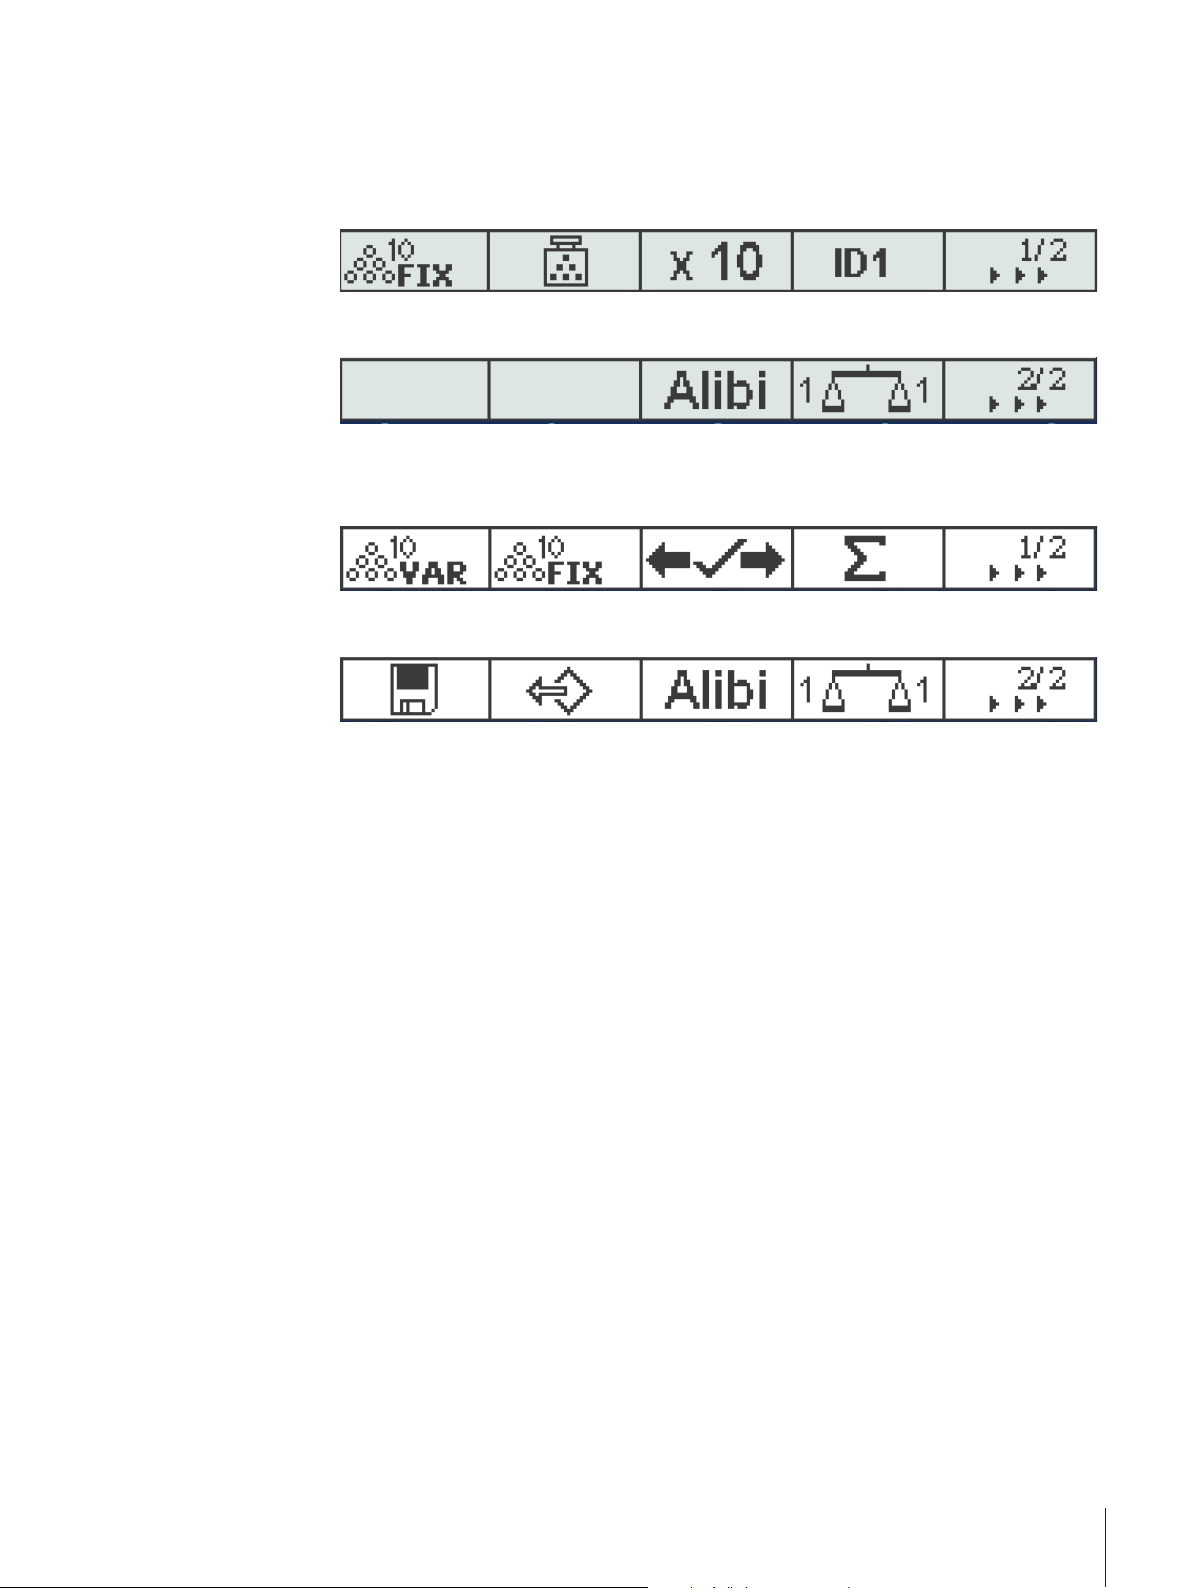
Soft keys
To meet your specific application requirements, ICS445 / ICS449 / ICS465 / ICS469 offer 16 soft keys
which can be configured in theTerminalmenu. The soft keys are divided into four lines (pages).
Factory setting ICS44_
Page 1
Fix reference
here: 10 pieces
Page 2
APW Higher resolution ID1 Scroll to page 2
Alibi memory Switch scale Scroll to page 3
Factory setting ICS46_
Page 1
Variable reference
here: 10 pieces
Page 2
Save Over/Under
Checkweighing
parameters
Fix reference
here: 10 pieces
Load Over/Under
Checkweighing
parameters
Over/Under
Checkweighing
Alibi memory Switch scale Scroll to page 3
Page 3, Page 4
Pages 3 and 4 are free for customer configuration.
When scrolling further after the last page, page 1 is displayed again.
Totalizing Scroll to page 2
Operating soft keys
- Press the key below the desired function.
Introduction 13
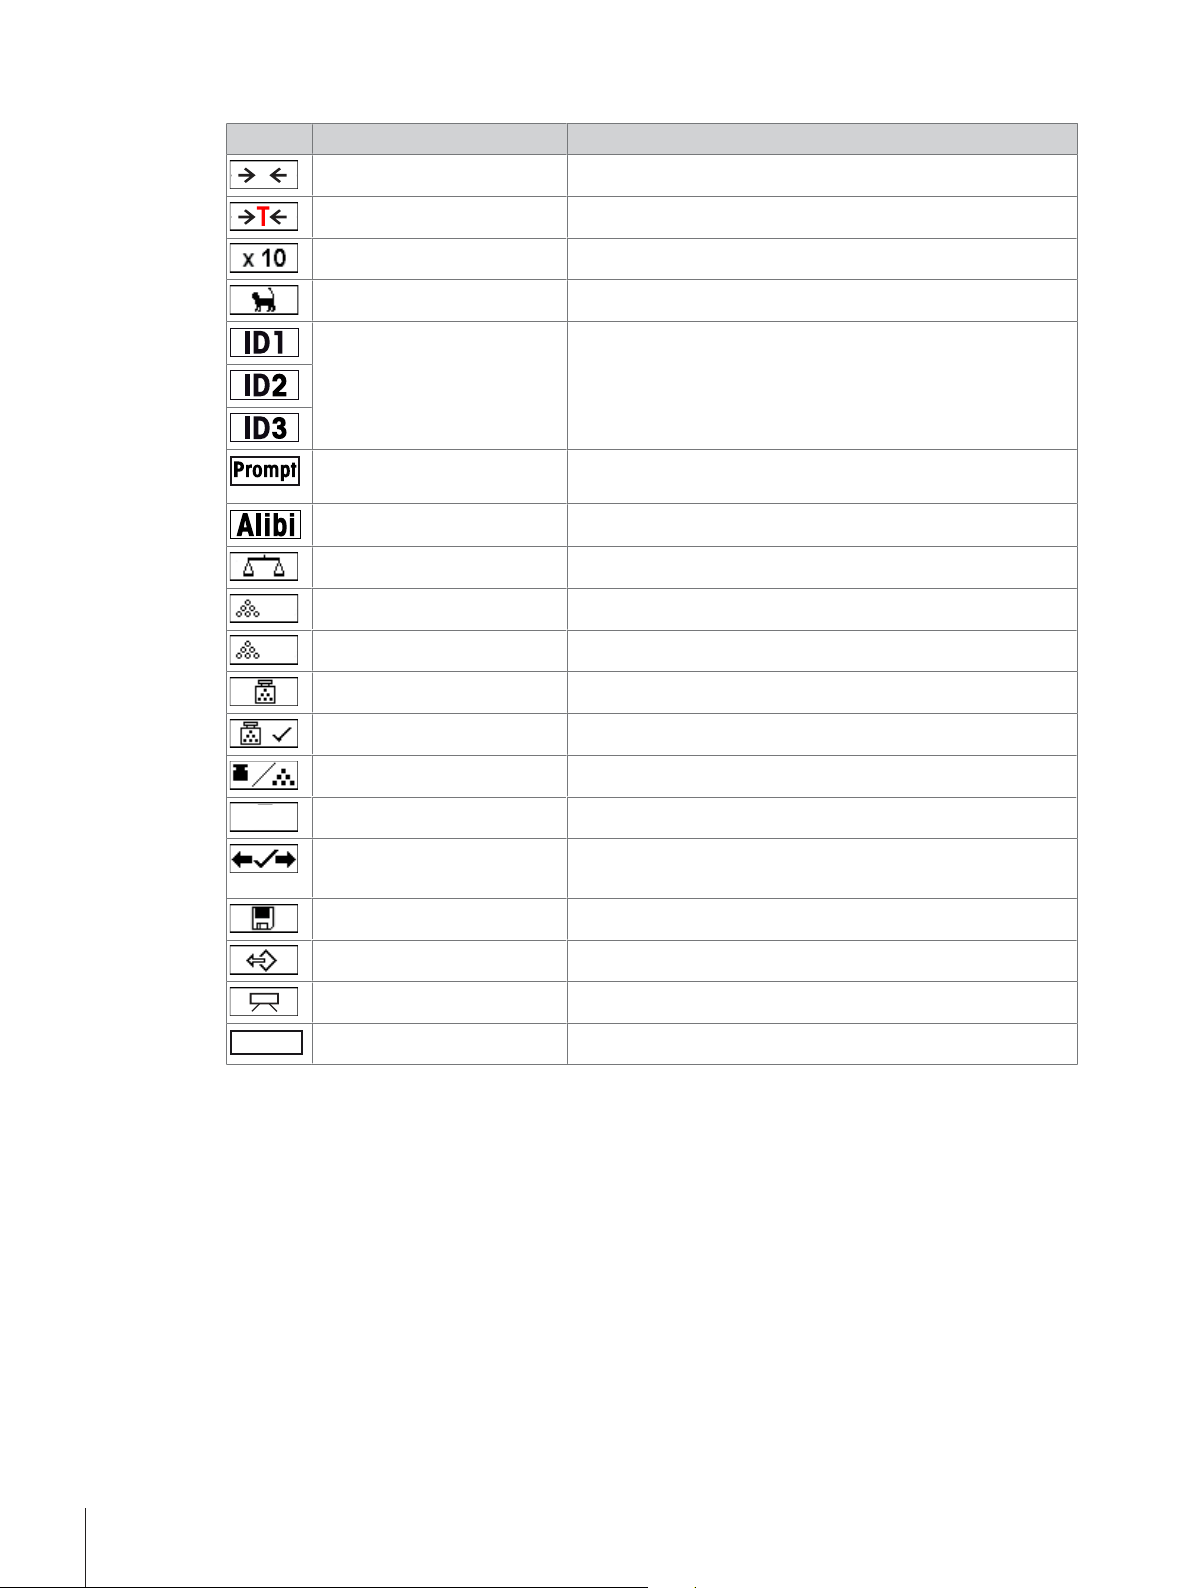
Soft key options
0
VAR
FIX
Σ
#
Symbol Menu setting Function
Zero
Tare
High resolution Show the weight value with 10 times higher resolution
Average weighing Start average weighing
ID1, ID2, ID3 Enter identifications
Prompt Start a predefined workflow. The user will be guided step by
step.
Alibi memory Call up the optional alibi memory
Switch scale Switch between the connected scales
Ref n var Determine the average piece weight, freely adjustable
Ref n fix Determine the average piece weight, fixed reference sizes
APW Enter the average piece weight
APW optimization Reference weight optimization
Weight/count Switch between weight display and display of pieces
Totalizing
Over/Under Checkweighing Enter Over/Under Checkweighing parameters
Save article Save the current article parameters in the database
Recall article Recall parameters from the database
Display layout Switch between default weight display and 3-line mode
Consecutive number Enter start value for printout with consecutive number
Introduction14
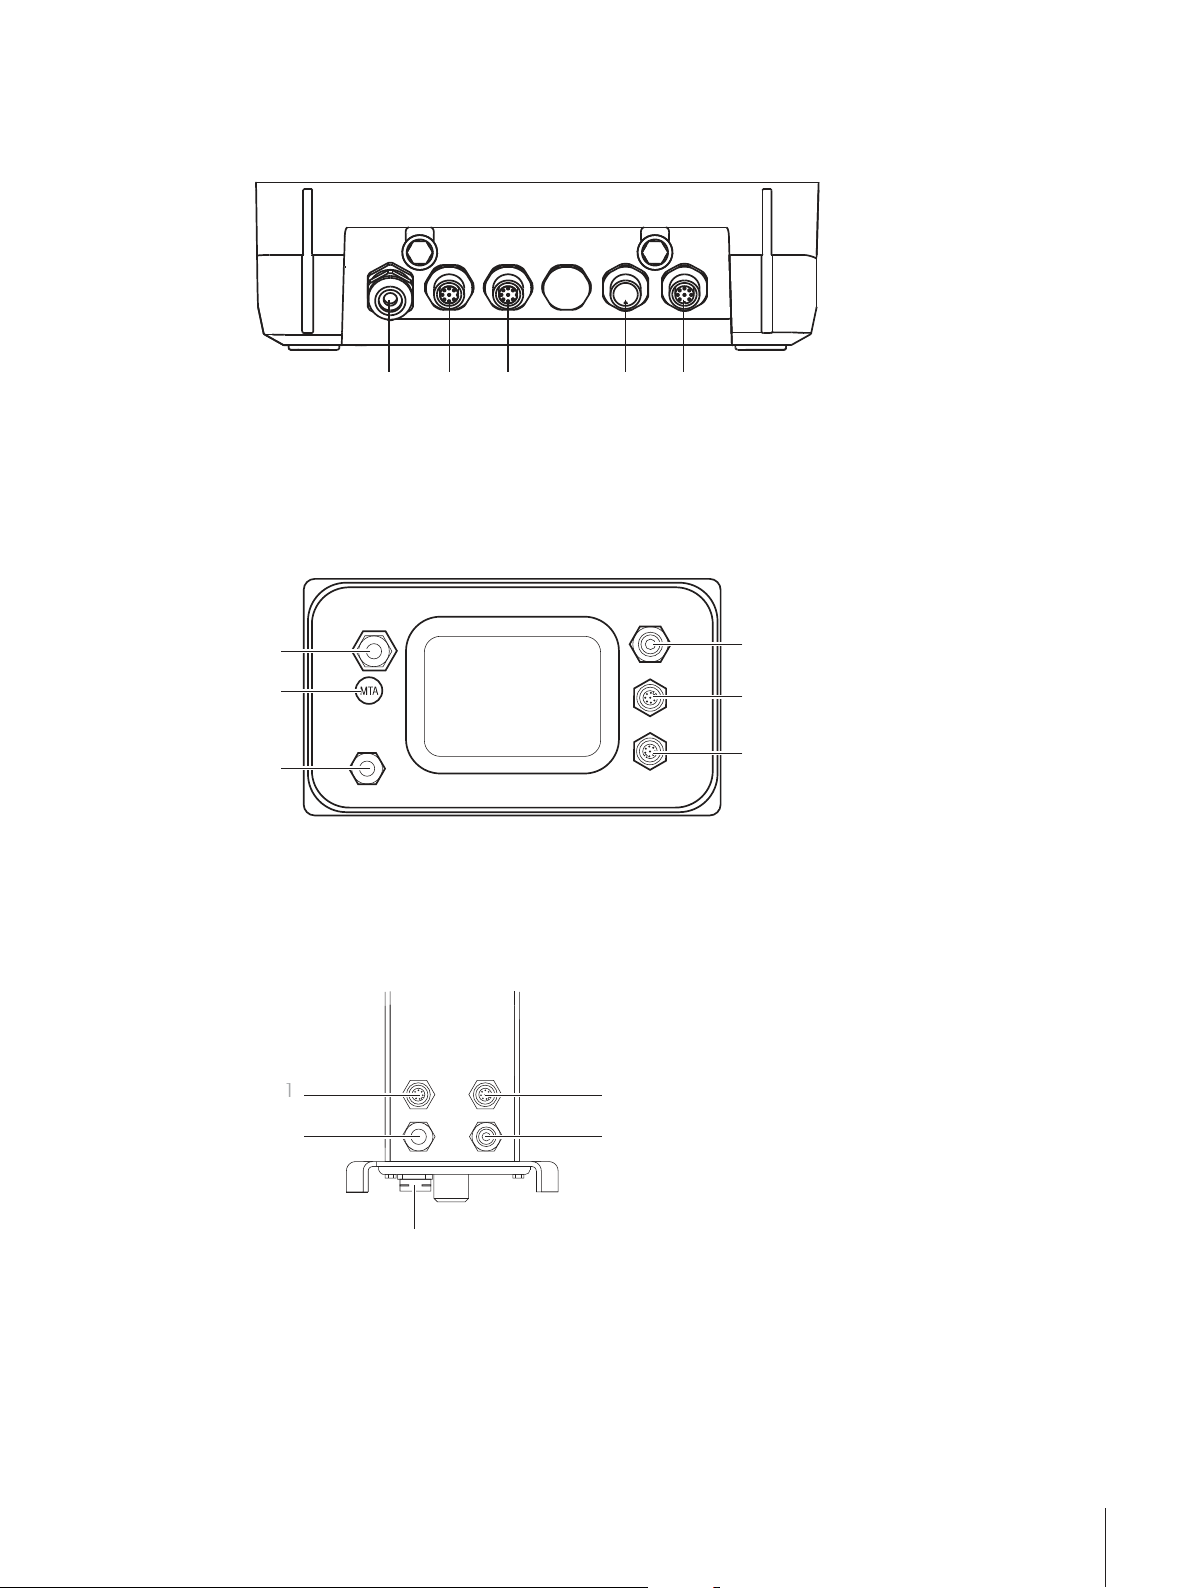
1.2.4 Connections
1
2
3 4
5
1
2
3
4
5
6
1
2
5
4
3
ICS4_5 weighing terminal for dry environments
AC power supply or battery charging
1
Optional interface COM2
3
Weighing platform connection SCALE1
5
ICS4_9 weighing terminal for wet environments
Weighing platform connection
1
Pressure compensation
3
Standard interface COM1 (RS232)
5
ICS4_9a-.../c
Standard interface COM1 (RS232)
2
Weighing platform connection SCALE2
4
Verification securing seal
2
AC power supply or battery charging
4
Optional interface COM2
6
Optional interface COM2
1
Pressure compensation
3
Standard interface COM1 (RS232)
5
The verification securing seal is applied directly on the weighing terminal.
Analog weighing platform connection
2
AC power supply or battery charging
4
Introduction 15
1.3 Commissioning
1
1
2
2
3
1.3.1 Selecting the location
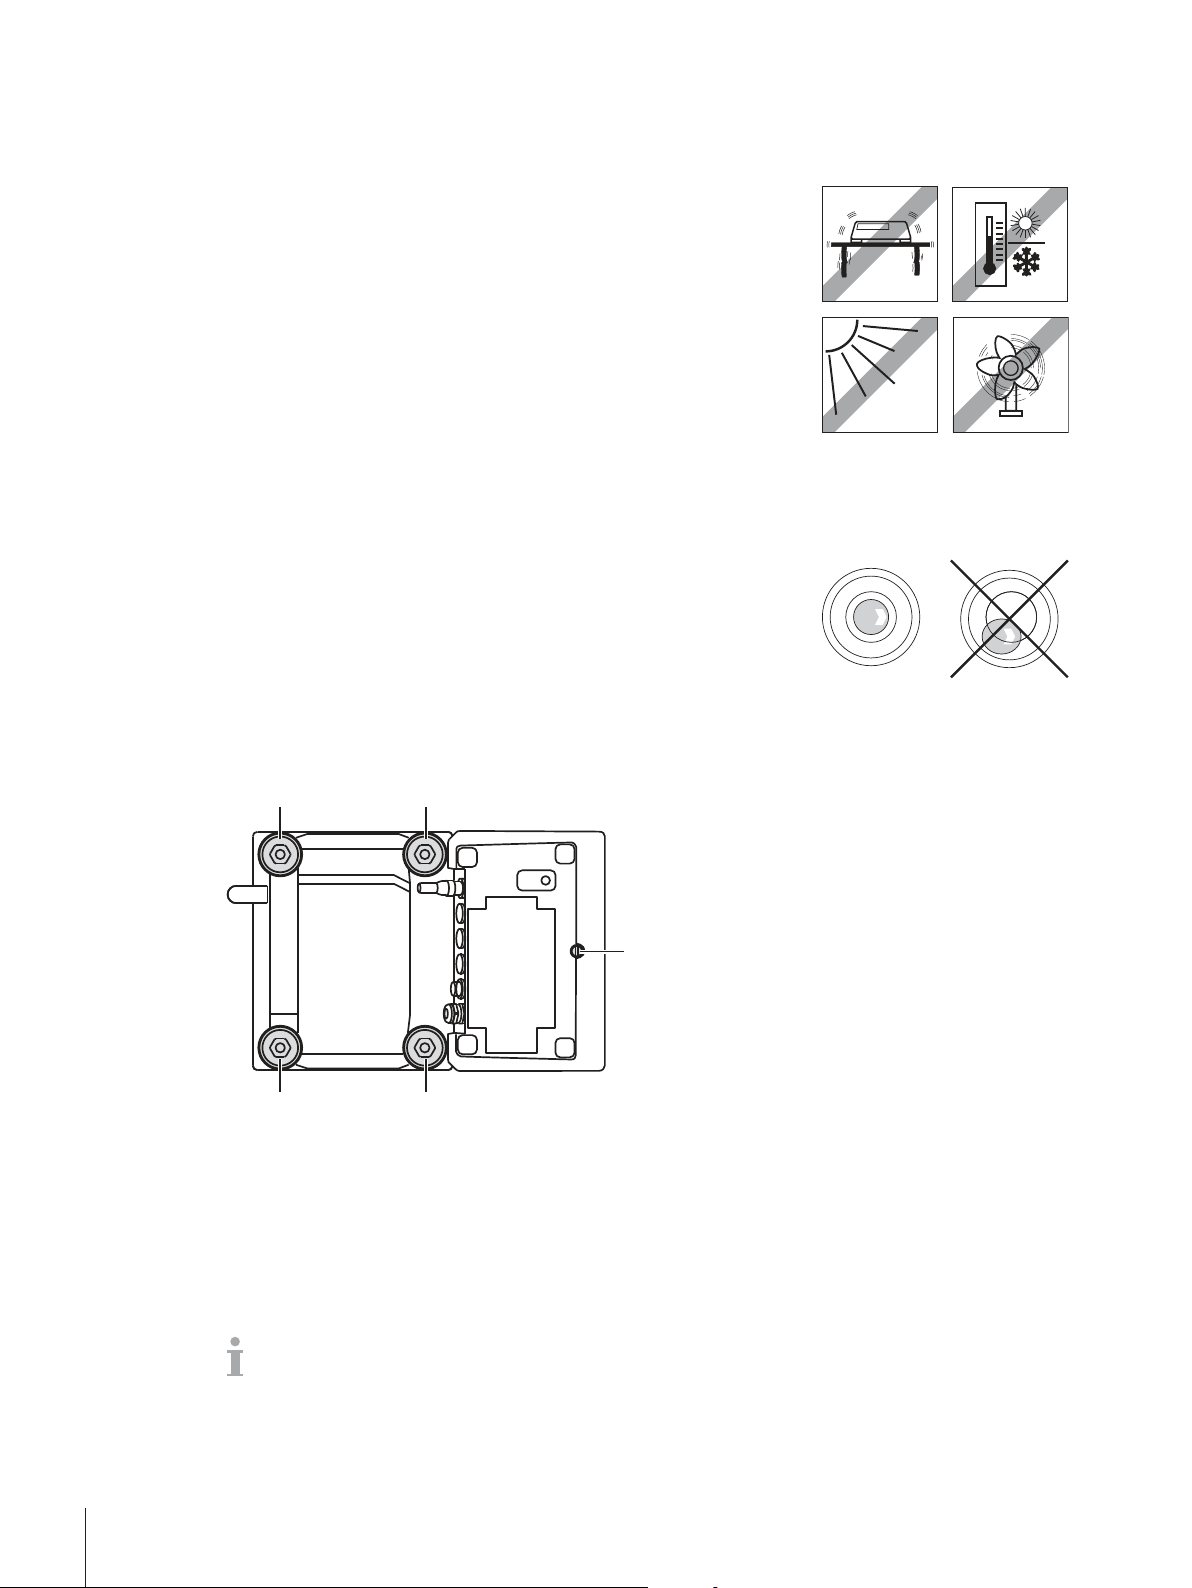
The correct location is crucial for the accuracy of the weighing results.
1 Select a stable, vibration-free and, if possible, a horizontal location for
the weighing platform.
ð The ground must be able to safely bear the weight of the fully
loaded weighing platform.
2 Observe the following environmental conditions:
ð No direct sunlight
ð No strong drafts
ð No excessive temperature fluctuations
1.3.2 Levelling
Levelling of weighing platforms
Only weighing platforms that have been levelled precisely horizontally,
provide accurate weighing results. Weights and Measures approved
weighing platforms have a level bubble to simplify levelling.
- Turn the adjustable feet of the weighing platform until the level bubble’s
air bubble is inside the inner circle.
Levelling of compact scales ICS4_5-.../f
On compact scales levelling can be done in an easier way.
1 Turn the compact scale upside down.
2 Screw in the 2 adjustable feet (2) on the terminal side of the weighing platform.
3 Turn over the compact scale to its normal position.
4 Level the compact scale by turning the other 2 adjustable feet (1) of the weighing platform until the level
bubble is inside the inner circle.
5 Screw out the feet (2) of the weighing platform until they have contact with the table.
The adjustable foot (3) of the weighing terminal is screwed out for 7 mm at the factory and needs
not be adjusted for levelling.
Introduction16

1.3.3 Weighing platform connection
Analog weighing platforms
- Call the METTLER TOLEDO service technician to connect an analog weighing platform to the ICS4_5g /
ICS4_9g weighing terminal.
Weighing platforms with digital scale interface
- Connect the weighing platform connector to the ICS4_5i / ICS4_9i or ICS4_5s / ICS4_9s weighing
terminal.
• If you have ordered an approved weighing system consisting of an ICS4_5s weighing terminal
and an approved PBD555 weighing platform, the approval was done in the factory (not for the
US market).
• You can disconnect the weighing platform from the ICS4_5s / ICS4_9s or ICS4_5i / ICS4_9i
weighing terminal of an approved weighing system without violating the approval.
If another weighing platform is connected to the weighing terminal, the system is not approved.
If the weighing platform of the approved system is connected again, the approval is valid again.
• If you have ordered an approved weighing system consisting of an ICS4_5s / ICS4_9s weighing
terminal and an approved PBK/PFK weighing platform, the approval was done in the factory (not
for the US market).
• If you have connected a non-approved weighing platform and want to have the system
approved, call the METTLER TOLEDO service technician.
1.3.4 Power supply connection
CAUTION
Risk of electric shock!
a) Before connecting the power supply, check whether the voltage value printed on the
label corresponds to your local system voltage.
b) Do not, under any circumstances, connect the device if the voltage value on the label
deviates from the local system voltage.
c) Make sure the weighing platform has reached room temperature before switching on
the power supply.
- Plug the power plug into the power socket.
ð After it has been connected, the device runs a self-test. The device is ready to operate when zero
appears on the display.
Introduction 17
1.3.5 Handling the storage battery
Battery symbol
The battery symbol shows the current charging status of the storage
battery.
• One segment corresponds with approx. 25 % capacity.
• If the symbol flashes, the storage battery has to be charged.
• During charging the segments are "running" until the battery is
fully charged and all segments light up continuously.
Note the following when operating a device with a built-in storage battery:
• Before the first operation charge the storage battery for at least 3 hours.
• The operating life depends on the intensity of use, the configuration, and the connected scale. For details
concerning ICS4_5, see "Operating life with battery [
with battery [
• The charging time of the storage battery amounts to 4 to 5 hours. The storage battery is protected
against overcharging.
• The storage battery has a service life of 500 to 1,000 charging/discharging cycles.
}100]".
CAUTION
Charging the storage battery below 0° C (32 °F) or above 40 °C (104 °F) is
prevented by the charging electronics!
a) Make sure that the temperature is within the range of 0 °C to 40 °C (32 °F to 104 °F)
to charge the storage battery.
}94]", or concerning ICS4_9, see "Operating life
CAUTION
Danger of soiling because the charger for the storage battery is not protected
according to IP69K!
a) Do not charge the device in humid or dusty rooms.
b) After the storage battery has been charged, close the cover cap of the charging socket
on the device.
Recommended use of the storage battery
The characteristics mentioned above are only valid if the following recommendations are observed:
• Change the battery as soon as the warning message "Low battery" appears and the battery symbol
starts flashing. When the message appears, you still have enough time (at least 10 minutes), to
complete your current task.
• For optimum battery performance, operate the device with built-in storage battery at an ambient
temperature range of 10 °C to 30 °C (50 °F to 86 °F). This also applies to discharging the battery.
Introduction18
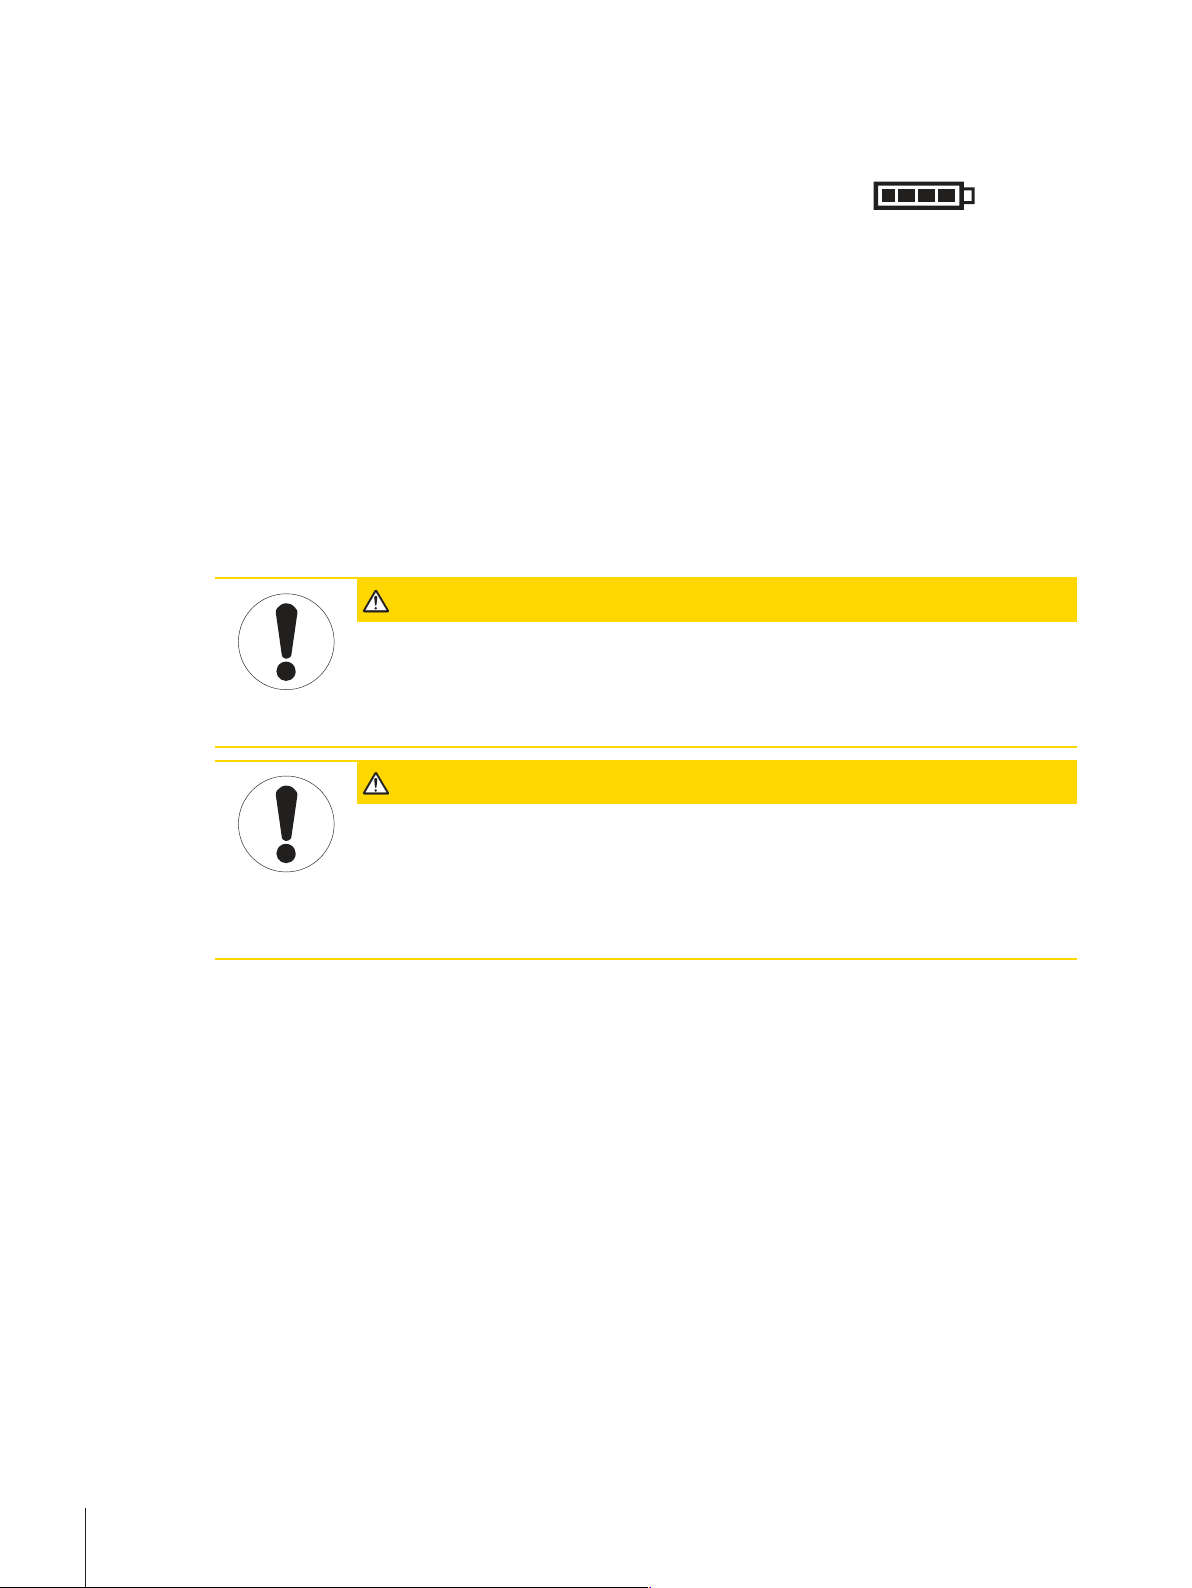
Changing battery (ICS4_5 only)
2.
1.
1 Unlock the battery by moving the slider away from the battery and remove the discharged battery.
2 Insert the fully charged battery and secure it by moving the slider towards the battery.
With optional IP65 protection, the battery is not accessible from the outside. Please call the
METTLER TOLEDO service technician.
1.3.6 Use in hygienically sensitive areas
ICS4_9 weighing terminals are easy to clean and are designed to be used in the food industry.
ICS4_9 features
• Protection degree IP68/69k
• Terminal housing and load plate made of stainless steel
• No open threads
• No screws with recesses
• Keypad made of PET with a smooth surface
• Reduced horizontal surfaces
• Continuous welding seams
The standard load cell is made of aluminium. As an option, stainless steel potted and hermetically
sealed load cells are available.
Introduction 19

2 Operation
2.1 Switching on/off
Switching on
- Press
ð For a few seconds the device shows a start-up screen with device name, software version, serial
.
number of the weighing terminal and the Geo Code value.
• You can freeze the start-up screen by pressing .
• When you start a compact scale, the metrology line shows whether it is approved or not. If you
have ordered an approved weighing system, approval has been done in the factory already (not
for the US market).
• With ICS4_5k-.../f compact scales ensure that the device is at room temperature before
switching on. To ensure accurate weighing results, wait 15 minutes after switching on before
starting weighing operation.
Switching off
- Press
ð Before the display goes out,OFFappears briefly.
.
Resetting
- Press and hold
ð The device is switched off.
for approx. 5 seconds.
2.2 Straight weighing
1 Place weighing sample on the scale.
2 Wait until the stability monitor
3 Read the weighing result.
disappears.
2.3 Switching units
If an additional second weight unit is configured in the menu, it is possible to switch back and forth
between the two weight units.
- Press
ð The weight value is displayed in the second unit.
.
• Possible units are g, kg, oz, lb, lb-oz, t and PCS in piece counting.
• When in the menu Scale–>Disp.unit&res.–>Unitrollis set toOn, the
weight value can be displayed in all available weight units by repeatedly pressing
.
Operation20
2.4 Zeroing / Zero point correction
Zeroing corrects the influence of slight changes on the load plate or minor deviations from the zero point.
Manual
1 Unload scale.
2 Press
ð Zero appears in the display.
.
Automatic
In case of non-approved scales, the automatic zero point correction can be deactivated in the menu or the
zero range can be changed. Approved scales are set fixed at 0.5 d per second.
• The zero function is only available within a limited weighing range.
• After zeroing the scale, the whole weighing range is still available.
2.5 Weighing with tare
2.5.1 Taring
- Place the empty container on the scale and press
ð The zero display and the symbol
ð The tare weight remains stored until it is cleared.
2.5.2 Clearing the tare
- Press
ð The symbol
.
If the symbol is displayed, i.e., the tare functionAutocleartareis activated in the
Scalemenu, the tare weight is automatically cleared as soon as the scale is unloaded.
.
appear.
goes out, the gross weight appears in the display.
2.5.3 Automatic clearing the tare
A tare weight is automatically cleared when the scale is unloaded.
Prerequisite
The symbol
menu.
The tare weight must be heavier than 9 scale divisions.
is displayed, i.e., the tare functionAutocleartareis activated in theScale
2.5.4 Automatic taring
If you place a weight on an empty scale, the scale tares automatically and the symbol
Prerequisite
The symbol
The weight to be tared automatically, e.g., packaging material, must be heavier than 9 scale
divisions.
is displayed, i.e., the tare functionAutotareis activated in theScalemenu.
is displayed.
Operation 21
2.5.5 Chain tare
With this function it is possible to tare several times if, e.g., cardboard is placed between individual layers
in a container.
§ The tare functionChaintareis activated in theScalemenu.
1 Place the first container or packaging material on the scale and press
ð The packaging weight is automatically saved as the tare weight, the zero display and the symbol
2 Load the sample and read/print out the result.
3 Place the second container or packaging material on the scale and press
ð The total weight on the scale is saved as the new tare weight. The zero display appears.
4 Load the sample in the second container and read/print the result.
5 Repeat steps 3 and 4 for other containers.
2.5.6 Tare preset
For established container weights enter the tare weight numerically or via barcode / SICS command. Thus,
you do not have to tare the empty container.
The entered tare weight is valid until a new tare weight is entered or the tare weight is cleared.
Tare preset with numeric entry
1 Enter the known tare weight and press
ð The weight display shows the negative tare weight and the symbol
2 Place the full container on the weighing platform.
ð The net weight is displayed.
.
appear.
again.
to confirm.
appears.
Tare preset with numeric entry is only available for ICS465 and ICS469.
Tare preset with barcode entry
§ For barcode use,Tarepresetis selected as destination for external input in the menu under
Communication–>COMx–>Externalinput–>Destination.
1 Enter the known tare weight via barcode.
ð The weight display shows the negative tare weight and the symbol
2 Place the full container on the weighing platform.
ð The net weight is displayed.
appears.
Tare preset with SICS command from a connected computer
1 Enter the known tare weight on the computer using the SICS commandTA_Value_Unit.
ð The weight display shows the negative tare weight and the symbol
2 Place the full container on the weighing platform.
ð The net weight is displayed.
appears.
Operation22
2.6 Displaying information
Up to 5 different items can be configured in the menu for the
menu under Terminal–>Device–>Keyboard–>Infokey, the following data can be
assigned in any order, e.g.,
• Date & Time
• Weight values
• Identifications
• Article information
• Application parameters
• Device information
• Serial numbers and software versions
• Network information
On the second and third info page, system and contact information can be displayed.
1 Press
2 Press
3 To leave the info screens, press
.
ð The (first) info page is displayed.
again.
ð The next info screen is displayed.
.
An info screen is displayed until is pressed again or until is pressed.
key. Depending on the configuration in the
Operation 23
2.7 Printing results
#
#
If a printer or computer is connected, weighing results and other information can be printed out or
transferred to a computer.
- Press
ð The defined data is printed out or transferred to the computer.
.
• The printout content can be defined in the menu underCommunication–>COMx–>
DefineTemplates. The template has to be assigned to the printout in the
Applicationmenu.
• If in theApplicationmenuMemorymodeis set toAlibiorTransaction, the
weighing result is stored in the memory when pressing
.
Printing without pressing a key (clever print)
§ In the menuApplication–>Cleverprint–>Activateis set toOn.
§ To initiate the next printout, the weight must drop below the set threshold.
1 Put the weighing sample on the load plate.
ð When a stable weight value is reached, the result is printed automatically.
2 Remove the weighing sample from the load plate and load the next weighing sample.
ð When the weight value has dropped below the set threshold, the next stable weight value is printed
automatically.
Printout with consecutive number
The device offers the possibility to number the weighings on the printout.
§ In the selected templateConsecutivenumberis assigned to a
line.
§ To define a start value, a soft key must be defined asConsecutive
number(
>Keyboard–>Softkeys.
1 To enter a start value for the consecutive number, press the soft key
.
2 Enter the desired start number and confirm with
ð The weighing results are printed out with a consecutive number,
beginning at the entered start number.
• If no start value is entered, the consecutive number will start with 1.
• The consecutive number can be displayed in the auxiliary line as well (Terminal–>
Device–>Display–>Auxiliaryline–>Consecutivenumber)
) in the menu under Terminal–>Device–
.
Operation24
2.8 Average (dynamic) weighing
With the average weighing function, it is possible to weigh moving weighing samples such as animals. If
this function is activated,
mean value from weighing operations within a certain time interval.
Start via soft key (factory setting)
§ Weighing sample heavier than 9 scale divisions.
1 Place the weighing sample on the scale.
is displayed in the info line. With average weighing, the scale calculates the
2 Press the soft key
ð During average weighing, stars appear in the display, and the average result will be displayed with
the symbol
3 Unload the scale to begin a new average weighing operation.
to start average weighing.
.
Start via hard key
§ Application>AverageWeighing>Mode–>Printkey(factory setting),
InfokeyorSwitchkeyis selected in the menu.
§ Weighing sample heavier than 9 scale divisions.
1 Place the weighing sample on the scale.
2 Press the key defined in the menu to start average weighing.
ð During average weighing, stars appear in the display, and the average result will be displayed with
the symbol
3 Unload the scale to begin a new average weighing operation.
.
With automatic start
§ Application>Average>Mode–>Autois selected in the menu.
§ Weighing sample heavier than 9 scale divisions.
1 Place the weighing sample on the scale.
ð Average weighing starts automatically.
ð During average weighing, stars appear in the display, and the average result will be displayed with
the symbol
.
2 Unload the scale to start a new average weighing operation.
Operation 25
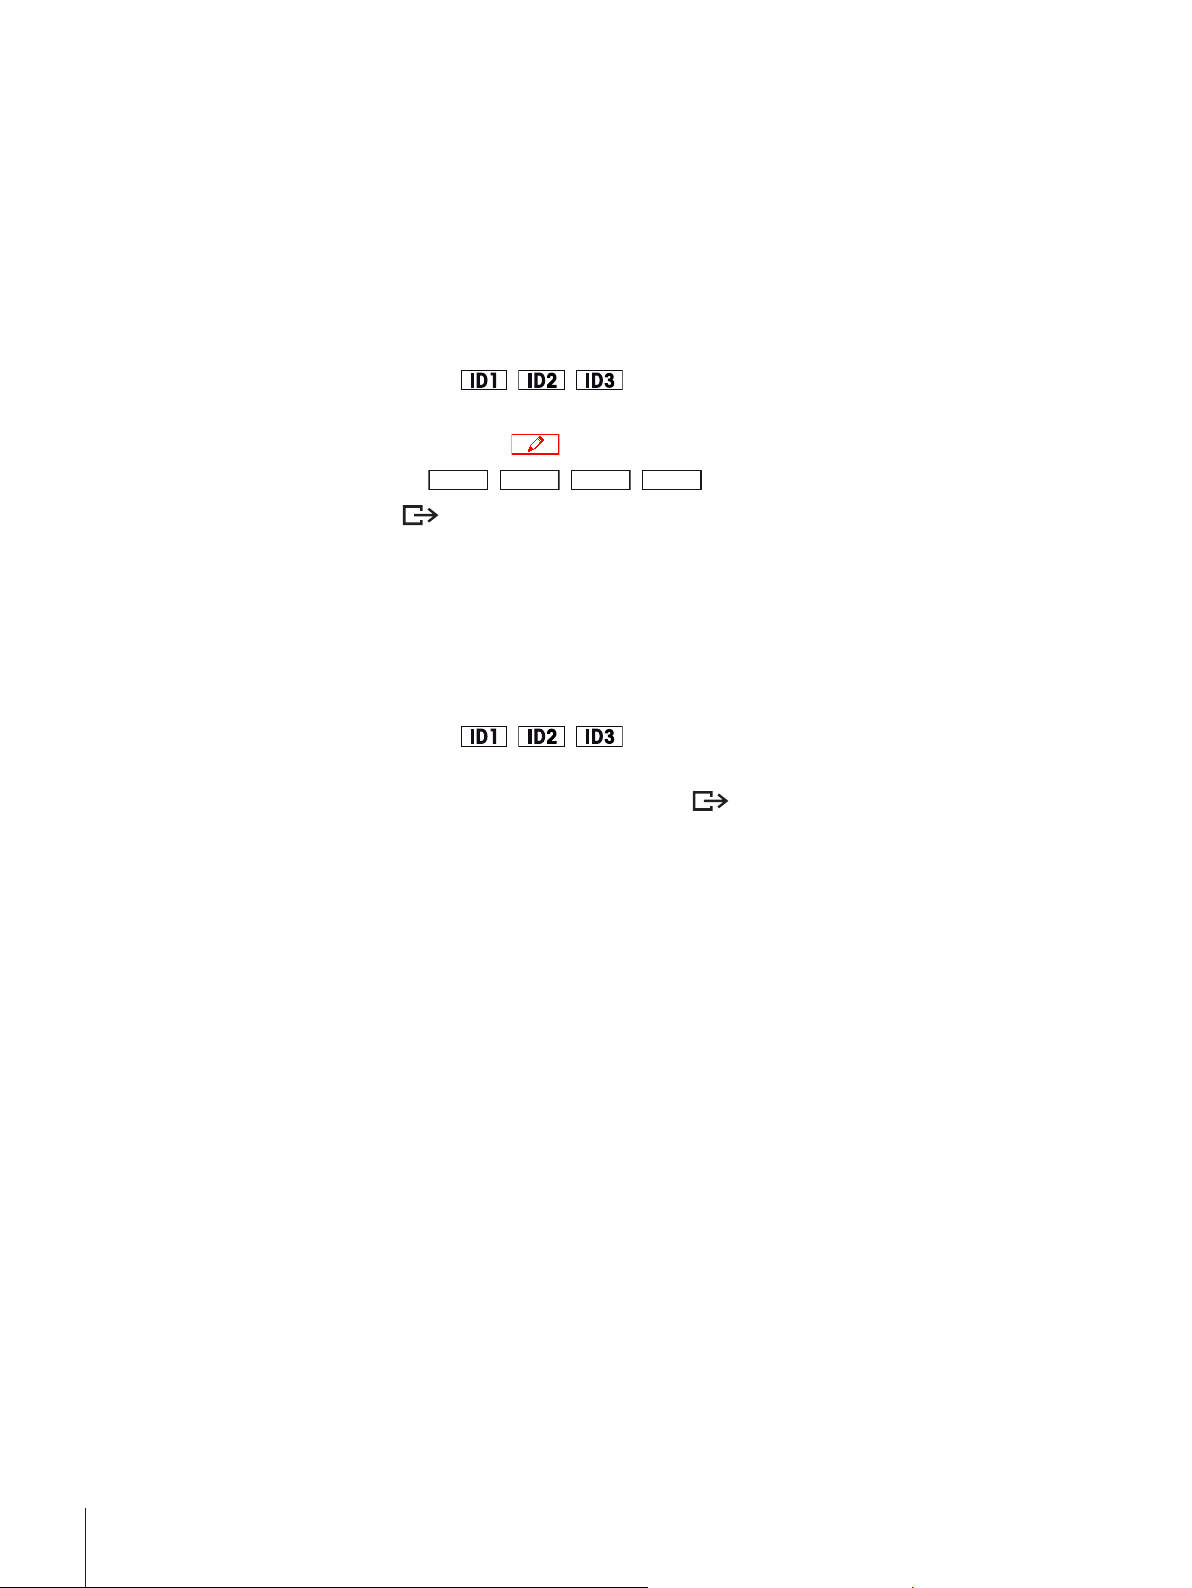
2.9 Working with identifications
Å, È, Ç, Æ
Weighing series can be assigned with 3 identification numbers ID1, ID2 and ID3 with up to 40 numeric
characters that are also printed out in the protocols. If, for example, a customer number and a batch
number are assigned, it can be clearly seen in the protocol which batch was weighed for which customer.
Direct entry (ICS445 and ICS449 only)
§ At least one of the soft keysID1,ID2orID3 is activated in the menu underTerminal–>
Device–>Keyboard–>Softkeys.
§ To display the identification in the auxiliary line, ID1, ID2orID3must be activated in the menu
underTerminal–>Device–>Display–>Auxiliaryline.
1 Press the desired soft key
ð The ID entered last is displayed.
2 To edit the ID, press the soft key
3 Enter the ID using the
4 Confirm entry with
ð The entered ID is assigned to the following weighings until the ID is changed.
.
, , .
.
soft keys.
Direct entry (ICS465 and ICS469 only)
§ At least one of the soft keysID1,ID2orID3 is activated in the menu underTerminal–>
Device–>Keyboard–>Softkeys.
§ To display the identification in the auxiliary line, ID1, ID2orID3must be activated in the menu
underTerminal–>Device–>Display–>Auxiliaryline.
1 Press the desired soft key
ð The ID entered last is displayed.
2 Enter the ID via the numeric keyboard and confirm with
ð The entered ID is assigned to the following weighings until the ID is changed.
, , .
.
Barcode use (for one identification only)
§ ID1,ID2 orID3is selected as destination for external input in the menu underCommunication
–COMx–>Externalinput–>Destination.
§ To display the identification in the auxiliary line,ID1, ID2orID3has to be activated in the menu
underTerminal–>Display–>Auxiliaryline.
- Scan the ID.
ð The ID is assigned to the following weighings until a new ID is scanned.
Using SICS command set (up to three identifications)
§ To display the identification in the auxiliary line,ID1, ID2orID3has to be activated in the menu
underTerminal–>Display–>Auxiliaryline.
- Send the ID command (I12, I13 or I14) from a PC.
ð The ID is assigned to the following weighings until a new ID is sent.
Operation26
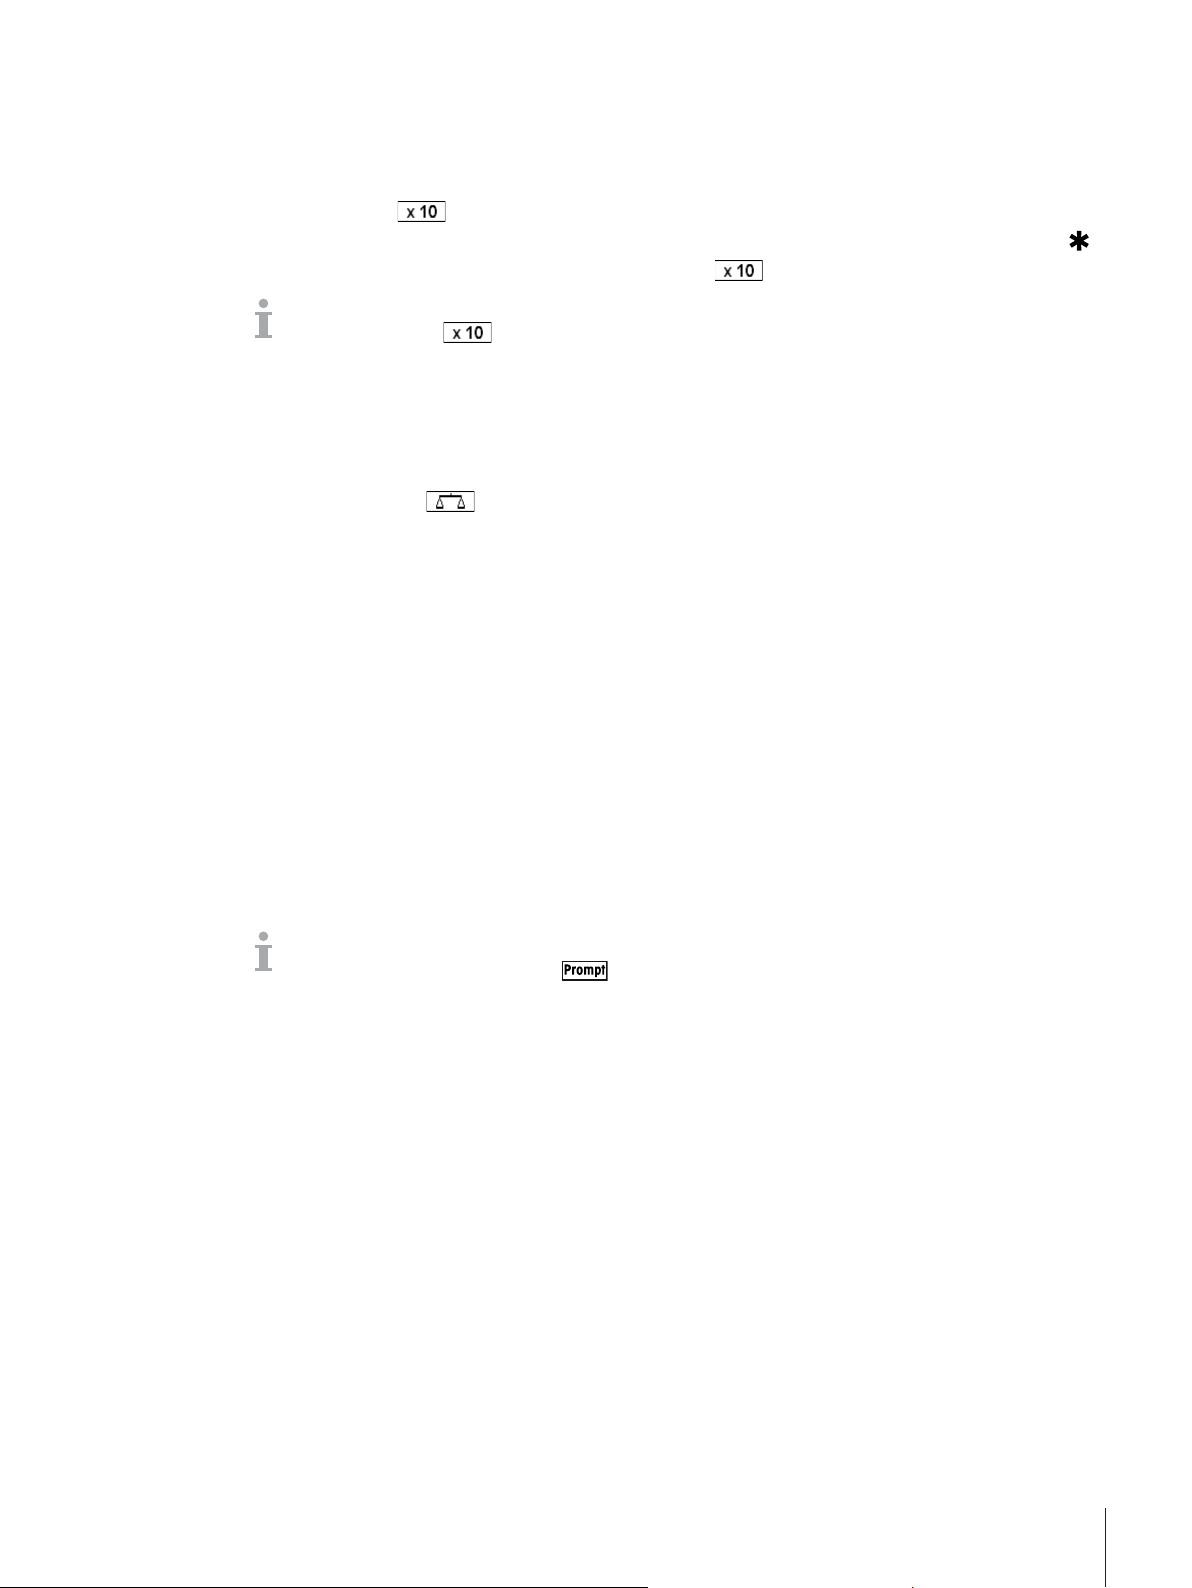
2.10 Working in a higher resolution
The weight value can be displayed in a higher resolution continuously or when called.
§ Soft keyx10Displayis activated in theTerminalmenu.
- Press soft key
ð The weight value is displayed in a resolution at least 10x higher and is marked with the symbol
ð The higher resolution is displayed until the soft key
With approved weighing platforms, the weight value appears in a higher resolution for 3 seconds
after the soft key
.
2.11 Switching scales
§ Two scales are connected to the weighing terminal.
§ The soft keySwitchscaleis activated in theTerminalmenu.
- Press the soft key
ð The current active scale is displayed in the symbol and info line on the top of the display.
2.12 Working with a prompt
2.12.1 Prompt overview
The device offers prompts for frequently used workflows. The weighing terminal will then lead you from step
to step.
In theApplicationmenu one of the following prompts can be activated:
• Tare/Sample– counting with first taring and then determining the average piece weight
• Sample/Tare– counting with first determining the average piece weight and then taring
• Handsfree– counting without pressing any key
• Multitare – taring several containers with the same tare weight
• Additivetare– adding different tare values
• Takeaway– checkweighing out of a container
.
is displayed again.
is pressed.
to switch the active scale.
• During prompting, no other soft keys are available.
• To start a prompt, the soft key
must be activated in theTerminalmenu.
Operation 27
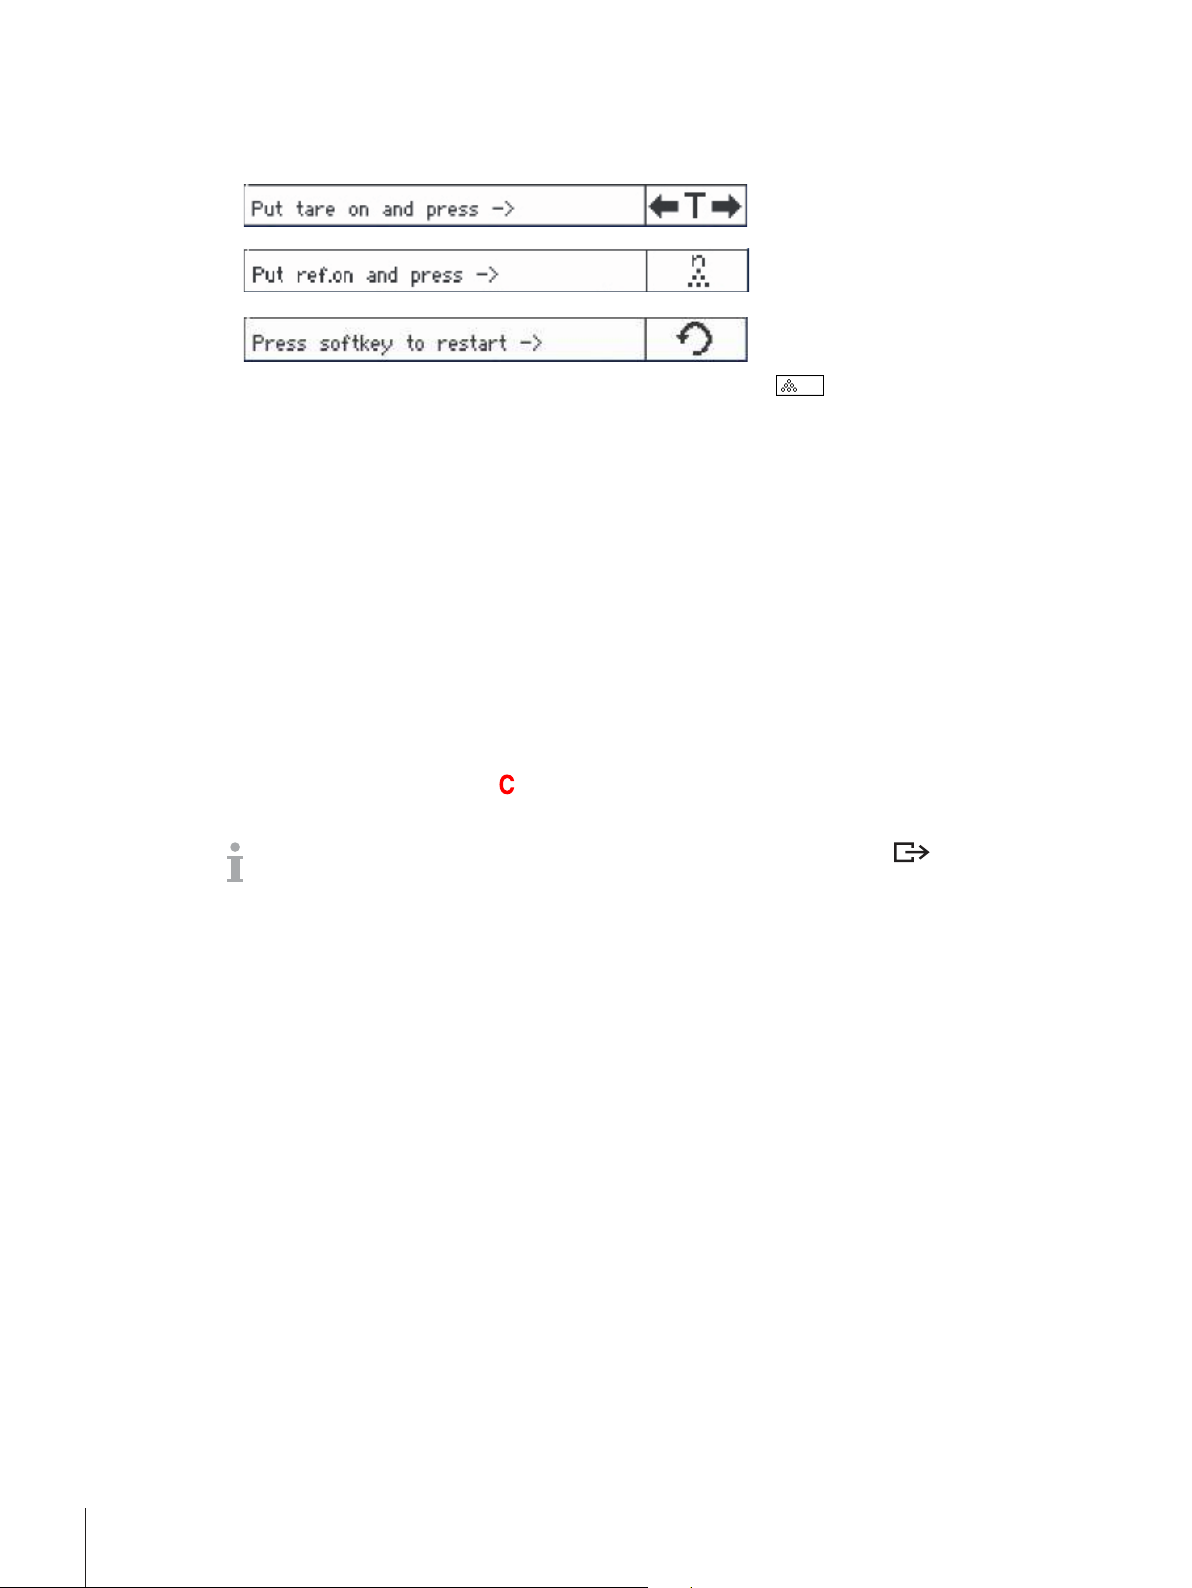
2.12.2 Tare/Sample
VAR
This prompt will guide you through piece counting with first taring and then determining the average piece
weight.
1 Check the current reference size which is indicated on the soft key
2 If necessary, change the reference size, see Counting section.
3 Press the prompt soft key.
ð In the soft key line the instructions for the first step are displayed.
4 Load the tare weight and confirm with the indicated soft key.
ð In the soft key line the instructions for the next step are displayed.
5 Load the reference parts and confirm with the indicated soft key.
ð The display unit changes to PCS and the soft key line changes.
6 Load the weighing samples and read the number of pieces.
7 To restart counting with a new reference, press the indicated soft key.
ð Cleared is displayed briefly before the first prompt is displayed again.
8 Repeat steps 4 to 7 for other references.
9 To leave piece counting, press
.
ð Cleared is displayed briefly.
If a printer is connected, each individual result can be printed out by pressing .
(Ref N var).
Operation28
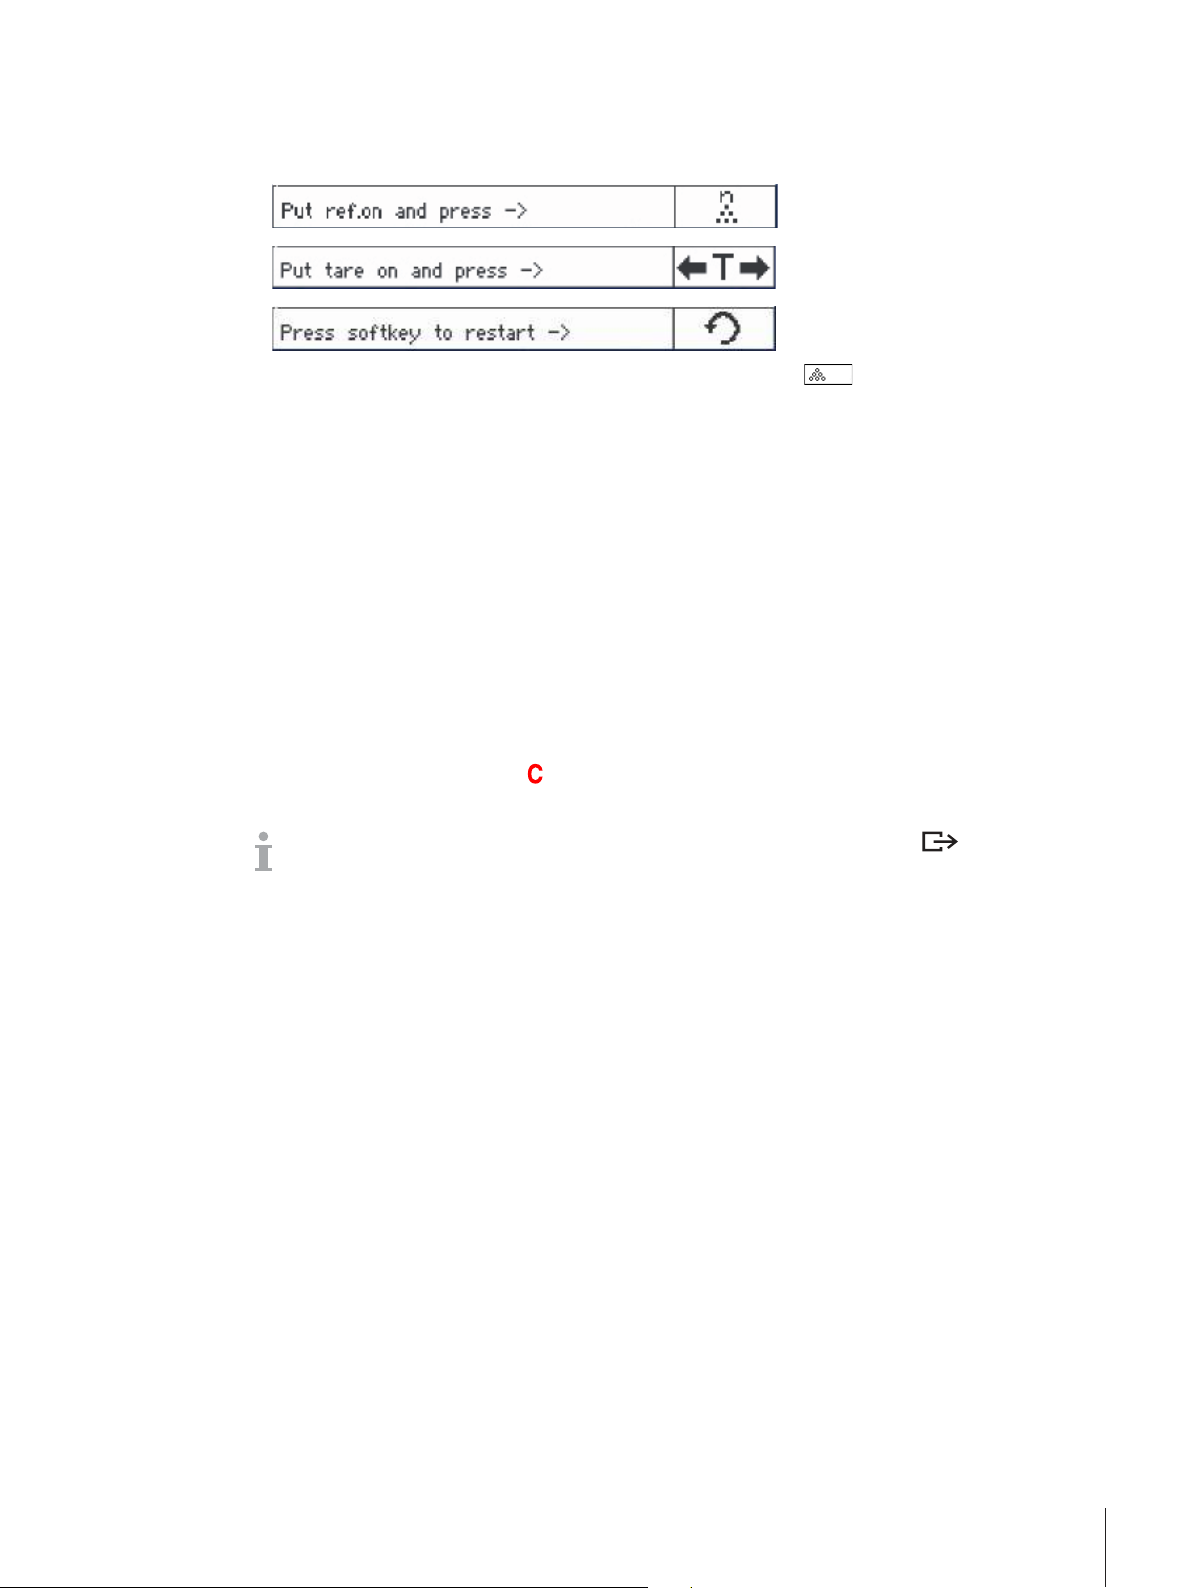
2.12.3 Sample/Tare
VAR
This prompt will guide you through piece counting with first determining the average piece weight and then
taring.
1 Check the current reference size which is indicated on the soft key
2 If necessary, change the reference size, see Counting section.
3 Press the prompt soft key.
ð In the soft key line the instructions for the first step are displayed.
4 Load the reference parts and confirm with the indicated soft key.
ð The display unit changes to PCS and the soft key line changes.
5 Load the tare weight and confirm with the indicated soft key.
ð In the soft key line the instructions for the next step are displayed.
6 Load the weighing samples and read the number of pieces.
7 To restart counting with a new reference, press the indicated soft key.
ð Cleared is displayed briefly before the first prompt is displayed again.
8 Repeat steps 4 to 7 for other references.
9 To leave piece counting, press
.
ð Cleared is displayed briefly.
If a printer is connected, each individual result can be printed out by pressing .
(Ref n var).
Operation 29
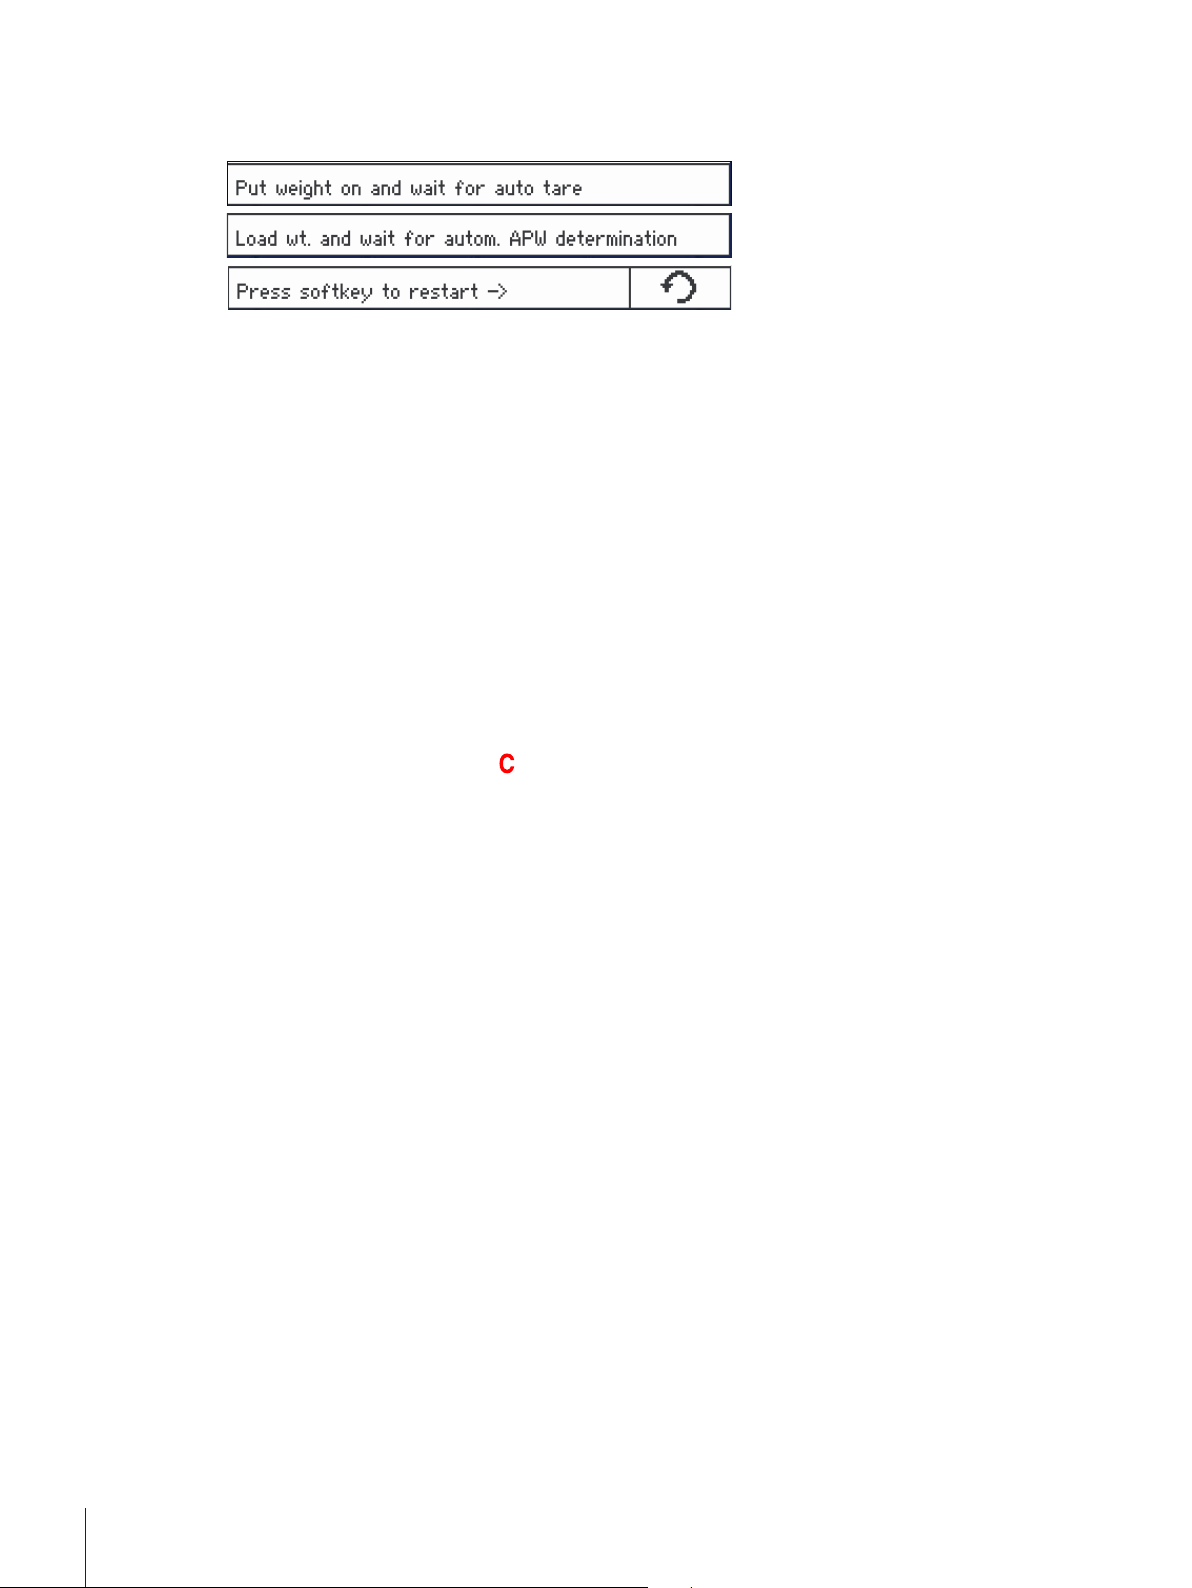
2.12.4 Hands free
This prompt will guide you through piece counting without pressing a key.
1 Press the prompt soft key.
ð In the soft key line the instructions for the first step are displayed.
2 Load the tare weight.
ð When the weight is stable, an automatic taring is carried out.
ð In the soft key line the instructions for the next step are displayed.
3 Load the indicated number of reference parts.
ð The average piece weight is determined automatically.
ð The weight unit changes to PCS and the soft key line changes.
4 Load the weighing samples and read the number of pieces.
Restarting piece counting
- To restart counting with a new reference, press the indicated soft key.
ð Cleared is displayed briefly before the first prompt is displayed again.
Leaving piece counting
- To leave piece counting, press
ð Cleared is displayed briefly.
.
Operation30
 Loading...