

Page 1
Operating instructions
HG63 and HG63-P Moisture Analyzers
Page 2
Overview of your HG63 Halogen Moisture Analyzer
25
24
23
22
33
21
20
6
5
28
7
30
2926 27
31
12
13
14
1516171819
8
9
10
1
2
54
53
4
11
5557
33
3
353432
36 37
11
38
39
56 56
404244
5152
50
4749
4648
45 43 41
Page 3

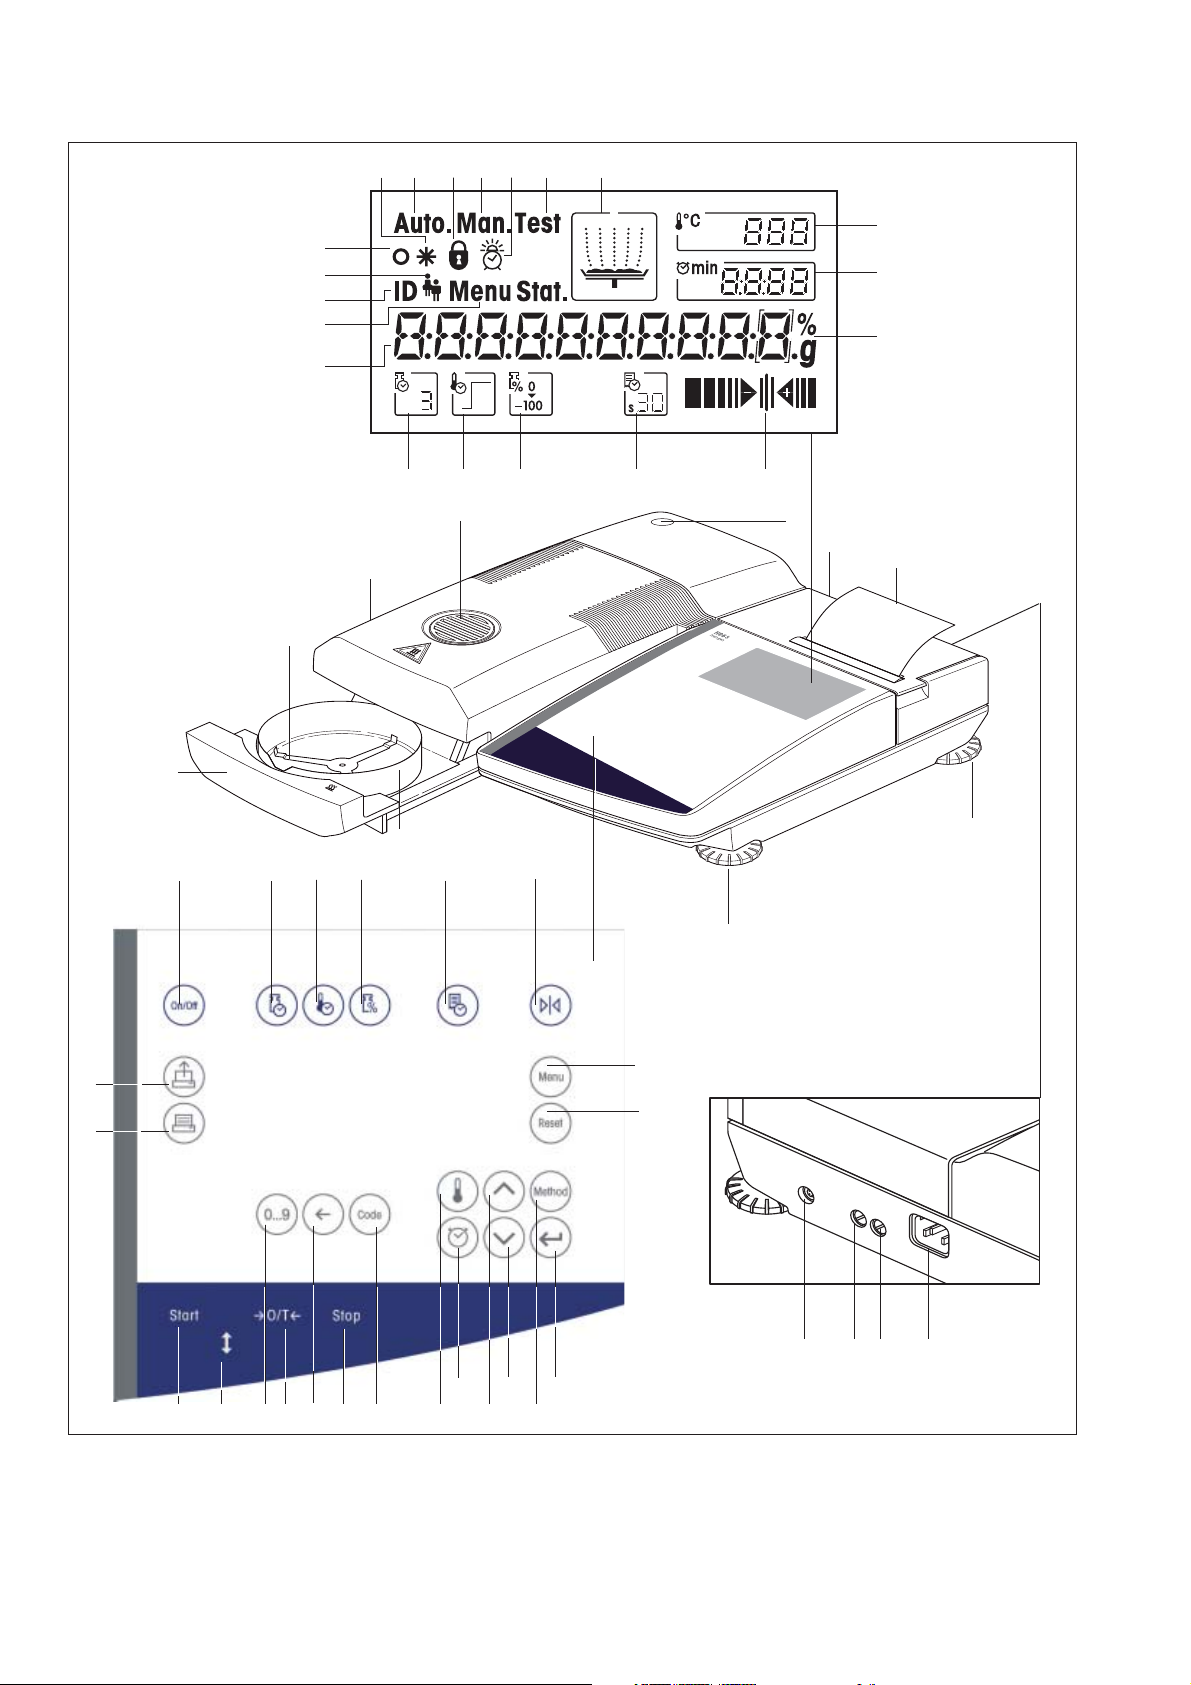
Display, controls and connections of your HG63
No. Designation Info see
Section
1 Display all
2 Keypad all
3 Draft shield 2.3
4 Automatic sample chamber 2.6
5 Sample pan holder 2.3
6 Heating module 7.6
7 Inspection window and vent 6.4
8 Level indicator (level) 2.3
9 Printer cover 7.2
10 Built-in printer (option) 7.5
11 Leveling screw 2.3
12 Display of drying temperature 4.3
13 Display of drying time /
Method number (Selection) 4.4
14 Display of unit (percent or grams) 4.5
15 Weighing-in aid 4.7
16 Function display “Print interval” 4.6
17 Function display “Display mode” 4.5
18 Function display “Drying program” 4.2
19 Function display “Switch-off criterion” 4.4
20 Dialog display (measured values, menu
dialog, text entry, etc.) all
21 Menu symbol 6
22 Method symbol 5
23 Symbol for record comment 4.9
24 Stability detector 8.2/8.3
25 Symbol for calculated result 2.6/4.10
26 Symbol for automatic operating mode of
the automatic sample chamber 6.11
No. Designation Info see
Section
29 Symbol for audio signal device (beeper) 6.12
30 Symbol for test measurement 4.11
31 Status display (User guide) 2.6
32 Key «On/Off» 2.6
33 Function key «Switch-off criterion» 4.4
34 Function key «Drying program» 4.2
35 Function key «Display mode» 4.5
36 Function key «Print interval» 4.6
37 Key «Target weight» (weighing-in aid) 4.7
38 Key «Menu» 6
39 Key «Reset» 2.6
40 Key «Accept entry» all
41 Key «Method» (method selection) 5.2
42 Key «Scroll down» 2.5
43 Key «Scroll up» 2.5
44 Key «Drying time» 4.4
45 Key «Drying temperature» 4.3
46 Key «Code» (record comment) 4.8
47 Key «Stop» (stop drying) 4.9/4.10
48 Key «Delete» 4.1
49 Key «Tare» (zero) 2.6
50 Key «0...9» (alphanumeric entry) 4.8
51 Key «Open/close auto sample chamber» 2.6
52 Key «Start» (start of drying) 2.6
53 Key «Print» 4.10/6.1
54 Key «Paper feed» 2.4/7.2
55 Power supply receptacle 2.3
56 Power line fuses 7.3
27 Symbol for Key protection 6.13
28 Symbol for manual operating mode of the
automatic sample chamber 6.11
57 LocalCAN universal interface ports 9.2
Page 4

Contents
4
Contents
1 Getting to know your Moisture Analyzer ............................................................................. 6
1.1 Introduction ....................................................................................................................... 6
1.2 What is the Halogen Moisture Analyzer used for?................................................................... 6
1.3 Safety has priority .............................................................................................................. 7
1.4 Important information for these instructions ........................................................................... 9
2 Your first measurement in next to no time ......................................................................... 10
2.1 Unpacking and checking the standard equipment .................................................................. 10
2.2 Selecting the location ......................................................................................................... 11
2.3 Setting up, leveling and connecting to power supply .............................................................. 11
2.4 Preparing the printer ........................................................................................................... 14
2.5 Setting the date and time ....................................................................................................15
2.6 Your first measurement .......................................................................................................17
3 How to obtain the best results ........................................................................................... 21
3.1 Measurement principle of the Halogen Moisture Analyzer ........................................................ 21
3.2 Notes on adjustment of the balance and the heating module................................................... 22
3.3 Optimum sample preparation .............................................................................................. 23
3.4 Further information on moisture determination ....................................................................... 23
4 Practical application of your Moisture Analyzer .................................................................. 24
4.1 Operating principles ........................................................................................................... 24
4.2 Selecting the drying program ............................................................................................... 25
4.3 Setting the drying temperature ............................................................................................. 25
4.4 Selecting the switch-off criterion ...........................................................................................27
4.5 Selecting the display mode ................................................................................................. 29
4.6 Defining the print interval .................................................................................................... 31
4.7 Working with the weighing-in aid ........................................................................................ 32
4.8 Comment lines .................................................................................................................. 34
4.9 Information on the measurement record ............................................................................... 36
4.10 Performing a measurement ................................................................................................. 37
4.11 Test measurement ............................................................................................................. 41
5Methods facilitate your work ............................................................................................. 42
5.1 What is a method? ............................................................................................................42
5.2 Recalling a method ............................................................................................................ 43
5.3 Changing methods ............................................................................................................ 43
5.4 Method menu .................................................................................................................... 45
5.5 Freely selectable switch-off criterion ..................................................................................... 45
5.6 Free factor (-MC) ............................................................................................................... 46
5.7 Free factor (g) ................................................................................................................... 47
5.8 Printing out methods parameters ......................................................................................... 47
Page 5

Contents
5
6 The menu (basic settings of the instrument) ...................................................................... 49
6.1 Menu operation ................................................................................................................. 49
6.2 Adjusting the balance ......................................................................................................... 50
6.3 Testing the balance ............................................................................................................ 51
6.4 Adjusting the heating module .............................................................................................. 52
6.5 Testing the heating module ................................................................................................. 54
6.6 Resetting to the factory settings............................................................................................56
6.7 Clearing the method memory .............................................................................................. 56
6.8 Setting the time .................................................................................................................. 57
6.9 Entering the date ................................................................................................................ 57
6.10 Setting the vibration adapter ................................................................................................ 57
6.11 Selecting operating mode of the automatic sample chamber ................................................... 58
6.12 Audio signal ...................................................................................................................... 58
6.13 Protecting your settings against change ................................................................................ 59
6.14 Superimposing or removing the function symbols .................................................................. 59
6.15 Switching the printer on or off .............................................................................................. 60
6.16 Switching the method option on or off .................................................................................. 60
6.17 Selecting the dialog language ............................................................................................. 61
6.18 Menu overview HG63 ......................................................................................................... 62
7 Servicing and replacing individual parts ............................................................................ 63
7.1 Cleaning ........................................................................................................................... 63
7.2 Changing the printer paper and ribbon ................................................................................. 64
7.3 Replacing the power line fuses ............................................................................................ 65
7.4 Printer test ........................................................................................................................ 66
7.5 Installing the built-in printer ................................................................................................. 66
7.6 Dismantling and replacing the heating module ...................................................................... 66
8 If problems arise on occasion ........................................................................................... 68
8.1 Notes on the error messages ............................................................................................... 68
8.2 Meaning of the error messages............................................................................................ 69
8.3 What if...? ......................................................................................................................... 71
9 Further useful information ................................................................................................. 74
9.1 Notes on interpretation of the measurement results and the ideal sample weight ....................... 74
9.2 LocalCAN universal interface ............................................................................................... 74
9.3 Application brochure .......................................................................................................... 75
9.4 Switch-off criterion “Weight loss per unit of time” ................................................................... 75
9.5 Comments on certified version............................................................................................. 76
9.6 Technical data ................................................................................................................... 77
9.7 MT-SICS Interface commands and functions.......................................................................... 79
9.8 Optional equipment, expendable material and spare parts ...................................................... 81
10 Index ............................................................................................................................... 82
Page 6

Getting to know your Moisture Analyzer – Section 1
6
1 Getting to know your Moisture Analyzer
Please read through this Section carefully, it contains important information for safe and economical operation of
your Moisture Analyzer.
1.1 Introduction
Thank you for deciding to purchase a Halogen Moisture Analyzer from METTLER TOLEDO – you have made a wise
choice. Your Moisture Analyzer is fast and reliable. It offers a high level of operating convenience and useful
functions to facilitate determination of the moisture content of your samples.
Behind your instrument stands METTLER TOLEDO, a leading manufacturer of not only balances and scales for the
lab and production, but also analytical measuring instruments. A customer service network covering the entire globe
with well trained personnel is at your service at all times, whether you are choosing accessories or require guidance
for a specific application to ensure optimum utilization of your instrument.
To ensure you make full use of the possibilities offered by your Moisture Analyzer, we advise you to read through
these operating instructions very carefully.
1.2 What is the Halogen Moisture Analyzer used for?
Your Halogen Moisture Analyzer is used for determining the moisture content of almost any substance. The
instrument works on the thermogravimetric principle: At the start of the measurement the Moisture Analyzer
determines the weight of the sample, the sample is then quickly heated by the integral halogen heating module
and the moisture vaporizes. During the drying process the instrument continually measures the weight of the
sample and displays the reduction in moisture. Once drying has been completed, the moisture or solids content
of your sample is displayed as the final result.
Of decisive importance in practice is the rate of heating. In comparison with conventional infrared heating or the
drying oven method, for example, the halogen heating module of your instrument needs a shorter time to reach its
maximum heating power. It also allows use of high temperatures, an additional factor in shortening the drying time.
Uniform heating of the sample material ensures good repeatability of the drying results and makes it possible to use
a smaller amount of sample.
All parameters of a measurement (drying temperature, drying time, etc.) can be preselected. But your Moisture
Analyzer offers many other possibilities. To avoid exceeding the scope of this introduction, only a few of these are
listed here:
– 10 different methods can be individually optimized to suit your samples, and easily activated at a keystroke.
– You can choose between various types of result display at any time.
– Your settings and measurement results can be recorded, stored and protected.
– One comment line can be entered for each measurement.
– Thanks to the built-in rechargeable battery your valuable data remain stored even on power failure.
Page 7

Section 1 – Getting to know your Moisture Analyzer
This wealth of functions notwithstanding, your Moisture Analyzer is very simple to operate. The status display (User
guide) guides you step by step through the measurement cycle. You always know which particular stage in a
measurement is currently being executed by the instrument and the next operating step. To exclude faulty handling
in routine work, the keypad can be locked to prevent access to all but the elementary functions. The motorized,
automatic sample chamber offers the operating convenience you are familiar with from compact disk (CD) players.
Moreover, the motorized sample chamber opens up new possibilities for automatic operation of the instrument
(loading by means of robots) when used with the LocalCAN universal interface installed as standard.
Besides operating convenience, however, the quality of the measurement results is still what counts above all. The
built-in weighing cell meets the high standard which has made METTLER TOLEDO the worldwide market leader in
the field of high-resolution precision balances.
A brief word regarding standards, directives and procedures for quality assurance. The Moisture Analyzer conforms
with all common standards and directives. It supports stipulations, work techniques and result records as demanded
by all international quality assurance systems, e.g. GLP (Good Laboratory Practice), GMP (Good Manufacturing
Practice). The instrument has a CE declaration of conformity and METTLER TOLEDO as the manufacturer has been
awarded ISO 9001 and ISO 14001 certification. This provides you with the assurance that your capital investment
is protected in the long term by a high product quality and a comprehensive service package (repairs, maintenance,
servicing, calibration service).
You will find further information in the following Sections of these operating instructions. Please read through this
information carefully to ensure you can use your instrument in an optimum and safe manner.
7
1.3 Safety has priority
Your Moisture Analyzer employs state of the art technology and meets the latest demands
regarding instrument safety. This notwithstanding, improper operation can endanger personnel
and cause damage to tangibles. For safe and dependable operation, please comply with the
following instructions:
– The Moisture Analyzer is used for determining the moisture in samples. Please use the
instrument exclusively for this purpose. Any other type of use can endanger personnel and
damage the instrument or other tangibles.
– The Moisture Analyzer must not be operated in a hazardous environment and only under the
ambient conditions specified in these instructions.
– The Moisture Analyzer may be operated only by trained personnel who are familiar with the
properties of the samples used and with the handling of the instrument.
– Your Moisture Analyzer is supplied with a 3-pin power cable with an equipment grounding
conductor. Only extension cables which meet the relevant standards and also have an
equipment grounding conductor may be used. Intentional disconnection of the equipment
grounding conductor is prohibited.
Page 8
Getting to know your Moisture Analyzer – Section 1
8
The Halogen Moisture Analyzer works with heat!
– Ensure sufficient free space around the instrument to avoid heat accumulation and
overheating (approx. 1 m free space above the instrument).
– The vent over the sample must never be covered, plugged, taped over or tampered with in
any other way.
– Do not place any combustible materials on, under or next to the instrument when it is
connected to the power supply, since the area around the heating module becomes hot.
– Exercise caution when removing the sample. The sample itself, the automatic sample
chamber and any sample vessels used may still be very hot.
– During operation, you should never open the heating module as the ring-shaped heating
module or its protective glass can reach 400 °C! If you have to open the heating module on
occasion, disconnect the instrument from the power supply and wait until the heating module
has cooled down completely.
–No modifications must be made within the heating module. It is particularly dangerous to bend
any components or remove them, or to make any other changes.
Certain samples require special care!
With certain types of samples, there is a possibility of danger to personnel or damage to tangibles
through:
Fire or explosion:
– Flammable or explosive substances
– Substances containing solvents
– Substances which evolve flammable or explosive gases or vapors when heated.
With such samples, work at a drying temperature that is low enough to prevent the formation
of flames or an explosion and wear protective goggles. Should there be any uncertainty
regarding the flammability of a sample, always work with a small amounts of sample (max.
1 gram). In such cases, never leave the instrument unattended! In cases of doubt, perform
a careful risk analysis.
Poisoning, burning:
– Substances which contain toxic or caustic components. Such substances may be dried only
in a fume cupboard.
Corrosion:
– Substances which evolve corrosive vapors when heated (e.g. acids). In the case of such
substances, we advise you to work with small amounts of sample as the vapor can condense
on cooler housing parts and cause corrosion (if necessary, the heating module can be
changed very easily by the user, see Section 7.6).
Please note that the user always takes responsibility and assumes liability for damage
caused by use of the types of samples mentioned above!
– Never make any modifications or constructional alterations to the instrument and use only
original spare parts and optional equipment from METTLER TOLEDO.
– Your Moisture Analyzer is a rugged precision instrument – but you should still treat it carefully;
it will then thank you with many years of trouble-free operation.
Page 9
Section 1 – Getting to know your Moisture Analyzer
– Please comply with all notes and instructions in these operating instructions. Keep the
instructions in a safe place where they are immediately to hand if any points are unclear.
If you lose these instructions, please contact your METTLER TOLEDO dealer for an
immediate replacement.
Moisture determination applications must be optimized and validated by the user
according to local regulations. Application-specific data provided by METTLER TOLEDO is
intended for guidance only.
1.4 Important information for these instructions
These instructions guide you step by step through the operation of your Moisture Analyzer. The first two Sections
help you put the instrument into operation quickly, safely and properly and perform your first measurement within
a short space of time. In Sections 3 through 6 you become intimately acquainted with the wide range of functions
of your Moisture Analyzer. During this learning phase, you will find the table of contents and the detailed index in
Section 10 a valuable orientation aid. Sections 7 through 9 contain additional information on the maintenance of
your instrument, troubleshooting and the available options. As soon as you are familiar with your Moisture Analyzer,
you will find the illustrations at the beginning of these instructions and the associated references (in the key) useful
for quick access.
The following identifications and symbols are used in these instructions:
– Key designations are shown enclosed by twin angle brackets «». Keys with inscribed text are
shown with the actual inscription (e.g. «On/Off» or «Start»). For all keys with symbols,
designations are used in the text which describe the function of the particular key («Print»,
«Accept entry» or «Scroll down»).
– This symbol indicates safety and hazard instructions. If these are not complied with, injury
to the user, damage to your instrument or other tangibles and malfunctions can result.
9
– This symbol indicates additional information and directions which facilitate your handling of
the instrument and contribute to proper and economical use.
These instructions are also available in foreign languages. Should you require a set of
instructions in a different language, please contact your METTLER TOLEDO dealer. You will find
the address of your nearest dealer in the attached “Declaration of Conformity 11780294”.
Page 10

Your first measurement in next to no time – Section 2
10
2Your first measurement in next to no time
In the Section you will learn how to put your new Moisture Analyzer into operation and obtain measurement results
within a very short space of time.
2.1 Unpacking and checking the standard equipment
Open the package and remove the instrument and the accessories. Check the completeness of the delivery. The
following accessories are part of the standard equipment of your new Moisture Analyzer:
– 80 aluminum sample pans
–1 sample holder
–1 sample handler
–1 specimen sample (circular, absorbent glass fiber filter)
–1 draft shield element
–1 power cable
–1 set of operating instructions, 1 set of short-form operating instructions
–1 Application brochure “Methods of moisture content determination”
–1 CE declaration of conformity (in separate brochure 11780294)
– Setup instructions
Remove the wrapping from the instrument.
Check the instrument for transport damage. Immediately inform your METTLER TOLEDO dealer if you have any
complaints or parts are missing.
Store all parts of the packaging. This packaging guarantees the best possible protection for the
transport of your instrument.
To prevent transport damage, the instrument is provided with a transport arrestment, which you
have to remove before putting the instrument into operation for the first time. The procedure for
removing the transport arrestment is explained in the description “Setup instructions 11780556”
enclosed with the package.
Page 11
Section 2 – Your first measurement in next to no time
11
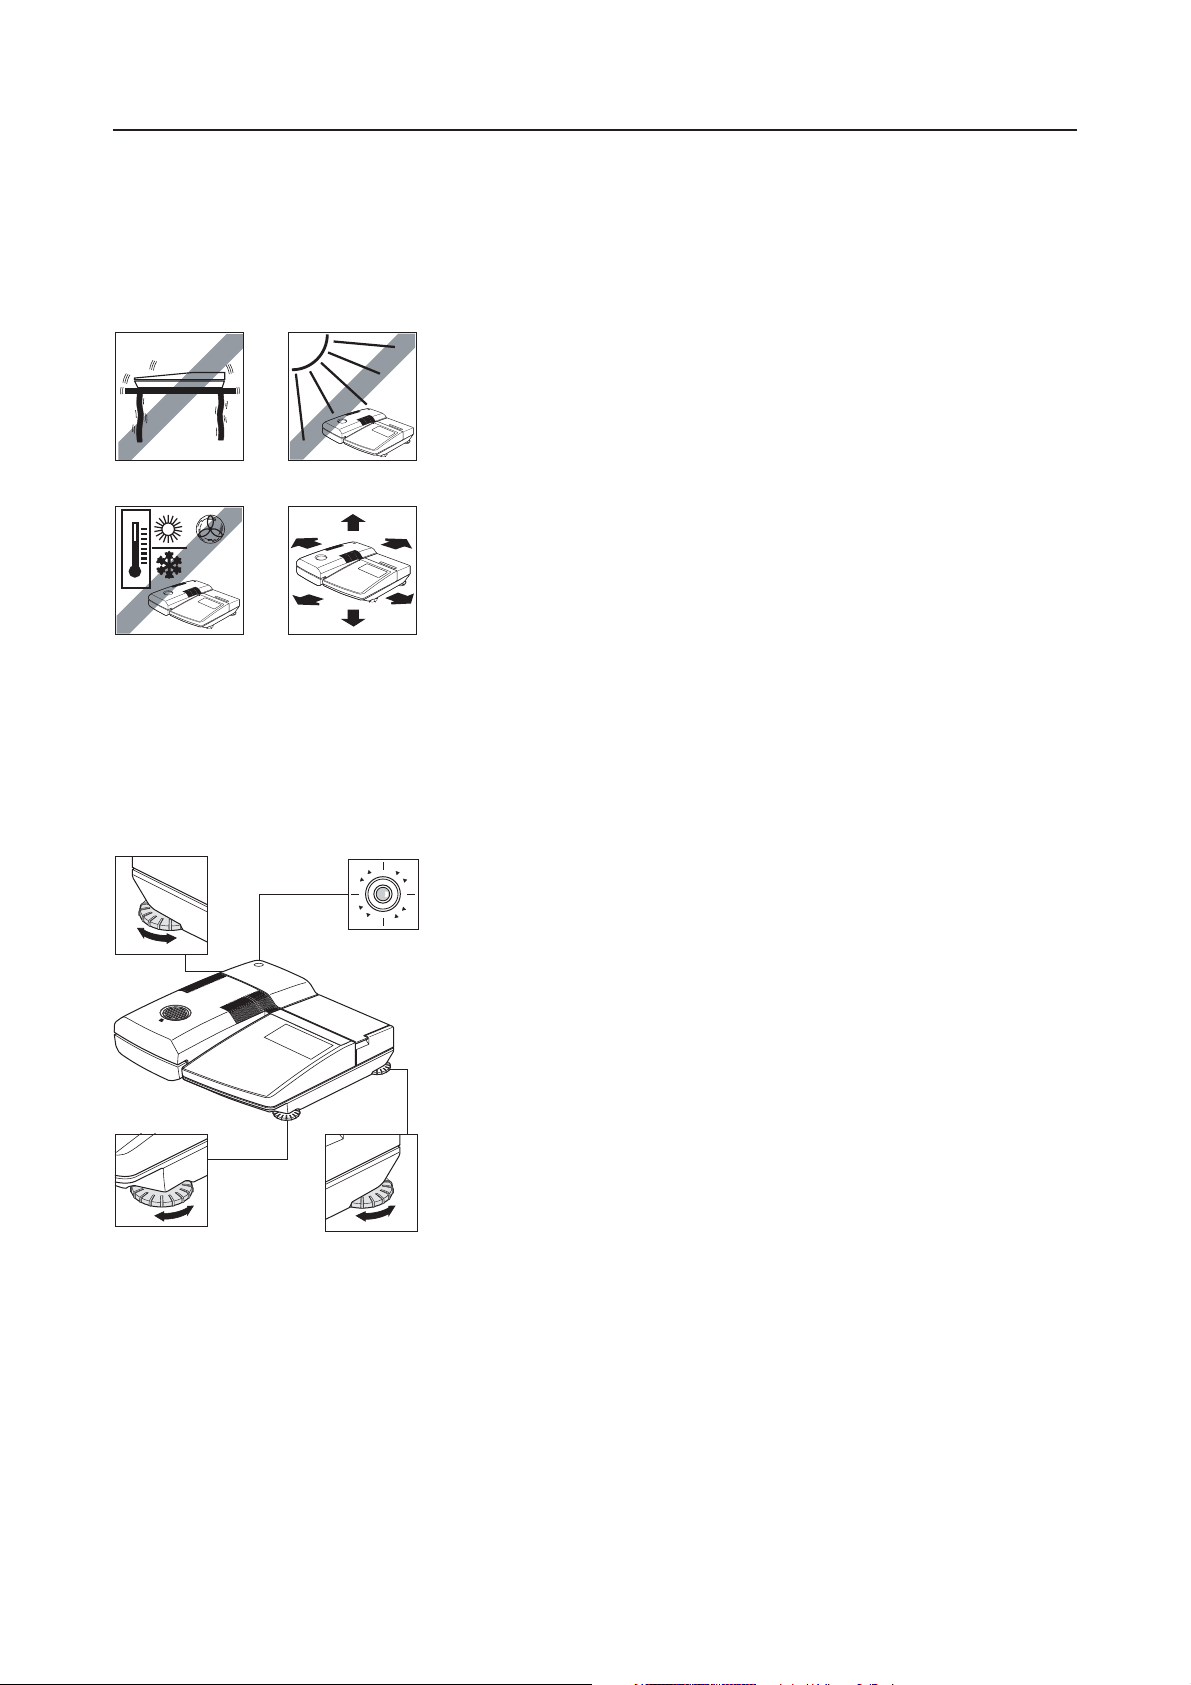
2.2 Selecting the location
Your Moisture Analyzer is a precision instrument. An optimum location guarantees accuracy and dependability:
– Firm, horizontal location as free from vibrations as possible
– Avoid direct sunlight
– No excessive temperature fluctuations
– No powerful drafts
– Surroundings as free from dust as possible
– Adequate free space at the front for opening the sample chamber and
sufficient clearance around the instrument to allow warm air to dissipate.
– Sufficient distance from heat-sensitive materials in the vicinity of the
instrument.
2.3 Setting up, leveling and connecting to power supply
Exact horizontal positioning and stable installation are prerequisites for repeatable results. To compensate small
irregularities or inclinations (±2%) at the location, the instrument can be leveled.
For exact horizontal positioning, the Moisture Analyzer has a level indicator
R
L
R
(level) and 3 leveling screws. As soon as the air bubble is precisely in the
L
middle of the cross hairs, the instrument is exactly horizontal. To level it,
proceed as follows:
Position your Moisture Analyzer at the selected location.
Screw in the right front leveling screw completely (it is not needed for
leveling). The instrument is now standing on the front left, nonadjustable
foot, as well as on the two rear leveling screws.
Turn the two rear leveling screws until the air bubble is located in the middle
of the level indicator. The arrows and the leveling screw designations (R =
right rear leveling screw, L = left rear leveling screw) on the cross hairs will
facilitate the setting:
Page 12
Your first measurement in next to no time – Section 2
12
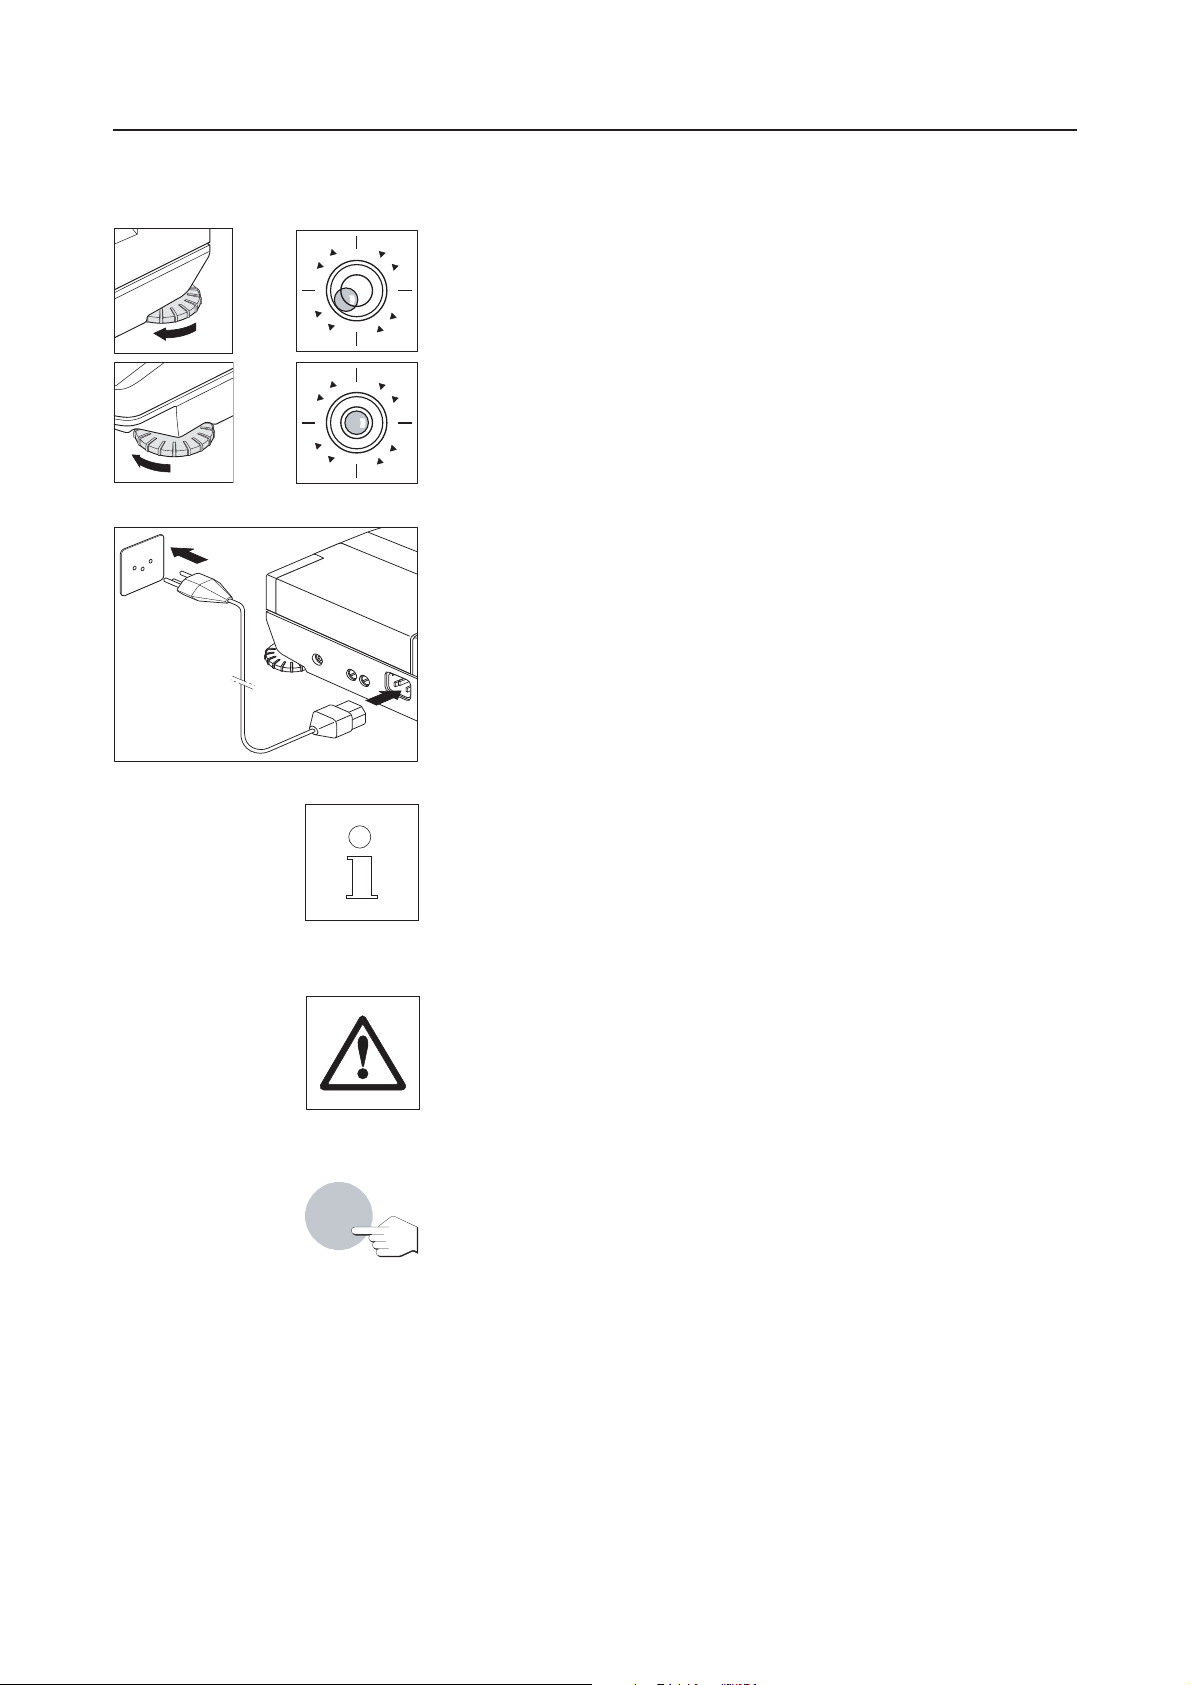
R
L
indicates the right leveling screw must be turned in a clockwise direction.
Unscrew the front right leveling screw until it contacts the support and the
If the air bubble is located at the bottom left, for instance, the inscription
R
L
instrument is resting firmly on all 4 feet. Ensure that the air bubble remains
in the center of the level indicator.
R
L
R
Note: The instrument should be releveled each time its location is changed.
L
Connect the instrument to the power supply.
Warning:
If the power cable supplied is not long enough, use only a 3-pin extension
cable with equipment grounding conductor!
For technical reasons, the halogen heating module is designed specifically
for a particular line voltage (110 V AC or 230 V AC). A heating module is
installed in the factory that is matched to the particular line voltage of the
country of destination. If you are not sure whether the heating module built
into your instrument is suitable for your local line voltage, check the voltage
data in the interior of the heating module before you connect the Moisture
Analyzer to the power supply!
Connection to a line voltage that is too high can lead to blowing of the fuses,
whereas a supply voltage that is too low will prolong the drying process.
On/Off
Ensure that the transport arrestment is removed. Instructions on how to
remove the transport arrestment can be found on the leaflet enclosed with the
package.
Switch the instrument on with the «On/Off» key.
Note: When putting into operation for the first time, leave the instrument
connected to the power supply for at least 5 hours to allow the built-in battery
to charge up! If the instrument is later disconnected from the power supply
for several months, the battery will become discharged. This leads to data
loss. To recharge the battery, leave the instrument connected to the power
supply for at least 5 hours.
Page 13
2
Section 2 – Your first measurement in next to no time
13
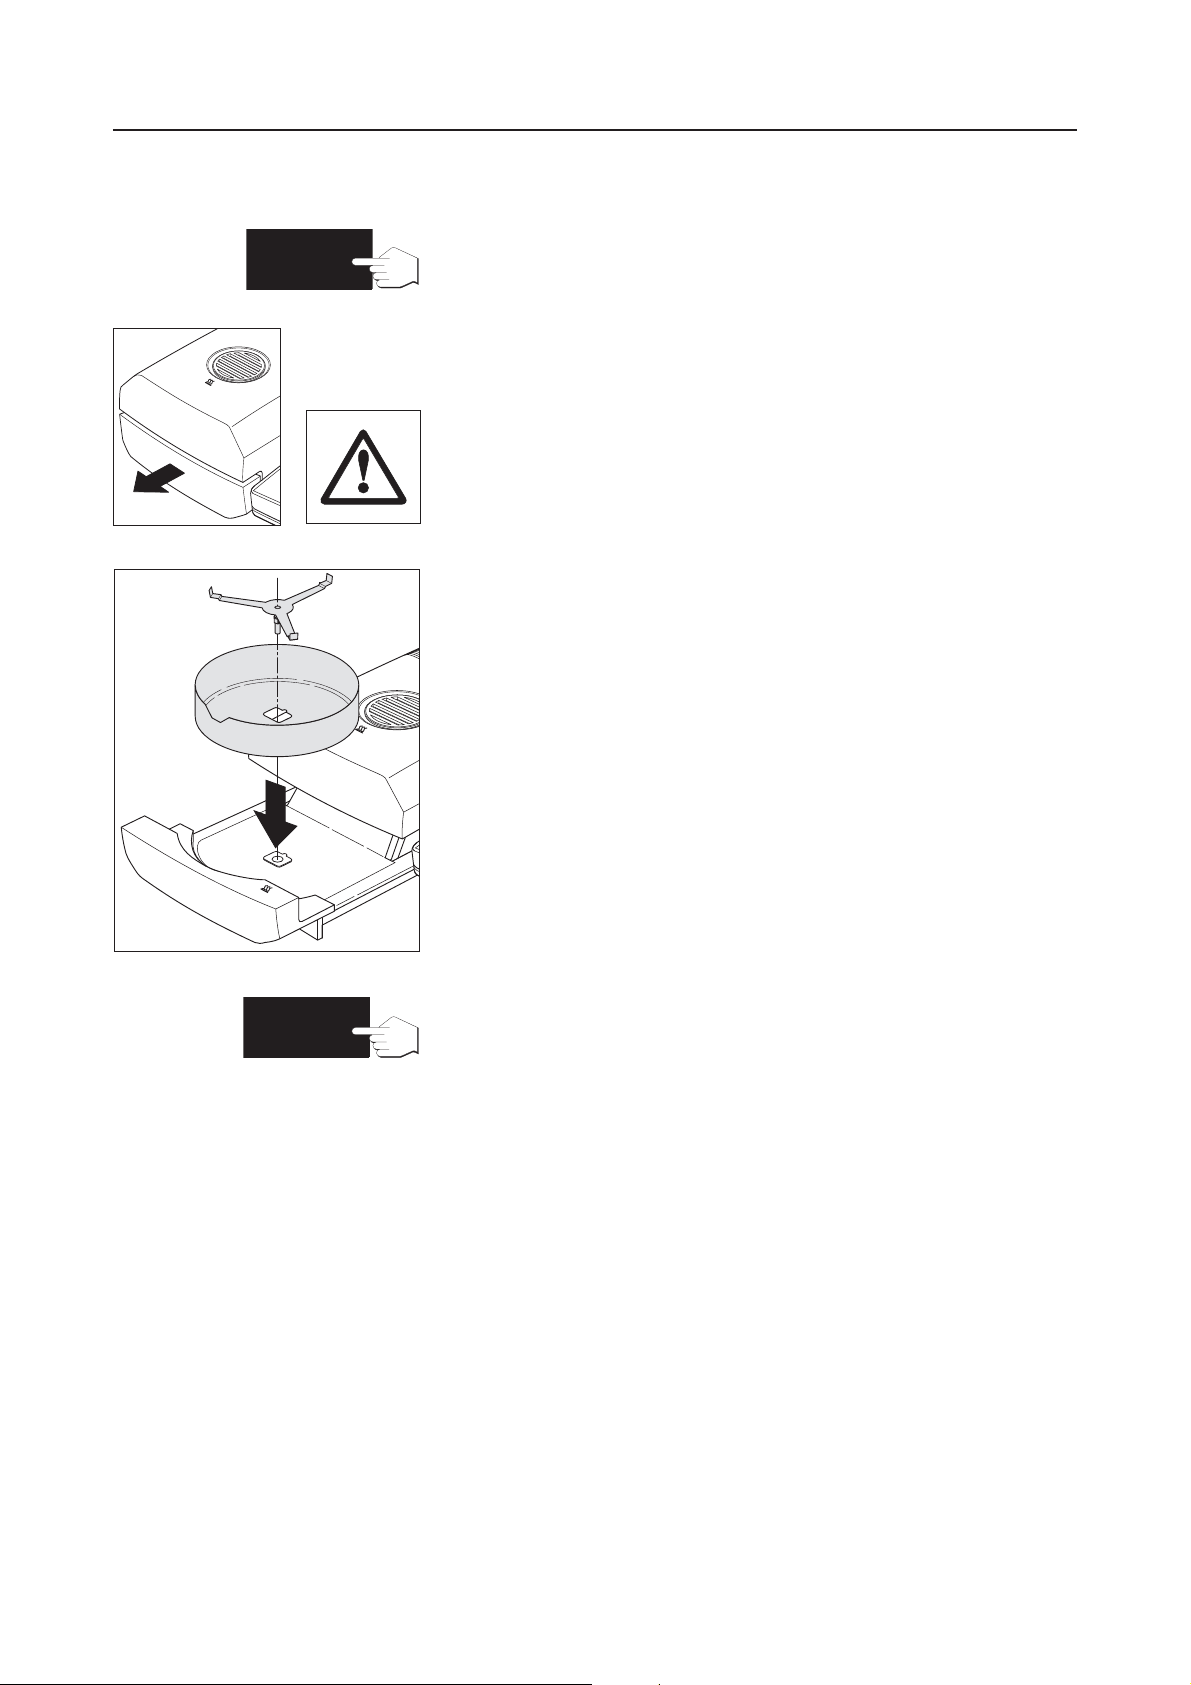
Press the «Open/close auto sample chamber» key and ...
… the motorized, automatic sample chamber opens.
Always ensure sufficient free space in front of the instrument since the
emerging automatic sample chamber could knock over objects in its path
or push them off the bench.
Install the draft shield element (only one position possible) and then the
sample pan holder. Turn the sample pan holder until it engages. In the locked
position, the rear arm of the sample pan holder points exactly in the direction
of motion of the automatic sample chamber.
2
Press the «Open/close auto sample chamber» key and ...
… the motorized, automatic sample chamber closes.
Page 14
Your first measurement in next to no time – Section 2
14
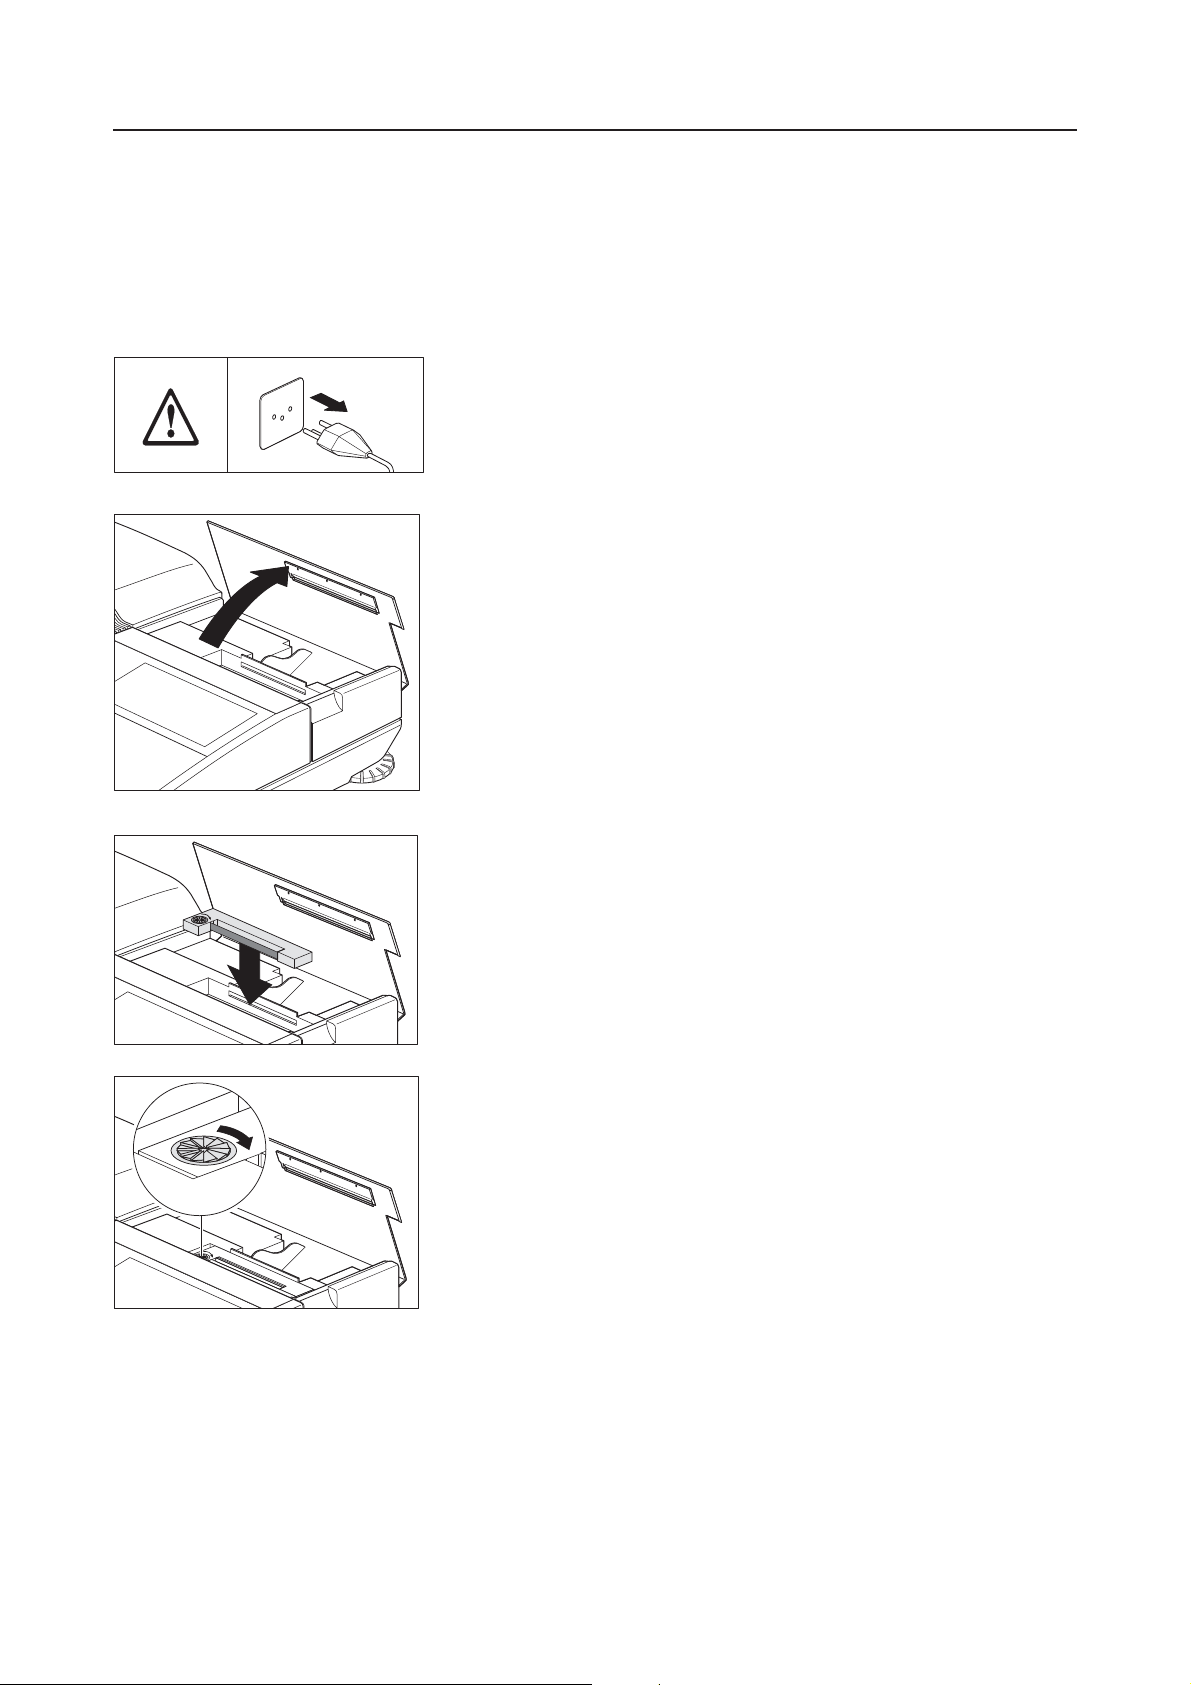
2.4 Preparing the printer
If your Moisture Analyzer is not equipped with a built-in printer, there is no need to read this section. You can always
order the built-in printer at a later date and install it yourself.
You can prepare the built-in printer for use as follows:
Disconnect the instrument from the power supply.
Swing back the cover of the printer.
HR73
Halogen Moisture Analyzer
Insert the ribbon cassette in the printer and press it down until you hear it click
into place.
EJECT
H
S
U
P
H
R
7
3
H
a
lo
g
e
n
M
o
is
tu
re
A
n
a
ly
z
e
r
Tension the ribbon by turning the small wheel on the left of the cassette in
the direction shown by the arrow.
H
R
7
3
H
a
lo
g
e
n
M
o
EJECT
is
tu
re
A
H
S
U
n
P
a
ly
z
e
r
Page 15
H
R
On/Off
Section 2 – Your first measurement in next to no time
15
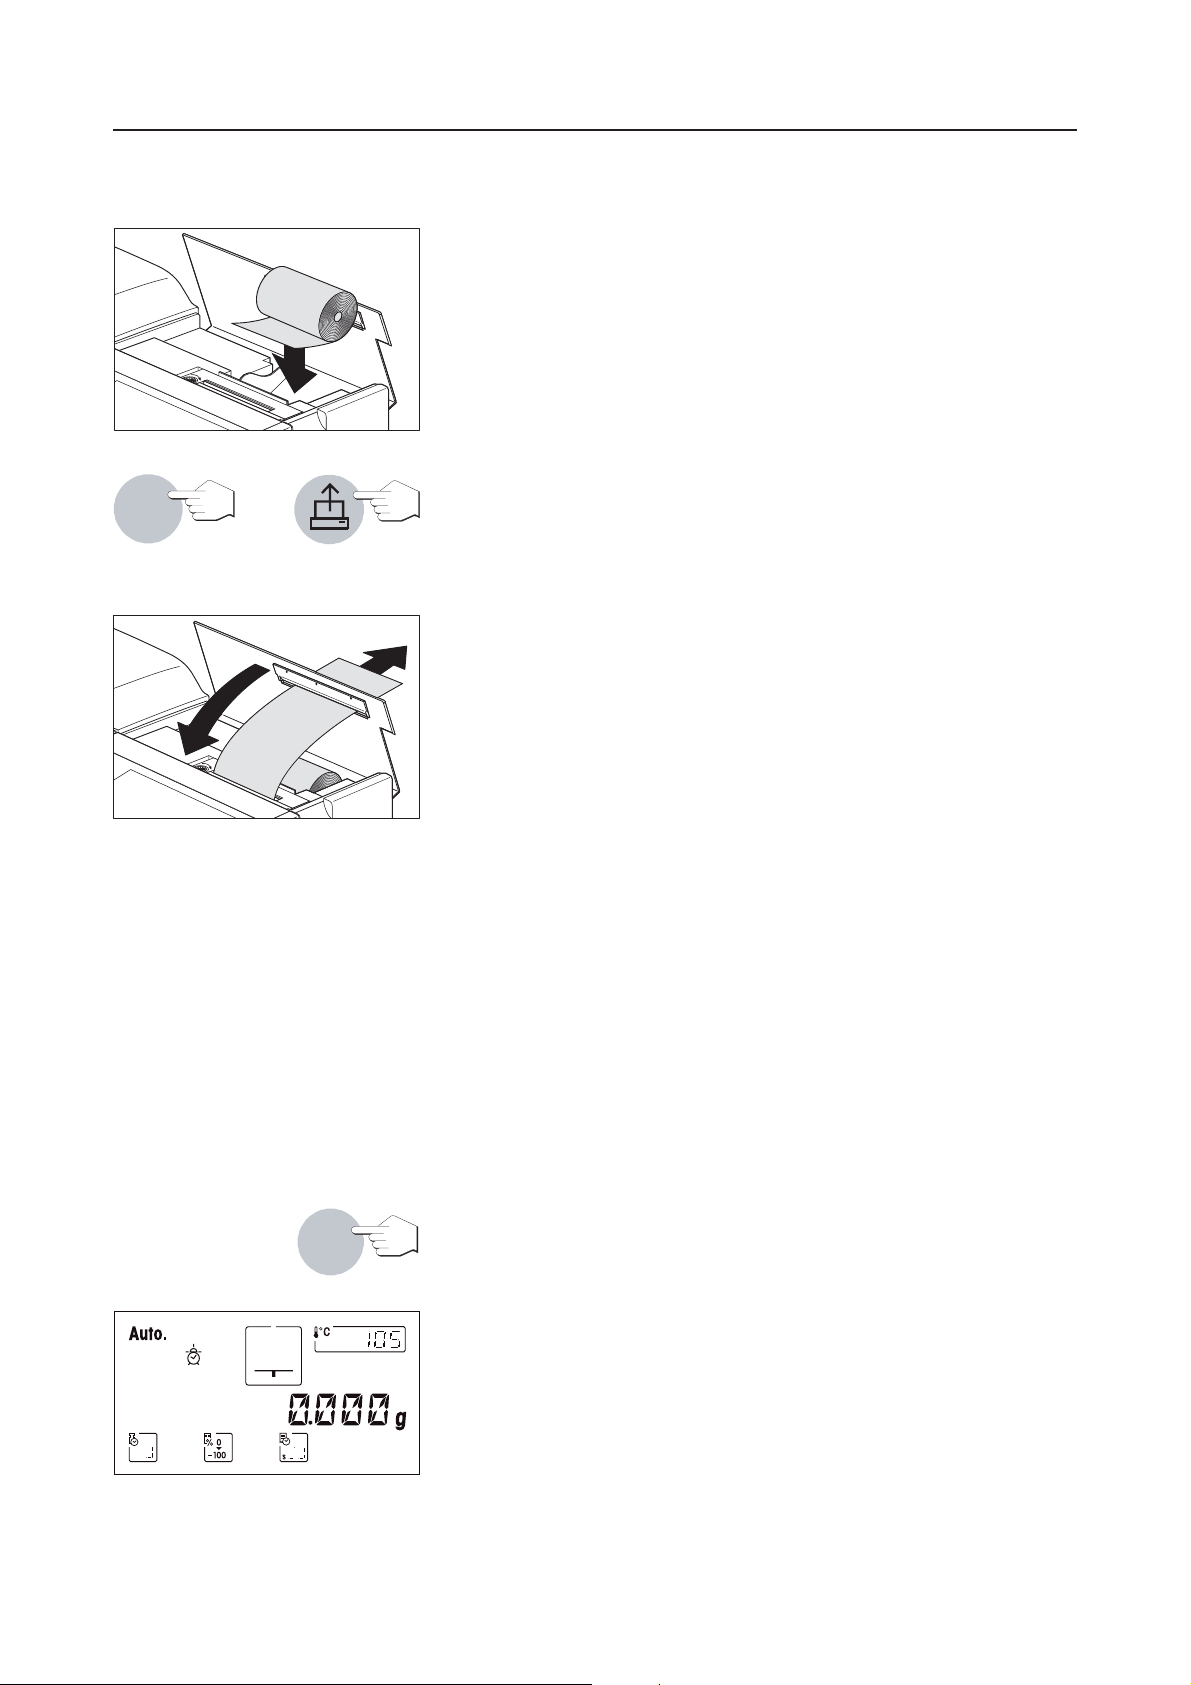
Place the roll of paper in the paper compartment and feed the paper
horizontally through the slot at the back of the printing unit.
7
3
H
a
lo
g
e
n
M
o
EJECT
is
tu
re
A
n
H
S
U
P
a
ly
z
e
r
Connect the instrument to the power supply and switch it on with the «On/
Off» key. Press the «Paper feed» key until the leading edge of the paper exits
the printing unit at the top.
Lead the paper through the slot in the cover of the built-in printer and close
the cover.
H
R
7
3
H
a
lo
g
e
n M
EJECT
o
isture
A
H
S
U
n
P
a
lyze
r
2.5 Setting the date and time
Your Moisture Analyzer prints out the date and time on every record. When you put your new instrument into operation
for the first time, you should enter the current date and the time. These settings are retained even if you disconnect
your instrument from the power supply.
In this Section you will enter the menu for the first time, although this is described in detail in a later section. Do not
worry if you have to press keys whose function you are not familiar with, simply follow the instructions step by step.
We describe the menu in detail in Section 6.
Note: Various languages are available for the dialog with your instrument and can be selected in the menu. You
will find further details on language selection in Section 6.17.
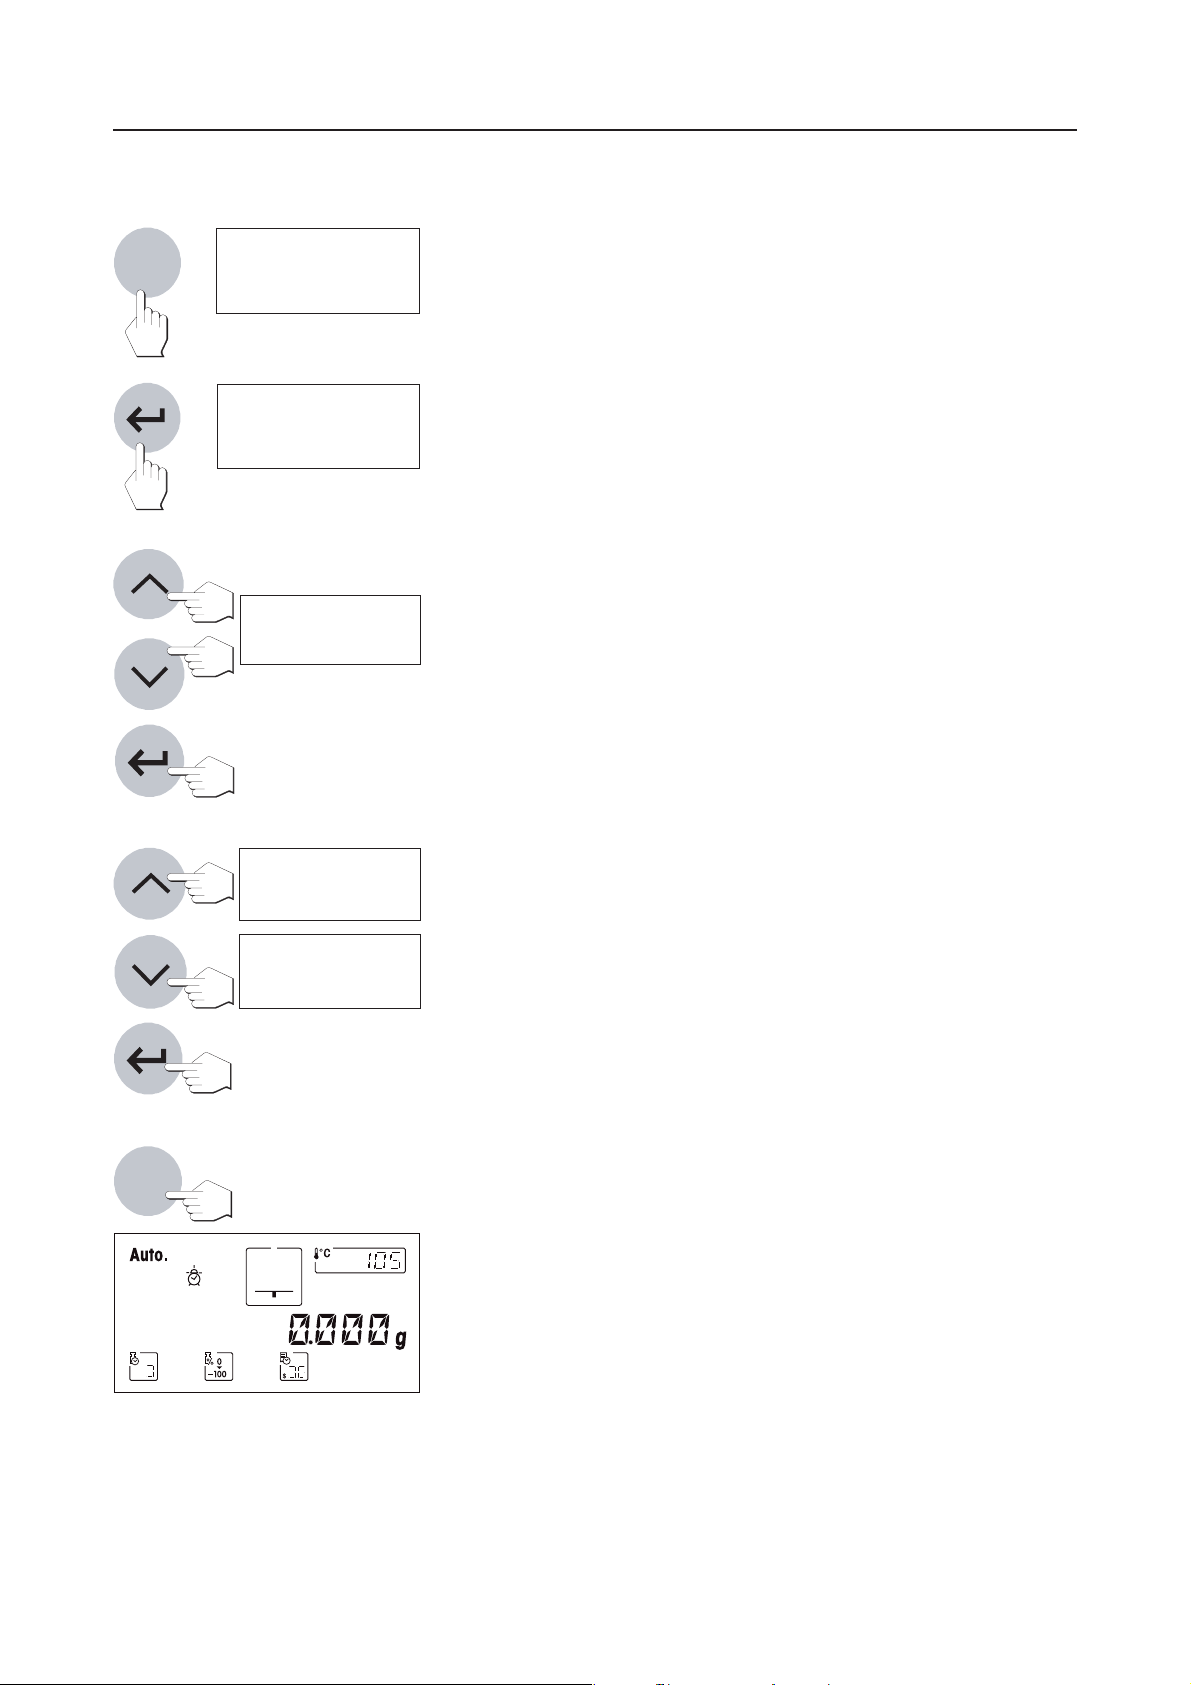
Press the «On/Off» key to switch the instrument on.
On/Off
After it has been switched on, the instrument performs a self-test. Wait until
the display shown opposite appears.
Page 16
Your first measurement in next to no time – Section 2
16
Menu
Menu
∑CAˆ NO
Menu
TIMË 1‹04
Menu
TIMË 1Æ28
Press the «Menu» key. You are now already in the menu.
Press the «Accept entry» or «Menu» key repeatedly until the display shown
1
opposite for entry of the time appears.
Important: Do not press any other key, otherwise you could possibly change
the factory settings of your instrument!
Use the «Scroll up» and «Scroll down» keys to set the time (00:00–23:59).
By pressing and holding the keys you can accelerate the change in the time.
1
Confirm your setting with the «Accept entry» key. The instrument stores the
time.
Reset
Menu
DAÎ 2{0“03
Menu
DAÎ 0[0#0#
After confirmation of the time, the display for entry of the current date appears.
2
Use the «Scroll up» and «Scroll down» keys to set the date in the format “Day
– Month – Year” (DD.MM.YY). By pressing and holding the keys you can
accelerate the change in the date. Confirm your entry with the «Accept entry»
2
key and the instrument stores the date.
Note: With US English as the dialog language, the following applies to entry
of the date format “Month – Day – Year” (MM/DD/YY).
This completes your entry of the date and time, and you can now quit the
menu by pressing the «Reset» key. Your settings are stored and remain so
even in the event of a power failure. The Moisture Analyzer is now ready for
your first measurement.
Page 17
Section 2 – Your first measurement in next to no time
17
2.6 Your first measurement
After you have successfully put your new Moisture Analyzer into operation for the first time, you can immediately
perform your first measurement. In doing so, you will become familiar with the instrument and the status display
and at the same time perform a function check.
Please use the specimen sample supplied for your first measurement. This sample is an absorbent glass fiber filter.
During your first measurement, the instrument operates with the factory settings.
Your Moisture Analyzer has a novel graphical status display (User guide)
which you will become acquainted with in this section. The status display
informs you continuously about the current status of the instrument and
prompts you to execute the next operating step (shown flashing).
Switch the instrument on with the «On/Off» key.
On/Off
2
Initial status with closed automatic sample chamber.
Press the «Open/close auto sample chamber» key and …
… the motorized, automatic sample chamber opens.
Always ensure sufficient free space in front of the instrument since the
emerging automatic sample chamber could knock over objects in its path
or push them off the bench.
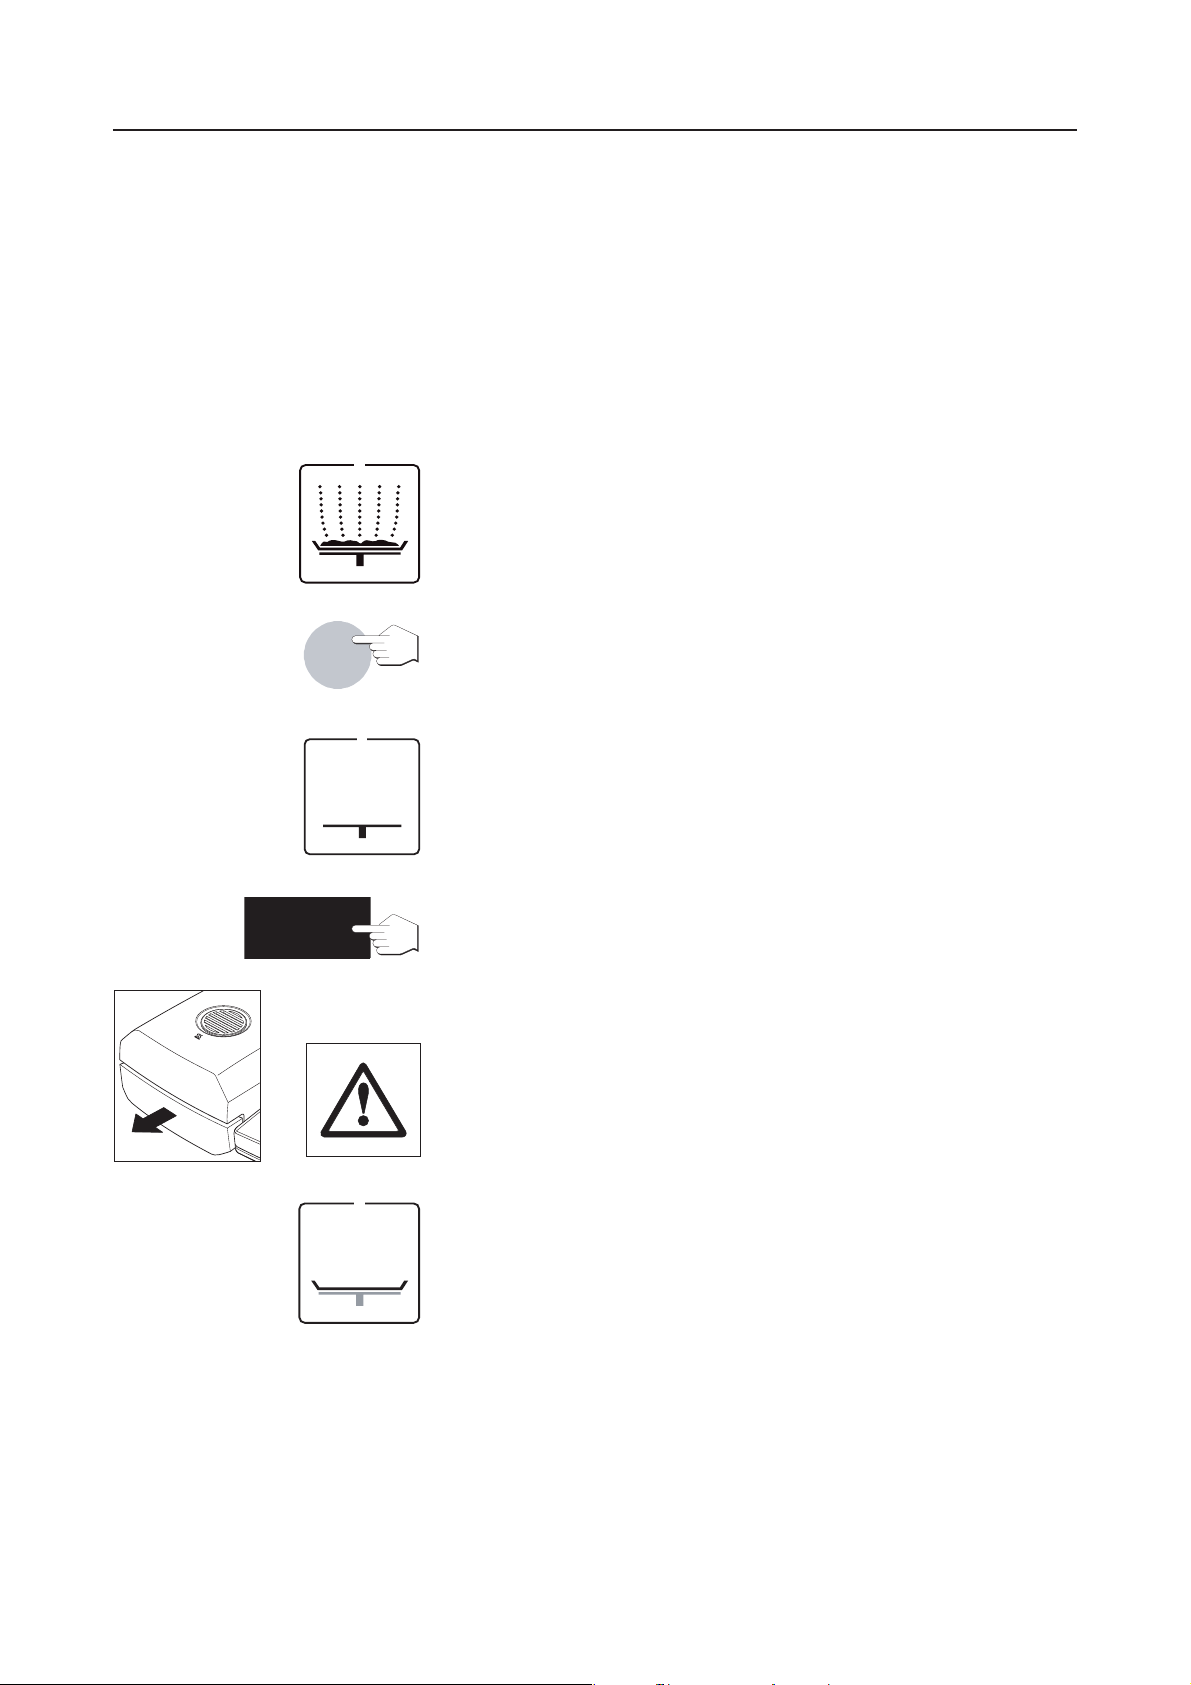
Status: Ready for taring
The status display flashes and prompts you to load the empty sample pan
and tare.
Page 18
Your first measurement in next to no time – Section 2
18
Place the empty sample pan in the sample pan handler (this is possible
without tilting the sample pan if you insert this in the pan handler from the
side directly below the round flange). Place the sample pan handler in the
automatic sample chamber. Ensure that the tongue of the pan handler fits
exactly in the slot of the draft shield element. The sample pan must lie flat
in the pan holder.
Note: We advise you to work with the sample pan handler at all times. The
pan handler is ergonomic, safe and provides protection against possible
burns due to the hot sample pan.
Press the «Tare (zero)» key. This sets the balance installed in the Moisture
#
Analyzer to zero. For taring, the automatic sample chamber closes briefly
then opens again.
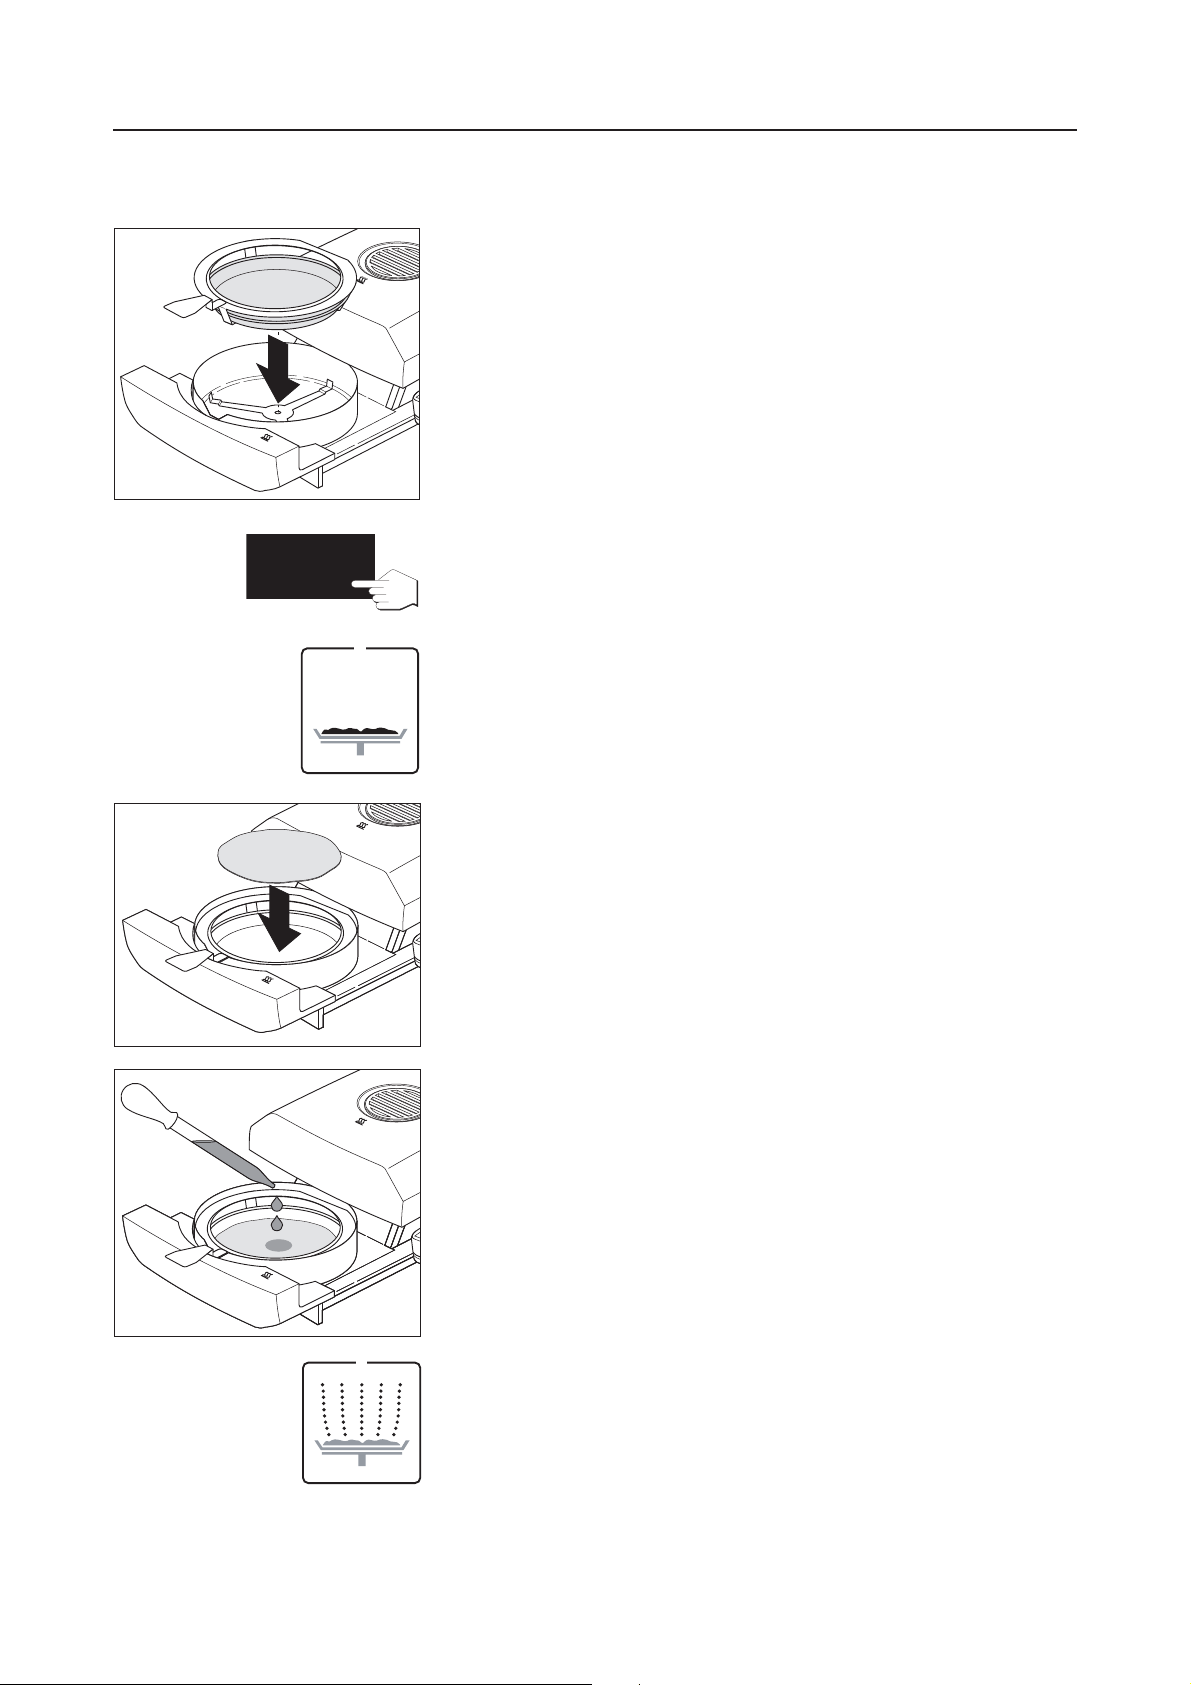
Status: Ready for weighing
After taring, the status display flashes and prompts you to place the sample
in the sample pan.
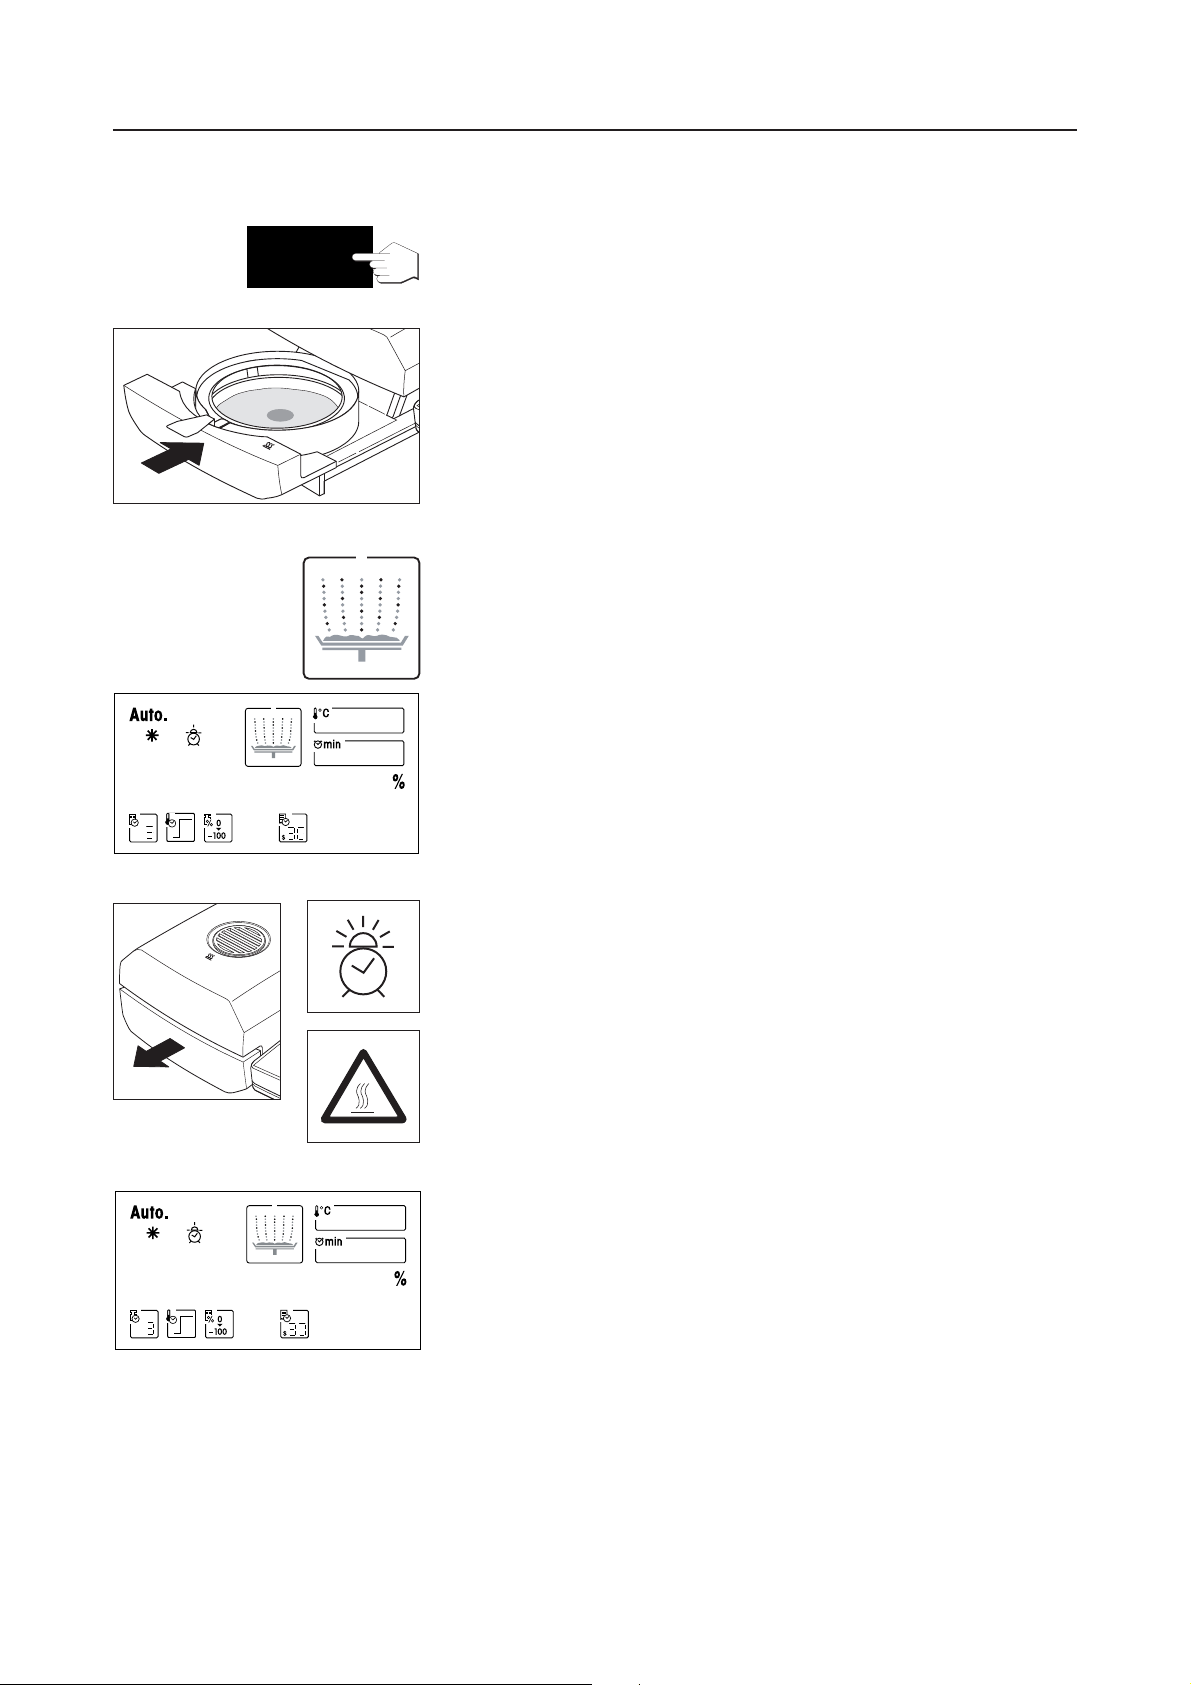
Place the specimen sample in the sample pan.
Wet the specimen sample with a few drops of water.
Status: Ready for start
The status display flashes and prompts you to start the drying process.
Page 19
Start
-|84
104
≠30
Section 2 – Your first measurement in next to no time
19
Press the «Start» key and …
… the motorized, automatic sample chamber closes. The instrument starts
the drying and measurement.
Status: Drying and measurement
You can follow the drying and measurement process in the display:
– The status display uses rising bubbles to symbolize the drying process.
– The current temperature in the heating module is displayed as well as the
elapsed drying time and the current drying value.
– Further, the display shows information on the selected settings. You will
find additional information on the meaning of the displays and the various
setting possibilities in Section 4. If your instrument has a built-in printer,
the measurement results will be printed out continually (at intervals of
30 seconds).
ENfl -1Ç52
At the end of the drying time, an audio signal sounds and the sample
chamber is automatically opened.
Warning: Sample pan and sample are still hot!
You can now read off the moisture content of your sample in the display.
59
‹10
Page 20
Your first measurement in next to no time – Section 2
20
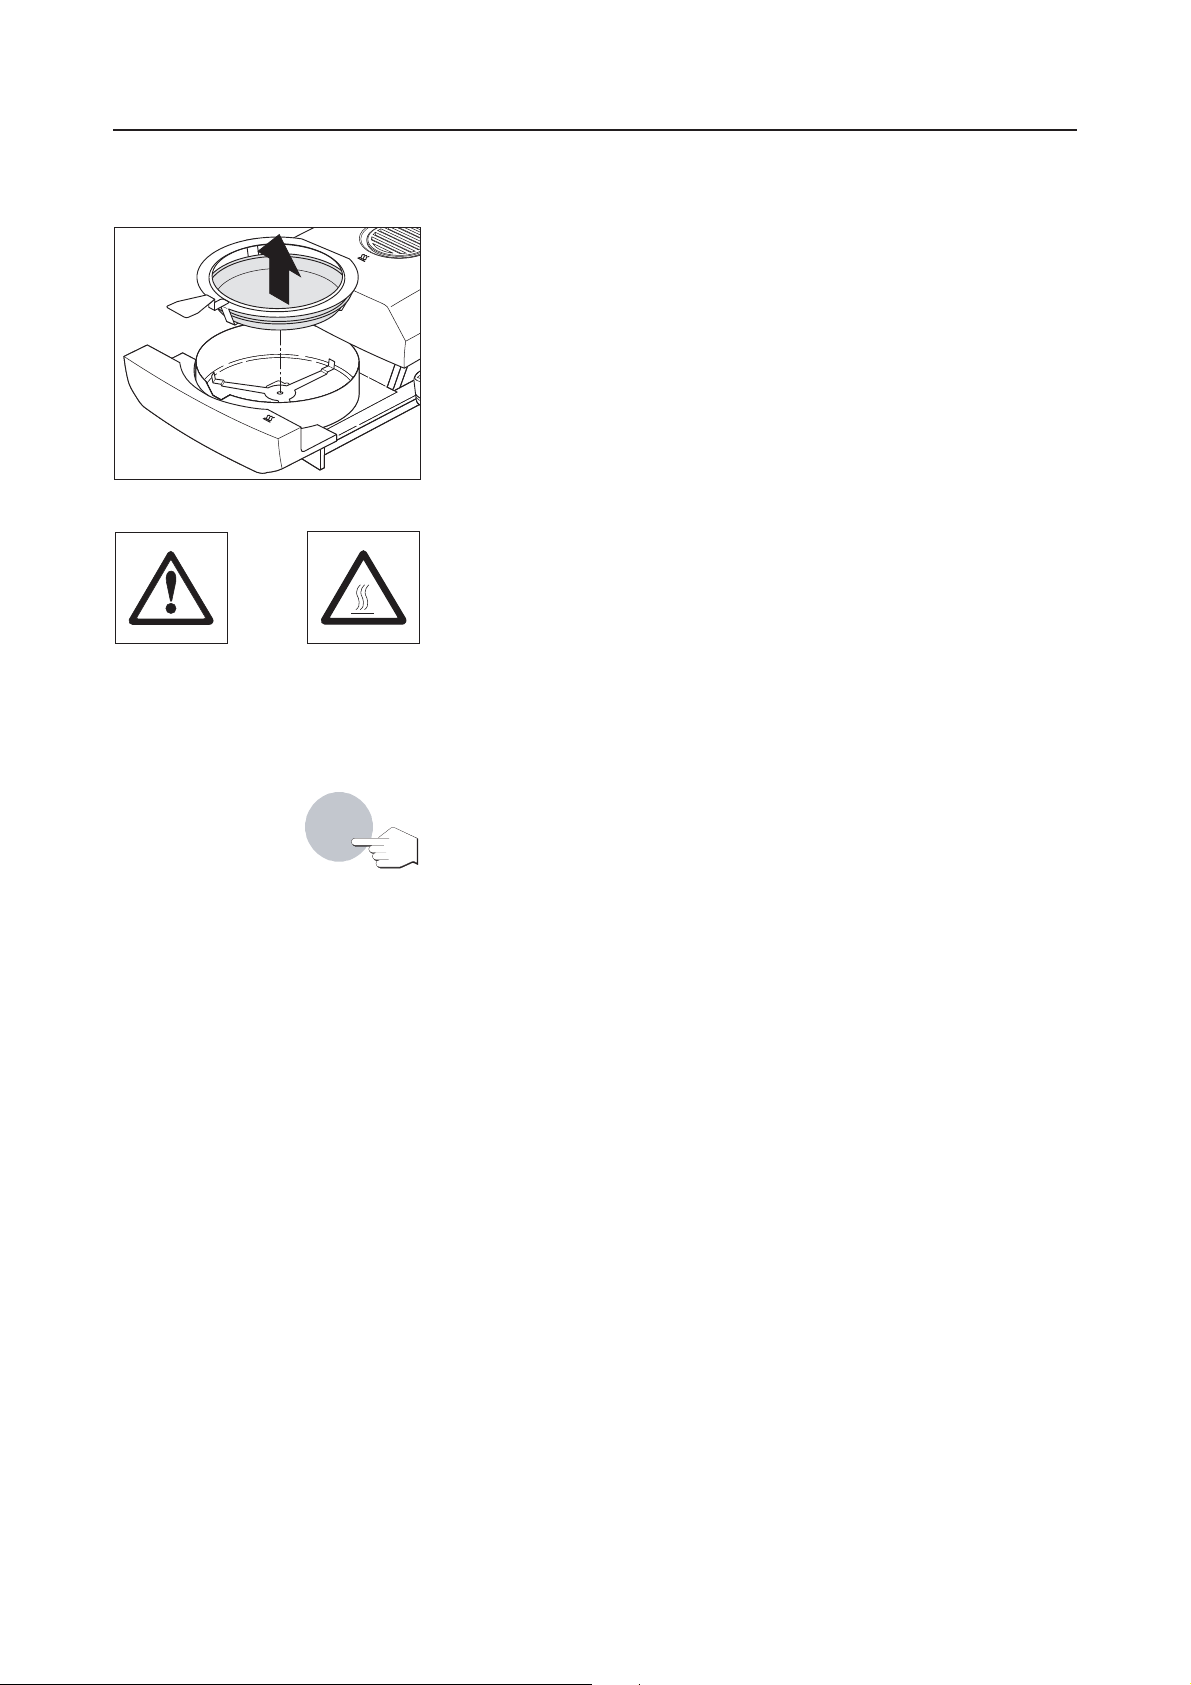
Carefully remove the sample pan handler from the automatic sample
chamber.
Warning: As the pan and sample may still be hot, you should let these cool
down before removing the pan from the handler!
Reset
To remove the sample pan from the handler, lift the pan slightly from below
and pull it sideways out of the handler (if you no longer need the sample and
the pan, you can simply tilt the handler until the pan slides out).
Press the «Reset» key to delete the measurement result from the display. The
instrument is now ready for the next measurement. If you do not wish to
perform another measurement, press the «Open/close auto sample chamber» key. The automatic sample chamber closes.
Congratulations!
You have just performed your first measurement with your new Moisture
Analyzer. In the following section you will find important information on the
operating principle of your instrument, its calibration and optimum preparation of your samples.
Notes on the automatic sample chamber
– Before every automatic closure of the automatic sample chamber, an
audio signal sounds.
– For reasons of safety, the open automatc sample chamber is automati-
cally closed after 2 minutes. If a weight change occurs or a key is pressed
during this time, the 2 minute period starts over again.
Page 21
Section 3 – How to obtain the best results
21
3 How to obtain the best results
Following your first practical work with the Moisture Analyzer, in this Section you will find important information on
how to obtain optimum results. You will discover what parameters influence the measurement process and how
you can match the instrument optimally to your particular measurement task.
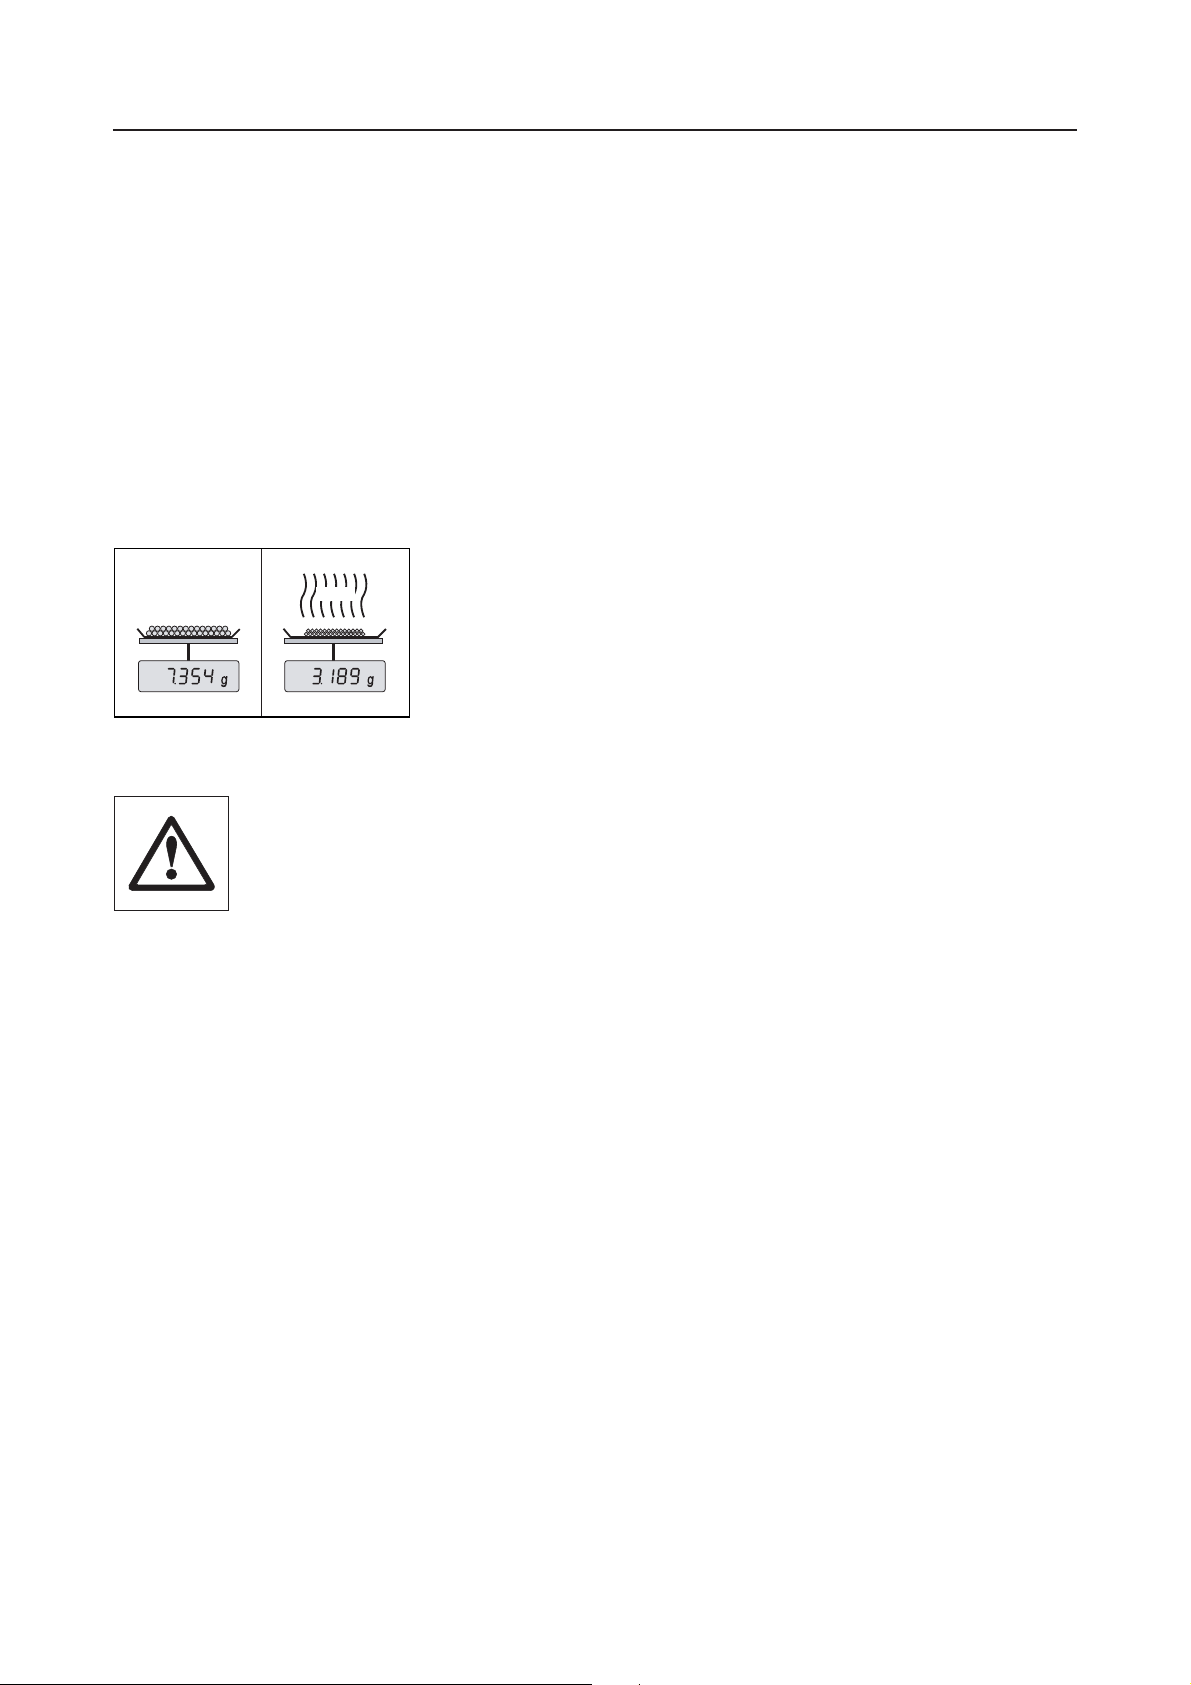
3.1 Measurement principle of the Halogen Moisture Analyzer
Your instrument performs measurements based on the thermogravimetric principle, i.e. the moisture is determined
from the weight loss of a sample dried by heating.
In principle, your instrument thus comprises two instruments: a precision
120
balance and a heating module. In contrast to other thermogravimetric
methods (drying oven, infrared, microwave), the Halogen Moisture Analyzer
operates with a halogen heating module. This ensures fast heating of the
sample and thus guarantees rapid availability of the measurement results.
Irrespective of the measurement method, the quality of the measurement results stands or falls by the preparation
of the sample and a correct choice of the important measurement parameters:
– Sample size
– Drying temperature
–Switchoff mode
– Drying time
Inappropriate setting of these parameters can cause the results to be incorrect or
misleading. For this reason, check that the results for each type of sample are what might
reasonably be expected.
You will find detailed information on the relationships between these parameters in the application brochure for
moisture determination (see Section 9.3), enclosed to your instrument.
In practice, however, not only the quality of the measurement results, but also the speed of the measurement
process is important. Thanks to its drying principle (with the heat generated by a halogen radiator), the Halogen
Moisture Analyzer is very fast. You can increase the speed even further through optimum setting of the instrument.
The optimum drying temperature and the drying time are dependent on the nature and size of the sample and
on the desired accuracy of the measurement results. These can be determined only by experiment. The Halogen
Moisture Analyzer supports you in this task: It offers automatic performance and result recording of test
measurements.
Page 22

How to obtain the best results – Section 3
22
3.2 Notes on adjustment of the balance and the heating module
You should adjust your Moisture Analyzer regularly (e.g. every six months) if this is stipulated by your quality
assurance system (e.g. GLP, GMP, ISO 9001).
The balance and the integral heating module in your instrument can be adjusted using the appropriate accessories
(see Section 9.8). The heating module and balance can also be tested (to check the adjustment). The operator
can define a test weight or the test temperature, together with permissible tolerances for this test. A test report is
printed out showing the test result as “Passed” or “Failed” (see Section 6.3 and 6.5).
By adjusting the heating module you can ensure comparability with results from other instruments of the same
design. This is done by using an appropriate thermometer, which is provided in the form of a temperature
adjustment set with calibration certificate (see Section 9.8). This adjustment set comprises a black plate with a
thermometer, which allows a reproducible adjustment of the heating module.
A Moisture Analyzer is typically used in place of or in addition to the oven method. In an oven heat energy is
transferred by the flow of air, which establishes an equilibrium between the sample temperature and the ambient
temperature. This is not the case in a Moisture Analyzer. The actual sample temperature primarily depends on the
specific absorption properties of the sample (“dark” samples absorb more heat), which can change during the
measurement process.
temperature inside the sample. The heat output is therefore not dependent on the true sample temperature but
instead is regulated by a temperature sensor underneath the halogen heating module.
For the reasons explained above, the temperature setting on the instrument will therefore by deviate to the true
sample temperature. By regularly adjusting the heating module, you will ensure a consistent and reproducible heat
output for the entire lifetime of your instrument.
Note: METTLER TOLEDO offers an adjustment service – please contact your local dealer.
– If you also use your instrument as a high precision lab balance, you should adjust the balance at regular intervals.
– If you replace the heating module, you must adjust it using the temperature adjustment set, which is available
as an accessory.
The procedure for adjusting the balance and heating module is described in Section 6.
There can also be differences between the temperature at the surface of the sample and the
Page 23

Section 3 – How to obtain the best results
23
3.3 Optimum sample preparation
Preparation of the sample is decisive for the speed of the measurement process and the quality of the measurement
results.
Please note the following basic rules for the preparation of your sample:
The amount of sample you select should be as small as possible and only as large as necessary
Excessive amounts of sample require more time for drying and thus prolong the measurement process. If the amount
of sample is too small, the measurement result may possibly not be representative. The following always holds:
The greater the inhomogeneity of the sample, the larger the amount of sample needed to obtain a repeatable result
(please see also the list in Section 9.1).
Distribute the sample evenly over the sample pan
You thus increase the surface area of the sample and facilitate heat absorption. The base of the pan should be evenly
covered.
With liquid, fat-containing, melting and highly reflecting samples, you should cover the sample with the glass fiber
filter available as optional equipment (HA-F1 214464, see Section 9.8). This also applies to samples which form
a skin on their surface when heated. The glass fiber filter ensures even and rapid heat distribution and prevents the
formation of a skin impervious to moisture on the sample surface.
3.4 Further information on moisture determination
You will find further information on the moisture determination, the importance of the parameters and the preparation
of the samples in the Application Brochure “Methods of moisture content determination” dealing with moisture
determination (see Section 9.3).
Useful tips and a variety of example methods (comparison between Halogen Moisture Analyzer results and the oven
method) can be downloaded from www.mt.com/moisture.
If you require information on specific applications, your METTLER TOLEDO dealer will be pleased to help you.
Moisture determination applications must be optimized and validated by the user according
to local regulations. Application-specific data provided by METTLER TOLEDO is intended for
guidance only.
Page 24
Practical application of your Moisture Analyzer – Section 4
24
4 Practical application of your Moisture Analyzer
In this Section we introduce you to the wide range of setting possibilities of your Moisture Analyzer and offer
information and tips for optimum setting of the parameters.
4.1 Operating principles
You already performed your first measurement in Section 2. This measurement was carried out using the factory
settings. However, your instrument offers a number of setting possibilities to match the measurement process to your
specific requirements. For instance, you can preselect the drying temperature, the type of result display and many
other parameters.
Settings are made using the function keys. These keys are right at the top of
the keypad, directly below the display. The setting you select appears in the
display directly above the associated key.
%
95
125
You will learn the available setting possibilities and the function keys in detail
in the following Sections. Further, you will also discover how to set the drying
temperature and the drying time and how to work with the weighing-in aid.
Finally, you will perform a complete measurement with the specific settings
for your sample.
Numeric entries:
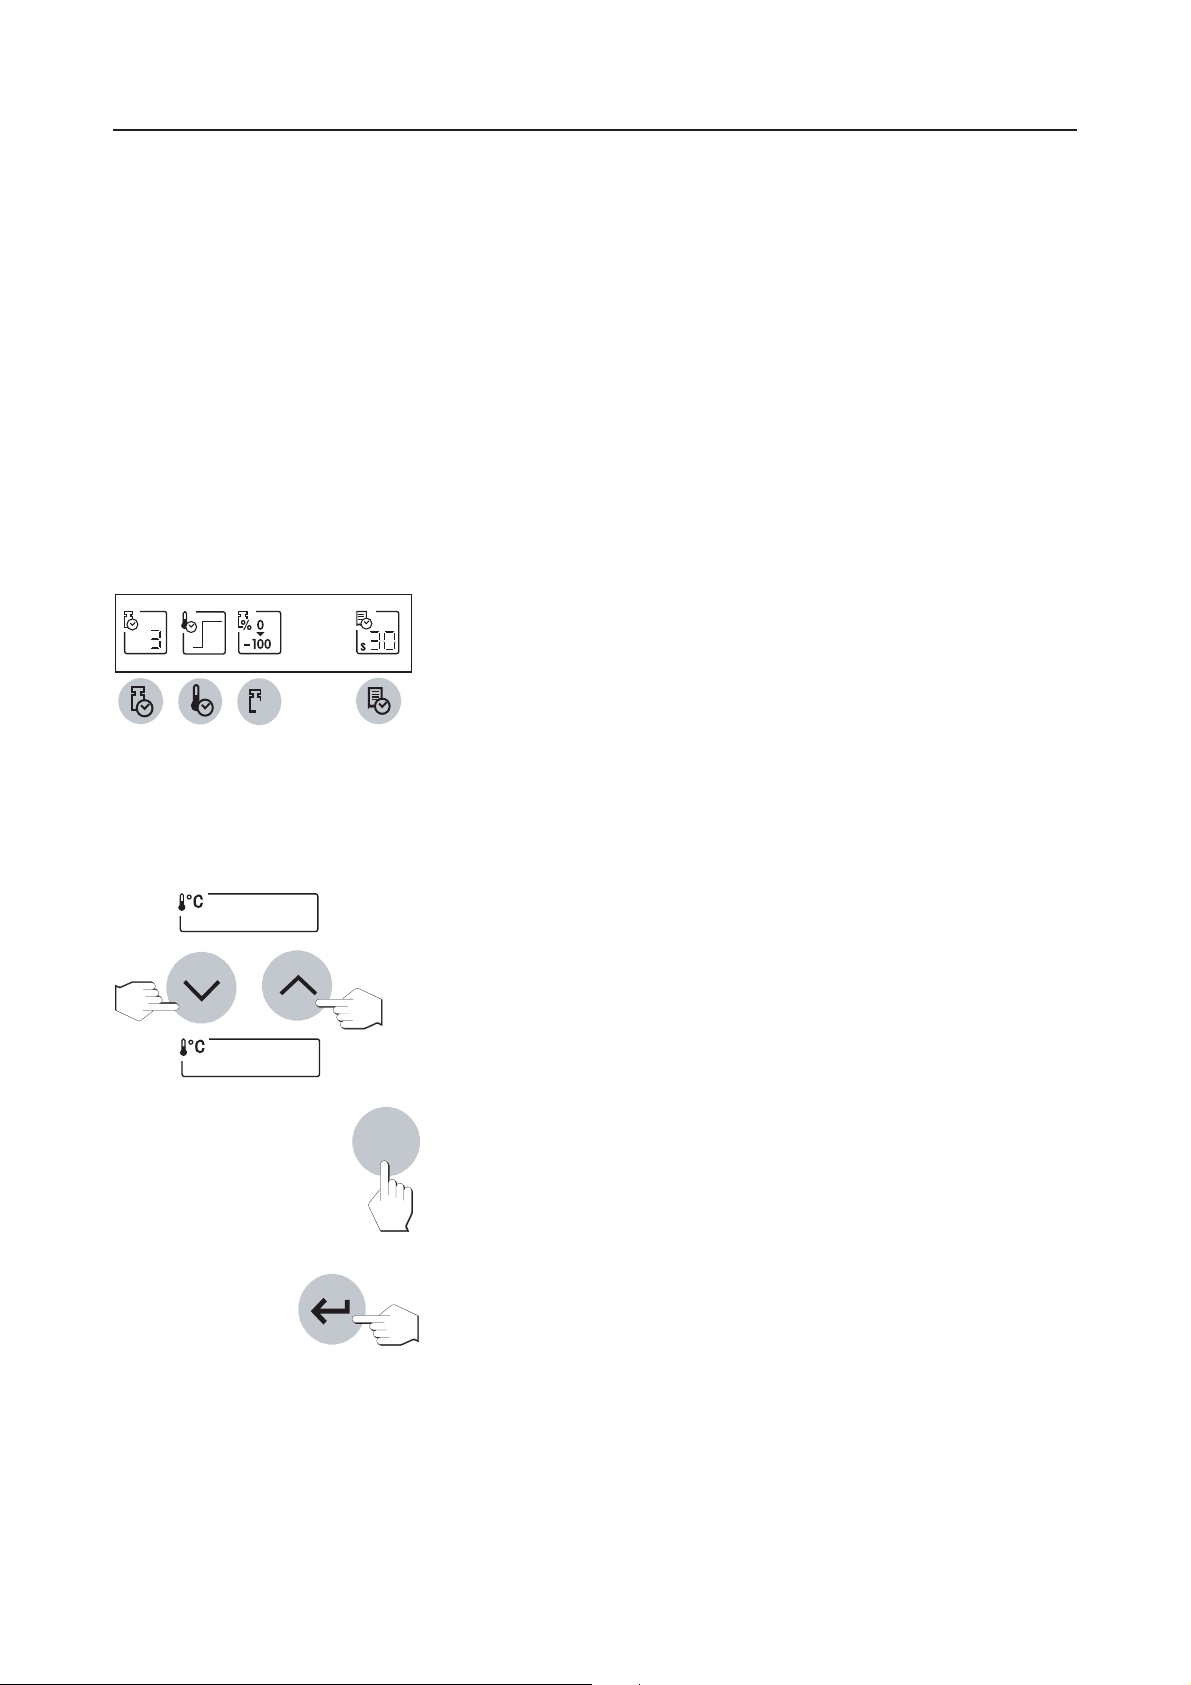
With some settings (e.g. the drying temperature), numeric entries are
required. There are two different ways of entering numerical values:
You can change the flashing displayed value with the «Scroll up» or «Scroll
down» key or ...
... You can enter the new value with the «0…9» key.
0...9
As soon as you have entered the desired value, press the «Accept entry» key.
The value will be stored.
Page 25
Section 4 – Practical application of your Moisture Analyzer
25
Preliminary information on the methods:
All settings for a sample which you will learn in the following Sections can be collected in a so-called “Method”.
You have 10 methods freely available thus giving you the possibility of defining a method for a particular sample
and recalling it at any time. This eases the work load considerably as each time you switch to a different type of
sample there is no need to repeat all the parameter settings. The methods are retained when the instrument is
switched off. You will find information on the compilation and use of methods in Section 5.
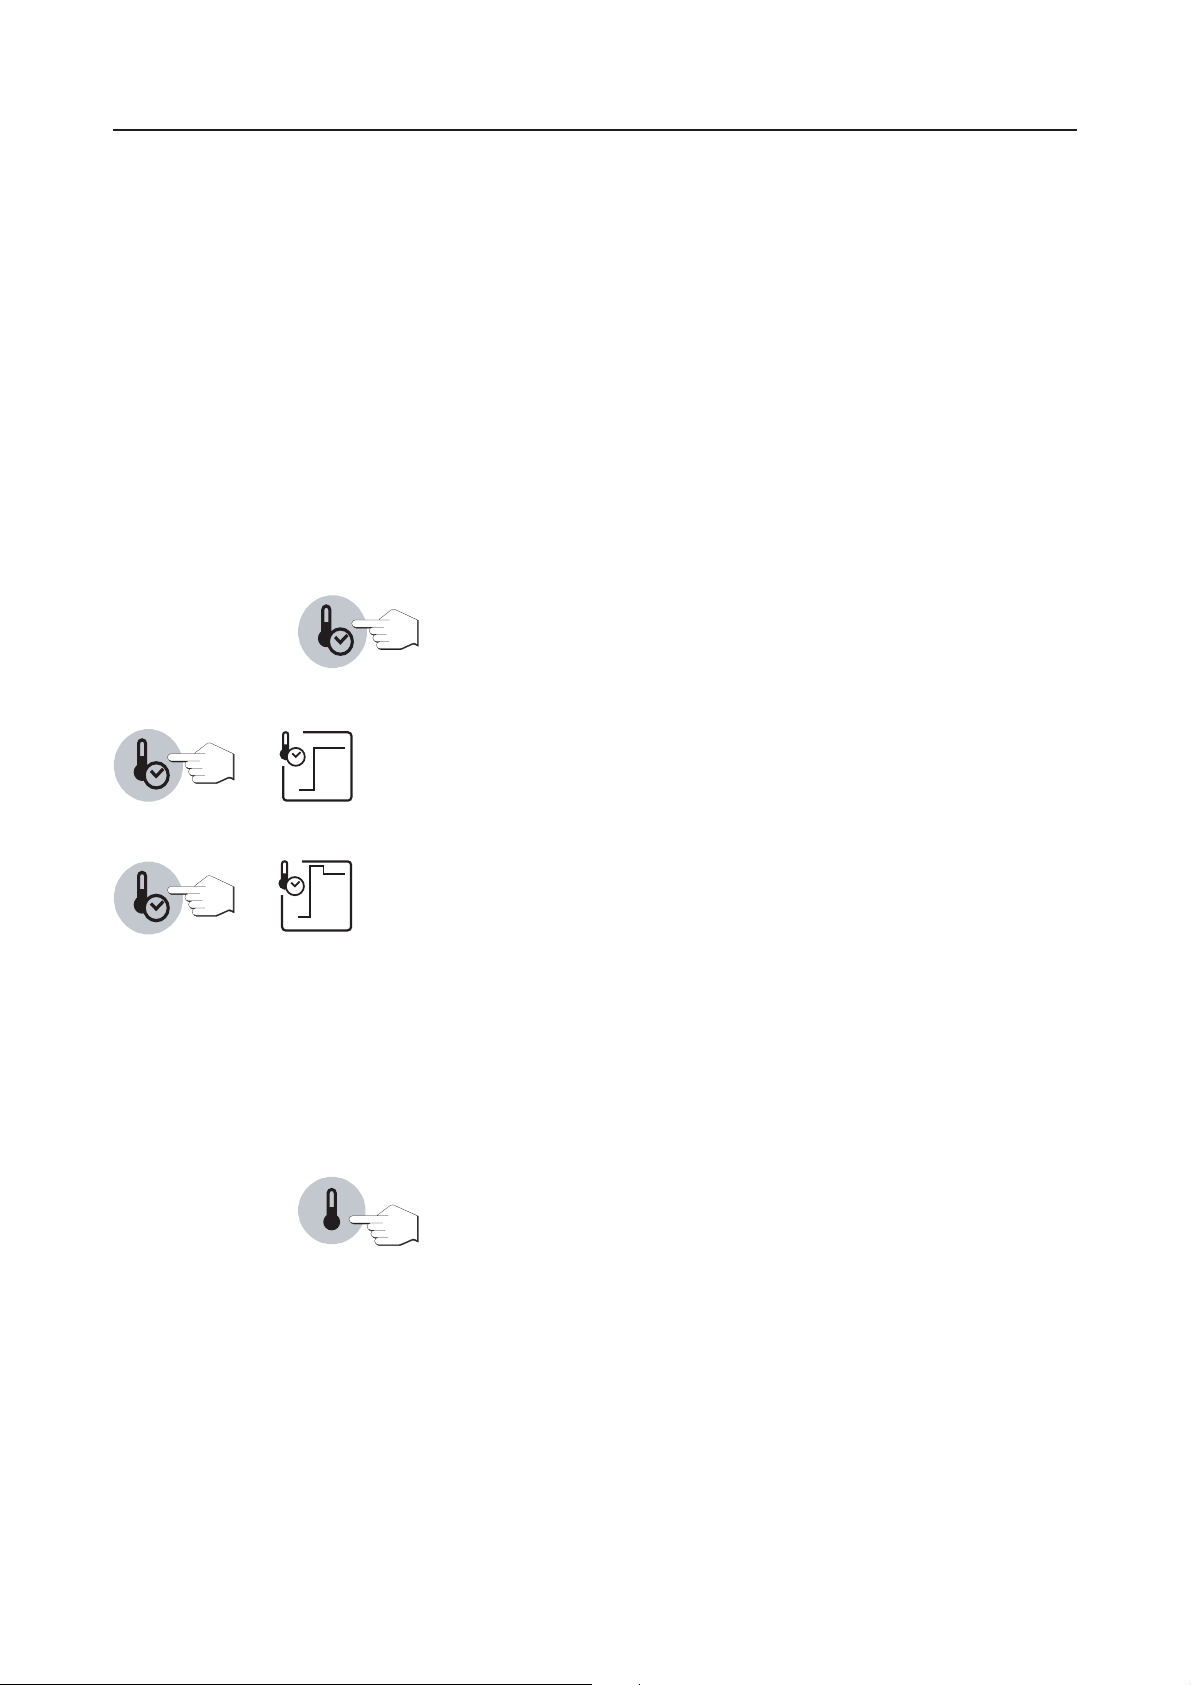
4.2 Selecting the drying program
This function key offers you two different drying programs for optimum matching of the drying characteristics to the
sample used.
Each time this key is pressed, the next program appears. After the fourth and
last program, the first reappears in the display. As soon as you have selected
the desired program, the setting is active and you do not have to confirm or
store it.
Standard drying
This drying program is set in the factory and is suitable for most samples.
The sample is heated to the drying temperature (set temperature) and held
constant at this temperature.
Rapid drying
This program is primarily suitable for samples with a moisture content over
30%. Following the start, the selected temperature is exceeded by 40% for
3 minutes to compensate the cooling due to vaporization and accelerate the
drying process. The drying temperature is then lowered to the set value and
maintained. You will find details on how to enter the drying temperature in
the Section 4.3.
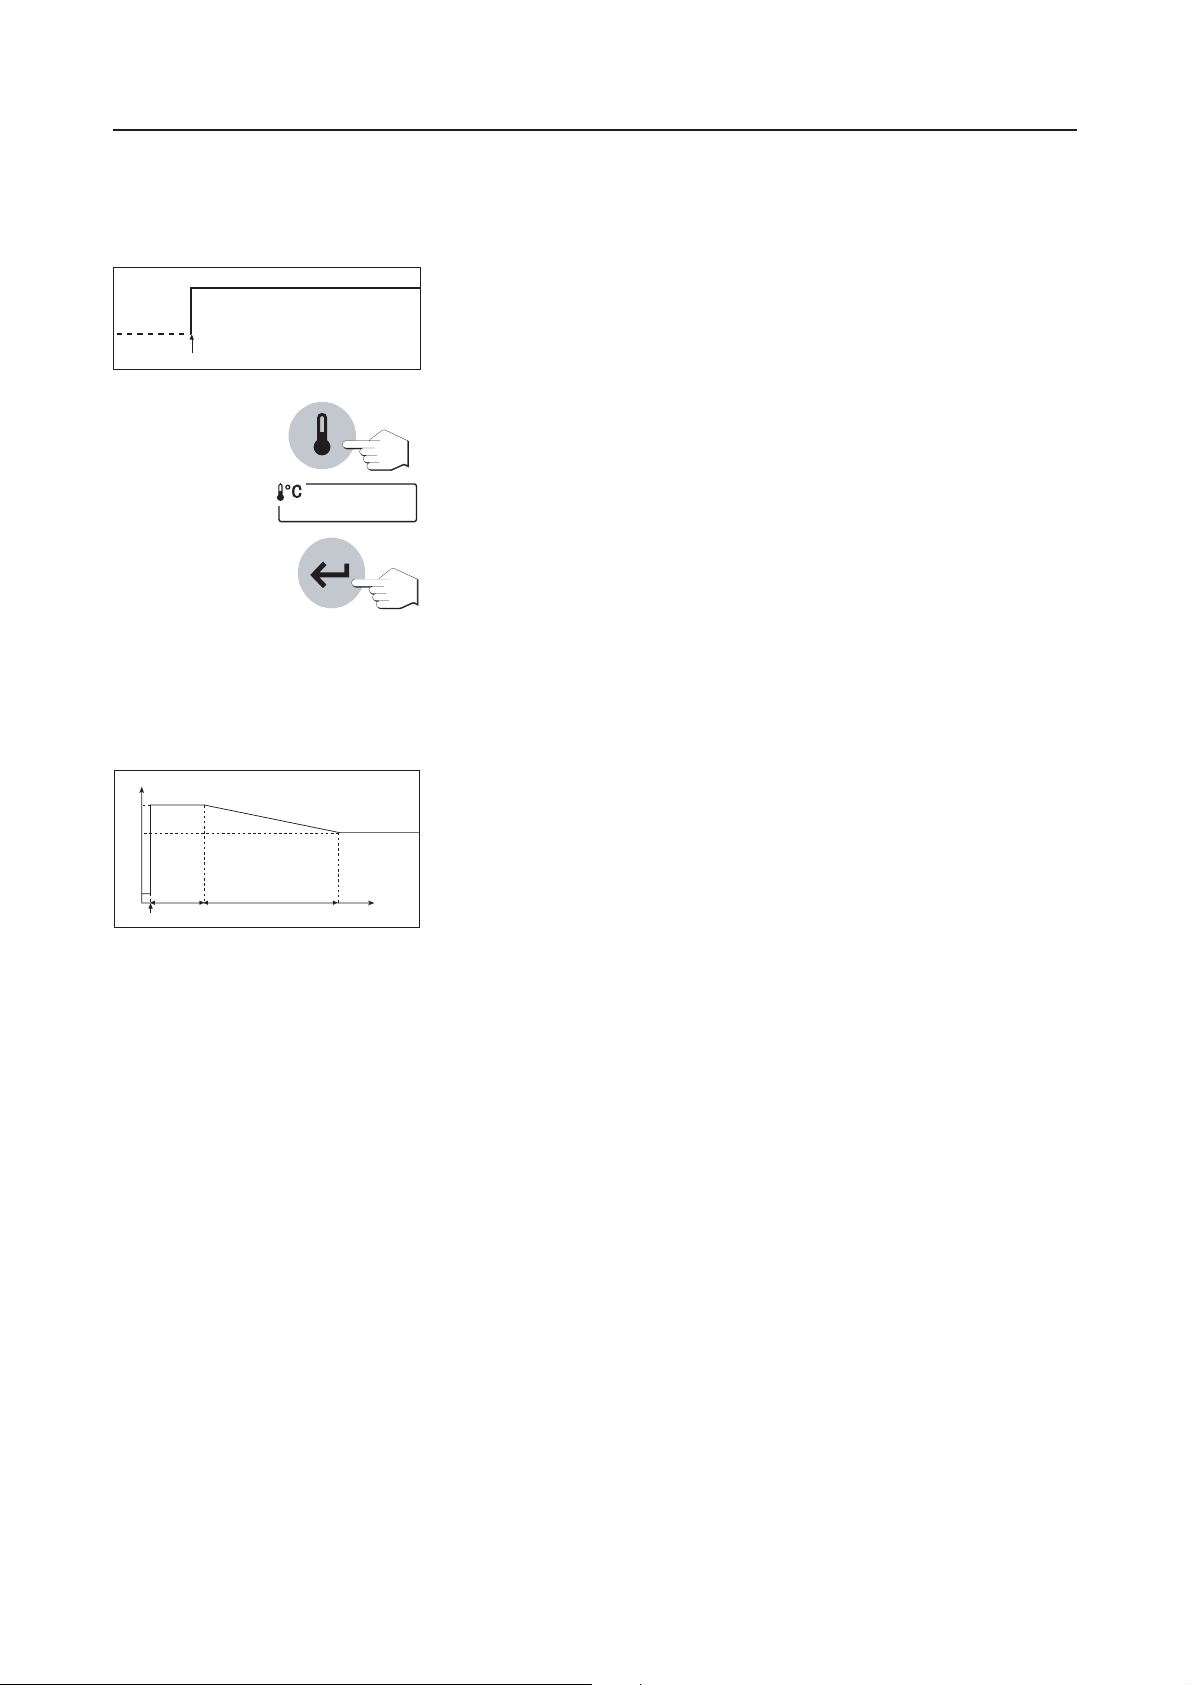
4.3 Setting the drying temperature
After pressing this key you can enter the drying temperature (set temperature).
The type of entry depends on the selected drying program (see Section 4.2).
If you have selected one of the programs “Standard drying” or “Rapid drying”,
you need enter only the drying temperature.
Page 26
Practical application of your Moisture Analyzer – Section 4
26
Selecting drying temperature for standard drying and rapid drying
Final temperature
Start of drying
125
Temperature limitation
°C
200
160
10 50
Start
t (min.)
You need enter only the desired final temperature.
Press the «Drying temperature» key and enter the desired drying temperature
(see Section 4.1).
– either with the «Scroll up» and «Scroll down» keys or
–with the «0…9» key.
Press the «Accept entry» key.
Note: The admissible input range for temperatures is 40°C–200 °C.
Several mutually independent systems prevent the instrument overheating:
– At temperatures above 160 °C a time limit becomes active. The higher the
temperature, the shorter the time until the instrument starts to lower the
temperature (envelope curve, see illustration opposite).
–A temperature switch independent of the normal black temperature sensor
over the sample (see Section 7.1) is triggered when it detects exceptionally high temperatures. This situation could arise, for example, if the
sample begins to burn or the temperature calibration is defective. If this
happens, the heating module is tripped out by a mechanical switch, and
the instrument cannot be restarted. Please refer to Section 8.3 for
troubleshooting.
When working with temperatures over 180 °C we recommend that you
always wait 2 - 3 minutes between individual measurements, in order to
ensure good reproducibility of the readings.
Note: A measurement cannot be started until the drying temperature is
higher than the temperature in the measuring room.
You can check the
current temperature by pressing the «Tare (zero)» key. This avoids a false
start (Error 10, Section 8.2).
Page 27
Section 4 – Practical application of your Moisture Analyzer
27
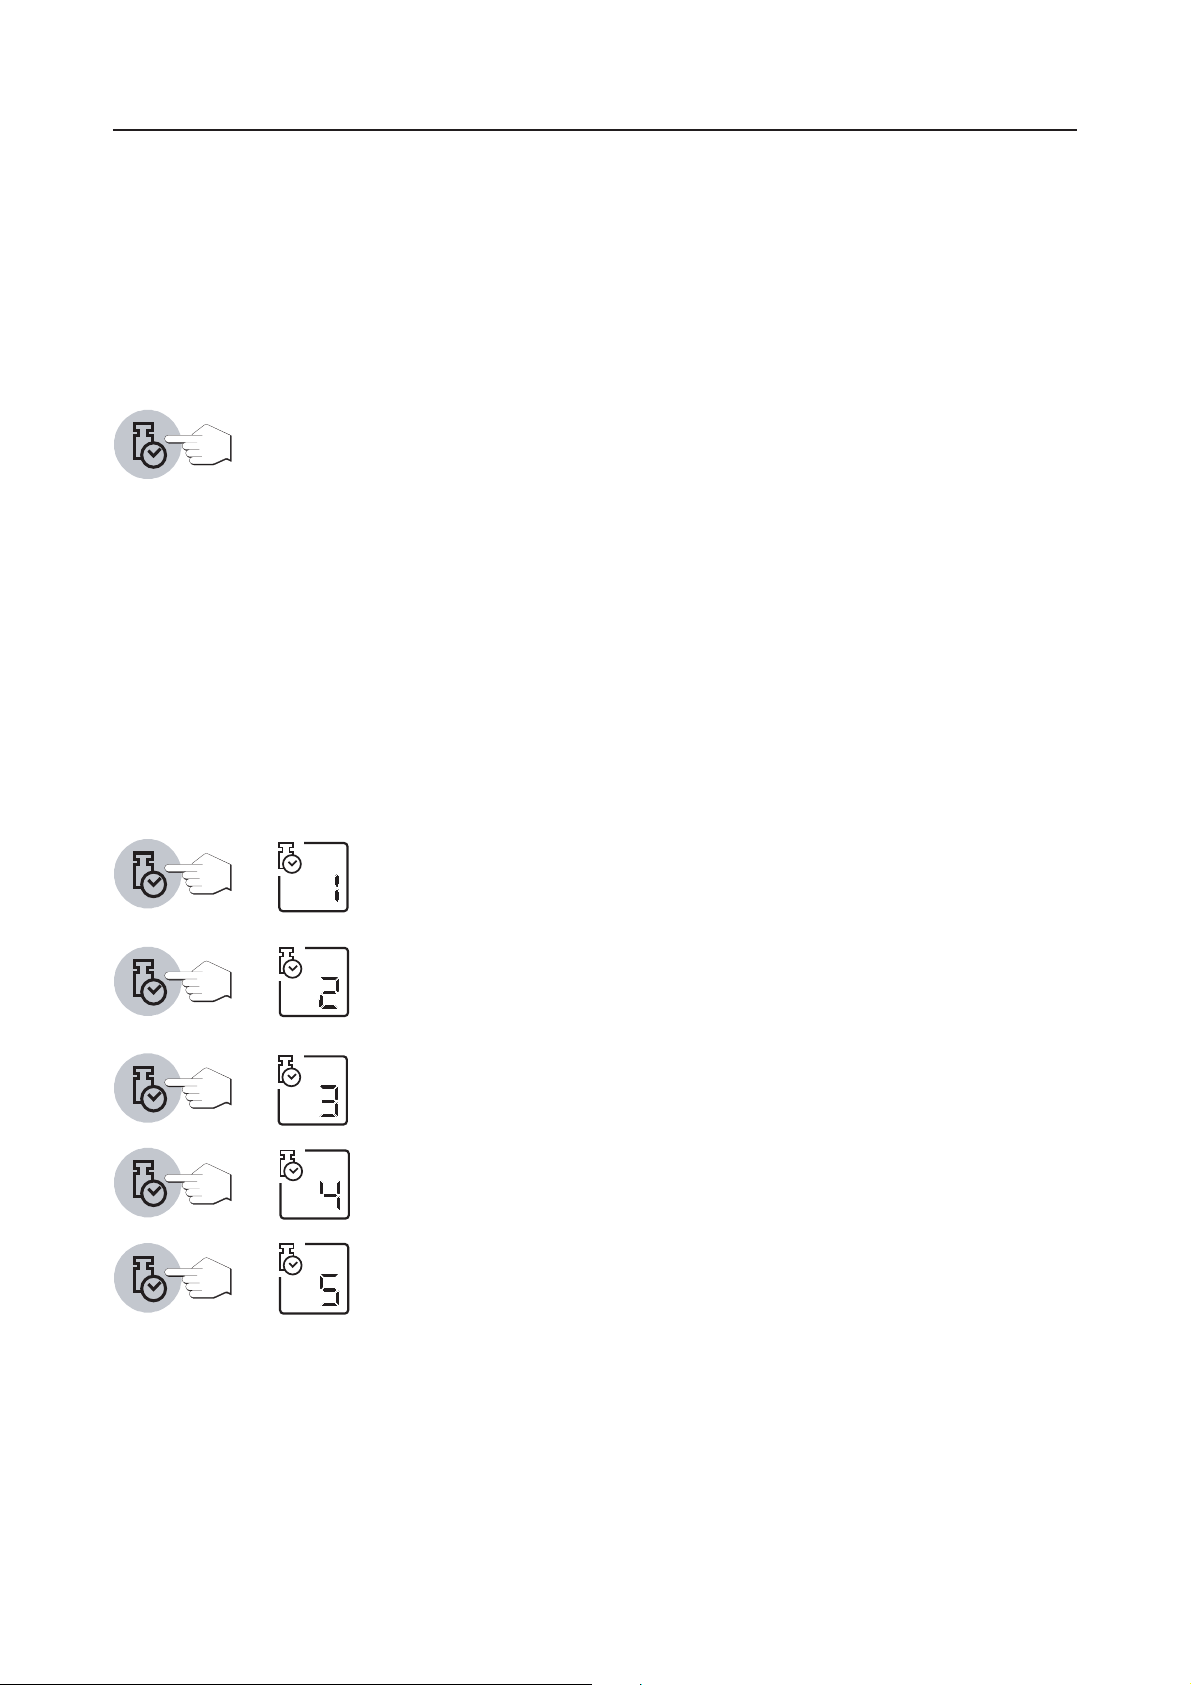
4.4 Selecting the switch-off criterion
This function key offers you different switch-off criteria. A switch-off criterion defines when the instrument should end
the drying. Switch-off criteria save you having to keep checking your watch and stopping the drying manually.
The following settings can be selected for the switch-off criterion:
–“Weight loss per unit of time” (5 settings)
– “Free switch-off criterion” (if activated in the Methods menu,
Section 5.4)
–“Manual switch-off”
– “Timed switch-off”
– “Test measurement” for determination of the suitable switch-off criterion
Weight loss per unit of time
This switch-off criterion is based on a weight loss per unit of time. As soon as the mean weight loss is less that a
preset value during a specified time, the instrument considers drying as complete and automatically discontinues
the measurement process. During the drying, the time display shows you how long the measurement process has
been in progress. The switch-off criterion is inactive during the first 30 sec. You will find additional information in
Section 9.4.
The following 5 settings are available:
This setting is suitable for samples which dry very quickly (surface moisture)
or for (relatively inaccurate) fast measurements to determine a trend.
This setting is suitable for quick drying samples.
This is the factory setting. It is suitable for most types of samples.
This setting is suitable for samples which dry moderately quickly.
This setting is suitable for samples which dry very slowly (trapped moisture,
skin formation).
Note: If you do not know the behavior of a sample, perform a test measurement to determine the suitable switch-off criterion. The procedure is
described later in this section under the title “Test measurement”.
Page 28

Practical application of your Moisture Analyzer – Section 4
28
Free switch-off criterion
This setting possibility is available only if you have activated it in the Methods menu (Section 5.4). There is one
free switch-off criterion available for each method. The free switch-off criterion is based on a user-defined mean
weight loss per unit of time.
You will find information on the activation and definition of the individual
switch-off criterion in Sections 5.5 and 9.4.
Manual
With this switch-off criterion the measurement process continues until you stop it with the «Stop» key.
The time shown in the display tells you how long the current measurement
has been in progress.
Timed switch-off
With this switch-off criterion the measurement lasts until the preset drying time has elapsed (the time display
provides you with continuous information on the drying time).
If you select this criterion, you must then enter the desired drying time as
follows:
Press the «Drying time» key.
⁄30
Enter the desired drying time.
Press the «Accept entry» key.
Test measurement
Press “t” to perform a test measurement which will help you to determine
suitable switch-off criteria (Section 4.11).
Page 29

Section 4 – Practical application of your Moisture Analyzer
29
4.5 Selecting the display mode
With this function key you can select the desired type of result display. You also define what values are printed on
the records.
The following display modes are available:
Moisture content
The moisture content of the sample is displayed (and printed out) as a
%
percentage of the wet weight (= ww = initial weight = 100%). This is the
factory setting.
When the results are printed out, the moisture content is marked by “%MC”
(Moisture Content) (e.g. –11.35 %MC) and shown as a negative value.
WW
WW
%
100%
Before
drying
100%
Before
drying
After
drying
After
drying
DW
DW
MC
=
[%]
MC [0…100%] = – *
Wet weight WW – Dry weight DW
Wet weight WW
100%
During the drying the current measured value is continuously displayed in
percent.
Dry content
The dry content of the sample is displayed (and printed out) as a percentage
of the wet weight (= ww = initial weight = 100%).
When the results are printed out, the dry content is marked by “%DC” (Dry
Content) (e.g. 88.65 %DC).
DC
=
[%]
During the drying the current measured value is continuously displayed in
DC [100…0%] = *
Dry weight DW
Wet weight WW
100%
percent.
Weight in grams
%
The weight of the sample is displayed (and printed out) in grams. With this
setting, the Moisture Analyzer is used as a precision balance.
During the drying the current weight is continuously displayed in grams.
Page 30

Practical application of your Moisture Analyzer – Section 4
30
ATRO moisture content
The moisture content of the sample is displayed (and printed out) as a
%
percentage of the dry weight ( = DW = final weight = 100%).
When the results are printed out, the ATRO moisture content is marked by
“%AM” (ATRO Moisture Content) (e.g. –255.33 %AM) and shown as a
negative value.
=
[%]
Before
drying
%
AD
WW
Before
drying
WW
100%
After
drying
100%
After
drying
AM
=
DW
=
[%]
AM [0…-1000%] = – *
Wet weight WW – Dry weight DW
Dry weight WW
100%
During the drying, the current measured value is continuously displayed in
percent.
ATRO dry content (Wet weight)
The wet weight of the sample is displayed (and printed out) as a percentage
of the dry weight (= DW = final weight = 100%).
When the results are printed out, the ATRO dry content is marked by “%AD”
(ATRO Dry Content) (e.g. 312.56 %AD).
DW
=
AD [100…1000%] = *
Wet weight DW
Dry weight WW
100%
During the drying, the current measured value is continuously displayed in
percent.
Comment on the ATRO display mode
If the current measured value in the ATRO display mode is greater or less than
the predefined limit value (i.e. greater than 999.99 %AD or less than
–999.99 %AM), a warning beep sounds and the instrument automatically
switches the display mode (from %AM to %MC and from %AD to %DC). A
display in the ATRO mode is no longer possible in this case, even if you have
started your drying operation in the %MC, %DC or “g” (grams) display
mode.
Page 31

Section 4 – Practical application of your Moisture Analyzer
31
4.6 Defining the print interval
One point before we start: This setting possibility is available only if the built-in printer is activated in the menu
(see Section 6.15).
The print interval determines the printout frequency of the intermediate results of an ongoing measurement.
The following settings are available under this function key:
Printout at intervals
These 6 settings allow printout of the intermediate results at fixed, preset
intervals. You can thus trace the drying process using the printed record. The
following print intervals are available:
– Printout every 5 seconds
– Printout every 10 seconds
– Printout every 30 seconds (factory setting)
– Printout every minute
– Printout every 2 minutes
– Printout every 10 minutes
Manual printout
With this setting there is no automatic printout. However, you can print out
the intermediate results at any time with the «Print» key.
Page 32

Practical application of your Moisture Analyzer – Section 4
32
4.7 Working with the weighing-in aid
The weighing-in aid can be defined for each method and facilitates weighing in of the sample to a preset weight
value (target value).This is particularly useful if you require all the samples you wish to process to have same weight
in order to improve the repeatability of the measurement results. In addition, the weighing-in aid can be configured
so that the drying process cannot be started if the weight of sample is outside the set tolerance. You are therefore
compelled to weigh in the correct quantity of sample (“Weighing-in aid active”).
Target weight
lower weight limit upper weight limit
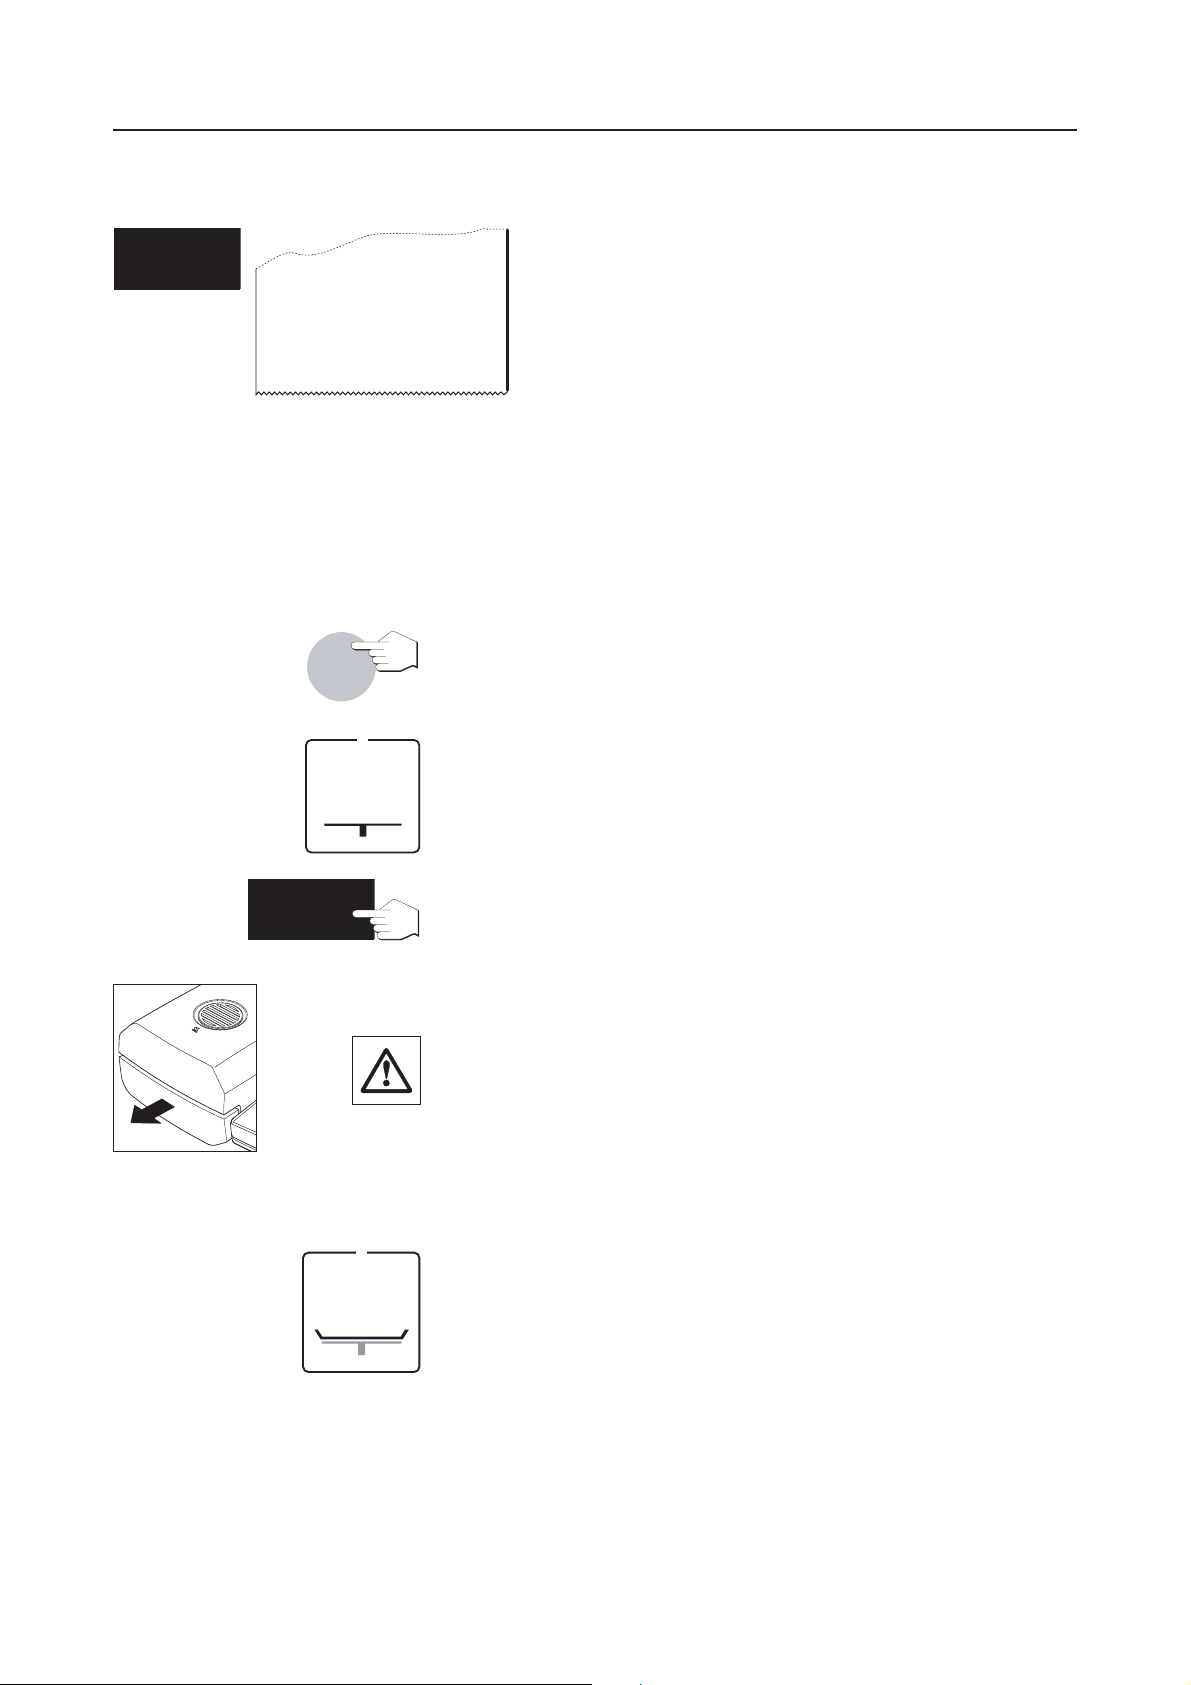
The weighing-in aid in the bottom right corner of the display comprises two
opposite facing bars and triangles with a minus or plus symbol.
The weighing-in aid is available only if it has been activated. If the minus
or plus symbol is visible after taring, the weighing-in aid is activated.
Underweight
WGªBAÈ OFF
WGªBAÈ PAS
WGªBAÈ ACT
Overweight
If you want to switch on the weighing-in aid, press the «Target weight
(Weighing-in aid)».
In the factory the weighing-in aid is switched off (“OFF”).
You can use the «Scroll up» and «Scroll down» keys to select either the
“Weighing-in aid passive” or “Weighing-in aid aktive” setting.
If the “Weighing-in aid passive” setting is selected, the weighing-in aid is
switched on and a target weight can be defined. With this setting the drying
process can be started even if the sample weight lies outside the set limits.
These are defined by the target weight and the sample weight tolerance as
a % of the target weight (see below).
With the weighing-in aid set at “Weighing-in aid active” the drying process
cannot be started if the sample weight is outside the set limits. You are
therefore compelled to weigh in the correct quantity of sample, and are
prevented from inadvertently starting the drying process with the wrong
sample weight.
After selecting the desired mode for the weighing-in aid, confirm your
selection by pressing the «Accept entry» key.
TAR‚ “500
Enter the desired target weight (0,100 g to 80,000 g) (Factory setting:
g
2.5 g) and confirm with the «Accept entry» key.
Page 33

Section 4 – Practical application of your Moisture Analyzer
33
BA®LI˚ 10
%
weight tolerance in the range 1% to 25%. The sample weight tolerance
(Factory setting: 10%) defines the lower and upper sample weight limits.
Confirm your entry with the «Accept entry» key.
The symbols of the weighing-in aid appear in the display after you have tared
the balance.
How the weighing-in aid operates
Before the start of weighing (standby mode)
Start of weighing (sample weight too low)
Lower weight limit reached (sample weight in tolerance range). The status
display (user guide) indicates with its flashing ‘rising bubble’ graphic that
the instrument is ready to run.
You can now use the «Scroll up» and «Scroll down» keys to define the sample
Target weight reached (sample weight in tolerance range). The status
display (user guide) indicates with its flashing ‘rising bubble’ graphic that
the instrument is ready to run.
Upper weight limit reached (sample weight in tolerance range). The status
display (user guide) indicates with its flashing ‘rising bubble’ graphic that
the instrument is ready to run.
Upper weight limit exceeded (sample weight too high)
After initiation of the measurement with the «Start» key, the bars of the
weighing-in aid disappear.
Page 34

Practical application of your Moisture Analyzer – Section 4
34
4.8 Comment line
You have the possibility of adding a freely defined comment to your measurement records. The alphanumeric
comment line can contain up to 20 characters and is method-specific. To enter a comment, proceed as follows:
-MOISTURE DETERMINATIONMETTLER TOLEDO
Halogen MoistureAnalyzer
Type: HG63
SNR: 1234567890
SW: 2.01
Method:
05 QUALITY CHECK
Standard drying
1
2
2A
0...9
0...9
Code
Press the «Code» key. The input field for the record header comment appears.
If a comment has been entered previously, it appears in the display. The
procedure for changing existing comments is described later. If you want to
enter a new comment, or completely overwrite an old one, proceed as
follows:
Press the «0…9»key. A flashing “1” appears at the first input position on the
extreme left and signals that the instrument is ready for your entry.
You can now use the «Scroll up» and «Scroll down» keys to select the first
character of the comment or a special character (A…Z, +, –, etc.).
Confirm your selection with the «0…9»key. The flashing “1” again appears,
but at the second position.
Code
Enter a further character of the desired comment as described above.
Notes
–A space is symbolized by an underline character “_”.
– You can remove wrong characters with the «Delete» key and then correct
your entry.
Changing a comment line
If you want to change an existing comment (e.g. increasing a sample
number, entering a serial number), proceed as follows:
Press the «Code» key. The most recently saved comment appears.
Press the «Delete» key. A flashing dash appears after the last character,
indicating input mode.
Page 35

CHARGE 1]0
0...9
0...9
Section 4 – Practical application of your Moisture Analyzer
35
With the «0…9» key you can then add further characters directly.
By pressing the «Delete» key a second time you can delete the last character.
The second last character flashes and can be changed using the numeric
keypad or the «Scroll up» and «Scroll down» keys, or confirmed with the
«0…9» key. Further characters can then be added as described above.
As soon as you have finished entering your comment, press the «Accept
entry» key to quit the input mode (the flashing character will also be
accepted). From now on your comment will be automatically printed out on
each measurement record.
Displaying the comment line during measurement
By pressing the «Code» key you can display the current comment for 3
seconds during the drying.
Page 36

Practical application of your Moisture Analyzer – Section 4
36
4.9 Information on the measurement record
If your instrument has a built-in printer and this is activated in the menu, the intermediate values will be printed out
at the preselected intervals and the final result recorded on completion of the measurement.
The measurement record contains the following data (from top to bottom):
A -MOISTURE DETERMINATION-
B METTLER TOLEDO
Halogen MoistureAnalyzer
C Type: HG63
D SNR: 1234567890
E SW: 2.01
F Method:
05
G QUALITY CHECK
H Switchoff mode F
I Standard drying
J Drying temp. 105 ° C
K Disp.mode 0...-100 %MC
L Start weight 2.507 g
001:00 min -2.51 %MC
M
002:00 min -3.39 %MC
003:00 min -3.71 %MC
N Total time 3:19 min
O Dry weight 2.412 g
P End result -3.79 %MC
Q ----30.06.03---15.14----
1 mg /00035 sec
A Record title
B Manufacturer and Designation of the instrument
C Type of the instrument
D Serial number of the instrument
E Version number of the software
F Number of the selected method (see Section 5)
G Comment line
H Selected switch-off criterion (or set drying time)
I Selected drying program
J Drying temperature (set temperature)
K Selected display mode
L Sample weight at start of drying
M Measured value at each print interval (the number of recorded measured
values depends on the selected print interval and the measurement time)
N Total time of drying
O Dry weight of the sample in grams
P Final result in the selected display mode
Q Date and time at the end of the measurement
Note: You will find information on the dimensions of the results (% MC,
%DC, %AM and % AD) in Section 4.5.
Reset
2
000:20 min -0.73 %MC
000:24 min --->
000:28 min <---
000:30 min -0.86 %MC
007:30 min -24.73 %MC
008:00 min -24.55 %MC
>>>>>>>> ABORT <<<<<<<<<
----30.06.03---15:26----
Special events are recorded in the measurement record as
follows:
In the manual operating mode of the automatic sample cham-
ber, the sample chamber was opened and closed during the
drying operation. When the automatic sample chamber is open,
drying is interrupted and then continued when the chamber is
closed.
The «Reset» key has been pressed. The drying process is aborted
and the measurement result at the time of the abort is not evaluated
as it could be wrong.
Page 37
Section 4 – Practical application of your Moisture Analyzer
37
The drying process has been stopped manually with the «Stop»
Stop
Total time 8:47 min
Dry weight 1.916 g
End result -24.67 %MC
>>>>>>>> MANUAL <<<<<<<<
----30.06.03---15:27----
key. The elapsed drying time at the time of the stop and the
measurement result are recorded. Please note that with manual
stop the final result only shows the moisture content after the
manually determined total duration.
4.10 Performing a measurement
You are now familiar with all the parameters of your Moisture Analyzer and have defined all values for your sample.
The instrument is now ready for the determination of your own samples. In this Section you will learn how to perform
measurements, print out the measurement results and stop the measurement process.
Switch the instrument on with «On/Off» key.
On/Off
2
The status display (User guide) symbolizes the initial status of the instrument
when the automatic sample chamber is closed.
Press the «Open/close auto sample chamber» key and …
… the automatic sample chamber opens.
Always ensure sufficient free space in front of the instrument since the
emerging sample chamber could knock over objects in its path or push them
off the bench.
The status display (User guide) now prompts you to load the empty sample
pan and tare the balance.
Page 38

Practical application of your Moisture Analyzer – Section 4
38
Position the empty sample pan in the sample pan handler. Place the sample
pan handler in the automatic sample chamber. Ensure that the tongue of the
sample pan handler lies exactly in the slot of the draft shield element. The
pan must lie flat in the pan holde.
Note: We advise you to work with the sample pan handler at all times. The
pan handler is ergonomic, safe and provides protection against burns due
to the hot sample pan.
Press the «Tare (zero)» key. This sets the integral balance to zero. For taring
#
the automatic sample chamber closes briefly then opens again.
Following taring, the status display prompts you to add the sample to the
sample pan.
Start
Add the sample to the sample pan. If you are working with the weighing-in
aid, weigh the sample (minimum weight 0.1 g) using the bar display as
explained in the Section 4.7.
The status display now prompts you to start the drying process.
Press the «Start» key and …
Page 39

-|84
101
≠30
Section 4 – Practical application of your Moisture Analyzer
39
… the motorized, automatic sample chamber closes. The instrument starts
the drying and measurement.
You can follow the measurement process in the display: The status display
uses ascending bubbles to symbolize the drying process with the following
values being continuously updated and displayed:
– current temperature in the heating module
Note: You can use the «Drying temperature» key to display the preselected
drying temperature (current set temperature) for 2 seconds.
– elapsed time since the start of the measurement process
Note: If you have selected the switch-off criterion “Timed switch-off”, the
elapsed drying time will be displayed. You can display the preselected
drying time for 2 seconds with the «Drying time» key.
– current result in the preselected display mode
You can select a different display mode with the function key at any time
even during the measurement.
If your instrument has the built-in printer and this has been activated, the
measured values are printed out at the preselected intervals. You can use the
«Print» key to output the intermediate result manually on the printer at any
time. The units of the intermediate result are as defined in the preselected
display mode and can therefore be changed during the drying process by
pressing the «Display mode» function key. You will find an explanation of the
measurement record in the Section 4.9.
As soon as the preselected switch-off criterion is met (or the selected drying
time has elapsed), an audio signal sounds. The measurement process is
now ended and the sample chamber automatically opens.
Warning: Pan and sample may still be hot! Allow them to cool before you
remove the pan from the handler!
Page 40

Practical application of your Moisture Analyzer – Section 4
40
Note: You can also manually stop the measurement process prematurely
Stop
59
‹10
ENfl -1Ç52
at any time by pressing the «Stop» key. With a measurement time of
minimum 30 seconds or more, the result will be printed out at the time of the
stop. If you abort a measurement process earlier or by using the «Reset» key,
the measurement result will not be displayed.
You can now read off the measurement result in the display. You will find
information on the interpretation of the measurement results in Section 9.1.
The result and time display remain at their final values, whereas the
temperature continues to be updated.
Carefully remove the sample pan handler from the automatic sample
chamber.
2
Reset
On/Off
Press the «Reset» key to delete the final result and the time display.
The display can also be cleared with the «Tare/zero» key. This facilitates
efficient working if the next empty sample vessel has already been loaded.
If you do not wish to perform another measurement, switch the instrument
off with the «On/Off» key. After this operation, the sample chamber automatically closes.
Page 41

Section 4 – Practical application of your Moisture Analyzer
4.11 Test measurement
You can use this function only if your instrument is fitted with a printer!
41
--- TEST MEASUREMENT --METTLER TOLEDO
Halogen MoistureAnalyzer
Type: HG63
SNR: 1234567890
SW: 2.01
Method:
05
QUALITY CHECK
Switchoff mode T
Standard drying
Drying temp. 120 ° C
Disp.mode 0...-100 %MC
Start weight 2.543 g
000:00 min -0.00 %MC
000:30 min -1.96 %MC
004:30 min -13.80 %MC
005:30 min -14.39 %MC
Switchoff mode 1
Time 5:37 min
Result -15.14 %MC
-2.158 g
If you wish to work with the switch-off criterion “Weight loss per unit of
time” and are not familiar with the behavior of the sample, the test
measurement will help you select the suitable setting.
The diagram opposite illustrates the progress of a drying. The points at
which the individual switch-off criteria were reached (1–5) are marked.
MC (%)
-20
-15
-10
-5
0
0 1 2 3 4 5 6 7 8 9 10 11
t
2
1
4
3
5
Test measurement procedure
Press “t” («Switch-off criterion» function key) to perform a test measurement. You perform a test measurement just like any other measurement.
You will find further information on how to perform the measurement in
Section 4.10.
Printing out the test measurement
During the test measurement a record is printed out which explains
exactly when and with what measurement result each switch-off criterion
was reached. The test procedure can be ended at any time with the «Stop»
key. Automatic switch-off follows after a measurement time of 8 hours.
007:00 min -15.28 %MC
007:30 min -15.42 %MC
Switchoff mode 2
Time 7:42 min
Result -15.81 %MC
11:00 min -16.56 %MC
Switchoff mode 5
Time 11:22 min
Result -16.91 %MC
Total time 12:33 min
Dry weight 2.108 g
End result -17.11 %MC
>>>>>>>> MANUAL <<<<<<<<
----30.06.03---15:28----
-2.141 g
-2.113 g
Page 42

Methods facilitate your work – Section 5
42
5 Methods facilitate your work
Methods simplify and accelerate your daily work. In this Section you will learn how you compile, print out and change
methods and how to use them. You will also become acquainted with the journal function and the statistics. You
will find an overview diagram of all menu options in Section 5.4.
5.1 What is a method?
Perhaps you remember: In Section 4 you became acquainted with all the parameters and setting possibilities you
can use to match your Moisture Analyzer to a particular measurement task. If you have to change samples frequently
during your work, the methods save you having to reenter the parameters and preclude wrong settings. Methods
thus make it easier for you to switch between different types of samples.
A method contains all settings for a particular sample. It can be recalled at
Methods
a keystroke and your instrument immediately operates with the corresponding settings. You have 10 methods freely available.
Methods
Margarine 1
Drying prog.: Standard drying
Drying temp.: 70 °C
Switchoff criterion:
Drying time: --------
Display mode result: MC (moisture content)
Print interval: 30 sec.
Target weight: 2.500 g
Loss < 1 mg/50 Sec.
The following parameters, which you have already learned in Section 4, form
part of a method:
1
2
3
4
5
6
7
8
9
10
4
– Drying program
– Drying temperature
–Switch-off criterion
– Drying time (depends on switch-off criterion)
– Display mode
– Print interval
– Target weight for weighing-in aid
– Settings in the Method menu (Section 5.4)
Work with methods is divided into two stages: in the setting stage you define
the parameters of the method and name the method. In the utilization stage
you perform routine measurements with different samples. When switching
from one sample to the next, you do not have to change any settings, you
need simply select the method suitable for the sample. You will find
information on how to use and set up of methods in the following Sections.
Page 43

Section 5 – Methods facilitate your work
43
5.2 Recalling a method
To activate all settings for a particular sample, simply call up the associated method. After recall of the method, all
appropriate settings become immediately active.
To recall an existing method (consult the next section for information on how
to compile methods), proceed as follows:
Press the «Method» key. The fixed method numbers (01-10) flash on the
Method
01
02
screen.
Now use the «Scroll up» and «Scroll down» keys to select the method. Then
press the «Accept entry» key.
All settings of the selected method are now active and you can immediately
perform your measurement.
105
Ò10
02 -|48
During the measurement the number of the active method (e.g. method
number 02) is displayed.
%
5.3 Changing methods
When you put your Moisture Analyzer into operation for the first time, all 10 methods are identical and are allotted
the factory setting for all parameters. You can change the parameters of a method at any time (except when a
measurement is running or the settings are protected against change as described in Section 6.13).
The compilation of a new or the modification of an existing method comprises 2 steps:
– Selecting a method (01 - 10)
– Selection of the settings
Page 44

Methods facilitate your work – Section 5
44
Selecting a method
Method
01
05
Press the «Method» key.
Now use the «Scroll up» and «Scroll down» keys to select the method you
wish to change.
Selecting the settings
The selected method is now ready for the entry or change of the parameters.
Now use the appropriate keys to match the following parameters to your
measurement task:
– Drying program
– Drying temperature
–Switch-off criterion
– Drying time (dependent on switch-off criterion)
%
Please consult Section 4 for the meaning of the individual parameters and details on how to proceed.
All settings are assigned to the selected method and automatically stored.
After you have completed all settings, your instrument is ready for measurement with the new or changed method.
Notes:
– The methods can be protected in the menu against changes (see Section 6.13).
– Display mode
– Print interval
– Target weight for weighing-in aid
Page 45

Section 5 – Methods facilitate your work
45
5.4 Method menu
If you press the «Method» key followed by the «Menu» key, the Method menu opens.
You can define the following settings here: Free switch-off criterion (1 mg to 10 mg / 5 sec to 180 sec), Free factor
-MC (0.500 to 2.000), Free factor F.F.G (1 to 100) and Method compilation.
Method
Menu
Free switch-off criterion
(= switch-off criterion F)
Free factor -MC
(correction factor)
ƒSOé
ƒƒ-Mé
NONO
NO
NONO
YES
NONO
NO
NONO
YES
'W†M‚'W†M‚
'W†M‚ 1
'W†M‚'W†M‚
'SE© 100
±000
POSPOS
POS
POSPOS
(1-10 mg)
(5-180 sec)
(0.500-2.000)
NEG
Free factor g
(calculated result)
ƒƒ‚
NONO
NO
NONO
YES
10
(1-100)
5.5 Freely selectable switch-off criterion
The free switch-off criterion (= switch-off criterion F) is based on the principle of the mean weight loss per unit of
time. As soon as this drops below the preset value, the measurement is automatically ended.
Method
ƒSOé NO
ƒSOé YES
' W†M‚ 1
Menu
Press the «Method» key followed by the «Menu» key to open the Method
menu.
The free switch-off criterion is deactivated (“NO”) as the factory setting.
If you wish to set a free switch-off criterion, use the «Scroll up» and «Scroll
down» keys to select “YES” and then press «Accept entry» to confirm.
A flashing 1 will appear in the display. Then use the «Scroll up» and «Scroll
down» keys to enter the weight loss (1 mg to 10 mg) in 1 mg increments.
Press the «Accept entry» key to confirm your input.
Page 46

Methods facilitate your work – Section 5
46
Now enter the time in the flashing field. You can alter it in 5-second
' SEé 100
increments using the «Scroll up» and «Scroll down» keys. Enter any second
value between 5 and 180. Press the «Accept entry» key to confirm your
input.
Note: To perform a measurement with a free switch-off criterion, it must be
defined in the Method menu. “F” must also be selected as the switch-off
criterion (see Section 4.4).
5.6 Free factor (-MC)
The free factor F.F.-MC (0.500 to 2.000) for the moisture content can be defined in the Method menu. It is used
to calculate a corrected final result (e.g. in order to compensate for systematic deviations from the reference result).
Press the «Method» key followed by the «Menu» key to open the Method
Method
Menu
menu.
ƒƒ-Mé NO
ƒƒ-Mé YES
ƒƒ-Mé ±000
ƒƒ-Mé POS
End result -22.90 %MC
************************
Factor (-%MC): 1.100
Calculated end result:
-25.19 %MC
************************
End result 77.10 %DC
************************
Factor (-%MC): 1.100
Calculated end result:
74.81 %DC
************************
The free factor (-MC) is deactivated (“NO”) as the factory setting.
If you wish to set the free factor F.F.-MC, use the «Scroll up» and «Scroll
down» keys to select “YES” and then press «Accept entry» to confirm.
Now enter the factor in the flashing field. You can alter it using the «Scroll up»
and «Scroll down» keys. Enter any value between 0.500 and 2.000. Press
the «Accept entry» key to confirm your input.
You can specify whether the factor has a positive (“POS”) or negative
(“NEG”) sign.
The final result is multiplied by the method-specific factor (0.500 to 2.000)
in %MC display mode and highlighted on the printout as the calculated final
result.
In %DC display mode, if you define a free factor (-MC), the final result %DC
is converted by means of the formula below and highlighted on the printout.
%DC = 100 + (factor x %MC)
Note: In %AM, %AD or g display mode, the final result is not converted.
Page 47

Section 5 – Methods facilitate your work
47
5.7 Free factor (g)
The free factor F.F.G (1 to 100) can be defined regardless of the display mode setting - %MC, %DC, %AM, %AD
or g.
Press the «Method» key followed by the «Menu» key to open the Method
Method
ƒƒ‚ NO
ƒƒ‚ YES
ƒƒ‚ 10
Dry weight 0.038 g
************************
Factor (G): 20
Calculated end result:
0.760
************************
Menu
menu.
The free factor F.F.G is deactivated (“NO”) as the factory setting.
If you wish to set the free factor F.F.G, use the «Scroll up» and «Scroll down»
keys to select “YES” and then press «Accept entry» to confirm.
Now enter the factor in the flashing field. You can alter it using the «Scroll
up» and «Scroll down» keys. Enter any value between 1 and 100. Press the
«Accept entry» key to confirm your input.
In %MC, %DC, %AM or %AD display mode, defining a F.F.G does not
convert the final result.
5.8 Printing out methods parameters
To ensure you do not lose your overview of the 10 methods, you can record the parameters of a particular method.
Call up the desired method (if not already active):
Method
Press the «Method» key and select the method with the «Scroll up» and
«Scroll down» keys.
Confirm your selection with the «Accept entry» key.
Page 48

Methods facilitate your work – Section 5
48
-- METHODS-PARAMETERS --
METTLER TOLEDO
Halogen MoistureAnalyzer
Type: HG63
SNR: 1234567890
SW: 2.01
Method:
02 CHECK
Switchoff mode 3
Gentle drying
Drying temp. 150 ° C
Disp.mode 0...-100 %MC
Print interval 1:00 min
Target weight 2.500 g
00Active +/-10 %
----30.06.03---15:50----
Press the «Print» key. A list of all parameters for the selected method is
printed. Please consult Section 4 for the meaning of the individual parameters and settings. Depending on the settings, your record may look slightly
different.
Page 49

Section 6 – The menu (basic settings of the instrument)
49
6 The menu (basic settings of the instrument)
6.1 Menu operation
In this Section you will learn how to use the menu to define the settings your instrument uses for operation. You will
also find out how to adjust the integral balance and the heating module. The menu is a list of selection possibilities
which you can use to preselect the basic setting of your instrument. The menu comprises various options (you
will find an overview diagram of all menu options in Section 6.18). In addition to the settings (which are numbered
for clarity), certain functions (e.g. balance adjustment and heating module adjustment) can also be performed.
All menu settings are retained even in the event of a power failure.
Menu
∑CAˆ NO
Menu
∑CAˆ NO
Menu
∑CAˆ YES
Menu
4
STARÎ AUTø
---- KONFIGURATION ---1 Time 15:56
2 Date 30.06.2003
3 Vibrations Medium
4 Start Auto.
5 Beep Low
6 Key protection Off
7 Symbols On
8 Printer On
9 Methods On
----30.06.03---15:56----
Menu
Reset
Using the menu is simple:
Press the «Menu» key to call up the menu. The first menu option is balance
adjustment (Section 6.2). All other menu items can be accessed by pressing
the «Menu» or «Accept entry» key repeatedly.
You can use the «Scroll up» and «Scroll down» keys to switch between the
selection possibilities within the current menu items and hence select the
desired setting or execute the particular function.
Save changes
Once you have defined your setting in a menu option, press the «Accept
entry» key. The setting will be saved and the next menu option opened.
Do not save changes
If you close a menu option by pressing the «Reset» key, the changes made
in the current menu option will not be saved.
Print menu settings
If your instrument is equipped with a built-in printer, you can record all menu
settings. To do this simply press the «Menu» key followed by the «Print» key.
The following Sections will acquaint you with the individual menu items. The
order corresponds exactly to that in the menu.
Page 50

The menu (basic settings of the instrument) – Section 6
50
6.2 Adjusting the balance
In this menu item you can adjust the balance of your instrument. Consult Section 3.2 to learn when an adjustment
is necessary. Before selecting the adjustment function, ensure that the sample pan is in position. Following a drying,
you should wait at least 30 minutes before undertaking an adjustment.
Menu
∑CAˆ NO
Menu
∑CAˆ YES
52
∑CAˆ 5≠000
The factory setting in this menu item is “NO” (no balance adjustment).
Note: The number above the word “NO” shows the number of adjustments
performed to date.
If you wish to adjust the integral balance, select “YES” (using the «Scroll up»
or «Scroll down» key).
Press the «Accept entry» key to start the adjustment process. The sample
chamber automatically opens.
The flashing display then prompts you to enter the adjustment weight (50 g).
Note: Ensure that your instrument is in a suitable location (see Section 2.2).
g
Place the requested adjustment weight in the middle of the sample pan. The
weight is automatically recorded.
Note: The 50 g adjustment weight is available as optional equipment (see
Section 9.8).
52
∑CAˆ ≠000
The instrument stores the determined weight value and the display prompts
you to lift off the adjustment weight.
g
Remove the adjustment weight.
This concludes the adjustment of the balance and the instrument automatically quits the menu and returns to the standby mode. The Moisture Analyzer
is now ready for further measurements.
Page 51

Section 6 – The menu (basic settings of the instrument)
51
A -- BALANCE ADJUSTMENT --
B 30.06.2003 14:48
C METTLER TOLEDO
Halogen MoistureAnalyzer
D Type: HG63
E SNR: 1234567890
F SW: 2.01
G Balance-Adjustment 159
H Weight ID:
........................
I Weight: 50.000 g
J Adjustment performed
Signature:
........................
---------- END ---------
If your instrument is equipped with the built-in printer and this is activated
(see Section 6.15), on completion of the balance adjustment an adjustment
record will be automatically printed out with the following data:
A Record title
B Date and Time of the record printout of the balance adjustment
C Manufacturer and Designation of the instrument
D Type of the instrument
E Serial number of the instrument
F Version number of the software
G Identification (consecutive number) of the balance adjustment, allows
assignment of the measurement record to the appropriate adjustment
record
H Field for entry of the number of the adjustment weight used
I Adjustment weight used
J Field for signature of the person who performed the balance adjustment
Please enter the number of the adjustment weight used, sign the record and
store it in a safe place. This assures traceability, one of the basic requirements of every quality assurance system.
In the “W.CAL” menu you can print out the latest adjustment record at any
time by pressing the «Print» key.
Only one original copy (with signature
field) can be printed, however.
6.3 Testing the balance
In this menu option you can test the balance on your instrument.
Checking balance adjustment
Menu
The factory setting in this menu item is “NO” (no balance adjustment).
∑CAˆ NO
Menu
To test (calibrate) the integral balance, use the «Scroll up» or «Scroll down»
keys to select “TEST”.
∑CAˆ TEST
Note: Ensure that your instrument is in a suitable location (see Section 2.2).
Press the «Accept entry» key to start the test procedure. The sample chamber
opens automatically.
The flashing display then prompts you for the test weight.
∑CAˆ 5≠000
g
Place the test weight on the balance. The rest of the procedure then continues
automatically.
Page 52

The menu (basic settings of the instrument) – Section 6
52
The display then shows you the recorded weight.
∑CAˆ 5≠001
g
The test record is printed out automatically.
A ----- BALANCE-TEST -----
B 30.06.2003 14:48
C METTLER TOLEDO
Halogen MoistureAnalyzer
D Type: HG63
E SNR: 1234567890
F SW: 2.01
G Weight ID:
........................
H Set Weight: 50.000 g
I Act. Weight: 50.001 g
J Test performed
Signature:
........................
---------- END ---------
The balance test record contains the following information.
A Record title
B Date and Time of the record printout of the balance adjustment
C Manufacturer and Designation of the instrument
D Type of the instrument
E Serial number of the instrument
F Version number of the software
G Field for entry of the number of the adjustment weight used
H Test weight used (= set weight)
I Recorded weight (= actual weight)
J Field for signature of the person who performed the balance test
In the “W.CAL” menu you can print out the latest test record at any time by
pressing the «Print» key.
Only one original copy (with signature field) can
be printed, however. The test record is only printed if the balance test was
performed after the last balance adjustment.
6.4 Adjusting the heating module
In this menu item you can adjust the temperature control of the heating module. Consult Section 3.2 to learn when
an adjustment of the heating module is necessary. We advise you to wait at least 30 minutes after a drying operation
(or previous heating module adjustment) before performing the adjustment.
Menu
†CAˆ NO
Menu
†CAˆ YES
The factory setting in this menu item is “NO” (no heating module
adjustment).
Note: The number above the word “NO” shows the number of adjustments
performed to date.
If you wish to adjust the heating module, select “YES” (using the «Scroll up»
or «Scroll down» key).
Page 53

Start
Section 6 – The menu (basic settings of the instrument)
53
Press the «Accept entry» key to start the adjustment process. The sample
chamber automatically opens and you are prompted to insert the temperature adjustment set.
Note: The temperature adjustment set is available as an accessory (see
Section 9.8).
Remove the sample pan holder from the automatic sample chamber.
Place the temperature adjustment set (together with the sample pan handler)
in the sample chamber.
Note: Ensure that your instrument is in a suitable location (see Section 2.2).
Press the «Start» key to initiate the adjustment process. The automatic
sample chamber closes and the heating module adjustment starts.
†CAˆ 100
†CAˆ 104
†JUSÎ 156
100
⁄30
The heating module is heated to a temperature of 100 °C. You can follow this
process in the temperature display. The instrument waits for 15 minutes until
the temperature adjustment set is displaying the temperature correctly. At the
end of this time a continuous audio signal sounds.
Read the temperature on the temperature adjustment set through the
inspection window in the heating module and use the «Scroll up» and
«Scroll down» keys to enter the value (NB: 1 graduation mark = 2 °C). After
entering the value, press the «Accept entry» key. The temperature must be
entered within 10 minutes of the audio signal sounding, otherwise the
adjustment process will be terminated and an error message outputted.
As this adjustment is a two-point adjustment (adjustment of the temperature
is defined by two points, namely 100 °C and 160 °C), the heating module
now heats to the second temperature (160 °C) . Proceed exactly as you did
for the first temperature. After you have confirmed your entry with the «Accept
entry» key, the adjustment is at an end.
On completion of the adjustment, the sample chamber automatically opens
and you can remove the sample pan handler with the temperature adjustment set.
Page 54

The menu (basic settings of the instrument) – Section 6
54
Warning: On completion of the heating module adjustment, the instrument
automatically quits the menu and returns to the standby mode. It is now
ready for further measurements.
On completion of the heating module adjustment, the instrument automatically quits the menu and returns to the standby mode. It is now ready for
further measurements.
The adjustment record is printed out automatically:
A - HEATING MODULE ADJUST-
B 30.06.2003 14:50
C METTLER TOLEDO
Halogen MoistureAnalyzer
D Type: HG63
E SNR: 1234567890
F SW: 2.01
G Heating module adj. 43
H Adjustment set ID:
........................
I Temperature 100°C: 101°C
J Temperature 160°C: 162°C
A Record title
B Date and Time of the record printout of the balance adjustment
C Manufacturer and Designation of the instrument
D Type of the instrument
E Serial number of the instrument
F Version number of the software
G Identification (consecutive number) of the heating module adjustment,
allows assignment of the measurement record to the appropriate adjustment record
H Field for entry of the number of the temperature adjustment set used
K Adjustement performed
Signature:
(number is printed on the set)
I Set and actual temperature for the first adjustment point
........................
---------- END ---------
J Set and actual temperature for the second adjustment point
K Field for signature of the person who performed the heating module
adjustment
Enter the number of the temperature adjustment set, sign the record and store
it in a safe place. This assures traceability, one of the basic requirements of
every quality assurance system.
In the “T.CAL” menu you can print out the latest adjustment record at any time
by pressing the «Print» key.
be printed, however.
Only one original copy (with signature field) can
6.5 Testing the heating module
In this menu option you can test the temperature control on the heating module.
Menu
†CAˆ NO
Menu
†CAˆ TEST
Check the heating module adjustment with TEST
The factory setting in this menu item is “NO” (no heating module
adjustment).
To check the last heating module adjustment at 100 °C and 160 °C, use
the «Scroll up» or «Scroll down» keys to select “TEST”. Press the «Accept
entry» key to confirm your selection.
Page 55

†TESÎ
Start
Section 6 – The menu (basic settings of the instrument)
55
Press the «Accept entry» key to start the test procedure. The sample chamber
opens automatically and you are prompted to insert the temperature
adjustment set.
Note: Ensure that your instrument is in a suitable location (see Section 2.2).
With the HA-TCC temperature adjustment set, the H
G63 can maintain a
tolerance of +/- 3°C.
Press the «Start» key to initiate the test procedure. The sample chamber
closes and the test for the two-point heating module adjustment begins.
Now proceed as for the standard two-point heating module adjustment.
The test record is printed out automatically.
The heating module test record contains the following information.
A --- DRYER UNIT TEST ---
B 30.06.2003 14:48
C METTLER TOLEDO
Halogen MoistureAnalyzer
D Type: HG63
E SNR: 1234567890
F SW: 2.01
G Adjustment set ID:
........................
H Set Temperature: 100 °C
I Act. Temperature: 101 °C
J Set Temperature: 160 °C
K Act. Temperature: 161 °C
L Test performed
Signature:
........................
---------- END ---------
A Record title
B Date and Time of the record printout of the balance adjustment
C Manufacturer and Designation of the instrument
D Type of the instrument
E Serial number of the instrument
F Version number of the software
G Field for entry of the number of the temperature adjustment set used
(number is printed on the set)
H Set temperature (first temperature) for the test adjustment
I Actual temperature (first temperature) for the test adjustment
J Set temperature (second temperature) for the test adjustment
K Actual temperature (second temperature) for the test adjustment
L Field for signature of the person who performed the heating module test
In the “T.CAL” menu you can print out the latest test record at any time by
pressing the «Print» key.
Only one original copy (with signature field) can
be printed, however. The test record is only printed subsequently if the
heating module test was performed after the last heating module adjustment.
Page 56

The menu (basic settings of the instrument) – Section 6
56
6.6 Resetting to the factory settings
In this menu item you have the possibility the reset the basic settings of the instrument to the factory setting.
Warning! With the exception of the time, date and dialog language, all
individual settings (incl. the method memory) you have made in the
menu will be lost and replaced by the factory settings! Journal and
statistics data will be deleted.
Menu
FC†SEÎ NO
The factory setting in this menu item is “NO”. If you really wish to delete
your individual menu settings, select “YES” and confirm this with the «Accept
entry» key.
Menu
FC†SEÎ YES
Menu
ABORT?
For reasons of safety, you are again asked if you really wish to delete your
data. You can abort the procedure at this point or delete the data, i.e. reset
to the factory settings. Confirm your selection with the «Accept entry» key.
Menu
SET?
6.7 Clearing the method memory
The method memory contains the individual settings for your measurements (switch-off criterion, display mode,
print interval, etc.). This menu item allows the method memory to be cleared. Your settings will be replaced by the
factory settings.
Warning! If the method memory is cleared, you will lose all individual
settings with the exception of the settings in the menu!
Menu
µCLÈ NO
Menu
µCLÈ YES
ABORT?
CLEAR?
The factory setting in this menu item is “NO”. If you really wish to clear the
method memory, select “YES” and confirm this with the «Accept entry» key.
For reasons of safety, you are again asked whether you really wish to clear
the method memory. You can abort the procedure at this point or clear the
memory. Confirm your selection with the «Accept entry» key.
Page 57

Section 6 – The menu (basic settings of the instrument)
57
6.8 Setting the time
In this menu item you enter the current time. This is necessary when putting your instrument into operation for the
first time and for possible corrections (e.g. changeover from summer to winter time).
Menu
TIMË 1‹04
1
Set the time with the «Scroll up» and «Scroll down» keys (Range 00:00–
23:59).
Confirm your setting with the «Accept entry» key and the instrument stores
Menu
1
the time.
TIMË 1Æ28
6.9 Entering the date
In this menu item you enter the current date. This is necessary when putting the instrument into operation for the
first time and for possible corrections.
Menu
DAÎ 2{0“03
Menu
DAÎ 0[0#03
2
2
Set the date with the «Scroll up» and «Scroll down» keys in the format “Day
– Month – Year” (DD.MM.YY). Confirm your entry with the «Accept entry» key
and your instrument stores the date.
Note: If US English is used as the dialog language, the entry has the format
“Month – Day – Year” (MM/DD/YY).
6.10 Setting the vibration adapter
You can use the vibration adapter to match your instrument to the ambient conditions at its location.
The following settings are available:
Menu
VIBRÅ LOW
Menu
VIBRÅ ME∂
Menu
VIBRÅ HIGH
3
3
3
Setting for very stable ambient conditions. The instrument operates quickly
but is sensitive to vibrations.
Setting for normal ambient conditions. This is the factory setting.
Setting for unstable ambient conditions. The instrument operates more
slowly but is less sensitive to vibrations.
Select the appropriate setting and confirm your selection with the «Accept
entry» key.
Page 58

The menu (basic settings of the instrument) – Section 6
58
6.11 Selecting operating mode of the automatic sample chamber
In this menu item you can choose whether the automatic sample chamber should operate automatically or
manually. Your instrument is set in the factory to the automatic operating mode. We advise you to use the manual
operating mode for samples which contain readily volatile substances. In contrast to the automatic operating mode,
in the manual operating mode the sample chamber does not automatically close when the «Start» key is pressed.
However, the initial weight (wet weight) important for the determination of the moisture content is recorded. In the
manual operating mode you have time for further preparation of the sample (e.g. mixing with quartz sand or even
distribution of the sample) while weight losses due to evaporation during the preparation time are measured from
the outset. As soon as the sample is ready for drying, press the key «Open/close auto sample chamber». The
automatic sample chamber closes and drying starts. In the manual operating mode you yourself can open the
sample chamber during a drying operation. In contrast to the automatic mode, drying will not be stopped but simply
interrupted until the automatic sample chamber is closed again.
Menu
STARÎ AUTø
Menu
4
The factory setting in this menu item is “AUTO.” (automatic operating
mode). If you wish to switch to the manual operating mode, select “MAN.”
and confirm this with the «Accept entry» key.
4
STARÎ MA~
6.12 Audio signal
Many processes are signalled by an audio signal (e.g. end of drying, entries, error messages, etc.). In this menu
item you can select whether the audio signal should be loud, soft or switched off.
The following settings are available:
Menu
5
BEE∏ OF F
Menu
5
BEE∏ LO W
Menu
5
BEE∏ HIGH
No audio signal
Soft signal (Factory setting)
Loud signal
Select the desired setting and confirm with the «Accept entry» key.
Note: The alarm clock symbol in the display indicates that an audio signal
has been activated in the menu.
Page 59

Section 6 – The menu (basic settings of the instrument)
59
6.13 Protecting your settings against change
You can protect the settings of your methods parameters (e.g. switch-off criterion, drying temperature, etc., see
Section 4) against change by locking the appropriate keys for entries.
Menu
KE¥PROÎ OFF
6
The instrument is set in the factory to allow the parameters to be changed
(“PROT: OFF”).
Menu
KE¥PROÎ ON
6
If you wish to protect the settings against change, selection “PROT: ON” and
confirm this with the «Accept entry» key.
The display shows the padlock symbol and the following settings can then
no longer be changed:
–Switch-off criterion
– Drying program
– Display mode
– Print interval
– Drying temperature
– Drying time
– Target weight of the weighing-in aid
If you press one of the locked keys, an audio signal and an error message
(see Section 8.2) draw your attention to the nonavailability of the corresponding function.
6.14 Superimposing or removing the function symbols
In this menu item you can select whether the function symbols should always be visible or only when needed. In
routine operation, the display is easier to survey if the symbols are faded out.
Menu
7
In the factory the symbols are switched on (“ON”).
SYMBOˆ ON
Menu
7
SYMBOˆ OFF
If you wish to switch off the symbols, select “OFF” and confirm this with the
«Accept entry» key.
Note: If you switch off the function keys, they will be displayed for around 30
seconds when the instrument is switched on and then faded out. If one of the
function keys is pressed, the function symbols will be shown immediately
and then faded out again 30 seconds after a function key has last been
pressed.
Page 60

The menu (basic settings of the instrument) – Section 6
60
6.15 Switching the printer on or off
In this menu item you can switch the built-in printer on or off.
Menu
PRINÎ ON
8
In the factory this item is switched on (“ON”).
Menu
PRINÎ OFF
8
If you wish to switch the printer off, select “OFF” and confirm this with the
«Accept entry» key.
6.16 Switching the method option on or off
If you do not wish to work with methods (see Section 5), you can switch off the method options in this menu item.
This simplifies operation of the instrument if you work only with one type of sample and consequently do not require
the possibilities offered by the methods.
Menu
9
MET· ON
Menu
9
MET· OFF
In the factory the method option is switched on (“METH: ON“).
To switch the method option off, select “METH: OFF” MET· OFF and confirm
this with the «Accept entry» key. You now no longer have the possibilities of
the method option available.
Page 61

6.17 Selecting the dialog language
In this menu item you specify the dialog langauge.
Menu
DEUTSCH
Select the desired dialog language and then confirm your entry with the
«Accept entry» key.
Section 6 – The menu (basic settings of the instrument)
61
Menu
FRANCAIS
Menu
ITALIANO
Menu
ESPANOL
Menu
RUSSIAN
Menu
ENGLISH EU
Menu
ENGLISH US
The following languages are available:
– German (“Deutsch”)
– French (“Français”)
– Italian (“Italiano”)
– Spanish (“Español”)
– Russian (“Russian”)
– British English (“English EU”)
–American English (“English US”)
Note: If you select American English (“English US”) as the dialog language,
the date format is changed and appears on all records in the American
notation (month/day/year).
Page 62

The menu (basic settings of the instrument) – Section 6
62
6.18 Menu overview HG63
Menu
▼
Functions
Balance-Adjustment
and -Test
∑CAˆ
NONO
NO
NONO
YES
TEST
▼
▼
Activate/deactivate 7
symbol display
SYMBOˆ
ONON
ON
ONON
OFF
Heating module-Adjustment
and -Test
Reset to factory
settings
Clear method memory
clear completely
Settings
Enter current 1
time
Enter current 2
date
Set vibration 3
adapter
Automatic/manual 4
sample champer
Set audio signal
Protect settings 6
†CAˆ
FC†SEÎ
µCLÈ
TIMË
DAÎ
VIBRÅ
STARÎ
BEE∏
KE¥PROÎ
NONO
NO
NONO
YES
TEST
NONO
NO
NONO
YES
NONO
NO
NONO
YES
1‹041‹04
1‹04
1‹041‹04
2{0“032{0“03
2{0“03
2{0“032{0“03
MEflMEfl
MEfl
MEflMEfl
HIGH
LOW
AUTøAUTø
AUTø
AUTøAUTø
MA~
LOWLOW
LOW
LOWLOW
HIGH
OFF
OFFOFF
OFF
OFFOFF
ON
ABORT?ABORT?
ABORT?
ABORT?ABORT?
SET?
ABORT?ABORT?
ABORT?
ABORT?ABORT?
CLEAR?
Switch built-in 8
printer on/off
Activate/deactivate 9
method option
Select dialog
language
▼
PRINÎ
MET·
DEUTSCHDEUTSCH
DEUTSCH FRANCAIS
DEUTSCHDEUTSCH
ONON
ON
ONON
OFF
ONON
ON
ONON
OFF
ITALIANO
ESPANOL
RUSSIAN
ENGLISH EU
ENGLISH US
▼
Selecting the setting within a menu item:
Quits the menu without saving the last menu item
Reset
you changed
Saves the menu item and skips to the next menu
item
For information on the separate Method menu, please refer to Section 5.4.
Menu
Calls up the next menu item
Select settings
Page 63

Section 7 – Servicing and replacing individual parts
63
7 Servicing and replacing individual parts
In this Section you will learn how to keep your Moisture Analyzer in good condition and how to replace expendable
parts. You also find information on how to check the printer and change the printer paper and ribbon.
7.1 Cleaning
To obtain precise measurement results, we advise you to clean the temperature sensor and the protective glass of
the heating modules at regular intervals. Please note the following directions for cleaning your instrument:
Disconnect the instrument from the power supply before cleaning.
Open the automatic sample chamber by pulling it out.
Remove the draft shield element and the sample pan holder before cleaning.
Use a lint-free cloth for cleaning.
Clean the exterior of the instrument and the drying compartment with a mild
cleaning agent. Although the housing is extremely rugged and resistant to
solvents, never use abrasive cleaning agents or solvents!
Ensure that no liquid enters the interior of the instrument.
To clean the temperature sensor and the protective glass of the heating module,
you should first open the heating module as described in Section 7.6.
Carefully remove any deposits from the black temperature sensor.
Page 64

Servicing and replacing individual parts – Section 7
3
64
To clean the protective glass of the heating module, dismantle the heating
module (see Section 7.6), place it on a flat work surface and clean the
protective glass with a commercial glass cleaner.
The air inlet of the fan is located at the rear of the instrument and its exterior
should be cleaned from time to time to free it from any dust deposits.
After the temperature sensor and/or the protective glass have been cleaned,
we recommend adjusting the heating module (Section 6.4).
7.2 Changing the printer paper and ribbon
Apart from the need to replace the printer paper and ribbon on occasion , the built-in printer requires no maintenance.
Changing the printer paper
The printer paper is changed as follows:
Open the cover of the built-in printer.
Pull any remaining paper upwards out of the printing unit.
HR7
Insert a new roll of paper in the paper compartment and feed the paper
horizontally through the slot at the back of the printing unit.
H
R
7
3
H
aloge
n M
oistu
EJECT
re A
nalyzer
H
S
U
P
Press the «Paper feed» key until the leading edge of the paper exits the
printing unit at the top.
Lead the paper through the slot in the cover of the built-in printer and close
the cover.
H
R
7
3
H
a
lo
g
e
n
M
EJECT
o
is
tu
r
e
A
H
S
U
n
P
a
l
y
z
e
r
Page 65

H
R
7
3
H
a
lo
g
e
n
M
o
HR73
Halogen Moisture Analyzer
Section 7 – Servicing and replacing individual parts
65
Replacing the ribbon
When the print quality deteriorates, replace the ribbon as follows:
Open the cover of the built-in printer and press the projection marked “PUSH”
on the right of the ribbon cassette.
EJECT
is
t
u
re
A
n
H
S
U
P
a
ly
z
e
r
Pull the ribbon cassette up and out of the instrument and insert the new
cassette. Thread the paper between the ribbon and the cassette. Press the
cassette down as far as it will go until you hear it click into place.
EJECT
H
S
U
P
Tension the ribbon by turning the small wheel on the left of the cassette in
the direction shown by the arrow. After you have tensioned the ribbon, close
the cover of the printer.
Used ribbons must be disposed of in accordance with applicable
HR73
Halogen Moisture Analyzer
EJECT
H
S
U
P
customer and national regulations.
7.3 Replacing the power line fuses
If the display of your instrument remains “dark” after switching on, in all probability the power line fuses of the
instrument are blown.
To change the fuses, proceed as follows:
Disconnect the instrument from the power supply.
The two power line fuses (for neutral and phase) are located at the rear of
the instrument. Turn the two fuse holders with a screwdriver to the left and
pull the fuse holders out of the instrument.
Check the condition of both fuses. Replace blown fuses by those of the same
type with the same rated value (5 x 20 mm, T6, 3H 250 V).
Page 66

Servicing and replacing individual parts – Section 7
66
The use of fuses of a different type or with different values as well as the
bridging of fuses is not allowed and can hazard your safety and lead to
instrument damage!
7.4 Printer test
Your instrument has a function to check the proper functioning of the built-in printer.
Ensure that the instrument is switched off.
Press and hold the «Paper feed» key while simultaneously switching the
On/Off
On/Off
instrument on with the «On/Off» key. The printer prints out its complete
character set.
To stop the test, switch the instrument off with the «On/Off» key.
7.5 Installing the built-in printer
If your instrument is not already fitted with a built-in printer, you can order a printer as an option and retrofit it at
any time. You can also change the built-in printer yourself without any problems should this be necessary. The
procedure for installing the built-in printer is described in the 11780558 you received with the printer.
7.6 Dismantling and replacing the heating module
If a fault arises, the complete heating module can be replaced. We also advise you to open or dismantle the heating
module to clean the protective glass of the heating module (see Section 7.1).
Disconnect the instrument from the power supply and be sure to allow the
heating module to cool down for 10 minutes before you start the work!
The heating module is released by withdrawing the automatic sample
chamber 2-3 cm.
Page 67

Section 7 – Servicing and replacing individual parts
67
Swing the heating module upward.
Disengage the hinge of the heating module by turning the two yellow levers
90° forward.
Remove the heating module (pull forward).
Install the (new or cleaned) heating module in the instrument and lock the
hinge with the two yellow levers.
After a heating modules has been cleaned or replaced, we recommend readjusting the heating module of your Halogen Moisture Analyzer (Section 6.4).
Defective parts must be disposed of in accordance with applicable
customer and national regulations.
Page 68

If problems arise on occasion – Section 8
68
8 If problems arise on occasion
In this Section you will learn how errors can appear during operation of your Moisture Analyzer and how you can
rectify these errors.
8.1 Notes on the error messages
Your instrument distinguishes between the three different types of errors explained below.
Input errors (key not active or can not be pressed in current operating
status) are reported by your instrument with a short audio signal (if
activated in the menu) without an error message in the display.
An application error occurs when the instrument can not perform a
ERROÈ 3
procedure or a corrective action is necessary as the limits of a value range
have been violated or because a general operating error exists. Application errors are reported by your instrument with an audio signal. Further,
the message “ERROR” appears in the display followed by the error
number. You will find a list of all application errors in the next Section.
ERROR: 3
Sample weight out if tol
----30.06.03---15:28----
ERROÈ 3
5
SYSTEM-ER®
Reset
If your instrument is equipped with a built-in printer, you can print the error
message in clear text with the «Print» key.
Before you can continue working, you must delete the error message with
the «Reset» key.
System errors indicate that a program or hardware error exists. The
message “SYSTEM-ERR.” appears in the display and the error number is
shown in the top right corner. In such a case, disconnect the instrument
from the power supply. Should the error reappear after reconnection to the
power supply, contact your METTLER TOLEDO dealer to arrange an
appointment for diagnosis and repair, Note the error number in order to
facilitate the work of the service engineer.
Page 69

Section 8 – If problems arise on occasion
69
8.2 Meaning of the error messages
In this Section you will find all error messages which appear in the display, the text of the error record on the printer,
the reason for the error message and directions on how to rectify the error.
Display: Error: 1
ERROÈ 1
ERROÈ 2
Printout: Weighing result unstable
Cause: No stability during taring or adjustment
Remedy: Ensure stable ambient conditions and an optimum location.
Also take care that no part of the sample or the sample pan
touch the draft shield element or the sample pan holder. Highly
volatile substances in the sample also prevent a stable
weighing result being detected.
Display: Error: 2
Printout: Wrong calibration weight
Cause: No or wrong adjustment weight loaded
Remedy: Load required adjustment weight
ERROÈ 3
ERROÈ 4
ERROÈ 5
Display: Error: 3
Printout: Sample weight outside limits
Cause: Sample weight below 100 mg or outside the set limits with the
weighing-in aid active (Section 4.7).
Remedy: Weigh in a sample of al least 100 mg, adjust the sample weight
so that it is within the set limits or deactivate the weighing-in
aid.
Display: Error: 4
Printout: Missing tare weight
Cause: Sample vessel has not been tared
Remedy: Tare sample vessel
Display: Error: 5
Printout: Entry inadmissible
Cause: Lower/ upper limit of input range violated
Remedy: Enter value in valid range
Page 70

If problems arise on occasion – Section 8
70
Display: Error: 6
ERROÈ 6
ERROÈ 7
ERROÈ 8
Printout: Not activated in menu
Cause: Keypad has been locked in menu, printer deactivated in menu
Remedy: Remove keypad locking, printer in menu
Display: Error: 7
Printout: Timer not activated
Cause: The selected switch-off criterion does not allow entry of a time
Remedy: Select “Timed switch-off” as switch-off criterion
Display: Error: 8
Printout: Entry missing
Cause: In the heating module adjustment, the wait time of 10 minutes
Remedy: Repeat heating module adjustment and enter temperature
for entry of the temperature value has been exceeded
values before elapse of the wait time
ERROÈ 9
ERROÈ 10
£-----$
!-----¨
Display: Error: 9
Printout: Function error
Cause: Undefined condition
Remedy: Press «Reset» key or briefly switch instrument off then on again
with the «On/Off» key. If this error appears in the calibration,
please contact your METTLER TOLEDO dealer
Display: Error: 10
Printout: Temperature > Start-Temp.
Cause: Sample chamber has not cooled down sufficiently.
Remedy: Allow the instrument to cool down to the starting temperature
Display: I_ _ _ _ _I
Cause: Underload
Remedy: Load the sample pan holder
_ _ _ _ _
Display: I
Cause: Overload
Remedy: Decrease the weight of your sample
I
Page 71

Section 8 – If problems arise on occasion
71
Display: RAM LOST
RAM LOST
Cause: The installed battery is discharged (the equipment was discon-
nected from the power supply for a longer periode) or the
instrument is faulty
Remedy: Charge battery (connect instrument to the power supply for
5 hours) and then reenter all settings. If the error reappears,
contact your METTLER TOLEDO dealer.
8.3 What if...?
… the display remains “dark” after switching on?
– no line voltage
– power cable not connected
– blown power line fuses
– instrument faulty
Ensure that the instrument is connected to the power supply and that power supply is actually supplied. Check the
power line fuses of the instrument and replace if necessary (see Section 7.3). If the instrument still refuses to function,
contact your METTLER TOLEDO dealer.
… after switching on “0.000” flashes in the display?
The sample pan holder is not installed. Install the sample pan holder.
… the function symbols disappear from the display after a certain time
You have deactivated the symbols in the menu (see Section 6.14).
… the symbol of the stability detector is continuously lit up immediately after the start?
As soon as the symbol of the stability detector fades, the weighing result is stable and is accepted as a “wet weight”.
If the symbol does not fade, your instrument is probably at an unsuitable location (vibrations, shocks, powerful
drafts, etc.). Seek a more suitable location.
Samples containing readily volatile substances may never reach stability owing to continuous evaporation. In this
case, you must select manual operation for the automatic sample chamber (see Section 6.11).
… the built-in printer does not print?
Ensure that the printer is activated in the menu (see Section 6.15) and that the ribbon and paper are correctly
installed. If the printer still refuses to print, perform a printer test (see Section 7.4). If the test is unsuccessful, contact
your METTLER TOLEDO dealer.
… no drying time can be entered?
Entry of the drying time is possible only if you have selected the switch-off criterion “Timed switch-off”, with all other
switch-off criteria this input possibility is not available (see Section 4.4). If you attempt to enter a drying time, the
instrument reports “Error: 7” (see Section 8.2).
Page 72

If problems arise on occasion – Section 8
72
… certain keys are inactive?
You have protected the parameters (switch-off criterion, print interval, etc.) in the menu against change (see Section
6.13). If you attempt to change a parameter, the instrument reports “Error: 6” (see Section 8.2).
… an error message appears when I press certain keys?
You have entered an illegal value, see Error messages (see Section 8.2)
… the measurement takes too long?
You have selected an unsuitable switch-off criterion. The suitable switch-off criterion is simple to determine by a test
measurement. You will find information on how to perform a test measurement in Sections 4.4 and 4.11.
An excessive amount of sample can also be the cause of slow drying, likewise samples which tend to form a skin
which hinders vaporization.
Perform experiment at higher temperature.
… the weighing-in aid is not visible?
The weighing-in aid is available only if you have activated (see Section 4.7).
… the automatic sample chamber does not close after pressing «Start»?
You have selected the manual operating mode in the menu (see Section 6.11).
… no methods are available?
You have deactivated the method option in the menu (see Section 6.16).
… the instrument does not heat following the start?
The dryer unit is overheated and the thermal overload protection has responded. The instrument is equipped with
thermal overload protection (bimetallic sensor) which switches off the heating tube if overheating occurs. If this
happens, the device must be reset. To do this, proceed as follows:
Disconnect the instrument from the power supply and be sure to allow the
heating module to cool down for 10 minutes before you start the work.
The heating module is released by withdrawing the automatic sample
chamber 2-3 cm.
Swing the heating module upward.
Page 73

Section 8 – If problems arise on occasion
73
The thermal overload protection is reset by pressing the rear part of the white
temperature switch.
The Analyzer can be restarted after closing the cover and connecting the
instrument to the power supply.
Note: If this is not possible, there may be a fault (e.g. a faulty halogen heating
module). In such a case, contact your METTLER TOLEDO dealer.
After the temperature switch is reset or a heating module replaced (Section
7.6) we recommend that you readjust the heating module of your Halogen
Moisture Analyzer (Section 6.4).
… the measurement results are not repeatable?
– The samples are not homogeneous, i.e. they have different compositions. The more inhomogeneous a sample,
the larger the amount of sample needed to obtain a repeatable result.
– You have selected a drying time that is too short. Extend the drying time or select a suitable switch-off criterion
“Weight loss per unit of time”.
– The sample does not become completely dry (e.g. owing to skin formation). Dry the sample with the aid of glass
fiber filters (Section 3.3).
– You have selected a temperature that is too high and the sample has oxidized. Lower the drying temperature.
– The sample boils and the splashed drops continuously change the weight. Lower the drying temperature.
– Insufficient heating power as the protective glass is dirty. Clean the protective glass (Section 7.1).
– The temperature sensor is contaminated or faulty. Clean the temperature sensor (see Section 7.1) or have it
replaced by a service engineer.
– The support on which the instrument is standing is not sufficiently stable. Use a stable support.
– The instrument is not stable on its 4 feet.
– The surroundings are very unstable (vibrations etc.).
Page 74

Further useful information – Section 9
74
9 Further useful information
9.1 Notes on interpretation of the measurement results and the ideal sample weight
The accuracy of the measurement results depends on the wet weight and the original moisture of the sample. The
relative accuracy of the measurement result improves with increasing wet weight. While the moisture of the sample
is fixed, the weight of the sample can frequently be determined by the user. However, with increasing weight the drying
process is lengthened. We thus advise you to select the weight of your sample to obtain the repeatability you
require. You can use the following table to determine the ideal weight for your sample. The table does not include
the scatter due to the sample and its preparation.
An example will suffice: A result with a repeatability of ±0.1% is expected. As the following table shows, your sample
should have a minimum weight of 2 grams.
Repeatability of the result Minimum sample weight
±0.02 % 10 g
±0.05 % 4 g
±0.1 % 2 g
±0.2 % 1 g
9.2 LocalCAN universal interface
Your Moisture Analyzer is fitted with a modern LocalCAN universal interface. This universal interface allows your
instrument to interchange data with a computer or a control system. METTLER TOLEDO LC-P43 and LC-P45 printers
can also be operated via this interface. The content and format of the printouts are the same as those produced by
the optional built-in printer HA-P43.
Devices (e.g. a computer) with an RS232 serial interface (with a DB9 or
DB25 connector of the type usually found with PCs and laptops/notebooks)
can be attached with the optional interface cables (LC-RS9 or LC-RS25, see
Section 9.8).
For interface commands please refer to the “Reference Manual METTLER
TOLEDO Standard Interface Command Set” 11780559, available from your
METTLER TOLEDO dealer or download from the Internet (www.mt.com/
moisture). More Information please find in the Section 9.7.
Data of the LocalCAN universal interface
– Cable length between two devices maximum 10 m
– Total of cable lengths of all attached devices maximum 15 m
Page 75

SPin assignment
Pin No. Signal
Section 9 – Further useful information
75
12
43
1 negative signal line (–CAN)
2 positive signal line (+CAN)
3 plus pin of supply (V CAN) for peripherals
4minus pin of supply (0 V) for peripherals
9.3 Application brochure
The application brochure for moisture determination from METTLER TOLEDO (order number: 11795011) contains
a great deal of useful information for optimum utilization of your Moisture Analyzer. To order your personal copy,
please contact your METTLER TOLEDO dealer.
Example methods and applications can be found at www.mt.com/moisture.
Moisture determination applications must be optimized and validated by the user according
to local regulations. Application-specific data provided by METTLER TOLEDO is intended for
guidance only.
9.4 Switch-off criterion “Weight loss per unit of time”
With the switch-off criterion “Weight loss per unit of time”, drying is automatically ended as soon as the mean weight
loss (∆ g in mg) per unit of time (∆ t in seconds) drops below a preset value. 5 levels are preprogrammed in the
factory each with a fixed weight loss per unit of time.
Further, a “Free switch-off criterion” allows you to define the weight loss per unit of time yourself.
The following applies to the individually selectable levels:
∆ g in mg ∆ t in seconds
Switch-off criterion 1 1 mg 10 seconds
Switch-off criterion 2 1 mg 20 seconds
Switch-off criterion 3 1 mg 50 seconds
Switch-off criterion 4 1 mg 90 seconds
Switch-off criterion 5 1 mg 140 seconds
Switch-off criterion “F” (free) 1 mg to 10 mg 5 seconds to 3 minutes
Page 76

Further useful information – Section 9
76
The graph below exemplifies the mode of operation of the switch-off operation (not to scale).
Weight of sample
Weight of sample
equal
area
=
∆g
= Mean weight loss per unit of time
∆ g
)
(
∆ t
∆t
(10 s)
∆g
∆t
(50 s)
∆g
∆t
(140 s)
Switch-off criterion 1 Switch-off criterion 3 Switch-off criterion 5 Time
Key:
Switch-off criterion 1 (rapid availability of the result, suitable for determination of a trend)
Switch-off criterion 3
Switch-off criterion 5 (suitable for precision measurement)
9.5 Comments on certified version
Approval of the built-in balance is to EN45501 (OIML R76) requirements. When the heating module is switched
off, the balance meets the applicable requirements of accuracy class 1. The metrological data are given on the
certification plate (rear panel of instrument).
Adjustment of the built-in balance
Before adjustment of the balance, a wait time of 15 min. (following completion of the last heating cycle) assures
compliance with the calibration tolerance limits following EN45501 (OIML R76).
Page 77

Section 9 – Further useful information
77
9.6 Technical data
Please note that the Moisture Analyzer will undergo continuous further development in the interest of the users.
METTLER TOLEDO thus reserves the right to change all technical data at any time and without prior notification.
TDryer
Heating module: Halogen ring-shaped radiator
Temperature range: 40–200 °C
Temperature step: 1 °C
Heating module adjustment: with temperature adjustment set HA-TC or HA-TCC
Balance
Minimum sample weight: 0.1 g
Maximum sample weight:
1)
Balance adjustment: with external weight, 50 g ± 0.1 mg
Units: g, % moisture content, % dry content, ATRO moisture content,
Stability detector: with symbol in display
Readability of the balance: 1 mg
Readability of the result: 0.01%
2)
Repeatability (sd) with 1 g sample
Repeatability (sd) with 10 g sample
: 0.2%
2)
: 0.02%
61 g
ATRO dry content
Data
Time, date: system clock, fail safe
Drying time: manual, 30 seconds to 480 minutes
Operational settings: read-only memory, fail safe
Switch-off criteria: 5 levels, manual, timed, test, free
Method memories (fail safe): 10
Drying programs: Standard- or Fast drying
Sample identification: alphanumeric, 20 characters
Reset protection: by locking the keypad
Weighing-in aid (target weight): 0.1–61 g in 0.1 g steps
Limit values weighing-in aid: 1–25% (1% steps)
1)
Data for standard sample pan (diameter 90 mm), with the reusable sample pan the maximum sample weight
is 30 g.
2)
Instrument acclimatized in room and connected to power supply for 30 minutes, drying temperature 160 °C.
Page 78

Further useful information – Section 9
78
Evaluation
Display modes: 5 modes (moisture, dry content, weight, ATRO moisture
content, ATRO dry content = MC, DC, g, AM, AD)
Records: via built-in printer (Option)
Hardware
Audio signal: adjustable (soft, loud, off)
Data interface: LocalCAN universal interface built in, RS232C option
Inspection window: in heating module
Leveling: 3 leveling screws and level indicator
Display: LCD, supertwist LCD with backlighting
Status display (User guide): integrated in display
Alphanumeric entry key: integrated in keypad
Sample pan, Ø: 90 mm
Thermal overload protection: bimetallic-element switch in heating module
Dimensions (w x h x d): 36 x 11 x 34 cm
Weight, ready to measure: 7.7 kg (with built-in printer)
Admissible ambient conditions
Use only in closed rooms
Height up to: 4000 m
Temperature range: 5 °C to 40 °C
Atmospheric humidity: 80% RH @ to 30 °C
Voltage fluctuations: -15%+10%
Installation category: II
Pollution degree: 2
Power load: Max. 450 W during drying process
Current consumption: 4 A or 2 A, according to the heating module
Power supply voltage: 100 V – 120 V or 200 V – 240 V, 50/60 Hz
(the voltage is given by the heating module)
Power line fuse: 2 (in each conductor), 5 x 20 mm, T6,3H 250 V
Page 79

Section 9 – Further useful information
79
9.7 MT-SICS Interface commands and functions
Many of the instruments and scales used have to be capable of integration in a complex computer or data acquisition
system.
To enable you to integrate instruments in your system in a simple manner and utilize their capabilities to the full,
most instrument functions are also available as appropriate commands via the data interface.
All new METTLER TOLEDO instruments launched on the market support the standardized command set “METTLER
TOLEDO Standard Interface Command Set” (MT-SICS). The commands available depend on the functionality of the
instrument.
Basic information on data interchange with the instrument
The instrument receives commands from the system and acknowledges the command with an appropriate
response.
Command formats
Commands sent to the instrument comprise one or more characters of the ASCII character set. Here, the following
must be noted:
• Enter commands only in uppercase.
• The possible parameters of the command must be separated from one another and from the command name
/
by a space (ASCII 32 dec., in this description represented as
• The possible input for “text” is a sequence of characters of the 8-bit ASCII character set from 32 dec to 255 dec.
• Each command must be closed by C
The characters C
, which can be inputted using the Enter or Return key of most entry keypads, are not listed in this
RLF
(ASCII 13 dec., 10 dec.).
RLF
description, but it is essential they be included for communication with the instrument.
).
Example
S – Send stable weight value
Command S Send the current stable net weight value.
Response S
//
/
S
/
WeightValue
//
//
//
/
//
Unit
//
Current stable weight value in unit actually set under unit 1.
//
S
/
I Command not executable (balance is currently executing another
//
command, e.g. taring, or timeout as stability was not reached).
//
S
/
+ Balance in overload range.
//
//
S
/
- Balance in underload range.
//
Example
Command S Send a stable weight value.
Response S
//////////
/
S
/////
//
//////////
50.000
//
/
//
g
//
The current, stable weight value is 50.000 g.
Page 80

Further useful information – Section 9
80
The MT-SICS commands listed below is a selected list of available commands. Commands and further information
please refer to the Reference Manual “MT-SICS for Halogen Moisture Analyzers HR83/HG63 11780559”
downloadable from the Internet under www.mt.com/moisture.
Commands and responses MT-SICS level 0
I0 Inquiry of all implemented MT-SICS commends
I1 Inquiry of MT-SICS level and MT-SICS versions
I2 Inquiry of instrument data
I3 Inquiry of SW version and type definition number
I4 Inquiry of serial number
S Send stable weight value
SI Send weight value immediately
SIR Send weight value immediately and repeat
Z Zero
ZI Zero immediately
@ Reset
Commands and responses MT-SICS level 1
D Display
DW Weight display (Display show Weight)
Commands and responses MT-SICS level 2
DAT Date
PWR Power on/off
P100 Print out text on the strip printer
TIM Time
Commands and responses MT-SICS level 3
Control commands
HA01 Reset application / escape
HA02 Set factory settings
HA03 Switch keypad on/off
HA04 Open / close automatic sample chamber
HA05 Start / end drying
HA06 Trigger audio signal
HA07 Report instrument status change
HA08 Request printer record
Status inquiries
HA20 Inquiry of instrument status
HA21 Inquiry of automatic sample chamber position
HA22 Inquiry of last balance adjustment
HA221 Inquiry of last balance adjustment test
HA23 Inquiry of last heating module adjustment
HA231 Inquiry of last heating module adjustment test
HA24 Inquiry of temperature
HA25 Inquiry of drying weights
HA26 Inquiry of drying data
HA27 Inquiry of drying result
HA28 Inquiry of drying result with free factor
Instrument settings
HA40 Inquiry / setting of language
HA401 Inquiry / setting of start mode (operating mode)
HA402 Inquiry / setting of key protection (reset protection)
HA403 Inquiry / setting of printer on/off
HA411 Menu parameter: Setting of vibration adapter
HA412 Menu parameter: Setting of acoustic signal
HA413 Menu parameter: Symbols displayed
HA420 Menu parameter: Activate / deactivate methods option
HA60 Select method
HA61 Inquiry / setting of method parameters (part 1)
HA62 Inquiry / setting of method parameters (part 2)
HA621 Definition of comment line
Methods menu
HA631 Activate / deactivate free swich-off criterion
HA632 Activate / deactivate of freely selectable switch-off
criterion
HA633
HA634 Definition fo free %MC factor
HA635 Activate / deactivate free g factor
HA636 Definition of free g factor
HA639 Setting of sign for free %MC factor set
Weighing-in aid
HA650 Weighing-in aid no / passive / active
HA651 Weighing-in aid: definition of tolerance range
Method results
HA90 Report keys
HA91 Alphanumeric entry
HA92 Integer entry (positive values only)
HA93 Real entry (positive values only)
HA94 Date entry
HA95 Time entry
Activate / deactivate free %MC factor
Page 81

Section 9 – Further useful information
9.8 Optional equipment, expendable material and spare parts
Designation Order No. Notes
Optional equipment
Adjustment weight 50 g (Class F1) 15865 Adjustment of balance
Temperature adjustment set, HA-TC 214455 Adjustment of heating module
Calibrated temperature adjustment set, HA-TCC 214528 Adjustment of heating module
(including test certificate at 50 °C, 100 °C and 160 °C)
Recalibration from HA-TCC, HA-TCCRe 214534 Recalibration with certificate
(including test certificate at 50 °C, 100 °C and 160 °C)
Interface cable LC-RS25 (RS232/25-pin) 229050
Interface cable LC-RS9 (RS232/9-pin) 229065
Built-in printer, HA-P43 214456
Reusable sample pan
(steel, height: 6 mm), HA-DR1 214462 Set of 3 piece
Reusable sample pan (steel, height: 15 mm) 13954 1 piece
Transport case, HA-CASE 214515
Sample pan handler, HA-PH 214526 3 piece
Chemically resistant protective cover, HA-COVER 214533 2 piece
Textile sample pan for bulky samples, HA-CAGE 214695 1 piece
81
Expendable material
Printer paper for HA-P43 72456 Set of 5 rolls
Paper roll (self-adhesive) for HA-P43 11600388 1 piece
Ribbon (cassette, black) for printer HA-P43 65975 Set of 2 piece
Aluminum sample pan Ø 90 mm, HA-D90 13865 Set of 80 piece
Reinforced aluminum sample pan Ø 90 mm 11113863 Set of 80 piece
Glass fiber filter (for liquids), HA-F1 214464 Set of 100 piece
Spare parts
Heating module 110 V HA-HM110 214468
Heating module 230 V HA-HM230 214469
If you require other spare parts for your Moisture Analyzer, please contact your METTLER TOLEDO dealer.
Page 82

Index
82
10 Index
Symbols
%DC display mode 46
%MC display mode 46
0…9 24, 34
A
Accept entry 16, 24, 43, 49
Accuracy 74
Adjusting the balance 50
Adjusting the heating module 52
Adjustment 22
Adjustment of the balance 50
Adjustment of the heating modu-
le 52
Adjustment record 51, 54
Adjustment weight 50, 81
Air bubble 11
Application brochure 75
Application error 68
ATRO dry content 30
ATRO moisture content 30
Audio signal 58, 68
B
Balance adjustment 49, 50
Balance test 52
Basic settings 49
Built-in battery 12
Built-in printer 14, 60,
64, 66, 71, 81
Burning 8
C
Change by locking the appropriate
keys 59
Check the heating module adjust-
ment 54
Checking balance adjustment 51
Cleaning 63
Code 34
Comment 34
Comment line 6, 34
Computer 74
Control system 74
Corrosion 8
D
Date 15, 57
Delete 34
Dialog language 61
Display 71
Display mode 29, 39
Draft shield element 13, 63
Dry content 29, 30
Drying and measurement 19
Drying program 25
Drying temperature 21, 22,
25, 39
Drying time 21, 22, 28,
39, 71
E
Equipment 10
Error messages 68, 69, 72
Expendable material 81
Explosion 8
Extension cable 12
F
Factory settings 56
Fire 8
Free factor (-MC) 46
Free factor (g) 47
Free space 13, 17
Free switch-off criterion 28, 75
Freely selectable switch-off criteri-
on 45
Function keys 24
Function symbols 59, 71
G
Glass fiber filter 17, 23, 81
GLP 7, 22
GMP 7, 22
H
Halogen heating module 6
Halogen Moisture Analyzer 6
Heat accumulation 8
Heating module 6, 8, 12, 19,
21, 22, 39, 52, 63, 66, 72,
78, 81
Heating module adjustment 49,
55, 70
Heating module test 55
Heating module test record 55
I
Initial status 17
Input errors 68
Inspection window 53
Instrument safety 7
Interface 74
Interface cable LC-RS25 81
Interface cable LC-RS9 81
Interface commands 74, 79, 80
ISO 14001 7
ISO 9001 7, 22
L
Language 15, 61
Level 11
Level indicator 11
Leveling 11
Leveling screws 11
Line voltage 12, 71
LocalCAN universal interface 7,
74
Location 11, 69, 71
Page 83

Index
83
M
Manual printout 31
Manual switch-off criterion 28
Measurement 10, 17, 37
Measurement parameters 21
Measurement record 36
Menu 16, 45, 49, 62
Menu overview HG63 62
Method 43, 45, 47
Method memory 56
Method menu 45
Method menu overview 45
Method number 43
Method option 60
Methods 25, 42
Moisture 6
Moisture content 19, 29, 30
MT-SICS 79
N
Numeric entries 24
O
On/Off 12, 15, 17, 70
Open/close auto sample cham-
ber 13, 17, 37, 58
Operating mode 58
Operating principles 24
Optional equipment 81
Overheating 8, 72
P
Package 10
Paper feed 15, 64
Paper roll 15, 64, 81
Parameter 21, 44
Personnel qualification 6
Poisoning 8
Power cable 12, 71
Power line fuses 65, 71
Power supply 11, 12
Print 31, 39, 49, 51, 52,
54, 55, 68
Print interval 31, 72
Printer 14, 71, 81
Printer paper 64, 81
Printer test 66, 71
Printing out methods parame-
ters 47
Protective cover 81
Protective glass 8, 64
Protective glass of the heating
module 66
Q
Quality assurance system 22
R
Rapid drying 25
Ready for start 18
Ready for taring 17
Ready for weighing 18
Record 34, 36, 41, 47,
48, 51, 52, 55
Reference Manual 74
Repeatability 74
Reset 16, 20, 40, 49, 68, 70
Ribbon 14, 64, 81
Ribbon cassette 14
S
Safety 7
Sample 17
Sample chamber 7, 36, 58, 72
Sample pan 18, 23, 50, 81
Sample pan handler 18, 81
Sample pan holder 13, 63, 71
Sample preparation 23
Sample weight 74
Sample weight limits 33
Sample weight tolerance 33
Scroll down 16, 24, 43, 49
Scroll up 16, 24, 43, 49
Self-test 15
Servicing 63
Setting up 11
Settings change 59
Signal 19, 39, 68
Spare parts 81
Special character 34
Specimen sample 17, 18
Stability detector 49, 71
Standard drying 25, 26
Standard equipment 10
Start 19, 38, 53, 55, 58, 72
Status display 7, 17, 37
Stop 37, 40, 41
Switch-off criterion 27, 39,
70, 72
Symbols 59
System errors 68
T
Tare (zero) 18, 38
Target weight (Weighing-in
aid) 32
Technical data 77
Temperature 70
Temperature adjustment
set 53, 55, 81
Temperature limitation 26
Temperature sensor 63
TEST 51, 54
Test measurement 21,
22, 28, 41
Test record 52, 55
Testing the heating module 54
Textile sample pan 81
Thermogravimetric principle 6,
21, 22
Time 15, 57
Time limit 26
Timed switch-off 28
Trained personnel 7
Transport arrestment 10, 12
Transport case 81
Page 84

Index
84
U
User guide 17, 37
V
Vent over 8
Vibration adapter 57
W
Weighing in 32
Weighing-in aid 32, 72
Weight in grams 29
Weight loss per unit of time 27,
75
Page 85

Index
85
Page 86

Index
86
Page 87

Leer
Page 88

To protect your METTLER TOLEDO product's future:
METTLER TOLEDO service assures you of quality, measuring accuracy
and preservation of value of the METTLER TOLEDO products for
years to come.
Please send for details of our attractive terms of service.
Thank you.
P11780521
Subject to technical changes and to the availability
of the accessories supplied with the instruments.
© Mettler-Toledo GmbH 2003 11780521 Printed in Switzerland 0312/2.12
Mettler-Toledo GmbH, Laboratory & Weighing Technologies, CH-8606 Greifensee, Switzerland
Phone +41-1-944 22 11, Fax +41-1-944 30 60, Internet: http://www.mt.com
 Loading...