

Page 1
Quick Guide
Moisture Analyzer
HC103
Page 2

Page 3

1 Introduction
Thank you for purchasing a Halogen Moisture Analyzer from METTLER TOLEDO.
Your Moisture Analyzer is fast and reliable. It offers a high level of operating convenience and useful functions to
facilitate determination of the moisture content of your samples.
Behind your instrument stands METTLER TOLEDO, a leading manufacturer of not only balances and scales for the
lab and production, but also analytical measuring instruments. A customer service network covering the entire globe
with well trained personnel is your service at all times, whether you are choosing accessories or require guidance
for a specific application to ensure optimum utilization of your instrument.
Your Halogen Moisture Analyzer is used for determining the moisture content of almost any substance. The
instrument works on the thermogravimetric principle. At the start of the measurement the Moisture Analyzer
determines the weight of the sample, the sample is then quickly heated by the integral halogen heating module and
the moisture vaporizes. During the drying process the instrument continually measures the weight of the sample and
displays the reduction in moisture. Once drying has been completed, the moisture or solids content of your sample
is displayed as the final result.
Of decisive importance in practice is the rate of heating and even heating of the surface of the sample. In
comparison with conventional infrared heating or the drying oven method, for example, the halogen heating module
of your instrument needs a shorter time to reach its maximum heating power. It also allows use of high
temperatures, an additional factor in shortening the drying time. Uniform heating of the sample material ensures
good repeatability of the drying results and makes it possible to use a smaller amount of sample.
The Moisture Analyzer conforms with all common standards and directives. It supports stipulations, work techniques
and result records as demanded by all international quality assurance systems, e.g. GLP (Good Laboratory
Practice), GMP (Good Manufacturing Practice). The instrument has a CE declaration of conformity and METTLER
TOLEDO as the manufacturer has been awarded ISO 9001 and ISO 14001 certification. This provides you with the
assurance that your capital investment is protected in the long term by a high product quality and a comprehensive
service package (repairs, maintenance, servicing, adjustment service).
Finding More Information
u www.mt.com/moisture
Software version
These operating instructions are based on the initially installed firmware (software) version V1.10.
1.1 Conventions and Symbols Used in these Operating Instructions
Key and button designations are indicated by a picture or text in square brackets (e.g. [Save]).
These symbols indicate an instruction:
§ prerequisites
1 steps
2 ...
ð results
Introduction 3Moisture Analyzer
Page 4
2 Safety Information
2.1 Definition of Signal Warnings and Symbols
Safety notes are marked with signal words and warning symbols. These show safety issues and warnings. Ignoring
the safety notes may lead to personal injury, damage to the instrument, malfunctions and false results.
Signal Words
WARNING
CAUTION
Attention
Note
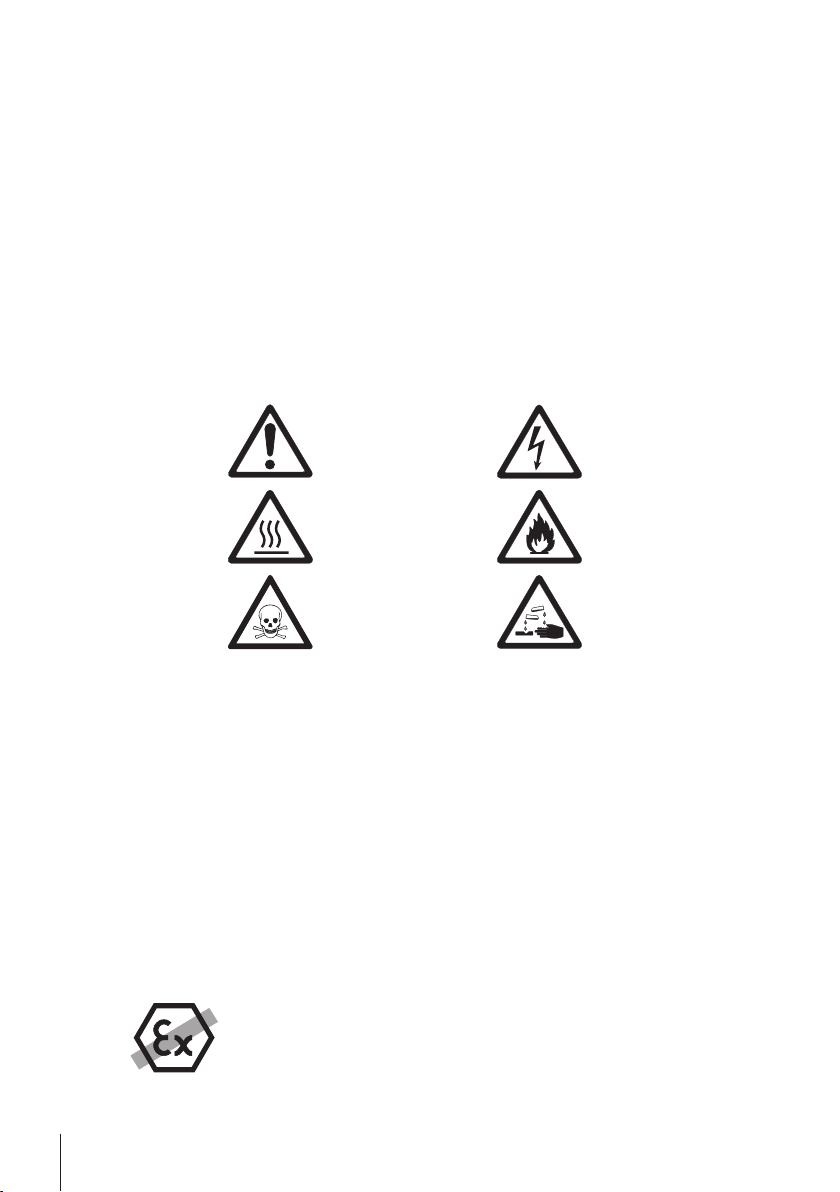
Warning Symbols
for a hazardous situation with medium risk, possibly resulting in severe injuries
or death if not avoided.
for a hazardous situation with low risk, resulting in damage to the device or the
property or in loss of data, or minor or medium injuries if not avoided.
(no symbol)
for important information about the product.
(no symbol)
for useful information about the product.
General hazard Electrical shock
Hot surface Inflammable or explosive
Toxic substance Acid / Corrosion
substance
2.2 Product Specific Safety Notes
General Safety Information
Your instrument meets the state of the art technology and complies with all recognized safety rules, however, certain
hazards may arise in extraneous circumstances. Do not open the housing of the instrument: It does not contain any
parts which can be maintained, repaired or replaced by the user. If you ever have problems with your instrument,
contact your authorized METTLER TOLEDO dealer or service representative.
Always operate and use your instrument only in accordance with the instructions contained in this manual. The
instructions for setting up your new instrument must be strictly observed.
If the instrument is not used according to these Operating Instructions, protection of the instrument may be
impaired and METTLER TOLEDO assumes no liability.
Intended Use
Your Moisture Analyzer is used for determining the moisture in samples. Use the instrument exclusively for this
purposes. Any other type of use and operation beyond the limits of technical specifications without written consent
from Mettler-Toledo AG, is considered as not intended.
Moisture determination applications must be optimized and validated by the user according to local regulations.
Application-specific data provided by METTLER TOLEDO is intended for guidance only.
It is not permitted to use the instrument in explosive atmosphere of gases, steam, fog, dust and
flammable dust (hazardous environments).
Safety Information4 Moisture Analyzer
Page 5
Staff Safety
The Moisture Analyzer may be operated only by trained personnel who are familiar with the properties of the
samples used and with the handling of the instrument.
In order to use the instrument, you must have read and understood the operating instructions. Keep the operating
instructions for further reference.
Never make any modifications to the instrument and use only original spare parts and optional equipment from
METTLER TOLEDO.
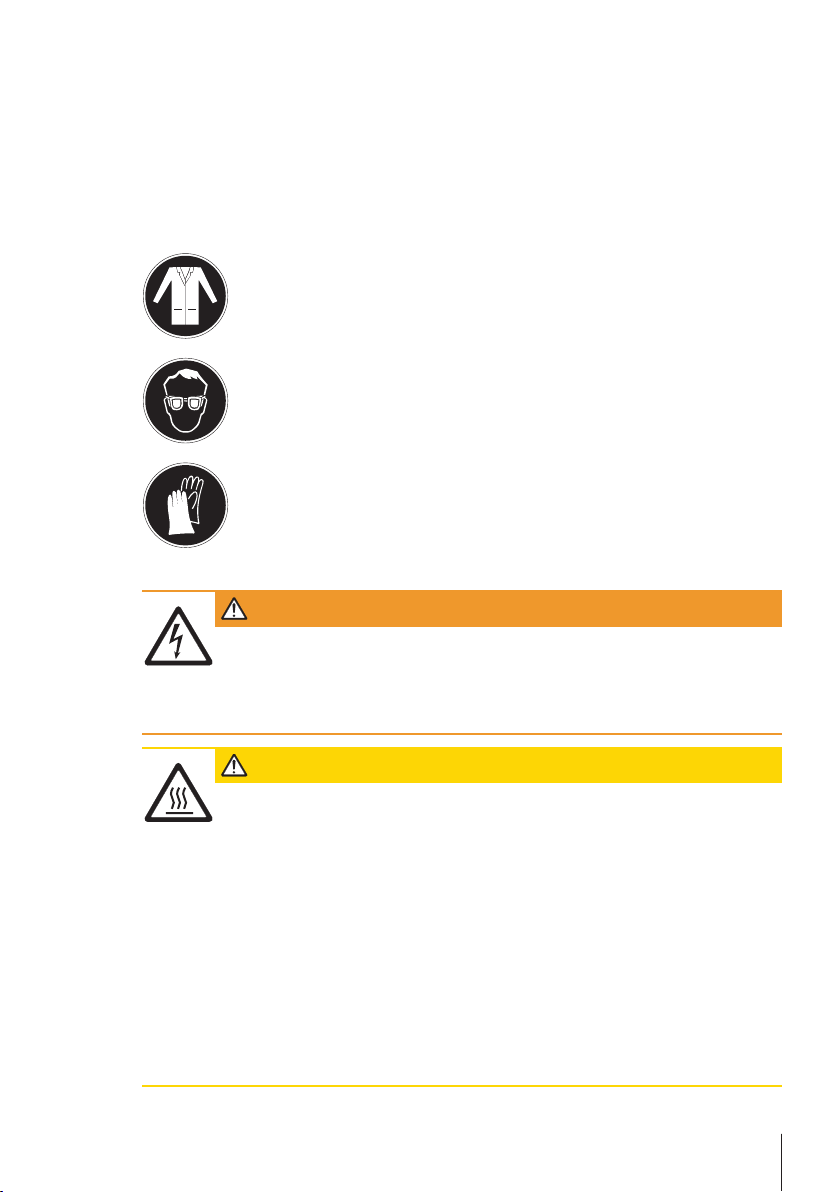
Protective Clothing
It is advisable to wear protective clothing in the laboratory when working with the instrument.
A lab coat should be worn.
A suitable eye protection such as goggles should be worn.
Use appropriate gloves when handling chemicals or hazardous substances, checking their
integrity before use.
Safety Notes
WARNING
Risk of electric shock
Your instrument is supplied with a 3-pin power cable with an equipment grounding conductor. Only
extension cables which meet this relevant standards and also have an equipment grounding
conductor may be used. Intentional disconnection of the equipment grounding conductor is
prohibited.
CAUTION
The Halogen Moisture Analyzer works with heat!
a) Ensure sufficient free space around the instrument to avoid heat accumulation and overheating
(approx. 1 m free space above the heating module).
b) The vent over the sample must never be covered, plugged, taped over or tampered with in any
other way.
c) Do not place any combustible materials on, under or next to the instrument since the area
around the heating module may be hot.
d) Exercise caution when removing the sample. The sample itself, the sample chamber, the draft
shield and any sample vessels used may still be very hot.
e) During operation, you should never open the heating module itself as the ring-shaped heating
reflector or its protective glass can reach 400 °C! If you have to open the heating module e.g.
for maintenance, disconnect the instrument from the power supply and wait until the heating
module has cooled down completely.
f) No modifications must be made within the heating module. It is particularly dangerous to bend
any components or remove them or to make any other changes.
Safety Information 5Moisture Analyzer
Page 6
Certain samples require special care!
With certain types of samples, there is a possibility of danger to personnel or damage of property. Please note that
the user always has the responsibility and liability for damage caused by use of any types of samples!
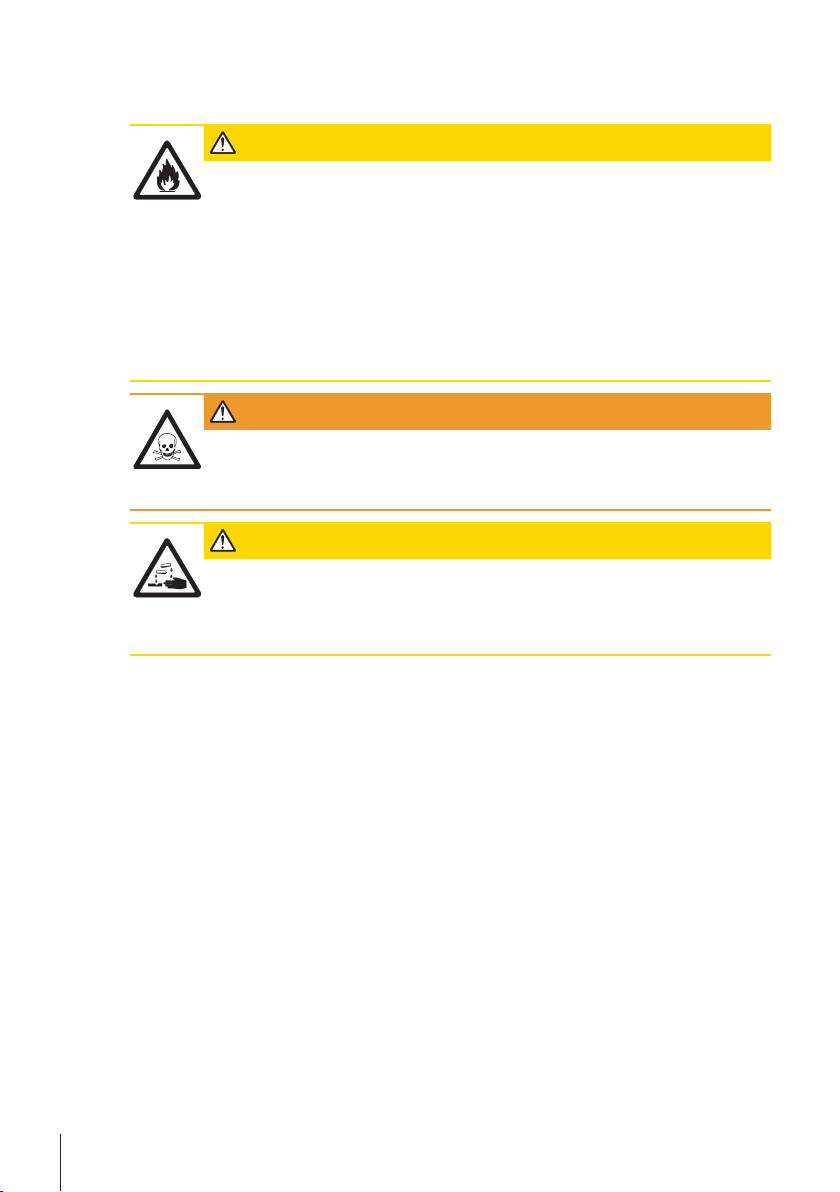
CAUTION
Fire or Explosion
• Flammable or explosive substances.
• Substances containing solvents.
• Substances which evolve flammable or explosive gases or vapors when heated.
a) In cases of doubt, perform a careful risk analysis.
b) Work at a drying temperature that is low enough to prevent the formation of flames or an
explosion.
c) Wear protective goggles.
d) Work with small amounts of sample.
e) Never leave the instrument unattended!
WARNING
Substances which contain toxic or caustic components
Toxic gases produced during drying could cause irritations (eyes, Skin, breathing), illness or death.
a) Such substances may be dried only in a fume cupboard.
CAUTION
Corrosion
Substances which evolve corrosive vapors when heated (e.g. acids).
a) Work with small amounts of samples as the vapor can condense on cooler housing parts and
cause corrosion.
Safety Information6 Moisture Analyzer
Page 7
3 Design and Function
1
8
2
3
6
7
11
9
13
4
5
12
10
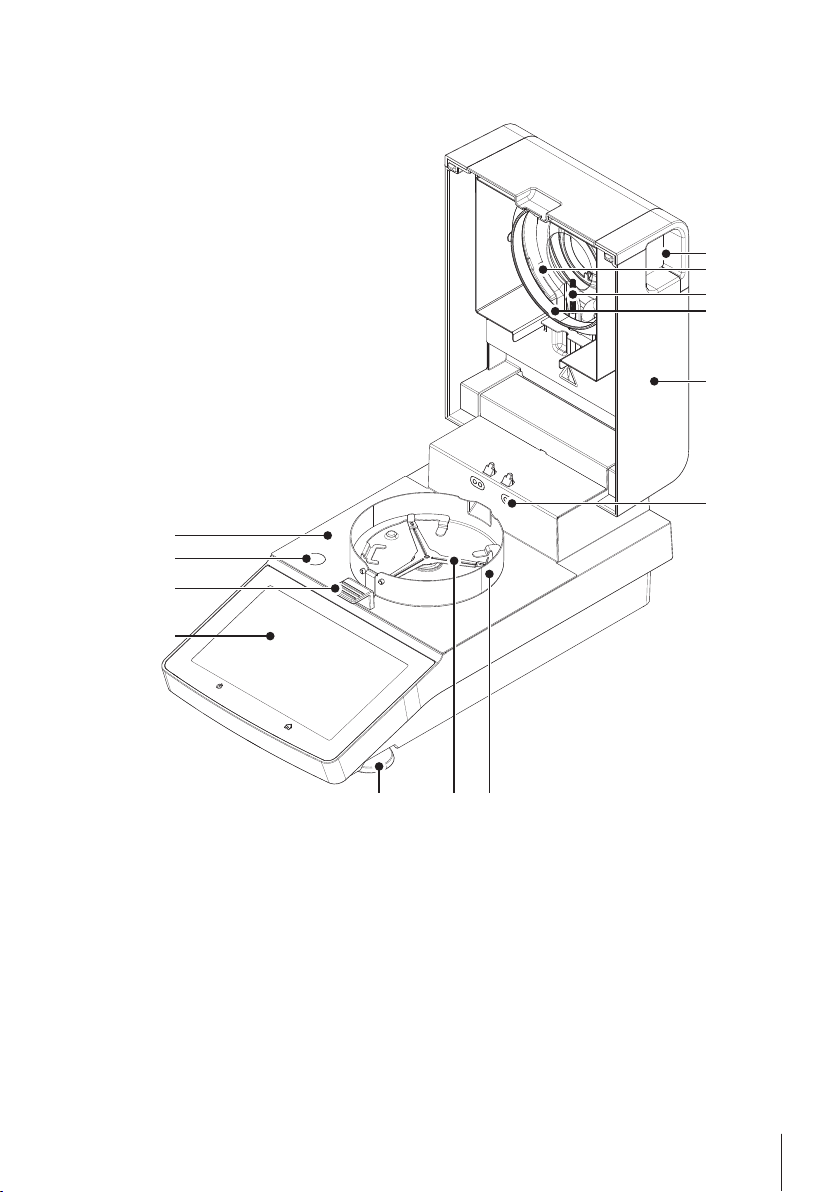
3.1 Components
Design and Function 7Moisture Analyzer
Page 8
Sample chamber
1
8
2
3
6
4
7
5
9
1
Level indicator
2
Sample pan handler
3
WVGA color display (touch screen)
4
Leveling screw
5
Sample pan holder
6
Draft shield element
7
Contacts for optional temperature adjustment kit
8
Heating module (with thermal overload protection)
9
Reflector ring
10
Temperature sensor
11
Protective glass
12
Handles for opening the sample chamber
13
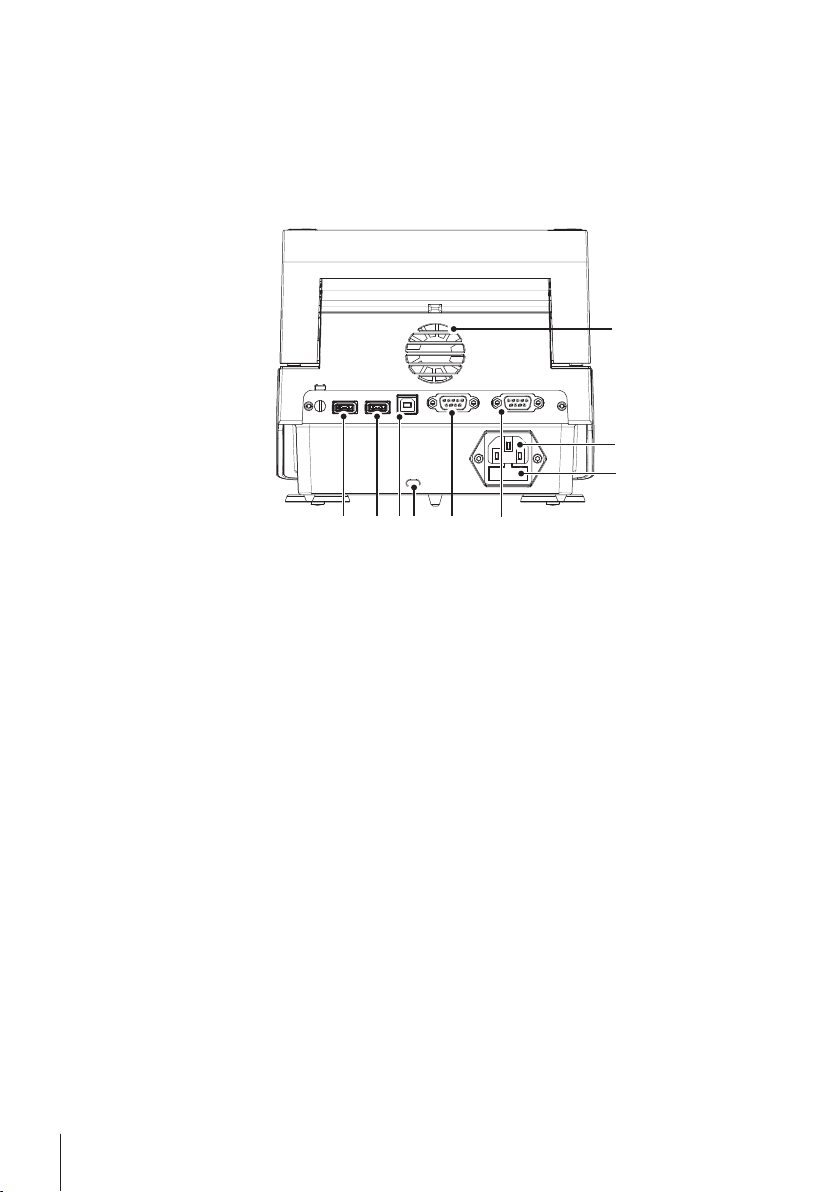
USB Host 1
1
USB Host 2
2
USB Device
3
Kensington slot for anti-theft purposes
4
RS232C
5
RS232C (for optional RHT sensor only)
6
Power line fuse
7
Power line socket
8
Fan
9
Design and Function8 Moisture Analyzer
Page 9
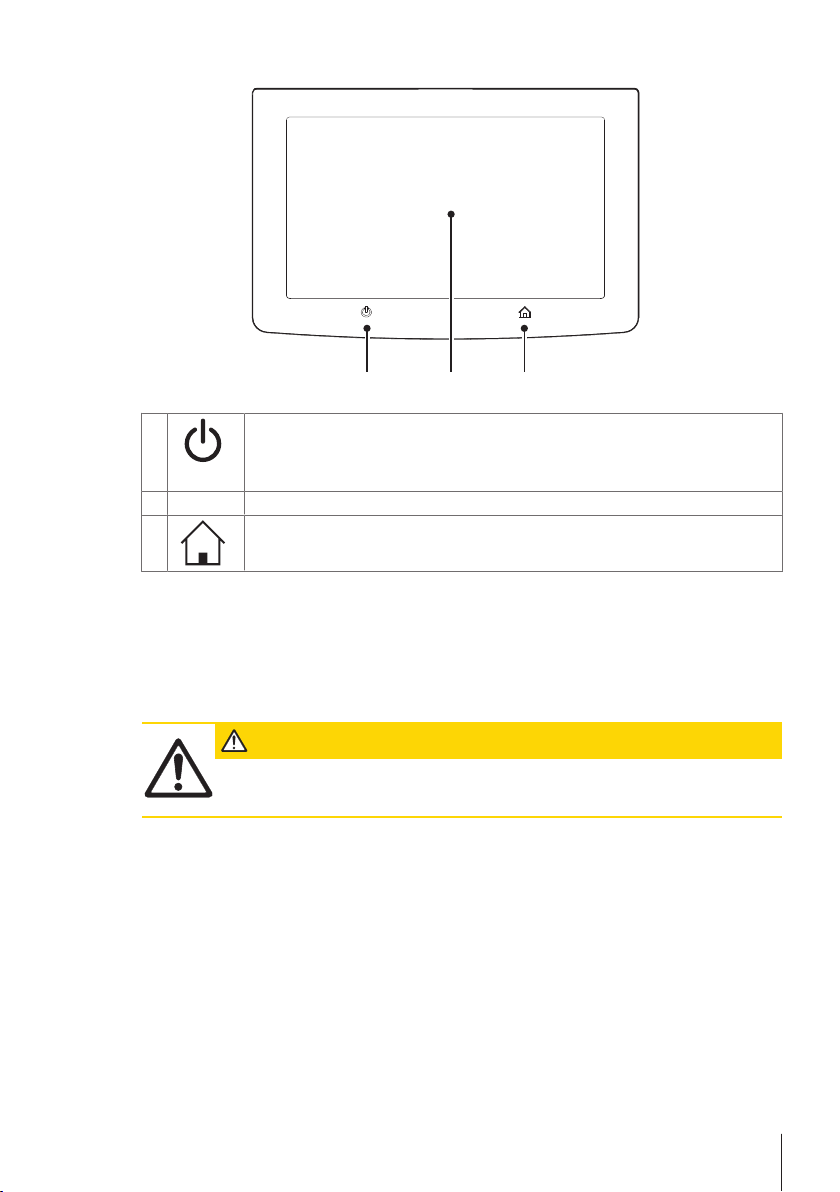
3.1.1 Keys on Display
1
2
3
1
2
3 Home
To switch on or off (standby operation) the instrument.
Note
Do not disconnect the instrument from the power supply except if you will not be using the
instrument for an extended period.
The touch screen area
To return to the user home screen.
3.2 User Interface
The colored touch screen is a touch-sensitive WVGA display. The touch screen not only displays information, it also
allows you to enter commands by touching certain areas on its surface. You can choose the information displayed
on the screen, change settings or perform certain operations on the instrument.
Buttons on the Touch Screen
Buttons are software elements on the touch screen (Soft keys).
CAUTION
Do not touch the touch screen with pointed or sharp objects!
This may damage the touch screen.
Design and Function 9Moisture Analyzer
Page 10
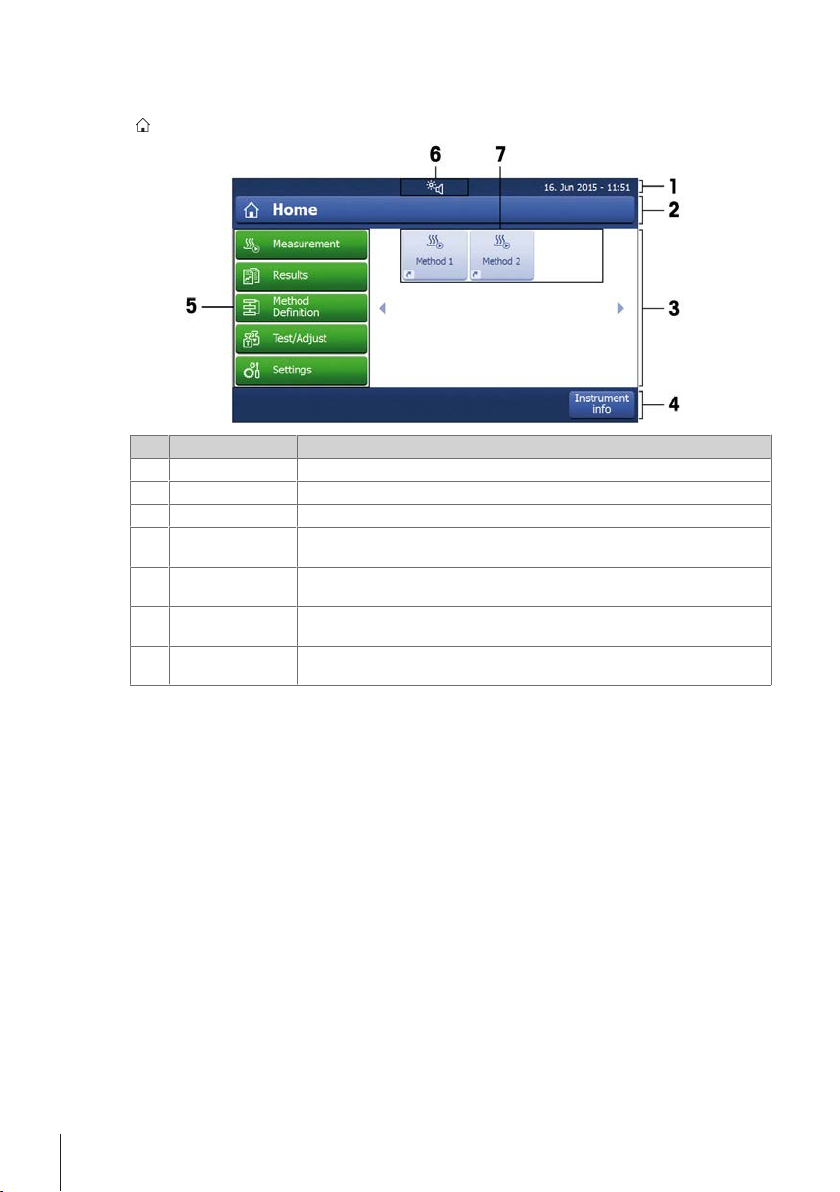
3.2.1 User Home Screen
The user home screen always appears after startup or login of the instrument. The user home screen is the central
screen where every application can be started. Returning to the user home screen is possible by pressing the button
[
] or by tapping [Home] in the action bar of the current process.
Name Explanation
Status bar The status bar shows status icons, date and time.
1
Title bar The title bar shows elements for the user's orientation and information.
2
Content area The content area is the main working area for menus and applications.
3
Action bar The action bar shows buttons for available actions in the current dialog
4
Main menu
5
Status icons Icons that show the status of the device.
6
User shortcuts User-specific shortcuts for frequently used methods. Shortcuts are saved in the user
7
(e. g. Back, ->0/T<-, Print, Save, Delete, OK).
In the main menu, the submenus Measurement, Results, Method Definition, Test/
Adjust or Settings can be chosen.
Status Messages.
profile.
Design and Function10 Moisture Analyzer
Page 11
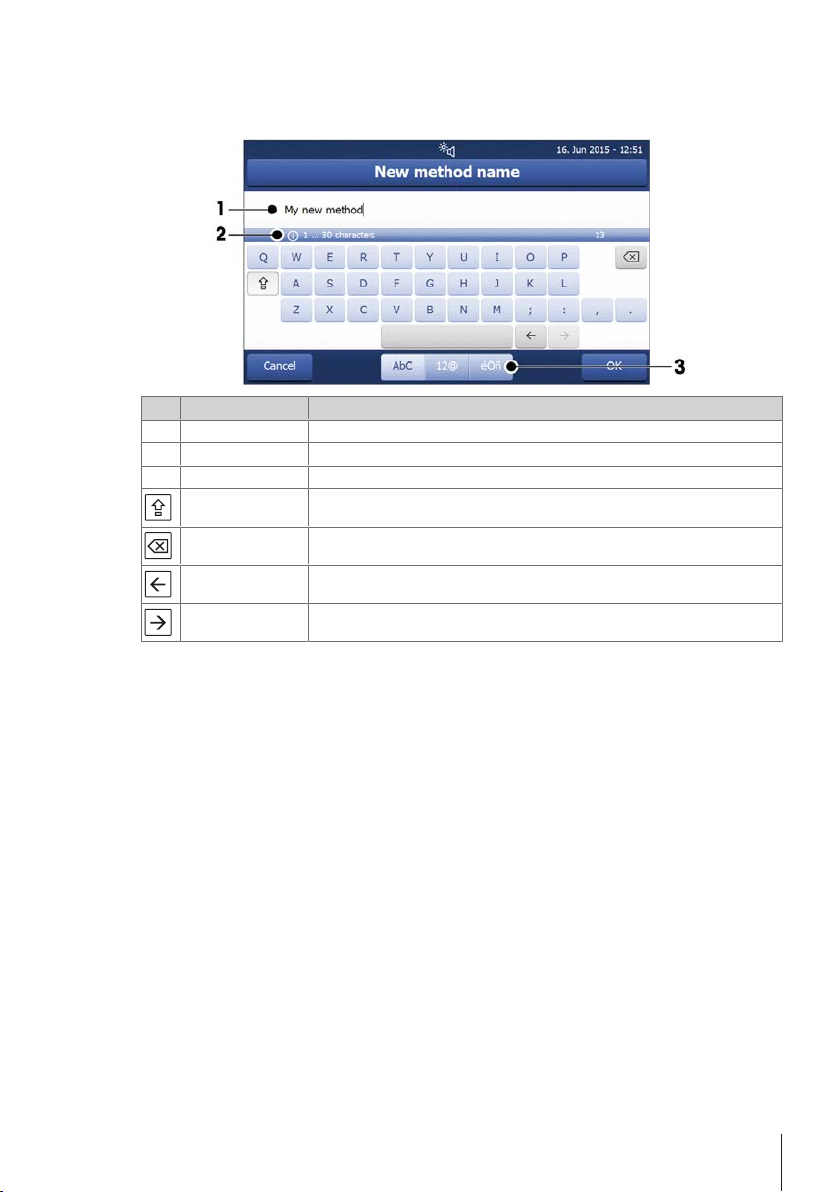
3.2.2 Input Dialogs
3.2.2.1 Entering Text and Numbers
The keyboard dialog allows you to enter characters including letters, numbers and a variety of special characters.
Name Explanation
Input field Shows the characters that have been entered.
1
Explanation field Shows additional information.
2
Specialized tabs To switch the keyboard mode for entering letters, numbers or special characters.
3
Shift-Lock To enter lower and upper case letters.
Delete Delete last character.
Cursor left To move the cursor to the left.
Cursor right To move the cursor to the right.
Note
It is also possible to place cursor directly in input field by tapping the respective position.
Design and Function 11Moisture Analyzer
Page 12

3.2.3 Lists and Tables
Simple list view
Name Explanation
Content area
1
Content title
2
Scroll bar Use the scroller to scroll up and down
3
Design and Function12 Moisture Analyzer
Page 13

3.2.4 Work Screen
The work screen is used for performing main tasks e.g. measurements.
Name Explanation
Name field Name of current method
1
Shortcut button Adding/editing a shortcut to the home screen for this method
2
Value panel Displays the current measured values of the work process
3
Graphics panel E.g. graphical illustrations of the drying curves, instructions for the user for
4
Parameter panel Displays the parameters of the current work process. A detailed overview of the
5
Action buttons Depending on the current context
6
performing tasks, and weighing-in aid
method parameters appears after tapping the parameter panel.
Design and Function 13Moisture Analyzer
Page 14

3.3 Peripheral Devices
076,&6
56
56
➂
➁
➀
➀
USB memory
stick
Workstation
USB host
USB device
Strip printer
Name Explanation
RS232C connection RS232C interface for connecting the instrument to a peripheral device (e.g. to a
1
USB Host USB interface for connecting a peripheral device to the instrument (e.g. a memory
2
USB Device USB interface for connecting the instrument to a peripheral device (e.g. a PC).
3
printer or a PC with a 9-pin male connection).
stick up to 32 GB. Type A socket.
Type B socket.
Design and Function14 Moisture Analyzer
Page 15

4 Installation and Putting into Operation
In this section you will find information how to put your new instrument into operation.
4.1 Scope of Delivery
Open the package and check the completeness of the delivery. The following accessories are part of the standard
equipment of your new Moisture Analyzer:
• 80 aluminum sample pans
• 1 Sample handler
• 1 Sample pan holder
• 1 Draft shield
• 1 Specimen sample (circular, absorbent glass fibre filter)
• 1 Power cable (country specific)
• 1 SmartCal sample
• 1 QuickGuide
• 1 CD-ROM
• 1 Application brochure «Guide to Moisture Analysis»
• 1 Declaration of conformity
• 1 Voucher for elearning "Proper Moisture Determination"
Remove the packaging from the instrument. Check the instrument for transport damage. Immediately inform your
METTLER TOLEDO representative if you have any complaints or parts are missing.
Note
Store all parts of the packaging. This packaging guarantees the best possible protection for the transport of your
instrument.
4.2 Location
Your Moisture Analyzer is a precision instrument. An optimum location guarantees accuracy and dependability.
Make sure that the following environmental conditions are met:
• Operate the instrument only indoors and at an altitude of less than 4000 m above sea level.
• Before switching on the instrument, allow all its parts to reach room temperature (+5 to 30°C).
Make sure that the relative humidity is between 20% and 80% and non-condensing conditions are met.
• The power plug must be easily accessible.
• Firm, horizontal location as free from vibrations as possible.
• Avoid direct sunlight.
• No excessive temperature fluctuations.
• No powerful drafts.
• Surroundings as free from dust as possible.
• Sufficient clearance around the instrument to allow warm air to
dissipate.
• Sufficient distance from heat-sensitive materials in the vicinity of the
instrument.
Installation and Putting into Operation 15Moisture Analyzer
Page 16

4.3 Connecting Instrument
WARNING
Risk of electric shock
a) Use only the 3-pin power cable with equipment grounding conductor which was supplied with
your instrument.
b) Only a 3-pin grounded outlet for connecting your instrument must be used.
c) Only extension cables which meet this relevant standards and also have an equipment
grounding conductor may be used.
d) Intentional disconnection of the equipment grounding conductor is prohibited.
Attention
• Check if the voltage printed on the type plate corresponds to your local line voltage. If this is not the case,
contact your METTLER TOLEDO sales representative or dealer. Do not connect the drying unit to the power
supply.
Two different versions with country-specific power cable are available (110VAC or 230VAC).
• The power plug must be always accessible.
• Before operating, check all cables for damage.
• Guide the cables so that they cannot become damaged or interfere with the measuring process.
Installation and Putting into Operation16 Moisture Analyzer
Page 17

4.4 Setting up the sample chamber
3
2
1
§ The device is connected to the mains.
1 Open the sample chamber.
2 Place the draft shield element (1) into the sample chamber.
ð Make sure that the draft shield element is correctly positioned. The element must be locked with the screw
heads on the bottom of the sample chamber.
3 Insert the sample pan holder (2) carefully.
ð Make sure that the sample pan holder is correctly positioned. When one arm of the sample pan holder has
a 90° angle to the display, the sample pan falls into position (see picture above).
4 Insert the sample pan handler (3).
5 Press [
Note
When putting into operation for the first time or if the instrument is disconnected from the power over a longer
period, leave the instrument connected to the power supply for at least 5 hours to allow the built-in rechargeable
battery to charge up! This battery ensures that the date and time are not lost when the instrument is disconnected
from the power. This battery can not be replaced by the user. Please contact a METTLER TOLEDO representative.
] to start the device.
Installation and Putting into Operation 17Moisture Analyzer
Page 18

4.5 Leveling the Moisture Analyzer
Exact horizontal positioning and stable installation are prerequisites for repeatable and accurate results. To
compensate for small irregularities or inclinations (±2%) at the location, the instrument must be leveled.
For exact horizontal positioning, the device has a level indicator and two
leveling feet. When the air bubble in the level indicator is exactly in the
center, the instrument is standing perfectly horizontally. To level it,
proceed as follows:
1 Position your Moisture Analyzer at the selected location.
2 Turn the two leveling feet until the air bubble is in the center of the level
indicator.
Air bubble at "12 o'clock" turn both feet clockwise
Air bubble at "3 o'clock" turn left foot clockwise,
Air bubble at "6 o'clock" turn both feet counter-
Air bubble at "9 o'clock" turn left foot counter-
Note
The drying unit should be re-leveled each time its location is changed.
The Moisture Analyzer can also be levelled by using the Tutorial 1. Leveling the instrument. For more information
see at section Instrument Tutorial [}20].
right foot counterclockwise
clockwise
clockwise, right foot
clockwise
4.6 Anti-theft Device
For protection against theft, the Moisture Analyzer is fitted with a
Kensington security slot for an anti-theft device. To find a suitable antitheft cable see Accessories and Spare Parts.
Installation and Putting into Operation18 Moisture Analyzer
Page 19

4.7 Setup Wizard
When you switch on your Moisture Analyzer for the first time, the Setup Wizard appears. The Setup Wizard is a
step-by-step instruction, that helps to define the basic functions (Language and Date format) and to install the
sample chamber of your device. The buttons in the action bar can be used for navigation.
Note
The application Setup Wizard appears automatically when the instrument was switched on for the first time (or
when a factory reset was performed). It must be successfully finished. If it is not finished, the device is not
operational and the function will reappear when the device is switched on the next time.
After the application Setup Wizard is successfully finished, the settings can be changed via Settings of the user
home screen.
Note
The application Instrument tutorial starts automatically after the application Setup Wizard is succesfully finished.
This option can be skipped by inactivating the checkbox Proceed to the Instrument Tutorial.
Installation and Putting into Operation 19Moisture Analyzer
Page 20

4.8 Instrument Tutorial
The tutorial helps you, to define the basic functionalities of your Moisture Analyzer.
Navigation: User Home Screen > Settings > Help and tutorials > Instrument tutorial
The following sections can be defined with the help of a tutorial:
• 1. Leveling the instrument
• 2. Testing and Adjusting
• 3. Defining a method
• 4. Creating a shortcut
• 5. Running a measurement
Note
The application Instrument tutorial can be started directly at the end of the application Setup Wizard or from the
home user screen via the section Settings / Help and tutorials.
Installation and Putting into Operation20 Moisture Analyzer
Page 21

4.9 Setting Date and Time
Navigation: Home > Settings > System settings > Regional Settings
When the instrument was switched into operation for the first time, date, time and language have been defined with
the function Setup Wizard. These settings are retained even if the instrument is being disconnected from the power
supply. The settings can also be changed manually as follows:
Set the current date
§ Regional Settings is selected.
1 Tap Date.
2 Set day, month and year.
3 Confirm with [Set date].
Set the current time
§ Regional Settings is selected.
1 Tap Time.
2 Set Hours and minutes.
3 Confirm with [Set time].
Note
For changing the format for date and time, see Regional Settings.
4.10 Adjustment
The following adjustment options are possible:
• Balance adjustment with external weight (accessory).
• Temperature adjustment with temperature adjustment kit (accessory).
To obtain accurate measuring results, it is necessary to adjust the integrated balance as well as the heating module
under working condition.
Adjusting is necessary before the instrument is used for the first time or after a change of location.
We recommend to do TESTS at regular intervals and adjust if necessary.
Installation and Putting into Operation 21Moisture Analyzer
Page 22

5 First Measurement
After you have successfully put your new Moisture Analyzer into operation for the first time, you can immediately
perform your first measurement. In doing so, you will become familiar with the instrument.
Use the supplied specimen sample (absorbent glass fiber filter) for your first measurement to determine the moisture
content. During your first measurement the instrument operates with the factory settings.
Create a method
1 Tap Method Definition.
ð Method Definition menu appears.
2 To define a new method, tap [New...].
ð The keypad appears.
3 Enter a name for your first method e.g. My first method.
4 Confirm with [OK].
5 To store your new method with factory settings, tap [Save].
6 Tap [Home].
ð User home screen appears.
Note
The number of methods that can be created is limited to 20.
Select the method for measuring
1 Tap [Measurement].
ð The methods list is displayed.
2 Tap My first method.
ð The work screen of the method My first method appears.
3 Open the sample chamber.
Placing sample pan
§ The display now prompts you to load the empty sample pan and tare
the balance.
1 Place the empty sample pan in the sample pan handler.
2 Place the sample pan handler in the sample chamber. Ensure that the
tongue of the pan handler fits exactly in the slot of the draft shield
element. The sample pan must lie flat in the pan holder.
Note
We advise you to work with the sample pan handler at all times. The pan
handler is ergonomic, automatic positioning, safe and provides protection
against possible burns due to the hot sample pan.
First Measurement22 Moisture Analyzer
Page 23

Taring the balance
Note
Before the sample pan is placed into the sample chamber, the left corner of the display must show Open cover,
place sample pan and tare.
If the display shows Add sample, tap [Cancel] before placing the empty sample pan in the sample chamber.
1 Close the sample chamber.
ð The instrument tares the balance (Starting mode: Automatic).
2 After taring, open the sample chamber.
Start measuring
1 Place the specimen sample in the sample pan.
2 Wet the specimen sample with a few drops of water.
3 Close the sample chamber.
ð The drying process starts automatically.
Drying process
You can follow the measurement process on the display, see Work Screen.
• The drying process is continuously displayed graphically.
• The current temperature in the heating module is displayed as well as the elapsed drying time and the current
drying value.
• The display shows the selected settings.
• Tap on [Stop drying]. The options [Abort measurement and save data], [Abort without saving] or [Cancel]
are available.
• Tap on [Abort measurement and save data] or [Abort without saving] to abort the process.
• Tap on [Cancel] to continue the process.
At the end of the drying process you can read the moisture content of your sample on the display.
First Measurement 23Moisture Analyzer
Page 24

CAUTION
Danger of burns
Sample, sample pan and other parts inside the sample chamber may still be hot.
Remove Sample
§ The drying process is completed.
1 Open the sample chamber.
2 Carefully remove the sample pan handler from the sample chamber.
Note
To remove the sample pan from the handler, lift the pan slightly from
below and pull it out of the handler.
3 • To perform a further measurement with the current method, tap
[Next Sample].
• To perform a measurement with a new method, tap [Methods].
• To return to the home screen, press [
Congratulations!
You have just performed your first measurement with your new Moisture Analyzer. In the following sections you
will find more information about the extensive functions of this instrument.
].
First Measurement24 Moisture Analyzer
Page 25

5.1 Work with Weighing-in Aid
The weighing-in aid can be defined for each method and facilitates weighing in of the sample to a target value. This
is particularly necessary if you require all the samples of a method you wish to process to have same weight in
order to improve the repeatability of the measurement results. In addition, the weighing-in aid can be set as active
so that the drying process cannot be started if the weight of sample is outside the set tolerance. You are therefore
compelled to weigh-in the correct quantity of sample. If all sample weighed are within tolerances then this will
improve the repeatability. The weighing-in aid is available only if start weight has been activated. For further
information see at section Settings of Start Weight.
Icon Function
Lower weight limit (tolerance range)
Target weight
Upper weight limit (tolerance range)
5.2 Using Shortcuts
Navigation for managing shortcuts: Home > Measurement > Method name > [
Shortcuts allow you to start methods directly from the home screen.
The following parameters can be defined:
Parameter Explanation Values
Shortcut name
Method name
Defining a shortcut
§ Menu Measurement is activated.
§ The method is selected.
1 Tap [
ð Window My shortcuts appears.
2 Tap Add a shortcut to my home for this method.... (To abort, tap [X].)
ð New shortcut appears.
3 To enter a name for the shortcut if needed, tap Shortcut name.
Note
It is recommended to choose a short name because only approx. 8 characters are displayed on the shortcut.
Name should be unique and unambiguous.
4 Confirm with [OK].
5 To store the setting, tap [Save].
ð The shortcut is added to the home screen.
Defines a name for the shortcut. It is recommended to choose a
short name because only approx. 8 characters are displayed on
the shortcut. Name should be unique and unambiguous.
Shows the name of the method. The name of the method is the
target of the shortcut and can not be changed.
].
]
any
none
First Measurement 25Moisture Analyzer
Page 26

6 To abort, tap [Cancel].
ð
Editing a shortcut
§ The method is selected.
1 Tap [
].
ð Window My shortcuts appears.
2 Tap Edit this shortcut.... (To abort tap [X].)
ð Shortcut properties appears.
3 To edit the name of the shortcut, tap Shortcut name.
4 Confirm with [OK].
5 To store the setting, tap [Save].
To abort, tap [Cancel].
Removing a shortcut
§ The method is selected.
1 Tap [
].
ð Window My shortcuts appears.
2 Tap Edit this shortcut.... (To abort, tap [X].)
ð Shortcut properties appears.
3 To remove the shortcut, tap [Remove].
ð A message window appears.
4 Confirm with [Remove]. (To abort, tap [Cancel].)
ð The shortcut is removed from the home screen.
First Measurement26 Moisture Analyzer
Page 27

6 Maintenance
WARNING
Risk of electric shock
– The instrument must be disconnected from the power supply, before cleaning or other maintenance
work to be performed.
– Use only the power cord from METTLER TOLEDO, if it needs replacing.
Note
• The thermal overload protection can not be reset by the user.
• The halogen lamp can not be replaced by the user.
In such cases, contact your METTLER TOLEDO representative.
6.1 Cleaning
CAUTION
Danger of burns
The interior parts of the heating module as well as the parts in the sample chamber could be very
hot.
a) Wait until the heating module has cooled down completely.
To obtain precise measurement results, we recommend you to clean the temperature sensor and the protective glass
of the halogen lamp regularly. Please note the following directions for cleaning your instrument.
General
Your Moisture Analyzer is made from high quality, resistant materials and can therefore be cleaned with a
commercially available, mild cleaning agent e.g. isopropanol.
Note
• Use a lint-free cloth for cleaning.
• Ensure that no liquids enters the interior of the instrument.
• Heating Module
Clean the exterior of the heating module with a mild cleaning agent although the housing is extremely rugged
and resistant to solvents.
• Display
On no account use cleaning agents, which contain solvents or abrasive ingredients, as this can result in
damage to the display.
• Never open the housing of the instrument – it contains no components, which can be cleaned, repaired or
replaced by the user.
Note
After the temperature sensor or the protective glass have been cleaned, we recommend adjusting the heating
module using the temperature adjustment kit, see Temperature Adjustment.
Maintenance 27Moisture Analyzer
Page 28

6.1.1 Cleaning the Sample Chamber
1
2
3
4
2
1
3
§ Sample chamber is open.
1 Remove the sample pan holder (1), the sample pan
handler (2) and the draft shield (3) for cleaning.
2 Carefully remove any deposits from the black
temperature sensor (4).
6.1.2 Cleaning the Heating Module
Reflector ring
1
Protective glass
2
Halogen lamp
3
CAUTION
Avoid touching the round halogen lamp. If you have to remove any splashes, deposits, or spots of grease from the
halogen lamp, it is advisable to use a weak organic solvent such as, for example ethanol. Ensure that the lamp is
cool. Do not remove the halogen lamp!
CAUTION
The protective glass is made of quartz glass. Always use gloves for touching the protective glass. Do not touch the
protective glass with bare hands. For cleaning always use non-alkaline cleaning agents.
Removing reflector ring
1 To unlock the reflector ring push the clips towards each other.
2 Pull carefully out the reflector ring.
CAUTION
The protective glass is loose and may fall out when the reflector ring is
removed.
Maintenance28 Moisture Analyzer
Note
Do not touch the lamp with your fingers.
Page 29

Removing protective glass
§ Reflector ring is removed.
- Pull out the protective glass.
Reassembling after cleaning
Reassemble all parts in the opposite order.
§ All parts are cleaned.
1 Insert the protective glass.
Note
The outer edges of the protective glass must precisely be placed into
the housing (see illustration).
2 Insert the reflector ring.
NotePush the reflector ring until you hear a click sound and the
reflector ring is locked.
3 Close the heating module.
6.1.3 Fan Grill
The air inlet of the fan is located at the rear of the instrument and its exterior should be cleaned from time to time to
free it from any dust deposits.
6.2 Disposal
In conformance with the European Directive 2002/96/EC on Waste
Electrical and Electronic Equipment (WEEE) this device may not be
disposed of in domestic waste. This also applies to countries outside the
EU, per their specific requirements.
Please dispose of this product in accordance with local regulations at the
collecting point specified for electrical and electronic equipment. If you
have any questions, please contact the responsible authority or the
distributor from which you purchased this device. Should this device be
passed on to other parties (for private or professional use), the content of
this regulation must also be related.
Thank you for your contribution to environmental protection.
Maintenance 29Moisture Analyzer
Page 30

7 Technical Data
7.1 General Technical Data
Drying Unit
Heating Module Halogen ring-shaped radiator
Temperature range 40–230 °C
Temperature step 1 °C
Temperature programs standard, rapid
Balance
Maximum capacity 101 g
Readability 1 mg
Minimum sample weight 0.5 g
Weighing technology Strain Gauge
Adjustment External weight (100 g, accessory)
Moisture Content
Readability 0.01%
Repeatability (sd) with 2 g sample 0.10%
Repeatability (sd) with 10 g sample 0.015%
Materials
Drying Unit
Housing PBT, PBX45A (UL94-V0)
Inspection window grill PPS, A504X90 (UL94-V0)
Protective glass Quartz glass
Halogen lamp Quartz glass
Reflector Stainless steel, X2CrNiMo17-2 (1.4404)
Draft shield, interior bottom plate Stainless steel, X2CrNiMo17-2 (1.4404)
Protection and Standards
Overvoltage category II
Degree of pollution 2
Standards for safety and EMC see Declaration of Conformity (part of standard equipment)
Range of application for use in dry interior rooms
Environmental Conditions
Height above sea level up to 4000 m
Ambient temperature range 5 °C to 40 °C
Relative air humidity 10% to 80% at 31 °C, linearly decreasing to 50 % at 40 °C,
Warm-up time At least 60 minutes after connecting the instrument to the power
Power Supply
110 V AC Version 100 V–120 V, 50/60 Hz, 4 A
230 V AC Version 220 V–240 V, 50/60 Hz, 2 A
Voltage fluctuations -15%+10%
Power load max. 450 W during drying process
noncondensing
supply; when switched on from standby, the instrument is ready for
operation immediately.
Technical Data30 Moisture Analyzer
Page 31

Power line fuse 5 x 20 mm, T6.3H 250 V
Interfaces
• 1 x RS232C (for METTLER TOLEDO RHTsensor only)
• 1 x RS232C (9-pin socket)
• 2 x USB Host (Type A socket), USB1.1
Supported memory sticks up to 32GB
• 1 x USB Device (Type B socket), USB1.1
Data
Export data format of results • CSV (Comma-separated values)
• PDF
Hardware
Drying unit
Sample chamber opening/closing manual
Leveling 2 leveling screws
Sample pan Ø 90 mm
Maximum height of sample 15 mm
Thermal overload protection Bimetallic-element switch in heating module
Dimensions (w x h x d) 192 x 169/370 x 385
Weight, ready to measure 5.1 kg
Display WVGA color display, resistive touch-sensitive
See Dimensions
Technical Data 31Moisture Analyzer
Page 32

7.1.1 Explanatory note to periodic inspections
In accordance with EU Directive 2001/95/EC
This instrument is provided with a 3-pin plug. The earth
conductor is led into the instrument and connected to
the bottom and the rear panel. The other accessible
metal parts are not connected to the earth conductor.
These parts are reinforced insulated and must not be
connected to the earth conductor according to current
European standards.
The earth connection must be checked on the metallic
rear panel.
Further information about conformance of this instrument can be found in the Declaration of Conformity which is
coming with the product or can be downloaded from the internet.
uhttp://www.mt.com/moisture-hc103
Technical Data32 Moisture Analyzer
Page 33

Page 34

Mettler-Toledo AG, Laboratory Weighing
CH-8606 Greifensee, Switzerland
Tel. +41 (0)44 944 22 11
Fax +41 (0)44 944 30 60
www.mt.com
Subject to technical changes.
© Mettler-Toledo AG 08/2015
30258540A en
www.mt.com/moisture
Further information
*30258540*
 Loading...