

Page 1
EasyClean 100/150
52 500 178
EasyClean100
EasyClean150
Instruction manual
Bedienungsanleitung
Instructions d’utilisation
Page 2

English: page 3
Deutsch: Seite 37
Français: page 71
Page 3

EasyClean100/150 3
EasyClean100/150 © 11/14 Mettler-Toledo AG, CH-8606 Greifensee
52 500 178 Printed in Switzerland
EasyClean100
EasyClean150
Instruction Manual
Page 4

4 EasyClean100/150
© 11/14 Mettler-Toledo AG, CH-8606 Greifensee EasyClean100/150
Printed in Switzerland 52 500 178
Product and maintenance log
D
ate Activity Performed Approved
by by
First installation
Page 5
EasyClean100/150 5
EasyClean100/150 © 11/14 Mettler-Toledo AG, CH-8606 Greifensee
52 500 178 Printed in Switzerland
How to use this instruction manual
This instruction manual is an integral part of the EasyClean100 and EasyClean150 and
contains notes and instructions that are important for safety and operation.
All persons working on or with the EasyClean100 and/or EasyClean150 must have first
read and understood the sections appropriate to the work in hand.
Please read this instruction manual carefully before using the EasyClean system. Keep this
document close to the unit, so operating personnel may be easily refer to it at any time.
First read Chapter 2 ”Safety”!
© It is forbidden to reprint this instruction manual in whole or part.
No part of this manual may be reproduced in any form, or modified, copied or distributed using electronic systems,
in particular in the form of photocopies, photographs, magnetic or other recordings, without written consent of
Mettler-Toledo AG, Process Analytics, CH-8902 Urdorf.
All rights reserved, in particular reproduction, translation and patenting/registration.
InTrac, InDip are registered trade marks of Mettler-Toledo AG, CH-8606 Greifensee
Page 6

6 EasyClean100/150
© 11/14 Mettler-Toledo AG, CH-8606 Greifensee EasyClean100/150
Printed in Switzerland 52 500 178
Contents
1 Product description 7
1.1 Introduction 7
1.2 Fittings and deliverables 7
1.3 Data and key characteristics EasyClean 100/150 8
2 Safety 10
2.1 Introduction 10
2.2 Intended use 10
2.3 Inappropriate use 10
2.4 Basic principles 11
2.5 Warning notices and symbols 11
2.6 Responsibility, organizational measures 12
2.7 Product-specific hazards 13
2.8 Residual hazards 13
2.9 Emergency measures 13
2.10 Safety measures 14
2.11 Modifications 14
3 Your device 15
3.1 Layout 15
3.2 Functions 16
3.3 Integration into a measurement system 17
4 Commissioning 18
4.1 Fitting 18
4.2 Connections 20
4.3 Installation and commissioning 24
5 Operation 26
5.1 Checks by the operator 26
5.2 Operating the EasyClean 100 26
5.3 Operating the EasyClean 150 26
5.4 Procedure in the event of a failure in the power supply 27
6 Maintenance and fault elimination 28
6.1 Maintenance 28
6.2 Fault elimination and repairs 29
7 Decommissioning, storage, disposal 31
7.1 Decommissioning 31
7.2 Storage 31
7.3 Disposal 31
8 Spare parts and accessories 32
8.1 List of spare parts and accessories EasyClean 100 32
8.2 List of spare parts and accessories EasyClean 150 34
Page 7

EasyClean100/150 7
EasyClean100/150 © 11/14 Mettler-Toledo AG, CH-8606 Greifensee
52 500 178 Printed in Switzerland
1 Product description
Conformity EasyClean100 and EasyClean150 correspond to the following guidelines:
• Low voltage guideline:
– EU guidelines 73/23/EU
– Swiss guidelines SR734.26NEV
–
safety guidelines EN61010-1
– IP-rating EN60529 IP65
• Guidelines EMC:
– emission EN61326-1, Class B
– harmonics EN61000-3-2
– voltage deviations EN61000-3-3
– immunity EN61326-1
Certificates CE, GS
Identification The type plate is located on the left-hand exterior of the housing.
Deliverables EasyClean100 and150 are shipped without connecting cables. At the installation site,
cables are connected to the appropriate terminals in the unit (please refer to section 4.2
”Connections”).
Packaging The unit is packed in plain and padded cardboard.
We recommend that you retain the packing materials for subsequent storage or transportation
of the unit. Should you choose to discard the packing materials, observe local regulations and
section 7.3 ”Disposal”.
Good inspection Check the goods for damage while unpacking. Should you notice signs of damage, inform the
shipper and your supplier without delay.
Check the delivery against your order and the delivery note.
1.1 Introduction
1.2 Fittings and deliverables
Page 8

8 EasyClean100/150
© 11/14 Mettler-Toledo AG, CH-8606 Greifensee EasyClean100/150
Printed in Switzerland 52 500 178
1.3 Data and key characteristics EasyClean100/150
Housing steel housing, powder-coated with polyester resin
m
aterial: mild steel DIN 1.1203 Ck55
attention: housing may not be cleaned with solvents
containing acetone
Weight of control unit approx. 3 kg (6.6 lb)
P
rotection rating IP65
Ambient conditions temp. in operation: 0 – +45° C (+32 – +113°F)
temp. storage/transportation: –10 – +70°C (+14 – +158°F)
degree of pollution: 2
overvoltage category: III
Power supply 100 – 230V AC, 50/60 Hz, 0.18 – 0.3 A (± 15%)
System control process initiation:
– via a wash contact in the associated transmitter
sequence:
– can not be set on unit
Control input 1 control input for wash contact in transmitter 24V
Transmitter METTLER TOLEDO transmitters:
– pH2050e, O
2
4050e, Cond7050e
– pH2100e, O24100e, Cond7100e, Trb8300
– alternatively via any standard transmitter with wash
contact and ”hold” function
Electrical connections Terminal strip 0.08 – 2.5 mm
2
Connection transmitter 4-wire control cable, 4 x 1.5 mm
2
length: 5 m (optional 10 m)
Cable ducts Ø 3.5 to 10 mm => M 16
Compressed air supply 4 – 8 bar (400 – 800 kPa, 58 – 116 psi)
– air quality according to ISO 8573-1
– moisture class 4 (water dew point +3°C)
– particles class 5 (filter 40 µm)
– max. oil content class 2 (0.1 mg/m3)
connection: thread G1/8"
Page 9

EasyClean100/150 9
EasyClean100/150 © 11/14 Mettler-Toledo AG, CH-8606 Greifensee
52 500 178 Printed in Switzerland
Connection to InDip housing LDPE hose Ø 6/4 mm (1/8"/1/4")
optional: PTFE hose Ø 6/4 (1/8"/1/4")
Connection to InTrac housing LDPE hose Ø 6/4 mm (1/8"/1/4")
optional: PTFE hose Ø 6/4 mm (1/8"/1/4")
Flushing water supply pressure: 2 – 6 bar (200 – 600 kPa, 29 – 87 psi)
connection: thread G1/4" female
a
dapter:
1
/4"
NPT male (PP)
Spray head material PVC or PVDF
Materials in contact PP, LDPE, Viton
®
, brass,
with flushing water, stainless steel DIN 1.4105, 1.4303, 1.4310
compressed air or
Medias in connection with water 0 – 60 °C (32 °F – 140 °F)
the LDPE hose
Medias in connection with water 0 – 90 °C (32 °F – 194 °F)
the PTFE hose
Subject to technical changes
Page 10

10 EasyClean100/150
© 11/14 Mettler-Toledo AG, CH-8606 Greifensee EasyClean100/150
Printed in Switzerland 52 500 178
2 Safety
2.1 Introduction
This instruction manual lists the main points of how to use the EasyClean100/150 efficiently,
in the intended manner. For safe, trouble-free operation, operators must be aware of these
s
afety instructions and comply with further warning notices in the instruction manual.
This instruction manual, and the safety requirements in particular, must be observed by the
operator and all other persons working with the EasyClean100/150. Compliance with local
regulations and statutory requirements is also essential.
The instruction manual must always be stored close at hand, in a place accessible to all
people working with the EasyClean100/150.
2.2 Intended use
EasyClean100 and EasyClean150 are intended solely for automatically controlled or manually
flushing of sensors, as described in this instruction manual.
Other prerequisites for appropriate use include:
– observing the instructions, notes and requirements set out in this instruction manual
– observing the prescribed inspection and maintenance intervals
– correct care and maintenance of the unit, according to the instruction manual
– observing the prescribed environmental and operational conditions, and permitted
installation positions.
– compliance with local statutes
2.3 Inappropriate use
Any other use, or use not mentioned here, that is incompatible with the technical specifications
is deemed inappropriate. The operator is solely responsible for any damage arising from such
use.
The following are deemed particularly inappropriate:
– use of hydraulic fluid in place of compressed air
– use of suspensions as cleaning media
Page 11
EasyClean100/150 11
EasyClean100/150 © 11/14 Mettler-Toledo AG, CH-8606 Greifensee
52 500 178 Printed in Switzerland
2.4 Basic principles
EasyClean100/150 and the spray head are state-of-the-art constructions and comply with
engineering safety guidelines.
All the same, there are certain risks and hazards:
–
if the unit is operated by inadequately trained personnel.
– if the unit is not used in the intended manner.
EasyClean 100/150 and the spray head must only be used while in perfect working order,
for its intended purpose, with due awareness of associated safety and hazard issues and
in compliance with the instruction manual.
Defects or damage that impact the unit’s safety and functionality must be immediately repaired
by the operator or a suitably qualified person, and reported in writing to the manufacturer.
2.5 Warning notices and symbols
This instruction manual identifies safety instructions by means of the following symbols:
DANGER!
Warns of a hazard that could lead to extensive material damage, death or grievous bodily
injuries.
CAUTION!
Warns of a potentially hazardous situation that could lead to minor bodily injury and/or
material damage.
NOTICE!
Information relating to technical requirements. Non-observance could lead to defects,
inefficient operation and possible loss of production.
Page 12

12 EasyClean100/150
© 11/14 Mettler-Toledo AG, CH-8606 Greifensee EasyClean100/150
Printed in Switzerland 52 500 178
2.6 Responsibility, organizational measures
Operator’s
responsibilities
– The operator must only permit personnel to work with the EasyClean if they are acquainted
with basic regulations concerning workplace safety and accident prevention, and familiar
with operating the unit. This instruction manual serves as a basis.
– In addition to the instruction manual, the operator must provide instruction in general statu-
tory and other binding regulations concerning workplace safety and accident prevention,
as well as environmental protection.
– Personnel safety and hazard awareness must be monitored regularly.
– Steps must be taken to ensure that the EasyClean is operated only while in a safe, properly
functional state.
Personnel
responsibilities
– All persons working with the EasyClean must have read the section on safety and
responsibilities the warning notices contained in this instruction manual.
– In addition to the instruction manual, generally applicable statutory and other binding regu -
lations concerning workplace safety and accident protection must also be observed.
– Avoid any hazardous working practices that exceed the unit’s intended purpose.
Personnel selection and
qualification
– basic responsibilities
– Only dependable, trained or supervised personnel may work with the EasyClean. Operators
must read this instruction manual beforehand.
– Responsibilities for operating, maintaining, installing, etc. the unit must be clearly defined.
– Appropriate steps must be taken to ensure that the unit is used by authorized personnel only.
– Personnel under instruction, supervision or general training may only work with the unit
under constant supervision by an experienced person.
– Work on electrical parts of the unit may only be performed by a qualified electrician in
compliance with electrical engineering regulations.
Constructional
modifications on the unit
– The unit may not be modified, extended or rebuilt in a way that impacts its safety without
written permission from Mettler-Toledo GmbH, Process Analytics.
– Any parts that are not in perfect working order must be replaced without delay.
Page 13
EasyClean100/150 13
EasyClean100/150 © 11/14 Mettler-Toledo AG, CH-8606 Greifensee
52 500 178 Printed in Switzerland
2.7 Product-specific hazards
Electrical hazards!
Opening the unit for installation or repair work exposes live electrical parts.
C
lose the unit immediately after work is completed!
Compressed air/water hazards!
Pressurized pipes (compressed air, water) must be isolated and depressurized before
commencing repair work!
2.8 Residual hazards
Despite all precautionary measures, there remain residual hazards such as:
– a pipe bursting
– hazards arising from a defect in a supervisory controller.
2.9 Emergency measures
Should fluid come into contact with the eyes, rinse thoroughly under running water for
at least 15 minutes. A doctor must be consulted for subsequent diagnosis.
Fluid coming into contact with the skin must be immediately washed away with water.
Medical assistance is mandatory for symptoms that clearly arise from skin or eye
contact with a medium. Inform the doctor about the type and specific identity of all
materials used.
Page 14

14 EasyClean100/150
© 11/14 Mettler-Toledo AG, CH-8606 Greifensee EasyClean100/150
Printed in Switzerland 52 500 178
2.10 Safety measures
Always observe local statutes and regulations. They are not incorporated in this instruction
manual.
Personal safety equipment like protective goggles and clothing must be worn.
The unit must only be operated while closed.
The operator is responsible for personnel instruction. By way of assistance, the instruction
m
anual can also be ordered in other languages. Being an integral part of the unit, this instruc-
tion manual must always be available at the unit’s location.
The operator should immediately inform the manufacturer about all safety-related events
occurring during use of the unit.
2.11 Modifications
Modifications are permitted only after prior consultation and written approval from the
manufacturer.
Only those parts of the unit essential to fulfilling its function may be removed and refitted.
This may be accomplished by hand, or with the supplied tools. Except for authorized service
personnel, it is forbidden to remove protective guards and covers using a regular tool.
Touching live electrical parts represents a lethal hazard.
Page 15
EasyClean100/150 15
EasyClean100/150 © 11/14 Mettler-Toledo AG, CH-8606 Greifensee
52 500 178 Printed in Switzerland
3 Your device
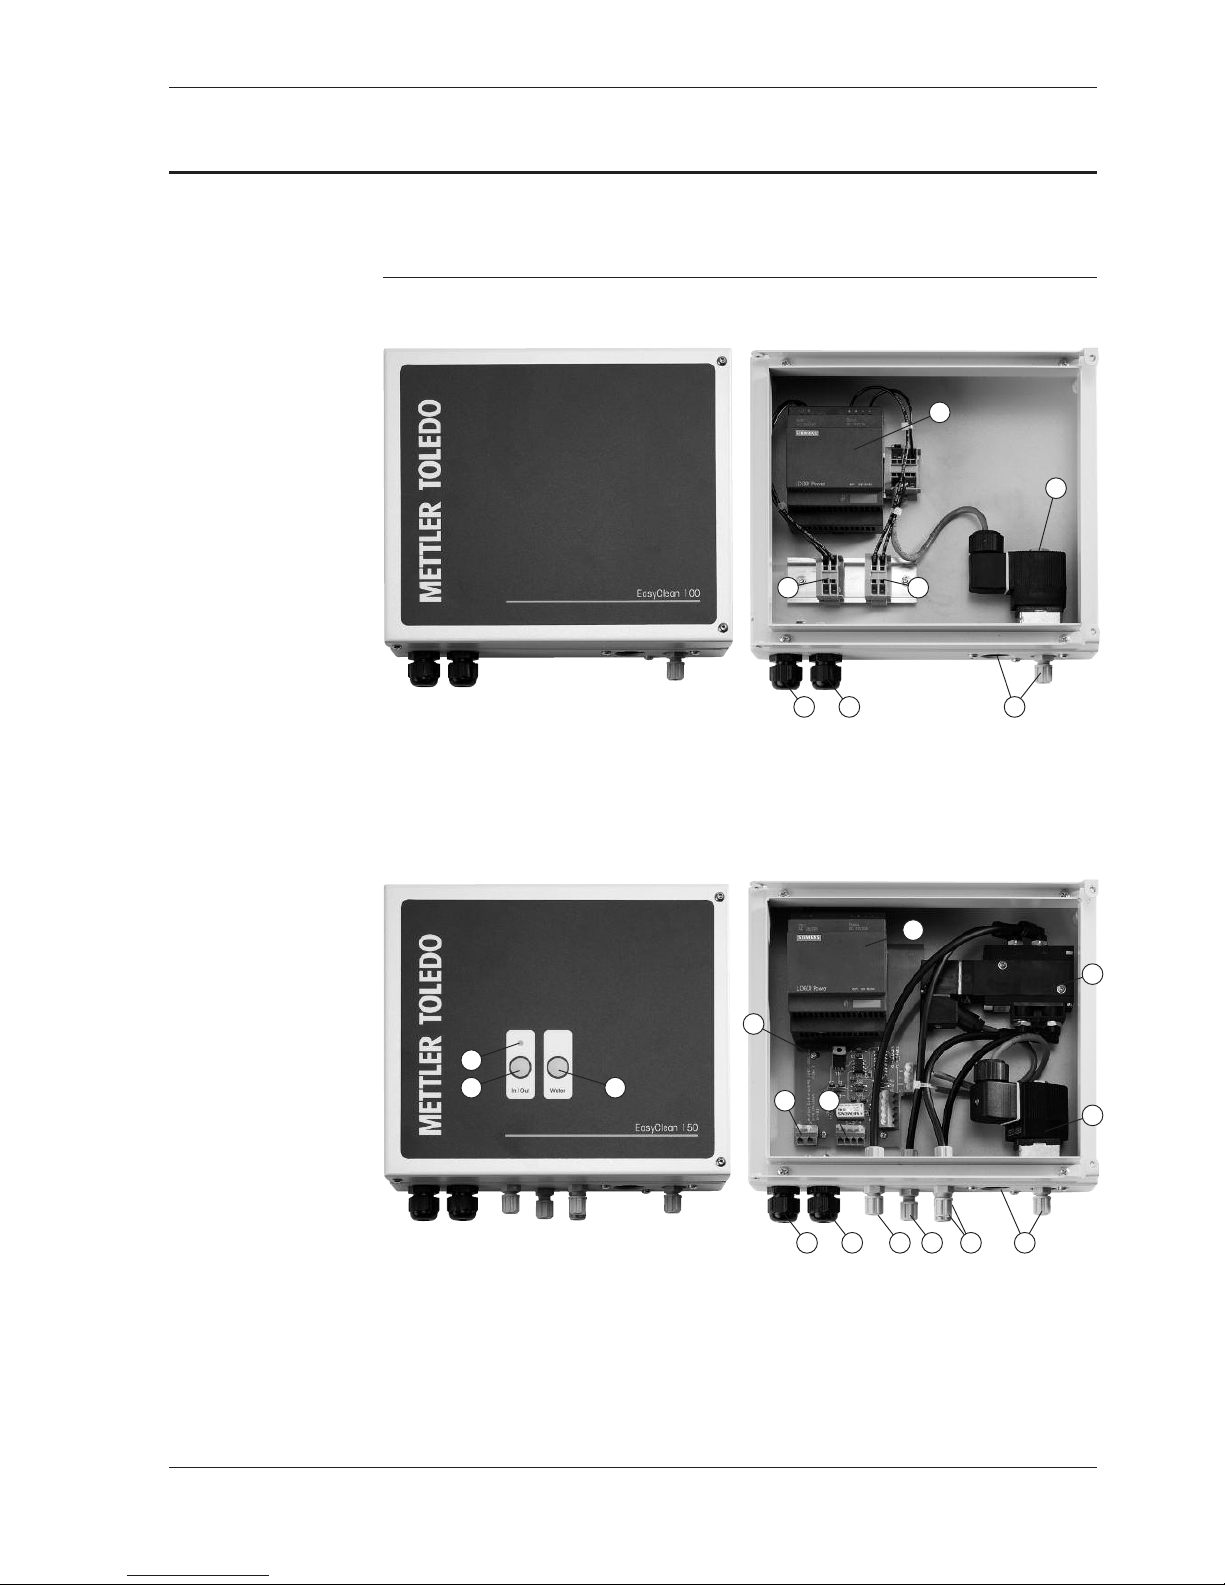
3.1 Layout
EasyClean100
4 5
7
6
21
5 6 74
1 3
10
11
12
13
14 15
2
5 Connection terminal control cable
6 Compressed air/water valve
7 Power supply unit
1 Main connection
2 Control cable connection
3 Compressed air or water connection
4 Connection terminal main cable
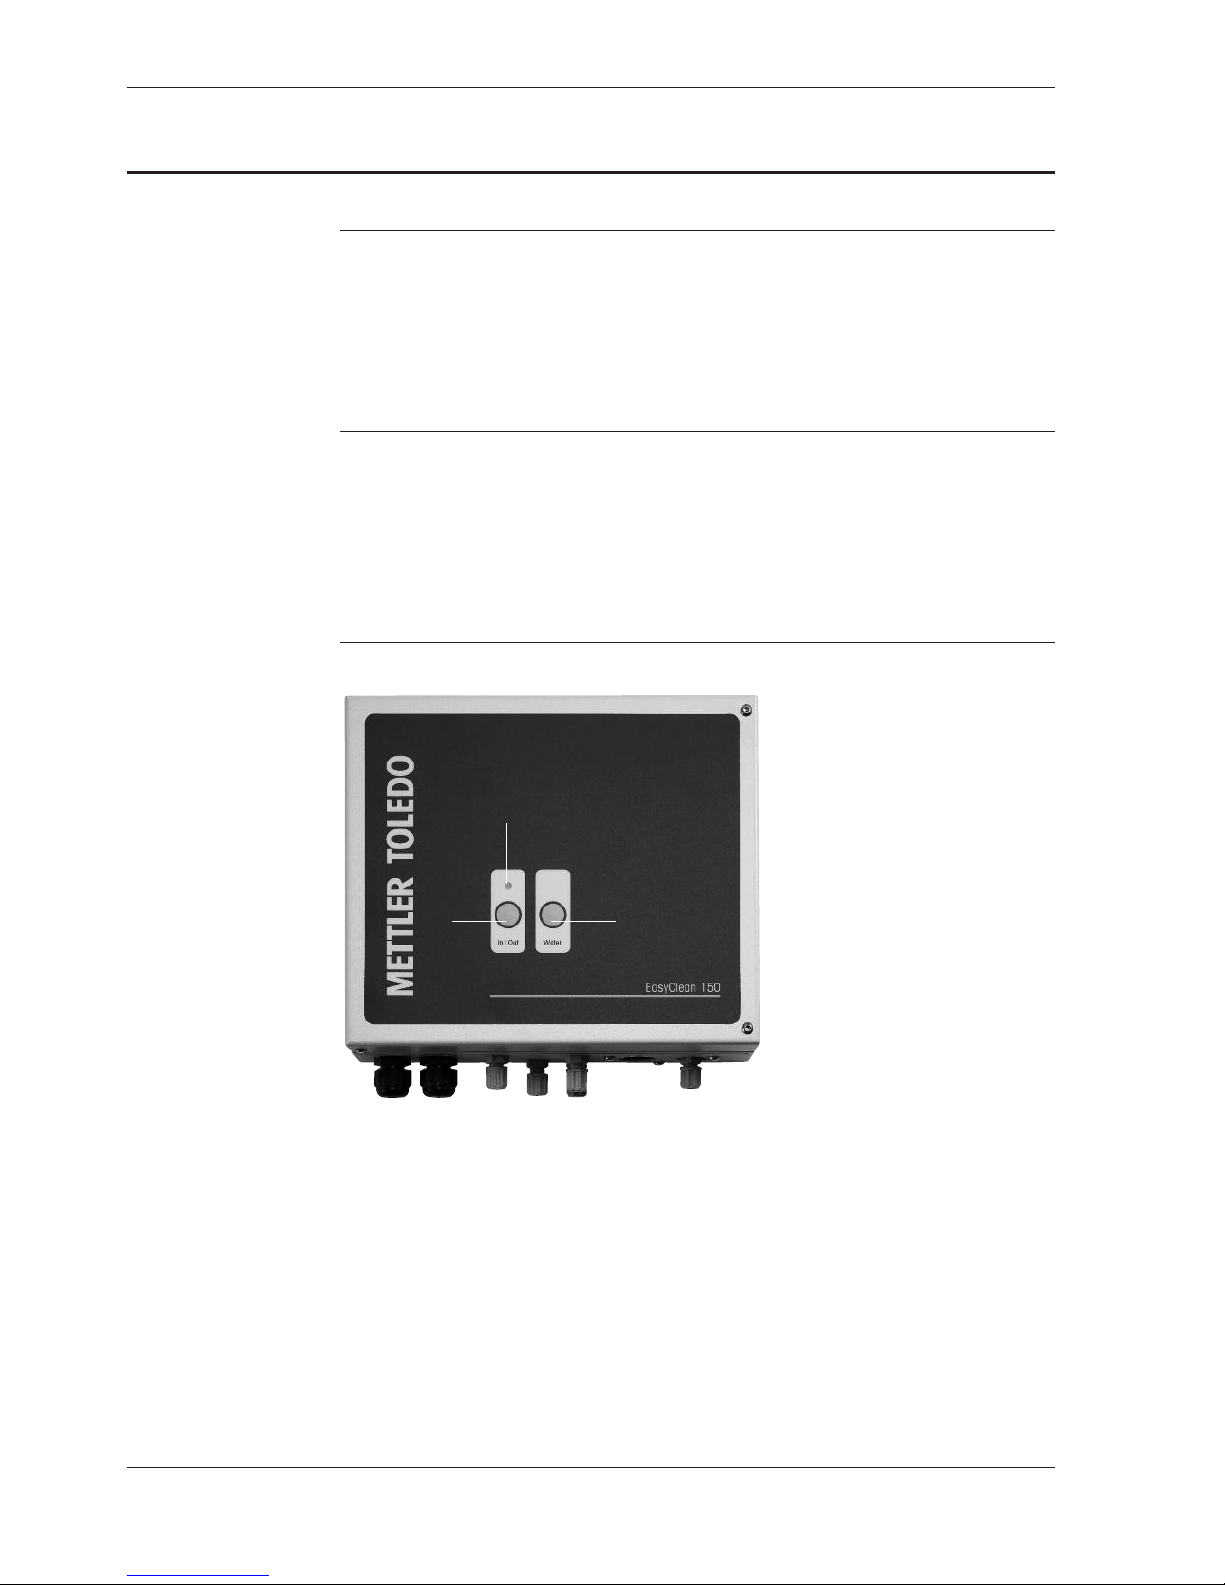
EasyClean150
1 ”In/Out” push button (position selector switch)
2 Pilot light LED
3 ”Water” push button
4 Main connection
5 Control cable connection
6 Compressed air connection
7 Air discharge
8 Compressed air outlet housing
9 Water connection
10 Water valve
11 Compressed air valve
12 Power supply unit
13 Control print
14 Connection terminal main cable
15 Connection terminal control cable
8 9
3
Page 16

16 EasyClean100/150
© 11/14 Mettler-Toledo AG, CH-8606 Greifensee EasyClean100/150
Printed in Switzerland 52 500 178
3.2 Functions
General The EasyClean100/150 controls the supply of compressed air or water to an electrode tip,
w
hich is integrated into an InDip housing (EasyClean100) or into a retractable housing
(EasyClean150). The flow is released and stopped via the transmitter’s washing contact.
Types of operation The transmitter assumes overall control of the device.
Basic setting The valves are de-energized when closed.
In the event of a loss of pressure the InTrac housing remains in its last position. In the event of
a power failure in the EasyClean150, the sensor moves out of the process and the transmitter
changes to ”hold mode” (reading is frozen).
In the event of a power failure, all functions of the EasyClean100 cut out, with no impact on
the reading.
Hold function For the exact function and settings of the Hold relay, please refer to the instruction manual for
the transmitter in question.
Pilot lights
The EasyClean100 has no pilot lights.
The EasyClean150 has a pilot light (LED) built into the front. The light is connected to the
control valve that controls the housing movement. It does not therefore indicate any fault in
the operation of the housing, but only indicates the key status (automatic operation or in
retracted ”service mode”).
Program sequence The rinse and wash time is indicated by the control signal (wash contact) of the transmitter,
(see transmitter’s instruction manual).
Page 17
EasyClean100/150 17
EasyClean100/150 © 11/14 Mettler-Toledo AG, CH-8606 Greifensee
52 500 178 Printed in Switzerland
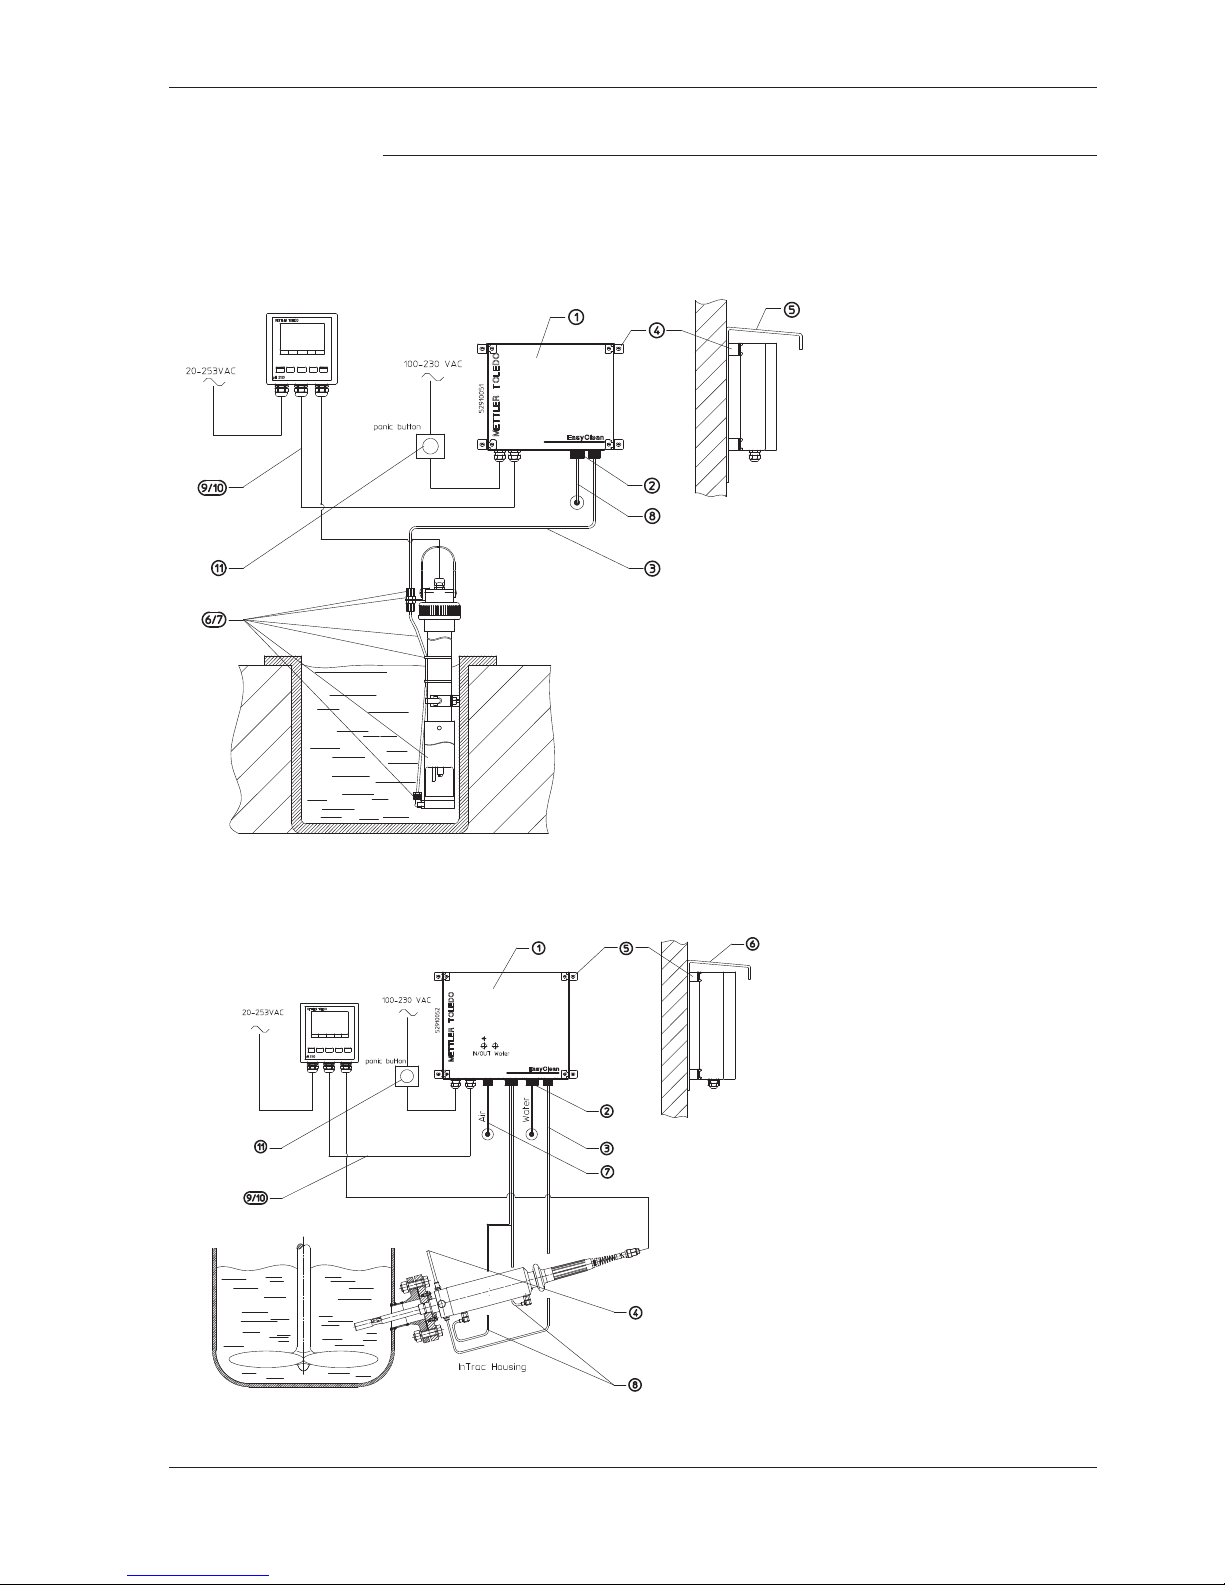
3.3 Integration into a measurement system
The following diagrams show typical examples of the integration of the EasyClean 100 or
the EasyClean150 respectively into a measurement system.
EasyClean100
1 EasyClean100
2 Compressed air/water connection
3 Compressed air or water hose
4 Wall mounting kit
5 Protective hood (optional)
6/7 Spray head
8 Compressed air inlet or water hose
9/10 Control cable
11 Panic button (optional)
1 EasyClean150
2 Water connection
3 Water hose
4 Drainwater hose
5 Wall mounting kit
6 Protective hood (optional)
7 Compressed air inlet (entrance)
8 Compressed air hoses (housing)
9/10 Control cable
11 Panic button (optional)
EasyClean150
Page 18
18 EasyClean100/150
© 11/14 Mettler-Toledo AG, CH-8606 Greifensee EasyClean100/150
Printed in Switzerland 52 500 178
4 Commissioning
DANGER
P
lease refer to chapter 2 ”Safety”.
All work on the system’s electrical components may only be performed by authorized,
specialist staff.
NOTICE
During commissioning, please proceed according to section 4.3 ”Installation and
commissioning”. Note the references to more detailed information.
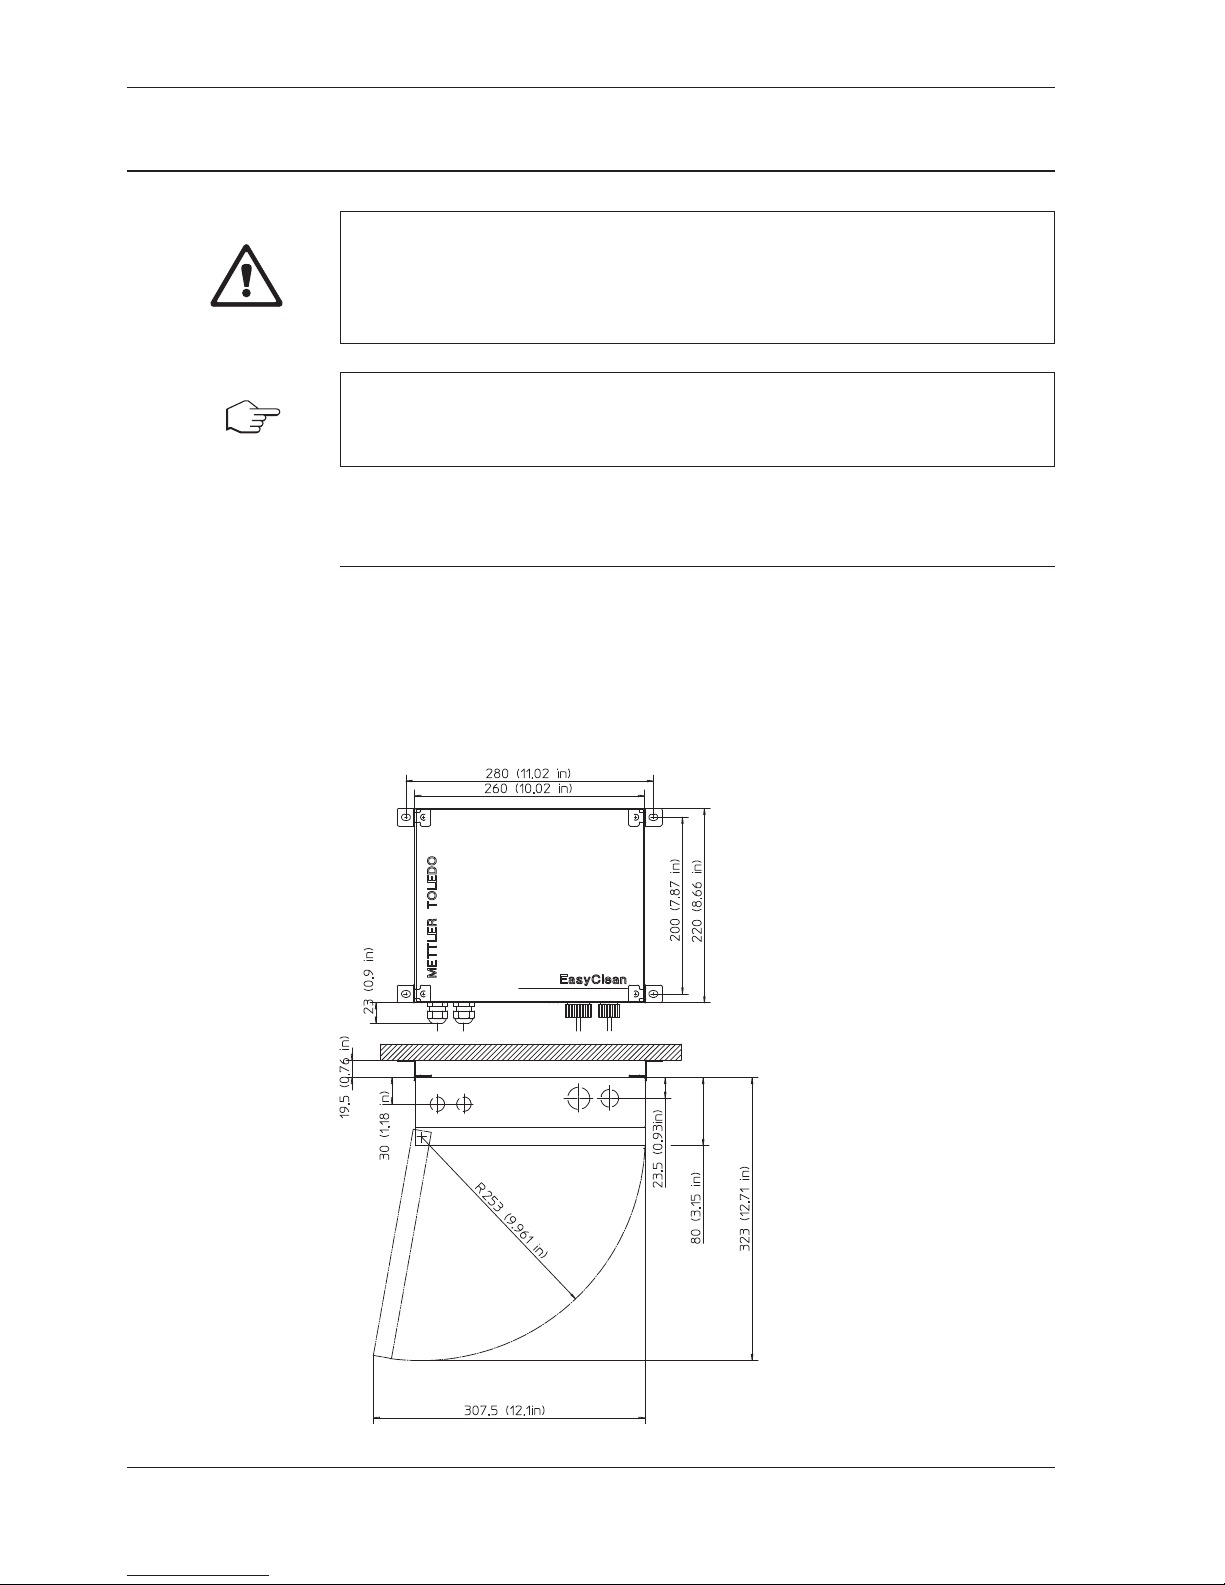
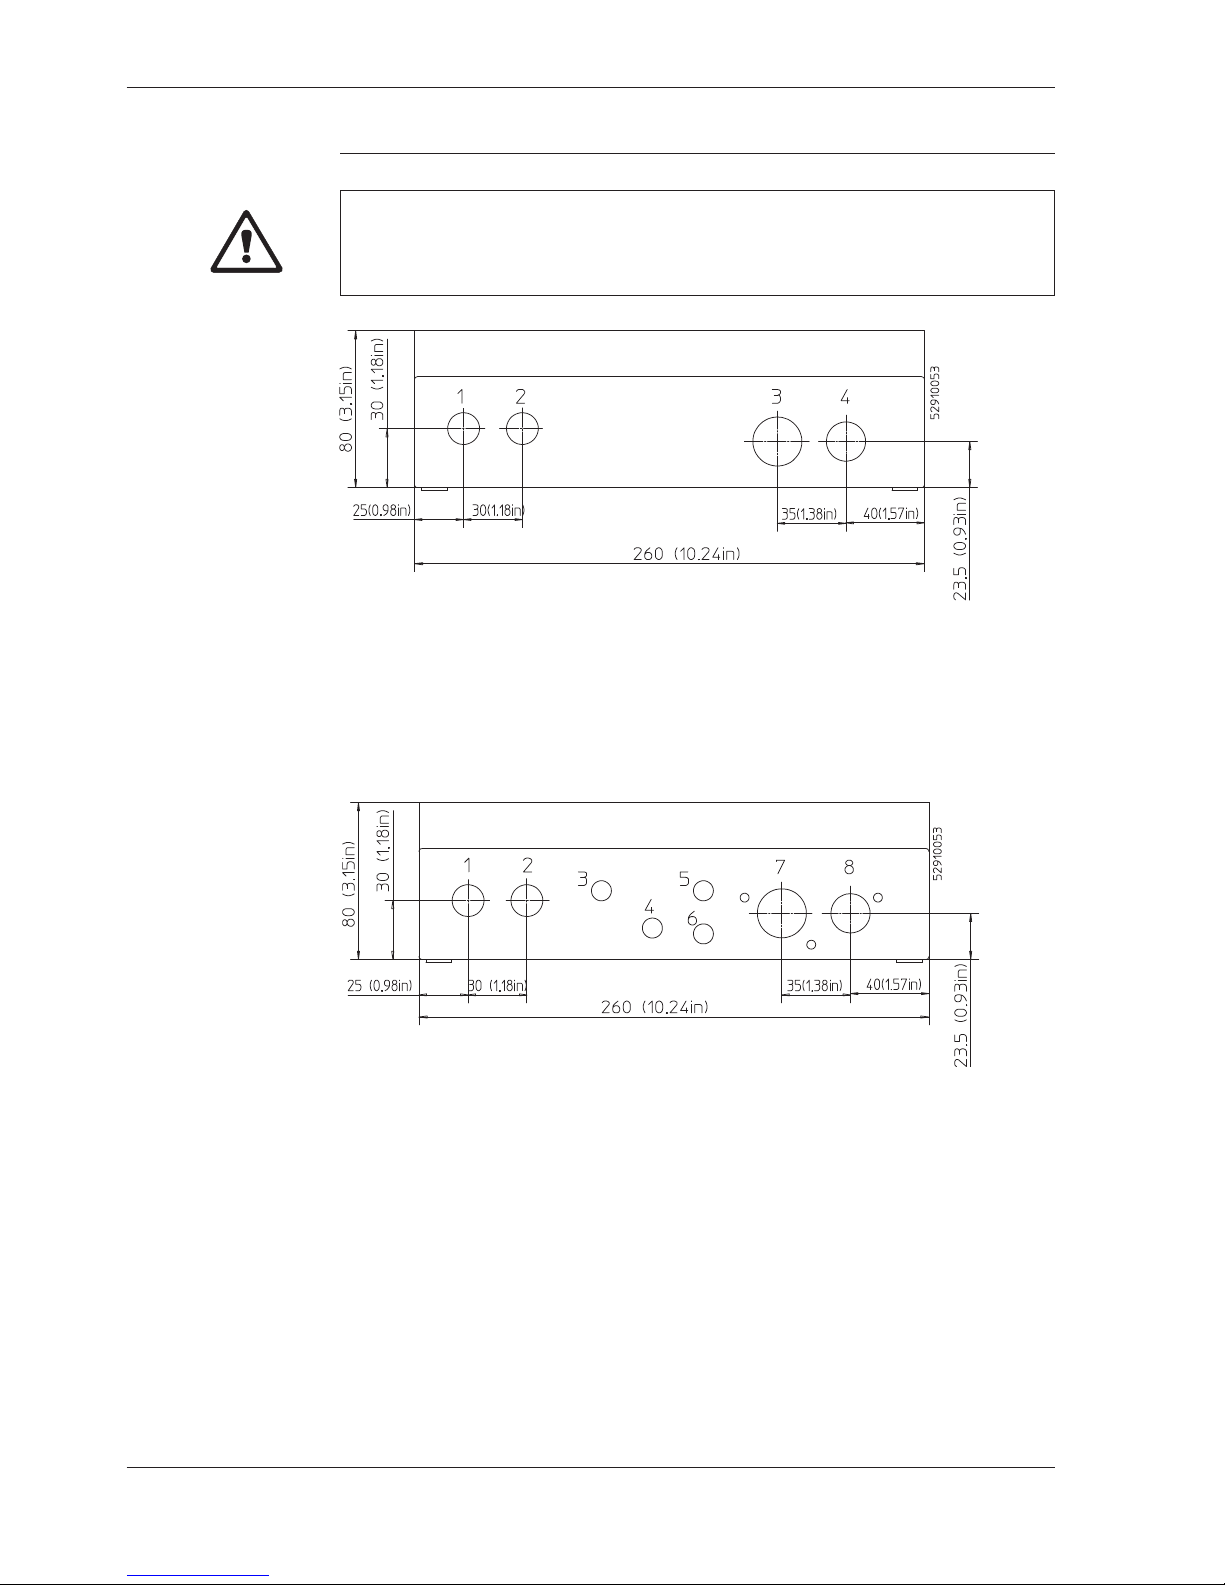
4.1 Fitting
The EasyClean100 and 150 are designed to be fitted directly (c-rails), on to walls or posts/
pipes. The EasyClean 100 and 150 are built into the same type of housing and therefore have
the same dimensions.
The fitting location must have sufficient stability and must as far as possible be free of vibration.
Please make sure that the lengths of the leads are as short as possible.
Wall mounting
Page 19
EasyClean100/150 19
EasyClean100/150 © 11/14 Mettler-Toledo AG, CH-8606 Greifensee
52 500 178 Printed in Switzerland
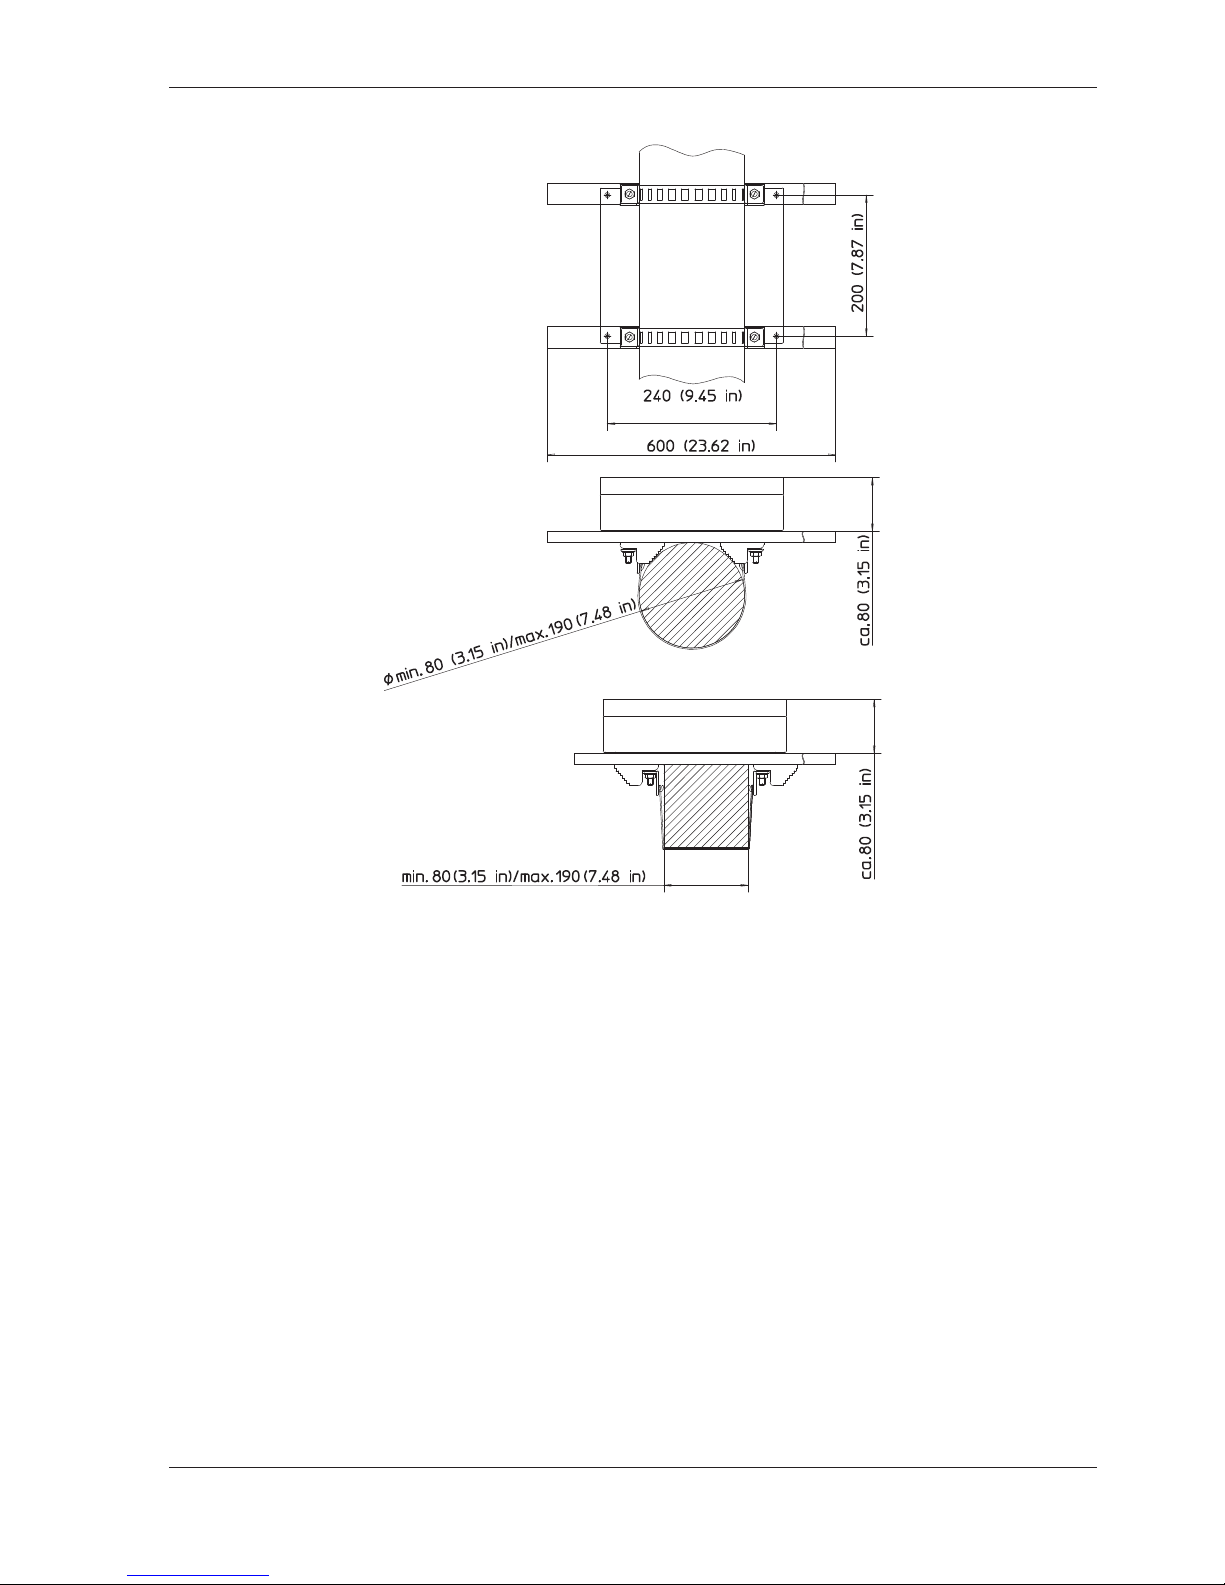
Pipe/post mounting
For the detailed procedure when fitting the suspended item, please refer to the installation
manual supplied separately.
Page 20
20 EasyClean100/150
© 11/14 Mettler-Toledo AG, CH-8606 Greifensee EasyClean100/150
Printed in Switzerland 52 500 178
4.2 Connections
CAUTION
B
efore making connections, check that the connection values as described in section
1.3 ”Data and key characteristics” are observed.
Connections to the
housing floor
EasyClean100
1 Main cable sleeve M16
2 Transmitter cable sleeve, M16
3 Air/water input G1/4" NPT, female
4 Output to InDip housing (Ø 6/4 mm hose)
Connections to the
housing floor
EasyClean150
1 Main cable sleeve, M16
2 Transmitter cable sleeve, M16
3 Air input (Ø 6/4 mm hose)
4 Air discharge
5 Compressed air output for InTrac housing ––> function: ”Back”
6 Compressed air output for InTrac housing ––> function: ”Forwards”
7 Water input G
1
/4", female,
8 Output to housing (Ø 6/4 mm hose)
Page 21
EasyClean100/150 21
EasyClean100/150 © 11/14 Mettler-Toledo AG, CH-8606 Greifensee
52 500 178 Printed in Switzerland
NOTICE
For purposes of efficiency, a valve is installed for water and compressed air from the building
close to the EasyClean100/150. This facilitates maintenance work and increases working
s
afety during fitting and dismantling of the device.
Please observe the local regulations for pneumatic and water installations.
Connections to the
immersion housing
The spray head is designed for the Mettler-Toledo InDip550. If the spray head is used with a different housing, installation and operation of the spray head is at the operator’s own risk.
For the installation of the retractable housing, please refer to the corresponding instruction
manual for the housing.
Electrical connections The EasyClean100 and 150 are designed for the Mettler-Toledo transmitter as described in
section 1.3. For the correct installation to other transmitters, please refer to the relevant manual.
DANGER
The mains connection may only be performed by authorized specialist staff in accordance
with electrical engineering rules.
Please also observe local regulations for the mains connection to the building.
NOTICE
The protective power switch has to be installed from the building installation and must be
placed near the EasyClean system.
Page 22
22 EasyClean100/150
© 11/14 Mettler-Toledo AG, CH-8606 Greifensee EasyClean100/150
Printed in Switzerland 52 500 178
T
ransmitter
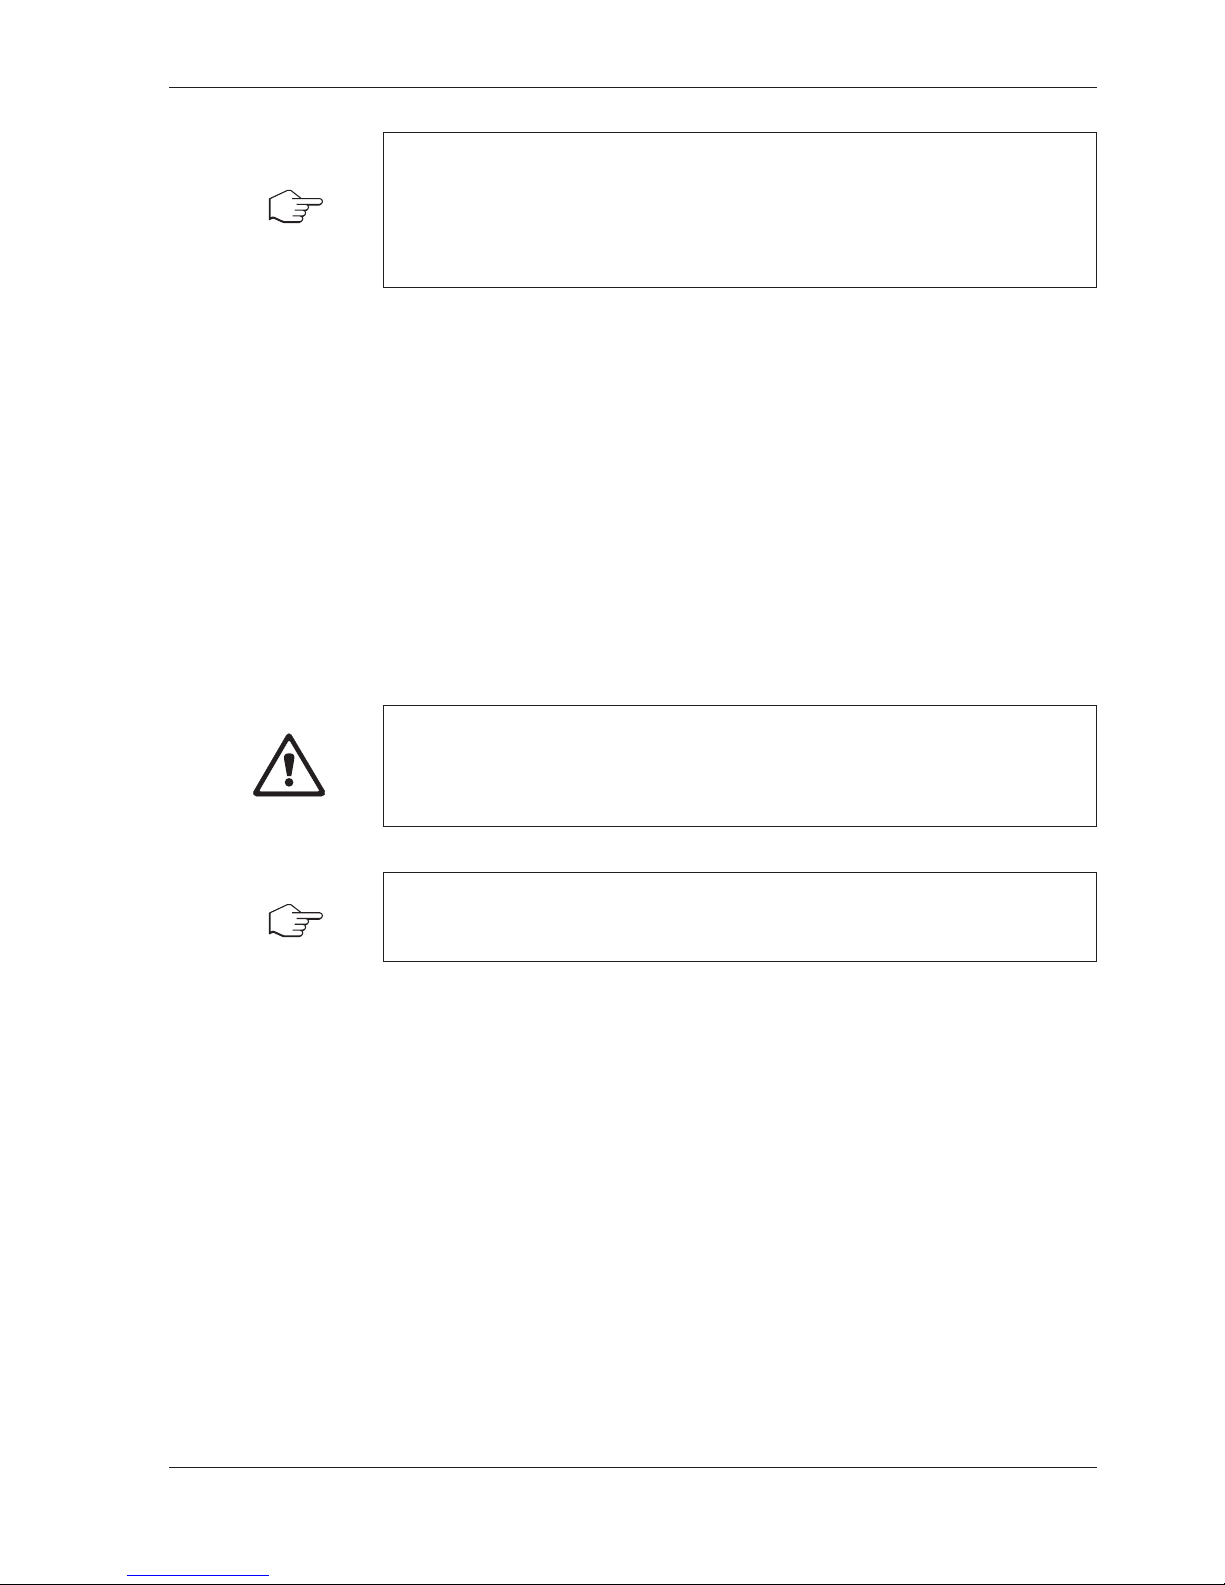
Electrical connections EasyClean100 with Mettler-Toledo transmitters
EasyClean 100
X100 e
1
Inp. 1
+24 VDC
17
18
Wash
2
E
asyClean 100
M300
1
Inp. 1
+24 VDC
2
1
TB1(1/2 DIN)
or
TB1B (1/4 DIN)
2
EasyClean 100
M700
1
Inp. 1
+24 VDC
3
4
K3
2
EasyClean 100
Trb 8300
1
Inp. 1
+24 VDC
TB5/6
TB5/5
Wash
2
Electrical connections
Transmitter X100 e
Define rinse interval and rinse time according to the process
require ments on the transmitter X100 e.
Transmitter M300
Set relay #1 (default) or #2, #3, #4 on the transmitter to
rinse contact.
Define rinse interval and rinse time according to the process
requirements on the transmitter M300.
Transmitter M700
Set relays K3 (or K1 or K2) to rinse contact. Set it on NO
(normally open).
Define the rinse interval and rinse time according to the process requirements.
Transmitter Trb 8300
Define rinse interval and rinse time according to the process
requirements on the transmitter Trb 8300.
Page 23
EasyClean100/150 23
EasyClean100/150 © 11/14 Mettler-Toledo AG, CH-8606 Greifensee
52 500 178 Printed in Switzerland
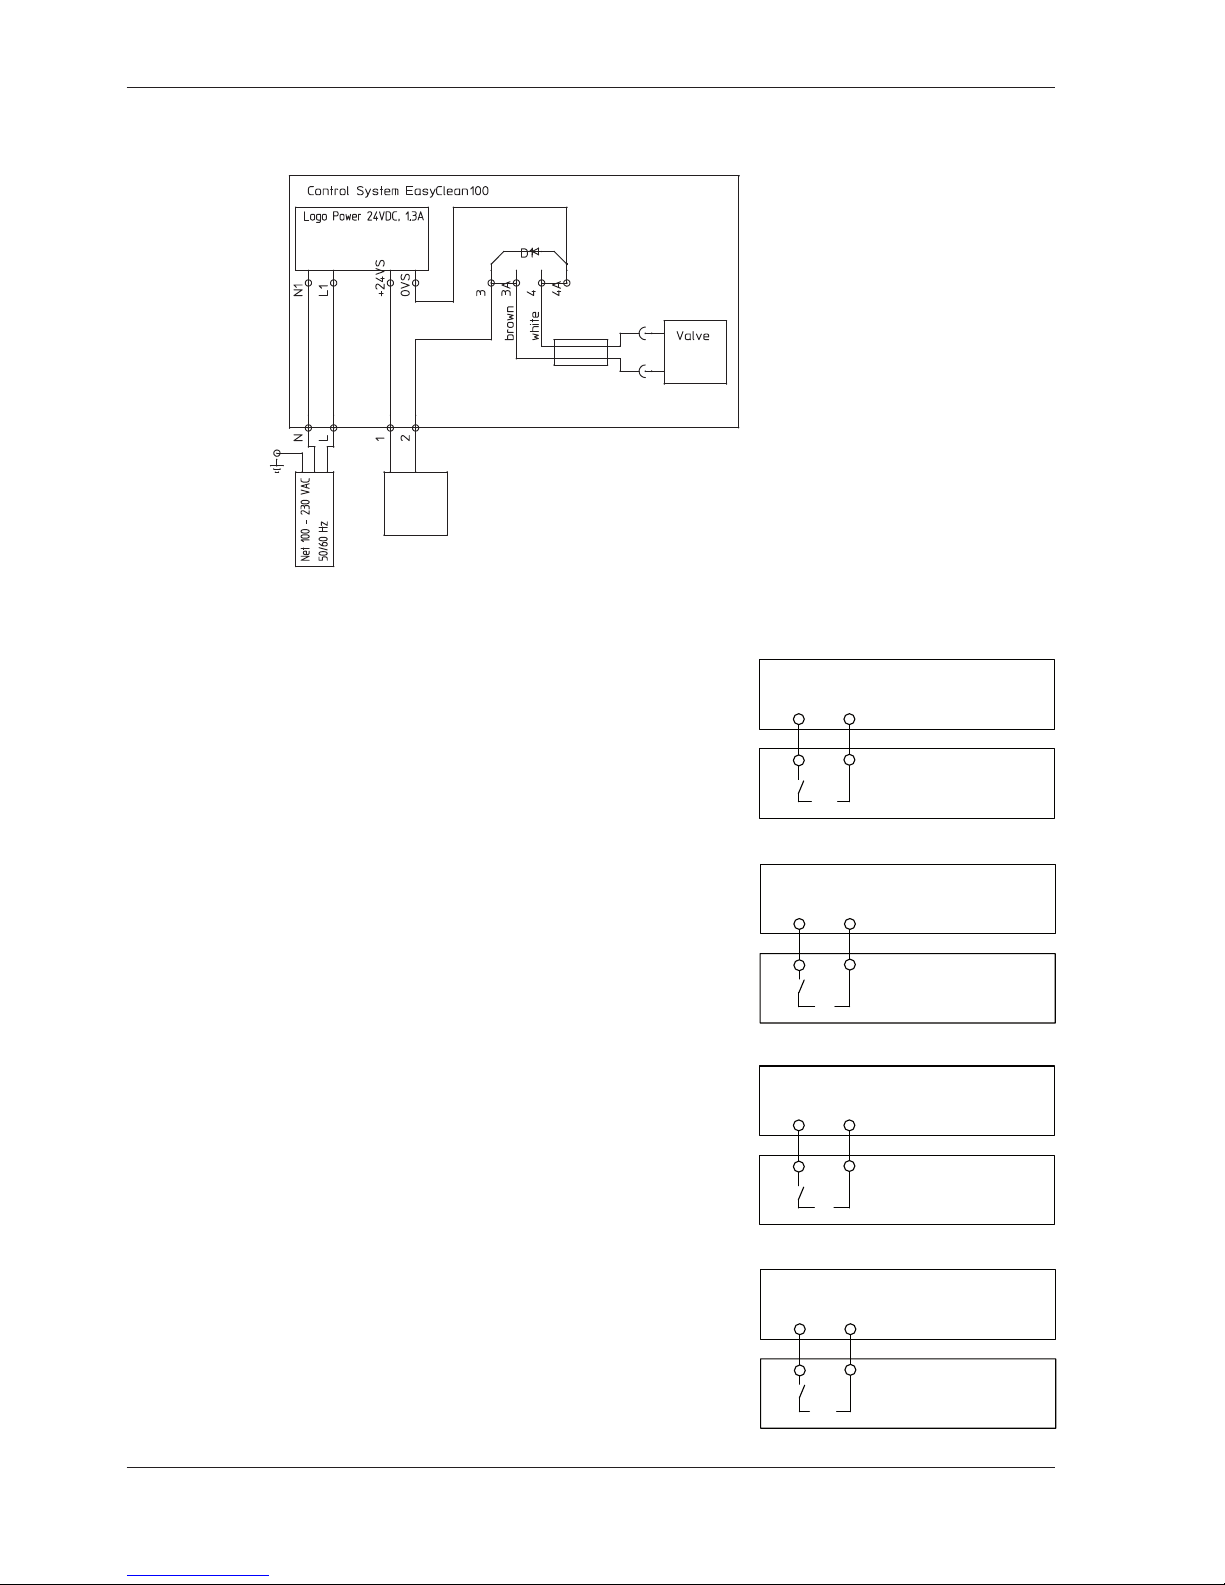
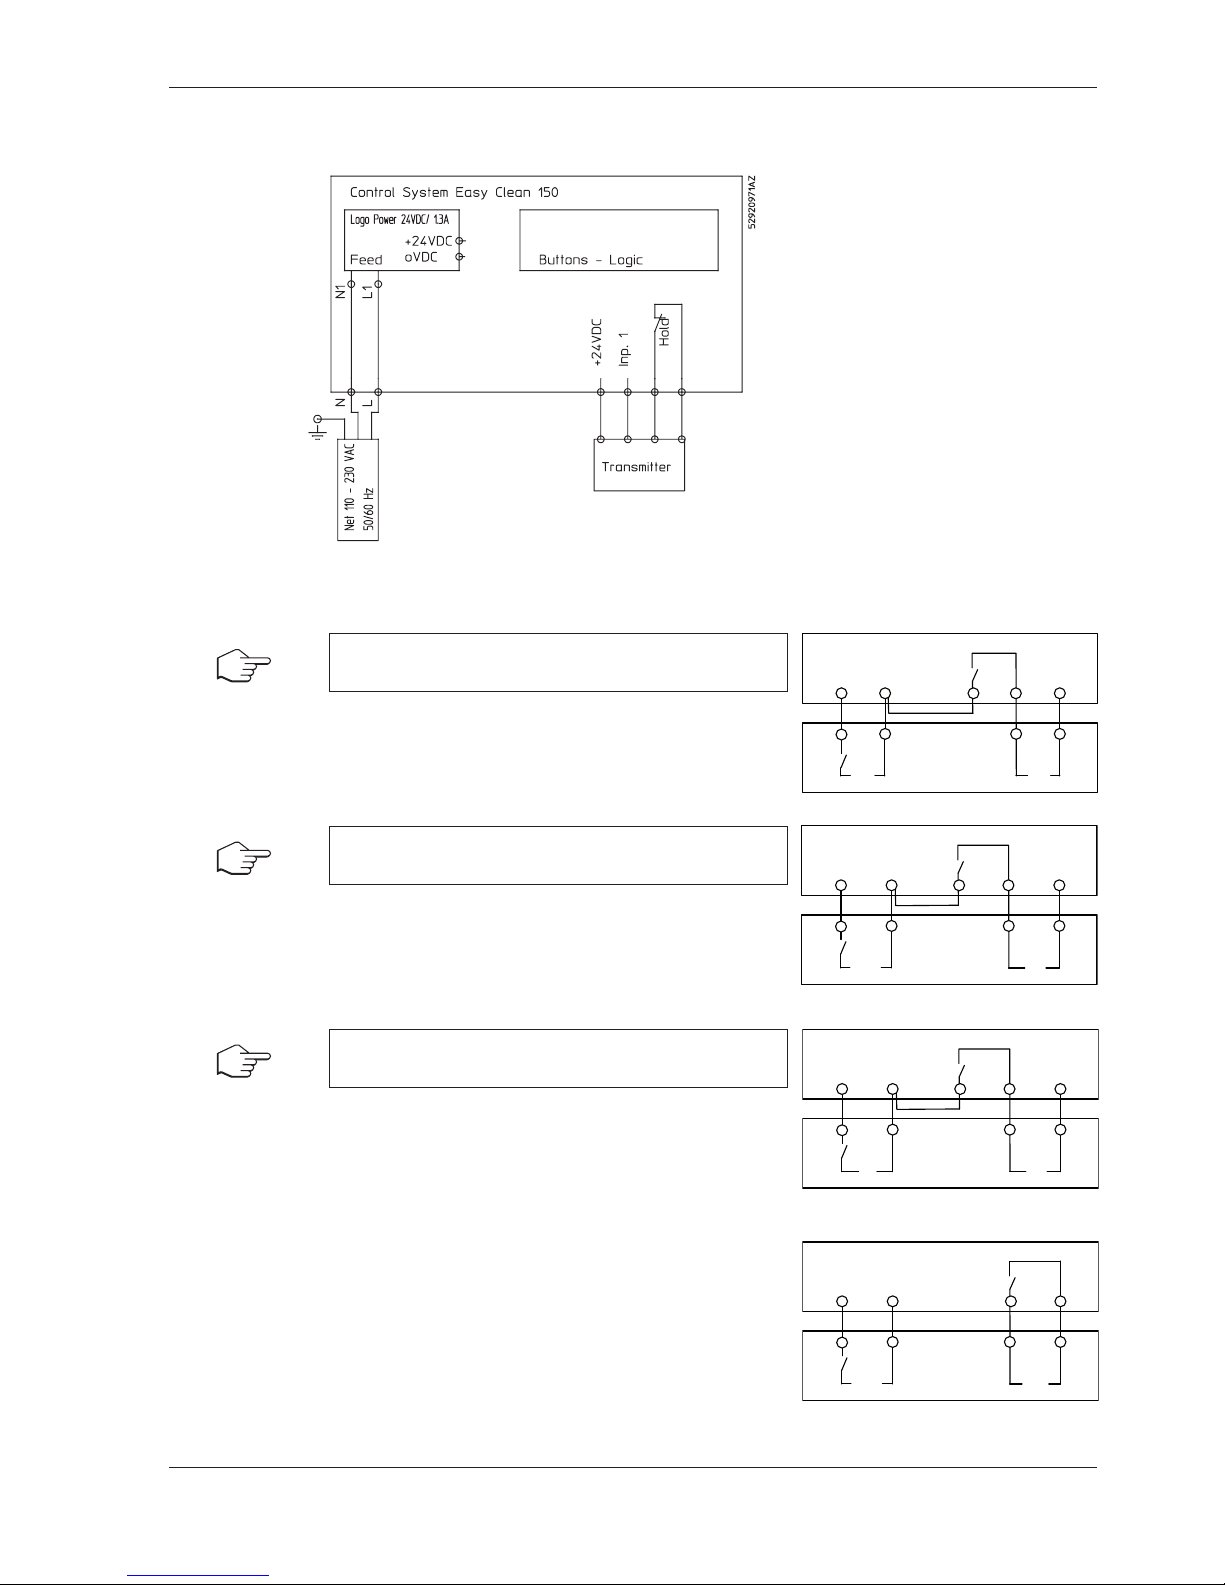
Electrical connections EasyClean150 with Mettler-Toledo transmitters
EasyClean100 and 150 are designed to work together with Mettler Toledo transmitters.
Please consult relevant instruction manuals of third party transmitters for proper installation.
EasyClean 150
X
100 e
1
Inp. 1
+24 VDC
TAO
17
18
6
7
Wash
Hold
2
4
3
EasyClean 150
M300
1
Inp. 1
+24 VDC
TAO
2
1
7
8
TB2
Hold
2
4
3
TB1(1/2 DIN)
o
r
TB1B (1/4 DIN)
EasyClean 150
M700
1
Inp. 1
+24 VDC
TAO
3
4
11
13
OK1
2
4
3
K3
EasyClean 150
Trb 8300
1
Inp. 1
+24 VDC
Hold
2
4
3
Wash
TB5/6
TB5/5
TB2/6
TB2/2
Transmitter X100 e
NOTICE
Bridge terminal 2 and 3 in the EasyClean 150.
Define rinse interval and rinse time according to the process
requirements on the transmitter X100 e.
Transmitter M300
NOTICE
Bridge terminal 2 and 3 in the EasyClean 150.
Set relay #1 (default) or #2, #3, #4 on the transmitter to
rinse contact.
Define rinse interval and rinse time according to the process
requirements on the transmitter M300.
Transmitter M700
NOTICE
Bridge terminal 2 and 3 in the EasyClean 150.
Set relays K3 (or K1 or K2) to rinse contact and NO (normally open). Define the rinse interval and rinse time according to
the process requirements.
Set input OK1 to HOLD (active 10–30 V) for the external hold
signal.
Transmitter Trb 8300
Define rinse interval and rinse time according to the process
requirements on the transmitter Trb 8300.
Electrical connections
Page 24
24 EasyClean100/150
© 11/14 Mettler-Toledo AG, CH-8606 Greifensee EasyClean100/150
Printed in Switzerland 52 500 178
b
c
d
a
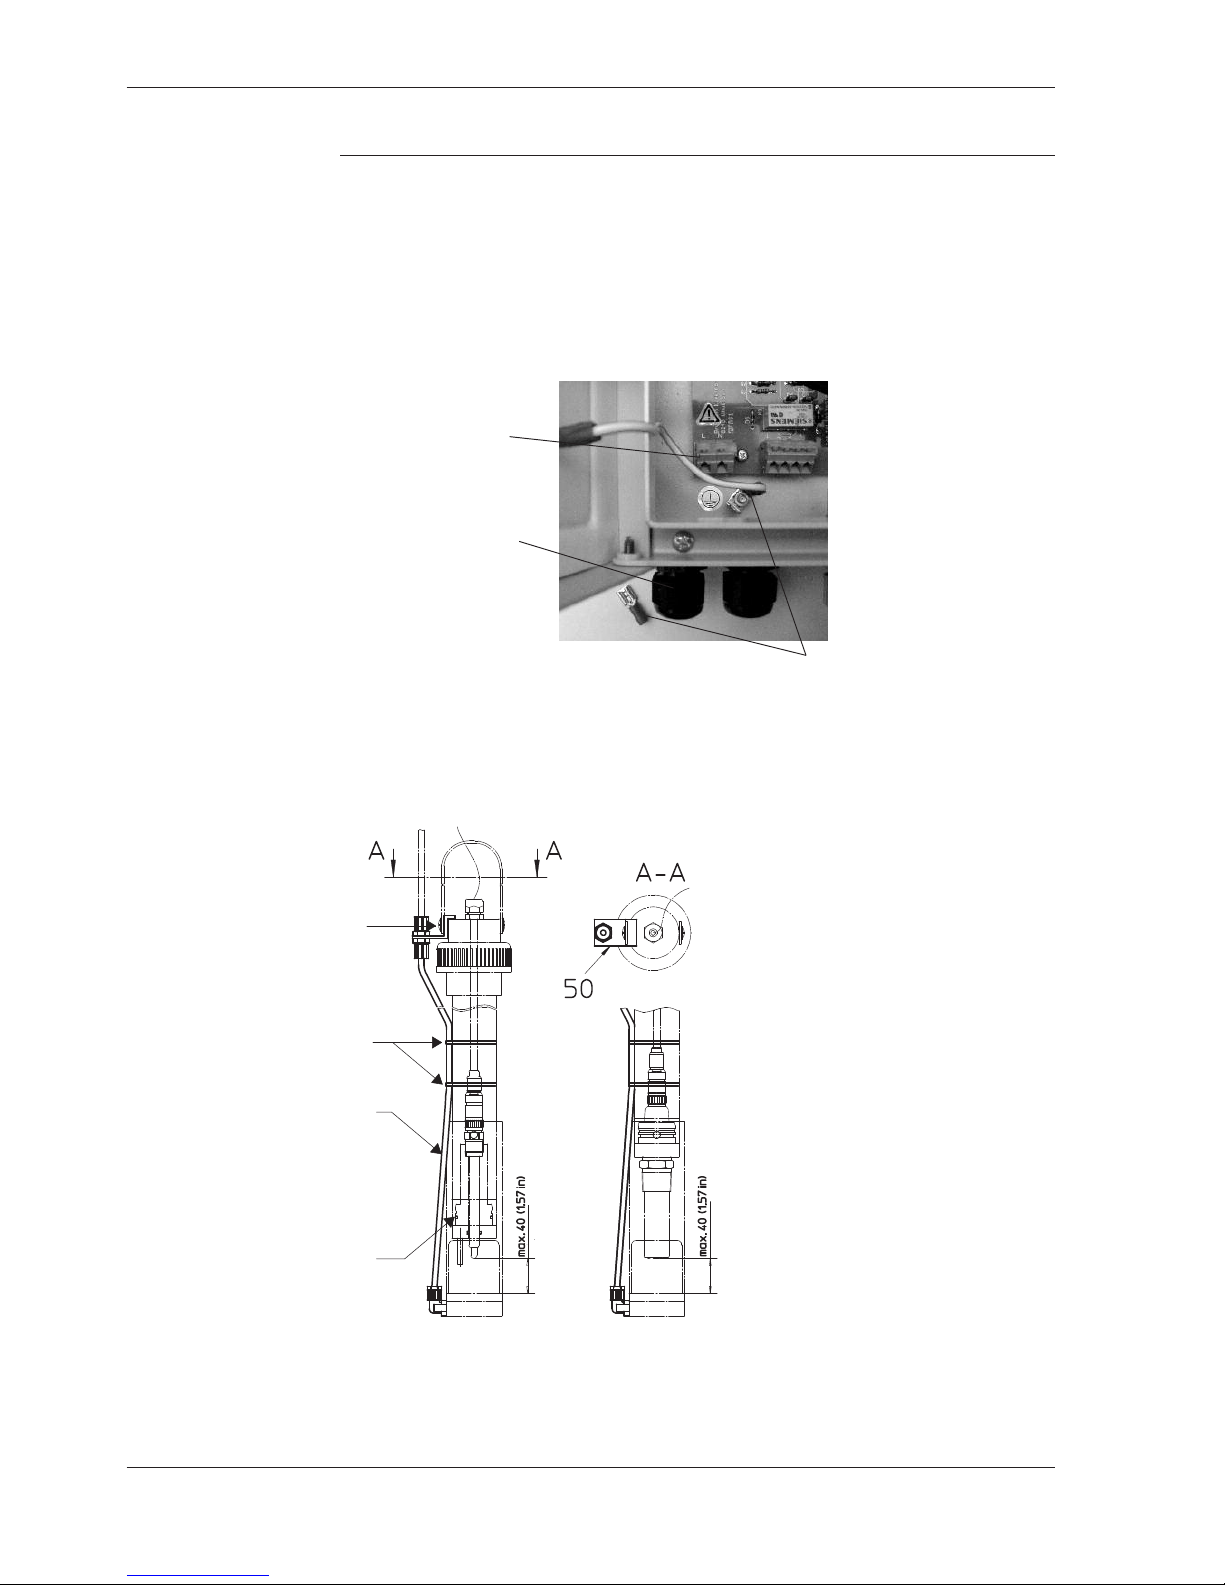
4.3 Installation and commissioning
a Push the spray head over the end
of the InDip housing that is to be
immersed. The distance between
the air outlet opening and the electrode should be approx. 1 cm.
b Install the hose system as follows:
Place a screw in the holding band
on the InDip housing, and use this
screw to secure the bracket to the
upper end of the housing.
c Insert the hose between the spray
head and the bracket as follows:
First of all, loosen the hose screw.
Push the hose by hand, without the
use of any tools, into the screw
housing, tighten the screw.
d Secure the loose hose to the tube
of the InDip housing using a cable
binder.
EasyClean100
1. Fit the EasyClean to a wall or a pipe/post, so that the connections are facing downwards.
2. Connect the transmitter to the EasyClean device (see section 4.2 ”Connections”).
3
. Connect compressed air and water from the building, taking care to ensure that the media
pressure does not exceed the specified device pressure. (see section 1.3 ”Data and key
characteristics”)
4. Connect hoses to the compressed air/water output and install the corresponding housing
c
onnections.
5. Connect the main cable.
Terminal for
N and L wires
Cable sleeve
When connecting the grounding wire use the
supplied blade terminals.
Crimp the terminals from both sides.
6. Fitting the spray head for the EasyClean100:
Page 25

EasyClean100/150 25
EasyClean100/150 © 11/14 Mettler-Toledo AG, CH-8606 Greifensee
52 500 178 Printed in Switzerland
EasyClean150 1. Connect the hoses to the EasyClean as described in section 3.3 ”Integration into a
measurement system”.
2. For the correct way to connect to the retractable housing, please refer to the corresponding
manual. Please note that no position indicator can be connected to the EasyClean150.
However, to monitor its function it is possible to used pneumatic check-back position
indicators, which indicate the position of the sensor.
3. Check before commissioning:
• Are compressed air and rinsing water correctly connected?
• Are all hose connections carefully (not bent!) secured?
4. First commissioning of the EasyClean150
• Connect the EasyClean to the power supply.
• Open the main tap (if available) for compressed air and water.
• Extend/retract the housing using the ”IN/OUT” push button.
• In extended position (maintenance) the LED must not lit and the transmitter must
be in ”HOLD” mode.
• Press the ”Water” push button ––> water valve opens.
• Release the ”Water” push button ––> water flow stops.
• Activate ”IN/OUT” push button ––> housing changes the position.
5. Control via transmitter
• Activate the transmitter’s washing contact (see transmitter manual).
• Check whether the valves are activated by the transmitter signal.
––> The housing must move and the water valve must be opened at the same time.
• The time interval for the washing contact is set on the transmitter (see transmitter
manual).
• When the time interval has expired, the water valve closes and the housing returns
to the measurement position.
7 Check before commissioning:
•
Are compressed air and rinsing water correctly connected?
• Are all hose connections carefully (not bent!) secured?
8. First commissioning of the EasyClean100
• Connect the EasyClean to the power supply.
• Open the main tap (if available) for compressed air and/or water.
9. Control via transmitter
•
Check whether the valves are activated by the transmitter signal.
––> Compressed air discharge by the spray head.
• Submerge the spray head under water and set the air volume to the required flow rate.
The air throughput can be regulated using a reducing valve.
Page 26
26 EasyClean100/150
© 11/14 Mettler-Toledo AG, CH-8606 Greifensee EasyClean100/150
Printed in Switzerland 52 500 178
5 Operation
5.1 Checks by the operator
When switching the device on, every day and when a new shift starts, check whether a
sufficient supply of: compressed air, rinsing water and electrical power is guaranteed,
and that the housing is functioning smoothly. For any kind of maintenance work on the
housing, please refer to the relevant manual.
5.2 Operating the EasyClean100
The EasyClean100 has no actuators. Its function can only be tested via the transmitter’s
wash contact.
If its function can no longer be guaranteed, please refer to section 6.2 ”Fault elimination
for the EasyClean100”.
5.3 Operating the EasyClean150
1 ”IN/OUT” push button
housing movement (retract,
extend)
2 ”Water” push button
opens the water valve (only
active as long as the button
is pressed).
3 Operational status indicator
(LED)
LED is lit when the housing
is in the measuring position.
Operating the EasyClean150
1. The housing can be moved using the ”IN/OUT” button.
2. If the housing is in maintenance position (out of process), the LED indicator is not lit.
The LED indicator only shows the position of the push button for the housing position.
No direct testing of the housing position or function is possible.
If the LED indicator is not lit, the transmitter is in ”HOLD” mode.
3. Rinsing with water can only be activated manually in the maintenance position.
This cycle runs for as long as the button is pressed down. No timer is activated.
12
3
Page 27
EasyClean100/150 27
EasyClean100/150 © 11/14 Mettler-Toledo AG, CH-8606 Greifensee
52 500 178 Printed in Switzerland
5.4 Procedure in the event of a failure in the power supply
EasyClean100
Failure in the
power supply
In the event of a power failure, all functions of the EasyClean100 cut out, with no impact on
the reading. The EasyClean100 is inactive. This means:
– The electrode continues to measure. If the transmitter is still being powered, the measure-
m
ent results can be used.
– The rinse function is closed. It is no longer possible to rinse the electrode.
NOTICE
When the power supply is reconnected the system is automatically returned to the state
specified by the transmitter.
EasyClean150
EasyClean valves are de-energized in the following positions.
– Water valve: closed
– Air valve: the housing or sensor moves out of the process and the transmitter
goes into ”HOLD” mode.
NOTICE
If the EasyClean150 is provided with power once more, the housing always moves into
the measuring position.
In the event of a loss of compressed air the sensor remains in its last position.
NOTICE
If the housing is in the process, it can be pushed into the maintenance position by means
of back pressure. In this case the transmitter continues to measure. As there is no indication
of the position of the housing, the EasyClean150 does not recognize the position of the
housing. A loss of compressed air does not, however, have any effect on the measurement.
Failure in the
power supply
Failure in the
compressed air supply
Page 28

28 EasyClean100/150
© 11/14 Mettler-Toledo AG, CH-8606 Greifensee EasyClean100/150
Printed in Switzerland 52 500 178
6 Maintenance and fault elimination
If you have any questions about faults or repairs, please contact your local METTLER TOLEDO
customer service. The addresses may be found at the end of this instruction manual.
6.1 Maintenance
The EasyClean100/150 is very service reduced.
To remove dust, dirt and stains, the external surfaces of the device can be wiped with a soft,
damp cloth. If necessary a mild detergent can also be used.
CAUTION
The housing may not be cleaned with any solvent containing acetone.
For further cleaning (e.g. blowing out the housing), you may use filtered compressed air that
is free of oil and water (pressure < 6 bar/87 psi).
CAUTION
The inside of the housing may not be cleaned using a liquid or a damp cloth.
The spray head is made of PVC or PVDF. You may use diluted acids or alkalis to remove dirt.
Page 29
EasyClean100/150 29
EasyClean100/150 © 11/14 Mettler-Toledo AG, CH-8606 Greifensee
52 500 178 Printed in Switzerland
6.2 Fault elimination and repairs
DANGER
Please refer to Chapter 2 ”Safety”!
Repair work may only be performed by specialists. Before the device is opened,
it must be disconnected from the power supply!
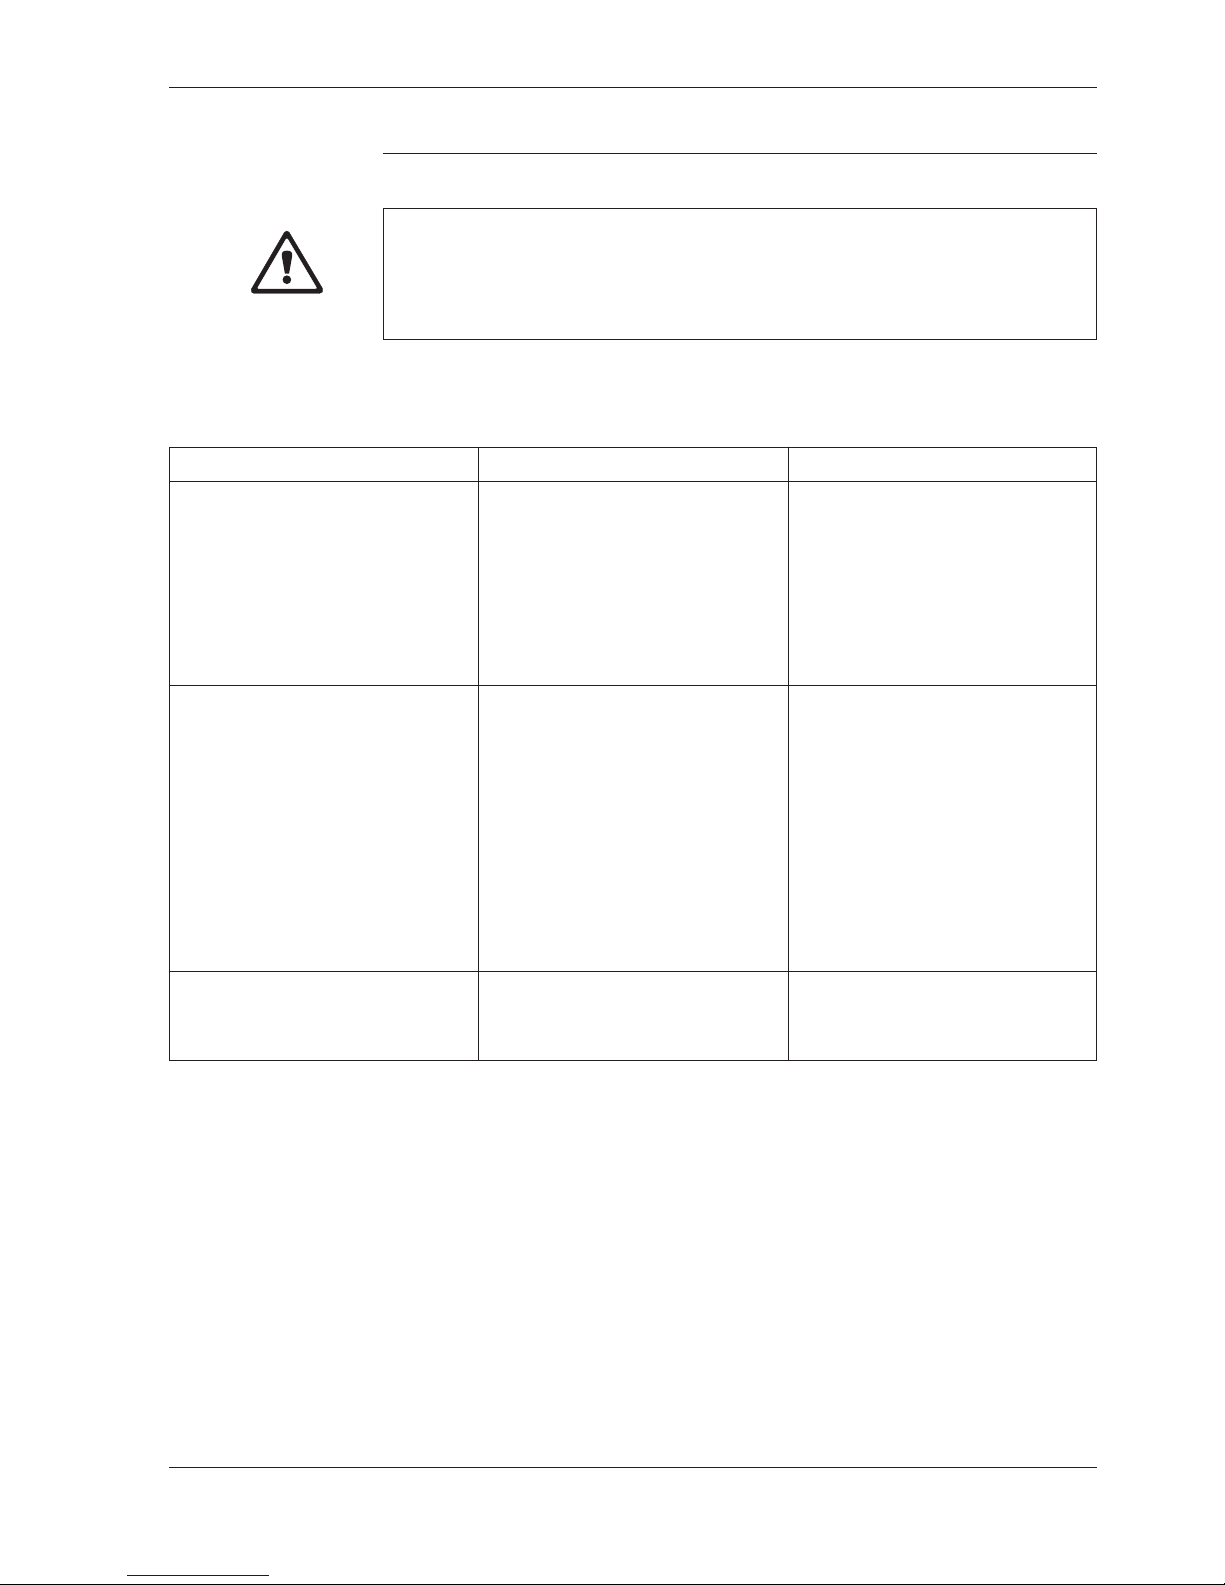
EasyClean100
Failure Cause Remedy
No air generated in the InDip housing Compressed air not switched on.
Air pressure too low.
Compressed air valve not
opening.
Air hoses incorrectly fitted (crimped) or
defective.
Spray head blocked.
Switch on compressed air.
Increase pressure.
Clean valve.
Check hoses for leaks, bends or any
kinks.
Clean the spray head.
Insufficient cleaning by the electrode Insufficient air flow.
Rinse interval too long and/or rinse
times too short.
Openings on the spray head are
blocked.
Air does not reach the electrode.
Increase the flow or clean the hoses
and spray head.
Shorten the interval on the transmitter,
increase rinse times.
Remove and clean the spray head.
Decrease the distance between the
spray head and the electrode tip.
Place the InDip housing somewhere
with less flow.
Increase pressure.
Rinsing does not start
(auto and/or manual)
The rinse interval from the transmitter is
not recognized by the device.
The valve is not receiving any power.
Check the cabling with reference to the
circuit diagram.
Check the power supply.
Page 30

30 EasyClean100/150
© 11/14 Mettler-Toledo AG, CH-8606 Greifensee EasyClean100/150
Printed in Switzerland 52 500 178
EasyClean150
Failure Cause Remedy
The InTrac housing does not move.
T
he sensor does not move out of or
into the process
Compressed air not switched on.
Air pressure too low.
Compressed air valve not opening.
Air hoses incorrectly fitted or defective.
Switch on compressed air.
Increase pressure (see specifications).
Clean valve.
Check hoses for leaks, bends or any
kinks.
The InTrac housing moves out of the
process independently
Compressed air pressure < process
pressure.
Sudden loss of pressure.
Increase air pressure
(see specifications).
Check connections and hoses for leaks.
Insufficient rinsing of the electrode Water flow insufficient.
Rinse interval too long.
Rinse times too short.
Rinsing chamber blocked.
Increase the flow.
Shorten the interval on the transmitter.
Increase rinse times.
Remove and clean the housing.
LED does not light LED defective / device working
normally.
No effect on functionality.
Transmitter does not go into
HOLD mode
Hold relay defective.
Connections for the transmitter are
loose or incorrectly connected.
Contact specialist.
Check connections and if necessary
re-install.
Rinsing cannot be activated Housing is in measuring position.
Rinse button defective.
Water valve defective..
No water flow.
Rinsing in measuring position not
possible.
Check cable. Contact supplier.
Clean water valve or replace if
necessary.
Check the lead to the EasyClean150.
Rinsing does not start
(auto and/or manual)
The rinse interval from the transmitter
is not recognized by the device.
The valve is not receiving any power.
Check the cabling with reference to
the circuit diagram.
Check the power supply.
Page 31

EasyClean100/150 31
EasyClean100/150 © 11/14 Mettler-Toledo AG, CH-8606 Greifensee
52 500 178 Printed in Switzerland
7 Decommissioning, storage, disposal
DANGER
Please refer to chapter 2 ”Safety”.
Decommissioning may only be performed by trained staff or specialists.
7.1 Decommissioning
1. Switch off the power supply, the compressed air supply and the water supply to the device.
2. Disconnect the device from the main unit.
3. Disconnect any signal leads used.
4. Disconnect leads for compressed air.
5. Remove the EasyClean from its mounting.
6. Rinse the hoses and valves with fresh water.
7. Clean the device with a damp cloth.
8. Allow the device to dry.
7.2 Storage
Store the EasyClean in a dry place, as described in section 1.3.
7.3 Disposal
It is recommended that the operator dispose of the device in accordance with local regulations.
The operator must deliver the device to either a licensed private or a public disposal company
or dispose of it himself in accordance with prevailing regulations.
Waste is to be recycled or disposed of without causing any risk to human health and without
using procedures or methods that might damage the environment.
EC guidelines 75/442/EEC
91/156/EEC
Procedure
Sorting takes place by placing the device into waste groups as listed in the current European
Waste Catalogue (EWC). This catalogue is valid for all waste, whether it is intended for disposal
or recycling.
The packaging contains the following materials:
– cardboard
– foam plastic
The device contains the following materials:
– steel
– electronic materials (cables, components)
– various components as described in the printed description
– the spray head consists of PVC or PVDF (depending on the version ordered).
Sorting
Page 32

32 EasyClean100/150
© 11/14 Mettler-Toledo AG, CH-8606 Greifensee EasyClean100/150
Printed in Switzerland 52 500 178
8 Spare parts and accessories
When ordering spare parts, please state the following details:
–
article number of the device
– serial number of the device
– ordering number from the following list of spare parts
– quantity required.
The addresses of manufacturers and customer services may be found at the end of this
instruction manual.
NOTICE
Spare parts must correspond to the technical requirements of the manufacturer of the device!
Only use original spare parts.
8.1 List of spare parts and accessories EasyClean100
Page 33

EasyClean100/150 33
EasyClean100/150 © 11/14 Mettler-Toledo AG, CH-8606 Greifensee
52 500 178 Printed in Switzerland
14
15
Pos. Art. no. Description
1 52 402 291 Spray head for InDip550/ PVC
2 52 402 290 Spray head for InDip550/ PVDF
3 52 402 370 Fitting set for spray head
4 52 402 306 Wall mounting kit, complete
5 52 402 308 Mast mounting kit, complete
6 52 402316 Weatherproof hood
7 52 402 283 Tubing PTFE Ø 6/4 mm, 5 m / 15 ft.
8 52 402 314 Hose LDPE Ø 6/4 mm / 20 m, for compressed air connection
9 52 402 337 Fittingset pneum./hydr.
10 52 402 336 Grommet set for cable
11 52 300 265 Connecting cable: control unit > transmitter (5 m)
12 52 300 266 Connecting cable: control unit > transmitter (10 m)
13 52 402 317 Panic button (emergency shutdown)
14 52 402 305 Power unit
15 52 402 309 Water valve
52 500 178 Instruction manual EasyClean100/150
Page 34

34 EasyClean100/150
© 11/14 Mettler-Toledo AG, CH-8606 Greifensee EasyClean100/150
Printed in Switzerland 52 500 178
8.2 List of spare parts and accessories EasyClean150
12
13
14
15
Page 35

EasyClean100/150 35
EasyClean100/150 © 11/14 Mettler-Toledo AG, CH-8606 Greifensee
52 500 178 Printed in Switzerland
Pos. Art. no. Description
1 52 402 306 Wall mounting kit, complete
2
52 402 308 Mast mounting kit, complete
3
52 402316 Weatherproof hood
4 52 402 283 Tubing PTFE Ø 6/4 mm, 5 m / 15 ft.
5 52 402 314 Hose LDPE Ø 6/4 mm / 20 m, for compressed air connection
6 52 401 322 Pneumatics hose PU Ø 6/4 mm, 10 m
7 52 402 337 Fittingset pneum./hydr.
8 52 402 336 Grommet set for cable
9 52 300 265 Connecting cable: control unit > transmitter (5 m)
10 52 300 266 Connecting cable: control unit > transmitter (10 m)
11 52 402 317 Panic button (emergency shutdown)
12 52 402 305 Power unit
13 52 402 338 Print EasyClean150
14 52 402 309 Water valve
15 52 402 320 Compressed air valve
52 500 178 Instruction manual EasyClean100/150 (g/e/f)
Page 36

Management System
certified according to
ISO 9001 / ISO 14001
9001
certified
ISO
140 01
certified
ISO
METTLER TOLEDO Market Organizations
Sales and Service:
Australia
Mettler-Toledo Ltd.
220 Turner Street
Port Melbourne
AUS- 3207 Melbourne/VIC
Phone +61 1300 659 761
Fax +61 3 9645 3935
e-mail info.mtaus@mt.com
Austria
Mettler-Toledo Ges.m.b.H.
Südrandstraße 17
A-1230 Wien
Phone +43 1 604 19 80
Fax +43 1 604 28 80
e-mail infoprocess.mtat@mt.com
Brazil
Mettler-Toledo Ind. e Com. Ltda.
Avenida Tamboré, 418
Tamboré
BR- 06460-000 Barueri/SP
Tel. +55 11 4166 7400
Fax +55 11 4166 7401
e-mail mettler@mettler.com.br
service@mettler.com.br
China
Mettler-Toledo Instruments
(Shanghai) Co. Ltd.
589 Gui Ping Road
Cao He Jing
CN- 200233 Shanghai
Phone +86 21 64 85 04 35
Fax +86 21 64 85 33 51
e-mail mtcs@public.sta.net.cn
Croatia
Mettler-Toledo d.o.o.
Mandlova 3
HR-10000 Zagreb
Phone +385 1 292 06 33
Fax +385 1 295 81 40
e-mail mt.zagreb@mt.com
Czech Republic
Mettler-Toledo s.r.o.
Trebohosticka 2283/2
CZ-100 00 Praha 10
Phone +420 2 72 123 150
Fax +420 2 72 123 170
e-mail sales.mtcz@mt.com
Denmark
Mettler-Toledo A/S
Naverland 8
DK- 2600 Glostrup
Phone +45 43 27 08 00
Fax +45 43 27 08 28
e-mail info.mtdk@mt.com
France
Mettler-Toledo
Analyse Industrielle S.A.S.
30, Boulevard de Douaumont
F-75017 Paris
Phone +33 1 47 37 06 00
Fax +33 1 47 37 46 26
e-mail mtpro-f@mt.com
Germany
Mettler-Toledo GmbH
Prozeßanalytik
Ockerweg 3
D-35396 Gießen
Phone +49 641 507 333
Fax +49 641 507 397
e-mail prozess@mt.com
Great Britain
Mettler-Toledo LTD
64 Boston Road, Beaumont Leys
GB- Leicester LE4 1AW
Phone +44 116 235 7070
Fax +44 116 236 5500
e-mail enquire.mtuk@mt.com
Hungary
Mettler-Toledo Kereskedelmi KFT
Teve u. 41
HU-1139 Budapest
Phone +36 1 288 40 40
Fax +36 1 288 40 50
e-mail mthu@axelero.hu
India
Mettler-Toledo India Private Limited
Amar Hill, Saki Vihar Road
Powai
IN- 400 072 Mumbai
Phone +91 22 2857 0808
Fax +91 22 2857 5071
e-mail sales.mtin@mt.com
Italy
Mettler-Toledo S.p.A.
Via Vialba 42
I-20026 Novate Milanese
Phone +39 02 333 321
Fax +39 02 356 2973
e-mail
customercare.italia@mt.com
Japan
Mettler-Toledo K.K.
Process Division
6F Ikenohata Nisshoku Bldg.
2-9-7, Ikenohata
Taito-ku
JP-110-0008 Tokyo
Phone +81 3 5815 5606
Fax +81 3 5815 5626
e-mail helpdesk.ing.jp@mt.com
Malaysia
Mettler-Toledo (M) Sdn Bhd
Bangunan Electroscon Holding, U 1-01
Lot 8 Jalan Astaka U8/84
Seksyen U8, Bukit Jelutong
MY- 40150 Shah Alam Selangor
Phone +60 3 78 44 58 88
Fax +60 3 78 45 87 73
e-mail
MT-MY.CustomerSupport@mt.com
Mexico
Mettler-Toledo S.A. de C.V.
Ejercito Nacional #340
Col. Chapultepec Morales
Del. Miguel Hidalgo
MX- 11570 México D.F.
Phone +52 55 1946 0900
e-mail ventas.lab@mt.com
Poland
Mettler-Toledo (Poland) Sp.z.o.o.
ul. Poleczki 21
PL- 02-822 Warszawa
Phone +48 22 545 06 80
Fax +48 22 545 06 88
e-mail polska@mt.com
Russia
Mettler-Toledo Vostok ZAO
Sretenskij Bulvar 6/1
Office 6
RU-101000 Moscow
Phone +7 495 621 56 66
Fax +7 495 621 63 53
e-mail inforus@mt.com
Singapore
Mettler-Toledo (S) Pte. Ltd.
Block 28
Ayer Rajah Crescent #05-01
SG-139959 Singapore
Phone +65 6890 00 11
Fax +65 6890 00 12
+65 6890 00 13
e-mail precision@mt.com
Slovakia
Mettler-Toledo s.r.o.
Hattalova 12/A
SK- 83103 Bratislava
Phone +421 2 4444 12 20-2
Fax +421 2 4444 12 23
e-mail predaj@mt.com
Slovenia
Mettler-Toledo d.o.o.
Pot heroja Trtnika 26
SI-1261 Ljubljana-Dobrunje
Phone +386 1 530 80 50
Fax +386 1 562 17 89
e-mail keith.racman@mt.com
South Korea
Mettler-Toledo (Korea) Ltd.
Yeil Building 1 & 2 F
124-5, YangJe-Dong
SeCho-Ku
KR-137-130 Seoul
Phone +82 2 3498 3500
Fax +82 2 3498 3555
e-mail Sales_MTKR@mt.com
Spain
Mettler-Toledo S.A.E.
C/Miguel Hernández, 69-71
ES- 08908 L’Hospitalet de Llobregat
(Barcelona)
Phone +34 902 32 00 23
Fax +34 902 32 00 24
e-mail mtemkt@mt.com
Sweden
Mettler-Toledo AB
Virkesvägen 10
Box 92161
SE-12008 Stockholm
Phone +46 8 702 50 00
Fax +46 8 642 45 62
e-mail sales.mts@mt.com
Switzerland
Mettler-Toledo (Schweiz) GmbH
Im Langacher
Postfach
CH- 8606 Greifensee
Phone +41 44 944 45 45
Fax +41 44 944 45 10
e-mail salesola.ch@mt.com
Thailand
Mettler-Toledo (Thailand) Ltd.
272 Soi Soonvijai 4
Rama 9 Rd., Bangkapi
Huay Kwang
TH-10320 Bangkok
Phone +66 2 723 03 00
Fax +66 2 719 64 79
e-mail
MT-TH.CustomerSupport@mt.com
USA/ Canada
METTLER TOLEDO
Process Analytics
900 Middlesex Turnpike, Bld. 8
Billerica, MA 01821, USA
Phone +1 781 301 8800
Freephone +1 800 352 8763
Fax +1 781 271 0681
e-mail mtprous@mt.com
Mettler-Toledo AG, Process Analytics
Im Hackacker 15, CH-8902 Urdorf, Switzerland
Tel. + 41 44 729 62 11, Fax +41 44 729 66 36
www.mt.com/pro
Subject to technical changes.
© Mettler-Toledo AG, Process Analytics
11/14 Printed in Switzerland. 52 500 178
Page 37

EasyClean100/150 37
EasyClean100/150 © 11/14 Mettler-Toledo AG, CH-8606 Greifensee
52 500 178 Printed in Switzerland
EasyClean100
EasyClean150
Bedienungsanleitung
Page 38

38 EasyClean100/150
© 11/14 Mettler-Toledo AG, CH-8606 Greifensee EasyClean100/150
Printed in Switzerland 52 500 178
Produkt- und Unterhaltsjournal
D
atum Tätigkeit Durchgeführt Abgenommen
durch von
Erstinstallation
Page 39

EasyClean100/150 39
EasyClean100/150 © 11/14 Mettler-Toledo AG, CH-8606 Greifensee
52 500 178 Printed in Switzerland
Verwendung dieser Betriebsanleitung
D
iese Betriebsanleitung ist integrierender Bestandteil von EasyClean100 und EasyClean150
und enthält wichtige Hinweise und Instruktionen für Sicherheit und Betrieb.
Alle Personen, die an und mit EasyClean100 und/oder EasyClean150 Arbeiten ausführen,
m
üssen vorgängig die für ihre Tätigkeit relevanten Kapitel gelesen und verstanden haben.
Lesen Sie diese Betriebsanleitung vor Gebrauch des EasyClean-Systems sorgfältig durch.
Bewahren Sie dieses Dokument in unmittelbarer Umgebung des Gerätes auf, um ein späteres
Nachschlagen durch das Bedienungspersonal jederzeit zu ermöglichen.
Lesen Sie zuerst das Kapitel 2 «Sicherheit»!
© Der Nachdruck dieser Betriebsanleitung, auch auszugsweise, ist verboten.
Ohne schriftliche Bewilligung der Firma Mettler-Toledo AG, Process Analytics, CH-8902 Urdorf, dürfen keine Teile
davon in irgendeiner Form reproduziert oder unter Anwendung elektronischer Systeme, insbesondere in Form von
Photokopien, Photos, Magnetverfahren oder anderen Aufzeichnungsarten, verarbeitet, vervielfältigt oder verbreitet
werden.
Alle Rechte, insbesondere das Recht der Vervielfältigung und Übersetzung sowie Patent- oder Registrierungsrechte,
sind vorbehalten.
InTrac, InDip sind registrierte Handelsmarken von Mettler-Toledo AG, CH-8606 Greifensee.
Page 40

40 EasyClean100/150
© 11/14 Mettler-Toledo AG, CH-8606 Greifensee EasyClean100/150
Printed in Switzerland 52 500 178
Inhaltsverzeichnis
1 Produktbeschreibung 41
1.1 Einleitung 41
1
.2 Ausstattung und Lieferumfang 41
1.3 Daten und Kenngrössen EasyClean 100/150 42
2 Sicherheit 44
2.1 Einleitung 44
2.2 Bestimmungsgemässe Verwendung 44
2.3 Nicht bestimmungsgemässe Verwendung 44
2.4 Grundsätze 45
2.5 Warnhinweise und Symbole 45
2.6 Verantwortlichkeiten, Organisatorische Massnahmen 46
2.7 Produktspezifische Gefahren 47
2.8 Restgefahren 47
2.9 Massnahmen im Notfall 47
2.10 Sicherheitsmassnahmen 48
2.11 Modifikationen 48
3 Ihr Gerät 49
3.1 Aufbau 49
3.2 Funktionen 50
3.3 Integration in ein Messsystem 51
4 Inbetriebnahme 52
4.1 Montage 52
4.2 Anschlüsse 54
4.3 Installation und Inbetriebnahme 58
5 Bedienung 60
5.1 Kontrollen durch den Bediener 60
5.2 Bedienung EasyClean 100 60
5.3 Bedienung EasyClean 150 60
5.4 Verhalten bei Ausfall der Energieversorgung 61
6 Wartung und Störungsbehebung 62
6.1 Wartung 62
6.2 Störungsbehebung und Instandsetzung 63
7 Ausserbetriebsetzung, Lagerung, Entsorgung 65
7.1 Ausserbetriebsetzung 65
7.2 Lagerung 65
7.3 Entsorgung 65
8 Ersatzteile und Zubehör 66
8.1 Ersatzteilliste und Zubehör für EasyClean 100 66
8.2 Ersatzteilliste und Zubehör für EasyClean 150 68
Page 41

EasyClean100/150 41
EasyClean100/150 © 11/14 Mettler-Toledo AG, CH-8606 Greifensee
52 500 178 Printed in Switzerland
1 Produktbeschreibung
1.1 Einleitung
Konfomität EasyClean 100 und EasyClean150 entsprechen folgenden Bestimmungen:
• Niederspannungsrichtlinien:
– EU Richtlinien 73/23/EG
–
Schweizer Richtlinie SR734.26NEV
– Sicherheitsbestimmungen EN61010-1
– IP-Schutzgrad EN60529 IP65
• EMV-Richtlinien:
– Emission EN61326-1, Klasse B
– Oberschwingungen EN61000-3-2
– Spannungsschwankungen EN61000-3-3
– Immunität EN61326-1
Zertifikate CE, GS
Kennzeichnung Das Typenschild befindet sich auf der linken Aussenseite der Geräte.
1.2 Ausstattung und Lieferumfang
Lieferumfang EasyClean-Geräte werden ohne Anschlusskabel geliefert. Die bauseitigen Anschlusskabel
werden an den dafür bestimmten Klemmen im Gerät angeschlossen (beachten Sie dazu
Abschnitt 4.2 «Anschlüsse»).
Verpackung
Die Verpackung besteht aus Karton und Kartonpolsterung.
Bewahren Sie die Verpackung, für eine spätere Lagerung oder einen Transport des Geräts, auf.
Falls Sie die Verpackung jedoch entsorgen wollen, beachten Sie die lokalen Vorschriften sowie
Abschnitt 7.3 «Entsorgung».
Achten Sie beim Auspacken auf Beschädigungen. Falls Sie solche feststellen, melden Sie dies
umgehend dem Transporteur und ihrem Lieferanten.
Überprüfen Sie die Lieferung anhand Ihrer Bestellung und der Lieferpapiere.
Kontrolle der Lieferung
Page 42

42 EasyClean100/150
© 11/14 Mettler-Toledo AG, CH-8606 Greifensee EasyClean100/150
Printed in Switzerland 52 500 178
1.3 Daten und Kenngrössen EasyClean100/150
Gehäuse mit Polyesterharz pulverbeschichtetes Stahlgehäuse
M
aterial: Vergütungsstahl DIN 1.1203 Ck55
Achtung: darf nicht mit azetonhaltigen Lösungsmitteln
g
ereinigt werden
Gewicht Steuergerät ca. 3 kg (6.6 lb)
S
chutzart IP65
Umgebungsbedingungen Temp. Betrieb: 0 – 45°C (+32 – +113 °F)
Temp. Transport/Lagerung: –10 – +70°C (+14 – +158°F)
Verschmutzungsgrad: 2
Überspannungskategorie: III
Spannungsversorgung 100 – 230V AC, 50/60 Hz, 0.18 – 0.3 A (± 15%)
Systemsteuerung Prozessauslösung:
durch einen Waschkontakt des angeschlossenen Transmitters
Ablauf:
nicht im Gerät einstellbar
Steuereingänge 1 Steuereingang für Waschkontakt vom Transmitter, 24V
Transmitter METTLER TOLEDO Transmitter:
– pH2050e, O
2
4050e, Cond 7050e
– pH2100e, O24100e, CondI7100e, Trb8300
– alternativ durch Transmitter mit Waschkontakt und
«Hold»-Funktion
Anschlüsse Anschlussklemmen 0.08 ... 2.5 mm
2
Verbindung zum Transmitter 4-adriges Steuerkabel, 1.5 mm
2
Länge: 5 m (optional 10 m)
Kabeldurchführungen Ø 3.5 – 10 mm => M 16
Druckluftversorgung 4– 8 bar (400 – 800 kPa, 58 – 116 psi)
– Luftqualität gemäss ISO 8573-1
– Luftfeuchte Klasse 4 (Wassertaupunkt +3° C)
– Feststoffe Klasse 5 (Filter 40 µm)
– max. Oelgehalt Klasse 2 (0.1 mg/m
3
)
Anschluss: Gewinde G1/8"
Page 43

EasyClean100/150 43
EasyClean100/150 © 11/14 Mettler-Toledo AG, CH-8606 Greifensee
52 500 178 Printed in Switzerland
Verbindung zu InDip-Armatur Schlauch LDPE Ø 6/4 mm (1/8" / 1/4")
optional: Schlauch PTFE Ø 6/4 mm (1/8" / 1/4")
Verbindung zu Wechselarmatur Schlauch LDPE Ø 6/4 mm (1/8" / 1/4")
optional: Schlauch PTFE Ø 6/4 mm (1/8" / 1/4")
Versorgung Spülwasser Druck: 2 – 6 bar (200 – 600 kPa, 29 – 87 psi)
Anschluss: Innengewinde G1/4"
A
dapter:
1
/4"
NPT Aussengewinde (PP)
Sprühkopfmaterial PVC, PVDF
Materialien in Berührung PP, LDPE, Viton
®
, Messing,
mit Spülwasser oder Druckluft rostfreier Stahl DIN 1.4105, 1.4303, 1.4310
Medien in Verbindung mit Wasser 0 – 60 °C (32 °F – 140 °F)
LDPE-Schlauch
Medien in Verbindung mit Wasser 0 – 90 °C (32 °F – 194 °F)
PTFE-Schlauch
Technische Änderungen vorbehalten
Page 44

44 EasyClean100/150
© 11/14 Mettler-Toledo AG, CH-8606 Greifensee EasyClean100/150
Printed in Switzerland 52 500 178
2 Sicherheit
2.1 Einleitung
Die Betriebsanleitung enthält die wichtigsten Angaben, um EasyClean100/150 und den Sprühkopf effizient und bestimmungsgemäss zu nutzen. Grundvoraussetzung für den sicherheits g
erechten Umgang und den störungsfreien Betrieb ist die Kenntnis dieser Sicherheits vorschriften
und die Beachtung der weiteren Warnhinweise in der Betriebsanleitung.
Diese Betriebsanleitung, insbesondere die Sicherheitsvorschriften, sind vom Betreiber und allen
Personen zu beachten, die mit EasyClean100/150 oder dem Sprühlkopf arbeiten. Darüber
hinaus sind die für den Einsatzort geltenden Regeln und gesetzlichen Vorschriften zu beachten.
Die Betriebsanleitung muss ständig griffbereit aufbewahrt werden und für jede Person, die mit
Easy Clean 100/150 oder dem Sprühkopf arbeitet, zugänglich sein.
2.2 Bestimmungsgemässe Verwendung
EasyClean100/150 und der Sprühkopf sind ausschliesslich für Spülen und Reinigen von
Sensoren bestimmt und wie in dieser Betriebsanleitung beschrieben einsetzbar.
Zur bestimmungsgemässen Verwendung gehören zudem:
– Die Beachtung der Anweisungen, Vorschriften und Hinweise in der vorliegenden
Betriebsanleitung.
– Die korrekte Instandhaltung und Pflege des Gerätes gemäss dieser Betriebsanleitung.
– Der Betrieb unter der Beachtung der vorgeschriebenen Umwelt- und Betriebsbedingungen
und den zulässigen Einbaulagen.
– Die Einhaltung der örtlichen Gesetzgebung
2.3 Nicht bestimmungsgemässe Verwendung
Jede andere als die oben erwähnte Verwendung sowie jede Anwendung, die nicht den technischen Daten entspricht, gilt als nicht bestimmungsgemäss. Für allfällige Schäden, die auf eine
solche Verwendung zurückzuführen sind, trägt der Betreiber das alleinige Risiko.
Insbesondere folgende Anwendungen sind unzulässig:
– Verwendung von Hydraulikflüssigkeiten anstelle von Druckluft
– Verwendung von Suspensionen und Lösungsmittel als Reinigungsmittel
Page 45

EasyClean100/150 45
EasyClean100/150 © 11/14 Mettler-Toledo AG, CH-8606 Greifensee
52 500 178 Printed in Switzerland
2.4 Grundsätze
EasyClean100/150 und der Sprühkopf sind nach dem Stand der Technik und den anerkannten
sicherheits technischen Regeln gebaut.
Dennoch können von dem Gerät Risiken und Gefahren ausgehen:
–
wenn das Gerät von ungenügend ausgebildeten Personen bedient wird.
– wenn das Gerät nicht bestimmungsgemäss verwendet wird.
EasyClean100/150 und der Sprühkopf dürfen nur in technisch einwandfreiem Zustand sowie
b
estimmungsgemäss, sicherheits- und gefahrenbewusst unter Beachtung der Betriebsanleitung
benutzt werden.
Störungen oder Beschädigungen, die die Sicherheit und Funktion beeinträchtigen, sind umgehend durch den Betreiber oder einer Fachperson zu beseitigen und dem Hersteller schriftlich
zu melden!
2.5 Warnhinweise und Symbole
In dieser Betriebsanleitung werden folgende Symbole zur Kennzeichnung von Sicherheitshin weisen benutzt:
GEFAHR!
Warnung vor einer Gefahr, die zu hohem Sachschaden, zum Tode oder zu schweren Körperverletzungen führen kann.
VORSICHT!
Warnung vor einer möglicherweise gefährlichen Situation, welche zu leichten Körperver letzungen und/oder Sachschäden führen kann.
HINWEIS!
Information, die auf technische Erfordernisse hinweist. Nichtbefolgung kann zu Störungen,
Unwirtschaftlichkeit und evtl. zu Produktionsverlusten führen.
Page 46

46 EasyClean100/150
© 11/14 Mettler-Toledo AG, CH-8606 Greifensee EasyClean100/150
Printed in Switzerland 52 500 178
2.6 Verantwortlichkeiten, Organisatorische Massnahmen
Verpflichtung des
B
etreibers
– Der Betreiber verpflichtet sich, nur Personen an EasyClean arbeiten zu lassen, die mit den
g
rundlegenden Vorschriften über Arbeitssicherheit und Unfallverhütung vertraut und in die
Handhabung des Geräts eingewiesen sind. Die vorliegende Bedienungsanleitung gilt hierfür
a
ls Grundlage.
– Ergänzend zur Betriebsanleitung sind allgemeingültige gesetzliche und sonstige verbindliche
Regelungen zur Arbeitssicherheit und Unfallverhütung sowie zum Umwelt schutz durch den
B
etreiber bereitzustellen und zu instruieren.
– Sicherheits- und gefahrenbewusstes Arbeiten des Personals ist in regelmässigen Abständen
zu überprüfen.
– Massnahmen sind zu treffen, damit EasyClean nur in sicherem, funktionsfähigem Zustand
betrieben wird.
Verpflichtung des
Personals
– Alle Personen, die mit Arbeiten an EasyClean beauftragt sind, verpflichten sich, das Kapitel
Sicherheitsvorschriften und die Warnhinweise in dieser Betriebsanleitung zu lesen.
– Ergänzend zur Betriebsanleitung sind allgemeingültige gesetzliche und sonstige verbindliche
Regelungen zur Arbeitssicherheit und Unfallverhütung zu beachten.
– Jede sicherheitsbedenkliche Arbeitsweise welche die bestimmungsgemässe Verwendung
des Gerätes überschreitet, ist zu unterlassen.
Personalauswahl
und -qualifikation
– grundsätzliche Pflichten
– Arbeiten an EasyClean dürfen nur von zuverlässigem, geschultem oder unterwiesenem
Personal durchgeführt werden. Das Bedienungspersonal muss das diese Betriebsanleitung
vorgängig gelesen haben.
– Zuständigkeiten des Personals für das Bedienen, Warten, Instandsetzen etc. sind klar
festzulegen.
– Es ist sicherzustellen, dass nur dazu beauftragtes Personal am Gerät tätig wird.
– Zu schulendes, anzuweisendes oder im Rahmen einer allgemeinen Ausbildung befindliches
Personal darf nur unter ständiger Aufsicht einer erfahrenen Person am Gerät tätig werden.
– Arbeiten an der elektrischen Ausrüstung des Geräts dürfen nur von einer Elektrofachkraft
gemäss den elektrotechnischen Regeln vorgenommen werden.
Bauliche Veränderungen
am Gerät
– Es dürfen keine Veränderungen, An- und Umbauten am Gerät, die die Sicherheit beeinträch -
tigen, ohne schriftliche Genehmigung von Mettler-Toledo GmbH, Prozess Analytik vorge nommen werden.
– Teile in nicht einwandfreiem Zustand sind sofort auszutauschen.
Page 47

EasyClean100/150 47
EasyClean100/150 © 11/14 Mettler-Toledo AG, CH-8606 Greifensee
52 500 178 Printed in Switzerland
2.7 Produktspezifische Gefahren
Gefährdung durch elektrische Energie!
Wenn das Gerät für die Durchführung von Installations- und Reparaturarbeiten geöffnet
wird, werden spannungsführende Teile freigelegt.
Schliessen Sie das Gerät nach Durchführung der Arbeiten sofort wieder!
Gefährdung durch Druckluft/Wasser!
Zu öffnende Druckleitungen (Druckluft, Spülwasser) vor Beginn von Reparaturarbeiten
absperren und drucklos machen!
2.8 Restgefahren
Trotz aller getroffenen Vorkehrungen bestehen Restgefahren wie z.B.:
– Bersten einer Leitung.
– Gefährdung durch Störung an einer übergeordneten Steuerung.
2.9 Massnahmen im Notfall
Falls Flüssigkeit in die Augen gelangt, sofort unter fliessendem Wasser mindestens
15 Minuten abspülen. Anschliessend muss ein Arzt zur Kontrolle aufgesucht werden.
Flüssigkeit auf der Haut sofort mit Wasser abwaschen.
Ärztliche Hilfe ist immer erforderlich bei Symptomen, die offensichtlich durch die Ein wirkung eines Kontaktes mit einem Medium auf Haut oder Augen zurückzuführen
sind. Informieren Sie den Arzt über Art und Kennzeichnung aller verwendeten Stoffe.
Page 48

48 EasyClean100/150
© 11/14 Mettler-Toledo AG, CH-8606 Greifensee EasyClean100/150
Printed in Switzerland 52 500 178
2.10 Sicherheitsmassnahmen
Die lokalen Gesetze und Vorschriften müssen immer beachtet werden. Sie sind nicht Bestandteil
dieser Betriebsanleitung.
Das Tragen von persönlicher Schutzausrüstung wie Schutzbrille und Schutzkleidung ist
g
rundsätzlich erforderlich.
Das Gerät darf nur in geschlossenem Zustand betrieben werden.
D
er Betreiber ist für die Instruktion des Personals verantwortlich. Dazu kann diese Betriebs an leitung auch in weiteren Sprachen nachbestellt werden. Diese Betriebsanleitung muss als
Bestandteil des Gerätes jederzeit dem Bedienungspersonal am Einsatzort des Gerätes zur
Verfügung stehen.
Der Betreiber informiert den Hersteller umgehend über alle sicherheitsrelevanten Vorkommnisse,
die sich bei der Verwendung des Gerätes ereignen.
2.11 Modifikationen
Modifikationen sind nur nach Rücksprache und schriftlicher Genehmigung des Herstellers
gestattet.
Es dürfen nur die zur Erfüllung der Funktion bestimmten Teile des Gerätes ein- und ausgebaut
werden. Dies ist von Hand oder mit den mitgelieferten Werkzeugen möglich. Entfernen von
Schutzvorrichtungen und Abdeckungen unter Zuhilfenahme von handelsüblichen Werkzeugen
ist – ausser von autorisiertem Instandsetzungspersonal – verboten. Bei Berührung spannungsführender Teilen besteht Lebensgefahr.
Page 49

EasyClean100/150 49
EasyClean100/150 © 11/14 Mettler-Toledo AG, CH-8606 Greifensee
52 500 178 Printed in Switzerland
3 Ihr Gerät
3.1 Aufbau
EasyClean100
1 Netzanschluss
2 Steuerkabelanschluss
3 Druckluft-/Wasseranschluss
4 Klemme Netzanschluss
1 Drucktaste «In/Out» (Armatursteuerung)
2 Meldeleuchte
3 Drucktaste «Water» (Wasser)
4 Netzanschluss
5 Steuerkabelanschluss
6 Druckluftanschluss
7 Abluftanschluss
8 Druckluftausgänge Armatur
EasyClean150
5 Klemme Steuerkabelanschluss
6 Druckluft-/Wasserventil
7 Netzteil
9 Wasseranschluss
10 Wasserventil
11 Druckluftventil
12 Netzteil
13 Steuerprint
14 Klemme Netzanschluss
15 Klemme Steuerkabelanschluss
4 5
7
6
21
5 6 74
1 3
10
11
12
13
14 15
2
8 9
3
Page 50

50 EasyClean100/150
© 11/14 Mettler-Toledo AG, CH-8606 Greifensee EasyClean100/150
Printed in Switzerland 52 500 178
3.2 Funktionen
Allgemeines Das EasyClean100/150 steuert die Zufuhr von Druckluft resp. Wasser zu einer Elektrodenspitze,
welche in einer InDip-Armatur (EasyClean100) oder in einer Wechselarmatur (EasyClean150)
eingebaut ist. Der Ablauf wird durch den Waschkontakt des Transmitters ausgelöst und wieder
g
estoppt
B
etriebsarten
Der Transmitter übernimmt die gesamte Steuerung des Gerätes.
Grundstellung Die Ventile sind stromlos geschlossen.
Die InTrac-Armatur bleibt bei Druckausfall in der letzten Position stehen. Bei Stromausfall im
EasyClean 150 fährt der Sensor aus dem Prozess aus und der Transmitter geht in den «Hold Modus» (Messwert wird eingefroren).
Bei Stromausfall entfallen alle Funktionen des EasyClean100 ohne Einfluss auf die Messung.
Hold-Funktion
Für die genaue Funktion und Einstellungen des Hold-Relais konsultieren Sie die Betriebsanleitung des jeweiligen Transmitters.
Meldeleuchten EasyClean100 ist mit keinen Meldeleuchten ausgestattet.
EasyClean150 verfügt über eine Meldeleuchte (LED) welche in der Front eingebaut ist. Die
Leuchte ist mit dem Steuerungsventil welches die Armaturenbewegung auslöst gekopplet.
Es zeigt also keine Fehlfuktionen der Armatur, sondern nur den Tasterzustand an (Automatik betrieb oder in der ausgefahrenen «Service»-Position).
Programmablauf Die Spül- resp. Waschzeit wird durch das Steuersignal (wash contact) des Transmitters
vorgegeben. (siehe Betriebsanleitung des Transmitters).
Page 51

EasyClean100/150 51
EasyClean100/150 © 11/14 Mettler-Toledo AG, CH-8606 Greifensee
52 500 178 Printed in Switzerland
3.3 Integration in ein Messsystem
In den nachfolgenden Schemas ist ein typisches Beispiel für die Integration von
EasyClean100 bzw. EasyClean150 in ein Mess system dargestellt.
EasyClean100
1 EasyClean150
2 Wasseranschluss
3 Wasserschlauch
4 Abwasserschlauch
5 Wandbefestigung
6 Wetterschutzdach (optional)
7 Druckluftschlauch (Eingang)
8 Druckluftschläuche (Armatur)
9/10 Steuerkabel
11 Not-Aus Schalter (optional)
1 EasyClean100
2 Druckluft-/Wasseranschluss
3 Druckluft- bzw. Wasserschlauch
4 Wandbefestigung
5 Wetterschutzdach (optional)
6/7 Sprühkopf
8 Druckluft- bzw. Wasserschlauch
9/10 Steuerkabel
11 Not-Aus Schalter (optional)
EasyClean150
Page 52

52 EasyClean100/150
© 11/14 Mettler-Toledo AG, CH-8606 Greifensee EasyClean100/150
Printed in Switzerland 52 500 178
4 Inbetriebnahme
GEFAHR
Beachten Sie Kapitel 2 «Sicherheit».
Alle Arbeiten an elektrischen Komponenten des Systems dürfen nur durch autorisiertes
Fachpersonal durchgeführt werden.
HINWEIS
Gehen Sie bei der Inbetriebnahme gemäss Abschnitt 4.3 «Checkliste für Installation und
Inbetriebnahme» vor. Achten Sie auf die Verweise für weitergehende Informationen.
4.1 Montage
EasyClean100und 150 sind für direkte Montage (C-Schiene), Wand- oder Mastmontage
vor gesehen. EasyClean 100 und EasyClean150 sind im gleichen Gehäusetyp eingebaut
und haben dem zu Folge die gleichen Abmessungen.
Der Montageplatz muss eine ausreichende Festigkeit haben und möglichst vibrationsfrei sein.
Achten Sie darauf, dass die Leitungslängen möglichst kurz sind.
Wandmontage
Page 53

EasyClean100/150 53
EasyClean100/150 © 11/14 Mettler-Toledo AG, CH-8606 Greifensee
52 500 178 Printed in Switzerland
Mastmontage
Das genaue Vorgehen bei der Montage der Aufhängung entnehmen Sie der separat beigelegten
Installationsanleitung.
Page 54

54 EasyClean100/150
© 11/14 Mettler-Toledo AG, CH-8606 Greifensee EasyClean100/150
Printed in Switzerland 52 500 178
4.2 Anschlüsse
VORSICHT
Kontrollieren Sie vor dem Anschliessen, dass die Anschlusswerte gemäss Abschnitt
1.3 «Daten und Kenngrössen» eingehalten sind.
Anschlüsse am Gehäuseboden EasyClean100
1 Durchführung Netzkabel, M16
2 Durchführung Transmitterkabel, M16
3 Luft/Wasser Eingang G1/4" NPT, female
4 Ausgang zur InDip-Armatur (Schlauch Ø 6/4 mm)
Anschlüsse am Gehäuseboden EasyClean150
1 Durchführung Netzkabel, M16
2 Durchführung Transmitterkabel, M16
3 Drucklufteingang (Schlauch Ø 6/4 mm)
4 Abluft
5 Druckluftausgang zur InTrac-Armatur ––> Funktion: «Zurück»
6 Druckluftausgang zur InTrac-Armatur ––> Funktion: «Vor»
7 Wassereingang G
1
/4", female,
8 Ausgang zur Armatur (Schlauch Ø 6/4 mm)
Page 55

EasyClean100/150 55
EasyClean100/150 © 11/14 Mettler-Toledo AG, CH-8606 Greifensee
52 500 178 Printed in Switzerland
HINWEIS
Z
weckmässigerweise wird für Wasser und Druckluft gebäudeseitig ein Absperrorgan in der
Nähe des EasyClean 100/150 installiert. Dies erleichtert Wartungsarbeiten und erhöht die
Arbeitssicherheit bei der Montage und Demontage des Gerätes.
Beachten Sie die örtlichen Vorschriften für Pneumatik- und Wasserinstallationen.
Anschlüsse an die
Eintaucharmatur
Der Sprühkopf ist für die Mettler-Toledo InDip550 ausgelegt. Wird der Sprühkopf mit einer
anderen Armatur benutzt, erfolgt das Betreiben und die Montage des Sprühkopfes auf die
Gefahr des Betreibers.
Für die Installation an der Wechselarmatur konsultieren Sie die entsprechende Betriebsanleitung
der Armatur.
Elektrische Anschlüsse Die EasyClean100 und 150 sind für die Mettler-Toledo Transmitter wie in Abschnitt 1.3
beschrieben ausgelegt. Für die korrekte Installation an anderen Transmittern konsultieren
Sie die jeweilige Anleitung.
GEFAHR
Der Netzanschluss darf nur durch autorisiertes Fachpersonal entsprechend den elektro-
technischen Regeln ausgeführt werden.
Für den gebäudeseitigen Netzanschluss beachten Sie auch die örtlichen Vorschriften.
Hinweis
Der Leitungsschutzschalter muss in der Gebäudeinstallation und in der Nähe des EasyCleanGerätes montiert sein.
Page 56

56 EasyClean100/150
© 11/14 Mettler-Toledo AG, CH-8606 Greifensee EasyClean100/150
Printed in Switzerland 52 500 178
Elektrische Anschlüsse EasyClean100 mit Mettler-Toledo Transmittern
T
ransmitter
EasyClean 100
X
100 e
1
Inp. 1
+24 VDC
17
18
Wash
2
EasyClean 100
M300
1
Inp. 1
+24 VDC
2
1
TB1(1/2 DIN)
or
TB1B (1/4 DIN)
2
EasyClean 100
M700
1
Inp. 1
+24 VDC
3
4
K3
2
EasyClean 100
Trb 8300
1
Inp. 1
+24 VDC
TB5/6
TB5/5
Wash
2
Elektrische Anschlüsse
Transmitter X100 e
Spülintervall und Spülzeit gemäss Applikationsbedingungen
am Transmitter X100 e einstellen.
Transmitter M300
Relais # 1 (Standardeinstellung) oder # 2, # 3, # 4 beim
Transmitter auf Spülkontakt setzen.
Spülintervall und Spülzeit gemäss Applikationsbedingungen
am Transmitter M300 einstellen.
Transmitter M700
Relais K3 (K1 oder K2) auf Spülkontakt und NO (Arbeits kontakt) setzen.
Spülintervall und Spülzeit gemäss Applikationsbedingungen
einstellen.
Transmitter Trb 8300
Spülintervall und Spülzeit gemäss Applikationsbedingungen
am Transmitter Trb 8300 einstellen.
Page 57

EasyClean100/150 57
EasyClean100/150 © 11/14 Mettler-Toledo AG, CH-8606 Greifensee
52 500 178 Printed in Switzerland
Elektrische Anschlüsse EasyClean150 mit Mettler-Toledo Transmittern
EasyClean100 und150 sind für die Mettler-Toledo Transmitter ausgelegt.
Für die korrekte Installation an anderen Transmittern konsultieren Sie die jeweilige Anleitung.
E
asyClean 150
X100 e
1
Inp. 1
+24 VDC
TAO
17
18
6
7
Wash
Hold
2
4
3
EasyClean 150
M300
1
Inp. 1
+24 VDC
TAO
2
1
7
8
TB2
H
old
2
4
3
TB1(1/2 DIN)
o
r
TB1B (1/4 DIN)
EasyClean 150
M700
1
Inp. 1
+24 VDC
TAO
3
4
11
13
OK1
2
4
3
K3
EasyClean 150
Trb 8300
1
Inp. 1
+24 VDC
Hold
2
4
3
Wash
TB5/6
TB5/5
TB2/6
TB2/2
Transmitter X100 e
HINWEIS
Brücke setzen an Klemme 2 und 3 im EasyClean 150.
Spülintervall und Spülzeit gemäss Applikationsbedingungen
am Transmitter X100 e einstellen.
Transmitter M300
HINWEIS
Brücke setzen an Klemme 2 und 3 im EasyClean 150.
Relais # 1 (Standardeinstellung) oder # 2, # 3, # 4 beim
Transmitter auf Spülkontakt setzen.
Spülintervall und Spülzeit gemäss Applikationsbedingungen
am Transmitter M300 einstellen.
Transmitter M700
HINWEIS
Brücke setzen an Klemme 2 und 3 im EasyClean 150.
Relais K3 (K1 oder K2) auf Spülkontakt und NO (Arbeits kontakt) setzen. Spülintervall und Spülzeit gemäss Applika tionsbedingungen einstellen.
Eingang OK1 auf HOLD setzen (aktiv 10…30V).
Transmitter Trb 8300
Spülintervall und Spülzeit gemäss Applikationsbedingungen
am Transmitter Trb 8300 einstellen.
Elektrische Anschlüsse
Page 58

58 EasyClean100/150
© 11/14 Mettler-Toledo AG, CH-8606 Greifensee EasyClean100/150
Printed in Switzerland 52 500 178
4.3 Installation und Inbetriebnahme
a Sprühkopf über das einzutauchen-
de Ende der InDip-Armatur schieben. Die Distanz zwischen den Luftaustrittsöffnungen und der Elektrode
sollte ca. 1cm betragen.
b Schlauchsystem wie folgt installie-
ren: Eine Schraube an Halteband
der InDip Armatur lösen,Winkelstück
mit dieser Schraube am oberen Ende der Armatur festschrauben.
c Schlauch zwischen Sprühkopf und
Winkelstück wie folgt einsetzten:Die
Schlauchverschraubung zuerst lösen. Schlauch von Hand, ohne Zuhilfenahme von Werkzeugen in die
Verschraubung schieben, Verschraubung festziehen.
d Losen Schlauch mit Kabelbinder am
Rohr der InDip-Armatur befestigen.
EasyClean 100 1. EasyClean an einer Wand oder an einem Mast montieren, so dass die Anschlüsse nach
unten gerichtet sind.
2. Transmitter an das EasyClean-Gerät anschliessen (siehe Abschnitt 4.2 «Anschlüsse»).
3
. Druckluft und Wasserversorgung gebäudeseitig anschliessen. Es ist dabei sicherzustellen,
dass der Mediendruck den spezifizierten Gerätedruck nicht überschreitet (siehe Kapitel
1.3 «Daten und Kenngrössen»).
4. Schläuche an Ausgang Druckluft/Wasser anschliessen und entsprechend den Anleitungen
d
er Armaturen installieren.
5. Netzkabel anschliessen.
Kabelanschlüsse
N- und L-Leiter
Kabeldurchführung
Für Schutzleiteranschluss muss
beigelegte Flachsteckhülse mit Doppelpressstelle verwendet werden.
6. Montage des Sprühkopfes für EasyClean100:
b
c
d
a
Page 59

EasyClean100/150 59
EasyClean100/150 © 11/14 Mettler-Toledo AG, CH-8606 Greifensee
52 500 178 Printed in Switzerland
EasyClean150 1. Schläuche am EasyClean gemäss Abschnitt 3.3 «Intergration in ein Messsystem»
anschliessen.
2. Für das Richige Anschliessen an der Wechselarmatur konsultieren Sie die entsprechende
Anleitung. Beachten Sie, dass am EasyClean150 keine Positionsmelder angeschlossen
werden können. Zur Funktionsüberwachung können jedoch pneumatische Rückmelder
verwendet werden, welche die jeweilige Position des Sensors anzeigen.
3. Kontrolle vor Inbetriebsetzung:
• Sind Druckluft und Spülwasser korrekt angeschlossen?
• Sind alle Schlauchverbindungen sorgfältig (nicht geknickt!) verlegt?
4. Erstinbetriebsetzung EasyClean150
• EasyClean an Stromversorgung anschliessen.
• Haupthahn (wenn vorhanden) für Druckluft und Wasser öffnen.
• Armatur durch Betätigung des «In/Out»-Tasters ein- resp. ausfahren.
• In ausgefahrener Position (Wartung) darf die LED nicht leuchten und der Transmitter
muss im «HOLD»-Modus sein.
• Drucktaster «Water» drücken ––> Wasserventil öffnet.
• Drucktaster «Water» loslassen ––> Wasserzufluss stoppt.
• Drucktaster «In/Out» betätigen ––> Armatur wechselt die Position.
5. Steuerung über Transmitter
• Waschkontakt des Transmitters aktivieren (siehe Anleitung Transmitter).
• Überprüfen ob die Ventile durch das Signal des Transmitters aktiviert werden.
––> Armaturbewegung und Öffnen des Wasserventils müssen gleichzeitig erfolgen.
• Der Zeitintervall des Waschkontaktes ist am Transmitter einzustellen (siehe Anleitung
Transmitter).
• Nach Ablauf des Zeitintervalles schliesst das Wasserventil und die Armatur fährt
wieder in die Messposition zurück.
7. Kontrollen vor Inbetriebsetzung:
• Sind Druckluft und Spülwasser korrekt angeschlossen?
• Sind alle Schlauchverbindungen sorgfältig (nicht geknickt!) verlegt?
8. Erstinbetriebsetzung EasyClean100
•
EasyClean an Stromversorgung anschliessen.
• Haupthahn (wenn vorhanden) für Druckluft und/oder Wasser öffnen.
9. Steuerung über Transmitter
• Überprüfen, ob die Ventile durch das Signal des Transmitters aktiviert werden.
––> Druckluftaustritt am Sprühkopf.
• Sprühkopf unter Wasser tauchen und die Luftmenge auf die gewünschte Flussrate
einstellen. Der Luftdurchfluss kann mit einem Reduzierventil reguliert werden.
Page 60

60 EasyClean100/150
© 11/14 Mettler-Toledo AG, CH-8606 Greifensee EasyClean100/150
Printed in Switzerland 52 500 178
5 Bedienung
5.1 Kontrollen durch den Bediener
P
rüfen Sie vor dem Einschalten sowie täglich bzw. bei Schichtwechsel ob eine genügende
Versorgung mit: Druckluft, Spülwasser und elektr. Energie gewährleistet ist, und die Armatur
e
inwandfrei funktioniert.
Für allfällige Unterhaltsarbeiten an der Armatur konsultieren Sie die entsprechende Anleitung.
5.2 Bedienung EasyClean100
Das EasyClean100 besitzt keine Bedienelemente. Die Funktionstüchtigkeit kann nur über
den Wasch-Kontakt des Transmitters geprüft werden.
Falls die Funktion nicht mehr gewährleistet ist, konsultieren Sie das Kapitel 6.2 «Störungsbe hebung EasyClean100».
5.3 Bedienung EasyClean150
1 Drucktaster «IN/OUT»
Armaturbewegung
(Ein-, Ausfahren)
2 Drucktaster «Water»
öffnet das Wasserventil (nur
aktiv, so lange der Taster
gedrückt wird.
3 Betriebszustandanzeige
(LED)
Die LED leuchted, wenn
Armatur in Messposition ist.
12
3
Bedienung des EasyClean150
1. Armaturbewegungen können mit dem Taster «IN/OUT» vorgenommen werden.
2. Ist die Armatur in Wartungsposition (aus dem Prozess) leuchted die LED-Anzeige nicht.
Hinweis: Die LED- Anzeige zeigt nur die Stellung des Drucktasters für die Armaturposition.
Es ist keine direkte Überprüfung der Armaturenstellung und Funktion möglich.
Leuchte die LED-Anzeige nicht, ist der Transmitter im «HOLD»-Modus.
3. Das Spülen mit Wasser kann manuell nur in der Wartungsposition aktiviert werden. Dieser
Zyklus läuft solange wie der Taster gedrückt wird. Es wird also kein Timer aktiviert.
Page 61

EasyClean100/150 61
EasyClean100/150 © 11/14 Mettler-Toledo AG, CH-8606 Greifensee
52 500 178 Printed in Switzerland
5.4 Verhalten bei Ausfall der Energieversorgung
EasyClean100
Ausfall der
Stromversorgung
Bei Stromausfall entfallen alle Funktionen des EasyClean100 ohne Einfluss auf die Messung.
EasyClean100 ist inaktiv. Das heisst:
–
Die Elektrode misst weiter. Steht der Transmitter noch unter Spannung, können die Mess resultate verwendet werden.
– Die Spülfunktion ist geschlossen. Es ist keine Spülung der Elektrode mehr möglich.
HINWEIS
Nach Wiederherstellung der Spannungsversorgung wird das System automatisch wieder
in den Zustand versetzt, welcher vom Transmitter vorgegeben ist.
EasyClean150
Ausfall der
Stromversorgung
EasyClean Ventile sind stromlos in folgenden Positionen
– Wasserventil: geschlossen
– Luftventil: fährt die Armatur resp. der Sensor aus dem Prozess heraus und der Transmit-
ter geht in den Hold-Modus
HINWEIS
Falls das EasyClean150 wieder mit Strom versorgt wird, fährt die Armatur in jedem Fall
immer in die Messposition.
Ausfall der
Druckluftver sorgung
Bei Verlust der Druckluft bleibt der Sensor in der letzten Position.
HINWEIS
Falls die Armatur im Prozess ist, kann sie durch den Gegendruck aus dem Prozess in die
Wartungsposition gestossen werden. In diesem Fall misst der Transmitter weiter. Da keine
Indikation auf die Position der Armatur vorhanden ist erkennt das EasyClean150 die Position
der Armatur nicht. Ein Ausfall der Druckluft hat jedoch keinen Einfluss auf die Messung.
Page 62

62 EasyClean100/150
© 11/14 Mettler-Toledo AG, CH-8606 Greifensee EasyClean100/150
Printed in Switzerland 52 500 178
6 Wartung und Störungsbehebung
Bei Fragen zu Störungen oder Reparaturen wenden Sie sich an ihren lokalen METTLER TOLEDO
K
undendienst. Die Anschriften finden Sie am Ende dieser Betriebsanleitung.
6.1 Wartung
EasyClean100/150 ist sehr wartungsarm.
Zum Entfernen von Staub, Schmutz und Flecken können die Aussenflächen des Geräts mit
einem weichen, mit Wasser angefeuchtetem Tuch abgewischt werden. Wenn nötig kann
auch ein mildes Reinigungsmittel verwendet werden.
VORSICHT
Gehäuse darf nicht mit azetonhaltigem Lösungsmittel gereinigt werden.
Für die weitere Reinigung (z.B. Ausblasen des Gehäuses) kann gefilterte, öl- und wasserfreie
Druckluft verwendet werden (Druck < 6 bar).
VORSICHT
Die Innenseite des Gehäuses darf nicht mit Flüssigkeit oder mit einem feuchten Lappen
gereinigt werden.
Der Sprühkopf besteht aus PVC oder PVDF. Zur Entfernung von Verschmutzungen dürfen
verdünnte Säuren oder Laugen benutzt werden.
Page 63

EasyClean100/150 63
EasyClean100/150 © 11/14 Mettler-Toledo AG, CH-8606 Greifensee
52 500 178 Printed in Switzerland
Keine Blasenbildung an der
InDip-Armatur
Störung Mögliche Ursache Behebung
Druckluft nicht eingeschaltet.
Druck der Luft ist zu niedrig.
Druckluftventil öffnet nicht.
Luftschläuche nicht richtig verlegt
(gequetscht) oder defekt.
Sprühkopf verstopft.
Druckluft einschalten.
Erhöhung des Druckes.
Ventil reinigen.
Schläuche auf Undichtigkeit, Knicke
und eventuelle Quetschungen hin
kontrollieren.
Sprühkopf reinigen.
Ungenügende Reinigung der
Elektrode
Zu wenig Luftfluss.
Spülintervall zu lang und/oder Spül zeiten zu kurz.
Öffnungen am Sprühkopf sind verstopft.
Blasen erreichen die Elektrode nicht.
Erhöhung des Flusses oder Leitungen
resp. Sprühkopf reinigen.
Intervall am Transmitter verkürzen,
Spülzeiten erhöhen.
Sprühkopf ausbauen und reinigen.
Distanz zwischen Sprühkopf und
Elektrodenspitze verringern.
Eintaucharmatur an einen Ort mit
weniger Strömung plazieren.
Druck erhöhen.
Spülungsintervall vom Transmitter
wird vom Gerät nicht erkannt.
Ventil wird nicht mit Strom versorgt.
Verkabelung anhand des Schaltschemas überprüfen.
Stromversorgung überprüfen.
Das Spülen startet nicht (auto
und/oder manuell)
6.2 Störungsbehebung und Instandsetzung
GERFAHR
B
eachten Sie Kapitel 2 «Sicherheit».
Instandsetzungsarbeiten dürfen nur durch Fachkräfte vorgenommen werden. Vor dem Öffnen des Gerätes muss dieses von der Stromquelle getrennt werden!
EasyClean100
Page 64

64 EasyClean100/150
© 11/14 Mettler-Toledo AG, CH-8606 Greifensee EasyClean100/150
Printed in Switzerland 52 500 178
EasyClean150
InTrac-Armatur bewegt sich nicht
Sensor fährt nicht aus oder in den
Prozess.
Druckluft nicht eingeschaltet.
D
ruck der Luft ist zu niedrig.
Druckluftventil öffnet nicht.
Luftschläuche nicht richtig verlegt
oder defekt.
Druckluft einschalten.
E
rhöhung des Druckes
(siehe Spezifikationen).
Ventil reinigen.
Schläuche auf Undichtheit Knicke und
eventuelle Quetschungen kontrollieren.
InTrac Armatur fährt selbständig
aus dem Prozess.
Druck der Druckluft < Prozessdruck.
Plötzlicher Druckverlust.
Druckluft erhöhen
(siehe Spezifikationen).
Verbindungen und Schläuche auf
Lecks überprüfen.
Ungenügende Spülung der Elektrode. Zu wenig Wasserfluss.
Spülintervall zu lang.
Spülzeiten zu kurz.
Spülkammer verstopft.
Erhöhung des Flusses.
Intervall am Transmitter verkürzen.
Spülzeiten erhöhen.
Armatur ausbauen und reinigen
LED leuchtet nicht. LED defekt / normale Gerätefunktion. Keinen Einfluss auf die Funktions -
tüchtigkeit.
Spülung kann nicht aktiviert werden. Armatur ist in Messposition.
Taster «Water» (Spülen) defekt.
Wasserventil defekt.
Kein Wasserfluss.
In Messposition kann nicht gespült
werden.
Kabel überprüfen. Kontaktieren Sie
Ihre Verkaufsstelle.
Wasserventil reinigen, evtl. austauschen.
Überprüfung der Zuleitung zum
EasyClean 150.
Transmitter geht nicht in
«HOLD»-Modus
Hold Relais defekt.
Anschlüsse für den Transmitter sind
lose oder falsch angeschlossen.
Fachperson beiziehen.
Anschlüsse kontrollieren und eventuell
neu installieren.
Störung Mögliche Ursache Behebung
Das Spülen startet nicht
(auto und/oder manuell).
Spülungsintervall vom Tansmitter
wird vom Gerät nicht erkannt.
Ventil wird nicht mit Strom versorgt.
Verkabelung anhand des Schalt schemas überprüfen.
Stromversorgung überprüfen.
Page 65

EasyClean100/150 65
EasyClean100/150 © 11/14 Mettler-Toledo AG, CH-8606 Greifensee
52 500 178 Printed in Switzerland
7 Ausserbetriebsetzung, Lagerung, Entsorgung
GEFAHR
Beachten Sie Kapitel 2 «Sicherheit».
D
ie Ausserbetriebsetzung darf nur durch ausgebildetes Personal oder Fachkräfte
vorgenommen werden.
7.1 Ausserbetriebsetzung
Vorgehen 1. Gebäudeseitige Spannungs-, Druckluft- und Wasserversorgung abstellen.
2. Netzanschluss vom Gerät trennen.
3. Vorhandene Signalleitungen abhängen.
4. Leitungen für Druckluft abhängen.
5. EasyClean von der Befestigung demontieren.
6. Spülen der Schläuche und des Ventiles mit Frischwasser.
7. Reinigung des Gerätes mit einem feuchten Lappen.
8. Gerät trocknen lassen.
7.2 Lagerung
Lagern Sie EasyClean an einem trockenen Ort gemäss den Angaben in Kapitel 1.3.
7.3 Entsorgung
Die Entsorgung ist durch den Betreiber gemäss den lokal geltenden Vorschriften zu vollziehen.
Der Betreiber muss das Gerät entweder einem konzessionierten privaten oder öffentlichen
Sammelunternehmen übergeben oder selbst vorschriftsgemäss beseitigen.
Abfälle sind zu verwerten oder zu beseitigen, ohne dass die menschliche Gesundheit gefährdet
wird und ohne dass Verfahren oder Methoden verwendet werden, welche die Umwelt schädigen
können.
EG-Richtlinie 75/442/EWG
91/156/EWG
Sortierung Die Sortierung erfolgt nach Zerlegung des Geräts in Abfallgruppen gemäss Verzeichnis des
aktuellen Europäischen Abfallkataloges (EWC).Dieser Katalog gilt für alle Abfälle, ungeachtet
dessen, ob sie zur Beseitigung oder zur Verwertung bestimmt sind.
Die Verpackung enthält folgende Stoffe:
– Karton
– Schaumstoff.
Das Gerät enthält folgende Stoffe:
– Stahl
– Elektronikmaterial (Kabel, Komponenten)
– verschiedene Komponente gemäss aufgedruckter Bezeichnung
– der Sprühkopf besteht aus PVC oder PVDF (je nach bestellter Version).
Page 66

66 EasyClean100/150
© 11/14 Mettler-Toledo AG, CH-8606 Greifensee EasyClean100/150
Printed in Switzerland 52 500 178
8 Ersatzteile und Zubehör
B
ei Ersatzteilbestellungen fügen Sie bitte folgende Angaben an:
– Artikelnummer des Geräts
– Seriennummer des Geräts
–
Bestellnummer aus der folgenden Ersatzteilliste
– gewünschte Stückzahl.
Die Hersteller- und Kundendienstanschriften finden Sie am Ende dieser Betriebsanleitung.
HINWEIS
Ersatzteile müssen den technischen Erfordernissen des Geräteherstellers entsprechen!
Verwenden Sie nur Originalersatzteile.
8.1 Ersatzteilliste und Zubehör für EasyClean100
Page 67

EasyClean100/150 67
EasyClean100/150 © 11/14 Mettler-Toledo AG, CH-8606 Greifensee
52 500 178 Printed in Switzerland
Pos. Art.-Nr. Beschreibung
1 52 402 291 Sprühkopf für InDip550/ PVC
2 52 402 290 Sprühkopf für InDip550/ PVDF
3 52 402 370 Fittingset für Sprühkopf
4 52 402 306 Wandbefestigung, komplett
5 52 402 308 Mastbefestigung, komplett
6 52 402316 Wetterschutzdach
7 52 402 283 PTFE-Schlauch, Ø 6/4 mm, 5 m
8 52 402 314 LDPE-Schlauch für Druckluftanschluss, Ø 6/4 mm, 20 m
9 52 402 337 Fittingset pneum./hydr.
10 52 402 336 Kabeldurchführungsset
11 52 300 265 Verbindungskabel Steuergerät > Transmitter (5 m)
12 52 300 266 Verbindungskabel Steuergerät > Transmitter (10 m)
13 52 402 317 «Not-Aus»-Schalter
14 52 402 305 Netzteil
15 52 402 309 Wasserventil
52 500 178 Bedienungsanleitung EasyClean100/150
14
15
Page 68

68 EasyClean100/150
© 11/14 Mettler-Toledo AG, CH-8606 Greifensee EasyClean100/150
Printed in Switzerland 52 500 178
8.2 Ersatzteilliste und Zubehör für EasyClean150
12
13
14
15
Page 69

EasyClean100/150 69
EasyClean100/150 © 11/14 Mettler-Toledo AG, CH-8606 Greifensee
52 500 178 Printed in Switzerland
Pos. Art.-Nr. Beschreibung
1 52 402 306 Wandbefestigung, komplett
2 52 402 308 Mastbefestigung, komplett
3 52 402316 Wetterschutzdach
4 52 402 283 PTFE-Schlauch, Ø 6/4 mm, 5 m
5 52 402 314 LDPE-Schlauch für Druckluftanschluss, Ø 6/4 mm, 20 m
6
52 401 322 Pneumatik-Schlauch, Ø 6/4 mm, 10 m
7
52 402 337 Fittingset pneum./hydr.
8 52 402 336 Kabeldurchführungsset
9 52 300 265 Verbindungskabel Steuergerät > Transmitter (5 m)
10 52 300 266 Verbindungskabel Steuergerät > Transmitter (10 m)
11 52 402 317 «Not-Aus»-Schalter
12 52 402 305 Netzteil
13 52 402 338 Steuerprint EasyClean150
14 52 402 309 Wasserventil
15 52 402 320 Luftventil
52 500 178 Bedienungsanleitung EasyClean100/150 (d/e/f)
Page 70

Management-System
zertifiziert nach
ISO 9001 / ISO 14001
9001
certified
ISO
140 01
certified
ISO
METTLER TOLEDO Markt-Organisationen
Technische Änderungen vorbehalten.
© Mettler-Toledo AG, Process Analytics
11/14 Gedruckt in der Schweiz. 52 500 178
Verkauf und Service:
Australien
Mettler-Toledo Ltd.
220 Turner Street
Port Melbourne
AUS- 3207 Melbourne/VIC
Tel. +61 300 659 761
Fax +61 3 9645 3935
E-Mail info.mtaus@mt.com
Brasilien
Mettler-Toledo Ind. e Com. Ltda.
Avenida Tamboré, 418
Tamboré
BR- 06460-000 Barueri/SP
Tel. +55 11 4166 7400
Fax +55 11 4166 7401
E-Mail mettler@mettler.com.br
service@mettler.com.br
China
Mettler-Toledo Instruments
(Shanghai) Co. Ltd.
589 Gui Ping Road
Cao He Jing
CN- 200233 Shanghai
Tel. +86 21 64 85 04 35
Fax +86 21 64 85 33 51
E-Mail mtcs@public.sta.net.cn
Dänemark
Mettler-Toledo A/S
Naverland 8
DK- 2600 Glostrup
Tel. +45 43 27 08 00
Fax +45 43 27 08 28
E-Mail info.mtdk@mt.com
Deutschland
Mettler-Toledo GmbH
Prozeßanalytik
Ockerweg 3
D-35396 Gießen
Tel. +49 641 507 333
Fax +49 641 507 397
E-Mail prozess@mt.com
Frankreich
Mettler-Toledo
Analyse Industrielle S.A.S.
30, Boulevard de Douaumont
F-75017 Paris
Tel. +33 1 47 37 06 00
Fax +33 1 47 37 46 26
E-Mail mtpro-f@mt.com
Grossbritannien
Mettler-Toledo LTD
64 Boston Road, Beaumont Leys
GB- Leicester LE4 1AW
Tel. +44 116 235 7070
Fax +44 116 236 5500
E-Mail enquire.mtuk@mt.com
Indien
Mettler-Toledo India Private Limited
Amar Hill, Saki Vihar Road
Powai
IN- 400 072 Mumbai
Tel. +91 22 2857 0808
Fax +91 22 2857 5071
E-Mail sales.mtin@mt.com
Italien
Mettler-Toledo S.p.A.
Via Vialba 42
I-20026 Novate Milanese
Tel. +39 02 333 321
Fax +39 02 356 2973
E-Mail
customercare.italia@mt.com
Japan
Mettler-Toledo K.K.
Process Division
6F Ikenohata Nisshoku Bldg.
2-9-7, Ikenohata
Taito-ku
JP-110-0008 Tokyo
Tel. +81 3 5815 5606
Fax +81 3 5815 5626
E-Mail helpdesk.ing.jp@mt.com
Kroatien
Mettler-Toledo d.o.o.
Mandlova 3
HR-10000 Zagreb
Tel. +385 1 292 06 33
Fax +385 1 295 81 40
E-Mail mt.zagreb@mt.com
Malaysia
Mettler-Toledo (M) Sdn Bhd
Bangunan Electroscon Holding, U101
Lot 8 Jalan Astaka U8/84
Seksyen U8, Bukit Jelutong
MY- 40150 Shah Alam Selangor
Tel. +60 3 78 44 58 88
Fax +60 3 78 45 87 73
E-Mail
MT-MY.CustomerSupport@mt.com
Mexiko
Mettler-Toledo S.A. de C.V.
Ejercito Nacional #340
Col. Chapultepec Morales
Del. Miguel Hidalgo
MX- 11570 México D.F.
Tel. +52 55 1946 0900
E-Mail ventas.lab@mt.com
Österreich
Mettler-Toledo Ges.m.b.H.
Südrandstraße 17
A-1230 Wien
Tel. +43 1 604 19 80
Fax +43 1 604 28 80
E-Mail infoprocess.mtat@mt.com
Polen
Mettler-Toledo (Poland) Sp.z.o.o.
ul. Poleczki 21
PL- 02-822 Warszawa
Tel. +48 22 545 06 80
Fax +48 22 545 06 88
E-Mail polska@mt.com
Russland
Mettler-Toledo Vostok ZAO
Sretenskij Bulvar 6/1
Office 6
RU-101000 Moskau
Tel. +7 495 621 56 66
Fax +7 495 621 63 53
E-Mail inforus@mt.com
Schweden
Mettler-Toledo AB
Virkesvägen 10
Box 92161
SE-12008 Stockholm
Tel. +46 8 702 50 00
Fax +46 8 642 45 62
E-Mail sales.mts@mt.com
Schweiz
Mettler-Toledo (Schweiz) GmbH
Im Langacher
Postfach
CH- 8606 Greifensee
Tel. +41 44 944 45 45
Fax +41 44 944 45 10
E-Mail salesola.ch@mt.com
Singapur
Mettler-Toledo (S) Pte. Ltd.
Block 28
Ayer Rajah Crescent #05-01
SG-139959 Singapore
Tel. +65 6890 00 11
Fax +65 6890 00 12
+65 6890 00 13
E-Mail precision@mt.com
Slowakei
Mettler-Toledo s.r.o.
Hattalova 12/A
SK- 83103 Bratislava
Tel. +421 2 4444 12 20-2
Fax +421 2 4444 12 23
E-Mail predaj@mt.com
Slowenien
Mettler-Toledo d.o.o.
Pot heroja Trtnika 26
SI-1261 Ljubljana-Dobrunje
Tel. +386 1 530 80 50
Fax +386 1 562 17 89
E-Mail keith.racman@mt.com
Spanien
Mettler-Toledo S.A.E.
C/Miguel Hernández, 69-71
ES- 08908 L’Hospitalet de Llobregat
(Barcelona)
Tel. +34 902 32 00 23
Fax +34 902 32 00 24
E-Mail mtemkt@mt.com
Südkorea
Mettler-Toledo (Korea) Ltd.
Yeil Building 1 & 2 F
124-5, YangJe-Dong
SeCho-Ku
KR-137-130 Seoul
Tel. +82 2 3498 3500
Fax +82 2 3498 3555
E-Mail Sales_MTKR@mt.com
Tschechische Republik
Mettler-Toledo s.r.o.
Trebohosticka 2283/2
CZ-100 00 Praha 10
Tel. +420 2 72 123 150
Fax +420 2 72 123 170
E-Mail sales.mtcz@mt.com
Thailand
Mettler-Toledo (Thailand) Ltd.
272 Soi Soonvijai 4
Rama 9 Rd., Bangkapi
Huay Kwang
TH-10320 Bangkok
Tel. +66 2 723 03 00
Fax +66 2 719 64 79
E-Mail
MT-TH.CustomerSupport@mt.com
Ungarn
Mettler-Toledo Kereskedelmi KFT
Teve u. 41
HU-1139 Budapest
Tel. +36 1 288 40 40
Fax +36 1 288 40 50
E-Mail mthu@axelero.hu
USA/ Kanada
METTLER TOLEDO
Process Analytics
900 Middlesex Turnpike, Bld. 8
Billerica, MA 01821, USA
Tel. +1 781 301 8800
Zollfrei +1 800 352 8763
Fax +1 781 271 0681
E-Mail mtprous@mt.com
Mettler-Toledo AG, Process Analytics
Im Hackacker 15, CH-8902 Urdorf, Schweiz
Tel. + 41 44 729 62 11, Fax +41 44 729 66 36
www.mt.com/pro
Page 71

EasyClean100/150 71
EasyClean100/150 © 11/14 Mettler-Toledo AG, CH-8606 Greifensee
52 500 178 Printed in Switzerland
EasyClean100
EasyClean150
Instructions d’utilisation
Page 72

72 EasyClean100/150
© 11/14 Mettler-Toledo AG, CH-8606 Greifensee EasyClean100/150
Printed in Switzerland 52 500 178
Journal produit et carnet d’entretien
D
ate Activité Exécuté Reçu
par par
Première installation
Page 73

EasyClean100/150 73
EasyClean100/150 © 11/14 Mettler-Toledo AG, CH-8606 Greifensee
52 500 178 Printed in Switzerland
Utilisation des présentes instructions d’utilisation
Les présentes instructions d’utilisation font partie intégrante de l’EasyClean100 et
l’EasyClean150 et contient d’importantes directives et instructions relatives à la sécurité
et à l’emploi.
Toutes les personnes qui devront travailler avec l’EasyClean100 et/ou l’EasyClean150
d
evront au préalable avoir lu et compris le chapitre relatif à leur activité.
Veuillez lire attentivement les présentes instructions d’utilisation avant d’utiliser le système
EasyClean. Conservez ce document à proximité immédiate de l’appareil, afin de faciliter
une consultation ultérieure par le personnel concerné.
Veuillez lire en premier lieu le chapitre 2 «Sécurité»!
© Toute reproduction, même partielle, des présentes instructions d’utilisation est strictement interdite.
Sans le consentement écrit préalable de la firme Mettler-Toledo GmbH, Process Analytics, CH-8902 Urdorf,
aucune partie ne peut en être reproduite, polycopiée ou diffusée sous quelque forme que ce soit, ni traitée
au moyen de systèmes électroniques, en particulier sous la forme de photocopies, photos, procédés
magnétiques ou autres types d’enregistrement.
Tous les droits, en particulier le droit de reproduction et de traduction, ainsi que les droits de brevets ou
d’enregistrement, sont strictement réservés.
InTrac, InDip sont des marques déposées de Mettler-Toledo AG, CH-8606 Greifensee
Page 74

74 EasyClean100/150
© 11/14 Mettler-Toledo AG, CH-8606 Greifensee EasyClean100/150
Printed in Switzerland 52 500 178
Table des matières
1 Description du produit 75
1.1 Introduction 75
1.2 Equipement et fourniture 75
1.3 Caractéristiques de l’EasyClean 100/150 76
2 Sécurité 78
2.1 Introduction 78
2.2 Utilisation judicieuse 78
2.3 Utilisation non judicieuse 78
2.4 Principes de base 79
2.5 Avertissements et symboles 79
2.6 Responsabilités, mesures organisationnelles 80
2.7 Dangers spécifiques au produit 81
2.8 Dangers latents résiduels 81
2.9 Mesures en cas d’urgence 81
2.10 Mesures de sécurité 82
2.11 Modifications 82
3 Votre appareil 83
3.1 Vue d’ensemble 83
3.2 Fonctions 84
3.3 Intégration à un système de mesure 85
4 Mise en service 86
4.1 Montage 86
4.2 Raccordement 88
4.3 L’installation et la mise en service 92
5 Fonctionnement 94
5.1 Contrôles par l’opérateur 94
5.2 Fonctionnement de l’EasyClean 100 94
5.3 Fonctionnement de l’EasyClean 150 94
5.4 En cas de coupure de courant 95
6 Maintenance et dépannage 96
6.1 Maintenance 96
6.2 Dépannage et maintenance 97
7 Mise hors service, entreposage, rejet 99
7.1 Mise hors service 99
7.2 Entreposage 99
7.3 Rejet 99
8 Pièces de rechange et accessoires 100
8.1 Liste des pièces de rechange et accessoires pour EasyClean 100 100
8.2 Liste des pièces de rechange et accessoires pour EasyClean 150 102
Page 75

EasyClean100/150 75
EasyClean100/150 © 11/14 Mettler-Toledo AG, CH-8606 Greifensee
52 500 178 Printed in Switzerland
1 Description du produit
1.1 Introduction
Conformité EasyClean100 et EasyClean150 sont conformes aux dispositions suivantes:
• Directives basse tension:
– directives UE 73/23/EG
– directives suisses SR734.26NEV
– dispositions de sécurité EN61010-1
– classe de protection IP EN60529 IP65
• Directives CEI (compatibilité électromagnétique):
– emission EN61326-1, Classe B
– harmoniques EN61000-3-2
– fluctuations de tension EN61000-3-3
– immunité EN61326-1
Certificats Certificat CE, GS
Caractérisation La plaque signalétique se trouve sur la face extérieure gauche de l’appareil.
1.2 Equipement et fourniture
Fourniture Les appareils EasyClean sont fournis sans cordon de branchement. Les cordons de branche-
ment à prévoir par le client seront raccordés aux prises prévues à cet effet sur l’appareil (voir
à ce sujet la section 4.2 «Branchements»).
Emballage
L’emballage est constitué de carton et de carton de rembourrage. Conservez l’emballage en
vue d’un éventuel entreposage ou d’un éventuel transport de l’appareil. Si toutefois vous
souhaitez vous débarrasser de l’emballage, conformez-vous aux prescriptions locales ainsi
qu’à la section 7.3 «Rejet».
Contrôle de la fourniture Lors du déballage, assurez-vous de l’absence de tous dégâts. Au cas où vous en constateriez,
signalez-le sans délai au Transporteur et à votre Fournisseur.
Vérifiez la fourniture à l’aide de votre bon de commande et des documents de livraison.
Page 76

76 EasyClean100/150
© 11/14 Mettler-Toledo AG, CH-8606 Greifensee EasyClean100/150
Printed in Switzerland 52 500 178
1.3 Caractéristiques de l’EasyClean100/150
Boîtier boîtier en acier revêtue de résine polyester en poudre
m
atérial: acier DIN 1.1203 Ck55
attention: ne pas nettoyer au moyen de solvants contenant
d
e l’acétone
Poids de l’appareil environ 3 kg (6.6 lbs)
C
lasse de protection IP 65
Conditions ambiantes temp. en service: 0 – +45°C (+32 – +113°F)
temp. transport/entreposage: –10 – +70°C (+14 – +158°F)
degrée de polution: 2
Surtension catégorie: III
Alimentation réseau 100 – 230 V AC, 50/60 Hz, 0.18 – 0.3 A (± 15%)
Commande système activation processus:
via un contact de lavage du transmetteur raccordé
déroulement:
non programmable sur l’appareil
Entrée de commande 1 entrée de commande pour contacts de lavage, venant du
transmetteur, 24V
Transmetteur transmetteurs METTLER TOLEDO:
– pH2050e, O
2
4050e, Cond7050e
– pH2100e, O24100e, Cond7100e, Trb8300
– alternativement via transmetteur avec contact de lavage
et fonction «hold»
Branchements bornes de branchement 0.08 – 2.5 mm
2
Liaison au transmetteur câble de commande 4 fils, 1.5 mm
2
longueur: 5 m (10 m en option)
Passages de câbles Ø 3.5 – 10 mm => M 16
Amenée d’air comprimé 4 – 8 bar (400 – 800 kPa, 58 – 116 psi)
– qualité d’air selon ISO 8573-1
– classe d’hygrométrie 4 (point de rosée d’eau +3°C)
– classe de solides 5 (filtre 40 µm)
– capacité d’huile max. classe 2 (0.1 mg/m
3
)
raccord: filet G1/8"
Page 77

EasyClean100/150 77
EasyClean100/150 © 11/14 Mettler-Toledo AG, CH-8606 Greifensee
52 500 178 Printed in Switzerland
Liaison au support InDip flexible LDPE, Ø 6/4 mm (1/8" / 1/4")
option: flexible PTFE, Ø 6/4 mm (1/8" / 1/4")
Liaison au support rétractable flexible LDPE, Ø 6/4 mm (1/8" / 1/4")
option: flexible PTFE, Ø 6/4 mm (1/8" / 1/4")
Alimentation d’eau de rinçage pression: 2 – 6 bar (200 – 600 kPa, 29 – 87 psi)
raccord: filet G1/4" feminin
a
daptateur:
1
/4"
NPT masculin (PP)
Matériau tête de pulvérisation PVC, PVDF
Matériaux en contact avec PP, LDPE, Viton
®
, laiton,
l’eau de rinçage ou acier inoxydable DIN 1.4105, 1.4303, 1.4310
l’air comprimé
Médias en connection avec de l'eau 0 – 60 °C (32 °F – 140 °F)
le flexible LDPE
Médias en connection avec de l'eau 0 – 90 °C (32 °F – 194 °F)
le flexible PTFE
Sous réserve de modifications techniques
Page 78

78 EasyClean100/150
© 11/14 Mettler-Toledo AG, CH-8606 Greifensee EasyClean100/150
Printed in Switzerland 52 500 178
2 Sécurité
2.1 Introduction
Les instructions d’utilisation contiennent les informations essentielles pour assurer une utili s
ation efficace et judicieuse de l’EasyClean100/150 et de sa tête de pulvérisation. Un prérequis
indispensable à une manipulation sûre et à un bon fonctionnement est la connaissance de
c
es consignes de sécurité et l’observance des autres mises en garde des présentes instructions
d’utilisation.
Les présentes instructions d’utilisation, et en particulier les consignes de sécurité, doivent être
scrupuleusement respectées par l’exploitant et par toutes les personnes susceptibles de travailler
avec l’EasyClean100/150 ou avec la tête de pulvérisation. Il y a lieu, en outre, de se conformer
aux réglementations locales du site d’utilisation et aux prescriptions légales.
Les instructions d’utilisation doivent toujours être conservées à portées de main et être accessibles à toute personne travaillant avec l’EasyClean100/150 ou avec la tête de pulvérisation.
2.2 Utilisation judicieuse
L’EasyClean100/150 et la tête de pulvérisation ne doivent être utilisés que pour le rinçage et
le nettoyage de capteurs, et ceci de la manière décrite dans les présentes Instructions.
Une utilisation judicieuse et responsable englobe les éléments suivants:
– Le respect des recommandations, prescriptions et directives des présentes instructions
d’utilisation.
– L’entretien et le soin corrects de l’appareil conformément aux présentes instructions
d’utilisation.
– L’utilisation conforme aux conditions d’environnement et d’emploi prescrites, ainsi
qu’aux positions de montage.
– Le respect de la législation locale.
2.3 Utilisation non judicieuse
Toute autre utilisation autre que celles mentionnées ci-dessus, ainsi que toute application ne
correspondant pas aux caractéristiques techniques, sont à considérer comme non judicieuses.
L’utilisateur assume tous les risques quant à tous dégâts qui seraient imputables à une telle
utilisation.
Les applications suivantes sont en particulier à prohiber:
• Utilisation de fluides hydrauliques au lieu d’air comprimé
• Utilisation de suspensions et de solvants comme produits de nettoyage
Page 79

EasyClean100/150 79
EasyClean100/150 © 11/14 Mettler-Toledo AG, CH-8606 Greifensee
52 500 178 Printed in Switzerland
2.4 Principes de base
L’EasyClean100/150 et la tête de pulvérisation sont construits conformément à l’état de la
technique et aux règles de sécurité reconnues.
L’appareil peut toutefois poser certains risques et dangers:
–
lorsqu’il est utilisé par des personnes insuffisamment formées.
– lorsqu’il n’est pas utilisé conformément aux prescriptions.
L’EasyClean100/150 et la tête de pulvérisation ne peuvent être utilisés que s’ils sont en parfait
état technique, conformément aux prescriptions, dans un souci de sécurité et en étant conscient
des dangers, et selon les consignes des instructions d’utilisation.
Tous dérangements ou dégâts qui compromettraient la sécurité et le fonctionnement doivent
être immédiatement réparés par l’utilisateur ou par un spécialiste, et signalés par écrit au
constructeur!
2.5 Avertissements et symboles
Les présentes instructions d’utilisation utilisent les symboles suivants pour caractériser les
consignes de sécurité:
DANGER!
Cet avertissement concerne un danger susceptible d’entraîner d’importants dégâts matériels,
des lésions corporelles graves ou même mortelles.
ATTENTION!
Cet avertissement signale une situation potentiellement dangereuse pouvant entraîner des
lésions corporelles et/ou des dégâts matériels légers.
REMARQUE!
Cette information attire l’attention sur des impératifs techniques. Sa non observance peut
déboucher sur des pannes, un défaut d’économie et éventuellement des pertes de production.
Page 80

80 EasyClean100/150
© 11/14 Mettler-Toledo AG, CH-8606 Greifensee EasyClean100/150
Printed in Switzerland 52 500 178
2.6 Responsabilités, mesures organisationnelles
Obligations de
l
’utilisateur
– L’utilisateur s’engage à ne laisser utiliser l’EasyClean que par des personnes familiarisées
a
vec les prescriptions de base sur la sécurité du travail et la prévention des accidents, et
affectées à la manipulation de l’appareil. Les présentes instructions d’utilisation font à cet
e
ffet office de guide pratique.
– Outre les instructions d’utilisation, l’utilisateur assurera la mise à disposition et l’instruction
des réglementations légales généralement en vigueur et des autres réglementations
c
ontraignantes en matière de sécurité du travail et de prévention des accidents, ainsi que
de protection de l’environnement.
– La conscience du personnel quant à la sécurité et aux dangers dot être contrôlée à
intervalles réguliers.
– Toutes les mesures nécessaires doivent être prises afin que l’EasyClean ne soit utilisé
qu’en parfait état de marche et en toute sécurité.
Obligations du
personnel
– Toutes les personnes chargées de travailler sur ou avec l’EasyClean doivent lire les
prescriptions de sécurité et les avertissements des présentes instructions d’utilisation.
– Outre les présentes instructions d’utilisation, le personnel respectera les réglementations
légales généralement en vigueur et les réglementations en matière de sécurité du travail
et de prévention des accidents.
– Toute méthode de travail suspecte au niveau de la sécurité et ne correspondant pas à
une utilisation judicieuse de l’appareil est à proscrire.
Sélection et qualification
du personnel –
obligations de base
– Toute opération sur l’EasyClean doit être exclusivement effectuée par un personnel fiable,
disposant d’une formation ou d’une instruction adéquate. Le personnel d’opération devra
au préalable avoir lu attentivement les présentes instructions d’utilisation.
– Les compétences du personnel en ce qui concerne la commande, l’entretien, la maintenance
etc. doivent être clairement définies.
– Il y a lieu de s’assurer que seul le personnel mandaté à cet effet effectue des activités sur
l’appareil.
– Le personnel en formation, à former ou relevant d’une formation générale ne peut travailler
sur l’appareil que sous la surveillance constante d’une personne expérimentée.
– Tous travaux sur l’équipement électrique de l’appareil seront exclusivement effectués par
un électricien spécialisé et conformément aux règles de l’art électrotechniques.
Modifications struc turelles de l’appareil
– Aucune modification, addition ni transformation de nature à affecter la sécurité ne peut
être entreprise sans l’accord écrit de Mettler-Toledo GmbH, Process Analytics.
– Tous les composants qui ne seraient pas en parfait état doivent être remplacés sans délai.
Page 81

EasyClean100/150 81
EasyClean100/150 © 11/14 Mettler-Toledo AG, CH-8606 Greifensee
52 500 178 Printed in Switzerland
2.7 Dangers spécifiques au produit
Dangers dus à l’énergie électrique!
Si l’appareil doit être ouvert à des fins de travaux d’installation et/ou de réparation, les
éléments sous tension doivent être déconnectés.
Refermer l’appareil dès que les travaux sont terminés!
Dangers dus à l’eau/air sous pression!
S’il y a lieu d’ouvrir des lignes sous pression (air comprimé, eau de lavage), elles doivent
être isolées et dépressurisées avant le début des travaux!
2.8 Dangers latents résiduels
Même si toutes les précautions ont été prises, il subsiste des dangers latents tel que,
par exemple:
– l’éclatement d’une canalisation.
– les dangers suscités par un dérangement d’une commande d’un niveau supérieur.
2.9 Mesures en cas d’urgence
En cas de projection de liquide dans les yeux, rincer abondamment à l’eau courante
pendant au moins 15 minutes. Consulter un médecin aux fins de contrôle.
En cas de contact avec la peau, rincer immédiatement à l’eau.
Une assistance médicale est dans tous les cas nécessaire en cas de symptômes
mani festement imputables au contact d’un fluide avec la peau ou les yeux. Indiquer
au médecin la nature et les caractéristiques de toutes les substances utilisées.
Page 82

82 EasyClean100/150
© 11/14 Mettler-Toledo AG, CH-8606 Greifensee EasyClean100/150
Printed in Switzerland 52 500 178
2.10 Mesures de sécurité
Les législations et prescriptions locales doivent être strictement respectées à tout moment.
Elles ne font pas partie intégrante des présentes instructions d’utilisation.
Le port d’un équipement de protection personnelle, tel que des lunettes de sécurité et un
v
êtement de protection, est impératif.
L’appareil ne peut être utilisé qu’à l’état fermé.
L
’utilisateur est responsable de la formation de son personnel. A titre de guidance, les présentes
instructions d’utilisation peuvent être commandées en différentes langues. Elle fait partie intégrante de l’appareil et doit en tous temps être disponible au site d’exploitation de ce dernier.
L’utilisateur informera immédiatement le constructeur de tous les événements qui se produiraient
dans le contexte de la sécurité lors de l’utilisation de l’appareil.
2.11 Modifications
Aucune modification ne peut être effectuée sans consultation et accord écrit préalables du
constructeur.
Seuls les composants indispensables pour assurer le fonctionnement de l’appareil peuvent
être installés et démontés.
Ceci peut être réalisé manuellement ou à l’aide de l’outillage fourni. Ne jamais déposer de
dispositifs de sécurité ni de couvercles en utilisant des outils du commerce, sauf moyennant
l’autorisation du service technique autorisé. Tout contact avec des éléments sous tension
constitue un danger mortel.
Page 83

EasyClean100/150 83
EasyClean100/150 © 11/14 Mettler-Toledo AG, CH-8606 Greifensee
52 500 178 Printed in Switzerland
3 Votre appareil
3.1 Vue d’ensemble
E
asyClean100
1 Raccordement secteur
2 Raccordement câble de commande
3 Raccordement d’air comprimé ou d’eau
4 Bornes de raccordement secteur
5 Bornes de raccordement
câble de commande
6 Vanne d’air comprimé/vanne d’eau
7 Bloc secteur
1 Touche «in/out» (sélecteur de position)
2 Lampe témoins DEL
3 Touche «water» (sélecteur de rinçage)
4 Raccordement secteur
5 Raccordement câble de commande
6 Raccordement d’air comprimé
7 Echappement d’air
8 Sorties d’air comprimé (in/out)
9 Raccordement d’eau
10 Vanne d’eau
11 Vanne d’air comprimé
12 Bloc secteur
13 Platine de commande
14 Bornes de raccordement secteur
15 Bornes de raccordement
câble de commande
EasyClean 150
4 5
7
6
21
5 6 74
1 3
10
11
12
13
14 15
2
8 9
3
Page 84

84 EasyClean100/150
© 11/14 Mettler-Toledo AG, CH-8606 Greifensee EasyClean100/150
Printed in Switzerland 52 500 178
3.2 Fonctions
Généralités L’EasyClean100/150 commande l’amenée d’air comprimé et/ou d’eau à une tête d’électrode
p
lacée dans un support InDip (EasyClean100) ou dans un support rétractable
(EasyClean150). L’écoulement est libéré et arrêté via le contact de lavage du transmetteur.
T
ypes d’opérations Le transmetteur prend en charge toute la commande de l’appareil.
P
osition de base Les vannes sont fermées et hors courant.
Le bloc InTrac demeure sur sa dernière position lors d’une chute de pression. En cas de
coupure de courant sur l’EasyClean150, le capteur quitte le processus et le transmetteur
passe en mode de maintien (la lecture est «gelée»).
En cas de coupure de courant, toutes les fonctions de l’EasyClean100 sont neutralisées,
sans affecter la mesure.
Fonction de Maintien En ce qui concerne la fonction exacte et les paramètres du relais de maintien, se reporter
au mode d’emploi du transmetteur utilisé.
Lampes témoins L’EasyClean100 n’est pas équipé de lampes témoins.
L’EasyClean150 dispose d’une lampe témoin (DEL) placée à l’avant. La lampe témoin est
couplée à la vanne de commande déclenchant le mouvement du support. Elle n’indique dès
lors pas un mauvais fonctionnement du bloc, mais simplement la position de la touche (mode
automatique ou mode «service» à l’état rétracté).
Déroulement du
programme
Le temps de rinçage et/ou de lavage est déterminé par le signal de commande (contact de
lavage) (voir le mode d’emploi du transmetteur).
Page 85

EasyClean100/150 85
EasyClean100/150 © 11/14 Mettler-Toledo AG, CH-8606 Greifensee
52 500 178 Printed in Switzerland
3.3 Intégration à un système de mesure
Les schémas ci-après sont des exemples type d’intégration de l’EasyClean100
et de l’EasyClean 150 à un système de mesure.
EasyClean100
1 EasyClean100
2 Connection de l’eau/de l'air comprimé
3 Flexible d’air comprimé ou d’eau
4 Fixation mural
5 Auvent de protection (option)
6/7 Tête de pulvérisation
8 Alimentation d’air comprimé ou d’eau
9/10 Câble de commande
11 Interrupteur d’arrêt d’urgence (option)
1 EasyClean150
2 Connection de l’eau
3 Flexible d’eau
4 Flexible de l’écoulement d’eau
5 Fixation mural
6 Auvent de protection (option)
7 Flexible d’air comprimé (entré)
8 Flexibles d’air comprimé (support)
9/10 Câble de commande
11 Interrupteur d’arrêt d’urgence (option)
EasyClean150
Page 86

86 EasyClean100/150
© 11/14 Mettler-Toledo AG, CH-8606 Greifensee EasyClean100/150
Printed in Switzerland 52 500 178
4 Mise en service
DANGER
Voir le chapitre 2 «Sécurité».
Tous travaux aux composants électriques du système ne peuvent être effectués que par
u
n personnel qualifié et autorisé.
REMARQUE
Pour la mise en service, procéder comme expliqué à la section 4.3 «L’installation et la mise
en service». Voir les références pour de plus amples informations.
4.1 Montage
Les EasyClean100 et150 sont prévus pour montage direct (rail en c), mural ou sur mâts/
poteaux. L’EasyClean100 et l’EasyClean150 sont installés dans le même type de carrosserie
et présentent dès lors les mêmes dimensions.
Le site de montage doit présenter une résistance suffisante et être autant que possible à
l’épreuve des vibrations.
Veiller à des longueurs minimales de lignes.
Montage mural
Page 87

EasyClean100/150 87
EasyClean100/150 © 11/14 Mettler-Toledo AG, CH-8606 Greifensee
52 500 178 Printed in Switzerland
Montage sur mât/poteau
Pour la procédure exacte de montage de la suspension, se reporter à la brochure d’installation
fournie à part.
Page 88

88 EasyClean100/150
© 11/14 Mettler-Toledo AG, CH-8606 Greifensee EasyClean100/150
Printed in Switzerland 52 500 178
4.2 Raccordement
ATTENTION
S’assurer, avant de procéder au raccordement, que les valeurs de raccordement selon
la section 1.3 «Données et caractéristiques techniques» sont bien conformes.
Raccordements au bas
du boîtier EasyClean100
1 Passage du câble secteur, M16
2 Passage du câble du transmetteur, M16
3 Entrée d’air/d'eau G
1
/4" NPT, femelle
4 Sortie vers support InDip (flexible Ø 6/4 mm)
1 Passage du câble secteur, M16
2 Passage du câble du transmetteur, M16
3 Entrée d’air (flexible Ø 6/4 mm)
4 Echappement d’air
5 Sortie d’air comprimé vers support InTrac ––> fonction: «retour»
6 Sortie d’air comprimé vers support InTrac ––> fonction: «avance»
7 Entrée d’eau G
1
/4", femelle
8 Sortie vers support (flexible Ø 6/4 mm)
Raccordements au bas du
boîtier EasyClean150
Page 89

EasyClean100/150 89
EasyClean100/150 © 11/14 Mettler-Toledo AG, CH-8606 Greifensee
52 500 178 Printed in Switzerland
R
emarques
Il est avantageux que le client installe une vanne d’arrêt d’eau et d’air comprimé à proximité
d
e l’EasyClean100/ 150. Ceci facilitera les travaux d’entretien tout en augmentant la sécurité
de travail lors du montage et du démontage de l’appareil.
Respecter les prescriptions locales en matière d’installations pneumatiques et de distribution
d’eau.
La tête de pulvérisation est conçue pour le Mettler-Toledo InDip550. Si la tête de pulvérisation
est utilisée avec un autre support, l’utilisation et le montage de la tête sont aux risques et périls
de l’utilisateur.
Pour l’installation sur support rétractable, se reporter au mode d’emploi correspondant du
support.
Raccordements du
support à immersion
Raccordements
électriques
Les EasyClean100 et 150 sont conçus pour le transmetteur Mettler-Toledo comme décrit à
la section 1.3. Se reporter au mode d’emploi correspondant pour l’installation correcte sur
un autre transmetteur.
DANGER
Le raccordement au secteur ne peut être réalisé que par un personnel spécialisé et
autorisé, selon les règles de l’art électrotechniques.
Pour le raccordement au secteur par le client, on se conformera également aux
prescriptions locales.
Remarque
Le dijoncteur de protection doit être integré dans l'installation électrique et monté à proximité
de l'EasyClean.
Page 90

90 EasyClean100/150
© 11/14 Mettler-Toledo AG, CH-8606 Greifensee EasyClean100/150
Printed in Switzerland 52 500 178
Raccordements électriques EasyClean100 avec transmetteurs Mettler-Toledo
T
ransmitter
EasyClean 100
X
100 e
1
Inp. 1
+24 VDC
17
18
Wash
2
EasyClean 100
M300
1
Inp. 1
+24 VDC
2
1
TB1(1/2 DIN)
or
TB1B (1/4 DIN)
2
EasyClean 100
M700
1
Inp. 1
+24 VDC
3
4
K3
2
EasyClean 100
Trb 8300
1
Inp. 1
+24 VDC
TB5/6
TB5/5
Wash
2
Raccordements électriques
Transmetteur X100 e
Fixer le temps de rinçage et l’intervalle de rinçage du transmetteur X100 e suivant les conditions d’application.
Transmetteur M300
Configurer le relais # 1 (préréglage) ou # 2, # 3, # 4 du
transmetteur en relais de rincage.
Fixer le temps de rinçage et l’intervalle de rinçage du transmetteur M300 suivant les conditions d’application.
Transmetteur M700
Configurer le relais de contact de commutation K3 (K1 ou
K2) en relais de rinçage et en mode travail (NO).
Fixer le temps de rinçage du transmetteur et l’intervalle de
rinçage suivant les conditions d’application.
Transmetteur Trb 8300
Fixer le temps de rinçage et l’intervalle de rinçage du transmetteur Trb 8300 suivant les conditions d’application.
Page 91

EasyClean100/150 91
EasyClean100/150 © 11/14 Mettler-Toledo AG, CH-8606 Greifensee
52 500 178 Printed in Switzerland
Raccordements électriques EasyClean150 avec transmetteurs Mettler-Toledo
EasyClean100 et 150, sont compatible avec les transmetteurs de Mettler-Toledo. Pour une installation
correcte avec d'autres transmetteurs veuillez consulter leurs mode d'emploi respectif.
E
asyClean 150
X100 e
1
Inp. 1
+24 VDC
TAO
17
18
6
7
Wash
Hold
2
4
3
EasyClean 150
M300
1
Inp. 1
+24 VDC
TAO
2
1
7
8
TB2
H
old
2
4
3
TB1(1/2 DIN)
o
r
TB1B (1/4 DIN)
EasyClean 150
M700
1
Inp. 1
+24 VDC
TAO
3
4
11
13
OK1
2
4
3
K3
EasyClean 150
Trb 8300
1
Inp. 1
+24 VDC
Hold
2
4
3
Wash
TB5/6
TB5/5
TB2/6
TB2/2
Transmetteur X100 e
REMARQUE
Mettre un pont entre les bornes 2 et 3 sur EasyClean 150.
Fixer le temps de rinçage et l’intervalle de rinçage du transmetteur X100 e suivant les conditions d’application.
Transmetteur M300
REMARQUE
Mettre un pont entre les bornes 2 et 3 sur EasyClean 150.
Configurer le relais # 1 (préréglage) ou # 2, # 3, # 4 en
relais de rincage.
Fixer le temps de rinçage et l’intervalle de rinçage du transmetteur M300 suivant les conditions d’application.
Transmetteur M700
REMARQUE
Mettre un pont entre les bornes 2 et 3 sur EasyClean 150.
Configurer le relais de contact de commutation K3 (K1 ou K2)
en relais de rinçage et en mode travail (NO). Fixer le temps de
rinçage et l’intervalle de rinçage suivant les conditions d’application. Le relais de contact OK 1 doit être configuré comme
HOLD (10…30V).
Transmetteur Trb 8300
Fixer le temps de rinçage et l’intervalle de rinçage du transmetteur Trb 8300 suivant les conditions d’application.
Raccordements électriques
Page 92

92 EasyClean100/150
© 11/14 Mettler-Toledo AG, CH-8606 Greifensee EasyClean100/150
Printed in Switzerland 52 500 178
4.3 L’installation et la mise en service
a Emboîter la tête de pulvérisation sur
l’extrémité à immerger du support
InDip. La distance entre les ouvertures de sortie d’air et l’électrode doit
être d’environ 1cm.
b Procéder comme suit pour installer
le système de flexibles:
Desserrer une vis du collier de serrage du support InDip, et l’utiliser
pour visser la pièce angulaire sur
l’extrémité supérieure du support.
c Procéder comme suit pour insérer le
flexible entre la tête de pulvérisation
et la pièce angulaire:
Libérer d’abord la vis du flexible.
Emboîter le flexible à la main sur le
raccord fileté, sans utiliser d’outil, et
serrer la vis.
d Fixer le côté libre du flexible au tube
du support InDip au moyen d’un
serre-câble.
EasyClean100 1. Monter l’EasyClean sur un mur ou un poteau, de manière que les raccords soient dirigés
vers le bas.
2. Raccorder le transmetteur à l’EasyClean (voir la section 4.2 «Raccordements»).
3. Raccorder l’air comprimé et l’amenée d’eau du site du client. Il y a lieu de s’assurer que
la pression du fluide n’excède pas la pression spécifique de l’appareil (voir le chapitre
1.3 «Données et caractéristiques techniques»).
4. Raccorder les flexibles aux sorties d’air comprimé/eau et installer en conséquence les
arrivées des supports.
5. Brancher le câble secteur.
6. Montage de la tête de pulvérisation pour l’EasyClean100
Bornes de câbles
pour fils N et L
Passage de câble
Pour connecter la masse avec la terre
veuillez utilisé la cosse a profil plat jointe
à l' EasyClean.
b
c
d
a
Page 93

EasyClean100/150 93
EasyClean100/150 © 11/14 Mettler-Toledo AG, CH-8606 Greifensee
52 500 178 Printed in Switzerland
1. Raccorder les flexibles comme expliqué à la section 3.3 «Intégration à un système
de mesure».
2. Pour le raccordement correct au support rétractable, se reporter au mode d’emploi correspondant. Veiller à ce qu’aucun indicateur de position ne puisse être raccordé à
l’EasyClean150. On peut toutefois utiliser pour la supervision du fonctionnement des
dispositifs de réponse, qui indiquent en permanence la position du capteur.
3. Contrôles avant mise en service:
• L’air comprimé et l’eau de rinçage sont-ils correctement raccordés?
• Toutes les liaisons par flexibles sont-elles soigneusement réalisées (sans pliures)?
5. Première mise en service de l’EasyClean150
• Raccorder l’EasyClean à l’alimentation secteur
• Ouvrir la vanne principale (si installée) d’air comprimé et/ou d’eau.
• Etendre et rétracter le support en appuyant sur le bouton «In/Out».
• En position étendue (maintenance), la DEL ne doit pas être allumée et le transmetteur
doit être en mode de «MAINTIEN».
• Appuyer sur le bouton-poussoir «Water» (eau) ––> la vanne d’eau s’ouvre.
• Relâcher le bouton-poussoir «Water» ––> l’arrivée d’eau est coupée.
• Appuyer sur le bouton-poussoir «In/Out» ––> le support change la position.
6. Commande via le transmetteur
• Activer le contact de lavage du transmetteur (voir le mode d’emploi du transmetteur).
• S’assurer que les vannes sont bien activées par le signal du transmetteur.
––> Le déplacement du support et l’ouverture de la vanne d’eau doivent se faire
simultanément.
• L’intervalle de temps du contact de lavage se règle au transmetteur (voir le mode
d’emploi du transmetteur).
• Au terme de l’intervalle de temps, la vanne d’eau se ferme et le support revient en
position de mesure.
EasyClean150
7. Contrôles avant mise en service:
•
L’air comprimé et l’eau de rinçage sont-ils correctement raccordés?
• Toutes les liaisons par flexibles sont-elles soigneusement réalisées (sans pliures)?
8. Première mise en service de l’EasyClean100
• Raccorder l’EasyClean à l’alimentation secteur.
• Ouvrir la vanne principale (si installée) d’air comprimé et/ou d’eau.
9. Commande via le transmetteur
•
S’assurer que les vannes sont bien activées par le signal du transmetteur.
––> Sortie d’air comprimé à la tête de pulvérisation.
• Immerger la tête de pulvérisation dans l’eau et ajuster la quantité d’air au débit souhaité.
Le débit d’air peut être réglé par un manodétendeur.
Page 94

94 EasyClean100/150
© 11/14 Mettler-Toledo AG, CH-8606 Greifensee EasyClean100/150
Printed in Switzerland 52 500 178
5 Fonctionnement
5.1 Contrôles par l’opérateur
Avant mise sous tension, chaque jour et avant chaque changement d’équipe, s’assurer qu’une
a
limentation suffisante en: air comprimé, eau de rinçage et énergie électrique est garantie,
et que le support fonctionne correctement.
Pour d’éventuels travaux d’entretien au support, se reporter au mode d’emploi correspondant.
5.2 Fonctionnement de l’EasyClean100
L’EasyClean100 ne dispose d’aucun élément de commande. L’aptitude au fonctionnement
ne peut être vérifiée que via le contact de lavage du transmetteur.
Si le fonctionnement ne peut plus être garanti, consulter le chapitre 6.2 «Dépannage de
l’EasyClean 100».
5.3 Fonctionnement de l’EasyClean150
1 Appuyer sur la touche
«IN/OUT»
déplacement du support
(avance, recul).
2 Appuyer sur «Water»
ouverture de la vanne d’eau
(ne reste active que tant que
l’on maintient la touche
enfoncée).
3 Affichage de l’état d’activité
La DEL s’allume lorsque le
support est en position mesure.
Fonctionnement de l’EasyClean150
1. Les déplacements du support peuvent être commandés par le bouton «IN/OUT».
2. Lorsque le support est en position d’entretien (hors processus), la DEL n’est pas allumée.
La DEL indique seulement la position du bouton-poussoir pour la position du support.
Aucune vérification directe de la position du support et du fonctionnement n’est possible.
Lorsque la DEL n’est pas allumée, le transmetteur est en mode de «MAINTIEN».
3. Le rinçage à l’eau ne peut être activé qu’en position de maintenance (DEL allumée). Ce
cycle se déroule tant que le bouton est enfoncé. Aucune minuterie n’est donc activée.
12
3
Page 95

EasyClean100/150 95
EasyClean100/150 © 11/14 Mettler-Toledo AG, CH-8606 Greifensee
52 500 178 Printed in Switzerland
5.4 En cas de coupure de courant
EasyClean100
Coupure de courant
En cas de coupure de courant, toutes les fonctions de l’EasyClean100 sont neutralisées,
sans impact sur la mesure. L’EasyClean100 est inactif. Ceci signifie que:
– l’électrode continue la mesure. Si le transmetteur est encore sous tension, les résultats
d
e mesure sont utilisables.
– la fonction de rinçage est neutralisée. Aucun rinçage de l’électrode n’est plus possible.
REMARQUE
Après restauration de l’alimentation électrique, le système est automatiquement remis en
l’état spécifié par le transmetteur.
EasyClean150
Coupure de courant
Les vannes de l’EasyClean sont, hors courant, dans les positions suivantes
– Vanne d’eau: fermée
– Vanne d’air: le support et/ou le capteur quittent le processus et le transmetteur passe
en mode de «MAINTIEN»
REMARQUE
Lorsque l’alimentation électrique de l’EasyClean150 est restaurée, le support revient toujours
en position de mesure.
Coupure de la
pression d’air
Lorsque la pression d’air tombe, le capteur demeure dans sa dernière position.
REMARQUE
Si le support est en fonctionnement, il peut être forcé en position de maintenance par la
contre-pression. Le transmetteur continue alors la mesure. Etant donné que l’on ne dispose
d’aucune indication sur la position du support, l’EasyClean150 ne reconnaît pas la position
du support. Une chute de la pression d’air n’a donc aucune influence sur la mesure.
Page 96

96 EasyClean100/150
© 11/14 Mettler-Toledo AG, CH-8606 Greifensee EasyClean100/150
Printed in Switzerland 52 500 178
6 Maintenance et dépannage
Pour toutes questions relatives à des dérangements ou des réparations, s’adresser au service
c
lientèle local de METTLER TOLEDO. Les adresses figurent à la fin des présentes instructions
d’utilisation.
6.1 Maintenance
L’EasyClean100/150 nécessite quelque peu d’entretien.
Pour éliminer la poussière, les saletés et les taches, on pourra essuyer les surfaces extérieures
de l’appareil au moyen d’un chiffon doux mouillé d’eau. Si nécessaire, on pourra également
utiliser un détergent doux.
ATTENTION
Ne jamais nettoyer le boîtier au moyen de solvants contenant de l’acétone.
En ce qui concerne le reste du nettoyage (par exemple soufflage de la carrosserie à l’air
comprimé, on pourra utiliser de l’air comprimé filtré exempt d’huile (pression < 6 bar).
ATTENTION
L’intérieur du boîtier ne peut être nettoyé avec des liquides ni avec des chiffons humides.
La tête de pulvérisation est en PVC ou en PVDF. Pour éliminer les souillures, utiliser des acides
ou des base dilués.
Page 97

EasyClean100/150 97
EasyClean100/150 © 11/14 Mettler-Toledo AG, CH-8606 Greifensee
52 500 178 Printed in Switzerland
6.2 Dépannage et maintenance
DANGER
Voir le chapitre 2 «Sécurité».
L
es travaux de maintenance ne peuvent être effectués que par un personnel spécialisé.
Avant d’ouvrir l’appareil, il est impératif de le déconnecter de sa source d’alimentation
électrique!
EasyClean 100
Problème Cause(s) possible(s) Remède
Pas de formation de bulles au
support InDip
Air comprimé non enclenché.
Pression d’air trop faible.
La vanne pneumatique ne s’ouvre pas.
Flexibles d’air mal installés (étranglés)
ou défectueux.
Tête de pulvérisation bouchée.
Activer la pression d’air.
Augmenter la pression.
Nettoyer la vanne.
Vérifier si les flexibles ne présentent
pas de fuites, de plis ou d’éventuels
étranglements.
Nettoyer la tête de pulvérisation.
Nettoyage insuffisant de l’électrode Débit d’air insuffisant.
Intervalle de rinçage trop long et/ou
temps de rinçage trop court.
Orifices bouchés à la tête de nettoyage.
Les bulles n’atteignent pas l’électrode.
Augmenter le débit ou nettoyer les
lignes et la tête de pulvérisation.
Raccourcir l’intervalle au transmetteur,
augmenter les temps de rinçage.
Démonter et nettoyer la tête de
pulvérisation.
Diminuer la distance entre la tête de
pulvérisation et la pointe de l’électrode.
Placer le support à immersion en un
endroit à moindre débit.
Augmenter la pression.
Le rinçage ne démarre pas
(mode auto et/ou manuel)
L’intervalle de rinçage du transmetteur
n’est pas reconnu par l’appareil.
La vanne ne reçoit pas d’alimentation.
Vérifier le câblage à l’aide du
schéma de câblage.
Vérifier l’alimentation électrique.
Page 98

98 EasyClean100/150
© 11/14 Mettler-Toledo AG, CH-8606 Greifensee EasyClean100/150
Printed in Switzerland 52 500 178
Le support InTrac ne se déplace pas.
Le capteur n’est pas activé ou dés activé
Pression d’air non enclenchée.
Pression d’air trop faible.
La vanne pneumatique ne s’ouvre pas.
Flexibles d’air mal installés ou
défectueux.
Activer la pression d’air.
Augmenter la pression (voir les
s
pécifications).
Nettoyer la vanne.
Vérifier si les flexibles ne présentent
pas de fuites, de plis ou d’éventuels
étranglements.
Le support InTrac se désactive de
lui-même
Pression de l’air comprimé < pression
de processus.
Chute de pression subite.
Augmenter la pression d’air (voir les
spécifications).
Vérifier l’étanchéité des raccords et
des flexibles.
Rinçage insuffisant de l’électrode Débit d’eau insuffisant.
intervalle de rinçage trop longue.
Temps de rinçage trop courts.
Chambre de rinçage encrassée.
Augmenter le débit.
Raccourcir l’intervalle au transmetteur.
Augmenter les temps de rinçage.
Démonter et nettoyer le support.
La DEL ne s’allume pas. DEL défectueuse / fonctionnement
normal de l’appareil.
Aucun effet sur la fonctionnalité.
Le transmetteur ne passe pas en
mode de «HOLD»
Relais de maintien défectueux.
Branchements détachés ou incorrects
au transmetteur.
Faire appel à un spécialiste.
Vérifier les branchements et les
réinstaller si nécessaire.
Impossible d’activer le rinçage Le support est en position de mesure.
Touche de rinçage défectueuse.
Vanne d’eau défectueuse.
Pas de débit d’eau.
Impossible de rincer en position de
mesure.
Vérifier le câble. Contactez votre
vendeur.
Nettoyer la vanne d’eau. Remplacer
si nécessaire.
Vérifier l’alimentation de
l’EasyClean150.
Le rinçage ne démarre pas
(mode auto et/ou manuel)
L’intervalle de rinçage du transmetteur
n’est pas reconnu par l’appareil.
La vanne ne reçoit pas d’alimentation.
Vérifier le câblage à l’aide du
schéma de câblage.
Vérifier l’alimentation électrique.
EasyClean 150
Problème Cause(s) possible(s) Remède
Page 99

EasyClean100/150 99
EasyClean100/150 © 11/14 Mettler-Toledo AG, CH-8606 Greifensee
52 500 178 Printed in Switzerland
7 Mise hors service, entreposage, rejet
D
ANGER
Voir le chapitre 2 «Sécurité».
La mise hors service ne peut être entreprise que par un personnel adéquatement formé
ou par des spécialistes.
7.1 Mise hors service
Procédure
1. Couper les alimentations locales en électricité, air comprimé et eau.
2. Déconnecter l’appareil du secteur.
3. Déconnecter les lignes de signalisation installées.
4. Déconnecter les lignes d’air comprimé.
5. Démonter l’EasyClean de sa fixation.
6. Rincer les flexibles et les vannes à l’eau claire.
7. Nettoyer l’appareil au moyen d’un chiffon humide.
8. Laisser sécher l’appareil.
7.2 Entreposage
Entreposer l’EasyClean en un endroit sec, selon les indications du chapitre 1.3.
7.3 Rejet
Le rejet est à assurer par l’utilisateur conformément aux prescriptions locales en vigueur. L’utilisateur confiera l’appareil à une entreprise de collecte autorisée privée ou publique, ou se chargera lui-même du rejet conformément aux prescriptions.
Les déchets seront à recycler ou à rejeter sans danger pour l’hygiène publique et sans utilisation
de méthodes ou de procédés susceptibles de nuire à l’environnement.
Directives CE 75/442/EWG
91/156/EWG
Tri Le tri est effectué après décomposition de l’appareil en groupes de déchets selon la classifica -
tion de l’actuel Catalogue Européen des Déchets (CED). Ce catalogue couvre tous les déchets,
qu’ils soient destinés au rejet ou au recyclage.
L’emballage contient les matières suivantes:
– carton
– mousse synthétique.
L’appareil contient les matières suivantes:
– acier
– matériel électronique (câbles, composants)
– différents composants selon la désignation imprimée
– la tête de pulvérisation est en PVC ou PVDF (selon la version commandée).
Page 100

100 EasyClean100/150
© 11/14 Mettler-Toledo AG, CH-8606 Greifensee EasyClean100/150
Printed in Switzerland 52 500 178
8 Pièces de rechange et accessoires
Prière de compléter les indications suivantes pour les commandes de pièces de rechange:
–
numéro d’article de l’appareil
– numéro de série de l’appareil
– numéro de commande de la liste de pièces de rechange ci-après
–
nombre de pièces souhaité.
Les adresses du constructeur et du service clientèle figure à la fin de ce manuel.
REMARQUE
Les pièces de rechange doivent être conformes aux exigences techniques du constructeur
de l’appareil! Utiliser exclusivement des pièces d’origine.
8.1 Liste des pièces de rechange et accessoires pour EasyClean100
 Loading...