

Page 1
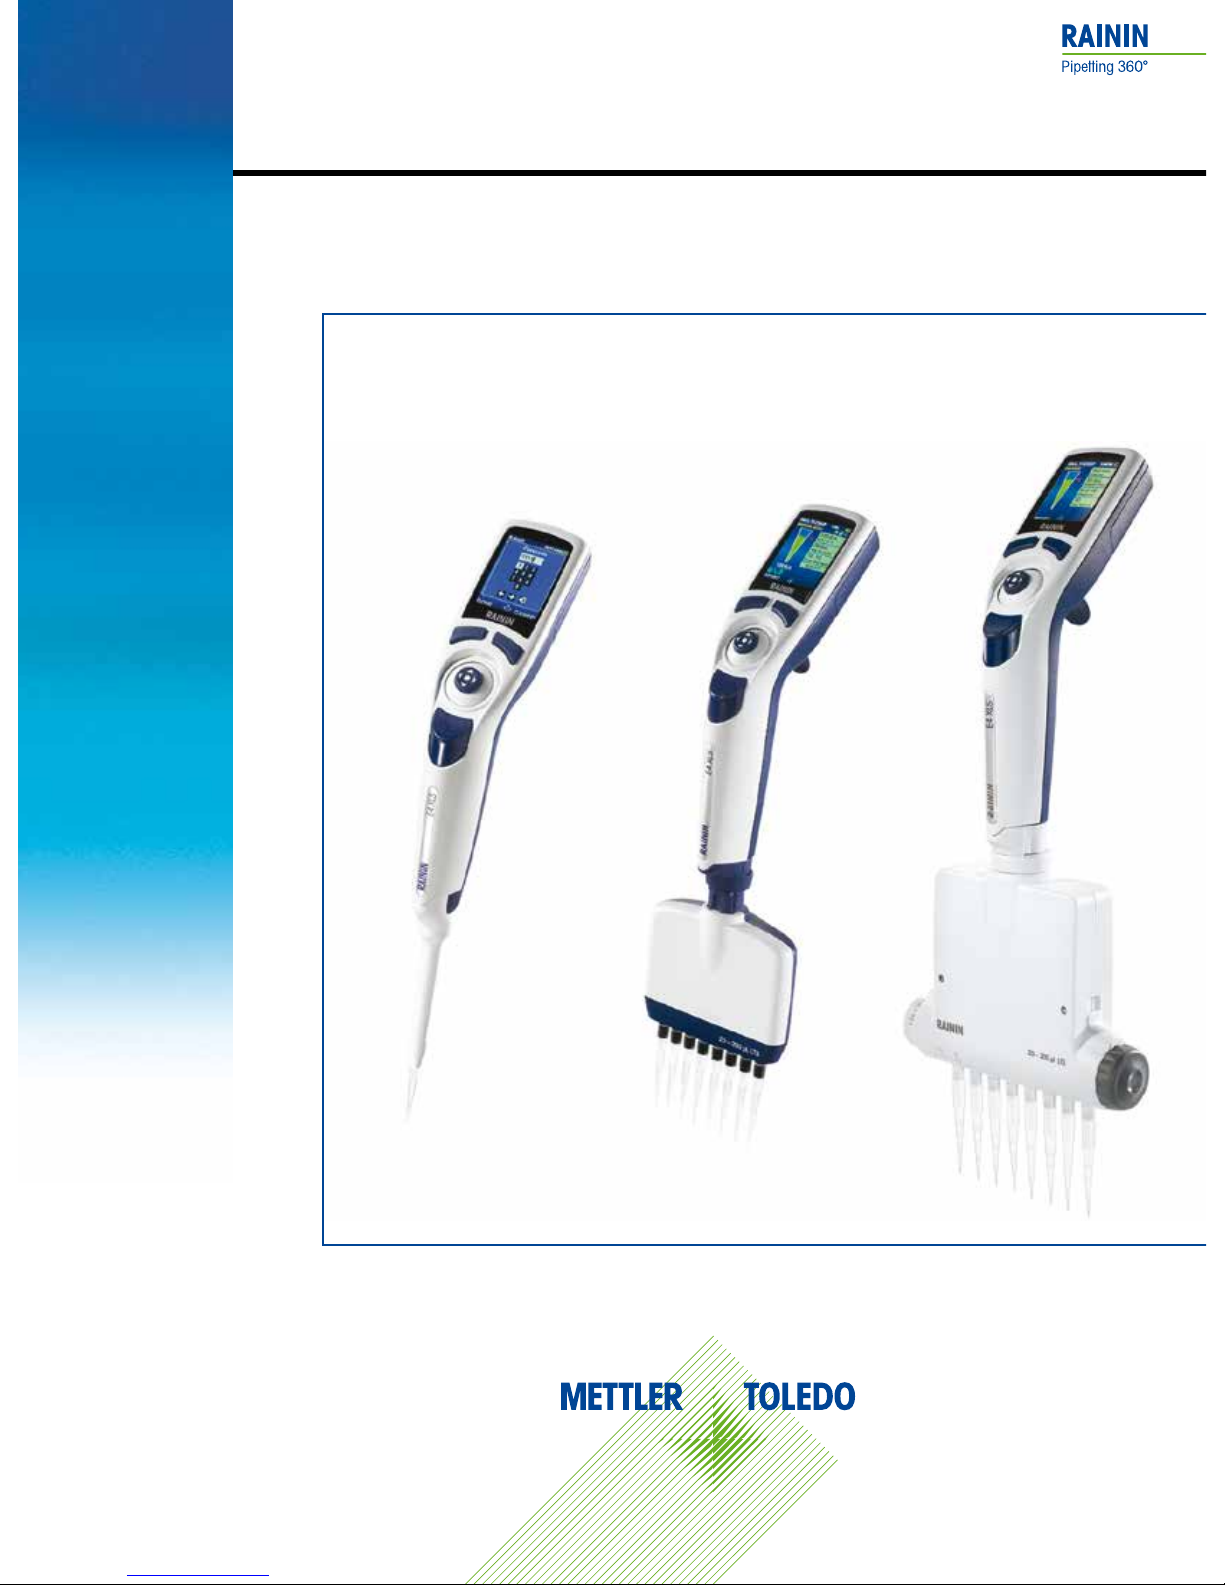
E4 XLS+ Electronic Pipettes
Advanced Electronic Pipettes with RFID
Operating Instructions
Single-channel Multichannel Adjustable Spacer
Page 2

2
• Single channel models with LTS or with universal-fit shafts
• Multichannel models with LTS
• Adjustable spacer multichannel models with LTS
• All models RFID enabled
E4™ XLS™ + Electronic Pipettes
Contents of Box
- E4 XLS+ Electronic Pipette
- Micro-SD card installed in pipette
- Battery
- Quick Reference Guide
- Sample Tips
- Wall Power Supply
- Conformance Certificate and Warranty Card
If any item is missing please call 800-472-4646 in the
US, or contact your local METTLER TOLEDO office or
distributor.
Safety Notice:
If this product is used other than as described in this
manual, its safety protection may be impaired.
Rainin, Pipetting 360°, E4, XLS, XLS+, LTS, LiteTouch, Hang-Ups are trademarks of Mettler-Toledo Rainin, LLC.
LabX and Pipet te-Scan are trademarks of Mettler-Toledo International.
No part of this manual may be copied without the express written permission of Mettler-Toledo Rainin, LLC.
Page 3

3
Contents
1 E4 XLS+ Single Channel Pipettes
1.1 Introduction ............................................................................................................................... 4
1.2 Pipette Overview ........................................................................................................................4
1.3 Getting Started ........................................................................................................................... 6
1.4 Menus and Modes ................................................................................................................... 11
1.5 Options and Settings ................................................................................................................ 12
1.6 Using the Pipette ...................................................................................................................... 15
1.6.1 Pipetting Guidelines .......................................................................................................... 15
1.6.2 Tip Selection and Mounting ................................................................................................ 15
1.6.3 Tip Immersion Depth ......................................................................................................... 16
1.6.4 Sleep Mode and Power Shutdown ...................................................................................... 16
1.6 .5 H e lp ................................................................................................................................ 17
1.6.6 Filter ................................................................................................................................ 17
1.7 Volume Ranges and Increments ................................................................................................. 18
1.8 Sound Alerts ............................................................................................................................ 18
1.9 Setup Mode ............................................................................................................................. 19
1.10 Admin Mode ............................................................................................................................ 24
1.11 Operational Modes ................................................................................................................... 28
1.12 LevelIIMenu ...........................................................................................................................38
1.13 Mode Presets ........................................................................................................................... 46
1.14 Service Mode ........................................................................................................................... 49
1.15 Battery Charging ...................................................................................................................... 51
1.16 Replacing the Battery ............................................................................................................... 52
1.17 S t o r a ge ................................................................................................................................... 53
1.18 Tip Ejector Arm Removal ...........................................................................................................53
1.19 Care and Maintenance .............................................................................................................. 54
1.20 Autoclaving ............................................................................................................................. 55
1.21 Upgrading your Liquid End to XLS+ ............................................................................................ 55
1.22 Troubleshooting ....................................................................................................................... 56
1.23 Micro-SD Card Management and Firmware Upgrades................................................................... 57
1.24 Service, Calibration and Repair .................................................................................................. 58
1.25 Replacement Parts ................................................................................................................... 58
2 RFID (Radio Frequency Identification Device)
2.1 Description and Operation .........................................................................................................60
3 E4 XLS+ Multichannel Pipettes
3.1 Description and Operation .........................................................................................................63
4 E4 XLS+ Multichannel Pipette with Adjustable Spacing
4.1 Description and Operation .........................................................................................................66
5 Appendices
5.1 Speed Table .............................................................................................................................68
5.2 Glossary of Terms .................................................................................................................... 68
5.3 Memory, Power and Settings Management ................................................................................. 71
Specifications....................................................................................................................................... 72
EC Declaration of Conformity .......................................................................................... Inside back cover
Page 4
4
E4 XLS+ Single Channel Pipettes
1 E4 XLS+ Single Channel Pipettes
1.1 Introduction
Rainin’s E4 XLS+ is a revolutionary electronic pipette
fully laden with features and with a new graphical user
interface that is extremely straightforward and intuitive
in operation. The joystick control provides an easy to
understand logic for setting operating modes and for aspiration and dispensing a variety of liquids. The pipette
is designed for maximum comfort.
You can store your favorite protocols, configure the
pipette set-up to your needs, and control access to pipette settings via passcode protection.
In models with the patented LTS
™
LiteTouch™ Tip Ejection System, tip ejection forces are reduced by up to
85% in the single channel LTS models, and consistent
sample pickup is easily attained across all channels
in multichannel models, as well as tip ejection force
reduction.
E4 XLS is available in single, multichannel and adjustable spacer versions.
All user settings and service settings are stored on nonvolatile memory and are protected even if the pipette is
reset or in the unlikely case of a battery failure.
E4’s built-in Service GLP section help you track the
pipette’s service records and intervals. E4 XLS models
also contain an RFID tag (radio-frequency identification) for facilitating calibration management for all your
pipette assets.
This manual describes features introduced with the
XLS+ model, firmware 1.4.
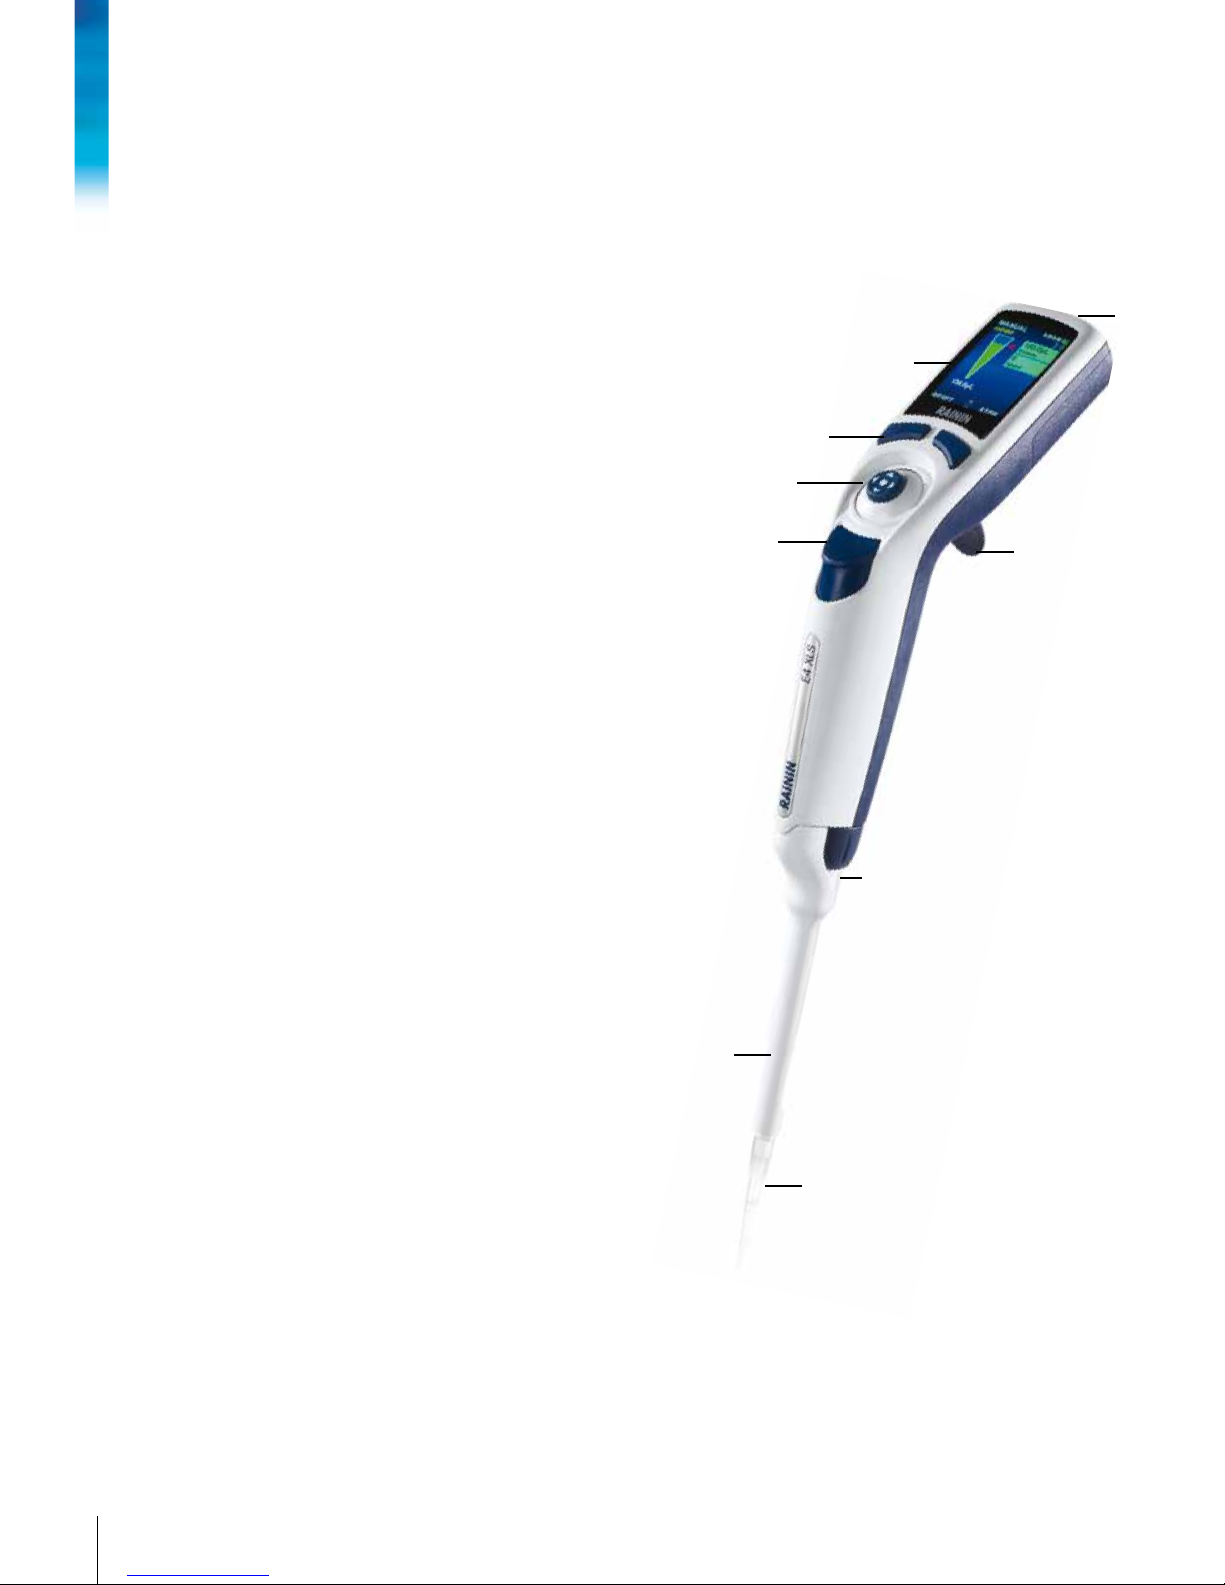
1.2 Pipette Overview
Before using the pipette for the first time, please review
the instrument components, user interface and pipette
controls as described on the next few pages.
1. USB / Charger Port
2. Display
3. Soft Keys
4. Finger Hook
- RFID Tag
- Serial No
5. Joystick
(also called
Thumbstick)
6. Tip Ejector Button
7. Shaft
8. Tip Ejector Arm
9. Disposable Tip
Figure 1: E4 XLS SIngle-channel Pipette
1
2
3
4
5
6
7
8
9
Page 5
5
Display
The high performance electronic color display is the user interface for E4 XLS+. Screen navigation, pipette operation, settings and options selections are performed using the soft keys and joystick controls. Common screen
information and the available functionality in menu and mode screens are shown in Figure 2.
1. Current menu or mode
2. Menu level, current operation or page number
3. Time
4. Battery charge indicator
5. System icon display
6. Carousel of modes
7. MenuLevelIandLevelIIaccessicon
8. Soft key functions
9. Joystick navigation icon
10. Tip Volume Indicator
Navigation
Navigation is done using the soft keys and the joystick control. The functions of the soft keys and joystick control
change according to the menu or mode displayed. In this manual we use the convention of showing the image
of the control to denote the action of selecting that control. As examples, the key means move the joystick to
the right, OPTIONS means “Select the OPTIONS soft key”.
-
or to view and select menu items
-
, or toentertheselectedBasicModeorLevelIIMenu
Soft Key Functions
There are two soft keys below the display. Left and right soft key functions
change according to the current menu or mode screen. Functions are
shown in the display above each soft key, and the available joystick
controls are highlighted in the navigation icon. In the example in Fig. 3
there is a function shown for the left soft key (RESET) but not for the right one.
Left soft key items that can be displayed:
- MAIN: Displays the Main Menu for the menu level selected
- PREV: Returns to the previously-used mode, allows toggling
between modes
- DONE: Exits Settings and Options screens after activity is done
- RESET: Empties tip and resets operation
- RETURN: Exits a Help screen and returns to the previous screen
- CONT: Exits notification messages and allows the current
operation to continue
Right soft key items that can be displayed:
- OPTIONS: Available mode options
- CANCEL: Cancels and exits the current action without saving changes
Figure2:DisplayComponents:LevelIMenu(left),
Basic Mode (right)
1
13 3
8 88 89 9
4 4
2
7 6
5
2
10
Figure 3: E4 XLS Controls
Page 6
6
E4 XLS+ Single Channel Pipettes
- HELP: Displays mode and menu information and operating instructions
- LOAD: Load a Preset
- SELECT: Select a Preset or Protocol
- SAVE: Save a Preset or Protocol
- DELETE: Delete a Preset or Protocol
Joystick (Thumbstick) Controls
Rainin recommends that users practice menu and mode screen navigation in order to familiarize themselves
with the joystick’s ease of use and sensitivity in control.
Press and click the center button to:
- Aspirate and dispense
- Access menu items
- Edit settings or options
- Choose and save selections
Note: The circle icon (
) represents a center-press control in this manual.
Move the joystick control left or right to:
- Navigate between menu items and pages
- Access Settings screens
- Make coarse setting value adjustments
Note: Left (
) and right ( ) arrows represent these joystick controls in this manual.
Move the joystick control up or down to:
- Aspirate and dispense
- Navigate between settings and options
- Make fine setting value adjustments
Note: Up (
) and down ( ) arrows represent these joystick controls in this manual.
1.3 Getting Started
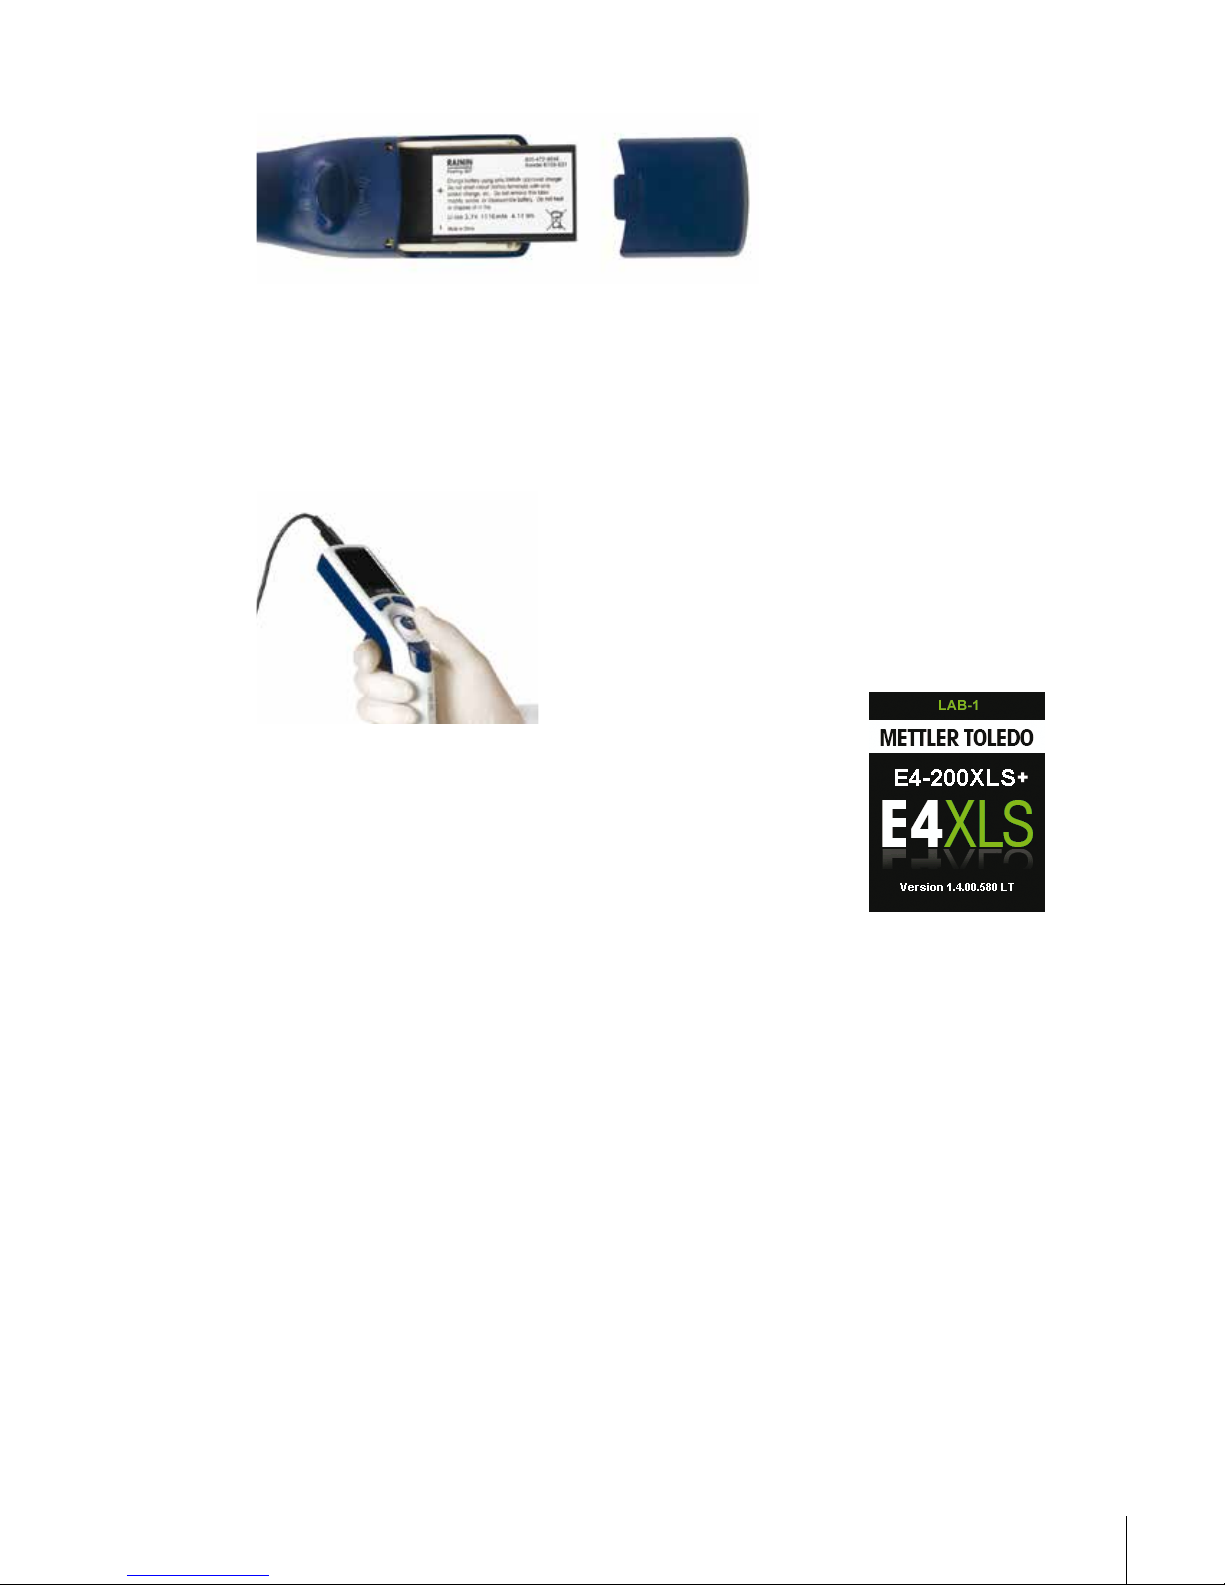
Battery
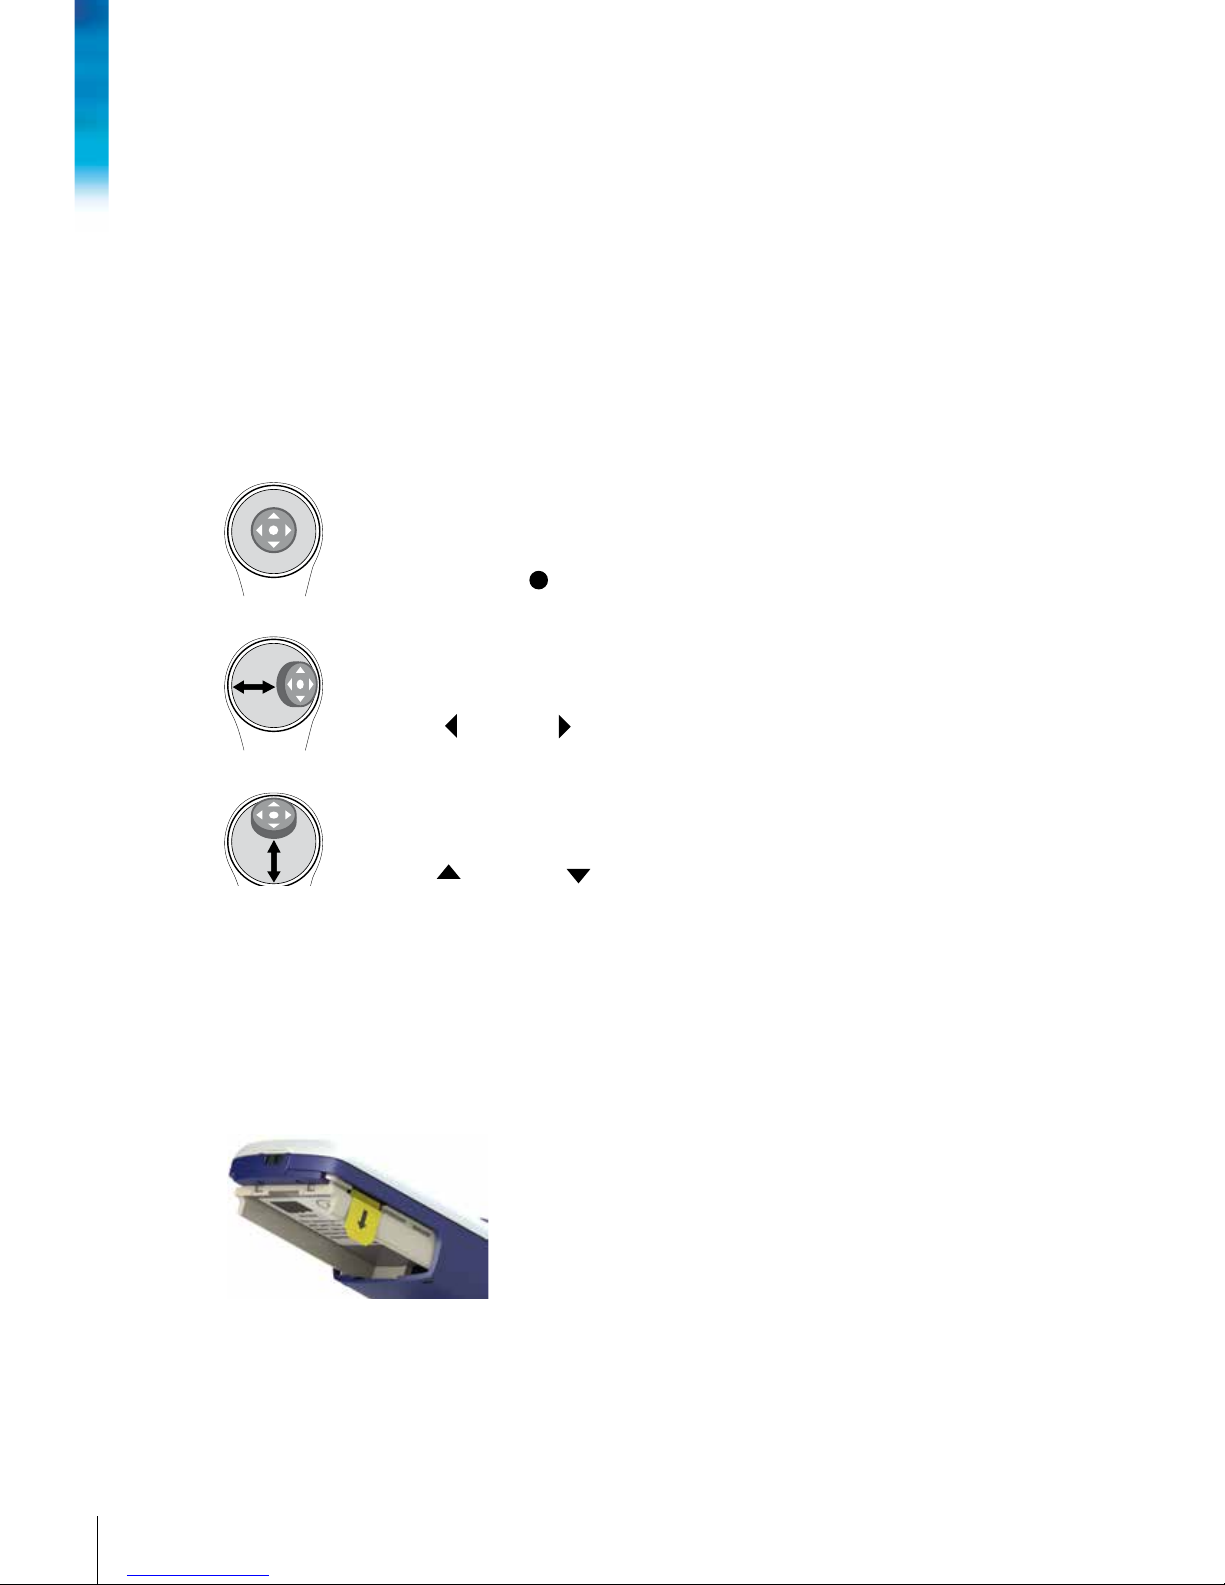
The pipette is shipped without the main battery installed, and with the back-up coin cell battery insulated so that
it will be fully-charged when you need it. To get started, open the battery cover on the back of the pipette head
and remove the pull-tab shown in Figure 4 - the pull tab is used to insulate the battery during shipping.
Locate the main battery and install it as shown in Figure 5, then you will see a screen advising you to set your
local time and language (the default language is English). Setting preferences is shown in section 1.9 - Setup
Mode. Make sure the label faces outward and the battery is in the same orientation as shown in the photo. Replace the battery door.
Figure 4: Insulating pull-tab
Page 7
7
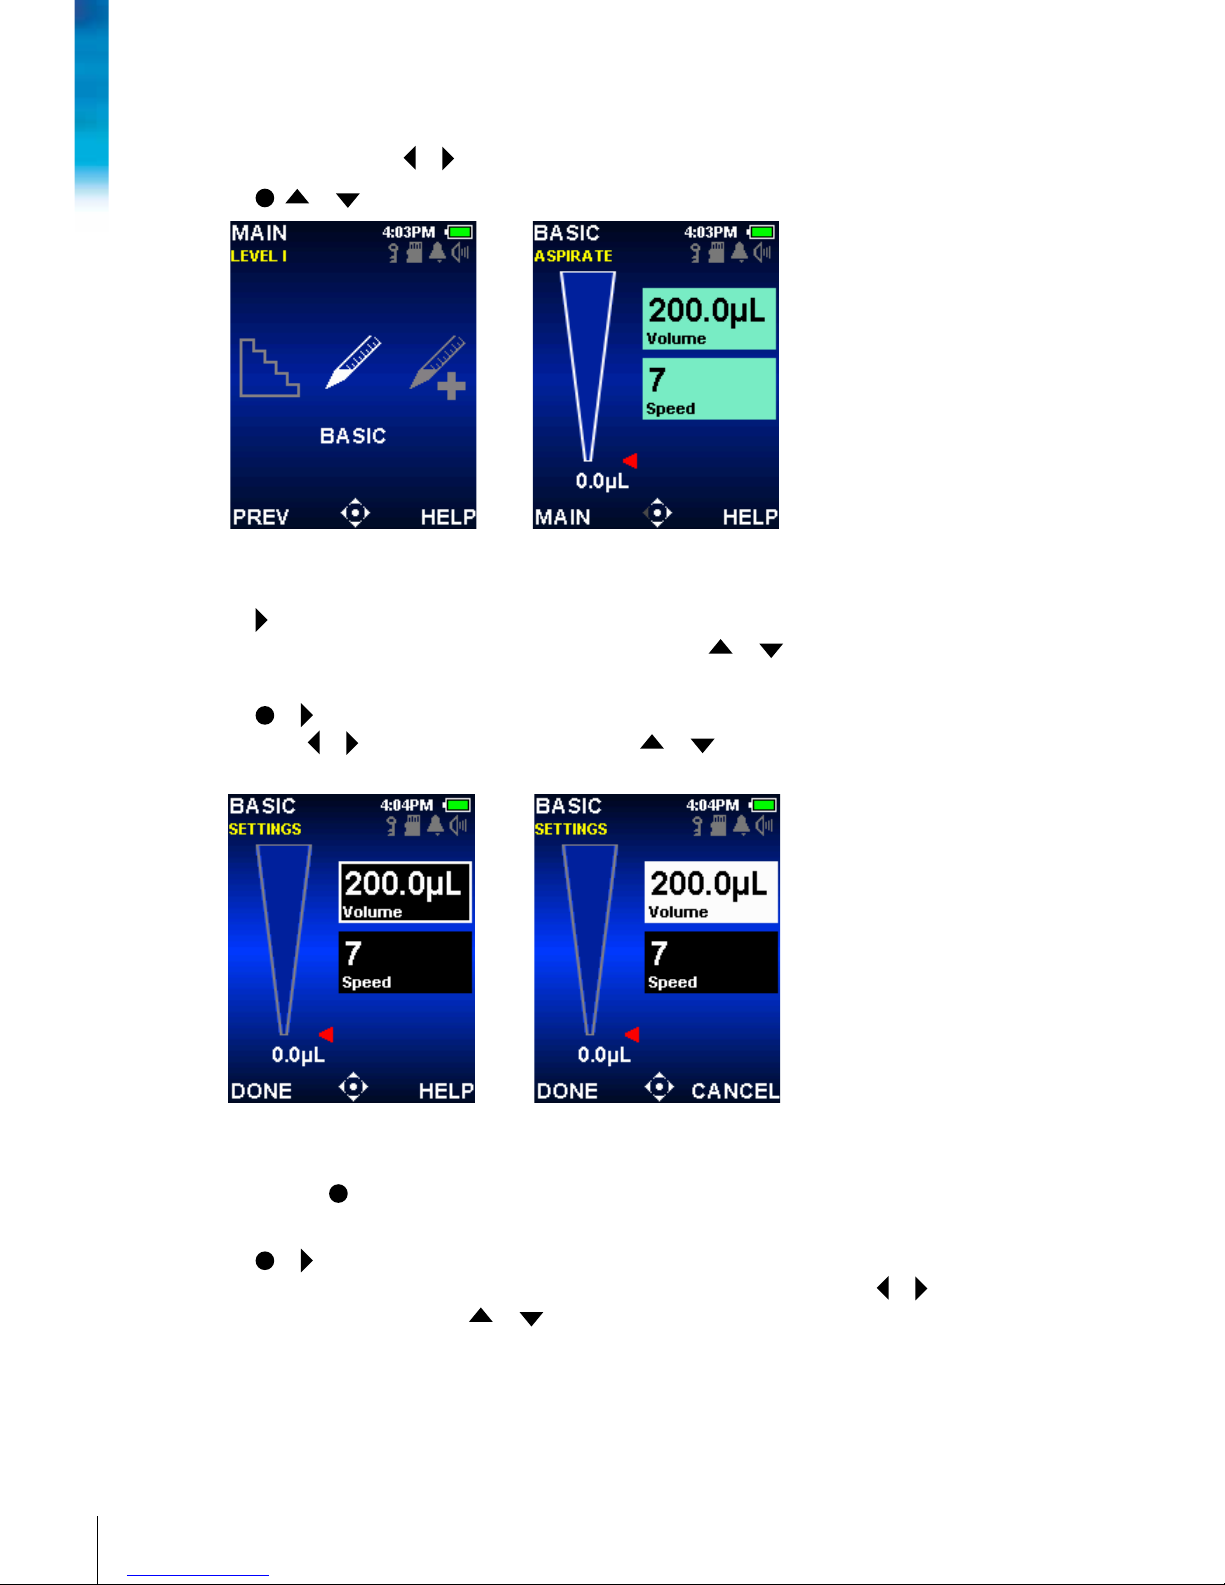
Charge the battery for at least 15 minutes before using the pipette for the first time. Pipettes can be charged
using the Wall Power Supply included with the pipette, the optional Rapid Charge Stand or with a computer using the optional USB cable. If the Wall Power Supply is used, E4 XLS+ can be operated while it is charging, as
shown in Figure 6. (Rainin does not recommend operating the E4 XLS+ when the pipette is connected to a computer for charging. Please refer to “Battery Charging” on page 44 for more information on charging the battery as
well as installing and using the Wall Power Supply, Rapid Charge Stand and the optional USB cable.
Power Up
Press one of the soft keys to turn the pipette on. It will initialize and
showthestart-upscreenmomentarilybeforedisplayingtheLevelI
Menu. See Figure 7. Note that your start-up screen may have different
text than this image.
Basic Operation — Using Basic Mode
Rainin recommends learning basic pipetting operations as well as the selection and editing of settings in Basic
Mode first before moving on to advanced operational modes. Rainin also recommends that users practice aspiration and dispense with water first prior to working with valuable samples.
At any time during operation:
- RESET empties the tip and resets the pipette operation to ASPIRATE.
- MAIN displays the menu the mode was accessed from.
- HELP provides general information for the highlighted setting. Operating instructions can be found in the Help
for the operating screen.
Options and Settings
- Options: None
- Settings: Single Volume, Single Speed
- Blowout: Automatic and Manual
Figure 5: Installing the main battery
Figure 6: Using E4XLS while connected by the power cord
Figure 7: Start-up Screen
Page 8
8
E4 XLS+ Single Channel Pipettes
Setup — Select Mode and Settings
1. In the Main Menu, or to highlight BASIC (Figure 8 left).
2.
, or to enter Basic Mode (Figure 8 right).
Figure8:BasicModeHighlightedinLevelIMenu(left),BasicModeOperatingScreen(right).
3. to enter the Settings screen. The first setting box in the screen, Volume, will be highlighted. This is indicated
by a white border around the settings box (Figure 9 left). or to navigate between and highlight other
settings.
4.
or to edit the volume setting. The settings box will turn white to indicate it is in edit mode (Figure 9
right). or for coarse volume adjustment and or for fine volume adjustment. Hold the joystick in
place to quickly scroll through values.
Figure 9: Basic Mode: Volume Highlighted (left), Volume in Edit Mode (right).
5. DONE or to save the volume setting. CANCEL to exit without saving changes. The next setting, speed, will
be highlighted (Figure 10 left).
6.
or to edit the Speed Setting. The settings box will turn white to indicate it is in edit mode (Figure 10
right). In Basic Mode, the same speed is used for both aspirate and dispense. or for coarse speed adjustment of 1, 5 or 10 and or for fine adjustment in single digits. Hold the joystick in place to quickly
scroll through values.
Page 9
9
Figure 10: Basic Mode with Speed Highlighted (left), and Speed in Edit Mode (right).
7. DONE or to save the Speed Setting. CANCEL to exit without saving changes.
8. DONE to exit the Settings screen and return to the operating screen.
If Basic Mode is exited, all settings are retained when the mode is accessed again.
Aspiration
The mode operation will flash ASPIRATE indicating E4 XLS+ is ready to aspirate sample. The joystick controls
used for aspiration will also flash in the navigation icon (Figure 11).
Figure 11: Basic Mode Aspirate Operation.
1. Attach a new Rainin tip. Press the shaft into the tip with only enough force to make a good seal.
2. Hold the pipette vertically or within 20 degrees of vertical. Place the tip into the sample at the recommended
immersion depth – see section 1.6.3 on page 16.
3.
or to aspirate the sample. It is not necessary to hold the joystick in place, E4 XLS+ will automatically
complete the operation. The Tip Volume Indicator will mimic sample aspiration into the tip, and its red guide
arrow and active volume display will adjust accordingly.
4. Pause for approximately one second (longer for large-volume pipettes) to ensure that the full volume of
sample is drawn into the tip.
5. Withdraw the tip from the sample. If any liquid remains on the outside of the tip, touch it off carefully, taking
care not to touch the tip orifice.
Page 10
10
E4 XLS+ Single Channel Pipettes
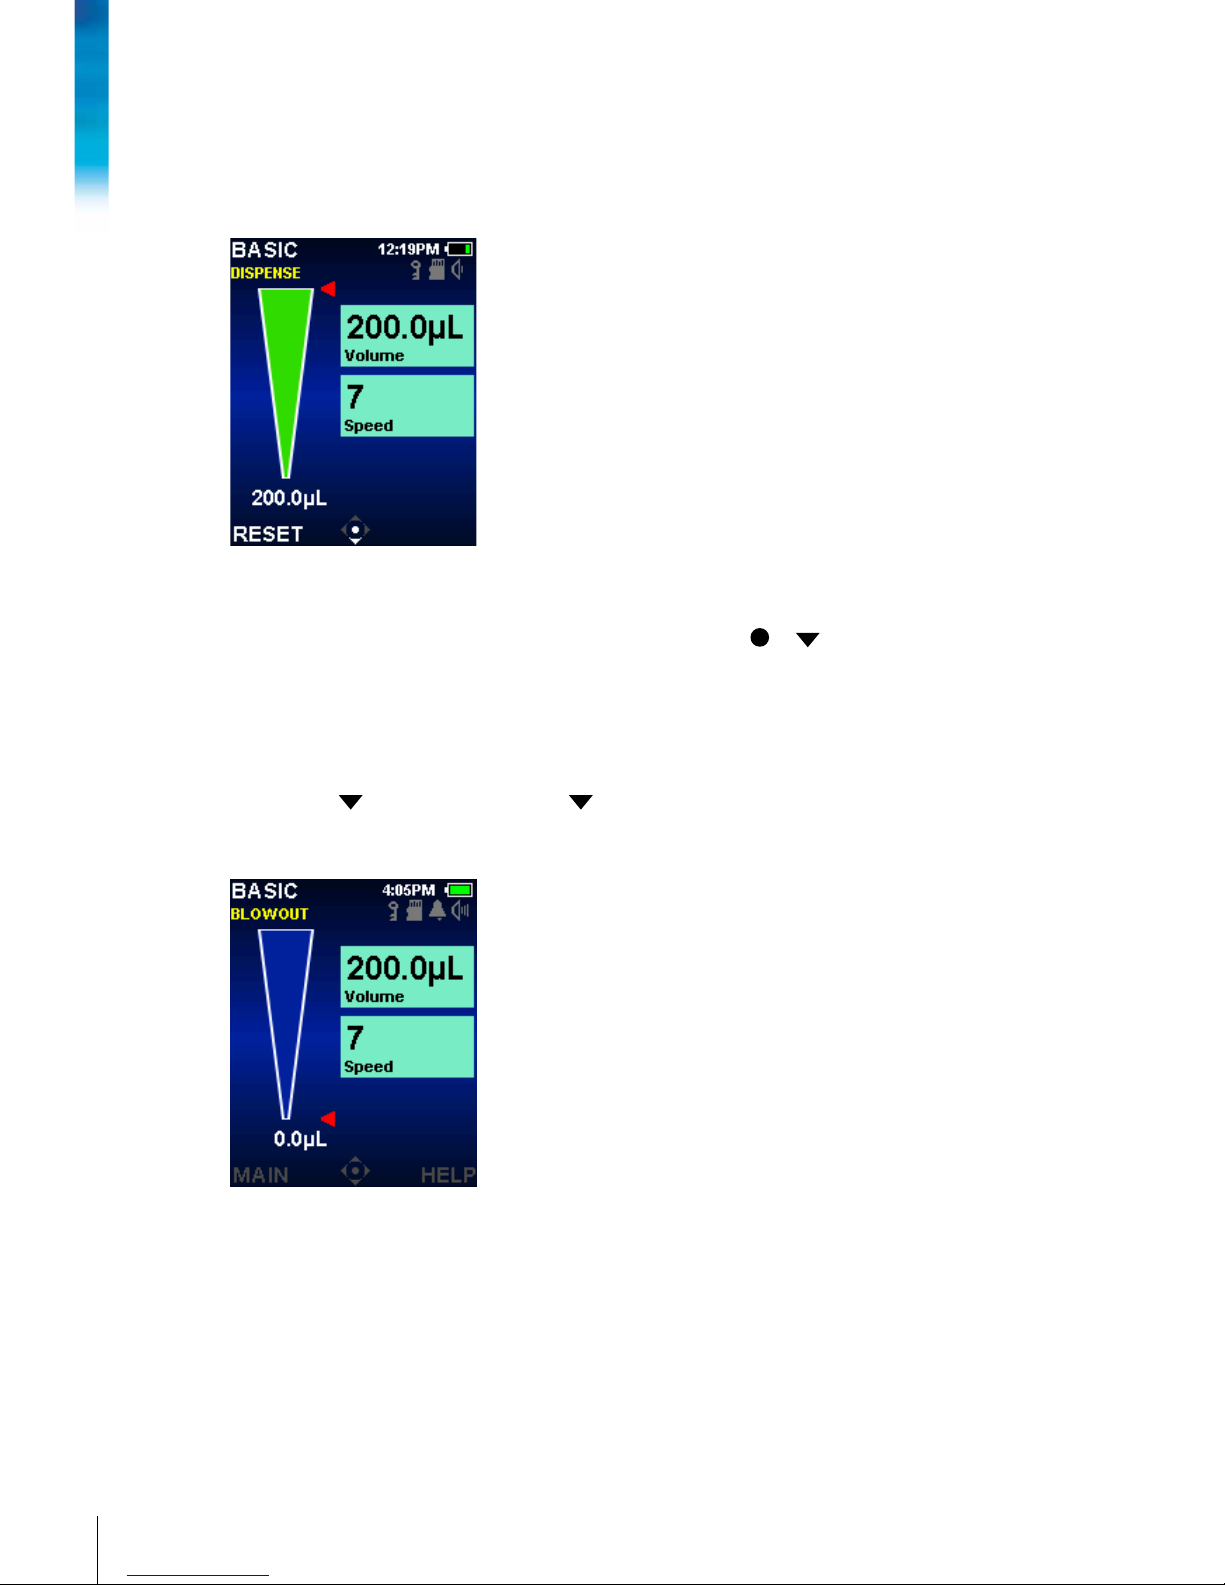
Dispense
The mode operation will now flash DISPENSE indicating E4 XLS is ready to dispense sample. The joystick controls used for dispense will also flash in the navigation icon (Figure 12).
Figure 12: Basic Mode Dispense Operation.
1. Touch the tip end against the side wall of the receiving vessel. or to dispense the sample. It is not necessary to hold the joystick in place, E4 XLS will automatically complete the operation. The Tip Volume Indicator will mimic sample dispense from the tip, and its red guide arrow and active volume display will adjust
accordingly.Wait1secondfor2–300μLvolumesand1–2secondsfor1000μLvolumesorhigher.
2. Withdraw the tip, sliding it along the wall of the vessel.
3. If needed,
or RESET for tip blowout. or RESET again as needed for more blowout(s) (Figure 13). For
viscous solutions, pause before blowout. Note that Blowout is automatic, but you can also perform blowout
manually to repeat. You can delay piston return time if desired by holding down the joystick.
Figure 13: Basic Mode Blowout Operation.
4. Press the tip ejector button lightly to discard the tip. To prevent carry-over, use a new tip for each sample.
Page 11

11
1.4 Menus and Modes
Overview
E4 utilizes two menu levels that allow user selection of pipetting modes and provide access to general pipette
information and settings:
- LevelI Menu: Allows selection of common operational modes and
accesstotheLevelIIMenu.SeeFigure14.ThedefaultLevelIMenu
operational mode selections include Basic Mode, Advanced Mode,
Multi-Dispense Mode, Manual Mode and Setup Modes.
- LevelII Menu: Provides selection of additional modes, pipette and
personalization settings, service information and options, and access to Level I menu. The default selection includes Reverse, Titrate,
Dilute, Service, Admin Modes, Power Off and Remote. Purespeed
will also show on 20, 200, 1000, and 1200 µL models.
The following operational modes offer a wide variety of pipetting capabilities:
- Basic Mode: Basic pipetting operation. Selection of a single volume and one aspirate/dispense speed.
- Advanced Mode: Provides all E4 XLS advanced pipetting options such as Mix and Volume Sequencing.
- Multi-Dispense Mode: Provides multi-aliquot dispensing with user-settable automatic dispense intervals.
- Manual Mode: Provides joystick control of E4 XLS that simulates manual pipette operation. Fine control of precise volume increments allows aspiration and dispense of measured sample volumes.
- Reverse Mode: Aspirates the selected volume along with the pipette blowout volume. Recommended for
dense or volatile liquids.
- Dilute Mode: Provides in-tip dilution of multiple sample volumes.
- Titrate Mode: Performs titration through measured dispensing. Allows an initial rapid dispense followed by
precise control of the remaining titration volume.
- PureSpeed
™
Mode: Performs sample preparation utilizing Rainin PureSpeed tips. For more information see
Pure Speed User Manual on the E4 User Manual disc or www.mt.com/purespeed.
- The following modes provide preference, configuration and access options for the pipette.
- Setup Mode: Provides basic personalization of pipette settings including display brightness, sleep timeout,
volume level, time/date setup, language, and alarms.
- Admin Mode: Provides configuration and access control to pipette settings. Admin allows you to control use of
your pipette by hiding, locking, and unlocking pipetting modes, date, time, alarms, and settings, with optional
passcode protection. Save backups of the entire configuration of the pipette after modifying settings in other
modes.
- Service Mode: Provides important instrument information including last service date, service log, serial num-
ber, manufacturing date, model number, and more. Information is protected for GLP compliance.
Figure 14: E4 XLS Controls
Page 12

12
E4 XLS+ Single Channel Pipettes
1.5 Options and Settings
The list of common options and settings is provided in the table below. A detailed description of these and other
mode-specific options follows.
Fixed
Volume
Volume
Sequencing
Single
Speed
Multi-
Speed
Mix Blowout
Control
Cycle
Counter
Auto
Pace
Mode
Presets
Basic
Advanced
Multi-dispense
Manual *
Reverse
Dilute
Titrate
*Speed in Manual Mode is variable.
Options
If pipetting options are available in an operational mode, OPTIONS will be shown in the operating screen.
Options can be selected as follows:
1. OPTIONS to access the Options screen (Figure 15 left).
2.
or to navigate between and highlight an option. When more than one page of options is available,
Options 1 of X is displayed in the upper left corner of the screen. To navigate between pages, or at
the first or last option on a page. (Figure 15 center and right).
3.
or to turn an option on or off.
4. DONE or
to save changes and return to the operating screen. When an option is on, an associated option
icon will be displayed in the lower left corner of operating screen and/or an additional settings box will be
shown.
If the operational mode is exited, all options are retained when the mode is accessed again.
Figure 15: Options in Advanced Mode: OPTIONS Soft Key in Operating Screen (left), Options 1 of 2 (center) and Options 2 of 2 (right)
Page 13

13
Volume Options
Fixed Volume. Provides the option of selecting up to 14 preset volumes from a table in the Volume Setting box.
When this option is turned on, the Fixed Volume Setting box will display in the operating screen. This option is
useful for routine work where standard volumes are used repetitively. Note repeat pressing will toggle through
the values.
Volume Sequencing. Provides the option of selecting up to 16 preset volumes in series from a table
in the Volume Setting box. This option is useful for preparative protocols that require multiple samples at various volumes. When this option is turned on, the Volume Sequencing icon and Setting box
will display in the operating screen.
Note: Only one volume option can be on at a time. For example, if Fixed Volume is turned on when Volume Sequencing is already on, E4 XLS+ will automatically turn Volume Sequencing off. If both options are off, the mode
defaults to Single Volume.
Mix Option
Provides in-tip mixing of dispensed samples. When this option is turned on, the Mix icon and Mix
Setting box will display in the operating screen. Users can specify mix volume and either manual
mixing or up to 99 automatic mix cycles.
Blowout Option
Allows adjustment of blowout function in specific modes. When this option is off, the Blowout Off
icon will display in the operating screen. Users can still perform manual blowout(s) when the Blowout option is off.
Cycle Counter Option
Counts each pipetting cycle which consists of one aspirate and one dispense and blowout operation. When this option is on, a Cycle Count Setting box is displayed in the operating screen.
Auto Pace Option
Provides automatic dispensing of aliquots at user-settable time intervals between 0.1 and 30 seconds. Available in Multi-dispense Mode only. When this option is on, the Auto Pace icon is displayed
in the operating screen.
Mode Preset Option
Mode Preset allows for saving and rapid recall of favorite protocols.
Allows saving entire mode setting to a Preset file. Preset files can be named, edited, and deleted.
Saved Mode Presets can be viewed and selected in the Settings screen. Mode Presets are specific to
the Mode in which they were created.
Page 14

14
E4 XLS+ Single Channel Pipettes
Settings
The pipette settings available in each operational mode are displayed in the boxes along the right side of the
operating screen. Volume and speed settings are common to all operating modes. Cycle count, mix settings and
Mode Presets are displayed if the corresponding option is available and has been turned on in the operational
mode.
In general, settings can be selected and changed as follows:
1.
to access the Settings screen.
2.
or to navigate between and highlight a setting.
3.
or to edit.
4.
or for coarse value adjustment and or for fine value adjustment. Hold the joystick in place to
quickly scroll through values.
Some option-specific settings may require additional steps. If the operational mode is exited, all settings are retained when the mode is accessed again.
Volume Settings
Allow users to set the volume of sample to be aspirated. Minimum and maximum volumes are dependent on the
E4 XLS pipette model. The type of Volume Setting displayed depends on what options are turned on or off in the
operational mode.
Single Volume. Allows one volume to be set and used for aspirate/dispense. When this setting
is active, Volume is displayed in the Volume Setting box. This is the default volume setting for
all operational modes, and the only volume setting available in Basic Mode.
Fixed Volume. Allows one of 14 preset volumes to be selected from a volume table. This setting
is shown only when the Fixed Volume option is on. When this setting is active, Fixed Vol X is
displayed in the volume setting box. For example, Fixed Vol 3 indicates the volume shown is
the third volume selection in the table.
Volume Sequencing. Allows up to 16 preset volumes to be selected for use in series from a
volume table. This setting is shown only when the Volume Sequencing option is on. When this
setting is active, Vol X of X is displayed in the volume setting box. For example, Vol 2 of 4 indicates the volume shown is the second of four volumes in the series selected in the table. The
volume value and number will increment as each cycle completes.
Speed Settings
Allow users to set aspirate, dispense and mix speeds from 1 (slow) to 10 (fast). High speed settings are best for
aqueous samples and lower speed settings are best for viscous, foaming, delicate or shear-sensitive samples.
The maximum speed settings for large-volume E4 XLS Basic Models are limited to prevent ‘fountaining’, or air
intake, during aspiration. See Appendix A for a complete speed table.
Single Speed. Allows one speed value to be set which is used for both aspirate and dispense.
This is the only speed setting available in Basic Mode.
Page 15

15
Multi-Speed. Allows aspirate, dispense and mix speed settings to be set individually. Displays
aspirate and dispense speeds (Asp/Dsp Spd) initially. During operation, the set value and current operation (Asp Speed, Dsp Speed or Mix Speed) will be shown in the settings box as
each action is carried out.
Cycle Count
Cycle is complete aspiration and dispense followed by blowout. Displays the operational mode’s
current cycle count, which increments after each cycle completes. Cycle count can be set to any
value between 0 and 99,999. This setting is shown only when the Cycle Counter option is on.
Mix
Allows users to perform in-tip mixing after dispense. A mix volume, up to 99 automatic mix
cycles or manual mixing can be selected. This setting is shown only when the Mix option is on.
Minimum and maximum volumes are dependent on the size of the E4 XLS pipette. When automatic mix cycles are used, the set volume and number of mix cycles (Mix Cyc X) are shown
in the settings box. The cycle number will increment as each mix cycle completes until the set
number of cycles is reached. When manual mixing is used, the set volume and Mix Manual are
shown in the settings box.
Preset Selector
Allows user to select a Mode Preset file, if one or more has been saved. The display shows
how many presets are available and which one is currently loaded (if any). Activating this
setting box allows users to scroll through and select any available preset with the joystick.
1.6 Using the Pipette
1.6.1 Pipetting Guidelines
E4 XLS+ pipettes incorporate several features to enhance pipetting consistency. In addition, these guidelines
should also be followed:
• Use a consistent immersion depth
• Pipette vertically or within 20 degrees of vertical
• Pre-rinse the tip twice by aspirating and dispensing sample before actual pickup
• Do not invert or lay the pipette flat with liquid in the tip
More information on Good Pipetting Technique, including a Lab Poster, can be found on the MT website:
www.mt.com/rainin
1.6.2 Tip Selection and Mounting
Rainin pipettes and tips are designed together as a pipetting system. E4 XLS+ pipettes are calibrated with Rainin
tips. Performance to published specifications can only be guaranteed when Rainin tips are used.
To mount a tip, press the E4 XLS shaft into the end of the tip with light force. With both LTS and traditional versions, the tip will seal properly on the shaft with minimal force — do not use more force than is required.
Page 16
16
E4 XLS+ Single Channel Pipettes
1.6.3 Tip Immersion Depth
The recommended depth for tip insertion into the sample for each model is shown below:
Nominal Volume Volume Range Immersion Depth
10μL 0.5to10μL 1–2 m m
20μL 2to20μL 2–3 mm
100μL 10to100μL 2–3 mm
200μL 20to200μL 3–6 mm
300μL 20to300μL 3–6 mm
1000μL 100to1000μL 3–6 mm
2000μL 200to2000μL 3–6 mm
5000μL 500to5000μL 6–10 m m
10 m L 1 to 10 mL 6–10 mm
20 mL 2 to 20 mL 6–10 mm
Tip immersion depth is critical. If the recommended depths are exceeded, the volume measured may be inaccurate and possibly out of specification. The tip angle is also important. The pipette should always be used in a
position within 20 degrees of vertical as shown in 16.
Figure 16: Tip Immersion Depth and Tip Angle
TIP
ANGLE
1.6.4 Sleep Mode and Power Shutdown
E4 XLS+ is equipped with display and sleep timeout features, both of which assist in conserving battery life Sleep Mode reduces power consumption by 98%. E4 XLS+ will automatically sleep after a set period.
- Display Timeout. Dims the intensity of the display after a user-specified period of inactivity. To wake E4 XLS+
from a display timeout, press either soft key or move the joystick in any direction.
Note: The soft key or joystick action taken to exit a display timeout will return the E4 XLS+ to ready mode only.
The associated soft key function or joystick command will not initiate.
- Sleep Timeout. Powers the display off and puts the unit into low power state after a user-specified period of
inactivity. To wake E4 XLS+ from a sleep timeout, press either soft key. The pipette will initialize and show the
splash screen momentarily before returning the display to the last screen accessed.
Refer to “Setup Mode“ in section 9 for information on how to change the time setting for these timeout features.
Shutdown
Besides Sleep mode, the E4 XLS+ can also shut down completely. The E4 XLS+ automatically shuts down after
16 hours of non-use. If you wish to shut it down earlier, push and hold both soft keys simultaneously. After 3
seconds, the units beeps twice and a warning screen notifies you that you are about to shut down the unit. Press
Page 17
17
CONT to shut down. Alternately, enter “POWER OFF” mode on Level II of the Main Menu. To turn on unit, press
any soft key.
1.6.5 Help
On-screen Help is available to assist users with step-by-step operation and provide detailed information for a
particular screen, menu item, setting or option.
- Menu Help. To get more information on a specific carousel menu item, highlight the item and select HELP.
- Settings and Options Help. To get more information on a specific setting or option in the current screen, highlight the item and select HELP.
Note: For all advanced operational modes, operating instructions can be found in the Help for the first setting
in the mode’s operating screen.
- General Information. In some screens, general information and/or operating instructions can be accessed
directly without having to highlight a particular item. In these screens, HELP will be an available function as
soon as the screen is accessed.
Note: In Basic Mode only, operating instructions can be found in the general help for the mode’s operating
screen.
Select RETURN to exit Help and return to the previous screen.
1.6.6 Filter
5000μL,10mL,and20mLpipettesuseafilter in the end of the shaft. This helps prevent liquid from entering
the shaft and contaminating the piston should the plunger snap up during aspiration. Using a filter is recommended when pipetting large volumes. The filter should be replaced if it gets wet.
Figure 17: Filter Orientation
The5000µLand10mLpipettesusethesamelter,asshowninthediagramabove:
5000 µL: small diameter into the shaft. 10 mL: large diameter into the shaft.
Filter part numbers are 6190-164 17001944 (pack of 100) and
6190-165 17001945 (pack of 1000).
Thelterforthe20mLmodelisacylinder.
Part numbers: 6190-221 17001951 (pack of 100),
6190-222 17001952 (pack of 500).
Page 18

18
E4 XLS+ Single Channel Pipettes
1.7 Volume Ranges and Increments
Volume ranges and increments for each model are shown in the following tables:
Single Channel E4 XLS+ Models
Volume (μL)
Adjustable
Range (μL)
Recommended
Range (μL)
Increment
(μL)
10 0.1 to 10 0.5 to 10 0.01
20 0.2 to 20 2 to 20 0.02
100 1 to 100 10 to 100 0.1
200 2 to 200 20 to 200 0.2
300 3 to 300 20 to 300 0.2
1000 10 to 1000 100 to 1000 1
2000 20 to 2000 200 to 2000 2
5000 50 to 5000 500 to 5000 5
10 m L 0.1 to 10 mL 1 to 10 mL 10
20 mL 0.2 to 20 mL 2 to 20 mL 20
Multichannel and Adjustable Spacer Models
Volume (μL)
Adjustable
Range (μL)
Recommended
Range (μL)
Increment
(μL)
10 0.1 to 10 0.5 to 10 0.01
20 0.2 to 20 2 to 20 0.02
50 0.5 to 50 5 to 50 0.05
100 1 to 100 10 t o 100 0.1
200 2 to 200 20 to 200 0.2
300 3 to 300 20 to 300 0.2
120 0 20 to 1200 100 to 1200 1
1.8 Sound Alerts
General Sound Alerts
- Aspiration complete: High-tone ding
- Dispense complete: Mid-tone ding
- Blowout complete: Low-tone ding
- Reset activated: Two high-tone beeps
- Reset complete (piston in home position): Low-tone ding
- Soft key function accessed: Short click
Page 19

19
- Menu navigation: Swoosh
- Menu item selected: Short click
- Setting or option selection: Short click
- Setting value or option edit: Short click
- Setting error (min/max setting has been reached): Buzz
- Cancel: Swoosh
- Low battery warning: Two high-tone beeps
- Service Alarm: Two high-tone beeps
Mode-Specific Sound Alerts
- Multi-Dispense Mode: A second low-tone ding will sound after the last aliquot is dispensed.
- Manual Mode: Aspirate and dispense complete alerts will sound only when the value set in the Volume Setting
is fully aspirated or dispensed.
- Titrate Mode: After Fast Dispense, the dispense complete alert will sound again only if the value set in the Volume Setting is fully dispensed.
1.9 Setup Mode
Setup Mode allows users to personalize general pipette settings. User-settable service alarms
canalsobeactivated.ThedefaultmenulevelforSetupModeisLevelI.ToaccessSetupMode,
or in the Main Menu to highlight SETUP and , or to enter.
Navigation of Setup Pages
- or to move between and highlight a setting
- To move between pages,
or at the first or last setting on a page or at any time. The current page
number is displayed in the upper left of each screen.
- HELP for a detailed description of the highlighted item
- MAIN to return to the Main Menu
Page 20
20
E4 XLS+ Single Channel Pipettes
Sound and Display Settings
Available sound, display and timeout settings are shown in Figure 18.
Figure 18: Setup Mode: Page 1 of 4
Sound Level
This is the volume setting for audible activity alerts. Volume levels between 1 and 10, or Off, can be selected.
1.
or to edit.
2.
or for coarse adjustment of Off, 5 or 10 and or for fine adjustment in single digits. or at 1
for Off. Volume level is shown on the System icon display.
3. DONE or
to save.
Display Brightness
This is the light intensity setting for the display. Values between 1 and 10 can be selected, where 1 is the dimmest and 10 is the brightest setting.
1.
or to edit.
2.
or for coarse adjustment and or for fine. The screen brightness will automatically adjust as the
setting is changed.
3. DONE or
to save.
Display Timeout
The Display Timeout will dim the display after a period of inactivity in order to conserve battery life. Time intervals between 5 and 120 seconds, or Never, can be selected.
Note: To wake E4 XLS+ from a Display Timeout, press either soft key or move the joystick in any direction.
1.
or to edit.
2.
or for coarse adjustment and or for fine.
3. DONE or
to save.
Page 21
21
Sleep Timeout
The Sleep Timeout will power the display off after a period of inactivity in order to conserve battery life. Time intervals between 1 and 60 minutes can be selected.
Note: If charging, the pipette will not enter a sleep timeout if a cycle is incomplete — for example, when a sample has been aspirated but not yet dispensed. To wake the pipette from a Sleep Timeout, press either soft key. If
not charging, the pipette will not enter a sleep timeout if a cycle is incomplete for an additional 15 minutes. The
interrupted cycle is recoverable for up to 18 hours when not charging.
1.
or to edit.
2.
or for coarse adjustment and or for fine.
3. DONE or
to save.
Time and Date Settings
Available time and date settings are shown in Figure 19.
Figure 19: Setup Mode: Page 2 of 4
Time
Shows the current time in a 24-hour, HH:MM:SS format. Time is displayed at the top right of all screens.
1.
or to edit.
2. Hour will be selected initially.
or to navigate between hour, minute and second settings.
3.
or to change value.
4. DONE or
to save.
Date
Shows the current date using the current Date Format Setting.
1.
or to edit.
2. The first field will be selected initially.
or to navigate between the other two date fields.
3.
or to change value.
4. DONE or
to save.
Page 22
22
E4 XLS+ Single Channel Pipettes
Time Display
This is the format of the on-screen time display. Select 24- or 12-hour formats or None to turn the time display off.
1.
or to edit.
2.
or to select display format.
3. DONE or
to save. The format of the time display in all screens will update immediately.
Date Format
This is the year, month and day format for the Date Setting. M/D/Y, Y/M/D, and D/M/Y formats can be selected.
1.
or to edit.
2.
or to select format.
3. DONE or
to save. The Date Setting will update automatically.
User Preference Settings
Available user preference settings are shown in Figure 20.
Figure 20: Setup Mode: Page 3 of 4
Language
Users can select one of the following languages: English, Japanese, Chinese, French, Spanish or German.
1.
or to edit.
2.
or to select language.
3. DONE or
to save. The text displayed in all screens will update to the new language immediately.
Owner
This setting identifies the pipette owner. Users can enter up to 16 characters. The owner will also display in the
splash screen.
1.
or to edit.
2. Use joystick to select characters in Texteditor popup screen. Use the bottom left icon
to select lowercase letters, numbers or symbols.
3. DONE to save.
Page 23
23
Mode Levels
TheoperationalmodesavailableforselectionineithertheLevelIorLevelIIMenu
can be customized by the user. Mode access can be moved between menu levels as
needed. Once a mode’s menu level is changed, it will be available only in the menu it
was assigned to. The order of appearance on the carousel can also be changed. Modes
that have been hidden in Admin Mode (Section 1.10) will not appear in the list. Locked
modes also show a padlock icon.
1.
or to view the mode menu table.
2.
or to highlight a mode’s level.
3.
or to edit.
4.
or toselectLevelIorLevelIIMenu.
5.
or to change order of appearance on carousel.
6. DONE or
to save.
7. DONE to exit table. Modes will immediately display as menu items in the selected menu.
Alarms
Users can set service alarms based on number of cycles executed or days in use. Alarm options and settings
are shown in Figure 21.
Figure 21: Setup Mode: Page 4 of 4
Cycle Alarm
The Cycle Alarm will notify users that pipette service is due after a set number of aspirate/dispense cycles have
been executed since last service (see Service Mode). To set a Cycle Alarm:
1.
or to turn the Cycle Alarm on.
2.
to highlight the Number of Cycles Setting.
3.
or to edit.
4.
or for coarse adjustment and or for fine adjustment. Values between 1000 and 1,000,000 can
be set.
5. DONE to save changes.
Page 24

24
E4 XLS+ Single Channel Pipettes
When the value set in the Number of Cycles Setting has been reached, the pipette will present the following:
- An on-screen Service Alarm notification
Note: To exit a notification message, select CONT
- The Service Alarm icon will appear on the System Icon display
- These notifications will continue to display until the Cycle Alarm is turned off, the Number of Cycles Setting is reset, or service is performed.
Days Alarm
The Days Alarm will notify users that pipette service is due after the pipette has been in use for a set number of
days. To set a Days Alarm:
1.
, or to turn the Days Alarm on.
2.
to highlight the Number of Days Setting.
3.
or to edit.
4.
or for coarse adjustment and or for fine adjustment. Values between 1 and 1,000 can be set.
5. DONE to save changes.
When the value set in the Number of Days Setting has been reached, E4 XLS will present the following:
- An on-screen Service Alarm notification
Note: To exit a notification message, select CONT
- The Service Alarm icon will appear on the System Icon display
These notifications will continue to display until the Days Alarm is turned off, the Number
of Days Setting is reset, or service is performed.
1.10 Admin Mode
Overview
Admin Mode allows you to control access to pipette settings and to personalize pipette configuration. This mode can be a helpful GLP/GMP/GCP compliance tool to enhance adherence to lab
protocols and to prevent unauthorized changes to pipette settings. Admin Mode can be a useful
tool for all users to simplify the pipette configuration, or as a convenient way to save personalized settings with a shared instrument.
Page 25

25
The Mode Access feature allows individual Modes to be
Unlocked (usable and modifiable), Locked (usable but
non-modifiable) or Hidden (inaccessible).
Service related settings such as Date/Time and Alarms
can be individually Locked to prevent changes to the
settings.
The administrator can Passcode-protect access to
Admin mode, thus preventing unauthorized access to
changing pipette settings.
The administrator can also save the entire Settings profile of the pipette as a User Preset, or restore the pipette
to Factory settings.
General Navigation
1. or to highlight Admin mode on Level II of the
Main menu.
2.
, or to access Admin mode.
3.
or to scroll through different features
(Figures A, B).
4.
to jump from one page to the next.
5.
or to access or turn individual features ON/OFF.
Setting Mode Access
Use this feature to simplify and control the pipette configuration by altering the accessibility of individual modes.
Mode access can be: Unlocked (usable and modifiable), Locked (usable but non-modifiable) or Hidden (inaccessible). The settings and options of a locked mode can be viewed, but not modified. Locking SetUp mode will
prevent unauthorized changes in Setup to pipette configuration. When it is locked, the Setup screens can also
still be viewed, which can be helpful if the user wants to check how certain features are set, such as alarms.
This is not possible if Setup is Hidden.
Admin mode cannot be hidden or locked (but can be passcode protected, see section below).
1.
or to CHANGE to modify mode access (Figure A).
2.
or to highlight mode(s) of interest (Figure C).
3.
or to edit access setting (Figure D).
4.
, , or to scroll through three options: Unlocked, Locked, or Hidden (D-E).
5.
or DONE when mode access is set.
6. Continue modifying other modes until finished.
7. DONE to return to Admin menu.
A Locked Mode will have a padlock icon on the operating screen in the bottom left corner. A Mode can be locked
with a Mode Preset already loaded, however other Mode Presets cannot be accessed.
A: Admin Page 1 B: Admin Page 2
C: Mode Access Select
D: Mode Access Select
E: Mode Access Select
Page 26

26
E4 XLS+ Single Channel Pipettes
Date/Time and Alarm Lock
Turn these locks on (Figure A) to prevent changes to the Date/Time and Alarm settings in Setup mode. Useful
for GLP compliance when on-board service alarms are being used, but you want to leave the rest of the pipette
configuration unlocked.
Lock All
Turn this function on (Figure A) to prevent changes to any setting outside of Admin Mode. Useful for SOP compliance and adherence when the pipette is utilized for repetitive procedures that do not vary often. Note: This will
only prevent changes to settings-any Mode that is not hidden (see Mode Access above) can still be used. A padlock icon appears on the system icon display.
Passcode Feature
Use a passcode to prevent unauthorized access to the
Admin functions.
Setting or changing a Passcode
1. or SET on page 2 of Admin mode to enter a
new passcode (Figure B). If a passcode is currently active, it will be overridden by the new one.
2. Select a passcode. Use
, , or to highlight
numbers, to select a number. Passcode must
be four digits long. DONE when complete (Figure
F).
3. CONT to confirm your passcode.
4. A new “Passcode Protection” field will appear beneath the “Set Passcode” field on page 2 of Admin
mode showing “ON” status (Figure G). A key icon
in the system icon display area also indicates that
a passcode is currently active (Figure G).
5. The active passcode is always the last one that was confirmed.
6. MAIN to exit Admin mode and enable the passcode protection.
7. Please store your passcode where you and approved colleagues
can access it!
Removing Passcode Protection from Admin Mode
1. In the “Passcode Protection” field, or ON to turn passcode OFF (Figure G).
2. CONT to confirm passcode removal.
Entering Admin Mode with Passcode Protection
After a passcode is set, re-entry into Admin mode requires entering the passcode (Figure H).
If you forget your passcode, select UNLOCK from the passcode screen and call technical support
(800-4-RAININ)in the USA or your local METTLER TOLEDO representative (Figure J).
F: Set Passcode G: Passcode ON
H: Enter Passcode J: Passcode UNLOCK
Page 27

27
User Preset Feature
A User Preset is a file that stores the entire settings
profile of the pipette, including Admin mode, with two
exceptions.
• User Presets do not include a passcode. The passcode setting is always the last active setting.
• User and Mode Presets (see Mode Presets Option
section) are stored separately on the on-board
micro-SD card. Mode Presets are therefore not linked
to any User Preset.
User Presets can be helpful tools for storing different
configurations of the pipette settings for distinct tasks.
Some tasks might require a more open configuration
(e.g. R&D) while others require a very restricted and
more controlled configuration (e.g. manufacturing processes). Saving each configuration as a User Preset
allows the user to quickly re-configure the pipette for
different purposes.
User Preset Management
If you want to save a new User Preset or edit an existing one, make sure that the current pipette setting configuration is the one desired. or ENTER on the User Preset menu (Admin mode page 2, Figure B). On the User
Presets screen you will see your list of saved Presets (Figure K).
To SAVE a new User Preset:
1. Use
and to highlight “New” (Figure K).
2. SELECT to enter a filename.
, , or to highlight characters, to select a character.
@ at the bottom left of the screen to access more symbols (Figure L).
3. SAVE or CANCEL when needed. The pipette will return to the User Preset screen.
4. BACK to return to Admin mode.
To LOAD or DELETE an existing User Preset:
1. In the Preset Select screen,
and to highlight a User Preset ( Figure M).
2. SELECT to access Preset Options screen (Figure N).
and to highlight LOAD or DELETE.
3. LOAD will immediately return pipette to the settings as they were when the Preset was saved.
4. DELETE will prompt a Delete Confirm warning message: DELETE to remove User Preset or CANCEL.
To edit an existing Mode Preset:
1. Use
and to highlight the Preset you wish to edit on the User Preset screen ( Figure M).
2. SELECT and then use
and to highlight SAVE on the Preset Options screen (Figure N).
3. SAVE opens the Filename screen, with the selected Preset name indicated.
4. SAVE again, without changing the Preset name, to edit the existing Preset. Confirm SAVE.
5. Changing the Preset name in step (4) will save your edited Preset as a new Preset without changing the
one you selected in (1).
M: User Preset Screen#2
N: Preset Option Screen
K: User Presets
L: Enter Presets
Page 28

28
E4 XLS+ Single Channel Pipettes
Factory Default Settings Reset
This feature resets the pipette back to its factory default settings. All temporary settings, including the Admin
passcode, are removed or reset, and the unit reverts to English. However, any Mode or User Presets are saved
because they are stored on the micro-SD card.
1.
or RESET on the Factory Default menu (Admin mode page 2, Figure B).
2. CONT to confirm reset.
1.11 Operational Modes
General information on editing settings and operation are described in “Basic Operation — Using Basic
Mode“onpage7.Detailedsettingsandoptionsdescriptionscanbefoundin“OptionsandSettings“on
page712.Thissectionwillprovidemode-specificinformationandoperatinginstructionsforeachoftheE4
XLS operational modes.
Basic Mode
Basic Mode provides basic laboratory pipetting needs. Users can select a single volume and
one speed that is used for both aspirate and dispense. The default menu level for Basic Mode is
LevelI.ToaccessBasicMode, or in the Main Menu to highlight BASIC and , or to
enter.
Options and Settings
- Options: None
- Settings: Single Volume, Single Speed
- Blowout: Automatic and manually repeatable
Advanced Mode
Advanced Mode provides the complete range of all E4 XLS advanced pipetting options. The defaultmenulevelforAdvancedModeisLevel1.ToaccessAdvancedMode, or in the Main
Menu to highlight ADVANCED and , or to enter.
Options and Settings
- Options: Fixed Volume, Volume Sequencing, Mix, Blowout, Cycle Counter, Mode Presets
- Settings: Single and Fixed Volume, Volume Sequencing, Multi-Speed, Mix, Cycle Count, Mode Presets
- Blowout: Automatic and manual
Options Selection
1. OPTIONS to enter the Options screen.
2.
or to navigate between and highlight options. or at the first or last option on a page to navi-
gate between pages.
3.
or to turn option on or off.
4. DONE or
to save and return to the operating screen.
Page 29

29
Mode Preset Option
For details on Mode Presets (options screen 2) see Mode Presets (section 1.13).
Editing Settings
When editing settings, hold the joystick in place to quickly scroll through values.
1.
to enter the Settings screen.
2.
or to navigate between and highlight settings.
Single Volume Settings
Volume is displayed in the Volume Setting box.
1.
or to edit.
2.
or for coarse adjustment and or for fine.
3. DONE or
to save. CANCEL to exit without saving changes.
4. DONE to exit Settings screen and return to operating screen.
Fixed Volume Settings
Fixed Vol is displayed in Volume Setting box. Option must be on for this setting to be
shown. or to view the volume table. The volume currently selected will be highlighted in the table.
1. To select a preset volume, use the joystick to highlight a volume. Only active table
cells (white text) will be available in the operating screen. DONE to set and exit table.
2. To add or remove active cells in the table, use the joystick to highlight a cell that
represents the last entry needed. END VOL to add cells up to or remove cells after the
highlighted cell.
3. To edit a preset volume, use the joystick to highlight the volume,
to edit. Both active and inactive cells can
be edited. or for coarse adjustment and or for fine. DONE or to save. Repeat as needed for
other volumes. CANCEL to exit without saving changes. DONE to exit table.
Note: If no other selection is made before exiting the table, the Volume Setting will be set to the last volume
edited.
4. DONE to exit Settings screen and return to operating screen.
Volume Sequencing Settings
Vol X of X is displayed in Volume Setting box. Option must be on for this setting to be
shown. or to view the volume table.
1. To select a series of preset volumes, use the joystick to highlight the last volume
for the series. Only active table cells (white text) will be available in the operating
screen. END VOL to set. DONE to exit table.
2. To edit a preset volume, use the joystick to highlight the volume,
to edit. Both
active and inactive cells can be edited. or for coarse adjustment and or
for fine. DONE or to save. Repeat as needed for other volumes. CANCEL to exit without saving changes.
DONE to exit table.
Page 30

30
E4 XLS+ Single Channel Pipettes
Note: If an END VOL is not set before exiting the table, the END VOL last selected will be retained.
3. DONE to exit Settings screen and return to operating screen.
Speed Settings
1. or to view individual operation speeds.
Note: The mix operation speed is shown only when the Mix option is on.
2.
or to highlight setting, or to edit.
3.
or for coarse speed adjustment of 1, 5 or 10 and or for fine adjustment in
single digits.
4. DONE or
to save. CANCEL to exit without saving changes. DONE to exit table.
5. DONE to exit Settings screen and return to operating screen.
Mix Settings
Option must be on for this setting to be shown. or to view mix settings. or to
highlight setting.
1. To change volume,
or to edit. or for coarse adjustment and or for
fine. DONE or to save. CANCEL to exit without saving changes. DONE to exit table.
2. To change cycles,
or to edit. or for coarse adjustment and or for fine
up to 99 cycles. at 1 for Manual. DONE or to save. CANCEL to exit without saving changes. DONE to
exit table.
3. DONE to exit Settings screen and return to operating screen.
Cycle Count Settings
Option must be on for this setting to be shown.
1.
or to edit.
2. RESET to zero counter.
or for coarse adjustment and or for fine.
3. DONE or
to save. CANCEL to exit without saving changes.
4. DONE to exit Settings screen and return to operating screen.
Operation
The active operation will be displayed in the upper left of the operating screen. When aspirating and dispensing,
it is not necessary to hold the joystick in place, E4 XLS will automatically complete the operation. At any time
during operation:
- RESET empties the tip and resets the pipette operation to ASPIRATE.
- MAIN displays the menu the mode was accessed from.
- HELP provides general information for the highlighted setting. Operating instructions can be found in the Help
for the Volume Setting.
Single and Fixed Volume Operation with optional Mixing
1. Single Volume operation: skip to step 2. Fixed Volume operation: to select the next fixed volume in the table
if needed.
Page 31

31
2. or to aspirate.
3.
or to dispense. Each dispense is followed by an automatic blowout if enabled. If the Mix option is on:
- When a set number of cycles is selected, mixing will execute automatically after each dispense followed
by an automatic blowout if enabled. Select PAUSE at any time to pause mixing, then RESUME to continue.
- If Manual is selected, continue to hold
after dispense to execute mix cycle(s). Mixing will continue until
the joystick is released. Mixing is followed by an automatic blowout if enabled.
4.
or RESET for manual blowout(s) if needed.
Volume Sequencing Operation with optional Mixing
1. to select the next preset series volume in the table if needed.
2.
or to aspirate.
3.
or to dispense. Each dispense is followed by an automatic blowout if enabled. The series number in
the Volume Setting box will increment after each dispense. If the Mix option is on:
- When a set number of cycles is selected, mixing will execute automatically after each dispense followed
by an automatic blowout if enabled. Select PAUSE at any time to pause mixing, then RESUME to continue.
- If Manual is selected, continue to hold
after dispense to execute mix cycle(s). Mixing will continue until
the joystick is released. Mixing is followed by an automatic blowout if enabled.
4.
or RESET for manual blowout(s) if needed.
5. Repeat the steps above until the series is complete.
Multi-Dispense Mode
Multi-Dispense Mode provides multi-aliquot dispensing with user-settable automatic dis-
penseintervals.ThedefaultmenulevelforMulti-DispenseModeisLevelI.ToaccessMulti-
Dispense Mode, or in the Main Menu to highlight MULTI-DISP and , or to enter. Note that the pipette aspirates an extra volume of liquid (residual liquid) that is left over
after dispensing all aliquots. This is to ensure accurate delivery of all aliquots.
Options and Settings
- Options: Fixed Aliquot Volumes, Mode Presets, Volume Sequencing, Auto Pace
- Settings: Single and Fixed Volume (with Number of Aliquots and Aliquot Volume), Volume Sequencing, MultiSpeed, Mode Presets
- Blowout: Joystick blowout optional: can be turned off
Options Selection
1. OPTIONS to enter the Options screen.
2.
or to navigate between and highlight options.
Fixed Volume, Volume Sequencing, and Blowout Options
or to turn option on or off.
1. DONE or
to save and return to the operating screen.
Page 32

32
E4 XLS+ Single Channel Pipettes
Blowout Option
ON (default condition) means that blowout with the joystick is enabled after dispensing the last aliquot. OFF
means that joystick blowout is disabled – the softkey must be used instead. OFF may be helpful for users concerned with inadvertently dispensing the residual (non-aliquot) liquid.
Auto Pace Option
1. or to edit.
2. Intervals from 0.1 to 30 seconds can be set.
or for coarse adjustment and or for fine. at 2.0 or
at 0.1 for Off.
3. DONE or
to save. CANCEL to exit without saving changes.
4. DONE to return to the operating screen.
Mode Preset Option
For details on Mode Presets (options screen 2) see Mode Presets (section 1.13).
Editing Settings
When editing settings, hold the joystick in place to quickly scroll through values.
1.
to enter the Settings screen.
2.
or to navigate between and highlight settings.
Single Volume — Dispensing Based on Number of Aliquots
1. Highlight the Aliquots Setting box (Aliquots). or to edit. or for coarse adjustment and or for
fine. DONE or to save. CANCEL to exit without saving changes.
Note: E4 XLS will only allow values in the Aliquots Setting that will not exceed the maximum pipette volume
with the current Aliquot Volume Setting. If the desired value cannot be selected, change the Aliquot Volume
Setting to a lower value. The Volume Setting will automatically adjust based on the new Aliquots Setting and
the existing Aliquot Volume Setting.
2. If needed, set the aliquot volume by highlighting the Aliquot Volume Setting box (Aliquot Vol).
or to
edit. or for coarse adjustment and or for fine. DONE or to save. CANCEL to exit without saving
changes.
Note: E4 XLS will only allow values in the Aliquot Volume Setting that will not exceed the maximum pipette
volume with the current Aliquots Setting. The Volume Setting will automatically adjust based on the new Aliquot Volume Setting and the existing Aliquots Setting.
3. DONE to exit Settings screen and return to operating screen.
Single Volume — Dispensing Based on Aliquot Volume
1. Highlight the Aliquot Volume Setting box (Aliquot Vol). or to edit. or for coarse adjustment and
or for fine. DONE or to save. CANCEL to exit without saving changes.
Note: E4 XLS will only allow values in the Aliquot Volume Setting that will not exceed the maximum pipette
volume with the current Aliquots Setting. If the desired value cannot be selected, change the Aliquots Setting
to a lower value. The Volume Setting will automatically adjust based on the new Aliquot Volume Setting and
the existing Aliquots Setting.
Page 33

33
2. If needed, set the number of aliquots by highlighting the Aliquots Setting box (Aliquots). or to edit. or
for coarse adjustment and or for fine. DONE or to save. CANCEL to exit without saving changes.
Note: E4 XLS will only allow values in the Aliquots Setting that will not exceed the maximum pipette volume
with the current Aliquot Volume Setting. The Volume Setting will automatically adjust based on the new Aliquots Setting and the existing Aliquot Volume Setting.
3. DONE to exit Settings screen and return to operating screen.
Fixed Aliquot Volume Settings
Fixed Aliquot Vol is displayed in Volume Setting box. Option must be on for this setting to be shown. or to
view the volume table. The volume currently selected will be highlighted in the table.
1. To select a preset volume, use the joystick to highlight a volume. Only active table cells (white text) will be
available in the operating screen. DONE to set and exit table.
2. To add or remove active cells in the table, use the joystick to highlight a cell that represents the last entry
needed. END VOL to add cells up to or remove cells after the highlighted cell.
3. To edit a preset aliquot volume, use the joystick to highlight the volume,
to edit. Both active and inac-
tive cells can be edited.
or for coarse adjustment and or for fine. DONE or to save. Repeat as
needed for other aliquot volumes. CANCEL to exit without saving changes. DONE to exit table.
Note: If no other selection is made before exiting the table, the Volume Setting will be set to the last aliquot
volume edited.
4. DONE to exit Settings screen and return to operating screen.
Volume Sequencing
Option must be on for these settings to be shown. The first setting, Volume Information (Vol X of X), displays the
total aspirate volume required to dispense the full or partial set of aliquots in the series. If only one aspiration is
required to dispense the full series, Vol 1 of 1 is shown. If the series volume exceeds the pipette maximum volume,
it is split into multiple aspirations and Vol 1 of X is shown: e.g., if two aspirations are required, Vol 1 of 2 is shown
at the initial ASPIRATE operation. This will increment to Vol 2 of 2 when the next volume must be aspirated.
1. To select a series of preset volumes, highlight the Aliquots Setting (Alq X of X).
or to view the volume
table. Use the joystick to highlight the last volume for the series. Only active table cells (white text) can be
selected. END VOL to set. DONE to exit table.
2. To edit a preset volume, use the joystick to highlight the volume,
to edit. Both active and inactive cells can
be edited. or for coarse adjustment and or for fine. DONE or to save. Repeat as needed for
other volumes. CANCEL to exit without saving changes. DONE to exit table.
Note: If an END VOL is not set before exiting the table, the END VOL last selected will be retained.
3. DONE to exit Settings screen and return to operating screen.
Speed Settings
1. or to view individual operation speeds.
2.
or to highlight setting, or to edit.
3.
or for coarse speed adjustment of 1, 5 or 10 and or for fine adjustment in
single digits.
4. DONE or
to save. CANCEL to exit without saving changes. DONE to exit table.
Page 34

34
E4 XLS+ Single Channel Pipettes
5. DONE to exit Settings screen and return to operating screen.
Operation
The active operation will be displayed in the upper left of the operating screen. When aspirating and dispensing,
it is not necessary to hold the joystick in place, E4 XLS will automatically complete the operation. At any time
during operation:
- RESET empties the tip and resets the pipette operation to ASPIRATE.
- MAIN displays the menu the mode was accessed from.
- HELP provides general information for the highlighted setting. Operating instructions can be found in the Help
for the Volume Setting.
Single or Fixed Aliquot Volume Operation
1. or to aspirate.
2.
or to dispense into the first receiving vessel:
- If the Auto Pace option is off, place the tip into the next receiving vessel.
again to dispense. Repeat this
step for each of the remaining aliquots. The series number in the Aliquot Setting will increment after each
dispense.
- If the Auto Pace option is on, DISPENSE AUTO will display. Place the tip into the next receiving vessel. An
interval counter will display at the top of the operating screen. The aliquot will dispense automatically when
the set interval is reached. Repeat this step for each of the remaining aliquots. The series number in the
Aliquot Setting will increment after each dispense.
3. When aliquot dispensing is complete, BLOWOUT will display.
to re-aspirate and repeat dispensing step,
, BLOWOUT or RESET to execute blowout. , BLOWOUT or RESET again if more blowout(s) needed.
will only work if Blowout option is on.
4.
to select the next fixed preset aliquot volume in the table if needed.
Volume Sequencing Operation
1. to select the next preset series volume in the table if needed.
2.
or to aspirate.
3.
or to dispense into the first receiving vessel:
- If the Auto Pace option is off, place the tip into the next receiving vessel.
again to dispense. Repeat this
step for each of the remaining aliquots. The Aliquot Setting box will display the volume for each aliquot in
the series, and the series volume number will increment after each dispense.
- If the Auto Pace option is on, DISPENSE AUTO will display. Place the tip into the next receiving vessel. An
interval counter will be shown at the top of the operating screen. The aliquot will dispense automatically
when the interval is reached. Repeat this step for each of the remaining aliquots. The Aliquot Setting box
will display the volume for each aliquot in the series, and the series volume number will increment after
each dispense.
4. If more than one aspirate volume is required to dispense the full series, the series number in the Volume
Information Setting will increment and ASPIRATE will display.
to aspirate the next volume and repeat
dispensing. or will blowout (if Blowout option is ON. Blowout between aspiration steps is optional.
Page 35

35
If Blowout option is OFF, use BLOWOUT softkey. Pressing RESET will move the piston through blowout and
reset back to the begining of the sequence.
5. Repeat the steps above until the series is complete.
6. When aliquot dispensing is complete,
to re-aspirate and begin sequence again, or blowout the residual
liquid.
Manual Mode
Manual Mode provides joystick control of E4 XLS that simulates manual pipette operation.
Additionally, fine control of precise volume increments allows aspiration and dispense of mea-
suredsamplevolumes.ThedefaultmenulevelforManualModeisLevelI.ToaccessManual
Mode, or in the Main Menu to highlight MANUAL and , or to enter.
Options and Settings
- Options: Fixed Volume, Cycle Counter, Mode Presets
- Settings: Single and Fixed Volume, Single Speed, Cycle Count, Mode Presets
- Blowout: Manual
Options Selection
1. OPTIONS to enter the Options screen.
2.
or to navigate between and highlight options.
3.
or to turn option on or off.
4. DONE or
to save and return to the operating screen.
Mode Preset Option
For details on Mode Presets (options screen 1) see Mode Presets (section 1.13).
Editing Settings
When editing settings, hold the joystick in place to quickly scroll through values.
1.
to enter the Settings screen.
2.
or to navigate between and highlight settings.
Single Volume Settings
Volume is displayed in Volume Setting box. This value represents the maximum aspiration volume required for
the desired measurement.
1.
or to edit.
2.
or for coarse adjustment and or for fine.
3. DONE or
to save. CANCEL to exit without saving changes.
4. DONE to exit Settings screen and return to operating screen.
Page 36

36
E4 XLS+ Single Channel Pipettes
Fixed Volume Settings
Fixed Vol X is displayed in Volume Setting box. Option must be on for this setting to be shown. This value repre-
sents the maximum aspiration volume required for the desired measurement. or to view the volume table.
The volume currently selected will be highlighted in the table.
1. To select a preset volume, use the joystick to highlight a volume. Only active table cells (white text) will be
available in the operating screen. DONE to set and exit table.
2. To add or remove active cells in the table, use the joystick to highlight a cell that represents the last entry
needed. END VOL to add cells up to or remove cells after the highlighted cell.
3. To edit a preset volume, use the joystick to highlight the volume,
to edit. Both active and inactive cells can
be edited. or for coarse adjustment and or for fine. DONE or to save. Repeat as needed for
other volumes. CANCEL to exit without saving changes. DONE to exit table.
Note: If no other selection is made before exiting the table, the Volume Setting will be set to the last volume
edited.
4. DONE to exit Settings screen and return to operating screen.
Speed Settings
1. or to edit.
2.
or for coarse speed adjustment of 1, 5 or 10 and or for fine adjustment in single digits.
3. DONE or
to save. CANCEL to exit without saving changes.
4. DONE to exit Settings screen and return to operating screen.
Cycle Count Settings
Option must be on for this setting to be shown.
1.
or to edit.
2. RESET to zero counter.
or for coarse adjustment and or for fine.
3. DONE or
to save. CANCEL to exit without saving changes.
4. DONE to exit Settings screen and return to operating screen.
Operation
The active operation will be displayed in the upper left of the operating screen. At any time during operation:
- RESET empties the tip and resets the pipette operation to ASPIRATE.
- MAIN displays the menu the mode was accessed from.
- HELP provides general information for the highlighted setting. Operating instructions can be found in the Help
for the Volume Setting.
Single and Fixed Volume Operation
1. Single Volume operation: skip to step 2. Fixed Volume operation: to select the next fixed volume in the table
if needed.
Page 37

37
2. and hold to aspirate, then and hold to dispense at any time. It is not necessary to aspirate the full
amount in the Volume Setting before beginning dispense. The amount of sample aspirated or dispense is
controlled directly through the joystick:
- As the joystick is moved towards its maximum position, larger volumes will aspirate/dispense at a faster
rate. To aspirate/dispense smaller volumes at slower rates, move the joystick slowly until the desired rate is
achieved.
- If the joystick is released operation will pause. When joystick control resumes, operation will continue from
the same point.
- STEP will aspirate/dispense the pipette’s minimum allowable increment each time the soft key is pressed.
STEP can be held down and continuously activated.
- If the value set in the Volume Setting is reached, aspiration control will halt.
3. When dispense is complete,
or RESET for manual blowout(s) if needed.
Volume Measurement (Single or Fixed Volume Operation)
1. Single Volume operation: skip to step 2. Fixed Volume operation: to select the next fixed volume in the table
if needed.
2.
to aspirate the unknown volume of sample into the tip:
- The amount of sample drawn into the tip is controlled directly through the joystick. As the joystick is moved
towards its maximum upward position, larger volumes will be aspirated at a faster rate. To aspirate smaller
volumes at slower rates, move the joystick slowly until the desired rate is achieved.
- If the joystick is released, operation will pause. When joystick control resumes, operation will continue
from the same point.
- STEP will aspirate the pipette’s minimum allowable increment each time the soft key is pressed.
3. If needed,
slowly to release unwanted air from the tip.
4. If the value set in the Volume Setting is reached, aspiration control will halt.
slowly to release sample or
air from the tip, or STEP to release a minimum increment.
5. Repeat the steps above as necessary until the liquid in the tip is level with the tip orifice. The in-tip sample
volume is displayed in the lower left of the operating screen and represents the measured volume.
6.
and hold or RESET to release sample from the tip.
7.
or RESET for manual blowout(s) if needed.
Page 38

38
E4 XLS+ Single Channel Pipettes
1.12 LevelII Menu
TheLevelIIMenuprovidesaccesstomoreadvancedmodesaswellasService mode, where users can view service information and set service alarms.
ThedefaultLevelIIoperationalmodeselectionsincludeReverseMode,Dilute
Mode, Titrate Mode, Admin Mode and (if available) PureSpeed Mode.
ToaccesstheLevelIIMenu,
or intheLevelIMenutohighlightLEVEL II
and , or to enter.
LevelII Menu Navigation
- or to view and select menu items
-
, or to enter the selected menu item
- Select LEVEL 1toreturntotheLevelIMenu
- PREV to return to the previously viewed screen
- HELP for a detailed description of the highlighted menu item
- SETUPwhenLevelIishighlightedtogodirectlytoSetupModeandchangepipettesettings
Reverse Mode
Reverse Mode is an established pipetting technique that enables users to aspirate the selected
volume along with the pipette blowout volume, and is recommended for dense or volatile liquids.
ThedefaultmenulevelforReverseModeisLevelII.ToaccessReverseMode, or intheLevelII
Menu to highlight REVERSE, and , or to enter.
Options and Settings
- Options: Fixed Volume, Volume Sequencing, Blowout, Cycle Counter, Mode Presets
- Settings: Single and Fixed Volume, Volume Sequencing, Multi-Speed, Cycle Count
- Blowout: Manual
Options Selection
1. OPTIONS to enter the Options screen.
2.
or to navigate between and highlight options.
3.
or to turn option on or off.
4. DONE or
to save and return to the operating screen.
Figure22:LevelIIMenu
Page 39

39
Blowout Option
Blowout ON in Reverse Mode means that a manual blowout is required before next aspiration. or RESET to
Blowout. Blowout OFF means that re-aspiration can occur without a blowout.
Mode Preset Option
For details on Mode Presets (options screen 2) see Mode Presets (section 1.13).
Editing Settings
When editing settings, hold the joystick in place to quickly scroll through values.
1.
to enter the Settings screen.
2.
or to navigate between and highlight settings.
Single Volume Setting
Volume is displayed in Volume Setting box.
1.
or to edit.
2.
or for coarse adjustment and or for fine.
3. DONE or
to save. CANCEL to exit without saving changes.
4. DONE to exit Settings screen and return to operating screen.
Fixed Volume Settings
Fixed Vol X is displayed in Volume Setting box. Option must be on for this setting to be
shown. or to view the volume table. The volume currently selected will be highlighted in the table.
1. To select a preset volume, use the joystick to highlight a volume. Only active table
cells (white text) will be available in the operating screen. DONE to set and exit table.
2. To add or remove active cells in the table, use the joystick to highlight a cell that
represents the last entry needed. END VOL to add cells up to or remove cells after the
highlighted cell.
3. To edit a preset volume, use the joystick to highlight the volume,
to edit. Both active and inactive cells can
be edited.
or for coarse adjustment and or for fine. DONE or to save. Repeat as needed for
other volumes. CANCEL to exit without saving changes. DONE to exit table.
Note: If no other selection is made before exiting the table, the Volume Setting will be set to the last volume
edited.
4. DONE to exit Settings screen and return to operating screen.
Volume Sequencing Settings
Vol X of X is displayed in Volume Setting box. Option must be on for this setting to be
shown. or to view the volume table.
1. To select a series of preset volumes, use the joystick to highlight the last volume
for the series. Only active table cells (white text) will be available in the operating
screen. END VOL to set. DONE to exit table.
Page 40

40
E4 XLS+ Single Channel Pipettes
2. To edit a preset volume, use the joystick to highlight the volume, to edit. Both active and inactive cells can
be edited. or for coarse adjustment and or for fine. DONE or to save. Repeat as needed for
other volumes. CANCEL to exit without saving changes. DONE to exit table.
Note: If an END VOL is not set before exiting the table, the END VOL last selected will be retained.
3. DONE to exit Settings screen and return to operating screen.
Speed Settings
1. or to view individual operation speeds.
2.
or to highlight setting, or to edit.
3.
or for coarse speed adjustment of 1, 5 or 10 and or for fine adjustment in
single digits.
4. DONE or
to save. CANCEL to exit without saving changes. DONE to exit table.
5. DONE to exit Settings screen and return to operating screen.
Cycle Count Settings
Option must be on for this setting to be shown.
1.
or to edit.
2. RESET to zero counter.
or for coarse adjustment and or for fine.
3. DONE or
to save. CANCEL to exit without saving changes.
4. DONE to exit Settings screen and return to operating screen.
Operation
The active operation will be displayed in the upper left of the operating screen. When aspirating and dispensing,
it is not necessary to hold the joystick in place, E4 XLS will automatically complete the operation. At any time
during operation:
- RESET empties the tip and resets the pipette operation to ASPIRATE.
- MAIN displays the menu the mode was accessed from.
- HELP provides general information for the highlighted setting. Operating instructions can be found in the Help
for the Volume Setting.
Single and Fixed Volume Operation
1. Single Volume operation: skip to step 2. Fixed Volume operation: to select the next fixed volume in the table
if needed.
2.
or to aspirate selected volume plus blowout volume.
3.
or to dispense. If blowout is enabled, BLOWOUT will display in the operating screen. to execute
blowout.
4.
or RESET for manual blowout(s) if needed.
Volume Sequencing Operation
1. to select the next preset series volume in the table if needed.
Page 41

41
2. or to aspirate the preset volume plus blowout volume.
3.
or to dispense. The series number in the Volume Setting box will increment after each dispense. If
blowout is enabled, BLOWOUT will display in the operating screen. to execute blowout.
4.
or RESET for manual blowout(s) if needed.
5. Repeat steps above until the series is complete.
Dilute Mode
Dilute Mode provides in-tip dilution of multiple sample volumes. Operation using the Single Volume setting allows aspiration of two volumes separated by an air gap. Operation using the Volume Sequencing option allows multiple volumes to be aspirated into the tip prior to dispense. The
defaultmenulevelforDiluteModeisLevelII.ToaccessDiluteMode, or intheLevelIIMenuto
highlight DILUTE and , or to enter.
Options and Settings
- Options: Volume Sequencing, Mix, Blowout, Cycle Counter, Mode Presets
- Settings: Single Volume, Volume Sequencing, Multi-Speed, Mix, Cycle Count, Mode Preset
- Blowout: Automatic and manual
Options Selection
1. OPTIONS to enter the Options screen.
2.
or to navigate between and highlight options.
3.
or to turn option on or off.
4. DONE or
to save and return to the operating screen.
Mode Preset Option
For details on Mode Presets (options screen 2) see Mode Presets (section 1.13).
Editing Settings
When editing settings, hold the joystick in place to quickly scroll through values.
1.
to enter the Settings screen.
2.
or to navigate between and highlight settings.
Single Volume Settings
Volume X is displayed in Volume Setting box. The Single Volume setting allows two dilution volumes to be set
for aspiration. During operation, Asp 1 will be aspirated first, followed by an air gap, then Asp 2.
Note: Rainin recommends using Asp 1 for diluent and Asp 2 for sample.
1.
or to view Dilute Volumes. or to highlight setting.
2.
or to edit.
3.
or for coarse adjustment and or for fine.
Page 42

42
E4 XLS+ Single Channel Pipettes
Note: Selectable Asp 2 values will automatically adjust to only allow values that will not exceed the pipette
maximum once the Asp 1 volume is aspirated.
4. DONE or
to save. CANCEL to exit without saving changes. DONE to exit table.
5. DONE to exit Settings screen and return to operating screen.
Volume Sequencing Settings
Vol X of X is displayed in Volume Setting box. Option must be on for this setting to be
shown. During operation, each volume selected will be aspirated in series. or to
view the volume.
1. To select a series of preset volumes, use the joystick to highlight the last volume for
the series. Only active table cells (white text) can be selected. END VOL to set. DONE
to exit table.
Note: E4 XLS will not allow selection of an END VOL that will cause the total series
volume to exceed the pipette maximum. If this occurs, edit the desired END VOL value until the total series
volume is less than the pipette max volume.
2. To edit a preset volume, use the joystick to highlight the volume,
to edit. Both active and inactive cells can
be edited. or for coarse adjustment and or for fine. DONE or to save. Repeat as needed for
other volumes. CANCEL to exit without saving changes. DONE to exit table.
Note: Preset volumes can be used for samples, diluents and air gaps. If an END VOL is not set before exiting
the table, the END VOL last selected will be retained.
3. DONE to exit Settings screen and return to operating screen.
Speed Settings
1. or to view individual operation speeds.
Note: The mix operation speed is shown only when the Mix option is on.
2.
or to highlight setting, or to edit.
3.
or for coarse speed adjustment of 1, 5 or 10 and or for fine adjustment in
single digits.
4. DONE or
to save. CANCEL to exit without saving changes. DONE to exit table.
5. DONE to exit Settings screen and return to operating screen.
Mix Settings
Option must be on for this setting to be shown. or to view mix settings. or to
highlight setting.
1. To change volume,
or to edit. or for coarse adjustment and or for
fine. DONE or to save. DONE to exit table.
2. To change cycles,
or to edit. or for coarse adjustment and or for fine
up to 99 cycles. at 1 for Manual. DONE or to save. CANCEL to exit without saving changes. DONE to
exit table.
3. DONE to exit Settings screen and return to operating screen.
Page 43

43
Cycle Count Settings
Option must be on for this setting to be shown.
1.
or to edit.
2. RESET to zero counter.
or for coarse adjustment and or for fine.
3. DONE or
to save. CANCEL to exit without saving changes.
4. DONE to exit Settings screen and return to operating screen.
Operation
The active operation will be displayed in the upper left of the operating screen. When aspirating and dispensing,
it is not necessary to hold the joystick in place, E4 XLS will automatically complete the operation. At any time
during operation:
- RESET empties the tip and resets the pipette operation to ASPIRATE.
- MAIN displays the menu the mode was accessed from.
- HELP provides general information for the highlighted setting. Operating instructions can be found in the Help
for the Volume Setting.
Single Volume Operation with optional mixing
1. Volume 1 will display in the Volume Setting box. or to aspirate diluent.
2. Remove the pipette tip from the diluent. AIR will display in the Volume Setting box.
or to aspirate an air
gap.
3. Place the pipette tip in the next sample. Volume 2 will display in the Volume Setting box.
or to aspi-
rate.
4.
or to dispense. Each dispense is followed by an automatic blowout if enabled. If the Mix option is on:
- When a set number of cycles is selected, mixing will execute automatically after each dispense followed
by an automatic blowout if enabled. Select PAUSE at any time to pause mixing, then RESUME to continue.
- If Manual is selected, continue to hold
after dispense to execute mix cycle(s). Mixing will continue until
the joystick is released. Mixing is followed by an automatic blowout if enabled.
5.
or RESET for manual blowout(s) if needed.
Volume Sequencing Operation with optional mixing
1. Vol 1 of X will display in the Volume Setting box. to select the next preset series volume in the table if
needed. Place the pipette tip in the first sample. or to aspirate.
2. Vol 2 of X will display in the Volume Setting box. Place the pipette tip in the next sample or diluent, or re-
move the tip completely from liquid for an air gap.
or to aspirate.
3. Repeat Step 2 until all samples in the series are aspirated. The series number in the Volume Setting box will
increment after each aspiration.
4.
or to dispense. Each dispense is followed by an automatic blowout if enabled. If the Mix option is on:
- When a set number of cycles is selected, mixing will execute automatically after each dispense followed
by an automatic blowout if enabled. Select PAUSE at any time to pause mixing, then RESUME to continue.
Page 44

44
E4 XLS+ Single Channel Pipettes
- If Manual is selected, continue to hold after dispense to execute mix cycle(s). Mixing will continue until
the joystick is released. Mixing is followed by an automatic blowout if enabled.
5.
or RESET for manual blowout(s) if needed.
Titrate Mode
Titrate Mode performs titration through measured dispensing. Users can set an initial rapid dispense and then precisely control dispense of the remaining titration volume. The default menu
levelforTitrateModeisLevelII.ToaccessTitrateMode, or intheLevelIIMenutohighlight
TITRATE and , or to enter.
Options and Settings
- Options: Cycle Counter, Mode Presets
- Settings: Single Volume (with Fast Dispense), Multi-Speed, Cycle Count, Mode Presets
- Blowout: Manual
Options Selection
1. OPTIONS to enter the Options screen.
2.
or to turn option on or off.
1. DONE or
to save and return to the operating screen.
Mode Preset Option
For details on Mode Presets (options screen 1) see Mode Presets (section 1.13).
Editing Settings
When editing settings, hold the joystick in place to quickly scroll through values.
1.
to enter the Settings screen.
2.
or to navigate between and highlight settings.
Single Volume Settings
Asp Vol is displayed in Volume Setting box. This value represents the maximum aspiration volume required for
the titration.
1.
or to edit.
2.
or for coarse adjustment and or for fine.
3. DONE or
to save. CANCEL to exit without saving changes.
4. DONE to exit Settings screen and return to operating screen.
Fast Dispense Volume Settings
The Fast Dispense Setting (Fast Dsp Vol) represents the first initial volume of sample to dispense prior to starting the fine dispense control for the titration.
Page 45

45
Note:Ifthisvalueissetto0.0μL,thefinedispensecontrolwillbeginimmediatelyafteraspiration.
1.
or to edit.
2.
or for coarse adjustment and or for fine.
3. DONE or
to save. CANCEL to exit without saving changes.
4. DONE to exit Settings screen and return to operating screen.
Speed Settings
1. or to view individual operation speeds.
2.
or to highlight setting, or to edit.
3.
or for coarse speed adjustment of 1, 5 or 10 and or for fine adjustment
in single digits.
4. DONE or
to save. CANCEL to exit without saving changes. DONE to exit table.
5. DONE to exit Settings screen and return to operating screen.
Cycle Count Settings
Option must be on for this setting to be shown.
1.
or to edit.
2. RESET to zero counter.
or for coarse adjustment and or for fine.
3. DONE or
to save. CANCEL to exit without saving changes.
4. DONE to exit Settings screen and return to operating screen.
Operation
The active operation will be displayed in the upper left of the operating screen. When aspirating or performing a
Fast Dispense, it is not necessary to hold the joystick in place, E4 XLS will automatically complete the operation.
At any time during operation:
- RESET empties the tip and resets the pipette operation to ASPIRATE.
- MAIN displays the menu the mode was accessed from.
- HELP provides general information for the highlighted setting. Operating instructions can be found in the Help
for the Volume Setting.
1.
or to aspirate.
2. If a value was set in the Fast Dispense Setting, FAST DISPENSE will display.
or to dispense. If this
value was set to zero, skip to the next step.
3. TITRATE will display and the Fast Dispense Setting box will now show Dsp Total.
slowly to begin titrating
the remaining volume:
- As the joystick is moved towards its maximum downward position, larger volumes will be titrated at a
faster rate. To titrate smaller volumes at slower rates, move the joystick slowly until the desired rate is
achieved.
Page 46

46
E4 XLS+ Single Channel Pipettes
- If the joystick is released, operation will pause. When joystick control resumes, operation will continue
from the same point.
- STEP will dispense the pipette’s minimum allowable increment each time the soft key is pressed.
- During the titration, the Dsp Total value will automatically update with the total volume dispensed, including the Fast Dispense volume.
4. When the titration is complete, the value in the Dsp Total represents the total titration volume. The volume
displayed in the lower left of the operating screen is the volume of sample that remains in the tip.
5.
and hold or RESET to release the remaining sample from the tip.
6.
or RESET for manual blowout(s) if needed.
1.13 Mode Presets
Mode Preset option allows for saving the entire mode
setting to a Preset file on the micro-SD card. Use this
option to save and rapidly recall favorite protocols.
Mode Presets require the presence of a micro-SD card
and firmware version 1.4 or higher (included in all E4s
with Serial numbers C14 and higher). See “Micro-SD
Card Management and Firmware Upgrades” section for
more details on how to upgrade older models.
Mode Presets are an Option available in all operational
Modes except Basic.
Mode Preset Rapid Selection
Once your Presets are saved (see section below), it
is easy to quickly load them and switch from one to
another, directly from the Settings screen. There is no
need to use the OPTIONS screen.
1.
to enter the Settings screen (A>B). and to
highlight Preset Selector. Note: If no Presets have
been saved, the Preset Selector will not show up.
2.
or Preset Selector to edit (C).
3.
, , or to scroll through available Mode
Presets (D>E). The Settings and Options for each
Preset will be displayed.
4.
or DONE to select a Preset, then or DONE to
exit Settings. Selected Preset is now loaded (F)
and ready to use.
A: Operation Screen
C: Preset Selector in Edit
Mode
E: Mode Preset Option
B: Preset Selector
Highlighted
D: Mode Preset Option
F: Preset Loaded
Page 47

47
Mode Preset Management
1. If you want to save or edit a Mode Preset, make
sure that the current Mode setting configuration is
the one desired (A).
2. Select OPTIONS and
or to highlight Mode
Preset Options (B)
3.
or SELECT to save, edit delete or load a Mode
Preset
4. On the preset select screen you will see your list of
saved Mode Presets (C).
5. To SAVE the current Mode Setting as a New Mode
Preset:
a. Use
and to highlight “New”.
b. SELECT to enter a filename (D). , , or
to highlight characters, to select a character
c. SAVE or CANCEL when needed. The E4 will return
to the Preset Select Screen
d. BACK to return to OPTIONS. DONE to return to
operating screen.
6. To LOAD or DELETE and existing Mode Preset:
a. In the Preset Select screen,
and to highlight a Mode Preset (F)
b. SELECT to access Preset Options screen. or
to highlight LOAD or DELETE (G)
c. LOAD will immediately return E4 to Operation
screen with the selected Mode Preset active.
d. DELETE will prompt a Delete Confirm warning
message (H): DELETE to remove Mode Preset (return to Preset Select screen) or CANCEL (return to
Preset Options screen).
A: Protocol to be saved
C: Preset Select screen
E: Preset ready to run
G: Preset Options screen
B: Mode Preset Option
D:EnterPresetlename
F: Preset Select screen
H:DeleteConrmscreen
Page 48

48
E4 XLS+ Single Channel Pipettes
7. To LOAD or DELETE and existing Mode Preset:
a. Edit the Mode Options and Settings to your new
preferred combination (I)
b. Select OPTIONS and and to highlight
Mode Preset Options (J)
c. or SELECT
d. Use or to highlight the Preset to edit on
the Preset Select screen, then press SELECT (K)
e. Use or to highlight the SAVE on the Preset Options screen (L)
f. SAVE opens the FIlename screen with the selected Preset name indicated (M).
g. SAVE again without changing the Preset name
to edit the existing Preset. Confirm SAVE (N).
h. Changing the preset name in step (g) above
will save your edited Preset as a new Preset (O/P)
without changing the one you selected in step (d)
above.
I: New Protocol
K: Preset Select screen
M:EnterPresetlename
O:EnterPresetlename
J: Mode Preset Option
L: Preset Options screen
N:SaveConrmscreen
P: New Preset saved
Page 49

49
1.14 Service Mode
Service Mode allows users to view information specific to E4 XLS such as the serial number,
firmware version and the full service log. In addition, usage logs including the number of pipetting cycles or days in use can be viewed and tracked for GLP purposes. To access Service
Mode, or intheLevelIIMenutohighlightSERVICE and , or to enter.
Navigation of Service Pages
- To move between pages, or for the next page and or for the previous page. The current page will
be displayed in the upper left of each screen.
- HELP for a detailed description of the highlighted item or page
- MAINtoreturntotheLevelIIMenu
Identification Page
This page contains pipette-specific identification details (Figure 23). This information is entered at the time of
manufacture and is not user-settable:
- Serial Number
- Manufacture Date
- Model Number
- Firmware Version
Note: When new firmware is downloaded to E4 XLS, the firmware version number displayed on the identification
page will update automatically.
Figure 23: Identification Page
Status Page
This page displays the pipette’s usage logs (Figure 24). These values are tracked and logged automatically and
are not user-settable:
- Days Since Service. Logs the number of days the pipette has been in use since it was last serviced.
Page 50

50
E4 XLS+ Single Channel Pipettes
- Cycles Since Service. Logs the number of aspirate/dispense cycles the pipette has executed since it was last
serviced.
- Lifetime Cycles. Logs the total number of aspirate/dispense cycles the pipette has executed since it was first
put into active use.
Note: The Days and Cycles Since Service logs will reset to zero after each pipette service is performed.
Figure 24: Status Page
Service Log
This page displays a historical log of the last 32 services performed on the pipette (Figure 25). This information
is entered by a service technician and is not user-editable.
Figure 25: Service Log
For each service entry logged:
- The first line in an entry contains the date and time of service and technician ID
- The next line in an the entry contains the number of cycles executed since the last service, and the total number of lifetime cycles at the time service was performed.
Page 51

51
1.15 Battery Charging
Unlike other battery types, the Li-Ion battery in E4 has no “memory effect” and does not need to be fully discharged.Pipettes can be charged using the Wall Power Supply, the optional Rapid Charge Stand or with a PC
using the optional USB cable.
The battery charge indicator in the top right corner of the display will change as the unit is charging. After 15
minutes, the pipette will have enough charge for a few hours of pipetting, and a full charge will be obtained after
approximately 90 minutes and will provide up to 3000 full-stroke cycles (fewer in large-volume models).
When charging is complete, the battery charge indicator will be solid green, indicating a full battery. As the battery depletes with use, the green bar will drop accordingly.
Wall Power Supply
To install the universal Wall Power Supply and charge E4, connect the power cord
to a power outlet. Connect the other end of the cord to the Micro USB port located
on the top of the unit. The pipette can be operated while connected to the Wall
Power Supply cord.
Rapid Charge Stand
To use, connect the universal Rapid Charge Stand power cord to a power outlet and connect the other end of
the cord to the power socket on the back of the Rapid Charge Stand. For convenience, you can dress the cable
along one of the vertical support legs using the channels provided. See Figure 27 B.
The E4-RCS Rapid Charge Stand will charge three E4 XLS+ pipettes simultaneously in about 90 minutes. Charging contacts mate with contacts under the pipette head.
Rainin recommends storing E4 XLS+ on the stand when not in use. This practice will provide a safe storage
place, and the pipette will always be fully charged.
Figure 26: Operating the pipette while connected to E4-WPS Wall Power Supply
Figure 27: A: E4-RCS holding E4 XLS+ pipet tes. B: Back of E4-RCS showing power cord connected and dresses along support leg
Page 52

52
E4 XLS+ Single Channel Pipettes
USB Cable
To charge E4 XLS with a PC using the optional USB cable, connect the cable’s USB connector to a computer USB
port. Connect the other end of the cable to the USB outlet located on the top of E4 XLS. Rainin does not recommend operating E4 XLS when the pipette is connected to a computer for charging.
(Note that charging E4 XLS with a PC will take approximately 2–3 times longer than using the Wall Power Supply or the Rapid Charge Stand.)
Electrical Specifications
This device is intended for use only with Rainin power sources with the part numbers listed below.
*Rainin-supplied power supplies are LPS (Limited Power Source) certified. No other power sources may be used
with this device.
It is important that the Wall Power Supply and Rapid Charge Stand can quickly be disconnected from AC power,
in case a hazard arises.
Source Part No. Input Output*
Rapid Charge Stand: E4-RCS 100-240 VAC, 50/60 Hz 5 VDC, 4A
Wall Power Supply: E4-WPS 100-240 VAC, 50/60 Hz 5 VDC, 2A
Battery E4-BATT Li-Ion 3.7 VDC Nominal
1250 mAh Nominal
Explanation of symbols:
Hz = Hertz, A = Amperes, mAh = Milliamp Hour, VAC = Volts Alternating Current, VDC = Volts Direct Current.
1.16 Replacing the Battery
E4 XLS user settings are retained if the battery is removed or replaced.
1. Open the battery compartment by sliding the compartment door open.
2. Remove the old battery by sliding it out.
3. Align the replacement battery connector plug with the socket in the battery compartment as shown in Figure
28. Slide the battery into place. Once the battery is installed properly, the pipette will turn on automatically,
initialize and display the start-up screen.
4. Replace the battery compartment door.
The battery life is dependent on such factors as:
- Pipette volume range
- Full-range or part-range pipetting
- Multidispensing
- Display brightness and display timeout settings
Figure 28: Replacing the Battery
Page 53

53
1.17 Storage
After use, store the pipette in a clean safe place. E4 XLS+ is a precision instrument and should be treated with
the level of care appropriate for laboratory instrumentation.
Rainin recommends storing E4 XLS on the Rapid Charge Stand if one is available. If not, three hangers are available to hold E4 XLS conveniently when not in use:
- CR-7: Free-standing carousel that holds three pipettes.
- HU-M3: Set of three individual magnetic Hang-Ups
™
for mounting on ferrous surfaces.
- HU-S3: Three Hang-Ups attached to a clamp that fits onto a shelf.
Note: All of the hangers listed above require a HU-A3 Adapter.
-
1.18 Tip Ejector Arm Removal52
Four types of tip ejector are used and all types can be removed with minimum effort – do not use force.
For models up to 2000 µL
Metal tip ejector: press in the quick-release tabs on the ejector arm and pull the arm down.
Plastictipejector:grasprmlyontheejectorarmandpulldown.
For 5000 µL & 10 mL models: grasp the top of the ejector arm and pull out then down.
For the 20 mL model: pull off the lower part of the ejector arm; the upper part stays in place. (Replace by align-
ingtherodwiththeholeintheupperpartandpressingrmly.)
Figure 29: Removing the Tip Ejector
To replace the ejector arm (except 20 mL described above), insert the shaft through the large opening, align the
topoftheejectorarmwiththetipejectorpush-rod,andpushtheejectorarmrmlyuntilitissecurelyinplace.
≤2000µLmetal≤2000µLplastic5000µL-10mL20mL
Page 54

54
E4 XLS+ Single Channel Pipettes
1.19 Care and Maintenance
E4 XLS pipettes are sophisticated lab instruments and should be treated with appropriate care. These pipettes
should provide years of trouble-free service if the operating recommendations in this manual are followed.
The most important factor in taking proper care of E4 XLS is to keep the mechanism dry and clean. The following
simple rules should be strictly observed:
1. Never allow liquid to enter the shaft where it can contact the piston or seal.
1. Never allow liquid to enter the electronics, including the display, soft keys and joystick.
2. Never pick up liquid without a tip attached.
3. Never invert the pipette or lay it on its side with liquid in the tip. Always hold E4 XLS upright and store upright
if possible. The Rapid Charge Stand holds three E4 XLS pipettes and charges them simultaneously.
4. Never use aggressive solvents to clean E4 XLS. It is best use a lint-free wipe dampened with water with dilute
mild detergent, if needed, to clean the instrument. Be sure to keep the display, soft keys and joystick dry.
5. Never attempt to recharge E4 XLS with a device other than the Rainin E4-WPS Wall Power Supply, the E4-RCS
Rapid Charge Stand or the E4-USB cable. Severe damage to the internal electronics will result.
Sample contamination of the shaft, seals or piston can cause rough, sticky plunger movement. Eventually
deposits on the piston can cause the seal to tear, leading to inaccurate results. Best practice for pipette maintenance is to regularly clean the pipette liquid end with the following procedure:
1. Remove tip ejector arm (See Tip ejector arm removal Figure 29).
2. On pipettes up to 1000 µL unscrew the shaft coupling nut and remove shaft. For 2000 µL unscrew the shaft.
For pipettes >2000 µL unscrew the lower part of the shaft.
3. When you remove the piston assembly, note the order and placement of the seals, retainers, springs and o-
rings on the piston assembly. XLS+ seals for models 100-2000 µL are asymmetrical and must be inserted in
the correct orientation (See figure 30 A and B). XLS+ seals for models 2-20 µL are symmetrical and can be
used in either orientation.
4. XLS+ seal sizes 1000-2000 µL may remain inside the shaft when you remove the piston assembly; this is
normal for this design. The seals may be removed from the shaft by inserting the large end of a tip into the
shaft (See Figure 30 C) and hooking the seal over it.
Figure 30A: Seal orientation,
100, 200 and 300 µL
A: Seal (note open edge faces outward)
B: Seal retainer
C: Piston assembly
A: Seal (note open edge faces outward)
B: Seal retainer
C: Piston assembly
A B C
A B C
Figure 30B: Seal orientation,
1000 and 2000 µL
Figure 30C: Using the large end of a tip to remove 1000 or 2000 µL XLS+ seal from the shaft
Shaft Seal Tip
Page 55

55
5. To inspect and clean seals sized 100-300 µL, remove them gently from their retainers by pushing them out
from the back side, preferably with a non-sharp object like a pipette tip.
6. Inspect the seals, retainers, o-rings, shaft and piston for contamination. Clean with a lint- free cloth with ei-
ther distilled water or isopropyl alcohol. Apply grease (part number 6200-524, 17014531) sparingly by gently rubbing the seal or o-ring between the thumb and index finger, ideally using a clean powder-free examination glove. Apply a small amount of grease on the piston as well.
Reassemble in the correct order and orientation.
7. If piston corrosion or staining is evident do not use the pipette and have a METTLER TOLEDO Service repre-
sentative assist with replacement of the piston.
8. The shaft, tip ejector and handle may also be cleaned using a damp cloth with distilled water, 10% bleach
solution, isopropyl alcohol, or any commercially available instrument decontamination solution. Be sure to
rinse off the cleaning agent with distilled water
1.20 Autoclaving
Autoclaving of your pipettes to perform sterilization may be performed at 121ºC, at 1 Bar, for 15-20 minutes, with
the following restrictions and guidelines.
Do not autoclave the entire pipette or any part not specifically identified in the table below.
Pipette line Model Range Autoclaveable parts
E4 XLS All single channel models Shaft and tip ejector
E4 XLS+ Single channel models
2 - 2000 µL
Shaft, tip ejector, piston assembly,
spring, seal, and seal retainer
E4 XLS, E4 XLS+ All multichannels, adjust-
able spacers
None
The entire liquid end of E4 XLS+ single channel pipettes may be removed and placed into the autoclave without
disassembling individual parts. The liquid end includes the following: Shaft, tip ejector, piston assembly (with
spring), seal and seal retainer. If you have upgraded the seals of an older E4 XLS to the new XLS+ seals (see
section 1.21), you can now autoclave the entire liquid end of your pipette. If you are unsure of your model type
se e s ec t i on 1.21.
If autoclaving more than one unit together, take care to reassemble your pipettes with all of their original parts.
If you clean the XLS+ piston and seals before autoclaving then be sure to re-grease them afterwards (see Care
and Maintenance).
See Care and Maintenance and Replacement Parts sections for more details on disassembling pipettes, and how
to identify the different parts.
-
1.21 Upgrading your Liquid End to XLS+
The XLS+ single channel line of pipettes is distinguished from earlier models by having a new lower stiction seal-
ing system, a completely autoclaveable liquid end, and a durable, corrosion-free plastic tip ejector.
IfyouhaveasinglechannelE4XLSpipetteinthe2-2000μLrange,youcanupgradeyourliquidendtoexperi-
ence the superior benefits of XLS+.
You can differentiate an XLS+ pipette from the earlier XLS version in the following ways: an original XLS+ pipette
will have a serial number beginning with C14 (or higher) but not A14 or B14. Also the RAININ logo on the silver
badge is colored blue. All the XLS+ seals are black, and no o-rings are used, while the XLS seals are white, and
o-rings sit below the seal on the piston.
Page 56

56
E4 XLS+ Single Channel Pipettes
You can upgrade your liquid end by ordering the seal replacement kit (see Replacement Parts). The new XLS+
seals require grease part# 6200-524 17014 5 31 (seeCareandMaintenance).Forthe1000and2000μLmod-
els, replacing the seal retainer requires specialized tools and handling to avoid damage to the piston. Please call
technical support (800-543-4030 in the USA) or your local METTLER TOLEDO service provider.
1.22 Troubleshooting
Problem Possible Cause Suggested Remedy
Leaks,
inaccuracy
Loose shaft Tighten coupling nut by hand.
Wornsealforpipettevolumes≤2000µL Replace seal
Worno-ringorinsufcientgreasesealfor
pipette volumes 5000 µL, 10mL, 20 mL
Replace o-ring and apply small amount of
grease.
Cracked or split shaft. Replace shaft. Check piston is not bent. If bent,
call Rainin service for a new piston.
Call 800-543-4030 in the US.
Rough, jerky, or
sticky plunger
movement
Contamination inside mechanism. Remove tip ejector arm, remove shaft and
check piston and seal clean as described in
Care and Maintenance section. If piston is
permanently corroded or stained, call Rainin
service for a new piston. Call 800-543-4030
in the US.
Insufcientgrease Apply grease sparingly to seal or o-ring
When removing the shaft from the pipette body, make sure the spring, seal and o-ring do not detach from the
piston, especially on smaller models. Be careful not to bend the piston on these small models. Recalibration of
the pipette is only required when the piston is replaced.
Acids and Corrosives
Extensive contact with corrosive fumes may result in premature seal wear and damage to the piston. Exposure
of the internal components to corrosive aerosols and fumes may be reduced by using Rainin tips with aerosol
barrier filters. After using concentrated acids or corrosive solutions, disassemble E4 XLS and inspect and clean
thepistonassembly,shaftandseal/o-ringwithdistilledwater.Useextremecareonthe10μLmodelstoavoid
damaging the small diameter piston, or losing small items such as seals. Dry all components thoroughly and
reassemble.
Warning Messages
E4 XLS+ monitors itself to inform you of important issues such as battery levels, USB connection, charge stand
connection, factory reset, real time clock status and more. Any changes to these variables that could affect your
operation of the pipette will be reported as a Warning message. Some warnings require action, such as recharging the unit or resetting the clock, while others are informational only (“Memory Clear” after factory reset). To
exit any warning message, press the left softkey (CONT). If a warning message is displayed during the E4 XLS
power up sequence that cannot be reset, note the error number and contact Tech Support at 800-543-4030 in
the US. In other countries contact METTLER TOLEDO or your distributor.
Error Messages
E4 XLS+ is a sophisticated product that is dependent on a complex mix of electronic hardware and software
components. In any complex system such as this, faults may occasionally occur. These are usually due to unexpected software conditions (invalid data, conflicting settings, etc.) or hardware related failures (invalid or no
Page 57

57
response). An Error message informs you that a fault has been detected. Press the left softkey (CONT) and the
unit will reset itself while performing a diagnostic test. Most of the time, the unit will fix itself, and pipetting can be
resumed normally. If the error messages continue, please cease pipetting, note the error code and message, and
call Tech Support at 800-543-4030 in the US. In other countries contact METTLER TOLEDO or your distributor.
1.23 Micro-SD Card Management and Firmware Upgrades
Introduction
With the release of the Rainin E4 firmware V 1.4 the included micro-SD card will add new functionality to the pipette. In previous firmware versions only PureSpeed™ protocols used the micro-SD card. Now the new ‘Preset’
features will also use the SD card.
Inserting and removing the SD card
New pipettes with version 1.4 firmware will come with a Rainin micro-SD Card preinstalled. To upgrade older
pipettes, a Rainin micro-SD Card can be purchased from Rainin or an authorized distributor. Please see below
for ordering information.
The micro-SD card is located in a small slot on the left side beneath the battery compartment (as seen from the
back of the pipette). A label under the battery door identifies the location of the SD-card. See A below.
A
To change or insert a new SD card, remove the battery compartment door and the battery. Insert the card with
minimal force into the SD-card slot as shown in the figure with the metal contacts facing down. Push the card
with your fingernail or a small, blunt non-conductive object (e.g. an unused pipette tip) into the slot until a
slight “click“ can be felt or heard.
To remove the card, use a similar tool: Push in the card until a click is heard, then release the card and the
spring in the card socket will push the card out a little bit and it can be removed. Do not touch the metal contacts of the card. Store in a clean, dry and cool environment.
If the card is inserted or removed while the pipette is powered on, a message will appear on the screen and
inform about the card insertion or removal and the pipette will restart.
After the SD-card is inserted properly and the pipette powered on, an SD card system icon is displayed and the
SD card functions like “Presets“ and “PureSpeed“ become available.
Model-specific Presets and Interchanging micro-SD cards
Presets are model-specific. Presets stored on micro-SD cards are only interchangeable between models with
the same volume e.g. 200 µL single, 8 and 12 channel pipettes. If the SD-card is transferred to a pipette with a
different volume, existing saved presets will not show up but new presets can be saved for the different model.
Troubleshooting
If you get an SD card error message, please confirm that the card is properly inserted into the pipette and is
clean and undamaged. If the error message persists, or preset files are not readable, please contact Rainin
Tech Support at tech.support@rainin.com.
Page 58

58
E4 XLS+ Single Channel Pipettes
Ordering SD cards and Upgrading older E4 models
To order new micro-SD cards, use part# 17012587, Model PT-E4-SD. The new E4 functions require at least
firmware version 1.2 for PureSpeed™ and version 1.4 for Mode Presets and Admin mode. If you have an E4
unit with older firmware, please contact your local MT representative to upgrade your firmware.
1.24 Service, Calibration and Repair
It is recommended to use only genuine Rainin replacement parts such as seals, o-rings, and shafts. It is NOT
necessary to recalibrate the pipette after changing the seal, o-ring, or shaft. Recalibration of the pipette is only
necessary when the piston is replaced, and should be done only by qualified factory-trained personnel in a
Rainin approved facility.
For pipettes under warranty, please note that the warranty will be voided if the pipette has been damaged as a
result of physical or chemical abuse, or if the pipette has been repaired or recalibrated by any service facility
which is not authorized by Rainin. In the US, call 800-543-4030 for service. Service is also available outside
the US. See www.mt.com/rainin for more information.
1.25 Replacement Parts
The commonly-replaced parts are shown here for each volume range for E4 XLS, single-channel LTS and
universal-tmodels.
The images in Figure 31 represent the 20, 200 and 1000 µL models (top) and the 10 mL model (bottom) –
other models are similar.
XLS+ Models
≤2000 µL
Seal replacement kit
1,3,5
Order # Shaft
1
Order # Tip Ejector
Metal
1
Order # Tip Ejector
Plastic
2
Order #
E4-10XLS+ 6200-511 17014 518 6202-064 170 0 486 2 6202-071 17005287 6 20 0 -517 17014524
E4-20XLS+ 6200-512 17014 519 6202-065 170 0 4861 6202-071 17005287 6 20 0 -517 17014524
E4-100XLS+ 6200-506 17014513 6202-066 1700 4 859 6202-073 170 05293 62 0 0- 518 17014 525
E4-200XLS+ 6200-513 17014520 6202-067 1700 486 0 6202-073 170 0 52 93 620 0-518 17014 52 5
E4-300XLS+ 6200-514 17014521 6202-425 1700 75 51 6200-419 1700 75 56 6 20 0 -519 17 014526
E4-1000XLS+
4
6200-515 17014 52 2 6202-068 1700 485 8 6202-074 170 0 52 94 6200-520 17014 52 7
E4-2000XLS+
4
6200-516 17014 52 3 6202-214 170 0 48 5 6 6200-168 17 005 29 6 6200 -521 170145 28
SE4-10XLS+ 6200-511 17 014518 6200-140 170 048 4 5 6200-133 17 005 29 2 6200-522 17 014529
SE4-20XLS+ 6200-512 17 014519 6200-145 170 048 47 6200-144 17 005 28 8 62 00-517 17014524
SE4-100XLS+ 6200-506 17014513 6200-147 17004848 6200-148 170 05289 6200-523 17014 5 30
SE4-200XLS+ 6200-513 170145 20 6200-157 1700 4 849 6200-156 170 052 91 620 0-518 17014 52 5
SE4-300XLS+ 6200-514 170145 21 6200-413 1700 75 54 6200-419 170 0755 6 620 0-518 17014 52 5
SE4-1000XLS+
4
6200-515 17014 52 2 6200-160 17004850 6200-163 170 052 90 6200-520 17014 52 9
SE4-2000XLS+
4
6200-516 17014 52 3 6200-169 170 0 48 4 6 6200-168 17 005 29 6 6200 -521 170145 30
Grease for all models: 6200-524 17014 5 31
XLS Models
≥5000 µL
Piston
O-Ring
Order # Cylinder
O-Ring
Order # Shaft Order # Tip Ejector Order #
E4-5000 XLS 6200-363 170 033 82 6200-364 17 003 47 7 6202-222 1700 4 85 7 6200-373 170 0 52 97
E4-10ML XLS 6200-369 170 033 8 3 6200-370 17 003 476 6202-223 170 048 5 5 6200-374 17 005 29 5
E4-20ML XLS 6202-299 170 0 3413 6202-300 1700 3 478 6202-302 1700 490 8 6202-298 17005308
SE4-5000 XLS 6200-363 17 00 338 2 6200-364 170 0 34 77 6200-362 170 0 48 52 6200-373 17 005 29 7
SE4-10ML XLS 6200-369 170 0 33 8 3 6200-370 170 03476 6200-368 17 004 8 51 6200-374 1700 52 9 5
Filters for 5 mL and 10 mL XLS models: 6190-164 17001944 (pack of 100). 6190-165 17001945 (pack of 1000)
Filters for 20 mL XLS models: 6190-221 17001951 (pack of 100). 6190-222 17001952 (pack of 500)
Page 59

59
Notes
1. Parts are back compatible with EDP1, EDP3 and E4 XLS.
2. Parts are back compatible with E4 XLS only.
3. XLS+ seals and retainers must be used together.
4. 1000 µL and 2000 µL EDP1, EDP3 and E4 XLS models require service to upgrade to XLS+ seal retainers.
5. Seal replacement kit includes seal, seal retainer, and grease.
Figure 31: Common Replacement Parts
Top < 2000 µL Bottom > 5000 µL
Internal liquid end assemblies for 20,
200 and 1000 µL E4XLS+
Othersizes≤2000µLaresimilar
SHAFT
EJECTOR
ARM
PISTON
O-RING
CYLINDER
O-RING
SHAFT
EJECTOR
ARM
20 µL 200 µL 1000 µL
A
B
C
A
B
C
A
A: Piston Assembly
B: Seal Retainer
C: Seal
B
C
Internal liquid end assembly for
10 mL E4XLS+
5000 µL and 20 mL are similar
Page 60

60
RFID (Radio Frequency Identification Device)
2 RFID (Radio Frequency Identification Device)
2.1 Description and Operation
All E4 XLS models incorporate a passive RFID tag in the finger-hook. The tag contains unique information about
the pipette including model type, serial number, RFID UID and service calibration information. The RFID tag can
be wirelessly linked with the optional reader and software to facilitate querying calibration tracking and service
reminders. The RFID tag is of negligible weight and has no effect on precision or accuracy. It operates only when
read by an RFID reader and the associated software.
Optional Rainin RFID Reader
Rainin recommends the Rainin RFID Reader which interfaces with a PC USB port, and does not recommend
any other RFID readers. Using the Rainin RFID Reader, information can be written to the pipette’s RFID tag in the
same consistent way as it is read from the RFID tag. The Rainin RFID Reader requires LabX™ Direct Pipette-Scan™
Softwareforread/writecapability.TheestimatedrangeofoperationoftheRFIDreaderisupto5cm.
Rainin RFID Reader LED Indicators
LEDs Description
Yellow & Green Reader powers up in this state and reverts to this
state when the application is stopped or a plug-in
is disabled.
Yellow Reader has detected a pipette. Keep pipette close
to reader until LED changes to Green (or Red).
Green When the application first starts, the Green LED
indicates the device is ready. After all data is read
from a pipette, the Green LED lights up.
Red Reader failed to read or write. Try scanning the
pipette again. If the LED stays red, restart the software.
Yellow & Red Data written to the pipette does not match the
data read back from the pipette.
Optional LabX Direct Pipette-Scan Software
Supplied on the same CD as this manual is a trial version of the LabX Direct Pipette-Scan software. A full version
isalsoavailableforpurchase.SupportedPCOperatingSystemsinclude:MicrosoftWindowsXP,VistaandWindows7.Userscanselectanyofthefollowinglanguages:Chinese(Simplified),Czech,Danish,English,French,
German, Hungarian, Italian, Japanese, Korean, Norwegian, Polish, Russian, Spanish, and Swedish.
Page 61

61
Operation Overview
The optional RFID Kit contains a Rainin RFID Reader and LabX Direct PipetteScan software. Once the Rainin RFID Reader is connected via USB to a PC
and the software is configured and running, operation is simple.
Place the head of the pipette over the Rainin RFID reader in the position
shown in Figure 32. Hold the pipette steady for a few seconds to allow the
pipette information stored in the RFID tag to be scanned and read into the
software.
Pipette RFID-Tag Read-Only Fields
The software will display the read-only data fields programmed into each
pipette’s RFID tag before it leaves the factory (Figure 33). These fields can
ONLY be modified by Rainin at the time of manufacture or when sent in for
service. Read-only fields include: RFID UID, Model Number, Serial Number, Factory Date, Last Service Date and
Next Service date. For QC or workflow purposes, multiple RFID enabled pipettes can be scanned sequentially.
Figure 33: Read-Only Pipette Data in Lab X Direct Pipette-Scan Software: Before Scan (top) and After Scan (bottom)
Writing Data to Custom Fields in the RFID Tag
In addition to read-only fields, several writable fields are available on the RFID tag. These can be customized
and/or standardized to suit the needs of an individual user or laboratory.
Custom writing operations require both the Rainin RFID Reader and the LabX Direct Pipette-Scan software.
Please refer to the software help file for complete instructions.
RFID/LabX Direct Pipette-Scan Software Benefits
- The flexibility of the LabX Direct Pipette-Scan software assists users in customizing individual workflows
- Entire departments can standardize both workflow and calibration checks when using the E4 XLS pipettes,
Rainin RFID Reader and LabX Direct Pipette-Scan software as a complete system
Figure 32: Rainin RFID Reader
Page 62

62
RFID (Radio Frequency Identification Device)
- The system simplifies the Quality Compliance process by shortening the calibration check cycle, allowing pipettes to be returned to active lab use faster
- Custom fields can be configured and written to the RFID tag and advanced workflows can be defined for custom settings
- Information within the tag can be exported to common formats, such as Excel® and Word® as well as Text.,
to facilitate records-keeping
What RFID Does Not Do
- RFID does not protect against misplacement, theft, or provide a pipette’s location
- RFID does not protect against erroneous data input
- RFID does not replace calibration stickers for businesses or displace QC professionals
- RFID does not validate laboratory workflows. The validation of the workflow and 21CFR Part 11 regulatory
compliance remains the responsibility of the customer.
Page 63

63
3 E4 XLS+ Multichannel Pipettes
3.1 Description and Operation
Introduction
E4 XLS+ multichannel pipettes are based on the E4 XLS single-channel pipette and use the patented LTS LiteTouch Tip Ejection System. Multichannel
E4 XLS+ is available in 8-channel and 12-channel versions. An 8-channel
version is shown in 2.
The 8- and 12-channel models are available in 6 volume ranges:
0.5–10μL
2–20μL
5–50μL
20–200μL
20–300μL
100–1200μL
Tip Selection
E4 XLS+ multichannel pipettes use Rainin LTS tips.
- Use20μLLTStipswiththefollowingE4XLS+models:E8-10XLS+,
E8-20XLS+, E8/12-10XLS+ and E12-20XLS+.
- Use250μLLTStipswiththefollowingmodels:E8-50XLS+,E12-50XLS+,
E8-200XLS+, and E12-200XLS+.
- Use300μLLTStipswithE8-300XLS+andE12-300XLS+
- 1200μLLTStipsarerecommendedforE8-1200XLS+andE12-1200XLS+.
Non-filter1000μLLTStipscanalsobeusedastheywillpickup1200μL.
LTS tips have a cylindrical cross-section with a well-defined seal ring, thin
wall, and positive stop. They seal properly on the shaft and cannot be
jammed or forced too far onto the shaft nozzles, and provide absolutely consistent sample pickup across all channels.
Mounting LTS Tips
Mounting racked LTS tips on L8 and L12 pipettes is simple.
1. Align the shaft nozzles into the row of tips, holding the pipette at an angle (Figure 35 left).
2. Position the pipette upright and press the nozzles into the tips until the “positive stop” is reached
(Figure 35 right).
The tips are now mounted with proper sealing. There is no need to hand-tighten, use heavy pressure, or rock
the nozzles onto the tips to obtain a good seal.
Figure 34: E4 XLS+ MultiChannel Pipette
Page 64

64
E4 XLS+ Multichannel Pipettes
Figure 35: Mounting Racked LTS Tips
Tip Immersion Depth
The recommended depth for tip insertion is shown in the table below.
Pipette Model Immersion Depth
E8-10XLS+, E12-10XLS+ E8-20XLS+, E12-20XLS+ 2-3 mm
E8-200XLS+, E12-200XLS+, E8-300XLS+, E12-300XLS+,
E8-1200XLS+, E12-1200XLS+
3-6 mm
Operate the pipette within 20 degrees of vertical.
Tip Ejection
Simply press on the tip ejector button. All tips are ejected cleanly with minimal pressure on the thumb because of
the progressive eject design built in to the liquid end manifold.
Positioning the Liquid End Manifold
The liquid end manifold can be rotated to any angle for convenience when filling plates. There is no need to
loosen the coupling nut.
Note: Unique tips for 1200 µL models
The RT-L1200 and RT-L1200S tips are specifically designed for use with 1200 µL models in MULTIDISPENSE mode.
The unique design of these tips prevents drop formation and eliminates the need for touch-off between dispenses in
MULTI DISPENSE mode.
The RT-L1200F aerosol-resistant tip allows a full 1200 µL to be aspirated under the filter. However, fluid dynamics
dictate that touch-off may be required when multidispensing.
Page 65

65
4 E4 XLS Adjustable Spacer Pipette
4.1 Description and Operation
Introduction
E4 XLS Adjustable-Spacer multichannel pipettes are based on E4 XLS
single-channel models, and operate in the same way. Two versions of
the E4 XLS Adjustable-Spacer pipette are available: 6-channel (LA6)
and 8-channel (LA8). Nozzle spacing adjustment ranges are listed
below:
6-channel: 9 mm to approximately 19 mm
8-channel: 9 mm to approximately 14 mm
6-channel versions are available in the following volume ranges:
20–300μL
100–1200μL
8-channel versions are available in the following volume ranges:
5–50μL
20–300μL
100–1200μL
Spacing Controls and Indicators
Nozzle spacing is changed with the use of two knurled knobs on either end of the liquid end manifold: the SPACING ADJUSTMENT knob
and the LIMITER knob, shown in Figure 36.
The LIMITER knob, which is marked with the nozzle spacing range,
sets the desired maximum spacing within the pipette’s spacing range.
A vertical arrow at the top of the knob on the liquid end manifold is the
set point, shown in Figure 37.
When the maximum spacing with the LIMITER knob has been set, turn
the SPACING adjustment knob to open the nozzle spacing to the set
value. A scale on the liquid end manifold gives a visual reference of the
set spacing. Simply line up the leftmost nozzle with the scale on the
manifold.
The full range of adjustment for the 8-channel version is shown in Figure 38. Nozzles are set to 9 mm spacing on
the left, and 14 mm spacing on the right.
Figure 36: E4 XLS Adjustable Spacer
A: SPACING ADJUSTMENT
B: LIMITER
Figure 37: Limiter Set Point
SET POINT
A B
Page 66

66
E4 XLS Adjustable Spacer Pipette
Figure 38: Nozzles: Minimum Spacing (left) and Maximum Spacing (right)
Tip Selection
E4XLSmultichannelpipettesuseRaininLTStips.Use250μLLTStipswiththeEA-50XLS.Use300μLLTStips
withtheEA6-300XLSandEA8-300XLS.1200μLLTStipsarerecommendedfortheEA6-1200XLSandEA81200XLS.Non-filter1000μLLTStipscanalsobeusedastheywillpickup1200μL.
LTS tips have a cylindrical cross-section with a well-defined seal ring, thin wall, and positive stop. They seal
properly on the LTS nozzles and cannot be jammed or forced too far onto the nozzles.
Mounting LTS Tips
Mounting racked LTS tips on Adjustable Spacer XLS pipettes is simple.
1. Set the nozzle spacing to 9 mm (same as the spacing for racked tips) by rotating the dark grey SPACING ADJUSTMENT knob fully clockwise.
2. Align the nozzles into the row of tips, holding the pipette at a slight angle (Figure 39 left).
3. Rotate the pipette upright and press the nozzles into the tips until the “positive stop” is reached (Figure 39
right).
The tips are now mounted with proper sealing. There is no need to hand-tighten, use heavy pressure, or rock
the nozzles onto the tips to obtain a good seal. Withdraw the tips from the tip rack.
Figure 39: Mounting LTS Tips
Page 67

67
Setting the Nozzle Spacing
With tips mounted on the nozzles, and before aspirating sample:
- If the spacing for the receiving wells or test-tube block is known, set this value on the LIMITER knob.
- If the spacing is not known, hold the pipette so that the tip ends are above the centers of the wells or test-tube
block into which sample will be dispensed. Look at the scale on the liquid end manifold, and note where the
marked nozzle aligns. Set this value on the LIMITER knob.
- If the spacing is over-extended, simply click the LIMITER knob to smaller values, stopping when the tip ends
are aligned over the centers of the wells/test tubes.
Once the LIMITER knob has been set, spacing the nozzles properly is simple:
1. Aspirate the sample(s).
2. Set the nozzle spacing by moving the SPACING ADJUSTMENT knob until it stops at the value set by the LIMITER knob.
3. Dispense into the wells or test-tube block.
Tip Immersion Depth
The recommended depth for tip insertion is shown in the table below.
E4 XLS Model Immersion Depth
EA8-50XLS 2–3 mm
EA6-300XLS, EA8-300XLS, EA6-1200XLS,
EA8-1200XLS
3–6 mm
Operate the pipette within 20 degrees of vertical.
Tip Ejection
Simply press on the tip ejector button. All tips are ejected cleanly with minimal pressure on the thumb because
of the progressive eject design built in to the liquid end manifold.
Positioning the Liquid End Manifold
The liquid end manifold can be rotated to any angle for convenience. There is no need to loosen the coupling nut.
Note: Unique tips for 1200 µL models
The RT-L1200 and RT-L1200S tips are specifically designed for use with 1200 µL models in MULTIDISPENSE mode.
The unique design of these tips prevents drop formation and eliminates the need for touch-off between dispenses in
MULTI DISPENSE mode.
The RT-L1200F aerosol-resistant tip allows a full 1200 µL to be aspirated under the filter. However, fluid dynamics
dictate that touch-off may be required when multidispensing.
Page 68

68
Appendices
5 Appendices
5.1 Speed Table (all times in seconds)
5.2 Glossary of Terms used in E4 XLS and this Manual
Pipetting Terms
ADVANCED – Advanced Pipetting mode
AIR – air gap between two aspirations within the same pipetting cycle
ALIQUOTS - a sample dispensed from a larger volume; typically, refers to an individual sample of multi-dispense
ALIQUOT VOL – a list of available preset volumes
ASPIRATE - to pick up liquid into the pipette tip
ASP SPEED – aspirate speed
ASP/DISP – aspirate and dispense speeds
AUTO PACE - a programmable timed event for each multi-dispense aliquot
BLOWOUT - to run piston to the end of stroke – empty the tip of liquid
CYCLE COUNTER (abr. CC) -a setting which counts the total number of pipetting cycles
CYCLE SPEEDS – aspirate, dispense and mix speeds
DILUTE mode – to pick up two or more samples which may be separated by an air gap
DISPENSE - to release an amount of liquid
DISP SPEED – dispense speed
DONE - a single keystroke that saves setting and in some cases exits to prior screen
END VOLUMES – final selection from a list of preset volumes
FAST DISP VOL – in titrate mode, the first volume dispensed before fine increment dispensing
FIXED VOLUMES / FIXED VOL - to move a consistent set of fixed aspiration / dispensing steps without variation; same volume all the time
GLP mode - good laboratory practices, tracks the service and calibration of lab instruments
Page 69

69
HOME - piston position after returning from blow out, ready to aspirate
JOYSTICK BLOWOUT – option in MULTIDISPENSE MODE; OFF prevents BLOWOUT at the end of a multidispense cycle
LEVEL I – within the main menu, the first set of available modes
LEVEL II – within the main menu, the second set of available modes
MANUAL mode - dynamic control of the motor to move the piston up or down using the joystick
MIX - to move the pipette’s piston up and down a number of times to mix sample
MODE - a distinct subset of the operation of the pipette
MULTI-DISPENSE / MULTI-DISP mode – to dispense multiple aliquots from one pick up volume
BASIC mode – to pick up and dispense a known volume
PIPETTE & MIX mode - to pick up and dispense a known volume into another sample, then mixing by rapidly aspirating & dispensing in
and out of the tip
PURESPEED MODE– allows E4 to run programs for functional pipette tips (e.g. Ion Exchange, ProA/ProG, and Ni-IMAC tips). See mt.com for
more details
REVERSE mode - method of picking up the blow out phase or second stop and dispensing only to the first stop, used for dense or viscous
liquids
SECOND STOP – hard stop at the end of blow out
STEP – small incremental dispense steps
TIP EJECT – a manual step, at the end of an operation, that removes the pipette’s tip
TITRATE mode – dispensing carefully measured amounts to a solution to cause a reaction
VOLUME SEQUENCING - optional setting; ability to program up to 16 different aliquot volumes in a series
SEQ VOLUMES – available set volumes selected from a list
µL – a unit of measure, microliter
mL - unit of measure, milliliter
General Terms
ADMIN MODE – allows administrator to LOCK pipette functions, HIDE menu entries, save USER PRESETS and reset all of the pipette settings
back to FACTORY DEFAULTS
ADMIN PASSCODE – a four digit code number, when set it protects the ADMIN MODE menu from unauthorized access
ALARM – a warning that pipette service is due – SETUP has user settable time and cycle intervals
ALARMS LOCK- ADMIN mode feature that prevents changes to ALARMS settings in SETUP mode
AUTO OFF setting – duration after last usage before automatic power shutdown
CALIBRATION - precision and accuracy verification of the instrument under controlled conditions
CANCEL- a single keystroke that cancels an action and in some cases exits to prior screen
CAROUSEL – method of displaying a menu in a continuous cyclic pattern
CYCLES SNC SERVICE – number of cycles recorded since service
DATE setting – user adjustable calendar time
DATE FORMAT – available calendar formats in which the day, month & year are displayed:
M/D/Y – month/day/year, Y/M/D – year/month/day, D/M/Y – day/month/year
DATE/TIME LOCK- ADMIN mode feature that prevents changes to DATE and TIME settings in SETUP mode
DEFAULT setting – preselected values, typically the most commonly used value
DISPLAY BRIGHTNESS setting – the level of backlighting for the LCD screen
DISPLAY TIMEOUT setting – the number of seconds before display dims, up to 120 seconds
DONE - a single keystroke that saves setting and in some cases exits to prior screen
FACTORY DEFAULTS – resets the pipette to factory default settings, and any ADMIN PASSCODE is deleted
FIRMWARE VERSION – version number of the operating firmware
GUI – graphical user interface – the displayed contents of the programmable features & setting
UI – user interface – the total user experience combining the visual, audio & tactile features
HELP mode – user guide with detailed operating information
LANGUAGE – available languages that are programmed in the unit;
EN English, ES Spanish, FR French, DE German, ZH Chinese ,JA Japanese
LIFETIME CYCLES – total number of cycles since unit was manufactured
LOCK ALL – All Modes and SETUP, except ADMIN MODE, will be locked so that settings cannot be changed. Use with PASSCODE to prevent
any changes to any setting on the pipette.
MAIN menu – the highest level in the programming sequence, also called TOP menu
MANUF DATE – date unit was manufactured
MINS - minutes
MENU - a grouping of programmable features contained within a single screen
MODE ACCESS – ADMIN mode function, allows a mode to be LOCKED, UNLOCKED or HIDDEN
LOCKED – MODE SETTINGS cannot get changed
UNLOCKED - MODE SETTINGS can get changed
HIDDEN – The mode is not available in the CAROUSEL
MODE LEVELS – user selectable level in the main menu for each mode
MODE SETTINGS – includes speed, volume, and OPTION SETTINGS
MODEL NUMBER – factory set volume range and tip style for each pipette
NUMBER OF CYCLES – number of cycles since the last service
NUMBER OF DAYS – number of days since the last service
OFF - option turned off
ON - option turned on
Page 70

70
Appendices
OPTIONS – additional settings available within a standard pipetting mode
OPTION ICONS – icons on the lower left of the operating screen indicating OPTION status
OWNER - the operator or owner of the instrument
PASSCODE – see ADMIN PASSCODE
MODE PRESET – allows you to save and restore mode settings to/from an SD card
PRESET- see MODE PRESET or USER PRESET
PRESET SELECTOR-displays the active Preset, or the number of saved Presets, and allows for Preset selection
PREV – previous operating mode
RESET - to cancel cycle by moving the piston to blowout
REMOTE MODE – Allows communication with a PC for firmware upgrade and future applications SAVE - to enter into memory
SECS – seconds, time measurement
SETTING(S) – optional pipetting inputs – primarily volume and speed for a specific program
SETUP - optional inputs for customization by the operator including name, sound level, backlight level, etc.
SERIAL NUMBER – factory designated unique number for each pipette
SERVICE LOG - Historical log of last 32 services performed on the pipette. Entered by technician. Not user-changeable
SERVICE MODE – Provides unit service, identification and status related information
SERVICE UNLOCK CODE (admin mode function) - 8 character code that allows you to overwrite the ADMIN MODE password protection
with a temporary code, issued by an authorized Rainin pipette service center. The pipette SERIAL NUMBER is needed to generate this code.
Available when an invalid PASSCODE is entered
SOUND LEVEL setting - to turn ON or OFF the speaker, i.e., beep, during operation; when ON, the volume level can be set between 1, soft,
and 10, loud
SPEED setting – to decrease or increase the rate of flow in which sample is aspirated, dispensed or mixed
SYSTEM ICONS – icons that indicate system status information such as volume level, SD card presence, password protection status and
more
SYSTEM ICON DISPLAY-area of the display on top right corner under the TIME and BATTERY ICON where SYSTEM ICONS are displayed
USB universal serial bus – communications link; versions include micro & mini connectors
USER PRESETS – allows you to save and restore all settings of a pipette, including MODE SETTINGS, SETUP and ADMIN settings, but does
not save ADMIN PASSCODE
TEXT EDITOR – a on-screen keyboard that allows text entry and editing with the joystick
TIME – current time set in hours, minutes & seconds, displayed on operating screen, user adjustable
TIME DISPLAY – available formats for displaying the time, user selected;
NONE – no time display, 12 HOUR – 12 hour clock, no AM or PM , 24 HOUR – 24 hour clock
VOLUME setting – setting for desired amount of liquid
UNLOCK CODE-see SERVICE UNLOCK CODE
Power Management Terms
BACKLIGHT SETTING – a user setting for the amount of power driving the display backlight during normal use, adjustable for either ease of
viewing or power conservation
BACK-UP BATTERY (coin cell) – internal battery used to maintain vital operating parameters, i.e., real time clock
BATTERY ICON – displays the state of the battery, amount of charge remaining until hibernation
CHARGE INDICATOR – display of charging taking place (flashing battery icon)
CHARGE CYCLE – time requirements for; 1) Charge Stand, 2) Micro-USB to PC, 3) Micro-USB to wall charger
DIMINISHING CAPACITY – annual reduction in battery capacity
INACTIVITY – period of time with no user input
POWER DOWN – selectable, to turn power off
POWER OFF MODE – will shut down the pipette and turns power off to preserve battery power
SLEEP – automatic, display goes blank, power conservation mode after time out
START – unit activated by pressing either soft keys, requires a single press
TETHERED POWER OPERATION – to use the unit while attached with a USB cable to a wall charger
TIME OUT FOR SLEEP – a user setting for duration before unit goes into sleep, up to 60 minutes
WAKE UP – to restart full power mode from either sleep or deep sleep, by pressing either soft keys, requires a single press
Page 71

71
5.3 Memory, Power and Settings Management
All user entered changes to settings on the E4 XLS, as well as Service Mode data, are saved in FLASH memory.
They are therefore preserved in the event of battery failure or removal, with the exception of time and date (see
paragraph below). If you wish to reset the pipette back to factory settings, open the battery door. Using a clean
pipette tip, gently press and hold the reset button (see illustration below) for about 7 seconds. The unit will
beep, a splash screen will appear, and a “Memory Clear” warning will be displayed. Press the left softkey to
continue. This reset will NOT remove service data from the pipette, or presets, which are stored on the micro-SD
card.
The real-time clock, which keeps track of time and date, requires a continuous source of power. If the main
Li-Ion battery fails or is removed, and no external power source is applied (such as wall power or rapid charge
stand) the clock runs off a back-up coin cell battery. This battery will keep the clock running for about 90-120
days. If the coin cell battery drains completely, a notice will remind you to reset the time and date after power is
restored to the unit. A new coin cell battery will be needed to provide back-up power for the clock if desired. The
E4 uses one standard CR1220 lithium ion coin cell battery, which can be purchased at any consumer electronic
store. For more information, please contact Technical Support at 800-543-4030 in the US, or your METTLER
TOLEDO office or distributor outside the US.
RESET BUTTON
Figure 40: Resetting E4 XLS
Page 72

72
Appendices
Specifications
These manufacturer’s specifications should be used as guidelines when establishing your own performance
specification.
Model
Volume μLIncrement
μL
Accuracy Precision
% μL (±) % μL (<)
10μL 1 0.01 2.5 / (4)
1
0.025 / (0.04)
1
1.2 / (3)
1
0.012 / (0.03)
1
5 1.5 0.075 0.6 0.030
10 1 0.10 0 0.4 0.040
20μL 2 0.02 7.5 0.15 2 0.04
10 1.5 0.15 0.5 0.05
20 1 0.20 0.3 0.06
50μL
2
5 0.05 3.5 0.18 1.5 0.075
25 1.2 0.30 0.4 0 .10 0
50 0.8 0.40 0.2 0.10 0
100μL 10 0.1 3.5 0.35 1 0.10
50 0.8 0.40 0.24 0.12
100 0.8 0.80 0.15 0.15
200μL 20 0.2 2.5 0.5 1 0.20
100 0.8 0.8 0.25 0.25
200 0.8 1.6 0 .15 0.30
300μL 30 0.2 2.5 0.75 1 0.300
150 0.8 1.20 0.25 0.375
300 0.8 2.40 0.15 0.450
1000μL 10 0 1 3 3 0.60 0.60
500 0.8 4 0.20 1
1000 0.8 8 0.15 1.5
1200μL
2
100 1 3.6 3.6 0.60 0.6
600 0.8 4.8 0.20 1. 2
1200 0.8 9.6 0.15 1.8
2000μL 200 2 3 6 0.60 1.2
1000 0.8 8 0.20 2
2000 0.8 16 0 .12 2.4
5000μL 500 5 2.4 12 0.60 3
2500 0.6 15 0.20 5
5000 0.6 30 0.16 8
10 mL 1 mL 10 5 50 0.60 6
5 mL 1 50 0.20 10
10 mL 0.6 60 0.16 16
20 mL 2 mL 20 5 100 0.60 12
10 mL 1 100 0.20 20
20 mL 0.6 120 0.16 32
Specifications are subject to change without notice.
1
Multichannel.
2
Multichannel models only in these volume ranges.
Page 73

73
EC Declaration of Conformity according to ISO 17050
Manufacturer’s Name: Mettler-Toledo Rainin, LLC.
Manufacturer’s Address: 7500 Edgewater Drive, Oakland, CA, 94621, USA
declares that the following product:
Product Name E4 XLS Electronic Pipette
Model Number: E4 XLS
Product Options: E4-WPS Wall Power Supply
E4-RCS Rapid Charge Stand
E4-RCSWPS Wall Power Supply for Rapid Charge Stand
conformstothefollowingProductSpecications:
Safety: IEC/EN 61010-1:2010
Emissions Testing: EN 61326-1:2014
Testing performed to:Class A Limits (commercial/industrial environment)
Radiated Emissions: 30MHz-1GHz
Conducted Emissions Power ports
Immunity Testing: EN 61326-1:2014
EN61000-4-2 Electrostatic Discharge 4kV Air & 4kV Contact
EN61000-4-3 Radiated Immunity:80MHz-1000MHz & 1400MHz-2700MHz)
EN61000-4-4 Electrical Fast Transients
EN61000-4-5 Surge: Power Ports
EN61000-4-6 Conducted Immunity: .15MHz-80MHz
EN61000-4-11 Voltage Dips and Interrupts
Herewith declares that the product is in conformity with the provisions of the following EC directives (incl. all
applicable amendments):
2014/35/EU Low voltage (LVD)
2014/30/EU Electromagnetic compatibility (EMC)
Supplementary Information:
Responsible Signatory: David Greenwood, Head of Quality
Date: August, 2016
This Declaration of Conformity applies only to products which have the CE mark attached.
WARNING:
This equipment generates and uses radio frequency energy and if not installed and used properly, i.e. in
strict accordance with the instruction manual, may cause harmful interference to radio communications.
It has been tested and found to comply with the limits for a Class A computing device pursuant to Subpart
B of Part 15 of FCC rules, which are designed to provide reasonable protection against such interference
when operated in a commercial environment. Operation of this equipment in a residential area is likely to
cause interference, in which case the user at his own expense will be required to take whatever measures
may be required to correct the interference.
Page 74

Mettler-Toledo Rainin, LLC
7500 Edgewater Drive
Oakland, CA 94621
Sales 800-472-4646 or +1 510 564 1600
Service 800-543-4030 or +1 510 564 1600
Subject to technical changes
© 2016 Mettler-Toledo Rainin, LLC
Printed in USA. Part Number 30370118 Version A
For more information
www.mt.com/rainin
Disposal
In conformance with the European Directive 2012/19/EU on
Waste Electrical and Electronic Equipment (WEEE) this device
may not be disposed of in domestic waste. This also applies
to countries outside the EU, per their specific requirements.
Please dispose of this product in accordance with local
regulations at the collecting point specified for electrical and
electronic equipment.
If you have any questions, please contact the responsible
authority or the distributor from which you purchased this
device.
Should this device be passed on to other parties (for private
or professional use), the content of this regulation must also
be related.
Thank you for your contribution to environmental protection.
RoHS Regulation # 2011/65/EU:
Rainin and METTLER TOLEDO fulfil requirements under RoHS
Regulation # 2011/65/EU.
E4 XLS products and accessories comply with the above
mentioned RoHS Regulation.
RoHS
 Loading...