

Page 1
Operating Instructions
KF Coulometer
DL32 / DL39
Page 2

Page 3

Contents
Page
1 The KF-Coulometer DL32/DL39...................................................................................5
1.1 Where can you find what information? ..........................................................................5
1.2 Coulometric determination of water - principle of measurement ........................................ 6
2 Safety Measures........................................................................................................7
2.1 Measures for your protection ........................................................................................ 7
2.2 Measures for operational safety .................................................................................... 7
3 The Coulometer .........................................................................................................8
3.1 Putting into operation .................................................................................................. 9
3.2 The operating concept ................................................................................................. 9
3.2.1 The arrow keys .........................................................................................................10
3.2.2 The command keys...................................................................................................10
3.2.3 The <Reset> key ....................................................................................................... 11
3.2.4 The <i> key..............................................................................................................11
3.2.5 The menu keys .........................................................................................................11
3.2.6 The auxiliary function keys .........................................................................................12
3.2.7 The enter keys .......................................................................................................... 12
3.3 Changing the language .............................................................................................13
4 Setup ......................................................................................................................14
4.1 Main methods (DL39 only)........................................................................................14
4.2 Peripherals...............................................................................................................15
4.2.1 Printer .....................................................................................................................15
4.2.2 Balance ...................................................................................................................16
4.2.3 Titration stand...........................................................................................................16
4.2.4 Generator electrode ................................................................................................... 17
4.2.5 Computer ................................................................................................................. 17
4.2.6 Oven sample changer Stromboli .................................................................................17
4.3 Settings ...................................................................................................................18
5 Methods..................................................................................................................20
5.1 The KF standard method ............................................................................................21
5.2 KF method parameters ..............................................................................................22
5.2.1 No. (of the method) ..................................................................................................22
5.2.2 Title (of the method)..................................................................................................22
5.2.3 Sample parameters ...................................................................................................22
5.2.4 Speed ......................................................................................................................22
5.2.5 Mix time ..................................................................................................................22
5.2.6 Auto start (DL39 only)...............................................................................................23
5.2.7 Control parameters....................................................................................................23
5.2.8 Termination parameters .............................................................................................23
5.2.9 Blank ......................................................................................................................24
5.2.10 Drift .........................................................................................................................24
METTLER TOLEDO DL32/DL39 1
Page 4

5.2.11 Result (DL32 only) ...................................................................................................24
5.2.12 Calculation 1 (DL39 only) .........................................................................................24
5.2.13 Calculation 2 / Calculation 3 (DL39 only) ................................................................... 25
5.2.14 Standby ...................................................................................................................25
5.2.15 Report .....................................................................................................................25
5.2.16 Author of the method .................................................................................................25
5.3 Storage procedures ...................................................................................................26
5.4 User and METTLER Methods (DL39 only) .................................................................... 28
5.5 METTLER methods “914 Br index” and “915 Br Blank” (DL39 only) ...............................29
5.6 METTLER Method “912 Stromboli” (DL39 only)............................................................31
6 Analysis (Run).........................................................................................................33
6.1 Starting a method .....................................................................................................33
6.1.1 Menu sequence up to standby mode (KF methods) ...................................................... 34
6.1.2 Standby mode ..........................................................................................................35
6.2 Sample determination................................................................................................36
6.2.1 Weight transfer from a balance ...................................................................................39
6.2.2 Post consumption .....................................................................................................39
6.2.3 Calculations .............................................................................................................39
6.2.4 Sample series with statistics (DL39 only) ....................................................................40
6.3 Blank determination .................................................................................................. 41
6.4 Drift determination.....................................................................................................41
6.5 Determination of bromine index (DL39 only) ...............................................................42
6.6 Sample determination with the oven sample changer Stromboli (DL39 only) ...................43
7 Auxiliary Functions (Stirrer, Pump, Results)..............................................................45
7.1 Stirrer ......................................................................................................................45
7.2 Pump ......................................................................................................................45
7.3 Results ....................................................................................................................46
7.3.1 All results .................................................................................................................46
7.3.2 Recalculation ...........................................................................................................47
7.3.3 Report .....................................................................................................................48
7.3.4 Calculations (DL39 only) ..........................................................................................48
7.3.5 Statistics (DL39 only) ...............................................................................................49
7.3.6 Statistics series (DL39 only) ...................................................................................... 50
8 Information Menu (<i> key) .....................................................................................51
9 Error Messages and Malfunctions .............................................................................52
9.1 Error messages from the coulometer ........................................................................... 52
9.2 Other errors and malfunctions ....................................................................................54
9.3 Checking hardware ...................................................................................................55
9.3.1 User interface ...........................................................................................................55
9.3.2 Peripheral interfaces ..................................................................................................55
9.3.3 Inputs and outputs ....................................................................................................56
2 METTLER TOLEDO DL32/DL39
Page 5

10 Installation and Maintenance ...................................................................................57
10.1 Equipping the titration stand .......................................................................................57
10.2 Installing the waste bottle...........................................................................................58
10.3 Attaching the magnetic stirrer, electrodes and devices....................................................59
10.4 Maintenance and servicing ........................................................................................60
10.5 Using TTL inputs and outputs (DL39 only)...................................................................61
11 Standard and optional equipment .............................................................................63
11.1 Standard equipment ..................................................................................................63
11.2 Optional equipment ...................................................................................................64
12 Technical Data.........................................................................................................66
Index ...................................................................................................................................71
METTLER TOLEDO DL32/DL39 3
Page 6

4 METTLER TOLEDO DL32/DL39
Page 7

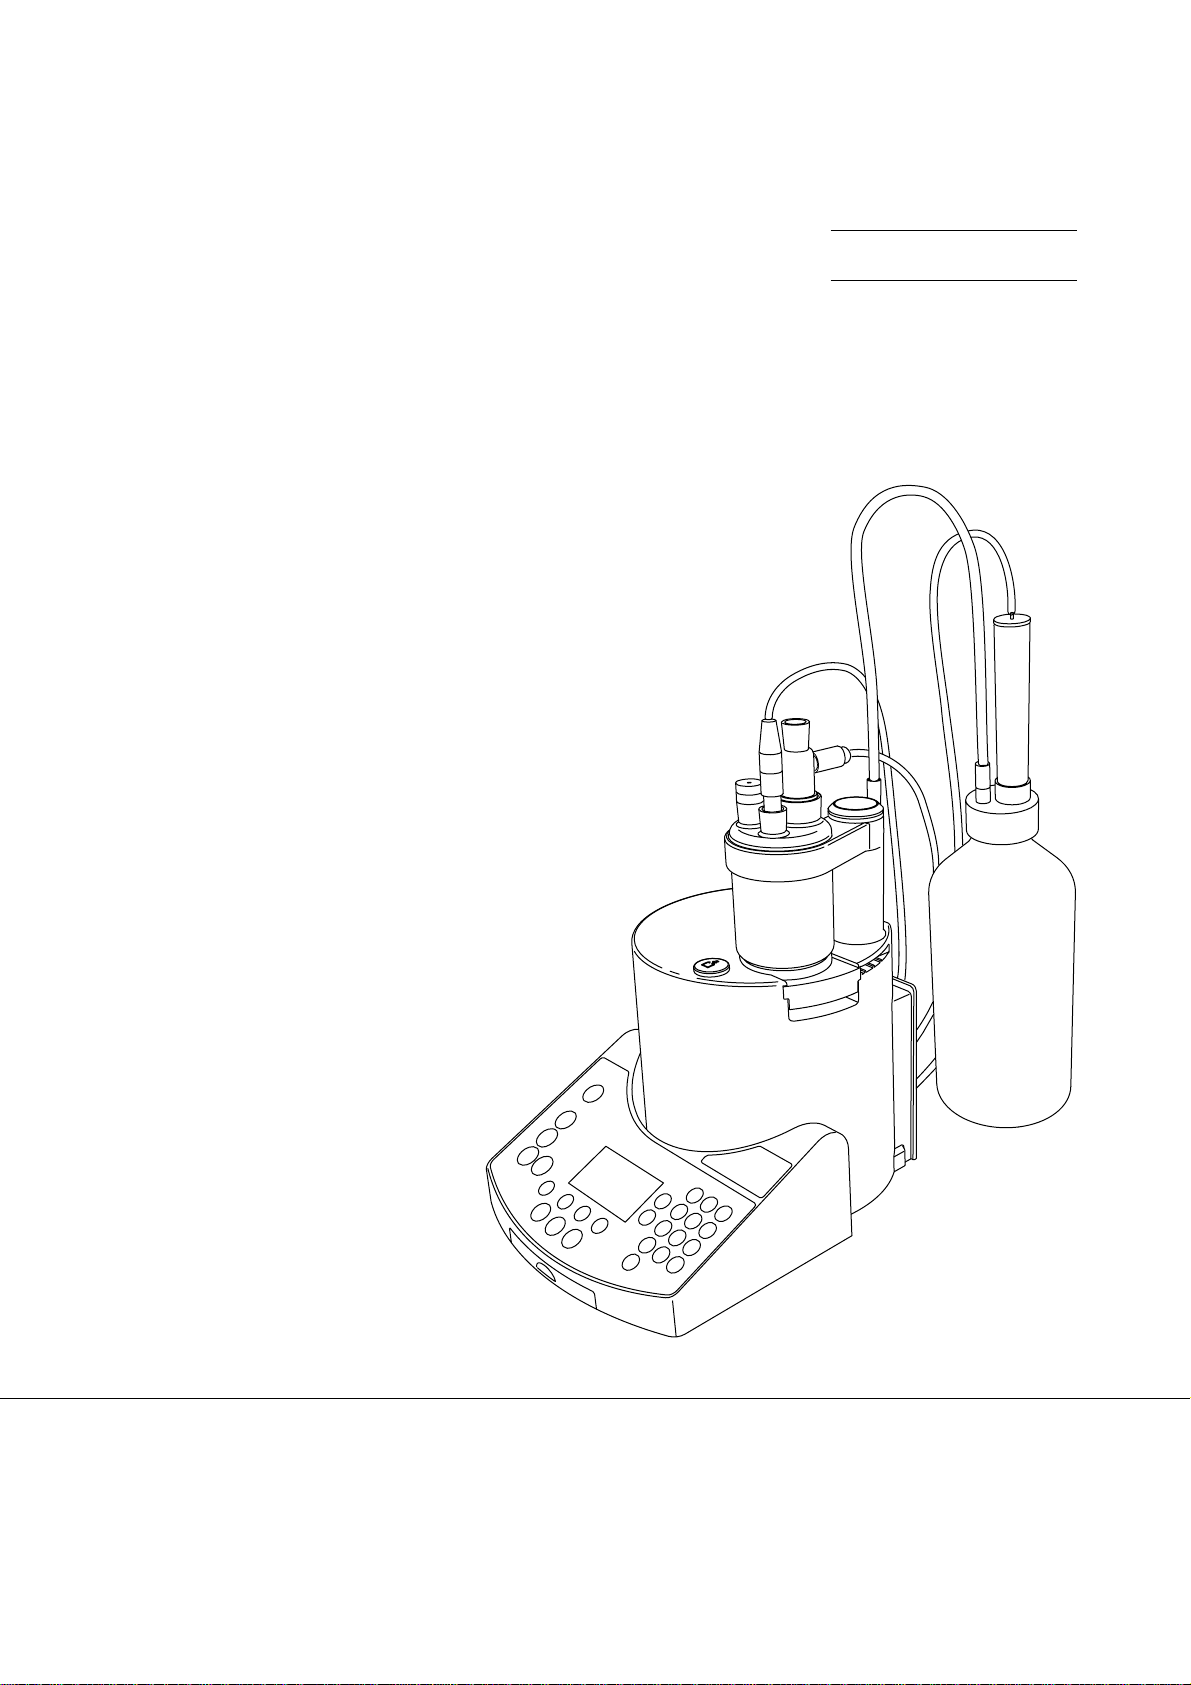
The KF-Coulometer DL32/DL39
1 The KF-Coulometer DL32/DL39
The METTLER TOLEDO DL32/DL39 coulometers are microprocessor controlled analytical instruments which
you can use to perform coulometric Karl-Fischer and bromine index determinations simply, quickly and
dependably.
You can attach a balance, the METTLER TOLEDO GA42 printer and a computer to the appropriate RS-232C
interfaces; an EPSON- or HP-compatible printer can be attached to the Centronics interface and the METTLER
TOLEDO drying oven Stromboli to the TTL-interface of the DL39.
The coulometers have a built-in tutorial, which allows you to quickly become acquainted with the instrument’s
operation and method.
The two coulometers are equal in operation. Differences in hardware and software are mentioned in the
corresponding sections.
These Operating Instructions correspond to software version 1.1 or higher.
1.1 Where can you find what information?
These Operating Instructions and the Help texts integrated in the titrator provide a complete description of
the method of functioning of the two titrators. Explanations of parameters contained in the Help text are
supplemented here when necessary.
On the memo card you can find a short overview of menus and methods.
The Application Brochure explains the theoretical fundamentals of the coulometric Karl-Fischer titration as
well as the METTLER methods that are in the DL39‘s memory.
The Help texts in the coulometer provide you with more information or refer you to the Operating Instructions
or the Application Brochure.
You will find a detailed description of the communication between the titrator and a computer in the Description
for the computer interface.
METTLER TOLEDO DL32/DL39 5
Page 8
The KF-Coulometer DL32/DL39
1.2 Coulometric determination of water - principle of measurement
When determining the water content according to Karl Fischer, water reacts with iodine and sulphur dioxide
in the presence of an alcohol and a base according to the following reaction:
H2O + I2 + SO2 + CH3OH + 3 RN ➙ [RNH]SO4CH3 + 2 [RNH]I (1).
For a volumetric titration, iodine is added as titrant. In the case of a coulometric titration, the iodine is
generated electrochemically by oxidation at the generator electrode:
2 I- ➙ I2 + 2 e
-
(2).
As long as there is water in the anolyte, the generated iodine will react according to reaction (1). I2 and H2O
react with each other on a 1:1 basis. According to Faraday’s Law, the generated amount of iodine is
proportional to the electric charge (10.72 mC = 1 µg H
O). Current consumption, therefore, is a measuring
2
stick for the amount of water.
As soon as all water has been used for the reaction, a small surplus of iodine will develop in the anodic
compartment. The iodine surplus is detected by the polarized measuring electrode, and the flow of current
to produce iodine is stopped.
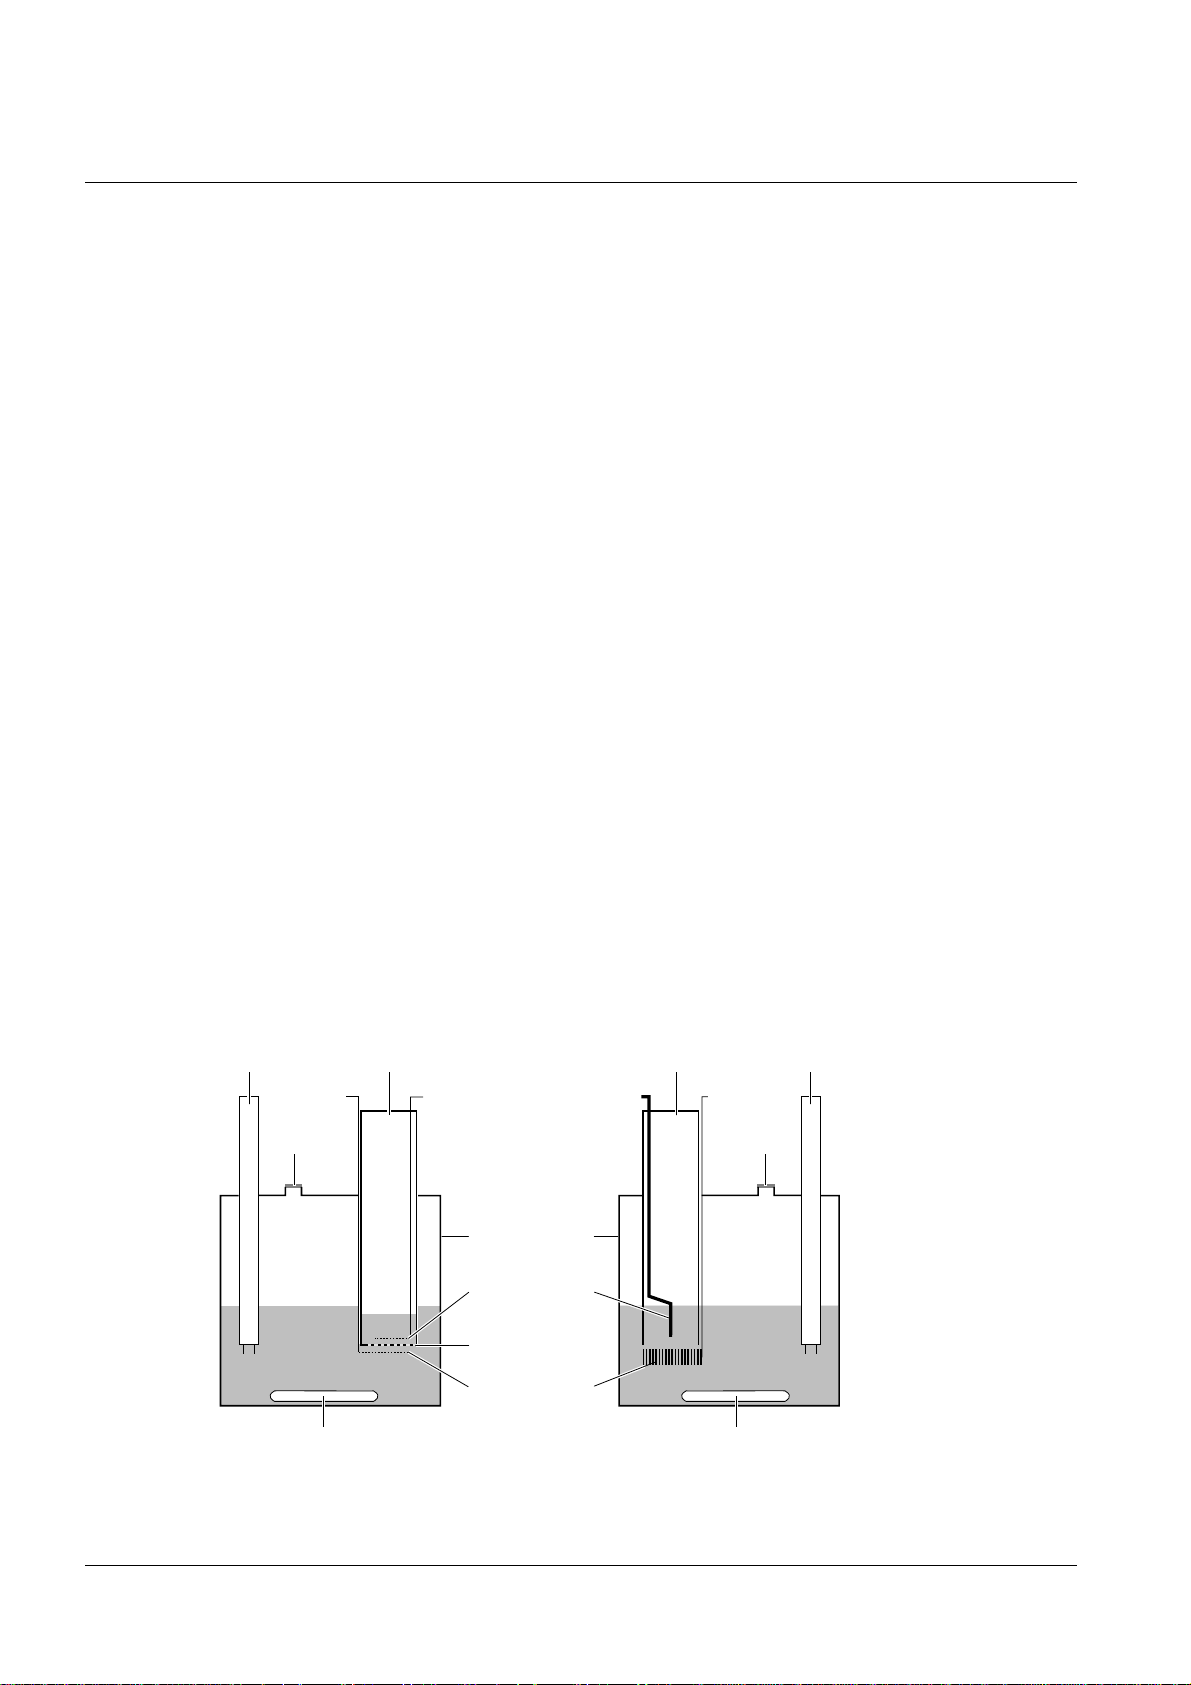
METTLER TOLEDO offers generator electrodes with or without diaphragms. In both cases, iodine generation
and detection are equal. The various applicabilities are described in the Application Brochure.
In coulometric bromine index determinations, electrochemically generated bromine reacts with the double
bonds of organic compounds:
Br2 + R1-C=C-R2 ➙ R1-CBr-CBr-R2 (3).
Bromine is, thereby, produced at the anode of the generator’s electrode:
2 Br- ➙ Br2 + 2 e
-
(4).
The bromine index [mg bromine / 100 g sample] indicates how much bromine is consumed in the
transformation of a sample according to equation (3).
Generator electrode
without diaphragm
Measuring electrode
Septum
Measuring electrode
Septum
Generator electrode
with diaphragm
Titration cell
Cathode
Diaphragm
Anode
Magnetic stirring rod
6 METTLER TOLEDO DL32/DL39
Magnetic stirring rod
Page 9
Safety Measures
2 Safety Measures
The titrators have been tested for the experiments and intended purposes documented in these Operating
Instructions. However, this does not absolve you from the responsibility of performing your own tests of the
products supplied by us regarding their suitability for the methods and purposes you intend to use them for.
You should, therefore, observe the following safety measures.
2.1 Measures for your protection
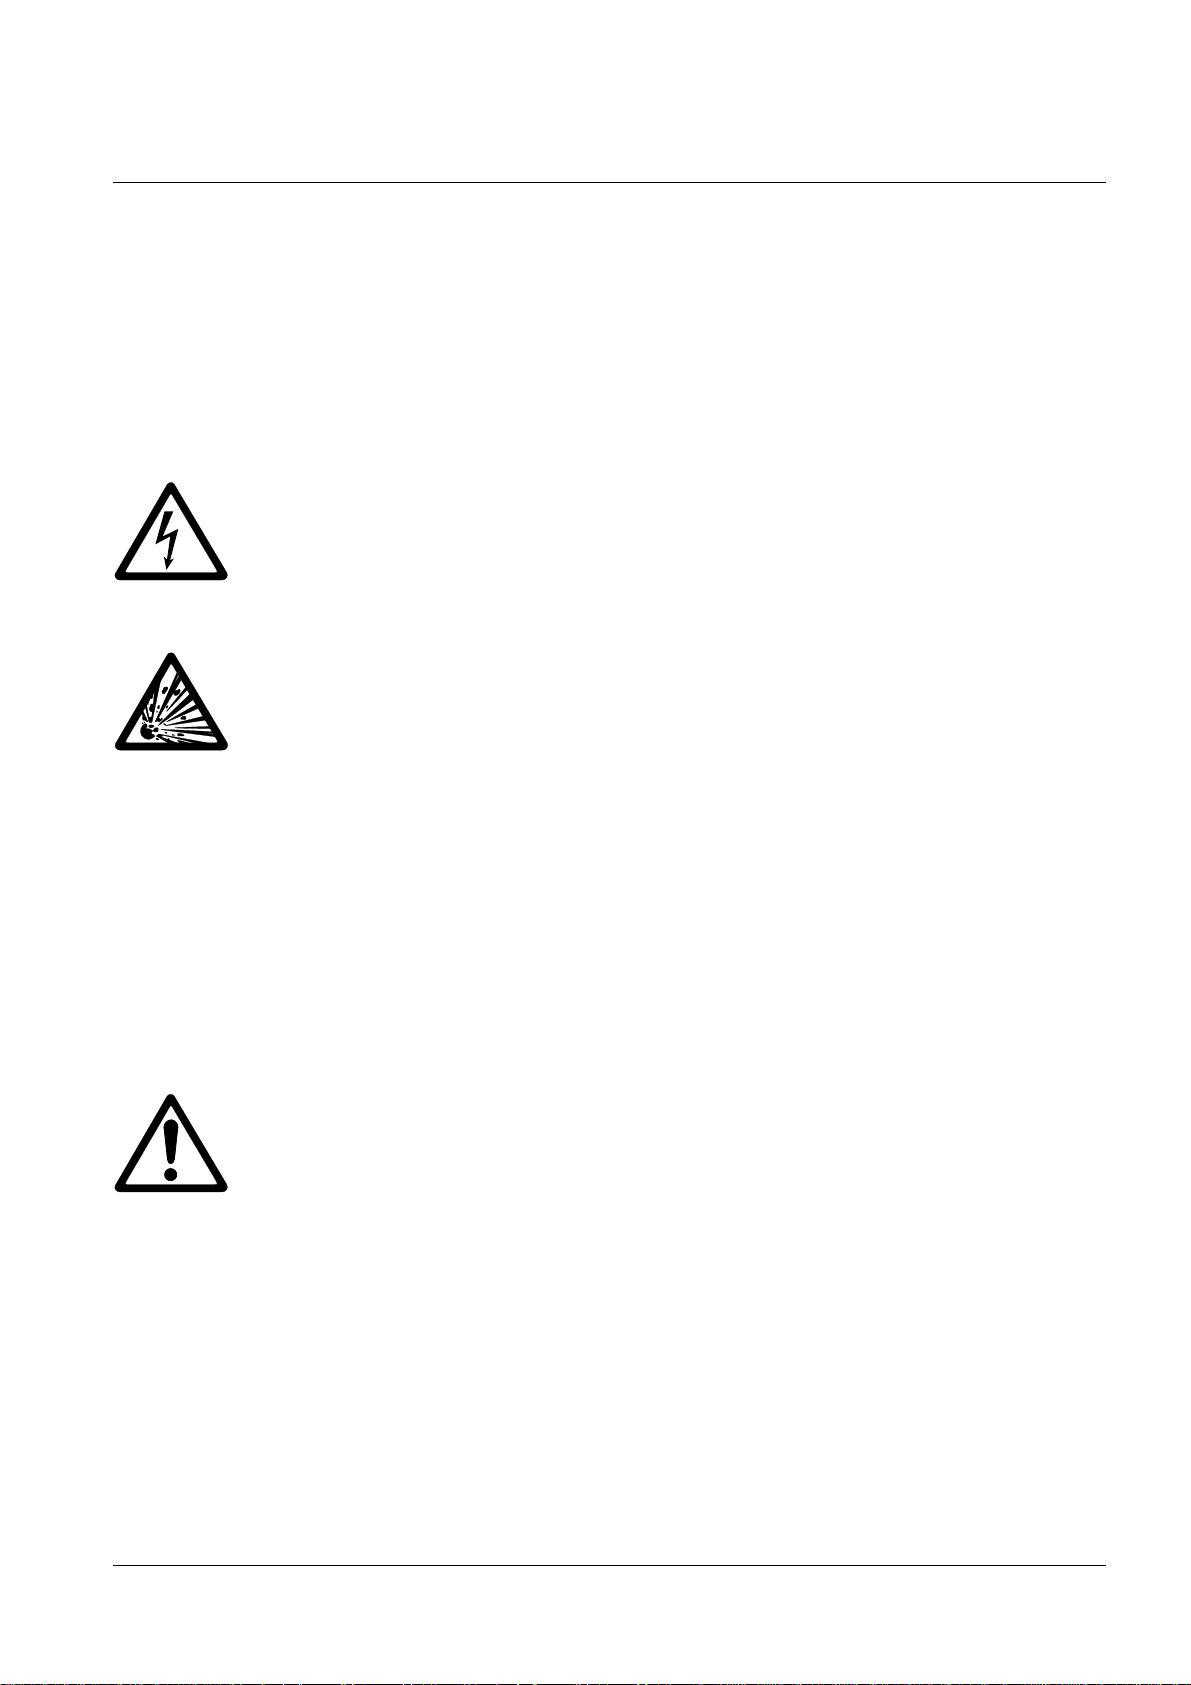
- Ensure that you plug the power cable supplied into a receptacle outlet that is grounded! In
the absence of grounding, a technical fault could be lethal.
Risk of electric
shock
- Never work in an environment subject to explosion hazards! The housing of the instrument
is not gas tight (explosion hazard due to spark formation, corrosion caused by the ingress
of gases).
Risk of
explosion
- When using chemicals and solvents, comply with the instructions of the producer and
the general lab safety rules!
All Karl Fischer reagents are readily flammable and toxic.
- In the case of skin contact, immediately wash off with copious amounts of water!
- If eye contact occurs, rinse intensively with copious amounts of water and consult a
physician!
2.2 Measures for operational safety
- Have the instrument serviced by METTLER TOLEDO Service only!
- Always wipe off splashed liquids immediately! The instrument is not waterproof.
- Exclude the following environmental influences:
Caution
• powerful vibrations,
• direct sunlight,
• atmospheric humidity greater than 80%,
• temperatures below 5 °C and above 40 °C,
• powerful electric or magnetic fields!
METTLER TOLEDO DL32/DL39 7
Page 10
The Coulometer
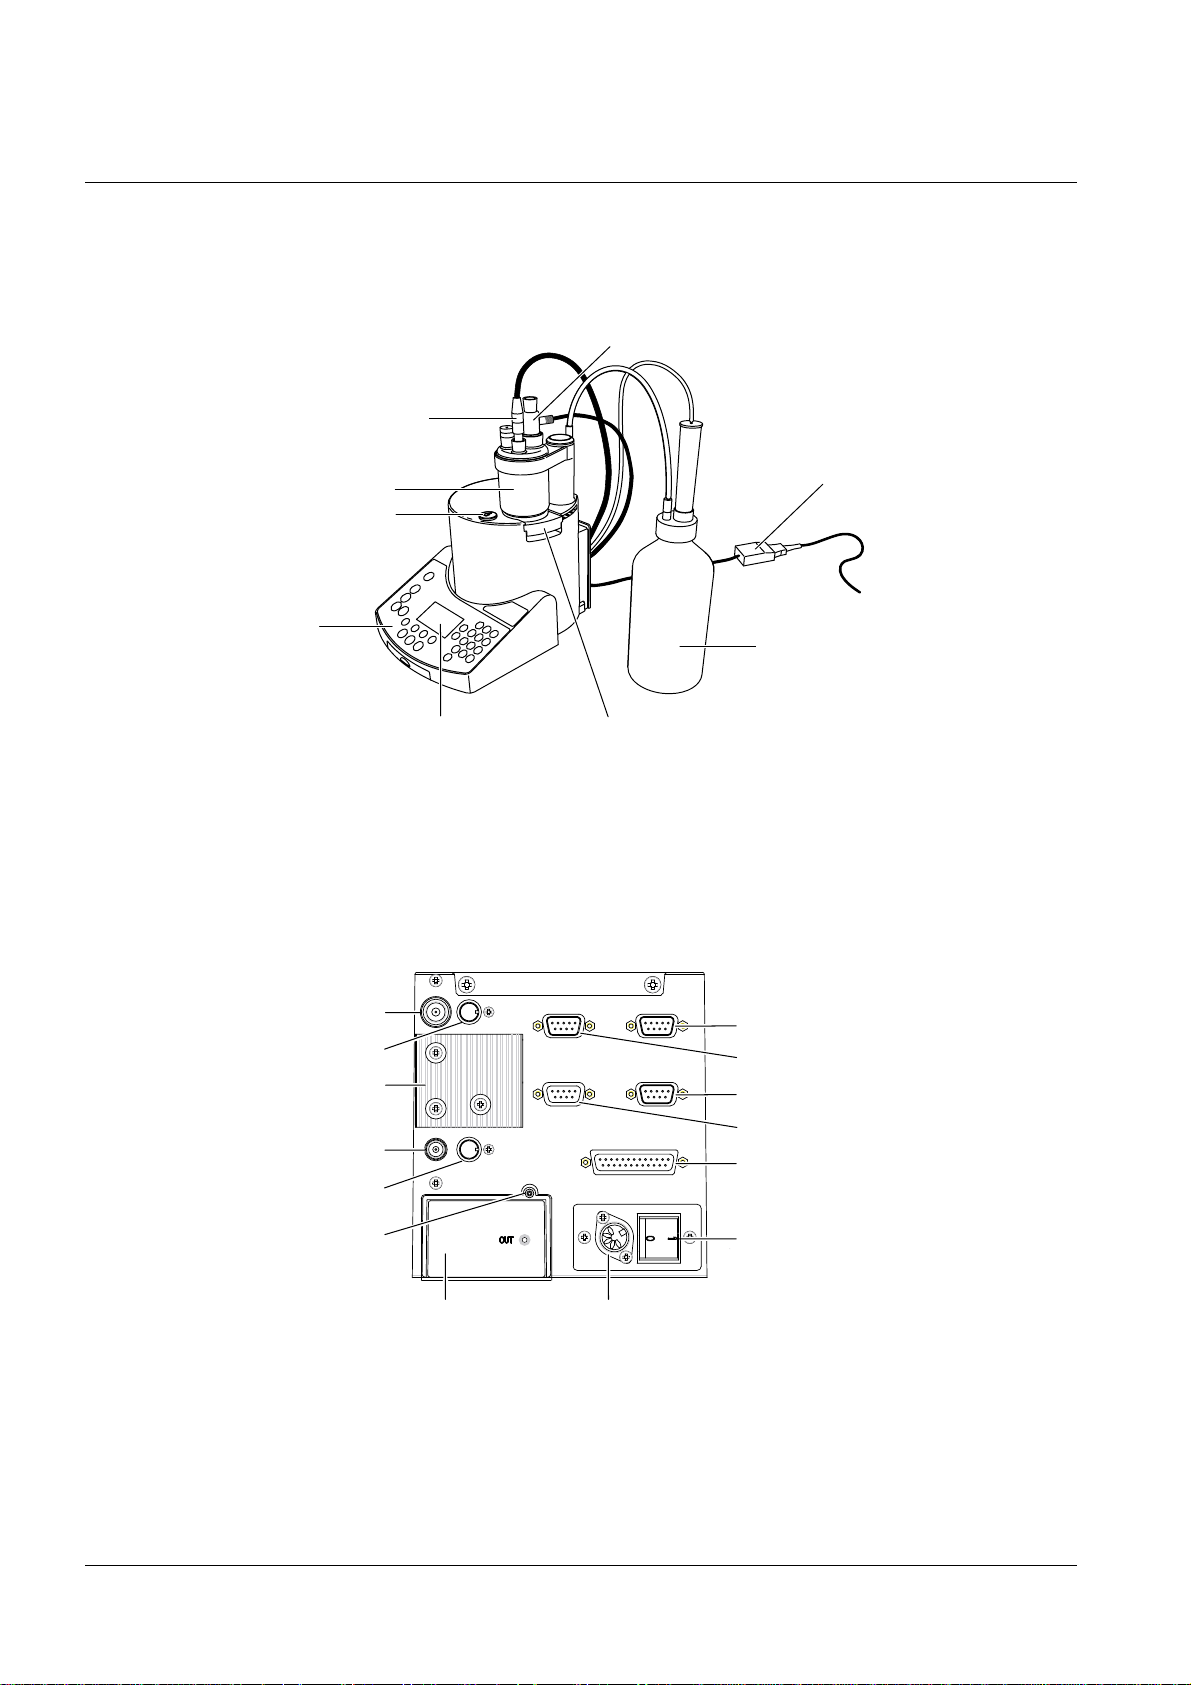
3 The Coulometer
Measuring electrode
Generator electrode
Titration cell
Pump button
Keypad
Display
Rear view of instrument with connection diagram
Measuring electrode (Sensor)
External titration stand (DV705)
Cooling fin
External power pack
Waste bottle
Magnetic stirrer
GA42 printer (RS-232C)
Balance (RS-232C)
Computer (RS-232C)
Stromboli (TTL I/O)
Generator electrode
Stirrer
Waste bottle
(Suction fitting)
Pump unit
8 METTLER TOLEDO DL32/DL39
Socket for
external power pack
EPSON- or HP-compatible
printer (Centronics)
On/Off
switch
Page 11
The Coulometer
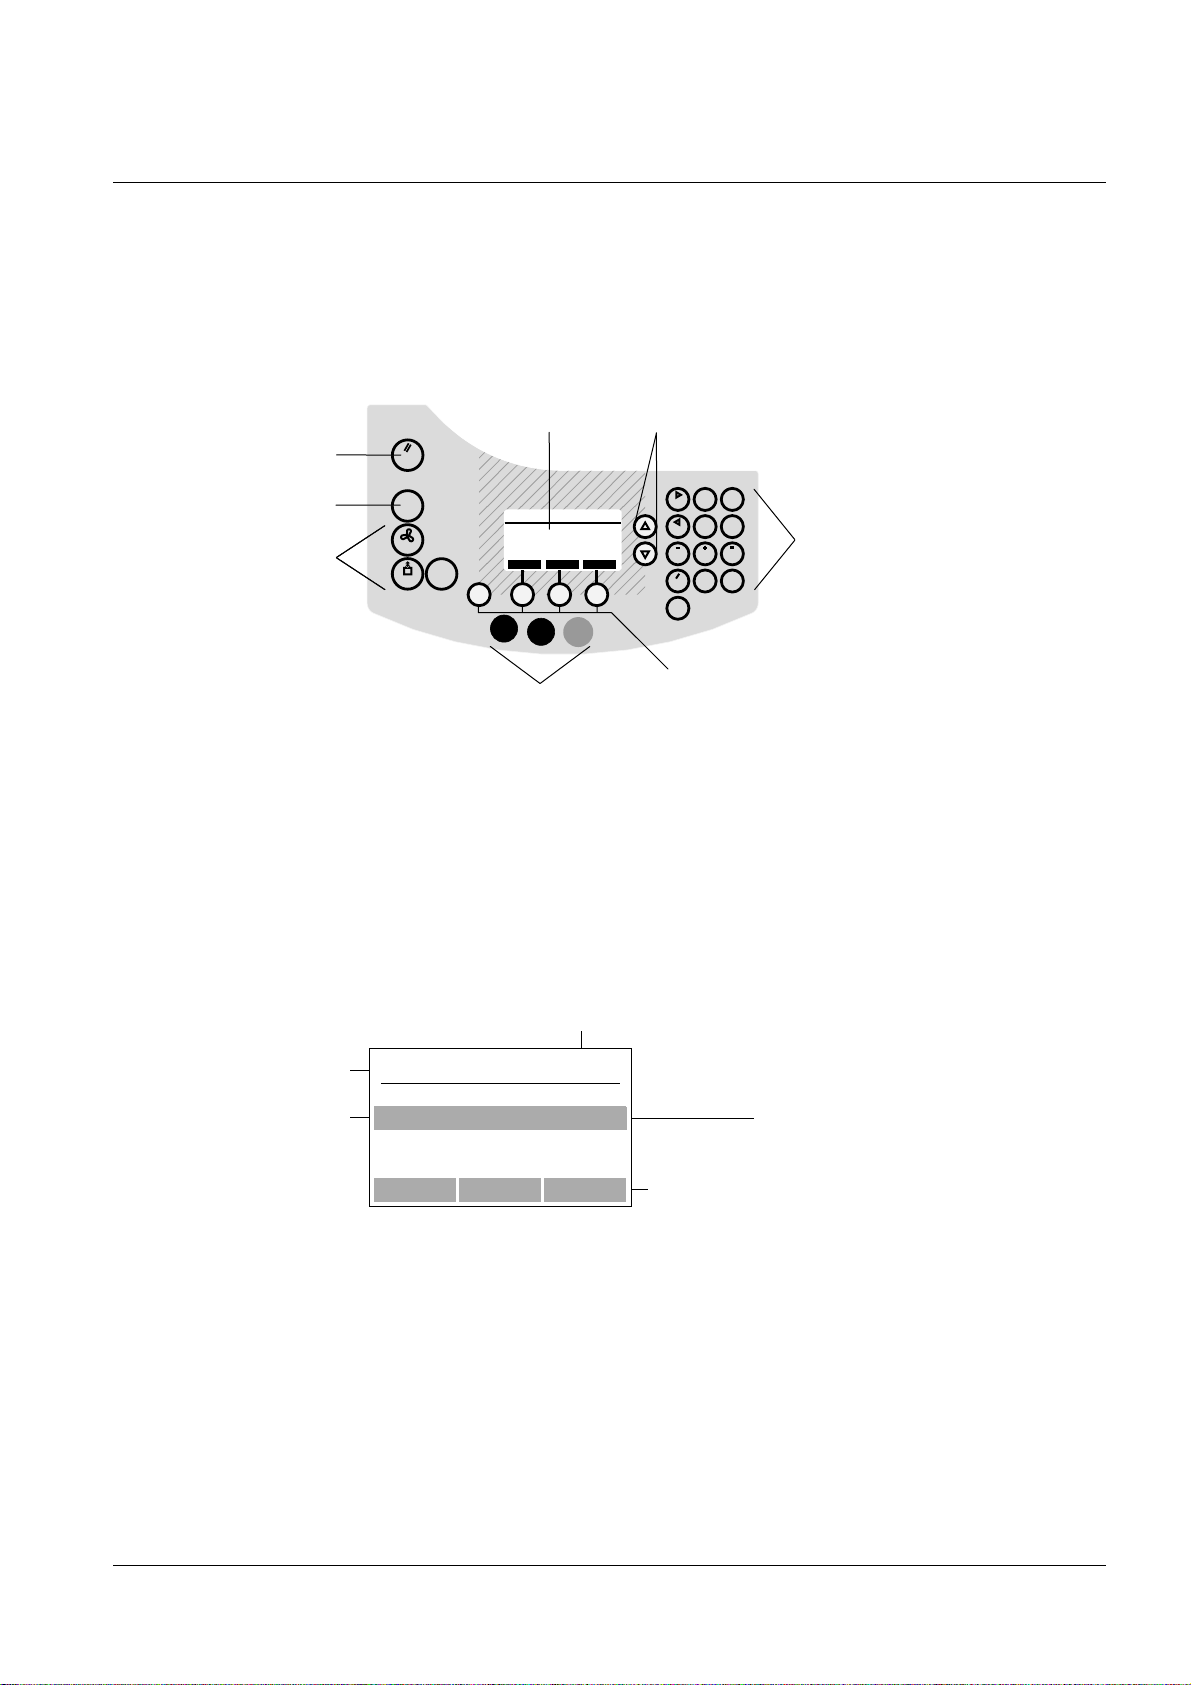
3.1 Putting into operation
- Connect the supplied external power pack; switch on the coulometer. A self-test is performed before the
name of the coulometer appears on the display (example DL39).
Hallo!
F3
Arrow keys
(
8
7
[
4
5
1
2
*
.
0
Shift
)
9
]
6
3
CE
Del
Entry keys
<Reset> key
<i> key
Auxiliary function keys
Reset
Stirrer
Pump
Display
i
*
Results
Esc
METTLER TOLEDO
DL39
F1
Setup
Method
Version
F2
Run
Command keys
Menu keys
After the coulometer has been switched on, the command key <F3>, “Hello!”, the <i> key and all menu and
auxiliary function keys can be activated.
3.2 The operating concept
- Press, e.g., the setup key:
Name of the key, i.e., the displayed
list of resources belongs to the
setup menu
Title line
Selection bar
Resources SETUP
Main methods
Peripherals
Settings
Help Print OK
DL32:
“Main methods” not available!
▼
Commands
Now you can also activate the <Reset> key as well as the arrow and command keys.
OK (Press <F3>): The list of selected resources appears.
Print
(Press <F2>): The list of selected resources is printed (if a printer has been selected and defined).
Help (Press <F1>): Information about the selected resource appears.
METTLER TOLEDO DL32/DL39 9
Page 12

The Coulometer
3.2.1 The arrow keys
▲▼
The arrow appears in the display when there are more lines to the list than are visible. When you
press the arrow keys (∇∆) next to the display, the lines are scrolled downwards or upwards. The
selection bar is fixed. By pressing <Shift>, ∇ or <Shift>, ∆ the lines are moved a page at a time.
The commands that can be executed always refer to the line highlighted by the selection bar.
3.2.2 The command keys
The commands, which can be triggered with <F1> ... <F3> change according to the selected menu item.
The following commands require an explanation:
Hello! When the instrument is delivered, the <F3> command in the initial mask “METTLER TOLEDO...”
is assigned to a tutorial menu. This is deleted when you have performed the first titration with
the tutorial.
Note You can call up the tutorial at any time with the <i> key.
OK This command is always a confirmation for what you
• wish to view,
• have viewed or entered,
• wish to adopt from a selection.
Modify When this command appears, a
• submenu can appear, which can or must be modified,
• a selection menu appears from which you can or must accept values or names,
• an existing parameter value or name can be directly replaced.
If a value can be modified or entered only with the keypad, the “Modify” command is missing.
ABC This command always appears when you can select letters or characters, e.g., for a name. In
this case, you cannot enter numbers until you have confirmed “ABC” (press<F1>).
Help Information about the selected resource appears.
The <Esc> key
If you have made changes in the current menu or submenu, they are discarded, i.e., the
Esc
original values/names remain. <Esc> returns you to the previous display.
10 METTLER TOLEDO DL32/DL39
Page 13

The Coulometer
3.2.3 The <Reset> key
The initial mask “METTLER TOLEDO...” reappears: <Reset> is used to terminate analyses or
Reset
other actions. Data that is not stored is lost.
3.2.4 The <i> key
The value of the current electrolyte capacity, the last drift determination, the last blank value
i
determination for Stromboli (METTLER method 912), the “Hello!” tutorial, and a menu for testing
the titrator hardware are accessible with this key.
3.2.5 The menu keys
In order to analyze a sample automatically, the required data must be stored. On the coulometer, this data
is assigned to task areas (the menus), and can be accessed with the menu keys. Only the interaction
between these menus makes automatic analysis possible.
All resources required for titration such as “Peripherals” and “Settings” are stored in the <SETUP>
Setup
menu and can be changed.
The sample is determined with the aid of a method. All methods necessary for the different
Method
analyses are stored in the <METHOD> menu and can be changed. All resources defined in the
<SETUP> menu are available for these methods.
DL32 Only one method can be stored.
DL39 Fifty user methods can be stored.
The titration is performed in the <RUN> menu. The method called up determines the analysis
Run
sequence.
Note Each menu is subdivided into task areas (submenus), which are designated to menus, lists or
masks in these Operating Instructions.
METTLER TOLEDO DL32/DL39 11
Page 14
The Coulometer
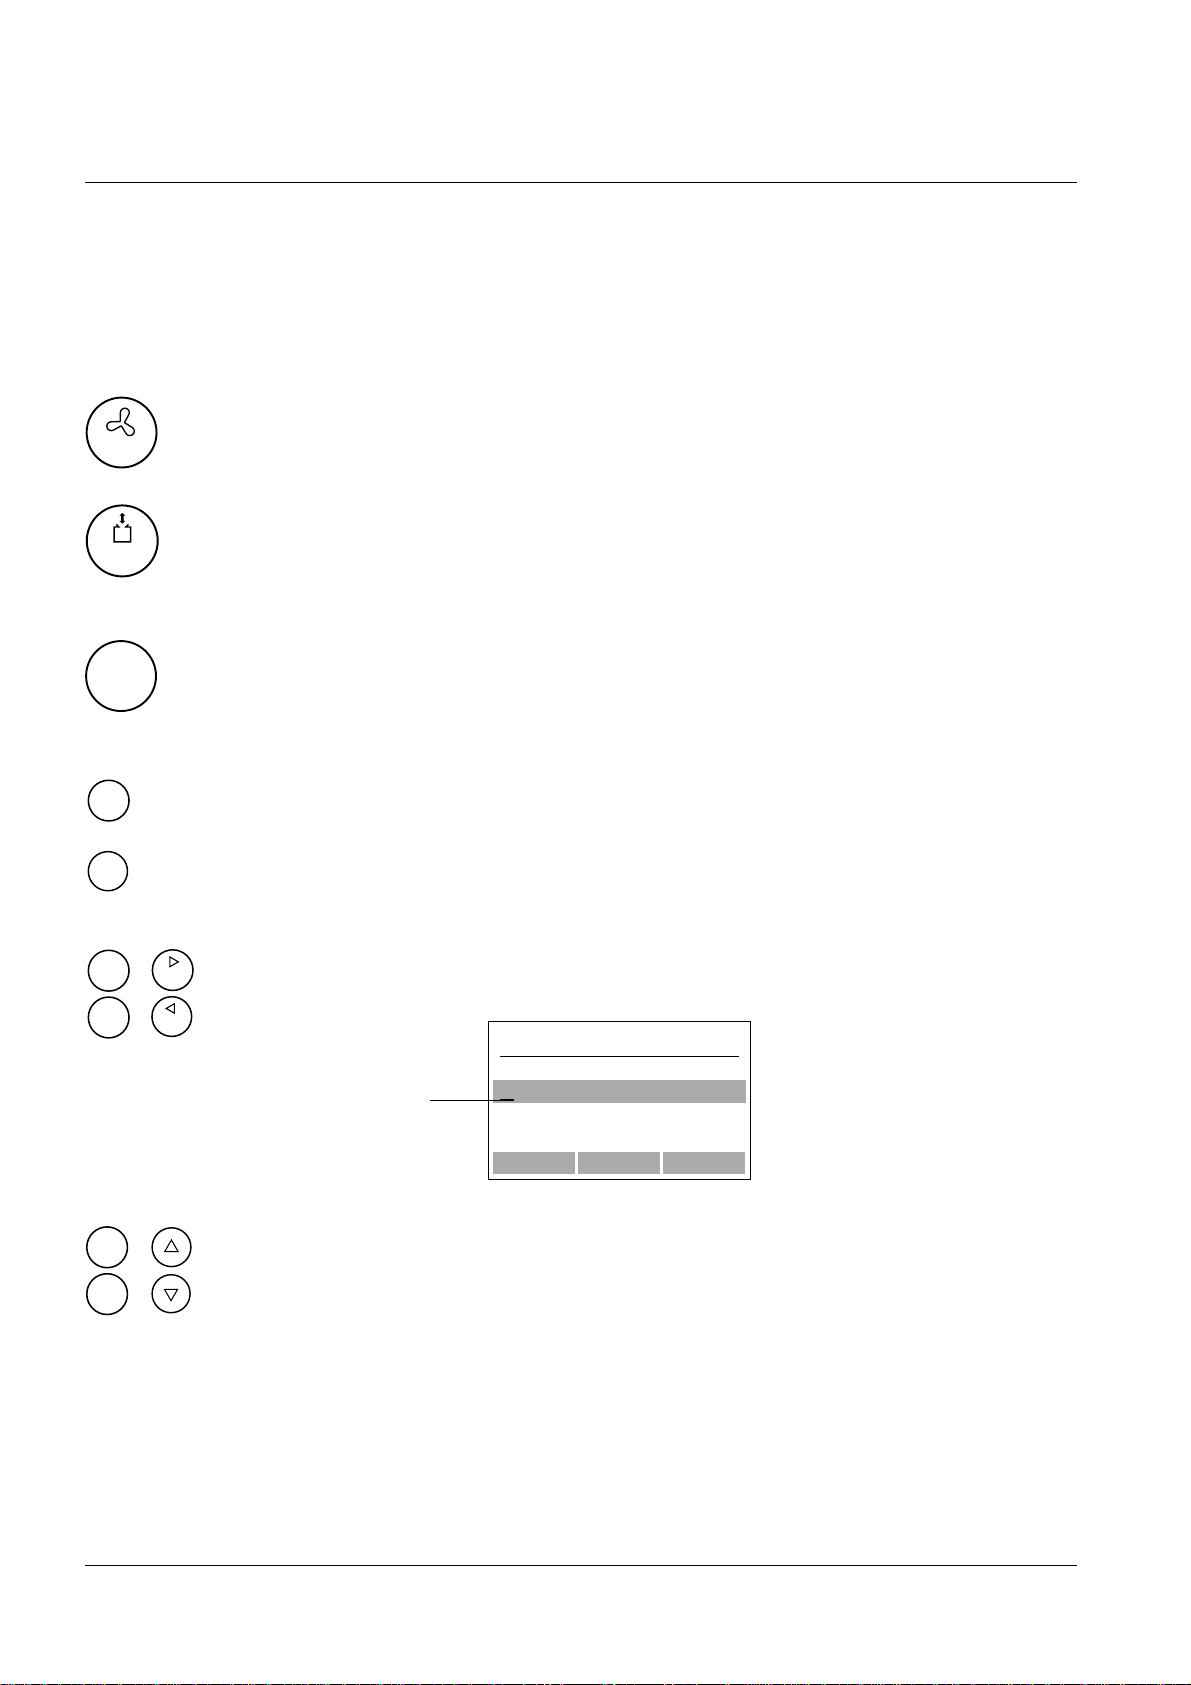
3.2.6 The auxiliary function keys
To activate the stirrer, the pump or to recalculate results, the required commands are also assigned to
menus. As they are independent of a sample analysis, but can support it, they are called auxiliary functions.
They are accessible under the corresponding keys.
You can switch the stirrer on or off and change the stirring speed.
Stirrer
You can siphon off electrolyte from the cell into the waste bottle. By pressing the <Pump> and
Pump
<F3> keys, “Start” or “Stop” resp., the value of the electrolyte capacity is reset to its initial value.
You can view the result list of analyzed samples, perform recalculations, change the statistical
*
Results
evaluation of a series (DL39 only!) and print out additional reports.
3.2.7 The enter keys
Shift
CE
Del
Shift
Shift
Shift
+
+
+
The <Shift> key activates the characters above the numbers.
CE You delete all entered numbers/characters/letters.
Del You delete the number/character/letter last entered.
7
4
You move the cursor to the right or left (only if letters/characters are selected),
see example:
moves the display up by 3 lines,
moves the display down by 3 lines.
Shift
+
Cursor
User a
abcdefghijklm
nopqrstuvwxyz
ABCDEFGHIJKLM
Help Select OK
12 METTLER TOLEDO DL32/DL39
Page 15
The Coulometer
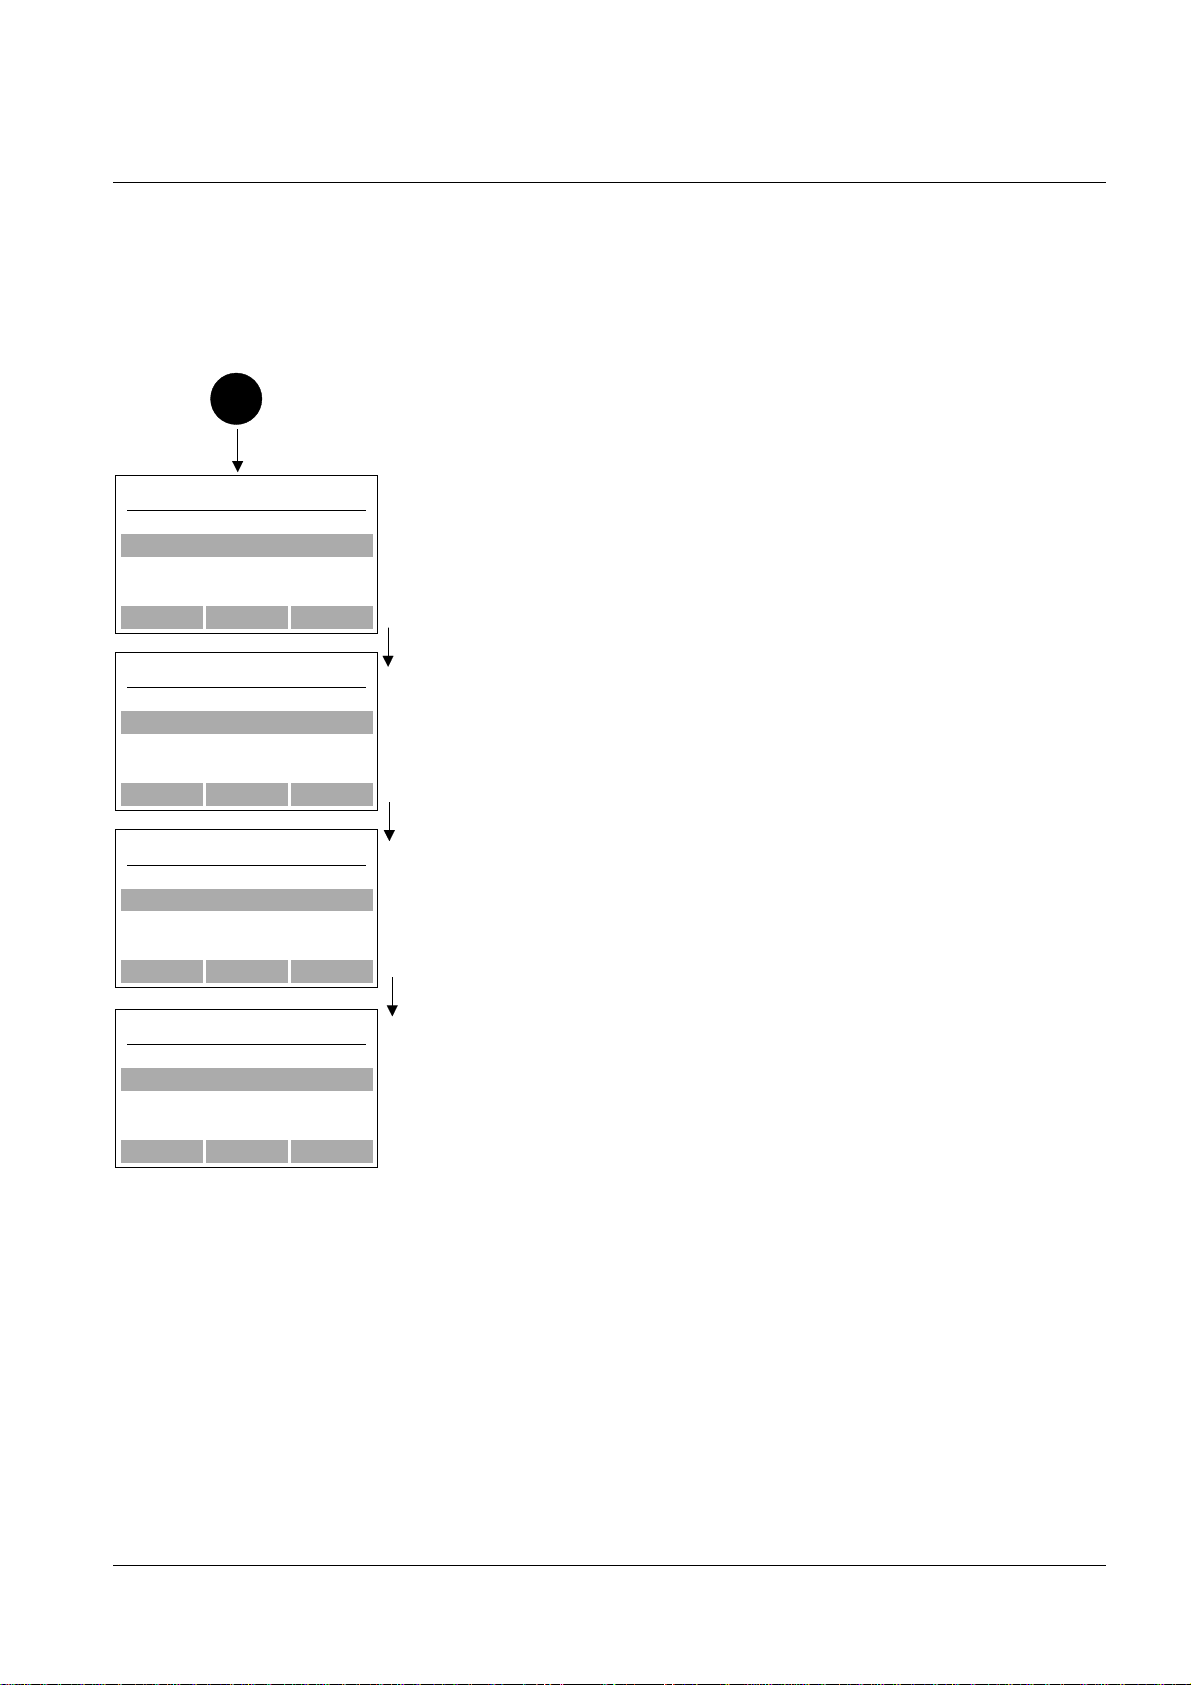
3.3 Changing the language
All texts on the coulometer are stored in German, English, French, Spanish, Italian and Russian. If you have
not run the tutorial and understand one of the available languages better than the one displayed, you
should select it:
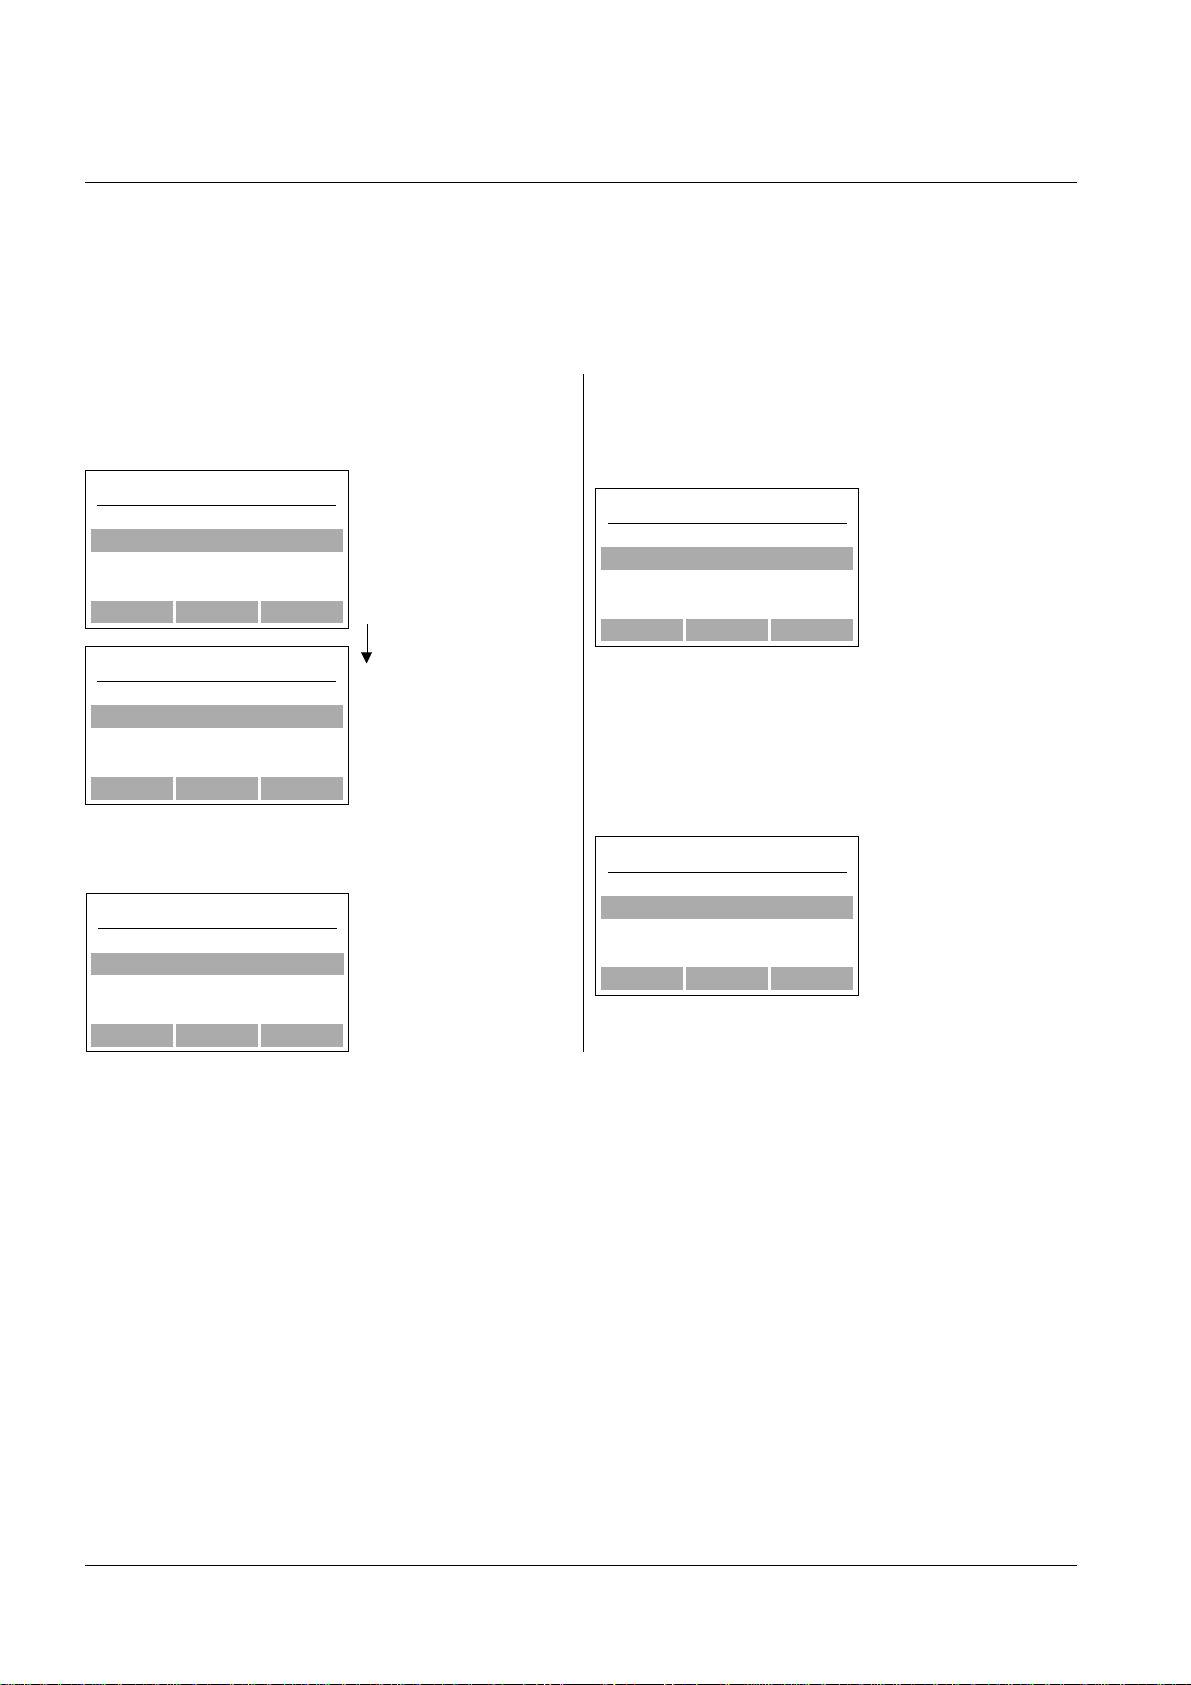
Setup
Resources SETUP
Main methods
Peripherals
Settings
Help OK
Resources SETUP
Peripherals
Settings
OK
Settings SETUP
Language English
User list
Date 04-09-2001
Modify OK
– Press the <Setup> key.
– Press <Shift> and the arrow key (-) at the same time in order to scroll
down by two lines, so that “Settings” is selected.
▲
– Press <F3>, “OK”.
▼
–
Press <F2>, “Modify” repeatedly until, e.g., “Español” appears (example).
Settings SETUP
Lengua Español
Lista usuarios
Fecha 04-09-2001
Modif. OK
METTLER TOLEDO DL32/DL39 13
Pressing “OK” or <ESC> returns you to the “Resources” mask.
OK Spanish text appears.
▼
Esc English text reappears.
Page 16

Setup
4 Setup
In order to perform titrations and to enable data transmission to the peripherals, your coulometer needs to
be setup with the necessary resources. In this menu, you define and store these resources.
When you press the <SETUP> key, the list of resources appears:
Main methods (DL39 only)
Peripherals
Settings
You can select the resources with the arrow keys and open the submenu with <F3>, “OK”.
4.1 Main methods (DL39 only)
When the titrator is delivered, the <F3> command is assigned to the “Hello!” tutorial, i.e., you can select its
sequence immediately. In this menu you can assign methods to command keys <F1>...<F3> or delete
“Hello!”.
With <F3>, “OK”, the following appears (example on delivery of the titrator):
Main methods SETUP
F1: Free
Modify OK
With <F2>, “Modify”, the following appears:
Main methods SETUP
User methods
METTLER methods
OK
You can select a method from the user methods, if available, or from the METTLER methods (e.g., “METTLER
912 Stromboli”:
Main methods SETUP
F1: Method 912
Title: Stromboli
Delete Modify OK
14 METTLER TOLEDO DL32/DL39
Page 17

Setup
With <F3>, “OK”, the following appears:
Main methods SETUP
F2: Free
Modify OK
You can select a method to configure the <F2> command (Press <F2>, “Modify”). If you confirm this
display with <F3>, “OK”, the following appears:
Main methods SETUP
F3: Hello!
Delete Modify OK
You can either delete “Hello!” with <F1> or overwrite it with another method (press <F2>, “Modify”).
4.2 Peripherals
With <F3>, “OK”, the names of the peripherals you can attach to the coulometer via the RS-232C interfaces
or the Centronics interface appear. You must define these and possibly change the preset settings.
Printer None
Balance None
Titrn stand Internal
Computer Not def.
4.2.1 Printer
With <F3>, “OK”, the name of the printer you connected to the coulometer appears.
HP
GA42
EPSON
None
If you select the METTLER TOLEDO GA42 there is no need for any further settings. If you select an EPSONor HP-compatible printer, you must enter the following settings (standard settings for the printer are printed
in bold).
METTLER TOLEDO DL32/DL39 15
Page 18
Setup
HP-compatible EPSON-compatible
Type PCL3+ or PCL3 LQ/Stylus or LX/SX
Paper Single sheet Single sheet or Fanfold
Format A4 or 81/2 * 11" A4, 81/2 * 11" or 81/2 * 12"
Automatic feed Yes Yes or No
Type Select “PCL3+”, “PCL3”, “LQ/Stylus” or “LX/SX”.
Paper Select “Single sheet” or “Fanfold.
Format • A4 (width= 21 cm, length= 29,7 cm)
• 81/2 * 11" (width= 81/2 inches, length = 11 inches)
• 81/2 * 12" (width= 81/2 inches, length= 12 inches)
Automatic feed Select “Yes” or “No”.
Yes Each report starts on a new page;
with “Paper: Single sheet”, a footer is printed out on each page.
No The individual reports are separated by a distance of 2 lines.
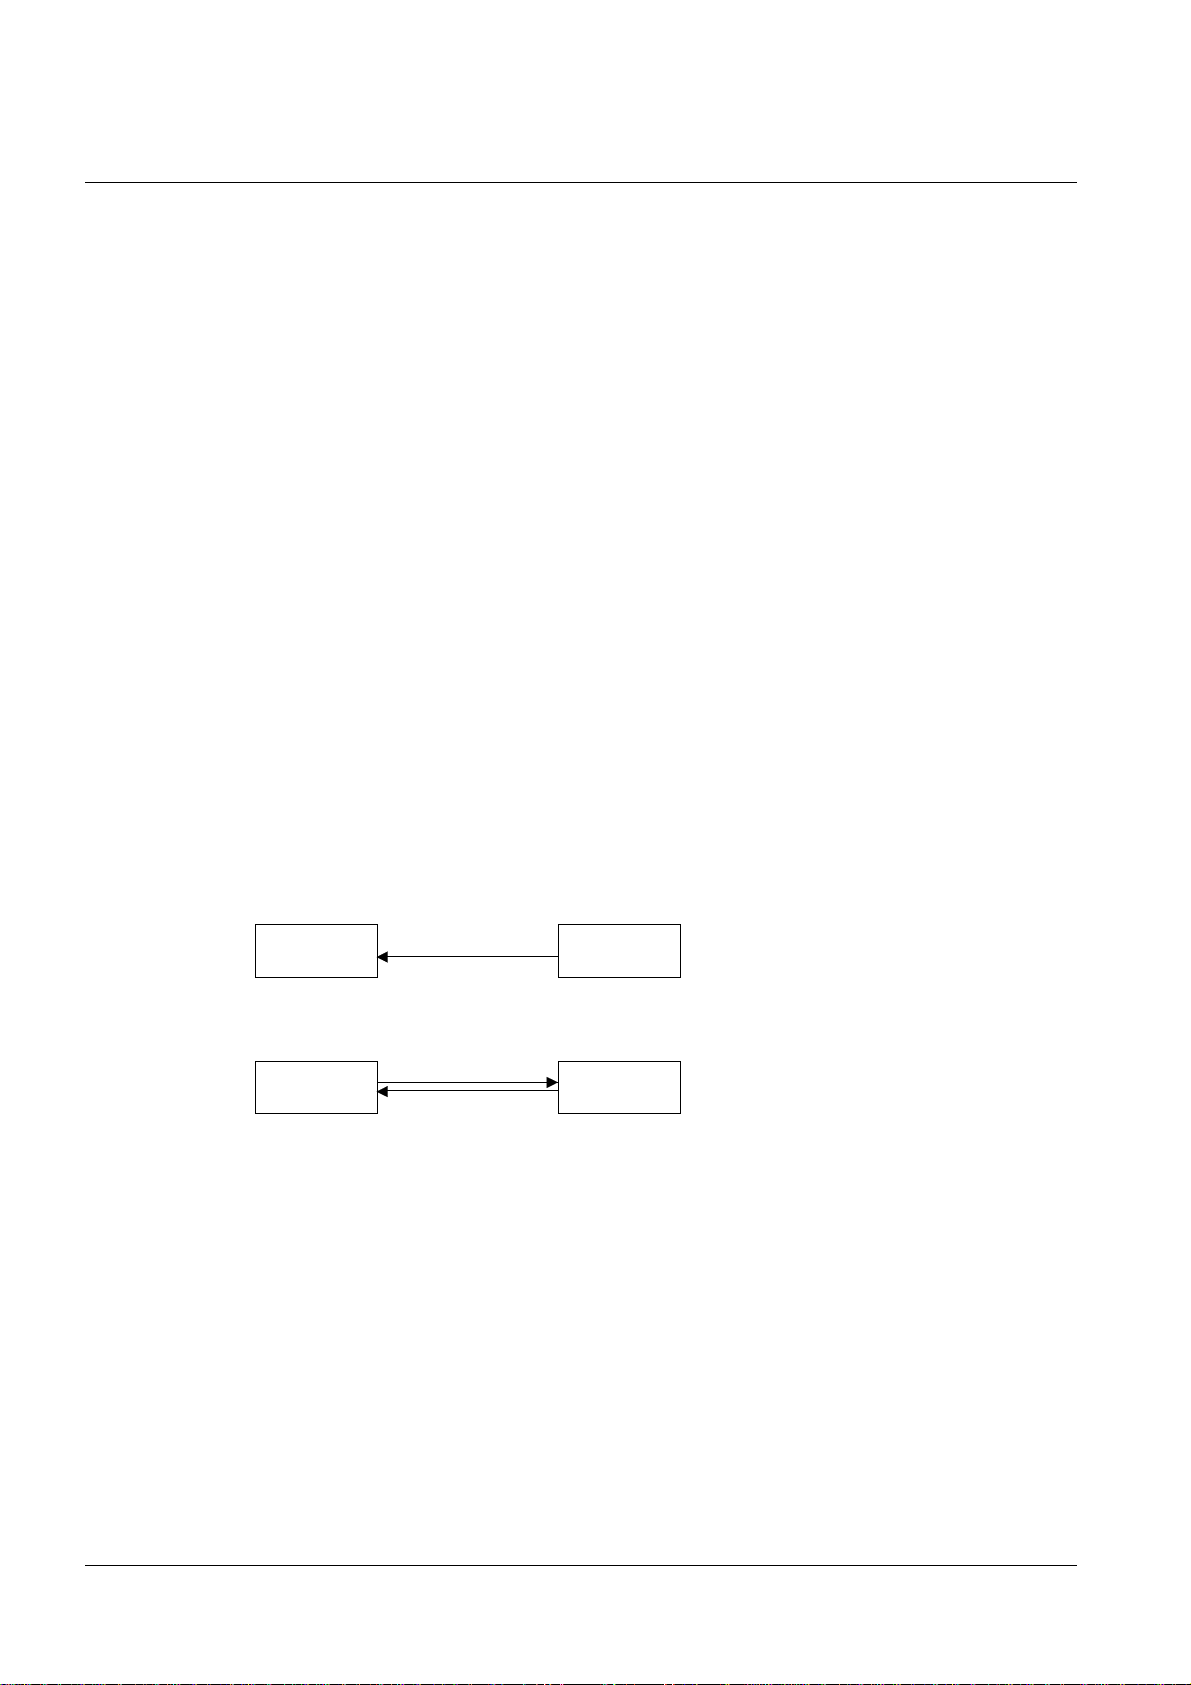
4.2.2 Balance
Unidirect.
Bidirect.
None
Unidirectional The weight, the balance continuously transfers the current weight value.
Coulometer Balance
Data to Coulometer
Configuration: “Send Cont.”
Bidirectional On requesting the weight, the balance transfers the current weight value when ordered by
the titrator.
Coulometer Balance
Command from Coulometer
Data to Coulometer
Configuration: “Send Stable”
(“Send on Transfer”)
For METTLER TOLEDO balances AB, AG, AT and AX always select “Bidirectional”.
4.2.3 Titration stand
Internal
External
You can attach the METTLER TOLEDO DV705 KF titration stand as an external titration stand. Its magnetic
stirrer and pump are controlled via the DV705. For use of the coulometric measuring cell on the external
titration stand, the titration arm must be exchanged (see optional equipment).
16 METTLER TOLEDO DL32/DL39
Page 19

Setup
4.2.4 Generator electrode
For the generator electrode (with or without diaphragm) there is no need for any further settings.
Note The maximum value of the current pulses of the generator electrode is 400 mA. If the conduc-
tivity of the electrolyte is low and this value can no longer be reached for this reason, the
coulometer limits the current pulses to 200 mA.
4.2.5 Computer
Defined
Not defined
If you connect a computer, you must select “Defined” and possibly change the settings.
Default settings for the computer
Baudrate 4800
Parity Even
Number of data bits8
Number of stop bits1
Character set ASCII
Start/End '{'/CR
Baudrate Select 1200, 2400, 4800 or 9600.
Parity Select “Even”, “Odd” or “None”.
Data bits Select 7 or 8 bits .
Stop bits Select 1 or 2 bit(s).
Character set Select “ASCII” or “DL”.
Note If you select “DL”, you must specify 8 for the number of data bits.
Start/End Select “'{'/CR” or “STX/ETX”.
Note You can find additional information on the communication between coulometer and the computer
in the “Description for the Computer Interface”.
4.2.6 Oven sample changer Stromboli
If you have an oven sample changer Stromboli connected to the DL 39, no further entries are necessary.
METTLER TOLEDO DL32/DL39 17
Page 20

Setup
4.3 Settings
You can select or define the following settings for the coulometer:
Language English
User list
Date 26-08-2001
Time 10:20
Titrator-ID
Access for Expert
Beep Yes
Capacity [mg] 80
Pumping time [s] 60
Language Select English, German, French, Spanish, Italian or Russian.
User list Press <F2>, “Modify”, and a list of defined names and an empty line appears (“...”)
where you can enter a new name.
Pres “ABC” and you can enter your name. Erase a selected name with “Delete”.
You can then select your name for both the development of a method and the performance
of the analysis.
Date You can set the date and select the format.
Day 26
Month 8
Year 2001
Format 31-08-2001
Format Select “31/08/2001”, “08-31-2001”, “31-Aug-2001” or “Aug/31/2001”.
Time You can set the time and select the format.
Hour 10
Minute 20
Format 24 h
Format Select between “24 h” or “am/pm”.
Titrator ID To enter an identification for your coulometer , press <F1>, “ABC”. The ID is always
reported.
Access for You can decide whether all persons who work with the coulometer should also have
access to the “Setup” and “Method” menus, i.e., have the right to modify resources or
methods.
Expert When the coulometer is delivered, you have access to all menus. To change
this, select “Routine”.
18 METTLER TOLEDO DL32/DL39
Page 21

Routine You can:
• in the “Setup” menu, only print out the defined resources and view the list
• in the “Method” menu only print out the list of methods (DL39 only) and
• not perform any recalculations or change any statistical data.
• under the <i> key, select neither the “Tutorial” nor the “Hardware test” .
Renewed access for experts is described on the last page of these Operating Instructions.
Beep You can select:
Yes
Minimum
No
Yes In addition to those cases described below under “Minimum”, a beep also
sounds after each keystroke.
Minimum A beep sounds on transition from pretitration to standby, on display of the
results and in the case of error messages.
Setup
of settings
each method.
Capacity You can perform several titrations consecutively in the same anolyte. Its capacity, however,
is limited. In the vicinity of the capacity limit the reaction rate decreases.
You should enter the value for capacity that the producers of the reagents recommend.
When this value is surpassed the message “Capacity exhausted” appears.
The amount of water (in mg) that has been titrated during the analyses and pretitrations
is added up. The difference between the value entered and the titrated water is displayed
under the <i> key. Pressing the <Pump> and <F3> keys, “Start” or “Stop” resp., reset the
value to its initial setting.
Pumping time The defined time is a safety criterion: the pump will shut off after this time if you, e.g.,
leave the coulometer while the pump is running.
METTLER TOLEDO DL32/DL39 19
Page 22
Methods
5 Methods
The coulometer automatically performs analyses with the help of predefined methods. On delivery of the
instrument
in the DL32, the KF standard method specified by
us is stored. You can modify this method and save it
under a number.
Methods METHOD
KF standard method
Help Modify
Methods METHOD
No. 0
of the method
Help OK
When you have modified and saved the method, the
following appears (example):
Methods METHOD
111 Methanol
KF standard method
in the DL39 the KF standard method specified by us
and 5 METTLER methods are stored. You can modify
these methods and save them as user methods.
Methods METHOD
User methods
METTLER methods
KF standard method
Help Print OK
Print The list of methods you have developed
is printed out.
OK The user methods with their defined
numbers and titles appear (example):
Methods METHOD
22 Toluene
33 Silicon oil
111 Methanol
Delete Print Modify
Help Print Modify
A complete titration method comprises sample preparation, mixing and wait times, the actual titration,
result calculation and a report. These partial steps are defined in the coulometer as parameters which
determine the progress of an analysis.
You modify a method
by changing its parameters.
20 METTLER TOLEDO DL32/DL39
Page 23

Methods
5.1 The KF standard method
You can use the KF standard method to develop your own method. In this you are guided from one
parameter to another in the specified order. Exceptions are sample, control, termination and report parameters,
which are shown as a group in a mask. In the case of the DL39, this also applies to the calculation
parameters.
With the user and METTLER methods, all parameters appear as a list in a mask. Exceptions are again the
above-mentioned groups.
The last parameter of a method, “Author of a method”, always appears in its own mask.
The method is always shown with the following default parameters.
No. of the method
Title of the method
Sample parameters
ID
Type Mass
Minimum [g] 0.0000
Maximum [g] 5.0000
Entry Before
Speed [%] 40
Mix time [s] 10
Auto start No
Control parameters
Pol. current [µA] 2
End point [mV] 100
Gen.speed Normal
Termination param.
Max. time [s] 300
Drift stop Rel.
Drift [µg/min] 3
Blank [µg] 0
Drift Online
Result
→→
→ DL39 only
→→
→→
→ DL32 only
→→
Calculation 1 ppm
R1 = x [ppm]*f1
f1 = 1.0000
Unit ppm
Decimal places 2
Statistics Yes
Max. srel [%] 0.00
Calculation 2
R2 = No calculation
f2 = 1.0000
Unit → DL39 only
Decimal places 2
Statistics Yes
Max. srel [%] 0.00
Calculation 3
R3 = No calculation
f3 = 1.0000
Unit
Decimal places 2
Statistics Yes
Max. srel [%] 0.00
Standby Yes
Report
Output Print.+Comp.
Type GLP
Author of the method
METTLER TOLEDO DL32/DL39 21
Page 24

Methods
5.2 KF method parameters
The following parameters can be changed. This will either cause some parameters to appear or disappear.
The METTLER methods 911 – 915 and specific parameters for automation with the METTLER TOLEDO oven
sample changer Stromboli are described in a separate chapter.
5.2.1 No. (of the method)
The method is stored under the number. The numbers 911– 915 are reserved for METTLER methods.
5.2.2 Title (of the method)
You can give the method a specific name.
5.2.3 Sample parameters ID You can enter an identification for the sample(s) now or just before the titration (“Request”)
for every sample.
Type Select “Mass”, “Fixed mass”, “Volume”, “Fixed volume”, “Pieces” or “Fixed pieces”.
Minimum/Maximum
appears when “Mass”, “Volume” or “Pieces” is selected. The unit depends on the
type of sample: [g], [mL] or [pcs]..
Help You can calculate and enter values for a fixed or variable amount of sample.
Entry of the amount of sample “Before” or “During” the actual titration. “Entry” appears when
“Mass”, “Volume” or “Pieces” is selected.
DL39: If you select “Yes” for the parameter “Auto start” (see below), “Before” is automatically
converted to “During” when storing.
Density appears when “Volume” or “Fixed Volume” is selected.
Weight appears when “Fixed Mass” is selected.
Volume appears when “Fixed volume” is selected.
Number appears when “Fixed pieces” is selected.
5.2.4 Speed
Stirring should guarantee quick and thorough mixing of the electrolyte. We recommend the setting: 40 %.
The magnetic stirring rod should not “jump”.
Only use the magnetic stirring rod included in the delivery (see equipment).
5.2.5 Mix time
The time is an empirical value and can be entered individually for the samples (“Request”).
22 METTLER TOLEDO DL32/DL39
Page 25

Methods
5.2.6 Auto start (DL39 only)
Yes The DL39 begins analysis as soon as a sample has been added. The time for adding a sample may
not exceed 30 seconds or the instrument will revert to its “Standby” mode.
5.2.7 Control parameters
Pol. current Select 1,2 or 5 µA for polarization current.
End point For the end point we recommend a value of 100 mV.
The recommended values for both types of generator electrodes (with or without diaphragm)
are in bold print.
Pol. current [µA] 1 2 5
End points [mV] 100 100 100
Gen. speed Select “Normal”, “Fast” or “Slow” for the titrant generation (iodine or bromine).
Normal This setting is optimized for the determination of water in the µg and lower
mg range.
Fast Select this setting for larger amounts of water in order to shorten the analysis.
Slow Select this setting for smaller amounts of water.
1000 µg50 µgH2O content of the sample
Generation speed
Slow FastNormal
5.2.8 Termination parameters
To terminate the titration, you must define “Max. time [s]” and “Drift stop” (“Delay” respectively) as a condition.
After reaching the end point, the titration is terminated when the first of the selected conditions is met.
Max. time As a safety measure, you must enter a value for the maximum time of analysis. If no end
point can be found, the analysis will be terminated after this time has run out.
Drift stop Select “Absolute”, “Relative” or “No”.
Relative Termination when actual drift is less than the drift measured before the
titration(D0) plus the entered value (Di): D < D0 + Di.
Absolute Termination when the drift is less than the entered value (Di): D < Di.
No “Drift [µg/min]” disappears and “Delay [s]” appears.
Delay If you enter “0” for the delay time, the titration is terminated as soon as the end point is
reached. This could result in premature termination of the titration.
METTLER TOLEDO DL32/DL39 23
Page 26

Methods
5.2.9 Blank
For the entry of a correct value, you should perform a determination. You can enter the value specific to the
sample (“Request”).
[mg] You can enter a value in the method.
Request Before each titration, the value is requested individually for each sample.
5.2.10 Drift
The drift value is needed for calculation of the result. You can enter a value (“[µg/min]”) in the method or
just before every titration (“Request”) or have it entered automatically:
[µg/min] You can enter a value in the method.
Request Before each titration, the value is requested individually for each sample.
Online The moisture that enters the titration vessel is continuously measured, evaluated and
displayed in the standby mode.
Determination Some standard operating procedures require insertion of the value of a drift determination.
If you have performed a drift determination, the result is stored under the <i> key and
used in the calculation.
5.2.11 Result (DL32 only)
The water content is calculated with the appropriate formula by selection of the unit: [mg], [µg], [%],
[ppm], [mg/pc], [mg or µg] and [% or ppm].
[mg or µg], [% or ppm] With the following limit values, the result is automatically set from one unit to
the other.
mg µg % ppm
smaller than 0,1 → 99,.. smaller than 0,1 → 999,..
0,1.. ← larger than 100 0,1.. ← larger than 1000
5.2.12 Calculation 1 (DL39 only) R1 Result of the first calculation: The water content is calculated with the appropriate formula
by selection of the unit: [mg], [µg], [%], [ppm], [mg/pc], [mg/g], [min], [ppm]ext.extr.,
[ppm]ext.soln., [%]ext.extr., [%]ext.soln.
[min] Duration of the titration.
[ppm]ext.extr., [ppm]ext.soln., [%]ext.extr., [%]ext.soln. Special calculation for
samples that are used after an external extraction or external dissolution. The
second and third calculations are needed. See Application Brochure.
Unit You can enter a user-defined unit (e.g., “g” if you define a factor of 0.001 for the calculation
of the H2O content in [mg]) .
24 METTLER TOLEDO DL32/DL39
Page 27

Methods
Statistics
To obtain the mean value x, the standard deviation s and the relative standard deviation srel,
of a sample series, you must select “Yes”. You can terminate a sample series using the
auxiliary function “Results”.
Max. srel If the entered value for the max. relative standard deviation is exceeded, a message appears.
5.2.13 Calculation 2 / Calculation 3 (DL39 only)
The available parameters are the same as for calculation 1. Instead of a formula, you can select “No calculation”.
The water content is calculated with the appropriate formula by selection of the unit:
[mg], [µg], [%], [ppm], [mg/pc], [mg/g], [min].
The following units are missing: [ppm]ext.extr., [ppm]ext.soln., [%]ext.extr., [%]ext.soln.
Note You cannot determine samples from an external extraction or dissolution in the routine mode as
you must enter the amount of sample for the extraction/dissolution and the amount of solvent
under calculation 2 and 3.
5.2.14 Standby
Yes After a titration, the cell is kept anhydrous. We recommend allowing the standby titration to run
even during lengthy pauses so that you can start the next titration at any time.
No After a titration the start mask of the analysis menu reappears.
[min] After the sample determination, a switch is made to the standby mode and the subsequent rate
of consumption is displayed and printed out every minute for the defined time.
5.2.15 Report
Output Select “Printer”, “Computer” or “Print.+Comp.” as output device.
Type DL32 Select “GLP”, “None” or “Short-form.
DL39 Select “GLP”, “GLP+curves”, “None” or “Short-form”. Curves can only be printed
out on an EPSON or HP compatible printer.
(GLP report: All data which is required by the rules of Good Laboratory Practice.)
5.2.16 Author of the method
By selecting your name from the user list, you can document that you are responsible for the development
of the method.
METTLER TOLEDO DL32/DL39 25
Page 28

Methods
5.3 Storage procedures
The following always appears as the last parameter of a method:
Methods METHOD
Author
of the method
Help Modify OK
The modified method is stored when you confirm by pressing <F3>, “OK”. Examples:
DL32 DL39
Methods METHOD
111 Methanol
KF standard method
Help Print Modify
Methods METHOD
22 Toluene
33 Silicon oil
111 Methanol
Delete Print Modify
If you have not entered any or a wrong method no., the following appears:
Error
No/invalid value
Min.: 1.00000
Max.: 899.000
OK
– Confirm the error message by pressing <F3>, “OK”.
Method METHOD
No. 0
of the method
OK
– Enter the number and confirm by pressing <F3>, “OK”. The method is stored.
26 METTLER TOLEDO DL32/DL39
Page 29

Methods
If you have entered a method no. that already exists (DL39 only), the following appears:
Method 22 METHOD
Method exists!
Change number
Overwrite method
OK
Change number The mask “No. of the method” reappears. You can now enter a new number.
Overwrite method The new or modified number is stored. The old method with the same number
is overwritten.
While you are modifying a user or a METTLER method, you can press the <Run> key in order to start an
analysis (the <Setup> and <Auxiliary functions> keys are blocked).
• If you have not yet modified any parameter of the method, the start mask of the “Analysis” menu appears.
• If you have already modified a parameter of the method, the mask “Author of the method” appears. The
method is stored with <F3>, “OK”, and the start mask of the “Analysis” menu is displayed.
METTLER TOLEDO DL32/DL39 27
Page 30

Methods
5.4 User and METTLER Methods (DL39 only)
The following methods have been developed by us and can be performed immediately (see Application
Brochure):
911 Standard 1.0
912 Stromboli
913 Ext.Extr.
914 Br Index
915 Br Blank
You can modify METTLER methods, but in this case you must always give them a new number (1– 899) so
that they are stored as user methods.
You can print out the selected methods by pressing <F2>, “Print”.
User methods can be deleted (only in expert mode).
Methods METHOD
22 Toluene
33 Silicon oil
111 Methanol
Delete Print Modify
If you press <F1>, “Delete”, the following appears:
Delete? METHOD
Yes
No
OK
Yes Pressing <F3>, “OK”, will delete the method.
No Pressing <F3>, “OK”, will bring up the list of methods.
The method is not deleted.
METTLER methods cannot be deleted.
Methods METHOD
911 Standard 1.0
912 Stromboli
913 Ext.Extr.
Print Modify
28 METTLER TOLEDO DL32/DL39
Page 31

Methods
5.5 METTLER methods “914 Br index” and “915 Br Blank” (DL39 only)
If you wish to develop a bromine index determination to meet your requirements, you can modify METTLER
method 914 and 915 and store them as user methods.
No. 914
Title Br Index
Sample parameters
ID Request
Type Mass
Minimum [g] 0.2000
Maximum [g] 0.4000
Entry Before
Speed [%] 40
Mix time [s] 120
Control parameters
Pol. current [µA] 2
End point [mV] 100
Gen.speed Normal
Termination param.
Max. time [s] 6000
Delay [s] 15
Blank Request
Calculation 1
R1 = x[Br index]*f1
f1 = 1.0000
Unit
Decimal places 2
Statistics Yes
Max. srel [%] 0.00
Calculation 2
R2 = No calculation
f2 = 1.0000
Unit
Decimal places 2
Statistics No
Max. srel [%] 0.00
Calculation 3
R3 = No calculation
f3 = 1.0000
Unit
Decimal places 2
Statistics No
Max. srel [%] 0.00
Report
Output Print.+Comp.
Type GLP
Author of the method
No. 915
Title Br Blank
Sample parameters
ID Request
Type Fixed Volume
Density [g/mL] 1.000
Volume [mL] 100
Speed [%] 40
Mix time [s] 120
Control parameters
Pol. current [µA] 1
End point [mV] 100
Gen.speed Normal
Termination param.
Max. time [s] 6000
Delay [s] 15
Calculation 1
R1 = x[mg]*f1
f1 = 1.0000
Unit mg
Decimal places 2
Statistics Yes
Max. srel [%] 0.00
Calculation 2
Calculation 3
Report
Output Print.+Comp.
Type GLP
Author of the method
Pretitration This parameter is not applicable.
Autostart This parameter is not applicable.
Pol. current Measurement results and endurance of the measuring electrode are ideal at a polarization
current of 1µA.
Gen. rate The speed of bromine generation at the anode of the generator electrode. For bromine
determinations the setting is fixed at “Normal”.
Delay Desired time of delay [s] after reaching the end point. Drift and driftstop are not applicable.
Blank The value determined as a blank (METTLER method “915 Br Blank”) can be determined
before the start of an analysis in the method, or it can be entered before the titration
(“Request”).
Drift This parameter does not apply because bromine determinations do not have a drift.
METTLER TOLEDO DL32/DL39 29
Page 32

Methods
R1 Result of the first calculation: the bromine index [Br-Index] is calculated according to the
selected formula.
Unit The bromine index and the bromine number are quantities without dimension.
The bromine index is the amount of bromine in [mg] reacting with 100 g of sample.
The bromine number is the amount of bromine in [g] reacting with 100 g of sample.
Standby This parameter does not apply.
Author “Author of the Method” only appears if you change the method.
Specific parameters for the blank determination with “915 Br Blank”.
Type Select “Fixed volume” because the measuring cell is filled with 100 mL of solvent.
Volume Select “100” because the measuring cell is filled with 100 mL of solvent.
Blank This parameter does not apply.
R1 The blank value is measured in [mg] and is needed for the calculation of the bromine
index.
30 METTLER TOLEDO DL32/DL39
Page 33

Methods
5.6 METTLER Method “912 Stromboli” (DL39 only)
If you wish to develop an automatic determination of the water content of thermally stable liquids or solids,
you can modify the METTLER method “912 Stromboli” and store it as a user method.
No. 912
Title Stromboli
Sample parameters
Type Mass
Minimum [g] 3.0000
Maximum [g] 8.0000
Speed [%] 40
Mix time [s] 300
Set temperature 250
Control parameters
Pol. current [µA] 2
End point [mV] 100
Gen.speed Normal
Termination param.
Max. time [s] 600
Driftstop Rel.
Drift [µg/min] 10
Blank Request
Drift Request
Calculation 1 ppm
R1 = x[ppm]*f1
f1 = 1.0000
Unit ppm
Decimal places 3
Statistics Yes
Max. srel [%] 0.000
Calculation 2
R2 = No calculation
f2 = 1.0000
Unit
Decimal places 2
Statistics Yes
Max. srel [%] 0.00
Calculation 3
R3 = No calculation
f3 = 1.0000
Unit
Decimal places 2
Statistics Yes
Max. srel [%] 0.00
Report
Output Print.+Comp.
Type GLP
Author of the method
Sample parameters The sample parameter “ID” and “Entry” are not applicable.
Mix time The time (in seconds) during which the water in the sample evaporates completely
and dissolves into the solvent in the measuring cell.
Autostart This parameter is not applicable because the sequence of the sample series is
controlled automatically.
Set temperature
Enter the set temperature in °C at which the H
O determination is to be performed.
2
The set temperature can be selected anywhere between 50 and 300 °C. This value
cannot be changed within a series. The set temperature is noted in the titration report.
Blank The blank value [µg] is made up of the H
O content of the carrier gas (time
2
dependent) and the H2O content of the sample vial (time independent). The
termination is like a “normal” sample determination with defined method parameters
and, therefore, can be integrated into the sequence of a series. Drift is deducted
from the result making the blank an absolute value independent of time. The blank
value for Stromboli can be viewed at any time by pressing the <i> key.
METTLER TOLEDO DL32/DL39 31
Page 34

Methods
DeterminationThe value is automatically determined before the sample series and stored
for calculating the results.
Request The value is requested before the series.
No The most recently stored value is used.
Note For a onetime blank determination for various sample series the blank value can be determined
individually. To do this, a method is built selecting “Determination” for the blank parameter.
When prompted to enter the number of samples under the sample parameters, enter “0”. The
resulting blank value is stored, i.e., it is available for all following sample series and can be
viewed at any time by pressing the <i> key.”
Drift
The drift can be determined manually in the standby mode at any time (press <F1>, “Drift”),
or automatically before each series.
DeterminationValue is determined automatically before the sample series and stored for
the calculation of the results.
Request Value is requested before the series.
No The most recently stored value is used.
Standby This parameter is not applicable because no post consumption measurement is performed.
Report The results are printed at the end of a series.
Author “Author of the Method” only appears if you modify the method.
At the beginning of a sample series, the following parameters are required as long as “Request” has
been selected for them in the method.
Blank [µg]
Drift [µg/min]
ID (text)
Number of samples (max. 13)
Sample parameter (mass, volume, pieces, etc.)
32 METTLER TOLEDO DL32/DL39
Page 35

Analysis (Run)
6 Analysis (Run)
You perform titrations with a selected method. The required data is stored in the “Method” and “Setup”
menus. While an analysis is running, all menus and auxiliary functions are blocked.
6.1 Starting a method
When you press the <Run> key, the start mask appears:
DL32 DL39
Start RUN
Method No. 0
Title
User
Help OK
Start RUN
Method No. 0
Title
User
Help Modify OK
The method number
• of “O” is entered if no method (DL32) or no user method (DL39) is stored.
• of the stored method (on the DL32) is always automatically entered together with the title.
• on the DL39 is always the number you either entered directly or accepted from a METTLER or user
method.
Notes
• You can select the user name. The name that was selected in the analysis last performed remains stored.
• DL39: The start mask always shows the number of the method with which an analysis was last per-
formed, e.g., method no. 22. If you delete this, “Method not available” appears when you confirm the
mask with “OK”.
METTLER TOLEDO DL32/DL39 33
Page 36

Analysis (Run)
6.1.1 Menu sequence up to standby mode (KF methods)
Example:
Start RUN
Method No. 22
Title Toluene
User K. Lips
Help Modify OK
PRETITRATION RUN
You start the pretitration by pressing <F3>, “OK”, (DL32: “Modify” is missing).
Pretitration is always executed with the control parameters of the selected
method. The electrolyte is titrated until anhydrous.
Potential [mV] 325
Help
STANDBY RUN
The actual potential is displayed.
Transition to standby mode is automatic.
The arrows beside the drift value indicates the drift status:
Active Method 22
Potential [mV] 98
Drift [µg/min] 1 ➙
DRIFT SAMPLE
➘ Wait. Drift is decreasing!
➙ This arrow indicates that you can start a determination.
➚ Wait. Drift is increasing!
Start a drift determination by pressing <F1>, “DRIFT”.
Start a sample determination by pressing <F3>, “SAMPLE”.
Note If the pretitration lasts longer than 30 minutes, a message appears. After confirmation with
“OK”, the pretitration starts again. In such a case, you should check whether, e.g., all connections of the titration stand and cell are tight.
34 METTLER TOLEDO DL32/DL39
Page 37

Analysis (Run)
6.1.2 Standby mode
During standby, the following menus are blocked or selectable:
Blocked <Setup>, <Pump> and, via the <i> key: “Hello!” and “Hardware test”.
Selectable <Stirrer>, <Results>, <Method>, <RUN> and <i> key (except “Hello!” and “Hardware test”.
Stirrer
You can change the speed of the stirrer. This is reported for the subsequent sample determination.
Results
The menu is not shown until you have performed the first measurement or a result is available.
Method
You can modify all methods. Within the active method, you cannot modify the following parameters:
• Polarization current
• End point
The modified parameters are adopted for the next sample. For documentation conforming with GLP, you
should print out the method before you switch back to the “Run” menu.
Note (DL39 only) If you change parameters of an active method, the sample series will be
terminated. If you restart a method, the results of the current series are deleted.
METTLER TOLEDO DL32/DL39 35
Page 38

Analysis (Run)
6.2 Sample determination
With <F3>, “OK”, or <Run> you start a sample determination. According to the selected method, the
following masks may appear.
In succession, specific parameters are requested if defined in the method as “Request”.
Example:
ANALYSIS RUN
Mix time [s] 10
OK
Then one of the following mask appears:
ANALYSIS RUN
Weight [g] 0
Minimum [g] 0.3750
Maximum [g] 0.8750
Help Bal. OK
The mask for the sample entry appears if a variable
amount of sample is defined with “Entry: Before”.
ANALYSIS RUN
Please add sample
0.3750 g -
0.8750 g
Help OK
The mask for sample addition appears if a variable
amount of sample is defined with “Entry: During”
(example: mass)
Note
• If you take longer than five minutes for the entry of samples or sample-specific parameters, the coulom-
eter switches back to the standby mode.
• If you have selected “Autostart: Yes” in the method, the sample must be added within 30 seconds.
Otherwise, the coulometer returns to the standby mode.
• If you accidentally add a sample while the titrator is in the standby mode, the coulometer will begin a
“Pretitration”, i.e., it will titrate all the water out of the sample. You can salvage the situation (“Emergency
analysis”) by pressing the <RESET> key first and then the <SHIFT> and <RUN> keys simultaneously.
One of the above displays will appear, i.e., pretitration and standby mode are skipped. Thus, your
sample is not “lost”.
36 METTLER TOLEDO DL32/DL39
Page 39

Sequence of sample determination
Example (with “Weight: before”):
Analysis (Run)
ANALYSIS RUN
Weight [g] 0
Minimum [g] 0.3750
Maximum [g] 0.8750
Help Bal. OK
Pressing <F3>, “OK”, will bring up the following mask appear.
ANALYSIS RUN
Add sample or
confirm addition:
0.3750 g -
0.8750 g
Help OK
Pressing <F3>, “OK”, confirms addition of the sample and starts the analysis.
ANALYSIS RUN
Sample Drift
The values and the limits for the weight are adopted from the defined sample
parameters of the method.
If you have attached a balance, you can transfer the value displayed on the
balance (weight of the sample) by pressing <F2>, “Balance”.
It is possible to enter the amount of the sample during analysis. Pressing
<F1>, “Sample”, the parameter “Weight [g]” or “Volume [mL] is displayed
for you to enter the value.
During titration you can switch to four different displays:
ANALYSIS RUN
Drift:
95 µg/min
Sample Cont. Graph
ANALYSIS RUN
Duration:
1 min
Sample Pot. OK
Drift Current generation rate.
Content H2O content titrated so far.
Duration Measuring time from beginning of data logging (excluding mixing time!).
Note The time value printed in the report includes mixing time!
Potential Potential measured at the measuring electrode.
ANALYSIS RUN
Content:
42.0012 µg
Sample Dur. OK
ANALYSIS RUN
Potential:
400 mV
Sample Drift OK
METTLER TOLEDO DL32/DL39 37
Page 40

Analysis (Run)
Titration is ended in accordance with the defined termination parameters. In the background, the coulometer goes back into the standby mode.
Report RUN
Printing...
The result is printed out and displayed.
Result RUN
Method 22
Sample 1
R1 = 1.98 %
OK
If you confirm with “OK”, one of the following is displayed:
• the standby mask (method parameter “Standby: Yes”), or
• the start mask (“Standby: No”), or
• the post consumption mask (method parameter “Standby: [min]).
The result is now stored under the auxiliary function “Results” so that you can, e.g., perform recalculations.
38 METTLER TOLEDO DL32/DL39
Page 41

6.2.1 Weight transfer from a balance
Analysis (Run)
ANALYSIS RUN
If you press <F2>, “Balance”, in the corresponding mask, the value displayed on the balance appears. It is accepted with “OK”.
> 1.2345 g
OK
6.2.2 Post consumption
STANDBY RUN
Post consumption:
Duration: 0:34 min
Drift: 6 µg/min
Stop
If you have selected “Standby: [min]” in the method, the subsequent measurement of the drift is performed directly after the sample determination, and
a drift value is automatically printed out every minute.
6.2.3 Calculations DL32 (without Auto start) / DL39 (“Auto start: No”)
If you press <F3>, “Sample”, or the <Run> key in the standby mode, measurement of the time needed for
calculation of the drift compensation starts. It is stopped as soon as the titration has ended.
<F3>, “Sample”,
or <Run>
Standby
<F3>, “Sample”,
Request and
adding of
sample
or <Run>
Mix time
Titration
Generation of titrant
“Duration” (Display)
“Duration” (Calculation/Report)
DL39 (“Auto start: Yes”)
In the case of an automatic start of the titration (“Autostart: Yes”), measurement of the time (“Duration”)
needed for the calculation of the drift compensation starts with the request for the sample. It is stopped as
soon as the titration has ended.
<F3>, “Sample”,
Standby
or <Run>
Requests
Waiting for addition of sample
(max. 30 s)
Sample
addition
Mix time
Titration
Generation of titrant
“Duration” (Display)
“Duration” (Calculation/Report)
METTLER TOLEDO DL32/DL39 39
Page 42

Analysis (Run)
H2O content in µg
H
O [µg] = (consumption [mC] / 10.72 [mC/µg]) – (drift [µg/min] * duration [min]) – (blank [µg])
2
To get the H2O content in mg, divide by 1,000.
H2O content in %
H2O [%] =
((consumption [mC] / 10.72 [mC/µg]) – (drift [µg/min] * duration [min]) – (blank[µg]))
mass [g] * 10
6
[µg/g]
100 [%]
*
To get the H2O content in ppm, multiply the formula by 10,000,
for the H2O content in g/kg, multiply by 10.
H2O content per piece
H
O [µg/pc] =
2
(consumption[mC] / 10.72 [mC/µg]) – (drift [µg/min] * duration [min]) – (blank [µg])
number of pieces [pcs]
These parameters are listed on every GLP report to allow you to double-check the result.
6.2.4 Sample series with statistics (DL39 only)
If you have selected “Statistics: Yes” in the method under Calculation 1, 2 or 3, results and statistical data
of the sample or concentration determinations are stored under the auxiliary function “Results”.
The series is terminated, if you
• enter the corresponding command in the auxiliary function “Results”,
• change the method parameters of the active method,
• select a different method,
• switch off the coulometer.
The series is not terminated if you stop a determination by pressing <Reset> and perform the next determination under the same method.
Note You can perform a series with a maximum of 99 samples. The last 60 results are stored.
40 METTLER TOLEDO DL32/DL39
Page 43

After, e.g., the third sample determination, the following appears:
Result RUN
Method 22
Sample 3
R1 = 1.91 %
Analysis (Run)
x OK
<F1> Allows you to toggle between displaying results or statistics.
Statistics RUN
Method 22
R1 n = 3
x = 1.95 %
s = 0.010901 %
Result OK
Note The mean is calculated after two samples; after three samples, the absolute and relative stan-
dard deviation are computed.
6.3 Blank determination
If you have dissolved a sample in a solvent with a H2O-content unknown to you, run an analysis with only
the solvent and without the sample. The obtained value can be entered as a blank before each titration
(“Request”) or can be entered automatically (“Determination”). This blank value is included in the calculations.
The blank value of the METTLER method “912 Stromboli” is stored under the <i> key.
6.4 Drift determination
You must determine the drift when “Drift: Determination” is defined in the method. By pressing <F1>, “DRIFT”,
the following appears:
DRIFT RUN
Duration: 2:21 min
Help
The bar will fill according to the time elapsed. After 3 minutes, the result is printed and displayed. Simultaneously, the value is stored under the <i> key.
METTLER TOLEDO DL32/DL39 41
Page 44

Analysis (Run)
6.5 Determination of bromine index (DL39 only)
The bromine index distinguishes itself from a KF titration by different method parameters and the missing
display of “Drift”, “Content” and “Duration” during the analysis. Because the determination of the bromine
index does not have a drift, it cannot be used as a termination parameter.
Note Because it is easier to clean we recommend using a generator electrode without diaphragm for
bromine index determinations.
Start RUN
Method No. 914
Title Br Index
User Mi Hoa
Help Modify OK
ANALYSIS RUN
If the parameters of the method have been defined with “Request”, they are
displayed before the screen to enter the sample appears (example “Mass”
Weight [g] 0
Minimum [g] 0.2000
Maximum [g] 0.4000
Help Bal.* OK
and “Entry: Before”).
* only appears if a balance has been defined.
After you have confirmed the sample addition with <F3>, “OK”, the titration will begin.
ANALYSIS RUN
Analysis running...
** only appears if you have not entered the sample size. Press <F1>,
Potential [mV] 580
Sample**
Result RUN
Method 914
Sample 2
Br Index = 370
OK
“Sample”, the parameter “Weight [g]” appears for you to enter the
value.
After the titration, the result is recorded before it is displayed.
Pressing <F3>, “OK”, will return you to the starting screen.
42 METTLER TOLEDO DL32/DL39
Page 45

Calculation formula
Analysis (Run)
Bromine index =
100 * (0,0008281 [mg/mC] * consumption [mC] – blank[mg])
weight of sample [g]
Blank [mg] = 0,0008281 [mg/mC] * consumption [mC]
bromine index [mg Bromine / 100 g sample]
Bromine number [g Bromine / 100 g sample] =
1000
Note Bromine molar mass: 79,9 [g/mol] 79,9
= 0,0008281 [mg/mC]
Faraday constant: 96485 [C/mol] 96485
6.6 Sample determination with the oven sample changer Stromboli (DL39 only)
The oven sample changer Stromboli is used in combination with the DL39 coulometer for the automatic
determination of H2O content of thermally stable liquids and solids. In order to do this, the sample is heated
in the oven and the evaporated water is transported into the measuring cell by means of a dry inert gas
stream. The DL39 controls all of Stromboli’s functions via the METTLER method “912 Stromboli”. Using this
method as point of departure, user methods can be developed allowing automatic determination of sample
series with up to 13 samples as well as drift and blank determinations. Prior to determination, Stromboli
automatically inserts the sample vials on the sample rack into the oven.
The result of a sample determination with Stromboli is made up of H2O content of the sample, blank value
(H2O content of an empty sample vial), and drift value (H2O content of the carrier gas).
A drift determination is automatically performed if “Drift: Determination” was selected in the method. The
drift can also be determined manually at any time in the standby mode (Press <F1>, “Drift”). In both cases,
the determination is performed with the sample vial in the “Drift” position. The vial is inserted into the oven
and the determination is performed for three minutes after reaching the set temperature entered in the
method. The result is stored (i.e., it is available for subsequent sample series) and can be viewed by
pressing the <i> key (including date and time of determination).
A blank determination is automatically performed if “Blank: Determination” was selected in the method. The
determination is performed with the sample vial in the “Blank” position (empty sample vial). The determination is performed like a normal sample determination and, therefore, can be integrated into the sequence of
a series. The blank value is defined as sample “0” without any content parameters and the default parameter
“ID: Blank”. The result of the blank determination is stored and can be seen under the sample number “0” in
the titration report or viewed by pressing the <i> key (including date and time of determination).
METTLER TOLEDO DL32/DL39 43
Page 46

Analysis (Run)
Sequence of a sample series
When starting a method from the idle state, the entered, set temperature is conveyed to the oven. The
sample vial in position “Drift” is inserted into the oven and the oven heats up to the set temperature during
pretitration, i.e., in the standby mode. The temperature display flashes on the Stromboli, and the display
alternates between current temperature and set temperature.
After reaching a constant drift at the set temperature, the sample series can be started from the standby
mode by pressing <F3>, “Sample”. The analysis will only begin when the oven has reached the set
temperature. Until the set temperature has been attained (can take several minutes), the message “Waiting
for Stromboli” appears.
ANALYSIS #01 RUN
ID
Weight [g] 0
Minimum [g] 2.000
Maximum [g] 4.000
Bal.* Start OK
No.ID Status
0 Blank Done
1 Active
2 Ready
3 Ready
Modify OK
Sample 1 RUN
ID
Weight [g] 0
Minimum [g] 2.000
Maximum [g] 4.000
Help Bal.* OK
* only appears if a balance
has been defined.
When starting a sample series, the parameters that have been set to “Re-
quest” in the method, are asked for. The entries are stored with <F3>,
“OK” and the display for the next sample (#...) appears. Pressing <F2>,
“Start”, starts the sample series even if the sample data have not all been
entered yet.
By pressing <F3>, “Sample” during a titration, the state (ready, active,
done) of the samples is displayed. Pressing <F2>, “Modify”, allows you
to change the entries or to complete them respectively. After each sample,
the results are calculated and recorded, and the series is continued without displaying the results. If a printer is installed, the results are printed
after each sample.
At the end of a series, the results of the last sample and the statistics for
the series (press <F1>, “x”) are displayed. In the standby mode, the
results can be viewed by pressing the <Results> key.
Important Results and statistics of a series are automatically deleted at
the start of the next series as soon as the message “Series
aborted!” has been confirmed with <F3>, “OK”.
Note
• If an analysis has been terminated by the termination parameter “Max. time”, even though water has been detected in the
measuring cell of the coulometer, the sample rack is returned to its base position (position “Drift” is below the oven) and
remains there even during pretitration for the next sample. Stromboli only changes to the next sample, when the DL39 goes
into the standby mode.
• As soon as a Stromboli connected to the DL39 is switched on, any titration will start automatically, regardless of whether
“Autostart” “Yes” or “No” was selected. Therefore, the Stromboli must be switched off for a KF method with “Autostart...No” and
without a Stromboli.
• When using automatic sample determination with Stromboli, the coulometer only starts running the timer when the sample
has reached the set temperature.
• In the following cases, the sample series is interrupted. The message has to be confirmed by pressing <F3>, “OK” on the
titrator in order to continue the sample series.
• Appearance of one of the following messages: “Weight [g] 0”, “No titration!”, “Capacity exhausted”.
• The calculated value of “srel” is above the value entered in the method.
• Sampling and entering of the parameters pertaining to the sample take more than 5 minutes.
44 METTLER TOLEDO DL32/DL39
Page 47

Auxiliary Functions (Stirrer, Pump, Results)
7 Auxiliary Functions (Stirrer, Pump, Results)
With the auxiliary functions keys, you can access menus that allow you to execute functions that are
independent of a titration method, but support or expand it. While an analysis is running, all auxiliary
functions are blocked: in standby mode you can activate only the functions of the <Stirrer> or <Results>
keys.
7.1 Stirrer
You can switch the stirrer on and off and change its speed.
Stirrer STIRRER
Speed [%] 40
Start
The stirrer stirs at the defined speed.
To change the speed in the standby mode during a titration,
– press the <Stirrer> key and change the speed.
Stirring can be started and stopped by pressing <F3>, “Start” or “Stop”.
Stirrer STIRRER
Speed [%] 35
– Confirm with <F3>, “OK”.
OK
The stirrer stirs at the new speed.
– Press the <Run> key to return to the “Analysis” menu.
7.2 Pump
With the aid of the pump, you can empty the anodic and cathodic compartments.
Pump PUMP
To empty, press <F3>
To fill, press <F3>
and press and hold
blue pump button
Start
METTLER TOLEDO DL32/DL39 45
The pump is switched on or off by pressing <F3>, “Start” or “Stop”.
While the pump is running, you can switch on the stirrer with <F2>, “Stir”.
Page 48

Auxiliary Functions (Stirrer, Pump, Results)
Emptying
– Connect the silicon tubing from the top of the waste bottle to the pump inlet (back of the titrator) of the
pump unit.
– Push the waste tube of the waste bottle to the bottom of the cell.
– Press <F3>, “Start”, and empty the cell.
– Pull the waste tube out of the cell while the pump is still running. Repeat for cathodic chamber if
generation electrode with diaphragm is being used.
– Press <F3>, “Stop”.
– Empty the waste bottle when full.
Note
• The pump will switch off automatically when the pumping time defined in the “Setup” menu has run out.
• Each pumping operation resets the electrolyte capacity to the value defined in the “Setup” menu.
7.3 Results
the following functions are available in this menu:
All results
Recalculation
Calculations (DL39 only)
Statistics (DL39 only)
Report
Statistics series (DL39 only)
“All results“ is accessible when at least one result is available.
“Statistics” are accessible when at least two results of a sample series are available.
“Report” is accessible when a drift determination has been performed or a result is available.
“Statistics series” is accessible when the first result of a sample series is available.
In order to change, e.g., results of KF determinations in the standby mode,
– press the <Results> key, change the result under “Recalculation” and confirm with “OK”.
– press the <Run> key to return to the “Analysis” menu.
7.3.1 All results
You can view the results generated in the titration of a sample or sample series. You can also print out the
results. The data in the result memory is deleted when you switch off the coulometer.
46 METTLER TOLEDO DL32/DL39
Page 49

Auxiliary Functions (Stirrer, Pump, Results)
DL32 The results of the last 20 determinations are stored.
DL39 You can perform a sample series with 99 samples. The results of the last 60 samples remain
stored, i.e., the results of sample 1 are deleted when you start to titrate sample 61.
Calculations of statistical data is always based on the last 60 samples.
Note
• Samples terminated with the error message “No titration!” are also stored.
• The result of a determination you terminated with <Reset> is also stored.
7.3.2 Recalculation
You can recalculate existing results by changing the following values for each sample:
• in a KF sample determination: Drift, blank value and/or amount of sample.
• in a bromine index determination: Blank value and/or amount of sample.
Recalculn RESULTS
Method 22
Sample 1
R1 : 105.1 ppm
Sample 2
Modify OK
▼
Recalculn RESULTS
Sample 1
Drift [µg/min] 6
Blank [µg] 0
Weight [g] 0.2
Undo OK
.
Recalculn RESULTS
Method 22
*Sample 1
R1 : 105.1 ppm
Sample 2
Modify OK
If you change one of the values, you can nullify it with <F1>, “Undo”. With
“Undo”, the changed values are always reset to the original values.
The sample with the changed result is marked by an asterisk (*).
▼
METTLER TOLEDO DL32/DL39 47
Page 50

Auxiliary Functions (Stirrer, Pump, Results)
Note
•
The values obtained in the determination always remain stored so that you can also nullify changes later.
• Under “All results” you can print out the recalculated results. The changed and the original values are
reported.
• DL39 The changed results are also taken into account for the statistical data.
7.3.3 Report
At the end of every determination, you can print out a (additional) data report or send it to the computer.
Report RESULTS
Output Print.+Comp.
Type GLP
Help Modify Start
Note If you have changed the result of the last determination beforehand, it will be printed out marked
with an asterisk (*).
7.3.4 Calculations (DL39 only)
At the end of every titration, you can perform additional calculations for this sample.
Calculations RESULTS
R = x [µg]*f
f = 1.0000
Unit µg
Help Modify OK
With <F3>, “OK”, the result is displayed and can be printed out.
48 METTLER TOLEDO DL32/DL39
Page 51

Auxiliary Functions (Stirrer, Pump, Results)
7.3.5 Statistics (DL39 only)
If you have selected “Statistics: Yes” in the method under calculation 1, 2 or 3, the mean is calculated in a
series of 2 samples. For more than 2 samples the absolute and relative standard deviation are additionally
calculated. You can print out these results here and modify the statistical evaluation by eliminating outliers.
In its statistical calculations the DL39 does not incorporate results that were obtained after a “Reset” or after
the message “No titration!”.
Example of a statistical evaluation of 3 samples
Statistics RESULTS
Method 22
R1 n = 3
x = 105.1 ppm
s = 0.010912
Result Print OK
▼
Using the list of results, you decide which sample result is an outlier and then delete it.
Statistics RESULTS
Method 22
Sample 1
R1 = 105.1 ppm
Sample 2
Delete OK
Statistics RESULTS
Method 22
R1 n = 2
x = 105.1 ppm
Result Print OK
If you delete “Sample 1” with <F1>, “Delete”, “Undo” is displayed to allow
you to nullify the command. Simultaneously sample 1 is marked as “De-
leted”.
By pressing <F3>, “OK”, the following appears:
▼
The statistical data based on the changed number of samples (e.g.: sample
1 is deleted) is calculated. You can delete several sample results and print
out the statistics each time.
As long as the result list of this sample series is stored, you are able to nullify the deletion operation.
METTLER TOLEDO DL32/DL39 49
Page 52

Auxiliary Functions (Stirrer, Pump, Results)
7.3.6 Statistics series (DL39 only)
With the help of this function you can terminate a sample series. This clears all data in the result memory.
A subsequent analysis with the same method restarts with “Sample 1”.
Stat. series RESULTS
End series?
No
Yes
OK
50 METTLER TOLEDO DL32/DL39
Page 53

Information Menu (<i> key)
8 Information Menu (<i> key)
The measured values and menus below are stored under the <i> key:
Capacity [mg] 80
Drift [µg/min] 0
Blank [µg] 0
Hello! (Tutorial)
Hardware tests
Capacity The anolyte capacity defined in the “Setup” menu is entered as an initial value. After each
titration, the difference between the initial value and the amount of analyzed water is
displayed. If “0” is reached or exceeded, an error message appears.
Note As soon as you press the pump button, the value defined in the “Setup”
menu is reentered.
Drift The value of the last drift determination performed is stored here and automatically adopted
for the drift compensation if you have defined “Drift: Determination” as a method parameter.
Blank The value of the last blank determination performed is stored here and automatically
adopted for calculations (only for method with Stromboli).
Hello! In this tutorial, you can acquaint yourself with the coulometer step by step.
Hardware tests Here, there are functions at your disposal allowing you to test the hardware of the cou-
lometer. For these tests you need the connector set (see optional equipment).
METTLER TOLEDO DL32/DL39 51
Page 54

Error Messages and Malfunctions
9 Error Messages and Malfunctions
9.1 Error messages from the coulometer
Error messages that refer to this section or that are not self-explanatory are explained here.
A. After the coulometer has been switched on, the following errors could be displayed
• ERROR
• RAM x test ERROR(Q)“x” represents a number
• ERROR –> HW version
• ERROR –> DCB
• ERROR –> application
• No application found
The messages refer to a faulty hardware component.
– Press any key: The coulometer attempts to continue the booting procedure; this may be successful, but
it does not guarantee proper functioning.
Measures
– Note the displayed text.
– Note the serial number and software version (can be found on every report).
– Notify METTLER TOLEDO Service of these points as well as of the attached peripheral units and the
defined configuration.
B. If the following three displays appear, parts of your hardware may be defective
Internal error: x
xxxxxxxxxxxxxxxxxxxxxxxxx
xxxxxxxxxxxxxxxxxxxxxxxxx
xxxxxxxxxxxxxxxxxxxxxxxxx
SYSTEM IS BLOCKED!
See manual: Errors
ERROR: x
SYSTEM IS BLOCKED!
Please call METTLER
TOLEDO service
OS ERROR: x
P1: xx
P2: xx
D1: xx
D2: xx
SYSTEM IS BLOCKED!
Please call METTLER
TOLEDO service
“x” represents letters and/or
numbers
Measure
– Apart from the text or error (e.g., “ERROR: 1000), also note the procedure that triggered the error.
– Note the serial number and software version (can be found on every report).
– Switch off the coulometer.
– Notify METTLER TOLEDO Service of these points as well as of the attached peripheral units and the
defined configuration.
52 METTLER TOLEDO DL32/DL39
Page 55

Error Messages and Malfunctions
C.
If the following warning appears, you have to consider the current procedure as failed and repeat it
Warning: x
“x” represents a number
Press any key
to continue
Measures
– Press any key: The coulometer can continue to function.
– On no account consider the result of a determination terminated in this manner!
– Should the warning appear frequently, take the measures mentioned under point B.
D. Faulty data deleted!
• The coulometer has only saved parts of a method if, e.g., the power fails while the method is being
saved. This will delete the method completely. It also possible that several methods have been deleted.
Measures
– Confirm the message.
– Check which methods have been deleted and re-enter them.
• The coulometer has only saved parts of the parameters of a resource if, e.g., the power fails while the
parameters are being saved. All data defined in the “Setup” menu will be deleted.
Measures
– Confirm the message. The coulometer then loads the default parameters of the “Setup” menu, i.e., all the
data that was stored on delivery.
– Switch the coulometer off and then on again.
– Check whether the default parameters are active again. Re-enter the names and values saved before the
power failure.
If you receive this error message frequently, the battery is discharged! The battery must be changed by
METTLER TOLEDO Service.
E. Method not stored!
• The coulometer can no longer save a method if the user data memory is full.
Measures
– Confirm the message.
– Delete one or more unused methods.
– Reenter the new method and save it.
METTLER TOLEDO DL32/DL39 53
Page 56

Error Messages and Malfunctions
9.2 Other errors and malfunctions
The following collection of errors and malfunctions that are not reported by the coulometer will help you
correct the fault yourself in many cases so that you do not have to rely on the METTLER TOLEDO Service
(referred to in the table as “Service”).
You can also check some malfunctions with the hardware test (“Information” menu, <i> key) first before
you contact Service.
Error Possible cause Remedy
No display on Device not connected Connect to power supply,
coulometer to power supply. otherwise, contact Service.
Several points on the Contact Service.
display are missing
Display and keys Contact Service.
do not match
Transmission error Peripheral device defective Check attached devices
to attached or switched off. for correct functioning.
peripheral device
Device (printer, Device not switched on Switch on device;
balance, computer) wrong settings and/or settings and
does not respond configuration (switch configuration must
positions wrong); match;
wrong cable. check cable.
Pump does not Suction tube not Connect suction
work connected; tube and check
connections;
defective pump. check pump.
TTL inputs or outputs Defective inputs. Check inputs/outputs.
do not function
Magnetic stirring bar Cable of magnetic Check magnetic stirrer,
does not rotate stirrer not plugged in change magnetic stirrer;
properly;
wrong magnetic Use delivered magnetic
stirring bar. stirring bar.
No hydrogen production Missing or bad Check contacts or
at the generator electrode contacts; connectors call Service; check
interchanged. connectors (colors!).
“Conductivity too low! Current pulse of generator Confirm message with <F3>
Titration terminated” electrode < 200 mA (instrument performs a “Reset”)
54 METTLER TOLEDO DL32/DL39
Page 57

Error Messages and Malfunctions
9.3 Checking hardware
The menu “Hardware tests” is stored under the <i> key and you can use it to check whether, e.g., the stirrer
and pump of the coulometer are functioning correctly. If you order the connector set for the interface check,
you can also test the interface and the TTL input and outputs of the coulometer
9.3.1 User interface
Display test
Five displays appear in succession, four with different patterns, the last without a pattern. This allows you
to detect faulty pixels on the display. The test mode automatically switches off after approx. 20 seconds.
Keyboard test
When you press a key, a numeric code assigned to this key appears. This allows you to recognize a faulty
key (see following table).
– Press the <Esc> key to quit the test mode.
Key codes
Key ............Code Key ............. Code Key ............. Code
Reset ..........23 F1 ............... 17 3................. 3
i .................30 F2 ............... 18 4................. 4
Stirrer..........28 F3 ............... 19 5................. 5
Pump .........27 ∇................ 11 6 ................. 6
Burette ........29 ∆ ................ 12 7 ................. 7
Results ....... 26 Shift ............ 10 8................. 8
Setup ..........25 0 ................ 0 9 ................. 9
Method .......24 1 ................ 1 Del .............. 31
Run ............21 2 ................ 2 ................... 33
Beep test
used to test the internal beeper
9.3.2 Peripheral interfaces
Interface test
– Before the test
• plug the test plug 51107288 into the balance, computer or GA42 interface.
• plug the Centronics cable into the Centronics interface and the test plug 51107287 into the Centronics
socket of the cable.
After the testing phase, either “Test successful” or “Test failed” will appear.
METTLER TOLEDO DL32/DL39 55
Page 58

Error Messages and Malfunctions
Balance test
This menu option is not displayed if no balance is defined in the “Setup” menu.
– The weight displayed on the balance must appear on the coulometer display.
Printer test (GA42, EPSON or HP)
The appropriate printer must be attached. If the error message “Printer: No connection” appears, you can
quit this error message with <Esc>. With “OK” the coulometer tries to set up the connection to the printer
again.
– The letters and characters available in the coulometer must be printed out.
9.3.3 Inputs and outputs TTL I/O (DL39 only)
– Before the test, connect the test plug 51107723 to the TTL I/O interface.
After the testing phase, either “Test successful” or “Test failed” appears.
Internal stirrer
Here, you test the rotational movement (counterclockwise) and change in the speed of the magnetic stirring bar.
External stirrer
Here, you test the rotational movement and change in the speed of the magnetic stirring bar on the connected
DV705 titration stand.
Internal pump
To test whether the pump functions.
– A “noise” must be heard.
– It must be able to siphon off when the waste bottle is attached properly.
External pump
To test whether the pump on the optional external DV705 titration stand functions (see “Internal pump”).
Note Always press the upper key (⇑ arrow) to siphon off.
56 METTLER TOLEDO DL32/DL39
Page 59

Installation and Maintenance
10 Installation and Maintenance
10.1 Equipping the titration stand
After setting up your coulometer in an appropriate location you can equip the titration stand. The arm of the
titrator can be turned in both directions.
– Carefully slide the magnetic stirring bar included in the delivery into the cell.
Note Only the original magnetic stirring bar will guarantee the specifications of your coulometer’s
magnetic stirrer.
– Place the cell in the titration stand and fasten it with the screw.
– Grease the ground joints with the included grease (see delivery note).
– Place the sample stopper with the septum into the opening in the cell.
– Place the measuring and generator electrodes in their respective openings in the cell.
– Fill the drying tube with desiccant and place it in the generator electrode.
– Insert the holder for the tip of the waste bottle.
Measuring electrode
Septum
Sample stopper
Magnetic stirrer bar
Drying tube
Generator electrode
Holder for suction tube
Screw
Titration arm
METTLER TOLEDO DL32/DL39 57
Page 60

Installation and Maintenance
10.2 Installing the waste bottle
Install the waste bottle to empty the cell (included in the delivery) as follows:
– Push the suction tube tip first from underneath through the collar of the screw cap and place the tip into
the holder for the suction tube on the titration stand.
– Place the flat gasket on the waste bottle and screw on the screw cap.
– Slide the silicone tube onto the drying tube of the bottle, connect the other end to the suction fitting on the
rear of the coulometer.
Suction tube
Silicon tube
Holder for suction tube
Drying tube
Screw cap
Flat gasket
Output
fitting
Suction
fitting
Notes
• You can connect a tube to the output fitting in order to carry solvent fumes to a suitable place.
• Check all connections for a tight fit in order to ensure the system’s tightness.
58 METTLER TOLEDO DL32/DL39
Page 61

Installation and Maintenance
10.3 Attaching the magnetic stirrer, electrodes and devices
– Attach the devices used to the corresponding connectors/sockets on the rear side of the coulometer (see
diagram).
Measuring electrode (Sensor)
External titration stand (DV705)
Cooling ribs
Generator electrode
Stirrer
Waste bottle
(Suction fitting)
–
The stirrer output is not inherently short-circuit proof! Damaged pins of the cable connector
Pump unit
External power
pack
GA42 printer (RS-232C)
Balance (RS-232C)
Computer (RS-232C)
Oven (TTL I/O)
EPSON- or HP-compatible
printer (Centronics)
On/Off switch
could cause a short circuit that will damage the coulometer, rendering it useless.
Magnetic stirrer
On delivery, the magnetic stirrer is pushed into the casing on the upper side of
the coulometer.
– Attach its cable to the stirrer output. The arrow on the miniDIN connector must
point towards the screw.
Measuring electrode
– Connect the electrode to the triaxial cable. Plug the cable into the measuring electrode input (Sensor)
and insert the electrode into the top of the cell.
Generator electrode
– Connect the electrode to the triaxial cable. Plug the cable into the generator electrode input and insert the
generator electrode into the top of the cell.
Balance, printer, computer, TBox DR42
Attach all peripheral devices to the same plug connector (phase) to which the coulometer is connected!
Otherwise, equalizing currents could flow across the cables.
METTLER TOLEDO and SARTORIUS balances are compatible with these coulometers.
METTLER TOLEDO DL32/DL39 59
Page 62

Installation and Maintenance
10.4 Maintenance and servicing
All Karl-Fischer reagents are easily combustible and poisonous.
- In the case of skin contact, rinse immediately with a lot of water.
- In the case of eye contact, rinse immediately and thoroughly with water, then consult a
doctor.
Cleaning
– You can clean the coulometer with a cloth moistened with alcohol
– If necessary, grease ground joints.
Clean the cell as follows
– Empty the anode and cathode compartments using the waste bottle and pump.
– Rinse thoroughly with methanol. Persistent contamination can be removed by using a common cleanser
(cleanser for lab equipment).
– Dry with a lint-free cloth.
– Dry in drying oven over night at 70 - 80 °C.
– If necessary, grease ground joints.
Clean the measuring and generator electrode as follows
– Rinse thoroughly with methanol.
– Dry with a lint-free cloth.
– In case of a contaminated diaphragm:
– Over night, soak the electrode in a suitable solution (preferably methanol).
– Dry in the drying oven at 70 - 80 °C.
– An electrochemical cleaning of the electrodes can be performed as follows:
– Fill the generator electrode with methanol and place it in a vessel filled with methanol. Connect the
generator electrode to a DC power source of 30 V / 1 A (if available, use a lab power pack with
30 V / 2 A).
– Reverse the polarity of the current after 5 minutes and permit it to react for another 5 minutes.
– Rinse well with methanol and dry in the drying oven at 70 – 80 °C for several hours.
Note Use of a fritt cleanser is not recommended.
Waste bottle
– The tubing should be replaced when the Teflon seal no longer seals properly (wear and tear).
Molecular sieve
– If the drift remains too high you should fill the drying tubes with fresh molecular sieve.
Note You can regenerate molecular sieve in a drying oven at 160 - 300 °C for at least 24 hours.
60 METTLER TOLEDO DL32/DL39
Page 63

Installation and Maintenance
Pump unit
If the diaphragm pump no longer functions, you can replace it:
– Pull out the pump unit and insert the new one.
Magnetic stirrer
If the magnetic stirrer is defective, you can replace it:
Battery
The battery installed in the coulometer has a service life of approx. 5 years. The battery may be changed
only by METTLER TOLEDO Service.
Disposal
Contact your METTLER TOLEDO dealer if you have to dispose of the coulometer.
10.5 Using TTL inputs and outputs (DL39 only)
You can only connect the METTLER TOLEDO oven sample changer Stromboli to this TTL socket.
METTLER TOLEDO DL32/DL39 61
Page 64

62 METTLER TOLEDO DL32/DL39
Page 65

Standard and optional equipment
11 Standard and optional equipment
You can order each part listed with an order number from METTLER TOLEDO.
11.1 Standard equipment
Coulometer
Titration cell
51108732
Magnetic stirrer
51108750
Magnetic stirrer bar
51191159
External power pack
100 - 240 VAC
51107777
Sample stopper (PTFE) with septum
51108741
Septum (12 pieces)
51108740
Brown glass bottle 1L
71296
Gasket
23981
Screw cap
23937
Pump unit
51107479
Fastener screw for titration cell
(PTFE)
51108752
Pump button (blue)
51107600
METTLER TOLEDO DL32/DL39 63
Silicon tube
Length: 0.45 m
51107490
Suction tube (PTFE)
Length: 0.8 m
23936
Holder
23960
Page 66

Standard and optional equipment
Keypad cover
1 piece
Seal (drying tube of titration stand)
51107492
Drying tube with cover
23961
Bottle with molecular sieve
71478
Silicon grease
71300
Measuring electrode DM143-SC
(double platinum pin electrode)
51107699
Cable for DM143-SC
(LEMO - SC)
Length: 0.6 m
89601
Cable for generator electrode
51107830
Syringe, 1 piece
Injection needle (80 x 0.8 mm),
1 piece
Bedienungsanleitung
Operating Instructions
German 51710107
English 51710108
KF-Coulometer
DL32 / DL39
French 51710109
Spanish 51710110
Die 4 wichtigsten Schritte
Setup
Method
Run
*
Results
–Das Coulometer mit den entsprechen-
den Hilfsmitteln einrichten.
Hauptmethoden (nur DL39)
Peripherie
Einstellungen
–Eine Methode wählen und nach Bedarf
ändern.
Benutzermethoden (nur DL39)
METTLER-Methoden (nur DL39)
911 Standard 1.0
912 Stromboli
913 Ext.Extr.
914 Br Index
915 Br Blank
KF-Standardmethode
–Analyse mit der gewählten Methode star-
ten, indem Sie <Run> oder <F3>, „Probe“, drücken.
–Abfragen beantworten.
–Probe zugeben. (DL39: Falls „Autostart:
Ja“ gewählt wurde, beginnt die Titration
automatisch bereits nach Zugabe der
Probe.)
–<Run> oder <F3>, „Start“, drücken, um
die Analyse zu starten. (DL39: Falls
„Autostart: Ja“ gewählt wurde, entfällt
dieser Schritt.)
–Resultatliste von analysierten Proben
anschauen, Nachberechnungen durchführen, die statistische Auswertung einer Serie ändern (nur DL39!) sowie zusätzliche Protokolle ausdrucken.
Die KF-Standardmethode
Nr. der Methode 0
Titel der Methode
Probenparameter
ID
Art Masse
Minimum [g] 0.0000
Maximum [g] 5.0000
Eingabe Vorher
Drehzahl [%] 40
Mischzeit [s] 10
→→
Autostart Nein
→ nur DL39
→→
Regelparameter
Pol.-Strom [∝A] 2
Endpunkt [mV] 100
Erz.-rate Normal
Abbruchparameter
Max. Zeit [s] 600
Driftstopp Rel.
Drift [∝g/min] 5
∝
g] 0
Blindwert [
Drift Online
Autor der Methode
→→
Resultat
→ nur DL32
→→
Berechnung 1 ppm
R1 = x [ppm]*f1
f1 = 1.0000
Einheit ppm
Dezimalstellen 2
Statistik Ja
Max. srel [%] 0.00
Berechnung 2
R2 = Keine Berech.
f2 = 1.0000
→→
Einheit
→ nur DL39
→→
Dezimalstellen 2
Statistik Ja
Max. srel [%] 0.00
Berechnung 3
R3 = Keine Berech.
f3 = 1.0000
Einheit
Dezimalstellen 2
Statistik Ja
Max. srel [%] 0.00
Standby Ja
Protokoll
AusgabeDruck.+Comp.
Typ GLP
Italian 51710111
DL32 D / DL39 D DL32 X / DL39 X
Generator electrode with
diaphragm
with straight
drying tube
51108751
11.2 Optional equipment
Drying oven
DO307
P
O
W
E
R
T
E
M
P
E
R
A
T
U
R
E
°
C
H
E
A
T
I
N
G
1
1
4
6
0
1
0
2
0
1
8
0
1
0
0
2
0
0
8
0
2
2
0
6
0
2
4
0
4
0
2
6
0
O
F
F
2
8
0
3
0
0
Adaptor for DO307
51108761
Memo card
German 51710112
English 51710113
French 51710114
Spanish 51710115
Italian 51710116
Generator electrode without
diaphragm
with straight
drying tube
51108753
Oven sample changer Stromboli
with DL39D or DL39X only
Stromboli
Connection cable for Stromboli
(DL39 only)
51190589
64 METTLER TOLEDO DL32/DL39
Page 67

Standard and optional equipment
Operating
Instructions
METTLER
TOLEDO
DL31/DL38:
Description
of
the
Computer
Interface
External titration stand
DV705
Connection cable for
METTLER TOLEDO balance
AM, PM, AT, AX
229029
Titration arm, without screw,
without holder
51108729
Connection cable for
METTLER TOLEDO balance
AG, AB, PB, PG (LC interface)
229065
Waste bottle complete
51108745
Connection cable for
METTLER TOLEDO balance
AB, PB, PG-S (RS9 interface)
11101051
1
7
.
3
7
1
5
9
g
.
3
1
9
8
g
.
0
0
3
7
.
g
7
7
3
6
g
.
5
5
1
4
0
g
.
5
0
6
8
g
.
0
MET
9
7
5
g
.
8
G
A
4
2
P
r
i
n
t
e
r
T
7
L
6
ER TO
3
g
.
2
0
5
1.0
g
9
LE
8
g
D
O
GA42
Olivetti Artjet printer
US version 51190986
EU version 51190985
Printer
Connection cable for
METTLER TOLEDO balance
AE with option 011
59759
Connection cable for
SARTORIUS balances
51190363
Keypad cover
3 pieces
51107666
Connector set
for hardware tests
51107790
Connection cable for
GA42 printer
51190362
Connection cable for
EPSON/HP compatible printer
(i.e. Olivetti Artjet)
51107780
Syringe, 100 pieces
1 mL 71492
10 mL 71482
1 mL
Injection needle, 12 pieces
80 x 1.2 mm 71483
.2
1
x
0
8
Operating
Instructions
METTLER
TOLEDO
DL31/DL38:
Description
of
the
Computer
Interface
80 x 0.8 mm 71484
Description of the interface
German 51709875
English 51709876
Drying tube, bent,
for DO307
51108639
Drying tube, straight,
51108733
METTLER TOLEDO DL32/DL39 65
Page 68

Technical Data
12 Technical Data
Power supply (External power pack)
Voltages 100 – 240 VAC ± 10 %
Frequency 50/60 Hz
Power consumption 45 VA
Fuse T3,15H250V (not interchangeable)
Voltage 24 V 0,8 A / 5 V 1,2 A
Dimensions
Width 240 mm
Depth 305 mm
Height 370 mm
Weight approx. 3.5 kg
Materials
Housing Polypropylene
Titration stand Polypropylene
Keypad Polyester
Titration cell Glass
Suction tube PTFE
Ambient conditions
Ambient temperature +5 °C ... +40 °C
Atmospheric humidity max. 80 % at 40 °C
Use indoors
Overvoltage category II
Pollution degree 2
Measurement system
KF input Triaxial socket
Pol. current (Sensor) 1 µA, 2 µA or 5 µA
End point 100 mV
Generator current 60 mA, 100 mA, 200 mA, 400 mA (automatic steps)
Generator voltage 28 V (pulsating)
Max. permissible errors < 0.2 %
66 METTLER TOLEDO DL32/DL39
Page 69

Outputs
Output 8-pin socket (mini DIN)
Magnetic stirrer type Stepper motor
Speed Software controlled (1–100%)
Power 2 W (24 V)
Max. speed 1050 rpm (40 % ≈ 600 rpm, 70 % ≈ 1050 rpm)
Output 5-pin socket (mini DIN)
Magnetic stirrer type DC motor
Speed Software controlled (1–100%)
Voltage range 0 bis 18 VDC (max. 300 mA)
Pump
Voltage 24 VDC (max. 400 mA)
Technical Data
Magnetic stirrer (stepper motor)
Max. Speed 1050 rpm
Power consumption 2 W
Diaphragm pump
Voltage 24 VAC (4 W)
Pressure buildup approx. 150 mbar
Display
Liquid crystal display 6 lines, 20 characters per line,
backlit
Languages German, English, French,
Spanish, Italian and Russian
Memories
KF standard method 1
Tutorial method 1
METTLER methods 5 (DL39)
User methods max. 50 (DL39) / max. 1 (DL32)
Interface
TTL I/O D-sub connector 9-pin
METTLER TOLEDO DL32/DL39 67
Page 70

Technical Data
Attachment possibilities for peripherals
Balance Attachment via RS232C interface
(9-pin D-sub connector) for METTLER TOLEDO and SARTORIUS balances
Printer Attachment via RS232C interface
(9-pin D-sub connector) for GA42 printer
Attachment via Centronics interface
(25-pin D-sub socket) for commercial EPSON compatible printers with
parallel interface
Computer Attachment via RS232C interface
(9-pin D-sub connector): full-duplex, short-circuit-proof,
handshake: X on/off, no hardware handshake
Stromboli Attachment via TTL I/O socket (9-pin D-sub)
RS232C connector (balance/GA42/computer)
5
RxD (In)
9
4
TxD (Out)
8
3
7
2
6
1
DTR
GND
+12 V
470 Ω
Titrator
Data to coulometer
2
3
Data from coulometer
4
Handshake from coulometer fixed to operational readiness
5
Signal ground, galvanically connected to coulometer electronics
TTL I/O socket
In TTL; short-circuit-proof; Pulse ≥150 ms
1
6
2
7
3
8
4
9
5
IN1
IN2
OUT1
OUT2
OUT3
OUT4
GND
Titrator
1
2
3
4
Out Open collector
5
6
7
8
GND Signal ground, galvanically connected to coulometer elec-
(the input signal for the coulometer must
be at least 150 ms)
• Vce max. = 24 V
• Ic max. = 20 mA
tronics
68 METTLER TOLEDO DL32/DL39
Page 71

Centronics socket
Technical Data
13
12
11
10
9
8
7
6
5
4
3
2
1
25
24
23
22
21
20
19
18
17
16
15
14
\Strobe
PD0
PD1
PD2
PD3
PD4
PD5
PD6
PD7
\ACK
\BUSY
PE
SLCT
\AUTOFDXT
\ERROR
\INIT
\SLCTIN
1
2
3
4
5
6
7
8
9
10
11
12
13
14
15
16
17
18
19
20
21
22
23
24
25
Data ready
Data accepted
Printer busy
End of paper
Printer aktive
Automatic line feed
Printer error
Printer initialized
Printer selected
Signal ground,
galvanically connected to
coulometer electronics
Coulometer
METTLER TOLEDO DL32/DL39 69
Page 72

70 METTLER TOLEDO DL32/DL39
Page 73

Index
Index
A
Analysis 33
Anolyte 6
Application Brochure 5
Arrow keys 10
Auto start 23, 39
Auxiliary function keys 12
Auxiliary functions 45
B
Balance 16, 39, 59, 68
Battery 61
Beep 19
Blank 24, 30, 41, 51
Bromine 6
Bromine index 6, 29, 42
C
Calculation 24, 25, 39
Calculation formula 43
Calculations 48
Capacity 19, 51
Centronics 69
Cleaning 60
Command keys 10
Computer 17, 59, 68
Control parameters 23
D
Date 18
Density 22
Diaphragm 6
Display test 55
Disposal 61
Drift 24, 34, 41, 51
Drift compensation 39
Drift stop 23
E
Electrodes 59
Electrolyte 12
End point 23
Enter keys 12
Entry 22
Equipping the titration stand 57
ERROR 52
Error messages 52
Errors 54
Esc key 10
Expert 18, 75
G
Generator electrode 6, 17, 59
H
Hardware tests 51
Hello! 51
I
i key 11, 51
ID 22
Information menu 51
Inputs 56
Installation 57
Installing the waste bottle 58
Interfaces 55
Iodine 6
K
Keyboard test 55
KF standard method 20, 21
L
Language 13, 18
METTLER TOLEDO DL32/DL39 71
Page 74

Index
M
Magnetic stirrer 59, 61
Main method 14
Maintenance 57, 60
Malfunctions 52, 54
Max. srel 25
Measuring electrode 6, 59
Menu keys 11
Method 20, 35
METTLER method 20, 28, 29
Mix time 22
O
Operating concept 9
Operation 9
Operational safety 7
Optional equipment 64
Outputs 56
Oven sample changer 17, 43
P
Peripherals 15
Pol. current 23
Post consumption 39
Pretitration 34
Principle of measurement 6
Printer 15, 59
Pump 45
Pump unit 61
Pumping time 19
Putting into operation 9
R
Recalculation 47
Report 25, 48
Reset key 11
Result 24
Results 35, 45, 46
Routine 19, 75
RS232C 68
S
Safety Measures 7
Sample changer 17, 43
Sample determination 36, 37
Sample parameter 22
Servicing 60
Settings 18
Setup 14
Speed 22, 35
Standard equipment 63
Standby 25
Standby mode 35
Starting a method 33
Statistics 25, 40, 49
Statistics series 50
Stirrer 12, 45
Storage procedures 26
Stromboli 17, 31, 43
T
TBox 59
Technical Data 66
Termination parameters 23
Time 18
Titration stand 16
Titrator ID 18
TTL I/O 56, 68
Tutorial 10
Type 22
U
User list 18
User method 11, 20, 28, 29
72 METTLER TOLEDO DL32/DL39
Page 75

METTLER TOLEDO DL32/DL39 73
Page 76

74 METTLER TOLEDO DL32/DL39
Page 77

Switching from routine to expert mode
Settings SETUP
Titrator ID
Acces for Routine
Beep Yes
Solv. capac.[mL] 80
Help OK
Settings SETUP
Titrator ID
Acces for Routine
Beep Yes
Solv. capac.[mL] 80
Help Modify OK
▲
Select this line in the Setup menu.
– While holding down the Shift key, press key 1 three times:
▼
▲
“Modify” is assigned to <F2> allowing you to select “Expert”.
▼
– Confirm with <F3>, “OK” to save the change.
METTLER TOLEDO DL32/DL39 75
✃
Page 78

76 METTLER TOLEDO DL32/DL39
Page 79

Page 80

To protect your METTLER TOLEDO product’s future:
METTLER TOLEDO Service assures the quality, measuring accuracy and preservation of value of
all METTLER TOLEDO products for years to come. Please send for full details about our attractive
terms of service. Thank you.
Printed on 100% chlorine-free paper, for the sake of our environment.
*P51710108*
© Mettler-Toledo GmbH 2001, 2002 ME-51710108A Printed in Switzerland 0203/2.12
Mettler-Toledo GmbH, Analytical, Sonnenbergstrasse 74, CH-8603 Schwerzenbach,
Tel. ++41 1 806 77 11, Fax ++41 1 806 73 50, Internet: http://www.mt.com
Subject to technical changes
 Loading...