

Page 1
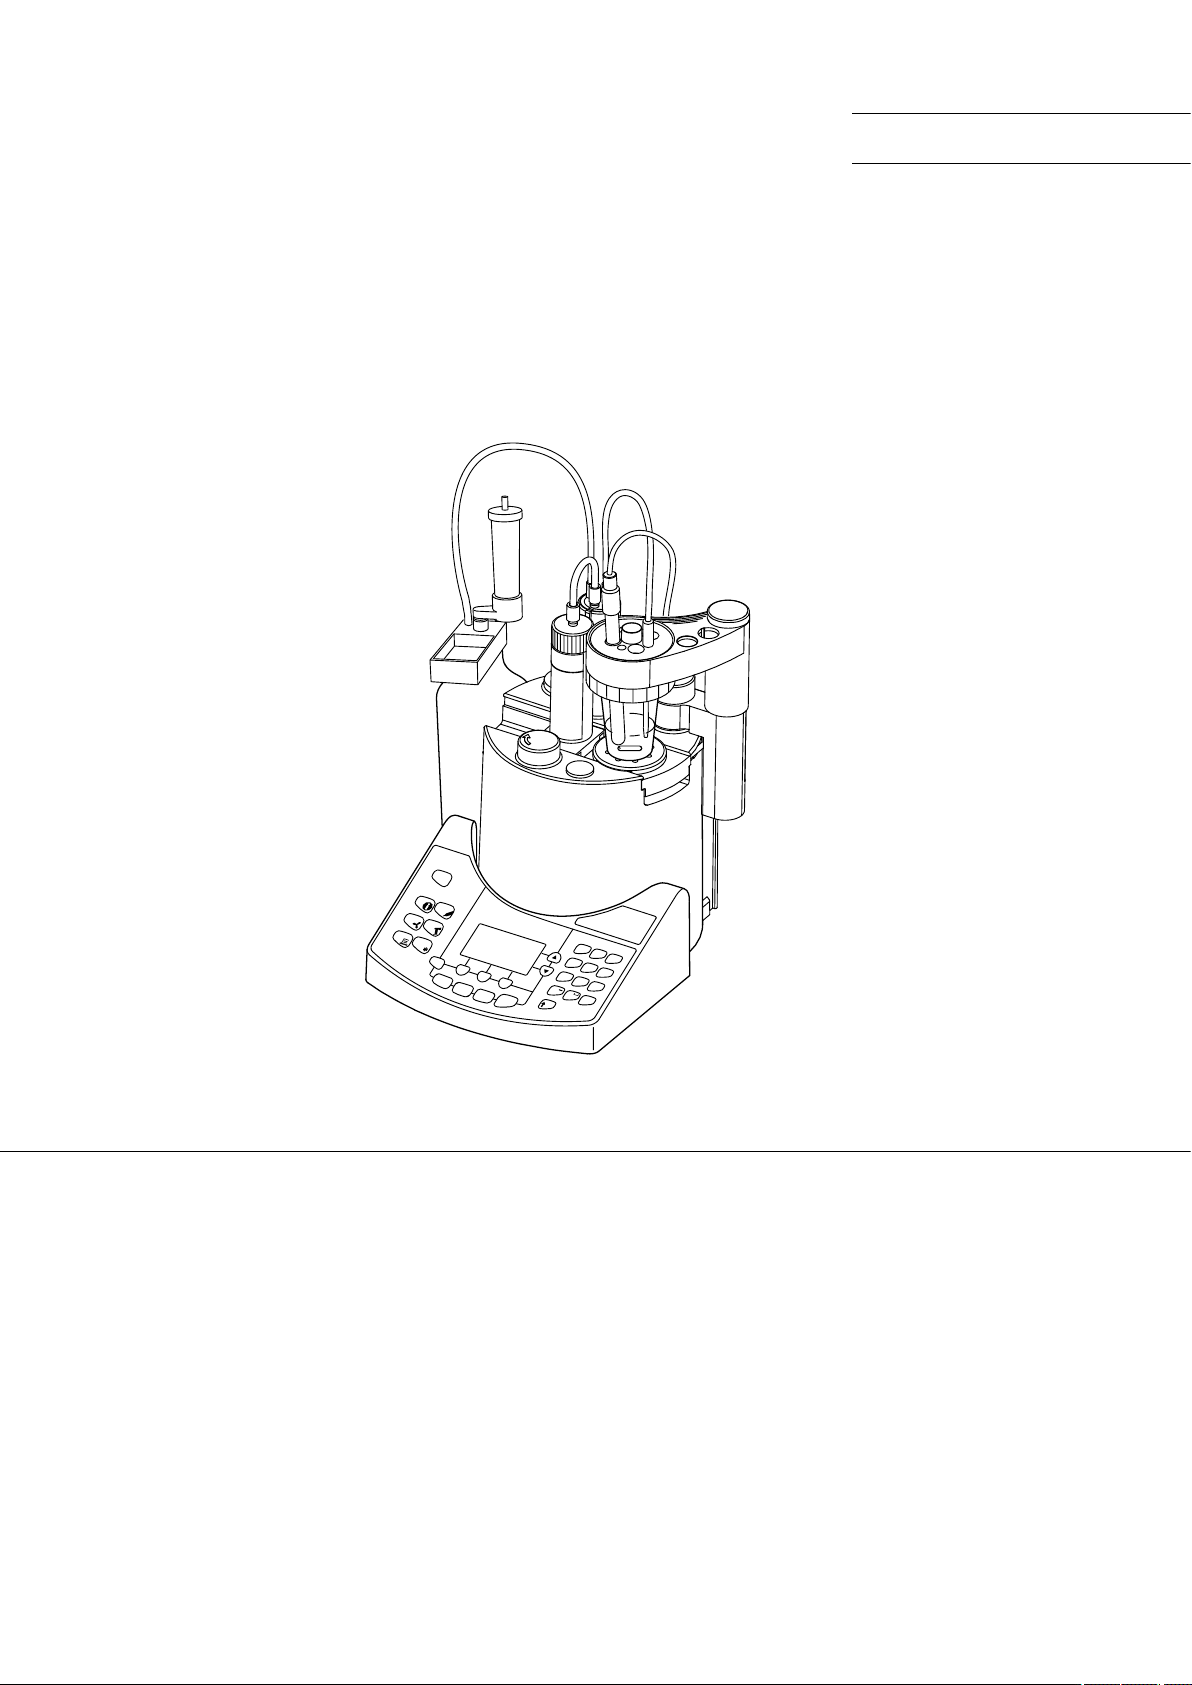
Operating Instructions
Titrator
DL15
Page 2

Page 3

Table of contents
METTLER TOLEDO DL15 I
Table of Contents
1. Introduction 5
2. Safety measures 6
3. Standard equipment and Installation 7
3.1 Standard equipment DL15 Titrator 7
3.2 Installation 9
3.2.1 Attaching the titration stand to the titrator 9
3.2.2 Installing the burette 10
3.2.3 Installing the magnetic stirrer 10
3.2.4 Swiveling the titration stand 11
3.2.5 Attaching and removing the titration beaker 12
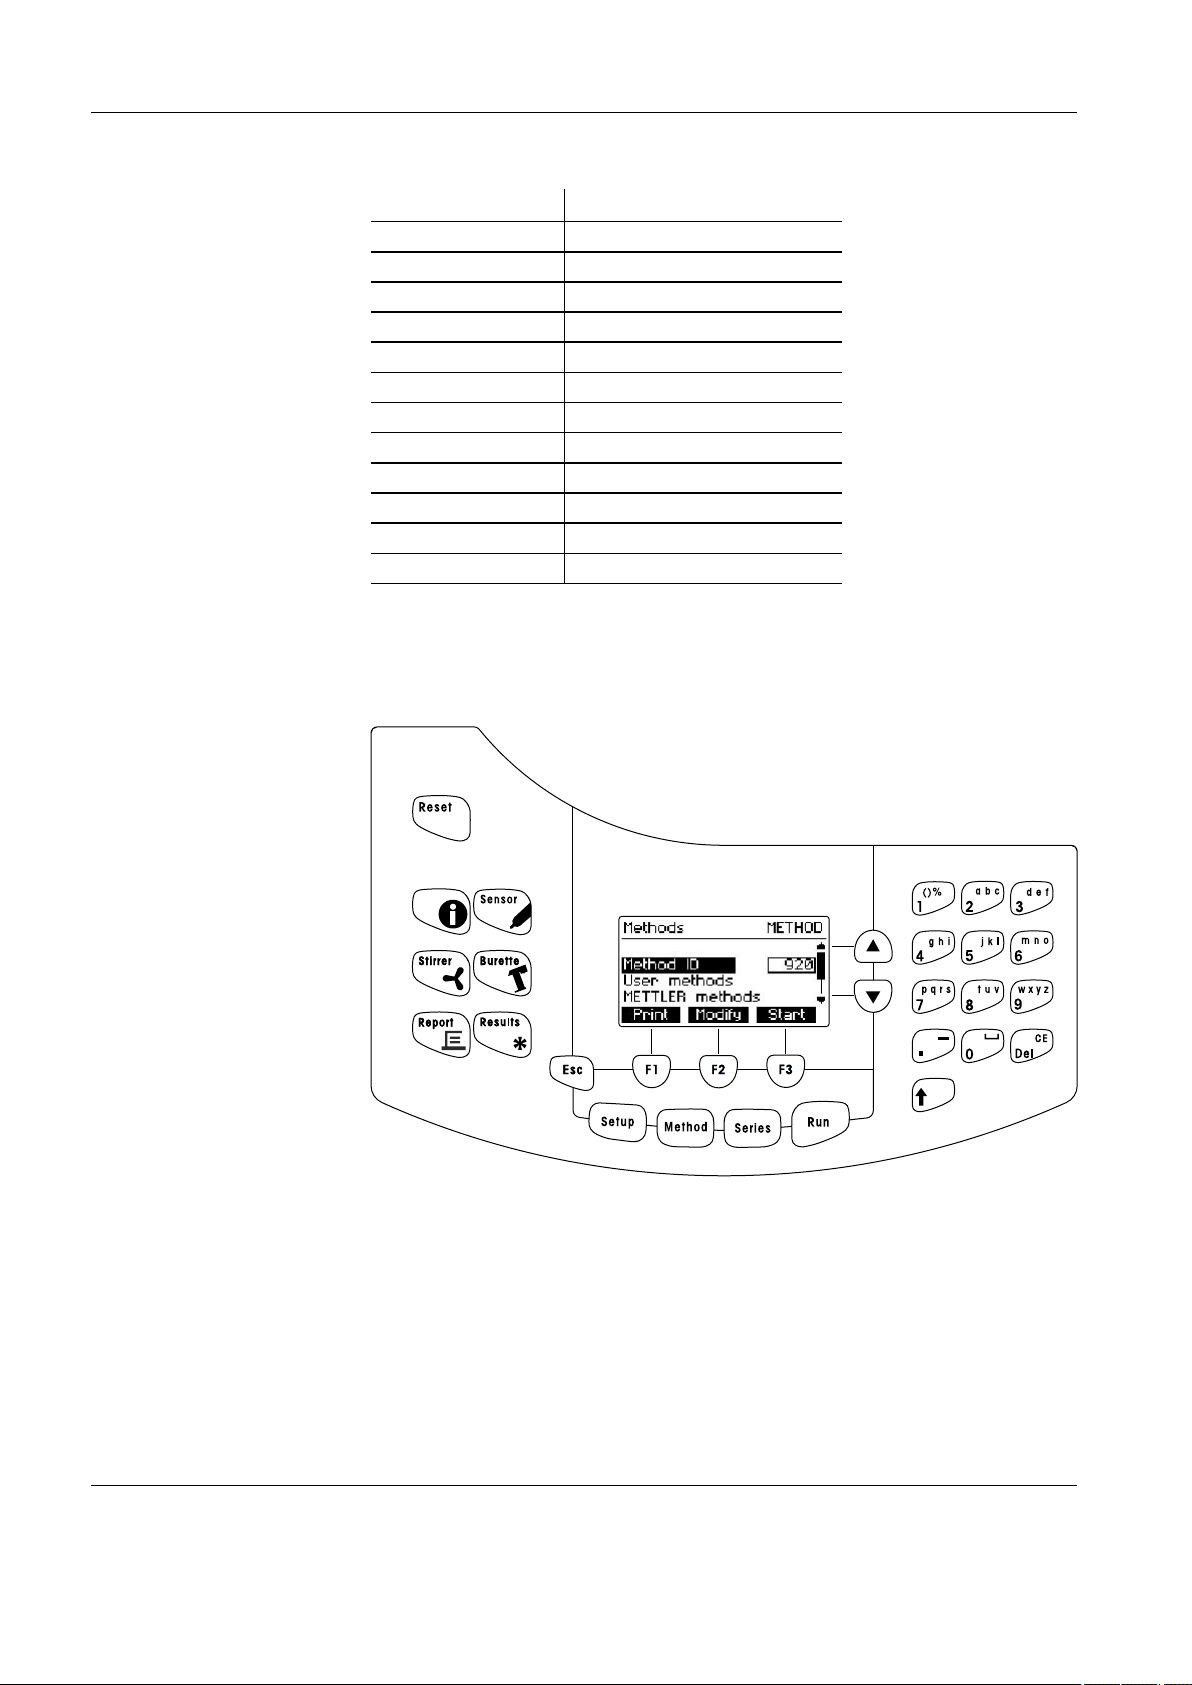
4. The titrator 13
4.1 Design of the titrator 13
4.2 Connections at the rear of the titrator 13
4.3 The operating concept 14
4.3.1 The display 15
4.3.2 The arrow keys 15
4.3.3 The function keys 15
4.3.4 The input keys 15
4.3.5 The menu keys 16
4.3.6 The Help function keys 17
4.3.7 The Escape key 17
4.3.8 The Reset key 17
4.3.9 The Home screen 18
5. Setup 19
5.1 Opening the Setup menu 19
5.2 Titrants 19
5.2.1 Adding a titrant 20
5.2.2 Modifying a titrant 20
5.2.3 Deleting a titrant 22
5.2.4 Printing a titrant 23
5.2.5 Titer determination from the titrant setup 23
5.3 Sensors 25
5.3.1 Adding a sensor 25
5.3.2 Modifying a sensor 26
5.3.3 Deleting a sensor 28
5.3.4 Printing a sensor 28
5.3.5 Sensor calibration from the sensor setup menu 29
5.3.6 Sensor test from the sensor setup menu 32
5.4 Peripherals 35
5.4.1 Setting up a printer 35
5.4.2 Setting up a balance 36
5.5 Standards 37
5.5.1 Adding a standard 37
5.5.2 Modifying a standard 37
5.5.3 Deleting a standard 39
5.5.4 Printing a standard 39
Page 4

Table of contents
II METTLER TOLEDO DL15
5.6 Blank values 40
5.6.1 Adding a blank value 40
5.6.2 Modifying a blank value 40
5.6.3 Deleting a blank value 42
5.6.4 Printing blank values 42
5.6.5 Blank value determination from the blank values setup menu 43
5.7 Main methods 43
5.7.1 Assignment of a function key 44
5.7.2 Changing the assignment of a function key 44
5.7.3 Deleting the assignment of a function key 45
5.8 User management 45
5.8.1 Adding a user 45
5.8.2 Deleting a user 46
5.8.3 Defining an active user 46
5.8.4 Defining access rights 47
5.9 Settings 47
5.9.1 Setting the language 48
5.9.2 Setting the date 48
5.9.3 Setting the time 49
5.9.4 Defining the temperature unit 49
5.9.5 Entering the titrator ID 49
5.9.6 Entering a report header 50
5.9.7 Setting the beeper sound 50
5.10 Titration stand 50
6. Methods (Method) 53
6.1 Starting a method 54
6.1.1 Starting methods from the method editor 54
6.2 Creating a method 55
6.3 Modifying a method 56
6.3.1 Sample 58
6.3.2 Stir 60
6.3.3 Measure 60
6.3.4 EP titration 61
6.3.4.1 Control param. 62
6.3.4.2 Recognition 65
6.3.4.3 Termination param. 65
6.3.4.4 Evaluation 66
6.3.5 Calculation 67
6.3.5.1 Table of formulas for the calculation of results 70
6.3.6 Report 71
6.4 Deleting methods 72
6.5 Printing a methods list 73
6.6 Printing a method 73
6.7 Predefined methods 74
7. Series 75
7.1 Starting a sample determination using the Series key 75
7.2 Starting a titer determination using the Series key 76
7.3 Starting a blank value determination using the Series key 77
8. Analysis (Run) 79
8.1 Starting a sample determination using the Run key 79
8.2 Starting a titer determination using the Run key 80
8.3 Starting a blank value determination using the Run key 80
Page 5

Table of contents
METTLER TOLEDO DL15 III
9. Performing a titration 83
9.1 Preparations 83
9.1.1 Filling the burette (rinsing) 84
9.2 Performing titration method 920 84
10. Auxiliary functions (Info, Sensor, Stirrer, Burette, Report, Results) 89
10.1 Information menu 89
10.2 Sensor 89
10.2.1 Measuring temperature 90
10.2.2 Measuring potential 90
10.2.3 Calibrating a sensor 91
10.2.4 Testing a sensor 91
10.3 Stirrer 91
10.4 Burette 92
10.4.1 Rinsing the burette 92
10.4.2 Rinsing the tip 93
10.4.3 Dispensing 93
10.4.4 Manual titration 93
10.5 Report 95
10.6 Results 95
10.6.1 Displaying and printing results 96
10.6.2 Statistics 96
10.6.3 Terminating the series 98
11. Error messages, malfunctions and hardware tests 99
11.1 Global errors and malfunctions 99
11.2 Hardware tests 100
11.2.1 User interface 100
11.2.2 Communication interfaces 101
11.2.3 Auxiliary I/O 102
11.2.4 pH input value 103
12. Optional accessories and maintenance 105
12.1 Optional accessories 105
12.2 Service and maintenance 107
12.2.1 Cleaning 107
12.2.2 Disposal 107
13. Technical data 109
Appendix: Predefined calibration standards 120
Index 124
Page 6

Table of contents
IV METTLER TOLEDO DL15
Page 7

Introduction
METTLER TOLEDO DL15 5
1. Introduction
The DL15 Titrator is the ideal solution for all requirements in the food industry, water/
wastewater analysis, and the chemical industry when all that is needed is an endpoint
titration or a pH measurement. The DL15 is mainly used to determine the acid and base
content of a sample.
It features easy-to-understand intuitive user guidance so that, for example, pressing the
Run button twice starts the method you last ran.
The user can assign three other methods to individual function keys, making methods
easy to find and start.
The keys used for the most frequently used manual functions are identified by pictograms.
Titrants and sensors can be selected from the instrument’s database.
Alphanumeric input is easily entered by means of a special keypad, just like with a mobile
phone. There is no need to connect an external keyboard.
The DL15 calculates the analytical results in predefined units and sends an analysis report
to commercially available printers.
Page 8
Safety measures
6 METTLER TOLEDO DL15
2. Safety measures
The titrators have been tested for the experiments and purposes documented in this
Operating Instructions. This does not, however, absolve you from the responsibility of
performing your own tests on the products supplied by us regarding their suitability for the
methods and purposes you intend to use them for. Please adhere strictly to the following
safety measures.
Measures for your protection
Risk of an electrical
shock
Risk of explosion
Corrosive chemicals
Caution
Caution
– Make sure that the power cable supplied is plugged into a power outlet that is
ground! A technical defect could otherwise have lethal consequences.
– Switch off the instrument and pull out the power cable before you open the instru-
ment housing! An electrical shock could have lethal consequences.
Do not work in an environment subject to the risk of explosions! The instrument
housing is not gastight (risk of explosion through spark formation, corrosion through
the ingress of gases).
– Make sure that the titration beaker is always securely attached in the titration head!
If the beaker falls out, you could injure yourself when working with poisonous titrants
and solvents, strong bases or acids.
– When using chemicals and solvents, follow the manufacturers' instructions and the
general rules for safety in the laboratory!
Measures for operational safety
– Have the instrument serviced only by METTLER TOLEDO Service!
– Wipe off any droplets of liquid! The instrument is not watertight.
– Eliminate the following environmental effects:
• strong vibrations,
• direct sunlight,
• humidity over 80%,
• temperatures below 5 °C and over 40 °C,
• strong electric or magnetic fields!
Page 9

Standard equipment and Installation
METTLER TOLEDO DL15 7
3. Standard equipment and Installation
3.1 Standard equipment DL15 Titrator
The parts are given with order number and the number of items supplied. For additional
orders, some parts are only available as a minimum order quantity. In this case, the
minimum order quantity is noted after the order number.
The standard equipment and the optional accessories for the DV1020 burette are listed
in the operating instructions for the interchangeable burette. This is supplied with the
burette.
Titrator
External power supply
51107777
Power cable (country specific)
(example)
Holder for titration stand
51109361
Fixing screw (for holder)
51109084
Magnetic stirrer
51108750
Magnetic stirrer bars
51191159
Cap (2x)
51107608
Dummy cover
51107600
Titration stand, manual
51109058
Spacing ring
00023842
Clamping ring
00025653
Threaded ring
00025652
DG115-SC
Combined glass electrode with
sleeve frit for titrations in aqueous
media
00089806
Page 10
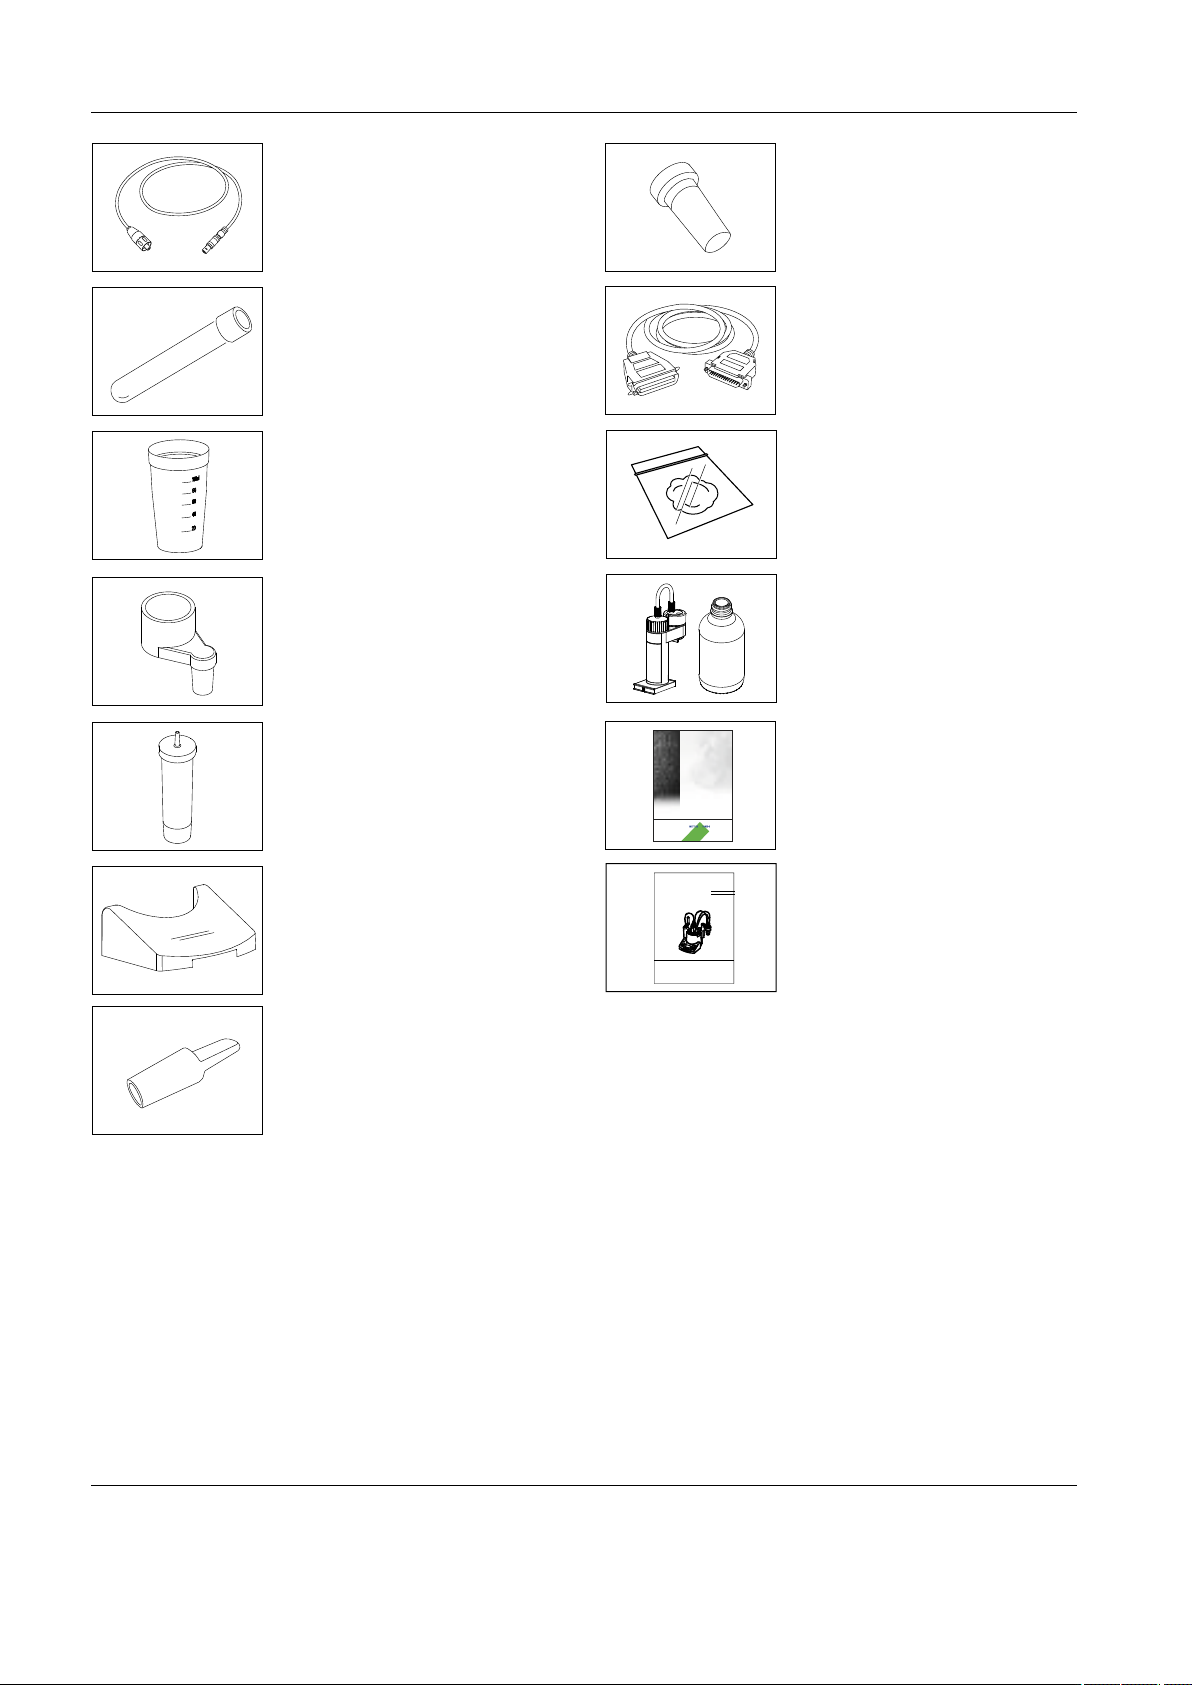
Standard equipment and Installation
8 METTLER TOLEDO DL15
Stopper ST 7.5 (4x)
00023452
(minimum order quantity 5 pcs.)
Connection cable for HP compatible
printer
51107780
2 g glass wool
51108143
Interchangeable burette,
complete (for further accessories:
see operating instructions for the
interchangeable burette)
DV1020
DL15 Applications Brochure
English
Operating Instructions
English
Triaxial cable SC-LEMO-60
(length: 60 cm)
00089601
Electrode sleeve
00025654
(minimum order quantity 5 pcs.)
Titration vessel 100 mL
polypropylene (2x)
00101974
(set of 1400 pcs.)
Drying tube holder
00023915
Drying tube
00023961
Protective cover for keypad
51107666
(minimum order quantity 3 pcs.)
Stopper ST 14.5 (5x)
00023451
(minimum order quantity 5 pcs.)
�
�
�
�
�
�
�
�
�
�
�
�
�
�
�
�
�
�
�
�
�
�
�
�
�
�
�
�
�
�
�
�
�
�
�
�
�
�
�
�
�
�
�
�
�
�
�
�
�
�
�
�
�
�
�
�
�
�
�
�
�
�
�
�
�
�
��
�
�
�
�
�
�
�
�
�
�
�
�
�
�
�
�
�
�
�
�
�
�
�
�
�
�
�
�
�
�
�
�
�
�
�
�
�
�
�
�
�
�
�
�
�
�
�
�
�
�
�
�
�
�
�
�
�
�
�
�
�
�
�
�
�
�
���
�
���
�
���
�
�
�
�
�
�
�
�
�
�
�
�
�
�
�
�
�
�
�
�
�
Page 11
Standard equipment and Installation
METTLER TOLEDO DL15 9
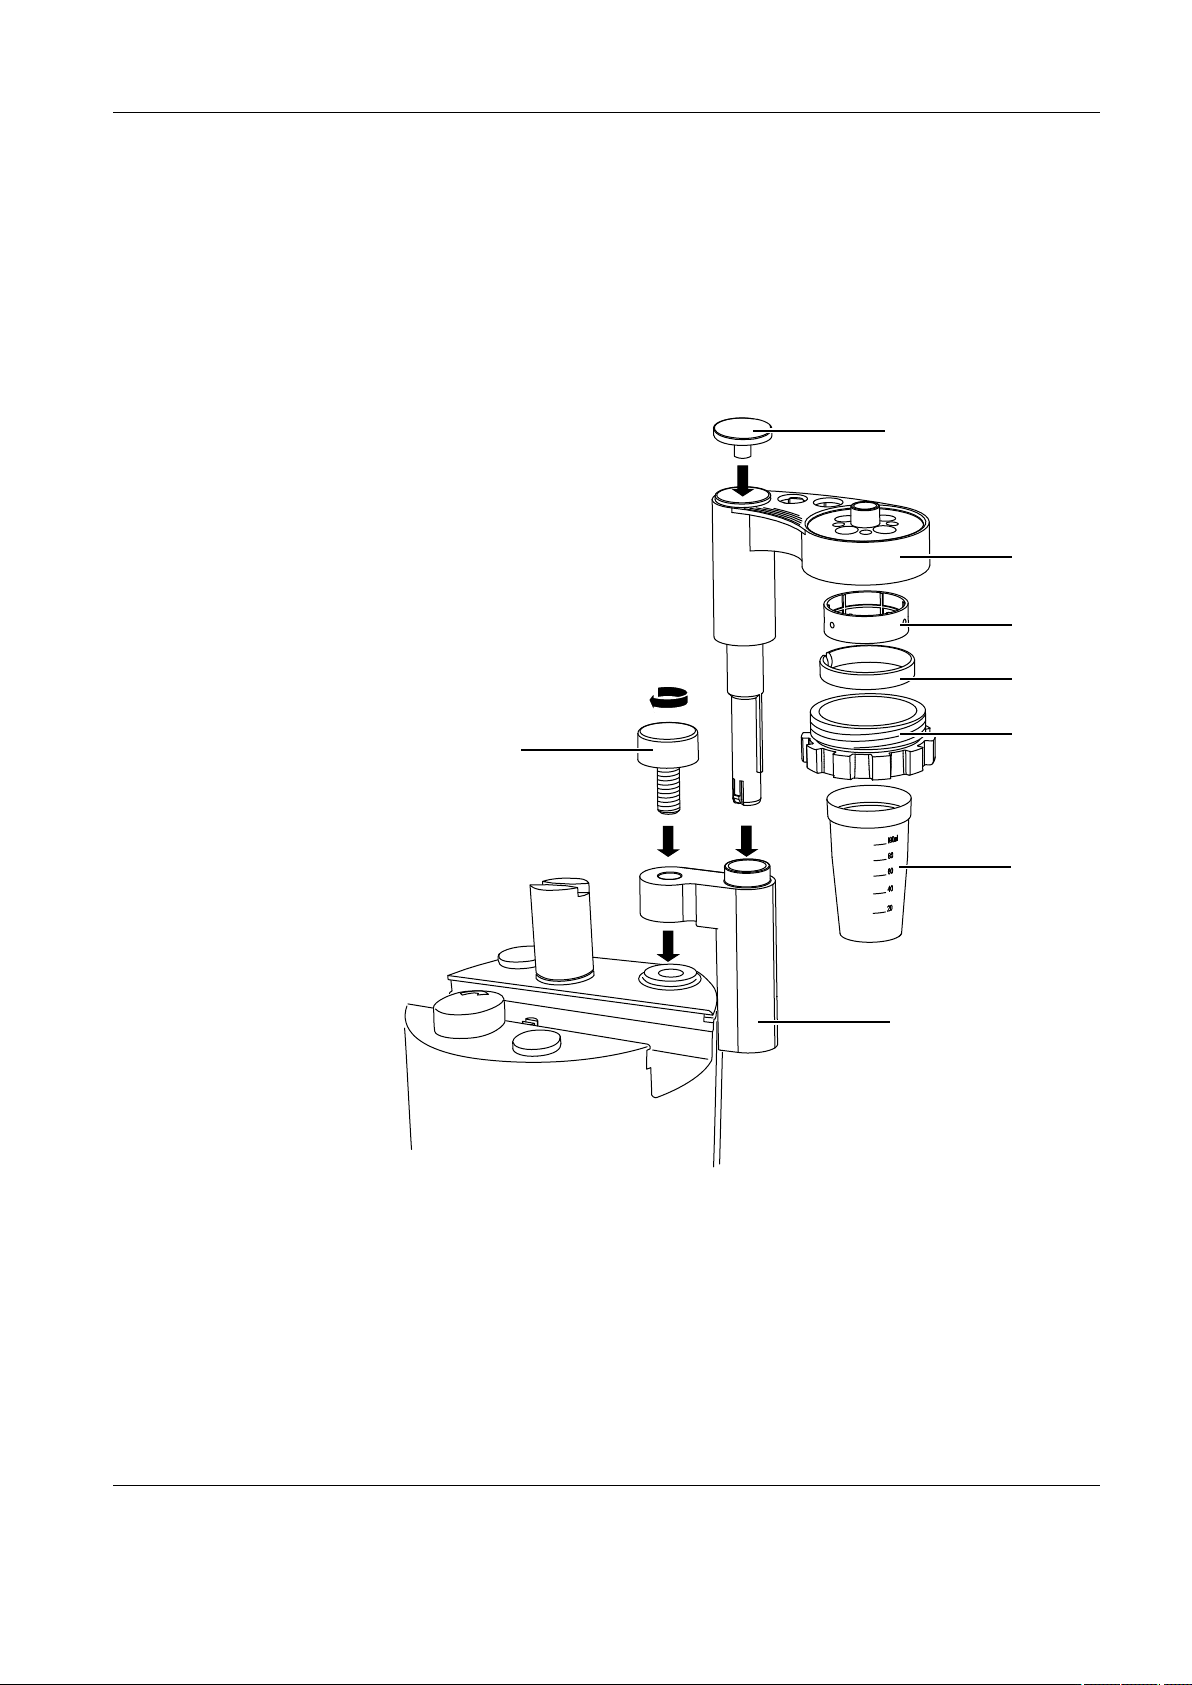
3.2 Installation
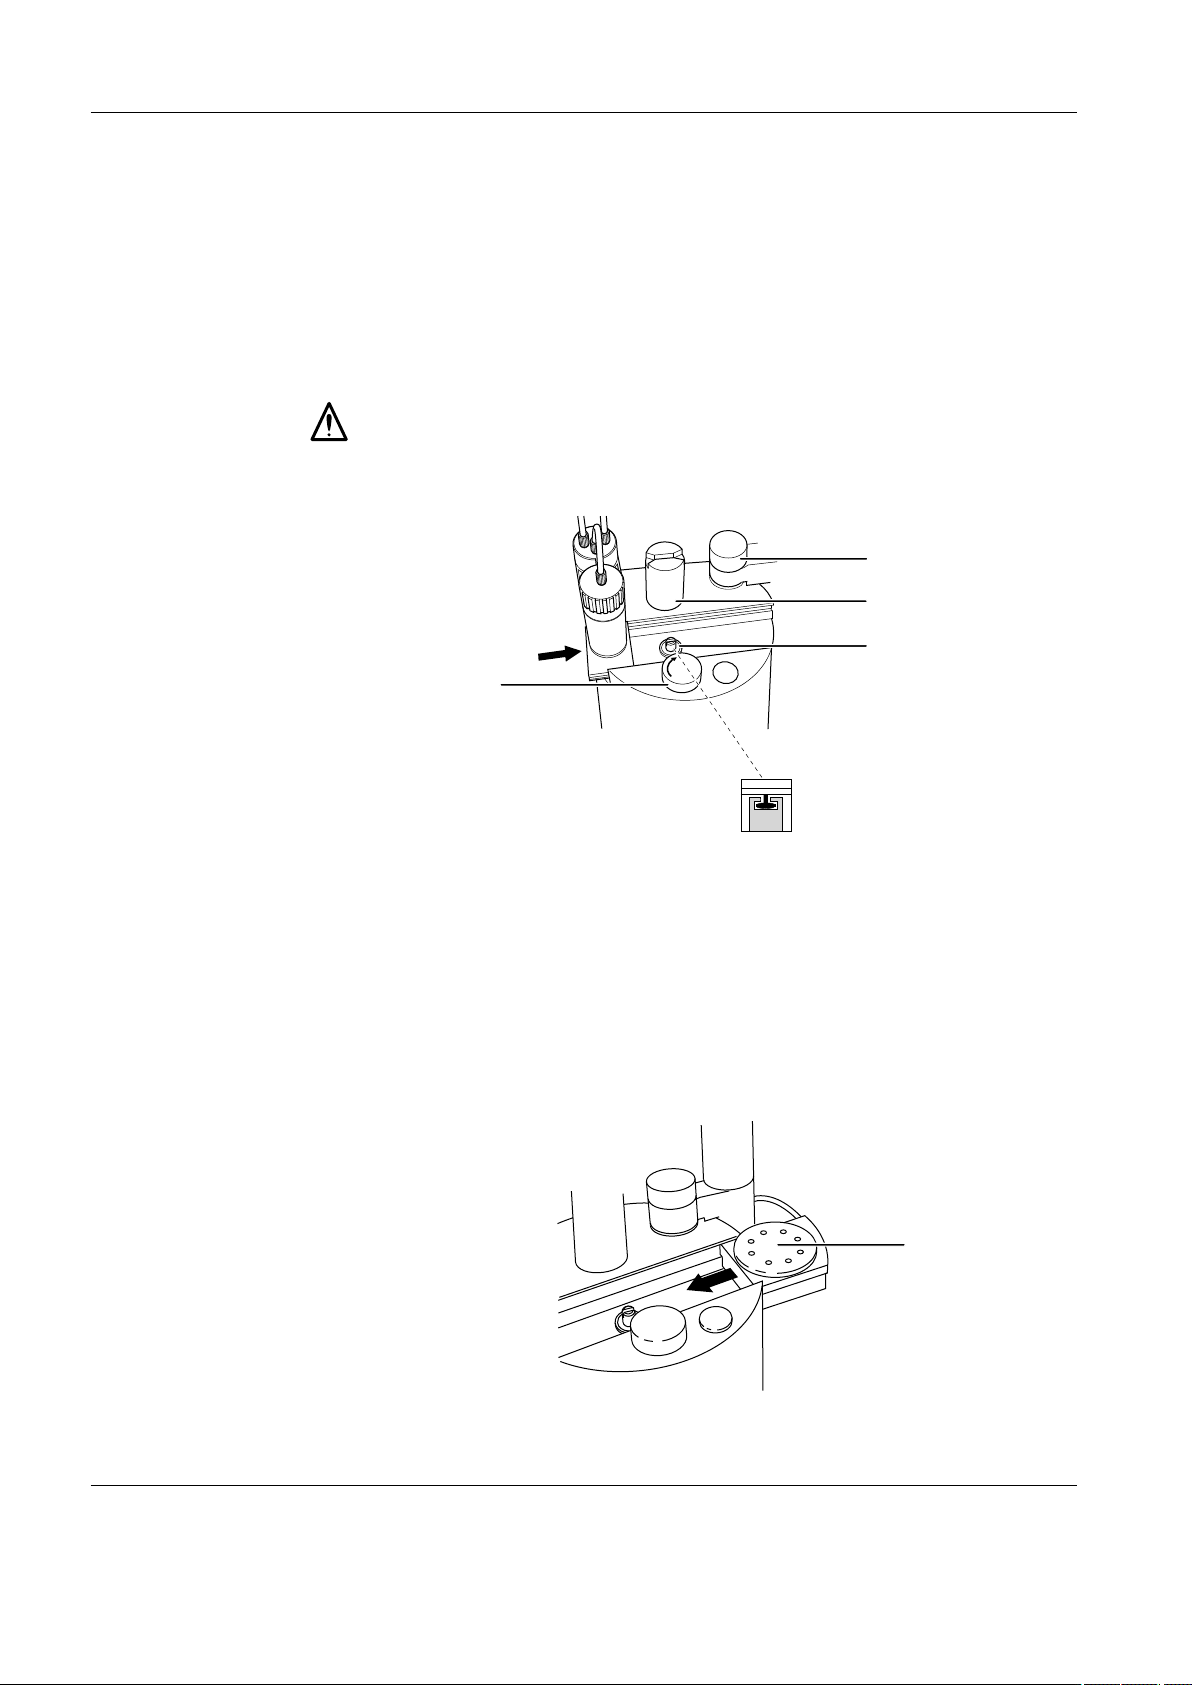
3.2.1 Attaching the titration stand to the titrator
When the titration stand is delivered, the spacing ring, clamping ring and threaded ring
are already mounted. The holder for the titration stand still has to be fixed to the titrator
with the corresponding screw. Afterward, the assembled titration stand can be inserted
from above. The diagram below shows how the titration stand is attached to the titrator
and how the titration stand can be assembled and disassembled.
Cap
Screw
Titration stand
Spacing ring
Clamping ring
Threaded ring
Titration beaker
Holder for titration stand
Page 12
Standard equipment and Installation
10 METTLER TOLEDO DL15
3.2.2 Installing the burette
1. Screw the burette with holder onto the titrant bottle (see operating instructions for
burette.
2. Slide the burette onto the titrator: The slot on the cam and piston rod must be parallel
plug-in unit. (If this is not the case, press the Reset key.)
3. Turn the arrestment knob in the direction shown by the arrow to fasten the burette.
4. Place the dispensing tube into one of the openings in the titration stand.
• When you rinse the burette and tubing, place the dispenser tube in a waste container!
Fixing screw for titration
stand holder
Cam
Piston rod of the burette
drive
Arrestment knob
3.2.3 Installing the magnetic stirrer
The titrator has a slot on the right side of the housing into which the METTLER TOLEDO
magnetic stirrer can be inserted as shown in the following diagram.
The magnetic stirrer is inserted into the slot of the titrator from the right so that it slides into
the guide rail. The connection cable of the magnetic stirrer is guided out to the rear in the
slot on the right side of the housing between the housing and the holder for the titration
stand. To do this you may have to briefly remove the holder for the titration stand. The
connection cable of the magnetic stirrer is connected to the "Magnetic stirrer" connection
at the rear side of the housing. The arrow on the mini-DIN plug must point toward the head
of the screw.
Magnetic stirrer
Page 13
Standard equipment and Installation
METTLER TOLEDO DL15 11
3.2.4 Swiveling the titration stand
The titration stand can be swiveled in order to work with the magnetic stirrer. If the compact
stirrer is used, it is advisable to use the titration stand in the swiveled position.
You can swivel the titration stand in and out. To
do this, you lift the titration stand slightly and pull
it upward a little bit out of the holder. Now you
can swivel it to the desired position and then let
it slide back into the holder.
Page 14
Standard equipment and Installation
12 METTLER TOLEDO DL15
3.2.5 Attaching and removing the titration beaker
To insert a titration beaker in the titration stand, you must first make sure that the threaded
ring is loose (a quarter to half a turn is sufficient).
Then, carefully insert the titration beaker from below into the titration stand A, and tighten
the threaded ring B.
To remove the titration beaker from the titration stand, loosen the threaded ring about a
quarter to half a turn C, and then carefully remove the titration beaker downward out of
the titration stand.
Page 15
The titrator
METTLER TOLEDO DL15 13
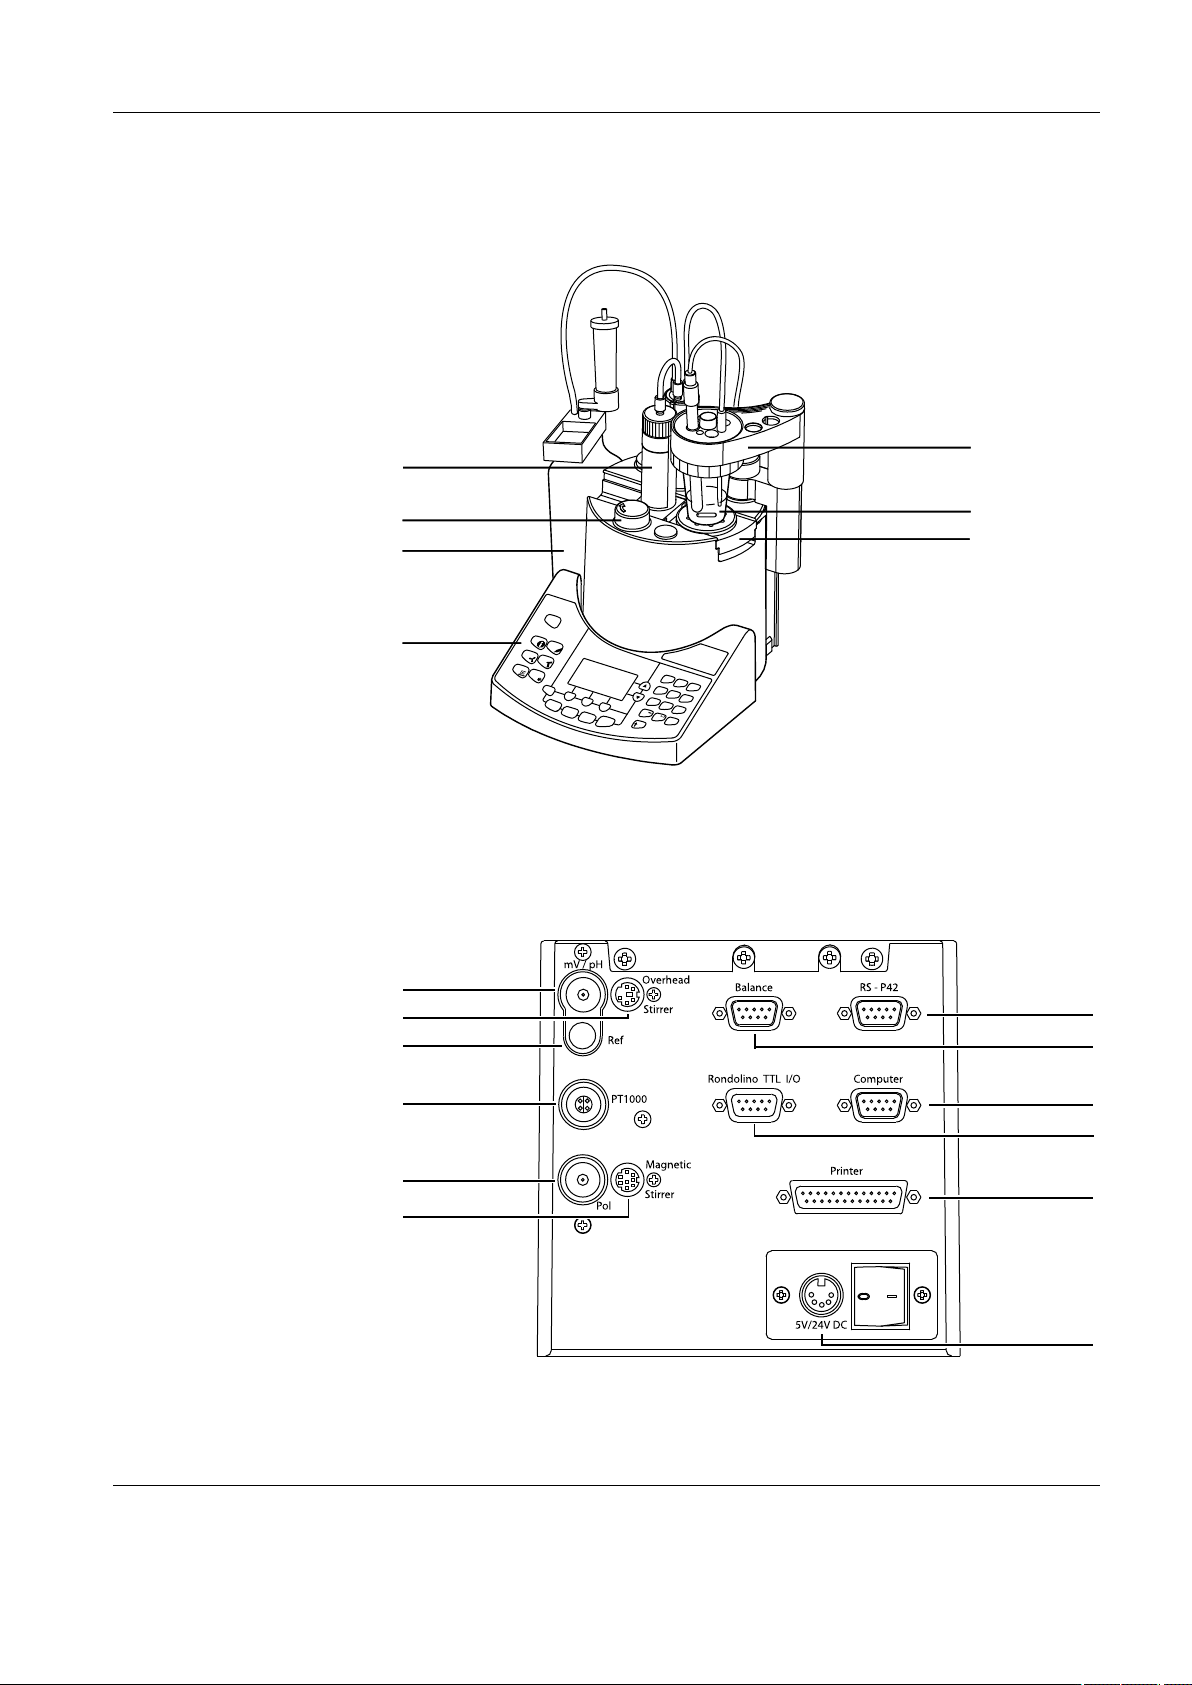
4. The titrator
4.1 Design of the titrator
4.2 Connections at the rear of the titrator
Magnetic stirrer
Titrator stand
Burette
Titrant bottle
Arrestment knob
Sample beaker
Keypad
RS-P42 printer
Balance
HP compat.
printer
Power supply
Magnetic stirrer
Overhead stirrer
mV / pH electrode
Reference
electrode
Temperature
sensor
Polariz. electrode
Rondolino
not assigned
Page 16
The titrator
14 METTLER TOLEDO DL15
The following devices can be connected to the corresponding interfaces:
Connection Device
mV/pH mV / pH electrode (sensor)
Ref Reference electrode
PT1000 PT1000 temperature sensor
Pol polarized electrode (sensor)
Overhead Stirrer Overhead stirrer
Magnetic Stirrer Magnetic stirrer
Balance Balance (RS232C)
Rondolino TTL I/O Rondolino, external devices
RS-P42 RS-P42 (GA-42) printer (RS232C)
Computer not assigned
Printer HP-compatible printer (Centronics)
5V/24V DC Power supply
4.3 The operating concept
The operating console of the titrator consists of the display in the middle with several
groups of keys arranged around it. The various functional areas are described in the following sections.
Page 17
The titrator
METTLER TOLEDO DL15 15
4.3.1 The display
The display consists of four different elements. The title line across the top shows the
name of the menu (B) and submenu (A) that you are currently using, or the name of the
screen.
On the right-hand side of the screen there is a scroll bar (D). This has a small black bar
that represents the portion of the menu shown on the display. You can move the visible
part of the menu upward or downward through the display area using the arrow keys. The
black-inverted line (C) always displays the current selection.
The three black-inverted boxes (E) across the bottom line of the display show the functions
to which the function keys directly below (F1, F2 and F3) are assigned for the menu item
selected.
4.3.2 The arrow keys
The arrow keys are located on the right of the display.
You can use these to move the black scroll bar up or down within a menu to select a menu
item. If you simultaneously press an arrow key and the Shift key (arrow pointing upward),
the scroll bar is shifted upward (or downward) three lines.
4.3.3 The function keys
The function keys are located directly below the display. Their assignment depends on the
particular menu item selected and is shown by the three black-inverted boxes across the
bottom line of the display, for example, Print for the command to print, or OK to confirm
a selection or a change.
4.3.4 The input keys
The input keys are located on the right-hand side of the operating console. They allow
alphabetical, numerical and special characters to be entered.
Entering character strings into text boxes
To enter a number or one of the letters written above a number, press the corresponding
number key repeatedly until the desired character appears in the display. After a short
pause, the cursor jumps one step further for you to enter the next character.
Page 18
The titrator
16 METTLER TOLEDO DL15
- Pressing the number key 2 once, for example, writes the letter "a"; pressing it three
time, the letter "c", and so on.
- To obtain large characters, you must press and hold down the Shift key (arrow pointing upward) while selecting the character.
- You can delete the last character by pressing the Del key. If you simultaneously press
the Delete key and the Shift key, the entire content of the text box is deleted.
- To insert a space, press the number key 0.
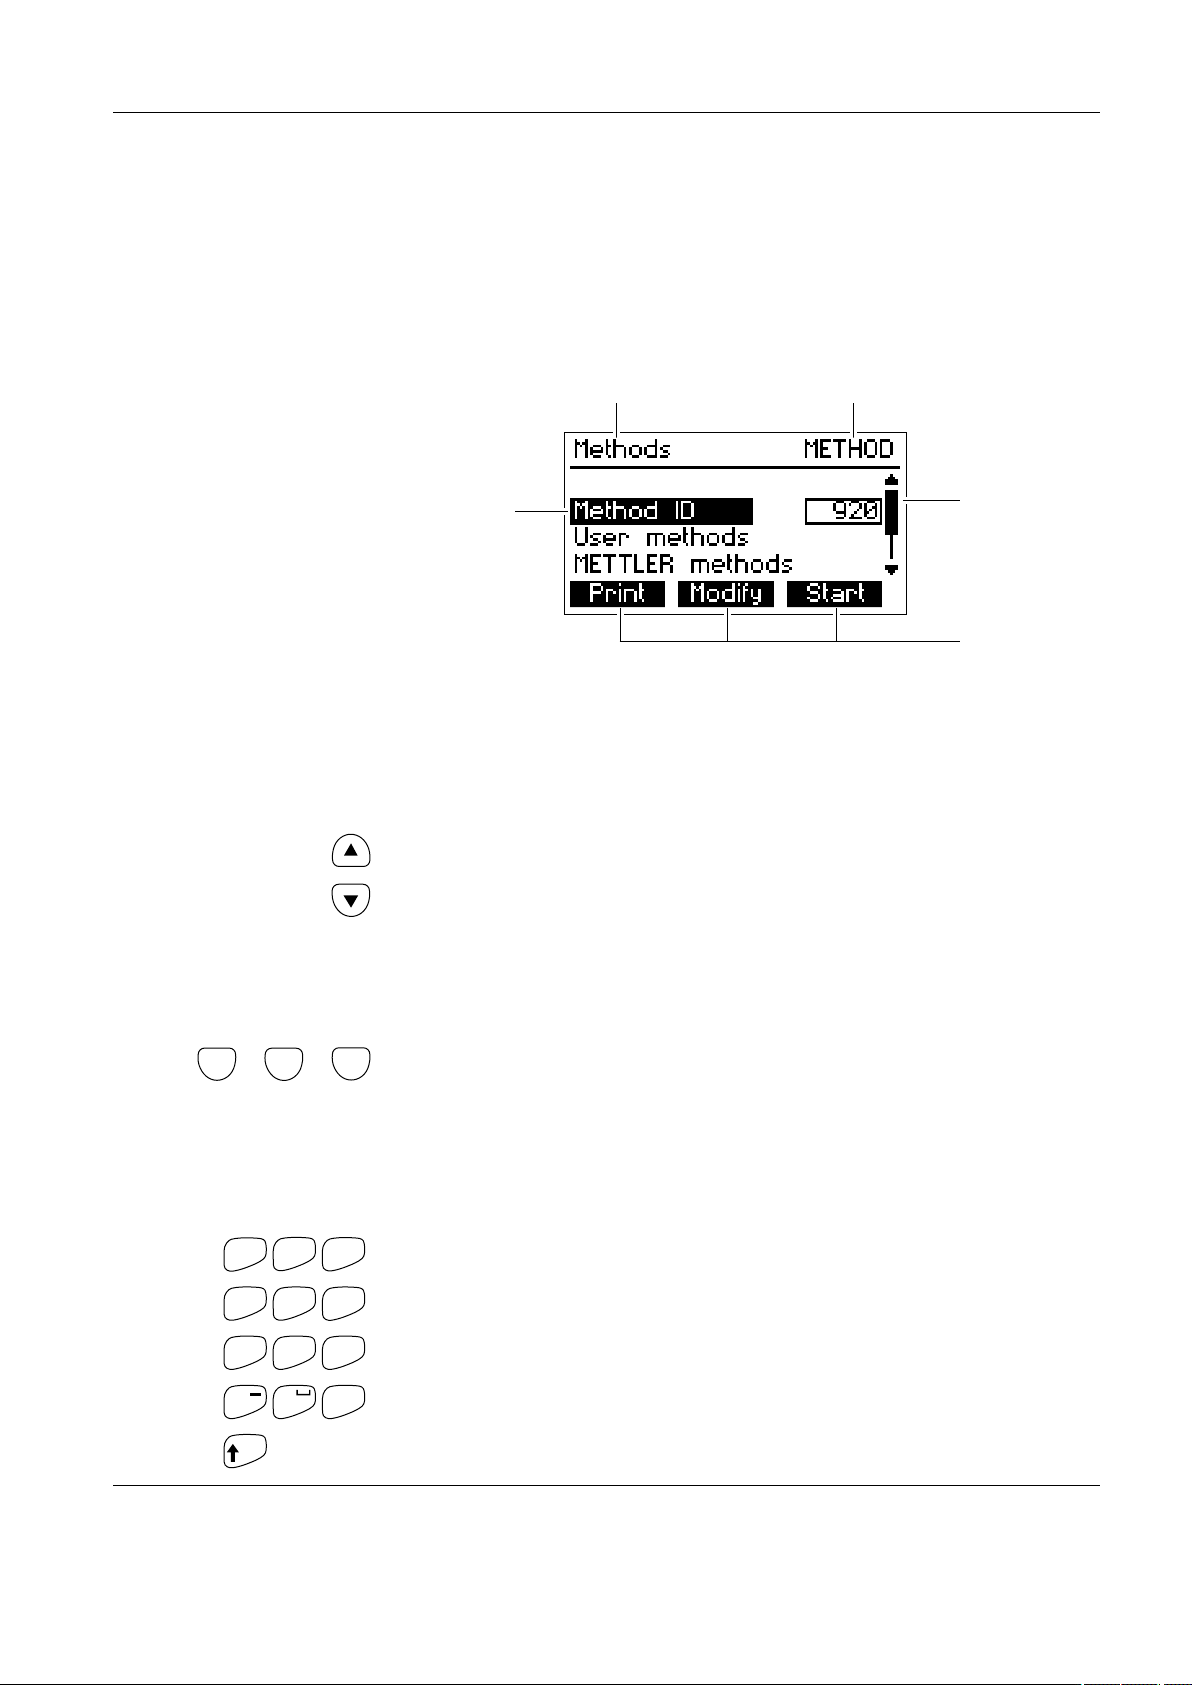
- You can insert special characters by simultaneously pressing the number key 1 and
the Shift key. A screen appears displaying all the available special characters. The
black box indicates the character currently selected.
- Select the desired character using the arrow keys and the < and > keys.
- Press OK to enter the special character in the text area.
Entering numbers into number boxes
Only numbers, a point, and a minus sign can be entered into number boxes.
- To enter a number, press the desired number key.
- To enter a negative sign, simultaneously press the . and the Shift keys.
4.3.5 The menu keys
Using the menu keys, you can call up the four main menus of the titrator.
Each of these three menus has a particular assignment for performing an automatic analysis.
The Setup key opens the Setup menu of the titrator. All the resources such as titrants, sensors, standards and blank values necessary for the titration are stored and managed in
this menu. In addition, you can select the internal titrator settings you require and configure
peripheral devices.
The Method key opens the Method menu of the titrator. The methods stored in the titrator
are managed in this menu. You can store your own methods, delete and modify them. A
number of methods developed by METTLER TOLEDO are already stored and can be directly
used to perform analyses or be used as templates for new methods.
The resources you want to use for a method must be defined and stored beforehand in
the Setup menu.
The Run key opens the Start menu to perform an analysis. Methods used for different
determinations can be selected and started.
The Series key opens the start menu to perform a sample series analysis. Methods used
for different determinations can be selected and started
An automation of the series determination can be achived by using a Rondolino sample
changer.
Page 19
The titrator
METTLER TOLEDO DL15 17
4.3.6 The Help function keys
The Help function keys let you access functions that are not directly involved in performing a sample analysis, but nevertheless in some way support it (hence the name Help
functions).
Examples of such functions are the rinsing of burettes, the calibration or testing of a sensor
or the display and management of analytical results.
This menu lets you measure the pH, potential or temperature of a solution and test and
calibrate pH and ISE sensors.
The burette and the burette tip can be rinsed, and any volume you like dispensed. You can
perform a manual titration.
The variable speed stirrer can be switched on and off.
You can view the titrator information and open a menu to test the titrator hardware and
the connected devices.
You can view, print and manage the results of your analyses including statistical evaluations.
In the Report menu you can define and print additional reports.
4.3.7 The Escape key
By pressing the Escape key, you can quit a menu or a selection at any time and discard
the changes you made. You always return to the previous menu and the original values
and names remain the same.
4.3.8 The Reset key
Pressing the Reset key terminates analyses, rinsing or dispensing processes, and other
actions. The titrator is then reset and you return to the Home screen. Data that was not
saved beforehand is lost.
Page 20

The titrator
18 METTLER TOLEDO DL15
4.3.9 The Home screen
The Home screen appears on the display as soon as you switch on the titrator.
It is the starting point for operating the titrator.
Each time you reset the titrator by pressing Reset, you return to the Home screen.
The screen displays the following important information:
• the current date and time.
• the current user. (See "5.8.3 Defining an active user")
• the access rights for the active user: Expert or Routine.
(See "5.8.4 Defining access rights for active users")
• the assignment of the F1, F2 and F3 function keys with the main methods.
(See "5.7 Main methods")
Page 21
Setup
METTLER TOLEDO DL15 19
5. Setup
In this chapter you learn how to set up the titrator for your specific requirements.
To perform a titration, you must first define and configure the resources (titrants, sensor,
peripherals, etc.) used for the method in the titrator.
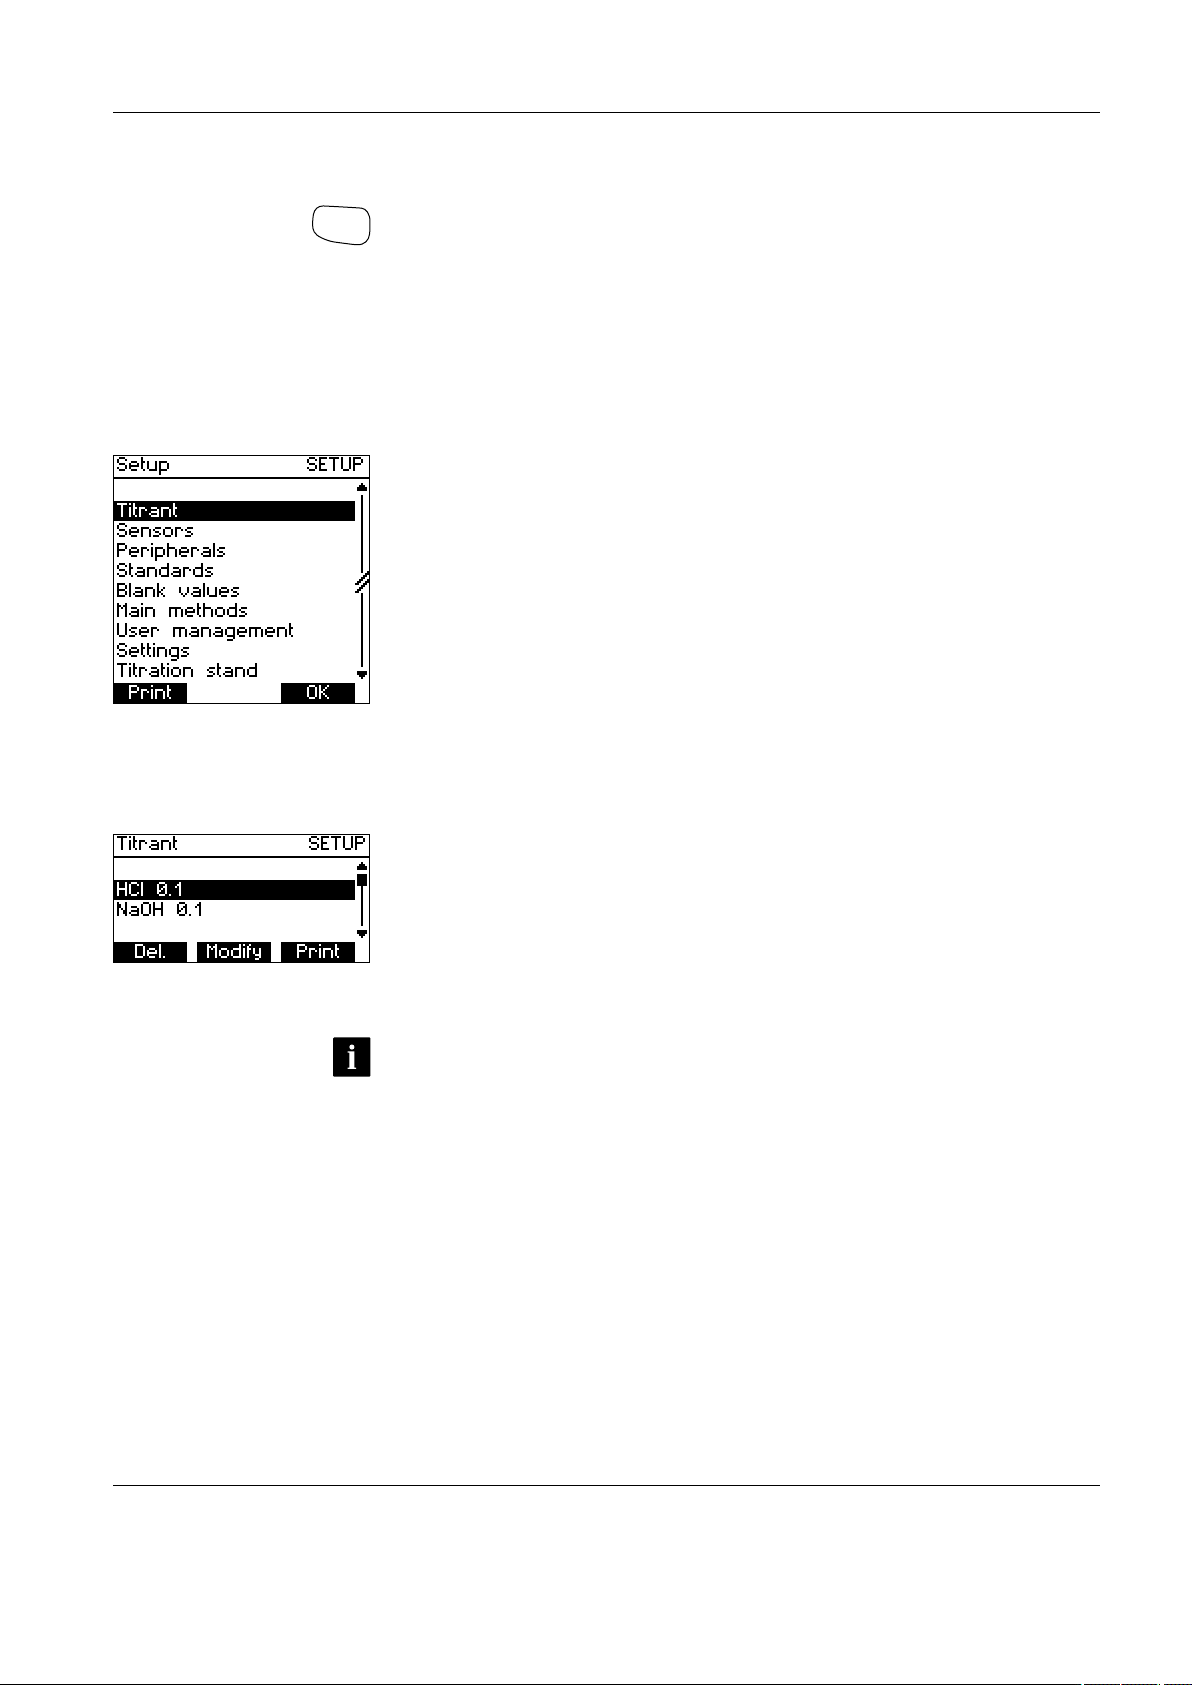
5.1 Opening the Setup menu
- Press the Setup button to open the Setup menu.
- A list of the resources appears.
You can scroll the list upward or downward using the arrow keys on the right next to the
display. The black-inverted line always shows the current selection.
If you press Print, the list with the available entries for the selected resource is printed.
See "5.4.1 Setting up a printer"
If you press OK, the list of the selected resources appears on the display.
5.2 Titrants
- Press Setup to open the Setup menu.
- Select "Titrant" using the arrow keys and press OK to confirm. The list of the titrants
stored in the titrator appears.
The titrants used by the METTLER methods are already preset in the titrator. You can delete
titrants, and modify or print the parameters of the selected titrants. Furthermore, you can
determine and store the titer for each titrant using an automatic function.
• You can add a new titrant by modifying the parameters of an existing titrant and then
storing it under a new name.
• A maximum of 30 titrants can be stored in the titrator.
Page 22
Setup
20 METTLER TOLEDO DL15
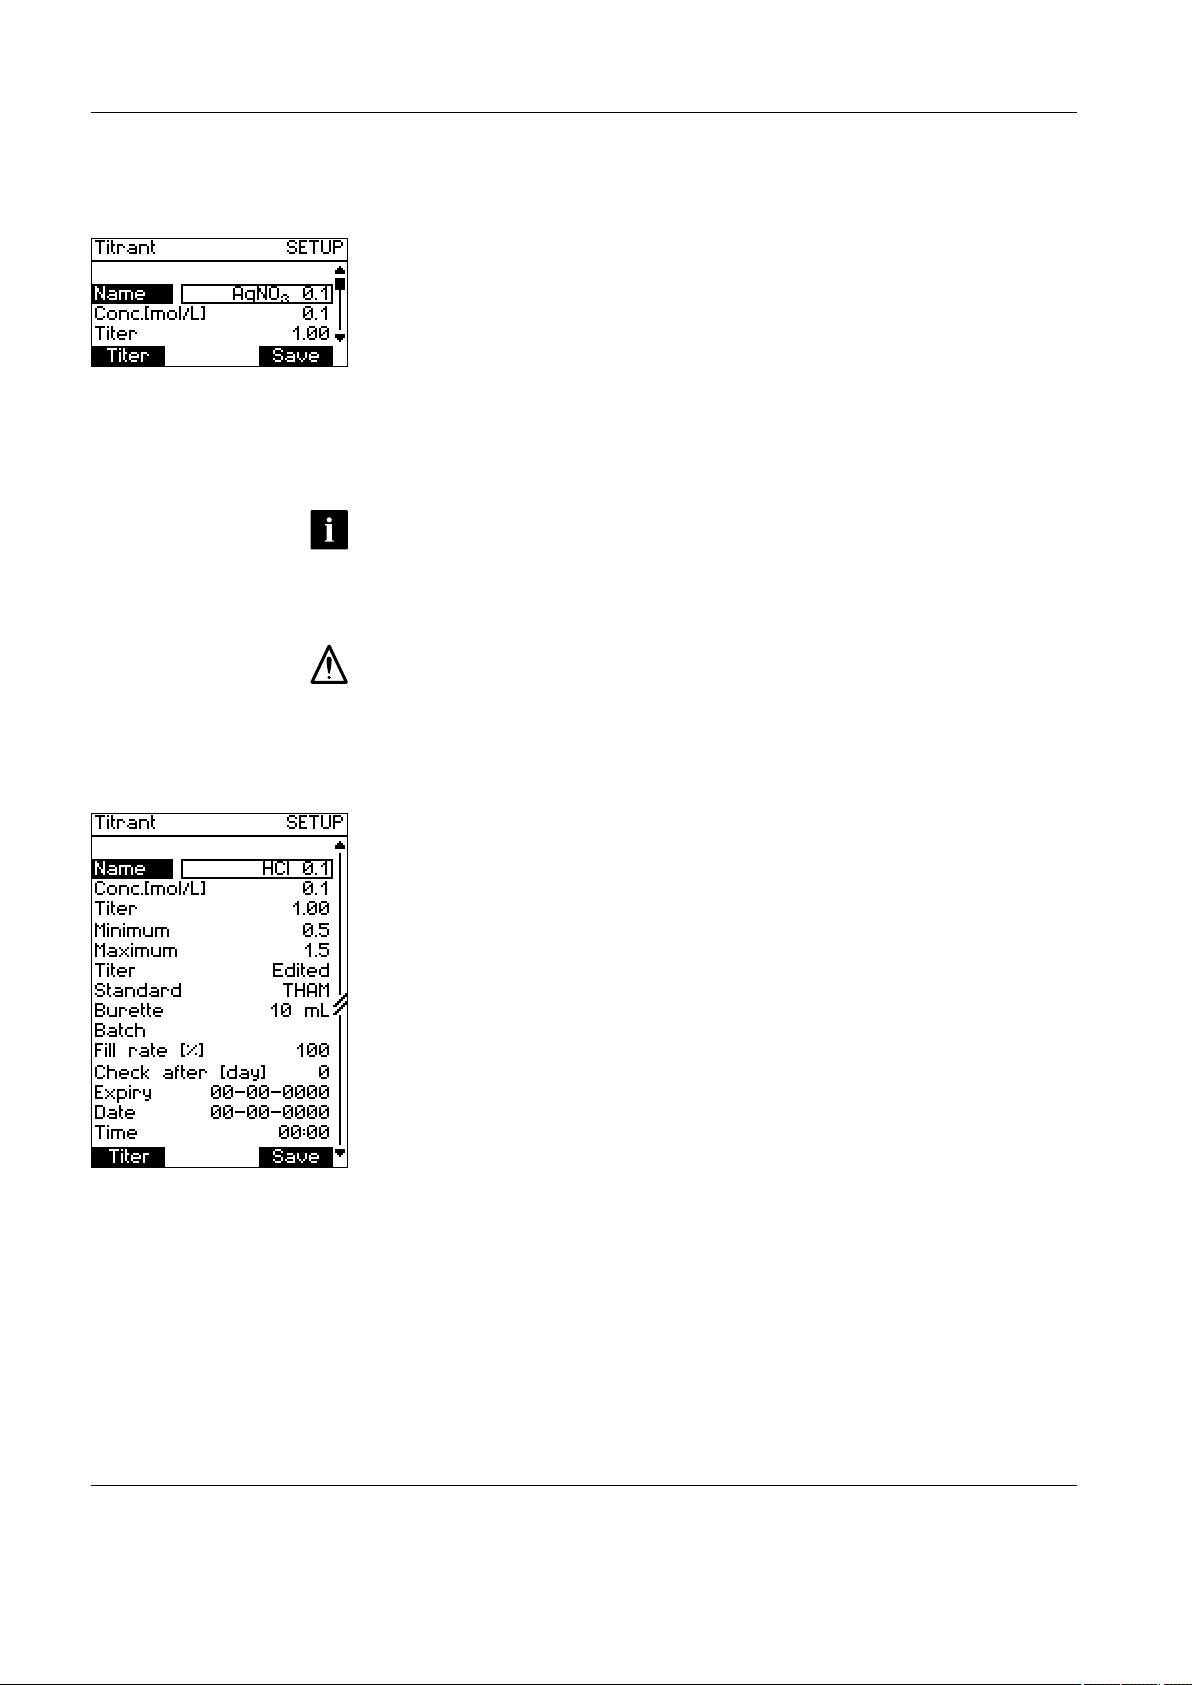
5.2.1 Adding a titrant
Proceed as follows to define a new titrant:
- Press Setup to open the Setup menu.
- Select "Titrant" using the arrow keys and press OK to confirm. The list of the titrants
stored in the titrator appears.
- Select an existing titrant from the list of titrants and press Modify.
- Change the name to the name of the new titrant you want to define.
- Change the parameters of the titrant corresponding to the new titrant you want to
define. See "5.2.2 Modifying a titrant".
- Press Save to confirm the changes you have made.
- The new titrant appears in the list.
• You can discard the changes you have made by pressing Esc to quit the selection. In
this case, the titrant is not stored.
• Determine the titer of the new titrant using the automatic titer determination (Titer
key) if you have not already entered it manually. See "5.2.5 Titer determination from
the Titrant setup".
• In any case, first change the name of the titrant. Otherwise the changes you made for
the existing titrant will be effective on pressing the Save key, and no new titrant will
be stored in the titrator!
5.2.2 Modifying a titrant
- Press Setup to open the Setup menu.
- Select "Titrant" using the arrow keys and press OK to confirm. The list of the titrants
stored in the titrator appears.
- Select the titrant whose parameters you want to change.
- Press Modify.
- The list of parameters of the selected titrant appears and the individual parameters
can be selected and changed.
- Press Save to accept your changes and quit the menu, or press Esc to discard your
changes and quit the menu.
All titrants contain the following parameters:
Page 23

Setup
METTLER TOLEDO DL15 21
Name The name of the titrant.
Conc. [mol/L] The concentration of the titrant in [mol/L].
Titer The titer can be automatically determined using a titer determi-
nation, or manually entered. If the titer is determined through a
titer determination, the current date and time are stored.
Minimum The "Minimum" parameter lets you define the lower limit for the
range within which the titer must be.
Maximum The "Maximum" parameter lets you define the upper limit for the
range within which the titer must be.
Titer This parameter indicates whether the titer determination was
automatically determined ("Determined") or manually entered
("Edited").
Standard Here you can select one of the standards defined in the titrator
to determine the titer of your titrant.
Burette Using this parameter you can define the burette volume. Pos-
sible values are 1, 5, 10 and 20 mL.
Charge With this parameter you can record information about the batch
from which the titrant originates.
Fill rate [%] The "Fill rate" indicates how quickly the burette is filled with
titrant. Filling the burette at the highest rate corresponds to a fill
rate of 100%, and at the lowest rate to a fill rate of 30%. The
preset value is 100%
Check after [day] This value is used to calculate the expiration date for the titrant.
A period of 0 to 100 days can be defined. If the parameter has
the value 0, no expiration date is determined.
Expiry If the value 0 is entered for the "Check after" parameter, no
expiration date is calculated.
Date The date of the last titer determination. Each time you store the
titrant, the date is set to 00-00-0000.
Time The time of the last titer determination. Each time you store the
titrant, the time is set to 00:00.
Page 24
Setup
22 METTLER TOLEDO DL15
• If you change the name of a titrant and save your changes, a new titrant is created
under the new name.
• If the value for the titer determined by a titer determination or the manually entered
value is outside the range defined by "Minimum" and "Maximum", an error message
appears and the titer must either be determined or entered again.
• When you use a titrant of higher viscosity, it is advisable to reduce the fill rate in
order to prevent air being sucked-in when filling the burette.
• If, at the start of an analysis, the titant has expired (the expiration date has been
exceeded), a message appears to draw your attention to this. If you still want to perform the determination, you must confirm the message. In the report, a corresponding line appears that notes that the titrant has expired.
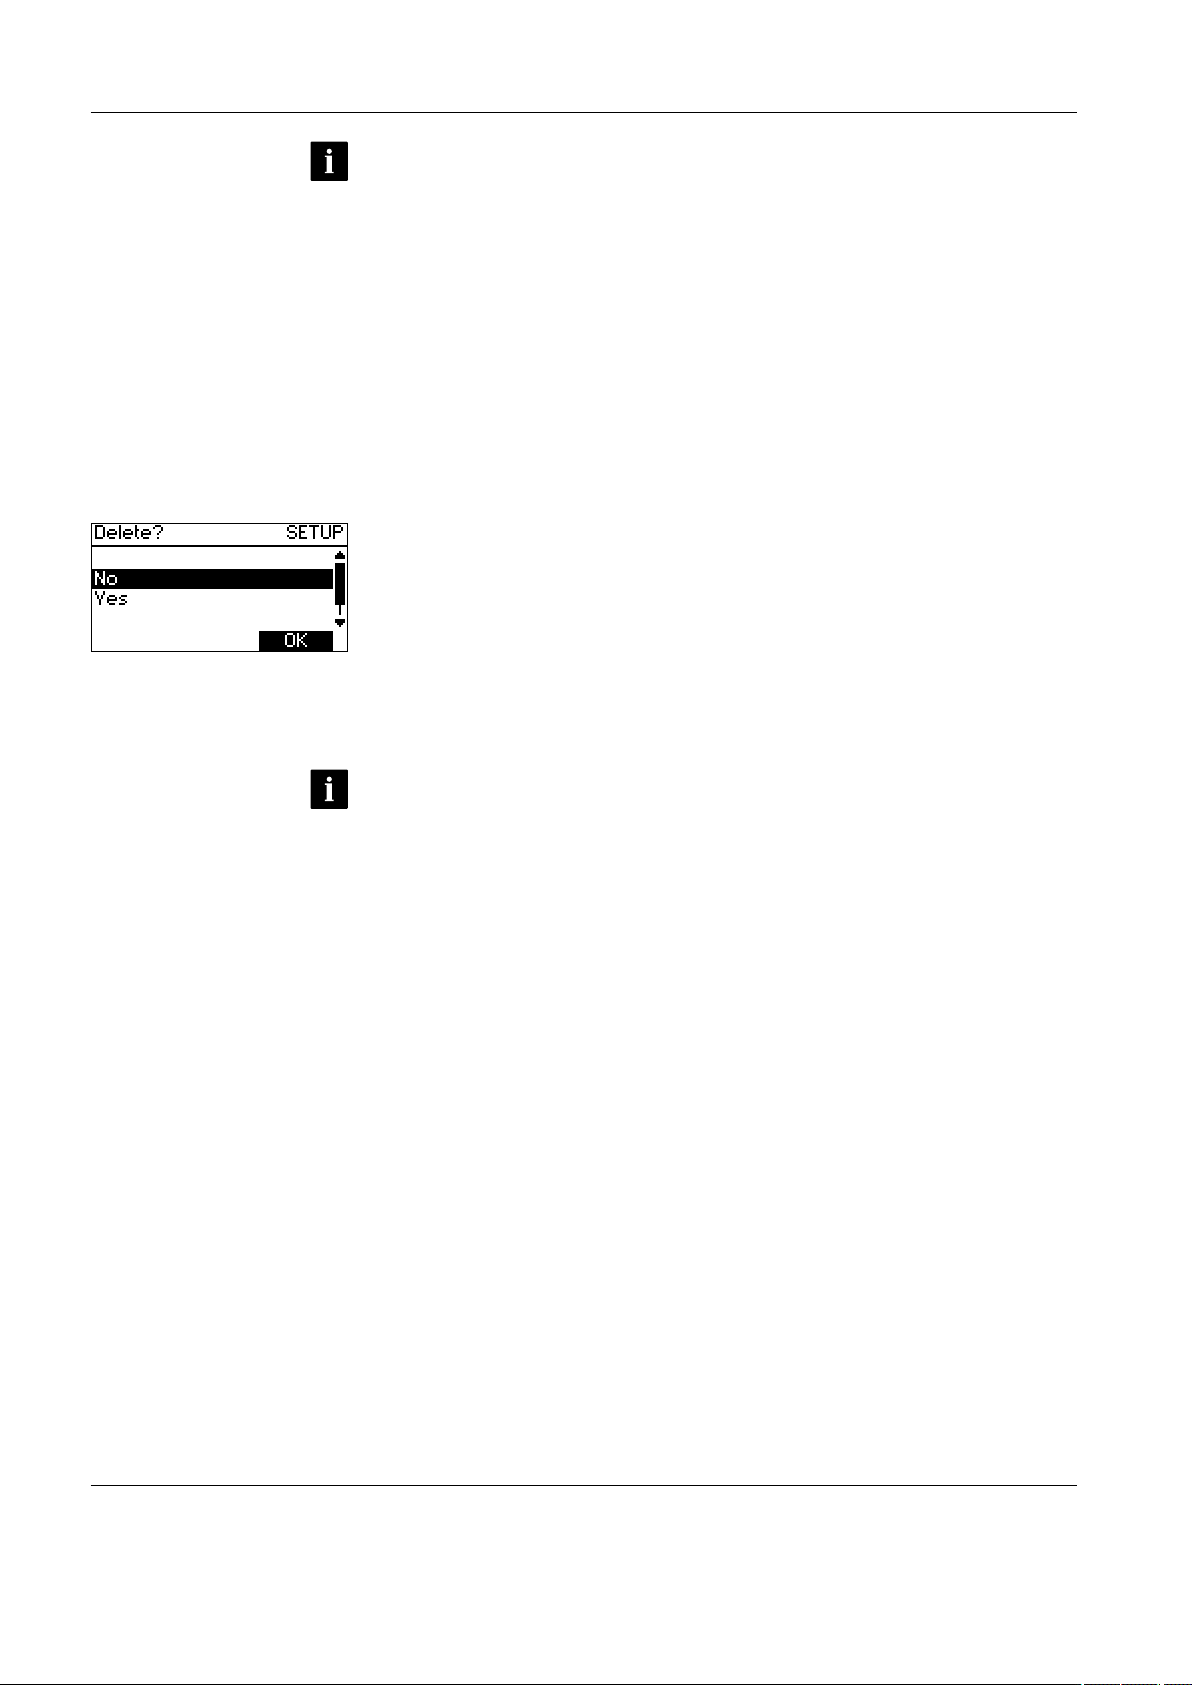
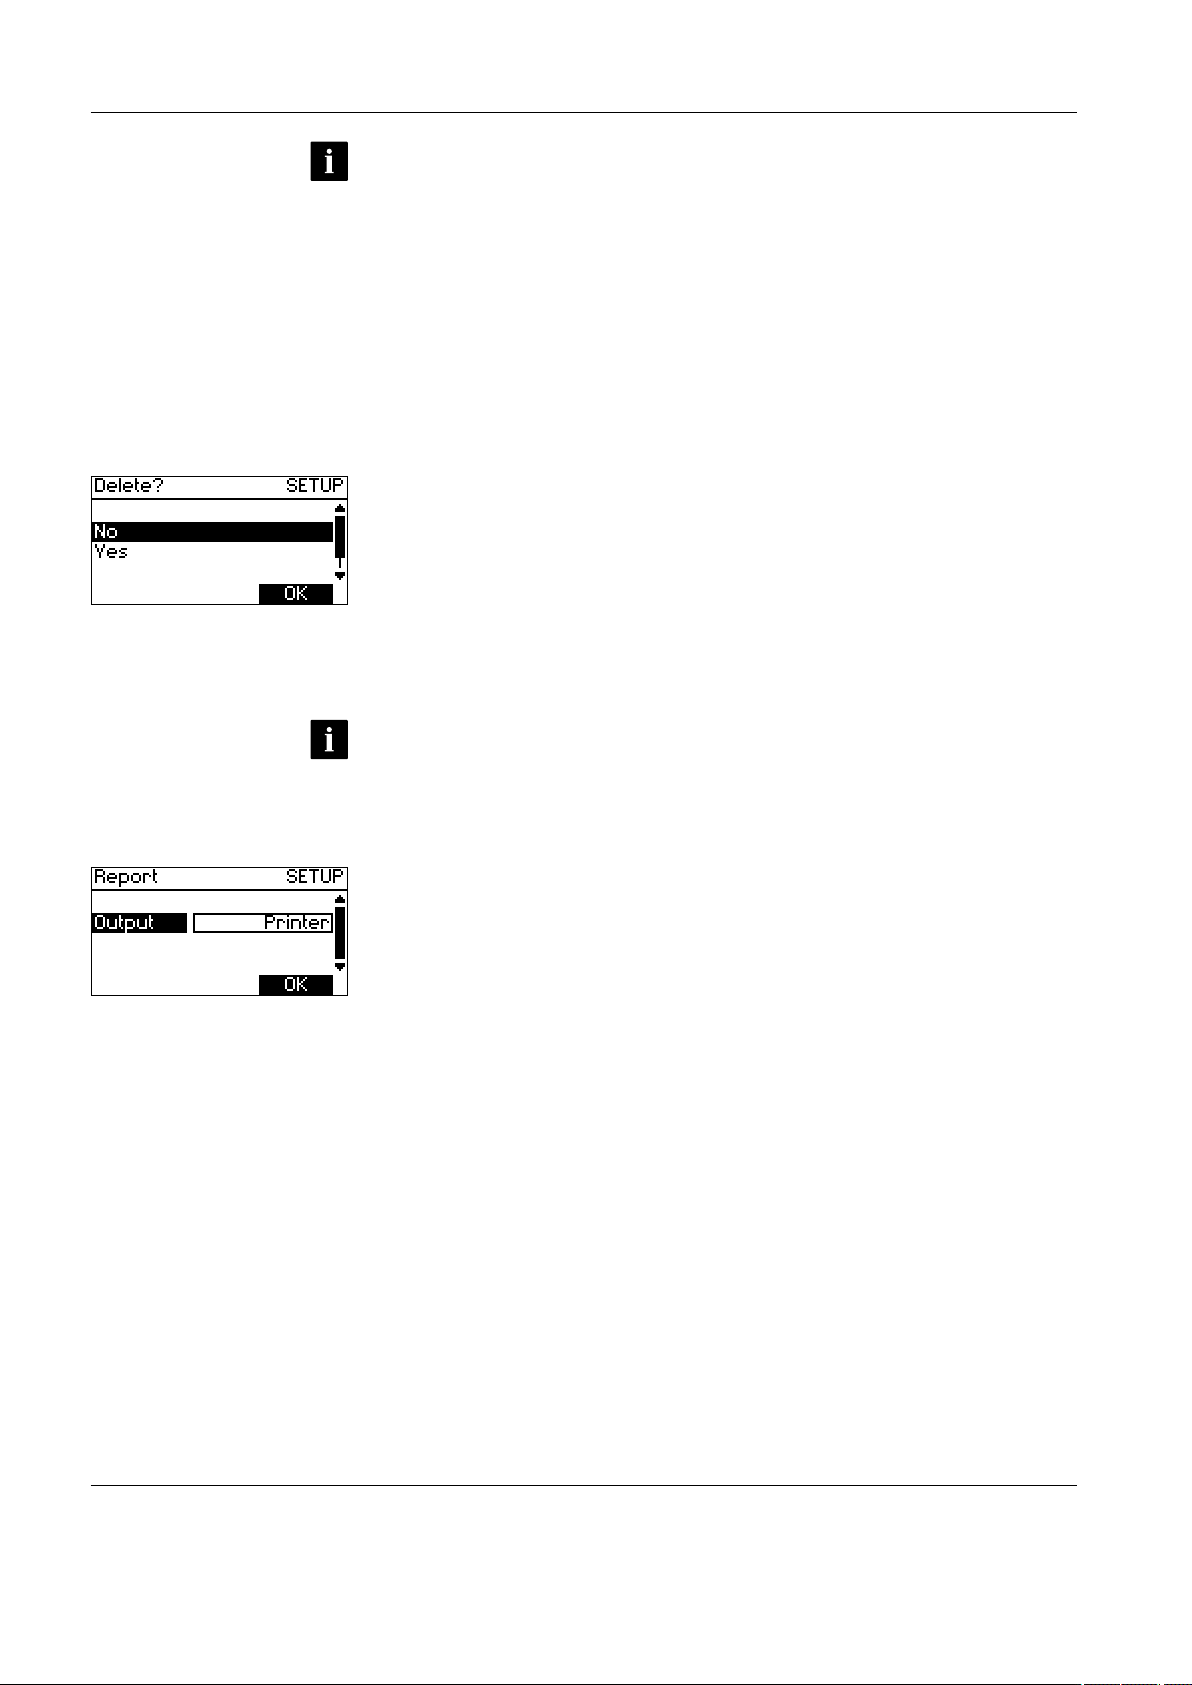
5.2.3 Deleting a titrant
- Press Setup to open the Setup menu.
- Select "Titrant" using the arrow keys and press OK to confirm. The list of the titrants
stored in the titrator appears.
- Select the titrant you want to delete.
- Press Delete.
- In the dialog that follows, you are asked whether you really want to delete the selected titrant. Confirm deletion by selecting "Yes" and pressing OK, or terminate deletion
by selecting "No" and pressing OK to confirm.
• You can only delete titrants that have not been used in a method.
• Titrants referenced by METTLER methods cannot be deleted.
Page 25
Setup
METTLER TOLEDO DL15 23
5.2.4 Printing a titrant
- Press Setup to open the Setup menu.
- Select "Titrant" using the arrow keys and press OK to confirm. The list of the titrants
stored in the titrator appears.
- Select the titrant whose parameters you want to print.
- Press Print.
- The parameters of the selected titrant are printed on the printer as soon as you con-
firm by pressing OK.
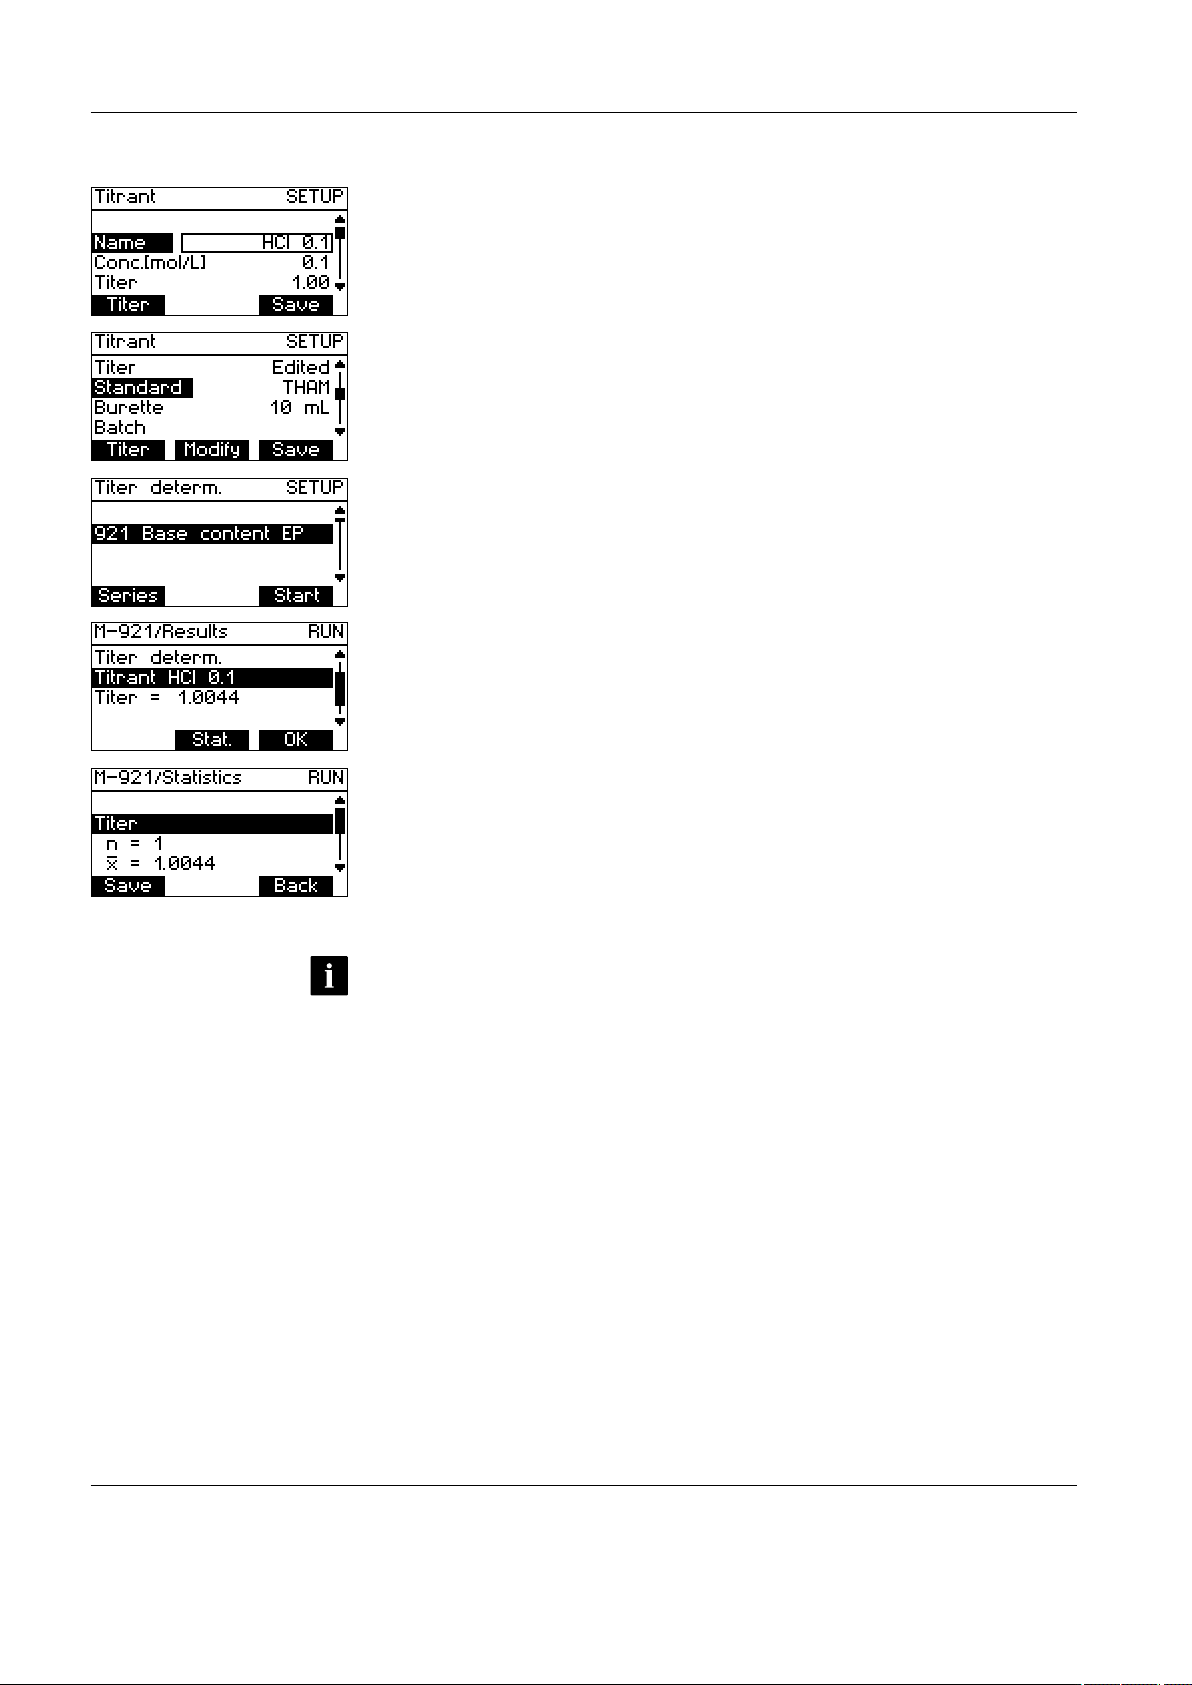
5.2.5 Titer determination from the titrant setup
The accuracy of the results of your analysis depends on the accuracy with which you
determine the concentration of your titrant.
When you prepare a titrant, a number of errors can occur that cause the actual concentration (C
actual
) to deviate from the desired concentration (C
nom
) of your titrant.
The quotient of the actual concentration of the titrant and its desired concentration is called
the titer of the titrant:
In the ideal case, C
actual
= C
nom
and the titer, t, is 1.
If the concentration of the titrant is too high, t is > 1.
If the concentration of the titrant is too low, t is <1.
The titer enables the titrator to calculate the results of your analyses corresponding to
the actual concentration of the titrant used. It is therefore essential for you to accurately
determine the actual concentration of the titrant against a reference substance before you
first use it.
The titrator can store the corresponding titer as a parameter for every titrant defined in
the titrator. As long as the titer for a titrant has not been determined, the default value 1
is used.
You can determine the titer yourself, enter the value for the titrant manually in the Setup
menu, or to determine it through automatic titer determination with the titrator.
Before doing this, you should make sure that a suitable standard is already stored in the
titrator for the primary standard you want to use. If this is not the case, you must first define
a new standard in the instrument. See "5.5.1 Adding a standard".
c
actual
c
nom
t =
Page 26
Setup
24 METTLER TOLEDO DL15
Performing the titer determination from the Titrant setup
- Press Setup to open the Setup menu.
- Select "Titrant" using the arrow keys and press OK to confirm. The list of the titrants
stored in the titrator appears.
- Select the titrant whose titer you want to determine.
- Press Modify.
- Select "Standard".
- Check whether the parameters of the selected standards match your primary standard substance. If this is not the case, press Modify and select the suitable standard
from the list of standards stored in the titrator. Press OK to confirm your selection.
- Press Titer to open the titer determination function.
- A list of the methods appears. It shows only methods that use the titrant whose titer
you want to determine.
- Select a suitable method using the arrow keys and start the titer determination by
pressing Start.
- The titer determination is performed according to the conditions predefined for the
method used. (See "6.3 Modifying a method"). The calculations from the method are
ignored. The sample data from the method is replaced with default data.
- After the determination, you can view the statistics of the current sample series by
pressing Stat..
- If the titer determined in this way is within the defined limits, press Save to accept the
result of the titer determination (or the mean results if you have performed the titer
determination several times).
- The date and time of the last titer determination are automatically updated.
- Quit the display that follows by pressing Esc. in order to prevent the date and time
being set to 00-00-0000 and 00:00.
• It is also possible to perform the automatic titer determination from the Analysis
menu. See "8.2 Starting a titer determination using the Run key"
• The concentration of a titrant can change after you have determined the titer. It is
therefore absolutely essential to determine the titer at regular intervals in order to
guarantee constant accuracy of the analysis results. The titrator can also generate a
specific expiration date for each titrant, which requests the user to determine the titer
again after a certain period.
Page 27
Setup
METTLER TOLEDO DL15 25
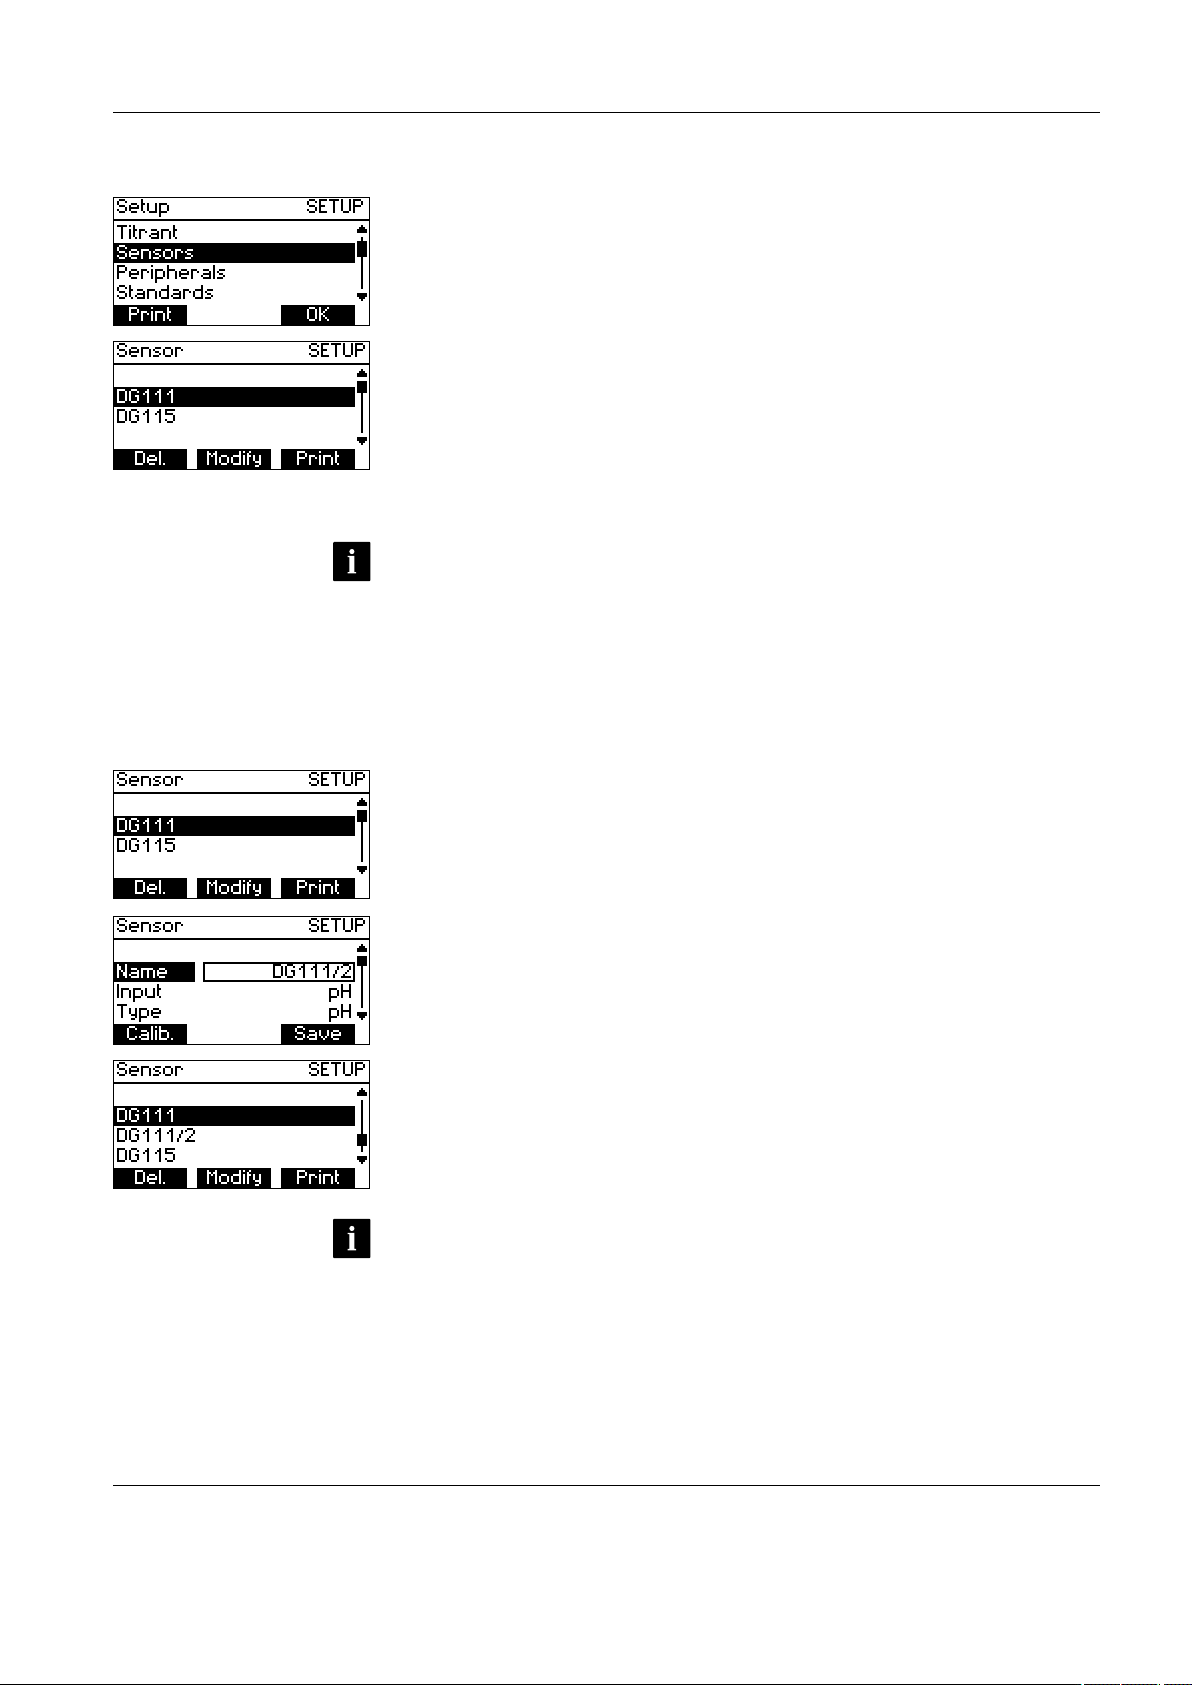
5.3 Sensors
- Press Setup to open the Setup menu.
- Select "Sensors" using the arrow keys and press OK to confirm. The list of sensors
stored in the titrator appears.
Some sensors are already predefined in the titrator. You can add new sensors, change them
or delete them from the list. For pH and ISE sensors you can also perform an automatic
sensor calibration.
You can define:
• mV sensors
• pH sensors
• ion selective sensors (ISE)
• polarized sensors
• To add a new sensor, you must change the parameters of one of the existing sen-
sors and then save it under a new name.
• A maximum of 20 sensors can be stored in the instrument.
5.3.1 Adding a sensor
To define a new sensor, proceed as follows:
- Press Setup to open the Setup menu.
- Select "Sensors" using the arrow keys and press OK to confirm. The list of sensors
stored in the titrator appears.
- Select an existing sensor from the list of sensors and press Modify.
- Change the name to the name of the new sensor you want to define.
- Change the parameters of the sensors according to the new sensor you want to
define. See "5.3.2 Modifying a sensor".
- Press Save to confirm your changes.
- The new sensor appears on the list.
• You can discard your changes at any time by pressing Esc to quit the selection. In
this case the sensor is not stored.
Page 28
Setup
26 METTLER TOLEDO DL15
• Before using it for the first time, you must calibrate a newly defined pH or ISE sensor
using the automatic calibration function (the Calib. key) if you have not already manually entered the slope and zero point. See "5.3.5 Sensor calibration from the sensor
setup menu".
• In any case, first change the name of the sensor. Otherwise when you press Save,
your changes will be effective for the existing sensor and no new sensor is stored in
the instrument!
5.3.2 Modifying a sensor
- Press Setup to open the Setup menu.
- Select "Sensors" using the arrow keys and press OK to confirm. The list of sensors
stored in the titrator appears.
- Select the sensor whose parameters you want to change from the list of sensors.
- Press Modify.
- The list of parameters of the selected sensor appears; the individual parameters can
be selected and changed.
- Press Save to accept your changes and to quit the menu, or press Esc to discard
your changes and quit the menu.
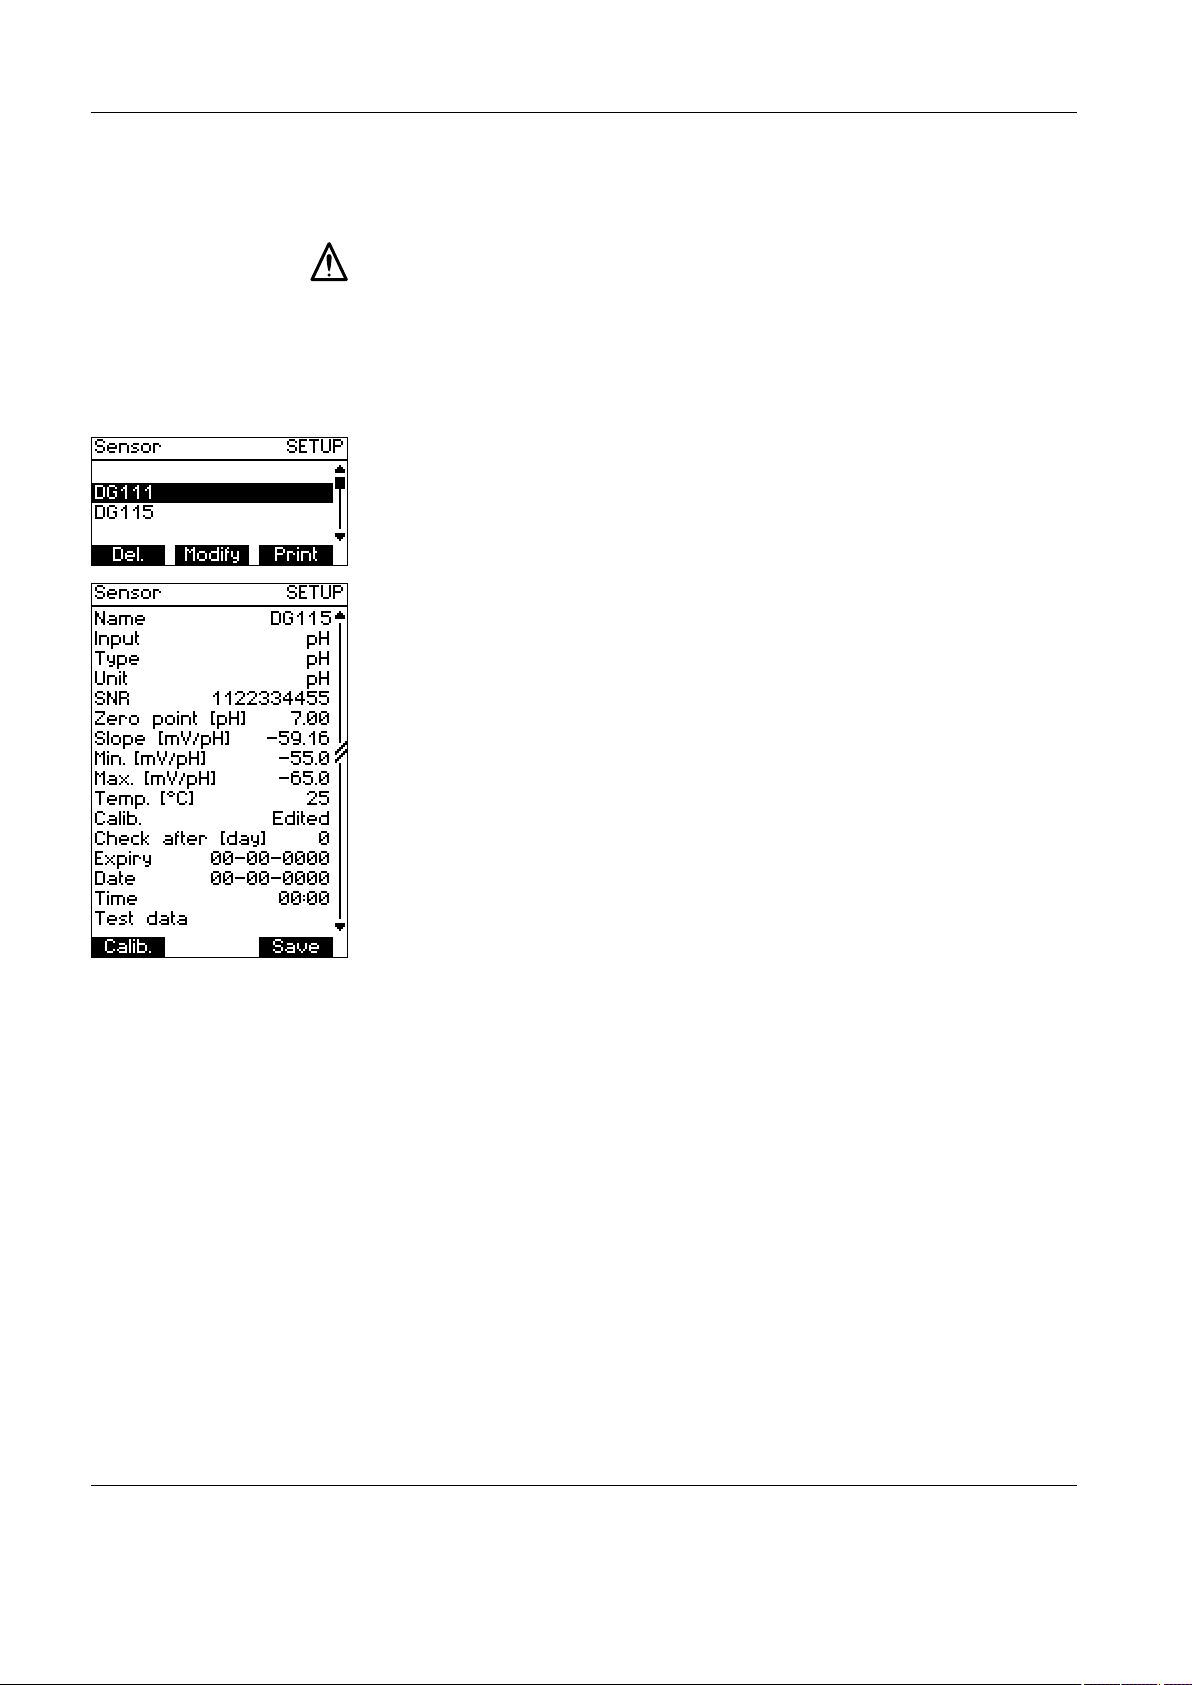
The following parameters can be changed, depending on the type of sensors:
Name The name of the sensor.
Input Depending on the type of sensor, either the pH or the pol. input
can be selected to connect the sensor. (see "4.2 Connections
at the rear of the titrator")
Type This parameter lets you define the sensor type for sensors at the
pH input. There is a choice of pH, mV and ISE.
Unit A possible unit can be selected for the sensor (pH, mV or pX).
This appears only for pH and ISE sensors!
SNR The serial number of the sensors can be entered here.
Zero point [pH]
or
Zero point [pX]
The zero point of the pH or ISE sensor used. This value can be
entered manually or be determined by the instrument during
automatic sensor calibration. Prior to the initial calibration, the
default value of 7.00 for pH sensors and ISE sensors is stored
here.
This appears only for pH and ISE sensors!
Slope [mV/pH]
or
Slope [mV/pX]
The slope of the pH or ISE sensor used. This value can be entered manually or be determined by the instrument during the
automatic sensor calibration. Prior to the initial calibration, the
default value of -59.16 for pH sensors is stored here.
This appears only for pH and ISE sensors!
Page 29

Setup
METTLER TOLEDO DL15 27
Min. [mV/pH]
or
Min. [mV/pX]
Min. defines the lower limit for the tolerance range within which
the slope must be. For a pH sensor, the default value is -65.00.
The upper limit is correspondingly defined by Max.
This appears only for pH and ISE sensors!
Max. [mV/pH]
or
Max. [mV/pX]
Max. defines the upper limit for the tolerance range within which
the slope must be. For a pH sensor, the default value is -50.00.
The lower limit is correspondingly defined by Min.
This appears only for pH and ISE sensors!
Temperature [°C],
[°F] or [K]
The measurement temperature can be specified here.
This appears only for pH and ISE sensors!
Calib.. This parameter indicates whether the calibration was automa-
tically determined ("Determined") or manually entered ("Edited").
Check after [day] This value is used to calculate the time for the next calibration
of the sensor. A period of 0 to 100 days can be defined. If this
parameter has the value 0, no date is set for the calibration of
the sensor.
This appears only for pH and ISE sensors!
Expiry The "Check after" parameter sets the expiration date for the
sensor, which indicates the time when the sensor has to be
recalibrated. If only the value 0 is entered for the "Check after"
parameter, then no expiration date is calculated.
This appears only for pH and ISE sensors!
Date The date of the last sensor calibration. This date is reset to 00-
00-0000 each time the sensor is stored.
This appears only for pH and ISE sensors!
Time The time of the last sensor calibration. This time is reset to 00:00
each time the sensor is stored.
This appears only for pH and ISE sensors!
Test data
Pressing the Test key opens the sensor test data.
This appears only for pH and ISE sensors!
Page 30
Setup
28 METTLER TOLEDO DL15
• If you change the name of a sensor and save the changes, a new sensor with a new
name is created.
• The parameters that appear in the list depend on the type of sensor.
• For pH, mV, ISE sensors and the phototrode, the pH input must be chosen; for polarized sensors, the pol. input.
• Prior to the first pH sensor calibration, the date and expiration date are 00-00-0000
and the time 00:00. The value for "Check after" is set to 0 days, and zero point and
slope are set to the default values.
5.3.3 Deleting a sensor
- Press Setup to open the Setup menu.
- Select "Sensors" using the arrow keys and press OK to confirm: The list of sensors
stored in the titrator appears.
- Select the sensor you want to delete from the list.
- Press Del.
- In the dialog that follows you are asked whether you really want to delete the selected
sensor. Confirm deletion by selecting "Yes" and pressing OK, or terminate the deletion
process by selecting "No" and pressing OK to confirm.
• You can only delete a sensor that has not been used in a method.
5.3.4 Printing a sensor
- Press Setup to open the Setup menu.
- Select "Sensors" using the arrow keys and press OK to confirm. The list of sensors
stored in the titrator appears.
- Select the sensor you want to print.
- Press Print.
- The parameters of the selected sensor are printed on the printer as soon as you press
OK to confirm.
Page 31

Setup
METTLER TOLEDO DL15 29
5.3.5 Sensor calibration from the sensor setup menu
Zero point and slope
The calibration parameters of a pH electrode are the zero point pH0 (pH at a potential of
0 mV) and the slope.
The theoretical values of a pH electrode are stored in the titrator:
• Zero point = 7.0 [pH]
and
• Slope = -59.16 [mV/pH].
The pH calculation is performed according to the following equation:
mV signal
slope
pH=pH0+
The slope is corrected for temperature in the calculation of the pH.
The sensor should be calibrated in order to obtain correct values for your electrode. The
theoretical values are then automatically overwritten with the calculated calibration data
during the calibration.
If you only calibrate your electrode with one buffer solution, only the electrode zero point
is recalculated. (Not possible with the titrator.)
With a two- or multiple-point calibration, the zero point and slope are calculated using
linear regression.
0
7
+mv
-mv
pH
0
8
6
9
MP
E
pH
MP
(MP)
0
7
14
+mv
-mv
pH
0
E
0
E
pH
0
7
+mv
-mv
pH
0
8
6
9
MP
E
pH
Page 32

Setup
30 METTLER TOLEDO DL15
Performing sensor calibration from the sensor setup menu
- Press Setup to open the Setup menu.
- Select "Sensors" using the arrow keys and press OK to confirm. The list of sensors
stored in the titrator appears.
- Select the sensor you want to calibrate.
- Press Modify.
- Press the Calib..
- The setup menu for sensor calibration with the parameter list appears.
Name The name of the sensor.
Buff. type The type of buffer solutions to be used for the calibration. You
can select:
pH (to define yourself)
pX (to define yourself)
DIN/NIST
DIN
Fluka
Merck
MT-EU
MT-USA
Fisher
JIS
For the temperature dependencies of the buffers, see
"Appendix A: Predefined calibration standards".
Number of buffers With this parameter you can define the number and type of buffer
solutions to be used for the calibration.
Speed [%] The stirrer speed.
Temp. sensor Either the PT1000 temperature sensor can be selected or the
temperature can be entered manually under the parameter
"Temperature".
Temperature The temperature during the sensor calibration. With this value
the temperature-corrected slope of the pH electrode is used in
the calculation of the pH.
Appears only when the parameter "Temp. Sensor" is set to
"Manual".
dE [mV] During dt, the drift of the electrode potential must be less than
dE/dt [mV/s] in order to be accepted as measured value.
This occurs in an interval defined by t(min) and t(max).
dt [s]
t(min) [s] The measured value is not accepted before t(min).
t(max) [s] The measured value is in any case accepted after t(max).
Report You can select whether you want a report to be printed on the
printer or not.
Page 33

Setup
METTLER TOLEDO DL15 31
- Select "Buff. type" using the arrow keys. Then press Modify and select the buffer
type you are using.
- Select "Number of buffers " and press Modify.
- Add the desired number of buffer solutions to the buffer list using Add. You can
select these from a list and then press OK to include them in the buffer list. (You can
remove buffers again from the list by selecting them and pressing Delete.)
- When you have defined the desired number of buffer solutions, press OK to return to
the setup menu for the calibration.
- Select "Speed [%]" and enter the speed for the stirrer in percent.
- Select "Temp.sensor", press Modify and select the "PT1000" temperature sensor or
"Manual".
- If you have selected "Manual" for "Temp.Sensor", select "Temperature" and enter the
temperature in the corresponding units.
- Select "dE [mV]" and enter the millivolt number for the determination of the maxi-
mum drift dE/dt [mV/s] of the electrode potential.
- Select "dt [s]" and enter the time in seconds for the determination of the maximum
drift dE/dt [mV/s] of the electrode potential.
- Select "t(min) [s]" and "t(max) [s]" one after the other and define the time at which
the measured value at the earliest (tmin) and at the latest (tmax) is to be accepted.
- Select "Report" and select "none" or "printer" for the report printout using Modify.
- Start the sensor calibration by pressing Start.
- For the selected number of buffer solutions, a message appears each time reques-
ting you to prepare the corresponding buffer solution. You must confirm this by
pressing OK to start the measurement with the corresponding buffer solution.
- After all buffer solutions have been measured, a summary of the calibration results
appears on the display with the following information:
• Name of the sensor
• Calibration "OK" / "not OK"
• measured slope [mV/pH]
• measured zero point [pH]
If the measured slope is outside the limits defined for the sensor Min. [mV/pH] and
Max. [mV/pH], "Calibration not OK" appears and the calibration results are not accepted.
- If the measured slope lies within the limits defined for the sensor, the slope and zero
point for the sensor can be accepted by pressing Save. The date and time for the
calibration are automatically updated.
- If "Printer" was selected for the "Report" parameter, a report of the sensor calibration
is printed on the printer.
- Quit the display that follows by pressing Esc. in order to prevent the date and time
from being set to 00-00-0000 and 00:00.
• The sensor calibration can also be opened using the Sensor Help function key. (See:
"10.2.3 Calibrating a sensor")
• For storing into Setup, the slope is converted to 25 °C.
Page 34

Setup
32 METTLER TOLEDO DL15
5.3.6 Sensor test from the sensor setup menu
Using the "Test sensor" function you can perform a test for a pH or ISE sensor. The data
determined in the test can be printed on the printer.
Performing the sensor test from the sensor setup menu
- Press Setup to open the Setup menu.
- Select "Sensors" using the arrow keys and press OK to confirm. The list of sensors
stored in the titrator appears.
- Select the sensor you want to test.
- Press Modify.
- Select "Test data" and press Test.
- The setup menu for the sensor test appears with the parameter list.
Page 35

Setup
METTLER TOLEDO DL15 33
Name The name of the sensor.
Buff. type The type of the buffer solutions to be used for the test. You
can select:
pH (to define yourself)
pX (to define yourself)
DIN/NIST
DIN
Fluka
Merck
MT-EU
MT-USA
Fisher
JIS
Number of buffers This parameter lets you define the number of buffer solutions
to be used for the sensor test.
Two buffer solutions must be selected.
Speed [%] The stirring speed of the stirrer.
Max. drift [mV/min] The maximum allowable drift in [mV/min]. Determines the
maximum value for the drift determined by the test in [mV/
min].
Temp. sensor You can select the PT1000 temperature sensor or enter the
temperature manually under the parameter "Temperature".
Temperature The temperature during the sensor tests. This value is used
to correct the slope of the pH electrode for temperature and is
taken into account in the calculation of pH.
It appears only if the parameter "Temp. sensor" is set to
"Manual".
dE [mV] During dt, the drift of the electrode potential must be less than
dE/dt [mV/s] in order to be accepted as a measured value.
This occurs in a period defined by t(min) and t(max).
dt [s]
t(min) [s] The measured value is not accepted before t(min).
t(max) [s] The measured value is in any case accepted after t(max).
Output You can select "Printer" or "None".
Page 36

Setup
34 METTLER TOLEDO DL15
- Using the arrow keys, select "Buff. type". Then press Modify and select the buffer
type you are using.
- Select "Number of buffers " and press Modify.
- Add two buffer solutions to the buffer list using Add. You can select these from a list
and then press OK to include them in the buffer list. (You can remove the buffers
again from the list by selecting them and then pressing Delete.).
- Press OK to return to the setup menu for the sensor test.
- Select "Speed [%]" and enter the speed for the stirrer in percent.
- Select "Max. Drift [mV/min]" and enter a value in [mV/min] that the drift must not
exceed.
- Select "Temp. sensor", press Modify and select the "PT1000" temperature sensor or
"Manual".
- If you have selected "Manual" for "Temp. Sensor", select "Temperature" and enter the
temperature in the corresponding units.
- Select "dE [mV]" and enter the millivolt number for the determination of the maximum
drift dE/dt [mV/s] of the electrode potential.
- Select "dt [s]" and enter the time in seconds for the determination of the maximum
drift dE/dt [mV/s] of the electrode potential.
- Select "t(min) [s]" and "t(max) [s]" one after the other and define the time at which
the measured value at the earliest (tmin) and at the latest (tmax) is to be accepted.
- Start the sensor test by pressing Start.
- For the two selected buffer solutions a message appears each time requesting you to
prepare the corresponding buffer solution. You must confirm this by pressing OK to
start the measurement with the corresponding buffer solution.
- After the measurements have been performed for both buffer solutions, the drift is
determined for a period of 60 seconds.
If you have selected "Printer" under the menu item, the results of the sensor test are
recorded on the printer. There follows the summary of the results of the sensor test on
the display with the following information:
• Name of the sensor
• Drift "OK" / "not OK"
• Slope "OK" / "not OK"
• Drift [mV/min]
• Zero point [pH]
• Slope [mV/pH]
Page 37

Setup
METTLER TOLEDO DL15 35
If the measured slope or the measured drift is outside the limits defined for the sen-
sor, then "Drift not OK" or "Slope not OK" appears.
- The sensor test was successful if "OK" appears for both for the drift and the slope.
• The sensor test can also be opened using the Sensor Help function key. (See
"10.2.4 Testing a sensor")
5.4 Peripherals
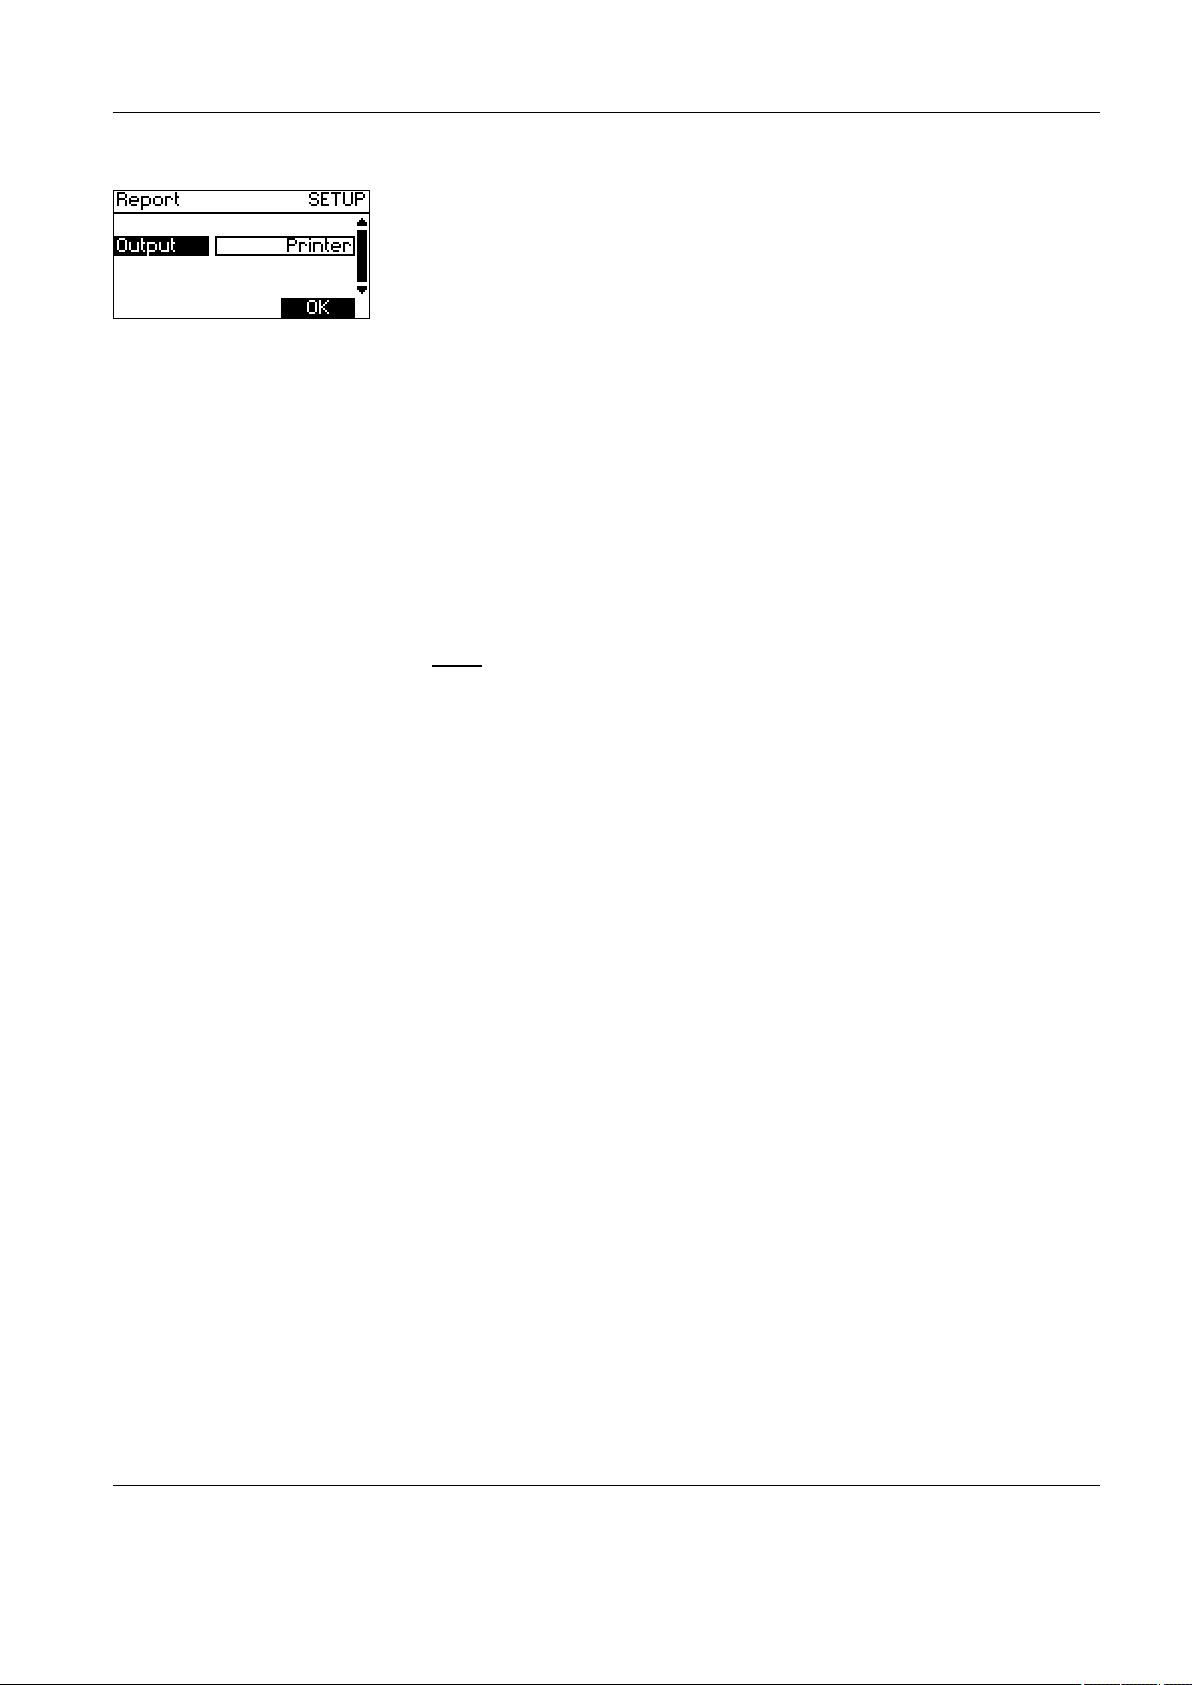
- Press Setup to open the Setup menu.
- Select "Peripherals" using the arrow keys and press OK to confirm. The setup menu
for the peripherals that can be connected to the titrator appears.
The following peripheral instruments can be connected:
• Printer (GA 42, RS-P42, HP compatible)
• Balance (uni- or bidirectional)
Proceed as follows to setup these peripheral instruments.
5.4.1 Setting up a printer
- Press Setup to open the Setup menu.
- Select "Peripherals" using the arrow keys and press OK to confirm. The setup menu
for the peripheral instruments that can be connected to the titrator appears.
- Select "Printer" and press Modify.
- Select one of the printers from the list.
- Press OK to accept your changes and quit the menu, or press Esc to discard your
changes and quit the menu.
The following printers can be selected:
• GA 42
• RS-P42
• HP compatible printer
Page 38

Setup
36 METTLER TOLEDO DL15
If you have connected an HP compatible printer, you can also define the paper format for
this printer.
- Select "HP compatible" and press Modify.
- In the menu that follows you can select the appropriate paper from the list of entries
by pressing Modify.
The following paper formats for HP compatible printers can be selected:
• 8 1/2 * 11"
• 8 1/2 * 12"
• A4
• If your titrator is not connected to a printer, select "Not defined" and confirm by pressing OK.
5.4.2 Setting up a balance
If you have connected a balance to the titrator, you can configure it in this menu. You can
then transfer the value for the sample weight directly from the balance each time the titrator
requests it by pressing Balance.
- Press Setup to open the Setup menu.
- Select "Peripherals" using the arrow keys and press OK to confirm. The setup menu
for the peripheral instruments that can be connected to the titrator appears.
- Select "Balance"and press Modify.
- Using Modify you can define the type of communication between the titrator and the
balance.
- Press OK to accept your changes and to quit the menu, or press Esc to discard your
changes and quit the menu.
The following configuration possibilities can be selected for a balance:
• "unidirectional" (for unidirectional communication between titrator and balance)
• "bidirectional" (for bidirectional communication between titrator and balance)
• "Not defined"
• If your titrator is not connected to a balance, select "Not defined" and confirm with
OK.
• For the METTLER TOLEDO AE, AG, AT, AX and XS balances, use the setting "Bidirectional" and the following balance settings: Baud rate: 2400, Data bits: 7, Parity:
even, Handshaking: no.
Page 39

Setup
METTLER TOLEDO DL15 37
5.5 Standards
- Press Setup to open the Setup menu.
- Select "Standards" using the arrow keys and press OK to confirm. The setup menu
for the standards stored in the titrator appears, or "Template" if no standards are
stored in the titrator.
In this menu you can define and store primary standard substances using different parameters. These standards are needed by the titrator for the automatic titer determination
and can be changed and also deleted again.
• A maximum of 20 standards can be stored in the titrator.
5.5.1 Adding a standard
Proceed as follows to define a new standard:
- Press Setup to open the Setup menu.
- Select "Standards" using the arrow keys and press OK to confirm. The setup menu
for the standards stored in the titrator appears, or "Template" if no standards are
stored in the titrator.
- Select an existing standard from the list of standards (or the template if no standard
is stored) and press Modify.
- Change the name to the name of the new standard you want to define.
- Change the parameters of the standard (or the template) according to the new stan-
dard you want to define. See "5.5.2 Modifying a standard".
- Confirm your changes finally by pressing Save.
- The newly defined standard appears in the list.
- You can discard your changes at any time by quitting the selection by pressing Esc.
In this case, the standard is not stored.
5.5.2 Modifying a standard
- Press Setup to open the Setup menu.
- Select "Standards" using the arrow keys and press OK to confirm. The setup menu
for the standards stored in the titrator appears.
- Select the standard whose parameters you want to change.
- Press Modify.
- The list of parameters of the selected standard appears; the individual parameters
can be selected with the arrow keys and changed.
- Press Save to accept you changes and quit the menu, or press Esc to discard your
changes and quit the menu.
Page 40

Setup
38 METTLER TOLEDO DL15
The following parameters can be changed depending on the type of standard:
Name Here you can enter the name under which the standard is to
be stored.
Entry type As entry type you can select mass or volume, depending wheth-
er you want to add the standard as a weighed quantity or a
measured volume during the automatic titer determination.
Minimum [g] /
[mL]
With "Minimum" and "Maximum" you can define a range for
the quantity of the standard to be added. Minimum defines the
lower limit of this range.
Depending on the selected entry type, Minimum is given in
[g] or in [mL].
Maximum [g] /
[mL]
Using "Minimum" and "Maximum" you can define a range for
the quantity of the standard to be added. Maximum defines the
upper limit of this range.
Depending on the selected entry type, Minimum is given in
[g] or in [mL].
Mol. m. [g/mol] Enter the molar mass of the standards.
This only appears if entry type mass is selected.
Conc. [mol/L] Enter the concentration of the standard.
This only appears if entry type volume is selected.
Equivalent
number z
Enter the equivalent number z of the standard.
• If you change the name of a standard and save your changes, a new standard is created under the new name.
Page 41

Setup
METTLER TOLEDO DL15 39
5.5.3 Deleting a standard
- Press Setup to open the Setup menu.
- Select "Standards" using the arrow keys and press OK to confirm. The list of stan-
dards stored in the titrator appears.
- Select the standard you want to remove from the list.
- Press Delete.
- In the dialog that follows you are asked whether you really want to delete the selec-
ted standard. Confirm deletion by selecting "Yes" and pressing OK, or terminate the
deletion process by selecting "No" and pressing OK.
• You can only delete standards that are not referenced by a titrant
.
5.5.4 Printing a standard
- Press Setup to open the Setup menu.
- Select "Standards" using the arrow keys and press OK to confirm. The setup menu
for the standards stored in the titrator appears.
- Select the standard whose parameters you want to print.
- Press Print.
- The parameters of the selected standard will be printed on the printer as soon as you
confirm by pressing OK.
Page 42

Setup
40 METTLER TOLEDO DL15
5.6 Blank values
- Press Setup to open the Setup menu.
- Select "Blank values" using the arrow keys and press OK to confirm. The list of blank
values stored in the titrator appears, or the entry "Template" if no blank values are
stored in the titrator.
In this menu you can determine and store all the blank values for the solvents you use.
These blank values are used for the calculation of the results of your analyses and can be
changed or deleted here.
• A maximum of 20 blank values can be stored in the titrator.
5.6.1 Adding a blank value
Proceed as follow to add a new blank value:
- Press Setup to open the Setup menu.
- Select "Blank values" using the arrow keys and press OK to confirm. The list of blank
values stored in the titrator appears, or the entry "Template" if no blank values are
stored in the titrator.
- From the list of blank values, select an existing blank value (or the template, if no
blank value is stored) and press Modify.
- Under "Solvent", enter the name of the solvent whose blank value you want to define.
- Change the parameters of the blank value (or the template) according to the new
blank value you want to define. See "5.6.2 Modifying a blank value".
- Press Save to confirm your changes.
- The new blank value appears on the list.
- You can discard your changes at any time by pressing Esc to quit the selection. In
this case no blank values are stored.
• You can enter the blank value of the solvent manually or by means of the automatic
blank value determination. See "5.6.5 Blank value determination from the blank
values setup menu".
5.6.2 Modifying a blank value
- Press Setup to open the Setup menu.
- Select "Blank values" using the arrow keys and press OK to confirm. The list of blank
values stored in the titrator appears.
- Select the blank value whose parameters you want to change.
Page 43

Setup
METTLER TOLEDO DL15 41
- Press Modify.
- The list of the parameters of the selected blank value appears. Individual parameters
can be selected and then changed.
- Press Save to accept your changes and to quit the menu, or press Esc to discard
your changes and quit the menu.
The following parameters can be changed:
Solvent Here you can enter the name of the name of the solvent whose
blank value is to be stored.
Blank value
[mmol]
The blank value of the solvent. This value can either be entered
manually or determined by the titrator during the automatic
blank value determination. If the blank value is automatically
determined, the date and the time are automatically updated.
Minimum [mmol] "Minimum" and "Maximum" let you define a range in which the
blank value of the solvent must be. "Minimum" defines the lower
limit of this range.
Maximum [mmol] "Minimum" and "Maximum" let you define a range in which
the blank value of the solvent must be. "Maximum" defines the
upper limit of this range.
Blank This parameter indicates whether the blanc value was automa-
tically determined ("Determined") or manually entered ("Edited").
Volume [mL] Enter the volume of the solvent to be used.
Check after [day] This value is used to calculate the expiration date for the blank
value. A period of 0 to 100 days can be defined. If the value of
this parameter is 0, no expiration date is calculated.
Expiry The expiration date for the blank value. If no other value than
0 is given for the parameter "Check after", then no expiration
date is calculated.
Date The date of the last blank value determination. Each time the
blank value is stored the date is set to 00-00-0000.
Time The time of the last blank value determination. Each time the
blank value is stored the time is set to 00:00.
Page 44

Setup
42 METTLER TOLEDO DL15
• If you change the name of a blank value and store your changes, a new blank value
is created under the new name.
5.6.3 Deleting a blank value
- Press Setup to open the Setup menu.
- Select "Blank values" using the arrow keys and press OK to confirm. The list of blank
values stored in the titrator appears.
- Select the blank value whose parameters you want to delete.
- Press Del..
- In the dialog that follows, you are asked whether you really want to delete the selected blank value. Confirm deletion by selecting "Yes" and pressing OK, or terminate
the deletion process by selecting "No" and pressing OK.
• You can only delete blank values that are not referenced by a method
.
5.6.4 Printing blank values
- Press Setup to open the Setup menu.
- Select "Blank values" using the arrow keys and press OK to confirm. The list of blank
values stored in the titrator appears, or the entry "Template" if no blank values are
stored in the titrator.
- Select the blank value whose parameters you want to print.
- Press Print.
- The parameters of the selected blank value are printed on the printer as soon as you
press OK to confirm.
Page 45

Setup
METTLER TOLEDO DL15 43
5.6.5 Blank value determination from the blank values setup menu
- Press Setup to open the Setup menu.
- Select "Blank values" using the arrow keys and press OK to confirm. The list of blank
values stored in the titrator appears, or the entry "Template" if no blank values are
stored in the titrator.
- Select the blank value whose value you want to determine.
- Press Modify.
- Press Blank.
- In the display that follows, the methods are shown that reference the blank through
the parameter "Solvent".
- Select one of the methods shown and press Start.
- The blank value determination is performed according to the preset conditions of the
method you use. (See "6.3 Modifying a method")
- If "Printer" was selected for the parameter "Report", a report of the blank value deter-
mination is printed on the printer.
- By pressing Stat. you can view the statistics of the current sample series.
- If the blank value determined is within the defined limits, the value (or the mean va-
lue of the results if you have performed the blank value determination several times)
can be accepted by pressing Save. The date and time for the blank value determination are then automatically updated.
- Quit the display that follows by pressing Esc. to prevent the date and time from being
set to 00-00-0000 and 00:00.
• You can also perform the automatic blank value determination from the Analysis
menu. See "8.3 Starting a blank value determination using the Run key"
5.7 Main methods
- Press Setup to open the Setup menu.
- Select "Main methods" using the arrow keys and press OK to confirm. The Main
methods setup menu appears.
Page 46

Setup
44 METTLER TOLEDO DL15
Using the "Main methods" setup function, a total of three methods (METTLER or User
methods) can be assigned to the function keys F1, F2 and F3.
These methods can then be started directly from the Home screen by pressing the function
keys.
Methods can be assigned to the function keys in the setup menu for the main methods;
the assignment can be changed or deleted.
5.7.1 Assignment of a function key
- Press Setup to open the Setup menu.
- Select "Main methods" using the arrow keys and press OK to confirm. The Main
methods setup menu appears.
- Select the function keys to which you want to assign a method.
- Press Modify.
- In the menu that follows, select either "User methods" or "METTLER methods" and
press OK to confirm your selection.
- In the next menu, select the desired method and press OK to confirm your selection.
- In the Main methods setup menu, the number of the assigned method appears next
to the corresponding function key.
- Quit the Main methods setup menu by pressing OK, or select another function key if
you want to change its assignment.
5.7.2 Changing the assignment of a function key
- Press Setup to open the Setup menu.
- Select "Main methods" using the arrow keys and press OK to confirm. The Main
methods setup menu appears.
- Select the function key to which you want to assign another method.
- Press Modify.
- In the menu that follows, select either "User methods" or "METTLER methods" and
press OK to confirm your selection.
- In the next menu, select the desired method and confirm your selection with OK.
- In the Main methods setup menu, the number of the newly assigned method appears
next to the corresponding function key.
- Quit the Main methods setup menu by pressing OK, or select another function key if
you want to change its assignment.
Page 47

Setup
METTLER TOLEDO DL15 45
5.7.3 Deleting the assignment of a function key
- Press Setup to open the Setup menu.
- Select "Main methods" using the arrow keys and press OK to confirm. The Main
methods setup menu appears.
- Select the function key whose assignment you want delete.
- Press Del.
- "Not assigned" now appears next to the selected function key.
- Quit the Main methods setup menu by pressing OK, or select another function key if
you want to change its assignment.
5.8 User management
- Press Setup to open the Setup menu.
- Select "User management" using the arrow keys and press OK to confirm. The User
management setup menu appears.
In the "User management" setup menu, titrator users can be added or changed on a user
list.
The active user can be defined here; the user’s access rights (Expert or Routine) can be
changed. (See "5.8.4 Defining access rights")
• As long as no user is entered in the user list, the entry "No user" appears instead of
the user name.
5.8.1 Adding a user
- Press Setup to open the Setup menu.
- Select "User management" using the arrow keys and press OK to confirm. The User
management setup menu appears.
- Select "User list" and press Modify.
- Press Add.
- Enter the name of the new user using the keypad and press Save to store the name
you enter.
Page 48

Setup
46 METTLER TOLEDO DL15
- The name appears in the user list.
- You can quit the user list by pressing OK.
- You can define another user by pressing Add.
5.8.2 Deleting a user
- Press Setup to open the Setup menu.
- Select "User management" using the arrow keys and press OK to confirm. The User
management setup menu appears.
- Select "User list" and press Modify.
- Select the user who you want to delete from the list, and press Del.
- The name is deleted from the user list.
5.8.3 Defining an active user
- Press Setup to open the Setup menu.
- Select "User management" using the arrow keys and press OK to confirm. The User
management setup menu appears.
- Select "Active" and press Modify.
- The user list is displayed.
- Select the user who you want to define as an active user from the list, and press
Active to confirm your selection.
- The new active user is displayed in the User management setup menu and on the
Home screen.
• By pressing Inactive you can deactivate the active user. "No user" appears again on
the display.
Page 49

Setup
METTLER TOLEDO DL15 47
5.8.4 Defining access rights
The access rights for the user can be restricted through the setting "Routine". In this mode
the user is only allowed to view and print settings in the Setup menu and methods and but
cannot to change them. (Exeptions: Selection of the titration stand in the "Routine" mode
and changing the active user.)
Furthermore, in this mode it is not possible to delete results or statistics.
- Press Setup to open the Setup menu.
- Select "User management" using the arrow keys and press OK to confirm. The User
management setup menu appears.
- Select "Access".
- By pressing Modify you can switch between the settings "Expert" and "Routine".
- When you switch from "Expert" to "Routine", you will be requested to define a pass-
word. Enter a password using the keypad and press Save to store it in the titrator.
- On switching from "Routine" to "Expert " you will be requested to enter the password
you defined before. Enter the password using the keypad and press OK to confirm.
- You can quit the setup menu for the user management by pressing OK.
- The modified access rights are displayed on the Home screen.
5.9 Settings
- Press Setup to open the Setup menu.
- Select "Settings" using the arrow keys and press OK to confirm. The Settings setup
menu appears.
In this menu you can change different titrator settings such as date, time and language.
The following settings can be made:
• Language
• Date
• Time
• Temperature unit
• Titrator ID
• Report header
• Beep
Page 50

Setup
48 METTLER TOLEDO DL15
5.9.1 Setting the language
You can choose German, English, French, Spanish, Italian and Russian.
- Press Setup to open the Setup menu.
- Select "Settings" using the arrow keys and press OK to confirm. The Settings setup
menu appears.
- Select "Language" and using Modify switch to your desired language.
- Press OK to accept your changes and quit the menu, or press Esc to discard your
changes and quit the menu.
5.9.2 Setting the date
You can change the date stored in the titrator and the date format.
- Press Setup to open the Setup menu.
- Select "Settings" using the arrow keys and press OK to confirm. The Settings setup
menu appears.
- Select "Date".
- Press Modify.
- Select "Day", "Month" and "Year" one after the other and enter the current date using
the keypad.
- Select "Format" and press Modify to change to your desired date format.
Four different date formats are available:
• 31-11-2004
• 11/31/2004
• 31-Nov-2004
• Nov/31/2004
- Press OK to accept your changes and quit the menu, or press Esc to discard your
changes and quit the menu.
Page 51

Setup
METTLER TOLEDO DL15 49
5.9.3 Setting the time
- Press Setup to open the Setup menu.
- Select "Settings" using the arrow keys and press OK to confirm. The Settings setup
menu appears.
- Select "Time".
- Press Modify.
- Select "Hour" and "Minute" one after the other and enter the current time.
- Select "Format" and press Modify to change to your desired time format.
Two different time formats are available:
• 05:00 pm
• 17:00
- Press OK to accept your changes and quit the menu, or press Esc to discard your
changes and quit the menu.
5.9.4 Defining the temperature unit
- Press Setup to open the Setup menu.
- Select "Settings" using the arrow keys and press OK to confirm. The Settings setup
menu appears.
- Select "Temp. unit" and press Modify to change to your desired temperature unit.
The temperature units available are: °C, °F and K.
- Press OK to accept your changes and quit the menu, or press Esc to discard your
changes and quit the menu.
5.9.5 Entering the titrator ID
- Press Setup to open the Setup menu.
- Select "Settings" using the arrow keys and press OK to confirm. The Settings setup
menu appears.
- Select "Titrator ID".
- You can now enter any set of characters and numbers using the keypad. This ID is
always included in the report.
- Press OK to accept your changes and quit the menu, or press Esc to discard your
changes and quit the menu.
Page 52

Setup
50 METTLER TOLEDO DL15
5.9.6 Entering a report header
- Press Setup to open the Setup menu.
- Select "Settings" using the arrow keys and press OK to confirm. The Settings setup
menu appears
- Select "Report header" and press Modify.
- You can now enter two lines of text using the keypad. These appear in the header of
the report form. You can switch between the two text lines using the arrow keys. Each
line can contain up to 24 characters.
- Press OK to accept your changes and quit the menu, or press Esc to discard your
changes and quit the menu.
5.9.7 Setting the beeper sound
- Press Setup to open the Setup menu.
- Select "Settings" using the arrow keys and press OK to confirm. The Settings setup
menu appears
- Select "Beep" and change to your desired setting using Modify.
- There are two different settings for the beep sound:
• "No": A beep occurs only if there is a system malfunction.
• "Yes": A beep occurs each time a key is pressed, with system malfunctions,
with error messages, and after performing a titration as soon as the results are
displayed.
- Press OK to accept your changes and quit the menu, or press Esc to discard your
changes and quit the menu.
5.10 Titration stand
- Press Setup to open the Setup menu.
- Select "Titration Stand" using the arrow keys and press OK to confirm. The Titration
Stand setup menu appears.
In this menu you can select a titration stand and change between the internal overhead
stirrer and the magnetic strirrer.
- Select the menu item "Stand" with the arrow keys and press Modify to change to
your desired setting "Internal", "Extern" or "Rondolino".
• "Internal": With this setting the titrator controls the internal titration stand.
• "Extern": The titrator can communicate with external devices (e.g. Kjeldahl distilla-
tion units of different manufacturers, pumps, etc.). See "13. Technical data".
Page 53

Setup
METTLER TOLEDO DL15 51
• "Rondolino": Performing an automated sample series determination with a
Rondolino sample changer requires this setting.
- Select "Stirrer" using the arrow keys.
- Press Modify to select "Magnetic stirrer" or "Overhead stirrer". If you select
"Rondolino" as titration stand the setting "Overhead stirrer" is given.
- Press OK to store your changes.
Page 54

Setup
52 METTLER TOLEDO DL15
Page 55

Method
METTLER TOLEDO DL15 53
6. Methods (Method)
Pressing the Method key opens the method editor.
The titrator automatically performs analyses with the aid of predefined methods. In this
chapter you learn how to open methods and how to define your own methods.
A number of METTLER methods are already stored in the titrator. These methods have been
developed by METTLER TOLEDO for certain applications and can be used directly for the
corresponding analysis. See "6.7 Predefined methods".
You can modify METTLER methods according to your requirements and store them as
User methods.
A complete titration method consists of sample preparation, stirring or waiting times, the
actual titration itself, result calculation and a report. In the titrator, these steps are defined
as functions. They are performed one after the other in an analysis. The individual functions consist of parameters whose values you can change.
Method (Method ID / Name)
Functions Parameter
Sample
Parameter 1
Parameter 2
…
Stir
Parameter 1
Parameter 2
…
Measure
Parameter 1
Parameter 2
…
EP titration
Parameter 1
Parameter 2
…
Calculation 1
Parameter 1
Parameter 2
…
Calculation 2
Parameter 1
Parameter 2
…
Calculation 3
Parameter 1
Parameter 2
…
Report
Parameter 1
Parameter 2
…
Page 56

Method
54 METTLER TOLEDO DL15
Each method has a name and a three-digit number that uniquely characterizes each method. For User methods, the method identification number (method ID) can be between
1 and 899. The range 900 to 999 is reserved for METTLER methods.
You can create a new method by modifying the parameters of the functions of an existing
method and storing them under a new method ID.
The method editor can be opened by pressing the Method key. It allows you to create,
modify, delete, print and start methods.
6.1 Starting a method
There are three ways to start a method:
- Using Run (see "8.1 Starting a sample determination using the Run key".)
- Using the Home screen (Start of the three main methods, see "4.3.9 The Home
screen").
- Using the method editor (see "6.1.1 Starting methods from the method editor").
6.1.1 Starting methods from the method editor
Proceed as follow to start a method from the method editor:
- Press Method to open the method editor.
- The Methods menu appears with the following items:
• Method ID
• User methods
• METTLER methods
In the "Method ID" box, you can enter the method ID of an existing method (User or METTLER methods).
- Press Start to execute the selected method.
If you do not know the method ID of the method that you want to execute, you can use the
arrow keys to select the method from a list using its name and method ID:
- Select "User methods" if want to select a self-defined method.
- Select "METTLER methods" if you want to select a METTLER TOLEDO predefined method.
- Press OK to confirm.
- In the display that follows, you can select the desired method from a list using its
name and method ID.
- Press Start to execute the selected method.
Page 57

Method
METTLER TOLEDO DL15 55
6.2 Creating a method
You can create a new method by changing the parameters of the functions of an existing
method and storing the method under a new method ID.
- Press Method to open the method editor.
- The Methods menu appears with the following items:
• Method ID
• User methods
• METTLER methods
- Select any method you want to modify and store as a new method.
Selecting a method using its method ID
You can enter the method ID of an existing method (User or METTLER method) in the
"Method ID" box.
- If you press Modify, the functions of the selected method are shown on the display.
- Modify the individual functions according to your requirements. (See "6.3 Modifying
a method")
- Select "Title" and enter a title for the new method using the keypad.
- Select "Method ID" and enter a method ID (range 1-899) for the new method.
- Press OK.
- A summary of the new method with method ID, title, author, date of creation and
time appears on the display.
- Press OK to store the new method.
Selecting a method from the methods list
If you do not know the method ID of the method you want to modify, you can use the arrow
keys to select the method from a list using its name and method ID:
- Select "User methods" if want to select a self-defined method.
- Select "METTLER methods" if you want to select a predefined method from METTLER
TOLEDO.
- Press OK to confirm.
Page 58

Method
56 METTLER TOLEDO DL15
- In the display that follows, you can use the arrow keys to select the desired method
with its name and method ID from a list.
- If you press Modify, the functions of the selected method are shown on the display.
- Modify the individual functions according to your requirements. (See "6.3 Modifying
a method")
- Select "Title" and enter a title for the new method using the keypad.
- Select "Method ID" and enter a method ID (range 1-899) for the new method.
- Press OK.
- A summary of the new method with method ID, title, author, date of creation and time
appears on the display.
- Press OK to store the new method.
6.3 Modifying a method
You can modify the parameters of a User method as desired and afterward store the method
again under its original method ID. If you want to modify the parameters of a METTLER
method, you must afterward store the method as a User method under a new method ID.
To modify the parameters of a method, you must first select the method:
- Press Method to open the method editor.
- The Methods menu appears with the following items:
• Method ID
• User methods
• METTLER methods
- Select the method whose parameters you want to modify.
Selecting a method using a method ID
You can enter the method ID of an existing method (User or METTLER method) in the
"Method ID" box.
- If you press Modify, the functions of the selected method are shown on the display.
- Modify the individual functions according to your requirements.
- Press OK to store the new method.
Page 59

Method
METTLER TOLEDO DL15 57
Selecting a method from the methods list
If you do not know the method ID of the method that you want to modify, you can use the
arrow keys to select the method from a list using its name and method ID:
- Select "User methods" if want to select a self-defined method.
- Select "METTLER methods" if you want to select a predefined method from METTLER
TOLEDO.
- Press OK to confirm.
- In the display that follows, you can select the desired method using its name and
method ID from a list.
- If you press Modify, the functions of the selected method are shown on the display.
- Modify the individual functions according to your requirements.
The parameters of the following functions are explained in the sections that follow:
• 6.3.1 Sample
• 6.3.2 Stirring
• 6.3.3 Measuring
• 6.3.4 EP titration
• 6.3.5 Calculation
• 6.3.6 Report
Page 60

Method
58 METTLER TOLEDO DL15
6.3.1 Sample
This function defines the request for sample information or the input of sample data such
as weight, density and equivalent number, and temperature.
The following parameters can be set:
Request ID [Yes/No]
This defines whether the ID of the sample is to be requested at the beginning of an analysis,
"YES", or as a parameter in the method, "No".
Select from the possible settings using Modify
ID
If "No" was selected, you can enter the sample ID here.
The ID can be entered using the keypad.
Entry type [Mass /Volume/Pieces]
This defines whether the sample is to be added as defined mass, defined volume or a defined number of pieces. The request for sample data is then adapted with regard to units.
Select from the possible settings using Modify
Request sample [Yes/No]
This determines whether mass, volume or number of pieces is to be requested at the beginning of the analysis or defined in the method.
Select from the possible settings using Modify.
Min. [mL] [g] [pcs.]
This defines the lower limit for entry of the sample data at the start of the analysis.
Appears only if "Yes" was selected for "Request sample". The unit depends on the setting
of the parameter "Entry type".
The desired value can be entered using the keypad.
Max. [mL] [g] [pcs.]
This defines the upper limit for the entry of the sample data at the start of the analysis.
Appears only if "Yes" was selected for "Request sample". The unit depends on the setting
of the parameter "Entry type".
The desired value can be entered using the keypad.
Weight [g]
The weight of the sample. Appears only if "No" was selected for "Request sample" and
"Mass" was selected as "Entry type".
The desired value can be entered using the keypad.
Volume [mL]
The volume of the sample. Appears only if "No" was selected for "Request sample" and
"Volume" was selected as "Entry type".
The desired value can be entered using the keypad.
Page 61

Method
METTLER TOLEDO DL15 59
Density [g/mL]
The density of the sample substance. Appears only if "No" was selected for "Request
sample" and "Mass" or "Volume" was selected as "Entry type".
The desired value can be entered using the keypad.
Weight [g/pc.]
The weight per piece of the sample substance. Appears only if "Number of pieces." as
"Entry type" was selected.
The desired value can be entered using the keypad.
Number [pcs.]
The number of sample units in a "piece". Appears only if "No" was selected for "Request
sample" and "Number of pieces" as "Entry type" was selected.
The desired value can be entered using the keypad.
Mol.m. [g/mol]
The molar mass of the sample substance in [g/mol]
The desired value can be entered using the keypad.
Equival. number z
The equivalent number of the sample substance.
The desired value can be entered using the keypad.
Temp. Sensor [Manual/PT1000]
Indicates whether the temperature is to be entered manually or determined automatically
by the PT1000 temperature sensor.
The temperature unit is the unit that was selected in the Setup.
Select from the possible settings using Modify.
Request [Yes/No]
Indicates whether the temperature at the start of the analysis is to be requested or stored
in the method. Appears only if "Manual" was selected for "Temp. sensor".
Select from the possible settings using Modify.
Temp.
The temperature during the determination. Appears only if "Manual" was selected for "Temp.
sensor" and "No" was selected for "Request temperature".
The temperature unit is the unit that was selected in the Setup.
The desired value can be entered using the keypad.
Page 62

Method
60 METTLER TOLEDO DL15
6.3.2 Stir
The parameters of the Stir function let you determine the speed of the overhead or magnetic
stirrer during the analysis and whether the stirring time is to be requested before beginning
the titration or defined in the method.
Speed [%]
The speed (rpm) of the stirrer during the analysis in %. (0%, stirrer does not rotate, 100%,
stirrer rotates at the highest speed)
The desired value can be entered using the keypad.
Request duration [Yes/No]
Indicates whether the stirring time is to be requested at the beginning of the analysis, "Yes",
or is to be defined in the method, "No". The stirring time indicates how long the stirrer has
to stir to homogenize the solution before the titration or the measurement is started.
Select from the possible settings using Modify.
Time [s]
The stirring time. Appears only if "No" was set for "Request time".
The stirring time indicates how long the stirrer has to stir to homogenize the solution before
the titration or the measurement is started.
The desired value can be entered using the keypad.
6.3.3 Measure
The Measure function enables you to measure the potential of a solution under defined
conditions.
The following parameters can be set:
Sensor
Using Modify, you obtain the list of sensors from which you can select the desired sensor.
Press OK to confirm. The unit (pH, or mV) is adapted for the other parameters according
to the sensor selected.
Unit [pH, pX, mV]
The unit for the measurement, depending on the sensor selected. You cannot change this
parameter.
Pol. Curr. [µA]
The polarization current strength in [µA]. The desired value can be entered using the keypad.
Appears only if you have selected a polarized sensor.
Page 63

Method
METTLER TOLEDO DL15 61
dE[mV]
The drift of the electrode potential must be less than dE/dt during dt in order to be accepted
as a measured value. This occurs during an interval defined by t(min) and t(max).
The desired value can be entered using the keypad.
dt[s]
The drift of the electrode potential must be less than dE/dt during dt, in order to be accepted
as a measured value. This occurs during an interval defined by t(min) and t(max).
The desired value can be entered using the keypad.
t(min) [s]
t(min) defines the earliest possible time that the measured value is accepted.
The desired value can be entered using the keypad.
t(max) [s]
t(max) defines the latest possible time after which the measured value is in any case
accepted.
The desired value can be entered using the keypad.
6.3.4 EP titration
Titr.
Using Modify, you obtain the list of titrants from which you can select the desired titrant.
Press OK to confirm. The concentration of the titrant from the Setup is used.
Conc. [mol/L]
The concentration of the titrant. You cannot change this parameter; the concentration of
the titrant is used as defined in the Setup.
Sensor
Using Modify, you can access the list of sensors from which you can select the desired
sensor. Press OK to confirm. The unit (pH, or mV) is adapted for the other parameters
according to the sensor selected.
• pX sensors are used like mV sensors in the method. The calibration parameters in
the Setup are used to perform calculations for measured values in [ppm] or [mol/L]
in the method.
Unit [pH, mV]
The unit for the measurement depending on the selected sensor. You cannot change these
parameters.
Page 64

Method
62 METTLER TOLEDO DL15
Pol. Curr. [µA]
The polarization current strength in [µA]. The desired value can be entered using the keypad.
Appears only if you have selected a polarized sensor.
Blank [Entry/From list/Request]
Here you can define whether, at the beginning of the analysis, a blank value is to be requested, "Request"; entered in the method, "Entry"; or selected from the list of blank values,
"From list".
Select from the possible settings using Modify.
Value [mmol]
This parameter allows you to enter a blank value in the method. The desired value can be
entered using the keypad.
Appears only if "Entry" was selected for the parameter "Blank value".
Solvent
Using Modify, you obtain the list of blank values stored in the titrator. From there you can
select a blank value and confirm by pressing OK.
Appears only if "From list" was selected for the parameter "Blank value".
Request predisp. [Yes/No]
Here you can define whether a certain volume of titrant is to be predispensed before the
start of the titration. With "Yes", this volume is requested before the beginning of the titration;
with "No", you can enter the volume in the method.
Select from the possible settings using Modify.
Vol.[mL]
With this parameter you can enter a volume for predispensing in [mL]. The desired value
can be entered using the keypad.
Appears only if "No" was selected for the parameter "Request predisp.".
Req. back value [Yes/No]
Here you can define whether a back value is to be requested at the beginning of the analysis,
"Yes", or is entered in the method, "No".
Select from the possible settings using Modify.
Back val. [mmol]
With this parameter you can define a back value in the method. The desired value can be
entered using the keypad.
Appears only if "No" was selected for the parameter "Req. back value".
6.3.4.1 Control param.
With the control parameters you can define the type of addition of titrant and the measure
mode. You can access the parameters of this function using Modify.
Page 65

Method
METTLER TOLEDO DL15 63
Determin. [Normal/Cautious/Fast/User]
Using the Determination parameter you can select a criterion for performing the titration.
The possibilities are "Normal", "Cautious", "Fast" and "User".
For the "Normal", "Fast" and "Cautious" settings, corresponding sets of parameters are
stored in the titrator. You can view these parameters by printing the method. No other
parameters need to be adapted. The "User" setting gives you the possibility to individually
adapt all the parameters with regard to the addition of titrant and the measure mode.
The following parameters "Addition" and "Measure" with the corresponding subparameters
are only available if you have selected "User" for the parameter "Determination".
Addition [Incremental/Dynamic]
By using this parameter you can set whether the addition of the titrant is to be performed
incrementally or dynamically. If you select "Incremental", the same volume increment is
always added throughout the entire titration; if you select "Dynamic", the volume increment
added during the titration is adapted dynamically within the preset limits to the course of
the titration in order to obtain a constant potential difference per increment.
Using Modify, you obtain the next screen on which you can select "Incremental" or "Dynamic" and define the subparameters using Modify. (For faster titrations, you should select
"Incremental".)
For the "Incremental" setting, the following parameters are available:
dV [mL]
Defines the size of the volume increment that is added in each dispensing step. This
volume increment remains constant throughout the entire titration. The value in [mL] can
be entered using the keypad.
For the "Dynamic" setting the following parameters are available:
dEnom [mV]
Here you can enter the desired potential difference in [mV] per titration step.
dVmin [mL]
This value defines the minimum size of the volume increment. The value in [mL] can be
entered using the keypad.
dVmax [mL]
This value defines the maximum size of the volume increment. The value in [mL] can be
entered using the keypad.
• The range defined by dVmin and dVmax should be chosen as large as possible and
the titrant addition controlled by dEnom.
Page 66

Method
64 METTLER TOLEDO DL15
Measure [EQU controlled/Fix time]
You can select either equilibrium-controlled "EQU controlled" or timed increment "Fix time"
measured value acquisition.
Using these parameters, you can define the wait time until the measured value acquisition
after an incremental addition. In the equilibrium-controlled measure mode the wait time is
variable; in the timed increment mode it is constant. You can only decide which measure
mode is best for your method when you know the reaction time of the components and the
response time of the sensor used.
• Equilibrium measure mode is used for acid/base titrations in aqueous solutions,
argentometric, complexometric, surfactant and redox titrations.
• Timed increment is used for acid/base titrations in nonaqueous solutions.
Using Modify, you obtain the next screen where you can select "EQU controlled" or " Fix
time" and define the subparameters using Modify.
For the "EQU controlled" setting the following applies:
Before the titrator dispenses the next increment, equilibrium must have been reached and
the measured value must have stabilized.
Responsible for the equilibrium is
• the measured change in potential, dE, in the solution within the defined time dt.
The wait time to the next incremental addition also depends on the definition
• of the minimum time (tmin) and the maximum time (tmax).
As soon as the change in potential of the solution is less than the defined equilibrium
(dE/dt), the titrator accepts the measured value and adds the next increment.
This can occur at the earliest at tmin and occurs at the latest at tmax. At tmax the measured
value is in any case accepted even if the equilibrium condition is not met.
This measure mode has the result that the incremental addition is fast in the flat part of the
titration curve, and slow in the steep part.
The following parameters are available:
dE [mV]
Defines the maximum change in potential per time interval dt in [mV]. The desired value
can be entered using the keypad.
dt [s]
Gives the time interval for the calculation of the calculation dE[mV]/dt[s]. The desired value
can be entered using the keypad.
t(min) [s]
Defines the wait time in [s] after which measured value acquisition occurs at the earliest.
The desired value can be entered using the keypad.
t(max) [s]
Defines the wait time in [s] after which the measured value is in any case accepted. The
desired value can be entered using the keypad.
Page 67

Method
METTLER TOLEDO DL15 65
For the "Fix time" setting the following applies:
The titrator waits for the time interval defined by dt after each incremental addition before
it adds the next increment. The following parameters are available:
dt [s]
Defines the wait time dt in [s] after each incremental addition. The desired value can be
entered using the keypad.
You can access the parameters of this function using Modify.
6.3.4.2 Recognition
The Recognition function lets you set the tendency for endpoint recognition. You can access
the parameters of this function using Modify.
Tendency [Positive/Negative]
Select "Positive" if you want the endpoint to be detected only for a positive tendency; select
"Negative" if you want the endpoint to be detected only for a negative tendency. You can
select from the possible settings using Modify.
• If the start potential already exceeds EP, the titration is terminated without the addi-
tion of titrant.
• For a relative EP the tendency describes the position of the EP related to the measu-
red start potential.
6.3.4.3 Termination param.
The termination parameters let you determine when a titration is terminated. You can
access the parameters of this function using Modify.
Vmax [mL]
The maximum volume of titrant dispensed during the determination. This parameter is a
safety measure to prevent unnecessary addition of titrant if a malfunction occurs during
the titration. The desired value can be entered using the keypad.
At tmax [Yes/No]
This parameter lets you define whether the titration is to be terminated after a certain time,
"Yes", or not "No".
t(max) [s]
This parameter lets you define the time interval after which the titration is terminated. The
desired value can be entered using the keypad.
This parameter appears only if "Yes" was selected for the parameter "At tmax".
Page 68

Method
66 METTLER TOLEDO DL15
6.3.4.4 Evaluation
The Evaluation function lets you define which endpoint of the titration is to be evaluated.
You can access the parameters of this function using Modify.
Numb. EPs [None/1/2]
The number of potentials that are to be additionally evaluated.
Possible values are none, 1 or 2.
Select from the possible settings using Modify.
End point 1 [Absolute/Relative]
The type of endpoint determination for Endpoint 1. Absolute or relative to the start potential.
Select from the possible settings using Modify.
Appears only if "1" or "2" was selected for the parameter "Numb. EPs".
Potential 1 [pH/mV]
The value for Potential 1. The unit depends on the sensor used, pH or mV. The desired value
can be entered using the keypad.
Appears only if "1" or "2" was selected for the parameter "Numb. EPs".
End point 2 [Absolute/Relative]
The type of endpoint determination for Endpoint 2. Absolute or relative to the start potential.
Select from the possible settings using Modify.
Appears only if "2" was selected for the parameter "Numb. EPs".
Potential 2 [pH/mV]
The value for Potential 2. The unit depends on the sensor used, pH or mV. The desired value
can be entered using the keypad.
Appears only if "2" was selected for the parameter "Numb. EPs".
Page 69

Method
METTLER TOLEDO DL15 67
6.3.5 Calculation
You can define three different calculations per analysis (Calculation 1-3). The following
parameters are available for this:
Calculation [None/Cont./Consump./Meas. val./User def./Blank/Titer]
The type of calculation, depending on the desired result.
Select from the possible settings using Modify.
None No calculation is performed.
Content The result of the calculation gives the content of the analysis.
Consumption The result of the calculation gives the consumption.
Measured value A measured value is produced.
User def. A user-defined formula for the calculation can be selected. The formula
for the calculation can be adapted with a factor and a constant to obtain
the result in the desired unit.
Blank value The blank value relative to 2. or 3. EPs is calculated.
Titer The titer relative to 2. or 3. EPs is calculated.
Type [Cont. w. Blank/Cont. back titr./Cont.]
The type of content determination. Content, content with blank value or content back titration
can be selected and indicate whether the titration parameter back value or blank value is
taken into account for the result.
If you select "Content with blank value", the default formula R=Q*C/m is replaced with
R=(Q-Bl)*C/m.
If you select "Content back titration", the default formula R=Q*C/m is replaced with R=(BaQ)*C/m.
Appears only if "Content" was selected for "Calculation".
Select from the possible settings using Modify.
• It is not sufficient, under the function EP-Titration to request or enter a blank value
or back value for it to be included in the calculation. In addition, you must set the
parameter "Type" in the calculation function accordingly.
Formula
For user-defined calculations, you can select a formula to calculate the results. (See
"6.3.5.1 Table of formulas for the calculation of results".)
Select from the possible settings using Modify.
This parameter only appears if you have selected "User def." for the parameter "Calculation".
C
For user-defined calculations, you can enter a constant to convert the results to the desired
unit.
The desired value can be entered using the keypad.
This parameter only appears if you have selected "User def." for the parameter "Calculation".
Page 70

Method
68 METTLER TOLEDO DL15
• The constant C is only included in the calculation if C is also present in the calculation formula.
Factor
For user-defined calculations, you can enter a factor to recalculate the results.
The desired value can be entered using the keypad.
This parameter only appears if you have selected "User def." for the parameter "Calculation".
Name
For user-defined calculations, you can enter a name that appears later in the report.
The desired name can be entered using the keypad.
This parameter only appears if you have selected "User def." for the parameter "Calculation".
Unit
You can select the desired unit for the result. The possibilities depend on the parameter
Calculation.
Select from the possible settings using Modify.
Calculation: Content [g/L] [mg/L] [mol/L] [eq/L] [meq/L] [mg/g] [%] [ppm]
[mol/kg] [mmol/kg] [mmol/g] [mmol/L]
Calculation: Consumption [mL] [mmol]
Calculation: Measured value [ppm] [mmol/L] [g/L] [mol/L] [mV] [pH] [pX]
Calculation: User-def. Can be freely chosen, depends on the formula for the
calculation of the results.
For user-defined calculations, the unit can be entered using the keypad.
Which EP
The parameter indicates for which number EP the result is calculated. Does not appear for
determinations of the type "Measurement".
The following possibilities are available for EP:
1, 2, Start value
Select from the possible settings using Modify.
Decimal places
You can enter the number of decimal places for the result of the calculation.
The desired value can be entered using the keypad.
Result limits [Yes/No]
Select "Yes" if you want to enter the limits for the result, or "No" if you want the result calculated independent of limits.
Select from the possible settings using Modify.
Page 71

Method
METTLER TOLEDO DL15 69
Minimum
Enter the lower limit for the calculated result.
Appears only if you have selected "Yes" for the "Result limits".
The desired value can be entered using the keypad.
Maximum
Enter the upper limit for the calculated result.
Appears only if you have selected "Yes" for the "Result limits".
The desired value can be entered using the keypad.
• If the result of a titration is outside the defined result limits, the result is marked with
an exclamation point and a message appears on the display.
Statistics [Yes/No]
This parameter lets you define whether the statistics of the analysis is included in the
report, "Yes", or not, "No".
Select from the possible settings using Modify.
The following table summarizes the formulas on which the individual calculations are
based.
Page 72

Method
70 METTLER TOLEDO DL15
Calculation: Titer Calculation:
blank value
Calculation:
consumption
Calculation: measured
value
Calculation: content
default formula:
R = Q*C/m
Calculation: user. def.
R = m/(VEQ*c*C) R = Q mL: R = VEQ mV: R = E %: C = M/(10*z) R = Q*C/m (default formula)
Liquid standards:
C = 1/(cst*z)
mmol: R = Q
Q = VEQ*c*t
pH: zero point[pH] +
E[mV]/slope[mV/pH]
mg/g: C = M/z R = (Q-Bl)*C/m (default for-
mula including the blank value)
Solid standards:
C = M/(1000*z)
pX: zero point[pX] +
E[mV]/slope[mV]
g/L: C = M/z R = (Ba-Q)*C/m (default for-
mula including the back value)
ppm: R = pw(-pX)*1000 ppm: C = M*1000/z mL: R = VEQ
mmol/L:
R = pW(-pX)*1000
mg/L: C = M*1000/z mmol: R = Q
Q = VEQ*c*t
g/L: R = pW(-pX) mol/L: C = 1/z mV: R = E
mol/L: R = pw(-pX) mol/kg:C = 1/z R = pw(-pX)*1000
(mmol/L, ppm or other unit of
measure, depending on the
position of the zero point)
mmol/g:C = 1/z R = pw(-pX)
(mol/L, g/L or other unit of
measure, depending on the
position of the zero point)
mmol/L: C = 1000/z
mmol/kg: C = 1000/z
eq/L: C = 1
meq/L: C = 1000
R = (Q-Bl)*C/m (content with blank value)
R = (Ba-Q)*C/m (content back titration)
The following table summarizes the symbols used and their meaning:
E Potential [mV, pH...] of the function measure Bl Blank value [mmol]
T Temperature [°C, °F, K] Ba Back value [mmol]
R Calculated result c Nominal concentration of the titrant [mol/L]
C Calculation constant c*t Actual concentration of the titrant [mol/L]
VEQ mL consumption t Titer
Q VEQ*c*t [mmol] z Equivalent number
M Molar mass [g/mol] cst Concentration of the liquid standard [mol/L]
6.3.5.1 Table of formulas for the calculation of results
Page 73

Method
METTLER TOLEDO DL15 71
6.3.6 Report
This function lets you determine whether a report is to be printed or not and defines the
size of the report.
You can define the following parameters:
Output [Printer/None]
Determines whether a report is to be printed "Printer", or not "None".
Select the setting you want using Modify.
Results [GLP/None/Short]
Determines the size of the presentation of the results in the report.
"GLP" Good Laboratory Practice - comprehensive.
"None" No presentation of the results.
"Short" Brief presentation of the results.
Select the setting you want using Modify.
Meas. val. table [Yes/No]
Determines whether a measured value table is to be included as part of the report, "Yes",
or not "No". Does not appear for measurements.
Select the setting you want using Modify.
E - V curve [Yes/No]
Determines whether a titration curve (potential plotted against volume) is to be included
in the report, [Yes], or not, [No]. Appears only for measurements
Select the setting you want using Modify.
dE/dV curve [Yes/No]
Determines whether the first derivative of the titration curve (potential plotted against volume) is to be included in the report, [Yes] or not, [No]. Appears only for measurements
Select the setting you want using Modify.
Page 74

Method
72 METTLER TOLEDO DL15
6.4 Deleting methods
You can only delete User methods. The METTLER methods stored in the titrator cannot be
deleted. To delete a method, you must first select it:
- Press Method to open the method editor.
Selecting a method using the method ID
You can enter the method ID of an existing User method in the Method ID box.
- By pressing Modify you can display the functions of the selected method.
- Using Del. you can delete the selected User method.
- On the screen that follows, you must select "Yes" and then press OK to confirm deletion.
- The method is deleted and you return to the start screen of the Methods menu.
Selecting a method from the methods list
If you do not know the method ID of the method that you want to delete, you can select the
method from a list using its name and method ID:
- Select "User methods".
- Press OK to confirm
- On the screen that follows, use the arrow keys to select the desired method from a
list using its name and method ID.
- By pressing Modify, you can display the functions of the selected method.
- Using Del. you can delete the selected User method.
- On the screen that follows, you must select "Yes" and then press OK to confirm deletion.
- The method is deleted and you return to the start screen of the Methods menu.
Page 75

Method
METTLER TOLEDO DL15 73
6.5 Printing a methods list
Proceed as follows to print a list of all the User or METTLER methods stored in the titrator:
- Press Method to open the method editor.
- The Methods menu appears with the following items:
• Method ID
• User methods
• METTLER methods
- Select "User methods" using the arrow keys if you want to print a list of User meth-
ods.
- Select "METTLER methods" if you want to print a list of the METTLER TOLEDO pre-
defined methods.
- Press Print to print the list of the methods.
- You must confirm the next screen by pressing OK before the print job is started.
6.6 Printing a method
To print the parameters of a method, you must first select the desired method.
- Press Method to open the method editor.
Selecting a method using the method ID
You can enter the method ID of an existing User method in the Method ID box (User method
or METTLER method).
- Press Print to print the parameters of the selected method.
Selecting a method from the methods list
If you do not know the Method ID of the method you want to delete, you can select the
method from a list using its name and method ID:
- Select "User methods" using the arrow keys if you want to select a self-defined me-
thod.
- Select "METTLER methods" if you want to select one of the predefined METTLER
TOLEDO methods.
- Press OK to confirm your selection
- On the screen that follows you can select the desired method using its name and
method ID from a list.
- Press Print to print the functions and parameters of the selected method on the
printer.
- You must confirm the next screen by pressing OK before the print job is started.
Page 76

Method
74 METTLER TOLEDO DL15
Method ID Title Samples Method type
Control param.
Sensor Titrant /
Standard
Result
920 Acid content EP acids
e.g. HCl
EP titration
EP = pH 7.0
DG115 NaOH
0.1 mol/L /
KHP
HCl (%)
M = 36.458; z=1
921 Base content EP base
e.g. NaOH
EP titration
EP = pH 7.0
DG115 HCl
0.1 mol/L /
THAM
NaOH (%)
M = 40.00; z=1
926 pH measure measure DG115 measured value pH
6.7 Predefined methods
Page 77

Series
METTLER TOLEDO DL15 75
7. Series
Pressing the Series key opens the Series menu. From this menu you can perform any type
of series determination (sample, titer or blanc value).
An Important prerequisite for performing an analysis with the titrator is that you have
properly set up all the necessary resources in the setup menu (See "5 Setup") and that the
methods you need are available. You can create or modify the methods using the method
editor (See "6 Methods").
Furthermore you have the possibility to automatize your series determination by using
a Rondolino sample changer. Up to nine samples can be analyzed automatically. It is
required to choose „Rondolino“ as titration stand if you use a Rondolino sample changer.
(See „5.10 Titration stand“)
7.1 Starting a sample determination using the Series key
- Press the Series key.
- The message: „Statistics memory: Memory is cleared“ is displayed. Confirm with
Proceed.
- Under "Determination", select either "Sample", "Titer" or "Blank value", depending on
the type of determination you want to perform, using Modify.
- Select "Method ID" using the arrow keys.
- Press Modify.
- Select "User methods" if you want to select a self-defined method.
- Select "METTLER methods", if you want to select one of the METTLER TOLEDO prede-
fined methods.
- Press OK to confirm your selection.
- In the display that follows you can select the desired method from a list using its
name and its method ID.
- Press OK to confirm your selection.
- Select „Number of samples“ using the arrow keys and enter the desired number of
samples (min. 1; max. 9) using the keypad.
- Press OK to confirm your selection.
Depending on the settings of the selected method a list of the samples and their related
parameters is displayed.
- Select the sample using the arrow keys.
- Press Modify.
- Enter the value of the respective parameter.
- Press OK to confirm your selection.
- Press Start to perform the selected method (you can press Modify to select another
method or press List to adept the number of the samples).
- The analyses are performed according to the instructions given in the method used.
• You can enter the method ID of an existing method (User method or METTLER me-
thod) in the "Method ID" box and then confirm this by pressing Start.
Page 78

Series
76 METTLER TOLEDO DL15
7.2 Starting a titer determination using the Series key
- Press the Series key.
- The message: „Statistics memory: Memory is cleared“ is displayed. Confirm with
Proceed.
- Under "Determination", select "Titer" using Modify.
- Select "Method ID" using the arrow keys.
- Press Modify.
- In the menu that follows, select either User methods or METTLER methods and confirm your selection by pressing OK.
- Select a method that uses the titrant whose titer you want to determine, and confirm
your selection by pressing OK.
- Select „Number of samples“ using the arrow keys and enter the desired number of
samples (min. 1; max. 9) using the keypad.
- Press OK to confirm your selection.
Depending on the settings of the selected method a list of the samples and their related
parameters is displayed.
- Select the sample using the arrow keys.
- Press Modify.
- Enter the value of the respective parameter.
- Press OK to confirm your selection.
- Press Start to start the titer determination.
- The titer determination is performed according to the instructions given in the method. (See "6.3 Modifying a method")
- A report is sent to the printer, depending on the settings defined in the method.
- After the determination you can view the statistics of the current sample series by
pressing Stat..
- If the titer is within the defined limits, you can accept the result of the titer determination (or the mean result if you have performed the titer determination several times) by
pressing Save.
- The date and time of the last titer determination are automatically updated.
- Quit the display that follows by pressing Esc. in order to prevent the date and time
being set to 00-00-0000 and 00:00.
Page 79

Series
METTLER TOLEDO DL15 77
7.3 Starting a blank value determination using the Series
key
- Press the Series key.
- The message: „Statistics memory: Memory is cleared“ is displayed. Confirm with
Proceed.
- Under "Determination", select "Blank value " using Modify.
- Select "Method ID" using the arrow keys.
- Press Modify.
- In the menu that follows, select either User methods or METTLER methods, and
confirm your selection by pressing OK.
- Select a method that references the blank value that you want to determine and
confirm your selection by pressing OK.
- Select „Number of samples“ using the arrow keys and enter the desired number of
samples (min. 1; max. 9) using the keypad.
- Press OK to confirm your selection.
Depending on the settings of the selected method a list of the samples and their related
parameters is displayed.
- Press Start to start the blank value determination.
- The blank value determination is performed according to the instructions given in the
method. (See "6.3 Modifying a method")
- A report is sent to the printer, depending on the settings defined in the method.
- You can view the statistics of the current sample series by pressing Stat..
- If the blank value is within the defined limits, you can accept the result of the blank
value determination (or the mean result if you have performed the blank value determination several times) by pressing Save. The date and time of the last blank value
determination are automatically updated.
- Quit the display that follows by pressing Esc. in order to prevent the date and time
being set to 00-00-0000 and 00:00.
Page 80

Series
78 METTLER TOLEDO DL15
Page 81

Run
METTLER TOLEDO DL15 79
8. Analysis (Run)
Pressing the Run key opens the Analysis menu. From this menu, you can perform any
type of determination (sample, titer or blank value determination).
An Important prerequisite for performing an analysis with the titrator is that you have
properly set up all the necessary resources in the setup menu (See "5 Setup") and that the
methods you need are available. You can create or modify the methods using the method
editor (See "6 Methods").
8.1 Starting a sample determination using the Run key
- Press the Run key.
- Under "Determination", select either "Sample", "Titer" or "Blank value", depending on
the type of determination you want to perform, using Modify.
- Select "Method ID" using the arrow keys.
- Press Modify.
- Select "User methods" if you want to select a self-defined method.
- Select "METTLER methods", if you want to select one of the METTLER TOLEDO prede-
fined methods.
- Press OK to confirm your selection.
- In the display that follows you can select the desired method from a list using its
name and its method ID.
- Press OK to confirm your selection.
- Press Start to perform the selected method (you can press Modify to select another
method or press Series to open the Series menu).
- The analysis is performed according to the instructions given in the method used.
• You can enter the method ID of an existing method (User method or METTLER me-
thod) in the "Method ID" box and then confirm this by pressing Start.
• You can facilitate starting the three most frequently used methods by defining them
as main methods in the Setup menu. The method ID of these main methods then
appear on the Home screen and can be started from there by pressing the corresponding function key. (See "5.7 Main methods".)
Page 82

Run
80 METTLER TOLEDO DL15
8.2 Starting a titer determination using the Run key
- Press the Run key.
- Under "Determination", select "Titer" using Modify.
- Select "Method ID" using the arrow keys.
- Press Modify.
- In the menu that follows, select either User methods or METTLER methods and confirm your selection by pressing OK.
- Select a method that uses the titrant whose titer you want to determine, and confirm
your selection by pressing OK.
- Press Start to start the titer determination.
- The titer determination is performed according to the instructions given in the method. (See "6.3 Modifying a method")
- A report is sent to the printer, depending on the settings defined in the method.
- After the determination you can view the statistics of the current sample series by
pressing Stat..
- If the titer is within the defined limits, you can accept the result of the titer determination (or the mean result if you have performed the titer determination several times) by
pressing Save.
- The date and time of the last titer determination are automatically updated.
- Quit the display that follows by pressing Esc. in order to prevent the date and time
being set to 00-00-0000 and 00:00.
8.3 Starting a blank value determination using the Run
key
- Press the Run key.
- Under "Determination", select "Blank value " using Modify.
- Select "Method ID" using the arrow keys.
- Press Modify.
- In the menu that follows, select either User methods or METTLER methods, and confirm your selection by pressing OK.
- Select a method that references the blank value that you want to determine and confirm your selection by pressing OK.
- Press Start to start the blank value determination.
- The blank value determination is performed according to the instructions given in the
method. (See "6.3 Modifying a method")
- A report is sent to the printer, depending on the settings defined in the method.
Page 83

Run
METTLER TOLEDO DL15 81
- You can view the statistics of the current sample series by pressing Stat..
- If the blank value is within the defined limits, you can accept the result of the blank
value determination (or the mean result if you have performed the blank value determination several times) by pressing Save. The date and time of the last blank value
determination are automatically updated.
- Quit the display that follows by pressing Esc. in order to prevent the date and time
being set to 00-00-0000 and 00:00.
Page 84

Run
82 METTLER TOLEDO DL15
Page 85

Performing a titration
METTLER TOLEDO DL15 83
9. Performing a titration
This chapter explains the general procedure for performing a titration method, using a
simple acid-base titration as an example. The method for determining the acid content
is stored as a METTLER method under the method ID 900 entitled "Acid Content EP". The
purpose of the method is to determine the acid content of an aqueous solution using an
endpoint titration.
The following determination is performed:
approx. 5 g of an HCl solution (conc. 0.1 mol/L)
is titrated with NaOH (conc. 0.1 mol/L).
9.1 Preparations
– Make up solutions of hydrochloric acid and sodium hydroxide in the concentrations
given above. The sodium hydroxide must be free of carbonate.
– Prepare the burette for the sodium hydroxide and attach it to the titrator (see "3.2.2
Installing the burette").
– To protect the sodium hydroxide from CO2, mount a drying tube on the burette holder
of the NaOH bottle.
– Attach a titration beaker to the titration stand and insert the NaOH dispensing tube
into one of the smaller openings of the titration head.
– Connect the stirrer to the appropriate connection, and check that the stirrer is cor-
rectly configured under the settings for the titration stand. (See "5.10 Titration stand")
If you use an overhead stirrer, attach it to the titration stand.
If you use a magnetic stirrer, make sure that the titration arm is swiveled in and that
the titration beaker is positioned above the magnetic stirrer.
– Fill the burette (see next page).
• A printer and/or a balance can be optionally connected to the titrator. (See "5.4
Peripherals")
Page 86

Performing a titration
84 METTLER TOLEDO DL15
9.1.1 Filling the burette (rinsing)
- Press the Burette key.
- The menu of the Burette auxiliary function menu appears.
- Select "Rinse" using the arrow keys and press Start to start the rinsing process.
- The screen displays "Rinse" during the rinsing process.
- The piston of the burette is moved upward and the air is forced out. A small volume
of sodium hydroxide solution is sucked in when the piston returns to its initial starting
position.
- The main menu of the Burette auxiliary function appears on the display again:
- Repeat the rinsing process twice to make sure that the burette is completely filled and
the tubing has been well rinsed.
– Press the Reset key. The start screen appears.
9.2 Performing titration method 920
– Connect the pH electrode to the sensor input "mV /pH" at the back of the titrator using
the Lemo cable, and insert it into one of the larger openings of the titration stand.
– Then remove the titration beaker and rinse the dispensing tube and the electrode with
deionized water. (If you are using an overhead stirrer, rinse the overhead stirrer as
well.)
– Fill a titration beaker with approx. 50 mL deionized water, pipette in approx. 5 g of
the hydrochloric acid solution and attach the beaker to the titration head.
• Make sure that the dispensing tube of the burette is attached to the titration stand and
is inserted in the titration beaker.
- Press the Run key.
Page 87

Performing a titration
METTLER TOLEDO DL15 85
- The Analysis start menu appears.
- If the ID of method 900 is not shown under "Method ID", select the entry using the
arrow keys, and enter "900" using the keypad.
- "Sample" must be selected under "Determination". If this is not the case, select "De-
termination" and change the setting to "Sample" using Modify.
- Press Start.
- The Request sample display appears.
- Now enter the weight of the sample (for this example, approx. 5g) using the keypad.
- If a balance is connected to the titrator and is configured in the Setup menu, you can
also transfer the sample weight directly from the balance.
- Press Balance in the Request sample display.
- The sample weight determined by the balance is shown on the display.
- Pressing OK transfers the weight from the balance for your analysis.
- Press OK or the Run key to start the titration.
Page 88

Performing a titration
86 METTLER TOLEDO DL15
- An appropriate message appears on the display while the burette is being filled.
- After the burette has been filled, the sample is stirred for the duration of the mixing
time to make sure the solution is homogeneous.
The duration of the mixing time can be defined in the method. (See "6 Methods
(Method)")
- The titration begins.
- During the determination, the following information is shown on the display:
• The volume already dispensed in [mL]
• The measured potential in [mV]
• The measured pH of the solution
• The signal symbolized by the varying black bar. The bar indicates the
limit below which the measured value of the potential is accepted.
- During the titration, you can display the titration curve (measured potential plotted
against dispensed volume) using Graph. A line shows the zero point of the y-axis (0
mV/ pH 7).
- You can return to the measured values display by pressing Values.
- You can terminate the titration by pressing Abort. Values already measured are however not lost.
- At the end of the titration, the result is shown on the display and at the same time the
analysis report is sent to the printer.
- If you confirm the result by pressing OK, the start screen of the Analysis menu appears.
- As long as the printout of the report on the printer is still in progress, the message
"Reporting" appears on the display; the titrator does not return to the start screen of
the Analysis menu until the printout is finished.
- If you perform the determination several times, you can display the statistical evaluation of your results by pressing Stat..
- You can view the result of your titration using the Results auxiliary function. (See
"10.6 Results")
Page 89

Performing a titration
METTLER TOLEDO DL15 87
- If you have not set up a printer in Setup, an error message is given at the end of the
analysis, which you must confirm by pressing Abort.
- The result is then shown on the display.
- If you have connected a printer, the following report is printed:
=================================================================
METTLER TOLEDO DLXX
-----------------------------------------------------------------
SNR ----- V1.00 ID
26-01-2005 15:21 User Meyer
=================================================================
EP titration
----------------------------------------------------------------Method ID 920 Title Acid content EP
25-01-2005 12:05 Author Meyer
Titer 1.03523
----------------------------------------------------------------Titrant NaOH 0.1 Sensor DG115
Conz. [mol/L] 0.1 Unit pH
----------------------------------------------------------------Sample 1
Sample ID HCl
Entry type Mass
Mass [g] 5.2354
Minimum [g] 1.2
Maximum [g] 6.5
Density [g/mL] 1.0
Mol.m. [g/mol] 36.46
Equival. number z 1
Predis. [mL] 1.000
Mixing time [s] 3
Init.pot. [mV] 275.3
Consumption [mL] 5.224
Duration [min:s] 2:00
Temp. [°C] 25.0
Abort All points reached
Blank [mmol] 0.00
Back value [mmol] 0.00
EP Volume [mL] Potential [pH]
----------------------------------------------------------------1 5.208 7.00
Result EP Calculat. Value Unit
----------------------------------------------------------------1 1 Cont. 0.363 [%]
Statistics report
Result n x s Unit srel
-----------------------------------------------------------------
1 1 0.363 0.000 [%] 0.00 [%]
26-01-2005 15:21 Page 1
EP titration
26-01-2005 15:21
----------------------------------------------------------------Method ID 920 Sample No. 1
25-01-2005 12:05 Sample ID HCl
-----------------------------------------------------------------
26-01-2005 15:21 Page 2
Page 90

Performing a titration
88 METTLER TOLEDO DL15
Page 91

Auxiliary functions (Info, Sensor, Stirrer, Burette, Report, Results)
METTLER TOLEDO DL15 89
10. Auxiliary functions (Info, Sensor, Stirrer, Bu-
rette, Report, Results)
The pictogram keys for the auxiliary functions enable you to open different titrator functions that are not involved in performing the actual analysis, but which can support or
extend it.
• The auxiliary function keys are locked during an analysis that is running and the
corresponding menus cannot be opened.
10.1 Information menu
You can open the Info menu by pressing the pictogram key i.
The following functions can then be opened:
System information
This function lets you view the system information for the titrator.
System test
This function lets you test the titrator hardware and any connected peripheral instruments,
such as a balance or a printer.
(See "11.2 Hardware tests")
Service
(This menu can only be accessed by service specialists.)
10.2 Sensor
If you press the Sensor key, the list of sensors stored in the titrator appears.
From this menu you can now select a sensor and
• with a temperature sensor, measure the temperature of a solution;
• with a pH, mV, ISE or polarized sensor, measure the potential of a solution;
• for a pH, or ISE sensor, perform a sensor calibration;
• for a pH, or ISE sensor, perform a sensor test.
Page 92

Auxiliary functions (Info, Sensor, Stirrer, Burette, Report, Results)
90 METTLER TOLEDO DL15
10.2.1 Measuring temperature
To measure the temperature of a solution:
- Press the Sensor key.
- Select "PT1000" for the temperature sensor using the arrow keys, and press Modify.
- Press Start to start the measurement.
- The measured signal is shown on the display.
- You can terminate the measurement by pressing Stop.
• You can also start the measurement directly by pressing Start after selecting the
temperature sensor. The setting last used is used for the stirrer speed.
• You can change the temperature unit in the "Settings" setup menu. (See "5.9.4 Defining the temperature unit")
10.2.2 Measuring potential
You can measure the potential of a solution using the appropriate sensors in mV, pH, or
pX:
- Press the Sensor key.
- Select the desired sensor for the measurements using the arrow keys and press
Modify.
- For polarized sensors, select "Pol. current [µA]" and enter the polarization current in
[µA].
- Select "Speed [%]" and enter the desired speed for the stirrer in [%].
- For pH and pX sensors, select "Temp. sensor" and using Modify select either "Manual" for manual temperature entry or "PT1000" for the measurement of temperature
using a temperature sensor.
- If you have selected manual temperature entry, for pH and pX sensors enter the temperature in the given unit under "Temperature".
- Press Start to perform the measurement.
Page 93

Auxiliary functions (Info, Sensor, Stirrer, Burette, Report, Results)
METTLER TOLEDO DL15 91
• You can also start the measurement by pressing Start directly after selecting the
sensor without changing the settings beforehand with Modify. The settings last used
are then adopted.
10.2.3 Calibrating a sensor
To perform a sensor calibration for a pH or ISE sensor:
- Press the Sensor key.
- Select the sensor you want to calibrate using the arrow keys.
- Press Modify.
- Press Calib.
The calibration is performed in the same way as described in the setup section for sensor
calibration from the setup menu. (See "5.3.5 Sensor calibration from the sensor setup
menu")
10.2.4 Testing a sensor
To perform a sensor test for a pH or ISE sensor:
- Press the Sensor key.
- Select the sensor you want to calibrate using the arrow keys.
- Press Modify.
- Press Test.
The sensor test is performed in the same way as described in the setup section for sensor
calibration from the setup menu. (See "5.3.6 Sensor test from the sensor setup menu")
10.3 Stirrer
If you press the Stirrer key, the Stirrer menu appears.
This menu lets you switch a stirrer on and off (an overhead or a magnetic stirrer) and
change its speed:
- Press the Stirrer key to open the Stirrer menu.
- Select "Speed [%]" and enter the desired stirrer speed in [%].
- Press Start to switch on the stirrer.
- Press Stop to switch off the stirrer.
Page 94

Auxiliary functions (Info, Sensor, Stirrer, Burette, Report, Results)
92 METTLER TOLEDO DL15
• The Stirrer auxiliary function always refers to the stirrer that was selected in the "Titration stand" setup menu. To change from an overhead stirrer to a magnetic stirrer, you
must make the corresponding settings in the setup menu. (See "5.10 Titration stand")
10.4 Burette
If you press the Burette key, the Burette auxiliary functions menu appears.
You can select and execute the following functions:
• Rinse the burette.
• Rinse the tip of the burette.
• Dispense a defined volume.
• Perform a manual titration.
10.4.1 Rinsing the burette
- Press Burette to open the burette auxiliary functions.
- "Rinse" is already selected.
- Press Modify to change the settings for the rinsing process.
- Select "Fill rate [%]" to change the speed at which the burette is filled. Enter a value
for the fill rate.
- Select "No. of rinse cycles" and enter how many times you want to empty and fill the
burette.
- Press Start to start the rinsing process. The titrator completely empties and fills the
burette each cycle. The piston of the burette is moved to below its zero position so
that air bubbles possibly present around the stopcock are also removed.
• A lower fill rate is recommended for reagents of high viscosity in order to prevent air
being sucked in.
• Make sure in rinsing processes that the waste container under the dispensing tube is
sufficiently large.
• You can also start the rinsing process at the rinsing rate shown by selecting "Rinse"
and pressing Start.
Page 95

Auxiliary functions (Info, Sensor, Stirrer, Burette, Report, Results)
METTLER TOLEDO DL15 93
10.4.2 Rinsing the tip
- Press Burette to open the Burette auxiliary functions.
- Select the parameter "Rinse tip" using the arrow keys.
- Press Start to start the rinsing process.
- 5% of the burette volume is dispensed to remove possible contaminants from the tip
of the dispensing tube.
• Make sure during the rinsing processes that the waste container under the dispens-
ing tube is sufficiently large.
10.4.3 Dispensing
- Press Burette to open the Burette auxiliary functions.
- Select "Dispense" using the arrow keys.
- Press Modify to change the settings for the dispensing process.
- Under "Volume", enter the volume in [mL] that you want to dispense.
- Select "Burette", and using Modify, select the volume of the burette you are using
(1 mL, 5 mL, 10 mL or 20 mL).
- Select "Fill rate [%]" to change the speed at which the burette is filled. Enter a value
for the fill rate.
- Press Start to start the rinsing process.
• A lower fill rate is recommended for reagents of high viscosity in order to prevent air
being sucked in.
• You can also start the dispensing process by selecting "Dispense" and pressing
Start. The settings last used are adopted for the fill rate and the burette volume.
10.4.4 Manual titration
- Press Setup to open the setup menu.
- Select "Titrants" using the arrow keys and press OK to confirm. The list of the titrants
stored in the titrator appears.
- Select the titrant and press Modify.
- Confirm the selection with Save.
- Press Esc to change to the setup menu.
- Select "Sensors" using the arrow keys and press OK to confirm. The list of the sen-
sors stored in the titrator appears.
- Select the desired sensor and press Modify.
- Confirm the selection with Save.
- Press Burette to open the Burette auxiliary functions menu.
Page 96

Auxiliary functions (Info, Sensor, Stirrer, Burette, Report, Results)
94 METTLER TOLEDO DL15
- Select "Man. Titration" using the arrow keys.
- Press Start to perform a manual titration.
- By pressing the numeric input keys (0 to 9) you define the volume of the increment
you want to dispens.
• The volume of the manual dispensed increments depends both on the volume of the
burette used and the numeric key. Press "1" to dispens the lowest volume depending
on the burette used up to "0" to dispens the highest volume.
The following table displays the volume of increments in mL for different burette sizes.
Key Increment [mL]
1 mL burette
Increment [mL]
5 mL burette
Increment [mL]
10 mL burette
Increment [mL]
20 mL burette
1 0.0001*) 0.0005*) 0.001 0.002
2 0.0002*) 0.001 0.002 0.004
3 0.0005*) 0.002 0.005 0.01
4 0.001 0.005 0.01 0.02
5 0.002 0.01 0.02 0.05
6 0.005 0.025 0.05 0.1
7 0.01 0.05 0.1 0.2
8 0.02 0.1 0.2 0.5
9 0.05 0.25 0.5 1
0 0.1 0.5 1 2
*) Rounded values are indicated. (Three decimal places)
• A continuous titration can be performed by permanently pressing a numeric key.
However it is not possible to dispense a defined volume. Therefore a manual titration
is conditionally recommendable.
Page 97

Auxiliary functions (Info, Sensor, Stirrer, Burette, Report, Results)
METTLER TOLEDO DL15 95
10.5 Report
If you press the Report key, Report auxiliary functions menu appears. This enables you to
print additional reports of the determination or measurement you performed last.
- Press Report to open the Report menu.
- Using the arrow keys, select "Results" and with Modify select either "Short" or "GLP".
(GLP stands for "Good Laboratory Practice" and means the maximum possible
detail of the results)
- Using the arrow keys, select "Meas. val. table" and with Modify select "Yes" or "No",
depending on whether the report should contain the measured results in table form
or not.
- Using the arrow keys, select "E-V curve" and with Modify select "Yes" or "No", de-
pending on whether the report should contain a titration curve (measured potential
plotted against consumed volume) or not.
- Using the arrow keys, select "dE/dV curve" and with Modify select "Yes" or "No",
depending on whether the report should contain the 1st derivative of the titration as
a curve or not.
• If no analyses or measurement results are stored in the titrator, only the message
"No results" appears on opening the Report menu and you cannot perform any settings in this menu.
• "Meas. val. table", "E-V curve" and "dE/dV curve" are not available for reports of
measurements.
10.6 Results
Pressing Results leads you into the menu of the Results auxiliary function. This function
enables you to
• view and print the results of a series of determinations or measurements;
• view and modify the statistics of a series of determinations or measurements;
• terminate a series of determinations or measurements .
• If no analyses or measurement results are stored in the titrator, only the message
"No results" appears on opening the Results menu and you cannot perform any settings in this menu.
Page 98

Auxiliary functions (Info, Sensor, Stirrer, Burette, Report, Results)
96 METTLER TOLEDO DL15
10.6.1 Displaying and printing results
- Press Results.
- Select "All results" using the arrow keys and confirm with OK.
- In the menu that follows, under "Number of samples" you can select the number of
results stored in the titrator", and under "Method", the method used for the current
sample series.
- Select "Results samp. no." and enter the sample number of the sample whose result
you want to view or print.
- Press Print to print the result.
- Press Show to present the result on the display.
• If no analyses or measurement results are stored in the titrator, the message "No
results" appears on opening the Results menu, and you can not perform any settings
in this menu.
• To select an individual result from a list of all the stored results, select "Number of
samples" and press List. You can then select any result using its sample number,
and view it by pressing Show.
• To print the method with which the sample series was performed, select "Method"
and press Print.
• While the results are shown on the display, you can view the following or the previous results using Next and Back.
10.6.2 Statistics
In the Statistics menu you can view and print a statistical evaluation of the results of your
current sample series. A sample series is always a series of analyses with the same (unchanged) method. It does not matter whether the analyses consist of a series of blank
value determinations, titer determinations, or sample determinations.
You can exclude individual samples from the statistical evaluation by deleting them from
the statistics memory. You can still view deleted samples in a list of the deleted results and
return them to the statistics if desired.
Page 99

Auxiliary functions (Info, Sensor, Stirrer, Burette, Report, Results)
METTLER TOLEDO DL15 97
Displaying or printing a sample series
- Press Results to open the Results menu.
- Select "Statistics" using the arrow keys and press OK to confirm.
- The statistics of the current sample series are shown on the display.
- For each calculation defined in the method used (R1 to R3), the display shows
• the number of results (n) used for the statistics,
• the mean value of the calculation results (x),
• the standard deviation (s),
• and the relative standard deviation (srel).
- Press Print to print the statistics.
- In the menu that follows you can define whether or not the statistics are to be printed
with the individual results.
- Select "With results" and using Modify, set "Yes" or "No".
- Press Start to start the print task.
- For blank values and titer determinations, you can transfer the mean value of the
determinations performed into the setup using Save.
Removing results from the statistics
- Press Results to open the Results menu.
- Select "Statistics" using the arrow keys and press OK to confirm.
- The statistics of the current sample series are shown on the display.
- Press Modify to make changes to the statistics.
- Select "Active samples" and press List.
- In the list of active samples that follows, you can select the desired result and view it
using Show.
- If you press Del., the result displayed is deleted from the statistical evaluation and
stored under "Deleted samples".
- If you press Next and Back you can view the next or the previous result on the list
and if necessary remove it from the statistics using Del..
• To select an individual result using its sample number, select "Results samp. no."
and enter the sample number using the keypad. You can view the result by pressing
Show and then if necessary remove it from the statistics using Del..
Page 100

Auxiliary functions (Info, Sensor, Stirrer, Burette, Report, Results)
98 METTLER TOLEDO DL15
Adding a result to the statistics
- Press Results to open the Results menu.
- Select "Statistics" using the arrow keys and confirm with OK.
- The statistics of the current sample series are shown on the display.
- Press Modify to make changes to the statistics.
- Select "Deleted samples" and press List.
- In the list of deleted samples that follows, you can select the desired result and view
it by pressing Show.
- If you press Add, the result displayed is added to the statistical evaluation and removed from under "Deleted samples".
- If you press Next and Back, you can view the next or the previous result on the list
and if necessary return it to the statistics by pressing Add.
• To select an individual result using its sample number, select "Results samp. no."
and enter the sample number using the keyboard. You can view the result by pressing Show and then if necessary add it to the statistics with Add.
10.6.3 Terminating the series
The "Terminate series" menu enables you to terminate the current sample series. All the
results stored in the titrator and the statistics memory are deleted.
- Press Results to open the Results menu.
- Select "Terminate series" using the arrow keys and confirm with OK.
- Answer the following question "End series?" with "Yes".
- The results of the current sample series and statistics memory are now deleted.
• If no analyses or measurement results are stored in the titrator, the message „No
results" appears on opening the Results menu and you can not perform any settings
in this menu.
 Loading...