

Page 1
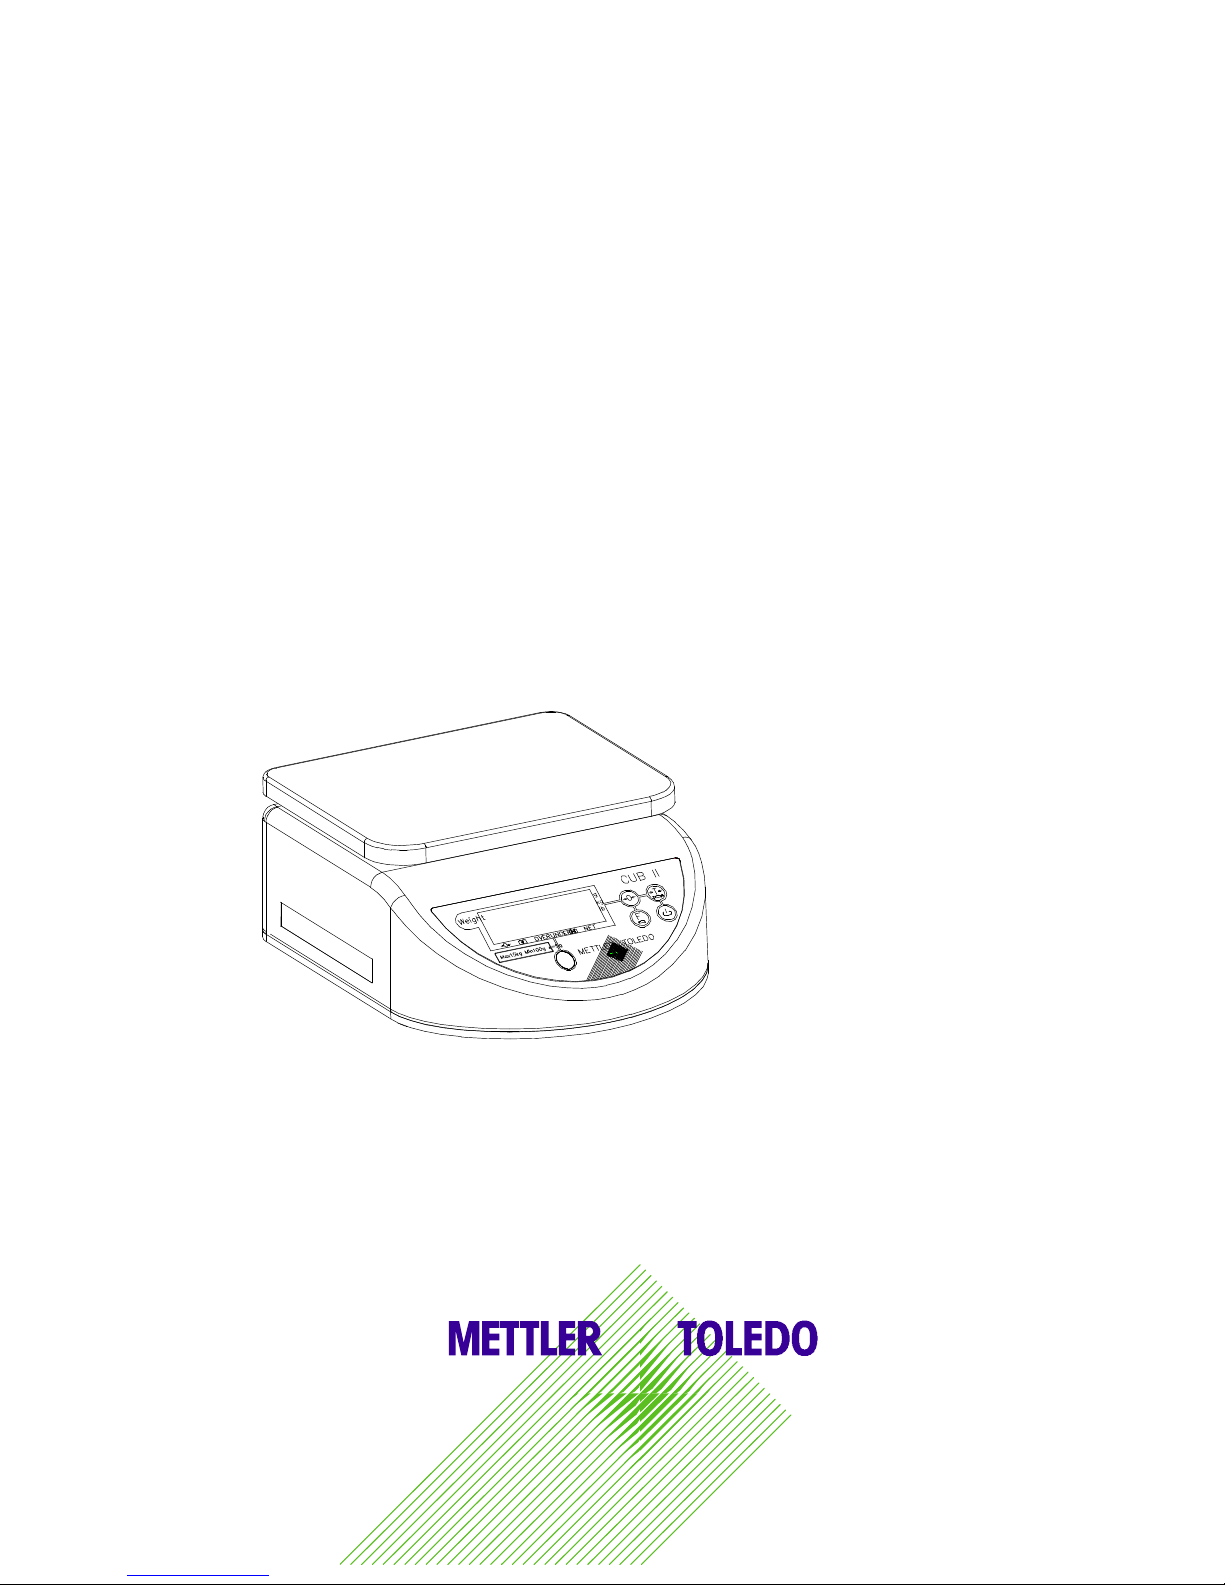
Cub-II
Weight Only Scale
Service Manual
Version:1.0 (03/03)
Page 2

CONTENTS
1
Introduction ....................................................................................... 1-1
2
Installation......................................................................................... 2-1
3
Set up and Calibration ......................................................................... 3-1
4
Operating Instructions.......................................................................... 4-1
5
Operations......................................................................................... 5-1
6
Over/Under ........................................................................................ 6-1
7
Batteries............................................................................................ 7-1
8
Service and Maintenance ..................................................................... 8-1
9
Parts and Accessories ......................................................................... 9-1
Page 3
Introduction
CUB II Service Manual 1-1
1 Introduction
Thank you for purchasing the Cub II weigh only scale, designed for various weighing applications.
1.1 Cub II Overview
The Mettler Toledo model Cub II is a stand-alone weigh only scale designed to meet the needs of a worldwide
market. According to working environment, 3 versions are available including RW10, RW11 and RW12.
1.1.1 Reliability
The Cub II was developed, produced, and tested in a Mettler Toledo facility that has been audited and registered
according to international ISO 9001 quality standards and ISO 14000 environment control program.
1.1.2 Standard Features
Not all features are available in all models.
+ Capacity: 600gx0.2g; 1.5x0.5g; 3x0.001kg; 6x0.002kg;15 x 0.005kg
1.5x0.0005lb; 3x0.001lb; 6x0.002lb; 15x0.005lb; 30x0.01lb
+ Average updating speed: up to 0.8 seconds
+ Accuracy: 3000 approved*, 6000/7500 maximum displayed
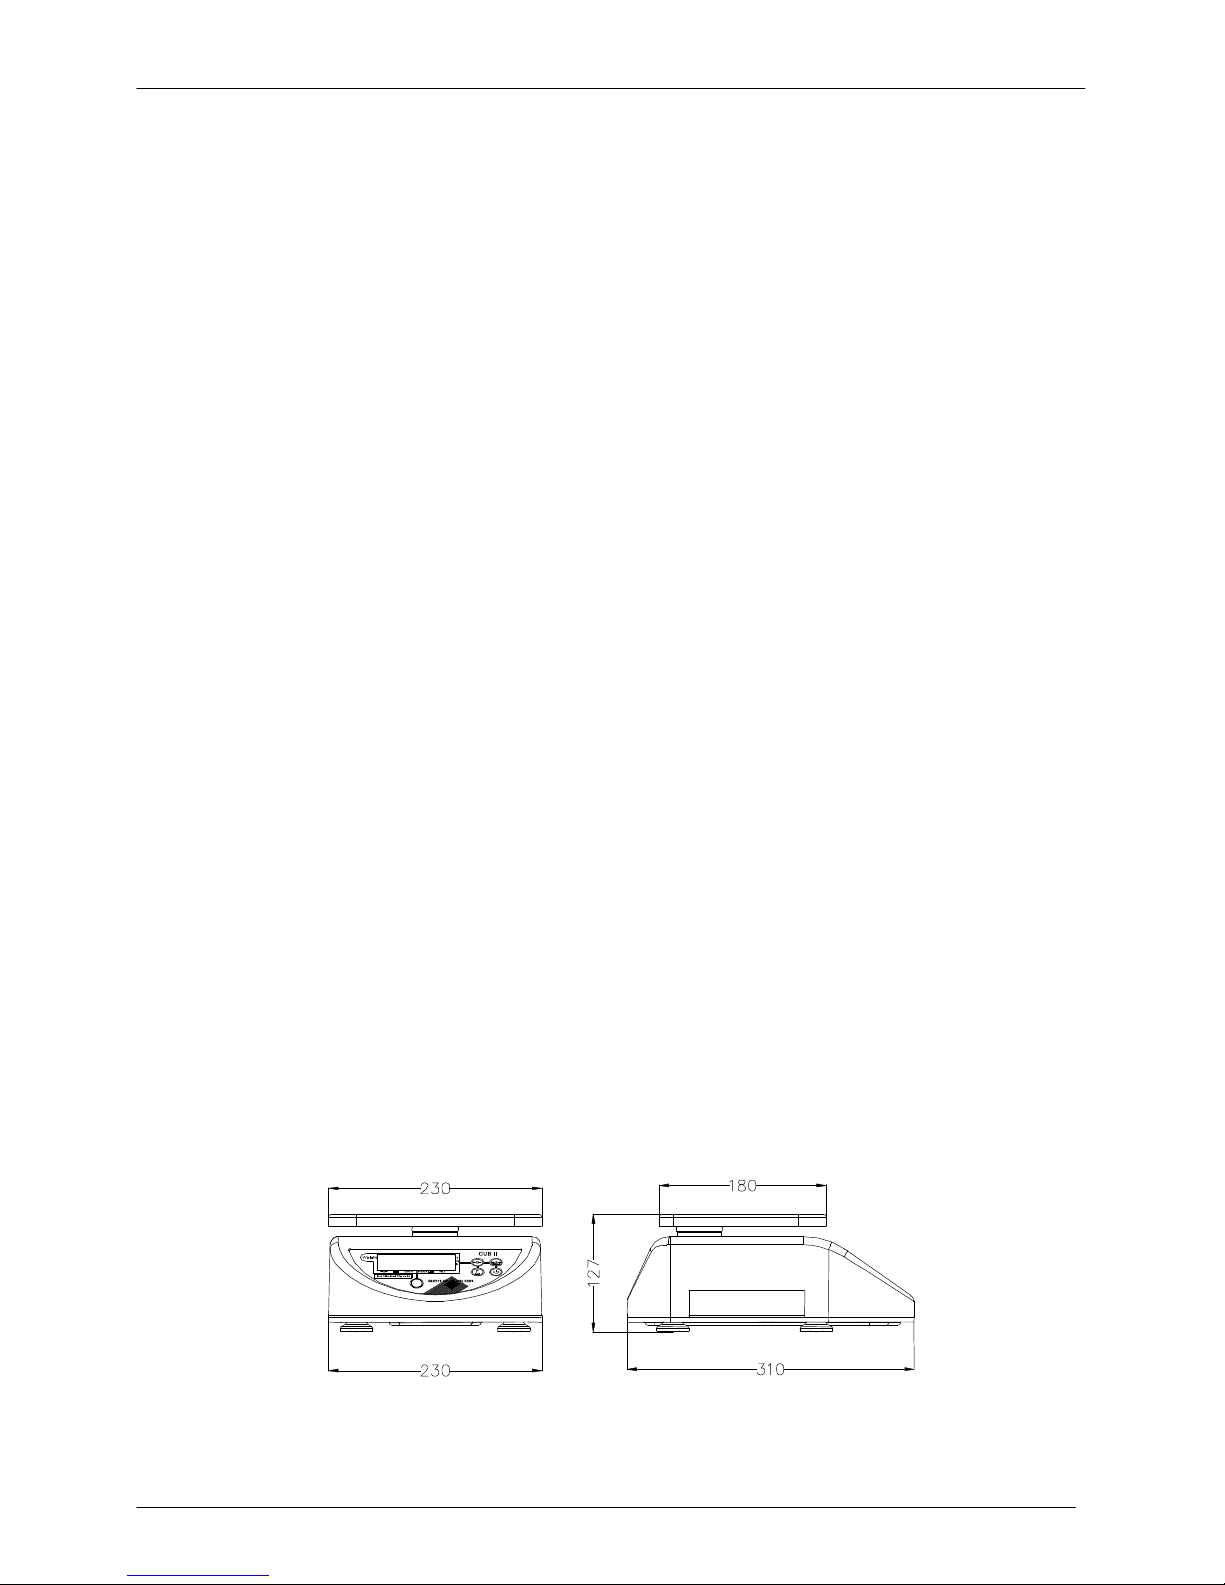
+ Platter: stainless steel: 180X230mm, x?x (600g only)
+ Display: LCD: 19 mm high, optional backlight is available, 6 digits.
LED: 14 mm high, red, 6 digits.
+ Different display updating style: normal updating or holding display.
+ Keyboard: 4 touch keys with a tactile and tone feedback upon key closure.
+ Power supply: External 9VDC/500mA power supply.
6V/5Ah lead-acid rechargeable battery.
6 1# D-cells (LCD version only).
Clever battery capacity indication gives you more convenience of use of battery (LCD version only).
+ Enclosure: Plastic or SS top and plastic bottom covers, SS spiders (top/lower).
+ Basic functions: zero; tare; on/off, over and under.
+ IP 65
+ Sealing: The following 3-level sealing will be available for some models. Battery is in a sealed and separated
housing.
First level rubber ring sealing is between up cover and base and spider and up cove;
The second rubber ring sealing is for both main PCB and back PCB, the two housing for two PCB are
also be separated
The third glue sealing is for main PCB.
* 600g is not approved.
1.1.3 Option
Big SS platter sized 200X290mm
1.1.4 Physical Dimensions
1.1.5 Power
Power supply
Page 4
Introduction
1-2 CUB II Service Manual
+ External 9VDC/500mA power supply.
+ 6V/5Ah lead-acid rechargeable battery.
+ 6 1# D-cells (LCD version only).
Notice: non-rechargeable battery can not be used in the scale with charging function.
The Work time is battery capacity/ working current.
Please use these calculated data as an indication, data will vary, depending on supplier, environment, age, way of
usage, etc.
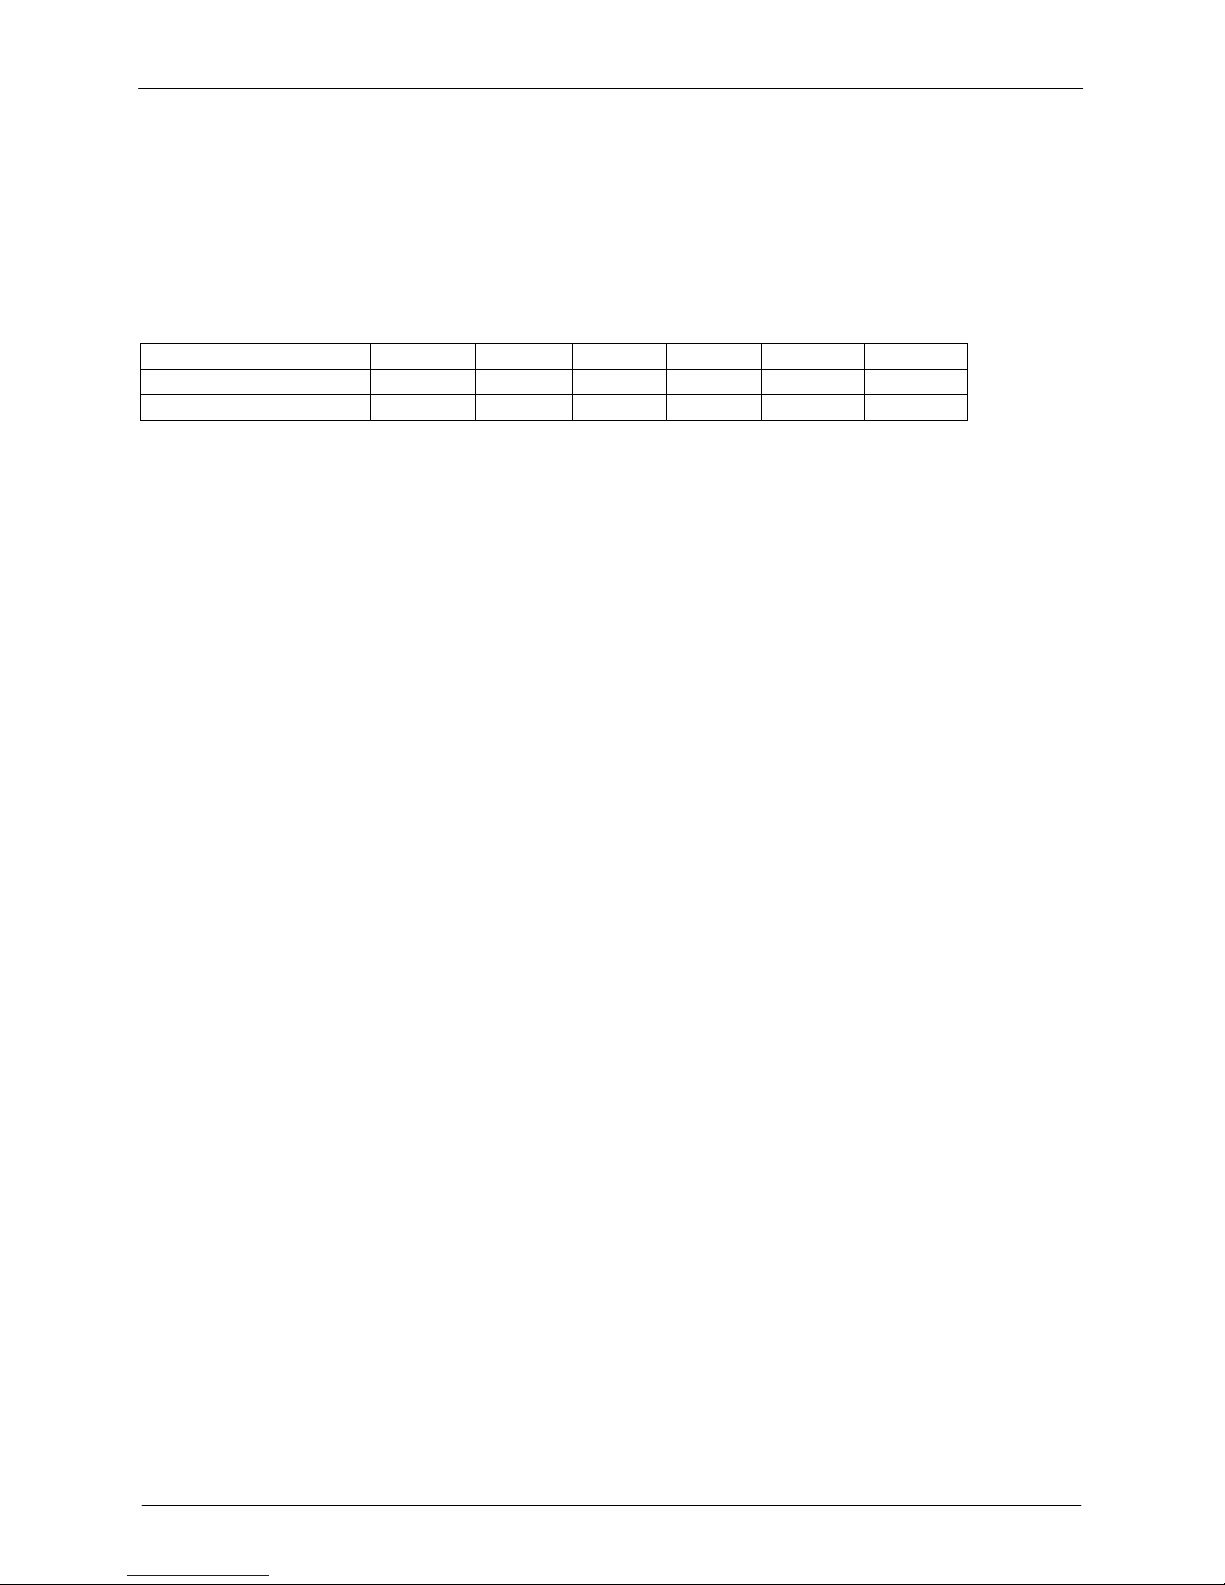
1.1.6 Load Cell
The capacity of the analog load cell versus the capacity of the scale is as follows:
Capacity of the scale
600g 1.5kg/3lb 3kg/6lb 6kg/15lb 15kg/30lb 30kg/60lb
Capacity of the load cell 1kg 3.5kg 6.5kg 15kg 30kg 40kg
Resistance of the load cell 1000 ohm 350 ohm 350 ohm 350 ohm 350 ohm 350 ohm
1.1.7 Temperature and Humidity
Working temperature range: from -10 to +40 oC (+14 to +114F) at following humidity:
+ RW10: dry, 10 to 85% humidity, non-condensing.
+ RW11: IP 65, 10 to 85% humidity, non-condensing.
+ RW12: damp.
Storage temperature range: from -25 to +50oC at 10 to 85% humidity, non-condensing.
1.1.8 Weights and Measures Approval
UL60950: The approval number is:xxxxxxxx
OIML 3000e: The approval number is: xxxxxxx
Factory Audit OIML (first step) by the Eichdirektion Stuttgart
For most EU countries the Cub II will be factory stamped.
Page 5
Introduction
CUB II Service Manual 1-3
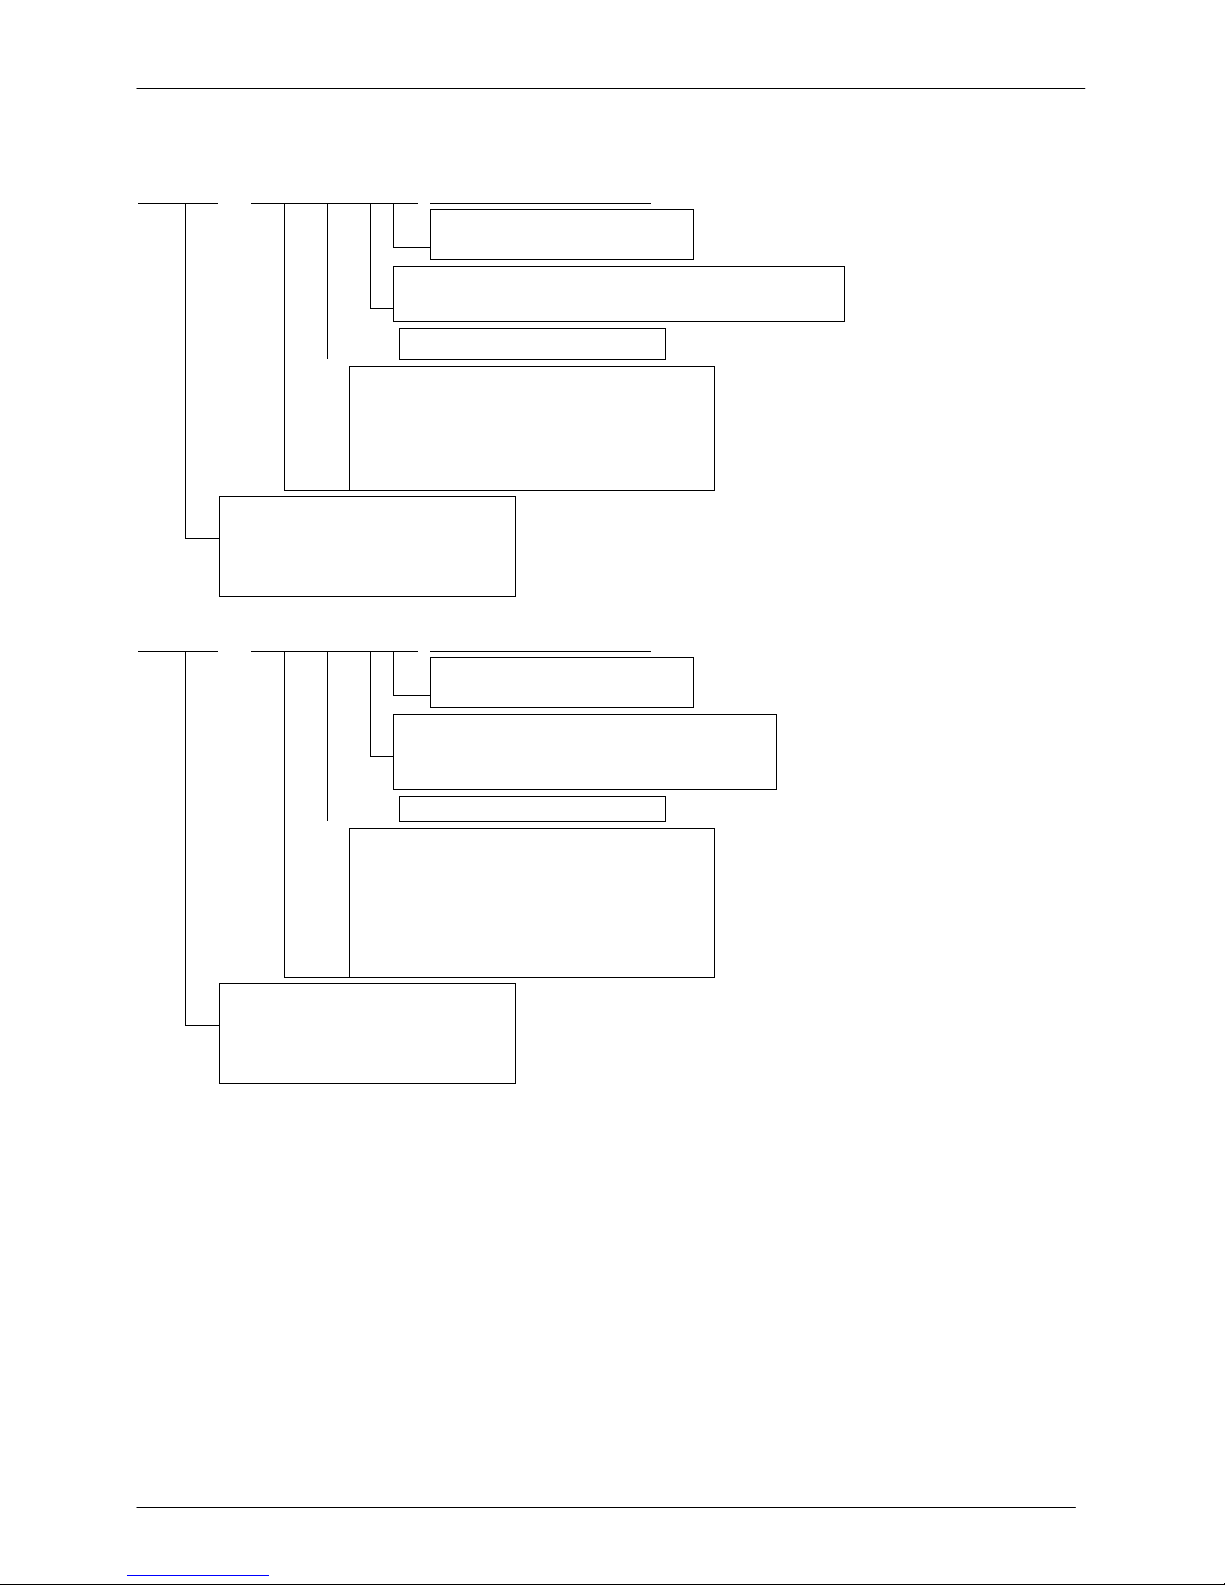
1.2 Model Configuration
LED Version:
RWXX - X X X X -Country Code
0: Double Sides
1: Single Side display
Power 0: AC
2: AC/DC ( Lead-acid Rechargeable )
Display 2=LED
Capacity: 1: 1.5kg/3lb
2: 3kg/6lb
3: 6kg/15lb
4: 15kg/30lb
6: 0.6kg/1.5lb
RW serial Cub II weigh only scale
10: Dry application
11: IP 65
12: damp
LCD Version:
RWXX - X X X X -Country Code
0: Double Sides
1: Single Side display
Power 0: AC
1: DC D-cell not in the scale
2: DC Lead-acid Rechargeable
Display 1=LCD
Capacity: 1: 1.5kg/3lb
2: 3kg/6lb
3: 6kg/15lb
4: 15kg/30lb
5: 30kg/60lb
6: 0.6kg/1.5lb
RW serial Cub II weigh only scale
10: Dry application
11: IP 65
12: damp
Notice: to Stainless steal version, the model will be RWXX-XXXXS-XXX. The difference between SS version and
plastic version (RWxx-xxxx-xxx) is just the one part, up cover, one is plastic, and the other is SS.
Page 6

Page 7

Installation
CUB II Service Manual 2-1
2 Installation
2.1 Precautions
This chapter gives detailed instructions and important information to install the Cub II scale successfully.
2.2 Environment
Before you install the scale, identify the best location for the equipment. The proper environment enhances its
operation and longevity. Keep in mind the following factors, which might have a negative influence on the scale's
operation:
+ Vibration
Vibration diminishes the scale’s ability to measure accurately. Electrical machinery such as conveyors and drill
presses can cause inaccurate and non-repeatable readings. The scale may also read inaccurately if it is not leveled
properly.
+ +Air current
Moving air can cause the scale to read an additional force (add. weight) and have the same effect as vibration.
+ +Friction
A scale cannot measure accurately if an object is rubbing or pressing against the plate.
2.3 Unpacking and inspection
Please inspect the package as it is delivered by the carrier. If the shipping container is damaged, check for internal
damage and file a freight claim with the carrier if necessary. If the container is undamaged, open the box, remove
the scale and place it on a solid, flat surface. Please keep the packing material and shipping insert in case you
need to return the scale to METTLER TOLEDO. The Cub II is a precision instrument and may be permanently
damaged if not shipped in factory approved packaging.
Package contents for all Cub II units include:
Package contents for all Cub II units include:
+ Cub II scale + platter+ AC-DC power adapter + operation manual
2.4 Setup
Open the box and pull up the scale, including the packing material. Remove the packing material from each side of
the scale.
Set the unit on a sturdy, level surface. Level the scale by turning the adjustable feet on the bottom of the unit. When
the bubble indicator is in the centre of the circle, Cub II is leveled correctly.
Bubble indicator: Good Wrong
All four feet must touch the surface to make sure that Cub II does not rock.
Put the platter on top of Cub II.
If no battery is in the scale, unpack the power adapter and plug it into the bottom of the scale. Plug the line cord
into a properly grounded AC power outlet.
2.5 Power up sequence and Turn Off the Scale
Press the power key turn on the Cub II. It goes through a series of self-tests when it is turned on. The scale
performs a diagnostic test on its ROM and RAM, and proceeds to normal operating mode. The power-up sequence
is as follows:
•
Light all segments of the display characters. This verifies operation of all segments.
•
Display the software part number, revision number, GEO value and battery type one by one.
•
Capture zero and be ready for normal operation.
Note: Before switching on the Cub II scale, always make sure there is nothing on the platter.
Press the power key until “OFF” is shown to turn off the scale.
Page 8
Installation
2-2 CUB II Service Manual
2.6 Sealing
After installation is complete, most legal-for-trade applications require sealing the enclosure so settings cannot be
changed.
There are two kinds of sealing, one is lead wire sealing, the other is sticker sealing
2.6.1 The lead wire sealing
•
Install special through-hole sealing screw.
•
Tighten these two screws and run a wire seal through the holes in the heads of the screws.
•
Apply the seal.
2.6.2 Sticker Sealing
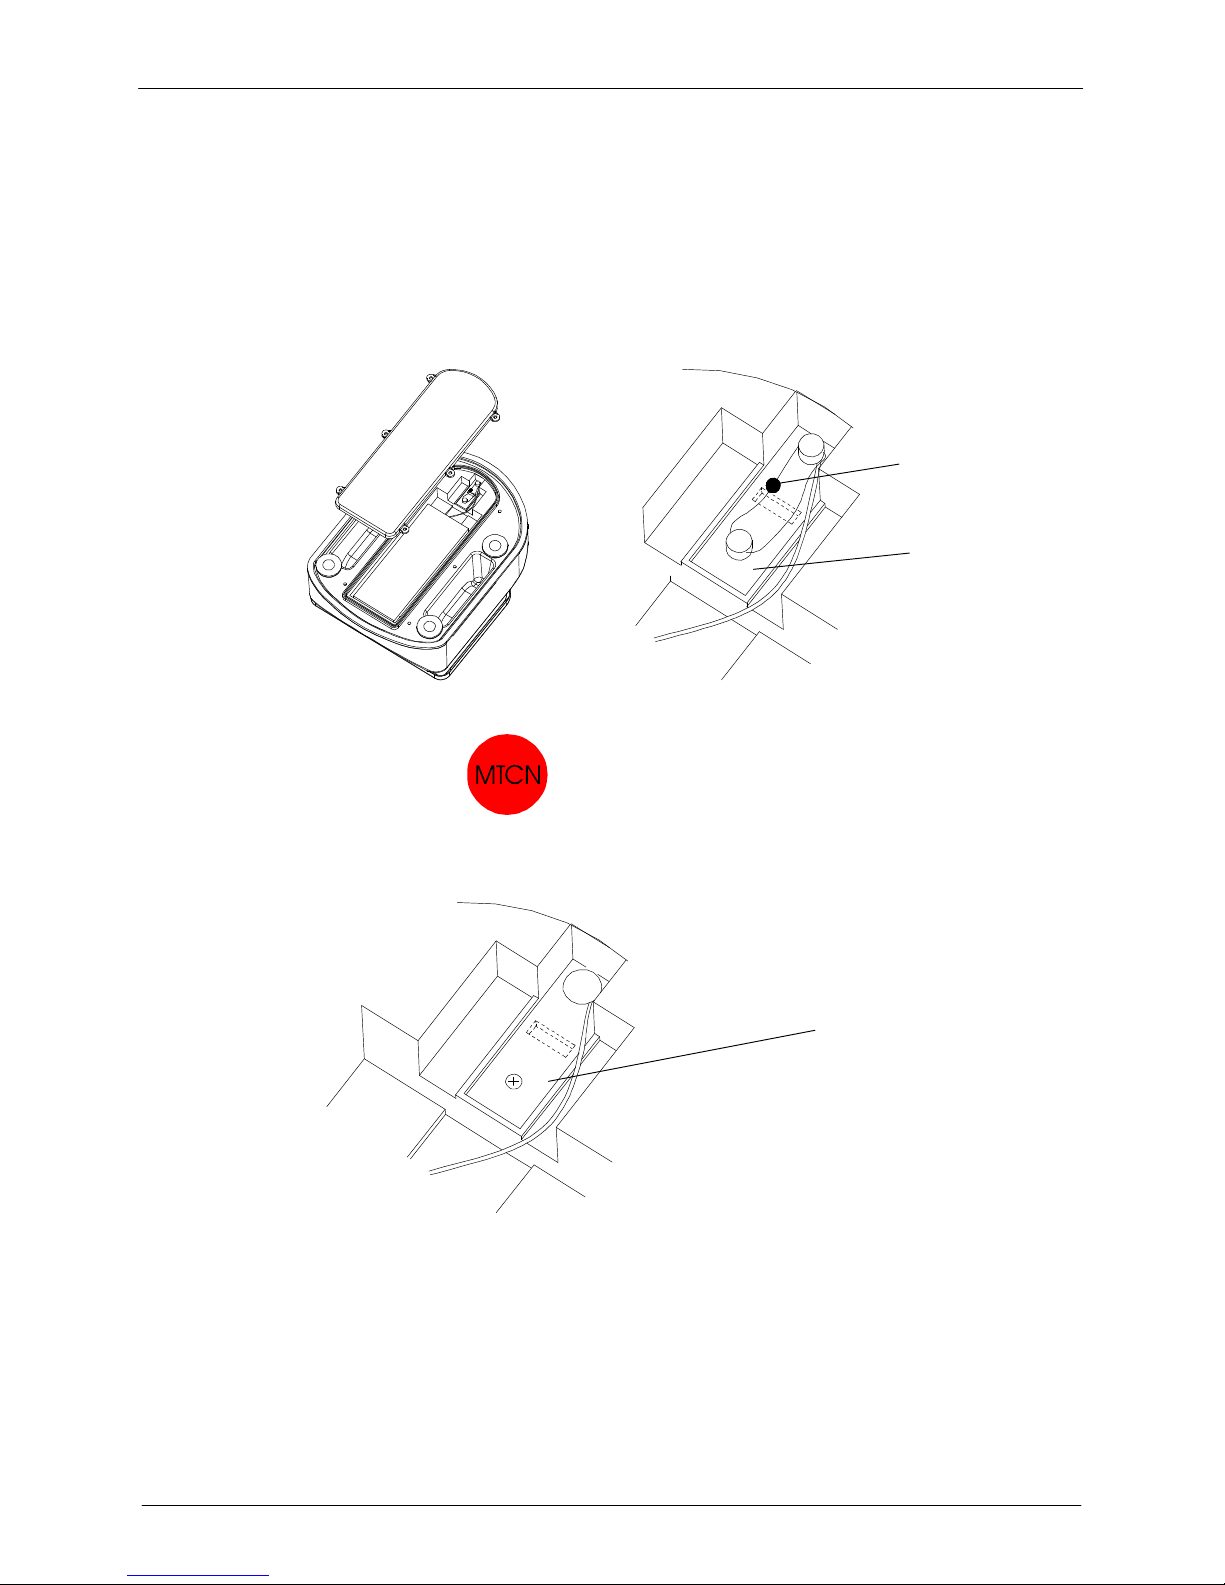
Security Sticker Ø 15mm material Vinyl white 3690 E UL, colour red, type black.
The position for the sealing and stamping stickers is shown below.
Lead head
Sealing plate
Sealing plate
MTCN
Page 9

Set up and Calibration
CUB II Service Manual 3-1
3 Set up and Calibration
This chapter discusses basic features of program blocks and the specific parameters and how to configure each
program block. There are two ways (Service Mode & Master Mode) to access the program steps and calibration. In
master mode, some softswitches are programmable, and in service mode, all softswitches and calibration are
programmable. The following section “Set up Softswitch and Default Table” lists softswitch default values in two
modes.
Service setup mode
Open battery holder cover, and remove the calibration plate, push the switch on the main PCB rightward with a thin
rod through the calibration hole. The display will show “S1 ON”, it means the scale has accessed to setup mode. At
this time, you may push the switch back. In this case, after setting finish, it is not needed to push the switch again.
Service setup mode:
Press and hold [>0<] until “S1 OFF” is displayed to access master mode when turn on the scale.
3.1 Function of the key
In Set up mode, the functions of the keys are as follows:
Key Name Function
[>0<] Accept key Finish setting
[>T<] Toggle key Chose parameter
[F] Back key Step backwards to last step
[on/off] Finish key Confirm choice and step forwards to next step
3.2 Set up Softswitch and Default Table
Step
Description Available parameter Default Available in master
mode
Def Initiate default No: don’t initiate the default
Yes: Initiate the default
no No
S1
Automatically
turn off
the scale
On: Enable this function
off: disable this function
off
yes
S2 Sleeping function
On: Enable this function
off: disable this function
on
yes
S3
Beep range
0:no beep
1:beep when weight is between over and under value.
2:beep when weigh is out of range of over and under
0
yes
S4 Filter streghtn
0:light
1:normal
2:strong
3:very strong
0
yes
S5 Weight unit g/kg/lb g yes
S6 LED brightness
0:normal, the work currence is ??mA
1:dimmer than “0” , the work current is ??mA
2:dimmer than “1” , the work current is ??mA
3:dimmer than “2” , the work current is ??mA
0
yes
S7 Display type
On: rapidly update
0ff: hold display
on
No
S8 Resolution
On: 6000/7500 (available)
0ff: 3000 (approved)
off No
S9 Enable access to S8
in master mode
On: Enable
Off: Disable
off No
S10 Expanded display On: Expanded display (30000/60000/75000)
Off: Normal display
off No
Page 10

Set up and Calibration
3-2 CUB II Service Manual
Bat Battery type Bat D: D-cell
Bat CH: Rechargeable battery
Bat CH:
No
GEO GEO 0~31 12 No
Cal Calibrate YES: Calibrate scale
NO: Don’t calibrate scale
no No
3.3 Calibration
3.3.1 Calibration switch & sealing stickers
Bottom view of Cub II
3.3.2 Calibrate scale and exit setting mode
Step Operation Display Description
[CAL YES]
Press [ON/OFF] [ kg] Calibration weight unit
1
Press [>T<] [ lb] Chose suitable parameter
Press [ON/OFF] [ 600] Capacity of the scale**
2
Press [>T<] [ 1500] Chose suitable parameter
3
Press [ON/OFF]
[
------
]
Capture zero, make sure the platter is empty before press
[>0<]
4
[ 5] The scale count down from 5 to 0, if the scale isn’t stable, it
will count again until find stable zero.
Press [ON/OFF] [ 400] Put the weight of 400g (2/3 of the full capacity) on the platter
5
Press [>T<] [ 600] Chose the suitable weight of 600g (full capacity)***
3
Press [ON/OFF] [ 5] Capture span. The scale count down from 5 to 0, if the scale
isn’t stable, it will count again until find stable zero.
Press [ON/OFF] [ save] Save calibration and all setting changes
1
Press [>T<] [ abort] Abort calibration and all setting changes
2 Press [ON/OFF] [ done] Finish calibration
Push the calibration
switch back
[ 0.000] Weigh display mode
* the lines highlighted by grey are for reference of parameter choice.
** The available capacities are as follows:
Capacity of the scale 600g 1.5kg 3kg 6kg 15kg 30kg
Display 600 1500 3000 6000 15000 30000
Capacity of the scale 1.5lb 3lb 6lb 15lb 30lb 60lb
Display 1500 3000 6000 15000 30000 60000
** The capacity of the scale versus the required added weight
MTCN
Page 11

Set up and Calibration
CUB II Service Manual 3-3
Capacity of the scale 600g 1.5kg 3kg 6kg 15kg 30kg
Full capacity 600 1500 3000 6000 15000 30000
2/3 of the capacity 400 1000 2000 4000 10000 20000
Capacity of the scale 1.5lb 3lb 6lb 15lb 30lb 60lb
Full capacity 1500 3000 6000 15000 30000 60000
2/3 of the capacity 1000 2000 4000 10000 20000 40000
3.4 Specifications by Country for GEO value and weight unit
Country GEO Weight Unit
RUSSIA
23 KГ
BELGIUM; NETHERLAND; Poland; England kg
Ukraine
21
KГ
GERMANY; Czechia 20 Kg
FRANCE; HUNGARY; Slovakia 19 kg
AUSTRIA; CROATIA; Slovenia; SWITZERLAND kg
Kazachstan
18
KГ
ITALY 17 kg
PORTUGAL; SPAIN 15 kg
USA lb
Other
12
kg
Page 12

Page 13

Operating Instructions
CUB II Service Manual 4-1
4 Operating Instructions
This chapter provides information that an operator will need to become familiar with the
scale and to perform its functions.
4.1 Display Area & Keypad
The CUB II price computing model has four overlay depending different version. These are pictured below:
EU Version
4.1.1 Overlay
LED version:
Operator side:
Customer side:
LCD version
Operator side:
Customer side:
I
b
k
g
METTLE
Max15kg Min 100g
Weight
0
OVER
UNDER
NET
CUB
g
F
0
T
METTL
Max15kg Min100g
Weig
F
CUB
0
T
Max15kg Min100g
METTLER
Weig
Max15kg Min100g
Weig
0
UNDE
k
I
g
Page 14

Operating Instructions
4-2 CUB II Service Manual
4.2 Keys
Key Name Function
>0<
Zero Key To return the scale to gross zero if drifting occurs
>T<
Tare Key To tare the scale
F
Function Key To enter over/under setting mode
Power key To turn on or turn off the scale
4.3
Cursors
Cursor Description
>0< To be lit when weight is gross 0
To be lit when power is AC or battery is fully charged
LED
version
(-)
To be lit when power is battery, it blinks to indicate the voltage of battery is lower than the
required
To be lit when power is AC or battery is fully charged
blinking means the voltage is being charged more than > V
To be lit when voltage is less than ?V
blinking means the voltage is being charged more than > V
To be lit when voltage is less than ?V
blinking means the voltage is being charged more than > V
LCD
version
In charging mode: blinking means the voltage is being charged more than > V
In discharging mode: To be lit when voltage is less than ?V, Begin blinking when the power
of the battery is less than the requirement. The scale will be turned off automatically when
voltage is less than the critical voltage point.
Net To be lit when tare is existed
under To be lit when weight is less than the under value
over To be lit when weight is more than the over value
Notice: Some model has back display. Please check with dealer if the model you purchase has back display.
Page 15

Operations
CUB II Service Manual 5-1
5 Operations
5.1 Straight weighing
Place the item to be weighed on the platter.
Remove the item from the platter, display will return to 0.
5.2 Re-zero function
There are two ways to re-zero the scale:
1. Power-up Zero
2. Push button Zero
5.2.1 Power-up Zero
The scale will automatically capture zero when it is turned on. The power-up zero capture range is +/-10% of the
scale capacity. When the scale is turned on with a weight on the platter of more than +/-10% of the capacity, the
scale will not capture zero (the weight display will show "-----") and the scale will not be ready for use. After
removing the weight the scale will capture "zero".
5.2.2
Pushbutton Zero
>0<
The ZERO key re-zeros the scale over a range of +/-2% of the scale capacity. To use this function, the scale must
be in the gross weighing mode(NET cursor must be off) and in a no motion condition. When the weight on the
platter is more then +/-2% of the scale capacity the depression of the zero key will not be accepted.
5.3 Tare Function
The Tare key subtracts the weight of the wrapping material.
1) Place the empty container or wrapping material on the platter, e.g. 50g.
2) Press
>T<
key, it show net weight 0g, meanwhile net weight cursor light.
3) Place the item to be weighed in the container or on the wrapping material and then onto the platter.
4) Remove the weighed item, as well as the container or wrapping material from the platter, the displays will show
all the negative net weight of the container, e.g. -50g.
5) Press
>T<
key to return the scale back to gross weighing mode.
5.4 Power Save and automatically turning off scale
Power saving feature is used to save battery power. Theses functions can be enabled or disabled trough setting.
When using the battery and the scale is idle for 2 minutes, both the price and total price displays will turn off, the
weight display will only display one decimal on the right and the battery in use cursor is lit. This indicates that the
scale is in the power saving cycle. When weight is placed on the platter or a key is pressed, the scale will wake up
automatically.
If there is still no key operation and weight change 15 minutes after power saving status occurred, the scale will be
turned off automatically.
5.5 Backlight
Press key [Zero] until to hear 2 continuous beep to turn on the backlight. Using the same way or just turning off the
scale turn off backlight.
The backlight will be turn off temporarily if there is no weight change or no key touching for 15 seconds, while in
this case, if weight changes or any key is pressed, backlight will be turned on automatically.
This function is only available in LCD with backlight version.
Page 16

Page 17

Over/Under
CUB II Service Manual 6-1
6 Over/Under
6.1 Setting mode
Press [F] key to access to setting mode. The display will show default 0.000 (the digits on the both sides of decimal
point vary with the capacity and its resolution E.g.: 0.000 (3kg scale)) or exiting value.
Notice: All value will be zero after resolution or weight unit is changes.
Cursor over will light when setting over values, and the under will light when setting under value.
6.2 Key Function
In over and under setting mode, the functions of the keys will be as follows:
key Description
[>o<] End setting mode and return the scale to weighing mode.
[T] Chose value in a circle from 0 to 9.
[F] Chose digit in a circle from left to right.
[0n/off] Confirm the choice and step forward to next step in a circle of over and under value.
6.3 Set over and under value
In setting mode, if the cursor over is lit, the over value can be set. Press key [F] some times to chose digit you want,
the chosen digit will blink, then press key [T] to change to value of this digit to what you want, use the same way to
set all digits and get the right over value, finally press [>0<] to confirm the over value and step forwards to under
value setting. The way to set under value is same as over value. When setting is finish, press [on/off] key to return
the scale to the weighing mode.
For example: 3kg scale, the over value is 505g, under value is 500g:
The procedures display show Lit cursor
1) Press [F] to access to setting mode [ 0.000] over
2) Press [F] [ 0.000] over
3) Press [T] 5 times [ 0.500] over
4) Press [F] twice [ 0.500] over
5) Press [T] 5 times [ 0.505] over
6) Press [ON/OFF] to set under value [ 0.000] under
7) Press [F] [ 0.000] under
8) Press [T] 5 times [ 0.500] under
9) Press [on/off] to set over value [ 0.505] over
10) Press [>0<] to be back to weighing mode [ 0.000]
The digit in grey shadow mean this digit is blinking.
6.4 Operation
When over and under value exists, beep will be available as a sound indication, the possible mode will be as
follows:
Weight S3 is 0 S3 is 1 S3 is 2 Lit cursor
> over value No beep No beep beep over
< under value No beep No beep beep Under
<= over value and >=under value No beep beep No beep Over and under
Over value=under value =0* No beep No beep No beep
*When both over and under values are 0, over and under indication function is disable.
Page 18

Page 19

Batteries
CUB II Service Manual 7-1
7 Batteries
+
Battery type
To rechargeable version, Cub II can use one 5V/5Ah lead-acid rechargeable battery.
To D-cell version, Cub II can use 6 1# d-cells. Always make sure that all six batteries have the same capacity.
Please contact your authorized dealer for more information.
+
Installation
Before you install the batteries, make sure that the external power supply is disconnected. Turn the scale upside
down and lay the scale carefully on the platter. Open the battery cover by unscrewing, and then install the batteries
as shown on the battery holder or the lable on the battery holder cover. Close the cover by screwing all screws
back.
+
Battery indication
Please see the detail insection 4.3. ay.
+
Charging (automatically)
The automatic charging will only start when the AC is provided until it is fully charged.
Note
The total operation time of the scale on fully charged batteries depends on the basic capacity (mAh) of the batteries.
The capacity of the NIHM batteries will reduce over the years and therefore also the total operation time of the scale.
This is not an error of the scale, but it is normal behavior of the NIHM batteries.
Page 20

Page 21

Service and Maintenance
CUB II Service Manual 8-1
8 Service and Maintenance
WARNING
ONLY PERMIT QUALIFIED PERSONNEL TO SERVICE THIS
EQUIPMENT. EXERCISE CARE WHEN MAKING CHECKS, TESTS
AND ADJUSTMENTS THAT MUST BE MADE WITH POWER ON.
FAILING TO OBSERVE THESE PRECAUTIONS CAN RESULT IN
BODILY HARM.
WARNING
DISCONNECT ALL POWER TO THIS UNIT BEFORE SERVICING OR
CLEANING.
This chapter provides information on servicing and maintaining the Cub II scale including:
+ Cleaning and regular maintenance
+ Troubleshooting
8.1 Cleaning and Regular Maintenance
You may wipe the display area and weighing platter with a clean, soft cloth that has been dampened with a mild
glass cleaner. Do not use any types of industrial solvents. These may damage the display and platter finish.
Regular maintenance inspections by a qualified service technician are also recommended.
8.2 Troubleshooting
Error Codes and Action
The following table lists Cub II’s error messages, descriptions, and corrective actions.
E11 RAM error
E16 ROM error
E18 EEPROM error
Call METTLER TOLEDO service
nnnnnn
in weight dislay
Over capacity Remove weight from Platter
uuuuuu
in weight display
Under zero
Add something
Turn off and then turn on the scale
Page 22

Page 23

Parts and Accessories
CUB II Service Manual 9-1
9 Parts and Accessories
Please refer to the following diagram and chart when ordering parts for the Cub II scale.
9.1 Explosion diagram
Page 24

Parts and Accessories
9-2 CUB II Service Manual
9.2 Part List - Cub II LCD Version
B12 118549 Sealing screw M4X8 2
B11 134428 Nut GB6170 M3-S.S 6
B10 152668 Self-driving screw ST 3.5X8.5 4
B9 102618 Nut GB6170 M2-Zn.D 5
B7 132545 Self-driving screw GB845 ST4X15 8
B6 115097 Screw GB818 M4X8-S.S 14
B4 124073 Screw M4X12-S.S 2
B3 132389 Screw GB70 M6X12-S.S 4
B2 102663 Grower washer GB93 6 2
B1 132627 Screw GB70 M6X20-S.S 2
28 152498 Transparent CUB-II 2
27 152309 Overlay, customer CUB-II 1
26 149397 Maintaining washer plate, main PCB TIGER-II 4
155273 Pillar washer, down side of load cell 1.5Kg CUB-II 1 1.5Kg
25 152298 Pillar washer, down side of load cell CUB-II 1 3Kg 6Kg 15kg
24 152303 Packing ring, key CUB-II 1
23 152307 Sealing rubber ring, key CUB-II 1
155789 Subassembly, main PCB LCD CUB-II 1 LCD
22 151404 Subassembly, main PCB LED CUB-II 1 LED
21 152294 Cover, housing of main PCB CUB-II 1
20 156481 Cover, calibration CUB-II 1
19 134997 Sponge mat RN00 1
18 152293 Cover, battery holder CUB-II 1
17 152499 Rubber sealing ring, battery holder CUB-II 1
16 155540 Foot CUB-II 4
15 152291 Base CUB-II 1
14 152304 Rubber sealing ring CUB-II 1
13 xxxxxx Load-cell 1
155795 PCB Subassembly, back display LCD CUB-II 1 LCD
12 151405 PCB Subassembly, back display LED CUB-II 1 LED
11 152295 Cover, housing of back display CUB-II 1
10 153673 Plate, stop loading CUB-II 1
9 119043 Data plate 1
8 152292 Up cover CUB-II 1
7 152310 Overlay, customer display CUB-II 1
6 152299 Transferring pillar washer CUB-II 1
5 152308 Thin rubber ring CUB-II 1
4 152301 Packing washer, for thin rubber ring CUB-II 1
3 152300 Up spider CUB-II 1
2 152296 Rubber mat, platter CUB-II 5
1 152302 Platter CUB-II 1
ID P/N Description Quantity Remark
Page 25

Mettler-Toledo
2003/3/26
 Loading...