

Page 1

CUB
Programming and Calibration
Page 2
1
This manual discusses basic features of program blocks and the specific parameters and how to
configure each program block. There are two ways (Service Mode & Master Mode) to access
the program blocks and calibration.
1 Programming
1.1 Master mode
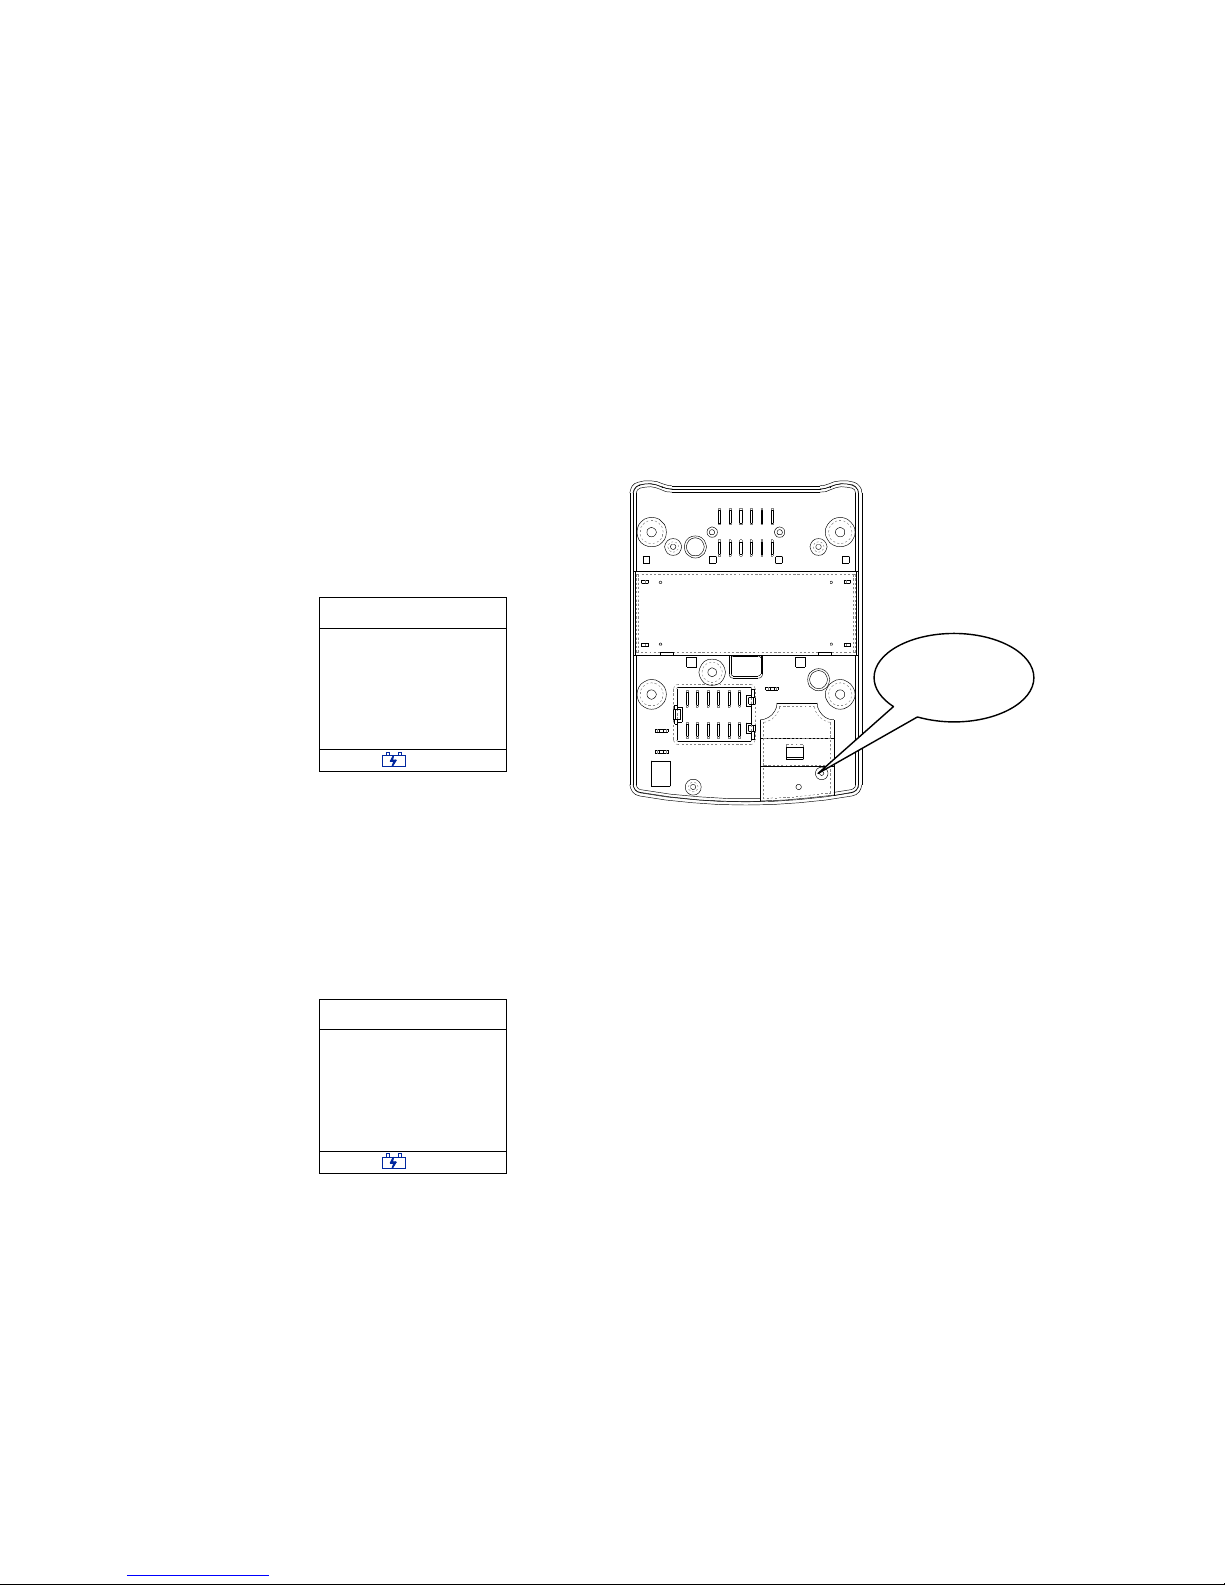
Short the switch on the main PCB with a metal rob (2~3mm wide) through a calibration hole
after remove the calibration screw, then “S 1” will be displayed. The following section will
show all softswitches and their functions. Only in this mode, the scale can be calibrated.
Weight (g)
S1
0
Zero lb Net
1.2 Service mode
This mode allows an operator to change certain softswitches directly from the keyboard. In
weigh mode, press and hold [TARE] key until “F 3” is displayed, it means scale accesses to the
service mode. The following section will show the detail.
Weight (g)
F3
0
Zero lb Net
During the setup procedure, the scale is configured for your specific needs with a special
interactive setup procedure. In order to access the various prompts, you must utilize the
following keys during the scale setup mode.
Toggle Key [TARE] Used to select softswitch settings.
Accept Key [ZERO/ON/OF]
Used to accept what you have selected, and advance
one softswitch at a time.
Calibration
Calibration Calibration
Calibration
Hole
HoleHole
Hole
Page 3

2
1.3 Parameters in Master Mode
Softswitch
Description Choice
0: Weight is displayed in normal display increments.
S1
Expanded Weight Display
1: Weight is displayed in the way of individual
quantity.(The Maximum individual quantity is
30000)
0: kg
S2
Weight Unit for
Calibration
1: lb
0: Not access to calibration setting mode
S3
Calibration
1: Access to calibration setting mode
0: Charge cursor can not be lit
S4
Charge Cursor
1: Charge cursor is lit when the battery is being
charged.
0: 1/1500, dual range
S5
Displayed Resolution
1: 1/3000, dual range
0
0: g
1: kg (not used)
S6
Displayed Weight Unit
2: lb
0
0: Abort all modification
E
End
1: Save all modification
1.4 Parameters in Master Mode
Softswitch
Description Choice Default
0: Disable
F3
Turn Off Automatically
1: Turn off 30 minutes later if no weigh
changes and on key is pressed.
0
0: Brightness is highest
5: Brightness is lowest
F4
Brightness Adjustment
(There are six levels)
1: Save all modification
0
0: Abort all modification
E
End
1: Save all modification
0
1.5 End of Scale Configuration
The last step of the configuration display as follow:
Weight (g)
E
0
Zero lb
Net
There are two choice, 0 and 1, 0 means aborting all modification, 1 means saving all
modification. Press [TARE] key to choose what you want, then press [ZERO/ON/OFF] key to
return the scale to the weighing mode.
Page 4

3
2 Calibration
WARNING
ONLY PERMIT QUALIFIED PERSONNEL TO SERVICE THIS
EQUIPMENT. EXERCISE CARE WHEN MAKING CHECKS,
TESTS AND ADJUSTMENTS THAT MUST BE MADE WITH
POWER ON. FAILING TO OBSERVE THESE PRECAUTIONS
CAN RESULT IN BODILY HARM.
The procedure to calibrate this scale is as follows:
1: Access to master mode;
2: Select parameter “1” in softswitch “S 3”, then press key [ON/OFF/ZERO];
3: Follow in the following 3 steps
Step 1::::Select Capacity
The scale displays the capacity as follows:
Weight (g)
15
Zero lb
Net
Press [TARE] key to select the required capacity. Press [ZERO/ON/OFF] key to step forward.
Available capacities are 1.5kg, 3kg, 7.5kg or 15kg。
Step 2: Clear the Platter and Initiate a Zero Reading
Weight (g)
L
0
Zero lb
Net
Empty the platter and then press [ZERO/ON/OFF] key.
Step 3: Add the Test Weight to the Platter
Weight (g)
H
0
Zero lb
Net
Page 5

4
Capacity 1.5 3 7.5 15
Weight Required(kg) 1 2 5 10
Refer to above chart and add the weight depending the capacity, then press [ZERO/ON/OFF] KEY.
The scale will count down from 5 to 0 while the zero reading is being taken. If motion is detected,
the count resets to 5, and then the scale will step forward to the next softswitch.
 Loading...