

Page 1
bRite WeighOnly
Retail scale
Operator Manual
Page 2

2
03/12
METTLER TO LEDO Operator Manual bRite WeighOnly Order number 30211829
Page 3

3
03/12
Contents
1 Your new retail scale ...............................................................4
1.1 Most important functions ............................................................4
1.2 Device overview ........................................................................4
1.3 Safety instructions .....................................................................6
1.4 Calibration instructions ..............................................................6
2 Setting up ..............................................................................7
2.1 Scope of delivery .......................................................................7
2.2 Requirements for scale’s location ................................................7
2.3 Setting up the scale ...................................................................7
2.4 Inserting the batteries.................................................................8
2.5 Connecting to mains power ........................................................8
2.6 Turning scale on/off ...................................................................8
2.7 Cleaning ..................................................................................9
3 Operation .............................................................................10
3.1 Weighing ...............................................................................10
3.2 Printing/transferring weighing results .........................................10
3.3 Taring ....................................................................................11
3.4 Zeroing ..................................................................................11
4 Operator setup .......................................................................12
4.1 Setup operation .......................................................................12
4.2 Operator setup overview ...........................................................13
5 What do you do if....? .............................................................15
6 Technical data and accessories ...............................................16
6.1 Technical data ........................................................................16
6.2 Accessories ............................................................................16
7 Appendix ...............................................................................17
7.1 Periodical verification in the countries of the EEC ........................17
7.2 Disposal ................................................................................18
METTLER TO LEDO Operator Manual bRite WeighOnlyOrder number 30211829
Page 4
4
03/12
Your new retail scale
1 Your new retail scale
1.1 Most important functions
Congratulations on your new scale.
This robust digital scale with its hygienic design and battery operation
facilitates comfortable mobile weighing while maintaining the highest
accuracy.
1.2 Device overview
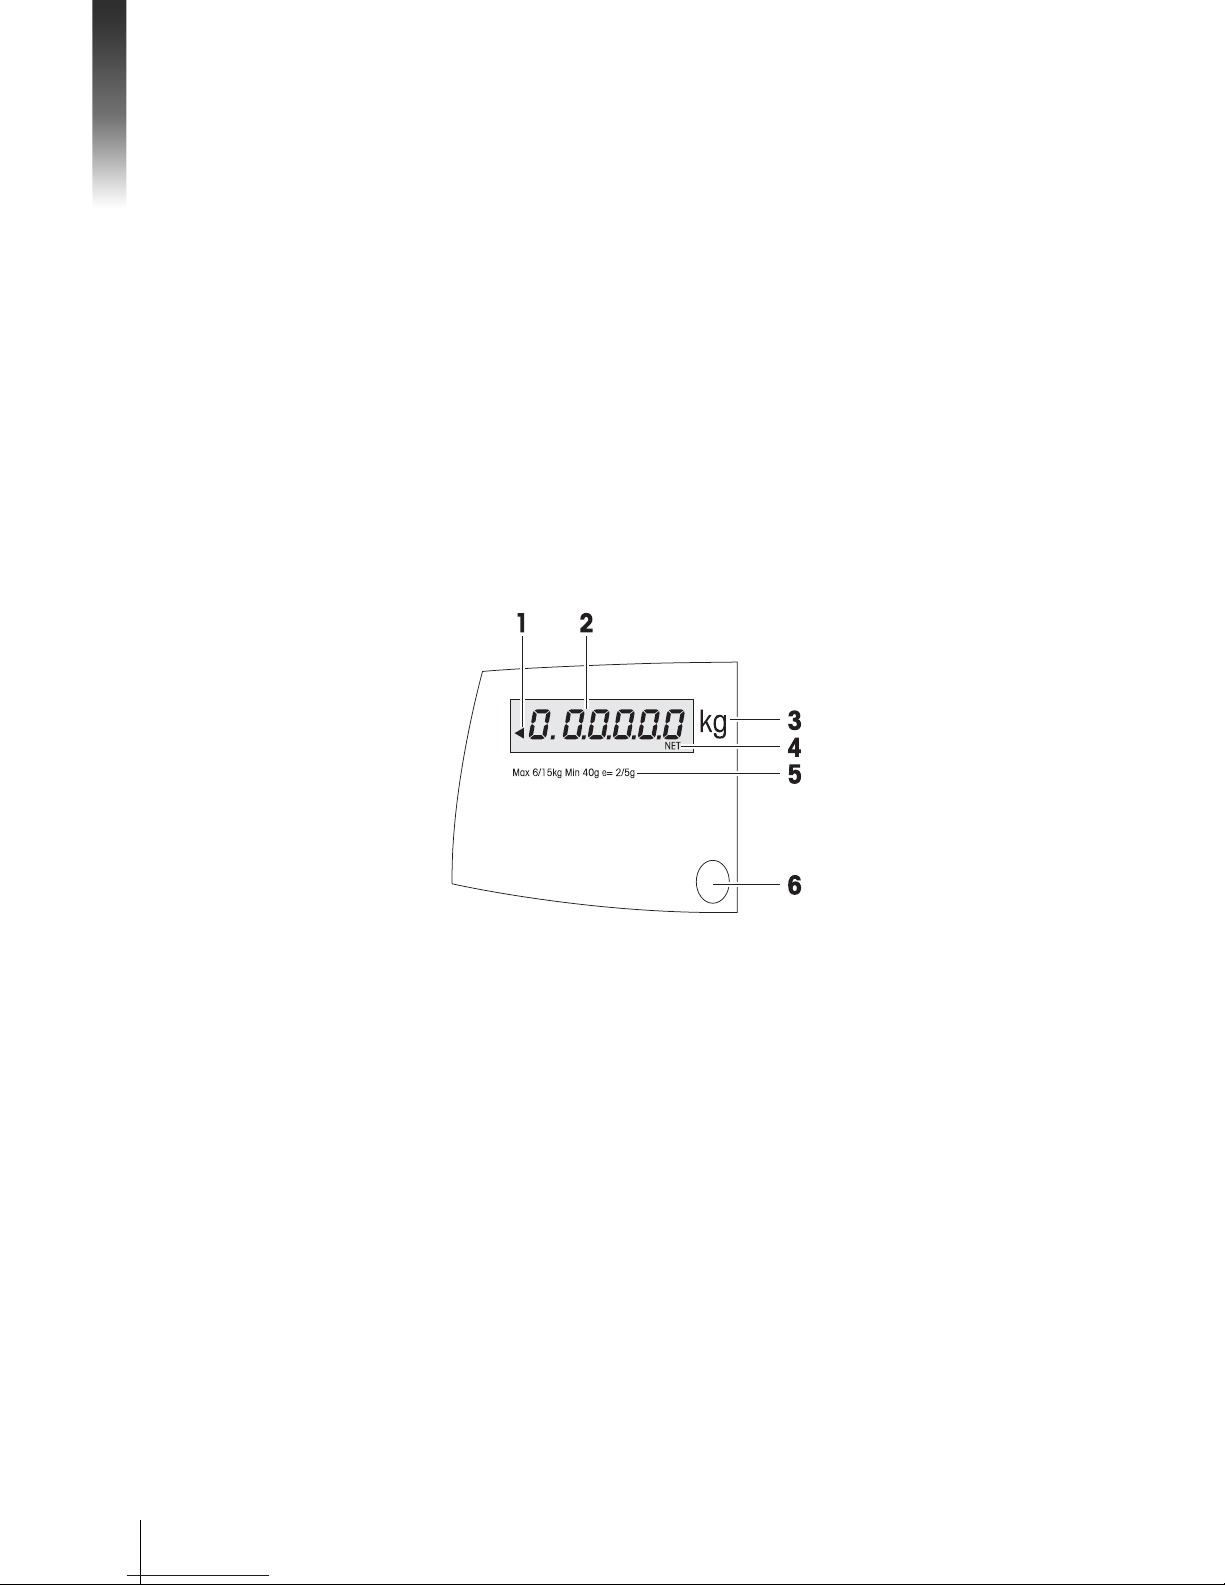
1.2.1 Display
1 Indicator for mains/battery operation
2 Weight display
3 Weight unit
4 Status line
5 Calibration plate
6 Level indicator
In addition to the weight, the following status messages and indicators
can be displayed:
ZERO Scale is at center of zero
PT Tare recalled from PLU
TARE Tare value (gross minus net)
NET Net value (gross minus tare)
METTLER TO LEDO Operator Manual bRite WeighOnly Order number 30211829
Page 5
5
03/12
Mains/battery indicator
The arrow W points on the type of power supply indicated left of the
display.
~
Mains operation
Battery operaton
The arrow is blinking when the battery is being charged
The display "BAT L" and a beep indicate that the battery voltage has
reached a critical level.
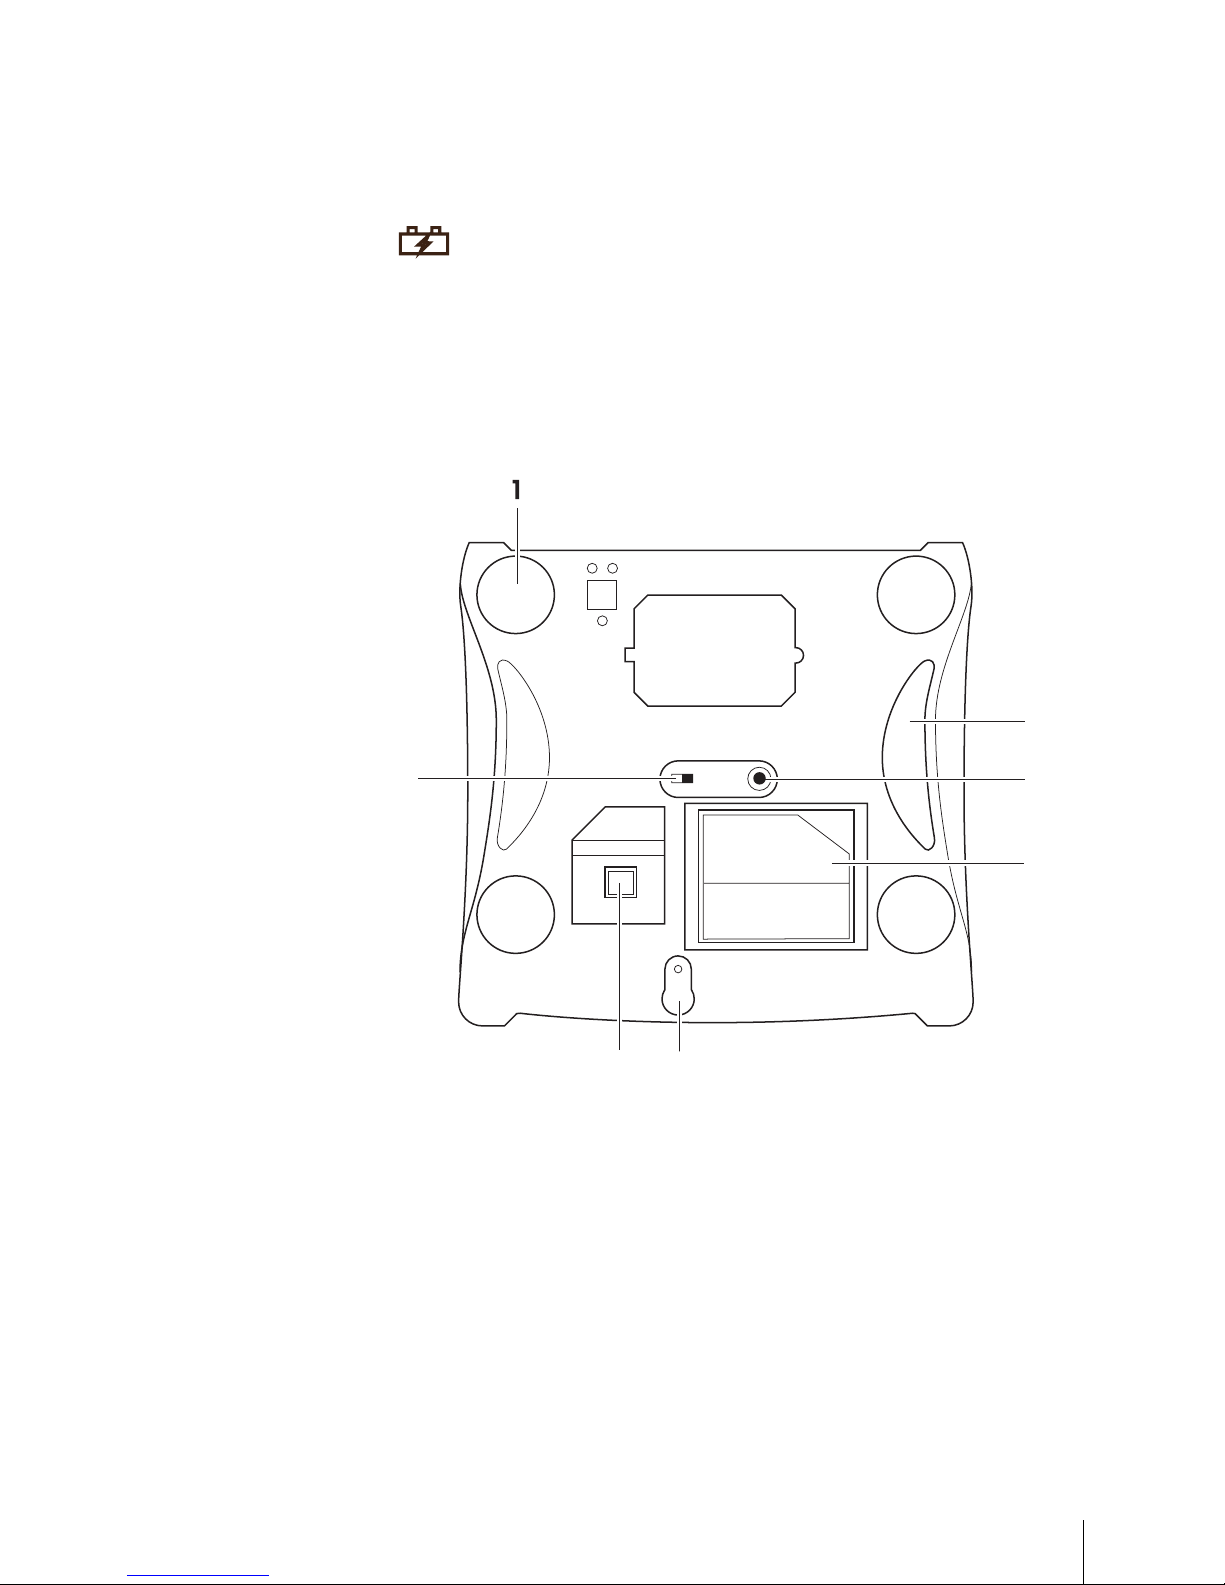
1.2.2 Connections and features on the underside
2
3
4
7
1 Adjustable feet
2 Grips
3 Power supply connection
4 Power supply storage box
5 Calibration button
6 Interfrace connection; RS232/USB, depending on cable
7 Battery switch: NiMH – D-cell
METTLER TO LEDO Operator Manual bRite WeighOnlyOrder number 30211829
Page 6
6
03/12
Your new retail scale
1.3 Safety instructions
Basic safety instructions
f Read these operating instructions prior to using your scale.
f Store these operating instructions in the vicinity of the scale for
future reference.
f Do not open the scale.
f Always unplug the scale before cleaning.
Safety instructions for battery operat ion
f The battery must not come into contact with chemical solvents, oil
or water.
f Keep batteries away from heat and fire.
f Do not open the battery.
1.4 Calibration instructions
Scales which have been factory-calibrated have a label indicating this
on the packaging.
Scales with a green M on the type plate are ready for operation.
Scales which are calibrated in two stages have a label indicating this
on the packaging.
These scales have only been calibrated in a first stage (declaration of
conformity in accordance with EN 45501-8.2). The second stage of
the calibration must be done on-site by authorized service personnel.
Please contact your local representative.
Medium accuracy scales that are used in commerce, where certified
calibration is required, must be calibrated and certified.
Observe the respective measurement data guidelines in your country.
M
M
METTLER TO LEDO Operator Manual bRite WeighOnly Order number 30211829
Page 7

7
03/12
2 Setting up
2.1 Scope of delivery
f Check if the delivery is complete:
– Scale
– Stainless steel weighing pan
– Power supply, stored in the power supply storage compartment
under the scale
– Operating instructions
2.2 Requirements for scale’s location
The right location is critical to weighing accuracy.
Conditions for an ideal location
• No shocks and vibrations
• No excessive temperature fluctuations
• No direct sunlight
• No strong drafts
• Select a stable, vibration-free and preferably horizontal location for
your scale.
2.3 Setting up the scale
2.3.1 Levelling the scale
Only a perfectly levelled scale delivers accurate weighing results. The
scale is equipped with a level indicator to make it easier to level the
scale.
f To level the scale, turn the scale’s adjustable feet until the air bubble
in the level indicator is in the inner circle.
METTLER TO LEDO Operator Manual bRite WeighOnlyOrder number 30211829
Page 8

8
03/12
Setting up
2.4 Inserting the batteries
1. Make sure that the external power supply is disconnected.
2. Remove the weighing pan.
3. Remove the battery compartment cover.
4. Turn over the scale and set the battery switch as follows:
– for rechargeable D-cell batteries: "NiMH".
– for non-rechargeable D-cell batteries: "Battery"
5. Turn over the scale.
WARNING
Risk of explosion when the battery switch is not set correctly.
f Make sure that the battery switch is in the right position for the
desired type of battery.
6. Place the batteries in the compartment so that the positive poles
face the springs, see pole markings on cover and housing.
7. Close the battery compartment and put the weighing pan back on.
2.5 Connecting to mains power
The power supply is stored in a department under the scale to support
save transport.
1. Connect the supplied power supply unit to the power connection
socket on the underside of the scale.
2. Plug the power supply unit into a correctly grounded power outlet.
2.6 Turning scale on/off
f To turn the scale on press the On/Off key.
f To turn the scale off press and hold the On/Off key until a long beep
can be heard.
• After the scale is turned on, it runs through a short display test. All
segments and status messages briefly light up, the software version
is displayed.
• The scale is ready when the weight display appears.
METTLER TO LEDO Operator Manual bRite WeighOnly Order number 30211829
Page 9

9
03/12
2.7 Cleaning
CAUTION
Damage to the scale
f Turn off and unplug the device before cleaning.
f Do not open the device.
f Make sure that no fluids get inside the device.
f Do not use scouring powders or plastic dissolving cleaning agents
for cleaning.
f Remove the weighing pan and clean it with a commercially available
household detergent.
f If heavily soiled, clean the surface of the device with a damp cloth
that has been dipped in water containing a mild liquid detergent
and well wrung out.
Cleaning
METTLER TO LEDO Operator Manual bRite WeighOnlyOrder number 30211829
Page 10

10
03/12
Operation
3 Operation
3.1 Weighing
1. Place the weighing goods on the scale.
2. Wait until a stable weighing result is displayed and read the
weighing result.
The weighing result is displayed as long as the weighing goods
remain on the scale.
3. Remove the weighing goods from the scale.
The display returns to 0.
3.2 Printing/transferring weighing results
If a printer or computer is connected to the scale, weighing results can
be printed or transferred to a computer.
f When a stable weighing result is displayed, double press the Enter
key.
The weighing result is printed or transferred to a computer.
0.350 kg
0.000 kg
0.350 kg
METTLER TO LEDO Operator Manual bRite WeighOnly Order number 30211829
Page 11

11
03/12
3.3 Taring
You fill containers with your products or customers bring their own container. The tare function makes sure that only the goods are weighed.
1. Place the empty container on the scale.
2. Press the Tare key.
The weight display is reset to 0.000 kg and the NET symbol
appears. The tare weight is displayed with negative sign in the
display when the empty container is removed from the scale.
3. Fill the container with the goods to be weighed.
4. Remove the container from the scale.
The display returns to 0.
3.4 Zeroing
Due to soiling on the weighing pan or unfavourable external influences,
it is possible that the weight display of an unloaded weighing pan may
no longer be 0.000 kg. In such cases, the scale must be reset to zero.
The maximum allowed deviation to be compensated by zeroing is
+/–2% of the weighing range.
f Press the Zero key.
The weight display is set to zero.
0.010 kg
0.000 kg
METTLER TO LEDO Operator Manual bRite WeighOnlyOrder number 30211829
Page 12

12
03/12
Operator setup
4 Operator setup
4.1 Setup operation
4.1.1 Entering operator setup
1. Press and hold the Menu key until a long beep can be heard.
SET 1 OP is displayed for "Operator Setup"
2. Press the Enter key to enter operator configuration.
The first operator setup step and its current setting are displayed.
4.1.2 Navigation in the setup
Selecting setup step
f To move to another setup step, use the Arrowdown (Tare) key or
Arrowup (Zero) key.
In the line below, the current setting of the step is displayed.
Changing settings
f To toggle between the settings of a setup step, use the Enter key.
When moving to another setup step, the selected setting is confirmed.
4.1.3 Ending setup
1. Press the Menu key to leave operator setup steps.
2. Press the Menu key again to leave the setup mode.
SAVE is displayed.
3. If you do not want to save, use the Enter key to toggle between
SAVE and ABORT.
4. Press the Menu key a third time to return to the weighing mode.
(press and hold)
seT 1
op
sTep 01
off
sTep 01
sTep 02
sTep 05
sTep 04
on off on
0
1 2 3
seT 1
op
save
save
abort
0.000 kg
METTLER TO LEDO Operator Manual bRite WeighOnly Order number 30211829
Page 13

13
03/12
4.1.4 Example: Setting digital filter to low (operator setup Step 6 = 0)
1. Press and hold the Menu key until a long beep can be heard.
SET 1 OP is displayed for "Operator Setup".
2. Press the Enter key to enter operator configuration.
The first operator setup step and its current setting are displayed.
3. To move to setup Step 6, press the Arrowdown (Tare) key repea-
tedly until Step 06 with its current setting is displayed.
4. To change the setting of setup Step 6, press the Enter key repeatedly until the setting is 0.
5. End setup by pressing the Menu key three times.
4.2 Operator setup overview
Factory settings are indicated in bold print.
No. Setting Descript ion
1 Reset
ON Reset operator setup functions to factory settings
OFF Do not reset operator setup functions
2 Beeper
ON Beep when a key is pressed
OFF No sound when a key is pressed
3 Backlighting
ON Backlighting on
OFF Backlighting off
4 Power off / sleep
0 Both disabled, power off and sleep function
1 No sleep funktion,
automatic power off after 30 minutes of non-use
2 Sleep function after 5 minutes of non-use,
no automatic power off
3 Sleep function after 5 minutes of non-use,
automatic power off after 30 minutes of non-use
4 Sleep function after 15 minutes of non-use,
no automatic power off
5 Sleep function after 15 minutes of non-use,
automatic power off after 30 minutes of non-use
(press and hold)
seT 1
op
sTep 01
off
... sTep 06
2
... sTep 06
0
0.000 kg
METTLER TO LEDO Operator Manual bRite WeighOnlyOrder number 30211829
Page 14

14
03/12
Operator setup
No. Setting Descript ion
5 Auto clear tare
ON Automatic clearing of the tare weight when the load is
removed from the platform
OFF No automatic clearing of the tare weight
6 Digital fi lter
0 Low digital fi ltering
1 Medium digital fi ltering
2 High digital fi ltering
7 Charging function
ON Battery charging function enabled
OFF Battery charging function disabled
To change charging function you are asked to enter a
passwort: 55555
8 Communication port
0 RS232
1 USB
9 Communication type
0 Protocol transfer to a connected computer
1 Printout on a connected printer
10 Communication format
0 7 data bits, parity even, 1 stop bit
1 7 data bits, parity odd, 1 stop bit
2 7 data bits, no parity, 1 stop bit
3 8 data bits, no parity, 1 stop bit
4 7 data bits, parity even, 2 stop bits
5 7 data bits, parity odd, 2 stop bits
6 7 data bits, no parity, 2 stop bits
7 8 data bits, no parity, 2 stop bits
11 Communication protocol *
0 CAS
1 Epelsa
2 8217
3 NCI
Supported commands: W, Z, T, t
* Communication protocols not available in all regions
METTLER TO LEDO Operator Manual bRite WeighOnly Order number 30211829
Page 15

15
03/12
5 What do you do if....?
General
If the scale shows an error message, proceed as follows:
1. Turn off the scale and wait for approx. 5 seconds.
2. Turn on the scale.
3. If the error message is still displayed, refer to the error message list.
Error message list
Error Cause Remedy
E11 RAM error f Call service technician
E16 ROM error f Call service technician
E18 EEPROM error f Call service technician
nnnnnn Overload f Reduce load
uuuuuu Load too small f Re-zero the scale
METTLER TO LEDO Operator Manual bRite WeighOnlyOrder number 30211829
Page 16

16
03/12
Technical data and accessories
6 Technical data and accessories
6.1 Technical data
Display
Weight display 6 digits
Ambient conditions
Operating temperature –10 °C to +40 °C
Storage temperature –25 °C to +50 °C
Electrical data
Power supply 12 V DC
Power consumption 50 mA
Plug-in adapter In: 230 V AC 50 Hz
Out: 12 V DC / 800 mA
Charging current 500 mA
NiMH battery 7000 mAh
6.2 Accessories
The following optional accessories are available from your sales representative:
• Weighing platform cover
• Scale cover
• POS connector RS232
• POS connector USB
• Deep bowl
• Rechargeable NiMH batteries
• Printer cable
The offering of accessories may vary by the region.
METTLER TO LEDO Operator Manual bRite WeighOnly Order number 30211829
Page 17

17
03/12
7 Appendix
7.1 Periodical verification in the countries of the EEC
Country Period Date on seal Verifi cation body Note
Austria 2 years Year MT W&M if no private body
accredited
Belgium 4 years Year W&M
Bulgaria 1 year class III Month W&M
Croatia 1 year Quarter W&M
Czech Republic 2 years Year W&M
Denmark 4 years Year Force, MT MT as of 2009
Estonia 1 year Month Metrosert
Finland 3 years Year W&M
France 2 years Month MT
Germany 2 years Year W&M
Greece 1 year Year W&M
Hungary 2 years Exact day W&M
Iceland 2 years Year W&M
Irland 1 year Exact day W&M
Italy 3 years Month MT
Latvia 2 years Year W&M
Lithuania 2 years Year W&M
Netherlands None – MT
Norway 3 years Year W&M
Poland 4 years /
25months
Year / Month W&M 4 years after initialisation,
25 months on periodic
Portugal 1 year Year W&M
Romania 1 year Month W&M
Slovakia 2 years Exact day W&M
Slovenia 2 years Exact day W&M
Spain 2 years Year W&M
Sweden 2 (1) years Year W&M 1 year when used out-
doors
Switzerland 2 years Year W&M
United Kingdom None – W&M
METTLER TO LEDO Operator Manual bRite WeighOnlyOrder number 30211829
Page 18

18
03/12
Appendix
7.2 D is pos al
In accordance with the requirements of European Directive 2002/96 EC
on Waste Electrical and Electronic Equipment (WEEE), this device may
not be disposed of with domestic refuse. This also applies for countries
outside the EU in accordance with their respective national regulations.
f Please dispose of this product in accordance with local regula-
tions for the separate collection of waste electrical and electronic
equipment.
Should you have any questions, please contact the corresponding
authorities or the dealer from whom this device was purchased.
If this device is passed on (for example for further private or commercial/
industrial use), this regulation is also to be passed on.
Many thanks for your contribution to the protection of the environment.
Batteries contain heavy metals and therefore cannot be disposed of in
the domestic refuse.
f Observe local regulations on the disposal of materials which are
hazardous to the environment.
Battery disposal
METTLER TO LEDO Operator Manual bRite WeighOnly Order number 30211829
Page 19

19
03/12 METTLER TO LEDO Operator Manual bRite WeighOnlyOrder number 30211829
Page 20

For more information
www.mt.com/service
Subject to technical changes
© 03/2012 Met tler-Toledo AG
Printed in Switzerland
Order number 30211829
Mettler-Toledo AG
 Loading...