

Page 1
Operating instructions
METTLER TOLEDO
BD balances
0.00
g
Page 2
Startup procedure
Unpacking, standard equipment
The standard equipment contains:
• BD balance,
• Weighing pan, permanently mounted with BD6000,
• AC adapter,
• Operating instructions.
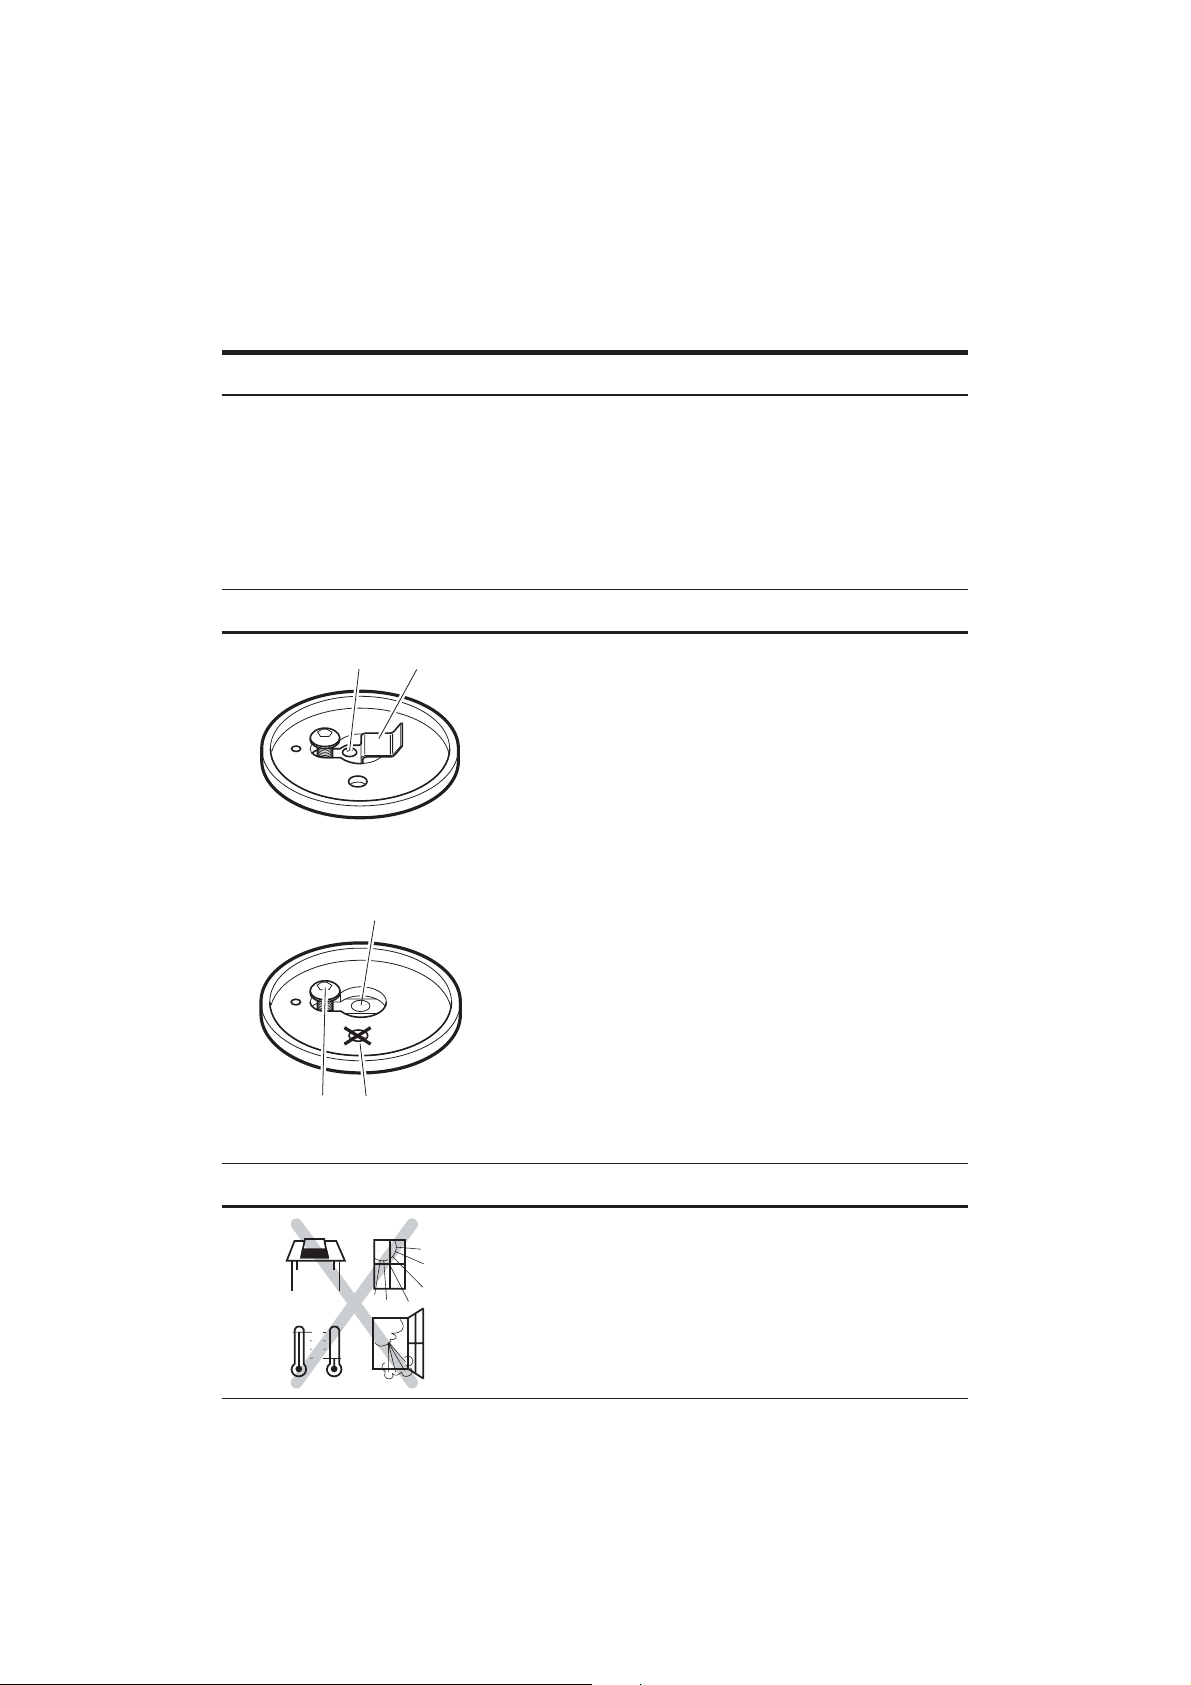
Mounting the weighing pan
1
Location
5
30°
20°
10°
0°
1 2
3
4
With BD6000
Remove packaging material underneath the weighing
pan.
Weighing pan is already mounted.
With BD202, remove transport arrestment
Unscrew arrestment screw (1).
Pull out transport arrestment (2).
Models with circular weighing pan
Insert the weighing pan with the stem in the middle of
the pan support (3).
Caution
Do not alter position of stop screw (5).
Notes
• Keep packaging for transport or storage in a safe
place.
• For transport, move weighing pan to position (4).
The best results are obtained when the balance is
correctly sited.
• Firm, horizontal support as free from vibrations as
possible.
• Avoid direct sunlight.
• No excessive temperature fluctuations.
• No drafts.
Page 3
Startup procedure
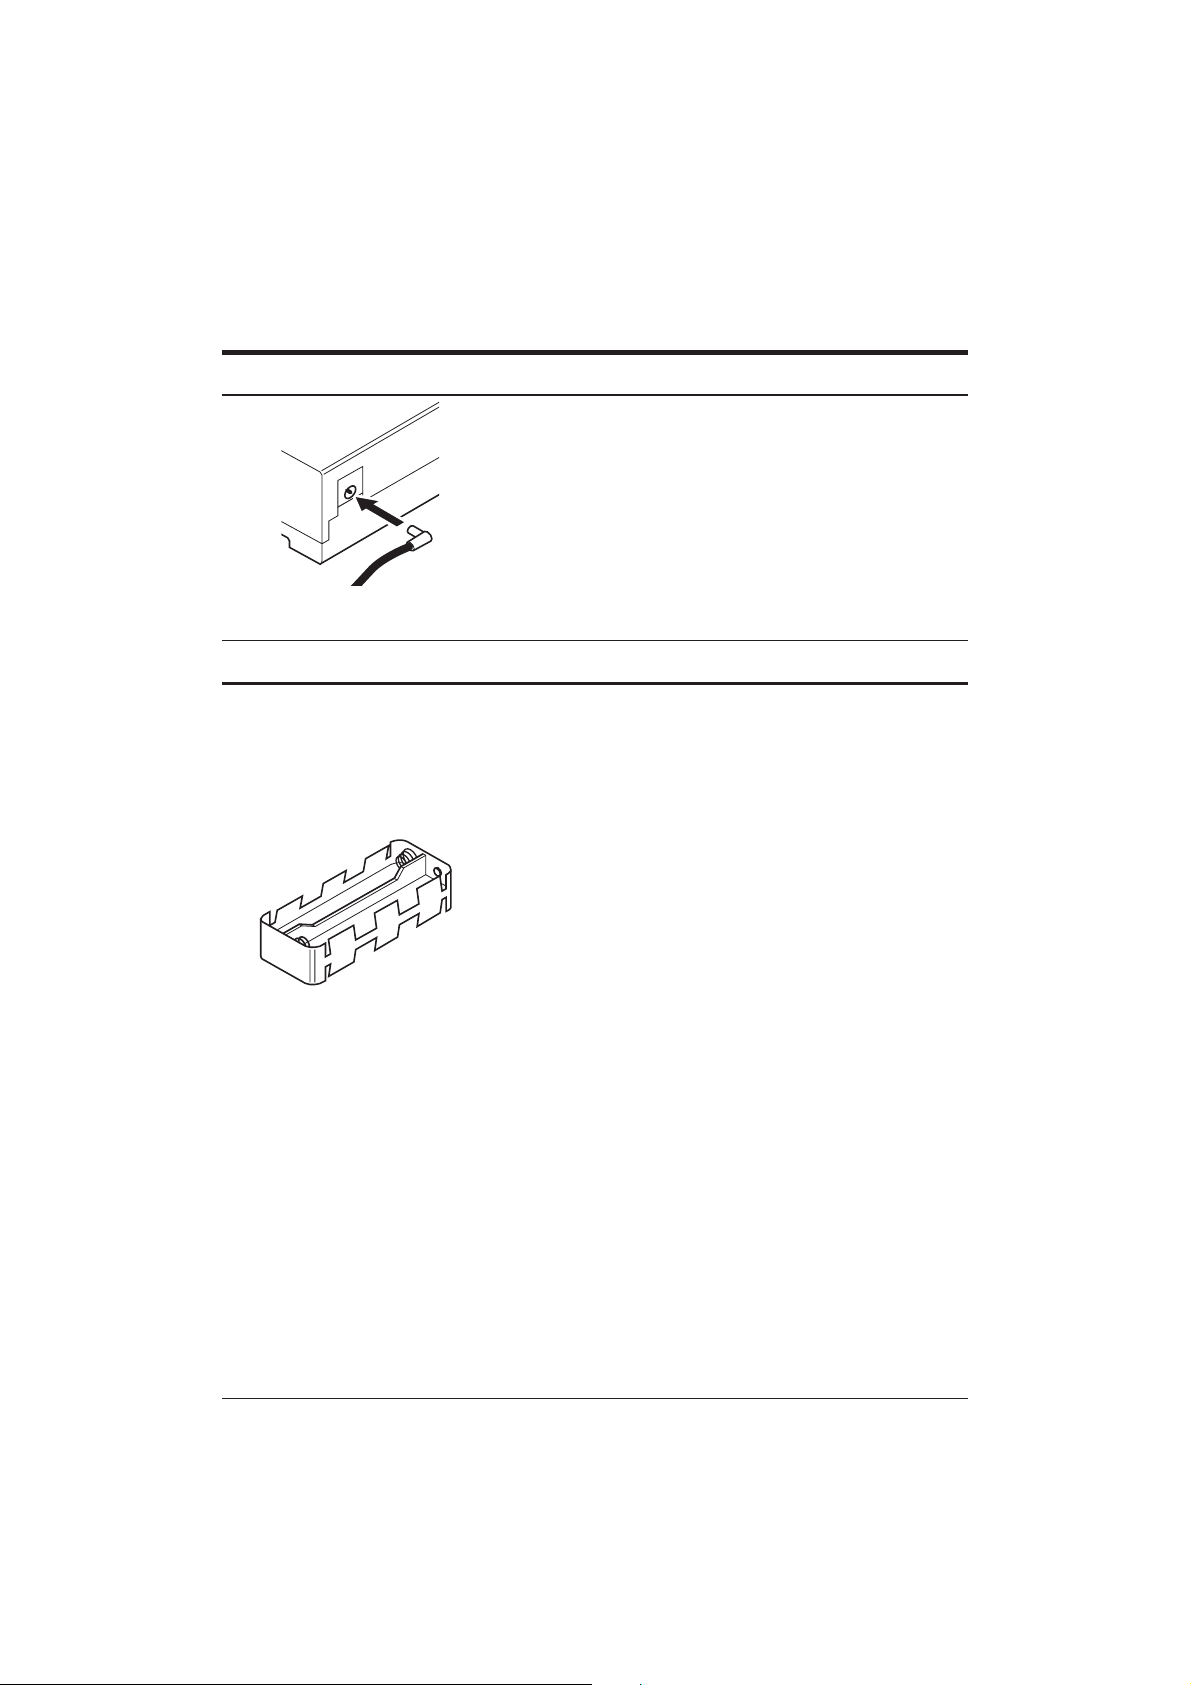
Attaching the AC adapter
Plug AC adapter into rear of the balance.
Connect AC adapter to power supply.
Installing the batteries
1. Lift off circular weighing pan, rectangular pan is
permanently fixed.
2. Turn balance over.
3. Slide off cover in the direction of the arrow.
–
+
+
–
4. Take out battery holder.
5. Insert 8 AA batteries so that the plus (+) and minus
(-) terminals coincide with the specifications on the
holder.
6. Insert battery holder and check plug-in connection.
7. Replace cover.
2
Notes
• When the AC adapter is attached, the batteries are
bypassed.
• The balance can also be operated with a storage
battery (see Accessories, Accu Pac, page 14).
• To prolong battery life, activate "automatic shutdown" in the menu, see page 11.
Page 4

Operation
Instrument overview
3
1
2
3
4675
Operation
2 operator control levels
• Weighing mode
(page 4 onwards)
and
• Menu (page 9 onwards)
(1) Circular or rectangular weighing pan
(2) Display panel
(3) Keypad
Green function = Press briefly
Blue function = Press and hold
(4) AC adapter socket
(5) Model plate
(6) Antitheft device
(7) Cover of RS-232 socket
BD balances have two operator control levels, the
weighing mode and the menu. General operation is
in the weighing mode.
In addition to the basic functions weighing and taring,
other functions are available such as unit switching,
counting or percent weighing. Selection of the functions and setting the balance parameters takes place
in the menu (page 9 onwards).
On 0/T
Off F
1 2 3
On
0/T
Off
F
(press briefly)
(press briefly)
(press and hold)
(press briefly)
(press and hold)
CAL/Menu
(1) Control key
Switch on
Zero setting/taring, return to weighing mode
Switch off
(2) Function key
Switching between unit 1/unit 2/% or piece number
In the menu: Change the settings
Enter reference weight or reference quantity
Page 5
Operation
(press briefly)
CAL/Menu
On/off switching
On
(press and hold)
1.8.8.8.8.8.8
BD 1201
0.0
(3) Menu key
Transmit data to a printer. An RS-232 interface must
be fitted for this (see Accessories, page 14).
In the menu: Select menu options.
Calibrate, entry into menu, store settings.
When balance is unloaded, press
1. All segments of the display panel light up.
g
On
2. The balance model is displayed.
3. "0.0" is displayed. The balance is in the weighing
g
mode.
4
.
Weighing
0/T
Taring
0/T
0.1
0.0
105,1
100.0
0.0
105,1
-100.0
Switching off the balance: Press and hold
until "Off" is displayed.
1. Set display to zero: Press
g
2. Load weighing sample.
g
3. Read display when stability detector (o) disap-
g
pears.
0/T
.
1. Set display to zero.
2. Load empty container on balance. The weight is
g
g
g
g
displayed.
0/T
3. Taring: Press
.
4. Add weighing sample to container. The net weight
of the contents is displayed.
5. Remove container from balance.
The weight of the container (tare) is displayed as a
negative value. The tare weight remains stored until
the
0/T
is pressed again or the balance is
switched off.
Off
Page 6

Operation
Calibration
CAL/Menu
-cal-
----
----
c DONe
1000
0.0
5
1. Before calibrating, the balance must be switched on
for at least 5 minutes.
2. Have required weight (see Accessories, page 14)
on hand.
BD202 200 g
BD601 500 g
BD1201 1000 g
BD6000 4000 g
3. Unload weighing pan completely.
4. Press and hold
lease key.
5. After attainment of stability, the value of the re-
g
quired calibration weight flashes.
6. Place calibration weight on the balance.
0
g
The balance calibrates itself.
7. When zero flashes, remove weight.
g
The operation is complete when "C donE" is displayed.
The balance returns to the weighing mode.
CAL/Menu
until "CAL" appears. Re-
ON
OFF
Disabling the calibration
Switch (1) to "On" position: Calibration disabled.
Switch (1) to "Off" position: Calibration enabled.
Changing the switch position
1. Remove circular weighing pan, rectangular pan is
1
permanently mounted.
2. Turn balance over.
3. Unscrew screws of baseplate and remove baseplate.
4. Move switch to desired position.
5. Replace baseplate.
Note
When the balance is open, do not touch the leads of
the sensor.
Page 7

Operation
Switching weight unit
22.0
g
oz
0.78
PC
10
Printing
6
Requirement
Different weight units for unit 1 and unit 2 must be
selected in the menu.
Switching
Switching between unit 1 and unit 2:
Press
If a function has been selected in the menu, switching
can be effected between unit 1, unit 2 and % or piece
number.
If an RS-232 interface is installed, weighing results
can be transmitted to a printer and printed out.
Parameters of the data transmission are defined in the
menu (see interface description).
Start printout: Press
.
.
Page 8

Operation
Counting
0/T
F
seT 10
0.0
10
75
Requirement
"F count" must be selected in the menu.
Setting reference
1. Set display to zero.
2. Place empty container on the balance:
g
PC
PC
PC
Press
3. Press and hold
10 is the preset reference quantity.
• Pressing
0/T
.
F
until "SEt ..." is displayed.
allows a reference quantity of 10,
20, 30, 50, 100 or 5 to be selected.
The selected value remains stored even if the
balance is switched off.
4. Load reference quantity and confirm with
The current piece number and PC (pieces) will be
displayed.
If the reference weight is too small, "Add" and the
current piece number are displayed.
• To assure counting accuracy, increase reference
quantity. Confirm with
• Ignore "Add" prompt: Confirm with
7
.
.
.
10
22.0
0.78
Counting
Add weighing sample to the container and read off
piece number.
The current reference weight remains stored until the
balance is switched off or the entry is changed.
Switching between piece number/weight units:
PC
Press
g
oz
Note
.
If no entry has been made for 30 seconds, the timeout
function switches to normal weighing operation.
Page 9

Operation
Plus/minus and percent weighing
Requirement
"F 100 %" must be selected in the menu.
Setting target weight
0/T
F
0.0
seT 100
100
100
95
1. Set display to zero.
g
2. Press and hold
%
%
the display.
3. Load target weight.
4. Confirm with
fined.
The current target weight remains stored until the
balance is switched off or the entry is changed.
Note
If no entry has been made for 30 seconds, the timeout
function switches to normal weighing operation.
Percent weighing
1. Set target weight, see above.
%
%
2. Load weighing sample.
The weight of the sample is displayed in percentage of
the target weight.
F
until "SEt 100 %" appears in
. The target weight is now de-
8
Switching between percent weighing/weight units:
%
95
.
0.78
22
Press
g
oz
Plus/minus weighing
100
0/T
0.0
-5
2. Tare: Press
%
3. Load weighing sample.
%
0/T
.
1. Set target weight, see above.
%
The percentage by which the weighing sample differs
from the target weight is displayed.
Switching between plus/minus weighing/weight units:
Press
.
Page 10

Menu
Menu overview
9
You can use the menu to configure the balance for
your special requirements.
The selection line with halftone backing represents the
current settings of the balance. You can access it with
the
The choices shown in halftone appear only when
the RS-232 interface is built in (see Accessories,
page 14).
key.
f NO uNIT 1 uNIT 2 iNT-2- a.Off - s.sTB B 2400 p -e- eseT
fCOUNT iNT-3- a.Off.5 s.all B 4800 p -o-
f 100 iNT-1- a.Off 1 s.aUTO B 9600 p - N-
%
gg
oz
ozt
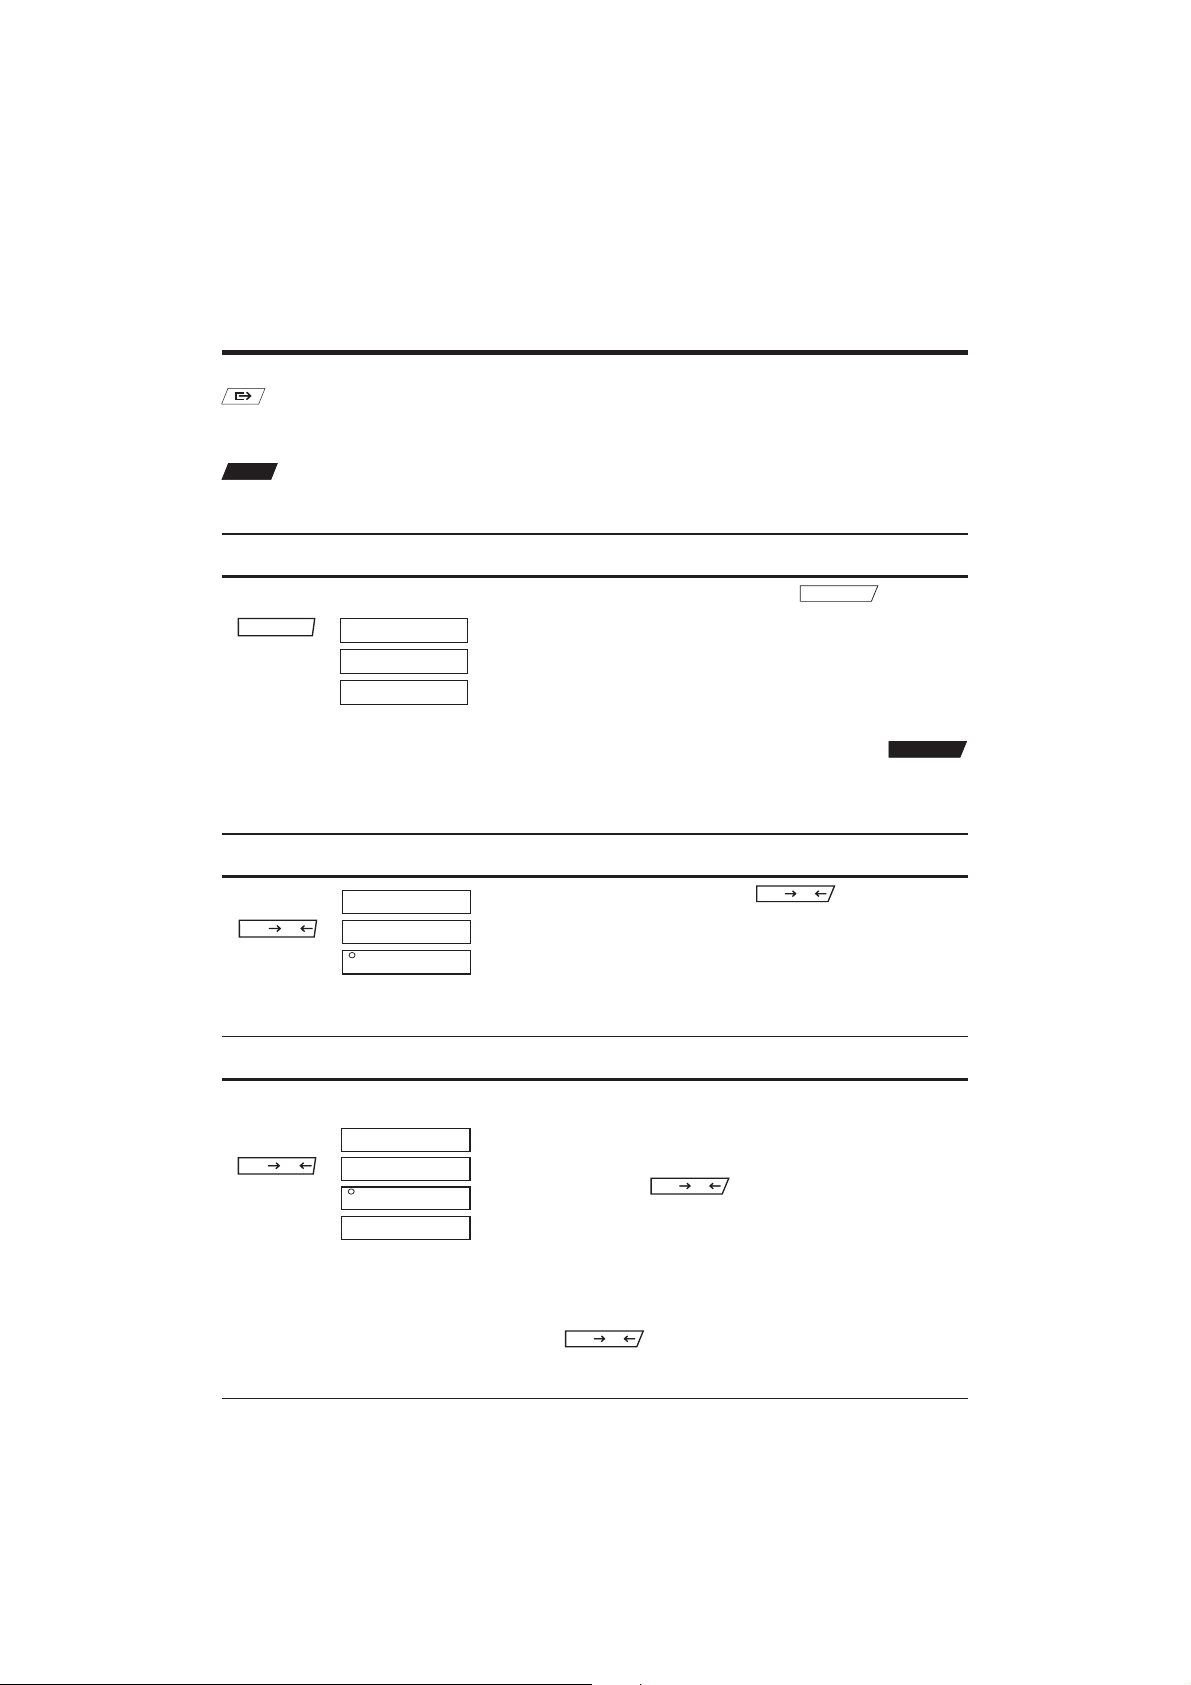
Menu operation
Entry into the menu
Selecting menu options
Changing the settings
Storing changed settings
Return to the weighing
mode without storing
changes.
oz
ozt
The possible settings are listed in the description of
the menu options.
Press and hold
Select next menu option with
CAL/Menu
until "MENU" is displayed.
.
Change the settings of a menu option using .
CAL/Menu
Press and hold
Quit the menu with
key until "StorEd" is displayed.
0/T
. The balance operates
with the settings currently stored.
Note
If no entry has been made in the menu for 30 seconds,
the timeout function switches to normal weighing operation. The balance operates with the current stored
settings.
Page 11

Menu
Menu factory settings
10
f NO
uNIT 1
g
uNIT 2
g
iNT-2-
a.Off -
s.sTB
B 2400
p -e-
Menu description
F
UNIT 1
no
g oz
S t
H t
oztt t
dwt
ct
GN
lb
F no no function
Unit 1 g Unit 1 in g
Unit 2 g Unit 2 in g (inactive)
Int-2- median integration time
A.off - automatic shutdown inactive
S.Stb Transmission mode:
stable single value
b 2400 Baud rate: 2400
P -E- Parity: even
Function
no no function
count counting
100 % Plus/minus and percent
weighing
Unit 1
g Gram
oz Ounce
oz t Troy ounce
dwt Pennyweight
ct Carat
GN Grain
lb Pound
Momme
H t Hong Kong tael*
S t Singapore tael*
t t Taiwan tael*
* During operation, only t is displayed.
Page 12

Menu
UNIT 2 g oz
GN
INT -2-
11
Unit 2
All units listed under unit 1 except taels can also be
ozt
lb
dwt
ct
-3-
-1-
selected for unit 2.
Integration time
The integration time influences the speed of the
balance and the reproducibility of the values.
-2- Median integration time
-3- Maximum integration time
-1- Minimum integration time
Setting Weighing speed Reproducibility
1 fast good
2
↑↓
3 slow very good
A.OFF – .5
RESET
CAL/Menu
DONe
Automatic shutdown
The automatic shutdown switches off the balance
when no change in the display has occurred within the
specified time.
– Inactive
12
.5 0.5 minutes
11 minute
22 minutes
Reset
Reset resets the menu to the factory settings.
To reset settings:
CAL/Menu
Press and hold the
until "r donE" is displayed.
The balance returns to the weighing mode.
Page 13

Error messages
12
å∫∫∫∫∫ç
å∫∫∫∫∫ç
eO 1
eO 2
eO 3
eO 9
Overload
Underload
Note
If an overload or underload error appears when the
balance is switched on, recalibrate balance.
No stability
• in taring
• in calibration
• when reference weight is loaded for counting or
percent weighing
No or wrong calibration weight loaded
➜ Load requested calibration weight
Reference quantity too small
➜ Increase piece number
Reference weight too small
➜ Increase reference weight
Internal error
➜ off/on switching, or
➜ calibration
If the error can not be rectified return balance to
customer service.
You will find further details on the warranty certificate
(bill).
Page 14

Technical data
BD202 BD601 BD1201 BD6000
Readability 0.01 g 0.1 g 0.1 g 1 g
Maximum load 200 g 600 g 1200 g 6000 g
Taring range (by subtr.) 0 … 200 g 0 … 600 g 0 … 1200 g 0 … 6000 g
Reproducibility 0.01 g 0.07 g 0.1 g 0.7 g
Linearity (±) 0.01 g 0.1 g 0.1 g 1 g
Stabilization time (typical) 3.0 s 3.0 s 3.5 s 3.0 s
Balance housing (W x D x H) 185 x 220 x 60 mm
Weighing pan ø 102 mm ø 102 mm ø 120 mm 120x175 mm
Weight ca. 800 g
Power supply 6-12 V DC, 70 mA,
with AC adapter, Accu Pac or 8 AA 1.5 V batteries
13
Maintenance
Cleaning Clean housing and weighing pan with a cloth and, if
necessary, a mild cleaning agent.
Protect balance and weighing pan against contamina-
tion.
Batteries You can operate BD balances with environmentally
friendly batteries.
Remove discharged or old batteries from balance and
dispose of as hazardous waste.
Page 15

Accessories (by ordering)
Order No.
Accu Pac (rechargeable NiCd battery) 590103
Carrying case 590116
Antitheft device 590101
RS-232 interface 590102
RS cable
male/25-pin 210492
female/25-pin 210491
female/9-pin 210493
Extension cable DATA I/O 5 m 216152
MiniMettler connector, solderable 33930
Calibration weights
200 g 216522
500 g 216524
1000 g 216526
2 x 2000 g 216532
14
AC adapter
100/120 V (US connector) 590108
220/240 V (EURO connector) 590109
240 V (UK connector) 590110
220/240 V (AUSTRALIA connector) 590111
Battery holder (without batteries) 590112
Battery compartment cover 590115
Weighing pans
102 mm (for BD202) 590118
102 mm (for BD601) 590113
120 mm (for BD1201) 590114
Pouch 590117
Page 16

To protect your METTLER TOLEDO product’s future:
METTLER TOLEDO service assures the quality, measuring
accuracy and preservation of value of all METTLER TOLEDO
products for years to come.
Please send for full details about our attractive terms of
service.
Thank you.
*P709106*
Subject to technical changes and to the availability
of the accessories supplied with the instruments.
© Mettler-Toledo GmbH 2000 709106A Printed in Switzerland 0001/2.12
Mettler-Toledo GmbH, CH-8606 Greifensee, Switzerland
Phone +41-1-944 22 11, Fax +41-1-944 30 60, Internet: http://www.mt.com
 Loading...