

Page 1
Service Manual
BC
Shipping Scale
Page 2

Essential Services for Dependable Performance of Your BC Shipping Scale
Register your product
Contact METTLER TOLEDO for service
Installation, Configuration, Integration and Training
Initial Calibration Documentation
Periodic Calibration Maintenance
BC Shipping Scale
Congratulations on choosing the quality and precision of METTLER TOLEDO. Proper use of your
new equipment according to this Manual and regular calibration and maintenance by our factorytrained service team ensures dependable and accurate operation, protecting your investment.
Contact us about a service agreement tailored to your needs and budget. Further information is
available at www.mt.com/service
There are several important ways to ensure you maximize the performance of your investment:
1.
www.mt.com/productregistration so we can contact you about enhancements, updates and
important notifications concerning your product.
2.
accuracy – an out of specification scale can diminish quality, reduce profits and increase
liability. Timely service from METTLER TOLEDO will ensure accuracy and optimize uptime and
equipment life.
.
: We invite you to register your product at
: The value of a measurement is proportional to its
a.
trained, weighing equipment experts. We make certain that your weighing equipment is
ready for production in a cost effective and timely fashion and that personnel are trained for
success.
b.
requirements are unique for every industrial scale so performance must be tested and
certified. Our calibration services and certificates document accuracy to ensure production
quality and provide a quality system record of performance.
c.
confidence in your weighing process and documentation of compliance with requirements.
We offer a variety of service plans that are scheduled to meet your needs and designed to
fit your budget.
: The installation environment and application
: A Calibration Service Agreement provides on-going
: Our service representatives are factory-
Page 3
© METTLER TOLEDO 2014
No part of this manual may be reproduced or transmitted in any form or by any means, electronic or
mechanical, including photocopying and recording, for any purpose without the express written
permission of METTLER TOLEDO.
U.S. Government Restricted Rights: This documentation is furnished with Restricted Rights.
Copyright 2014 METTLER TOLEDO. This documentation contains proprietary information of METTLER
TOLEDO. It may not be copied in whole or in part without the express written consent of METTLER
TOLEDO.
METTLER TOLEDO reserves the right to make refinements or changes to the product or manual
without notice.
COPYRIGHT
METTLER TOLEDO® is a registered trademark of Mettler-Toledo, LLC. All other brand or product
names are trademarks or registered trademarks of their respective companies.
METTLER TOLEDO RESERVES THE RIGHT TO MAKE REFINEMENTS OR CHANGES
WITHOUT NOTICE.
FCC Notice
This device complies with Part 15 of the FCC Rules and the Radio Interference Requirements of the
Canadian Department of Communications. Operation is subject to the following conditions: (1) this
device may not cause harmful interference, and (2) this device must accept any interference
received, including interference that may cause undesired operation.
This equipment has been tested and found to comply with the limits for a Class A digital device,
pursuant to Part 15 of FCC Rules. These limits are designed to provide reasonable protection against
harmful interference when the equipment is operated in a commercial environment. This equipment
generates, uses, and can radiate radio frequency energy and, if not installed and used in
accordance with the instruction manual, may cause harmful interference to radio communications.
Operation of this equipment in a residential area is likely to cause harmful interference in which case
the user will be required to correct the interference at his or her expense.
Declaration of Conformity is located on the documentation CD.
RoHS Compliance Statement.
The majority of our products fall within categories 8 and 9. Those categories currently do not fall
within the scope of the Directive 2002/95/EG (RoHS) of January 27, 2003. If our products are
intended for use in other products which themselves fall within the scope of the RoHS Directive,
compliance requirements have to be separately negotiated contractually.
Those products which fall within categories 1-7 and 10 will be in compliance with the EU RoHS
Directive from no later than July 1, 2006.
If it is not possible for technical reasons to replace any non-RoHS-compliant substances in any of
the above products as required, we plan to inform our customers in a timely manner
Statement regarding harmful substances
We do not make direct use of harmful materials such as asbestos, radioactive substances or
arsenic compounds. However, we purchase components from third party suppliers, which may
contain some of these substances in very small quantities.
Page 4
In conformance with the European Directive 2002/96/EC on Waste Electrical and Electronic
Warnings and Cautions
• READ this manual BEFORE operating or servicing this equipment and FOLLOW these
instructions carefully.
• SAVE this manual for future reference.
WARNING
ALWAYS REMOVE ALL POWER BEFORE SERVICING ANY EQUIPMENT. METTLER-TOLEDO
RECOMMENDS THAT ONLY QUALIFIED TECHNICIANS OPEN THE UNIT UP FOR MAINTENANCE
AND REPAIR. IF YOU MUST OPEN THE BC SCALE, READ THIS SECTION CAREFULLY TO AVOID
DAMAGE TO THE INTERNAL COMPONENTS.
WARNING
AC POWER SOURCES MUST HAVE PROPER SHORT CIRCUIT AND OVER CURRENT
PROTECTION IN ACCORDANCE WITH LOCAL AND NATIONAL ELECTRICAL REGULATIONS.
FAILURE TO PROVIDE THIS MAY RESULT IN BODILY INJURY AND/OR PROPERTY DAMAGE.
NOTICE
OBSERVE PRECAUTIONS FOR HANDLING ELECTROSTATIC SENSITIVE DEVICES.
Disposal of Electrical and Electronic Equipment
Equipment (WEEE) this device may not be disposed of in domestic waste. This also applies
to countries outside the EU, per their specific requirements.
Please dispose of this product in accordance with local regulations at the collecting point
specified for electrical and electronic equipment.
If you have any questions, please contact the responsible authority or the distributor from
which you purchased this device.
Should this device be passed on to other parties (for private or professional use), the
content of this regulation must also be related.
Thank you for your contribution to environmental protection.
Page 5

30126862 | 00 | 04/2014
METTLER TOLEDO BC Shipping Scales User's Service Manual
1
Contents
1 Introduction ................................................................................. 1-1
1.1. Standard Features ......................................................................... 1-2
1.1.1. BC15 ................................................................................................................. 1-3
1.1.2. BC30 ................................................................................................................. 1-3
1.1.3. BC60 ................................................................................................................. 1-3
1.1.4. BC150 ............................................................................................................... 1-3
1.2. Optional Accessories ..................................................................... 1-3
1.2.1. General .............................................................................................................. 1-3
1.2.2. 0271 Graphical or 0270 Basic Display Options ..................................................... 1-4
1.3. Specifications ............................................................................... 1-4
1.3.1. Physical Dimensions ........................................................................................... 1-4
1.4. Power Requirements ..................................................................... 1-5
1.5. Environmental Requirements .......................................................... 1-6
1.6. Standards Compliance................................................................... 1-6
1.7. RFI Susceptibility ........................................................................... 1-7
2 Installation .................................................................................. 2-1
2.1. Unpacking ................................................................................... 2-1
2.1.1. Package Inspection ............................................................................................. 2-1
2.1.2. Box Contents ...................................................................................................... 2-2
2.1.2.1. BC-15 ............................................................................................................................ 2-2
2.1.2.2. BC-60, 6L, 30, 3L ........................................................................................................... 2-2
2.1.2.3. BC-150 .......................................................................................................................... 2-3
2.2. Setup........................................................................................... 2-3
2.2.1. Scale Installation ................................................................................................. 2-3
2.2.1.1. BC-150 Display Installation ............................................................................................... 2-3
2.2.1.2. Scale Base Preparation, BC-150 Only ................................................................................. 2-4
2.2.2. Preparation, All Models ........................................................................................ 2-5
2.2.3. PC Connection .................................................................................................... 2-6
2.2.3.1. USB ................................................................................................................................ 2-6
2.2.3.2. Serial .............................................................................................................................. 2-7
2.2.4. Scale Configuration ............................................................................................. 2-8
2.3. Installing Accessory Items ............................................................ 2-10
2.3.1. Remote Displays ............................................................................................... 2-10
2.3.1.1. Second Display, in Addition to Base-Mounted Display......................................................... 2-11
2.3.1.2. Wall-Mounted Display .................................................................................................... 2-11
2.3.1.3. Dual Displays ................................................................................................................ 2-11
2.3.2. Ball and Roller Top Platters ................................................................................ 2-12
2.3.3. Conveyor Drop-In Kit for BC-150 ......................................................................... 2-13
2.3.3.1. Conveyor Drop-In-Kit 64058112 ..................................................................................... 2-13
Page 6

2
METTLER TOLEDO BC Shipping Scales User's Service Manual
30126862 | 00 | 04/2014
Contents
3 Operation and Maintenance .......................................................... 3-1
3.1. Power-Up Sequence ...................................................................... 3-1
3.2. Keypad and Display ...................................................................... 3-2
3.2.1. Display .............................................................................................................. 3-2
3.3. Keys and Navigation ..................................................................... 3-3
3.3.1. Navigation Keys .................................................................................................. 3-3
3.3.1.1. Special Functions ............................................................................................................. 3-3
3.3.2. Softkeys ............................................................................................................. 3-3
3.3.2.1. Mode .............................................................................................................................. 3-4
3.3.3. Page Layout in Weighing Mode ............................................................................ 3-4
3.3.4. Accessing and Navigating Setup Mode .................................................................. 3-5
3.3.4.1. Entering Setup ................................................................................................................. 3-5
3.3.4.2. Navigation ...................................................................................................................... 3-6
3.4. Operator Functions ........................................................................ 3-8
3.4.1. Parcel Weighing .................................................................................................. 3-8
3.4.2. Zeroing the Scale ................................................................................................. 3-8
3.4.3. Unit Switching ..................................................................................................... 3-9
3.5. Modes of Operation ....................................................................... 3-9
3.5.1. Selecting Modes .................................................................................................. 3-9
3.5.2. Weight and Tare Mode ....................................................................................... 3-10
3.5.3. Label Offset Mode .............................................................................................. 3-11
3.5.4. Product Verification Mode ................................................................................... 3-11
3.5.5. Take-Away Mode: Differential Weighing ............................................................... 3-12
3.5.6. Bulk Mail/Counting Mode ................................................................................... 3-13
3.5.7. Price Mode ....................................................................................................... 3-14
3.6. Cleaning and Regular Maintenance ............................................... 3-14
3.6.1. Overloads ......................................................................................................... 3-14
3.6.2. Display Check ................................................................................................... 3-15
3.6.3. Cal Weight Check .............................................................................................. 3-15
4 Technical Manual ........................................................................ 4-1
4.1. Setup Parameters and Calibration ................................................... 4-1
4.1.1. Quick Setup to Carrier’s Defaults ........................................................................... 4-1
4.2. Bypassing the Metrology Lock ........................................................ 4-2
4.3. Scale Program Menus ................................................................... 4-4
4.4. Configuration: Overview ................................................................. 4-6
4.4.1. Entering Setup Mode ............................................................................................ 4-7
4.4.2. Keyboard Shortcuts ............................................................................................. 4-7
4.4.3. Exiting Setup Mode .............................................................................................. 4-8
4.4.4. Remote Configuration .......................................................................................... 4-8
4.5. Configuration: Info ........................................................................ 4-8
4.5.1. Model ................................................................................................................ 4-9
4.5.2. Cal Info .............................................................................................................. 4-9
Page 7

30126862 | 00 | 04/2014
METTLER TOLEDO BC Shipping Scales User's Service Manual
3
4.5.3. Working Time ..................................................................................................... 4-9
4.5.4. BT ..................................................................................................................... 4-9
4.5.5. Error Log ............................................................................................................ 4-9
4.5.6. HELP ................................................................................................................. 4-9
4.6. Defaults ..................................................................................... 4-10
4.7. Operating Mode .......................................................................... 4-11
4.7.1. WtTare ............................................................................................................. 4-11
4.7.2. Hold ................................................................................................................ 4-12
4.7.3. LabOff .............................................................................................................. 4-12
4.7.4. TakeAW – Differential Weighign .......................................................................... 4-13
4.7.5. Price ................................................................................................................ 4-13
4.7.6. Count ............................................................................................................... 4-13
4.7.7. ProdVy ............................................................................................................. 4-14
4.8. Setup: Overview .......................................................................... 4-14
4.9. Setup: Display ............................................................................ 4-15
4.9.1. Language ......................................................................................................... 4-15
4.9.2. Filter ................................................................................................................ 4-16
4.9.3. Feedback .......................................................................................................... 4-17
4.9.4. Logo ................................................................................................................ 4-17
4.9.5. Custom Message .............................................................................................. 4-17
4.9.6. Password ......................................................................................................... 4-17
4.10. Setup: Communications ............................................................... 4-19
4.10.1. Serial ............................................................................................................... 4-19
4.10.1.1. Baud ............................................................................................................................ 4-20
4.10.1.2. ASCII Data Bits ............................................................................................................... 4-20
4.10.1.3. Parity ............................................................................................................................ 4-20
4.10.1.4. Stop Bit ......................................................................................................................... 4-21
4.10.1.5. Protocol ........................................................................................................................ 4-21
4.10.2. USB ................................................................................................................. 4-21
4.10.3. Ethernet ............................................................................................................ 4-22
4.10.4. Bluetooth .......................................................................................................... 4-22
4.10.5. SendWT ........................................................................................................... 4-22
4.11. Setup: Scale ............................................................................... 4-23
4.11.1. Metrology Lock.................................................................................................. 4-24
4.11.2. Type Approval ................................................................................................... 4-24
4.11.3. Set Default ........................................................................................................ 4-25
4.11.4. Capacity and Increment ..................................................................................... 4-25
4.11.4.1. Primary Units ................................................................................................................. 4-26
4.11.5. Calibration ........................................................................................................ 4-29
4.11.5.1. Calibration Weight .......................................................................................................... 4-29
4.11.5.2. Calibration .................................................................................................................... 4-30
4.11.5.3. Use GEO ....................................................................................................................... 4-32
4.11.5.4. Cal Prompt .................................................................................................................... 4-34
4.11.6. Zero ................................................................................................................. 4-34
4.11.6.1. Pushbutton Zero ............................................................................................................. 4-35
Page 8

4
METTLER TOLEDO BC Shipping Scales User's Service Manual
30126862 | 00 | 04/2014
Contents
4.11.6.2. Zero Indicator ................................................................................................................ 4-35
4.11.6.3. Automatic Zero Maintenance ............................................................................................ 4-36
4.11.6.4. Power-Up Zero ............................................................................................................... 4-36
4.11.7. Rounding ......................................................................................................... 4-37
4.11.8. Functions ......................................................................................................... 4-37
4.11.9. Boot-Up ............................................................................................................ 4-38
4.11.9.1. GeoCal ......................................................................................................................... 4-39
4.11.9.2. Language and Units ....................................................................................................... 4-39
4.11.9.3. Manifest Software ........................................................................................................... 4-39
4.11.9.4. Exit ............................................................................................................................... 4-40
4.12. Setup: Maintenance ..................................................................... 4-40
4.12.1. Overloads ......................................................................................................... 4-40
4.12.2. Display Test ...................................................................................................... 4-41
4.12.3. Calibration Check .............................................................................................. 4-41
4.13. End ........................................................................................... 4-42
4.14. Basic Display ............................................................................. 4-43
4.15. Metrological Sealing .................................................................... 4-44
5 Service and Repair ...................................................................... 5-1
5.1. Troubleshooting ............................................................................ 5-1
5.1.1. Error Codes......................................................................................................... 5-1
5.1.2. Check Power Adapter ........................................................................................... 5-2
5.1.3. Blank Display ..................................................................................................... 5-3
5.1.4. No Keypad Interaction .......................................................................................... 5-4
5.1.5. Display Indicator Locked ...................................................................................... 5-4
5.1.6. Serial Communication Test with PC ....................................................................... 5-4
5.2. Update Scale Software ................................................................... 5-8
5.3. Main PCB Replacement ............................................................... 5-10
5.4. Load Cell Replacement ................................................................ 5-13
5.5. Base-Mounted Display Replacement.............................................. 5-16
A Serial (RS-232) Host Interface ..................................................... A-1
A.1. Communication Parameters ........................................................... A-1
A.2. Protocols ..................................................................................... A-1
A.2.1. ASCII Characters and Conversions ......................................................................... A-2
A.2.2. Toledo Protocol Host Commands .......................................................................... A-4
A.3. Scale Status Byte Information ......................................................... A-5
A.4. Scale Confidence Byte Format ......................................................... A-5
A.5. Calibrate Using Host Interface ......................................................... A-6
B USB Host Interface ....................................................................... B-1
B.1. References ................................................................................... B-1
B.2. Hardware ..................................................................................... B-1
Page 9

30126862 | 00 | 04/2014
METTLER TOLEDO BC Shipping Scales User's Service Manual
5
B.3. Electrical Connection ..................................................................... B-1
B.4. Power.......................................................................................... B-2
B.5. Protocol ....................................................................................... B-2
C USB Virtual Serial Driver .............................................................. C-1
C.1. Hardware ..................................................................................... C-1
C.2. Driver Installation .......................................................................... C-1
C.2.1. Installation .......................................................................................................... C-2
D Host Interface for Setup ................................................................ D-1
D.1. Software Application ...................................................................... D-1
D.2. Driver Installation .......................................................................... D-1
E Special Configuration................................................................... E-1
E.1. Software Application ...................................................................... E-1
E.2. Driver Installation .......................................................................... E-1
E.3. Price Command ............................................................................ E-1
E.4. Logo Command ............................................................................ E-1
E.5. Custom Message Command .......................................................... E-1
F GEOCAL Codes ............................................................................ F-1
Page 10
30126862 | 00 | 04/2014
METTLER TOLEDO BC Shipping Scales Service Manual
1-1
This chapter covers
1 Introduction
letter and parcel
parcel
Model
BCA-15
BCA-30
BCD-3L
BCA-6L
BC-15
BC-30
BC-60
BCA 150
Capacity
150 / 300
60 / 150 kg
Readability
0-10lb x 0.1oz
0-149lb x 0.5oz
15-32kg x 10g
Platter
Construction
ABS Plastic
Roller Top
Stainless
Roller Top
PC Connection
Standard
Optional
Standard
Optional
Units
Thank you for purchasing a BC shipping scale from METTLER TOLEDO.
• Standard Features
• Optional Accessories
• Specifications
• Power Requirements
• Environmental Requirements
• Standards Compliance
• FRI Susceptibility
The BC scale is a low profile, high precision scale designed to meet the needs of the legal-for-trade
parcel/manifest markets. The BC scale is capable of communicating through Toledo, SICS, and the
protocols of the major shipping carriers. The scale configuration can be customized, or easily
programmed through default communication settings. For preconfigured models, set up is simple
and easy with plug and play capability.
The BC scale family has 4 main models with maximum capacity at 15 kg (30 lb), 30 kg (70 lb),
60 kg (150 lb) and 150 kg (300lb). There are four postal versions with high resolution to process
letters as well as parcels. Typical BC models and platter options are summarized in Table 1-1.
Refer to the “Cap-inc” program block in Chapter 4 for the default capacity and increment settings.
The BC scale, like all METTLER TOLEDO products, is designed for maximum
durability and reliability in even the most demanding shipping applications. The BC
is manufactured in one of METTLER TOLEDO’s ISO 9000 certified facilities so you
are assured to receive a high-quality product.
The BC scale is designed for robust use in parcel shipping, mail, and other light
industrial environments. BC scale models have a wide temperature and humidity
range and can be used on most unheated shipping docks.
The
carriers. The
models provide the high resolutions required for shipping via postal and parcel
models offer superb reliability for retail stores, mail rooms and shipping
departments sending packages via parcel carriers or truck lines.
Table 1-1: BC Scale Versions
30 lb
15 kg
0-15lb x 0.1oz
15-30lb x 0.2oz
0-3kg x 0.001kg
3-15kg x 0.005kg
ABS Plastic
Letter and Parcel Parcel
70 lb
30 kg
0-7lb x 0.1oz
7-70lb x 0.2oz
0-15kg x 0.005kg
15-30kg x 0.01kg
ABS Plastic
Stainless Steel
: USB, RS-232, Virtual Serial, Keyboard Wedge
: Ethernet, Bluetooth
70 lb.
32 kg
0-7lb x 0.05oz
7-70lb x 0.2oz
0-3kg x 0.001kg
3-15kg x 0.005kg
ABS Plastic
Stainless Steel
150 lb.
(lb only)
0-70lb x 0.2oz
0-5lb x 0.005lb
0-25lb x 0.05lb
0-150lb x 0.1lb
ABS Plastic
Stainless Steel
Ball Top
Lb., Lb-oz, Kg, g
30 lb
15 kg
0.01lb
0.005kg
ABS
Plastic
70 lb
30 kg
0.05lb
0.02kg
ABS Plastic
Stainless Steel
: USB, RS-232, Virtual Serial, Keyboard Wedge
150 lb
60 kg
0.05lb
0.02kg
Stainless Steel
Ball Top
: Ethernet, Bluetooth
lb.
0.05 / 0.1lb
0.02 / 0.05
kg
Steel
Ball Top
Page 11

1-2
METTLER TOLEDO BC Shipping Scales Service Manual
30126862 | 00 | 04/2014
Introduction
Model
BCA-15
BCA-30
BCD-3L
BCA-6L
BC-15
BC-30
BC-60
BCA 150
Approval
EC / OIML / NTEP / Metro. Canada / UL NTEP / UL EC / OIML / NTEP / Metro. Canada / UL
Letter and Parcel Parcel
The BC60 has 60 kg (150 lb) capacities. The BC150 (150 / 300 lb.) version is utilized for the
applications that need a larger platter size.
BC6L, BC3L, and a version of the BC15 have multi-interval technology for high resolution, autoranging scales that are approved as weight classifiers for letters as well as parcels. It is like having
multiple scales in one.
Additional information can be obtained from the MT website to help with installation and operation
of the scale:
In the unlikely event you experience difficulties operating your scale, please contact the local
distributor or METTLER TOLEDO representative from whom you purchased the scale.
1.1. Standard Features
The following are standard features built into each BC shipping scale.
www.mt.com/IND-BCscale
• High quality Mettler Toledo precision load cell that is capable of being programmed for Lb., lb-
oz, Kg or grams.
• Unit switching between the selected primary and secondary units.
• Multi-interval capacities that provide better weight resolution at the lower range. Scale has auto
range capability to automatically switch between intervals.
• Capacities and resolution can be customized. Legal for Trade units must be within approval
requirements.
• GeoCal Setup compensates the sensitive factory calibration for local gravitational differences,
eliminating the expense of an onsite calibration.
• Graphical display with soft key selections and easy to use navigation keypad. Intuitive interface
that allows easy configuration of the scale.
• Adjustable display angle for better viewing
nd
• Detachable display for remote mounting. Option for 2
display in a graphical or seven segment
option.
• Simple to communicate to a PC. Scale is capable of communicating via USB or RS232. For
USB, the BC scale can be set up to use Microsoft POS HID scale protocol, virtual serial (serial
communication over a USB cable), or Keyboard wedge functionality.
• Selectable communication protocols to match major carrier or manifest software’s.
• USB Cable (10 ft.)
• RS-232 serial interface cable (10 ft)
Page 12

30126862 | 00 | 04/2014
METTLER TOLEDO BC Shipping Scales Service Manual
1-3
• Universal Power supply with localized plug (Used with RS232, Ethernet, and BlueTooth
communication, Scale is self-powered through USB connection)
The following features are specific to particular BC models.
1.1.1. BC15
• 30 lb / 15 Kg capacity
• Coated steel plate for base and sub-platter
• Base mounted display
• ABS Plastic platter
1.1.2. BC30
• 70 lb / 30 Kg capacity
• Die-cast aluminum base and sub-platter
• Base mounted display
• ABS Plastic or stainless steel platter
1.1.3. BC60
• Standard Capacity 150 lb / 60 Kg
• Die-cast aluminum base and sub-platter
• Base mounted display
• Stainless steel, ABS plastic, or ball top platter
1.1.4. BC150
• 150 lb / 60 Kg or 300 lb / 150 Kg capacity
• Painted steel base and sub-platter
• Display bracket with 14 ft cable where display can be base mounted or wall mounted
• Platter is typically packaged in a separate box.
1.2. Optional Accessories
1.2.1. General
• Ethernet Option and Bluetooth Option.
• Alibi Memory (Europe).
• Roller Top transfer platter (BC-60 and BC-150) is used for conveyor applications. It allows
easy movement of package in bi-directional (right-left) motion.
• Ball Top transfer platter (BC-60 and BC-150) that allows easy rotation of package on the
platter.
• Conveyor Rail mounting Kit.
Page 13
1-4
METTLER TOLEDO BC Shipping Scales Service Manual
30126862 | 00 | 04/2014
Introduction
• Platter overlay.
• Mounting Kit for In-Counter applications.
1.2.2. 0271 Graphical or 0270 Basic Display Options
• Single wall mount display (Graphical or basic) with 14 ft. cable, replaces the base display.
• Single tower display (Graphical or basic) with 14 ft. cable for counter top mounting, replaces
the base display.
• Dual wall mount displays (Graphical or basic) with 14 ft. cables, replaces the base display.
• Dual display tower (Both Graphical or both basic) with 10 ft. cable for counter top mounting,
replaces the base display.
nd
• 2
• 2
• Display cable extension kit, 14 ft. (basic only).
• RS232 extension cable, 10 ft with male / female adapters.
display, wall- or tower-mounted (Graphical or basic) with 14 ft. cable. Used in conjunction
with base display.
nd
display, base-mounted (Graphical or basic). Used in conjunction with first base display.
1.3. Specifications
The BC shipping scale conforms to and operates best within the specifications described in Figure
1-1, Table 1-2 and Table 1-3.
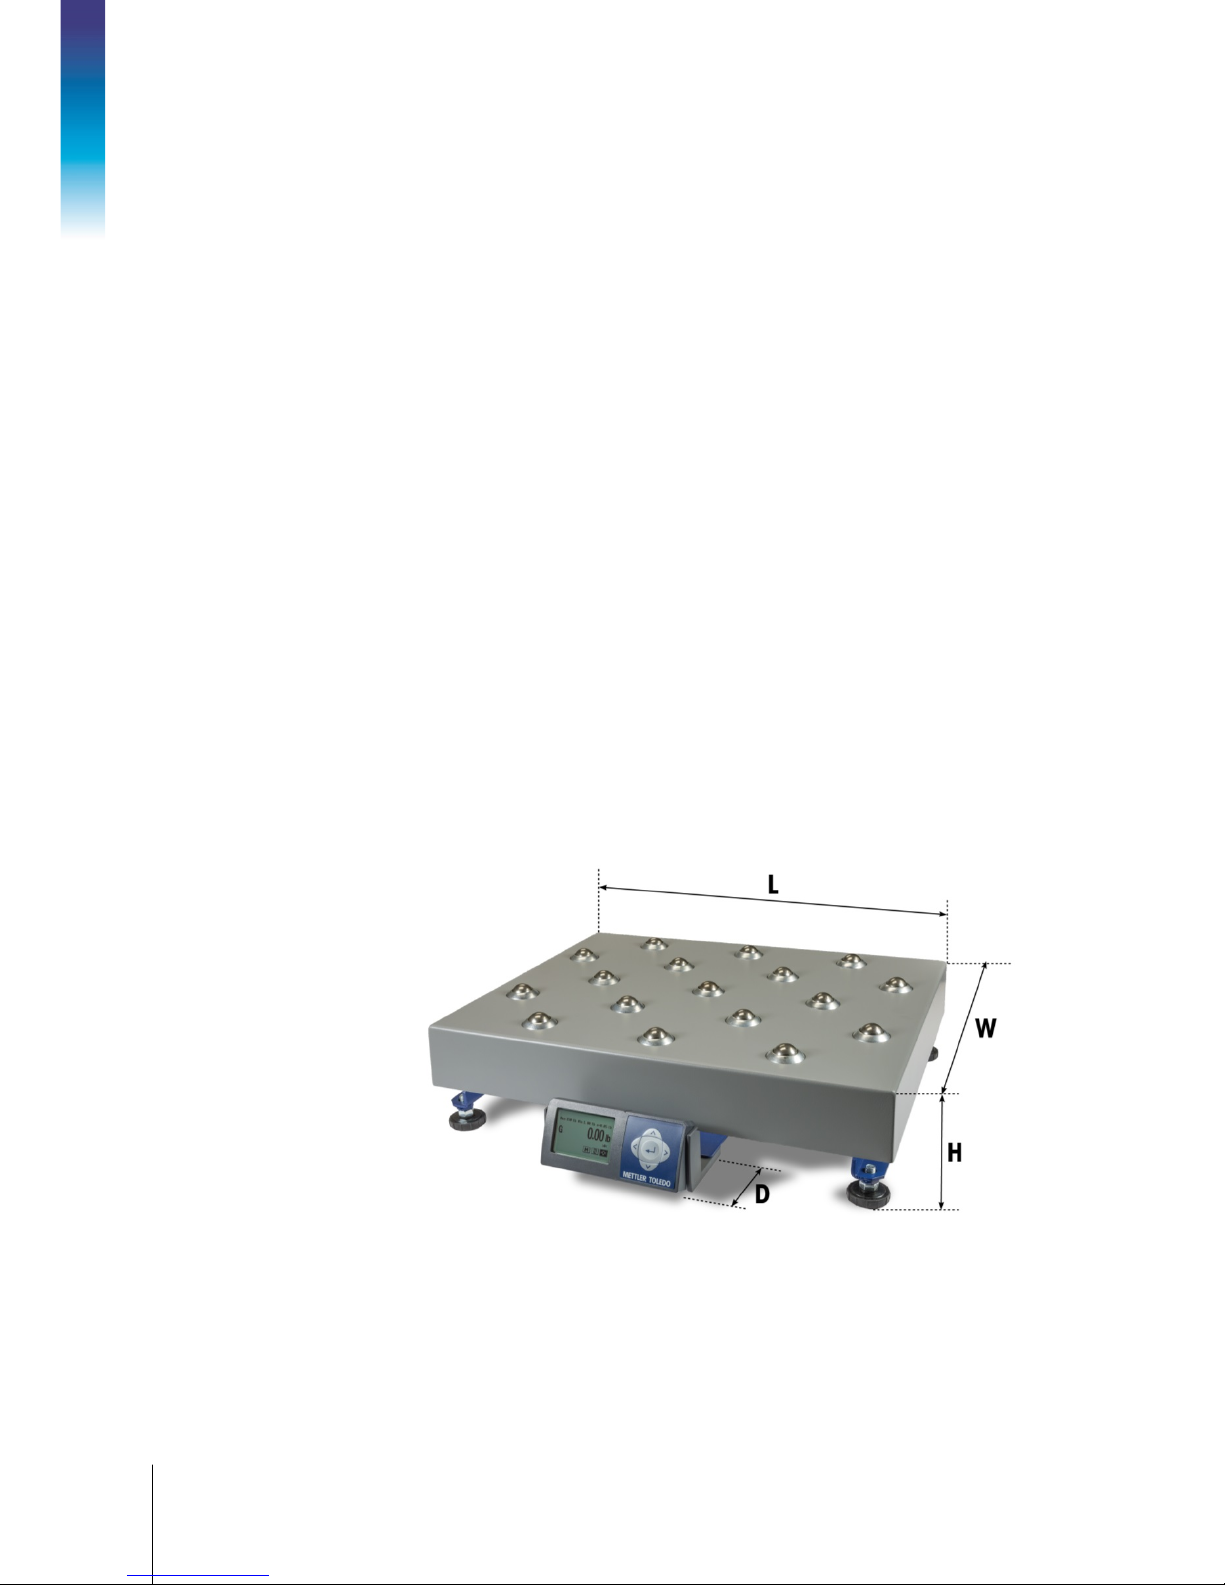
1.3.1. Physical Dimensions
Figure 1-1: Key to Physical Dimensions
Page 14
30126862 | 00 | 04/2014
METTLER TOLEDO BC Shipping Scales Service Manual
1-5
Table 1-2: Physical Dimensions of BC Scales, Pounds and Inches
PS15
PS30
PS60
PS90
PS15
PS30
PS60
PS90
Scale Shipping Box
Weight and Dimensions
Model Platter Wt L W H D Wt L W H
Plastic
Plastic
Stainless Steel
Plastic
Stainless Steel
Ball Top
Roller Top
Stainless Steel
Ball Top
Roller Top
8 11.6 10.9 3.5 2 11 16 14 8
12 13.9 12.3 4 2 17 19 18 7.8
12 13.9 12.3 4 2 17 19 18 7.8
19 13.9 12.3 5.2 2 23 19 18 7.8
24 17 17.6 5.8 0 31 22 19 17
44 20.5 16.5 4.25 2.3 53 27 22 12
54 19.8 15.8 4.8 2.6 65 27 22 15
53 22.8 17.5 6.1 2 65 27 22 16
Table 1-3: Physical Dimensions of BC Scales, Kilograms and Millimeters
Scale Shipping Box
Weight and Dimensions
Model Platter Wt L W H D Wt L W H
Plastic
Plastic
Stainless Steel
Plastic
Stainless Steel
Ball Top
Roller Top
Stainless Steel
Ball Top
Roller Top
3.6 295 277 88.9 51 5.0 406 356 203
5.5 353 312 102 51 7.7 483 457 198
5.5 353 312 102 51 7.7 483 457 198
8.6 353 312 132 51 10.5 483 457 198
10.9 432 447 147 0 14.1 559 483 432
20.0 521 419 108 58 24.1 686 559 305
24.5 203 401 122 66 29.5 686 559 381
24.1 579 445 155 51 28.6 686 559 406
1.4. Power Requirements
The BC operates over an input voltage of 5 VDC, at a current of 100 mA or less. The scale is
powered through the USB port on the scale so the USB cable is always used for power.
• For USB operation, the scale communicates and is powered through the USB port of the PC.
With the low power consumption, the BC scale is within the USB power requirements for
connection to your PC without requesting additional power. Scale can also communicate and
be powered through a USB hub.
Page 15

1-6
METTLER TOLEDO BC Shipping Scales Service Manual
30126862 | 00 | 04/2014
Introduction
BC-15
BC-3L
BC-60
BC-150
BC-6L
An external 5 VDC power supply is required for power to the BC scale for standalone applications,
RS232 applications, Ethernet applications or BlueTooth applications. For these applications, the
scale will be powered by the universal power adapter located in the scale’s shipping box. The wall
mounted transformer is rated between 110-220V and 50-60 Hz. Connect the USB cable to the PC
and then to the power supply. The power supply may have multiple plug adapters that can be
clipped to the transformer based on the available country outlet.
1.5. Environmental Requirements
The BC scale is designed to operate in conditions of 10-90% relative humidity, non-condensing,
and a temperature range of:
0° to +40°C (+14° F to +104°F)
0° to +40°C (+14°F to +104°F)
0° to +40°C (+14°F to +104°F)
0° to +40°C (+14°F to +104°F)
+10° to +40°C (+14°F to +104°F)
The shipping and storage temperature range is −20° to +60°C (-4°F to +140°F) at 0 to 95%
relative humidity, non-condensing.
The scale is designed for use in parcel shipping and other light industrial environments. This unit is
not intended for wash down or hazardous area operation, nor for operation in environments of
extreme heat, cold, or humidity (outside of the range listed above for each model).
1.6. Standards Compliance
The BC Family:
• Meets or exceeds USA NIST HB-44, EC and international OIML requirements for a 3000
division, Class III parcel scale.
• Meets UL and CE safety requirements.
• Meets RoHS and REACH material requirements.
Page 16

30126862 | 00 | 04/2014
METTLER TOLEDO BC Shipping Scales Service Manual
1-7
1.7. RFI Susceptibility
The BC scale meets the requirements of the European Norm. 45501 for RFI susceptibility as listed
below with a maximum of one display increment of change when calibrated for recommended
builds.
Radio Interference Frequency Field Strength
80 - 2000 MHz 10 volts/meter
Page 17

30126862 | 00 | 04/2014
METTLER TOLEDO BC Shipping Scales Service Manual
2-1
This chapter covers
• Installing Accessory Items
2 Installation
Do not
This chapter gives detailed instructions and important information you will need to
• Unpacking
• Setup
2.1. Unpacking
2.1.1. Package Inspection
Please inspect the package as the carrier delivers it.
• If the shipping container is damaged, check for internal damage and file a freight claim
with the carrier if necessary.
• If the container is undamaged, open the box, remove the scale, and place it on a solid, flat
surface.
The platter provided with the BC-150 is shipped in a separate box.
install the BC scale successfully. Please read this chapter thoroughly before you
begin installation. This information is also covered in the BC Quick Start Guide.
Please keep the packing material and shipping insert in case the scale needs to be returned to
METTLER TOLEDO. The BC is a precision instrument and may be permanently damaged if not
shipped in factory-approved packaging.
Open box and remove the packaging material from the top of the scale. Remove the platter (BC15/30/3L/60/6L). Remove scale by grasping the bottom sides and lifting straight up.
scale by grasping the sub-platter. Remove any protective shipping materials under the platter or
sub-platter.
If you choose to dispose of the package, please recycle the materials. The packaging is
recyclable natural fiber with biodegradable adhesives. Refer to the list of recycling centers in the
scale documentation
Locate a suitable environment for the scale.
The proper environment enhances the operation and longevity of the scale.
The scale will need to be placed on a sturdy, level surface. Refer to Chapter 1 for environmental
specifications. If communication to the PC will be serial RS232, Ethernet, or Bluetooth, the scale
will need to be located near an AC outlet for power.
lift the
Page 18
2-2
METTLER TOLEDO BC Shipping Scales Service Manual
30126862 | 00 | 04/2014
Installation
2.1.2. Box Contents
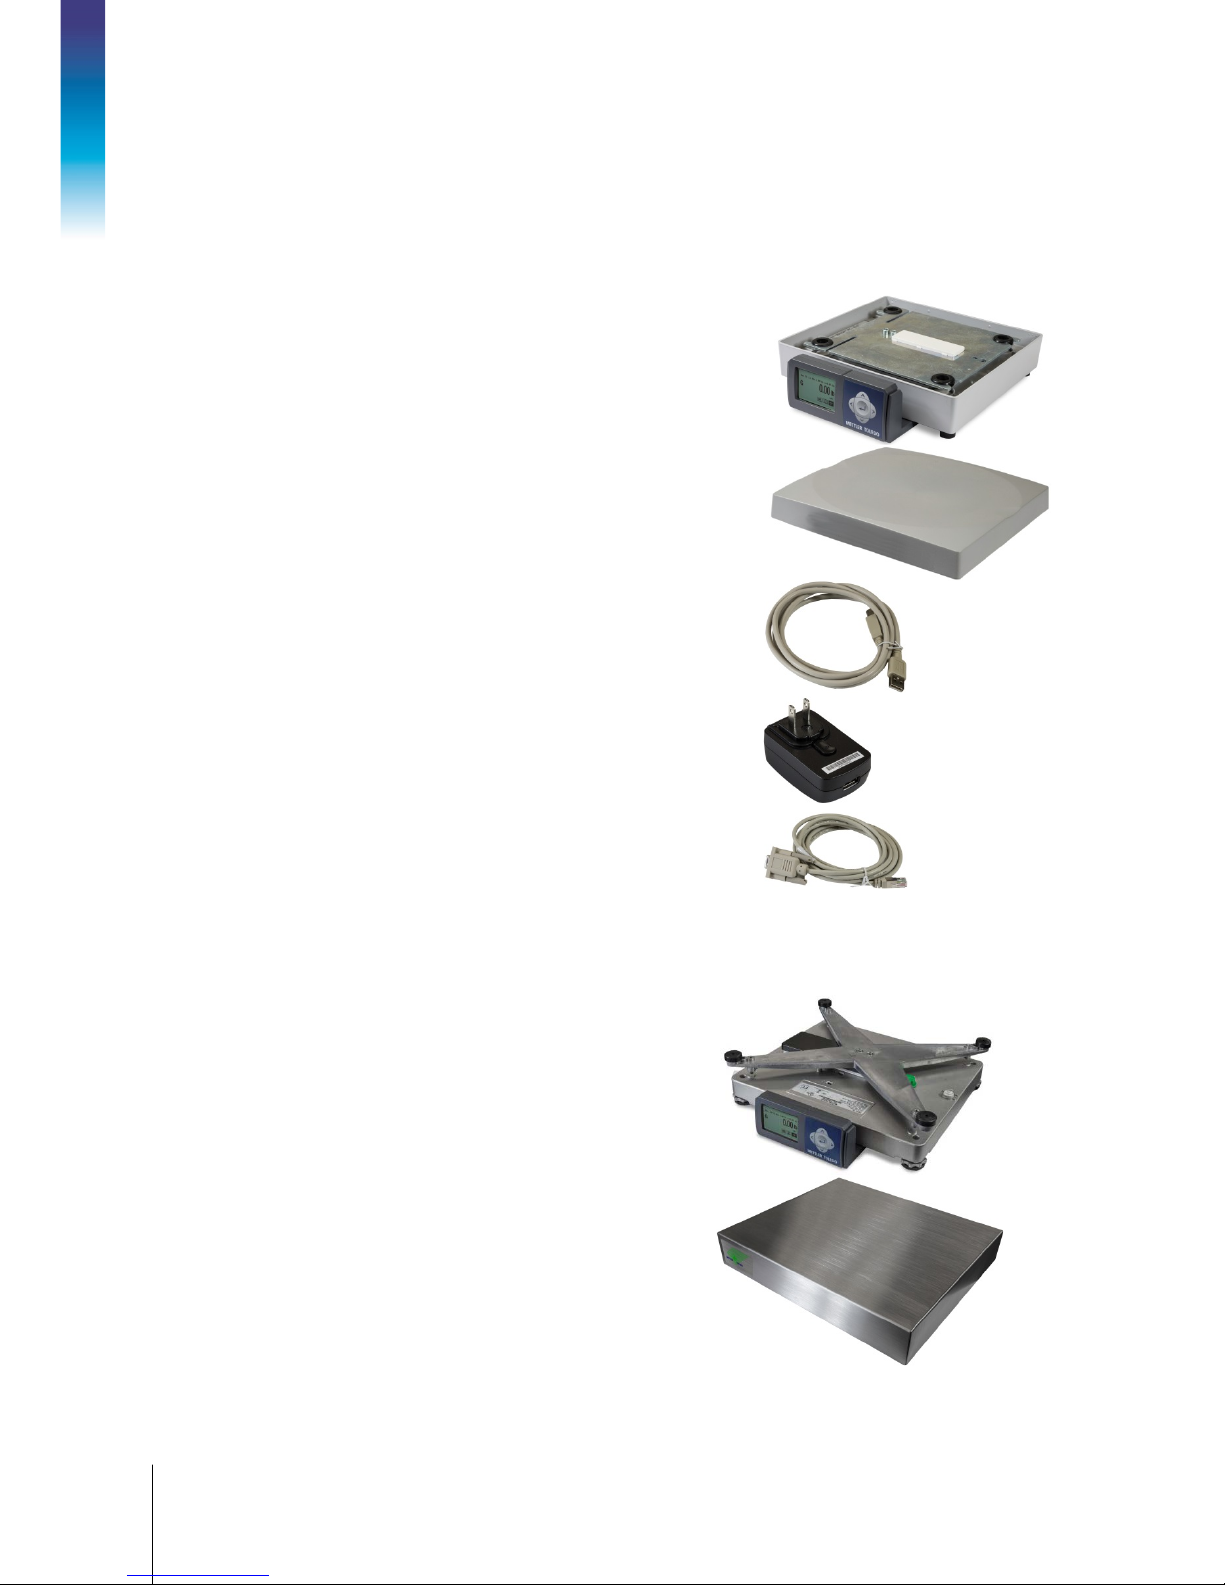
Check the contents of the box.
2.1.2.1. BC-15
Scale base and display
Platter
USB Cable – 10 ft. (for USB connection to PC)
Power Supply
(for Serial
connection to PC)
RS-232 cable – 10 ft.
2.1.2.2. BC-60, 6L, 30, 3L
Differs from BC-15 only in the appearance of the base and platter
Scale base and display
Platter
Page 19
30126862 | 00 | 04/2014
METTLER TOLEDO BC Shipping Scales Service Manual
2-3
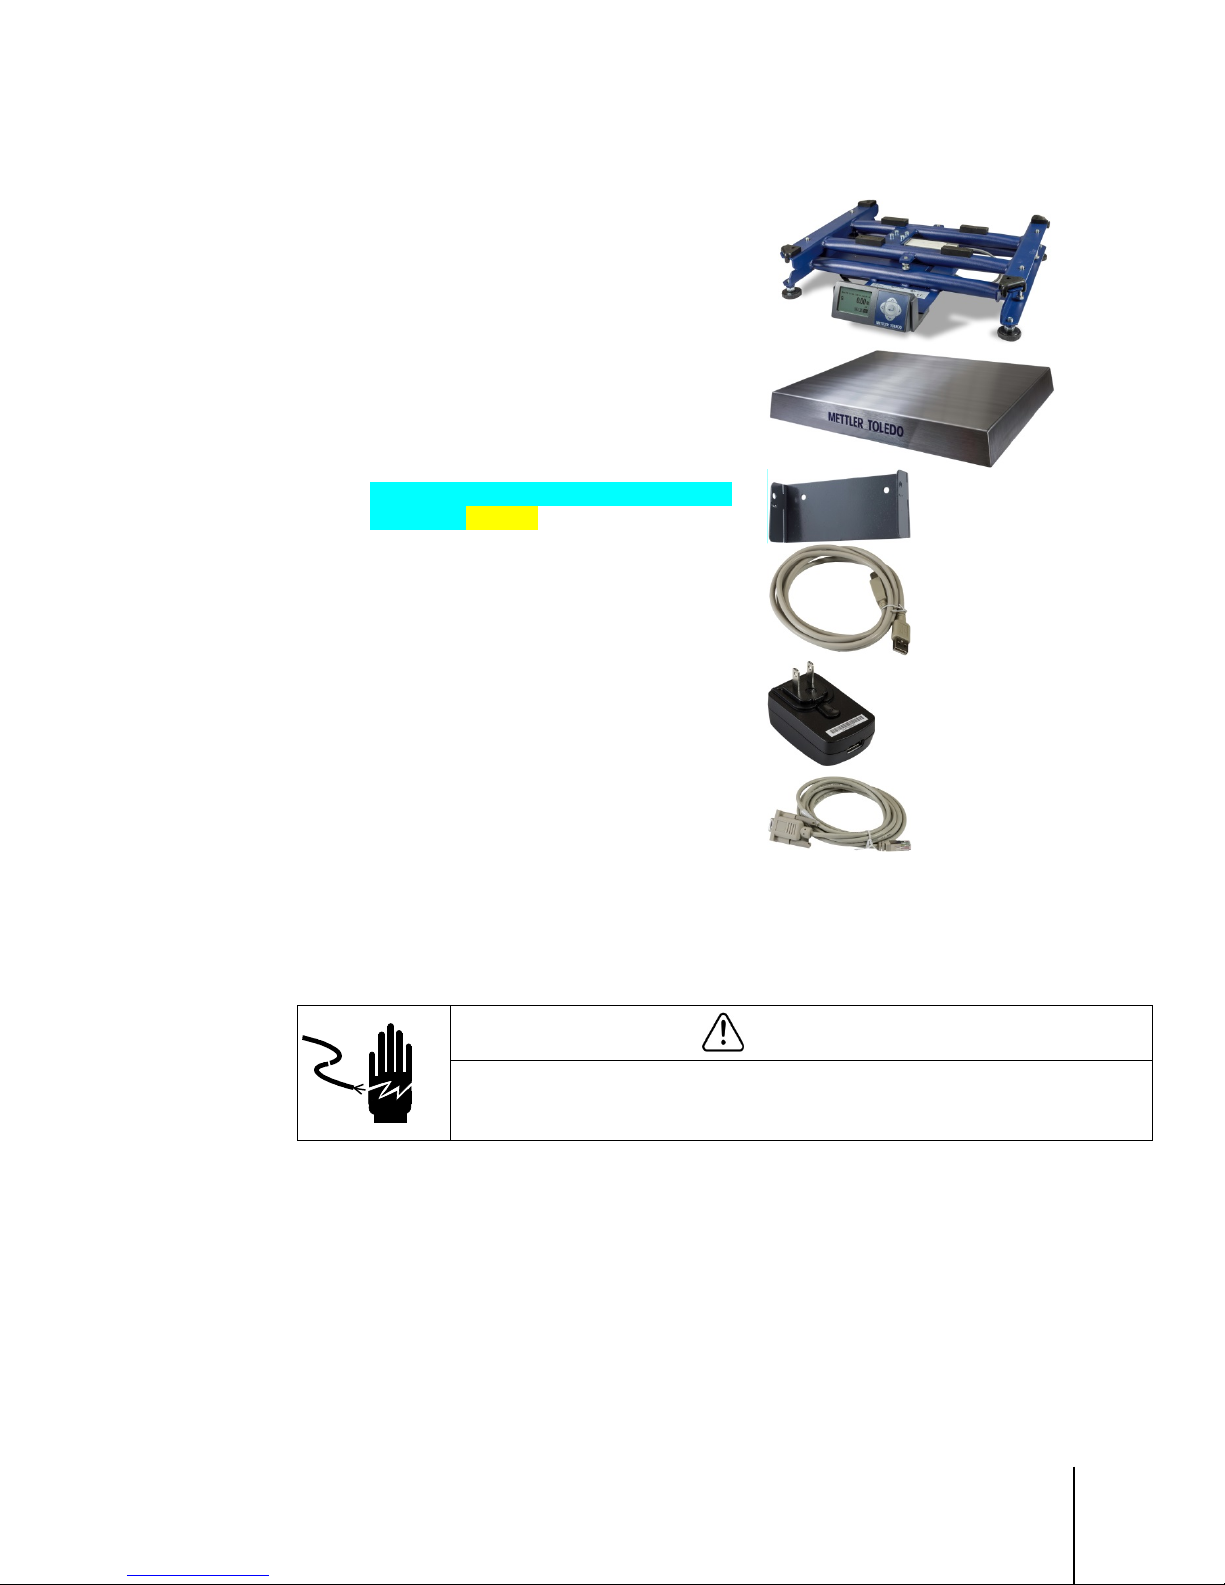
2.1.2.3. BC-150
Scale base and display
Platter (in separate box)
Display with base/ wall-mount, adhesive pad,
14 ft. cable and clips
USB Cable – 10 ft. (for USB connection to PC)
Power Supply
(for Serial
connection to PC)
RS-232 cable – 10 ft.
2.2. Setup
2.2.1. Scale Installation
AC POWER SOURCES MUST HAVE PROPER SHORT CIRCUIT AND OVER CURRENT
PROTECTION IN ACCORDANCE WITH LOCAL AND NATIONAL ELECTRICAL REGULATIONS.
FAILURE TO PROVIDE THIS MAY RESULT IN BODILY INJURY AND/OR PROPERTY DAMAGE.
The BC shipping scale is fully assembled at the factory and ready for installation.
For the BC-60, BC-6L, BC-30, BC-3L, and BC-15, proceed to section 2.2.2.
2.2.1.1. BC-150 Display Installation
Mount the display and remove the shipping tabs as instructed below. The display can be mounted
to the scale base, or wall-mounted.
WARNING
Page 20

2-4
METTLER TOLEDO BC Shipping Scales Service Manual
30126862 | 00 | 04/2014
Installation
2.2.1.1.1. Base Mounting
With black plastic clips in the insert position, attach display to the base by inserting the plastic clips
at yellow arrows indicated below. Turn the plastic clips- 90 degrees to lock into position.
Replaced by screws?
2.2.1.1.2. Wall Mounting
Remove liner on one side of the adhesive pad and insert into the display bracket. Remove liner from
the other side of the adhesive pad and position the display on the wall. Display should be located
on the bottom portion of the bracket. Press bracket firmly against the wall until it is secured.
2.2.1.2. Scale Base Preparation, BC-150 Only
With the display mounted:
1. Connect the display cable to the display and scale at the two red arrows above. Note that the
cable can be inserted through guide holes in the back of the display bracket. The scale
connector panel will have four connectors. Insert cable at connector labeled “Display”. The
male cable connectors have a tab. Press cable into display connector and scale connector until
the tab locks into position.
2. Wrap excess cable beneath scale. There are two grey clips on the bottom of the scale that the
cable can be wrapped around.
3. Adjust the display angle according to the scale’s mounting position. Hold the top and bottom of
the display and gently rotate it up or down.
Page 21
30126862 | 00 | 04/2014
METTLER TOLEDO BC Shipping Scales Service Manual
2-5
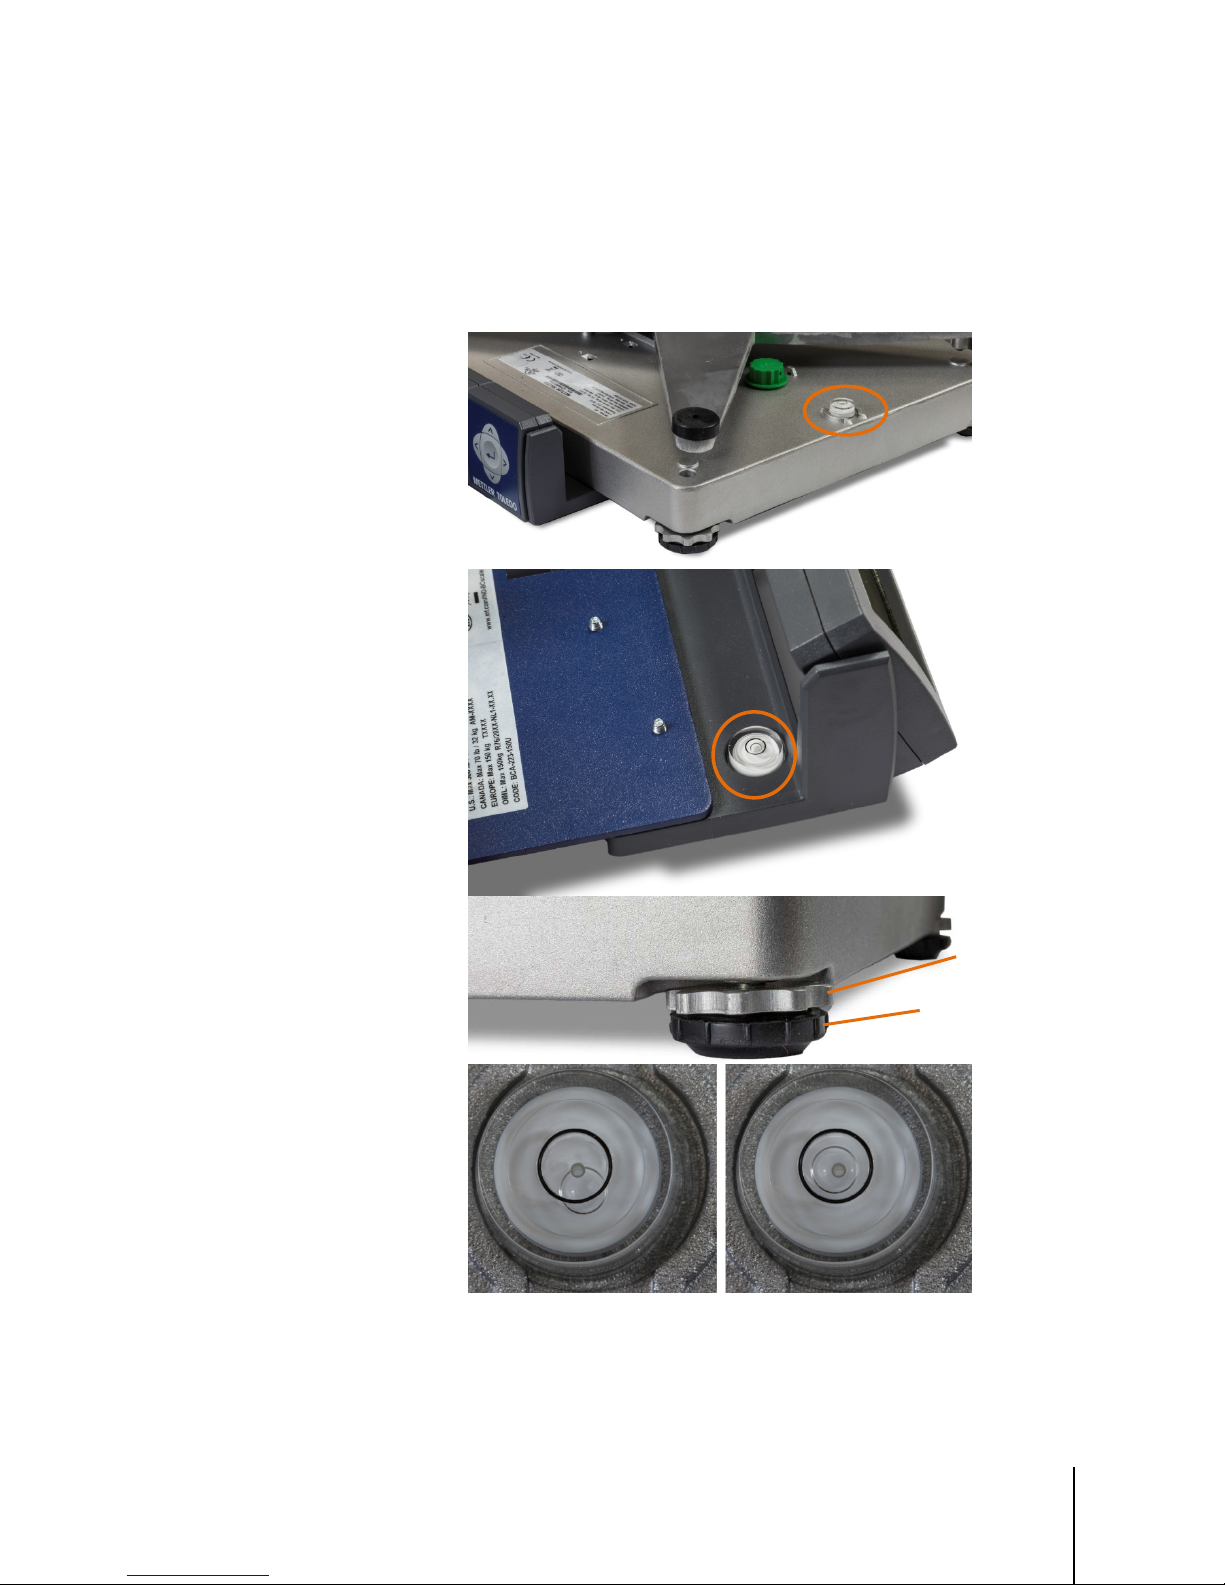
2.2.2. Preparation, All Models
Thumb wheel
locking knob
Adjustable
foot
1. Level the scale by turning the adjustable feet on the bottom of the unit. The scales are equipped
with a level bubble. When the bubble is within the circle in the bubble indicator, the BC scale is
level. The feet must be adjusted so the scale is stable and does not rock. After leveling, tighten
the thumb wheel locking nut if equipped. The level bubble may be on the display bracket, under
the platter or on a side bracket.
INCORRECT CORRECT
Figure 2-1: Leveling the Scale
Page 22

2-6
METTLER TOLEDO BC Shipping Scales Service Manual
30126862 | 00 | 04/2014
Installation
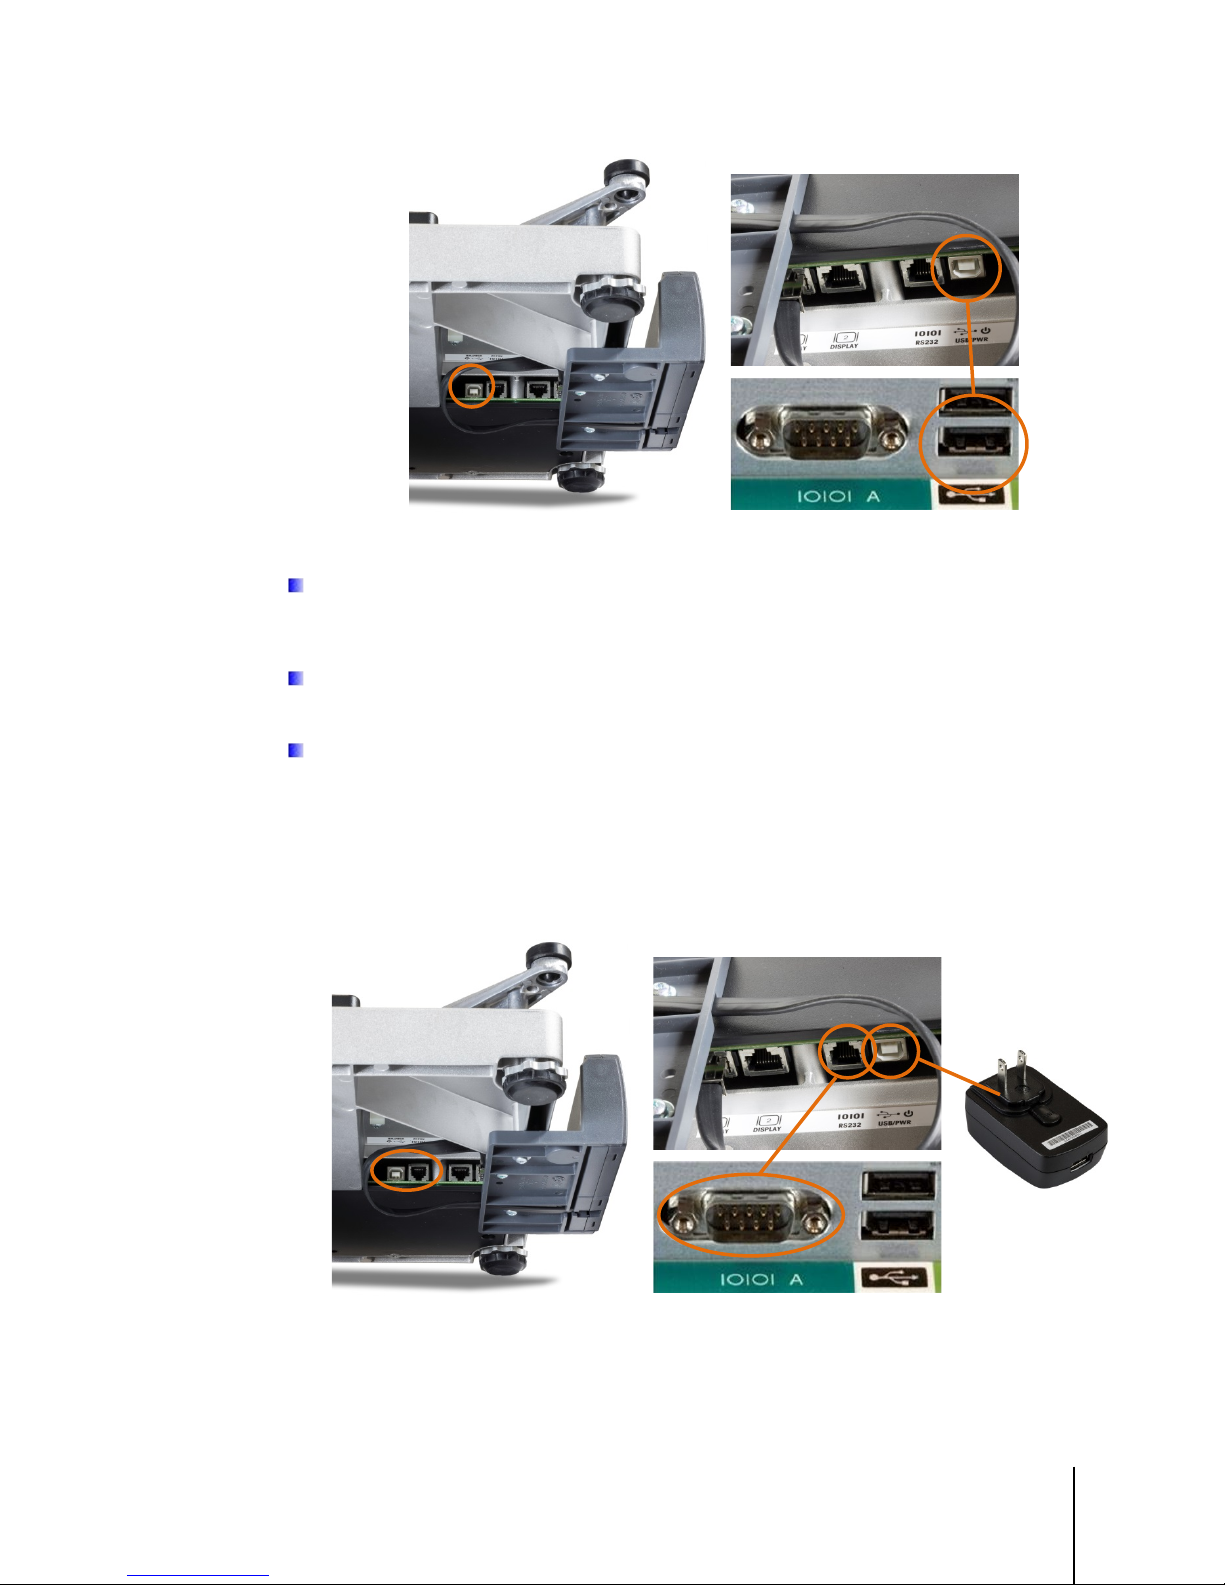
USB
RS-232
USB
2. Place the Platter on the scale. The platter is held in place by compression fit with the rubber
grommets on the sub-platter, or spider.
Figure 2-2: Installing the Platter
3. Confirm the method that will be used to connect the scale to the PC for communication. USB
and RS232 configurations are possible. Choose one method only.
Figure 2-3: Connection Methods
• USB is preferred if the Shipping/Carrier manifest system supports and designates the scale
for USB set up. Consult the Carrier’s software documentation for details.
• USB must be used if the scale is to communicate with multiple shipping programs.
2.2.3. PC Connection
2.2.3.1. USB
USB is the preferred method of connection.
1. Plug the small end of the USB cable (B connector) into the scale connector port marked
.
Page 23
30126862 | 00 | 04/2014
METTLER TOLEDO BC Shipping Scales Service Manual
2-7
The scale must be turned over to access the scale connector ports.
Plug the large end of USB cable (A connector) into the PC.
A power supply is not required since the low power requirement of the PS scale is met by power
from the computer’s USB port.
If the PC has difficulty powering the scale through the USB Port, connect scale to a powered
USB hub, then connect the PC to the hub.
2.2.3.2. Serial
Serial is the alternative method of connection. Note that the serial connection requires the use of the
USB cable to supply power from an electrical socket via the transformer.
Figure 2-4: USB Connections, Scale and PC
Figure 2-5: Serial Connections, Scale(left, top) and PC (bottom center); Power Supply (right)
1. Plug the small connector of the RS232 cable (B connector) into the scale connector port
marked “RS232”.
Page 24

2-8
METTLER TOLEDO BC Shipping Scales Service Manual
30126862 | 00 | 04/2014
Installation
USB.
Appendix F
2. Plug the small end of the USB cable into the scale port marked
3. Locate the serial connector on your PC (typically labeled COM 1, COM A or IOIOI).
4. Plug the large connector on the RS232 cable into the PC serial connector.
5. Plug the large end of the USB cable (A connector) into the power supply and plug the Power
Supply into an AC outlet.
Note:
Note: If additional cable length is needed, a 10 ft RS232 extension cable - 0900-0322-000
BC-15, BC-150 Connectors are labeled in the reverse direction.
(62010759) is available.
If the RS232 cable is plugged into the incorrect PC port, turn the computer off first, then change
ports and reboot the computer.
If additional cable length is needed, see replacement parts for 10 ft. RS232 extension cable
with appropriate connectors.
Use only the Mettler Toledo 5 VDC Power Supply to energize the scale.
2.2.4. Scale Configuration
The patented GEOCAL™ feature provides the best scale accuracy. This feature precisely
compensates for gravitational differences between the factory location (where the scale was
calibrated) and the scale’s point of use location. Since the Earth’s gravity varies based on latitude
and altitude, the GeoCal feature allows the BC scale to maintain the sensitive factory calibration to
ensure the most accurate weighting results.
For Legal-For-Trade applications, contact your local Weights and Measure office for additional
requirements and certification.
Visit www.ncwm.net/state for listing of the US Weights and Measure offices by state.
2.2.4.1.1. GEO Calibration Values
2.2.4.1.2. Graphical Display
Refer to
for a table of regions and corresponding GEO codes.
1. Observe the display when the scale is first powered up:
If 0.00 displays, then GEOCAL is not activated, and no code is required. Proceed to step 7. For
best accuracy, the scale should be calibrated on-site by a trained technician using certified
weights.
If the initial boot screen (Figure 2-6) is displayed, the scale will prompt for the entry of a Geo
code, and selections for language, unit selection and the type of manifest software the scale
will communicate with.
Page 25
30126862 | 00 | 04/2014
METTLER TOLEDO BC Shipping Scales Service Manual
2-9
English – Lb
English – Kg, French
Spanish, German
Chinese
FedEx ShipManager, UPS World ship, DHL EasyShip, Purolator E-
Ship
Figure 2-6: Initial Boot Screen, Graphical Display
2. Enter GEOCAL Set up code on Initial Boot Up screen.
Note: If the GEOCAL™ capabilities of your BC unit have been activated, the scale will only
prompt for the “Geo in” code on the first power up.
3. Use the up ▲ and ▼ down arrows to scroll to and highlight the selection with the bolded box.
4. Use the left ◄ and right ► arrows to scroll through the selection’s parameters
5. Press Enter to accept the selection.
6. Geo Code - Press ◄ or ► to scroll through the code numbers. Refer to Appendix F for the
correct code. Numbers will repeat. Press Enter to accept.
7. Language / Units - Use the up▲ and down ▼ arrows to scroll to and highlight the Language
parameter. Press ◄ or ► to scroll through the options:
, and
. Options will repeat. Press Enter to accept.
.,
,
8. Manifest SW - Use the up and down arrows to highlight the manifest parameter. Press ◄ or ►
to scroll through the options:
. Options will repeat. Press Enter to accept.
If the correct GEOCAL code was not entered at first power up, refer to Chapter 4 to reset the
feature for the next power up.
For states that have multiple listings, choose the location that is closest. The GeoCal code
within a state is based on latitude and is segmented between north and south directions only.
Locations near a boundary can chose either code.
2.2.4.1.3. Basic, 7-Segment Display
If “GEo in” is displayed, enter the two digit GeoCal Location Code for the area where the scale will
be used. Refer to Appendix F for the correct code.
Figure 2-7: GEOCAL Screen, 7-Segment LCD Display
The sequence for selecting a GEOCAL™ code is as follows:
Page 26

2-10
METTLER TOLEDO BC Shipping Scales Service Manual
30126862 | 00 | 04/2014
Installation
1. Press the ZERO key repeatedly to scroll through the Codes. If the correct code is missed, keep
scrolling since numbers will repeat
2. Select the desired code by pressing the UNITS key once. DONE will be displayed.
3. Press the UNITS key a second time and the scale will reboot and display 0.00.
2.2.4.1.4. PC Configuration
Configure the Carrier or Shipping software on the PC to communicate with the scale. Open your
carrier or shipping software and go to the Set Up screen. Select the proper scale model from the
pull-down list. (Example: Toledo BC-60).
For additional assistance, contact the shipping software provider.
2.3. Installing Accessory Items
2.3.1. Remote Displays
METTLER TOLEDO offers several options for displays: they can be base-, wall- or tower-mounted.
Power down the scale before plugging in a remote or base mounted display. If display is
plugged in “Hot” and is displaying erratically, power down the scale for 10 seconds and
reboot.
• The base mounted display has the display mounted to the scale base.
• Wall mounted displays allow the weight to be seen at eye level.
• Tower mounted display is typically used for mounting on a counter top.
Remote displays are often used for better visibility. Most scales are ordered with a base-mounted
display. Remote wall or tower displays are typically used where package size is large enough to
obstruct the view of the scale’s base display. In Legal-for-Trade applications, a customer-facing
display is typically required in addition to the operator-facing display.
There are two display connectors (RJ45) on the scale, and it can support two displays. Each
display will have its own cable.
There are two display types, the graphical display model 0271 and the basic display model 0270
(seven segment LCD). The display types can be mixed, except in dual tower displays (where a
single tower supports two back-to-back displays).
• The 0271 model consists of a monochrome graphical display. The 0271 can show
special messages and the added value applications. The 0271 display will recognize the
scale and display the correct capacity and increment.
• The 0270 model is for basic weighing only and needs a printed lens to show the capacity
and increment size. The display needs to be matched to the scale capacity and increment
size. So changing the build requires a new Lens for the 0270 model.
Page 27

30126862 | 00 | 04/2014
METTLER TOLEDO BC Shipping Scales Service Manual
2-11
2.3.1.1. Second Display, in Addition to Base-Mounted Display
A 2nd wall- or tower-mounted display can be added in parallel to the base display with the use of a
10 ft cable. Display kits are 0270-3X00-000 or the 0271-3100-000 (30125729). To install this
option:
Figure 2-8: Second Display Installation
1. Disconnect power to the scale and locate the scale connectors on the bottom of scale.
2. The base display should already be connected to one of the display connectors. Locate the
other unused connector marked “Scale display”, insert the jack of the 10 ft. cable, closest to the
ferrite, into this RJ45 connector port.
3. Mount remote display (Wall or Tower) in proper location with mounting screws.
4. Connect the other end of the cable into the back side of the remote display.
5. Power up the scale.
Make sure any excess cable is properly secured and does not provide a trip hazard for
personnel or customers
2.3.1.2. Wall-Mounted Display
If the base display is not desired, then a single wall mounted (0270-3X00-000), or tower mounted
displays (0270-2X00-000) can be substituted for the scale base display. These remote displays
include a 10 ft. cable.
1. Disconnect power to the scale and locate the scale connectors on the bottom of the scale.
2. For the connector marked “Scale display”, disconnect base display cable by pressing in the
latching tab on the jack while pulling the cable out. Remove the screws mounting the Base
Display.
3. Mount remote display (Wall or Tower) in proper location with mounting screws. Connect the
Display Cable into the one of the Scale Display Jack and the remote display.
4. Power up the scale.
2.3.1.3. Dual Displays
If two displays are needed and the base display is not desired, then use one of the following
options:
• Dual wall mounted display
o Two 0270-3X00-000 each with a 10 ft. cable or
o Two 0271-3100-000 each with a10 ft. cable,
• 2 sided Tower display
o 0270-6X00-000 with one Y cable
o 0271-6100-000 with two10 ft. cable
Page 28
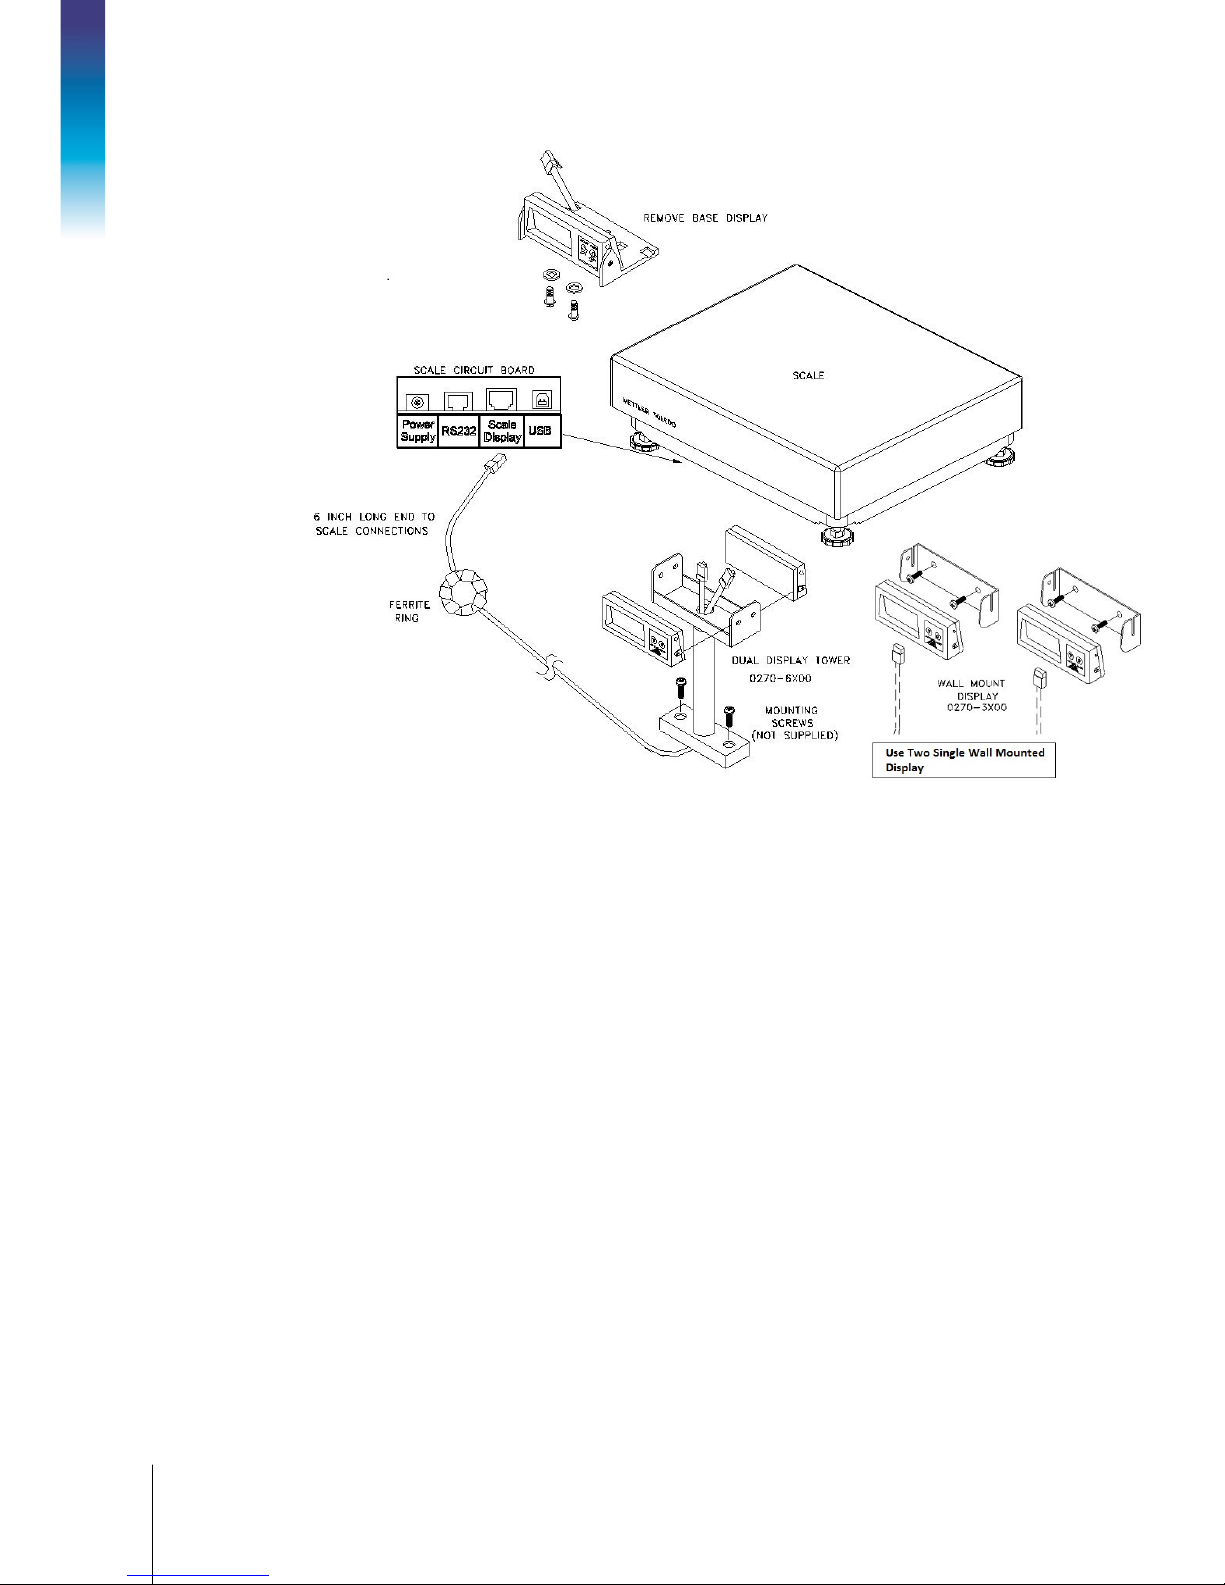
2-12
METTLER TOLEDO BC Shipping Scales Service Manual
30126862 | 00 | 04/2014
Installation
Figure 2-9: Dual Displays
1. Disconnect power to the scale and locate the scale connectors on the bottom of the scale.
2. For the connector marked “Scale display”, disconnect base display cable by pressing in the
latching tab on the jack while pulling the cable out. Remove the screws mounting the Base
Display.
3. Connect the Display Cable/s into the Scale connector labeled Display Jack
4. Mount remote display (Dual Wall or Tower) in proper location with mounting screws. Connect
the Display Cable into each display.
5. Power up the scale.
2.3.2. Ball and Roller Top Platters
A ball top or roller top transfer platter is available for the BC-60 and BC-150. To install the ball or
roller transfer platter:
1. Remove the platter supplied with the BC-60. BC-150 can be ordered without a platter.
2. Place the ball or roller top transfer platter on the BC - scale.
3. Ensure that the ball or roller top transfer platter drops into place without mechanical
interference.
Page 29
30126862 | 00 | 04/2014
METTLER TOLEDO BC Shipping Scales Service Manual
2-13
If the unit fails to capture zero, reboot the scale by cycling power (unplug the Wall transformer
and/or USB cable). Reconnect the power source. If the scale still fails to capture zero, recalibration will be required. The difference in dead load between platter types can be substantial
and outside the power-up criteria of the scale.
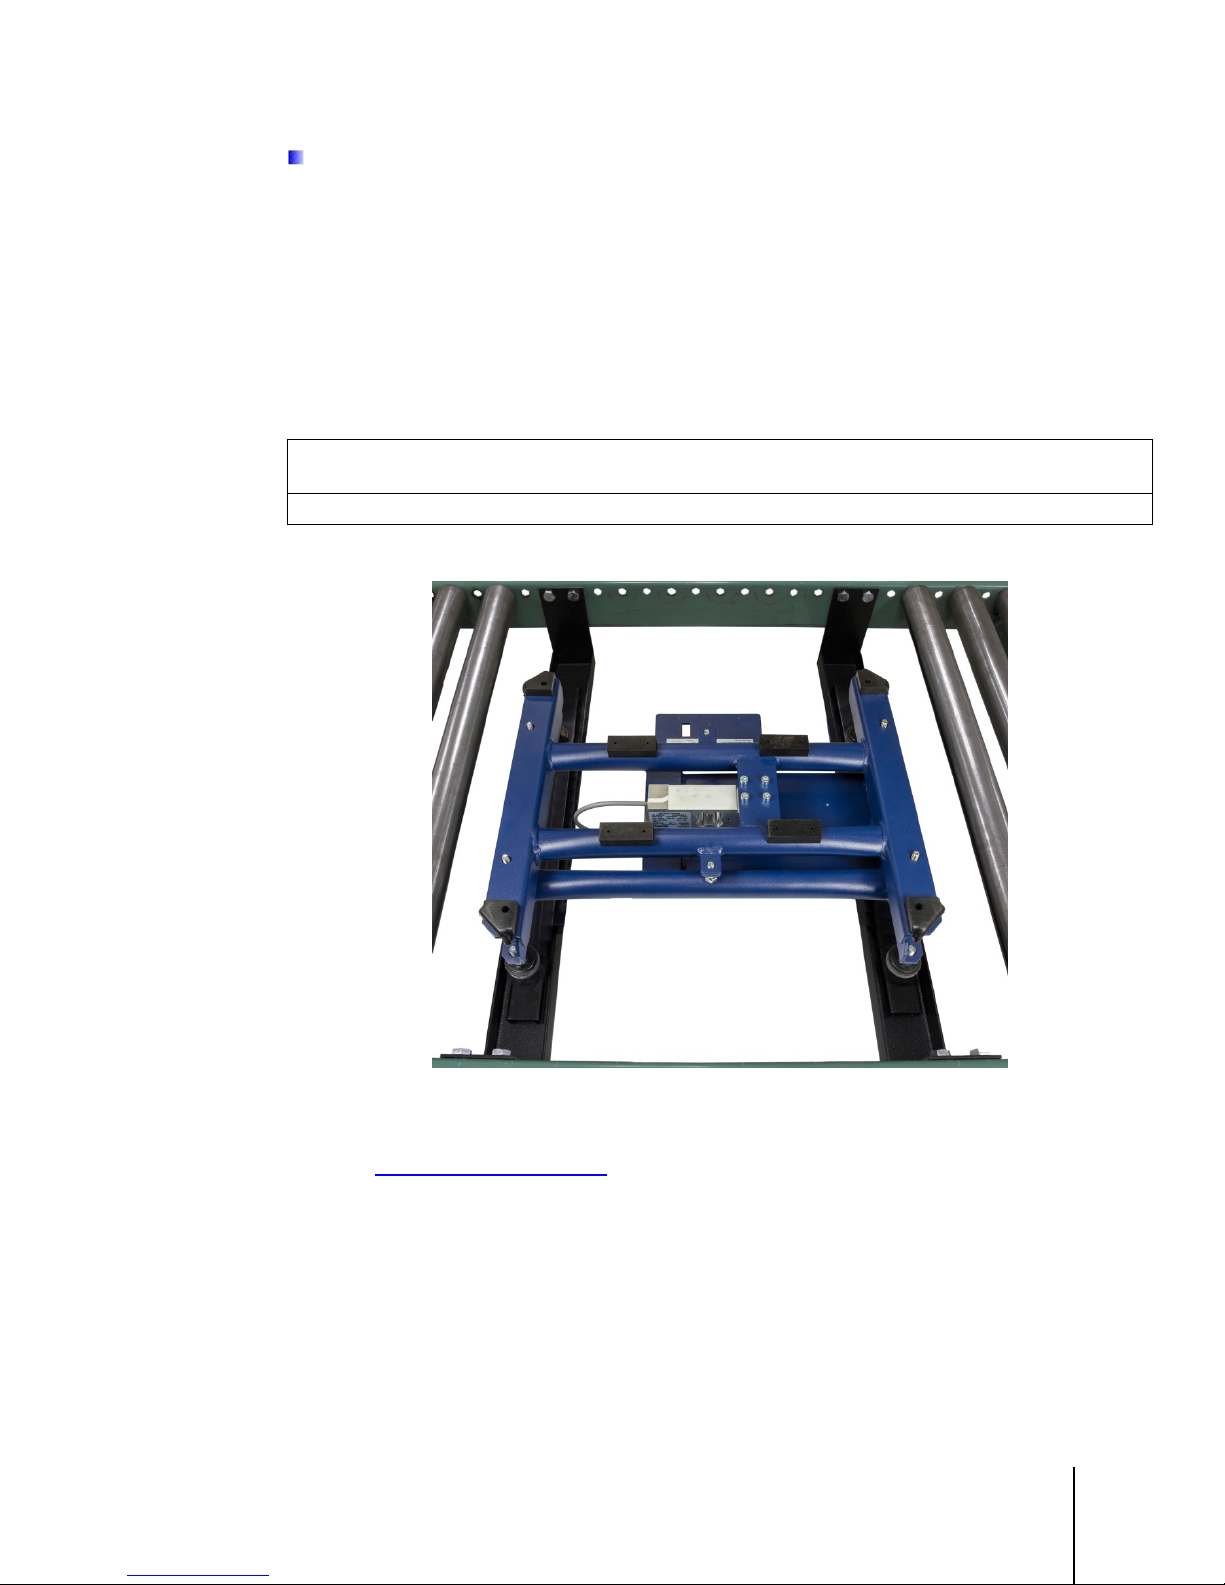
2.3.3. Conveyor Drop-In Kit for BC-150
The Conveyor drop in kit includes two adjustable width rail brackets that allow a BC-150 scale to
be integrated into a standard gravity conveyor, that measures between 22 and 32 inches wide
(between the conveyor frame rails). The kit is designed for standard conveyors that use 1.9”
diameter rollers on a frame that supports 1.5” spacing increments.
DO NOT ATTEMPT TO INSTALL THIS KIT IN A POWERED CONVEYOR.
2.3.3.1. Conveyor Drop-In-Kit 64058112
NOTICE
Reference the detailed instructions (document 64058111) provided in the shipping box, or obtain
a copy at www.mt.com/ind-BCscale
• The BC-150 scale can be mounted lengthwise or transverse in the conveyor frame for the
Ball Top Platter. The ball-top platter allows packages to be rotated easily when on the
scale. This option is commonly used when packages have labels that must be scanned at
the shipping station.
• The BC-150 scale should always be mounted lengthwise when used with the roller-top
platter. The roller-top platter is commonly used when packages are significantly larger than
the scale.
Figure 2-10: Conveyor Drop-In Kit Installed
.
Page 30

30126862 | 00 | 04/2014
METTLER TOLEDO BC Shipping Scales Service Manual
3-1
This chapter covers
• Cleaning and Regular Maintenance
3 Operation and Maintenance
USB communication
Other communication
(RS232, Ethernet,*
Bluetooth*)
This chapter provides operating instructions for the BC scale during normal
• Power-Up Sequence
• Keypad and Display
• Keys and Navigation
• Operator Functions
• Modes of Operation
3.1. Power-Up Sequence
The scale is energized whenever power is applied to it (plugged in), and de-energized when
power is removed (unplugged).
A power adapter is not needed for USB connection to a PC since the power requirements are
within standard USB specifications of 100ma.
The PC can provide additional power up to 500 mA, required for scale options.
operation. Before weighing parcels, the BC Scale should be configured properly
and power applied as instructed below. How the scale operates is based on the
parameter settings selected in the setup program. Refer to Chapter 2 for
installation instructions and Chapter 4 for advanced programming of the setup
parameters.
In the unlikely event that the PC is not providing power through the USB port, a powered USB
hub can be used.
Special software versions may be used for specific applications.
If a power switch is required, use a terminal strip with a power switch.
Power is applied by plugging the scale into a power source. Since the scale is a USB peripheral
device with low power consumption, it does not have a typical on/off switch. The scale operates
similar to a USB keyboard or PC mouse where a power switch is not needed. To power up the
scale:
Plug in USB cable to an energized PC. Power can also be supplied
from a powered USB hub between the scale and PC.
Plug in USB cable to the power adapter and then plug the power
adapter into an AC outlet.
* The Ethernet and Bluetooth options are not currently available.
When using other communication types than USB, the power input to the scale is through the USB
cable and a power adapter with USB connection (like many cellphones).
Page 31

3-2
METTLER TOLEDO BC Shipping Scales Service Manual
30126862 | 00 | 04/2014
Operation and Maintenance
USB
Other (RS232, Ethernet, Bluetooth)
The BC goes through a power-up sequence each time power is applied. The scale performs a
diagnostic test on its ROM and RAM, and then proceeds to the normal operating mode. The powerup sequence is as follows:
1. All pixels or segments of the display characters are activated. This verifies operation of all
display segments.
2. The scale displays the software part number followed by the software revision status. Software
number for the standard BC model is 30099478, version 00.00.01.
3. The scale then captures zero based on the Power Up zero setting, which can be ±10% or 20%
of calibrated capacity, and is ready for normal operation.
4. To turn off the scale, unplug the power source to the scale:
Unplug the USB cable (and power adapter if used).
Unplug the power adapter from AC outlet.
3.2. Keypad and Display
The BC scale includes a monochrome graphical display and a navigational keypad with a central
“Enter” key. The keypad is similar to a TV remote control and can scroll up, down, right, and left
between soft selection keys on the display. An item is selected by scrolling to its position and
pressing the center “Enter Key”. The keypad is used for scale operation as well as configuration.
A Basic 0270 LCD display can also be used for weight display only. The 0270 display is very
limited in set up capability, and has a zero key and unit switching keypad.
Press the navigation keys by placing one finger behind the bottom-right corner of the display to
support it while pressing the keys with the thumb (similar to texting on a cellphone).
Figure 3-1: Graphical Display, Default Screen
The R1 / R2 / R3 icon will indicate the weight range on Multi-Range models. Range indication is
not needed with Multi-Interval models that have auto-ranging capability.
3.2.1. Display
The BC scale graphical display has a monochrome screen with a resolution of 240 x 160 pixels.
Each weight digit is 12 mm high standard, with option for 21mm high. The BC’s status symbols
Page 32

30126862 | 00 | 04/2014
METTLER TOLEDO BC Shipping Scales Service Manual
3-3
(Ranges, Gross/Net, center of zero, etc.) are smaller letters and appear below the weight data or to
Setup
the left. Units (Lb., oz., Kg) are to the right of the data and are also in smaller letters.
The display area also indicates over-capacity and under-capacity conditions. Over- and undercapacity are indicated on the display as follows:
Figure 3-2: Over- and Under-Capacity Displays
3.3. Keys and Navigation
The BC keypad contains a navigation key for easy scrolling and selection of the softkeys, as well as
entering of parameter options.
3.3.1. Navigation Keys
Four navigation keys (Figure 3-3) allow the cursor to be moved UP, DOWN, RIGHT, and LEFT, to
select softkeys and parameters on the graphical display. The position of the cursor is indicated by
the softkey box (outline) being shown in bold (e.g., Figure 3-5). The central ENTER key allows
selection of the softkey.
Figure 3-3: Keypad, Graphical Display
3.3.1.1. Special Functions
Press and hold the UP key for 5 seconds to enter
mode.
Press the DOWN Key to increase numeric weight characters to 20mm (only If TYPE APPROVAL is
set to “No”). To exit this display modem press any key.
3.3.2. Softkeys
Table 3-1 lists the softkeys available in the scale, and describes each softkey’s function.
Page 33

3-4
METTLER TOLEDO BC Shipping Scales Service Manual
30126862 | 00 | 04/2014
Operation and Maintenance
Mode
Capacity and increment
size shown on display
-
line display shows
additional information
Functional softkeys, if
Navigation keypad with
UP, LEFT, RIGHT,
DOWN and ENTER keys
Table 3-1: BC Scale Softkeys
Position Symbol Function Description
Zero the scale - nothing on the platter. If Pushbutton Zero is
6
5
4
3
2
Zero
Switch Units
Mode
Tare
APW
not set for 0%, this softkey will appear in all modes.
Toggle between primary and secondary weighing units. If Unit
switching is enabled, this softkey will appear in all modes.
Open the Mode page to select the weighing process.
If Basic Weigh is the only mode available, this softkey will not
be shown. See list of modes below.
Tare a container on the scale for a Net weight instead of Gross
weight.
Calculate the average piece weight (APW) of a quantity of
items. This softkey appears if Bulk Mail / Counting mode is
enabled.
Hold
1
SendWT
In normal operating mode, these keys function as follows.
3.3.2.1. Mode
Press the
key to access available modes of operation.
3.3.3. Page Layout in Weighing Mode
Space for customer
defined message
Multi-
Activate the Hold function for weighing large parcels that may
block the view of the scale display. Function maintains weight
reading on the display after parcel is removed. If enabled, this
softkey will appear in Basic Weigh mode only.
Manually send weight from scale for serial communication. If
Send weight (SendWT) is configured for Send Key, this softkey
will appear in all modes.
enabled
The screen may include one or more of the following status indicators:
Figure 3-4: Weighing Mode Display
Page 34

30126862 | 00 | 04/2014
METTLER TOLEDO BC Shipping Scales Service Manual
3-5
G
R1
>0<
Home
Setup
Setup
Menu structure location
indication; displays one
level back
Current location
Parameter selection
softkeys
Current setting of
selected parameter
Gross weight
Current weighing range, in multi-range configuration
Center of Zero
3.3.4. Accessing and Navigating Setup Mode
3.3.4.1. Entering Setup
To enter setup, press and hold the UP key for 5 seconds. The
Figure 3-5: Home Screen
Use the RIGHT arrow to scroll to select
, then press ENTER. The first
screen will display.
screen will appear.
Figure 3-6: Initial Setup Mode Display
Page 35

3-6
METTLER TOLEDO BC Shipping Scales Service Manual
30126862 | 00 | 04/2014
Operation and Maintenance
Baud
9600
9600
Serial
Menu structure location
indication
Currently selected
parameter
Current setting of
parameter
Softkeys for available
parameter settings;
current setting highlighted
Arrow indicates more
settings available by
pressing the RIGHT button
A typical setup screen includes the elements shown in Figure 3-7.
Figure 3-7: Typical Setup Screen
3.3.4.2. Navigation
A small arrow at the bottom right of the screen (as in Figure 3-7) indicates that more settings are
available on the next page; press the RIGHT arrow to scroll to it.
To select the menu structure softkeys at the top of the screen, press the UP key; then press LEFT or
RIGHT to select a screen, and ENTER to access that screen.
To reduce keystrokes, the selection wraps around. For example, pressing RIGHT five times in Figure
will return to highlight
3-8
If TYPE APPROVAL is set to No, press the DOWN arrow when in weighing mode to show the large
21mm typeface.
3.3.4.2.1. Exiting Current Screen
When a setting softkey is selected, and its setting is current (for example, in Figure 3-7
highlighted, and
up – this case, the
.
is the current setting), pressing ENTER returns the display to the next level
setup screen (Figure 3-8).
is
Figure 3-8: Serial Setup Screen
Page 36

30126862 | 00 | 04/2014
METTLER TOLEDO BC Shipping Scales Service Manual
3-7
3.3.4.2.2. Exiting Setup
Abort
After a warning notice displays, returns to weighing mode without saving any
Save
After displaying a notice screen, saves changes made in setup, restarts the scale,
At any point when in setup, press and hold ENTER for 5 seconds to jump immediately to the END
(exit) screen (Figure 3-9).
Saving changes will cause the scale to restart in order to implement the changes.
Options available on this screen are:
Figure 3-9: END Screen
changes made to the scale configuration while in setup.
Figure 3-10: Abort Confirmation Screen
and returns to weighing mode.
Figure 3-11: Save and Update Confirmation Screen
Page 37

3-8
METTLER TOLEDO BC Shipping Scales Service Manual
30126862 | 00 | 04/2014
Operation and Maintenance
No
Returns view to the Home screen. Pending changes are neither saved nor
CstDft
Saves the current configuration as the custom default, and returns to the Home
0.00
abandoned.
screen.
Figure 3-12: Custom Default Update Confirmation Screen
3.4. Operator Functions
The BC scales are easy to operate, and support one primary function: parcel weighing. With the
two-key display, the operator has functions for:
• Unit switching
• Zeroing the scale
3.4.1. Parcel Weighing
To weigh a package:
1. If the display shows a weight when there is nothing on the platter, press ZERO to capture zero.
The display will read
side of screen.
2. Place the parcel to be weighed on the platter. The display reads the parcel weight with
corresponding units of weight (lb. or kg) in smaller font.
3. Record the parcel weight as needed, then remove the parcel from the platter.
You may wish to recapture zero periodically when the scale is in continuous use. It is not
necessary to press ZERO before each transaction.
3.4.2. Zeroing the Scale
Most scales are set up to re-zero if weight is within 2% of the scale capacity. If the zero change
exceeds the 2% limit, the scale will not capture zero. In this case, cycle power or recalibrate.
and, if enabled, a center of zero icon ( >0< ) will appear on right
Remove all weight and debris from the scale platter and press ZERO to capture the zero weight. The
BC display will indicate a zero reading 0.00 and a center of zero icon ( >0< ) on the right side of
the screen. The scale will re-zero provided the weight is within the designated percentage of scale
capacity as programmed in setup (XREF).
Page 38

30126862 | 00 | 04/2014
METTLER TOLEDO BC Shipping Scales Service Manual
3-9
If the scale does not capture zero with the above procedure:
Disabled
Basic Weighing
Gross weight only
1. Unplug the scale, remove all weight from the platter, make sure nothing is touching the platter,
and reconnect the power.
2. If cycling power does not work, recalibrate the scale as described in Chapter 4.
3.4.3. Unit Switching
Some selections made in setup, such as Multi-Interval capacities, may inhibit unit switching
inhibited. In this case, the only option available will be
The BC scale allows the displayed scale weight to be viewed in primary and secondary units. Unit
switching must be enabled in setup mode (refer to section 4.11.4 in Chapter 4) to convert and
display in secondary units. The primary units are also designated in setup (refer to section 4.11.4
in Chapter 4)
To switch units:
1. With scale weight displayed, press the UNITS key. The BC scale automatically converts the
displayed primary weight to the secondary weight unit.
2. Press UNITS again to switch the scale back to the primary units. The weight shown on the
display will be the primary units as indicated by the cursor.
.
3.5. Modes of Operation
3.5.1. Selecting Modes
The BC scales have seven operating modes. Press the MODE softkey to access other modes of
operation. Depending on the scale’s configuration, a screen like the one shown in Figure 3-13 will
appear.
Figure 3-13: Mode Selection Screen
Selections are:
Selections are:
Page 39

3-10
METTLER TOLEDO BC Shipping Scales Service Manual
30126862 | 00 | 04/2014
Operation and Maintenance
Weight and Tare
Tare a container for Net weight instead of Gross weight.
Label Offset
Gross plus an offset weight to compensate for labels added after weighing
Take Away Mode
(Differential weighing)
Gives the decremented differential weight to weigh letters pulled out of a
Product Verification
Gives incremental differential weight for verification of an item placed into
Bulk Mail / Counting
Weighs sample quantity to give Average Piece weight.
Show Price
The scale will display the price calculated and communicated from the
Mode
Home > Setup > Scale > Func
Home > OPMode
Basic Weighing
Auto Clear
Keypad Clear
Home > OPMode
> WT-Tare > Enable
Weight and Tare
0.00
Tare
0.00
Auto-Clear Tare
Keypad Tare
process.
container.
the parcel at a packing station.
local PC for the item weighed.
When the
appears at the bottom left of the screen. Use the navigation keys to scroll to softkey for the desired
mode, then press ENTER to select it. The mode description will be updated with the newly selected
mode. Press ENTER again to exit the Mode page.
If a mode is disabled, the rectangle box around its name will consist of small dashed lines instead
of solid lines. A disabled mode cannot be selected.
Modes are enabled in two places:
•
•
will not be shown.
page opens, the current mode’s softkey is highlighted in bold, and its description
a manager.
, where function parameters are set. This area can be password protected by
cannot be disabled. If Basic Weighing is the only mode available, the Mode softkey
3.5.2. Weight and Tare Mode
Weight and Tare can be set for either
The
provide the Net weight of the contents. Enable the Mode as described in section
.
mode allows the container weight to be subtracted from the gross weight to
, which is protected by the Metrology lock.
or
in setup at
3.5.1, above.
1. If the display shows a weight with nothing on the platter. Press ZERO to capture zero. The
display will read
on the screen.
2. Place the container to be used on the platter. Scroll to the
the container. The display will read
weight will appear. Add material to the container. The display reads the NET weight of the
material with corresponding units of weight (lb. or kg) in smaller font.
3. Record the NET weight as needed, then remove the container from the platter.
4. If
is selected, the tare is cleared only when the TARE softkey is pressed with nothing
and, if enabled, a center of zero icon ( >0< ) will appear at lower right
is selected, the tare will be cleared once the scale sees a zero gross weight. If
softkey and press ENTER to tare
with the container still on the scale, and an N for NET
Page 40

30126862 | 00 | 04/2014
METTLER TOLEDO BC Shipping Scales Service Manual
3-11
on the scale platter. Keypad tare is used when the same container will be used for multiple
Home > OPMode > LabOff >
Enable
Label Offset
G+
OFFSET =
0.45 lb
LabOff
0.00
Tare
G+
Auto-Clear
Keypad Clear
Keypad Clear
Product Verification
weighments.
3.5.3. Label Offset Mode
Label Offset can be set for an Auto Clear or Keypad Clear in
.
Parcels are always weighed and dimensioned by the carriers, and if the addition of the packing list
causes the parcel to weigh into the next pricing tier, the carriers will implement back charges. With
Carrier pricing tiered at every whole pound or ½ kg, there is plenty of opportunity for back-charges
to occur on an average shipping day. For “Prepay and Add” parcels, the back charges cannot be
recovered.
mode is designed to minimize these back-charges from Carriers in a non-legal for
trade application. It is similar to a Tare but it adds an offset instead of subtracting one. This mode
after
allows compensation for items added to the parcel
the final weight was taken for weighing and
pricing of the shipping service. Typical items are labels and packing lists which can equate to
several scale increments. This is important in “Pre-pay and Add” transactions where several US
dollars could be lost per back-charge.
In this mode, the displayed weight is the gross weight plus the offset weight tared into the scale.
When this mode is in use, the display will show
(where the document weight is 0.45 lb). The document weight should be a representative
and the secondary line will show
sample to cover the majority of weighments. Enable the
Mode as described in section 3.5.1,
above.
1. If the display shows a weight with nothing on the platter. Press ZERO to capture zero. The
display will read
and, if enabled, a center of zero icon ( >0< ) will appear on right side of
screen.
2. Place the documents to be used on the platter. Scroll to the
input the document weight. The display will read twice the document weight with the document
still on the scale. The
3. Add a parcel to the scale. The display will show the gross weight of the parcel plus the
document offset. The corresponding unit of weight (lb. or kg) is shown in smaller tyepface.
4. Record the G+ weight as needed, then remove the parcel from the platter.
5. If
is selected, the offset will be cleared once the scale sees a zero gross weight. If
is selected, the offset is cleared only when the TARE softkey is pressed with
nothing on the scale platter.
used for multiple weighments.
3.5.4. Product Verification Mode
item placed added to the box during packaging. Weight verification eliminates mistakes. This mode
will communicate the gross weight and the positive change in weight from the last stable weight.
Gross weight is indicated by the “G” on the display, and is in the large typeface. The verification
weight is shown below the Gross weight in smaller typeface.
mode is designed for warehouse packing stations to verify the weight of each
softkey and press ENTER to
will be displayed. Remove the document from the scale.
is used when the same representative offset will be
Page 41

3-12
METTLER TOLEDO BC Shipping Scales Service Manual
30126862 | 00 | 04/2014
Operation and Maintenance
ProdVy
0.00
Differential Weighing
Product Verification
G/N
TakeAW
0.00
0.00
N
During the packing of the box, the incremental weight can be communicated to a connected PC and
merged with the last bar code scan, to confirm that the correct item was placed in the box. When
the pick and pack order is complete, final packaging can be added, the box sealed, and final gross
weight communicated for shipping services. Enable the
3.5.1, above.
If the display shows a weight with nothing on the platter, press ZERO to capture zero. The
display will read
screen.
If an item is removed from the box it will show a negative incremental weight.
1. Place the packing box on the scale; note that the gross weight and incremental weight are the
same. Scan the first item to be packed, and add the first item to the box. In large font, the
display will show the Gross weight of the box and first item. The incremental weight will show
only the first item.
2. Record the + incremental weight as needed.
3. Scan a second item and add it to the box. In large font, the display will show the Gross weight
of the box, first item and second item. The incremental weight will show only the second item.
and, if enabled, a center of zero icon ( >0< ) will appear on right side of
mode as described in section
4. Record the + incremental weight as needed.
5. After weighing all items and sealing the box, record the gross weight for shipping.
6. Remove the parcel from the scale. Scale will zero the Gross weight and incremental weight
3.5.5. Take-Away Mode: Differential Weighing
of added. Differential weighing is designed to accommodate a container of letters, where the whole
container can be placed on the scale, and weights of individual letters are communicated as each
is removed from the container. The container can be tared if necessary.
This mode communicates the gross weight (or Net weight, if a tare was taken) and the negative
change in weight from the last stable measurement. Gross/Net weight is indicated by the
display, and is in the large font. The differential weight is shown below the Gross/Net weight in
smaller font. Enable the
If the display shows a weight with nothing on the platter. Press ZERO to capture zero. The
display will read
screen.
If an item is removed from the box, a negative incremental weight will display.
1. Decide if a container is to be used or not:
mode is similar to
mode as described in section 3.5.1, above.
and, if enabled, a center of zero icon ( >0< ) will appear on right side of
mode, but items are removed instead
on the
a. If yes, place the container on the platter. Scroll to the Tare softkey and press ENTER to tare
the container. The display will read
for NET weight. Add letters to the container. The display reads the NET weight of the
an
material with corresponding units of weight (lb. or kg). The tare value is still shown in the
line below the Net weight on an increasing weight. It will show the decremented weight
once a letter is removed.
with the container still on the scale, and display
Page 42

30126862 | 00 | 04/2014
METTLER TOLEDO BC Shipping Scales Service Manual
3-13
b. If no, place the letters on the platter. The display reads the Gross weight of the material with
Home > OPMode > COUNT > Enable
Enable
Bulk Mail/Counting
Bulk Mail/Counting
0.00
APW
corresponding units of weight (lb. or kg).
2. Remove a letter and note the decremented weight in smaller font below the Gross/Net weight.
3. Record the decremented weight as needed.
4. Remove another letter and record the decremented weight as needed.
5. Remove additional letters until the Net value or Gross value is zero.
6. If Net is zero, remove the container, and tare the scale (scroll to the Tare softkey and press
ENTER) with nothing on the platter.
3.5.6. Bulk Mail/Counting Mode
Mettler Toledo offers a wide variety of counting scales. For higher accuracy or functionality,
consult your local representative.
For best results, zero the scale first to clear the tare before calculating a new APW.
Bulk Mail/Count can be set at
. Once
is pressed,
options for the APW quantity are shown.
The BC scales have a simple counting mode designed for bulk mailers and warehouse packing
stations to determine non-critical quantities. Accuracy of the counting mode is based on the
accuracy of the load cell.
mode allows for a sample of identical parts or letters
to be weighed, and the Average Piece Weight (APW) recorded, to four decimal places. As more
identical parts are added to the scale, the scale will calculate the estimated quantity by dividing the
Net weight by the APW.
Enable the
mode as described in section 3.5.1, above.
1. If the display shows a weight with nothing on the platter. Press ZERO to capture zero. The
display will read
and, if enabled, a center of zero icon ( >0< ) will appear on right side of
screen.
2. Decide if a container is to be used or not:
a. If yes, place the container on the platter. Scroll to the Tare softkey and press ENTER to tare
the container. The display will read 0.00 with the container still on the scale. The left side
of the display indicates an N for NET weight. The units of weight (lb. or kg) are indicated
on the right side. The tare value is still shown in the line below the Net weight.
b. If no, go to step 3. The display reads the Gross weight of the material with corresponding
units of weight (lb. or kg).
3. Scroll to the
added (i.e. 10) to the scale will display at the bottom of the screen. Place this quantity of items
or letters on the scale. You will see the weight increase. Now, with the APW softkey still
selected, press ENTER. The sample count (i.e. 10) will be shown on the display as well as the
Average Piece Weight.
4. Add additional items or letters to the scale and the new count or quantity will automatically be
displayed.
5. Record the count and APW weight as needed.
softkey. Once the softkey is highlighted, the number of sample pieces to be
Page 43

3-14
METTLER TOLEDO BC Shipping Scales Service Manual
30126862 | 00 | 04/2014
Operation and Maintenance
same
new
Maintenance
6. Remove the items from the scale. The APW will still be active. Add additional identical items for
a new count with the
APW.
7. To calculate a
scale and press ENTER to recalculate the APW.
8. Scroll to the ZERO softkey and press ENTER. The count will return to zero. Scroll to Tare or APW
and enter a new COUNT sequence.
APW, remove all items from the platter. Put the new sample quantity on the
3.5.7. Price Mode
The Price mode is designed for retail counters and legal-for-trade applications. When this mode is
enabled, a connected local PC will provide the scale the calculated total price of the current
weighment. The weight and price will appear on the operator display, and on the remote customer
display. No operator action is needed except to enable the Price Mode as described in section
3.5.1, above.
To disable the Price mode, scroll to the MODE Softkey and enable a different mode.
3.6. Cleaning and Regular Maintenance
The BC scale is basically maintenance free.
Depending on environmental conditions, it may be necessary to wipe the keypad and platter with a
clean, soft cloth that has been dampened with a mild cleaner. Do not use any type of industrial
solvent such as toluene or isopropanol (IPA). These may damage the display finish. Do not spray
cleaner directly onto the display LCD. Make sure no overspray hits the cable connectors or circuit
board.
The set up menu includes a
accuracy of the scale. The maintenance setup screens are also described in section 4.12 of
Chapter 4.
Figure 3-14: Maintenance – Selection Screen
page (Figure 3-14) to assist with the longevity and
3.6.1. Overloads
After selecting this softkey, a pop up window (Figure 3-15) will display the number of overloads the
scale has experienced from heavy parcels or abuse. An overload may be registered due to the
impact of a weight dropped onto the scale. The second line shows the cumulative time for which
the scale was subject to an overload condition.
Page 44

30126862 | 00 | 04/2014
METTLER TOLEDO BC Shipping Scales Service Manual
3-15
3.6.2. Display Check
ZERO
OK
When this check is selected, the scale will cycle through a sequence of display views (Figure 3-16)
to power each pixel. This is a check for any bad locations on the LCD display area.
3.6.3. Cal Weight Check
This test provides an expanded weight (x10) reading on a calibrated test weight to check the
scale’s accuracy before rounding.
Figure 3-15: Maintenance – Overloads Display
Figure 3-16: Maintenance – Display Check
First, press the zero softkey with nothing on the platter. A pop up window will appear stating
. Select EXIT and press ENTER to proceed.
Figure 3-17: Maintenance – Cal Weight Check
Page 45

3-16
METTLER TOLEDO BC Shipping Scales Service Manual
30126862 | 00 | 04/2014
Operation and Maintenance
CalWt
Figure 3-18: Zero Check
Next, place a test weight on the scale and scroll to the
window will show the expanded weight.
Figure 3-19: Cal Weight Check Pop-Up
The test weight must be within the scale capacity range.
The weight shown is the weight before rounding (X 10 resolution). If weight is outside tolerances,
recalibrate the scale.
softkey. Press ENTER and a pop up
Page 46

30126862 | 00 | 04/2014
METTLER TOLEDO BC Shipping Scales Service Manual
4-1
This chapter covers
4 Technical Manual
Scale
Default, Operation Mode
Setup
Home
Default (Deflt
Home
End
End
Save
4.1. Setup Parameters and Calibration
This chapter discusses basic information and specific instructions for configuring
• Setup Parameters and Calibration
• Bypassing the Metrology Lock
• Scale Program Menus
• Configuration: Overview
• Configuration Info:
• Defaults
• Operating Mode
• Setup: Overview
• Setup: Display
• Setup: Communications
• Setup: Scale
• Setup: Maintenance
• End
• Basic Display
• Metrological Sealing
each program block of the BC scale, setting the operating parameters, and
calibrating the BC scale.
The scale’s interface program for the graphical display is shown in the menu trees
in section 4.3. 62 functions or programming steps are available, with three levels of
access:
• Normal set up parameters that can be accessed by any operator.
• Password-protected parameters for Manager Access only.
• Full access to all set up parameters after pressing the calibration button
(Cal Button) under the green cap on the scale. Removing the green cap will require
removal of the metrology seal if the scale is used in a Legal-For-Trade application.
The Metrology lock affects items in the
affects parameters in the
the
screen.
program block. Password protection
, and
areas accessed from
4.1.1. Quick Setup to Carrier’s Defaults
For a quick setup process that does not include calibration parameters, the BC scale menu has a
specific default setting for each of the major Shipping Carriers (FedEx, UPS, DHL NA, Purolator,
etc). Go directly to the
carrier. The scale will automatically input the other parameters (Baud, Parity, etc.); however, they
are not yet saved at this point. Scroll to select
. Please use one of the default settings if you do not wish to customize the parameter settings
and you are not calibrating the scale with test weights.
) soft key in the
screen and select the default for the
and press ENTER. From the
screen, select
Page 47

4-2
METTLER TOLEDO BC Shipping Scales Service Manual
30126862 | 00 | 04/2014
Technical Manual
Home
Setup
Setup
BC15
Turn scale over and remove the screw securing the plastic cover. Remove the
BC30, BC3L,
BC6L, BC60
Remove the Platter. The green plug is located to the right of center on the scale
BC150
Remove the platter and remove Metrology screw or seal on the scale. Use a stylus
4.2. Bypassing the Metrology Lock
Accessing the Cal button requires breaking the Weights and Measures seal.
When the Metrology Lock is enabled and an attempt is made to access the setup menus, the scale
will request that the SW2 calibration (Cal) button be pressed. Pressing this button will momentarily
by-pass the Metrology lock.
To access the scale setup menus, press the UP arrow on the keypad for five seconds. On the
screen, use the RIGHT arrow to scroll to
.
Figure 4-1: Home Screen
With
selected, press ENTER; a popup message will display requesting that the Cal button be
pressed.
The SW2 Cal button is located under the green cap which is under the platter on the right center
side of the scale (BC-60U / BC-30U), as viewed from display side.
First, remove the platter, then unscrew the green cap:
slotted screw, lift the front edge of PCB Cover and pull it free from the rear base
tabs. Press the SW2 Cal button.
housing. Break the Metrology seal if installed and unscrew the green cap. Use a
stylus, pencil, or finger to push down on the SW2 switch and release.
or pencil to push down on the SW2 switch and release.
Figure 4-2: Access to Cal Button, BC30, BC3L, BC60, BC6L
Page 48

30126862 | 00 | 04/2014
METTLER TOLEDO BC Shipping Scales Service Manual
4-3
The Scale setup menu will appear.
enable
disable
Save
End
Figure 4-3: Scale Setup Menu
When leaving the Scale setup menus, the Cal button must be pressed again.
In non-Legal-for-Trade modes, the Cal button can be disabled by pressing the metlck softkey on the Scale
menu, then pressing ENTER.
Figure 4-4: Metrology Lock Screen
The Metrology Lock can be
accept. To implement this change,
Saving changed parameters will cause the scale to restart.
d or
d. Scroll to desired option and press ENTER to
the parameters from the
screen.
Page 49

4-4
METTLER TOLEDO BC Shipping Scales Service Manual
30126862 | 00 | 04/2014
Technical Manual
Scale
4.3. Scale Program Menus
The
menu screens are accessed by pressing the UP arrow for five seconds. Figure 4-5, Figure
4-6 and Figure 4-7
indicates displays of information, while green shading highlights lists of parameter options
available for selection.
show all the branches of the menu structure. In these figures, blue shading
Figure 4-5: Info, Defaults and Operating Mode Menu Structure
Page 50

30126862 | 00 | 04/2014
METTLER TOLEDO BC Shipping Scales Service Manual
4-5
Figure 4-6: Setup Menu Structure
Page 51

4-6
METTLER TOLEDO BC Shipping Scales Service Manual
30126862 | 00 | 04/2014
Technical Manual
Customized
Preset
Home > Dflt
END
Save
Type Approval
None, HB44
OIML
HOME > Setup > Scale > TpAppv
Yes
Home > Setup > Scale > SetDft
END
Save
Figure 4-7: End Menu Structure
4.4. Configuration: Overview
WARNING
ONLY PERMIT QUALIFIED PERSONNEL TO SERVICE THIS EQUIPMENT. EXERCISE CARE
WHEN MAKING CHECKS, TESTS AND ADJUSTMENTS THAT MUST BE MADE WITH POWER
ON. FAILING TO OBSERVE THESE PRECAUTIONS CAN RESULT IN BOIDLY HARM.
The BC scale can be:
•
•
1.
serial setup parameters and protocols. Use a default selection if you do not wish to
customize the parameter settings; the default setting will automatically enter the parameter
settings. It is necessary to save the parameters by accessing the
.
2. Selecting a
then selecting
capacity and increment parameters for the scale. It is necessary to save the parameters by
accessing the
Note that limitations of the 7-segment display mean that a limited set of alpha characters is
available. For example, the letter “m” cannot be displayed, and will be replaced with an “n.”
by accessing the setup menus and configuring each parameter
to a default configuration which automatically sets all parameters:
provides a default configuration for each of the major carriers, focusing on a
screen and selecting
at
screen and selecting
of
or
.
(at
will automatically enter the approved
)
Page 52

30126862 | 00 | 04/2014
METTLER TOLEDO BC Shipping Scales Service Manual
4-7
4.4.1. Entering Setup Mode
INFO
Deflt
*
OPMode
*
Setup
*
END
To enter setup, press and hold the UP arrow on the navigation keypad for 5 seconds, until HOME is
displayed.
To configure the scale, use the navigation keys to scroll to the desired softkey, then press ENTER.
The display will show selection softkeys across the bottom of the screen. At the top of the screen,
softkeys will appear, representing the various levels of the menu structure.
The Home screen provides the following options. Asterisks (*) indicate sections that can be
password-protected.
Figure 4-8: Home Screen
Displays scale status information such as full model number, scale calibration weight,
capacity and increment size, etc. (Figure 4-5)
Allows setting of the METTLER TOLEDO defaults, carrier defaults, or a Custom default
previous saved from the END menu. (Figure 4-5)
Configure the availability of modes available to the operator when the M (Mode) softkey is
pressed on the weighing screen. Modes include Tare, Count, HOLD, Label offset, etc.
(Figure 4-5)
Accesses the setup menu tree (Figure 4-6) where display, communication, scale and
maintenance parameters are configured.
Save or abandon changes, set a Custom default (Figure 4-7).
4.4.2. Keyboard Shortcuts
• If the cursor is on a softkey representing the currently-selected value, pressing ENTER will
move the view to the next higher menu screen.
• Press and hold ENTER to jump directly to the END screen.
• A small arrow at lower right on a screen of selections (see Figure 4-9) indicates that further
options may be viewed by scrolling right.
• When the cursor reaches the last item in a row of options, pressing RIGHT will return the
cursor to the first item in the list – it wraps around.
Page 53

4-8
METTLER TOLEDO BC Shipping Scales Service Manual
30126862 | 00 | 04/2014
Technical Manual
Save
Abort
Appendix D
info
HOME
Info
Home
Model
Cal Info
END
WT Info
Work
BT
IP
ERRORS
Help
4.4.3. Exiting Setup Mode
There are three ways of leaving setup:
• Press ENTER and hold for five seconds. The END screen will appear.
• Press the UP arrow and scroll to HOME, then press ENTER. Scroll to select END and press
or
ENTER. Scroll to select either
, and press ENTER.
• Disconnect the scale from power. Changes will not be saved.
4.4.4. Remote Configuration
The BC scale can also be configured remotely using the METTLER TOLEDO Host Interface. Details
on the use of this interface are given in
.
4.5. Configuration: Info
The
screen accessible from the
setup information. To exit an information screen, press the UP arrow and highlight either
, then press ENTER.
screen (Figure 4-8) provides important reference and
or
Figure 4-9: Info Screen
Scale information Includes scale status information including full model number, serial
number, calibration weight, capacity and increment size, etc.
Defaults Allows the selection of METTLER TOLEDO defaults, Carrier Defaults, or a
Custom default previous saved from the
Weight information Displays information about the scale’s capacity, increment, ranges and
minimum weight settings.
Working time Shows scale’s power on time, and amount of time spent at 25% and
50% capacity.
Bluetooth Displays the scale’s Bluetooth address and device name.
IP Address Shows the type of IP address (static or DHCP) and, if the address is
static, lists IP address, subnet mask and gateway values.
Scale error log Displays a log of the five most recent scale errors.
Help Displays the BC scale website address, and technical support telephone
number either for METTLER TOLEDO or local dealer.
screen.
Page 54

30126862 | 00 | 04/2014
METTLER TOLEDO BC Shipping Scales Service Manual
4-9
4.5.1. Model
Home > Setup > Scale > Cal
This screen displays:
• Complete BC model number including all options orderd
• Serial number of the scale
• Software number and version
• Checksum (CRC) calculation
4.5.2. Cal Info
This screen displays:
• GEO Code location for which the scale was last calibrated
• Calibration weight used – the value configured in setup at
• Min Weight – the number of divisions used to calculate the “Min” value displayed to
comply with Metrology requirements
4.5.3. Working Time
This screen displays the amount of time the scale has been in use:
• Power on time, including time when scale is at zero
• Time at >25% of capacity, in seconds
• Time at >50% of capacity, in seconds
4.5.4. BT
This screen displays information about the Bluetooth connection:
• BT Address
• BT Name
4.5.5. Error Log
This screen displays the last five error messages displayed by the scale.
4.5.6. HELP
This screen displays information about service and product assistance resources:
• URL for the scale product web page
• Contact telephone number for METTLER TOLEDO service or local dealership.
Page 55

4-10
METTLER TOLEDO BC Shipping Scales Service Manual
30126862 | 00 | 04/2014
Technical Manual
Filter
Baud
ASCII BIT string
Parity
Stop Bits
Protocol
USB
Metrology Lock
Unit Switching
PB Zero
Zero Indicator
AZM
Power-Up Zero
Rounding Mode
Home
Deftl
END > CUSTOM
Home
END
Save
4.6. Defaults
Default values for various carriers can be set automatically. Values affected are:
To select a default settings for the Carriers or MT protocol:
1. On the
2. Scroll to the desired default and press ENTER again. The scale will be updated with the
parameters, but the change is not immediately saved. Options are:
• Default: METTLER TOLEDO
• Def F – FedEx
• Def F2 – FedEx 2
• Def U – UPS
• Def D – DHL
• Def P – Purolator
• TLDOML – Toledo OIML
• SICS – MT SICS
• CUSTOM – Values saved ast
3. Scroll up to the
4. Scroll to
5. Scroll to
screen, scroll to the
softkey and press ENTER.
and press ENTER.
, press ENTER, and confirm the operation.
softkey and press ENTER.
Page 56

30126862 | 00 | 04/2014
METTLER TOLEDO BC Shipping Scales Service Manual
4-11
4.7. Operating Mode
Setup > Scale > Function
Operate Mode
WtTare
Hold
LabOff
TakeAW
Price
Count
ProdVy
Appendix
A
T
WtTare
Disable
Enable
For a Function to be displayed in the Mode selection screen accessible to the operator, it must first
be enabled in setup at
enabled from the
managers level.
Weight and Tare Allows use of tare function to subtract container weight and display a net
Hold Holds the display weight after a large parcel is removed – useful in cases
, an area protected by the metrology lock; and then
screen (Figure 4-10), which can be password protected on a
Figure 4-10: Operating Mode Screen
weight value
when a parcel on the platter conceals the display
In each of these options, values are communicated using the Toledo Protocol; refer to
.
4.7.1. WtTare
Tare mode is used when the application needs a net weight of contents without container weight.
The scale will allow the container to be subtracted from the Gross Weight. The tare value is created
by placing the container on the scale and pressing the
for Net weight.
To disable tare, press the T softkey again when the platter is empty. Tare can also be set to clear
automatically, so that so when the scale sees zero gross weight the Tare is cleared. Auto clear is
used for a single weighment. Key pad Tare can be used for multiple weighments with the same
container. To enable the Tare function, scroll to
Label Offset Adds an offset for items such as packing lists, added after the parcel is
weighed
Take Away Allows differential weighing – for example, removing letters from a basekt
Show Price Shows price and weight on the display
Bulk Mail / Count Calculates the Average Piece Weight (APW) to determine a count
Product Verification Shows differential weight for a packing station, to assist in verifying
package contents
soft key. The display will then display an N
and press ENTER.
1. Select
or
, and press ENTER.
Page 57

4-12
METTLER TOLEDO BC Shipping Scales Service Manual
30126862 | 00 | 04/2014
Technical Manual
Disabled
Operate
Mode
Hold
Disable
Enable
Disabled
HdTime
stbTm
HdTime
stbTm
2. If
Tare. Scroll to and highlight either Auto-C (auto-clear) or Key-T (keypad tare).
3. Press ENTER.
was selected, Exit the screen. Otherwise, the scale will prompt for the type of
4.7.2. Hold
The hold function will retain the displayed weight for a specified length of time after the weight has
been removed from the platter. This function is used when scale weight is being recorded manually,
and a large box makes it impossible to see the display. To enable this function, access the
screen (Figure 4-10), scroll to
, and press ENTER.
1. Select
2. If
3. Scroll to
• 2 sec
• 5 sec
• 7 sec
• 10 sec
• 15 sec
• 20 sec
4. Highlight the desired value and press ENTER.
5. Scroll to
• 0.5 sec
(
for which the scale will retain the displayed weight after it sees a significant change in
weight. Options are:
must be steady on the platter (without motion or vibration) before the scale will recognize it
as the final weight. Options are;
or
, and press ENTER.
was selected, Exit the screen. Otherwise, the scale will prompt for the hold time
) and stable time (
and press ENTER. This value determines the amount of time, in seconds,
and press ENTER. This value determines the amount of time the weight
).
• 1.0 sec
• 1.5 sec
• 2.0 sec
6. Highlight the desired value and press ENTER.
7. Press ENTER again to exit the screen.
4.7.3. LabOff
The Label Offset Mode is similar to the Tare mode, except the weight amount is added to the gross
weight to give a Gross+ value. Label Offset mode allows a shipper to compensate for any packing
labels, box tape, or other items added to the parcel after final weighing for price determination. This
is important for Pre-pay and Add scenarios, where Carriers will back-charge for a higher weight
than the one originally determined when the parcel was shipped.
Page 58

30126862 | 00 | 04/2014
METTLER TOLEDO BC Shipping Scales Service Manual
4-13
The Offset value is determined by placing a sample load on the scale and pressing the T softkey.
G+
LabOff
Disable
Enable
Disabled
Auto-C
Key-C
TakeAW
Disable
Enable
Disabled
This feature is only available in MT-
SICS protocol.
Price
Disable
Enable
Disabled
GSPMNY"xxxxxx,
GSPMNY"$12.40,”
Appendix E
Count
Disable
Enable
The display will display
(for Gross Plus weight).
The offset can be disabled by pressing the T soft key button with nothing on the platter, or it can be
set to Auto-Clear so when the scale sees zero gross weight the Offset is cleared. Auto-clear is used
for a single weighment. Keypad Tare can be used for multiple weighments using the same
container. To enable the label offset function, scroll to
and press ENTER.
1. Select
2. If
or
was selected, Exit the screen. Otherwise, the scale will prompt for the type of
clearing function –
, and press ENTER.
or
3. Select the desired option and press ENTER. Press ENTER again to exit the screen.
4.7.4. TakeAW – Differential Weighign
Differential weighing is designed to accommodate a container of letters, where the whole container
can be placed on the scale, and the weight of each letter is communicated as it is removed from
the container. If necessary, the container can be tared. To Enable the differential weighing function,
scroll to
1. Select
2. If
and press ENTER.
was selected, Exit the screen. Otherwise, press the Enabled softkey a second
or
, and press ENTER.
time to exit the screen.
4.7.5. Price
When the price mode is enabled, the scale will accept communication of the calculated total price
of the weighment from a local PC. The scale will display the weight and price on the operator
display and the remote customer display, if one is attached.
To enable the label offset function, scroll to
.
and press ENTER.
1. Select
2. If
or
, and press ENTER.
was selected, Exit the screen. Otherwise, press the Enabled softkey a second
time to exit the screen.
With Price mode enabled, the scale will look for a command from the PC, such as
and decimal or comma. For example, if the PC sends
displayed. Refer to
where xxxxxx denotes the price to be displayed, including the currency symbol
for additional details. The price will be displayed until the scale
$12.40 will be
returns to zero.
4.7.6. Count
Bulk Mail / Counting mode allows for a sample of identical parts or letters to be weighed, and an
Average Piece Weight (APW) calculated to four decimal places. As more identical parts are added
to the scale, the scale will calculate the number of parts by dividing the Net weight by the APW. To
enable the counting function, scroll to
1. Select
or
, and press ENTER.
and press ENTER.
Page 59

4-14
METTLER TOLEDO BC Shipping Scales Service Manual
30126862 | 00 | 04/2014
Technical Manual
Disabled
ProdVy
Disable
Enable
Disabled
Disp
COMM
Scale
Maintc
2. If
pieces used to calculate the average piece weight. Options are:
• AVW 10
• AVW 20
• AVW 50
• AVW 100
was selected, Exit the screen. Otherwise, the scale will prompt for the number of
4.7.7. ProdVy
The product verification mode is designed for Warehouse packing stations where verifying the
weight of each item placed in to the box during packaging helps eliminate packing errors. The
mode will communicate the gross weight and the incremental weight from the last stable weight.
The incremental weight can be compared to the database weight for compliance. To enable the
product verification function, scroll to
and press ENTER.
1. Select
2. If
time to exit the screen.
or
was selected, Exit the screen. Otherwise, press the Enabled softkey a second
, and press ENTER.
4.8. Setup: Overview
The Setup screen (Figure 4-11) offers four options.
Figure 4-11: Setup Screen
Display Sets operator interface parameters such as Language,
Communications Sets parameters for Serial USB, Ethernet, etc.
Scale configuration Configures scale metrology calibration
Maintenance options Accesses scale information useful for troubleshooting and preventive
maintenance
Page 60

30126862 | 00 | 04/2014
METTLER TOLEDO BC Shipping Scales Service Manual
4-15
4.9. Setup: Display
Display
lang
filter
FeedBk
LOGO
CusMsg
PwdSet
Language
Español
ESPANL
The
screen allows the scale’s user interface to be configured. It includes six options.
Language Sets the scale’s display language
Filter Sets the filter value used to compensate for vibration
Feedback Configures the visual feedback used to indicate that an input has been
Screen-saver Enables the display of the screen-saver logo
Figure 4-12: Display Setup Screen
accepted
4.9.1. Language
Five standard languages are supported in the BC scale series:
• English
• Spanish - Español
• French - Français
• German - Deutsche
• Chinese.
In the
should be shown in its own language. Thus, Spanish is displayed as
description
Custom message Enables the display of a custom message
Password set Used to set the manager’s password
screen (Figure 4-13) select the desired language and press ENTER. Each option
.
with softkey
Page 61

4-16
METTLER TOLEDO BC Shipping Scales Service Manual
30126862 | 00 | 04/2014
Technical Manual
END > Save
LIGHT
HEAVY
NONE
Figure 4-13: Language Setup Screen
If you the wrong language is selected, to return to the Language screen, either:
• Scroll UP to the last (right-most) softkey in the location display at the top of the screen, and
press ENTER. Repeat until the Language screen appears – each option will still display in
its own language. Scroll to the correct language softkey and press ENTER.
or
• Power down the scale by unplugging the power supply or USB cable. Parameter settings
not yet saved at
will be cancelled.
4.9.2. Filter
This setting configures the vibration noise filter used to determin weight stability on the scale. The
BC disregards environmental vibrations that affect the weighing accuracy, depending on the filter
setting. If the scale display reading is not stabilized while a steady load is on the scale, then
or
increase the filter setting to
stable weight. The default setting is
To configure the filter setting:
1. Access Home > Setup > Display > Filter.
2. Select the desired option:
• None
• Light
• Heavy
3. Press ENTER to confirm. Press ENTER again to leave the screen.
. A higher filter setting will take a longer time to reach a
, and this is appropriate for most applications
Page 62

30126862 | 00 | 04/2014
METTLER TOLEDO BC Shipping Scales Service Manual
4-17
4.9.3. Feedback
Disabled
Enabled
Home > Setup > Display > Feedback
Home > Setup > Display > LOGO
Home > Setup > Display > CusMsg
Appendix E
The BC scale can provide a visual indicator when a navigation keypad press has registered with the
scale. The indicator is a small circle that appears at the bottom right of the screen (Figure 4-14
weighing mode, it is directly below the ZERO softkey. The option can be
4.9.4. Logo
The BC scale can display a logo as a screen-saver. This can be disabled or enabled, and an idle
time configured that determines how long the scale will wait before switching to screen-saver mode.
The option can be configured at
The idle time can be set to:
.
Figure 4-14: Keypress Feedback Symbol
.
or
). In
at
• 1 minute
• 5 minutes
• 10 minutes
The logo image must be a monochrome bitmap measuring 240 by 160 pixels. A special SICS
program is needed to download a custom logo image. Refer to
4.9.5. Custom Message
The BC scale can display a custom message at the top of its Weighing Mode screen. To enable a
message, access
The message to be displayed must be downloaded to the scale using a SICS command:
GSPMSG "xxxxxx-AAAAAA- CCCCC"
Refer to
4.9.6. Password
Before entering a password, write down the keystroke sequence for future use. Passwords are
created using the UP, DOWN, RIGHT, and LEFT arrow keys. Keep the password in a safe
location for future use.
Appendix E for dtails.
.
for further instructions on how to load a message.
A manager’s password can be set in the BC scale, to limit access to the program modes. In the HOME page,
the DEFAULTS, OPERATOR MODE, and SETUP soft keys are password protected. Only INFORMATION and END
are not password protected. A password consists of 1 to 6 key strokes on the navigation keys (UP, DOWN,
RIGHT, LEFT).
Page 63

4-18
METTLER TOLEDO BC Shipping Scales Service Manual
30126862 | 00 | 04/2014
Technical Manual
DisPwd
SetPwd
DisPwd
SetPwd
SetPwd
1. To set a password, access Home > Setup > Display > PwdSet.
Figure 4-15: Password Set Screen
2. Select either
3. If
arrow key to cancel. To confirm disabling the password, press ENTER and exit the screen
by scrolling up to the location line, selecting a previous page, and pressing ENTER.
4. If
5. If
6. Use the arrow keys to enter a password sequence of 1 to 6 key-presses; press ENTER to
assign the password.
was selected,a confirmation screen will appear. Press ENTER to confirm, or any
was selected, a popup window will appear for password entry.
was selected, a popup window will appear for password entry.
(disable) or
Figure 4-16: Password Entry Screen
(set password).
7. A confirmation prompt will appear; re-enter the password and press ENTER.
Figure 4-17: Password Confirmation Screen
Page 64

30126862 | 00 | 04/2014
METTLER TOLEDO BC Shipping Scales Service Manual
4-19
8. If the passwords
do not
Not same, please retry!
match
Home > END > Save
without creating a password
Home > End > Save
Abort
COMM
Serial
USB
ETH
BT
SendWT
W
match, the Password Entry screen will reappear with the message
Repeat the process from the beginning.
9. If the passwords
, the initial password screen (Figure 4-15) will reappear.
10. To accept the password and exit the screen, use the UP arrow to highlight an icon in the
location line at the top of the screen, then press ENTER. The password will not be finalized
until all changes are saved at
11. To exit either password entry screen
• Either: Visit
and,
Setup will not be saved, and the weighing screen will reappear.
• Or: Cycle power to the scale. Changes made in any area of Setup will not be saved.
4.10. Setup: Communications
The
screen allows the scale’s communication settings to be configured. It includes five
options.
.
:
, and confirm. Changes made in any area of
* Ethernet and Bluetooth options are not currently available
4.10.1. Serial
The SERIAL program block is used to configure RS-232 communications including Protocol used. This set up
will also apply to the Virtual Serial settings in USB applications (section 4.10.2).
IMPORTANT: For successful communication between the scale and a PC, both the serial
parameters and the protocols in scale and PC must match. The weight request command is
case sensitive. Thus, if a weight “request” command is a capital
will not get a weight response from the scale.
Figure 4-18: Communications Setup Screen
Serial settings Sets parameters such as baud rate and data bits
USB settings Sets USB options
Ethernet settings* Sets Ethernet address settings. (Requires additional hardware)*
Bluetooth settings* Sets Bluetooth connection settings*
Sends weight data Weight data can be sent, either by a keypad press or continuously
, sending a lower case w
Page 65

4-20
METTLER TOLEDO BC Shipping Scales Service Manual
30126862 | 00 | 04/2014
Technical Manual
Serial
Baud
1200
2400
4800
9600
19200
38400
57600
Serial
Serial
Serial
DatBit
Serial
Serial
ASCII
Parity
Space, Mark, Odd
Even
ASCII
Parity
None
Serial
Parity
Figure 4-19: Serial Communications Setup Screen
4.10.1.1. Baud
Sets the baud rate for the RS-232 connection. This is the speed, in bits per second, at which data is
transmitted.
1. In the
screen, scroll to
and press ENTER.
2. Scroll to desired baud rate to highlight it and press ENTER to accept the value. Options are:
3. Press ENTER again to return to
page, or press the UP arrow and highlight the
softkey, then press ENTER.
4.10.1.2. ASCII Data Bits
Sets the number of data bits that make up an ASCII character for the RS-232 connection. Options
are seven or eight data bits.
1. In the
screen, scroll to
and press ENTER.
2. Scroll to the desired value to highlight it, and press ENTER to accept the value. Options are:
• 7
• 8
3. Press ENTER to select the value.
4. Press ENTER again to return to the
softkey, then press ENTER.
page, or press the UP arrow and highlight the
4.10.1.3. Parity
Sets the parity option for the RS-232 connection. Parity is an error checking mechanism. The
setting selected here depends on the configuration of the ASCII Data Bits:
• If
• If
To configure parity:
1. In the
= 7, then typical
= 8, then
screen, scroll to
options are
is typically set to
and press ENTER.
.
and
.
Page 66

30126862 | 00 | 04/2014
METTLER TOLEDO BC Shipping Scales Service Manual
4-21
2. Scroll to the desired value to highlight it, and press ENTER to accept the value. Options are:
Space
mark
Odd
Even
None
Serial
Serial
Serial
Stop
Serial
Serial
S
Protocol
Baud
disabl
toledo
mt-sic
Prot F
Prot U
Prot P
(Disabled)
(METTLER TOLEDO)
MT-SICS
FedEx
UPS
Purolator
Serial
Serial
Home > Setup > Communication > USB
HIDPOS
HIDPOS is a standard Microsoft Human Interface Device protocol for Point-of-
USB
HIDPOS
USB
3. Press ENTER to select the value.
4. Press ENTER again to return to the
4.10.1.4. Stop Bit
Select the number of stop bits to be transmitted for each ASCII character in an RS-232 connection.
1. In the
2. Scroll to the desired value to highlight it, and press ENTER to accept the value. Options are:
• 1
• 2
3. Press ENTER to select the value.
4. Press ENTER again to return to the
4.10.1.5. Protocol
elect a pre-configured set of scale commands for an RS-232 connection. Protocols are configured
in the factory according to your ordering information. This screen permits a pre-configured protocol
to be selected.
1. In the
softkey, then press ENTER.
screen, scroll to
softkey, then press ENTER.
screen, scroll to
page, or press the UP arrow and highlight the
and press ENTER.
page, or press the UP arrow and highlight the
and press ENTER.
2. Scroll to desired selection to highlight it and press ENTER to accept the value. Options are:
3. Press ENTER again to return to
softkey, then press ENTER.
4.10.2. USB
The USB screen allows various types of USB communication to be configured. These include
HIDPOS, Virtual Serial, and Keyboard Wedge. The option chosen here will also apply to Virtual
Serial in the USB applications.
The
Sale equipment which includes a scale. If the software on the PC is programmed
for HIDPOS, the connection is “Plug and Play” and no additional drivers are
needed. In this case, the scale operates as a USB peripheral to the PC.
To configure the parameter from the
ENTER. To exit the page, press ENTER again to go back to the
press the UP arrow and select the desired page and press ENTER.
page, or press the UP arrow and highlight the
screen includes the following options:
screen, scroll to
and press
screen, or
Page 67

4-22
METTLER TOLEDO BC Shipping Scales Service Manual
30126862 | 00 | 04/2014
Technical Manual
Virtua
The Virtual USB setting enables communication over a USB cable using a serial
Appendix C
KBWed
The BC scale has the flexibility to configure the scale to operate like a Keyboard
SendWT
Home > Setup > COMM
KD Wedge
None, Tab
Return
Toledo
protocol. No additional cabling or hardware adapter is needed, but a special
software driver is required for the PC. Refer to
To configure the parameter from the USB screen, scroll to VIRTUA (Virtual Serial)
and press ENTER. To exit the page, press ENTER again to go back to the USB
screen, or press the UP arrow and select the desired back page and press
ENTER. Serial settings and protocol will apply. See SERIAL program block above.
without any additional cabling or hardware. In this setting, the scale is
configured as a keyboard in the HID of the PC. Weight is effectively “typed” into
any software program from the scale, as if the operator was typing in the weight
using a keyboard.
for details.
4.10.3. Ethernet
The Ethernet option is not currently available.
This setting is used in conjunction with the
accessible at
be sent by pressing the keypad, upon sensing a stable weight, or sent
continuously.
Once the
an additional character can be designated after the weight data is typed, to index
to the next space in the program. Options are
Figure 4-20: Keyboard Wedge Configuration Screen
screen (Figure 4-20) is accessed, a further option appears:
. The scale can be configured for weight to
(send weight) command
and
.
4.10.4. Bluetooth
The Bluetooth option is not currently available.
4.10.5. SendWT
The Send Weight function is typically used with Keyboard Wedge, or serial communication in the
protocol. The function activates a communication message when
• The Send Weight softkey is selected and pressed on the weighing screen,
or
Automatically when the scale detects a stable, non-zero weight,
•
•
or
as a continuous output.
Page 68

30126862 | 00 | 04/2014
METTLER TOLEDO BC Shipping Scales Service Manual
4-23
In the SendWT screen, select the type of output and press ENTER. Options are:
Disabl
Disable
Disables the Send Weight function.
Send K
Send Softkey
The Send icon will appear at the left of the weighing screen. Manually
AutoSe
Auto Send
Sends the weight value whenever a non-zero stable weight is detected
Contin
Continuous
Sends the weight value continuously at a specified time interval. Select
Home > Setup > Scale > metlck
metlck
Metrology lock
Enable or disable the metrology lock, which prevents modification of
send the current scale weight by scrolling to the icon and pressing
ENTER.
on the scale. The delay time after stability is detected must be selected
from the following options:
• nodela (send immediately)
• 0.5 sec
• 1.5 sec
• 2.0 sec
the interval from the following options:
• 0.1 sec
• 0.2 sec
• 0.5 sec
• 1.0 sec
• 1.5 sec
4.11. Setup: Scale
The Scale setup menu system allows the user to configure parameters that determine the scale’s
performance. If the metrology lock is in place (enabled at
lock can only be bypassed using the method detailed in section
Figure 4-21: Scale Setup Screen
The following options are available from this screen:
the Scale setup parameters.
4.2.
). This
Page 69

4-24
METTLER TOLEDO BC Shipping Scales Service Manual
30126862 | 00 | 04/2014
Technical Manual
TpAppv
Type approval
Selects the type of approval for the scale.
SetDft
Set default
Populates the default capacity and increment parameters based on
CapInc
Capacity and
Sets the primary units, ranges, and increments, and the capacity and
Calib
Calibration
Sets the Geo code and calibrates the scale
Zero
Zero
Configures the scale’s zero functionality.
Round
Rounding
Determines the rounding methods used.
Func
Functions
Enables the operating modes that will appear on the Mode selection
BootUp
Boot-up menu
Configures the scale’s boot-up behavior.
Home > END > Save
Home > Setup > Scale
Setup
Scale
IMPORTANT
Home > Setup > Scale > metlck
Disabl
Enable
Setup
Set Default
Home > Setup > Scale > TpAppv
Setup
the Type Approval.
Increment
Settings selected in the Scale Setup block are not saved until
selected and confirmed.
4.11.1. Metrology Lock
The Metrology Lock can be disabled or enabled. If it is enabled, the Cal button SW2 must be
pressed to obtain access to the
Access is ended by accessing the
the
It may be acceptable to disable the Metrology Lock for easier access to applications that are not
Legal-for-Trade.
menu system, the Cal button must be pressed again.
increment sizes for each range.
screen (refer to Chapter 3).
screen, or anywhere higher in menu structure. To re-enter
menu items described in this section.
has been
required to have the Metrology lock sealed to prevent tampering.
1. To set the metrology lock, access
2. Highlight the desired selection – either
3. Press ENTER to make the selection, then press ENTER again to return to the
: Check with local authorities if your application is Legal-for-Trade, and if you are
or
.
.
screen.
4.11.2. Type Approval
The Type Approved parameters allow selection of the approval criteria. It is used in conjunction with
the
1. To set the type approval, access
2. Highlight the desired selection:
• None Scale not approved
• HB44 Follows Handbook 44, the requirements for the National Type Evaluation Program
• OIML Follows requirements of the International Organization of Legal Metrology’s R76
3. Press ENTER to confirm the selection, then press ENTER again to return to the
parameter (section 4.11.3) to populate the remaining scale setup parameters.
(NTEP), for the USA, and Metrology Canada, for Canada.
model regulations for member states, such as countries of the European Community (EC)
.
screen.
Page 70

30126862 | 00 | 04/2014
METTLER TOLEDO BC Shipping Scales Service Manual
4-25
4.11.3. Set Default
Set Default
Yes
Home > End > Save > [confirm]
Home > End> Abort
Home > Setup > Scale > SetDft
NO
Yes
message build loaded ok!
Home > Setup > Scale
Type Approval
Set Default
Home > End > Save
Set Default
Yes
Home > Setup > Scale > CapInc
Home >
Setup > Scale > CapInc
Primry
Primary units
Sets the scale’s primary units of measure
UntSwt
Unit switching
Enables switching between primary and secondary units
Sndary
Secondary units
Sets the scale’s secondary units of measure
simplifies configuration by setting the remaining scale setup parameters, depending on
the type approval selected (
capacities and increments are set. However, the scale parameters can still be customized.
Parameters are not saved until the
abandon the change, select
1. To set a default configuration, access
2. Highlight the desired selection – either
3. Press ENTER. A pop-up window will appear with the
ENTER again to exit to the
If
. In this case, check all parameters at
is changed and
is selected. Either Abort the changes, or return to
4.11.4. Capacity and Increment
4.11.2). Once this parameter is enabled by selecting
, or power down the scale without saving.
or
.
sequence is complete. To
.
set to NO, a save error will be displayed when
screen.
.
, default
Press
and select
Figure 4-22: Capacity and Increment Setup Screen
The Capacity and Increment parameters set the scale’s metrological configuration, including
primary and secondary units if unit switching is enabled. To set these parameters, access
.
In the Capacity and Increment screen, select from:
Page 71

4-26
METTLER TOLEDO BC Shipping Scales Service Manual
30126862 | 00 | 04/2014
Technical Manual
CapInc > Primry
Units
Units
Sets the primary units of measure
Ranges
Number of ranges
Sets the number of ranges
Pr Cap
Capacity and increment
Sets capacities and increments for the configured ranges
OvrCap
Over capacity
Sets the weight value at which the scale will blank, or
MinWgt
Minimum weight
Sets the minimum weight that will display on the weighing
Single
Single range
MR2
Two ranges
MR3
Three ranges
MI2
Two intervals
MI3
Three intervals
4.11.4.1. Primary Units
Figure 4-23: Primary Units Setup Screen
Here, the primary units, number of ranges, capacity and increment size, over-capacity value and
minimum weight parameters can be set.
In the
screen, highlight the desired softkey and press ENTER. The following options
are available:
display the overcapacity symbol
screen
4.11.4.1.1. Units
Options for primary weight units are:
• Lb-Lb (Example: 45.85 lb.)
• Lb-oz (Example: 45 lb. 13.6oz)
• Kg (Example: 20.840 kg)
4.11.4.1.2. Ranges
• G (Example: 20840 g)
Options for a single range, multiple ranges, or multiple increments. Options are:
Page 72

30126862 | 00 | 04/2014
METTLER TOLEDO BC Shipping Scales Service Manual
4-27
Capacity and increment selections for the configured range/s or intervals are made at
Home >
Setup > Scale > CapInc > Prmry > PrCap
Setup > Scale > CapInc > Prmry > Range.
Cancel
Primary
No
HB44
OIML
4.11.4.1.3. Capacity and Increment
When this screen is accessed, a chart of options will display, with contents determined by the
range and increment settings made at
button will be highlighted.
1. Press the UP arrow to access the first cell of the chart, then use the arrow keys to select the
values to be modified.
(section 4.11.4.1.3).
Figure 4-24: Capacity and Increment Setup Screen
The
2. With the cell highlighted, press ENTER. The last digit will be highlighted.
3. Use the UP or DOWN arrow to increase or decrease the value.
4. Use the LEFT or RIGHT arrow to move to the previous or next value, and use UP and DOWN
to change it.
5. When all digits are at the desired value for the block, press ENTER. The highlight will
disappear from the selected digit.
6. Use the arrows keys to move to the next block and press ENTER to access the digits.
Repeat the modification process described in steps 2 to 5.
7. When all values are set for all ranges, use the DOWN arrow to highlight OK and press
ENTER. The
screen will reappear.
Default values for these parameters are shown in Table 4-1.
Table 4-1: Capacity and Increment Default Values
W&M
Approved
BC-15 BC-30 BC-3L BC-60 BC6L BC-150
7 x 0.005 lb
30 x 0.005 lb
15 lb x 0.1 oz
30 lb x 0.2 oz
Multi-Interval
3 x 0.001 kg 15 x 0.005 kg 3 x 0.001 kg
70 x 0.02 lb
Multi-Range
7 lb x 0.1 oz
7 lb x 0.2 oz
Multi-Interval
7 x 0.005 lb
70 x 0.02 lb
Multi-Range
3 lb x 0.05 oz
7 lb x 0.1 oz
70 lb x 0.2 oz
Multi-Interval
60 x 0.02 lb
150 x 0.05 lb
Multi-Interval
150 x 0.05 lb
Single Range
60 x 0.02 kg 30 x 0.01 kg
5 x 0.05 lb
25 x 0.05 lb
150 x 0.1 lb
Multi-Interval
10 lb x 0.1 oz
70 lb x 0.2 oz
149 lb x 0.5 oz
Multi-Range
150 x 0.05 lb
300 x 0.1 lb
Multi-Range
150 x 0.05 lb
300 x 0.1 lb
Multi-Range
60 x 0.02 kg
Page 73

4-28
METTLER TOLEDO BC Shipping Scales Service Manual
30126862 | 00 | 04/2014
Technical Manual
15 x 0.005 kg
30 x 0.001 kg
6 x 0.002 kg
Single Range
Single Range
150 x 0.05 kg
5d
Five divisions
9d
Nine divisions
12d
Twelve divisions
Min 25 g
5d
Five divisions
10d
Ten divisions
20d
Twenty divisions
UntSwt
disable
Enable
1, 2
Sndary
W&M
Approved BC-15 BC-30 BC-3L BC-60 BC6L BC-150
Multi-Interval
4.11.4.1.4. Over-Capacity
This parameter sets the high weight value at which the scale’s display will blank, or show the overcapacity symbol, as well as the low weight value at which the display will blank, or show the
under-capacity symbol. Options are expressed as divisions in the increment size for the range:
4.11.4.1.5. Minimum Weight
This parameter sets the minimum weight that the scale will display for the capacity and increment
size. Postal applications may have different minimum weight requirements than retail applications.
Example: Max: 15/30 kg
Options are expressed as divisions in the increment size for the range:
Multi-Interval
e = 5/10 g
35 x 0.01 kg
Multi-Interval
Multi-Range
4.11.4.1.6. Unit Switching
The secondary unit softkey will only display on the weighing screen if Unit Switching is
enabled.
The
parameter can be set to
4.11.4.1.7. Secondary Units
or
.
This parameter sets secondary units for the scale capacity. The scale converts primary units into
secondary units. The maximum capacity may not be a whole number; the converted increment size
is a factor of
Options for the
or 5, and is equal to or less than the primary unit size.
parameter are:
• Lb-Lb ( Example 45.85 lb.)
• Lb-oz (Example 45 lb. 13.6oz)
• Kg (Example 20.840 kg)
• g (example: 20840 g)
Page 74

30126862 | 00 | 04/2014
METTLER TOLEDO BC Shipping Scales Service Manual
4-29
4.11.5. Calibration
Calibrate
CalWgt
Calibration weight
Cal
Perform calibration
UseGeo
Use the Geo code for the scale’s location
CalPrm
Calibration prompt for quality control
Pounds
Metric
Pounds
Figure 4-25: Calibration Setup Screen
The parameters set from the
4.11.5.1. Calibration Weight
The versatility of the BC scale allows it to be configured for a primary unit of pounds, but be
calibrated with a kg test weight.
This parameter sets the size of the weight used to calibrate the scale.
menus include the following:
Select either
calibration weight selection screen will appear.
is selected.
or
Figure 4-26: Calibration Weight Setup Screen
, then press ENTER. Depending on which option was selected, a
Figure 4-27 shows the screen displayed when
Page 75

4-30
METTLER TOLEDO BC Shipping Scales Service Manual
30126862 | 00 | 04/2014
Technical Manual
CalWgt
Note
Enabled
Home > Setup > Scale
Appendix F
Calibration
GEO Adjust
Figure 4-27: Calibration Weight Selection Screen, Pounds
Scroll to the desired weight and press ENTER to return to the
4.11.5.2. Calibration
Access this screen to set the Geo code for the calibration location, and perform scale calibration.
Changes made here will be saved immediately once the calibration sequence is complete. The
scale will automatically save the calibration data, exit setup mode, and reboot. The End
program block will not be displayed after calibrating the scale.
Table 4-2: Calibration Weight Options
Scale Units Cal 1 Cal 2 Cal 3 Cal 4
Pounds-lb. 5 10 20 30
BC-15
Metric-kg 2 5 10 15
Pounds-lb. 10 25 50 70
BC-30/3LU
Metric-kg 5 10 20 30
Pounds-lb. 25 50 100 150
BC-60/6LU
Metric-kg 10 20 45 60
Pounds-lb. 30 50 100 300
BC-150U
Metric-kg 15 20 45 150
screen.
: If the calibration sequence is the end of the programming process, make sure the
Metrology lock is
Refer to
1. When the
not highlighted, scroll to it using the arrow keys).
for Legal-For-Trade applications. To check this, attempt to access
.
for a table of areas and corresponding Geo codes.
screen is first accessed, the
softkey will be highlighted. (If it is
Page 76

30126862 | 00 | 04/2014
METTLER TOLEDO BC Shipping Scales Service Manual
4-31
Appendix F
Start Calibration, please Empty scale, then Press ENTER
Put Load, then Press ENTER
Figure 4-28: Geo Adjust Screen
2. Press the UP or DOWN key to adjust the GEO code value. When the correct value is shown,
press ENTER to accept it. Refer to
for a table of locations and corresponding GEO
codes.
3. Scroll to the Calibration softkey and press ENTER to start the calibration sequence.
4. The scale will request
.
Figure 4-29: Start of Calibration Sequence
5. Ensure that the platter is on the sub-platter, there is no weight or debris on the platter, and
there is nothing touching the platter. Once the above items are confirmed, press the ENTER
key. The scale will capture zero.
6. Now the scale will request to
. The calibration weight value is
shown at lower left of this screen. The scale will capture span.
Figure 4-30: Calibration Sequence – Place Load
Page 77

4-32
METTLER TOLEDO BC Shipping Scales Service Manual
30126862 | 00 | 04/2014
Technical Manual
Empty Scale again, then Press ENTER
Calibration was OK
Use GEO
7. The scale will request
platter and press ENTER.
Figure 4-31: Calibration Sequence – Empty Scale Again
8. The scale will display a status message –
. Remove weight from the scale
.
Figure 4-32: Calibration Sequence Successful
9. The scale will count down a few seconds, and then reboot to save the calibration parameters.
To exit during the process described above, use the arrow keys to highlight EXIT, then press
ENTER. If GEO code setting or the calibration sequence is underway, it must be completed. To
exit immediately during either the GEO setting or calibration sequence, power down the scale
and reboot it.
When the scale powers back up, check the accuracy of the scale. Verify zero and span using test
weights. Place the test weight at multiple locations on the platter.
4.11.5.3. Use GEO
Refer to section 4.15 for information on sealing the scale for Legal-for-Trade applications.
The METTLER TOLEDO GEOCAL procedure, which prompts for the Geo-Code update on the first
power up, uses the USEGEO parameter.
In remote areas, it is expensive to send a service technician to the scale’s location. The
function will update the GEO-code value for a location other than the calibration site. In countries
where W&M authorities allow this procedure, a certified technician can:
• Set the GEO Code for the calibration location.
• Calibrate the scale.
Page 78

30126862 | 00 | 04/2014
METTLER TOLEDO BC Shipping Scales Service Manual
4-33
• Reset the Geo code for the point of use location.
Home > Info > Cal Info
UseGeo
3
Save
Calib
• Seal the scale and fill out proper documentation.
• Ship the sealed scale to the remote point of use location.
The USEGEO simplifies the resetting of the Geo-code while keeping record of the original calibration
GEO Code. Values can be viewed at
.
To configure the parameter:
1. In the Calibration setup screen (Figure 4-25
), scroll to
and press ENTER.
2. A numeric box will appear on screen.
Figure 4-33: Use Geo Setup Screen
3. The right digit will be highlighted, press the UP or DOWN arrow to increase or decrease the
value. Once the correct digit is shown, press the LEFT or RIGHT arrow to scroll to the tens digit.
The Geo code range is 00 to 31. The tens digit will display a
only if the ones digit is 0 or 1.
4. Update the tens digit in the same way and press ENTER to accept the value.
5. Press the DOWN arrow and scroll to the
screen will display.
softkey. Press ENTER to confirm the setting. The
Refer to Chapter 2 for a table of areas and corresponding Geo codes.
Page 79

4-34
METTLER TOLEDO BC Shipping Scales Service Manual
30126862 | 00 | 04/2014
Technical Manual
CalPrm
Home > Setup > Maintc > CalCkh
Calibration
Zero
Pb 0
Pushbutton zero
>0<
Zero Indicator – displays a center-of-zero icon on weighing display
4.11.5.4. Cal Prompt
The
accuracy of the scale after a specified number of weighments or weighing cycles. Scale accuracy
can be checked by accessing
Options for this parameter are:
• Disabl
softkey allows a message to be set, to remind an operator to check the calibration
Figure 4-34: Calibration Prompt Screen
.
• 5K wts (5,000 weighing cycles)
• 10k wt
• 50k wt
• 100k w
Select the desired value and press ENTER to accept it. The
screen will display.
4.11.6. Zero
Figure 4-35: Zero Screen
The
screen allows the configuration of parameters that affect the way the scale zeroes. The
options in this screen are:
when the scale is zeroed
Page 80

30126862 | 00 | 04/2014
METTLER TOLEDO BC Shipping Scales Service Manual
4-35
AZM
Automatic Zero Maintenance
Pwr 0
Zero at power up
4.11.6.1. Pushbutton Zero
Pb 0
PushBtn 0
100%
>0<
Disabl
Enable
When
is enabled, the Zero softkey
status of the scale and the setting selected in the
zero the scale by pressing the softkey.
The options are expressed as a percentage of the scale’s capacity, and determine how far from zero
the scale can be before the pushbutton zero softkey won’t zero the scale. Options are:
• Disabl
• 2%
Figure 4-36: Pushbutton Zero Screen
will appear on the weighing screen. Depending on the
screen, the operator will be able to re-
• 5%
• 100%
If
is selected, the zero softkey will always zero the scale.
4.11.6.2. Zero Indicator
can be set to
division (the scale’s smallest increment size) of calibrated zero, an indicator will appear on the
weighing screen at right, immediately below the weight display.
or
. When it is enabled and the scale is stable within 0.25% of a
Figure 4-37: Center of Zero Indication
Page 81

4-36
METTLER TOLEDO BC Shipping Scales Service Manual
30126862 | 00 | 04/2014
Technical Manual
Disabl
Enable
Pwr 0
For example, on a scale with an increment size of 0.05 lb in normal rounding, debris on the platter
weighing 0.0249 lb would still display a zero weight, and the center of zero icon will display
whenever the debris weight is below 0.0125 lb.
4.11.6.3. Automatic Zero Maintenance
AZM can be set to
within a certain programmable band of zero but is not exactly at the center of zero, the scale will
automatically track itself back to the center of zero.
AZM typically works in a range of 0.5 divisions (the smallest scale increment).
4.11.6.4. Power-Up Zero
sets the range, in percent of scale capacity, within which the scale will capture zero when it
is first powered up. Options are:
• Disabl
or
. When it is enabled, and the weight indication on a scale is
Figure 4-38: Power-Up Zero Screen
• 10%
• 20%
If Power-Up Zero does not capture zero, try re-booting the scale.
Page 82

30126862 | 00 | 04/2014
METTLER TOLEDO BC Shipping Scales Service Manual
4-37
4.11.7. Rounding
Classi
Weight classifier rounding up; round up for values above zero (1+).
Normal
Retail rounding: round up for values 5+.
Usps
USPS rounding within maintenance tolerances. Used for basic
Expand
Displays expanded weight, typically at 10x resolution.
factor
[For METTLER TOLEDO internal use only.]
Func
Home > OPMode
This parameter sets the rounding method used by the scale. Normal rounding means that with a
0.05 lb increment, 0.0250 will round up to 0.05, and 0.0249 will round down to 0.00.
The options for this parameter are:
Figure 4-39: Rounding Screen
Used for basic weighing only.
Classifier and USPS rounding are used in basic weighing only.
Expanded weight displays the raw weight before rounding. It is not a legal rounding mode in
the scale.
4.11.8. Functions
weighing only.
Figure 4-40: Functions Screen
The
screen enables and disables weighing modes available to the operator. The set of modes
available is protected by the metrology lock. Functions enabled here must also be selected in the
screen in order to be available from the weighing screen.
Page 83

4-38
METTLER TOLEDO BC Shipping Scales Service Manual
30126862 | 00 | 04/2014
Technical Manual
WtTare
LabOff
TakeAW
ProdVy
Count
Price
Hold
disabl
enable
Bootup dialog
Bootup
disable
Disable the dialog.
GEO
Prompt for GeoCal location code only.
G+M
Prompt for GeoCal location code and Manifest Software with which
G+L
Prompt for GeoCal location code and scale language and units.
G+M+L
Prompt for GeoCal location code, scale language and units, and
Home > End > Save > [confirm]
Available functions are:
These functions are described in detail in Chapter 3, Section 3.5.
Each function can be set to
4.11.9. Boot-Up
The
on first power-up only. After first power up, the
The options available in this screen are:
or
.
screen is similar to a setup wizard, which prompts the operator for configuration
Figure 4-41: Bootup Dialog Screen
setting is disabled.
the scale will communicate.
Manifest Software with which the scale will communicate.
Selections are described in detail in sections 4.11.9.1, 4.11.9.2 and 4.11.9.3. Once a selection is
made in this screen and changes are saved at
dialog will display at next power-up. For example, if G+M+L is selected and the configuration
saved, the next time the scale is powered up, the initial screen will be like the one shown in
4-42.
, the selected
Figure
Page 84

30126862 | 00 | 04/2014
METTLER TOLEDO BC Shipping Scales Service Manual
4-39
4.11.9.1. GeoCal
Home > Info > Cal Info
Use the LEFT and RIGHT arrows to select the correct value, from 00 to 31. Press ENTER to accept
the selection.
For details about GeoCal, refer to section 2.2.4, Scale Configuration, in Chapter 2. This section also
includes a table of locations and corresponding GEO codes.
The METTLER TOLEDO GeoCal™ procedure uses the USEGEO parameter. Geo values can be
viewed in the
4.11.9.2. Language and Units
Use the LEFT and RIGHT arrows to select the correct value. Options are:
• English – Lb
• English – Kg
• Spanish – Kg
• French – Kg
Figure 4-42: Boot Dialog, G+M+L
screen.
• German – Kg
• Chinese – Kg
4.11.9.3. Manifest Software
Use the LEFT and RIGHT arrows to select the serial communication defaults used to communicate
with manifest software. Options are:
• Standard No change
• F ShipMGR FedEx Ship manager
• U Worldship UPS WorldShip
• D EasyShip DHL EasyShip
• P E-Ship Purolator E-Ship
Page 85

4-40
METTLER TOLEDO BC Shipping Scales Service Manual
30126862 | 00 | 04/2014
Technical Manual
Maintenance
Ovlds
Displays the number of times the scale has been over-loaded.
dspTst
Runs a series of display test patterns to verify that all pixels are operating.
CalCkh
Performs a calibration check for zero, and with a test weight.
4.11.9.4. Exit
Once the parameters are set, scroll to the EXIT softkey and press ENTER. The scale will continue the
boot-up process.
4.12. Setup: Maintenance
Figure 4-43: Maintenance Setup Screen
Scale tests can be run from the
usage. Options are:
screen, which also provides information about scale
4.12.1. Overloads
The scale tracks the number of times it has been overloaded. It keeps track of the date and time as
long as power is applied to the scale.
Figure 4-44: Scale Overloads Display
Page 86

30126862 | 00 | 04/2014
METTLER TOLEDO BC Shipping Scales Service Manual
4-41
4.12.2. Display Test
zero
calwt
The display test resembles the one that runs when the scale is powered up.
4.12.3. Calibration Check
Figure 4-45: Example Display Test Screen
Figure 4-46: Calibration Check Screen
To perform the calibration check from this screen:
1. Check that the scale is level by looking at the level bubble.
2. For the zero test, clear the scale platter, scroll to the
softkey and press ENTER. The scale
will display a pop up window indicating that the test has completed successfully.
Figure 4-47: Zero Test Confirmation Screen
3. For the calibration weight test, place a test weight on the platter, scroll to the
press ENTER. The scale will display the weight in expanded mode before rounding.
softkey, and
Page 87

4-42
METTLER TOLEDO BC Shipping Scales Service Manual
30126862 | 00 | 04/2014
Technical Manual
Home > End
End
Abort
After the selection is confirmed, the scale will reboot without saving setup changes.
Figure 4-48: Calibration Weight Test Screen
4. If the test weight does not read the proper weight, check the tolerance allowed. The weight
tolerance for Legal-for-Trade usage can be found via a web search for Handbook 44 (in North
America) or R76 (for European and OIML approvals).
4.13. End
Before any changes (other than scale calibration) are saved,
settings saved, and the action confirmed.
Figure 4-49: End Screen
The
screen offers the following options:
must be accessed, the
Figure 4-50: Abort Confirmation Screen
Page 88

30126862 | 00 | 04/2014
METTLER TOLEDO BC Shipping Scales Service Manual
4-43
Save
After the selection is confirmed, all changes will be saved and the scale will reboot.
Figure 4-51: Save Confirmation Screen
No
Returns to the Home page (Figure 4-1).
CstDft
Saves current settings as a custom default for future reference. Default settings can be
Home > Deflt > Custom
End
recalled at
the action and return to the
Note that at this stage, changes have not been saved.
Figure 4-52 Custom Default Setting Confirmation Screen
4.14. Basic Display
. When this option is selected, the scale will confirm
screen.
Figure 4-53: Basic (7-Segment) Display
Although the 0270 Basic Display (seven-segment type) is typically used as a remote display, it
can also be used as the scale’s primary display. The scale functionality is greatly reduced in
comparison to use of the graphical display. Basic weighing is the only operating mode when this
Page 89

4-44
METTLER TOLEDO BC Shipping Scales Service Manual
30126862 | 00 | 04/2014
Technical Manual
Unit Switch
Zero
GeoCal
Geo Code
Refer to the location and code table in Chapter 2.
CAL
Scale
When YES is selected, the scale will prompt for the zero capture,
Mode
(Node)
Rounding
Options are Classifier (Round Up), Normal rounding, USPS
shows N in place of M; hence, Mode appears as Node.
Defaults
For serial
Use the ZERO key to scroll through the options; accept a selection by
SAVE
Save
All parameters are saved if YES is selected, and the scale will reboot.
BC-15
Single seal
Loop the wire through the holding screw for PCB cover and holes in the
plastic cover
display is used. The limited setup parameters are accessed by pressing and holding the UNITS key
for 5-8 seconds.
This display includes a
buttons.
After entering Setup, the scale will display the Geo-Cal function on the first power up only if the
parameter is enabled. Use the ZERO key to scroll through the selection of codes 00-31, and the
UNITS key to accept the selection.
The other parameters that can be configured are:
Calibration
Method
communication
key and a
prompt for the selection of the Cal weight to be used, and complete
the Span capture.
rounding, Expanded mode, and Factory mode.
Note that due to its graphical limitations, the 7-segment display
pressing UNITS key. Options are:
No Change, Toledo, Def F1, Def F2, Def U, Def D, Def P, ToledoOIML, MT-SICS, and Custom.
key. All functionality is accessed using these
parameters
If NO is selected, settings are not saved and the scale returns to its
basic weighing mode.
4.15. Metrological Sealing
If a wire seal is required for Weights and Measures approval, the BC scale can be sealed after
calibration and setup by installing a wire seal on the Main PCB access cover,
Figure 4-54: BC-15 Sealing
Page 90

30126862 | 00 | 04/2014
METTLER TOLEDO BC Shipping Scales Service Manual
4-45
BC-60
BC-6L
BC-30
BC-3L
Two seals
Loop the wires through:
1. The holding screw for the PCB cover on the bottom of the scale (left,
BC-150
Two seals
1. Loop the wire through the holding screw for the PCB cover on the
in Figure 4-55).
2. The green cap and tab hole on the housing scale (right, in Figure
4-55).
Figure 4-55: BC-60, -6L, -30 and -3L Sealing
bottom of the scale (left, in Figure 4-56).
2. Loop the wire through the two drilled-head screws over the
calibration switch (right, in Figure 4-56).
Figure 4-56: BC-15 Sealing
Page 91

30126862 | 00 | 04/2014
METTLER TOLEDO BC Shipping Scales Service Manual
5-1
This chapter covers
5 Service and Repair
Home > Info > Errors
This chapter provides information on servicing, upgrading and maintaining the BC
• Troubleshooting
• Update Scale Software
•
5.1. Troubleshooting
The BC shipping scale is designed to be virtually error-free and reliable. If problems do occur, do
not attempt to repair the scale before you have determined the source of the problem. Record as
much information as possible about what has happened including any messages and physical
responses. The following troubleshooting information may help to determine the cause of the
problem.
scale, including troubleshooting and replacement of key components.
WARNING
ALWAYS REMOVE ALL POWER BEFORE SERVICING ANY EQUIPMENT. METTLER-TOLEDO
RECOMMENDS THAT ONLY QUALIFIED TECHNICIANS OPEN THE UNIT UP FOR MAINTENANCE
AND REPAIR. IF YOU MUST OPEN THE BC SCALE, READ THIS SECTION CAREFULLY TO AVOID
DAMAGE TO THE INTERNAL COMPONENTS.
5.1.1. Error Codes
The BC scale keeps a log of the five most recent errors. This information can be viewed by pressing
the UP arrow for 5 seconds, then navigating to
When error codes are displayed on the weight indicator, they are shown with a leading E to
distinguish them from weight data.
.
Page 92

5-2
METTLER TOLEDO BC Shipping Scales Service Manual
30126862 | 00 | 04/2014
Service and Repair
SetDft
SetDft
Home > Setup > Scale > SetDft
Yes
Home > End > Save
not
Home > End > Abort
Yes
USB
Does not require the power adapter. Scale is powered by PC.
RS232, Ethernet,
Bluetooth*
A power adapter is used with the USB cable to supply power to the scale.
Table 5-1: Error Codes
Message Text Action
Type Approval (HB44 / OIML) is interlocked with
Default Build.
Access
New Approval selected, but
configured
ERR_MENU_SEG_READ_LC_CAP = 0,
ERR_MENU_SEG_CalibOrder, Recalibrate
ERR_MENU_SEG_CALIBWT Reconfigure weight
ERR_MENU_SEG_CLR_CALIB_PARAM
ERR_MENU_SEG_READ_SPAN_TOLERANCE
ERR_MENU_SEG_StoreParams, Clear EEPROM. See SICS commands
ERR_MENU_SEG_GEO_SET Error in setting the GEO CAL.. Reset and try again
Error Uart Framing Serial Data Incorrect, check device and PC settings
not
Parameters will be updated in setup, but not saved. Review
the parameters in the remainder of setup.
If they are acceptable, access
If they are
select
not be saved.
Wrong Build for scale model, Check if Load Cell cable is
attached
Recalibrate the scale, make sure there is no vibrations while
calibrating
Error reading Test weight during calibration. Weight is out of
tolerance range. Check setting of Cal Weight selected.
acceptable, make the appropriate change or
and press
and select
. Parameters will
, the
.
.
5.1.2. Check Power Adapter
Error Write EEPROM Check if Load Cell cable is attached, Reload Firmware
OVERLOAD occur Weight exceeded Scale capacity.
Contact METTLER TOLEDO for the correct power adapter part number. Using the wrong type of
adapter may damage the scale.
The BC scale can have either of two power sources, depending on its mode of communication:
* Ethernet and Bluetooth options not currently available.
To see if the scale is powered, check the display for activity, and/or look at the connectors under the
scale. A green status light on the PCB behind the connectors should be lit or flickering, if the scale
is receiving power.
Page 93

30126862 | 00 | 04/2014
METTLER TOLEDO BC Shipping Scales Service Manual
5-3
If the scale is not powered, use the following method to determine if there is a problem with the
power adapter, the USB cable, or the scale:
1. Confirm that the AC outlet has power by plugging in another, functioning device.
2. Check the USB connections to the power adapter and the scale. Make sure the USB A connector
is firmly attached to the power adapter and the USB B connector is firmly attached to the scale
USB port. Plug the power adapter into the AC outlet.
3. If there is no power through the Power adapter, disconnect the serial cable, then disconnect the
USB A connector from the power adapter and plug it into a USB port on the PC.
4. If there is still no power, try another USB cable that is known to be functional. Connect the new
USB cable to the scale and PC.
5. If there is still no activity, consult a METTLER TOLEDO technician. The PCB may be damaged.
5.1.3. Blank Display
If the scale’s display is blank:
• Check that the scale is receiving power, and that the display cable is attached to the scale base
properly. Refer to section 5.1.2.
Figure 5-1: Green PCB Status Light Illuminated
• Look at the connectors under the scale to see if the green PCB light is energized (Figure 5-1). If
the scale is receiving power, the green light should be lit or flickering.
• For RS-232, confirm that the power adapter is plugged into a working AC outlet and the USB
cable is properly plugged into the power adapter and scale.
• For USB, make sure the USB cable is pushed in all the way at both the scale and the PC.
Once it is verified that the scale is receiving power, and the display remains blank, check the
display cable at the connectors. Unplug the display by pushing in on the connector tab and pulling
back on the cable. Reinsert the display cable into the scale connector, making sure the tab clicks
into position.
If the display still does not work, connect the display to the secondary display connector.
If the display is still blank, it must be replaced.
Page 94

5-4
METTLER TOLEDO BC Shipping Scales Service Manual
30126862 | 00 | 04/2014
Service and Repair
Home
Home > Setup > Maintc
dspTst
Load Cell Replacement
5.1.4. No Keypad Interaction
To test the operation of the keypad, remove power from the scale, then reapply it. With the unit
powered, allow the scale to go through its boot-up sequence, and then attempt to enter setup mode
by pressing and holding the UP key for 5 to 8 seconds. If the display does not display the
page, replace the display.
5.1.5. Display Indicator Locked
A display test can be run to check the functionality of display pixels. This is the same test shown at
boot-up. Access
will display.
To test operation of the display indicator, remove power and then reapply it. With the unit powered
and display reading zero, add weight. If the displayed weight does not change, check the cable
connection from the load cell to the PCB. Disconnect and reconnect the cable. Refer to section 5.4,
If the display appears to function but will not indicate a weight, replace either the load cell or the
PCB.
.
. Select
and press ENTER. A series of test patterns
5.1.6. Serial Communication Test with PC
This test does not apply if PC communication is via USB.
A HyperTerminal serial (RS-232) test can be conducted to see if serial communication problems
are occurring. This test can determine if the issue is with the scale connection / communication to
the PC, or if the issue is within the shipping software program itself.
Note: HyperTerminal is no longer standard in Win 7 or later versions of Windows. It can still
be obtained on-line or copied from an XP computer. Similar Programs such as PuTTY or MT
Albatross can also be used.
The HyperTerminal test will confirm
• If the scale is properly connected to the PC
• If the scale is able to communicate by serial RS232 to the PC
• If the scale is able to display the correct weight
Run this test whenever it is unknown why the manifest or shipping software is not showing a
weight, or the proper weight, on the PC screen.
Page 95

30126862 | 00 | 04/2014
METTLER TOLEDO BC Shipping Scales Service Manual
5-5
1. Connect the scale to the PC as shown in Figure 5-2. Note the COM port on the PC that the scale
PC Connectors
AC
Outlet
Display
Serial
USB &
Power
Power Supply required with RS232
connection
Geo in
Home > SetUp > Comm > Serial
Accessories > Communications
File | New Connection
BC Scale
OK
Connect Using
is connected to; this information will be needed in step 5
Figure 5-2: Serial Connections
2. After the scale powers up, enter the GeoCal value if
is displayed. Refer to Chapter 3 for
Geo Location Codes, and how to enter the value.
3. Check the scale’s serial set up parameters at
. Write down the
values for Baud, ASCII, Parity, Stop Bits and Protocol; they will be needed to enter the matching
data in the HyperTerminal screen.
4. Access the HyperTerminal program on your PC as shown in Figure 5-3 (the way to run a
program differs between different Windows operating systems). HyperTerminal is a standard
Windows program in XP operating systems under
, and can
still be downloaded from the Internet for later versions of Windows. An Internet search for
HyperTerminal will show numerous suppliers.
Figure 5-3: Opening Hyperterminal
. Click on the drop-down bar for
. Name the connection
. Select the
5. Once HyperTerminal is opened, choose
for future reference and click
Page 96

5-6
METTLER TOLEDO BC Shipping Scales Service Manual
30126862 | 00 | 04/2014
Service and Repair
OK
Flow Control
None
Apply
Home > Setup >
COMM > Serial > Protoc
communication port that the scale cable connects to on the PC. COM A is equivalent to COM 1.
Click
when completed.
6. Program the same setup parameters in HyperTerminal as used in the scale (Baud = Bits per
second). For the
setting, select
– the scale does not use this parameter.
7. Click
HyperTerminal screen will appear.
8. Now that the scale set up matches the HyperTerminal set up, put some weight on the scale and
note the displayed value.
9. Go to the HyperTerminal screen and click on the blank screen.
10. Enter the weight command that corresponds to the scale’s protocol setting (
after entering the values. The data will be accepted. Click OK, and a blank
).
Weight Protocol Proto Enter
METTLER TOLEDO Toledo W
FedEx Proto F W <CR>
UPS Proto U <CR>
Page 97

30126862 | 00 | 04/2014
METTLER TOLEDO BC Shipping Scales Service Manual
5-7
Weight Protocol Proto Enter
File | Properties | Setting | ASCII Setup
Echo typed characters
locally
Send line ends with line feeds
Purolator Proto P W <CR>
DHL Proto D W <CR>
MT SICS MT-SIC S <CR>
<CR> is carriage return, or ENTER.
Uppercase letters must be used.
The typed character will not display unless Echo is checked in HyperTerminal’s settings – in
HyperTerminal, access
. If the MT-SICS is used, also check
, and click
.
Figure 5-4: HyperTerminal ASCII Settings
11. A weight value should now be displayed on the HyperTerminal screen that matches the weight
on the scale display. If another message appears, zero the scale first by repeating this step with
no weight, then try again with a weight.
12. If the same weight is displayed on the scale and HyperTerminal screen, the scale is
communicating correctly to the PC.
Consult the Shipping Software provider for further assistance.
Note: Exit HyperTerminal before trying to communicate to the manifest software again.
Page 98

5-8
METTLER TOLEDO BC Shipping Scales Service Manual
30126862 | 00 | 04/2014
Service and Repair
Download
Simple Loader
Simple Loader Operating Instructions.pdf
Start > Control Panel > Device Manager
Ports
5.2. Update Scale Software
NOTICE
OBSERVE PRECAUTIONS FOR HANDLING ELECTROSTATIC SENSITIVE DEVICES.
Ensure that current settings are saved by backing them up for future reference.
The BC scale software can be updated without any hardware changes. Simple Loader is a METTLER
TOLEDO application used to load the new software into the scale. The application can be
downloaded from the METTLER TOLEDO website at www.mt.com/ind-BCscale
This procedure requires a serial connection. An external USB-to-Serial adapter (such as
tab, select
Keyspan USA-19HS) can be used if the PC does not have a serial connection to the scale. The
scale’s virtual serial setting will not function for this purpose, since it uses the USB port. Use
cable 16317400A/64052046.
, and download to a local PC folder.
. Click on the
Please reference the operating instructions (
details are needed:
Check which PC COM port the scale is connected to.
On the PC, go to
port. Make sure no other serial program is using the same port as the scale. Shut down
HyperTerminal or any other serial tool before starting the firmware update.
. Click on
and select the proper COM
) additional
Figure 5-5: Device Manager, Port Settings
Simple Loader program is based on the SICS protocol, but the scale will upload the firmware
regardless of what Protocol the scale is set for. If the SICS protocol is not used, an error message
107 will appear. This message can be ignored if the scale is not set up for SICS.
Page 99

30126862 | 00 | 04/2014
METTLER TOLEDO BC Shipping Scales Service Manual
5-9
For an upload that does not encounter Error 107, set the scale protocol to MT-SICS. This can b
Home > Deflt
SICS
Home > End > Save
Settings
General Settings
Baud rate
Change…
.mot
Open
Bridge, Rainbow
Request power cycle and send bells
Activate Loading
Start
done by pressing and holding the UP key for 5 seconds to enter setup, then accessing Home >
Defaults, highlighting MT. Access
and save the settings.
, highlight
and press ENTER. Access to
Open the PC file for the SimpleLoader by double clicking on the icon.
Figure 5-6: SimpleLoader Icon
With SimpleLoader open, click on the
tab in the toolbar, then click on
the drop down list. Update the COM port if needed, and set
the
file. Highlight the file and click
If necessary, select radio buttons for
Check
button in the bottom portion of the box, and browse to the location of the scale
. The file is now selected.
Figure 5-7: Configuring SimpleLoader
, and
and click OK.
to 57600 or 115200. Click
in
.
When ready for the update, press
scale software will start to load into the scale, and progress will be indicated by a blue bar (Figure
5-8). The download time may be several minutes.
Once the process is started, the system must be rebooted quickly – within 3 seconds. The
procedure is to click Start, immediately unplug the scale’s power adapter, then plug it back in
to reboot the scale.
(at left, in Figure 5-7) and immediately reboot the scale. The
Page 100

5-10
METTLER TOLEDO BC Shipping Scales Service Manual
30126862 | 00 | 04/2014
Service and Repair
Program successfully loaded into the
product
Figure 5-8: SimpleLoader Running (left) and Download Complete (right)
When the download is complete, the screen will state
.
If an error 101 Timeout error is shown, the scale was not rebooted in time. Initialize the process
again. An error 107 can be ignored.
5.3. Main PCB Replacement
To replace the PCB:
1. Record the scale’s setup configuration. Refer to the setup menu trees in section 4.3 of Chapter
4 – a printed copy of these can be used to note current settings.
2. Remove power from the scale and remove the platter.
3. Use an appropriate wrist wire or other means to ensure static grounding.
4. Turn the scale upside down.
5. Disconnect the scale display cable, communication cable (USB/RS-232), and power adapter
cable (if used) from the scale connectors.
 Loading...