

Page 1

Operating Instructions
METTLER TOLEDO
L-IC Line of balances
• AL-IC
• PL-IC
www.mt.com/classic
Page 2
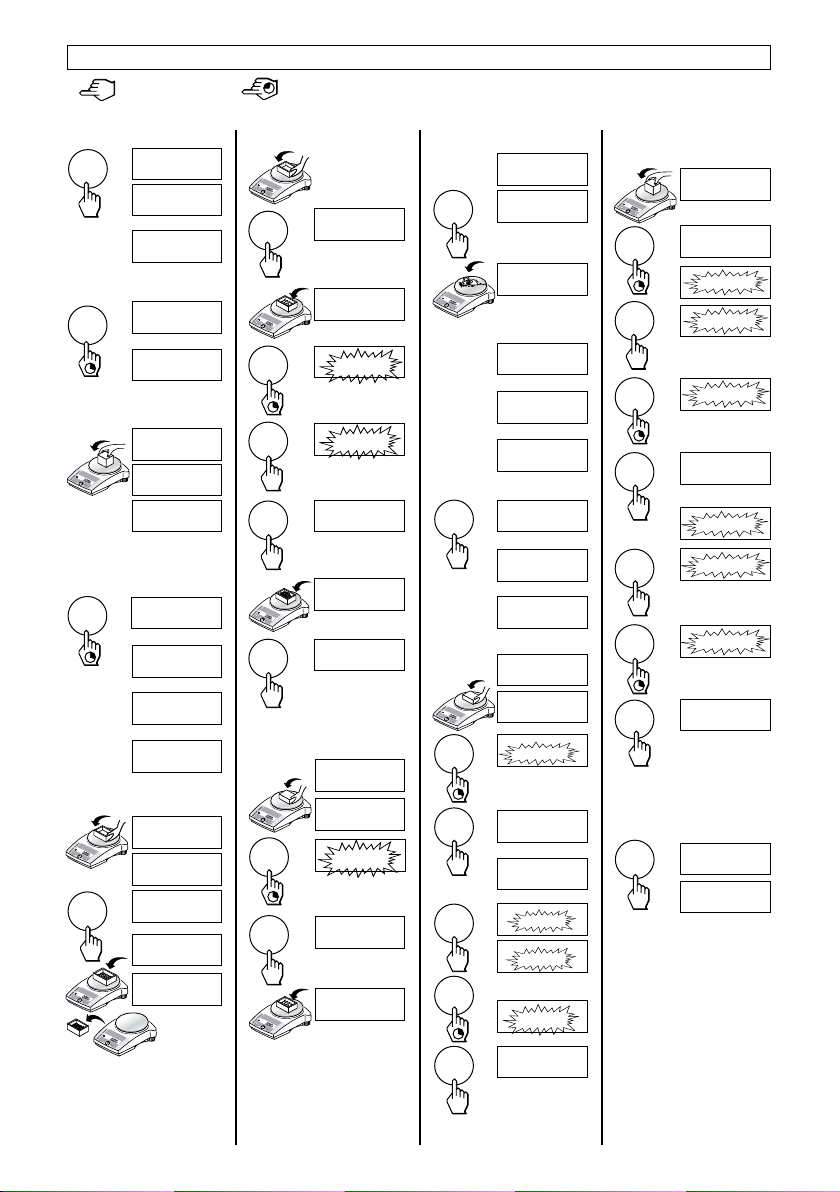
Operating instructions in a nutshell
Press key briefly
* These functions must be activated in the menu (section 4.3.2)
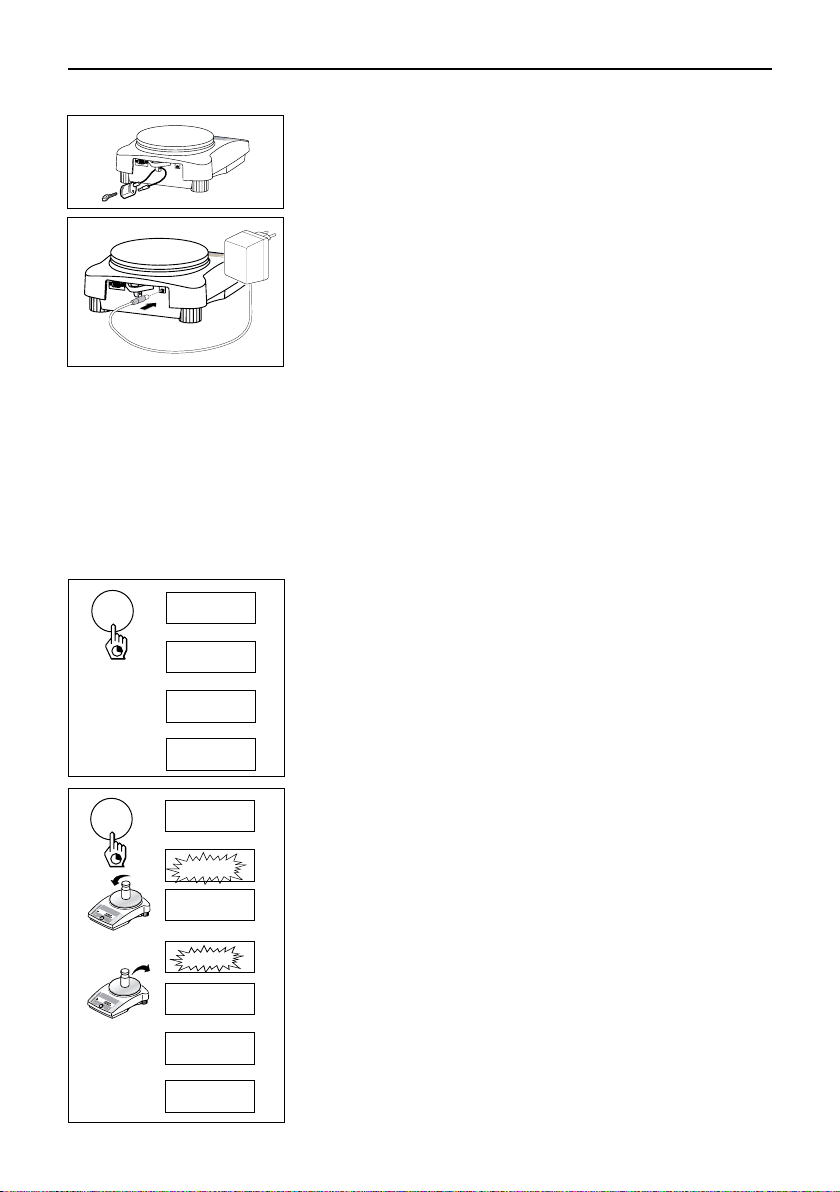
Switching on
On
88888888
▼
0.00 g
Switching off
OFF
Off
▼
Simple weighing
0.00 g
• 1182.03 g
1250.00 g
Adjusting (calibration)
internal
1/10d
Cal
CAL int
▼
Cal
------
▼
CAL donE
▼
0.00 g
Taring
0.00 g
121.01 g
#
0.00
g
95.97 g
-121.01 g
Press and hold key down until the desired display appears automatic sequence
Piece counting*
#
0.00 g
12.07 g
F
“
±
“
SEt 10
SEt 20
20
244
147.25 g
PCS
PCS
PCS
PCS
Percent weighing*
0.00 g
12.07 g
%
%
%
±
F
SEt100
100.00
101.60
Dynamic weighing*
0.00 g
á
0.00 g
“
á
• 257.35 g
▼
with automatic start (Dyn A)
á
-- 3 --
…
á
-- 1 --
▼
á
260.33 g
*
with manual start (Dyn M)
á
±
-- 3 --
á
-- 1 --
á
260.33 g
*
…
▼
Plus-minus weighing*
0.00 g
15.13 g
- ok +
F
±
“
“
±
tArGEt
ok
*
15.13 g
▼
- +
toLá
▼
- +
1.00
- +
1.01
…
- +
5.00
ok
15.13 g
▼
Free factor / selectable
display increment*
F
1/10d
1/10d
±
“
“
±
Unit switching*
“
%
%
%
%
17.89 g
#
F FAC ŸÖ
#
1.0000
#
0.9999
…
#
0.9500
#
StEPá
▼
#
0.01
#
0.02
…
#
0.05
#
17.00
22.00 g
oz
0.78
Page 3

Contents
Contents
3
1 Getting to know L-IC balances line ..............4
1.1 General .............................................................. 4
1.2 Layout of balances ............................................... 4
1.3 Overview of key functions ...................................... 5
2 Startup ......................................................6
2.1 Unpacking / standard equipment ............................ 6
2.2 Cautionary notes ................................................. 6
2.3 Setting up, leveling, preparations for weighing below
the balance ......................................................... 6
2.4 Adjusting (calibration) ..........................................
3 Weighing ...................................................8
3.1 On/Off switching ................................................... 8
3.2 Simple weighing ..................................................
3.3 Faster weighing with reduced readability ................. 8
3.4 Taring .................................................................
4 Menu .........................................................9
4.1 Overview ............................................................. 9
4.2 Menu operation ..................................................
4.3 Description of menu options ................................
5 Functions .................................................15
5.1 Piece counting ................................................... 15
5.2 Percent weighing ................................................ 15
5.3 Dynamic weighing ............................................. 16
5.4 Plus-minus weighing .......................................... 18
5.5 Weighing with free factor and/or selectable display
increments ........................................................ 18
5.6 Switching weight units ........................................ 19
6 Technical data, options,
7
8
8
optional equipment ..................................20
6.1 Technical data ................................................... 20
6.2 RS232C interface ............................................... 22
6.3 MT-SICS Interface commands and functions .......... 22
6.4 Optional equipment ............................................ 24
6.5 Dimensional drawings (in mm) ........................... 25
7 Appendix .................................................26
7.1 Typical printouts from METTLER TOLEDO
RS-P26 and LC-P45 printers ............................... 26
7.2 What if ...? ........................................................ 27
10
7.3 Maintenance and cleaning .................................. 28
10
7.4 Declaration of conformity .................................... 29
Page 4
Getting to know L-IC balances line
4
1 Getting to know L-IC balances line
1.1 General
Balance features
• The L-IC balance line ranges from high-resolution analytical balances (AL-IC) with a readability of 0.1 mg through to precision
balances (PL-IC) with a readability of 0.001 g to 1 g. The weighing ranges extend from 51 g to 4.1 kg.
• The operation of all theses balances is identical.
• In addition to basic operations such as
counting”, “Percent weighing”, “Dynamic weighing”, “+/- Weighing” or “Free factor” can be activated.
• Several balances are fitted with a glass draft shield in the factory; with other models a draft shield is available as an optional
extra.
Note
All Models are available as certified versions. Please ask your METTLER TOLEDO dealer for details.
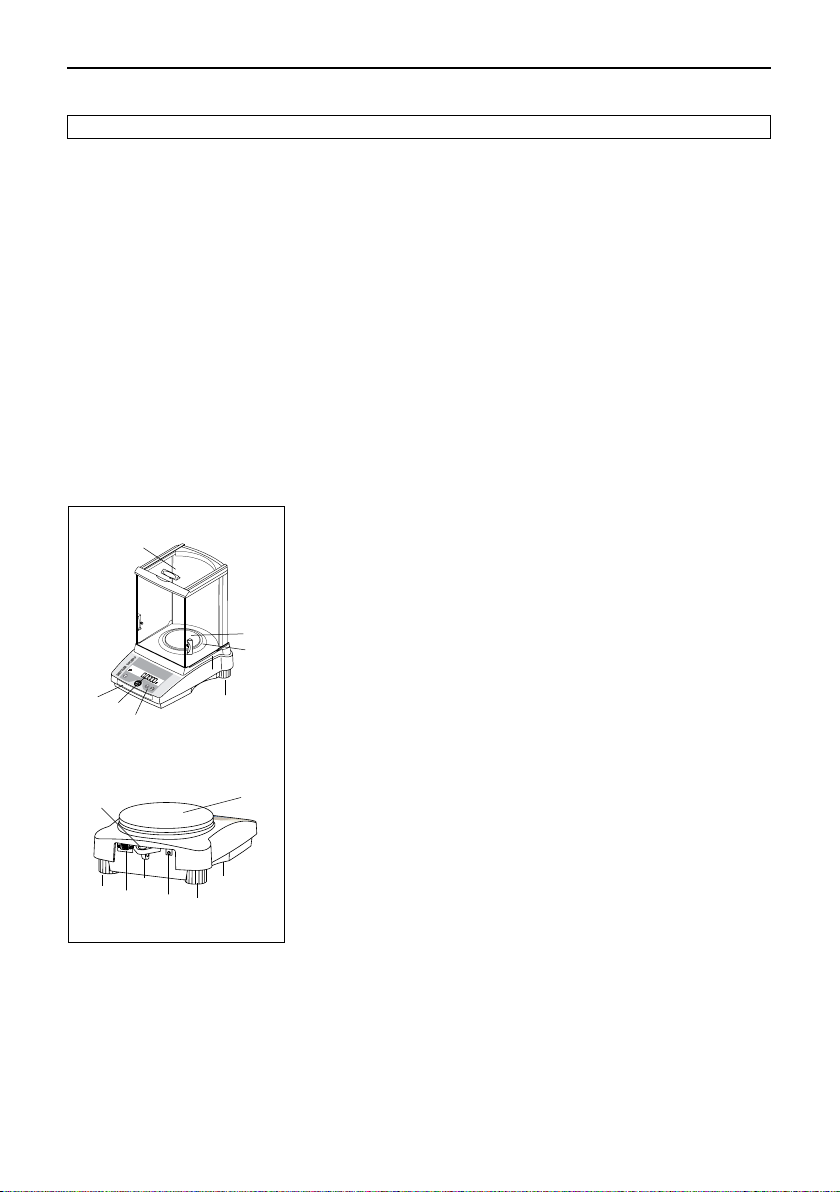
1.2 Layout of balances
6
12
3
2
1
7
4
weighing, taring and adjusting (calibration) miscellaneous functions such as “Piece
1 Keys
2 Display
3 Model plate with the following data:
“Max”: maximum capacity
“d”: readability
“Min”: minimum capacity (recommended minimum load; only relevant for
certified balances)
4
5
“e”: verification scale interval (smallest display increment tested during
certification; only relevant for certified balances)
4 Weighing pan
5 Draft shield element (not on all models)
6 Draft shield (supplied as standard with models with a readability of 0.1 mg and
1 mg)
7 Leveling feet
8 Hanger opening for weighing below the balance (underside of balance)
9 AC adapter socket
10 RS232C interface
11 Lug for optional antitheft device
12 Leveling control
Keys and display are identical for all L-IC balances.
11
7
10
8
9
7
Page 5
Getting to know L-IC balancees line
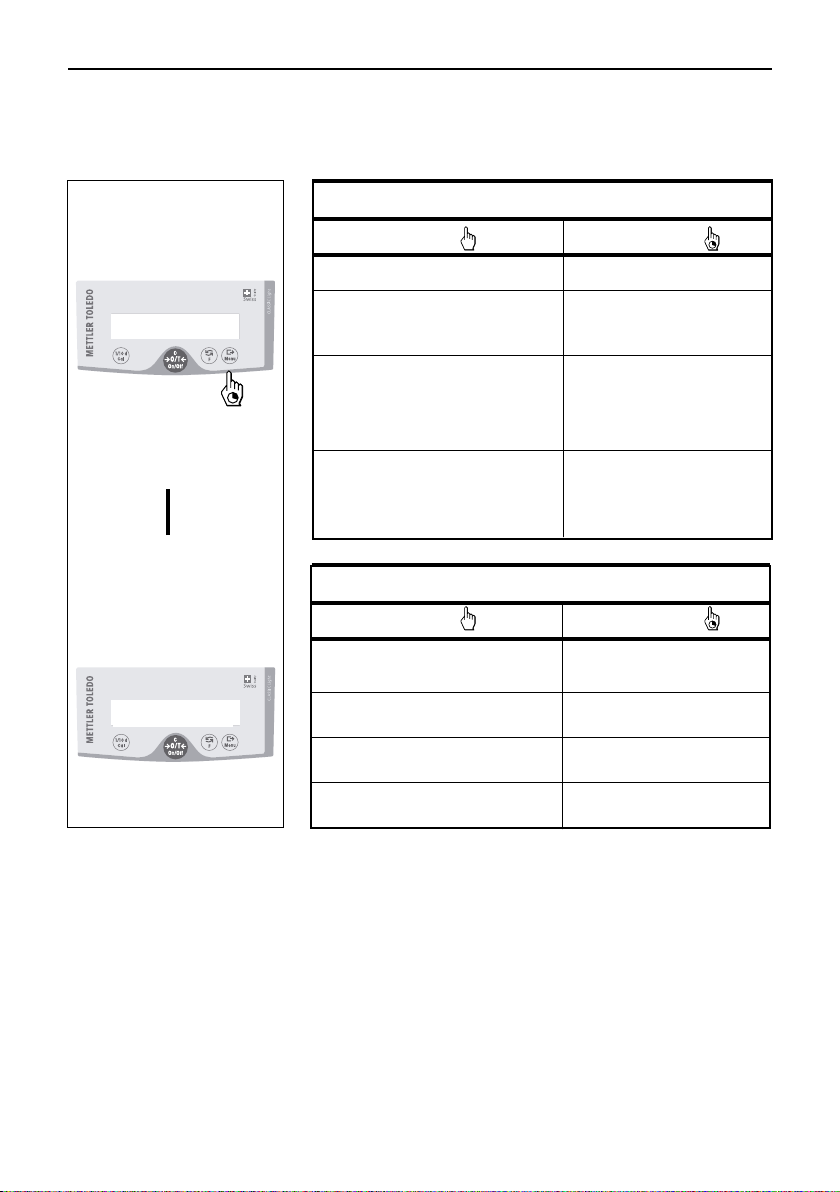
1.3 Overview of key functions
The balances have two operator control levels: the weighing mode and the menu. The function of each individual key depends
on the operator control level and how long the key is pressed.
Key functions in weighing mode
5
Weighing mode
Menu
0.000
▼
ŸÖENV
Press briefly
1/10d • Reduce readability Cal • Adjust (calibrate)
On • Switch on Off • Switch off
g
# • Zero/tare
C • Cancel function
“ • Switch F • Call function;
• Change settings A function must be
activated in the menu,
otherwise “F nonE”
appears in the display
± • Transfer weighing data via Menu • Show menu (hold key
interface with activated down until MENU
printer appears)
• Confirm settings
Key functions in menu mode
Press briefly Press and hold down
1/10d • Change settings 1/10d • Reduce value
• Reduce value by 1 step rapidly
C • Close menu (without –
saving changes)
“ • Change settings “ • Increase value rapidly
• Increase value by 1 step
± • Select next menu item Menu • Save changes and close
menu
Press and hold down
Page 6
Startup
6
2 Startup
2.1 Unpacking / standard equipment
The standard equipment for every balance comprises:
AC adapter, to national standard
•
Weighing pan, Weighing pan support, draft shield element (depending on
•
model)
Draft shield
•
models available as an optional extra
• Operating Instructions
standard supply with models of 0.1 /1 mg readability (
)
for other
1)
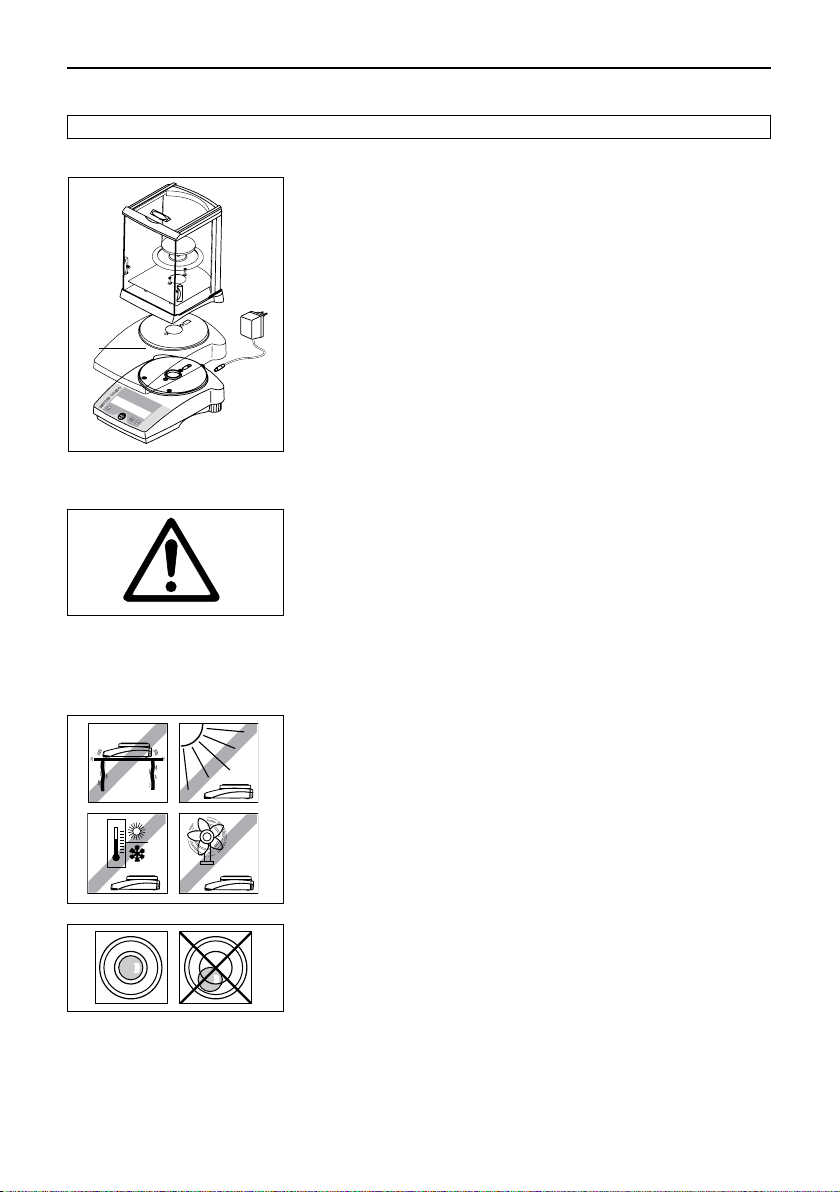
2.2
Cautionary notes
2.3 Setting up, leveling, preparations for weighing below the balance
1) In-use covers are available as optional extras (Section 6.4).
• L-IC balances must
ply AC adapter.
connecting the AC adapter, verify that the voltage printed on it corresponds
• Before
to the local AC power supply voltage. If this is not the case, please contact your
local METTLER TOLEDO dealer.
• L-IC balances may only be used indoors in a dry environment.
• For use with CSA Certified (or equivalent approved) power source, which must
have a limited and SELV circuit output.
The optimum location
The correct location makes an important contribution to the accuracy of the weighing
results of high-resolution analytical and precision balances.
• Stable, vibration-free position as horizontal as possible
• No direct sunlight
• No excessive temperature fluctuations
• No drafts
The best location is on a stable bench in a corner protected against drafts, as far
away as possible from doors, windows, radiators or the louvers of air conditioners.
not be operated in hazardous areas with the standard-sup-
Leveling
All models are equipped with a level glass and two leveling feet to compensate
for minor irregularities in the surface on which the balance stands. The balance is
exactly horizontal when the air bubble is in the middle of the level glass.
Note: The balance should be leveled each time it is moved to a new location.
Preparations for weighing below the balance
To carry out weighing operations below the balance, get rid of the special cover on
the underside of the balance. (Note: never put the balance without the protective
cover over its cone down on its head, only on its side!). This exposes the opening
for the hanger, making weighing below the balance possible.
Page 7
2.4 Adjusting (calibration)
Cal
CAL int
▼
Cal
------
▼
Cal
CAL donE
▼
0.00 g
Startup
7
Antitheft device
All models are provided with a lug for attaching an antitheft device (see optional
equipment in Section 6.4).
Power supply
➞ Plug the AC adapter into the AC adapter socket on the balance, and connect to
the power supply.
➞ The balance performs a self-test. This test is finished when “OFF” appears.
➞ Press the «On» key briefly: the balance is in operational readiness. Before any
work is performed with the balance, it must be adjusted (Section 2.4).
Notes
To achieve accurate results with analytical balances (AL-IC), they must be left
switched on for at least 60 minutes to reach operating temperature before carrying
out the first weighing operation.
To obtain accurate weighing results, the balance must be adjusted to match the
gravitational acceleration at its location.
Adjusting is necessary
• before the balance is used for the first time
• at regular intervals during weighing service
• after a change of location
To obtain accurate results, the balance must be left switched on for 60 minutes to
reach operating temperature before starting the adjustment procedure.
Adjusting with internal weight
➞ To carry out tis operation, in the second menu option (Adjustment) select
“CAL int” (= factory setting) (section 4.1).
➞ Unload weighing pan.
➞ Press and hold the «Cal» key down until “CAL” appears in the display, then
release key.
➞ The balance adjusts itself automatically.
The adjusting is finished when the message «Cal done» appears briefly in the
display, followed by “0.00 g”. The balance is again in weighing mode and
ready for operation.
Cal
CAL
▼
Cal
2000.00
Cal
------
▼
Cal
0.00
Cal
------
▼
Cal
CAL donE
▼
0.00 g
Adjusting with external weight
➞ Have required adjusting weight ready.
➞ Unload weighing pan.
➞ Press and hold the «Cal» key down until “CAL” appears in the display. Release
key.
The required adjustment weight value flashes in the display.
➞ Place adjustment weight in centre of pan. The balance adjusts itself auto-mati-
cally.
➞ When “0.00 g” flashes, remove adjustment weight.
The adjusting is finished when the message “CAL done” appears briefly in the
display, followed by “0.00 g”. The balance is again in weighing mode and ready
for operation.
Notes
• This adjustment procedure can be terminated at any time with the «C» (“Cancel”)
key. The balance reverts to weighing mode.
Page 8

Weighing
8
3 Weighing
3.1 On/Off switching
On
0.00 g
88888888
▼
Switching on
➞ Remove any load from weighing pan and press «On» key briefly.
The balance performs a display test (all segments in the display light up
briefly).
When zero is displayed, the balance is ready for operation.
Off
3.2 Simple weighing
3.3 Faster weighing with reduced readability
The balance has the facility for speeding up the weighing operation by reducing its readablity (number of decimal places):
1/10d
3.4 Taring
#
OFF
▼
0.00 g
• 1182.03 g
1250.00 g
1.24 g
1.2 g
0.00 g
121.01 g
0.00 g
Switching off
➞ Press and hold the «Off» key down until “OFF” appears in the display. Release
the key.
➞ Place weighing sample on the weighing pan.
➞ Wait until the stability detector “•” disappears.
➞ Read the result.
➞ The balance is operating with its normal readability and speed.
➞ Press the «1/10d» key and …
➞ … the balance operates with reduced readability (one decimal place less), but
displays the weighing result quicker. Pressing the «1/10d» key briefly again
toggles the balance back to its full readability.
➞ Place empty container on the balance.
➞ The weight is displayed.
➞ Press the «#» key briefly.
95.97 g
-121.01 g
➞ Add weighing sample to container. The net weight is now displayed.
If the container is removed from the balance, the
negative value.
The tare weight remains stored until the «
balance is switched off.
tare weight will be shown as a
#» key is pressed again or the
Page 9
4 Menu
kg
Unit 1
Unit 1
mg
Unit 1
ct
oz
Unit 1
Unit 1
ozt
Unit 1
GN
Unit 1
Unit 1
Unit 1
Unit 1
Unit 1
Unit 1
Unit 1
Unit 1
lb
dwt
t o
t tl
S tl
H tl
m
mo
Unit 1
b t
kg
Unit 2
Unit 2
mg
Unit 2
ct
oz
Unit 2
Unit 2
ozt
Unit 2
GN
Unit 2
Unit 2
Unit 2
Unit 2
Unit 2
Unit 2
lb
t o
ti
m
mo
dwt
Unit 2
b t
HoSt
ZDISPLAY
S. StbS. ALL
S. PÑÖ
bd
4800
bd
9600
bd
1200
bd 600
bd
19200
7b-no7b-odd
8b-no
HS
SoFtHS
HArd
rESEt
LiST
HS OFF 7b-E bd 2400
S. SICS
S. oFF
PrintEr
S. ContS. Auto
F count
F100
F nonE
PCS
Std
dosrobust
Unit 1
g
F
FAC d
F
FAC
ÑÖ
F PÑÖ
#
#
- ok +
no A.ZEro
A.Off -
A.Off
5
'
A.Off
30"
A.Off
2'
Unit 2
g
A.ZEro
A.Off 10'
%
CAL int
CAL E
Cal
Fdyn A
FdynÑÖ
Cal
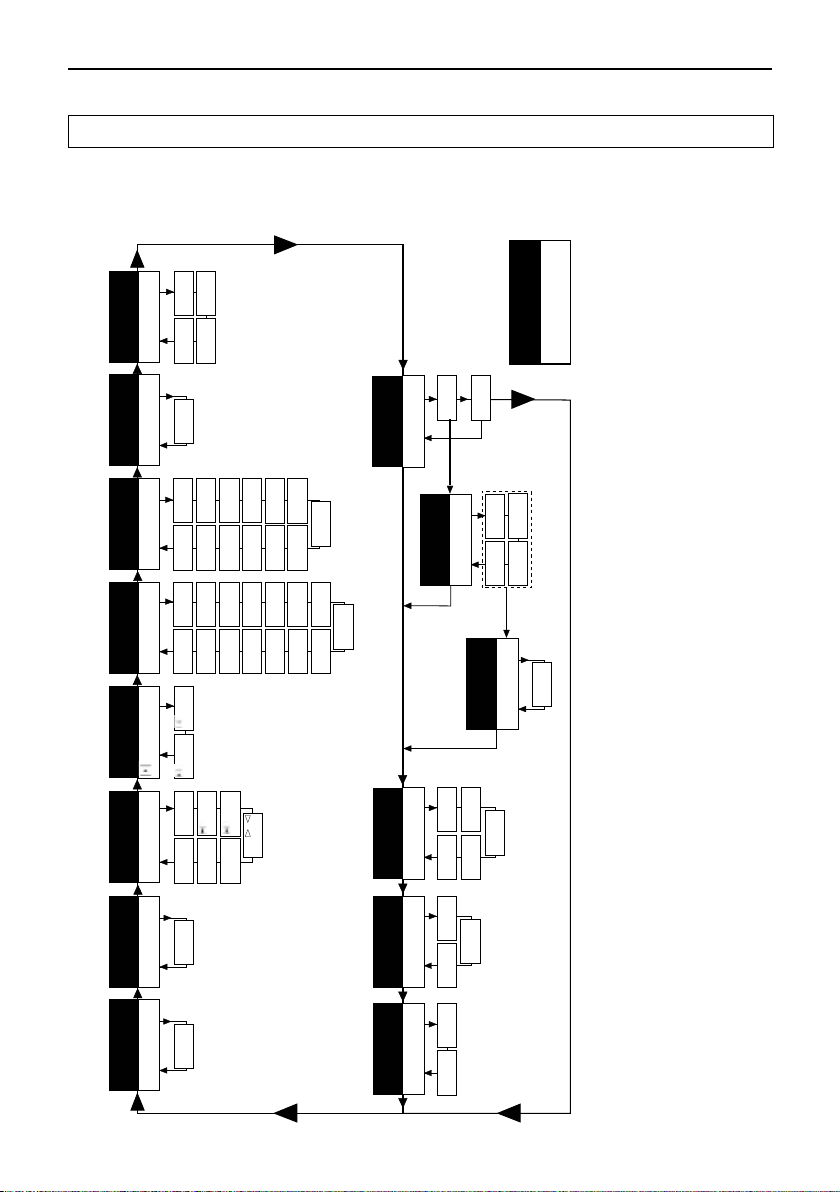
4.1 Overview
In the menu you can change the weighing unit (for certified balances, only if national weights and measures legislation allows),
select additional functions and carry out various settings. A description of the individual menu options is given in Section 4.3.
8 Auto shut off
1)
7 Autozero
2)
6 Weighing
unit 2
2)
unit 1
5 Weighing
4 Weighing
mode
6)
9 Peripheral
unit
5) 6)
10 Send
3) 6)
mode
11 Send
4) 6)
format
Menu option
Factory setting
Menu
9
Overview of menu
1)
2 Calibration
1 Reset 3 Function
12 Baud rate
5) 6)
13 Bit/Parity
5) 6)
14 Handshake
legislation may be selected.
With certified balances, this menu option has a fixed setting and cannot be changed.
With certified balances, only those weighing units allowed by the appropriate national weights and measures
Notes
1)
This menu option is only shown if “Host” has been selected in menu option 8 (Peripheral unit).4) This menu option is only shown if “S.oFF” has not been selected in menu option 9 (Send mode).5) These menu options are only shown if “Host” or “Printer” has been selected in menu option 8 (Peripheral unit).
2)
3)
Only displayed if the optional interface has been installed.
6)
Page 10
Menu
10
4.2 Menu operation
Menu
±
0.01 g
ŸÖENU
▼
rESEt
rESEt
F count
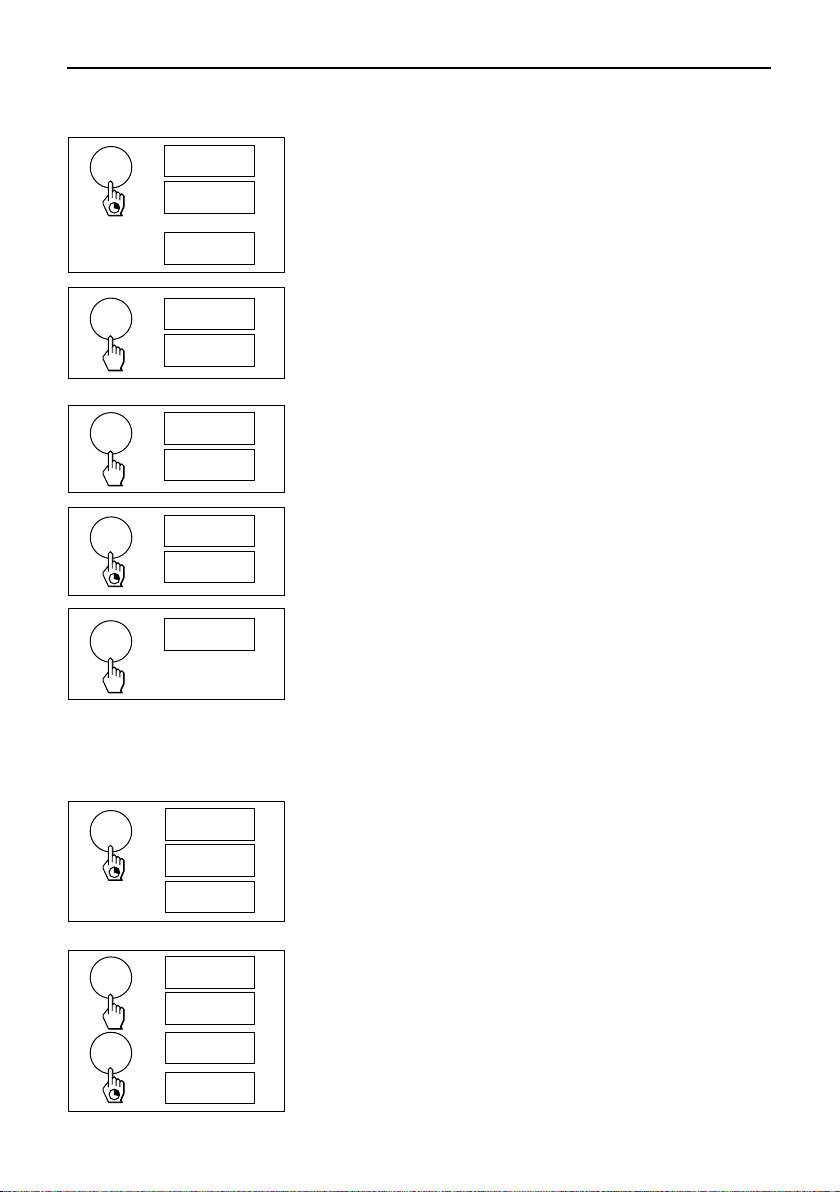
Opening the menu
In weighing mode, press and hold down the «Menu» key until “MENU” appears in
the display. Release the key: the 1st menu option is displayed.
Select menu options
The «±» key is used to select individual menu options with their current settings
one after the other.
PCS
Change settings
Pressing the «“» key displays the next setting; pressing the «1/10d» key displays
the previous one. Once the desired setting appears in the display, the next menu
option can be selected («±») or you can close the menu (see following Section).
“
F count
F 100
PCS
%
Saving settings and closing the menu
Menu
StorEd
Hold the «Menu» key down until “StorEd” appears in the display. Release the key and
the balance reverts to weighing mode. All changes are saved.
0.01 g
Abort
0.01 g
C
Press the «C» key briefly. The balance reverts to weighing mode. Changes are not
saved.
Note
If no entry is made within 45 seconds, the balance reverts to weighing mode.
Changes are not saved.
4.3 Description of menu options
4.3.1 Reset or recording of balance settings (1st menu option “RESET”)
Reset balance settings
Menu
rESEt
r donE
➞ Select “Reset”, press and hold down the «Menu» key until the message “r donE”
confirms that all menu settings have been reset. The balance then reverts to
weighing mode and works with the factory settings (Section 4.1).
0.00 g
Recording balance settings
“
rESEt
LISt
➞ Select “List” and hold down the «Menu» key until the message “StorEd” is dis-
played.
The current balance settings are transmitted to the peripheral device connected
to the optional RS232C interface. To do this the setting “Printer” must always be
Menu
StorEd
selected at the 8th menu option (Peripheral unit). The current balance settings
are saved at the same time.
0.00 g
Page 11

Menu
- ok +
11
4.3.2 Adjustment (2nd menu option)
In this menu option you can select whether you wish to adjust the balances using the internal or the extternal adjustment
weight:
cal
“
CAL int
cal
CAL E
4.3.3 Functions (3rd menu option / see Section 5 for their use)
In addition to simple weighing, the following functions can be selected with the «“» key:
PCS
F count“
%
F 100
á
F dYn A
á
F dYn ŸÖ
F PŸÖ
#
F FAC ŸÖ
#
F FAC d
F nonE
CAL int Adjusting with internal adjustment weight (factory setting)
CAL E Adjusting with external adjustment weight
F count Piece counting
F 100 % Percent weighing
F dYn A Dynamic weighing with automatic start
F dYn M Dynamic weighing with manual start
F PM Plus-minus weighing
F FAC M Multiply free factor value by weight, change size of display
increment
F FAC d Divide free factor value by weight, change size of display increment
F non E No function, simple weighing
4.3.4 Weighing mode (4th menu option)
Ö
Ü
Ñ
robuSt
Std
doS
“
This setting allows you to adapt the balance to the weighing mode. Select “Std”
(standard) for all normal weighing processes. With “doS” (dosing) - for dispensing
substances in liquid or powder form - the balance reacts very rapidly to the slightest
changes of weight. With “robuSt” (absolute weighing) the balance only reacts to
more significant changes in weight, so that the weighing result is very stable.
Page 12

Menu
12
4.3.5 Weighing unit 1 (5th menu option “UNIT 1”)
Depending on requirements, the balance can operate with the following units (possible with certified balances only if permitted
by national weights and measures legislation):
Unit Conversion factor Comments
“
“
“
4.3.6 Weighing unit 2 (6th menu option “UNIT 2”)
If it is required to show the weighing result in weighing mode in an additional unit by pressing the «“» key, the desired second
weighing unit can be selected in this menu option. The same weighing units are available as under “UNIT 1”, with the exception
of the tael units (“H tl”, “S tl” and “t tl”).
Unit 1 g
Unit 1 kg
…
Unit 1 oz
…
Unit 1 dwt
g gram factory setting
kg kilogram 1 kg = 1000 g not with 0.1 mg and
1 mg balances
mg milligram 1 mg = 0.001 g with 0.1 mg and 1 mg
balances
ct carat 1 ct = 0.2 g
lb pound 1 lb = 453.59237 g not with 0.1 mg
balances
oz ounce 1 oz = 28.349523125 g
ozt troy ounce 1 ozt = 31.1034768 g
G N grain 1 GN = 0.06479891 g not with 1 g balances
dwt pennyweight 1 dwt = 1.55517384 g
mo momme 1 mom = 3.75 g
m Mesghal 1 msg ≈ 4.6083 g
H tl Hong Kong tael 1 tlh = 37.429 g
S tl Singapore tael 1 tls ≈ 37.79934666667 g The Malaysian tael has
the same value
t tl Taiwan tael 1 tlt = 37.5 g
t o tola 1 tola = 11.6638038 g
b t baht 1 baht = 15.16 g
4.3.7 Autozero (7th menu option / see overview and notes in Section 4.1)
This menu option allows you to switch the automatic zero correction on or off.
“
4.3.8 Auto shut off
If the automatic shut off function is activated, the balance automatically switches itself off after a selected period of inactivity (i.e.
with no key being pressed or changes of weight occurring):
“
ÅZEro
no ÅZEro
A.OFF 10é
A.OFF -
A.OFF 30”
A.OFF 2é
A.OFF 5é
Autozero switched on
The zero point is automatically corrected (e.g. if drift occurs or the weighing pan
becomes dirty). Certified balances, however, have a fixed zero point.
Autozero switched off
The zero point is not automatically corrected. This setting is advantageous for special
applications (e.g. evaporation measurements).
A.OFF 10' Automatic shutoff after 10 minutes inactivity
A.OFF - Automatic shutoff
A.OFF 30" Automatic shutoff after 30 seconds inactivity
A.OFF 2' Automatic shutoff after 2 minutes inactivity
A.OFF 5' Automatic shutoff after 5 minutes inactivity
not activated
Page 13

4.3.9 Peripheral unit (9th menu option / see overview and notes in Section 4.1)
The balance automatically saves the appropriate settings (Sections 4.3.10 – 4.3.14) for every peripheral device.
Printer Connected to a printer.
“
4.3.10 Send mode (10th menu option / see overview and notes in Section 4.1)
Note: This menu option is only available if the “Host” setting was selected in the 8th menu option (Peripheral unit)!
It specifies how a value is transferred to a peripheral device.
“
PrintEr
Host
z.dISPLAY
S. oFF
S. Stb
S. Cont
S. Auto
S. ALL
Host Connection to any desired peripheral device.
Aux. display Connection of an optional auxiliary display unit (communications
parameters cannot be selected).
S. oFF Send mode switched off.
S. Stb The next possible stable value will be transferred after the «
has been pressed.
S. Cont All values are transferred automatically.
S. Auto Only stable values are transferred automatically.
S. All The current value is transferred after the «
pressed.
±» key has been
Menu
13
±» key
4.3.11 Send format (11th menu option / see overview and notes in Section 4.1)
Note: This menu option is only available if the “S.oFF” setting was not selected in the 9th menu option (“Send mode”)!
It sets the data transfer format.
“
S. SICS
S. PŸÖ
“S. SICS”: The MT-SICS data transfer formats are used. Please refer to the
“Reference Manual MT-SICS B-S/L/L-S balances 11780447”,
available from your METTLER TOLEDO dealer or downloaded from
the Internet (www.mt.com/sics-classic).
More Information please find in the Section 6.3.
“S. PM”*: The following PM balance data transfer formats are used:
S.Stb:
S.Cont: S////1.67890/g SD///1.39110/g
S.Auto: S////1.67890/g
S.All: /////1.67890/g
/D///1.39110/g
* unidirectional, no MT-SICS commands are accepted.
/////1.67890/g
Page 14

Menu
14
4.3.12 Baud rate (12th menu option / see overview and notes in Section 4.1)
Note: This menu option is only available if the “Printer” or “Host” setting was selected
“
“
4.3.13 Bit/Parity (13th menu option / see overview and notes in Section 4.1)
Note: This menu option is only available if the “Printer” or “Host” setting was selected in the 9th menu option (Peripheral unit)!
It sets the character format for the peripheral device connected to the balance.
“
4.3.14 Handshake (14th menu option / see overview and notes in Section 4.1)
Note: This menu option is only available if the “Printer” or “Host” setting was selected in the 9th menu option (Peripheral unit)!
This function is used to select the data transfer mode to suit different serial devices.
“
bd 2400
bd 4800
…
bd 19200
7b-E
7b-no
8b-no
7b-odd
HS oFF
HS SoFt
in the 8th menu option (Peripheral unit)!
The baud rate (data transfer rate) determines the speed of transmission via the serial
interface. The unit is the baud (bd) = 1 bit/second.
The following settings are available: 600 bd, 1200 bd, 2400 bd, 4800 bd, 9600
bd and 19200 bd.
For problem-free data transmission the sending and receiving devices must be set
at the same value.
7b–E 7 data bits/even parity
7b–no 7 data bits/no parity
8b–no 8 data bits/no parity
7b–odd 7 data bits/odd parity
HS oFF No handshake
HS SoFt Software handshake (XON/XOFF)
HS HArd Hardware handshake (RTS/CTS)
HS HArd
Page 15

Functions
15
5 Functions
Settings and values saved under a given function are retained until they are replaced or another function is selected. The «C» key
can be used to cancel the procedure currently in progress.
5.1
Piece counting
Requirement
The function “F count” must be activated in the menu (Section 4).
#
SEt 10
F
“
SEt 20
±
240
“
144.81 g
5.2 Percent weighing
0.00 g
0.00 g
20
PCS
PCS
PCS
PCS
➞ Place empty container on the balance and tare by briefly pressing the
«#» key.
Setting the reference: a reference weight must first be entered for piece counting:
➞ Add a number of reference pieces to container. Possible numbers are 5, 10,
20, 50, 100 and “no” (piece counting deactivates).
Note that the minimum weight = 10d (d: display increment), and the
minimum unit weight = 1d!
➞ Hold the «F» key down until “SEt ... PCS” is displayed.
➞ Repeatedly press the «“» key until the display equals the number of
reference pieces entered.
➞ Confirm the number of reference pieces with the «±» key or automatic
acceptance after 7 seconds. The current number of pieces (PCS = pieces) is
displayed.
Switching between piece count and weight display
➞ Place the items to be counted in the container. The number of pieces is
displayed.
➞ Press the «“» key. The weight is displayed (in unit 1, and if the key is
pressed again, in unit 2, provided this function is activated).
➞ Return to the piece count display by pressing the «“» key again.
Requirement
The function “F 100 %” must be activated in the menu (Section 4).
±
148.50 g
SEt100
F
%
Set target weight
➞ Target weight (Reference weight, which corresponds to 100 %) in centre of
pan.
Note that the minimum weight = 10d (d: display increment).
➞ Hold the «F» key down until “SEt 100 %” is displayed.
100.00
%
➞ Press the «“» key to select “SEt 100 %” or “SEt no %” (Percent weighing
deactivated).
➞ The «±» key can be used briefly to confirm or automatic acceptance after 7
seconds.
Page 16

Functions
16
101.60
“
“
5.3 Dynamic weighing
Dynamic weighing is suitable for the weighing of unstable weighing samples. The mean value of the weighing results is determined over a specified time period (weighing time). The more unstable the weighing sample, the longer the selected weighing
time.
Requirement
“F dYn A” for automatic start or “F dYn M” for manual start must be activated in the menu (Section 4). Factory setting is a
weighing time of 3 seconds (t = 3“).
“
150.88 g
101.60
0.00 g
á
0.00 g
á
• 257.35 g
á
-- 3 --
á
-- 1 --
á
260.33 g
*
%
%
▼
…
▼
Switching between percent weighing and weight display
➞ Place weighing sample in centre of pan.
The weight of the sample is displayed as a percentage of the target weight.
➞ Press the «“» key. The weight is displayed (in unit 1, and if the key is
pressed again, in unit 2, provided this function is activated).
➞ Return to display in percent: pressing the «“» key again.
Dynamic weighing with automatic start (F dYn A)
➞ The «“» key can be used select the dynamic weighing. The display shows
the symbol
➞ Load weighing sample. As soon as the balance is relatively stable, weighing
starts automatically.
During the weighing time, a "count down" runs in the display.
➞ Read off result.
The result of the dynamic weighing is displayed with
and remains in the display until the weighing sample is removed from the
weighing pan or the container.
á.
✱ (= calculated value)
Page 17

Functions
17
“
±
Notes
• The weighing cycle with the same weighing sample can be restarted with the «
• The «
• For weighing goods below 5 g the weighing must be started manually with the «
automatic start.
F
“
±
0.00 g
á
0.00 g
á
• 257.35 g
▼
á
-- 3 --
…
á
-- 1 --
▼
á
260.33 g
*
“» key can be used to switch between dynamic weighing and normal weighing.
á
t á 3 ”
á
t á 5 ”
0.00 g
Dynamic weighing with manual start (F dYn M)
➞ The «“» key can be used select the dynamic weighing. The display shows
the symbol á.
➞ Load weighing sample.
➞ Start weighing with the «±» key.
During the weighing time, a “count down” runs in the display.
➞ Read off result.
The result of the dynamic weighing is displayed with
and remains in the display until the weighing sample is removed from the
weighing pan or the container.
Changing the weighing time
➞ Press and hold the «F» key, until “t = 3“” appears in the display.
➞ Repeatedly press the «“» key, until the desired weighing time appears.
Possible values are 3“, 5“, 10“, 20“, 1“, 2“.
➞ election with the «±» key briefly to confirm or by automatic acceptance after
3 seconds.
✱ (= calculated value)
±» key.
±» key, even for dynamic weighing with
Page 18

Functions
18
5.4 Plus-minus weighing
The plus-minus weighing function enables the parts or quantities dispensed on the weighing pan to be compared with a target
weight and tolerances set by the user. Symbols in the display (ÇokÉ) help the operator to assess the weighing result quickly.
Requirement
The function “F PM” must be activated in the menu (Section 4).
Setting target weight and tolerances (+/-)
➞ Place the target weight on the weighing pan. Minimum weight = 10d (display
increment)
➞ Hold down the «F» key until “tArGEt” appears.
➞ Press the «“» key to select “tArGEt” and “notArGEt” (Plus-minus weighing
deactivated).
➞ Confirm this with the «±» key; the target weight is adopted automatically after
7 seconds if no action is taken.
The target weight is displayed again for a further two seconds, following which the
display changes (“toL=”), prompting you to enter the tolerances as a percentage of
the target weight.
The displayed default value can be changed:
➞ Pressing the «“» key increases the tolerance.
Pressing the «1/10d» reduces the tolerance.
Pressing the key once changes the value by one increment. If the key is held down,
the value changes increasingly rapidly.
➞ Confirm the selected tolerance with the «±» key; it is adopted automatically
after 7 seconds if no action is taken. The target weight and the tolerances have
now been set.
±
“
0.00 g
15.13 g
F
- ok +
tArGEt
ok
*
15.13 g
▼
- +
toL
▼
- +
1.00
- +
1.01
%
%
%
“
±
…
- +
5.00
ok
15.13 g
Displayed weighing results
%
The display indicates the weighing status as follows:
“Ç” lights up: The weight on the pan is less than the set lower tolerance.
“Ç” and “ok” light up: The weight on the pan is within the set tolerances, but below
target weight.
“ok” lights up: The weight on the pan is exactly equal to the target weight.
“ok” and “É” light up: The weight on the pan is within the set tolerances but greater
than the target weight.
“É” lights up: The weight on the pan is greater than the set upper tolerance.
Toggling between plus-minus weighing with weight display and percent display
➞ Place the sample on the weighing pan. Its weight is shown in unit 1.
➞ Press the «“» key. The weight is then displayed as a percentage (provided
the balance is activated for unit 2 and the key is pressed again).
➞ To return to the plus-minus weighing display: press the «“» key again.
5.5 Weighing with free factor and/or selectable display increments
In this menu option a custom “free factor” can be defined at will.
This value is then either multiplied (“F FAC M”) by the weighing result (in grams), i.e. reading = factor * weight, or it is divided
(“F FAC d”) by the weight, i.e. reading = factor / weight. The range over which this factor can be selected depends on the weighing
range and the readability of the model concerned.
The “free factor” (FAC M) function can, for example, be used to calculate the price of the material weighed directly or to calculate
the weight per defined unit of surface area. It can also be used to convert the weight into any desired alternative unit. This facility
for dividing the factor by the weight (FAC d) is required for instance in the textile industry to determine yarn count.
The ability to select the display increments makes it possible to specify how the weighing result is to be presented, the choice of
display increments being limited by the set factor and the resolution of the balance model itself.
Page 19

Requirement
The function “F FAC M” or “F FAC d” must be activated in the menu (Section 4).
Entering the free factor and/or the display increments
➞ Hold the «F» key down until “F FAC M” or “F FAC d” appears in the display.
➞ Press the «“» key to select “FAC M” / “FAC d” or “noFAC M” / “noFAC d”
(Function deactivated).
➞ Release the key. Either the factor 1 appears as default value or the factor that
was saved most recently.
This value can now be changed:
➞ Pressing the «“» key increases the factor.
Pressing the «1/10d» key reduces the factor.
Pressing the key once changes the value by one increment. If the key is held down,
the value changes increasingly rapidly.
Confirm the selected factor with the «±» key (it will not be saved automatically).
“StEP=” appears in the display, and the program changes auto-matically to allow
the display increments to be entered. The smallest possible display increment
appears as default value, or the last value that was saved.
➞ This value can be changed in the same way as for the free factor (see above).
Confirm the selected display increment with the «±» key (it will not be saved
automatically).
The appropriate calculation is then made using the weight on the pan in grams and
the selected factor, the result being displayed with the selected display increment.
No units are displayed, the symbol “#” being displayed instead. The calculation is
always based on the weight in grams.
Note
• If you only want to change the display increments, set the free factor
at exactly 1.
Toggling between displaying the calculated value and the measured weight
Place the sample on the weighing pan. The appropriate calculation is then made
using the weight of the sample and the selected factor, the result being displayed
with the selected display increment.
Press the «“» key. The weight is displayed (in unit 1, and if the key is pressed
again in unit 2, provided that this option is activated).
➞ Press the «“» key again to return to the calculated value.
F
1/10d
1/10d
±
“
“
±
17.89 g
#
F FAC ŸÖ
#
1.0000
#
0.9999
…
#
0.9500
#
StEPá
▼
#
0.01
#
0.02
…
#
0.05
#
17.00
Functions
19
5.6 Switching weight units
Requirement
Different weight units must be activated in the menu for unit 1 and unit 2 (Section 4).
➞ The «“» key can be used at any time to toggle between the two weighing
“
64.71 g
64710 mg
units selected in the menu (“UNIT 1” and “UNIT 2”).
Notes
• Switching between weight units may be blocked with certified balances,
depending on national weights and measures legislation.
• This function is not available with dynamic weighing.
Page 20

Technical data, options, optional equipment
20
6 Technical data, options, optional equipment
6.1 Technical data
Standard equipment of L-IC balances
• AC adapter to national standard
100–240 VAC/50–60 Hz, 0.3 A
12 VDC, 0.84 A
Balance power input 6-14,5VAC, 50/60Hz, 4VA or
7-20VDC, 4W
• Draft shield (on models with 0.1 / 1 mg resolution)
• All models can weigh below balance
Materials
• Housing base: die-cast aluminum, painted
• Top housing: plastic (ABS/PC)
• Weighing pan: 18/10 chromium-nickel steel
Protection
• Protected against dust and water
• Pollution degree: 2
• Installation category: class II
• EMC: see declaration of conformity
AL54-IC AL104-IC AL204-IC AL304-IC
Max. capacity 51 g 110 g 220 g 320 g
Readability 0.0001 g 0.0001 g 0.0001 g 0.0001 g
Repeatability (sd) 0.0001 g 0.0001 g 0.0001 g 0.0001 g
Linearity 0.0002 g 0.0002 g 0.0002 g 0.0002 g
Sensitivity temperature drift 2.5 ppm/°C 2.5 ppm/°C 2.5 ppm/°C 2.5 ppm/°C
(10 °C … 30 °C)
Settling time, typical 4 s 4 s 4 s 4 s
Adjustment weight internal yes yes yes yes
External dimensions of balance
(W/D/H) in mm 238x335x364 238x335x364 238x335x364 238x335x364
External dimensions of packaging
(W/D/H) in mm 520x385x555 520x385x555 520x385x555 520x385x555
Weighing pan ø 90 mm ø 90 mm ø 90 mm ø 90 mm
Usable height of draft shield 225 mm 225 mm 225 mm 225 mm
Net weight (with packaging) kg 5.8 (8.4) 5.8 (8.4) 5.8 (8.4) 5.8 (8.4)
Level indicator yes yes yes yes
Number of leveling screws 2 2 2 2
Ambient conditions
The technical data are valid under the following ambient
conditions:
• Heigh above mean Up to 2000 m
sea level
• Ambient temperature 10 °C … 30 °C
• Relative humidity 10 % to 80 % at 31 °C,
linear decreasing
to 50 % at 40 °C
noncondensing
Operability is assured at ambient temperatures between 5
and 40 ºC.
Page 21

Technical data, options, optional equipment
PL203-IC PL-303-IC PL-403-IC
Max. capacity 210 g 310 g 410 g
Readability 0.001 g 0.001 g 0.001 g
Repeatability (sd) 0.001 g 0.001 g 0.001 g
Linearity 0.002 g 0.002 g 0.002 g
Sensitivity temperature drift 6 ppm/°C 6 ppm/°C 6 ppm/°C
(10 °C … 30 °C)
Settling time, typical 3 s 3 s 3 s
Adjustment weight internal yes yes yes
External dimensions of balance
(W/D/H) in mm 238x335x287 238x335x287 238x335x287
External dimensions of packaging
(W/D/H) in mm 520x385x555 520x385x555 520x385x555
Weighing pan ø 100 mm ø 100 mm ø 100 mm
Usable height of draft shield 150 mm 150 mm 150 mm
Net weight (with packaging) kg 5.1 (7.9) 5.1 (7.9) 5.1 (7.9)
Level indicator yes yes yes
Number of leveling screws 2 2 2
PL2002-IC PL3002-IC PL4002-IC
Max. capacity 2100 g 3100 g 4100 g
Readability 0.01 g 0.01 g 0.01 g
Repeatability (sd) 0.01 g 0.01 g 0.01 g
Linearity 0.02 g 0.02 g 0.02 g
Sensitivity temperature drift 6 ppm/°C 6 ppm/°C 6 ppm/°C
(10 °C … 30 °C)
Settling time, typical 3 s 3 s 3 s
Adjustment weight internal yes yes yes
External dimensions of balance
(W/D/H) in mm 238x335x111 238x335x111 238x335x111
21
External dimensions of packaging
(W/D/H) in mm 520x385x360 520x385x360 520x385x360
Weighing pan ø 180 mm ø 180 mm ø 180 mm
Usable height of draft shield – – –
Net weight (with packaging) kg 4 (6.4) 4 (6.4) 4 (6.4)
Level indicator yes yes yes
Number of leveling screws 2 2 2
Page 22

Technical data, options, optional equipment
15
9 6
IN
GND
OUT
HAND
SHAKE
IN
DATA
OUT
RxD
TxD
CTS
RTS
22
6.2 RS232C interface
6.3 MT-SICS Interface commands and functions
Many of the balances used have to be capable of integration in a complex computer or data acquisition system.
To enable you to integrate balances in your system in a simple manner and utilize their capabilities to the full, most balance
functions are also available as appropriate commands via the data interface.
All new METTLER TOLEDO balances launched on the market support the standardized command set “METTLER TOLEDO Standard
Interface Command Set” (MT-SICS). The commands available depend on the functionality of the balance.
Basic information on data interchange with the balance
The balance receives commands from the system and acknowledges the command with an appropriate response.
Every balance is equipped with an optional RS232C interface for connection to a
peripheral device (e.g. printer, auxiliary display or PC with a 9-pin male connector,
see Section 6.4). The balance must then configured to suit the peripheral device in
a menu dialog (Sections 4.3.9 – 4.3.12).
A detailed description of the available interface commands is given in the “Reference
Manual MT-SICS for L/L-S balances 11780447”. This can be downloaded from the
Internet (www.mt.com/sics-classic) and is only available in English.
The wide range of features of the L-IC balances regarding documentation of the
results can be utilized by connecting to a printer, e.g. the RS-P26 or LC-P45 from
METTLER TOLEDO. Printed results then make a decisive contribution to simplifying
GLP/GMP-compliant work.
Command formats
Commands sent to the balance comprise one or more characters of the ASCII character set. Here, the following must be noted:
• Enter commands only in uppercase.
• The possible parameters of the command must be separated from one another and from the command name by a space
(ASCII 32 dec., in this description represented as /).
• The possible input for “text” is a sequence of characters of the 8-bit ASCII character set from 32 dec to 255 dec.
• Each command must be closed by CRLF (ASCII 13 dec., 10 dec.).
The characters CRLF, which can be inputted using the Enter or Return key of most entry keypads, are not listed in this description,
but it is essential they be included for communication with the balance.
Example
S – Send stable weight value
Command S Send the current stable net weight value.
Response
S/S/WeightValue/Unit
Current stable weight value in unit actually set under unit 1.
S/I Command not executable (balance is currently executing another command, e.g.
taring, or timeout as stability was not reached).
S/+ Balance in overload range.
S/- Balance in underload range.
Example
Command S Send a stable weight value.
Response
The current, stable weight value is 100.00 g.
S/S/////100.00/g
Page 23

Technical data, options, optional equipment
23
The MT-SICS commands listed below is a selected list of available commands. For additional commands and further information please refer to the Reference Manual “MT-SICS for B-S/L/L-S balances 11780447” downloadable from the Internet under
www.mt.com/sics-classic.
S – Send stable weight value
Command S Send the current stable net weight value.
SI – Send value immediately
Command SI Send the current net weight value, irrespective of balance stability.
SIR – Send weight value immediately and repeat
Command SIR Send the net weight values repeatedly, irrespective of balance stability.
Z – Zero
Command Z Zero the balance.
@ – Reset
Command @ Resets the balance to the condition found after switching on, but without a zero setting
being performed.
SR – Send weight value on weight change (Send and Repeat)
Command SR Send the current stable weight value and then send continuously the stable weight
value after every weight change.
The weight change must be at least 12.5 % of the last stable weight value,
minimum = 30d.
ST – Send stable weight after pressing ± (transfer) key
Command ST Inquiry of actual status of the ST function.
SU – Send stable weight value with currently displayed unit
Command SU As the “S” command, but with the currently displayed unit.
Page 24

Technical data, options, optional equipment
24
6.4 Optional equipment
AC adapter
AC adapter universal (EU, USA, AU, UK) 11120270
100–240 VAC/50–60 Hz, 0.3 A
12 VDC, 0.84 A
AccuPac B-S
Rechargeable external power source for
15 hours weighing operation independent
of AC power supply 21254691
Adjustment weights
Available as OIML weights (E1, E2, F1,
with calibration certificate); for further details see
METTLER TOLEDO Weights brochure 11795461
or see www.mt.com/weights
Antitheft device
Cable with lock (for all models) 00590101
Auxiliary display
1)
• Auxiliary display including RS cable 00224200
and seperate AC adapter
• Auxiliary display with switchbox 12120057
Draft shields
• For “0.1 mg” balances (225 mm) 12106720
• For “mg” balances (150 mm) 12105346
Interface cable
• RS9–RS25: (m/f), length 2 m 11101052
• RS9–RS9: (m/f), length 1 m 11101051
• RS9–RS9: (m/m), length 1 m 21250066
• RS232–USB converter cable 11103691
In-use cover
12102970
Printer, Application printer (LC-P45)
Plain-paper printer, 24 characters, with
additional functions (time, date, statistic,
multiplier etc.) 00229119
Printer, Report printer (RS-P26)
1)
12120788
Plain-paper printer, 24 characters, with
additional functions (date and time).
Software 1)
LabX direct balance 11120340
(software for easy data transfer to PC)
Page 25

6.5 Dimensional drawings (in mm)
335.2
238
287
150
335.2
238
111
238
335.2
225
364
AL-IC with “0,1” mg draft shield (235 mm)
Technical data, options, optional equipment
25
PL-IC with “mg” draft shield (150 mm)
PL-IC without draft shield
Page 26

Appendix
26
7 Appendix
7.1 Typical printouts from METTLER TOLEDO RS-P26 and LC-P45 printers
Function: Adjusting
-BALANCE CALIBRATION-
04.07.2002 09:50:18
METTLER TOLEDO
Type: PL3002-IC
SNR: 1120053108
SW:
1.0
Weight ID: ............
Weight: 2000.00 g
External Cal. done
Signature:
........................
--------- END ---------
Function: Piece counting
Printout with reference
weight
---- PIECE COUNTING ---APW: 0.99 g
Out of: 10 PCS
27.00 g
27 PCS
Function: Percent
weighing
----- % - WEIGHING ----Ref. 10.008 g
100.00 %
60.01 g
599.59 %
Function: Dynamic
weighing
--- DYNAMIC WEIGHING --Weigh Time: 2 s
DW 49.999 g
Function: Free factor
- FREE FACTOR WEIGHING Formula: factor * weight
Factor: 12.73
Step: 0.01
49.94 #
Function: List
Printout of the current balance settings
--- LIST OF SETTINGS ---
04.07.2002 09:55:10
METTLER TOLEDO
Type: PL403-IC
SNR: 1120053108
SW: 1.0
TDNR: 7.17.1.286.108
-----------------------Application:
Count
-----------------------Weighing Parameters:
Weighing Mode Standard
Unit 1 g
Unit 2 mg
A.Zero On
-----------------------System Parameters:
Auto off 10 min
-----------------------Peripheral Devices:
P.Device Printer
Baud 2400
Bit/Parity 7b-even
Handshake Off
P.Device Host
Sendmode Off
Baud 9600
Bit/Parity 8b-no
Handshake
Soft
--------- END ----------
Function: Verification of the
calibration (adjustment)
with external weight.
Only possible with LC-P45.
Function is triggered via the
printer.
----- BALANCE TEST -----
04.07.2002 09:52:12
METTLER TOLEDO
Type: PL3002-IC
SNR: 1120053108
SW:
1.0
Weight ID: .............
Target : ...............
Actual : .......199.98 g
Diff : ...............
External test done
Signature:
........................
--------- END ----------
Function: Statistics
Only possible with LC-P45.
Function is triggered via the
printer.
04.07.2002 10:44:07
ID 666
SNR: 1118015657
1 1100.15 g
2 1600.10 g
3 1699.95 g
n 3
x 1466.733 g
s 321.372 g
srel 21.91 %
min. 1100.15 g
max. 1699.95 g
dif. 599.80 g
--------- END ----------
Notes
The operating instructions
for the LC-P45 include a
description of the functions
that are triggered via that
printer.
The RS-P26 prints all reports
in English. This applies also
to the LC-P45 reports that
originate in the balance. In
the case of reports triggered
by the LC-P45, the following
languages may be selected:
German, English, French,
Spanish or Italian.
Function: Plus-minus
weighing
----- +/- WEIGHING ----Nominal: 9.68 g
+/-Tol: 1.04 %
16.21 g
above range
Function: Multiplier
Only possible with LC-P45.
Function is triggered via the
printer.
04.07.2002 08:23:22
ID 242
SNR: 1118015657
Factor 1.65
588.43 g
* 970.9095
Page 27

Appendix
7.2 What if ...?
Error/Error message Cause Rectification
Overload
неееем
zero again (tare).
Underload
î____ï
positioned properly.
No stability
Error 1
• in taring or adjusting (calibration)
• when reference weight for piece counting
is placed on pan
necessary
Wrong adjustment weight on pan or none at all
Error 2
centre of pan.
Reference weight (Piece counting, Percent
Error 3
weighing, Plus-minus weighing) too small
Internal fault
Error 4
service.
Wrong weighing pan or pan missing or
0.000 g
not empty balance.
Adjustment aborted with the «
Abort
No display
• AC adapter not plugged in ➞ Check AC power supply.
Plug AC adapter into power supply.
• Batteries discharged (only with compact ➞ Replace batteries; if using rechargeables
models) connect instrument to AC power supply.
C» key
➞ Remove sample from weighing pan,
➞ Check whether weighing pan is
➞ Wait for stability before pressing key.
➞ Ensure more stable ambient conditions.
➞ Remove weighing pan and clean if
➞ Place required adjustment weight in
➞ Increase reference weight.
➞ Contact METTLER TOLEDO customer
➞ Place correct pan or empty pan on
27
Page 28

Appendix
28
7.3 Maintenance and cleaning
Service
Regular servicing of your balance by a service technician prolongs its working life. Ask your METTLER
TOLEDO dealer for details of servicing options.
Cleaning
Every now and then, clean the weighing pan, draftshield element, draftshield (depending on the
model) and housing of your balance using a damp cloth. Your balance is made of high-quality,
durable materials and can therefore be cleaned with a standard, mild cleaning agent.
Please observe the following notes
• On no account use cleaning agents, which contain solvents or abrasive ingredients, as this can
• After working with chemicals, it is advisable to wash or clean the weighing pan and the bottom
• Although all materials are of high quality, corrosion may occur if corrosive substances are de
• Ensure that no liquid comes into contact with the balance or the AC adapter!
• Never open the balance or AC adapter – they contain no components, which can be cleaned,
• Soiled protective covers can be replaced on all balance types (see Optional equipment).
Disposal
In conformance with the European Directive 2002/96/EC on Waste Electrical and Electronic Equipment (WEEE) this device may not be disposed of in domestic waste. This also applies to countries
outside the EU, per their specific requirements. Please dispose of this product in accordance with
local regulations at the collecting point specified for electrical and electronic equipment.
If you have any questions, please contact the responsible authority or the distributor from which you
purchased this device.
Should this device be passed on to other parties (for private or professional use), the content of this
regulation must also be related.
Thank you for your contribution to environmental protection.
result in damage to the terminal overlay.
plate (if draft shield fitted).
posited on chrome steel for an extended period of time (and if air is excluded, for example by a
coating of grease).
repaired or replaced by the user.
Page 29

7.4 Declaration of conformity
The undersigned declare on behalf of
Mettler-Toledo AG
Im Langacher
CH-8606 Greifensee
that the balances METTLER TOLEDO AL…-IC / PL…-IC to which this declaration relates (serial number
specified on the product) are in compliance with the below mentioned EEC Directives (including all amendments)
73/23/EEC Low Voltage Directive
89/336/EEC Electromagnetic compatibility
and that following standards have been applied
IEC/EN61010-1:2001,
EN61326:1997+ A1:98+A2:01+A3:03 (class B)
EN61326:1997+ A1:98+A2:01+A3:03 (Minimal requirements)
for Canada, USA and Australia
CAN/CSA-C22.2 No.61010-1-04, UL Std. No.61010A-1, FCC, Part 15, class A,
AS/NZS CISPR 22, AS/NZS 61000.4.3
Balances in certified version additionally compliy with 90/384/EEC Non-automatic weighing instruments
and standard EN45501.
EC type approval No: – AL-IC balances: D06-09-004
– PL-IC balances: D06-09-004
Greifensee, 03.10.2007
Mettler-Toledo AG
Laboratory & Weighing Technologies
Appendix
29
René Lenggenhager Marcel Strotz
General Manager Manager SBU LAB Basic Weighing
Page 30

Leer
Page 31

Leer
Page 32

To protect your METTLER TOLEDO product’s future:
*11780837*
METTLER TOLEDO Service assures the quality, measuring accuracy
and preservation of value of all METTLER TOLEDO products for years to
come.
Please send for full details about our attractive terms of service.
Thank you.
© Mettler-Toledo AG 2008 11780837B Printed in Switzerland 0802/2.12
Mettler-Toledo AG, Laboratory & Weighing Technologies, CH-8606 Greifensee, Switzerland
Phone +41-1-944 22 11, Fax +41-1-944 30 60, Internet: http://www.mt.com
Subject to technical changes and to the availability
of the accessories supplied with the instruments.
 Loading...