

Page 1
User Guide
ACT350/ACT350DI0 Analog Type
Weight Transmitter User Guide
Page 2

Page 3

Statements
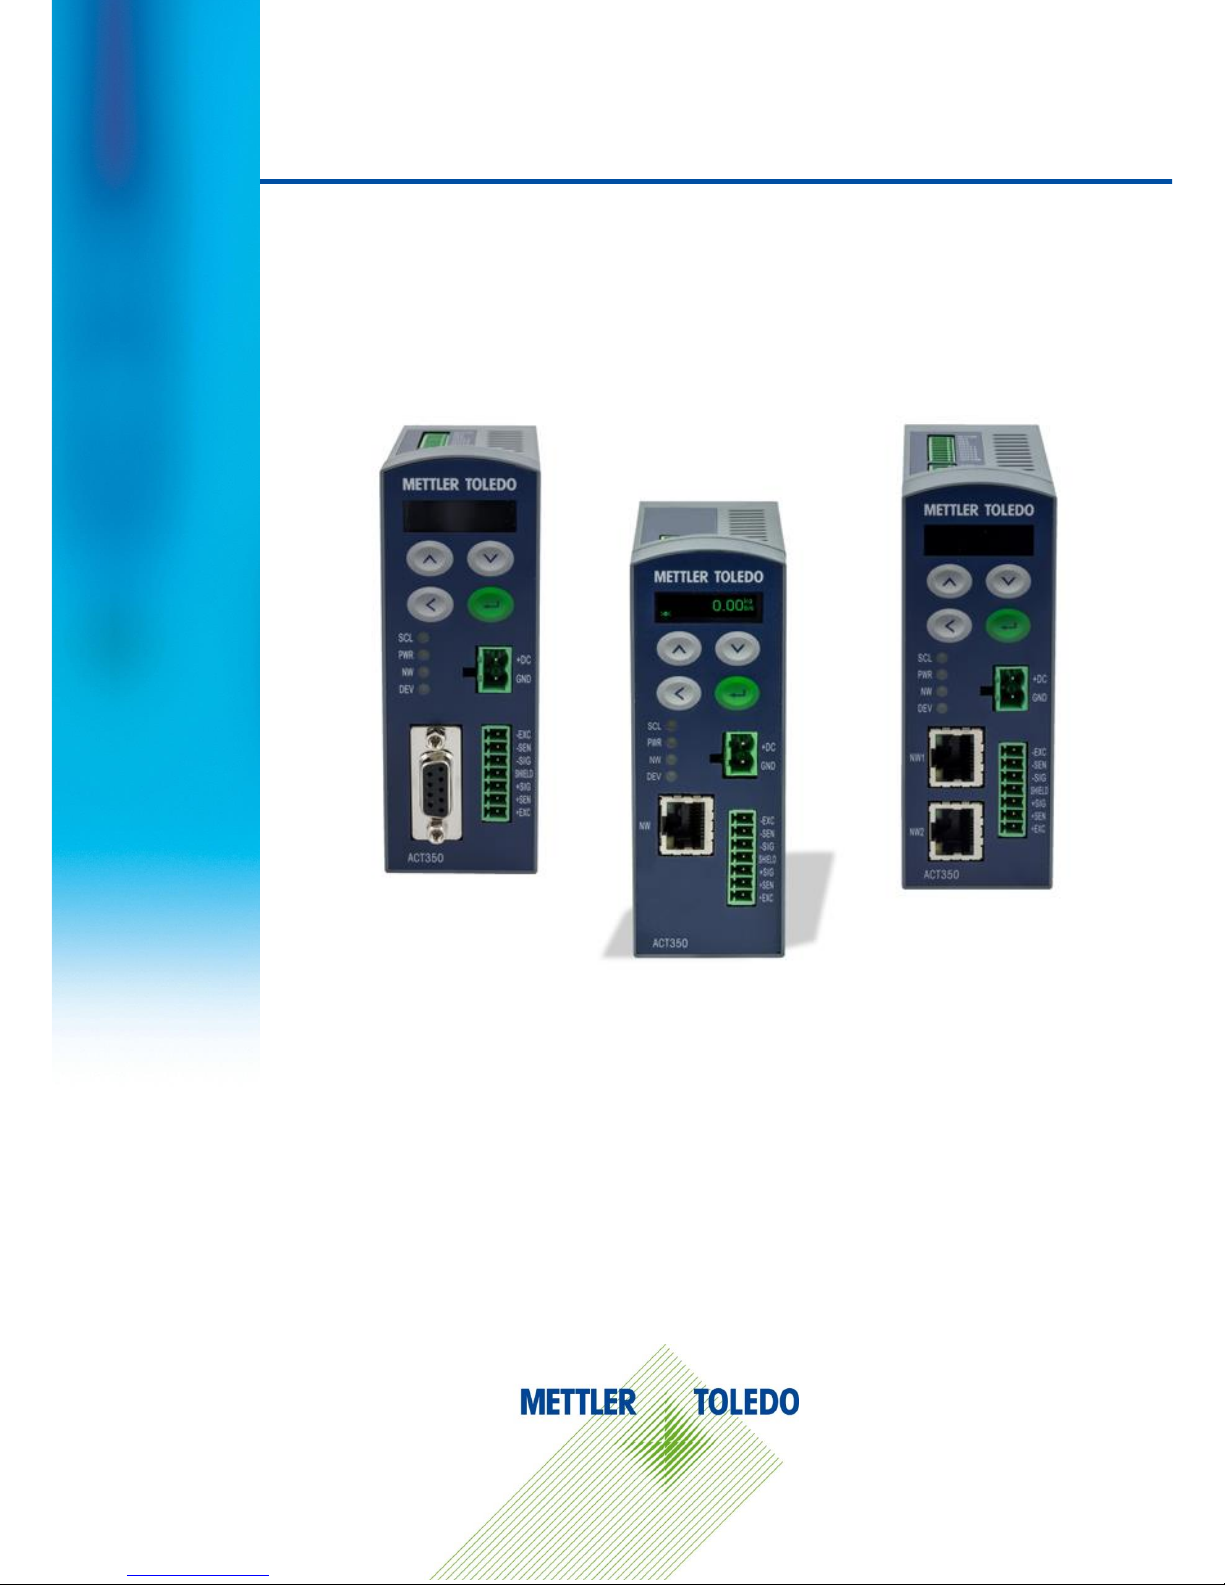
ACT350 Transmitter
Essential Services for Dependable Performance of Your ACT350 Transmitter
Congratulations on choosing the quality and precision of METTLER TOLEDO. Proper use of your
new equipment ensures dependable and accurate operation, protecting your investment. Contact us
about a service agreement tailored to your needs and budget. Further information is available at
www.mt.com/service.
There are important ways to ensure you maximize your investment’s performance.
1. Register your product: We invite you to register your product at
www.mt.com/productregistration so we can contact you about enhancements, updates and
important notifications concerning your product.
2. Contact METTLER TOLEDO for service: The value of a measurement is proportional to its
accuracy – an out of specification scale can diminish quality, reduce profits and increase
liability. Timely service from METTLER TOLEDO will ensure accuracy and optimize uptime and
equipment life.
a. Installation, Configuration, Integration and Training: Our service representatives are factory-
trained, weighing equipment experts. We make certain that your weighing equipment is
ready for production in a cost effective and timely fashion, and that personnel are trained
for success.
b. Initial Calibration Documentation: The installation environment and application
requirements are unique for every industrial scale, so performance must be tested and
certified. Our calibration services and certificates document accuracy to ensure production
quality and provide a quality system record of performance.
c. Periodic Calibration Maintenance: A Calibration Service Agreement provides on-going
confidence in your weighing process and documentation of compliance. We offer a variety
of service plans that meet your needs and fit your budget.
d. GWP
®
Verification: A risk-based approach for managing weighing equipment allows for
control and improvement of the entire measuring process, which ensures reproducible
product quality and minimizes process costs. GWP (Good Weighing Practice), the sciencebased standard for efficient life-cycle management of weighing equipment, gives clear
answers about how to specify, calibrate and ensure accuracy of weighing equipment,
independent of make or brand.
Page 4

© METTLER TOLEDO 2018
No part of this manual may be reproduced or transmitted in any form or by any means, electronic or
mechanical, including photocopying and recording, for any purpose without the express written
permission of METTLER TOLEDO.
U.S. Government Restricted Rights: This documentation is furnished with Restricted Rights.
Copyright 2018 METTLER TOLEDO. This documentation contains proprietary information of
METTLER TOLEDO. It may not be copied in whole or in part without the express written consent of
METTLER TOLEDO.
COPYRIGHT
METTLER TOLEDO® is a registered trademark of Mettler-Toledo, LLC. All other brand or product names
are trademarks or registered trademarks of their respective companies.
METTLER TOLEDO RESERVES THE RIGHT TO MAKE REFINEMENTS
OR CHANGES WITHOUT NOTICE.
FCC Notice
This device complies with Part 15 of the FCC Rules and the Radio Interference Requirements of the
Canadian Department of Communications. Operation is subject to the following conditions: (1) This
device may not cause harmful interference, and (2) this device must accept any interference received,
including interference that may cause undesired operation.
This equipment has been tested and found to comply with the limits for a Class A digital device,
pursuant to Part 15 of FCC Rules. These limits are designed to provide reasonable protection against
harmful interference when the equipment is operated in a commercial environment. This equipment
generates, uses, and radiates radio frequency energy and, if not installed and used in accordance
with the instruction manual, may cause harmful interference to radio communications. Operation of
this equipment in a residential area is likely to cause harmful interference in which case the user will
be required to correct the interference at his or her expense.
RoHS Compliance Statement
The majority of our products fall within categories 8 and 9. Those categories currently do not fall
within the scope of the Directive 2002/95/EG (RoHS) of January 27, 2003. If our products are
intended for use in other products which themselves fall within the scope of the RoHS Directive,
compliance requirements have to be separately negotiated contractually.
Those products which fall within categories 1-7 and 10 will be in compliance with the EU RoHS
Directive from no later than July 1, 2006.
If it is not possible for technical reasons to replace any non-RoHS-compliant substances in any of
the above products as required, we plan to inform our customers in a timely manner.
Statement regarding harmful substances
We do not make direct use of harmful materials such as asbestos, radioactive substances or arsenic
compounds. However, we purchase components from third party suppliers that may contain some of
these substances in very small quantities.
Page 5

Warnings and Cautions
Warnings and Cautions
READ this manual BEFORE operating or servicing this equipment and FOLLOW these instructions
carefully.
WARNING
THE ACT350 IS INTENDED TO BE USED FOR PROCESS CONTROL AND IS NOT
APPROVED AS A SAFETY COMPONENT. WHEN USED AS A COMPONENT PART OF A
SYSTEM, ANY SAFETY CIRCUITS MUST BE INDEPENDENT OF THE ACT350 AND
REMOVE POWER FROM THE ACT350 OUTPUTS IN THE EVENT OF AN EMERGENCY
STOP OR EMERGENCY POWER DOWN.
WARNING
ONLY USE RECOMMENDED 12-24 VDC POWER SUPPLY APPROVED AS NEC Class 2
OR RATED AS LIMITED POWER PER IEC60950-1.
WARNING
WHEN THIS EQUIPMENT IS INCLUDED AS A COMPONENT PART OF A SYSTEM, THE
RESULTING DESIGN MUST BE REVIEWED BY QUALIFIED PERSONNEL WHO ARE
FAMILIAR WITH THE CONSTRUCTION AND OPERATION OF ALL COMPONENTS IN THE
SYSTEM AND THE POTENTIAL HAZARDS INVOLVED. FAILURE TO OBSERVE THIS
PRECAUTION COULD RESULT IN BODILY HARM AND/OR PROPERTY DAMAGE.
WARNING
ONLY THE COMPONENTS SPECIFIED ON THE ACT350 DOCUMENTATION MEDIA CAN
BE USED IN THIS TRANSMITTER. ALL EQUIPMENT MUST BE INSTALLED IN
ACCORDANCE WITH THE INSTALLATION INSTRUCTIONS DETAILED IN THE USER’S
GUIDE. INCORRECT OR SUBSTITUTE COMPONENTS AND/OR DEVIATION FROM THESE
INSTRUCTIONS CAN IMPAIR THE SAFETY OF THE TRANSMITTER AND COULD RESULT IN
BODILY HARM AND/OR PROPERTY DAMAGE.
WARNING
BEFORE CONNECTING/DISCONNECTING ANY INTERNAL OR EXTERNAL ELECTRONIC
COMPONENTS, LOAD CELLS, HARNESSES OR INTERCONNECTING WIRING BETWEEN
ELECTRONIC EQUIPMENT ALWAYS REMOVE POWER AND WAIT AT LEAST THIRTY (30)
SECONDS BEFORE ANY CONNECTIONS OR DISCONNECTIONS ARE MADE. FAILURE TO
OBSERVE THESE PRECAUTIONS COULD RESULT IN BODILY HARM AND/OR PROPERTY
DAMAGE.
WARNING
INSTALLATION AND ANY SERVICE ON THIS EQUIPMENT MUST BE DONE ONLY AFTER
THE AREA IS SECURED AS NON-HAZARDOUS BY THE RESPONSIBLE PERSON ON-SITE
AUTHORIZED TO DO SO.
WARNING
THE ACT350 IS NOT INTRINSICALLY SAFE! DO NOT USE IN HAZARDOUS AREAS
CLASSIFIED AS DIVISION 1, ZONE 0, ZONE 20, ZONE 1 OR ZONE 21 BECAUSE OF
COMBUSTIBLE OR EXPLOSIVE ATMOSPHERES.
Page 6
NOTICE
DO NOT ACTIVATE POWER OVER ETHERNET (PoE) ON ETHERNET SWITCHES ON THE
ACT350 NETWORK. ACTIVATING PoE MAY RESULT IN DAMAGE TO THE ACT350
TRANSMITTER.
NOTICE
IN ORDER TO ENSURE PROPER DISSIPATION OF HEAT FROM THE TRANSMITTER’S PCBS,
AND TO AVOID DAMAGE TO THE EQUIPMENT, THE ACT350 MUST BE MOUNTED
VERTICALLY, ON A HORIZONTAL DIN RAIL.
NOTICE
OBSERVE PRECAUTIONS FOR HANDLING ELECTROSTATIC SENSITIVE DEVICES.
Disposal of Electrical and Electronic Equipment
In conformance with the European Directive 2002/96/EC on Waste Electrical and
Electronic Equipment (WEEE) this device may not be disposed of in domestic waste.
This also applies to countries outside the EU, per their specific requirements.
Please dispose of this product in accordance with local regulations at the collecting
point specified for electrical and electronic equipment.
If you have any questions, please contact the responsible authority or the distributor
from which you purchased this device.
Should this device be passed on to other parties (for private or professional use), the
content of this regulation must also be related.
Thank you for your contribution to environmental protection.
Page 7

Contents
1 Introduction ................................................................................................................................. 5
1.1. Inspection and Contents Checklist ........................................................................................... 5
1.2. Model Identification ............................................................................................................... 6
1.3. Versions of PLC Interfaces ...................................................................................................... 6
1.4. Physical Dimensions ............................................................................................................ 7
2 Operation .................................................................................................................................... 8
2.1. Front Panel .......................................................................................................................... 8
2.1.1. Display Layout .............................................................................................................. 9
2.2. Front Panel Keys .................................................................................................................. 9
2.3. LEDs Status ....................................................................................................................... 10
2.4. ACT350 Device Main Menu .................................................................................................. 10
2.4.1. Information Recall ........................................................................................................ 12
2.4.2. x10 Resolution ............................................................................................................ 13
2.4.3. Comparators ............................................................................................................... 13
2.4.4. Calibration .................................................................................................................. 14
2.4.5. Language ................................................................................................................... 22
2.4.6. Parameters Setup ......................................................................................................... 22
2.4.7. Password Security ....................................................................................................... 22
2.4.8. Reset Configuration and Master Reset ............................................................................. 22
2.2. ACT350 Basic Operation Functions ....................................................................................... 23
2.2.1. Zero ........................................................................................................................... 23
2.2.2. Tare ........................................................................................................................... 24
2.2.3. Filter .......................................................................................................................... 25
2.2.4. Error Message ............................................................................................................. 25
3 Installation ................................................................................................................................ 27
3.1. Mechanical Installation........................................................................................................ 27
3.2. Electrical Installation ........................................................................................................... 28
3.2.1. RS-232 Serial Connection ............................................................................................. 29
3.2.2. Digital Inputs and Outputs connecting Instruction. ............................................................ 30
3.2.3. Analog Load Cell Connection ......................................................................................... 33
3.2.4. PLC Connection ........................................................................................................... 34
3.2.5. MRP and DLR Ring Topology ........................................................................................ 36
3.3. DIP Switches ..................................................................................................................... 36
3.4. Legal for Trade ................................................................................................................... 37
3.5. Power Supply .................................................................................................................... 37
4 Fieldbus Communication ............................................................................................................ 38
4.1. Overview ........................................................................................................................... 38
Page 8

4.1.1. Cyclic data .................................................................................................................. 38
4.1.2. Acyclic data ................................................................................................................ 39
5 Troubleshooting PLC Connectivity ................................................................................................. 41
6 Setup+/ Webserver Configuration and Maintenance Tool ............................................................... 42
6.1. General Overview ............................................................................................................... 42
6.2. PC Installation ................................................................................................................... 42
6.3. Setup+ User Guide .............................................................................................................. 42
6.4. Webserver ......................................................................................................................... 43
6.4.1. Webserver Setup .......................................................................................................... 43
7 GEO Codes ............................................................................................................................... 45
7.1. Original Site Calibration ....................................................................................................... 45
7.2. New Site GEO Code Adjustment ............................................................................................ 45
8 Appendix A -Trigger Weight ......................................................................................................... 48
8.1. Electrical Installation ........................................................................................................... 48
8.2. Trigger Weight Typical example. ........................................................................................... 49
8.3. Calibration ......................................................................................................................... 49
8.4. Configuration on triggered weight application ......................................................................... 50
8.6. VA commands ................................................................................................................... 55
Page 9

30303895 | 001 | 09/2018 METTLER TOLEDO ACT350 Transmitter User's Guide 5
Introduction
1 Introduction
The ACT350 represents the latest in METTLER TOLEDO technology and is one of
the most versatile weighing transmitters available today for conventional strain
gauge weighing technology. The factory pre-configured PLC communication
interface in a DIN rail mounting scheme makes the ACT350 a perfect match for
basic industrial process weighing applications including:
Filling
Dosing
Sorting
Checkweighing
Enhance measurement or control applications with an ultra-fast A/D-D/A
conversion rate of 1200 Hz, patented TraxDSP™ digital filtering technology and
a PLC update rate of 800 Hz. The ACT350 delivers fast, precise measurement
data from milligrams to tons in a single cost-effective package that easily
integrates into control panel systems.
The versatile ACT350 excels in controlling simple filling and dosing applications,
delivering best-in-class performance for fast, precise, accurate results in fully
automatic operations. Utilize the control capabilities of the ACT350 to effectively
manage project costs.
1.1. Inspection and Contents Checklist
Verify the contents and inspect the package immediately upon delivery.
The package should include:
ACT350 transmitter
Safety warnings in multiple languages
Parts for installation, including ferrite, connectors, load cell
connector protection sleeve, etc.
NOTICE
All relevant documentation, software, fieldbus files and sample codes are available at
www.mt.com/ind-act350-downloads.
Page 10
30303895 | 001 | 09/2018 METTLER TOLEDO ACT350 Transmitter User's Guide 6
Introduction
1.2. Model Identification
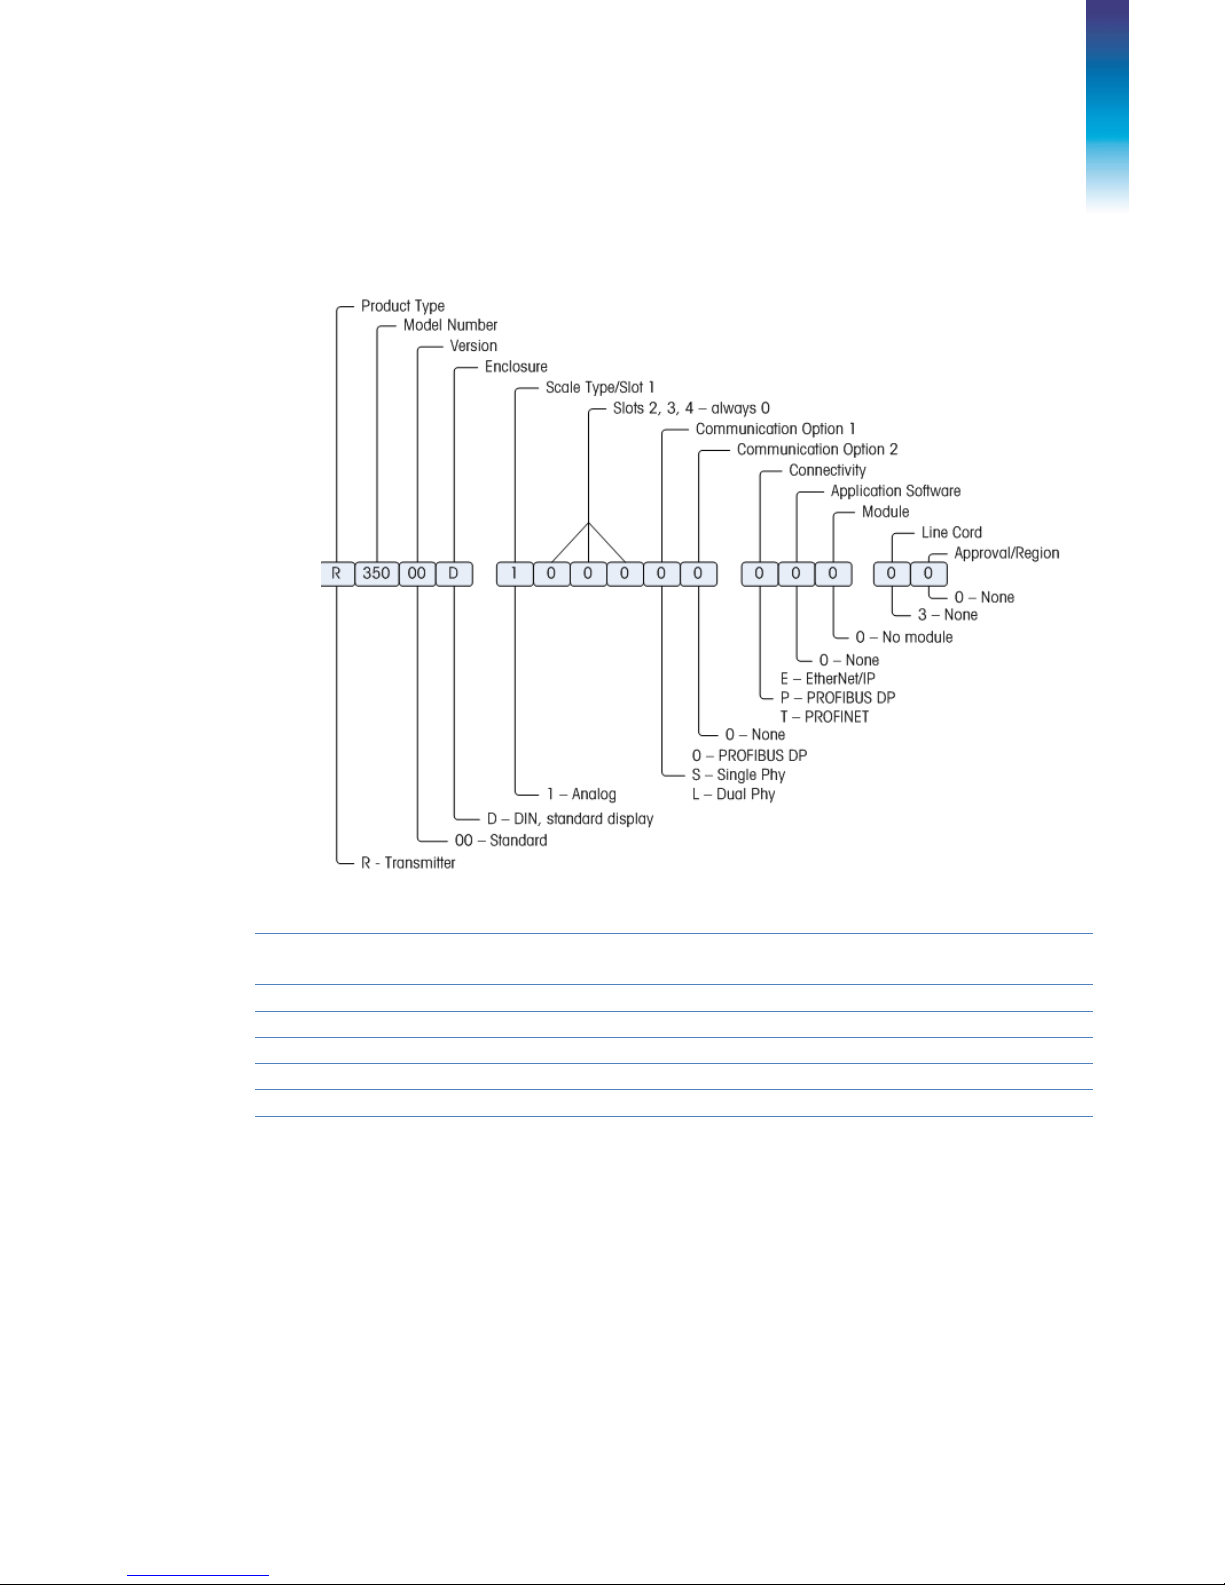
The ACT350 model number is located on the data plate on the back of the
transmitter along with the serial number. Refer to Figure 1-1 to identify the
ACT350 configuration.
Item
Number
Description / SKC Number
Version
Fieldbus
Type
30076688
WEIGH TRANSM PBDP R35000D100000P0030
ACT350
PROFIBU DP
30076689
WEIGH TRANSM PRNT R35000D1000S0T0030
ACT350
PROFINET IO
30076690
WEIGH TRANSM ETIP R35000D1000S0E0030
ACT350
EtherNet/IP
30076691
WEIGH TRANSM PBDP R35000D10000CP0030
ACT350DIO
PROFIBU DP
30076692
WEIGH TRANSM PRNT R35000D1000LCT0030
ACT350DIO
PROFINET IO
30076693
WEIGH TRANSM ETIP R35000D1000LCE0030
ACT350DIO
EtherNet/IP
Figure 1-1: ACT350 Model Identification Numbers
1.3. Versions of PLC Interfaces
The ACT350 comes factory-configured with PLC interface options including
PROFIBUS DP
EtherNet/IP
PROFINET IO
Each product version is specific to the PLC interface and cannot be changed to
a different fieldbus type.
Page 11
30303895 | 001 | 09/2018 METTLER TOLEDO ACT350 Transmitter User's Guide 7
Introduction
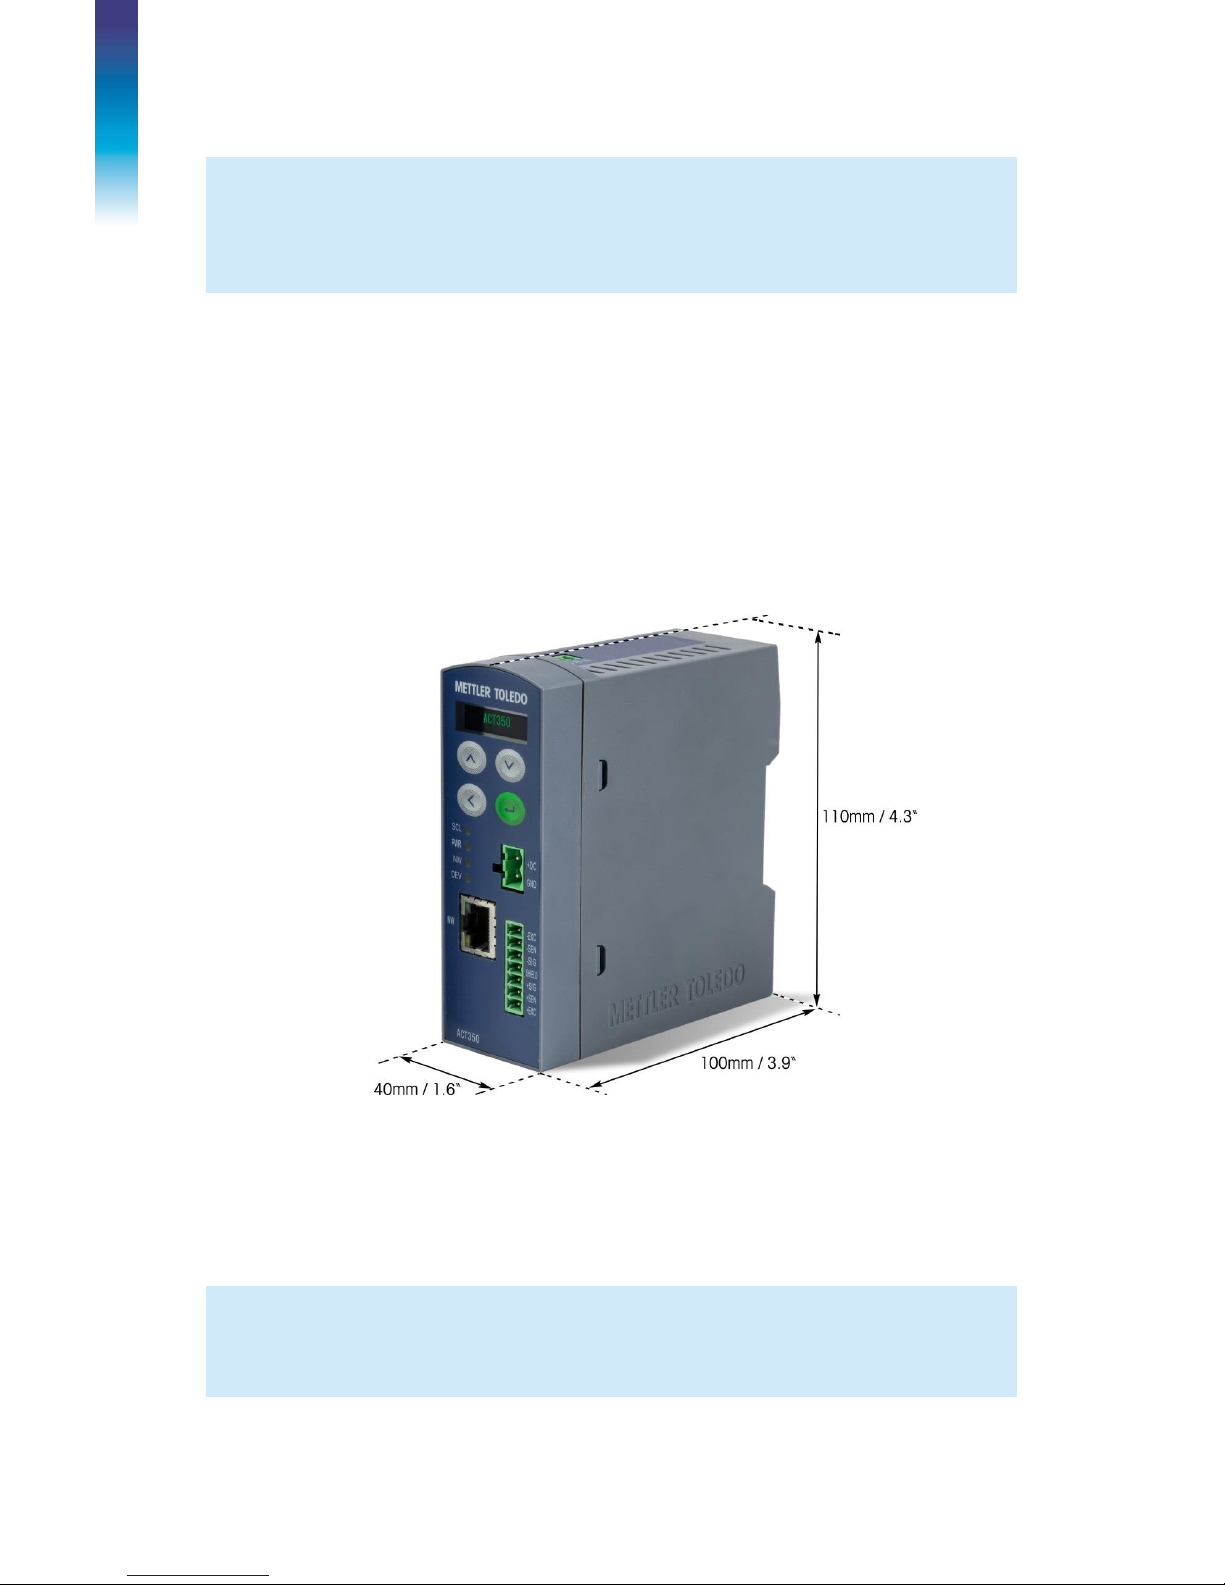
1.4. Physical Dimensions
All available types of ACT350 have the same physical dimensions of the
enclosure. An example of ACT350 enclosure is shown in Figure 1-2: ACT350
Panel Mount Enclosure Dimensions Figure 1-2: ACT350 Panel Mount Enclosure
Dimensions.
Figure 1-2: ACT350 Panel Mount Enclosure Dimensions – relevant to all models
NOTICE
PLC Device Description Files as well as PLC Sample Code are available at
www.mt.com/ind-act350-downloads.
NOTICE
2D and 3D drawings available at www.mt.com/ind-act350-downloads.
Page 12
30303895 | 001 | 09/2018 METTLER TOLEDO ACT350 Transmitter User's Guide 8
Operation
2 Operation
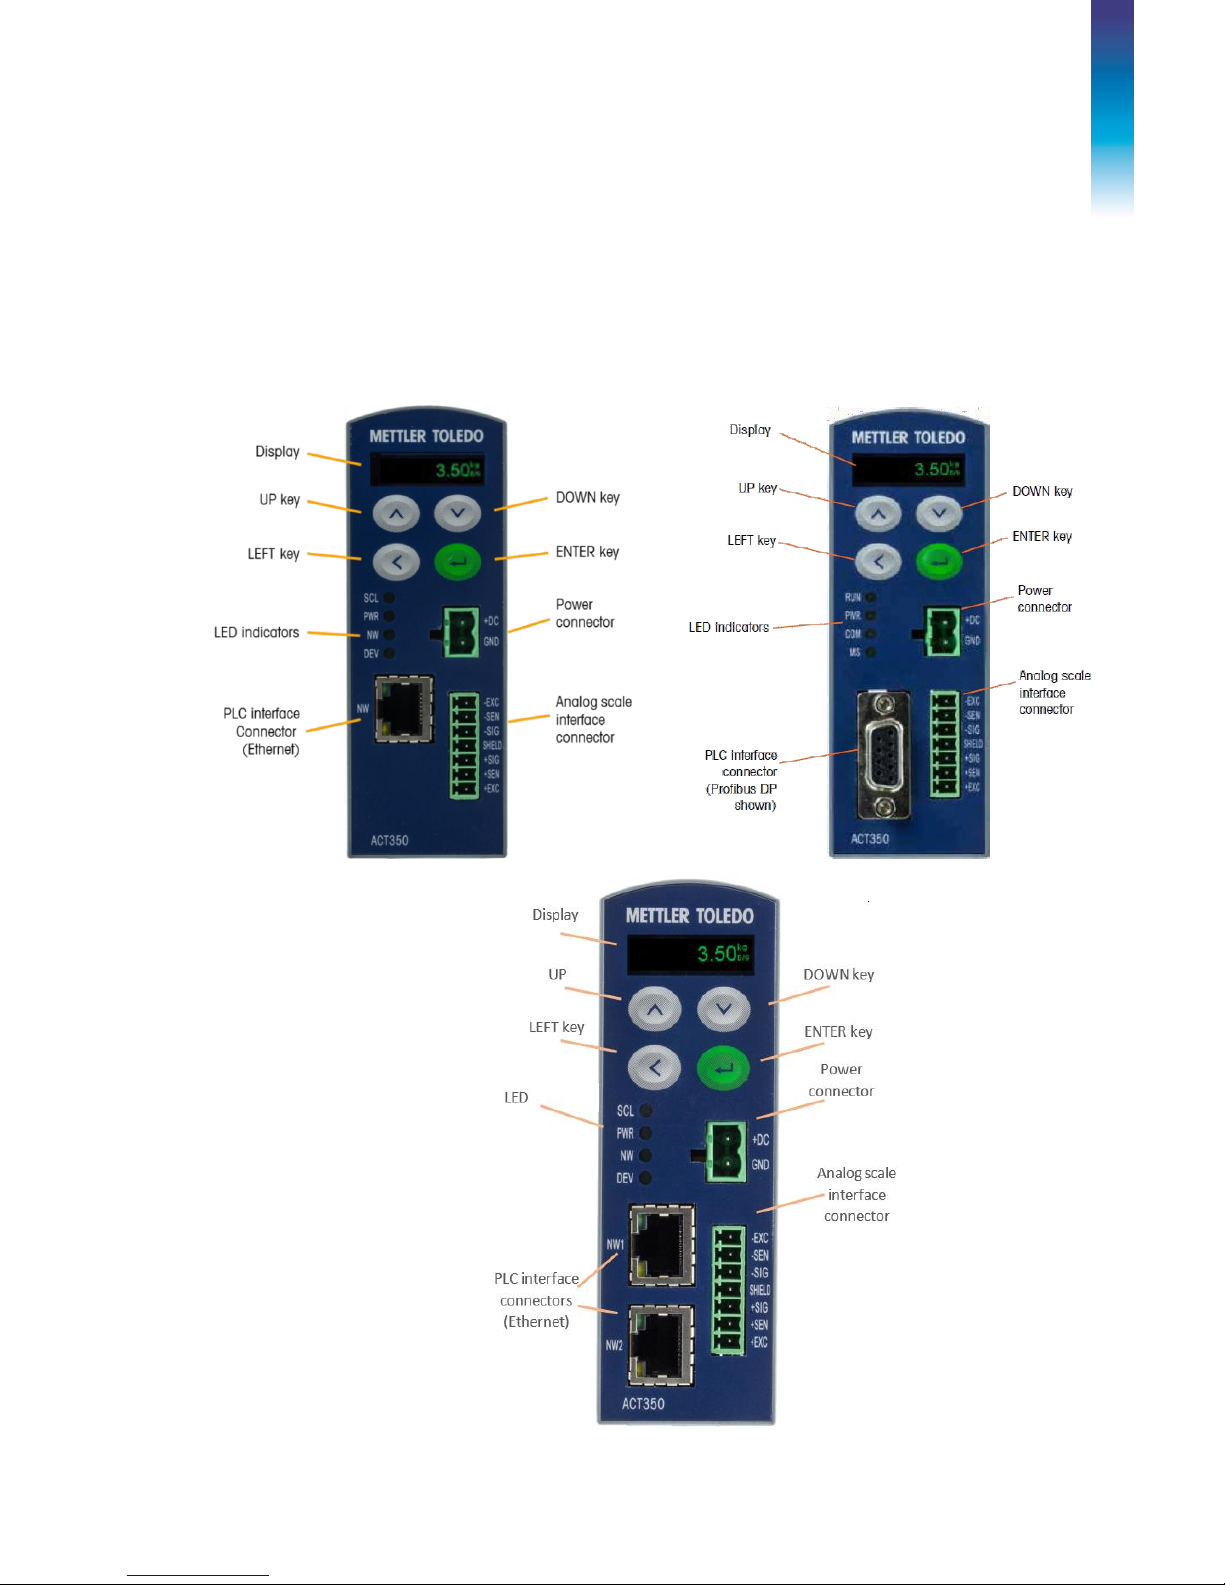
2.1. Front Panel
An example of the ACT350 front panel is shown in Figure 2-1: ACT350 Front
Panel Layout.
Figure 2-1: ACT350 Front Panel Layout
Page 13
30303895 | 001 | 09/2018 METTLER TOLEDO ACT350 Transmitter User's Guide 9
Operation
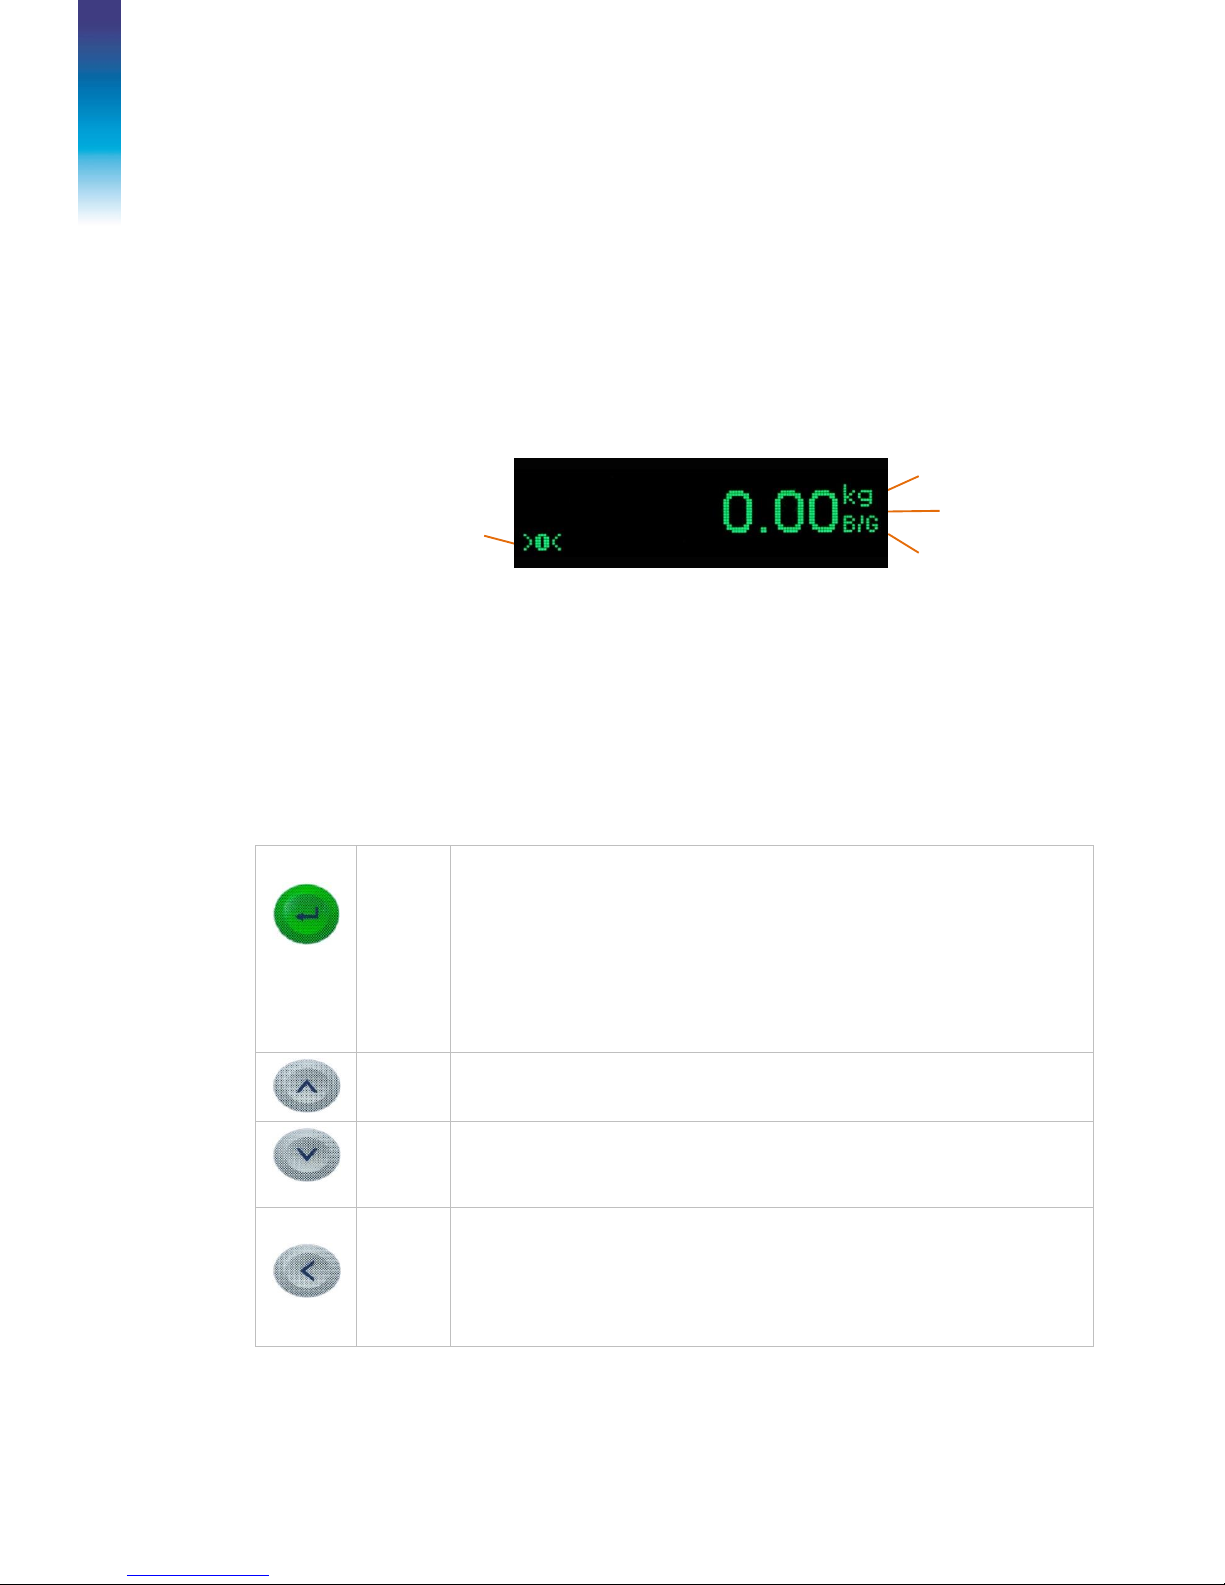
2.1.1. Display Layout
The ACT350 transmitter has an organic LED (OLED) display, 128 32 dot
matrix graphic type display. The display is reserved for scale weight, units,
Net/Gross indicator and error messages.
Additional information provided includes:
Weight unit ( Ib, kg, g )
Motion / no-motion condition
Center of zero
Gross or net mode
Figure 2-2 Display in Weighing Mode
2.2. Front Panel Keys
Four dedicated function keys are located on the front panel to support
manual setup configuration. These provide the interface to navigate the setup
menu hierarchy and data entry, as well as make setup selections within data
entry and drop down boxes.
ENTER
Press the ENTER key for 3 seconds to access the device menu. Press the
ENTER key to make a selection from the device menu and sub-menus.
When in a data entry field, press the ENTER key to accept the numeric value
entered.
When the display is in weighing mode, briefly press the ENTER key to
execute the zero operation if the scale weight is within the Pushbutton zero
range specified in Setup+.
UP
Press the UP key to scroll within the device menu and sub-menus. The UP
key is also used for incrementing numerals in the numeric data entry field.
DOWN
Press the DOWN key to scroll within the device menu and sub-menus. The
DOWN key is also used for decrementing numerals in the numeric data
entry field.
LEFT
Press the LEFT key to navigate up one step on the device menu tree. The
LEFT key is also used to scroll to the numeral to the left in a data entry field.
With the left most numeric character highlighted, the next key press will
wrap around to the right most numeral.
Center of
Zero
Unit of
measure
Gross mode
indication
Weight display
Page 14
30303895 | 001 | 09/2018 METTLER TOLEDO ACT350 Transmitter User's Guide 10
Operation
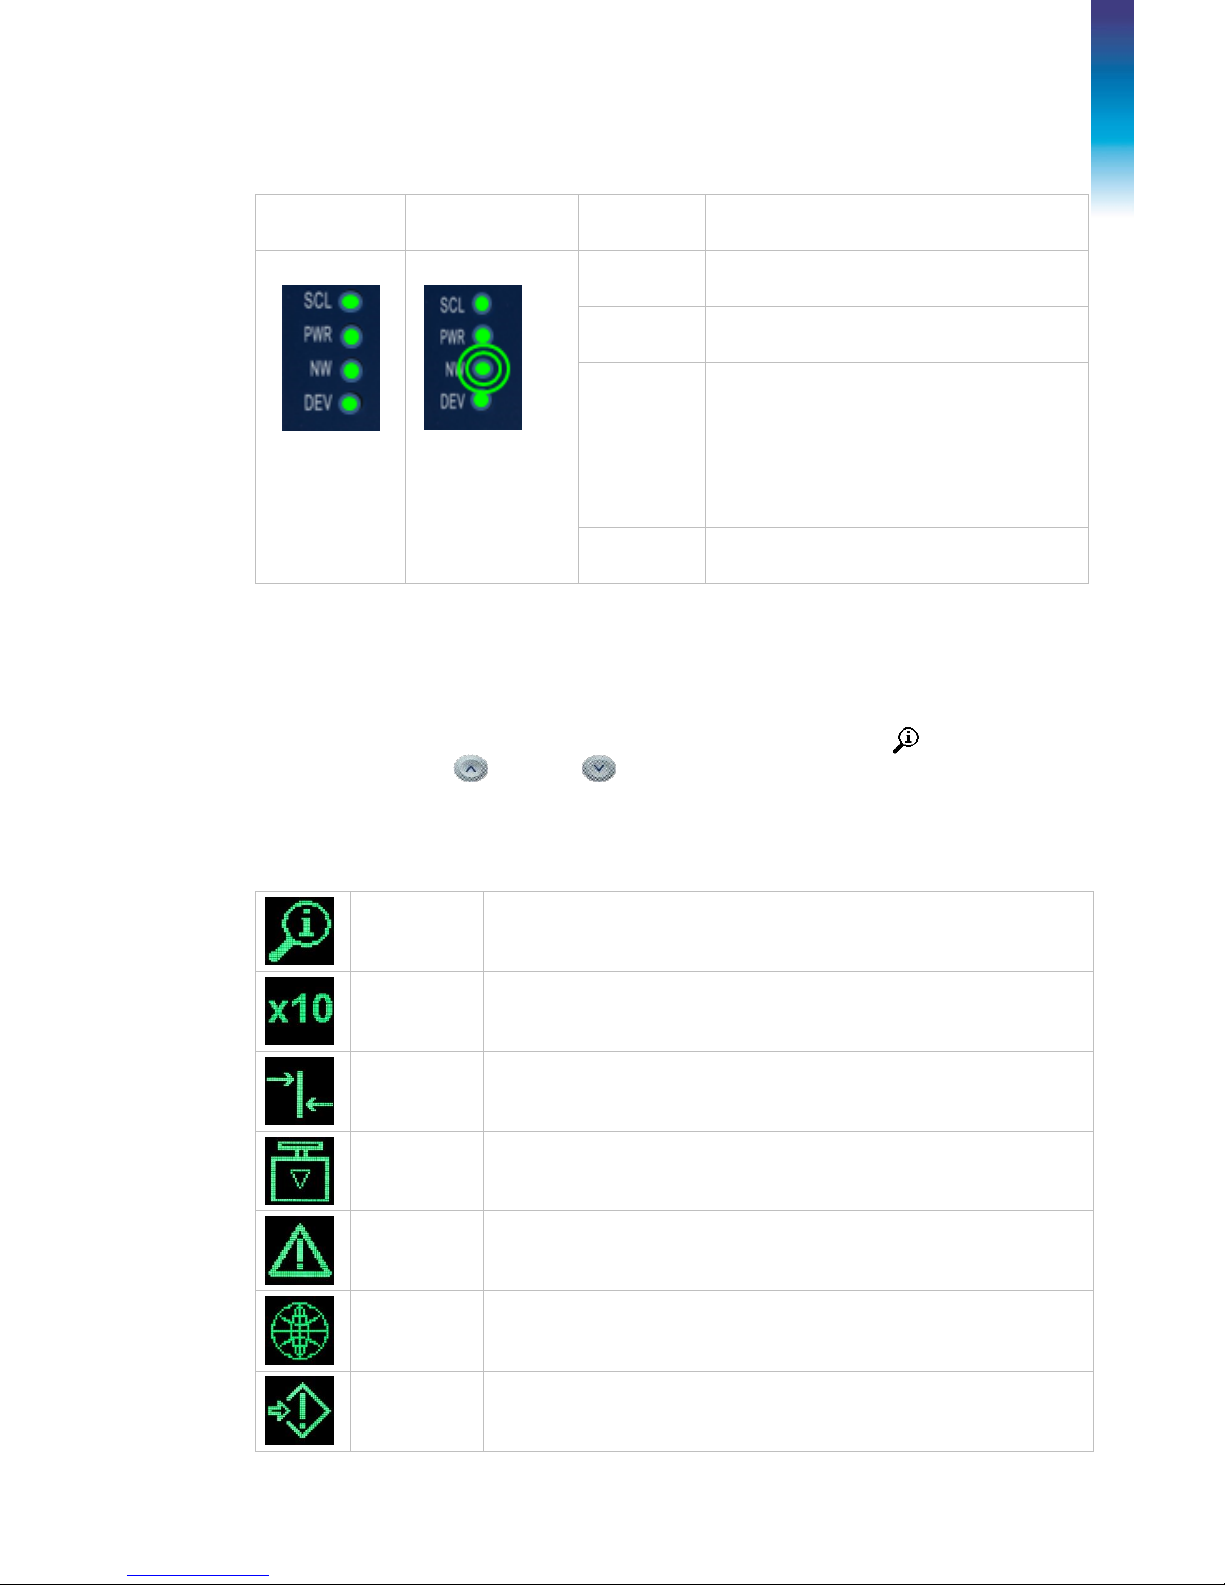
2.3. LEDs Status
Normal Work
Network Error
(Example)
LED
STATUS
SCL
Scales status: ON okay, flashing indicates
scale error
PWR
Power status: ON okay, OFF error
NW
EtherNet/IP:
After having a successfully communication
with PC or PLC, then "NW" will always keep
solid light;
PROFINET IO / PROFIBUS DP:
When cyclic communication is used, then
"NW" will be solid light;
DEV
Device Status: ON okay; flashing contact
service
2.4. ACT350 Device Main Menu
From the front panel press and hold the ENTER key for 3 seconds to access
the device menu from the front panel. The display will change from showing
the normal weight display to showing the Information Recall icon. Press
the UP or DOWN keys on the front panel to display icons for the
various functions listed in Table 2-1.
Table 2-1: Device Menu Icons
Information
Recall
Recall mode for most transmitter information fields.
Resolution
Temporary expands weight display resolution for diagnostic
purposes
Comparators
Access to the limit value for all comparators.
Calibration
Access to calibration menu including zero and span adjustment
(in non-approved mode only).
Error
Message
Access to list of current error messages
Language
Selects between English and Chinese
Setup
Access to all setup parameters for the transmitter.
Page 15
30303895 | 001 | 09/2018 METTLER TOLEDO ACT350 Transmitter User's Guide 11
Operation
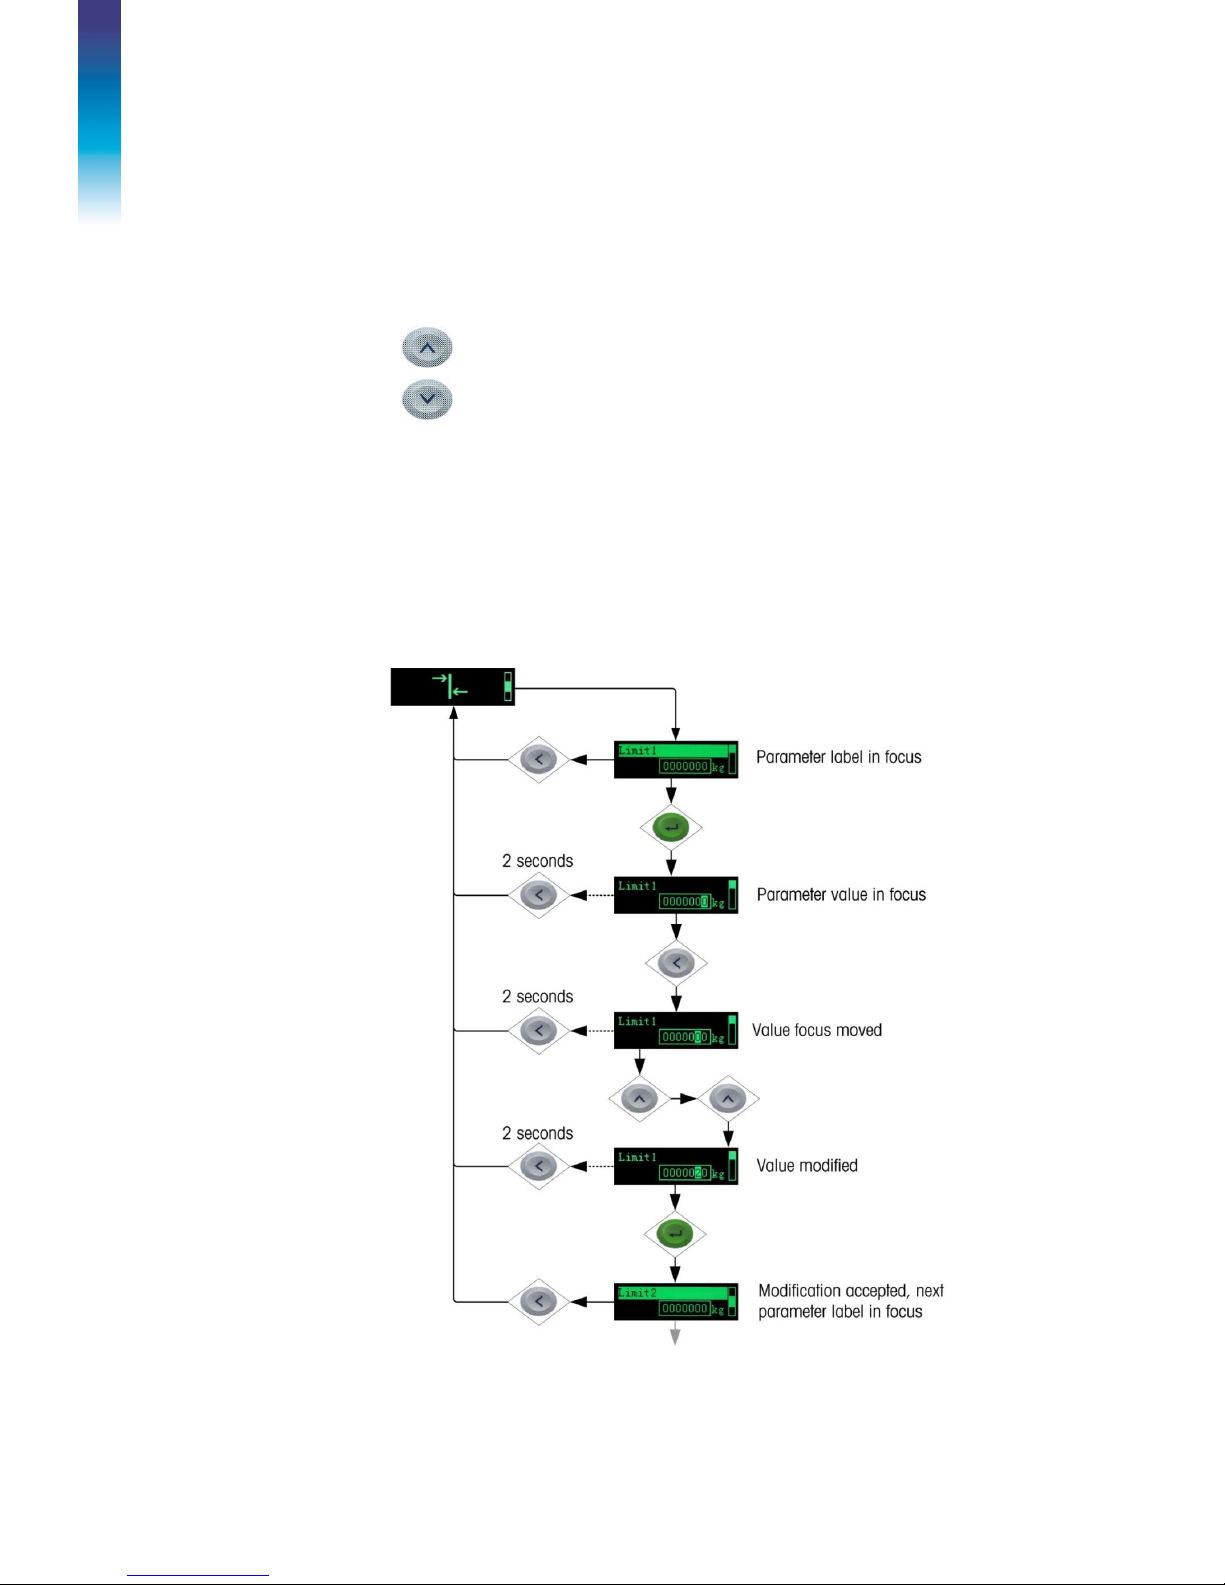
Once focus is in a value field, repeated presses of the UP, DOWN or LEFT keys will
cycle back to the beginning, so if the LEFT key is pressed when focus is in the leftmost position, focus returns to the right-most position. In the case of the UP and
DOWN keys, the numerical value will cycle through numerical values and the
decimal point as follows:
0 > 1 > 2 > 3 > 4 > 5 > 6 > 7 > 8 > 9 > . 0 > 1 > …
0 > . > 9 > 8 > 7 > 6 > 5 > 4 > 3 > 2 > 1 > . > …
After accepting the value by pressing ENTER and the focus has moved to the parameter
description, press the LEFT key to exit to the next higher level of the menu.
Pressing the LEFT multiple times will exit the device menu.
Figure 2-3 shows an example of how to access and modify the value of a parameter.
The currently selected item (in focus) is indicated by reverse video.
Figure 2-3: Numerical Data Entry Example
Page 16
30303895 | 001 | 09/2018 METTLER TOLEDO ACT350 Transmitter User's Guide 12
Operation
2.4.1. Information Recall
Once the Information Recall icon appears, press the ENTER key to recall
specific information about the transmitter. Figure 2-4 shows the elements of
the Information Recall menu in the sequence in which they occur. Note that
some items may not appear, depending on the configuration of the transmitter.
Figure 2-4: Information Recall Menu
Page 17
30303895 | 001 | 09/2018 METTLER TOLEDO ACT350 Transmitter User's Guide 13
Operation
2.4.2. x10 Resolution
This function expands the weight display resolution by 10 so that a finer
weight increment can be seen. It can be enabled by pressing the ENTER key
when the transmitter’s device menu has been accessed and the
icon is displayed on screen:
Figure 2-5: x10 Indication
2.4.3. Comparators
The device supports a total of five comparators. One, two or all five
comparators may be used. The limit of each comparator may be modified by
accessing the Comparator menu in the setup menu. Comparator values are
limited to 7 digits, and can be written to the device or read from it by the PLC.
2.4.3.1. Setting Comparators
Access the Comparator menu by pressing the ENTER key when the
transmitter’s device menu is visible and the icon is displayed on the
device.
If the operator is a single value, only one limit value can be set for the
comparator. Pressing the ENTER key again returns to the list of comparators.
If the operator is a range, then the Limit screen is followed by the High Limit
screen, from which the ENTER key exits back to the list of comparators. To
edit parameters other than limits, Comparator configuration must be accessed
in setup. Refer to the Numerical Data Entry section for the method used to
modify numerical values.
NOTICE
THE x10 DISPLAY RESOLUTION SETTING CANNOT BE CONFIGURED USING SETUP+.
The function is intended for diagnostic purposes only. The transmitter should not be used in the
x10 expanded mode for normal operation. The Data Ok bit is set to zero when in x10 display
mode to indicate that the ACT350 is not in normal operating mode. The PLC should continuously
monitor the Data OK bit in the ACT350 communication to determine the validity of data received
by the PLC.
Page 18

30303895 | 001 | 09/2018 METTLER TOLEDO ACT350 Transmitter User's Guide 14
Operation
2.4.4. Calibration
Calibration is the process of adjusting the display of the transmitter so that
when the scale is empty, the display shows zero gross weight. With a
specific amount of weight on the scale, it also shows an accurate weight
value.
The ACT350 transmitter calibration menu enables entry of a GEO Codes
adjustment value, selection of linearity adjustment (none [default], three,
four or five point), traditional zero calibration and three different types of
span calibration:
Traditional span calibration – This uses test weights.
Step adjust calibration - Using a build-up or substitution method of
calibration, this method is used for large vessels where only a portion of
the required test weights can be placed on the scale.
CalFree calibration – Once certain load cell criteria have been entered
manually, the transmitter will automatically calculate the span; no test
weights are required.
Page 19

30303895 | 001 | 09/2018 METTLER TOLEDO ACT350 Transmitter User's Guide 15
Operation
2.4.4.1. Setting Calibration
Access to the Calibration menu using the device's front panel is accomplished
by pressing the ENTER key when the icon is displayed on the device.
The Calibration menu also can be accessed using the PC-based Setup+
Configuration Tool.
Figure 2-6: Calibration Menu – Overview
2.4.4.2. Setting Geo Code
The Geo code, which sets the appropriate adjustment value for the current
geographical location, is selected here. Geo codes are numbered 0–31. See
Figure 2-6 for more information on the Geo code setting using the transmitter’s
front panel buttons, and refer to Appendix E, Geo Codes to find the appropriate
Geo Code for the installation location.
Page 20

30303895 | 001 | 09/2018 METTLER TOLEDO ACT350 Transmitter User's Guide 16
Operation
2.4.4.3. Setting Linearity
To set the Linearity Adjustment value, see Figure 2-6: Calibration Menu –
Overview Figure 2-6. Choose the number of linearity points from the selection
box. Options are None [default], 3 point, 4 point, 5 point.
Points are distributed as follows:
None
Linearity is disabled
3
Zero, midpoint and highpoint
4
Zero, lowpoint, midpoint and
highpoint
5
Zero, lowpoint, midpoint, midhighpoint, highpoint
2.4.4.4. Zero Calibration and Under Zero Blanking
Scale zero is set simply by emptying the scale and running the “Set Zero”
calibration routine, as shown in Figure 2-7.
Figure 2-7: Zero Calibration
Page 21

30303895 | 001 | 09/2018 METTLER TOLEDO ACT350 Transmitter User's Guide 17
Operation
If the transmitter detects scale motion during the calibration process, it will
retry the start of calibration several times and then proceed, displaying a
motion indication. In this case, when calibration is complete, the transmitter
will present two options – accept or reject the value.
Figure 2-8: Zero Calibration with Motion
Blanking of the display is used to indicate an under-zero condition when the
weight on the scale falls below the current zero reference. Set the under zero
blanking for the number of divisions (d) that the transmitter is permitted to go
under zero before blanking.
NOTICE
A setting value of 0-98 blanks the display at the specified number of divisions below gross
zero. A value of 99 disables blanking under zero and the transmitter will display a weight as
far under as possible.
Page 22

30303895 | 001 | 09/2018 METTLER TOLEDO ACT350 Transmitter User's Guide 18
Operation
2.4.4.5. Span Calibration
The scale’s span calibration can be determined either with or without a linearity
adjustment. With linearity disabled, a single reference point is used to calibrate
the scale. This is the normal method of span calibration. In Figure 2-9, the
transmitter is configured with three-point linearity – low, mid and high.
The low point is set during zero calibration, and the mid and high points are
set during this procedure.
Figure 2-9: Span Calibration
If linearity is enabled, additional mid-range weight reference points are added
to the adjustment procedure. Linearity can be enabled or disabled in the
Calibration branch of the device menu. Refer to ACT350 Device Main Menu
section for the method used to modify numerical values.
2.4.4.6. Step Adjust
Step adjustment is an iterative process in which a build-up or material
substitution method of calibration is used to calibrate the span. Each step
calibrates a portion of the full span.
This method is typically used with large vessels where only a portion of the
required calibration test weights can be placed on the scale at one time. Figure
2-10 shows the logic of the procedure using a simple, two-step example.
When sufficient steps have been calibrated, pressing the LEFT button returns
the view to the calibration menu.
Page 23

30303895 | 001 | 09/2018 METTLER TOLEDO ACT350 Transmitter User's Guide 19
Operation
First, a test load is defined by entering its
weight.
Confirm the value entry by pressing ENTER.
The ACT350 prompts for the addition of the test
load.
Press ENTER to start the first step,
The ACT350 indicates its progress.
Once the first step is calibrated, the ACT350 sets
a temporary zero point, and prompts for the
removal of the test load. A live weight display
indicates that the scale has been cleared.
Press ENTER to confirm the scale is empty.
The ACT350 will prompt to add the test load
again.
The live weight indicates that the test load is on
the scale.
Press ENTER to start the second step.
The ACT350 indicates its progress.
Press LEFT to complete calibration and exit the
procedure.
The ACT350 indicates that the calibration has
succeeded.
Press either LEFT or ENTER to return to the
calibration menu.
Figure 2-10: Step Adjustment
Page 24

30303895 | 001 | 09/2018 METTLER TOLEDO ACT350 Transmitter User's Guide 20
Operation
2.4.4.7. CalFree™
CalFree allows the scale to be calibrated without the use of test weights. The
total load cell capacity, unit and output in mV/V must be entered. The system
then calculates correct calibration for the scale. Figure 2-11 provides a visual
representation of the CalFree calibration procedure.
Notes on Load Cell Capacity and Rated Cell Output
For load cell capacity, enter the sum of all load cell capacities. For
example, for three 50t load cells, enter 150,000 kg.
For systems with passive dummy load cells, enter the value as if all legs
have live load cells. For example, for a system with two 50t live load cells
and two passive supports, enter 200,000.
For Rated Cell Output, enter the sensitivity of each live load cell in mV/V –
for example, 2.0000. For multiple load cells, enter the average sensitivity of
all cells.
The ACT350 transmitter allows calibration of the scale without using test
weights. This is based on manual entry of capacity and performance data
from the load cell or load cell platform. This method of calibration can be
used for initial check-out and testing of systems or when a large structure is
used as the weighing vessel and it is not possible to apply test weights to the
structure. METTLER TOLEDO highly recommends that test weights be used
whenever possible, as this provides the most accurate method of calibration.
The Rated Cell Output and Cell Capacity values cannot be zero, and are
limited to 7 digits.
NOTICE
Scale calibration using CalFree™ will not be accurate when using zener diode barriers (such
as Mettler Toledo ISB05 and ISB05x) between the transmitter and the scale. Do not use
CalFree™ when barriers are installed.
Page 25

30303895 | 001 | 09/2018 METTLER TOLEDO ACT350 Transmitter User's Guide 21
Operation
Figure 2-11: CalFree
Page 26

30303895 | 001 | 09/2018 METTLER TOLEDO ACT350 Transmitter User's Guide 22
Operation
2.4.5. Language
The ACT350 supports a device menu in English [default] and in Chinese.
2.4.6. Parameters Setup
The last icon displayed in the device menu from the front panel is Setup ,
where many of the transmitter’s programming parameters can be viewed
and modified. It is not intended that operators enter the setup mode after a
weighing system is installed and is operational. It should not be necessary
for an operator to access setup.
2.4.7. Password Security
Note that a security password can be enabled in setup from the PC-based
Setup+ Configuration Tool. When a password is set, it must be entered to
access setup. This protects the setup parameters from inadvertent changes.
Figure 2-12: Password Entry Screen
2.4.8. Reset Configuration and Master Reset
2.4.8.1. Reset Configuration
To reset all configured items except calibration data:
1. Remove power from the transmitter.
2. Locate the DIP switches, accessible from the underside of the housing.
3. Set both DIP switches, 1 and 2, to ON (up, in Figure 2-13), and restore
power to the transmitter.
Figure 2-13: DIP Switches
4. Set both DIP switches to OFF.
Page 27

30303895 | 001 | 09/2018 METTLER TOLEDO ACT350 Transmitter User's Guide 23
Operation
2.4.8.2. Master Reset
A master reset restores all settings to their factory default values:
1. Remove power from the transmitter.
2. Set switch 2 to its ON position and restore power to the transmitter.
The ACT350 will prompt for confirmation.
Figure 2-14: Master Reset Confirmation
3. Press ENTER on the front panel to perform the master reset.
4. Set Switch 2 to OFF.
2.2. ACT350 Basic Operation Functions
2.2.1. Zero
The Zero function is used to set or reset the initial zero reference point of the
transmitter. There are two types of zero setting modes:
2.2.1.1. Green ENTER Button
The zero function can be accomplished by a short press of the green ENTER
scale function key. The Zero range selections include Disabled, 2%
[default] or 20% plus or minus from the calibrated zero point. A change to
the default setting is done via the PC-based Setup+ Configuration Tool. If the
current scale weight is outside the zero range when a pushbutton zero is
commanded, the transmitter will display a message:
Figure 2-15: ENTER button Zero Failure Message
Remote initiation of the semi-automatic Zero command is possible via a
command initiated by the PLC interface.
Page 28

30303895 | 001 | 09/2018 METTLER TOLEDO ACT350 Transmitter User's Guide 24
Operation
2.2.1.2. Power Up
The Power Up mode setting determines if at power up, the transmitter will
restart with the most recent zero reference point it had before power down or
if it will reset to the calibrated zero reference.
The selections include Reset [default] and Restart.
2.2.1.2.1. Reset
With the setting on Reset, the last zero calibration value will be used as the
zero reference point. The Power Up Zero capture range selections include
Disabled [default], 2% or 10% plus or minus. If the range setting is enabled,
the Power Up Zero is applied only when the weight reading on the scale is
within the selected range around the originally calibrated zero reference. For
example, if the range setting for Power Up Zero is set at +/- 2%, Power Up
Zero will only occur when the weight reading on the scale is within +/- 2%
of scale capacity above the original calibrated zero reference. If the weight
on the scale is outside of the zero range, the display will indicate EEE until
the weight is adjusted to within this range and zero is captured.
2.2.1.2.2. Restart
A setting of Restart enables the transmitter to reuse the most recent zero
reference weight after a power cycle so it returns to the same, previouslydisplayed gross weight value. The Power Up Zero setting is configured using
the PC-based Setup+ Configuration Tool.
2.2.2. Tare
The tare value is subtracted from the gross weight measurement, providing
the computation of the net weight (material without the container). The tare
function can also be used to track the net amount of material being added to
or removed from a vessel or container. In the second case, the weight of the
material inside is included with the tare weight of the container and the
display reflects the net amount being added to or removed from the vessel.
Tare is captured by PLC command. Tare is cleared by PLC command.
Page 29

30303895 | 001 | 09/2018 METTLER TOLEDO ACT350 Transmitter User's Guide 25
Operation
2.2.3. Filter
The Filter section offers three settings:
Limit
Frequency
Selections from 1 to 20 in this drop-down box set the cut-off
frequency, in Hertz, above which the filter actively attenuates
the signal.
Weighing
Mode
Sets the type of weighing, Normal, Dynamic, Trigger Weigh
for which the ACT350 is being used in the current
application.
Environment
Sets the type of environment in which the ACT350 is working,
depending on how stable the scale is likely to be.
2.2.3.1. Triger Weigh
Triggered weight mode is to determine the weight value during the dynamic
weighing process of the weighing object, and the key technical indexes are
the weighing accuracy and throughput rate. More information are available
in Appendix A
2.2.4. Error Message
With the Errors icon in view, press the ENTER key to access a listing of
current error messages.
Table 2-2: ACT350 Faults
Error
ACT350 Display
Description
Action
002
Local calib. in process or
Setup+ calib. in process
Calibration in process.
Distinguishes between
calibration performed in
the ACT350, and
calibration performed from
Setup+
Wait for calibration to
finish
005
NW Module init.fail
SAI initialize fail
Cycle power; call service if
issue persists
006
NW connection
disconnected
Lose connection to
network
Check cable or connector
009
Board info. err
Hardware information error
Cycle power; call service if
issue persists
010
Calib. err
Calibration block data
error; block data is lost
Perform master reset;
Re-calibrate
011
Scale err
Scale block data error;
block data is lost
Perform master reset
Perform setup for scale
block
012
Term. err
Transmitter block data
error; block data is lost
Perform master reset
Perform setup for
transmitter block
Page 30

30303895 | 001 | 09/2018 METTLER TOLEDO ACT350 Transmitter User's Guide 26
Operation
Error
ACT350 Display
Description
Action
013
APP. err
Application block data
error; block data is lost
Perform master reset
Perform setup for
application block
014
NW. err
Communication block
data error; block data is
lost
Perform master reset
Perform setup for
communication block
015
Maint. err
Statistics block data error;
block data is lost
Perform master reset
Perform setup for
maintenance block
016
Analog system A/D fail
Lost analog signal;
abnormal functioning of
scale
Call service
018
Zero failed Motion
Scale in motion when Zero
attempted
Zero when scale is stable
019
Zero failed net mode
Scale in net mode when
Zero attempted
Clear tare before zeroing
020
Zero failed out of range
Weight out of Zero range
Unload scale and zero
021
Zero failed Zero disabled
Zero attempted when
function disabled in setup
Enable Zero function in
Setup
022
Tare failed Motion
Tare failed as scale is in
motion
Tare when scale is stable
027
Tare failed Not rounded
value
Preset tare value not in
display increment size
The preset tare value must
be rounded to the same
increment
028
Tare failed Value too
small
Tare value too small
The preset tare value must
be minimum of 1 display
increment
029
Tare failed Zero not
captured
Power-up zero not
captured; Zero not
captured after power cycle
(with Zero capture
enabled) then tare was
attempted
Disable zero capture at
power-up or unload scale
and power-up again, then
tare
030
Tare Failed, Scale Over
capacity
Tare was attempted while
scale was over capacity
Remove weight and tare
within weighing range
031
Tare failed Negative value
Tare value under zero
The preset tare value must
be positive
035
Analog saturation
A/D converter in overload
Reprogram Scale Capacity
Page 31

30303895 | 001 | 09/2018 METTLER TOLEDO ACT350 Transmitter User's Guide 27
Installation
3 Installation
3.1. Mechanical Installation
The ACT350 mounts to a standard DIN rail. DIN mount includes an
integral transmitter grounding system, visible in Figure 3-1.
Figure 3-1: DIN-Mount Latch
To mount the ACT350 on a rail, open the latch by pulling down, then position
the transmitter so that its upper tabs rest on the DIN rail.
Use a screwdriver to close the latch and secure the transmitter in position.
Figure 3-2: Latch Closure
Upper mounting tabs
Sliding latch
Grounding
Page 32

30303895 | 001 | 09/2018 METTLER TOLEDO ACT350 Transmitter User's Guide 28
Installation
To remove the ACT350, simply put the blade of a screwdriver in the latch
and press it downward
.
3.2. Electrical Installation
Figure 3-3: ACT350 – PROFIBUS (left) and PROFINET or EtherNet/IP
(right). Figure 3-3 indicates ACT350 connections and their functions.
Figure 3-3: ACT350 – PROFIBUS (left) and PROFINET or EtherNet/IP (right)
Function Key:
1
Power connector (12- 30 VDC)
2
Fieldbus connection (ProfiBus, Profinet, Ethernet/IP )
3
Analog scale interface (Number of load cells: up to 8x 350Ω or
20x 1000Ω; 1-2 mV/V; Number of scale: 1; Number of scale
ranges: 1; Load cell excitation voltage; 5 VDC; 6 wire
connection)
NOTICE
In order to ensure proper dissipation of heat from the transmitter’s PCBs, and to avoid damage
to the equipment, the ACT350 must be mounted vertically, on a horizontal din rail.
Page 33

30303895 | 001 | 09/2018 METTLER TOLEDO ACT350 Transmitter User's Guide 29
Installation
3.2.1. RS-232 Serial Connection
The serial RS-232 connection on top of the transmitter is used for service
purposes only Figure 3-4.
Figure 3-4: ACT350, Top View (DIO model shown)
The Figure 3-5 present the correct RS-232 wiring connection.
Figure 3-5: RS-232 Wiring Connection
NOTICE
ACT350 transmitters may have a single port or dual network ports depending on type of the
ACT350. EtherNet/IP and PROFINET ACT350 have multiple port options available, while
Profibus ACT350 only supports single port operation.
NOTICE
The special automatic grounding system at the back of the unit is present to ensure that the unit
is grounded to the DIN rail. See Figure 3-1
Page 34

30303895 | 001 | 09/2018 METTLER TOLEDO ACT350 Transmitter User's Guide 30
Installation
3.2.2. Digital Inputs and Outputs connecting Instruction.
Three digital inputs and five outputs are allocated on a top of each
ACT350DIO version Figure 3-4 and the Table 3-1 represents digital inputs
and outputs specification.
Table 3-1: Digital Inputs and Outputs Specification
Input
Output
Permissible input voltage
0 ~ 24 VDC
5~30 VDC
Logical Low-level
0 ~ 5 VDC
Logical High-level
10 ~ 24 VDC
Input resistance
>3Kῼ
Max.current of one output
<150mA
Accumulated current of
all outputs
<750mA
Support Sinking
GND connected to IN-
COM
GND connected to OUT-
COM
Support Sourcing
Power source to IN-
COM
Power source to OUT-COM
Default function
Zero
Polarity Value
+True(Default) or –True
Available Functionality
None; Clear Tare; Tare;
Zero
None; Center of Zero;
Comparator 1-5; Fault;
Motion; NET; Over Capacity;
Under Zero
Example: Using a rising-edge input signal to trigger the ACT350 to perform a Zero
operation, "Polarity" can be set as "+ True" and "Assignment" as "Zero". Refer to
Figure 3-6:
Figure 3-6: A Rising-edge Trigger Signal on Input
NOTICE
DIO is available in versions with dual ports.
The RS233 port can be used to connect ACT350 to the PC-based Setup+ Configuration Tool.
This tool is available online and can be downloaded at www.mt.com/ind-act350-downloads
Page 35

30303895 | 001 | 09/2018 METTLER TOLEDO ACT350 Transmitter User's Guide 31
Installation
Using a falling-edge signal on Input to trigger ACT350 perform a Tare operation,
"Polarity" can be set as "- True" and "Assignment" as "Tare". Refer to Figure 3-7.
Figure 3-7: A Falling-edge Trigger Signal on Input
Digital inputs and Outputs electrical connection instruction is shown below. (from
Figure 3-8 to Figure 3-11)
Figure 3-8: Sinking Input, Sourcing Output
1 10
IN COM
IN1
IN2
IN3
OUT1
OUT2
OUT3
OUT4
OUT5
OUT COM
LOAD
LOAD
LOAD
LOAD
LOAD
Voltage Source
Common
+ Voltage Source
PLC or Other
Discrete Output
Device
COM
OUT1
OUT2
OUT3
SUPP
SUPP
SUPP
SUPP
SUPP
+ Voltage Source
Voltage Source
Common
NOTICE
Do not use input voltage between 5 – 10 VDC. Unstable input signal will result. See figure 36 and 3-7 for proper operation
Page 36

30303895 | 001 | 09/2018 METTLER TOLEDO ACT350 Transmitter User's Guide 32
Installation
Figure 3-9: Sinking Input, Sinking Output
Figure 3-10: Sourcing Input, Sourcing Output
1 10
IN COM
IN1
IN2
IN3
OUT1
OUT2
OUT3
OUT4
OUT5
OUT COM
LOAD
LOAD
LOAD
LOAD
LOAD
Voltage Source
Common
+ Voltage Source
PLC or Other
Discrete Output
Device
COM
OUT1
OUT2
OUT3
SUPP
SUPP
SUPP
SUPP
SUPP
+ Voltage Source
Voltage Source
Common
1 10
IN COM
IN1
IN2
IN3
OUT1
OUT2
OUT3
OUT4
OUT5
OUT COM
LOAD
LOAD
LOAD
LOAD
LOAD
Voltage Source
Common
+ Voltage Source
PLC or Other
Discrete Output
Device
COM
OUT1
OUT2
OUT3
SUPP
SUPP
SUPP
SUPP
SUPP
+ Voltage Source
Voltage Source
Common
Page 37

30303895 | 001 | 09/2018 METTLER TOLEDO ACT350 Transmitter User's Guide 33
Installation
Figure 3-11: Sourcing Input, Sinking Output
3.2.3. Analog Load Cell Connection
For ESD protection, cabling for the analog load cell must include a ferrite
and a silicone protection sleeve, included with the transmitter.
Install the ferrite by passing it through the ferrite and wrapping it around
once, as indicated here.
Figure 3-12: Ferrite Installed on Analog Load Cell Cable
1 10
IN COM
IN1
IN2
IN3
OUT1
OUT2
OUT3
OUT4
OUT5
OUT COM
LOAD
LOAD
LOAD
LOAD
LOAD
Voltage Source
Common
+ Voltage Source
PLC or Other
Discrete Output
Device
COM
OUT1
OUT2
OUT3
SUPP
SUPP
SUPP
SUPP
SUPP
+ Voltage Source
Voltage Source
Common
NOTICE
To accommodate the ferrite, it may be necessary to cut the silicone sleeve to size.
Analog load cell connector
Silicone sleeve
Ferrite
Page 38

30303895 | 001 | 09/2018 METTLER TOLEDO ACT350 Transmitter User's Guide 34
Installation
Błąd! Nieprawidłowy odsyłacz do zakładki: wskazuje na nią samą. provides recommended
Maximum Cable Lengths.
Table 3-2 Recommended Maximum Cable Lengths
TSR (Ohms)
24 Gauge
(meters/feet)
20 Gauge
(meters/feet)
16 Gauge
(meters/feet)
350
234/800
610/2000
1219/400
87
(4 -350 Ω cells)
60/200
182/600
304/1000
43
(8 -350 Ω cells)
30/100
91/100
152/500
3.2.4. PLC Connection
To connect ACT350 with PLC, use a fieldbus connection port shown on
Figure 3-3.
Figure 3-13 presents single (A) and multiple (B) connections for single port
solution and Figure 3-14 presents single (A) and multiple (B) connections
for dual port solution.
A) Single port version single-line connection
B) Single port version Multi-line connection
Figure 3-13: ACT350 and PLC connection single port version.
Page 39

30303895 | 001 | 09/2018 METTLER TOLEDO ACT350 Transmitter User's Guide 35
Installation
A) Dual port version Single-line connection
B) Dual port version Multi-line connections
Figure 3-14: ACT350DIO and PLC connection dual port version.
NOTICE
Ethernet cables are the industry standard 8P8C ( RJ45).
Page 40

30303895 | 001 | 09/2018 METTLER TOLEDO ACT350 Transmitter User's Guide 36
Installation
3.2.5. MRP and DLR Ring Topology
All PROFINET ACT350DIO (dual port versions) of the ACT350
support the setting up of a MRP (Media Redundancy Protocol)
redundant topology in the form of a ring, both for IO
communication and for the standard TCP/IP communication.
All Ethernet IP ACT350DIO (dual port versions) of the ACT350
support the setting up of a DLR (Device Level Ring) redundant
topology in the form of a ring, both for IO communication and
for the standard TCP/IP communication.
3.3. DIP Switches
Two DIP switches, 1 and 2, are accessible from the underside of the
ACT350’s housing. Table 3-3 summarizes their functions.
Table 3-3: DIP Switch Functions
ACT350 DIP Switches
Legal for Trade
Reset
Switch 1
Switch 2
Function
OFF
OFF
Normal operation
ON
OFF
Legal-for-trade mode;
calibration data
protected
OFF
ON
Master reset of all data
during transmitter
power-up
ON
ON
Reset of all except
calibration data during
transmitter power-up
Page 41

30303895 | 001 | 09/2018 METTLER TOLEDO ACT350 Transmitter User's Guide 37
Installation
3.4. Legal for Trade
When the transmitter is certified as legal for trade, the DIP switch 1,
accessible on the underside of the housing, must be set to ON. A
metrological seal must be placed over the DIP switch array to prevent this
setting from being changed.
Please refer to Figure 3-15 for method to seal ACT350 Transmitter.
Figure 3-15 ACT350 Sealing Diagram
3.5. Power Supply
The ACT350 transmitter is powered only by external DC input (12V to 30V).
ACT350 1-Port PBDP
ACT350 1-Port PRNT
ACT350 1-Port ETIP
Current
mA
Power Watts
Current
mA
Power Watts
Current
mA
Power Watts
12V
320
4
259 3 248
3
24V
160
4
128 3 123
3
30V
131
4
104 3 100
3
ACT350 2-Port PBDP
ACT350 2-Port PRNT
ACT350 2-Port ETIP
Current
mA
Power Watts
Current
mA
Power Watts
Current
mA
Power Watts
12V
320
4
367 5 367
5
24V
160
4
184 5 184
5
30V
131
4
152 5 152
5
NOTICE
When the transmitter is in legal for trade mode, approval significant settings cannot be
accessed via keypad or in Setup+. These include unit, capacity, increment size, calibration,
zero and stability settings.
Page 42

30303895 | 001 | 09/2018 METTLER TOLEDO ACT350 Transmitter User's Guide 38
Fieldbus Communication
4 Fieldbus Communication
4.1. Overview
The Standard Automation Interface (SAI) is a protocol designed to
exchange data between METTLER TOLEDO devices and third-party
automation systems. This interface provides the following:
• A common data layout for load cells, terminals and other devices
regardless of the physical interface or automation network used.
• A single protocol for the convenience of automation integrators,
control system programmers and our automation customers.
• A flexible protocol for diverse devices.
Communication Modes
The protocol has two primary modes of operation.
• cyclic data • acyclic data
4.1.1. Cyclic data
Cyclic data is broken up into sections of data. Each section represents a block.
Each block of data contains four words of 16 bits each.
The data within these words can express numeric values, individual bits which
represent state or command depending on the type of block specified.
Two fixed formats divided into blocks (1 block, 2 blocks) are available for SAI
devices depending on the product. The default format for weigh modules is the two
block format with eight words in and eight words out. The number of input words
(data sent from the device to the process controller) and output words (data sent
from the process controller to the device) always match. This limits the number of
configurations to a reasonable amount.
There are two types of cyclic blocks supported on the SAI device:
• Measuring block (IEEE 754 floating point data)
– Used for numeric values
– Decimal point and sign included and do not require special data handling
• Status block
– Used for numeric values
– Status block data grouped together in 16 bit words.
NOTICE
Acyclic data is also referred to as asynchronous data or explicit messaging.
Page 43

30303895 | 001 | 09/2018 METTLER TOLEDO ACT350 Transmitter User's Guide 39
Fieldbus Communication
4.1.2. Acyclic data
With acyclic messages, the variable can be accessed directly through
a unique name or number defined by the control system's acyclic
message block.
Refer to the applicable SAI Reference Manual available at
www.mt.com/ind-act350-downloads for detailed information
NOTICE
Acyclic data is also referred to as asynchronous data or explicit messaging.
Page 44

Page 45

30303895 | 001 | 09/2018 METTLER TOLEDO ACT350 Transmitter User's Guide 41
Troubleshooting
5 Troubleshooting PLC
Connectivity
If the ACT350 does not communicate with PLC, do the following:
Power cycle the ACT350 to reestablish communications.
A solid green NW LED on the front panel implies that the ACT350 is on
the network. A flashing NW LED indicates that the ACT350 is not on
the fieldbus network.
Check LED status of the connection socket. The top LED should be
solid green. If the top LED is not solid green, this implies that no
hardware connection is seen by the device -check cabling and
connector insertions. The bottom LED will blink amber if data is being
transferred. If the top LED is solid green, but the bottom LED is not
blinking, this implies a configuration issue - either in the ACT350 or
the PLC.
Confirm that the ACT350 can respond to a ping on the network. If it
doesn’t, check the wiring and network connections.
Diagnose and correct specific network error conditions such as IP
Address conflicts.
Confirm that the ACT350 settings for address, format and byte order
match those in the PLC and that each ACT350 has a unique address.
Check the Electronic Keying from in the PLC program. Confirm that the
firmware revision of the Ethernet/IP module in the ACT350 is greater
than or equal to the firmware revision specified in the ACT350’s
communication module in the PLC. Change the firmware revision
being looked for in the PLC’s communication module if necessary.
Contact METTLER TOLEDO for replacement of the ACT350 transmitter.
Visit the METTLER TOLEDO web page at www.mt.com/ind-act350-
downloads to check actual Troubleshooting information.
Page 46

30303895 | 001 | 09/2018 METTLER TOLEDO ACT350 Transmitter User's Guide 42
Setup+ Configuration
Setup+ Configuration
6 Setup+/ Webserver
Configuration and
Maintenance Tool
6.1. General Overview
Figure 6-1: Setup+ Splash Screen
Setup+ is a PC tool available online to support the following functions:
Configuring of the ACT350 Transmitter using local PC
Saving transmitter configuration to a local PC
Loading a saved configuration to other transmitters performing
similar applications
Restoring to a ‘last known good state’ for service purposes
ACT350 Transmitter software upgrade and maintenance
6.2. PC Installation
Please follow the Setup+ installation guide on your PC after
downloading the Setup+ software from www.mt.com/ind-act350-
downloads.
6.3. Setup+ User Guide
Open Setup+ on your PC and click on the Help icon in the toolbar to
download the Setup+ User Guide.
Figure 6-2: Setup+ Home Screen
Page 47

30303895 | 001 | 09/2018 METTLER TOLEDO ACT350 Transmitter User's Guide 43
Geo Codes
6.4. Webserver
Webserver supports the following functions:
Configuring of the ACT350 Transmitter via web browser, such as IE,
Chrome and Safari;
Accessing diagnostic and maintenance information for service
purposes;
Figure 6-3 Webserver Splash Screen
By inputting the IP address of ACT350 Transmitter in the web browser,
the startup screen of webserver will be displayed.
6.4.1. Webserver Setup
6.4.1.1. PC setup
The typical PC's configuration:
IP address: 192.168.0.X (X = 0 ~ 255, exclude 2), Subnet Mask:
255.255.255.0, (Gateway statement needed )
NOTICE
The webserver is available for units with Serial Number starting from B750152347
NOTICE
Make sure the PC and ACT350 Transmitter are in the same local network.
Page 48

30303895 | 001 | 09/2018 METTLER TOLEDO ACT350 Transmitter User's Guide 44
Setup+ Configuration
Setup+ Configuration
Figure 6-4 Local Area Connection Setting
6.4.1.2. IE setup
Internet Option -> LAN setting -> Automatically detect settings should
be unchecked.
Figure 6-5 IE setting
NOTICE
The default setting of ACT350 Transmitter is as follower:
IP address: 192.168.0.2, Subnet Mask: 255.255.255.0, Gateway: 192.168.0..
Page 49

30303895 | 001 | 09/2018 METTLER TOLEDO ACT350 Transmitter User's Guide 45
GEO CODES
7 GEO Codes
The GEO code feature provided in the ACT350 transmitter permits calibration
readjustment due to changes in elevation or latitude without reapplying test
weights. This adjustment assumes a previously accurate calibration was
completed with the GEO code set properly for that original location, and that the
GEO code for the new location can be accurately determined. The procedure for
using this feature is as follows.
7.1. Original Site Calibration
1. Use the GEO code chart (Table 7-1) on the following pages to determine
the GEO code for the current altitude and location at which the scale will be
calibrated.
2. Enter that GEO value into the GEO code parameter in setup at Scale >
Calibration.
3. Immediately after entering the GEO code, perform a zero and span
adjustment using accurate test weights.
4. Exit the setup menu tree.
5. The scale can now be used in its new location.
7.2. New Site GEO Code Adjustment
When a terminal is to be reinstalled at a different geographic location,
gravitational and altitude changes can be accounted for by following these
steps. Note that this procedure is not necessary if an on-site recalibration is
performed.
1. Use the GEO code chart (Table 7-1) on the following pages to determine the
GEO code for the new altitude and location at which the scale will be used.
2. Enter that GEO value into the GEO code parameter in Setup at Scale >
Calibration.
3. Immediately after entering the GEO code, exit the setup menu tree. DO NOT
perform a normal calibration.
The calibration has now been adjusted for the differences in gravity from the
original site of calibration to the new site of use.
Using the GEO code value for calibration adjustment is not as accurate as
re-applying certified test weights and re-calibrating the scale in a new location.
Page 50

30303895 | 001 | 09/2018 METTLER TOLEDO ACT350 Transmitter User's Guide 46
Setup+ Configuration
GEO CODES
Latitude North
or South,
in Degrees and
Minutes
Height Above Sea Level, in Meters
0
325
650
975
1300
1625
1950
2275
2600
2925
3250
325
650
975
1300
1625
1950
2275
2600
2925
3250
3575
Height Above Sea Level, in Feet
0
1060
2130
3200
4260
5330
6400
7460
8530
9600
10660
1060
2130
3200
4260
5330
6400
7460
8530
9600
10660
11730
0° 0'–5° 46'
5 4 4 3 3 2 2 1 1 0 0
5° 46'–9° 52'
5 5 4 4 3 3 2 2 1 1 0
9° 52'–12° 44'
6 5 5 4 4 3 3 2 2 1 1
12° 44'–15° 6'
6 6 5 5 4 4 3 3 2 2 1
15° 6'–17° 0'
7 6 6 5 5 4 4 3 3 2 2
17° 10'–19° 2'
7 7 6 6 5 5 4 4 3 3 2
19° 2'–20° 45'
8 7 7 6 6 5 5 4 4 3 3
20° 45'–22° 22'
8 8 7 7 6 6 5 5 4 4 3
22° 22'–23° 54'
9 8 8 7 7 6 6 5 5 4 4
23° 54'–25° 21'
9 9 8 8 7 7 6 6 5 5 4
25° 21'–26° 45'
10 9 9 8 8 7 7 6 6 5 5
26° 45'–28° 6'
10
10 9 9 8 8 7 7 6 6 5 28° 6'–29° 25'
11
10
10 9 9 8 8 7 7 6 6
29° 25'–30° 41'
11
11
10
10 9 9 8 8 7 7
6
30° 41'–31° 56'
12
11
11
10
10 9 9 8 8 7 7
31° 56'–33° 9'
12
12
11
11
10
10 9 9 8 8 7 33° 9'–34° 21'
13
12
12
11
11
10
10 9 9 8 8
34° 21'–35° 31'
13
13
12
12
11
11
10
10 9 9
8
35° 31'–36° 41'
14
13
13
12
12
11
11
10
10 9 9
36° 41’–37° 50’
14
14
13
13
12
12
11
11
10
10
9
37° 50’–38° 58’
15
14
14
13
13
12
12
11
11
10
10
38° 58’–40° 5’
15
15
14
14
13
13
12
12
11
11
10
40° 5’–41° 12’
16
15
15
14
14
13
13
12
12
11
11
41° 12’–42° 19’
16
16
15
15
14
14
13
13
12
12
11
42° 19’–43° 26’
17
16
16
15
15
14
14
13
13
12
12
43° 26’–44° 32’
17
17
16
16
15
15
14
14
13
13
12
44° 32’–45° 38’
18
17
17
16
16
15
15
14
14
13
13
45° 38’–46° 45’
18
18
17
17
16
16
15
15
14
14
13
46° 45’–47° 51’
19
18
18
17
17
16
16
15
15
14
14
47° 51’–48° 58’
19
19
18
18
17
17
16
16
15
15
14
48° 58’–50° 6’
20
19
19
18
18
17
17
16
16
15
15
Page 51

30303895 | 001 | 09/2018 METTLER TOLEDO ACT350 Transmitter User's Guide 47
GEO CODES
Latitude North
or South,
in Degrees and
Minutes
Height Above Sea Level, in Meters
0
325
650
975
1300
1625
1950
2275
2600
2925
3250
325
650
975
1300
1625
1950
2275
2600
2925
3250
3575
Height Above Sea Level, in Feet
0
1060
2130
3200
4260
5330
6400
7460
8530
9600
10660
1060
2130
3200
4260
5330
6400
7460
8530
9600
10660
11730
50° 6’–51° 13’
20
20
19
19
18
18
17
17
16
16
15
51° 13’–52° 22’
21
20
20
19
19
18
18
17
17
16
16
52° 22’–53° 31’
21
21
20
20
19
19
18
18
17
17
16
53° 31’–54° 41’
22
21
21
20
20
19
19
18
18
17
17
54° 41’–55° 52’
22
22
21
21
20
20
19
19
18
18
17
55° 52’–57° 4’
23
22
22
21
21
20
20
19
19
18
18
57° 4’–58° 17’
23
23
22
22
21
21
20
20
19
l9
18
58° 17'–59° 32'
24
23
23
22
2\2
21
21
20
20
19
19
59° 32'–60° 49'
24
24
23
23
22
22
21
21
20
20
19
60° 49'–62° 9'
25
24
24
23
23
22
22
21
21
20
20
62° 9'–63° 30'
25
25
24
24
23
23
22
22
21
21
20
63° 30'–64° 55'
26
25
25
24
24
23
23
22
22
21
21
64° 55'–66° 24'
26
26
25
25
24
24
23
23
22
22
21
66° 24'–67° 57'
27
26
26
25
25
24
24
23
23
22
22
67° 57'–69° 35'
27
27
26
26
25
25
24
24
23
23
22
69° 5'–71° 21'
28
27
27
26
26
25
25
24
24
23
23
71° 21'–73° 16'
28
28
27
27
26
26
25
25
24
24
23
73° 16'–75° 24'
29
28
28
27
27
26
26
25
25
24
24
75° 24'–77° 52'
29
29
28
28
27
27
26
26
25
25
24
77° 52'–80° 56'
30
29
29
28
28
27
27
26
26
25
25
80° 56'–85° 45'
30
30
29
29
28
28
27
27
26
26
25
85° 45'–90° 00'
31
30
30
29
29
28
28
27
27
26
26
Table 7-1: GEO Adjustment Values
Page 52

30303895 | 001 | 09/2018 METTLER TOLEDO ACT350 Transmitter User's Guide 48
Setup+ Configuration
8 Appendix A -Trigger Weight
Triggered weight application is to determine the weight value during the dynamic
weighing process of the weighing object, and the key technical indexes are the
weighing accuracy and throughput rate.
This appendix describes:
how to use the triggered weight application on ACT350DIO,
how to install,
how to calibrate,
how to configure the parameters of application
how to get the weight value by PLC.
8.1. Electrical Installation
Regarding the installation, please make sure the following physical connections:
1) Power Supply: connect to the DC power, and the range is from 10V DC – 30V
DC. Typically 24V DC.
2) Load cell interface: connect to the analog load cell with 4 or 6 wires, and pay
more attention about the ESD protection (Ferrite and silicone sleeve), and the
sensitivity of the load cell should be 1mv/v or 2mv/v.
3) Digital input and output: please connect signal from light barrier to the digital
input of the ACT350, and this is required by triggered weight application.
4) PLC interface: use the shield cable to keep the communication quality.
NOTICE
The Trigger Weight Mode is available only on ACT350DIO version, as a specific weighing
function.
There are no dedicated special approvals and certificates available for ACT350DIO and related
with this mode. Only static weighing approvals are available.
Page 53

30303895 | 001 | 09/2018 METTLER TOLEDO ACT350 Transmitter User's Guide 49
8.2. Trigger Weight Typical example.
Trigger weight application is to determine the weight value during the dynamic
weighing process of weighing object, and the key technical indexes are the
weighing accuracy and throughput rate.
Figure 8-1: Trigger Weight Mode example
Please see the Figure 8-1 as the typical triggered weight system:
Infeed conveyor: moving the weighing object into the weighing conveyor;
Weighing conveyor: detecting the weighing object coming by the light barrier
(①), and start the weighing process when the whole weighing object is on
the scale, and determine the weight of the weighing object when it is leaving
(②);
Outfeed conveyor: moving the weighing object into the manufacture.
In order to get the better weighing accuracy, the time of whole weighing object
should be as longer as possible, and also the system disturbance should be as
smaller as possible, but should also consider the system throughput rate.
The main parameters of the system are:
Scale belt speed (m/s):
Scale platform length (m)
Object distance (m): to keep only one weighing object on the weighing conveyor,
otherwise the weighing accuracy will be very poor; Object length (m):
8.3. Calibration
The calibration can be performed using a device main menu or Setup+. Before
calibration, please configure the scale capacity, scale incremented size.
NOTICE
Sensor signal and light barrier signal must be connected to ACT350 correctly; otherwise it is
impossible to run the triggered weight mode.
Light Barrier
SL : Scale platform length
( m )
V : Scale belt speed
( m / s )
Object 2 Object 1 1
2
OL : Object length
( m )
OD : Object Distance
( m )
Page 54

30303895 | 001 | 09/2018 METTLER TOLEDO ACT350 Transmitter User's Guide 50
Setup+ Configuration
8.4. Configuration on triggered weight
application
During this configuration process, PC must connect to the ACT350 via RS232
interface, and need the serial communication tool, such as HyperTerminal.
Because all configuration should be done by VA commands, and see the VA
command list in the Table 8-1.
Change the weighing mode
Before using the triggered weight application, must configure the weighing
mode to “Trigger weight”.
No
Send VA Cmd
Receive
Notes
1
LOGON
-
Start VA communication
2
R118
R118 0
Get current weighing mode
3
W118
W118 2
Set the trigger weight mode
4
LOGOF
-
Stop VA communication
Configure the digital input port function
Before using the triggered weight application, must configure the one digital input
as the start signal for triggered weight application.
No
Send VA Cmd
Receive
Notes
1
LOGON
-
Start VA communication
2
R208
R210
R212
R208 0
R210 0
R212 0
Input 1 assignment is: None
Input 2 assignment is: None
Input 3 assignment is: None
3
W208 4
-
Set the input 1 assignment to:
TriggerWeightFront
4
R011
R011 00
Read the status of all input ports
5
LOGOF
-
Stop VA communication
Configure the parameters of triggered weight application
Before using the triggered weight application, must set the following
parameters, such as scale belt speed, scale platform length, object distance,
object length, time for light barrier occlusion and transparent property.
No
Send VA Cmd
Receive
Notes
1
LOGON
-
Start VA communication
2
R811
R812
R813
R814
R816
R811 0.000000
R812 0.000000
R813 0.000000
R814 0.000000
R816 0.000000
Scale belt speed
Scale platform length
Object distance
Object length
Time for light barrier occlusion
Page 55

30303895 | 001 | 09/2018 METTLER TOLEDO ACT350 Transmitter User's Guide 51
R817
R817 0
Is transparent object
3
W811 0.5
W812 1.0
W813 1.0
W814 0.1
W816 4.0
W817 0
-
-
-
-
-
-
Scale belt speed: 0.5 m/s
Scale platform length: 1 m
Object distance: 1 m
Object length: 0.1 m
Time for light barrier occlusion: 4 s
Is transparent object: no
4
LOGOF
-
Stop VA communication
Read the information of triggered weight application
1) By VA commands
It is possible to read out the information, including status of triggered weight
application, triggered weight value and other information by VA commands,
please see the below table:
No
Send VA Cmd
Receive
Notes
1
LOGON
-
Start VA communication
2
R036
R036 0
The flag of new data available
3
R037
R037 0
Object status on weighing scale
4
R038
R038 0
Error message on triggered weight mode
5
R039
R039 0.000000
Latest triggered weight
6
R041
R041 0
Number of triggered weight counts
7
R042
R042 0.000000
Max triggered weight
8
R043
R043 0.000000
Min triggered weight
9
R044
R044 0.000000
Average triggered weight
10
R045
R045 0.000000
Standard deviation of last 20 trigger weights
11
R046
R046 2114
Application status
12
R047
R047 1
Flag of update zero
13
LOGOF
-
Stop VA communication
2) By SAI commands
It is also possible to read out the status of triggered weight application,
triggered weight value and other information by SAI commands, please see
below table:
Status of the triggered weight application
Read out the status information via the following status block cyclic
commands:
Page 56

30303895 | 001 | 09/2018 METTLER TOLEDO ACT350 Transmitter User's Guide 52
Setup+ Configuration
Value
Description
23
Alarm, I/O group 1, Customer application group 1
Please see below table in more
detail: Alarm Group
Bit #
Soft Alarm
Description
0
Rate of change
error
Product, application or customer defines a weight / time
scenario as a
method of assurance that the scale is detecting weight. A
typical application would be a filling
system where either the material is not available for filling
or a feeding system is not
transporting material to the scale (slow fill timeout)
1
Communication
error
relates to a device that is connected to a sensor or
terminal and the
necessary communication is not functioning according to
specification
2
Over / under
voltage(s)
relates to a device that is supports dynamic measurement
of system power for example POWERCELL CAN network
voltages
3
Weight drift
relates typically to a strain gage sensor that either has
a broken bridge or is damaged by water or lightning.
The drift weigh vs. time is outside of acceptable
tolerances.
4
Breach
the sensors enclosure has been compromised and
therefore vulnerable to outside
influences such as moisture / water – in most cases a
failure will occur if the breach is not corrected or the
sensor replaced
5
Calibration expired
Customer / technician determines the maximum number
of
transactions,
or a time limit to occur before a preventative service or
recalibration – the alarm will toggle on
N+1 weighing transactions
6
- 7
-
8
- 9
-
10
-
11
- 12
- 13
- 14
- 15
-
Page 57

30303895 | 001 | 09/2018 METTLER TOLEDO ACT350 Transmitter User's Guide 53
I/O Group 1
Bit #
Data
Description
0
In 1
Status of the input 1
1
In 2
Status of the input 2
2
In 3
Status of the input 3
3
-
4
-
5
-
6
-
7
- 8
Out 1
Status of the output 1
9
Out 2
Status of the output 2
10
Out 3
Status of the output 3
11
Out 4
Status of the output 4
12
Out 5
Status of the output 5
13
-
14
- 15
-
Customer application group 1
Bit #
Soft Alarm
Description
0
NewDataAvaiable
If this bit is 1, that means the triggered weight is available,
otherwise it is not available.
1
Ok(Ready for next
object)
Finished the last weighing process and can start the next
weighing process
2
UpScale
Weighing object is coming on the scale
3
OnScale
Weighing object is on the scale
4
WeighingStart
Start the weighing or calibration process
5
WeighingOver
End the weighing or calibration process
6
Ok(No error)
There is no error in the weighing process
7
LongObject
Object is too longer, and can’t be weighted
8
ShortDistance
Distance between two objects is short, and can’t be
weighted
9
PhotoOcclusionFront
The light barrier (front) is occlusion, and should be
stopped and clear the light barrier
Page 58

30303895 | 001 | 09/2018 METTLER TOLEDO ACT350 Transmitter User's Guide 54
Setup+ Configuration
10
PhotoOcclusionRear
The light barrier (Rear) is occlusion, and should be
stopped and clear the light barrier
11
FlagOfUpdateZero
If this bit is 1, that means PLC can send the zero
command to clear the zero, otherwise it not possilbe
12
-
13
-
14
-
15
-
Read out the weighing result of the triggered weight application by acyclic
SAI commands, please see below table:
PROFINET
Slot, sub-slot
Index
Description
0, 1
0x4501
Last process weight
0, 1
0x4503
Number of dynamic weighments
0, 1
0x4504
Max dynamic weight
0, 1
0x4505
Min dynamic weight
0, 1
0x4506
Average dynamic weight
0, 1
0x4507
Standard deviation of last 20 dynamic wghmnts
PROFIBUS
Slot
Index
Description
2
0x90
Last process weight
2
0x92
Number of dynamic weighments
2
0x93
Max dynamic weight
2
0x94
Min dynamic weight
2
0x95
Average dynamic weight
2
0x96
Standard deviation of last 20 dynamic wghmnts
ETHERNET/IP
Class, instance
Attribute
Description
0x41A, 01
0x01
Last process weight
0x41A, 01
0x03
Number of dynamic weighments
0x41A, 01
0x04
Max dynamic weight
0x41A, 01
0x05
Min dynamic weight
0x41A, 01
0x06
Average dynamic weight
0x41A, 01
0x07
Standard deviation of last 20 dynamic wghmnts
Page 59

30303895 | 001 | 09/2018 METTLER TOLEDO ACT350 Transmitter User's Guide 55
8.6. VA commands
The InSite PC tool (or other PC program) can connect with ACT350 to read
and write variables per the following examples:
Read request: R(index#)<CR><LF>
Read AD Board Type: R021<CR><LF>
Response 1 (valid): R021<SP>1<CR><LF>
Read AD Board Type: R021<CR><LF>
Response 2 (error): R021<SP>Error: Invalid
Request<CR><LF>
Write request: W(index#)<SP>xxxxx<CR><LF>
Write target value : W603<SP>42.75<CR><LF>
Response 1: <ACK><CR><LF> (if data is accepted)
Response 2: <NAK><CR><LF> (if data or variable is
invalid)
Table 8-1: Trigger Weight VA commands
Index
Name
Description
Default
R/W
208
Input 1 Assignment
0 – None
1 – ClearTare
2 – Tare
3 – Zero
4 – Triggered weight_Front
5 – Triggered weight_Rear
0
R/W
210
Input 2 Assignment
Same as Input 1 Assignment
0
R/W
212
Input 3 Assignment
Same as Input 1 Assignment
0
R/W
118
Weighing Mode
0 – Normal
1 – Dynamic
2 – Triggered weight
0
R/W
811
Scale belt speed
Manual Entry – float type, and range is 0 ~ 5,
unit: m/s
0
R/W
812
Scale platform length
Manual Entry – float type, and range is 0 ~ 5,
unit: m
0
R/W
813
Object distance
Manual Entry – float type, and range is 0 ~ 5,
unit: m
0
R/W
814
Object length
Manual Entry – float type, and range is 0 ~ 5,
unit: m
0
R/W
816
TimePhotoblock
Manual Entry – float type, and range is 0 ~
5, unit: s If no configuration, the default value
is:
2 * Scale platform length / Scale belt speed
default
R/W
817
IsTansparent
0 – Non transparent object
1 – Transparent object
0
R/W
036
NewDataAvailable
0 – Not available
1 – Available
0
R
Page 60

30303895 | 001 | 09/2018 METTLER TOLEDO ACT350 Transmitter User's Guide 56
Setup+ Configuration
037
Object status on
weighing scale
0 – ok
1 – UpScale
2 – OnScale
3 – WeighingStart
4 – WeighingOver
0
R
038
Error message on
triggered weight
mode
0 – ok
1 – LongObject
2 – ShotDistance
3 – PhotoOcclusion
0
R
039
Latest triggered
weight
Latest triggered weight value, float type
0
R
040
Object length
By internal calculated object length, float type
0
R
041
Number of triggered
weight counts
By internal calculated number of triggered weight
counts, integer type
0
R
042
Max triggered weight
Maximum triggered weight value, float type
0
R
043
Min triggered weight
Maximum triggered weight value, float type
0
R
044
Average triggered
weight
Mean triggered weight value, float type
0
R
045
Standard deviation of
last 20 trigger
weights
Standard deviation of last 20 triggered weight,
float type
0
R
046
Application status
The same value as Custom Application Status
Bits,Group1 of SAI
0
R
047
Flag of update zero
Be ready to do the update zero work
0
R
Page 61

30303895 | 001 | 09/2018 METTLER TOLEDO ACT350 Transmitter User's Guide 57
A
Analog Load Cell Connection · 33
C
Cable Lengths · 33
CalFree · 20
CalFree calibration · 14
Calibration · 14
Comparators · 13
conversion rate · 5
D
Device Description Files · 6
Digital Inputs · 30
Digital Outputs · 30
DIP switches · 22
DIP Switches · 36
DLR (Device Level Ring) · 36
E
Electrical Installatio · 28
Error Message · 25
EtherNet/IP · 6
F
Front Panel · 8
G
geo code · 14
I
Information Recall · 12
Installation · 27
L
Legal for Trade · 36
Load Cell Capacity · 20
M
Master Reset · 22, 23
Mechanical Installation · 27
Model Identification · 6
MRP (Media Redundancy Protocol) · 36
O
Operation Functions · 23
P
Password Security · 22
PLC Connection · 34
PLC Interfaces · 6
Power Supply · 37
Power Up · 24
PROFIBUB · 6
PROFINET · 6
R
Redundant topology · 36
Reset Configuration · 22
Resolution · 13
Ring Topology · 36
RS-232 · 29
S
Safety warnings · 5
Sample Code · 6
Setting Calibration · 15
Setting Comparators · 13
Setting Geo Code · 15
Setting Linearity · 16
Setup Access · 22
Span Calibration · 18
Step Adjust · 18
T
Tare · 24
Z
Zero · 23
Zero Calibration · 16
Page 62

30303895 | 001 | 09/2018 METTLER TOLEDO ACT350 Transmitter User's Guide 58
Setup+ Configuration
Figure Table:
Figure 1-1: ACT350 Model Identification Numbers .................................................. 6
Figure 1-2: ACT350 Panel Mount Enclosure Dimensions – relevant to all models ....... 7
Figure 2-1: ACT350 Front Panel Layout ................................................................ 8
Figure 2-2 Display in Weighing Mode ................................................................... 9
Figure 2-3: Numerical Data Entry Example .......................................................... 11
Figure 2-4: Information Recall Menu ................................................................... 12
Figure 2-5: x10 Indication ................................................................................ 13
Figure 2-6: Calibration Menu – Overview ............................................................. 15
Figure 2-7: Zero Calibration ............................................................................... 16
Figure 2-8: Zero Calibration with Motion .............................................................. 17
Figure 2-9: Span Calibration.............................................................................. 18
Figure 2-10: Step Adjustment ............................................................................ 19
Figure 2-11: CalFree ........................................................................................ 21
Figure 2-12: Password Entry Screen ................................................................... 22
Figure 2-13: DIP Switches ................................................................................ 22
Figure 2-14: Master Reset Confirmation .............................................................. 23
Figure 2-15: ENTER button Zero Failure Message ................................................. 23
Figure 3-1: DIN-Mount Latch ............................................................................. 27
Figure 3-2: Latch Closure .................................................................................. 27
Figure 3-3: ACT350 – PROFIBUS (left) and PROFINET or EtherNet/IP (right) ............. 28
Figure 3-4: ACT350, Top View (DIO model shown) .............................................. 29
Figure 3-5: RS-232 Wiring Connection ............................................................... 29
Figure 3-6: A Rising-edge Trigger Signal on Input ................................................. 30
Figure 3-7: A Falling-edge Trigger Signal on Input ................................................ 31
Figure 3-8: Sinking Input, Sourcing Output .......................................................... 31
Figure 3-9: Sinking Input, Sinking Output ............................................................ 32
Figure 3-10: Sourcing Input, Sourcing Output ...................................................... 32
Figure 3-11: Sourcing Input, Sinking Output ........................................................ 33
Figure 3-12: Ferrite Installed on Analog Load Cell Cable ........................................ 33
Figure 3-13: ACT350 and PLC connection single port version. ............................... 34
Figure 3-14: ACT350DIO and PLC connection dual port version. ............................ 35
Figure 3-15 ACT350 Sealing Diagram ................................................................ 37
Figure 6-1: Setup+ Splash Screen ...................................................................... 42
Figure 6-2: Setup+ Home Screen ....................................................................... 42
Figure 6-3 Webserver Splash Screen .................................................................. 43
Figure 6-4 Local Area Connection Setting ............................................................ 44
Figure 6-5 IE setting ......................................................................................... 44
Figure 8-1: Trigger Weight Mode example ........................................................... 49
Page 63

To protect your METTLER TOLEDO product’s future:
Congratulations on choosing the quality and
precision of METTLER TOLEDO. Proper use
according to these instructions and regular
calibration and maintenance by our factorytrained service team ensure dependable and
accurate operation, protecting your
investment. Contact us about a METTLER
TOLEDO service agreement tailored to your
needs and budget.
We invite you to register your product at
www.mt.com/productregistration so we can
contact you about enhancements, updates
and important notifications concerning your
product.
www.mt.com
For more information
Mettler-Toledo, LLC
1900 Polaris Parkway
Columbus, OH 43240
Phone 800 438 4511
Fax 614 438 4900
© 2018 Mettler-Toledo, LLC
30303895 Rev. 1, 09/2018
 Loading...