

Page 1
Instruction Manual
Made in Israel
Distributed by:
1333 South Claudina Street • Anaheim, CA 92805, U. S. A.
Toll Free: (800) 854–9305 • Telephone: (714) 533–2221 • FAX: (714) 635–7539
Web Site: http://www.mettlerelectronics.com • Email: [email protected]
IR9–77 Rev.C_11/19/13
Copyright © 2013 by Mettler Electronics Corp.—Anaheim, CA
Page 2

APT – User’s Manual Rev.C_11/19/13 2
Page 3

Table of contents:
1. Introduction 5
2. System components 6
3. Preparing the APT Hi-Lo 10
4. Installation for use – Arms exercise 11
5. Installation for use - Legs exercise 13
6. Operation instructions 15
7. General Maintenance & Storage 19
8. Trouble shooting 20
9. Accessories 21
10. Disposal and Recycling 22
11. Technical Data 23
12. Appendix – Exercise Parameter Values 24
NOTE: Design details may change without notice
Page
APT – User’s Manual Rev.C_11/19/13 3
Page 4

APT – User’s Manual Rev.C_11/19/13 4
Page 5

1. INTRODUCTION
The APT is an electric exercise machine used for the improvement of physical abilities. The APT provides the user
with a variety of exercise options and modes of operation that meet a broad range of physical needs.
A wide range of accessories are available that offer many exercise options and make the APT suitable for the
maintenance of fitness and physical well being.
The APT can be operated in either the ACTIVE mode at varying degrees of resistance or in the PASSIVE mode at
adjustable speed and torque levels. In the PASSIVE mode it is also possible to combine PASSIVE with ACTIVE train-
ing by using physical effort in conjunction with the electrical operation of the motor. The APT functions forwards or
backwards and is suitable for arm or leg exercises (upper or lower limbs).
The APT’s light weight makes it portable, easy to store and convenient to use in the comfort of one’s home. The unit
is also suitable for use in health care institutions.
Use of the APT is recommended for the maintenance of muscle strength, flexibility, muscle tone, endurance and gen-
eral fitness for users of all ages.
APT – User’s Manual Rev.C_11/19/13 5
Page 6
2. SYSTEM COMPONENTS AND DETAILS
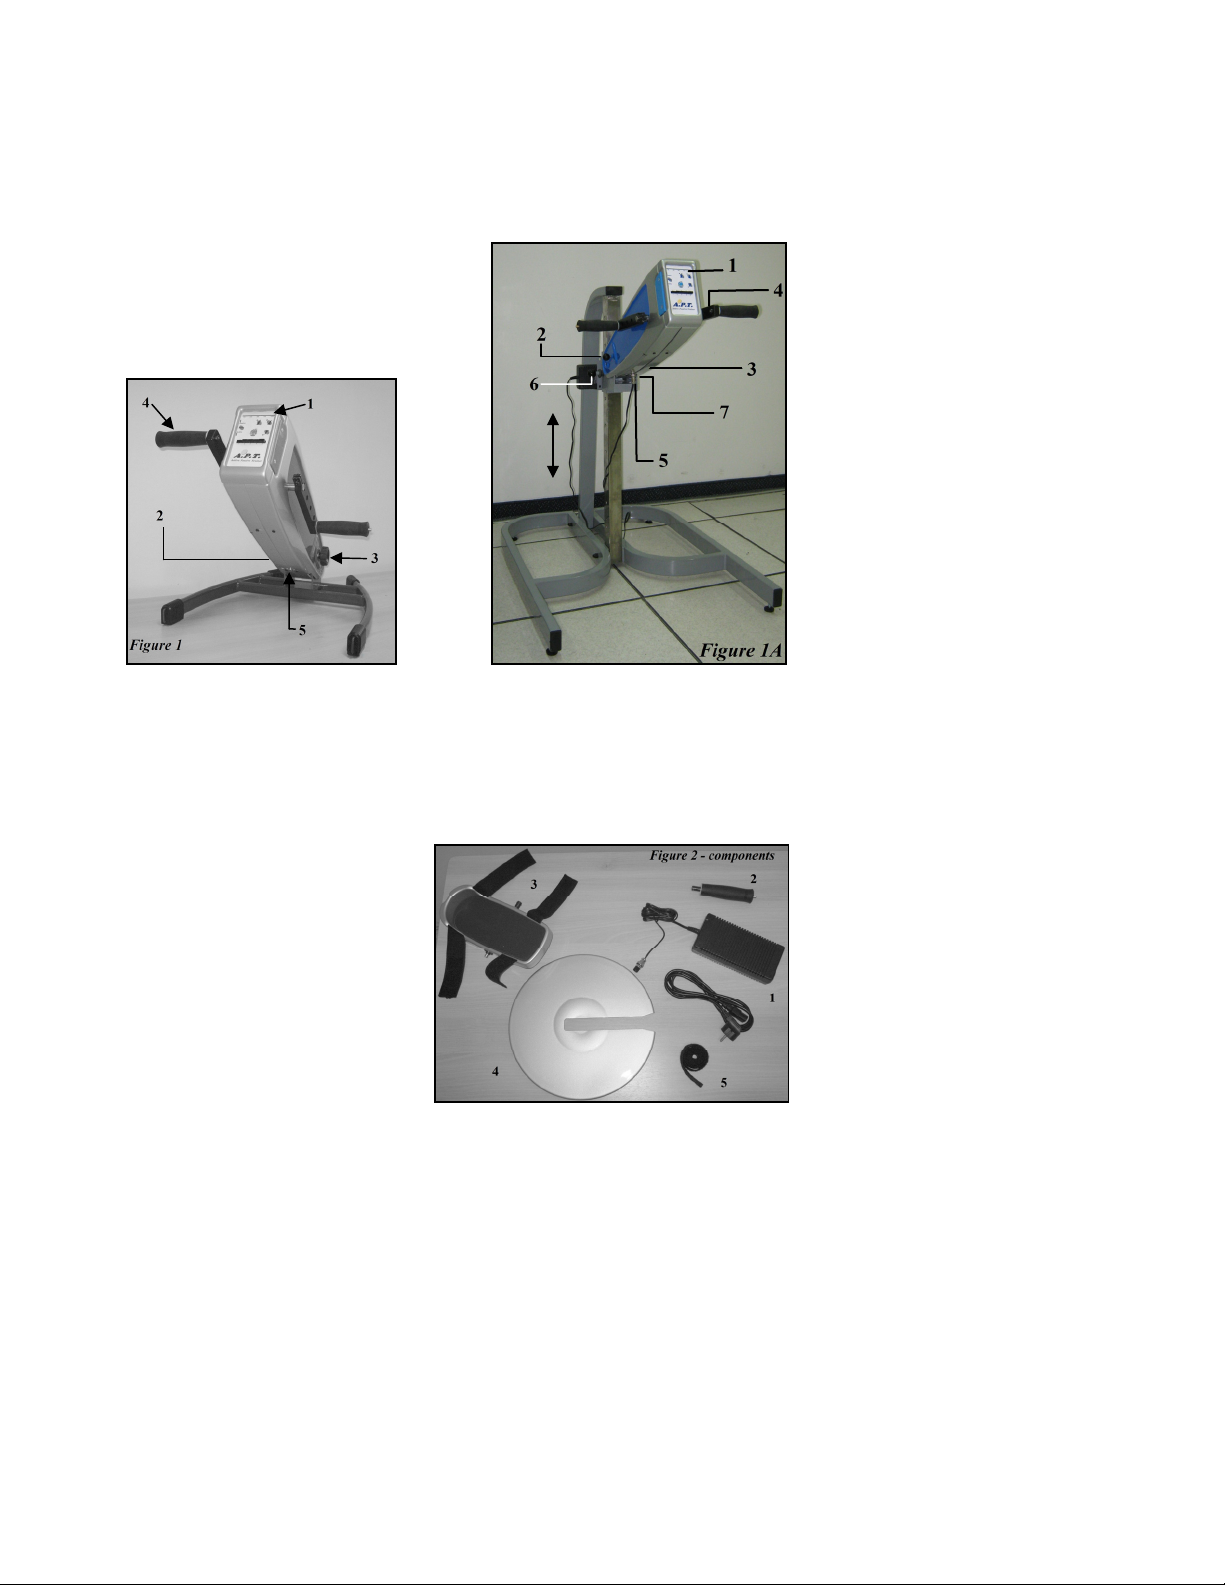
2.1. APT unit (Figure 1)
APT Hi-Lo (Figure 1A)
1. Operator panel
2. Angle release knob
3. Angle securing knob
4. Crank-arm
5. Power input socket
6. Height release knob (Hi-Lo only)
7. Height securing knob (Hi-Lo only)
2.2. Primary components (Figure 2):
1. Power supply unit
2. Straight hand-grips (Optional)
3. Footrests (Optional)
4. Finger protection disks
5. Securing straps (Optional)
APT – User’s Manual Rev.C_11/19/13 6
Page 7

2.3. The Type Plate
When this equipment is no longer operational it must
be sent to a separate collection facility for recovery
and recycling.
CE approved Notified Body No. 0123.
Type B equipment.
Read this user manual and all labels before operating.
APT – User’s Manual Rev.C_11/19/13 7
Page 8
2.4.
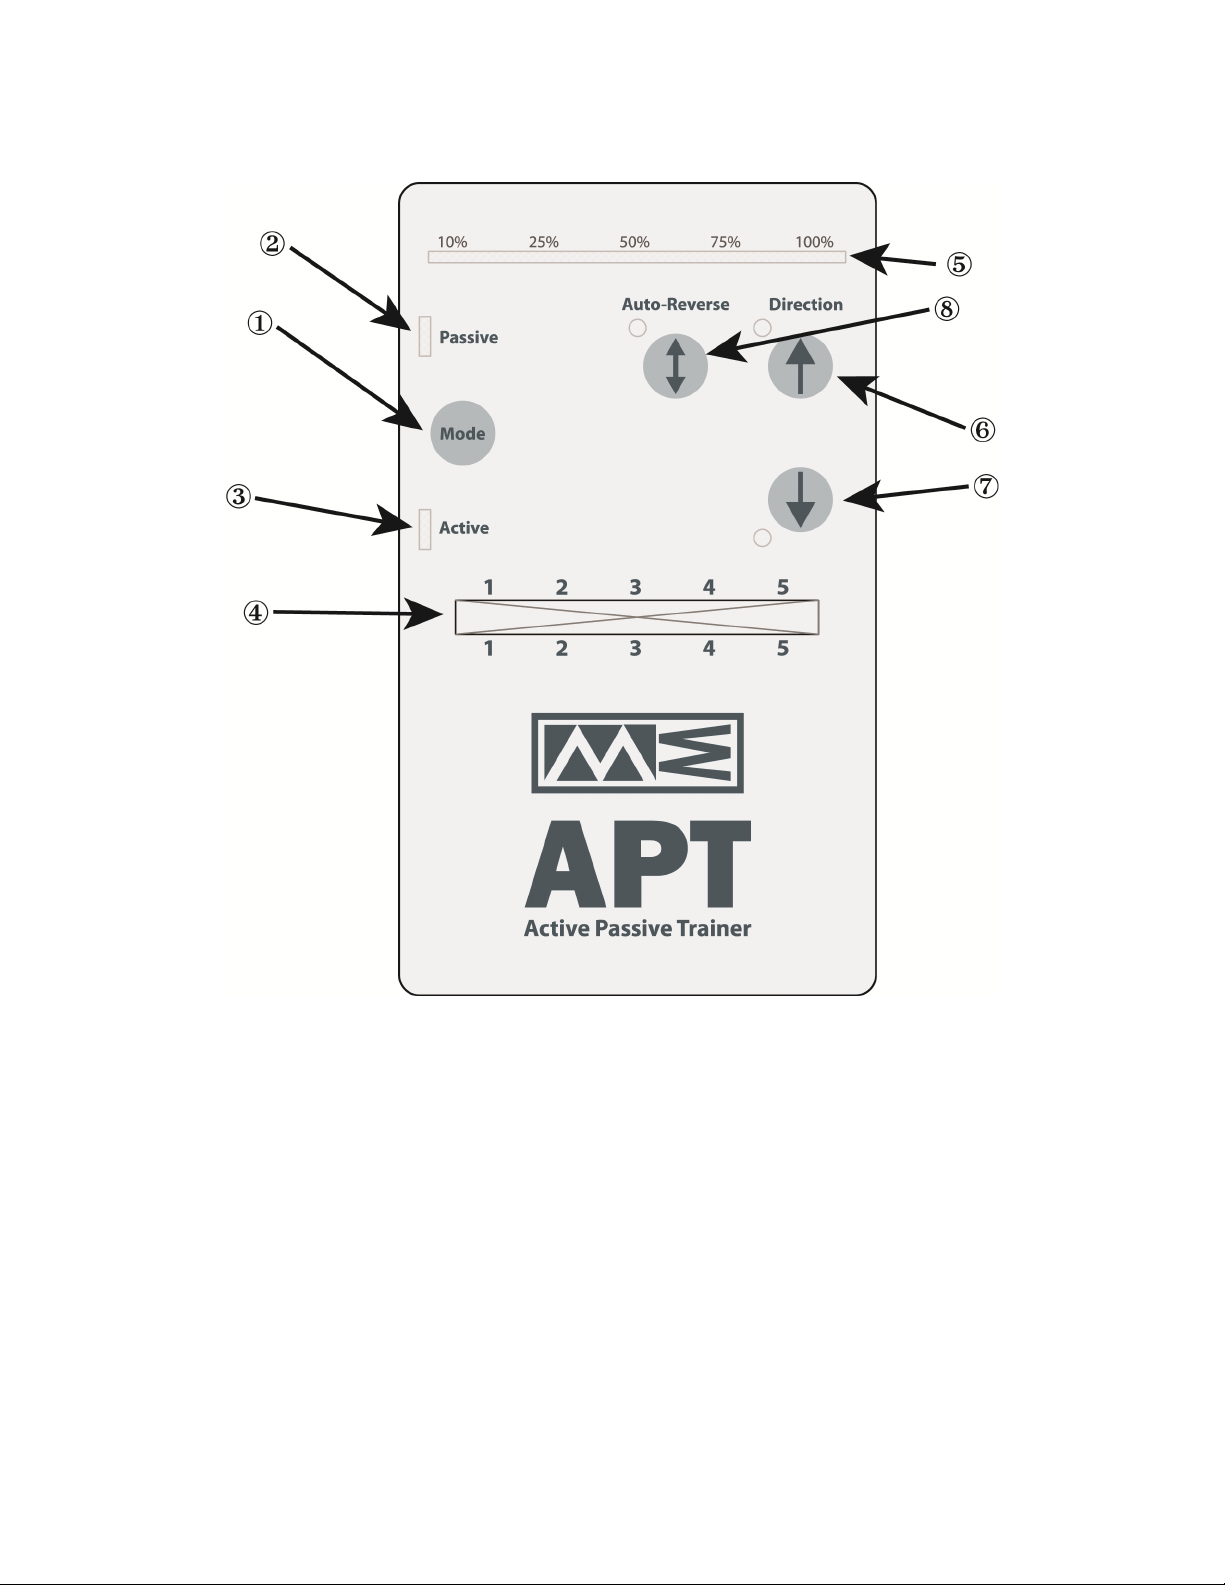
The APT - Operator Panel
Figure 3
APT – User’s Manual Rev.C_11/19/13 8
Page 9
1
2
3
4
5
6
7
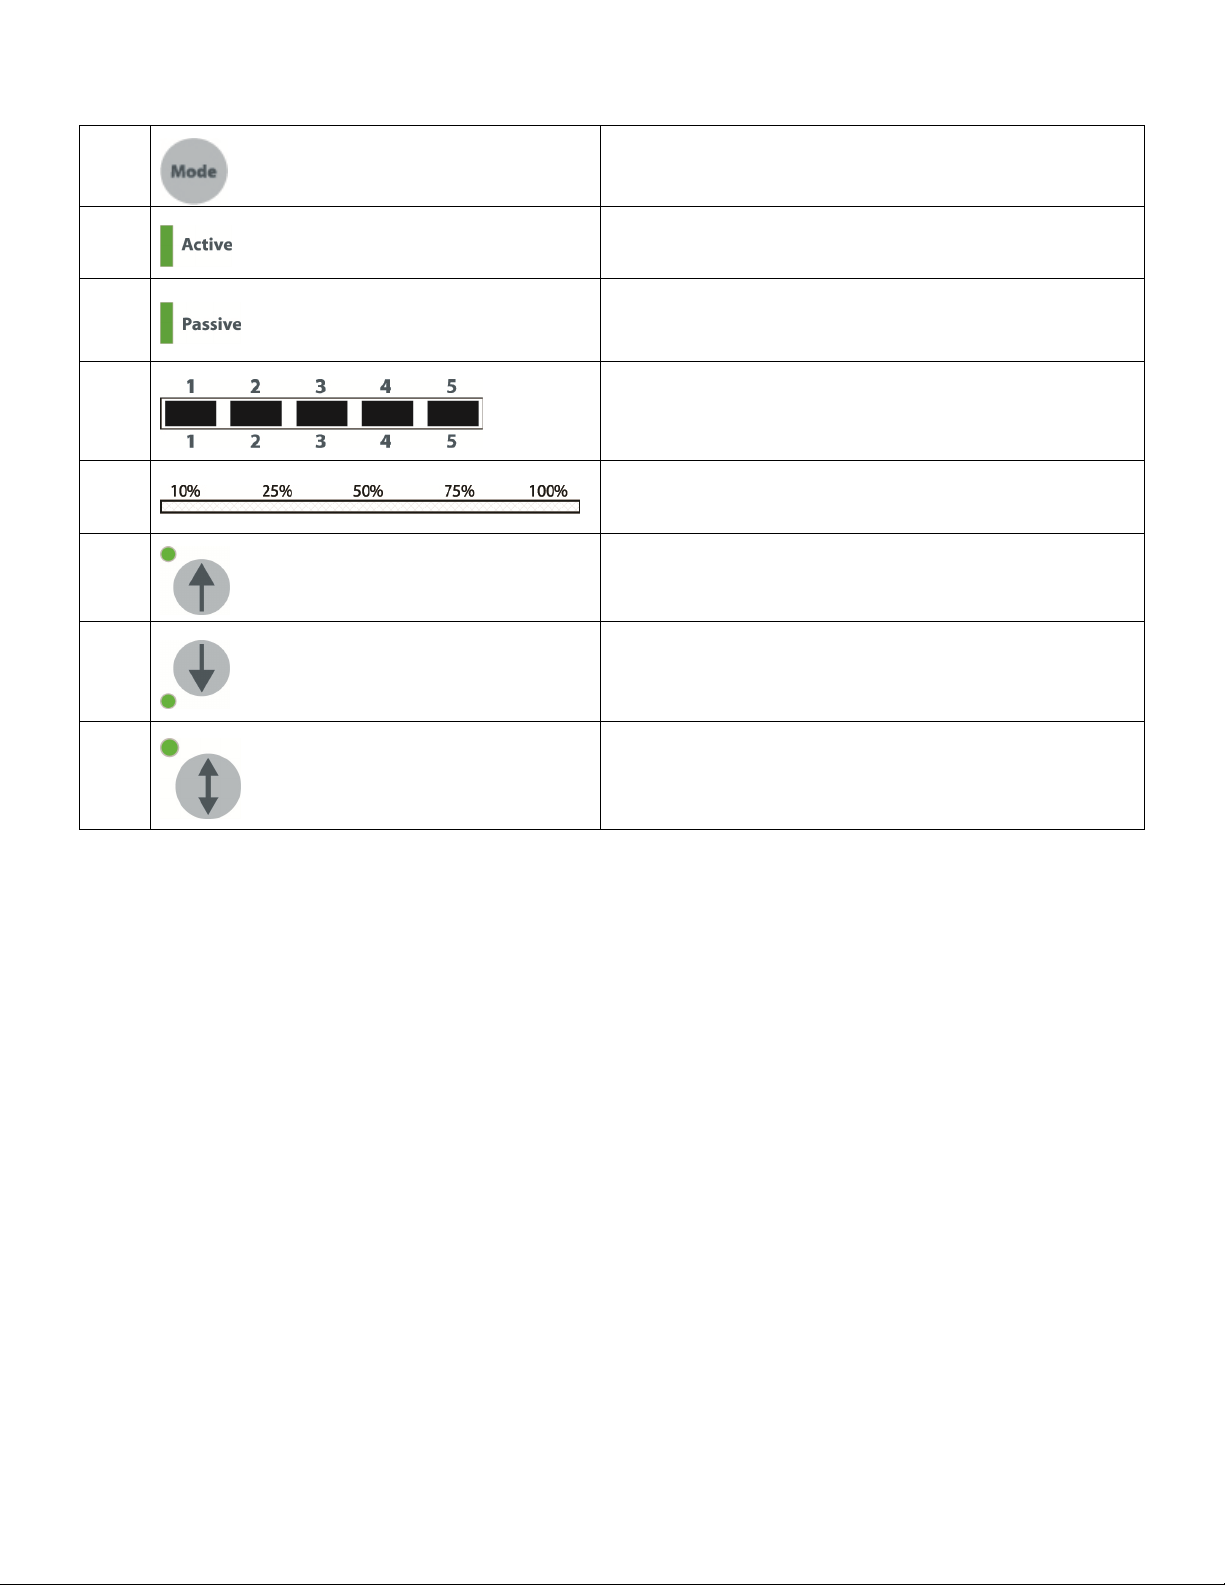
Operation mode Button - for selecting mode of operation.
Green indicator is lit when ACTIVE mode is selected by mode
button.
Green indicator is lit when PASSIVE mode is selected by mode
button.
Exercise level selection push switches
1 - Lowest level
5 - Highest level
Indicates actual load level (%)
Button for forward operation in the PASSIVE mode. The green
indicator is lit to indicate forward operation.
Button for backward operation in the PASSIVE mode. The green
indicator is lit to indicate backward operation.
8
Button activating Auto-Reverse function in the PASSIVE mode.
In the ACTIVE mode this button activates the constant force
function. The green indicator is lit when activated.
APT – User’s Manual Rev.C_11/19/13 9
Page 10
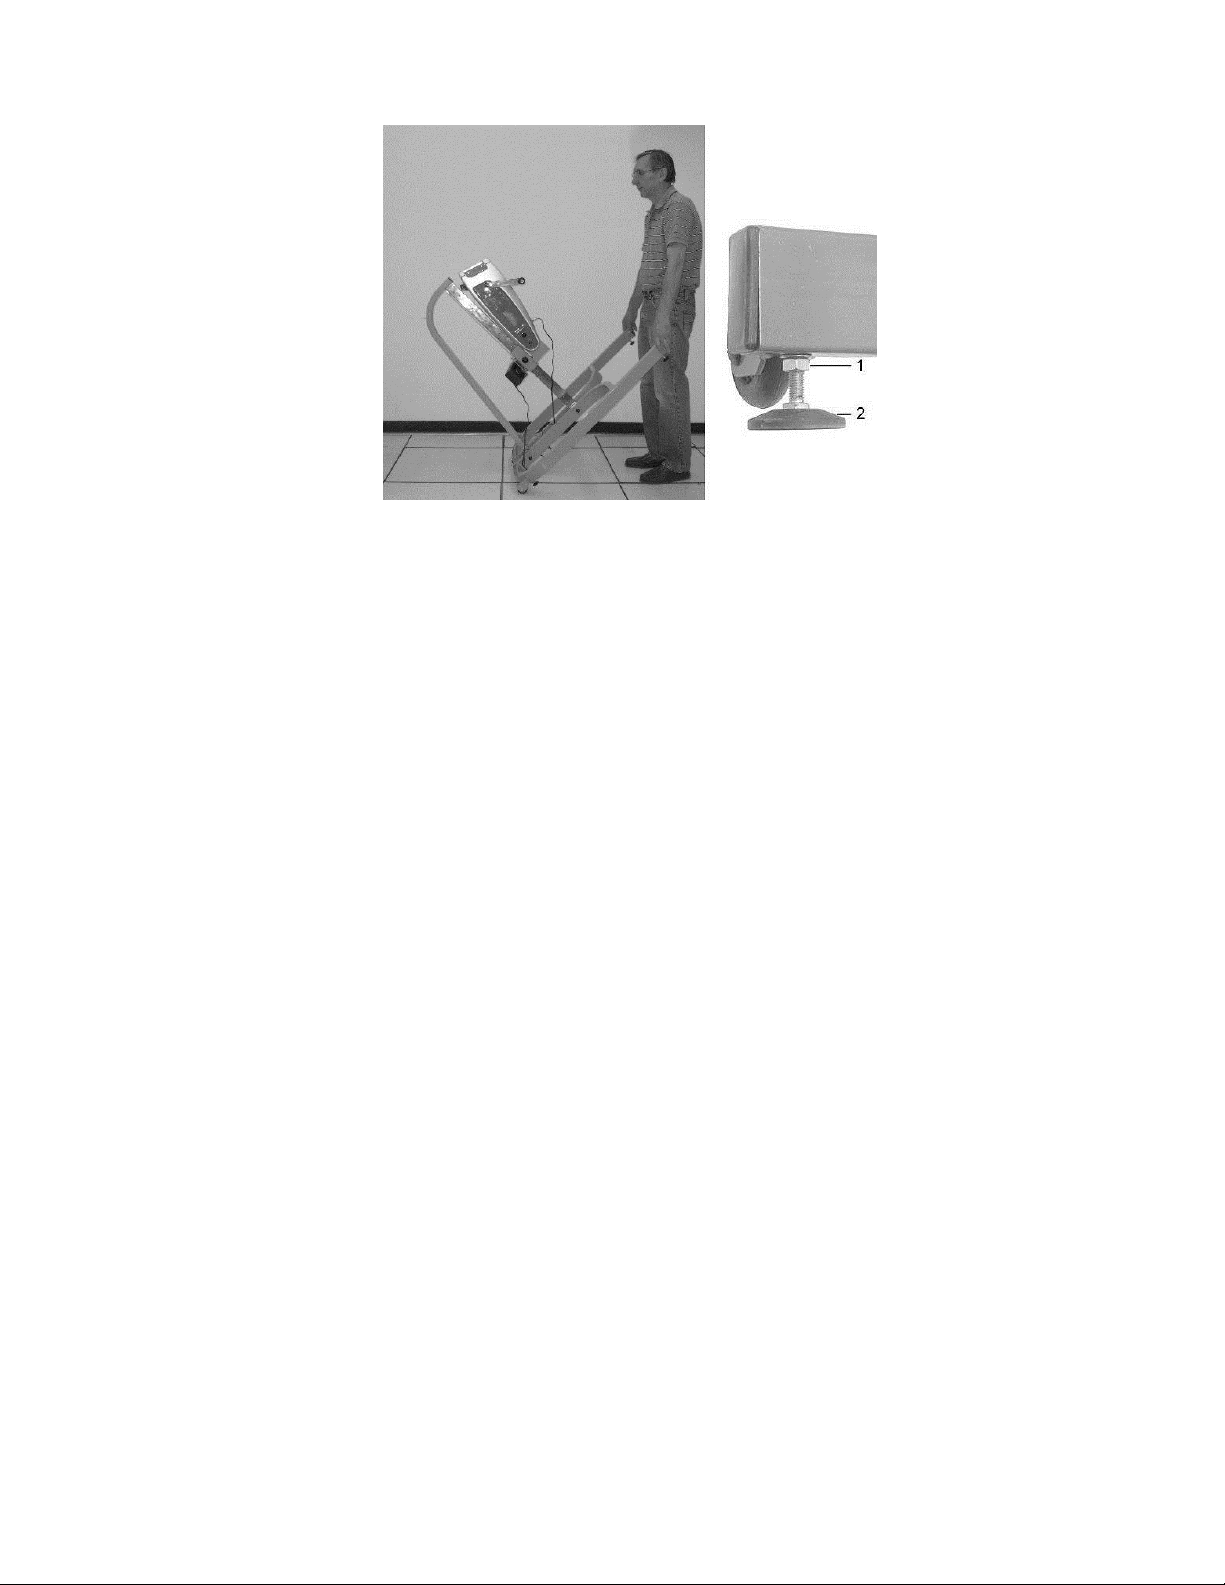
3. PREPARING THE APT HI-LO
Figure 4 Figure 4A
3.1. Moving your APT Hi-Lo
The APT Hi-Lo can easily be moved by lifting the end of the frame and pushing the unit using its wheels, see
Figure 4.
3.2. Positioning the APT Hi-Lo
Position the APT Hi-Lo close to an electrical socket outlet. The adjustable feet on the underside keep the APT
Hi-Lo level and prevent it from sliding.
NOTE: Ensure that the APT Hi-Lo is level in order to prevent damage to the trainer or its components.
If readjustment of one of the feet is needed, open the contra nut (4A/1), turn the foot (4A/2) to the desired height
and secure the foot with the contra nut (4A/1).
APT – User’s Manual Rev.C_11/19/13 10
Page 11
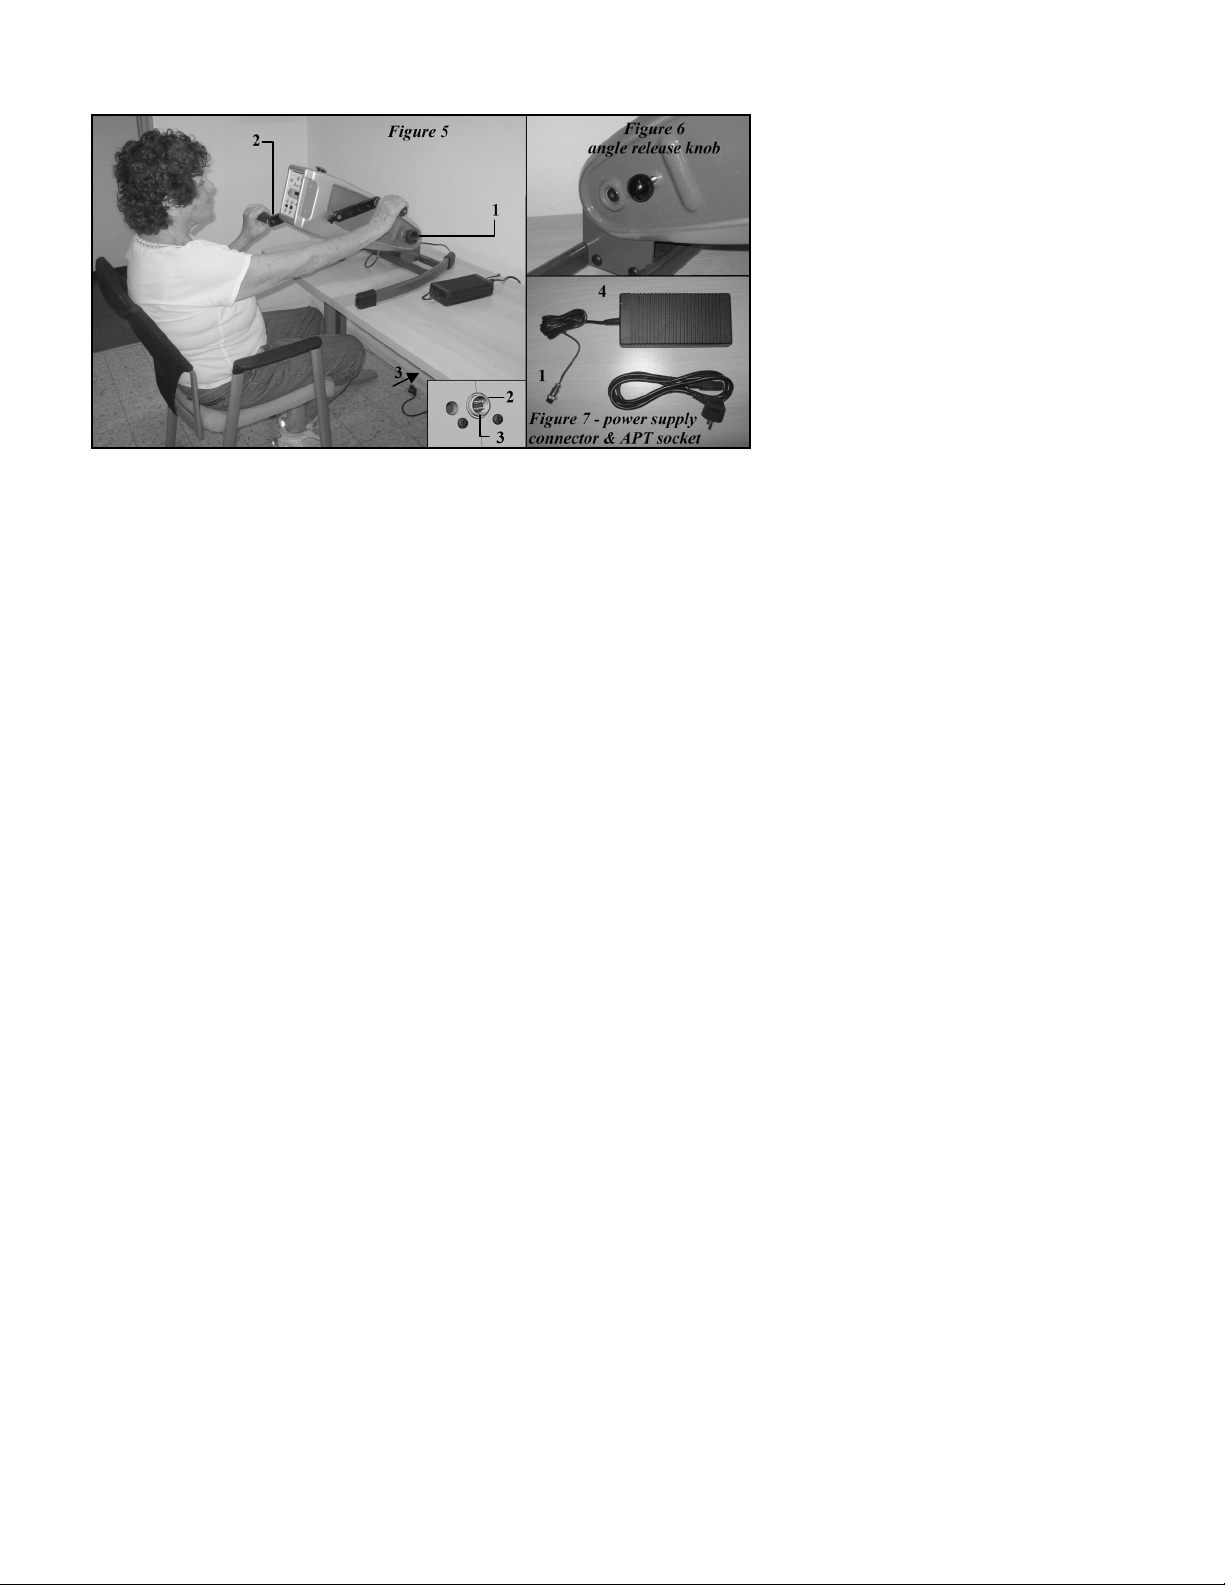
4. INSTALLATION FOR USE – ARMS EXERCISE
Step 1: Position the APT on a level table top close to an electrical socket outlet (Figure 5).
For the APT Hi-Lo: loosen the height securing knob (Figure 1A-7, pull the grey ring of the height release
knob (Figure 1A-6) and adjust the unit to the required height. Release the grey ring and tighten the height
securing knob (Figure 1A-7).
Step 2: Loosen the angle-securing knob (Figure 5-1) and adjust the APT to the required angle. To increase the an-
gle, lift the body of the APT, allow it to “click” into one of the operating positions and retighten the securing
knob. To decrease the angle, pull the angle release knob (Figure 6), lower the body of the APT, allow it to
“click” into another operating position and tighten the securing knob.
CAUTION: Make sure that the minimum distance between crank arm and the table surface is approximately 5 cm. / 2” (Figure 5-2).
Step 3: Connect the output connector (Figure 7-1) of the power supply (Figure 7-4) to the APT power input socket
(Figure 7-2) while ensuring correct position of connector groove opposite the guide key of socket (Figure 7-
3).
NOTE: The APT must be used only with an original APT Power Supply unit.
APT – User’s Manual Rev.C_11/19/13 11
Page 12
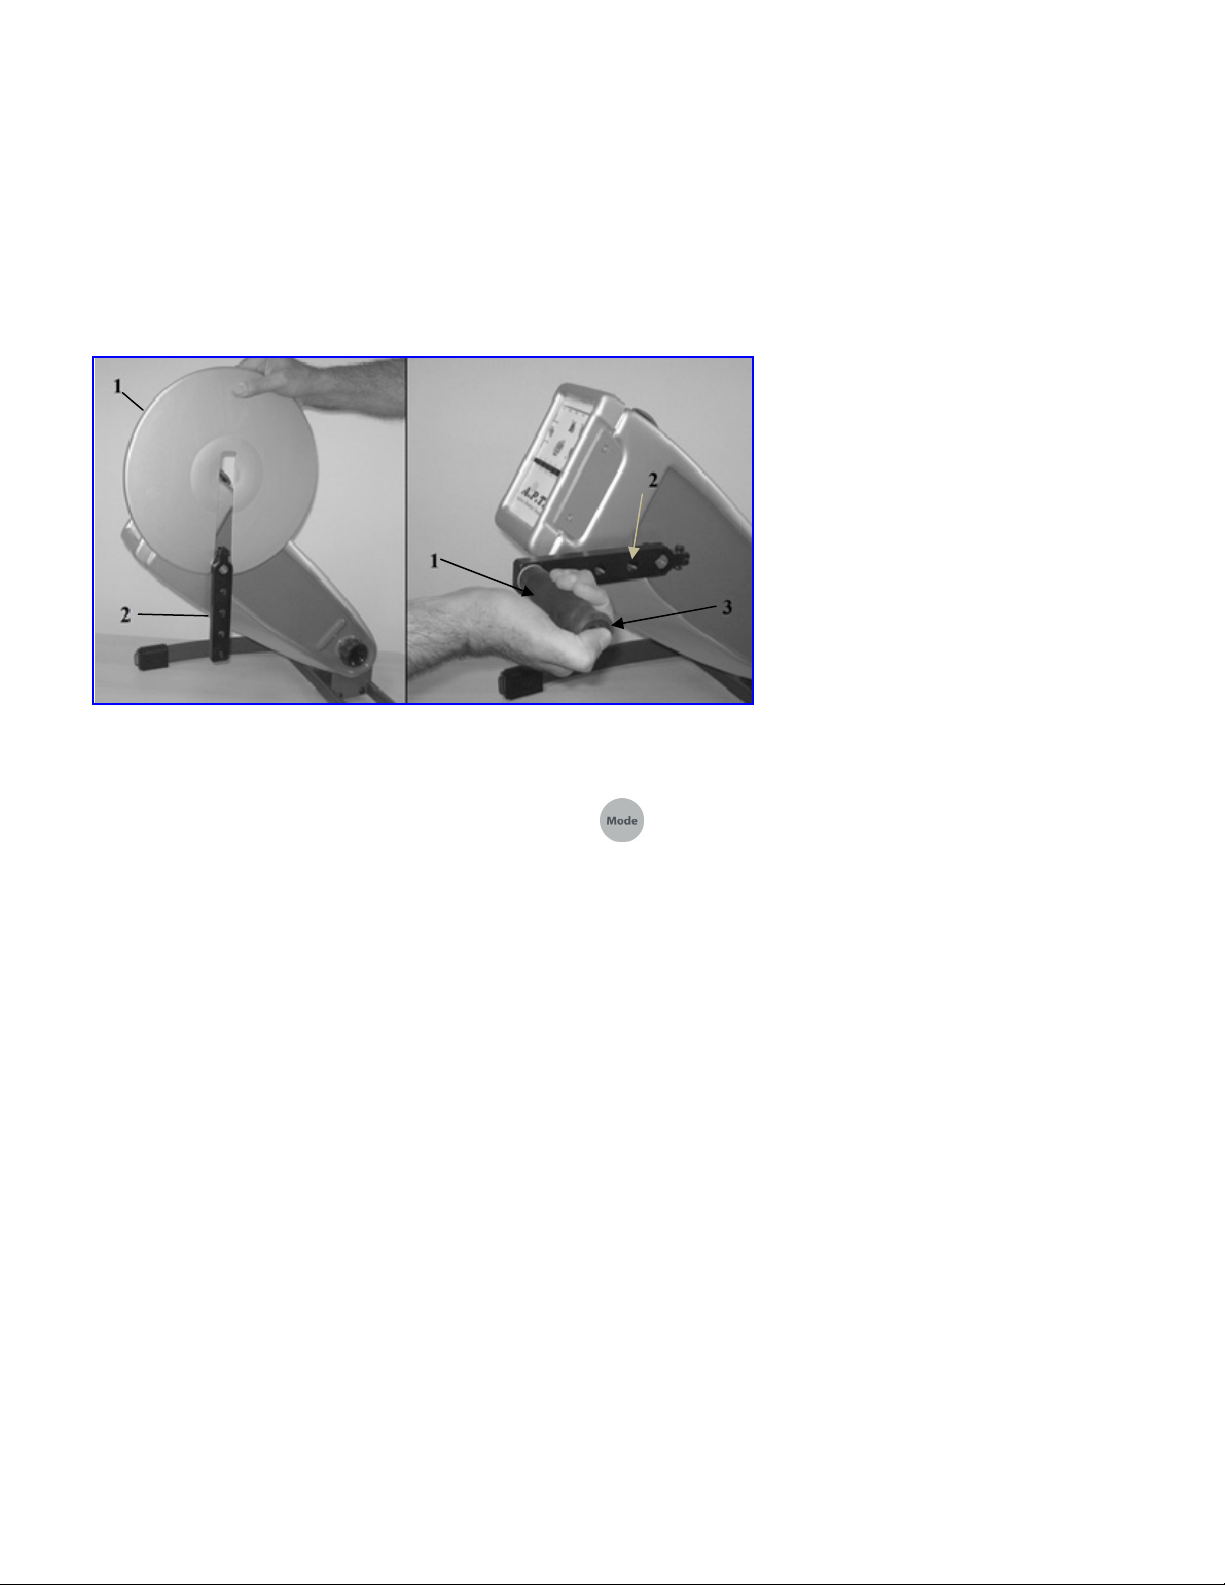
Step 4: Install the finger protection discs (Fig. 8-1) by sliding them into the grooves on the outside edges of the crank
arms (Figure 8-2) in the direction shown.
NOTE: The finger protection discs are important for safe operation of the unit during hands exercise.
Step 5: Insert handgrip (Figure 9-1) in one of the four mounting holes (Figure 9-2) in each of the APT crank arms. In-
stallation or removal requires only a straight push or pull while simultaneously pressing on the release pin
(Figure 9-3) at the end of the handle.
NOTE: The choice of mounting hole provides variable resistance levels and ranges of motion. See operation
instructions.
Figure 8 Figure 9
finger protection discs and crank handgrip and crank
Step 6: Plug the power supply mains power plug into the electrical socket outlet (Figure 5-3). The APT will enter a
stand by position. To start operating, press the
button. The green ACTIVE mode indicator will light up.
You may start exercising in the ACTIVE mode. For operation instructions, see 5.1 & 5.2.
NOTE: If the APT moves across the table during arm exercises, anti-slip pads (Figure 8-3) may require
cleaning.
APT – User’s Manual Rev.C_11/19/13 12
Page 13
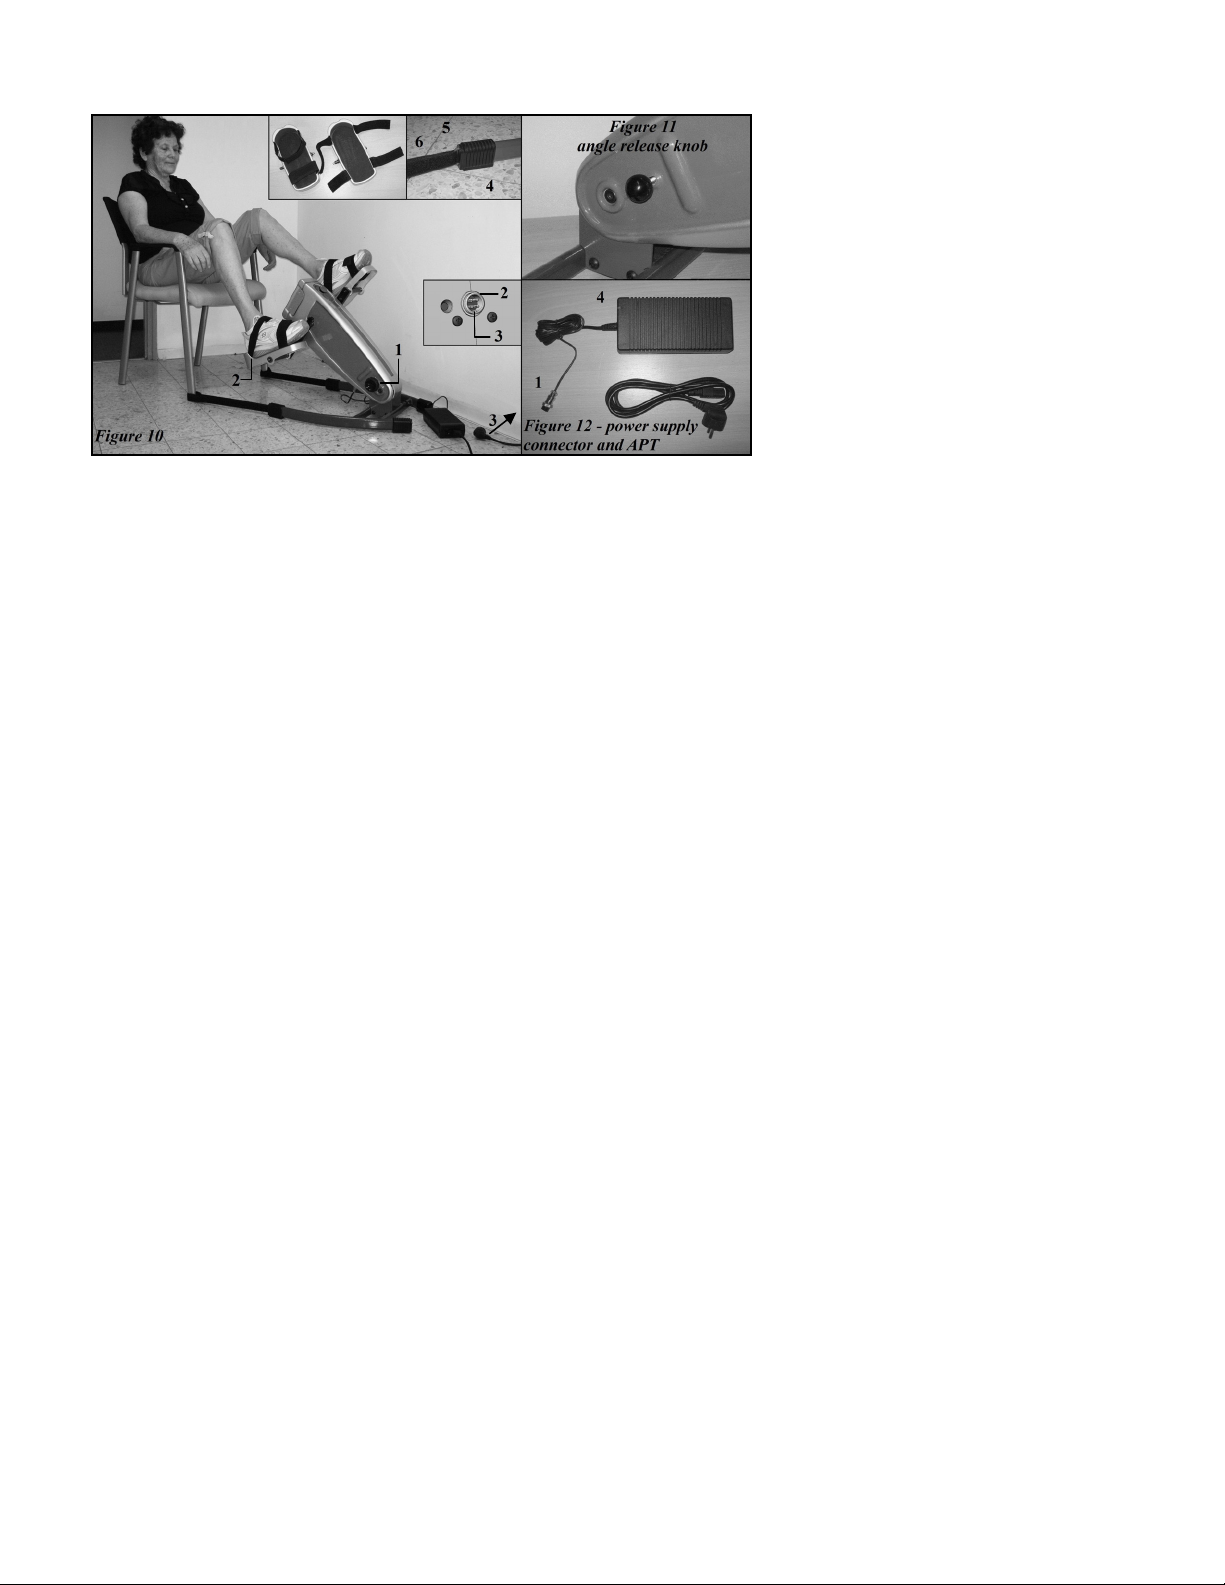
5. INSTALLATION FOR USE – LEG EXERCISE
Step 1: Position the APT on the floor close to an electrical socket outlet (Figure 10).
For the APT Hi-Lo: loosen the height securing knob (Figure 1A-7, pull the grey ring of the height release
knob (Figure 1A-6) and adjust the unit to the required height.
Step 2: Loosen the angle-securing knob (Figure 10-1) and adjust the APT to the required angle. To increase the an-
gle, lift the body of the APT, allow it to “click” into one of the operating positions and retighten the securing
knob. To decrease the angle, pull the angle release knob (Figure 11), lower the body of the APT, allow it to
“click” into another operating position and tighten the securing knob.
CAUTION: Make sure that the minimum distance between crank arm and the floor surface is approximately 5 cm. / 2” (Figure 10-2)
Step 3: Place a chair at the desired distance from the APT. If necessary, attach the Securing straps (Figure 10-6) be-
tween the APT base rings (Figure 10-5) and the chair legs to prevent any change in distance between the
APT and the chair during leg exercises.
APT – User’s Manual Rev.C_11/19/13 13
Page 14
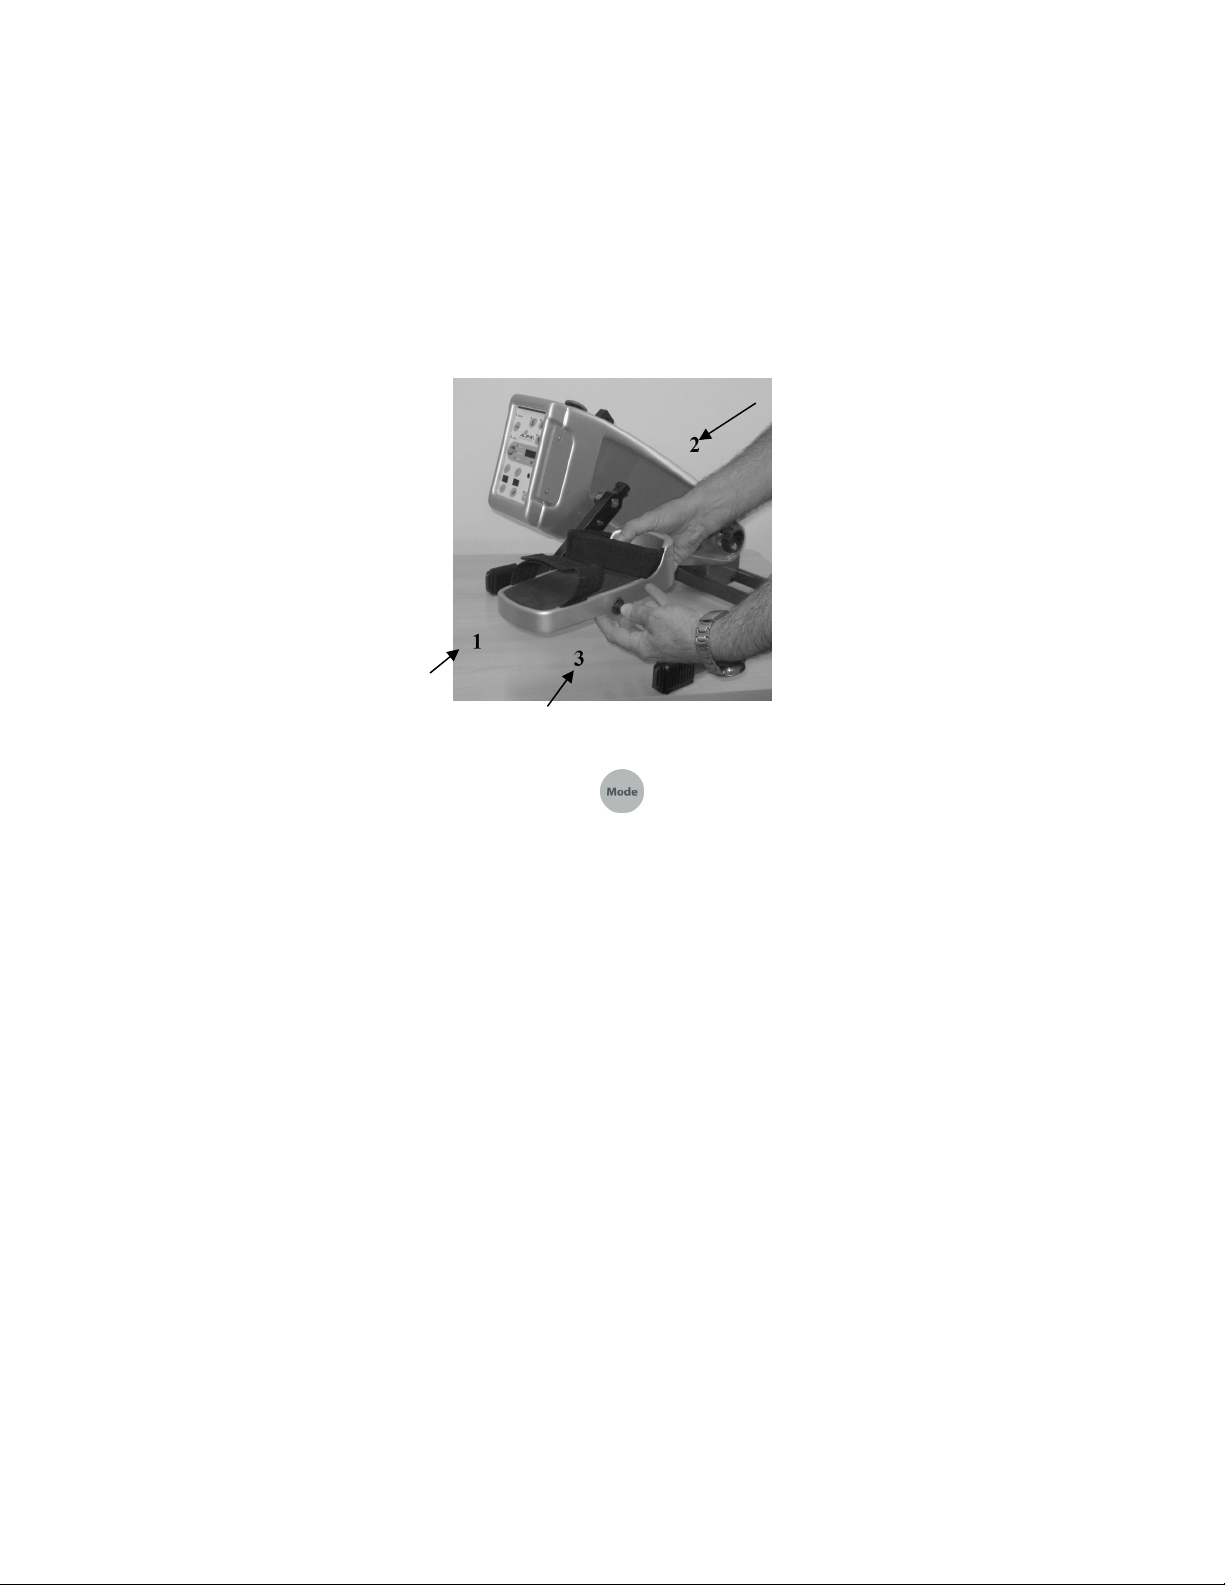
Step 4: Connect the power output connector (Figure 12-1) of the power supply (Figure 12-4) to the APT power input
socket (Figure 12-2) while ensuring correct position of connector groove opposite the guide key of socket
(Figure 12-3).
NOTE: The APT must be used only with an original APT Power Supply unit.
Step 5: Insert Footrest (Figure 13-1) in one of the four mounting holes (Figure 13-2) in each of the APT crank arms.
Installation or removal requires only a straight push or pull while simultaneously pressing on the release pin
(Figure 13-3) as shown. Secure feet in place with straps fastened diagonally as shown in Figure 10.
NOTE: The choice of mounting hole provides variable resistance levels and ranges of motion. See operation
instructions.
Figure 13
Step 6: Plug the power supply mains power plug into the electrical socket outlet (Figure 10-3). The APT will enter a
stand by position. To start operating, press the
button. The green ACTIVE mode indicator will light up.
You may start exercising in the ACTIVE mode. For operation instructions, see 5.1 & 5.2.
NOTE: If the APT moves across the floor during leg exercises, make sure anti-slip pads (Figure 10-4) are
clean. If possible – use the APT on a carpet or rubber mat.
APT – User’s Manual Rev.C_11/19/13 14
Page 15

6. OPERATION INSTRUCTIONS
NOTE: Install APT for arms or legs exercise as described in the previous chapters.
6.1. Active mode - ISOKINETIC operation
Step 1: Insert the handgrips or footrests in one of the four mounting holes according to the radius and range of
motion required.
NOTE: As the effective crank arm length is reduced in the ACTIVE mode, the amount of effort required increases
while the range of motion decreases, and vice versa.
Step 2: To activate the active mode from the stand by position (after the electrical power is supplied to the APT):
press the
button. The green ACTIVE mode indicator (Figure 3-2) will light up.
Step 3: Set the desired load level by pressing one of the five load selection push switches (Figure 3-4).
Step 4: Rotate the APT handgrips or footrests forward or backward. Actual exercising force is displayed as a
percentage (%) on the Bar Indicator (Figure 3-5).
NOTE: In this mode, an increase in the rotation speed (RPM) will lead to an increase in the exercising force (Ta-
ble 1, Appendix 1).
6.2. Active mode - CONSTANT FORCE Operation
Step 1: Press the
button to activate the CONSTANT FORCE FUNCTION in the ACTIVE mode. The green
indicator will light up.
Step 2: Set the desired load level by pressing one of the five load selection push switches (Figure 3-4).
Step 3: Rotate the APT handgrips or footrests forward or backwards. The exercising force as displayed on the
Bar Indicator (Figure 3-5) will now remain constant at 50% for the selected load level, irrespective of the
crank arm rotation speed (Table 2, Appendix 1).
APT – User’s Manual Rev.C_11/19/13 15
Page 16

6.3. PASSIVE mode
Step 1: Insert the handgrips or footrests in one of the four mounting holes according to the radius and range of
motion required.
NOTE: As the effective crank arm length is reduced in the PASSIVE mode, the range of movement is reduced
and the degree of resistance that the motor can overcome is increased.
Step 2: To activate the passive mode from the stand by position (after the electrical power is supplied to the
APT): Press the
button two times, until the green PASSIVE mode indicator (Figure 3-3) will light up.
From the ACTIVE mode – press once only.
Step 3: Set the desired rotation force and speed by pressing one of the five exercise level selection push switch-
es (Figure 3-4). 1 = lowest force, 20 rpm / 5 = highest force, 60 rpm
Step 4: Hold onto the handgrips (for arm exercise) or secure both feet to the footrests (for legs exercise). Make
sure that APT is placed at a comfortable distance for exercise by turning the crank arms one complete
revolution.
Press the
Press the
button for forward rotation.
button for backward rotation.
NOTE: There will be a short delay before the APT begins to turn in the chosen direction.
Step 5: The operation force of the crank arms should rotate the arms or legs of with no effort on the part of the
user. This rotation force varies according to exercise level and crank arm mounting hole location selected
(Table 3, Appendix 1).
Step 6: To stop the rotation of the crank-arms and exit the PASSIVE mode, press the button. The indicators
will turn off and the APT will return to the stand-by position.
APT – User’s Manual Rev.C_11/19/13 16
Page 17

6.4. COMBINED active/passive mode
Step 1: Operate the APT in the passive mode and work against the force of the motor by applying resistance to
the rotation of the crank arms.
Step 2: The resistance force to the rotation is displayed on the on the Bar Indicator as a percentage (%) at each
level.
Step 3: If the resistance force stops the crank arm rotation completely, the Bar Indicator (Figure 3-5) reaches
100% and the red indicator will light up. After holding this position for approximately 2 seconds, the crank
arm rotation will stop automatically.
NOTE: To restart, Press the
button for forward rotation, or the button for backward rotation.
6.5. Passive mode - AUTO-REVERSE function
Step 1: Push the
button to activate the AUTO-REVERSE function in the PASSIVE mode. The green indica-
tor will light up.
Step 2: Operate the APT as in usual passive or combined active/passive mode.
Step 3: When the resistance force stops the crank arm rotation completely, the Bar Indicator (Figure 3-5) reach-
es 100% and the red indicator will light up. After holding this position for approximately 2 seconds, the
crank arm rotation will stop automatically. After a short delay the DIRECTION OF ROTATION WILL BE
REVERSED. This feature also serves as an ANTI-SPASM function, stopping the motor in case of muscle
spasm and reversing the direction of rotation after a short delay.
Step 4: As long as the
button indicator is lit, this function will continue to operate in the PASSIVE mode.
APT – User’s Manual Rev.C_11/19/13 17
Page 18
6.6. Shut down
Step 1: To turn off the APT, from the PASSIVE mode- press the
button once. From the Active mode –
press twice. The indicators will turn off and the APT will return to its stand-by position.
Step 2: Disconnect the power from the APT by first disconnecting the mains electrical plug from the electrical
socket outlet. Disconnect Power supply output connector from the APT power input socket.
CAUTION: For safe disconnection always take the mains plug out of the electrical socket before disconnecting
the Power supply from the APT.
6.7. Emergency Switch
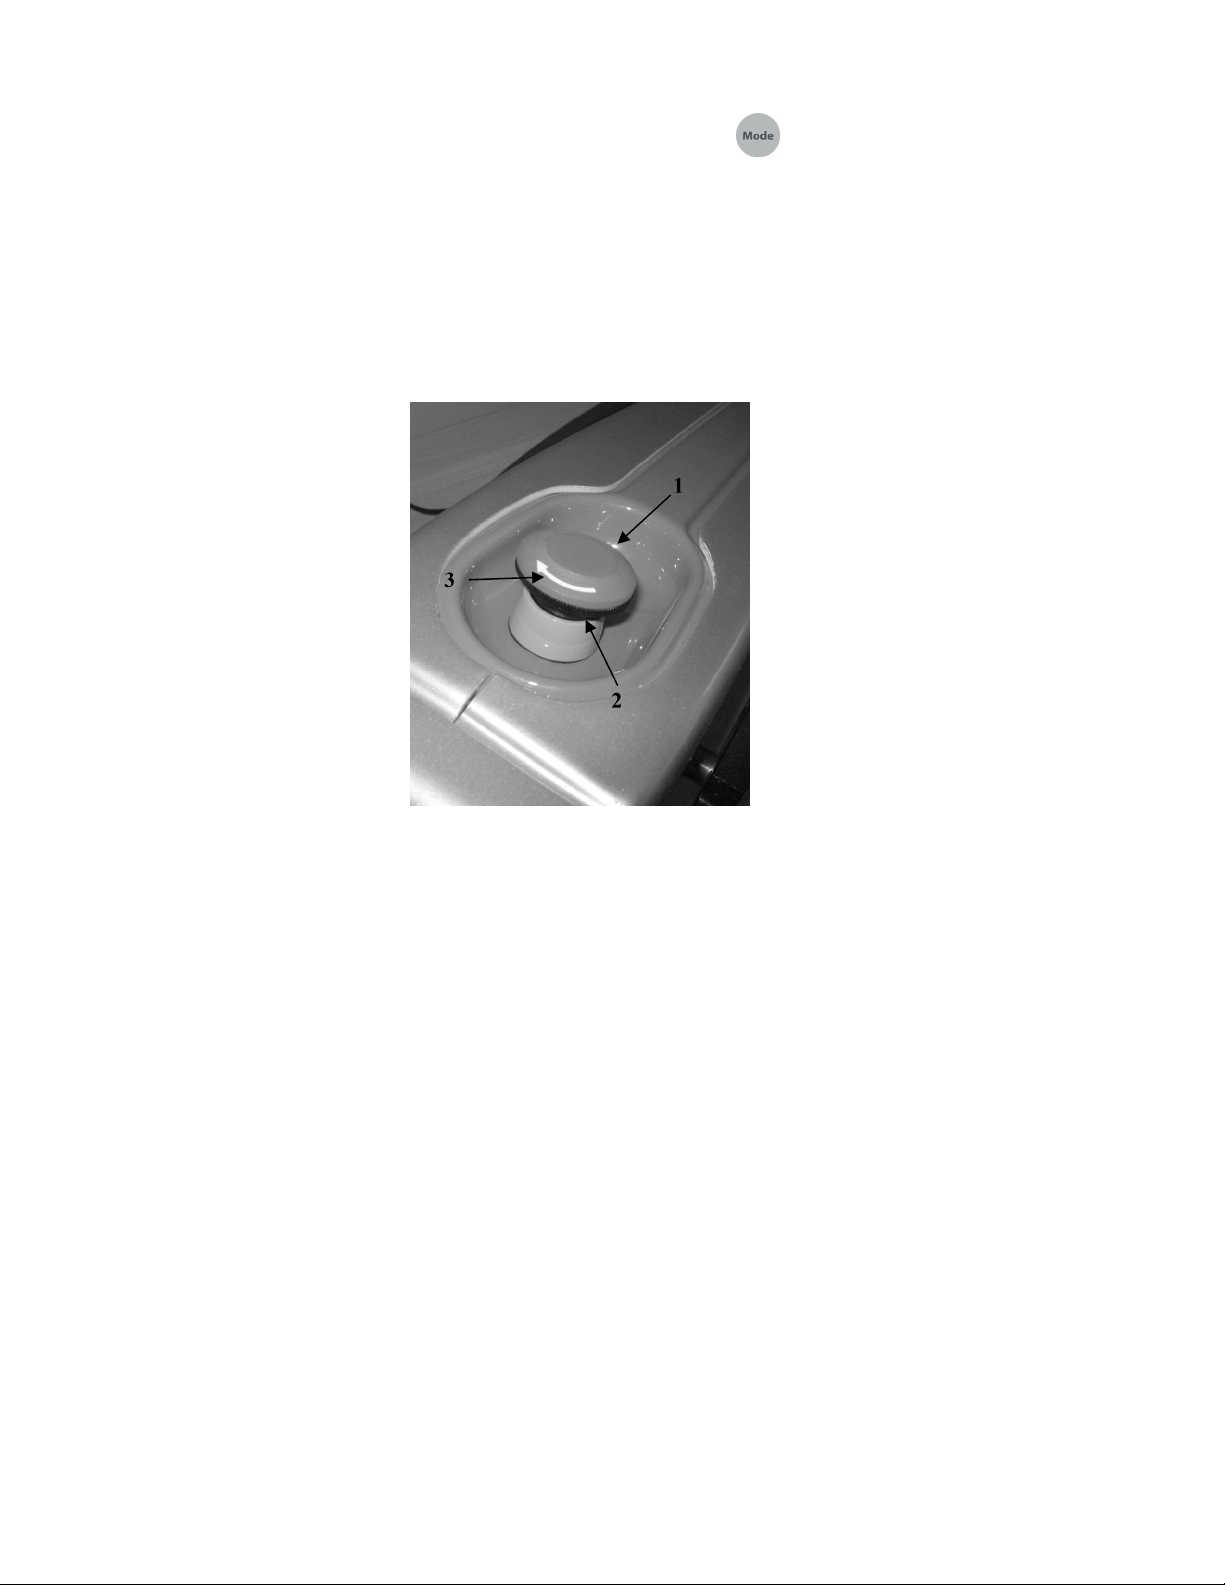
In the event of the need to stop the APT quickly, press the red mushroom headed button (Figure 14-1) situated
on the top of the trainer body (above the control panel). This will immediately cut the electrical supply to the APT.
The button will stay depressed and as long as it is
in this position the APT will
not function.
In order to restore the electrical supply to the APT, turn
the knurled black disc underneath the red button (Figure 14-2) in the direction of
the white arrow (Figure 14-3)
on the red button (clockwise). The red button will
then return to its original position.
The APT may then be restarted as previously described.
Figure 14 – Emergency Switch
APT – User’s Manual Rev.C_11/19/13 18
Page 19

7. GENERAL MAINTENANCE & STORAGE
The rugged design of the Active Passive Trainer and the use of selected, modern materials ensure minimal requirements for care and maintenance. The APT can be lifted safely in its folded position by grasping on to the centre
of either of the legs of the base and carrying like a suitcase.
NOTE: Improper handling or neglect in the care of the Active Passive Trainer may reduce or cancel the coverage of
the manufacturer’s warranty.
7.1. Regular care
Inspect Power supply cables and plug for visible damages.
Check power-input connector for visible damage or insecure fastening.
On a regular basis check that all screws and components are fastened tightly.
Ensure that the anti-slip pads under the base are always kept clean.
CAUTION: If any damage is detected – do not use APT. Please contact your authorized dealer. Only au-
thorized personnel may carry out repairs.
7.2. Cleaning instructions
Disconnect Power Supply and wipe dry with clean cloth.
CAUTION: For safe disconnection of the APT always take the mains plug out of the wall socket before
removing the connector from the APT power socket.
Take care not to allow water to enter the unit. Keep cables and electric components away from water and
humidity.
7.3. Storage
Store the APT between –20 and +40 degrees C and between 10% and 80% humidity.
For storage in a confined space, fold the APT unit by pulling the angle release knob (Figure 1-2) and lower-
ing it to the flat position. Tighten the angle-securing knob (Figure 1-3) to prevent unintentional unfolding.
APT – User’s Manual Rev.C_11/19/13 19
Page 20

8. TROUBLE-SHOOTING
Hereunder are some types of disorders, which can usually be repaired rather simply. If these following measures are
unsuccessful, an authorized dealer should be contacted!
PROBLEM CHECK POINT
Power Supply not connected properly to mains outlet or to
the APT.
The APT does not function at all
The crank-arms do not start to rotate in the passive
mode
Models with remote control: remote unit not functioning
smoothly
APT in standby mode. Press the button to enter ac-
tive or passive modes.
(Models with Stop-switch) Stop switch in lower - disconnec-
tion position. Turn switch anti-clockwise to release.
No load/speed selection button is selected (pushed in-
wards)
(Models with Independent Speed controller) Speed control
Knob is in the “0” (off) position. Turn knob clockwise to de-
sired exercise speed.
Remote unit’s transmitter LED needs to be wiped clean
Remote unit batteries need replacement
APT – User’s Manual Rev.C_11/19/13 20
Page 21
9. ACCESSORIES
The following items are designed for use in combination with the APT.
CAUTION: The use of accessories other than these can be unsafe.
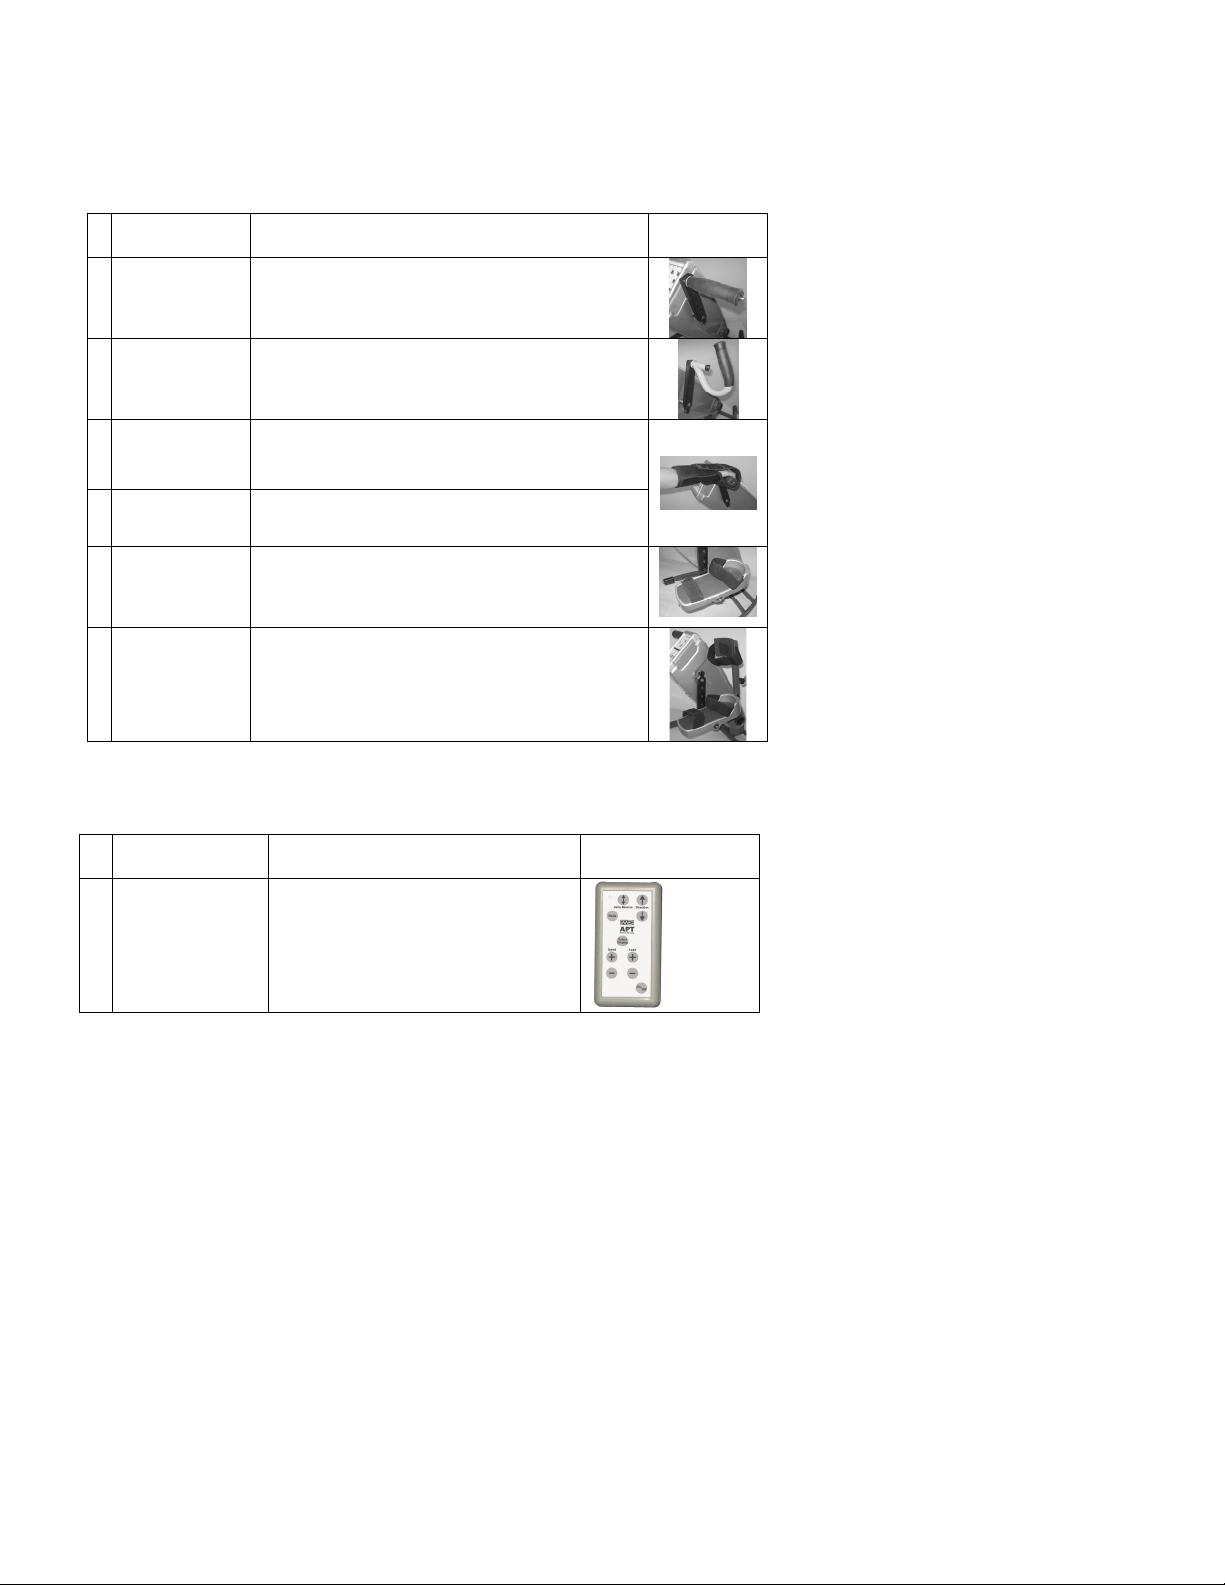
9.1. Optional hand grips and Footrests
#
ACCESSORY USAGE DESCRIPTION FIGURE
Straight
a)
Handgrips
Angled
b)
Handgrips
Used for most of the upper limb exercising.
Ergonomically designed, mainly for
strength exercising in the Active mode.
Used for securely supporting the wrist and
Hemi-glove
c)
hand on the handgrips for users who have
little or no muscle strength.
Pediatric
d)
Hemi-glove
Standard
e)
Footrests
High support
f)
for footrests
Hemi-glove specially designed to be used
by children.
Used for most of the lower limb exercising.
May be attached to footrests for supporting the lower limbs of users that have little
or no muscle strength.
9.2. Optional added functions
#
ACCESSORY USAGE DESCRIPTION FIGURE
Remote Con-
a)
trol
Used mainly for lower limb exercising by users who have difficulty in reaching the operating
panel.
APT – User’s Manual Rev.C_11/19/13 21
Page 22
10. DISPOSAL AND RECYCLING
The packing material must be separated to plastic and paper/cardboard components and submitted to authorized re-
cycling locations.
The APT device consists of electronic components, cables, plastic parts, steel body and base frame, and aluminium
parts. Do not discard any components to normal refuse facilities. When APT is no longer operational, it is to be dis-
mantled and separated into above material groups and submitted to authorized recycling facilities
.
Page 23

11. TECHNICAL DATA
APT Unit
Model 8300
Weight 22 lbs.
Length 28 in. Overall
Width 18 in.
Height 6.5 in. Folded
Working voltage 24 VDC
Revolutions per minute 20 - 60 RPM
Rotation Radius 1.5, 3.0, 4.5, 6.0 in.
Exercising Positions 15°, 30°, 45°, 60°
Current Rating 4.16 A Max.
Accuracy of measurement display ±10%
Type B equipment
Equipment not suitable for use in the presence
Continuous operation
of flammable anaesthetic mixture with air or
with oxygen or nitrous oxide.
External Power Supply
Weight 1.8 lbs.
Length 7.5 in.
Width 3.5 in.
Height 1.8 in.
Input: 100~240 V 47-63 Hz 1.25 A
Output: 24 VDC 100 W Max. 4.16 A
APT Hi Lo
Model 8500
Weight 86 lbs.
Base Dimensions 40 x 30 in.
Height 40 in.
Working Height from Ground Up 50 in.
Class I equipment
APT – User’s Manual Rev.C_11/19/13 23
Page 24

12. APPENDIX
Table 1: Active Mode ISOKINETIC operation
25% 50% 75% 100%
Level
Force R1 3.5 0.1 4 0.15 10 0.3 20 0.55
R2 5.0 0.15 6 0.2 13 0.35 25 0.75
R3 7.5 0.2 9 0.3 20 0.6 40 1.2
1
R4 15 0.4 18 0.5 40 1.2 80 2.3
Power Watts 0.5 1 3 9
Speed RPM 30 50 65 100
Force R1 7.5 0.2 9 0.25 21 0.6 40 1.1
R2 10 0.3 12 0.35 28 0.8 53 1.5
R3 15 0.4 18 0.5 42 1.2 80 2.3
2
R4 30 0.85 36 1.0 84 2.4 160 4.6
Power Watts 1 2 6 18
Speed RPM 30 50 65 100
Force R1 15 0.4 18 0.5 42 1.2 80 2.3
R2 20 0.6 24 0.7 56 1.6 110 3.0
R3 30 0.85 36 1.0 86 2.4 160 4.6
3
R4 60 1.7 72 2.0 170 4.7 320 9.2
Power Watts 2 4 12 36
Speed RPM 30 50 65 100
Force R1 30 0.85 36 1.0 84 2.4 160 4.6
R2 40 1.1 48 1.4 110 3.2 220 6.0
R3 60 1.7 70 2.0 170 4.7 320 9.2
4
R4 120 3.4 140 4.0 340 9.5 640 18.5
Power Watts 4 8 24 72
Speed RPM 30 50 65 100
Force R1 60 1.7 70 2.0 165 4.7 320 9.1
R2 80 2.3 95 2.7 220 6.2 430 12
R3 120 3.4 145 4.1 330 9.3 650 18
5
R4 240 6.8 290 8.2 660 18.5 130 36
Power Watts 8 16 48 144
Speed RPM 30 50 65 100
NOTE: Force Levels are indicated for Mounting Hole locations R1, R2, R3 & R4 on crank-arms (Figure 9 / Figure 13).
oz. Kg. oz. Kg. oz. Kg. oz. Kg.
APT – User’s Manual Rev.C_11/19/13 24
Page 25
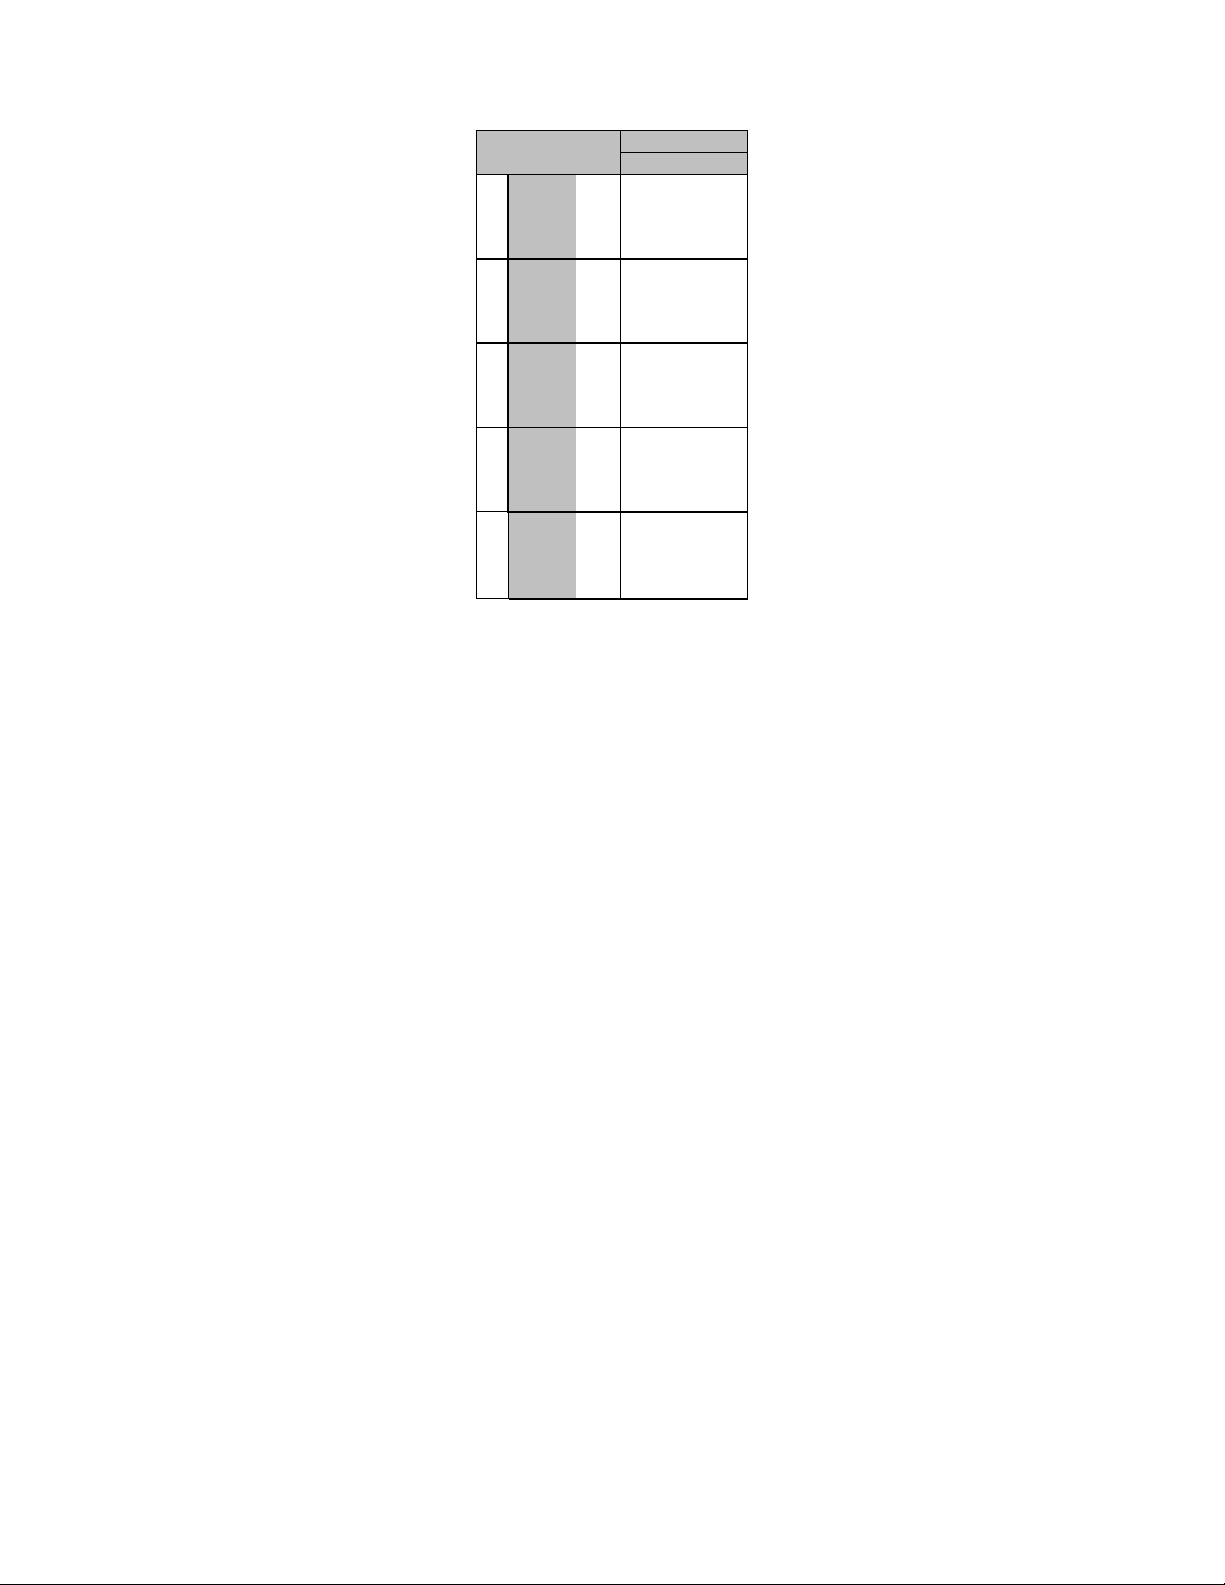
Table 2: Active Mode CONSTANT FORCE operation
50%
Level
Force R1 4.5 0.13
R2 6 0.17
1
R3 9 0.25
R4 18 0.50
Force R1 9 0.25
R2 12 0.3
2
R3 18 0.5
R4 36 1.0
Force R1 18 0.5
R2 24 0.7
3
R3 36 1.0
R4 72 2.0
Force R1 36 1.0
R2 48 1.4
4
R3 70 2.0
R4 140 4.0
Force R1 72 2.0
R2 96 2.7
5
R3 140 4.0
R4 280 8.0
NOTE: Force Levels are indicated for Mounting Hole locations R1, R2, R3 & R4 on crank-arms (Figure 9 / Figure 13).
oz. Kg.
APT – User’s Manual Rev.C_11/19/13 25
Page 26
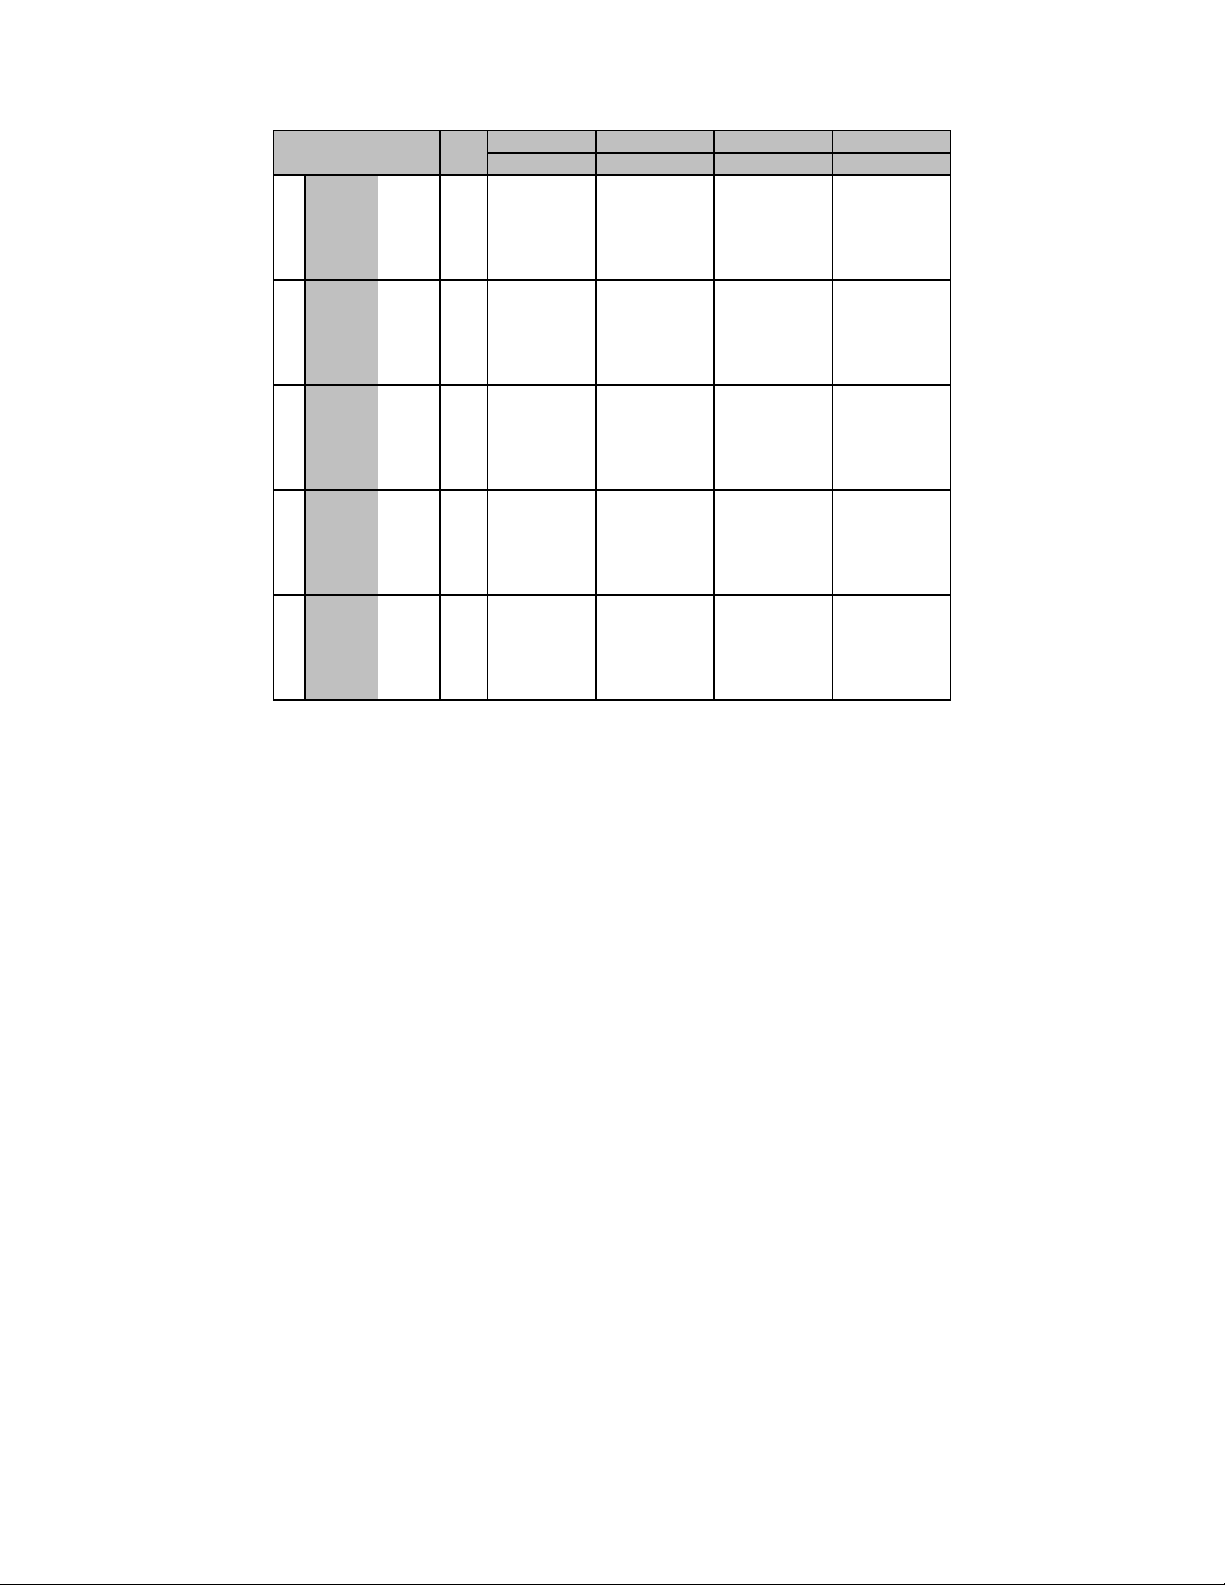
Table 3: Passive Mode
0% 25% 50% 75% 100%
Level
Force R1 0 25 0.7 50 1.4 75 2.1 100 2.8
R2 0 33 0.95 67 1.9 100 2.8 135 3.7
1
R3 0 50 1.4 100 2.8 150 4.3 200 5.6
R4 0 100 2.8 200 5.6 300 8.5 400 11.2
Speed RPM 20 15 10 5 0
Force R1 0 32 0.90 63 0.55 95 2.7 125 3.5
R2 0 43 1.20 84 2.4 125 3.6 170 4.7
2
R3 0 65 1.80 125 3.5 190 5.4 250 7.0
R4 0 130 3.60 250 7.0 380 10.7 500 14
Speed RPM 30 23 15 8 0
Force R1 0 38 1.1 75 2.1 110 3.0 150 4.2
R2 0 51 1.4 100 2.8 145 4.1 200 5.0
3
R3 0 75 2.1 150 4.2 215 6.1 300 8.4
R4 0 150 4.3 300 8.4 430 12.2 600 16.9
Speed RPM 40 30 20 10 0
Force R1 0 44 1.2 88 2.5 130 3.7 175 5.0
R2 0 59 1.7 115 3.3 175 5.0 253 6.6
4
R3 0 88 2.5 175 5.0 265 7.4 350 9.8
R4 0 175 5.0 350 10 530 15 700 19.7
Speed RPM 50 38 25 13 0
Force R1 0 50 1.4 100 2.8 150 4.2 200 5.6
R2 0 67 1.9 133 3.7 200 5.6 267 7.5
5
R3 0 100 2.8 200 5.6 300 8.4 400 11.3
R4 0 200 5.6 400 11.3 600 16.9 800 22.5
Speed RPM 60 45 30 15 0
NOTE: Force Levels are indicated for Mounting Hole locations R1, R2, R3 & R4 on crank-arms (Figure 9 / Figure 13).
oz. Kg. oz. Kg. oz. Kg. oz. Kg.
APT – User’s Manual Rev.C_11/19/13 26
Page 27

For safety and for warranty assurance reasons, any modifications and repair of the APT or its components must
be performed exclusively by authorized personnel and exclusively with original spare parts.
The APT Active Passive Trainer and its accessories have been designed and manufactured in accordance with the
specification of the following:
DIRECTIVE: Medical devices 93/42 EEC (Annex V)
APT – User’s Manual Rev.C_11/19/13 27
Page 28

APT – User’s Manual Rev.C_11/19/13 28
 Loading...