


BALL VALVE
Series Top5
®
Installation, Maintenance and
Operating Instructions
1 T5 71 en • 12/2008

2 1 T5 71 en
Table of Contents
1 GENERAL........................................................ 3
1.1 Introduction ............................................3
1.2 Valve structure .......................................3
1.3 Markings................................................. 3
1.4 Valve approvals......................................4
1.5 CE marking ............................................4
1.6 Recycling and disposal .......................... 4
1.7 Safety precautions .................................4
2 TRANSPORTATION, RECEPTION AND
STORAGE........................................................ 5
3 INSTALLATION IN THE PIPELINE ................. 5
4 COMMISSIONING ........................................... 5
5 SERVICING...................................................... 5
5.1 Gland packing ........................................6
5.2 Dismantling the valve.. .... .......................6
5.3 Assembly................................................6
6 TESTING THE VALVE................................... 10
7 INSTALLING THE ACTUATOR .................... 10
7.1 Installing the BC/B1C-series actuator.. 10
7.2 Installing the BJ/B1J-series actuator....11
8 ORDERING SPARE PARTS ......................... 11
9 PARTS LIST .................................................. 13
10 DIMENSIONS AND WEIGHTS ...................... 14
11 TYPE CODING............................................... 20
READ THESE INSTRUCTIONS FIRST!
These instructions provide information about safe handling and operation of the valve.
If you require additional assistance, please contact the manufact urer or manufactu rer's representa tive.
Addresses and phone numbers are printed on the back cover.
SAVE THESE INSTRUCTIONS!
Subject to change without notice.
All trademarks are property of their respective owners.

1 T5 71 en 3
1 GENERAL
1.1 Introduction
These instructions describe the installation, operation
and main-tenance of Top 5
Entry Rotary Control Valve series.
Top 5 is a generic name for a product series group
comprising the following valve series:
❑ T5 — flanged, reduced bore, single seated
❑ T4 — like T5, with weld ends
❑ T25 — full bore, flanged, otherwise like T5
❑ T35 — like T25, with weld ends.
When the valve is equipped with a control ball reducing
the flow rate and thus preventing noise and cavitation, it
is called Q-T5 etc.
Further information on the installation, operation and
maintenan-ce of actuators is given in the individual
manuals for each actuator model.
NOTE:
Selection and use of the valve in a specific application
requires close consideration of detailed aspects. Due
to the nature of the product, this manual cannot cover
all the individual situations that may occur when the
valve is used. If you are uncertain about use of the
valve or its suitability for your intended purpose,
please contact Metso’s Automation business for more
information.
®
, a valve in the Metso Top-
1.2 Valve structure
The Top 5 valve series is intended for either control or
special shut-off applications. It is tight in one direction.
The ball may be equipped with an attenuator element
(Q attenuator). The ball has been mounted on the body
and on the bonnet with bearings.
Thanks to its top entry structure, the valve is also applicable for use as a butt weld end version, because the
valve can be serviced without removing it from the
pipeline.
1.3 Markings
positioner id plate
Note. When the actuator
cover is removed, the ball
position can be checked at
the line stamped at the end
of the stem
actuator id plate
customer’s tag or position
number (if exists)
identification plate,
see fig. 3
manufacturing number
arrow showing the tight
direction, on both sides
of the body
Fig. 2 Valve markings
In addition to the markings shown in Figure 2, the valve
may have directional arrows:
FLOW DIRECTION
TIGHT DIRECTION
When standard seats are used, the arrow on the body
shows the tight direction.
(1) (2) (5) (7) (8)
ATTENTION : READ INSTRUCTIONS BEFORE INSTALLATION OR SERVICING. CONTACT METSO AUTOMATION FOR COPY.
BODY
TRIM
(3) (4) (6) (9) (10)
T max
SHAFT
SEAT
MAX. OPER. psatRATING TYPE
T min
No.
Fig. 3 Identification plate markings
MADE BY METSO AUTOMATION
MOD
XXXX
Fig. 1 The valve bonnet is bolted to the body
Identification plate markings:
1. Body material
2. Stem material
3. Trim material
4. Seat material
5. Maximum and minimum operating temperatures
6. Maximum shut-off pressure differential / temperature
7. Pressure class
8. Type designation
9. Valve manufacturing parts list no.
10. Model
The type designation is explained in Metso standard
S389. An extract of the standard is shown on page 16.

4 1 T5 71 en
1.4 Technical specifications
The identification plate must be checked for the essential safety limits in the extreme range, such as pressure
and temperature resistance and the highest operable
pressure difference.
The selected actuator size or the available instrument
air pressure may place restrictions on the highest operable pressure so that it becomes lower than the limits
determined by the mechanical strength of the valve.
Face-to-face length:
series T5 ANSI/ISA S75.03,
IEC 534-3-3
series T25, T4, T35 API Class 600
Body pressure and
temperature rating: ANSI B16.34*), see Table 1
Ball bearings:
bearings, code E Metal-reinforced PTFE
easy, low Δp use:
max. +230 °C
demanding, high Δp use:
max +200 °C
bearings, code B Cobalt based alloy
+450 °C
max. pressure difference
according to a separate
specification
Dimensions: See pages 14 and 15
Weights: See pages 14 and 15
*) Unless the selected ball bearings or flange standards impose a lower pressure and temperature restriction.
1.5 Valve approvals
The valve is fire safe for hydrocarbon applications
according to API 607 and BS 6755.
1.6 CE marking
The valve meets the requirements of the European
Directive 97/23/EC relating to pressure equipment, and
has been marked according to the Directive.
recycling and disposal instructions are available from
the manufacturer. A valve can also be returned to the
manufacturer for recycling and disposal against a fee.
1.8 Safety precautions
CAUTION:
Do not exceed the valve performance limitations!
Exceeding the limitations marked on the valve may
cause damage and lead to uncontrolled pressure
release. Damage or personal injury may result.
CAUTION:
Do not dismantle the valve or remove it from the
pipeline while the valve is pressurized!
Dismantling or removing a pressurized valve will result in
uncontrolled pressure release. Always isolate the relevant part of the pipeline, release the pressure from the
valve and remove the medium before dismantling the
valve. Be aware of the type of medium involved. Protect
yourself and the environment from any harmful or poisonous substances. If the valve is equipped with an
actuator, do not forget to close and detach the actuator
pressure supply pipeline. Failure to do this may result in
damage or personal injury.
CAUTION:
Beware of the cutting movement of the ball!
Keep hands, other parts of the body, tools and other
objects out of the open flow port. Leave no foreign
objects inside the pipeline. When the valve is actuated,
the ball functions as a cutting device. Close and detach
the actuator pressure supply pipeline for valve maintenance. Failure to do this may result in damage or personal injury.
CAUTION:
Protect yourself from noise!
The valve may produce noise in the pipeline. The
noise level depends on the application. It can be
measured or calculated using the Metso Nelprof software. Observe the relevant work environment regulations on noise emission.
1.7 Recycling and disposal
Most valve parts can be recycled if sorted according to
material. Most parts have material marking. A material
list is supplied with the valve. In addition, separate
CAUTION:
Beware of a very cold or hot valve!
The valve body may be very cold or very hot during
use. Protect yourself against cold injuries or burns.
Table 1 Body materials commonly used by Metso and their resistance to pressure and temperature according
ANSI 16.34,
Pressur
e class
1)
ANSI
300
ANSI
600
Flange
code 1)
D A216 gr WCB
F A216 gr WCB
Body material Material
Carbon steel
A351 gr CF8M
Stainless steel
Carbon steel
A351 gr CF8M
Stainless steel
code
D
A
D
A
°C
38 50 100 150 200 250 300 350 400
51,1
49,6
102,1
99,3
50,1
48,1
100,2
96,3
46,4
42,2
92,8
84,4
45,2
38,5
90,5
77,0
43,8
35,7
87,6
71,3
41,7
33,4
83,4
66,8
38,7
31,6
77,5
63,3
37,0
30,4
73,9
60,8
34,5
29,1
69,0
58,2
1) Flange codes according to PN standards, see Chapter 13. Max resistance to pressure and temperature
depending to the flange and its material. Resistance in the middle part of the valve up to size DN 400 (16") according to table A600.

1 T5 71 en 5
2 TRANSPORTATION, RECEPTION
AND STORAGE
Check the valve and the accompanying devices for any
damage that may have occurred during transpor t.
Store the valve carefully before installation, preferably
indoors in a dry place. Do not take the valve to the
intended location and do not remove the flow port protectors until the valve is installed. The valve is delivered
in the open position, with the exception of valve packages where the actuator spring closes the valve.
NOTE:
Valves with a carbon steel body may become badly
corroded on the inside if the inside is left damp during
storing.
CAUTION:
Never lift the valve or valve package by the actuator, positioner, limit switch or their piping. Place
the lifting ropes securely around the valve body.
3 INSTALLATION IN THE PIPELINE
Remove the protecting plates around the valve and
check that the valve is clean. Flush and blow the pipeline carefully before installing the valve. Foreign particles, such as sand or pieces of welding electrode, will
damage the valve.
Check that the pipeline is supported properly. Do not
attempt to correct any pipeline misalignment by means
of the flange bolting or welding of the valve. Do not support the pipeline using the valve as help.
An arrow pointing at the tight direction of a seat that is
tight in one direction (the most commonly used version)
is cast on both sides of the valve. This is usually the
flow direction. If the flow direction and the tight direction can be opposite to each other, the piping plan must
be checked for the correct position.
Check that the unbroken side of the ball faces the seat
when the valve is in the CLOSED position.
dimensional drawing of the valve.
There should be enough free space around the valve
so that the actuator can be removed and the valve dismantled without detaching the valve from the pipeline.
Check that the indicator arrow on the actuator is parallel to the ball flow opening.
The actuator must not touch the pipeline or any permanent structures, because pipeline vibration may damage it or interfere with its operation. If the pipeline
drawings show a support for the actuator, the support
must be installed.
Make sure that the valve is in the OPEN position when
welding a weld end valve into the pipeline.
Note! A valve equipped with a BJ actuator is in the
CLOSED position when it is not pressurized. Direct
compressed air into the cylinder to turn the valve open.
When welding a valve into a pipeline, protect the valve
from welding spatter, see Fig. 5. Always ground the
welding apparatus on the side of the pipeline.
4 COMMISSIONING
The gland packing may leak after long storage. If the
packing leaks, tighten it steadily until the leaking stops.
Do not tighten the packing unnecessarily as this will
increase the required torque and impair the control
properties. (More information about the gland packing
in section 5.1.).
Check that the valve has been installed correctly in
relation to the flow direction.
Fig. 4 Installation of the valve into the pipeline
Install the valve in the position shown in the piping
installation drawing. The position code shows the installation position that should be used when the actuator
has been installed at the factory. The position code has
been given either on the specification sheet or in the
Fig. 5 Protecting the valve during welding
5 SERVICING
CAUTION:
Observe the safety precautions listed in section
1.8 before starting work.
The valve can be serviced without removing it from the
pipeline. Servicing in a workshop is, however, recommended whenever possible.
If the valve is removed from the pipeline, the body must
be supported for servicing with the stem standing
upright.
The numbers in parentheses refer to the exploded view
and the parts list on pages 12 and 13, unless otherwise

6 1 T5 71 en
indicated.
NOTE:
If you send the valve to the manufacturer for servicing,
do not dismantle it. Clean the valve. If the medium is
dangerous, inform the manufacturer when you send
the valve.
5.1 Gland packing
The gland packing of the valve may be made of graphite with a PTFE finish or it may be a model where the
lowest graphite ring has been replaced with a metallic
O-ring sleeve, see Fig. 6. If the gland packing is tightened too much, the control properties of the valve may
suffer. The need to tighten the packing may be reduced
by means of the O-rings.
Even if the O-rings were damaged, there will be enough
graphite rings to enable tightening of the packing and
to ensure reliable operation.
The standard is a graphite gland packing with a PTFE
finish.
graphite
O-ring
Fig. 7 Using a special tool to remove the gland
packing
5.2 Dismantling the valve
CAUTION:
Do not dismantle the valve or remove it from the
pipeline while the valve is pressurized!
❑ Remove the actuator and the actuator mounting
shelf.
❑ Remove the key (10). Check that there are no
burrs on
❑ the edges of the key slot.
❑ Loosen the gland packing by unscrewing the
nuts (18).
❑ Remove the hexagon nuts (16) on the bonnet.
❑ Lift the bonnet. You may use an extractor as help,
see Fig. 8.
Fig. 6 Gland packing
5.1.1 Changing the gland packing
CAUTION:
Do not dismantle the valve or remove it from the
pipeline while the valve is pressurized!
❑ Remove the actuator.
❑ Make sure the valve is not pressurized.
❑ Detach the gland (9).
❑ Remove the old packing rings (69), see Fig. 7.
❑ Clean the packing ring counterbore.
❑ Check that there are no burrs on the edges of the
key slot.
❑ Install the new packing rings one by one using
the gland as a tool.
❑ Tighten the gland packings uniformly.
If the packing has O-rings, lubricate them with silicone
grease before installation. Put the outer O-ring on the
bottom of the packing ring counterbore and the inner
O-ring on the gland.
Cover the stem key slot with tape, a plastic bag or other
similar material that protects the O-ring when you push
the gland over the key slot.
Fig. 8 Detaching the bonnet
❑ Turn the valve ball 180 degrees from the
CLOSED position, see Fig. 9.
❑ Lift the ball. Check that the unbroken side of the
ball does not rest on the seat, see Fig. 10.
❑ Remove the seat (7). You may use a tool to pull
out a seat that has been installed by means of Orings, see Fig. 11.
5.3 Assembly
Check all sealing surfaces with care. If necessary, lap
the sealing
surfaces with diamond powder and thereafter with
water sanding

1 T5 71 en 7
Fig. 9 Turning the ball
Fig. 10 Lifting the ball from the body
Fig. 12 Installing the seat
5.3.1.1 A-seat, Figure 13
❑ Check the sealing surfaces.
❑ Install the back seal (130) on the seat (7).
❑ Install the ring (129).
❑ Install the spring (62) into the seat body.
❑ Install the support ring (35).
❑ Spread some anticorrosive agent, e.g. Cortec
VCI-369, in the seat recess of a carbon steel
body.
❑ Push the seat into its place.
Fig. 11 Using a tool to pull out the seat
paper no. 1200. Clean all parts carefully.
Spray the sealing surfaces of the ball and the seat
thinly with e.g. Molykote 321R dry lubricant. Wipe the
surfaces with a soft cloth after the lubricant has dried.
Check the gland packing. If it shows any signs of dam-
age, remove it and clean the packing ring counterbore.
Do not install a new gland packing until you have put
the bonnet back.
5.3.1 Installing a seat
The same seat selection is available for all Top 5 series
valves. The dimensions of seat recesses have been
standardized to be of equal sizes since June, 1990.
Push the seat into the body by hand; the final installa-
tion is done using a tool (in the reverse order compared
Fig. 13 A seat
5.3.1.2 F-seat, Figure 14
❑ Check the sealing surfaces.
❑ Check the sealing surfaces at the ends of the
spring (62).
❑ Check the spring countersurface in the body.
❑ Spray both ends of the spring and their counter-
surfaces thinly with dry lubricant.
❑ Install the spring on the seat (7).
❑ Spread some anticorrosive agent, e.g. Cortec
VCI-369, on the countersurface of the spring in a
carbon steel body.
❑ Push the seat into its place.

8 1 T5 71 en
❑ Install the O-ring (63).
❑ Install the support ring (64) into its groove. Cut
the ribbon ends diagonally to make a flexible
seam.
❑ Only in the Fire Safe version:
❑ Install the back seal (130) and the ring (129). See
Fig. 17.
❑ Install the spring (62) into the seat body (7).
❑ Install the spring support ring (131).
Fig. 14 F seat
5.3.1.3 G-seat, Figure 15
❑ Check the sealing surfaces.
❑ Lubricate the O-rings (63, 75) with silicone
grease before installation.
❑ Install the O-ring (63).
❑ Install the support rings (64) into their groove.
Cut the ribbon ends diagonally to make a flexible
seam.
❑ Install the back seal (130) and the ring (129).
❑ Install the spring (62) into the seat body (7).
❑ Install the O-ring (75).
❑ Install the support ring (76) into its groove. Cut
the ribbon ends diagonally to make a flexible
seam. See Fig. 15.
❑ Spread some anticorrosive agent, e.g. Cortec
VCI-369, on the seat recess of a carbon steel
body.
❑ Push the seat into its place.
Fig. 16 R-seat. Delivered after 4/95 only as a spare
part.
The G-seat has been replaced with the A-seat
Deliveries of the G-seat ceased in 1990
Fig. 15 G seat
5.3.1.4 R-seat, Figures 16 and 17
❑ Check the sealing surfaces.
❑ Lubricate the O-ring (63) with silicone grease
before installation.
Fig. 17 R-seat (Fire Safe)
5.3.1.5 E1-seat, Figure 18
❑ Check the sealing surfaces.
❑ Install the back seal (130) on the seat (7).
❑ Install the ring (129).
❑ Install the spring (62) into the seat body.
❑ Install the ring (133).
❑ Install the seal (135).
❑ Install the support ring (35).
❑ Spread some anticorrosive agent, e.g. Cortec
VCI-369, in the seat recess of a carbon steel
body.
❑ Push the seat into its place.

1 T5 71 en 9
using a press-on fit. See Fig. 20.
If the surfaces are badly damaged and cannot be
‘restored’ using an abrasive cloth, the bearings and the
ball must be replaced.
When installing new bearings (4, 5), lock them securely
to the bonnet and the body using a nail punch.
thrust bearing (4)
bearing (60)
sleeves made of
Fig. 18 E1-seat
5.3.2 Installation of bearings
Check the bearings and the bearing surfaces. If neces-
sary, grind the bearing surfaces with an abrasive cloth
and replace worn bearings. Spray the bearing surfaces
special steel have been
installed in the ball
using a press-on fit
Fig. 20 Heat-resistant bearings
5.3.3 Installing the ball
(5, 61)
lightly with dry lubricant.
If the ball surface has deep scratches that cannot be
5.3.2.1 Standard bearings
The bearing material is PTFE reinforced with an acid-
resistant steel
net. If the bearings are so worn that the net is visible on
the wear
surface, you should replace the bearings (60, 61, 89,
94). See Fig. 19.
removed using an abrasive cloth or if it is not completely round, you should send the ball to the manufacturer for repair.
Adjust the seat to the ball by lapping them together with
diamond powder before you install the ball (and the
seat) into the body.
Install the ball into the body with the ‘cut’ side against
the seat. Take care not to damage the bearing and the
seat with the ball. In valves that have PTFE bearings
and have a size of 6" or more, the bearings (94, 61, 5)
are ready-fitted on the ball and locked using a lock ring
bearing (60)
(27).
When the ball is in its place, turn the ball against the
seat and check visually that the ball has enough room
to complete the operating circle and that it turns easily
thrust bearing (89)
(61, 94)
against the seat.
5.3.4 Installing the bonnet
The bonnet is installed in the reverse order compared
to the disassembly, see section 5.2. Spray the bolts
lightly with Molykote 321R dry lubricant.
Fig. 19 Standard bearings
Twist the bonnet gasket (graphite ribbon) around two
times so that the ends overlap for about 25 mm, see
5.3.2.2 Heat-resistant bearings
Fig. 21.
The position of the ball in the direction of the stem is
determined by means of the bearings (4, 60). Pipeline
pressure causes a pressure force towards the cross
section of the ball stem; this force removes the clear-
ances against the bearings (4, 60) supported on the
bonnet.
The bearings (4, 5) are precision-machined cobalt
based alloy sleeves.
The bearing countersurface is a sleeve (60, 61) of spe-
cial steel, which has been installed against the ball

10 1 T5 71 en
Fig. 21 Installing a gasket for the bonnet
Pull at the stem to make the ball perpendicular. The
bonnet settles in the correct position, and the necessary pre-compression between the ball and the seat is
achieved, see Fig. 22.
Table 2 Torques for the bonnet nuts
Val ve sizeDNScrews Stage 1
0,2xM
(Nm)
4
20
20
20
35
80
80
80
165
165
165
01
015
02
03
04
06
08
10
12
14
16
Size
UNC
3/8
5/8
5/8
5/8
3/4
1
1
1
1 1/4
1 1/4
1 1/4
Pcs. Wrench
opening
8
6
6
8
8
8
12
16
16
22
22
1 1/16
1 1/16
1 1/16
1 1/16
1 1/4
1 5/8
1 5/8
1 5/8
2
2
2
6 TESTING THE VALVE
CAUTION:
Pressure testing should be carried out using
equipment conforming to the correct pressure
class!
We recommend that the valve body be pressure tested
after the valve has been assembled.
The pressure test should be carried out in accordance
with an applicable standard using the pressure rating
required by the pressure class or flange bore of the
valve. The valve must be in an open position during the
test.
If you also want to test the tightness of the closure
member, contact the manufacturer.
7 INSTALLING THE ACTUATOR
CAUTION:
Beware of the cutting movement of the ball!
Installation of the actuator must not cause bearing
loads on the valve. The valve has two bearings, and the
actuator serves as the third bearing. They must all be
aligned.
Fig. 22 Adjusting the bonnet by pulling at the ball stem
Tighten the bonnet nuts crosswise as shown in Table 2.
Stages 1 to 4: all bolts are tightened crosswise.
Stage 5: the bolts are tightened in succession along the
circumference.
Install the gland packing as explained in section 5.1.
final
Stage 2
0,5xM
(Nm)
10
50
50
50
90
200
200
200
415
415
415
final
Stage 3
0,8xM
(Nm)
16
80
80
80
145
320
320
320
665
665
665
final
Stage 4
1xM
final
(Nm)
20
100
100
100
180
400
400
400
830
830
830
Stage 5
1xM
final
(Nm)
20
100
100
100
180
400
400
400
830
830
830
If the actuator causes extra torsion on the stem, it is
seen as increased need for torque and impaired control properties.
More detailed information on actuators can be obtained
from the installation, operation and maintenance
instructions for each actuator type.
7.1 Installing the BC/B1C-series
actuator
❑ Drive the actuator piston to the extreme outward
end and turn the valve into the closed position.
❑ Clean the stem bore and file off any burrs.
❑ If a coupling is needed between the actuator and
the valve stem, install it into the stem bore. Lubricate the coupling and stem bore. Note the correct position. The line at the end of the stem
indicates the direction of the ball flow bore.
❑ Fasten the bracket loosely to the valve.
❑ Push the actuator carefully onto the valve stem.
Avoid forcing it, since this may damage the ball
and seats. We recommend mounting the actuator so that the cylinder is pointing upwards.
❑ Align the actuator as accurately as possible
using the valve as help. Lubricate the mounting

1 T5 71 en 11
screws. Install the washers and tighten all
screws. Final tightening may not change the
position of the fixture.
❑ Adjust the ball open and closed positions (limits
to piston movement) by means of the actuator
stop screws (see Fig. 23). An accurate open
position can be seen in the body flow bore.
Check that the yellow arrow indicates the direction of the ball flow bore. "Times"Keep your fin-
gers out of the flow bore!
There is no need to adjust the stop screw if the actuator
is re-installed in the same valve. Drive the actuator piston to the housing end (open position). Turn the actuator by hand until the valve is in the open position
(unless it is already open). Fasten the actuator in this
position.
❑ Check the tightness of the stop screw at the end
of the cylinder during cylinder operation. An O-
ring is used for sealing.
❑ Check that the actuator is functioning correctly.
Check the ball flow bore position and the actua-
tor movement relative to the valve (clockwise:
close, counterclockwise: open) after installing
the actuator. The valve should be closed when
the piston is in the extreme outward position.
❑ Check that the yellow arrow indicates the direc-
tion of the flow bore. If necessary, change the
position of the arrow.
7.2.1 BJ/B1J-type
Install the actuator so that the piston is in the extreme
outward position. The cylinder must not be pressurized
and air supply connections must be open. The valve
must be in the closed position.
7.2.2 BJA/B1JA-type
Install the actuator so that the piston is in the cylinderend position at housing side. The cylinder must not be
pressurized and the air supply connection must be
open. The valve must be in the open position.
The rest of the installation procedure is the same as for
the BC/B1C actuator.
8 ORDERING SPARE PARTS
When ordering spare parts, always include the following information:
❑ type code, sales order number, serial number
(stamped on a valve body)
❑ number of the parts list, part number, name of
the part and quantity required
This information can be found from the identification
plate or documents.
Limiting screw for the
CLOSED position
Limiting screw for the
OPEN position
Fig. 23 Open and closed position in a B1 actuator
7.2 Installing the BJ/B1J-series actuator
Spring-return actuators are used in applications where
valve opening or closing movement is needed in case
the air supply is interrupted. The BJ/B1J type is used
for spring-to-close operation; the spring pushes the piston towards the cylinder end, the extreme outward
position. In turn, the BJA/B1JA type is used for springto-open operation; the spring is between the piston and
the cylinder end and pushes the piston towards the
housing.
Spring-return actuators are installed in a manner similar
to BC/B1C-series actuators, taking into account the following.
12 1 T5 71 en
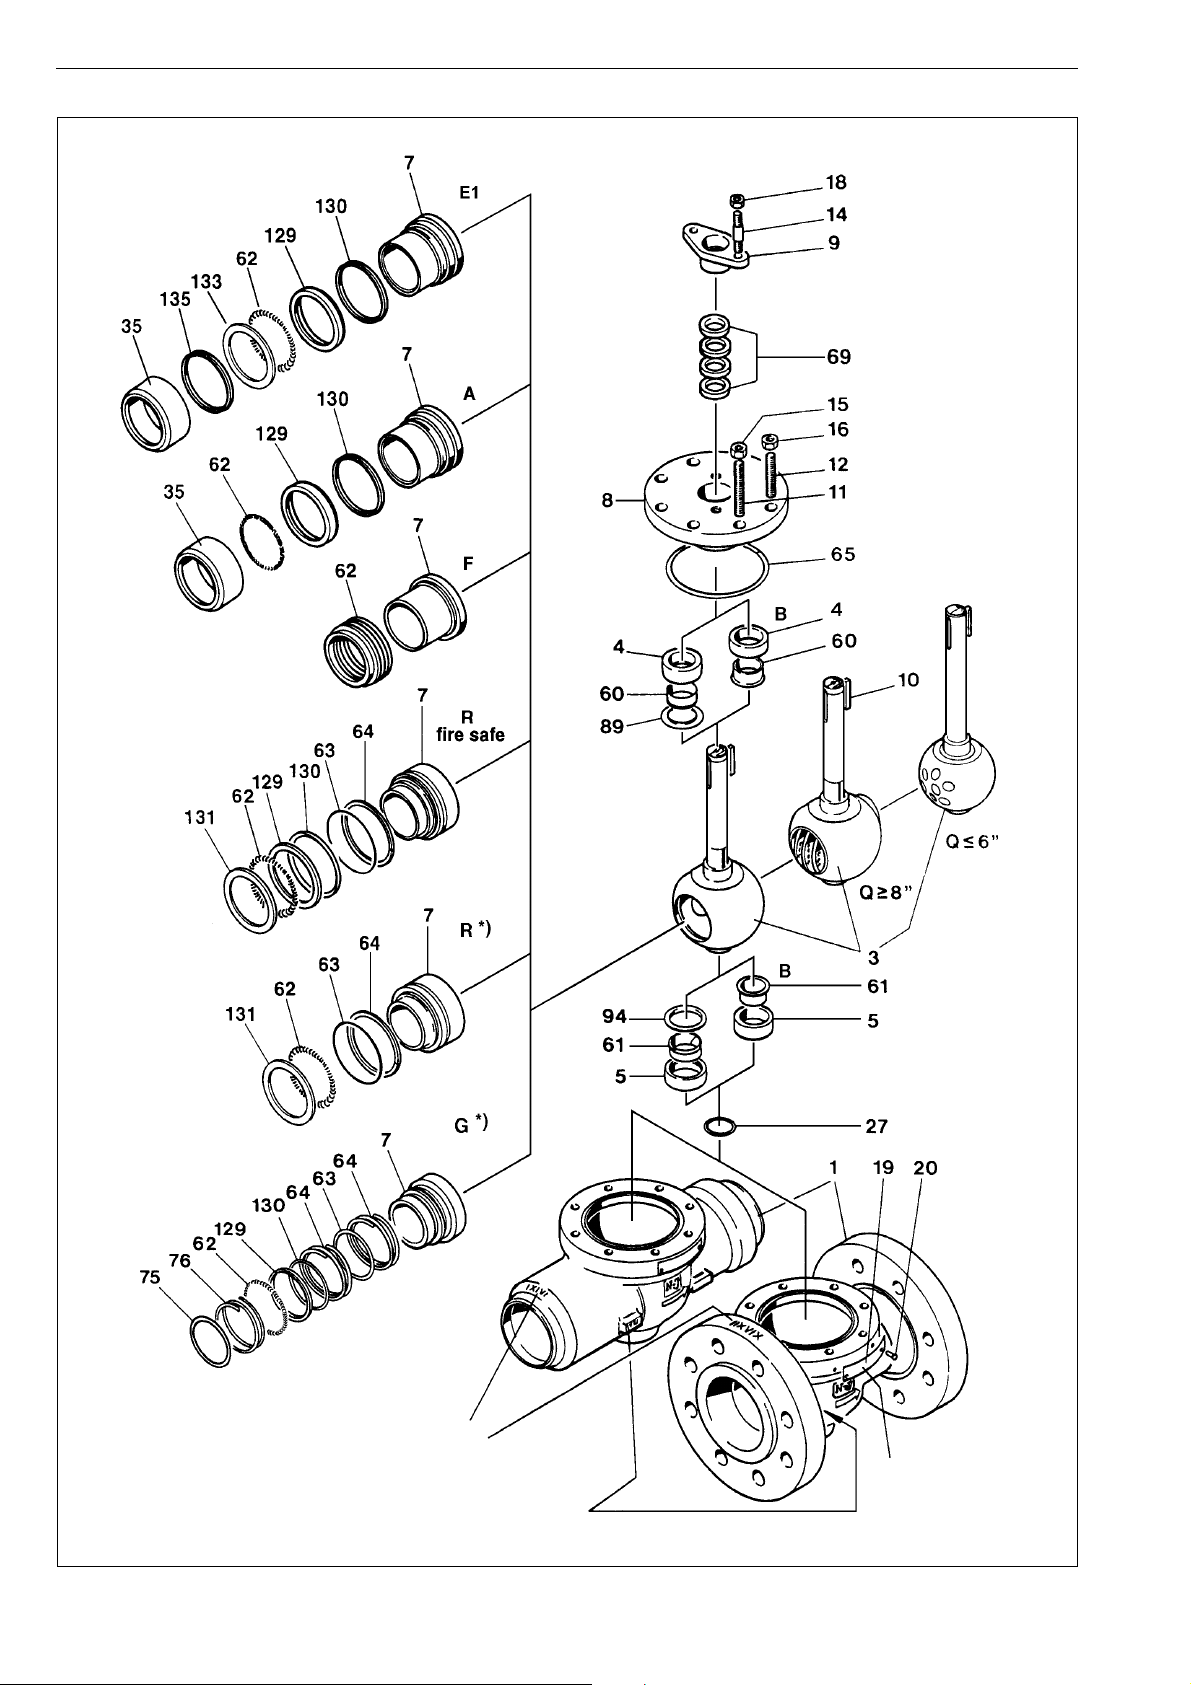
9 EXPLODED VIEW

1 T5 71 en 13
10 PARTS LIST
Item Qty. Description Spare part category
1 1 Body
3 1 Ball 3
4 1 Thrust bearing 3
5 1 Trunnion bearing 3
7 1 Seat 2
8 1 Bonnet
9 1 Gland
10 1 Key 3
11 Stud
12 Stud
14 Stud
15 Hexagon nut
16 Hexagon nut
18 Hexagon nut
19 1 Identification plate
20 2 Screw
27 1 Lock ring
35 1 Support ring 2
60 1 Bearing 3
61 1 Bearing 3
62 1 Spring 2
63 1 O-ring
64 1 (G-seat: 2) Support ring
65 1 Gasket 1
69 Gland packing 1
75 1 O-ring
76 1 ( 4") Support ring
89 1 Thrust bearing 1***
94 1 Thrust bearing 1***
125 1 O-ring sleeve
129 1 Ring 2
130 1 Back seal 2
131 1 Spring retainer
133 1 Ring
135 1 Seal
Spare part category 1: Recommended soft parts, always needed for the repair. Delivered as a set.
***) Bearing set
Spare part category 2: Parts for replacing of the seat. Delivered as a set.
Spare part category 3: Parts for replacing of the closing element.
Spares for the full overhaul: All parts from the categories 1, 2 and 3

14 1 T5 71 en
11 DIMENSIONS AND WEIGHTS
T5D-BC, B1C
Type DN A _B _D F G H I J V X NPT kg
T5D01 - B1C6 25 197 124 25 400 260 335 215 191 36 90 1/4 14
T5D01 - B1C9 25 197 124 25 455 315 330 220 192 43 110 1/4 20
T5D015 - B1C6 40 235 155.4 38 400 260 380 215 223 36 90 1/4 19
T5D015 - B1C9 40 235 155.4 38 455 315 380 220 225 43 110 1/4 25
T5D015 - B1C11 40 235 155.4 38 540 375 390 225 230 51 135 3/8 31
T5D02 - B1C6 50 267 165.1 38 400 260 385 215 223 36 90 1/4 23
T5D02 - B1C9 50 267 165.1 38 455 315 385 220 225 43 110 1/4 29
T5D02 - B1C11 50 267 165.1 38 540 375 395 225 230 51 135 3/8 35
T5D03 - B1C11 80 317 209.5 50 540 375 430 225 245 51 135 3/8 48
T5D03 - B1C13 80 317 209.5 50 635 445 460 235 260 65 175 3/8 63
T5D04 - B1C13 100 368 254 76 635 445 525 235 303 65 175 3/8 87
T5D04 - B1C17 100 368 254 76 770 545 555 255 315 78 215 1/2 110
T5D04 - B1C20 100 368 254 76 840 575 590 270 337 97 215 1/2 129
T5D06 - B1C17 150 473 317.5 102 770 545 645 255 375 78 215 1/2 169
T5D06 - B1C20 150 473 317.5 102 840 575 680 270 397 97 215 1/2 188
T5D06 - B1C25 150 473 317.5 102 1040 710 735 310 415 121 265 1/2 245
T5D08 - B1C20 200 568 381 125 840 575 755 270 440 97 215 1/2 312
T5D08 - B1C25 200 568 381 125 1040 710 815 310 465 121 265 1/2 369
T5D08 - B1C32 200 568 381 125 1330 910 895 350 505 153 395 3/4 489
T5D10 - B1C25 250 708 444.5 152 1040 710 865 310 480 121 265 1/2 445
T5D10 - B1C32 250 708 444.5 152 1330 910 940 350 515 153 395 3/4 565
T5D10 - B1C40 250 708 444.5 152 1660 1150 1040 370 565 194 505 3/4 760
T5D12 - B1C25 300 775 520.7 202 1040 710 960 310 539 121 265 1/2 660
T5D12 - B1C32 300 775 520.7 202 1330 910 1040 350 576 153 395 3/4 780
T5D12 - B1C40 300 775 520.7 202 1660 1150 1140 370 626 194 505 3/4 975
T5D14 - B1C32 350 927 584.2 254 1330 910 1250 350 755 153 395 3/4 1300
T5D14 - B1C40 350 927 584.2 254 1660 1150 1350 370 805 194 505 3/4 1495
T5D14 - B1C50 350 927 584.2 254 1970 1350 1455 415 855 242 610 1 1880
T5D16 - B1C32 400 1057 647.7 254 1330 910 1280 350 755 153 395 3/4 1350
T5D16 - B1C40 400 1057 647.7 254 1660 1150 1385 370 805 194 505 3/4 1545
T5D16 - B1C50 400 1057 647.7 254 1970 1350 1485 415 855 242 610 1 1930

1 T5 71 en 15
T5F-BC, B1C
Type DN A _B _D F G H I J V X NPT kg
T5F01 - B1C6 25 210 124 25 400 260 298 215 191 36 90 1/4 15
T5F01 - B1C9 25 210 124 25 455 315 309 220 192 43 110 1/4 21
T5F015 - B1C6 40 251 155.4 38 400 260 350 215 223 36 90 1/4 21
T5F015 - B1C9 40 251 155.4 38 455 315 380 220 225 43 110 1/4 27
T5F015 - B1C11 40 251 155.4 38 540 375 390 225 230 51 135 3/8 33
T5F02 - B1C6 50 286 165.1 38 400 260 385 215 223 36 90 1/4 25
T5F02 - B1C9 50 286 165.1 38 455 315 385 220 225 43 110 3/8 31
T5F02 - B1C11 50 286 165.1 38 540 375 395 225 230 51 135 3/8 37
T5F03 - B1C11 80 337 209.5 50 540 375 430 225 245 51 135 3/8 52
T5F03 - B1C13 80 337 209.5 50 635 445 460 235 260 65 175 3/8 67
T5F04 - B1C13 100 394 273.1 76 635 445 535 235 303 65 175 3/8 100
T5F04 - B1C17 100 394 273.1 76 770 545 565 255 315 78 215 1/2 123
T5F04 - B1C20 100 394 273.1 76 840 575 600 270 337 97 215 1/2 142
T5F06 - B1C17 150 508 355.6 102 770 545 665 255 375 78 215 1/2 201
T5F06 - B1C20 150 508 355.6 102 840 575 700 270 397 97 215 1/2 220
T5F06 - B1C25 150 508 355.6 102 1040 710 755 310 415 121 265 1/2 277
T5F08 - B1C20 200 610 419.1 125 840 575 775 270 440 97 215 1/2 360
T5F08 - B1C25 200 610 419.1 125 1040 710 835 310 465 121 265 1/2 417
T5F08 - B1C32 200 610 419.1 125 1330 910 915 350 505 153 395 3/4 537
T5F10 - B1C25 250 752 508 152 1040 710 895 310 480 121 265 1/2 533
T5F10 - B1C32 250 752 508 152 1330 910 970 350 515 153 395 3/4 653
T5F10 - B1C40 250 752 508 152 1660 1150 1075 370 565 194 505 3/4 848
T5F12 - B1C25 300 819 558.8 202 1040 710 980 310 539 121 265 1/2 743
T5F12 - B1C32 300 819 558.8 202 1330 910 1060 350 576 153 395 3/4 863
T5F12 - B1C40 300 819 558.8 202 1660 1150 1160 370 626 194 505 3/4 1058
T5F14 - B1C32 350 972 603.3 254 1330 910 1260 350 755 153 395 3/4 1373
T5F14 - B1C40 350 972 603.3 254 1660 1150 1360 370 805 194 505 3/4 1568
T5F14 - B1C50 350 972 603.3 254 1970 1350 1465 415 855 242 610 1 1953
T5F16 - B1C32 400 1108 685.8 254 1330 910 1300 350 755 153 395 3/4 1478
T5F16 - B1C40 400 1108 685.8 254 1660 1150 1400 370 805 194 505 3/4 1673
T5F16 - B1C50 400 1108 685.8 254 1970 1350 1505 415 855 242 610 1 2058
T5D-BJ/BJA, B1J/B1JA
Type DN A _B _D F G H I J V X NPT kg
T5D01 - B1J/B1JA8 25 197 124 25 560 420 320 220 192 43 135 3/8 27
T5D01 - B1J10 25 197 124 25 650 490 350 225 198 51 175 3/8 40
T5D015 - B1J/B1JA8 40 235 155.4 38 560 420 380 220 225 43 135 3/8 32
T5D015 - B1J/B1JA10 40 235 155.4 38 650 490 395 225 230 51 175 3/8 45
T5D015 - B1J12 40 235 155.4 38 800 620 440 235 255 65 215 1/2 72
T5D02 - B1J/B1JA8 50 267 165.1 38 560 420 385 220 225 43 135 3/8 36
T5D02 - B1J/B1JA10 50 267 165.1 38 650 490 400 225 230 51 175 3/8 49
T5D02 - B1J12 50 267 165.1 38 800 620 445 235 255 65 215 1/2 76
T5D03 - B1J/B1JA10 80 317 209.5 50 650 490 440 225 245 51 175 3/8 62
T5D03 - B1J/B1JA12 80 317 209.5 50 800 620 475 235 260 65 215 1/2 89
T5D03 - B1J/B1JA16 80 317 209.5 50 990 760 515 255 275 78 265 1/2 132
T5D04 - B1J/B1JA12 100 368 254 76 800 620 540 235 303 65 215 1/2 113
T5D04 - B1J/B1JA16 100 368 254 76 990 760 575 255 315 78 265 1/2 156
T5D04 - B1J/B1JA20 100 368 254 76 1200 935 660 270 337 97 395 3/4 231
T5D06 - B1J/B1JA16 150 473 317.5 102 990 760 670 255 378 78 265 1/2 215
T5D06 - B1J/B1JA20 150 473 317.5 102 1200 935 755 270 395 97 395 3/4 290
T5D06 - B1J/B1JA25 150 473 317.5 102 1530 1200 830 310 415 121 505 3/4 465
T5D08 - B1J/B1JA20 200 568 381 125 1200 935 830 270 440 97 395 3/4 414
T5D08 - B1J/B1JA25 200 568 381 125 1530 1200 910 310 465 121 505 3/4 589
T5D08 - B1J/B1JA32 200 568 381 125 1830 1410 965 350 505 153 540 1 909
T5D10 - B1J/B1JA20 250 708 444.5 152 1200 935 865 270 445 97 395 3/4 490
T5D10 - B1J/B1JA25 250 708 444.5 152 1530 1200 955 310 480 121 505 3/4 665
T5D10 - B1J/B1JA32 250 708 444.5 152 1830 1410 1010 350 515 153 540 1 985
T5D12 - B1J/B1JA25 300 775 520.7 202 1530 1410 1055 270 539 121 505 3/4 880
T5D12 - B1J/B1JA32 300 775 520.7 202 1830 1410 1110 350 576 153 540 1 1200
T5D14 - B1J/B1JA32 350 927 584.2 254 1830 1410 1320 350 755 153 540 1 1720
T5D16 - B1J/B1JA32 400 1057 647.7 254 1830 1410 1350 350 755 153 540 1 1770

16 1 T5 71 en
T5F-BJ/BJA, B1J/B1JA
Type DN A _B _D F G H I J V X NPT kg
T5F01 - B1J/B1JA8 25 210 124 25 560 420 320 220 192 43 135 3/8 28
T5F01 - B1J10 25 210 124 25 650 490 350 225 198 51 175 3/8 41
T5F015 - B1J/B1JA8 40 251 155.4 38 560 420 380 220 225 43 135 3/8 34
T5F015 - B1J/B1JA10 40 251 155.4 38 650 490 395 225 230 51 175 3/8 47
T5F015 - B1J12 40 251 155.4 38 800 620 440 235 255 65 215 1/2 74
T5F02 - B1J/B1JA8 50 286 165.1 38 560 420 385 220 225 43 135 3/8 38
T5F02 - B1J/B1JA10 50 286 165.1 38 650 490 400 225 230 51 175 3/8 51
T5F02 - B1J12 50 286 165.1 38 800 620 445 235 255 65 215 1/2 78
T5F03 - B1J/B1JA10 80 337 209.5 50 650 490 440 225 245 51 175 3/8 66
T5F03 - B1J/B1JA12 80 337 209.5 50 800 620 475 235 260 65 215 1/2 93
T5F03 - B1J/B1JA16 80 337 209.5 50 990 760 515 255 275 78 265 1/2 136
T5F04 - B1J/B1JA12 100 394 273.1 76 800 620 550 235 303 65 215 1/2 126
T5F04 - B1J/B1JA16 100 394 273.1 76 990 760 585 255 315 78 265 1/2 169
T5F04 - B1J/B1JA20 100 394 273.1 76 1200 935 670 270 337 97 395 3/4 244
T5F06 - B1J/B1JA16 150 508 355.6 102 990 760 690 255 378 78 265 1/2 247
T5F06 - B1J/B1JA20 150 508 355.6 102 1200 935 770 270 395 97 395 3/4 322
T5F06 - B1J/B1JA25 150 508 355.6 102 1530 1200 845 310 415 121 505 3/4 497
T5F08 - B1J/B1JA20 200 610 419.1 125 1200 935 850 270 440 97 395 3/4 467
T5F08 - B1J/B1JA25 200 610 419.1 125 1530 1200 930 310 465 121 505 3/4 637
T5F08 - B1J/B1JA32 200 610 419.1 125 1830 1410 985 350 505 153 540 1 957
T5F10 - B1J/B1JA20 250 752 508 152 1200 935 900 270 445 97 395 3/4 578
T5F10 - B1J/B1JA25 250 752 508 152 1530 1200 990 310 480 121 505 3/4 753
T5F10 - B1J/B1JA32 250 752 508 152 1830 1410 1040 350 515 153 540 1 1073
T5F12 - B1J/B1JA25 300 819 558.8 202 1530 1200 1070 310 539 121 505 3/4 963
T5F12 - B1J/B1JA32 300 819 558.8 202 1830 1410 1125 350 576 153 540 1 1283
T5F14 - B1J/B1JA32 350 927 603.3 254 1830 1410 1330 350 755 153 540 1 1793
T5F16 - B1J/B1JA32 400 1108 685.8 254 1830 1410 1370 350 755 153 540 1 1898
T25F-BC, B1C
Type DN A _B _D F G H I J V X NPT kg
T25F02 - B1C11 50 292 165.1 50 540 375 410 225 245 51 135 3/8 53
T25F02 - B1C13 50 292 165.1 50 635 445 440 235 260 65 175 3/8 68
T25F03 - B1C13 80 356 209.5 76 635 445 500 235 300 65 175 3/8 107
T25F03 - B1C17 80 356 209.5 76 770 545 530 255 315 78 215 1/2 130
T25F03 - B1C20 80 356 209.5 76 840 575 570 270 337 97 215 1/2 145
T25F04 - B1C17 100 432 273.1 102 770 545 625 255 375 78 215 1/2 205
T25F04 - B1C20 100 432 273.1 102 840 575 660 270 397 97 215 1/2 218
T25F04 - B1C25 100 432 273.1 102 1040 710 715 310 415 121 265 1/2 285
T25F06 - B1C25 150 559 355.6 152 1040 710 820 310 480 121 265 1/2 445
T25F06 - B1C32 150 559 355.6 152 1330 910 895 350 515 153 395 3/4 565
T25F06 - B1C40 150 559 355.6 152 1660 1150 995 370 565 194 505 3/4 760
T25F08 - B1C25 200 660 419.1 202 1040 710 910 310 539 121 265 1/2 630
T25F08 - B1C32 200 660 419.1 202 1330 910 990 350 576 153 395 3/4 770
T25F08 - B1C40 200 660 419.1 202 1660 1150 1090 370 626 194 505 3/4 970
T25F10 - B1C32 250 787 508.0 254 1330 910 1210 350 755 153 395 3/4 1080
T25F10 - B1C40 250 787 508.0 254 1660 1150 1315 370 805 194 505 3/4 1270
T25F10 - B1C50 250 787 508.0 254 1970 1350 1415 415 855 242 610 1 1660
T25F-BJ/BJA, B1J/B1JA
Type DN A _B _D F G H I J V X NPT kg
T25F02 - B1J/B1JA10 50 292 165.1 50 650 490 415 225 245 51 175 3/8 67
T25F02 - B1J/B1JA12 50 292 165.1 50 800 620 450 235 260 65 215 1/2 95
T25F02 - B1J/B1JA16 50 292 165.1 50 990 760 490 255 275 78 265 1/2 140
T25F03 - B1J/B1JA12 80 356 209.5 76 800 620 515 235 303 65 215 1/2 129
T25F03 - B1J/B1JA16 80 356 209.5 76 990 760 555 255 315 78 265 1/2 175
T25F03 - B1J/B1JA20 80 356 209.5 76 1200 935 640 270 335 97 395 3/4 250
T25F04 - B1J/B1JA16 100 432 273.1 102 990 760 650 255 378 78 265 1/2 245
T25F04 - B1J/B1JA20 100 432 273.1 102 1200 935 730 270 395 97 395 3/4 330
T25F04 - B1J/B1JA25 100 432 273.1 102 1530 1200 805 310 415 121 505 3/4 500
T25F06 - B1J/B1JA20 150 559 355.6 152 1200 935 820 270 445 97 395 3/4 480
T25F06 - B1J/B1JA25 150 559 355.6 152 1530 1200 910 310 480 121 505 3/4 660
T25F06 - B1J/B1JA32 150 559 355.6 152 1830 1410 965 350 515 153 540 1 980
T25F08 - B1J/B1JA25 200 660 419.1 202 1530 1200 1005 310 539 121 505 3/4 860
T25F08 - B1J/B1JA32 200 660 419.1 202 1830 1410 1060 350 576 153 540 1 1180
T25F10 - B1J/B1JA32 250 787 508 254 1830 1410 1280 350 755 153 540 1 1490

1 T5 71 en 17
T4D-BC, B1C
Type DN A _B C _D _E F G H I J V X NPT kg
T4D01 - B1C6 25 210 36 38 25 26.6 400 260 275 215 191 36 90 1/4 20
T4D01 - B1C9 25 210 36 38 25 26.6 455 315 365 220 192 43 110 1/4 26
T4D015 - B1C6 40 251 52 60 38 40.6 400 260 365 215 223 51 135 1/4 22
T4D015 - B1C9 40 251 52 60 38 40.6 455 315 360 220 225 43 110 1/4 27
T4D015 - B1C11 40 251 52 60 38 40.6 540 375 370 225 230 51 135 3/8 33
T4D02 - B1C6 50 292 62 60 38 52.5 400 260 365 215 223 43 110 1/4 22
T4D02 - B1C9 50 292 62 60 38 52.5 455 315 360 220 225 43 110 1/4 30
T4D02 - B1C11 50 292 62 60 38 52.5 540 375 370 225 230 51 135 3/8 36
T4D03 - B1C11 80 356 91 68 50 77.9 540 375 395 225 245 51 135 3/8 50
T4D03 - B1C13 80 356 91 68 50 77.9 635 445 425 235 260 65 175 3/8 65
T4D04 - B1C13 100 432 117 90 76 102.3 635 445 425 235 300 65 175 3/8 100
T4D04 - B1C17 100 432 117 90 76 102.3 770 545 515 255 315 78 215 1/2 125
T4D04 - B1C20 100 432 117 90 76 102.3 840 575 552 270 337 97 215 1/2 205
T4D06 - B1C17 150 559 172 122 102 154.1 770 545 610 255 375 78 215 1/2 185
T4D06 - B1C20 150 559 172 122 102 154.1 840 575 645 270 397 97 215 1/2 198
T4D06 - B1C25 150 559 172 122 102 154.1 1040 710 700 310 415 121 265 1/2 265
T4D08 - B1C20 200 660 223 140 125 202.7 840 575 705 270 440 97 265 1/2 283
T4D08 - B1C25 200 660 223 140 125 202.7 1040 710 765 310 465 121 265 1/2 350
T4D08 - B1C32 200 660 223 140 125 202.7 1330 910 845 350 505 153 395 3/4 480
T4D10 - B1C25 250 787 278 170 152 254.4 1040 710 810 310 480 121 265 1/2 425
T4D10 - B1C32 250 787 278 170 152 254.4 1330 910 885 350 515 153 395 3/4 545
T4D10 - B1C40 250 787 278 170 152 254.4 1660 1150 995 370 565 194 505 3/4 735
T4D12 - B1C25 300 838 329 210 202 303.2 1040 710 960 310 539 121 265 1/2 605
T4D12 - B1C32 300 838 329 210 202 303.2 1330 910 990 350 576 153 395 3/4 745
T4D12 - B1C40 300 838 329 210 202 303.2 1660 1150 1090 370 626 194 505 3/4 945
T4D14 - B1C32 350 889 362 275 254 333.4 1330 910 1230 350 755 153 395 3/4 1210
T4D14 - B1C40 350 889 362 275 254 333.4 1660 1150 1335 370 805 194 505 3/4 1400
T4D14 - B1C50 350 889 362 275 254 333.4 1970 1350 1435 415 855 242 610 1 1790
T4D16 - B1C32 400 991 413 275 254 381.0 1330 910 1230 350 755 153 395 3/4 1260
T4D16 - B1C40 400 991 413 275 254 381.0 1660 1150 1335 370 805 194 505 3/4 1450
T4D16 - B1C50 400 991 413 275 254 381.0 1970 1350 1435 415 855 242 610 1 1840

18 1 T5 71 en
T4F-BC, B1C
Type DN A _B C _D _E F G H I J V X NPT kg
T4F01 - B1C6 25 210 36 38 25 24.4 400 260 275 215 191 36 90 1/4 20
T4F01 - B1C9 25 210 36 38 25 24.4 455 315 365 220 192 43 110 1/4 26
T4F015 - B1C6 40 251 52 60 38 37.8 400 260 365 225 223 51 135 1/4 22
T4F015 - B1C9 40 251 52 60 38 37.8 455 315 360 220 225 43 110 1/4 27
T4F015 - B1C11 40 251 52 60 38 37.8 540 375 370 225 230 51 135 3/8 33
T4F02 - B1C6 50 292 62 60 38 49.3 400 260 365 225 223 51 135 1/4 22
T4F02 - B1C9 50 292 62 60 38 49.3 455 315 360 220 225 43 110 1/4 30
T4F02 - B1C11 50 292 62 60 38 49.3 540 375 370 225 230 51 135 3/8 36
T4F03 - B1C11 80 356 91 68 50 73.7 540 375 395 225 245 51 135 3/8 50
T4F03 - B1C13 80 356 91 68 50 73.7 635 445 425 235 260 65 175 3/8 65
T4F04 - B1C13 100 432 117 90 76 97.1 635 445 425 235 303 65 175 3/8 100
T4F04 - B1C17 100 432 117 90 76 97.1 770 545 515 255 315 78 215 1/2 125
T4F04 - B1C20 100 432 117 90 76 97.1 840 575 552 270 337 97 215 1/2 205
T4F06 - B1C17 150 559 172 122 102 146.3 770 545 610 255 375 78 215 1/2 185
T4F06 - B1C20 150 559 172 122 102 146.3 840 575 645 270 397 97 215 1/2 198
T4F06 - B1C25 150 559 172 122 102 146.3 1040 710 700 310 415 121 265 1/2 265
T4F08 - B1C20 200 660 223 140 125 188.9 840 575 705 270 440 97 265 1/2 283
T4F08 - B1C25 200 660 223 140 125 188.9 1040 710 765 310 465 121 265 1/2 350
T4F08 - B1C32 200 660 223 140 125 188.9 1330 910 845 350 505 153 395 3/4 480
T4F10 - B1C25 250 787 278 170 152 242.8 1040 710 810 310 480 121 265 1/2 425
T4F10 - B1C32 250 787 278 170 152 242.8 1330 910 885 350 515 153 395 3/4 545
T4F10 - B1C40 250 787 278 170 152 242.8 1660 1150 955 370 565 194 505 3/4 735
T4F12 - B1C25 300 838 329 210 202 288.8 1040 710 960 310 539 121 265 1/2 605
T4F12 - B1C32 300 838 329 210 202 288.8 1330 910 990 350 576 153 395 3/4 745
T4F12 - B1C40 300 838 329 210 202 288.8 1660 1150 1090 370 626 194 505 3/4 945
T4F14 - B1C32 350 889 362 275 254 317.6 1330 910 1230 350 755 153 395 3/4 1210
T4F14 - B1C40 350 889 362 275 254 317.6 1660 1150 1335 370 805 194 505 3/4 1400
T4F14 - B1C50 350 889 362 275 254 317.6 1970 1350 1435 415 855 242 610 1 1790
T4F16 - B1C32 400 991 413 275 254 363.6 1330 910 1230 350 755 153 395 3/4 1260
T4F16 - B1C40 400 991 413 275 254 363.6 1660 1150 1335 370 805 194 505 3/4 1450
T4F16 - B1C50 400 991 413 275 254 363.6 1970 1350 1435 415 855 242 610 1 1840
T4D-BJ/BJA, B1J/B1JA
Type DN A _B C _D _E F G H I J V X NPT kg
T4D01 - B1J/B1JA8 25 210 36 38 25 26.6 560 420 305 220 192 51 175 3/8 33
T4D01 - B1J10 25 210 36 38 25 26.6 650 490 325 225 198 65 215 3/8 45
T4D015 - B1J/B1JA8 40 251 52 60 38 40.6 560 420 360 220 225 43 135 3/8 34
T4D015 - B1J/B1JA10 40 251 52 60 38 40.6 650 490 380 225 230 51 175 3/8 47
T4D015 - B1J12 40 251 52 60 38 40.6 800 620 425 235 255 65 215 1/2 74
T4D02 - B1J/B1JA8 50 292 62 60 38 52.5 560 420 360 220 225 43 135 3/8 37
T4D02 - B1J/B1JA10 50 292 62 60 38 52.5 650 490 380 225 230 51 175 3/8 50
T4D02 - B1J12 50 292 62 60 38 52.5 800 620 425 235 255 65 215 1/2 78
T4D03 - B1J/B1JA10 80 356 91 68 50 77.9 650 490 400 225 245 51 175 3/8 64
T4D03 - B1J/B1JA12 80 356 91 68 50 77.9 800 620 435 235 260 65 215 1/2 92
T4D03 - B1J/B1JA16 80 356 91 68 50 77.9 990 760 475 255 275 78 265 1/2 137
T4D04 - B1J/B1JA12 100 432 117 90 76 102.3 800 620 500 235 303 65 215 1/2 122
T4D04 - B1J/B1JA16 100 432 117 90 76 102.3 990 760 540 255 315 78 265 1/2 175
T4D04 - B1J/B1JA20 100 432 117 90 76 102.3 1200 935 625 270 337 97 395 3/4 245
T4D06 - B1J/B1JA16 150 559 172 122 102 154.1 990 760 635 255 378 78 265 1/2 225
T4D06 - B1J/B1JA20 150 559 172 122 102 154.1 1200 935 715 270 395 97 395 3/4 300
T4D06 - B1J/B1JA25 150 559 172 122 102 154.1 1530 1200 790 310 415 121 505 3/4 485
T4D08 - B1J/B1JA20 200 660 223 140 125 202.7 1200 935 765 270 425 97 395 3/4 395
T4D08 - B1J/B1JA25 200 660 223 140 125 202.7 1530 1200 860 310 465 121 505 3/4 570
T4D08 - B1J/B1JA32 200 660 223 140 125 202.7 1830 1410 915 350 505 153 540 1 890
T4D10 - B1J/B1JA20 250 787 278 170 152 254.4 1200 935 815 270 445 97 395 3/4 450
T4D10 - B1J/B1JA25 250 787 278 170 152 254.4 1530 1200 905 310 480 121 505 3/4 645
T4D10 - B1J/B1JA32 250 787 278 170 152 254.4 1830 1410 955 350 515 153 540 1 965
T4D12 - B1J/B1JA25 300 838 329 210 202 303.2 1530 1200 1005 310 539 121 505 3/4 845
T4D12 - B1J/B1JA32 300 838 329 210 202 303.2 1830 1410 1060 350 576 153 540 1 1165
T4D14 - B1J/B1JA32 350 889 362 275 254 333.4 1830 1410 1300 350 755 153 540 1 1530
T4D16 - B1J/B1JA32 400 991 413 275 254 381.0 1830 1410 1300 350 755 153 540 1 1680

1 T5 71 en 19
T4F-BJ/BJA, B1J/B1JA
Type DN A _B C _D _E F G H I J V X NPT kg
T4F01 - B1J/B1JA8 25 210 36 38 25 24.4 560 420 305 220 192 43 135 3/8 33
T4F01 - B1J10 25 210 36 38 25 24.4 650 490 325 225 198 51 175 3/8 45
T4F015 - B1J/B1JA8 40 251 52 60 38 37.8 560 420 360 220 225 43 135 3/8 34
T4F015 - B1J/B1JA10 40 251 52 60 38 37.8 650 490 380 225 230 51 175 3/8 47
T4F015 - B1J12 40 251 52 60 38 37.8 800 620 425 235 255 65 215 1/2 74
T4F02 - B1J/B1JA8 50 292 62 60 38 49.3 560 420 360 220 225 43 135 3/8 37
T4F02 - B1J/B1JA10 50 292 62 60 38 49.3 650 490 380 225 230 51 175 3/8 50
T4F02 - B1J12 50 292 62 60 38 49.3 800 620 425 235 255 65 215 1/2 78
T4F03 - B1J/B1JA10 80 356 91 68 50 73.7 650 490 400 225 245 51 175 3/8 64
T4F03 - B1J/B1JA12 80 356 91 68 50 73.7 800 620 435 235 260 65 215 1/2 92
T4F03 - B1J/B1JA16 80 356 91 68 50 73.7 990 760 475 255 275 78 265 1/2 137
T4F04 - B1J/B1JA12 100 432 117 90 76 97.1 800 620 500 235 303 65 215 1/2 122
T4F04 - B1J/B1JA16 100 432 117 90 76 97.1 990 760 540 255 315 78 265 1/2 175
T4F04 - B1J/B1JA20 100 432 117 90 76 97.1 1200 935 625 270 337 97 395 3/4 245
T4F06 - B1J/B1JA16 150 559 172 122 102 146.3 990 760 635 255 378 78 265 1/2 225
T4F06 - B1J/B1JA20 150 559 172 122 102 146.3 1200 935 715 270 395 97 395 3/4 300
T4F06 - B1J/B1JA25 150 559 172 122 102 146.3 1530 1200 790 310 415 121 505 3/4 485
T4F08 - B1J/B1JA20 200 660 223 140 125 188.9 1200 935 765 270 425 97 395 3/4 395
T4F08 - B1J/B1JA25 200 660 223 140 125 188.9 1530 1200 860 310 465 121 505 3/4 570
T4F08 - B1J/B1JA32 200 660 223 140 125 188.9 1830 1410 915 350 505 153 540 1 890
T4F10 - B1J/B1JA20 250 787 278 170 152 242.8 1200 935 815 270 445 97 395 3/4 450
T4F10 - B1J/B1JA25 250 787 278 170 152 242.8 1530 1200 905 310 480 121 505 3/4 645
T4F10 - B1J/B1JA32 250 787 278 170 152 242.8 1830 1410 955 350 515 153 540 1 965
T4F12 - B1J/B1JA25 300 838 329 210 202 288.8 1530 1200 1005 310 539 121 505 3/4 845
T4F12 - B1J/B1JA32 300 838 329 210 202 288.8 1830 1410 1060 350 576 153 540 1 1165
T4F14 - B1J/B1JA32 350 889 362 275 254 317.6 1830 1410 1300 350 755 153 540 1 1530
T4F16 - B1J/B1JA32 400 991 413 275 254 363.6 1830 1410 1300 350 755 153 540 1 1680
T35F-BC, B1C
Type DN A _B C _D _E F G H I J V X NPT kg
T35F02 - B1C11 50 292 91 68 50 73.7 540 375 375 225 245 51 135 3/8 49
T35F02 - B1C13 50 292 91 68 50 73.7 635 445 425 235 260 65 175 3/8 63
T35F03 - B1C13 80 356 117 90 76 97.1 635 445 485 235 300 65 175 3/8 97
T35F03 - B1C17 80 356 117 90 76 97.1 770 545 515 255 315 78 215 1/2 120
T35F03 - B1C20 80 356 117 90 76 97.1 840 575 550 270 337 97 215 1/2 135
T35F04 - B1C17 100 432 172 122 102 146.3 770 545 610 255 375 78 215 1/2 185
T35F04 - B1C20 100 432 172 122 102 146.3 840 575 645 270 397 97 215 1/2 203
T35F04 - B1C25 100 432 172 122 102 146.3 1040 710 700 310 415 121 265 1/2 265
T35F06 - B1C25 150 559 278 170 152 242.8 1040 710 810 310 480 121 265 1/2 415
T35F06 - B1C32 150 559 278 170 152 242.8 1330 910 885 350 515 153 395 3/4 535
T35F06 - B1C40 150 559 278 170 152 242.8 1660 1150 990 370 565 194 505 3/4 730
T35F08 - B1C25 200 660 329 210 202 288.8 1040 710 910 310 539 121 265 1/2 595
T35F08 - B1C32 200 660 329 210 202 288.8 1330 910 990 350 576 153 395 3/4 725
T35F08 - B1C40 200 660 329 210 202 288.8 1660 1150 1090 370 626 194 505 3/4 920
T35F10 - B1C32 250 787 362 275 254 317.6 1330 910 1230 350 755 153 395 3/4 1010
T35F10 - B1C40 250 787 362 275 254 317.6 1660 1150 1335 370 805 194 505 3/4 1205
T35F10 - B1C50 250 787 362 275 254 317.6 1970 1350 1435 415 855 242 610 1 1590
T35F-BJ/BJA, B1J/B1JA
Type DN A _B C _D _E F G H I J V X NPT kg
T35F02 - B1J/B1JA10 50 292 91 68 50 73.7 650 490 400 225 245 51 175 3/8 63
T35F02 - B1J/B1JA12 50 292 91 68 50 73.7 800 620 435 235 260 65 215 1/2 92
T35F02 - B1J/B1JA16 50 292 91 68 50 73.7 990 760 475 255 275 78 265 1/2 135
T35F03 - B1J/B1JA12 80 356 117 90 76 97.1 800 620 500 235 303 65 215 1/2 119
T35F03 - B1J/B1JA16 80 356 117 90 76 97.1 990 760 540 255 315 78 265 1/2 165
T35F03 - B1J/B1JA20 80 356 117 90 76 97.1 1200 935 625 270 335 97 395 3/4 240
T35F04 - B1J/B1JA16 100 432 172 122 102 146.3 990 760 635 255 378 78 265 1/2 230
T35F04 - B1J/B1JA20 100 432 172 122 102 146.3 1200 935 715 270 395 97 395 3/4 315
T35F04 - B1J/B1JA25 100 432 172 122 102 146.3 1530 1200 790 310 415 121 505 3/4 485
T35F06 - B1J/B1JA20 150 559 278 170 152 242.8 1200 935 815 270 445 97 395 3/4 445
T35F06 - B1J/B1JA25 150 559 278 170 152 242.8 1530 1200 905 310 480 121 505 3/4 635
T35F06- B1J/B1JA32 150 559 278 170 152 242.8 1830 1410 955 350 515 153 540 1 945
T35F08 - B1J/B1JA25 200 660 329 210 202 288.8 1530 1200 1005 310 539 121 505 3/4 825
T35F08 - B1J/B1JA32 200 660 329 210 202 288.8 1830 1410 1060 350 576 153 540 1 1145
T35F10 - B1J/B1JA32 250 787 362 275 254 317.6 1830 1410 1300 350 755 153 540 1 1430
20 1 T5 71 en
12 TYPE CODING
TOP ENTRY BALL VALVE, Series Top 5
1. 2. 3. 4. 5. 6. 7. 8. 9. 10.
TS F B 04 A A F 03 / 01
1. TRIM OPTIONS, V-PORT, Q-TRIM
2. SERIES
T5 Reduced bore, flanged
T4 Reduced bore, weld ends
T25 Full bore, flanged
T35 Full bore, weld ends
3. PRESSURE RATING
D ASME class 300
F ASME class 600
4. CONSTRUCTION
E General, PTFE bearings
High and low temperature, metal bearings.
B
Temperature range -50 °C...+450 °C.
5. SIZE
01, 015, 02, 03, 04, 06, 08, 10, 12, 14, 16
6. BODY SCREWS
A CF8M B8M
D WCB L7M
7. BALL
A CF8M + hard chrome with metal seats
D CF8M + NiBo
8. SEAT
A, F, E1 Standard metal seat
R Standard soft seat
9.
Seat
seal
Bonnet
gasket
Gland
packing
Seat
Graphite Graphite Graphite A, F E or C
Graphite Graphite Graphite A, F B or C
Viton GF Graphite Graphite R E
10. FLANGE FACING
- Stock Finish (Ra 10-12.5), without sign (standard)
01 Smooth Finish (Ra 3,2-6,3)
05 Ring Joint
Constru
ction
Metso Automation Inc.
North America, 44 Bowditch Drive, P.O. Box 8044, Shrewsbury, MA 01545, USA. Tel. +1 508 852 0200. Fax +1 508 852 8172
Latin America, Av. Independéncia, 2500-Iporanga, 18087-101, Sorocaba-São Paulo, Brazil. Tel. +55 15 3235 9700. Fax +55 15 3235 9748/49
Asia Pacific, 238A Thomson Road, #25-09 Novena Square Tower A, 307684 Singapore. Tel. +65 6511 1011. Fax +65 6250 0830
China, 19/F, the Exchange Beijing, No. 118, Jianguo Lu Yi, Chaoyang Dist, 100022 Beijing, China. Tel. +86-10-6566-6600. Fax +86-10-6566-2575
Europe, Levytie 6, P.O. Box 310, 00811 Helsinki, Finland. Tel. +358 20 483 150. Fax +358 20 483 151
Middle East, Roundabout 8, Unit AB-07, P.O. Box 17175, Jebel Ali Freezone, Dubai, United Arab Emirates.
Tel. +971 4 883 6974. Fax +971 4 883 6836
www.metso.com/automation
 Loading...