

Page 1
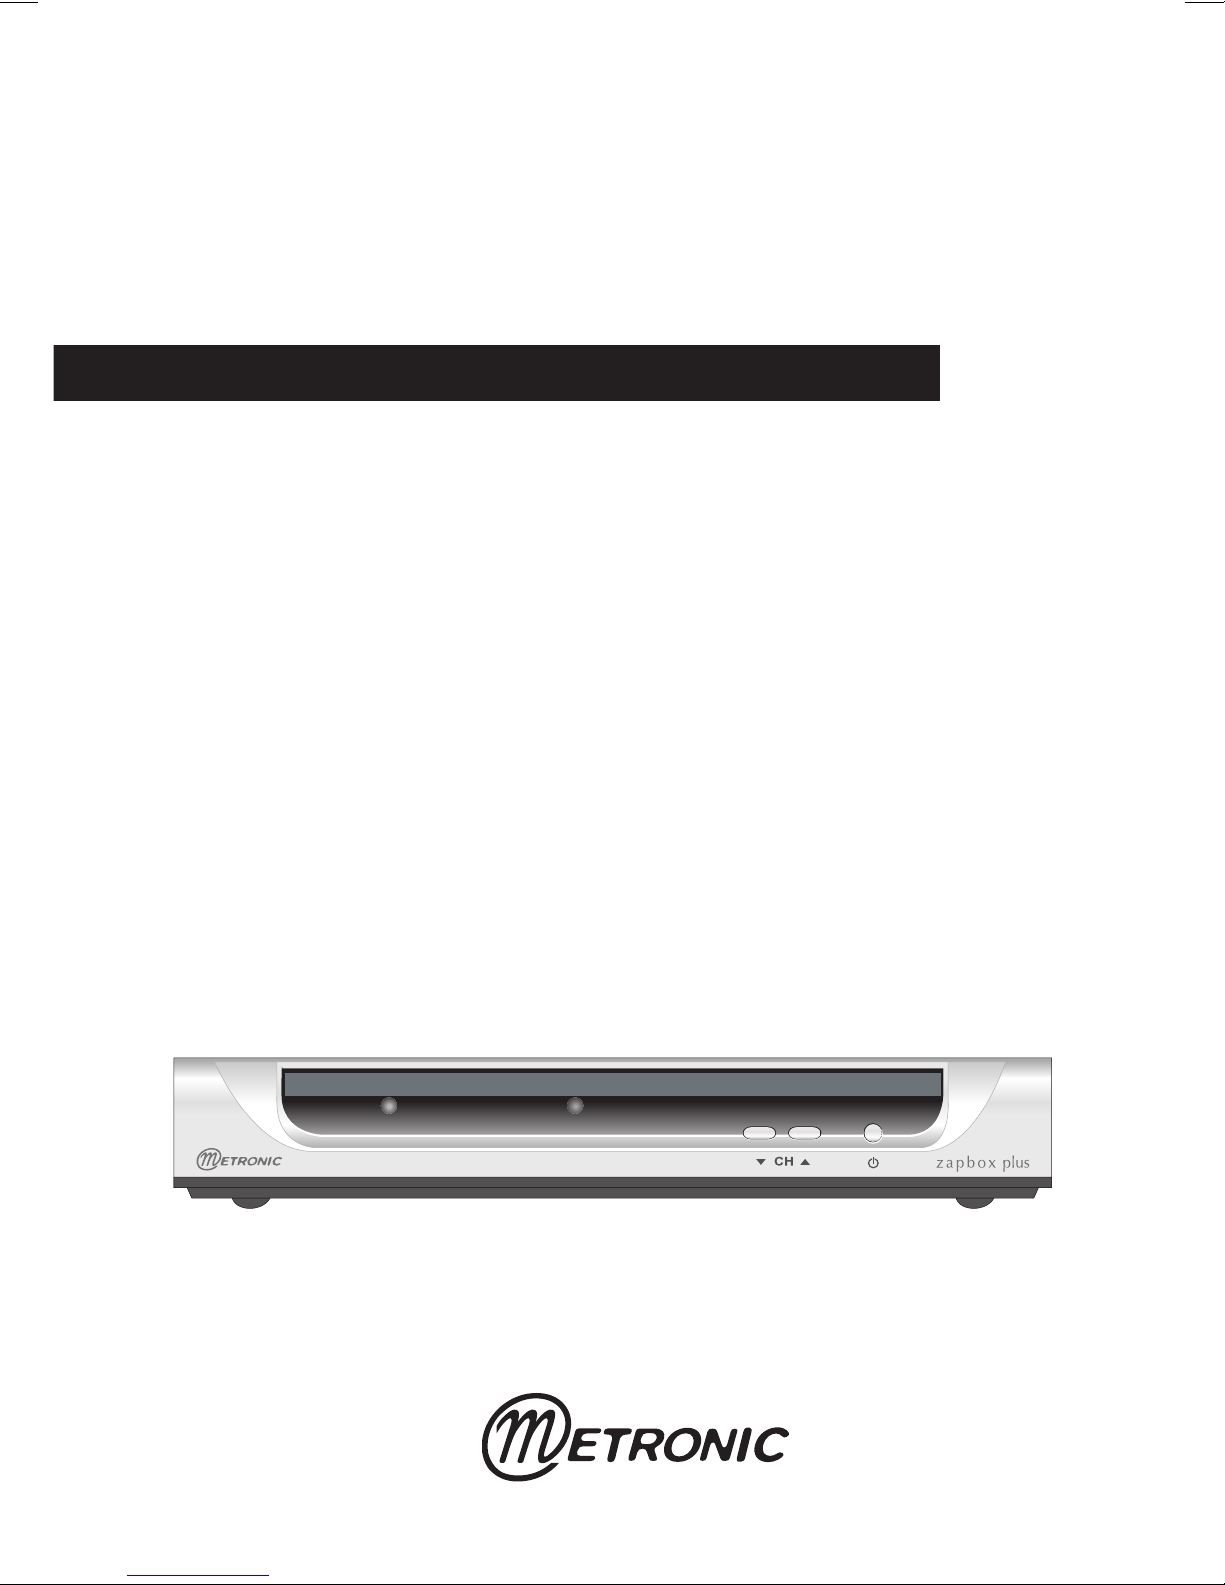
Digital Terrestrial Receiver
MET28
Item code : 441810
z a p b o x plus
Page 2

Page 3
3
Before installing your ZAPBOX Plus it is important that you read and
understand the instructions completely.
Remember that contact with 230V AC mains can be lethal or can cause severe
electric shock. To avoid this risk :
• Never remove the top cover of the receiver. There are no user-
serviceable parts inside it, but there are some high-voltage live parts.
• Never attempt to repair your receiver. Please contact your retailer.
• Make sure all electrical connectors are properly made.
• Do not place your receiver close to sources of heat, such as heater
or direct sunlight.
• Do not put anything on your receiver which might drip or spill onto it.
• Never place the product near objects filled with water.
• Do not use a liquid form to clean your receiver or remote. A dry cloth
will be sufficient.
If you come across a word that you do not understand, please refer to the
Glossary at the end of this manual.
Your receiver only has one tuner, meaning that you cannot record a channel
other than the one you are watching.
The remote requires two AAA 1.5V batteries. Ensure they are placed correctly.
Please do not dispose of used batteries in your domestic bins. You should
bring them back to your point of sale and place them in the right container
.
WARNING - IMPORTANT
ASSISTANCE AND ADVICE
THIS PRODUCT HAS A 12-MONTH WARRANTY FROM THE
DATE OF PUCHASE. DURING THIS PERIOD, IN AN EVENT OF
ANY PROBLEMS, PLEASE RETURN TO THE RETAILER WITH
PROOF OF PURCHASE.
Page 4
4
Programming the receiver is achieved through the various menus.
In order to make this manual easier to understand, we will describe
accessing a menu as shown below :
Go to MENU /
Setup / Service Setup / xxxx / Manual Scan.
This means :
• Press the MENU key to access the main menu.
• Press the arrow to select Setup.
• Press OK to confirm.
• Press the
arrow to select Service Setup.
• Press OK to confirm.
• Enter the 4 digit PIN code (0000 on purchase).
• Press the
arrow to select Manual Scan and confirm by
pressing OK.
• Note that words written in bold letters are those you can see on the
TV screen.
This symbol indicates that the
product must not be treated as
household
waste. The harmfull
substances possibly contained in
the equipment may have
negative
consequences on the environment
and / or the human health. At the end of its
life, bring
any electronic equipment back to
your retailer or at the collection point that
your city or town puts at your disposal
.
Page 5

5
INDEX
1 Installation 06
2 Remote description 10
3 Receiver description 12
4 Daily use 13
5 Personalising the channels listing 13
6 Parental lock 15
7 Resetting the receiver 16
8 Adjusting the TV signal 17
9 Radios 17
10 Channel Search 17
11 Using the receiver with a VCR 18
A - Programming 18
B - Connecting 19
12 TV guide 20
13 What to do if you experience a reception problem 21
14 Glossary 23
15 Multiplexes - channels 24
16 Channels list 25
Page 6
6
1 - Installation
A - Simplified installation
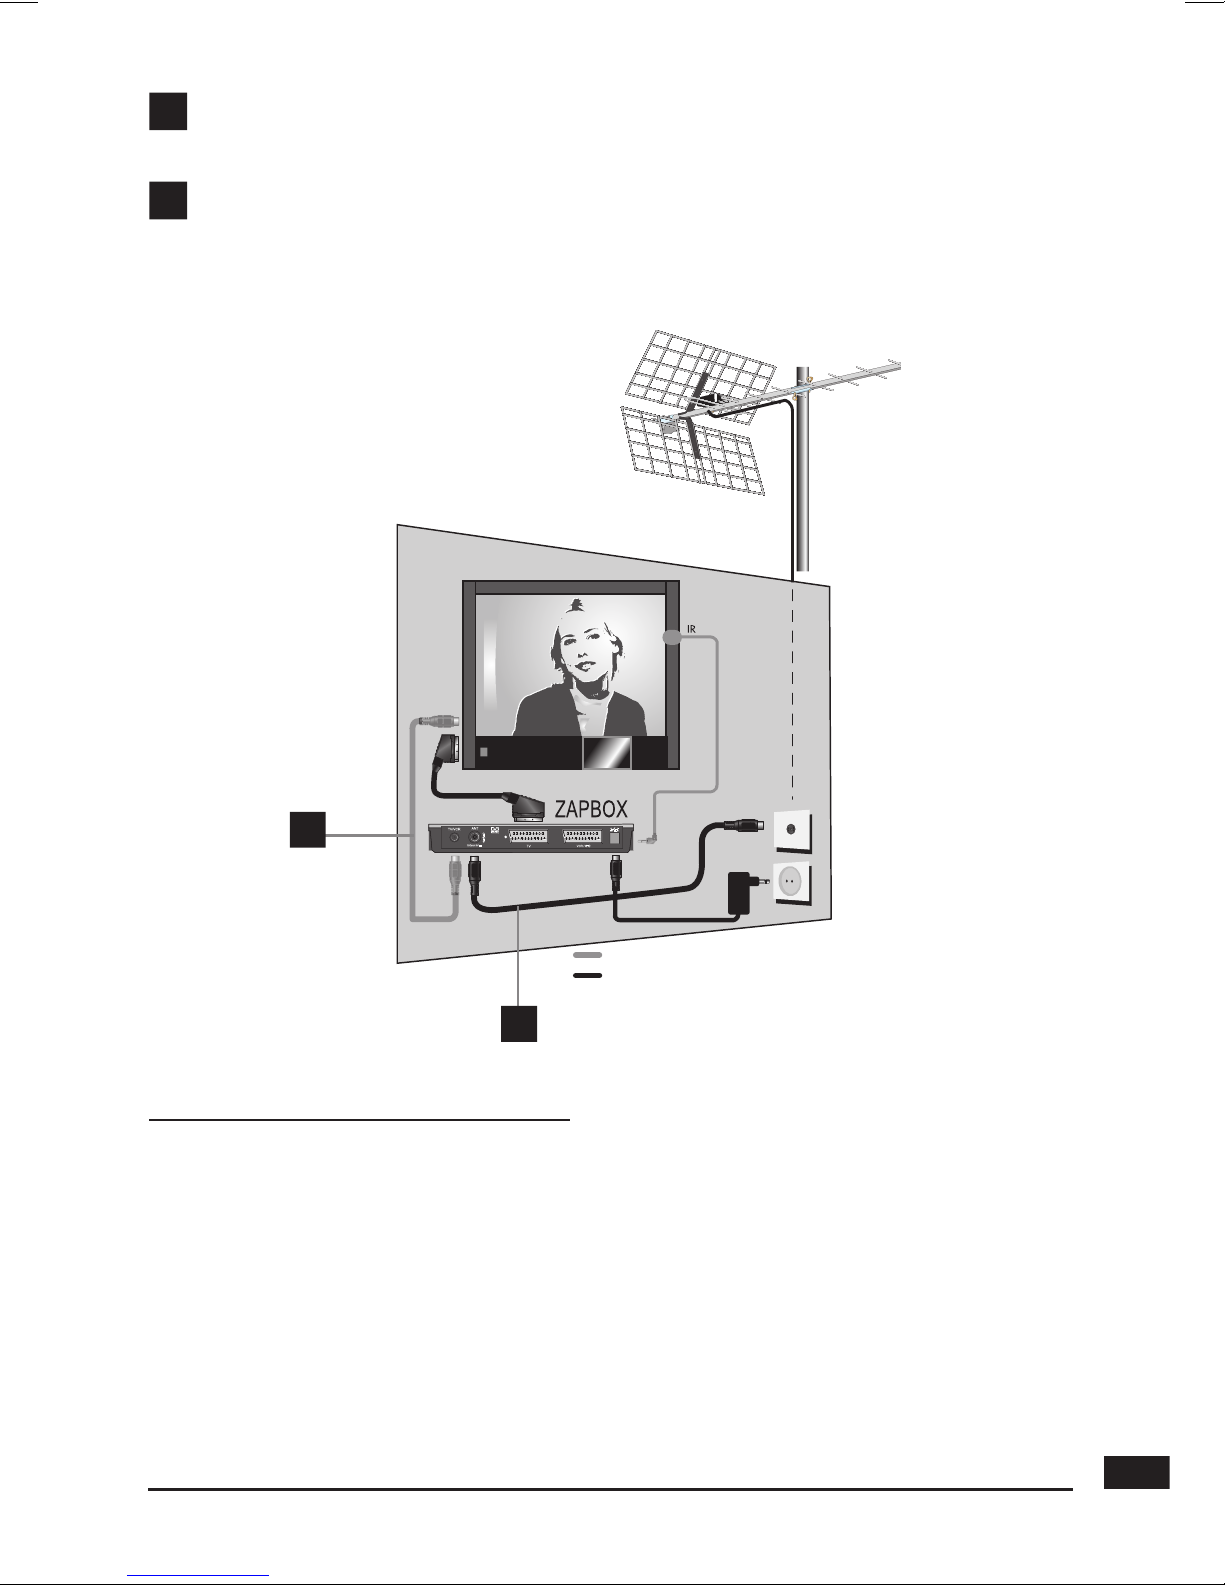
As the receiver is not yet plugged into the main source, connect the antenna
directly to the ANT input of the receiver. Connect the TV to the TV scart outlet
of the receiver. Switch on the TV and connect the receiver to the main source.
Insert the batteries in the remote.
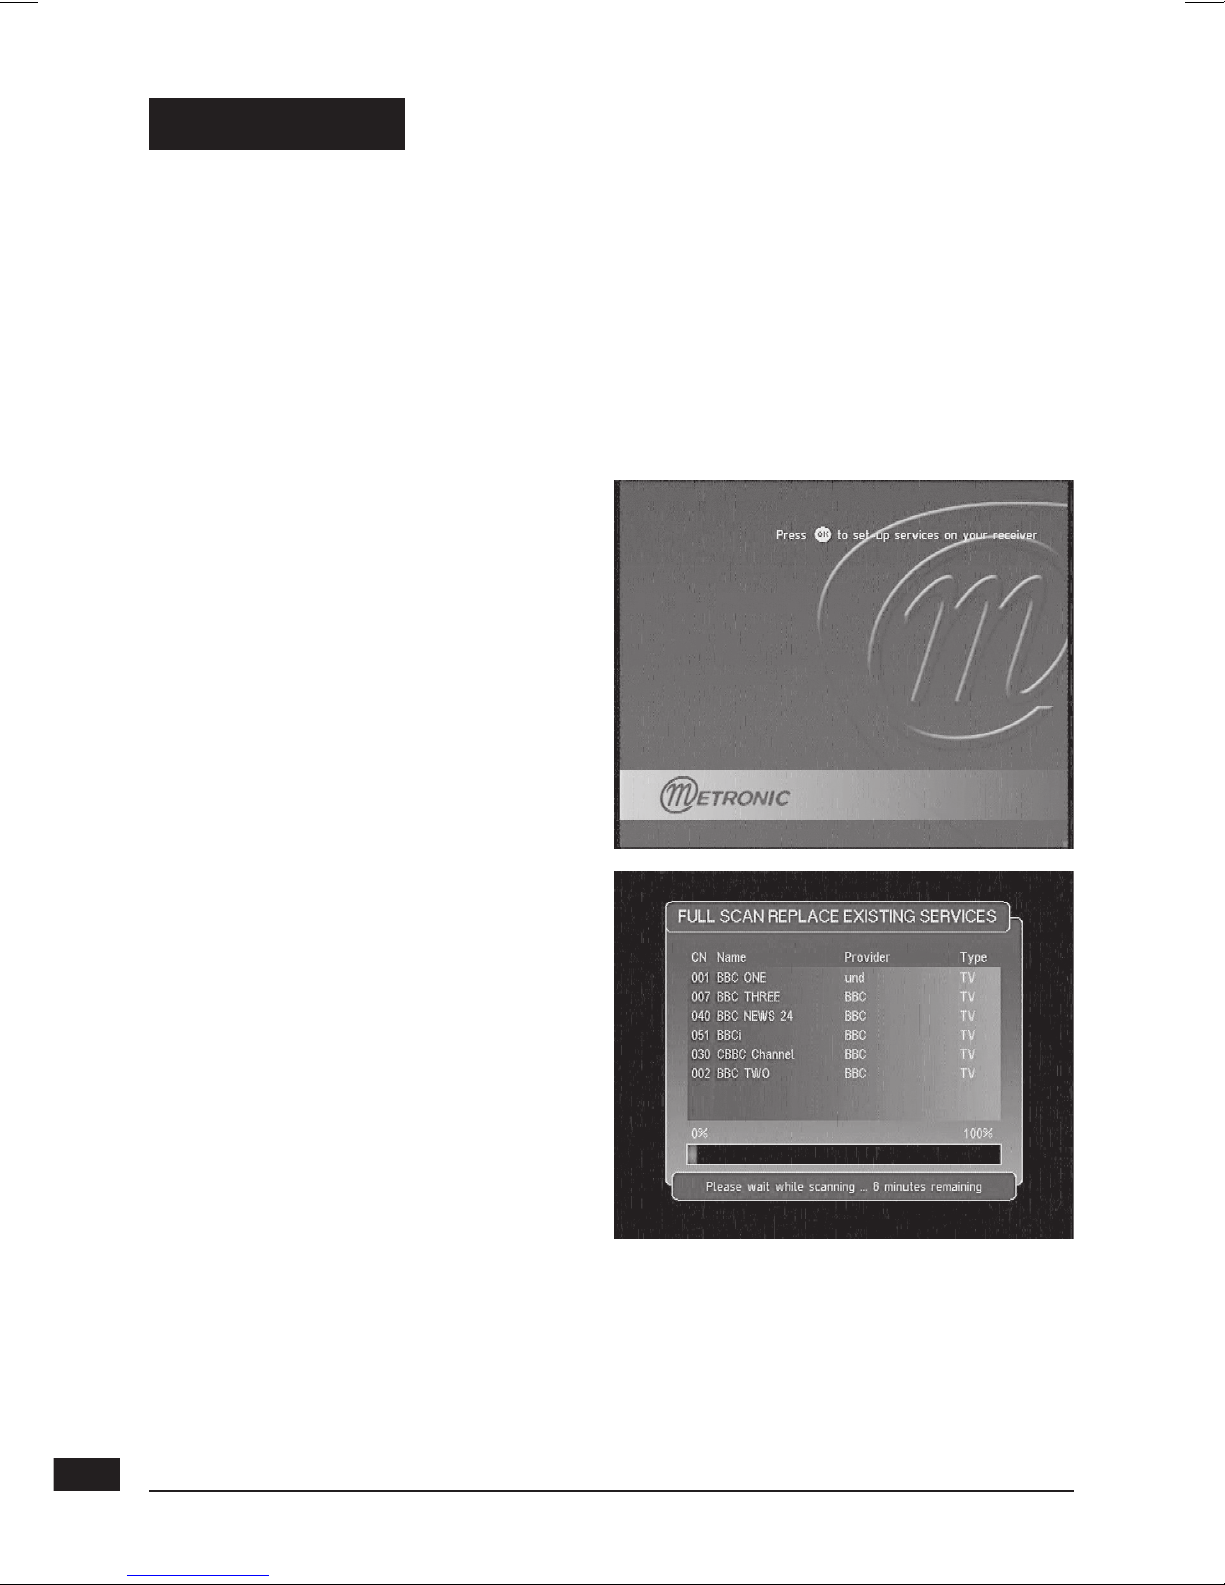
A red indicator appears on the
receiver. Press the ON/OFF
key of the remote. The green
indicator will light on and the
welcome screen appears on the
screen. If this is not the case, you
should double-check the scart
connections and or force the A/V
or EXT mode of your TV (refer
to the TV manual). Press OK to
start the installation.
The automatic channels lookup
should start. At the end, the first
channel will appear, meaning the
standard installation is done
.
At the bottom of the screen, an
estimation of the remaining time
is displayed. Allow one or two
minutes for the
receiver gives a
reliable estimation.
If the search has
not found all channels (or none), this probably means that you need
to better the installation (see next paragraph). If no channels
are found after you have done so, this probably means that you area
is not covered by Free To View.
Page 7
OPTIONAL
MANDATORY
B
A
Screened cable. Replace in case of poor reception by
a high quality cable.
By connecting the TV and the receiver, you will keep the analogue channels
on your TV. You can then record a digital channel whilst watching another
analogue channel.
Installation of the remote extender :
Your zapbox Plus is provided with an infrared extender that allows you to hide
the unit behind the TV set or behind the TV furniture, maintaining the possibility
to control it with the remote controller. Note : you can use use your zapbox
normally without the remote extender.
Connect the extender’s plug on the hole marked IR. Stick the extender on the
side of the TV set, or behind it, paying attention that the wire runs backward.
Before you definitively stick the extender, check that the place you have
chosen allow to correctly operate the remote controller, with a comfortably
wide angle.
Page 8
8
B - Wedging / adjusting the aerial
If no channels have been found through your current antenna, it means
that it probably is pointing towards an analogue only transmitter. If your area
is covered by digital, it means that the programs are coming from another
transmitter. You will hence have to adjust the antenna. There are two possible
options, as follows :
Option 1
You know at least one network number (between 21 and 69) used
in your area.
• Go to Menu / Setup / Service Setup
/ xxxx / Manual Scan.
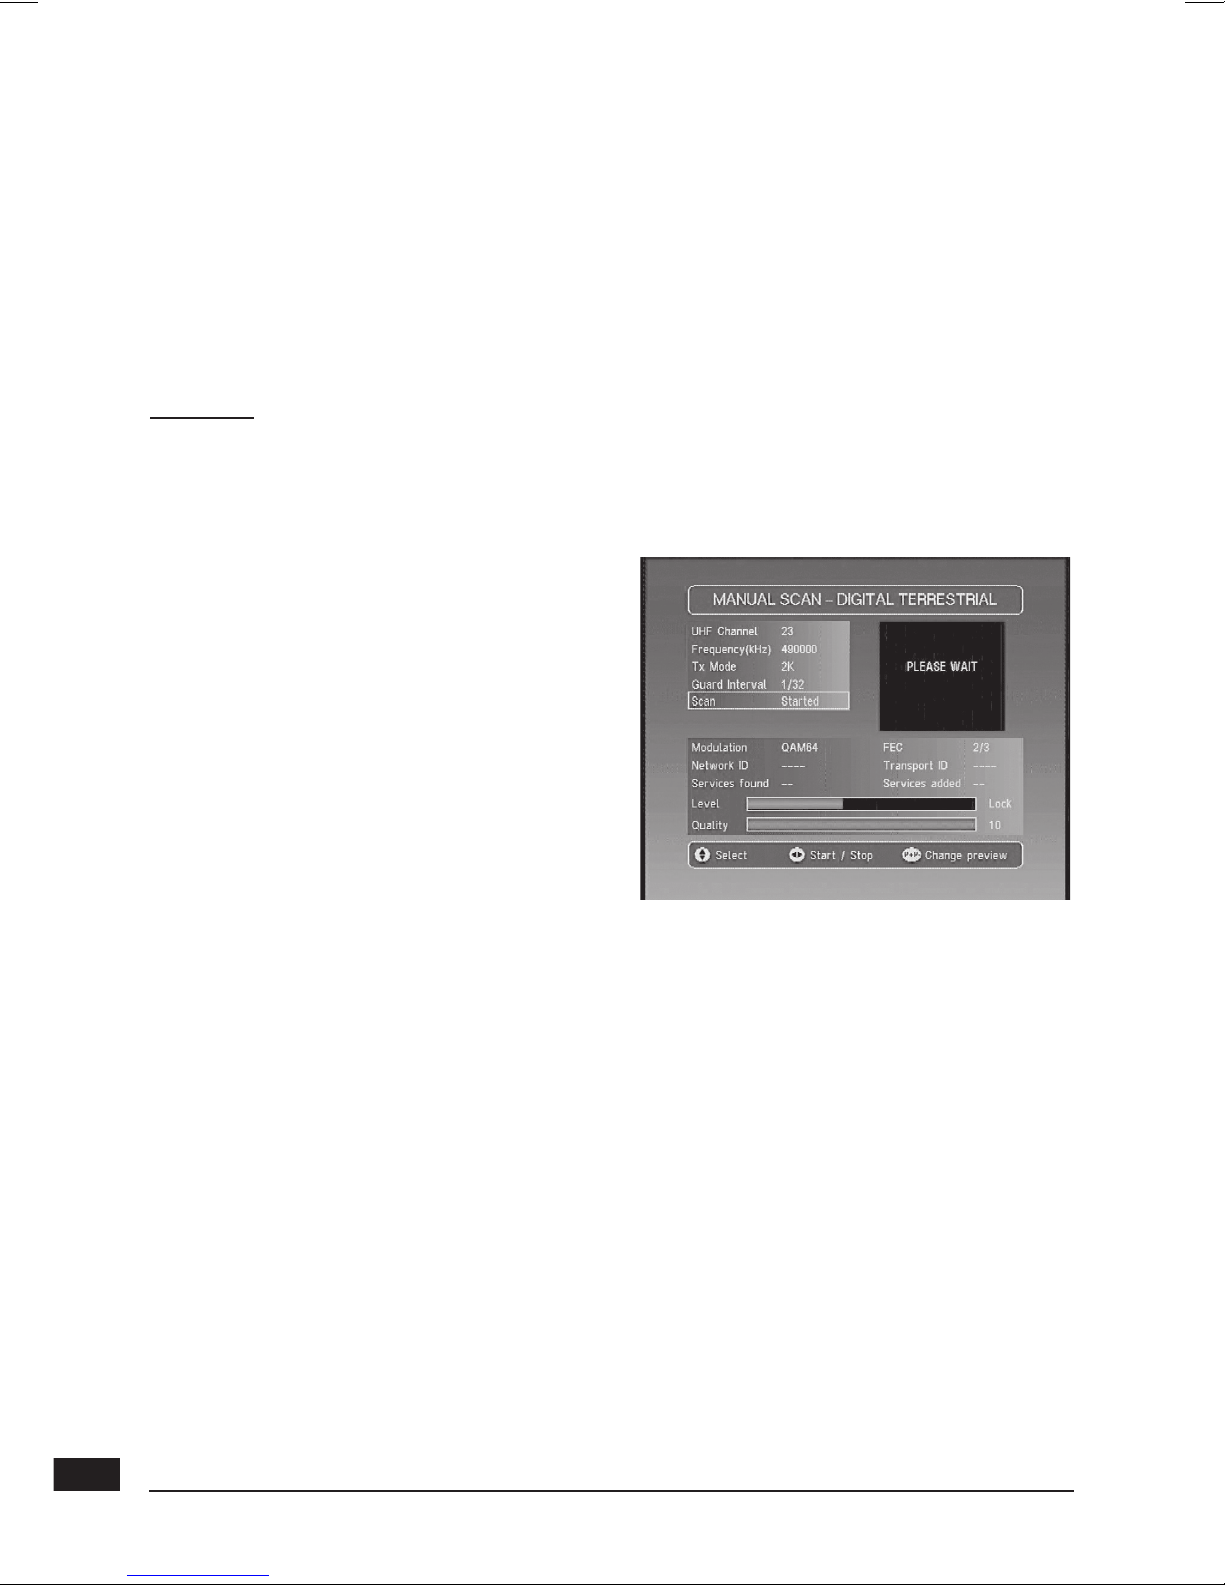
• Press the arrow until the number
of the UHF network that emits digital
channels appears (see channels list
page 25).
• On TxMode, select 2k with
the arrow.
• On Guard Interval , select 1/32 with
the arrow.
• Wait for a few seconds and monitor
the Quality and Level graphs.
• Swivel the antenna to maximise reception. When you get near the emitter,
the Signal Level should increase, and then the Quality. 6 is the lowest
number for a stable image. If the Level does not increase, this means that
you have chosen an incorrect network number, or that the emission is too far
from your antenna.
• Once you have reached the maximum Level / Quality, screw the antenna
tightly.
• Press EXIT.
• Go to Menu / Setup / Service Setup / xxxx / Fullscan Replace Existing
Services.
Page 9

9
Option 2
You are able to receive national channels in analogue and you have no idea
what you can receive in digital quality.
If you are certain that you can receive additional channels, but you do
not know which network is used for these channels, we advise that
you do the following :
Find an UHF antenna with high gain (at least 15 dB) and connect it to
the ANT input of the
receiver. Adjust the antenna so it is in the same
position as the previous one and start an automatic channels search
(Go to Menu / Setup / Service Setup / xxxx / Fullscan Replace Existing
Services).
If you find channels that you were unable to receive with your previous
antenna, simply replace it with the new one. Otherwise, swivel the antenna 1/8
of a turn and start another automatic search. As long as you do not find any
channels, continue the same process. You should end up receiving at least
a few channels.
• Find one of the new channels received.
• Go to Menu / Setup / Service Setup / xxxx / Manual Scan.
• At the bottom of the screen, you can view the reception level and quality.
• Turn the antenna to optimise the quality and level (quality must be
at least 6).
• Screw the antenna tightly.
• Press Menu to go back to the previous menu.
• Make an automatic search (Go to Menu / Setup / Service Setup / xxxx /
Fullscan Replace Existing Services).
Page 10
1 2 3
4
5 6
7
0
8
9
060810
MENU
PAUSE
EXIT
TV/R
AUDIO
AV
INFO
M/P
TXT
S-T
P
P
V
V
EPG
LIST
FAV
OK
1
3
4
8
20
14
21
22
12
5
2
18
11
13
6
10
5
4
15
19
9
16
17
7
Page 11
11
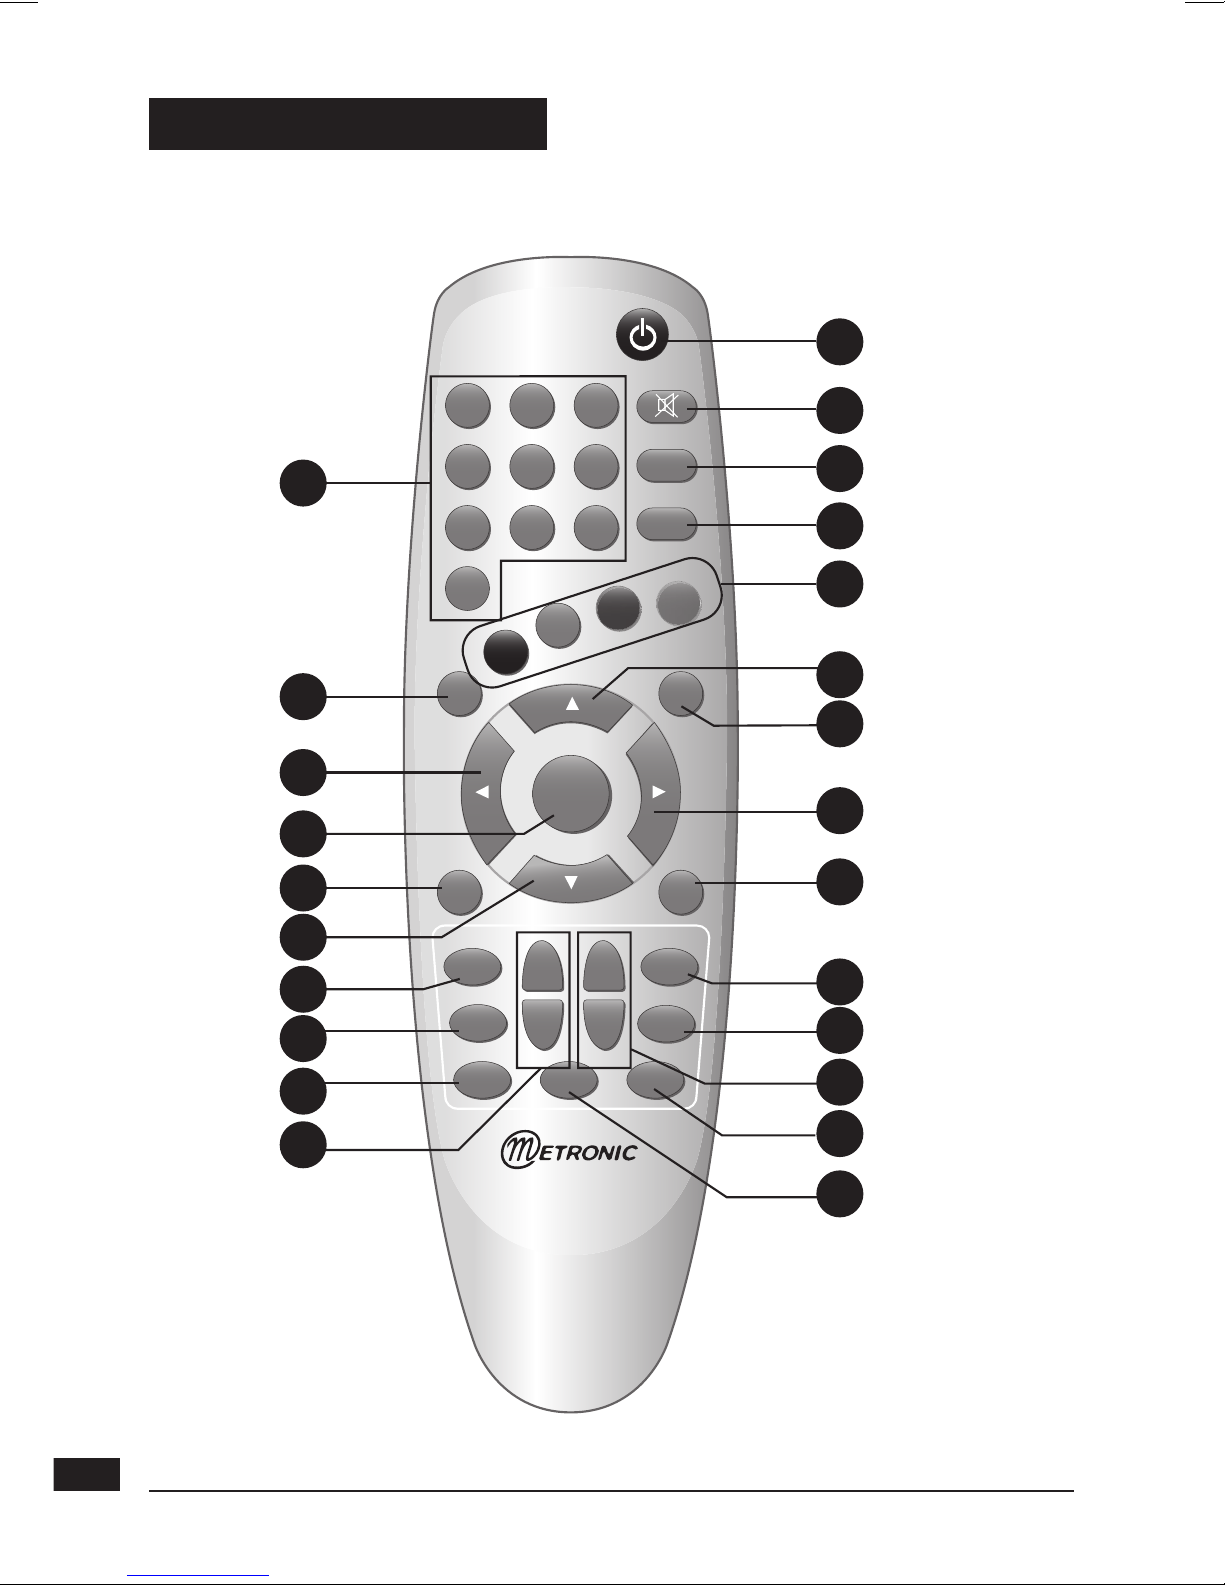
1 Digital keys. In normal use, they will allow you to enter the channel number you wish
to view. In programming mode, they will allow you to enter digital values.
2
ON / OFF key : allows you to put the receiver on standby or switch it on.
3
MENU key : allows you to enter the main menu or to come back to the previous menu
when you are in a sub-menu.
4
keys : in the menu, they allow you to modify various parameters.
5
keys : in menus, these allow you to go from one line to another.
6 PAUSE key. Frozens the picture. A second keypress resumes to normal view.
7
S-T key. This allows you to access the subtitles selection menu. The value is OFF = no
subtitles. When you activate the subtitles, they will appear after a short while, although this
can sometimes take longer.
8 LIST key. To display the channel list.
9
AUDIO key : allows you to select an alternative audio track.
10
EXIT key : allows you to leave all menus and go back to the channel you were watching.
11
MUTE key : by pressing this once, stops the sound, and by pressing it again the sound
will come back to normal.
12
OK key : allows you to validate a choice in the menus.
13
TV/R key : to go from TV mode to Radio mode and back. When you are in
Radio Mode, the CH keys will list the radio services.
14 FAV key : allows you to access your favourite list. Press several times to select the correct
FAV list if you have defined more than one. To exit the FAV mode, go to Menu / Favourites
and select OFF.13
15 EPG key (Electronic Programs Guide) : allows you to view the program playing at that time
and the following ones.
16 Page key. To go one page Up or Down in long lists.
17 TEXT key : displays the digital teletext service, if available.
18 Color keys to navigate in the digital teletext, if broadcast by the operator. The red key
launches the digital teletext, if available.
19 AV key. To release to command that turns TV on AV mode. Allows to view an analogue
channel while recording a digital channel.
20 INFO key : If you press this key, information on the current channel you are watching
will appear (channel name, program, next program).
21 M/P key. To display a mosaique,
22 Volume keys. In viewing mode, allow to adjust the volume.
Page 12
12
A
B
E
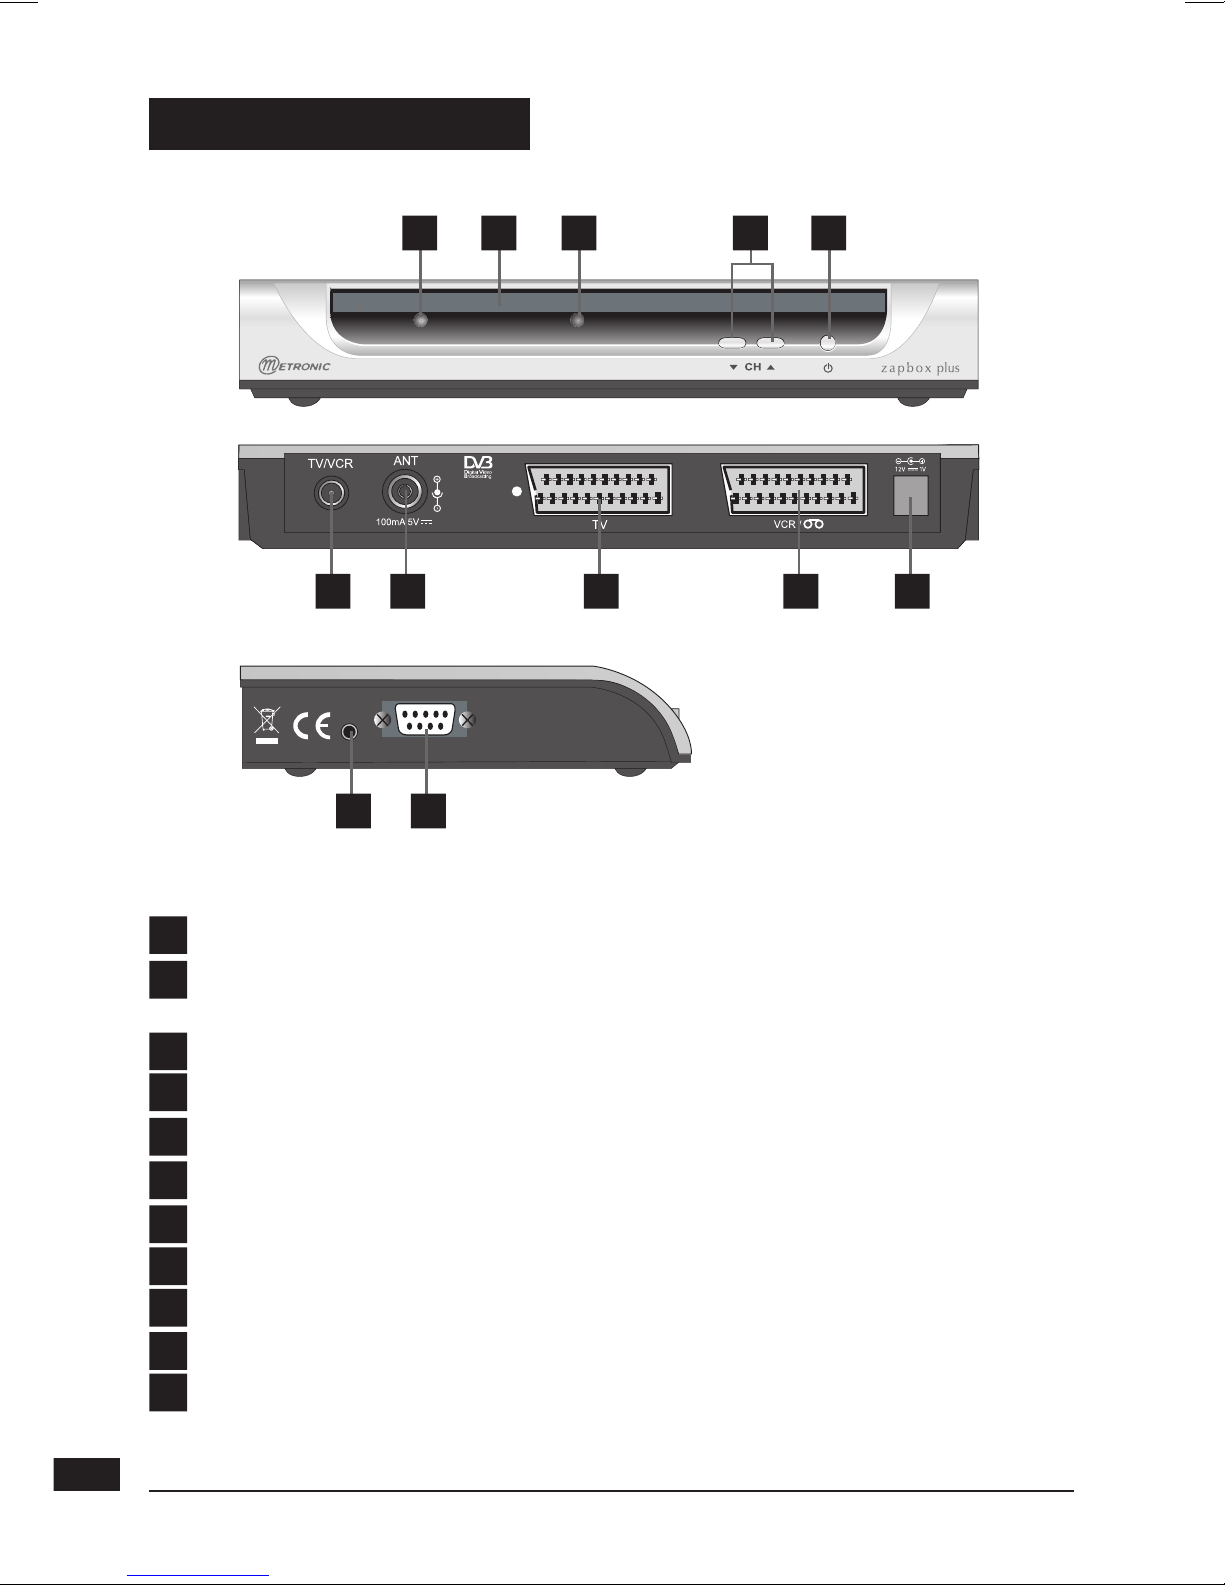
3 -
Receiver Description
F
H
I
G
Infra-red receiver (detects the remote infra-red signal).
Status indicators : red when the product is on standby / green when it is
switched on.
ON / OFF key : allows you to put the receiver on standby or switch it on.
CH key, same as on remote controller.
TC scart outlet, to connect the receiver to the TV.
VCR scart plug.
Main power source.
Terrestrial antenna input.
TV output.
Connector for the remote extender (optional)
RS232 socket for service only.
RS232
IR
A D C B
J K
E FI GH
B
C
D
J
K
Page 13
13
5 - Personalising the channels listing
In normal use, you will only use the following keys (the function of these keys
is explained in the previous paragraph) :
• CH key to change channels.
• MUTE key to stop and bring back the sound.
• Digital keys to go directly to a channel.
• EPG key to access the programs guide.
• INFO key to find out about the channel you are viewing
(name, program, next program).
• RED to access the digital teletext.
4 -
Daily use
There are two ways of personalising the channel list. The first
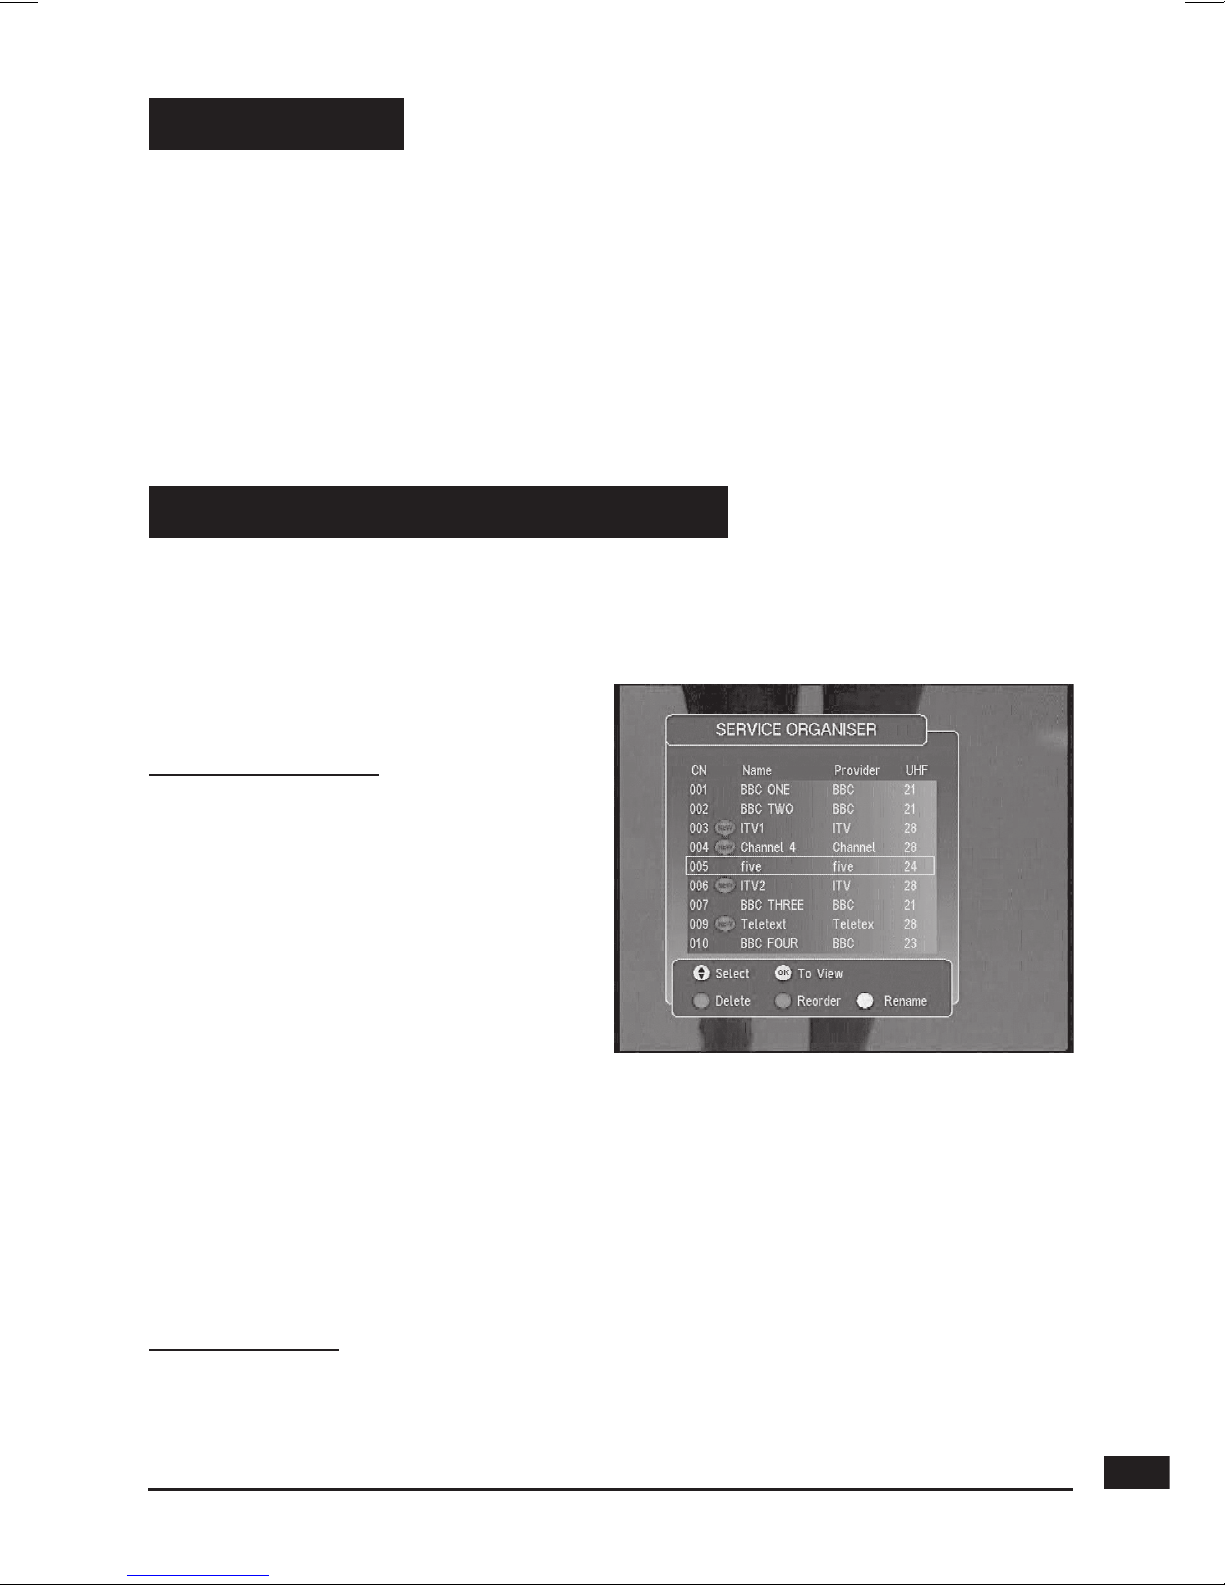
way is to create favourite channels. The second is to delete, move or
rename existing channels.
A - Favourite channels
Selecting channels
• Go to Menu / Favourites.
• The first line indicates OFF,
meaning that the favourites
mode is inactive. In this OFF
mode, the
CH
key allow
you to access all TV services.
• Press the green key to create a
list and then the yellow key to
edit its content.
• The left part shows all services
available. Use the
keys to select a channel and press OK to add it on
your FAV list.
• Press EXIT when you are done.
N.B. A FAV list may contain TV and Radio services together.
Renaming a list
• Go to Menu / Favourites
.
• Use the
, keys to select the list you wish to rename (Favourites 1,
if you created only one list).
Page 14
14
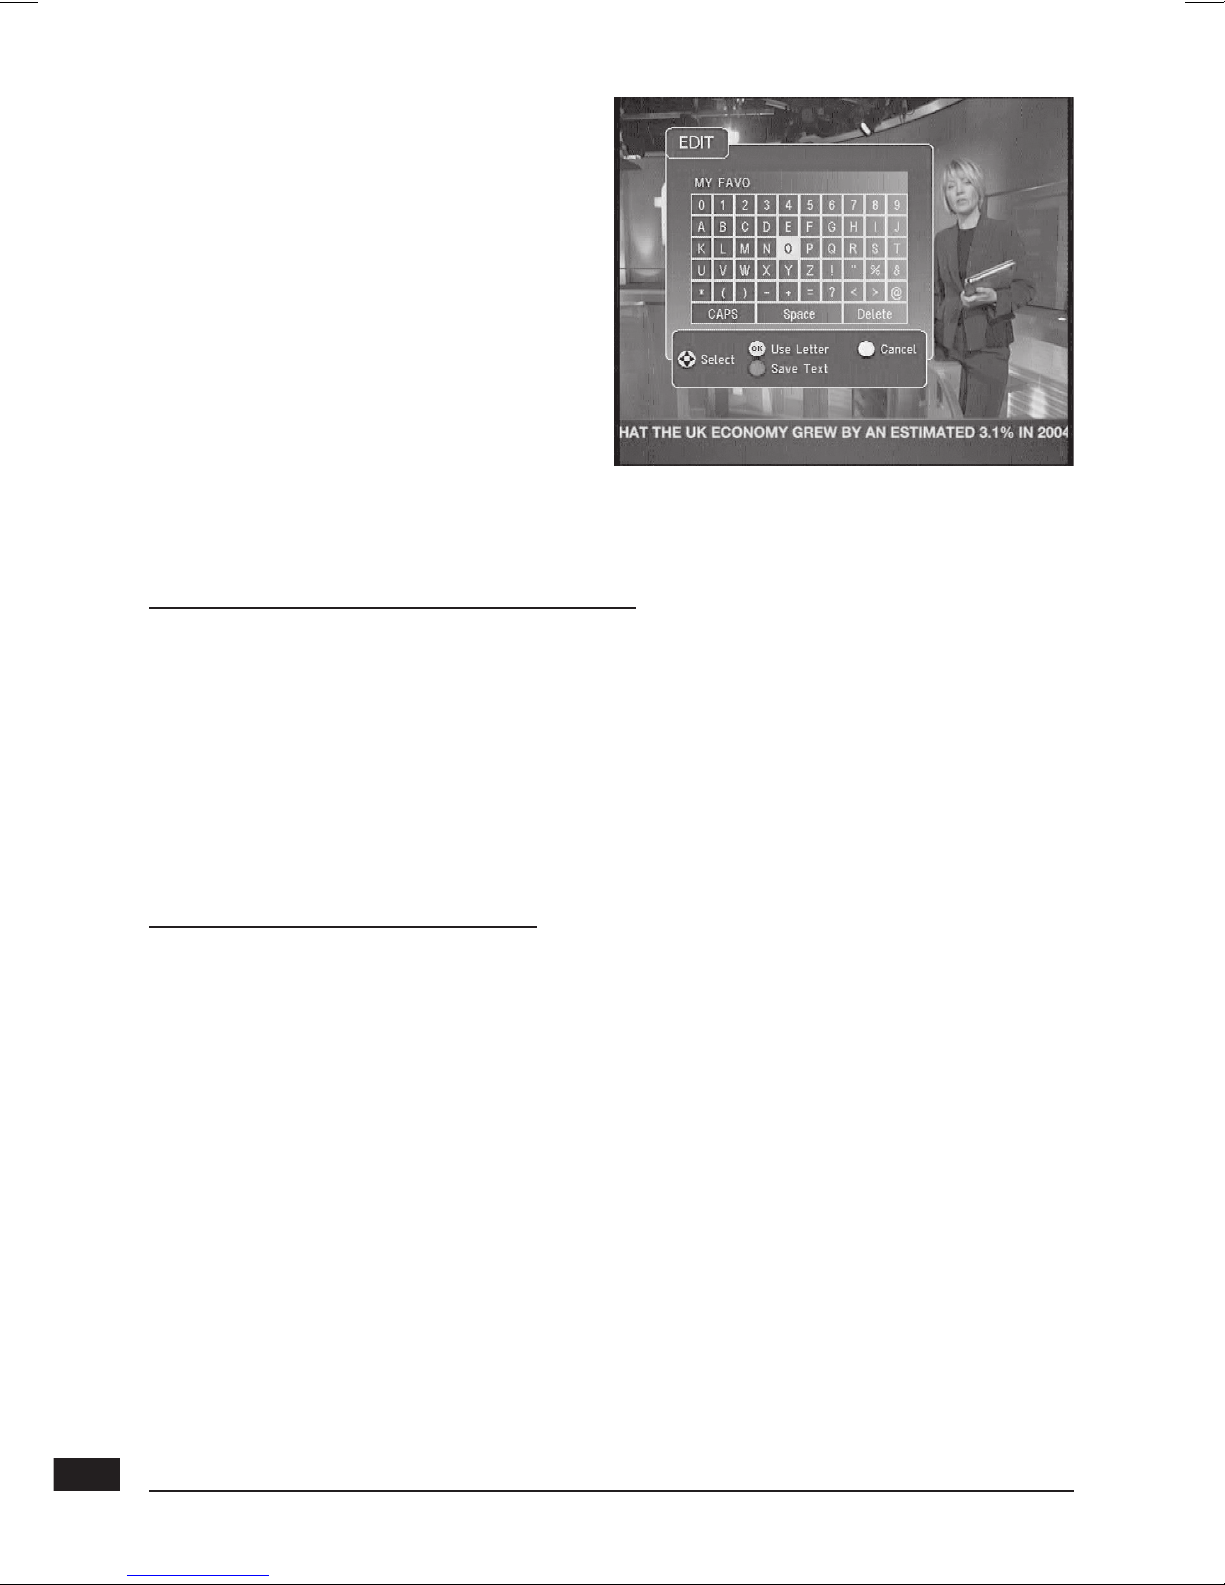
• Press the yellow key and
then the
key.
• Press the yellow key again to
view the keyboard.
• Go to Delete using the arrows
and press OK to delete the
unwanted letters.
• Use the arrows to select one
by one the letters of your
choice, and press OK for
every letter.
• Press the green key to save
the changes.
• Press EXIT to quit.
Modifying the content of a favourites list
• Go to Menu / Favourites
.
• Use the
keys to select the list you wish to edit.
• Press the yellow key and then the key.
• Press the red key to delete the channel.
• To move a channel, go on it using the cursor, press the green key, choose
a new place for it with the
keys and press OK to confirm.
• Press EXIT to quit.
Viewing your favourite channels
Simply press the FAV key until the desired list is shown.
From now on, the CH+ and CH- keys will allow to go from one channel
to another amongst your FAV list.
To come back to the full channel list, go to Menu / Favourites, select OFF
and press OK to confirm.
Page 15
15
B - Modifying the channel list
Deleting channels
• Go to Menu / Service Organiser.
• Use the
keys to select the channel you wish to delete.
• Press the RED key. You are then requested to enter a code to confirm.
• Enter your PIN code (0000 on purchase).
• Press EXIT to quit.
Moving channels
• Go to Menu / Service Organiser.
• Use the
keys to select the channel you wish to move.
• Press the green key and move the channel where you want it to be using
the
keys.
• Press OK to confirm the new position.
• Press EXIT to quit.
N.B. The channel will keep its logical number.
Renaming a channel
• Go to Menu / Service Organiser.
• Use the
keys to select the channel you wish to rename.
• Press the yellow key to view the keyboard.
• Go to Delete using the arrows and press OK to delete the unwanted
letters.
• Use the arrows to select one by one the letters of your choice, and press
OK for every letter.
• Press the green key to save the changes.
• Press EXIT to quit.
6 - Parental Lock
Your ZAPBOX receiver is delivered with a secret code (PIN) which is 0000.
This code allows to lock channels that you do not wish others to access, or to
protect the settings of the receiver. We advise you to change this code.
Page 16
16
Modifying the PIN code
• Go to Menu / Setup
/ Parental Control.
• Enter the 4-digits code (0000 on purchase).
• Select Change PIN and press OK to confirm.
• Enter the new 4-digits code.
• Enter this code once more.
• Press EXIT to quit and save the changes.
IMPORTANT ! Keep your PIN code safe.
Locking channels
• Go to Menu / Setup
/ Parental Control / xxxx / Lock Services.
• Use the
keys to select the channel you wish to lock.
• Press OK to confirm and a lock symbol will appear next to the channel.
• Press EXIT to quit and save the changes.
Moral leve
l
The Censorship parameter that is located in Menu / Setup / Parental Control
allows you to adjust an age limit. The standard value is OFF (no limits). If you
adjust a new limit with arrow keys, the PIN code will be requested to view
the program that the operator decided can only be viewed by people older
than the existing limit.
You should follow this process if you have modified the adjusting and hence
making the receiver inoperative. You should also reset the receiver if it shows
unexplained problems.
Resetting the receiver means that you will lose all personalised functions
(favourites, parental lock etc).
• Go to Menu / Setup / Service Setup / xxxx / First Time Setup.
• Enter your pin code and confirm by pressing OK.
• The menu will disappear and and the welcome page will be displayed.
• The receiver is now back in its original configuration.
7 - Resetting the receiver
Page 17
17
You can access the adjusting options for the TV signal in Menu / Setup /
TV Setup.
• On Aspect Ratio, select 4:3 or 16:9 depending on your screen format.
• If you have a 4:3 screen, you can choose on widescreen the way a 16:9
image will appear on your TV.
- The CenterCutout mode increases the image size without
distorting it to fill the whole screen.
- The FullFrame mode resizes the image horizontally in a 4:3 screen.
The image is therefore distorted.
- The Letterbox mode shows a full image, with black strips at the top
and bottom of the screen.
• On Standard, choose between RGB and CVBS. The CVBS mode
(composite) gives an image of lower quality than the RGB, but is compatible
with all TVs.
IMPORTANT ! If you have a 4:3 screen, do not adjust the Aspect Ratio to 16:9 !
Apart from TV channels, terrestrial digital also allows you to receive
radio channels.
As soon as you press the TV/RAD key, you are entering the radio
mode. From then on, the
CH key will allow you to move from one
radio channel to another one. To go back to the TV mode, press the TV/RAD
key once more.
9 - Radios
10 - Channel Search
You should follow this process when you have lost a channel or if new channels
are emitted by operators.
• Go to Menu / Setup / Service Setup / xxxx / Fullscan Replace Existing
Services.
The receiver will search for new channels and add them.
8 - Adjusting the TV signal
Page 18
18
11 - Using the receiver with a VCR
A - Programming
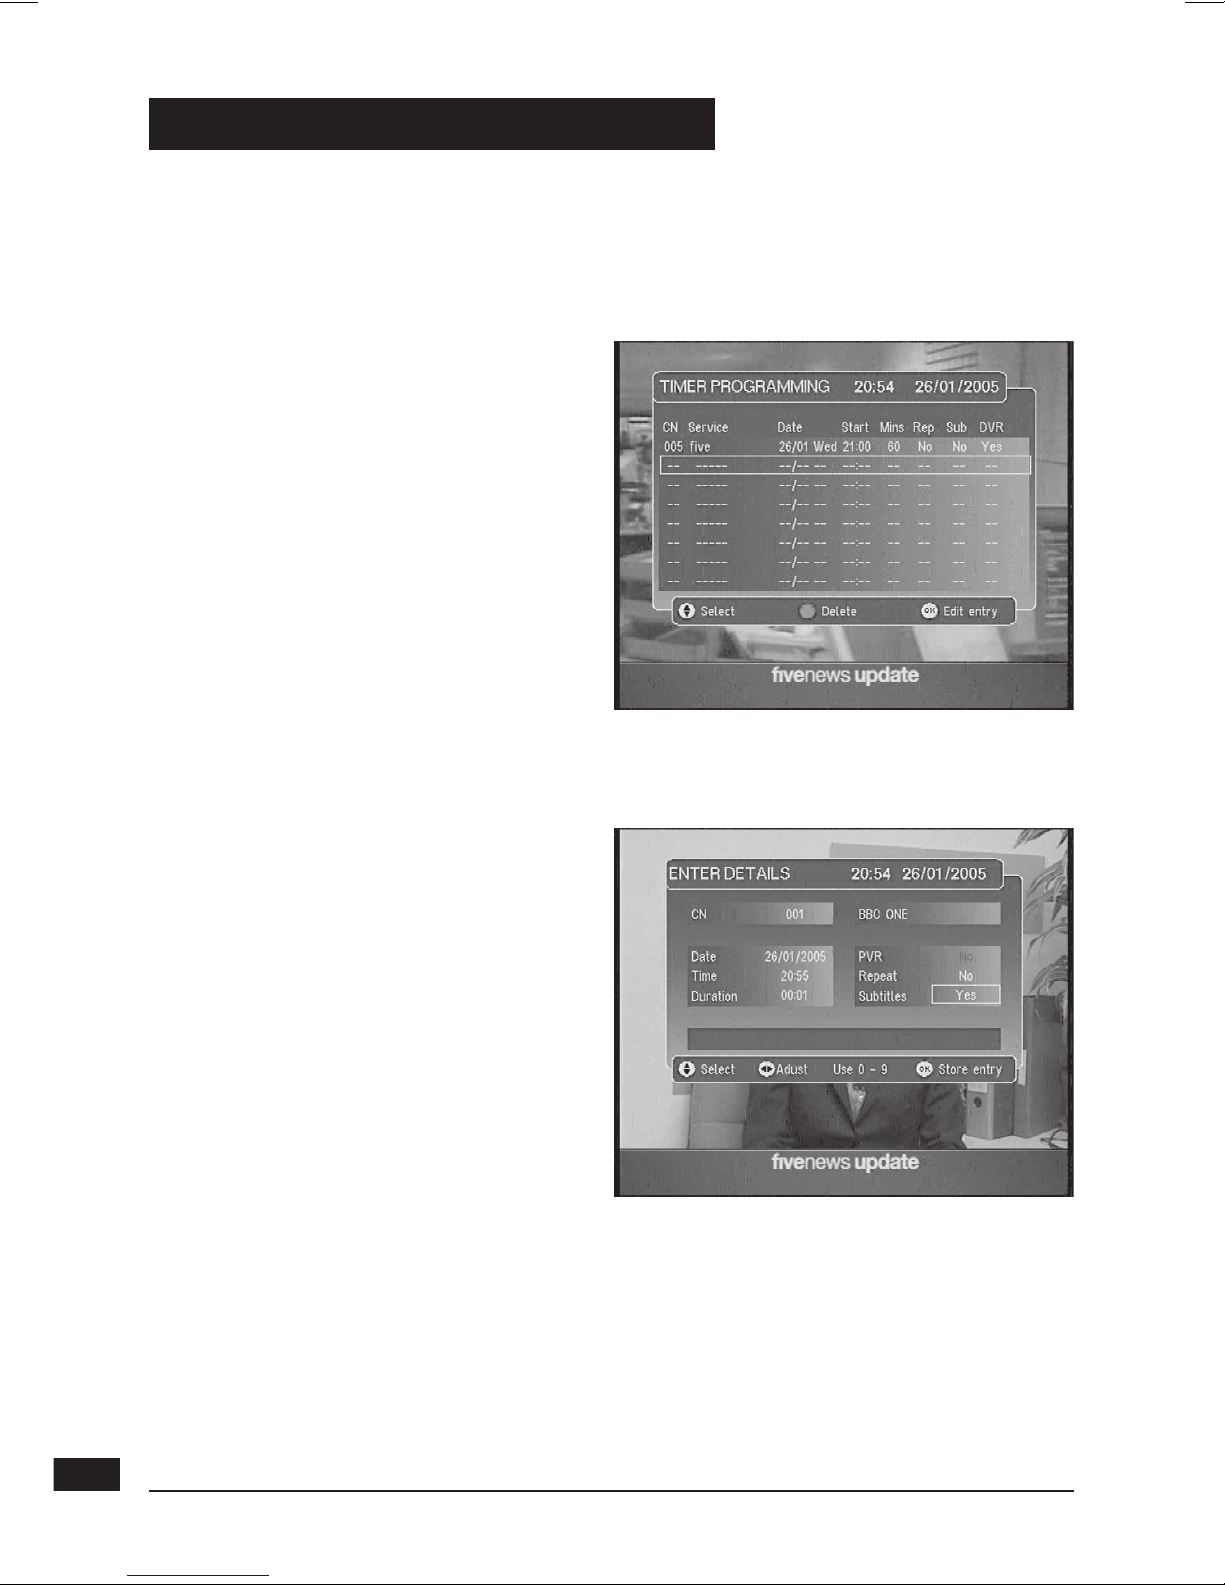
• Go to Menu / Timer Programming.
• The Timer Programming
window lists the programs
to be recorded
.
• To program a new recording,
press OK on an empty line.
• On
CN, select the channel you
wish to record using the
keys
• On
Date, enter the date of the
program with the digital keys
.
• On
Hour, enter the time at which
the program starts.
• On Duration, enter the duration
time of the program.
• On Repeat, select No if this is
a one off recording, Weekly if
you wish for the program to be
recorded the same day every
week, or
Daily if you wish for this
program to be recorded every day
at the same time.
• On Subtitles, select Yes or No
depending whether you wish to
record these as well.
You must then program your VCR
in the same way so that it starts
recording at the same time.
You should remember to record the
channel that corresponds to the scart
plug (AUX, EXT etc). Please refer
to our VCR manual if necessary.
If you switch on the
receiver whilst a program is supposed
to be recorded, you will be requested to confirm any changes
by pressing EXIT.
Page 19
19
B - Connecting.
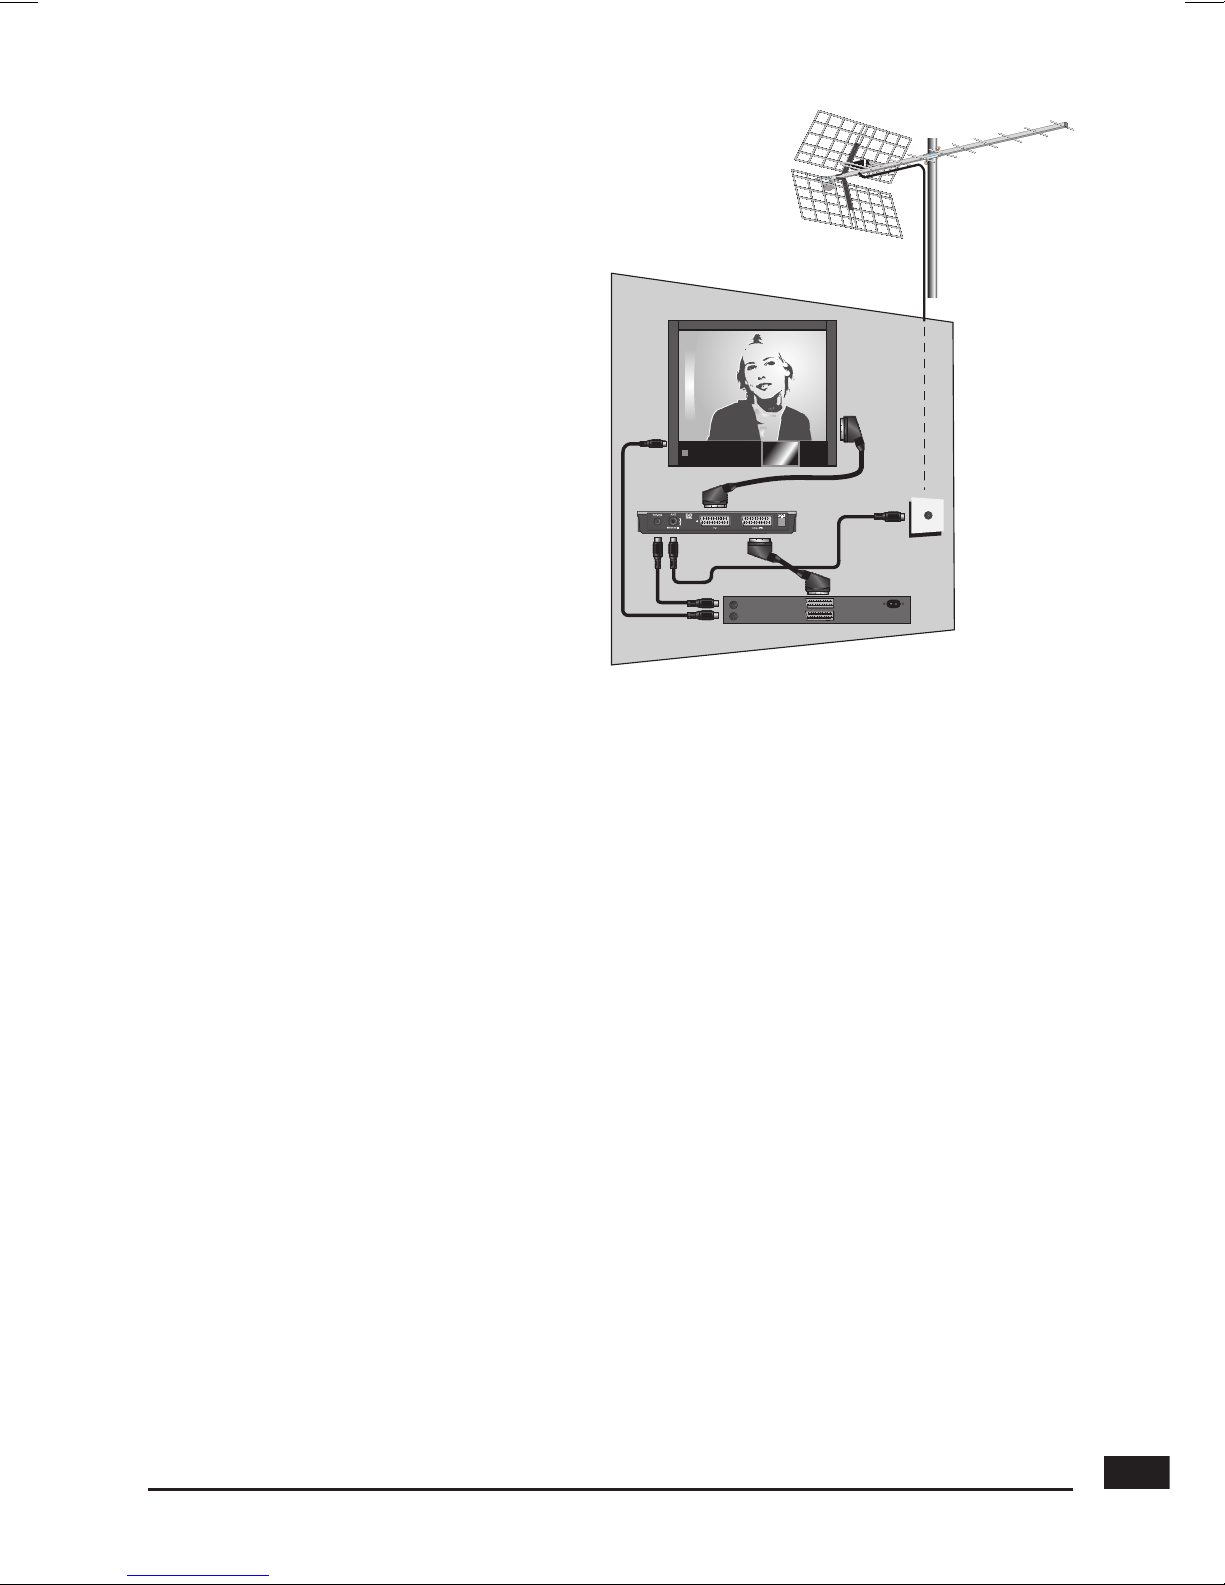
Simply connect your VCR to the
VCR scart on your receiver.
To record a channel, start by playing
the channel on your TV. You should
then start recording on the AV chan
nel of the VCR (0, AV, EXT etc).
If necessary, refer to your VCR
manual to make sure you are doing
everything correctly. For your infor
mation, this channel can normally
be found on many VCRs by selec
ting channel 1 and by then pressing
the CH key once or twice.
To play a tape, the receiver should
be on standby. Simply insert the
tape and start playing. The image will appear on the screen. If this is not the
case, press the TV/VCR key on your VCR remote.
REMINDER ! You cannot record a channel other than the one you are watching.
VCR
ZAPBOX
Page 20
20
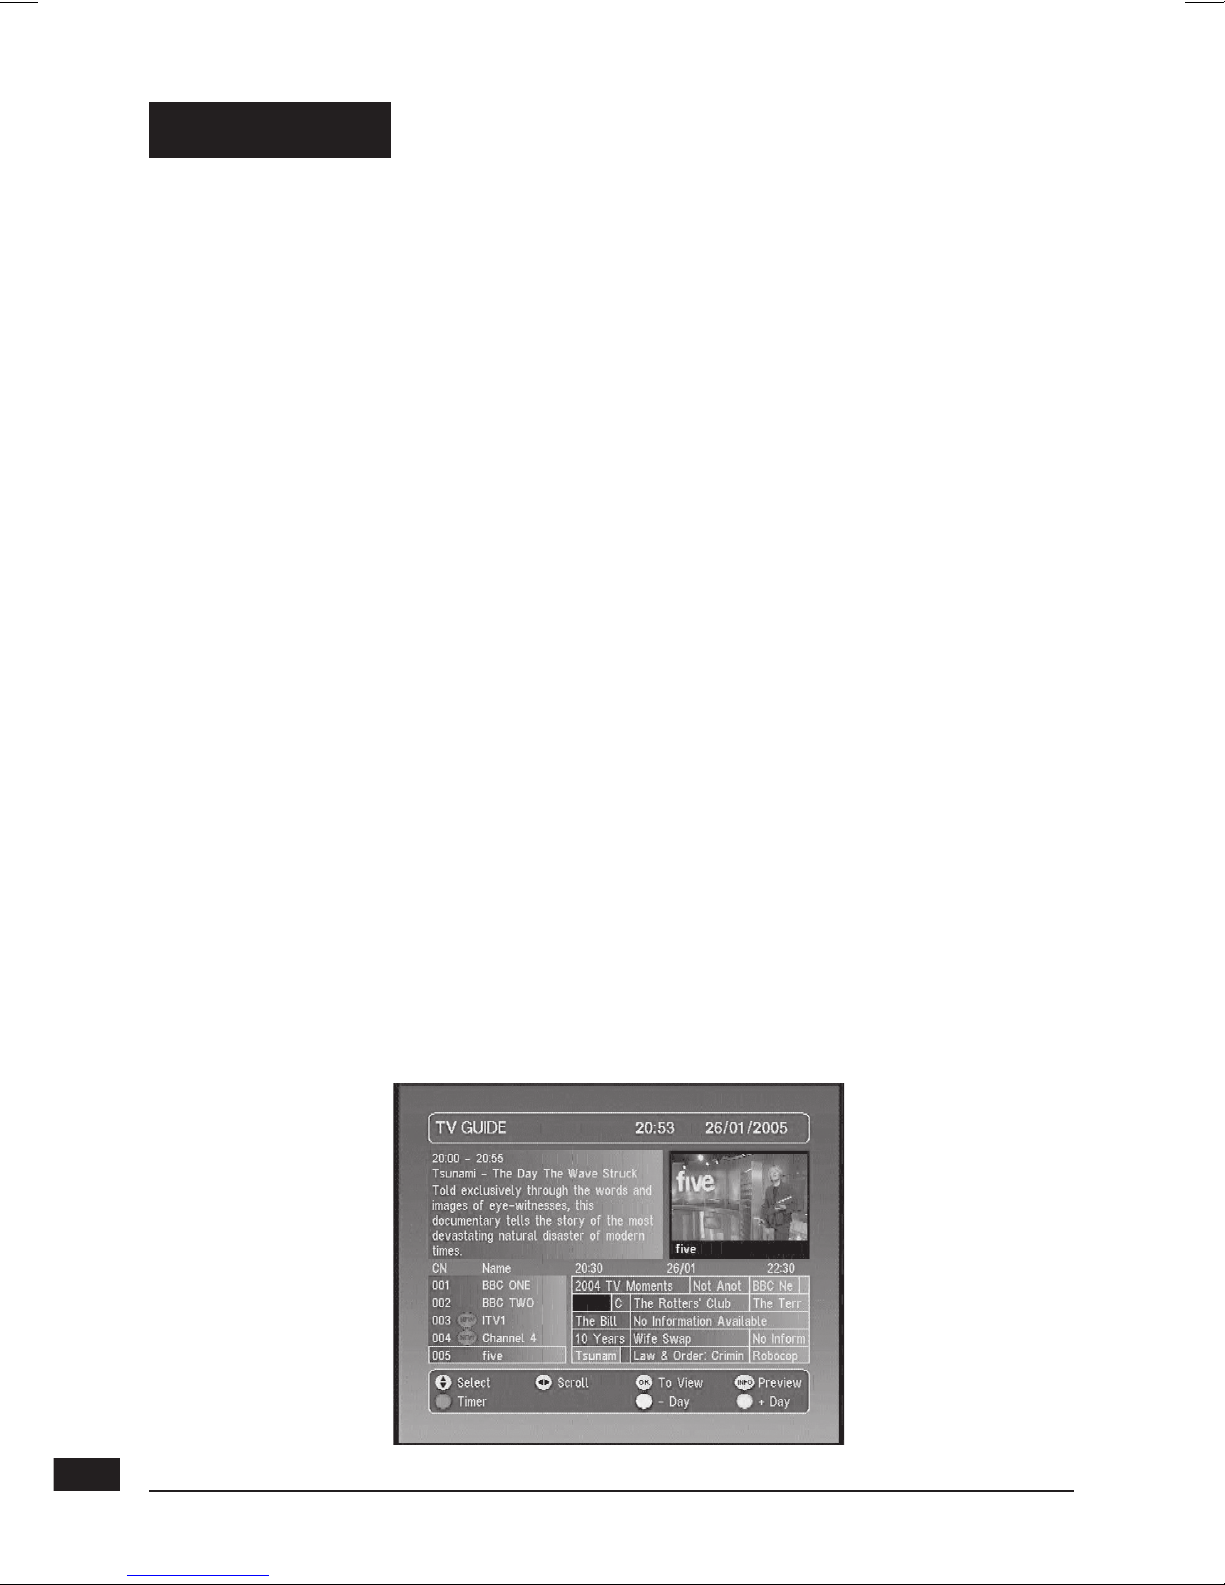
12 - TV Guide
Pressing the GUIDE key will allow you to access the list of programs playing
at the moment or later.
The name of the program playing at that time appears in orange in the bottom
right window. You can select the following program with the
arrow. A description
of the program selected appears in the top left window.
Use the keys to select programs on the following and previous channels.
If you select another channel, you can pre-view it in the top right window pressing
the INFO key, or in full screen by pressing OK.
The blue key allows you to view the following days’ programs (as long as the
information is emitted). Use the yellow key to go back one day
.
When a program has been selected, you can press the red key to enter
the information details directly in the recordings Timer Programming. If you press
the red key for a program that is playing at that time, the recording will start and
you must confirm all changes by pressing EXIT.
If the selected program has not started yet, you can press the green button
to put a reminder on this program. In this case, a reminder will appear regardless
of what channel you are watching.
Page 21
21
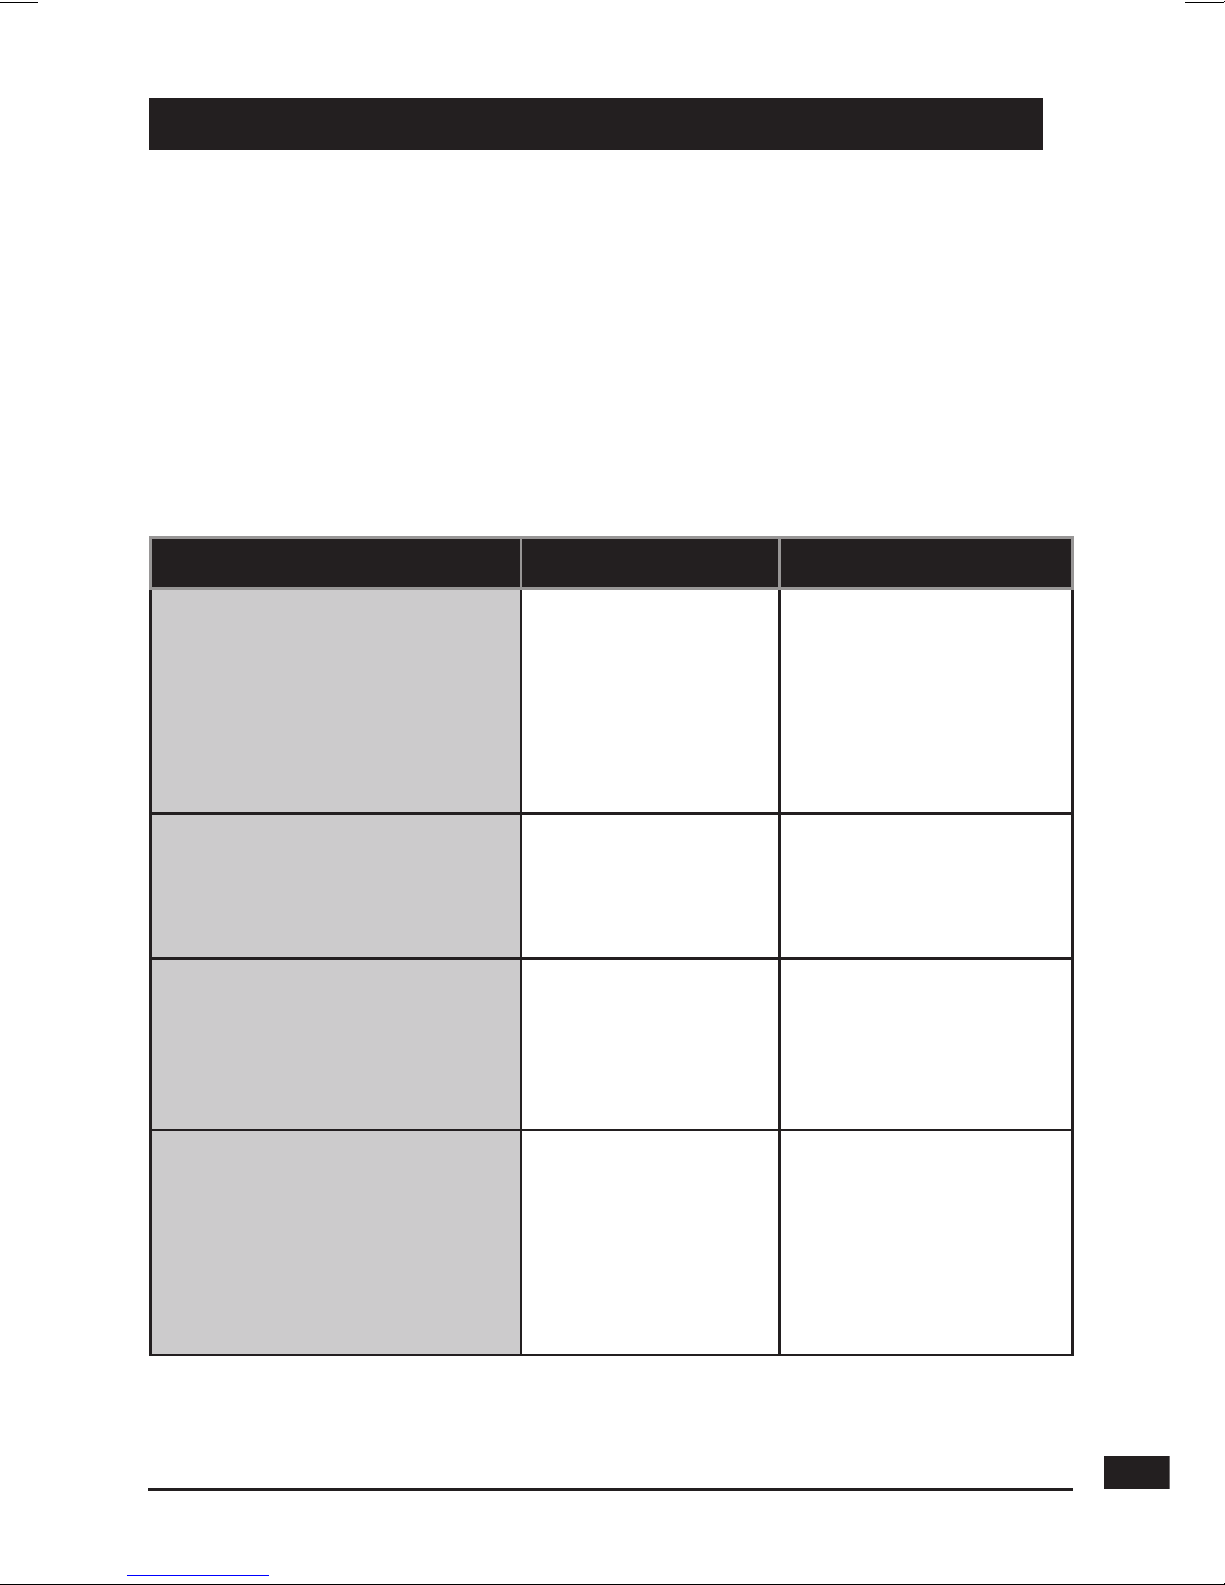
13 - What to do if you experience a reception problem
Symptom Possible Cause Solution (to try)
You are receiving analogue
channels without a problem,
but no digital channel seems
to be getting through.
Your antenna is
pointing towards
an analogue
emitter, when
digital channels are
emitted by another
transmitter.
Adjust the orientation
of your antenna (see
paragraph 1B p.8).
You are receiving analogue
channels without a problem,
but no digital channel seems
to be getting through. You live
in a flat.
The system of
collective antenna
is not adapted to
terrestrial digital.
Contact the flat owner
or the residence union.
You are receiving analogue
channels without a problem,
but no digital channel seems
to be getting through.
Your area is
not covered by
digital terrestrial
yet. There is no
immediate solution.
You must wait until
your area is covered
.
There are some channels
you are not receiving at all.
The channels that you are
receiving do not have a high
reception level. The image
you get in analogue is not
great either.
You are located far
from the emitter.
1 - Try an indoor
amplifier.
2 - Try a mast
amplifier.
3 - Find a more
performant antenna.
To help you figure out the problem you have come across, it could be useful
for you to obtain more information on the position of digital emitters, as well as
the UHF networks that are used.
IMPORTANT !
If you experience a problem with the digital terrestrial reception,
it is necessary to define as clearly as possible the symptom of the problem
that is occurring
If you refer to the board below, you will see various solutions for problems
you may come across.
Page 22
22
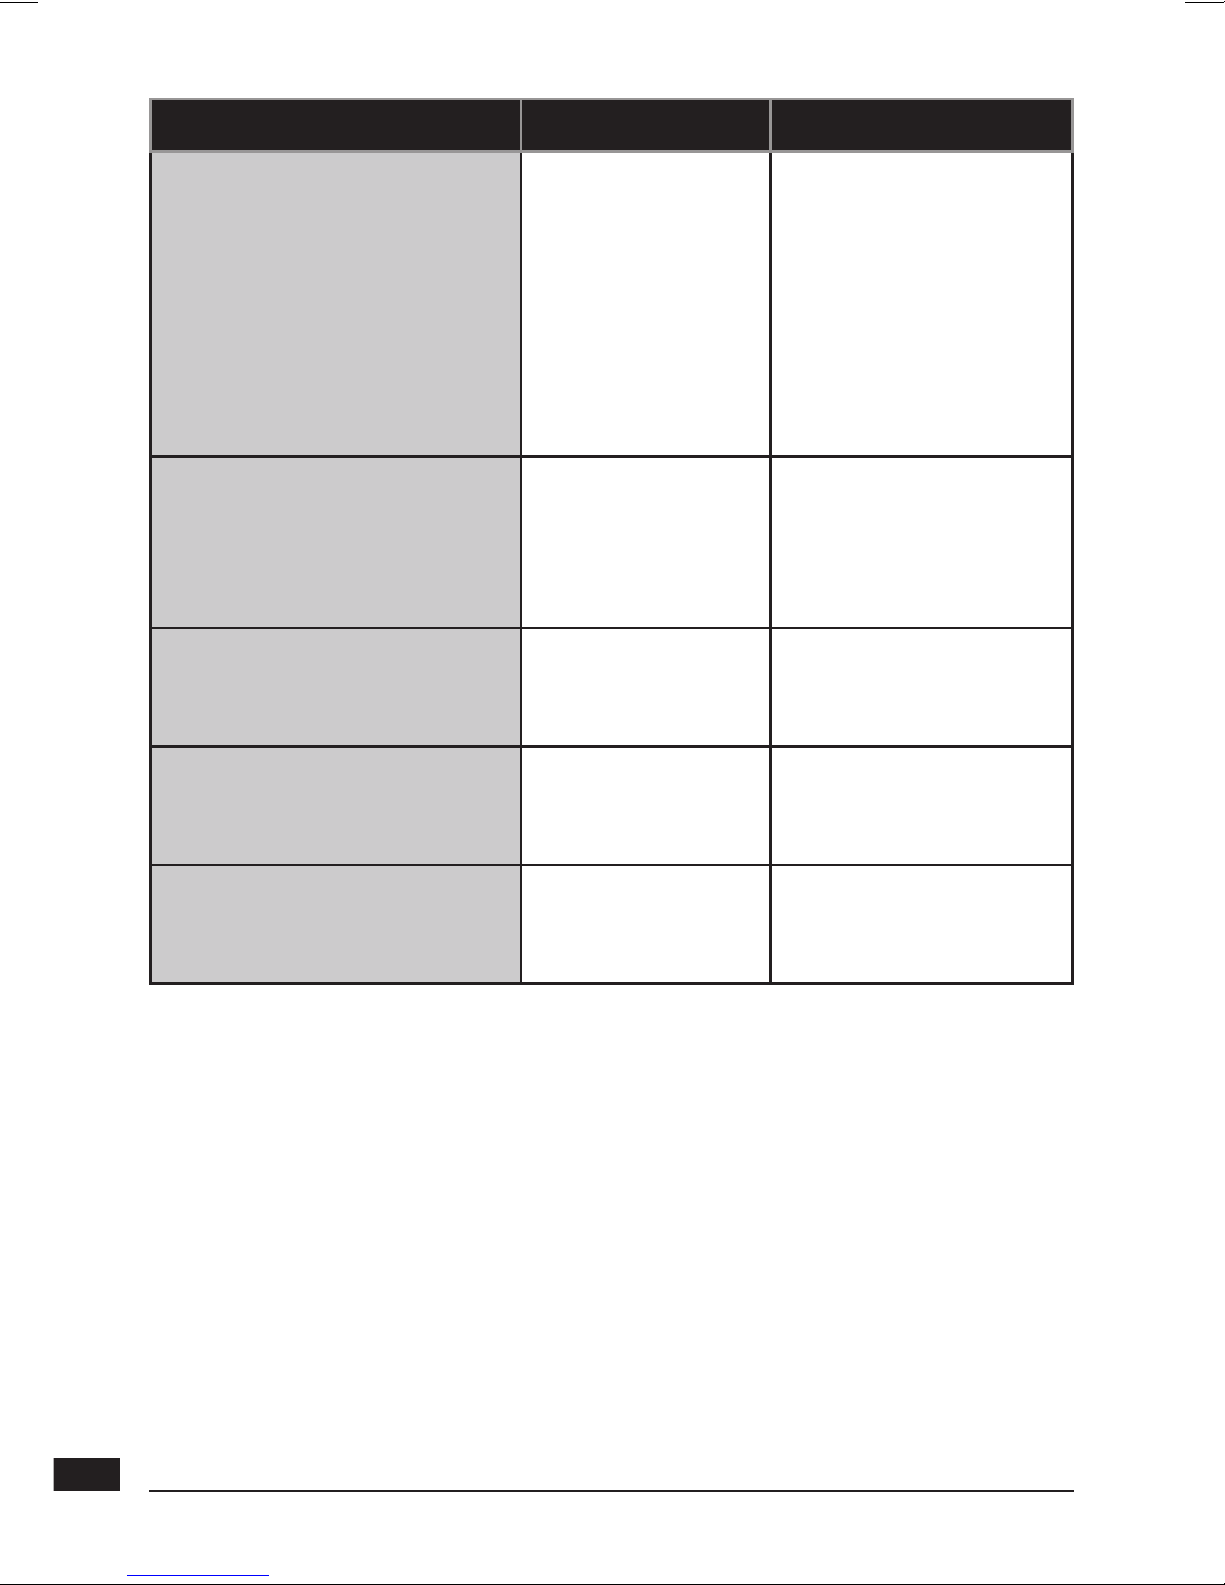
Symptom Possible Cause Solution (to try)
You are receiving all digital
channels but the reception is
disrupted at times (i.e. when
another electrical product is
switched on)
.
You are
experiencing
electric
disturbances.
1 - Replace the TV
cable that links the TV
plug to the antenna
with a screened cable.
2 - Replace the
accessories (splitters
etc) with screened
products.
3 - Replace the cable
that connects the
antenna to the plug.
You are receiving some
networks but others are
disrupted or not received at
all.
You are
experiencing
echoes.
1 - Slightly adjust the
antenna.
2 - Replace the
antenna with a new one
that has more powerful
anti-echo screens.
You are receiving some
networks but the networks
superior to 60 are disrupted or
not received at all.
Your antenna
hides the top of
the UFB band.
You need a more
powerful antenna for
the whole UHF band.
You are receiving the
networks between 21and 35,
but none of those between 36
and 69
.
Your antenna only
receives one part
of the UHF band.
You need a more
powerful antenna that
is designed to work on
the whole UHF band.
Your reception is fine most
of the time, but it is disrupted
when it rains or at some other
random moments.
You are on the
limit on the
covered area.
You need a more
powerful antenna.
What is a disrupted reception in digital ?
In digital reception, a disrupted reception results in frozen pictures
(partially or totally), or the appearance of mosaic effect. The sound may disappear
for a while, or strange effect can be heard. The consequences are totally
different from the consequence in analogue (snow effect).
What about indoor reception ?
The transmission parameters are not optimised for indoor reception. As a
consequence, even though it is possible to receiver Freeview channels with
an indoor antenna, it is never guaranteed. Coverage areas are defined for
a roof-aerial. Indoor reception is only possible at a short distance from the
transmitter. In this case, electronic noise from home appliances
(washing machines, switches, ...) often causes fleeting reception problems.
You cannot find the solution to your problem.
Please send us your query at : [email protected].
Page 23

23
Equipment that allows you to receive digital TV, like Free To
View channels.
Receiver connected to your TV that allows to receive additional
channels.
Nature of the signals used for terrestrial television since the
middle of the 20th Century. Since digital has come along,
analogue will disappear (starting 2008).
Number given to a frequency band. In UHF, networks
are numbered from 21 to 69.
Pylon that re-transmits digital or analogue channels,
and towards which your antenna must be pointed.
Be careful: it is possible for an emitter to not emit all available.
Electronic Programs Guide.
Free to Air = free channels.
Nature of the signals used in modern transmissions. Digital
allows you to view more channels than analogue. Digital
channels have existed for a few years on satellite and cable.
They will replace the terrestrial analogue channels. One channel
(i.e. BBC1) can be emitted both in analogue and digital.
Orientation of the emitter wave. Most UHF emissions
are horizontal. The elements of your aerial must therefore
be horizontal.
Refers to transmissions in the air, as opposed to cable
or satellite.
Receiver
Set-top-box
Analogue
Network
Emitter
EPG
FTA
Digital
Polarization
Terrestrial
14 - Glossary
Page 24
24
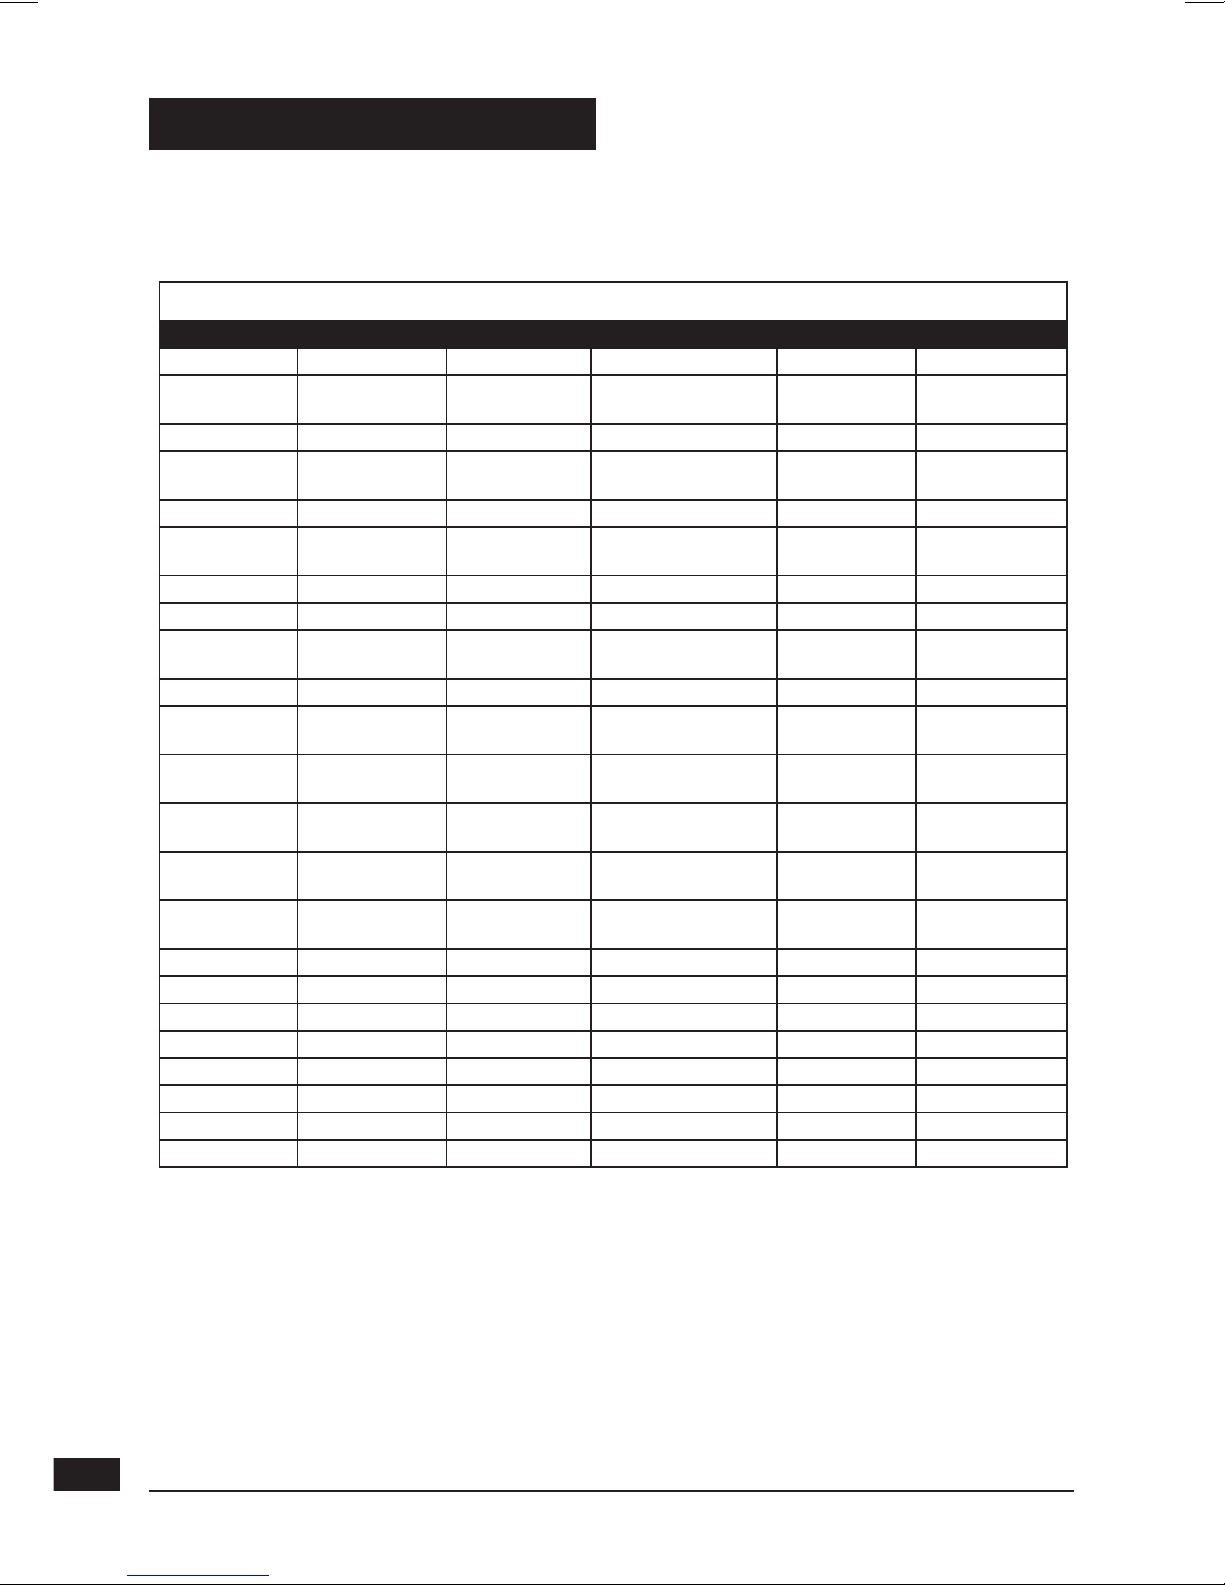
15 - Multiplexes - channels
(please check http://www.dtg.org.uk/retailer/dtt_channels.html for channels updates)
MULTIPLEX 1 MULTIPLEX 2 MULTIPLEX A MULTIPLEX B MULTIPLEX C MULTIPLEX D
BBC One ITV 1 Channel 5 BBC Four Sky Three The Hits
BBC Two
Channel 4 abc1 Cbeebies UKTV History
UKTV Bright
Ideas
BBC Three
ITV 2 QVC BBC Parliament E4+1 f tn
CBBC ITV 3 UK Gold
The Community
Channel
SmileTV TMF
BBC News 24 More E4 Bid TV 301 - BBC Sky News Ideal World
BBC i E4 price-drop tv 302 - BBC
Sky Sports
News
Film 4
ITV 4 UK TV Style 303 - BBC Sky Text ITV 2+1
Film 4+1 Eurosport 305 tvtv digital 4TV Interactive
CITV Setanta Sports 1 Xtra BBC talkSPORT
BBC World
Service
Teletext
Five Us Radio 5 Live Clyde1 Radio The Hits Radio
Teletext Holidays
Five Life
BBC Five Live Sports
Extra
Premier Radio Smash Hits!
Teletext Cars
TopUpAny
-
time 1
BBC 6 Music Virgin Radio KISS
Teletext on 4
TopUpAny
-
time 2
BBC 7 Magic
Heart
TopUpAny
-
time 3
BBC Asian Network
Q
Radio Music
Shop
Thomas Cook
TV
Oneword
BBC radio 1 Smooth FM
BBC radio 2 Kerrang!
BBC radio 3
BBC radio 4
Teachers' TV
Television X
heat
MOJO
Page 25
25
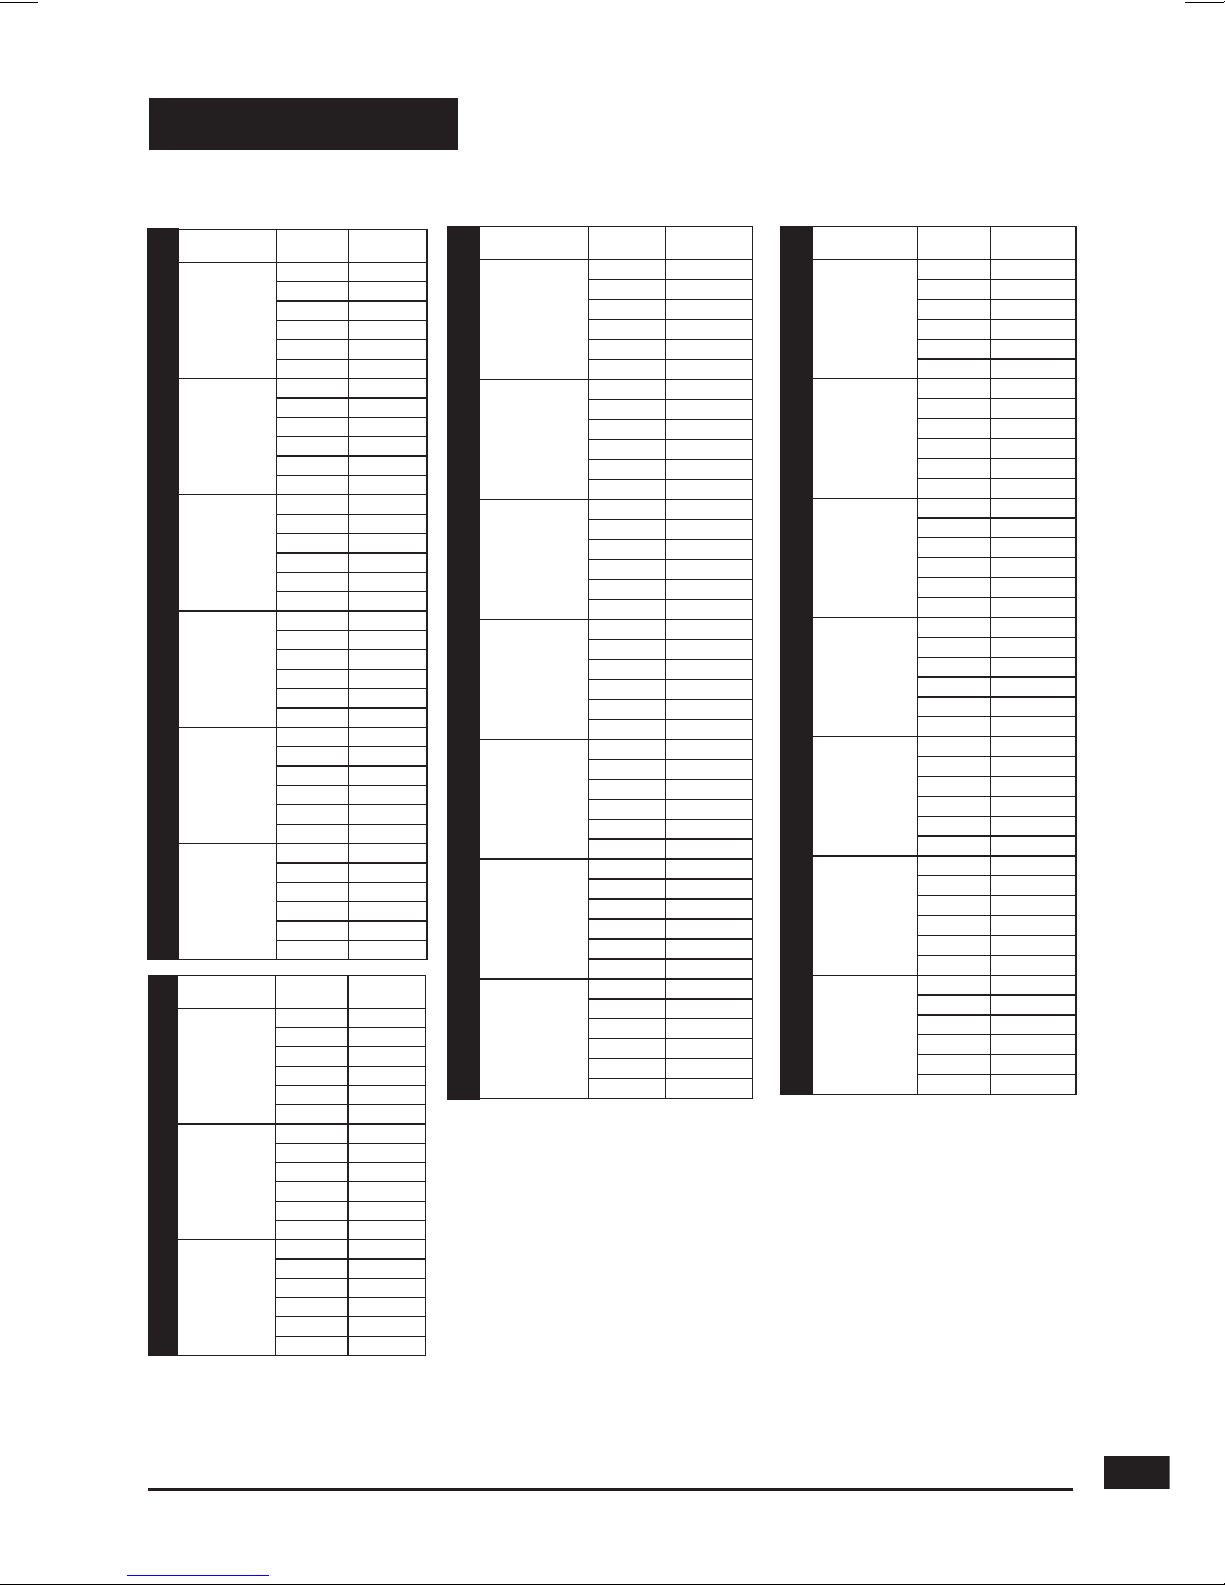
16 - Channels list
LONDON AND SOUTH EAST
TRANSMITTER
NAME
CHANNEL
N°
MULTIPLEX
Crystal Palace 22 2
25 1
28 B
29 D
32 A
34 C
Guildford 41 A
44 2
47 C
49 1
51 B
54 D
Reigate 21 2
24 A
27 B
31 1
39 C
66 D
Tunbridge
Wells
39 C
42 A
45 B
55 1
59 D
61 2
Hemel
Hempstead
48 1
55 2
59 B
60 A
62 C
65 D
Bluebell Hill 24 2
27 A
39 D
42 C
45 B
59 1
Dover 55 A
57 C
58 B
60 D
61 2
68 1
GRAMPIAN AND THE HIGHLANDS
TRANSMITTER
NAME
CHANNEL
N°
MULTIPLEX
Durris 30 1
34 2
41 C
44 D
51 B
52 A
Knock More 30 2
34 1
53 A
56 D
57 B
60 C
Rosemarkie 41 A
44 B
46 C
47 1
50 D
51 2
Eitshall 22 A
25 B
28 C
30 2
32 D
34 1
Rumster Forest 22 2
25 A
28 1
32 B
59 D
62 C
Keelylang Hill 41 A
44 B
47 C
48 1
51 D
52 2
Bressay 21 1
24 2
27 A
31 B
66 C
68 D
EAST ANGLIA
TRANSMITTER
NAME
CHANNEL
N°
MULTIPLEX
Tacolneston 53 A
58 B
60 2
61 C
63 1
64 D
Sudbury 39 B
48 A
49 1
50 D
54 C
68/56 2
Sandy Heath 40 C
42 1
43 A
45 2
46 D
67 B
CENTRAL SCOTLAND AND TAYSIDE
TRANSMITTER
NAME
CHANNEL
N°
MULTIPLEX
Black Hill 41 1
44 A
47 2
51 B
55 C
65 D
Torosay
21 C
23 1
26 2
29 A
31 D
33 B
Darvel 22 1
25 2
28 B
30 C
32 A
34 D
Rosneath 48 D
53 2
57 A
60 B
63 C
67 1
Craigkelly 23 A
26 B
29 2
33 1
39 D
42 C
Angus 56 C
59 A
62 B
65 D
66 2
68 1
Page 26
26
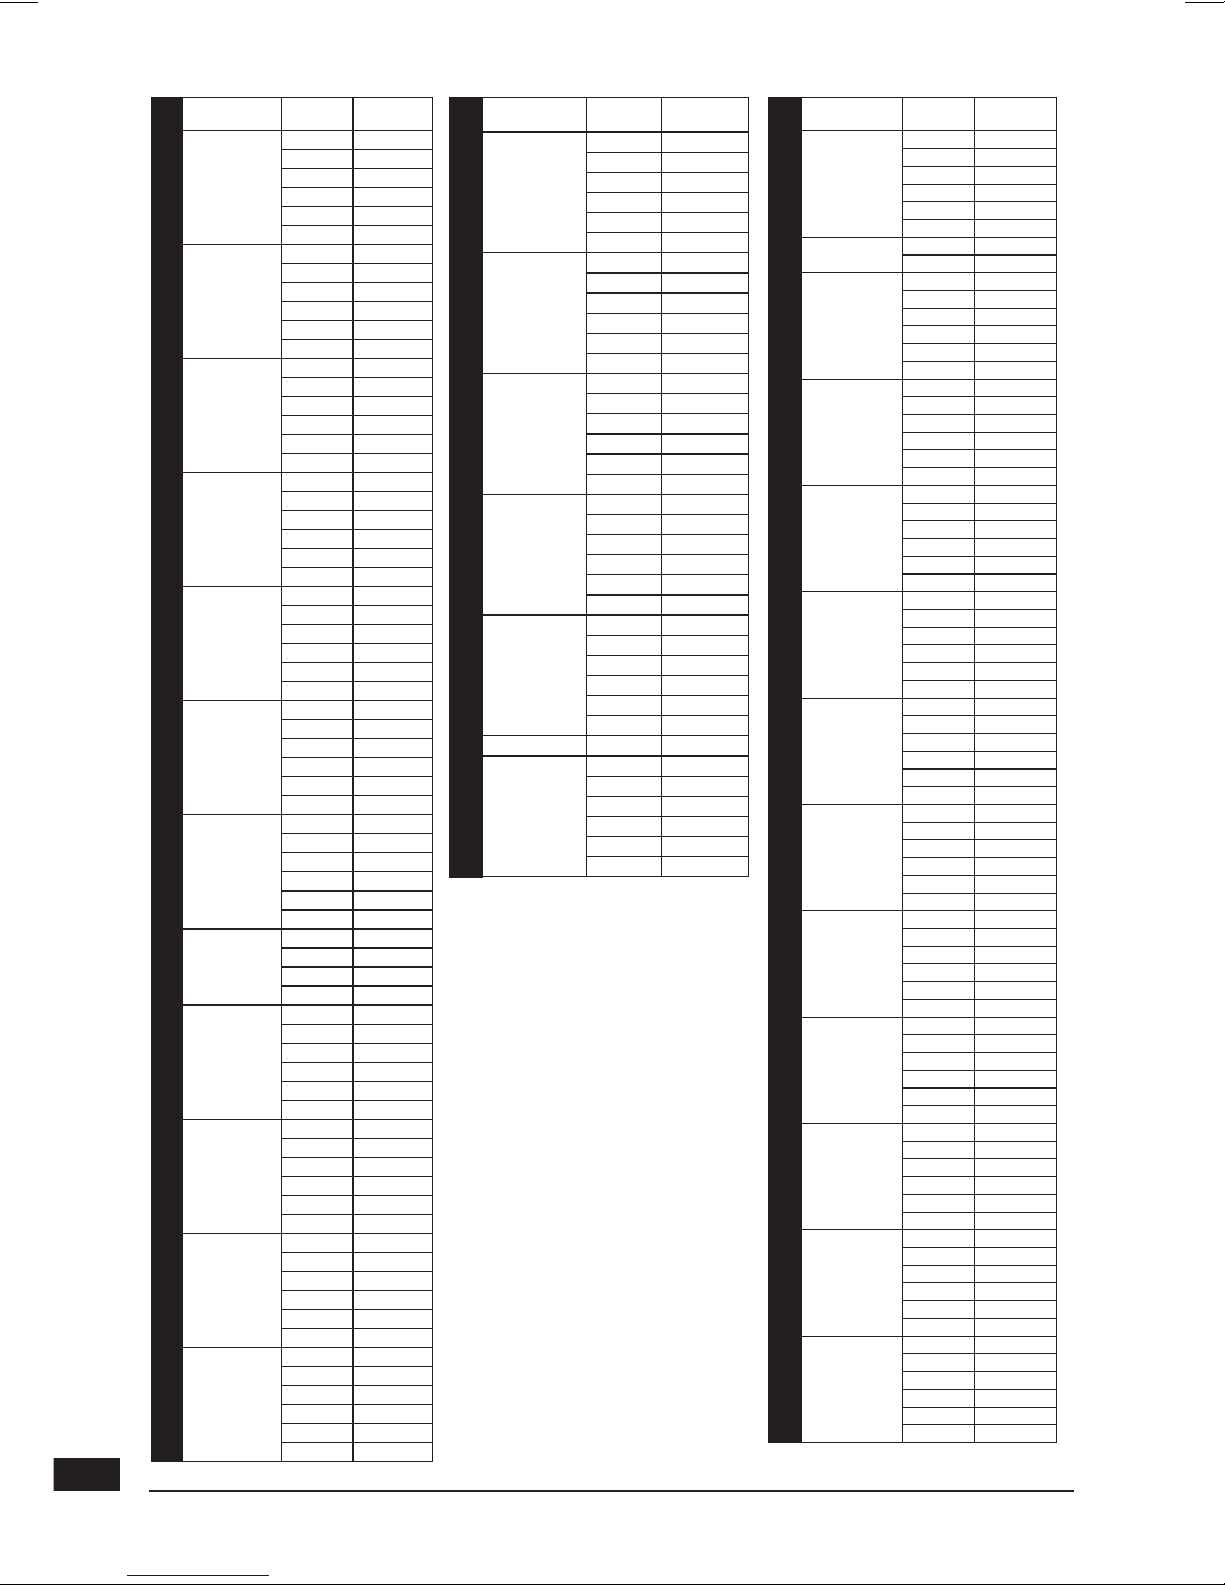
NORTH
TRANSMITTER
NAME
CHANNEL
N°
MULTIPLEX
Winter Hill 56 1
60 C
63 D
66 2
67 B
68 A
Winter Hill B 43 C
40 D
Pendle Forest 21 1
24 2
27 A
30 C
31 B
34 D
Saddleworth 39 C
41 2
44 A
47 1
51 B
56 D
Storeton 23 A
26 B
29 C
30 1
33 D
34 2
Lancaster 22 2
25 A
28 1
30 D
32 B
34 C
Emley Moor 40 2
43 A
46 B
49 D
50 C
52 1
Sheffield
39 1
42 D
45 C
53 2
57 A
60 B
Chesterfield
34 1
40 2
43 A
46 B
50 C
52 D
Keighley 30 C
34 D
48 1
53 B
66 A
68 2
Idle 30 C
34 A
42 D
45 1
53 2
56 B
Belmont 30 1
48 2
57 D
60 C
66 B
68 A
Olivers Mount 49 1
54 A
58 B
61 C
64 D
67 2
NORTH EAST AND BORDERS
TRANSMITTER
NAME
CHANNEL
N°
MULTIPLEX
Bilsdale 21 2
24 B
27 C
31 A
34 1
42 D
Pontop Pike 48 1
53 D
55 2
59 A
62 B
65 C
Fenham 22 2
25 A
28 B
30 1
32 C
57 D
Chatton 40 1
43 A
46 B
47 C
50 2
51 D
Caldbeck 23 2
25 1
26 A
39 B
42 D
45 C
Sandale 67 2
Selkirk 53 1
56 D
57 2
60 A
63 B
66 C
MIDLANDS
TRANSMITTER
NAME
CHANNEL
N°
MULTIPLEX
Sutton
Coldfield
41 1
44 2
47 A
51 B
52 C
55 D
Brierley Hill 56 A
59 B
62 D
65 2
66 C
68 1
Bromsgrove 23 B
26 C
29 2
30 D
33 A
34 1
Malvern 39 2
41 D
44 B
47 A
51 C
52 1
Larkstoke 21 1
24 A
27 B
31 2
57 C
60 D
Fenton 22 A
25 B
28 C
30 2
32 D
34 1
The Wrekin A
21 1
24 A
27 B
31 2
53 C
57 D
The Wrekin B
39 1
42 A
45 B
49 2
Ridge Hill 42 C
45 D
53 1
57 2
60 A
63 B
Oxford 29 D
34 1
48 C
51 A
52 B
68 2
Waltham
23 2
26 A
33 B
42 D
45 C
49 1
Nottingham 29 C
39 1
53 A
59 D
63 B
67 2
Page 27
27
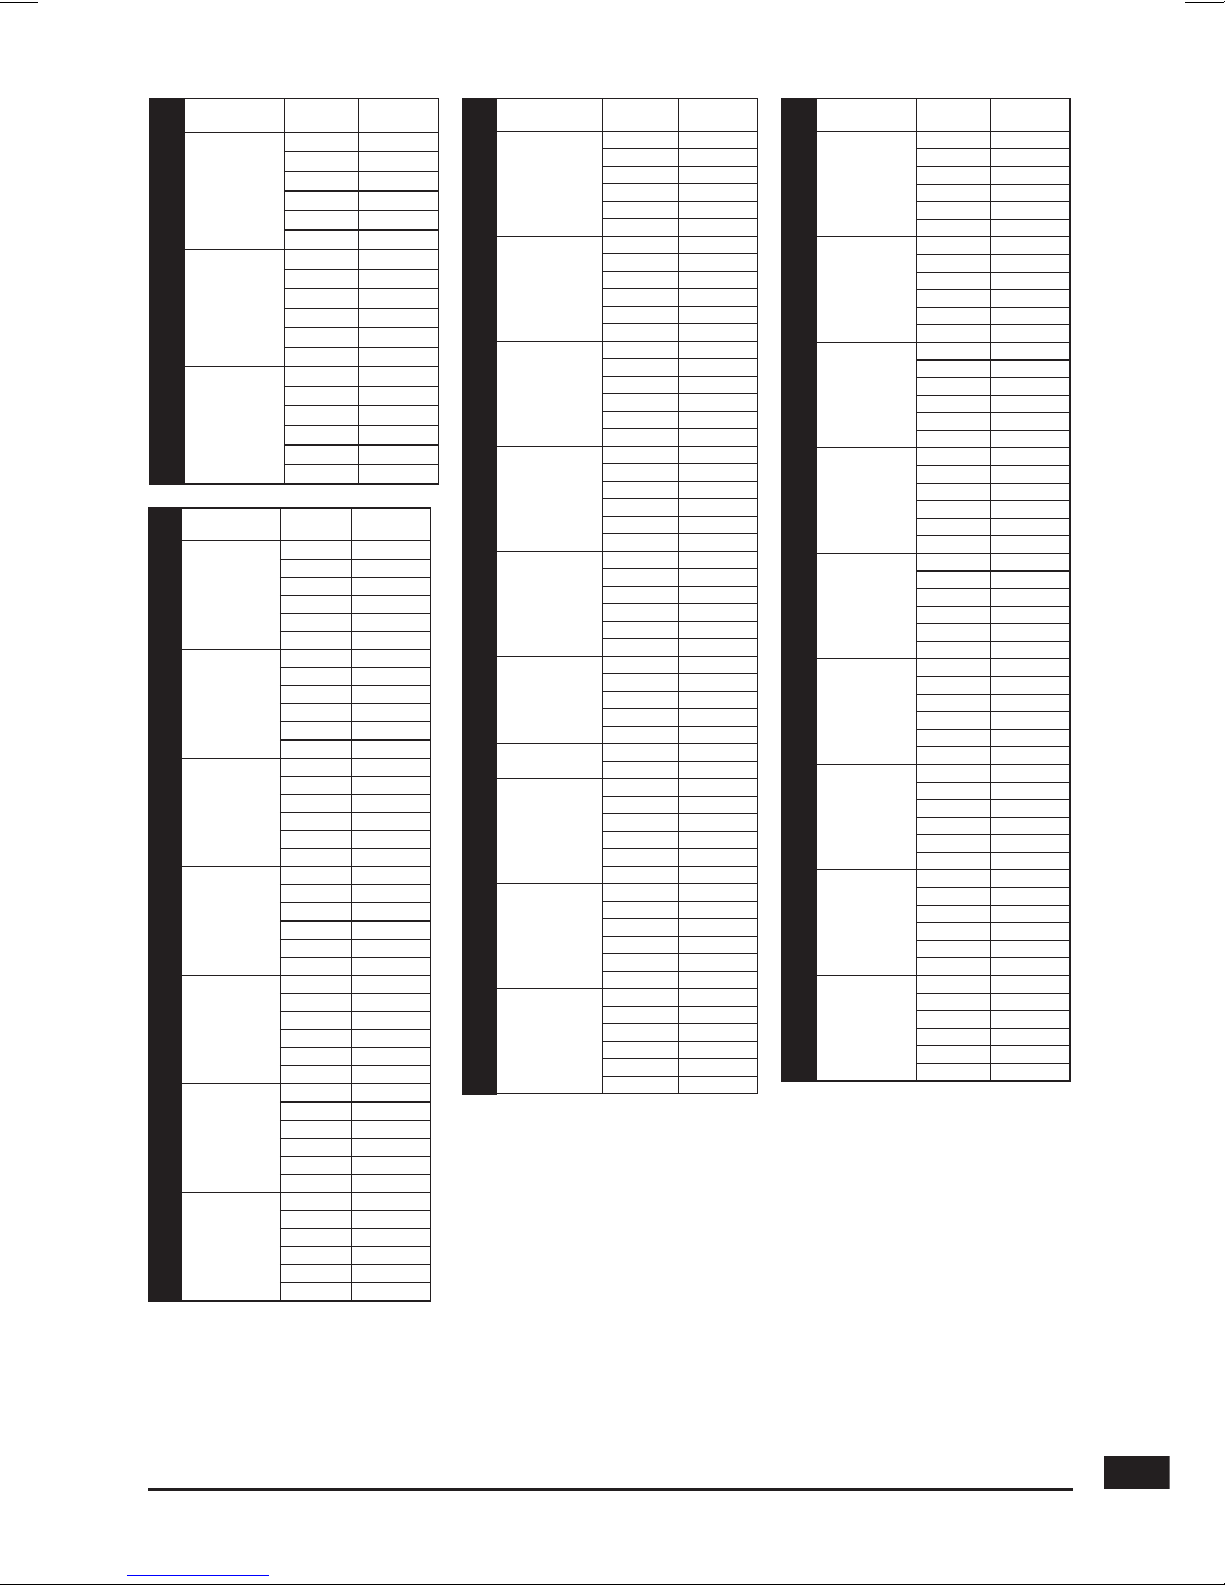
WALES AND WEST
TRANSMITTER
NAME
CHANNEL
N°
MULTIPLEX
Wenvoe
30 1
34 2
40 A
43 C
46 D
50 B
Kilvey Hill 21 C
22 2
25 1
28 A
31 D
32 B
Aberdare 23 A
26 B
28 1
29 C
32 2
33 D
Pontypool 42 A
45 B
48 2
52 1
66 C
68 D
Carmel 55 1
59 A
62 B
65 2
66 D
68 C
Preseli 39 A
42 B
45 C
47 1
49 D
51 2
Blaenplwyf 22 2
25 A
28 1
29 C
32 B
33 D
Llanddona 46 D
54 2
58 A
61 B
64 C
67 1
Moel-y-Parc 30 C
34 D
54 1
58 2
61 A
64 B
SOUTH WEST
TRANSMITTER
NAME
CHANNEL
N°
MULTIPLEX
Mendip 55 2
56 C
59 1
62 A
65 B
67 D
Bristol KW 22 1
25 2
28 A
30 C
32 B
34 D
Bristol IC 39 2
41 A
44 B
47 C
49 1
51 D
Stockland Hill 22 1
25 A
28 2
30 C
32 B
34 D
Beacon Hill 52 1
54 B
56 C
58 A
61 2
64 D
Huntshaw Cross 53 C
54 1
58 2
61 A
64 B
Huntshaw B 47 D
51 C
Caradon Hill 21 B
24 C
27 D
31 2
34 1
48 A
Plympton 52 1
56 D
60 B
63 C
66 A
67 2
Redruth 39 1
42 2
43 C
45 A
49 B
50 D
SOUTH OF ENGLAND
TRANSMITTER
NAME
CHANNEL
N°
MULTIPLEX
Rowridge 23 1
26 C
30 A
32 B
33 D
28 2
Salisbury 52 D
55 1
56 2
59 A
62 B
65 C
Whitehawk Hill 48 B
50 2
55 A
58 C
61 D
66 1
Hannington 40 A
41 D
43 2
44 C
46 B
50 1
Midhurst 56 1
59 B
60 D
62 A
64 C
65 2
Heathfield
North
29 2
34 1
47 B
48 A
51 D
54 C
Hastings 21 A
24 B
27 2
31 1
60 D
63 C
NORTHERN IRELAND
TRANSMITTER
NAME
CHANNEL
N°
MULTIPLEX
Divis 23 A
26 B
29 1
33 2
34 D
48 C
Limavady 53 A
57 B
58 2
60 C
63 D
67 1
Broughe
Mountain
23 A
26 B
29 C
30 1
33 D
34 2
Page 28

Product made in Asia.
Metronic Ltd, Regus,
Cardinal Point,
Park Road,
Rickmansworth WD3 1RE,
UK.
www.metronic.com
 Loading...