

Page 1
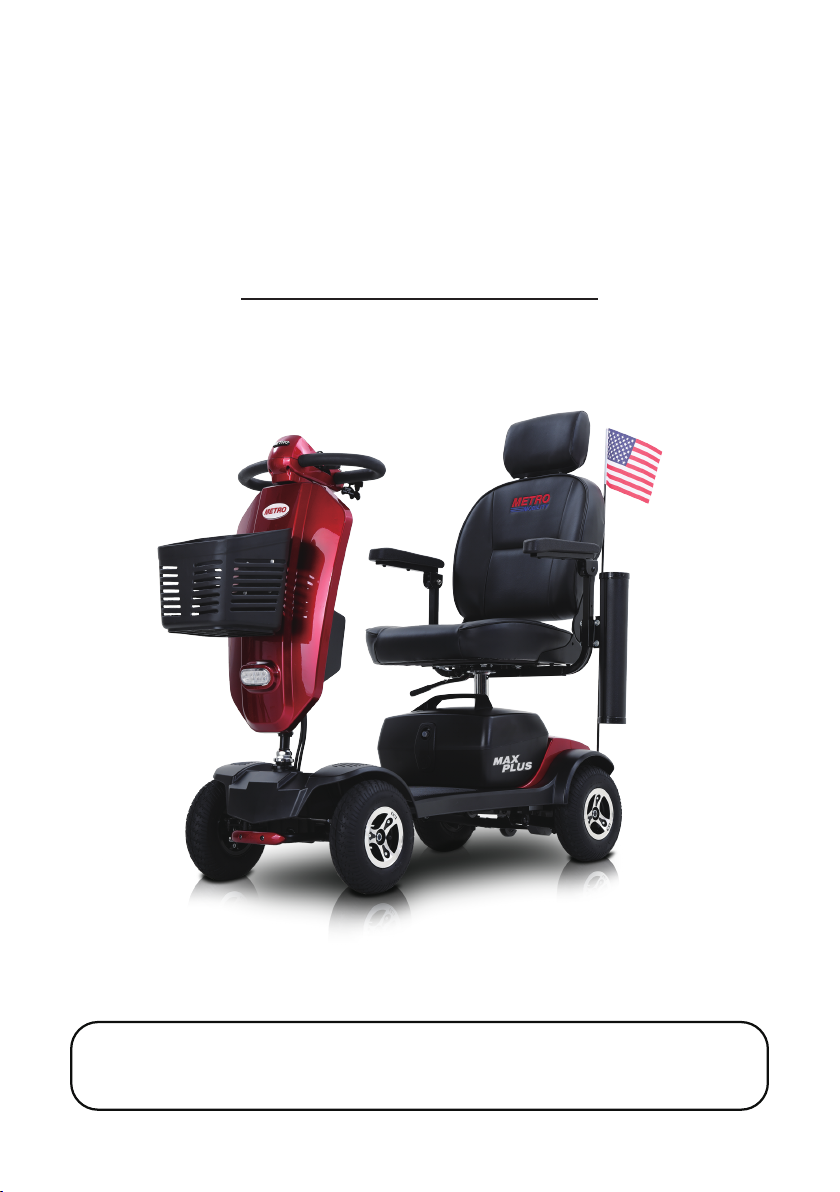
USER MANUAL
Model: Max Plus
Non-medical Device
This product is not a medical device and is not intended to assist, treat, diagnose
or alleviate any medical condition or disability.
Page 2

How to Use This Manual
Please read the user manual carefully before taking the product into use.
· This manual applies to our model: Max Plus
· This manual contains operations and assembly methods.
· This manual contains scooter maintenance and self inspection methods. Please
store in proper place.
· This manual contains solutions to simple device faults.
· Please provide this manual for reference when other people are going to use this
scooter.
· The annotations and illustrations in this manual might be slightly different with
the real parts due to quality improvements from changing design. We thank you for
your patience.
· Contact your dealer if there is any ambiguity or questions.
· Improper use of any vehicle may lead to injury. Unsafe driving could harm
yourselves and others.
· The mobility scooter is intended to comfortably transport those with walking
difficulties.
· This mobility scooter is designed to transport 1 person only.
Page 3

Content
I. Introduction .............................................................................................................................03
II. Safety Guide ............................................................................................................................04
III. Operation .................................................................................................................................05
IV. Seat Removal and Adjustment ..........................................................................................10
V. Tiller, Battery and Charging...................................................................................................11
VI. Transportation..........................................................................................................................14
VII. Guidance for Safe Operation and Use.............................................................................. 15
VIII. Battery and Charging Information ...................................................................................18
IX. General Warning ....................................................................................................................20
X. Specifications .......................................................................................................................... 22
XI. Routine Maintenance ...........................................................................................................24
XII. Trouble Shooting Guide .......................................................................................................25
XIII. Warranty ..................................................................................................................................28
02
Page 4

Introduction
All of our Scooters undergo rigorous tests to ensure they meet our requirements for
comfort, safety and durability.
Metro Mobility is based in product quality, value and genuinely caring for our customers.
We pride ourselves not only on designing and building the most innovative products, but
also on our commitment to offer an excellent standard of customer service both in sale
and after sale.
Before using your scooter please read this manual carefully. It will provide you with all
the information you will require. However, if you have any questions about the use, maintenance or safety of your scooter, please contact your local dealer. If you have any
questions regarding other areas, please write to support@metromobilityusa.com,
where our support team will catch up with you.
The scooter is intended for the use of people of all ages who may have difficulty walking
for periods of time. It is ideal for outdoor use and suitable for users up to 136kg in weight,
300lbs. Differing user weights can cause performance variation. Maximum user weight
was tested using a 136kg test dummy.
Electromagnetic fields, such as those emitted by shop alarms may be disturbed by the
use of the scooter. The function of the scooter may also be disturbed by these electromagnetic fields.
We are dedicated to providing products of quality that fully and reliably meet the
requirements of their intended use. We are BS/EN ISO 9001 accredited which is the internationally recognized standard for quality management systems. This approval ensures
we provide quality in all areas of our business from development through to final delivery. Should you require any further assistance, please contact your local dealer.
03
Page 5

Safty Guide
DO NOT OPERATE THE SCOOTER BEFORE READING AND UNDERSTANDING THIS INSTRUCTION
MANUAL.
IF YOU ARE IN DOUBT ABOUT THE MEANING OF THESE INSTRUCTIONS, OR ANY OF THE CAUTIONS AND WARNINGS, PLEASE CONSULT YOUR HEALTHCARE PROFESSIONAL, DEALER OR
RELEVANT TECHNICAL PERSONNEL.
FAILURE TO FULLY UNDERSTAND THE OPERATION OF THE SCOOTER MAY RESULT IN ANUNEXPECTED RESPONSE FROM THE EQUIPMENT WHICH CAN THEN LEAD TO POSSIBLE INJURY OR
DAMAGE.
NOTES
Warning and Caution notices used in this manual apply to hazards and unsafe practices that could result in personal injury or damage to property.
WARNING
We supply an extensive range of mobility scooters to meet the varying needs of individual users. It is the responsibility of the individual user and their qualified healthcare advisor, to decide which scooter is suitable for the user’s intended purpose.
Regarding restraints, seat positioning straps, posture correction or other positional aids
and accessories, it is the obligation of the qualified healthcare professional in conjunction with the dealer to ensure the suitability of such equipment for the safe operation of
the scooter.
Serious injury can occur in the event of a fall from a mobility scooter. We DO NOT RECOMMEND that a scooter user is transported in any type of vehicle when seated in the scooter.
At this time, there are no approved Tie-down Systems for the transportation of a user in
ANY moving vehicle whilst seated in a scooter.It is our opinion that users of mobility
scooters should be transferred into the appropriate vehicle seating with proper
restraints for transportation.
Intended Use
The intended use of the device is for people who can barely walk but have the ability
to operate a mobility scooter.
04
Page 6
Operation
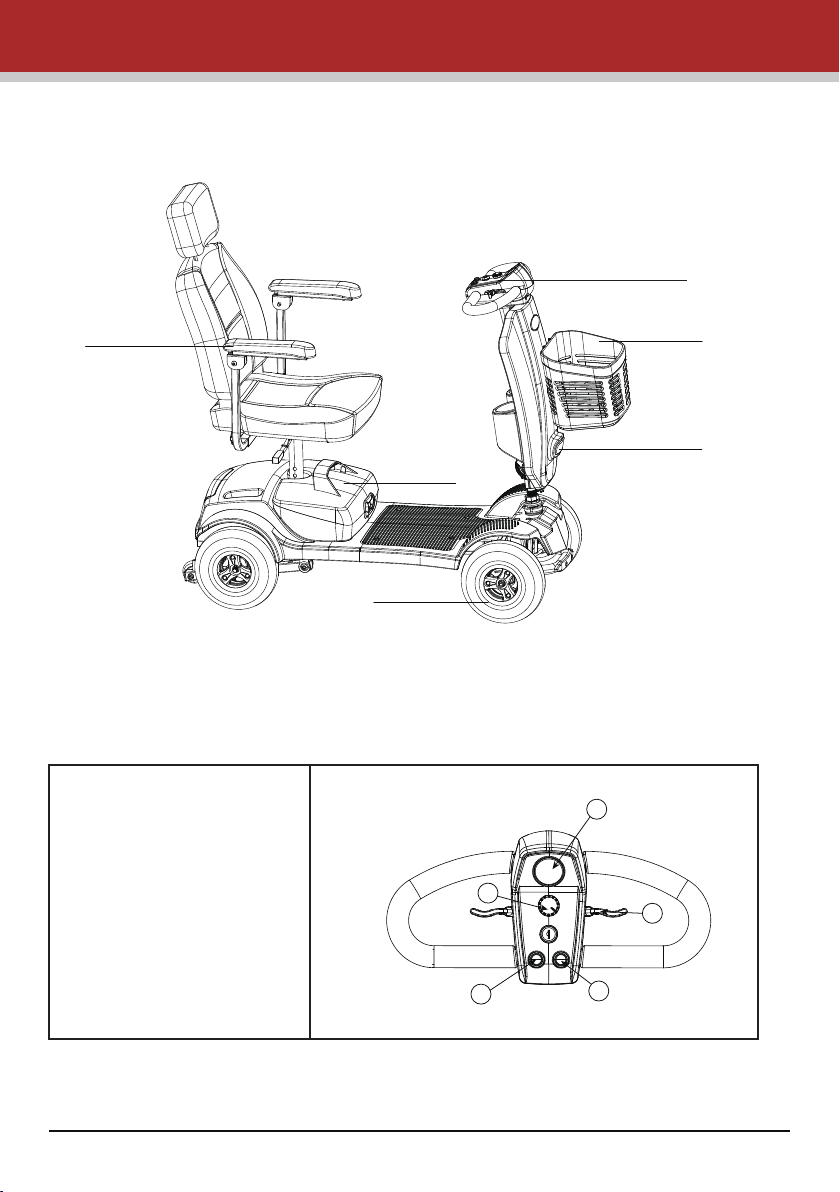
PARTS DESCRIPTION
Control Panel
Adjustable
Armests
Battery
Tires
Basket
Headlight
CONTROL PANEL
All of the drive controls for the scooter are to be found on the tiller control box.
1. Battery Gauge
1
2. Speed Knob
3. Throttle Control Lever
2
3
4. Light Swtich
5. Horn Button
05
4
5
Page 7
The Preset Speed Knob
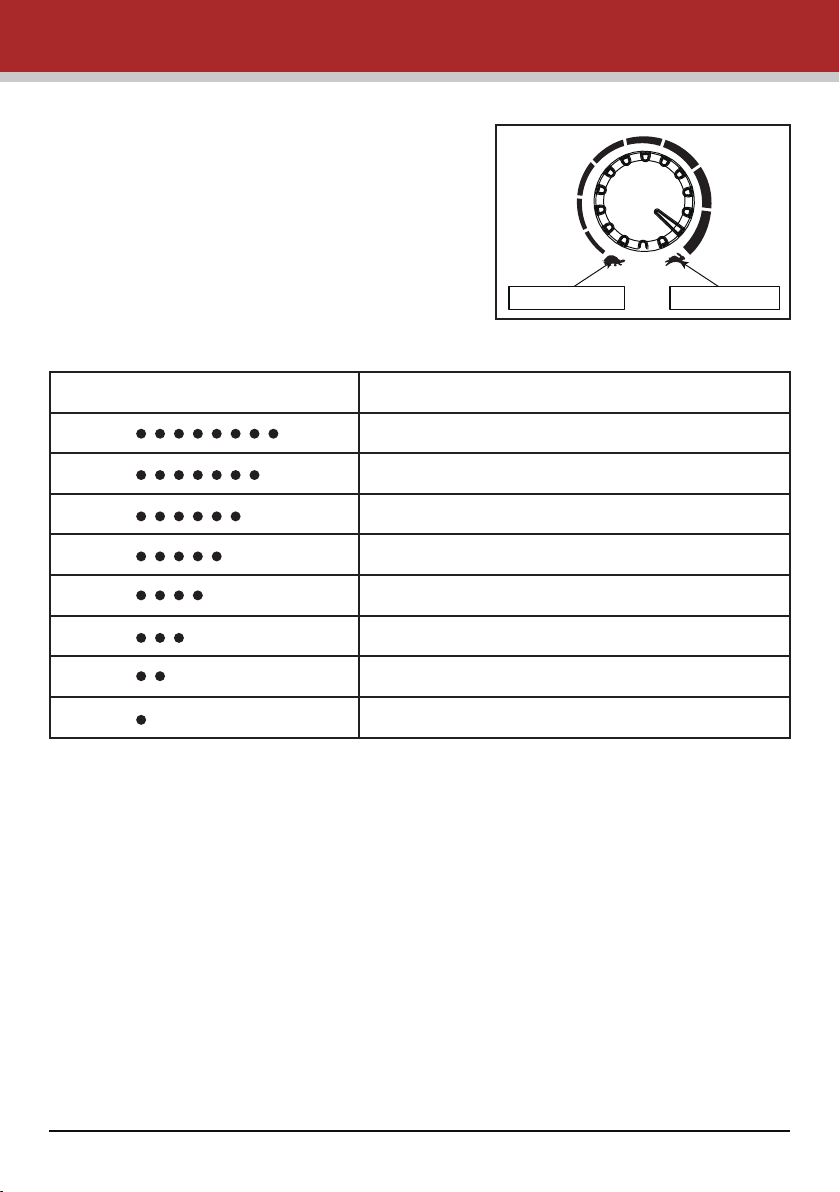
Turning this knob to the left, reduces your available maximum speed.
Turning it to the right, increases the available
maximum speed (see figure 1).
The Battery Gauge
This gives an approximation of battery charge
and is illuminated for clarity.
The gauge is “RED” empty, to “YELLOW” charge
required, to “GREEN” charged.
Slowest Setting
Figure 1
Operation
Fastest Setting
LEDS
As the scooter moves over differing terrain, it is normal for the Battery Gauge to dip up
and down. For a more accurate reading, stop the scooter. The gauge will dip more often
in cold and damp weather as the capacity and efficiency of all batteries drop in these
conditions.
TIP
If your battery gauge has gone into the “RED” section you can increase your remaining
range by reducing your maximum speed. Remember you MUST charge your battery
overnight as soon as you can to prevent battery damage.
BATTERY PERCENTAGE
91-100% battery remaining
76-90% battery remaining
61-75% battery remaining
46-60% battery remaining
31-45% battery remaining
21-30% battery remaining
10-20% battery remaining
<10% battery remaining
Operating the Lights
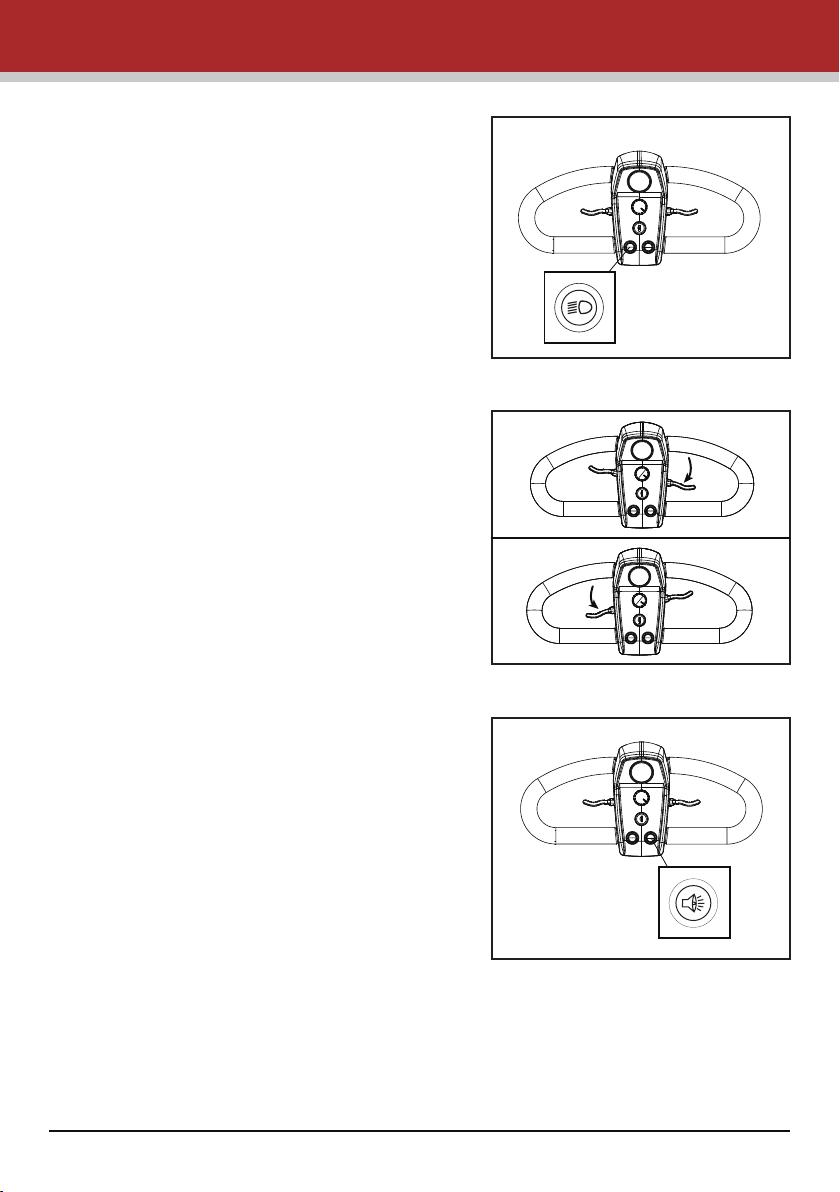
The lights are operated by pressing the blue button on the front fascia panel. Press the
button once to illuminate the lights, press the button again to switch the lights off. Switch
the lights on to make yourself more visible in low levels of light, day or night (see figure
2).
06
Page 8
Operation
Throttle Lever
The throttle lever controls the speed as well as
the forward and reverse motion of the scooter.
To move the scooter in a FORWARD motion,
PULL the lever with the RIGHT hand or PUSH the
lever with the LEFT THUMB.
To move the scooter in a REVERSE motion, PULL
the lever with the LEFT HAND or PUSH the lever
with the RIGHT THUMB. The lever will return
when released and the scooter will slow to a
stop .
The more you move the lever, the more your
speed will increase (up to its preset maximum). It is possible to operate your scooter
using only one side of the throttle lever. To do
this simply PUSH and PULL on the chosen side
of the throttle lever(see figure 3).
Horn Button
Pressing the horn button produces an audible
warning sound. Use this function to warn
pedestrians of your presence when necessary
(see figure 4).
Figure 2
Key Switch
The key switch switches the scooter ON and
OFF.
Please note that the key cannot be removed
when it is in the ON position.
Turning the key to OFF while driving will cause
the scooter to stop very abruptly. This is not
recommended, except in an emergency, as
continual use of this function could result in
damage to the scooter.
07
Figure 3
Figure 4
Page 9
Operation
Make sure that the switch is in the OFF position before getting on or off the scooter. To
ensure that the scooter is OFF, remove the key.
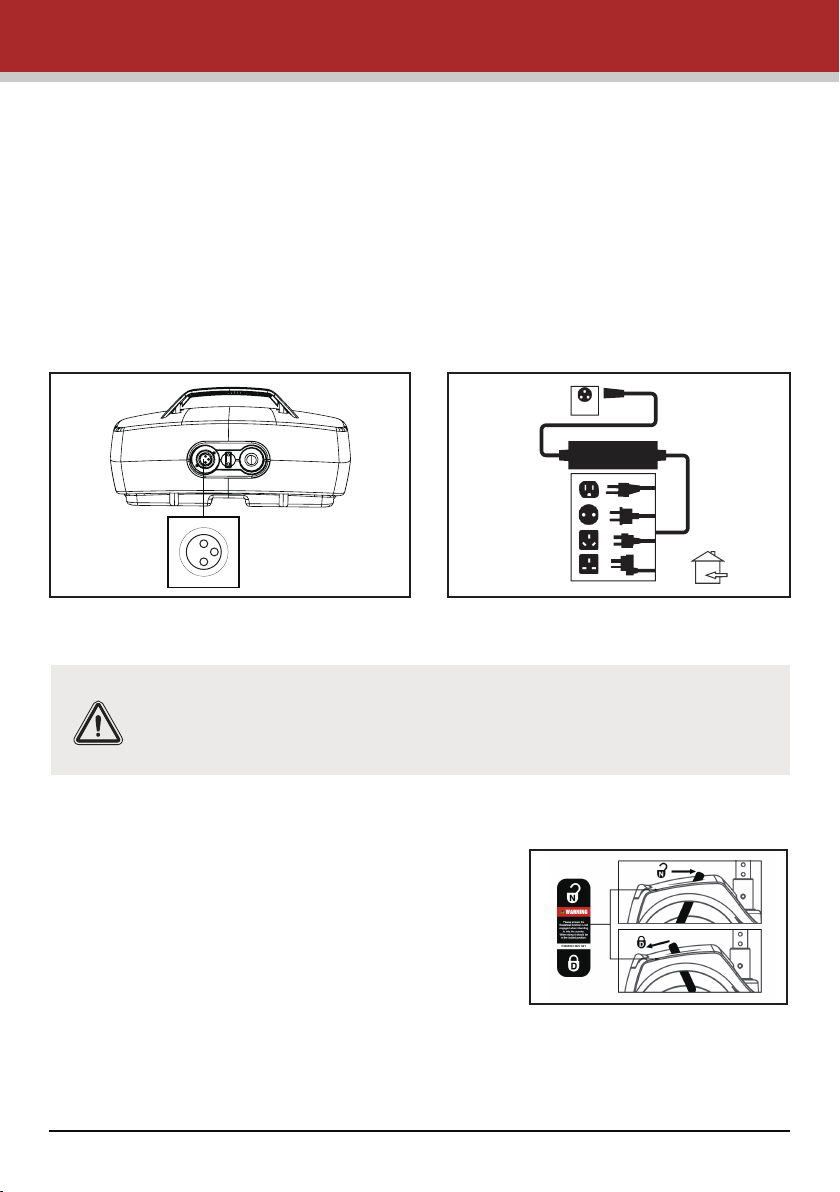
Charging Socket
The socket to connect the charger is located on the battery pack (see figure 5 and 6).
To use the socket, swivel the plastic cover to the left or right to reveal the socket connections. The charger output plug can now be connected, ready to accept charge current
from the battery charger.
After use, ensure that the plastic swivel cover is rotated back into place. This action helps
prevent water from entering the socket connections.
XLR
Figure 5 Figure 6
WARNING
Do not attempt to charge your scooter outdoors or in damp/wet conditions. Failure to comply with this instruction may lead to a shock or fire
hazard.
Freewheel mechanism
A freewheel device disengages the engine to allow for
manual operation only. By pushing the lever backward, you will engage the motor to drive again. Please
make sure to power off the scooter when moving the
lever from unlock to lock position. This will ensure the
scooter registers the change.
The lever is located on the right hand side of the
scooter rear panel(see figure 7).
08
Figure 7
Page 10

Operation
WARNING
Use extreme caution in the freewheel mode, especially on slopes/inclines. In these circumstances, letting go of your scooter will cause the
scooter to roll.
Please ensure that the freewheel function is disengaged when intending to ride the scooter and that after use, it is reengaged. Failure to do so
may result in injury.
09
Page 11
Seat Removal and Adjustment
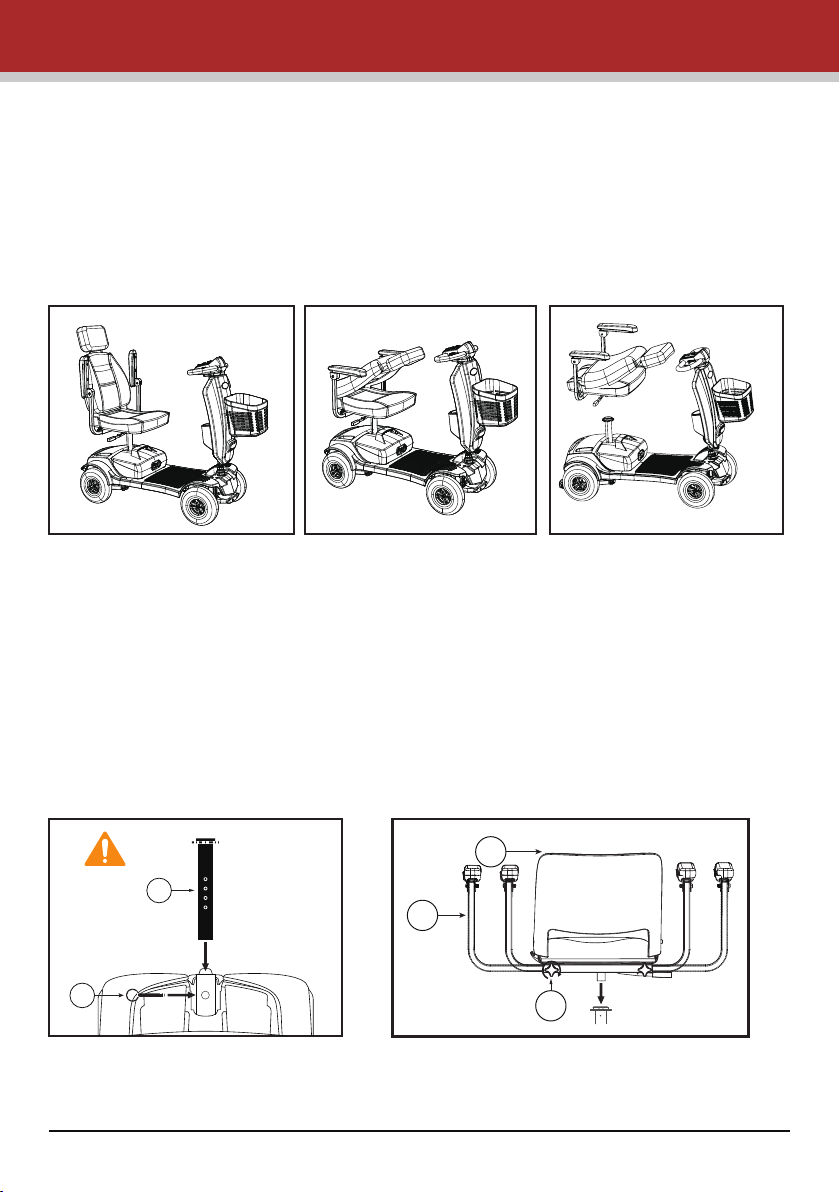
Removing the Seat
1. Lift armrests up for easier access to the seat lever (see figure 8).
2. Stand behind the seat and fold the backrest down (see figure 9).
3. Grab the seat base and while pulling the seat lever up, lift the seat vertically (see figure
10).
4. Place seat at desired location for stowage.
Note: Exercise caution when lifting the seat.
Figure 8 Figure 9 Figure 10
Seat Height Adjustment
1. Remove the seat base as described earlier .
2. Change the seat post to the new position and refit the detent pin (see figure 11).
3. Put the seat base back on.
Armrest Adjustment
1. Loosen the adjustable screws .
2. Move the armrests to the desired position and re-tighten the adjustable screws,
changing the space between armrests(see figure 12).
1
1
2
2
Figure 11 Figure 12
10
3
Page 12
Tiller, Battery and Charging
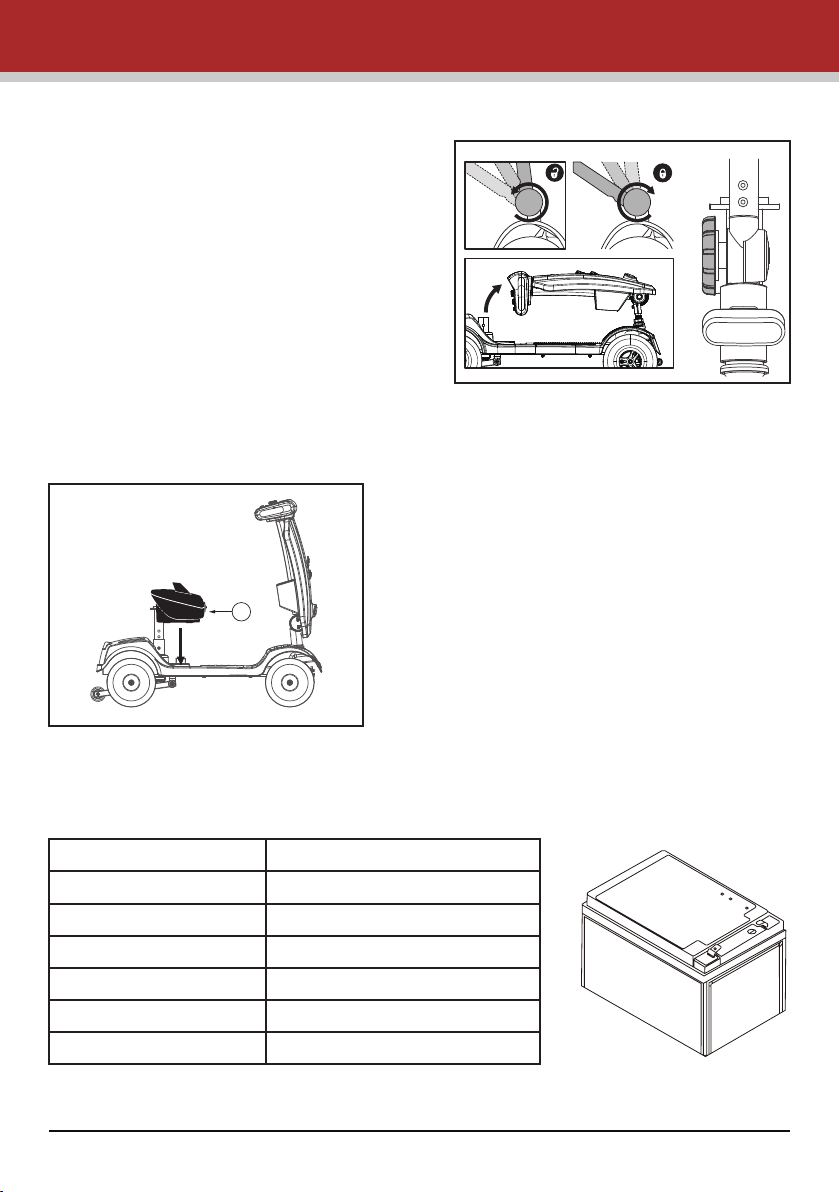
Tiller Adjustment
The scooter features an infinitely adjustable tiller which allows you to lock the
tiller in the most comfortable position for
driving. This feature also lets you fold the
tiller down fully, for transportation and
stowage (see figure 13).The folding knob
is located on the bottom of the tiller.
To adjust, support the tiller with your left
hand. Rotate the folding knob counterclockwise to release the tiller .
Move the tiller to the desired location.
Rotate the folding knob clockwise to lock
the tiller .
Battery Removal
It is important to remove the seat base and
seat post first to allow for better access to the
batteries. Lift the battery vertically out of its
tray using the handle provided (see figure
14).
1
Figure 14
When reassembling the scooter, remember
to insert the detent pin. Failure to do so may
result in being unable to take out the seat
post and adjust the seat height. Ensure that
the battery pack is free from dirt and grit - this
will affect the performance of the battery.
Figure 13
SPECIFICATIONS
Rated Voltage
Rated Capacity
Total Battery Length
Total Battery Width
Shell Height
Total Battery Height
Weight
12V
20Ah(C2,to 10.5V@25℃)
180mm±3mm
77mm±2mm
171mm±2mm
176mm±2mm
6.10kg±0.2kg
11
Page 13

Tiller, Battery and Charging
Battery Charging
Your scooter is supplied with a charger. Please note
that only chargers supplied by your local authorized
dealer with a capacity of minimum 2.0 Amps and
maximum of 6.0 Amps should be used. Turn off
scooter before charging.
To charge, move the charger connector cover
located on the battery pack and connect the charger(see figure 15). Ensure that the charger plug is
dry and intact before connecting it to the scooter.
A reset button is located on the battery, as well.
Please check that the button is pressed in .
Note
Operating instructions
· Make sure that the power cord, charger and battery connector are connected.
· Check that the output voltage of the charger is the same as the connecting battery.
· Connect the plug of the charger with the battery first, and then plug the AC power plug
into the electricity outlet.
LED indications
· Red light on: Power on, disconnect with the battery
· Orange light on: Charging
· Green light on: Full-charged
Figure 15
Troubles shooting
When the RED light is off despite the power being on.
· Check if the input power cord of the charger has been plugged into a proper socket, one
where electricity passes from the outlet. If this is the case, the battery may be defective.
please send the charger back to the manufacturer for repair.
When the ORANGE light is off while charging.
· Check if the charger and battery connectors are correctly connected and that the
battery is not fully charged, if this is the case, the battery maybe defective. Please send
the charger back to the manufacturer
When the ORANGE light turns to GREEN immediately.
· Check to see if the battery is fully charged, if not, the charger maybe defective,
please send the charger back to the manufacturer for repair.
Caution
For indoor use only. Do not expose to rain. Please remove charger from outlet before
removing the charger from the battery. Avoid explosive gases or sparks by putting the
charger in a well ventilated area when charging. Only use the charger with 24V lead acid
batteries.
12
Page 14
Tiller, Battery and Charging
WARNING!
Only use the original charger from our company. Using another brand’s
charger may shorten your warranty period, using an unknown charger
may cause damage to your scooters, and using the wrong charger may
cause a fire.
Use extreme caution to manage the battery and charger.
Don’t throw the battery into the fire. Dispose of battery according to the
local law.
Don’t put the battery near to any heating device that may cause the
battery to explode.
Don’t press on the battery, stab it, or let it endure any high pressure. This
may cause it to short circuit or overheat.
DO NOT TOUCH BATTERY PACK TERMINALS WITH METAL OBJECTS. THIS
INCLUDES METALLIC JEWELLERY. DO NOT EXPOSE CHARGING BATTERIES TO
NAKED FLAMES OR SMOKE. REPLACE DAMAGED OR LEAKING BATTERIES
IMMEDIATELY. WEAR GLOVES IF MOVING LEAKING BATTERIES.
IF THERE IS DAMAGE TO THE BATTERIES OR THE BATTERY BOXES, CONTACT
YOUR LOCAL DEALER IMMEDIATELY. DO NOT ATTEMPT TO FIX THE BATTERIES
YOURSELF.
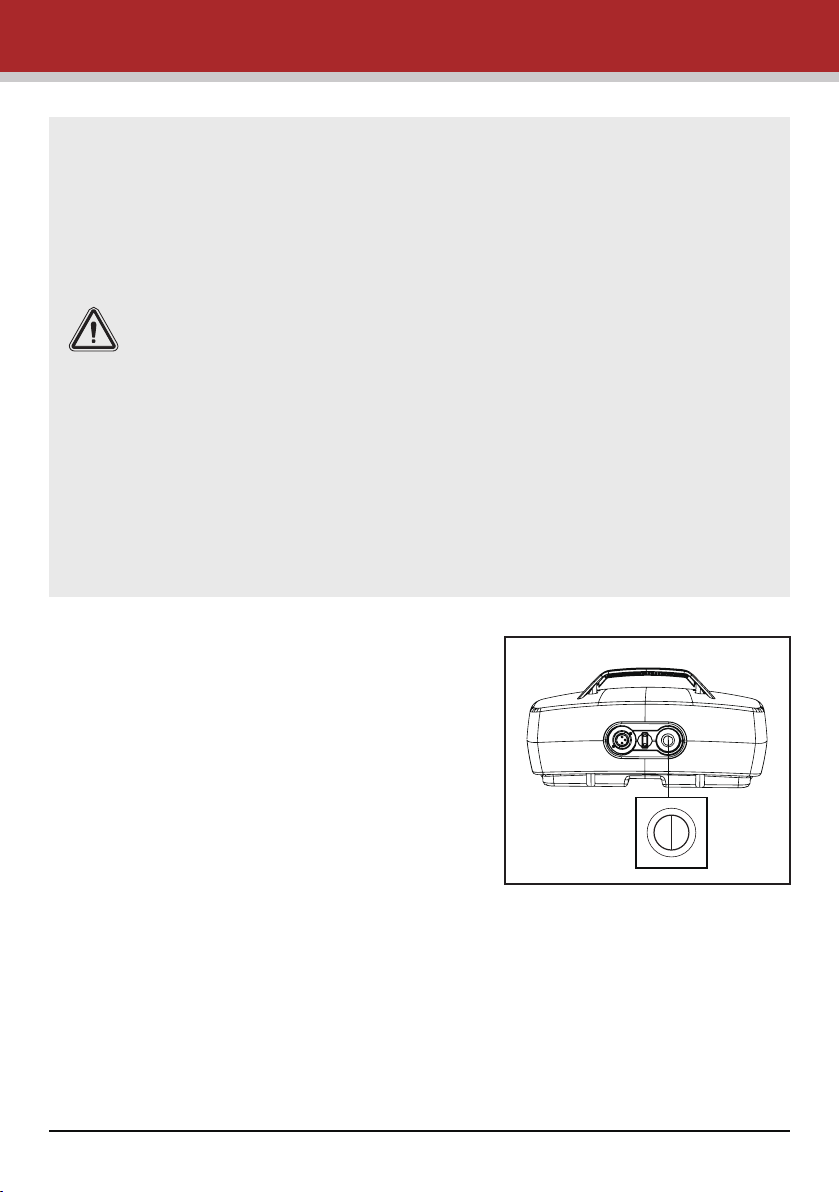
Fuse
If a fault occurs, the reset button will pop out.
Switch the scooter off, press the button in and
switch the scooter back on (see figure 16).
There is a 5A fuse fitted to the positive terminal
of battery.
There is also a 2.5A fuse fitted in the charger
and a 2A fuse in the main plug of the battery
charger. All fuses must be replaced by an
authorized service agent if needed.
13
Figure 16
Page 15
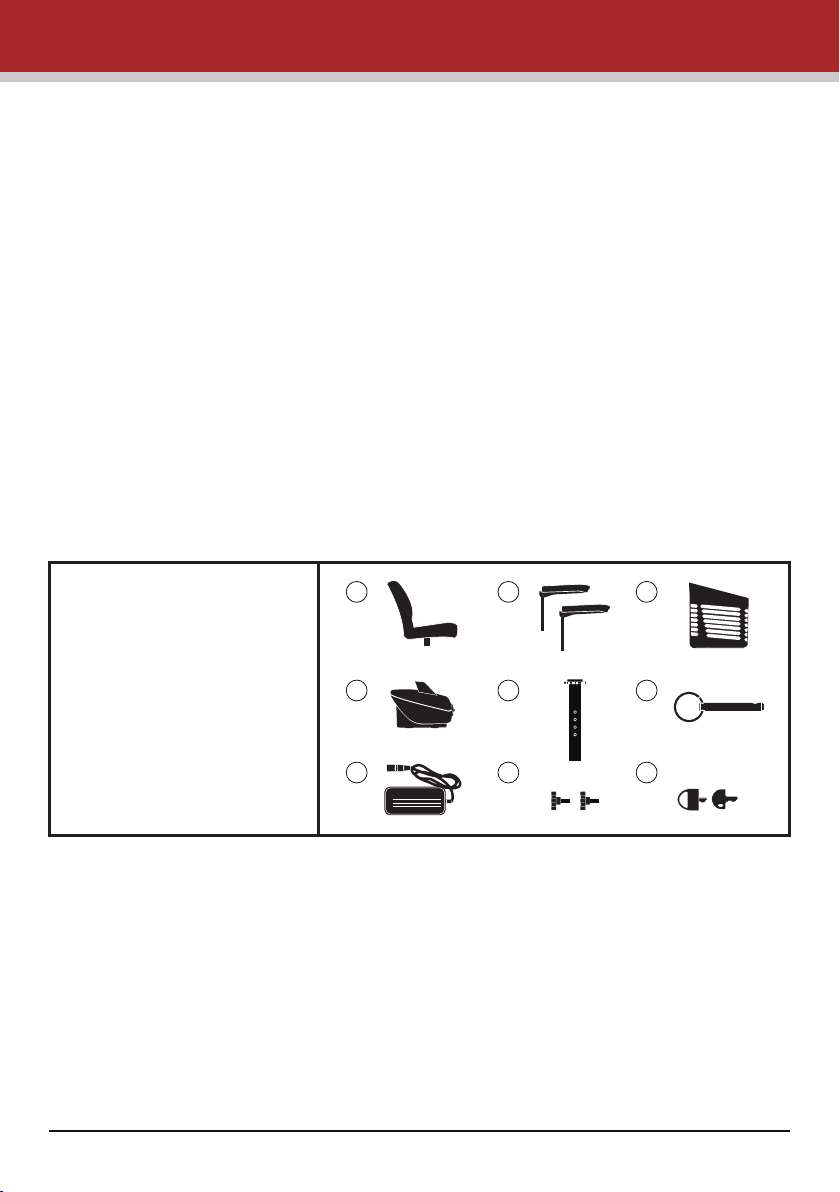
Transportation
Disassembling Transportation
1. Switch off the scooter
2. Remove the basket
3. Remove the seat
4. Take out the detent pin and remove the seat post
5. Using the folding knob, lower the tiller to lock into its lowest setting
6. Using the lifting handles provided, carefully lift the scooter safely and securely into the
luggage compartment of the vehicle
TIP
Please put all the parts after disassembling into the original carton from us to insure the
safe transportation (see figure 17). To reassemble your scooter, simply reverse the
above steps.
Important
When reassembling the scooter, remember to properly insert the detent pin. Failure to
do so may result in being unable to take out the seat post and adjust the seat height.
Always secure your scooter parts before transportation. Remember to stop the scooter
from moving by pushing the freewheel lever forwards. Don’t sit on the scooter during
transportation.
IDENTIFICATION KEY
1. Seat
2. Armrests
3. Basket
4. Battery Box
5. Seat Post
6. Detent Pin (for Seat Post)
7. External Charger
8. Armrest Adjustment Knobs
9. Keys
Figure 17
1 2
4
7
Class 2 Battery Charger
24V
14
3
5
8
6
9
Page 16

Guidance for Safe Operation and Use
Basic Driving
It is advisable, for the first few sessions of operating your scooter, that the area around
you is clear of obstacles and pedestrians.
Before operating your scooter, ensure the seat height and position has been adjusted to
your satisfaction and that the tiller angle has been set for optimal safety and comfort.
· To start, be properly seated on the scooter and check that the speed control knob is
fully to the left. Then turn the key switch to the “ON” position .
· On the tiller, use the throttle levers as described earlier. You will gently accelerate.
Release and you will gently stop. Practice these two basic functions until you get used to
them.
· Steering the scooter is easy and logical. Remember to allow enough clearance when
turning corners so that the rear wheels will clear any obstacles.
· Short cutting a pavement corner can cause problems to the back wheels if the corner
is very rough. Avoid this at all times by steering an exaggerated curve around the obstacle.
· When steering in a tight spot, such as entering a doorway or when turning around, stop
the scooter, turn the handlebar to where you want to go, then apply power gently. This
will make the scooter turn very sharply. It is also recommended that the preset speed is
set to a slower setting so that there is more control over the scooter.
· Reversing requires caution - especially exercise caution when reversing down slopes.
When reversing, always turn the handlebars in the opposite direction to the way you
want to go. The more you operate the throttle lever, the faster you will go. Reverse speed
is 50% slower than forward speed. If the scooter does not move in reverse, carefully turn
the speed control knob clockwise until the scooter moves gently backwards.
Important
To preserve battery power there is a “sleep timer” feature built into the controller. Should
the scooter be left ON, but not operated for 15 minutes the scooter will go into “sleep
mode”. To reset this, switch the scooter OFF and then back ON again.
Note: The user’s visual standards must be higher than 0.5.
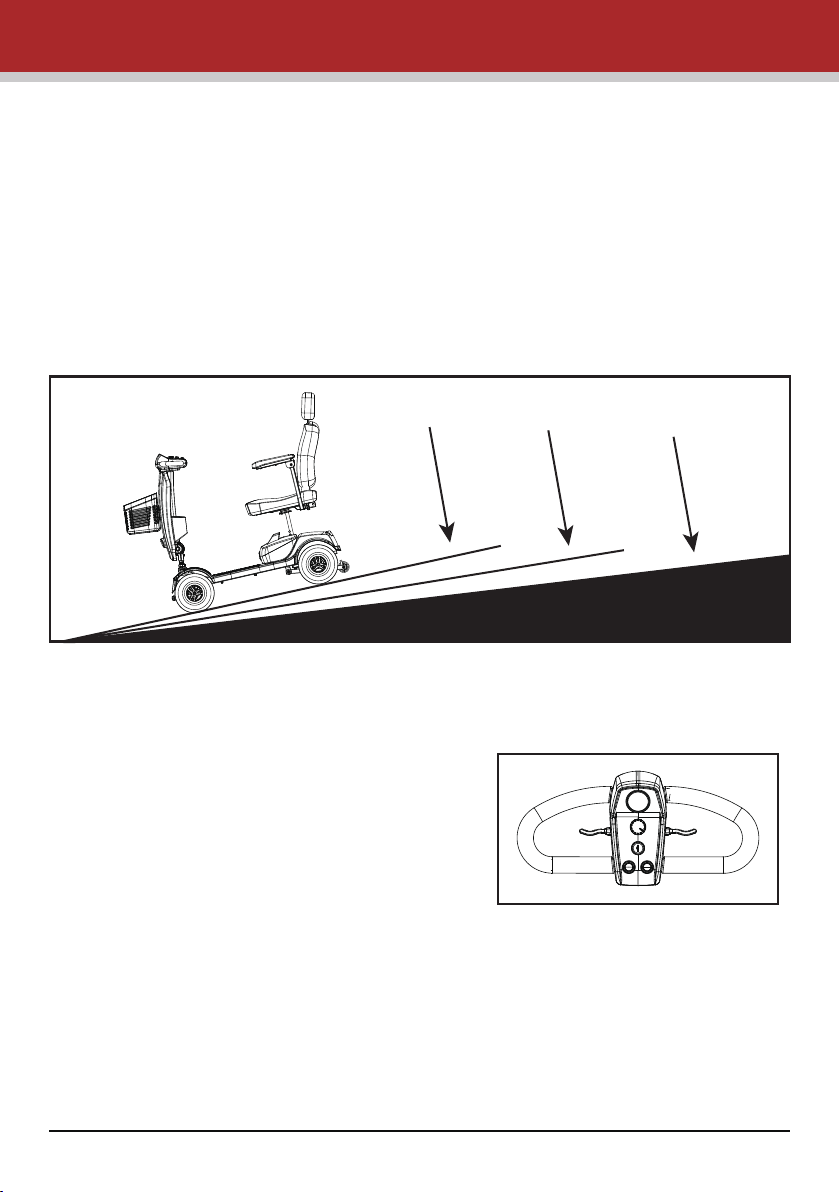
Hill Climbing
This scooter has been tested to climb an incline of no more than 8° with a maximum
user weight of up to 136kg (300 lbs) (see figure 18). Do not attempt to climb inclines
greater than this.
Always reduce your speed when reversing on slopes. Do not attempt to reverse down
hills in excess of 8°.
Do not attempt to drive with the wheels at different levels, e.g. along the footpath and
road simultaneously.
15
Page 17
Guidance for Safe Operation and Use
Hill climbing capability and the distance travelled between battery charges will be
adversely affected by things such as:
· The weight of the user.
· The use and weight of accessories
· The terrain (e.g. grass or gravel).
· The steepness of hills.
· The level of charge and the age of the batteries.
· Extremes in temperature.
Note: Do not traverse across the face of a slope that is greater than 8°.
8°
200lbs
Figure 18
Braking
To bring the scooter to a stop, simply let go of
the throttle control lever (see figure 19).
Remember to keep both of your hands on the
handlebars when the scooter is braking.
Release of the control lever will stop your scooter
in seconds.
Note: Automatic braking is not instantaneous.
It will engage within the rotation of half of a tire
upon stopping.
7°
250lbs
Figure 19
6°
300lbs
16
Page 18

Guidance for Safe Operation and Use
Emergency Braking
In an emergency or the unlikely event of an unwanted movement of the scooter, switching off the key switch will bring the scooter to a stop. Though very effective, emergency
braking is extremely abrupt and must never be used under normal circumstances.
Letting go of the throttle lever will slow the scooter to a controlled stop. Routine use of
emergency braking will cause damage to your scooter.
Switching off and Storage
The scooter must be switched off by the key switch. When the scooter is stowed or not in
use for a long period of time, always charge the batteries for 12 hours and then disconnect the battery pack before storing at or near room temperature.
Use on the Footpaths
When using your scooter on a footpaths, always be aware of pedestrians and situations
that might require extra care. For example, those with young children and pets. Remember, especially when driving in public places, to drive with caution and regard for others
at all times. When maneuvering in confined areas, including shops, ensure the minimum
speed is selected . If you leave your scooter outside a shop, ensure that it does not
obstruct the footpath or vehicular access.
Always switch off and take your key with you.
Crossing roads
Your scooter is not capable of mounting and dismounting curbs and other obstacles in
excess of 45mm.
Remember before crossing the road to drive forwards and position the scooter at 90° to
the road, stopping about 30 - 60cm (1 - 2 feet) away from the edge of the footpath .Check
that it is clear to cross. Select a medium to high speed setting and when safe to do so,
drive across without stopping. Note that heavier users will require higher speed settings.
Turning corners
Always reduce your speed when turning corners. Disregard of this advice could lead to
your scooter tipping over. The anti-tip devices fitted to the scooter must not be removed.
A lower speed setting is also recommended when travelling downhill or in reverse.
Use of mobile phones
Mobile telephones or two way radio devices must not be used while operating the vehicle.
Use of mobile phones or two way radios can cause excessively strong electromagnetic
fields that may interfere with the vehicle’s electronic systems.
If mobile phones or mobile radios are required to be used, bring the vehicle to a stop and
turn off the scooter’s power before such devices are used.
Tires
Your scooter has pneumatic tires but It is good to inspect the tires for damage or wear
regularly.
17
Page 19
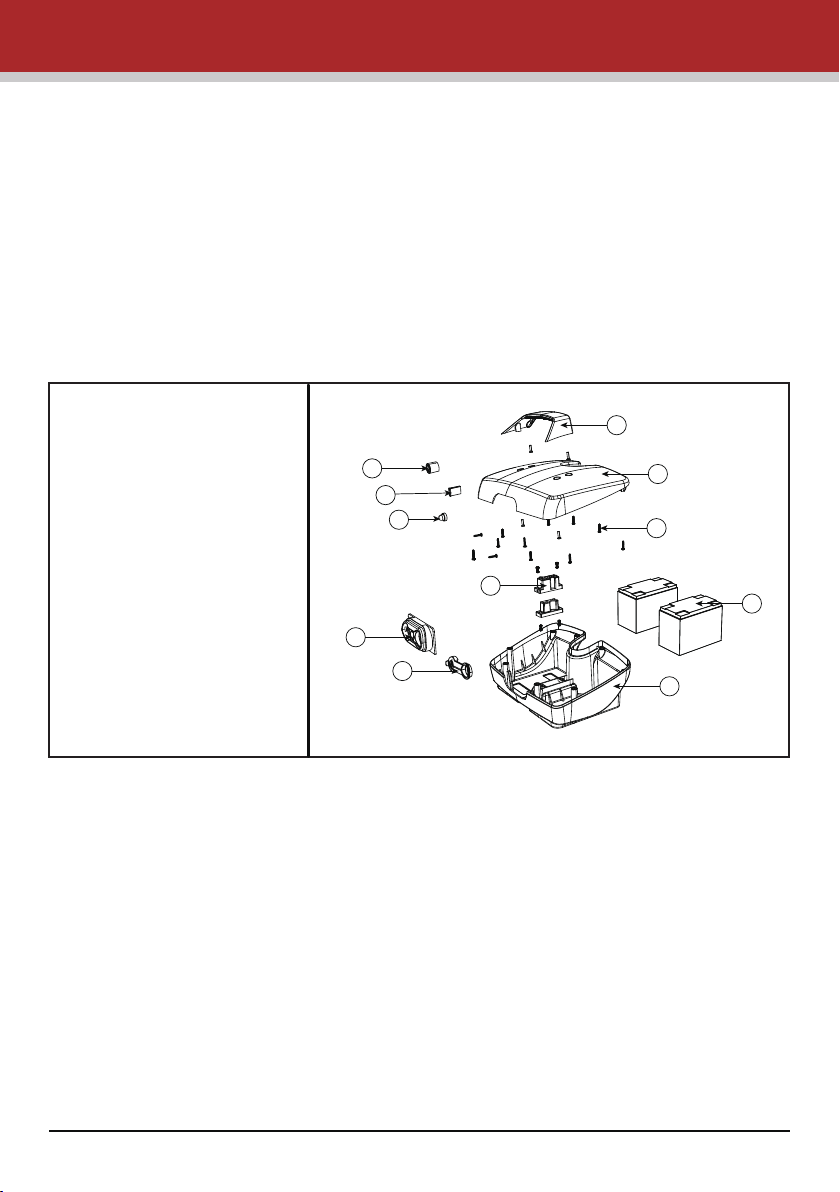
Battery and Charging Information
General information
Batteries are the power source for almost all of the modern mobility products available
today. The design of batteries used in mobility products is significantly different from
other batteries. Car batteries, for example are designed to release a large amount of
power over a short period of time, while mobility batteries (commonly called deep cycle
batteries) release their power evenly over a long period of time. Due to the lower
production volumes and increased technological requirements, mobility batteries cost
more. Commonly, two 12 volt batteries are used together in a mobility product to give it
a total voltage of 24 volts. The size of the battery (e.g. its available power) is expressed
in amps per hour. The higher the number, the bigger the battery size and weight, allowing for a greater amount of distance you can travel (see figure 20).
IDENTIFICATION KEY
1
1. Battery case handle
2. Battery box cover
3. Screw
4. Lead-acid batteries
5. Battery box lower cover
6. Power female plug
7. Charging socket and wiring
harness assembly
8. Chip fuse
9. Overload Protector Assembly
10.Fuse box holder
11.Fuse box cover
Figure 20
7
8
9
6
10
11
2
3
4
5
Batteries
Your scooter is fitted with batteries that require no maintenance, other than regular
charging.
If a battery is physically damaged, please use extreme caution when handling it.
Battery fluids are corrosive and care should be taken at all times to avoid contact with it.
If it comes into contact with the skin or clothing, wash immediately with soap and water.
If it comes into contact with the eye, immediately flood the eye with running cold water
for at least 10 minutes and seek medical attention.
In such an event, call your local dealer for assistance.
Please do not dispose of batteries in normal waste, always recycle in accordance with
local laws.
Maintenance free
18
Page 20

Battery and Charging Information
This type of battery uses GEL electrolytes which are totally sealed within the battery’s
outer case. As the battery case is sealed, you can safely transport this type of battery
without fear of acid spilling. Furthermore, they are approved for transportation on
aircraft, boats and trains.
It is recommended that the batteries are always transported and stored upright.
Only use batteries supplied by an authorized dealer.
Charging Battery Care
Do not expose any part of the battery to direct heat and when charging always place
on a hard surface in a room with good ventilation. You should not charge the batteries
in outdoor conditions.Do not smoke when in the vicinity of charging batteries. Clear all
naked flames from the area. Do not allow the batteries to freeze.Remove all conductive
jewelry before checking the battery terminals to ensure that they do not short circuit.
Battery Pack Care
We have set out a plan for maintenance free batteries. if these directions are not
followed, this may result in lower than expected performance from your mobility vehicle.
· Only use the approved battery charger that is compatible with the vehicle.
· Charge your batteries for 8-10 hours before first time use,.
· Do not interrupt the charging cycle.
· Please recharge the scooter when the battery indicator shows low. Please do not
charge battery everyday if not needed.
Range of Vehicle
Most manufacturers of mobility products state the range of their vehicles either in the
sales information or within the Owner’s Manual.
The range stated sometimes differs from manufacturer to manufacturer even though
the battery size is the same. We measure the range of our vehicles in a consistent and
uniform manner, but variation may still occur due to motor efficiencies and overall
product load weight.
The range figures stated should be seen as a theoretical maximum and could be
reduced if any single, or combination, of the following circumstances occur:
1. User weight heavier than 136kg (300lbs).
2. Batteries whose age and condition are less than perfect.
3. The terrain is difficult or unsuitable (e.g. very hilly, sloping, muddy ground, gravel,
grass, snow and ice).
4. Thick carpets within the home can affect range, as well.
5. The ambient temperature is very hot or very cold.
6. Damage occurs to one or more tires.
7. Lots of starts and stops when driving.
Note: If you are out on your scooter and the battery gauge is reading low the remaining
range can be increased slightly by decreasing the maximum available speed.
19
Page 21
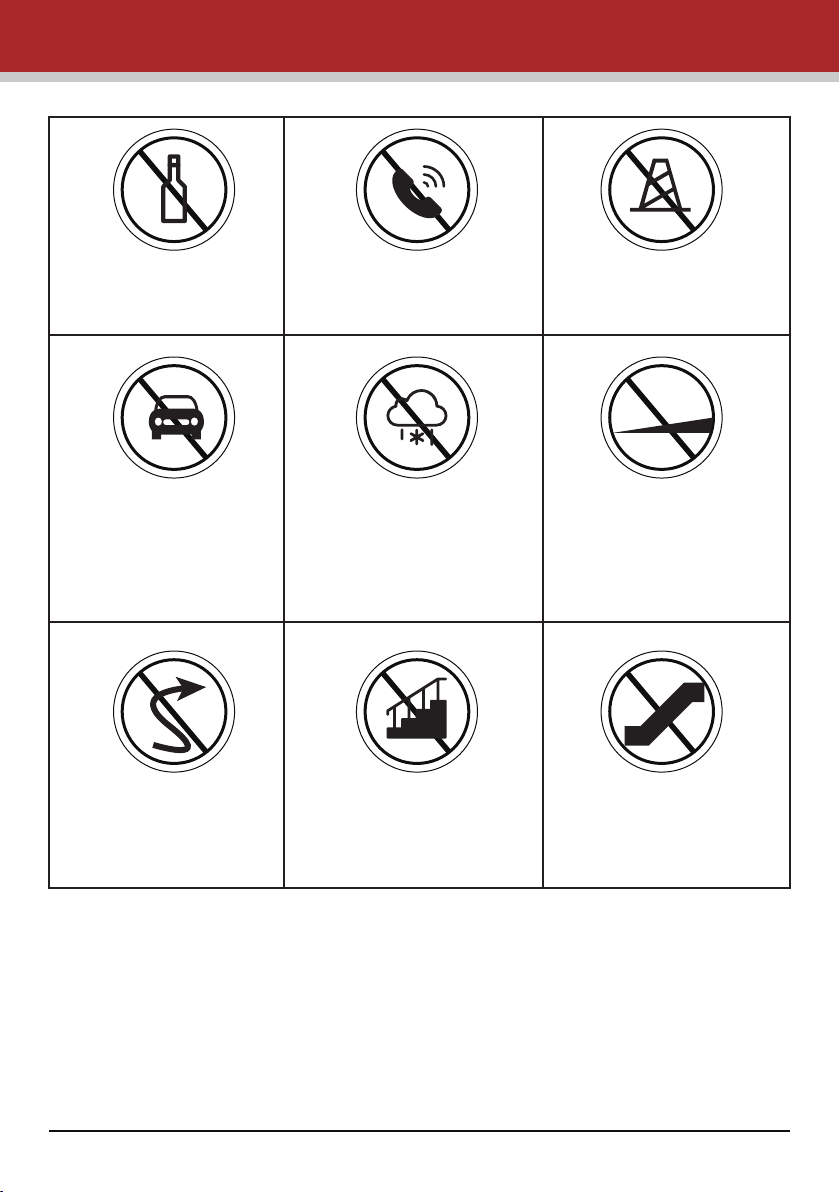
General Warning
Never operate the scooter
while you are under the
influence of alcohol.
Do not ride your scooter in
traffic.
DO not make sharp turnsat
high speeds in forward or
reverse.
Never use electronic radio
transmitters such as
walkie-talkies or cellular
phones while operating.
Do not ride your scooter in
snow to avoid an accident
from slippery roads.
Do not attempt to climb
curbs that are beyond the
limitations stated in technical specification.
Make sure that there are no
obstacles behind you when
reversing.
>10°
DO not attempt to climb,
ascend, or descend ramps
greater than 8 degrees.
DO not use an escalator to
move the mobility scooter
between floors as this may
lead to serious bodily injury.
Personal & Operational Guidelines
Driver profiles should only be adjusted by healthcare professionals and approved
agents/dealers, who are totally conversant with the process. They must also fully
understand the user’s capabilities and the user’s ability to operate the scooter
safely. Incorrect settings may cause injury or damage to the user, bystanders, the
scooter and/or nearby property. To determine personal mobility limitations,
practice combinations of bending, reaching, mount and dismount techniques. For
users with balance problems, practice the above techniques with the aid of an
assistant and in the presence of a healthcare professional.
20
Page 22

General Warning
Attention: Switch on the scooter lights to make yourself visible when there are low
levels of light, day or night.
The rear body panel (where fitted) is designed to cover the Drive Assembly, Wiring
Harness and Electrical Connectors. DO NOT stand on any of the body panels, only
the foot pedal. DO NOT stand on the scooter seat.
DO NOT attempt to transfer into or out of the scooter seat without first checking
that it is LOCKED into position. Attempting unsafe transfers can result in bodily
injury and/or damage. DO NOT drive your scooter if the seat is not LOCKED in the
FORWARD position. The seat must be secured in the FORWARD facing position
BEFORE and DURING operation of the scooter. Attempting to operate the scooter
with an unsecured seat could result in bodily injury and/or damage.
DO NOT operate the scooter without ensuring that the Tiller is properly adjusted
and secured. To check that the tiller is locked in the correct position, gently push
and pull the Tiller to make sure it is secured. An unsecured Tiller could result in
bodily injury and/or damage.
If the throttle lever is released while going up an incline, a roll back will occur. In
FORWARD or REVERSE motion the scooter will rollback approximately 30
centimeters (1 foot) before the brake engages.
Check that all electrical connections are secure before using your scooter. DO
NOT, under any circumstances, disconnect, cut, extend or modify ANY of the wiring
harnesses installed in or connected to your mobility scooter or your mobility
scooter battery charger. It is important that your mobility scooter battery charger
is connected to a properly installed electrical socket. Failure to comply with the
above requirements could result in a possible SHOCK HAZARD.
DO NOT use any batteries that are not DEEP CYCLE GEL, AGM or SEALED LEAD-ACID
type. Other types of batteries are NOT SUITABLE. Please read battery/battery
charger information before installation.
21
Page 23

Specifications
Measurements are for guidance only. Small differences may occur.
PARAMETER
LENGTH
REAR WIDTH
HEIGHT
MAX. USER WEIGHT
BATTERY CAPACITY
MAX SAFE SLOPE
TURN RADIUS
NARROWEST FOR TURNNING
SEAT - BASE HEIGHT
MAX SPEED
WHEEL DIAMETER FRONT
WHEEL DIAMETER REAR
CHARGER OFF-BOARD
RANGE
OVERALL WEIGHT
SEAT WEIGHT
BATTERY WEIGHT
FRONT BASKET WEIGHT
GROUND CLEARANCE
CONTROLLER (Dynamic)
Category classification A.1.4 to
prevent electric shock
Max Plus
1080mm
510mm
990mm
136 kg (300 lbs)
20Ah
8 degrees at 136kg
1170mm
2000mm
350mm
8km/h (4.97mph)
228.6mm*76.2mm
228.6mm*76.2mm
2A
15-25km(10-16Miles)
52kg
8.7kg
12.8kg
0.8kg
45mm
DR50-A01(Programmable by Dealer)
Internal power class
Category classification to prevent
electric shock
Classification of the degree of water
resistance
Safety degree when exposed to
flammable gas conditions
B class
IPX4
Not AP/APG
22
Page 24

Specifications
Classification of operation
Volts of the mobility scooter power
Type of power
Continuous operation
24VDC(2 units)
D.C.24V
23
Page 25

Routine Maintenance
The following gives an indication as to when routine maintenance checks should be
made.
Daily
Look at the battery charge indicator on the tiller, before use, to ensure batteries were
charged.
Weekly
Use a damp soft cloth and mild detergent on panels, battery wells, tiller and seat.
Each tire should be free of debris, oil, deep cuts, or distortion.
Please ensure that the batteries are charged for a minimum of 8 hours.
Quarterly
Check the tires to ensure that the tread is visible and continuous.
Annually
· Full service by dealer
· Inspection of seat swivel and seat slide
· Inspection of wiring and connectors for chafing and wear
· Inspection of battery terminals
· Inspection of the parking brake
· Inspection of stabilizer wheels for wear
· Inspection of motor brushes
Storage
When storing your scooter for long periods (in excess of one month), charge
the batteries for 8 hours and then disconnect to minimize battery discharge.
Electronic faults
Do not attempt to investigate faults in the control box, the control pod or
charger as the design and set up of these electronics is critical for your safety.
Spare parts and services are available from authorized dealers.
Replacing LED
Caution! Disconnect batteries before changing LED.
Wheels
Wheels should only be removed and refitted by an authorized dealer.
24
Page 26

Trouble Shooting Guide
Sympton
Shortened range
Battery pack is
not charging or
the battery
gauge shows it
as empty after
charging
Charging
current is
too high
Possible Cause Solution
Batteries have not been
charged for enough time
Batteries are weak and cannot
hold charge
Battery pack fault
Charge fault
Charger loom or plug damaged
Loose connection
No output from wall outlet
Fuse in charger’s mains plug
blown
Reset button on the battery
pack has popped out
Output fuse in charger is blown
Faulty batteries
Scooter switched on during charging
Brake release lever is disengaged
(unlocked)
Flat batteries
Charge batteries for eight
hours or more
Replace battery pack
Replace charger
Contact local mobility dealer
Check plugs and looms
Try a wall socket in a different
room
Unplug from wall & change fuse
Switch off and press button
back in
Switch off and press button back
in
Unplug from wall and contact
dealer
Replace battery pack
Turn Scooter off
Engage brake release lever
(lock)
Charge battery pack
No drive
Scooter is not switched on
with key
Battery pack not engaged properly
Charger plugged in
Reset button on the battery
pack has popped out
Disconnected loom or plugs
Control system fault
25
Ensure the key is switched on
Check battery pack is
fully engaged onto connectors
Unplug charger
Reset circuit-breaker button
Check all plugs & looms
Contact dealer
Page 27

Trouble Shooting Guide
Sympton
Motor runs irregularly
and/or noisily
Do not attempt to open any parts of the scooter control system, battery pack, looms,
plugs, or battery charger.
This is critical for your safety as there are no user serviceable parts.
Your scooter is fitted with a self diagnostic controller that will give a sequence of audible beeps
when an error is detected. This will help you, or an authorized service agent, determine what is
wrong.
Should you switch on the scooter and hear the beeps, note the number of them (a short delay
separates each sequence). Then, refer to the table.
Number of beeps Represent SolutionPossible cause
1
2
3
4
Battery power low Not enough power Battery needs harging
Low battery voltage Not enough power Battery needs harging
High battery voltage Voltage is too high
High electric current
Possible Cause Solution
Electrical malfunction Contact dealer
Control system fault Contact dealer
when overloading or
climbing
Electric current is
over the limit of the
motor
Decrease speed while
climbing
Check battery connection
Check motor and relative
wiring connections
Switch off and wait a few
minutes and Switch on.
5
6
Freewheel level
issue
Issue with
accelerate
variable resistor
The freewheel level is
on
Accelerate variable
resistor is not in the
neutral position
Please power off scooter
Confirm the rear lever is
in the locked position
then turn on the scooter
Make sure the accelerate
variable resistor is on the
neutral position
Decrease speed while
climbing
26
Page 28

Trouble Shooting Guide
Number of beeps Represent SolutionPossible cause
7
Speed limit
resistor issue
Accelerate variable
resistor, Speed
limited variable
resistor or other
wiring issue
Check all the accelerate
variable resistor, Speed
limited variable resistor
or other wiring
8
9
Motor voltage issue Motor and other
Other issues
relative wirings issue
Some inner issues in
the controller
Check Motor and other
relative wirings
Check all the connection
and wirings
27
Page 29

Warranty
One-year limited warranty
Drivetrain parts (transaxle, motor and brake), all electrical parts, including controllers
and battery chargers are covered for one year under warranty.
Any attempt to open or dismantle these parts will lead to this warranty beingvoid.
Half year limited warranty
Batteries are covered by a six-month warranty from the original manufacturer.
Not covered under warranty
The following are classed as wear items, which may, under normal wear and tear,
require replacing. The items that are not covered under warranty include tires, seat
belts, bulbs, upholstery, plastic shrouds, motor brushes, and fuses.
Warranty will also be refused if damage is deemed to have been caused through
misuse or an accident for which Metro Mobility cannot be deemed responsible.
NOTE: Metro Mobility provides parts only under warranty. Your authorized Metro
Mobility dealer is responsible for labor and services.
Please contact your authorized Metro Mobility dealer for information on these
services and for any applicable charges.
Your local service agent:
Metro Mobility USA LLC
Address: 159 Liberty Ave, Mineola, NY, 11501
Metro Support Team
888-616-3876
[email protected]
28
 Loading...