

Page 1

Lancast
®
CenturyStack
®
8100 Managed Hub
10/100Mbps
Network Management Guide
Page 2

© 1998-1999 METRObility Optical Systems, Inc. All rights reserved. Printed in USA.
This publication is protected by the copyright laws of the United States and other countries, with all rights
reserved. No part of this publication may be reproduced, stored in a retrieval system, translated, transcribed, or transmitted, in any form, or by any means manual, electric, electronic, electromagnetic,
mechanical, chemical, optical or otherwise, without prior explicit written permission of METRObility Optical
Systems, Inc.
Lancast and CenturyStack are registered trademarks of METRObility Optical Systems, Inc. All other
trademarks appearing in this manual are the property of their respective owners.
The information contained in this document is assumed to be correct and current. The manufacturer is not
responsible for errors or omissions and reserves the right to change specifications at any time without
notice.
Page 3

Table of Contents
Managed CenturyStack® 10/100Mbps Hub Network
Management Guide
Introduction ...............................................................................................7
Overview of Managed CenturyStack 8100 Hub ........................ 7
Network Management ................................................................ 8
Remote Network Monitoring (RMON)..................................8
MIB Browser Management .................................................... 8
Web-based Management ........................................................ 8
SNMP Management Systems ................................................. 8
RMON Support .......................................................................... 9
RMON Statistics Group ......................................................... 9
RMON History Group............................................................9
RMON Alarm Group............................................................10
RMON Event Group ............................................................ 10
Getting Started ......................................................................................... 13
Web-Based Management Requirements ..................................13
1
Home Page ............................................................................... 13
Trap W indow............................................................................ 15
Device Panel............................................................................. 17
Port Icon ...............................................................................17
Cascaded Hubs .....................................................................17
System Information .................................................................. 18
Management Setup .................................................................................. 19
Network Configuration ............................................................19
2
Ethernet Menu ...................................................................... 19
Slip Menu .............................................................................20
Serial Port Configuration .........................................................21
Console Menu ......................................................................21
Page 4

Out-of-Band Menu ...............................................................22
SNMP Community ................................................................... 23
Trap Receiver ...........................................................................24
Controlling CenturyStack Hubs.............................................................. 25
Group Control .......................................................................... 26
Port Control .............................................................................. 28
3
Monitoring the Network ..........................................................................37
4
Switch Module Control ............................................................30
2/3port Bridge Module Control............................................30
Redundant Link Control...........................................................32
Configuring Link Pairs.........................................................32
Editing a Link Pair ............................................................... 33
Deleting a Link Pair ............................................................. 33
Intrusion Control ...................................................................... 34
Group Statistic Information...................................................... 37
Port Statistics Information........................................................ 38
Address Tracking......................................................................41
Address Search Information.....................................................43
Broadcast Storm Protection...................................................... 45
Broadcast Storm Detected .................................................... 47
Remote Network Monitoring................................................................... 49
Statistics Group Configuration.................................................51
Adding a Statistics Group.....................................................51
5
4 CenturyStack 8100 Managed Hub
Deleting a Statistics Entry .................................................... 52
Modifying a Statistics Group ............................................... 52
History Group Configuration ................................................... 53
Adding a RMON History Group .......................................... 53
Deleting a RMON History Group ........................................54
Modifying a RMON History Group.....................................54
Alarm Group Configuration ..................................................... 54
Page 5

Event Group Configuration ...................................................... 61
Statistics Information ............................................................... 63
History Information..................................................................65
Event Log .................................................................................68
System Utility........................................................................... 70
System Restart......................................................................70
Additional Information............................................................................ 71
Agency Compliance .................................................................71
RFI Statements .........................................................................71
6
Standards Compliance..............................................................72
Warranty & Servicing............................................................... 72
5
Page 6

6 CenturyStack 8100 Managed Hub
Page 7
Introduction
Overview of Managed CenturyStack 8100 Hub
The Managed CenturyStack 8100 Hub is a series of auto sensing dual
speed, manageable and stackable hubs. The Managed CenturyStack Series
consists of masters and managed slaves with 12 or 24 ports. The features
and functions of the Managed CenturyStack make it a powerful, cost
effective solution for large campus networks and rapid growth companies.
All models of the Managed CenturyStack accept slide-in expansion
modules, adding more power and versatility, such as: Bridging 10Mbps
and 100Mbps segments and extending distances up to 2 kilometers.
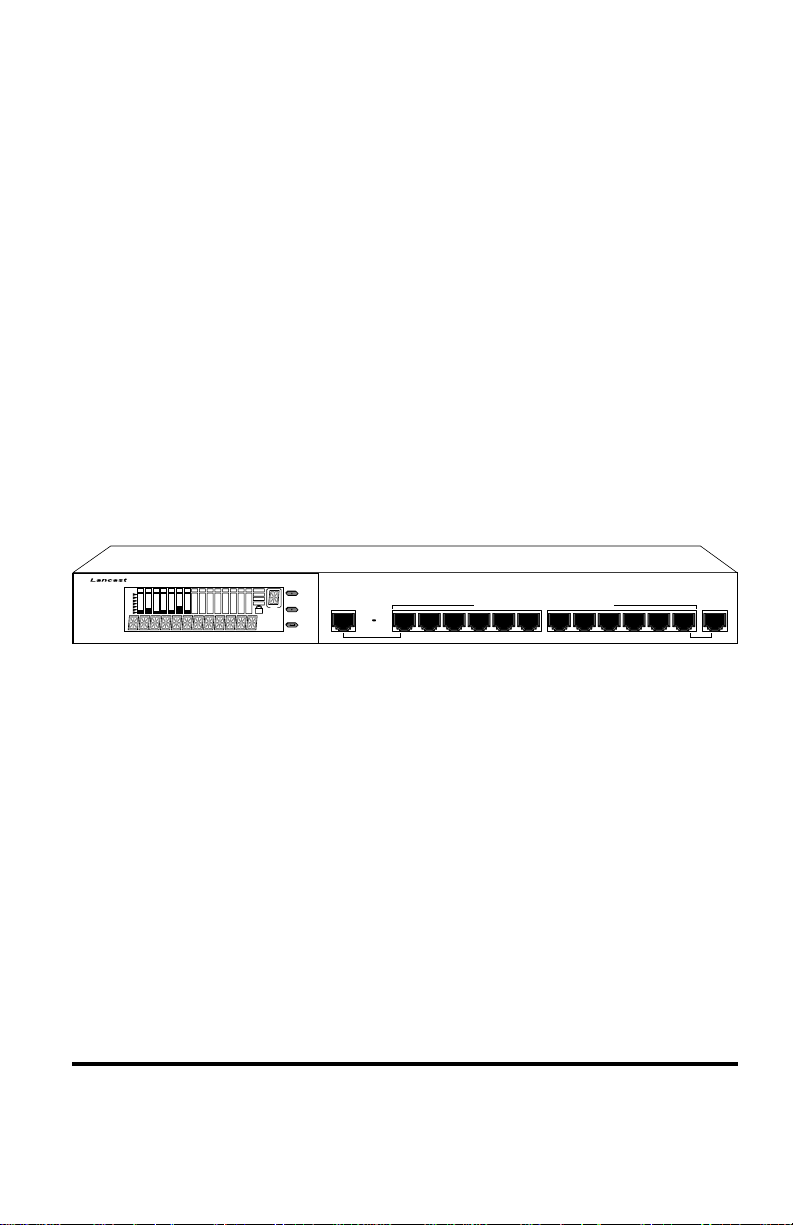
The 8112-01-M master model shown below, includes a Network
Management Unit (NMU), Mini Console, 12 dual-speed auto sensing
ports, 2 MDI-II ports and a multi-purpose expansion slot.
¤
TM
CenturyStack
8112-01-M
Prev
ID
MDI-II
Next
Switch Module
Enter
Installed
1x 2x 3x 4x 5x 6x 9x8x7x 10x 11x 12x
CenturyStack Hub 8112-01-M
10/100 Mbps Dual Speed Ethernet Hub
MDI-II
This manual describes how to manage the Managed CenturyStack Hub
through supported Network Management features such as local console,
TELNET, SNMP, RMON, and Web-Based Management.
Introduction 7
Page 8

Network Management
The Managed CenturyStack Hubs offer extensive management functions
including local console, remote telnet, RMON Management, MIB
Browser Management, Web-Based Management and SNMP Management.
Remote Network Monitoring (RMON)
Remote Monitoring allows users to monitor LANs remotely. Users can
remain at one station and collect information from many different LANs.
Managed CenturyStack supports Remote Network Monitoring and enables
the user to set up for RMON using Web-Based Management.
MIB Browser Management
Managing CenturyStack Hubs through a MIB browser can be an economical alternative. MIB browsers are easy to obtain and often available
as shareware, or are put on management platforms such as HP OpenView
or SNMPc. Management Information Base (MIB) browsers are simple
utilities for monitoring and configuring the MIB objects supported by
Managed CenturyStack.
Web-Based Management
Managed CenturyStack Web-Based Management enables users to monitor
and manage the hubs using the familiar interface of a web browser. For
more detailed information, refer to Chapter 1 of this guide.
SNMP Management Systems
SNMP is a standard management protocol that is supported on many
general network platforms such as: SunNet Manager, HP OpenView for
UNIX, HP OpenView for NT, SNMPc and others.
NOTE: The SNMP agent, TCP/IP stack and the Web engine are
implemented on the 10Mbps bus of the master hub. Therefore the
10Mbps segment must be used for Web-Based Management in the
absence of a switch module.
8 CenturyStack 8100 Managed Hub
Page 9

RMON Support
RMON is a major step forward in internetwork management. It defines a
remote monitoring MIB that supplements MIB-II and provides the
network manager with vital information about the internetwork. The
Managed CenturyStack Hub Series fully supports RMON Management
Groups 1, 2, 3, and 9, and users can set up for RMON Management using
Web-Based Management, or SNMP Management. With these capabilities,
Managed CenturyStack provides an effective and efficient way to monitor
networks. For more detailed information, refer to Chapter 5 of this guide.
RMON Statistics Group
RMON group 1 is also recognized as Statistics Group, which contains the
basic statistics for each monitored network. This group consists of a
single table, with one entry for each monitored interface. The statistics
group provides useful information about the load on a network and the
overall health of the network.
Managed CenturyStack’s RMON Management enables users to set up
Statistic Groups to record various statistics counters. The statistics group
contains statistics measured by the probe for each monitored interface on
the hub. These statistics take the form of free running counters that start
from zero when a valid entry is created. Users can create up to 16 Ether
Statistics entries. Syntax and semantic checking are performed to verify
the value input by the user before it can be set to the Ether Statistics
group. The valid Ether Statistics configuration data is saved in the system
nonvolatile memory (NVRAM).
RMON History Group
RMON group 2 is also recognized as History Group, which is used to
define sampling functions for one or more of the monitor’s interfaces. It
contains two tables: historyControlTable, which specifies the interface and
the details of the sampling function, and either HistoryTable, which
records the data.
Managed CenturyStack RMON Management enables users to set up
History Groups. The history control group controls the periodic statistical
sampling of data from various types of networks. The history Control
Table stores configuration entries that each define an interface, polling
Introduction 9
Page 10

period, and other parameters. Once samples are taken, the data is stored as
an entry in a media-specific table. Each entry defines one sample, and is
associated with the history Control Entry that caused the sample to be
taken. Each counter in the ether History Entry counts the same event as its
similarly named counterpart in the Ether Stats Entry, except that each
value here is a cumulative sum during a sampling period.
The user can create up to 16 History Control Entries.
RMON Alarm Group
RMON Alarm Group is used to define a set of thresholds for network
performance. Managed CenturyStack RMON Management enables users
to set up Alarm Groups. The Alarm Group periodically takes statistical
samples from variables in the probe and compares them to thresholds that
have been configured. The alarm table stores configuration entries that
define a variable, polling period, and threshold parameters. If a sample is
found to cross the threshold values, an event is generated. This function
generates one event as a threshold and is crossed in the appropriate
direction. No more events are generated for that threshold until the
opposite threshold is crossed.
Managed CenturyStack provides the threshold control function to support
the RMON Alarm Group. Up to 16 Alarm Control Entries can be created.
The syntax and semantic checking is performed to verify the value input
by the user before it can be set to the object of the Alarm Group. The valid
Alarm Group configuration data is saved into the system NVRAM.
Managed CenturyStack periodically monitors the threshold value of
counter objects that have been specified as the RMON Alarm Variable.
The associated RMON event is raised and the proper event action is
performed when the value of counter object crosses its threshold value as
specified in the RMON Alarm Threshold object.
RMON Event Group
RMON Event Group supports the definition of events. An event is
triggered by a condition located in the MIB, and an event can trigger an
action defined elsewhere in the MIB. An event may also cause information to be logged in this group and may cause an SNMP trap message to
10 CenturyStack 8100 Managed Hub
Page 11

be issued.
Managed CenturyStack RMON Management enables users to set up Event
Groups. The Event Group Implementation of the Event Group is optional.
The Event Group controls the generation and notification of events from
the hub. Each entry in the event Table describes the parameters of the
event that can be triggered. Each event entry is fired by an associated
condition located in the MIB. An event entry may also be associated with
a function elsewhere in the MIB that will be executed when the event is
generated. For example, a channel may be turned on or off by the firing of
an event. Each entry may optionally specify that a log entry be created on
its behalf whenever an event occurs. Each entry may also specify that
notification should occur by way of SNMP trap messages. In this case, the
community for the trap message is given in the associated event Community object. The enterprise and specific trap fields of the trap are determined by the condition that triggered the event. Two traps are defined:
rising Alarm and falling Alarm. If the event Table is triggered by a
condition specified elsewhere, the enterprise and specific trap fields must
be specified for traps to be generated for that condition.
Users can create up to 32 Event Entries.
Introduction 11
Page 12

12 CenturyStack 8100 Managed Hub
Page 13

Chapter 1
Getting Started
Web-based Management Requirements
Web-based Management allows comprehensive monitoring and configuring of the CenturyStack with the familiar interface of a Web browser. Web
Management uses photographic quality views and real-time updates of
hub activity.
Web Management allows managing the CenturyStack from any location.
Before the CenturyStack Web Management feature can be used, users
must configure the hub’s Network Configurations. See “Network Configuration” in the Lancast CenturyStack Series 8100 Managed Installation and
User Guide. Users need a Web browser and must be either connected to
the World Wide Web (for remote connections) or have an Ethernet
connection to a hub in the stack (for in-band connections).
Home Page
CenturyStack Web-Based Management provides authentication and
security access when you enter the hub’s IP Address in the Web Browser’s
Location mini-window. The CenturyStack login screen displays once a
connection is made. Type in the User Name and Password that you want
to use. The default User Name is “LANCAST” and the default Password
is “public”.
Login Panel
Getting Started 13
Page 14
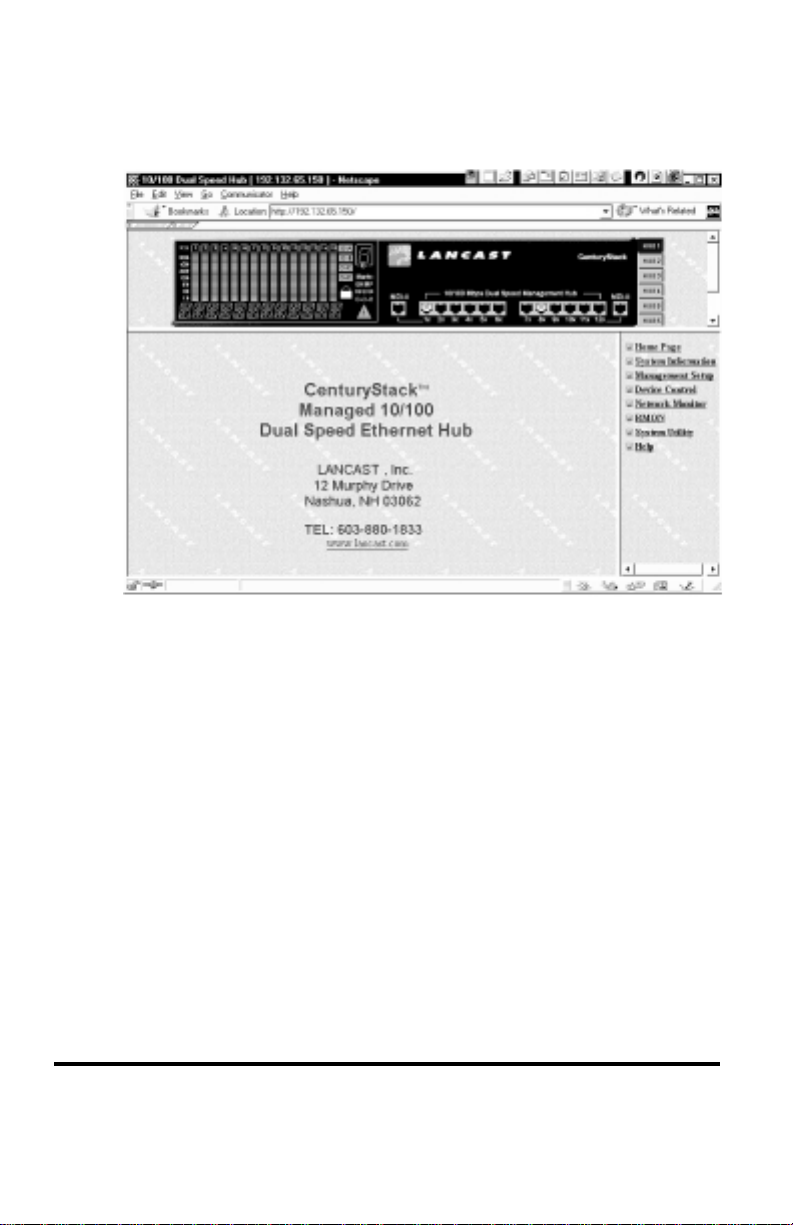
The CenturyStack Home Page is loaded into the Web browser application
as shown below.
Home Page
NOTE: If the CenturyStack Home Page does not load:
1. Review “Network Configuration” in the Lancast Century-
Stack 8100 Managed Hub Installation and User Guide.
2. Check the hub’s IP Address using the Mini-Consoles. From
the main menu select System Info. The IP Address displays;
check this against the IP Address you enter in your Web
Browser.
14 CenturyStack 8100 Managed Hub
Page 15
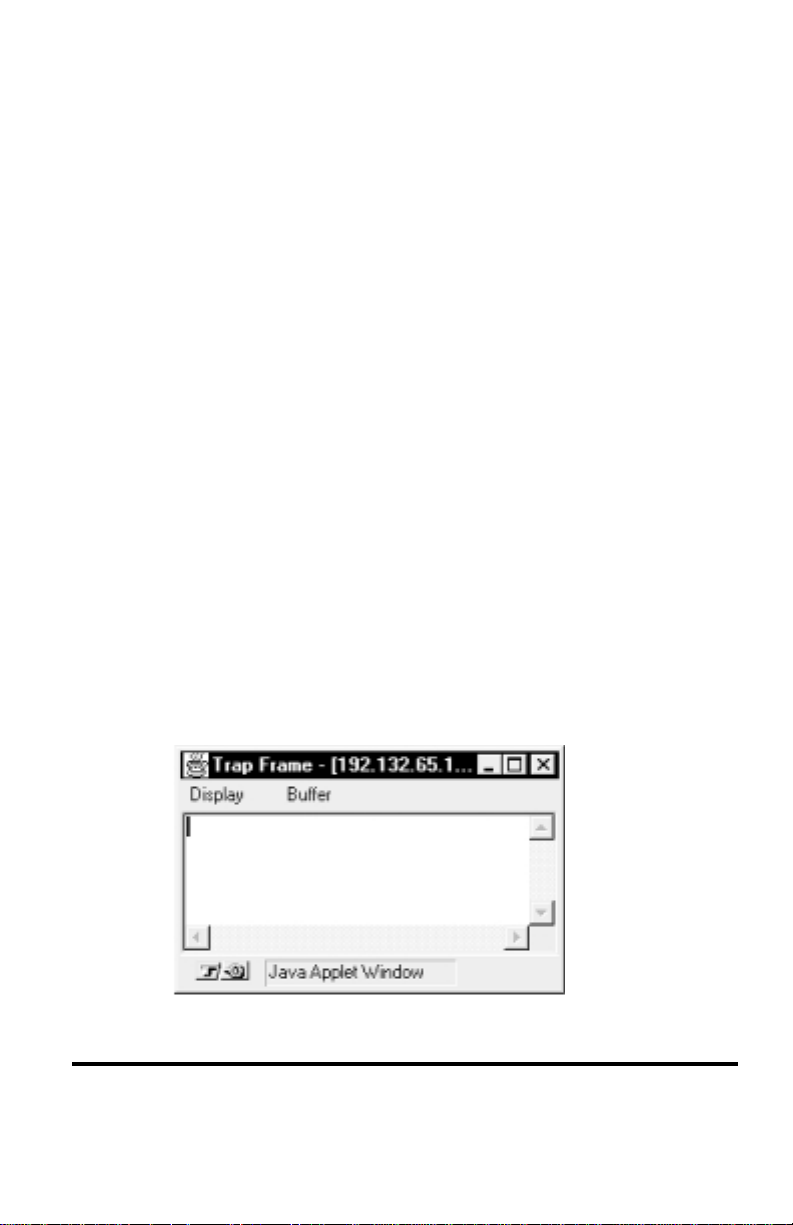
Trap Window
A Trap Window is loaded when a web connection is made to a
CenturyStack hub. The Trap Window is used to indicate any trap messages
from the device. The Trap Window can be closed. When the Trap Window
pops up, users can use the two menu items: Display and Buffer as follows:
Display
The CenturyStack management Trap Window displays a
maximum of up to 100 traps. The Display menu has 3 sub menus:
Pause: Pauses the display.
Continue: Continue to display the trap messages.
Clear: Clears the trap messages.
Buffer
CenturyStack management stack also provides a trap buffer to store the
most recent trap messages up to 100 traps. Users can use the following
menus to manage the trap messages in the buffer:
Delete: Deletes all the trap messages stored in the trap buffer.
Dump: Dumps all the trap messages stored in the trap buffer
to the Trap Frame.
Trap Window
Getting Started 15
Page 16

The following traps are sent to the Trap Frame window:
ColdStart: The system is re-initialized and may be altered from
a previous state.
LinkDown: A failure in one of the communications links.
LinkUp: A communication link has come up.
AuthenticationFailure: An unauthorized SNMP manager is
detected.
RptrGroupChange: A repeater group has been either added or
removed.
RptrResetEvent: A repeater function logic has been reset.
risingAlarm: A RMON alarm entry has crossed its rising
threshold.
fallingAlarm: A RMON alarm entry has crossed its falling
threshold.
hubGrpLastChangeTrap: The value of the Group Last
Change has been changed.
hub3PortBridgeExtPortLinkStsChtgTrap: The link status of
the 3-Port Switch Modules’s external port has been changed
between link-up and link-down.
HubRdntLinkSwitchOverTrap: The active link of the
redundant pair has been changed or switched over.
HubPortSecuIntrTrap: An intruder was detected for a
particular port.
HubPortBcastAlarmTrap: The broadcast packet rate of a
given port is over the specified threshold value.
HubOptionalModuleBcastAlarmTrap: The broadcast packet
rate of a given optional module is over the specified threshold
value.
16 CenturyStack 8100 Managed Hub
Page 17
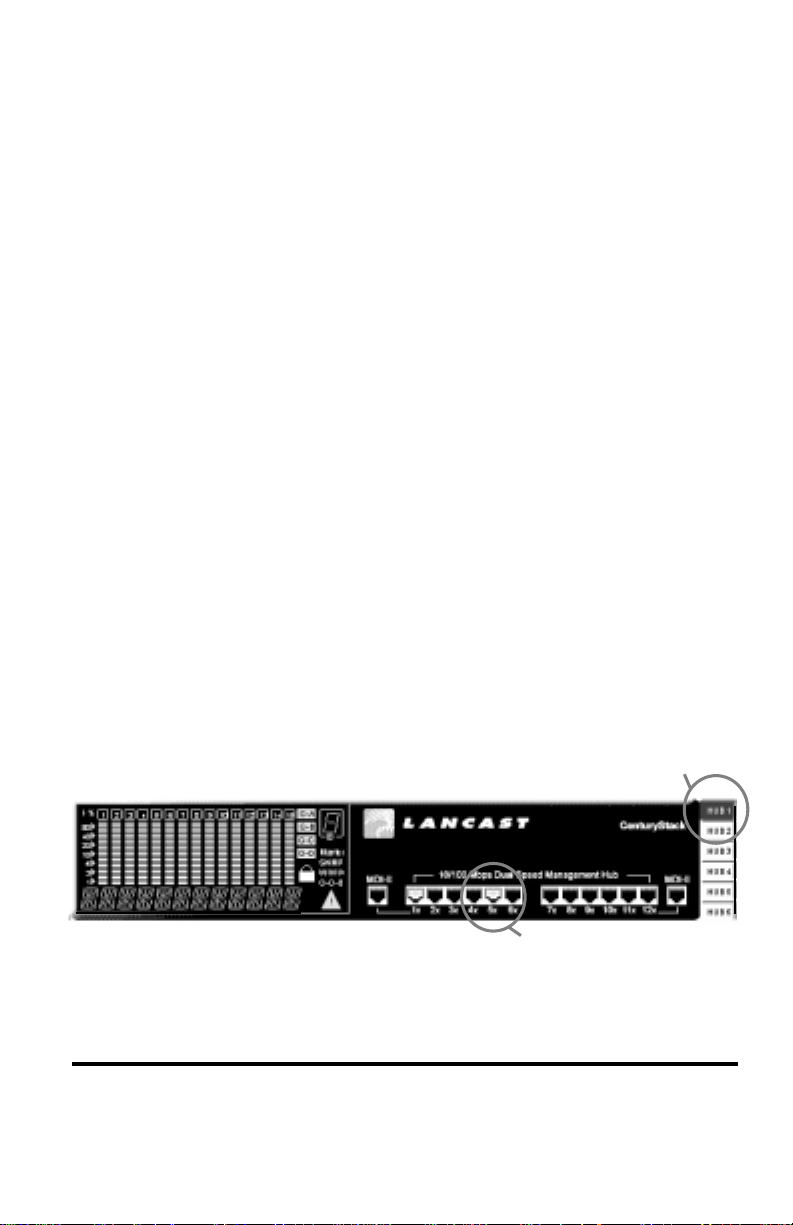
Device Panel
A device panel that emulates the front panel of the CenturyStack managed
hub is loaded in the Device Panel window in the web-browser application.
The device panel uses Java applets to display the utilization information
that is displayed in the Mini-Console. Additional device panels in each
device in the CenturyStack can be loaded by clicking on the hub number
icons located on the right side of the device panel. The blue icon indicates
a master hub is present. A green icon indicates a slave hub. A gray icon
indicates the hub is not present in the stack. In the example below, there is
only one hub in the stack. Therefore, hubs 2–6 are grayed and not available.
Port Icon
For each port that has a link, an icon displays in the device panel, over the
port as shown below. In the example, only port 12 has a link.
Cascaded Hubs
To build a hub stack, each CenturyStack managed hub must be connected
with cascade cables (50 pin SCSI cables). The stacking ports are located on
the rear panel of each hub. A cascade cable is connected to the down port of
one hub and to the up port of the next hub. For more information about
Cascaded Hubs, see the “Installation” section of the Lancast CenturyStack
8100 Managed Hub Installation and User Guide.
For each hub that is in the CenturyStack, the Hub ID is highlighted as
shown below. Clicking on a highlighted hub ID opens a device panel of the
selected hub.
Device Panel
Cascaded Hub ID
Active Port Icon
Getting Started 17
Page 18
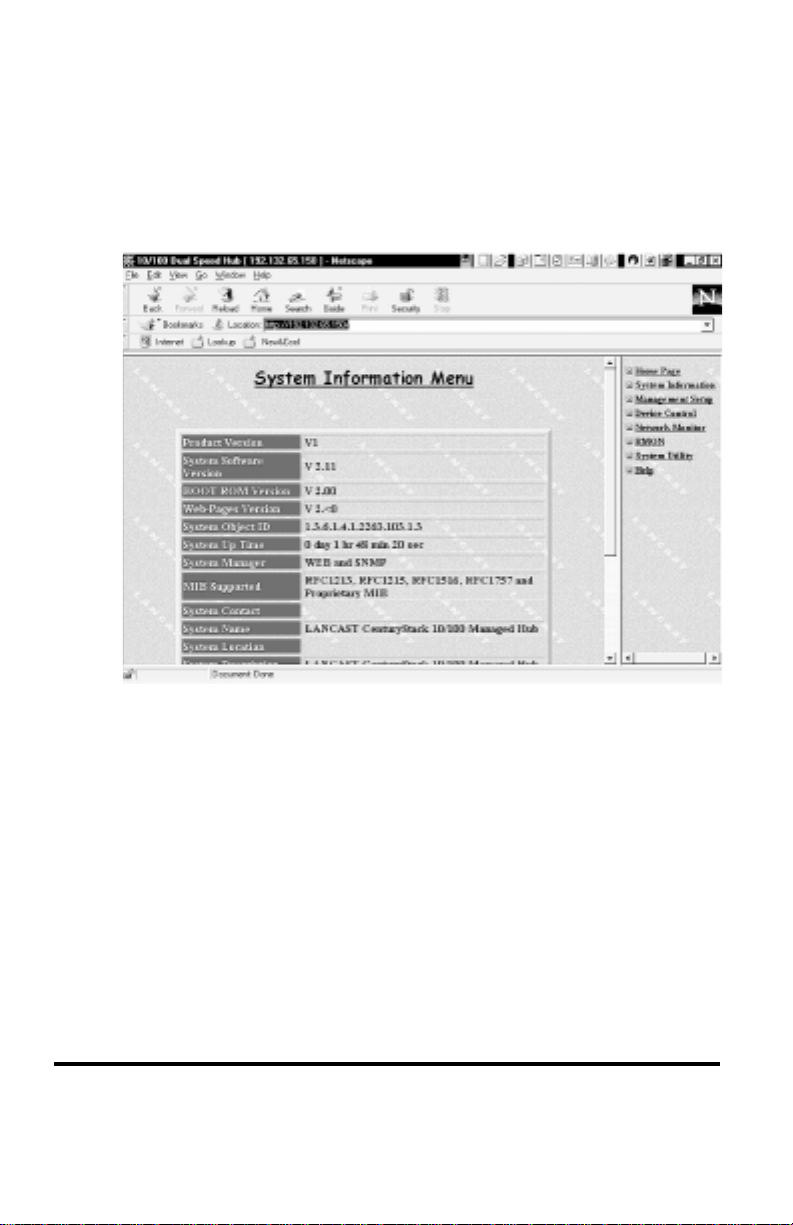
System Information
The System Information Menu displays information about the system
software. You can view the system software and hardware information and
configure the following system configurations: System Contact, System
Name and System Location.
System Information
The following System Information is configurable:
System Contact_______ Character string up to 48 bytes
System Name ________ Character string up to 48 bytes
System Location ______ Character string up to 48 bytes
System information can be set by the user, allowing others viewing the
device to know who is responsible for the device, where it is located and
the system name. (i.e., accounting hub).
18 CenturyStack 8100 Managed Hub
Page 19
Chapter 2
Management Setup
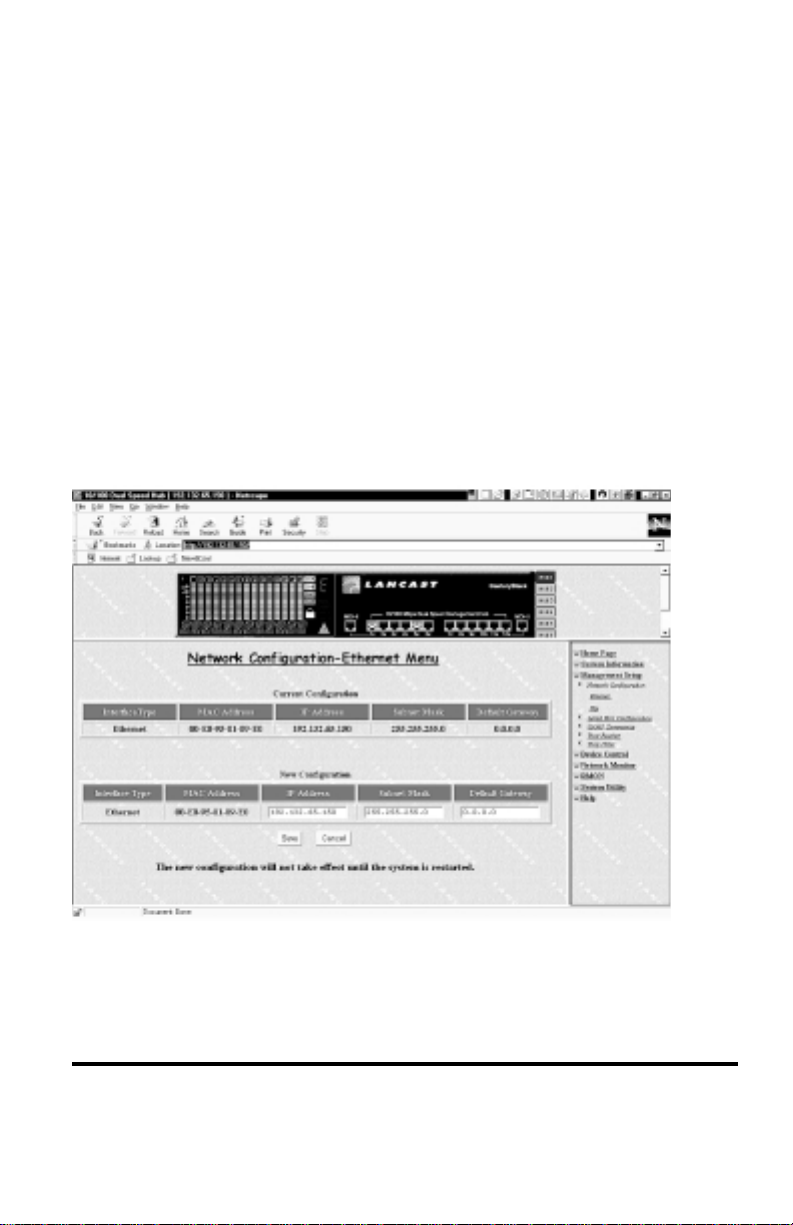
Network Configuration
The Network Configuration Menu enables users to configure connections
to the CenturyStack hubs. The Ethernet Menu is used to setup Ethernet
connections. The Slip Menu is used to setup slip connections. The
Console Menu is used to setup console or serial connections. The SNMP
Community Setup Menu is used to setup SNMP Communities, and the
Trap Receiver Menu is used to setup SNMP Trap Receivers.
Ethernet Menu
The Ethernet menu displays the Interface Type, the MAC Address of the
hub, and other current network configurations. Users can configure the
hub’s IP Address, Subnet Mask and Default Gateway through this menu.
Select Save to update new configurations.
Network Configuration – Ethernet Menu
Management Setup 19
Page 20

Slip Menu
The Slip Menu displays current Slip configurations and allows users to
make new slip configuration settings, IP Address and Subnet Mask.
Network Configuration – Slip Menu
Please select Save to update the new configuration.
20 CenturyStack 8100 Managed Hub
Page 21

Serial Port Configuration
The Serial Port Configuration enables users to monitor and configure Outof-Band serial connections through the sub menus, Console Menu and
Out-of-Band Menu. Serial connections allow users to connect to the Hub
while the hub is operating either by cable or modem.
Console Menu
A Console Port connection is made by connecting a null modem cable
between the hub and a PC. A VT-100 emulator is needed to make the
software connection between the two devices. For Windows 95 users, a
terminal program “HyperTerminal” is provided under Accessories. The
following displays the required settings for the VT-100 emulator.
Serial Port Configuration – Console Menu
Management Setup 21
Page 22
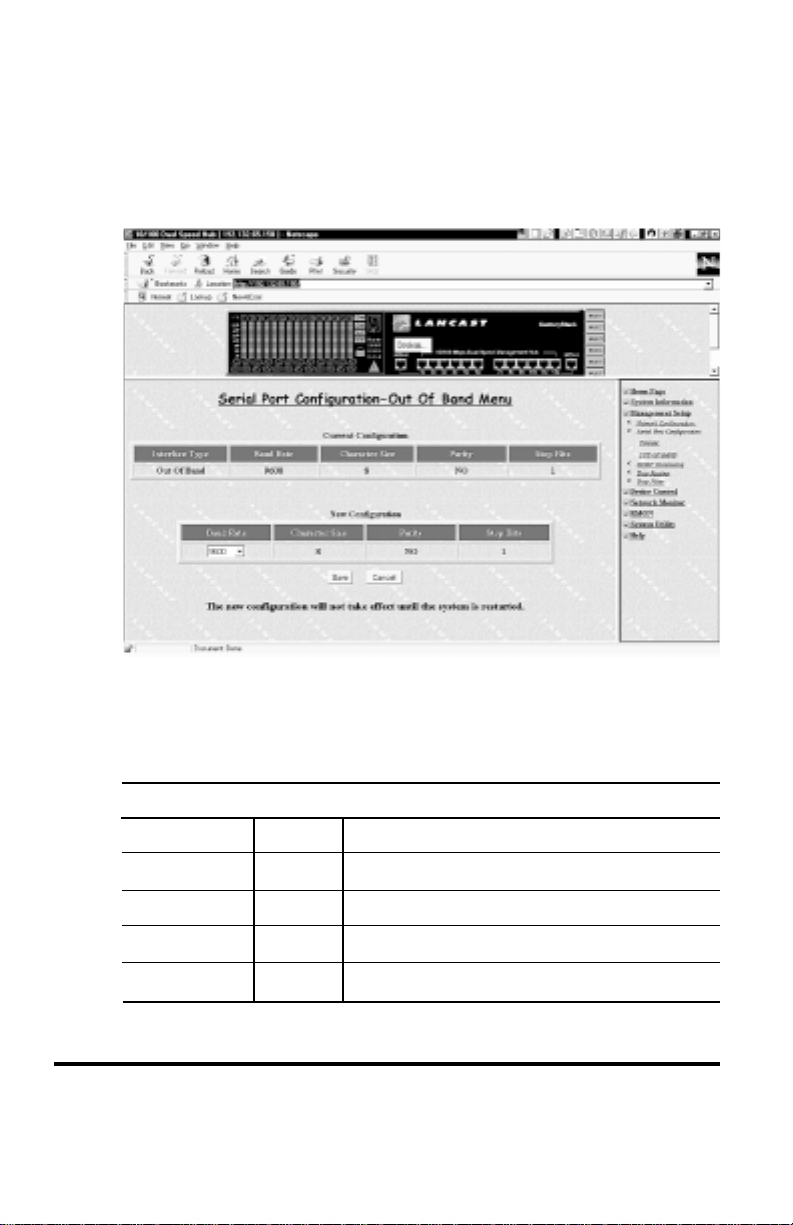
Out-of-Band Menu
The Out-of-Band Menu allows setting up for connections to CenturyStack
using a modem. Users can configure the Baud Rate to attain the fastest
speed available to both the hub and the modem.
Serial Port Configuration – Out-of-Band Menu
The following shows the configurations and the optional values available
for this menu.
Out-of-Band Serial Port Configurations
Configuration Default Options
Baud Rate 9600 1200, 2400, 4800, 9600, 19200, 38400
Character Size 8
Parity NO
Stop Bits 1
22 CenturyStack 8100 Managed Hub
Page 23
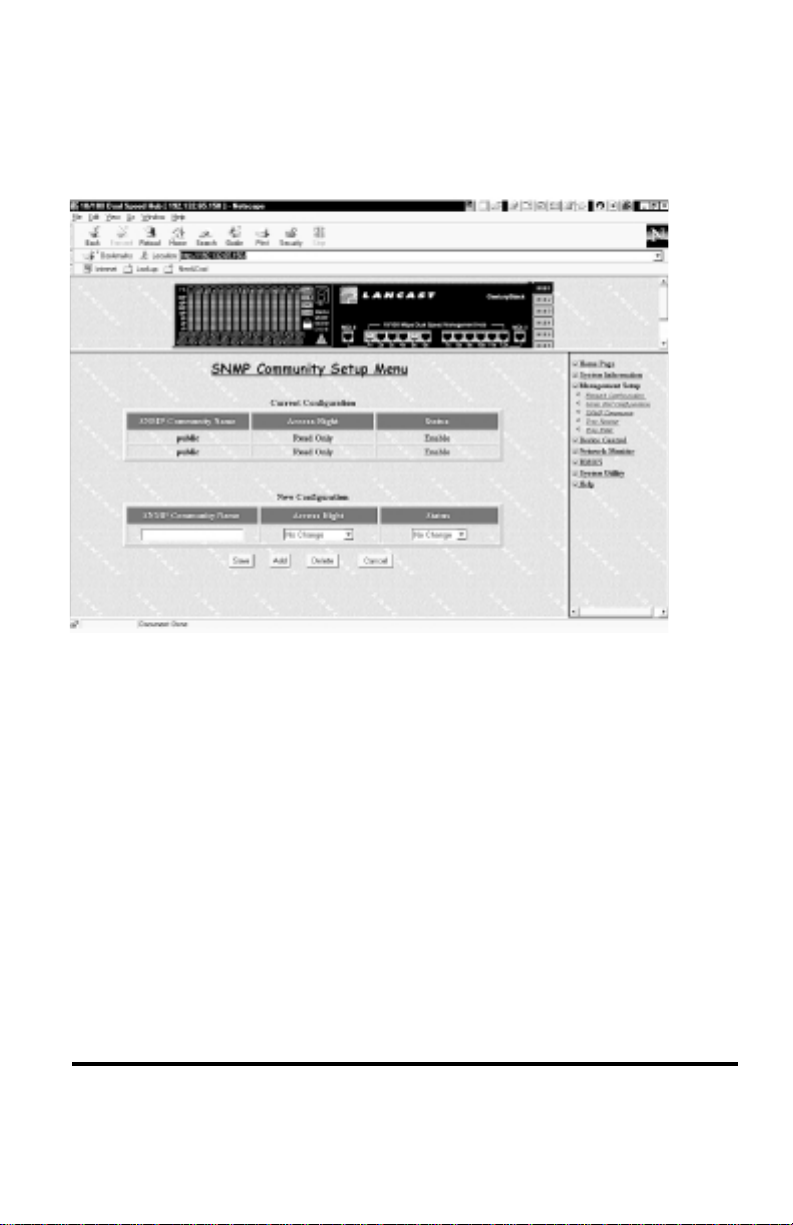
SNMP Community
The SNMP Community Setup Menu allows setting up a maximum of six
Community Names, setting Access Right and Status.
SNMP Community Setup Menu
To setup an SNMP community, enter a valid SNMP Community name in
the SNMP Community Name field. Set the Access Right (Read Only or
Read/Write) and Status, then select Add. A valid community name is a
community name that already exists in the network.
When editing an existing name, use the Save button to update the
configuration.
To delete a community name, enter its string and select Delete.
Management Setup 23
Page 24

Trap Receiver
The Trap Receiver Setup Menu allows setting up a maximum of six trap
receivers. Users can setup trap receivers to receive traps when network
violations occur.
Trap Receiver Setup Menu
To set up Trap Receivers enter an Index number, a SNMP Trap Receiver
Name, the SNMP manager IP Address of the trap receiver, and set the
Status. When all information is entered, select Add.
To edit an existing trap receiver, enter its index number and the new
information and select Save.
To delete a trap receiver, enter its index number and select Delete.
Trap Receivers that have their Status set to “Disable” do not receive traps.
24 CenturyStack 8100 Managed Hub
Page 25

Chapter 3
Controlling CenturyStack Hubs
Users can control Managed CenturyStack Hubs by selecting Device
Control from the main menu. The following lists the controls available
and a brief description of the control.
Device Control Description
Repeater Group Control/Status Monitor and configure hubs
Repeater Port Control/Status Monitor and configure ports
2/3-Port Bridge Module* Monitor and configure 2/3-Port
Control/Status Bridge Module(s)
External AUI Module** Monitor and configure External
Control/Status AUI Module(s)
Redundant Link Control Monitor and configure
Security Intrusion Monitor and configure eavesdropping
in the stack
in the stack
Redundant Links
protection
* The “Bridge Module” is also referred to as the “Switch Module.”
** METRObility does not support the AUI module.
Controlling CenturyStack Hubs 25
Page 26

Group Control
The Repeater Group Control/Status Menu displays status information for
groups and allows enabling or disabling a group as well as naming and
resetting the group.
Repeater Group Control
26 CenturyStack® 8100 Managed Hub
Page 27

Repeater Group Control – 2
To configure the Repeater Group Control, first select a group (1 – 6) and
click the Submit button, to load the configurations for the selected group.
Next configure the items listed below and select Save, to update the new
configuration.
Repeater Group Control
Group Admin State No Change/Enable 10M/Enable 100M/
Group Reset No Change/Reset All/Functions Only/
Group Name A name of up to 28 characters
Enable All/Disable All
Counters Only
Controlling CenturyStack Hubs 27
Page 28

Port Control
The Repeater Port Control/Status Menu displays status information for
each port of each linked repeater. This menu allows enabling or disabling
the Administration State, setting the Speed Control, and enabling or
disabling Link Status Change Notification for ports.
Repeater Port Control-1
28 CenturyStack® 8100 Managed Hub
Page 29

Repeater Port Control-2
To configure repeater ports, first select the group (1 – 6) and select
Submit to load the configurations for the selected group. Next select the
port of the selected group that is to be configured. Then configure the
items listed below and select Save to update the new configuration.
Repeat for each port of each group.
Repeater Port Control
Port Number 1 – 12/24
Admin State Enable/Disable/No Change
Link Test Enable/Disable
Speed Control Auto Negotiate/10 Mbps/100 Mbps/
Link Status Change Notify Enabled/Disabled/No Change
No Change
Controlling CenturyStack Hubs 29
Page 30

Switch Module Control
Switch Modules are slide-in units that can be inserted into managed
CenturyStack Hubs to gain additional functions such as extending
distances and switching between different speeds. The 3-Port Bridge
Module has two internal ports (to bridge 10M and 100M segments) and
one external port. The function of the external port can vary between
different modules. For detailed features of modules, please refer to the
CenturyStack Installation and User Guide.
2/3-Port Bridge Module Control
The 3-Port Bridge Module Control/Status Menu displays current configurations and allows configuring External Function Administration State,
Internal Function Administration State, and Link Status Change Notify.
Configurations can only be made if the module is present.
3-Port Bridge Module Control/Status Menu
30 CenturyStack® 8100 Managed Hub
Page 31

To configure the 3-Port Bridge Module, first select the group (1 – 6)
where a module exists and select Submit. If a module exists in the
selected group, it is indicated next to Description under Current
Configuration. Next, configure the items listed below and select Save
to update the new configuration.
3-Port Bridge Module Control
External Bridge Admin State No Change/Disable/Enable
Internal Function Admin State No Change/Disable/Enable
Link Status Change Notify No Change/Disable/Enable
Controlling CenturyStack Hubs 31
Page 32

Redundant Link Control
The Redundant Link Control Menu allows configuring of up to 24 pairs of
redundant links within a stack. Users can ensure that all packets sent will
reach their destination even in the event of a hub failure when Link Pairs
are configured. Configuring Link Pairs requires naming the Link Pair with
a numeral from 1~24, configuring primary and secondary groups and
ports, setting the Link Switch Notify, setting the Status, and, finally,
saving the configuration.
Redundant Link Control Menu
Configuring Link Pairs
1. Select the Link Pair number from 1 – 24.
2. Enter the Primary Link Group (1 – 6).
3. Enter the Primary Link Port (1 – 12/24).
4. Enter the Secondary Link Group (1 – 6).
NOTE: You can configure and save the Secondary Link
Group and the Primary Link Group as the same hub,
however this will be of no use in the event of a hub failure.
5. Enter the Secondary Link Port (1 – 12/24).
32 CenturyStack® 8100 Managed Hub
Page 33

6. Enable the Link Switch Over Notify. (Optional)
7. Enable the Status.
8. Select Save to update the new Linked Pair. Repeat these
steps for each Link Pair.
Editing a Link Pair
Users can edit a Link Pair by entering the Link Pair number (of an
existing Link Pair) and reconfiguring the rest of the columns, then select
Save. The Link Pair is updated to the new settings.
Deleting a Link Pair
Users can delete a Link Pair by entering the Link Pair number (of an
existing Link Pair) and setting the Status to Invalid, then select Save.
The Link Pair is removed.
Controlling CenturyStack Hubs 33
Page 34

Intrusion Control
The Security Intrusion Control/Status Menu allows setting up security
features. Intrusion control is a MAC address-based capability to prevent
any unauthorized nodes from accessing the network. The hub monitors
those nodes that have been secured by the security control function.
When a security violation is detected, a trap may be raised. The trap will
be sent to the network manager to report the event and the port may also
be disabled.
Security Intrusion
34 CenturyStack® 8100 Managed Hub
Page 35

Security Intrusion-2
To configure Security Intrusion:
1. Select a port number from the Port Number drop down list.
2. Set the Intrusion Status.
3. Set the Intrusion Auth Address Auto Learn.
4. Enter the Intrusion Auth MAC Address.
5. Set the Intrusion Action.
6. Save
Security Intrusion Control/Status
Group Number Hub ID of a hub in the stack
Port Number Number of the port that is selected
Intrusion Control Enabled/Disabled
Intrusion Address Auto Learn Enabled/Disabled
Intrusion MAC Address Type in the intrusion MAC address
Intrusion Action No Action/Send Trap/Partition Port/Both
in the Group Number configuration
Controlling CenturyStack Hubs 35
Page 36

36 CenturyStack® 8100 Managed Hub
Page 37

Chapter 4
Monitoring the Network
CenturyStack network management enables users to monitor network
statistics counters. Counters can be monitored in relative and absolute
values. Counters can be monitored for each segment, each group, and each
port. The Network Monitoring Menu also enables Address Search and
Tracking and configuring Broadcast Storm Protection.
Group Statistics Information
The Repeater Group Statistics Information Menu displays statistic
counters for each group.
Statistics Information Menu
Monitoring the Network 37
Page 38

To view the Repeater Group Statistics counter, select a group (1 – 6) from
the Group Number drop down list. Next select the Display Mode and
select Submit to load the counters for the selected group.
Repeater Group Statistics Counters
Group Number Selected group’s Hub ID
Display Mode Counter values in Absolute/Relative terms
Total Frames Total frames received
Total Errors Total errors
Total Octets Total octets received
Port Statistics Information
The Repeater Port Statistics Information Menu shows statistics in
Absolute and Relative values.
Port Statistics Information Menu
38 CenturyStack 8100 Managed Hub
Page 39

Port Statistics Information Menu – 2
To view port statistic information, select a group (1 – 6) from the Group
Number drop down list. Then select a port (1 – 12/24), set the Display
Mode and select Submit to load the counters for the selected port and
group.
Monitoring the Network 39
Page 40

Port Statistics Information
Group Number Number of the group in the stack (1 – 6)
Port Number Port number of selected group (1 – 12/24)
Display Mode Absolute or Relative
Readable Frames Total readable frames received by the port
FCS Errors Total FCS Errors received by the port
Alignment Errors Total Alignment Errors received by the port
Frame Too Long Total frames received by the port that were
Short Events Total frames received by the port that were
Runts Total runts received by the port
Collisions Total collisions
Late Events Total late events received by the port
Very Long Events Total very long events received by the port
Data Rate Mismatches Total data rate mismatches received by the port
Auto Partitions Total auto partitions
Isolates* Total isolates for 100Mbps transmissions
Symbol Errors* Total symbol errors for 100Mbps transmissions
Total Errors Total errors received by the port
Broadcast Packets Total broadcast packets received by the port
Multicast Packet Total multicast packets received by the port
*100Mbps only
longer than 1518 octets
shorter than 64 octets
40 CenturyStack 8100 Managed Hub
Page 41

Address Tracking
The Address Tracking Information Menu provides per port based, node
tracking capability (MAC address based). This capability provides the basic
traffic analysis capability to diagnose network problems, such as Intrusion.
The node tracking function records the source MAC of each data packet.
Up to 15 Source MAC Addresses can be detected on each port.
Address Tracking Information Menu
To monitor address tracking information, select a group from the Group
Number pop up list (1 – 6), then select a port from the Port Number pop
up list and select Submit. A list of source MAC addresses displays for this
port, if there are any.
Monitoring the Network 41
Page 42

Address Tracking Information
Group Number Repeater Group (1 – 6)
Port Number Port number of selected group
Source Address Change This counter is incremented by
Last Source Address The Source MAC Address of the
Source MAC Address Tracking List A list of source MAC addresses
(1 – 12/24)
one for each time that the Last
Source Address for this port has
changed
last readable frame received by
this port
that were recently received on this
port. The first Source MAC Address
(i.e., 00-E0-95-00-00-00) in the
tracking list contains the value that is
given by the Last Source Address
for this port.
42 CenturyStack 8100 Managed Hub
Page 43

Address Search Information
CenturyStack network management provides source (MAC address)
search capability. This active address tracking capability is used to watch
for a given MAC address and report which port on which it was seen. This
capability can also be used to collect the necessary information for
mapping the topology of a network. Up to 8 MAC address can be
searched simultaneously.
Address Search Information Menu
The user can search a MAC address by entering search parameters,
including Search Index, Address Searched and Address Search Status. The
syntax and semantic checking is performed to verify the source search
parameters input by the user. See below for a description of search
parameters.
To perform an address search:
1. Enter an Index number in the Search Index field at the
bottom of the Address Search Information Menu.
2. Type in the source MAC address to be searched.
Monitoring the Network 43
Page 44

3. Execute the Save command to get the owner of this entry.
If the entry is free and available, the Address Search Lock is
increased by 1, Address Search Status is set to “In Use”, and
Address Search Owner is set to “Web”, as shown below.
Otherwise, the request to own the entry is rejected.
4. After executing the Save command, please wait for a few
seconds and press Save again to get the search result.
6. Repeat Steps 1 – 4 for as many addresses to be searched.
Address Search Information
Address Search “In Use”
Search Index Index number (1 – 8)
Address Searched MAC address to be searched
Address Search Lock This number will increment by one if the
Address Search Status Search Status will be set to “In Use” if the
Address Search Group Group number where address has been located
Address Search Port Port number where address has been located
Address Search Owner Set to Web if the entry is free and available
search lock is successful
entry is free and available
44 CenturyStack 8100 Managed Hub
Page 45

Broadcast Storm Protection
The CenturyStack Hub periodically monitors the broadcast counters of
each hub port to detect a broadcast storm condition. If a hub port is
detected to be causing a broadcast storm, the following actions can be
taken: (1) sending a trap, (2) partition the port, or (3) both sending a trap
and partitioning the port. The Hub continually monitors those ports that
have been partitioned to check if the broadcast storm condition still exists.
The partitioned hub port is auto recovered to normal operation once the
broadcast storm condition is released.
Broadcast Storm Protection
Users can configure the port broadcast threshold value and optional
module threshold value of each segment.
The Segment Rate Threshold, Port Rate Threshold, and Optional Module
Rate Threshold determines whether the broadcast storm exists or not.
Monitoring the Network 45
Page 46

Segment Rate Threshold: the number of broadcast packets
received on a given segment per second
Port Rate Threshold: the number of broadcast packets
received on a given port per second.
Optional Module Rate Threshold: the number of broadcast
packets received on each port of a given optional module per
second.
Formula for calculating Broadcast packet rate:
Broadcast packet rate = Broadcast packet received ÷ Sampling Interval in Seconds
To configure the threshold for Broadcast Storm Protection:
1. Select the segment from the Segment ID pop up list.
2. Enter a value in the Segment Rate Threshold field
(or optional module).
3. Enter a Port Rate Threshold.
4. Set the Alarm Action.
5. Set the Alarm Status.
6. Select Save.
Broadcast Storm Protection
Segment ID 10Mbps Segment or 100Mbps Segment
Segment Rate Threshold Broadcast threshold value for each
Optional Module Rate Broadcast threshold value for each module
Threshold
Port Rate Threshold Broadcast threshold value for each port
Alarm Action Send Trap/Partition/Send Trap and Partition
Alarm Status Invalid/Enabled/Disabled
segment
46 CenturyStack 8100 Managed Hub
Page 47

Broadcast Storm Detected
CenturyStack network management provides broadcast storm detection.
If a broadcast storm is detected, the Broadcast Storm Detected Menu
displays the detected broadcast storm Group number, Port number, or the
group number of the optional module.
Monitoring the Network 47
Page 48

48 CenturyStack 8100 Managed Hub
Page 49

Chapter 5
Remote Network Monitoring
The CenturyStack Hub fully supports RMON Management Group 1, 2, 3,
and 9. Users can setup for RMON Management using Web-Based
Management or SNMP Management. Described here is detailed
information for RMON Group 1, 2, 3, and 9 as well as the operation with
Web-Based Management.
Remote network monitoring (RMON) probe is an instrument that exists
for the purpose of managing a network. The goals of RMON probe are
described as follows:
• Offline Operation
There are sometimes conditions when a management station
will not be in constant contact with its remote monitoring
devices. This is sometimes by design in an attempt to lower
communications costs (especially when communicating over
a WAN or dial up link), or by accident as network failures
affect the communications between the management station
and the probe. For this reason, this MIB allows a probe to be
configured to perform diagnostics and to collect statistics
continuously, even when communication with the management station may not be possible or efficient. The probe may
then attempt to notify the management station when an
exceptional condition occurs. Thus, even in circumstances
where communication between the management station and
the probe is not continuous, fault, performance, and configuration information may be continuously accumulated and
communicated to the management station conveniently and
efficiently.
• Proactive Monitoring
Given the resources available on the monitor, it is potentially
helpful for it to continuously run diagnostics and to log
network performance. The monitor is always available at
the onset of any failure. It can notify the management station
of the failure and can store historical statistical information
about the failure. The management station can play this
historical information back in an attempt to perform further
diagnostics of the cause of the problem.
Remote Network Monitoring 49
Page 50

• Problem Detection and Reporting
The monitor can be configured to recognize conditions, most
notably error conditions, and to continuously check for them.
When one of these conditions occurs, the event may be
logged, and management stations may be notified in a
number of ways.
• Value Added Data
Because a remote monitoring device represents a network
resource dedicated exclusively to network management
functions, and because it is located directly on the monitored
portion of the network, the remote network monitoring
device has the opportunity to add significant value to the
data it collects. For instance, by highlighting those hosts on
the network that generate the most traffic or errors, the probe
can give the management station precisely the information it
needs to solve a class of problems.
• Multiple Managers
An organization may have multiple management stations for
different units of the organization, for different functions
(e.g. engineering and operations), and in an attempt to
provide disaster recovery. Because environments with
multiple management stations are common, the Remote
Network Monitoring device has to deal with more than
one management station, potentially using its resources
concurrently.
50 CenturyStack 8100 Managed Hub
Page 51

Statistic Group Configuration
The Statistic Group Configuration enables configuring statistic groups.
Indexes can be edited, saved, added, and deleted.
Statistics Group Configuration Menu
Adding a Statistics Group
To add an index item all the following must be entered: Index, Owner, and
Status, otherwise the entry will not be saved.
To add an index item:
1. Enter an Index number in the Index field.
2. Set the data source.
3. Enter the name in the Owner field.
4. Set the Status.
5. Select Add.
Remote Network Monitoring 51
Page 52

Deleting a Statistics Entry
To delete a statistics entry, enter the index number. Then, select Delete to
remove the index item. NOTE: The default Index 1 and 2 cannot be
deleted.
Modifying a Statistics Group
To modify an existing index item, enter the existing index number with
the new information for each field. Then, select Save to complete the
modification.
The following lists the configurable items in the Statistics Group
Configuration Menu.
Statistics Group Configuration
Index Any number
Data Source 10 Mbps segment/100 Mbps segment/No Change
Owner Owner name of this entry
Status Valid/underCreation/invalid
52 CenturyStack 8100 Managed Hub
Page 53

History Group Configuration
The History Group Menu provides a means of collecting the data gathered
by the statistics group over time intervals and storing them for later
retrieval.
History Groups can be monitored, edited, saved, added and deleted with
the History Group Configuration Menu. If any fields are left blank, the
Status is saved as underCreation.
History Group Configuration Menu
Adding a RMON History Group
To add an RMON History Group:
1. Enter a unique number in the Index field.
2. Select the Data Source.
3. Enter the number of Buckets Requested.
4. Enter an Interval.
5. Enter an Owner name.
6. Set the status to Valid.
7. Select Add.
Remote Network Monitoring 53
Page 54

Deleting a RMON History Group
To delete a History Group, enter the index number. Then, select Delete to
remove the index item.
Modifying a RMON History Group
To modify an existing index item, enter the existing index number with the
new information for each field. Then, select Save to complete the
modification.
RMON History Group Configuration
Index A value from 1 – 65535. The value must be unique.
Data Source 10 Mbps or 100 Mbps segment
Bucket requested Number of sample buckets you want to collect and
Bucket granted Number of sample buckets that will be collected and
Interval Interval in seconds, between bucket samples.
Owner The entity that configured this entry and is using the re-
Status Valid/CreateRequest/UnderCreation/ Invalid
Not to be confused with Data Source Index.
store. The range is 1 to 65535.
stored. The number granted is affected by available
resources. (1-20)
The range of the interval is 1 to 3600 seconds
(1 hour). The default is 1800 seconds.
sources assigned to it. A string of up to 12 characters.
A valid status has all fields filled in. Setting the
status to invalid deletes the index. Indexes with
incomplete information in some fields automatically
set the status as UnderCreation.
Alarm Group Configuration
Alarm Group Configuration allows configuring alarms. The Alarm Group
periodically takes statistical samples from variables in the probe and
compares them to thresholds that have been configured. The alarm table
stores configuration entries that each define a variable, polling period, and
threshold parameters. If a sample is found to cross the threshold values, an
event is generated. This function generates one event as a threshold is
crossed in the appropriate direction. No more events are generated for that
54 CenturyStack 8100 Managed Hub
Page 55

threshold until the opposite threshold is crossed.
The Hub provides the threshold control function to support the RMON
Alarm Group. Up to 16 Alarm Control Entries can be created. The syntax
and semantic checking are performed to verify the value input by the user
before it can be set to the object of Alarm group. The valid Alarm Group
configuration data is saved into the system NVRAM.
The Hub periodically monitors the threshold value of those counter
objects that have been specified as the RMON Alarm Variable. The
associated RMON event is raised and the proper event action is performed
when the value of the counter object crosses its threshold value as
specified in the RMON Alarm Threshold object.
Alarm Group Configuration Menu
Remote Network Monitoring 55
Page 56

To configure an Alarm Group:
1. Enter the number in the Alarm Group Index (for Creation)
field.
2. Select Add. After selecting Add the newly added index
number shifts from the “For Creation” field, to the
“For Modification and Deletion” field, and is ready for
modification.
3. Configure the remaining fields.
4. Select Save.
Alarm Group Configuration Menu-2
The following table explains the meaning of each field in the Alarm
Group Configuration Menu.
56 CenturyStack 8100 Managed Hub
Page 57

Alarm Group Configuration
Alarm Group Index
• creation Create a new alarm group (number).
• modification & deletion Select an existing alarm group to monitor or edit.
Variable Category RMON/ rptr group/ rptr port
Alarm Index The current alarm group index number
Alarm V ariable Category Read only
Alarm Interval The time in seconds over which the data is sampled.
Alarm Sample Type
• Absolute Value stored is compared to the threshold level
• Delta Value stored is compared to the difference between
Alarm Value Value of the statistic during the last sampling period.
Alarm Startup No Change/Rising Alarm/Falling Alarm/Both Alarms
the variable at the last sampling and its current
value.
Alarm Rising Threshold Threshold for the sampled statistic. When the current
Alarm Falling Threshold Threshold for the sampled statistic. When the current
Alarm Rising Event Index of the event entry that is used when the
Index Rising Threshold is crossed.
Alarm Falling Event Index of the event entry that is used when the
Index Rising Threshold is crossed.
Alarm Owner The entity that configured this entry and is using
Alarm Status Valid/underCreation/invalid
sampled value is greater than or equal to this
threshold,and the value of this sample at the last
sampling interval was less than the threshold, then a
single event is generated. After a rising event is
generated, another rising event is not generated until
the sampled value falls below this threshold and
reaches the Alarm Falling Threshold.
sampled value is less than or equal to this threshold,
and the value of this sample at the last sampling
interval was greater than the threshold, then a single
event is generated. After a falling event is generated,
another falling event is not generated until the
sampled value rises above this threshold and
reaches the Alarm Rising Threshold.
the resources assigned to it.
Remote Network Monitoring 57
Page 58

Event Group Configuration Menu-3
The Counter Ids, as shown below, are explained as follows:
EtherStats DropEvents: The number of times drop events have
been detected due to lack of resources.
EtherStats Octets: The total number of octets of data
(including those in bad packets) received on the network
(excluding framing bits, but including FCS octets).
EtherStats Pkts: The total number of packets (including bad
packets, broadcast packets, and multicast packets) received.
EtherStats Broadcast Pkts: The total number of good packets
received which were directed to a broadcast address. NOTE:
this does not include multicast packets.
EtherStats Multicast Pkts: The total number of good packets
received which were directed to a multicast address. NOTE: this
number does not include packets directed to the br oadcast address.
58 CenturyStack 8100 Managed Hub
Page 59

EtherStats CRC Align Errors: The total number of packets
received that had a length (excluding framing bits, but including
FCS octets) between 64 and 1518 octets, but had either a bad
Frame Check Sequence (FCS) with an integral number of octets
(FCS Error) or a bad FCS with a non-integral number of octets
(Alignment Error).
EtherStats Undersize Pkts: The total number of packets
received that were less than 64 octets long (excluding framing
bits, but including FCS octets) and were otherwise well formed.
EtherStats Oversize Pkts: The total number of packets
received that were longer than 1518 octets (excluding framing
bits, but including FCS octets) and were otherwise well formed.
EtherStats Fragments: The total number of packets received
that were less than 64 octets in length (excluding framing bits,
but including FCS octets) and had either a bad Frame Check
Sequence (FCS) with an integral number of octets (FCS Error)
or a bad FCS with a non-integral number of octets (Alignment
Error). NOTE: this is entirely normal for etherStatsFragments
to increment. This is because it counts both runts (which are
normal occurrences due to collisions) and noise hits.
EtherStats Jabbers: The total number of packets received that
were longer than 1518 octets (excluding framing bits, but
including FCS octets), and had either a bad Frame Check
Sequence (FCS) with an integral number of octets (FCS Error)
or a bad FCS with a non-integral number of octets (Alignment
Error).
EtherStats Collisions: The best estimate of the total number of
collisions on this Ethernet segment. The value returned will
depend on the location of the RMON probe.
Pkts 64 Octets: The total number of packets (including bad
packets) received that were 64 octets in length (excluding
framing bits, but including FCS octets).
Remote Network Monitoring 59
Page 60

EtherStats Pkts 65 to 127 Octets: The total number of packets
(including bad packets) received that were between 65 and 127
octets in length inclusive (excluding framing bits, but including
FCS octets).
EtherStats Pkts 128 to 255 Octets: The total number of
packets (including bad packets) received that were between 128
and 255 octets in length inclusive (excluding framing bits, but
including FCS octets).
EtherStats Pkts 256 to 511 Octets: The total number of
packets (including bad packets) received that were between 256
and 511 octets in length inclusive (excluding framing bits, but
including FCS octets).
EtherStats Pkts 512 to 1023 Octets: The total number of
packets (including bad packets) received that were between 512
and 1023 octets in length inclusive (excluding framing bits, but
including FCS octets).
EtherStats Pkts 1024 to 1518 Octets: The total number of
packets (including bad packets) received that were between
1024 and 1518 octets in length inclusive (excluding framing
bits, but including FCS octets).
Group Counter: Group counter is an entry in the table. Group
counter contains total performance and error statistics for a
single group. Regular retrieval of the information in this table
provides a means of tracking the performance and health of the
CenturyStack attached to this group’s ports.
The counters in this table are redundant in the sense that they
are the summations of information already available through
other objects. However, these sums provide a considerable
optimization of network management traffic over the otherwise
necessary retrieval of the individual counters included in each sum.
Port Counter: Port counter is an entry in the table. It contains
performance and error statistics for a single port.
60 CenturyStack 8100 Managed Hub
Page 61

Event Group Configuration
The Event group controls the generation and notification of events from the
CenturyStack. Each entry in the event Table describes the parameters of the
event that can be triggered. Each event entry is fired by an associated
condition located elsewhere in the MIB. An event entry may also be
associated with a function elsewhere in the MIB that will be executed when
the event is generated. For example, a channel may be turned on or off by the
firing of an event. Each event Entry may optionally specify that a log entry
be created on its behalf whenever the event occurs.
Each entry may also specify that notification should occur by way of SNMP
trap messages. In this case, the community for the trap message is given in
the associated event Community. The specific trap fields of the trap are
determined by the condition that triggered the event. Two traps are defined:
rising Alarm and falling Alarm. If the event Table is triggered by a condition
specified elsewhere, the enterprise and specific trap fields must be specified
for traps generated for that condition.
Users can create up to 32 Event Entries.
Event Group Configuration Menu
Remote Network Monitoring 61
Page 62

To configure the Event Group:
1. Enter an index number in the Event Group Index field.
2. Enter a description.
3. Select the Event Type.
4. Enter a valid Event Community name.
5. Enter the Event Owner name.
6. Set the Event Status to valid.
7. Select Add to add the Event Group.
After saving an Event Group, the configuration is written under Current
Configurations. The New Configuration is empty and available to enter
another Event Group. See below.
Event Group Index The event group index number
Event Description Event description
Event Type No Change/Event None/Log/Trap/Log & Trap
Event Community Name of a valid event community
Event Owner Name of the Event Owner
Event Status No Change/valid/underCreation/invalid
62 CenturyStack 8100 Managed Hub
Page 63

Statistics Information
The RMON Statistics Information Menu displays statistics counters in
Absolute or Relative values, for 10Mbps segments and 100Mbps
segments. To view statistics information, select an Ethernet Statistics
Index from the drop down list. Select the Display Mode and click Submit.
The statistics display.
Statistics Information Menu
“Statistics Information” lists the available statistics counters. Refer to the
table on the following page.
Remote Network Monitoring 63
Page 64

Statistics Information
Index 1 (10M segment)/2 (100M segment)
Display Mode Absolute/Relative
Data Source 10M segment/100M segment
Owner The name of the Statistics group
Status Valid
Readable Frames Total readable frames received by the segment
Multicast Frames Total multicast frames received by the segment
Broadcast Frames Total broadcast frames received by the segment
Packet Size 64 Total packets received by the segment of size 64
Packet Size 65 to 127 Total packets received by the segment of size
Packet Size128 to 255 Total packets received by the segment of size
Packet Size 256 to 511 Total packets received by the segment of size
Packet Size 512 to1023 Total packets received by the segment of size
Packet Size1024 to 1518 Total packets received by the segment of size
CRC Alignment Errors Total CRC alignment errors received by the segment
Undersize Packets Total undersize packets received by the segment
Oversize Packets Total oversize packets received by the segment
Fragments Total fragments received by the segment
Jabbers Total jabbers received by the segment
Collisions Total collisions in the segment
Readable Octets Total readable octets received by the segment
Drop Events Total drop events in the segment
65 – 127
128 – 255
256 – 511
512 – 1023
1024 – 1518
64 CenturyStack 8100 Managed Hub
Page 65

History Information
The History Information Menu enables users to view history information
as configured in the History Group Configuration Menu.
RMON History Information
To view history information, select an Ethernet History Index from the
drop down list and click Submit.
To view a sample, select an index number from the Sample Index drop
down list and select Submit.
Remote Network Monitoring 65
Page 66

RMON History Information-2
66 CenturyStack 8100 Managed Hub
Page 67

History Information
History Control Data Source 10M segment/100M segment
History Control Owner Name assigned as the Owner.
History Control Bucket Request Number of sample buckets requested
History Control Bucket Granted Number of sample buckets that were granted
History Control Status Valid/CreateRequest/UnderCreation/Invalid
History Control Interval The interval in seconds, between bucket
Readable Frames Total readable frames received
Drop Events The number of events in which packets were
Octets A whole number representing the total
Packets Total packets received including bad packets,
Broadcast Frames Total packets received that were directed to
Multicast Frames Total packets received that were directed to
Utilization Percent utilization
CRC Alignment Errors The total CRC alignment error frames within
Undersize Packets Total packets received that were less than
Oversize Packets Total packets received that were greater than
Fragments Total fragments received
samples
dropped by the monitor because of lack of
resources
readable octets received
broadcast packets and multicast packets
the broadcast address
the multicast address
the proper size of 64 – 1518 octets received
64 octets
1518 octets long
Jabbers Total jabbers received
Collisions Total collisions
Remote Network Monitoring 67
Page 68

Event Log
The RMON Event Log Menu displays information based on valid
configurations made in the RMON Event Group Configuration Menu.
RMON Event Log
To view Event Logs, select the Log Index drop down list and select an
index number from the Event Index drop down list and then select
Submit.
68 CenturyStack 8100 Managed Hub
Page 69

Event Log
Event Index Valid index items configured in the RMON Event
Log Index Number of the event log
Event Description Description of the event
Event Type No Change/Event None/Log/Trap/Log & Trap
Event Community Name of the event community
Event Owner Owner of the event community
Event Status No Change/valid/underCreation/invalid
Log Time The time to record the log
Log Description Description of the log
Configuration Menu
Remote Network Monitoring 69
Page 70

System Utility
The System Utility Menu provides the function System Restart. The
system can be restarted at any time without loss of settings.
System Restart
The System Restart Menu allows the user to reset the system with a
Warm start. A warm restart only reloads the system software.
System Restart
70 CenturyStack 8100 Managed Hub
Page 71

Chapter 6
Additional Information
Agency Compliance
Product Safety and Compliance Statements:
This equipment complies with the following requirements:
• UL
• CSA
• EN60950 (safety)
• FCC Part 15, Class A
• EN55022 Class A (emissions)
• EN50082-1 (immunity)
This product shall be handled, stored and disposed of in accordance with
all governing and applicable safety and environmental regulatory agency
requirements.
Radio Frequency Interference Statements
FCC Radio Frequency Interference Statement
This equipment has been tested and found to comply with the limits for
Class A digital device, pursuant to Part 15 of FCC Rules. These limits are
designed to provide reasonable protection against harmful interference
when the equipment is operated in a commercial environment. This
equipment generates, uses and can radiate radio frequency energy, and if
not installed and used in accordance with the instruction manual, may
cause harmful interference to radio communication. Operation of this
equipment in a residential area is likely to cause harmful interference in
which case the user will be required to correct the interference at his own
expense.
CAUTION: Changes or modifications to this equipment not expressly
approved by the party responsible for compliance could void the user’s
authority to operate the equipment.
Canadian Radio Frequency Interference Statement
This Class A digital apparatus meets all requirements of the Canadian
Interference-Causing Equipment Regulations.
Cet appareil numérique de la classe A respecte toutes les exigences du
Réglement sur le matériel brouilleur du Canada.
Additional Information 71
Page 72

Standards Compliance
• IEEE 802.3 10BASE-T, 10BASE-5 Ethernet
• IEEE 802.3u 100BASE-TX Ethernet
• RFC 1213 MIB II
RFC 1516 Repeater MIB
Proprietary MIBs
• RFC 1757 RMON Group 1, 2, 3 and 9
• In-Band and Out-of-Band Management
• VT-100 Terminal Interface support
Warranty and Servicing Information
METRObility Optical Systems, Inc. warrants the CenturyStack 8100
Managed Hub to be in good working order for a period of THREE
YEARS from the date of METRObility shipment. Should the unit fail
anytime during said three-year period, METRObility will, at its option,
replace or repair the product. This warranty is limited to defects in
workmanship and materials and does not cover damage from accident,
disaster, misuse, abuse or unauthorized modifications. Under no circumstances will METRObility be liable for any damages incurred by the use
of this product including, but not limited to, lost profits, lost savings, and
any incidental or consequential damages arising from the use of, or
inability to use, this product.
If the product was purchased from an authorized METRObility dealer,
limited warranty service may be obtained by returning the product to the
dealer. Return the product in its original shipping container (or equivalent), pre-insured, and with proof of purchase.
72 CenturyStack 8100 Managed Hub
Page 73

Additional Information 73
Page 74

25 Manchester Street, Merrimack, NH 03054 USA
tel: 603-880-1833 • fax: 603-594-2887
www.metrobility.com
5620-810001-001 B
8/01
 Loading...