

Page 1
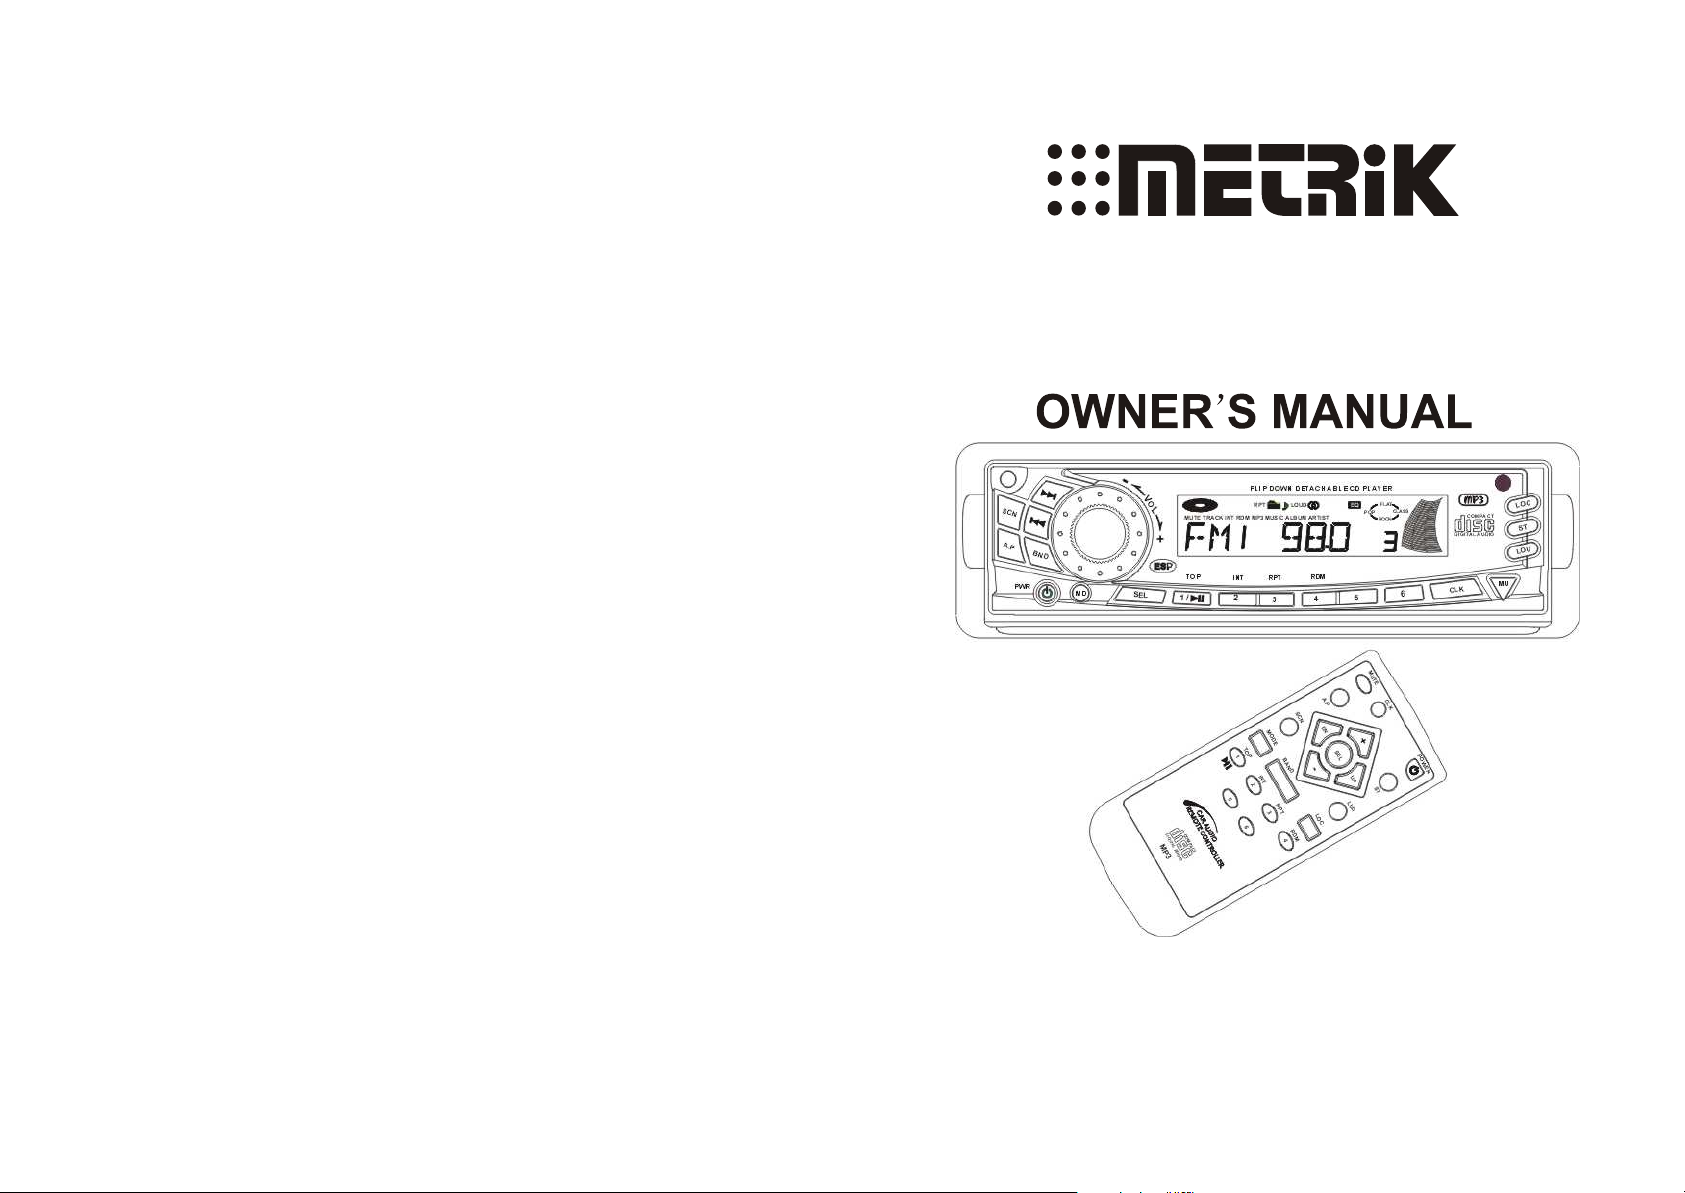
MCD-795
ANTI-THEFT FLIP DOWN DETACHABLE SYSTEM
AUTO-LOADING DISC CD/ MP3 PLAYER
ELECTRONIC ANTI-SHOCK / SKIP PROTECTION
AM/FM-STEREO DIGITAL PLL TUNING RECEIVER
INFRARED REMOTE CONTROL
Page 2

DEAR CUSTOMER:
Thank you for your purchase of our audio product.
Selecting fine audio equipment such as the unit you have just purchased is only the start
of your musical enjoyment. Now it is time to consider how you can maximize the fun and
excitement your equipment offers.
We hope you get the most out of your equipment by playing it at a safe level.
One that lets the sound come through loud and clear without annoying blare or distortion,
and, more important, without affecting your sensitive hearing.
Sound can be misled. Over time your hearing " comfort level " adapts to higher volumes
of sound. So what sounds " normal " can actually be loud and harmful to your hearing.
Guard against this by setting your equipment at a safe level BEFORE your hearing adapts.
To establish a safe level:
Start your volume control at the lowest setting , then slowly increase the sound until you can
hear it comfortably and clearly, and without distortion we want you listening for a lifetime.
Once you have established a comfortable sound level:
Set the dial and leave it there.
Taking a minute to do this now will help to prevent hearing damage or loss in the
future. After all, we want you listening for a lifetime.
ABOUT THIS MANUAL
This product features a number of sophisticated functions ensuring superior reception and
operation. All are designed for the easiest possible use, but many are not self-explanatory.
This operation manual is intended to help you benefit fully from their potential and to
maximize your listening enjoyment.
We recommend that you familiarize yourself with the functions and their operation by
reading through the manual before you begin using this product. In this operation manual,
the Basic Operation for each sound source is outlined at the beginning of its explanation,
covering simple operation for that source, such as merely playing music.
Remark:
In addition to normal audio CD, this unit can play CD-R and CD-R/W disc that contain
audio tracks as well; however, depending on the conditions of the recording equipment,
recording program or the CD-R as well as CD-R/W disc itself, some CD-R or CD-R/W
may not play.
When making music CD with CD-R or CD-R/W disc, too high recording speed may
result in poor signal quality and therefore, it is recommendable to select 24x or lower
speed for CD-R recording and 4x or lower speed for CD-R/W recording.
Page 1
Page 3
SPECIFICATION
GENERAL
Supply Voltage DC 13.8V. Negative Ground
Current Consumption Max.10A
Power Output 25Watts X 4ch.
Number of channels 2 STEREO channels.
Unit Dimensions 178[W] X 165[D] X 50[H] mm.
FM SECTION
Frequency range 87.5MHz -107.9MHz
Effective sensitivity 3uV.
I.F Frequency 10.7MHz.
AM SECTION
Frequency range 530KHz - 1710KHz
Effective sensitivity 40dB.
I.F Frequency 450KHz
RCA LINE OUT (OPTION)
Output 1200mV @ CD MAX.
CD PLAYER
System MP3 Audio System.
Suitable CDs MP3/ CD/CD-R/CD-RW Disc
Frequency characteristics 20Hz-100Hz < 5dB
10KHz-20KHz < 5dB.
S/N Ratio to CD 50dB [1KHz]
\
\
LOCATION AND FUNCTION OF CONTROLS
Page 13
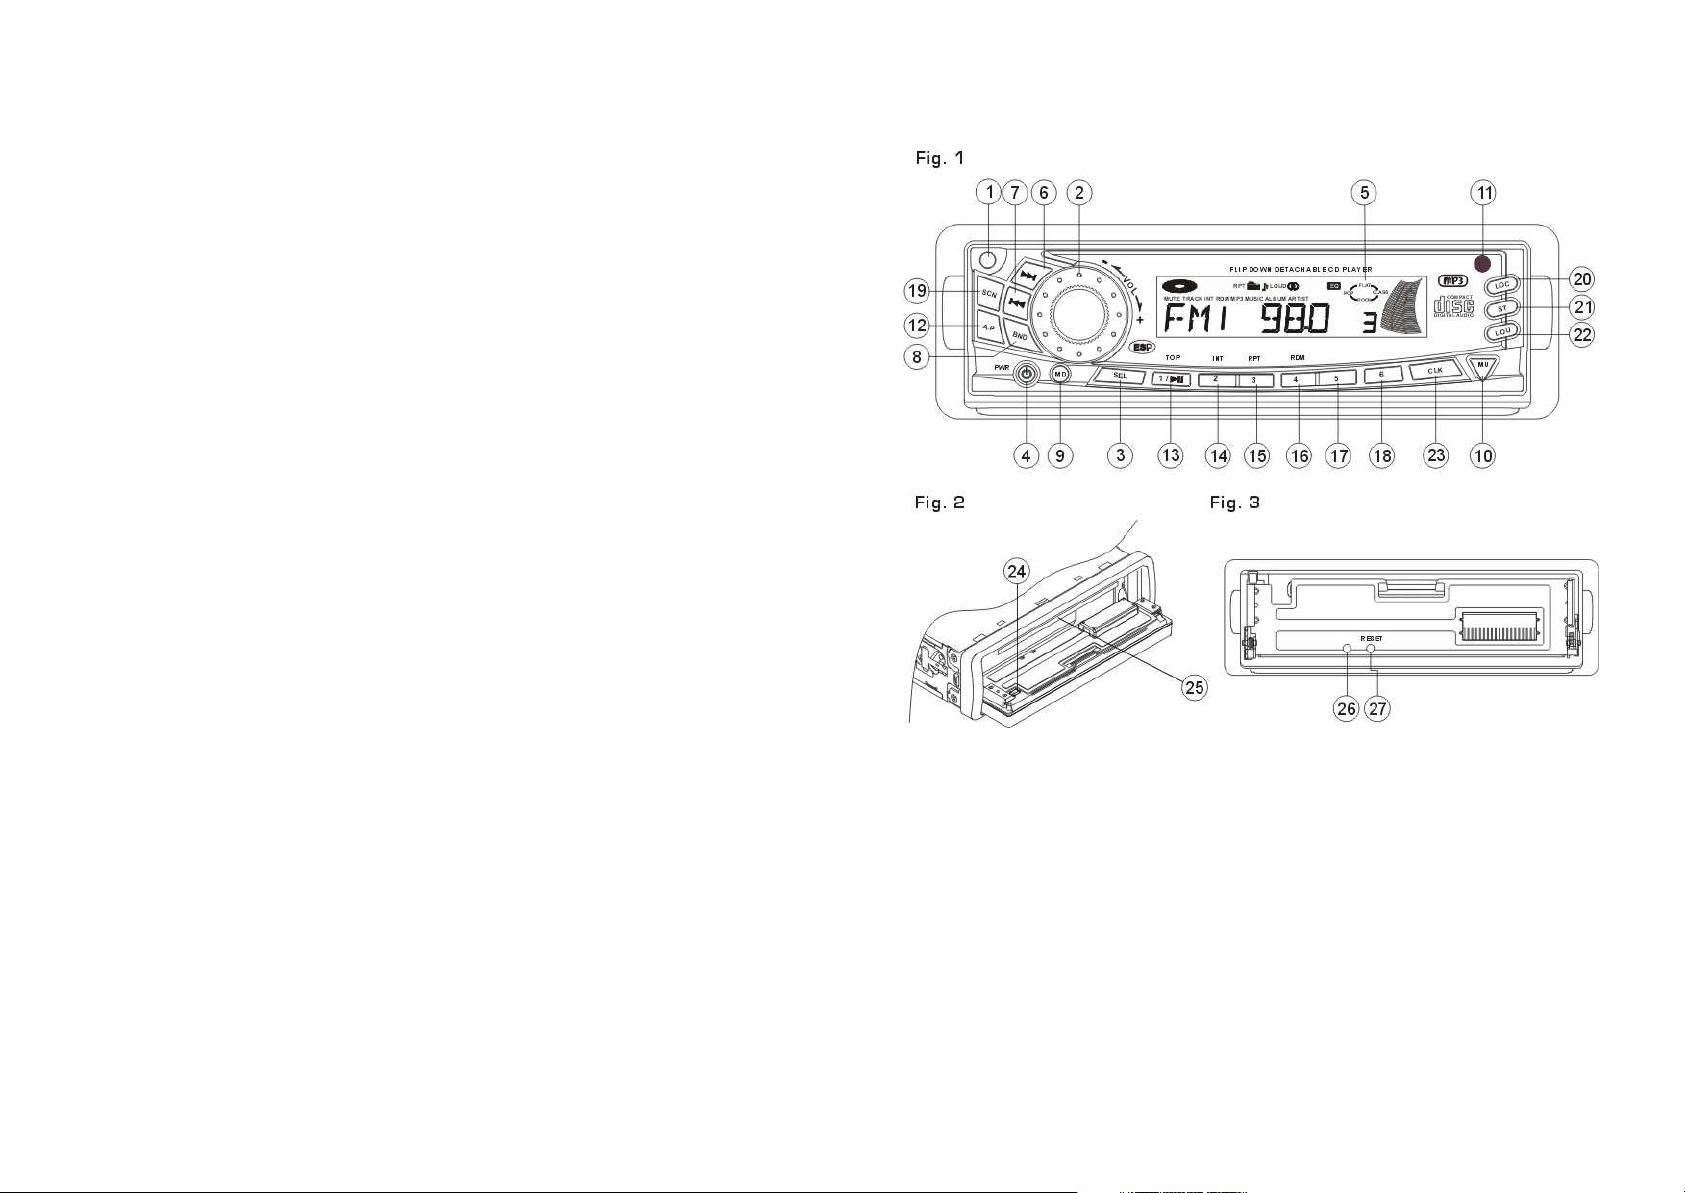
1. OPEN BUTTON
Press the OPEN button to fold down the front control panel.
Then a CD can be inserted into the CD slot or ejected by pressing the EJ button
at the rear of the front control panel; After flipping down the front panel, pull
panel forward to remove it from the chassis.
2.3. SEL BUTTON (Select) AND VOL KNOB
a) Press the SEL button briefly, it is activated as selecting each mode of E. VOL.
-> VOLUME ->BASS ->TREBLE -> BALANCE -> FADER ->
In each mode, the waiting time is about 5 seconds, and the time waiting time
is over, it returns to the last display mode of tuner or CDP mode.
VOLUME CONTROL
1) The volume can be adjusted at any time by rotating the VOL knob as select
mode has been initially defaulted at volume mode.
2)The volume can be also obtained by continuously pressing the SEL button
until the character VOL appear on the LCD display, then rotate the VOL knob
to adjust the volume.
Page 2
Page 4
BASS CONTROL
1) Press SEL button to select the bass mode until BAS appears on the display.
2) Rotate the VOL knob to adjust the bass.
TREBLE CONTROL
1) Press SEL button to select the treble mode until TRE appears on the display.
2) Rotate the VOL knob to adjust the treble.
BALANCE CONTROL
1) Press SEL button to select the balance mode until BAL appears on the display.
2) Rotate the VOL knob to adjust the left/right speaker balance.
FADER CONTROL
1) Press SEL button to select the balance mode until FAD appears on the display.
2) Rotate the VOL knob to adjust the front/rear speaker balance.
b) When pressed longer 2 seconds, it is activated as cyclical mode of following
functions for user s selection.
-> BEEP (2nd/ALL/OFF) ->SEEK1/ 2 -> DSP(OFF/POP/ROCK/CLASSIC/
FLAT) ->VOL LAST/VOL ADJ mode.
After selecting the desired mode, rotate the VOL knob to select one setup item
of the desired mode.
BEEP 2ND, BEEP ALL, BEEP OFF MODE
The situation of beep sound is selected. The 3 mode is selected as also rotating
the VOL knob.
- Beep 2nd mode:
The beep is only generated when an allotted double key is pressed long (1
second).
- Beep all mode:
The beep is generated when every key is pressed.
- Beep off mode:
The beep sound is disabled when a key is pressed.
SEEK 1/SEEK 2 mode:( Only available during radio operation)
SEEK 1: Press and hold the >>| or |<< button to seek up or down for
the strong signal stations. And the seek stops when received a strong
signal station.
SEEK 2: Press and hold the >>| or |<< button to seek up or down for the strong
signal stations. But the seek does not stop when received a strong
signal stations excepting release the >>| or |<< button.
VOL LAST/VOL ADJ
VOL LAST: The radio switches on at the actual volume it had when it was last
switched off.
VOL ADJ: Rotating the VOL knob you can pre-select a constant switch-on
volume.
4. POWER ON/OFF
When the unit is power off, the unit comes to ON by pressing any button on the
front panel (except the OPEN key or the EJ key). It also can turn on the unit to
insert a disc into CD slot. When the unit is power on, press and hold the power
button for more than 0.5 seconds, the unit goes into power off mode.
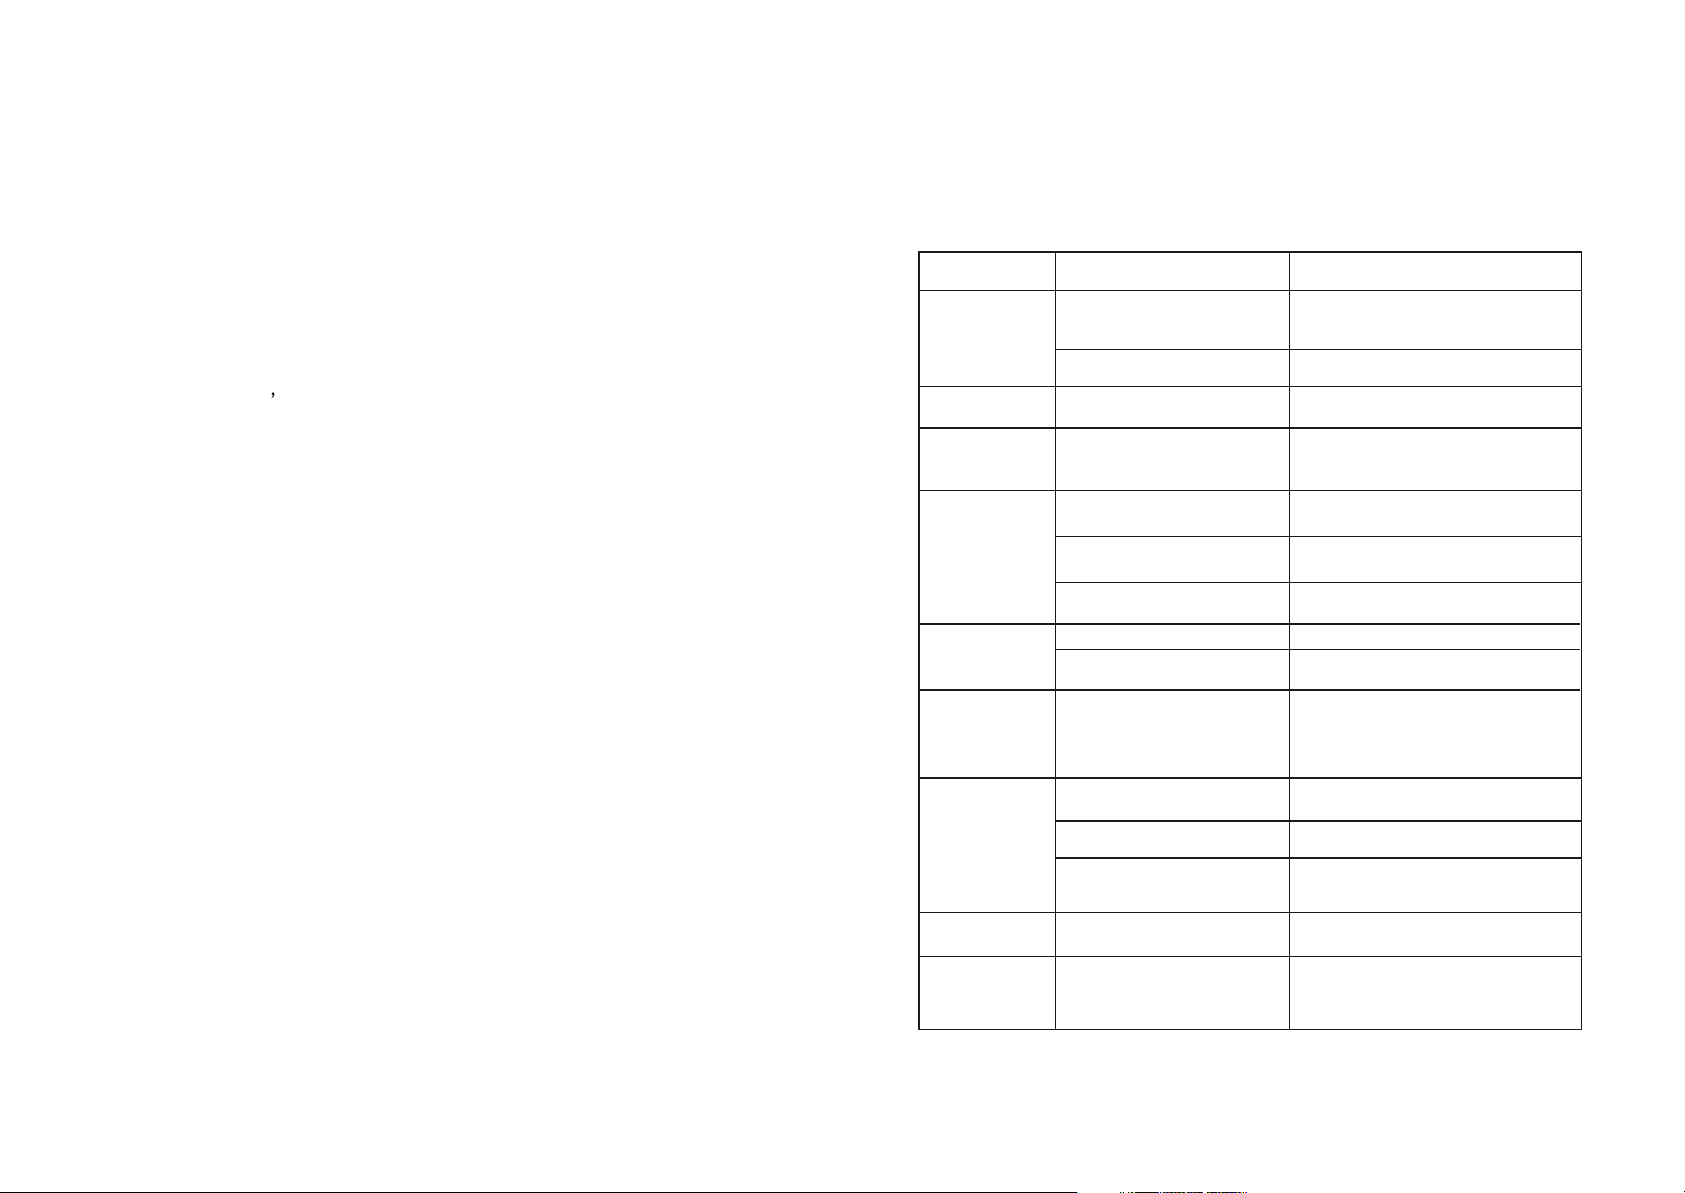
TROUBLE SHOOTING
Before using the check list please make all the connections first.
If you still have questions after going through the checklist, please consult
your local customer service representative.
Common Symptoms
There is no power.
The CDs cannot
be loaded.
The CDs are loaded
only halfway into
the CD tray.
The device does
not work correctly
(EJECT, LOAD,
PLAY)
There is no sound.
The operation keys
do not work
The sound of the
CD player skips
No radio reception.
In automatic search
mode the radio does
not stop at a transmitting station.
Cause
The car ignition is switched off.
The fuse has blown.
Presence of CD disc inside the player
The transport screws have not been
removed.
Inserting the disc in upside down
The surface of CD is extremely dirty
or it is damaged.
Temperature inside the car is too
high.
The volume control is set too low.
The device has not been correctly
connected.
1.The built-in microcomputer is not
operating properly due to noise
2.Front panel is not properly fix into
its place
The installation angle is more than
30 degrees
The surface of the road is uneven.
The surface of CD is extremely dirty
or it is damaged.
The antenna cable is not connected. Insert the antenna cable firmly into the
weak.
If the power supply is properly connected to
the car accessory, switch the ignition key to
ON or " ACC " " " .
Replace another fuse according to the wiring
diagram.
Remove the disc in the player then put a new
upward
Remove the transport screws before using.
Insert the compact disc with the label facing
upward
Clean the CD or try another CD, if this works
correctly, the first CD is properly damaged.
Cool off until the ambient temperature returns
to normal
Turn up the volume properly.
Check the power and earth connection
according to the wiring diagram.
1. Switch the device off and on again. Or press
the RESET button to resume the program.
2. Reinstall the front panel
Adjust the installation angle to less than 30
degrees
Wait until the road becomes smoother before
playing the CD.
Clean the CD or try another CD, if this works
correctly, the first CD is properly damaged.
antenna socket of the device.
Tune in to a radio station manually.The transmission signals are too
Solution
5. LCD Display
Page 3
Page 12
Page 5
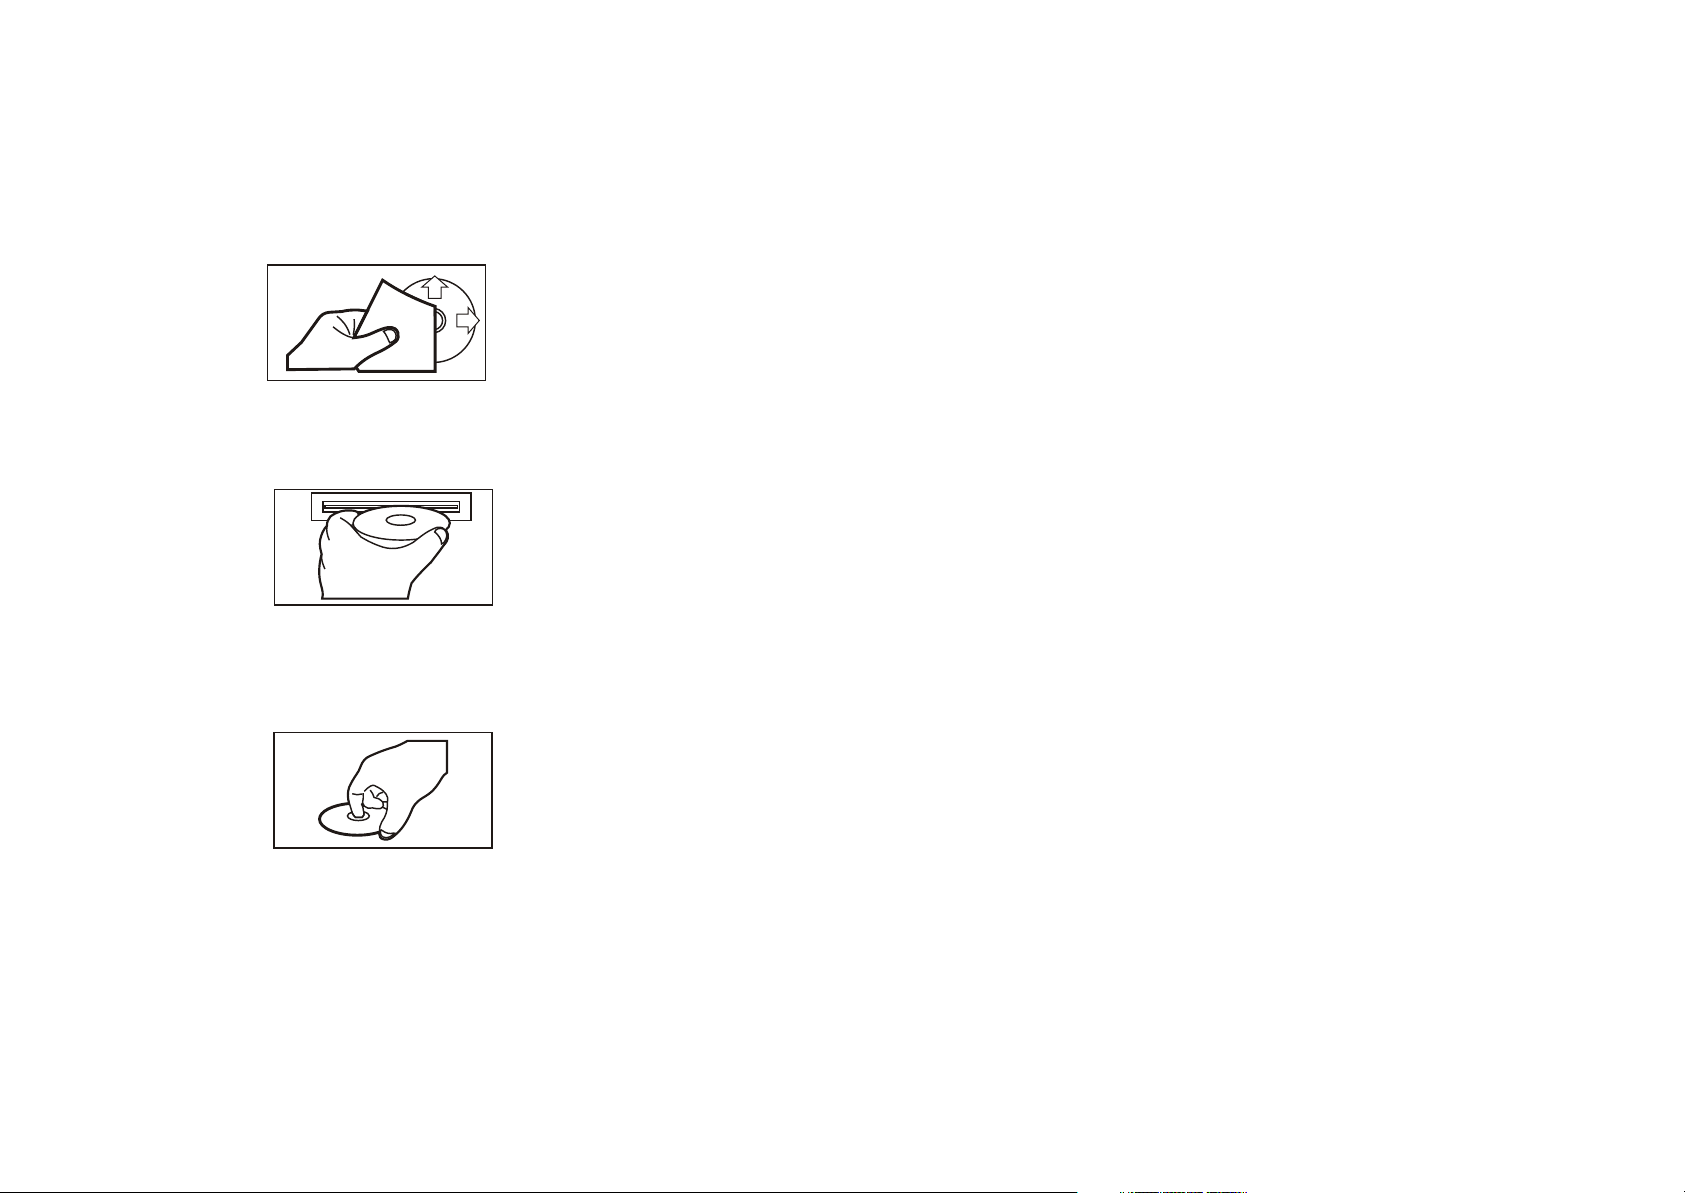
PRECAUTION OF DISC PLAY:
Cleaning the CD:
Before playing a CD, wipe it off with a clean, dust-free cleaning cloth.
Wipe the disc in the direction of the arrow.
Always insert the CD with the label side facing upwards.
If the CD is inserted with the printed side facing downwards, the device may be
damaged.
Note: If there is already a CD in the CD slot, do not try to insert a second CD.
This may damage the device.
Always hold CDs by the edge. In order to keep the CD clean do not touch the surface.
Pull out the CD as shown below.
6.7. TUNE, SEEK, TRACK, SKIP UP / DOWN BUTTONS
a) During RADIO mode:
Press the >>| or |<< button shortly to manual tune up/down for the
desired radio station frequency with step by step.
Press and hold the >>| or |<< button for longer 0.5 seconds, to automatically
tune up/down for the radio station frequency of strong signal.
b) During CD/MP3 playback mode:
Press the >>| button briefly to play next track. Press the |<< button once to
play the current track from the beginning of the current track.
Press the |<< button twice continuously to play the previous track.
When the >>| or |<< button is pressed long (more than 1 seconds) for skip
forwards or backwards.
8. BAND BUTTON
Press the BND button briefly to select the radio broadcasting band you would
like to hear. The MW/FM band is toggled cyclically through the tuning bands
->FM 1-> FM 2 -> FM 3 -> MW 1->MW 2 ->.
9. MODE BUTTON
1) When a CD/MP3 disc is existed inside the CD slot, press the MODE button
shortly to change between CD/MP3 and RADIO mode each other.
The LCD display appears radio reception information when you change it
to radio mode; The LCD display appears CD/MP3 playback information when
you change it to CD/MP3 playback mode.
2) When there is no a disc inside the CD slot, the button has not the function of
mode changing.
10. MUTE BUTTON
This button serves to switch the MUTED state on/off.
Press the MUTE button to suppress the loudspeaker temporarily, and press
again to resume listening. The muted state will be also released when the
MODE, BAND, SEL button is pressed and VOL knob on the front panel is used.
Do not attach any sticker or adhesive tape on the CD.
Do not expose the CD to direct sunlight or sources of heat such as heating vents.
Do not leave CDs in a car if it is parked in direct sunlight as that will lead to a con siderable rise in the temperature inside the car.
Note: Do not use any solvents such as petrol or thinning agents.
Commercially available cleaning substances or antistatic spray. This will damage
the device.
Page 11
11. INFRARED REMOTE CONTROL SENSOR
12. A.P BUTTON (Auto-storage /Preset scan)
During radio mode:
1) when long pressing for more than 1 seconds, the radio searches from the
current frequency and checks the signal strength level until 1 cycle search
is finished. And then 6 strongest stations frequency are preset to the cor responding preset memory numbered bank. The auto-storage operation is
implemented in the each selected band. When the auto-storage operation
is finished, the radio execute the Preset Scan
2) when short pressing, the radio searches for each preset station in the
current band. When the field strength level is more than the threshold level
of stop level, the radio is holding at that preset number for 5 seconds with
releasing mute, and than search again.
Page 4
Page 6
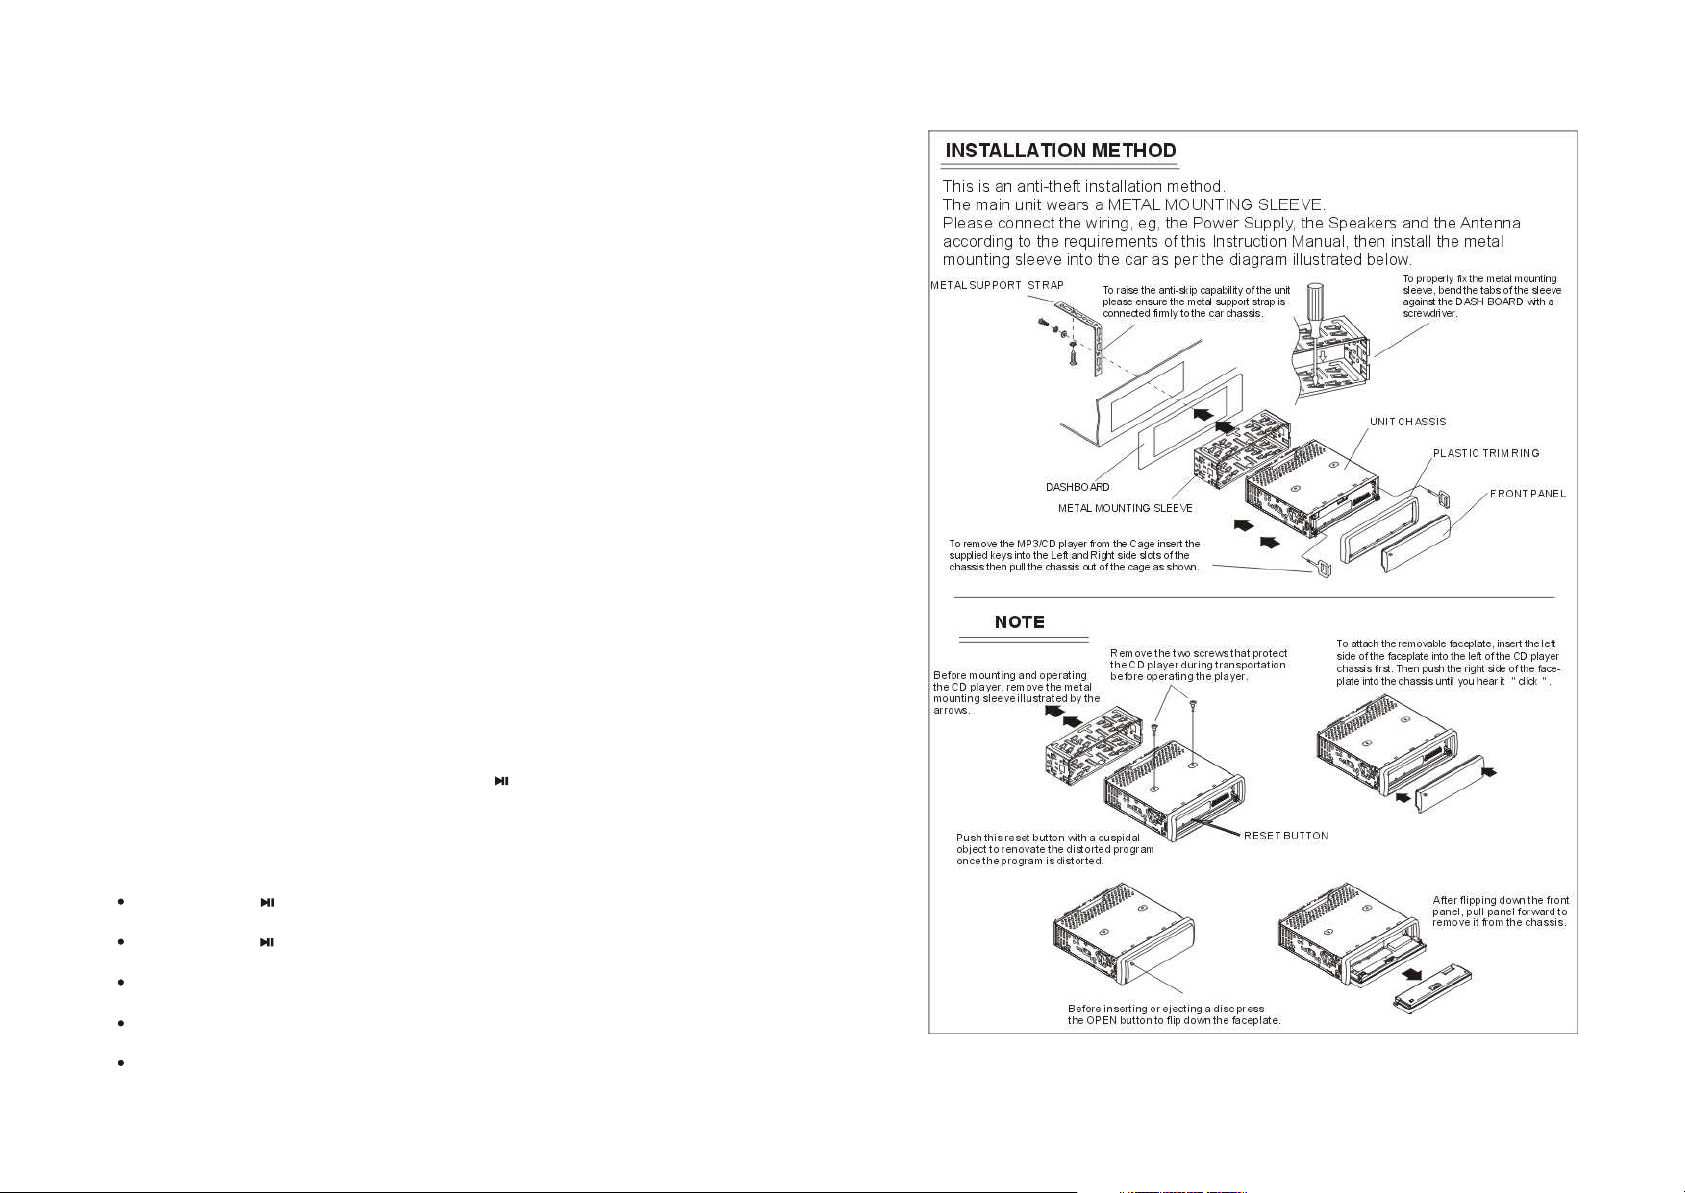
During MP3 mode:
Press the A.P button short, it is activated as cyclical selecting song mode as
following: -> TRACK SEARCH -> DIRECTORY SEARCH -> THE FIRST
CHARACTER SEARCH ->
1) In TRACK SEARCH selecting song mode, the MP3 T 000 will be visible on
the LCD display and the hundreds digit 0 that the MP3 disc contain will flash.
Rotate the VOL knob to select and enter the number on the flashing digit
place from 1 to 9.
Then press the SEL button to confirm the entered number and the 0 on the
tens digit will be flashing.
Rotate the VOL knob to select and enter the number on the flashing digit
from 1 to 9.
Then press the SEL button to confirm the entered number and the 0 on the
units place digit will be flashing.
Rotate the VOL knob to select and enter the number on the flashing digit
from 1 to 9.
After finishing enter all the number of the song serial number on the flashing
digit, press the SEL button to play the corresponding track.
2) In DIRECTORY SEARCH selecting song mode, the root folder will be visible
on the LCD will display. (If there is not a root folder in the current MP3 disc,
you will found a root named ROOT.)
Then rotate the VOL knob to select a desired folder.
And then press the >>| or |<< button to select a desired track in the folder.
Finally press the SEL button to play the selected track.
3) In the FIRST CHARACTER SEARCH selecting song mode, the A--......, will
be visible on the LCD display. (If there are files names its first character are
A, the......is the first file name its first character is A by the order of A~Z and
0~9; otherwise, the ......is NONE.)
Rotate the VOL knob to select files that the first character by the order of
A~Z and 0~9.
Then press the >>| or |<< button to select one file its first character is the
selected one. Finally press the SEL button to play the selected file.
13-18. PRESET STATION MEMORY AND TOP/ , INT, RPT, RDM BUTTONS
a) During radio mode:
When pressed short, these buttons select a preset station directly.
If the six buttons are pressed for more than 2 seconds, the station
currently being listened to is memorized into the selected preset button.
b) During CD/MP3 mode:
Press the TOP/ button briefly to interrupt the playback of the disc.
Press again to resume normal playback of the CD/MP3.
Press the TOP/ button and hold for approximately 0.5 seconds to play
the first track of the current disc.
Press the INT button to play the first 10 seconds part of each track.
Press again to stop scan, while the currently selected track will be played.
During MP3 mode, press the INT button and hold for more than 0.5 seconds
to play the first 10 seconds part of each track in current folder.
Press the RPT button to play the current track repeatedly.
Press again to cancel this function.
Page 5
Page 10
Page 7
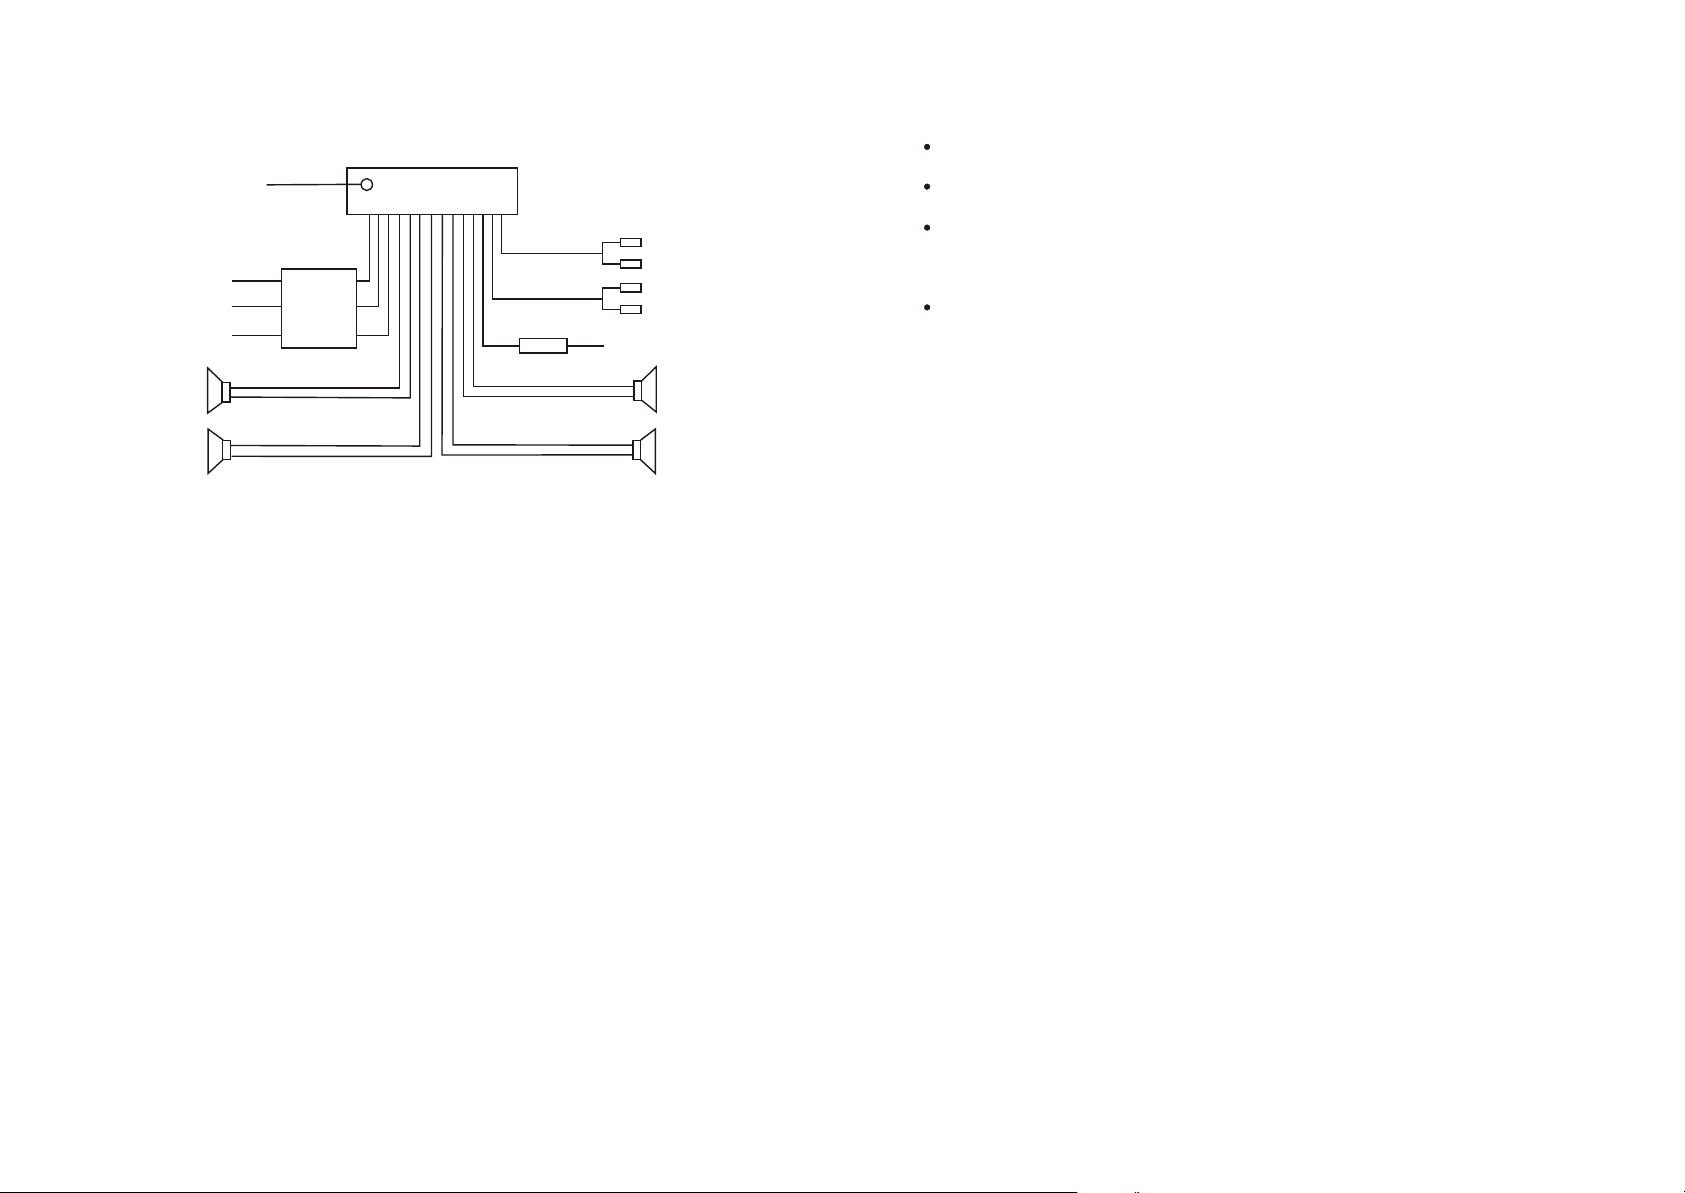
WIRING DIAGRAM
ANTENNA PLUG
RCA LINE OUT
CONSTANT B+
BLACK(GND)
IGNITION SWITCH
RED (B+)
FRONT
LEFT
LOUDSPEAKER
REAR
YELLOW
+
-
+
-
FUSED
10A & 0.5A
FUSES
FILTER BOX
WHITE
WHITE/BLACK
GREEN
GREEN/BLACK VIOLET/BLACK
Note:
1.Make sure use ONLY speakers with 4 ohm load impedance.
2.Do not allow the auto antenna wire and ground touch each other.
FRONT (BLACK)
RCA LINE OUT
REAR (GRAY)
FUSE 0.5A
GRAY
GRAY/BLACK
VIOLET
RED R
WHITE L
RED R
WHITE L
BLUE POWER ANT
+
FRONT
-
LOUDSPEAKER
-
RIGHT
REAR
+
During MP3 mode, press the RPT button and hold for more than 0.5 seconds
to play the current folder repeatedly. Press again to cancel this function.
Press the RDM button to play all tracks on disc in random order.
Press again to cancel this function.
During MP3 mode, Press the RDM button and hold for more than 0.5 seconds
to play the track in random order in the current folder.
Press again to cancel this function.
c) During the normal playback of CDs in MP3 format:
Press the radio preset button 6 and 5 to move up and down10 tracks at a time.
19. SCAN BUTTON
Press the SCN button to scan the radio frequency. If a valid signal has detected,
the current frequency will be hold and blinked for 5 seconds, then press SCN
again to stop scan and remain the current frequency; otherwise, the radio will
go on to scan the other radio frequency fiver seconds later.
20. LOC BUTTON
Radio station search mode is divided by this LO/DX switch, this button can be
used to control an attenuator in the tuner during search. The detecting level
of seek, scan, auto-memory will be reduced as much as the attenuated level
of the tuner. In radio mode, press the LOC button to change local reception or
distance reception. Note: This button is only for FM reception. In AM mode,
LOC is void.
21. ST/MO BUTTON
In radio mode, press the ST briefly to select stereo or mono sound mode.
22. LOUDNESS BUTTON
When press shortly, the LOUD mode is turned on, its to enhance the bass sound
effect when the volume level is low. Press again to cancel the loudness effect.
Page 9
23. CLOCK BUTTON
Press the CLK button briefly to display time for 5 seconds on the display, and
then returns to its previous display unless the button is pressed again.
Then press the CLK button and hold for more than 1 seconds until the real time
flashes on the display. Then you can adjust HOUR or MINUTE by rotating the
VOL knob.
24. EJECT KEY
In the power on state, the loaded disc can be ejected by pressing the EJ key.
25. CD SLOT
26. FLASHING LED
When the front control panel is removed this indicator flashes.
Page 6
Page 8
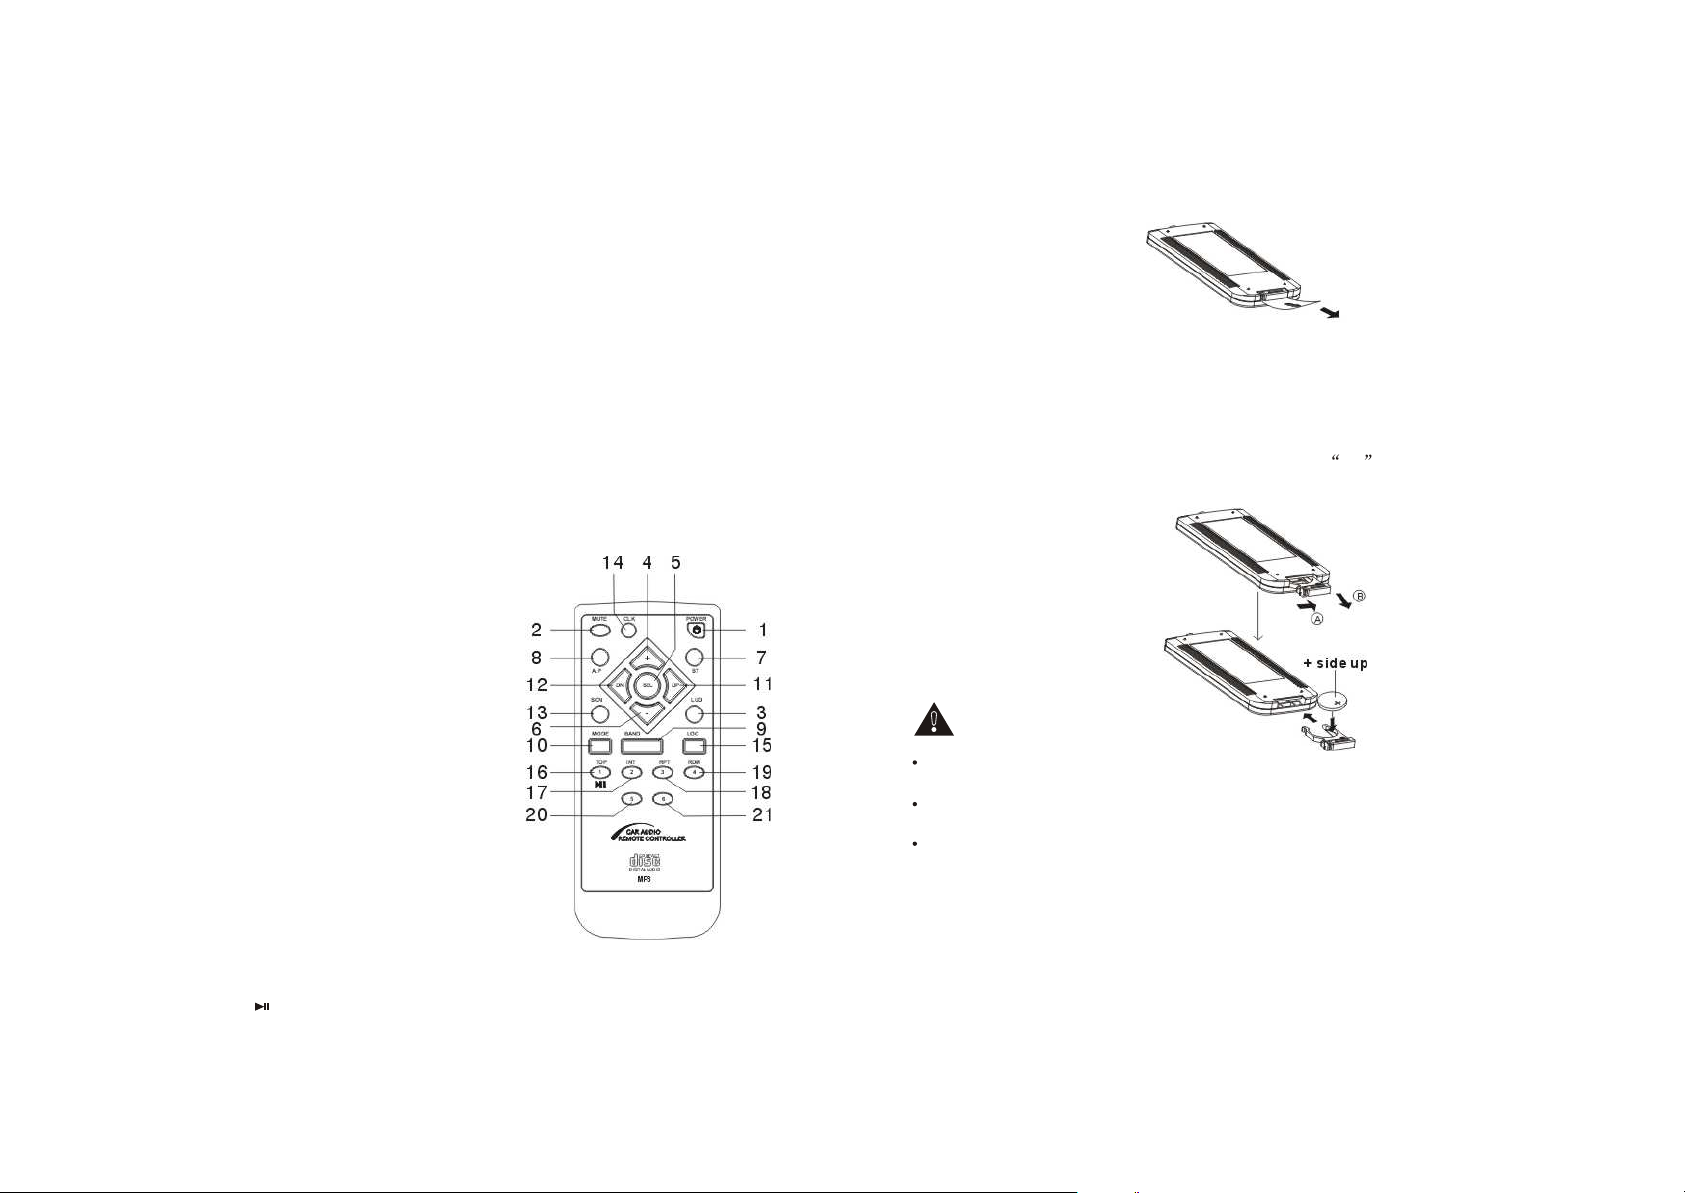
MAINTENANCE OF REMOTE CONTROL
27. RESET BUTTON
Before operating the unit for the first time, or after replacing the car battery or
changing the connections. You must reset the unit.
Press this button with a cuspidal object. This operation will erase the clock
setting and some stored contents.
OPERATION OF REMOTE CONTROL:
Note:
Before use this remote control, please make sure
turn on the device by pressing the power button on
the front control panel.
1. Power On/Off.
2. Mute Button
3.
Loudness Button
4. Level/MENU UP Button 5. SEL/MENU
Button
Before using the remote control, pull out the insulating patch. This patch
was installed to insulate the battery from draining until ready to use.
BATTERY INFORMATION:
Lithium Battery: CR2025 3V
Battery Life: Approximately 6 months.
Replacing the Battery from the Remote Control:
1) Remove the battery holder by pressing the locking tab with your thumb
and pulling it out.
2) Replace the battery with the same type and the + side facing up.
3) Gently push in the holder until securely locked into place.
WARNING:
Do not recharge, disassemble or dispose of in fire.
6. Level/MENU Down Button 7. MO/ST Button
8. A.P Button 9.Band Button 10. Mode Button
11.Tune/Seek Up And Track Skip Up/FF Button
12.Tune/Seek Down And Track Skip Down/REW Button
13. SCAN BUTTON 14. Clock Display /Setting Button 15. LO/DX Button
16. CD Track TOP/ /Radio Preset 1 17. CD Track INT/Radio Preset 2
18. CD Track RPT/Radio Preset 3 19. CD Track RDM/Radio Preset 4
20. Radio Preset 5 21. Radio Preset 6
Page 7
Battery leakage may cause damage to the unit.
To avoid the risk of accident, keep batteries out of reach of children.
Page 8
 Loading...