

Page 1
TeraOhm 5kV Plus
MI 3201
User Manual
Version 1.7 Code No. 20 751 272
Page 2

Distributor:
Producer:
METREL d.d.
Ljubljanska 77
SI-1354 Horjul
Tel.: +386 1 75 58 200
Fax: +386 1 75 49 226
E-mail: metrel@metre.si
http://www.metrel.si
Mark on your equipment certifies that this equipment meets the requirements of the EU
(European Union) concerning safety and interference causing equipment regulations
© 2008 Metrel
No part of this publication may be reproduced or utilized in any form or by any means
without permission in writing from METREL.
2
Page 3

MI 3201 TeraOhm 5 kV Plus Table of contents
Table of contents
1 General introduction ........................................................................................... 4
1.1 Features..................................................................................................... 4
1.2 Applied Standards...................................................................................... 4
2 Instrument Description........................................................................................ 5
2.1 Instrument Casing ...................................................................................... 5
2.2 Operator’s Panel ........................................................................................ 5
2.3 Connectors.................................................................................................6
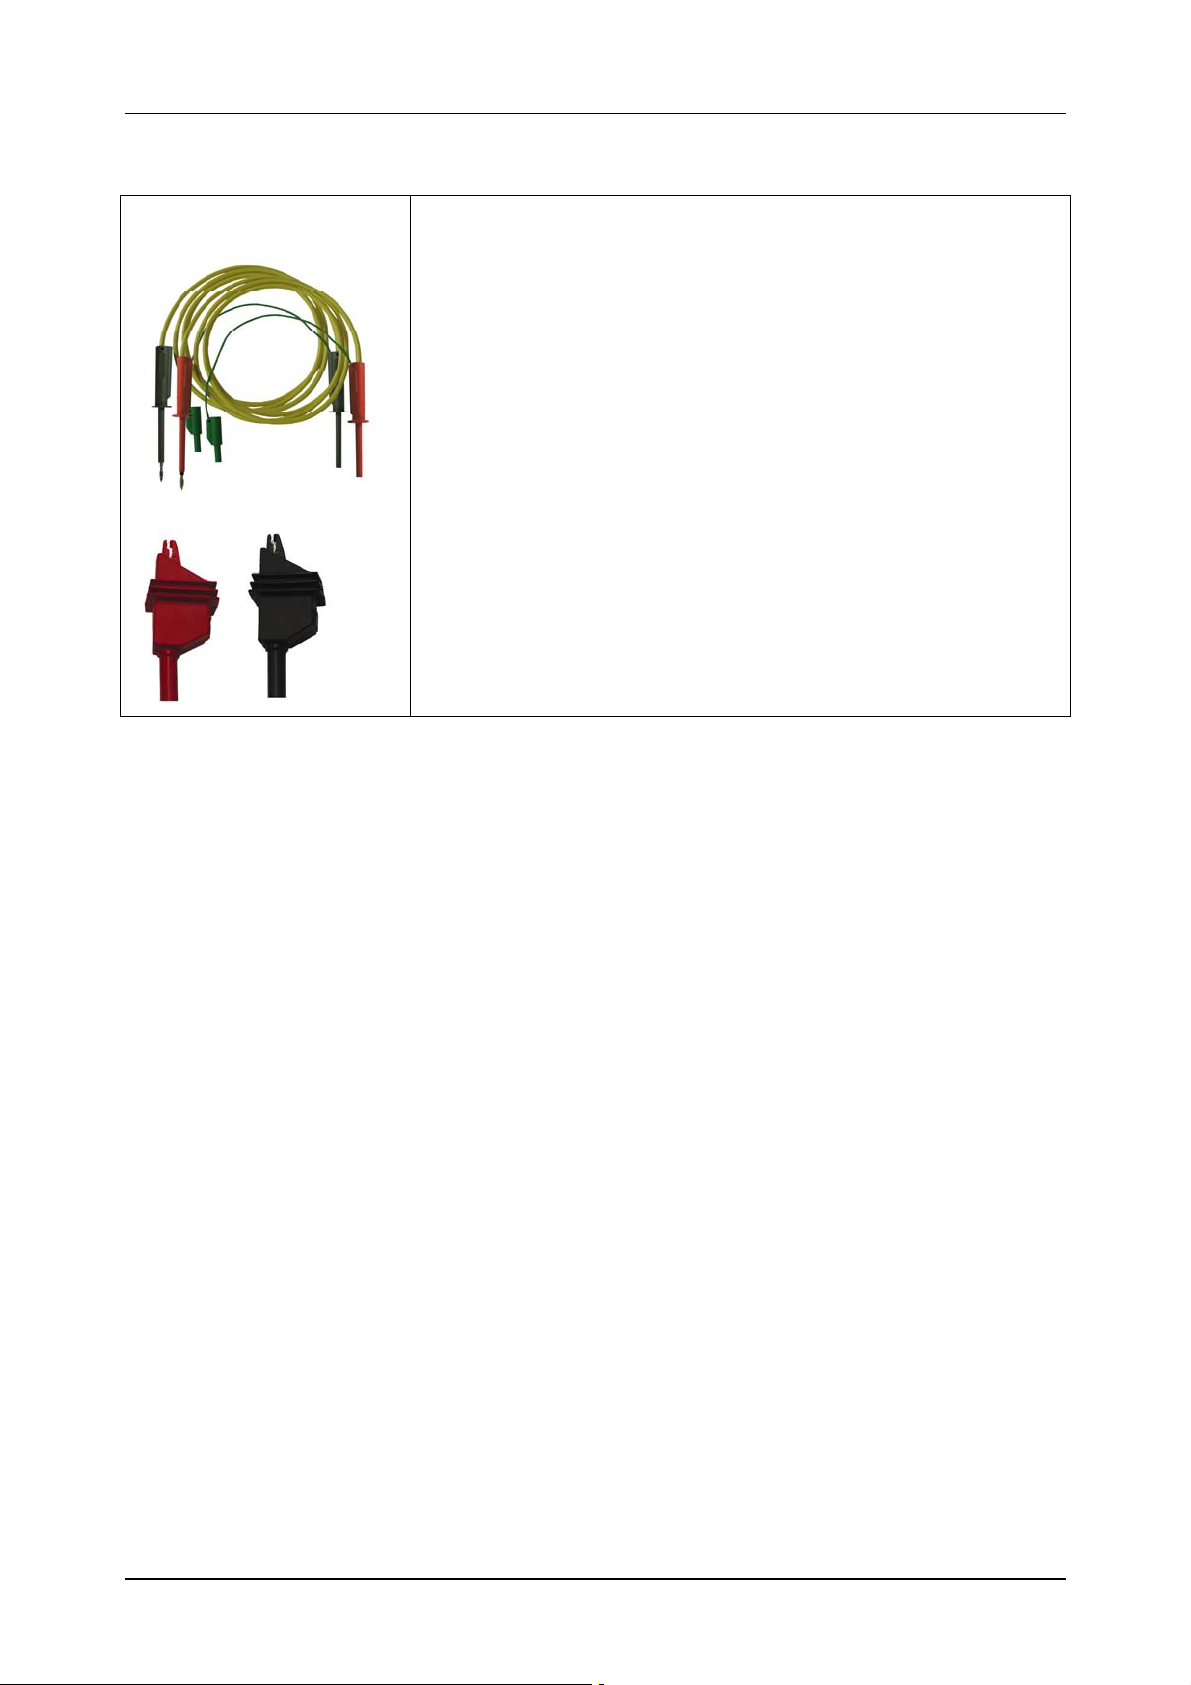
2.4 Accessories................................................................................................7
2.5 Test leads................................................................................................... 7
2.5.1 High voltage shielded test tips with High voltage alligator clips .............. 8
2.5.2 Guard test lead with alligator clips.......................................................... 8
3 Warnings ............................................................................................................ 9
4 Performing measurements ............................................................................... 11
4.1 Switching on the instrument ..................................................................... 11
4.1.1 Configuration ........................................................................................ 12
4.1.2 Setup .................................................................................................... 13
5 Measurements.................................................................................................. 15
5.1 General Information about High DC voltage testing................................. 15
5.2 Guard terminal.......................................................................................... 19
5.3 Filter options............................................................................................. 20
5.4 Voltage measurement .............................................................................. 21
5.5 Insulation Resistance measurement ........................................................ 22
5.6 Diagnostic Test......................................................................................... 26
5.7 Step Voltage Insulation Resistance testing .............................................. 32
5.8 Withstanding voltage................................................................................ 36
6 Working with your Results................................................................................ 39
6.1 Storing, Recalling and Clearing Results................................................... 39
6.2 Transferring Data to a PC......................................................................... 41
7 Maintenance..................................................................................................... 42
7.1 Inspection................................................................................................. 42
7.2 Inserting and charging batteries for the first time...................................... 42
7.3 Replacing and charging batteries............................................................. 42
7.4 Cleaning................................................................................................... 44
7.5 Calibration................................................................................................ 44
7.6 Service ..................................................................................................... 44
8 Specifications ................................................................................................... 45
8.1 Measurement specifications..................................................................... 45
8.2 General specifications.............................................................................. 48
3
Page 4

MI 3201 TeraOhm 5 kV Plus General introduction
1 General introduction
1.1 Features
The TeraOhm 5kV Plus Tester is a portable battery / mains powered test instrument
intended for the testing of Insulation Resistance by using high test voltages of up to
5kV.
The instrument is designed and produced with the extensive knowledge and experience
acquired through many years of working in this sector.
Available functions offered by the TeraOhm 5kV Plus Tester:
High insulation resistance measurement up to 10 T
- Programmable test voltage from 250 V up to 5 kV, steps 25 V
- R(t) Graphs
- Programmable timer (1s up to 100 min)
- Automatic discharge of test object after completion of measurement
- Capacitance measurement
Insulation resistance measurement versus test voltage (step-up voltage test)
- Five discrete test voltages proportionately set within preset test voltage range
- Programmable timer 1 min up to 30 min per step
Polarization Index (PI), Dielectric Absorption ratio (DAR) and Dielectric Discharge
(DD) ratio
- PI = RINS (t2) / RINS (t1)
DAR = R
-
- DD = Idis
Withstanding voltage (DC) up to 5 kV
- Programmable ramp test voltage from 250 V up to 5 kV
- High resolution ramp (approx. 25 V per step)
- Programmable threshold current up to 5 mA
Voltage and frequency measurement up to 600 V AC/DC
A dot matrix LCD offers easy-to-read results and all associated parameters. The
operation is straightforward and clear to enable the user to operate the instrument
without the need for special training (except reading and understanding this Users
Manual).
Test results can be stored on the instrument. The new professional PC SW enables
straightforward transfer of test results and other parameters in both directions between
the test instrument and PC.
1min
1min
/ R
15s
/ CU
1.2 Applied Standards
Instrument operation IEC / EN 61557-2
Electromagnetic compatibility (EMC) EN 61326 Class B
Safety EN 61010-1 (instrument),
EN 61010-031 (accessories)
4
Page 5
MI 3201 TeraOhm 5 kV Plus Instrument Description
2 Instrument Description
2.1 Instrument Casing
The instrument is housed in a plastic box that maintains the protection class defined in
the general specifications.
2.2 Operator’s Panel
The operator’s panel is shown in Fig. 1 below.
Fig. 1. Front panel
Legend:
1........... START/STOP key to start or stop any measurement.
2........... ON/OFF key to switch the instrument ON or OFF.
3........... MEM key to store, recall and erase results.
4........... SELECT key to enter set-up mode for the selected function or to select the active
parameter to be set.
5...........
6........... cursor key to select an option downward.
7........... cursor key to decrease the selected parameter.
8...........
cursor key to select an option upward.
cursor key to increase the selected parameter.
4
9..........ESC key to exit the selected mode.
10........Light key to turn the display backlight ON or OFF.
5
Page 6
MI 3201 TeraOhm 5 kV Plus Instrument Description
2.3 Connectors
The TeraOhm 5 kV Tester contains the following connections:
- Connection of test leads to four banana safety sockets (Fig. 2),
- Mains supply cable connection to the mains socket and communication socket (USB
and RS232) (Fig. 3).
Fig. 2. Test leads connector
1..........Negative Insulation Resistance test terminal. (-OUT)
2..........GUARD test terminals intended to lead away potential leakage current while
measuring the Insulation. Both green sockets are connected together inside the
instrument.
3..........Positive Insulation Resistance test terminal (+OUT)
Use original test accessories only!
Max. allowed external voltage between test terminals and ground is 600V!
Max. allowed external voltage between test terminals is 600V!
6
Page 7
MI 3201 TeraOhm 5 kV Plus Instrument Description
Fig. 3. Communication and Mains connector
1..........Galvanic separated RS232 connector to connect the instrument to PC.
2..........Galvanic separated USB connector to connect the instrument to PC.
3..........Mains connector to connect the instrument to the mains supply.
Use original mains supply cable only!
2.4 Accessories
The accessories consist of standard and optional accessories. Optional accessories can
be delivered upon request. See attached list for standard configuration and options or
contact your distributor or see the METREL home page: http://www.metrel.si.
2.5 Test leads
The standard length of test leads is 2m, optional lengths are 8m and 15m. For more
details see attached list for standard configuration and options or contact your
distributor or see the METREL home page: http://www.metrel.si.
All test leads are made of high voltage shielded cable, because shielded cable provides
higher accuracy and immunity to disturbance of measurements that can occur in
industrial environment.
7
Page 8
MI 3201 TeraOhm 5 kV Plus Instrument Description
2.5.1 High voltage shielded test tips with High voltage alligator clips
Application notes:
These test leads is designed for diagnostic testing of
insulation and also for hand held testing of insulation.
Insulation ratings:
- High voltage banana connector (red, black): 5kV d.c
(double insulation);
- High voltage tip (red, black): 5kV d.c ( double insulation);
- Alligator (red, black): 5kV d.c (double insulation);
- Guard banana connector (green): 600V CAT IV (double
insulation);
- Cable (yellow): 12kV (shielded).
2.5.2 Guard test lead with alligator clips
Insulation ratings:
- Guard test lead with banana connectors (green): 600V CAT IV (double insulation);
- Alligator (green): 600V CAT IV (double insulation).
8
Page 9
MI 3201 TeraOhm 5 kV Plus Warnings
3 Warnings
In order to reach the highest level of operator’s safety while carrying out various
measurements and tests using the TeraOhm 5kV Plus Tester, as well as to ensure that
the test equipment remains undamaged, it is necessary to consider the following
warnings:
MEANING OF SYMBOLS
Symbol on the instrument means “Read the User Manual with special
care!”.
Symbol on the instrument means “Hazardous voltage higher than 70V
may be present at the test terminals!”.
GENERAL PRECAUTIONS
If the test equipment is used in a manner not specified in this Users Manual,
the protection provided by the equipment may be impaired!
Do not use the instrument and accessories, if any damage is noticed!
Consider all generally known precautions in order to avoid the risk of electric
shock while dealing with electric installations!
Service intervention or recalibration procedure can be carried out only by a
competent and authorized person!
Only adequately trained and competent persons may operate the instrument.
A dot matrix LCD offers easy-to-read results and all associated parameters.
Operation is simple and clear; the operator does not need any special training
(except reading and understanding this Users Manual) to operate the
instrument.
BATTERIES
Disconnect all test leads, main supply cable and switch the power off before
opening the Battery cover!
Use only NiMh rechargeable batteries (C size)!
EXTERNAL VOLTAGES
Do not connect the instrument to a mains voltage different from the one
defined on the label adjacent to the mains connector, otherwise the instrument
may be damaged.
Do not connect test terminals to an external voltage higher than 600 V DC or
AC (CAT IV environment) to prevent any damage to the test instrument!
WORKING WITH THE INSTRUMENT
Use only standard or optional test accessories supplied by your distributor!
Equipment under test must be switched off i.e. (de-energized) before test
leads are connected to the equipment.
9
Page 10

MI 3201 TeraOhm 5 kV Plus Warnings
Do not touch any conductive parts of equipment under test during the test.
Make sure that the tested object is disconnected (mains voltage disconnected)
before starting the Insulation Resistance measurement!
Do not touch the tested object whilst testing it, risk of electric shock!
In case of a capacitive test object (long tested cable etc.), automatic discharge
of the object may not be done immediately after finishing the measurement –
“Please wait, discharging” message will be displayed.
HANDLING WITH CAPACITIVE LOADS
Note that 40 nF charged to 1 kV or 9 nF charged to 5 kV are hazardous live!
Never touch the measured object during the testing until it is totally
discharged.
Maximum external voltage between any two leads is 600 V (CAT IV
environment).
10
Page 11
MI 3201 TeraOhm 5 kV Plus Performing measurements
4 Performing measurements
4.1 Switching on the instrument
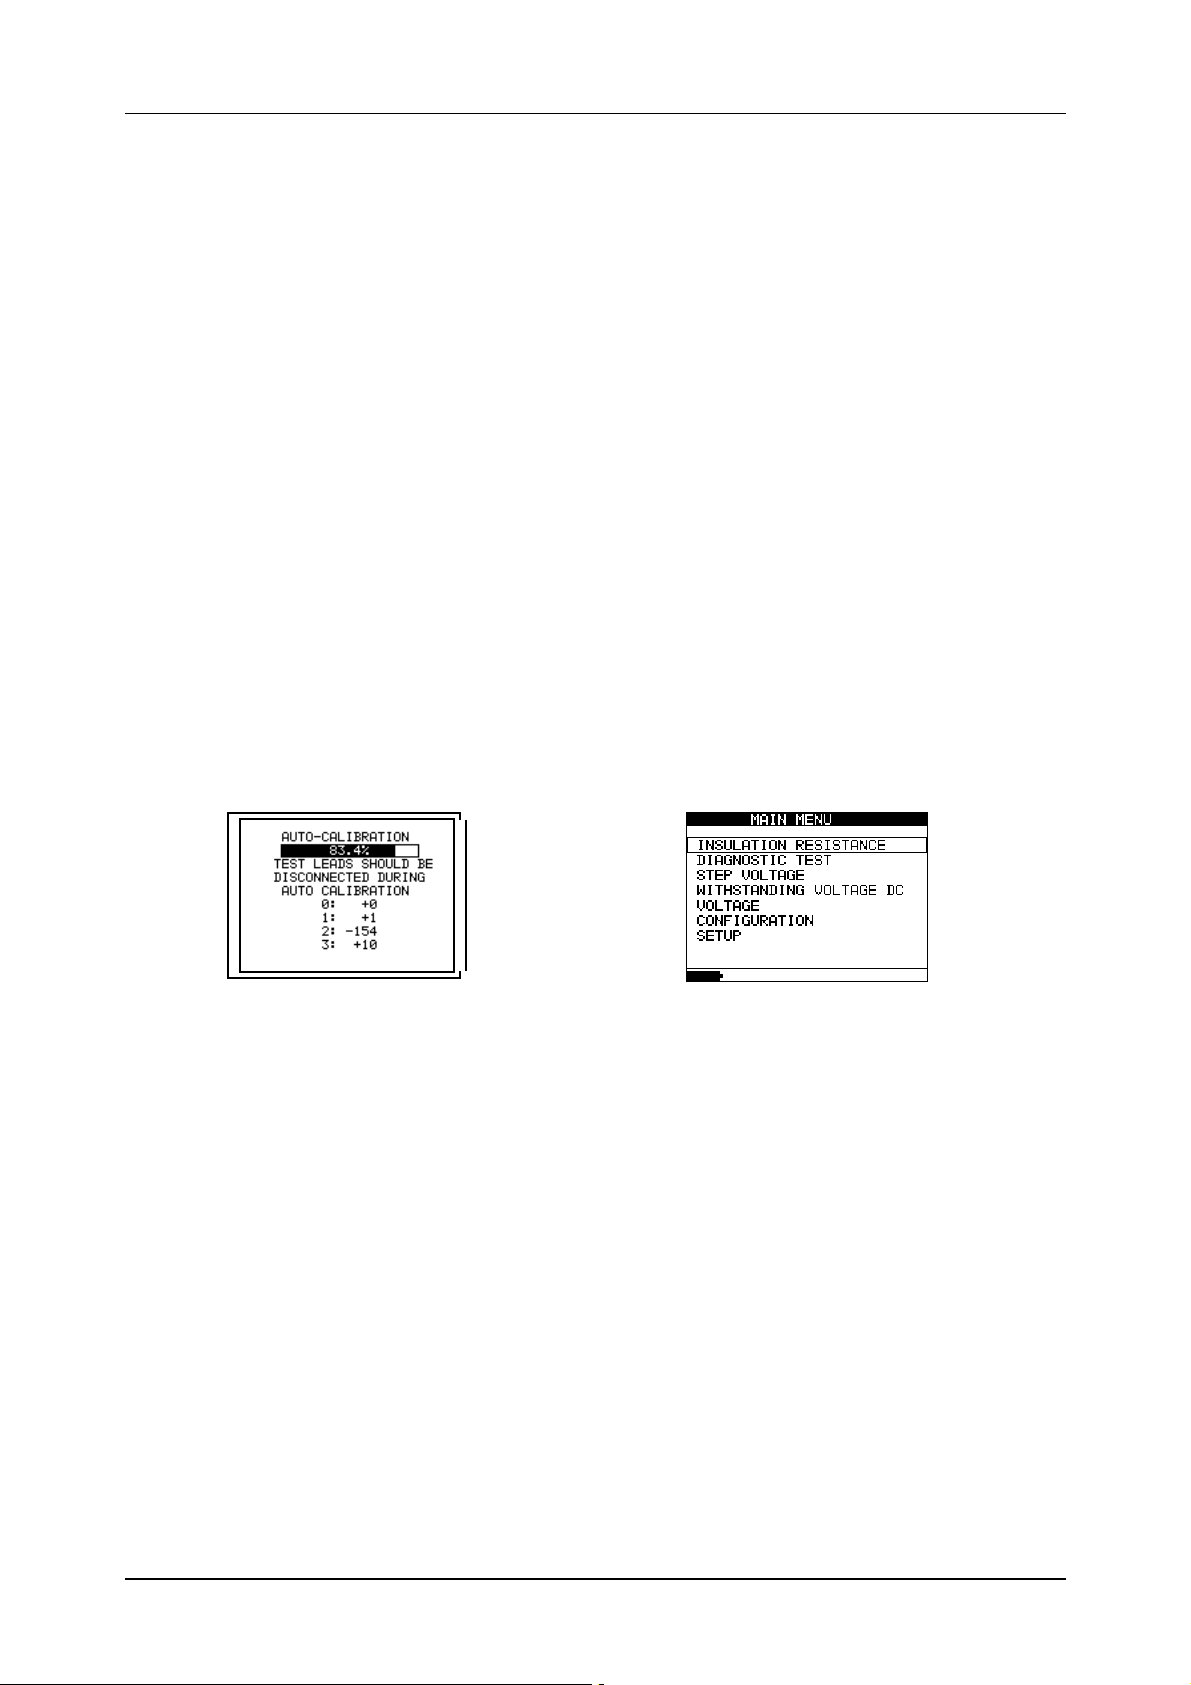
Auto-calibration
The instrument is switched ON by pressing the ON/OFF key. After turning on, the
instrument will execute the auto-calibration (Fig. 4).
Note:
If batteries are defective or missing and the instrument is powered from mains supply,
the instrument will not turn ON.
Measuring test leads should be disconnected during auto-calibration. If not, the autocalibration procedure could be false and instrument will require disconnection of the test
leads and repeat switching OFF and ON.
After finishing the auto-calibration, the MAIN MENU (Fig.5) will appear and instrument
is ready for normal operation.
Auto-calibration prevents the reduction in accuracy when measuring very low currents.
It compensates the effects caused by ageing, temperature and humidity changes etc.
A new auto-calibration is recommended when the temperature changes by more than
5C.
Fig. 4. Auto-calibration state
Note:
If the instrument detects an incorrect state during the auto-calibration, the following
warning message will be displayed:
ERROR!
-TEST LEADS CONNECTED:
DISCONNECT AND SWITCH ON THE INSTRUMENT AGAIN
- CONDITIONS OUT OF RANGE: PRESS START TO CONTINUE
Possible reasons for out of range conditions are excessive humidity, excessively high
temperature, etc. In this case it is possible to perform measurements by pressing the
START/STOP button again but results could be out of technical specification.
Mains powered instrument operation
If you connect instrument to the mains supply when instrument is turned OFF, internal
charger will begin to charge the batteries but instrument will remain turned OFF. In
Fig. 5. Main Menu
11
Page 12

MI 3201 TeraOhm 5 kV Plus Performing measurements
bottom left angle of LCD screen the plug character and the flashing battery indicator will
appear to indicate that the batteries are charging.
Note: If batteries are defective or missing, the charger will not work. In lower left corner
of LCD screen only plug character will be appeared (without battery indicator).
If the instrument is connected to the mains supply when the instrument is turned ON,
the instrument will automatically switch from the battery supply to the main supply. In
bottom left corner of LCD screen, the plug character will appear. If instrument is not in
measuring mode*, the internal charger will begin to charge the batteries. In bottom left
corner of LCD screen battery indicator will start to flash, indicating that the batteries are
charging.
Note: It is not recommended to connect or disconnect the instrument to mains supply
while the instrument is in measuring mode*.
*measuring mode: When the instrument is performing a test.
Backlight operation (battery powered instrument)
After turning the instrument ON the LCD backlight is automatically turned ON. It can be
turned OFF and ON by simply clicking the LIGHT key.
Backlight operation (mains powered instrument)
After turning the instrument ON the LCD backlight is automatically turned OFF. It can be
turned OFF and ON by simply clicking the LIGHT key.
Off function
The instrument can be switched OFF only by pressing the ON/OFF key. The auto-off
function is not available to allow long-term measurements to be performed.
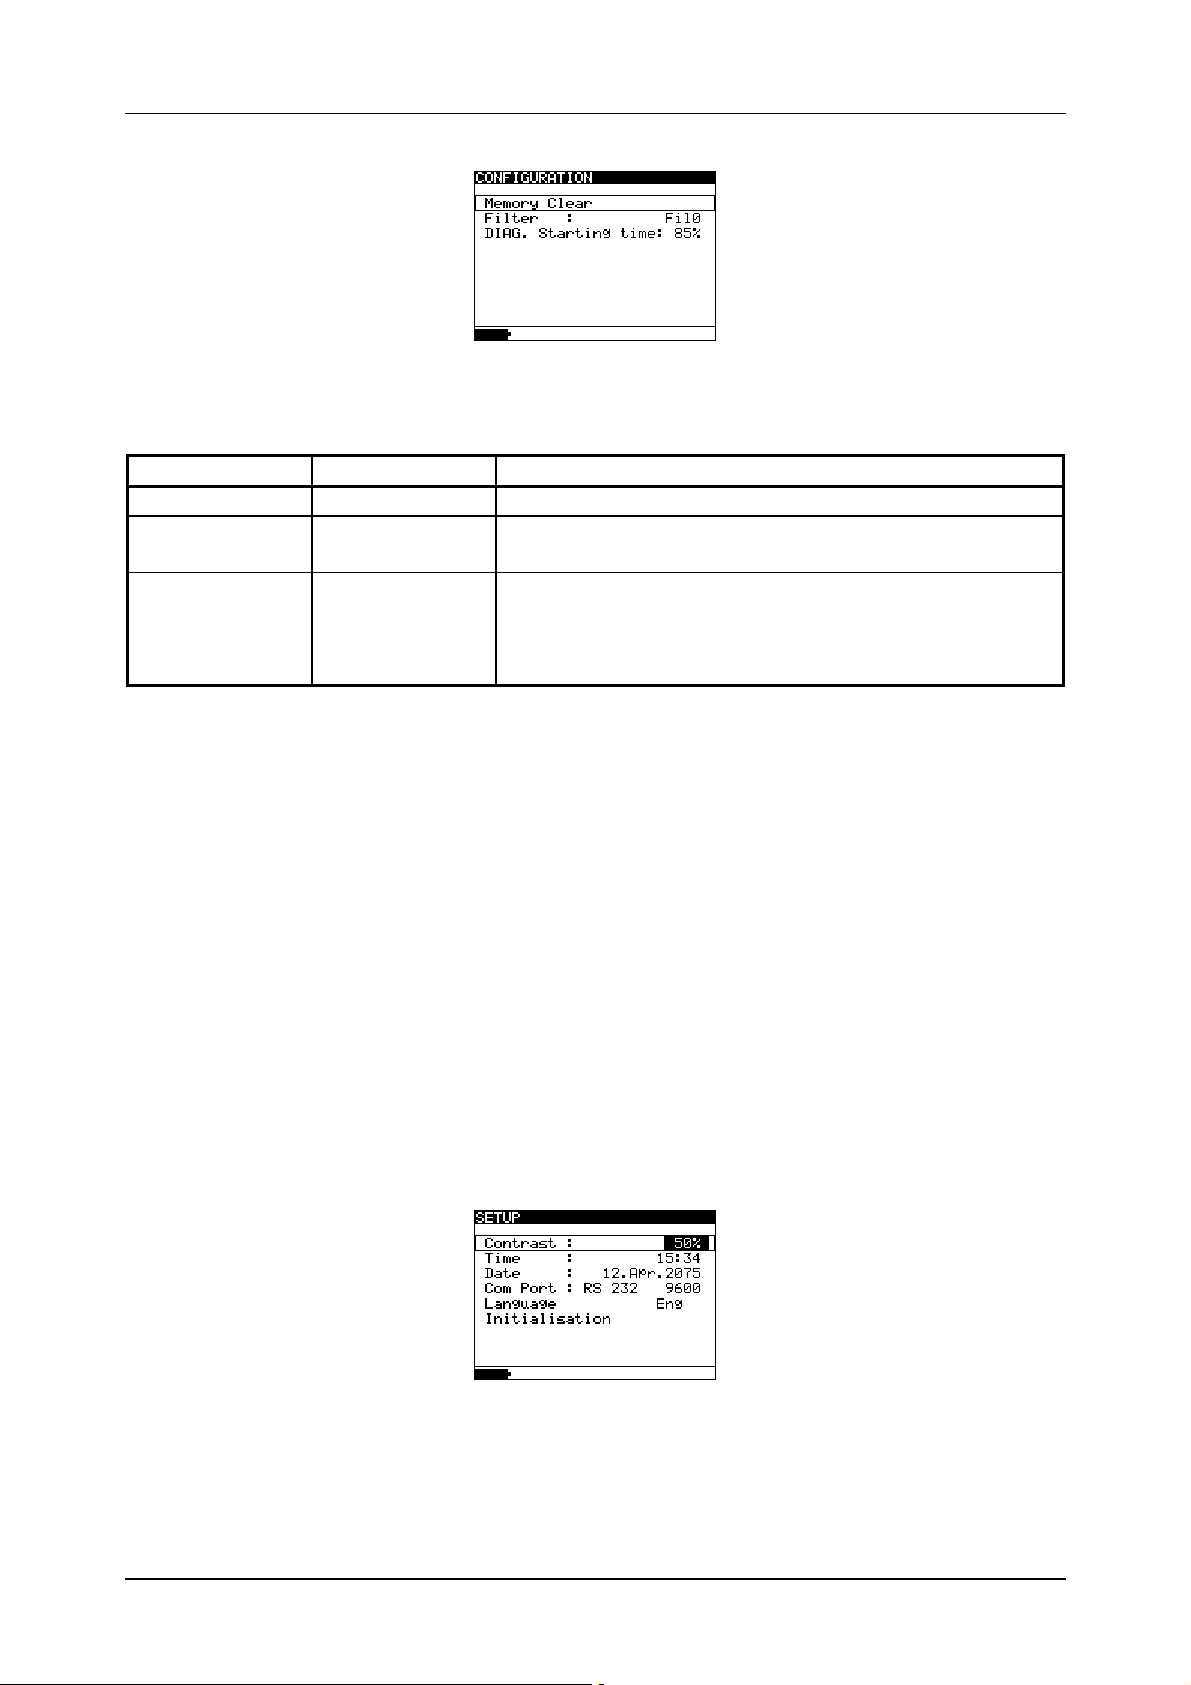
4.1.1 Configuration
The configuration function enables the selection and adjustment of parameters (Table
1a.) of the measurements. In addition memorized results can be cleared in this menu.
(Fig. 5a).
In the lower section of the display the power supply status is shown.
The following procedure must be carried out when adjusting some of the configuration
parameters:
1. Use and arrows to select parameter (line) to be adjusted.
2. Use and arrows to change the value of the selected parameter. If there are
two or more sub-parameters in one line (e.g. date and time) then use the SELECT
key to skip to the next sub-parameters and back.
To clear all memory locations:
1. Select Configuration from the main menu
1. Highlight the Memory Clear option using and arrows.
2. Press the SELECT key, (“Press MEM to confirm!” message will be displayed).
3. Press the MEM key to clear all memory locations or ESC to cancel the activity.
12
Page 13
MI 3201 TeraOhm 5 kV Plus Performing measurements
Fig. 5a. Configuration menu
Parameter Value Note
Memory clear
Filter
DIAG.
Starting time
Clear all memory locations
Fil1, Fil2, Fil3,
Fil0
Selection of noise rejecting filter, see the chapter
5.3. Filter Option
0%..90% Adjustment of start of the timer in the
DIAGNOSTIC TEST functions, according to the
nominal voltage Unominal. See additional
explanation in chapter 5.6.
Table 1a. Parameters in Configuration menu
4.1.2 Setup
The setup function enables the selection and adjustment of general parameters (Table
1b.) of the instrument (Fig. 5b).
In the lower section of the display the power supply status is shown.
The following procedure must be carried out when adjusting some of the configuration
parameters:
3. Use and arrows to select parameter (line) to be adjusted.
4. Use and arrows to change the value of the selected parameter. If there are
two or more sub-parameters in one line (e.g. date and time) then use the SELECT
key to skip to the next sub-parameters and back.
Fig. 5b. Setup menu
13
Page 14

MI 3201 TeraOhm 5 kV Plus Performing measurements
Parameter Value Note
Contrast
Time
Date
Com Port
Language
Initialization
0%..100% Adjustment of the LCD contrast
Set real time (hour: minute)
Set current date (day-month-year)
RS 232 2400,
RS 232 4800,
RS 232 9600,
RS 232 19200,
USB 115000
Set language
For internal factory and service maintenance only!
Table 1b. Parameters in Setup menu
Set communication mode and rate.
14
Page 15
MI 3201 TeraOhm 5 kV Plus Measurements
5 Measurements
5.1 General Information about High DC voltage testing
The purpose of insulation tests
Insulating materials are important parts of almost every electrical product. The
material’s properties depend not only on its compound characteristics but also on
temperature, pollution, moisture, ageing, electrical and mechanical stress, etc. Safety
and operational reliability require the regular maintenance and testing of the insulation
material to ensure it is kept in good operational condition. High voltage tests are used to
test insulating materials.
DC vs. AC testing voltage
Testing with a DC voltage is widely accepted as being as useful as testing with AC and /
or pulsed voltages. DC voltages can be used for breakdown tests especially where high
capacitive leakage currents interfere with measurements using AC or pulsed voltages.
DC is mostly used for insulation resistance measurement tests. In this type of test, the
voltage is defined by the appropriate product application group. This test voltage is
lower than the voltage used in the withstanding voltage test so the tests can be applied
more frequently without stressing the test material
Typical insulation tests
In general, insulation resistance tests consist of the following possible procedures:
- Simple insulation resistance measurement also called a spot test;
- Measurement of the relationship between voltage and insulation resistance;
- Measurement of the relationship between time and insulation resistance;
- Test of residual charge after the dielectric discharge.
The results of this test can indicate whether the replacement of the insulation system is
needed.
Typical examples of where testing insulation resistance and its diagnosis are
recommended are transformer and motor insulation systems, cables and other electrical
equipment.
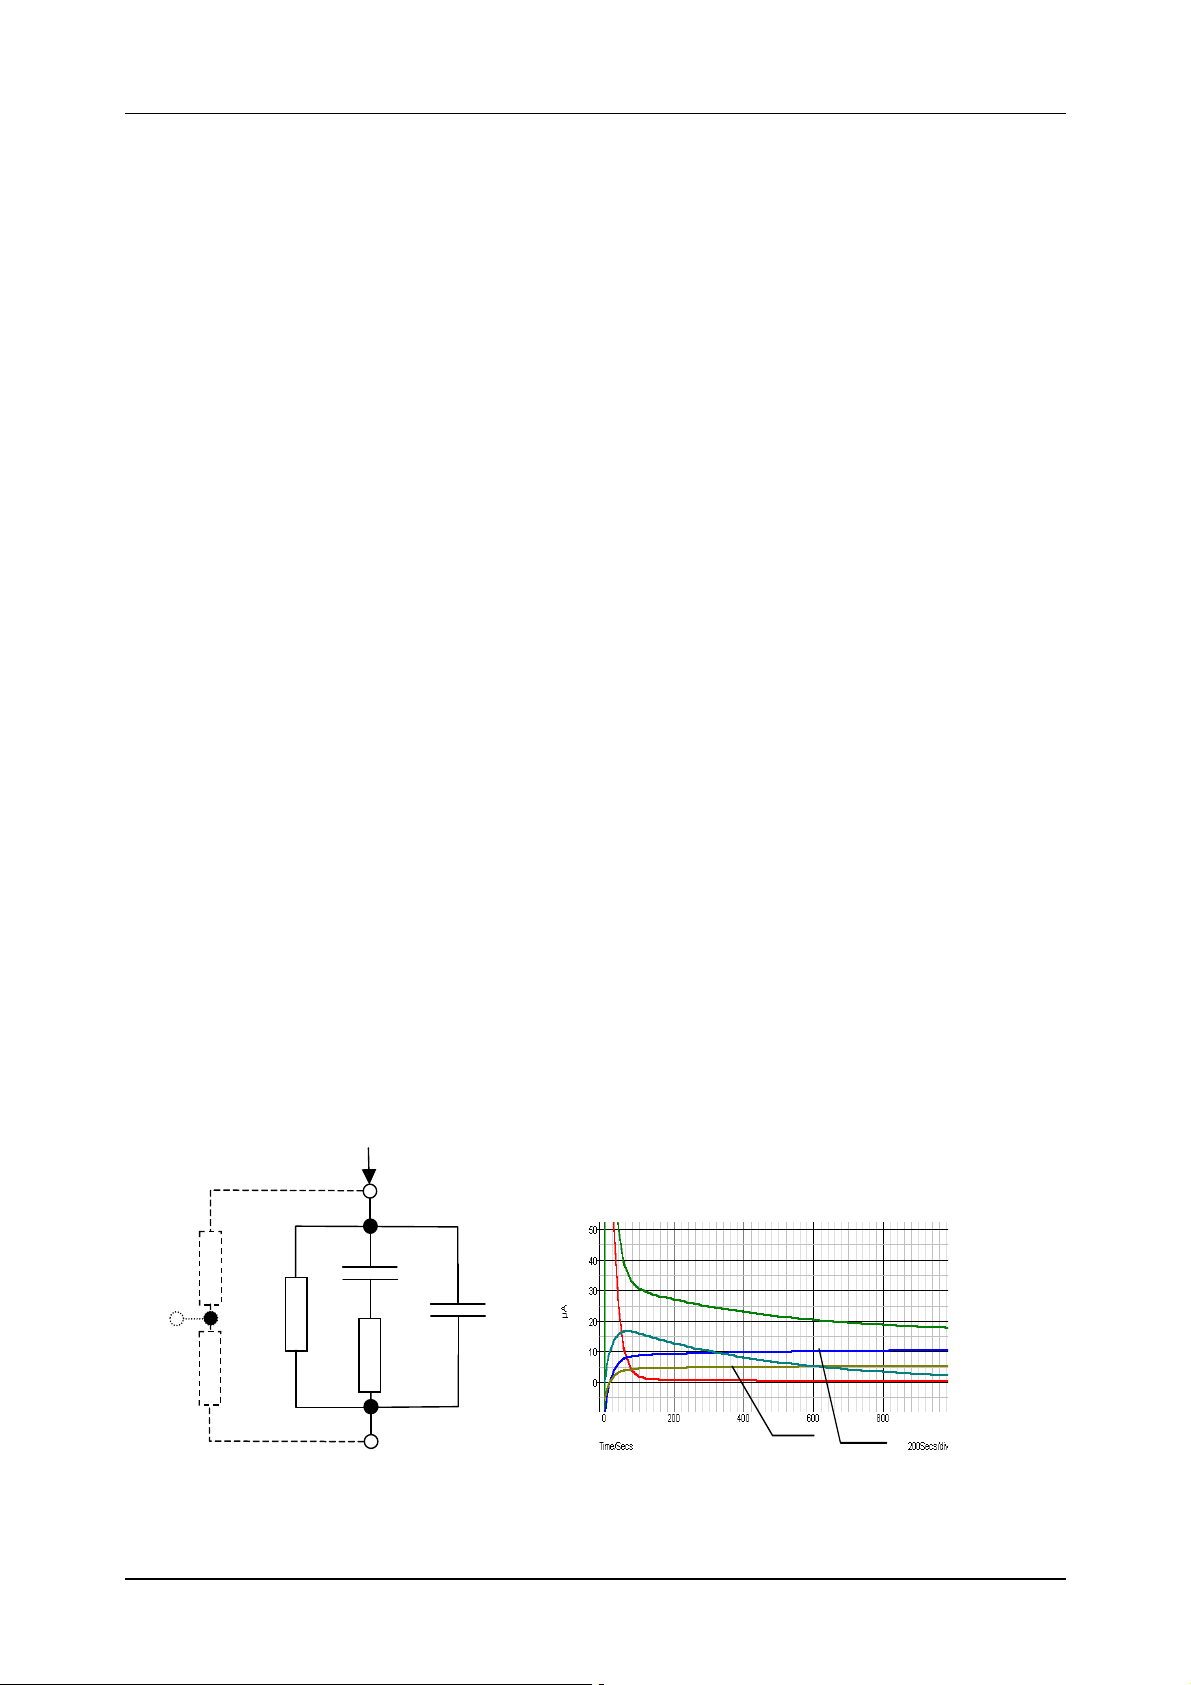
Electrical representation of insulating material
Fig. 7 represents the equivalent electrical circuit of an insulating material
surface
Itest
+
material
Guard
Riss1
Cpi
Itest
PI
I
Ciso
Riss2
Riso
Rpi
-
Ciso
I
Fig. 7. Fig. 8.
15
I
RisoIRiss
Page 16

MI 3201 TeraOhm 5 kV Plus Measurements
R
and R
iss1
R
– the actual insulation resistance of material
iso
C
– capacitance of material
iso
- the surface resistivity (position of optional guard connection)
iss2
Cpi, Rpi - represents polarization effects.
Fig. 8 shows typical currents for that circuit.
I
= overall test current (I
test
I
= polarization absorption current
PI
= actual insulation current
I
RISO
I
= surface leakage current
RISS
= IPI+ I
test
RISO
+ I
RISS
)
Some application examples for using Teraohm 5 kV
Basic Insulation resistance test
Virtually every standard concerning the safety of electrical equipment and installations
requires the performance of a basic insulation testing. When testing lower values (in the
range of M), the basic insulation resistance (R
) usually dominates. The results are
iso
adequate and stabilize quickly.
It is important to remember the following:
- The voltage, time and limit are usually given in the appropriate standard or
regulation.
- Measuring time should be set to 60 s or the minimum time required for the Insulation
capacitance (Ciso) to be charged up.
- Sometimes it is required to take ambient temperature into account and adjust the
result for a standard temperature of 40C.
- If surface leakage currents interfere with the measurements (see Riss above) use
the guard connection (see 5.2.). This becomes critical when measured values are in
the G range.
Voltage dependence test – Step voltage test
This test shows if the insulation under test has been electrically or mechanically
stressed. In this instance the quantity and size of insulation anomalies (e.g. cracks, local
breakdowns, conductive parts, etc.) is increased and the overall breakdown voltage is
reduced. Excessive humidity and pollution have an important role especially in the case
of mechanical stress.
- The test voltage steps are usually close to those required in the DC withstanding
test.
- Sometimes it is recommended that the maxi mum voltage for this test should not be
higher than 60 % of the withstanding voltage.
If the results of successive tests show a reduction in the tested insulation resistance the
insulation should be replaced.
Time dependence test – Diagnostic test
POLARISATION INDEX
The purpose of this diagnostic test is to evaluate the influence of the polarization part of
insulation (Rpi, Cpi).
16
Page 17

MI 3201 TeraOhm 5 kV Plus Measurements
After applying a high voltage to an insulator the electric dipoles distributed in the
insulator align themselves with the applied electrical field. This phenomenon is called
polarization. As the molecules polarize, a polarization (absorption) current lowers the
overall insulation resistance of the material.
The absorption current (IPI) typically collapses after a few minutes. If the overall
resistance of the material doesn’t increase, this means that other currents (e.g. surface
leakages) dominate the overall insulation resistance.
- PI is defined as the ratio of the measured resistances in two time slots. The most
typical ratio is 10 min value to 1 min value but this is not a rule.
- The test is typically performed at the same voltage as the insulation resistance test.
- If the one-minute insulation resistance is greater than 5000 M, then this
measurement may not be valid (new modern types of insulation).
- Oiled paper used in transformers or motors is a typical insulation material that
requires this test.
In general, insulators that are in good condition will show a “high” polarization index
while insulators that are damaged will not. Note that this rule is not always valid. Refer
to Metrel’s handbook Insulation Testing Techniques for more information.
General applicable values:
PI value Tested material status
1 to 1.5 Not acceptable (older types)
2 to 4 (typically 3) Considered as good insulation (older types)
4 (very high insulation resistance) Modern type of (good) insulation systems
Example for minimum acceptable values for motor insulation (IEEE 43):
Class A =1.5, Class B = 2.0, Class F =2.0, Class H =2.0.
DIELECTRIC DISCHARGE
The polarisation effect (described in “Polarisation Index”) causes a capacitance to form
(Cpi). Ideally this charge would dissipate immediately a voltage was removed from the
material. In practice, this is not the case.
In conjunction with the polarisation index (PI), Dielectic Discharge (DD) is another way
to check the quality and suitability of a insulation material. A material that discharges
quickly would provide a low value while a material that takes a long time to discharge
will provide a higher value (described in the table below, for more information see
section 5.6).
DD value Tested material status
> 4 bad
2 - 4 critical
< 2 good
Withstanding voltage test
Some standards allow the use of a DC voltage as an alternative to AC withstanding
voltage testing. For this purpose the test voltage has to be present across the insulation
under test for a specific time. The insulation material only passes if there is no
breakdown or flash over. Standards recommend that the test starts with a low voltage
17
Page 18

MI 3201 TeraOhm 5 kV Plus Measurements
and reaches the final test voltage with a slope that keeps the charging current under the
limit of the current threshold. The test duration normally takes 1 min.
Withstanding voltage test or dielectric test is usually applied for:
- Type (acceptance) tests when a new product is being prepared for manufacture,
- Routine (production) tests for the verification of safety on each product,
- Maintenance and after service tests for any equipment where insulation system can
be exposed to degradation.
Some examples for DC withstanding test voltage values:
Standard (only sample values) Voltage
EN/IEC 61010-1 CAT II 300 V basic insulation 1970 V
EN/IEC 61010-1 CAT II 300 V double insulation 3150 V
IEC 60439-1 (clearance between live parts…), withstanding impulse
voltage 4 kV, 500 m
4700 V
IEC 60598-1 2120 V
Humidity and insulation resistance measurements
When testing outside the reference ambient conditions, the quality of the insulation
resistance measurements can be affected by humidity. Humidity adds leakage paths
onto the surface of the complete measuring system, (i.e. the insulator under test, the
test leads, the measuring instrument etc). The influence of humidity reduces accuracy
especially when testing very high resistances (i.e. tera ohms). The worst conditions
arise in environments containing high condensation, which can also reduce safety. In
the case of high humidity, it is recommended to ventilate the test areas before and
during the measurements. In the case of condensed humidity the measuring system
must dry and it can take several hours or even few days to recover.
18
Page 19

MI 3201 TeraOhm 5 kV Plus Measurements
A
A
5.2 Guard terminal
The purpose of the GUARD terminal is to lead away potential leakage currents (e.g.
surface currents), which are not a result of the measured insulation material itself but
are a result of surface contamination and moisture. This current interferes with the
measurement i.e. the Insulation Resistance result is influenced by this current. The
GUARD terminal is internally connected to the same potential as the negative test
terminal (black one). The GUARDs test clip should be connected to the test object so as
to collect most of the unwanted leakage current, see the Fig. 9 below.
I
L
I
M
I
L
I
+OUT +OUT
-OUT
A
I
M
I
A
I
-OUT GUARD
L
Ut Ut
Fig. 9. Connection of GUARD terminal to measured object
Where:
Ut........Test voltage
IL.........Leakage current (resulted by surface dirt and moisture)
IM ........ Material current (resulted by material conditions)
IA.........A-meter current
Result without using GUARD terminal: R
INS = Ut / IA = Ut / (IM + IL) …incorrect result.
Result using GUARD terminal: R
INS = Ut / IA = Ut / IM ……correct result.
It is recommended to use the GUARD connection when high insulation resistance
(>10G ) are measured.
Note:
The guard terminal is protected by an internal impedance (200 K).
The instrument has two guard terminals to allow easy connection of shielded
measuring leads.
19
Page 20

MI 3201 TeraOhm 5 kV Plus Measurements
5.3 Filter options
Filters are built in to reduce the influence of noise on measurement results. This option
enables more stable results especially when dealing with high Insulation Resistances
(Insulation Resistance, Diagnostic Test, Step Voltage). In these functions, the status of
the filter option is shown in the top right corner of the LCD screen. The table below
contains a definition of the individual filter options:
Fil0 Low pass filter with cut off frequency of 0.5 Hz in signal line.
Fil1 Additional low pass filter with cut off frequency of 0.05 Hz in the signal
line.
Fil2 Fil1 with increased integrating time (4 s).
Fil3 Fil2 with additional cyclic averaging of 5 results.
Table 2. Filter options
THE PURPOSE OF FILTERING
In simple terms the filters smooth the measured currents by means of averaging and
bandwidth reduction. There are various sources of disturbance:
- AC currents at the mains frequency and its harmonics, switching transients etc,
cause the results to become unstable. These currents are mostly cross talk through
insulation capacitances close to live systems,
- Other currents induced or coupled in the electromagnetic environment of the
insulation under test.
- Ripple current from internal high voltage regulator,
- Charging effects of high capacitive loads and / or long cables.
Voltage changes are relatively narrow on high resistance insulation, so the most
important point is to filter the measured current.
Note:
Any of the selected filter options increases the settling time with Fil1 to 60 s, Fil2 to 70 s,
and Fil3 to 120 s.
- It is necessary to pay close attention to the selection of time intervals when using the
filters.
- The recommended minimum measuring times when using filters are the settling
times of the selected filter option.
Example:
A noise current of 1 mA / 50 Hz adds approximately 15 % distribution to the measured
result when measuring 1 G.
By selecting FIL1 option the distribution will reduce to less than 2 %.
In general using FIL2 and FIL3 will further improve the noise reduction.
20
Page 21

MI 3201 TeraOhm 5 kV Plus Measurements
5.4 Voltage measurement
Selecting this function displays the following states (initial state and state with results
after completion of the measurement). See fig. 10 below.
Fig. 10. Voltage function display states
Measurement procedure:
- Connect the test leads to the instrument and to the measured source.
- Press the START key to start the measurement, continuous measurement starts to
run.
- Press the START key again to stop the measurement.
- The result (see the right picture in Fig 10) can optionally be saved by pressing the
MEM key twice, see chapter 6.1. Store, Recall and Clear Operation.
Warning!
Refer to Warnings chapter for safety precautions!
21
Page 22

MI 3201 TeraOhm 5 kV Plus Measurements
5.5 Insulation Resistance measurement
Selecting this function displays the following states (initial state and state with results
after the completion of the measurement). Fig 11 shows states when Graph R(t) is
disabled.
Initial display – numerical mode
Display with results - numerical mode
Fig. 11. Insulation Resistance function display states - Graph R(t) disabled
Fig. 12 shows states when Graph R(t) is enabled. When Graph R(t) is enabled you can
simple switching initial state and state with results after the completion of the
measurement, between numerical and graphical mode with pressing or keys.
graphical mode
numerical mode
Note:
- It is not possible to switching mode of presentation when measurement running!!!
Initial display - numerical mode
Initial display - graphical mode
Display with results - numerical mode
Display with results - graphical mode
Fig. 12. Insulation Resistance function display states - Graph R(t) enabled
22
Page 23

MI 3201 TeraOhm 5 kV Plus Measurements
Measurement procedure:
- Connect the test leads to the instrument and to the test object.
- Select INSULATION RESISTANCE function in MAIN MENU.
- Press the START/STOP key and release it, continuous measurement will begin.
- Wait until the test result has stabilized then press the START/STOP key again to
stop the measurement or, if enabled, wait for the set timer runs out.
- Wait for the object under test to discharge.
- The result can optionally be saved pressing the MEM key twice, see chapter 6.1.
Store, Recall and Clear Operation.
Legend of displayed symbols:
fil0 (Fil1, Fil2, Fil3)
5000V
U=5323V
I=266nA
19.9G
C=0.0nF
tm:04min 26s
Bar
Rmax=20.1G
Rmin=19.9G
Notes:
- If the timer is disabled then OFF is displayed instead of the timer value.
- During a measurement, the timer information displays the time needed to the
complete the measurement (tr) while after the completion the test duration (tm) is
displayed.
- A high-voltage warning symbol appears on the display during the measurement to
warn the operator of a potentially dangerous test voltage.
- Value of capacitance is measured during the final discharge of the test object.
Filter type enabled, see the chapter 5.3.
Configuration
Set test voltage
Actual test voltage – measured value
Actual test current – measured value
Insulation Resistance – result
Capacitance of measured object
Timer information – test duration
Analogue representation of result
Maximum value of result (only if timer is
enabled)
Minimum value of result (only if timer is
enabled)
23
Page 24

MI 3201 TeraOhm 5 kV Plus Measurements
Setting up parameters for Insulation Resistance test:
- Press the SELECT key, the set-up menu will appear
on the display, see the Fig 13.
- Select the parameter (line) to be set using the and
keys;
- Adjust set parameter using the and keys. Skip
to the next sub-parameter by pressing the SELECT
key (if there are two or more sub-parameters) and
repeat the adjustment.
- Complete the set-up adjustments by pressing either
the ESC key or START/STOP key (to run the
measurement directly). The settings displayed last
Fig. 13. Set-up menu in
Insulation Resistance
measurement
are stored.
Legend of displayed symbols:
INSULATION RESISTANCE
SETTING PARAMETERS:
Unominal 5000V
Timer 5min 00s
Timer on/off ON
Time1 01min 00s
Name of selected function
Set test voltage –25 V steps
Duration of the measurement
ON: timer enabled, OFF: timer disabled
Time to accept and display first Rmin and
Rmax results
Graph R(t) ON
Enable/Disable Graph R(t)
Timer and Time1 are independent timers. Maximum time for each of them is
99 min 60 s.
Enable/Disable the graph R(t) and Set-up the graph R(t)
parameters in the Insulation Resistance function:
- Press the SELECT key, Set-up menu appears on display,
see the Fig. 14.
- Select the parameter Graph R(t) to be set using the and
keys;
- Enable/Disable the graph R(t) using the and keys.
- Press the SELECT key to Set-up the parameters of the
graph R(t), see the Fig. 15. Press the ESC key to return
to basic Set-up menu in the Insulation Resistance
function.
- Complete the set-up adjustments pressing either the ESC
Fig. 14. Set-up menu in
Insulation Resistance
measurement
key or START/STOP key (to run the measurement
directly). The last displayed settings are stored.
24
Page 25

MI 3201 TeraOhm 5 kV Plus Measurements
Fig. 15. Set-up menu of the Graph R(t)
Notes:
- If the Timer is OFF is not possible to Enable the Graph R(t).
- The time duration of Graph R(t) is equal to the value of Timer.
- The Timer value could be very long (up to 100 minutes), so the Special automatic
decimation algorithm is use to write the Graph R(t) to the LCD.
- The cursors of the Graph R(t) could be activated with key
- The cursors of the Graph R(t) could be moved with and keys.
Warning!
Refer to Warnings chapter for safety precautions!
25
Page 26

MI 3201 TeraOhm 5 kV Plus Measurements
5.6 Diagnostic Test
Selecting this function displays the following states (initial state and state with results
after the completion of the measurement). ). Fig. 16 shows states when Graph R(t) is
disabled.
Initial display – numerical mode
Display with results – numerical mode
Fig. 16. Diagnostic test display states - Graph R(t) disabled
Fig. 17 shows states when Graph R(t) is enabled. When Graph R(t) is enabled you can
simple switching initial state and state with results after the completion of the
measurement, between numerical and graphical mode with pressing or keys.
graphical mode
numerical mode
Note:
- It is not possible to switching mode of presentation when measurement running!!!
Initial display - numerical mode
Display with results - numerical mode
Initial display - graphical mode
Display with results - graphical mode
Fig. 17. Diagnostic test display states - Graph R(t) enabled
26
Page 27

MI 3201 TeraOhm 5 kV Plus Measurements
R
Diagnostic test is a long duration test for evaluating the quality of the insulation material
under test. The results of this test enable the decision to be made on the preventive
replacement of the insulation material.
DIELECTRIC ABSORPTION RATIO (DAR)
DAR is ratio of Insulation Resistance values measured after 15s and after 1 minute. The
DC test voltage is present during the whole period of the test (also an Insulation
Resistance measurement is continually running). At the end, the DAR ratio is displayed:
iso
15
iso
tC10
U
min1
s
s
.
V
3
DAR
Some applicable values:
DAR value Tested material status
< 1.25 Not acceptable
< 1.6 Considered as good insulation
> 1.6 Excellent
Note: When determining Riso (15s) pay attention to the capacitance of test object. It has
to be charged-up in the first time section (15s). Approximate maximum capacitance
using:
max
Where:
t...........period of first time unit (e.g. 15s)
U.........test voltage.
To avoid this problem, increase the DIAG. Starting time parameter in
CONFIGURATION menu, because the start of timer in the DIAGNOSTIC TEST
functions depends on the test voltage. The Timer begins to run when test voltage
reaches the threshold voltage, which is product of the DIAG. Starting time and nominal
test voltage Unominal.
Using filters (fil1,fil2,fil3) in the DAR function is not recommended!
Analysing the change in the measured insulation resistance over time and calculating
the DAR and PI are very useful maintenance tests of an insulating material.
POLARIZATION INDEX (PI)
PI is the ratio of Insulation Resistance values measured after 1 minute and after 10
minutes. The DC test voltage is present during the whole period of the measurement
(an Insulation Resistance measurement is also running). On completion of the test the
PI ratio is displayed:
R
F
27
Page 28

MI 3201 TeraOhm 5 kV Plus Measurements
R
R
PI
Note: When determining Riso (1min) pay close attention to the capacitance of the object
under test. It has to be charged-up in the first time section (1 min). Approximate
maximum capacitance using:
F
max
where:
t...........period of first time unit (e.g. 1min)
U.........test voltage.
To avoid this problem, increase the DIAG. Starting time parameter in
CONFIGURATION menu, because the start of timer in the DIAGNOSTIC TEST
functions depends on the test voltage. The timer begins to run when test voltage
reaches the threshold voltage, which is product of the DIAG. Starting time and nominal
test voltage (Unominal).
Analysing the change in the measured insulation resistance over time and calculating
the DAR and PI are very useful maintenance tests of an insulating material.
DIELECTRIC DISCHARGE TESTING (DD)
DD is the diagnostic insulation test carried out after the completion of the Insulation
Resistance measurement. Typically the insulation material is left connected to the test
voltage for 10 30 min and then discharged before the DD test is carried out. After 1
minute a discharge current is measured to detect the charge re-absorption of the
insulation material. A high re-absorption current indicates contaminated insulation
(mainly based on moisture):
DD
where:
Idis 1min......discharging current measured 1 min after regular discharge
U.................. test voltage
C.................. capacitance of test object.
min10
iso
min1
iso
tC10
U
min1
.
s
.
V
mAIdis
FCVU
3
,
28
Page 29

MI 3201 TeraOhm 5 kV Plus Measurements
Measurement procedure:
- Select DIAGNOSTIC TEST function in MAIN MENU.
- Connect the test leads to the instrument and to the measured object.
- Press the START/STOP key to start the measurement.
- Wait until set timer runs out, the result is displayed.
- Wait until the object under test has discharged
- The result can optionally be saved by pressing the MEM key twice, see the chapter
6.1. Store, Recall and Clear Operation.
Legend of displayed symbols:
Fil0 (Fil1, Fil2, Fil3)
Filter type enabled, see the chapter 5.3.
Configuration
5000V
U=5295
I=55.6nA
10.5G
C=2.1nf
Tr:00min 15s
Bar
R15sec=10.6G
R01min=10.5G
R10min=10.5G
DAR=1.67
PI=1.21
DD=__
Set test voltage – step 25 V
Actual test voltage – measured value
Actual test current – measured value
Insulation Resistance – result
Capacitance of measured object
Set timer value
Analogue representation of Riso result
Resistance value measured after set time 1
Resistance value measured after set time 2
Resistance value measured after set time 3
DAR as ratio of R1min / R15s
PI as ratio of R03/R02
DD result
Notes:
- A high-voltage warning symbol appears on the display during the measurement to
warn the operator of a potentially dangerous test voltage.
- The value of the capacitance is measured during the final discharge of the test
object.
- If enabled, the instrument measures Dielectric Discharge (DD) when the capacitance
is in the range of 5 nF to 50 F.
Setting-up parameters of the Diagnostic Test:
- Press the SELECT key, (the Set-up menu appears
on display, see the Fig. 18).
- Select the parameter to be set using the and
keys;
- Adjust the parameter using the and keys.
- Complete the set-up adjustments by pressing either
the ESC key or START key (to run the measurement
directly). The settings displayed last are stored.
Fig. 18. Set-up menu in
Diagnostic Test
29
Page 30

MI 3201 TeraOhm 5 kV Plus Measurements
Legend of displayed symbols:
DIAGNOSTIC TEST
SETTING PARAMETERS:
Unominal 5000V
Time1 01min
Time2 02min
Name of selected function
Set test voltage – step 25 V
Time node to take R1min result
Time node to take R2min result and
calculate DAR
Time3 03min
Time node to take R3min result and
calculate PI
DD on/off ON
Graph R(t) ON
ON: DD enabled, OFF: DD disabled
Enable/Disable Graph R(t)
Time1, Time2 and Time3 are timers with the same start point. The value of each
presents the duration from the start of the measurement. The maximum time is 100 min.
The following Fig. 19 shows the timer relationships.
0 Time1 Time2 Time3 t
Stop
R03min
PI
(if enabled DD)
Start
Time1 Time2
Time2 Time3
R15s R01min
DAR
Fig. 19. Timer relations
Enable/Disable the graph R(t) and Set-up the graph R(t)
parameters in the Diagnostic Test function:
- Press the SELECT key, Set-up menu appears on display,
see the Fig. 20.
- Select the parameter Graph R(t) to be set using the and
keys;
- Enable/Disable the graph R(t) using the and keys.
- Press the SELECT key to Set-up the parameters of the
graph R(t), see the Fig. 21. Press the ESC key to return
to basic Set-up menu in the Diagnostic Test function.
- Complete the set-up adjustments pressing either the ESC
key or START/STOP key (to run the measurement
directly). The last displayed settings are stored.
Fig. 20. Set-up menu in
Diagnostic Test
measurement
30
Page 31

MI 3201 TeraOhm 5 kV Plus Measurements
Fig. 21. Set-up menu of the Graph R(t)
Notes:
- The time duration of Graph R(t) is equal to the value of Timer 3.
- The Timer value could be very long (up to 100 minutes), so the Special automatic
decimation algorithm is use to write the Graph R(t) to the LCD.
- The cursors of the Graph R(t) could be activated with key
- The cursors of the Graph R(t) could be moved with and keys.
Warning!
Refer to Warnings chapter for safety precautions!
31
Page 32

MI 3201 TeraOhm 5 kV Plus Measurements
5.7 Step Voltage Insulation Resistance testing
Selecting this function displays the following states (initial state and state with results
after the completion of the measurement). Fig. 22 shows states when Graph R(t) is
disabled.
Initial display
Display with results
Fig. 22. Step Voltage function display states- Graph R(t) disabled
Fig. 23 shows states when Graph R(t) is enabled. When Graph R(t) is enabled you can
simple switching initial state and state with results after the completion of the
measurement, between numerical and graphical mode with pressing or keys.
graphical mode
numerical mode
Note:
- It is not possible to switching mode of presentation when measurement running!!!
Initial display - numerical mode
Initial display - graphical mode
Display with results - numerical mode
Display with results - graphical mode
Fig. 23. Step Voltage function display states - Graph R(t) enabled
32
Page 33

MI 3201 TeraOhm 5 kV Plus Measurements
U
In this test, the insulation is measured in five equal time periods with test voltages from
one fifth of the final test voltage up to full scale (see the Fig. 24). This function illustrates
the relationship of a materials Insulation resistance and its applied voltage
Measurement procedure:
- Connect the test leads to the instrument and to the test object.
- Press the START/STOP key to start the measurement.
- Wait until set timer runs out, (the result will be displayed).
- Wait for the object under test to discharge
- The results can be saved by pressing the MEM key twice, see the chapter 6.1.
Storing, Recalling and Clearing Results.
U
0.8U
0.6U
0.4U
0.2U
0
Fig. 24. Step-up test voltage
Legend of displayed symbols:
Fil0 (Fil1, Fil2, Fil3)
5000V
U=5308V
I=266nA
19.9G
C=1.2nF
Tm:05min 00s
R1000V=20.0G
R2000V=20.0G
R3000V=20.0G
R4000V=19.9G
R5000V=19.9G
U1=1077V
U2=2142V
U3=3239V
U4=4283V
U5=5308V
T2T3T4T5T t
Filter type enabled, see the chapter 5.3.
Configuration
Set test voltage – step 125 V
Actual test voltage – measured value
Actual test current – measured value
Insulation Resistance – result
Capacitance of measured object
Actual test duration
Last result of 1st step
Last result of 2nd step
Last result of 3rd step
Last result of 4th step
Last result of 5th step
1st step voltage
2nd step voltage
3rd step voltage
4th step voltage
5th step voltage
33
Page 34

MI 3201 TeraOhm 5 kV Plus Measurements
Notes:
- Timer information is displayed from the start of the measurement until the
completion of each step measurement.
- Timer information shows the complete measurement period after the completion of
the measurement.
- A high-voltage warning symbol appears on the display during the measurement to
warn the operator of a potentially dangerous test voltage.
- The value of capacitance is measured during the final discharge of test object.
Settting up parameters for the Step Voltage test:
- Press the SELECT key, (the Set-up menu (Fig. 25)
will appear on the display).
- Select the parameter (line) to be set using the and
keys;
- Adjust the parameter using the and keys.
Complete the parameter adjustments by pressing either
the ESC or the START/STOP key (to run the
measurement directly). The settings displayed last will
Fig. 25. Set-up menu in Step
Voltage Test
be saved
Legend of displayed symbols:
STEP VOLTAGE
SETTING PARAMETERS:
Unominal 5000V
Step Time 01min
Graph R(t) ON
Name of selected function
Set test voltage – step 125 V
Duration of measurement per step
Enable/Disable Graph R(t)
Note:
- Maximum value for Step Time is 30 min.
Enable/Disable the graph R(t) and Set-up the graph R(t)
parameters in the Step Voltage function:
- Press the SELECT key, Set-up menu appears on display,
see the Fig. 26.
- Select the parameter Graph R(t) to be set using the and
keys;
- Enable/Disable the graph R(t) using the and keys.
- Press the SELECT key to Set-up the parameters of the
graph R(t), see the Fig. 27. Press the ESC key to return
to basic Set-up menu in the Step Voltage function.
- Complete the set-up adjustments pressing either the ESC
key or START/STOP key (to run the measurement
Fig. 26. Set-up menu in
Step Voltage
measurement
directly). The last displayed settings are stored.
34
Page 35

MI 3201 TeraOhm 5 kV Plus Measurements
Fig. 27. Set-up menu of the Graph R(t)
Notes:
- The time duration of Graph R(t) is equal to the value of Step Time Multiplied by 5.
- The Timer value could be very long (up to 150 minutes), so the Special automatic
decimation algorithm is use to write the Graph R(t) to the LCD.
- The cursors of the Graph R(t) could be activated with key
- The cursors of the Graph R(t) could be moved with and keys.
Warning!
Refer to Warnings chapter for safety precautions!
35
Page 36

MI 3201 TeraOhm 5 kV Plus Measurements
5.8 Withstanding voltage
This function offers Withstanding Voltage test of insulation material. It covers two types
of tests:
a) Breakdown voltage testing of high voltage device, e.g. transient suppressors
b) DC withstanding voltage test for insulation coordination purposes.
Both functions require breakdown current detection. In the function, the test voltage is
increased from the starting voltage to the stop voltage over a predefined time (set by the
parameters). The Stop voltage is then maintained for a predefined test time, (see the
Fig. 28).
Ut Ut
Ustop
step
U
Ustart Ustart
00
T
step
T
end
tt
Ub
Fig. 28. Test voltage presentation without breakdown (left part) and with breakdown
(right part)
Ut........Test voltage
Ustop..End test voltage
Ustep..Voltage step approx. 25 V (fixed value - not presetable)
Ustart..Starting voltage
Tstep...Test voltage duration per step
Tend ...Constant test voltage duration after reaching End value
t...........Time
Ub.......Breakdown voltage
Selecting this function displays the following states. Fig. 29 shows the initial screen and
a screen with results after the completion of a measurement
Initial display
Display with results
Fig. 29. Withstanding Voltage function display states
36
Page 37

MI 3201 TeraOhm 5 kV Plus Measurements
Legend of displayed symbols:
WITHSTANDING VOLTAGE DC
1000V
5000V
5275V
I=0.001mA
tm:01min 00s
Measuring procedure:
- Connect the test leads to the instrument and to the measured object.
- Press the START/STOP key to start the measurement.
- Wait until the set timers runs out or until breakdown occurs, (the result will be
displayed).
- Wait for the object under test is discharge.
- The results can be saved by pressing the MEM key twice, see the chapter 6.1.
Storing, Recalling and Clearing Results.
Note:
- Breakdown is detected when the measured current reaches or exceeds the set
current level Itrig.
Notes:
- The timer shows the time needed to complete each step during the measurement
and it shows the total measurement period after the completion of the measurement.
- A high-voltage warning symbol appears on the display during the measurement to
warn the operator of a potentially dangerous test voltage.
Legend of displayed symbols:
WITHSTANDING VOLTAGE DC
SETTING PARAMETERS:
Ustart
Ustop
Tstep 00min 00s
Tend 01min 00s
Itrigg 1.000mA
1000V
5000V
Name of selected function
Start test voltage, step = 25 V
Stop test voltage, step = 25 V
Duration of test voltage per one step
Duration of constant test voltage after reaching stop
value
Set trigger leakage current, step = 10 A
Name of selected function
Start test voltage
Stop test voltage
Actual test voltage – measured value
Actual test current – measured value
Timer information
37
Page 38

MI 3201 TeraOhm 5 kV Plus Measurements
Set-up parameters for Withstanding Voltage:
- Press the SELECT key, (the set-up menu (Fig. 30)
appears on display);
- Select the parameter (line) to be set using the and
keys;
- Adjust the parameter using the and keys or skip
to the next sub-parameter by pressing the SELECT
key (if there are two or more sub-parameters) and
repeat the adjustment.
- Complete the parameter adjustments by pressing
either the ESC or the START/STOP key (to run the
measurement directly). The settings displayed last will
be saved.
Notes:
Tstep and Tend are independent timers. The maximum time for each timer is 30 min
60 s. Tend begins after the completion of the ramp period. Ramp period can be
calculated from:
Tramp Tstep(Ustop – Ustart) / 25 V
If Tstep is set to 00min 00s, then the ramp voltage increases by approximately 25 V
every 2s.
Fig. 30. Set-up menu in
Withstanding Voltage function
Warning!
Refer to Warnings chapter for safety precautions!
38
Page 39

MI 3201 TeraOhm 5 kV Plus Working with your Results
6 Working with your Results
6.1 Storing, Recalling and Clearing Results
The instrument contains battery supported storage memory to retain results when
power is disconnected. This enables the test engineer to make the measurements and
then to recall them later on. This way the engineer can analyze and print results on the
instrument or transfer them to a computer for further analysis.
After pressing the MEM key, the memory
menu (Fig. 31) is displayed. Here the
engineer has the option to save, recall and
clear results.
SAVE
CLR RCL nnnn
Notes:
Fig. 31. Storage operation menu
nnnn is the results serial number
There are the following possibilities are selectable using the or arrow keys:
- To store result: Highlight SAVE and confirm by pressing the MEM key. If graph R(t)
is enabled in the measurement, it will be automatically saved with the measurement.
- To recall stored result: Highlight RCL and confirm by pressing the MEM key. The
last stored result will be displayed. The menu is replaced with:
Recall measurement without the graph R(t):
Recall: 0006
Recall measurement with the graph R(t):
Recall: 0007 G
“0006” and “0007” represents the serial number of the stored results. G letter means
the graph R(t), if added. Results can be scrolled through by using the and keys.
To see the Graph R(t) press the SELECT key, to go back to the numerical
measurement result press the ESC key.
The recall function can be exited by pressing the ESC or Start key.
- To clear the last stored result: highlight CLR and confirm by pressing the MEM key.
To clear the complete memory see paragraph 4.2. Configuration.
In addition to the main result, the subresults and parameters of the selected function are
also recorded. The following is a list of all the data stored for each function.
39
Page 40

MI 3201 TeraOhm 5 kV Plus Working with your Results
Function List of stored data
Voltage
Function name
Measured voltage
Frequency of the measured voltage
Ser. number of stored result
Date *
Time *
Insulation resistance
Function name
Measured insulation resistance value
Set test voltage
Actual test voltage - measured value
Actual test current - measured value
Capacitance of the tested object
Duration of the measurement
Maximum detected value of measured resistance
Maximum detected value of measured resistance
Ser. number of stored result
Date *
Time *
Diagnostic test
Function name
Last measured insulation resistance
Set test voltage
Actual test voltage - measured value
Actual test current - measured value
Capacitance of the tested object
Duration of the complete test
Insulation Resistance value taken after T1
Insulation Resistance value taken after T2
Insulation Resistance value taken after T3
DAR value
PI value
DD value
Ser. number of stored result
Date *
Time *
Withstanding voltage DC
Function name
Last measured test voltage
Set Start voltage
Set Stop voltage
Set trigger current value
Actual test current - measured value
Set Step test time
Set End time
Actual test time (at Stop test voltage)
Ser. number of stored result
Date *
Time *
40
Page 41

MI 3201 TeraOhm 5 kV Plus Working with your Results
Step voltage
Function name
Last measured insulation resistance
Set test voltage
Actual test voltage - measured value
Actual test current - measured value
Capacitance of the tested object
Complete duration of the measurement
First step measured resistance with its nominal voltage
First step actual test voltage - measured value
Second step measured resistance with its nominal voltage
Second step actual test voltage - measured value
Third step measured resistance with its nominal voltage
Third step actual test voltage - measured value
Fourth step measured resistance with its nominal voltage
Fourth step actual test voltage - measured value
Last step measured resistance with its nominal voltage
Last step actual test voltage - measured value
Ser. number of the stored result
Date *
Time *
Note:
*Date and time of storing the test result are transferred to PC while date and time
of recalling are displayed when recalling results.
6.2 Transferring Data to a PC
Stored results can be transferred to a PC. A special communication program TeraLinkPRO has the ability to identify the instrument and download the data.
How to transfer the stored data:
Connect the instrument to the COM port of the PC using the communication cable
(RS232 or USB).
- Power up both the PC and the instrument.
- In the CONFIGURATION menu of the instrument (chapter 4.2), set the
communication mode (RS232 or USB) and Baud Rate appropriately. At the end,
leave the CONFIGURATION menu by pressing the ESC button.
- Run the Teralink-PRO program on the PC. In the Configuration / Com Port menu,
set the Com Port and Baud Rate appropriately. The Auto Find function can be used
to configure Com port Settings automatically. If Auto Find function is not successful
first time, try one more time.
- The PC and the instrument should automatically recognize each other.
With the TeraLink program, the following tasks can be performed:
-- download data;
-- clear instrument data;
-- change and download user data;
-- prepare a simple report form;
-- prepare a file to import in to a spreadsheet program.
The program Teralink-PRO is a Windows 2000/XP/VISTA
TM
based PC software
41
Page 42

MI 3201 TeraOhm 5 kV Plus Maintenance
7 Maintenance
7.1 Inspection
To maintain the operator’s safety and to ensure the reliability of the instrument it is
advisable to inspect the instrument on a regular basis. Check that the instrument and its
accessories are not damaged. If any defect is found please consult your service center,
distributor or manufacturer.
7.2 Inserting and charging batteries for the first time
Battery cells are stored in the bottom section of the instrument casing under the battery
cover (see Fig. 32). When inserting batteries for the first time please note the following:
Disconnect any measurement accessories or mains supply cable connected to
the instrument before opening the battery cover to avoid electric shock.
Remove the battery cover.
Insert the batteries correctly (see Fig. 32), otherwise the test instrument will
not operate!
Replace the battery cover and fixed the cover back in place.
Connect the instrument to the mains power supply for 14 hours to fully charge batteries.
(Typical charging current is 300 mA).
When you charge the batteries for the first time, it normally takes about 3 charge and
discharge cycles for the batteries to regain full capacity.
7.3 Replacing and charging batteries
The instrument is designed to be power by rechargeable battery supported by mains
supply. The LCD contains an indication of battery condition (lower left section of LCD).
When the low-battery indication appears the batteries have to be recharged, connect
the instrument to the mains power supply for 14 hours to recharge cells. The typical
charging current is 300 mA.
Note:
The operator does not need to disconnect the instrument from mains supply after the
full recharging period. The instrument can be connected permanently.
Fully charged rechargeable batteries can supply the instrument for approx. 4 hours.
(Continues testing at 5kV)
If the batteries have been stored for a long time, it normally takes about 3 charge and
discharge cycles for the batteries to regain full capacity.
Battery cells are stored in the bottom section of the instrument casing under the battery
cover (see Fig. 32). In case the batteries become defective please note the following:
42
Page 43

MI 3201 TeraOhm 5 kV Plus Maintenance
Turn the power off and disconnect any measurement accessories or mains
supply cable connected to the instrument before opening the battery cover to
avoid electric shock.
Remove the battery cover.
All six cells have to be replaced and they have to be of the same type.
Insert the batteries correctly (see Fig. 32), otherwise the test instrument will
not operate and battery may be discharged!
Replace the battery cover and fixed the cover back in place.
The Instrument will only work when rechargeable batteries are inside the
instrument.
Nominal power supply voltage is 7.2 V DC. Use six NiMH cells with C size (dimensions:
diameter = 26 mm, height = 46 mm). See the next Fig. 32 for correct polarity of the
batteries.
Fig. 32. Correct polarity of inserted batteries
1..........Battery cover.
2..........Screw (unscrew to replace the batteries).
3..........Correct inserted batteries.
Ensure batteries are used and disposed of in accordance with Manufacturers guidelines
and in accordance with Local and National Authority guidelines.
DISCONNECT ALL TEST LEADS AND SWITCH OFF THE
INSTRUMENT BEFORE REMOVING THE BATTERY COVER!
HAZARDUS VOLTAGE!
43
Page 44

MI 3201 TeraOhm 5 kV Plus Measurements
7.4 Cleaning
Use a soft cloth, slightly moistened with soapy water or spirit to clean the surface of the
instrument and leave the instrument to dry totally before using it.
Notes!
Do not use liquids based on petrol or hydrocarbons!
Do not spill cleaning liquid over the instrument!
7.5 Calibration
It is essential that all measurement instruments be regularly calibrated. For occasional
daily use we recommend an annual calibration to be carried out. When the instrument is
used continuously every day, we recommend calibrating the instrument every six
months.
7.6 Service
For repairing under or out of warranty period contact your distributor for further
information.
44
Page 45

MI 3201 TeraOhm 5 kV Plus Specifications
8 Specifications
8.1 Measurement specifications
Note: All data regarding accuracy is given for nominal (reference) environment
condition.
Insulation resistance
Nominal test voltage: 250 V to 5 kV, steps by 25V
Current capability of test generator: >1 mA
Short-circuit test current: 5 mA10%
Automatic discharge of tested object: yes
Measuring range Riso: 0.12 M up to 10 T*
Display range Riso Resolution Accuracy
5 k 999 k 1 k
1.00 9.99 M 10 k
10.0 99.9 M 100 k
100 999 M 1 M
1.00 9.99 G 10 M
10.0 99.9 G 100 M
100 999 G 1 G
1.00 10.00 T 10 G (15 % of reading + 3 digits)
*
Full-scale value of insulation resistance is defined according the following equation:
RFS = 2 G * U
test
[V]
DC test voltage:
Voltage value: 250 V to 5 kV.
Accuracy: -0 / +10 % + 20 V.
Output power: 5 W max.
Display range Test voltage (V) Resolution Accuracy
0 5500 V
Current:
Display range I (mA) Resolution Accuracy
1.00 5.50 mA 10 A
100 999 A 1 A
10.0 99.9 A
1.00 9.99 A
100 999 nA
10.0 99.9 nA
0.00 9.99 nA
)
(5 % of reading + 3 digits)
1 V
(3 % of reading + 3 V)
100 nA
10 nA
(5 % of reading + 0.05 nA)
1 nA
0.1 nA
0.01 nA
45
Page 46

MI 3201 TeraOhm 5 kV Plus Specifications
Noise current rejection (resistive load)
Fil0 1.5
Fil1 2.5
Fil2 4.5
Fil3 5
Generator Capability vs Resistance
6
5
4
3
[ kV ]
2
1
0
0,1 1 10 100
[ M ]
Utest=5kV
Dielectric absorption ratio DAR
Display range DAR Resolution Accuracy
0.01 9.99
10.0 100.0
0.01
0.1
(5% of reading + 2digits)
(5% of reading)
Polarization index PI
Display range PI Resolution Accuracy
0.01 9.99
10.0 100.0
0.01
0.1
(5 % of reading + 2 digits)
(5% of reading)
Dielectric discharge test DD
Display range DD Resolution Accuracy
0.01 9.99
10.0 100.0
0.01
0.1
(5 % of reading + 2 digits)
(5% of reading)
Capacitance range for DD test: 5 nF to 50 F.
Step voltage
DC test voltage:
Voltage value: Any value within 1000 V (200 V, 400 V, 600 V, 800 V, 1000 V)
and 5 kV (1000 V, 2000 V, 3000 V, 4000 V, 5000 V), steps by
125 V.
Accuracy: -0 / +10 % + 20 V.
46
Page 47

MI 3201 TeraOhm 5 kV Plus Specifications
Display range Test voltage (V) Resolution Accuracy
0 5500 V
1 V
(3 % of reading + 3 V)
Withstanding voltage DC
DC test voltage:
Voltage value: 250V to 5kV, steps 25V.
Accuracy: -0 / +10 % + 20 V.
Display range Test voltage (V) Resolution Accuracy
0 5500 V
1 V
(3 % of reading + 3 V)
Leakage current
Display range Itrigg (mA) Resolution Accuracy
0.000 0.009 1 A (3 % of reading + 3 digits)
0.01 5.50 10 A (3 % of reading)
Voltage
Voltage AC or DC
Display range External Voltage (V) Resolution Accuracy
0 600
1 V
(3 % of reading + 4 V)
Frequency of external voltage
Display range (Hz) Resolution Accuracy
0 and 45 65
0.1 Hz
0.2 Hz
Note:
- for frequency between 0 and 45 Hz displayed <45 Hz
- for frequency over 65 Hz displayed >65 Hz
- for voltages under 10V frequency result is shown as ---
Input resistance: 3 M 10 %
Capacitance
Measuring range C: 50 F*
Display range C Resolution Accuracy
0.0 99.9 nF
100 999 nF
1.00 50.00 F
0.1 nF
1 nF
10 nF
(5 % of reading + 4 nF)
C measured if R > 5 M
*Full-scale value of capacitance is defined according to the following equation:
CFS = 10 F * U
test
[kV]
47
Page 48

MI 3201 TeraOhm 5 kV Plus Specifications
8.2 General specifications
Battery power supply.....................................7.2 V DC (6 × 1.2VDCNiMH C size)
Mains power supply.......................................90-260 V AC, 45-65 Hz, 40 VA
(300V CAT III)
Protection classification.................................double insulation
Over-voltage category ...................................600 V CAT IV
Pollution degree.............................................2
Degree of protection......................................IP 40 with case closed
Dimensions (w × h × d)..................................31 x 13 x 25 cm
Weight (without accessories, with batteries).. 3 kg
Visual and sound warnings............................ yes
Display........................................................... LCD dot matrix with backlight - (160x116)
Memory.......................................................... Non-volatile internal memory,
.......................................................................1000 numerical measurements with time
.......................................................................and date.
ENVIRONMENT CONDITIONS
Working temperature range........................... -10 50 °C
Nominal (reference) temperature range......... 10 30 °C
Storage temperature range............................ -20 +70 C.
Maximum humidity ........................................90% RH (0 40 °C) non-condensing
Nominal (reference) humidity range............... 40 60 % RH
Nominal altitude.............................................up to 2000m
AUTO-CALIBRATION
Auto-calibration of measuring system............ every time after turning power on
CONNECTING SYSTEM
Two safety banana sockets........................... +OUT, -OUT (5kV CAT I, Double)
Two GUARD. banana sockets....................... GUARD (600V CAT IV, Double)
Guard resistance ........................................... 200 k 10 %
DISCHARGING
Every time after measurement completion.
Discharging resistance: .................................300 k 10 %
RS232 SERIAL COMMUNICATION
RS232 serial communication......................... galvanic separated
Baud rates: .................................................... 4800, 9600, 19200 baud, 1 stop bit,
no parity.
Connector:..................................................... standard RS232 9-pin D female.
USB COMMUNICATION
USB slave communication............................. galvanic separated
Baud rates ..................................................... 115000 baud,
Connector...................................................... standard USB connector - type B.
CLOCK
Built-in Real time clock ..................................Displayed permanently and stored as a
parameter in combination with the result.
48
 Loading...