

Page 1
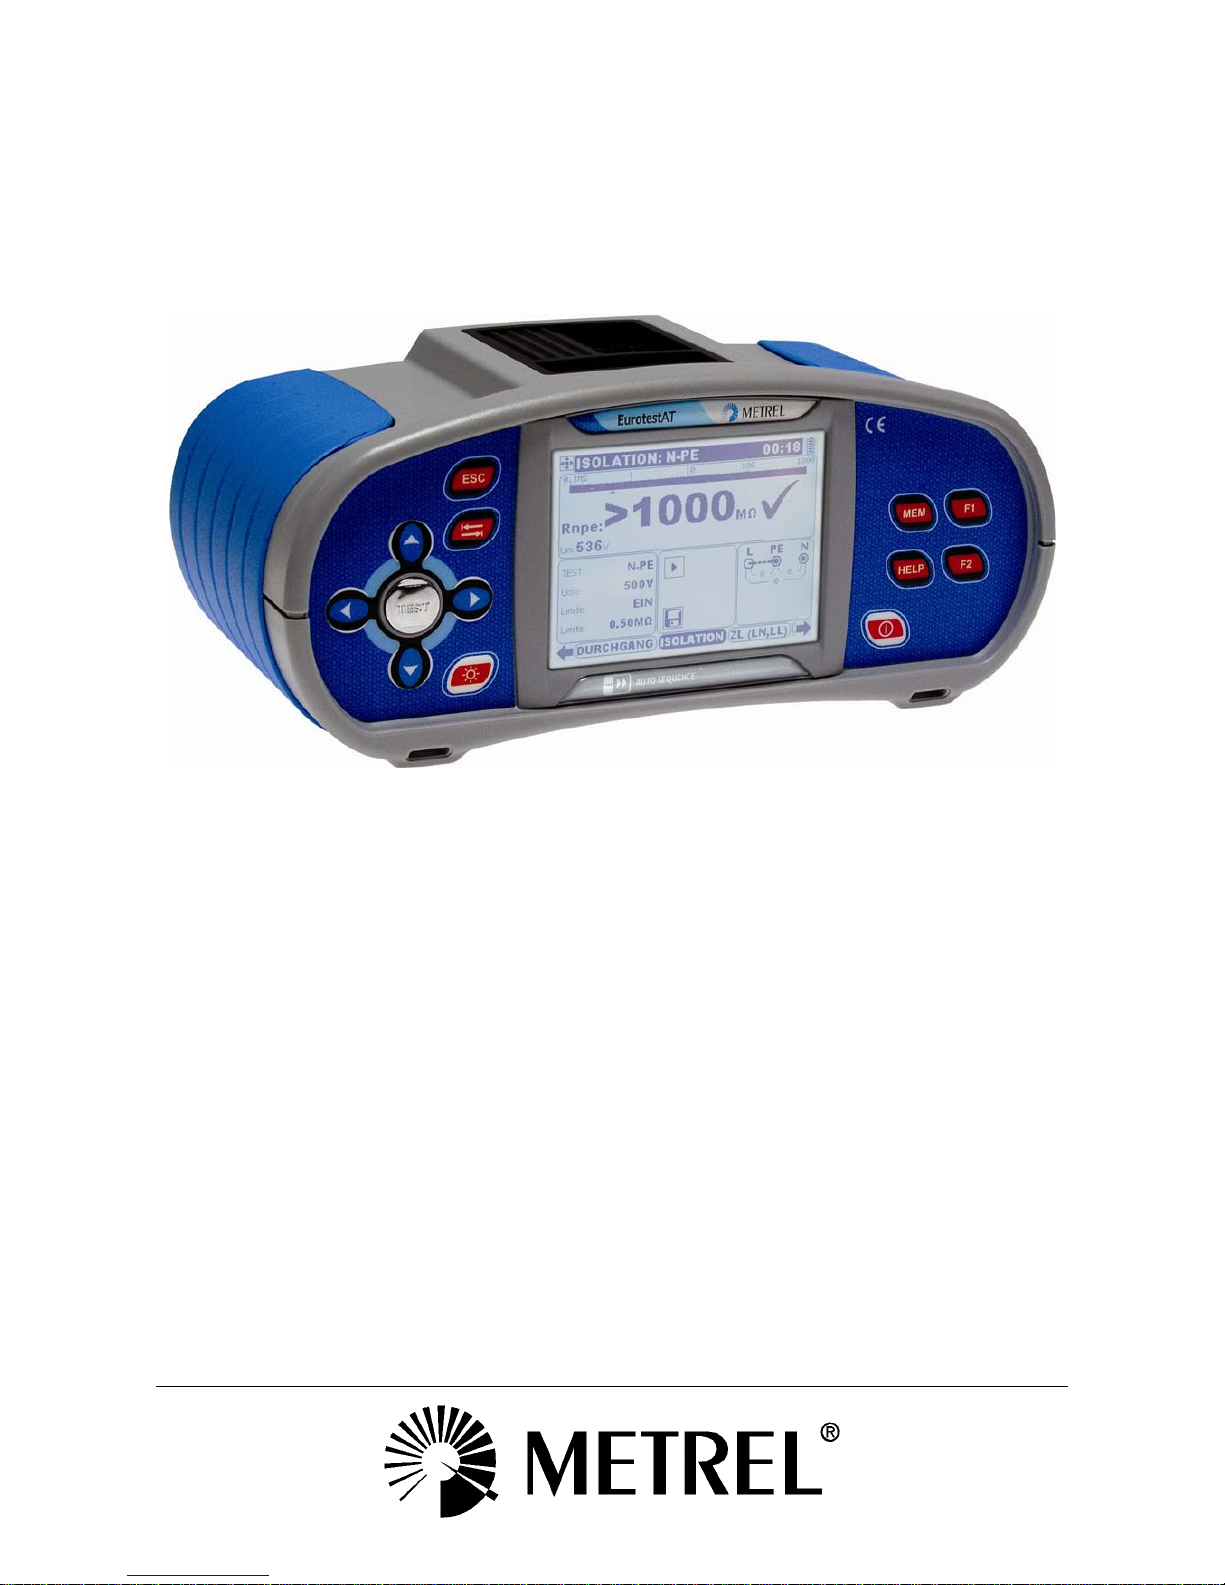
EurotestAT
MI 3101
Instruction manual
Version 5.0, HW 5; Code no. 20 751 834
Page 2

2
Distributor:
Manufacturer:
METREL d.d.
Ljubljanska cesta 77
1354 Horjul
Slovenia
web site: http://www.metrel.si
e-mail: metrel@metrel.si
Mark on your equipment certifies that this equipment meets the requirements of the EU
(European Union) concerning safety and electromagnetic compatibility regulations
© 2005..2010 METREL
No part of this publication may be reproduced or utilized in any form or by any means
without permission in writing from METREL.
Page 3

MI 3101 EurotestAT Table of contents
3
1 Preface ..................................................................................................................................... 6
2 Safety and operational considerations ................................................................................. 7
2.1 Warnings a
nd notes .......................................................................................................... 7
2.2 Battery and
charging ....................................................................................................... 10
2.2.1 New battery cells or
cells unused for a longer period.............................................. 11
2.3 Standards applied
........................................................................................................... 12
3 Instrument description
......................................................................................................... 13
3.1 Front panel
...................................................................................................................... 13
3.2 Connector panel
.............................................................................................................. 14
3.3 Back panel....................................................................................................................... 15
3.4 Bottom
............................................................................................................................. 16
3.5 Display organization
........................................................................................................ 17
3.5.1 Term
inal voltage monitor......................................................................................... 17
3.5.2 Menu line
.................................................................................................................18
3.5.3 Message fie
ld .......................................................................................................... 18
3.5.4 Result field
............................................................................................................... 19
3.5.5 Other m
essages......................................................................................................19
3.5.6 Sound warnings
....................................................................................................... 19
3.5.7 Help
.........................................................................................................................19
3.5.8 Backlight an
d contrast adjustments......................................................................... 20
3.6 Carrying the
instrument................................................................................................... 21
3.7 Instrument set and acce
ssories....................................................................................... 21
3.7.1 Standard set
............................................................................................................ 21
3.7.2 Optional accessories
............................................................................................... 21
4 Instrument operation
............................................................................................................ 22
4.1 Main menu
....................................................................................................................... 22
4.2 Single test
........................................................................................................................ 23
4.3 Automatic testing
............................................................................................................. 24
4.3.1 Auto sequence num
ber main menu ........................................................................ 26
4.3.2 Auto sequence set
...................................................................................................26
4.3.3 Test parameters in auto
sequence.......................................................................... 27
4.3.4 Na
me and description of auto sequence................................................................. 28
4.3.5 Storing auto sequence settings (seq
uence, number, name)................................... 29
4.3.6 Pause flag a
nd comments in auto sequence........................................................... 30
4.3.7 Setting pause flag and co
mments...........................................................................30
4.3.8 Building an
auto sequence......................................................................................32
4.4 Miscellaneo
us.................................................................................................................. 37
4.4.1 Language
................................................................................................................ 37
4.4.2 Supply syste
m, Isc factor, RCD standard................................................................ 38
4.4.3 Me
mory ...................................................................................................................40
4.4.4 Date and time
..........................................................................................................40
4.4.5 Initial se
ttings........................................................................................................... 40
4.4.6 Co
mmunication port ................................................................................................ 43
4.4.7 Locator
.................................................................................................................... 43
4.4.8 Operator
..................................................................................................................43
5 Measureme
nts ....................................................................................................................... 45
5.1 Insulation re
sistance........................................................................................................ 45
5.2 Resistance t
o earth connection and equipotential bonding............................................. 47
5.2.1 Continuity
R200 mA measurement..........................................................................47
5.2.2 7
mA resistance measurement................................................................................ 49
5.2.3 Co
mpensation of test leads resistance....................................................................50
5.3 Testing RCDs
.................................................................................................................. 52
Page 4

MI 3101 EurotestAT Table of contents
4
5.3.1 Contact voltage (RCD Uc)....................................................................................... 53
5.3.2 Trip-out time (RCD t)...............................................................................................54
5.3.3 Trip-out current (RCD I
) ......................................................................................... 55
5.3.4 RCD Autotest ..........................................................................................................56
5.4 Fault loop impedance and prospective fault current
........................................................ 58
5.5 Line impedance / prospe
ctive short-circuit current and Voltage drop ............................. 60
5.5.1 Line im
pedance and prospective short circuit current.............................................61
5.5.2 Voltage drop
............................................................................................................ 62
5.6 Voltage, frequency and phase sequ
ence........................................................................ 64
5.7 Resistance t
o earth ......................................................................................................... 66
5.7.1 Standard 3-wire
measurement................................................................................66
5.7.2 Specific eart
h resistance measurement .................................................................. 68
5.8 2 line/loo
p impedance.................................................................................................. 69
5.9 PE test terminal
............................................................................................................... 72
5.10 Locator
............................................................................................................................ 73
5.11 Varistor test
..................................................................................................................... 75
6 Data handling
........................................................................................................................ 77
6.1 Memory org
anization....................................................................................................... 77
6.2 Installation data
structure ................................................................................................ 77
6.3 Storing test
results........................................................................................................... 80
6.3.1 Saving results specialtie
s........................................................................................80
6.4 Recalling te
st results and parameters............................................................................. 81
6.4.1 Recalling re
sult........................................................................................................ 81
6.5 Clearing saved data
........................................................................................................ 83
6.5.1 Clearing sp
ecialties................................................................................................. 84
6.6 Editing insta
llation data structure .................................................................................... 85
6.6.1 Adding new locations
.............................................................................................. 85
6.7 Communication
............................................................................................................... 87
6.8 Operation with barcode
scanner ..................................................................................... 88
7 Maintenance
.......................................................................................................................... 89
7.1 Replacing fu
ses............................................................................................................... 89
7.2 Cleaning
.......................................................................................................................... 89
7.3 Periodic calibration
.......................................................................................................... 89
7.4 Service
............................................................................................................................ 89
8 Technical specifications
....................................................................................................... 90
8.1 Insulation re
sistance........................................................................................................ 90
8.2 Continuity
........................................................................................................................ 91
8.2.1 Resistance
R200mA (LPE, NPE)............................................................................ 91
8.2.2 Resistance
R7mA (LPE, NPE)................................................................................ 91
8.3 RCD testing
..................................................................................................................... 91
8.3.1 General data
............................................................................................................91
8.3.2 Contact voltage RCD-Uc
......................................................................................... 92
8.3.3 Trip-out time
............................................................................................................92
8.3.4 Trip-out curr
ent........................................................................................................ 93
8.4 Fault loop impedance and prospective fault current
........................................................ 93
8.4.1 No disconne
cting device or FUSE selected ............................................................ 93
8.4.2 RCD selected
.......................................................................................................... 94
8.5 Line impedance / prospe
ctive short-circuit current and Voltage drop ............................. 94
8.6 Voltage, frequency, and phase rotation
........................................................................... 95
8.6.1 Phase rotation
.........................................................................................................95
8.6.2 Voltage
....................................................................................................................95
8.6.3 Frequency
............................................................................................................... 95
8.7 Online terminal voltage monitor
....................................................................................... 95
Page 5

MI 3101 EurotestAT Table of contents
5
8.8 Earth resistance .............................................................................................................. 95
8.9 2 line/loop impedance.................................................................................................. 96
8.9.1 High precision line im
pedance ................................................................................96
8.9.2 High precision fault loop
impedance .......................................................................97
8.9.3 Contact volt
age .......................................................................................................98
8.10 Varistor test
..................................................................................................................... 98
8.11 General data.................................................................................................................... 99
A Appendix A - Fuse table
..................................................................................................... 100
B Appendix B - Accessories for specific measurements
................................................... 103
C Appendix C – Locator receiver R10K
................................................................................ 104
C.1 Tracing prin
ciples .......................................................................................................... 105
C.1.1 Positioning t
he receiver.........................................................................................105
C.1.2 Positioning current
clamp......................................................................................105
C.1.3 Positioning selective
probe.................................................................................... 106
C.2 Detection distances for
different connections................................................................ 106
C.3 R10K power supply
....................................................................................................... 106
C.4 Maintenance
.................................................................................................................. 106
D Appendix D - IT suppl
y systems........................................................................................ 107
D.1 Standard references
...................................................................................................... 107
D.2 Fundamentals................................................................................................................ 107
D.3 Measureme
nt guides..................................................................................................... 108
D.3.1 MI 3101 test functions a
nd IT systems.................................................................. 109
E Appendix E - Reduced low voltage
supply systems ....................................................... 110
E.1 Standard reference........................................................................................................ 110
E.2 Fundamentals................................................................................................................ 110
E.3 MI 3101 guides
.............................................................................................................. 110
E.3.1 MI 3101 functions and r
educed low voltage systems............................................ 111
E.4 Technical specificat
ions ................................................................................................ 113
E.4.1 RCD
.......................................................................................................................113
E.4.2 Fault loop impedance and prospective short-cir
cuit current.................................. 115
E.4.3 Line im
pedance and prospective short-circuit current........................................... 117
F Appendix F – Country
notes .............................................................................................. 118
F.1 List of count
ry modifications.......................................................................................... 118
F.2 Modification
issues........................................................................................................ 118
F.2.1 AT
modification - G type RCD...............................................................................118
F.2.2 ES
modification - CONTINUITY LOOP Re............................................................ 119
F.2.3 IT
modification - CONTINUITY LOOP Re ............................................................. 121
F.2.4 CH
modification - Change L/N............................................................................... 123
G Appendix G – ES1; ap
plication of regulative UNE-202008.............................................. 124
G.1 Main menu
..................................................................................................................... 124
G.1.1 Inspection
..............................................................................................................124
G.2 Miscellaneo
us................................................................................................................ 125
G.2.1 Operation mode
.....................................................................................................125
G.3 Measureme
nts............................................................................................................... 125
G.3.1 Inspection
s............................................................................................................ 126
G.3.2 Resistance t
o earth connection and equipotential bonding................................... 127
G.3.3 Fault loop impedance and prospective fault curr
ent.............................................. 130
G.3.4 Line im
pedance and prospective short-circuit current........................................... 132
H Appendix H – DK modifications
......................................................................................... 134
H.1 Fault loop impedance and prospective fault current
...................................................... 134
Page 6

MI 3101 EurotestAT Preface
6
1 Preface
Congratulations on your purchase of the instrument and its accessories from METREL.
The instrument was designed on basis of rich experience, acquired through many years of
dealing with electric installation test equipment.
The multifunctional hand-held installation tester EurotestAT is intended for all tests and
measurements required for total inspection of electrical installations in buildings. In general
the following measurements and tests can be performed:
True rms voltage and frequency, phase sequence,
Insulation resistance,
Resistance to earth connection and equipotential bonding plus continuous
resistance measurement,
Line impedance / Voltage drop,
Loop impedance,
2 line/loop impedance
RCD protection,
Resistance to earth,
Tracing the installation,
Overvoltage protection devices,
Specific earth resistance measurement.
Tests can be performed on the following supply systems:
TN / TT,
IT,
110 V reduced low voltage (2 x 55 V), and
110 V reduced low voltage (3 x 63 V).
The high-resolution graphic display with backlight offers easy reading of results,
indications, measurement parameters and messages. Operation is simple and clear –
operator does not need any special training (except reading this instruction manual) to
operate the instrument.
In order for operator to be familiar enough with measurements in general and their typical
applications it is advisable to read Metrel handbook Measurements on electric installations
in theory and practice.
The instrument is equipped with all accessories necessary for comfortable testing. It is
kept in a soft carrying bag together with all accessories.
Page 7
MI 3101 EurotestAT: Safety and operational considerations Warnings and notes
7
2 Safety and operational considerations
2.1 Warnings and notes
In order to reach high level of operator’s safety while carrying out various tests and
measurements using EurotestAT, as well as to keep the test equipment undamaged, it is
necessary to consider the following general warnings:
Warning on the instrument means »Read the Instruction manual with
special care to safety operation«. The symbol requires an action!
If the test equipment is used in a manner not specified in this user manual the
protection provided by the equipment might be impaired!
Read this user manual carefully, otherwise use of the instrument may be
dangerous for the operator, for the instrument or for the equipment under test!
Do not use the instrument and accessories if any damage is noticed!
In case a fuse has blown follow the instructions in this manual to replace it!
Consider all generally known precautions in order to avoid risk of electric
shock while dealing with hazardous voltages!
Do not use the instrument in supply systems with voltages higher than
550 V!
Service intervention or adjustment and calibration procedure is allowed to be
carried out only by a competent authorized person!
Use only standard or optional test accessories supplied by your distributor!
Consider that older and some of new optional test accessories compatible with
this instrument meet overvoltage category CAT III / 300 V! It means that
maximum allowed voltage between test terminals and ground is 300 V!
Instrument contains rechargeable NiCd or NiMh battery cells. The cells should
only be replaced with the same type as defined on the battery placement label
or in this manual. Do not use standard alkaline battery cells while power supply
adapter is connected, otherwise they may explode!
Hazardous voltages exist inside the instrument. Disconnect all test leads,
remove the power supply cable and switch off the instrument before removing
battery compartment cover.
All normal safety precautions have to be taken in order to avoid risk of electric
shock when working on electrical installations!
Warnings related to measurement functions:
Insulation resistance
Do not touch the test object during the measurement or before it is fully
discharged! Risk of electric shock!
Automatic discharge of capacitive object will take some time after the finished
insulation resistance measurement. Warning message
and actual voltage is
displayed during discharging until voltage drops below 10 V. In no case you
should disconnect test leads until tested object is completely discharged!
Page 8

MI 3101 EurotestAT: Safety and operational considerations Warnings and notes
8
Notes related to measurement functions:
General
Indicator means that the selected measurement can't be performed because of
irregular conditions on input terminals.
Insulation resistance, varistor test, continuity functions and earth resistance
measurements shall be performed on de-energized objects, i.e. voltage between
test terminals should be lower than 10 V!
PASS / FAIL indication is enabled when limit is set to ON. Apply appropriate limit
value for evaluation of measurement results.
In case that only two of three wires are connected to test electrical installation, only
voltage indication between these two wires is valid.
Insulation resistance
When measuring insulation resistance between installation conductors all loads
must be disconnected and all switches closed!
The instrument automatically discharge tested object after finished measurement.
Keep the TEST key pressed for continuous measurement.
Continuity functions
Parallel resistance paths and interfering currents in measured circuit will influence
the test result!
If necessary compensate test lead resistance before performing continuity
measurement, see 5.2.3.
Measuring the resistance of wire wound components like transformer or motor
windings is possible only in continuous function (R7mA) due to great influence of
the winding inductance.
RCD functions
Parameters set in one function are also kept for other RCD functions.
The measurement of contact voltage will not trip-out RCD of tested installation if
selected rated test current is the same as rated I
N
of observed RCD. However, the
RCD trip-out may occur and Uc measurement is affected as a result of PE leakage
currents caused by appliances that are connected to the tested installation.
The RCD trip-out current test and Uc measurement could be affected as a result of
potential fields of other earthing installations.
RCD trip-out current and time will be measured only if pretest of those functions
gives contact voltage lower than the selected conventional limit contact voltage.
L and N test terminals are reversed automatically according to detected terminal
voltage.
In case the RCD trips-out during safety pretests it is possible to continue
measurements just by recovering the RCD. Possible reasons for trip-out are
incorrect RCD sensitivity (IN) selected, relatively high leakage currents in tested
installations or defective RCD.
Page 9

MI 3101 EurotestAT: Safety and operational considerations Warnings and notes
9
Z-LOOP
Fault loop impedance measurement (protection: FUSE or no protection ---) trips-out
the RCD. Use the Z-LOOP Impedance, Protection: RCD option to prevent the tripout.
Fault loop impedance function with selected RCD protection takes longer time to
complete but offers much better accuracy then RL sub-result in RCD: Uc function.
Specified accuracy of tested parameters is valid only if mains voltage is stable
during the measurement and no additional operating circuits are connected in
parallel.
L and N test terminals are reversed automatically according to detected terminal
voltage.
Z-LINE / Voltage drop
Measurement of Z
Line-Line
with the instrument test leads PE and N connected
together will generate warning of dangerous PE voltage when the TEST key is
touched but measurement is not prohibited.
Specified accuracy of tested parameters is valid only if mains voltage is stable
during the measurement and no additional operating circuits are connected in
parallel.
L and N test terminals are reversed automatically according to detected terminal
voltage.
Earth resistance
High currents and voltages in earthing could influence the measurement results.
High resistance of S and H probes could influence the measurement results. In this
case, indications Rp and Rc appear in the message field. There is no pass / fail
indication in this case.
Resistance of E measuring wire is added to the measurement result of resistance to
earth. Use only standard test accessory without extension lead for E probe.
Line tracer
Receiver R10K should always be in IND mode when working with the MI 3101
instrument.
When dealing with complex installations (long conductors or more current loops
connected in parallel), it is advisable to disconnect parts of the installation that are
not of interest at that moment. Otherwise the test signal will spread all over the
installation and the selectivity can fall to an unacceptable level.
Page 10
MI 3101 EurotestAT: Safety and operational considerations Battery and charging
10
2.2 Battery and charging
The instrument uses six AA size alkaline or rechargeable Ni-Cd or Ni-MH battery cells.
Nominal operating time is declared for cells with nominal capacity of 2100 mAh.
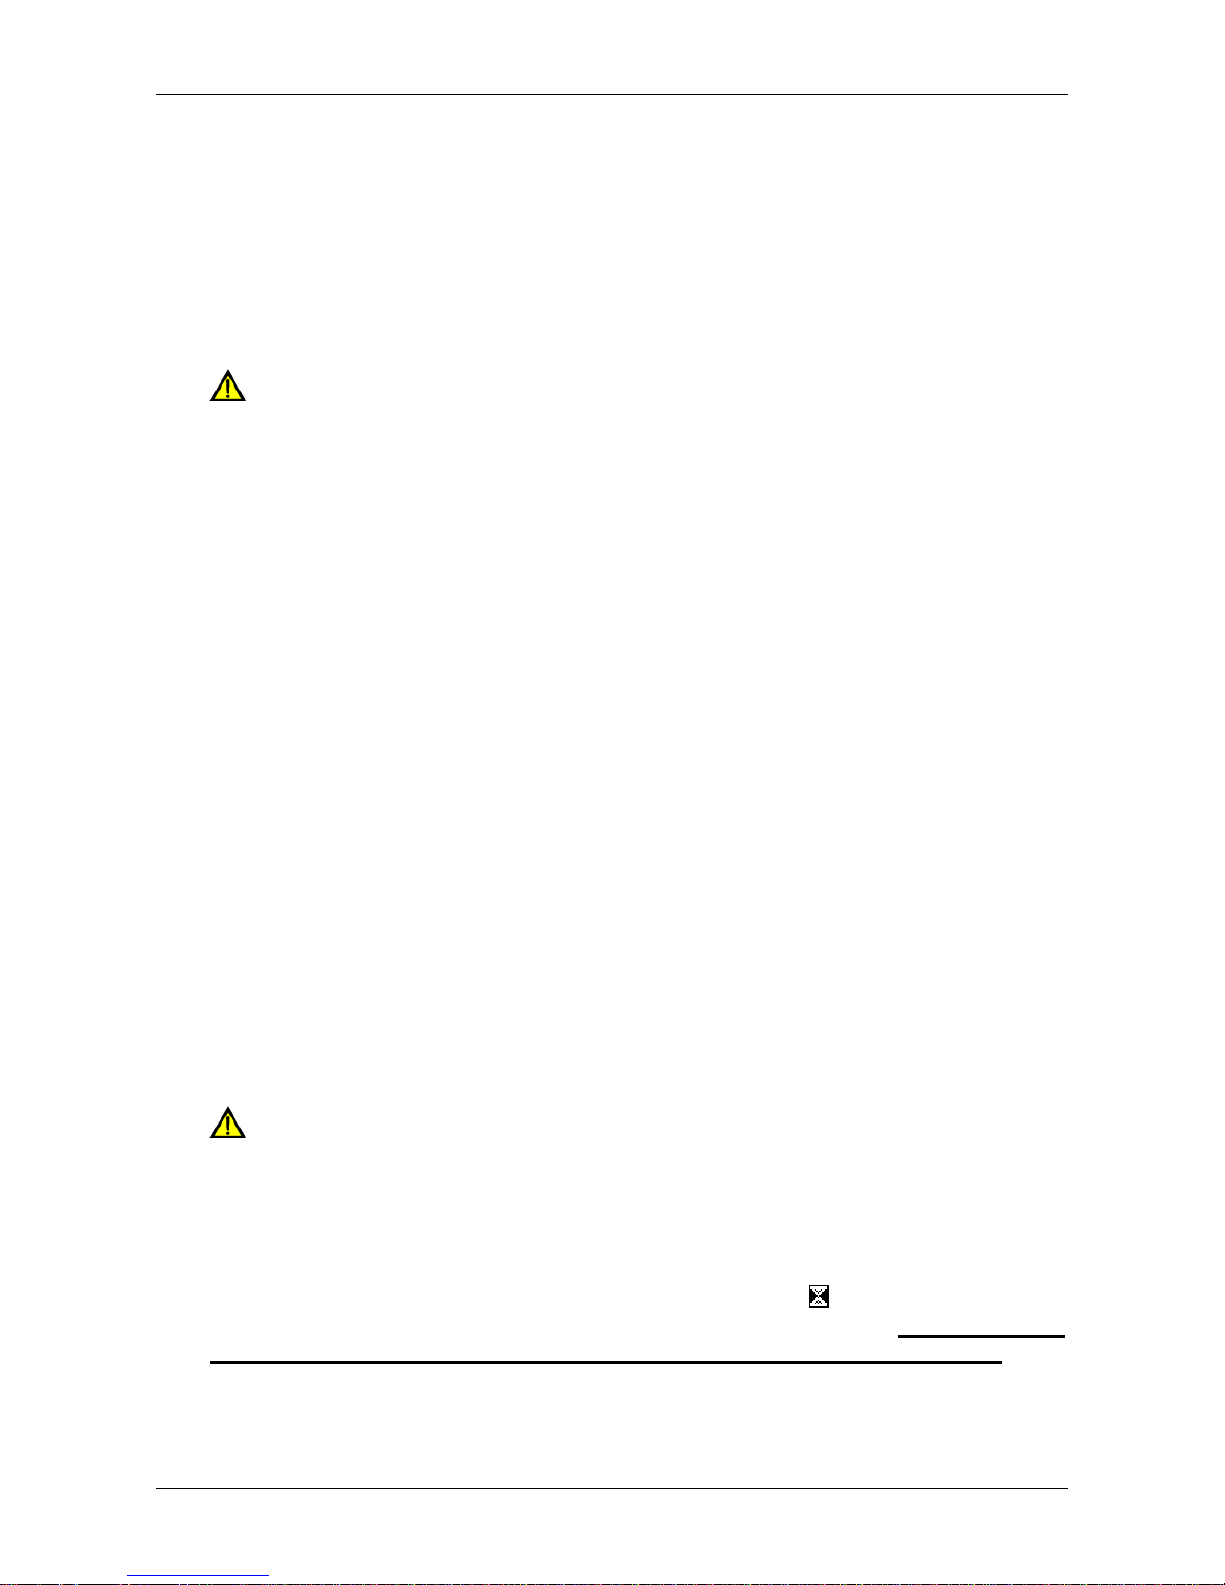
Battery condition is always present on the display when the instrument is turned on.
In case the battery is weak the instrument indicates this as shown in figure 2.1. This
indication appears for a few seconds and then the instrument is turned off.
Figure 2.1: Discharged battery indication
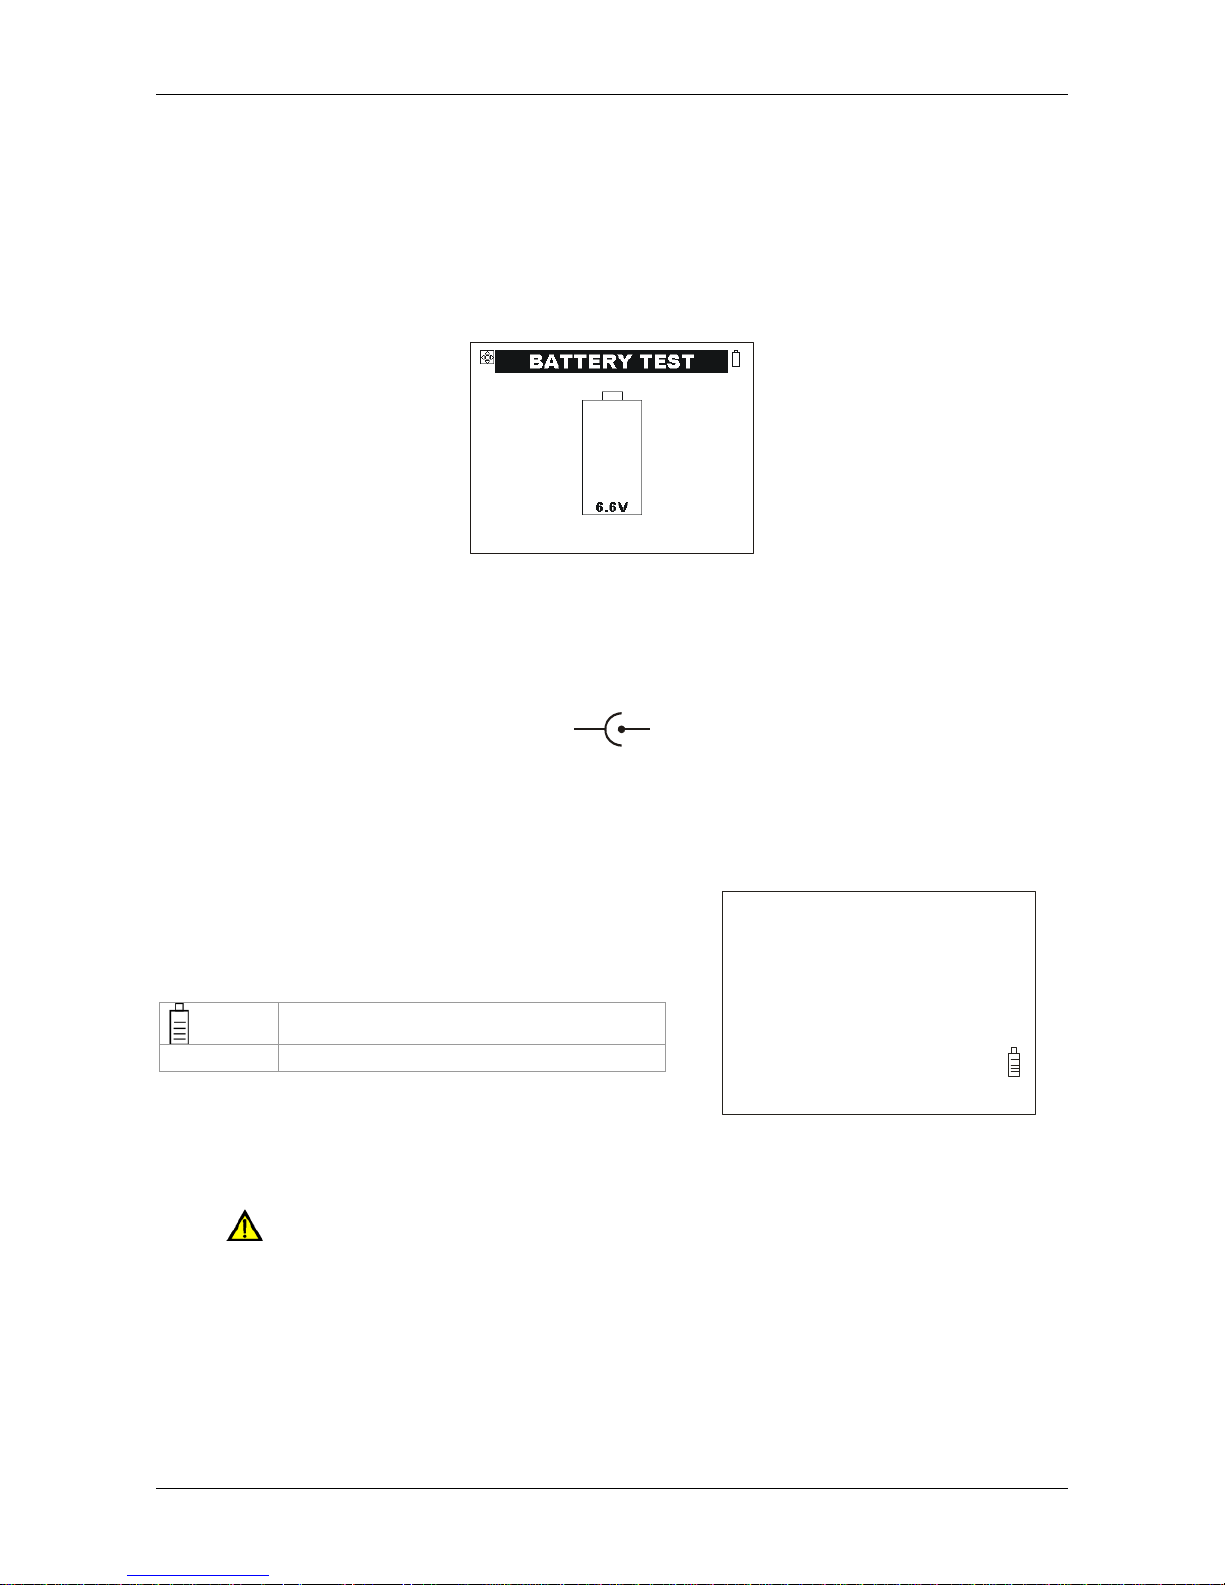
The battery is charged whenever the power supply adapter is connected to the instrument.
Internal circuit controls charging assuring maximum battery lifetime. Power supply socket
polarity is shown in figure 2.2.
+
-
Figure 2.2: Power supply socket polarity
The instrument automatically recognizes connected power supply adapter and controls
charging.
Symbols:
Indication of battery charging
7.2 Battery voltage
7.2
Figure 2.3: Charging indication
Before opening battery / fuse compartment cover disconnect all measuring
accessories connected to the instrument and power off the instrument.
Insert cells correctly, otherwise the instrument will not operate and the batteries
could be discharged.
If the instrument is not used for longer period remove all battery cells from the
battery compartment.
Do not charge alkaline battery cells!
Page 11

MI 3101 EurotestAT: Safety and operational considerations Battery and charging
11
Take into account handling, maintenance and recycling requirements that are
defined by related regulatives and manufacturer of alkaline or rechargeable
batteries!
Use only power supply adapter delivered from manufacturer or distributor of the test
equipment to avoid possible fire or electric shock!
2.2.1 New battery cells or cells unused for a longer period
Unpredictable chemical processes can occur during charging of new battery cells or cells
that were unused for a longer period (more than 3 months). Ni-MH and Ni-Cd battery cells
are affected to capacity degradation (sometimes called as memory effect). As a result the
instrument operation time can be significantly reduced.
Recommended procedure for recovering battery cells:
Procedure Notes
Completely charge the battery.
At least 14h with in-built charger.
Completely discharge the battery.
Can be performed with normal work with the
instrument.
Repeat the charge / discharge cycle for
at least two times.
Four cycles are recommended.
Complete discharge / charge cycle is performed automatically for each cell using external
intelligent battery charger.
Notes:
The charger in the instrument is a pack cell charger. This means that the battery
cells are connected in series during the charging. The battery cells have to be
equivalent (same charge condition, same type and age).
One different battery cell can cause an improper charging and incorrect discharging
during normal usage of the entire battery pack (it results in heating of the battery
pack, significantly decreased operation time, reversed polarity of defective cell,…).
If no improvement is achieved after several charge / discharge cycles, then each
battery cell should be checked (by comparing battery voltages, testing them in a cell
charger, etc). It is very likely that only some of the battery cells are deteriorated.
The effects described above should not be mixed with normal decrease of battery
capacity over time. Battery also loses some capacity when it is repeatedly charged /
discharged. The actual decrease of capacity versus number of charging cycles
depends on battery type and is provided in the technical specification from battery
manufacturer.
Page 12

MI 3101 EurotestAT: Safety and operational considerations Standards applied
12
2.3 Standards applied
The MI 3101 EurotestAT instrument is manufactured and tested according to the following
regulations, listed below.
Electromagnetic compatibility (EMC)
EN 61326
Electrical equipment for measurement, control and laboratory use –
EMC requirements
Class B (Hand held equipment used in controlled EM environments)
Safety (LVD)
EN 61010 - 1
Safety requirements for electrical equipment for measurement, control,
and laboratory use – Part 1: General requirements
EN 61010 - 031
Safety requirements for hand-held probe assemblies for electrical
measurement and test
Functionality
EN 61557
Electrical safety in low voltage distribution systems up to 1000 V a.c. and
1500 V d.c. - Equipment for testing, measuring or monitoring of
protective measures
Part 1 General requirements
Part 2 Insulation resistance
Part 3 Loop resistance
Part 4 Resistance of earth connection and equipotential bonding
Part 5 Resistance to earth
Part 6 Residual current devices (RCDs) in TT and TN systems
Part 7 Phase sequence
Part 10 Combined measuring equipment
Other reference standards for testing RCDs
EN 61008
Residual current operated circuit-breakers without integral overcurrent
protection for household and similar uses
EN 61009
Residual current operated circuit-breakers with integral overcurrent
protection for household and similar uses
EN 60755 General requirements for residual current operated protective devices
EN 60364-4-41
Low-voltage electrical installations - Part 4-41: Protection for safety Protection against electric shock
EN 60364-5-52
Low-voltage electrical installations - Part 5-52: Selection and erection of
electrical equipment - Wiring systems
IEC 62423
Type F and type B residual current operated circuit-breakers with and
without integral overcurrent protection for household and similar use
BS 7671 IEE Wiring Regulations
AS / NZ 3760 In-service safety inspection and testing of electrical equipment
Note about EN and IEC standards:
Text of this manual contains references to European standards. All standards of EN 6xxxx
(e.g. EN 61010) series are equivalent to IEC standards with the same number (e.g. IEC
61010) and differ only in amended parts required by European harmonization procedure.
Page 13
MI 3101 EurotestAT: Instrument description Front panel
13
3 Instrument description
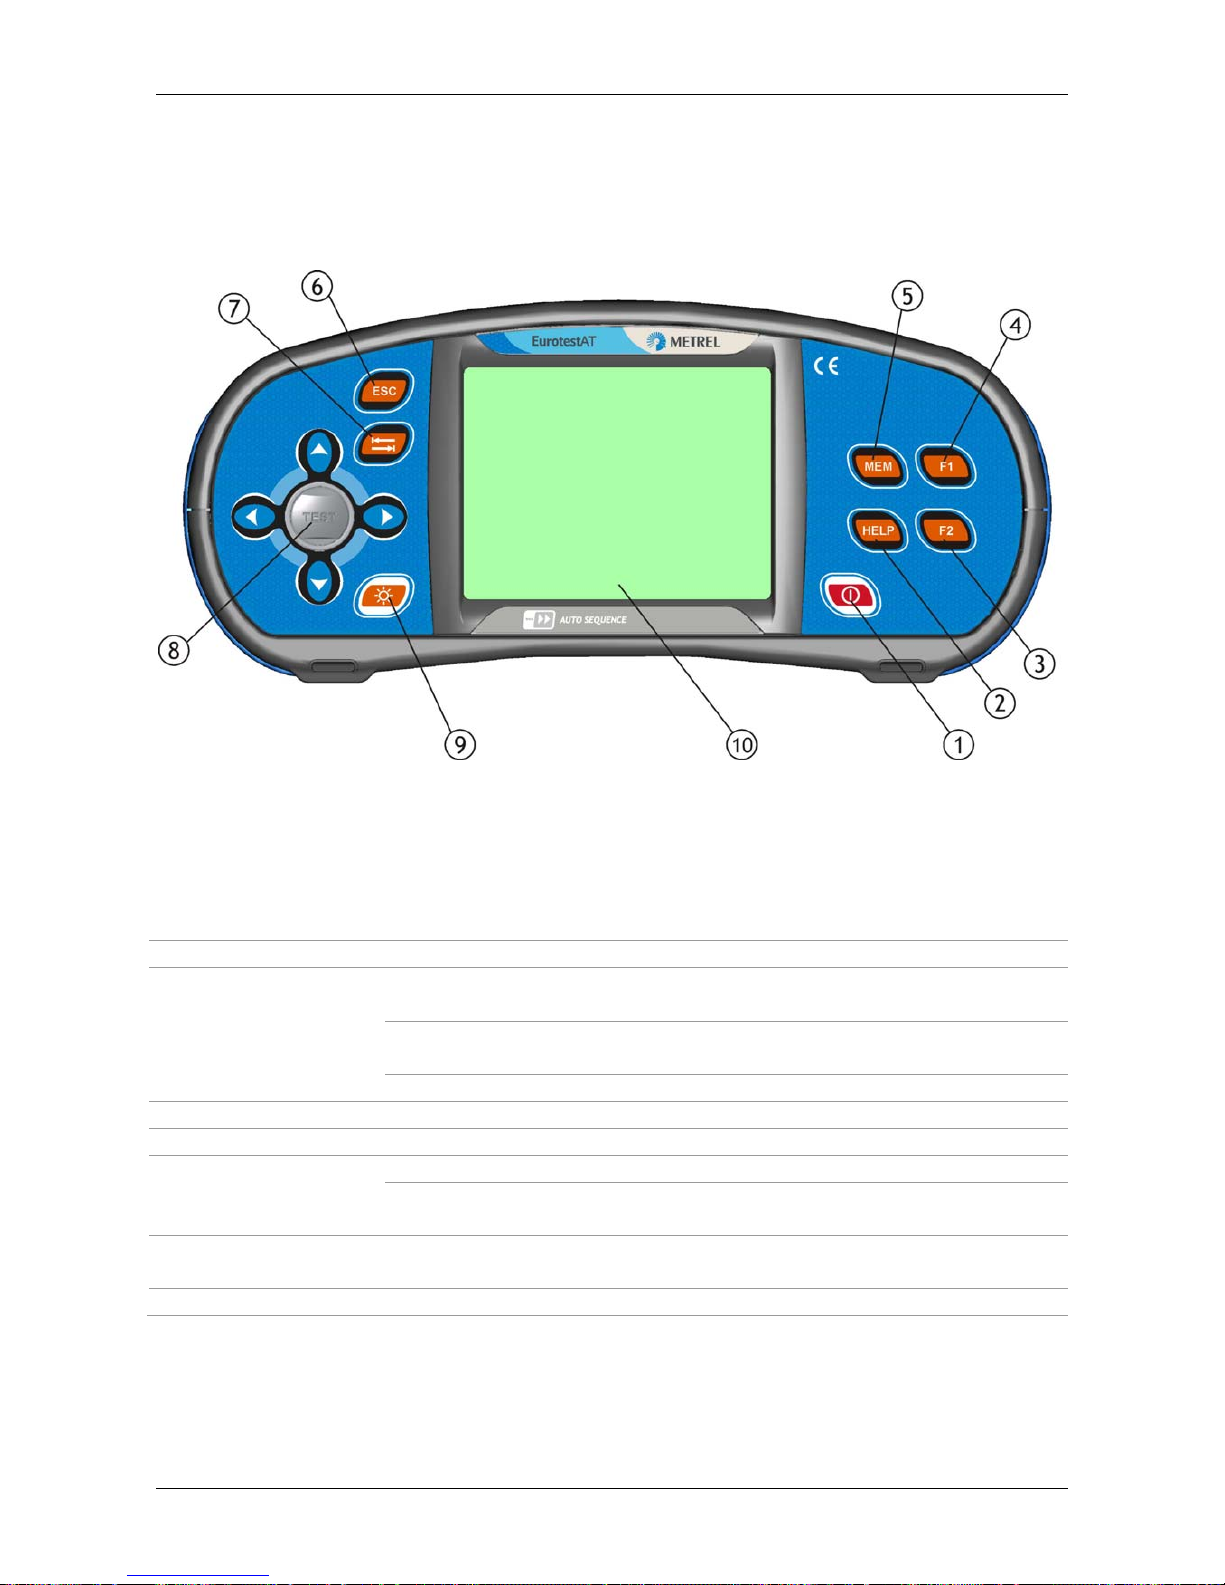
3.1 Front panel
Figure 3.1: Front panel
Legend:
Switches the instrument power on or off.
1 ON / OFF
The instrument automatically turns off 15 minutes after the last
key was pressed.
2 HELP Accesses help menus.
Adds new memory location.
3 F2
Confirmation of name entered in edit mode.
Enters memory editing mode.
4 F1
Deletes character on the left in edit mode.
5 MEM Handling with memory.
6 ESC Exits selected and displayed option.
7 TAB Jumps between display windows.
Cursors Selection of tested function and its working parameters.
Initiates measurements.
8
Cursor keypad
with TEST key
TEST
Acts also as the PE touching electrode.
9
BACKLIGHT,
CONTRAST
Changes backlight level and contrast.
10 LCD 320 x 240 dots matrix display with backlight.
Page 14
MI 3101 EurotestAT: Instrument description Connector panel
14
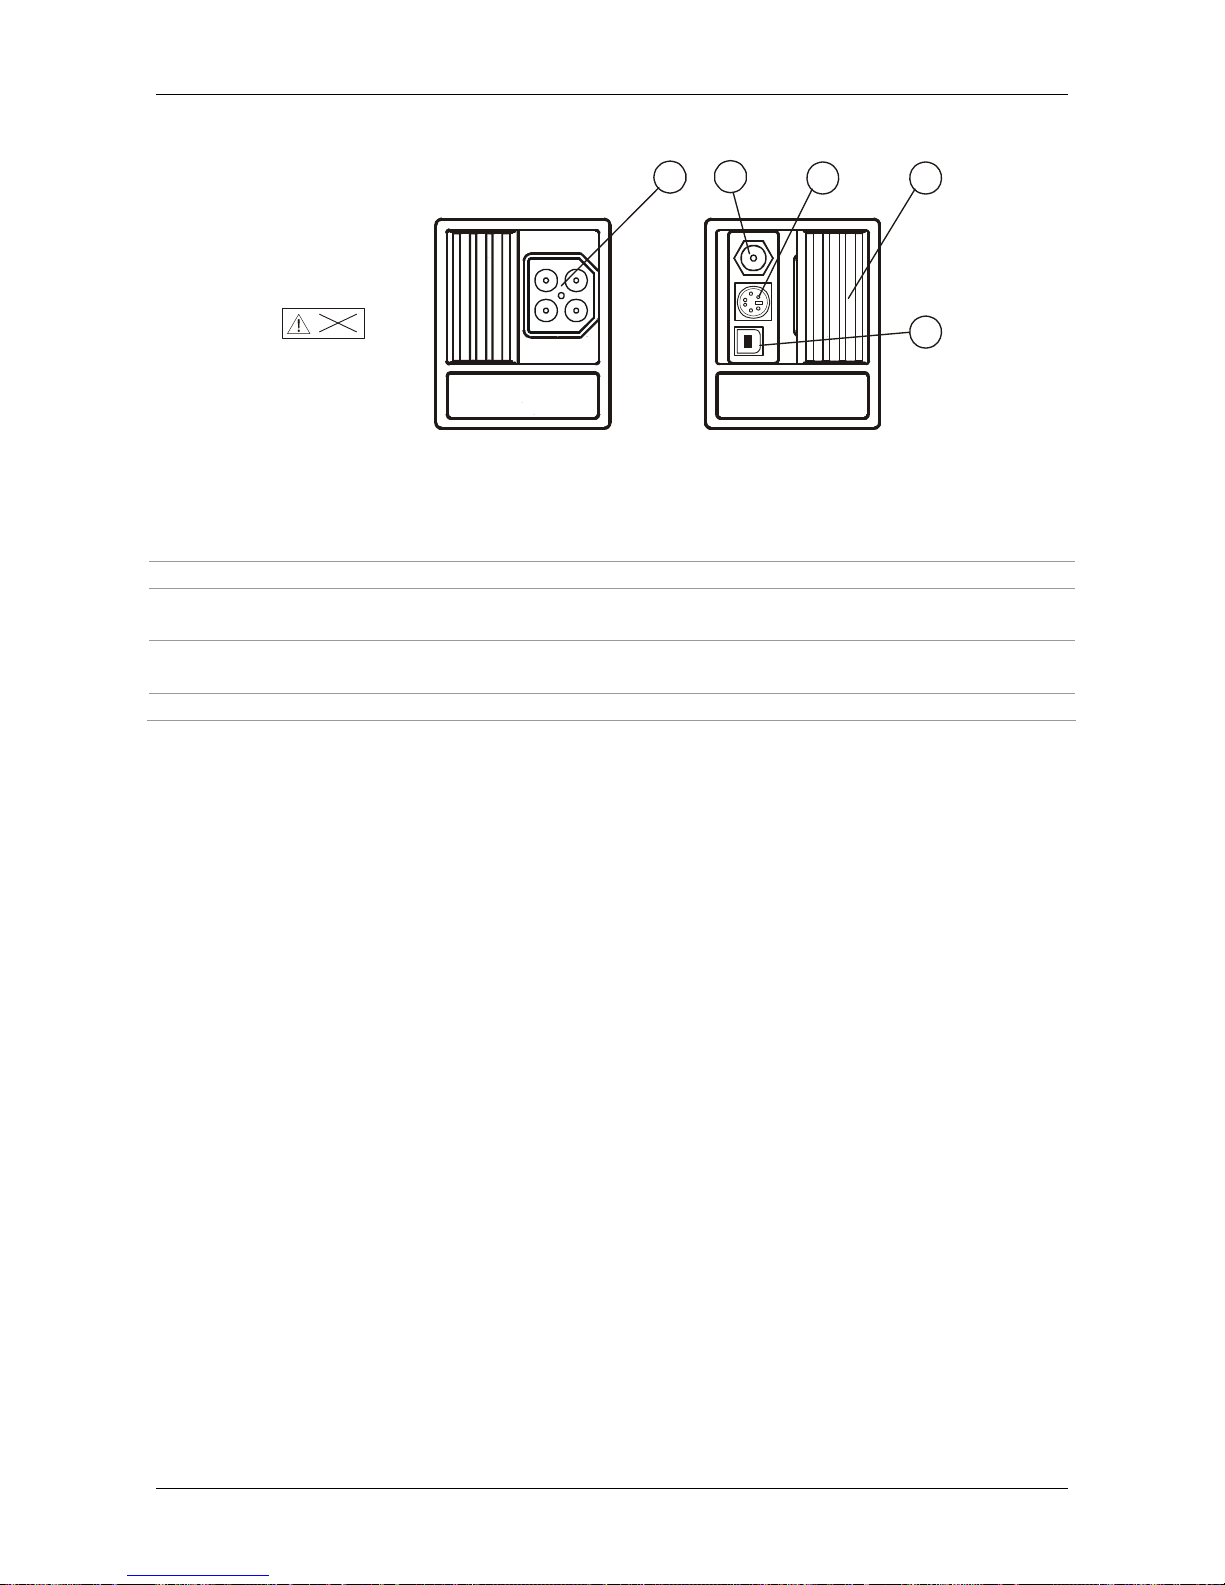
3.2 Connector panel
1
3
2
> 550V
4
5
Figure 3.2: Connector panel
Legend:
1 Test connector Measuring inputs / outputs, connection of measuring cables.
2 Charger socket Connection of power supply adapter.
3 PS/2 connector
Communication with PC serial port and connection to optional
measuring adapters.
4 Protection cover
Protects from simultaneous access to test connector and power
supply adapter socket plus communication connectors.
5 USB connector Communication with PC USB (1.1) port.
Warnings!
Maximum allowed voltage between any test terminal and ground is 600 V!
Maximum allowed voltage between test terminals is 550 V!
Maximum short-term voltage of external power supply adapter is 14 V!
Page 15
MI 3101 EurotestAT: Instrument description Back panel
15
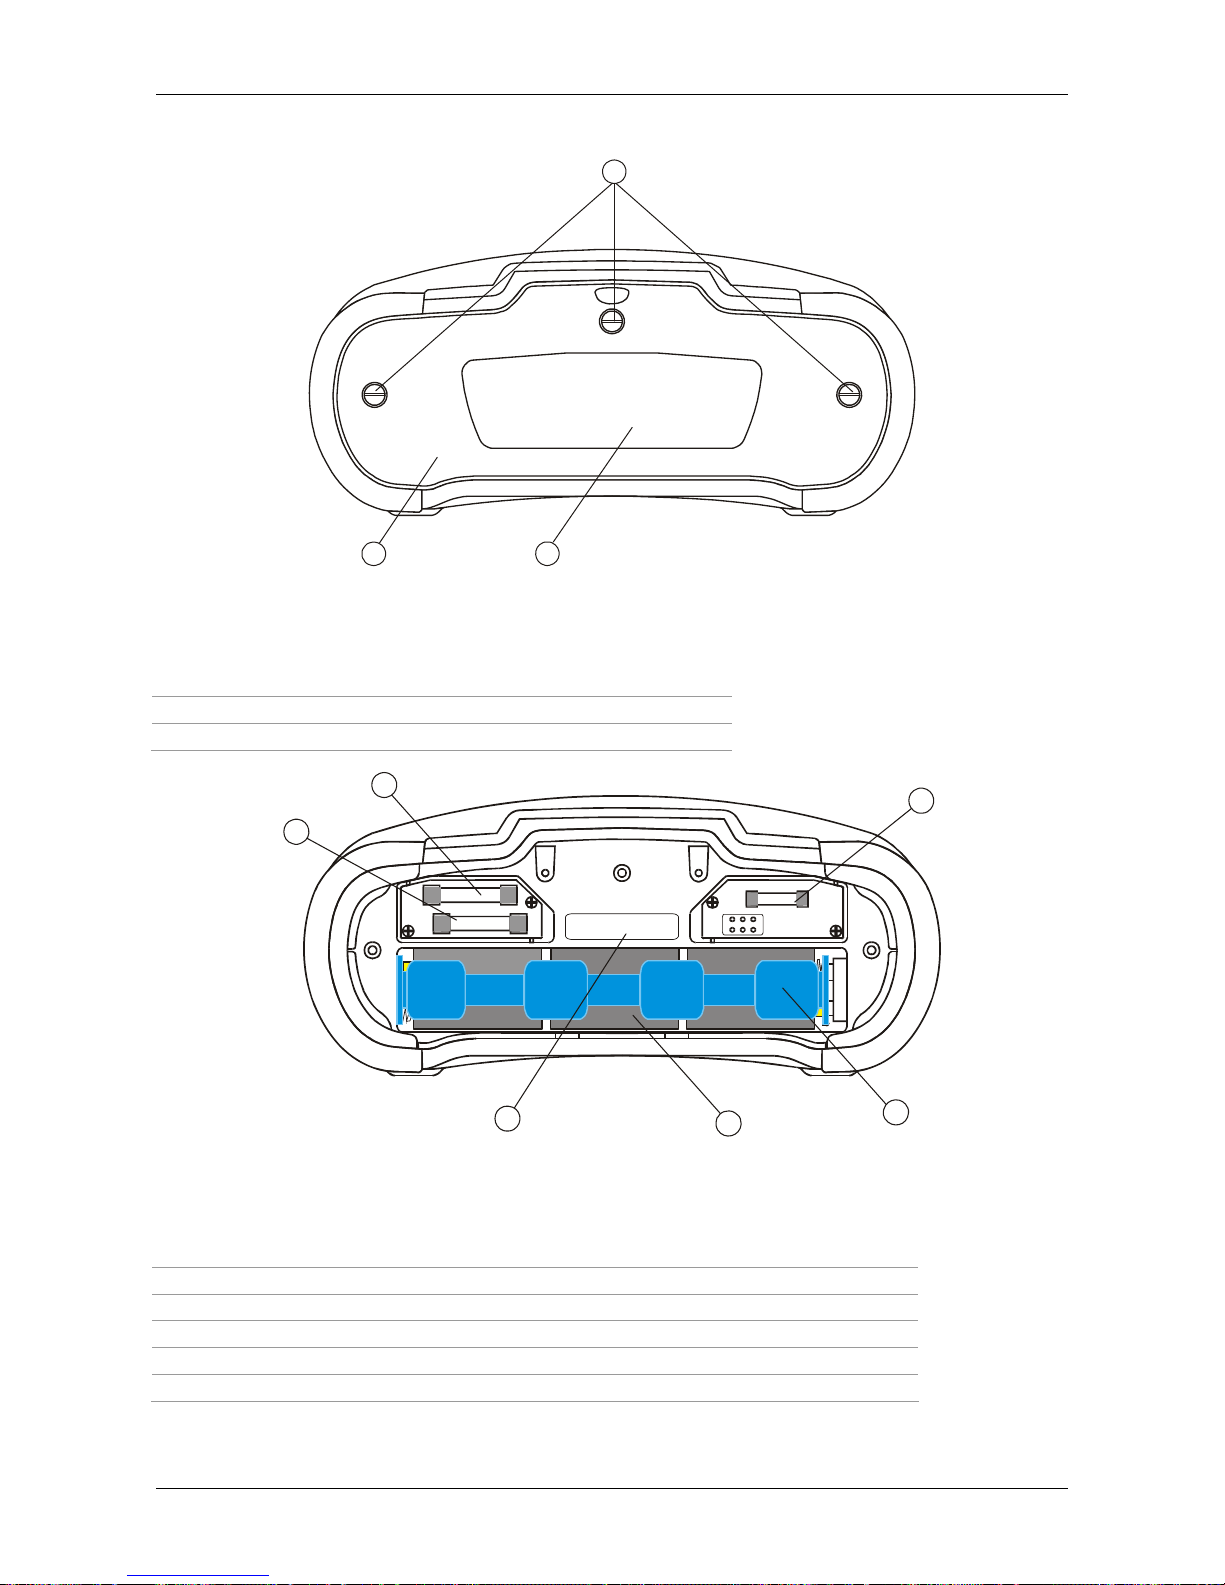
3.3 Back panel
1
2
3
Figure 3.3: Back panel
Legend:
1 Battery / fuse compartment cover
2 Back panel information label
3 Fixing screws for battery / fuse compartment cover
5
6
4
1
2
3
F1
F3
F2
Fuse
Fuse
Fuse
SIZE AASIZE AA
SIZE AA
SIZE AASIZE AASIZE AA
S/N XXXXXXXX
Figure 3.4: Battery and fuse compartment
Legend:
1 Fuse F1 T 315 mA / 250 V
2 Fuse F2 T 4 A / 500 V
3 Fuse F3 T 4 A / 500 V
4 Serial number label
5 Battery cells Size AA, alkaline / rechargeable NiMH or NiCd
6 Battery holder Can be removed from the instrument
Page 16
MI 3101 EurotestAT: Instrument description Bottom
16
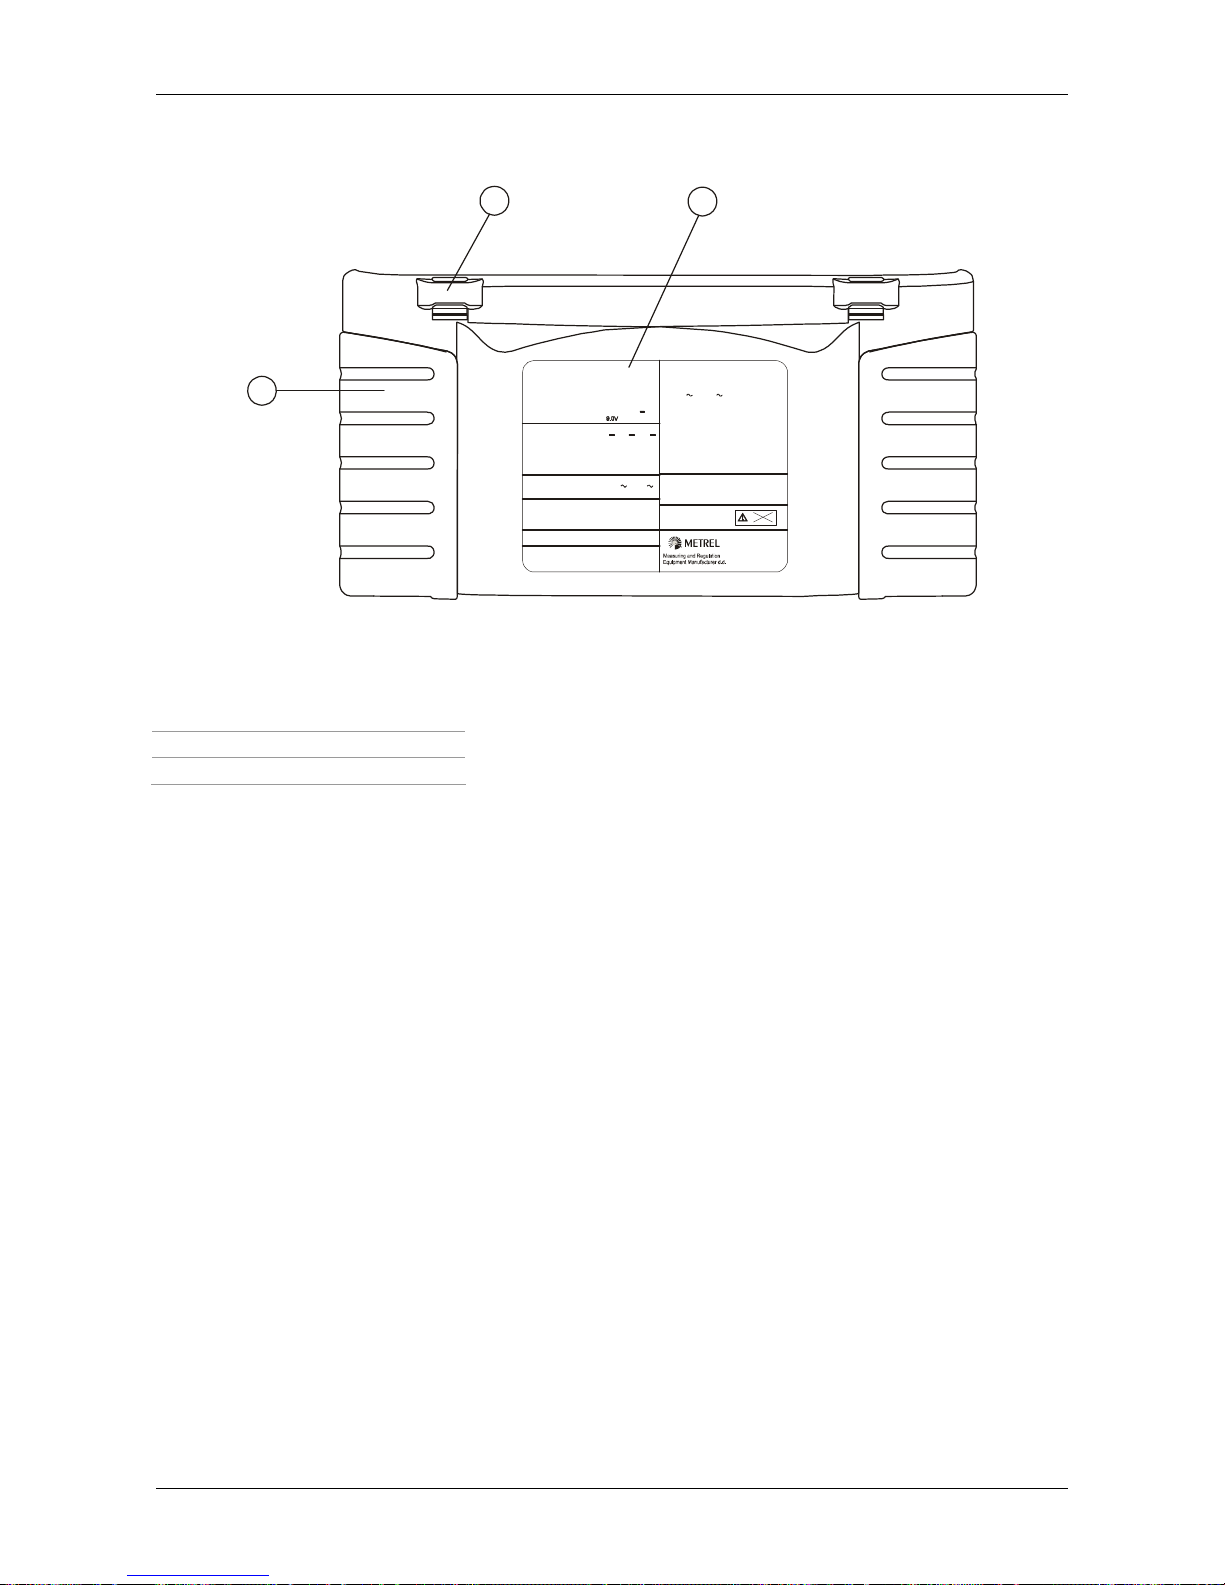
3.4 Bottom
3
1
2
R: 0.0 1999 Test current: max. 8.5mA
Open-circuit voltage: 6.5V
Continuity 7mA
R: 0.18M 199.9M , U =50V ,100 ,
R: 0.12M 999M , U = 500V , 1kV
U: 0V 1200V
Nominal voltages: 100V , 250V , 500V , 1kV
Measuring current: min. 1mA at R =U 1k /V
Short-circuit current: < 3mA
N
N
NN
Insulation resistance (EN 61557-2)
V250V
Continuity
Tripping time
non-delayed (time-delayed) RCDs
1: 0ms 300ms (500ms)
2: 0ms 150ms (200ms)
5: 0ms 40ms (150ms), U : 0.0V 100.0V
C
Tripping curre nt
I : 0.2 I 1.1 I AC (
t : 0ms 300ms, U : 0.0V 100.0V
C
NN N
1.5 I A)
Multiplier: 0.5, 1, 2, 5
Cont act v oltag e
U : 0.0V 100.0V
R : 0.0 0 10.0 0k (R =U / I )
C
SSCN
R : 0. 1999 I : 0. A . kA
L-N(L) PSC
17 20 1 4
Nominal voltage: 100V 440V/ 15Hz 500Hz
Line impedance(EN 61557-3)
Fault loop (EN 61557-3)
R : 0. 1999
I : 0. A .kA
PFC
14 14
Nominal voltage: 100V 264V/ 15Hz 500Hz
impedance
L-PE
17
Voltage, frequency
U: 0V 440V / f: 15Hz 500Hz
Phase rotation (EN 61557-7)
Nominal voltage: 100V 440V / 1 00
Results: 1.2.3 or 2.1.3
5Hz 5 Hz
RCD (EN 61557-6)
I : 10mA, 30mA, 100mA, 300mA, 500mA, 1A
Nominal voltage: 100V 264V/ 15Hz 500Hz
R Low (EN 61557-4)
R: 0.12 1999
Test current: min. ±200mA at 2
Open-circuit voltage: 6.5V 9.0V
Resistance to earth (EN 61557-5)
R: 0.04 9999
Open-circuit voltage :
Short-circuit current
< 45V
: < 20mA
RMS
Ljubljanska 77
SI - 1354 Horjul
Tel: +386 1 75 58 200
http://www.metrel.si
20 224 83 2
CAT III 600V
550V
Figure 3.5: Bottom
Legend:
1 Bottom information label
2 Neck belt openings
3 Handling side covers
Page 17
MI 3101 EurotestAT: Instrument description Display organization
17
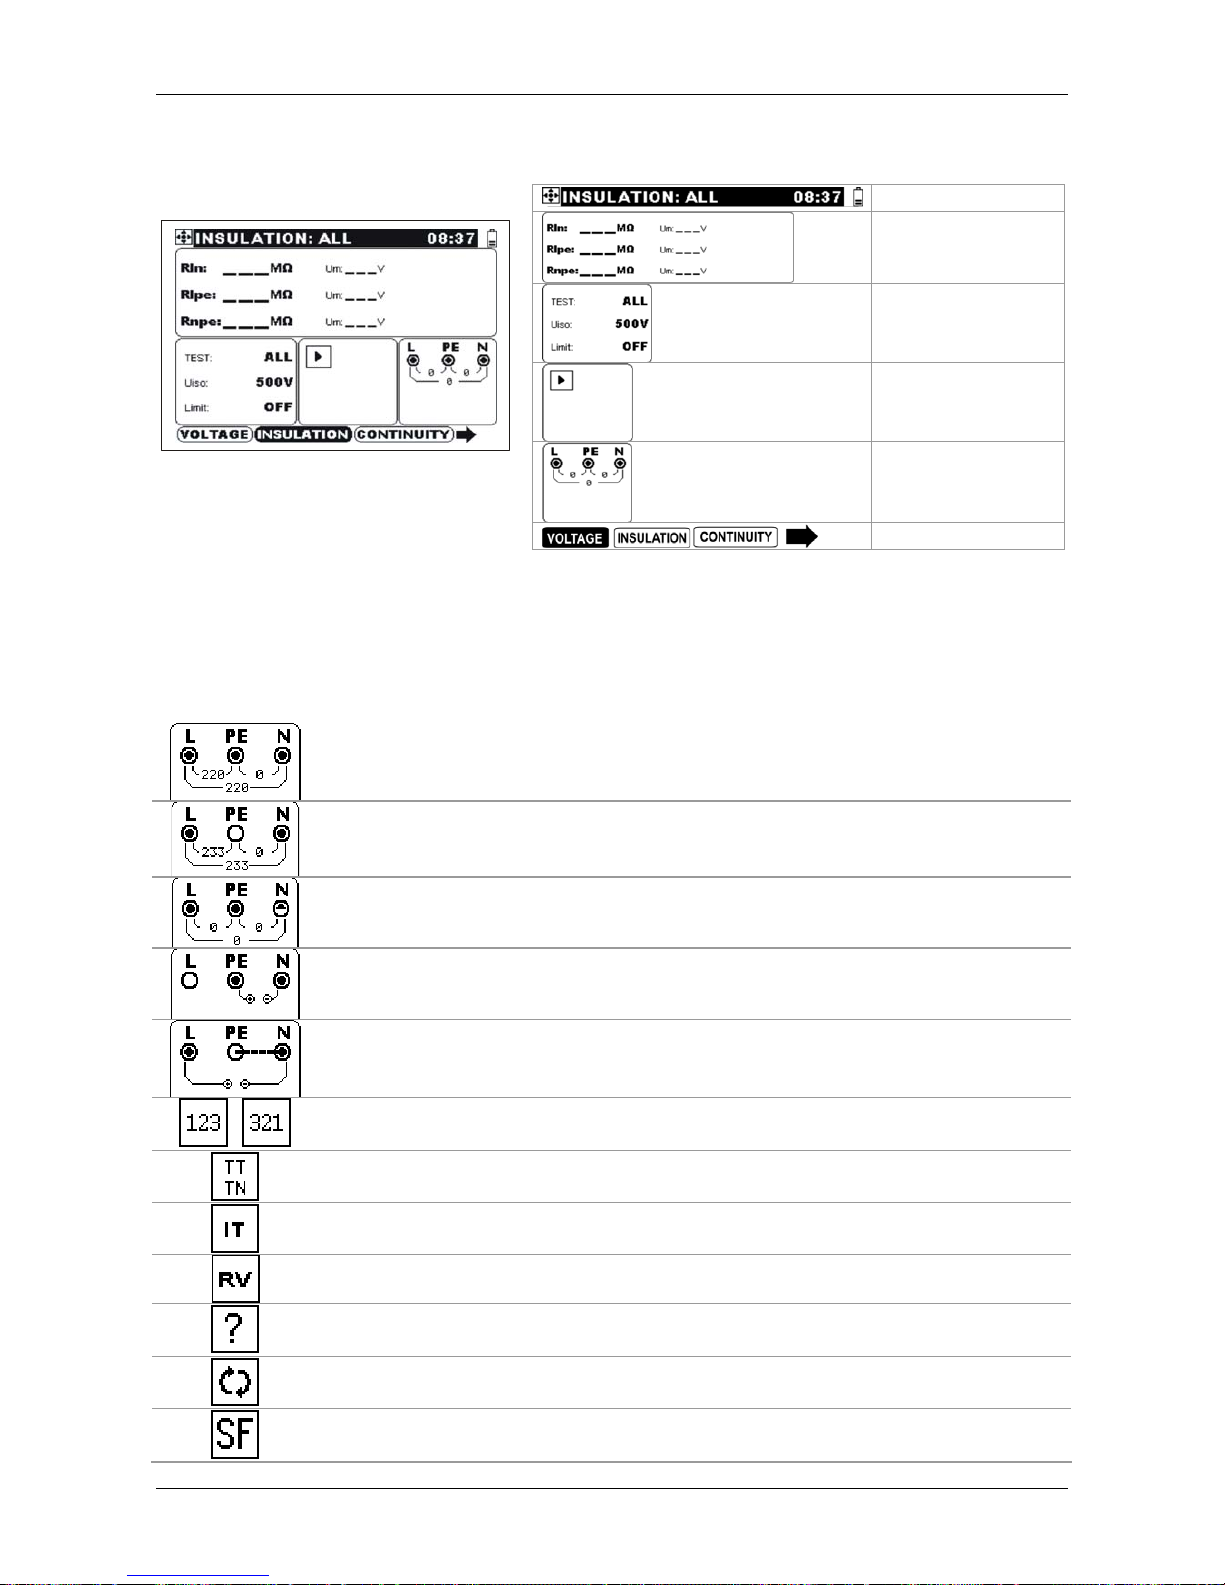
3.5 Display organization
Figure 3.6: Typical single test
display
Menu line
Result field
Test parameter
field
Message field
Terminal voltage
monitor
Function tabs
3.5.1 Terminal voltage monitor
The terminal voltage monitor displays current voltages present on the test terminals. In its
lower part messages are displayed regarding the measured voltages and selected voltage
system (see 4.4.2 Supply system).
Online voltage is displayed together with test terminal indication.
L and N test terminals are used for selected measurement.
L and PE are test terminals; N terminal should also be connected for
reference in measuring circuit.
Polarity of test voltage applied to the output terminals.
Insulation test: two measuring terminals should be shorted.
,
Three-phase connection indicator.
TT / TN supply system.
IT supply system.
Reduced low voltage supply system.
Unknown supply system (atypical voltage at input terminals for selected
supply system).
L – N polarity changed.
First fault in IT supply system.
Check monitored voltages to fix the problem.
Page 18

MI 3101 EurotestAT: Instrument description Display organization
18
Warning! Phase voltage on the PE terminal! Stop the activity immediately
and eliminate the fault / connection problem before proceeding with any
activity!
3.5.2 Menu line
In the menu line the name of the selected function is displayed. Additional informations
about active cursor / TEST keys and battery condition are shown.
Function name.
Time.
Active keys on cursor / TEST keypad ( and TEST in this
example).
Battery capacity indication.
Low battery.
Battery is too weak to guarantee correct result. Replace or
recharge the battery cells.
Recharging in progress (if power supply adapter is connected).
3.5.3 Message field
In the message field different warnings and messages are displayed.
Warning! High voltage is applied to the test terminals.
Measurement is running, consider displayed warnings.
Conditions on the input terminals allow starting the measurement (TEST
key), consider other displayed warnings and messages.
Conditions on the input terminals do not allow starting the measurement
(TEST key), consider displayed warnings and messages.
Test leads resistance in CONTINUITY tests is not compensated, see
Chapter 5.2.3 for compensation procedure.
Test leads resistance in CONTINUITY tests is compensated.
Possibility to perform reference measurement (Zref) in ΔU sub-function.
RCD tripped-out during the measurement (in RCD functions).
Instrument is overheated, the temperature inside the instrument is higher
than the safety limit, and measurement is prohibited until the temperature
decreases under the allowed limit.
Fuse F1 has blown or not inserted (CONTINUITY and EARTH functions).
It is possible to store result(s).
High electrical noise during measurement. Results may be impaired.
Page 19
MI 3101 EurotestAT: Instrument description Display organization
19
Probe resistances Rc or Rp could influence earth resistance result.
Pause activated in auto sequence test. Follow required activity for paused
test function.
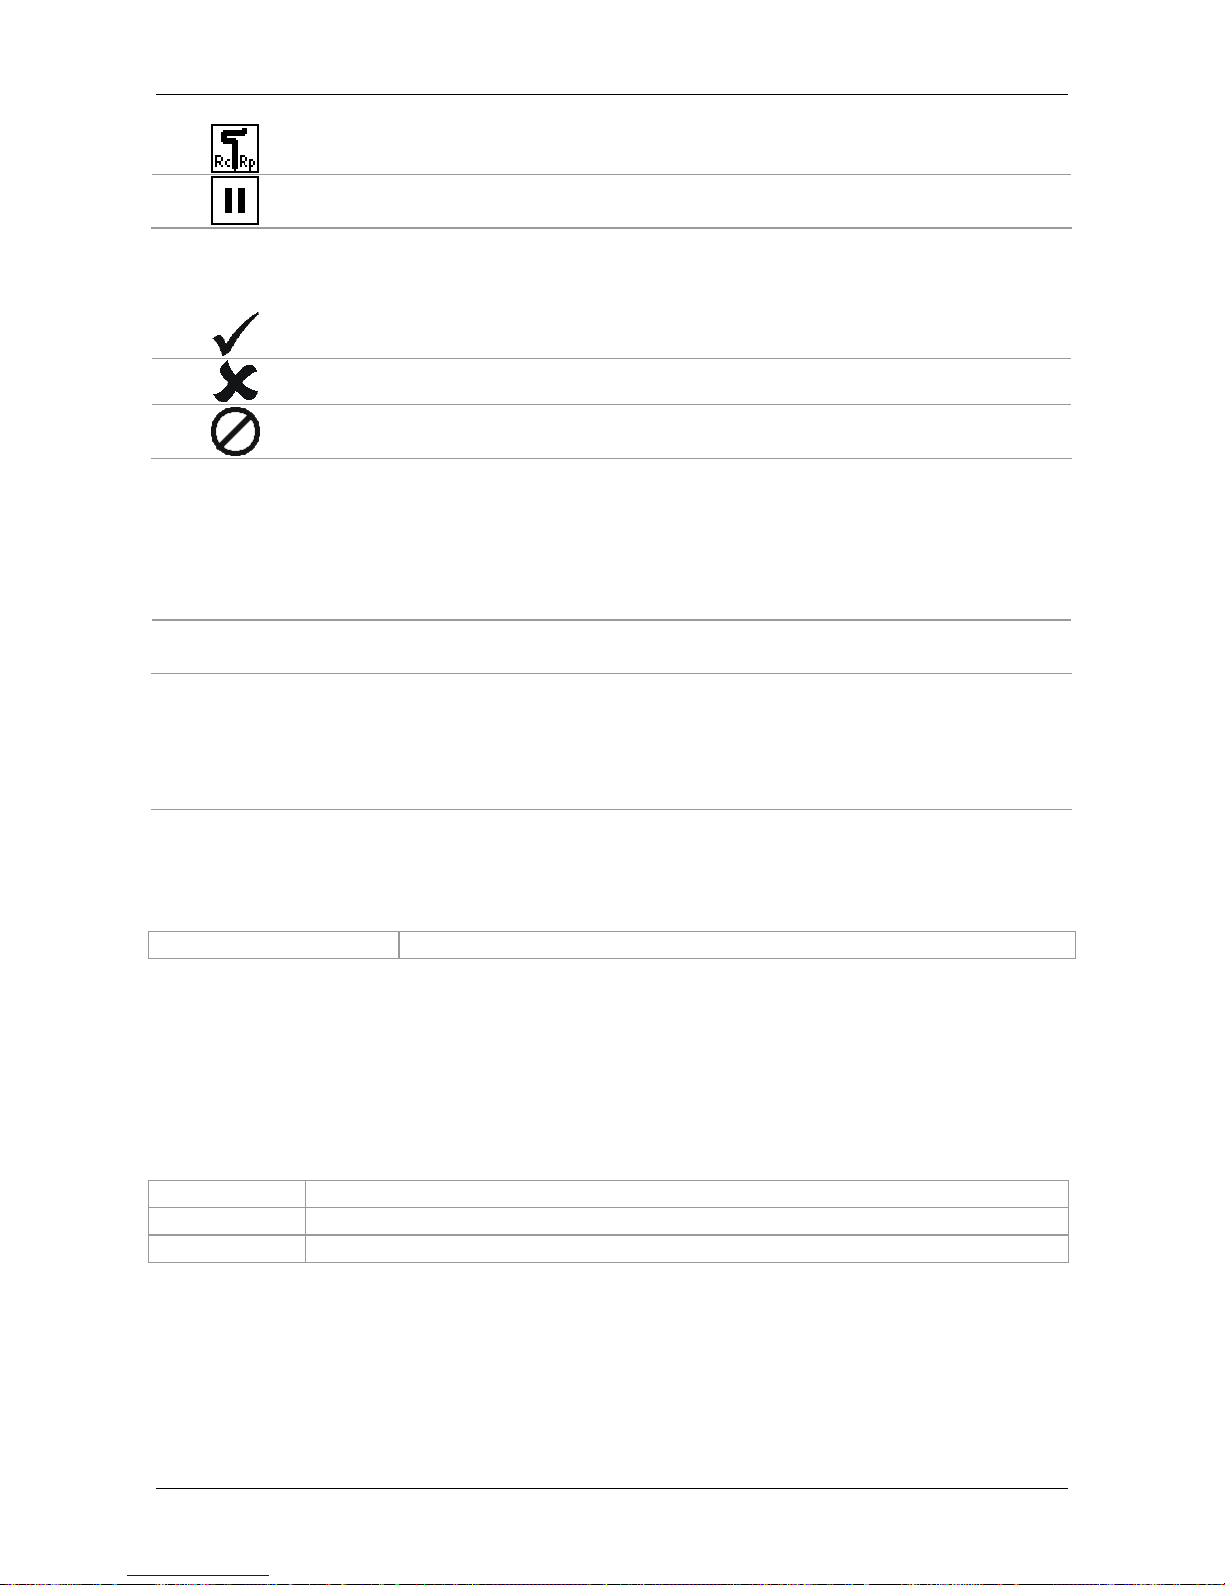
3.5.4 Result field
Measurement result is inside pre-set limits (PASS).
Measurement result is out of pre-set limits (FAIL).
Measurement is aborted. Consider displayed warnings and messages.
3.5.5 Other messages
Hard Reset
Instrument settings and measurement parameters/limits are set to
initial (factory) values, for more information refer to chapter 4.8.5.
Recalling original settings.
CAL ERROR!
Service intervention required.
3.5.6 Sound warnings
Periodic sound
Warning! Dangerous voltage on the PE terminal is detected.
Refer to chapter 5.8 for more information.
3.5.7 Help
Key:
HELP
Opens help screen.
The help menu contains some basic schematic / connection diagrams to illustrate
recommended connection of the instrument to the electrical installation and information
about the instrument.
Pressing the HELP key in single test generates help screen for selected single test
function, while in other working menus the voltage system help is displayed first.
Keys in help menu:
/ Select neighbour help screen.
HELP
Rotates through help screens.
ESC
Exits help menu.
Page 20

MI 3101 EurotestAT: Instrument description Display organization
20
Figure 3.7: Examples of help screen
3.5.8 Backlight and contrast adjustments
With the BACKLIGHT key backlight and contrast can be adjusted.
Click
Toggle backlight intensity level.
Keep pressed for 1 s
Lock high intensity backlight level until power is turned off or the
key is pressed again.
Keep pressed for 2 s Bargraph for LCD contrast adjustment is displayed.
Figure 3.8: Contrast adjustment menu
Keys for contrast adjustment:
Reduces contrast.
Increases contrast.
TEST
Accepts new contrast.
ESC
Exits without changes.
Page 21
MI 3101 EurotestAT: Instrument description Carrying the instrument
21
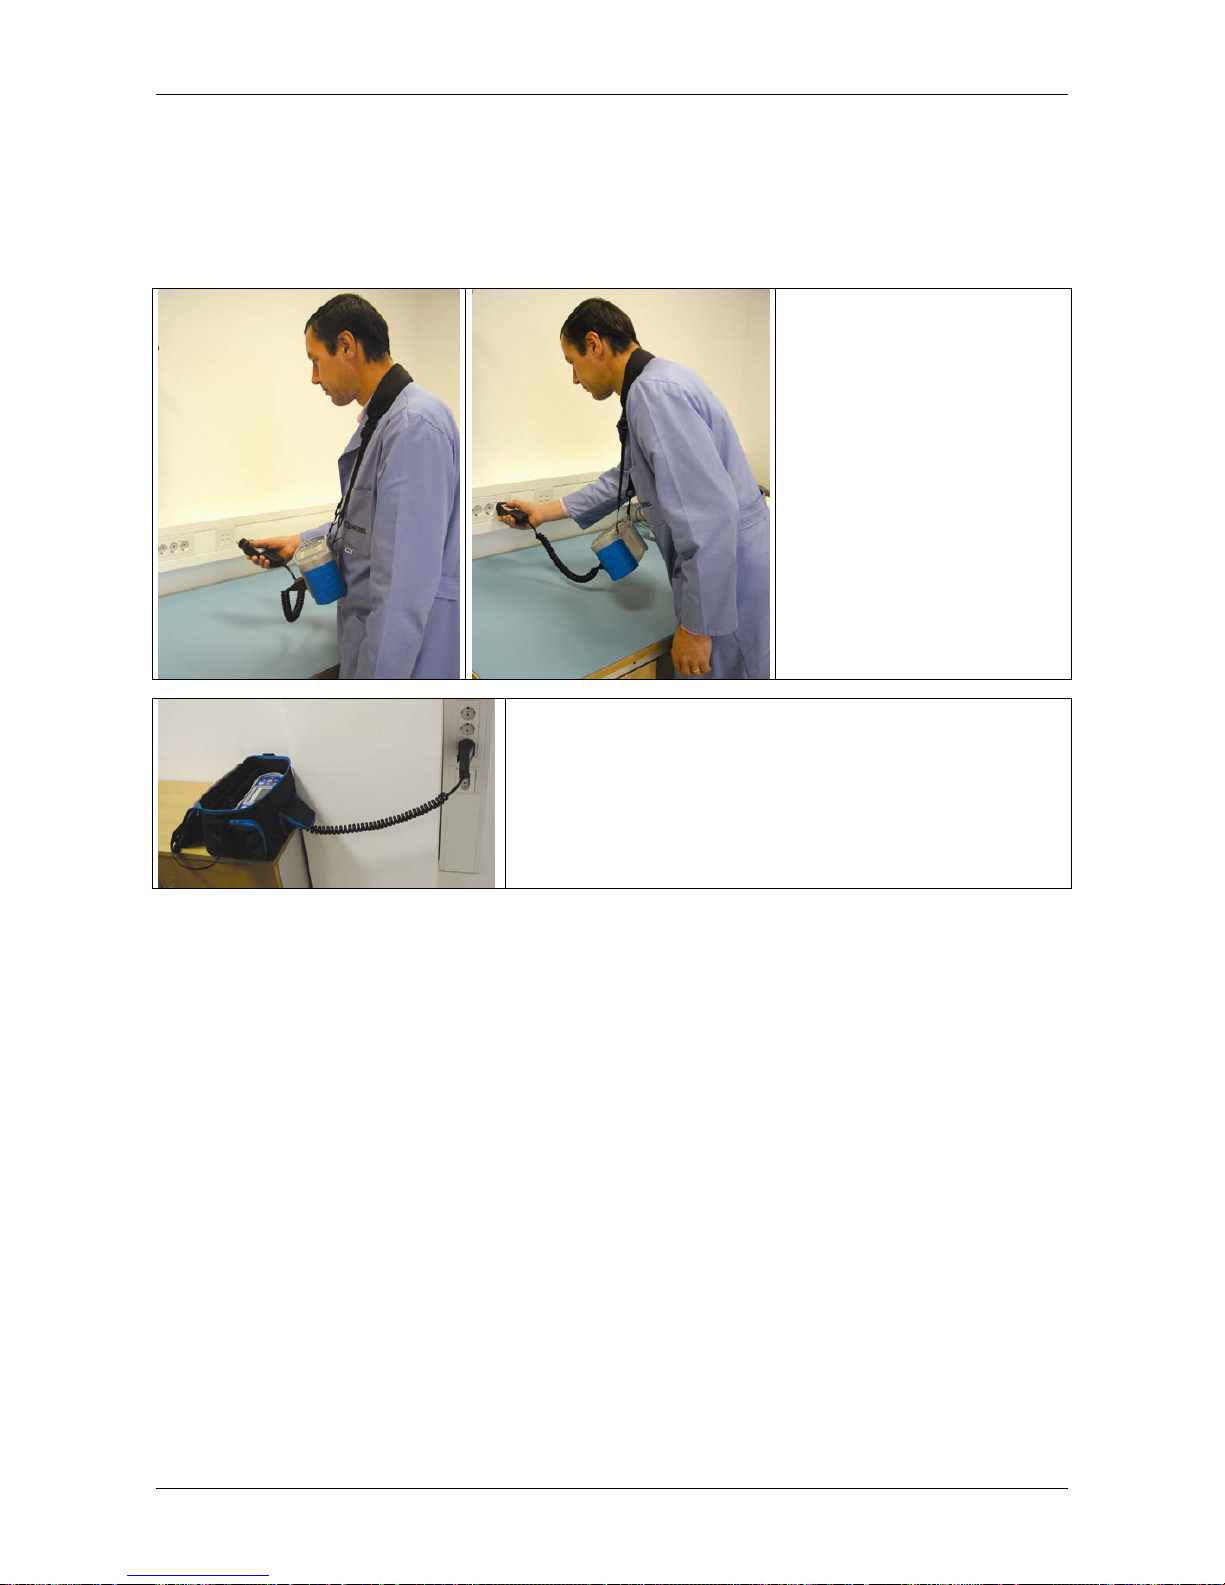
3.6 Carrying the instrument
With the neck-carrying belt supplied in standard set, various possibilities of carrying the
instrument are available. Operator can choose appropriate one on basis of his operation,
see the following examples:
The instrument hangs
around operators neck
only - quick placing and
displacing.
The instrument can be used even when placed in soft
carrying bag – test cable connected to the instrument
through the front aperture.
3.7 Instrument set and accessories
3.7.1 Standard set
Instrument
Soft carrying bag
Short instruction manual
Product verification data
Warranty declaration
Declaration of conformity
Universal test cable
Three test tips
Schuko plug commander
Three alligator clips
Power supply adapter
CD with instruction manual,
handbook Measurements on
electric installations in theory and
practice, PC software
USB interface cable
RS232 interface cable
3.7.2 Optional accessories
See the attached sheet for a list of optional accessories that are available on request from
your distributor.
Page 22
MI 3101 EurotestAT: Instrument operation Main menu
22
4 Instrument operation
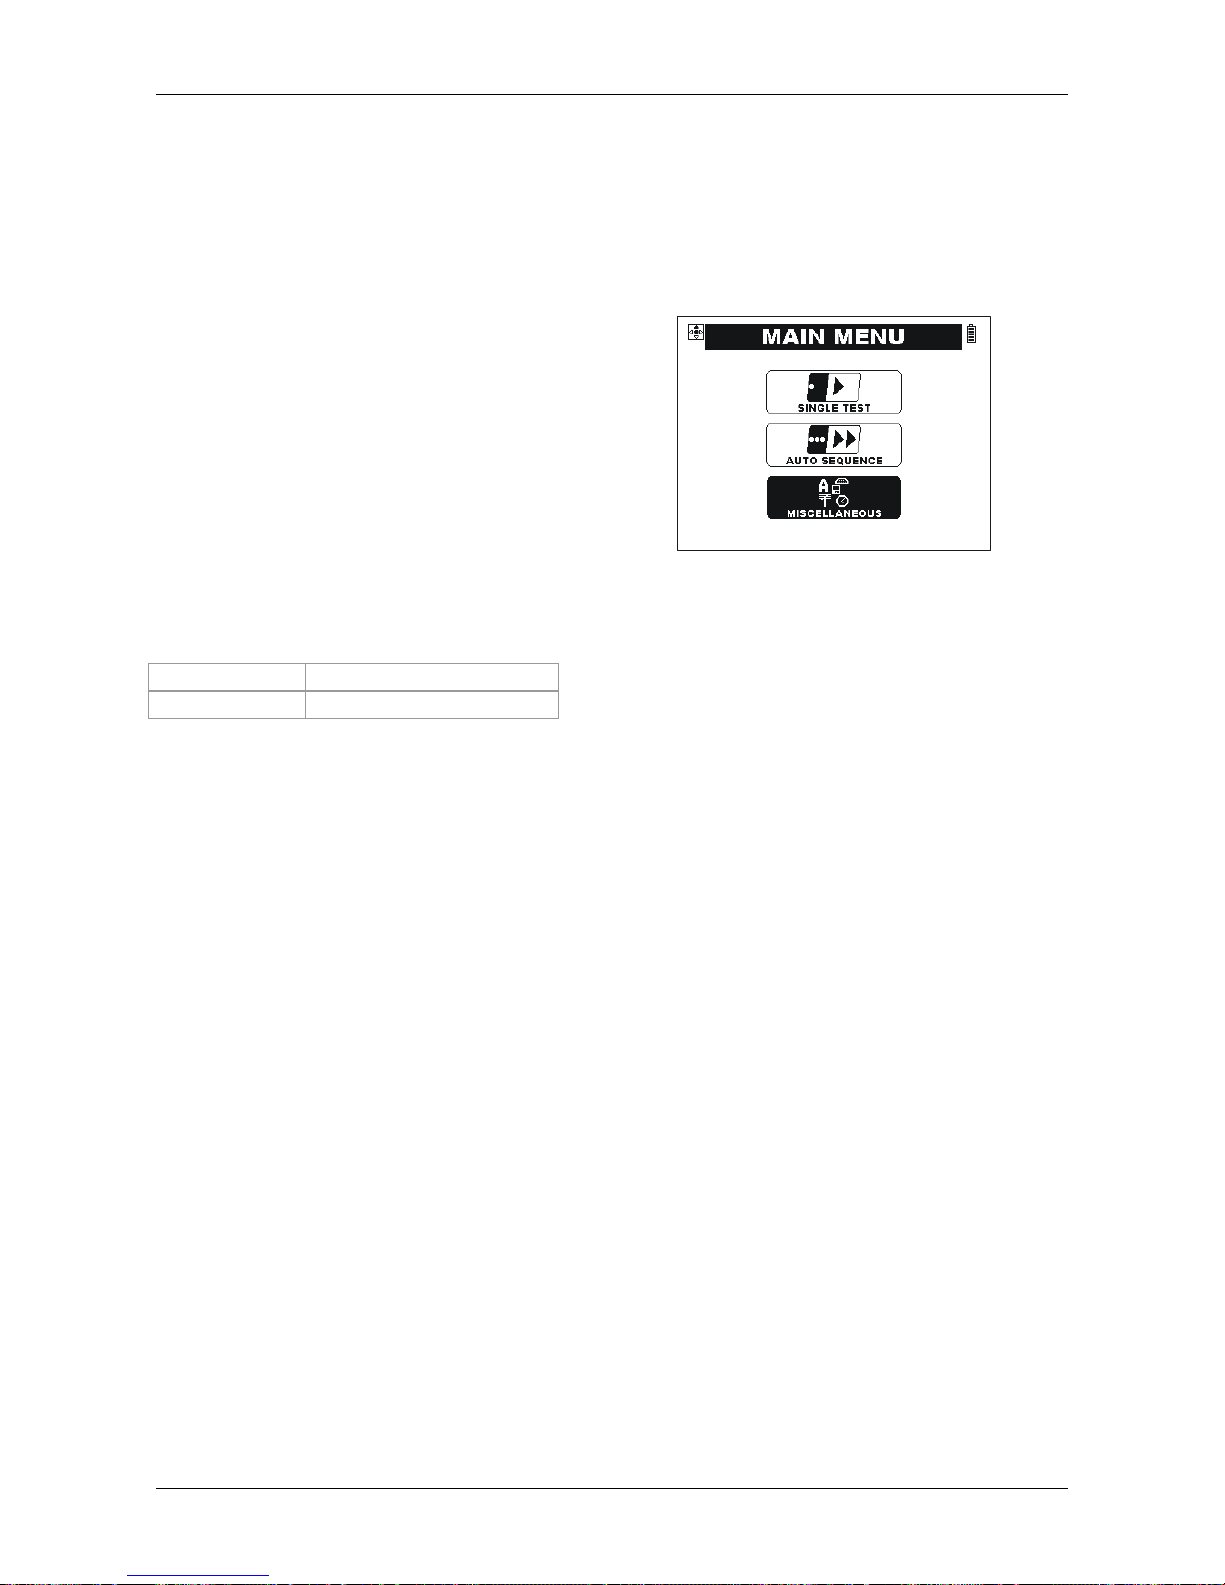
4.1 Main menu
From the Main menu different instrument operation modes can be set.
Single test menu (see 4.2),
Auto sequence menu (see 4.3),
Miscellaneous (see 4.4).
Figure 4.1: Main menu
Keys:
/ Select the mode.
TEST
Enters selected mode.
Page 23
MI 3101 EurotestAT: Instrument operation Single test
23
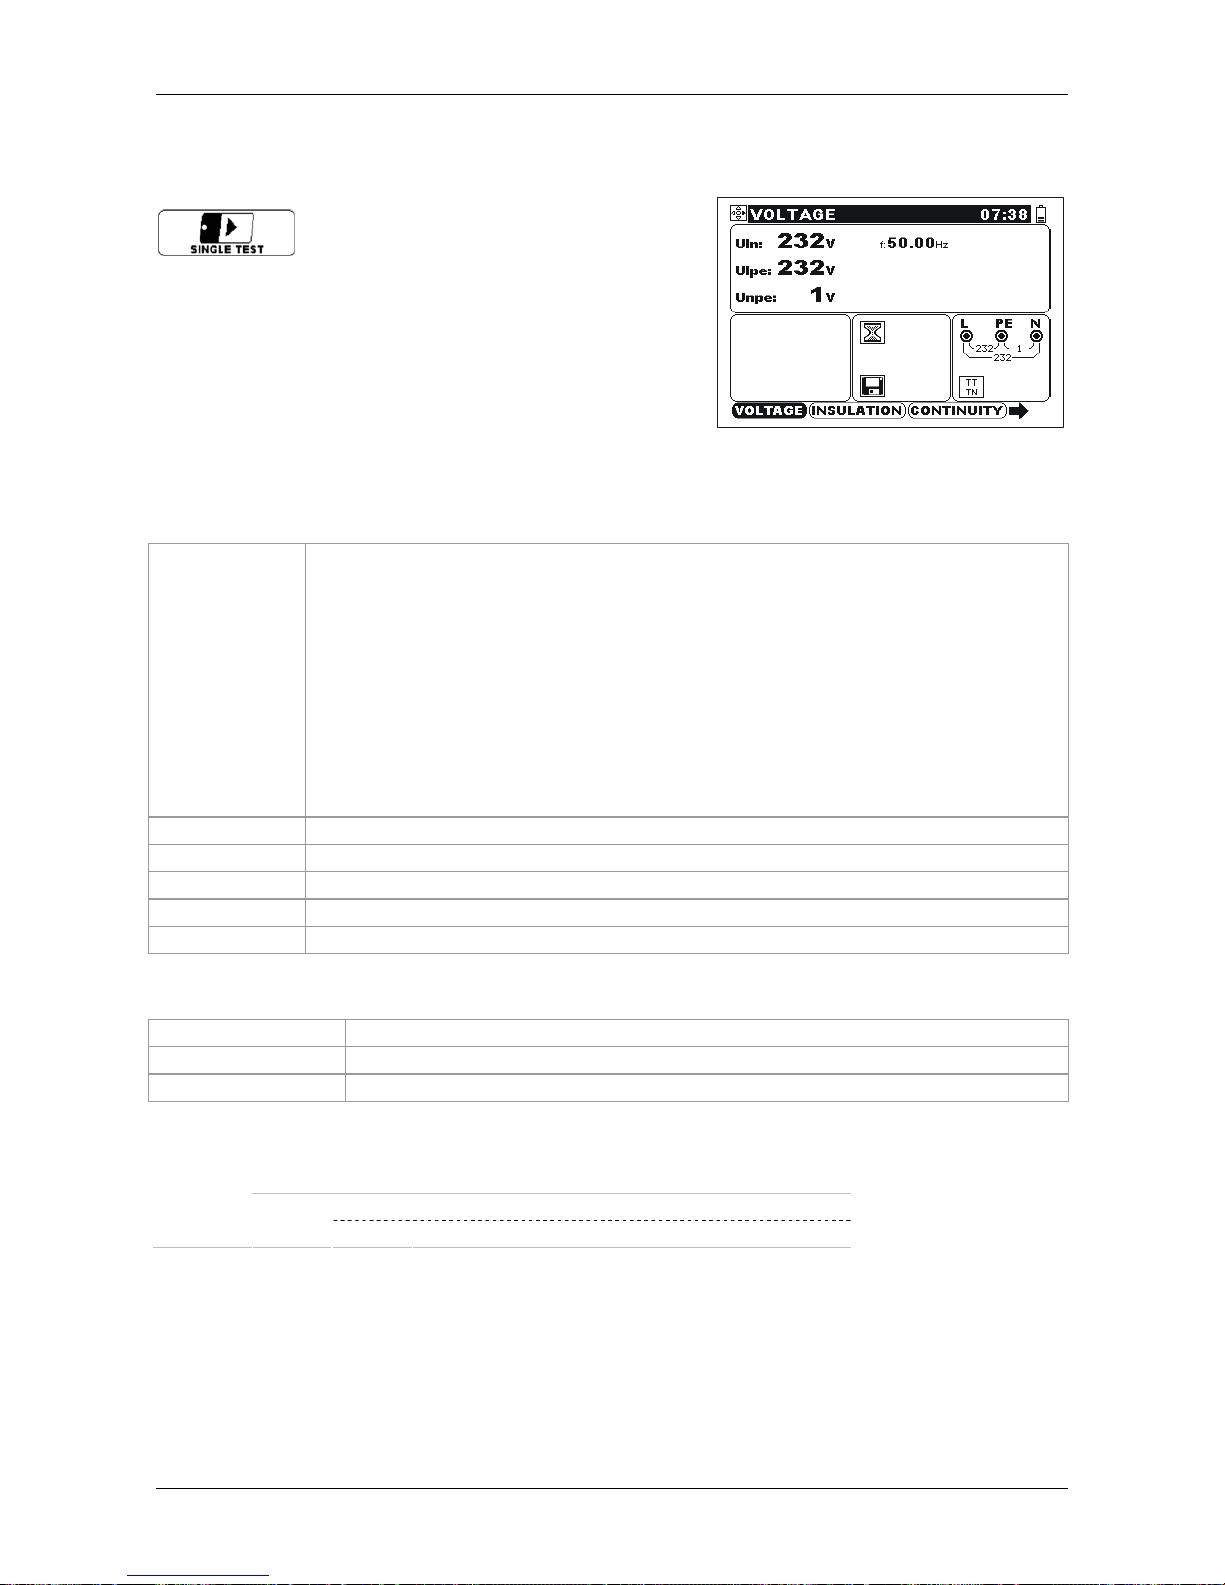
4.2 Single test
is intended to run individual test /
measurement functions.
Figure 4.2: Example of typical
Single test screen
Keys in main single test screen:
/
Select test / measurement function:
<VOLTAGE> Voltage and frequency plus phase sequence.
<INSULATION> Insulation resistance.
<CONTINUITY> Resistance to earth connection and equipotential
bonding.
<Z-LINE> Line impedance.
<Z-LOOP> Fault loop impedance.
<RCD> RCD testing.
<EARTH> Resistance to earth.
<VARISTOR TEST> Transient suppressor test.
/
Select sub-function in selected measurement function.
TEST
Runs selected test / measurement function.
TAB
Enters test parameters field.
ESC
Exits single test operation mode.
MEM
Stores measured results / recalls stored results.
Keys in test parameter field:
/ Select measuring parameter.
/
Change the selected parameter.
TEST, TAB, ESC
Exit back to main single test screen.
General rule for enabling limits for evaluation of measurement / test result:
OFF
No limit comparison
Limit ON – enabled comparison Limit
ON
Limit Value – minimum / maximum limit value *
* Type of limit value depends on particular function.
See Chapter 5 for more information about operation of the instrument in single test
functions.
Page 24
MI 3101 EurotestAT: Instrument operation Automatic testing
24
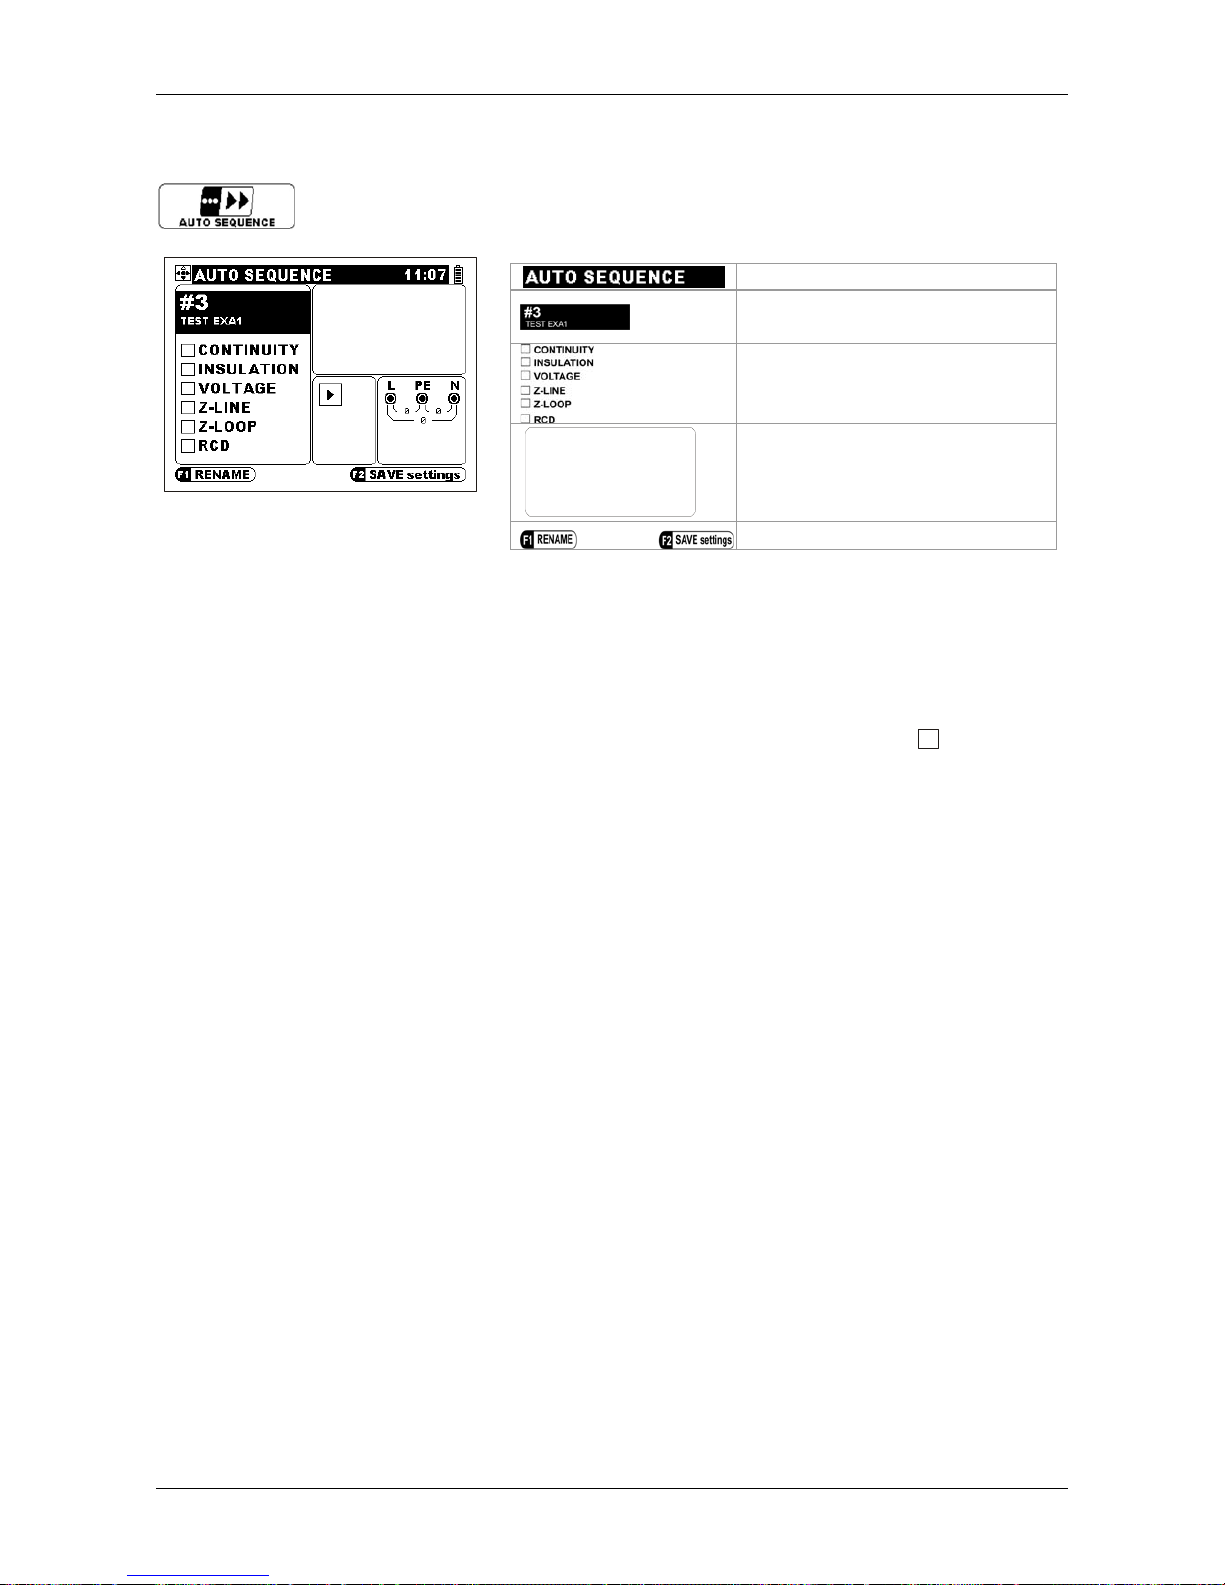
4.3 Automatic testing
is intended for automatic executing of predefined measurement sequences.
Figure 4.3: Typical auto
sequence screen
Auto sequence menu.
Selected sequence number
and (optional) name.
Sequence field.
Test parameter / auto
sequence description field.
Saving and renaming options.
Running auto sequence:
Select auto sequence (see 4.3.2).
Connect the instrument to tested object as required for the first measurement in the
sequence.
Press TEST key.
The sequence will pause at the functions marked with pause flag
II
.
Comments
regarding the paused function will be displayed (optional).
♦ Press the TAB key to toggle between comments menu and auto sequence main
menu.
♦ If the conditions at input terminals are valid, the test will proceed after pressing
the TEST key.
♦ Press the F1 key to skip the paused function. The test will continue with the
next test (if any) or will end.
♦ Press the ESC key to skip the remaining functions and finish the auto
sequence.
The set of measurements will be performed in sequential manner until the
conditions at input terminals are valid for each individual test. If not, the instrument
will stop (the buzzer sounds). The auto sequence will proceed:
♦ After correct conditions are restored at the input terminal (e.g. by reconnecting,
switching on the RCD).
♦ If pressing the F1 key this function will be skipped.
♦ By pressing the ESC key to skip the remaining functions and finish the auto
sequence.
Results of a finished auto sequence can be viewed and stored. See chapter 6. for
more information.
Page 25
MI 3101 EurotestAT: Instrument operation Automatic testing
25
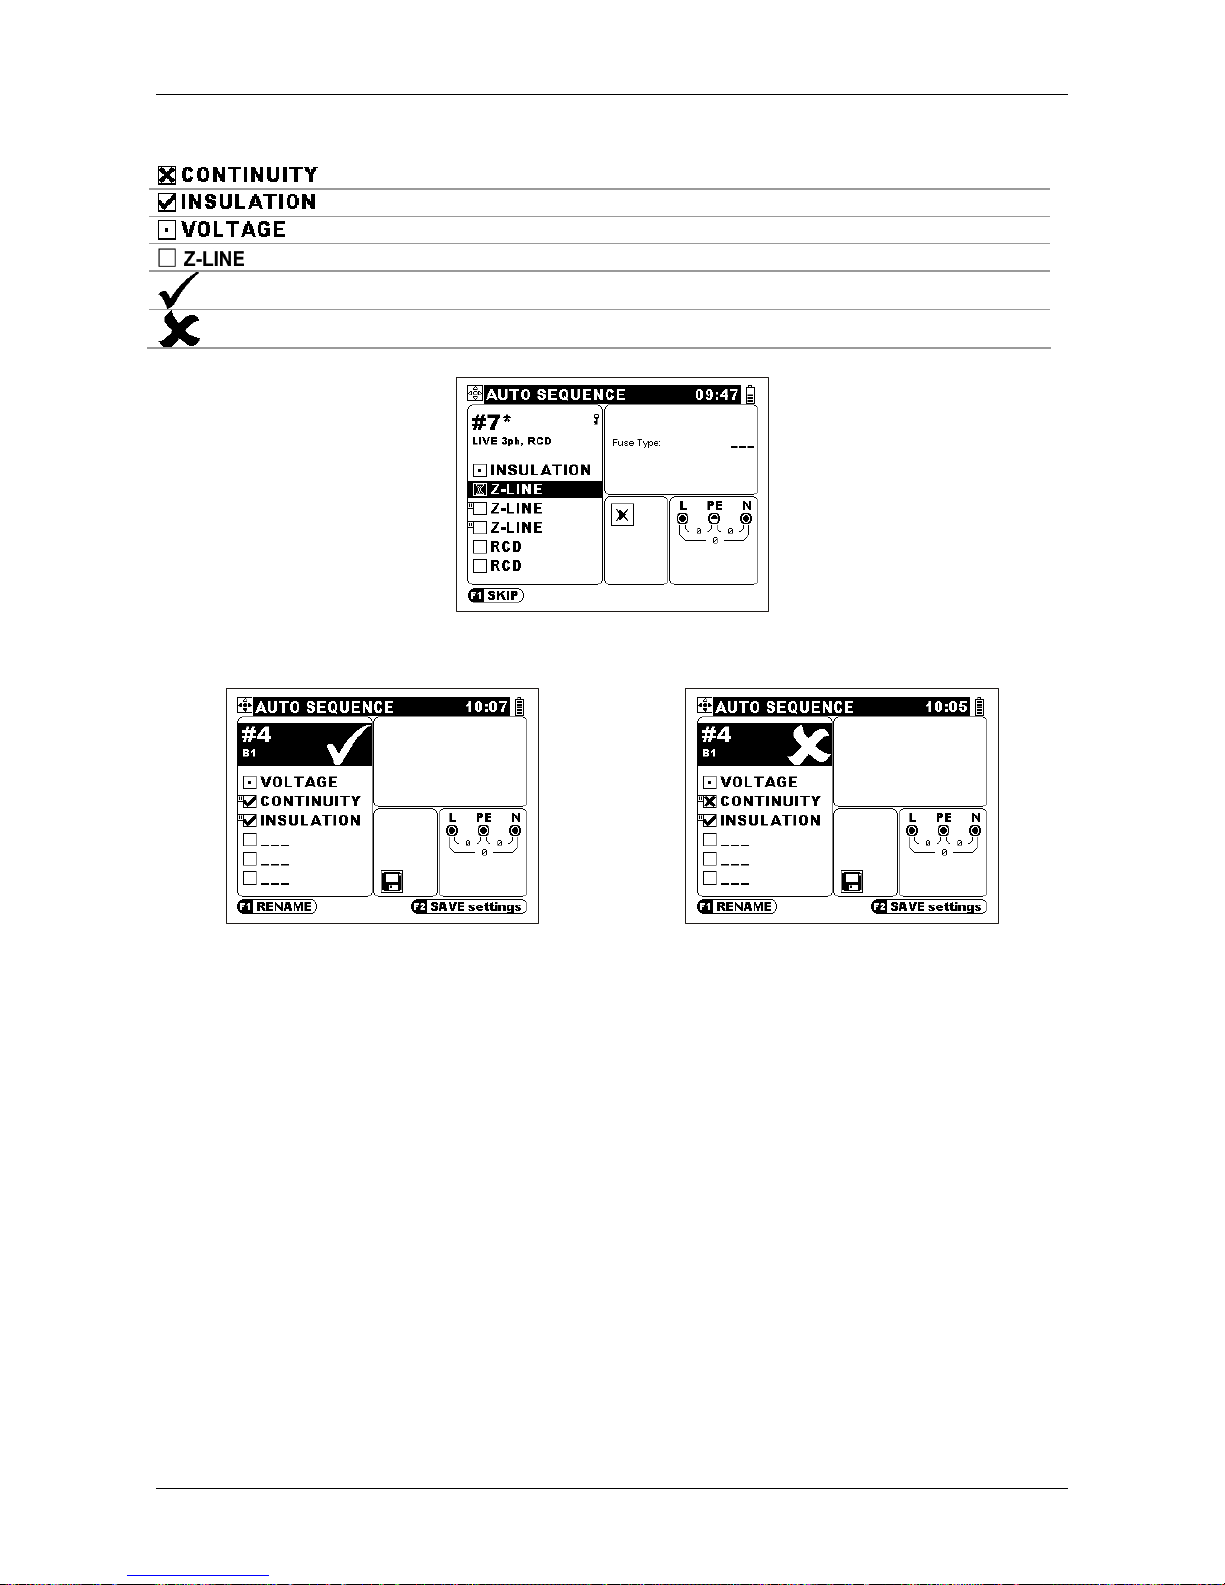
Measurements are marked with one of the following symbol after finished test.
Measurement is finished and has failed.
Measurement is finished and has passed.
Measurement is finished. No comparison limit was applied.
Measurement is not performed yet (during test) or was skipped.
Overall PASS result is reported if all performed tests passed.
Overall FAIL result is reported if one or more performed tests failed.
Figure 4.4: Waiting for right input condition to proceed
Figure 4.5: Overall PASS example
Figure 4.6: Overall FAIL example
Viewing auto sequence particular results:
After finished auto sequence press the key to move focus into sequence field.
♦ Press TEST key.
♦ Result of selected function is displayed.
♦ Press the key (or ) to select the next function of the sequence.
♦ Repeat this part until all results are observed.
Viewing of the results is finished by pressing the key until selected sequence
number is focused or by pressing the ESC key.
Page 26
MI 3101 EurotestAT: Instrument operation Automatic testing
26
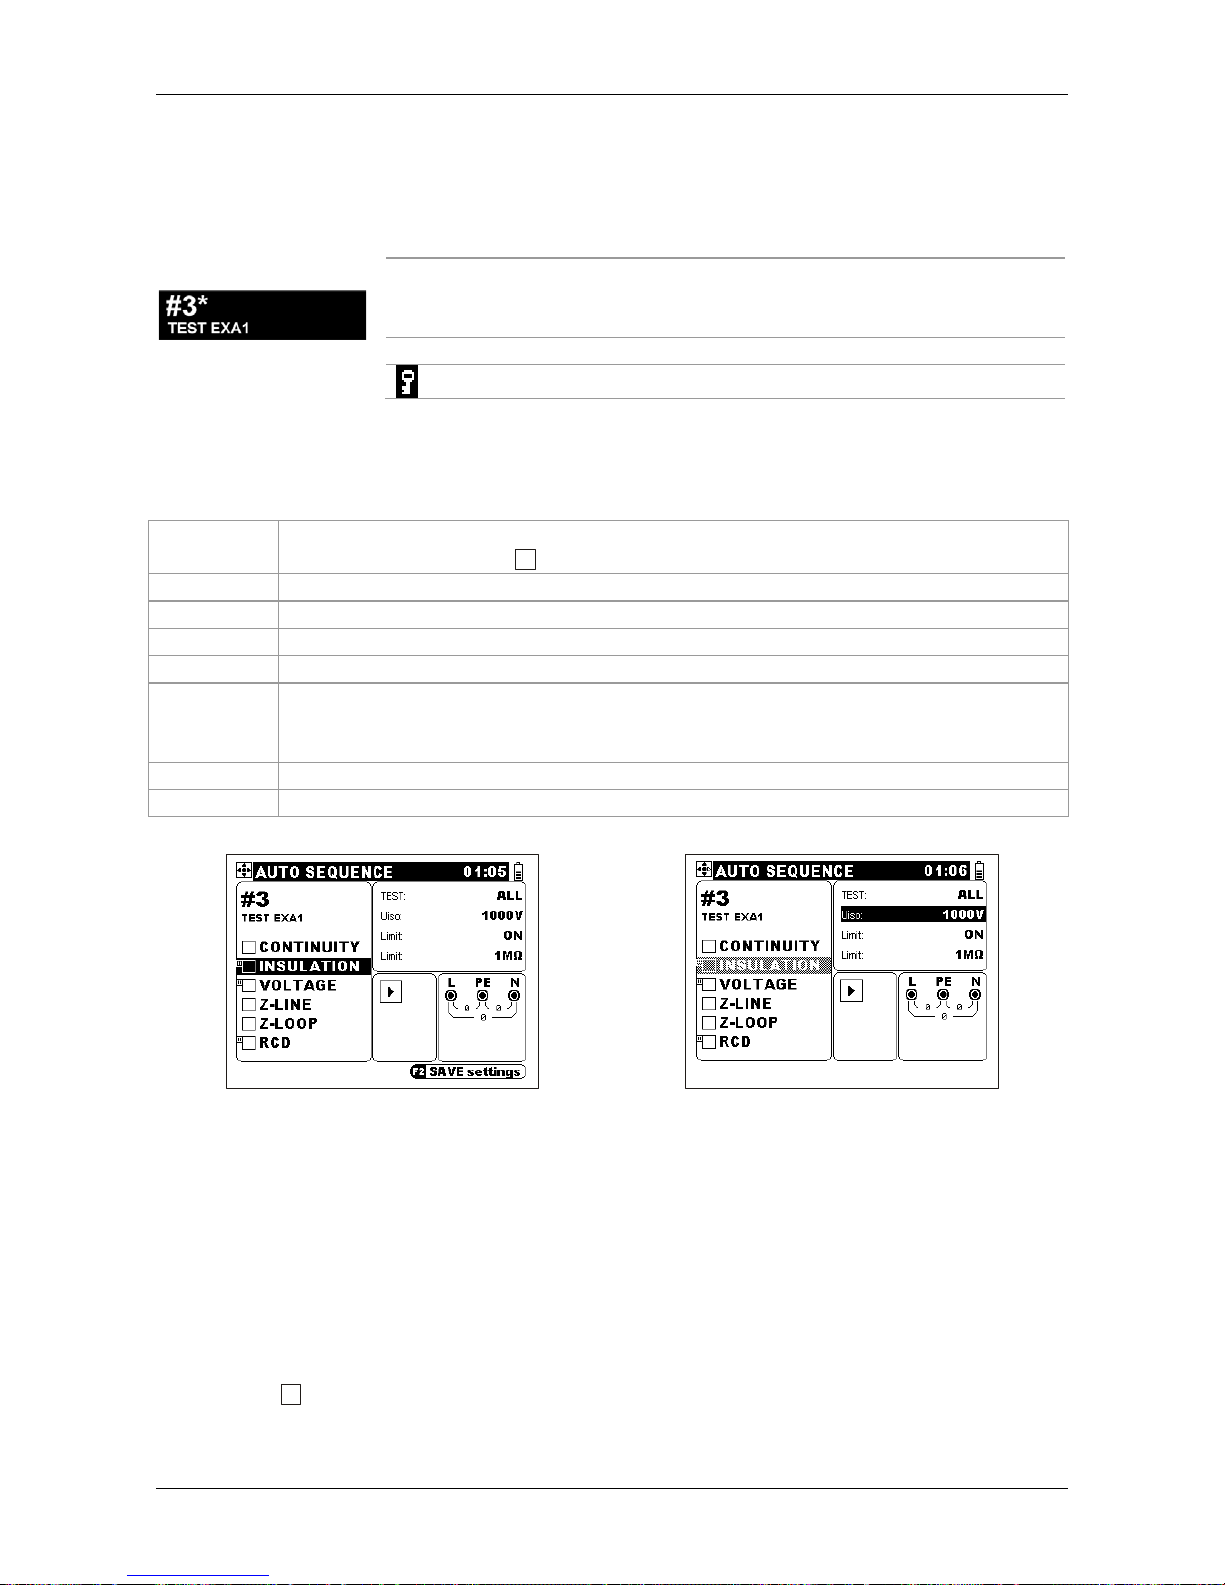
4.3.1 Auto sequence number main menu
In the instrument up to 99 automatic sequences can be stored.
#3 Auto sequence number.
* Indicator that the preset sequence was changed and is
not stored yet, the auto sequence can be performed
anyway.
TEST EXA1
Optional sequence name (see 4.3.4).
Indication of locked sequence (see 4.3.2).
4.3.2 Auto sequence set
Keys in main auto sequence menu:
TEST
Starts the selected test sequence.
Enters / clears pause II before test.
/ Select the test sequence number or measuring function (see 4.3.1).
/ Select individual sequence step / measuring function.
TAB
Enters test parameter field (see 4.3.3).
ESC
Exits auto sequence menu without changes.
F1
Enters editor to rename selected test sequence and enter its description (see
4.3.4).
Enters menu for
setting pause flag and comments (see 4.3.7).
F2
Saves entered test sequence (see 4.3.5).
MEM
Stores / recalls AUTO SEQUENCE results.
Function selection
Parameter selection
Figure 4.7: Example of setting auto sequence sequence
For each of 6 predefined sequence steps any of the following measurement function can
be selected: voltage, continuity, insulation, Zline, Zloop, RCD and earth. The field can also
be left empty (- - -).
Test parameters are applied to individual measurements as in the single test. The test
parameter menu of selected measurement is available on the right side of the display.
The pause
II
flag holds the auto sequence until prosecution is confirmed with the TEST
key. It is recommended to use it if additional checks or reconnections have to be
performed before performing the next measurement.
Page 27
MI 3101 EurotestAT: Instrument operation Automatic testing
27
The key is indication of locked sequence. This indication appears at predefined sequences
that were loaded into the instrument from PC. It is possible to modify locked auto
sequences and run them. However, the modified sequence cannot be stored by
overwriting.
Note:
It is recommended to save current auto sequence if modified or new prepared, to
keep it during manipulation.
4.3.3 Test parameters in auto sequence
Keys in test parameter menu (in auto sequence):
/ Select test parameter value or enable / disable parameter.
/ Select test parameter.
TEST, TAB, ESC
Return to auto sequence main screen.
Whenever a new function is selected for auto sequence its test parameters should be
verified and changed to appropriate values / states.
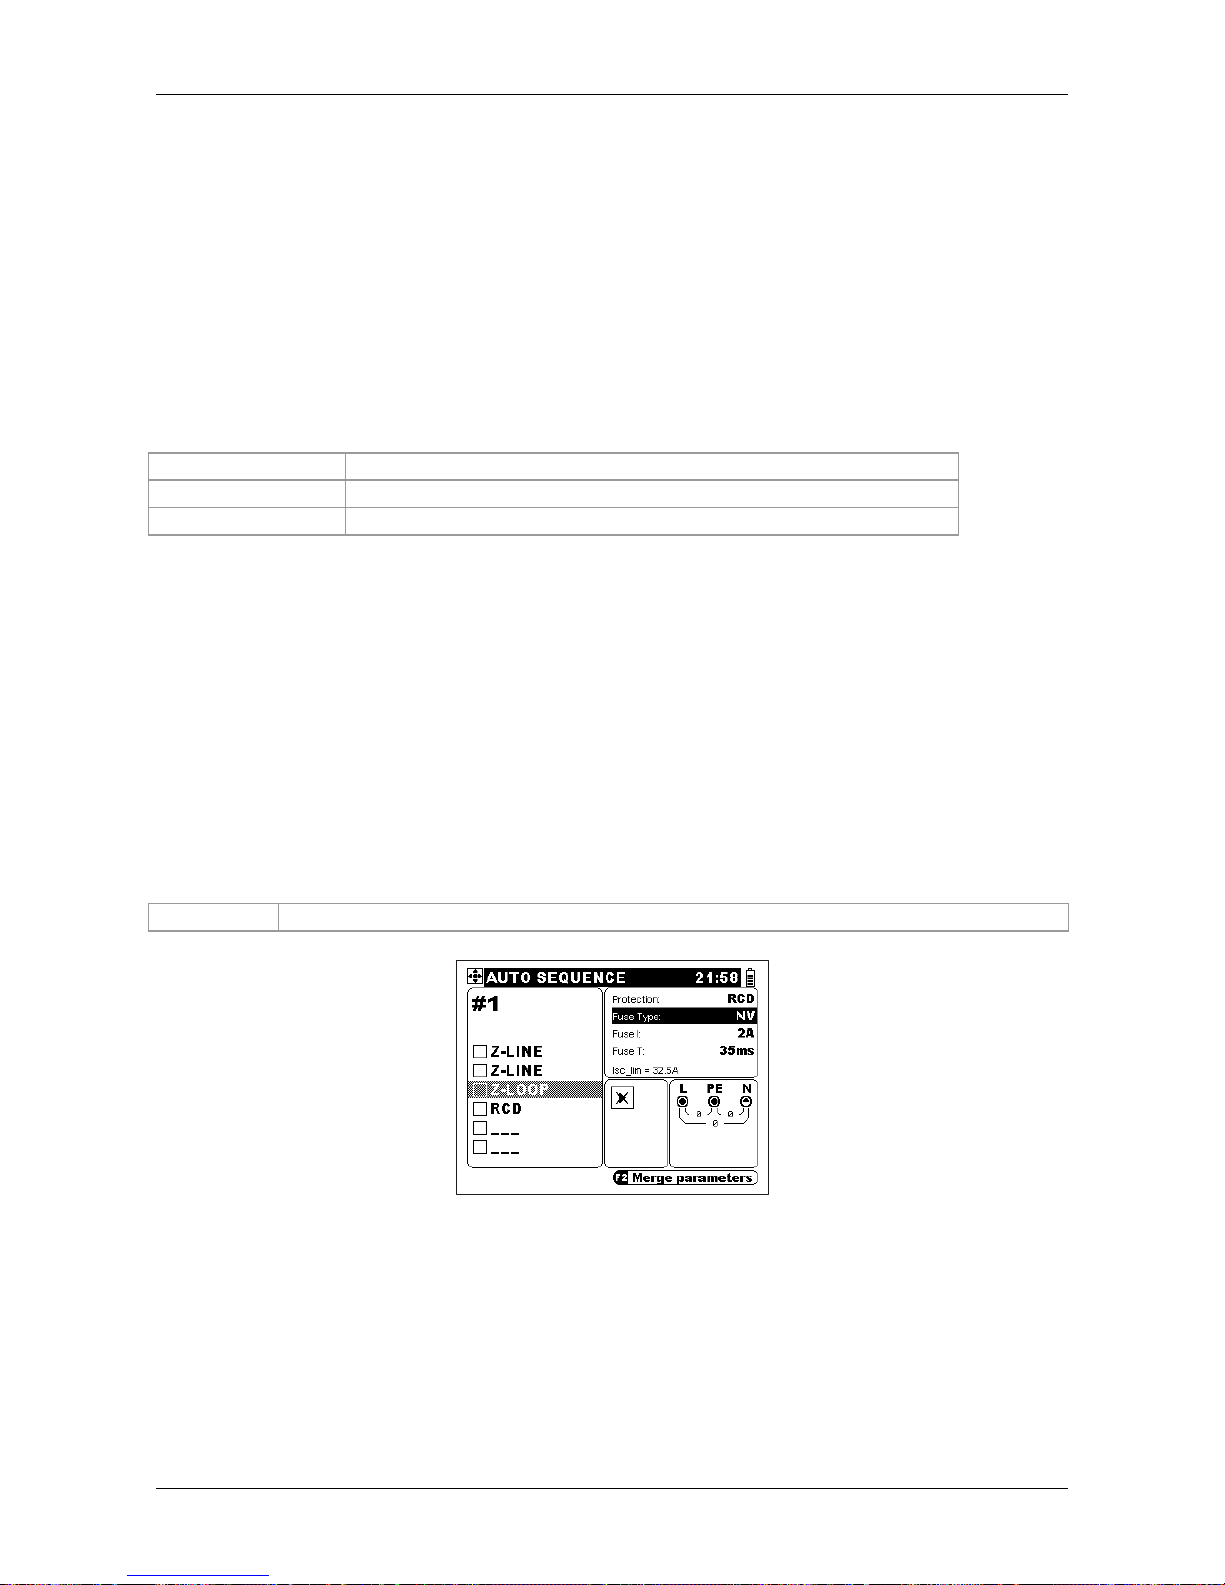
Test parameter merging
When the prepared sequence from section 4.3.2 contains selected at least two of Zline,
Zloop, or RCD, is possible to merge test parameters of one function to others of mentioned
in the same sequence.
Merged parameters are related to:
- fuse data, and
- RCD data, except start polarity of test current.
Additional Key in main auto sequence menu with selected Zline, Zloop, or RCD:
F2
Merges test parameters.
Figure 4.8: Parameter merging possibility
Page 28
MI 3101 EurotestAT: Instrument operation Automatic testing
28
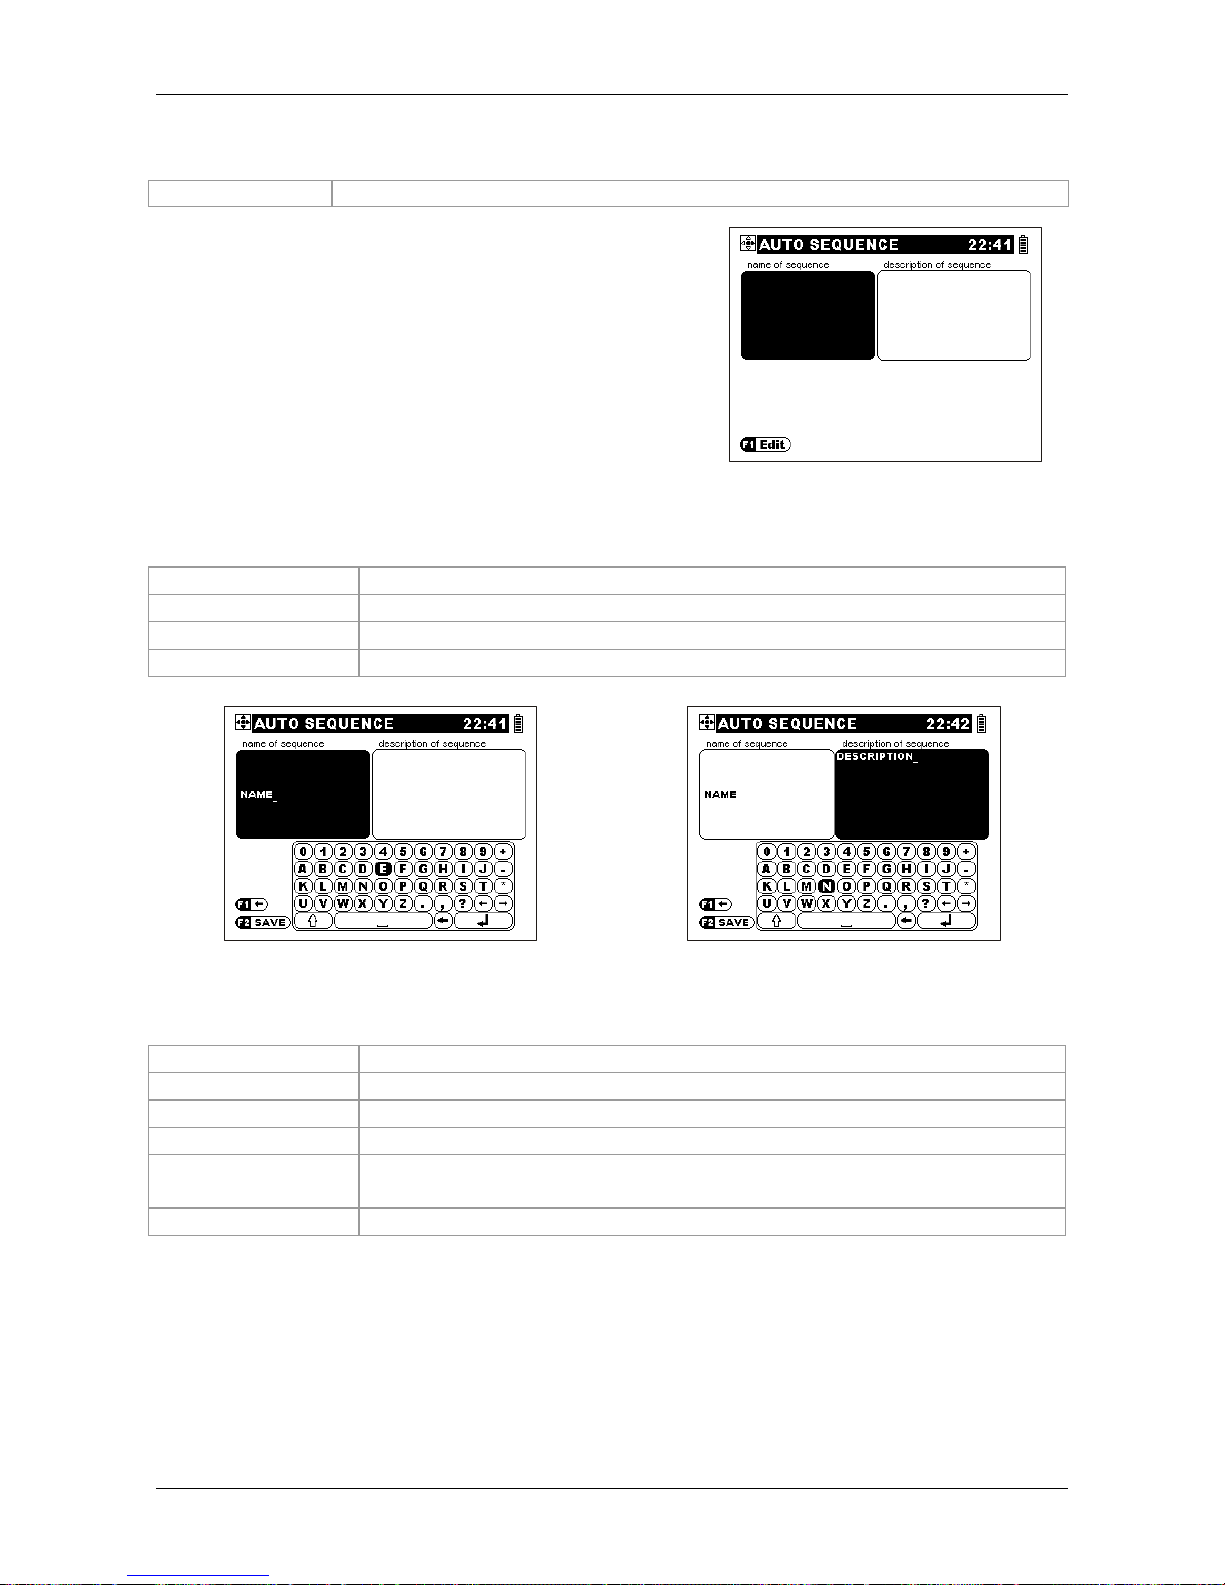
4.3.4 Name and description of auto sequence
F1
Enters test sequence name menu from auto sequence main menu.
Name and description for the selected auto sequence
can be added or changed (optional) in this two level
menu.
Figure 4.9: Auto sequence name
menu
Keys for 1st level:
/ Select between name and description field.
TEST
Returns to auto sequence main menu.
F1
Enters editing of selected field (2nd level).
ESC
Returns to auto sequence main menu without changes.
Figure 4.10: Auto sequence name edit
menu
Figure 4.11: Auto sequence description edit
menu
Keys for 2
nd
level:
Highlighted key
Selected symbol or activity.
/ / / Select symbol or activity.
TEST
Enters selected symbol or performs selected activity.
F1
Deletes last entered symbol in the name line.
F2
Confirms name and returns to 1st level of auto sequence name
menu.
ESC
Returns to 1st level of auto sequence name menu without changes.
20 characters is the maximum length of the auto sequence name.
100 characters is the maximum length of the auto sequence description.
Page 29
MI 3101 EurotestAT: Instrument operation Automatic testing
29
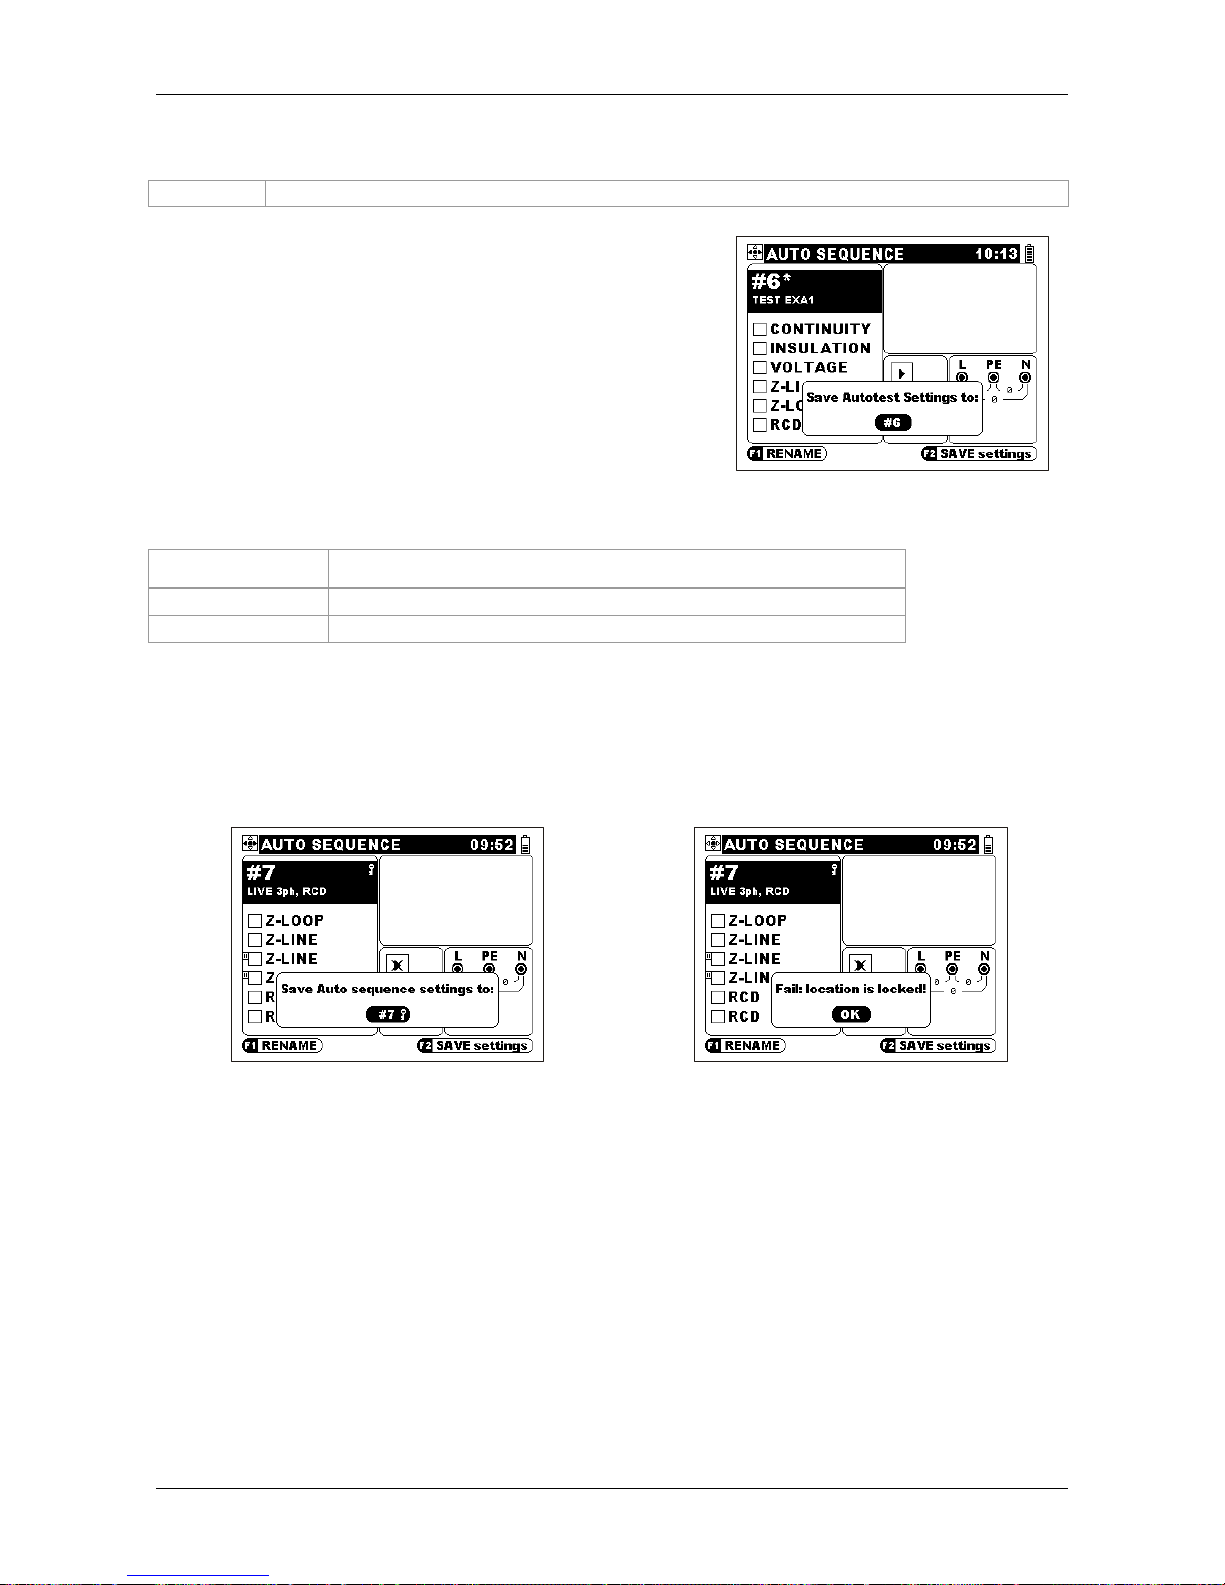
4.3.5 Storing auto sequence settings (sequence, number, name)
F2
Opens dialog for storing auto sequence settings in auto sequence main menu.
The dialog enables storing existing auto sequence
settings into different location or overwriting existing.
Figure 4.12: Store dialog
Keys:
/
Select the auto sequence number.
TEST
Confirms the storing.
ESC
Returns to auto sequence main menu without changes.
Auto sequence settings are stored in nonvolatile memory. Stored auto sequence
procedures remain in memory until the user changes them.
It is not possible to store any auto sequence in locked location. Locked auto sequence can
be copied in an unlocked location. Stored sequence is unlocked in this case.
Figure 4.13: Store dialog for locked sequence
Figure 4.14: Failed storing
It is possible to unlock all locked sequences (see 4.4.5 for more information) if necessary.
Page 30
MI 3101 EurotestAT: Instrument operation Automatic testing
30
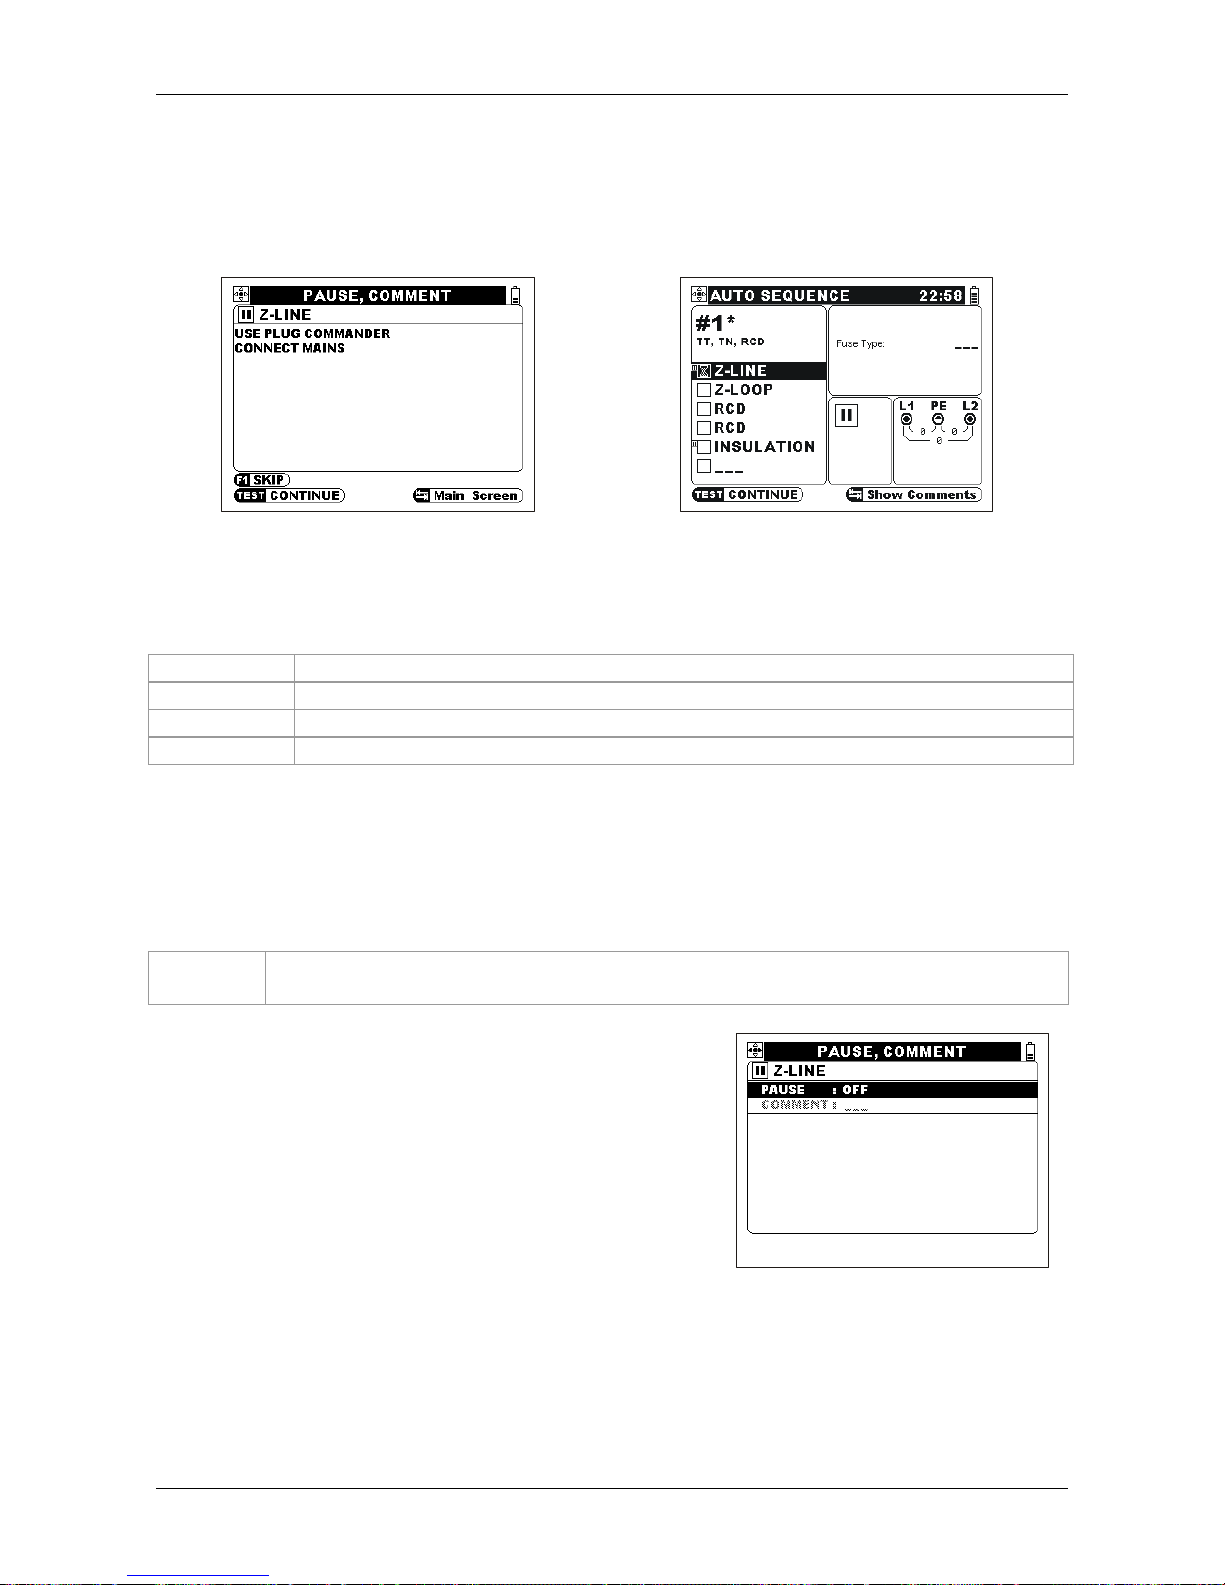
4.3.6 Pause flag and comments in auto sequence
The auto sequence holds if a pause flag is associated with the measurement and the predefined comment is displayed. When the input conditions are regular, the auto sequence
can be continued by pressing the TEST key.
Comment appears with the pause
Blinking pause flag in main screen
Figure 4.15: Examples of screens during the pause in auto sequence
Keys:
TAB
Toggles between comment screen and auto sequence main screen.
TEST
Continues with the paused test.
F1
Skip paused test.
ESC
Skip all tests and ends auto sequence.
4.3.7 Setting pause flag and comments
Operator of the instrument can prepare comments regarding the measurements.
Warnings, reconnection hints or other useful remarks related to the test sequence can be
applied this way.
F1
Enters pause set-up and comments menu for selected function in auto
sequence main menu.
Set-up of comments is enabled if pause flag is set to
ON.
Figure 4.16: Pause set-up menu
Page 31

MI 3101 EurotestAT: Instrument operation Automatic testing
31
Keys:
/
Enable (ON) / disable (OFF) pause flag.
/ Select between pause flag and comments fields.
TEST
Confirms pause and comment selection, and returns to auto
sequence main menu.
ESC
Returns to auto sequence main menu without changes.
Comments set-up menu enables selection and editing
of the pause comment.
Figure 4.17: Comments set-up
menu
Keys:
/ Select between setup of pause and comment.
/
Select comment [--- (no comment), #1 #99].
F1
Enters edit comments menu for selected comment number.
TEST
Confirms pause and comment selection and returns to auto
sequence main menu.
ESC
Returns to auto sequence main menu without changes.
Comments can be entered and edited in the Edit
comments menu.
Maximum comment length: 250 characters (including
space and new line characters).
Figure 4.18: Comments edit
menu
Keys:
Highlighted key
Selected symbol or activity.
/ / / Select symbol or activity.
TEST
Enters selected symbol or performs selected activity.
F1
Deletes last entered symbol in the name line.
F2
Opens dialog for comment storing.
ESC
Deletes comment (immediately after entering the editor).
Returns to auto sequence main menu without changes.
Page 32

MI 3101 EurotestAT: Instrument operation Automatic testing
32
Storing comment opens dialog for storing into selected
location.
Figure 4.19: Store dialog for
comment
Keys:
/ Select comment number.
TEST
Confirms storing the comment and returns.
ESC
Returns to Edit comments menu.
Note:
It is not possible to overwrite comments associated to locked auto sequences.
4.3.8 Building an auto sequence
The instrument supports up to 99 auto sequences, each consisting of up to 6 steps. It is
not necessary that all steps are enabled.
The auto sequence can be prepared in the following way:
By storing the existing auto sequence under another auto sequence number (see
4.3.5),
By changing an existing auto sequence and saving it under the same auto
sequence number (not possible for locked auto sequence),
By building a new auto sequence.
Building a new auto sequence
In the main menu (see 4.1) select auto sequence.
Press the TEST key.
Select auto sequence number (see 4.3.2).
Repeat until finished (maximum 6 steps):
♦ Select auto sequence step (see 4.3.2).
♦ Select auto sequence function (see 4.3.2).
♦ Select auto sequence test parameters of the function (see 4.3.3).
♦ Set / reset pause flag IIand select or create new comment if necessary (see
4.3.7).
Name (or rename) the auto sequence and enter its description (see 4.3.4).
Save prepared auto sequence (see 4.3.5).
Page 33

MI 3101 EurotestAT: Instrument operation Automatic testing
33
Figure 4.20: Blank auto sequence
Example of building an auto sequence
A house installation wall socket protected with fuse (type gG, In = 6 A, td = 5 s) and RCD
(type AC, I
N
= 30 mA) shall be tested.
The following measurements must be performed:
Equipotential bonding resistance of PE terminal to main PE collector (R ≤ 0.1 ),
Insulation resistances between L – N, L – PE and N – PE (U = 500 V, R 1 M),
Voltages on the socket,
Line impedance with fuse verification,
RCD trip-out time at nominal current,
RCD trip-out time at increased current (5 x I
N
).
The name of test sequence number 10 is “Sock. 6A / 30mA(AC)”. Description of the test
sequence is: “Verification of wall socket, protected with fuse and RCD”.
For the measurement the following conditions shall apply:
Equipotential bonding resistance and insulation resistance measurement has to be
performed on de-energized socket;
Equipotential bonding resistance test (see figure 5.6) should be performed with the
universal test cable and extension lead;
Insulation resistance test should be performed with the plug cable or commander
(see figures 5.2 and 5.3);
Other tests have to be applied on energized test socket with the plug cable or
commander (see figures 5.13, 5.22 and 5.26).
Page 34

MI 3101 EurotestAT: Instrument operation Automatic testing
34
Example:
Item/keys
Chapter
reference
Comment
Auto sequence, TEST
4.1
Selection of auto sequence operation in main
menu.
/ 4.3.1 Selection of test sequence number 10.
F1
4.3.4 Enter into sequence name editing menu.
F1
4.3.4 Enter the sequence name editor.
Sock. 6A / 30mA(AC)
4.3.4 Enter the name of auto sequence.
F2
4.3.4 Accept name and exit into sequence name editing
menu.
4.3.4 Select description of test field.
F1
4.3.4 Enter the description of test editor.
Verification of wall
socket, protected with
fuse and RCD
4.3.4 Enter the description.
F2
Accept description and exit into sequence name
editing menu.
TEST
4.3.4 Exit sequence name editing menu.
4.3 Enter into sequence field.
/ 4.3.2 Select CONTINUITY.
TAB
4.3.2 Enter test parameter selection mode.
TEST R200mA
Limit ON
Limit 0.1
5.2
Set test parameters for equipotential bonding
resistance.
TAB
4.3.2 Exit parameter mode.
F1
4.3.2 Set PAUSE (wait to prepare for measurement).
/ 4.3.7 Set PAUSE: ON.
4.3.7 Select COMMENT.
4.3.7 Select COMMENT: #1.
F1
4.3.7 Enter Edit comment menu.
Disconnect mains,
univ. cable + ext.
4.3.7 Enter the comment.
F2
4.3.7 Save the comment.
TEST
4.3.7 Store the comment to location #1.
4.3.7 Select COMMENT: #2.
F1
4.3.7 Enter Edit comment menu.
Commander
4.3.7 Enter the comment.
F2
4.3.7 Save the comment.
TEST
4.3.7 Store the comment to location #2.
4.3.7 Select COMMENT: #3.
F1
4.3.7 Enter Edit comment menu.
Connect mains
4.3.7 Enter the comment.
F2
4.3.7 Save the comment.
TEST
4.3.7 Store the comment to location #3.
4.3.7 Select COMMENT: #4.
F1
4.3.7 Enter Edit comment menu.
Turn ON RCD
4.3.7 Enter the comment.
F2
4.3.7 Save the comment.
TEST
4.3.7 Store the comment to location #4.
Page 35

MI 3101 EurotestAT: Instrument operation Automatic testing
35
(3 x) 4.3.7 Select COMMENT: #1.
TEST
4.3.7 Confirm selected pause and its comment.
4.3 Next step.
/ 4.3.2 Select INSULATION.
TAB
4.3.2 Enter test parameter selection mode.
TEST ALL
UISO 500 V
Limit ON
Limit 1M
5.1 Setting test parameters for insulation resistance.
TAB
4.3.2 Exit parameter mode.
F1
4.3.2 Set PAUSE (wait to reconnect measuring leads).
/ 4.3.7 Set PAUSE: ON.
4.3.7 Select COMMENT.
(2 x) 4.3.7 Select COMMENT: #2.
TEST
4.3.7 Confirm selected pause and its comment.
4.3 Next step.
/ 4.3.2 Select VOLTAGE.
F1
4.3.2 Set PAUSE (wait to connect mains voltage).
/ 4.3.7 Set PAUSE: ON.
4.3.7 Select COMMENT.
(3 x) 4.3.7 Select COMMENT: #3.
TEST
4.3.7 Confirm selected pause and its comment.
4.3 Next step.
/ 4.3.2 Select Z-LINE.
TAB
4.3.2 Enter test parameter selection mode.
FUSE type gG
FUSE I 6A
FUSE T 5s
5.5
Set test parameters for line impedance and fuse
test.
TAB
4.3.2 Exit parameter mode.
4.3 Next step.
/ 4.3.2 Select RCD.
TAB
4.3.2 Enter test parameter selection mode.
TEST Tripout current
Idn 30mA
type G
Ulim 50V
5.3
Test parameters for RCD trip-out current test
(results of this test are also contact voltage at I
and trip out time).
TAB
4.3.2 Exit parameter mode.
4.3 Next step.
F1
4.3.2 Set PAUSE (wait to activate RCD).
/ 4.3.7 Set PAUSE: ON.
4.3.7 Select COMMENT.
(4 x) 4.3.7 Select COMMENT: #4.
TEST
4.3.7 Confirm selected pause and its comment.
/ 4.3.2 Select RCD.
TAB
4.3.2 Enter test parameter selection mode.
TEST Tripout time t
Idn 30mA
type
G
MUL x5
Ulim 50V
5.3
Test parameters for RCD trip out time test at 5I
N
(result of this test is also contact voltage at I
N
).
Page 36

MI 3101 EurotestAT: Instrument operation Automatic testing
36
TAB
4.3.2 Exit parameter mode.
(6 x) 4.3 Exit the editing of sequence field.
F2
4.3.5 Store prepared test sequence.
TEST
4.3.5 Confirm storing.
Figure 4.21: Auto sequence screen of the example above
Page 37

MI 3101 EurotestAT: Instrument operation Miscellaneous
37
4.4 Miscellaneous
Different instrument options can be set in the
menu.
Options are:
Selection of language,
Selection of mains supply system,
Recalling and clearing stored results,
Setting date and time,
Selection of communication port,
Setting the instrument to initial values,
Entering locator function,
Selection of operator.
Figure 4.22: Options in Miscellaneous
menu
Keys:
/ / /
Selection of option.
TEST
Enters selected option.
ESC
Returns to the main menu.
4.4.1 Language
The instrument supports different languages.
Figure 4.23: Language selection
Keys:
/
Select language.
TEST
Confirms selected language and exits to settings menu.
ESC
Exits to settings menu without changes.
Page 38

MI 3101 EurotestAT: Instrument operation Miscellaneous
38
4.4.2 Supply system, Isc factor, RCD standard
In the Voltage system menu the following parameters can be selected:
Voltage system
Mains supply system type.
Set Isc factor
Correction factor for Isc
calculation (ksc).
RDC testing
RCD normative reference.
Figure 4.24: System parameters
Keys:
/
Select option.
/
Change the option.
TEST
Confirms selected option.
ESC
Exits to settings menu with new setup.
Mains supply systems
The following supplying systems are supported:
TT / TN (earthed systems),
IT (system insulated from earth),
110 V reduced low voltage (2 x 55 V center tap grounded),
110 V reduced low voltage (3 x 63 V three phase, star center grounded).
TN, TT and IT systems are defined in EN 60364-1 standard. 110 V reduced low voltage
systems are defined in BS 7671.
See Appendix D for particular characteristics of IT supply system measurements and
instrument characteristics.
See Appendix E for particular characteristics of 110 V reduced low voltage supply systems
measurements and instrument characteristics.
Isc factor - ksc
Short circuit current Isc in the supply system is important for selection or verification of
protective circuit breakers (fuses, over-current breaking devices, RCDs).
The default value of ksc is 1.00. Change the value as required by local regulative for
tested type of mains supply system.
Range for adjustment of the ksc is 0.20 3.00.
Page 39

MI 3101 EurotestAT: Instrument operation Miscellaneous
39
RCD normative references
Maximum RCD disconnection times differ in various standards.
The trip-out times defined in individual standards are listed below.
Trip-out times according to EN 61008 / EN 61009:
½I
N
*)
I
N
2IN 5IN
General RCDs
(non-delayed)
t
> 300 ms t < 300 ms t < 150 ms t < 40 ms
Selective RCDs
(time-delayed)
t
> 500 ms 130 ms < t < 500 ms 60 ms < t < 200 ms 50 ms < t < 150 ms
Trip-out times according to EN 60364-4-41:
½I
N
*)
I
N
2IN 5IN
General RCDs
(non-delayed)
t
> 999 ms t < 999 ms t < 150 ms t < 40 ms
Selective RCDs
(time-delayed)
t
> 999 ms 130 ms < t < 999 ms 60 ms < t < 200 ms 50 ms < t < 150 ms
Trip-out times according to BS 7671:
½I
N
*)
I
N
2IN 5IN
General RCDs
(non-delayed)
t
> 1999 ms t < 300 ms t < 150 ms t < 40 ms
Selective RCDs
(time-delayed)
t
> 1999 ms 130 ms < t < 500 ms 60 ms < t < 200 ms 50 ms < t < 150 ms
Trip-out times according to AS/NZ
**)
:
½I
N
*)
I
N
2IN 5IN
RCD type
I
N
[mA] t t
t
t
Note
I
10
40 ms 40 ms 40 ms
II
> 10 30
300 ms 150 ms 40 ms
III > 30
> 999 ms
300 ms 150 ms 40 ms
500 ms 200 ms 150 ms
Maximum break time
IV
S
> 30 > 999 ms
130 ms 60 ms 50 ms Minimum non-actuating time
*)
Minimum test period for current of ½IN, RCD shall not trip-out.
**)
Test current and measurement accuracy correspond to AS/NZ requirements.
Maximum test times related to selected test current for general (non-delayed) RCD
Standard
½IN I
N
2IN 5IN
EN 61008 / EN 61009 300 ms 300 ms 150 ms 40 ms
EN 60364-4-41 1000 ms 1000 ms 150 ms 40 ms
BS 7671 2000 ms 300 ms 150 ms 40 ms
AS/NZ (I, II, III) 1000 ms 1000 ms 150 ms 40 ms
Maximum test times related to selected test current for selective (time-delayed) RCD
Standard
½IN I
N
2IN 5IN
EN 61008 / EN 61009 500 ms 500 ms 200 ms 150 ms
EN 60364-4-41 1000 ms 1000 ms 200 ms 150 ms
BS 7671 2000 ms 500 ms 200 ms 150 ms
AS/NZ (IV) 1000 ms 1000 ms 200 ms 150 ms
Page 40

MI 3101 EurotestAT: Instrument operation Miscellaneous
40
4.4.3 Memory
In this menu the stored data can be recalled, viewed
and cleared. See chapter 6 Data handling for more
information.
Figure 4.25: Memory options
Keys:
/ Select option.
ESC
Exits this option.
TEST
Enters selected option.
4.4.4 Date and time
Date and time can be set in this menu.
Figure 4.26: Setting date and time
Keys:
Selects the field to be changed.
/ Modify selected field.
ESC
Exits date and time setup without changes.
TEST
Confirms new setup and exits.
4.4.5 Initial settings
Instrument settings and measurement parameters
and limits are set to their initial values in this menu.
Figure 4.27: Initial settings dialogue
Page 41

MI 3101 EurotestAT: Instrument operation Miscellaneous
41
Keys:
TEST
Restores default settings.
ESC
Exits the menu without changes.
F2
Opens other settings menu.
Warning:
Custom made settings will be lost when this option is used!
The default setup is listed below:
Instrument setting Default value
Contrast As defined and stored by adjustment procedure
Isc factor 1.00
Supply system TN / TT
RCD standards EN 61008 / EN 61009
COM port RS 232
Language English
Function
Sub-function
Parameter / limit value
CONTINUITY R 200 mA
R LOW
High limit resistance value: OFF
Continuity High limit resistance value: OFF
INSULATION Nominal test voltage: 500 V
Low limit resistance value: OFF
Selected test leads combination: LN
Z - LINE Fuse type: none selected
ΔU Limit: 4.0 %
Z
ref
: 0.00 Ω
Z - LOOP Protection: Fuse
Fuse type: none selected
2 line/loop impedance m L-N Fuse type: none selected
RCD RCD t
Nominal differential current: IN=30 mA
RCD type: G
Test current starting polarity: (0)
Limit contact voltage: 50 V
Current multiplier: 1
Earth resistance 3-wire
3-wire Limit value: OFF
Specific resistance Distance unit: m
Varistor test Lo limit: 300 V
Hi limit: 400 V
Other settings
F2
Enters menu to unlock the protected auto sequences and comments and/or
select distance unit for specific earth resistance measurement.
Page 42

MI 3101 EurotestAT: Instrument operation Miscellaneous
42
Unlock protected sequences or distance
unit can be selected.
Figure 4.28: Other settings dialogue
Keys:
/
Select other settings item.
TEST
Enters selected item.
ESC
Exits the menu without changes.
Unlocking autotests and comments
Protection flag (key) for all default auto
test sequences and associated
comments will be cleared.
Figure 4.29: Other settings dialogue
TEST
Unlocks locked auto test sequences.
ESC
Exits the menu without changes.
Units selection
Unit for specific earth resistance will be
selected.
Figure 4.30: Other settings dialogue
/ Select distance units.
TEST
Enters selected distance units.
ESC
Exits the menu without changes.
Page 43

MI 3101 EurotestAT: Instrument operation Miscellaneous
43
4.4.6 Communication port
The communication port (RS232 or USB) can
be selected in this menu.
Figure 4.31: Communication port selection
Keys:
/ Select communication port.
TEST
Confirms selected port.
ESC
Exits without changes.
Note:
Only one port can be active at the same time.
4.4.7 Locator
This function enables tracing electrical lines.
Keys:
TEST
Starts locator function.
ESC
Exits miscellaneous menu.
See chapter 5.10 Locator for locator operation.
4.4.8 Operator
This menu enables registering the operator of
the instrument. Selected operator name
appears on the bottom of the LCD during
turning on of the instrument. It is also
associated to stored measurement results.
Up to 5 operators can be defined.
Figure 4.32: Operator menu
Keys:
/
Select operator.
TEST
Accepts selected operator.
ESC
Exits to miscellaneous menu without changes.
F1
Enters operators name edit menu.
Page 44

MI 3101 EurotestAT: Instrument operation Miscellaneous
44
Operators name can be entered or modified.
Maximum 15 characters can be entered for
operator.
Figure 4.33: Operator name edit menu
Keys:
Highlighted key
Selected symbol or activity.
/ / / Select symbol or activity.
TEST
Enters selected symbol or performs selected activity.
F1
Deletes last entered symbol in the name line.
F2
Confirms comment and returns to operator main menu.
ESC
Deletes operator (immediately after entering the editor).
Returns to operator main menu without changes.
Page 45

MI 3101 EurotestAT: Measurements Insulation
45
5 Measurements
5.1 Insulation resistance
Insulation resistance measurement is performed in order to assure safety against electric
shock through insulation. It is covered by the EN 61557-2 standard. Typical applications
are:
Insulation resistance between conductors of installation,
Insulation resistance of non-conductive rooms (walls and floors),
Insulation resistance of ground cables,
Resistance of semi-conductive (antistatic) floors.
See chapter 4.2 Single test for functionality of keys.
Figure 5.1: Insulation resistance
Test parameters for insulation resistance measurement
TEST Test configuration [L-N, L-PE, N-PE, ‘L-PE,N-PE’, ‘L-N,L-PE’, ALL]
Uiso Test voltage [50 V, 100 V, 250 V, 500 V, 1000 V]
Limit
Minimum insulation resistance [OFF, 0.1 M ÷ 200 M, (‘L-PE,N-PE’,
‘L-N,L-PE’, ALL: 20 M)]
Test circuits for insulation resistance
L1
L2
L3
N
PE
mains voltage
switched off
closed
switches
loads disconnected
N/L2
L
/
L
1
PE/L3
Figure 5.2: Connection of universal test cable for general insulation resistance
measurement (TEST: L-PE)
Page 46

MI 3101 EurotestAT: Measurements Insulation
46
L1
L2
L3
N
PE
LPEN
L
/
L
1
N
/
L
2
P
E
/
L
3
mains voltage
switched off
loads disconnected
Figure 5.3: Application of plug commander and universal test cable for insulation
resistance measurement (TEST: ‘L-PE,N-PE’, ‘L-N,L-PE’, ALL)
Insulation resistance measuring procedure
Select the INSULATION function.
Set test parameters.
Enable and set limit value (optional).
Disconnect tested installation from mains supply (and discharge tested insulation).
Connect test cable to the instrument and tested item (see figures 5.2 and 5.3).
Press the TEST key for measurement (keep pressing for continuous
measurement).
After the measurement is finished wait until tested item is discharged.
Store the result (optional).
Figure 5.4: Examples of insulation resistance measurement results
Displayed results:
Rln ..........Insulation resistance between L (+) and N (-).
Rlpe ........Insulation resistance between L (+) and PE (-).
Rnpe .......Insulation resistance between N (+) and PE (-).
Um ..........Test voltage(s) – actual value(s).
Note:
Follow the correct test wiring as indicated in terminal voltage monitor
when the particular insulation test is selected. If only two test wires are
connected, and L-N, L-PE or N-PE test is selected, then technical
specification for INSULATION ALL applies.
Page 47

MI 3101 EurotestAT: Measurements Continuity
47
5.2 Resistance to earth connection and equipotential bonding
The resistance measurement is performed in order to assure that protective measures
against electric shock through earth bond connections are effective. Four subfunctions are
available:
Earth bond resistance measurement according to EN 61557-4 (between N and PE
terminals, test current >200 mA),
Earth bond resistance measurement according to EN 61557-4 (between L and PE
terminals, test current >200 mA),
Continuous resistance measurement with lower test current (between N and PE
terminals, test current ca 7 mA),
Continuous resistance measurement with lower test current (between L and PE
terminals, test current ca 7 mA).
See chapter 4.2 Single test for functionality of keys.
Figure 5.5: Continuity
Test parameters for resistance measurement
TEST Resistance measurement sub-function [R200mA NPE, R7mA NPE, R200mA
LPE, R7mA LPE]
Limit
Maximum resistance [OFF, 0.1 ÷ 20.0 ]
5.2.1 Continuity R200 mA measurement
The resistance measurement is performed with automatic polarity reversal of the test
voltage.
Page 48

MI 3101 EurotestAT: Measurements Continuity
48
Test circuit for Continuity R200mA measurement
PCC1
PCC2
PCC3
PE/L3
L/L1
MPEC
MPEC....Main Potential Equilizing Collector
PCC....Protection Conductor Collector
extension lead
N/L2
Figure 5.6: Connection of universal test cable plus optional extension lead
Resistance to earth connection and equipotential bonding measurement procedure
Select the CONTINUITY function.
Set sub-function R200mA (L-PE or N-PE).
Enable and set limit (optional).
Connect test cable to the instrument.
Compensate test leads resistance (if necessary).
Disconnect from mains supply and discharge tested installation.
Connect test leads to the tested PE wiring (see figure 5.6).
Press the TEST key for measurement.
After the measurement is finished store the result (optional).
Figure 5.7: Example of continuity R200mA result
Displayed results:
R..............Main R200mA resistance (average of R+ and R- results),
R+............R200mA sub-resistance with positive voltage at N terminal,
R- ............R200mA sub-resistance with positive voltage at PE terminal.
Page 49

MI 3101 EurotestAT: Measurements Continuity
49
5.2.2 7 mA resistance measurement
In general this function serves as standard -meter with low test current. The
measurement is performed continuously without pole reversal. The function can also be
applied for testing continuity of inductive components.
Test circuit for continuous resistance measurement
Ry
S
zTx
N
/
L
2
P
E
/
L
3
L
/
L
1
Figure 5.8: Universal test cable application
Continuous resistance measurement procedure
Select the CONTINUITY function.
Set sub-function R 7mA (L-PE or N-PE).
Enable and set limit (optional).
Connect test cable to the instrument.
Compensate test leads resistance (if necessary).
Disconnect from mains supply and discharge tested object.
Connect test leads to the tested object (see figure 5.8).
Press the TEST key for continuous measurement.
Press the TEST key to stop measurement.
After the measurement is finished store the result (optional).
Figure 5.9: Example of 7 mA resistance measurement
Displayed result:
R..............Resistance.
Page 50

MI 3101 EurotestAT: Measurements Continuity
50
5.2.3 Compensation of test leads resistance
This chapter describes common principle for compensation of test leads resistance for
both CONTINUITY functions. The compensation is required to eliminate the influence of
test leads resistance plus internal resistances of the instrument. The lead compensation is
very important to obtain correct result. The compensation status ( / ) is indicated
in the message field.
Key:
F1
Enters test leads resistance compensation menu for any of mentioned
functions.
See chapter 4.2 Single test for functionality of keys.
Figure 5.10: Test leads resistance
compensation menu
Keys:
TEST
Performs compensation
/ Sets function to be compensated
The instrument compensates following Continuity subfunctions.
Compensation NPE
Same compensation for both 7 mA and 200
mA measurements.
Short N and PE terminals.
Compensation LPE
Same compensation for both 7 mA and 200
mA measurements.
Short L and PE terminals
Page 51

MI 3101 EurotestAT: Measurements Continuity
51
Circuits for compensating the resistance of test leads
N
/
L
2
P
E
/
L
3
N
/
L
2
P
E
/
L
3
extension lead
P
E
/
L
3
N
/
L
2
Figure 5.11: Shorted test leads-examples for N-PE
Compensation of test leads resistance procedure
Select the CONTINUITY function (any).
Connect test cable to the instrument and short N/PE or L/PE terminals (see figure
5.11).
Press the F1 key to open test leads resistance compensation menu.
Press the TEST key for measurement and compensation of test leads resistance.
Press the ESC key to return to function menu.
Note:
20 is limit value for test leads resistance compensation.
Page 52

MI 3101 EurotestAT: Measurements Testing RCD
52
5.3 Testing RCDs
Various test and measurements are required for verification of RCD(s) in RCD protected
installations. Measurements are based on the EN 61557-6 standard.
The following measurements and tests (sub-functions) can be performed:
Contact voltage,
Trip-out time,
Trip-out current,
RCD autotest.
See chapter 4.2 Single test for functionality of keys.
Figure 5.12: RCD test
Test parameters for RCD test and measurement
TEST RCD sub-function test [Tripout time t, Uc, AUTO, Tripout current].
Idn
Rated RCD residual current sensitivity IN[10 mA, 30 mA, 100 mA, 300 mA,
500 mA, 1000 mA].
type
RCD type [ , ], test current waveform plus starting polarity [ , , ,
, ,
].
MUL Actual test current relative to rated Idn [½, 1, 2, 5].
Ulim Conventional touch voltage limit [25 V, 50 V].
The instrument is intended for testing of General (non-delayed) and Selective (timedelayed) RCDs, which are suited for:
Alternating residual current (AC type, marked with symbol),
Pulsating residual current (A type, marked with symbol).
DC residual current (B type, marked with
symbol
)
Time delayed RCDs demonstrate delayed response characteristics. They contain residual
current integrating mechanism for generation of delayed trip out. However, contact voltage
pre-test in the measuring procedure also influences the RCD and it takes a period to
recover into idle state. Time delay of 30 s is inserted before performing trip-out test to
recover RCD after pretests.
Page 53

MI 3101 EurotestAT: Measurements Testing RCD
53
Circuits for testing RCD
L1
L2
L3
N
PE
R
E
Ro
LPEN
L
/
L
1
N
/
L
2
P
E
/
L
3
Figure 5.13: Connecting the plug commander and the universal test cable
5.3.1 Contact voltage (RCD Uc)
A current flowing into the PE terminal causes a voltage drop on earth resistance, i.e.
voltage difference between PE equipotential bonding circuit and earth. This voltage
difference is called contact voltage. The voltage is present on all accessible conductive
parts connected to the PE. It should always be lower than the conventional safety limit
voltage. The contact voltage is measured with a test current lower than ½ IN to avoid tripout of the RCD and then normalized to the rated IN.
Contact voltage measurement procedure
Select the RCD function.
Set sub-function Uc.
Set test parameters (if necessary).
Connect test cable to the instrument.
Connect test leads to the tested object (see figure 5.13).
Press the TEST key.
After the measurement is finished store the result (optional).
Displayed contact voltage relates to the rated nominal residual current of the RCD and is
multiplied by appropriate factor. Common factor of 1.05 is applied to avoid negative
tolerance of result, additional depend on RCD type and type of test current. See table 5.1
for detailed contact voltage calculation.
RCD type
Contact voltage Uc proportional to
Rated I
N
AC G
1.05IN
AC
S
21.05IN
any
A G
1.41.05IN
A
S
21.41.05IN
30 mA
A G
21.05IN
A
S
221.05IN
< 30 mA
B G
21.05IN
B
S
221.05IN
any
Table 5.1: Relationship between Uc and I
N
Page 54

MI 3101 EurotestAT: Measurements Testing RCD
54
Loop resistance is indicative and calculated from Uc result (without additional proportional
factors) according to:
N
C
L
I
U
R
.
Figure 5.14: Example of contact voltage measurement results
Displayed results:
Uc....... Contact voltage.
Rl........ Fault loop resistance.
5.3.2 Trip-out time (RCD t)
Trip-out time measurement verifies the sensitivity of an RCD at different residual currents.
Trip-out time measurement procedure
Select the RCD function.
Set sub-function Tripout time t.
Set test parameters (if necessary).
Connect test cable to the instrument.
Connect test leads to the tested object (see figure 5.13).
Press the TEST key.
After the measurement is finished store the result (optional).
Figure 5.15: Example of trip-out time measurement results
Displayed results:
t .......... Trip-out time,
Uc....... Contact voltage for rated IN.
Page 55

MI 3101 EurotestAT: Measurements Testing RCD
55
Note:
See 4.4.2 RCD standard for selection of appropriate standard test conditions.
5.3.3 Trip-out current (RCD I)
A continuously rising residual current is intended for testing the threshold sensitivity for
RCD trip-out. The instrument increases the test current in small steps through appropriate
range as follows:
Slope range
RCD type
Start value End value
Waveform
AC
0.2IN 1.1IN
Sine
A (IN 30 mA) 0.2IN 1.5IN
A (IN = 10 mA) 0.2IN 2.2IN
Pulsed
B
0.2IN 2.2IN
DC
Maximum test current is I (trip-out current) or end value in case the RCD didn’t trip-out.
Trip-out current measurement procedure
Select the RCD function.
Set sub-function Tripout current.
Set test parameters (if necessary).
Connect test cable to the instrument.
Connect test leads to the tested object (see figure 5.13).
Press the TEST key.
After the measurement is finished store the result (optional).
Trip-out
After the RCD is turned on again
Figure 5.16: Trip-out current measurement result example
Displayed results:
I .......... Trip-out current,
Uci ...... Contact voltage at trip-out current I or end value in case the RCD didn’t trip,
t .......... Trip-out time.
Page 56

MI 3101 EurotestAT: Measurements Testing RCD
56
5.3.4 RCD Autotest
RCD autotest function is intended to perform complete RCD testing and measurement of
belonging parameters (contact voltage, fault loop resistance and trip-out time at different
residual currents) in one set of automatic tests, guided by the instrument. If any false
parameter is noticed during the RCD autotest, then individual parameter test has to be
used for further investigation.
RCD autotest procedure
RCD Autotest steps Notes
Select the RCD function.
Set sub-function AUTO.
Set test parameters (if necessary).
Connect test cable to the instrument.
Connect test leads to the tested object (see figure 5.13).
Press the TEST key. Start of test
Test with ½I
N
, 0 (step 1).
RCD should not trip-out
Test with ½I
N
, 180 (step 2).
RCD should not trip-out
Test with I
N
, 0 (step 3).
RCD should trip-out
Re-activate RCD.
Test with I
N
, 180 (step 4).
RCD should trip-out
Re-activate RCD.
Test with 5I
N
, 0 (step 5).
RCD should trip-out
Re-activate RCD.
Test with 5I
N
, 180 (step 6).
RCD should trip-out
Re-activate RCD.
After the measurement is finished store the result (optional). End of test
Result examples:
Step 1
Step 2
Page 57

MI 3101 EurotestAT: Measurements Testing RCD
57
Step 3
Step 4
Step 5
Step 6
Figure 5.17: Individual steps in RCD autotest
Displayed results:
.... Step 1 trip-out time (½IN, 0º),
.... Step 2 trip-out time (½IN, 180º),
... Step 3 trip-out time (IN, 0º),
... Step 4 trip-out time (IN, 180º),
... Step 5 trip-out time (5IN, 0º),
... Step 6 trip-out time (5IN, 180º),
Uc....... Contact voltage for rated I
N.
Notes:
The autotest sequence is immediately stopped if any incorrect condition is detected,
e.g. excessive Uc or trip-out time out of bounds.
Auto test is finished without tests in case of testing the RCD type A with rated
residual currents of I
n = 300 mA, 500 mA, and 1000 mA. In this case auto test
result passes if all previous results pass, and indications
and are omitted.
Page 58

MI 3101 EurotestAT: Measurements Fault loop impedance
58
5.4 Fault loop impedance and prospective fault current
Fault loop is a loop comprising mains source, line wiring and PE return path to the mains
source. The instrument has ability to measure impedance of mentioned loop and calculate
short circuit current and contact voltage regarding the selected circuit breaker type. The
measurement is covered by requirements of the EN 61557-3 standard.
See
4.2 Single test for active keys.
Figure 5.18: Fault loop
impedance
Test parameters for fault loop impedance measurement
Protection Selection of main protection device in fault loop [RCD, FUSE]*
Fuse type Selection of fuse type [---, NV, gG, B, C, K, D] **
Fuse I Rated current of selected fuse
Fuse T. Maximum breaking time of selected fuse
Isc_lim Minimum short circuit current for selected fuse combination.
See Appendix A for reference fuse data.
* Select RCD to prevent trip-out of RCD in RCD protected installation.
** --- Means no fuse selected.
Circuits for measurement of fault loop impedance
L1
L2
L3
N
PE
R
E
Ro
LPEN
L
/
L
1
N
/
L
2
P
E
/
L
3
Figure 5.19: Connection of plug cable and universal test cable
Page 59

MI 3101 EurotestAT: Measurements Fault loop impedance
59
Fault loop impedance measurement procedure
Select the Z-LOOP function.
Select test parameters (optional).
Connect test cable to the EurotestAT.
Connect test leads to the tested object (see figure 5.19).
Press the TEST key.
After the measurement is finished store the result (optional).
Figure 5.20: Examples of loop impedance measurement result
Displayed results:
Z ..............Fault loop impedance,
ISC ............Prospective fault current,
R..............Resistive part of loop impedance,
Xl .............Reactive part of loop impedance.
Prospective fault current ISC is calculated from measured impedance as follows:
Z
kUn
I
SC
SC
where:
Un ........Nominal U
L-PE
voltage (see table below),
ksc ....... Correction factor for Isc (see chapter
4.4.2).
Un Input voltage (L-PE)
110 V
(93 V
U
L-PE
134 V)
230 V
(185 V U
L-PE
266 V)
Notes:
High fluctuations of mains voltage influence the measurement results. The noise
sign is displayed in the message field in such case. Repeat the measurement.
Isc is not calculated in case the terminal voltage monitor does not detect voltage
state that corresponds to the selected supply system, indication .
This measurement will trip-out RCD in RCD-protected electrical installation if FUSE
is selected as breaking device instead of RCD.
Page 60

MI 3101 EurotestAT: Measurements Line impedance / Voltage drop
60
5.5 Line impedance / prospective short-circuit current and
Voltage drop
Line impedance is measured in loop comprising of mains voltage source and line wiring. It
is covered by the requirements of the EN 61557-3 standard.
The Voltage drop sub-function is intended to check that a voltage in the installation stays
above acceptable levels if the highest current is flowing in the circuit. The highest current
is defined as the nominal current of the circuit's fuse. The limit values are described in the
standard EN 60364-5-52.
Sub-functions:
Z-LINE – Line impedance measurement according to EN 61557-3,
ΔU – Voltage drop measurement.
Figure 5.21: Line impedance
See 4.2 Single test for keys functionality.
Figure 5.22: Voltage drop
Test parameters for line impedance measurement
TEST Selection of sub-function [Z, ΔU]
FUSE Type Selection of fuse type [---, NV, gG, B, C, K, D] *
FUSE I Rated current of selected fuse
FUSE T Maximum breaking time of selected fuse
Isc_lim Minimum short circuit current for selected fuse combination.
See Appendix A for reference fuse data.
*--- Means no fuse selected
Additional test parameters for voltage drop measurement
Limit Maximum voltage drop [3.0 % ÷ 9.0 %].
Page 61

MI 3101 EurotestAT: Measurements Line impedance / Voltage drop
61
5.5.1 Line impedance and prospective short circuit current
Circuit for measurement of line impedance
L1
L2
L3
N
PE
R
E
Ro
LPEN
L
/
L
1
N
/
L
2
P
E
/
L
3
N/L2
L
/
L
1
PE/L3
Figure 5.23: Phase-neutral or phase-phase line impedance measurement – connection of
plug commander and universal test cable
Line impedance measurement procedure
Select the Z-LINE function.
Select the Z sub-function.
Select test parameters (optional).
Connect test cable to the instrument.
Connect test leads to the tested object (see figure 5.23).
Press the TEST key.
After the measurement is finished store the result (optional).
Line to neutral
Line to line
Figure 5.24: Examples of line impedance measurement result
Displayed results:
Z ..............Line impedance,
ISC ............Prospective short-circuit current,
R..............Resistive part of line impedance,
XL............Reactive part of line impedance.
Prospective short circuit current is calculated as follows:
Z
kUn
I
SC
SC
where:
Un ........Nominal L-N or L1-L2 voltage (see table below),
Page 62

MI 3101 EurotestAT: Measurements Line impedance / Voltage drop
62
ksc ....... Correction factor for Isc (see chapter 4.4.2).
Un Input voltage range (L-N or L1-L2)
110 V
(93 V U
L-N
134 V)
230 V
(185 V U
L-N
266 V)
400 V
(321 V U
L-L
485 V)
Note:
High fluctuations of mains voltage influence the measurement results. The noise
sign is displayed in the message field in this case. Repeat the measurement.
Isc is not calculated in case the terminal voltage monitor does not detect voltage
state that corresponds to the selected supply system, indication
.
5.5.2 Voltage drop
The voltage drop is calculated based on the difference of line impedance at connection
points (sockets) and the line impedance at the reference point (usually the impedance at
the switchboard).
Circuits for voltage drop measurement
Figure 5.25: Phase-neutral or phase-phase voltage drop measurement – connection of
plug commander and 3-wire test lead
Voltage drop measurement procedure
Step 1: Measuring the impedance Zref at electrical installation origin
Select the Z-LINE function.
Select the ΔU sub-function.
Select test parameters (optional).
Connect test cable to the instrument.
Connect the test leads to the origin of electrical installation (see figure 5.25).
Press the F1 key to perform the measurement of Zref.
Step 2: Measuring the voltage drop
Keep the ΔU sub-function selected.
Select test parameters (Fuse type must be selected).
Connect test cable or plug commander to the instrument.
Connect the test leads to the tested points (see figure 5.25).
Press the TEST key to perform the measurement.
After the measurement is finished Store the result (optional).
Page 63

MI 3101 EurotestAT: Measurements Line impedance / Voltage drop
63
Step 1 - Zref Step 2 - Voltage drop
Figure 5.26: Examples of voltage drop measurement result
Displayed results:
ΔU ...........Voltage drop,
ISC............Prospective short-circuit current,
Z ..............Line impedance at measured point,
Zref..........Reference impedance
Voltage drop is calculated as follows:
100
)(
%
N
NREF
U
IZZ
U
where:
ΔU........ calculated voltage drop
Z ..........impedance at test point
Z
REF
......impedance at reference point
IN..........rated current of selected fuse
U
N
........nominal voltage (see table below)
U
n
Input voltage range (L-N or L1-L2)
110 V
(93 V U
L-N
134 V)
230 V
(185 V
U
L-N
266 V)
400 V
(321 V
U
L-L
485 V)
Note:
If the reference impedance is not set the value of Zref is considered as 0.00 Ω.
The Zref is cleared (set to 0.00 Ω) if pressing F1 key while instrument is not
connected to a voltage source.
I
SC
is calculated as described in chapter 5.5.1 Line impedance and prospective
short circuit current.
If the measured voltage is outside the ranges described in the table above the ΔU
result will not be calculated.
High fluctuations of mains voltage can influence the measurement results (the noise
sign is displayed in the message field). In this case it is recommended to repeat few
measurements to check if the readings are stable.
Page 64

MI 3101 EurotestAT: Measurements Voltage, frequency, phase sequence
64
5.6 Voltage, frequency and phase sequence
Voltage and frequency measurement is always active in the terminal voltage monitor. In
the special voltage menu the measured voltage, frequency and information about
detected three-phase connection can be stored. Phase sequence measurement conforms
to the EN 61557-7 standard.
See 4.2 Single test for keys functionality
Figure 5.27: Voltage in single
phase system
Test parameters for voltage measurement
There are no parameters.
Circuits for voltage measurement
L3
L2
L1
N
PE
N
/
L
2
N
/
L
2
L
/
L
1
L
/
L
1
P
E
/
L
3
P
E
/
L
3
result 1.2.3 result 2.1.3
Figure 5.28: Connection of universal test cable and optional adapter in three-phase system
L1
L2
L3
N
PE
R
E
Ro
LPEN
L
/
L
1
N
/
L
2
P
E
/
L
3
N/L2
L
/
L
1
PE/L3
Figure 5.29: Connection of plug commander and universal test cable in single-phase
system
Page 65

MI 3101 EurotestAT: Measurements Voltage, frequency, phase sequence
65
Voltage measurement procedure
Select the VOLTAGE function.
Connect test cable to the instrument.
Connect test leads to the tested object (see figures 5.28 and 5.29).
Store current measurement result (optional).
Measurement runs immediately after selection of VOLTAGE function.
Figure 5.30: Examples of voltage measurement in three-phase system
Displayed results for single phase system:
Uln...........Voltage between phase and neutral conductors,
Ulpe.........Voltage between phase and protective conductors,
Unpe........Voltage between neutral and protective conductors,
f ...............frequency.
Displayed results for three-phase system:
U12..........Voltage between phases L1 and L2,
U13..........Voltage between phases L1 and L3,
U23..........Voltage between phases L2 and L3,
1.2.3 ........Correct connection – CW rotation sequence,
3.2.1 ........Invalid connection – CCW rotation sequence,
f ...............frequency.
Page 66

MI 3101 EurotestAT: Measurements Resistance to earth
66
5.7 Resistance to earth
Resistance to earth is important for protection against electric shock. This function is
intended for verification of earthing of house installation and other earthings, e.g., earthing
for lighting. The measurement conforms to the EN 61557-6 standard. The following
resistance to earth sub-functions are available:
Standard 3-wire, for standard resistance to earth measurements.
Specific earth resistance by using optional external adapter.
See 4.2 Single test for keys functionality.
Figure 5.31: Resistance to earth
Test parameters for earth resistance measurement
TEST
Test configuration [3-wire, ]
Limit
Maximum resistance [OFF, 1 ÷ 5 k]
If selected:
Distance Distance between probes [0.1 m ÷ 30.0 m] or [1 ft ÷ 100 ft]
5.7.1 Standard 3-wire measurement
Circuits for measuring resistance to earth
MPEC
Rc Rp R
E
d>5d
E
H
S
blue - N
b - Llack
green - PE
Figure 5.32: Resistance to earth measurement – PE grounding
Page 67

MI 3101 EurotestAT: Measurements Resistance to earth
67
blue - N
black - L
green - PE
E
H
S
R3
E
R4
E
MPEC
d
>5d
R
E1
R2
E
RpRc
Figure 5.33: Resistance to earth measurement – lighting protection
Resistance to earth measurement procedure
Select the EARTH function.
Enable and set limit (optional).
Connect test cable to the instrument.
Disconnect tested object from mains supply.
Connect test leads to the tested object (see figures 5.32 and 5.33).
Press the TEST key.
After the measurement is finished store the result (optional).
Figure 5.34: Example of resistance to earth measurement result
Displayed results for earth resistance measurement:
R..............Earth resistance,
Rc............Resistance of S probe,
Rp............Resistance of H probe.
Page 68

MI 3101 EurotestAT: Measurements Resistance to earth
68
5.7.2 Specific earth resistance measurement
The measurement is intended for measuring specific earth resistance by using special
adapter A1199.
Circuit for specific earth resistance measurement
aaa
EES
S
H
a/20 max.
g
r
e
e
n
b
l
u
e
r
e
d
black
Figure 5.35: Specific earth resistance measurement with -adapter
Specific earth resistance measurement procedure
Select the EARTH function.
Connect -adapter to the instrument.
Select measurement.
Select distance unit (optional).
Set distance (optional).
Connect test leads of -adapter to tested object (see figure 5.35)
Press the TEST key.
After the measurement is finished, store the result (optional).
Figure 5.36: Example of specific earth resistance measurement result
Displayed results for earth resistance measurement:
..............Specific earth resistance.
Page 69

MI 3101 EurotestAT: Measurements 2
line/loop impedance
69
Note:
Distance units can be selected in Miscellaneous/Initial settings/Other settings menu,
see 4.4.5.
5.8 2 line/loop impedance
The measurement extends application range of the instrument and is performed with
Impedance adapter A1143 connected to the instrument via RS 232 interface. It is
automatically recognized in Z-LINE and Z-LOOP functions. With this adapter, low
impedances up to 1999 m can be measured. The measurement is covered by
requirements of the EN 61557-3 standard.
See chapter 4.2 Single test for functionality of keys.
Figure 5.37: Impedance adapter
connected
Test parameters for 2 line/loop impedance measurement
Function Z-LINE
Test
Impedance function [m L-N, m L-L]
Functions Z-LINE and Z-LOOP
FUSE type Selection of fuse type [---, NV, gG, B, C, K, D] *
FUSE I Rated current of selected fuse
FUSE T Maximum breaking time of selected fuse
Isc_lim Minimum short circuit current for selected fuse combination.
See Appendix A for reference fuse data.
*--- Means no fuse selected
Additional key:
F2
Toggles between result screens.
Test setup for 2 line/loop impedance measurement
Page 70

MI 3101 EurotestAT: Measurements 2
line/loop impedance
70
PS/2
RS 232
Figure 5.38: Connection of impedance adapter to the instrument
2 line/loop impedance measuring procedure
Connect Impedance adapter to the instrument (see figure 5.38).
Select the functions Z-LINE or Z-LOOP.
Enable and set limit value (optional).
Power ON the Impedance adapter (ON/OFF key, green LED will lit).
Connect Impedance adapter to tested installation.
Press the TEST key for measurement.
Store the result (optional).
Figure 5.39: Example of 2 line/loop measurement results
Displayed results:
Z ........................ Line / loop impedance,
ISC ...................... Prospective short-circuit current,
R........................ Resistive part of line impedance,
Xl ....................... Reactive part of line impedance.
The following parameters are displayed in sub-screen for single-phase line impedance
measurement:
IscMaxL-N ......... Maximum prospective short-circuit current.
IscMinL-N .......... Minimum prospective short-circuit current.
IscStd ................ Standard prospective short-circuit current.
When testing phase-to-phase line impedance the following parameters are displayed in
sub-screen:
Page 71

MI 3101 EurotestAT: Measurements 2
line/loop impedance
71
IscMax3Ph......... Maximum three-phase prospective short-circuit current.
IscMin3Ph.......... Minimum three-phase prospective short-circuit current.
IscMax2Ph......... Maximum two-phase prospective short-circuit current.
IscMin2Ph.......... Minimum two-phase prospective short-circuit current.
IscStd ................ Standard prospective short-circuit current.
The following parameters are displayed in sub-screen for loop impedance measurement:
IscMaxL-Pe ....... Maximum prospective fault current.
IscMinL-Pe ........ Minimum prospective fault current.
IscStd ................ Standard prospective fault current.
Ub...................... Contact voltage at maximum prospective fault current (Contact
voltage is measured against probe S).
Notes:
For application and technical data of the Impedance adapter A1143, see its user
manual 20750859
.
High fluctuations of mains voltage can influence the measurement results.
Check adapter indications in case the abort symbol appears after the start of
measurement.
Page 72

MI 3101 EurotestAT: Measurements PE test terminal
72
5.9 PE test terminal
It can happen that a dangerous voltage is applied to the PE wire or other accessible metal
parts. This is a very dangerous situation since the PE wire and MPEs are considered to be
earthed. A common reason for this fault is incorrect wiring (see examples below).
When touching the TEST key in all functions that require mains supply the user
automatically performs this test.
Examples for application of PE test terminal
L1
N
PE
Reversed phase and
protection conductors!
T MOST DANGEROUS
SITUATION!
HE
Figure 5.40: Reversed L and PE conductors (application of plug commander)
L1
N
Reversed phase and
protection conductors!
MOST DANGEROUS
SITUATION!
PE
LPEN
L
/
L
1
N
/
L
2
P
E
/
L
3
Figure 5.41: Reversed L and PE conductors (application of universal test cable)
Page 73

MI 3101 EurotestAT: Measurements Locator
73
PE terminal test procedure
Connect test cable to the instrument.
Connect test leads to the tested object (see figures 5.40 and 5.41).
Touch PE test probe (the TEST key) for at least one second.
If PE terminal is connected to phase voltage the warning message is displayed,
instrument buzzer is activated, and further measurements are disabled in Z-LOOP
and RCD functions.
Warning:
If line voltage is detected on the tested PE terminal, immediately stop all
measurements, find and remove the fault!
Notes:
In main and miscellaneous menus the PE terminal is not tested.
PE test terminal does not operate in case the operator’s body is completely
insulated from floor or walls!
5.10 Locator
This function is intended for tracing mains installation, like:
Tracing lines,
Finding shorts, breaks in lines,
Detecting fuses.
The instrument generates test signals that can be
traced with the handheld tracer receiver R10K. See
Locator appendix for additional information.
Figure 5.42: Locator entry point
Parameters for locator
There are no parameters.
Page 74

MI 3101 EurotestAT: Measurements Locator
74
Typical applications for tracing electrical installation
ON
LPEN
L
/
L
1
N
/
L
2
P
E
/
L
3
Figure 5.43: Tracing wires under walls and in cabinets
ON
Selective
probe
Energized installation
Receiver R10K
Figure 5.44: Locating individual fuses
Line tracing procedure
Select the LOCATOR function in MISC menu.
Connect test cable to the instrument.
Connect test leads to the tested object (see figures 5.43 and 5.44).
Press the TEST key.
Trace lines with receiver (in IND mode) or receiver plus its optional accessory.
After tracing is finished press the ESC key to stop generating test signal.
LOCATOR
Figure 5.45: Locator active
Page 75

MI 3101 EurotestAT: Measurements Varistor test
75
5.11 Varistor test
This test is performed to verify overvoltage protection devices. Typical devices are:
Metal oxide varistors,
Gas arresters,
Semiconductor transient voltage suppressors.
See chapter 4.2 Single test for functionality of keys.
Figure 5.46: Varistor test menu
Test parameters for varistor test
Lo limit Low limit DC threshold voltage [50 V ÷ 1000 V]
Hi limit High limit DC threshold voltage [50 V ÷ 1000 V]
It = 1.00 mA
Threshold current
Test circuit for varistor test
L1
L2
L3
N
PE
mains voltage
switched off
opened
switches
N/L2
L
/
L
1
PE/L3
permanent
loads
disconnected
Figure 5.47: Connection of universal test cable for varistor test
Page 76

MI 3101 EurotestAT: Measurements Varistor test
76
Varistor test procedure
Select the VARISTOR TEST function.
Set test parameters.
Disconnect mains supply and consumers from tested overvoltage device.
Connect test cable to the instrument and tested item (see figure 5.47).
Press the TEST key for measurement.
After the measurement is finished wait until tested item is discharged.
Store the result (optional).
Figure 5.48: Example of varistor test result
Displayed results:
U .............Measured threshold voltage at It (1 mA).
Uac .........Rated AC voltage.
Uac is calculated from U according to: Uac = U/1.6.
Page 77

MI 3101 EurotestAT: Data handling Memory organization
77
6 Data handling
6.1 Memory organization
The following data can be stored in instrument memory:
Auto sequence name, sequence, and function parameters,
Auto sequence and single test results with belonging parameters,
Installation structure with belonging data.
Stored data can be organized according to the installation structure of the tested object.
Measured results can be stored into corresponding location of the structure.
6.2 Installation data structure
This functionality helps to organize operation with data in a simple and effective manner.
The memory organization can be customized according to the actual structure of the
tested electrical installation.
Main benefits are:
Test results can be organized and grouped in a structured manner that equals the
structure of the tested electrical installation. If a test plan for verification of electrical
installation is prepared it is possible to organize the data structure according to it.
Each tested location place like room, floor, installation node, switchgear, etc. can be
reflected as its own location in memory.
Simple browsing through structure and results.
Test reports can be created with no or little modifications after downloading results
to a PC.
Test procedures can be prepared in advance on the PC and sent to the instrument.
A new installation structure can be built on the instrument
An existing structure can be upgraded on the instrument.
A name can be assigned to each location.
The data structure can be accessed and updated in each of the three main memory
menus (store, recall, clear memory), but also through tree structure view.
Basic view
Tree structure view
Figure 6.1: Example of data structure fields
Page 78

MI 3101 EurotestAT: Data handling Installation data structure
78
Figure 6.2: Installation structure example as presented on PC
Legend:
Memory operation menu
Installation data structure field
Root level in the structure:
METREL d.d.: 1
st
level location name.
1/1: No. of selected / available locations on this level.
Sub-level (level 2) in the structure:
PRODUCT.: sub-location name.
2/5: No. of selected / available locations on this level.
Sub-level (level 3) in the structure:
3PH SOCKET: location name.
1/3: No. of selected / available locations on this level.
Results field – stored results in the selected location.
Arrows point to existing non-displayed structure locations.
Available memory information.
No. of stored test results in selected location / No. of all stored
test results (in complete structure).
Option for opening the structure tree view.
Options for modification of the structure (see chapter 6.6).
Note:
Only three locations in the installation data structure field (placed horizontally) can
be displayed at the same time in the basic view.
Page 79

MI 3101 EurotestAT: Data handling Installation data structure
79
Keys:
/ / /
Select the existing location.
Pressed for 2 s opens dialog box for adding a new location.
F2
Enters installation structure tree screen.
F1
Renames the current location.
HELP
Enters installation structure tree screen.
ESC
Back to the last operation mode of the instrument.
Note:
The tree structure is limited to 2000 locations with 10 levels in depth, see figure 6.3.
Figure 6.3: Sub-levels depth definition
Figure 6.4
shows how individual structure elements are displayed on the instrument. The
outlook is the same for all three memory menus.
Figure 6.4: Data structure elements
Page 80

MI 3101 EurotestAT: Data handling Storing test results
80
6.3 Storing test results
After the completion of a single test or auto sequence the results and parameters are
ready for storing ( icon is displayed in the information field). Press the MEM key to store
the results.
See chapter 6.2 for definitions of displayed
fields.
Figure 6.5: Save test menu
Keys in save test menu - installation data structure field:
/ / /
Short press - select the location in structure of installation data field.
Pressed for a few seconds in some cases - add a new location in the
structure, see 6.6.1.
MEM
Saves test results to the last position in selected location and returns to
the measuring menu.
TAB
Toggles between results and structure data fields, see 6.3.1.
ESC
Exits save test menu.
F1
Edits name of selected location (see 4.3.4).
F2
Enters installation structure tree view to select appropriate location.
Notes:
Press the MEM key twice to quickly store the results to pre-selected location.
By default it is offered to append the result to the existing results in the selected
location.
6.3.1 Saving results specialties
It is possible to overwrite existing result when storing new result.
Appending new result
Overwriting requires confirmation
Figure 6.6: Saving in result field
Page 81

MI 3101 EurotestAT: Data handling Recalling test results and parameters
81
Keys in save test menu - results field:
/ Select stored test result.
TEST
Saves test result into selected line
(confirmation is needed to overwrite an
existing result).
ESC
Back to store test menu - installation
data structure field.
Keys with open dialog:
/ Select YES / NO.
TEST
Confirms selected
option.
ESC
Cancels without
changes.
For information about storing into a new non-existent location see 6.6.1.
6.4 Recalling test results and parameters
Press the MEM key in single or auto sequence menu when there is no result available for
storing or select in MISC menu.
See
6.2 for definitions of displayed fields.
Figure 6.7: Main recall menu
Keys in main recall memory menu:
/ / /
Short press - select the location in structure of installation data field.
Pressed for a few seconds in some cases - add a new location in the
structure, see 6.6.1.
TAB
Toggles between results and structure data field.
ESC
Exits to the last state of the instrument.
F1
Edits name of selected location (for editing see 4.3.4).
F2
Enters installation structure tree view to select appropriate location.
6.4.1 Recalling result
Result field has to be selected.
Figure 6.8: Recall data menu
Page 82

MI 3101 EurotestAT: Data handling Recalling test results and parameters
82
Keys in results field:
/ Select the stored data.
TEST
Opens selected stored item.
TAB, ESC
Back to recall memory main menu.
Key:
ESC
Back to recall memory main menu.
Figure 6.9: Stored single test
example
Keys:
/ Select stored data.
TEST
Opens function result.
ESC
Back to recall memory main menu.
Key in open function result:
ESC
Back to observed auto sequence.
Figure 6.10: Auto sequence stored
example
Page 83

MI 3101 EurotestAT: Data handling Clearing saved data
83
6.5 Clearing saved data
From main menu select miscellaneous menu and enter option (see 4.4.3).
In select
option for erasing complete test
results memory.
Figure 6.11: Clear memory
Keys:
/ Select CANCEL / CLEAR.
TEST
Confirms selected option.
ESC
Cancels dialog without changes.
In select
option to delete particular result
or modify installation data structure.
Figure 6.12: Clear test menu
Keys:
/ Select location.
TEST
Opens dialog for clearing in installation data structure.
TAB
Moves focus into result field for selection of surplus result, see 6.5.1.
F2
Enters installation structure tree view to select appropriate location.
F1
Renames current location.
ESC
Back to the last mode of the instrument.
Page 84

MI 3101 EurotestAT: Data handling Clearing saved data
84
6.5.1 Clearing specialties
In the result field the particular stored test result can be cleared.
Selection of data for clearing
Dialog before clear
Figure 6.13: Clearing particular test
Keys:
/ Select stored test.
TEST
Opens dialog for clearing selected test.
ESC
Back to last mode of the instrument.
Keys in opened dialog:
/ Select YES / NO.
TEST
Confirms selected option.
ESC
Cancels without changes.
Legend for clearing in installation data structure:
Results in current location.
Results in sub-locations.
Remove current location and its
sub-locations.
Figure 6.14: Clear in installation
data structure menu
Keys:
/ / / Select option.
TEST
Confirms option.
ESC
Cancels dialog without changes.
Page 85

MI 3101 EurotestAT: Data handling Editing installation data structure
85
6.6 Editing installation data structure
Installation data structure when once stored in the instrument can also be modified during
use of the instrument. Editing possibilities are:
Adding new location – see 6.6.1,
Modifying the name of selected location,
Clearing location / tree structure, see 6.5.1.
The possibilities are accessible in save, recall and clear (partly) menus.
6.6.1 Adding new locations
Note:
The structure can be expanded to 10 horizontal levels deep and with maximum
2000 storing locations.
Keys:
/ / /
Select the existing location.
Pressed for a few seconds in some cases - add a new location in the
structure, see 6.6.1.
F2
Enters installation structure tree view to select appropriate location.
F1
Renames the current location.
ESC
Back to the last operation mode of the instrument.
(for 2 seconds)
Opens dialog box for adding new location at the same level.
Active only if selected location is the last in the level.
Name of the new location: Same name as previous +1.
(for 2 seconds)
Opens dialog box for adding new location at the next sublevel.
Active only if there are no sublevels at the selected location.
Name of the new location: Location
Keys in open dialog box:
/ Select YES / NO.
TEST
Confirms selected option.
ESC
Cancels dialog box without changes.
An example for opening a new location and storing a test result into the location is
presented below.
Finished test with the results prepared for
saving is marked with
icon.
Figure 6.15: Test result prepared for saving
Page 86

MI 3101 EurotestAT: Data handling Editing installation data structure
86
Key:
MEM
Enters the save test menu.
Figure 6.16: Save test menu
Keys:
F2
Changes structure view.
TEST
Confirms the new location.
F1
Enters name of the location.
Figure 6.17: Dialog box for new location
Enter name of the location.
Key:
F2
Confirms the name.
Figure 6.18: Entering name for the new
location
Key:
MEM
Saves results into the
location.
Figure 6.19: Location prepared
Figure 6.20: Stored example
Page 87

MI 3101 EurotestAT: Data handling Communication
87
6.7 Communication
Stored results can be transferred to a PC. A special communication program on the PC
automatically identifies the instrument and enables data transfer between the instrument
and the PC.
There are two communication interfaces available on the instrument: USB or RS 232 (for
selection see 4.4.6).
1
1
PS/2 - RS 232 cable
minimum connections: 1 to 2, 4 to 3, 3 to 5
PS/
2
for MI 3101
3
5
2
4
6
9 pin D female for PC
Figure 6.21: Interface connection for data transfer over PC COM port
How to transfer stored data:
In the MISC: select appropriate communication interface (USB / RS 232).
RS 232 selected: connect a PC COM port to the instrument PS/2 connector using the PS/2
- RS232 serial communication cable;
USB selected: connect a PC USB port to the instrument USB connector using the USB
interface cable.
Power on the PC and the instrument.
Run the program Eurolink.
The PC and the instrument automatically recognize each other.
The program on the PC enables the following possibilities:
Downloading data;
Clearing storage;
Changing and downloading user data;
Preparing a simple report form;
Preparing a file for exporting to a spreadsheet.
The program Eurolink is a PC software running on Windows NT, Windows 2000, Windows
XP, Windows Vista, Windows 7. Read the file README_EuroLink.txt on CD for
instructions about installing and running the program.
Note:
USB drivers should be installed on PC before using the USB interface. Refer to
USB installation instructions available on installation CD.
Page 88

MI 3101 EurotestAT: Data handling Operation with barcode scanner
88
6.8 Operation with barcode scanner
Instruments (hardware version HW 5 or higher) support operation with barcode scanner.
The main application is to identify barcode labeled installation structure elements.
How to read data with barcode scanner:
Connect barcode scanner to PS/2 communication port
In ‘Edit location menu’ (see chapter 6.6, figure 6.18) the location name can be
alternatively read from barcode.
Note:
Proper operation is assured only with barcode scanners supplied by METREL.
For support of different barcode format refer to Barcode reader’s manual.
Maximal length of barcode is 10 characters.
Page 89

MI 3101 EurotestAT: Maintenance Replacing fuses/Cleaning/Calibration/Service
89
7 Maintenance
Unauthorized person is not allowed to open the EurotestAT instrument. There are no user
replaceable components inside the instrument, except three fuses and batteries under rear
cover.
7.1 Replacing fuses
There are three fuses under back cover of the EurotestAT instrument.
F1
M 0.315 A / 250 V, 205 mm
This fuse protects internal circuitry of continuity function if test probes are
connected to the mains supply voltage by mistake during measurement.
F2, F3
F 4 A / 500 V, 326.3 mm
General input protection fuses of test terminals L/L1 and N/L2.
Warnings:
Disconnect any measuring accessory and power off the instrument before
opening battery/fuse compartment cover, hazardous voltage inside!
Replace blown fuse with original type only, otherwise the instrument may be
damaged and/or operator’s safety impaired!
Position of fuses can be seen in Figure 3.4 in chapter 3.3 Back panel.
7.2 Cleaning
No special maintenance is required for the housing. To clean the surface of the instrument
use a soft cloth slightly moistened with soapy water or alcohol. Then leave the instrument
to dry totally before use.
Warnings:
Do not use liquids based on petrol or hydrocarbons!
Do not spill cleaning liquid over the instrument!
7.3 Periodic calibration
It is essential that the test instrument is regularly calibrated in order technical specification
listed in this manual is guaranteed. We recommend an annual calibration. Only an
authorized technical person can do the calibration. Please contact your dealer for further
information.
7.4 Service
For repairs under warranty, or at any other time, please contact your distributor.
Page 90

MI 3101 EurotestAT: Technical specifications
90
8 Technical specifications
8.1 Insulation resistance
Insulation LN, LPE, NPE
Insulation resistance (nominal voltages 50 VDC, 100 V
DC
and 250 VDC)
Measuring range according to EN61557 is 0.25 M 199.9 M.
Measuring range (M) Resolution (M)
Accuracy
0.00 19.99
0.01
(5 % of reading + 5 digits)
20.0 99.9 (10 % of reading)
100.0 199.9
0.1
(20 % of reading)
Insulation resistance (nominal voltages 500 VDC and 1000 VDC)
Measuring range according to EN61557 is 0.15 M 1000 M.
Measuring range (M) Resolution (M)
Accuracy
0.00 19.99
0.01
(5 % of reading + 3 digits)
20.0 199.9
0.1
200 299
1
(10 % of reading)
300 1000
1
(20 % of reading)
Insulation ALL and ‘L-PE,N-PE’, ‘L-N,L-PE’
Insulation resistance (nominal voltages 50 VDC, 100 VDC , 250 VDC ,500 V
DC,
1000 VDC)
Measuring range according to EN61557 is 0.34 M 30.0 M.
Measuring range (M) Resolution (M)
Accuracy
0.00 19.99
0.01
20.0 30.0
0.1
(10 % of reading + 5
digits)
Voltage
Measuring range (V) Resolution (V) Accuracy
0 1200
1
(3 % of reading + 3 digits)
Nominal voltages .............................. 50 V
DC
, 100 VDC, 250 VDC, 500 VDC, 1000 VDC
Open circuit voltage .......................... -0 % / + 20 % of nominal voltage
Measuring current............................. min. 1 mA at RN=UN1 k/V
Short circuit current........................... max. 0.6 mA
Specified accuracy is valid if universal test cable is used while it is valid up to 100 M if tip
commander is used.
Specified accuracy is valid up to 100 M if relative humidity > 85%.
In case the instrument gets moistened the results could be impaired. In such case it is
recommended to dry the instrument and accessories for at least 24 hours.
The error in operating conditions could be at most the error for reference conditions
(specified above for each function) 5 % of measured value.
The number of possible tests............ > 1200, with a fully charged battery
Auto discharge after test.
Page 91

MI 3101 EurotestAT: Technical specifications
91
8.2 Continuity
8.2.1 Resistance R200mA (LPE, NPE)
Measuring range according to EN61557 is 0.16 1999 .
Measuring range R () Resolution ()
Accuracy
0.00 19.99
0.01
(3 % of reading + 3 digits)
20.0 199.9
0.1
200 1999
1
(5 % of reading)
2000 9999
1 Indicator only
Measuring range R+, R- () Resolution ()
Accuracy
0.00 19.9
0.1
(5 % of reading + 5 digits)
20.0 199.9
0.1
200 1999
1
(10 % of reading)
2000 9999
1 Indicator only
Open-circuit voltage.......................... 6.5 VDC 9 VDC
Measuring current............................. min. 200 mA into load resistance of 2
Test lead compensation.................... up to 20
The number of possible tests ........... > 2000, with a fully charged battery
Automatic polarity reversal of the test voltage.
8.2.2 Resistance R7mA (LPE, NPE)
Measuring range () Resolution ()
Accuracy
0.0 19.9
0.1
20 1999
1
(5 % of reading + 3 digits)
2000 9999
1 Indicator only
Open-circuit voltage.......................... 6.5 VDC
9 VDC
Short-circuit current .......................... max. 8.5 mA
Test lead compensation.................... up to 20
8.3 RCD testing
8.3.1 General data
Nominal residual current (A,AC) ....... 10 mA, 30 mA, 100 mA, 300 mA, 500 mA,
1000 mA
Nominal residual current accuracy.... -0 / +0.1I; I = IN, 2IN, 5IN
-0.1I / +0; I = 0.5IN
AS / NZ selected: ± 5 %
Test current shape............................ Sine-wave (AC), pulsed (A),DC (B)
DC offset for pulsed test current ....... 6 mA (typical)
RCD type .......................................... G (non-delayed), S (time-delayed)
Test current starting polarity ............. 0 º or 180 º
Voltage range ................................... 40 V 264 V (14 Hz 500 Hz)
Page 92

MI 3101 EurotestAT: Technical specifications
92
RCD test current selection (r.m.s. value calculated to 20ms) according to IEC 61009:
IN × 1/2 IN × 1 IN × 2 IN × 5 RCD I
IN (mA)
AC A B AC A B AC A B AC A B AC A B
10 5 3.5 5 10 20 20 20 40 40 50 100 100
30 15 10.5 15 30 42 60 60 84 120 150 212 300
100 50 35 50 100 141 200 200 282 400 500 707 1000
300 150 105 150 300 424 600 600 848 n.a. 1500 n.a. n.a.
500 250 175 250 500 707 1000 1000 1410 n.a. 2500 n.a. n.a.
1000 500 350 500 1000 1410 n.a. 2000 n.a. n.a. n.a. n.a. n.a.
n.a.
n.a..................................................... not applicable
8.3.2 Contact voltage RCD-Uc
Measuring range according to EN61557 is 20.0 V 31.0V for limit contact voltage 25V
Measuring range according to EN61557 is 20.0 V 62.0V for limit contact voltage 50V
Measuring range (V) Resolution (V) Accuracy
0.0 19.9
0.1
(-0 % / +15 %) of reading ± 10 digits
20.0 99.9
(-0 % / +15 %) of reading
The accuracy is valid if mains voltage is stabile during the measurement and PE terminal
is free of interfering voltages.
Test current....................................... max. 0.5IN
Limit contact voltage ......................... 25 V, 50 V
Specified accuracy is valid for complete operating range.
8.3.3 Trip-out time
Complete measurement range corresponds to EN 61557 requirements.
Maximum measuring times set according to selected reference for RCD testing.
Measuring range (ms) Resolution (ms) Accuracy
0.0 40.0
0.1
1 ms
0.0 max. time *
0.1
3 ms
* For max. time see normative references in 4.4.2 – this specification applies to max. time
>40 ms.
Test current....................................... ½
I
N
, IN, 2IN, 5I
N
5IN is not available for IN=1000 mA (RCD types AC) or I
N
300 mA (RCD type A,B).
2
I
N
is not available for IN=1000 mA (RCD type A,B).
1
I
N
is not available IN=1000 mA (RCD Typ B).
Page 93

MI 3101 EurotestAT: Technical specifications
93
8.3.4 Trip-out current
Trip-out current
Complete measurement range corresponds to EN 61557 requirements.
Measuring range I Resolution I
Accuracy
0.2IN 1.1IN (AC type) 0.05IN 0.1IN
0.2IN 1.5IN (A type, IN ≥30 mA) 0.05IN 0.1IN
0.2IN 2.2IN (A type, IN <30 mA) 0.05IN 0.1IN
0.2IN 2.2IN (B type) 0.05IN 0.1IN
Trip-out time
Measuring range (ms) Resolution (ms) Accuracy
0 300
1
3 ms
Contact voltage
Measuring range (V) Resolution (V) Accuracy
0.0 19.9
0.1
(-0 % / +15 %) of reading 10 digits
20.0 99.9
0.1 (-0 % / +15 %) of reading
The accuracy is valid if mains voltage is stabile during the measurement and PE terminal
is free of interfering voltages.
Measurement can not be performed for IN=1000 mA (RCD type B).
Specified accuracy is valid for complete operating range.
8.4 Fault loop impedance and prospective fault current
8.4.1 No disconnecting device or FUSE selected
Fault loop impedance
Measuring range according to EN61557 is 0.25 19999 .
Measuring range (
) Resolution ()
Accuracy
0.00 9.99
0.01
10.0 99.9
0.1
100 19999
1
(5 % of reading + 5 digits)
Prospective fault current (calculated value)
Measuring range (A) Resolution (A) Accuracy
0.00 9.99
0.01
10.0 99.9
0.1
100 999
1
1.00k 9.99k
10
10.0k 23.0k
100
Consider accuracy of fault
loop impedance
measurement
The accuracy is valid if mains voltage is stable during the measurement.
Test current (at 230 V)...................... 6.5 A (10 ms)
Nominal voltage range ...................... 30 V 500 V (14 Hz 500 Hz)
Page 94

MI 3101 EurotestAT: Technical specifications
94
8.4.2 RCD selected
Fault loop impedance
Measuring range according to EN61557 is 0.46 19999 .
Measuring range () Resolution ()
Accuracy *
0.00 9.99
0.01
(5 % of reading + 10 digits)
10.0 99.9
0.1
10 % of reading
100 19999
1
10 % of reading
* Accuracy may be impaired in case of heavy noise on mains voltage
Prospective fault current (calculated value)
Measuring range (A) Resolution (A) Accuracy
0.00 9.99
0.01
10.0 99.9
0.1
100 999
1
1.00k 9.99k
10
10.0k 23.0k
100
Consider accuracy of fault
loop impedance
measurement
Nominal voltage range ...................... 30 V 500 V (14 Hz 500 Hz)
No trip out of RCD.
R, XL values are indicative.
8.5 Line impedance / prospective short-circuit current and
Voltage drop
Line impedance
Measuring range according to EN61557 is 0.25 19.9 k.
Measuring range () Resolution ()
Accuracy
0.00 9.99
0.01
10.0 99.9
0.1
100 999
1
1.00k 9.99k
10
10.0k 19.9k
100
(5 % of reading + 5 digits)
Prospective short-circuit current (calculated value)
Measuring range (A) Resolution (A) Accuracy
0.00 0.99
0.01
1.0 99.9
0.1
100 999
1
1.00k 99.99k
10
100k 199k
1000
Consider accuracy of line
impedance measurement
Test current (at 230 V)...................... 6.5 A (10 ms)
Nominal voltage range ...................... 30 V 500 V (14 Hz 500 Hz)
R, XL values are indicative.
Page 95

MI 3101 EurotestAT: Technical specifications
95
Voltage drop (calculated value)
Measuring range (%) Resolution (%) Accuracy
0.0 99.9
0.1
Consider accuracy of line
impedance measurement
Z
REF
measuring range……………………… 0.00 Ω 20.0 Ω
8.6 Voltage, frequency, and phase rotation
8.6.1 Phase rotation
Nominal system voltage range.......... 100 VAC 550 VAC
Nominal frequency range.................. 14 Hz
500 Hz
Result displayed ............................... 1.2.3 or 3.2.1
8.6.2 Voltage
Measuring range (V) Resolution (V) Accuracy
0 550
1
(2 % of reading + 2 digits)
Result type........................................ True r.m.s. (trms)
Nominal frequency range.................. 0 Hz, 14 Hz 500 Hz
8.6.3 Frequency
Measuring range (Hz) Resolution (Hz) Accuracy
0.00 999.99
0.01
(0.2 % of reading + 1 digit)
Nominal voltage range ...................... 10 V 550 V
8.7 Online terminal voltage monitor
Measuring range (V) Resolution (V) Accuracy
10 550
1
(2 % of reading + 2 digits)
8.8 Earth resistance
Earth resistance three-wire method
Measuring range according to EN61557 is 0.67 9999
Measuring range () Resolution ()
Accuracy
0.00 19.99
0.01
20.0 199.9
0.1
(3 % of reading + 3 digits)
200 1999
1
5 % of reading
2000 9999
1
10 % of reading
Additional spike resistance error if
Rc max. or Rp max. is exceeded ......
(5 % of reading + 10 digits)
Rc max. ............................................ 100 RE or 50 k (whichever is lower)
Page 96

MI 3101 EurotestAT: Technical specifications
96
Rp max. ............................................ 100 RE or 50 k (whichever is lower)
Automatic test of probe resistance.......... yes
Additional error
at 3 V voltage noise (50 Hz).............. (5 % of reading +10 digits)
Automatic test of voltage noise ......... yes
Noise voltage indication threshold .... 1 V (<50 , worst case)
Open-terminal test voltage................ 40 VAC
Test voltage frequency...................... 125 Hz / 150 Hz
Short-circuit test current.................... < 20 mA
Specific earth resistance
Measuring range (m) Resolution (m)
Accuracy
0.0 99.9
0.1
100 999
1
1.00k 9.99k
0.01k
10.0k 99.9k
0.1k
>100k 1k
See accuracy note
Measuring range (ft) Resolution (ft)
Accuracy
0.0 99.9
0.1
100 999
1
1.00k 9.99k
0.01k
10.0k 99.9k
0.1k
>100k 1k
See accuracy note
Principle:
= 2··distance·Re,
with Re as measured resistance in 4-wire method.
Accuracy note:
Accuracy of the specific earth resistance result depends on measured resistance
Re and is as follows:
Measuring range ()
Accuracy
1.00 1999 5 % of measured
2000 19.99k 10 % of measured
>20k
20 % of measured
Additional error
See Earth resistance three-wire method.
8.9 2 line/loop impedance
8.9.1 High precision line impedance
Measuring range according to EN61557 is 5.0 1999 m
Measuring range (m) Resolution (m)
Accuracy
0.1 199.9
0.1
200 1999
1
(5 % + 1 m)
Page 97

MI 3101 EurotestAT: Technical specifications
97
Nominal voltage range ............................100 V 440 V
Nominal frequency ..................................50 Hz
Maximum test current (at 400V)..............267 A (10 ms)
Calculation of prospective short-circuit current (standard voltage value):
Z
V230
=I
K
U
L-N
= 230 V 10 %
Z
V400
=I
K
U
L-L
= 400 V 10 %
Calculation of prospective short-circuit current (non-standard voltage value):
L-L
L)-L(NMAX
ph3KMAX
Z
2
×
3
U×C
=I
HOT L)-(L
L)-L(NMIN
ph3KMIN
Z
2
×
3
U×C
=I
L-L
L)-L(NMAX
ph2KMAX
Z
U×C
=I
HOT L)-(L
L)-L(NMIN
ph2KMIN
Z
U×C
=I
N-L
N)-L(NMAX
N)-(LKMAX
Z
U×C
=I
HOT N)-(L
N)-L(NMIN
N)-(LKMIN
Z
U×C
=I
2
L-L
2
L-LL-L
X+R=Z
()
2
L-L
2
L-LHOT L)-(L
X+R×5.1=Z
2
N-L
2
N-LN-L
X+R=Z
()
2
N-L
2
N-LHOT N)-(L
X+R×5.1=Z
U
N(L-N)
= 230 V 10 %
U
N(L-L)
= 400 V 10 %
230 V < U
N
< 400 V
C
MAX
1.05 1.10
C
MIN
0.95 1.00
8.9.2 High precision fault loop impedance
Measuring range according to EN61557 is 5.0 1999 m
Measuring range (m) Resolution (m)
Accuracy
0.0 199.9
0.1
200 1999
1
(5 % + 1 m)
Nominal voltage range ............................100 V 440 V
Nominal frequency ..................................50 Hz
Maximum test current (at 230 V).............154 A (10 ms)
Calculation of prospective short-circuit current (standard voltage value):
Z
V230
=I
K
U
L-PE
= 230 V 10 %
Calculation of prospective short-circuit current (non-standard voltage value):
PE-L
PE)-L(NMAX
PE)-(LKMAX
Z
U×C
=I
HOT PE)-(L
PE)-L(NMIN
PE)-(LKMIN
Z
U×C
=I
2
PE-L
2
PE-LPE-L
X+R=Z
()
2
PE-L
2
PE-LHOT PE)-(L
X+R×5.1=Z
Page 98

MI 3101 EurotestAT: Technical specifications
98
U
N(L-PE)
= 230 V 10 %
230 V < U
N
< 400 V
C
MAX
1.05 1.10
C
MIN
0.95 1.00
8.9.3 Contact voltage
Measuring range (V) Resolution (V) Accuracy
0 100
1
(10 % + 3 digits)
8.10 Varistor test
DC voltage
Measuring range (V) Resolution (V) Accuracy
0 1000
1
(3 % of reading + 3 digits)
AC voltage
Measuring range (V) Resolution (V) Accuracy
0 625
1
Consider accuracy of DC voltage
Measurement principle...................... d.c. voltage ramp
Test voltage slope............................. 500 V/s
Threshold current.............................. 1 mA
Page 99

MI 3101 EurotestAT: Technical specifications
99
8.11 General data
Power supply voltage........................ 9 V
DC
(61.5 V battery or accu, size AA)
Operation .......................................... typical 13 h
Charger socket input voltage ............ 12 V
10 %
Charger socket input current............. 400 mA max.
Battery charging current.................... 250 mA (internally regulated)
Overvoltage category........................ 600 V CAT III, 300 V CAT IV
Plug commander
overvoltage category ................ 300 V CAT III
Protection classification .................... double insulation
Pollution degree................................ 2
Protection degree ............................. IP 40
Display ............................................ 320x240 dots matrix display with backlight
Dimensions (w
h d) ..................... 23 cm 10.3 cm 11.5 cm
Weight ............................................ 1.32 kg, without battery cells
Reference conditions
Reference temperature range........... 10
C 30 C
Reference humidity range................. 40 %RH
70 %RH
Operation conditions
Working temperature range .............. 0
C 40 C
Maximum relative humidity ............... 95 %RH (0
C 40 C), non-condensing
Storage conditions
Temperature range ........................... -10
C +70 C
Maximum relative humidity ............... 90 %RH (-10
C +40 C)
80 %RH (40
C 60 C)
Locator.............................................. supports inductive mode
Maximum operation voltage.............. 440 V a.c.
Communication transfer speed
RS 232.............................................. 115200 baud
USB .................................................. 256000 baud
The error in operating conditions could be at most the error for reference conditions
(specified in the manual for each function) +1 % of measured value + 1 digit, unless
otherwise specified in the manual for particular function.
Page 100

MI 3101 EurotestAT: Appendix A Fuse table
100
A Appendix A - Fuse table
Fuse type NV
Disconnection time [s]
35m 0.1 0.2 0.4 5
Rated
current
(A)
Min. prospective short- circuit current (A)
2 32.5 22.3 18.7 15.9 9.1
4 65.6 46.4 38.8 31.9 18.7
6 102.8 70 56.5 46.4 26.7
10 165.8 115.3 96.5 80.7 46.4
16 206.9 150.8 126.1 107.4 66.3
20 276.8 204.2 170.8 145.5 86.7
25 361.3 257.5 215.4 180.2 109.3
35 618.1 453.2 374 308.7 169.5
50 919.2 640 545 464.2 266.9
63 1217.2 821.7 663.3 545 319.1
80 1567.2 1133.1 964.9 836.5 447.9
100 2075.3 1429 1195.4 1018 585.4
125 2826.3 2006 1708.3 1454.8 765.1
160 3538.2 2485.1 2042.1 1678.1 947.9
200 4555.5 3488.5 2970.8 2529.9 1354.5
250 6032.4 4399.6 3615.3 2918.2 1590.6
315 7766.8 6066.6 4985.1 4096.4 2272.9
400 10577.7 7929.1 6632.9 5450.5 2766.1
500 13619 10933.5 8825.4 7515.7 3952.7
630 19619.3 14037.4 11534.9 9310.9 4985.1
710 19712.3 17766.9 14341.3 11996.9 6423.2
800 25260.3 20059.8 16192.1 13545.1 7252.1
1000 34402.1 23555.5 19356.3 16192.1 9146.2
1250 45555.1 36152.6 29182.1 24411.6 13070.1
Fuse type gG
Disconnection time [s]
35m 0.1 0.2 0.4 5
Rated
current
(A)
Min. prospective short- circuit current (A)
2 32.5 22.3 18.7 15.9 9.1
4 65.6 46.4 38.8 31.9 18.7
6 102.8 70 56.5 46.4 26.7
10 165.8 115.3 96.5 80.7 46.4
13 193.1 144.8 117.9 100 56.2
16 206.9 150.8 126.1 107.4 66.3
20 276.8 204.2 170.8 145.5 86.7
25 361.3 257.5 215.4 180.2 109.3
32 539.1 361.5 307.9 271.7 159.1
35 618.1 453.2 374 308.7 169.5
40 694.2 464.2 381.4 319.1 190.1
50 919.2 640 545 464.2 266.9
63 1217.2 821.7 663.3 545 319.1
80 1567.2 1133.1 964.9 836.5 447.9
100 2075.3 1429 1195.4 1018 585.4
 Loading...