

Page 1
INSTALLATION INSTRUCTIONS FOR PART 98-8999
Applications
MITSUBISHI
3000 GT 1991-1999, Diamante 1997-2004, Eclipse 1995-2005,
Galant*1994-2009 (* With Manual Climate Control), Mirage 1997-2003,
Montero 1996-2005, Montero Sport 2000-2004
SUBURU
Baja 2003-2005, Forester 1998-2008, Impreza 1993-2007,
Impreza WRX 2002-2005, Legacy 1995-2004, Outback 2000-2004
VOLKSWAGEN
Golf 2001-2005, Jetta**2001-2005 (** No Including New A5)
Passat 2001-2005
(page1)
(page2)
(page3)
98-8999
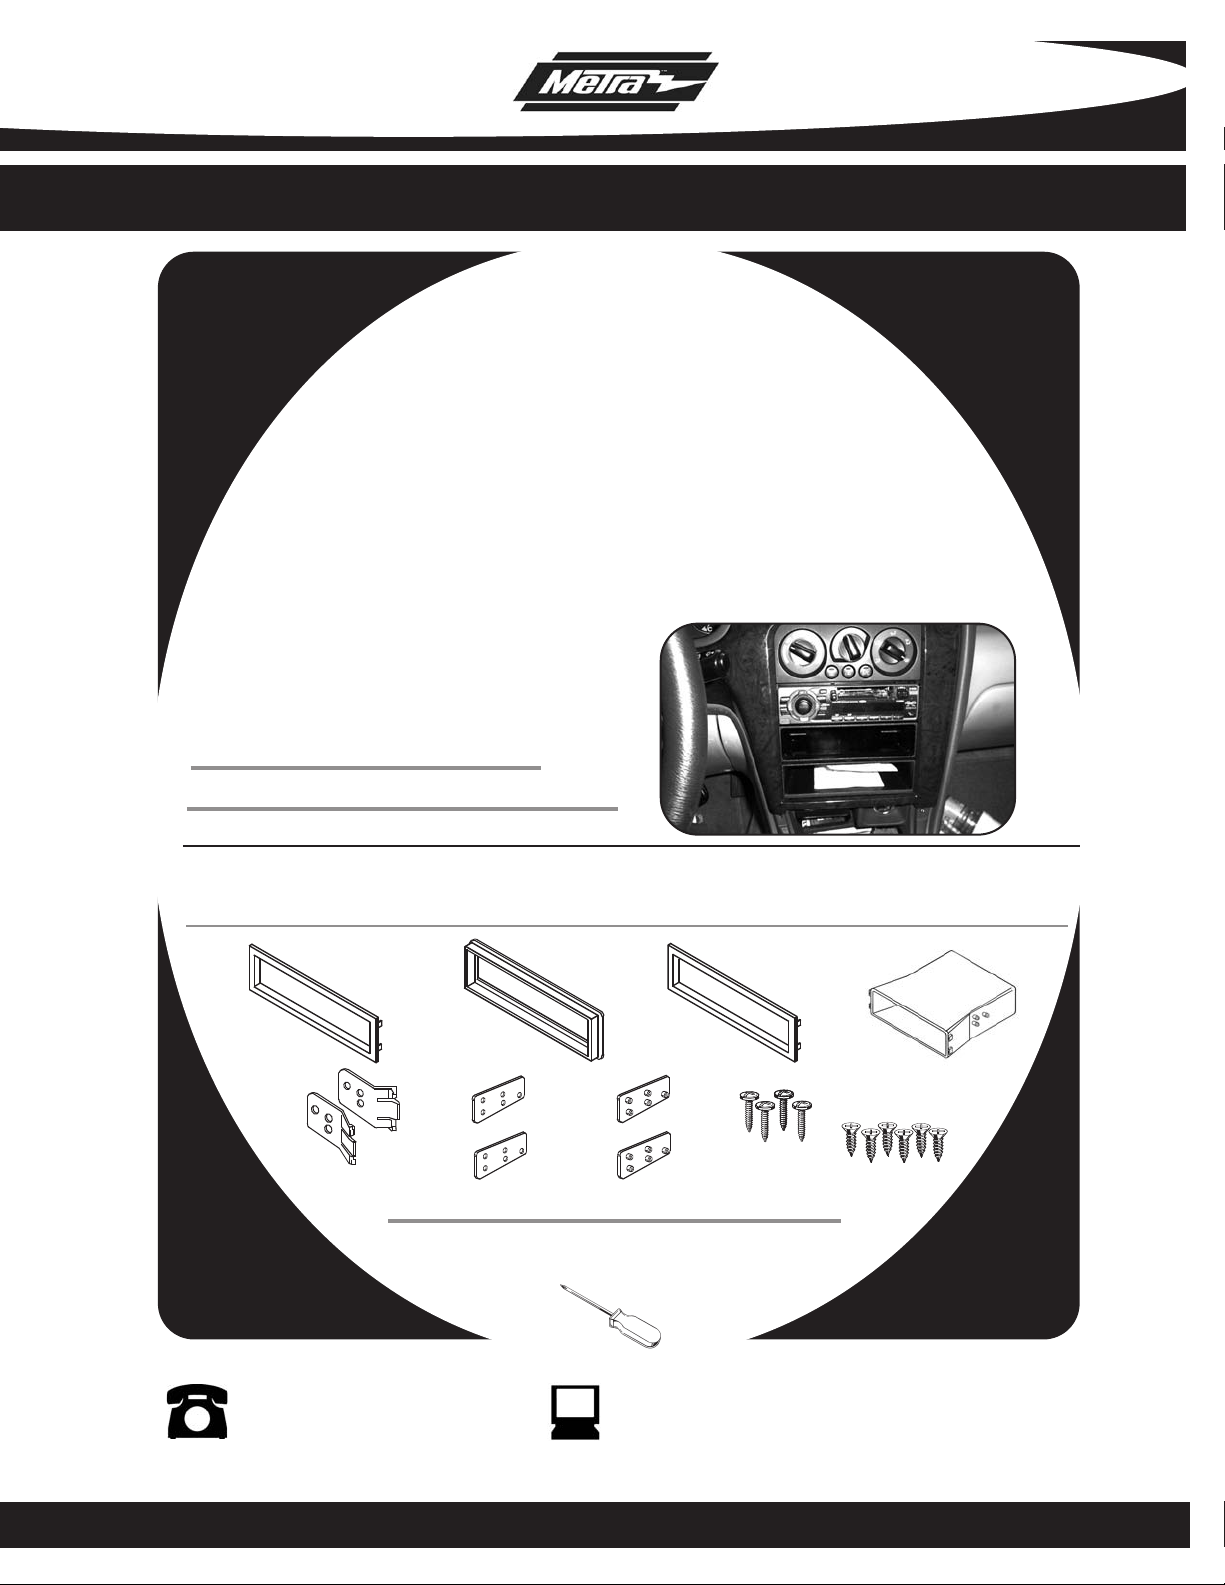
KIT FEATURES
• Holds Three CD Jewel Cases
KIT COMPONENTS
A) VW Pocket Trim Plate • B) Subaru Pocket Trim Plate • C) Mitsubishi Trim Plate • D) Pocket
• E) (2) VW Brackets • F) (2) Left Brackets • G) (2) Right Brackets • H) (4) #8 x 1/4” Phillips Pan Head Screws
I) (6) #6 x 1/4” Phillips Flat Head Screws
A
E
B
F
G
TOOLS REQUIRED:
Phillips Screwdriver
C
H
D
I
1-800-221-0932 www.metraonline.com
© COPYRIGHT 2002-2008 METRA ELECTRONICS CORPORATION
Page 2

98-8999
B2
MITSUBISHI POCKET
Disconnect the negative battery
1
terminal to prevent an accidental
short circuit.
2
Snap Pocket Trimplate MIT onto
the front of the Pocket. Locate one
of the Left Brackets and mount it
to the “L” side of the Pocket with
(2) #6 x 1/4" Phillips Flat Head
Screws
Right Brackets and mount it to
the “R” side of the Pocket with
#6 x 1/4" Phillips Flat Head
Screws.
. Next locate one of the
(Figure A)
POCKET ASSEMBLY
A
(2)
B
Mount the factory brackets to the
3
shaded bosses (Fig. B2) with
x 1/4" Phillips Pan Head Screws
supplied and mount the entire
assembly to the sub-dash.
(4) #8
(Figure B)
1
Page 3

98-8999
B2
SUBARU POCKET
Disconnect the negative battery
1
terminal to prevent an accidental
short circuit.
2
Snap Pocket Trimplate SUB onto
the front of the Pocket. Locate one
of the
to the “L” side of the Pocket with
(2) #6 x 1/4" Phillips Flat Head
Screws. Next locate one of the
Right Brackets and mount it to
the “R” side of the Pocket with
#6 x 1/4" Phillips Flat Head
Screws.
Left Brackets and mount it
(Figure A)
POCKET ASSEMBLY
A
(2)
B
Mount the factory brackets to the
3
shaded bosses (Fig. B2) with
x 1/4" Phillips Pan Head Screws
supplied and mount the entire
assembly to the sub-dash.
(4) #8
(Figure B)
2
Page 4

98-8999
K
NOWLEDGE IS POWER
Enhance your installation and fabrication skills by
enrolling in the most recognized and respected
mobile electronics school in our industry.
Log onto www.installerinstitute.com or call
800-354-6782 for more information and take steps
toward a better tomorrow.
VOLKSWAGEN POCKET
Disconnect the negative battery
1
terminal to prevent an accidental
short circuit.
2
Snap Pocket Trimplate VW (labeled
TP-9008) onto the front of the
Pocket. Locate the X-5599L
Bracket and mount it to the “L”
side of the Pocket with (3) #6 x
1/4" Phillips Flat Head Screws
Next locate the X-5599R Bracket
and mount it to the “R” side of the
Pocket with
Flat Head Screws.
(3) #6 x 1/4" Phillips
(Figure A)
POCKET ASSEMBLY
A
.
B
Pull out the plastic tray separating
3
the dash cavity and remove the tray
(“A”). Position the
Pocket so each
bracket is configured with (2) screws
on the top and (1) screw on the bot-
(“B”). Slide the pocket into the
tom
dash opening until the side clips
engage.
(Figure B)
1-800-221-0932
. 08/12/08 © COPYRIGHT 2002-2008 METRA ELECTRONICS CORPORA
REV
www.metraonline
TION INST98-8999
3
.com
 Loading...