

Page 1
INSTALLATION INSTRUCTIONS FOR PART 95-3302
APPLICATIONS
See application list inside
GM multi-kit 2004-2010
95-3302
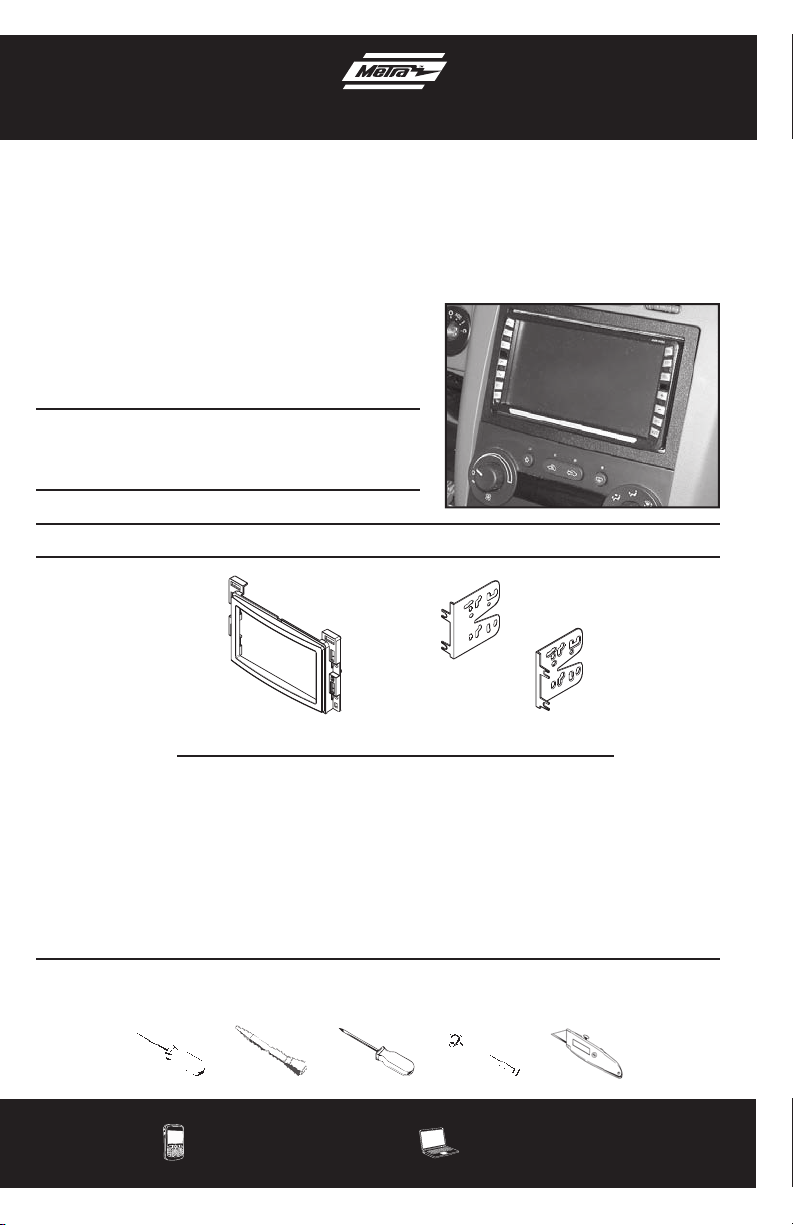
KIT FEATURES
• Double DIN mount radio provision
• Stacked ISO mount radio provision
• Painted to match factory dash
KIT COMPONENTS
• A) Double DIN housing • B) Double DIN brackets
BA
WIRING & ANTENNA CONNECTIONS (sold separately)
Wiring Harness:
• Visit www.metraonline.com for specific interface
applications
Antenna Adapter:
• 40-GM10 - GM antenna adapter 1988-up
• 40-CR10 - Chrysler antenna adapter 2002-up
TOOLS REQUIRED
• Small flat blade screwdriver • Panel removal tool • Phillips screwdriver
• Socket set • Cutting tool
METRA. THE WORLD’S BEST KITS.™
1-800-221-0932
© COPYRIGHT 2004-2011 METRA ELECTRONICS CORPORATION
metraonline.com
REV. 01/30/12 INST95-3302
Page 2

95-3302
Applications
Chevrolet
Cobalt 2005-2010*
Equinox 2005-2006
HHR 2006-2010
Malibu 2004-2007**
Pontiac
G5 2007-2009*
G6 2005-2009**
Solstice 2006-2009
Torrent 2006
Saturn
Aura 2007-2009
Ion 2006-2007
Sky 2006-2009
Vue 2006-2007
Malibu 2008-2010**
Note: (Cobalt and G5 2005-2006) To retain OnStar use 99-3303 instead.*
Note: (Malibu and G6 only) The Driver Information Center and radio are one unit. Removal of the radio
will prohibit the vehicle owner from programming any of the features of the Driver Information Center.
However once the features are programmed the vehicle will retain all the settings. An alternative kit
99-3303 includes a replacement driver information center with programming capabilities.**
The 99-3303 does not allow for Double DIN installations.
CAUTION: Metra recommends disconnecting the negative battery terminal before beginning
any installation. All accessories, switches, and especially air bag indicator lights must be
plugged in before reconnecting the battery or cycling the ignition.
Note: Refer to the instructions included with the aftermarket radio.
KNOWLEDGE IS POWER
Enhance your installation and fabrication skills by
enrolling in the most recognized and respected
mobile electronics school in our industry.
Log onto www.installerinstitute.com or call
800-354-6782 for more information and take steps
toward a better tomorrow.
Metra recommends MECP
certified technicians
Page 3

95-3302
Table of Contents
Dash Disassembly
- Chevrolet Cobalt 2005-2010/Pontiac G5 2007-2009 ....................................................... 4
- Chevrolet Equinox 2005-2006/Pontiac Torrent 2006 ........................................................ 5
- Chevrolet HHR 2006-2010 .............................................................................................. 6
- Chevrolet Malibu 2004-2007 ........................................................................................... 7
- Chevrolet Malibu 2008-2010 ........................................................................................... 9
- Pontiac G6 2005-2009 ................................................................................................... 10
- Pontiac Solstice 2006-2009 ........................................................................................... 11
- Saturn Aura 2007-2009.................................................................................................. 12
- Saturn Ion 2006-2007 .................................................................................................... 13
- Saturn Sky 2006-2009 ................................................................................................... 14
- Saturn Vue 2006-2007 ................................................................................................... 15
Kit Assembly
- Double DIN mount radio provision ................................................................................. 16
- Stacked ISO mount radio provision ................................................................................ 17
3
Page 4
Dash Disassembly 95-3302
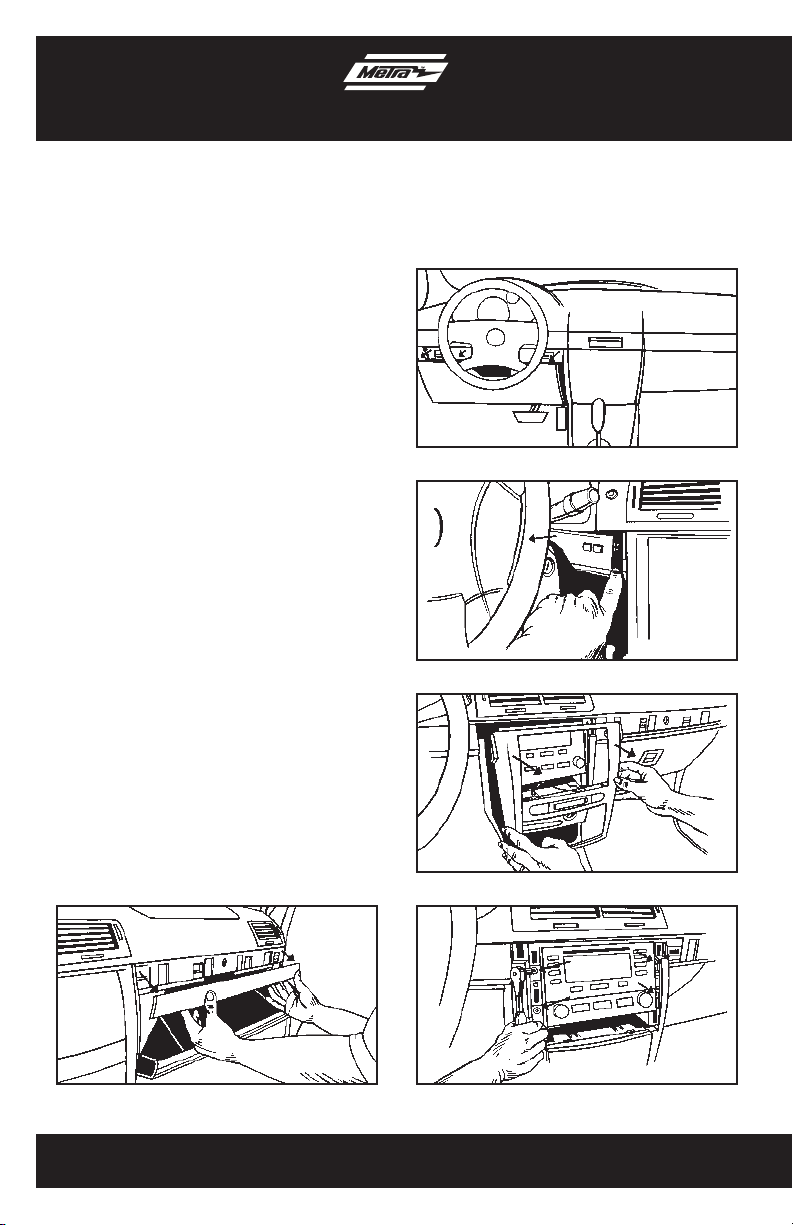
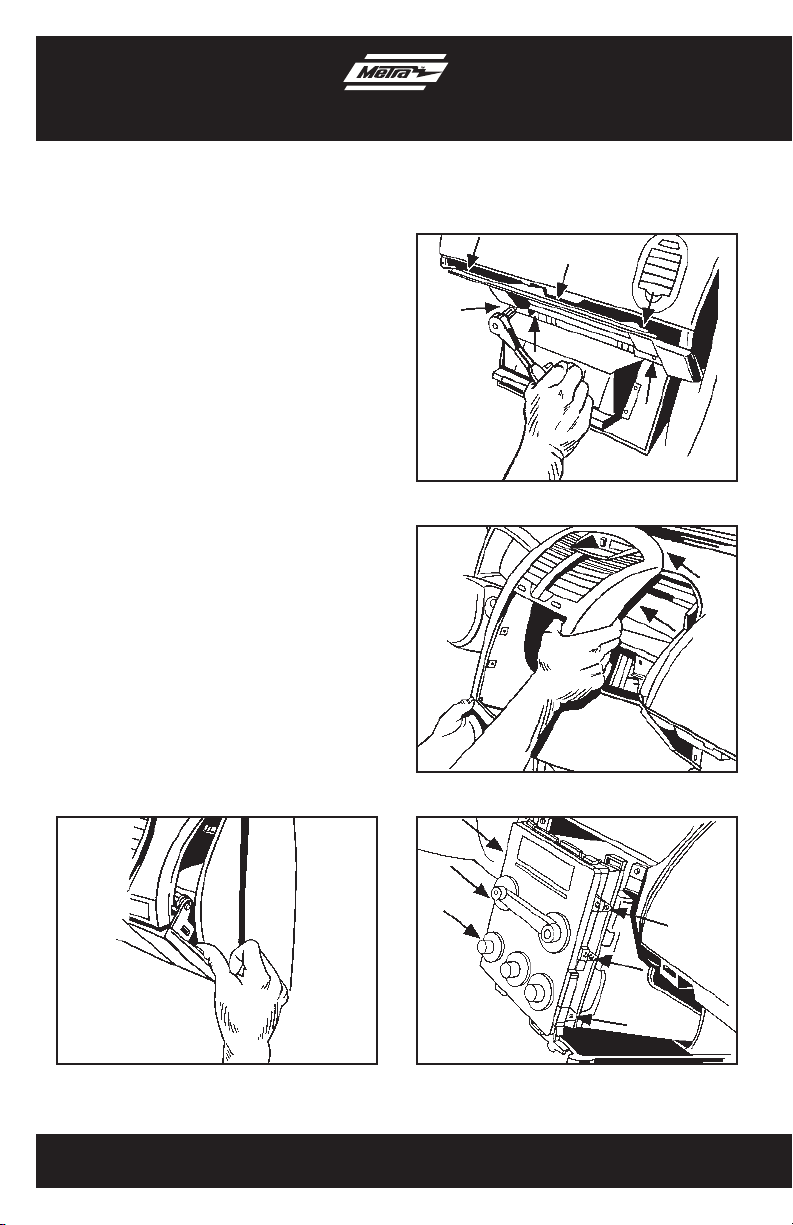
Chevrolet Cobalt 2005-2010
Pontiac G5 2007-2009
1. Unclip and remove trim panel from
above glove box. (Figure A)
2. Unclip upper edge of panel below
steering column and let hang. It is
not necessary to remove completely.
(Figure B)
3. Unclip and remove small trim panel to
right of ignition switch. (Figure C)
4. Unclip and remove trim panel
surrounding radio and climate controls.
(Figure D)
5. Remove (4) 9/32 screws securing radio.
Unplug and remove the radio. (Figure E)
Continue to kit assembly
(Figure B)
(Figure C)
(Figure A)
(Figure D)
(Figure E)
4
Page 5
Dash Disassembly 95-3302
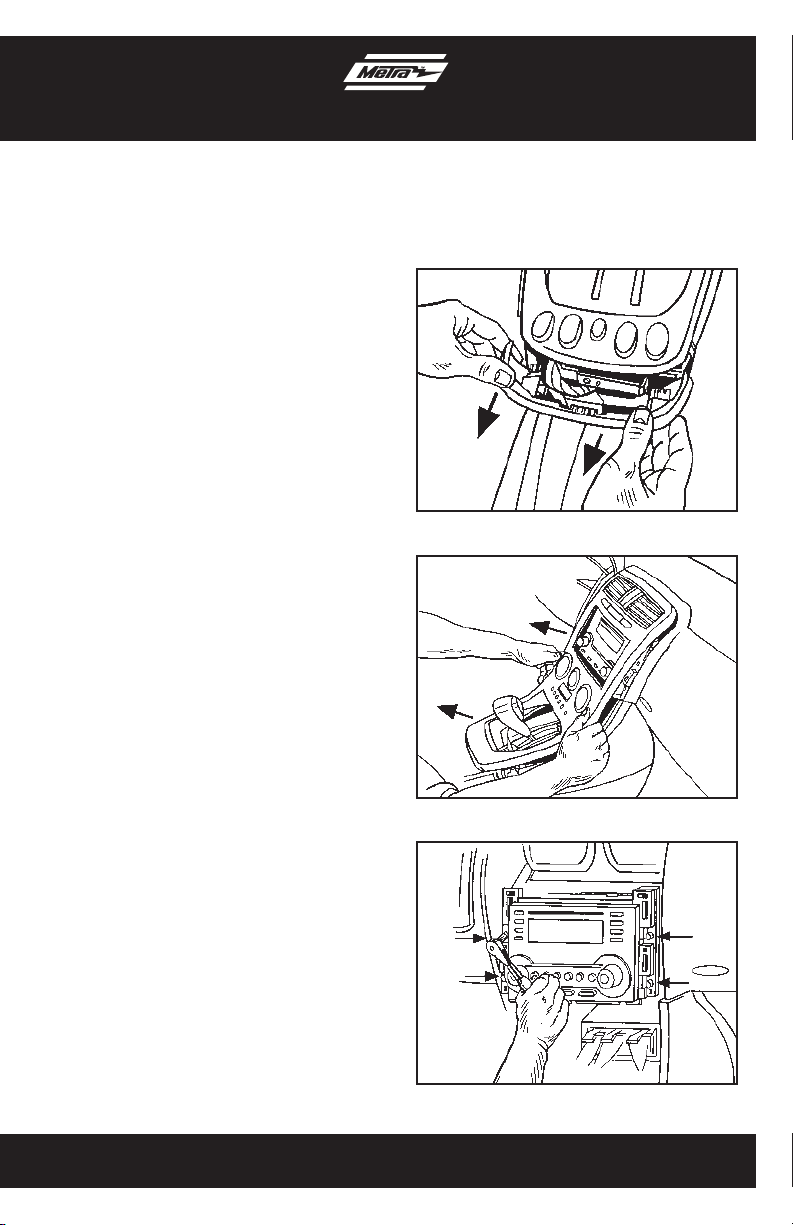
Chevrolet Equinox 2005-2006
Pontiac Torrent 2006
1. Unsnap panel below power window
switch and remove.
Note: This allows you to unplug the
window switch easier. (Figure A)
2. Unsnap and remove entire panel
surrounding radio and shifter. (Figure B)
3. Remove (4) 9/32 screws securing radio.
Unplug and remove the radio. (Figure C)
Continue to kit assembly
(Figure A)
5
(Figure B)
(Figure C)
Page 6

Dash Disassembly 95-3302
Chevrolet HHR 2006-2010
1. Unclip and remove entire panel
surrounding radio and climate controls
including the A/C vents. (Figure A)
2. Remove (8) 9/32” screws securing radio
and A/C control to remove radio.
(Figure B)
Continue to kit assembly
(Figure A)
6
(Figure B)
Page 7
Dash Disassembly 95-3302
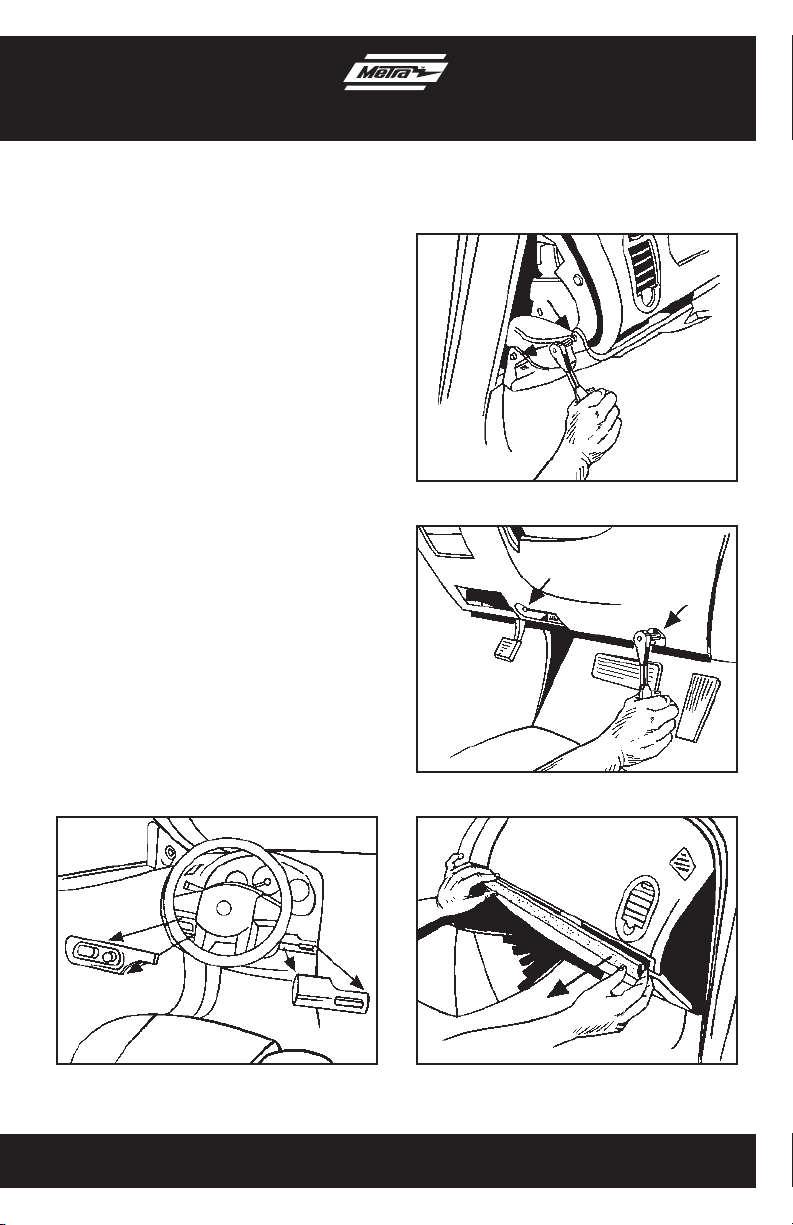
Chevrolet Malibu 2004-2007
1. Unclip and remove wood grain/painted
trim pieces from both sides of steering
wheel. (Figure A)
2. Unclip and remove side panel from
driver’s side of dash with door open and
remove (2) 7 mm screws. (Figure B)
3. Remove (2) 7 mm screws from bottom
edge of panel below steering wheel,
unclip panel and let hang. It is not
necessary to completely remove panel.
(Figure C)
4. Unclip and remove wood grain/painted
trim piece from above glove box.
(Figure D)
Continue on next page
(Figure B)
(Figure A)
(Figure C)
(Figure D)
7
Page 8
Dash Disassembly 95-3302
Chevrolet Malibu 2004-2007
5. Unclip and remove side panel from
passenger side of dash with door open
and remove (2) 7 mm screws from
behind panel. (Figure E)
6. Remove (2) 7 mm screws from bottom
of glove box then open box and squeeze
sides together to open further and
remove the remaining (4) 7 mm screws.
Unclip the black vent cover under the
glove box then unclip and remove entire
glove box assembly. (Figure F)
7. Unclip and remove trim panel
surrounding radio and climate controls.
(Figure G)
8. Remove (4) 7 mm screws securing the
radio and (2) 7 mm screws securing the
climate control. Unplug and remove the
radio. (Figure H)
Continue to kit assembly
(Figure F)
(Figure E)
(Figure G)
(Figure H)
8
Page 9
Dash Disassembly 95-3302
Chevrolet Malibu 2008-2010
1. Unsnap and remove shifter trim.
Note: Start around shifter and be sure
to pull down before back because this
panel slides up under the radio/climate
panels. (Figure A)
2. Remove (2) 8 mm screws from bottom
of radio/climate panel.
3. Unsnap and remove the climate/radio
panel and upper vent trim panel
together (they can be separated after
removal). (Figure B, C)
4. Remove (6) 8 mm screws from radio
and climate controls.
Continue to kit assembly
(Figure A)
9
(Figure B)
(Figure C)
Page 10

Dash Disassembly 95-3302
Pontiac G6 2005-2009
1. Open glove box and remove (6)
screws from outer edge then unclip
and remove box. (Figure A)
2. Remove (4) screws from panel below
steering column. Unclip and remove
panel. (Figure B)
3. Unclip and remove center panel
surrounding radio and climate controls.
(Figure C)
4. Remove (4) screws securing the radio.
Unplug and remove the radio.
(Figure D)
Continue to kit assembly
(Figure B)
(Figure A)
(Figure C)
(Figure D)
10
Page 11
Dash Disassembly 95-3302
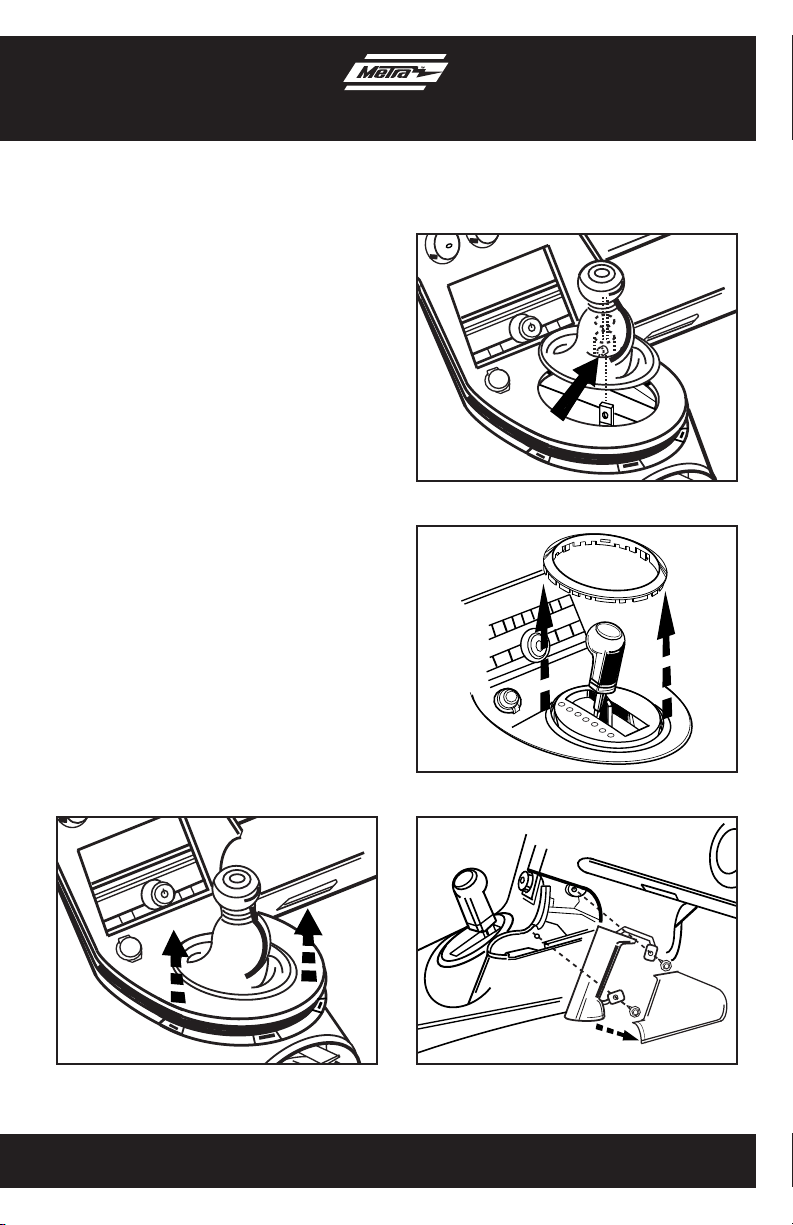
Pontiac Solstice 2006-2009
1. Manual transmission:
A. Lift up the lower edge of the
instrument panel cluster trim plate
enough to reach underneath and
release the shift boot trim ring
retaining tabs. (Figure A)
B. Lift up on the shift boot and loosen
the setscrew to release the shift lever.
(Figure B)
Automatic transmission:
A. Unclip and remove shifter trim ring.
(Figure C)
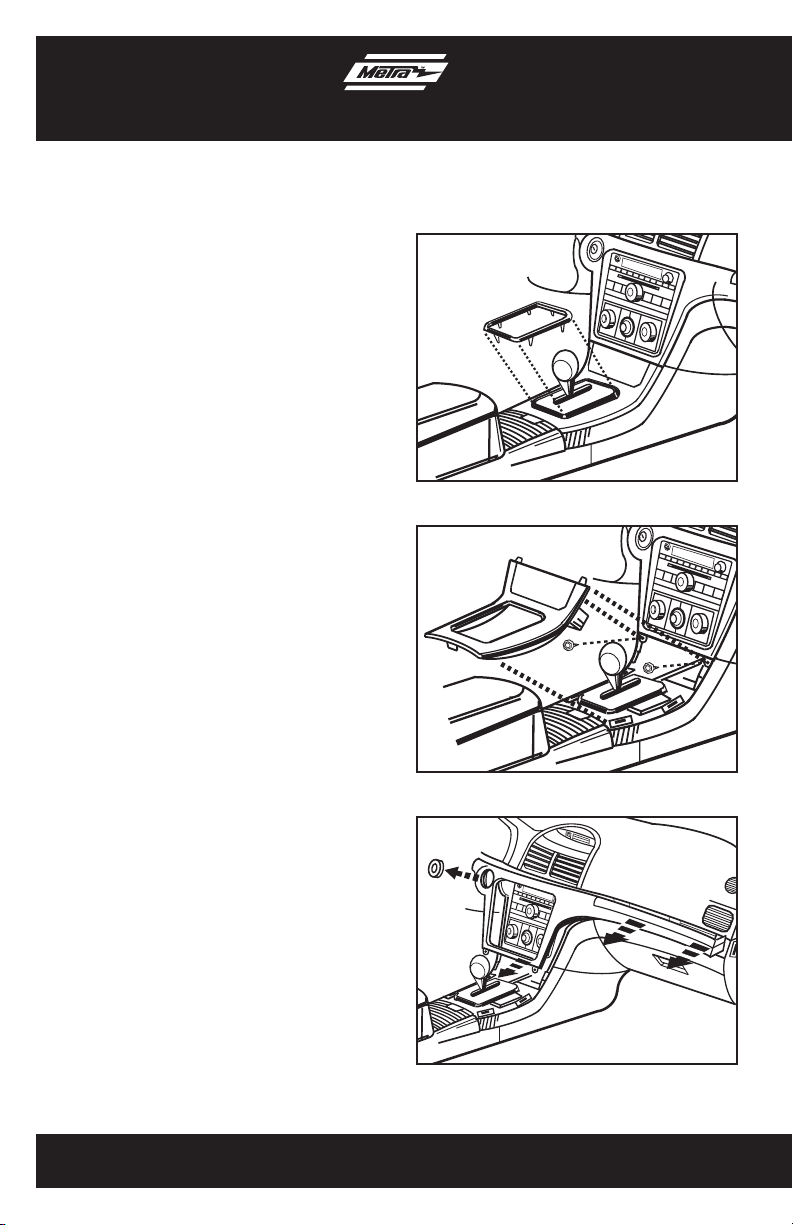
2. Unclip and remove passenger assist
handle trim panel. (Figure D)
3. Remove (2) bolts securing the
passenger assist handle and
remove handle. (Figure D)
4. Unclip and remove dash trim panel.
5. Remove (4) screws securing the radio.
Unplug and remove the radio.
Continue to kit assembly
(Figure B)
(Figure C)
(Figure A)
(Figure D)
11
Page 12
Dash Disassembly 95-3302
Saturn Aura 2007-2009
1. Unclip and remove shifter trim ring.
(Figure A)
2. Unclip and remove the center console
trim panel, then remove (2) screws from
bottom edge of dash trim panel.
(Figure B)
3. Unclip and remove the key switch
trim ring, then unclip and remove dash
trim panel. (Figure C)
4. Remove (2) screws securing the
climate controls.
5. Remove (4) screws securing the radio.
Unplug and remove the radio.
Continue to kit assembly
(Figure A)
12
(Figure B)
(Figure C)
Page 13

Dash Disassembly 95-3302
Saturn Ion 2006-2007
1. Unclip radio trim panel. (Figure A)
2. Unplug connectors from trim panel and
remove panel. (Figure B)
3. Remove (4) screws securing the radio.
Unplug and remove the radio.
Continue to kit assembly
(Figure A)
13
(Figure B)
Page 14

Dash Disassembly 95-3302
Saturn Sky 2006-2009
1. Unclip and remove side panel from
driver’s side of dash with door open and
remove (2) 7 mm screws. (Figure A)
2. Remove (2) 7 mm screws from bottom
edge of panel below steering wheel,
unclip panel and remove panel.
3. Unclip and remove side panel from
passenger side of dash with door open
and remove (2) 7 mm screws from
behind panel. (Figure B)
4. Open the glove box and disconnect the
glove box dampener from the glove box
assembly. Squeeze sides together to
open further. (Figure C)
5. Remove (2) bolt covers from top edge of
glove box frame. (Figure C)
6. Remove (5) bolts from glove box frame
and remove frame. (Figure C)
7. Unsnap and remove climate control trim
panel. (Figure D)
8. Remove (1) screw from lower left
corner of radio trim panel and unplug
connectors to remove panel. (Figure D)
9. Remove (4) screws securing the radio.
Unplug and remove the radio.
Continue to kit assembly
(Figure A)
(Figure B)
(Figure C)
14
(Figure D)
Page 15

Dash Disassembly 95-3302
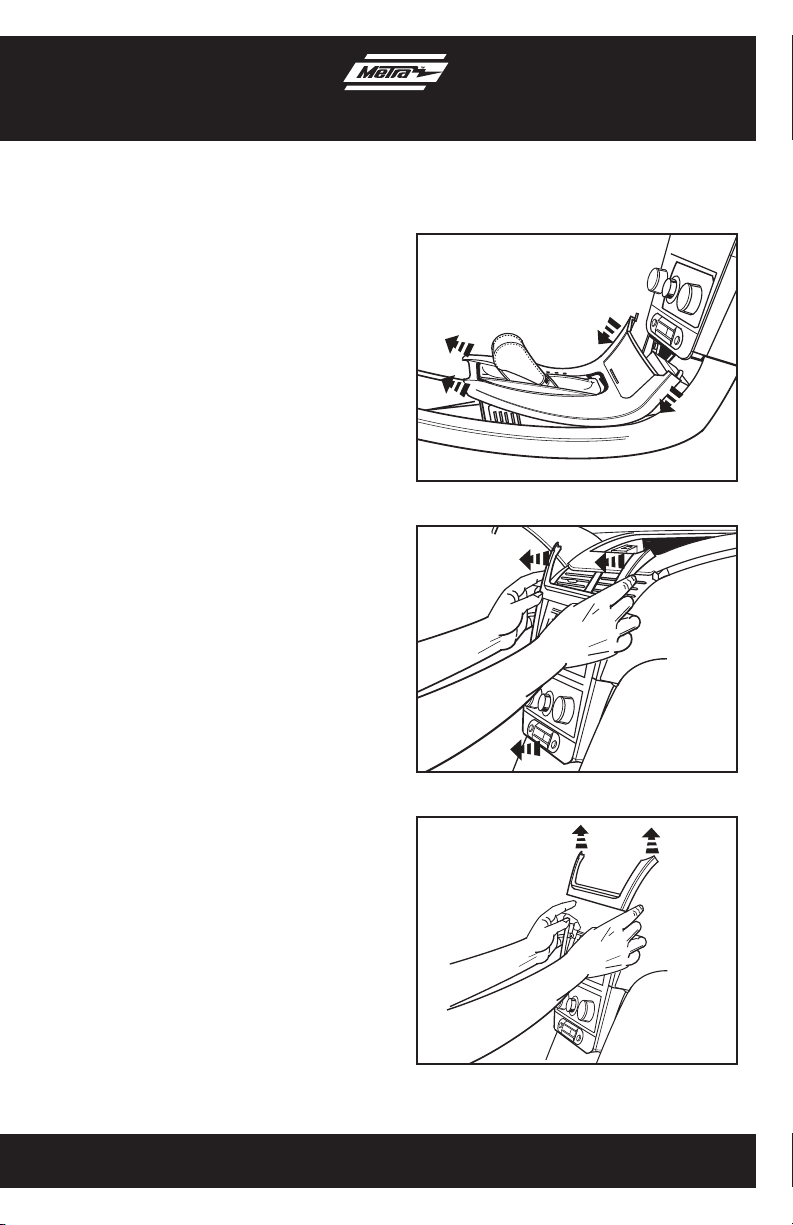
Saturn Vue 2006-2007
1. Grasp the front edge of the shifter trim
panel and pull outward and upward.
(Figure A)
2. Squeeze the locking tabs located at
the front edge of the shifter trim panel
together to release the front edge of
the panel from the center console.
(Figure B)
3. Pull upward on the panel to release the
remaining clips, and remove trim panel.
4. Remove (4) screws securing storage
pocket and remove pocket. (Figure C)
5. Unclip and remove center dash
trim panel. (Figure D)
6. Remove (4) screws securing the radio.
Unplug and remove the radio.
Continue to kit assembly
(Figure B)
BOTTOM VIEW
Bottom View
(Figure A)
(Figure C)
(Figure D)
15
Page 16

Kit Assembly 95-3302
Double DIN mount radio provision
1. Slide the appropriate bracket into the
trim plate aligning the holes in the trim
plate to the clips on the bracket.
(Figure A)
2. Slide the DDIN radio unit into the trim
plate bracket assembly and secure the
unit to the kit using the screws supplied
with the head unit. (Figure B)
3. Aura, Cobalt, G5, HHR, Sky and
Vue only: Cut and remove top mounting
tabs on each side of the radio housing.
(Figure C)
4. Locate the factory wiring harness in the
dash. Metra recommends using the
proper mating adapter from Metra or
AXXESS. Re-connect the negative
battery terminal and test the unit for
proper operation.
5. Reassemble dash in reverse order
of disassembly.
(Figure A)
16
(Figure B)
Cut the two top holes off
(Figure C)
Page 17

Kit Assembly 95-3302
Stacked ISO mount radio provision
1. Slide the stacked ISO DIN units into the
trim plate bracket assembly and secure
the units to the kit using the screws
supplied with the head units. (Figure A)
2. Slide the stacked ISO DIN unit into the
trim plate bracket assembly and secure
the unit to the kit using the screws
supplied with the head unit. (Figure B)
3. Aura, Cobalt, G5, HHR, Sky and
Vue only: Cut and remove top mounting
tabs on each side of the radio housing.
(Figure C)
4. Locate the factory wiring harness in the
dash. Metra recommends using the
proper mating adapter from Metra or
AXXESS. Re-connect the negative
battery terminal and test the unit for
proper operation.
5. Reassemble dash in reverse order
of disassembly.
(Figure A)
17
(Figure B)
Cut the two top holes off
(Figure C)
Page 18

Notes
Page 19

Notes
Page 20

INSTALLATION INSTRUCTIONS FOR PART 95-3302
REV. 01/30/12 INST95-3302
METRA. THE WORLD’S BEST KITS.™
1-800-221-0932
© COPYRIGHT 2004-2011 METRA ELECTRONICS CORPORATION
metraonline.com
Page 21

INSTRUCCIONES DE INSTALACIÓN PARA LA PIEZA 95-3302
APLICACIONES
Lista de aplicaciones dentro
GM multi-kit 2004-2010
95-3302
CARACTERÍSTICAS DEL KIT
• Provisión de radio de montaje doble DIN
• Provisión de radio de montaje ISO vertical
• Pintada para igualar el tablero de fábrica
COMPONENTES DEL KIT
• A) Carcasa doble DIN • B) Soportes doble DIN
BA
CABLEADO Y CONEXIONES DE ANTENA (se venden por separado)
Arnés de cableado:
• Visite www.metraonline.com para ver las aplicaciones específicas de
la interfase
Adaptador de antena:
• 40-GM10 - Adaptador de antena GM 1988 y más recientes
• 40-CR10 - Adaptador de antena Chrysler 2002 y más recientes
HERRAMIENTAS REQUERIDAS
• Destornillador de hoja plana pequeño • Herramienta de remoción de panel • Destornillador
Phillips • herramientas toma de corriente • Herramientas de corte
METRA. THE WORLD’S BEST KITS.™
1-800-221-0932
© COPYRIGHT 2004-2011 METRA ELECTRONICS CORPORATION
metraonline.com
REV. 01/30/12 INST95-3302
Page 22

95-3302
KNOWLEDGE IS POWER
Enhance your installation and fabrication skills by
enrolling in the most recognized and respected
mobile electronics school in our industry.
Log onto www.installerinstitute.com or call
800-354-6782 for more information and take steps
toward a better tomorrow.
Aplicaciones
Chevrolet
Cobalt 2005-2010*
Equinox 2005-2006
HHR 2006-2010
Malibu 2004-2007**
Pontiac
G5 2007-2009*
G6 2005-2009**
Solstice 2006-2009
Torrent 2006
Saturn
Aura 2007-2009
Ion 2006-2007
Sky 2006-2009
Vue 2006-2007
Malibu 2008-2010**
Nota: (Cobalt y G5 2005-2006) Para conservar OnStar utilice 99-3303.*
Nota: (Malibu y G6 only) El Centro de Información del Conductor y el radio son una misma unidad. Qui-
tar el radio le impedirá al propietario del vehículo programar cualquiera de las funciones del Centro de
Información del Conductor. Sin embargo, una vez que las funciones se hayan programado, el vehículo
retendrá todos los parámetros. Un kit alternativo, el 99-3303, incluye un centro de información del
conductor de reemplazo con capacidades de programación.**
El 99-3303 no permite instalaciones doble DIN.
PRECAUCIÓN: Metra recomienda desconectar el terminal negativo de la batería antes de
comenzar cualquier instalación. Todos los accesorios, interruptores y, especialmente, las luces
indicadoras de airbag deben estar enchufados antes de volver a conectar la batería o comenzar
el ciclo de ignición.
Nota: Remítase a las instrucciones incluidas con el radio de posventa.
EL CONOCIMIENTO ES PODER
Mejore sus habilidades de instalación y fabricación
inscribiéndose en la escuela de dispositivos
electrónicos móviles más reconocida y respetada de
nuestra industria. Regístrese en www.installerinstitute.
com o llame al 800-354-6782 para obtener más
información y avance hacia un futuro mejor.
Metra recomienda técnicos con
certificación del Programa de
Certificación en Electrónica Móvil
(Mobile Electronics Certification
Program, MECP).
Page 23

95-3302
Indice
Desmontaje del tablero
- Chevrolet Cobalt 2005-2010/Pontiac G5 2007-2009 ....................................................... 4
- Chevrolet Equinox 2005-2006/Pontiac Torrent 2006 ........................................................ 5
- Chevrolet HHR 2006-2010 .............................................................................................. 6
- Chevrolet Malibu 2004-2007 ........................................................................................... 7
- Chevrolet Malibu 2008-2010 ........................................................................................... 9
- Pontiac G6 2005-2009 ................................................................................................... 10
- Pontiac Solstice 2006-2009 ........................................................................................... 11
- Saturn Aura 2007-2009.................................................................................................. 12
- Saturn Ion 2006-2007 .................................................................................................... 13
- Saturn Sky 2006-2009 ................................................................................................... 14
- Saturn Vue 2006-2007 ................................................................................................... 15
Ensamble del kit
- Provisión de radio de montaje doble DIN........................................................................ 16
- Provisión de radio de montaje ISO vertical ..................................................................... 17
3
Page 24

Desmontaje del tablero 95-3302
Chevrolet Cobalt 2005-2010
Pontiac G5 2007-2009
1. Desenganche y retire el panel de la
moldura de arriba de la guantera.
(Figura A)
2. Desenganche el borde superior del
panel debajo de la columna de dirección
y déjelo colgando. No es necesario
retirar el panel por completo. (Figura B)
3. Desenganche y retire el pequeño panel
de moldura a la derecha del interruptor
de encendido. (Figura C)
4. Desenganche y retire el panel de
moldura que rodea el radio y los
controles del clima. (Figura D)
5. Retire los (4) tornillos de 9/32” que
sujetan el radio. Desconecte y retire
el radio. (Figura E)
Continuará al ensamble del kit
(Figura B)
(Figura C)
(Figura A)
(Figura D)
(Figura E)
4
Page 25

Desmontaje del tablero 95-3302
Chevrolet Equinox 2005-2006
Pontiac Torrent 2006
1. Suelte a presión el panel debajo
del interruptor de la ventana eléctrica
y retire.
Nota: Esto le permite desconectar más
fácilmente el interruptor de la ventana.
(Figura A)
2. Suelte a presión y retire todo el panel
que rodea el radio y la palanca de
velocidades. (Figura B)
3. Retire los (4) tornillos de 9/32” que
sujetan el radio. Desconecte y retire
el radio. (Figura C)
Continuará al ensamble del kit
(Figura A)
5
(Figura B)
(Figura C)
Page 26

Desmontaje del tablero 95-3302
Chevrolet HHR 2006-2010
1. Desenganche y retire todo el panel
que rodea el radio y los controles del
clima, incluyendo las rejillas del aire
acondicionado. (Figura A)
2. Retire los (8) tornillos de 9/32” que
sujetan el radio y el control del aire
acondicionado para retirar el radio.
(Figura B)
Continuará al ensamble del kit
(Figura A)
6
(Figura B)
Page 27

Desmontaje del tablero 95-3302
Chevrolet Malibu 2004-2007
1. Desenganche y retire las piezas de
moldura de veta de madera/pintadas de
ambos lados del volante. (Figura A)
2. Desenganche y retire el panel lateral
del lado del conductor del tablero con la
puerta abierta y retire los (2) tornillos de
7 mm. (Figura B)
3. Retire los (2) tornillos de 7 mm del
borde inferior del panel debajo del
volante, desenganche el panel y déjelo
colgando. No es necesario retirar el
panel por completo. (Figura C)
4. Desenganche y retire la pieza de
moldura de veta de madera/pintada de
arriba de la guantera. (Figura D)
Continúa en la página
(Figura B)
(Figura A)
(Figura C)
(Figura D)
7
Page 28

Desmontaje del tablero 95-3302
Chevrolet Malibu 2004-2007
5. Desenganche y retire el panel lateral
del lado del conductor del tablero con
la puerta abierta y retire los (2) tornillos
de 7 mm detrás del panel. (Figura E)
6. Retire los (2) tornillos de 7 mm de la
parte inferior de la guantera, abra la
guantera y apriete los lados para abrirla
aún más y retire los (4) tornillos de 7
mm restantes. Desenganche la tapa
negra de la rejilla debajo de la guantera,
luego desenganche y retire todo el
ensamble de la guantera. (Figura F)
7. Desenganche y retire el panel de
moldura que rodea el radio y los
controles del clima. (Figura G)
8. Retire los (4) tornillos de 7 mm que
sostienen el radio y los (2) tornillos de 7
mm que sostienen el control del clima.
Desconecte y retire el radio. (Figura H)
Continuará al ensamble del kit
(Figura F)
(Figura E)
(Figura G)
(Figura H)
8
Page 29

Desmontaje del tablero 95-3302
Chevrolet Malibu 2008-2010
1. Suelte y retire la moldura de la palanca
de velocidades.
Nota: Empiece alrededor de la palanca
de velocidades y asegúrese de jalar
hacia abajo antes que hacia atrás,
debido a que este panel se desliza
hacia arriba debajo de los paneles del
radio/clima. (Figura A)
2. Retire los (2) tornillos de 8 mm de la
parte inferior del panel del radio/clima.
3. Suelte y retire el panel del clima/radio
y el panel de la moldura de la rejilla
superior juntos (pueden separarse
después de retirarlos). (Figura B, C)
4. Retire los (6) tornillos de 8 mm de los
controles del radio y clima.
Continuará al ensamble del kit
(Figura A)
9
(Figura B)
(Figura C)
Page 30

Desmontaje del tablero 95-3302
Pontiac G6 2005-2009
1. Abra la guantera y retire los (6) tornillos
del borde exterior, luego desenganche y
retire la guantera. (Figura A)
2. Retire los (4) tornillos del panel debajo
de la columna de dirección. Suelte y
retire el panel. (Figura B)
3. Desenganche y retire el panel central
que rodea el radio y los controles del
clima. (Figura C)
4. Retire los (4) tornillos que sostienen el
radio. Desconecte y retire el radio.
(Figura D)
Continuará al ensamble del kit
(Figura B)
(Figura A)
(Figura C)
(Figura D)
10
Page 31

Desmontaje del tablero 95-3302
Pontiac Solstice 2006-2009
1. Transmisión manual:
A. Levante el borde inferior de la placa
de la moldura del conjunto del panel de
instrumentos lo suficiente para meter
la mano debajo y liberar las pestañas
retenedoras del aro de la moldura de
la bota de la palanca de velocidades.
(Figura A)
B. Levante la bota de la palanca de
velocidades y afloje el tornillo de
sujeción para liberar la palanca de
velocidades. (Figura B)
Transmisión automática:
A. Suelte y retire el aro de la moldura de
la palanca de velocidades. (Figura C)
2. Desenganche y retire el panel de
moldura de el mango de asistencia del
pasajero. (Figura D)
3. Retire los (2) pernos que sostienen
el mango de asistencia del pasajero.
(Figura D)
4. Desenganche y retire el panel de la
moldura del tablero.
5. Retire los (4) tornillos que sostienen el
radio. Desconecte y retire el radio.
Continuará al ensamble del kit
(Figura A)
(Figura B)
(Figura C)
11
(Figura D)
Page 32

Desmontaje del tablero 95-3302
Saturn Aura 2007-2009
1. Desenganche y retire el aro de la
moldura de la palanca de velocidades.
(Figura A)
2. Desenganche y retire el panel de la
moldura de la consola central, luego
retire los (2) tornillos del borde inferior
del panel de la moldura del tablero.
(Figura B)
3. Desenganche y retire el aro de la
moldura del interruptor de llave, luego
desenganche y retire el panel de la
moldura del tablero. (Figura C)
4. Retire los (2) tornillos que sostienen los
controles del clima.
5. Retire los (4) tornillos que sostienen el
radio. Desconecte y retire el radio.
Continuará al ensamble del kit
(Figura A)
12
(Figura B)
(Figura C)
Page 33

Desmontaje del tablero 95-3302
Saturn Ion 2006-2007
1. Desenganche el panel de moldura del
radio. (Figura A)
2. Desconecte los conectores del panel de
la moldura y retire el panel. (Figura B)
3. Retire los (4) tornillos que sostienen el
radio. Desconecte y retire el radio.
Continuará al ensamble del kit
(Figura A)
13
(Figura B)
Page 34

Desmontaje del tablero 95-3302
Saturn Sky 2006-2009
1. Desenganche y retire el panel lateral
del lado del conductor del tablero con
la puerta abierta y retire los (2) tornillos
de 7 mm. (Figura A)
2. Retire los (2) tornillos de 7 mm del
borde inferior del panel debajo del
volante, desenganche el panel y retírelo.
3. Desenganche y retire el panel lateral
del lado del conductor del tablero con
la puerta abierta y retire los (2) tornillos
de 7 mm detrás del panel. (Figura B)
4. Abra la guantera y desconecte el
amortiguador de la guantera del
ensamble de la misma. Apriete los lados
uno hacia otro para abrir aún más.
(Figura C)
5. Retire las (2) tapas de los pernos del
borde de la parte superior del bastidor
de la guantera. (Figura C)
6. Retire los (5) pernos del bastidor de la
guantera y retire el bastidor. (Figura C)
7. Suelte y retire el panel de la moldura
del control de clima. (Figura D)
8. Retire los (1) tornillo de la esquina
inferior izquierda del panel de radio
asiento y desconecte los conectores
para retirar el panel. (Figura D)
9. Retire los (4) tornillos que sostienen el
radio. Desconecte y retire el radio.
Continuará al ensamble del kit
(Figura A)
(Figura B)
(Figura C)
14
(Figura D)
Page 35

Desmontaje del tablero 95-3302
Saturn Vue 2006-2007
1. Sostenga el borde delantero del
panel de la moldura de la palanca de
velocidades y jale hacia afuera y hacia
arriba. (Figura A)
2. Apriete las pestañas de bloqueo
localizadas en el borde delantero del
panel de la moldura para liberar el
borde delantero del panel de la consola
central. (Figura B)
3. Jale hacia arriba el panel para liberar el
resto de los ganchos y retire el panel de
la moldura.
4. Retire los (4) tornillos que sujetan la
cavidad de almacenamiento y retire la
cavidad. (Figura C)
5. Desenganche y retire el panel de la
moldura del tablero central. (Figura D)
6. Retire los (4) tornillos que sostienen el
radio. Desconecte y retire el radio.
Continuará al ensamble del kit
(Figura B)
BOTTOM VIEW
Vista inferior
(Figura A)
(Figura C)
(Figura D)
15
Page 36

Ensamble del kit 95-3302
Provisión de radio de
montaje doble DIN
1. Deslice el soporte correspondiente en
la placa de la moldura, alineando los
orificios de la placa con los ganchos del
soporte. (Figura A)
2. Deslice la unidad del radio DDIN en el
ensamble del soporte de la placa de la
moldura y sujete la unidad al kit con los
tornillos suministrados con la unidad
central. (Figura B)
3. Solo Aura, Cobalt, G5, HHR,
Sky y Vue: Corte y retire las pestañas
de montaje superior a cada lado de la
carcasa del radio. (Figura C)
4. Ubique el arnés del cableado de fábrica
en el tablero. Metra recomienda usar el
adaptador de acoplamiento adecuado
de Metra o AXXESS. Vuelva a conectar
el terminal negativo de la batería y
pruebe la unidad para verificar que
funcione correctamente.
5. Vuelva a montar el tablero en forma
inversa al desmontaje.
(Figura A)
(Figura B)
16
Cortar la parte superior dos orificios
(Figura C)
Page 37

Ensamble del kit 95-3302
Provisión de radio de
montaje ISO vertical
1. Deslice las unidades ISO DIN verticales
en el ensamble de soporte de la placa
de la moldura y sujete las unidades al
kit con los tornillos suministrados con
las unidades centrales. (Figura A)
2. Deslice la unidad ISO DIN verticales
en el ensamble del soporte de la placa
de la moldura y sujete la unidad al kit
con los tornillos suministrados con la
unidad central.
3. Solo Aura, Cobalt, G5, HHR,
Sky y Vue: Corte y retire las pestañas
de montaje superior a cada lado de la
carcasa del radio. (Figura C)
4. Ubique el arnés del cableado de fábrica
en el tablero. Metra recomienda usar el
adaptador de acoplamiento adecuado
de Metra o AXXESS. Vuelva a conectar
el terminal negativo de la batería y
pruebe la unidad para verificar que
funcione correctamente.
5. Vuelva a montar el tablero en forma
inversa al desmontaje.
(Figura A)
(Figura B)
17
Cortar la parte superior dos orificios
(Figura C)
Page 38

Notas
Page 39

Notas
Page 40

INSTRUCCIONES DE INSTALACIÓN PARA LA PIEZA 95-3302
REV. 01/30/12 INST95-3302
METRA. THE WORLD’S BEST KITS.™
1-800-221-0932
© COPYRIGHT 2004-2011 METRA ELECTRONICS CORPORATION
metraonline.com
 Loading...