


CERAMIC HOB RANGE
ARDOX C
TYPE: C4, C6
Accessories
Chef 220
Chef 240
Installation and Operation Manual
S/N: 085528/01 Rev.: 3.0
Original instructions


22.3.2010 Rev. 3.0
Dear C us tom e r ,
Congratulatio ns on deciding to choose a Metos appliance for your kitchen act ivities. You
made an excellent choice. We will do our best to make you a satisfied Metos customer
like thousands of customers we have around the world.
Please read this manual carefully. You will learn correct, safe and efficien t working methods in order to get the best possibl e benefit from the applia nce. Th e instr uctions and hints
in this manual will give you a quick and easy start, and you will soon note how nice it is
to use the Metos equipm ent.
All rights are reserved for technical changes.
You will find the main te chnical da ta on the rating plate fixed to the equipment . When you
need service or technical help, please let us know the serial number shown on the rating
plate. This will make it easier to provide you with corr ect service.
For your convenienc e, spa ce is provide d below f or you to r ecord you r lo cal Me tos s ervic e
contact informati on.
METOS TEAM
Metos service phone number:...............................................................................................
Contact person:....................................................................................................................

22.3.2010 Rev. 3.0

22.3.2010 Rev.
1. General .......................................................................................................... 1
1.1 Symb o l s us e d i n th e manual ...... .............. ...................................................................... 1
1.2 Symb o l s us e d o n the ap p liance .............. ........................................................................ 1
1.3 Check i n g t h e relation sh i p o f t h e ap p l iance and th e m a n u a l ...................... .................... 1
2. Safety .............................................................................................................. 2
2.1 Safe use of the appliance ............................................................................................... 2
2.2 Disposal of the appliance ............................................................................................... 2
3. Functional description .................................................................................. 3
3.1 Intended use of the appliance ........................................................................................ 3
3.1.1 Prohibited use ........................................................................................................ 3
3.2 Operating principle and construction ........................................................................... 3
4. Operation instructions ................................................................................. 4
4.1 Before use ...................................................................................................................... 4
4.1.1 Selecting cookware ............................................................................................... 4
4.2 Operation procedures ..................................................................................................... 4
4.2.1 Using the range ..................................................................................................... 4
4.3 After use ................................................................................................................... ..... 6
4.3.1 Cleaning ................................................................................................................ 6
4.3.2 Oth er service m e a sures ......................................... ................................................. 6
5. Installation ..................................................................................................... 7
5.1 General ....................................................................................................................... ... 7
5.2 Transporting and unpacking the range .......................................................................... 7
5.3 Positioning the range ..................................................................................................... 7
5.4 Electrical connections .................................................................................................... 7
5.5 Test-run .......................................................................................................................... 8
6. Troubleshooting ............................................................................................ 9
8. Technical specifications .............................................................................. 17

22.3.2010 Rev.

22.3.2010 Rev. 3.0
General
1
1. General
Carefully read the instructions in this manual as they contain important information regarding proper, efficient and safe installa tion, use and mainten anc e of the appliance.
Keep this manual in a safe place for eventual use by other operators of the appliance.
The installation of this appliance must be carried out in accordance with the manufacturer’s instructions and following local regulations. The connection of the appliance to the
electric and water supply must be carried out by qualified persons only.
Persons using this appliance should be spe cifically traine d in its operation.
Switch off the appliance in case of failure or malfunction. The periodical function checks
requested in the manual must be carried out according to the i nstructions. Have the appliance serviced by a technically qualified person authorized by the manufactur er and using
original spare parts.
Not complying with the above may put the safety of the appliance in danger.
1.1 Symbols used in the manual
This symbol in forms about a sit uation whe re a saf ety ri sk m ight be at h and. Give n i nstructions are mandatory in order to prevent injury.
This symbol informs about th e rig ht way to per form in orde r to preve nt bad resul ts, a ppliance damage or hazardous situa tions.
This symbol informs about recom me ndations and hints that help to get the best performance out of the appliance.
1.2 Sy mbols used on th e applia nc e
This symbol on a part informs about electrical terminals behind the part. The removal of
the part must be carried out by qual ified persons only.
1.3 Checking the relationship of the applian ce and the ma nual
The rating plate of the appliance indicates the serial number of the appliance. If the manuals are missing, it is possible to order new ones from the manufacturer or the local representative. When ordering new manuals it is essential to quote the serial number shown
on the rating plate.

22.3.2010 Rev. 3.0
Safety
2
2. Safety
2.1 Safe use of the appliance
Because the range is a heated appliance that has hot surfaces during normal use, the following warnings and instructions must be followed in order to avoi d burns .
During long-time operation even the frame surrounding the cooking plates gets hot.
The cooking zones are hot a long time after switching them off, although the visible heat
radiation has ended.
For safe handling of cookware on the cooking top, always use heat protective gloves.
Do not leave the range on for long periods totally without supervision.
2.2 Disposal of the appliance
The destroying of the appliance when its economical lifetime has been reached may be
harmful to the environment if not properly handled. Utilization of materials that are reusable is best done by professional personnel specialized in recycling.

22.3.2010 Rev. 3.0
Functional description
3
3. Functional description
3.1 Intended use of the applianc e
The Ardox C range is intende d for preparin g different ki nds of foodstuffs using cookware .
3.1.1 Prohibited use
Use of the appliance for other purposes than stated above is prohibited.
Preparing food directly on the cooking plate without cookware is pr ohibited.
The manufacturer of the appliance takes no responsibility for situations that might occur
if the warnings and instructions in this manual are neglected.
3.2 Operating principle and construction
Depending on the model, the range is equipped with two, four or six cooking zones.
The cooking zones are heated by infrared heaters positioned under the ceramic surface.
Each cooking zone is equipped with a stepless power control.
Due to the lo w mass of th e h eate r an d th e exc ell en t heat tr an sf er pro p ert ie s of t he ce ra mic
surface, the cooking zone re aches the maximum temperature in just a few minutes. Every
cooking zone is fitted with a temperature limiter, which controls the heater should the
cooking zone acc identally be l eft on without any load. A gree n pilot ligh t for every cooking zone indicates that the zone is ON.
In addition to a single range, there are combinations of a range and an oven (Che f 220 or
Chef 240). This manual covers the Ardox C range, while Chef 220 and Chef 240 have
their own manuals.

22.3.2010 Rev. 3.0
Operation instructions
4
4. Operation instructions
4.1 Before use
4.1.1 Selecting cookware
Cookware made of stainless steel, aluminium and enamelled steel is best suitable for the
ceramic range. Enamel based cast iron cookware can be used if handled with extra care.
Cookware made of copper, ceramic and glass is not suit able for use on the ceramic ra nge.
Always use good quality cookware with smooth and flat bases.
To get the best benefit from the range as well as fro m the cookware observ e the followin g:
• Always lift pans, do not drag.
• Use good quality flat-based cookware.
• Wait for pans to cool before putting them in cold water.
• Always ensure pans have clea n, dry bases before use.
• Ensure pan handles are positioned safely and away fr om heat sources.
• Always use pan lids excep t when fryi ng.
• Ensure pans match the size of the hotplate or heating area where possible.
• Remember good quality pans retain heat well, so generally only low or medium
heat is necessary.
Keep plastic and aluminium foils away from the ceramic surface, because they are laborious to remove once melted.
4.2 Operation procedures
4.2.1 Using the range
Switch the appliance off if it is dam aged or is mal f unctioning. Contact authorised servic e
personnel using original spare parts for service of the appliance.
Ranges intended for use aboard ships are equipped with a potrack. Using a range aboard
a ship without the potrac k is prohibited.
During the inst allati on, a mains s witch may have been fit ted near the range, often on a wall
nearby. Check that the mains switch is in the ON position.

22.3.2010 Rev. 3.0
Operation instructions
5
The range is controlled with power regulators and pilot lights.
Operating panel
1. Pilot light, cooking zone on
2. Power regulator, front zone
3. Power regulator, rear zone
The ceramic range heats up very fast so no preheating is necessary. This feature also
makes it possible to swit ch off the cooking zone immediat ely when no long er needed . By
using the range in this way, energy is saved and a cooler working environment is
achieved.
Select the cooking zone according to the pan. The power controls of the cooking zones
can be set between 1-6. The green pilot light also turns on.
Start cooking on posit io n 6 and when boil ing s tarts decr ease t he power as n ee ded. De spit e
the fact that every cooking zone is fitt ed with a high temperature lim iter the zones s hould
not be left on wit hout pans for long er periods . If the set p ower of the cooking zone ex ceeds
the heat reception capability of the pan, the temperature limiter automatically adjusts the
power as needed.
If there are longer interruptions in the electricity distribution, all power regulators of the
range should be set to the 0 position. This should be done in order to prevent unexpected
start-up of the range when the electricity distribution is restored.
The ceramic top of t he range is v ery dura ble i n nor mal u sage. If, howe ver, t he ce ramic t op
due to an except ion ally s trong p oint ed blow is cr acke d, us e of the range is p rohi bit ed unti l
the ceramic top is exchanged.

22.3.2010 Rev. 3.0
Operation instructions
6
4.3 After use
4.3.1 Cleaning
Use of a water hose or pressure cleaning jet is strictly forbidden.
When clean i n g the cook ing top, re member that it is hot a long time after use.
Cleaning is very easy, if possible spillovers are remove d immediately with a dam p cloth.
Sugar and mixes containing much sugar must be removed immediately , be cause later removing is laborious and may leave permanent marks.
Burned spillovers are easy to remove with a scrap er deli vered wit h the range . The scrape r
blade is exchanged by loosening the screw on the scraper shaft. The blade is a regular razor blade.
If plastic or aluminium foils melt on the ceramic top, they can also be removed with the
scraper.
In all cleaning, prefer chemical cleaning methods rather than mechanical rubbing. Use a
slightly alkaline detergent (pH 8-10) diluted in water according to instructions when
cleaning the surfaces of the range.
4.3.2 Other service measures
The appliance does not include any user serviceable parts inside. Service must be left to
authorised service personnel.

22.3.2010 Rev. 3.0
Installation
7
5. Installation
5.1 General
The installation of this appliance must be carried out in accordance with the manufacturer’s instructions and following local regulations. This installation manual must be used
together with the installation drawing of the appliance.
The connection of the appliance to the elec trical and water supply must be carried out by
qualified persons only.
5.2 Transporting and unpacking the range
The best way to m ove the range i s to keep i t in i ts pa ck age as long as possibl e while it also
protects the ra nge from outer damage . If it is nece ssary to unpack the range, possib le lifting must be done from the bottom frame using s uitabl e space rs of wood. In order to avo id
damages it is not allo wed to us e the cooking top as a workbench during installation.
5.3 Positioning the range
Because the temperature of a cooking zone accidentally forgotten on without a pan may
reach even 550°C, it is mandatory to follow local fire safety regulations when installing
the range.
The range is positi oned in the in stal lati on pla ce and adjus ted in a horizont al positi on fro m
the adj us table leg s.
When the range is on the correct locati on and in a hori zontal positi on, it m ust be bol ted to
the floor, the land models by the flanges in the rear adjusting legs and the marine models
from all four leg flanges.
5.4 Electrical connections
Besides the live electrical parts, also look out for possible moving mechanisms inside the
appliance, if there is a need for testing during installation and the guards or cover plates
are detached.
In orde r to ma ke eve ntu al fut ure serv ice ea sier and increa se safet y, a mai ns s witc h mus t
be installed near the appliance. This switch must disconnect the appliance completely
from the electrical suppl y network.

22.3.2010 Rev. 3.0
Installation
8
The feed-through for t he connectio n cable i s located i n the bottom of the range, in the rig ht
front corner. In order to make the connection the knobs and the front panel of the range
must be removed. The connection terminal is on the right side of the front casing.
5.5 Test-run
Acquaint yourself with the us er manual of this appli anc e before tes ting it. The appliances
under the cooking top are provi ded with their own manuals.
After connecting the cable check the function of the range.
Check that
• every cooking zone heats up and the corresponding pilot light turns on when the
zone is switched on with the power regulator
• no wires inside the appl iance get jammed before refitting the outer panels.
Refit the outer panels.

22.3.2010 Rev. 3.0
Troubleshooting
9
6. Troubleshooting
If the appliance does not function, check the following:
• Has the appliance been used according to the ins tructions?
• Are all possibl y removable parts refitted?
• Is the mains switch on the appliance or nearby - often on the wall - in the ON position?
• Are the c ircuit break ers (fuses) of t he a ppli ance in th e electri city dis tribut ion board
in working order? Ask an aut horised person to check the circ uit breakers.
If even this does not help, figure out in advance how to briefly describe the breakdown
and contact an authorised service person.

22.3.2010 Rev. 3.0
Troubleshooting
10

22.3.2010 Rev. 3.0
Technical specifications
17
8. Technical specifications
Main and control circuit diagram T02110 A3
Main and control circuit diagram T02111 A3
Installation drawing T02023 A3
Installation drawing T02025 A3
Installation drawing T02024 A3
Installation drawing T02026 A3

Main and control circuit diagram T02110 A3
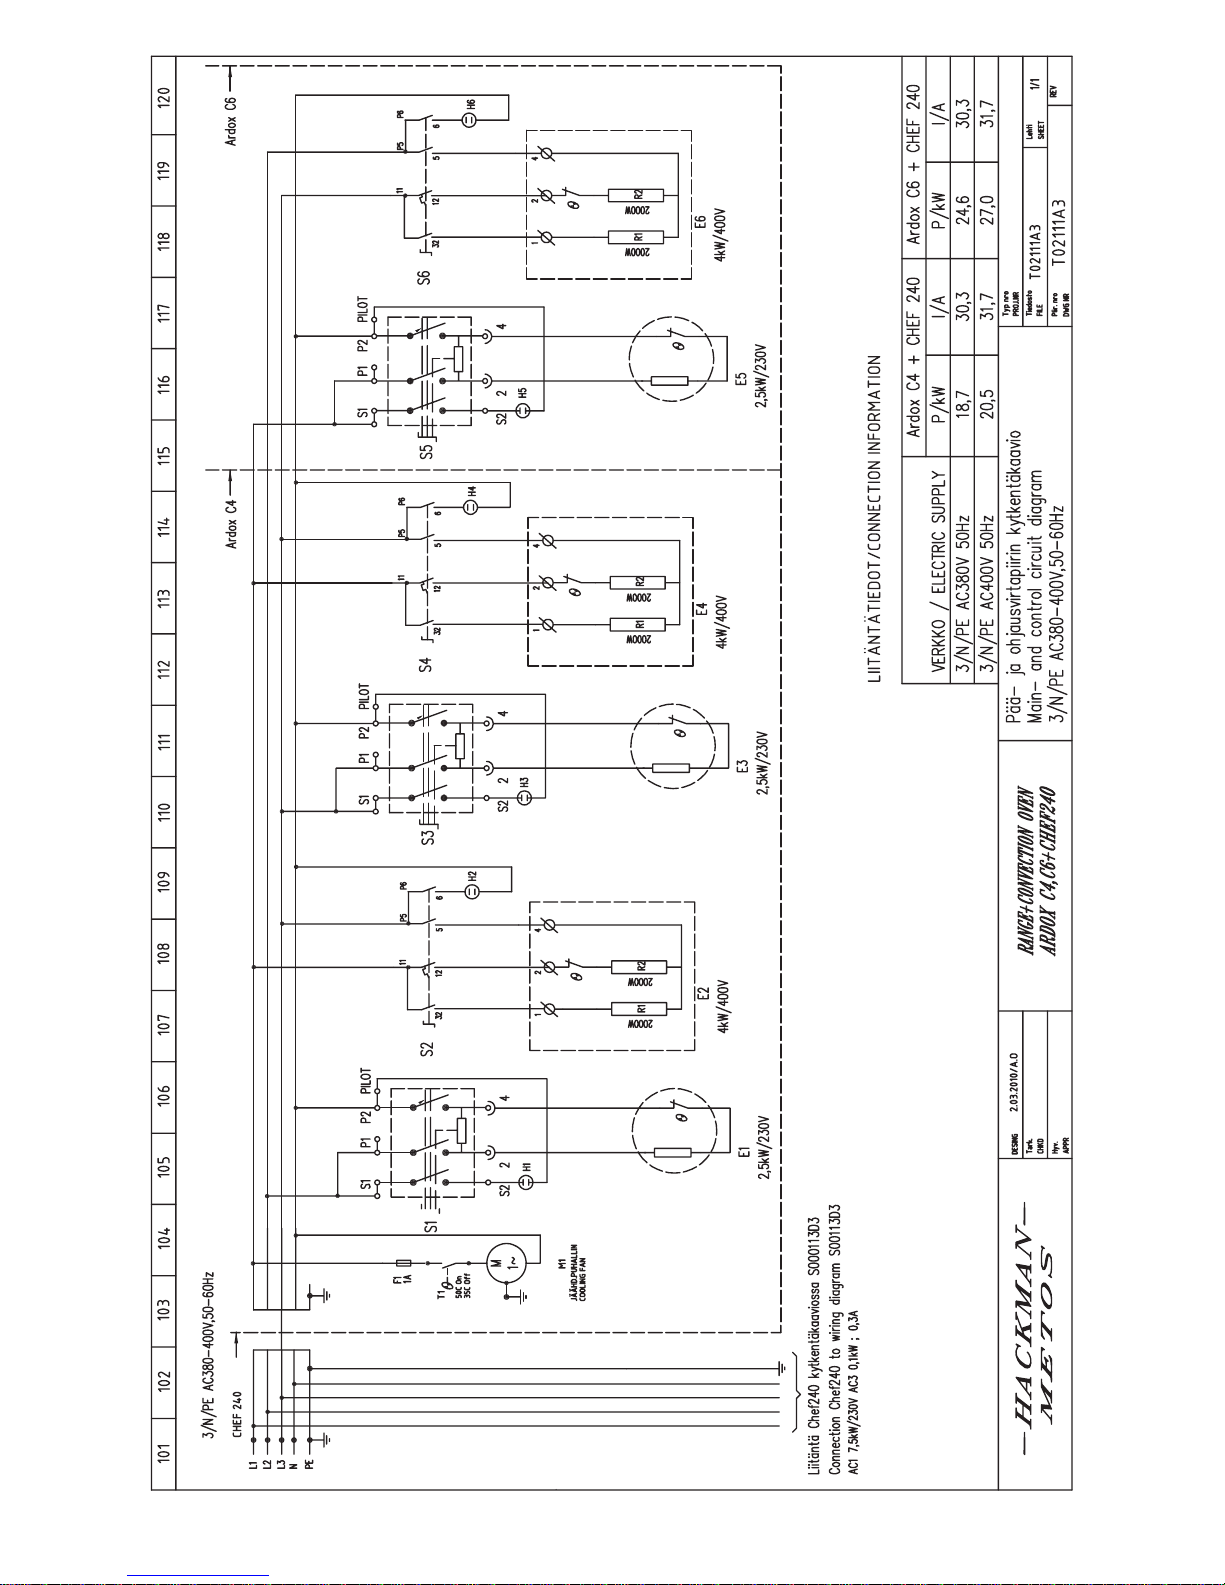
Main and control circuit diagram T02111 A3

Installation drawing T02023 A3

Installation drawing T02025 A3
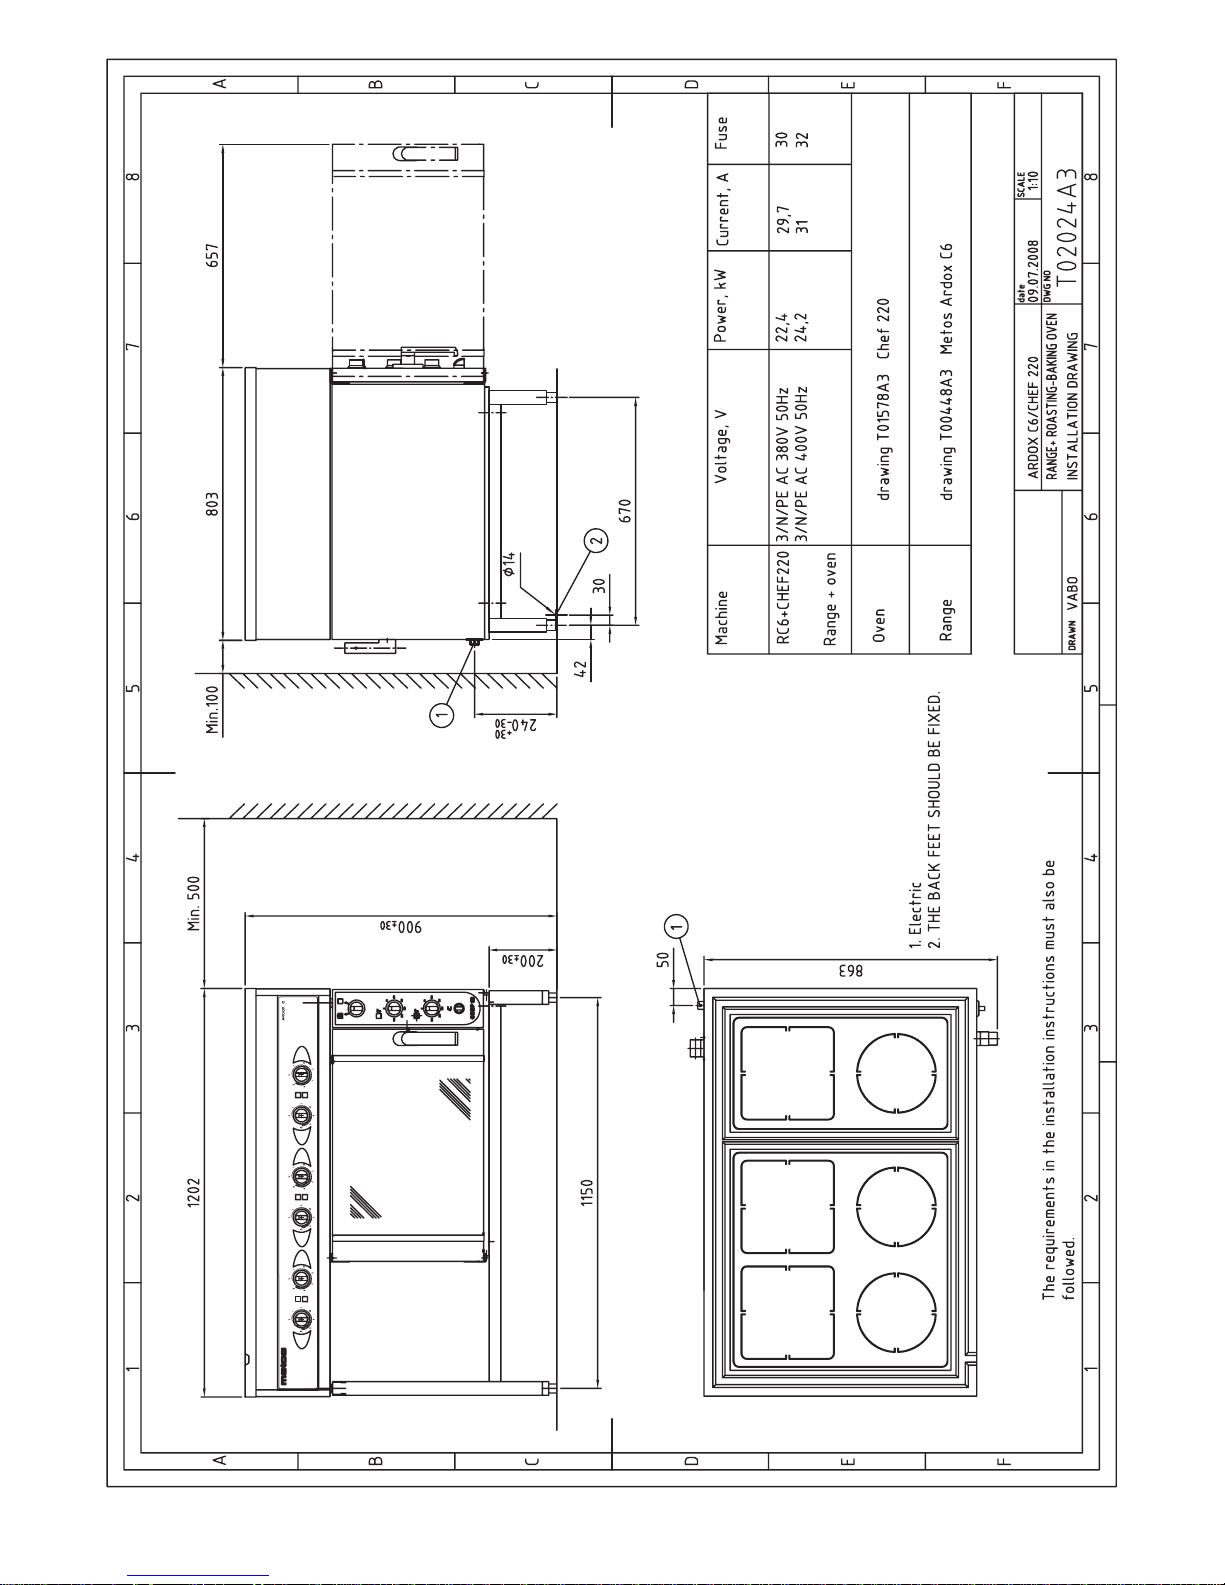
Installation drawing T02024 A3

Installation drawing T02026 A3
22.3.2010 Rev. 3.0
Technical specifications
24
C=ARDOX C
4=C4, 6=C6
22=Chef 220, 24=Chef 240
A=3/N/PE∼400/230V 50Hz, G=3/N/PE∼415/240V 50Hz, H=3/PE∼230V 50 H z, I=3/PE∼220V 60Hz
Item Model Type Acces-
sory
Specification
Outer dimensions WxDxH C 4 800x800x 900 m m
Outer dime nsions WxDxH C 6 1200x800x900 mm
Cooking top dimensions WxD C 4 650x650 mm
Cooking top dimensions WxD C 6 347x650 mm, 650x65 0 mm
Cooking zones C 4 2x ø230mm, 2x2 70x270mm
Cooking zones C 6 3x ø230mm, 3x270x2 70m m
Power regulation C Stepless power regulator, pilot
light for each zone
Material C Ceramic cooking hob. All outer
surfaces of stainless steel
Weight wit h package C 4 Approx. 95 kg
Weight with package C 4 22 Approx. 145 kg
Weight wit h package C 4 24 Approx. 155kg
Weight with package C 6 Approx. 140 kg
Weight with package C 6 22 Approx. 190 kg
Weight with package C 6 24 Approx. 200 kg
Weight wit hout package C 4 Approx. 60 kg
Weight without package C 4 22 Approx. 110 kg
Weight without package C 4 24 Approx. 120 kg
Weight without package C 6 Appr ox . 85 kg
Weight without package C 6 22 Approx. 135 kg
Weight without package C 6 24 Approx. 145 kg
Package dimensions WxDxH C 4 860x920x1050 mm
Package dim ensions WxDxH C 6 1260x920x1050 mm
Electrical connection See installation drawings
Operation conditions Normal commercial kitchen con-
ditions, temp.over 0°C

 Loading...