

Page 1
SUPPORT
Have a question or problem? Our support team can help.
We manufacture, test, calibrate, and repair every instrument in house. Our scientists and
technicians use the instruments every day in our product testing lab. No matter what your
question is, we have someone who can help you answer it.
NORTH AMERICA
Email: support.environment@metergroup.com
Phone: +1.509.332.5600
EUROPE
Email: support@metergroup.de
Phone: +49 89 12 66 52 47
TEROS 11 + TEROS 12
ADVANCED SOIL MOISTURE SENSING
Page 2
ERROR
OK
TEST
(–)
(+)
(–)
(+)
(–)
(+)
(+)
(–)
(+)
(–)
P1 P2 P3 P4P5 P6
Port 1Port 2Port 3Port 4 Port 5Port 6
TEST
OK
ERROR
(-)
(-)(-) (-)
(-)(+)(-)(+)(+)
(+)(+)(+)
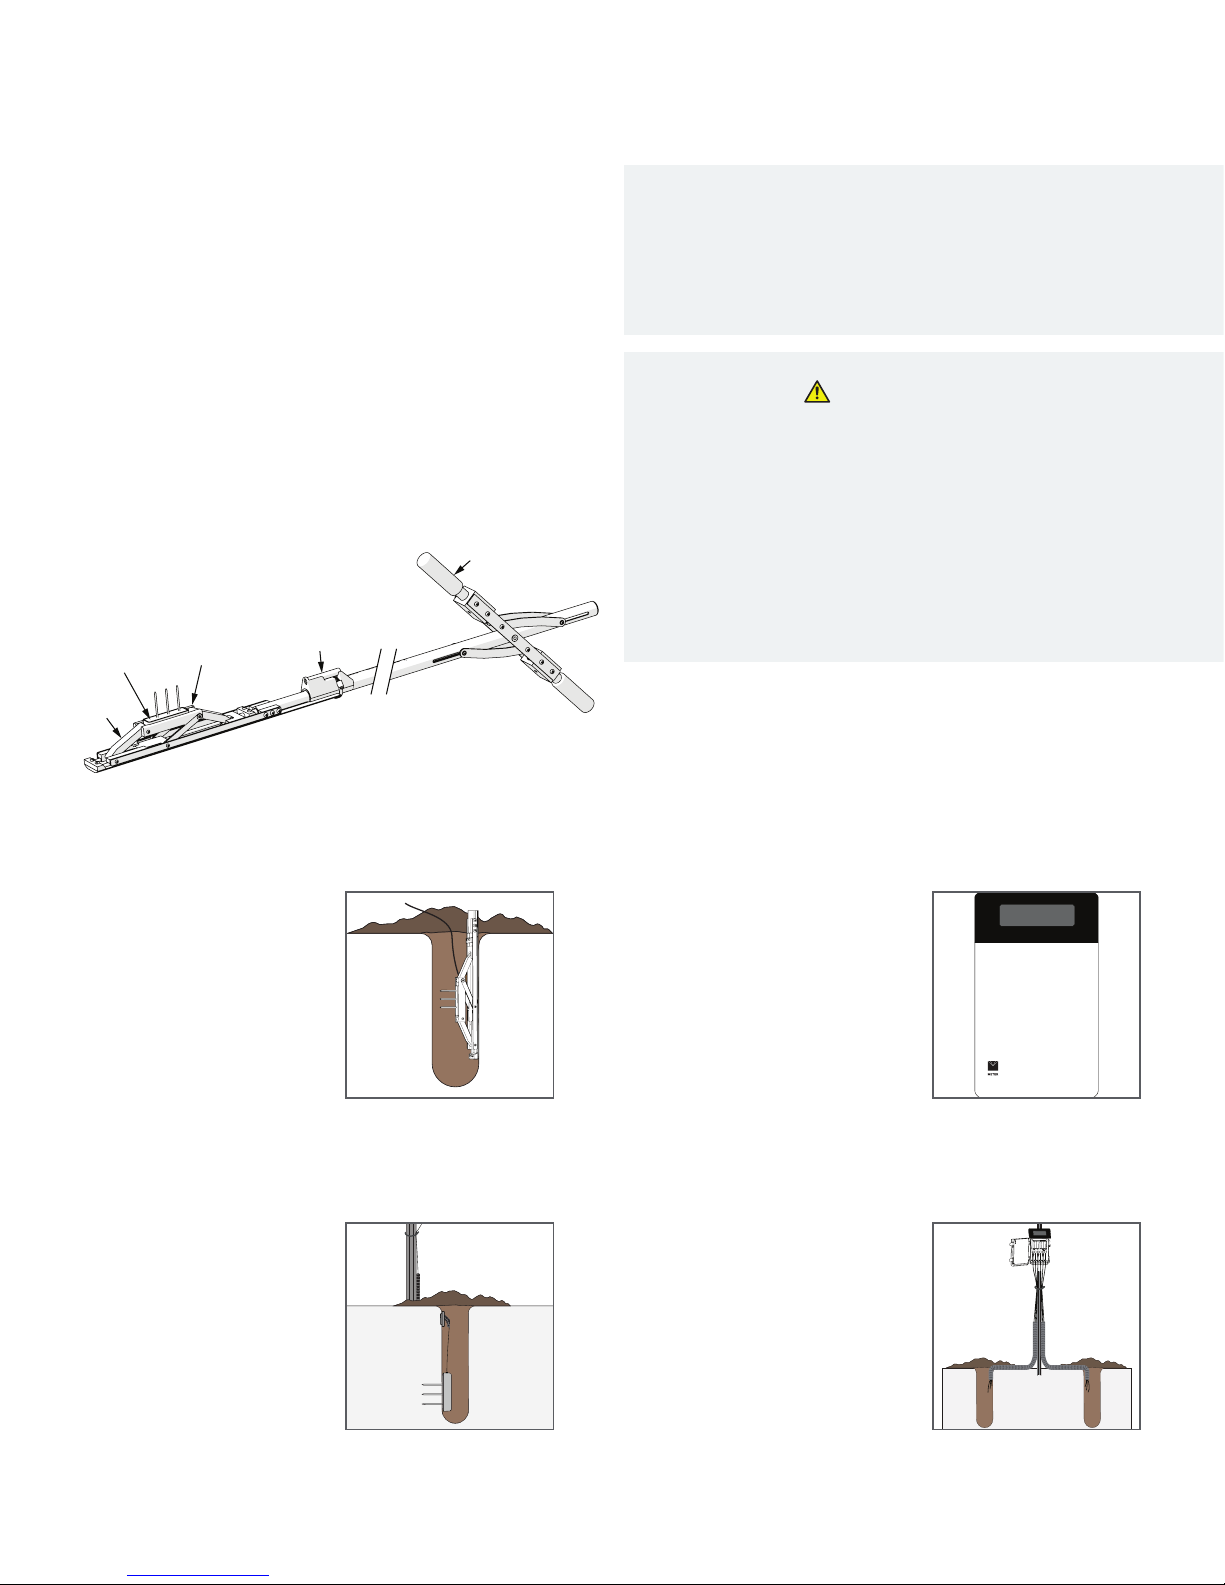
3. Repack Soil and
Protect Cables
Secure and protect cables with
PVC casing or exible conduit
andbackll the trench or hole.
1. Insert Sensor
Auger or trench a hole to the
desired sensor depth. Insert the
sensor into the undisturbed soil.
When using the borehole
installation tool, load the
TEROS11/12 as shown above.
Lower the tool into the hole or
trench with the back of the tool
supported by the far wall. Pull on
the lever to activate the jack and
insert the sensor into hole wall.
2. Check Sensor Operation
Plug the sensor into the data logger
and use the SCAN function in the
software to do a quick check of
sensor operation before backlling.
Installation
TEROS 11/12 QUICK START
Preparation
Inspect and verify the sensor components (TEROS11 Soil Moisture
and Temperature or TEROS 12 Soil Moisture, Temperature, and
Electrical Conductivity). To validate sensor-to-sensor variability as
well as logger functionality, take a sensor measurement in air and
water. The TEROS 11/12 will read ~0.70 m3/m3 in water and a slightly
negative value in air.
NOTE: The sensors are optimized to read in soils, therefore the sensor will not read 100% in
pure liquid water.
Installation Tool
Proper installation of the sensors is critical for proper operation.
Refer to the TEROS 11/12 User Manual for details.
For easy installation, use the borehole installation tool. The
installation tool (shown below) is available for rent from METER
Group. Contact Customer Support for more information.
4. Plug Sensor In and
Congure Logger
Plug the sensor into the data
logger. Use data logger software
to apply appropriate settings to
the sensors plugged into each
data logger port.
ATTENTION
TEROS 11/12 requires the most current software and rmware
versions. Please make updates as necessary.
ZL6/EM60 rmware version 2.02 or higher
Em50 rmware version 2.29 or higher
ProCheck rmware version 1.70 or higher
ZENTRA Utility version 1.14 or higher
ECH2O Utility version 1.83 or higher
DataTrac 3 version 3.17.2 or higher
Go to metergroup.com/environment/downloads/ to nd the current
software or rmware version for the data logger being used.
18193-01
2.15.2019
jack
cradle
carriage
shaft
actuator
lever
flashlight
TEROS
sensor
What is soil moisture?
Soil moisture is a key variable in controlling the exchange of
water and heat energy between the land surface and the
atmosphere through evaporation and plant transpiration.
Learn more at metergroup.com
Page 3
 Loading...