

Page 1

-1-
METEOR
SOUND 110
Direct ther mal and ther mal tra nsfer
BR AVA
Dir ect ther ma l
Meteor s.r .l.
Via Delle Macchine 24
30038 Spinea VE
Ita ly
Tel. +390415412600
Fax +390415412231
E-mail: [email protected]
Web: www.meteorbarcode.it
Page 2
-2-
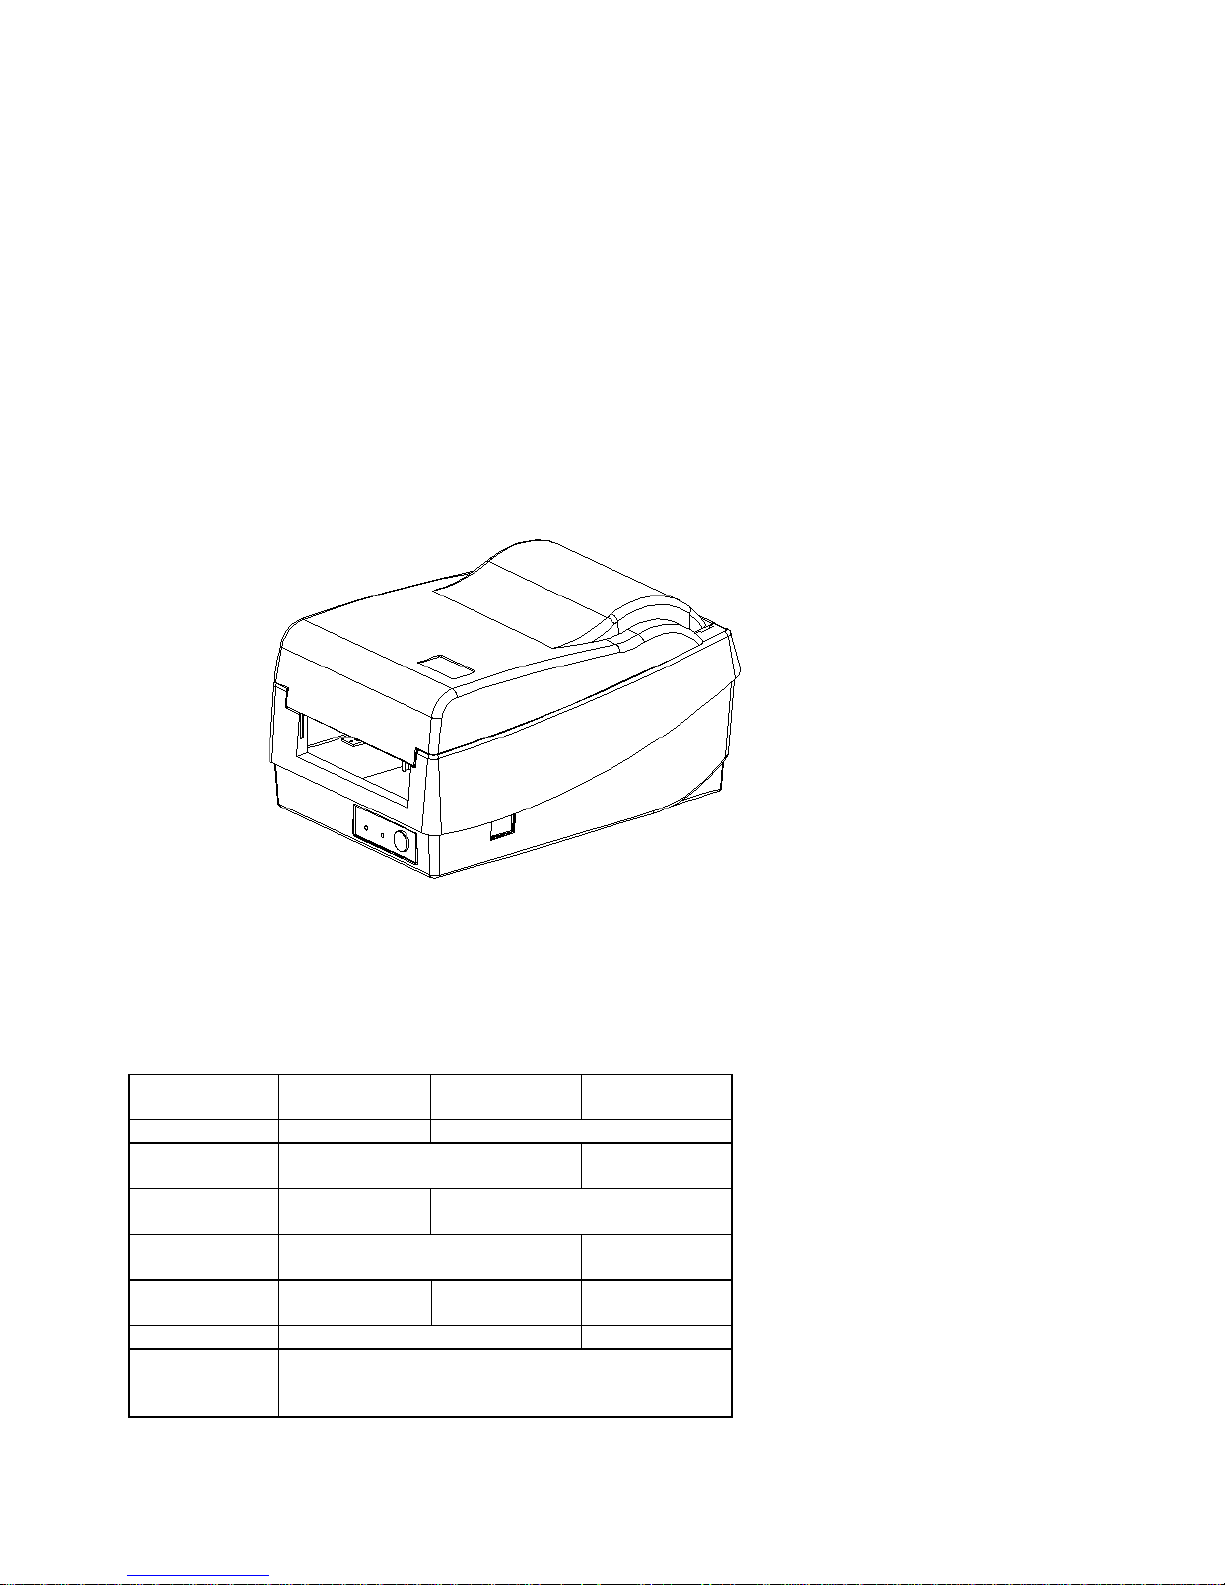
1. PRODUCT DESCRI PT I ON
This label printer is a high-performance, low-cost direct thermal/thermal transfer labeling system. Its user-friendly design and
affordable price set a new standard for the Desktop Label Printer in retail, office and industrial applications.
The printer is designed with the most efficient memory management technology -
True Speed
and prints at a speed of 2 ~ 3 inches
per second. When bundled with its smart printer driver, the user can easily print out bar codes, texts and graphics from any editing
application (e.g. CodeSoft, BarTender) under Windows 95, 3.1 and NT. All popular bar codes and fonts are resident in the printer
memory to handle versatile applications.
The solidly designed mechanism allows quick and easy media(paper) and ribbon loading. The optional Dispenser and Cutter
provide the alternatives of fan-fold label and continuous paper handling.
This printer is a compact, highly integrated, high performance and high resolution on-site labeling system.
The User’s Manual will help you understand basic operations of the printer such as setup, installation, configuration and
maintenance. Before reading the manual you should first identify your printer model.
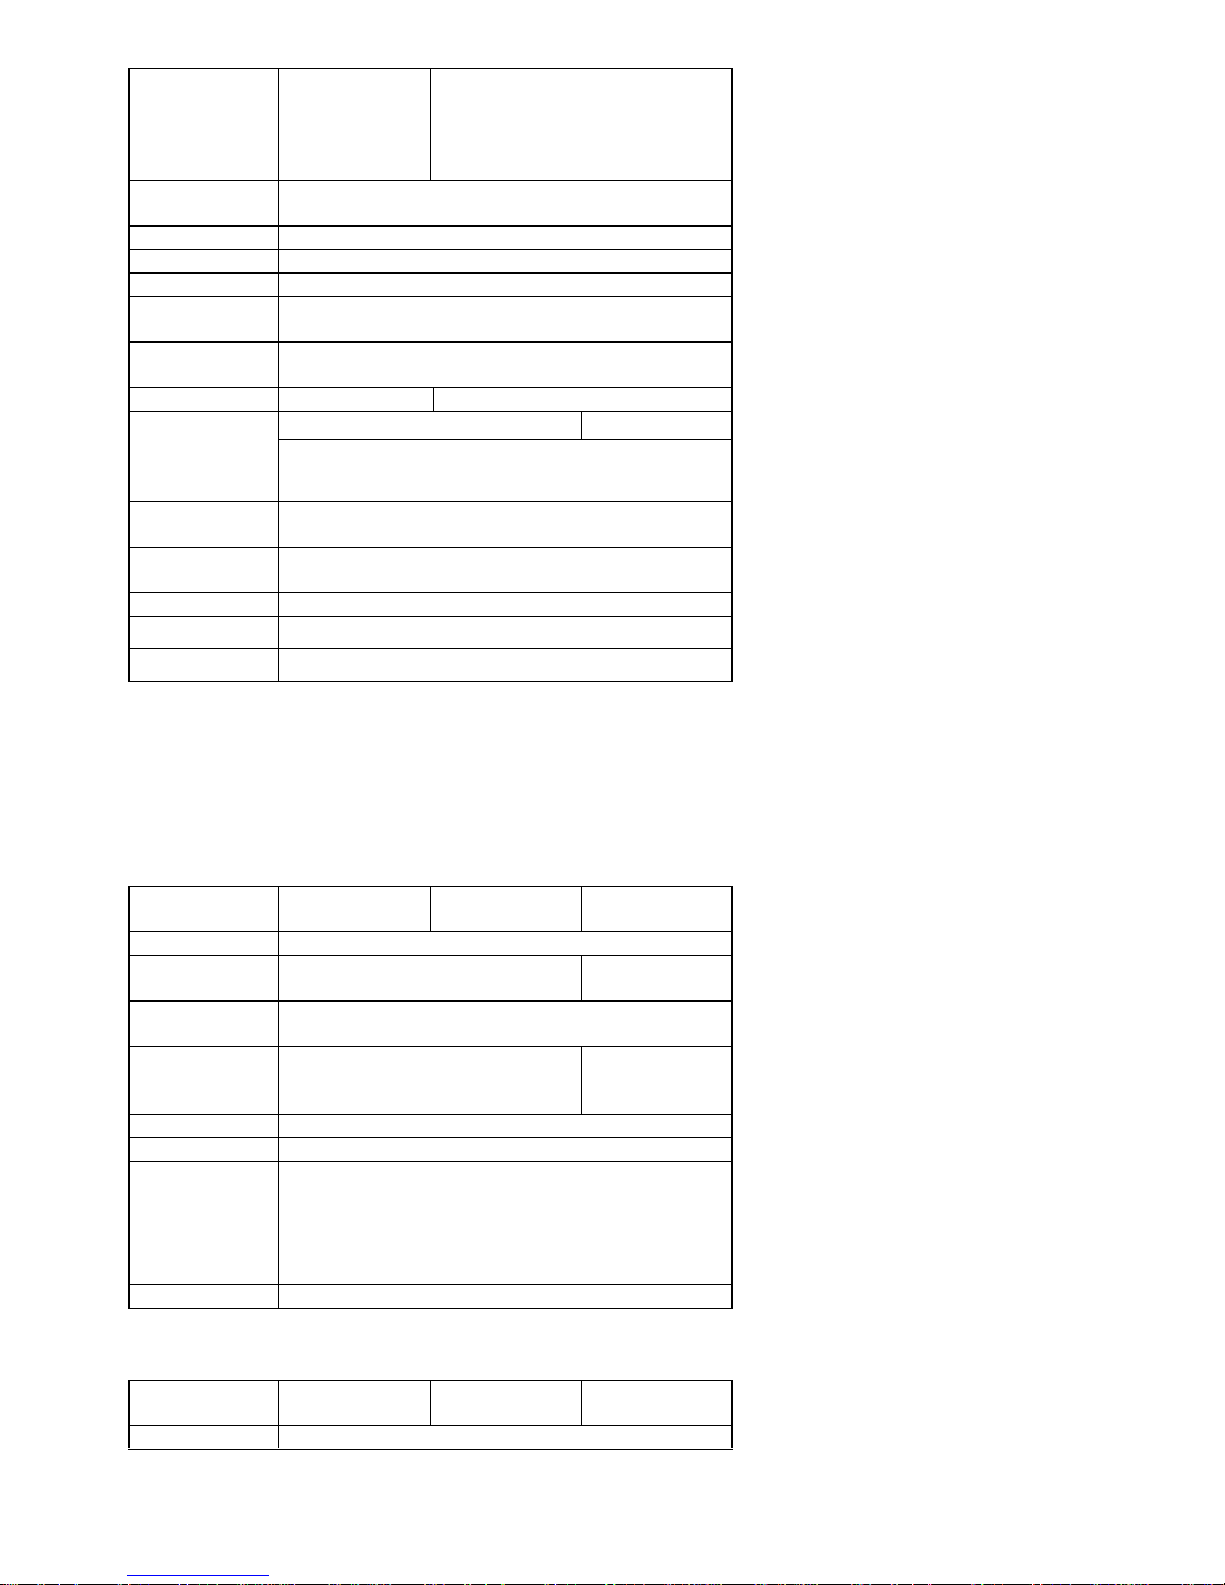
Gener a l Pr int er Specifications
Specification Mod el BRAVA Mod el SOUND Model SOUND
300 DPI
Print method Direct thermal Direct thermal and thermal transfer
Resolution 203 DPI
(8 dots/mm)
300 DPI
(12 dots/mm)
Maximum print
width
4.2 in. (107 mm) 4.10 in. (104 mm)
Maximum print
length
43 in. (1090 mm)
**
29 in. (736 mm)
**
Maximum print
speed
2 inches (50.8 mm)
per second
3 inches (76.2 mm)
per second
2 inches (50.8 mm)
per second
Onboard RAM 512 K bytes 2 M bytes
Media type I. Direct thermal:
paper or vinyl, vinyl, visible light and infrared scannable
label, tag stock, butt cut or die cut, with various adhesives.
Page 3
-3-
r
II. All above media, plus thermal
transfer paper or vinyl labels and tags,
butt cut or die cut, with various
adhesives.
Maximum label
roll diameter
4 in.(102mm) outside diameter, 1 in.(25.4mm) inside
diameter
Label indexing Black stripe and gap
Ribbon types Wax, Wax/resin and Resin
Ribbon size OD 1.45 in. (37 mm); ID 0.5 in. (12.7mm)
Interface RS-
232 serial and Centronics parallel ports, auto polling for
both ports
Dimension W7.3 in. x D10.9 in. x H6.0 in.
(W186 mm x D278 mm x H153mm)
Weight 1.7 kg (3.74 lbs) 1.9 kg (4.1 lbs)
FCC class B FCC class AElectrical
CE, UL and CUL approved. Input 19 VAC or 24 VDC (min.
2.5 A), 50/60 Hz
Operating
temperature
40° ~ 140°F (5° ~ 38°C)
Storage
temperature
-40° ~ 140°F (-40° ~ 60°C)
Humidity 15~85% RH
Windows driver for Win 95, 98, NT4, 2000, XP
Rotation 0o, 90 o, 180 o and 270 o , 4 direction rotations
Fonts, Bar Codes a nd Grap h ics
The specifications of fonts, bar codes and graphics depend on the printer emulation. The emulation is a printer programming
language, through which the host can communicate with your printer. There are two printer programming languages for models
204/214/314, they are PPLA and PPLB.
Printer Programming Language A, PPLA
Specification Model BRAVA Model SOUND Model SOUND
300 DPI
General fonts 7 alpha-numeric fonts, OCR A and OCR B
ASD smooth fonts 6, 8, 10, 12, 14 and 18 points 4, 6, 8, 10, 12, 14,
and 18 points
Symbol sets for
smooth fonts
USASCII, UK, German, French, Italian, Spanish, Swedish,
and Danish/Norwegian
Courier fonts 8 symbol set (PC, PC-A, PC-B,
EAMA-94, Roman8, Legal, Greek and
Russian)
r
Soft fonts Downloadable PCL fonts
Font expandability 1x1 to 24x24
Bar code types Code 39, Code 93, Code 128/subset A,B,C, Codabar,
Interleave 2 of 5, UPC A/E/2 and 5 add-on, EAN-8/13,
UCC/EAN-128, Postnet, Plessey, HBIC, Telepen and FIM.
MaxiCode and PDF417 (2D symbologies).
Graphics PCX, BMP, IMG and HEX formats
Printer Programming Language B, PPLB
Specification Model BRAVA Model SOUND Model SOUND
300 DPI
General fonts 5 fonts with different point sizes
Page 4

-4-
Symbol sets
(Code pages)
8 bits: code page 437, 850, 852, 860, 863 and 865.
7 bits: USA, British, German, French, Danish, Italian,
Spanish, Swedish and Swiss.
Soft fonts Downloadable soft fonts
Font expandability 1x1 to 24x24
Bar code types Code 39(checksum), Code 93, Code 128/subset A,B,C,
Codabar, Interle
ave 2 of 5(checksum), Matrix 25, UPC A/E
2 and 5 add-on, EAN-8/13, Code 128UCC, UCC/EAN,
Postnet, German Postcode.
MaxiCode and PDF417 (2D symbologies).
Graphics PCX and binary raster
Optiona l Accessor ies
♦ Serial(RS232) cable
♦ External media stacker (for media roll with max. 8-inch OD)
♦ Dispenser
♦ Cutter
♦ Flash memory
♦ Font board
♦ Extension RAM
++
(0.5M for models Sound/Brava and 1M for models Sound/Brava 300 DPI)
Notes:
**
:
Since this printer uses band buffer technology the maximum print length
depends on the printout contents. If you just print texts or bar codes the maximum length can be more than 30 inches, whereas
if you print many gra phics the maximum can be about 10 inches in length under standard 512K RAM.
++
:
The dispenser, cutter, expansion RAM and flash memory options are all
installed at factory.
As the extension RAM, font board and flash modules use the same connector
they cannot function simultaneously.
Unpacking and Inspection
This printer is packed in a heavyweight carton and custom recyclable foam for environmental protection. Inspect the shipping
carton and contact the carrier directly to report any suspected damage.
Consider the following when unpacking:
♦ The container should stay right-side up.
♦ Lift the printer out of the box carefully.
♦ Remove the accessory items.
♦ Set the printer on a solid, flat surface. Inspect the shipping container and printer for any damage that may have occurred
during shipping.
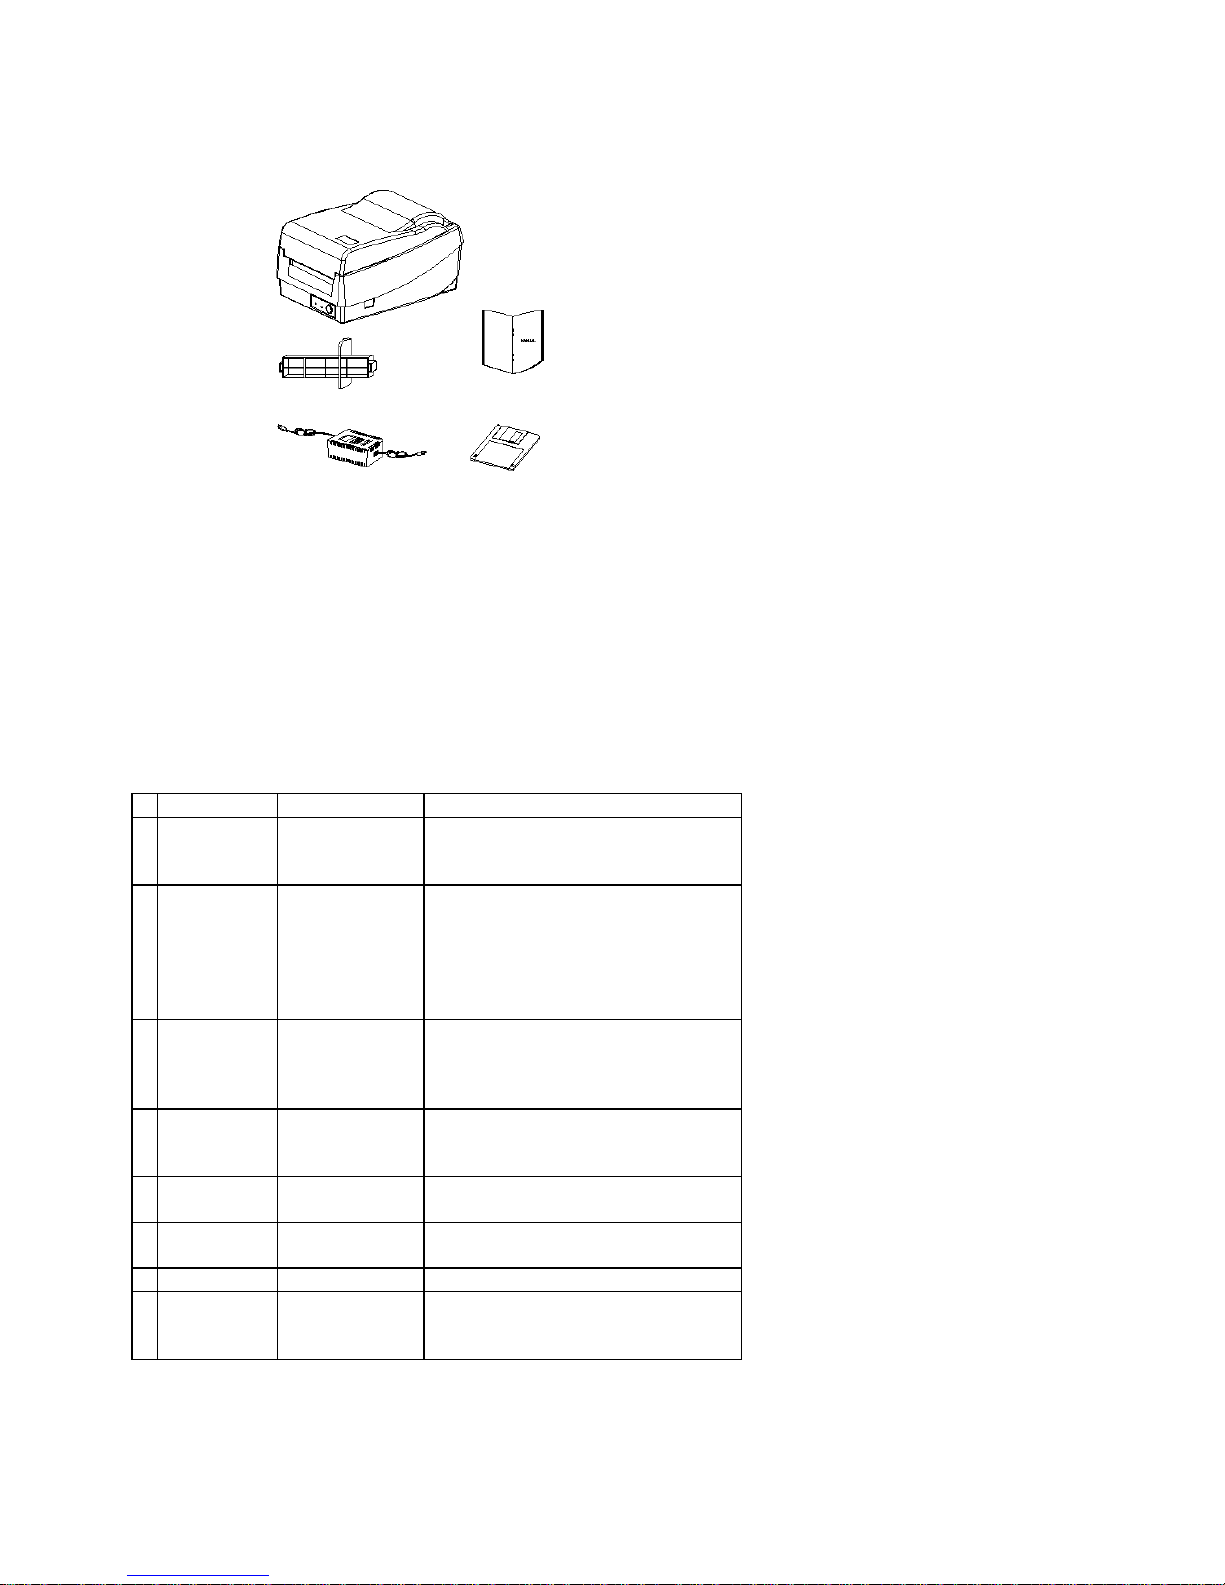
Verify that you have the following materials when unpacking:
a. Printer
b. User’s and technical reference manual
c. Media spindle (with paper guide)
d. Power adapter (AC to AC)
e. Driver CD rom for Windows 95/98/NT4/Win2000/XP.
Page 5
-5-
2. OP E RATI NG INSTRUCTIO NS
Swit ch, Ind icators and Conn ections
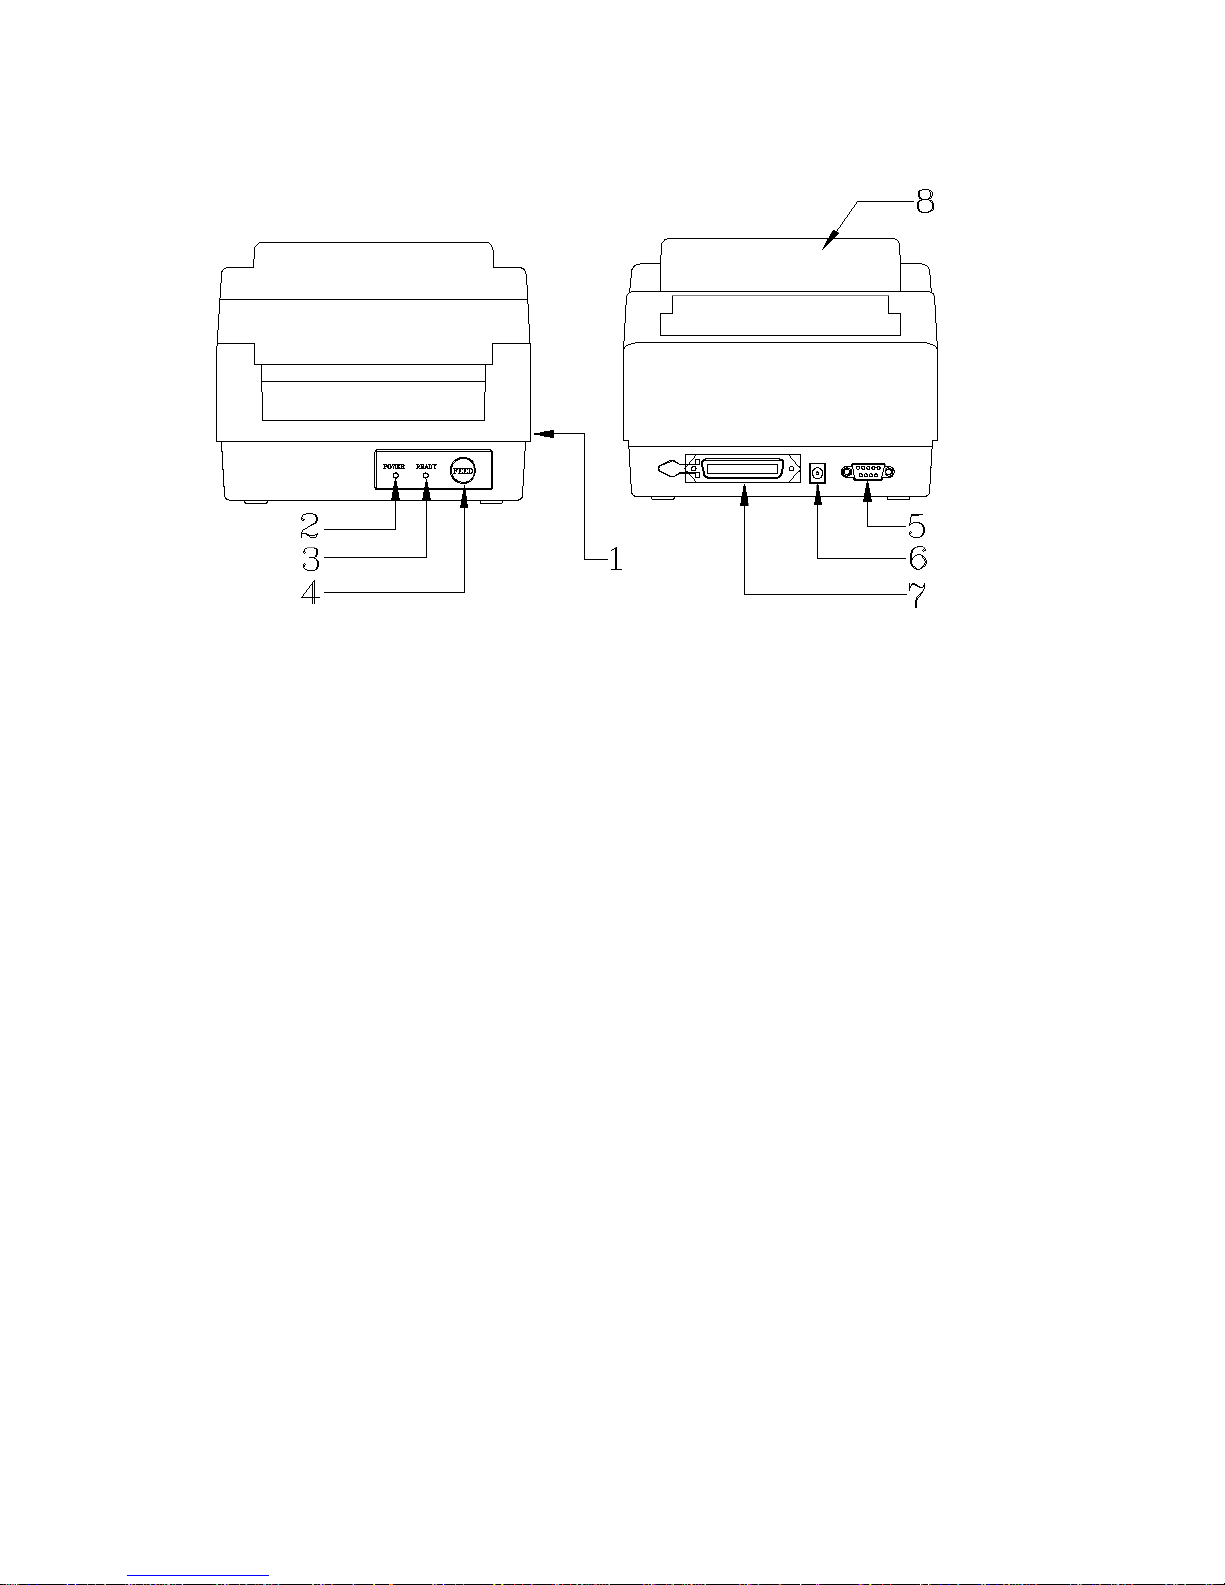
Table 1 summarizes the functions of the various printer switches(buttons), indicators and connections.
Tab le 1. Switches, Indicators and Conn ections
No
Device name Function Usage
1
On/Off switch
(power
switch)
Controls printer
power
On – normal operation
Off – loading paper and ribbon
2
FEED button
Advances the
media stock to
first printing
position of next
label
Press - to advance a label
Press and hold while turning on power
- to print out the self test pattern
Press -
to continue printing when READY
LED is blinking
Press - to resume printing
3
READY
indicator
Shows the printer
status
Green - printer is ready to operate
Blinking - printer is paused; press
“FEED” button to continue
operation
4
POWER
indicator
Shows the power
and error status
Off - printer power off
Green - printer power on
Blinking - error has occurred
6
Power jack Connected to
power adapter
Connected with power supply transformer
plug
5
RS232 serial
port
Communication Connected to host (either 9 or 25 pin
RS232 COM port), terminal or KDU
7
Parallel port Communication Connected to host (Centronics )
8
Top cover Protects the
printer media and
ribbon
Lift and reach the media/ribbon
compartment
Page 6
-6-
Set ting up the Print er
Before setting up the printer you should first consider the following:
♦ Find a solid flat surface with adequate room for the printer. Make sure
there is enough room on the top side for the media and ribbon access.
♦ The location should be near the host or terminal. Consider the distance between host and printer for the communication cable
(serial or parallel cable)
♦ Clear the ground and isolate from other electrical cables for the power adapter.
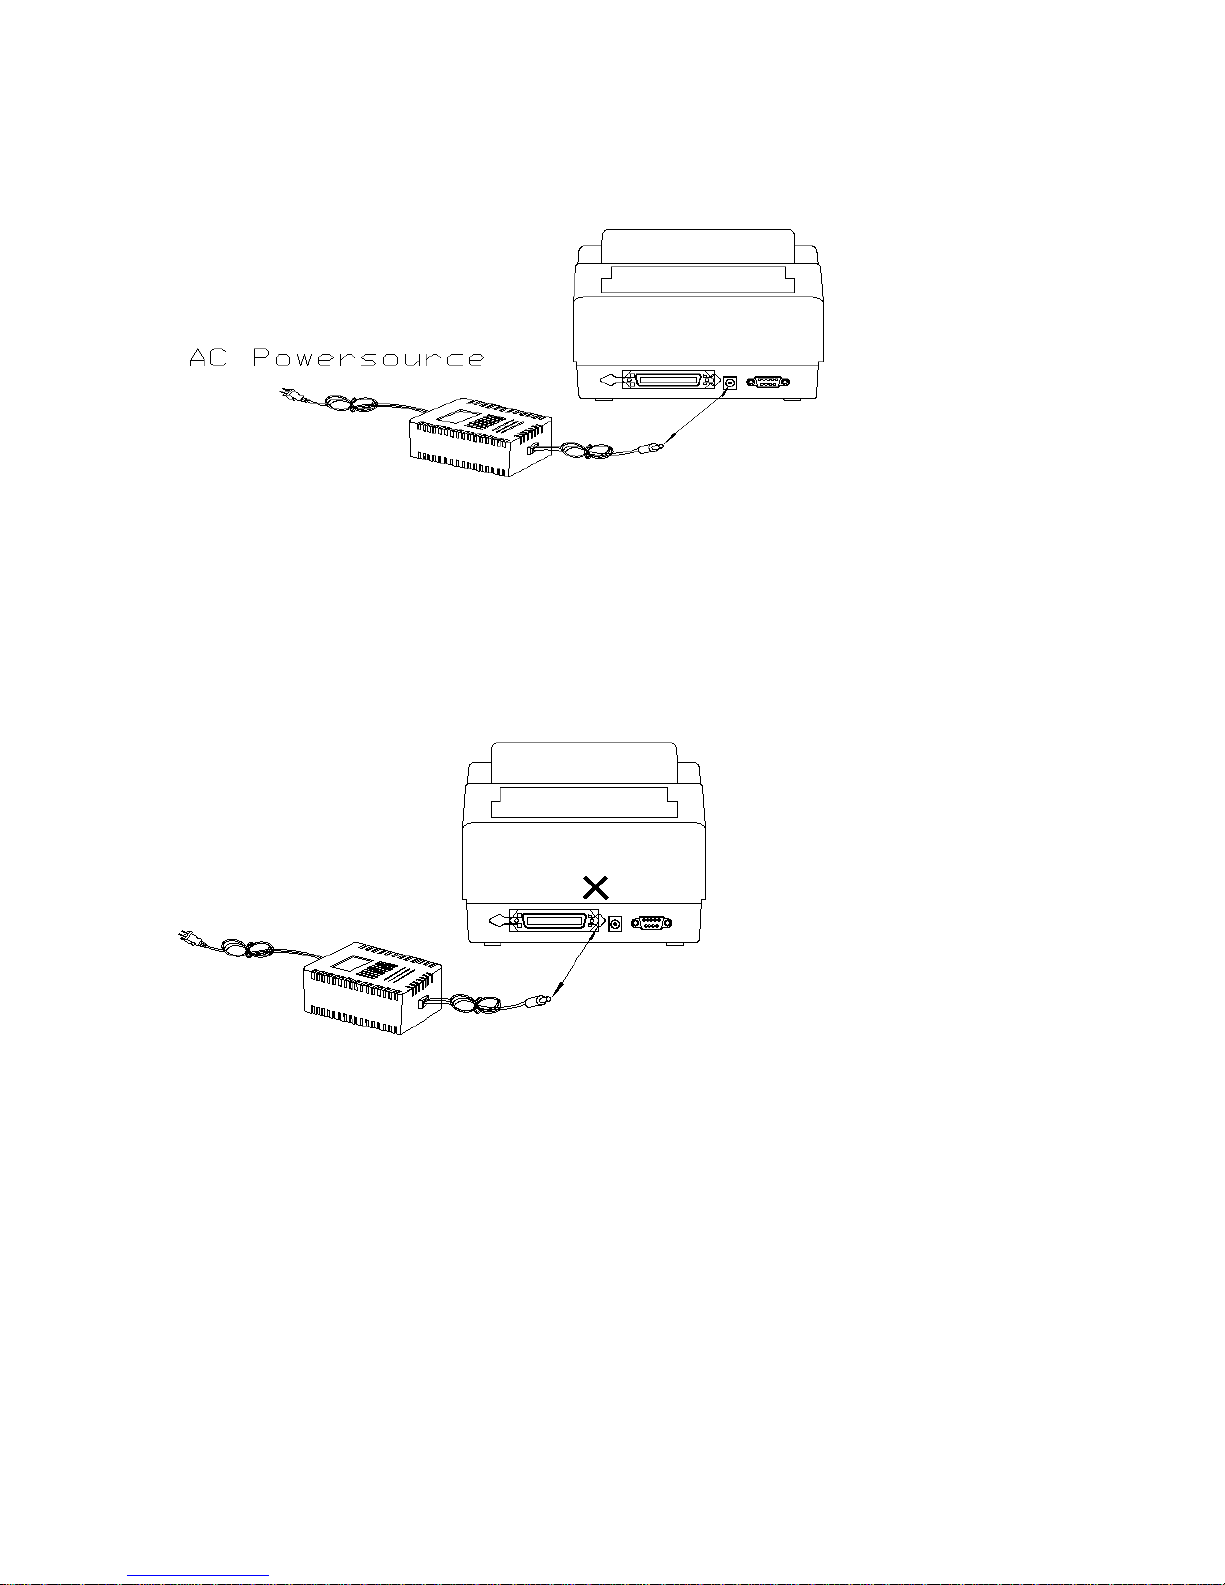
Connecting the P ower Cor d
1. Leave the power switch at the ”O” position.
2. Connect the power supply plug to the power jack and the other end to your AC source.
Page 7
-7-
Note : When plugging into power jack, make sure that you avoid the 36 pin para llel connector.
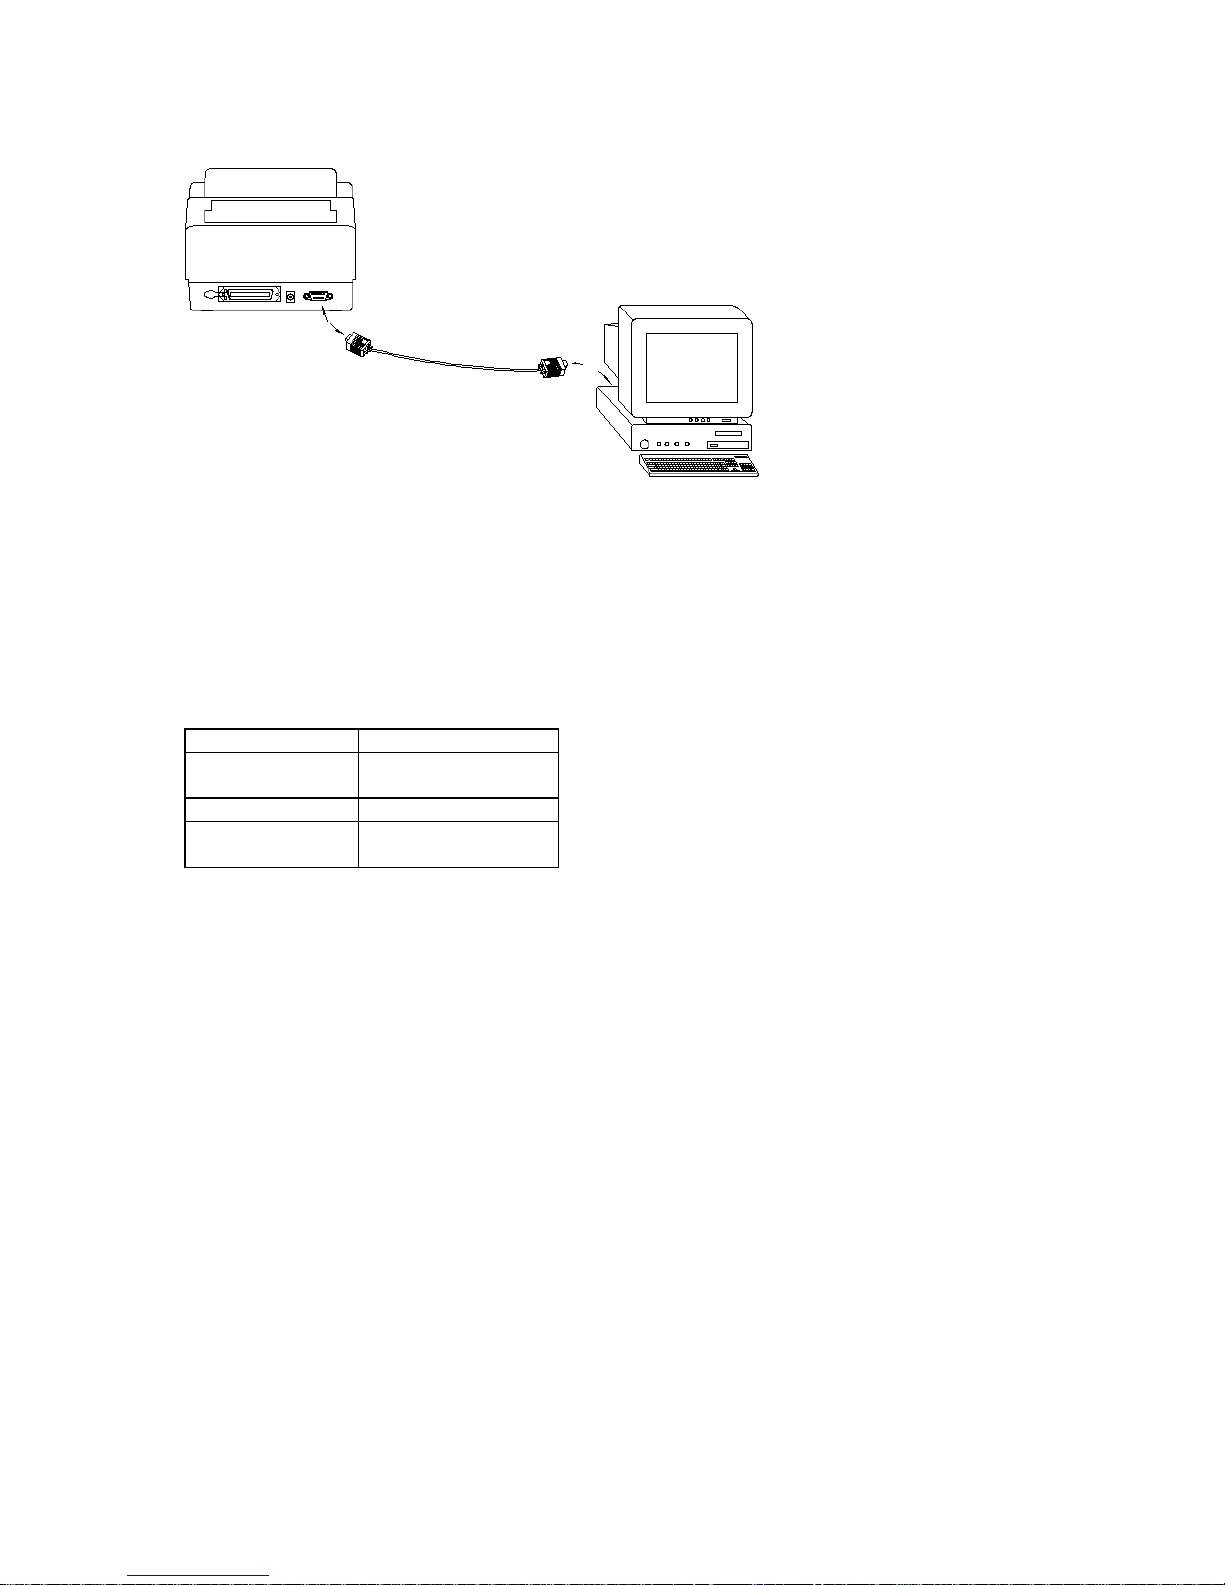
Connecting t h e Pr inter to Your Host
1. You can connect the printer with any standard Centronics cable to the parallel port of the host computer.
2. Alternatively you can connect the printer with a serial cable to the RS232C port of your computer or terminal. (for PC
compatibles, the RS232C port is COM1, COM2 or COM3.)
Note : Using Centronics allows for a much higher communication speed than the use of a seria l.
Page 8
-8-
1. If you use the serial port be sure that the speed(baud rate) and protocol are consistent between printer and host.
The factory default parameters of serial port are:
Speed (baud rate) 9600
Data format 1 start bit, 8 data bits and
1 stop bit.
Parity None
Handshaking
(Flow control)
XON/XOFF as well as
RTS/CTS
Notes :
1. It is not necessary to set the switch or send any command for the parallel and serial por t selection. The printer can
automatically detect it.
2. The default settings can be read from the self test pa ge.
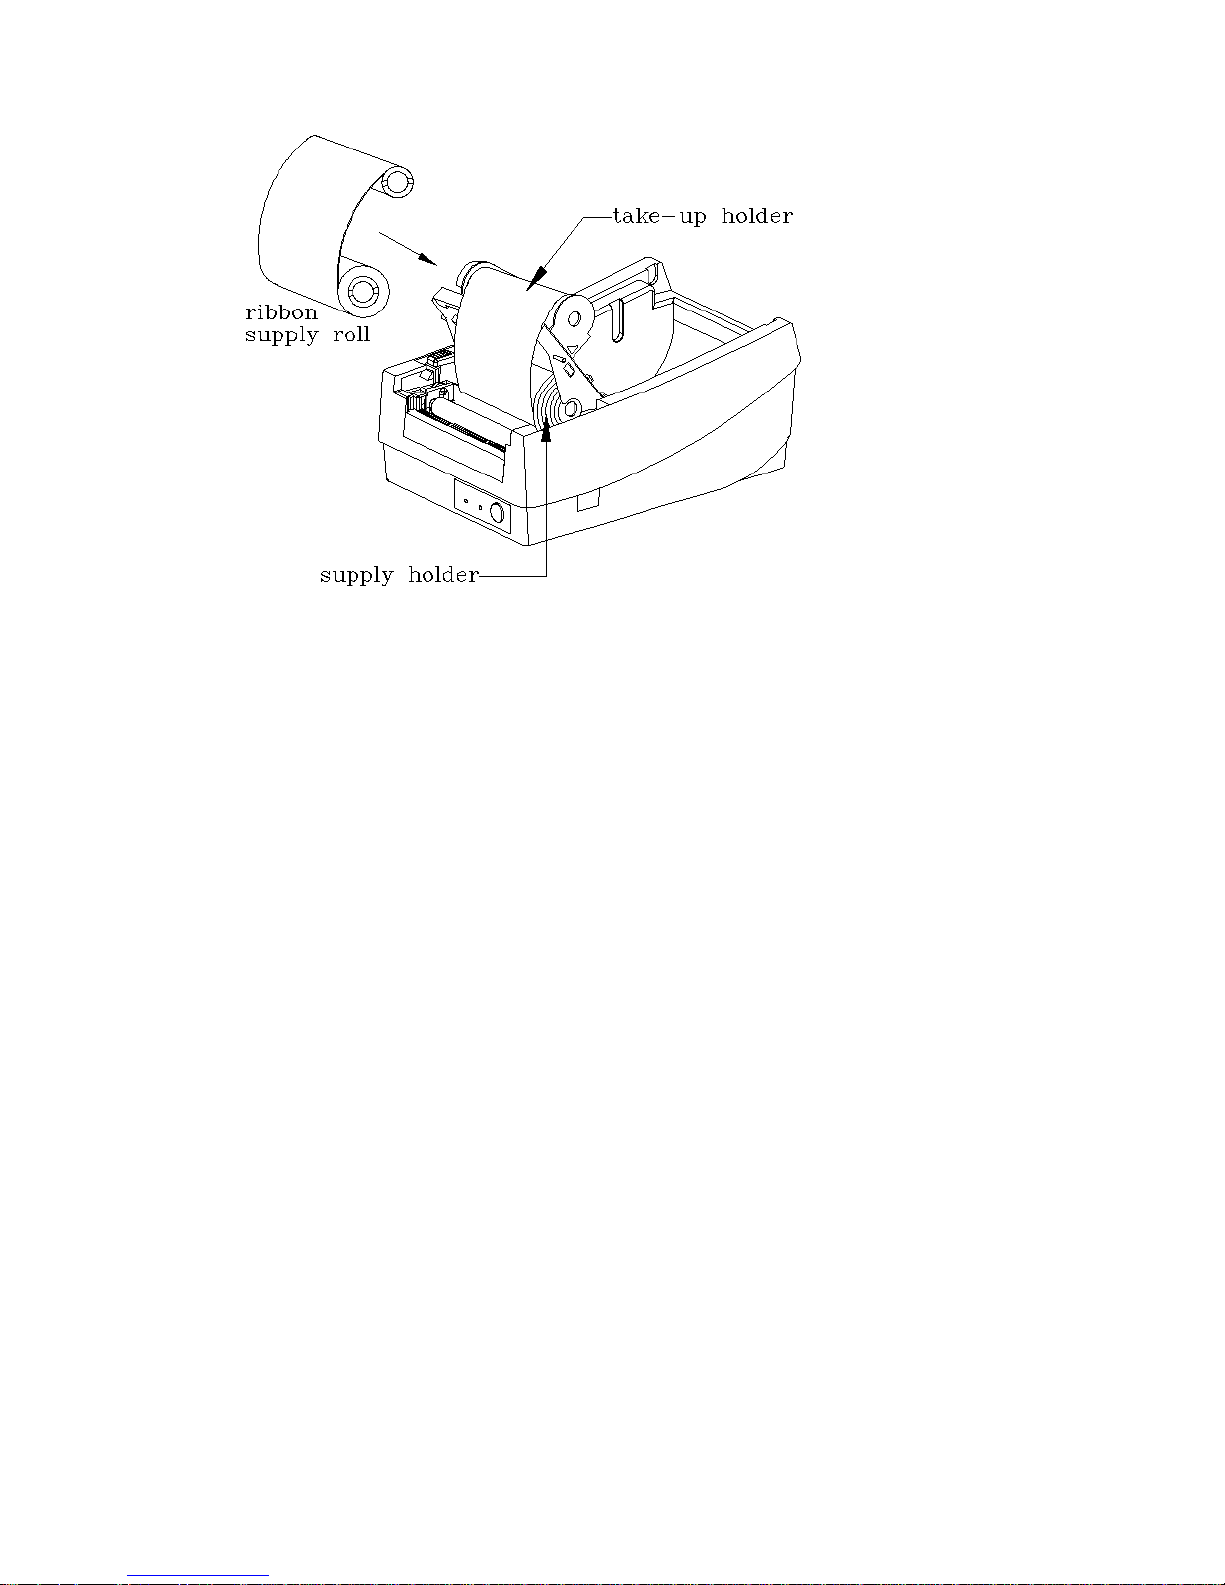
Loading the Ribbon
1.Lift the printer top cover and keep it at the open position
2.Release the print head module and raise it to the vertical position
3.Unwrap the ribbon roll and place the supply roll into the supply holder of the print head module. (first insert the left end of the
ribbon core into the holder shaft, then insert the right end)
4.Place the pick-up core into the take-up holder of the print head module. (first insert the left end of the pick-up core into holder
shaft, then insert the other end)
Note : This procedure is not necessary when direct thermal media is used.
Page 9
-9-
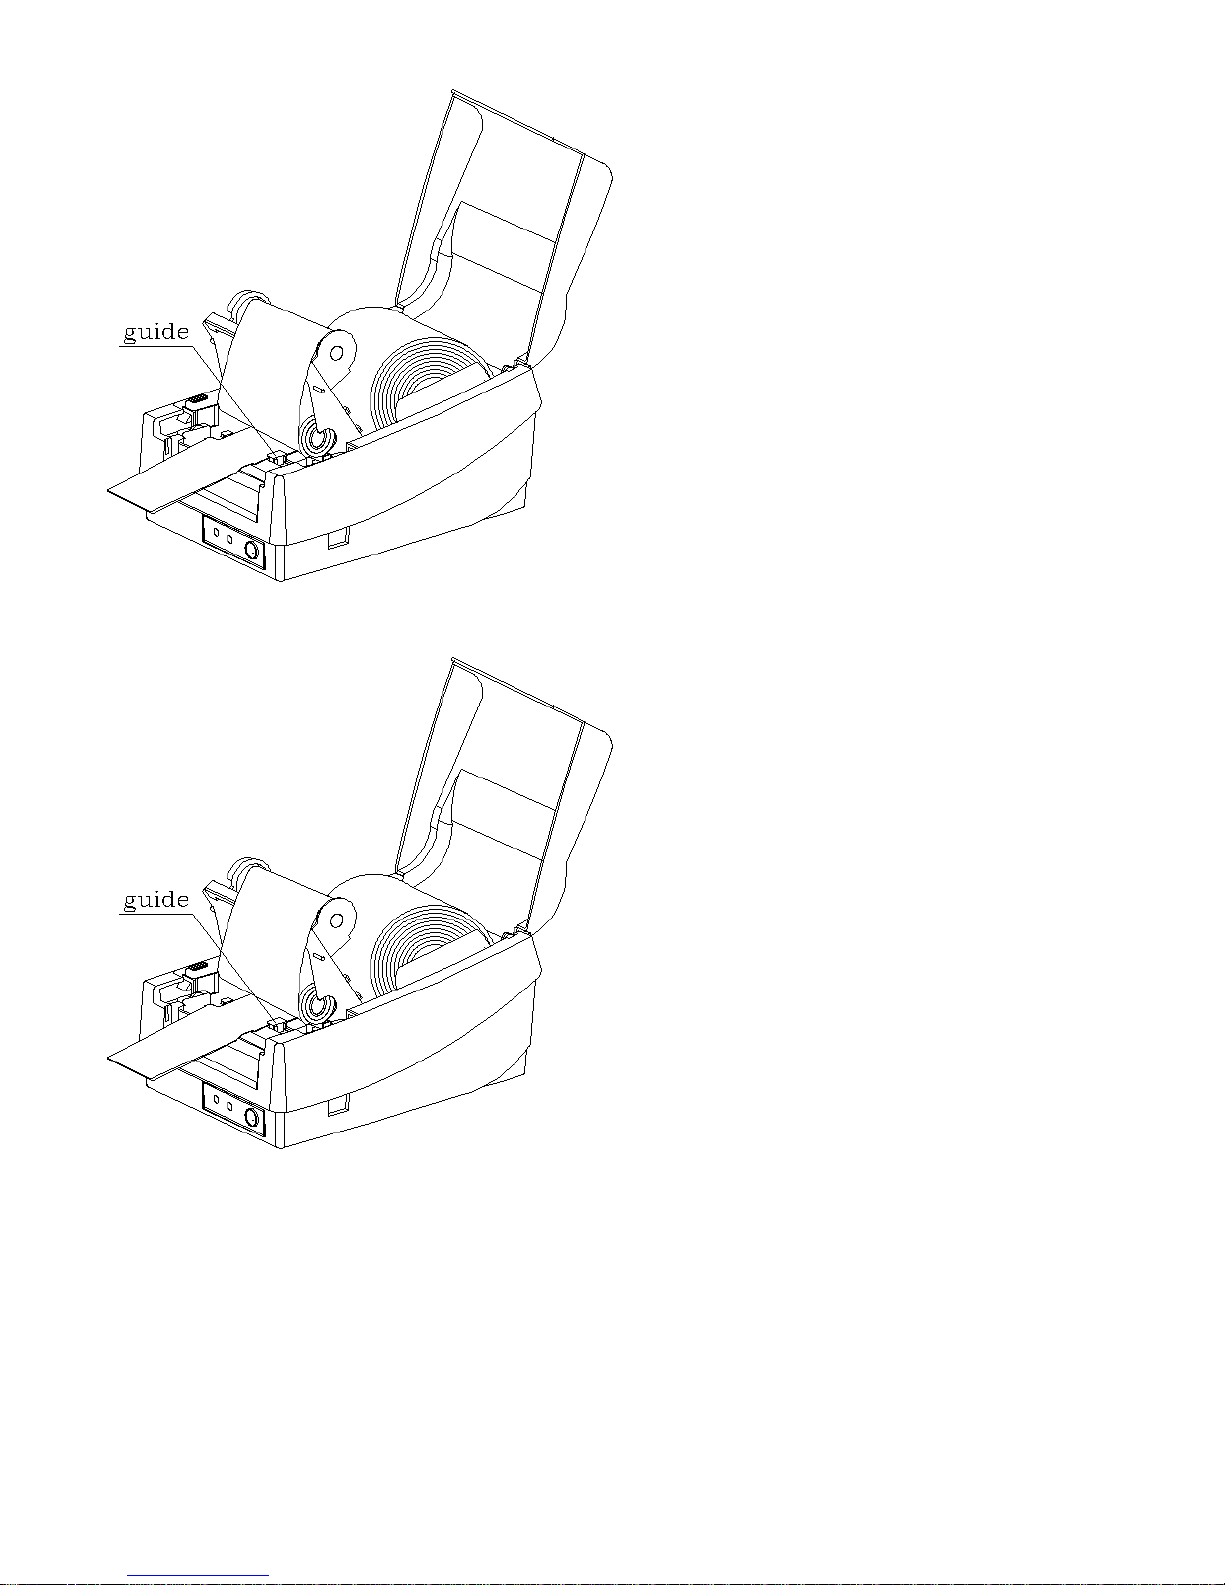
Loading Media
1. Lift the printer top cover and keep it in the open position.
2. Slide the two print head latches toward the rear and unlock the module.
3. Raise the print head module.
4. Insert the media spindle into core of the label media(the guide should be on the right). Insert the spindle and media into the
slots in the printer. Slide the media to the far left and slide in the guide snug with the media.
5. Pull out 6 inches of media and thread the end of the media between the guides(adjusters) located under the print mechanics.
Slide in the right guide snug(adjuster) with the media. Thread the media over the roller until 2” of the media shows out of the
printer. (ENSURE THAT THE LABELS ARE FACING UP.)
6. Press the print head module down firmly until it snaps into place.
7. Close the top cover.
8. Turn on the printer.
9. If you are using die-cut media, press the ”FEED” button to advance the first label into the standby position.
Page 10
-10-
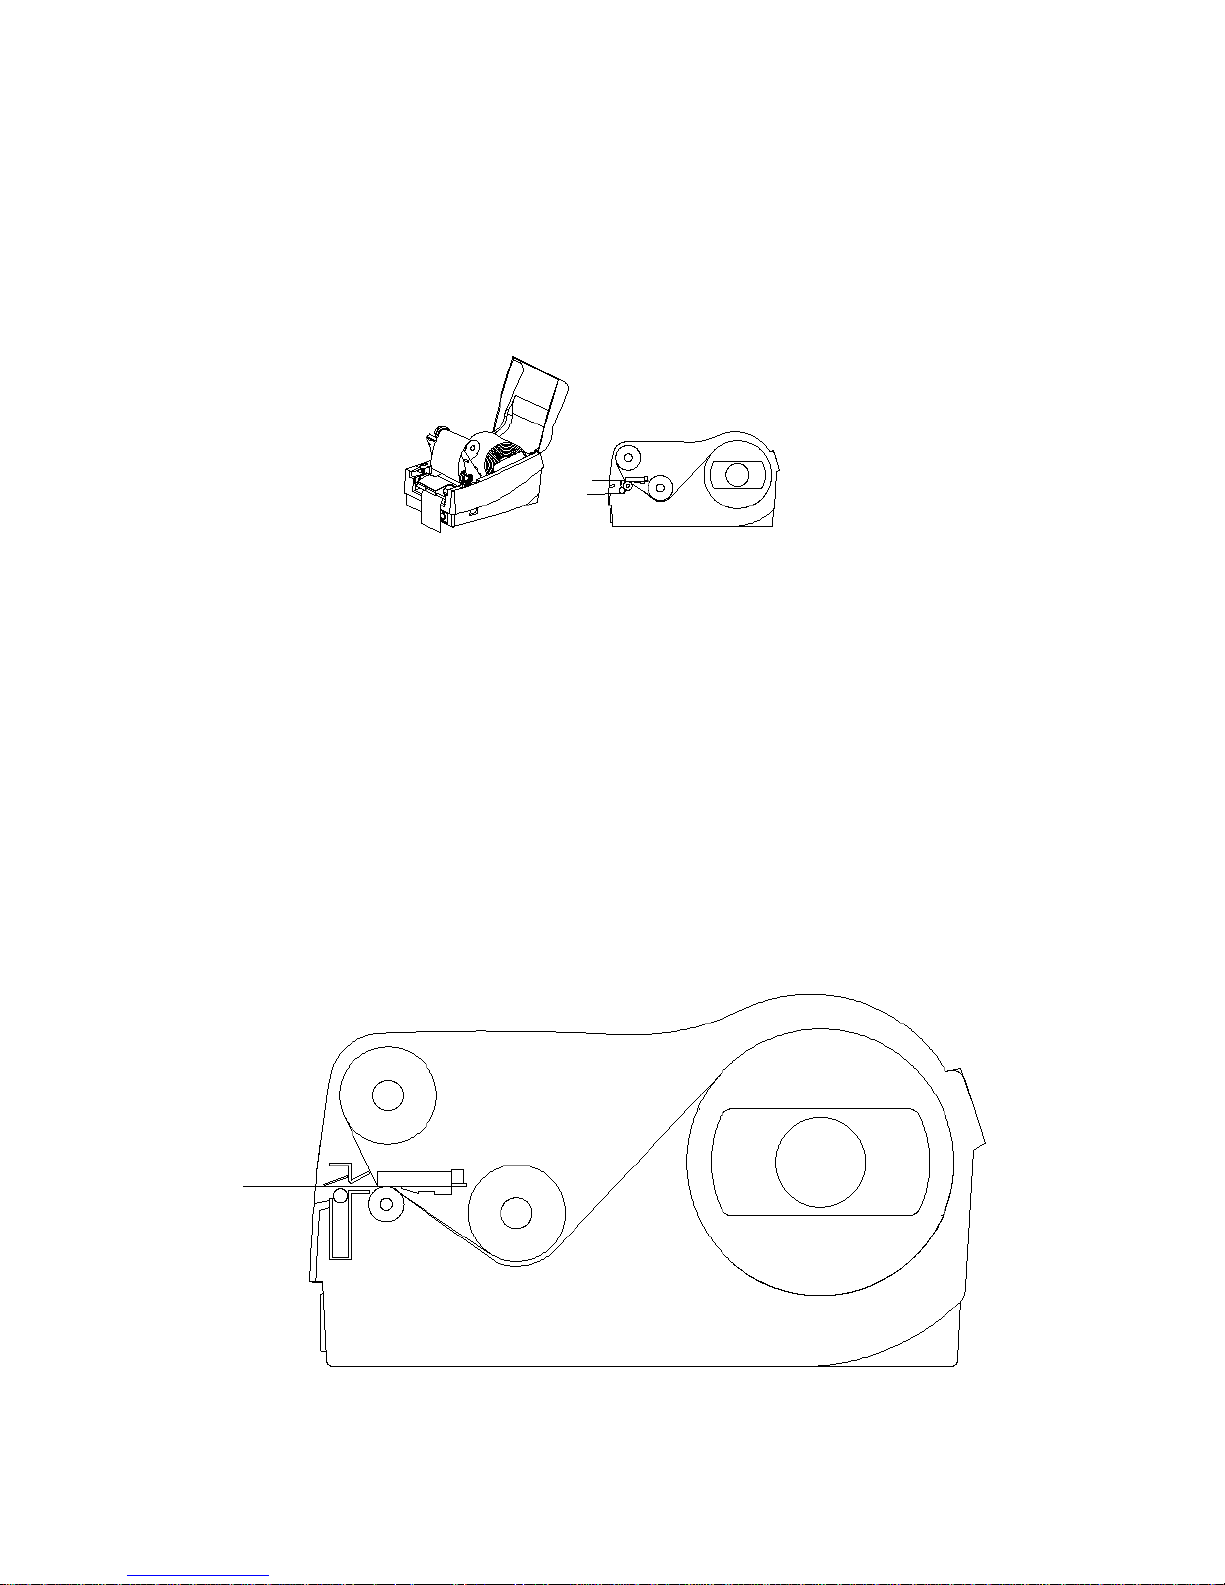
Load ing Media When Disp enser is E q uipped
1. Follow the same procedure as above for steps 1~5.
2. Peel off, remove 6-inch labels and route the label backing through the dispen ser bar into roller gap between the feed ing
r oller and d ispenser roller.
3. Turn on the power to “1” position.
4. Press “FEED” button and the label backing will advance to dispensing position.
Page 11
-11-
5. Pull down the print head module until it is secure.
6. Close the top cover.
Loading Media Wh en Cutt er is Eq uipp ed
Follow the same procedure as “Loading Media” except for step 5.
After you thread the media over the roller, find the horizontal gap at the cutter module, and route the media through this gap.
Page 12

-12-
Performing the L a bel Sen sor Calibr a t ion an d Self Test
1. Power the printer on while pressing the button on the front panel.
2. 2 seconds later, the printing motor will be activated.
3. Do not release the “FEED” button.
4. After feeding 12-inch blank media, the printer will print out the configuration and font list automatically.
5. You can check the firmware version, ROM checksum, RS232, thermal transfer/direct thermal settings, hardware
configuration and font types from the self test page.
6. At PPLB emulation the printer will enter character dump m ode. To exit from dump mode y ou just press the feed button again.
Notes:
This step is very important and must always be carried out after installation and every time the media type is changed. Failure to
do so will result in the gap and la bel-empty detection being incorrect.
Self Test Pattern for PPLB
Reset t in g the Pr int er to Factory Defa u lt Settings
If you would like to reset the printer to its factory defaults after certain commands have been sent or settings changed:
1. Press and hold the “FEED” button for about 10 seconds.
2. The “READY” LED will turn off.
3. Release the “FEED” button.
4. When both LEDs turn on again, the printer is already reset to the factory default condition.
Note : All settings are stored in non-volatile E2PROM and cannot be destroyed even by turning the printer off.
 Loading...