

Metalux FM9WR30R, FM9WR40R, FM11WR30R, FM11WR40R, FM15WR30R Instruction Manual
...
Instruction Manual/
Directives/Instrucciones
Questions?/Questions/¿Preguntas? 1-800-334-6871 ConsumerProducts@
cooperlighting.com
LED
White Round LED Flushmount
Luminaire fluorescent DEL
rond encastré
Luminaria LED blanca, redonda
para montaje rasante
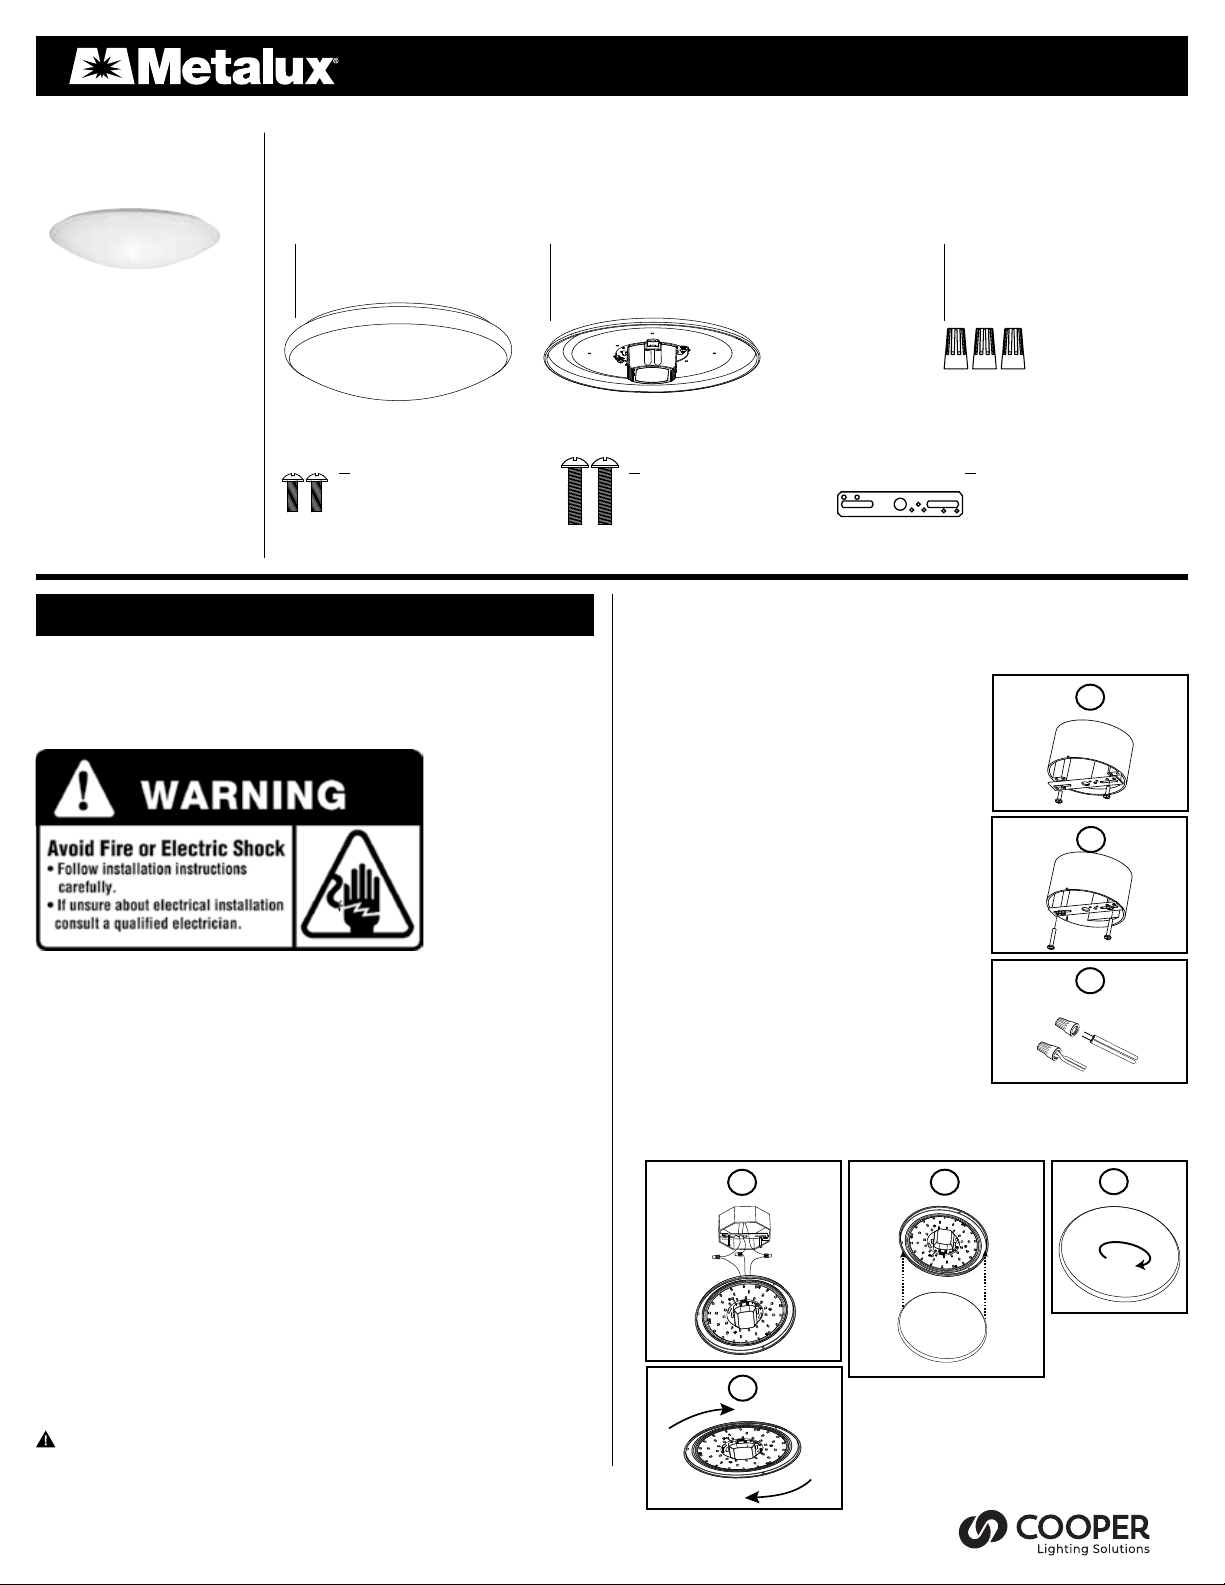
PACKAGING CONTENTS/ CONTENU DU PAQUET/CONTENIDO DEL PAQUETE
A. Round diuser
Diuseur acrylique
Difusor acrílico
B. Fixture housing
Boîtier du luminaire
Alojamiento del accesorio
FM9WR30R
FM9WR40R
(9 inch/23 cm)
FM11WR30R
FM11WR40R
(11 inch/28 cm)
FM15WR30R
FM15WR40R
(15 inch/38 cm)
FM19WR30R
D. (2) Short Screw #8-32
(2) vis courtes #8-32
(2) tornillos cortos n.º 8-32
FM19WR40R
(19 inch/48 cm)
ENGLISH
ITEMS REQUIRED
(Purchase separately)
• Phillips Head Screwdriver
WARNINGS AND CAUTIONS
Safety Information • Read carefully for your protection
• Turn off the power at fuse or circuit breaker box before installation and maintenance.
• Wear rubber-soled shoes and work on a sturdy ladder.
• NOTE: This fixture should be used on a 120-Volt fused circuit. (Check fixture labeling)
• Fixture must be installed according to National Electric Code and local building codes.
• Ground fixture to avoid potential electric shock.
• Handle metal parts carefully to prevent cuts.
• To avoid a hazard to children, account for all parts and destroy all packing materials.
• If you are unsure about wiring, consult a qualified electrician.
• If any part is missing or damaged, do not attempt to assemble, install or
operate the product.
• This equipment has been tested and found to comply with the limits for a Class B digital
device, pursuant to Part 15 of the FCC Rules. These limits are designed to provide reasonable
protection against harmful interference in a residential installation. This equipment generates,
uses and can radiate radio frequency energy and if not installed and used in accordance with
the instructions, may cause harmful interference to radio communications. However, there is
no guarantee that interference will not occur in a particular installation. If this equipment does
cause harmful interference to radio or television reception, which can be determined by turning
the equipment off and on, the user is encouraged to try to correct the interference by one or
more of the following measures:
- Reorient or relocate the receiving antenna.
- Increase the separation between the equipment and receiver.
- Connect the equipment into an outlet on a circuit different from that to which the
receiver is connected.
- Consult the dealer or an experienced radio/TV technician for help.
WARNING: FCC Regulations state that any unauthorized changes or
modifications to this equipment not expressly approved by the manufacturer
could void the user’s authorization to operate this equipment.
SAVE THESE INSTRUCTIONS.
C. (3) Wire connectors
(3) Serre-ls
(3) Conectores de cable
E. (2) Long Screw M4 x 23
(2) vis longues M4 x 23
(2) tornillos largos M4 x 23
F. Crossbar (Not to scale)
Barre transversale
(non à l’échelle)
Barra transversal (no a escala)
WIRING AND FIXTURE INSTALLATION
1. TURN POWER OFF AT MAIN FUSE/ BREAKER BOX. Carefully open carton, remove fixture
from carton.
2. Attach the mounting bracket to the JBOX by
inserting the short #8-32 x 9/16” screws into the
slots of the bracket and threading into JBOX.
3. Add the longer M4 x 23mm screws to the
mounting bracket in either the outer or inner thread
hole locations leaving about 1 in. of space between
the screw head and the mounting bracket.
4. Connect the fixture wires to the supply wires.
Black to black, white to white, and green to
bare / green ground wire.
5. Lift fixture pan up toward ceiling and carefully tuck
wires into outlet box. Align keyholes on fixture pan
with long screws, then twist fixture pan until the long
screws engage the narrow end of the keyholes.
Tighten long screws to secure pan.
6. Align the tabs on fixture pan with the channels on
diffuser, then insert diffuser into fixture pan. Carefully
twist the diffuser clockwise until secure.
7. To clean diffuser, use a mild detergent and water.
Wipe and allow to air dry.
8. Restore power to the electrical box. Turn the light
switch on to activate the fixture.
ENERGY STAR
®
5
6
6
2
3
4
6
1
ENERGY STAR
Environmental Protection Agency & U.S. Department of Energy.
Visit www.energystar.gov to learn more.
®
is sponsored by the U.S.
TROUBLESHOOTING
Problem Cause / Solution
Light does not
come ON.
No power to the fixture.
• Check if circuit breaker tripped.
• Confirm wall switch is ON.
TURN OFF POWER BEFORE CONTINUING.
Wiring to the unit is loose.
• Confirm wiring is properly secured.
5-YEAR LIMITED WARRANTY
THE FOLLOWING WARRANTY IS EXCLUSIVE AND IN LIEU OF ALL OTHER WARRANTIES,
WHETHER EXPRESS, IMPLIED OR STATUTORY INCLUDING, BUT NOT LIMITED TO, ANY
WARRANTY OF MERCHANTABILITY OR FITNESS FOR ANY PARTICULAR PURPOSE.
Cooper Lighting Solutions ("CLS") warrants to customers that, for a period of five years from
the date of purchase, CLS products will be free from defects in materials and workmanship.
The obligation of CLS un-der this warranty is expressly limited to the provision of replacement
products. This warranty is extended only to the original purchaser of the product. A
purchaser’s receipt or other proof of date of original purchase acceptable to CLS. This is
required before warranty performance shall be rendered. This warranty does not apply to CLS'
products that have been altered or repaired that have been subjected to neglect, abuse,
misuse or accident (including shipping damages). This warranty does not apply to products
not manufactured by CLS' which have been supplied, installed, and/or used in conjunction
with CLS products. Damage to the product caused by replacement bulbs or corrosion or
discoloration of brass components are not covered by this warranty.
LIMITATION OF LIABILITY:
IN NO EVENT SHALL CLS BE LIABLE FOR SPECIAL, INDIRECT, INCIDENTAL, OR CONSEQUENTIAL DAMAGES (REGARDLESS OF THE FORM OF ACTION, WHETHER IN CONTRACT, STRICT
LIABILITY, OR IN TORT INCLUDING NEGLIGENCE), NOR FOR LOST PROFITS; NOR SHALL THE
LIABILITY OF CLS FOR ANY CLAIMS OR DAMAGE ARISING OUT OF OR CONNECTED WITH THESE
TERMS OR THE MANUFACTURE, SALE, DELIVERY, USE, MAINTENANCE, REPAIR OR
MODIFICATION OF CLS PRODUCTS, OR SUPPLY OF ANY REPLACEMENT PARTS THEREFORE,
EXCEED THE PURCHASE PRICE OF CLS PRODUCTS GIVING RISE TO A CLAIM. NO LABOR
CHARGES WILL BE ACCEPTED TO REMOVE OR INSTALL FIXTURES.
To obtain warranty service, please contact CLS, at 1-800-334-6871, press option 2 for
Customer Service, or via e-mail ConsumerProducts@cooperlighting.com and include the
following information:
• Name, address and telephone number
• Date and place of purchase
• Catalog and quantity purchase
• Detailed description of problem
All returned products must be accompanied by a Return Goods Authorization Number issued
by the Company and must be returned freight prepaid. Any product received without a Return
Goods Authorization Number from the Company will be refused. CLS is not responsible for
merchandise damaged in transit. Repaired or replaced products shall be subject to the terms
of this warranty and are inspected when packed. Evident or concealed damage that is made
in transit should be reported at once to the carrier making the delivery and a claim filed with
them.
Reproductions of this document without prior written approval of CLS are strictly prohibited.
For assistance, call 1-800-334-6871 or e-mail us at ConsumerProducts@cooperlighting.com
Printed in China
FRENCH
ARTICLES NÉCESSAIRES
(à acheter séparément)
• Tournevis cruciforme
PRÉCAUTION
Consignes de sécurité • Lisez attentivement afin de vous protéger
• L’alimentation électrique doit être mise hors tension depuis la boîte des fusibles ou de la
boîte des disjoncteurs avant l’installation ou l’entretien.
• Portez des souliers à semelles de caoutchouc et utilisez une échelle robuste.
• REMARQUE : Ce luminaire doit être raccordé à un circuit à fusible de 120 V. (Vérifiez les
étiquettes du luminaire)
• Installez le luminaire conformément aux dispositions du Code national de l’électricité et des
Codes du bâtiment locaux.
• Mettez le luminaire à la terre afin d’éviter tout risque de décharge électrique.
• Manipulez prudemment les pièces métalliques pour éviter les blessures.
• To avoid a hazard to children, account for all parts and destroy all packing materials Pour
que le luminaire ne représente pas un danger pour les enfants, comptez les pièces et
détruisez tous les matériaux d’emballage.
• Si vous avez des doutes concernant le câblage, consultez un électricien qualifié.
• En cas de pièce manquante ou endommagée, ne tentez pas d’installer ou de faire
fonctionner le produit.
• Après la mise à l’essai, cet équipement a été déclaré conforme aux limites établies
pour un dispositif numérique de catégorieB en vertu de la section 15 des règlements
de la FCC. Ces limites sont conçues pour assurer une protection raisonnable contre toute
interférence nuisible dans une installation résidentielle. Cet équipement génère, utilise et
dégage de l’énergie radiofréquence. S’il n’est pas installé et utilisé conformément aux
instructions, il est susceptible de créer des interférences nuisibles aux communications
radio. Toutefois, il n’est absolument pas garanti qu’aucune interférence ne se produira dans
une installation donnée. Si l’équipement crée des inter férences nuisibles à la réception
d’émissions de radio ou de télévision (pour le savoir, allumez-le et éteignez-le), il est
conseillé à l’utilisateur d’essayer d’éliminer ces interférences en adoptant une ou plusieurs
des mesures suivantes:
- Réorientez ou déplacez l’antenne réceptrice.
- Augmentez la distance entre l’équipement et le récepteur.
- Branchez l’équipement sur la prise électrique d’un circuit autre que celui sur lequel le
récepteur est branché.
- Demandez de l’aide au distributeur ou à un technicien radio ou TV qualifié.
AVERTISSEMENT : Les réglementations de la FCC mentionnent que toute
modification ou altération apportée à cet équipement n’étant pas expressément
approuvée par le fabricant peut annuler le droit de l’utilisateur à faire
fonctionner cet équipement.
CONSERVEZ CES INSTRUCTIONS.
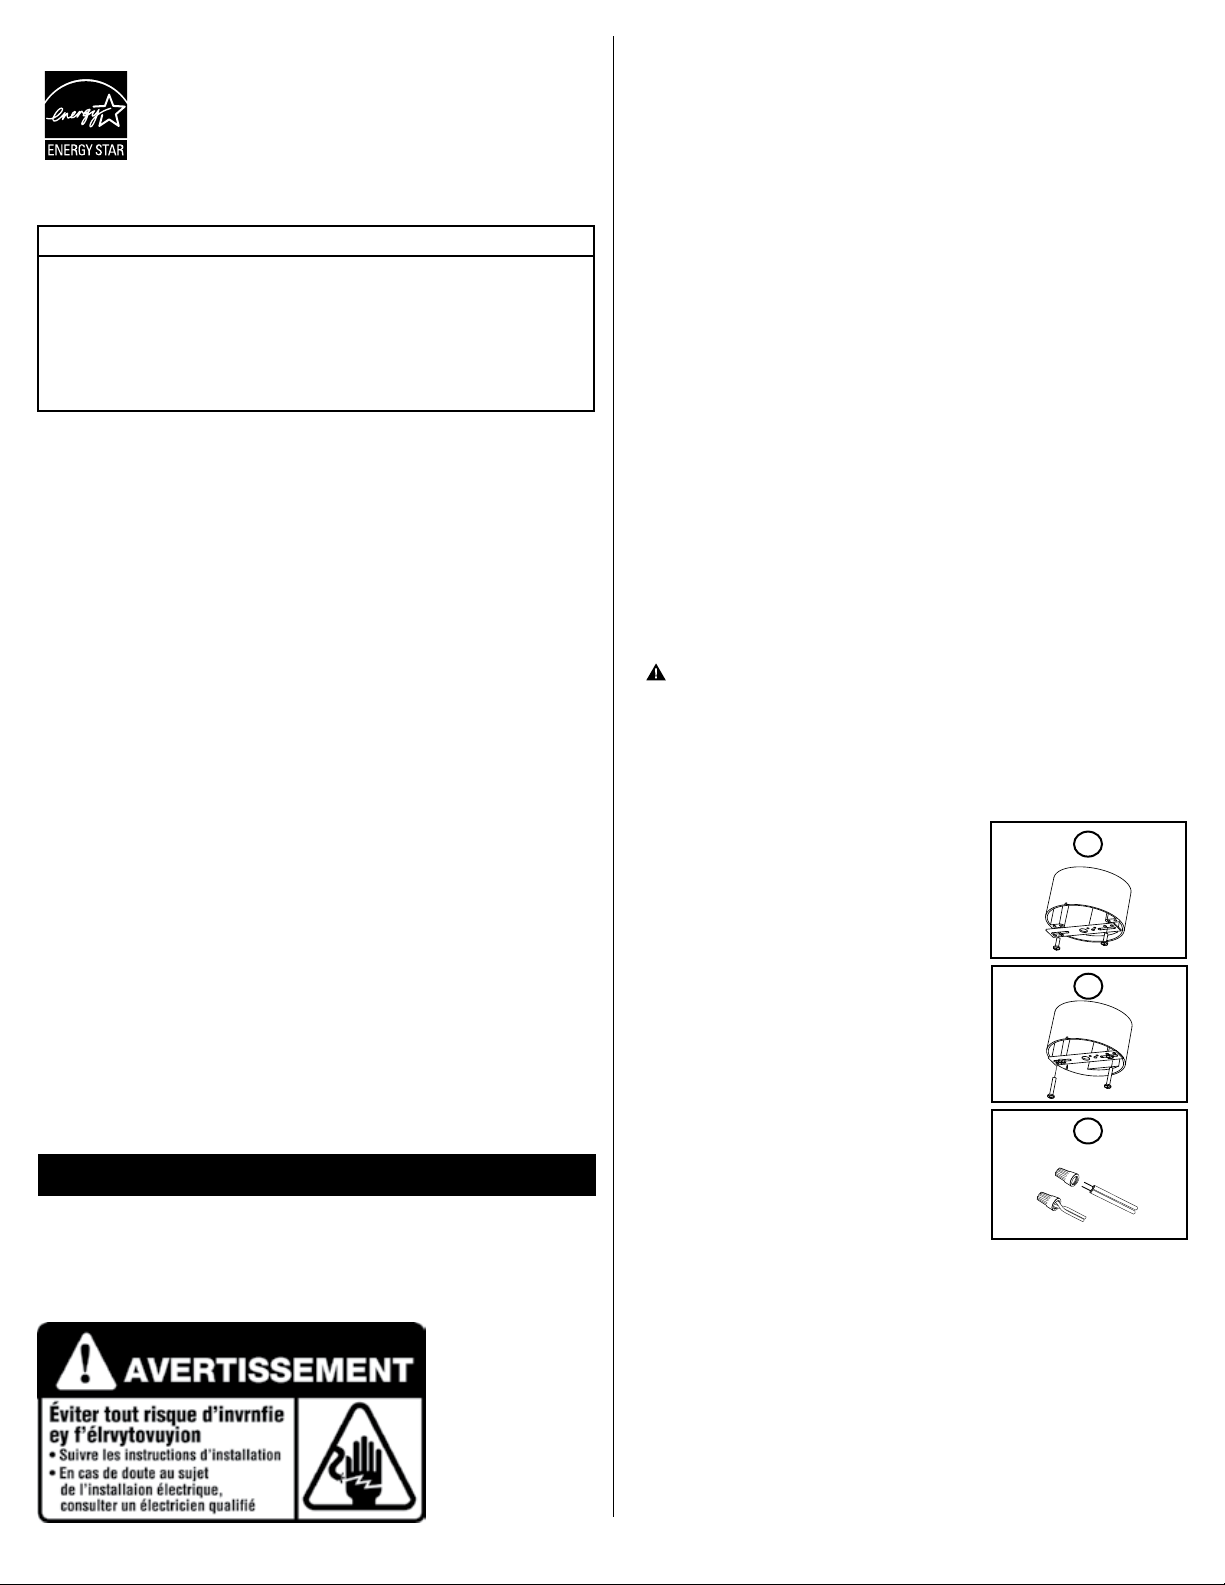
WIRING AND FIXTURE INSTALLATION
1. METTEZ L’ALIMENTATION ÉLECTRIQUE HORS
TENSION DEPUIS LE COFFRET DE FUSIBLE
OU DE DISJONCTEUR PRINCIPAL. Ouvrez
soigneusement l’emballage et sortez le luminaire
de l’emballage.
2. Attachez le support de montage à la boîte de jonction en
insérant les vis courtes #8-32 x 9/16 po (14,28 mm)
dans les fentes du support et en les vissant dans la
boîte de jonction.
3. Ajoutez les vis plus longues M4 x 23mm au support
de montage dans les emplacements des trous filetés
extérieurs ou intérieurs en laissant environ
1 pouce (2,5 cm) d’espace entre la tête des vis et le
support de montage.
4. Raccordez les fils du luminaire aux câbles
d’alimentation. Le noir sur le noir, le blanc sur le
blanc et le vert sur le fil dénudé / sur le fil de
mise à la terre vert.
5. Soulevez le panneau du luminaire vers le haut et
enfoncez les fils dans la boîte à prise avec précaution.
Alignez les fentes en trou de serrure sur le panneau
du luminaire à l’aide des vis longues, puis tournez le
panneau du luminaire jusqu’à ce que les vis longues
entrent en contact avec l’extrémité étroite des fentes
en trou de serrure. Serrez les vis longues pour fixer
le panneau.
6. Alignez les languettes sur le panneau du luminaire avec
les canaux sur le diffuseur, puis insérez le diffuseur
dans le panneau du luminaire. Tournez avec précaution
le diffuseur dans le sens des aiguilles d’une montre
et serrez bien.
7. Nettoyez le diffuseur avec un détergent doux et de
l’eau. Essuyez-le et laissez-le sécher à l’air libre.
2
3
4
2
 Loading...