

MetalTech E-LAD8T2 Jobsite, E-LAD15T1 Jobsite, E-LAD12T2 Jobsite, E-LAD12S Jobsite Maintance Manual
OPERATIONAL, SAFETY AND
MAINTENANCE INSTRUCTIONS
MODELS: E-LAD8T2 / E-LAD12T2 / E-LAD12SQ / E-LAD15T1
ENGLISH
FRANÇAIS
1
YEAR
WARRANTY
READ THESE INSTRUCTIONS CAREFULLY BEFORE USING THIS PRODUCT.
KEEP THIS MANUAL HANDY FOR FUTURE REFERENCE.
Ladder may differ from actual product

2
All photos and drawings in this booklet are for reference purposes only. Refer to applicable codes and regulations for the proper use of this equipment.
OPERATIONAL AND SAFETY INSTRUCTIONS
FAILURE TO UNDERSTAND AND FOLLOW ALL SAFETY RULES AND OPERATIONAL
INSTRUCTIONS COULD RESULT IN SERIOUS INJURY OR DEATH.
METAL CONDUCTS ELECTRICITY:
Do not use this equipment where contact may be made with power lines or other live electrical circuits.
STEP 1: EXTENDING THE LADDER
1. Release the securing strap.
2. Extend ladder with latches facing user.
3. The ladder extends and locks in 1 ft (30 cm) increments.
4. Place ladder on firm and level surface.
5. Place your foot on the bottom rung to hold ladder in place.
6. With both hands, pull up on the couplings of the 3rd rung from the bottom.
7. Make sure that each rung is pulled up to its full extension and locks before attempting
to extend the next rung.
8. Extend desired number of rungs to achieve required height.
9. When the ladder is fully extended, do not stand or step on last top three rung
of the ladder.
TIP: To extend the ladder to its fullest height, pull-up on the top rung first, raising the rung to its full
extension, making sure it locks in place. Then continue with each remaining rung. Again making
sure that each rung locks in place before extending the next rung.
STEP 2: CLOSING THE LADDER
GREAT CARE SHOULD BE USED WHEN CLOSING LADDER. Do not place any part of your body
including hands, fingers or thumbs on, or between rungs or couplings above the closing rung.
1. The ladder closes and locks in 1 ft (30 cm) increments.
2. Grasp the ladder by the couplings below the rung that you are activating the latches.
3. Place thumbs on latches that you wish to disengage.
4. Place the rest of your hand below the coupling.
5. Simultaneously, push latches inward (towards each other) until the above
rung is lowered.
6. Repeat this operation with each rung.
STEP 3: CARRYING THE LADDER
Replace the “securing strap”. Grab the ladder by the grip handle located underneath the
2nd rung. Do not lift the ladder by the rungs. It may open and cause injury to the user and
damage the ladder as well.
SAFETY INSTRUCTIONS
Read all safety instructions before using the ladder.
When extending the ladder, make sure that the ladder is securely standing
on level, solid, slip free surface.
Improper hand or finger position may cause injury.
Lean ladder only with the top end of rungs against a firm structure, never against
the stiles. Doing this may cause stile damage and void the warranty.
Do not attempt to extend the ladder while climbing or standing on the ladder.
For your security group unused section at top for safe climbing.
If ladder becomes damaged, it may malfunction and should not be used.
Do not carry or use the ladder near electrical lines or equipments. The ladder
does conduct electricity.
Store ladder in a dry place to avoid moisture.
Do not use as a sawhorse.
Ladder is not designed for use in water or in the rain.
If ladder becomes wet, wipe immediately with a clean dry towel.
Attention: Winter condition may affect the retracting mechanisms.
COMPONENTS OF A
TELESCOPIC LADDER
RUNG
STILE
LATCHES
GRIP HANDLE
RUBBER FOOT
SECURING STRAP
PLASTIC
COUPLING
IMPROPER HAND
OR FINGER
POSITION MAY
CAUSE INJURY.
FOR YOUR SECURITY
GROUP UNUSED
SECTION AT TOP FOR
SAFE CLIMBING.
OPERATIONAL INSTRUCTIONS
3
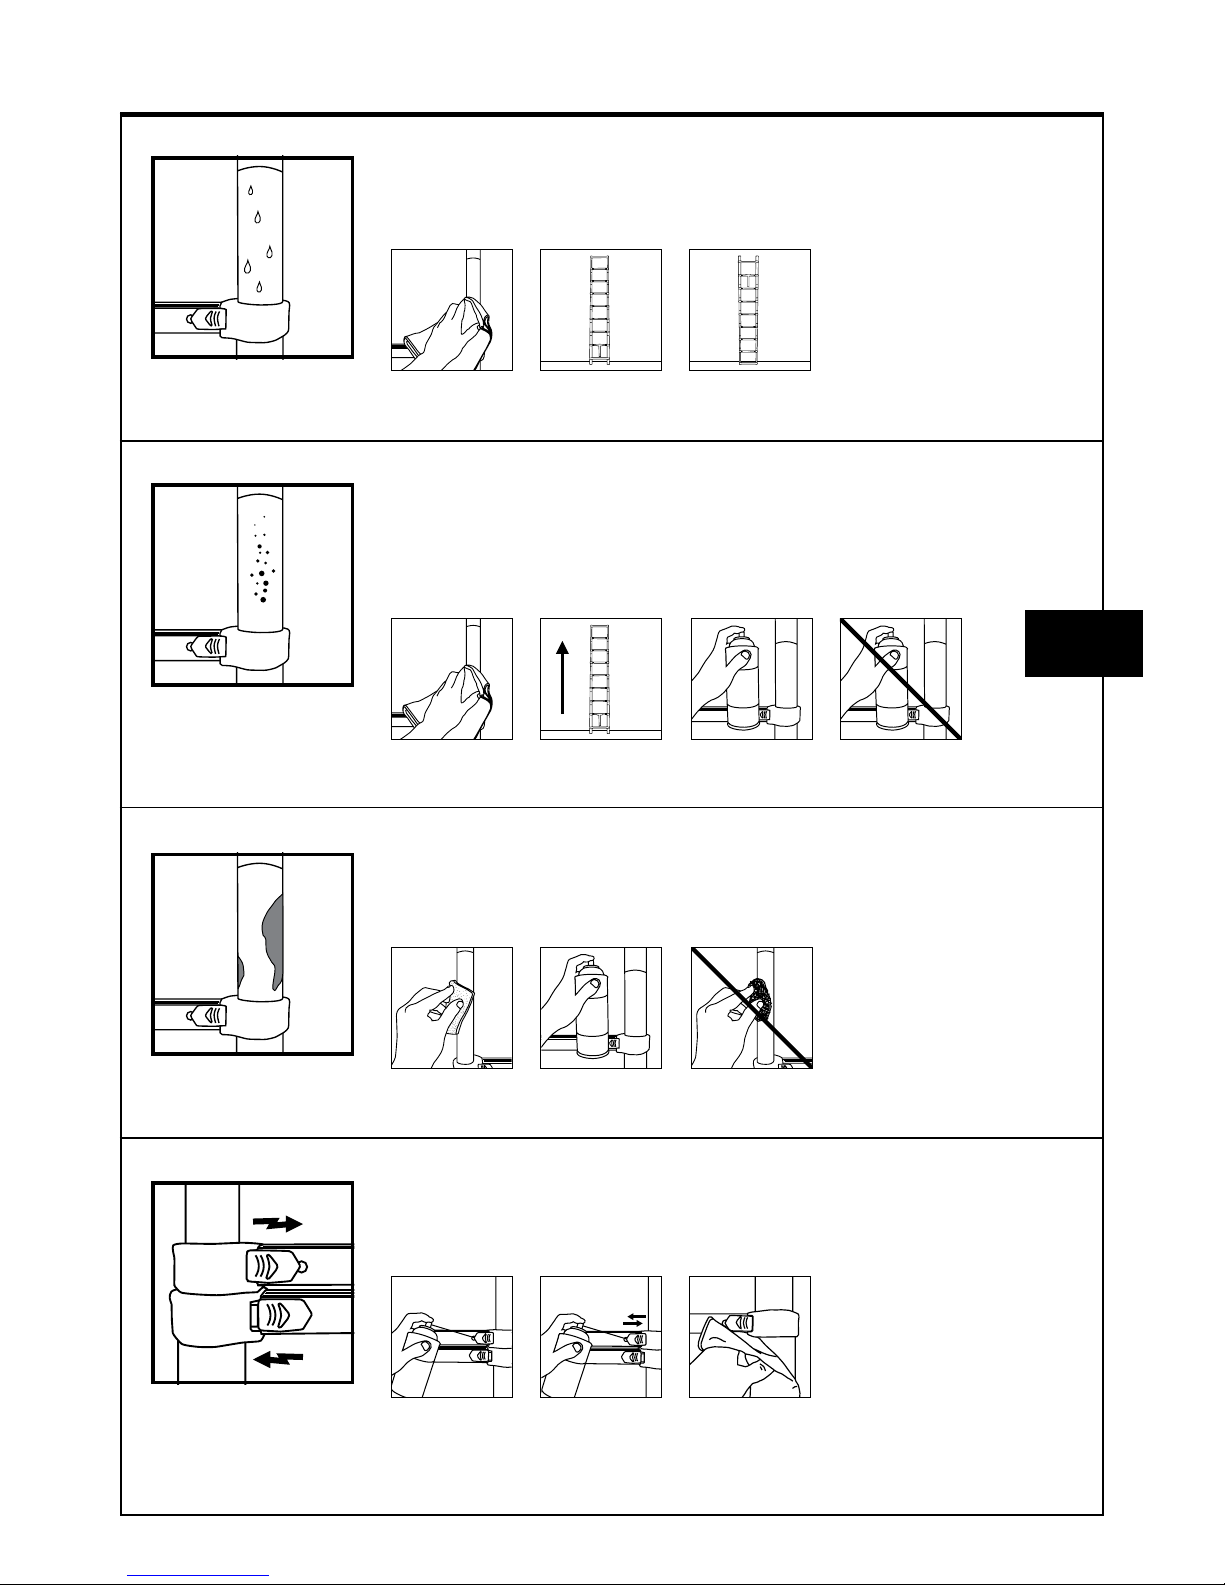
MAINTENANCE TIPS
HARD TO PUSH LATCHES
If the latches are hard to push, use a compressor or a compressed air duster to properly clean
the latches. Then, lubricate the latches (with a silicone based lubricant) with a forward/backward
movement. Dry lubricant with a dry cloth.
CLEAN LUBRICATE DRY
AIR
LUB
WET LADDER
If the ladder is wet or if there is water on the ladder, open the ladder to the maximum and, with a dry
cloth, absorb the water. It is recommended to let the ladder dry fully opened, on one side and then
on the other, with the ladder leaning against a wall.
DRY LET DRY TURN
OXIDIZED LADDER
If the ladder is oxidized (due to previous poor drying), there will be white residue on the stiles.
First, remove the spots with a dry cloth. Then, to ensure the ladder deploys and retracts correctly,
use a silicone based lubricant once the ladder is fully opened and dry it correctly. Wait a few minutes
and close the ladder. Never use a cleaner such at WD-40 – it will dry the internal mechanism
of your ladder.
CLEAN LUBRICATEEXTEND WD-40
WD-40
PAINT OR OTHER SUBTANCES STICKING TO STILES
If paint residues were left on the ladder, they must be removed using a slightly abrasive sponge.
Do not use steel wool since it might damage the opening/closing mechanism. After all residues have
been removed from the stiles, apply a lubricant as indicated in above section “Oxidized ladder”.
CLEAN LUBRICATE STEEL WOOL
ENGLISH
 Loading...