

Page 1
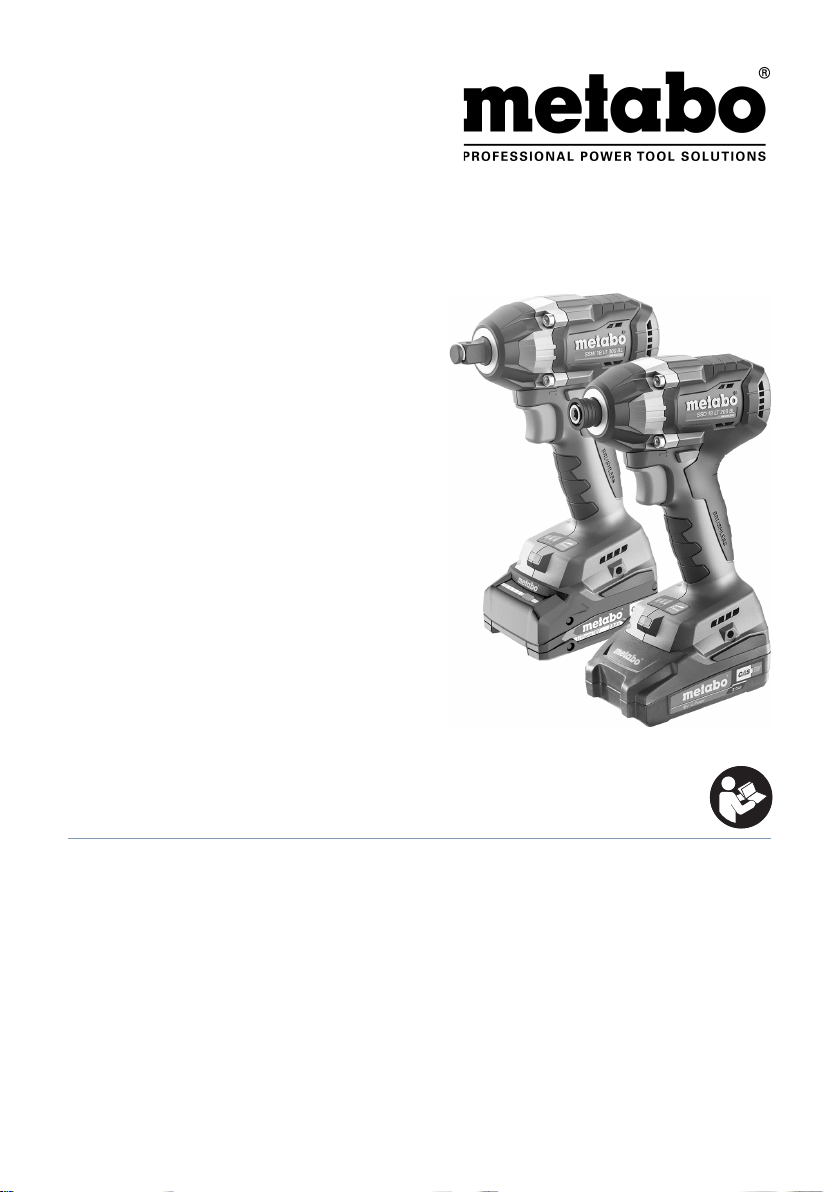
SSD 18 LT 200 BL
SSW 18 LT 300 BL
de Originalbetriebsanleitung 5
zh 使用说明 5 CHI 使用說明 9
en Original instructions 9
Kr 지침 원본 13 en Original instructions 17
fr Notice originale 13
nl Oorspronkelijke gebruiksaanwijzing 17
it Istruzioni originali 21
es Manual original 25
pt Manual original 29
sv Bruksanvisning i original 33
fi Alkuperäiset ohjeet 37
no Original bruksanvisning 41
da Original brugsanvisning 45
pl Instrukcja oryginalna 49
el Πρωτότυπο οδηγιώνχρήσης 53
hu Eredeti használati utasítás 57
ru Оригинальное руководство по
эксплуатации 61
www.metabo.com
Page 2
SSW...
1
SSD...
2
3
4
5
6
7
8
9
13
2
2
10
11
12
Page 3
SSD 18 LT 200 BL SSW 18 LT 300 BL
11.
11
*1) Serial Number: 02397...
UV 18 18
n
0
/min, rpm 0 - 3050 0 - 3050
S /min, bpm 3750 3900
H- 1/4“ (6,35 mm) 1/2“ (12,70 mm)
m kg (lbs) 1,6 (3.5) 1,6 (3.5)
M
M
M
a
/ K
h
/ K
L
pA
/ K
L
WA
Nm (in-lbs) 40 (354) 50 (443)
1
Nm (in-lbs) 150 (1328) 175 (1549)
2
Nm (in-lbs) 200 (1770) 300 (2655)
3
h
pA
WA
2
m/s
dB(A) 97 / 3 97 / 3
dB(A) 108 / 3 108 / 3
14,0 / 1,5 13,8 / 1,5
*1) Serial Number: 02398...
*2) 2014/30/EU, 2006/42/EC, 2011/65/EU
*3) EN 62841-1:2015, EN 62841-2-2:2014, EN IEC 63000:2018
2021-04-21, Bernd Fleischmann
Direktor Produktentstehung & Qualität (Vice President Product Engineering & Quality)
*4) Metabowerke GmbH - Metabo-Allee 1 - 72622 Nuertingen, Germany
3
3
Page 4
A
SC 30
B
18 V 4,0 Ah 6.25367 LiHD
18 V 4,0 Ah 6.25591 Li-Power
etc.
C
SSD...:
etc.
6.28849
6.28850
etc.
6.28838
D
SSW...:
6.28831
6.28832
1/2” 1/4”
4
4
6.28836
Page 5
使用说明
1. 一致性声明
作为唯一责任人,我们特此声明,此等无线冲击起
子(按类型和序列号 *1) 标识)符合所有指令 *2)
和标准 *3) 的相关要求。*4) 的相关技术文档 - 详见
第 3 页。
以下声明仅针对英国:
作为制造商和获授权编写技术文件(请参见第
3 页的 *4))的人员,我们特此声明:我公司
无线冲击扳手产品按型号和序列号标识(请参见第
3 页的 *1)),符合英国条例 S.I. 2016/1091、S.I.
2008/1597 和 S.I. 2012/3032 以及指定标准 EN
62841-1:2015、EN 62841-2-2:2014 和 EN IEC
63000:2018 中的所有相关规定。
简体中文 zh
确保您要使用本工具的地方没有铺设电源电缆,煤
气管道或水管(例如:可使用金属探测器检测)。
固定工件,防止滑动或旋转(例如,可使用螺旋夹
钳固定)。
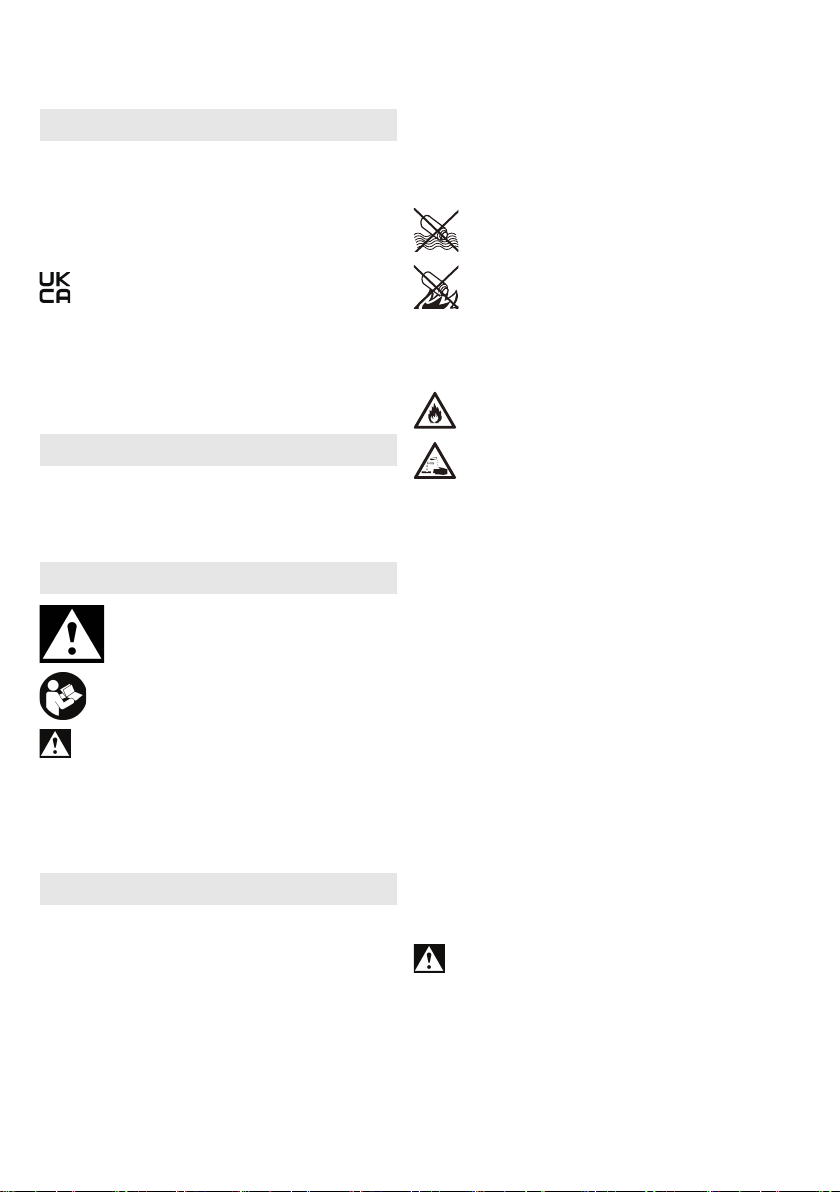
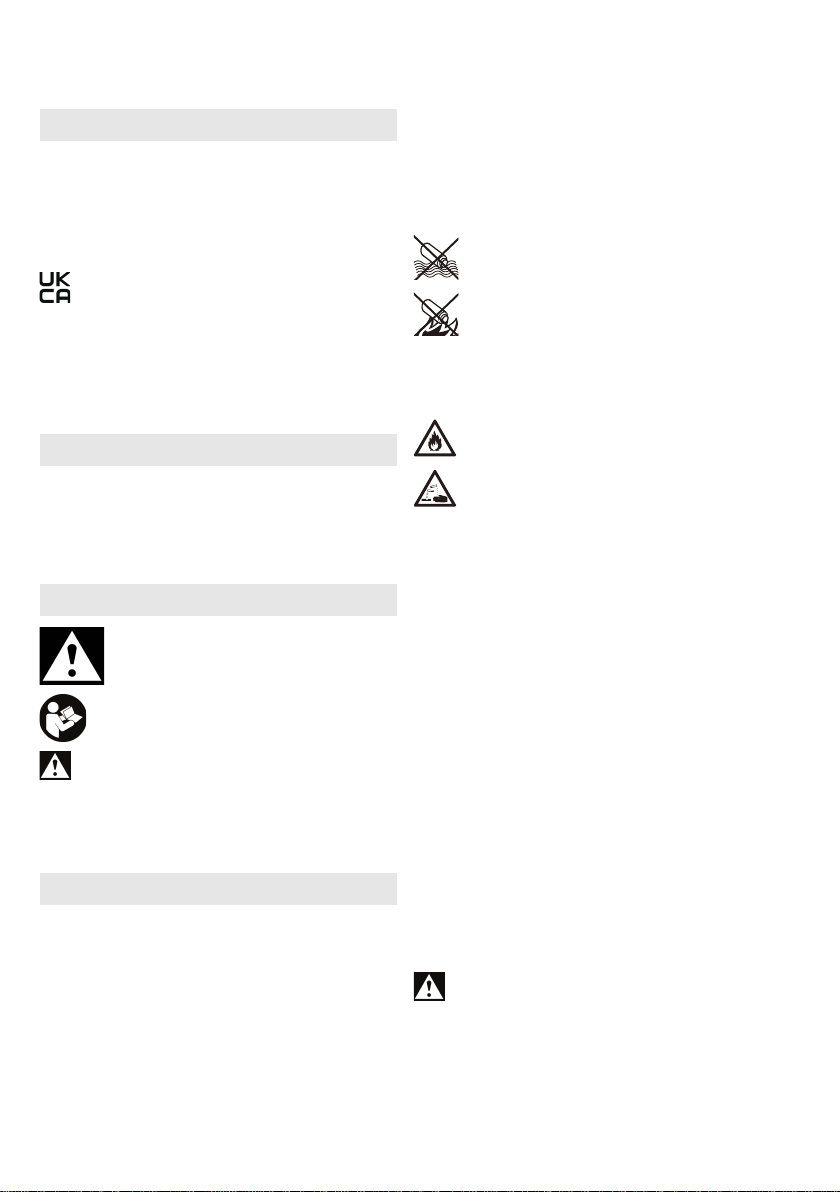
避免电池组处于潮湿环境!
切勿将电池组暴露于明火!
切勿使用破损变形的电池组!
切勿打开电池组!
切勿触摸或将电池组触点短路!
损坏的锂电池组可能会泄漏弱酸性可燃液体!
2. 规定用途
冲击起子适用于旋入和拆卸螺钉。
因使用不当造成的任何损坏由用户承担全部责任。
必须遵守通用事故预防规章和随附的安全资料。
3. 一般安全信息
为了您自身的安全及保护您的电动工具,
请特别注意标有此符号的所有文本!
警告 – 仔细阅读使用说明可降低受伤风险。
警告 – 仔细阅读该电动工具附带的所有安全警
告、说明、图示及规格。
如果未遵守下列说
明,可能导致电击、火灾和/或人员重伤。
妥善保存所有安全说明和信息资料以备查阅。
交接您的电动工具时,请务必将这些文档与工具一
起交接。
4. 特殊安全说明
在紧固件可能触及暗线之处进行操作时,要通过绝
缘握持面来握持工具。
紧固件碰到“带电”导线会使电动工具外露的金属
零件“带电”从而使操作者受到电击。
在进行任何调节、更换配件、维护或清洁之前,必
须从工具中卸下电池组。
在安装电池组之前,请确保已关闭工具。
如果皮肤接触到电池泄漏的液体,请立即用
大量清水冲洗。如果眼睛接触到电池泄漏的
液体,请用清水冲洗并立即就医!
工具发生故障时,请从工具中取出电池组。
只能使用适合冲击起子的螺丝批头。
旋入长螺钉时要小心 - 有滑落的危险。
仅在工具关闭时向工具上放置螺钉。
长时间工作时,需配戴护耳器。长期接触高强度噪
音可能会影响您的听力。
LED 指示灯 (7):请勿通过光学仪器直视 LED 辐
射光。
锂电池组的运输:
锂电池组的运输必须遵守危险品运输的相关法律
(UN 3480 和 UN 3481)。运输锂电池组时,请了
解现行的有效规范。如有必要,请咨询货运代理。
麦太保提供经认证的包装。
仅配送外壳完好、不漏液的电池组。配送过程中,
应将电池组从工具中取下。防止触点发生短路(例
如,可用胶带保护)。
减少粉尘暴露:
警告 – 打磨、锯切、研磨、钻孔和其他制造活
动产生的一些粉尘中含有已知会导致癌症、出
生缺陷或其他生殖伤害的化学物质。此类化学物质
的一些示例包括:
- 铅基涂料中的铅;
- 砖、水泥和其他砖石产品中的结晶二氧化硅;以及
- 经过化学处理的木材中的砷和铬。
5
Page 6
zh 简体中文
这些化学物质的暴露风险取决于您执行此类工作的
频率。为降低对这些化学物质的暴露程度:在通风
良好的区域作业,并穿戴经认可的防护装备,例如
那些专为过滤微小颗粒而设计的防尘面罩等。
这同样适用于来自其他材料的粉尘,例如某些木材
(例如橡木或山毛榉粉尘)、金属、石棉。其他已
知疾病包括过敏反应、呼吸系统疾病。切勿吸入这
些灰尘。
遵守物料、员工、应用和应用地点的相关准则和国
家/地区法规(例如,职业卫生与安全法规、废物处
理规范等)。
从源头收集产生的颗粒,避免在周围环境中沉积。
对于特殊作业,使用适当的配件。这样一来,将可
以减少进入环境中的微粒。
使用适当的除尘装置。
通过以下措施降低粉尘暴露程度:
- 请勿将颗粒和废气流朝向自己或附近人员逃逸或
排放,也不要将其朝向沉积的粉尘。
- 使用除尘装置和/或空气净化器。
- 确保工作区域通风良好,使用真空吸尘器保证工
作区域的清洁。吹扫会使粉尘飞散。
- 使用吸尘器或水清洁防护服。请勿吹、打或刷防
护用具。
5. 概述
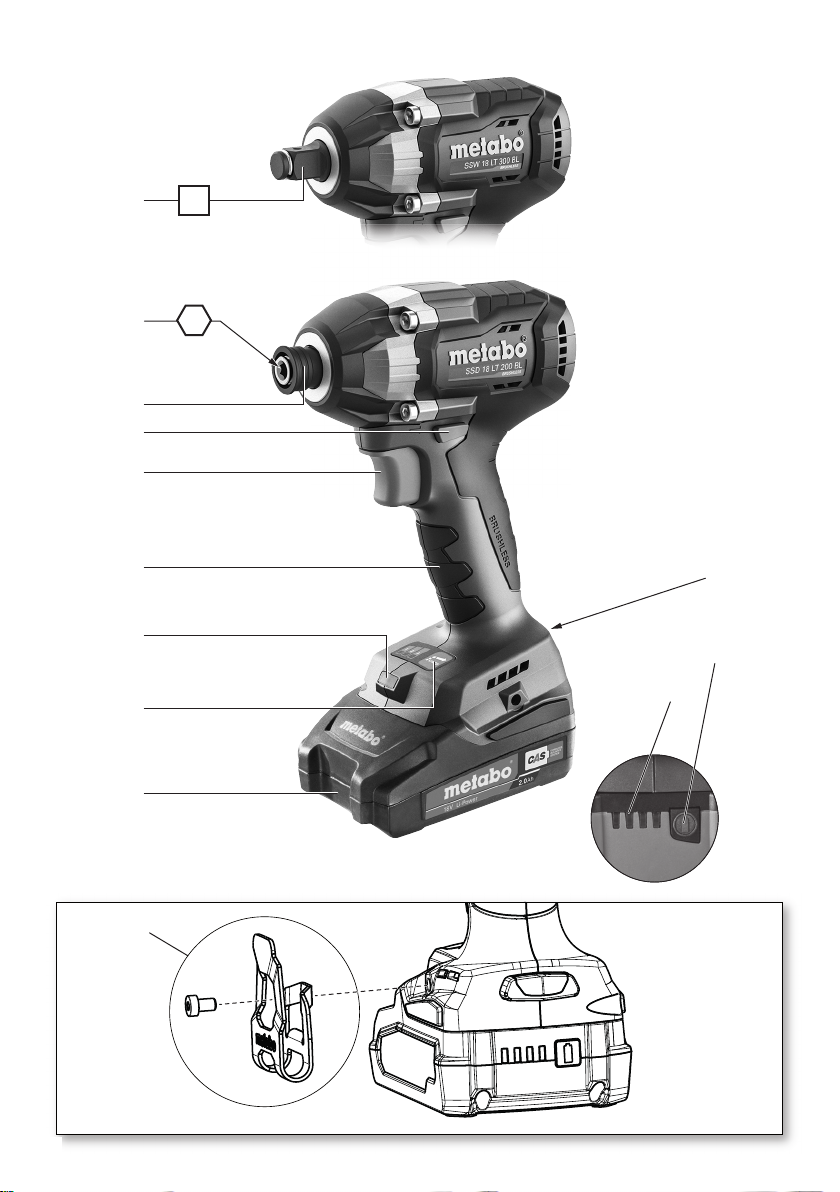
请参见第 2 页。
1 适用于 1/2" 工具的方形附件*
2 适用于六角螺丝批头的六角插孔附件*
3 锁定套筒*
4 旋转选择开关/运输安全装置
5 触发开关
6 手柄(握持面)
7 LED 指示灯
用于光线不足的区域。工具启动时 LED 指示
灯亮起。
8 速度和紧固扭矩选择按钮
9 电池组*
10 电池组卸装按钮
11 电池容量指示灯按钮*
12 电池容量和信号指示灯*
13 带扣(如图所示安装)*
* 取决于功能/型号
6
6. 初始操作/设置
进行任何调整或维护前,必须将电池组从电动
工具中取出。在安装电池组之前,请确保已关
闭工具。
6.1 电池组
首次使用前请给电池组 (9) 充电。如性能减退,请
给电池组重新充电。
有关电池组充电的说明,请参见麦太保充电器的使
用说明。
锂离子电池组“Li-Power,LiHD”容量及信号指
示灯 (12):
- 按下按钮 (11),LED 将显示电量。
- 如果一个 LED 闪烁,则表明电池组电量几乎耗
尽,必须重新充电。
卸下:
按下电池组卸装按钮 (10) 并向前抽出电池组 (9)。
插入:
滑入电池组 (9),直至卡合到位。
6.2 设置旋转方向,启动运输安全装置(开关锁)
仅在电机静止时操作旋转选择开关/运输安全
装置 (4)!
启动旋转选择器开关/启动运输锁 (4)。
R = 顺时针设置(旋入螺钉)
L = 逆时针设置(拧松螺钉)
0 = 中间位置:运输安全装置(开关锁)设置
6.3 接通与关闭
接通:按下触发开关 (5)。
关闭:松开触发开关 (5)。
6.4 速度/紧固扭矩
速度和紧固扭矩直接相关。速度越低,紧固扭矩
越小。
紧固扭矩受两个因素的影响:
1) 选择最大紧固扭矩。
可以通过按下按钮 (8) 来选择三种紧固扭矩设置之
一。最大紧固扭矩可在第 3 页的表格中找到(M1、
M2、M3)。
指示灯指示选择了哪种设置。
1 = 最小紧固扭矩
2 = 中等紧固扭矩
3 = 最大紧固扭矩
Page 7
简体中文 zh
2) 紧固扭矩的无级调节:
通过用力或轻按触发开关 (5) 可在任何扭矩设置下
无级调节速度和紧固扭矩,从而适应工作条件。
建议:可以通过试拧螺钉来确定正确的设置。
6.5 更换 SSD 螺丝批头
插入螺丝批头:向前滑动锁定套筒 (3) 并将螺丝批
头插入到底。释放锁定套筒 (3)。
拉动螺丝批头以检查其是否正确安装到位。
拆卸螺丝批头:向前滑动锁定套筒 (3) 并取下螺丝
批头。
仅使用带有此类插入式末端的螺丝批头:
9,5 mm (3/8“)
使用的螺丝批头必须与螺钉相匹配。
请勿使用损坏的螺丝批头。
6.6 更换 SSW 的螺丝批头...
插入螺丝批头:将工具安装在方形附件 (1) 上,直
到限位。
拆卸螺丝批头:从方形附件 (1) 中拉出工具。
使用的螺丝批头必须与螺钉相匹配。
在硬质材料中旋入螺钉时(金属等硬质材料的螺纹
联接),在很短的冲击持续时间 (a) 后即可达到最
大紧固扭矩。
在软质材料中旋入螺钉时(木材等软质材料的螺纹
联接),需要更长的冲击持续时间 (b)。
建议:可以通过试拧螺钉来确定正确的冲击持续
时间。
注意!对于小螺钉,可以在 0.5 秒的冲击持续时间
后达到最大扭矩。
- 这就是为什么必须准确监控旋入螺钉过程的持续
时间。
- 使用按钮设置 (8) 合适的紧固扭矩(参见
第 6.4 章)。
- 通过用力或轻按触发开关 (5) 可调整紧固扭矩,确
保螺钉不会损坏或螺钉头不会脱落。
8. 配件
仅可使用原装麦太保或 CAS(无绳联盟系统)电池
组和配件。
仅可使用符合使用说明中所列要求及规格的配件。
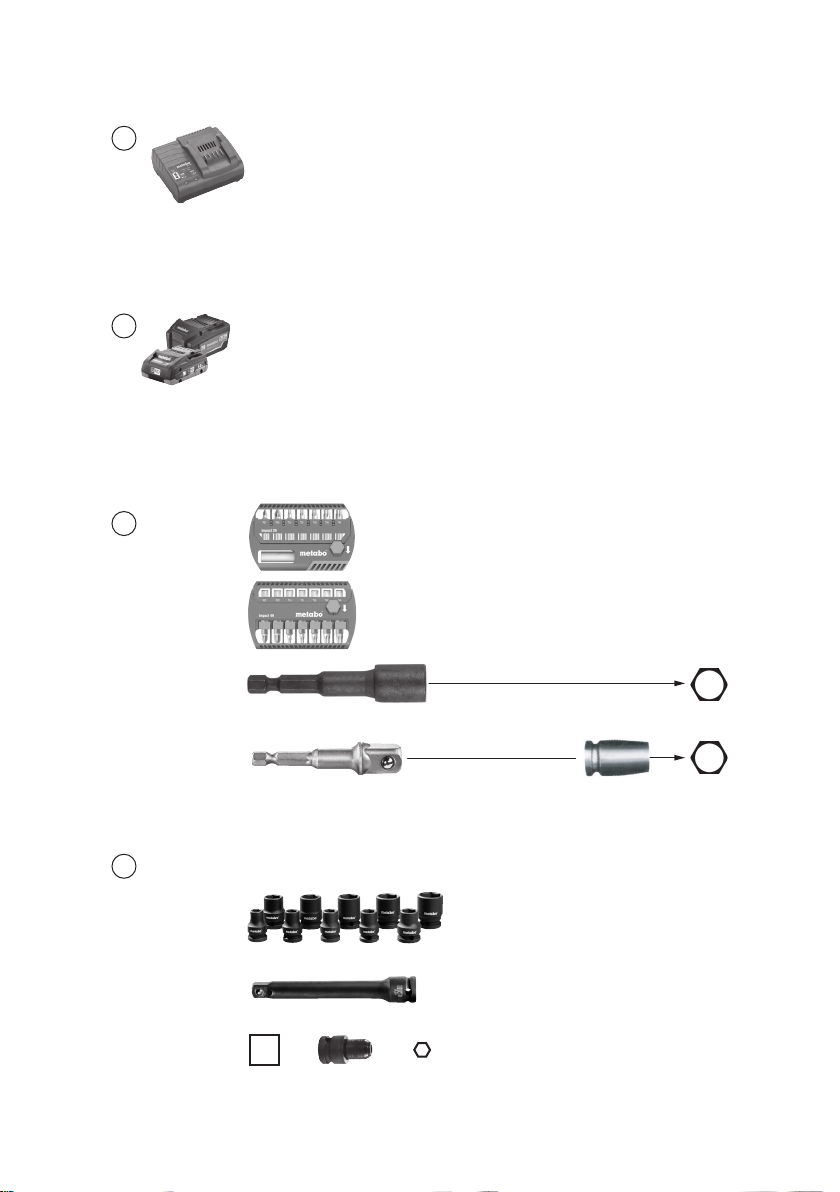
请参见第 4 页。
A 充电器
B 不同容量的电池组。仅使用电压适合您的电动
工具的电池组。
C 螺丝批头
有关完整配件列表,请参阅 www.metabo.com 或
产品目录。
请勿使用损坏的螺丝批头。
7. 使用
向工具上放置螺钉,确保对齐。
旋入螺钉过程包括 2 个部分:插入螺钉和使用冲击
机构拧紧螺钉。
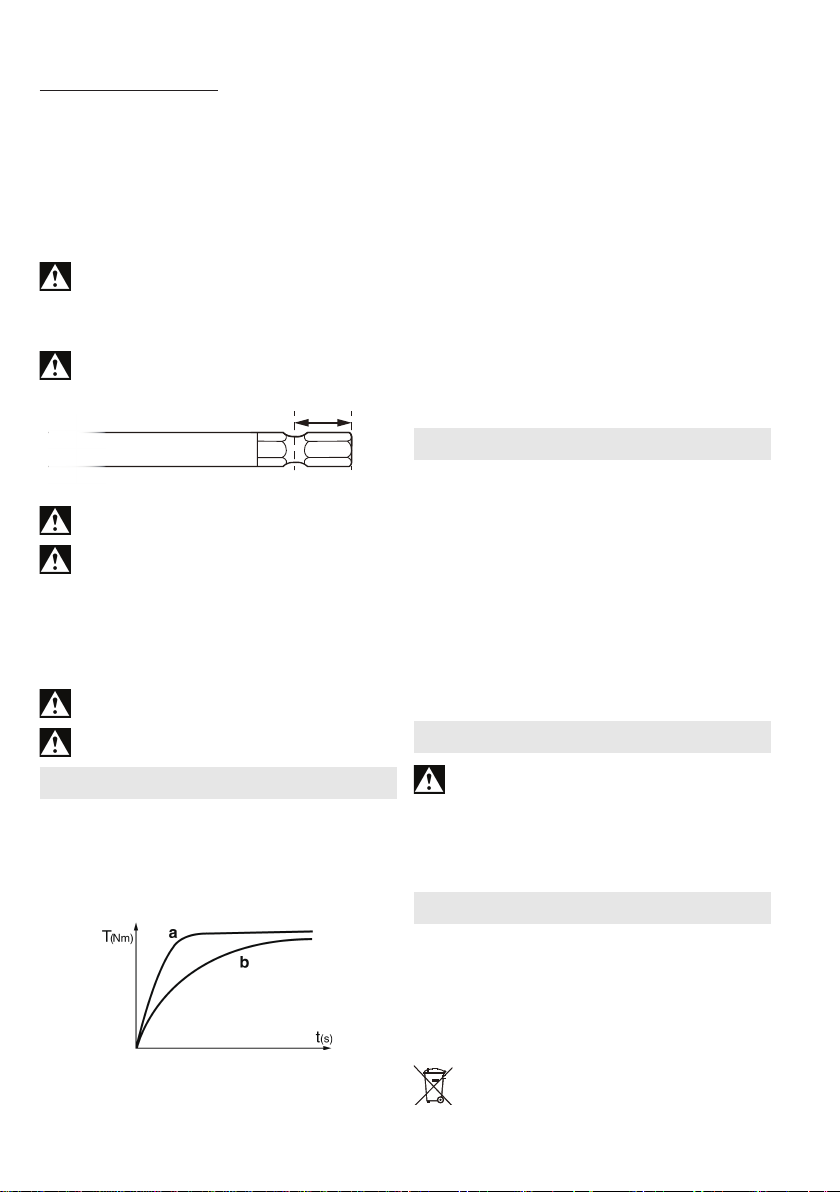
紧固扭矩取决于冲击持续时间。
冲击持续时间约为 5 秒时,将达到最大紧固扭矩。
扭矩曲线取决于应用类型:
9. 维修
只能由合格的电工修理电动工具!
如果需要维修麦太保电动工具,请联系您当地
的麦太保销售代表。要获取地址,请访问
www.metabo.com。
您可以从 www.metabo.com 下载配件列表。
10. 环境保护
有关废弃的工具、包装和配件的环保性处置及回
收,请遵循国家/地区的相关规定。
电池组不可按常规废物处置。请将故障或废旧电池
组送还给您的麦太保经销商!
勿使电池组与水接触!
仅适用于欧盟国家/地区:不要随生活垃圾一
同处置电动工具!根据有关废旧电子和电气
设备的欧盟指令 2012/19/EU 以及国家法律
7
Page 8
zh 简体中文
的规定,废旧的电动工具必须单独收集,并以环保
方式回收。
在处置前,请用尽电动工具电池组中的电力。防止
触点发生短路(例如,可用胶带保护)。
11. 技术规格
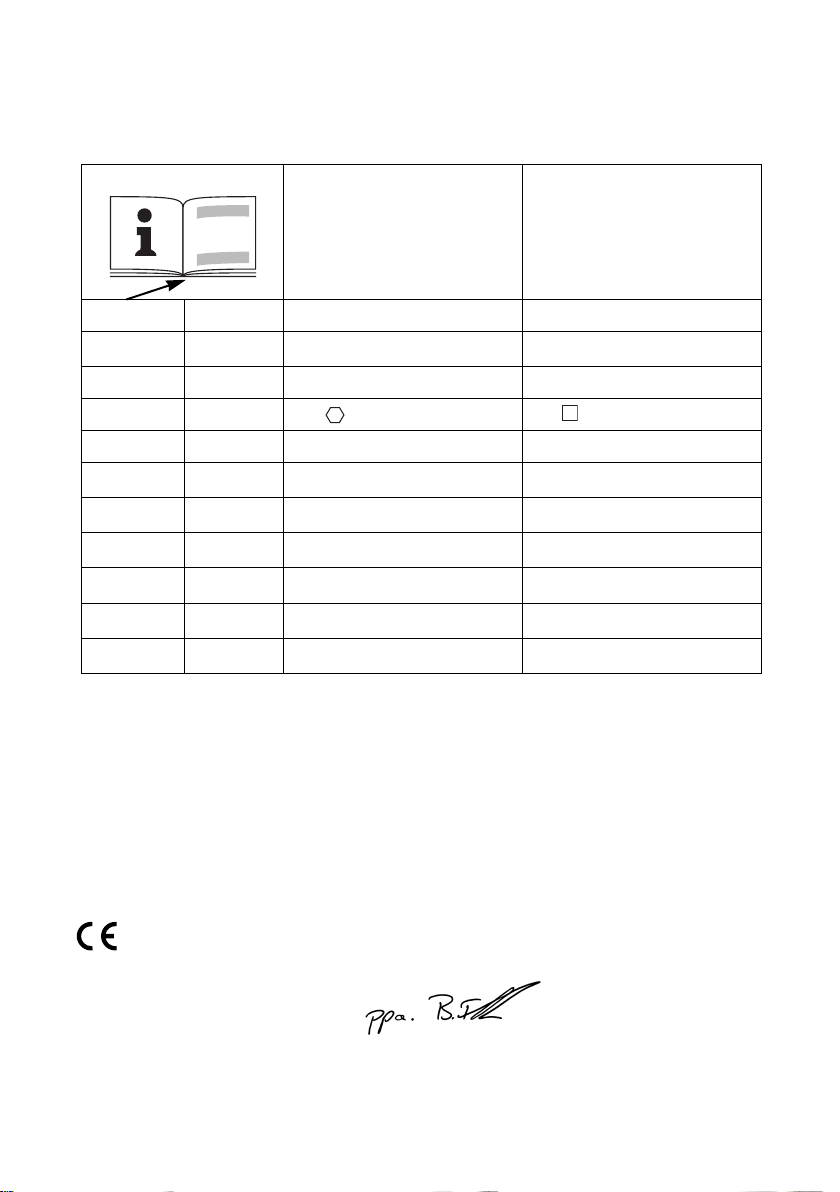
有关规格的解释性说明,请参见第 3 页。
保留因技术发展而进行变更的权利。
U = 电池组电压
n0 = 空载转速
S = 冲击频率
H = 电动工具座
m = 重量(带最轻电池组)
M
= 最小紧固扭矩
1
M
= 中等紧固扭矩
2
M
= 最大紧固扭矩
3
测量值依照 EN 62841 确定。
运行期间允许的环境温度:-20 °C 至 50 °C(温度
低于 0 °C 时性能受限)。允许的存储环境温度:
0 °C 至 30 °C
直流
引用的技术资料皆含有公差值在内(依照相关有效
标准)。
排放值
这些值可用来评估电动工具的排放量,以及比
较不同的电动工具。根据操作条件、电动工具及所
用配件的情况,实际载荷可能会更高或更低。当载
荷较低,无法进行评估时,请让工具休息一下。根
据调整后的估计值,为使用者安排保护措施,例如
组织措施。
振动总值(三个方向的矢量和)依据 EN 62841
确定:
ah = 振动排放值(冲击旋入螺钉)
Kh = 不确定性(振动)
典型 A 荷重声音等级:
L
pA
L
WA
KpA、KWA = 不确定度(噪音水平)
= 声压等级
= 声压功率等级
佩戴护耳器!
8
Page 9
使用說明
1. 一致性聲明
作為唯一責任人,我們特此聲明,此等無線衝擊式
起子:按型號和序號識別 *1) 符合所有指令 *2) 和
標準 *3) 的相關要求。*4) 的相關技術文件 - 見第
3 頁。
以下聲明僅針對英國:
作為製造商和獲授權編寫技術文件 (請參閱第
3 頁的 *4)) 的人員,我們特此聲明:我公司無
線衝擊扳手產品按型號和序號識別 (請參閱第 3 頁
的 *1)),符合英國條例 S.I. 2016/1091、S.I. 2008/
1597 和 S.I. 2012/3032 以及指定標準 EN 628411:2015、EN 62841-2-2:2014 和 EN IEC 63000:
2018 中的所有相關規定。
2. 規定的使用條件
衝擊式起子適用於鎖緊和拆卸螺絲。
使用者必須承擔不當使用造成任何損壞的完全責任。
請瞭解並遵守一般事故防範條例,以及隨附的安全
資訊。
3. 一般安全資訊
為了您的安全與保護您的電動工具,請
特別注意有此警示標誌的地方!
警告 – 閱讀使用說明將能降低受傷的風險。
警告 – 仔細閱讀本電動工具所附之所有安全警
告、說明、圖解及技術參數。
出的指示,將可能導致電擊、著火和/或人員重傷
請妥善保存所有安全說明與資訊,以供將來參考。
轉交電動工具時,務必一併轉交這些文件。
4. 特殊安全說明
如果工作時使用的緊固件有可能接觸隱藏電線時,
一定要握著絕緣手柄操作工具。
緊固件若接觸到「帶電」的電線時,可能導致電動
工具的金屬部位也「帶電」,造成操作者因此
觸電。
進行任何調整、更換工具、維護或清潔之前,請取
出工具的電池組。
若不遵照以下列
。
繁體中文 CHI
安裝電池組之前,請確定已關閉工具。
請先確認:施工的位置沒有埋設電線、瓦斯管線或
水管 (可使用如金屬探測器的設備偵測)。
固定工件,以免滑動或轉動 (例如,使用螺絲鉗
固定)。
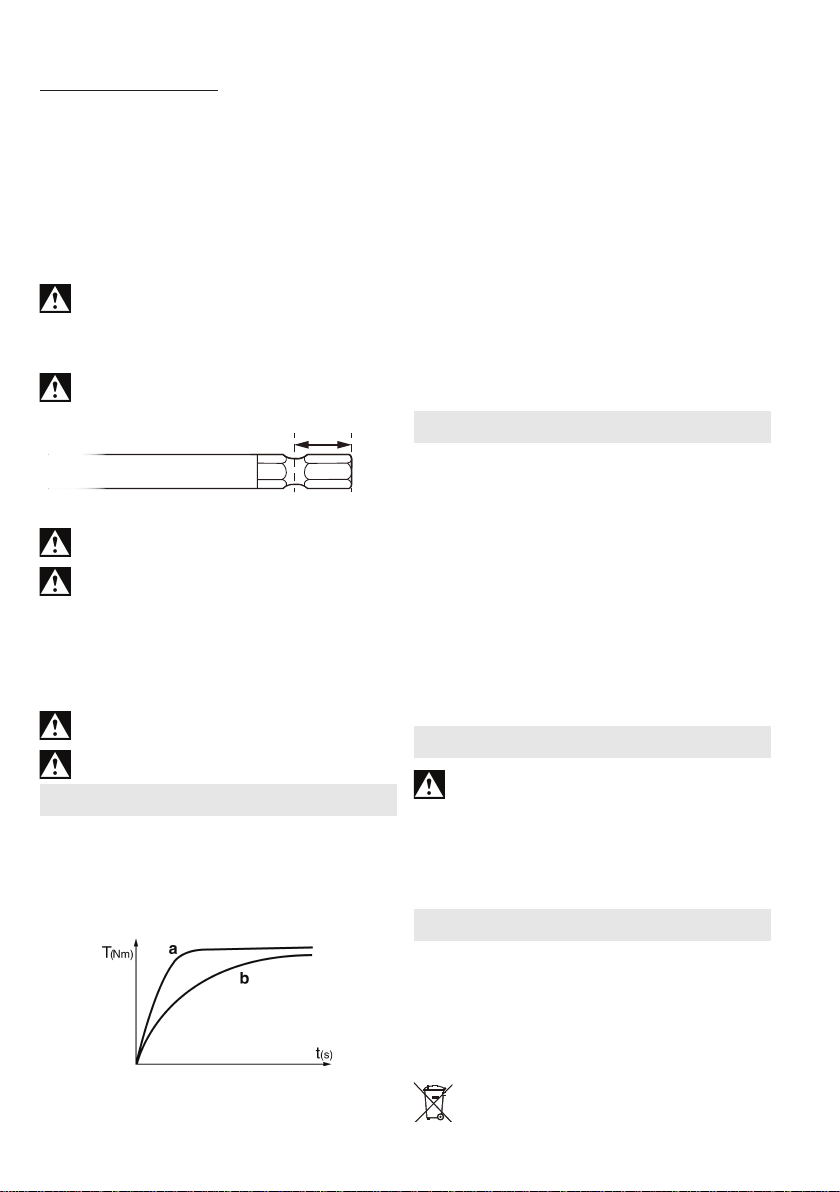
電池組不可沾水與受潮!
不要使電池組接近火源!
不要使用有故障或變形的電池組!
不要拆開電池組!
不可觸碰觸點或使電池組短路!
損壞的鋰電池組可能會洩漏弱酸性可燃液體!
如果電池洩漏出的液體接觸到皮膚,請立即
用大量清水沖洗。如果電池滲漏出的液體接
觸到眼睛,請用清水沖洗並立即就醫!
如果電動工具損壞,請取出其中的電池組。
只能使用適合衝擊式起子的鎖螺絲鑽頭。
鎖緊長螺絲必須小心,長螺絲可能會滑動。
只有在工具的電源關閉時,才能將螺絲裝在工具上。
長時間工作時請戴上耳塞。長期暴露在高噪音等級
下可能會影響聽覺。
LED 指示燈 (7):請勿透過光學儀器直視 LED 輻
射光。
鋰電池組的運輸:
鋰電池組的運輸必須遵守危險品運輸的相關法律
(UN 3480 與 UN 3481)。運輸鋰電池組時,請瞭解
現行的有效規範。必要時,請洽詢貨運商。麥太保
提供通過認證的包材。
送交運送的電池組必須外表無損,而且無漏液。送
交運送工具時,請取出電池組。避免觸點短路 (例
如,用膠帶保護)。
減少灰塵暴露:
警告 – 強力打磨、鋸切、研磨、鑽孔與其他作
業活動產生的一些粉塵含有已知會導致癌症、
先天缺陷或其他生殖損害的化學物質。這些化學物
質的其中一些範例如下:
- 含鉛油漆中的鉛、
- 磚、水泥和其他磚石產品中的結晶二氧化矽;以及
9
Page 10

CHI 繁體中文
- 經過化學處理的木材中的砷和鉻。
這些暴露的風險依您進行此類作業的頻率而定。為
降低對這些化學物質的暴露程度:在通風良好的區
域作業,並穿戴經認可的防護裝備,例如那些專為
過濾微小顆粒而設計的防塵面罩等。
這同樣適用於來自其他材料的粉塵,例如某些木材
(例如橡木或山毛櫸粉塵)、金屬、石棉。其他已知
疾病包括過敏反應、呼吸系統疾病等等。不要讓粉
塵進入人體。
遵守材料、人員、應用和應用地點的相關準則和國
家法規 (例如,職業健康和安全規定、處置)。
收集從源頭產生的粒子,並避免在周圍區域堆積。
使用特殊工作適用的配件。如此可減少粒子恣意進
入環境。
使用適當的除塵裝置。
利用下列措施減少灰塵暴露:
- 請勿將顆粒和廢氣流朝向自己或附近人員逃逸或
排放,也不要將其朝向沉積的粉塵。
- 使用除塵裝置和/或空氣淨化器。
- 確保工作區域通風良好,使用真空吸塵器保證工
作區域的清潔。掃除或吹揚灰塵。
- 以吸塵器抽吸或清洗防護衣。不可對保護齒輪吹
氣、拍打或刷除。
5. 概觀
見第 2 頁。
1 適用於 1/2" 工具的方形附件*
2 適用於六角鎖螺絲鑽頭的六角插孔附件*
3 鎖定套筒*
4 旋轉選擇開關/運輸安全裝置
5 觸發開關
6 手柄 (握持面)
7 LED 指示燈
用於光線不足的區域。工具啟動時 LED 指示
燈亮起。
8 速度和鎖緊扭矩選擇按鈕
9 電池組 *
10 電池組卸裝按鈕
11 容量指示燈按鈕 *
12 容量和訊號指示燈 *
13 帶扣 (如圖所示安裝)*
* 端視功能/機型而定
6. 初始操作/設定
進行任何調整或維護前,請取出工具的電池
組。安裝電池組之前,請確定已關閉工具。
6.1 電池組
使用前將電池組 (9) 充電。如果性能降低,請將電
池組重新充電。
如需電池組充電的說明,請參閱麥太保充電器的使
用說明。
鋰離子電池組「Li-Power,LiHD」容量及訊息指
示燈 (12):
- 按下按鈕 (11),LED 將顯示電量。
- 如果一個 LED 閃爍,則表明電池組電量幾乎耗
盡,必須重新充電。
取出:
按下電池組卸裝按鈕 (10) 並向前抽出電池組 (9)。
裝入:
滑入電池組 (9),直至卡合到位。
6.2 設定旋轉方向,啟動搬運安全裝置 (開啟鎖定)
僅在電機靜止時操作旋轉選擇開關/運輸安全
裝置 (4)!
啟動旋轉選擇器開關/啟動運輸鎖 (4)。
R = 順時針設定 (鎖緊螺絲)
L = 逆時針設定 (鬆開螺絲)
0 = 中間位置:運輸安全裝置 (開關鎖) 設定
6.3 接通與關閉
接通:按下觸發開關 (5)。
關機:鬆開觸發開關 (5)。
6.4 速度/鎖緊扭矩
速度和鎖緊扭矩直接連接。速度愈低,鎖緊扭矩
愈低。
鎖緊扭矩受兩方面的影響:
1) 選擇最大鎖緊扭矩。
可以透過按下按鈕 (8) 來選擇三種鎖緊扭矩設定之
一。最大鎖緊扭矩可在第 3 頁的表格中找到 (M1、
M2、M3)。
指示燈指示選擇了哪種設定。
1 = 最小鎖緊扭矩
2 = 中等鎖緊扭矩
3 = 最大鎖緊扭矩
10
Page 11
繁體中文 CHI
2) 鎖緊扭矩的無級調整:
視工作環境而定,用力或輕輕按下觸發開關 (5),
便能夠以無級的方式在任何扭矩設定調整速度和鎖
緊扭矩。
建議:進行鎖螺絲測試,決定正確的設定。
6.5 更換 SSD 鎖螺絲鑽頭
插入鎖螺絲鑽頭:向前滑動鎖定套筒 (3) 並將鎖螺
絲鑽頭插入到底。釋放鎖定套筒 (3)。
拉動鎖螺絲鑽頭以檢查其是否正確安裝到位。
拆下鎖螺絲鑽頭:向前滑動鎖定套筒 (3) 並取下鎖
螺絲鑽頭。
鎖螺絲鑽頭僅適用於此類插入端:
9,5 mm (3/8“)
使用的鎖螺絲鑽頭必須符合螺絲。
不可使用損壞的鎖螺絲鑽頭。
6.6 更換 SSW 的鎖螺絲鑽頭...
插入鎖螺絲鑽頭:將工具安裝在方形附件 (1) 上,
直到限位。
拆下鎖螺絲鑽頭:從方形附件 (1) 中拉出工具。
使用的鎖螺絲鑽頭必須符合螺絲。
不可使用損壞的鎖螺絲鑽頭。
7. 使用
將螺絲裝在工具上,確定筆直對準。
鎖緊螺絲過程包括 2 個部分:插入螺絲和使用撞擊
機制鎖緊螺絲。
鎖緊扭矩取決於衝擊時間長度。
衝擊時間長度大約 5 秒時,即達到最大的鎖緊扭矩。
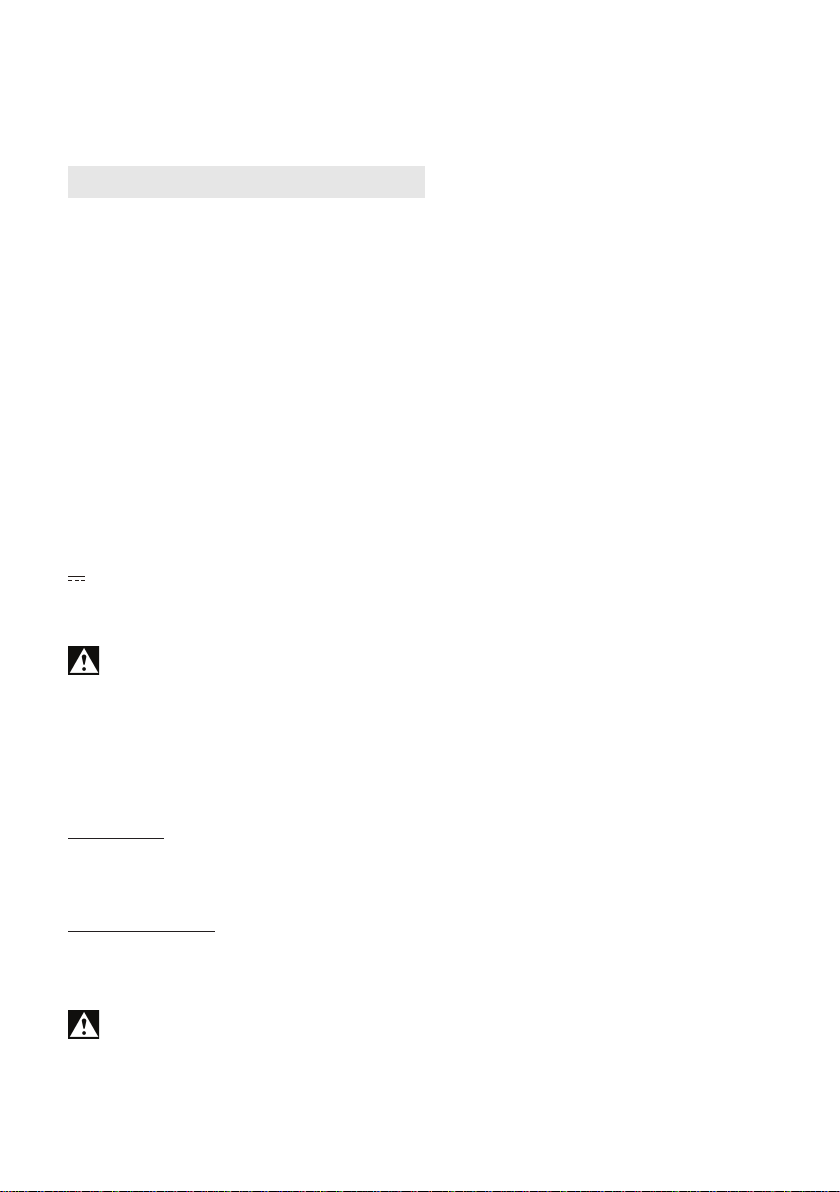
扭矩曲線取決於應用的類型:
在硬質材料中鎖緊螺絲時 (金屬等硬質材料的螺紋
聯接),在很短的衝擊持續時間 (a) 後即可達到最大
鎖緊扭矩。
在軟質材料中鎖緊螺絲時 (木材等軟質材料的螺紋
聯接),需要更長的衝擊持續時間 (b)。
建議:進行鎖螺絲測試,決定正確的衝擊時間長度。
小心!對於小螺絲,可以在 0.5 秒的衝擊持續時間
後達到最大扭矩。
- 這就是為什麼必須準確監控鎖緊螺絲過程的持續
時間。
- 使用按鈕設定 (8) 合適的鎖緊扭矩 (參閱第 6.4 章)。
- 透過用力或輕按觸發開關 (5) 可調整鎖緊扭矩,確
保螺絲不會損壞或螺絲頭不會脫落。
8. 配件
務必使用原廠麥太保或 CAS (無線聯盟系統) 電池組
與配件。
務必僅使用符合這些使用說明中所列需求和參數的
配件。
請參閱第 4 頁。
A 充電器
B 不同容量的電池組。僅使用電壓適合您的電動
工具的電池組。
C 鎖螺絲鑽頭
關於完整的配件清單,請參閱 www.metabo.com
或產品目錄。
9. 維修
只有合格的電工可以修理電動工具!
如果您的麥太保電動工具需要維修,請聯絡附近的
麥太保業務代表。如需地址,請參閱
www.metabo.com。
您可以從 www.metabo.com 下載備品清單。
10. 環保
請依照所在國家/地區的法規,以符合環保的方式處
置及回收廢棄的工具、包材及配件。
不可將電池組視為一般廢棄物進行處理。故障或用
過的電池交由麥太保經銷商處理!
不可使電池組沾水!
針對歐盟國家:請勿將電動工具當做家庭廢
棄物處置!根據電氣與電子設備廢棄物的歐
11
Page 12
CHI 繁體中文
盟指令 2012/19/EU 以及施行的國家/地區法律,廢
棄的電動工具必須個別收集並以環保的方式回收。
在丟棄前,將電動工具的電池組放電。避免觸點短
路 (例如,用膠帶保護)。
11. 技術規格
相關規格註解,請見第 3 頁。
本公司保留相關權利,可依技術發展而變更相關
內容。
U = 電池組電壓
n0 = 空載轉速
S = 衝擊頻率
H = 電動工具座
m = 重量 (含最輕電池組)
M
= 最小鎖緊扭矩
1
M
= 中等鎖緊扭矩
2
M
= 最大鎖緊扭矩
3
測量依據 EN 62841 標準確認。
運作中允許的環境溫度:-20°C 至 50°C (溫度低於
0°C 時性能受限)。存放時允許的環境溫度:0°C
至 30°C
直流
上述技術規格皆含有公差在內 (符合相關的有效
標準)。
排放值
這些值可用來評估電動工具的排放量,以及比較不
同的電動工具。實際負載可能更高或更低,視操作
條件、電動工具或配件的使用條件而定。當負載較
低無法評估時,請允許休息並停止一下。根據調整
後的估計值,為使用者安排保護措施,例如組織
措施。
整體振動總值 (三個方向的向量總和) 依據 EN
62841 判定:
ah = 振動排放值 (衝擊鎖緊螺絲)
Kh = 不確定性 (振動)
典型 A 荷重聲音等級:
L
pA
L
WA
= 聲壓等級
= 聲壓功率等級
KpA、KWA = 不確定性 (噪音等級)
請佩戴防護耳罩!
12
台灣華嶠貿易股份有限公司
聯絡電話:02-28124901
聯絡地址:台北市士林區重慶北路四段 103 號
Page 13
지침 원본
1. 적합성 선언
제품에 대한 전적인 책임을 지고 있는 당사는 형식
과 일련 번호 *1)로 식별되는 본 무선 임팩트 드라이
버가 지침안 *2)과 표준 *3)의 모든 관련 요건을 충족
함을 선언합니다.*4)에대한기술문서-3페이지
참조.
영국에만 해당:
제조업체이자 기술 파일 컴파일 권한이 있는
당사자(3페이지의 *4) 참조)로서 제품에 대한
전적인 책임을 지고 있는 당사는 3페이지의 형식과
일련 번호 *1)로 식별되는 본 무선 임팩트 렌치가 영
국 규정 S.I. 2016/1091, S.I. 2008/1597, S.I. 2012/
3032와 지정된 표준 EN 62841-1:2015, EN 628412-2:2014, EN IEC 63000:2018의 모든 관련 조항을
준수함을 선언합니다.
2. 지정된 사용 조건
임팩트드라이버는스크류체결및분리에적합합
니다.
부적합한 사용으로 인한 손상은 전적으로 사용자의
책임입니다.
일반적으로 통용되는 사고 방지 규정과 동봉된 안정
정보를 준수해야 합니다.
3. 일반 안전 정보
신체를 보호하고 전동 공구를 보호하기
위해 이 기호가 표시된 모든 설명에 주의
하시기 바랍니다!
경고 – 부상의 위험을 줄이기 위해 조작 설명
서를 읽어 주십시오.
경고 – 본 전동 공구와 함께 제공된 모든 안전
경고, 지침, 그림 및 사양을 읽어 보십시오.
래 나열된 모든 지침을 따르지 않을 경우 감전, 화재
및/또는 심각한 부상을 초래할 수 있습니다
나중에 참조할 수 있도록 모든 안전 지침과 정보를
보관해 두십시오.
전동 공구를 전달할 때 항상 본 문서를 함께 전달하
십시오.
4. 특수 안전 지침
패스너가 숨겨진 배선에 접촉할 수 있는 작업을 수
행하는 경우 절연된 그립 표면으로 전동 공구를 잡
으십시오.
"전기가 흐르는" 전선에 패스너가 접촉하면 전동 공
구의 노출된 금속 부분에 "전기가 흘러" 작업자가 감
전될 수 있습니다.
조정, 공구 교체, 유지보수 또는 청소 작업을 수행하
기 전에 장비에서 배터리 팩을 분리하십시오.
배터리 팩을 설치하기 전에 공구 전원이 꺼져 있는
지 확인하십시오.
아
.
KOREAN kr
작업하려는 위치에 전력 케이블, 가스 배관 또는 수
도관이 지나가지 않는지 확인하십시오(예: 금속 탐
지기 사용).
작업물이 미끄러지거나 회전하지 않도록 고정하십
시오(예: 스크루 클램프로 고정).
물과 습기가 있는 곳에 배터리 팩을 두지 마
십시오!
배터리 팩이 불에 노출되지 않도록 하십시오!
결함이있거나변형된배터리팩을사용하지마십
시오!
배터리 팩을 열지 마십시오!
배터리 팩 접점을 만지거나 단락시키지 마십시오!
리튬 이온 배터리 팩에 결함이 있는 경우 미
산성의 가연성 액체가 누출될 수 있습니다!
배터리 누액이 피부에 닿은 경우 즉시 물로
충분히 씻어 내십시오. 배터리 누액이 눈에
닿은 경우 깨끗한 물로 씻어내고 즉시 의사의
진찰을 받으십시오!
장비에 결함이 있으면 장비에서 배터리 팩을 분리하
십시오.
임팩트 드라이버에 적합한 스크류드라이버 비트만
사용해야 합니다.
긴 스크류를 체결할 경우 미끄러질 위험이 있으니
주의하십시오.
장비 전원이 꺼져 있을 때에만 스크류에 장비를 장
착하십시오.
장시간 작업할 때는 청력 보호 용구를 착용하십시
오. 장시간 시끄러운 소음에 노출되면 청력이 손상
될 수 있습니다.
LED 조명(7): 광학 기기로 LED 방사광을 직접 관측
하지 마십시오.
리튬 이온 배터리 팩 운송:
리튬 이온 배터리 팩 운송 시, 위험물 운송과 관련된
법률(UN 3480 및 UN 3481)이 적용됩니다. 리튬 이
온 배터리 팩을 운송할 경우 현재 유효한 사양을 확
인하십시오. 필요한 경우 화물운송업체에 문의하십
시오. 인증된 포장재는 Metabo에서 구입할 수 있습
니다.
하우징에 손상이 없고 누액이 없는 경우에만 배터리
팩을 배송하십시오. 배터리 팩은 장비에서 분리하여
배송해야 합니다. (예를 들어 접착 테이프로 보호하
여) 접촉부가 단락되지 않도록 주의하십시오.
분진 노출 최소화:
경고 – 파워 샌딩, 쏘잉, 그라인딩, 드릴링 및 기
타 건설 활동에서 생성된 분진 중 일부에는 암,
선천성 결함 또는 기타 생식 유해성을 유발하는 것
으로 알려진 화학물질이 포함되어 있습니다. 이러한
화학물질의 몇 가지 예는 다음과 같습니다.
- 납 계열 페인트의 납
- 벽돌과 시멘트 및 기타 벽돌 쌓기 제품에 포함된 결
정성 실리카
13
Page 14

Kr KOREAN
- 화학 처리된 목재의 비소 및 크롬
화학물질에 대한 노출로 인한 위험은 해당 유형의
작업 수행 빈도에 따라 다릅니다. 이러한 화학물질
에 대한 노출을 줄이려면, 환기가 잘 되는 장소에서
작업하고 미세 입자 필터링 기능이 있는 방진 마스
크 등의 보호 장구를 착용하십시오.
이는 일부 목재 유형(떡갈나무 또는 너도밤나무 분
진 등), 금속, 석면과 같은 다른 물질의 분진에도 적
용됩니다. 다른 알려진 질병으로는 알레르기 반응,
호흡기 질환 등이 있습니다. 분진이 신체 내에 유입
되지 않도록 주의하십시오.
해당 재료, 직원, 사용 분야 및 사용 위치에 관련된 지
침 및 국가 규정을 따르십시오(예: 직업 건강 및 안전
규정, 폐기).
발생하는 입자를 즉시 수거하고 주변에 쌓이지 않도
록 하십시오.
특수 작업에 적합한 부속품을 사용하십시오. 이 방
법으로, 해당 환경에 무절제하게 유입되는 입자를
줄일 수 있습니다.
적합한 탈거 장치를 사용하십시오.
다음과 같은 방법으로 분진 노출을 줄이십시오.
- 배출되는 입자 및 배출 공기의 흐름이 자신이나 인
접한 사람 또는 쌓여 있는 분진을 향하지 않도록 하
십시오.
- 탈거 장치 및/또는 공기 정화기를 사용하십시오.
- 작업장을 잘 환기시키고 진공 청소기를 사용하여
깨끗하게 유지하십시오. 쓸거나 바람을 불면 먼지
가 날립니다.
- 보호복을 진공 청소기로 먼지를 빨아 들이거나 세
탁하십시오. 보호 장비에 바람을 불거나 두드리거
나 털지 마십시오.
5. 개요
2페이지 참조.
1 1/2" 공구용 사각형 부착물*
2 육각 스크류드라이버 비트용 육각 소켓 부
착물*
3 잠금 슬리브*
4 회전 셀렉터 스위치/이동 안전 장치
5 트리거
6 핸들(그립 표면)
7 LED 조명
조명이 어두운 장소에서 작업 시 사용. 장비 전
원이 켜지면 LED 조명이 켜집니다.
8 속도 및 조임 토크 선택 버튼
9 배터리 팩*
10 배터리 팩 분리 버튼
11 용량 표시등 버튼*
12 용량 및 신호 표시등 *
13 벨트 고리(그림과 같이 부착)*
* 기능/모델에 따라 상이
6. 최초 작동/설정
조정 또는 유지보수 작업을 수행하기 전에 장
비에서 배터리 팩을 분리하십시오. 배터리 팩
을 설치하기 전에 공구 전원이 꺼져 있는지 확인하
십시오.
6.1 배터리 팩
사용 전에 배터리 팩(9)을 충전하십시오. 성능이 약
한 경우 배터리 팩을 다시 충전하십시오.
배터리 팩 충전 지침은 Metabo 충전기 조작 설명서
에 나와 있습니다.
리튬 이온 배터리 팩인 "Li-Power, LiHD"에는 용량
및 신호 표시등(12)이 있습니다.
- 버튼(11)을 누르면 LED를 통해 충전량이 표시됩
니다.
- LED 하나가 깜박이면 배터리 팩이 거의 방전된 것
이며 재충전이 필요합니다.
분리:
배터리팩분리버튼(10)을누르고배터리팩(9)을앞으
로 당깁니다.
삽입:
배터리 팩(9)이 맞물릴 때까지 안으로 밉니다.
6.2 회전 방향 설정, 이동 안전 장치 사용(스위치
잠금 장치)
모터가 정지한 상태일 때에만 회전 셀렉터 스
위치/이동 안전 장치(4)를 작동하십시오.
회전 셀렉터 스위치를 작동하고 이동 잠금 장치(4)를
잠그십시오.
R = 시계 방향 설정
(스크류 체결)
L = 반시계 방향 설정
(스크류 분리)
0 = 중간 위치: 이동 안전 장치
(스위치 잠금 장치) 설정됨
6.3 전원 켜기 및 끄기
전원 켜기: 트리거 스위치(5)를 누릅니다.
전원 끄기: 트리거(5)를 해제합니다.
6.4 속도/조임 토크
속도 및 조임 토크는 직접적인 관련이 있습니다. 속
도가 낮아지면 조임 토크도 줄어듭니다.
조임 토크는 다음 두 가지 방식에 따라 영향을 받습
니다.
1) 최대 조임 토크를 선택합니다.
버튼(8)을 눌러 조임 토크 설정 3개 중 하나를 선택
할 수 있습니다. 최대 조임 토크는 3페이지에 있는
표(M1, M2, M3)에 나와 있습니다.
표시등이 어떤 설정이 선택되었는지 표시합니다.
1 = 최소 조임 토크
2 = 중간 조임 토크
3 = 최대 조임 토크
14
Page 15
2) 조임 토크 무단계 조정:
작업 조건에 따라 트리거(5)를 세게 또는 살짝 눌러
모든 토크 설정에서 속도와 조임 토크를 무단계로
조정할 수 있습니다.
권장 사항: 테스트로 스크류를 체결하여 올바른 설
정을 결정하십시오.
6.5 SSD 스크류드라이버 비트 교체
스크류드라이버 비트 삽입: 잠금 슬리브(3)를 앞으
로 밀고 스크류드라이버 비트를 더 이상 들어가지
않는 위치까지 삽입합니다. 잠금 슬리브(3)를 놓습
니다.
스크류드라이버 비트를 당겨 제자리에 고정되
었는지 확인하십시오.
스크류드라이버 비트 분리: 잠금 슬리브(3)를 앞으
로 밀고 스크류드라이버 비트를 분리합니다.
다음과 같은 플러그인 끝이 있는 스크류드라이
버 비트만 사용하십시오.
9,5 mm (3/8“)
사용하는 스크류드라이버 비트가 스크류와 일
치해야 합니다.
손상된 스크류드라이버 비트는 사용하면 안 됩
니다.
6.6 SSW용 스크류드라이버 비트 교체 ...
스크류드라이버 비트 삽입: 정지 위치에 도달할 때
까지 사각형 부착물(1)에 공구를 끼웁니다.
스크류드라이버 비트 분리: 사각형 부착물(1)에서
공구를 당겨 뺍니다.
사용하는 스크류드라이버 비트가 스크류와 일
치해야 합니다.
손상된 스크류드라이버 비트는 사용하면 안 됩
니다.
7. 사용
스크류에 장비를 장착하고 일렬로 정렬되었는지 확
인합니다.
스크류 체결 과정은 먼저 스크류를 삽입한 후임팩트
메커니즘을 사용하여 스크류를 조이는 두 부분으로
구성됩니다.
조임 토크는 임팩트 지속 시간에 따라 다릅니다.
임팩트 지속 시간이 약 5초일 경우 최대 조임 토크에
도달합니다.
KOREAN kr
토크 곡선은 적용 분야에 따라 다릅니다.
단단한 재질에 스크류를 체결할 경우(금속 등 단단
한 재료에 스크류 체결) 짧은 임팩트 지속 시간(a) 후
최대 조임 토크에 도달합니다.
연한 재질에 스크류를 체결할 경우(목재 등 연성 재
료에 스크류 체결) 더 긴 임팩트 지속 시간(b)이 적용
되어야 합니다.
권장 사항: 테스트로 스크류를 체결하여 올바른 임
팩트 지속 시간을 결정하십시오.
주의! 작은 스크류일 경우 0.5초의 임팩트 지속 시간
으로도 최대 토크에 도달할 수 있습니다.
- 따라서 스크류 체결 시 지속 시간을 정확히 모니터
링해야 합니다.
- 버튼(8)을 사용해 적합한 조임 토크를 설정하십시
오(6.4장 참조).
- 트리거(5)를 세게 또는 살짝 눌러 조임 토크를 조정
하여 스크류가 손상되지 않고 스크류 헤드가 떨어
지지 않도록 하십시오.
8. 부속품
정품 Metabo 또는 CAS(Cordless Alliance System)
배터리 팩 및 부속품만 사용하십시오.
조작 설명서에 설명된 요건과 사양을 충족하는 부속
품만 사용하십시오.
4페이지 참조.
A 충전기
B 용량이 다른 배터리 팩. 해당 전동 공구에 적합한
전압의 배터리 팩만 사용하십시오.
C 스크류드라이버 비트
전체 부속품을 보려면www.metabo.com 또는 카탈
로그를 참조하십시오.
9. 수리
전동 공구 수리는 자격을 갖춘 전기 기술자만
수행해야 합니다!
Metabo 전동 공구에 수리가 필요한 경우 현지 Metabo
대리점에 문의하십시오. 주소는 www.metabo.com을
참조하십시오.
www.metabo.com에서 예비 부품 목록을 다운로드
할 수 있습니다.
10. 환경 보호
환경 친화적 폐기 및 폐기된 장비, 포장 및 부속품의
재활용에 관한 국가 규정을 따르십시오.
배터리 팩은 일반 폐기물과 함께 폐기할 수 없습니
다. 결함이 있거나 사용된 배터리 팩을 Metabo 대리
점으로 보내주십시오!
배터리 팩에 물이 닿지 않도록 하십시오!
유럽 연합 국가에만 해당: 전동 공구를 가정용
폐기물과 함께 폐기하지 마십시오! 사용된 전
동 공구는 폐 전기/전자 장비에 대한 유럽 지
침안 2012/19/EU 및 국가 법률 체계에서 이 지침안
의 구현에 따라 별도로 수거하여 환경 친화적 재활
용에 적합하게 처리해야 합니다.
15
Page 16
Kr KOREAN
폐기 전에 전동 공구의 배터리 팩을 방전시키십시
오. (예를 들어 접착 테이프로 보호하여) 접촉부가 단
락되지 않도록 주의하십시오.
11. 기술 사양
3페이지에 사양에 대한 설명이 나열되어 있습니다.
기술 진보로 인해 사양이 변경될 수 있습니다.
U = 배터리 팩의 전압
n0 = 무부하 시 속도
S = 임팩트 주파수
H = 장비 공구 홀더
m = 중량(최소 배터리 팩 장착 시)
M
= 최소 조임 토크
1
M
= 중간 조임 토크
2
M
= 최대 조임 토크
3
EN 62841에 따라 결정된 측정값.
작동 시 허용 주변 온도: -20°C ~ 50°C(0°C 미만에서
성능 제한). 보관 시 허용 주변 온도: 0°C ~ 30°C
직류
명시된 기술 사양에는 오차가 있을 수 있습니다(관
련된 적용 표준에 따름).
방출 값
이러한 값을 이용하면 전동 공구의 방출을 평
가하고 여러 전동 공구를 비교할 수 있습니다. 작동
조건, 전동 공구 또는 부속품의 사용 조건에 따라 실
제 부하는 더 높거나 낮을 수 있습니다. 평가가 목적
인 경우 부하가 더 낮으면 휴식 시간을 두도록 하십
시오. 조정된 예상치에 기초하여 조직적 조치를 비
롯하여 사용자를 위한 보호 조치를 마련하십시오.
EN 62841에 따라 결정된 진동 전체 값(세 방향의 벡
터 합):
ah = 진동 방출 값(임팩트를 사용한 스크류 체결)
Kh = 불확실성(진동)
일반적인 A-가중 소음 레벨:
L
pA
L
WA
KpA, KWA = 불확실성(소음 레벨)
= 음압 레벨
= 음력 레벨
청력 보호 용구를 착용하십시오!
16
Page 17
Original instructions
1. Declaration of Conformity
We hereby declare under our sole responsibility that
these cordless impact drivers, identied by type and
serial number *1), meet all relevant requirements of
directives *2) and standards *3). Technical
documents for *4) - see page 3.
For UK only:
We as manufacturer and authorized person to
compile the technical le, see *4) on page 3,
hereby declare under sole responsibility that these
cordless impact wrench, identied by type and
serial number *1) on page 3, fulll all relevant
provisions of following UK Regulations S.I.
2016/1091, S.I. 2008/1597, S.I. 2012/3032 and
Designated Standards EN 62841-1:2015, EN
62841-2-2:2014, EN IEC 63000:2018.
2. SpeciedConditionsofUse
The impact driver is suitable for driving in and
removing screws.
The user bears sole responsibility for any damage
caused by inappropriate use.
Generally accepted accident prevention
regulations and the enclosed safety information
must be observed.
3. General Safety Information
For your own protection and for the
protection of your power tool, pay
attention to all parts of the text that are
marked with this symbol!
WARNING – Read the operating
instructions to reduce the risk of injury.
WARNING–Readallsafetywarnings,
instructions,illustrationsand
specicationsprovidedwiththispowertool.
Failure to follow all instructions listed below may
result in electric shock, re and/or serious injury.
Keepallsafetyinstructionsandinformation
for future reference.
Always include these documents when passing on
your power tool.
4. Special safety instructions
Holdthepowertoolbyinsulatedgripping
surfaces, when performing an operation where
thefastenermaycontacthiddenwiring.
Fasteners contacting a "live" wire may make exposed
metal parts of the power tool "live" and could give the
operator an electric shock.
Remove the battery pack from the machine before
making any adjustments, changing tools, maintaining
or cleaning.
ENGLISH en
Make sure that the tool is switched o before tting
the battery pack.
Ensure that the spot where you wish to work is free of
powercables,gaslinesorwaterpipes (e.g. using
a metal detector).
Secure the workpiece to prevent slipping or rotation
(e.g. by securing with screw clamps).
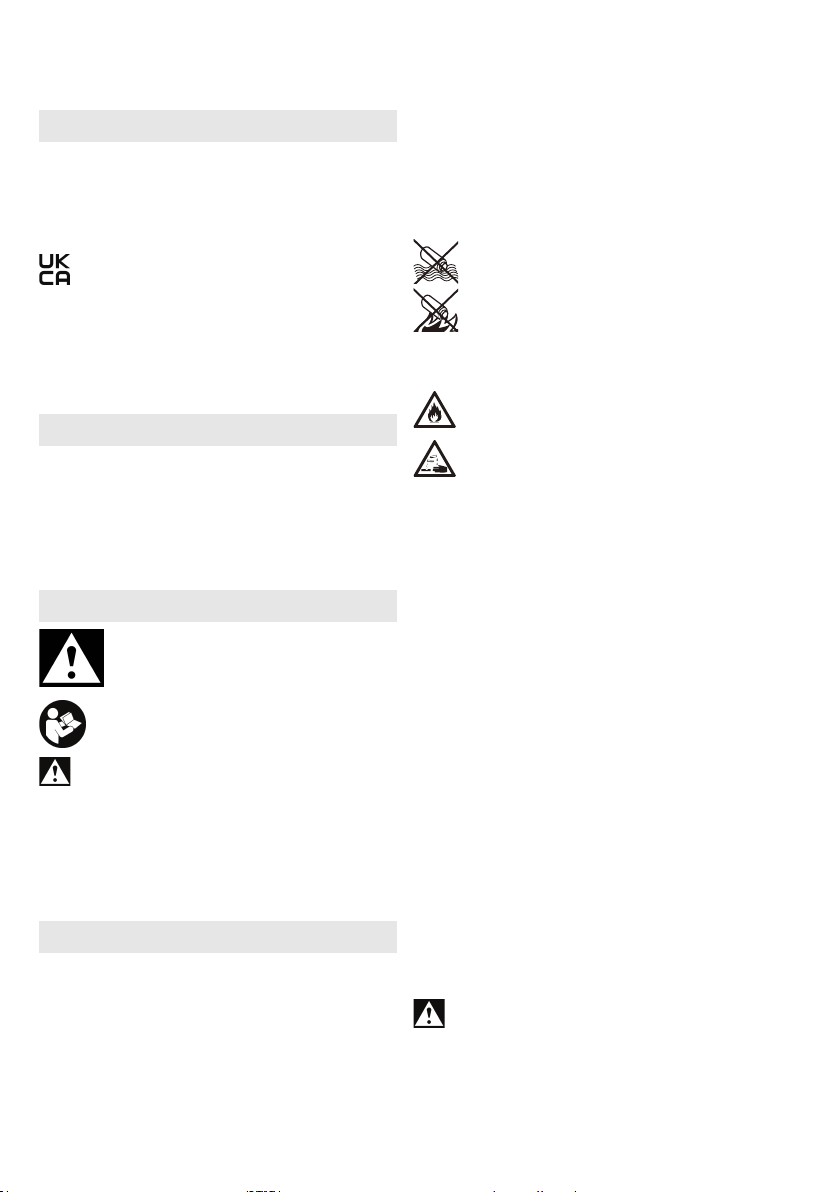
Protect battery packs from water and
moisture!
Do not expose battery packs to re!
Do not use faulty or deformed battery packs!
Do not open battery packs!
Do not touch or short circuit battery pack contacts!
A slightly acidic, ammable uid may leak
from defective Li-Ion battery packs!
If battery uid leaks out and comes into
contact with your skin, rinse immediately with
plenty of water. If battery uid leaks out and
comes into contact with your eyes, wash them with
clean water and seek medical attention
immediately!
If the machine is defective, remove the battery pack
from the machine.
Only screwdriving bits suitable for the impact drivers
must be used.
Take care when driving in long screws - risk of slipping.
Mount the machine on the screw only when it is
switched o.
Wear ear protectors when working for long
periodsoftime. High noise levels over a prolonged
period of time may aect your hearing.
LED light (7): do not observe the LED radiation
directly with optical instruments.
TransportofLi-Ionbatterypacks:
The shipping of Li-Ion battery packs is subject to laws
related to the carriage of hazardous goods (UN 3480
and UN 3481). Inform yourself of the currently valid
specications when shipping Li-Ion battery packs. If
necessary, consult your freight forwarder. Certied
packaging is available from Metabo.
Only send the battery pack if the housing is intact and
no uid is leaking. Remove the battery pack from the
machine for sending. Prevent the contacts from
short-circuiting (e.g. by protecting them with adhesive
tape).
Reducingdustexposure:
WARNING – Some dust created by power
sanding, sawing, grinding, drilling, and other
construction activities contains chemicals known to
cause cancer, birth defects or other reproductive
harm. Some examples of these chemicals are:
- Lead from lead-based paints,
- crystalline silica from bricks and cement and other
masonry products, and
17
Page 18
en ENGLISH
- arsenic and chromium from chemically treated
lumber.
Your risk from these exposures varies, depending
on how often you do this type of work. To reduce
your exposure to these chemicals: work in a
well-ventilated area, and work with approved safety
equipment, such as those dust masks that are
specially designed to lter out microscopic
particles.
This also applies to dust from other materials, such
as some timber types (like oak or beech dust),
metals, asbestos. Other known diseases are e.g.
allergic reactions, respiratory diseases. Do not let
dust enter the body.
Observe the relevant guidelines and national
regulations for your material, sta, application and
place of application (e.g. occupational health and
safety regulations, disposal).
Collect the particles generated at the source, avoid
deposits in the surrounding area.
Use suitable accessories for special work. In this
way, fewer particles enter the environment in an
uncontrolled manner.
Use a suitable extraction unit.
Reduce dust exposure with the following measures:
- do not direct the escaping particles and the
exhaust air stream towards yourself or nearby
persons or towards dust deposits,
- use an extraction unit and/or an air purier,
- ensure good ventilation of the workplace and
keep it clean using a vacuum cleaner. Sweeping
or blowing stirs up dust.
- Vacuum or wash protective clothing. Do not blow,
beat or brush protective gear.
5. Overview
See page 2.
1 Square attachment for 1/2“ tools *
2 Hexagon socket attachment for hexagon
screwdriving bits*
3 Locking sleeve*
4 Rotation selector switch / Transporting safety
device
5 Trigger
6 Handle (gripping surface)
7 LED light
For working in badly lit areas. The LED light
lights up when the machine is switched on.
8 Button for speed and tightening torque
selection
9 Battery pack *
10 Battery pack release button
11 Capacity indicator button *
12 Capacity and signal indicator *
13 Belt hook (attach as shown) *
* depending on the features / model
6. Initial Operation/Setting
Remove the battery pack from the machine
before any adjustment or maintenance is
carried out. Make sure that the tool is switched o
before tting the battery pack.
6.1 Battery pack
Charge the battery pack (9) before use. Recharge
the battery pack if performance diminishes.
Instructions on charging the battery pack can be
found in the operating instructions of the Metabo
charger.
Li-Ionbatterypacks“Li-Power,LiHD“ have a
capacity and signal indicator (12):
- Press the button (11), the LEDs indicate the
charge level.
- The battery pack is almost empty and must be
recharged if one LED is ashing.
Removing:
Press the battery pack release button (10) and pull
the battery pack (9) forwards.
Inserting:
Slide in the battery pack (9) until it engages.
6.2 Settingthedirectionofrotation,
engagingthetransportingsafetydevice
(switch-on lock)
Only operate the rotation selector switch /
transporting safety device (4) when the motor
is at standstill!
Actuate the rotation selector switch / Engage the
transportation lock (4).
R = Clockwise setting
(drive in screws)
L = Anti-clockwise setting
(undo screws)
0 = middle position: transportation safety device
(Switch-on lock) set
6.3 Switchingonando
Switching on: press the trigger switch (5).
Switchingo: Release the trigger (5).
6.4 Speed/tighteningtorque
The speed and tightening torque are connected
directly. The lower the speed, the lower the
tightening torque.
The tightening torque is inuenced in two ways:
1) Select maximum tightening torque.
You can select one of three tightening torque
settings by pressing the button (8). The maximum
tightening torques can be found in the table on
page 3 (M1, M2, M3).
The lights indicate which setting is selected.
1 = min. tightening torque
2 = medium tightening torque
3 = max. tightening torque
18
Page 19
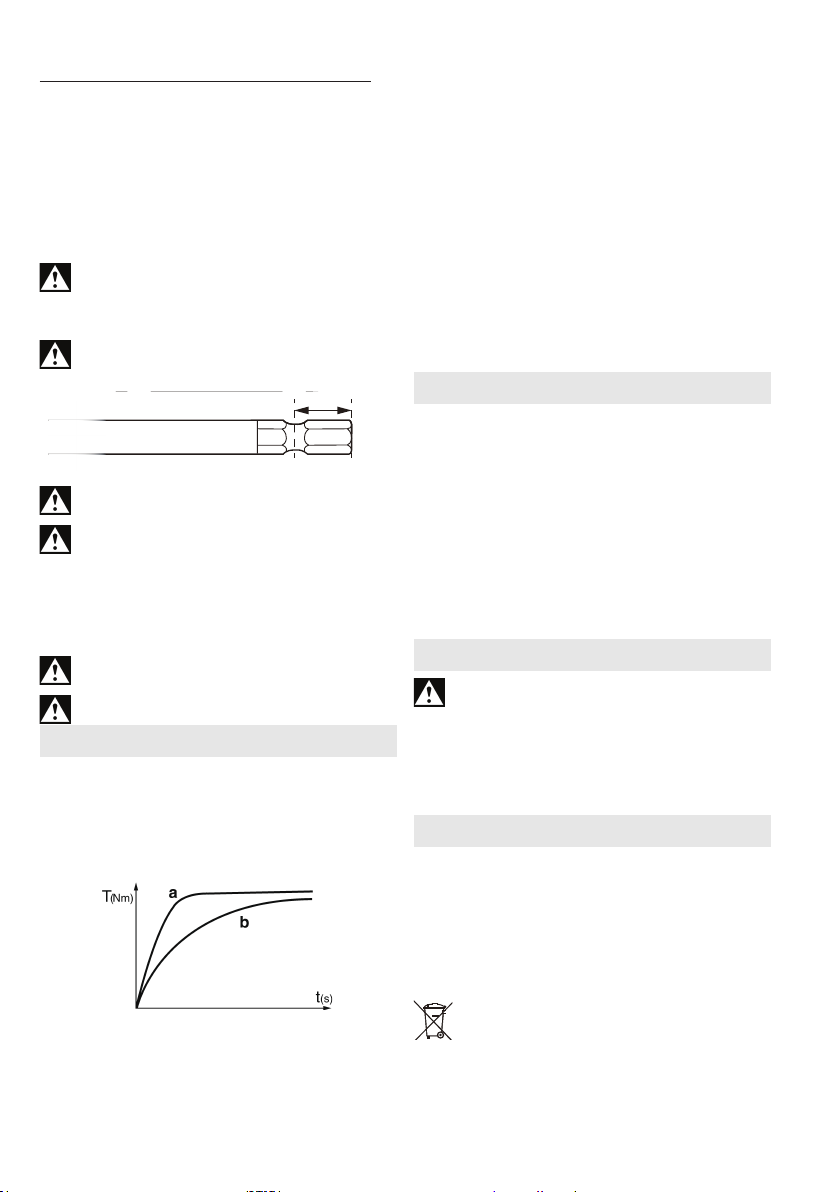
2) Stepless adjustment of the tightening torque:
The speed and tightening torque can be adjusted
steplessly in any torque setting by pressing the trigger
(5) rmly or lightly, thus adapting to working conditions.
Recommendation: determine the correct setting
by carrying out trial screwdriving.
6.5 ChangingSSDscrewdrivingbits
Insertingscrewdrivingbit: Slide locking sleeve
(3) forward and insert screwdriving bit as far as the
stop. Release locking sleeve (3).
Pull on the screwdriver bit to check that it is
correctly seated.
Removingscrewdrivingbit: Slide locking sleeve
(3) forward and remove screwdriving bit.
Only use screwdriving bits with such plug-in
ends:
9,5 mm (3/8“)
The screwdriving bit used must match the
screw.
Damaged screwdriving bits must not be used.
6.6 ChangescrewdrivingbitforSSW...
Insertingscrewdrivingbit: Fit the tool on the
square attachment (1) until the limit stop.
Removingscrewdrivingbit: Pull the tool from the
square attachment (1).
The screwdriving bit used must match the
screw.
Damaged screwdriving bits must not be used.
7. Use
Mount the machine on the screw, ensuring it is
aligned straight.
The screwdriving process consists of 2 parts:
insert screw and tighten screw with the impact
mechanism.
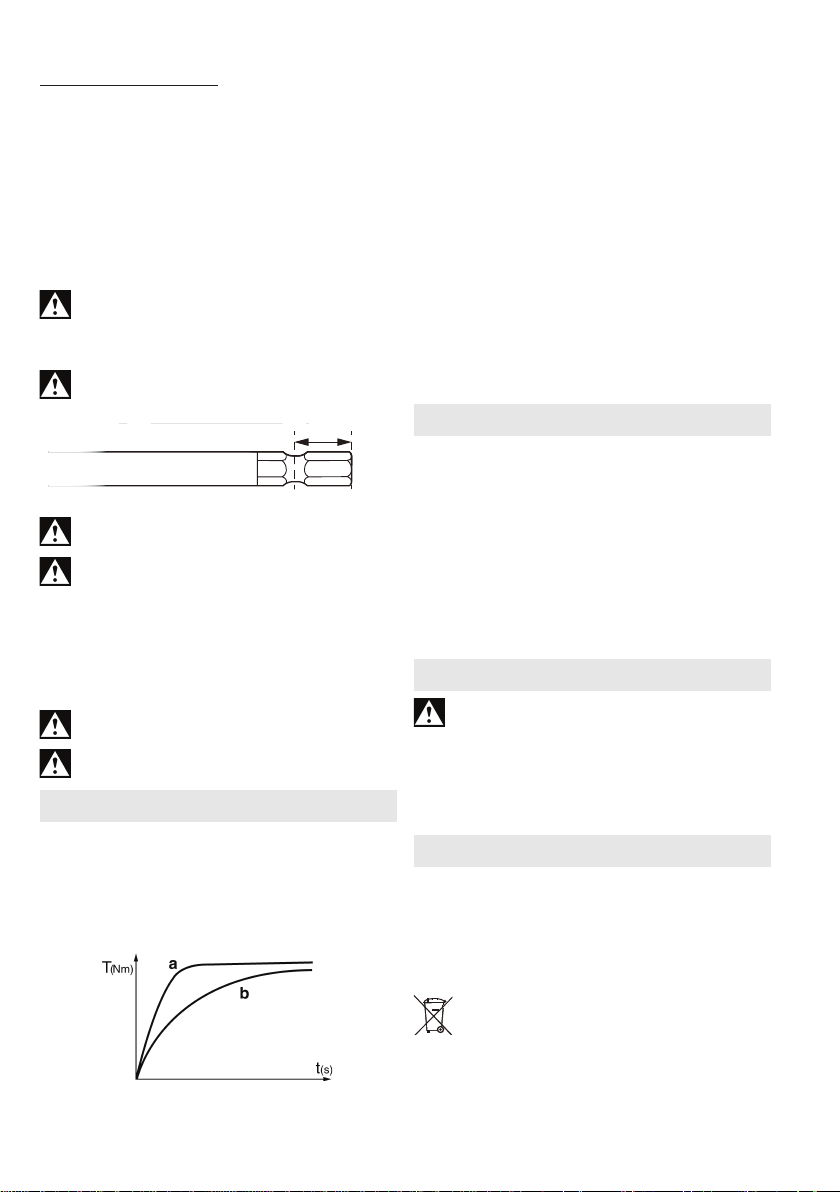
The tightening torque depends on the impact duration.
With an impact duration of approx. 5 seconds, the
maximum tightening torque has been reached.
The torque curve depends on the type of application:
With a hard screwdriving application (screw-
couplings in hard material such as metal), maximum
tightening torque is already reached after a short
ENGLISH en
impact duration (a).
With a soft screwdriving application (screw-
couplings in soft material such as wood), a longer
impact duration (b) is required.
Recommendation: determine the correct impact
duration by carrying out trial screwdriving.
Caution! For small screws the maximum torque
can be reached already after 0.5 seconds impact
duration.
- This is why the duration of the screwdriving process
must be monitored exactly.
- Set a (8) suitable tightening torque using the button
(see chapter 6.4).
- Adjust the tightening torque by pressing rmly or
lightly on the trigger (5), ensuring that the screw is
not damaged or that the screw head does not tear
o.
8. Accessories
Use only original Metabo or CAS (Cordless Alliance
System) battery packs and accessories.
Use only accessories that full the requirements and
specications listed in these operating instructions.
See page 4.
A Chargers
B Battery packs with dierent capacities Use only
battery packs with voltage suitable for your
power tool.
C Screwdriving bits
For a complete range of accessories, see
www.metabo.com or the catalogue.
9. Repairs
Repairs to electrical tools must ONLY be
carried out by qualied electricians!
Contact your local Metabo representative if you
have Metabo power tools requiring repairs. For
addresses see www.metabo.com.
You can download a list of spare parts from
www.metabo.com.
10.EnvironmentalProtection
Observe national regulations on environmentally
compatible disposal and on the recycling of
disused machines, packaging and accessories.
Battery packs may not be disposed of with regular
waste. Return faulty or used battery packs to your
Metabo dealer!
Do not allow battery packs to come into contact
with water!
Only for EU countries: never dispose of
power tools in your household waste!
According to European Directive 2012/19/
EU on Waste from Electric and Electronic
Equipment and implementation in national law,
used power tools must be collected separately and
recycled in an environmentally-friendly manner.
Discharge the battery pack in the power tool before
19
Page 20
en ENGLISH
disposal. Prevent the contacts from short-circuiting
(e.g. by protecting them with adhesive tape).
11.TechnicalSpecications
Explanatory notes on the specications on page 3.
Changes due to technological progress reserved.
U = Voltage of battery pack
n0 = No-lo sad peed
S = impact frequency
H = machine tool holder
m = weight (with the smallest battery pack)
M
= min. tightening torque
1
M
= medium tightening torque
2
M
= max. tightening torque
3
Measured values determined in conformity with EN
62841.
Permitted ambient temperature during operation:
-20 °C to 50 °C (limited performance with
temperatures below 0 °C). Permitted ambient
temperature for storage: 0 °C to 30 °C
direct current
The technical specications quoted are subject to
tolerances (in compliance with relevant valid
standards).
Emissionvalues
These values make it possible to assess the
emissions from the power tool and to compare
dierent power tools. The actual load may be
higher or lower depending on operating conditions,
the condition of the power tool or the accessories
used. Please allow for breaks and periods when
the load is lower for assessment purposes.
Arrange protective measures for the user, such as
organisational measures based on the adjusted
estimates.
Vibration total value (vector sum of three
directions) determined in accordance with EN
62841:
ah = Vibration emission value (screwdriving
Kh = uncertainty (vibration)
Typical A-weighted sound levels:
L
L
KpA, KWA = Uncertainty (noise level)
with impact)
pA
WA
= sound-pressure level
= acoustic power level
Wear ear protectors!
20
Page 21

Page 22

Page 23

Page 24

170 27 8280 - 0521
Metabowerke GmbH
Metabo-Allee 1
72622 Nuertingen
Germany
www.metabo.com
 Loading...