

Page 1
®
1
3
2
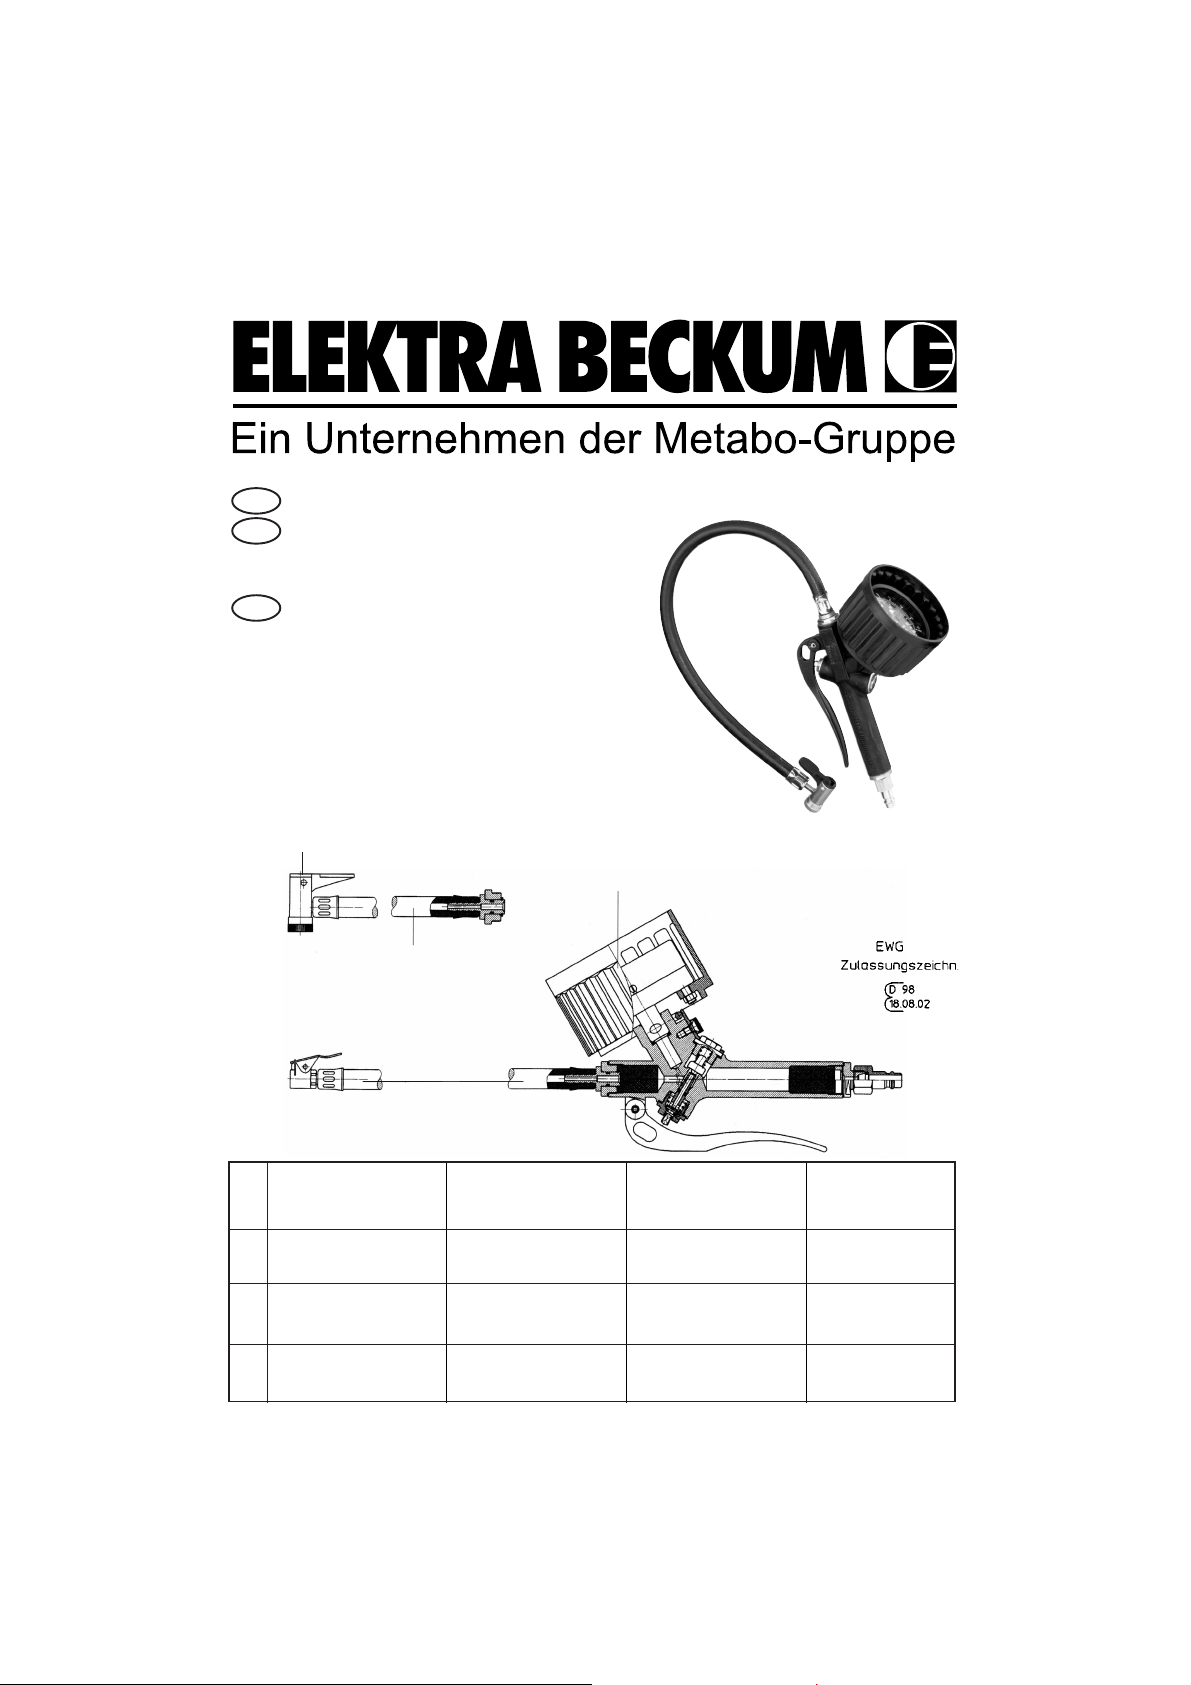
Lfd.
Nr.
1
2
3
Benennung
Schlauch mit
Hebelstecker, komplett
Hebelstecker
mit Klemme
Manometer komplett
mit Schutzkappe
Artikel-Nr.
Stock-Nr.
N
o
de commande
100 167 2319
771 067 2339
782 367 7232
Ersatzteilliste / Spare parts list / List de pièces détachées
Description
Hose with lever chuck,
complete
Lever chuck
with clip
Pressure gauge with
protecting cap
Dénomination
tuyan flexible avec connecteur à levier, complet
Connecteur à levier
avec borne
Manomètre avec
capuchon protecteur
Bedienungsanleitung Reifenfüllmeßgerät RF 480, geeicht
Operating Instructions for the
Manual Tyre Filling Gauge
Modell RF 480, calibrated
Contrôleur manuel de gonflage,
modèle RF 480, calibré
- Instructions de service
D
ENG
F
RF 480
Best.-Nr./ Stock-Nr./ Node commande: 090 105 4630
D/ENG/F / 3600 - 1.0
Page 2

Das klassische Reifenfüllmeßgerät
ist der Bauart nach zugelassen.
Geräte mit Meßbereich 0 - 10 bar
für den Gebrauch an öffentlichen
Tankstellen o.ä. sind von der
Eichbehörde geeicht und entsprechend gekennzeichnet. Die
Gültigkeit der Ersteichung beträgt 2
Jahre. Nach Ablauf der Eichfrist
muß das Gerät nachgeeicht werden.
Inbetriebnahme
Gerät sorgfältig auspacken und
darauf achten, daß keine
Verpackungsrückstände ins Gerät
gelangen. Luftschlauch
anschließen (Verschraubung oder
Kupplung).
Bedienung
1) Nach Abnahme der
Staubschutzkappe am Reifenventil, Doppeltankstellenstecker,
Hebelstecker oder
Momentstecknippel auf Reifenventil aufstecken, so daß eine
dichte Verbindung entsteht. Der
vorhandene Reifendruck kann
am Manometer abgelesen werden.
2) Zum Füllen muß der Hebel ganz
durchgezogen werden.
3) Zum Ablassen, falls erforderlich,
darf der Hebel nur halb durchgezogen werden.
4) Zum Prüfen muß der Hebel in
Ruhestellung (Ausgangsstellung) gebracht werden.
5) Füllventil schnell vom
Reifenventil abziehen, um
Druckverluste zu vermeiden.
Wartung
Das Reifenfüllmeßgerät arbeitet
praktisch wartungsfrei. Das
Manometer ist durch eine
Schutzkappe weitgehend
geschützt. Durch Vermeiden von
Schlägen und harten Umgang wird
die Genauigkeit lange Zeit erhalten.
Reparatur
Ein eichpflichtiges Gerät muß nach
der Reparatur von der zuständigen
Eichbehörde geeicht werden.
Deshalb empfehlen wir bei
Störungen, das Gerät zur Überprüfung dem Fachhändler bzw. ins
Werk einzusenden.
Entölte Druckluft verwenden, nicht
zum Füllen oder Prüfen von wassergefüllten Ballastreifen oder mit
Korrosionsmittel behandelten
Reifen verwenden.
The classic manual tyre filling
gauge is homologated according to
its design. Devices with a measuring range of 0 - 10 bar for the use
in public filling stations et are calibrated by the Office if Weights and
Standards and marked accordingly.
First calibration is valid for two
years. After expiration of the calibration period, the device must be
recalibrated.
Initial operation
Carefully unpack the device and
ensure that the device is free of
residues of ‘packing material.
Connect air tube (scewconnection
and coupling).
Operation
1) After taking off the valve sealing
cap, put on dual filling station
connector, lever connector or
connecting nipple in order to
achieve tight connection. The
existing tyre pressure can be
read off from the pressure
gauge.
2) For filling, the lever must be entirely pulled through.
3) If necessary, the lever may only
be pulled by half a turn for deflating.
4) For testing, the lever must be in
it’s initial position (starting position).
5) Quickly pull off filling valve from
tyre valve in order to avoid pressure losses.
Maintenance
The manual tyre filling gauge is virtually maintenance-free. The pressure gauge is to a great extent protected by a protecting cap.
Precision of the instrument can be
preserved for a long time by avoiding blows and incautious handling.
Reparation
A device subject to calibration must
be calibrated by the responsible
Office of Weights and Standards.In
case of problems we therefore
recommend sending the device to
the specialist retailer and/or back to
the factory for examination.
Use only oil and water free compressed air. Do not use for inflating
or checking pressure of hydro flateck tyres or those containing corrosives.
Ce type de contrôleur de gonflage
classique est homologué. Les
appareils ayant une plage de mesure de 0 - 10 bar destinés aux stations-service ouvertes au public ou
établissements similaires sont étalonnés par l’Office des poids et
messure et marqués en conséquence.La durée de validité du premier étalonnage est de deux ans.
L’appareil doit faire l’objet d’un nouvel étalonnage.
Mise en service
Déballer soigneusement l’appareil
en veillant à ce que du matériel
d’emballage ne pénètre pas dans
celui-ci. Brancher le flexible d’air
comprimé (vissage ou couplage).
Mode d’emploi
1) Après avoir retiré le bouchon
pare-poussière, brancher sur la
valve de pneu le double raccord
station-service, le raccord à
levier, ou le raccord instantané
pour établir une liaison étanche.
La pression régnant dans le
pneu peut être lue au manomètre.
2) Pour gonfler, serrer la poignée à
fond.
3) Pour dégonfler, si nécessaire,
ne serrer la poignée qu’à moitié.
4) Pour contrôler, la poignée doit
être ramenée en position de
repos (position initiale).
5) Retirer rapidement l’embout de
gonflage de la valve du pneu,
pour éviter une perte de pression.
Entretien
Le contrôleur manual de gonflage
ne nécessite pratiquement pas
d’entretien. Le manomètre est largement protége par un cache de
protection. La précision de l’appareil est longtemps conservée si
l’on évite les coups et le maniement
brutal.
Réparation
Après réparation, l’appareil assujetti à l’étalonnage doit être de nouveau étalonné par l’Office des poids
et mesures compétent. C’est pourquoi, en cas d’incident, nous conseillons d’envoyer l’appareil au
revendeur spécialisé ou à l’usine
pour vérification.
Utiliser de l’air comprimé filtré et
déshuilé.Ne pas utiliser pour le gon
flage on le contrôle de pneus les
tés à l’eau on contenant des produits corrosifs.
D ENG F
Page 3

13-217 445, Fax: +40-13-214 505
-
Dilex d.o.o.,
Orginceva ut. 17, SLO-51113 Ljublijana
Remtech Spol. S.R.O.,
Vinice 293, SK-90021 Svaty Jur
Tel.: +42-1-744 971 981, Fax: +42-1-744 971 291
Agent Trade, S. C., S.R.L.,
Aleea Bran Nr. 2, BL. 92, P., Ap. 47,
RO- 751552 Bucuresli 4
Metabo s.r.o.,
Kralovicka 544, CZ-25001 Brandys nad Labem
Tel.: +42-202-804 458, Fax: +42-202-804 456,
e-mail: Miranda@metabo.cz,
Internet: http://www.metabo.cz
Tel.: +40
Tel.: +386-61-168 16 20, Fax: +386-61-168 16 16
EB_Adr1B.fm
c
Bolas - Máquinas e Ferramentas de Qualidade, S.A.,
Rua 8, Lotes 8, 10, 12, P.O. Box 53,
P-7001 Évora-Codex
P
s
Metabo Danmark A/S,
Tel.: +351-66-74 93 00, Fax: +351-66-74 93 09,
e-mail: bolas@mail.telepac.pt
K
R
Marielundvej 48 C, DK-2730 Herlev
Tel.: +44-84-13 55, Fax: +44-84-86 04,
e-mail: brasmus@post10.tele.dk
Profilma-Import A/S,
N
O
HDF-Paulsson AB,
Box 525, Svaravaregatan 5, S-30180 Halmstad
Tel.: +46-35-154 400, Fax: +46-35-121 780
Nofa OY, P.O.Box 28,
Hannuksentie 1, FIN-02270 Espoo
Postboks 536 Nanset, Sophus Buggesvei 48,
N-3252 Larvik
Tlf.: +47-33-114 777, Fax: +47-33-114 108
S
Tel.: +358-9-804 851, Fax: +358-9-809 485
J
91-578 47 72
-
28,
GdyĖska
SzczeciĖski
z o.o.J.V., ul.
EB Nefro KFT,
EB- Polska,
Spółka
PL-73110 Stargard
p
Futo U. 70, HU-3508 Miskolc
Tel.: +48-91-578 47 72, Fax: +48
h
Extra Industrial Goods,
Tel.: +36-46-362 264; +36-46-366 363,
+36-30-450 618, Fax: +36-46-362 761
a
ITA Ltd.,
Balakirevskij Pereulok 19, str. 1, RUS-Moscow
Tel.: +7-95-737 93 11; +7-95-737 93 12,
+7-95-737 93 13, Fax: +7-95-737 93 14,
Rr. Fadil Rada 88, AL-Tirana
Tel.: +355-42-330 62, Fax: +355-42-330 63
AS Mecro,
Peterburi tee 44, EST-11415 Tallinn
Tel.: +372-6-201 101, Fax: +372-6-201 112
e
r
e-mail: ita1@online.ru
Elektra Beckum AG,
D
Metabo UK Ltd., 25 Majestic Road, GB-SO 16 OYT
Tel.: +44-2380-732 000, Fax: +44-2380-747 500
Daimlerstraße 1, D-49716 Meppen
Tel.: +49-1803-333 456, Fax: +49-1803-333 457
A
Lurem MACHINES à BOIS,
G
F
S.A. Ferunion N.V., 19-23, Rue de L‘Escaut /
Scheldestraat 19-23, B-1080 Bruxelles/Brussel
Tél.: +32-2-427 71 10, Fax: +32-2-425 37 21,
e-meil: general@ferunion.be
Metabo Nederland b. v.,
Keulschevaart 8, NL-3621 MX Breukelen,
Zone Industriell/BP 1, F-617000 Domfront
Tel.: +33-2-333 757 00, Fax: +33-2-333 720 70
B
Postbus 180, NL-3620 AD Breukelen,
H
Metabo Kistool AG,
Badener Str. 816, CH-8010 Zürich
Tel.: +41-1-437 82 80, Fax: +41-1-437 82 77,
e-mail: metkis@swissonline.ch
Fischknecht, Markus Schweisstechnik,
Marktgasse 6, 9050 Appenzell
Tel.: +41-71-787 14 05, +41-79-696 36 44,
Fax: +41-78-782 07
Carlo Stechel & Figli S.R.L.,
Tel.: +31-3462-642 44, Fax: +31-3462-635 54,
e-mail: marianne@metabo.nl
C
Via Buozzi 22, I-20097 San Donato Milanese (MI)
I
Herramientas Metabo, S.A.,
Polígono Ind. N°6, Parcela 16,
E-28935 Móstoles (Madrid)
Tel.: +34-91-616 57 67, Fax: +34-91-616 43 55,
e-mail: metabo-madrid@accesosis.es
Kestra S.A. Soldadura,
Polg. Ind. La Ferreria, C.Del Treball, No. 19,
E- 08110 Montcada I Reixac,
Tel.: +39-02-556 001 11, Fax: +39-02-556 003 22,
e-mail: a.casano@stechel.it
Tel.: +34-935-750 030, Fax: +34-935-753 394
E
 Loading...