

Page 1
Bh 6009 S
使用说明 ..................................... 5
Operating Instructions ................ 8
170 24 1400 – 0507
Page 2
EN 60745
98/37EG, 89/336/EWG
Erhard Krauß, Geschäftsführung
© 2007 Metabowerke GmbH, 72622 Nürtingen, Germany
麦太保有限公司,D-72622,德国约廷根
2
Page 3
1
2
3
5467
3
Page 4
A
E
6.30992
B
6.31285 6.35035
C
D
F
6.31800
6.31800
G
4
Page 5
使用说明
亲爱的用户:
感谢您对本公司的信任,并购买本公司的麦太保电动工具!每一台麦太保的工具都已经过麦太保质保部门
详细的检验测试及严格的品质控制。然而,电动工具的使用寿命与您如何来使用它是息息相关的。因此请
您务必注意本说明书及附带文献所提供的信息。当您使用麦太保电动工具时越细心、越得法,它为您效力
的时间也就越长。
目录
1 一致性声明
2 规定用途
3 一般安全规则
4 特殊安全规则
5 概述
6 产品特性
7 调试
7.1 附带手柄的安装
8 使用
8.1 设定限深器
8.2 接通和切断
8.3 操作模式选择
8.4 带SDS夹头的钻头更换
9 提示与技巧
10 维护
11 配件
12 修理
13 环保
14 技术规格
1 一致性声明
作为唯一责任人,我们特此声明,本产品符合第
2页所列指令和标准。
2 规定用途
此旋转冲击钻配有合适的配件,可以用冲击钻头对
水泥、石头以及其它此类材料进行冲击钻孔和开
凿。它还可以对金属、木头等材料进行非冲击钻
孔。
因使用不当造成的损坏责任由用户自负。
必须遵守通用事故预防规章和附带的安全资料。
3 一般安全规则
在使用本电动工具前,请先仔细通读和熟悉所有附
带的安全资料(红色小手册)和使用说明。妥善保
管所有附带文件以备参考,如需转交电动工具,必
须将这些文件一同转交。
4 特殊安全规则
为了您的安全及保护您的电动工
具,请特别注意有此警示标志的地
方!
戴护耳器。接触噪音可能会导致听力丧失。
佩带合适的防尘面罩。
使用与工具一起提供的附带手柄。失控会导致人员
伤害。只能在安装了附带手柄的情况下进行操作。
双手始终握住提供的手柄,站稳,专心工作。
当操作本工具时,请务必戴好护目镜、手套及穿安
全鞋。
确保您要使用本工具的地方没有电源电缆,气体管
道或水管(例如用一个金属探测器检测)。
如需接触隐蔽电缆或供电电缆,必须将手握在电动
工具外壳的绝缘部分。接触通电的电线会使金属部
件带电,因此会使操作者触电。
麦太保S自动安全离合器
如果安全离合器发出信号,请立即关闭本机器!
避免无意启动:在工具没有插上电源或断电的情况
下,始终断开开关。
请勿接触正在旋转的电动工具。
只能在机器静止时清理碎屑和类似材料。
在进行任何调整或保养工作前,先从插座中拔出插
头。
5
Page 6
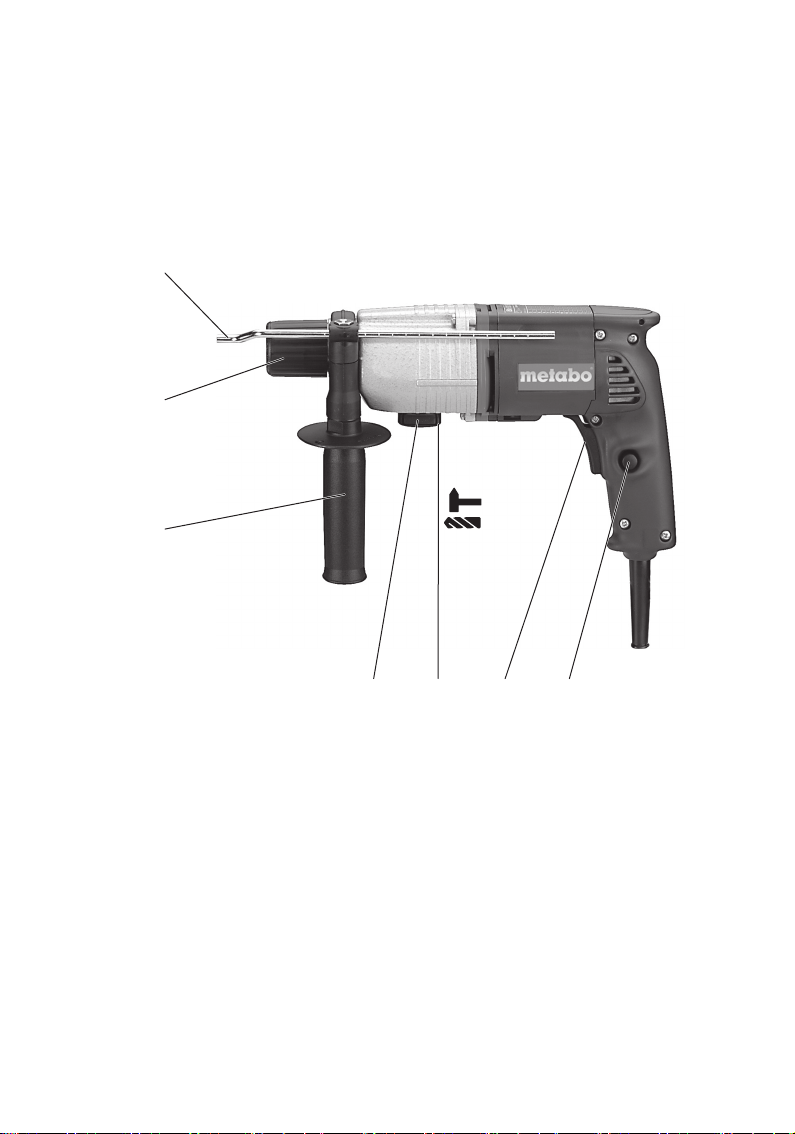
5 概述
见第3页。
1 限深器
2 SDS夹头
3 侧手柄
4 锁
5 控制旋钮
6 触发开关
7 锁定按钮
6 产品特性
麦太保S自动安全离合器:
如果插入的钻头阻塞或卡住,发动机的电流大小将
会被限制。由于此时会产生巨大力量,请始终双手
紧握机器的手柄处,站稳,专心工作。
7 调试
在接上电源前,请查看额定主电压及主频
率(标明在额定值标签上)是否与供应电源
相吻合。
7.1 附带手柄的安装
为保证安全,请始终使用提供的附带手
柄。
逆时针旋转附带手柄(3),以打开卡环。将附带
手柄安装在机器的轴环上。插入限深器(1)。根
据当前工作的需要将附带手柄拧紧到适当的角度。
8 使用
8.1 设定限深器
松开附带手柄(3)。设置限深器(1)到所期望的钻孔
深度,并重新紧固附带手柄。
8.2 接通和切断
按触发开关(6)启动机器。
通过锁定按钮(7)锁定触发开关可进行连续操作。
再次按触发开关可停止操作。
当持续接通电源时,如工具脱手,它会仍
然处于运作状态。因此,请始终双手紧握
机器的手柄处,站稳,专心工作。
8.3 操作模式选择
通过旋转控制旋钮(5)来选择合适的操作模式。
如要旋转,则同时推动锁(4)。
钻孔
冲击钻孔
朝逆时针方向进行冲击钻孔和其他钻孔操
作。
8.4 带SDS夹头的钻头更换
安装前,先清洁工具柄部,然后涂上专用
润滑脂(配件订购号6.31800)!仅使用
SDS-Plus钻头!
插入钻头:
插入钻头时转动,直到锁在正确位置。钻头自动锁
定。
拆下钻头:
朝箭头(a)指示的方向转动钻头锁(2)取下钻头
(b)。
9 提示与技巧
冲击钻只需要中等压力。施加高压不会提高性能。
钻深孔时,定期从孔中取出钻头清除灰屑。
在瓷砖或其它脆性材料中钻孔时,不要使用冲击钻
孔。
10 维护
机器的通气槽应定期清洁。
6
Page 7
11 配件
只能使用麦太保原厂配件。
如果您需要任何配件,请与您的经销商协商。
为了购买正确的配件,请告知经销商您所拥有的电
动工具的准确型号名称。
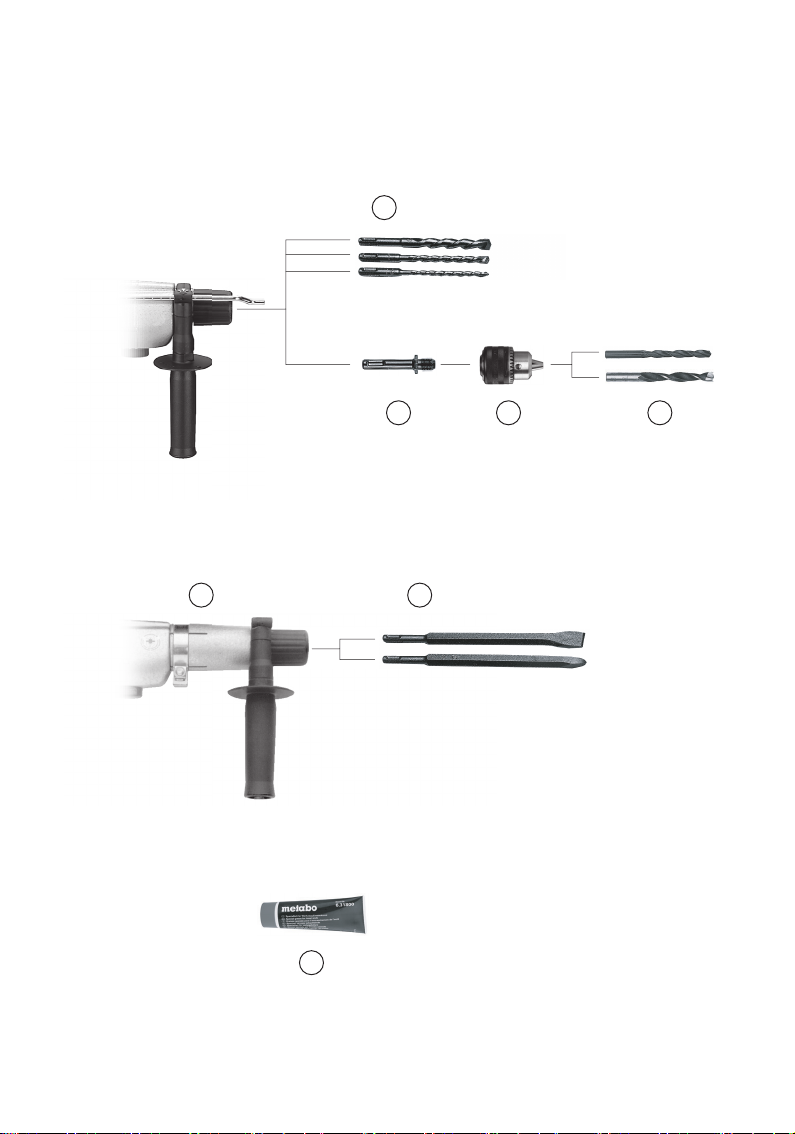
见第4页。
A 带有SDS-Plus柄部的钻头
B 连接器
C 齿轮夹头
D 金属和木材麻花钻
E 开凿附加装置
F 带有SDS-Plus柄部的凿子
G 专用润滑脂
如需了解全部配件,请见www.metabo.com或主目
录。
12 修理
只能由具有资质的电工修理电动工具!
任何需要修理的麦太保电动工具都可送到麦太保授
权维修中心进行修理。
请随电动工具附上一份故障说明。
13 环保
所有麦太保的包装品,皆可100%回收。
电动工具或配件用坏后,含有大量有价值的材料和
塑胶等,皆可回收再生。
本说明书使用无氯再生纸印刷。
14 技术规格
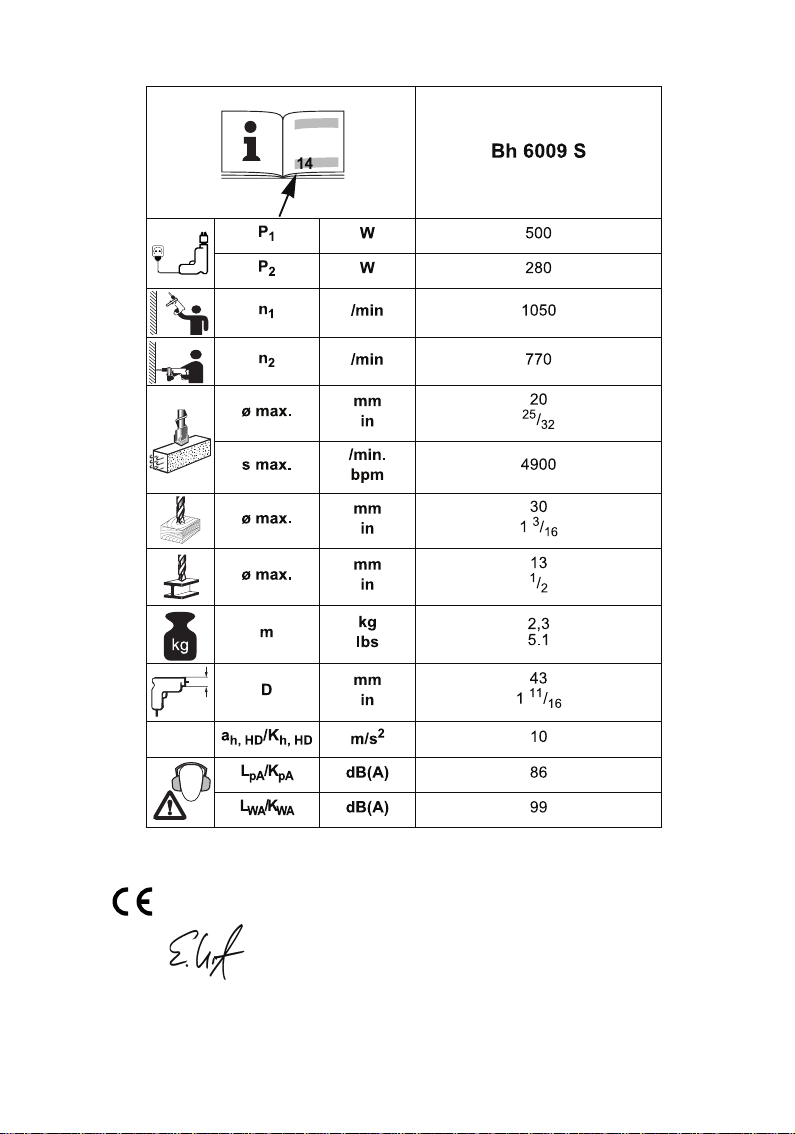
第3页的规格注释如下。
保留因技术发展而进行变更的权利。
P
= 额定功率输入
1
P2 = 额定功率输出
n1 = 空载转速
n
= 负载转速
2
ø max = 整体钻头最大直径
s max = 最大冲击率
m = 重量
D = 轴套直径
b = 夹头能力
依照EN 60745规定的振动总值(三个方向上的矢量
和):
a
= 振动值(对混凝土进行冲击钻孔)
h,HD
K
= 不安全(振动)
h,HD
典型A荷重声音水平:
L
= 声压水平
pA
LWA = 声压功率水平
KpA, KWA = 不安全(噪音等级)
操作过程中,噪音水平可能超过85 dB(A)。
戴护耳器!
测量值依照EN 60745确定。
引用的技术资料皆含有公差值在内(依照相关有效
标准)。
更换电源线时,请更换符合245IEC66(YCW)的电
源线。
7
Page 8
Operating Instructions
Dear Customer,
Thank you for the trust you have placed in us by buying a Metabo power tool. Each Metabo power tool
is carefully tested and subject to strict quality controls by Metabo’s quality assurance. Nevertheless, the
service life of a power tool depends to a great extent on you. Please observe the information contained
in these instructions and the enclosed documentation. The more carefully you treat your Metabo power
tool, the longer it will provide dependable service.
Contents
1 Declaration of Conformity
2 Specified Conditions of Use
3 General Safety Information
4 Special Safety Information
5 Overview
6 Special Product Features
7 Start of Operation
7.1 Side handle installation
8 Use
8.1 Depth Stop Setting
8.2 Switching on/off
8.3 Operating mode selection
8.4 Tool Change with SDS Chuck
9 Tips and Tricks
10 Maintenance
11 Accessories
12 Repairs
13 Environmental Protection
14 Technical Specifications
1 Declaration of Conformity
We, being solely responsible, hereby declare
that this product conforms to the standards and
directives specified on page 2.
2 Specified Conditions of Use
With the appropriate accessories this rotary
hammer drill is suitable for impact drilling with
impact masonry bits and chiselling into concrete,
stone and other such materials as well as for
non-impact drilling into metal and wood etc.
The user bears sole responsibility for any damage
caused by inappropriate use.
Generally accepted accident prevention
regulations and the enclosed safety information
must be observed.
8
3 General Safety Information
Before using this power tool, completely read
and understand the enclosed safety information
(red booklet) and the instructions. Keep all
enclosed documentation for future reference, and
pass on your power tool only together with this
documentation.
4 Special Safety Information
For your own protection and for
the protection of your power tool
pay attention to all parts of the
text that are marked with this
symbol!
Wear ear protectors. Exposure to noise can
cause loss of hearing.
Wear a suitable dust protection mask.
Use the additional handle supplied with the
tool. Loss of control can lead to injuries. Work
only with the additional handle correctly installed.
Always hold the machine with both hands
using the handles provided, stand securely and
concentrate.
Always wear protective goggles, gloves, and
sturdy shoes when working with this tool.
Ensure that the spot where you wish to work is
free of power cables, gas lines or water pipes
(e.g. using a metal detector).
Hold the power tool only at insulated housing
parts if there is any danger of making contact
with concealed electric cables or the supply
cable. Contact with live wires energises the metal
parts of the housing and can cause electric shock
to the operator.
Metabo S-automatic safety clutch.
When the safety clutch responds, switch off the
machine immediately!
Avoid inadvertent starts by always unlocking the
switch when the plug is removed from the mains
socket or in case of a power cut.
Do not touch the rotating tool!
Page 9
Remove chips and similar material only with the
machine at standstill.
Pull the plug out of the plug socket before any
adjustments or servicing are performed.
5 Overview
See page 3.
1 Depth stop
2 SDS chuck
3 Side handle
4 Stop
5 Control knob
6 Trigger
7 Lock button
6 Special Product Features
Metabo S-automatic safety clutch:
If the insertion tool jams or hooks, the power flow
to the engine will be restricted. Because of the
high power which then arises, always hold the
machine with both hands on the handles, stand
safely, and concentrate on your work.
7 Start of Operation
Before plugging in check to see that
the rated mains voltage and mains
frequency, as stated on the rating label,
match with your power supply.
7.1 Side handle installation
For safety reasons, always use the side
handle supplied.
Open the clamping ring by turning the side handle
(3) counter-clockwise. Place the side handle
onto the machine’s collar. Insert the depth stop
(1). Tighten the side handle in the required angle
depending on the task at hand.
8 Use
8.1 Depth Stop Setting
Loosen the side handle (3). Set depth stop (1) to
the desired drilling depth and retighten the side
handle.
8.2 Switching on/off
To start the machine, press the trigger (6).
For continuous operation the trigger can be locked
with the lock button (7). To stop the machine,
press the trigger again.
If switched on continuously, the
machine continues running if it is jerked
out of your hands. Therefore, always
hold the machine with both hands on the
handles, stand safely, and concentrate on
your work.
8.3 Operating mode selection
Select the desired operating mode by turning the
control knob (5). To turn, push the stop (4).
twist drilling
hammer drilling
Hammer drilling and other drilling
operations only in clockwise direction.
8.4 Tool Change with SDS Chuck
Before fitting, clean tool shank and
apply special grease 6.31800! Use only
SDS-Plus tools!
Inserting the tool:
Turn the tool while inserting, until it engages. The
tool is automatically locked.
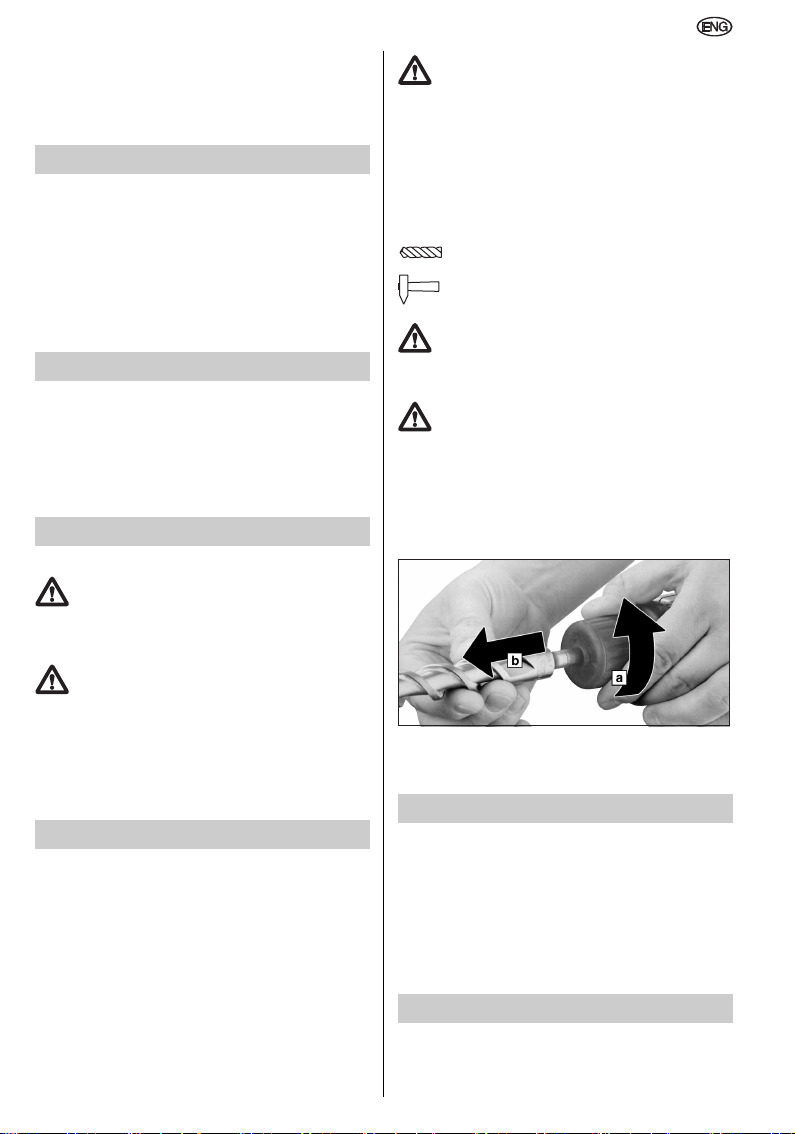
Removing the tool:
Turn tool lock (2) in direction indicated by arrow
(a) and remove the tool (b).
9 Tips and Tricks
Only moderate pressure is required for hammer
drilling. Exerting a high force does not increase
performance.
When drilling deep holes, remove the drill bit
periodically from the hole to release the stone
dust.
Drill tiles and other brittle materials without impact.
10 Maintenance
The vent slots of the machine should be cleaned
from time to time.
9
Page 10
11 Accessories
Use only genuine Metabo accessories.
If you need accessories, check with your dealer.
For the dealer to select the correct accessory, he
needs to know the exact model designation of
your power tool.
See page 4.
A Drills with SDS-Plus shank
B Connector
C Geared Chuck
D Twist drills for metal and wood
E Chiselling attachment
F Chisels with SDS-Plus shank
G Special Grease
For complete range of accessories, see
www.metabo.com or the main catalogue.
12 Repairs
Repairs to electrical tools must be carried out by
qualified electricians ONLY!
Any Metabo power tool in need of repair can be
sent to one of the addresses listed in the spare
parts list.
Please attach a description of the fault to the
power tool.
14 Technical Specifications
Explanatory notes on the information on page 3.
Changes due to technological progress reserved.
P
= rated input
1
P2 = rated output
n1 = no-load speed
n
= load speed
2
ø max = max. solid drill diameter
s max = max. impact rate
m = weight
D = spindle collar diameter
b = drill chuck chucking capacity
Vibration total value (vector sum of three
directions) determined in accordance with
EN 60745:
a
= Vibration emission value
h, HD
(hammer drilling into concrete)
K
= Unsafe (vibration)
h,HD
Typical A-effective perceived sound levels:
= Sound pressure level
L
pA
LWA = Acoustic power level
KpA, KWA = Unsafe (noise level)
During operation the noise level can exceed
85 dB(A).
Wear ear protectors!
13 Environmental Protection
Metabo’s packaging can be 100% recycled.
Worn out power tools and accessories contain
considerable amounts of valuable raw and plastic
materials, which can be recycled.
These instructions are printed on chlorine-free
bleached paper.
10
Measured values determined in conformity with
EN 60745.
The technical specifications quoted are subject to
tolerances (in compliance with the relevant valid
standards).
Page 11

Page 12

Metabowerke GmbH,
72622 Nürtingen, Germany
www.metabo.com
 Loading...