

Page 1
AUFBAU-und BEDIENUNGSANLEITUNG
Mounting and operating instructions
Instructions de montage et de service
82455
Stand 04.2008
META-FIX
Schraubregal
Stand 04.2008Stand 04.2008
Page 2
2
Inhaltsverzeichnis
Index
Indice
Beschreibung Seite
Benötigtes Werkzeug 3
Wichtige Hinweise und Sicherheitsregeln fü rdie Aufstellung 4
Grundaufbau: Schraubregal 8
Systemübersicht 9
Regalaufbau (Einfachregal) 10
Grundaufbau Einfachregal 20 + 21
Montage (Einfachregal) 11
Regalaufbau (Doppelregal) 12
Grundaufbau Doppelregal 22 + 23
Montage (Doppelregal) 13
Kippsicherung 30 + 35
Fachboden und Anordnung der Fixwinkel
L80 14 + 15
S100 und MS230 II 16
S100; V150; V200; MS230 II (MS330) 17
Büro - Compactregal 36 + 37
Büro - Archivregal 46 + 47
MS230II und MS330II
14 - 17
Büro-Compactregal 34
Büro-Compactregal: Belastungswerte 36 + 37
Archiv-Compactregal: Belastungswerte 46 + 47
Grundaufbau Büro-Compactregal ab 40
Archiv-Compactregal 45
Grundaufbau Archiv-Compactregal 45
Systemzubehör:
Seiten.- und Rückwand 26 - 27
Tiefenunterzug für MS230 und MS330 Böden 28
Längsunterzug für MS230 Böden 29
Fachteiler und Trenngitter durchgehend 32
Fachteiler und Trenngitter freistehend 33
Endanschlagleiste 38
Mittelanschlag 39
Verschiebbarer Fachteiler 42
Tiefenleiste 43
Trennstange und Pendelprofilanbindung 44
Technische Änderung vorbehalten.
Subject to technical changes
Sous réserve de modifications techniques
Systemabmessungen + Belastungswerte L80; S100; V150; V200;
Stand 04.2008
Page 3
3
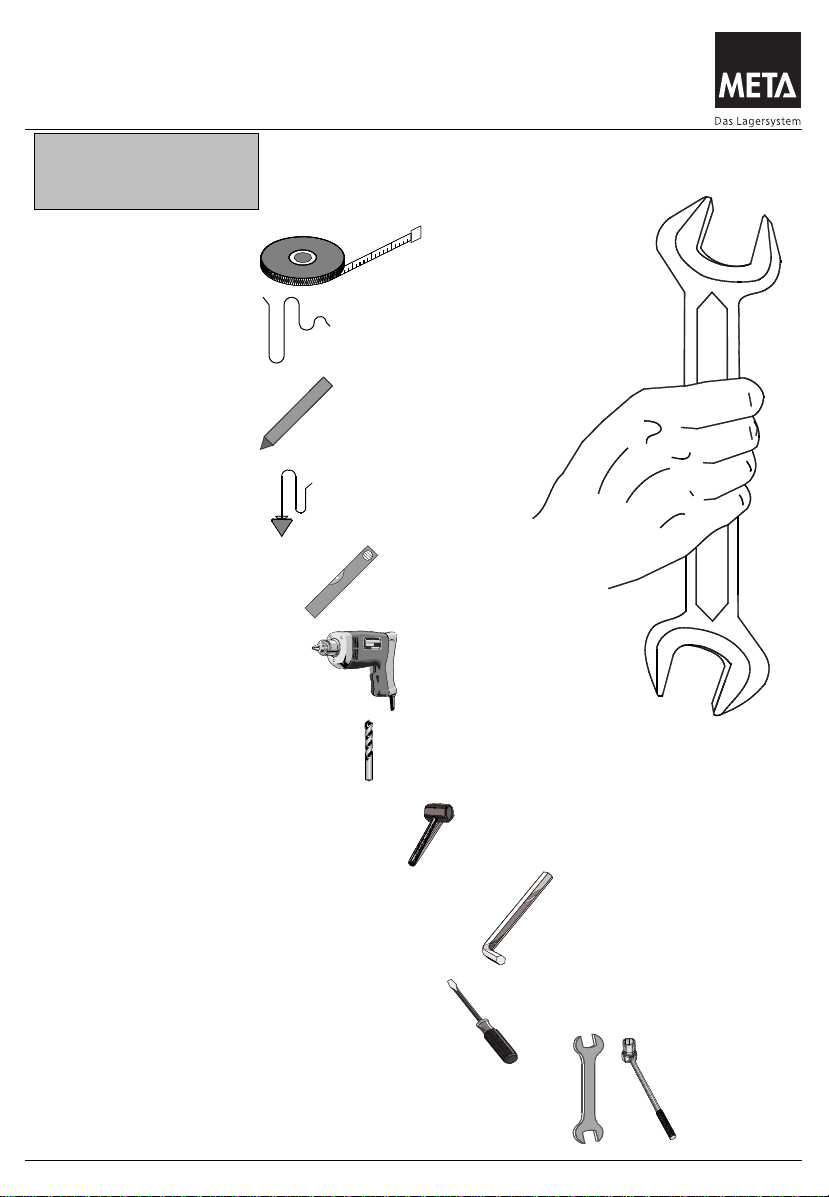
Benötigtes Werkzeug
Needed tools
Les utiles indispensables
Maßband
Measuring tape
Mêtre
Kreide
Chalk
Craie
Lot
Plumbline
Fil à plomp
Wasserwaage
Water level
Niveau à bulle d´air
Schlagbohrmaschine
Percussion drill
Perceuse à percussion
Schlagbohrer Ø 10 + Ø 8
Percussion drill bits Ø 10 + Ø 8
Foret à percussion Ø 10 + Ø 8
Innensechskant-Schlüssel SW 4
Spanner for hexagonal socket-headed screws
Clé mâle coudée pour vis à six pans creux
Maul- und Steckschlüssel SW 10
Open- jawed and box spanners,sizes 10
Clè à fourche et clé à pipe ( à douille ), ouverture 10
Benötigtes Werkzeug
Tools required
Outils indispensables
Schraubendreher
Screwdriver
Tournevis
Schnur
Cord
Mêtre-ruban
Kunststoff- oder Gummihammer
Plastic or rubber hammer
Marteau en plastique ou en caoutchouc
Stand 04.2008
Page 4

4
Hinweise Sicherheitsregeln für die Aufstellung und Bedienung von
META-Regalen
Lesen Sie vor dem Aufbau Ihrer META - Regale unbedingt die in
dieser Anleitung aufgeführten Informationen.
Bitte halten Sie sich bei dem Aufbau und bei der späteren
Nutzung exakt an die Angaben in dieser Anleitung, den
Hinweisen in unseren Auftragspapieren sowie den Belehrungen
durch unser Fachpersonal.
Die von META gelieferte Regalteile dürfen nur ihrem
Verwendungszweck entsprechend eingesetzt werden. Für
unsachgemäßen Einsatz, Nutzung oder Montage übernimmt
META keine Gewährleistung.
Alle Angaben in dieser Anleitung gelten nicht für Regale in
Außenaufstellung, bzw. Regale, die zusätzlich durch Wind,
Schnee, Erdbeben oder andere Zusatzlasten beaufschlagt sind.
In solchen Fällen ist eine individuelle Dimensionierung durch den
Hersteller erforderlich.
Durch Umbau, bzw. Neuaufstellung unserer Regale an einem
anderen Ort können sich die Bedingungen für die Nutzung und
Belastung ändern.
Bei Umbau der Regalanlage bzw. Unstimmigkeiten beim Aufbau,
sind META-Fachleute zu Rate zu ziehen.
Der Aufbau sowie der Umbau der Regale darf nur im
unbeladenen Zustand nach unseren beiliegenden Aufbau- und
Bedienungsanleitungen vorgenommen werden.
Die Beladung der Regale darf erst nach völligem
Montageabschluss vorgenommen werden.
Der Aufbau der Regale sollte durch mindestens 2 Personen
erfolgen. Gute Dienste leistet dabei ein hüfthöher Tisch, oder
zwei freistehende Böcke, auf denen die Bauteile zur Vormontage
aufgelegt werden können.
Beim Zusammenbau der Einzelteile darf keine rohe Gewalt durch
Einschlagen mit einem Metallhammer, oder durch Hebelstangen
angewendet werden. Verwenden Sie grundsätzlich einen
Gummihammer oder eine weiche Holzzwischenlage.
Um Personen- und Sachschäden abzuwenden, haben wir uns als
Hersteller von Regalanlagen den vom RAL anerkannten Güteund Prüfbestimmungen der RAL-RG 614 unterworfen.
Bei der Planung von Regalanlagen sind die "Richtlinien für
Lagereinrichtungen und -geräte BGR 234" des Hauptverbandes
der gewerblichen Berufsgenossenschaften, Stand 10/88, sowie
die einschlägigen Arbeitsstättenverordnungen verbindlich und die
allgemeinen Unfallverhütungsvorschriften zu beachten.
Von META werden die maximalen Stützlasten und
Flächenpressungen am Fußboden vorgegeben. Sie als Betreiber
müssen dafür Sorge tragen, dass diese Belastungen vom Boden
des Aufstellplatzes sicher aufgenommen werden können. Bei
fehlenden Angaben darf META von einer zulässigen
Fußbodenpressung von mindestens 50 Kg/cm² ausgehen.
Verkehrswege in Regaleinrichtungen sind mindestens 1,25m,
Nebengänge mindestens 0,75m breit auszulegen. Der
Sicherheitsabstand zu Fördermitteln muss mindestens 0,50m auf
jeder Seite betragen.
Die angegebenen, maximal möglichen Fach- und Feldlasten
dürfen nicht überschritten werden.
Regale mit einer Fachlast von mehr als 200 Kg oder einer
Feldlast von mehr als 1.000Kg müssen mit einem Typenschild
gekennzeichnet sein. Typenschildangaben: Hersteller, Baujahr
oder Kommissioniernummer, zulässige Fach- und Feldlasten.
Das mitgelieferte Typenschild ist deutlich sichtbar anzubringen.
Bei korrosionsaktiven Industrieböden (z.B. Magnesitböden) muss
eine Isolierung der Stützenfußbereiche vorgesehen werden. Die
Gebrauchsanleitung der Fußbodenhersteller ist verbindlich zu
beachten.
Regalanlagen dürfen nur nach den ihrer Bestimmung zugrunde
liegenden Maßgaben belastet werden. Die Beladung der Regale
sollte gleichmäßig vorgenommen werden, da die statische
Auslegung auf der Annahme einer gleichmäßig verteilten
Flächenbelastung beruht. Punktförmige Stoßlasten und
Schiebelasten sind daher grundsätzlich zu vermeiden.
Regalrahmen und -fächer, insbesondere Fachböden dürfen nicht
von Personen betreten werden.
Beschädigte und verformte tragende Bauteile einer Regalanlage
müssen umgehend ausgetauscht werden, da die Belastbarkeit
nur im einwandfreien Zustand von META garantiert wird.
Gemäß §10 Prüfung der Arbeitsmittel des
Gerätes- und Produktsicherheitsgesetzes unterliegen Regale der
Prüfpflicht.
Wir empfehlen:
- monatliche Prüfung auf Beschädigung durch den Betreiber
und
- jährliche Inspektion durch den Hersteller
Jährliche Inspektionspflicht für Lagereinrichtungen
Der Arbeitgeber ist dazu verpflichtet, sämtliche
Lagereinrichtungen - d.h. elektrisch angetriebene sowie
statische Regale - systematisch und regelmäßig zu
inspizieren. Wenn vom Regalhersteller aufgrund der
Konstruktion oder der Einsatzbedingungen keine
verschärften Inspektionen gefordert werden, sind die
Regelungen der BGR 234 sowie der Normentwürfe DIN
EN 15512, DIN EN 15620, DIN EN 15629 und im
Besonderen der DIN EN 15635 einzuhalten. Laut der
Betriebssicherheitsverordnung (BetrSichV) trägt der
Arbeitgeber die Verantwortung für die Sicherheit seiner
Lagereinrichtung. Regale müssen somit mindestens alle
12 Monate durch einen Experten inspiziert werden.
META bietet diese Experteninspektion durch einen
verbandsgeprüften Regalinspektor an. Zu näheren
Informationen: www.regalinspektion.de
Auf verzinkten Regalböden oder Paneelen dürfen nicht
unmittelbar Lebensmittel gelagert werden.
Die maximal zulässigen Bodenunebenheiten am Aufstellort sind
der DIN 18202, Tabelle 3, Zeile 3 zu entnehmen.
Stand 04.2008
Page 5
5
Instructions Safety Rules for the mounting and handling of META
shelves
Safety Rules for the mounting and handling of META shelves
Please read the information presented in this guideline thoroughly
before you start mounting your META shelves. Please follow in
the course of mounting and during the utilization of the shelves
exactly the advice given in these guide-lines and follow the
instructions in our order documents as well as the advice given by
our technical experts.
The shelf components supplied by META are allowed to be
utilized only in the framework of the technical purpose intended.
META does not accept any warranty for improper handling,
utilization or mounting.
All details in these instructions do not apply to outdoor racks or
racks that are additionally subject to stress by wind, snow,
earthquakes or other additional loads. In such cases, individual
dimensioning by the manufacturer is essential.
It is possible that the conditions for the utilization of the shelves
are changed, when they are placed at a different location, when
they are altered in their construction or when they are newly
erected.
In case the construction of the shelves is altered or when
difficulties are encountered during erection, you are strongly
advised to ask for META experts to assist you.
Mounting and erection work is allowed to be carried out only when
the shelves are empty, according to our Mounting and Handling
Instruction Sheets attached.
The shelves are permitted to be loaded only after the mounting
work has completely been completed.
For the mounting of the shelves, a minimum of two persons is
required. Very useful in this connection is a table with a height up
to the hips, or two free standing horses, on which the individual
components can be placed for the preliminary mounting.
When joining the various components, it is not allowed to use
great force to forcibly insert by means of a metal hammer or by
using a lever. On principle, use only a rubber hammer or a soft
wooden intermediary layer.
We, as the manufacturers of shelf constructions, have submitted
and dedicated ourselves to the Quality and Testing Regulations
RAL-RG 614, recognized by the RAL Institute, in order to prevent
injuries of persons and material damage.
In the course of planning shelf installations, the "Guidelines for
Storage Installations and devices BGR 234" of the Main
Association of the industrial trade organizations, status 10/88, as
well as the relevant regulations governing the prevailing
conditions at the workplace are binding, and the general
regulations for the prevention of accidents must be adhered to.
META states the maximum supporting loads and the pressures
allowed to be exerted on the surfaces of the areas at the ground.
The customer and user must ensure that the bearing capacity of
the ground at the place of mounting can safely withstand these
loads. Unless specific details are made to the contrary, META
assumes that the minimum permissible floor pressure is 50 kg/
cm².
The minimum width for traffic aisles in shelf constructions is 1.25
m, the minimum width of sub-aisles is 0.75 m. The minimum
safety distance between the means of transportation and the
shelves must be 0.50 m on either side.
The maximum possible shelf and field loads as stated are not
allowed to be exceeded.
Shelves with a shelf load of more than 200 kg or a field load of
more than 1000 kg must be equipped with a name plate.
The necessary details on this name plate are as follows:
Manufacturer, year of construction or number of commissioning,
admissible shelf and field loads. The name plate supplied must be
attached at a conspicuous place of the construction.
In the case of corrosive active industrial floors (e.g. magnesite
floors), an insulation of the support base areas must be provided
for. The instructions for use, issued by the floor manufacturers,
must be strictly observed.
Shelf constructions are allowed to be loaded only in strict
compliance with the purpose intended on the basis of the details
specified. Loading of the shelves should be carried out in a
uniform manner, because the static design is based on
assumption that the area loading will be effected uniformly.
Impact loads on certain points only and sliding loads must, on
principle, be avoided.
Persons are not allowed to stand or walk on the shelf frames and
shelf boards.
Bearing components that are damaged or deformed out of shape
must be replaced without delay because the nominal load
capacity is warranted by META on the condition that the complete
construction is in perfect shape.
According to §10 Testing of Equipment of the Appliance and
Product Safety Act, the testing of racks is obligatory.
We recommend:
- monthly inspection for damage performed by the plant operator
and
- yearly inspection by the manufacturer
Mandatory annual inspections for warehouse equipment
The employer is obligated to inspect all of its warehouse
equipment - including all electric-powered vehicles as well as
static shelving - systematically and at regular intervals. Providing
that the racking manufacturer does not stipulate that additional
inspections are to be made due to the specific design of the
racking or its conditions of use, the following regulations must be
met: BGR 234 (stipulated by the German employer's liability
insurance association) as well as Draft Standards DIN EN 15512,
DIN EN 15620, DIN EN 15629 and, in particular, DIN EN 15635.
According to the terms of the German Ordinance on Industrial
Safety and Health (BetrSichV), the Employer is responsible for
the safety of its racking equipment. For this reason, racking
systems must be inspected by an expert every 12 months. META
offers an expert inspection service conducted by an Associationcertified racking inspection body. For more information, please
go to www.regalinspektion.de
.
Food is not allowed to be placed directly on galvanized shelves or
panels. For the maximum permissible deviations from levelness
conditions at the place of mounting, see DIN 18202, Table 3, line
3.
Stand 04.2008
Page 6
6
Indications et règles de sécurité pour le dressage et l'utilisation des
rayonnages META
Avant de procéder au dressage de vos rayonnages META,
veuillez lire impérativement les informations et "règles de
sécurité" fournies dans les présentes instructions. Veuillez
également, aussi bien lors du dressage que l'utilisation ultérieure
de vos rayonnages, vous conformer exactement aux informations
fournies dans les présentes instructions, aux indications figurant
dans nos documents de commande ainsi qu'aux enseignements
fournis par notre personnel technique.
Les éléments de rayonnage livrés par META ne doivent être
utilisés que conformément à leur destination. META décline toute
responsabilité pour tous les dommages qui résulteraient d'une
exploitation, d'une utilisation ou d'un montage incorrects du
rayonnage.
Toutes les indications fournies dans les présentes instructions ne
s'appliquent pas aux rayonnages implantés à l'extérieur ou à ceux
qui sont soumis à la charge supplémentaire du vent, de la neige,
d'un tremblement de terre ou à toute autre charge
supplémentaire. Dans les cas suscités, un dimensionnement
individuel par les soins du constructeur sera nécessaire.
La reconstruction et le nouveau dressage de nos rayonnages sur
un autre site sont susceptibles d'entraîner la modification des
conditions d'utilisation et de charge.
Faites appel à des spécialistes de META à toute reconstruction
de l'installation à rayonnages ou en cas d'irrégularités lors du
dressage.
Le dressage et la reconstruction des rayonnages ne doivent être
effectués que lorsque ces derniers sans vides, conformément à
nos instructions de dressage et d'utilisation ci-jointes.
Le chargement des rayonnages ne doit être effectué qu'après la
fin totale des travaux de montage.
Le dressage des rayonnages doit être effectué par deux
personnes au moins. De précieux services vous seront fournis
dans ce contexte par une table présentant la hauteur la hauteur
de la hanche ou deux chevalets librement implantés, sur lesquels
vous pourrez poser les éléments pour le montage préliminaire.
Au moment de l'assemblage des différents éléments, il ne vous
est pas permis d'exercer une violence brute, par exemple par des
frappes à l'aide d'un marteau métallique ou par l'utilisation d'une
barre de relevage utilisée comme bras de levier. D'une manière
générale, utilisez une massette en caoutchouc ou une lame
intercalaire en bois tendre.
Dans le but de vous éviter les dégâts humains et matériels, nous
nous sommes conformé comme constructeur d'installation de
rayonnages aux dispositions de qualité et d'essai RAL-RG 614,
reconnues par le RAL.
L'étude des installations de rayonnage est soumise
obligatoirement aux "directives relatives aux installations et
appareils de stockage BGR 234" du Regroupement principal des
unions professionnelles industrielles, situation 10/88 ; conformezvous également aux ordonnances afférentes relatives aux lieux
du travail et aux dispositions générales relatives à la prévention
des accidents de travail.
La société META vous indique les valeurs maximales pour la
charge d'appui verticale et la pression superficielle au plancher.
En votre qualité d'exploitant du rayonnage, vous êtes tenus de
prendre les mesures nécessaires afin que ces charges exercées
au sol du lieu de dressage puissent être supportées sûrement.
Dans le cas de l'absence d'information, la société META admettra
une pression superficielle minimale sur le plancher de 50 Kg/cm2.
Au sein des installations de rayonnages, vous devez
dimensionner les voies de circulation à une largeur minimale de
1,25 m et de 0,75 m pour les passages secondaires. La distance
de sécurité minimale vis-à-vis des engins de transport doit être de
0,50 m sur les deux côtés.
Il ne vous est pas permis de dépasser les charges maximales
possibles par casier et par niveau, telles qu'elles sont indiquées.
Les rayonnages dotés d'une charge par niveau supérieur à 200
kg ou une charge par casier supérieure à 1.000 kg doivent
impérativement être repérés par une plaque signalétique.
Indications sur la plaque signalétique : Constructeur, année de
construction ou numéro de commission, charges par casier et par
niveau autorisées. La plaque signalétique fournie avec le
rayonnage doit être montée à un endroit bien visible.
Sur les sols industriels favorisant la corrosion (par exemple les
planchers magnésiens), il sera nécessaire de prévoir un
isolement des zones de pieds des appuis. Les instructions du
fabricant du plancher doivent être respectées obligatoirement.
Les installations de rayonnages ne doivent être soumises aux
charges que conformément aux prescriptions conformes à leur
destination. Le chargement des rayonnages doit être effectué
uniformément, car la conception statique se fonde sur la
présomption d'une charge superficielle uniformément répartie.
Par conséquent, évitez en général les charges par à-coups et les
charges coulissantes ponctuelles.
Il n'est pas permis aux personnes d'accéder aux cadres et aux
casiers des rayonnages, notamment aux fonds de casier.
Remplacez impérativement et immédiatement les pièces
porteuses endommagées et déformées d'une installation de
rayonnages, car la capacité de charge ne vous est garantie par
META que dans l'état technique impeccable de ces éléments.
Conformément à l'article 10 portant sur l'examen des moyens de
travail de la Loi sur la sécurité des appareils et des produits, les
rayonnages sont soumis à l'obligation de contrôle.
Nous vous recommandons :
-un contrôle mensuel de la présence éventuelle de dommages
par l'exploitant
et -une inspection annuelle par le constructeur
Obligation d'inspection annuelle pour les installations de
rayonnages
L'employeur est tenu d'effectuer une inspection systématique et
régulière de toutes les installations de rayonnages - c'est-à-dire
les rayonnages à commande électrique et statiques. Si le
constructeur du rayonnage n'exige pas d'inspections plus
rigoureuses en raison de la construction du rayonnage ou de ses
conditions d'exploitation, les inspections doivent se conformer
aux règlements BGR 234 ainsi qu'aux projets de normes DIN EN
15512, DIN EN 15620, DIN EN 15629 et, particulièrement, à la
norme DIN EN 15635. En vertu de l'ordonnance allemande
relative à la sécurité dans les entreprises (BetrSichV),
l'employeur est responsable de la sécurité de ses rayonnages.
Les rayonnages doivent ainsi faire l'objet d'une inspection par un
expert au moins une fois tous les 12 mois. META propose ces
inspections d'expert par les soins d'un inspecteur de rayonnage
agréé par le regroupement professionnel. Pour de plus amples
informations : www.regalinspektion.de.
Il ne vous est pas permis de stocker des aliments directement sur les
fonds de casier zingués ou sur les panneaux de lambris.
Les inégalités de sol maximales au lieu de dressage du rayonnage
vous sont indiquées par la norme DIN 18202, tableau 3, ligne 3.
Stand 04.2008
Page 7

7
Notizen
Notes
Notes
Stand 04.2008
Page 8
8
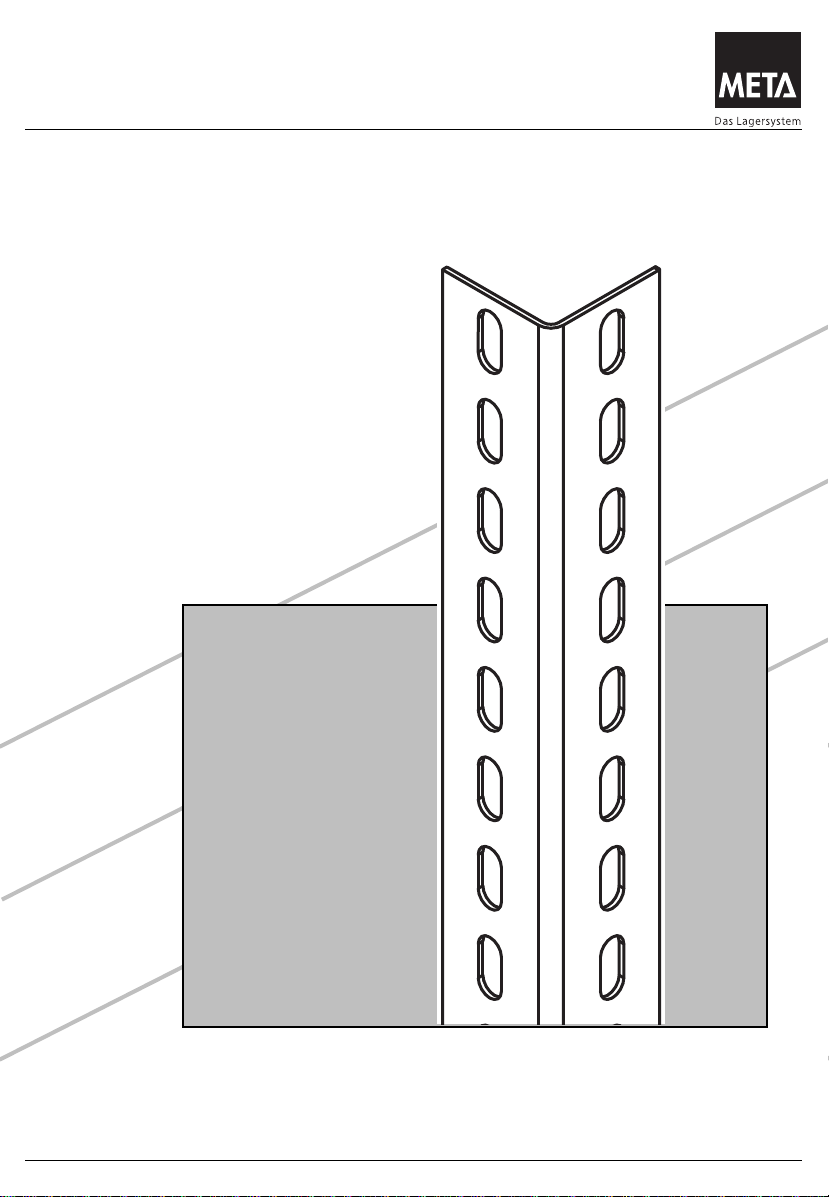
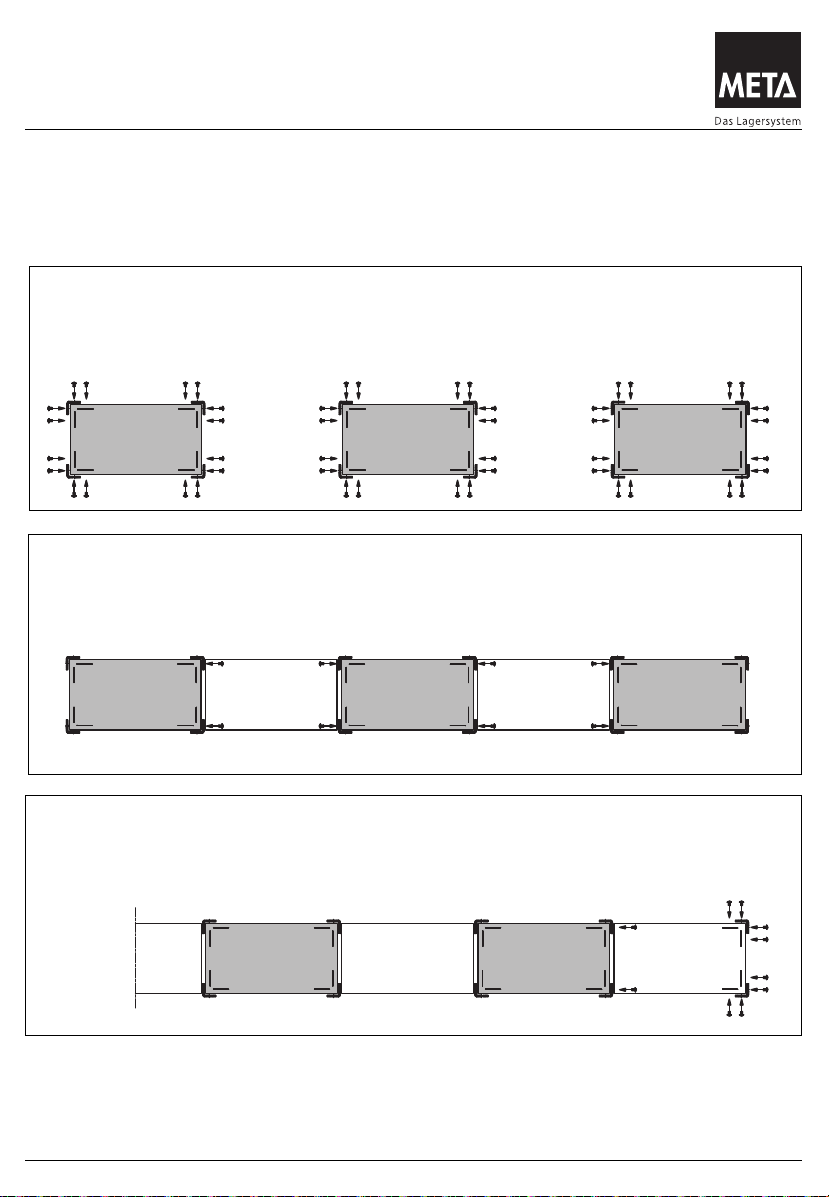
META-FIX - Schraubregal , Grundaufbau
META-FIX - Slotted angle rack , Basic-fitting
META-FIX - Rayonnage à vis , montage de base
A
A
B
B
B
Grundaufbau: Basic-fitting / Montage de base
1. Typ 1 liegend vormontieren Schrauben nur handfest anziehen
1. The rack must be preassembled in horizontal position - screws should only be tightened loosely.
1. Prémontage du rayon à plat - ne pas trop serrer les vis
Fachbodenregal 2000
Linsenflanschkopfschrauben
mit Innensechskant M6 x 12
Screw M6 x 12 / Boulon M6 x 12
Bundmutter M6
M6 / Ecrou M6
Regal danach aufstellen
Then it should be set up
Puis mettez le rayon debout
Detail A
Detail B
A
A
B
B
B
Anordnung der Fixwinkel, siehe Fachboden Typen.
Assembly of the Fix Corner plates, see shelf types
L’arrangement des cornières de fixation voir les types des tablettes.
Stand 04.2008
Page 9
9
META-FIX-Schraubregal , Systemübersicht
META-FIX- Slotted angle rack , Overview of the system
META-FIX-
Rayonnage à vis , Apercu de système
Typ 1
Typ 3
Typ 1
Typ 2
Typ 1
Aufbau diverse Regaltypen
Assembly of various shelf types
Installation de divers modèles de rayonnages
Typ 1
Typ 4
Typ 2
Typ 1
Typ 2
Typ 1
Typ 1
Typ 2
Typ 1
Typ 4
Doppelregal
Double shelf rack
Rayon double
Einfachregal
Single shelf unit
Rayon simple
Stand 04.2008
Page 10
10
META-FIX-Schraubregal , Regalaufbau ( Einfachregal )
META-FIX- Slotted angle rack , Shelf-unit assembly ( Single shelf-unit )
META-FIX-
Rayonnage à vis , Rayons montage ( Rayous simple )
Bauart Typ 1
Bauart Typ 1
Bauart Typ 1
Bauart Typ 1
Bauart Typ 1
Bauart Typ 1
Bauart Typ 1
Bauart Typ 1
Bauart Typ 1
Bauart Typ 1
Bauart Typ 1
Bauart Typ 1
Bauart Typ 2
Bauart Typ 2
Bauart Typ 2
Bauart Typ 2
Bauart Typ 2
Bauart Typ 2
Bauart Typ 3
Bauart Typ 3
Bauart Typ 3
Fixwinkel
Fachboden
Pfostenprofil
Aufbausytematik für META-Fix Einfachregale, Fachbodenebene mit Fixwinkel
Verschraubungshinweise zu Einfachregalen siehe nachfolgende Seite
Assembly method for META-Fix single shelves, Base of bay including securing bracket.
For single-shelf fixing instructions see next page.
Systématique de construction pour les rayonnages simples META-Fix, Niveau de tablette avec angle de
renforcement, Pour les conseils de vissage concernant les rayonnages simples, reportez-vous à la page
suivante
T
H
B
Bauart Typ 3
Bauart Typ 1
T
H
B
Bauart Typ 2
Stand 04.2008
Page 11
Bauart Typ 1 Bauart Typ 1
Bauart Typ 2 Bauart Typ 3
Bauart Typ 1 Bauart Typ 1 Bauart Typ 1
Bauart Typ 2 Bauart Typ 2
11
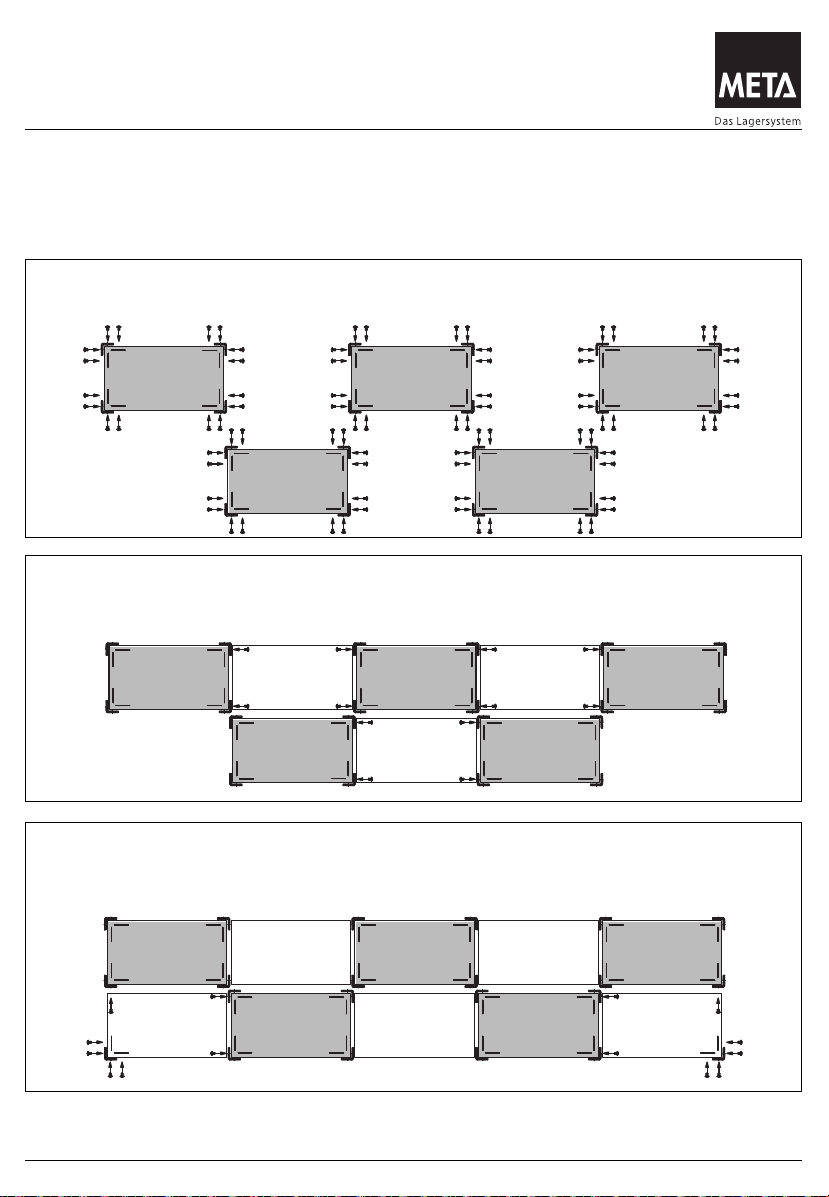
META-FIX-Schraubregal , Montage ( Einfachregal )
META-FIX- Slotted angle rack , Assembling ( Single shelf rack )
META-FIX-
Rayonnage à vis , Instruktion de montage ( Rayous simple )
Grundaufbau und Verschraubungshinweise bei Einfachregalzeile
Basic assembly and fixing instructions for single-shelf rack
Construction de base et conseils de vissage pour la rangée de rayonnage simple
Montageschritt Nr.1, siehe Seite 8
3 . Typ 2 in die Regalzeile einführen und mit Regal Typ 1 verschrauben.
Type 2 - insert into shelf rack and bolt vertically to a type 1 shelf.
Introduire le rayonnage de type 2 dans la rangée de rayonnage et visser dans le sens de la
profondeur avec le rayonnage de type 1.
4 . Typ 3 an die Regalzeile anschließen und in Tiefenrichtung mit Typ 1 verschrauben.
Type 3 - connect to shelf rack and bolt vertically to a type 1 shelf.
Raccorder le rayonnage de type 3 à la rangéede rayonnage et visser dans le sens
de la profondeur avec le type 1.
Beachten Sie die Aufbausystematik.
Assembly method must be observed.
Tenez compte de la systématique de construction.
Bauart Typ 1 Bauart Typ 1Bauart Typ 1
2 . Typ 1 aufstellen - ausrichten - und Schrauben fest anziehen.
Type 1 - erect, align and tighten bolts in longitudinal direction.
Installer le rayonnage de type 1 - l'ajuster - et serrer fortement les vis dans
le sens de la longueur.
Stand 04.2008
Page 12
12
META-FIX-Schraubregal , Regalaufbau ( Doppelregal )
META-FIX- Slotted angle rack , Shelf-unit assembly (Double shelf rack )
META-FIX-
Rayonnage à vis , Rayous montage ( Rayous double )
Bauart Typ 1
Bauart Typ 3
Bauart Typ 1
Bauart Typ 4
Bauart Typ 1
Bauart Typ 4
Bauart Typ 1
Bauart Typ 1
Bauart Typ 1
Bauart Typ 1
Bauart Typ 1
Bauart Typ 1
Bauart Typ 1
Bauart Typ 1
Bauart Typ 1
Bauart Typ 1
Bauart Typ 1
Bauart Typ 1
Bauart Typ 4
Bauart Typ 4
Bauart Typ 4
Bauart Typ 4
Bauart Typ 4
Bauart Typ 4
Bauart Typ 2
Bauart Typ 2
Bauart Typ 2
Bauart Typ 2
Bauart Typ 2
Bauart Typ 2
Fixwinkel
Fachboden
Pfostenprofil
Aufbausytematik für META-Fix Doppelregale
Fachbodenebene mit Fixwinkel
Verschraubungshinweise zu Einfachregalen siehe
nachfolgende Seite
Assembly method for META-Fix double shelves
Base of bay including securing bracket.
For single-shelf fixing instructions see next page.
Systématique de construction pour les rayonnages doubles META-Fix
Niveau de tablette avec angle de renforcement
Pour les conseils de vissage concernant les rayonnages simples,
reportez-vous à la page suivante
T
H
B
Bauart Typ 3 Bauart Typ 4
Bauart Typ 1
T
H
B
Bauart Typ 2
Stand 04.2008
Page 13
Bauart Typ 1 Bauart Typ 1 Bauart Typ 1
Bauart Typ 1
Bauart Typ 1
13
Bauart Typ 1 Bauart Typ 1 Bauart Typ 1
Bauart Typ 1 Bauart Typ 1
Bauart Typ 2 Bauart Typ 2
Bauart Typ 2 Bauart Typ 4Bauart Typ 4
Bauart Typ 1 Bauart Typ 1
Bauart Typ 2
Bauart Typ 1 Bauart Typ 1 Bauart Typ 1
Bauart Typ 2 Bauart Typ 2
META-FIX-Schraubregal , Montage ( Doppelregal )
META-FIX- Slotted angle rack , Assembling ( Double shelf rack )
META-FIX-
Rayonnage à vis , Instruktion de montage ( Rayous double )
2 . Regal aufstellen - ausrichten - und Schrauben fest anziehen
Set up shelf - align - and secure bolts
Installer le rayonnage - l'ajuster -et serrer fortement les vis
3 . Fachböden ( Typ2 ) in die Regalzeile einfügen und mit Regal ( Typ 1 ) verschrauben
Place base elements of bays ( type 2 ) into shelf rack and bolt to shelf ( type 1 )
Insérer les tablettes (type 2) dans la rangée de rayonnage et visser avec le rayonnage (type 1)
4 . Regal ( Typ 4 ) an die Regalzeile anschliessen und mit Regal ( Typ 1 ) verschrauben
Connect shelf ( type 4 ) to shelf rack and bolt to shelf ( type 1 )
Raccorder le rayonnage (type 4) à la rangée de rayonnage et visser avec le rayonnage (type 1)
Verschraubungshinweise für Doppelregalzeile
Fixing instructions for double shelf racks
Conseils de vissage pour la rangée de rayonnage double.
Montageschritt Nr.1, siehe Seite 8
Stand 04.2008
Page 14
14
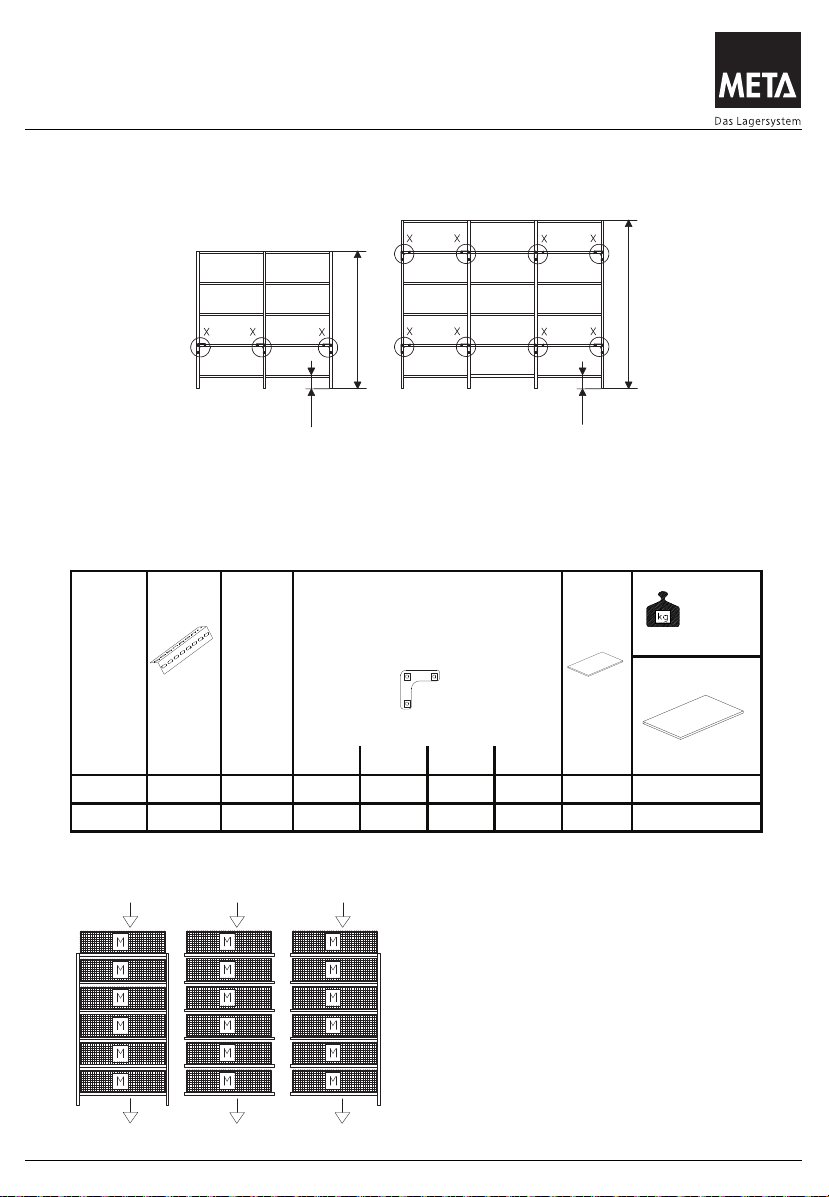
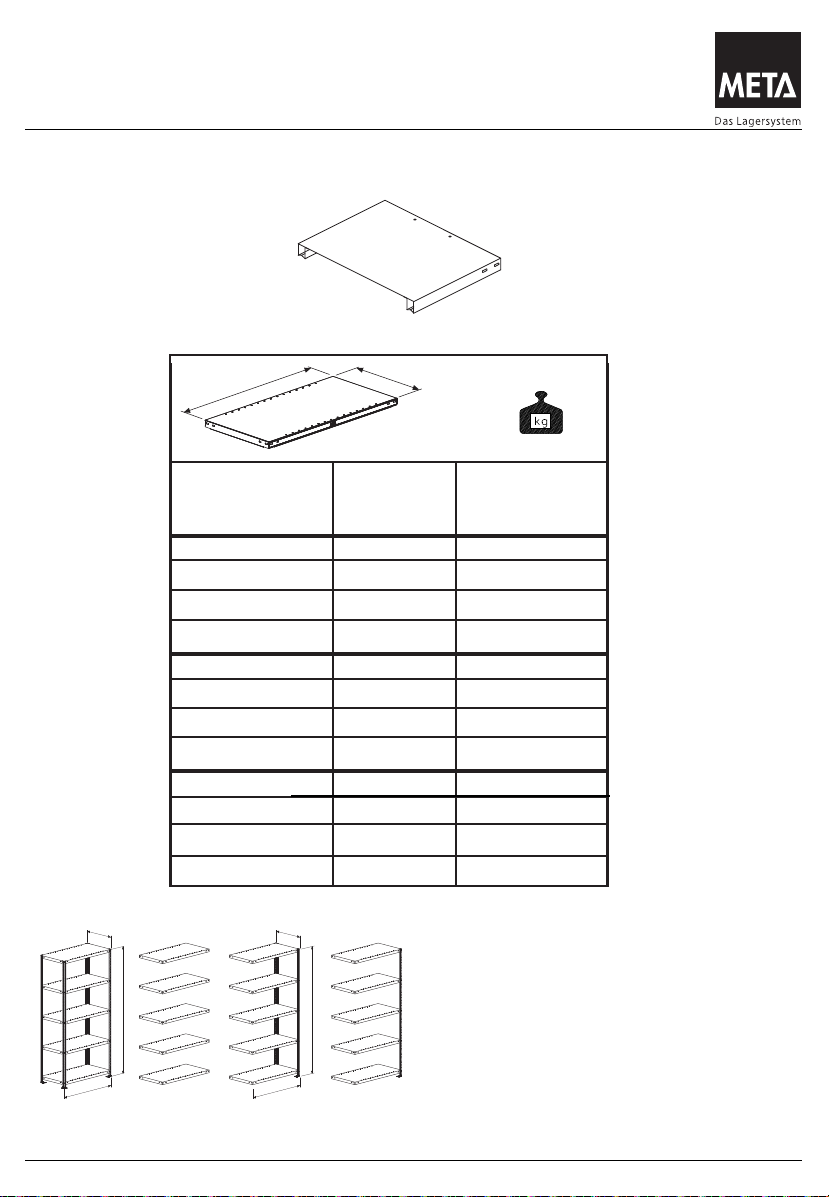
META-FIX-Schraubregal , Systemabmessungen u. Belastungswerte
META-FIX- Slotted angle rack , System sizes and loading data
META-FIX- Rayonnage à vis , Dimensions du système et capacités de charge
Typ 1
Typ 3
Typ 2
M = Gleichmässig verteilte Last
M = Evenly distributed laod
M = Charge régulièrement réparatie
H mm
versteifte Ebenen
Typ
ML 35 Typ 1 Typ 2 Typ 3 Typ 4 Stück L 80
2000 x 1 8 0 4 2 5 600
2500 x 2 16 0 8 4 6 800
Fachboden L 80
H = 2000
H = 2500
200
max.
200
max.
Typ 1
Typ 3
Typ 1
Typ 2
Typ 1
Anordnung der ausgesteiften Ebenen, gem. Abbildung siehe oben.
Arrangement of the strengthened levels, illustration see above.
Une disposition celui niveaux renforcés, illustration voir en haut.
Fixwinkel pro Typ
Fixing set-square
I´équerre de fixation
Σ M
Σ M
Σ MΣ M
Stand 04.2008
Page 15
15
B x T Typ 1 Typ 2,3 + 4
mm kg kg
750 x 300 110 100
750 x 400 100 90
750 x 500 90 80
750 x 600 90 80
1000 x 300 80 80
1000 x 400 80 80
1000 x 500 90 80
1000 x 600 90 80
1250 x 300 85 80
1250 x 400 85 80
1250 x 500 90 85
1250 x 600 95 90
META-FIX-Schraubregal , Fachbodenbelastungen
META-FIX-Slotted angle rack , Load capacity per shelf
META-FIX- Rayonnage à vis , Capacité de charge par tablette
Fachboden L 80
T
H
B
Bauart Typ 3 Bauart Typ 4
Bauart Typ 1
T
H
B
Bauart Typ 2
Weitere Aufbauangaben ab Seite 10
Further building-up data on page 10
Vous trouverez d'autres indications
de montage à la page 10
B
T
Σ
L-80
Stand 04.2008
Page 16
16
META-FIX-Schraubregal , Systemabmessungen u. Belastungswerte
META-FIX- Slotted angle rack , System sizes and loading data
META-FIX- Rayonnage à vis , Dimensions du système et capacités de charge
H = 2000
H = 2500
200
max.
200
max.
Typ 1
Typ 3
Typ 1
Typ 2
Typ 1
Typ 1
Typ 3
Typ 2
Σ M
Σ MΣ M
M = Gleichmässig verteilte Last
M = Evenly distributed laod
M = Charge régulièrement réparatie
Fachboden S 100 und MS 230 II
Anordnung der ausgesteiften Ebenen, gem. Abbildung siehe oben.
Arrangement of the strengthened levels, illustration see above.
Une disposition celui niveaux renforcés, illustration voir en haut.
mit 4 Böden mit 5 Böden
Typ
ML 35 ML 40 Typ 1 Typ 2 Typ 3 Typ 4 Stück
2000 x 2 16 0 8 4 4 900 2500 x 2 16 0 8 4 5 840 2000 x 2 16 0 8 4 4 - 1460
2500 x 2 16 0 8 4 5 - 1400
H
mm S 100 MS 230//
versteifte Ebenen
Fixwinkel pro Typ
Fixing set-square
I´équerre de fixation
Σ M
Typ
Stand 04.2008
Page 17

17
META-FIX-Schraubregal , Systemabmessungen u. Belastungswerte
META-FIX- Slotted angle rack , System sizes and loading data
META-FIX- Rayonnage à vis , Dimensions du système et capacités de charge
Typ 1
Typ 3
Typ 2
M = Gleichmässig verteilte Last
M = Evenly distributed laod
M = Charge régulièrement réparatie
Typ
ML35 ML40 Typ1 Typ2 Typ3 Typ4 Stück
2000 x 2 16 0 8 4 4 900 940
2500 x 2 16 0 8 4 5 840 860
3000 x 3 24 0 12 6 7 800 820
2000 x 2 16 0 8 4 4 1320 1460
2500 x 2 16 0 8 4 5 1180 1400
3000 x 3 24 0 12 6 7 1000 1240
mm
S100 +
V150
MS230II+
MS330II
versteifte Ebenen
V200
Fachboden S100 V150 V200 MS230 II MS330II
H = 2000
H = 2500
H = 3000
200
max.
200
max.
200
max.
Typ 1
Typ 3
Typ 1
Typ 2
Typ 1
Typ 1
Typ 2
Typ 1
Typ 3
Anordnung der ausgesteiften Ebenen, gem. Abbildung siehe oben.
Arrangement of the strengthened levels, illustration see above.
Une disposition celui niveaux renforcés, illustration voir en haut.
Fixwinkel pro Typ
Fixing set-square
I´équerre de fixation
Σ M
Σ M
Σ MΣ M
mit 5 Böden mit 6 Böden mit 7 Böden
H
Stand 04.2008
Page 18

Typ B x T Typ 1 Typ 2, 3 + 4
600x500 160 140
750x300 120 100
750x400 120 100
750x500 120 100
750x600 120 100
1000x300 100 75
1000x400 115 95
1000x500 110 90
1000x400
1000x500
1000x600
1000x400
1000x500
1000x600
1000x300
1000x400
1000x500
1000x600
1000x300
1000x400
1000x500
200 200
V 150
mit Längs-
unterzug
150 130
S 100
V 150
Kurz-
boden
mit Längs-
unterzug
200 200
230 230
V 200
V 200
18
META-FIX-Schraubregal , Fachbodenbelastungen
META-FIX-Slotted angle rack , Load capacity per shelf
META-FIX- Rayonnage à vis , Capacité de charge par tablette
Fachboden S 100 I V 150 / V 200 / Kurzboden
S 100
V 150
T
H
B
Bauart Typ 3 Bauart Typ 4
Bauart Typ 1
T
H
B
Bauart Typ 2
Weitere Aufbauangaben ab Seite 10
Further building-up data on page 10
Vous trouverez d'autres indications
de montage à la page 10
B
T
Σ
V 150
V 200
V 150
V 200
Längsunterzug
Longitudinal / Longitudinal
S100 Einbau von Verstärkungsunterzügen nicht möglich.
Building-in of strengthening beams not possible.
Impossibilité de monter les traverses de renforcement.
mm kg kg
800x400 160 140
1000x600 100 80
Stand 04.2008
1000x600
Page 19

19
META-FIX-Schraubregal , Fachbodenbelastung
META-FIX- Slotted angle rack , Load capacities per shelf
META-FIX-
Rayonnage à vis , Capacité de charge par tablette
L =
1000 (1300)
L =
1000 (1300)
L = 1300
1000 x 300 230 kg 280 kg 300 kg ----- ----1000 x 400 230 kg 280 kg 300 kg ----- ----1000 x 500 230 kg 280 kg 300 kg ----- ----1000 x 600 230 kg 280 kg 300 kg ----- -----
1300 x 300 230 kg ----- ----1300 x 400 230 kg 330 kg
1300 x 500 230 kg 330 kg 400 kg
1300 x 600 230 kg 330 kg 400 kg
1000 x 400 330 kg 380 kg 400 kg ----- ----1000 x 500 330 kg 380 kg 400 kg ----- ----1000 x 600 330 kg 380 kg 400 kg ----- -----
MS 230 II.
MS 330 II.
Zur Reduzierung der
Bodenmittendurchbiegung können
Tiefenunterzüge eingesetzt werden.
Hierdurch werden keine
-----
Fachboden MS 230 //
(MS330//)
Shelf MS 230// (MS330//)
Fond de casier MS230// (MS330//)
Fachboden MS 230 //
(MS330//) mit Tiefenunterzügen
Shelf MS 230// (MS330//)
with depht support
Fond de casier MS230// (MS330//)
avec solive de renforcement
Fachboden MS 230 // (MS330//)
mit Längsunterzügenunterzügen
Shelf MS 230// (MS330//)
with length support
Fond de casier MS230// (MS330//)
avec solive de renforcement
Fachboden MS 230 II (MS 330II )
*To reduce the sag in the centre, wide bearing
elements may be used.
This does not increase the load capacity of the
respective bays.
*Afin de réduire la déformation centrale des
tablettes, il est possible d'installer des supports
de profondeur. Aucune augmentation de charge
par casier n'est obtenue de cette façon.
Typ B x T ohne Unterzug 1 Unterzug 2 Unterzug 1 Unterzug 2 Unterzug
1000 x 800 230 kg 280 kg 300 kg ----- -----
1300 x 800 230 kg 250 kg 270 kg
Stand 04.2008
Fachlaststeigerungen erziehlt.
Page 20

20
META-FIX - Schraubregal , Grundaufbau Einfachregal
META-FIX - Slotted angle rack , Basic-fitting
META-FIX - Rayonnage à vis , montage de base
Fachboden L 80 S 100 V 150 V 200
Fachboden MS 230 II (MS 330II )
Typ 1
Typ 3
D
B
B
D
B
A
E
C
C
E
D
B
B
D
B
C
H = 2000
Anordnung der ausgesteiften
Ebenen
Detailpunkte Einfachregal
Points of detail Single shelf rack
Points de détail Rayous simple
Anordnung der Fixwinkel für
abweichende Regalhöhen gemäß
Abbildung auf Seite 14, 16 und 17.
Stand 04.2008
Page 21

21
META-FIX - Schraubregal , Grundaufbau Einfachregal
META-FIX - Slotted angle rack , Basic-fitting
META-FIX - Rayonnage à vis , montage de base
Fachboden L 80 S 100 V 150 V 200
Fachboden MS 230 II (MS 330II )
Typ 1
Typ 2 + 3
Typ 1
Typ 2 + 3
Typ 1
Typ 1
Typ 1
Typ 1
Typ 2 + 3
A B
C D
E
Bundmutter M6
Nut M6 / Ecrou M6
Linsenflanschkopfschrauben
mit Innensechskant M6 x 12
Screw M6 x 12 / Boulon M6 x 12
Bundmutter M6
Nut M6 / Ecrou M6
Linsenflanschkopfschrauben
mit Innensechskant M6 x 12
Screw M6 x 12 / Boulon M6 x 12
Achtung: Fixwinkel innenliegend montiert
Take care: internally mounted fixing set-square
Attention : l'équerre de fixation est montée à l'intérieur
Achtung:
Fixwinkel innenliegend
montiert
Take care:
Internally mounted fixing set-square
Attention :
l'équerre de fixation est montée à l'intérieur
Fixwinkel
fixing set-square
l'équerre de fixation
Stand 04.2008
Page 22

22
META-FIX - Schraubregal , Grundaufbau Doppelregal
META-FIX - Slotted angle rack , Basic-fitting
META-FIX - Rayonnage à vis , montage de base
Fachboden L 80 S 100 V 150 V 200
Fachboden MS 230 II (MS 330II )
Typ 4
Typ 1
Typ 1
Typ 4
C
E
C
E
C
D
F
D
F
D
H
G
H
G
H
A
B
I
J
H = 2000
Anordnung der ausgesteiften
Ebenen
Detailpunkte Doppelregal
Points of detail Double shelf rack
Points de détail Rayous double
Anordnung der Fixwinkel für
abweichende Regalhöhen gemäß
Abbildung auf Seite 14, 16 und 17.
Stand 04.2008
Page 23

23
META-FIX - Schraubregal , Grundaufbau Doppelregal
META-FIX - Slotted angle rack , Basic-fitting
META-FIX - Rayonnage à vis , montage de base
Fachboden L 80 S 100 V 150 V 200
Fachboden MS 230 II (MS 330II )
Typ 2 + 3 + 4
Typ 1
Typ 2 + 3 + 4
Typ 1
Typ 1
Typ 1
Typ 1
Typ 2 + 3 + 4
A
B
D E
F
Bundmutter M6
Nut M6 / Ecrou M6
Linsenflanschkopfschrauben
mit Innensechskant M6 x 12
Screw M6 x 12 / Boulon M6 x 12
Bundmutter M6
Nut M6 / Ecrou M6
Linsenflanschkopfschrauben
mit Innensechskant M6 x 12
Screw M6 x 12 / Boulon M6 x 12
Achtung: Fixwinkel innenliegend montiert
Take care: internally mounted fixing set-square
Attention : l'équerre de fixation est montée à l'intérieur
Achtung:
Fixwinkel innenliegend
montiert
Take care:
Internally mounted fixing set-square
Attention :
l'équerre de fixation est montée à l'intérieur
Fixwinkel
fixing set-square
l'équerre de fixation
Typ 1
C
Stand 04.2008
Page 24

24
META-FIX - Schraubregal , Grundaufbau Doppelregal
META-FIX - Slotted angle rack , Basic-fitting
META-FIX - Rayonnage à vis , montage de base
Fixwinkel
Fixwinkel
Übersicht
Typ 1
Typ 1
Typ 1
Typ 1
Typ 2+3+4
Typ 2+3+4
Typ 2+3+4
Typ 2+3+4
Übersicht
Typ 1
Typ 1
Typ 1
Typ 1
Typ 2+3+4
Typ 2+3+4
Typ 2+3+4
Typ 2+3+4
I
J
Achtung: Fixwinkel innenliegend montiert
Take care: internally mounted fixing set-square
Attention : l'équerre de fixation est montée à l'intérieur
Achtung: Fixwinkel innenliegend montiert
Take care: internally mounted fixing set-square
Attention : l'équerre de fixation est montée à l'intérieur
Typ 1
nur Typ 4
G
nur Typ 4
Typ 1
H
Bauart Typ 1: siehe ab Seite 12
Design type 1: see page 12
Conception type 1 : voir page 12
Stand 04.2008
Page 25

25
Notizen
Notes
Notes
Stand 04.2008
Page 26

26
META-FIX-Schraubregal , Systemzubehör
META-FIX- Slotted angle rack , System accessories
META-FIX- Rayonnage à vis , Accessoires de système
Fachboden L 80 S 100 V 150 V 200
Fachboden MS 230 II (MS 330II )
1a = Seitenwand / side panel / face latérale
6a = Rückwand / back panel / face arrière
1a
1a
6a
6a
Typ 1
Typ 2
Typ 1
Typ 3
Nennmass
Nennmass
A
B
C
B
D
Stand 04.2008
Page 27

27
META-FIX-Schraubregal , Systemzubehör
META-FIX- Slotted angle rack , System accessories
META-FIX- Rayonnage à vis , Accessoires de système
Fachboden L 80 S 100 V 150 V 200
Fachboden MS 230 II (MS 330II )
Detail B
Detail C
Detail A
Bundmutter M6
Nut M6
Ecrou M6
Linsenflanschkopfschrauben
mit Innensechskant M6 x 12
Screw M6 x 12
Boulon M6 x 12
Detail B
Detail D
Typ 1
Typ 2
Typ 3
Detailpunkt für Seiten. + Rückwand
Stand 04.2008
Page 28

28
L = 1000 ( 1300 ) mm
1
2
3
A
A
META-FIX-Schraubregal , Systemzubehör
META-FIX- Slotted angle rack , System accessories
META-FIX- Rayonnage à vis , Accessoires de système
Fachboden MS 230 II (MS 330II )
Tiefenunterzug für Fachboden L = 1000 ( 1300 ) mm
Wide bearing element for bay base
Support de profondeur pour tablette
Stand 04.2008
Page 29

29
L = 1300 mm
Längsunterzug für Fachboden L = 1300 mm
Longitudinal bearing element for bay base
Support longitudinal pour tablette
1
1
2
META-FIX-Schraubregal ,
Systemzubehör
META-FIX- Slotted angle rack , System accessories
META-FIX- Rayonnage à vis , Accessoires de système
Fachboden MS 230 II (MS 330II )
Stand 04.2008
Page 30

30
Kippsicherung :
Stabilizer :
Stabilisateur :
HZ
T
h
H
Kippsicherung wenn :
stabilizer needed in case of :
stabilisateur nécessaire en cas de :
H : T ≥ 5 : 1
h ≥ 750 mm
H z ≥ 5 kg
Aus Sicherheitsgründen müssen Regale mit einem Höhen - Tiefenverhältnis
≥ 5 : 1 gegen Kippen gesichert werden.
(Fußverdübelung oder Wandverdübelung)
For safety reasons, it is essential to anchor shelf units with a height-to-depth ratio of ≥ 5 : 1
to prevent them toppling over. ( foot or wall pegging )
Pour des raisons de securité, les rayon dont le rapport hauteur / profondeur est
≥ 5 : 1
doivent étre sécurisés contre un basculement. (assamblage par chevilles aux pieds ou au mur)
Kippsicherung :
Fußverdübelung
Stabilizer :
Foot dowelling
Stabilisateur :
Fixation des pieds par chevilles
Kippsicherung :
Wandverdübelung
Stabilizer :
Wall anchorages
Stabilisateur :
Chevillage mural
Unterlegplatten dienen bei
Bedarf zur Regulierung.
Underlay plates are used for
levelling if necessary
Les cales d’épasseur servent
ànive- ler si nécessaire
Stand 04.2008
Page 31

31
Notizen
Notes
Notes
Stand 04.2008
Page 32

32
META-FIX-Systemzubehör : Schraubregal
META-FIX - System parts : Slotted angle rack
META-FIX - Eléments du système : Rayonnage à vis
T
H
H
4
3
2
1
b
a
a = Fachteiler durchgehend
/shelf dividers / continuous
/éléments de séparation pour casiers continus
b = Trenngitter durchgehend /Separating screens continuous
/Grilles de séparation continues
Stand 04.2008
Page 33

33
META-FIX-Systemzubehör : Schraubregal
META-FIX - system parts : Slotted angle rack
META-FIX - Eléments du système : Rayonnage à vis
H
H
T
d
c
c = Fachteiler freistehend /Free-standing separator
/Elément de séparation pour casier non soutenu
d = Trenngitter freistehend /Free-standing grille
/Grille de séparation non soutenue
Stand 04.2008
Page 34

34
META-FIX - Büro-Compactregal
META-FIX - Office-Compact rack
META-FIX - Rayonnage Bureau-Compact
1850 2200 2550
750 300 * * *
1000 300 * * *
1250 300 * * *
750 600 * * *
1000 600 * * *
1250 600 * * *
Doppelregal
Einfachregal
H mm
B mm T mm
Typ 1
Typ 1
Typ 1
Typ 3
Typ 2
Einfachregal
Single shelf unit
Rayon simple
Typ 1
Typ 3
Doppelregal
Double shelf rack
Rayon double
Regaltyp 3
B
H
B
H
T
T
Regaltyp 1
Regaltyp 2
Für weitere Aufbauvarianten siehe ab Seite 10
For further structure variants see to page 10
Pour d'autres variantes de construction voir page 10
Stand 04.2008
Page 35

35
Kippsicherung : Büro-Compact, Büro-Archivregalen
Stabilizer : Office-compact, Office-archive
Stabilisateur : Bureau-Compact, Bureau-archive
HZ
T
h
H
Kippsicherung wenn :
stabilizer needed in case of :
stabilisateur nécessaire en cas de :
H : T ≥ 5 : 1
h ≥ 750 mm
H z ≥ 5 kg
Aus Sicherheitsgründen müssen Regale mit einem Höhen - Tiefenverhältnis
≥ 5 : 1 gegen Kippen gesichert werden.
(Fußverdübelung oder Wandverdübelung)
For safety reasons, it is essential to anchor shelf units with a height-to-depth ratio of ≥ 5 : 1
to prevent them toppling over. ( foot or wall pegging )
Pour des raisons de securité, les rayon dont le rapport hauteur / profondeur est
≥ 5 : 1
doivent étre sécurisés contre un basculement. (assamblage par chevilles aux pieds ou au mur)
Kippsicherung :
Fußverdübelung
Stabilizer :
Foot dowelling
Stabilisateur :
Fixation des pieds par chevilles
Kippsicherung :
Wandverdübelung
Stabilizer :
Wall anchorages
Stabilisateur :
Chevillage mural
Unterlegplatten dienen bei
Bedarf zur Regulierung.
Underlay plates are used for
levelling if necessary
Les cales d’épasseur servent
ànive- ler si nécessaire
Stand 04.2008
Page 36

36
META-FIX-Büro-Compactregal , Fachbodenbelastung
META-FIX-Office-Compact rack , Load capacity per shelf
META-FIX-Rayonnage Bureau-Compact, Capacité de charge par tablette
A + C Abdeckboden
Covershelf
Fond de recouvrement
B Fachboden, Büro-Compact
mit Endanschlagleiste
Shelf, Office-compact with stop
Fond de casier,
Bureau-Compact avec arrèt
D Fachboden, Büro-Doppel-
Compact mit Mittelanschlag Shelf, Office-Duble-
compact / Fond de casier,
Bureau-Compact double
B x T
Bauart
Typ 1
Bauart
Typ 2 +
Typ 3
Summe
mm kg kg Stück
750 x 300 100 95 1000 x 300 80 75 1250 x 300 80 75 -
750 x 300 100 95 9
1000 x 300 80 75 12
1250 x 300 80 75 15
750 x 600 80 75 1000 x 600 75 70 1250 x 600 80 75 -
750 x 600 80 80 18
1000 x 600 80 80 24
1250 x 600 100 100 30
Typ
A
Abdeckboden 300 Tief
B
Compactboden 300 Tief
D
Compactboden 600 Tief
Zu D: > Der Mittelanschlag hat eine statische Funktion und bewirkt im eingebauten.
Zustand die Reduzierung der Fachbodendurchbiegung.
Dies führt zur Erhöung der zulässigen Fachlast.
Zu B: > Die Endanschlagleiste hat keine statische Funktion
C
Abdeckboden 600 Tief
Zu C: > Wird der Fachboden ohne Mittelanschlag eingesetzt (als Abdeckboden),
gelten die oben angegebenen, reduzierten Fachlasten.
A
C
B
D
T
T
H
H
B
B
Bauart Typ 1
Bauart Typ 2
Bauart Typ 3
Winkelprofil
Winkelprofil
Fixwinkel
Fixwinkel
Fachboden
Fachboden
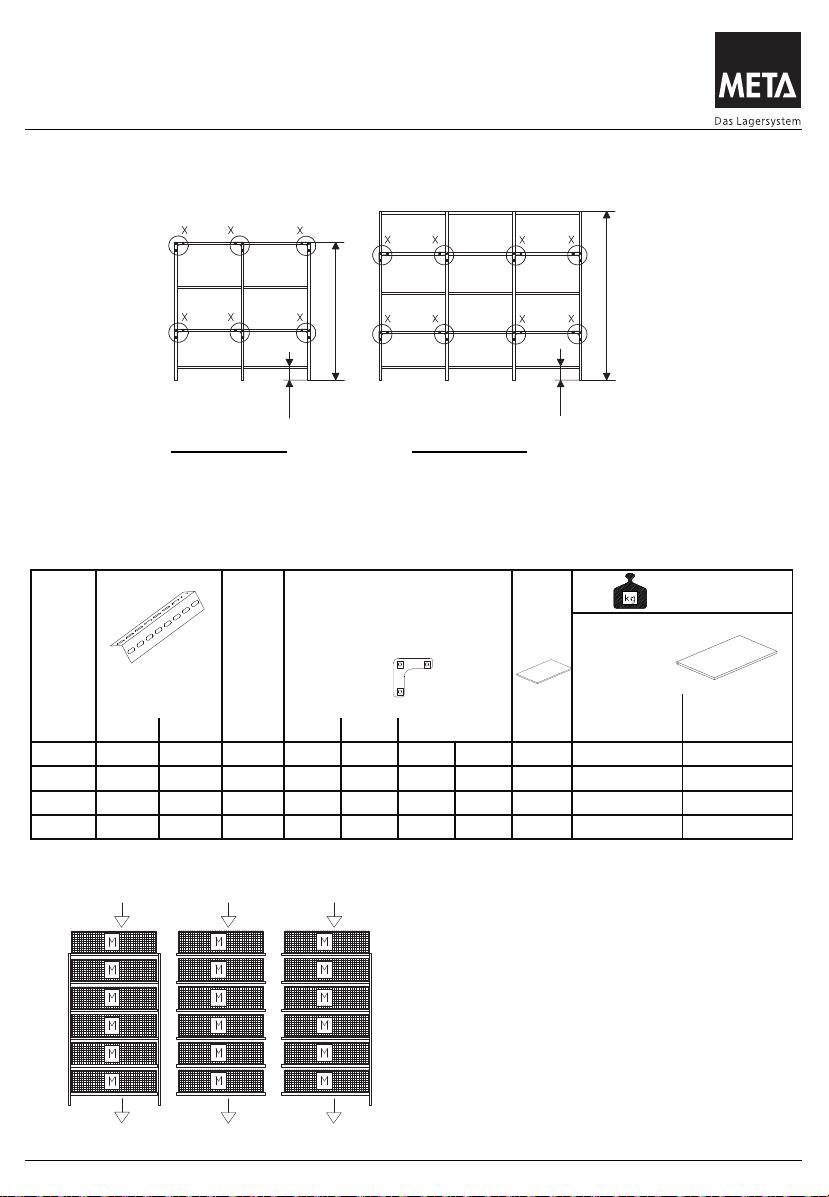
Aufbausystematik für Compact Einfachregal
Aufbausystematik für Compact Doppelregal
Typ 1
Typ 1
Typ 1
Typ 1
Typ 3
Typ 2
Typ 3
Stand 04.2008
Page 37

37
META-FIX-Büro-Compactregal, Systemabmessungen & Belastungswerte
META-FIX - Office-Compact rack ,System sizes and loading data
META-FIX - Rayonnage Bureau-Compact , Dimensions du système et capacités
de charge
Fixwinkel pro Ebene
x =
Versteifte
H ML 35 Ebenen H 1 Typ 1 Typ 2 Typ 3 Fachboden B / D Fachboden A / C
mm Stück mm Stück Stück 750x300 750x300 Stück
1850 x 1 350 8 0 4 5 1 45
2200 x 1 350 8 0 4 6 1 54
2550 x 2 350 16 0 8 7 1 63
1000x300 1000x300
1850 x 1 350 8 0 4 5 1 60
2200 x 1 350 8 0 4 6 1 72
2550 x 2 350 16 0 8 7 1 84
1250x300 1250x300
1850 x 1 350 8 0 4 5 1 75
2200 x 1 350 8 0 4 6 1 90
2550 x 2 350 16 0 8 7 1 105
750x600 750x600
1850 x 1 350 8 0 4 5 1 90
2200 x 1 350 8 0 4 6 1 108
2550 x 2 350 16 0 8 7 1 126
1000x600 1000x600
1850 x 1 350 8 0 4 5 1 120
2200 x 1 350 8 0 4 6 1 144
2550 x 2 350 16 0 8 7 1 168
1250x600 1250x600
1850 x 1 350 8 0 4 5 1 150
2200 x 1 350 8 0 4 6 1 180
2550 x 2 350 16 0 8 7 1 210
S
S
S
Typ 1
Typ 3
Typ 1
Typ 1
Typ 2
Typ 1
Typ 1
Typ 2
Typ 3
100
100
100
H1 =
350
H = 2550
H1 =
350
H = 2200
H1 =
350
H = 1850
Typ 1
M = Gleichmässig verteilte Last
M = Evenly distributed laod
M = Charge régulièrement réparatie
Fixwinkel pro Regaltyp
Feldlast 600 KG
Feldlast 700 KG
Feldlast 800 KG
Stand 04.2008
Page 38

38
META-FIX - Büro-Compact Einfachregal
META-FIX - Office-Compact single rack
META-FIX - Bureau-Compact rangée simple
Endanschlagleiste und Compactboden mit Linsenflachkopfschrauben M6 x 12 und
Bundmutter M6 an ML 35 angeschraubt.
Terminal stop moulding and compact shelf with flat mushroom head nuts M6 x 12 and flanged nut M6 are
tightly screwed onto the profile ML 35
La plinthe de butée terminale et la tablette compact sont vissées sur le profilé ML 35 à l'aide d'écrous à
tête cylindrique bombée mince et d'écrous à embase M6
a
a
a = Endanschlagleiste
a = Terminal stop moulding
a = butée terminale
L
12
20
M6
M6 x 12
L = 750
L = 1000
L = 1250
Typ1 + Typ 3
M6
M6 x 12
Typ2 + Typ 3
Stand 04.2008
Page 39

39
META-FIX - Büro-Compact Doppelregal
META-FIX - Office-Compact double-sided rack
META-FIX - Bureau-Compact rangée double
b = Mittelanschlag
b = Mid stop
b = Butée centrale
b
L
b
L = 750
L = 1000
L = 1250
20
20
Kunstoffkeil
Plastic wedge
Cale en plastique
X
Detail X
Ansicht von unten
Stand 04.2008
Page 40

40
META-FIX-Büro-Compactregal , Grundaufbau
META-FIX - Office-compact rack , Basic fitting
META-FIX - Rayonnare Bureau-Compact , montage de base
1. Regal liegend vormontieren - Schrauben nur handfest anziehen -
2. Regal danach aufstellen - ausrichten - und Schrauben fest anziehen
1. The rack must be preassembled in horizontal position - screws should only be tightened loosely
2. Then it should be set up - adjusted - and the screws be drawn in tightly
1. Prémontage du rayon à plat - ne pas trop serrer les vis -
2. Puis mettez le rayon debout - redressez-le - et serrez les vis à fond
A
B
B
B
B
B
C
C
C
C
C
E
D
B
B
B
B
B
D
A
B
B
B
B
B
C
C
C
C
C
E
D
B
B
B
B
B
D
Anordnung der ausgesteiften Ebenen
H = 1850mm
Stand 04.2008
Page 41

Bundmutter M6
Nut M6 / Ecrou M6
Linsenflanschkopfschrauben
mit Innensechskant M6 x 12
Screw M6 x 12 / Boulon M6 x 12
41
META-FIX-Büro-Compactregal , Grundaufbau
META-FIX - Office-compact rack , Basic fitting
META-FIX - Rayonnare Bureau-Compact , montage de base
A
B
C D
E
Typ 1
Typ 2+3
Typ 1
Typ 1
Typ 2+3
Typ 1
Typ 1
Typ 2+3
Untersicht
Achtung: Fixwinkel innenliegend montiert
Take care: internally mounted fixing set-square
Attention : l'équerre de fixation est montée à l'intérieur
Achtung:
Fixwinkel innenliegend
montiert
Take care:
Internally mounted fixing set-square
Attention :
l'équerre de fixation est montée à l'intérieur
Bundmutter M6
Nut M6 / Ecrou M6
Linsenflanschkopfschrauben
mit Innensechskant M6 x 12
Screw M6 x 12 / Boulon M6 x 12
Fixwinkel
fixing set-square
l'équerre de fixation
Stand 04.2008
Page 42

42
META-FIX Systemzubehör: Büro-Compact
META-FIX System parts: Office-compact
META-FIX Eléments du sysstème: Bureau-Compact
Verschiebbarer Fachteiler
skiable subject divisor
des diviseurs décalent le sujet
1
2
3
Stand 04.2008
Page 43

43
META-FIX Systemzubehör: Büro-Compact
META-FIX System parts: Office-compact
META-FIX Eléments du sysstème: Bureau-Compact
Tiefenleiste
lateral strip
listeau latéral
Tiefenleiste
lateral strip
listeau latéral
Stand 04.2008
Page 44

44
B
A
B
C
a = Pendelprofilanbindung / Suspended profile connection /
Raccord pour profil de suspension
b = Trennstangen / Separating bars / barres séparatrices
META-FIX Systemzubehör: Büro-Compact, Büro-Archiv
META-FIX System parts: Office-compact, Office-archive
META-FIX Eléments du sysstème: Bureau-Compact, Bureau-Archive
b
a
b
A
a
C
Stand 04.2008
Page 45

45
META-FIX Archiv-Compactregal
META-FIX - Archive-Compact rack
META-FIX - Rayonnage Archiv-Compact
Typ 1
Typ 3
Typ 1
Typ 3
Einfachregal
Single shelf unit
Rayon simple
Doppelregal
Double shelf rack
Rayon double
Für weitere Aufbauvarianten siehe Seite 10 + 12
For further structure variants see to page 10 + 12
Pour d'autres variantes de construction voir page 10 + 12
Typ 1
Typ 2
Typ 1
Bauart Typ 1
Bauart Typ 2
Bauart Typ 3
T
T
B
B
H
H
2000 2200 2500
900 350 * * *
900 700 * * *
Doppelregal
Einfachregal
H mm
B mm T mm
Stand 04.2008
Page 46

46
META-FIX Archiv-Compactregal , Fachbodenbelastung
META-FIX - Archive-Compact rack , Load capacity per shelf
META-FIX - Rayonnage Archiv-Compact , Capacité de charge par tablette
Fachboden:
Büro-Archiv-Compact
Shelf:
Office-archive - compact
Fond de casier:
Bureau-Archive-Compact
Fachboden:
Büro-Archiv-Doppelcompact
Shelf:
Office-archive-doublecompact
Fond de casier:
Bureau-Archive-Double-compact
900 x 350
900 x 700
Für weitere Aufbauvarianten siehe Seite 10 + 12
For further structure variants see to page 10 + 12
Pour d'autres variantes de construction voir page 10 + 12
B x T Bauart Bauart Bauart
Typ
1 Typ 2 Typ 3 Ablagen
Typ mm
kg kg kg
Stück
Einfach-Archivboden
900 x 350 70 60 60 3
Doppel-Archivboden
900 x 700 90 80 80 6
Bauart Typ 1
Bauart Typ 2
Bauart Typ 3
T
T
B
B
H
H
Winkelprofil
Winkelprofil
Fixwinkel
Fixwinkel
Fachboden
Fachboden
Typ 1
Typ 1
Typ 1
Typ 1
Typ 3
Typ 2
Typ 3
Aufbausystematik für Einfachregal
Building-up classification for double-sided rack
Systématique de montage pour le rayonnage à
rangée double
Aufbausystematik für Doppelregal
Building-up classification for double-sided rack
Systématique de montage pour le rayonnage à
rangée double
Stand 04.2008
Page 47

47
Typ 1
Typ 3
Typ 1
Typ 1
Typ 2
Typ 1
Typ 1
Typ 2
Typ 3
125
100
50
H1 =
350
H = 2500
H1 =
350
H = 2200
H1 =
375
H = 2000
META-FIX-Archiv-Compactregal, Systemabmessungen & Belastungswerte
META-FIX - Archive-Compact rack ,System sizes and loading data
META-FIX - Rayonnage Archiv-Compact , Dimensions du système et capacités
de charge
Typ 1
Typ 3
Typ 2
M = Gleichmässig verteilte Last
M = Evenly distributed laod
M = Charge régulièrement réparatie
Fixwinkel pro Ebene
x =
Versteifte
H ML 35
Ebenen
Typ 1 Typ 2 Typ 3 900x350 900x700
mm Stück mm Stück Stück Stück Stück
Stück
kg
2200 1 350 8 0 4 7 7 400
2500 2 350 16 0 8 8 8 600
H 1
S
S
S M
2000 1 375 8 0 4 6 6 500
Trennstangeanordnung
arrangement of separating bars
arrangement des barres separatrices
Typ1, Typ2 + Typ3 = 4 x •
für 3 Ablagen
Einfachregal 900 x 350
Typ1, Typ2 + Typ3 = 11 x •
für 6 Ablagen
Doppelregal 900 x 700
Stand 04.2008
Page 48

48
META-FIX Archiv-Compactregal , Grundaufbau
META-FIX - Archive-Compact rack , Basic-fitting
META-FIX - Rayonnage Archiv-Compact , montage de base
B
B
D
B
B
B
D
C
C
C
E
C
C
C
C
C
E
C
C
B
B
B
A
A
B
B
D
B
B
A
A
Trennstangen in liegendes Regal einstecken
Put the separating bars into the lying rack
Mettez les barres séparatrices dans le rayon à plat
1. Regal liegend vormontieren - Schrauben nur handfest anziehen -
2. Regal danach aufstellen - ausrichten - und Schrauben fest anziehen
1. The rack must be preassembled in horizontal position srews should only be tightened loosely -
2. Then it should be set up - adjusted - and the screws be drawn in tightly
1. Prémontage du rayon à plat - ne pas trop serrer les vis -
2. Puis mettez le rayon debout - redressez-le - et serrez les vis à fond
B
D
B
B
B
Anordnung der ausgesteiften Ebenen Anordnung der Fixwinkel für abweichende
Regalhöhen gemäß Abbildung ab S.14
H = 2000mm
Stand 04.2008
Page 49

49
C D
E
Typ 2+3
Typ 1
Typ 1
Typ 2+3
Typ 1
Typ 1
Typ 2+3
Untersicht
Achtung: Fixwinkel innenliegend montiert
Take care: internally mounted fixing set-square
Attention : l'équerre de fixation est montée à l'intérieur
Achtung:
Fixwinkel innenliegend
montiert
Take care:
Internally mounted fixing set-square
Attention :
l'équerre de fixation est montée à l'intérieur
META-FIX Archiv-Compactregal , Grundaufbau
META-FIX - Archive-Compact rack , Basic-fitting
META-FIX - Rayonnage Archiv-Compact , montage de base
Typ 1
Bundmutter M6
Nut M6 / Ecrou M6
Linsenflanschkopfschrauben
mit Innensechskant M6 x 12
Screw M6 x 12 / Boulon M6 x 12
A
B
Bundmutter M6
Nut M6 / Ecrou M6
Linsenflanschkopfschrauben
mit Innensechskant M6 x 12
Screw M6 x 12 / Boulon M6 x 12
Bundmutter M6
Nut M6 / Ecrou M6
Linsenflanschkopfschrauben
mit Innensechskant M6 x 12
Screw M6 x 12 / Boulon M6 x 12
Fixwinkel
fixing set-square
l'équerre de fixation
Stand 04.2008
Page 50

50
Notizen
Notes
Notes
Stand 04.2008
Page 51

51
Notizen
Notes
Notes
Stand 04.2008
Page 52

Stand 04.2008
 Loading...