

Page 1
Page 2

© 201 5 MES A SAF E COMPAN Y
Page 3
CATEGORY PAGE
CHECK LIST
2
OPENING YOUR SAFE
3
LOCK-OUT PENALTY
3
USING THE OVERRIDE FUNCTIONS
4
CHANGING THE OVERRIDE
4
CHANGING THE LOCK SETTTINGS
5
SETTING THE DATE & TIME
7
VIEW LOCK OPENING RECORDS
8
THE ANCHOR KIT
9
CHANGING THE BATTERIES
9
TROUBLESHOOTING
10
HOW TO ORDER KEYS
11
IMPORTANT INFORMATION ON SAFE USAGE
11
REGISTER YOUR SAFE
11
LIMITED 1 YEAR SAFE WARRANTY
12
Page 4
PG .2 |
mesa
TM
SAFE C OMPANY
I
1
2
3
6
9
5
8
0
4
7
AA
r
AA
r
AA
r
AA
r
MH-SERIES
E LEC TRO NIC LO CK INSTR UCT ION S
DEAR VALUED CUSTOMER:
Congratula tion s on cho osin g you r ne w ME SA SA FE to se cure and prote ct your
valu able s! You h ave made an excelle nt choice in your secu rit y me asures.
ME S A SA F E CO M PANY h as b uilt a s olid repu tati on o n integri ty and quali
ty
craf tsmanship.
We pri de o urse lves on d eliverin g the best produc ts in t he industry and
consisten tly exceed cus tomer expectatio ns.
Before u s ing your u n it, thorou g hly read a nd unders tand the O perating I nstruc tions
of the u nit. This will e nsure maxi m um effic i ency a nd usabi l ity.
IMPO RTAN T : DO N OT RE T UR N SA FE TO STO RE
!
If you a re missin g pa rt s, have di ffic ulty programm ing the lock or opening your
safe, or a ny additional que stio ns regard ing the use and care of yo ur s afe, D O
NOT RE TUR N you r sa fe to the store. Ple ase
Suppor t : 888.381 . 8514 [M o nday thru Fr iday 7AM - 4PM/PST ] for a ssistance.
contac t MES A SA FE COMPA NY Technical
CHECK LIST
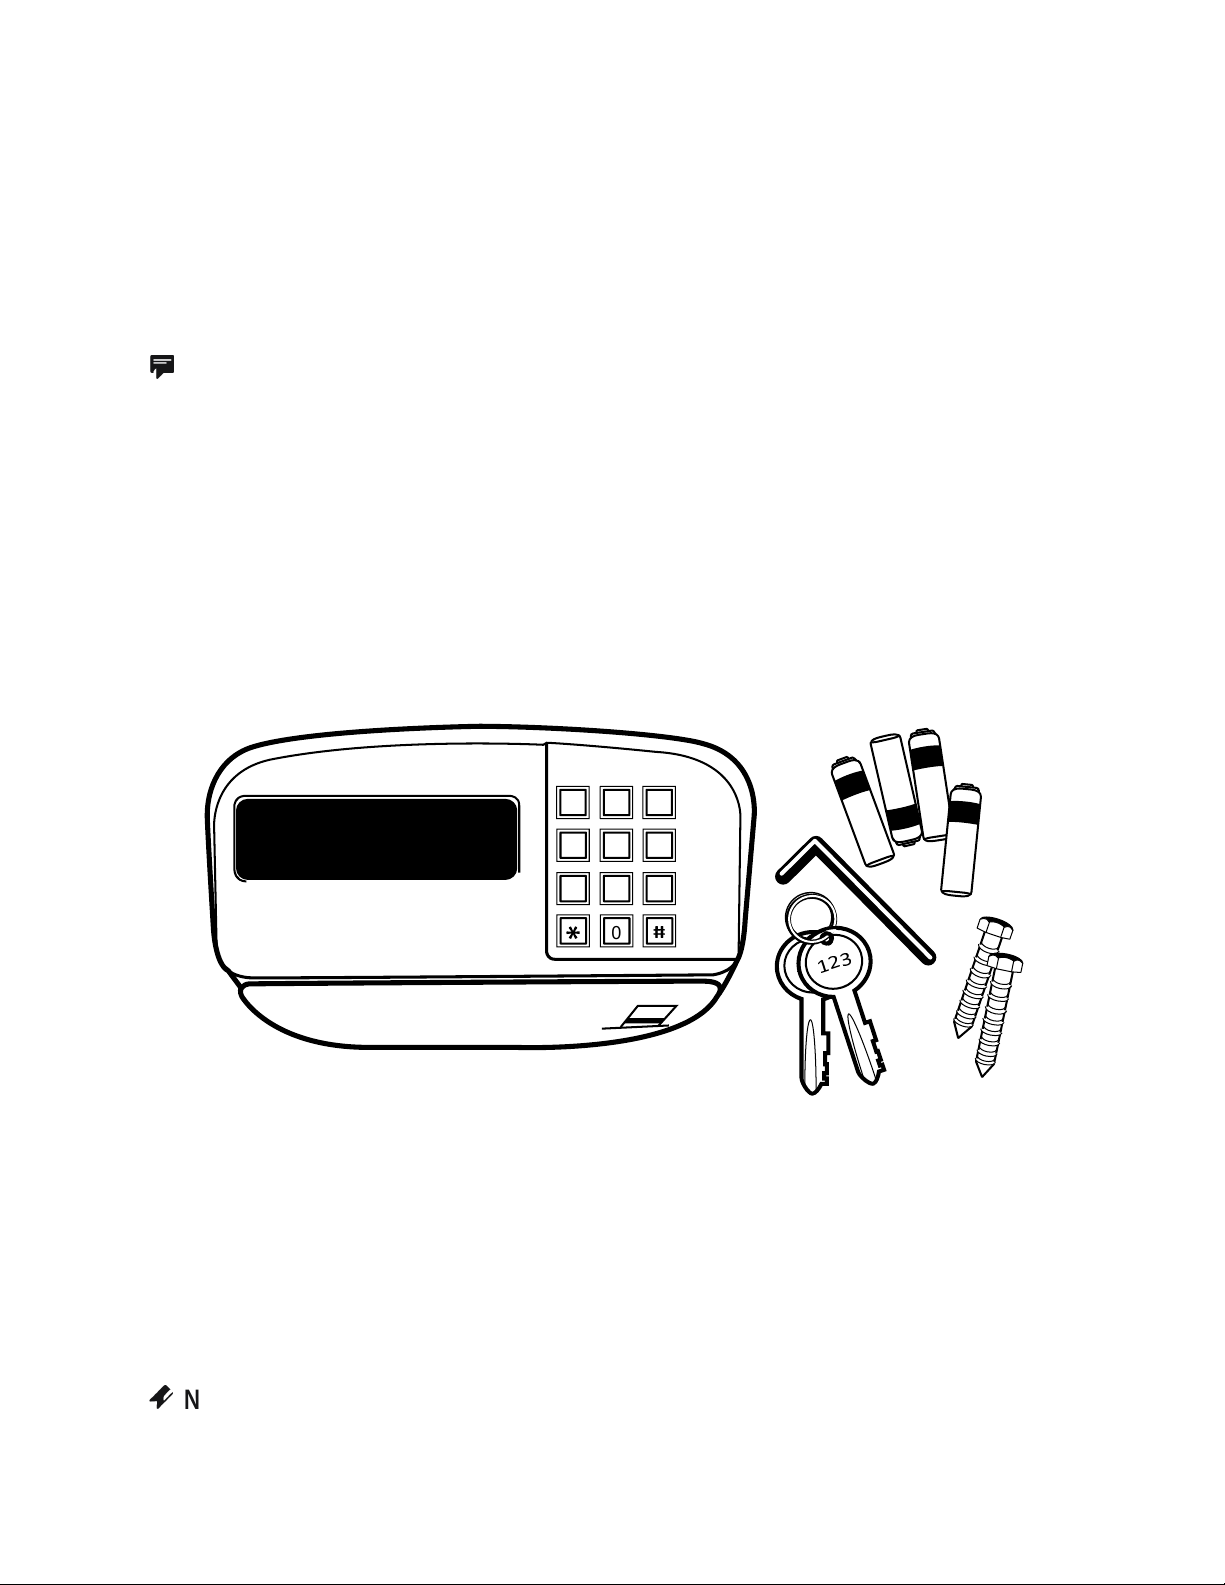
4AA Batteries [not included]
n
2 O verr ide Keys [ do N OT sto re ke ys i n you r sa fe]
m
1 A llen Wrench
G
2 A ncho r Bo lts
o
N OTE : The lock is fac tor y se t to Hote l Fun ction. [See Changing the Lock
Setting to c hang e to Standard Function]
Page 5

OPENING YOUR SAFE [ For th e fi rst time]
N OTE : The safe come s fro m th e fa ctory unlo cked.
Using Persona l Cod e
1
To unl ock the safe: Ente r your 3- 6 di git code; [[ OPEN ED ] ] wi ll a ppea r on
the disp lay & the safe will unlock
2
To loc k th e sa fe: E nter your 3-6 digi t code th en i nput #; [[ C LO SED ]] w ill
appe ar o n th e di splay & the s afe will be l ocke d
Th is i s a hote l roo m configurati on l ock . User se ts n ew c ode ever y t ime
the safe is u sed [ The code you use to un lock the safe is the code you use
to lock the safe. Once the safe is in the unlocked position, the safe wil l
reset itself ready for any code]
Use * to delete nu mber s th at a ppea r on the display. I f * is entered
before you r cod e, a [[
-
]] w ill appe ar rather tha n th e nu mber, as a
secu rit y fea ture
Using a Credit Card
[Any c ard with a magnet ic s trip ]
1
To unl ock the safe: Sli de yo ur c redit card firmly from rig ht to left w ith the
magnetic str ip d own; [[ O PENE D ]] wil l ap pear on the disp lay & the safe
will be lock ed
2
To loc k th e sa fe: S lide your credit c ard firm ly f rom r ight to left wit h th e
magnetic str ip d own; [[ C LO SED ]] w ill appe ar o n th e di splay & t he s afe w ill
be l ocke d
Th is i s a hote l roo m configurati on l ock . User se ts n ew c ard ever y time
the safe is u sed. [ The card you use to un lock the safe is the card you use
to lock the safe. Once the safe is in th e un lock ed p osit ion, the safe wil l
reset itself ready for any card]
IMP ORTA NT : Swip e you r ca rd firmly & e venly from right to left. If an
incorrec t di rect ion or s wipi ng s peed too fast or too slow, [[ ERR OR ] ] or
[[ AGAIN ]] will appear on the display. You will need to sw ipe your card
agai n. The card to unlock the safe should be the same as the c ard to lo ck
the safe. If not, [[ E-CARD ]] (error card ) wi ll a ppea r on the dis play.
LOCKOUT PENALTY
W hen the safe is i n the locked position [[ E-Code ] ] or [[ E-Card ]] will appear
on t he d ispl ay after an invalid entr y.
If an incor rec t cod e or card is used 4 conse cuti ve ti mes & [[ E- Code ]] or [[
E-Card ]] appeare d on the dis play after every incorrect entr y, the safe wil l
go i nto a lock-o ut p erio d of 15 minu tes. Dur ing the peri od, w hen pressing
a bu tton on the keypad, [ [ HO LD## ]] will appear on the display. Th e ##
represents the tim e th at i s rem aini ng i n th e lo ck-out peri od.
MH-SERIES
E LEC TRO NIC LO CK INSTR UCT ION S | PG. 3
Page 6
PG .4 |
* * * * * * *
* * * * * *
* * * * * * *
MH-SERIES
USING THE OVERRIDE FUNCTIONS
E LEC TRO NIC LO CK INSTR UCT ION S
If [[ E-Code ]], [[ E- Card ]] o r [[ ERR OR ] ] ap pear on the display a fter enterin g
your code or swip ing your card to u nloc k th e sa fe, you wil l ne ed t o us e the
Ove rrid e Code, Over ride Card or Override Key s
If [[ E-BAR ]] appears on the d ispl ay, you will nee d to use the Ove rrid e Keys
Using th e O verr ide Code
In put :
1
#- #
In put : Overri de Co de; the safe will unl ock
2
#- #;
entr ies]
[[ S UPER ]] will app ear on t he d ispl ay [d o no t pa use between
Th e de faul t O verri de Co de i s:
IMP ORTA NT : Bec ause the codes are fa ctor y set, we highly reco mmen d
chan ging the code s to your own uniq ue codes imme diately!
Using th e O verr ide Card
Swipe the O verride Card, the safe will unl ock
1
[See Cha ngin g th e Overri de Ca rd to set your
card]
Using th e O verr ide Keys
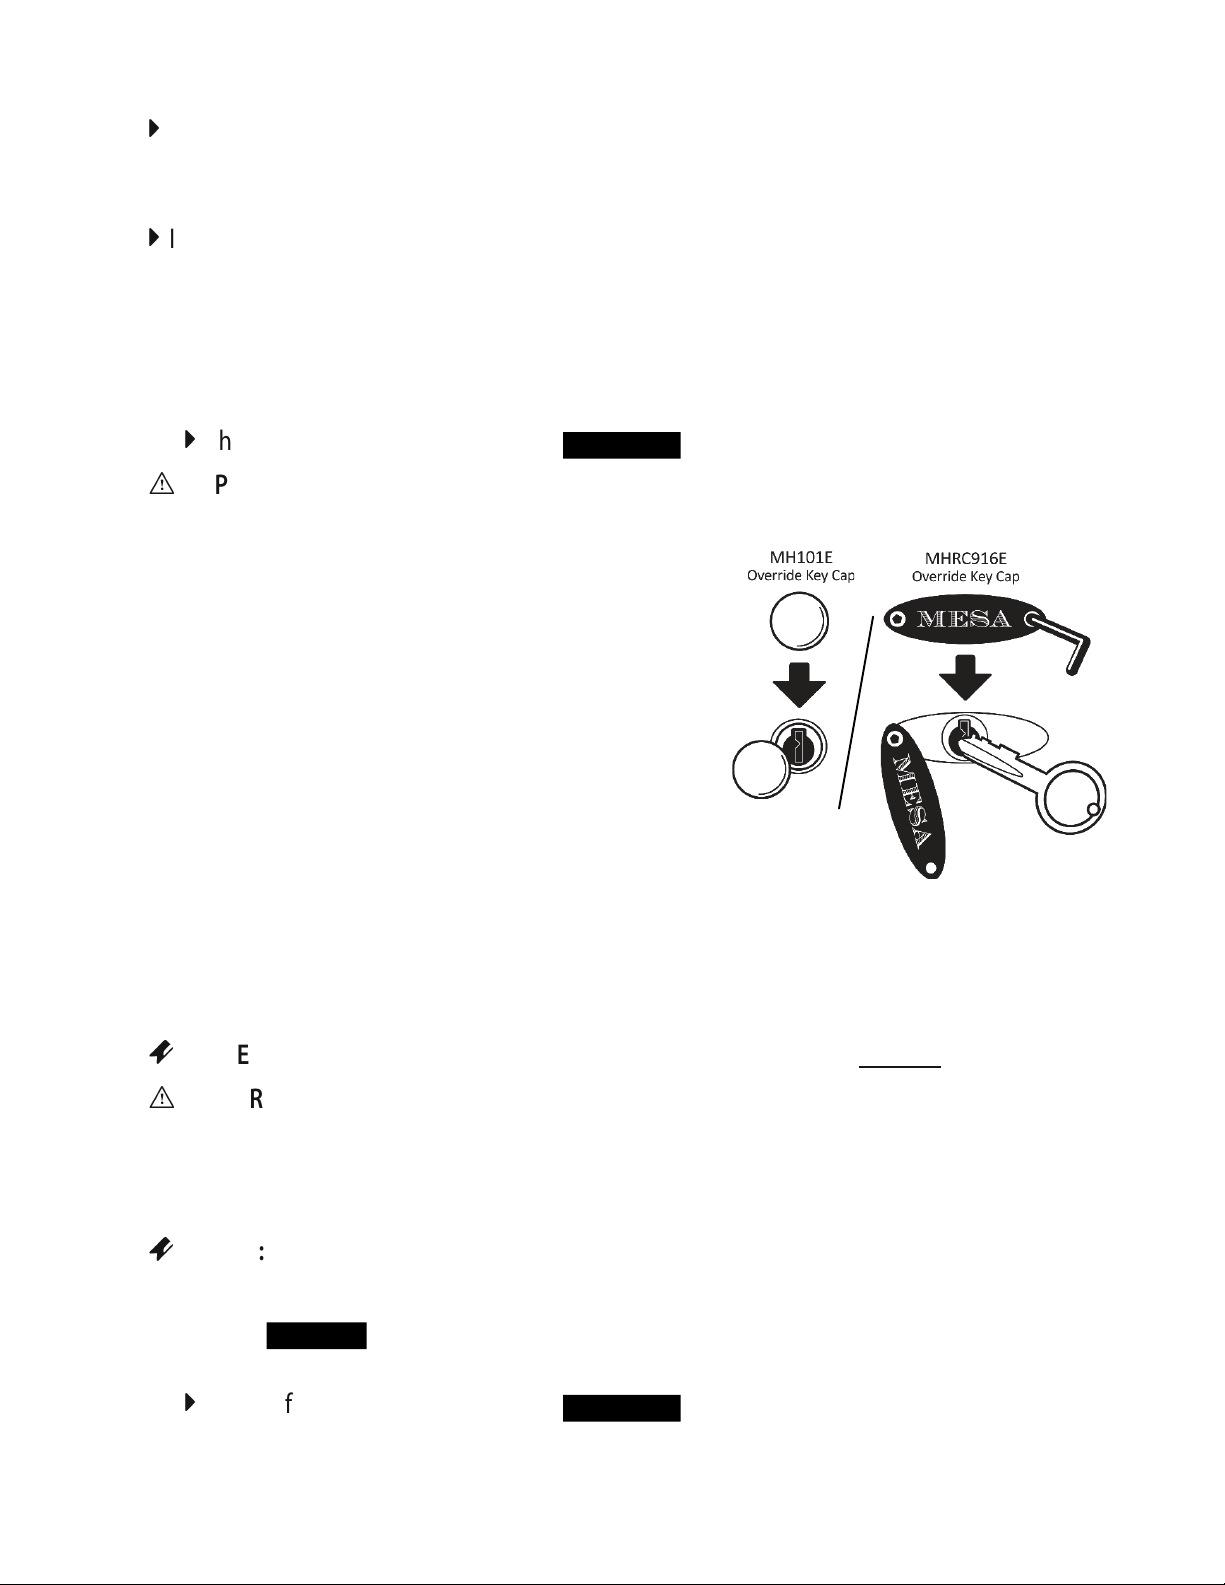
Loca te the small round cap [on MH101E ] , or
1
the oval embl em [ on M HRC9 16E], jus t be low
the right si de o f th e ke ypad
Using the allen wren ch ( incl uded ), re move the cover [for
2
MH10 1 Model, simply remove the cap with you r fi nger tip s]
In ser t the O verri de Key & turn clockw ise, a ¼ tur n & open doo r
3
To remove th e ke y, tur n th e ke y cou nter-cl ockw ise, a ¼ tur n, b ack to t he
4
inse rte d po siti on
N OTE : The Over ride Key will onl y wor k wh en s afe i s in loc ked position.
IMP ORTA NT : Do NOT store t he O verride Ke ys in the safe !
CHANGING THE OVERRIDE
Chan ging the O verride Code
N OTE : The safe must be in t he u nloc ked position
In put:
1
In put: ; [[ OL D ] ] wi ll a ppea r on the dis play
2
In put: Ove rrid e Code
3
*-*
Th e de faul t O verri de Co de i s:
; [[ PR OG ]] will appear on the displ ay
[[ NE W ]] will appear on the display
- #;
In put a ne w 6- digit co de
4
Re -I nput the new Ove rrid e Code
5
[[ AGA I N ]] will appear on the disp lay
- #;
[[ GO OD ]] will appear on the displ ay.
- #;
The Override Code has been suc cessf ully cha nged.
Page 7
MH-SERIES
0 0 0 0 0 0
* * * * * *
* * * * * *
* * * * * *
Chan ging the O verride Card
N OTE : The safe must be in t he u nloc ked position
E LEC TRO NIC LO CK INSTR UCT ION S | PG. 5
In put:
1
In put: ; [[ CA RD ]] wil l ap pear on the disp lay
2
Swipe the card yo u wi sh to set as the new Over ride Card ; [[ GO OD ]] will
3
*-*
; [[ PR OG ]] will appear on the displ ay
appe ar o n th e di splay. The Ove rride Card has bee n su ccessfully ch ange d
CHANGING THE LOCK SETTINGS
N OTE : The safe must be in t he u nloc ked
posi tion
In put:
1
disp lay
In put: ; [[ COD E ]] w ill appear on the display foll owed by a
2
*-*
6-d igit num ber
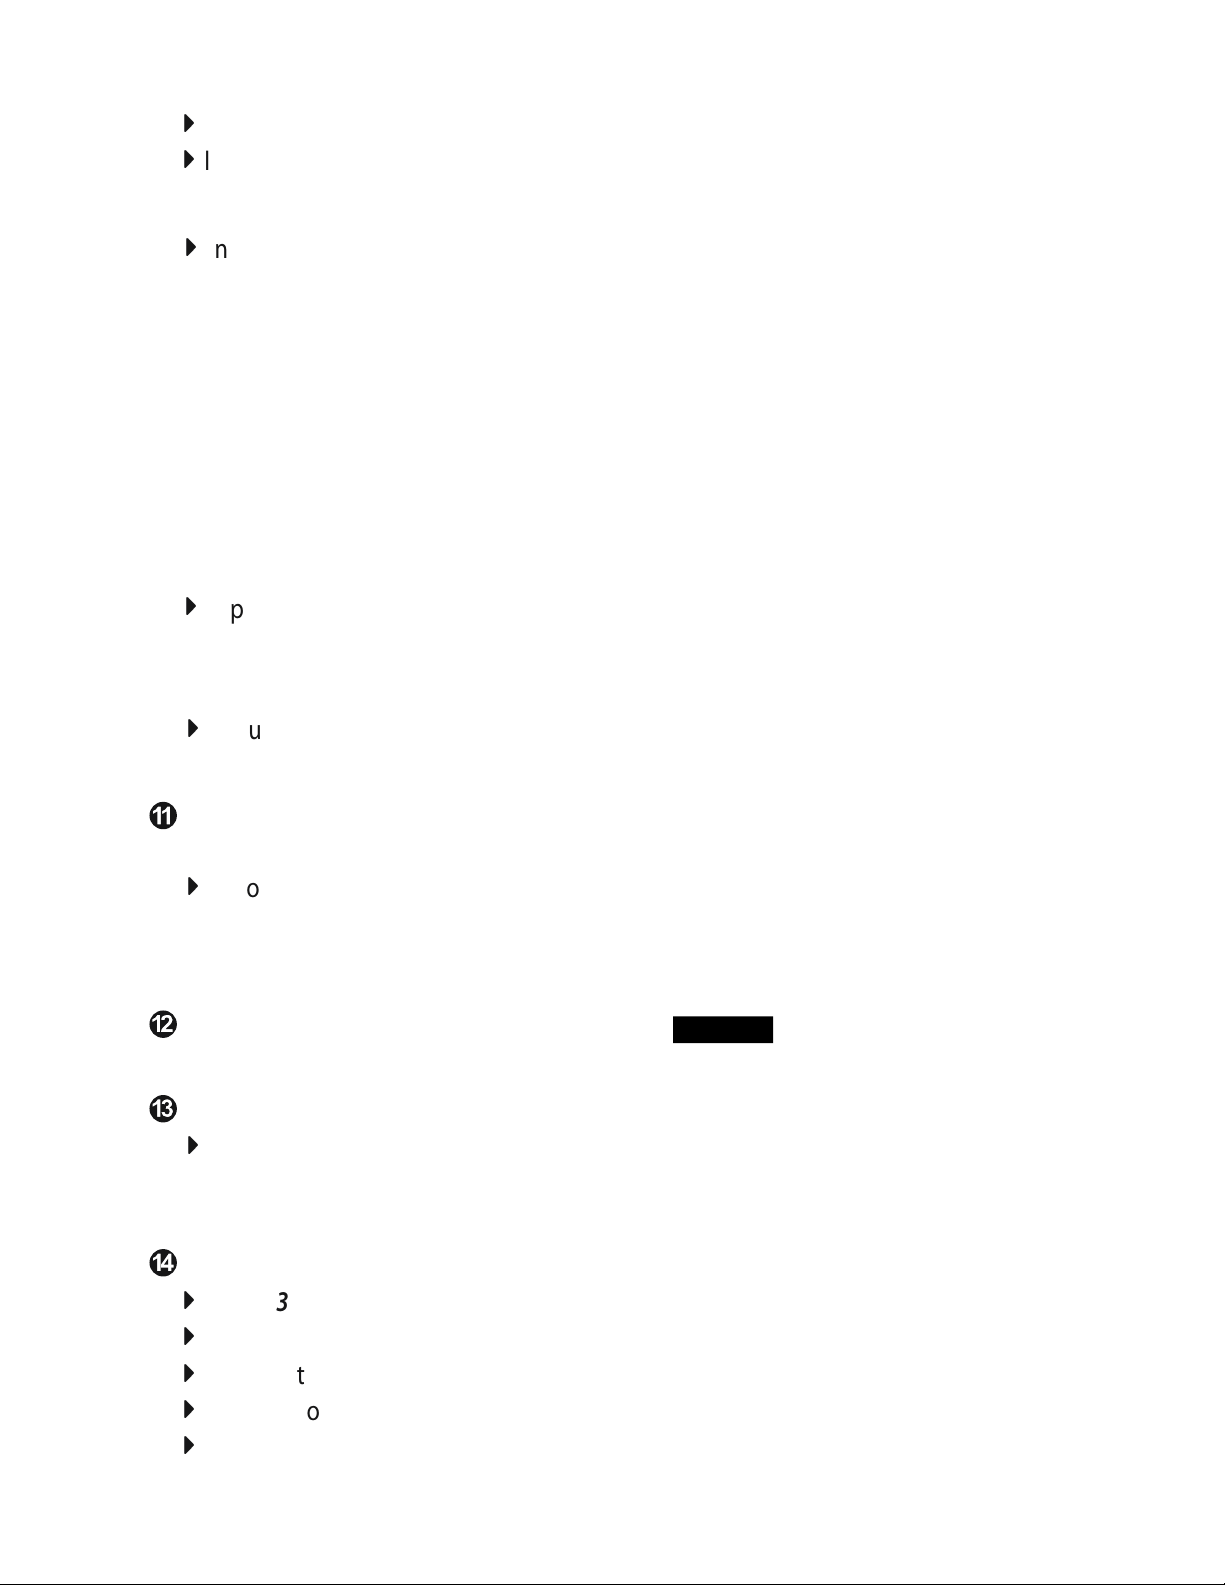
Th e 1st 6- digi t nu mber is now d ispl ayed & Slot #1 will be ‘Blinki ng’ [S lots :
4
refer to graph]
Default set ting is:
To advance to the next Slot wit hout mak ing cha nges to the curre nt S lot,
enter the number disp layed in the current Slot
In put # if you do no t wa nt to mak e any cha nges to the 1st 6- digi t nu mber
& would like to m ove on to the 2nd 6- digi t nu mber
In put: * if you would like to star t over & go back to Slot #1
; [[ PR OG ]] will appear on the
Slot #1 : E ntr y D isplay
5
In put: 0 to disable Entry Dis play . The numbers entered wil l no t di splay
In put: 1 to ac tivate En try Di spla y. The numbers entere d wi ll d ispl ay
W hen Entr y Disp lay is a cti vated, In put : * before ent erin g code & the
numb ers entered will not display fo r ad ded secu rity
Slot #2 : Co de Disp lay
6
In put: 0 to disable Cod e Display. The code ente red w ill not be d ispl ayed
after the safe is locked
In put: 1 to ac tivate Co de D ispl ay. The code entered will dis play for 2
seconds afte r the safe is locked
Slot #3 : H ide But ton
7
W hen Entr y Disp lay is a cti vated, In put : * before ent erin g code & the
numb ers entered will not display
In put: 0 to disable Hide Bu tton fun cti on
In put: 1 to ac tivate Hi de B utto n fu nction
Page 8
8
Slot #4 : Au dit Func tion
In put: 0 to disable Aud it Fun ction
In put: 1 to ac tivate Au dit Functi on
9
Slot #5 : Lo cking Funct ion
In put: 1 to place t he l ock into Stan dard Lock Mode
If Stan dard Lock Mod e is sel ected:
!
Th e 1st code/card you use to lock the safe will be the set code /card
@
Once the cod e/ca rd is set, you only need t o in put # to lock the safe
#
Yo u will need to in put your set code /card to unlock the safe
$
To cha nge your set code/card, you will need to go back into the Lock
Set ting s [R efer back to Changing the Lock Settings]
%
Pla ce th e lo ck f unc tion into Hot el Lock Mo de
^
Go back into the Lock Settings
&
Pla ce th e lo ck i nto Standard Lock Mode
In put: 2 to pla ce t he l ock into Hotel Lock Mod e
[ This is the defa ult mode]
0
Slot #6 : U nused Slot
In put: 1 i f no t al ready entered. This slot does not disable or ac tiv ate a ny
func tio ns
Inp ut:
#
to confi rm the 1st set of Lock Sett ings & m ove fo rwa rd to the 2nd
set of Lock S etti ngs
If you do n ot want to ma ke a ny ch ange s to the 2nd set of Lock Sett ings ,
inpu t
#
aga in
The 2nd se t of Loc k Set tings
The 2nd 6- digi t nu mber [de faul t se ttin g: ] is n ow displayed & Slo t
#1 i s ‘Bl inki ng’
Slot #1 : I nvalid Entr y
In put a nu mber from 1-9 digits to se t th e nu mber of time s al lowed for
entering an invali d code or card before p laci ng t he l ock into the Lock-
Out Penal ty
Slot #2 : Co de Lengt h
In put 3 to set the code leng th to a 3-digit code
In put 4 to set the code leng th to a 4-digit code
In put 5 to set the code leng th to a 5-digit code
In put 6 to set the code leng th to a 6-digit code
In put 7 to set the code leng th to a 3-6 digit code
PG .6 |
MH-SERIES
E LEC TRO NIC LO CK INSTR UCT ION S
* * * * * *
Page 9
MH-SERIES
1 3 1 2 0 1
! " # $ % & ' ( ! )
0 7 2 5 5 9
* $ + " # , % + & - . / $ % 0 -
* * * * * *
Slot #3 & # 4 Lock-Out Perio d
In put a nu mber 00-99 to set the length of the Lo ck-Out Penalty
E LEC TRO NIC LO CK INSTR UCT ION S | PG. 7
Exam ple : For 5 mi ntues ent er 0 in Slot #3 & 5 in Slo t #4
Slot #5 Ove rrid e Functi on
In put 0 to disable the Over ride Function
In put 1 to use the Over ride Cod e entry onl y, dis able s th e O verride Card
In put 2 to use the Over ride Card ent ry only, disa bles the Ov erride Co de
[Code & Ca rd]
In put 3 to use the Over ride Cod e & Card toget her. In put the Ove rrid e Code
then swi pe O ver ride Card
In put 4 to use either the O verr ide Code or the Over ride Card
Slot #6 Unu sed Slot
In put 0 if not already ente red. This slot does not disable or ac tivate any
functions
Inp ut:
to confi rm the 2nd set of Lock Sett ings & [ [ GO OD ] ] wi ll a ppea r on
#
the disp lay
SETTING THE DATE & TIME
N OTE : You w ill only need to set the date & ti me t o use the Lock Op enin g
Recor ds f unc tion . The sa fe must be in the unl ocke d po sition.
In put:
1
In put: ; [[ DAT E ]] will appear on the dis play followed by a
2
*-*
; [[ PR OG ]] will appear on the displ ay
6-d igit num ber
Th e 6- digit n umbe r rep resents t he ye ar - mon th - day
Exam ple: December 1, 2013 = 131201
Slot #1 & # 2 :
3
Enter the Year
Slot #3 & # 4 :
4
Enter the Month
Slot #5 & # 6 :
5
Enter the Day
In put: # to confi rm the date sett ing & move on to t he c lock
7
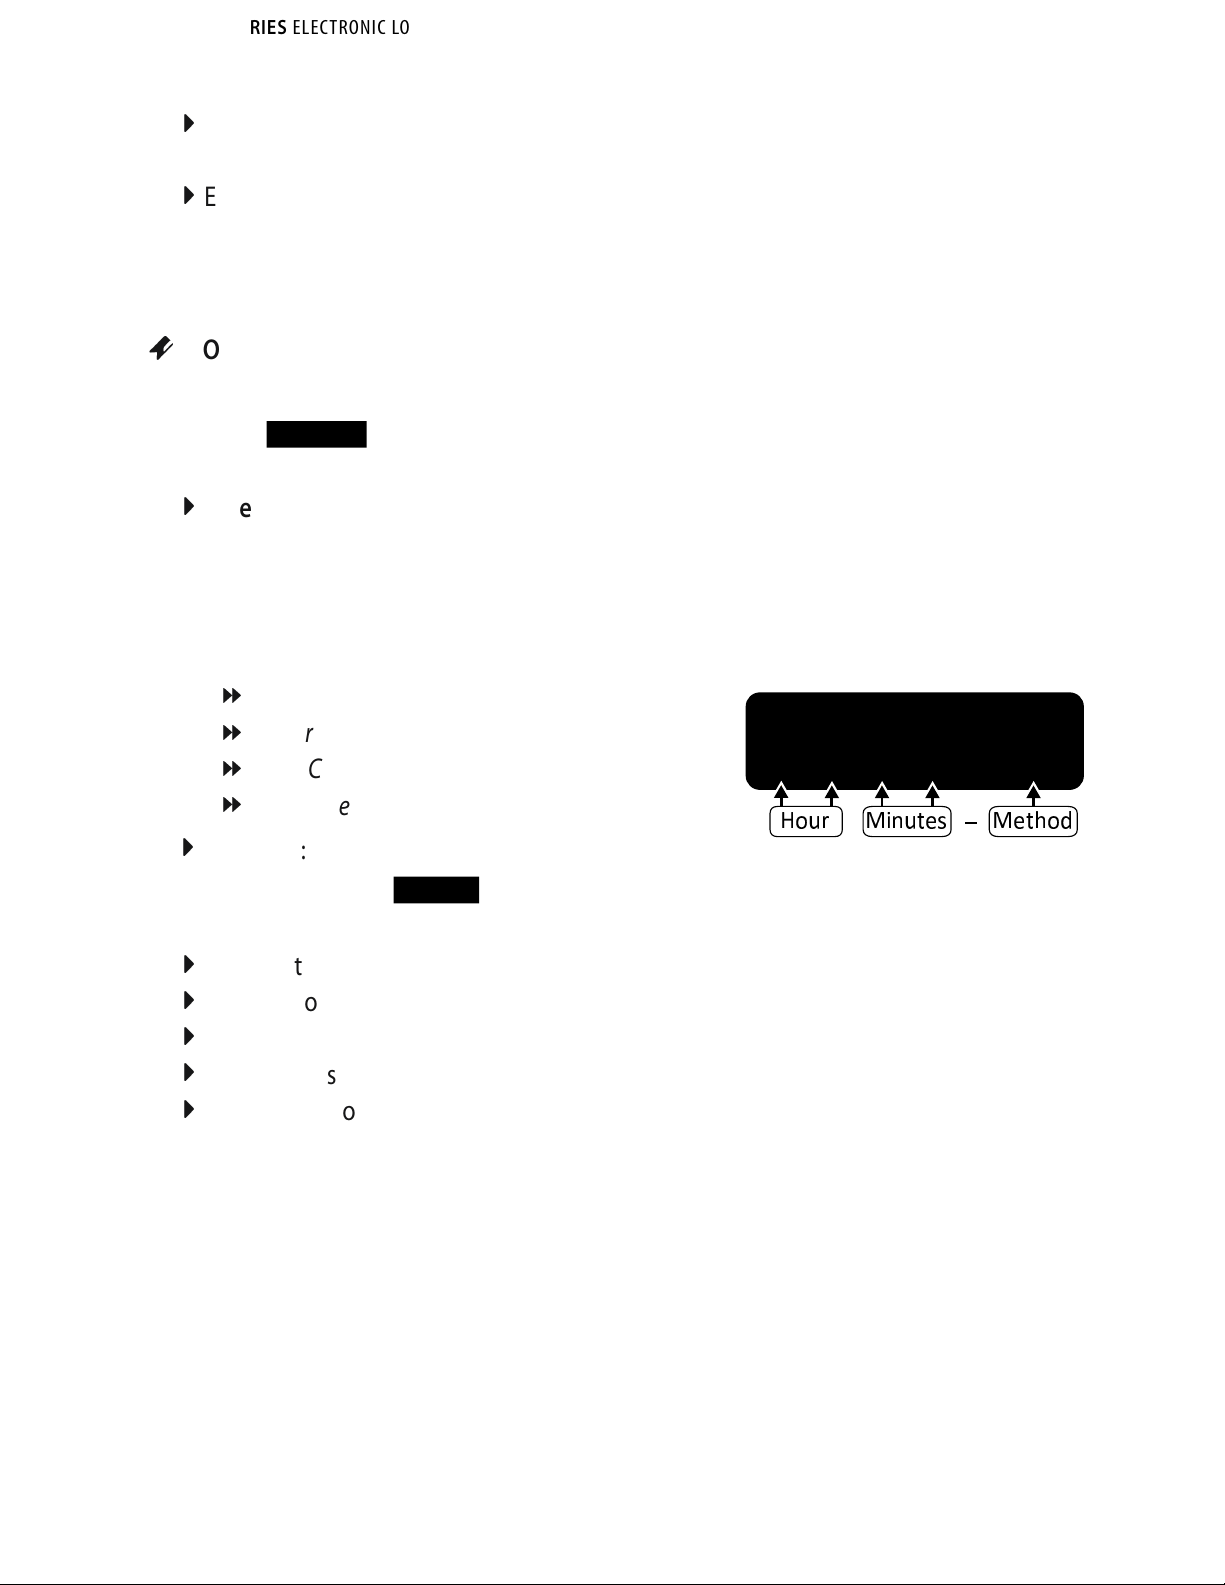
Th e 6- digit n umbe r represents t he h our - mi nute - second
W hen adju sting the hour, you will need to use mili tar y time
[24- hr rotati on]
Exam ple: 7:2 5:59 am = 072 559
Slot #1 & # 2 :
8
Enter the Ho ur
Page 10
9
Slot #3 & # 4 :
1
Enter the M inutes
0
Slot #5 & # 6 :
1
Enter the S econd s
7
In put: # to confi rm the clock setting, [[ GOOD ]] will app ear on t he d ispl ay
VIEW LOCK OPENING RECORDS [Audi t Trail]
2
N OTE : The safe must be in t he u nloc ked position.
1
In put:
*-*
; [[ PR OG ]] will appear on the displ ay
2
In put: ; [[ GO OD ]] will appear on the displ ay fo llowed by a
6-d igit num ber
1
One ope ning reco rd uses t wo screens:
!
Th e 1st screen displays t he d ate that the safe was opened
@
Th e 2nd screen displays t he t ime & me thod use d to open the safe
[Method: user co de, c ard, overr ide code, etc.]
Method Refe rence
[ What Ope ned the Safe? ]
3
User Cod e: 1 is d ispl ayed
3
Overri de Co de: 2 is displayed
3
Use r Card: 5 is d ispl ayed
3
Ove rrid e Car d: 6 is d ispl ayed
1
Exam ple: Safe was ope n at 3:3 0:00pm by the
Ove rrid e Code =
3
Navigating t hrou gh the Open Re cords
1
Press 2 to go back to the previ ous record
1
Press 8 to go for ward to t he n ext record
1
Press 6 to show th e ne xt scre en of a specific record
1
Press 4 to show th e previous screen of a sp ecif ic record
1
Press 5 to go to t he l atest Lock-O peni ng record
4
In put: * ; [[ GO OD ]] will appear on the displ ay & the Lock- Op ening Re cords
will clo se
1 5 3 0 0 2
4 5 6 7 8 9 : 6 ; < = 8 < ; > 5 ?
@
PG .8 |
MH-SERIES
E LEC TRO NIC LO CK INSTR UCT ION S
* * * * * *
* * * * *
Page 11

MH-SERIES
E LEC TRO NIC LO CK INSTR UCT ION S | PG. 9
THE ANCHOR KIT
To m aximize t he s ecur ity of your safe, ME S A recom mend s us ing the anch or k it
[prov ided ] to bolt dow n you r sa fe. The s afe c an b e an chore d to a wall, floo r,
etc., or a ME SA Model M
Cho ose a su itab le & conve nient locatio n for your safe. Se t th e sa fe in pla ce
1
& lo cate the anch or h oles prov ided on the safe to mark the area to be
drilled on t he w all, floo r, desk , e tc.
A
If bol ting your safe to a wal l, please ensure that the safe is resting on a
supp or ting sur face; i .e., floor, tab le, s helf .
After m ark ing the drill spots, move the safe aside and drill holes of the
2
appropriate d iame ter & depth for the t ype of h ardwa re be ing used & t he
moun ting sur fa ce. [Ancho r Kit: refer to Ch ecklist for all items inc lude d]
Pla ce sa fe back, ali gnin g th e an chor holes over the holes drilled, & i nsta ll
3
the fasteners as requ ired.
B
IMP ORTA NT : If bolting down your safe from the bot tom, be sure to
remove the feet pad s.
P-Pedestal [se e ME SASA F E. COM fo r mo re info].
CHANGING THE BATTERIES
Wi th t he d oor open , rem ove t he b atter y compart ment cover loc ated on t he
1
insi de o f th e do or by pulling dow n th e cl ip to release it
In stal l 4AA alk ali ne b atter ies [not included], note the pol arit y mark ings
2
(-/+ ) in the batter y compar tme nt to ensure prope r in stal lation
Re -at tach the batter y compar tme nt co ver b ack into plac e
3
B
IM POR TA NT : Do n ot u se re chargeable batteries, mix alkaline with non-
alk alin e batteri es, o r mi x ol d an d ne w bat teri es.
Page 12

PG .10 |
MH-SERIES
E LEC TRO NIC LO CK INSTR UCT ION S
TROUBLESHOOTING
THE ISSUE WHAT’S GOING ON THE SOLUTION
[[
LO BATT
[[
E BA R
[[
HO LD ##
[[
E CODE
[[
E C AR D
[[
ER RO R
[[
AGA I N
To view Battery Levels, input [#] when safe is in the locked position
or
]]
]]
]]
]]
]]
]]
]]
The batteries are low Change your batteries
The door is not closed properly / The
bolts are not locking
4 repeated incorrect user attempts.
Lock-Out Penalty was initiated.
Incorrect user code entry Verify user code & re-enter
Incorrect card used/not swiping
the same card originally used to
open safe
Card was swiped incorrectly from
left to right / Card was swiped too
fast or too slow
Override Keys must be used
to unlock & re-lock safe, then
remove keys & try code.
Wait 15 minutes then input
correct user code/card
Swipe original card used to
open safe
Evenly re-swipe card from left
to right
[[
BATT H
[[
BATT L
]]
]]
Battery level is high
Battery level is low
Page 13

MH-SERIES
E LEC TRO NIC LO CK INSTR UCT ION S | PG. 11
HOW TO ORDER KEYS
Cont act Mes a Safe’s Sales Dep artment for avail abil ity & p rices :
1
800. 490. 5624
Yo u will need to provide your Proof of Purchase [receipt/invoice ]. I f yo u
2
can’t p rovid e a Proof of Pu rchas e, pl ease sen d a nota rize d do cume nt
stat ing that you are t he owner of the safe
notari z e d docume n t by mail, c o pies wil l NOT be accept e d]
Make sure t hese item s are on your notarized document: Name, Safe
3
Numb er, Key Num ber [sta mped on the key lock], M aili ng Ad dress
IMPORTANT INFORMATION ON SAFE USAGE
u
C
Hol d on to your Proof of Pu rchas e [receip t/invoice] .
You will need thi s to orde r ke ys or use the War rant y S ervice
C
Do not open your safe if it is lying on its side, back or top.
Only ope n your sa fe when i t is in the upright posi tion
C
Do not slam the doo r. Ext reme shoc k ca n da mage the loc k or jam the
bolt work sys tem
C
Do not shut the doo r wi th t he l ock ing bolt s in the loc ked posi tion .
This may dama ge t he l ock ing bolt s & create pro blem s unlock ing &
lock ing the safe
C
Do not overs tuff contents in the safe so that t he d oor must be forced shu t.
Bolt wor k may jam as a result
C
Kee p li quid s away fro m th e ke ypad. Liq uids can dam age the keyp ad
C
If you expe rien ce a difference in the feel of the opera tion, inconsi sten cy
or d iffi cult y opening or operati ng t he s afe, D O NOT LO CK THE SAFE .
Imme diate ly contac t o ur Profess iona l Tech A ssis tants at M
C
OM PA N Y C
usto mer Care : 88 8.38 1.85 14 [ M onday th r u Friday 7AM - 4PM/PST ]
[you mus t send th e original
ES A SAF E
REGISTER YOUR SAFE
To a id with warra nty coverage, please re giste r your produc t online or
complete the encl osed regi strat ion card.
Regi ster your safe onl ine at M
Fill o ut t he R egis trati on Card i nclu ded with your safe & m ail to:
Customer Ser vice P. O Box 52282 I rvine, CA 9 2619
ES A SA FE.C O M /register --or--
Page 14

~
MESA SAFE COMPANY LIMITED 1 YEAR WARRANTY
Mesa Safe Com pany will gua rante e you r Mesa Safe free from defects for a
period of on e year from o riginal purch ase date on m anuf act urer defec ts only.
This warranty is non-tran sfera ble and only applies to o rigi nal owner with
proof of purchase from an auth orized dealer.
Mesa Safe Com pany will not , under any c ircum stan ces, be liable to the init ial
consumer for any i ncid ental, con sequ enti al, s peci al, exempl ar y, or punitive
dama ges aris ing out of t he p urchase or use of any Mes a Sa fe Com pany
product( s). Mesa Sa fe Com pany ’s liabilit y for any breach of this wa rran ty shall
be l imited exclusi vely to repair or replaceme nt o f th e de fect ive p roduc t(s ),
as d escr ibed abo ve or a re fund of the product( s). In no e vent shal l Me sa S afe
Company’s ob ligation under this warra nty excee d the pr ice of the origin al
product( s). Unde r no circumstance s wi ll M esa Safe Company b e held liable for
conte nts stored inside the Safe(s).
This warranty is limited to the te rms stated herin . All exp ressed and implied
warr anties including the warr anties of merchantability and fit ness for a
par tic ular pur pose are exclu ded, except as stated above. Mesa Safe Company
disc laim s al l li abil itie s for inc idental or co nseq uent ial damages resul ting from
the use of t his produ ct, or aris ing out of a ny breach of t his warr anty. Some
states do not all ow t he exclusion or limita tion of inci dental or con sequ enti al
dama ges, so t he a bove limi tation may no t ap ply to yo u. This warranty gives
you specific lega l rights, and you may have othe r ri ghts as well, whic h wi ll
var y from s tate to state.
PG .12 |
MH-SERIES
E LEC TRO NIC LO CK INSTR UCT ION S
Page 15

© 201 5 MES A SAF E COMPAN Y
Page 16

 Loading...